

Page 1
Trillium Lane Labs® Plug-ins
Version 8.0
Page 2

Legal Notices
This guide is copyrighted ©2008 by Digidesign, a division of
Avid Technology, Inc. (hereafter “Digidesign”), with all rights
reserved. Under copyright laws, this guide may not be
duplicated in whole or in part without the written consent of
Digidesign.
003, 96 I/O, 96i I/O, 192 Digital I/O, 192 I/O, 888|24 I/O,
882|20 I/O, 1622 I/O, 24-Bit ADAT Bridge I/O, AudioSuite,
Avid, Avid DNA, Avid Mojo, Avid Unity, Avid Unity ISIS,
Avid Xpress, AVoption, Axiom, Beat Detective, Bomb Factory,
Bruno, C|24, Command|8, Control|24, D-Command, D-Control,
D-Fi, D-fx, D-Show, D-Verb, DAE, Digi 002, DigiBase,
DigiDelivery, Digidesign, Digidesign Audio Engine, Digidesign
Intelligent Noise Reduction, Digidesign TDM Bus, DigiDrive,
DigiRack, DigiTest, DigiTranslator, DINR, D-Show, DV Toolkit,
EditPack, Eleven, HD Core, HD Process, Hybrid, Impact,
Interplay, LoFi, M-Audio, MachineControl, Maxim, Mbox,
MediaComposer, MIDI I/O, MIX, MultiShell, Nitris, OMF,
OMF Interchange, PRE, ProControl, Pro Tools M-Powered,
Pro Tools, Pro Tools|HD, Pro Tools LE, QuickPunch, Recti-Fi,
Reel Tape, Reso, Reverb One, ReVibe, RTAS, Sibelius,
Smack!, SoundReplacer, Sound Designer II, Strike, Structure,
SYNC HD, SYNC I/O, Synchronic, TL Aggro, TL AutoPan, TL
Drum Rehab, TL Everyphase, TL Fauxlder, TL In Tune, TL
MasterMeter, TL Metro, TL Space, TL Utilities, Transfuser,
Trillium Lane Labs, Vari-Fi Velvet, X-Form, and XMON are
trademarks or registered trademarks of Digidesign and/or Avid
Technology, Inc. Xpand! is Registered in the U.S. Patent and
Trademark Office. All other trademarks are the property of their
respective owners.
Product features, specifications, system requirements, and
availability are subject to change without notice.
Guide Part Number 9329-59303-00 REV A 11/08
Documentation Feedback
At Digidesign, we're always looking for ways to improve our
documentation. If you have comments, corrections, or
suggestions regarding our documentation, email us at
techpubs@digidesign.com.
Page 3

Contents iii
contents
Chapter 1. Introduction . . . . . . . . . . . . . . . . . . . . . . . . . . . . . . . . . . . . . . . . . . . . . . . . . . . . . . 1
Contents of the Boxed Version of Your Plug-in . . . . . . . . . . . . . . . . . . . . . . . . . . . . . . . . . . . . 1
System Requirements and Compatibility . . . . . . . . . . . . . . . . . . . . . . . . . . . . . . . . . . . . . . . . 2
Register Your Plug-ins . . . . . . . . . . . . . . . . . . . . . . . . . . . . . . . . . . . . . . . . . . . . . . . . . . . . . 2
Using Trillium Lane Labs Plug-ins with Pro Tools . . . . . . . . . . . . . . . . . . . . . . . . . . . . . . . . . . 2
Using Trillium Lane Labs Plug-ins with VENUE . . . . . . . . . . . . . . . . . . . . . . . . . . . . . . . . . . . . 2
Conventions Used in This Guide . . . . . . . . . . . . . . . . . . . . . . . . . . . . . . . . . . . . . . . . . . . . . . 3
About www.digidesign.com . . . . . . . . . . . . . . . . . . . . . . . . . . . . . . . . . . . . . . . . . . . . . . . . . 3
Chapter 2. Installation . . . . . . . . . . . . . . . . . . . . . . . . . . . . . . . . . . . . . . . . . . . . . . . . . . . . . . . 5
Installing Plug-ins for Pro Tools. . . . . . . . . . . . . . . . . . . . . . . . . . . . . . . . . . . . . . . . . . . . . . . 5
Installing Plug-ins for VENUE Systems . . . . . . . . . . . . . . . . . . . . . . . . . . . . . . . . . . . . . . . . . . 6
Authorizing Plug-ins . . . . . . . . . . . . . . . . . . . . . . . . . . . . . . . . . . . . . . . . . . . . . . . . . . . . . . . 6
Uninstalling Plug-ins for Pro Tools . . . . . . . . . . . . . . . . . . . . . . . . . . . . . . . . . . . . . . . . . . . . . 7
Uninstalling Plug-ins for VENUE Systems . . . . . . . . . . . . . . . . . . . . . . . . . . . . . . . . . . . . . . . . 8
Chapter 3. TL Aggro . . . . . . . . . . . . . . . . . . . . . . . . . . . . . . . . . . . . . . . . . . . . . . . . . . . . . . . . . 9
Introduction . . . . . . . . . . . . . . . . . . . . . . . . . . . . . . . . . . . . . . . . . . . . . . . . . . . . . . . . . . . . 9
TL Aggro Controls . . . . . . . . . . . . . . . . . . . . . . . . . . . . . . . . . . . . . . . . . . . . . . . . . . . . . . . 11
Using the Side-Chain Input . . . . . . . . . . . . . . . . . . . . . . . . . . . . . . . . . . . . . . . . . . . . . . . . . 13
Chapter 4. TL AutoPan . . . . . . . . . . . . . . . . . . . . . . . . . . . . . . . . . . . . . . . . . . . . . . . . . . . . . . 15
Introduction . . . . . . . . . . . . . . . . . . . . . . . . . . . . . . . . . . . . . . . . . . . . . . . . . . . . . . . . . . . 15
TL AutoPan Controls . . . . . . . . . . . . . . . . . . . . . . . . . . . . . . . . . . . . . . . . . . . . . . . . . . . . . 15
Using TL AutoPan . . . . . . . . . . . . . . . . . . . . . . . . . . . . . . . . . . . . . . . . . . . . . . . . . . . . . . . 21
Using the Side-Chain Input . . . . . . . . . . . . . . . . . . . . . . . . . . . . . . . . . . . . . . . . . . . . . . . . . 22
Page 4

Trillium Lane Labs Plug-ins Guideiv
Chapter 5. TL Drum Rehab . . . . . . . . . . . . . . . . . . . . . . . . . . . . . . . . . . . . . . . . . . . . . . . . . . 23
Introduction . . . . . . . . . . . . . . . . . . . . . . . . . . . . . . . . . . . . . . . . . . . . . . . . . . . . . . . . . . . 23
Using TL Drum Rehab . . . . . . . . . . . . . . . . . . . . . . . . . . . . . . . . . . . . . . . . . . . . . . . . . . . . 24
TL Drum Rehab Controls and Displays . . . . . . . . . . . . . . . . . . . . . . . . . . . . . . . . . . . . . . . . 28
TL Drum Rehab Main Window . . . . . . . . . . . . . . . . . . . . . . . . . . . . . . . . . . . . . . . . . . . . . . 28
TL Drum Rehab Library Browser. . . . . . . . . . . . . . . . . . . . . . . . . . . . . . . . . . . . . . . . . . . . . 43
Loading Samples and Saving Custom DRP Files . . . . . . . . . . . . . . . . . . . . . . . . . . . . . . . . . 44
Chapter 6. TL EveryPhase . . . . . . . . . . . . . . . . . . . . . . . . . . . . . . . . . . . . . . . . . . . . . . . . . . . 47
Introduction . . . . . . . . . . . . . . . . . . . . . . . . . . . . . . . . . . . . . . . . . . . . . . . . . . . . . . . . . . . 47
TL EveryPhase Controls . . . . . . . . . . . . . . . . . . . . . . . . . . . . . . . . . . . . . . . . . . . . . . . . . . . 48
Using TL EveryPhase . . . . . . . . . . . . . . . . . . . . . . . . . . . . . . . . . . . . . . . . . . . . . . . . . . . . . 54
Chapter 7. TL InTune . . . . . . . . . . . . . . . . . . . . . . . . . . . . . . . . . . . . . . . . . . . . . . . . . . . . . . . 57
Introduction . . . . . . . . . . . . . . . . . . . . . . . . . . . . . . . . . . . . . . . . . . . . . . . . . . . . . . . . . . . 57
TL InTune Controls and Displays . . . . . . . . . . . . . . . . . . . . . . . . . . . . . . . . . . . . . . . . . . . . 58
Customizing TL InTune . . . . . . . . . . . . . . . . . . . . . . . . . . . . . . . . . . . . . . . . . . . . . . . . . . . 60
Using TL InTune . . . . . . . . . . . . . . . . . . . . . . . . . . . . . . . . . . . . . . . . . . . . . . . . . . . . . . . . 62
Chapter 8. TL MasterMeter . . . . . . . . . . . . . . . . . . . . . . . . . . . . . . . . . . . . . . . . . . . . . . . . . 63
Introduction . . . . . . . . . . . . . . . . . . . . . . . . . . . . . . . . . . . . . . . . . . . . . . . . . . . . . . . . . . . 63
Using TL MasterMeter . . . . . . . . . . . . . . . . . . . . . . . . . . . . . . . . . . . . . . . . . . . . . . . . . . . . 67
TL MasterMeter Controls and Displays . . . . . . . . . . . . . . . . . . . . . . . . . . . . . . . . . . . . . . . . 68
Chapter 9. TL Metro . . . . . . . . . . . . . . . . . . . . . . . . . . . . . . . . . . . . . . . . . . . . . . . . . . . . . . . . 71
Introduction . . . . . . . . . . . . . . . . . . . . . . . . . . . . . . . . . . . . . . . . . . . . . . . . . . . . . . . . . . . 71
Configuring Pro Tools for Use with TL Metro . . . . . . . . . . . . . . . . . . . . . . . . . . . . . . . . . . . . 71
TL Metro Controls and Displays . . . . . . . . . . . . . . . . . . . . . . . . . . . . . . . . . . . . . . . . . . . . . 72
Synchronization . . . . . . . . . . . . . . . . . . . . . . . . . . . . . . . . . . . . . . . . . . . . . . . . . . . . . . . . 74
Customizing TL Metro . . . . . . . . . . . . . . . . . . . . . . . . . . . . . . . . . . . . . . . . . . . . . . . . . . . . 74
Page 5

Contents v
Chapter 10. TL Space TDM and TL Space Native . . . . . . . . . . . . . . . . . . . . . . . . . . . . . . 77
Introduction . . . . . . . . . . . . . . . . . . . . . . . . . . . . . . . . . . . . . . . . . . . . . . . . . . . . . . . . . . . 77
System Performance . . . . . . . . . . . . . . . . . . . . . . . . . . . . . . . . . . . . . . . . . . . . . . . . . . . . . 82
Impulse Responses . . . . . . . . . . . . . . . . . . . . . . . . . . . . . . . . . . . . . . . . . . . . . . . . . . . . . . 85
Presets . . . . . . . . . . . . . . . . . . . . . . . . . . . . . . . . . . . . . . . . . . . . . . . . . . . . . . . . . . . . . . 88
Snapshots . . . . . . . . . . . . . . . . . . . . . . . . . . . . . . . . . . . . . . . . . . . . . . . . . . . . . . . . . . . . 89
TL Space Controls and Displays . . . . . . . . . . . . . . . . . . . . . . . . . . . . . . . . . . . . . . . . . . . . . 90
Using TL Space . . . . . . . . . . . . . . . . . . . . . . . . . . . . . . . . . . . . . . . . . . . . . . . . . . . . . . . . 100
IR Library . . . . . . . . . . . . . . . . . . . . . . . . . . . . . . . . . . . . . . . . . . . . . . . . . . . . . . . . . . . . 102
Index . . . . . . . . . . . . . . . . . . . . . . . . . . . . . . . . . . . . . . . . . . . . . . . . . . . . . . . . . . . . . . . . . . . . 103
Page 6

Trillium Lane Labs Plug-ins Guidevi
Page 7

Chapter 1: Introduction 1
chapter 1
Introduction
Welcome to the Trillium Lane Labs® plug-ins
for Pro Tools|HD
®
, Pro Tools LE®, and VENUE
systems (brought to you by Digidesign
®
), as well
as Avid Xpress
®
, Avid Xpress DV, and
Avid DNA™ systems.
Digidesign Trillium Lane Labs plug-ins include
the following:
Free Trillium Lane Labs Plug-ins:
The following plug-ins are installed with
Pro Tools:
•TL InTune™
• TL MasterMeter™
•TL Metro™
Paid Trillium Lane Labs Plug-ins:
• TL Aggro™
• TL AutoPan™
• TL Drum Rehab™
•TL EveryPhase™
• TL Space™ TDM and TL Space Native
Contents of the Boxed
Version of Your Plug-in
Your plug-in package contains the following
components:
• Installer disc
• Digidesign Registration Information Card
• One of the following authorization cards for
authorizing plug-ins with an iLok USB Smart
Key (not supplied):
• Activation Card with an Activation Code
(for authorizing plug-ins with an iLok USB
Smart Key, not supplied)
– or –
• License Card (for authorizing plug-ins with
an iLok USB Smart Key, not supplied)
References to Pro Tools LE™ in this guide
are usually interchangeable with Pro Tools
M-Powered™, except as noted in the
Pro Tools M-Powered Setup Guide.
Page 8

Trillium Lane Labs Plug-ins Guide2
System Requirements and
Compatibility
To use Digidesign plug-ins you need the following:
• An iLok USB Smart Key
• An iLok.com account for managing iLok licenses
• One of the following:
• A Digidesign-qualified Pro Tools|HD system, Pro Tools LE system, or Pro Tools MPowered system
• A Digidesign-qualified Pro Tools system
and a third-party software application that
supports the Digidesign TDM, RTAS
®
, or
AudioSuite™ plug-in standards
• A Digidesign-qualified VENUE live sound
environment
• A qualified Avid Xpress, Avid Xpress DV, or
Avid DNA system (AudioSuite only)
Digidesign can only assure compatibility and
provide support for hardware and software it has
tested and approved.
For complete system requirements and a list of
Digidesign-qualified computers, operating systems, hard drives, and third-party devices, refer
to the latest information on the Digidesign website:
www.digidesign.com/compatibility
Register Your Plug-ins
If you purchase a plug-in online from the DigiStore (www.digidesign.com) using Internet Activation, you are automatically registered.
If you purchase a plug-in boxed version, check
the enclosed Digidesign Registration Information Card for information about how to register
online.
Registered users receive periodic software update and upgrade notices.
Please refer to the Digidesign website
(www.digidesign.com) or the Digidesign Registration Information Card for information on
technical support.
Using Trillium Lane Labs Plugins with Pro Tools
Refer to the Pro Tools Reference Guide for infor-
mation on working with plug-ins, including:
• Inserting plug-ins on tracks
• Plug-in Window controls
• Adjusting plug-in controls
• Automating plug-ins
• Using side-chain inputs
• Using plug-in presets
• Clip indicators
Using Trillium Lane Labs Plugins with VENUE
Refer to the D-Show Guide that came with your
VENUE system for information on working with
plug-ins.
Page 9
Chapter 1: Introduction 3
Conventions Used in This
Guide
All Digidesign guides use the following conventions to indicate menu choices and key commands:
:
The names of Commands, Options, and Settings
that appear on-screen are in a different font.
The following symbols are used to highlight important information:
About www.digidesign.com
The Digidesign website (www.digidesign.com)
is your best online source for information to
help you get the most out of your Pro Tools system. The following are just a few of the services
and features available.
Product Registration Register your purchase online.
Support and Downloads Contact Digidesign
Technical Support or Customer Service; download software updates and the latest online
manuals; browse the Compatibility documents
for system requirements; search the online Answerbase; or join the worldwide Pro Tools community on the Digidesign User Conference.
Training and Education Study on your own using
courses available online or find out how you can
learn in a classroom setting at a certified
Pro Tools training center.
Products and Developers Learn about Digidesign
products; download demo software or learn
about our Development Partners and their plugins, applications, and hardware.
News and Events Get the latest news from Digidesign or sign up for a Pro Tools demo.
Pro Tools Accelerated Videos Watch the series of
free tutorial videos. Accelerated Videos are designed to help you get up and running with
Pro Tools and its plug-ins quickly.
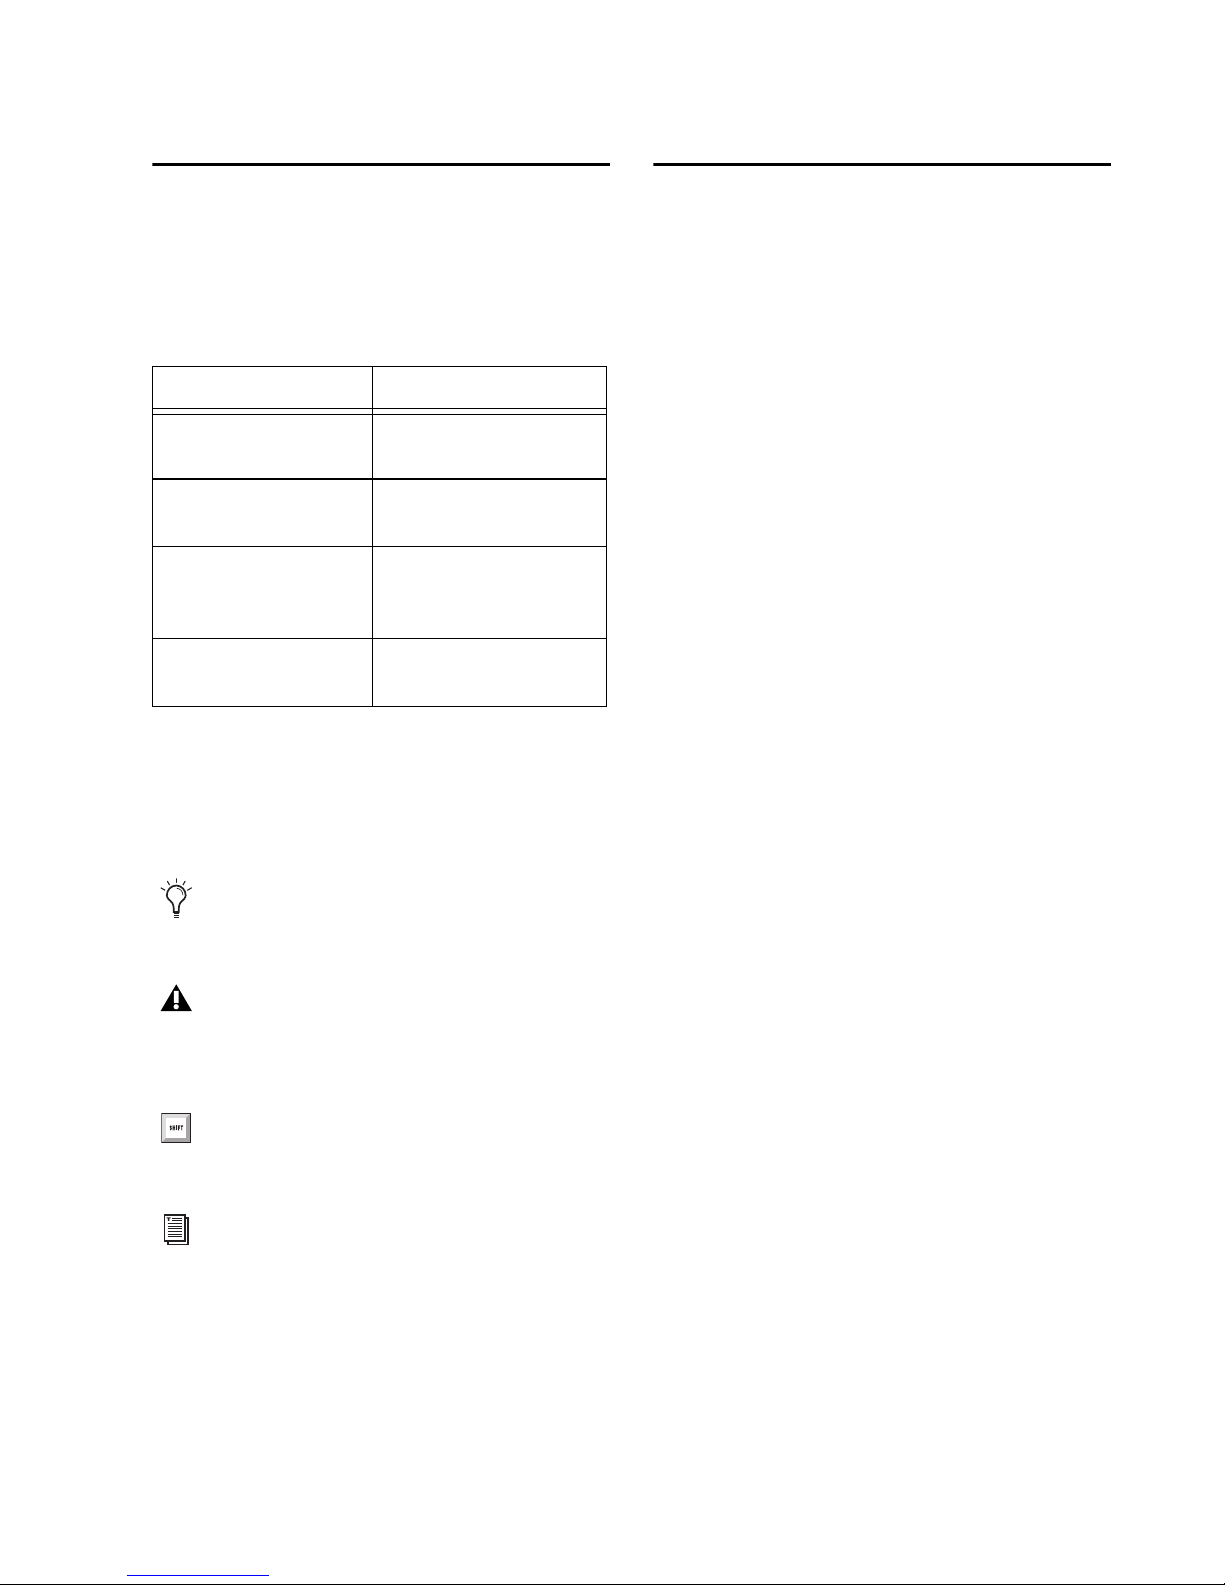
Convention Action
File > Save Choose Save from the
File menu
Control+N Hold down the Control
key and press the N key
Control-click Hold down the Control
key and click the mouse
button
Right-click Click with the right
mouse button
User Tips are helpful hints for getting the
most from your Pro Tools system.
Important Notices include information that
could affect your Pro Tools session data or
the performance of your Pro Tools system.
Shortcuts show you useful keyboard or
mouse shortcuts.
Cross References point to related sections in
this guide and other Digidesign guides.
Page 10

Trillium Lane Labs Plug-ins Guide4
Page 11

Chapter 2: Installation 5
chapter 2
Installation
Installing Plug-ins for
Pro Tools
Installers for your plug-ins can be downloaded
from the DigiStore (www.digidesign.com) or can
be found on the plug-in installer disc (included
with boxed versions of plug-ins).
An installer may also be available on a Pro Tools
installer disc or on a software bundle installer
disc.
Installation steps are essentially the same, regardless of the package, system, or bundle.
Free TL Labs Plug-ins
The free TL Labs plug-ins are installed when you
install Pro Tools. For more information about
installing Pro Tools, see the Setup Guide that
came with your system.
Updating Older Plug-ins
Because the Trillium Lane Labs plug-ins installers contain the latest versions of Digidesign
plug-ins, use them to update any Trillium Lane
Labs plug-ins you may already own.
Installation
To install a plug-in:
1 Do one of the following:
• Download the installer for your computer
platform from the Digidesign website
(www.digidesign.com). After downloading,
make sure the installer is uncompressed
(.ZIP on Windows or .SIT on Mac).
– or –
• Insert the Installer disc into your computer.
2 Double-click the plug-in installer application.
3 Follow the on-screen instructions to complete
the installation.
4 When installation is complete, click Finish
(Windows) or Quit (Mac).
When you open Pro Tools, you are prompted to
authorize your new plug-in (see “Authorizing
Plug-ins” on page 6).
Be sure to use the most recent versions of
Trillium Lane Labs plug-ins available from
the Digidesign website
(www.digidesign.com).
Page 12
Trillium Lane Labs Plug-ins Guide6
Installing Plug-ins for VENUE
Systems
Installers for VENUE plug-ins can be downloaded from www.digidesign.com. After downloading, the installer must be transferred to either a USB drive or a CD-ROM. Plugs-ins can be
installed using a USB drive connected to the
UDB ports on any VENUE system, or using a
CD-ROM inserted into the CD drive available on
an FOH Rack or Mix Rack.
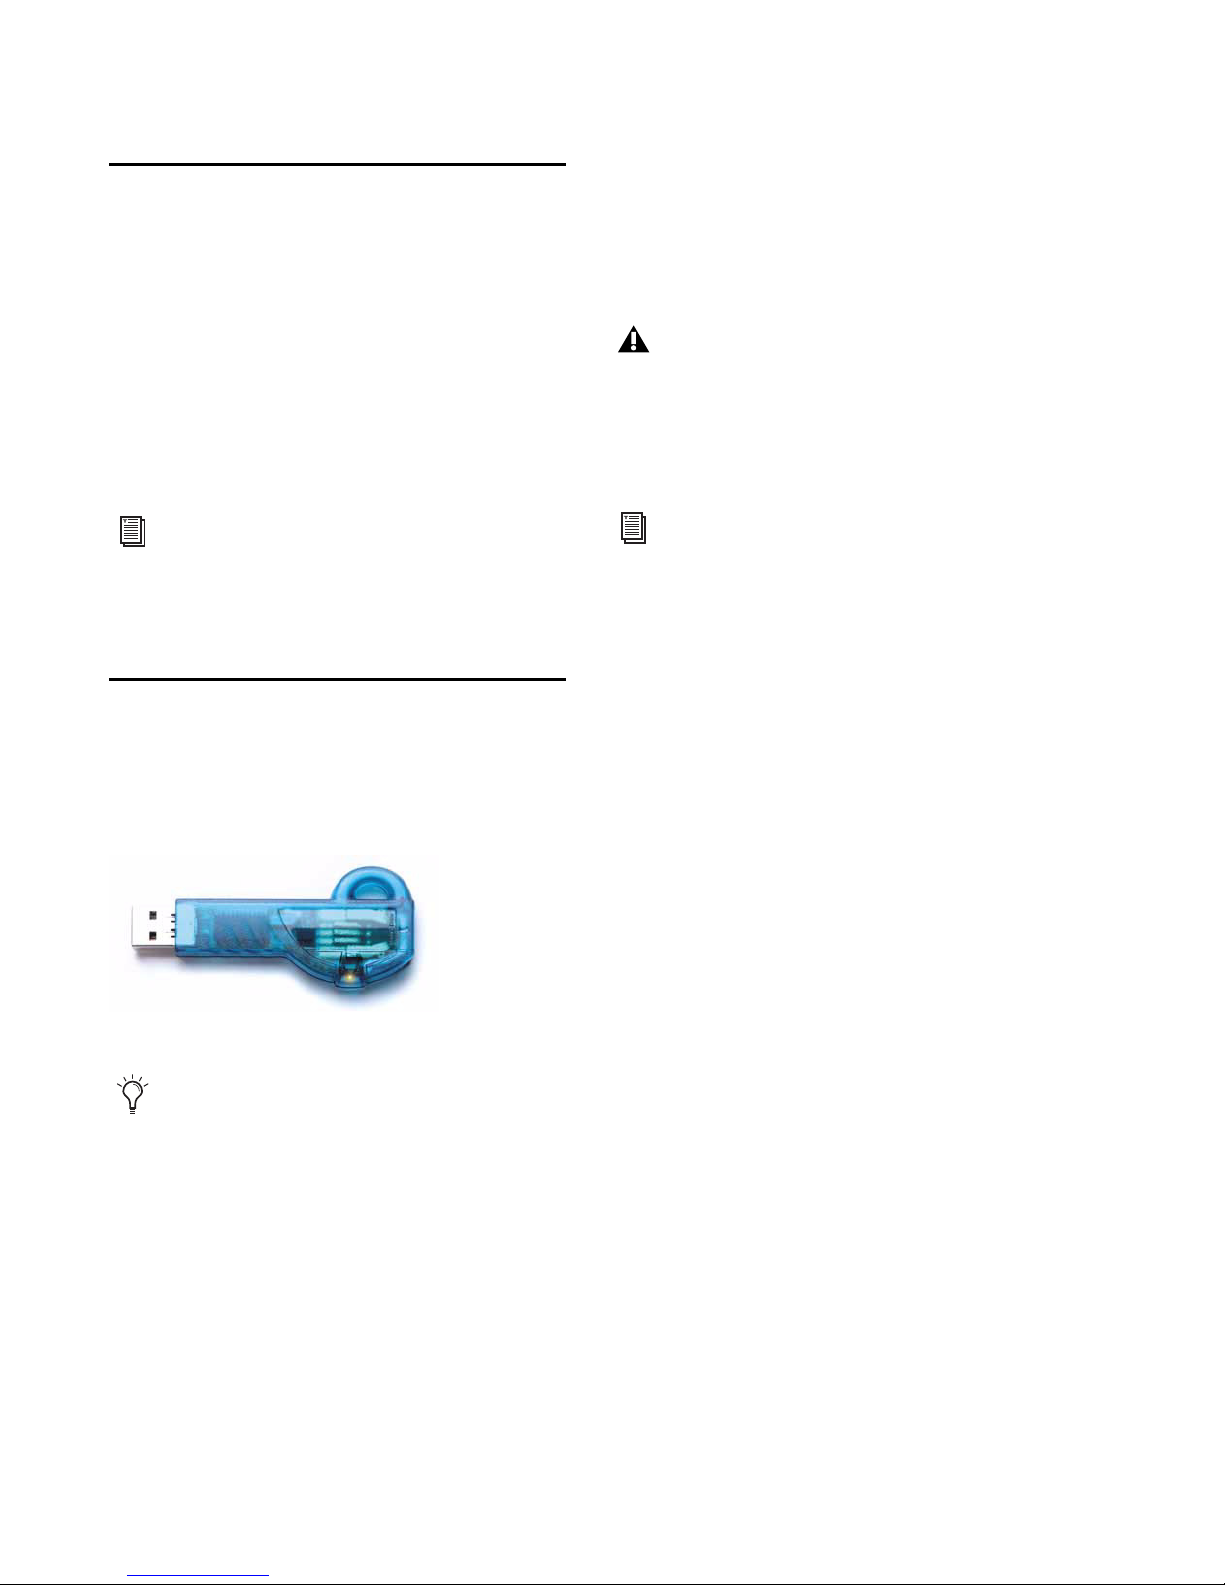
Authorizing Plug-ins
Trillium Lane Labs plug-ins are authorized using
the iLok USB Smart Key (iLok), manufactured by
PACE Anti-Piracy, Inc.
The iLok is similar to a dongle, but unlike a dongle, it is designed to securely authorize multiple
software applications from a variety of software
developers.
This key can hold over 100 licenses for all of
your iLok-enabled software. Once an iLok is authorized for a given piece of software, you can
use the iLok to authorize that software on any
computer.
Authorizing Download Versions of
Plug-ins for Pro Tools
If you purchased a download version of a plugin from the DigiStore (www.digidesign.com),
authorize the plug-in by downloading licenses
from iLok.com to an iLok.
Authorizing Boxed Versions of
Plug-ins for Pro Tools
If you purchased a boxed version of a plug-in, it
comes with an Activation Code (on the included Activation Card). You will need this code
to authorize your plug-in.
To authorize a plug-in using an Activation Code:
1 If you do not have an existing iLok.com ac-
count, visit www.iLok.com and sign up for an
iLok.com account.
For complete instructions on installing
plug-ins for VENUE systems, see the documentation that came with your VENUE
system.
iLok USB Smart Key
Not all Trillium Lane Labs plug-ins require
authorization. For example, no authorization is required for TL Utilities plug-ins.
The iLok USB Smart Key is not supplied
with your plug-in or software option. You
can use the one included with certain
Pro Tools systems (such as Pro Tools|HDseries systems), or purchase one separately.
For more information, visit the iLok website
(www.iLok.com) or see the
iLok Usage
Guide
.
Page 13

Chapter 2: Installation 7
2 Transfer the license for your plug-in to your
iLok.com account by doing the following:
• Visit http://secure.digidesign.com/
activation.
• Input your Activation Code (listed on your
Activation Card) and then your iLok.com
User ID. Your iLok.com User I D is the name
you create for your iLok.com account.
3 Transfer the licenses from your iLok.com ac-
count to your iLok USB Smart Key by doing the
following:
• Insert the iLok into an available USB port
on your computer.
• Go to www.iLok.com and log in.
• Follow the on-screen instructions for transferring your licences to your iLok.
4 Launch Pro Tools.
5 If you have any installed unauthorized plug-
ins or software options, you are prompted to authorize them. Follow the on-screen instructions
to complete the authorization process.
VENUE Systems
After installing a plug-in on a VENUE system,
the system re-creates the list of available plugins. Whenever the racks initialize, the system
checks authorizations for all installed plug-ins.
If no previous authorization for a plug-in is recognized, you will be prompted to authorize the
the plug-in.
VENUE supports challenge/response and iLok
USB Smart Key authorization, including pre-authorized iLoks and Activation Cards.
Challenge/Response Challenge/response authorization is only valid for the VENUE system the
plug-in is currently installed on. Challenge/response codes can be communicated using any
computer with Internet access.
iLok USB Smart Key Plug-ins supporting web authorizations through iLok.com can be authorized for your iLok Smart Key from any computer with Internet access. This lets you take
your iLok and your plug-in authorizations anywhere, to use plug-ins installed on any system.
Uninstalling Plug-ins for
Pro Tools
If you need to uninstall a plug-in from your system, follow the instructions below for your
computer platform.
Windows Vista
To remove a plug-in:
1 Choose Start > Control Panel.
2 Double-click Programs and Features.
3 Select the plug-in from the list of installed ap-
plications.
4 Click Uninstall.
5 Follow the on-screen instructions to remove
the plug-in.
For complete instructions on authorizing
plug-ins for VENUE systems, see the documentation that came with your VENUE
system.
For more information, visit the iLok website
(www.iLok.com) or see the
iLok Usage
Guide
.
Page 14

Trillium Lane Labs Plug-ins Guide8
Windows XP
To remove a plug-in:
1 Choose Start > Control Panel.
2 Double-click Add or Remove Programs.
3 Select the plug-in from the list of installed ap-
plications.
4 Click Remove.
5 Follow the on-screen instructions to remove
the plug-in.
Mac OS X
To remove a plug-in:
1 Locate and open the Plug-ins folder on your
Startup drive (Library/Application Support
/Digidesign/Plug-ins).
2 Do one of the following:
• Drag the plug-in to the Trash and empty
the Trash.
– or –
• Drag the plug-in to the Plug-ins (Unused)
folder.
Uninstalling Plug-ins for
VENUE Systems
Plug-ins installed on VENUE systems can be disabled, uninstalled, or deleted. A plug-in that has
been disabled or uninstalled (but not deleted)
can be reinstalled without the CD-ROM or USB
drive containing the plug-in installers. Deleted
plug-ins, however, must be installed from installers located on either a USB drive or a
CD-ROM.
For complete instructions on uninstalling
plug-ins for VENUE systems, see the documentation that came with your VENUE
system.
Page 15
Chapter 3: TL Aggro 9
chapter 3
TL Aggro
(TDM and RTAS)
Introduction
TL Aggro is a TDM and RTAS compressor plug-in
that is modeled on vintage FET compressors. At
moderate settings, TL Aggro is designed to
sound smooth and transparent, perfect for vocals and acoustic instruments. Crank TL Aggro
up for maximum aggressiveness and it instantly
adds character and intensity to guitars and
drum tracks.
Analog Compression
Compression is a common audio processing
technique that is essential to many recording
styles. A compressor is a specialized type of amplifier that acts to reduce the dynamic range between the quietest and loudest peaks of an audio
signal. When dynamic range is compressed, this
highlights quieter parts of an audio signal while
taming the loudest parts. Heavy use of compression on percussion, instruments, and vocals is a
staple in musical genres such as rock and pop.
Before the introduction of digital technology in
the studio, compressors were typically designed
around a set of analog components. Various
compressor circuit designs are known for their
distinctive sound and characteristics. Popular
analog compressors are often designed around
optical isolator, VCA (voltage controlled amplifier), or FET (field effect transistor) based circuits
that produce the compression effect.
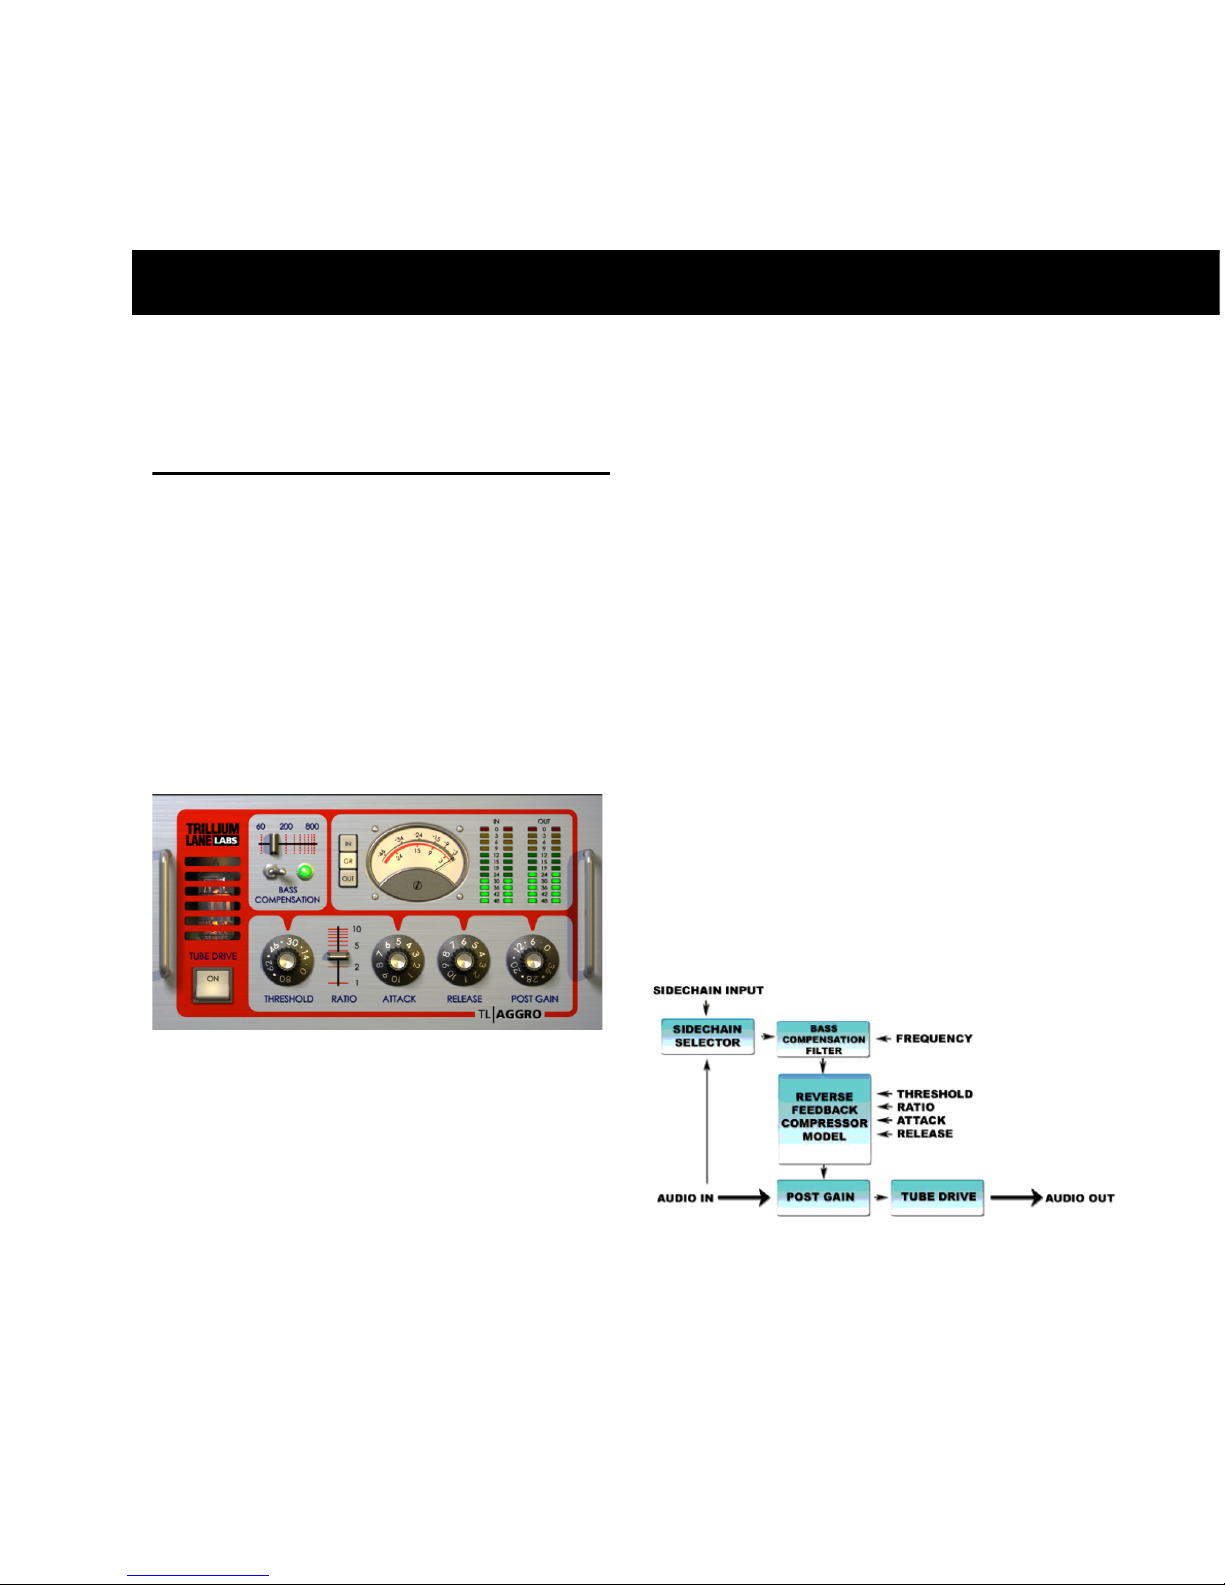
TL Aggro
TL Aggro implements a unique compressor topology based on a traditional analog FET design,
with several updates for the digital age. Figure 2
shows the different modules of TL Aggro and
how they interact with the audio signal.
TL Aggro uses a reverse feedback system common to many analog compressors. In essence,
this means that the compressor is not compressing the input signal but rather analyzing and
compressing the already compressed output sig-
Figure 1. TL Aggro plug-in
Figure 2. TL Aggro signal flow, processing, and controls
Page 16

Trillium Lane Labs Plug-ins Guide10
nal. Sound weird? It is. Reverse-feedback is a
strange and paradoxical concept. It can lead to
strange and chaotic behavior if not well-tamed.
In fact, at least one well known and popular
hardware compressor that uses a reverse feedBack topology becomes marginally unstable at
extreme compression settings. Despite this
sometimes unpredictable behavior, the reverse
feedBack model produces a desirable and
unique compression sound.
TL Aggro adds modern digital conveniences to
the reverse feedBack model. Precise bass compensation provides for improved tracking of
bass heavy instruments or a complete stereo
mix. TL Aggro provides linked stereo operation
to preserve stereo imaging as well as full sidechain support. A tube drive module adds additional tube-style distortion if desired.
TL Aggro uses a program dependent release
which provides more natural sounding compression. In essence, the program dependent release works to slow down the release time of
compressor so that it more smoothly rides the
average loudness of the audio material.
The most unique feature of TL Aggro is its
Threshold control. Most reverse-feedback compressors do not implement a Threshold control
typical to non-FET compressors. Instead, they
provide an input control that increases the
amount of compression as the unit is driven
harder. However, an input control adjustment is
often less intuitive than a Threshold control.
Implementing a Threshold control into the operation of TL Aggro has two specific side-effects.
At the extreme setting of a high threshold, high
ratio, fast attack, and a slow release, TL Aggro
can overshoot in compression and become
“sticky” with a high gain reduction. Sonically,
this sounds like “pops” in the output signal. In
more technical terms, TL Aggro is becoming
marginally unstable. In this scenario you can alleviate the problem by doing one or more of the
following:
• Lower the Threshold
• Reduce the Ratio
• Reduce the Attack
• Increase the Release
The second side effect is that for a given set of
Ratio and Attack settings, the compressor has a
finite range of available gain reduction. At some
cutoff point on the Threshold knob, you might
find that compressor ceases to apply anymore
compression to the signal. To acquire more
compression range, increase the Ratio slider, or
alternatively increase the Attack speed.
The reverse-feedback model combined with the
Threshold control and additional features like
Bass Compensation and Tube Drive gives
TL Aggro a wide range of compression styles
once you understand how it operates. The ability to adjust threshold gives TL Aggro a distinctive advantage over traditional reverse feedBack
designs, both in terms of functionality and
sonic character.
Page 17
Chapter 3: TL Aggro 11
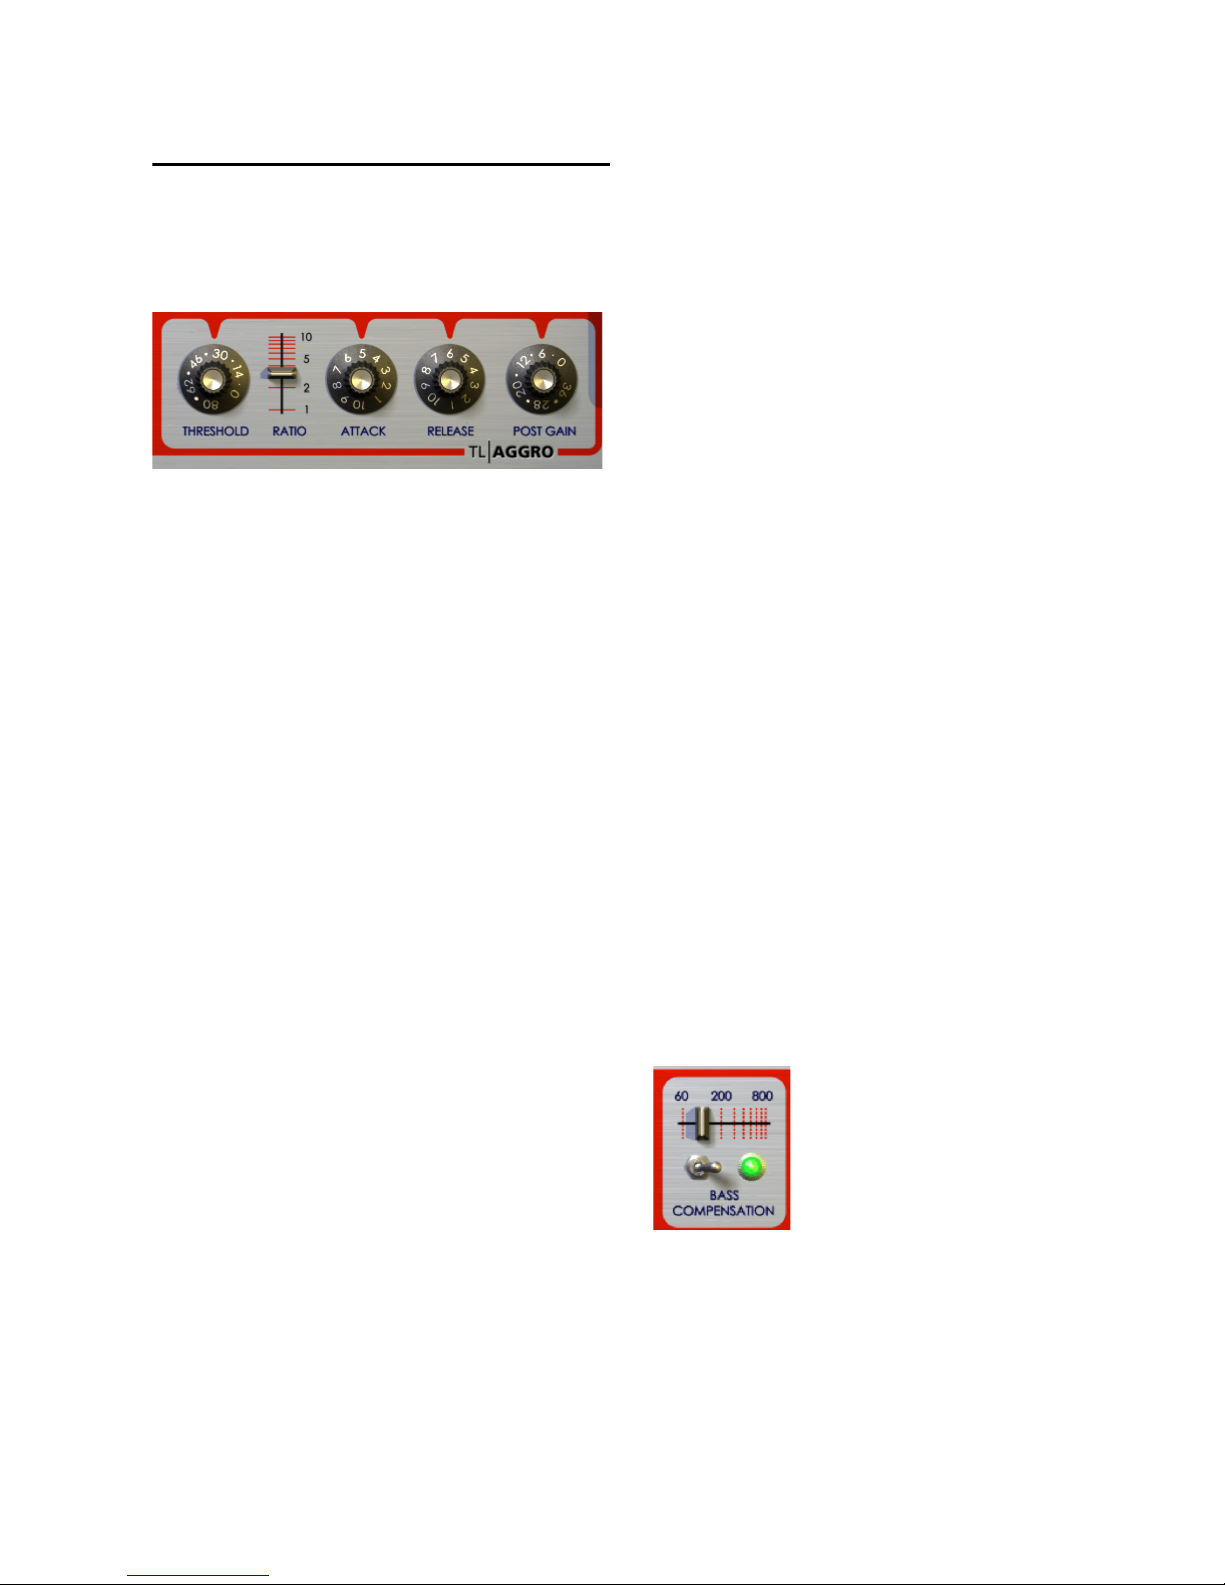
TL Aggro Controls
Compression
TL Aggro provides the standard compression
controls Threshold, Ration, Attack, Release, and
Post Gain.
Threshold
The Threshold control sets the amplitude level
at which the compressor begins to affect the input signal. The values indicated on the Threshold knob are in negative dB. At the default 0 dB
setting, TL Aggro will pass the audio signal
through at unity gain and will have no effect on
the audio. As the Threshold knob is turned
clockwise (click and drag up), the threshold will
be lowered deeper into the input signal and result in more gain reduction as the compressor
becomes sensitive to more of the incoming audio signal.
Ratio
The Ratio control indicates the degree at which
TL Aggro is reducing dynamic range. The Ratio
slider increases the amount of compression as
the slider is pushed upwards, by increasing the
amount of gain reduction in the output signal
relative to the input signal. Additionally, as the
ratio is increased, the “knee” of compression
curve is made tighter. At lower ratio settings,
TL Aggro has a gentle knee in the compression
curve.
Attack and Release
The Attack control controls the amount of time
it takes TL Aggro to begin compression once the
audio signal has reached the threshold. Slow attack times tend to promote overall brightness
and high frequency audio within the compressed audio signal.
Conversely, the Release control controls the
time it takes TL Aggro to return to unity gain
once the audio signal has fallen back below the
threshold. TL Aggro uses a program dependent
release which slows down the release time to
more smoothly ride the average loudness of the
audio material.
Turning the Attack and Release knobs clockwise
increases the reaction speed of the compressor.
1 is the slowest setting and 10 is the fastest setting.
Post Gain
The Post Gain control lets you make up for the
signal gain lost through compression. The values indicated on the knob are in dB. At maximum setting, 36 dB of gain can be applied to the
compressed signal.
Bass Compensation
The Bass Compensation section of TL Aggro affects the compressor’s side-chain circuitry. By
default, Bass Compensation is enabled as indicated by the illuminated green light. To disable,
Compressions controls
Bass Compensation controls
Page 18
Trillium Lane Labs Plug-ins Guide12
toggle the switch in the section by clicking it.
The green lamp will turn off to indicate that
Bass Compensation has been switched out of
the side-chain signal path.
When Bass Compensation is enabled, the compressor becomes less sensitive to bass frequencies in the input signal. This models the sensitivity of the human ear, which is also much less
sensitive to low frequencies. For most signal
sources, enabling Bass Compensation will reduce the total amount of gain reduction that
TL Aggro induces, but the result will often be
more natural sounding with less pumping and
breathing. For example, Bass Compensation
sounds great on bass guitar or when you have
TL Aggro on your master fader as stereo bus
compressor.
Additionally, TL Aggro provides a cutoff frequency control to tailor the sound of the bass
compensation. This acts as a high pass filter and
the values indicated above the Bass Compensation slider are in Hertz. As the slider increases
from left to right, the compressor will be even
less reactive to low frequencies.
For example, place a stereo TL Aggro on a full
stereo drum mix. Set the compressor for moderate to high gain reduction levels, enable the Bass
Compensation, and slide the frequency control
from left to right. As the cutoff frequency is increased, you will hear more and more of the kick
drum “punch” through the mix and become
louder relative to snare or cymbals.
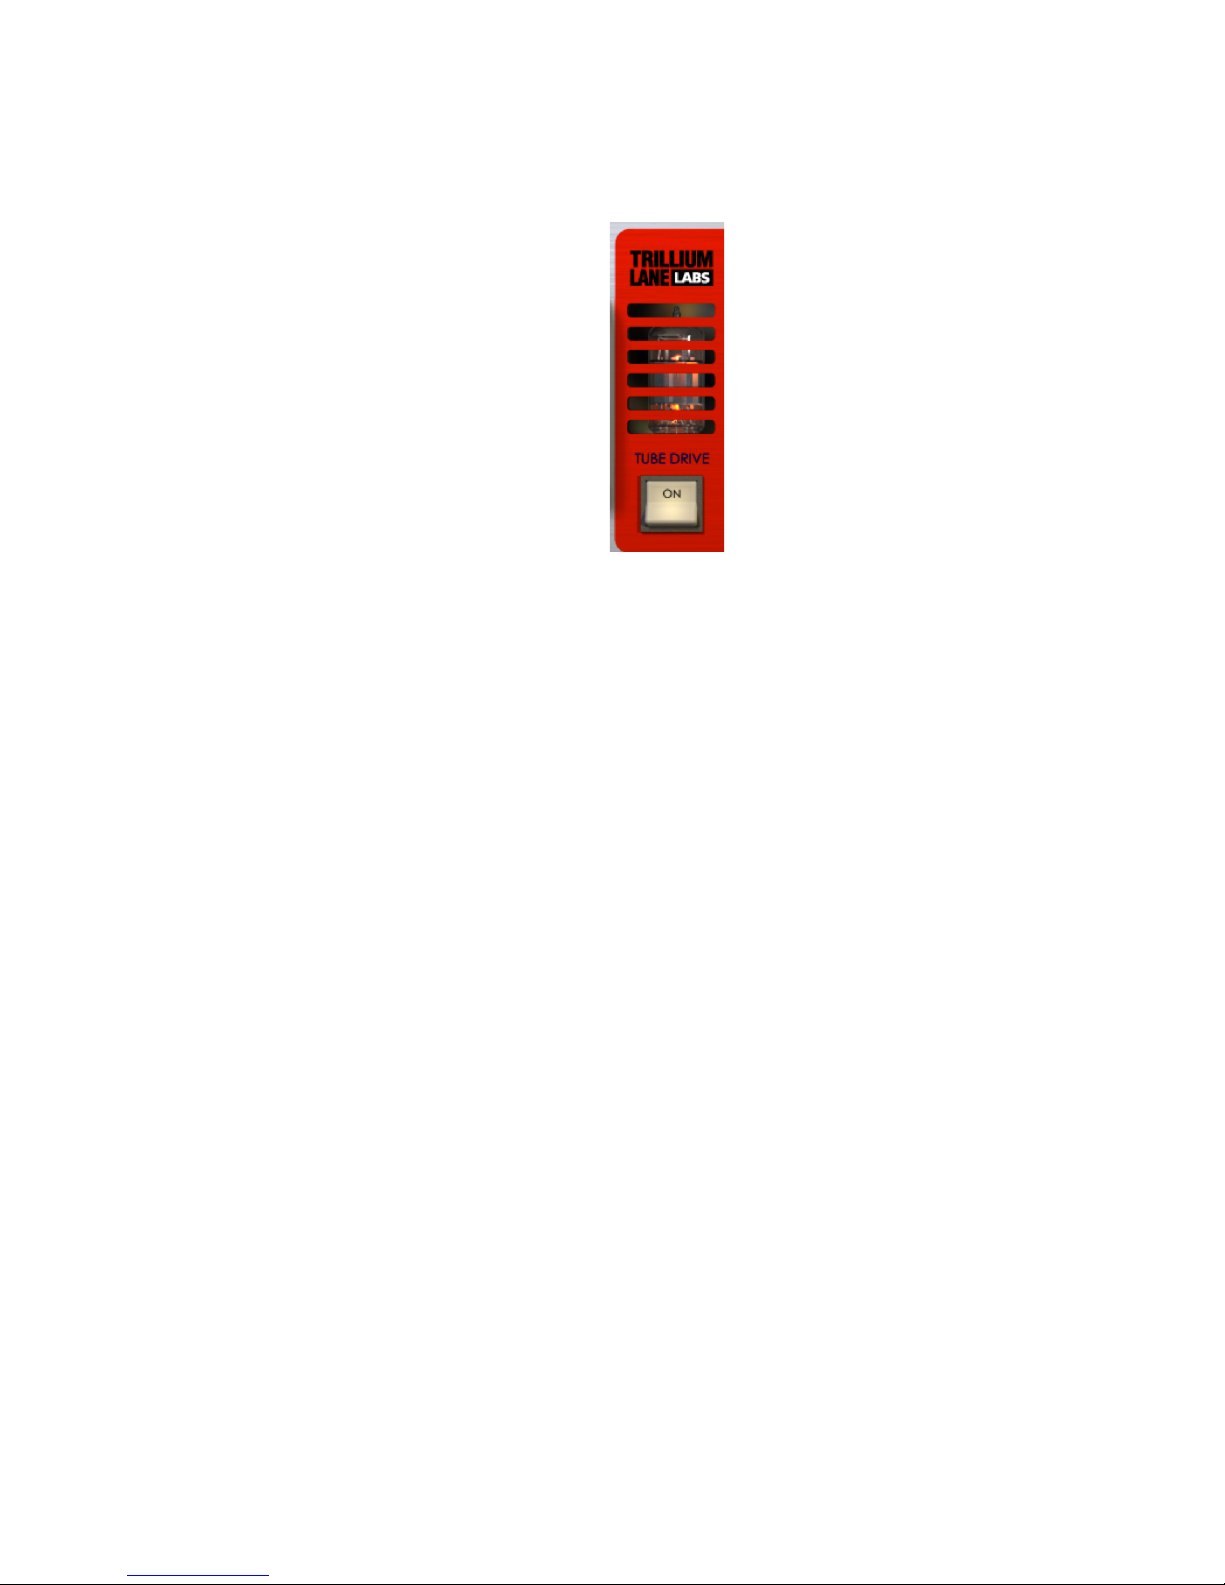
Tube Drive
The Tube Drive module adds subtle even order
distortion after the compression processing,
simulating the effect of a vacuum tube amplifier. This provides a difference in the sonic signature of TL Aggro and is most noticeable on
audio with harmonic content such as piano and
acoustic guitar.
To engage the Tube Drive, turn the Tube Drive
rocker switch to on by clicking it. The Tube
Drive rocker switch and tube light up when
Tube Drive processing is on. The amount of distortion increases with the output level.
Tub e Drive con trol
Page 19
Chapter 3: TL Aggro 13
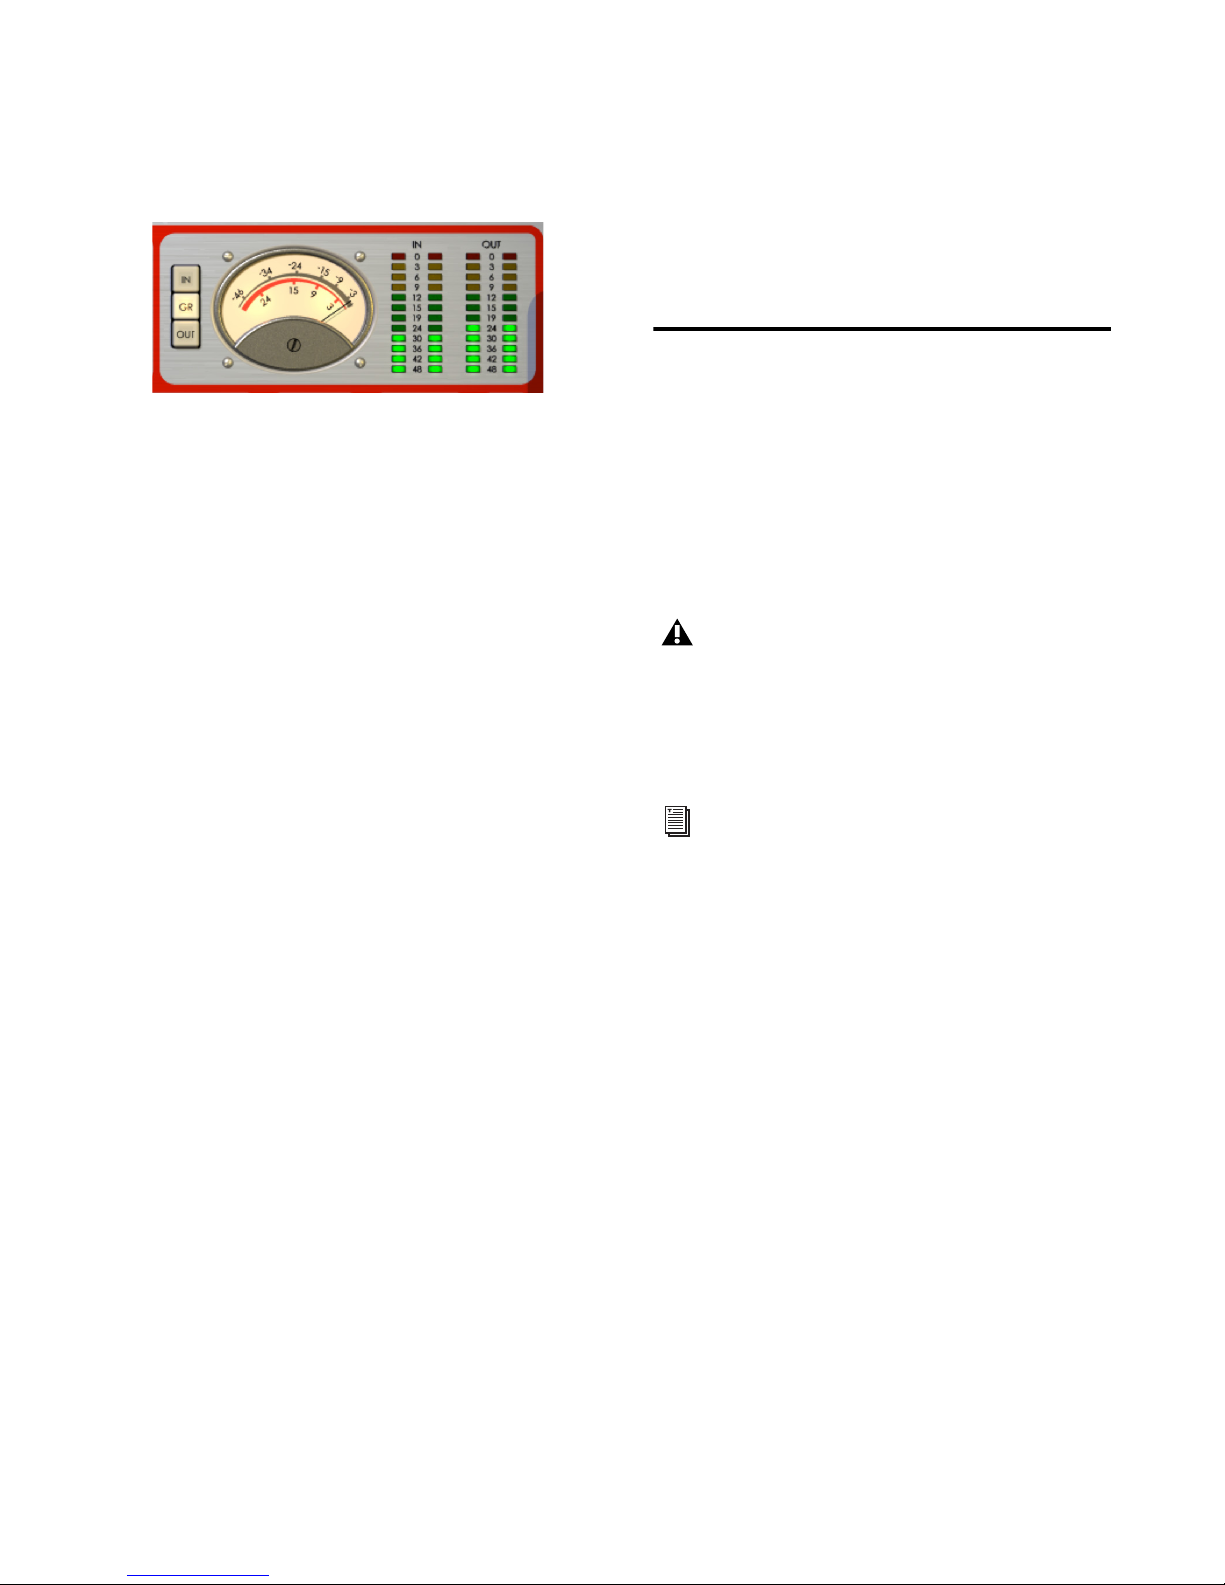
Meters
LED Meters
The LED meters display the peak input and output levels. The LED meters are normalized to
0 dB at digital full-scale.
Note that when TL Aggro is inserted on a mono
track, only the left LED meters will display levels.
Needle Meter
The Needle meter shows input, output, and gain
reduction levels, selectable by the buttons directly to the left of the meter. By default, the GR
(gain reduction) button is selected and the
meter displays the amount of gain reduction
TL Aggro is applying on the input.
When in GR mode, the needle instantaneously
reacts to peak reductions that occur. The red
scale of the meter indicates compression in dB.
This gives you an accurate representation of the
total amount of gain reduction being applied.
However, the release speed of the needle is limited to give it more natural motion. At fast release settings, the instantaneous gain reduction
might be less than what it is presented by the
needle.
In Input (IN) or Output (OUT) mode, the needle
meter displays an average of the signals roughly
approximating the RMS (root-mean-square)
strength of the signal. The grey scale on the
meter represents the input and output levels in
negative dB This gives you a better representation of the overall loudness of the signal with respect to the LED meters.
Using the Side-Chain Input
Using a Side-Chain Input to TL Aggro lets you
direct audio from another track or hardware input in your Pro Tools session to drive the input
of the TL Aggro compressor. This is usually
achieved by sending the audio from the desired
channel to a bus and setting the side-chain input on TL Aggro to the same bus.
LED Meters, In and Out
On versions of Pro Tools prior to 7.0, RTAS
plug-ins do not provide side-chain processing on TDM systems. Use the TDM version
of TL Aggro if you require side-chain processing on a TDM system.
For more information on using Side-Chain
Input, see the Pro Tools Reference Guide.
Page 20

Trillium Lane Labs Plug-ins Guide14
Page 21
Chapter 4: TL AutoPan 15
chapter 4
TL AutoPan
(TDM and RTAS)
Introduction
TL AutoPan is a TDM and RTAS plug-in for
Pro Tools. TL AutoPan is an automatic panning
plug-in that pans a mono input to a multichannel (stereo, LCR, quad, or 5.0) output based on a
LFO, envelope follower, MIDI Beat Clock, or
manual automation. TL AutoPan is ideal for
rhythmic panning effects based on your
Pro Tools session tempo. It also provides an easy
and elegant way to automate panning to multichannel surround formats for post-production.
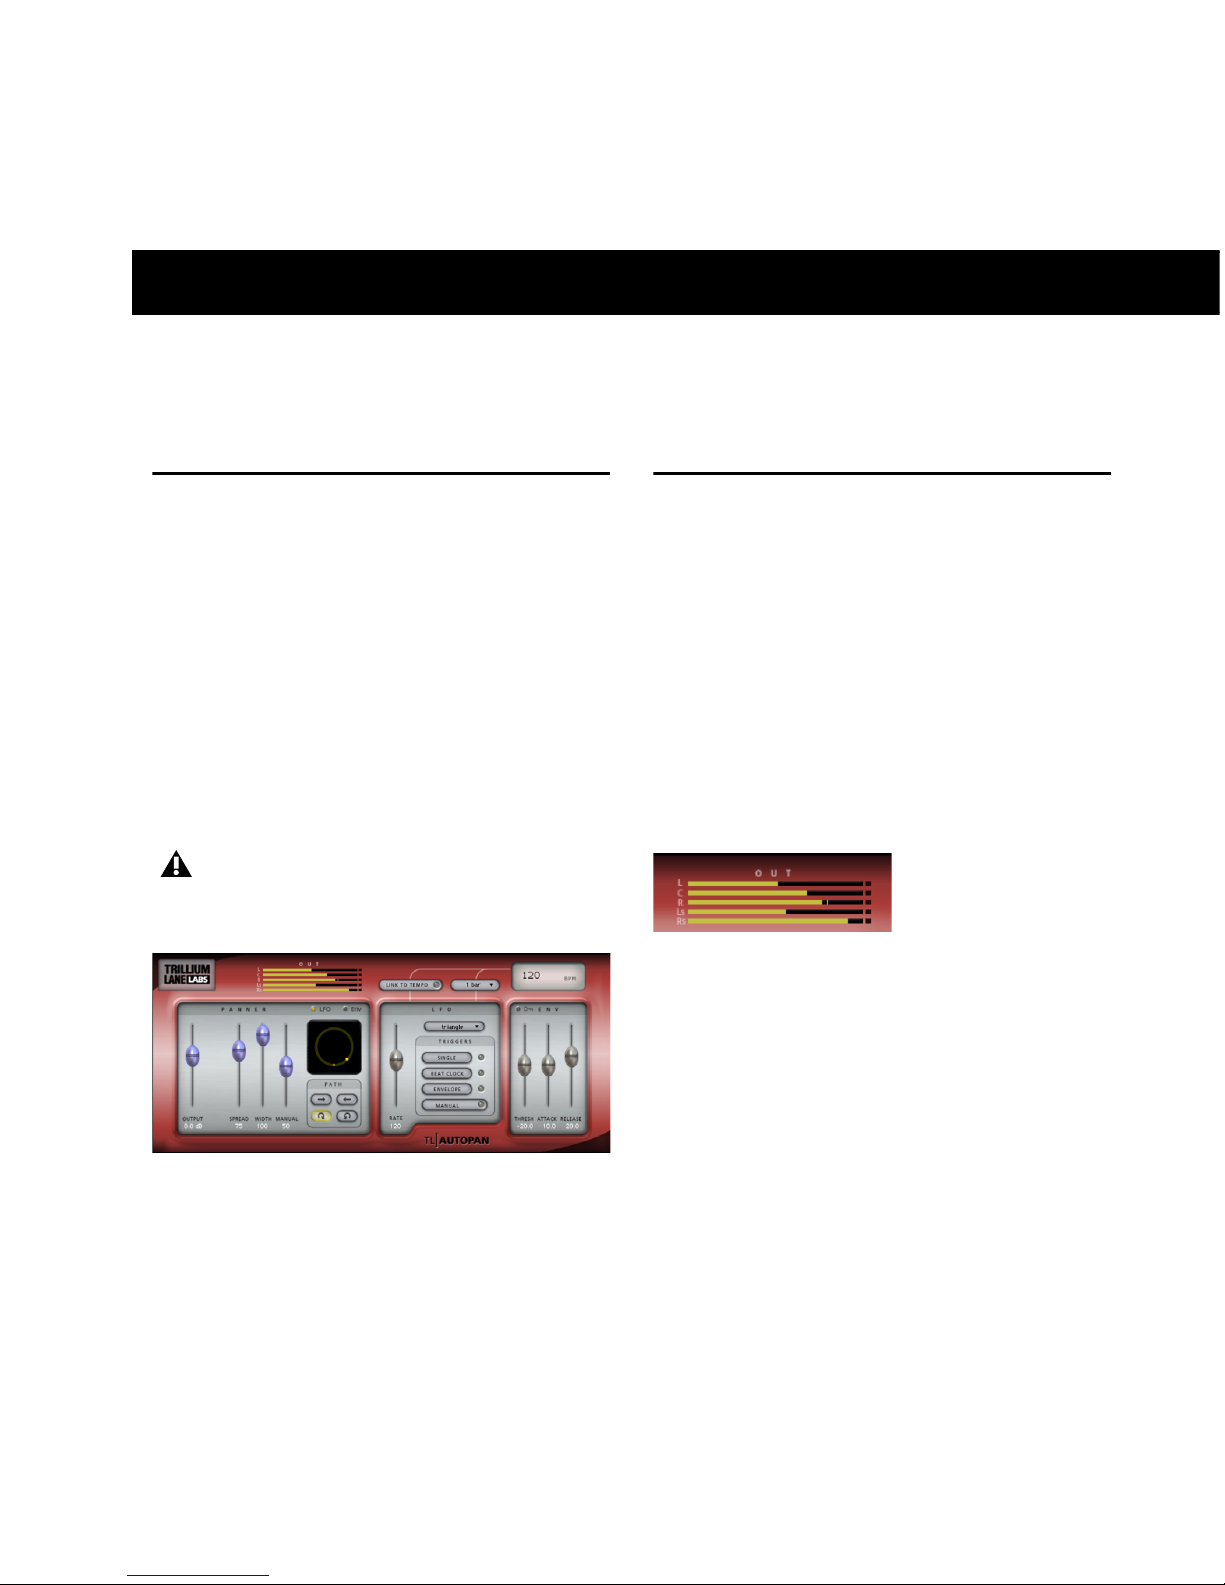
TL AutoPan Controls
The TL AutoPan interface is divided into several
sections, each of which is described below.
Output Meters
The Output meters display the amplitude of the
outgoing audio. In mono-to-stereo mode, a two
meter bar is shown. In mono-to-LCR, quad, or
5.0 mode, three, four, or five channels are
shown respectively.
The Clip indicator lights red when the channel
has clipped. The clip indicator for each channel
can be cleared by clicking it.
RTAS on Pro Tools LE only supports monoto-stereo.
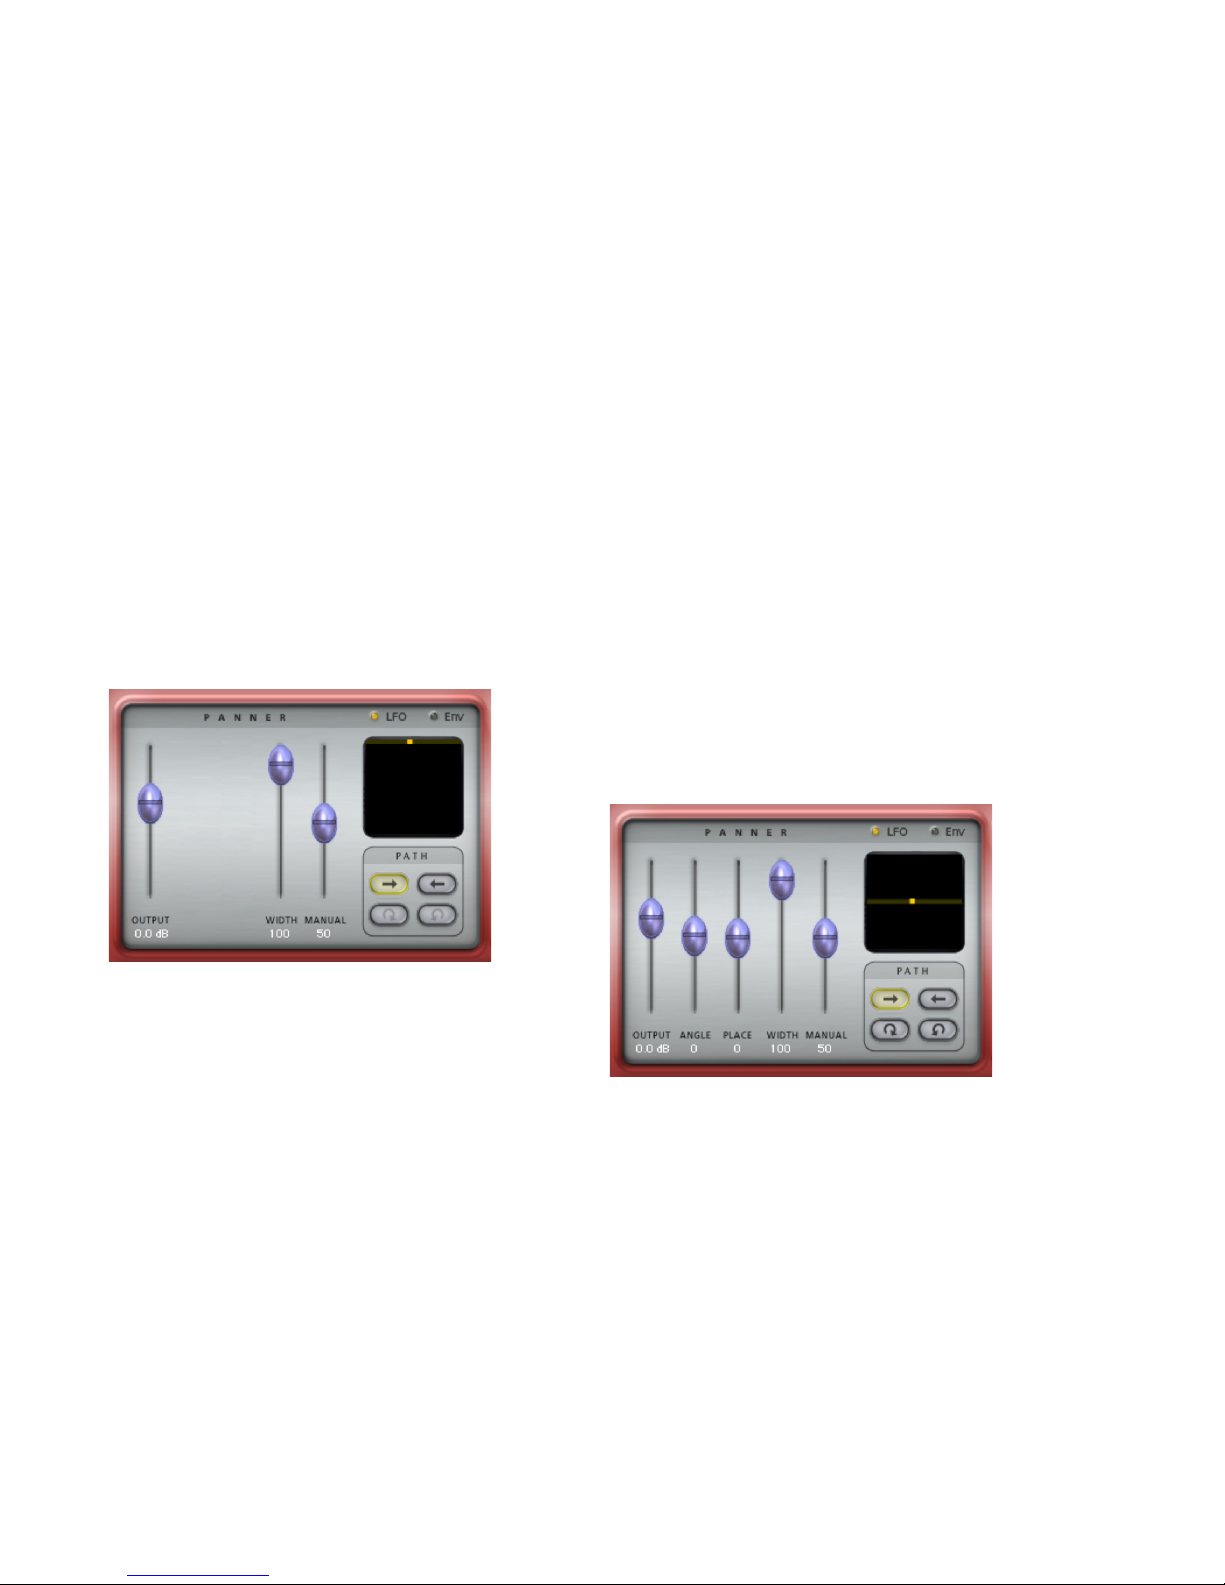
Figure 1. TL AutoPan plug-in, TDM version
Output meters (L, C, R, Ls, Rs)
Page 22
Trillium Lane Labs Plug-ins Guide16
Panner Section
The Panner section provides different controls
for different output channel configurations.
TL AutoPan in mono-to-stereo and mono-toLCR formats provide controls common to all
output configurations: Output, Width, and
Manual. TL AutoPan mono-to-quad and monoto-5.0 formats provide additional controls depending on the Path selection: Angle and Place,
or Spread. Additionally, the Panning Source selector, Panning display, and Path selectors are
common to all output channel configurations.
Output
The Output slider lets you cut or boost the output signal level from –24 dB to +12 dB.
Width
The Width slider controls the width of the panning field. At 100%, the panning field is at its
widest. At 0%, the panning field is centered and
stationary. The Width slider effectively determines the amount of LFO or Envelope control
on the pan position.
Manual
The Manual slider directly controls the pan position, this lets you manually control the pan
position from a control surface or by using automation. The amount of manual control is affected by the setting of the Width slider. For full
manual control, set the Width slider to 0%.
When the Width slider is at 100%, the Manual
slider has no effect on the pan position. When
Width is set to 50%, the LFO sweeps the position through 50% of its range and the Manual
slider lets you move the position of that 50%
range.
Angle
The Angle slider adjusts the orientation of the
panning field from –90° to +90°. At 0°, the panning field is oriented strictly left/right. At –90°
or +90°, the panning field is oriented strictly
front/back.
The Angle slider is only available with mono-toquad and mono-to-5.0 formats, and a left to
right or right to left path selected.
Panner section, mono-to-stereo, left to right path
selected
Panner section, mono-to-5.0, left to right path selected
Page 23
Chapter 4: TL AutoPan 17
Place
The Place slider adjusts the front/back placement of the panning field. At 0%, the panning
field is centered front/back. At +100%, it is
placed all the way front. At –100%, it is placed
all the way back.
The Place slider is only available with mono-toquad and mono-to-5.0 formats, and a left to
right or right to left path selected.
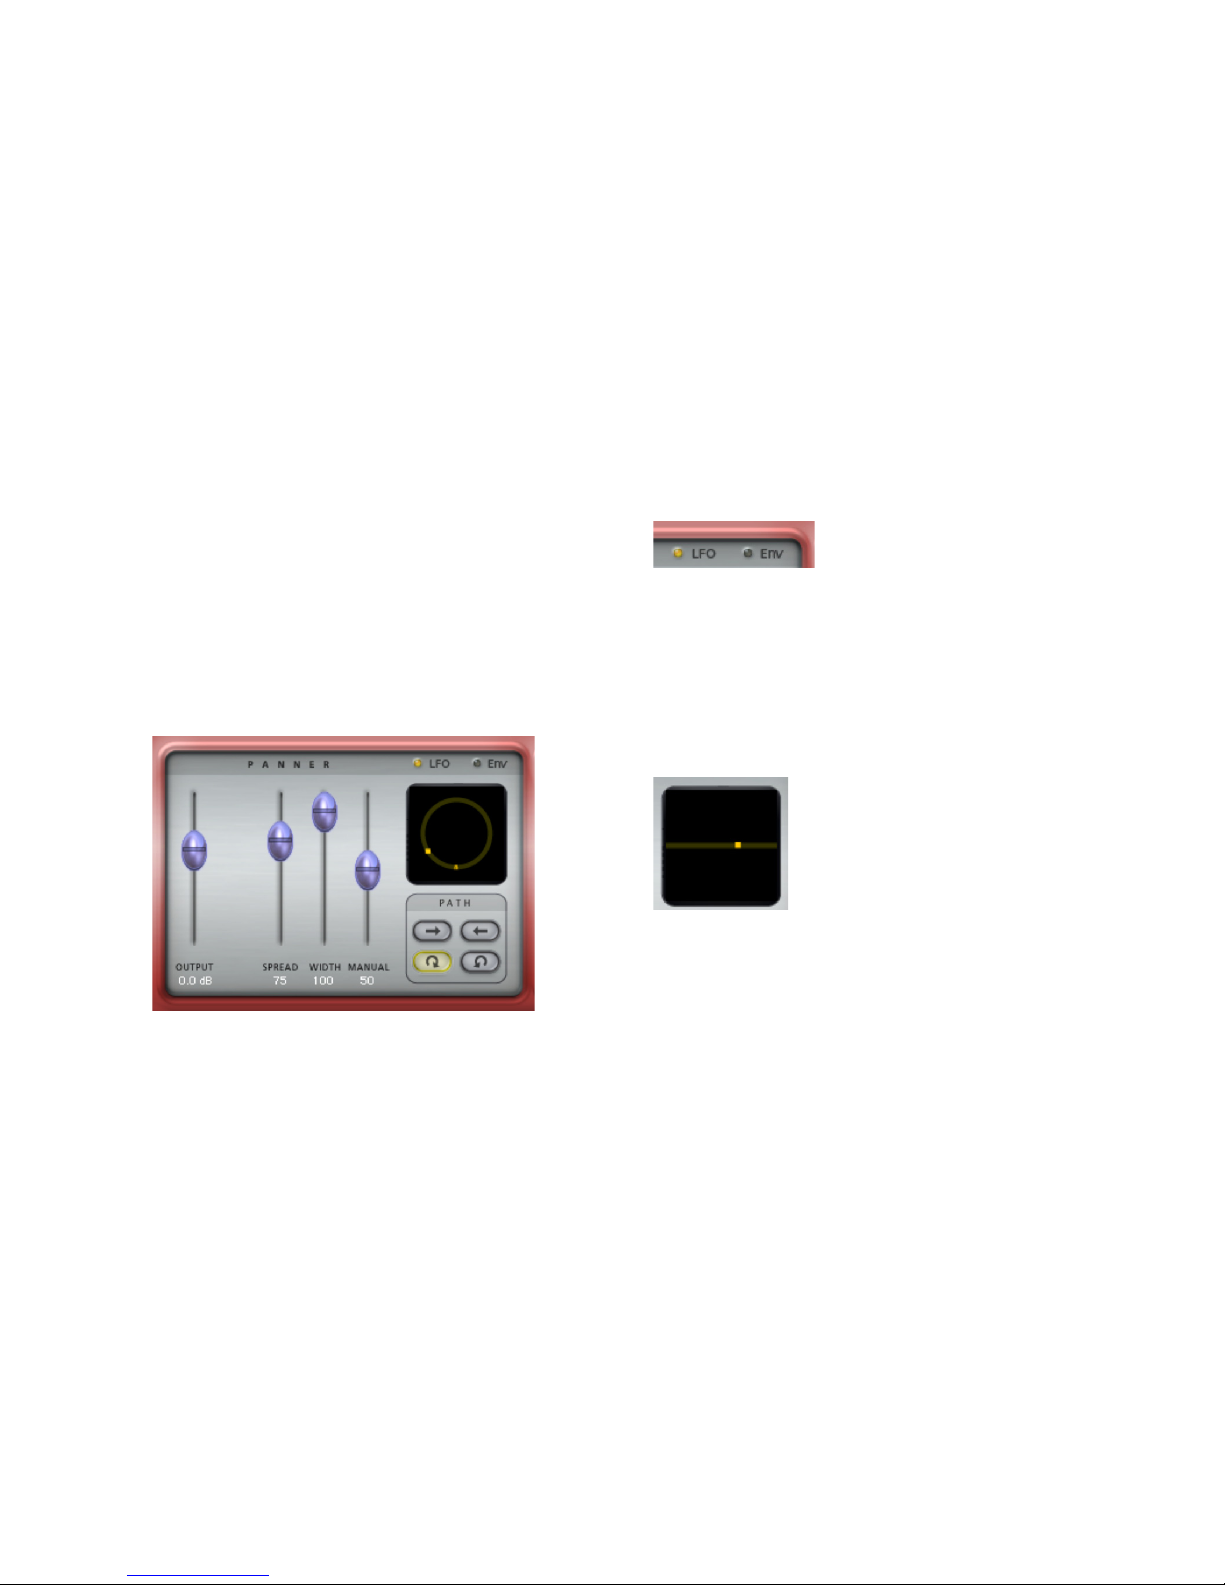
Spread
The Spread slider opens or constricts the field of
panning. At 100%, the spread of the panning
field is at its greatest. At 0%, the spread of the
panning field is completely constricted, and the
sound is centered and stationary (left/right and
front/back).
The Spread slider is only available with monoto-quad and mono-to-5.0 formats, and a circular
path (clockwise or counterclockwise) selected.
Panning Source
Click LFO or ENV to select the source for panning. When the Source is set to LFO, panning is
controlled by the LFO and its controls (see “LFO
Section” on page 18). When the Source is set to
Envelope (ENV), panning is controlled by the
Envelope Detector and its controls (see “Envelope Section” on page 20). The Envelope Detector can be triggered by the panned audio signal,
or by a side-chain input (see “Using the SideChain Input” on page 22).
Panning Display
The Panning display graphically represents the
panning field and the location of the sound
source within that field.
Sound Location Indicator This bright yellow light
indicates the location of the sound source.
Panning Field Indicator This is the grey line on
which the yellow Sound Location indicator
travels and indicates the panning field.
Panner section, mono-to-5.0, clockwise path selected
Panning Source buttons
Panning display, mono-to-5.0, left to right path selected
Page 24

Trillium Lane Labs Plug-ins Guide18
Path
The Path selectors determine whether the audio
signal pans left to right, right to left, or in a circular motion clockwise, or counterclockwise.
The circular path selectors (clockwise and counterclockwise) are only available with mono-toquad and mono-to-5.0 formats.
LFO Section
The LFO section provides controls for the Low
Frequency Oscillator that can be used to modulate panning. The controls in the LFO section
only affect the panning if LFO is selected as the
panning source in the panning section (see
“Panning Source” on page 17).
Rate
The Rate slider adjusts the rate of the LFO in
beats per minute. When Link to Tempo is activated, the slider is ignored and the Tempo LCD
always displays the current session tempo (see
“Tempo LCD” on page 20).
Wavefor m
The Waveform selector determines the wave
shape used by the LFO. The waveform shape in
use is graphically depicted by the movement of
the Sound Location indicator in the Panning
display.
LFO Triggers
By default, the LFO cycles continuously through
the selected waveform. The LFO can be set to cycle through the selected waveform just once, or
it can be triggered by MIDI Beat Clock, the Envelope, or manually.
Path selectors, left to right path selected
LFO section
When the Panner section is set to Envelope
(ENV), the controls in the LFO section have
no effect on panning.
Selecting the LFO Waveform
LFO Triggers
Page 25
Chapter 4: TL AutoPan 19
Single
When the Single trigger is selected, the LFO will
cycle thru the waveform once only and then
stop.
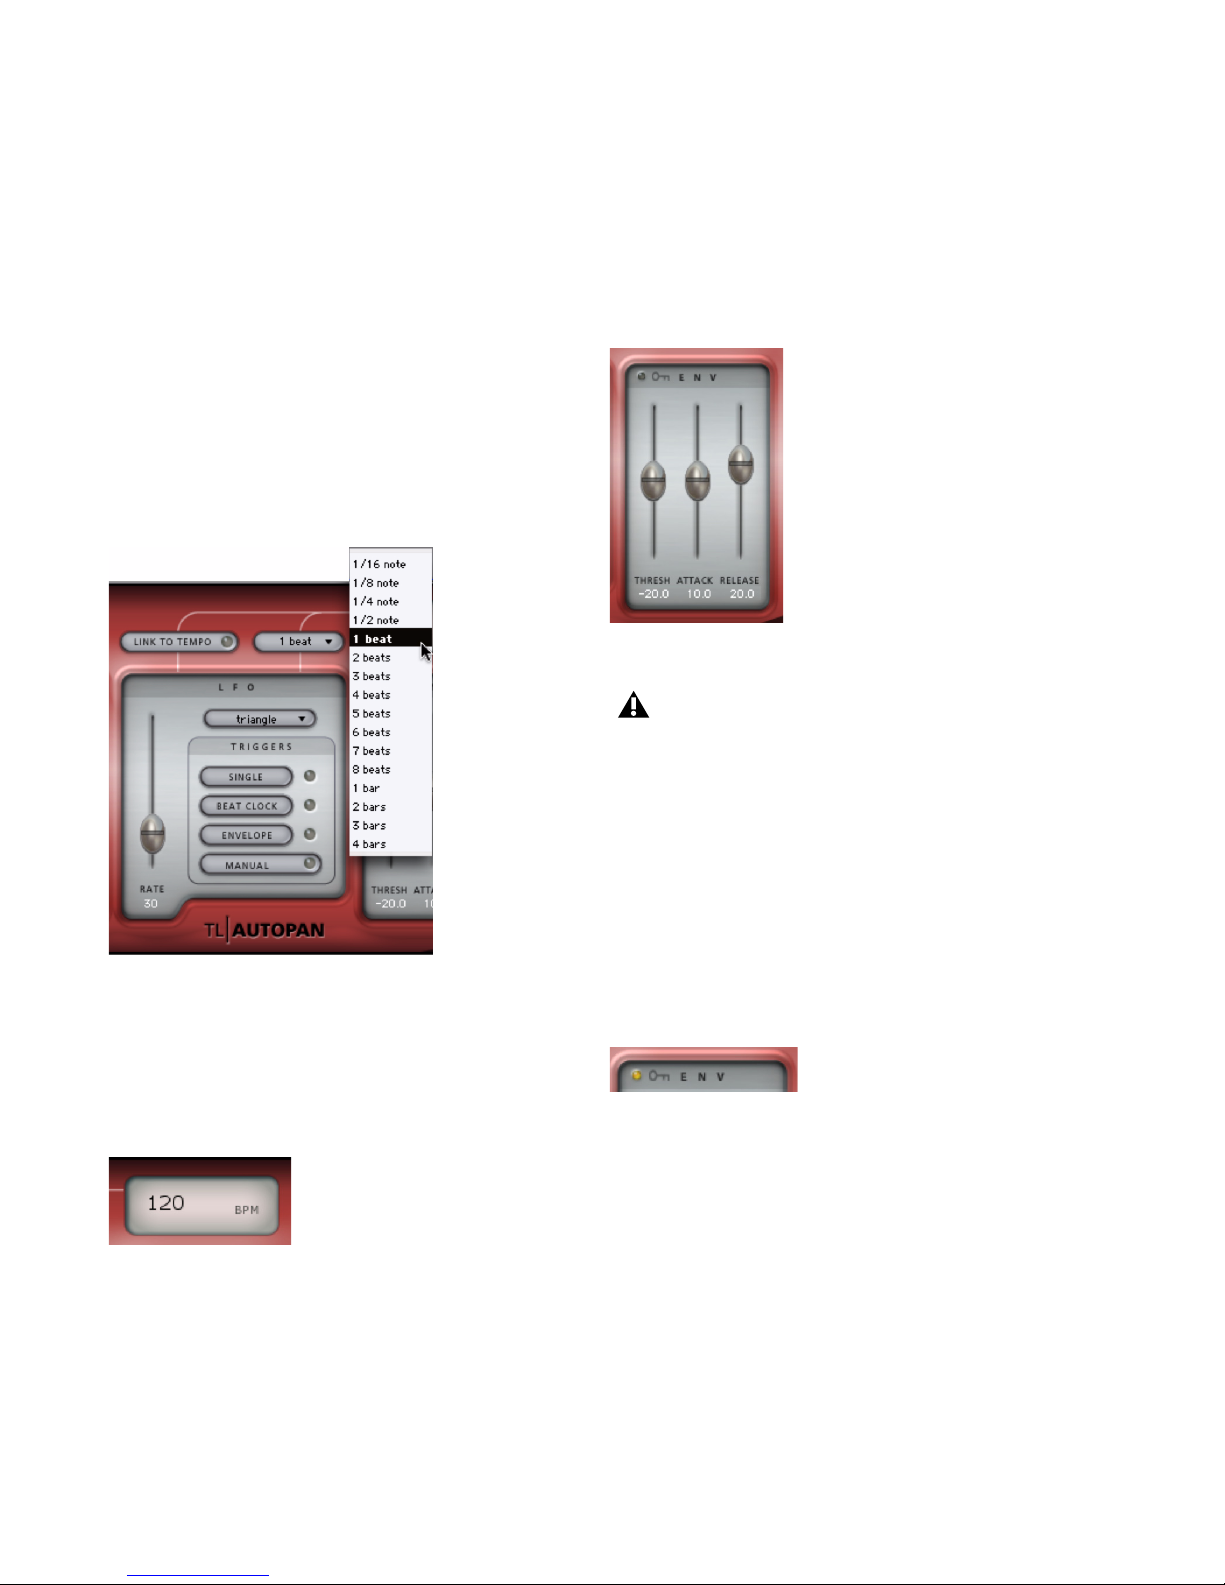
Beat Clock
When the Beat Clock trigger is selected, the LFO
synchronizes to MIDI Beat Clock. TL AutoPan
receives Beat Clock signal every 64th-note. The
Duration menu determines how often the Beat
Clock signal triggers TL AutoPan, ranging from
every 16th-note to every 4 bars. When Beat
Clock signal is received, the Beat Clock trigger
light blinks brightly. Using the Beat Clock function enables TL AutoPan to produce consistent
panning results, ensuring that the LFO is always
in the same state at each beat.
Envelope
When the Envelope trigger is selected, the LFO
is triggered directly by the Envelope Detector,
which analyzes the amplitude of the audio signal. If the Side-Chain Input selector in the Envelope section is activated, then the side-chain audio signal is used instead. When activated, the
Envelope light blinks brighter when an audio
signal is detected. The threshold level can be adjusted using the Threshold control in the Envelope section.
If the Envelope Detector is completely released
due to previous portions of the audio signal going above threshold, a trigger occurs the next
time the audio goes above the threshold level.
Another trigger will not happen until the Envelope Detector has completely released after the
audio goes below the specified threshold. Increasing the release time reduces the rate at
which triggers can occur and decreasing the release time increases the rate at which triggers
can occur.
Manual
When the Manual trigger is selected, the LFO is
triggered manually. This can be especially useful
if you want to trigger the LFO using Pro Tools
automation.
With control surfaces and automation, the
Manual trigger acts like an on/off switch and
triggers the LFO every time it changes state.
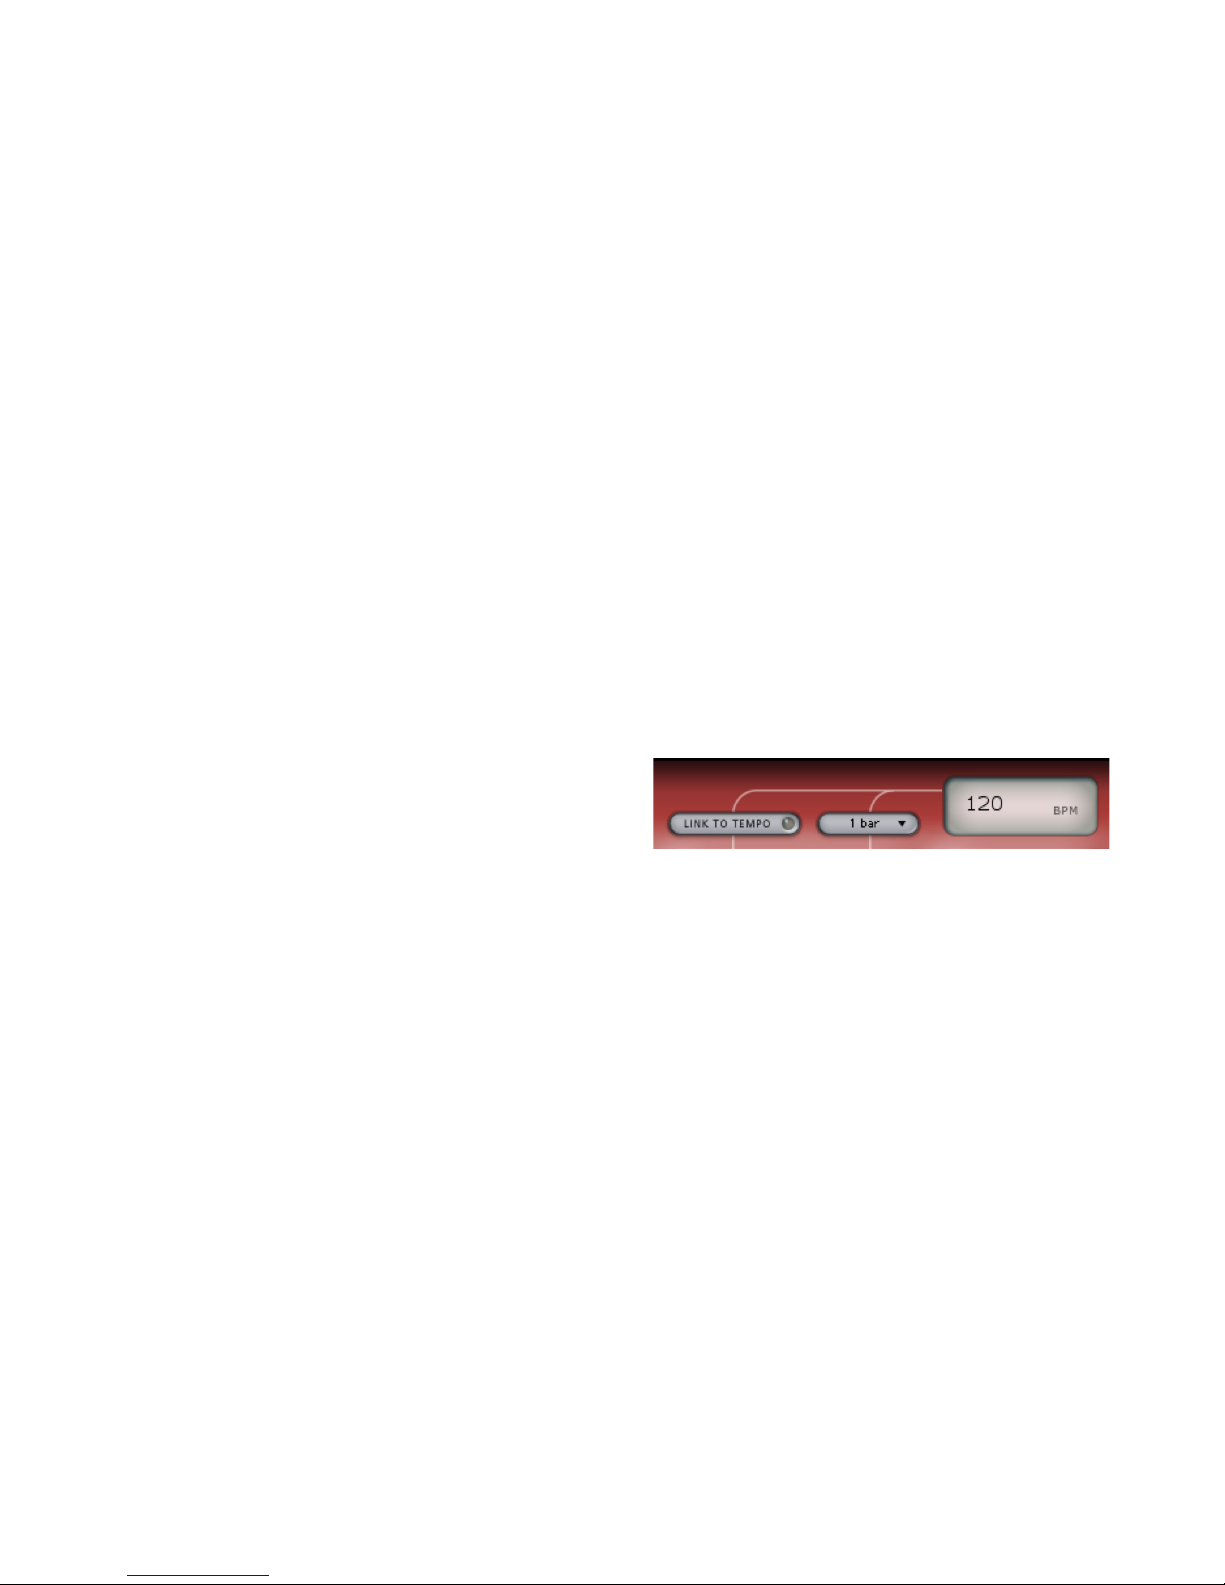
Tempo C ontro ls
Link To Tempo
When the Link To Tempo option is enabled, the
LFO rate is set to the Pro Tools session tempo,
and any tempo changes in the session are followed automatically. In addition, the LFO rate
slider is ignored and the tempo displayed in the
LCD always displays the current session tempo.
Tempo c ont rols
Page 26
Trillium Lane Labs Plug-ins Guide20
Duration Selector
The Duration selector works in conjunction
with the session tempo, LFO rate, and Beat
Clock trigger. By default, Duration is set to 1 bar.
At that setting, the LFO cycles once within one
bar. When Duration is set to 1 beat, the LFO cycles within the duration of one beat. When Link
to Tempo is enabled, the Duration menu allows
the LFO rate to be set as a function of the tempo
of the Pro Tools session. The Duration menu
also controls how often the Beat Clock trigger is
activated.
Tempo LCD
The Tempo LCD displays the tempo in BPM.
The value in the Tempo LCD can also be edited
directly by clicking it and typing a new value.
Envelope Section
When Envelope (ENV) is selected as the Panning
source, Panning (as shown in the Panning display) is controlled by the audio signal and the
Envelope section controls.
Side-Chain Input
When the Side-Chain Input selector (the key
icon) is enabled, the audio for the Envelope Detector is taken from the side-chain input rather
than the current track. Select the Side-Chain Input using the Pro Tools Key Input selector at the
top of the plug-in window.
Threshold
The Threshold slider sets the amplitude level required for the Envelope Detector. The LFO Envelope Detector light blinks brighter when audio is detected above the threshold.
Selecting Duration
Tempo L CD
Envelope section
When Envelope (ENV) is not selected as the
Panning Source, the controls in this section
have no effect on the sound.
Side-Chain Input selector enabled
Page 27

Chapter 4: TL AutoPan 21
Attack
The Attack slider sets the attack rate of the Envelope Detector.
Release
The Release slider sets the release rate of the Envelope Detector.
Using TL AutoPan
TL AutoPan can be used for dynamic panning
effects based on a Low Frequency Oscillator
(LFO), an amplitude envelope (ENV), or manual
control. TL AutoPan makes it easy to pan to the
beat of a music track, as well as panning “flyaround” effects. The following section describes
two possible scenarios for using TL AutoPan:
panning to the beat for rhythmic panning effects and surround panning effects for post production.
Panning to the Beat
TL AutoPan lets you synchronize the LFO to
MIDI Beat Clock for rhythmic panning effects.
To synchronize TL AutoPan to MIDI Beat Clock:
1 Make sure that your session tempo matches
the tempo of the music.
2 Insert a mono-to-stereo instance of
TL AutoPan on the mono audio track containing the audio you want to pan. The track’s channel width changes from mono-to-stereo.
3 In the TL AutoPan Plug-in window, enable
Link To Tempo. This sets the LFO rate to follow
the session tempo.
4 Select the desired duration from the Duration
selector. For example, select 2 Beats.
5 Select the desired waveform for the LFO from
the Waveform selector. For example, select 4
Step Triangle.
6 Enable Beat Clock for the LFO Trigger. This en-
sures that the LFO is synchronized to the beat.
7 Play back the session to hear the panning ef-
fect.
Post Production Panning
(Pro Tools|HD Systems Only)
TL AutoPan lets you pan a mono track to a
greater than stereo (LCR, Quad, or 5.0) output in
a surround path. This is especially useful for
post-production applications. The following example describes how to use TL AutoPan to pan a
“mosquito” sound in 5.0 surround.
To pan a mono track to 5.0 with TL AutoPan:
1 Insert a mono-to-5.0 instance of TL AutoPan
on the mono track containing the audio you
want to pan. The track’s channel width changes
from mono-to-5.0.
2 Select a 5.0 output path from the track’s Out-
put selector.
3 In the TL AutoPan Plug-in window, select a
clockwise or counter-clockwise Path as desired.
4 Adjust the Spread and Width sliders as de-
sired.
5 From the LFO Waveform selector, select Half
Sine.
Try automating Spread and Width to alter
the positioning of the panned sound.
Try automating the Manual control instead
of using the LFO to create a more erratic
panning of the “mosquito” sound.
Page 28

Trillium Lane Labs Plug-ins Guide22
6 Adjust the Rate slider as desired.
7 Play back the session to hear the “mosquito”
flying around your head.
Using the Side-Chain Input
The Side-Chain Input option in TL AutoPan lets
you direct audio from another track in your
Pro Tools session to the Envelope Detector. This
is achieved by sending the audio from the desired channel to a bus and setting the side-chain
input on TL AutoPan to the same bus.
Try automating Rate to alter the speed of
the panned sound over time.
For more information on using the SideChain Input, see the Pro Tools Guide.
Page 29
Chapter 5: TL Drum Rehab 23
chapter 5
TL Drum Rehab
(RTAS Only)
Introduction
TL Drum Rehab is an RTAS plug-in for Pro Tools
that provides engineers with a powerful tool for
the precise drum replacement and enhancement of drum tracks in real-time, regardless of
performance, equipment, or recording limitations in the original track. Use TL Drum Rehab
to do everything from replacing poor drum
sounds to remixing drum performances with
completely new and different sounds.
TL Drum Rehab Features
• Editable sample-accurate trigger locations
• Dynamic multi-sample support of up to 16
layers (Zones)
• Envelope and tone shaping controls
•Undo
• Powerful sample browser and converter
•Favorites
• Custom file format (DRP)
• Tracking, compression, and quantization
• Triggering sensitivity and filtering controls
• Random sample selection
•No Latency mode
TL Drum Rehab is a mono plug-in only. It
cannot be used on multi-channel tracks
(stereo or greater).
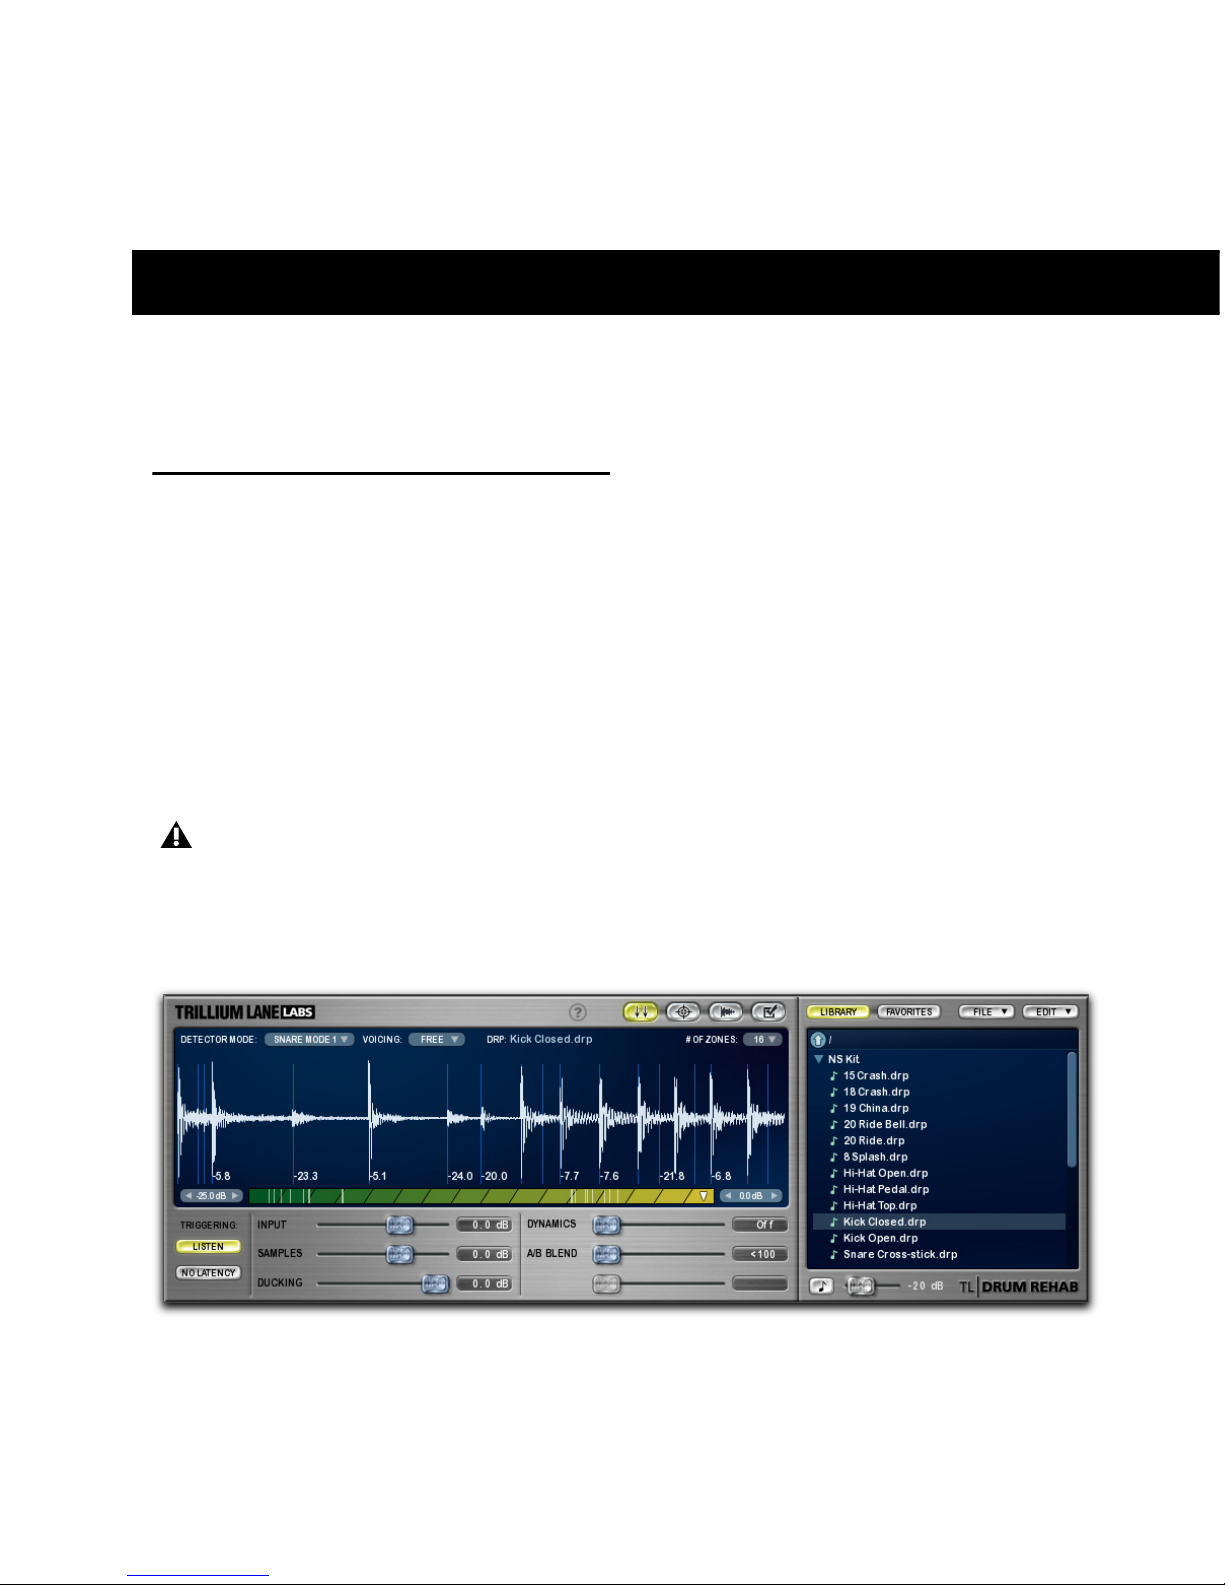
Figure 1. TL Drum Rehab plug-in
Page 30
Trillium Lane Labs Plug-ins Guide24
Using TL Drum Rehab
TL Drum Rehab can be used to reinforce a drum
performance with sampled drum sounds or can
be used to replace the original drum sounds entirely with sampled drums.
For most applications of TL Drum Rehab you
only need to use the Trigger panel (see “Trigger
Panel Display and Controls” on page 29).
For more complicated drum parts, you may
want to use the Expert panel to commit or ignore specific detected triggers, as well as quantize or edit the location of committed triggers
(see “Expert Panel Display and Controls” on
page 35).
To edit sample layers and adjust the sound of
samples, use the Samples panel (“Samples Panel
Display and Controls” on page 39).
TL Drum Rehab Workflow
Examples
The following section describes two possible
workflow examples for using TL Drum Rehab.
The first example uses TL Drum Rehab to replace the kick drum sound on a mono kick drum
track in real-time. The second example describes
a more complicated procedure, using TL Drum
Rehab’s Expert panel to replace a high hat track
and quantize the replacement samples.
Workflow Example 1
Using TL Drum Rehab to replace a kick drum
sound:
1 Insert TL Drum Rehab on a mono audio track
of a kick drum recording.
2 Make a short selection to set TL Drum Rehab’s
parameters. For example, make a two bar selection.
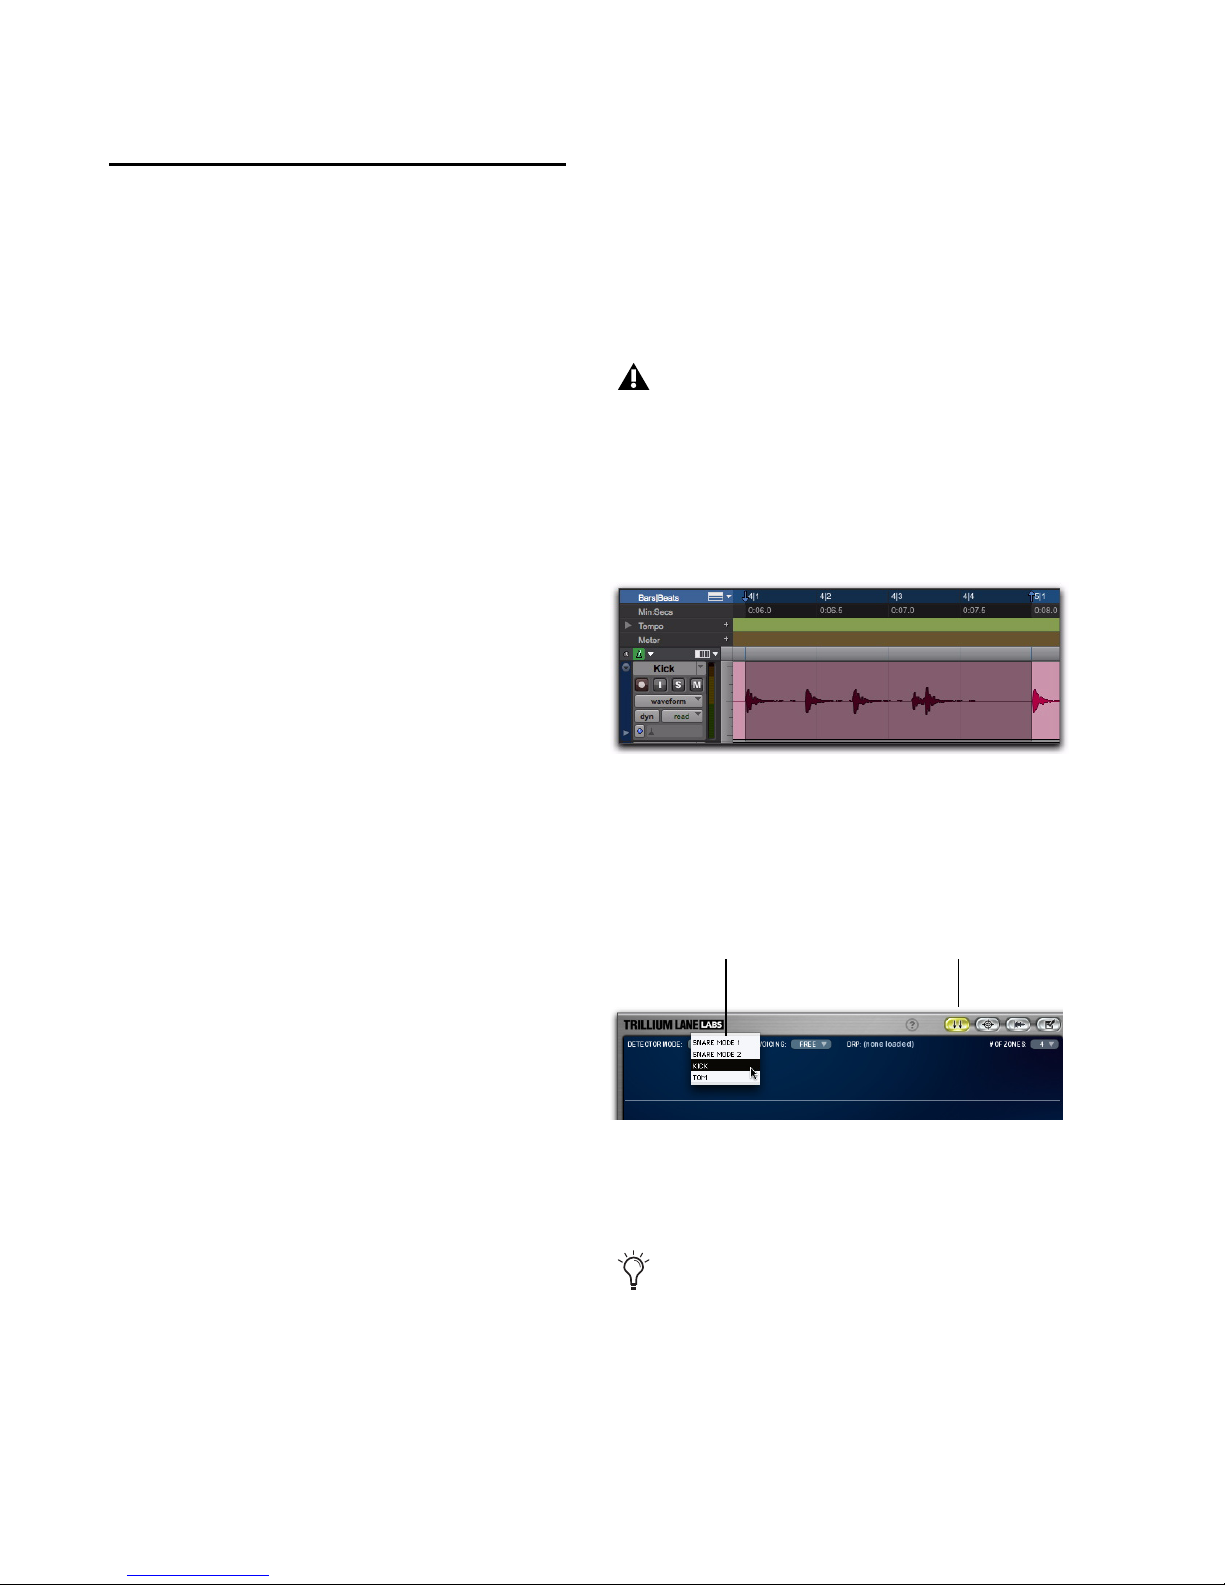
3 In TL Drum Rehab’s Trigger panel (see “Trigger
Panel Display and Controls” on page 29), select
Kick from the Detector Mode pop-up menu (see
“Detector Mode” on page 30).
4 Enable Listen mode by clicking the Listen but-
ton. The Listen button lights when Listen mode
is enabled.
TL Drum Rehab is a mono plug-in only. It
cannot be used on multi-channel tracks
(stereo or greater).
Create a Selection memory location for your
two-bar selection. This lets you quickly return to the original selection in case you
want to further adjust TL Drum Rehab’s
settings.
Detector Mode pop-up menu Trigger Panel button
Page 31

Chapter 5: TL Drum Rehab 25
5 Start playback in Pro Tools. As Pro Tools plays
back, TL Drum Rehab “listens” to the track, and
analyzes the audio for attack transients and
marks those sample locations with triggers.
These triggers play back the samples loaded into
TL Drum Rehab to replace or enhance the drum
sounds on the audio track.
6 In this example, there is some bleed from the
snare on the kick track and TL Drum Rehab detected a trigger on one of the snare hits. Adjust
the Minimum Threshold control so that only
the kick drum hits are detected (see “Minimum
and Maximum Threshold Controls” on
page 33).
7 After adjusting the Minimum Threshold, play
back the selection to re-detect triggers.
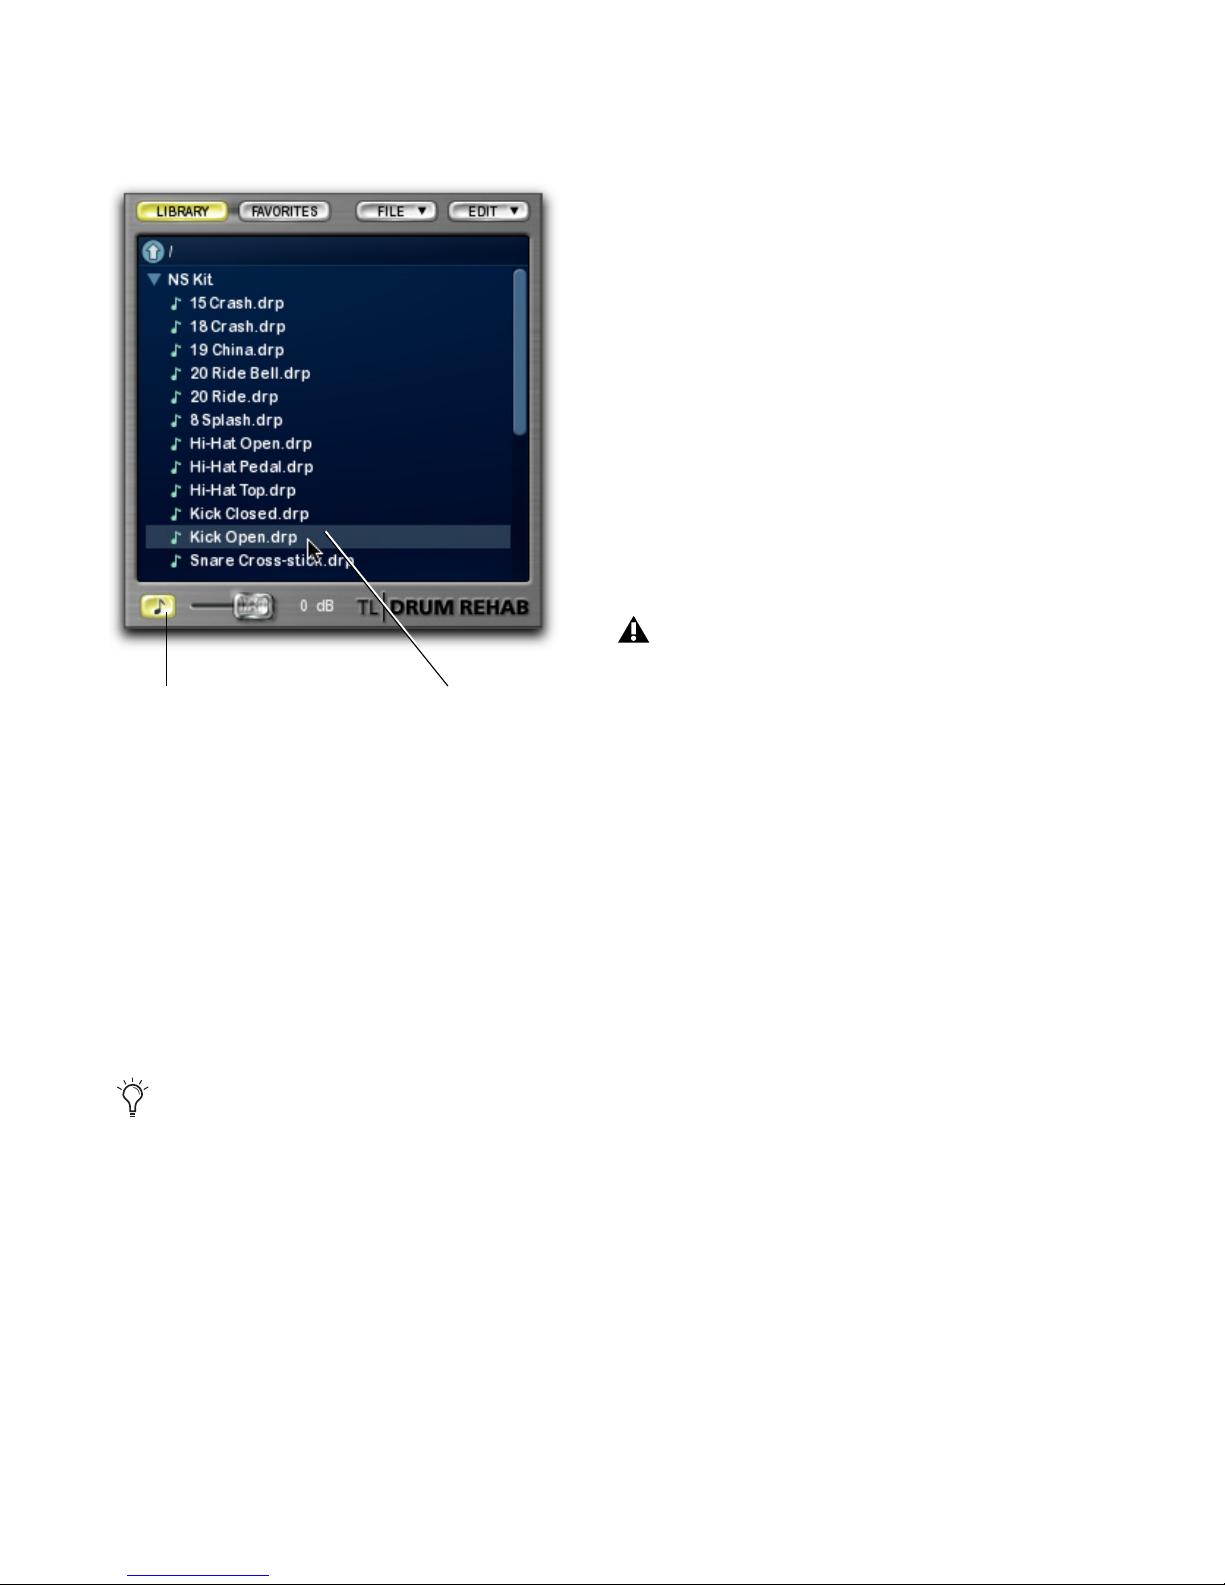
8 In TL Drum Rehab’s Library browser (see “TL
Drum Rehab Library Browser” on page 43), locate the drum sample or DRP file you want to
load. You can audition samples and DRP files by
enabling the Auto-Audition option and selecting the sample or DRP file you want audition in
the browser.
DRP files are a collection of samples loaded into
TL Drum Rehab’s Zones and Clips that work together to create a realistic and dynamic drum
sound. For more information on DRP files, see
“DRP Name Display” on page 30.
9 Do one of the following:
• To load a DRP file into TL Drum Rehab,
double click the desired DRP file in the Library browser.
– or –
• To load a sample into TL Drum Rehab, double click the desired sample (WAV, AIF, or
SD2) in the Library browser. The sample is
loaded into the currently selected Zone (see
“Velocity Map and Velocity Zones” on
page 32).
Listen button Detected triggers
Minimum Threshold
Detected triggers
Page 32
Trillium Lane Labs Plug-ins Guide26
10 In the Trigger panel, decrease the Input slider
to lower the volume of the original kick sound,
and increase the Samples slider to increase the
volume of the replacement kick sample. This
way you can effectively augment or replace the
original drum sound with the sampled drum
sound. You can also adjust the Dynamics control to have the amplitude of the original drum
sound affect the playback amplitude (velocity)
of the sampled drum sound. (For more information, see “Playback Controls” on page 34.)
11 In the Pro Tools Transport window, press Re-
turn to Zero, and press Play to begin playback
from the beginning of the track. TL Drum Rehab
plays back the selected drum sample at every detected trigger in the original track, all in real
time.
During playback, you can further adjust
TL Drum Rehab’s playback controls as desired to
get just the right blend between the original
drum sound and the replacement drum sound.
12 Once you are satisfied with the result, do one
of the following:
• Bus and record the output of TL Drum Rehab to a new audio track.
• Use Bounce to Disk to render the replacement track and import it back into the session. For more information on Bounce To
Disk, see the Pro Tools Reference Guide.
• Leave the plug-in inserted and continue to
use it during playback.
Workflow Example 2
Using the TL Drum Rehab Expert panel to replace
and quantize a high hat sound:
1 Insert TL Drum Rehab on a mono audio track
containing a high hat recording.
2 As in workflow example 1, do the following:
• Load the desired DRP file, or load samples
(WAV, AIF, or SD2) into Zones.
• Make a Timeline selection.
• In the Trigger panel, select the appropriate
Detector Mode setting.
• Enable Listen mode.
• Play back the selection to detect triggers.
You can also use the Ducking control to
mask track’s audio with the triggered sample (see “Playback Controls” on page 34).
Auto-Audition enabled Selected sample
When using committed triggers, and bussing and recording TL Drum Rehab to another track, it is strongly recommended that
you set the H/W Buffer Size (Setup > Playback Engine) to 2048 samples. This is the
optimal setting for recording TL Drum Rehab. Lower buffer settings may result in offset triggers.
Page 33
Chapter 5: TL Drum Rehab 27
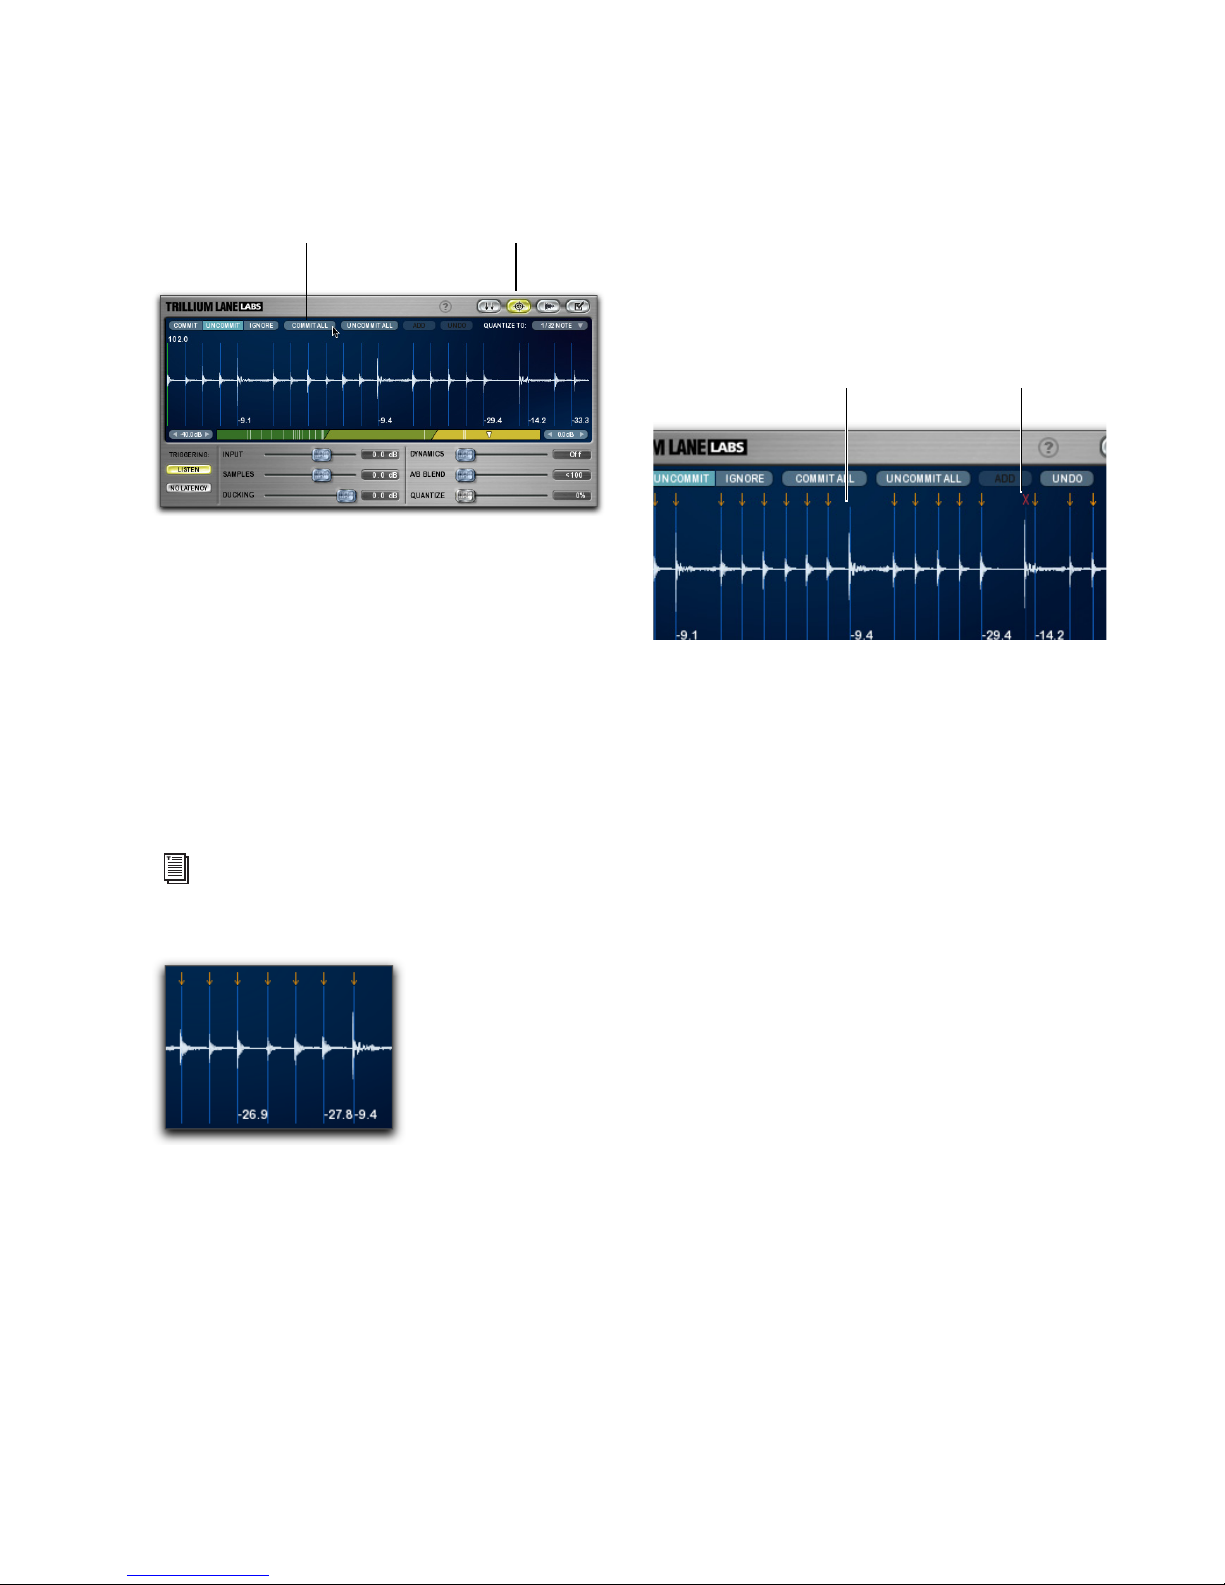
3 In the Expert panel, click Commit All.
Committed triggers play back regardless of
whether or not Listen mode is enabled.
TL Drum Rehab lets you edit the position of
committed triggers by clicking and dragging,
which can be useful if you are working with
drum sounds that do not have clear attack transients, or if you need to compensate for the delay inherent in non-close miked recordings
(such as overs for the cymbals). Committed triggers are indicated by a red arrow.
4 If there are some committed triggers that you
do not want to play back, click either Uncommit
or Ignore.
Uncommitted triggers do not playback if Listen
mode is disabled, but do playback if it is enabled
(because they are re-detected in Listen mode, so
a new trigger is generated). Ignored triggers do
not playback regardless of whether or not Listen
mode is enabled. When working with committed triggers, Listen mode is typically disabled so
that TL Drum Rehab doesn’t reanalyze the selection’s attack transients and generate new triggers after you have already edited any committed triggers.
5 Disable Listen mode.
6 For no latency on playback, enabled No La-
tency mode (see “Triggering Controls” on
page 34).
7 Select the desired quantize resolution from
the Quantize To pop-up menu (see “Quantize
To” on page 38).
8 Adjust the Quantize slider to achieve the de-
sired amount of quantization. 100% hard quantizes committed triggers to the selected
Quantize To resolution (for example, sixteenth
notes).
9 Adjust TL Drum Rehab’s playback controls as
desired (see “Playback Controls” on page 34).
10 Once you are satisfied with the result, do one
of the following:
• Bus and record the output of TL Drum Rehab to a new audio track.
• Use Bounce to Disk to render the replacement track and import it back into the session. For more information on Bounce To
Disk, see the Pro Tools Reference Guide.
For more information on working with committed triggers, see “Commit” on page 36.
Commit All Expert Panel button
Uncommitted trigger Ignored trigger
Page 34
Trillium Lane Labs Plug-ins Guide28
• Leave the plug-in inserted and continue to
use it during playback.
TL Drum Rehab Controls and
Displays
When using TL Drum Rehab, most operations
take place in one of two displays: the Main window and the Library Browser.
TL Drum Rehab Main Window Provides access to
four different control panels: Trigger, Expert,
Sample, and Preferences.
TL Drum Rehab Library Browser Is to the right of
the Main window and lets you select samples for
playback, and also lets you manage your sample
library.
TL Drum Rehab Main Window
The TL Drum Rehab Main window lets you access four different panels: Trigger, Expert, Samples, and Preferences.
Trigger Panel Provides the most commonly used
controls for detecting triggers and playback controls (see “Trigger Panel Display and Controls”
on page 29).
Expert Panel Lets you precisely edit the placement of triggers (see “Expert Panel Display and
Controls” on page 35).
Samples Panel Lets you view and manage drum
samples loaded into TL Drum Rehab (“Samples
Panel Display and Controls” on page 39).
Preferences Panel Lets you edit TL Drum Rehab’s preferences (see “Preferences Panel Display and Controls” on page 42).
A Note About TL Drum Rehab Control
Sliders
TL Drum Rehab has several control sliders that
are global controls and are available in more
than one panel. For example, the A/B Blend
control is available in the Trigger, Expert, and
Samples panels. Adjusting a global control in
one panel view updates that control in all panel
views. These controls can be automated and are
displayed in a luminous blue.
When using committed triggers, and bussing and recording TL Drum Rehab to another track, it is strongly recommended that
you set the H/W Buffer Size (Setup > Playback Engine) to 2048 samples. This is the
optimal setting for recording TL Drum Rehab. Lower buffer settings may result in offset triggers.
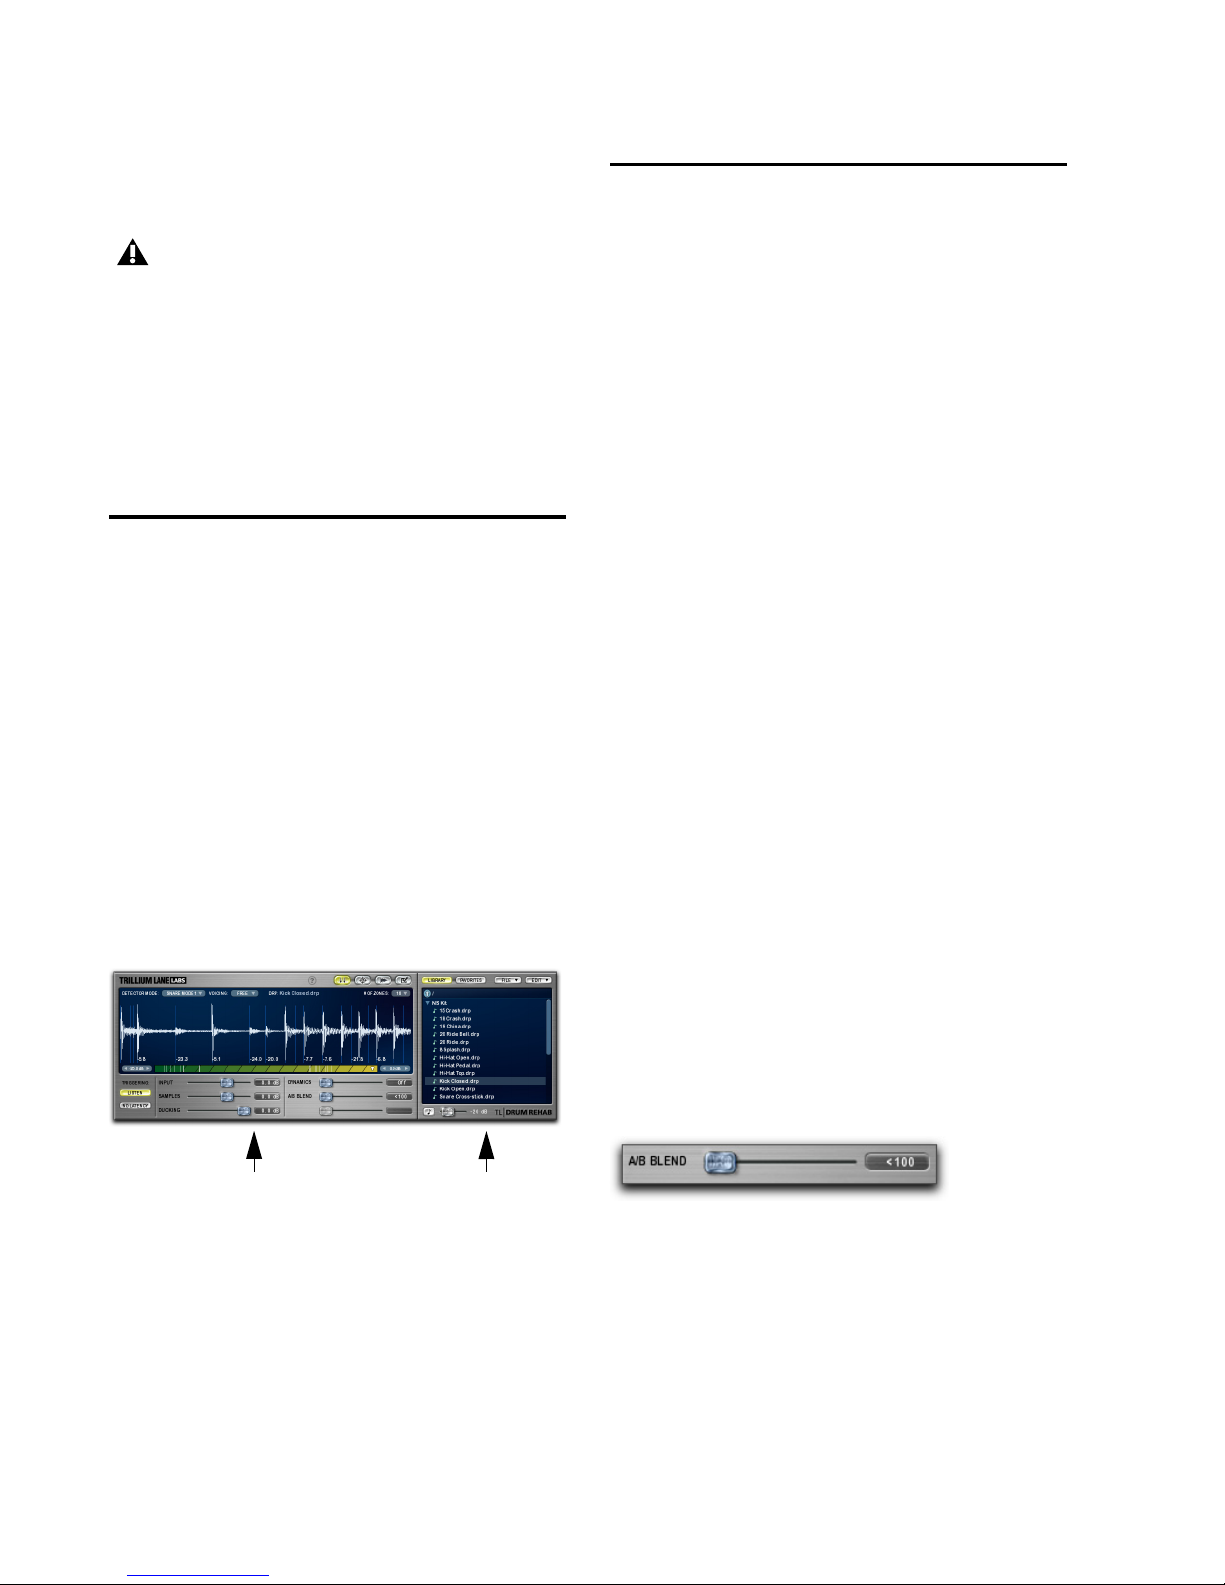
TL Drum Rehab Main window and Library browser
Main Window Library Browser
A/B Blend slide, a global control
Page 35
Chapter 5: TL Drum Rehab 29
Other sliders are unique to a single panel, such
as the Quantize control in the Expert panel.
These controls cannot be automated and are displayed in a luminous gray.
Not all sliders are active controls in every panel.
For example, the last slider in the Trigger panel
is grayed out.
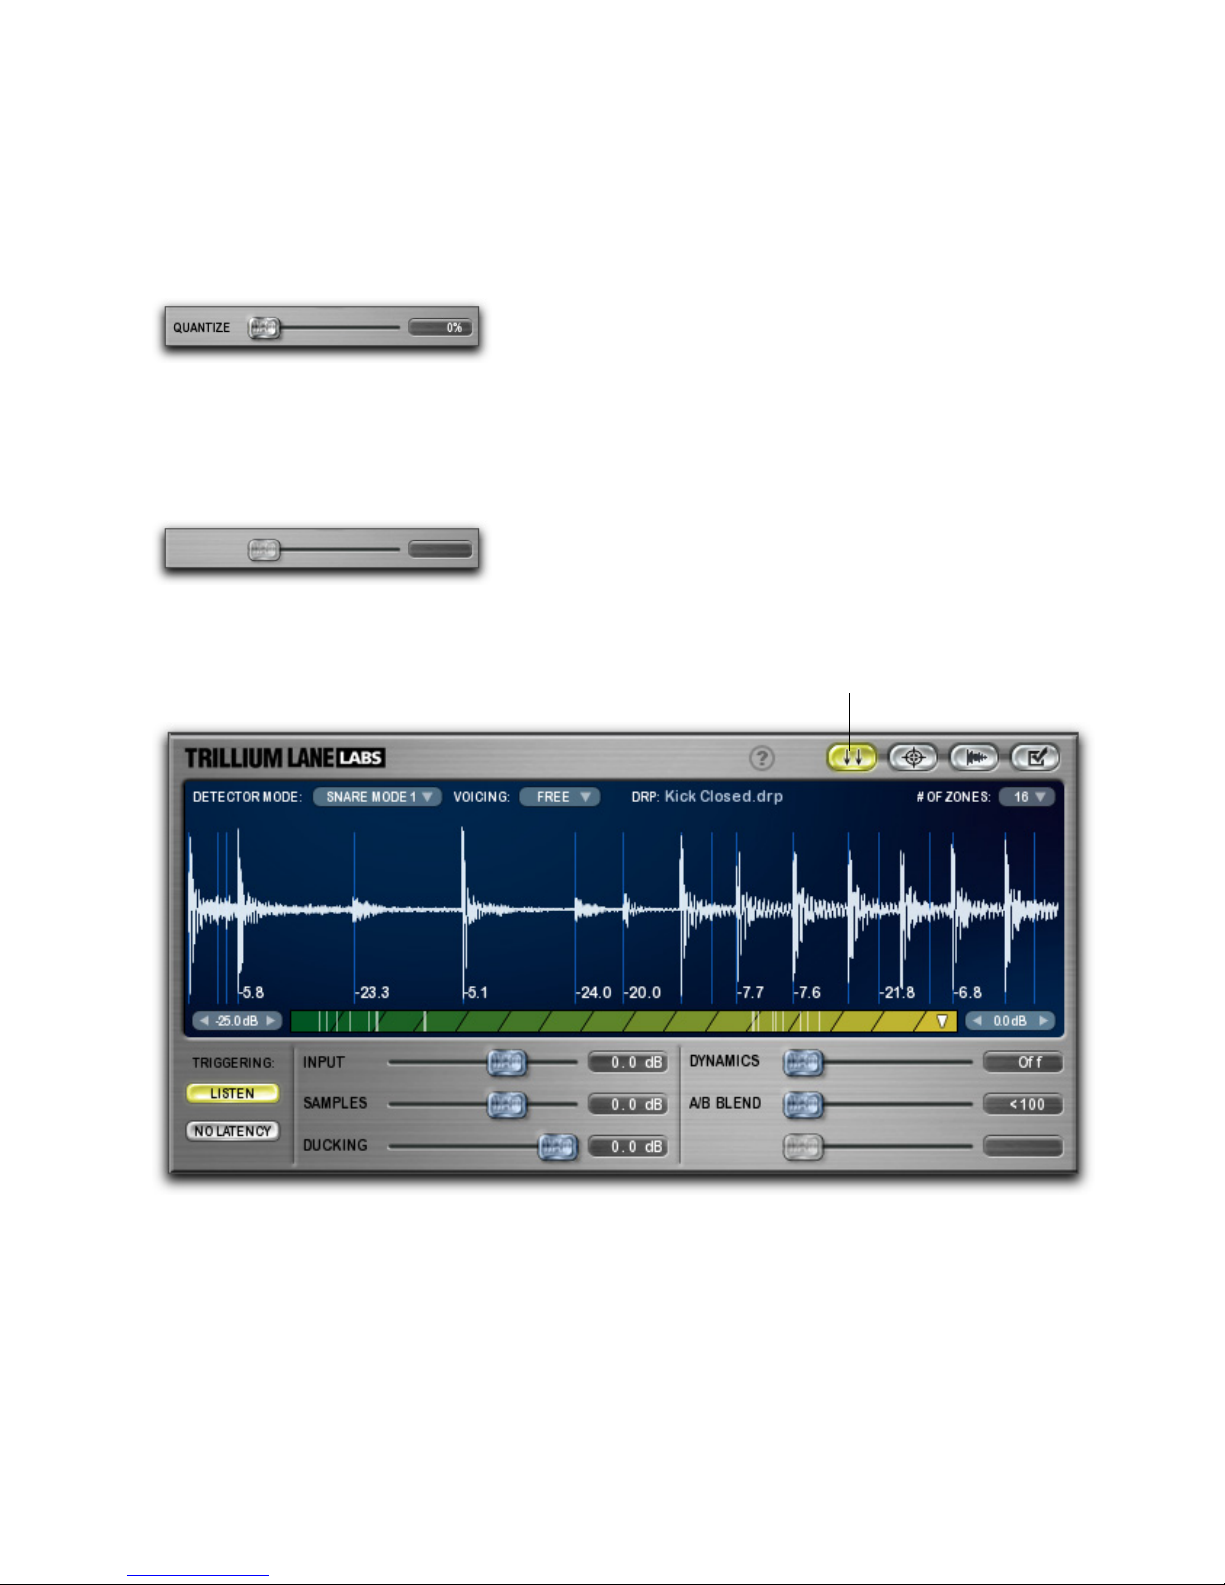
Trigger Panel Display and Controls
The Trigger panel provides most of the controls
you need to use TL Drum Rehab (see Figure 2).
The Trigger panel lets you identify triggers and
set up Velocity Zones for sample playback. Additionally, the trigger panel provides several playback controls.
To access the trigger panel:
Click the Trigger Panel button.
Quantize slider, a unique control
Inactive slider
Figure 2. Trigger panel
Trigger Panel button
Page 36
Trillium Lane Labs Plug-ins Guide30
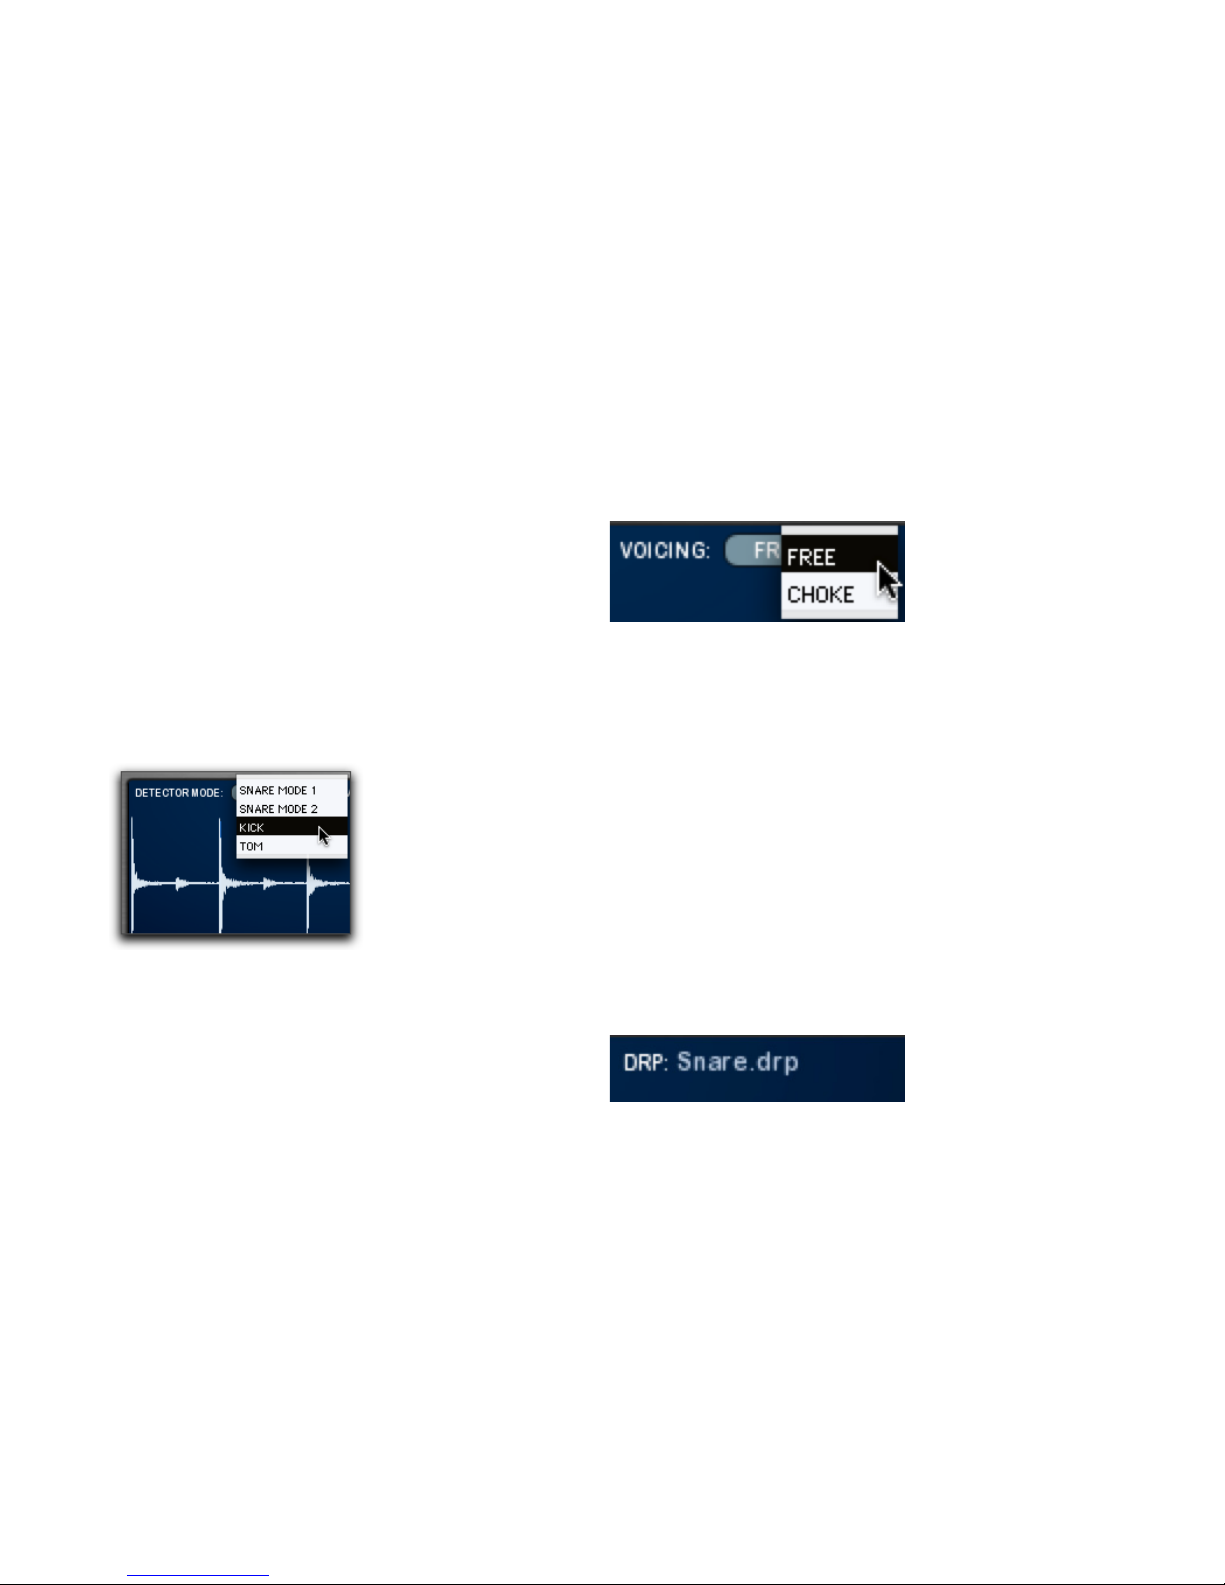
Detector Mode
Use the Detector Mode pop-up menu to select
the algorithm for trigger detection. TL Drum Rehab provides four detection algorithms: Snare
Mode 1, Snare Mode 2, Kick, and Tom.
Snare 1 Use Snare 1 for detecting flams and
rolls. Snare 1 is a more sensitive trigger for busier
snare tracks.
Snare 2 Use Snare 2 for detecting snare hits and
cymbals. Snare 2 is a more general purpose detection setting.
Kick Use Kick for lower frequency sounds.
Tom Use Tom for mid-range sounds.
Depending on the type of material on the track,
experiment and try different settings to get the
results you want.
Voicing
Use the Voicing pop-up menu to select whether
the triggered sample plays back freely (the entire
sample plays when triggered) or is choked (the
triggering of the next sample silences the sounding sample). Typically, you would select Free for
cymbals, since they tend to ring, and Choke for
drums, like kicks and snares. However, you may
find that you get some interesting effects by trying something a little different, such as selecting
Choke for cymbals.
DRP Name Display
The DRP Name display displays the name of the
currently loaded DRP file above the Waveform
display in the Trigger and Samples panels. DRP
files are a collection of samples loaded into TL
Drum Rehab’s Zones and Clips that work together to create a realistic and dynamic drum
sound. DRP files can contain a up to 16 Zones,
two positions (A and B), and four clips per position. TL Drum Rehab comes with a full library of
DRP files.
To load a DRP file:
In the Library browser, locate and double-
click the DRP file you want to load. All samples
in the DRP file are loaded into their assigned
Zones and Clips.
Selecting the detection algorithm from the Detector
Mode pop-up menu
Selecting the voicing
DRP display
Page 37
Chapter 5: TL Drum Rehab 31
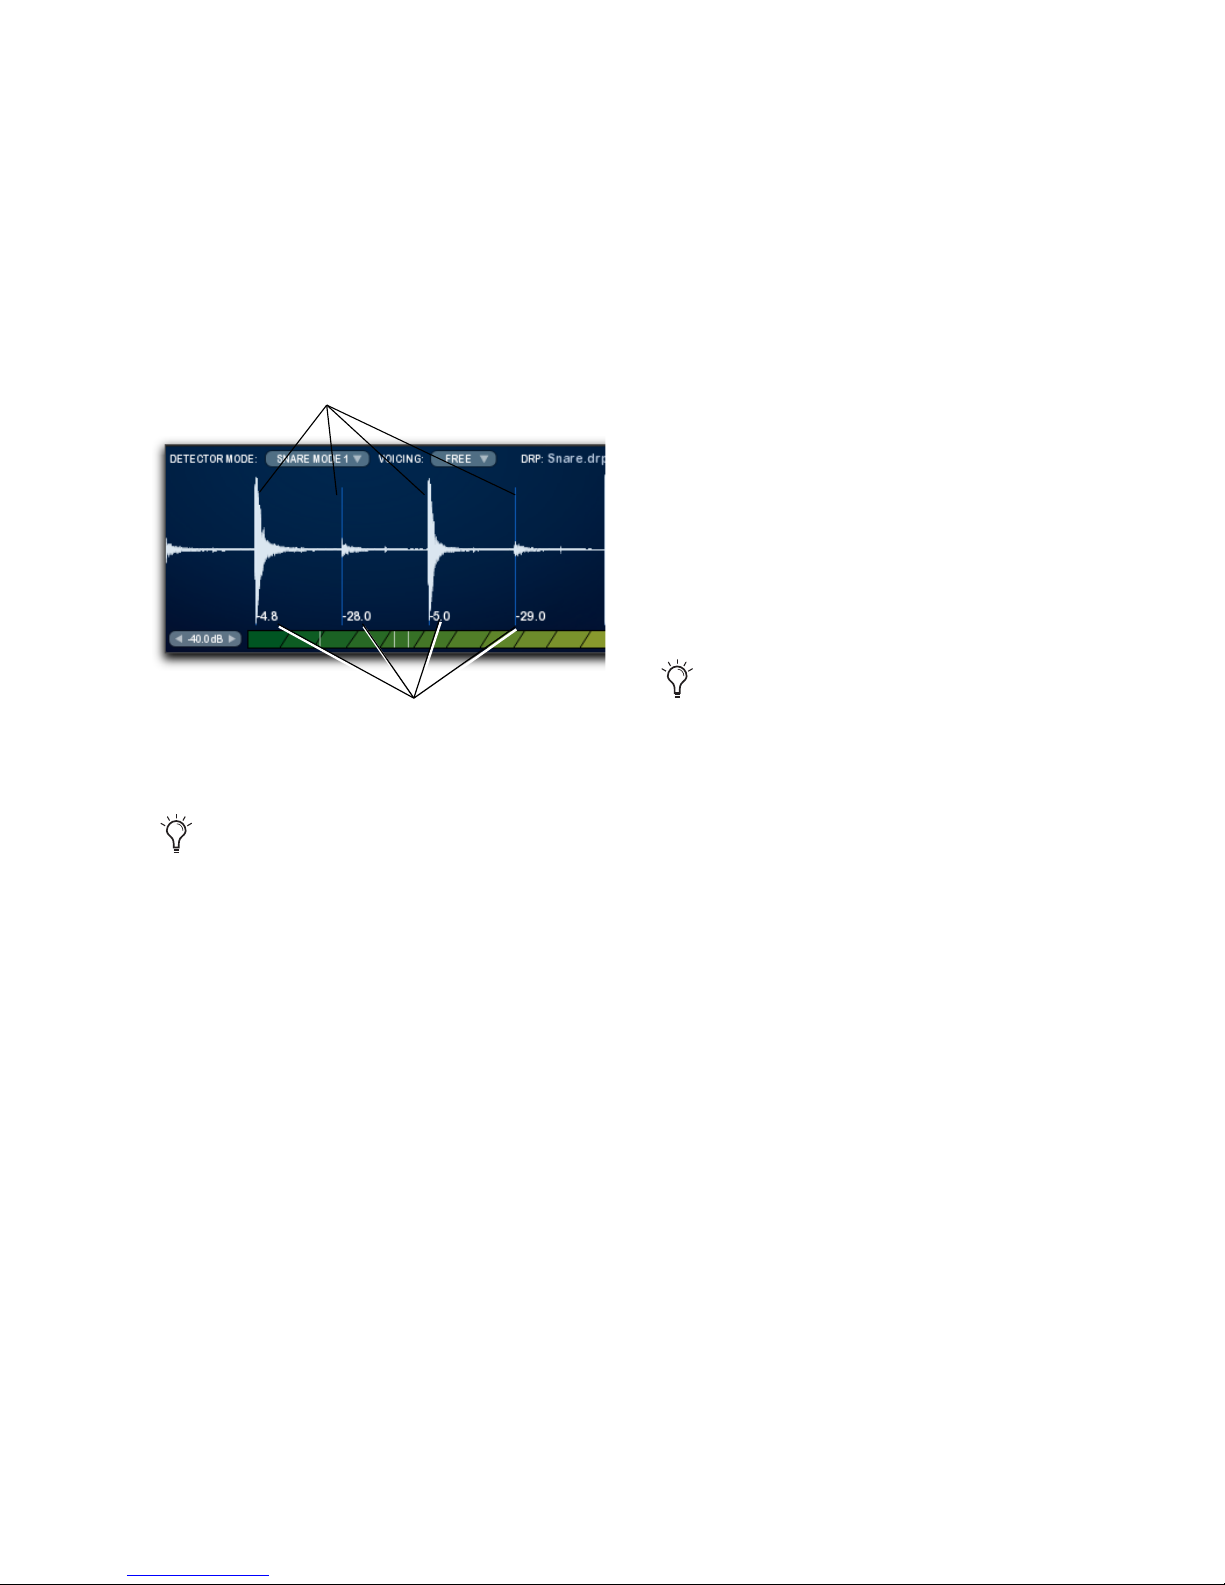
Waveform Display
The Waveform display provides a graphic representation of the selected track’s audio, and also
displays detected triggers and velocities (amplitudes). Detected triggers are displayed as light
blue lines on the waveform.
You can increase or decrease the vertical zoom
of the waveform in the Waveform display by
clicking on the waveform and dragging up or
down.
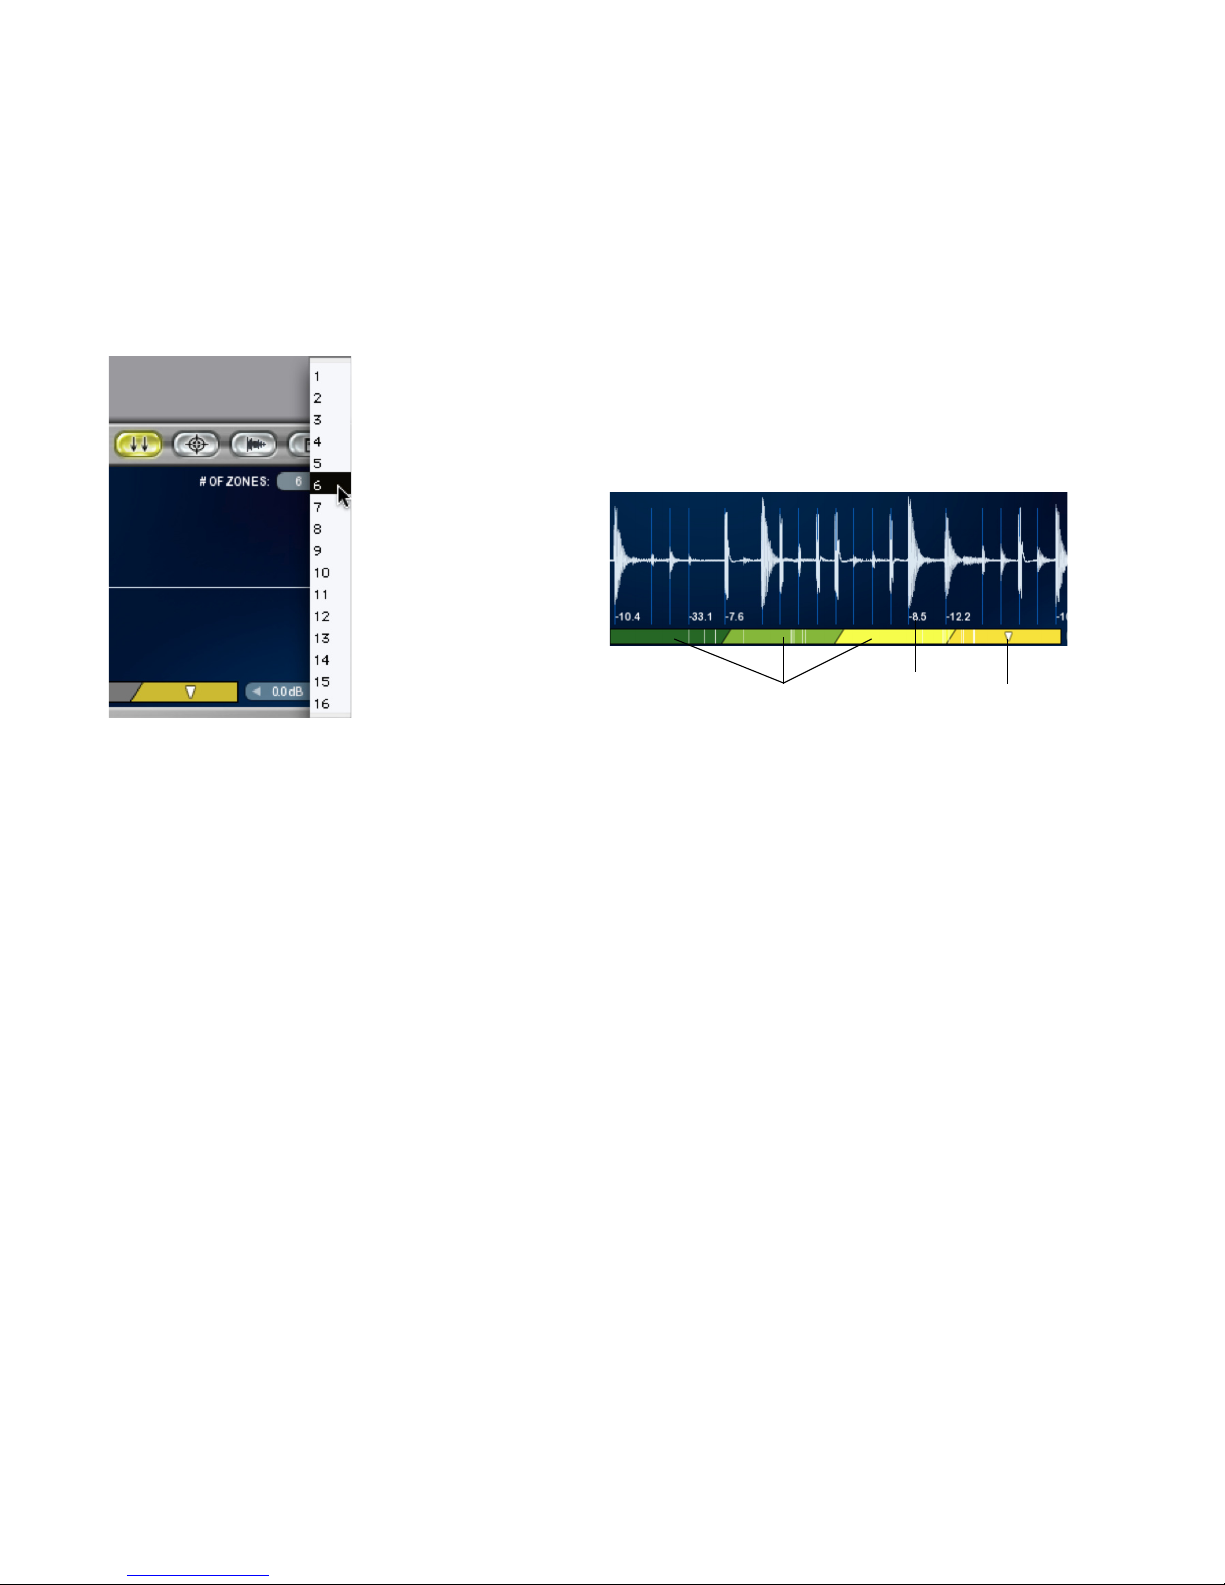
# of Zones
The # of Zones pop-up menu lets you select the
number of Velocity Zones into which you can
load samples. Use multiple Zones to load samples of different dynamics, but use only as many
Velocity Zones as necessary to layer dynamically
differentiated samples for play back at varying
velocities. For example, using four Zones, you
can load in, from left (quiet) to right (loud), a p
snare sample, an mf snare sample, a f snare sample, and an ff snare sample. During playback,
each Zone is triggered only by the corresponding amplitude of the detected transient so that a
soft hit on the original snare track triggers the p
snare sample and a loud snare hit triggers the f
or ff snare sample.
Waveform display with detected triggers and
amplitudes
If TL Drum Rehab detects unwanted triggers (such as kick bleed through on the snare
track), refer to the detected amplitude for the
unwanted triggers and adjust the Minimum
Threshold control accordingly (see “Minimum and Maximum Threshold Controls”
on page 33).
Detected amplitudes
Detected triggers
When using only one or a just a few Velocity Zones, you may want to use the Dynamics control to affect the playback velocity by
the detected amplitude on the original drum
track. The Dynamics slider controls the amplitude (velocity) of the triggered sample relative to the original detected amplitude.
When a more natural sounding drum track
is desired, using multiple Velocity Zones
more closely models the sound of acoustic
drums at different dynamic levels. For more
information on the Dynamics control, see
“Playback Controls” on page 34.
Page 38
Trillium Lane Labs Plug-ins Guide32
TL Drum Rehab lets you have up to 16 Velocity
Zones, and up to 4 Clips (samples) per Zone. Using slightly different sounds on multiple Clips
per Zone adds a greater degree of realism by adding variety to the sound (see “Clips” on
page 40).
Velocity Map and Velocity Zones
The Velocity Map, below the Waveform display,
graphically represents playback amplitude of
the track audio against the specified Velocity
Zones. TL Drum Rehab translates the detected
amplitudes to MIDI velocity for sample playback. When the detected amplitude of trigger is
in the range of a particular Velocity Zone, the
sample loaded into that Zone is played back
(triggered).
The Velocity Map displays the current velocity
(amplitude) on playback. The Velocity Zones are
depicted as colored bars in the Velocity Map.
The different colors from left to right (quiet to
loud) indicate the velocity range: darker colors
represent lower velocity ranges (for example,
1–32) and brighter represent higher velocity
ranges (for example, 95–127). Velocity Zones
trigger samples within the amplitude range of
the Minimum and Maximum Threshold settings (see “Minimum and Maximum Threshold
Controls” on page 33.
Selecting the number of Velocity Zones
Velocity Zones in the Velocity Map
Velocity Zones Selected
Velocity Zone
detected
amplitude
(in dB)
(quiet to loud)
Page 39
Chapter 5: TL Drum Rehab 33
Use the Velocity Map to select a Zone for loading a sample and also to adjust the crossfade between Zones. Using multiple Velocity Zones lets
you layer samples by dynamics for more realistic
drum sample playback. Use the left-most Zone
for the quietest (pianissimo) samples, use the
right-most for the loudest (fortissimo). Up to
four samples (Clips) can be added to each Zone,
to give playback a more human and natural
quality. (For more information on using multiple clips per Zone, see “Clips” on page 40).
To load a sample into a Zone:
1 Click the Zone in the Velocity Map where you
want to load a sample. The selected Zone is indicated by a white triangle.
2 In the Library browser (located to right of the
Main window), navigate to the audio file you
want to load (a WAV, AIF, or SD2 file, not a DRP
file).
3 Double-click the audio file (WAV, AIF, or SD2)
you want to load into the selected Zone.
In most simple TL Drum Rehab applications,
you may only need to load a single sample into
a single Zone. However, for nuanced and dynamic sounds, you can use up to 16 Zones for
dynamically layered samples.
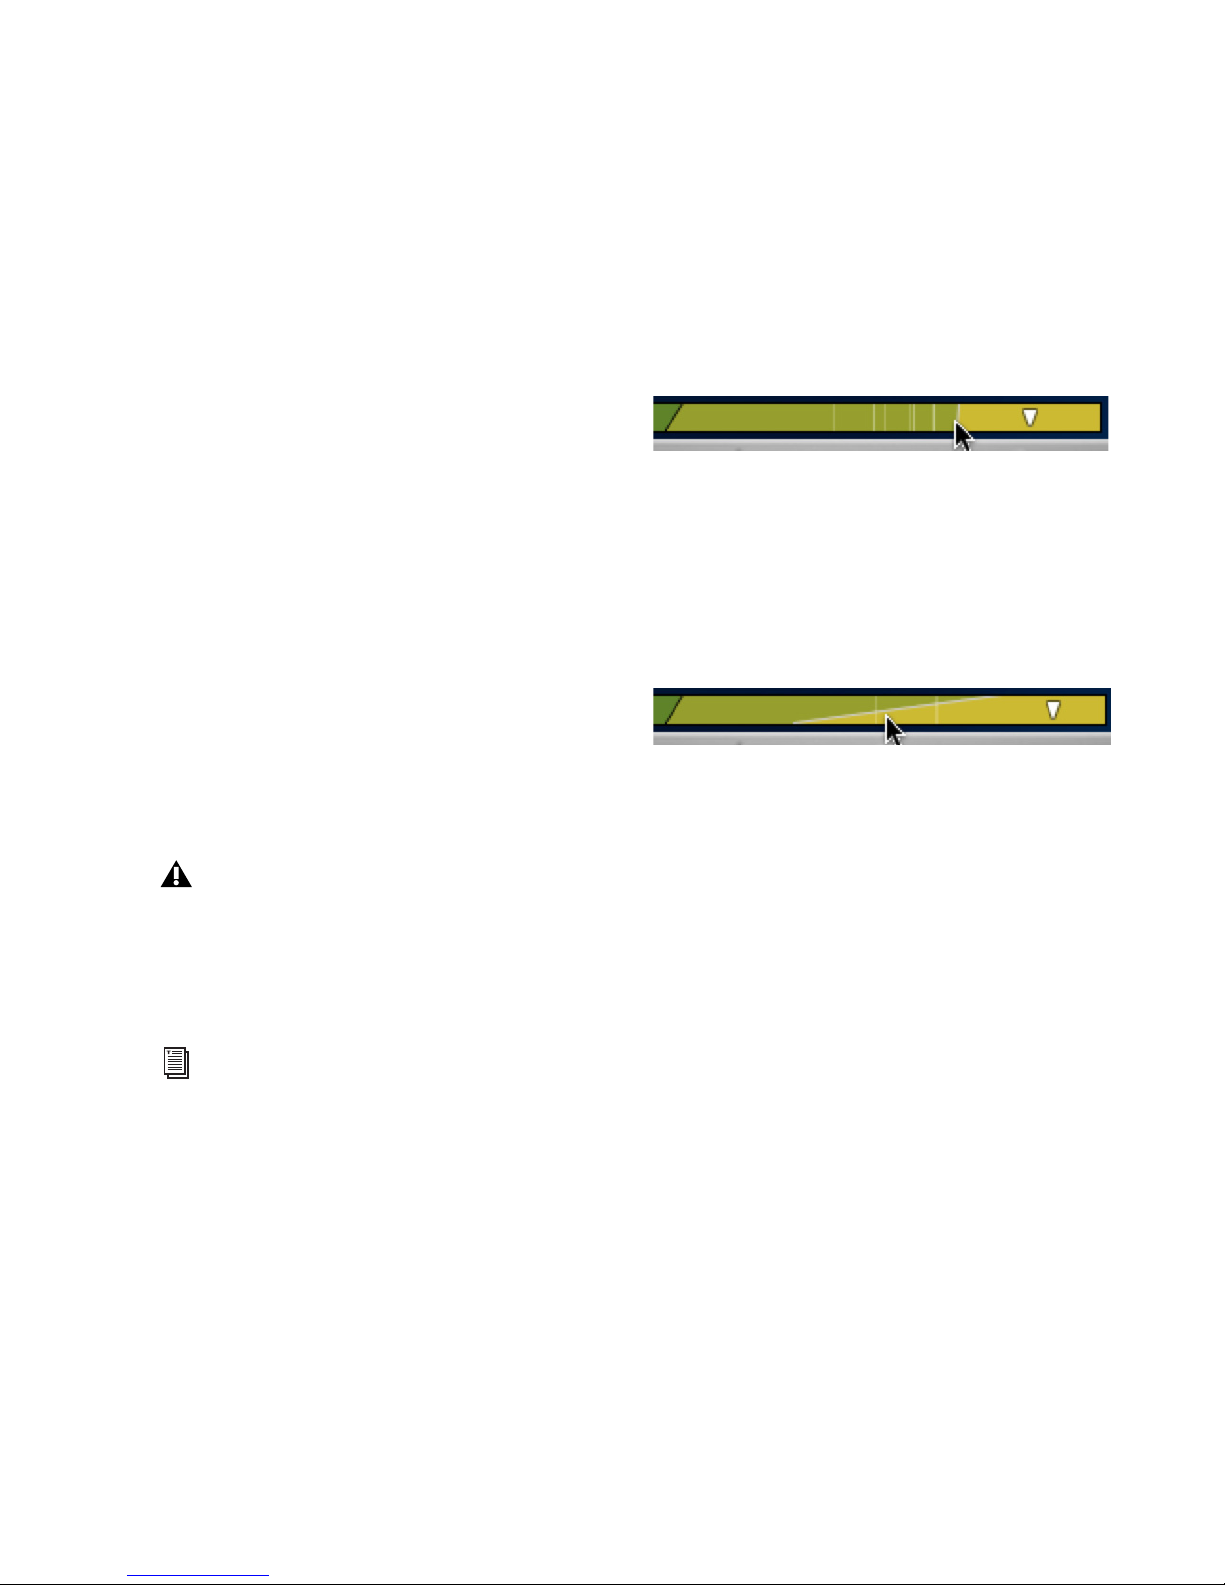
To adjust the crossfade between Zones:
To change the location of the crossfade be-
tween Zones, click the border between Zones
and drag it left or right. This determines the
range in which the detected amplitude of the
original track triggers (plays back) the sample
loaded into the Zone.
To change the range of the crossfade between
Zones, click the border between Zones and drag
it up or down. This determines the range of the
crossfade between samples loaded into adjacent
Zones.
Minimum and Maximum Threshold
Controls
Adjust the Minimum and Maximum Threshold
controls to determine the minimum and maximum amplitudes for detecting triggers. The
Minimum Threshold control is to the left of the
Velocity Map and the Maximum Threshold control is to the right. The Minimum Threshold
control is useful for filtering out bleed through
hits (like the snare bleed through on a kick
track) so that you only get the triggers you want.
The Minimum and Maximum Threshold controls also set the amplitude range within which
Velocity Zones trigger samples.
DRP files cannot be loaded into a Zone.
DRP files contain multiple sample with
fixed Zone and Clip assignments. Once you
load samples into Zones and Clips, you can
save them all together as a DRP file.
For a workflow example of loading samples
into Zones, see “Loading Samples and Saving Custom DRP Files” on page 44.
Adjusting the location of the crossfade between Velocity
Zones
Adjusting the range of the crossfade between Velocity
Zones
Page 40

Trillium Lane Labs Plug-ins Guide34
Triggering Controls
Listen Enable the Listen button to “listen” for
triggers in TL Drum Rehab. When Listen is disabled, TL Drum Rehab only plays back Committed triggers (see “Commit” on page 36). For
most uses of TL Drum Rehab, Listen is enabled.
No Latency Enable the No Latency button to
play back committed triggers with 0 samples of
latency. No Latency mode ensures sample accurate drum replacement. This is useful when Delay Compensation is disabled in Pro Tools (Op-
tions > Delay Compensation), or for use with
Pro Tools LE or lower versions of Pro Tools that
do not provide Delay Compensation. When No
Latency mode is enabled, only committed triggers play back and Listen is deactivated.
Playback Controls
The Trigger panel provides global playback controls for input gain (track audio), sample playback gain, ducking, dynamics, and A/B blend.
All playback controls can be automated.
Input Controls the playback gain of the source
track audio. This is like a Dry Mix control. The
range of the Input control is between –40 dB
and +20 dB.
Samples Controls the playback gain of samples
loaded into Velocity Zones. This is like a Wet
Mix control. The range of the Samples control is
between –40 dB and +20 dB.
Ducking Controls the amount of gain reduction
applied to the input audio when a sample is triggered. This is like a balance control, letting you
adjust exactly how much the track’s audio is
suppressed by the samples triggered by TL Drum
Rehab. The range of the Ducking control is between –40dB and 0dB.
Dynamics Controls the dynamic response of
sample playback and scales the playback velocity of the triggered sample to the detected amplitude of the audio on the track. The range of
the Dynamics control is between 1% and 100%.
When the Dynamics control is all the way to the
left, it is off and samples play back at their original amplitude with no gain scaling. The Dynamics control is especially useful if you are triggering a single sample or only a few Zones, but
you want more dynamic response on playback
than the number of Zones and loaded samples
provide.
A/B Blend Controls the mix between samples
loaded into Positions A and B in the Samples
panel (see “Position A/B” on page 40). For example, Position A could have one center hit snare
sample and position B could have another center hit snare sample of a slightly different color.
Mixing between the A and B positions helps give
triggered samples a fuller sound by blending alternate samples.
Page 41
Chapter 5: TL Drum Rehab 35
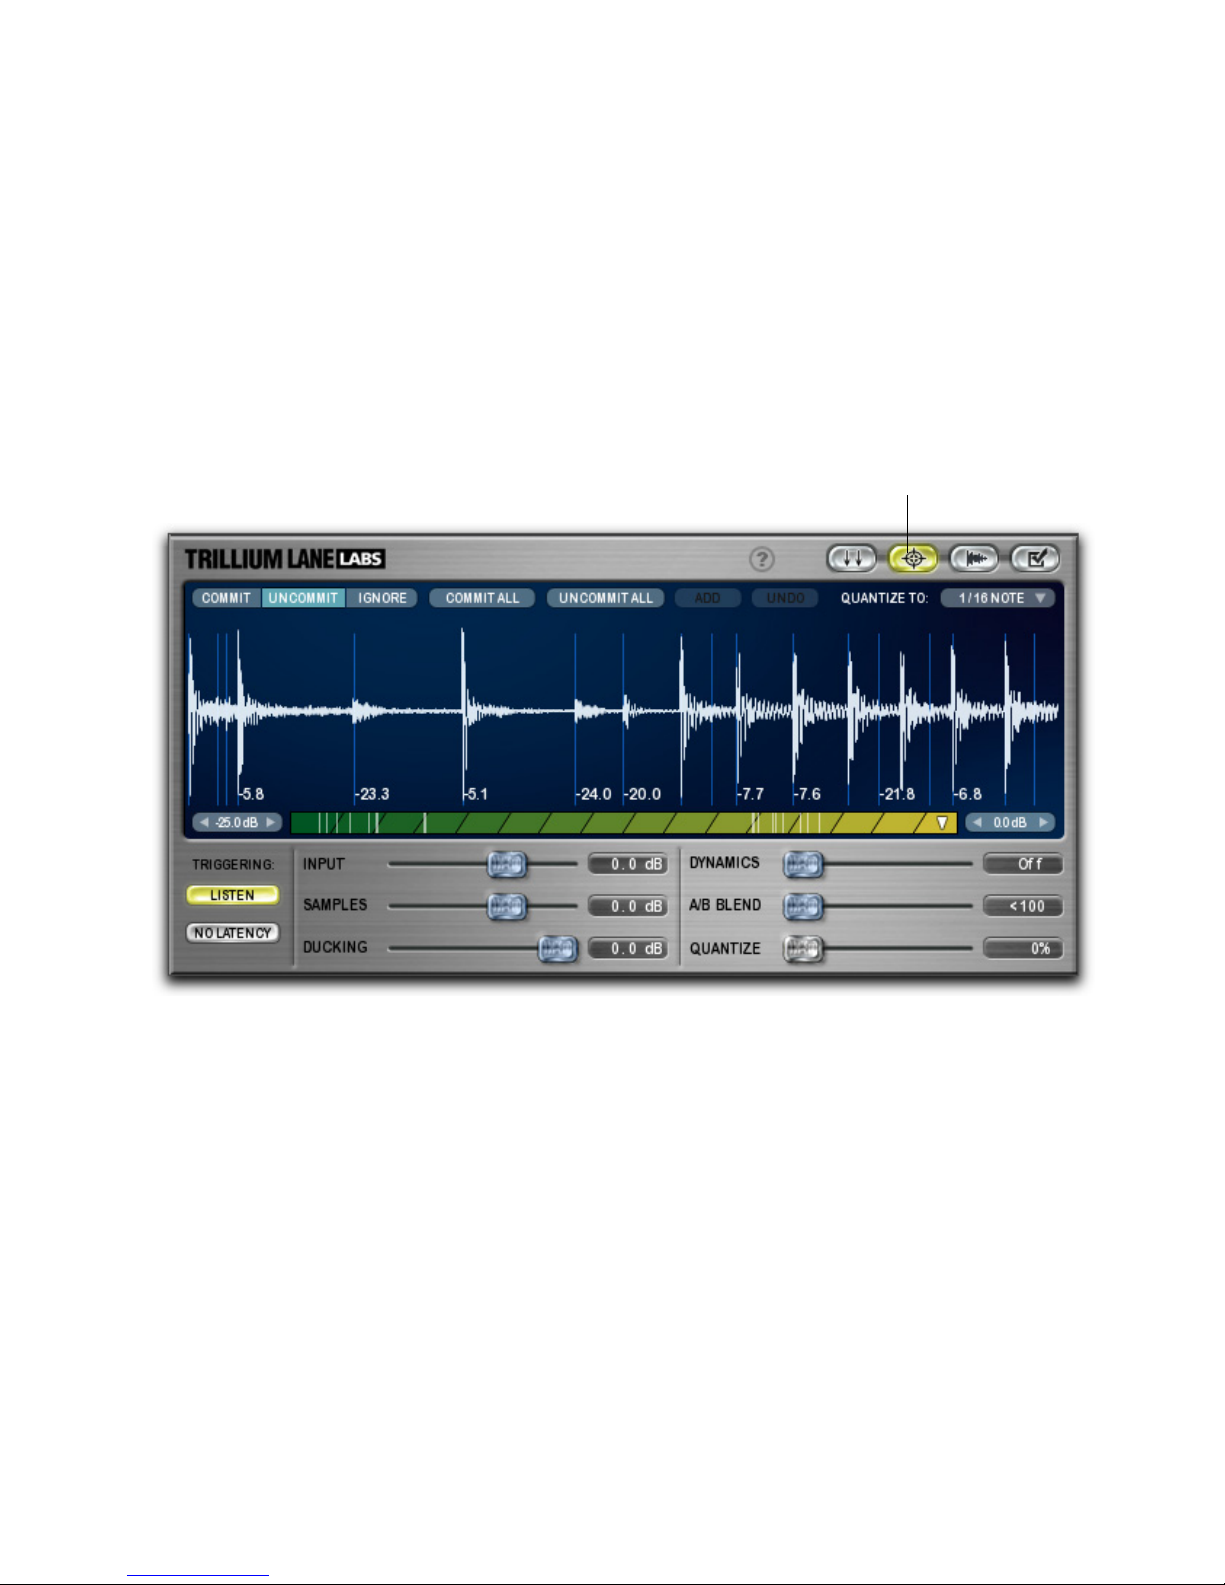
Expert Panel Display and Controls
The Expert panel lets you commit, uncommit,
or ignore specific triggers for sample playback,
as well as quantize committed triggers and edit
the location of committed triggers. Playback
must be stopped to commit, uncommit, ignore,
or otherwise edit triggers.
The Expert panel also provides some of the same
controls as the Trigger panel: Listen, No Latency, Minimum and Maximum Threshold, and
the Velocity Map and Velocity Zones.
To access the Expert panel:
Click the Expert Panel button (see Figure 3).
Figure 3. Expert panel
Expert Panel button
Page 42

Trillium Lane Labs Plug-ins Guide36
Commit
Commit lets you commit specific triggers for
sample playback. Committed triggers play back
regardless of whether or not Listen is enabled. If
Listen is enabled, all detected triggers play back.
If Listen is disabled, only committed triggers
play back. Committing triggers with Listen enabled is useful for making sure that specific triggers are always at the desired location—for example, with sounds that do not have clear
attack transients, you can commit and move the
detected trigger to the desired location. Committing triggers with Listen disabled is useful for
playing back only the committed triggers—for
example, when using TL Drum Rehab on a track
with a recording of an entire drum kit, you may
want to only enhance the kick drum sound.
To commit detected triggers:
1 Listen for triggers (see “Triggering Controls”
on page 34).
2 Select the Expert panel.
3 Do one of the following:
• Click Commit All to commit all detected triggers.
– or –
• Click Commit and then click only the triggers you want to commit. Committed triggers are indicated by a red arrow.
To play back only committed triggers:
1 Deselect Listen.
2 Start playback.
To edit the position of a committed trigger:
1 In the Expert or Trigger panels, click and hold
the trigger you want to move. The waveform
display zooms to the sample level centered
around the selected trigger.
2 While still holding down the mouse, move
the trigger left or right until it is at the desired
location.
3 Release the mouse.
If you have already selected replacement samples to be triggered, the waveform of the replacement sample is displayed in green over the
track audio waveform (which is white).
Committing specific detected triggers
Editing the location of a committed trigger
Editing the location of a committed trigger,
replacement sample waveform displayed in green
Page 43

Chapter 5: TL Drum Rehab 37
To change the amplitude of a committed trigger:
Control-click (Windows) or Command-click
(Mac) and drag the trigger left to lower its amplitude or right to increase its amplitude.
Uncommit
Uncommit lets you uncommit triggers that are
currently committed. This can be useful for simplifying a recorded part (you can uncommit triggers for a more sparse kick track), and in cases
when the Minimum and Maximum Threshold
controls aren’t able to filter out all the undesired
triggers. For example, if TL Drum Rehab detects
erroneous triggers from bleed though, such as
the floor tom sounding on the kick track, you
can Commit All triggers to be sure you get all the
kick drum hits, and then manually Uncommit
all the triggers generated by the floor tom.
To uncommit triggers, do one of the following:
In the Expert panel, click Uncommit All to un-
commit all triggers.
– or –
Click Uncommit and click only the triggers you
want to uncommit.
Ignore
When Listen is enabled, Ignore lets you specify
detected triggers to be ignored during playback.
Triggers do not have to be committed to be ignored.
To ignore specific triggers during playback when
Listen is enabled:
1 In the Expert panel, click Ignore.
2 Click only the triggers you want to ignore.
Triggers that are ignored are marked with a red
X.
Commit All
Clicking Commit All commits all detected triggers
in the Timeline selection.
Uncommit All
Clicking Uncommit All uncommits all detected
triggers in the Timeline selection.
Add
Clicking Add analyzes the amplitude of the audio signal at the sample location of the
Pro Tools playback cursor and adds a new trigger with a velocity based on that analysis at that
location. You can use the Add command to add
a trigger during playback or at the current playback cursor location when playback is stopped.
If you have a timeline (playback) selection, the
Add button is greyed out and unavailable.
Ignoring specific detected triggers
While the playback is stopped, use the
Pro Tools Tab To Transients feature to locate the desired trigger location, or zoom to
the sample level to place the cursor at the
precise sample location where you want to
add a trigger.
Page 44

Trillium Lane Labs Plug-ins Guide38
Undo
If you clicked a trigger that you did not want to
commit, uncommit, or ignore, click Undo in the
Expert panel. TL Drum Rehab supports multiple
undos.
Quantize To
Use the Quantize To pop-up menu to select the
quantize grid value. The Quantize To pop-up
menu lets you select a quantize grid of 1/2, 1/4,
1/8, 1/16, 1/32, or 1/64 notes.
Quantize
The Quantize slider adjust the amount (from 0%
to 100%) that committed triggers are quantized
to the selected Quantize To value. Quantizing
committed triggers is useful for tightening up a
sloppy performance, as well as an effect to get a
drum machine–like sound.
Playback Controls
The Expert panel provides the same playback
controls as the Trigger panel: Input, Sample,
Ducking, Dynamics, and A/B Blend. See “Playback Controls” on page 34).
Waveform Display
The Waveform display in the Expert panel is the
same as in the Trigger panel (see “Waveform
Display” on page 31), it provides a graphic representation of the selected track’s audio, and
also displays detected triggers and velocities
(amplitudes). Detected triggers are displayed as
light blue lines on the waveform. If the Tempo
Changes preference is enabled (see “Tempo
Changes” on page 42), the Waveform display in
the Expert panel also shows Pro Tools Tempo
events as green lines with the tempo indicated
at the top of the display.
Velocity Map
In the Samples panel, the Velocity Map functions the same as in the Trigger panel (see “Velocity Map and Velocity Zones” on page 32).
Selecting Quantize To value
Accurate quantization requires an accurate
Tempo map and Bar|Beat grid. For more information on using the Tempo map and
Bar|Beat grid, see the Pro Tools Reference
Guide.
Waveform display in Expert mode with detected
triggers and amplitudes, and Tempo events
Temp o ev ent s
Page 45

Chapter 5: TL Drum Rehab 39
Samples Panel Display and
Controls
The Samples panel lets you load, view, shape,
and organize samples for playback.
To access the Samples panel:
Click the Samples Panel button (see Figure 4).
Figure 4. Samples panel
Samples Panel button
Page 46

Trillium Lane Labs Plug-ins Guide40
Position A/B
The Position A and B button lets you store samples in two different sets of Zones and Clips. The
mix between Positions A and B can be controlled during playback using the A/B Blend
slider in the Trigger, Expert, or Samples panels.
For example, Position A could have a center hit
snare sample and position B could have an offcenter hit snare sample. Mixing between the A
and B positions helps give triggered samples a
fuller sound by blending between alternate samples. The A/B Blend control can be automated to
vary the mix between Position A and Position B
over time.
Clips
In the Samples panel, TL Drum Rehab lets you
load up to four samples per Velocity Zone using
Clips 1, 2, 3, and 4. Use the Clip Playback Mode
pop-up menu to select whether the Clips are
triggered in sequential order (Cycle) or in random order (Random). Using slightly different
sounds on multiple Clips per Zone adds a
greater degree of realism by adding variety to
the sound. For example, you might want to load
samples of the same drum played with slightly
different stick positions into Clips 1–4 and have
TL Drum Rehab trigger them in random order
for a more realistic sounding “performance.”
To add a sample to a Clip:
1 In the Samples panel, select the Velocity Zone
to which you want to add a sample.
2 Click the desired Clip: 1, 2, 3, or 4. In order to
select a Clip, there must be a sample already
loaded into the preceding clip.
3 In the Library browser (located to right of the
Main window), double-click the sample (WAV,
AIF, or SD2) you want to add. TL Drum Rehab
loads the sample into the selected Clip for the
selected Zone.
4 Repeat steps 2–3 as desired.
5 From the Clip Playback Mode pop-up menu,
select Cycle or Random to determine whether the
clips playback in sequence or in random order.
DRP Name Display
The DRP Name display displays the name of currently loaded DRP file above the Waveform display in the Samples panel. This is the same as in
the Trigger panel (see “DRP Name Display” on
page 30).
Selecting the Clip Playback mode
Page 47

Chapter 5: TL Drum Rehab 41
# of Zones
The # of Zones pop-up menu lets you select the
number of Velocity Zones into which you can
load samples. TL Drum Rehab lets you have up
to 16 Velocity Zones. This is the same as in the
Trigger panel (see “# of Zones” on page 31).
Play
In the Samples panel, click Play to audition the
currently loaded sample for the selected Zone
and Clip.
Clear
In the Samples panel, click Clear to clear the currently loaded sample for the selected Zone and
Clip.
Velocity Map
In the Samples panel, the Velocity Map functions the same as in the Trigger panel (see “Velocity Map and Velocity Zones” on page 32).
Sample Name Display
The Sample Name display displays the name of
the sample currently loaded into the selected
Zone and Clip is displayed right above the Clear
button.
Invert
In the Samples panel, click Invert to invert the
phase of all Clips in the currently selected position (A or B). Invert can be useful for ensuring
phase alignment with other drum tracks in the
session. It can also be used for shaping the tone
of drum sounds—a classic analog technique.
Waveshaping Controls
Use the envelope and EQ controls to shape the
sound for all clips in the currently selected position (A or B).
Attack Emphasizes or reduces the attack characteristics of all clips in the currently selected position (A or B). The Attack slider has a range of
–100% to +100%.
Sustain Emphasizes or reduces the sustain characteristics of all clips in the currently selected
position (A or B). The Sustain slider has a range
of –100% to +100%.
EQ Gain Applies a peaking or dipping EQ to all
clips in the current position (A or B). The EQ
Gain slider has a range of –15 dB to +15 dB.
Freq Adjusts the frequency of the EQ for all clips
in the current position (A or B). The EQ Gain
slider has a range of 10 Hz to 15 kHz.
Q Adjusts the Q of the EQ for all clips in the current position (A or B). The Q slider has a range of
0.1 to 6.0.
Sample Name display
Page 48
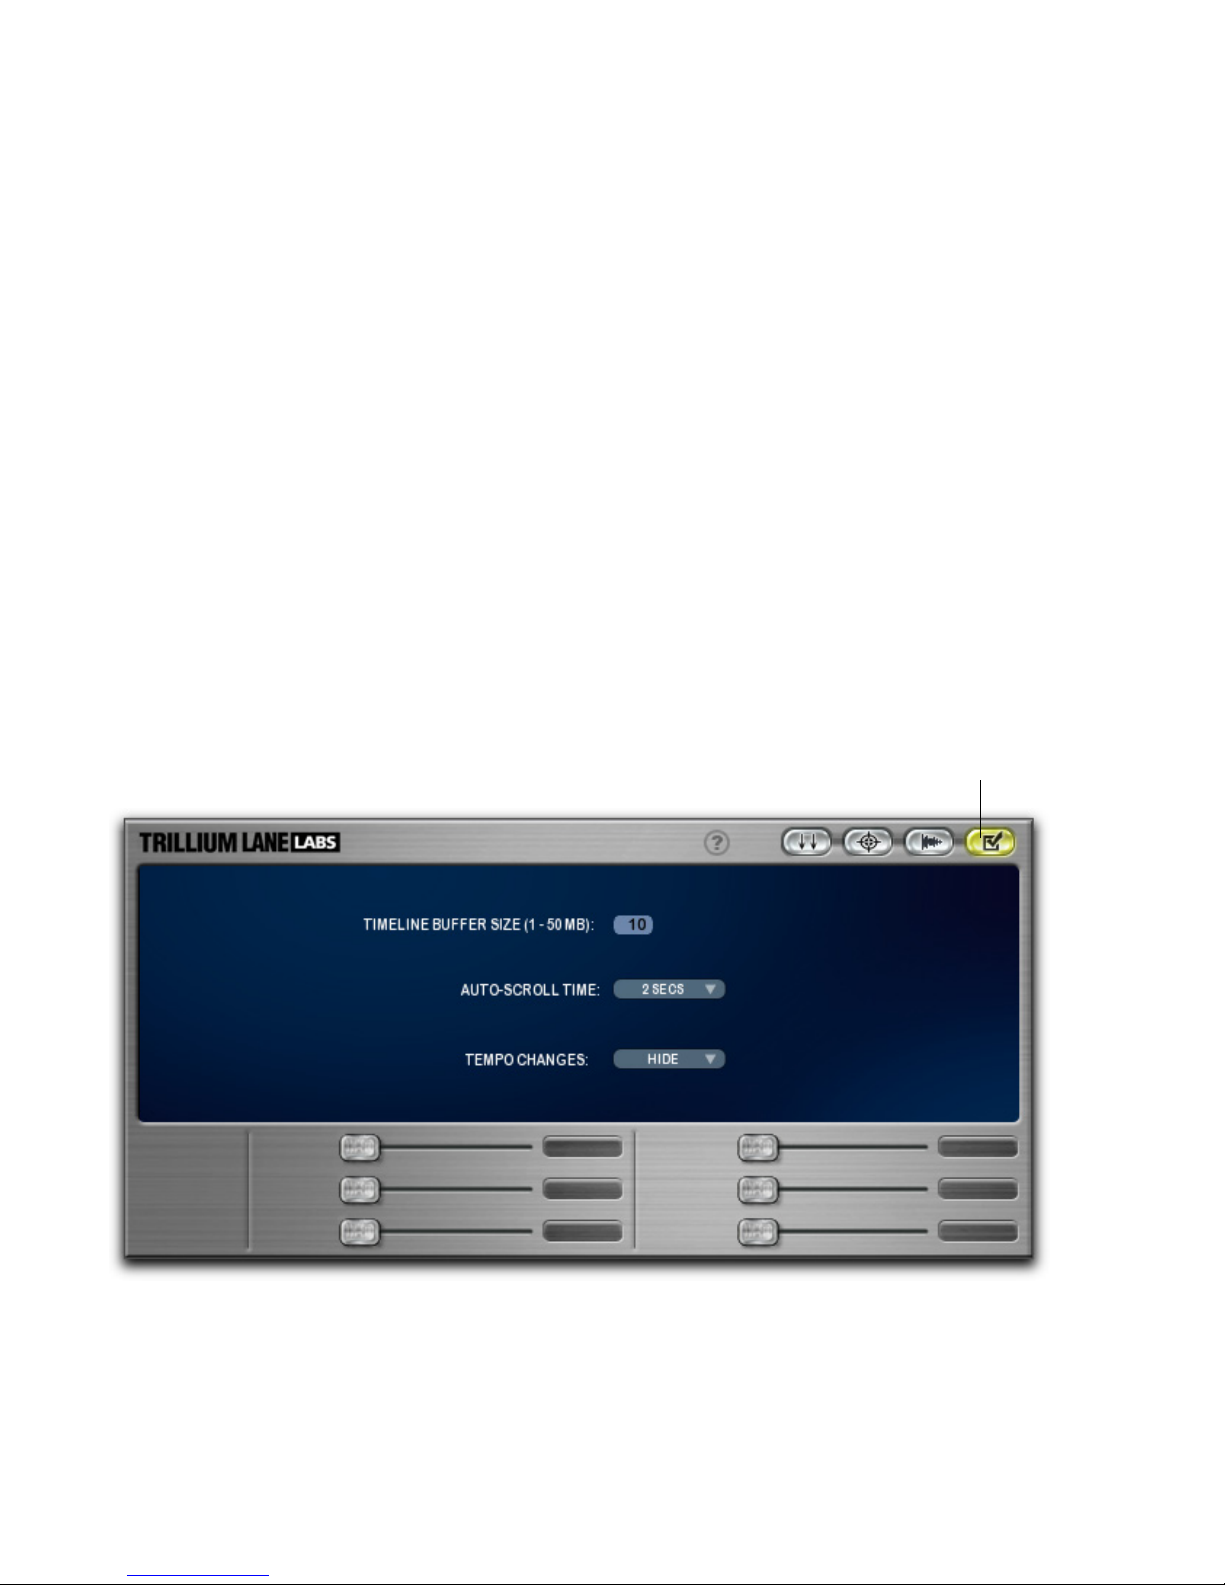
Trillium Lane Labs Plug-ins Guide42
Preferences Panel Display and
Controls
The Preferences panel lets you set the preferences for TL Drum Rehab. In most cases the default preference settings do not need to be
changed.
To access the Preferences panel:
Click the Preferences Panel button (see
Figure 5).
Timeline Buffer Size
The Timeline Buffer Size determines the amount
of RAM allocated for the Waveform display. If
you are using TL Drum Rehab on large selections, you may want to increase the Timeline
Buffer Size.
Auto-Scroll Time
When there is no Timeline selection in
Pro Tools, the Auto-Scroll Time preference sets
the amount of time displayed in TL Drum Rehab’s Waveform display during playback. During playback, the Waveform display scrolls incrementally by the amount of time specified in
the Auto-Scroll Time preference.
Tempo Changes
When the Tempo Changes preference is set to
Show, TL Drum Rehab shows Pro Tools Tempo
events as green lines with the tempo indicated
at the top of the Waveform display in the Expert
panel (see “Waveform Display” on page 38).
This preference is set to Hide by default.
Figure 5. Preferences panel
Preferences Panel button
Page 49
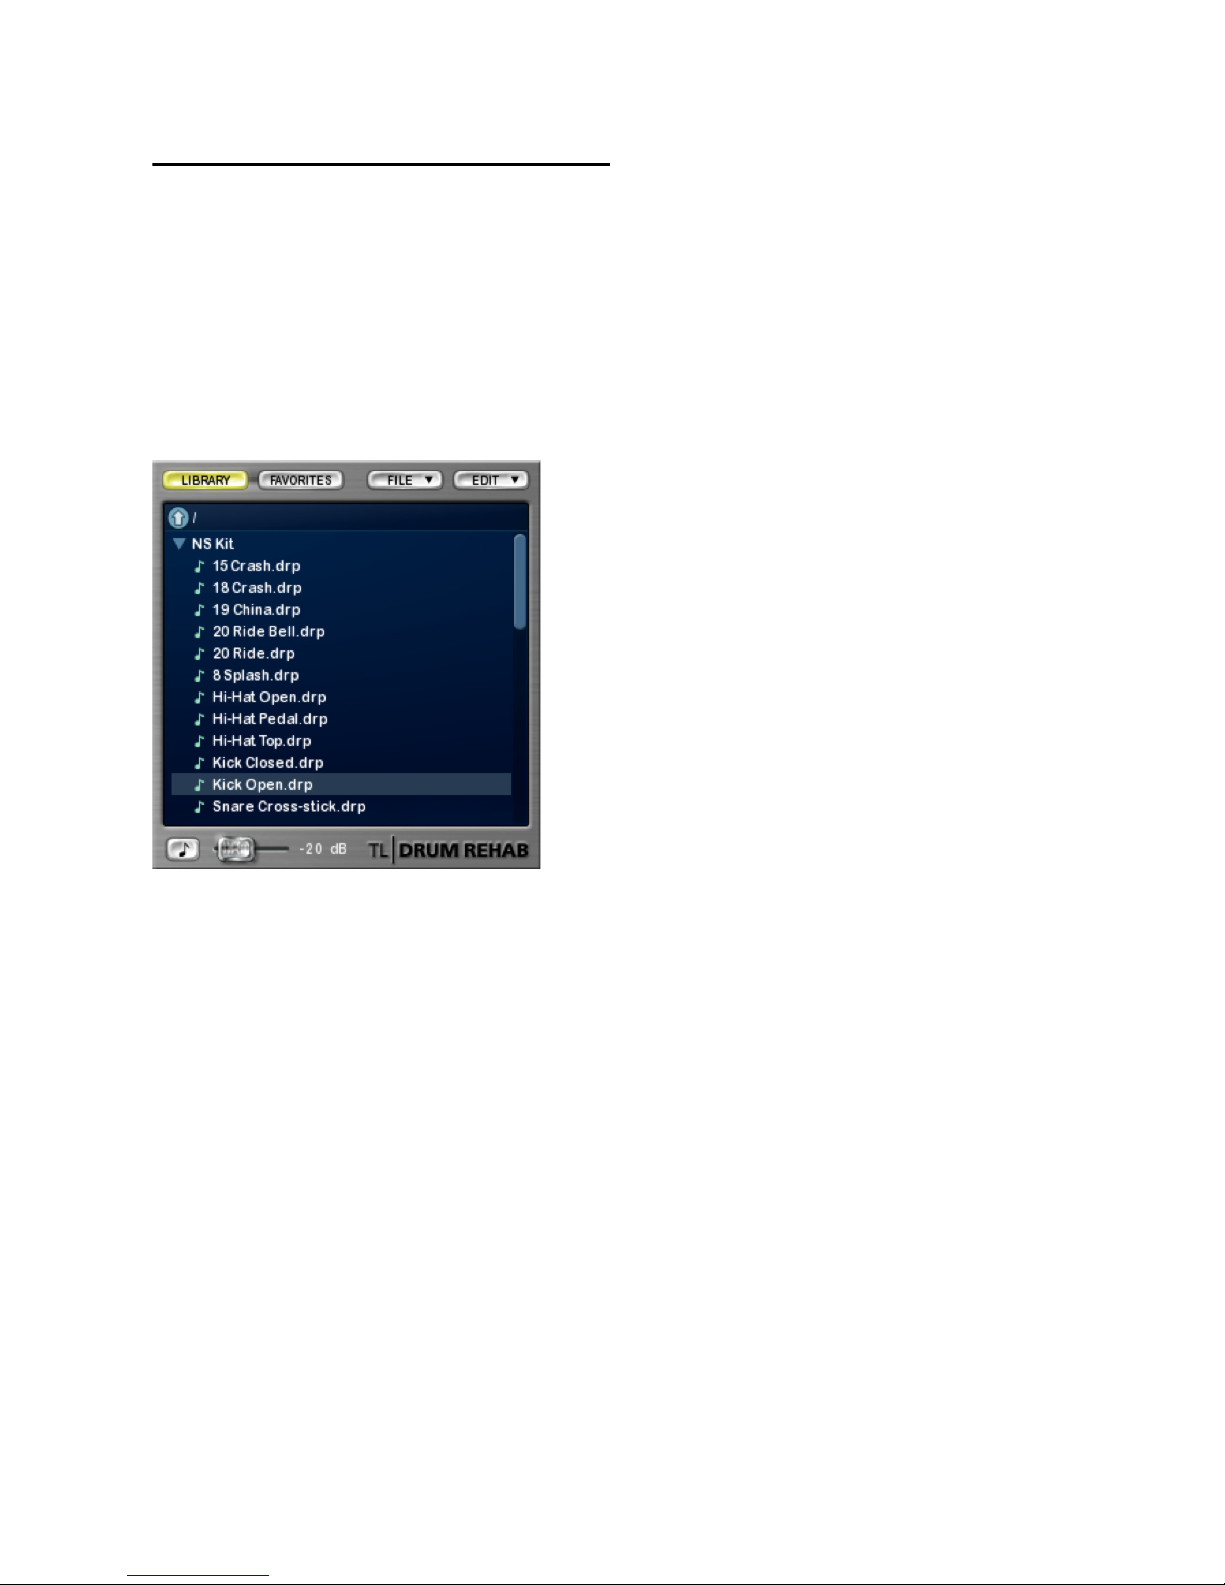
Chapter 5: TL Drum Rehab 43
TL Drum Rehab Library
Browser
TL Drum Rehab provides a Library browser for
finding and organizing your library of DRP files
and drum samples. TL Drum Rehab includes a
library of professionally recorded DRP files
(drum samples) tailored specifically for use with
TL Drum Rehab.
In addition to using the samples that come with
TL Drum Rehab, you can also import your own
samples and save your own custom DRP files
(see “Loading Samples and Saving Custom DRP
Files” on page 44).
Library
Click the Library button to view TL Drum Rehab’s Library of DRP files. To navigate through
multiple directories, double-click folders and
use the Up arrow to go up one directory level.
You can also use the disclosure triangles to show
or hide the contents of a folder.
All of the files available to the TL Drum Rehab
library are stored in the following locations:
Windows <system drive letter>:\Documents and
Settings\<user name>\Application Data
\Trillium Lane\TL Drum Rehab\Samples
Mac /Library/Application Support
/Trillium Lane/TL Drum Rehab/Samples
Favorites
Click the Favorites button to show your favorite
drum samples and folders of drum samples. For
information on Favorites, see “Edit” on page 44.
File
Use the File pop-up menu to navigate to directories and files, and to save DRP files.
Save New DRP File Saves all audio files currently
loaded into Clips and Zones as a new DRP file.
Save DRP File Saves any edits to the currently
loaded DRP file.
Show All Volumes Displays all volumes (drives)
in the Library browser. The Show All Volumes
command retains the last finder view and location.
Refresh All Volumes Searches for newly
mounted volumes (such as sample CDs). It also
clears the most recent finder search location,
and returns the browser to the root level view.
Library browser
Page 50
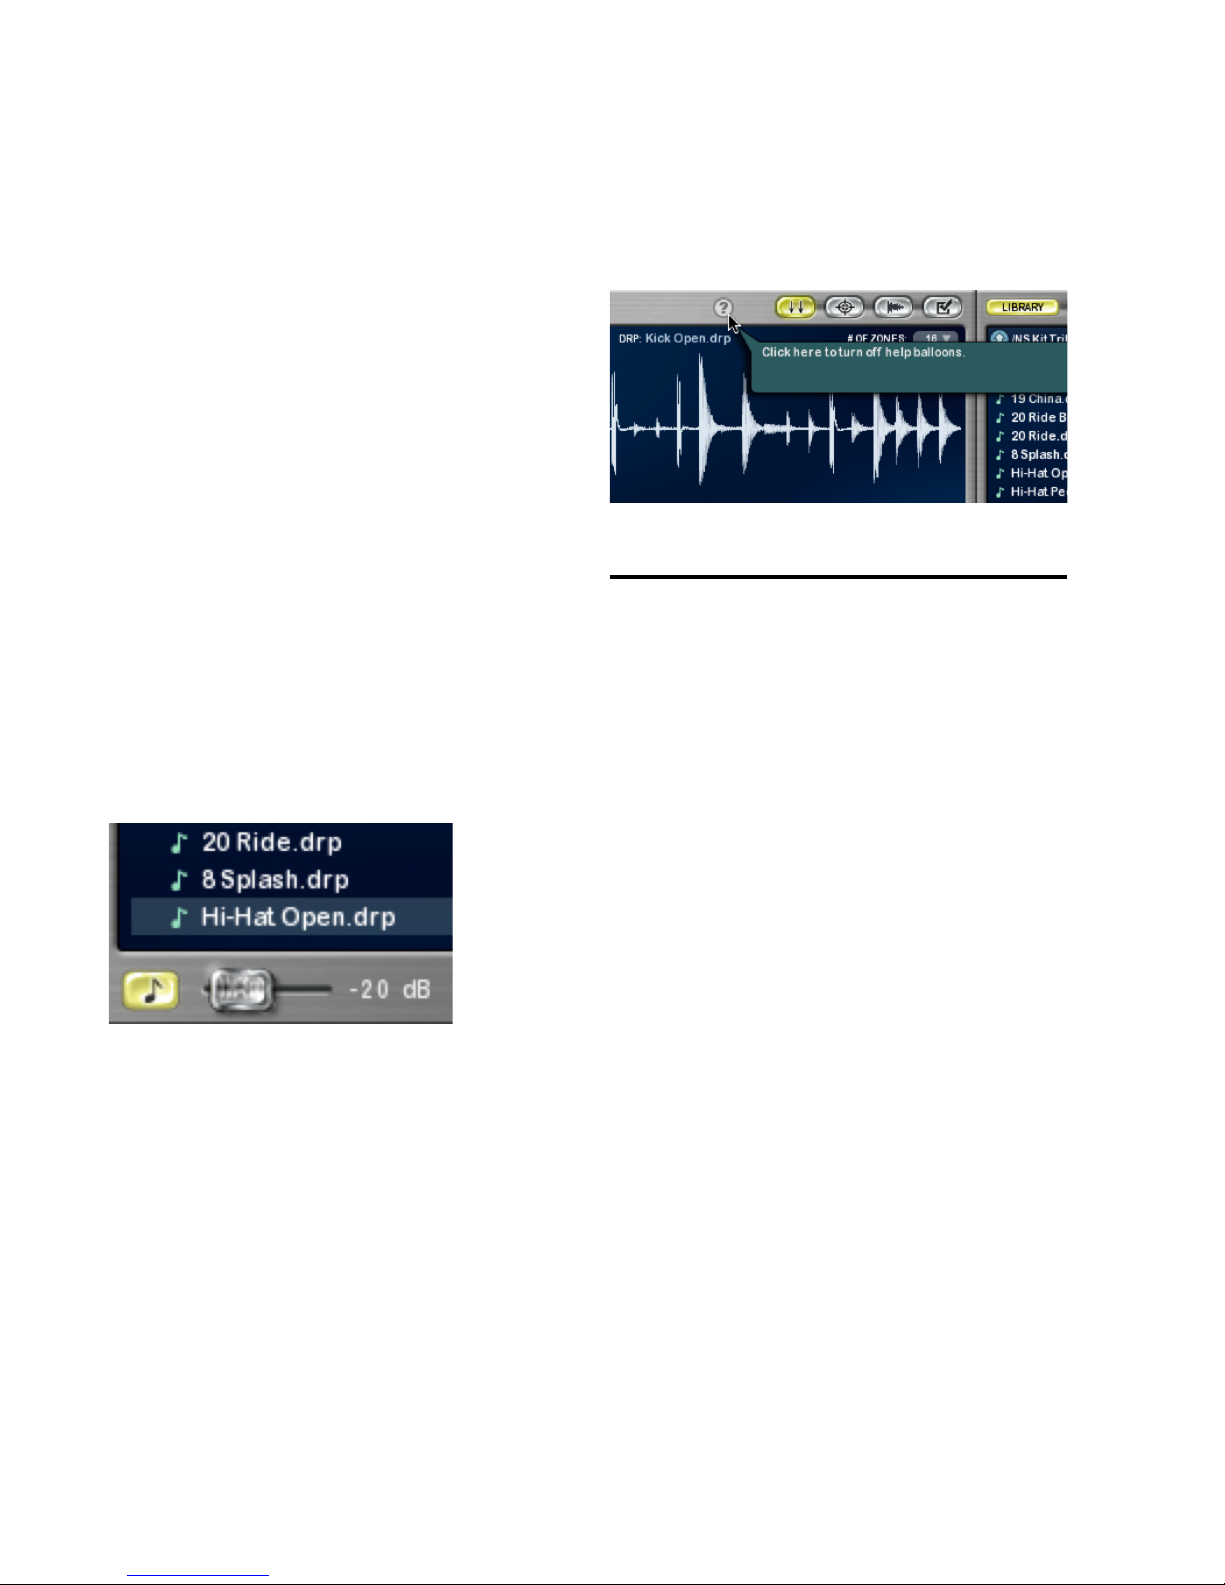
Trillium Lane Labs Plug-ins Guide44
Edit
Use the Edit pop-up menu to Add or Remove Favorites, and organize your Favorites in folders.
Add To Favorites Adds the currently selected
DRP file or folder to the Favorites folder.
Remove From Favorites Removes the currently
selected DRP file or folder from the Favorites
folder.
New Favorites Folder Creates a new folder in the
Favorites folder.
Rename Favorites Folder Lets you rename the selected Favorites folder.
Auto-Audition
Enable Auto-Audition to hear drum samples in
the Library browser automatically when you
click them. Use the slider to adjust the audition
volume.
Help
The Help button at the top of the Main window
turns TL Drum Rehab Help Balloons on or off.
Loading Samples and Saving
Custom DRP Files
In addition to using the DRP files that come
with TL Drum Rehab, TL Drum Rehab lets you
load your own samples and save custom DRP
files. While you can load samples in both the
Trigger and Expert panels, the Samples panel
provides the most extensive features for loading
samples and saving custom DRP files. The following example describes loading several snare
samples layered by dynamics and then saving
them as a custom DRP file.
Workflow Example
Loading samples and saving a custom DRP file:
1 Insert TL Drum Rehab on a mono audio track.
2 In the Library browser, select File > Show All
Volumes. The Library browser displays the root
level of your computer.
Auto-Audition
TL Drum Rehab Help Balloons
Page 51
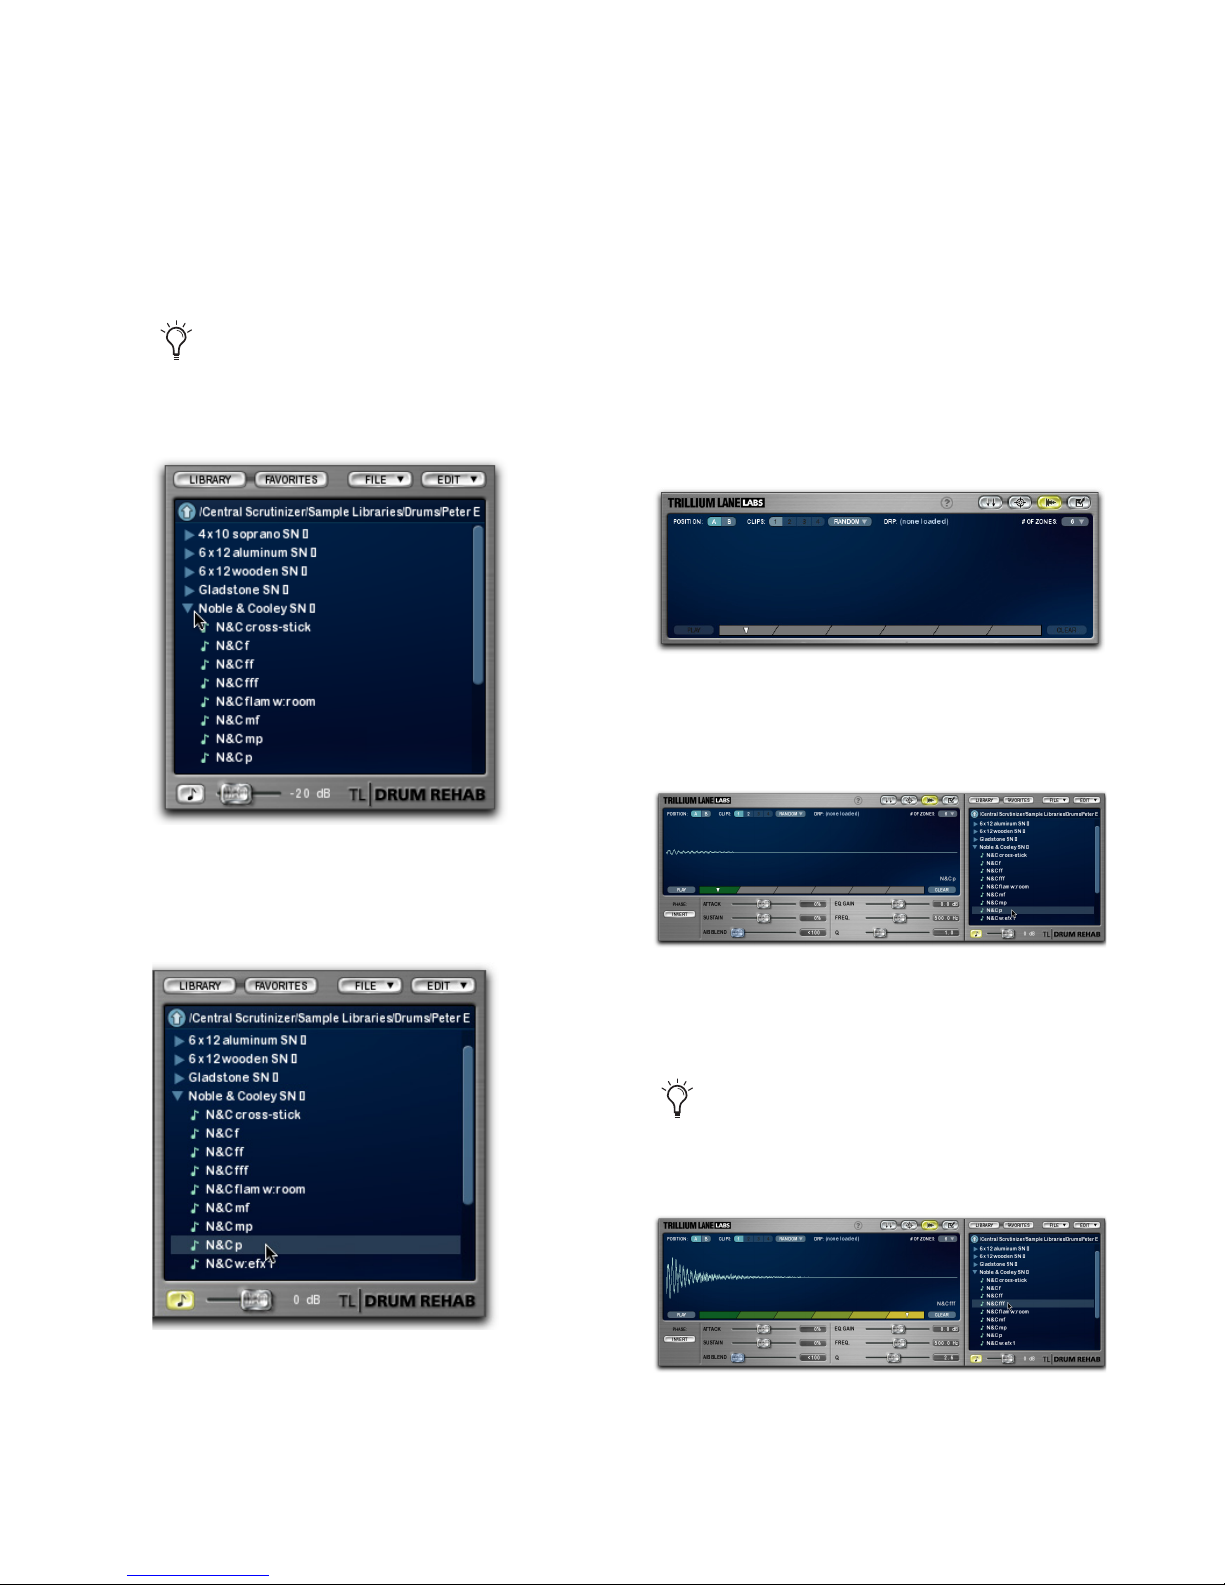
Chapter 5: TL Drum Rehab 45
3 Navigate to the directory where the snare sam-
ples are located. Double-click a volume or directory to open it in the Library browser, or click
the disclosure triangle to the left of the volume
or directory name to reveal its contents.
4 To audition a file before importing it, enabled
Auto-Audition and click the sample name in the
Library browser.
5 Select the Samples panel (see “Samples Panel
Display and Controls” on page 39).
6 Select the desired number of Zones from the #
Of Zones pop-up menu. This example uses 6
Zones for 6 samples of a snare hit all recorded at
different dynamics from p to fff. (See “# of
Zones” on page 41.)
7 Select the Zone into which you want to load
the first sample. In this example the samples
will be loaded from soft to loud, so select the
left-most Zone first. (See “Velocity Map and Velocity Zones” on page 32.)
8 In the Library browser, double-click the de-
sired audio file (WAV, AIF, or SD2) to load it into
the selected Zone.
9 Repeat steps 7 and 8 for each new sample until
all the samples have been loaded into the corresponding Velocity Zones.
If you want to import samples from a CD,
and you don’t see the CD you may have just
inserted, select File > Refresh All Volumes.
For more variety of sound, you can load
more samples into as many as four Clips per
Zone. (See “Clips” on page 40.)
Page 52
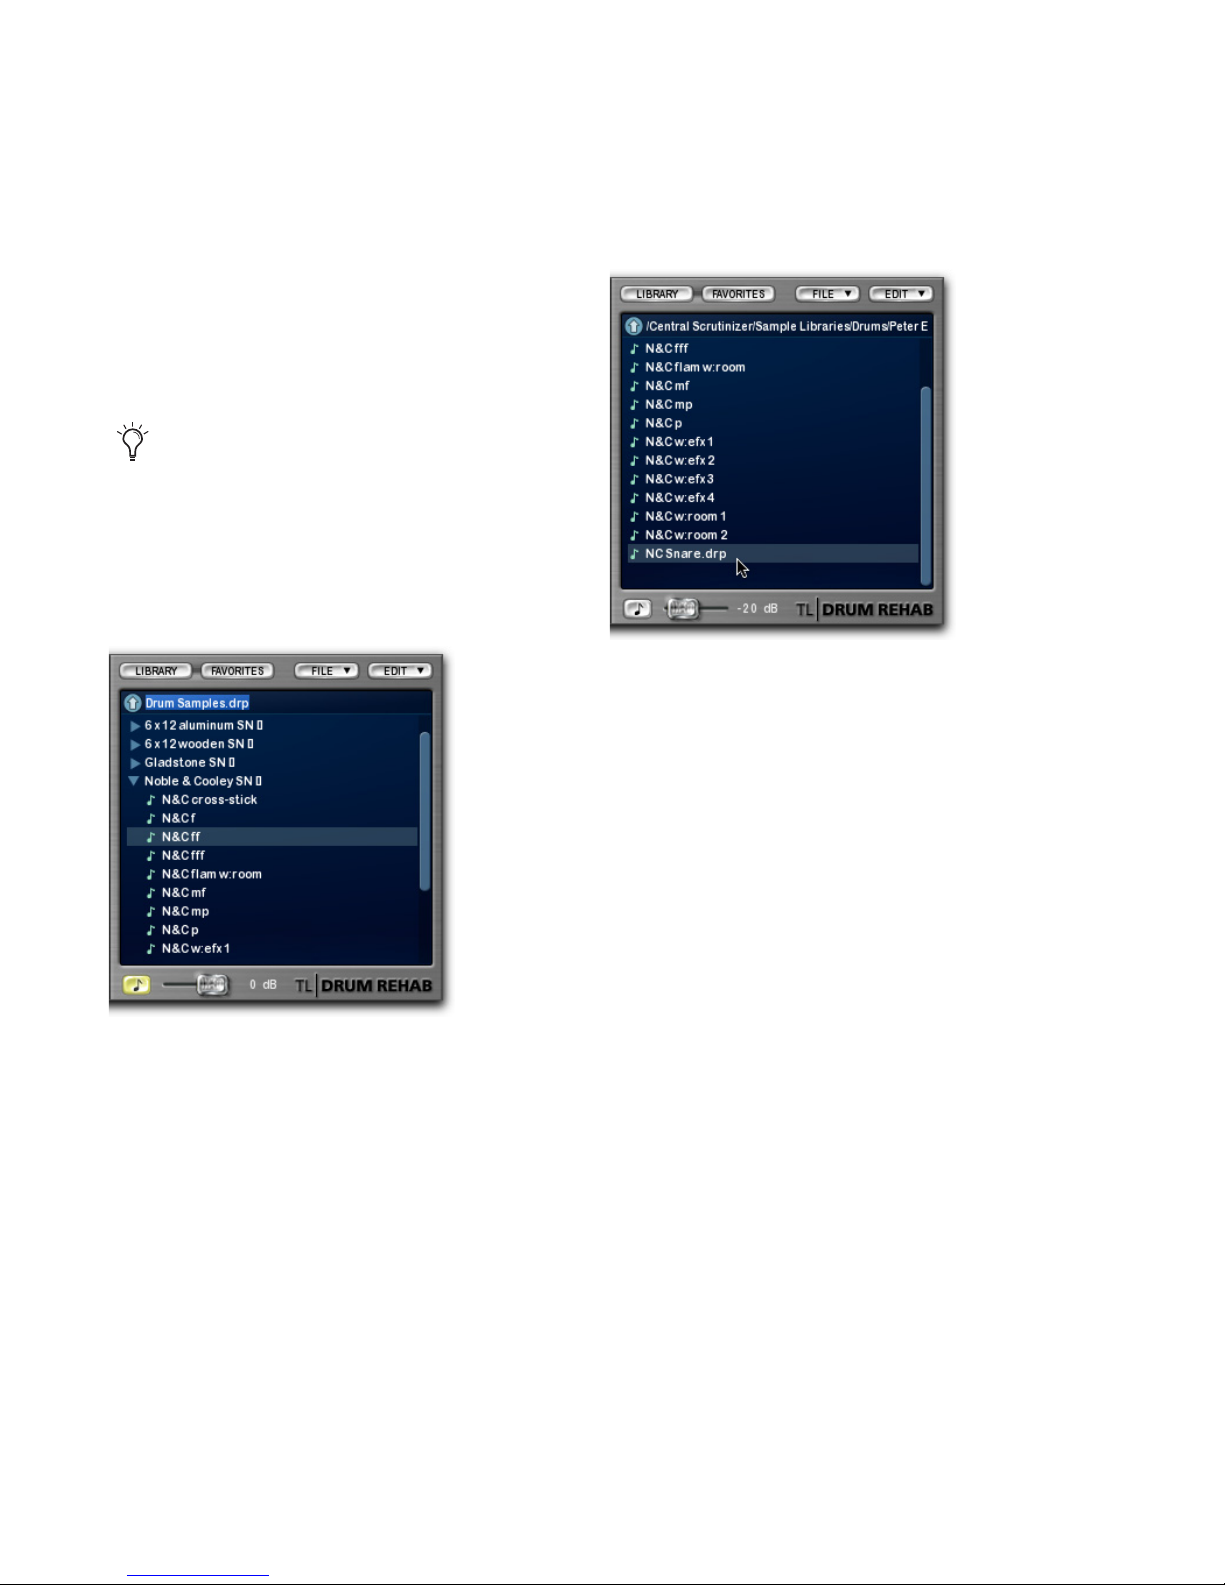
Trillium Lane Labs Plug-ins Guide46
10 Click the Play button to audition the sample
loaded into the currently selected Zone and adjust the Waveshaping controls and other Samples panel parameters until you get the sound
you want.
11 In the Library browser, navigate to the direc-
tory where you want to save the loaded samples
as a new DRP file.
12 Select File > Save New DRP File. The new DRP
file appears highlighted at the top of the browser
list as “Drum Samples.drp.”
13 Click and rename the file to something iden-
tifiable. In this example, the samples were recordings of a Noble and Cooley snare, so it is
named “NC Snare 1.”
14 Press Enter (if you do not press Enter, the
new DRP will not be saved). The new DRP file
appears in the current directory.
15 Select the new DRP file in the Library browser
and choose Edit > Add To Favorites to readily access to the new DRP file in the future.
TL Drum Rehab provides a User DRPs directory in the Library for storing your custom
DRP files.
Page 53

Chapter 6: TL EveryPhase 47
chapter 6
TL EveryPhase
(TDM and RTAS)
Introduction
TL EveryPhase is a TDM and RTAS 18-stage analog modeled phaser effects plug-in designed to
reproduce classic phaser effects as well as creating exciting new sounds.
How a Phaser Works
Traditional Analog Phasers
The phaser (or phase shifter) is a classic sound
effect often heard on guitars or synthesizers. The
sweeping sound of a phaser can vary from subtle
modulation and tremolo on a delicate guitar
track to the most extreme filtered feedBack. Traditionally, phasers were analog effects devices.
Analog phasers delivered the benefits of a
smooth analog sound, but like many analog devices were often unreliable and introduced unwanted noise and hum.
A phaser functions by moving a portion of the
incoming audio out of phase and then adding
the processed audio back to the original signal.
Each stage of a multiple stage phaser can be
thought of as a narrow band or notch of the frequency range which is filtered out. As the frequency is adjusted, the classic sweeping phaser
sound is heard.
Figure 1. TL EveryPhase plug-in
Page 54
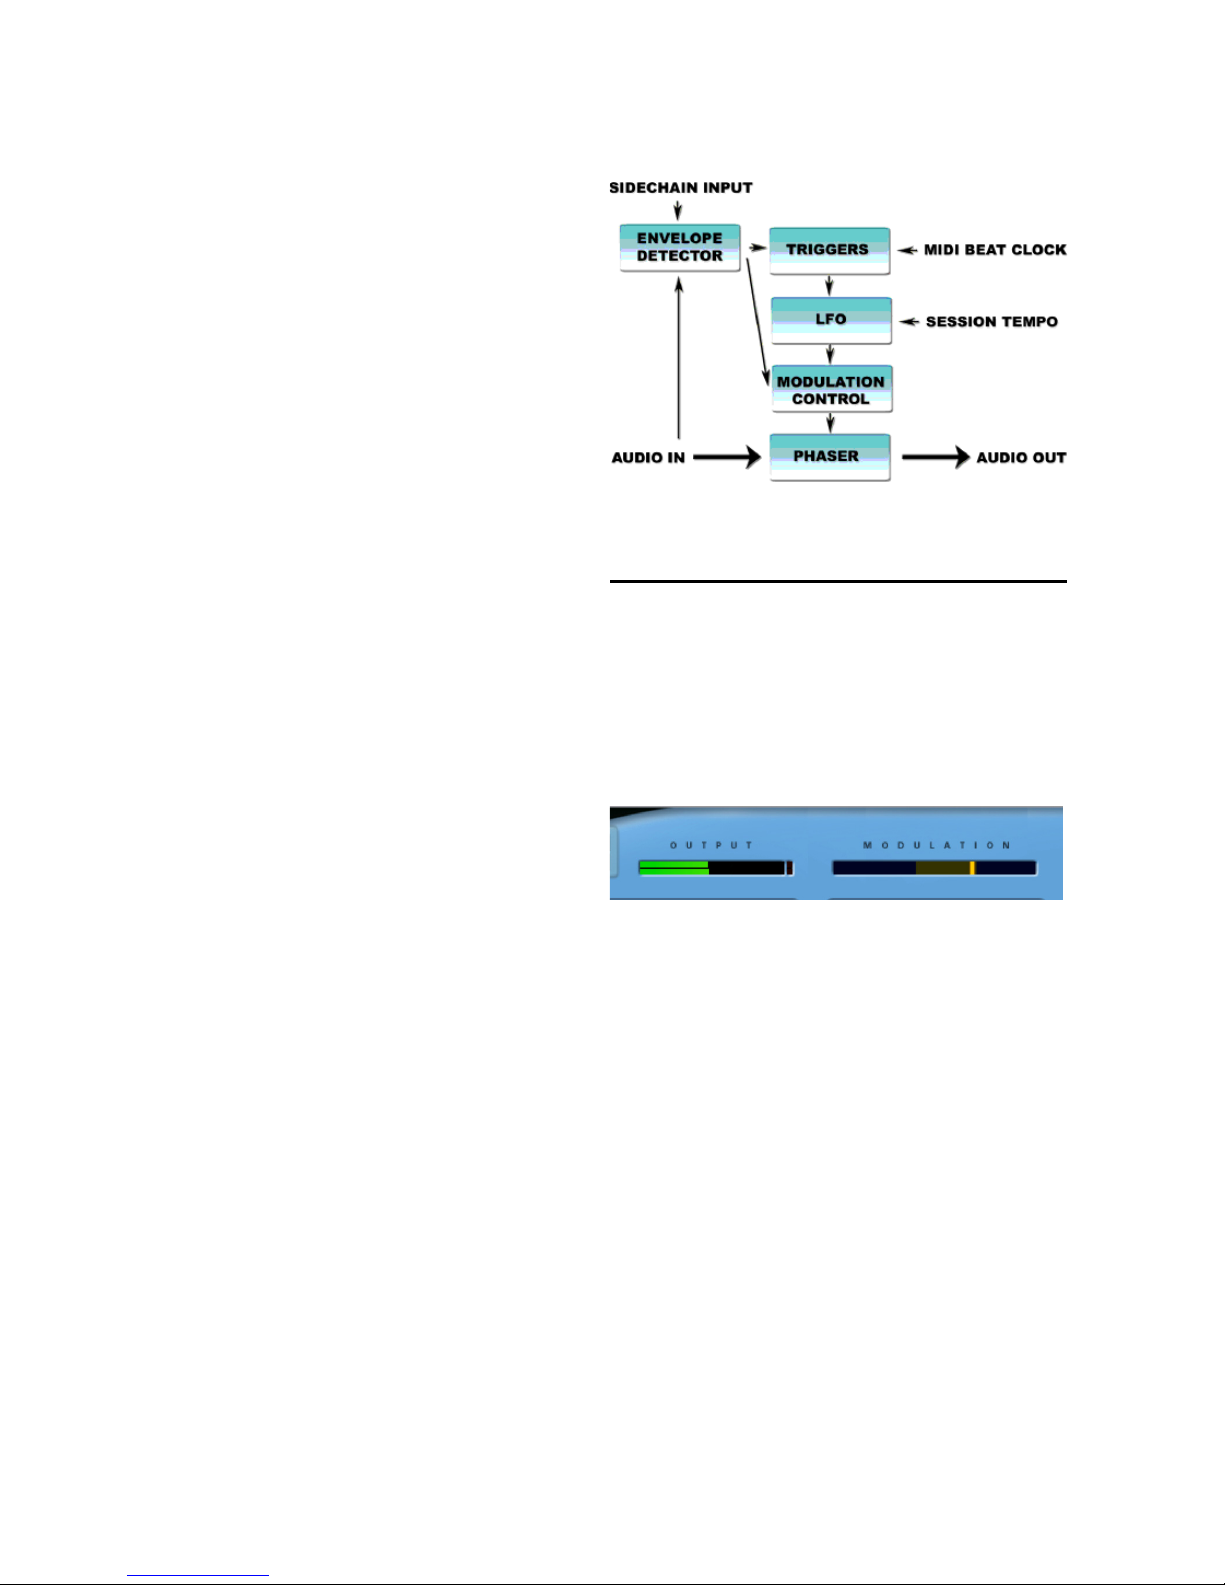
Trillium Lane Labs Plug-ins Guide48
TL EveryPhase
TL EveryPhase uses proprietary DSP algorithms
to deliver the classic analog phaser sound in digital form, with the added benefits of extensive
synchronization and automation options.
Figure 2 shows the different modules of
TL EveryPhase and how they interact with the
audio signal.
The modulation of the phaser algorithm in
TL EveryPhase can be controlled by a low frequency oscillator (LFO) or by the envelope of an
audio signal using the built-in envelope detector. The Depth control switches TL EveryPhase
between phasing in opposite and identical phasing modes, and feedBack can be taken from any
stage of the phaser by adjusting the Resonance
control.
TL EveryPhase provides controls to enable the
LFO to be synchronized to the current tempo of
the Pro Tools session. A variety of LFO triggers
are also provided to ensure that a phase effect
can be created to match the timing of any audio
signal.
The envelope detector in TL EveryPhase provides several options to control the phasing directly from an audio signal. Firstly, the envelope
detector can be driven by the audio of the current track or audio from a side-chain input. The
envelope detector can drive the phaser modulation directly by selecting ENV for the Source in
the Modulation section. Alternatively the envelope detector can be used as a trigger for the LFO
by selecting Envelope under Triggers in the LFO
section.
TL EveryPhase Controls
The TL EveryPhase interface is divided into several sections, each of which is described below.
Meter Section
Output
The Output meter displays the amplitude of the
outgoing audio. In mono mode, a single meter
bar is shown. In mono to stereo and stereo
modes, two meter bars are shown with the left
channel at the top of the meter display. In 5.1
mode, six channels are shown, in the order L C
R Ls Rs LFE from the top of the meter display.
The red clip indicator indicates a channel has
clipped. The clip indicator for each channel can
be cleared by clicking on it.
Figure 2. TL EveryPhase signal flow, processing, and
controls
Output and Modulation meters
Page 55
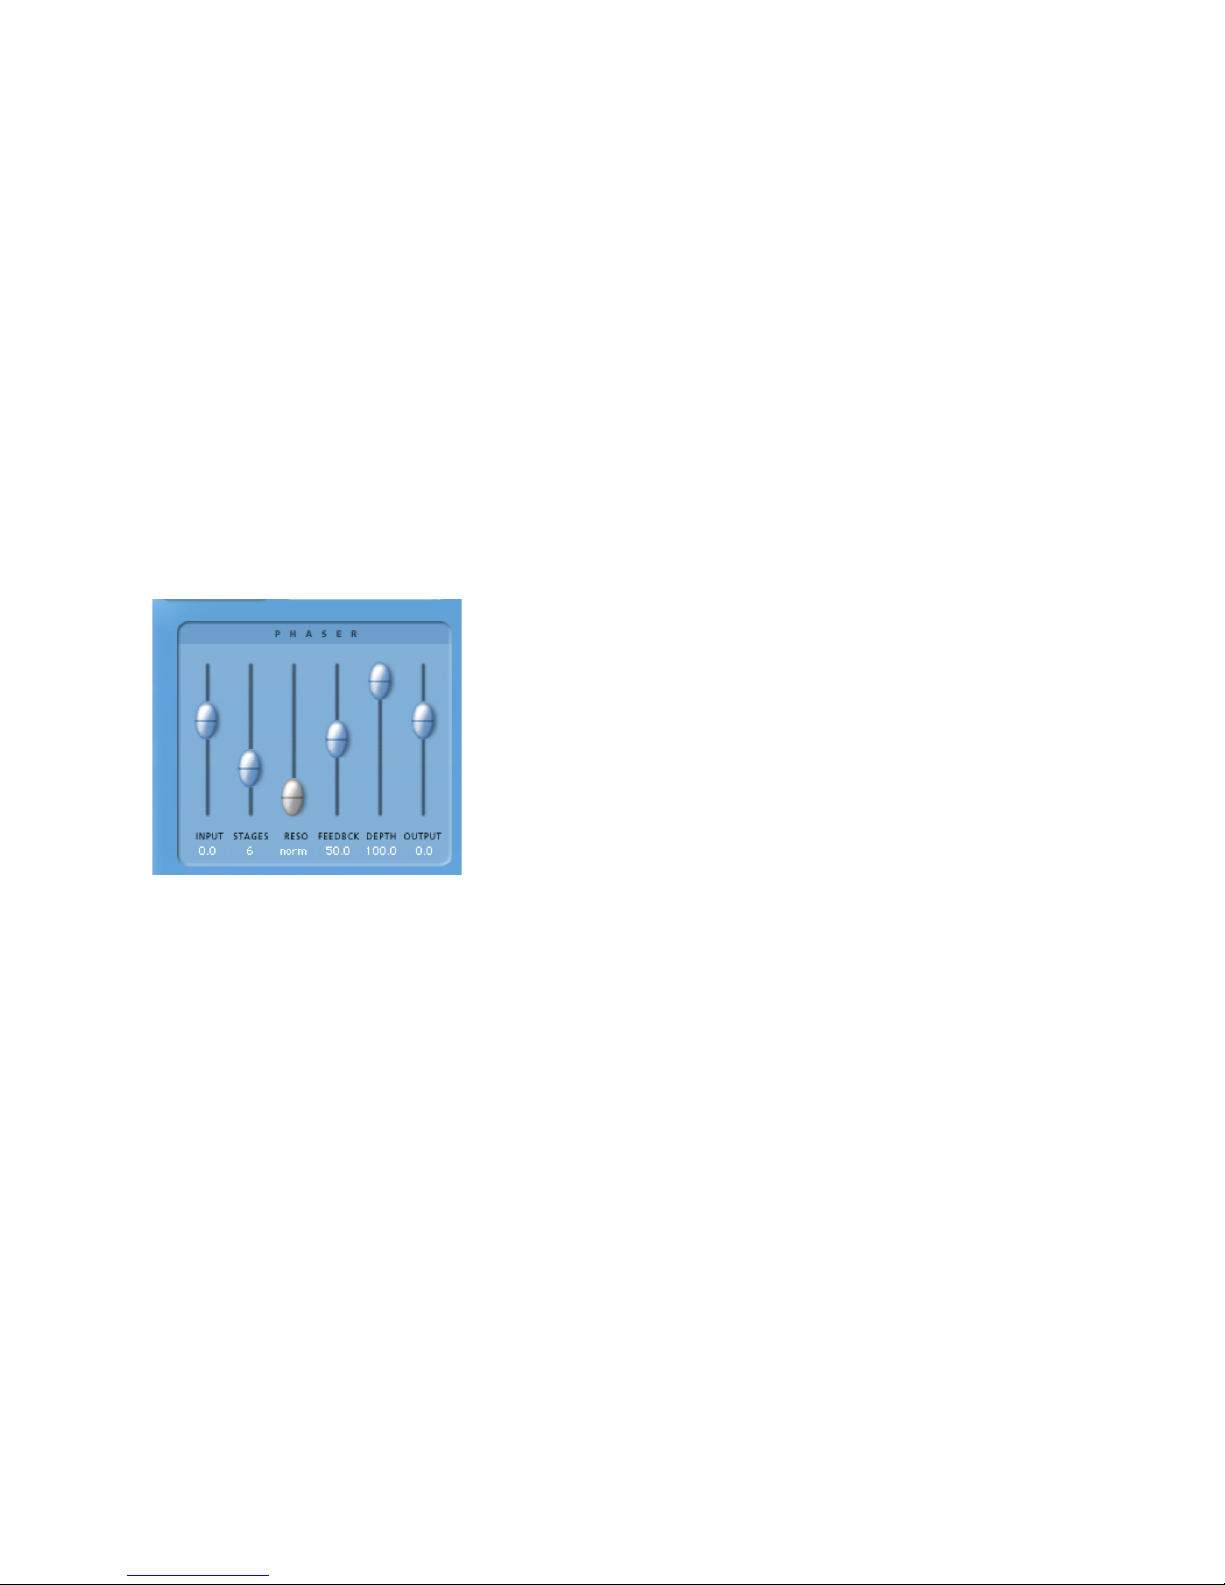
Chapter 6: TL EveryPhase 49
Modulation
The Modulation meter displays several items at
once. First, the range of phaser sweep set by the
Modulation Width and Manual controls is indicated by the shaded background area. The
movement of the phaser itself is indicated by
one or two scanning bars. When TL EveryPhase
is instantiated on a mono, stereo, or 5.1 track, a
single bar is shown in this meter. When instantiated on a mono track as a mono to stereo plugin, two scanning bars are shown.
Phaser Section
Input
The Input slider lets you cut or boost of the input signal level from –24 dB to +12 dB.
Stages
The Stages slider sets number of phaser stages
from 2 to 18. This changes the character of the
sound as the number of stages controls the
number of notches that TL EveryPhase affects.
Resonance
The Resonance slider changes the character of
the feedBack tone created by allowing the feedBack to come from a different stage of the
phaser. When Resonance is set to Norm, feedBack is based on the stage of the phaser set by
the Stages slider. When Resonance set to any
other value, feedBack is taken from the stage indicated by the Resonance slider and a different
feedBack tone is created.
FeedBack
The FeedBack slider feeds the output signal of
TL EveryPhase back into the input, creating a
resonant or singing tone in the phaser when set
to maximum.
Depth
The Depth slider adjusts the depth of the
notches in the phased signal. When set to zero,
TL EveryPhase does not phase the audio signal.
Depth can be set to positive or negative values
which allows for two separate types of phasing
to occur. When Depth is positive, the notches
occur at frequencies that are at opposite phase,
which is a common feature of many analog
phasers. When Depth is negative, the notches
occur at frequencies that have identical phase.
The sound quality of these two types of phasing
can be remarkably different.
Output
The Output slider lets you cut or boost of the
output signal level from –24 dB to +12 dB.
Phaser section
Page 56
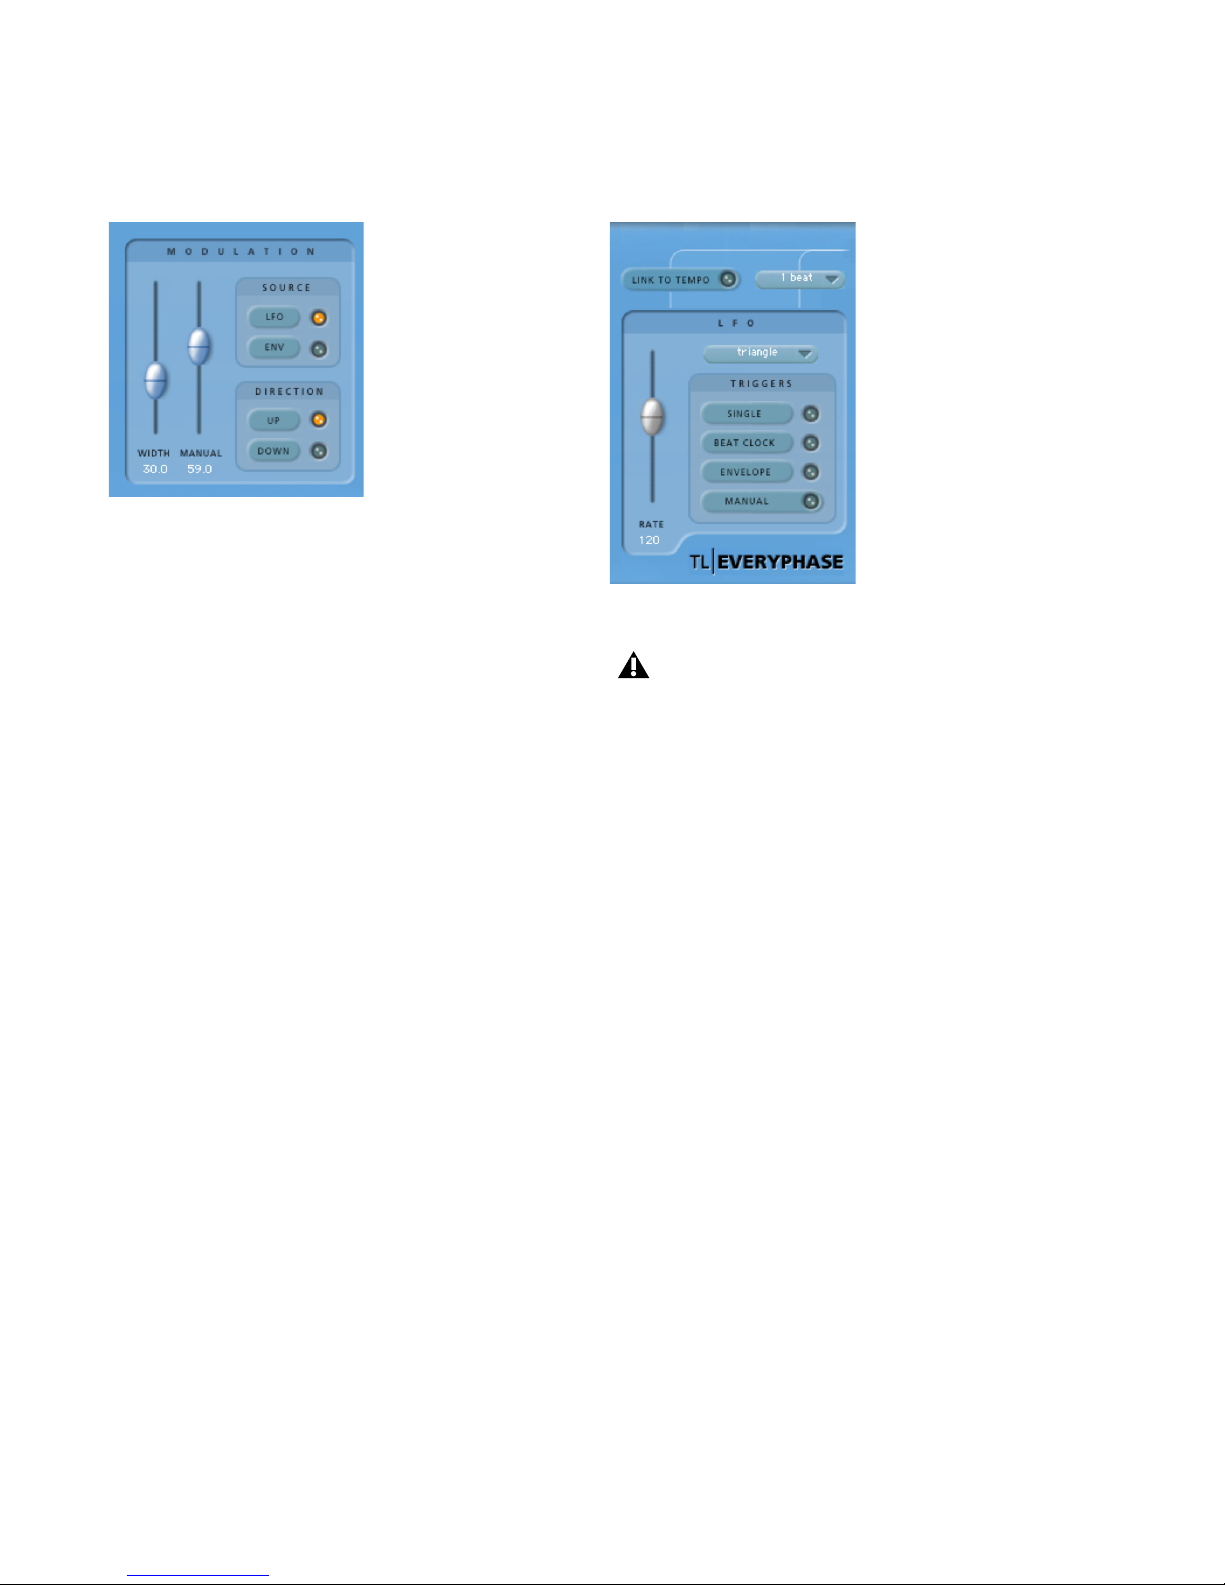
Trillium Lane Labs Plug-ins Guide50
Modulation Section
Width
The Width slider determines the amplitude of
the modulation sweep. This is displayed graphically in the modulation meter.
Manual
The Manual slider offsets the modulation
sweep. This is displayed graphically in the modulation meter.
Source
Click LFO or ENV to select the source for modulation. When the Source is set to LFO, modulation is controlled by the LFO. When it is set to
Envelope (ENV), modulation is controlled by
the Envelope Detector which listens to the audio signal. If the side-chain input in the Envelope section is activated, the side-chain audio is
used instead of the current track.
Direction
Click Up or Down to change the direction of the
modulation.
LFO Section
Rate
The Rate slider adjust the rate of the LFO in
beats per minute. When Link to Tempo is activated, the slider is ignored and the LCD always
displays the current session tempo.
Modulation section
LFO section
When the Modulation section’s Source is
set to the Envelope (ENV), the controls in
the LFO section have no effect on the current sound.
Page 57
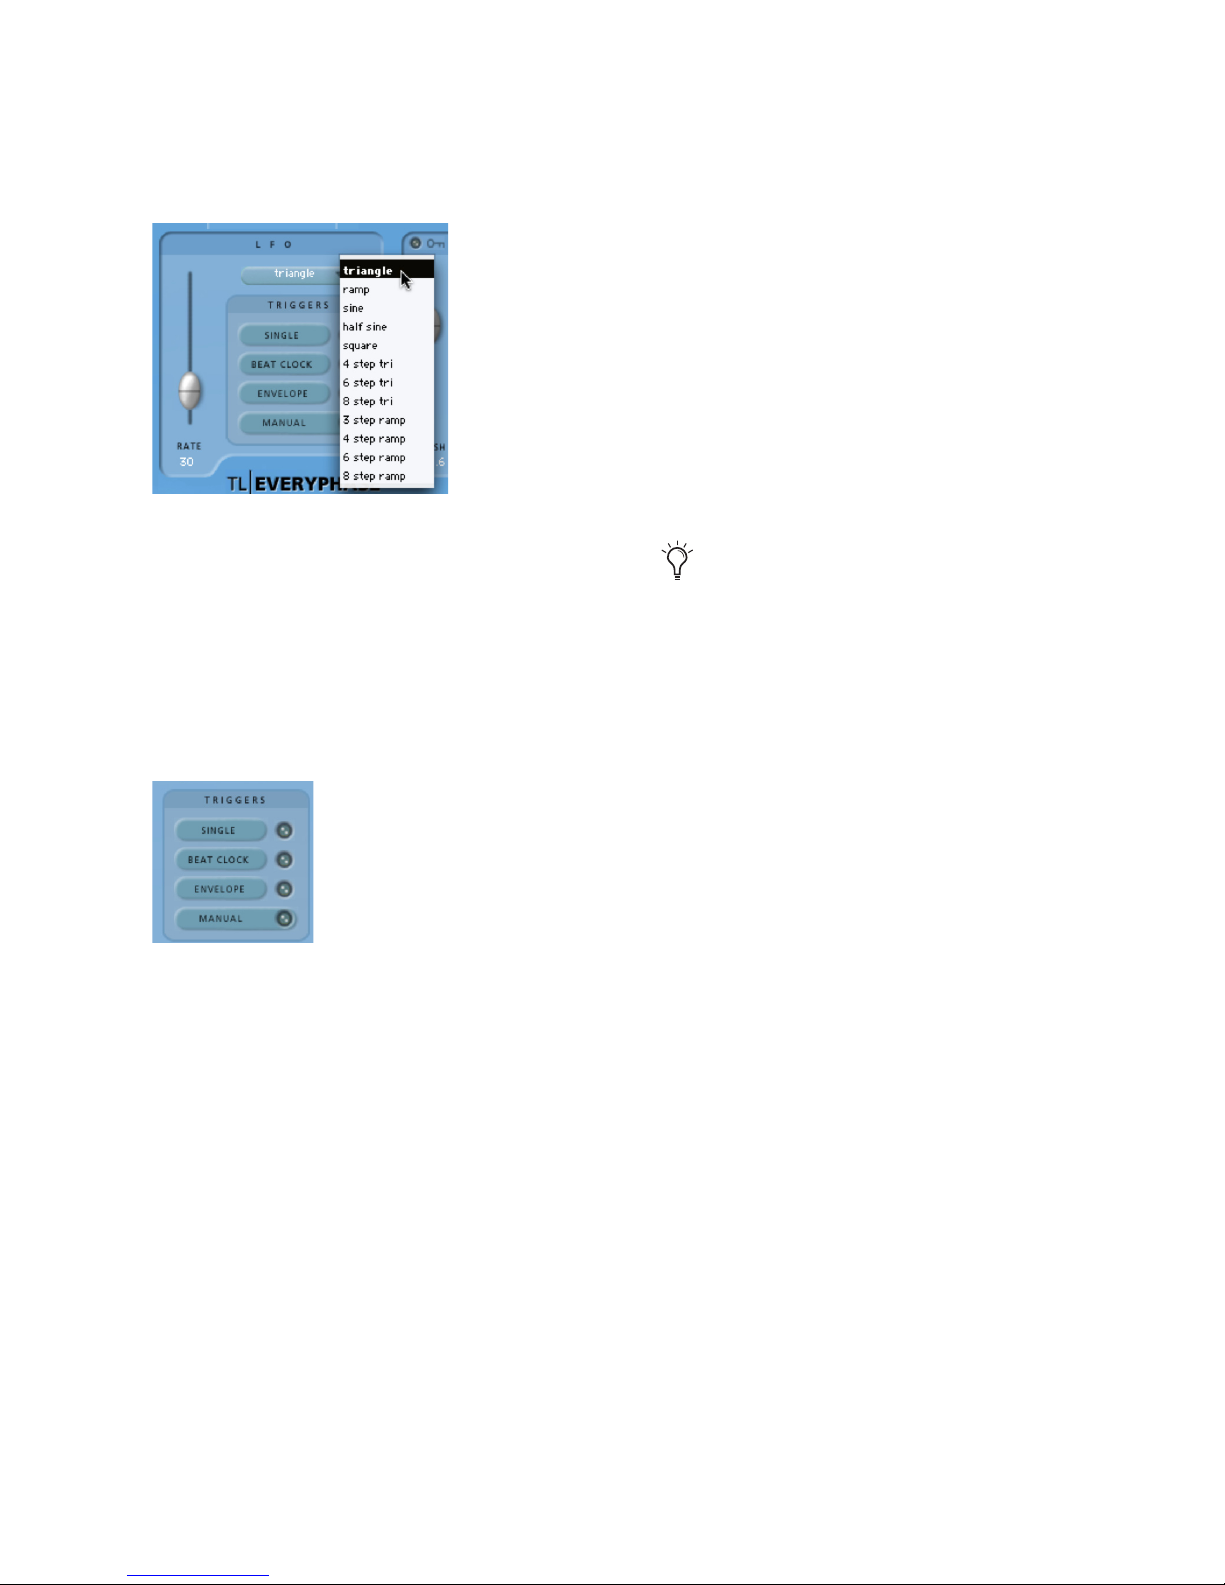
Chapter 6: TL EveryPhase 51
Wavefor m
The Waveform selector (Triangle, Ramp, Sine,
etc.) determines the wave shape used by the
LFO. The waveform shape in use is graphically
depicted by the movement of the scanning bars
in the Modulation meter.
LFO Triggers
By default, the LFO cycles continuously through
the selected waveform. The LFO can be set to cycle through the selected waveform just once, or
it can be triggered by MIDI Beat Clock, the Envelope, or manually.
Single
When the Single trigger is selected, the LFO will
cycle thru the waveform once only and then
stop.
Beat Clock
When the Beat Clock trigger is selected, the LFO
synchronizes to MIDI Beat Clock. TL EveryPhase
receives Beat Clock signal every 64th-note. The
Duration menu determines how often the Beat
Clock signal triggers TL EveryPhase, ranging
from every 16th-note to every 4 bars. When Beat
Clock signal is received, the Beat Clock trigger
light blinks brightly. Using the Beat Clock function enables TL EveryPhase to produce consistent phasing results, ensuring that the LFO is always in the same state at each beat.
Envelope
When the Envelope trigger is selected, the LFO
is triggered directly by the Envelope detector,
which listens to the audio signal. If the SideChain Input selector in the Envelope section is
activated, then the side-chain audio signal is
used instead. When activated, the Envelope
light blinks brighter when an audio signal is detected. The threshold level can be adjusted using
the Threshold control in the Envelope section.
If the Envelope Detector is completely released
due to previous portions of the audio signal going above threshold, a trigger occurs the next
time the audio goes above the threshold level.
Another trigger will not happen until the Envelope Detector has completely released after the
audio goes below the specified threshold. Thus,
increasing the Release slider will reduce the rate
at which triggers can occur and decreasing the
Release time increases the rate at which triggers
can occur.
Selecting the LFO Waveform
LFO Triggers
In Pro Tools 6.1 and earlier, MIDI Beat
Clock be enabled in Pro Tools. Select MIDI
> MIDI Beat Clock, and enable MIDI Beat
Clock and select TL EveryPhase as a destination.
Page 58
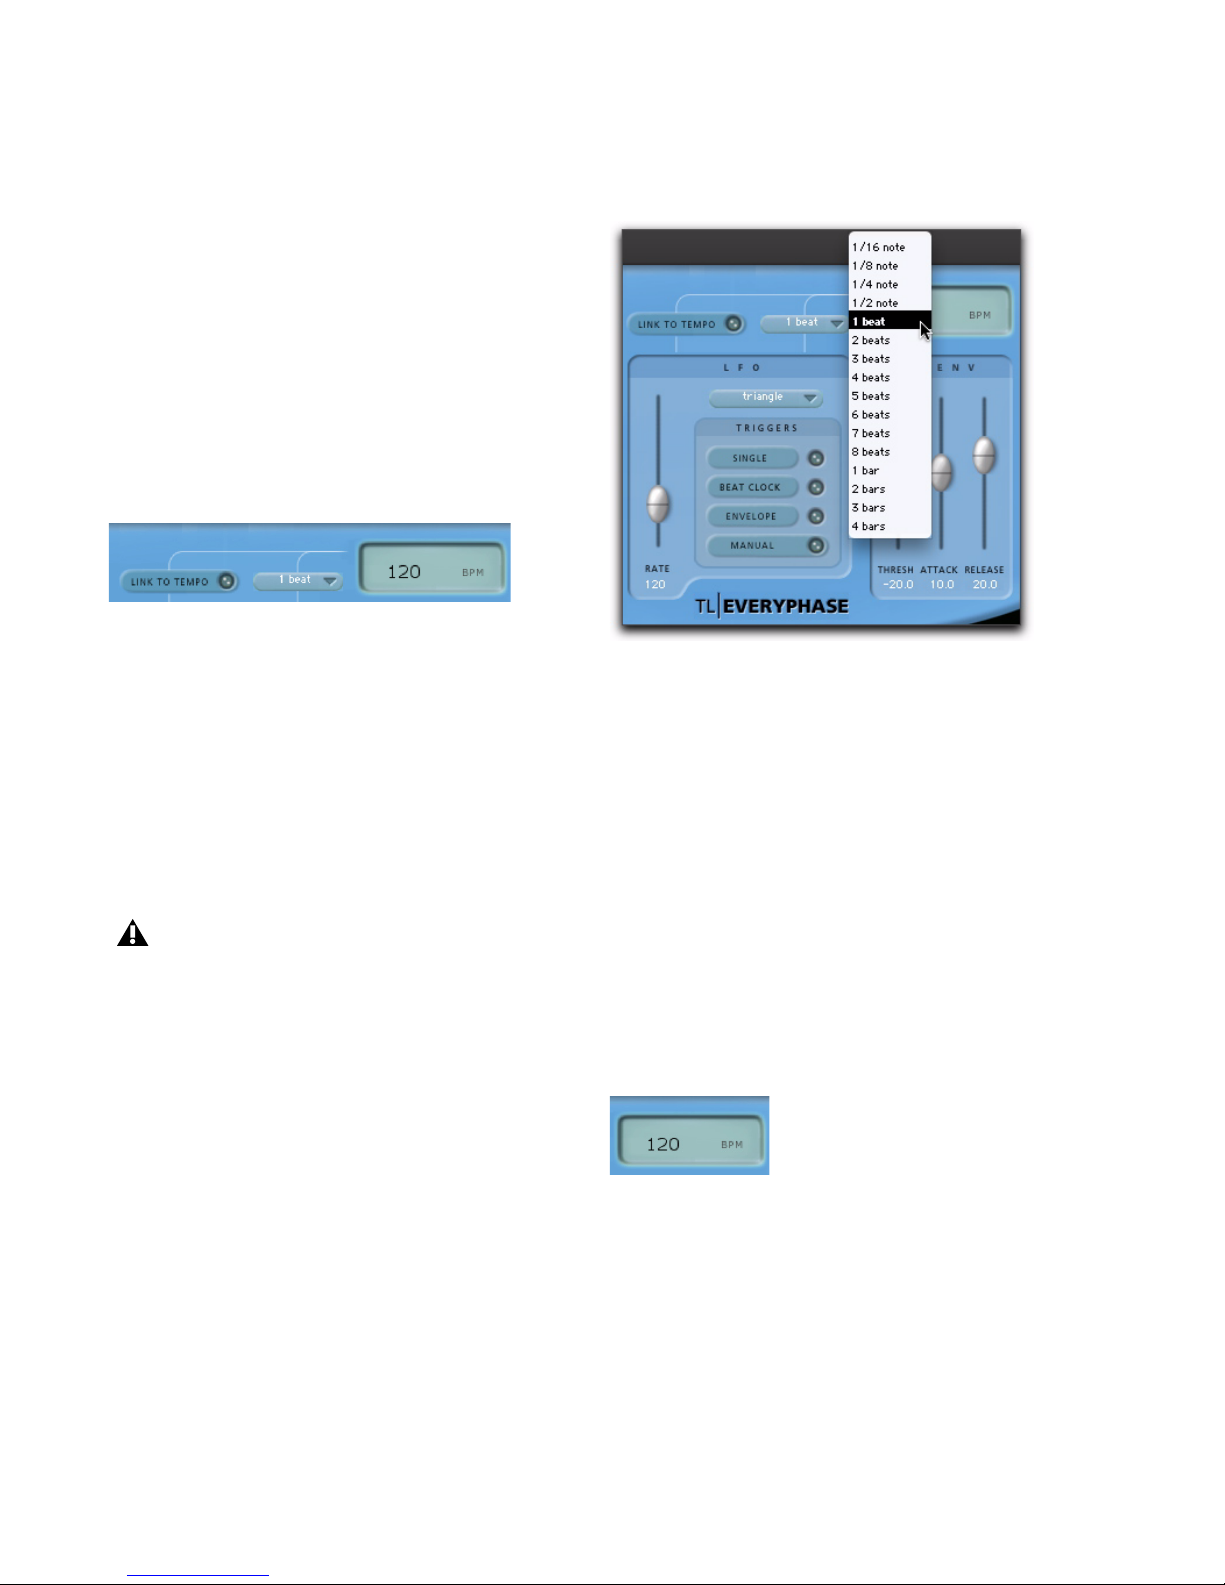
Trillium Lane Labs Plug-ins Guide52
Manual
When the Manual trigger is selected, the LFO is
triggered manually. This can be especially useful
if you want to trigger the LFO using Pro Tools
automation.
With control surfaces and automation, the
Manual trigger acts like an on/off switch and
triggers the LFO every time it changes state.
Tempo C ontro ls
Link To Tempo
When the Link To Tempo option is enabled, the
LFO rate is set to the Pro Tools session tempo,
and any tempo changes in the session are followed automatically. When Link To Tempo is
enabled, the LFO rate slider is ignored and the
tempo displayed in the LCD always displays the
current session tempo.
Duration Selector
The Duration selector works in conjunction
with the session tempo, LFO rate, and Beat
Clock trigger. By default, Duration is set to 1 bar.
At that setting, the LFO cycles once within one
bar. When Duration is set to 1 beat, the LFO cycles within the duration of one beat. When Link
to Tempo is activated, the Duration selector sets
the LFO rate as a function of the tempo of the
Pro Tools session. The Duration selector also
controls how often the Beat Clock trigger is activated.
Tempo Display
The Tempo Display displays the tempo in BPM.
The value in the Tempo Display can also be edited directly by clicking it.
Tempo c ont rols
The Link To Tempo control is only available on Pro Tools 6.1 and later. In earlier
releases of Pro Tools, manually set the LFO
rate to match the session tempo for the
same effect.
Selecting Duration
Tempo D isp lay
Page 59
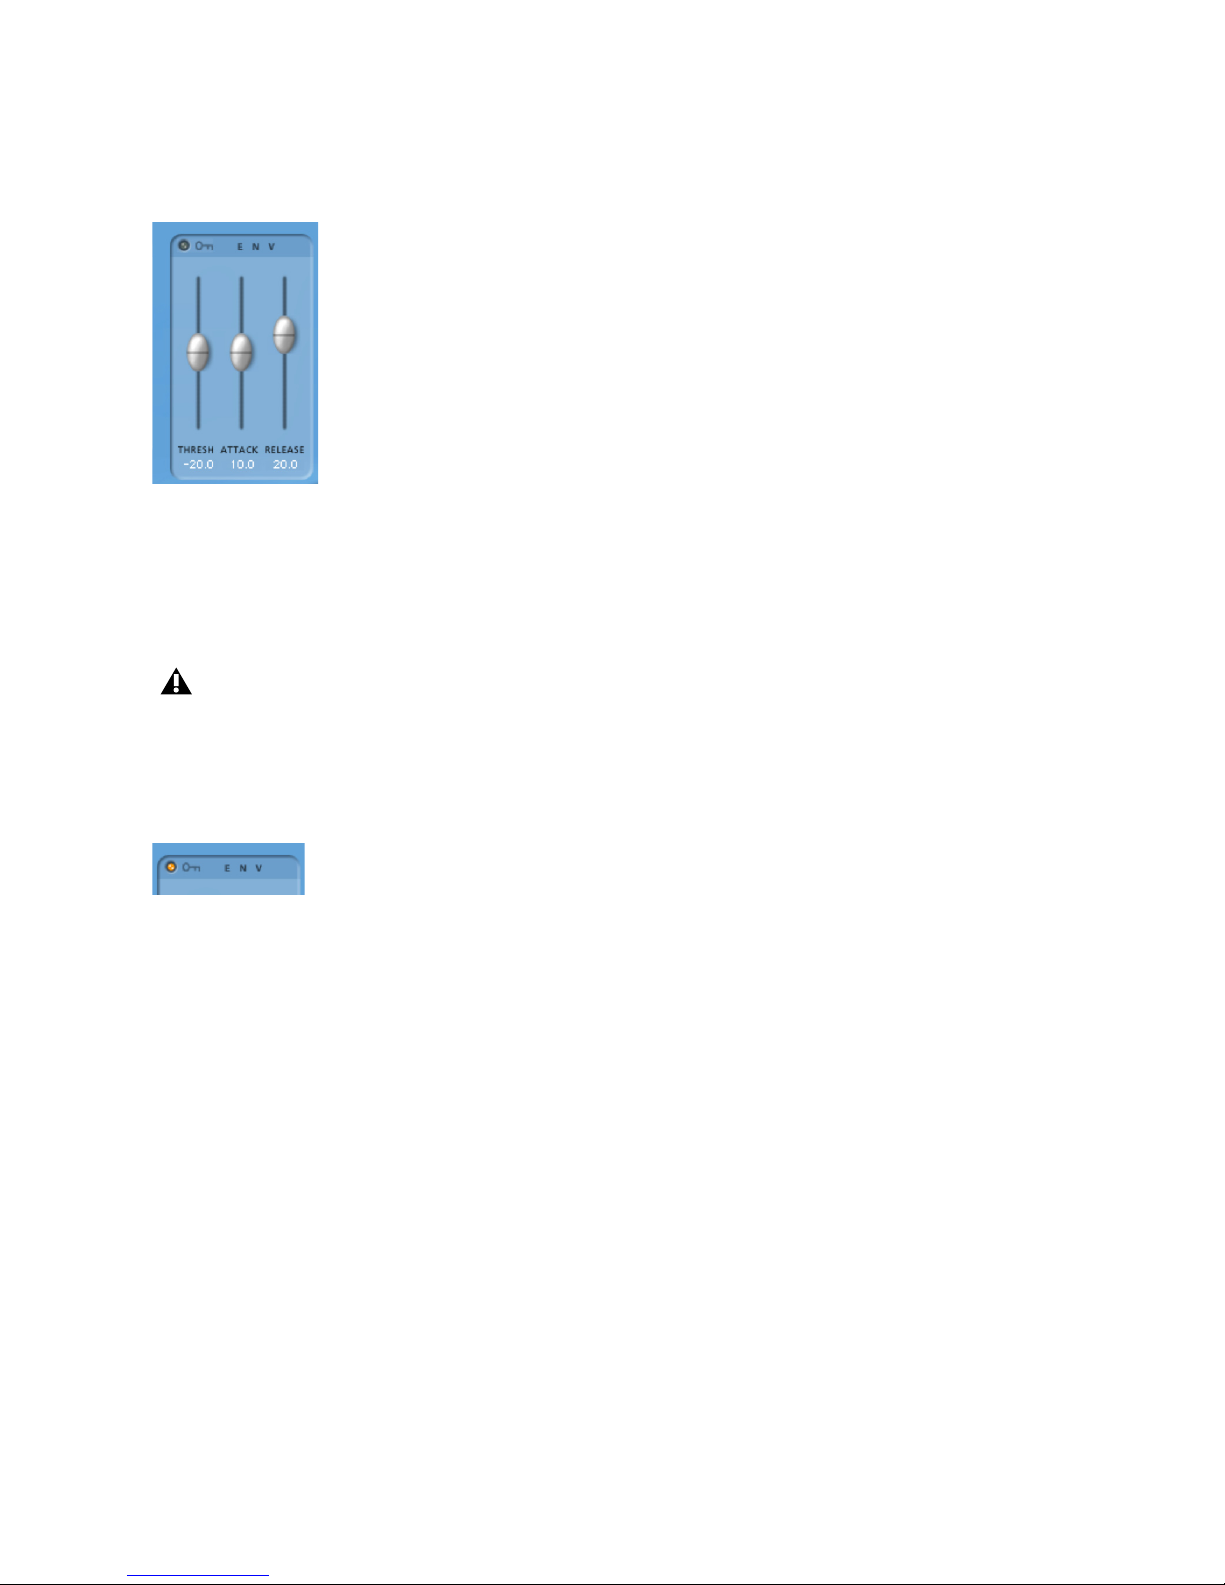
Chapter 6: TL EveryPhase 53
Envelope Section
When you select Envelope as the Modulation
source, Modulation (as shown in the Modulation Meter) is controlled by the audio signal and
the Envelope Detector section controls.
Side-Chain Input
When the Side-Chain Input selector (the key
icon) is enabled, the audio for the Envelope Detector is taken from the side-chain input rather
than the current track. Select the Side-Chain Input using the Pro Tools key icon at the top of
the plug-in window.
Threshold
The Threshold slider sets the amplitude level required for the Envelope Detector. The LFO Envelope Detector light blinks brighter when audio is detected above the threshold.
Attack
The Attack slider sets the attack rate of the Envelope Detector.
Release
The Release slider sets the release rate of the Envelope Detector.
Envelope section
When the Envelope Detector is not in use,
the controls in this section have no effect on
the sound.
Side-Chain Input selector enabled
Page 60

Trillium Lane Labs Plug-ins Guide54
Using TL EveryPhase
This section addresses some common scenarios
in which TL EveryPhase can be used during a
Pro Tools session.
Using Presets
TL EveryPhase ships with a wide selection of factory presets for different phaser sounds. The following should be noted when using presets:
• Presets which use the Envelope Detector
may need to have the Envelope Threshold,
Attack and Release adjusted appropriately
for the current audio signal.
• Some presets utilize the Side-Chain Input.
If necessary, ensure that you have a sidechain input assigned, and adjust the Envelope Detector to get the best results.
• Adjust the input and output levels appropriately for your track to avoid clipping.
Creating a Single Phased Sound
A single phased sound (one cycle of the phaser)
can be created using automation of the LFO
manual trigger.
To create a single phased sound:
1 Insert TL EveryPhase on a track.
2 Select an appropriate LFO Waveform, such as
Ramp.
3 Set the Rate to an appropriate value.
4 Enable the LFO Single trigger so the LFO will
only cycle once.
5 Select the Auto button at the top of the
TL EveryPhase plug-in window.
6 Add LFO Manual Trigger to the automation
list.
7 Set the Automation mode for the track to
Write or Touch.
8 Play the session
9 At the point where you wish phasing to start,
click on Manual Trigger to start the LFO. The automation for this action will be recorded onto
the track.
The Bypass and/or Depth controls can also be
automated to ensure TL EveryPhase does not effect any part of the sound except the specific
section required.
Creating a Gradual Phaser Effect
As an alternative to bypassing TL EveryPhase
when an effect isn’t needed, the Depth control
can be automated to introduce and fade out
TL EveryPhase on a track as required.
Manually Automating Triggers
TL EveryPhase offers Beat Clock triggers which
allow you to trigger the LFO on bars and beats. If
you want the phasing effect of TL EveryPhase to
match an irregular sound (such as a guitar lead
that doesn’t fall on a specific beat), manually automating the LFO Manual Trigger provides an
alternative.
You can manually automate the LFO to trigger
at specific points in the session in a similar fashion to that described above. The following
screenshot shows a guitar track with automation of the LFO Manual Trigger at points which
match key phrases in the guitar playing.
LFO Manual Trigger automation on a guitar track
Page 61

Chapter 6: TL EveryPhase 55
Alternatively, with an appropriate audio signals,
using the LFO envelope trigger with the correct
threshold settings will trigger the LFO as
needed.
Using the Beat Clock
The Beat Clock trigger lets you trigger the LFO
on specific bars and beats. Using the LFO Duration menu and the Beat Clock trigger, you can
restart the LFO as often as once every 16th-note.
This is useful when the tempo and timeline in a
Pro Tools session have been set to match the
music.
Using the Side-Chain Input
The Side-Chain Input option in TL EveryPhase
lets you direct audio from another track in your
Pro Tools session to the Envelope Detector. This
is achieved by sending the audio from the desired channel to a bus and setting the side-chain
input on TL EveryPhase to the same bus.
The Side-Chain Input feature lets you control
the TL EveryPhase modulation and LFO using
external audio sources, allowing you to explore
creative possibilities not available with most
phasers.
For example, a side-chain input can be used to
“listen” to a percussion track and create a rhythmic phasing effect on a bass line. This is especially effective in R&B, hip hop and electronic
music.
Consider the following two bar bass line and
drum loop. The bass line is simply a single bass
guitar note which lasts for almost an entire bar.
The bass line can be phased by the drum loop as
follows:
1 Instantiate TL EveryPhase on the bass line
track.
2 Send the drum loop track to a bus.
3 Set the Side-Chain Input on TL EveryPhase to
listen to the selected bus.
4 Activate the Side-Chain Input in TL Every-
Phase by selecting the key icon in the Envelope
section.
5 The Side-Chain audio can modulate the audio
directly by selecting Source:Envelope in the
Modulation section. Alternatively, the SideChain Input can be used to trigger the LFO by
selecting the Envelope trigger in the LFO section.
6 After starting the transport, adjust the Thresh-
old in the Envelope section until the drum loop
is triggering the Envelope Detector. This is
shown by the Source:Envelope or Envelope trigger light blinking brighter, as well as shown by
the action of the Modulation Meter.
7 The Attack and Decay in the Envelope section
can also be adjusted to suit your needs.
Selecting a bus as the Side-Chain Input
Bass line and drum loop tracks
Page 62
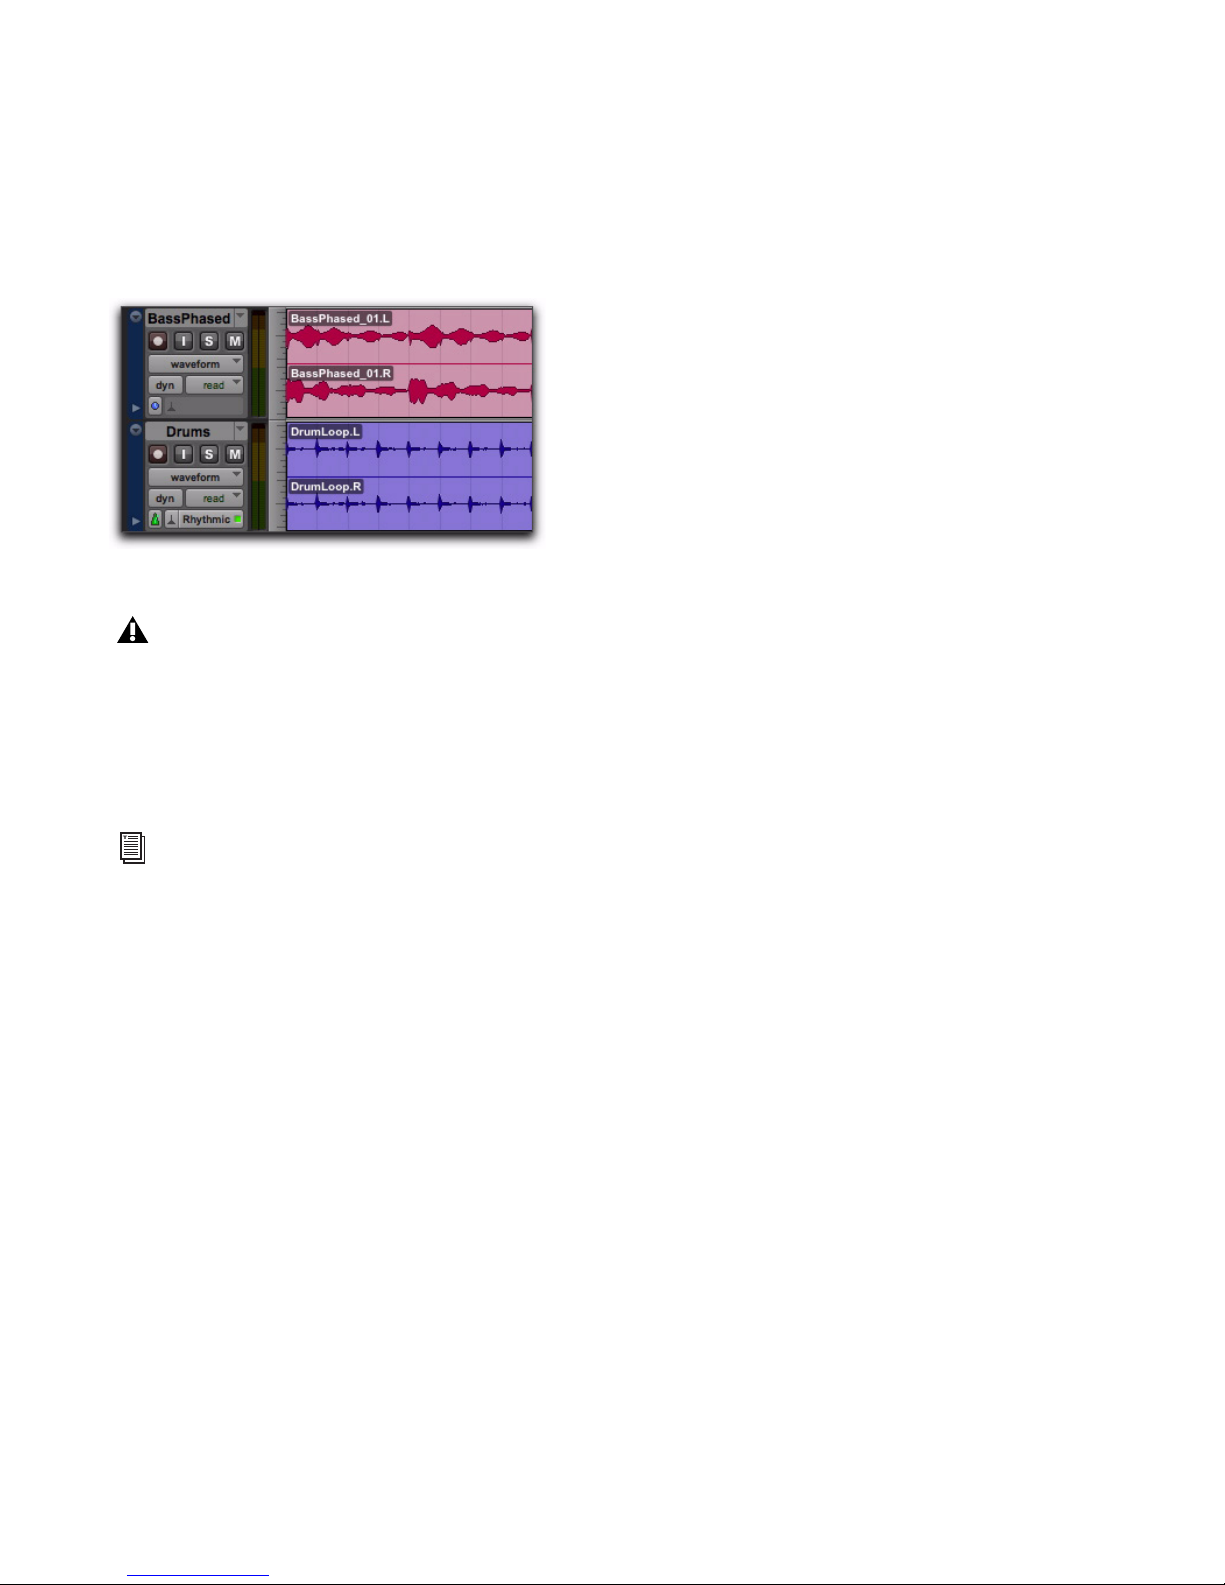
Trillium Lane Labs Plug-ins Guide56
The phased bass line is shown below after being
recorded to a separate track. The effect of TL EveryPhase triggered by the drum loop can be seen
in the resulting waveform.
Adding Other Effects
For different phaser sounds, try using a compressor before or after TL EveryPhase. Other useful effect plug-ins to try with TL EveryPhase include distortion, delay, and EQ.
Tweaking TL EveryPhase
Can’t get the perfect phaser sound? Try some of
these ideas!
• Try a preset. TL EveryPhase includes over
120 presets in eight categories. The categories are merely suggestions—a preset created for guitar may have just the sound you
need for vocals.
• Adjust the Depth. Setting Depth to positive
or negative values allows for two separate
types of phasing to occur. When Depth is
positive, the phaser notches occur at frequencies that are at opposite phase, which
is a common feature of many analog
phasers. When Depth is negative, the
notches occur at frequencies that have
identical phase. Flipping the Depth from
positive to negative or vice versa can have a
dramatic impact on the sound.
• Change the Resonance. If you want to
modify the ‘singing’ tones created by high
FeedBack settings, try adjusting the Resonance control. By default, the Resonance
slider is set to ‘Norm’ which is equal to the
current Stages setting. For example, when
using TL EveryPhase with Stages set to 10,
setting the Resonance slider at 2, 4, 6, or 8
stages will provide a reduced feedback
tone. Likewise, to increase feedback tones,
set the Resonance slider to a higher setting.
• Some LFO shapes may create transients or
‘blips’ in the phased sound. This is especially common with the Ramp and Square
Wave LFO shapes. To reduce the transient,
reduce the FeedBack and Stages settings.
Resulting phased bass line
On versions of Pro Tools prior to 7.0, RTAS
plug-ins do not provide side-chain processing when used on TDM systems. Use the
TDM version of TL EveryPhase if you require side-chain processing on a TDM system.
For more information on using the SideChain Input, see the Pro Tools Reference
Guide.
Page 63

Chapter 7: TL InTune 57
chapter 7
TL InTune
(TDM and RTAS)
Introduction
TL InTune is a TDM and RTAS professional instrument tuner plug-in. It offers the features and
performance of a rack mounted digital tuner in
the convenience of a plug-in. TL InTune provides accurate and rapid tuning for a wide range
of musical instruments, saving valuable studio
time and adding a level of unprecedented convenience for musicians and audio engineers.
To use TL InTune with Pro Tools, simply create a
new mono audio or Auxiliary Input track in
Pro Tools, and select TL InTune from the plugin menu for that track.
When TL InTune detects an audio signal from
the track, the meter lights up and displays the
relative pitch of the incoming signal. With
stringed instruments, this will vary during the
attack and decay of the note.
By default, TL InTune loads the Chromatic
tuner preset. This displays all notes in the scale
and automatically displays the required octave.
TL InTune provides a number of factory presets
for stringed instruments in alternate tunings.
Each factory preset is programmed with the specific notes for each string of the instrument in
order to speed the tuning process, as well as
making it easier for engineers to generate test
tones for musicians to tune with.
Figure 1. TL InTune plug-in
Page 64
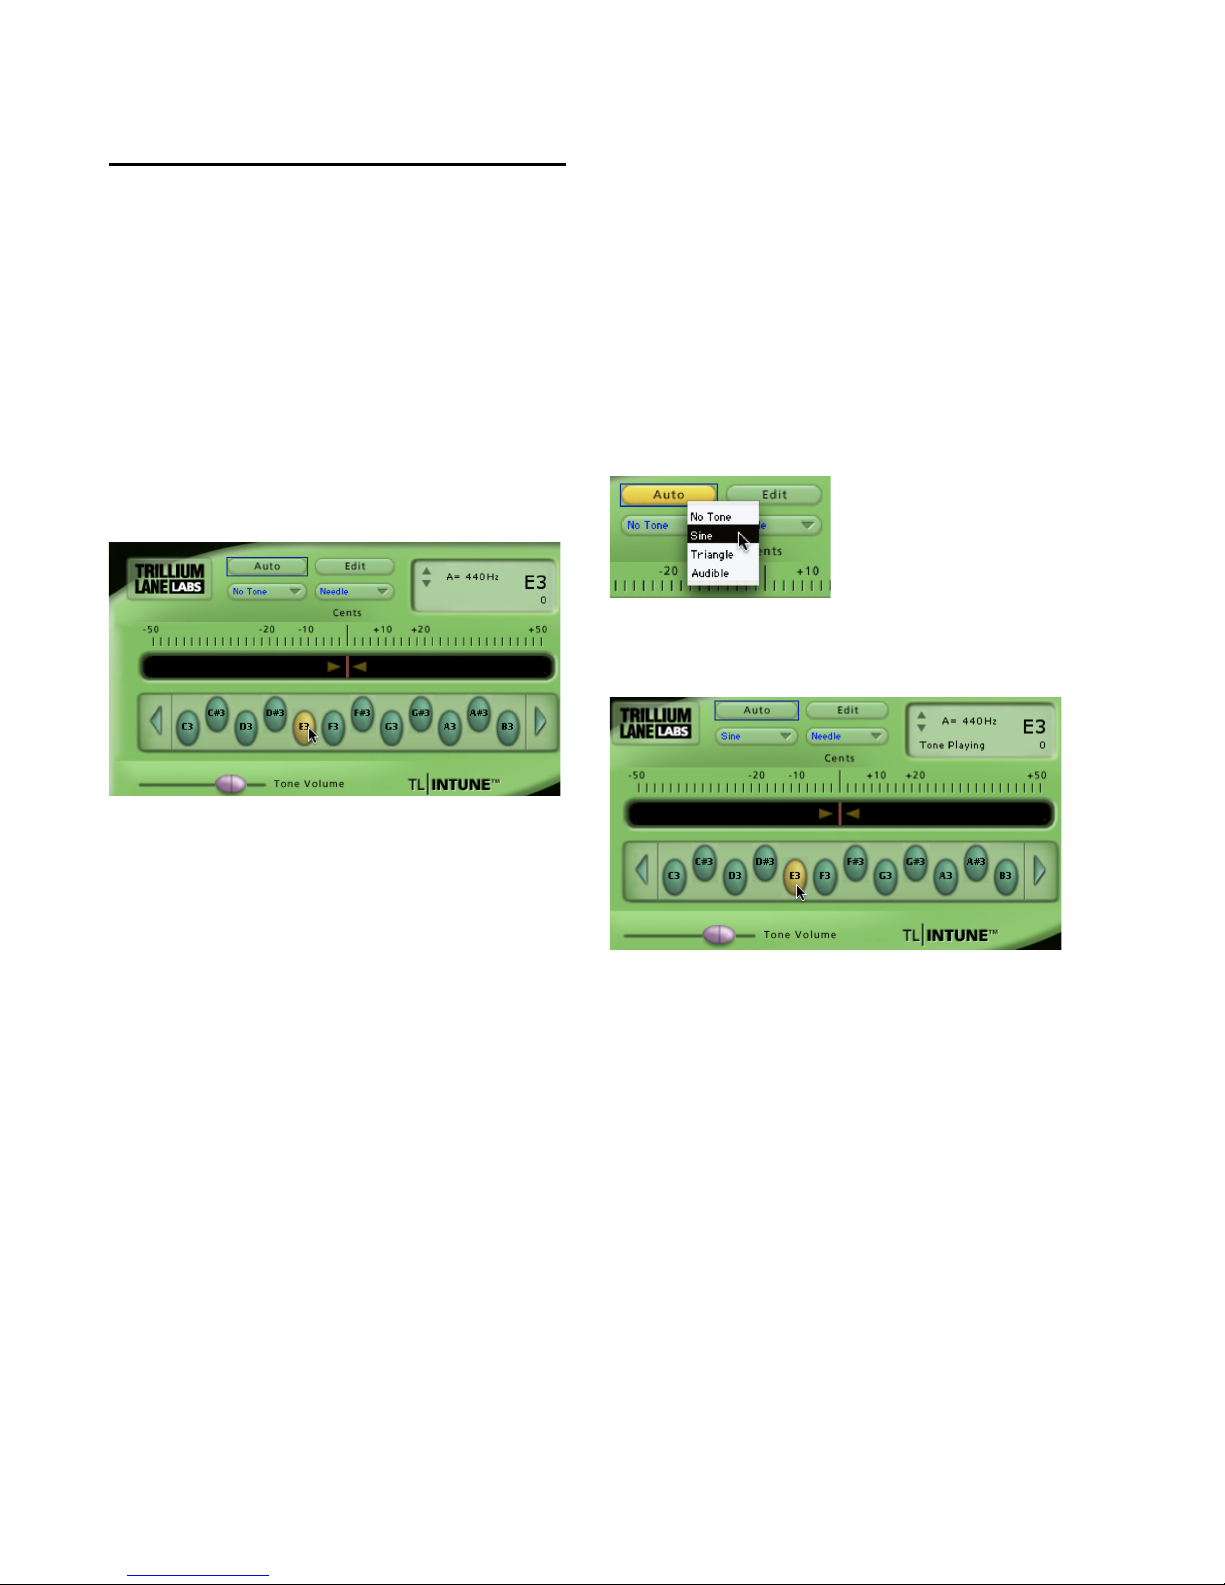
Trillium Lane Labs Plug-ins Guide58
TL InTune Controls and
Displays
Automatic Mode
When Automatic mode is active, TL InTune will
detect the note played and automatically show
the pitch for that note.
To tune to a single note:
Click the button for the desired note.
This turns off automatic mode. TL InTune will
now display pitch relative to the selected note
only.
To enable Automatic mode:
Click the Auto button to enable Automatic
mode. The Auto button highlights.
Test Tone
TL InTune will generate both sine wave and triangle wave test tones as shown in the tone
menu. The “Audible” tuning tone modulates
the input signal against the reference tone.
To hear a test tone:
1 Select Sine, Triangle, or Audible from the Test
Tone se lector.
2 Click the Note button for the desired note.
3 Adjust the Tone Volume slider as desired.
When a test tone is playing, “Tone Playing” appears in the information display.
Selecting a note
Selecting a test tone
Selecting a test tone note
Page 65
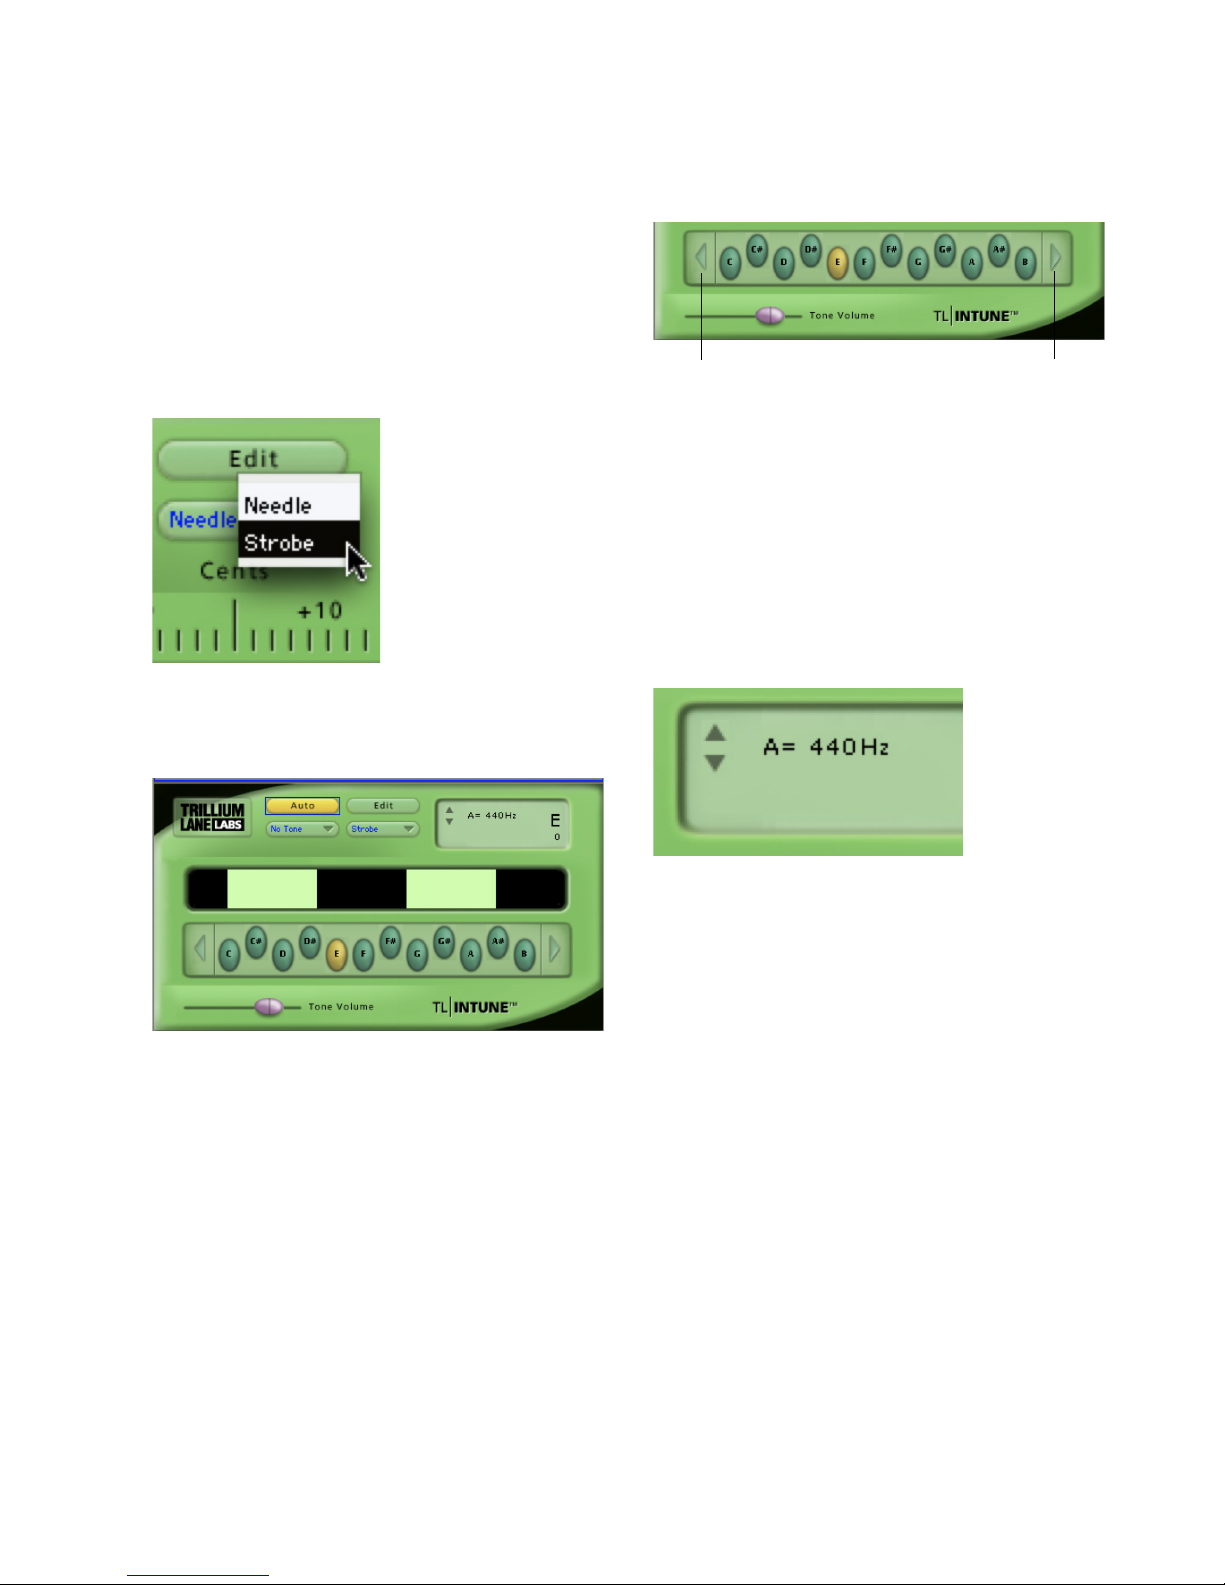
Chapter 7: TL InTune 59
Meter Display
The Meter selector lets you use a standard needle
style meter or a strobe style display.
To select the Meter display:
Select Needle or Strobe from the Meter selec-
tor.
Strobe Display
The Strobe display scrolls to the left when the
tuned note is flat, and to the right when the
tuned note is sharp. When the tuned note is
close to the target note, the strobe slows to a
stop. The information display shows the exact
number of cents sharp or flat from the target
note.
Octave
The octave range of 0–6 displayed in TL InTune
is based on middle C being equal to C4. In chromatic presets, you can select the desired tuning
octave from 0–6 using the arrows at each end of
the note display.
Reference Frequency
You can adjust the tuning reference frequency
using the arrows inside the information display.
By default, reference frequency is A=440 Hertz.
Information Display
The LCD style information display in TL InTune
displays the following:
• The reference frequency
• The current note to which TL InTune is
tuning
• The number of cents sharp or flat from the
current note
• The status of any test tones playing
Selecting Meter display, Strobe
TL InTune, Strobe display
Octave buttons
TL InTune, Reference Frequency
Down Octave button
Up Octave button
Page 66
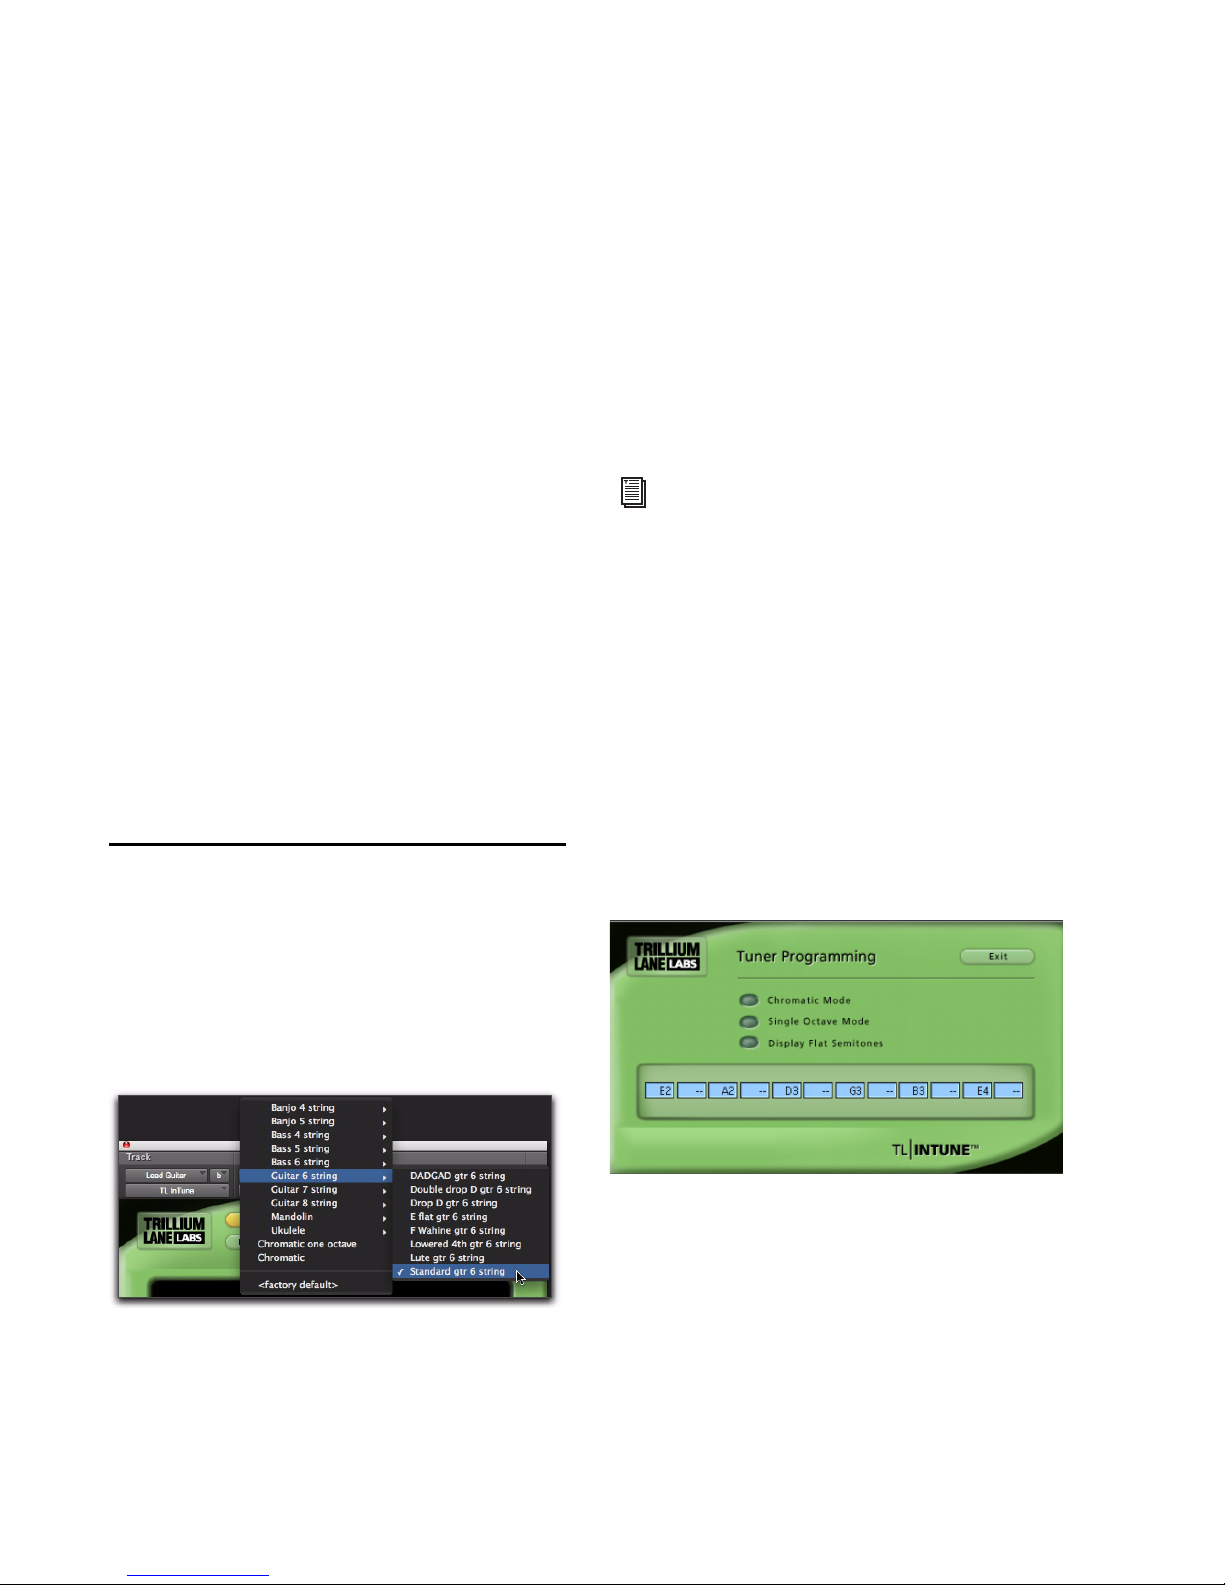
Trillium Lane Labs Plug-ins Guide60
Note Selection
The Note Selection buttons provide two functions:
• When in automatic mode, clicking on a
note button will turn off automatic mode
and TL InTune will now display pitch relative to the selected note only.
• When a tone is selected in the test tone
menu, clicking on a note button will play a
test tone for that note. Click the note button again to turn off the test tone.
The number of note buttons will depend on the
preset selected. The default chromatic preset
will display all twelve notes. A preset for a six
string guitar will only display six notes.
Tone Volume
The Tone Volume slider controls the volume of
the test tone audio signal.
Customizing TL InTune
Presets
TL InTune provides a selection of factory presets
for stringed instruments. These presets can be
selected from the Plug-in Librarian menu.
To make any preset the default when TL InTune is
instantiated:
1 From the Plug-in Librarian menu, select the
desired preset.
2 From the Plug-in Settings menu, select Set As
User Default.
3 From the Plug-in Settings menu, select Set-
tings Preferences > Set Plug-in Default To > User
Setting.
Creating Tuning Presets
TL InTune lets you create customized tuning
presets that display note selections for specific
instruments and tunings. Once created, these
tuning presets can be saved as part of a standard
Pro Tools plug-in preset.
From the main TL InTune screen, click the Edit
button to display the Tuner Programming
screen.
Chromatic Mode
When selected, Chromatic Mode overrides any
custom note selections and displays a 12-note
chromatic scale. The note entry fields are disabled when Chromatic Mode is selected.
Selecting a TL InTune preset
For more information on using plug-in presets in Pro Tools, see the
Pro Tools Reference
Guide
.
Tun er Programming
Page 67

Chapter 7: TL InTune 61
Single Octave Mode
When selected, Single Octave Mode disables the
display of octave information with each note on
the main TL InTune screen. When tuning in this
mode, TL InTune ignores the octave of the note
being tuned. The octave information entered in
the Edit screen is used only for generating test
tones.
Single Octave Mode is typically used for instruments which generate harmonics in multiple
octaves, such as bass guitars. Because of the low
frequency waveform generated by a bass guitar,
it is easier for TL InTune to tune to a higher harmonic of the note instead.
Display Flat Semitones
TL InTune will display all semitones entered
into note fields as sharp by default. For example,
a guitar tuned to E-flat is usually represented by
the following.
Eb2, Ab2, Db3, Gb3, Bb3, Eb4
By default, if these notes are entered in the Edit
screen, TL InTune will display these same notes
in the following way.
D#2, G#2, C#3, F#3, A#3, D#4
The Display Flat Semitones option overrides the
default behavior and displays semitones as flats,
not sharps. It is not possible to display both
sharp and flat semitones in the same tuning preset.
Note Entry Fields
The twelve note entry fields allow entry of individual notes from A0 to G7. Flat semitones are
entered with a “b” (for example, Ab2), and sharp
semitones are entered with a hash or pound
character (for example, A#2). To clear an entry,
enter “– –.”
Note fields are committed by pressing Return
(Macintosh) or Enter (Windows). If you do not
press Return or Enter, the note field will return
to the previous value entered. TL InTune will automatically justify the note buttons as needed so
they fit in the correct area on the main screen.
The Note Entry fields are not available in Chromatic mode.
Exit
In the Tuner Programming screen, click the Exit
button to return to the main TL InTune screen.
Page 68

Trillium Lane Labs Plug-ins Guide62
Using TL InTune
When TL InTune detects a signal, the meter
lights up and displays the relative pitch of the
incoming signal. With stringed instruments,
this will vary during the attack and decay of the
note.
In Automatic mode, TL InTune estimates the
note to which you are trying to tune. If the correct note is not lit in automatic mode, click on
the note to which you are trying to tune for
greater accuracy. This will lock TL InTune to the
specified note.
The meter will display the frequency of the note
detected, and the accuracy is displayed on a
scale of plus/minus 50 cents. In addition, the information display will display the note and the
number of cents from perfect tuning.
When loading factory presets, stringed instruments are laid out from the highest numbered
string (usually the lowest tone) to the highest,
from left to right. For example, a six string guitar
in standard tuning is shown as E2, A2, D3, G3,
B3, E4, which are the notes and octaves for the
sixth string through to the first string respectively.
For best tuning results with guitars, do the following:
• Use headphones, as loud monitors can
modulate the guitar string.
• Switch your guitar to its rhythm (neck)
pickup, if it has one.
• Roll your guitar’s tone knobs all the way off
to remove all the highs.
• Pluck the open string right over the twelfth
fret, not over the pickup.
To produce convenient test tones, select the appropriate preset from the Librarian menu and
select an appropriate test tone from the Test
Tone menu. Click on the desired Note button to
produce the appropriate test tone. Test tones
can be routed to headphones as required for musicians during session.
Page 69

Chapter 8: TL MasterMeter 63
chapter 8
TL MasterMeter
(TDM and RTAS)
Introduction
TL MasterMeter is a TDM and RTAS oversampling meter plug-in that is designed for critical
mixing and mastering applications.
Figure 1. TL MasterMeter plug-in
Page 70
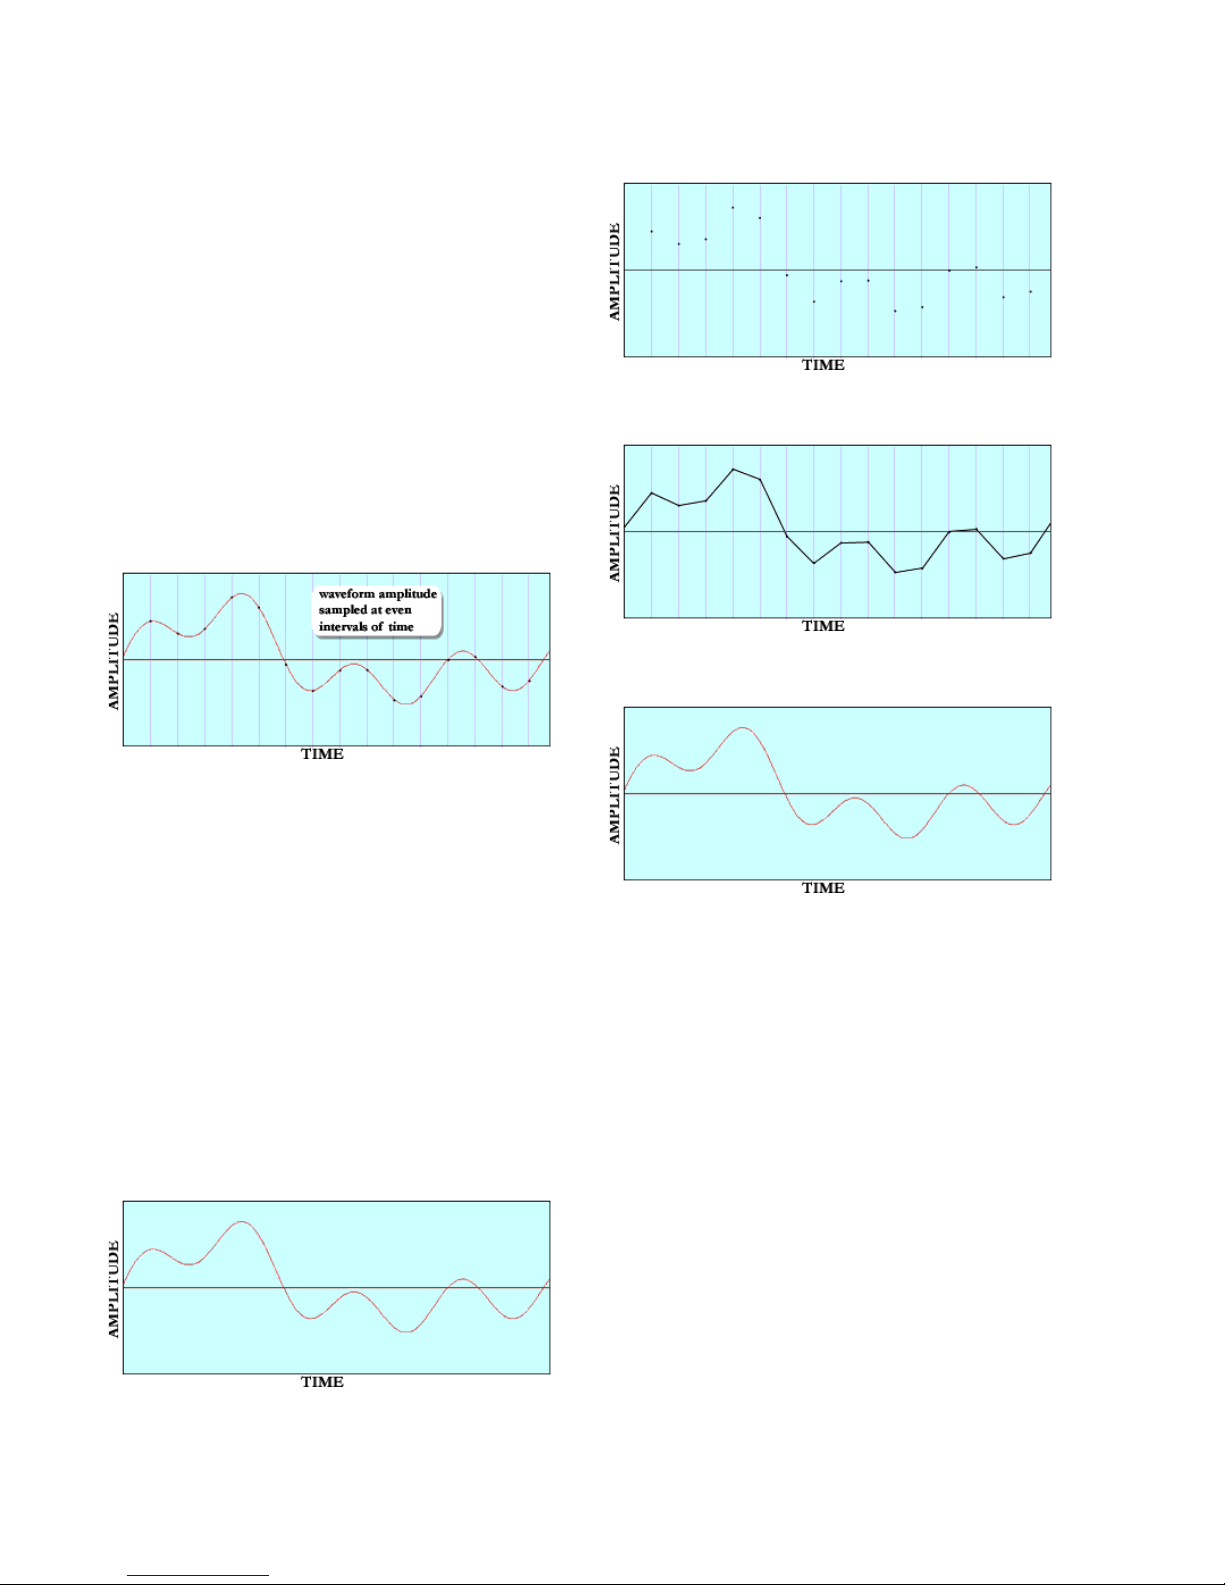
Trillium Lane Labs Plug-ins Guide64
Understanding Digital Distortion
Clients in the music industry regularly demand
the loudest possible mixes. In the process of
achieving such a “hot mix,” unwanted distortion can be introduced. Intersample peaks that
exceed 0 dB may play without distortion in a
studio environment, but when the same mix is
played through a consumer CD player, the digital to analog conversion and oversampling process can reproduce a distorted mix.
Digital Audio Theory
A key observation in digital audio theory is that
the entire waveform is represented by the sampling points, but a reconstruction process still
needs to occur in order to recreate the waveform
represented. One cannot simply “connect the
dots” between sample points (as shown in
Figure 2) and yield the original waveform.
A waveform can be represented in multiple ways
during the process of sampling, display and reconstruction. Figure 3 through Figure 6 show
how the same complex waveform in Figure 2
can be represented in the digital domain.
The process of recreating the original waveform
from the sampled waveform involves a filter
called a reconstruction filter. This filter removes
all content above the Nyquist frequency (half
the sample rate). The range below the Nyquist
frequency defines the “legal” range of allowed
frequencies as frequencies in this range can be
accurately reproduced. All frequencies above
the Nyquist frequency do not adhere to Nyquist
or Shannon’s theorems regarding allowable frequencies, cannot be reproduced and are therefore considered “illegal” frequencies. Because of
mathematical realities observed by Fourier in
the 1800’s and subsequently by Shannon in
Figure 2. Sampling
Figure 3. A complex waveform
Figure 4. Waveform sampled
Figure 5. Waveform as represented in DAW
Figure 6. Waveform as reconstructed at the D/A
Page 71

Chapter 8: TL MasterMeter 65
1948, when a waveform has all frequencies removed above the Nyquist frequency, the resulting waveform will be the original waveform that
was sampled.
This process is significantly more involved than
simply “connecting the dots” between sample
points. Today it involves extremely sophisticated means of reconstructing the waveform,
using filters that are highly complex mathematical systems utilizing “oversampling,” “upsampling,” “linear phase, equiripple FIR” designs
and much more.
Oversampling creates a more accurate digital
representation of an analog signal by sampling
some number of times per second (frequency)
and converting into digital form. Oversampling
requires at least twice the bandwidth of the frequency being sampled. For example, a consumer CD player using 2x oversampling is processing information at 88.2 kHz.
The result is that today’s digital to analog converters get closer to the original than ever before, making music played on systems today as
accurate as possible. Even today’s inexpensive
components such as off-the-shelf CD players
have drastically improved filters and thus better
reconstruction abilities than in years past.
Application
Most contemporary audio recording is done
with Digital Audio Workstations (DAWs), although digital mixing systems in the form of
outboard digital mixers are also very popular. To
the user, these digital systems appear similar to
traditional audio tools and are designed order to
emulate the operation of a conventional analog
recording system.
One familiar analog tool that has been carried
over to the digital realm is a “peak meter” that
tells the amplitude of the waveform’s peaks. In
the analog realm, peak signal was an indicator
that would alert the audio engineer when the
peak signal level was getting too high. A peak
signal in analog recording would cause the tape
to saturate, creating distortion. In an analog system however, this type of distortion was often
deliberately engineered into tracks in order to
achieve a certain sound.
In the digital realm this type of meter is important and more vital, because if the amplitude of
a waveform exceeds the top of the measurable
scale (full scale, or “full code”), the signal will
“clip” causing unwanted and unpleasant distortion rather than the traditional distorted sound
of analog. This digital clipping occurs because
the waveform is “lopped off” and the data is
changed. When the waveform is reconstructed
it cannot be accurately done in order to represent the original waveform. Instead, it has a significant amount of inharmonic distortion
caused by aliasing. For this reason, digital recording has a maximum level at which signals
can be recorded. Anything exceeding this level
(full scale) has undesirable consequences.
The method used for computing the peak value
inside the system however is not particularly accurate. DAW systems typically take the amplitude of the samples and use these as the basis for
the peak meter. The problem with this approach
is easily identified: the samples themselves do
not represent the peak value of the waveform.
The waveform is only complete after the reconstruction process. Until this process has been
completed, the waveform is inaccurately represented by the samples. This is the reason that in
most DAWs the waveform is represented on the
screen as a “dot to dot” connection between
sample points. They do not undergo the reconstruction process inside the system, so all that
Page 72
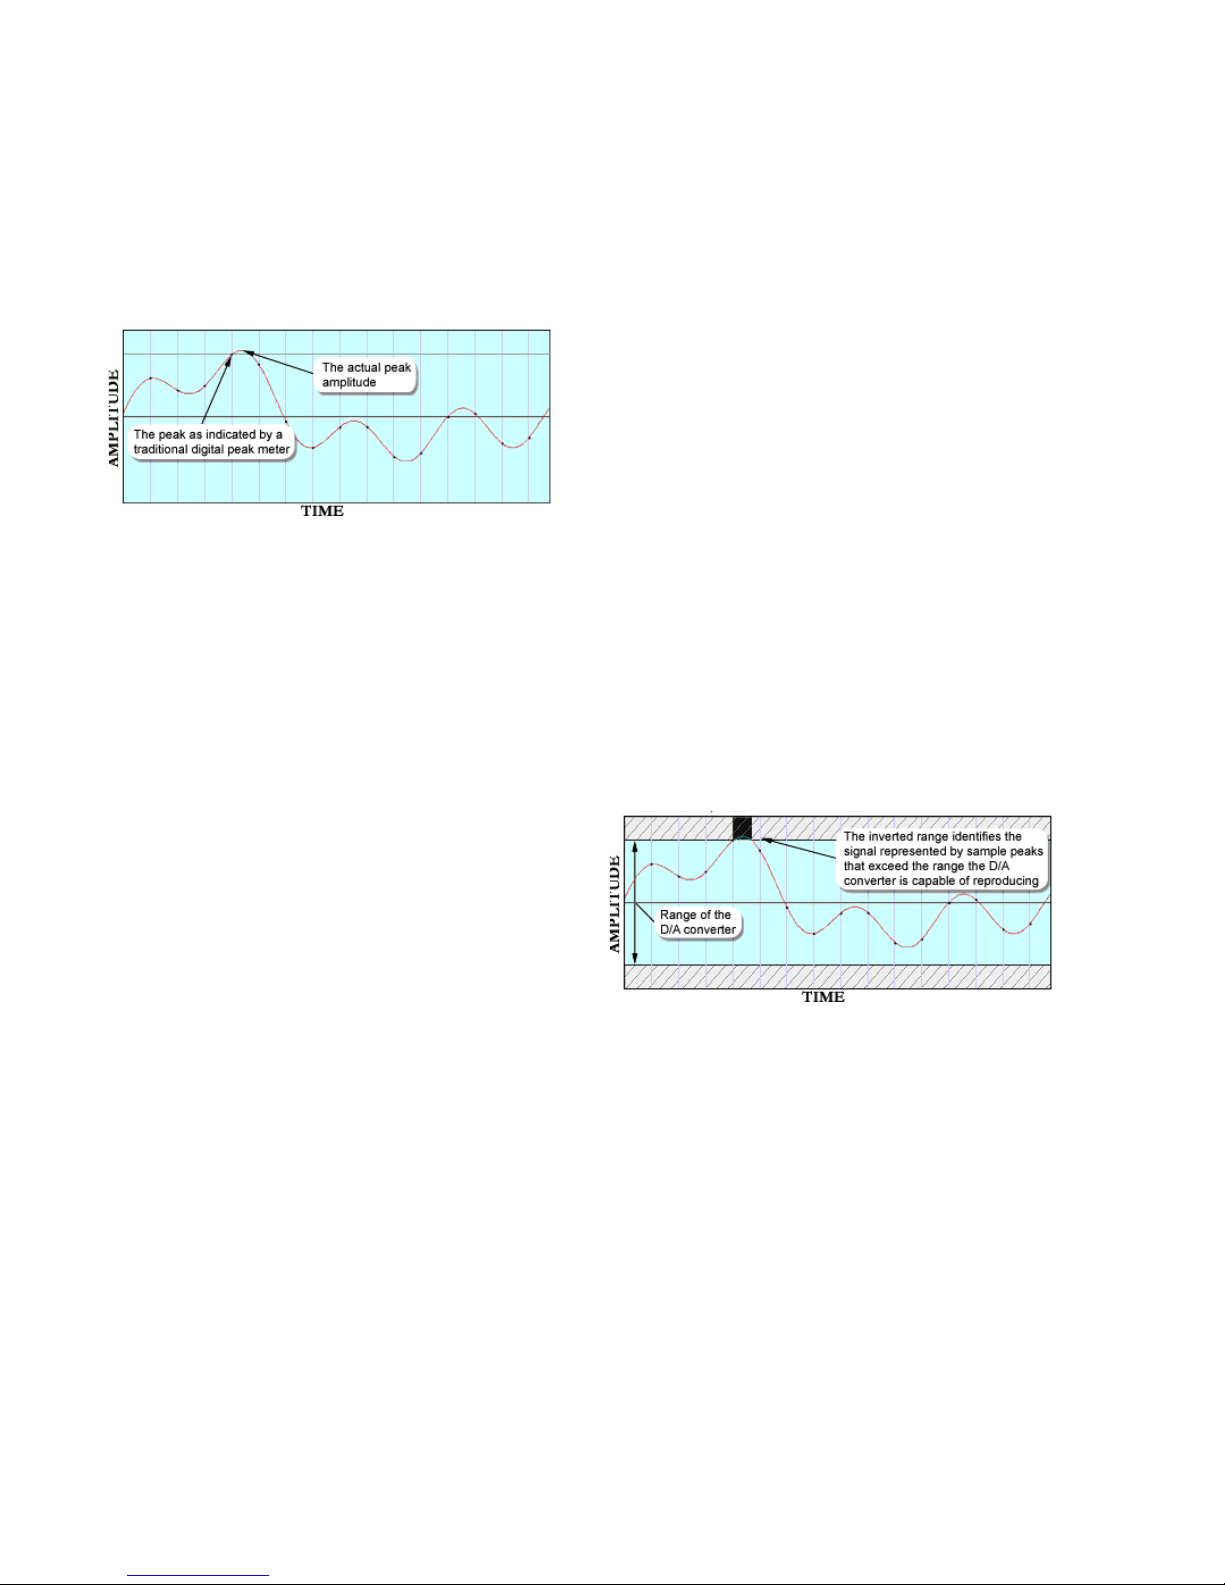
Trillium Lane Labs Plug-ins Guide66
can be represented is the sample points and for
the sake of visual ease, they connect the dots between them with straight lines. They save the reconstruction process for the digital to analog
converters.
The consequence of the way in which DAWs
treat waveforms is that the meter inside the
DAW or other digital mixers inevitably shows
inaccurate information. It is virtually a mathematical certainty that the waveform will exceed
the amplitude of the samples in any sampling
system. The samples themselves only represent
a waveform. It is important to understand that
the amplitude of the waveform will invariably
exceed the sample values.
Manifestation
Today’s recording environment demands that
sessions are mixed and mastered as “hot” as is
possible, pushing the levels up to the highest
tolerable amount, supposedly just short of clipping. Sophisticated digital tools allow music to
be highly compressed, then recompressed, compressed even more so with multi-band compressors, limited, normalized, and maximized to get
the audio to play as loud as possible out of a
consumer’s system. Hence, it is very common
for popular music CDs to be full of digital samples that are at, or nearly at full scale.
The problem is realized in that while going
through these digital gyrations and utilizing
digital tools to amplify the signal as much as
possible, both during mixing and during mas-
tering, the “peak value” of the sample points is
closely watched to ensure that it does not get to
full scale. Since the peak meters in said DAW
and digital mixing systems are inaccurate, and
do not actually indicate the peak values of the
resulting waveform, the result is that while the
samples themselves do not exceed full scale and
are carefully monitored to ensure this, the resulting waveforms represented by the samples
may exceed full scale throughout any standard
CD!
While the digital mixing system is not clipping
the music or distorting the music, the digital to
analog converters that have the task of recreating the audio through digital reconstruction filters are clipping repeatedly throughout most
CDs on the market. The result is that most CDs
and DVDs end up distorting with regularity
when they are asked to reconstruct and play
back audio that appears to be completely “legal”
because not a single sample actually clipped.
In a recent paper [Nielsen 2003], seven consumer CD players were subjected to tests designed to analyze their ability to reproduce and
reconstruct signal levels above full scale
(0 dBFS). All of the players experienced difficultly dealing with signal levels this high, further showing that, while all of the samples can
be legal, the level can still be hotter than is legal.
The result is that a CD player can be unable to
reproduce the audio accurately. In some cases,
Figure 7. Intersample peaks
Figure 8. D/A converter range
Page 73

Chapter 8: TL MasterMeter 67
the reconstruction sounds “perfect” to the mastering engineer, because the engineer’s equipment can actually reproduce the waveforms
properly.
The Red Book format for CDs and the DVD specs
both allow for this illegal content and the mastering engineer is still allowed to put out releases
that meet the spec while allowing consumers’
players to distort. With an oversampled peak
meter, the engineer will be able to know that the
music is clipping, by how much and where.
With this knowledge the engineer can then decide with complete information whether or not
to accommodate the legal range of digital audio
on a PCM sampled system.
The goal of TL MasterMeter is to allow an engineer to use a DSP model of the reconstruction
process to monitor the reconstructed waveform
for potential clipping at the final mix and mastering stages. Using TL MasterMeter, engineers
can compare regular and intersample peaks over
time and make appropriate adjustments without sacrificing overall level or dynamic range.
Utilizing an oversampled peak meter in the digital audio studio that represents the reconstruction filters in digital to analog converters is the
first step toward an improvement in audio quality in music releases.
References and Further Reading
Aldrich, Nika. Digital Audio Explained For the
Audio Engineer. San Francisco: Backbeat Books,
2004.
Banquer, Dan, Dick Pierce, Herbie Robinson, et
al. “Intersample Peaking.” Pro Audio Mailing
List. 21 December, 2002 - 31 December, 2002.
Nielsen, Soren and Thomas Lund. “Level Control in Digital Mastering.” Preprint 5019, 107th
AES Convention. Denmark, 1999.
Nielsen, Soren and Thomas Lund. “0 dBFS+ Levels in Digital Mastering.” TC Electronic: Risskov,
Denmark. 17 July, 2003. http://www.tcelectronic.com/media/ Level_paper_AES109.pdf
Nyquist, Henry. “Certain Topics in Telegraph
Transmission Theory.” Transactions of the AIEE.
Vol. 47 (April 1928): 617-644.
Shannon, Claude E. “Communication in the
Presence of Noise.” Proceedings of the IRE. Vol.
37 (January 1949): 10-21.
Using TL MasterMeter
TL MasterMeter uses the DSP power of Pro Tools
to model the conversion process found in typical consumer devices. In technical terms, the TL
MasterMeter algorithm uses a 31-tap BlackmanHarris windowed sync conversion with oversampling ratios from 2x to 8x depending on the
session sample rate. The output of this DSP algorithm is then displayed visually. This assists engineers in highlighting potential distortion
which may be introduced on playback of mixes,
especially mixes which have been processed to
be particularly loud or “hot.”
TL MasterMeter can be used in two different
ways during a session: Real-Time Metering or
Historical Metering.
Real-Time Metering
TL MasterMeter can be used to monitor live signal levels, even if the Pro Tools transport is
stopped. This can be useful in quickly determining the appropriate level for mixing and mastering.
When used in real time, the timecode information displayed in the browsers should be ignored.
Page 74

Trillium Lane Labs Plug-ins Guide68
Historical Metering
To gain an overall picture of the levels in an entire session, TL MasterMeter can be inserted on a
Master Fader track and the entire session played
from beginning to end. This is typically done
during final mix and mastering.
When session playback is complete, TL MasterMeter shows historical peak and event information for the entire session, as well as a historical
list of events in the browsers for both signal clips
and oversampled clips. You can then manually
examine the relevant parts of the session using
the timecode listed in the browsers to determine
any appropriate corrective actions.
TL MasterMeter Controls and
Displays
Signal Clip Events Browser
The Signal Clip Events browser displays historical clip events from the current session. The columns displayed show the relevant time code for
the beginning and ending of a clip event. When
used in a stereo track, the first column shows L
or R to indicate if the left or right channel has
clipped. The Min and Max values in this browser
will always be zero, unless the Clip level is set
below zero. The contents of this browser can be
sorted in ascending and descending order by
any column simply by clicking on the desired
column one or more times.
The time information displayed in this browser
is relative to where the transport started. The
Offset field can be used to adjust the timecode
values if TL MasterMeter is being used for historical metering but the session was started from a
point other than the beginning. If TL MasterMeter is being used in real time, the timecode information in this browser can be ignored.
At the bottom of the browser, the Peak field displays the highest dB value of the audio signal received so far. The Events field shows the historical total of clip events in the audio signal. Once
TL MasterMeter reaches 2,000 clip events, it
ceases to record additional events. Although the
meters remain active and the Peak field continues to be updated, new events will not be added
to the browsers. The Events field flashes “2000”
to indicate this condition.
The information in this browser is cleared using
the Clear button, or is cleared automatically
whenever the Pro Tools transport is started.
Signal Clip Events browser
Page 75
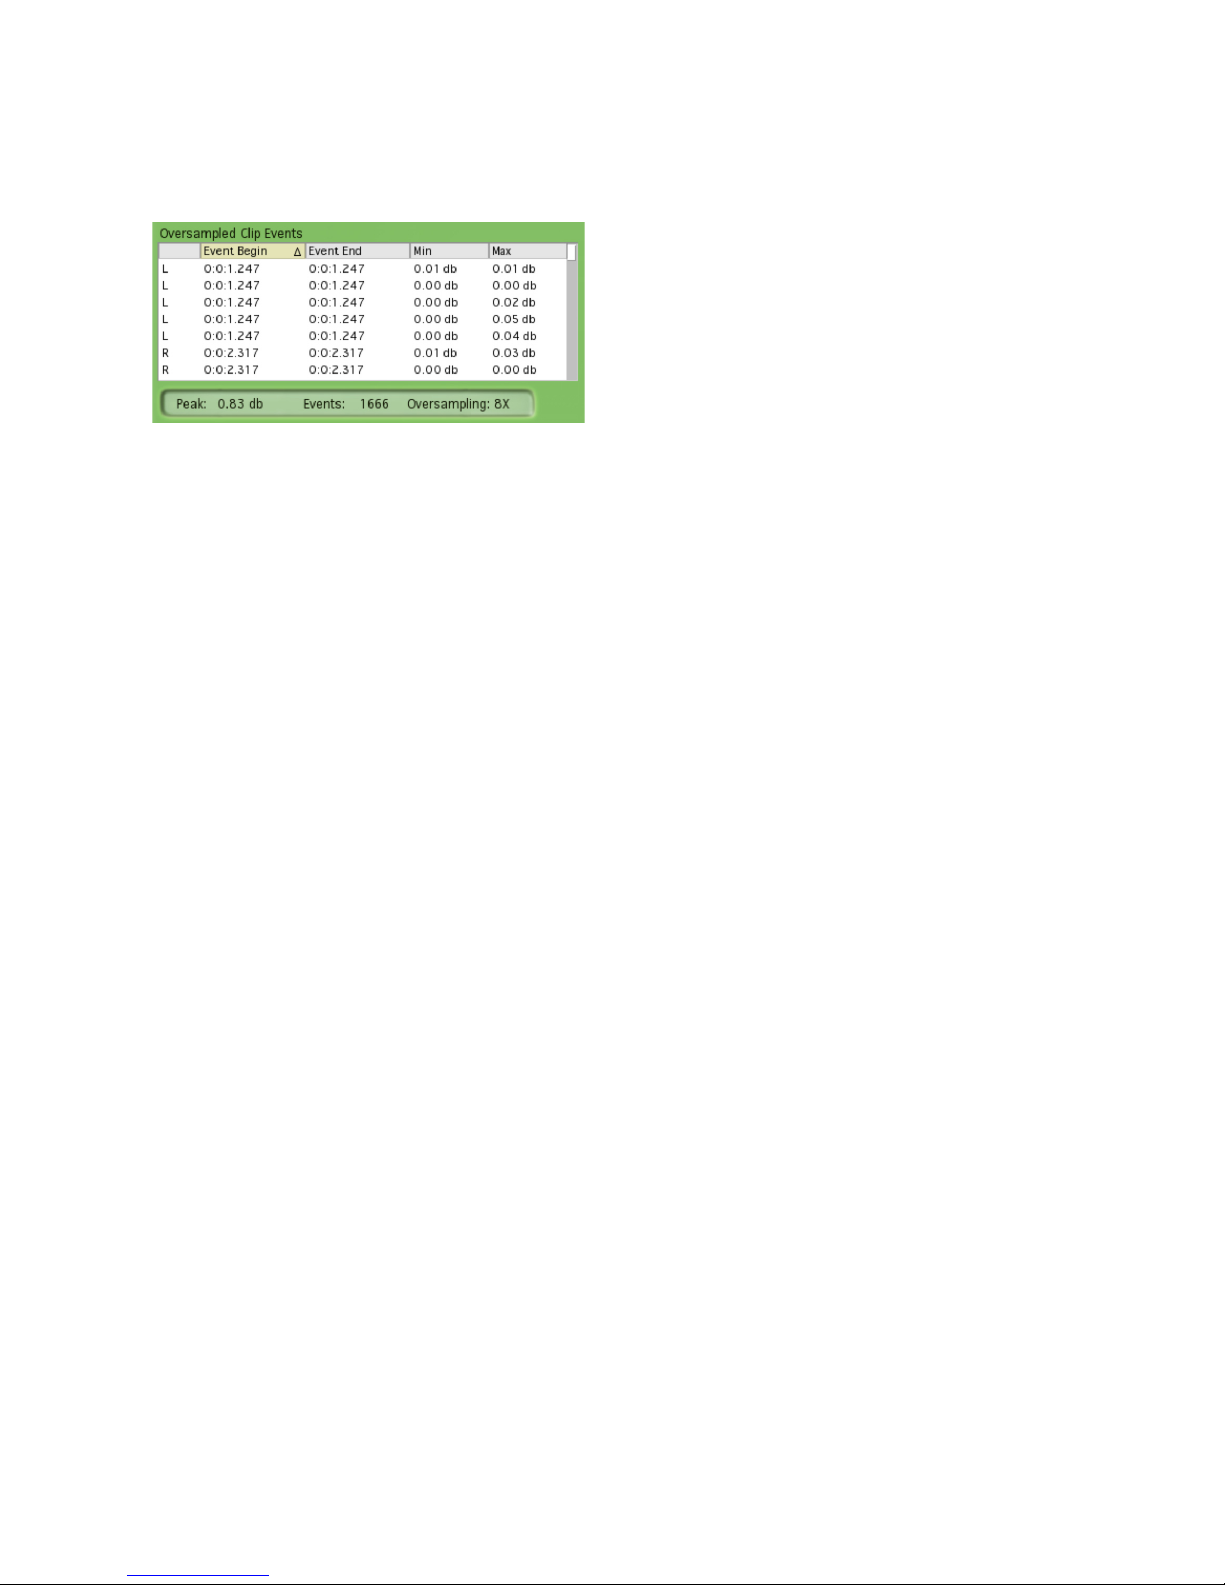
Chapter 8: TL MasterMeter 69
Oversampled Clip Events Browser
The Oversampled Clip Events browser displays
historical clip events from the DSP oversampling of the session audio. The amount of potential clipping in excess of 0 dB is also displayed.
The columns displayed show the relevant timecode for the beginning and ending of a clip
event, as well as the minimum and maximum
clip values created after passing through the DSP
processing. When used in a stereo track, the first
column shows L or R to indicate if the left or
right channel has clipped. The contents of this
browser can be sorted in ascending and descending order by any column simply by clicking on the desired column one or more times.
The time information displayed in this browser
is relative to where the transport started. The
Offset field can be used to adjust the timecode
values if TL MasterMeter is being used for historical metering but the session was started from a
point other than the beginning. If TL MasterMeter is being used in real time, the timecode information in this column can be ignored.
At the bottom of the browser, the Peak field displays the highest dB value of the oversampled
audio received so far. The Events field shows the
historical total of clip events in the oversampled
audio signal. Once TL MasterMeter reaches 2000
clip events, it ceases to record additional events.
Although the meters remain active and the Peak
field continues to be updated, new events will
not be added to the browsers. The Events field
flashes ‘2000’ to indicate this condition.
The Oversampling field displays the current
oversampling factor in use by the DSP processing. This will vary between 2x, 4x and 8x oversampling depending on the session sample rate.
The information in this browser is cleared using
the Clear button, or is cleared automatically
whenever the Pro Tools transport is started.
Signal Level Meter
The Signal Level meter shows the instantaneous
signal level of the current audio signal. The clip
light at the top of the meter can be cleared by
clicking on it, or by using the Clear button.
Oversampled Level Meter
The Oversampled Level meter shows the instantaneous signal level of the current audio signal
after it has been oversampled. As the oversampling process can create levels above 0 dB, this
meter shows an expanded scale from –6 dB to
0dB and from 0dB to +6dB.
The clip light at the top of the meter can be
cleared by clicking on it, or using the Clear button.
Clear Button
The Clear button clears all of the historical information displayed in Signal Clip Events
browser and the Oversampled Clip Events
browser. It also click the clip lights at the top of
the Signal Level and Oversampled Level meters.
This information is also cleared when the
Pro Tools transport is activated by pressing Play
or Record.
Oversampled Clip Events browser
Page 76

Trillium Lane Labs Plug-ins Guide70
Export Button
The Export button exports all of the information displayed in the two browsers to the clipboard as tab delimited text. It can then be pasted
into any text or spreadsheet application.
View Time Menu
The View Time menu lets you select the way in
which timing information is displayed, in either
minutes and seconds format, or in samples format. This affects the timecode display in both
the data browsers and the Offset field.
Offset Field
The Offset field offsets the values displayed in
both the browsers by the value entered. This is
useful for historical metering but the session
was started from a point other than the beginning. The Enter key must be used after a new offset is typed for it to become active. The information shown in the browsers is updated
immediately when the new Offset is entered.
For example, if the session was started from the
point 1:03.901 (1 minute 3.901 seconds), this
value should be entered into the Offset to ensure the timecode displayed in both of the
browsers matches that of the Pro Tools session.
Clip Field
The Clip field can be used to set the clip threshold at a lower point. For example, if a session
must not exceed –10 dB, the Clip field can be set
to –10 dB and TL MasterMeter will treat that as
the clip threshold for both signal and oversampled clip events. When the Clip field is set to a
non-zero value, the Min and Max values of the
Signal Clip browser are used to indicate the clip
range.
Page 77
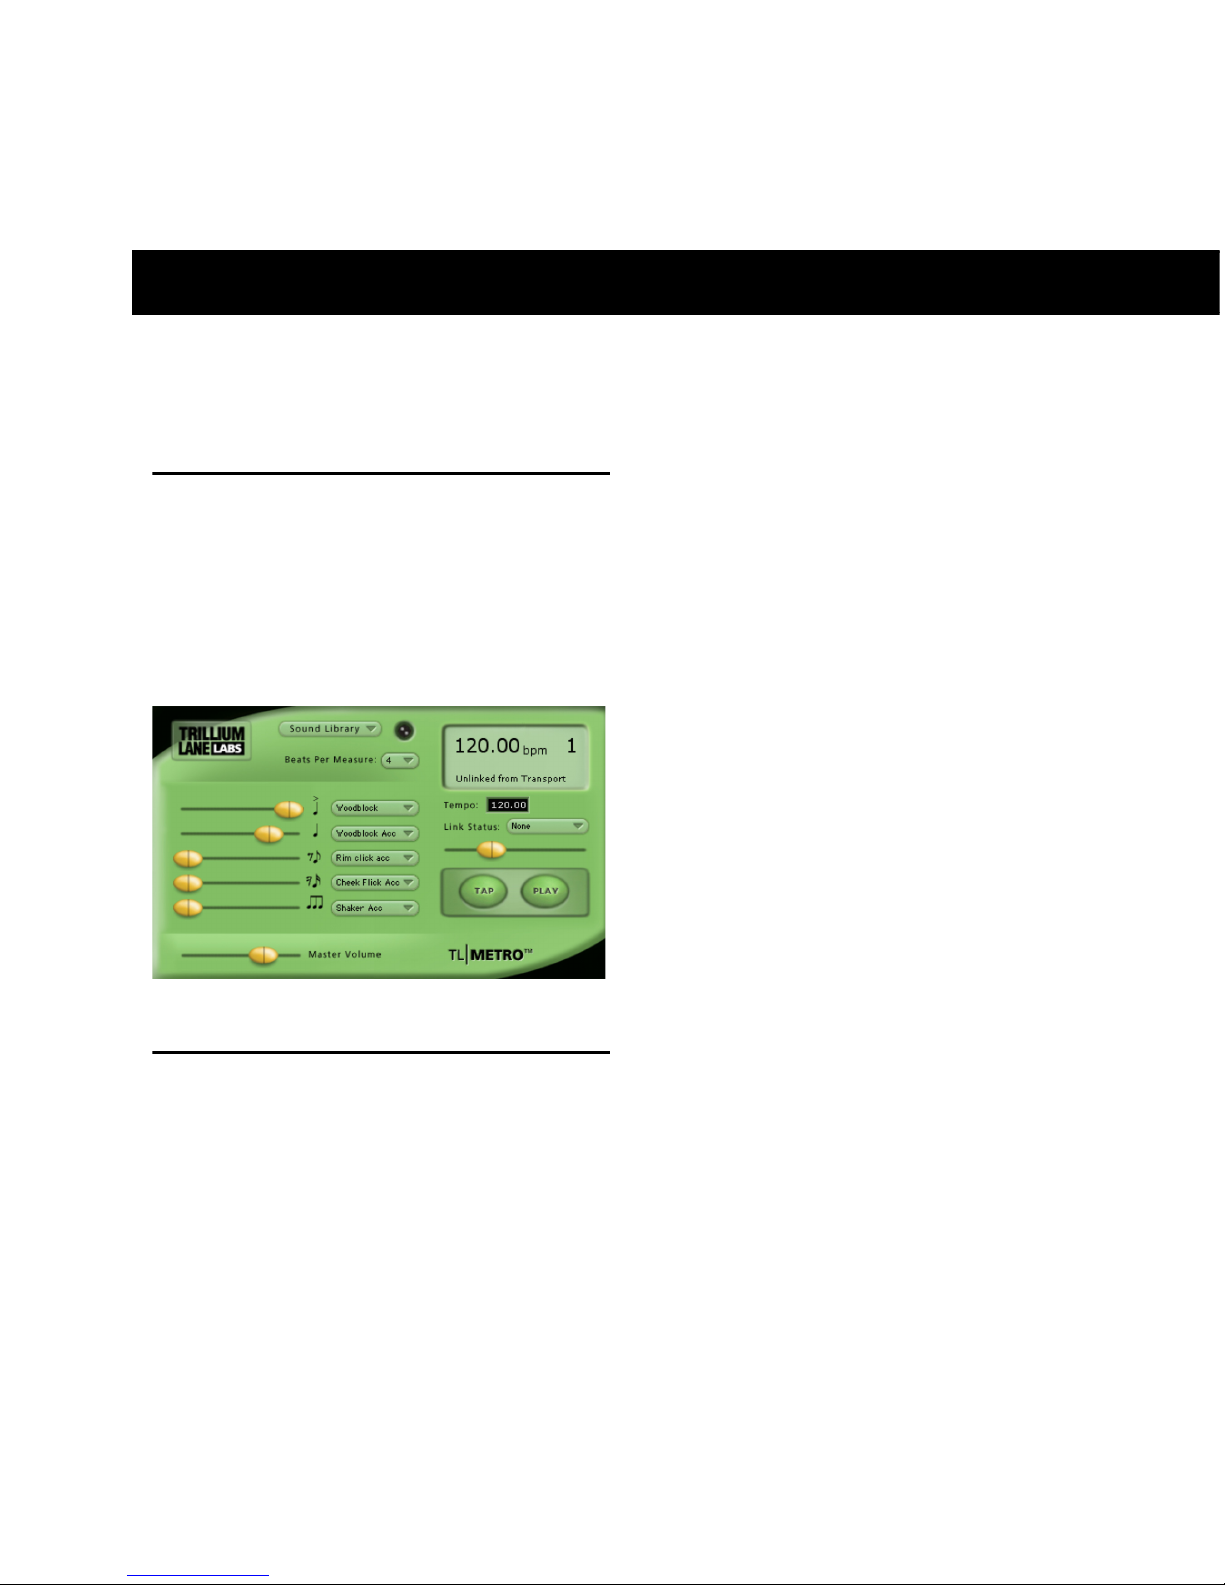
Chapter 9: TL Metro 71
chapter 9
TL Metro
(RTAS Only)
Introduction
TL Metro is an RTAS metronome plug-in designed to provide you with the convenience of a
traditional metronome, as well as providing advanced functionality for sophisticated timekeeping requirements.
Configuring Pro Tools for Use
with TL Metro
For TL Metro to work in conjunction with the
Pro Tools transport in “linked” mode, it must receive MIDI from Pro Tools. This is configured in
each Pro Tools session.
To configure Pro Tools versions 7.x or higher for
use with TL Metro:
1 Create a new Pro Tools session.
2 Create a new audio, Auxiliary Input, or Instru-
ment track.
3 Insert TL Metro on the new track.
4 Ensure that Options > Click is enabled.
To configure Pro Tools versions 6.9 or earlier for
use with TL Metro:
1 Select MIDI > Click Options.
2 In the Click Options dialog, ensure that the
velocity for the accented note is higher than
that of the unaccented note. By default, they
should be 127 and 100 respectively.
3 Click OK.
4 Ensure that the MIDI > Click is enabled.
To configure Pro Tools versions 6.1 or earlier for
use with TL Metro, you must also do the following:
1 Select MIDI > MIDI Beat Clock.
2 Enable MIDI Beat Clock.
3 Select TL Metro as an output.
Figure 1. TL Metro plug-in
Page 78

Trillium Lane Labs Plug-ins Guide72
4 Click OK.
Factory Presets
TL Metro provides a number of factory presets
that provide a range of sounds.
To audition a preset:
1 Select the desired preset from the Plug-in Li-
brarian menu.
2 Click Play in TL Metro.
TL Metro Controls and
Displays
Volume Sliders
The volume of each individual note can be adjusted using the five Volume sliders. If the volume slider for the accented whole note is reduced to zero, the quarter note will be played
instead of the whole note.
Sample Selectors
Select the desired audio sample played for each
of the five different notes from the corresponding Sample selector. A sample can be selected
from any of up to 50 sample slots.
Master Volume
The Master Volume slider controls the overall
volume of the metronome audio signal.
Tempo Controls
Tempo can be specified by manually entering
the tempo, or using the provided slider. Tempo
controls are disabled when TL Metro is linked to
Transport and Tempo.
Create a Pro Tools session as a template
with this MIDI setup and use the template
as a basis for future Pro Tools sessions with
TL Metro.
Volume sliders
Sample selectors
Tempo c ont rols
Page 79

Chapter 9: TL Metro 73
Link Status
TL Metro can be linked to the Pro Tools Transport or to the Pro Tools Transport and Tempo
track. For more information, see “Synchronization” on page 74.
Beats Per Measure
Select the number of beats per measure using
the Beats Per Measure selector. If Link Status is
set to Transport+Tempo, TL Metro uses the
Pro Tools session’s Meter track and the Beats Per
Measure selector is unavailable.
Sound Library
The Sound Library menu lets you import custom samples for specific beats. For more information, see “Importing Custom Samples” on
page 75.
Play Button
The Play button activates the metronome. In
linked modes, the Play button is disabled and
the metronome is activated when the Pro Tools
transport is engaged.
Tap Button
The Tap button provides a tap tempo function.
Click the tap button in time with the beat to determine the beast. The detected tempo is displayed in the Tempo field and in the LCD display.
Information Display
The LCD style information display in TL Metro
displays the following:
• The current tempo in beats per minute
(bpm)
• The current beat of the measure
•Link status
The MIDI name of this instantiation of the
TL Metro plug-in also appears in the display beneath the tempo. This is typically shown as “TL
Metro 1,” “TL Metro 2,” or similar. This enables
multiple instantiations of TL Metro to be easily
identified when routing MIDI.
If a flashing question mark appears in the information display, this indicates TL Metro has encountered an error. For example, MIDI Beat
Clock may not be configured correctly. Click on
the question mark for a dialog window with additional information.
Control Surfaces
TL Metro parameters can be assigned to a control surface, such as D-Command, Command|8,
Control|24, or Pro Control. The abbreviated
name for each of the beats when displayed on a
control surface as follows.
• Accented Quarter Note = Beat 1
• Quarter Note = Beat 2
• Eighth Note = Beat 3
• Sixteenth Note = Beat 4
•Triplet = Beat 5
Selecting the number of beats per measure
Page 80
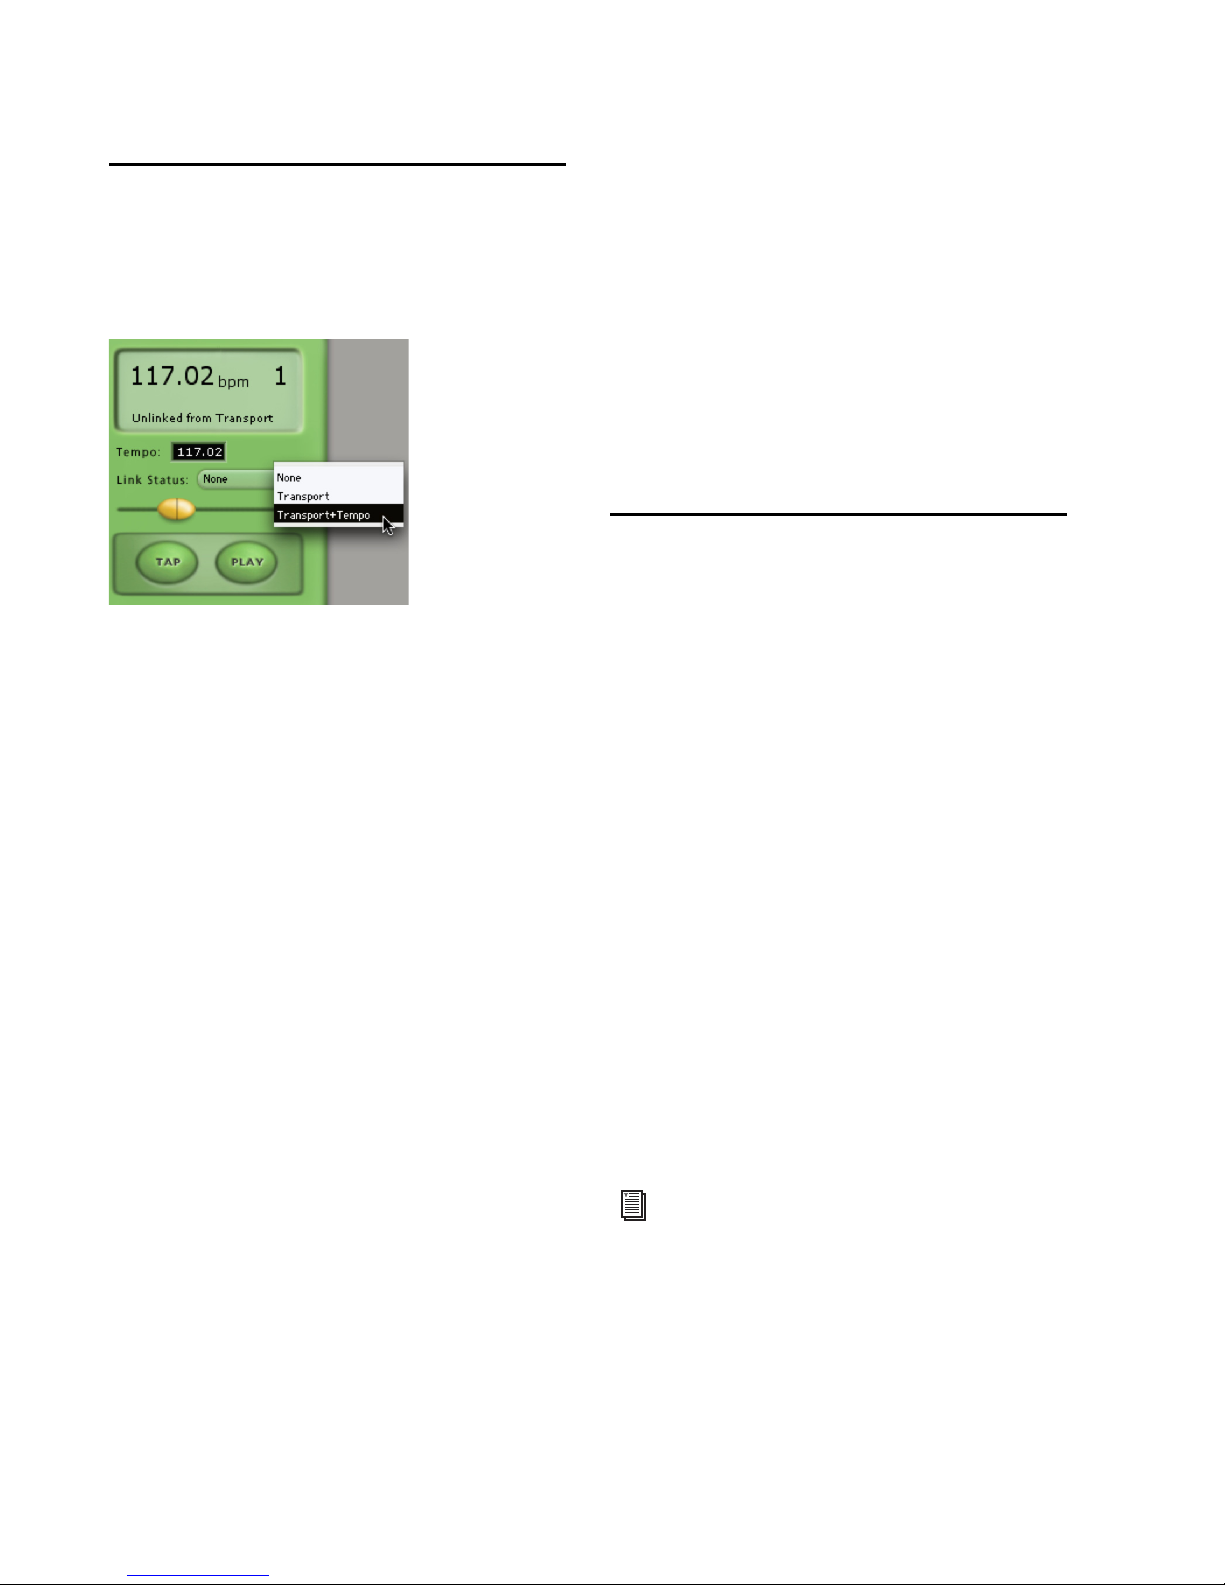
Trillium Lane Labs Plug-ins Guide74
Synchronization
TL Metro can be synchronized to the Pro Tools
Transport and Tempo using the Link Status selector.
Unlinked
When the Link Status is set to None, the TL
Metro can be started and stopped independently of the Pro Tools Transport and Tempo.
This is useful for recording when you only need
the metronome for a few bars.
Linked to Transport
When the Link Status is set to Transport, the
metronome will start and stop automatically
when the Pro Tools Transport is engaged or disenganged.
When using TL Metro linked to Transport, three
points should be kept in mind:
• Ensure that MIDI is correctly configured for
TL Metro in Pro Tools (see “Configuring
Pro Tools for Use with TL Metro” on
page 71).
• The tempo in TL Metro must be set manually.
• TL Metro assumes you are starting from the
beginning of each bar when you start the
Transport.
Linked to Transport and Tempo
TL Metro can also be linked to both the
Pro Tools Transport and Tempo. In this mode,
TL Metro automatically follows the tempo of
the Pro Tools session in addition to following
the Transport.
Ensure that MIDI is correctly configured for TL
Metro in Pro Tools (see “Configuring Pro Tools
for Use with TL Metro” on page 71).
Customizing TL Metro
Presets
TL Metro provides a selection of factory presets,
including commonly used click sounds. These
presets can be selected from the Plug-in Librarian menu.
User created presets can also be stored using the
Plug-in Settings menu.
To make any preset the default when TL Metro is
instantiated:
1 From the Plug-in Librarian menu, select the
desired preset.
2 From the Plug-in Settings menu, select Set As
User Default.
3 From the Plug-in Settings menu, select Set-
tings Preferences > Set Plug-in Default To > User
Setting.
Selecting TL Metro Link Status
For more information on using plug-in presets in Pro Tools, see the
Pro Tools Reference
Guide
.
Page 81

Chapter 9: TL Metro 75
Importing Custom Samples
TL Metro supports up to 50 different samples for
metronome click sounds. TL Metro includes factory samples in the first 40 slots, the remaining
slots are marked as “<Unassigned>.”
TL Metro supports import of WAV and AIFF
sound files for specific beat sounds. Sounds can
be loaded into any one of the 50 available slots.
Typically, user samples are loaded into the unassigned slots in order to avoid overwriting the
factory samples. However, any of the 50 slots
can be replaced by user imported samples if desired.
For best results, imported sounds should have
the following characteristics.
• The sound should start in the very first
sample of the file, and have a sharp attack
to ensure proper timing.
• The sample should be normalized before
importing.
• Sound length should be limited to approximately one second to avoid playback
problems.
To import a sound:
1 Click the Sound Library button to display the
sample menu.
2 Select an unassigned slot.
3 In the resulting File dialog, select the WAV or
AIFF file you want to import.
4 Click OK.
The name of the selected file is displayed in each
sample menu. To use the imported sample, select it from the sample menu for the appropriate
beat.
Factory and imported samples are stored in a
preferences file named “TL Metro Plug-in” located in your system preferences folder. On
Windows, it’s located in <system drive letter>:\Documents and Settings\<user
name>\Application Data\Trillium Lane\TL
Metro PlugIn.rsr. On Macintosh, it’s located in
Users\<user name>\Library\Preferences\TL
Metro Plug-in.
If you want to use the particular samples you
imported into TL Metro on a different Pro Tools
system, copy this preferences file between systems. If the TL Metro preferences file is deleted,
all factory and user samples will be deleted. To
restore TL Metro to the factory samples only,
quit Pro Tools and delete this preferences file.
The next time you use TL Metro, it will recreate
the preferences file with only the factory samples.
Page 82

Trillium Lane Labs Plug-ins Guide76
Page 83

Chapter 10: TL Space TDM and TL Space Native 77
chapter 10
TL Space TDM and TL Space Native
(TDM, RTAS, and AudioSuite)
Introduction
TL Space is a convolution reverb TDM, RTAS,
and AudioSuite plug-in. There are two versions
of TL Space: TL Space TDM and TL Space Native.
TL Space TDM includes all plug-in formats.
TL Space Native includes RTAS and AudioSuite
plug-in formats only.
TL Space was designed to be the ultimate reverb
for music and post-production applications. By
combining the sampled acoustics of real reverb
spaces with advanced DSP algorithms, TL Space
offers stunning realism with full control of reverb parameters in mono, stereo, and surround
formats.
Figure 1. TL Space plug-in
Page 84

Trillium Lane Labs Plug-ins Guide78
Feature Highlights
TL Space has an extensive feature set designed to
assist users in creating the best reverb effect in
the shortest possible time.
Listed below are some of the key innovations
that TL Space offers over traditional software reverbs.
Reverb Features
• Mono, Stereo, and Quad and 5.0–channel
output support
• Multiband EQ
• Independent wet/dry and decay levels
• Separate reverb early and late levels and
length
• Control of early size, low-cut, and balance
• Pre delay and late delay controls
• Precise control of low, mid, and high decay
crossover
• Adjustable waveform reverse, displayed in
beats per minute
• Waveform processing bypass
Interface Features
• Full waveform view, zoom, and channel
highlight functions
• Onscreen input and output metering with
clip indicators
• Impulse response information display
Impulse Response (IR) Loading and
Organization Features
• Scrollable IR browser makes finding impulse responses easy
• Browser supports user defined IR groups on
any local drives
• Browser keyboard shortcuts
•IR favorites function
• Automatically recognizes common IR formats for one click loading
• IR browser hides to save screen real estate
• Quick browser buttons allow rapid IR loading and preview
Automation and Ease of Use Features
• Snapshot mode supports rapid changes between ten predefined reverb scenes
• Picture preview mode allows user to view
image files stored with impulse responses
• Impulse responses stored directly in
Pro Tools presets and sessions for easy session sharing
• New impulse responses can be copied to
system and loaded without closing
TL Space
• iLok support for quick and easy relocation
to other Pro Tools systems
Surround and Post-Production Features
• Full input and output surround metering
on screen at all times
• Separate front, center, and rear levels
• Independent front and rear decay
• Snapshot mode ideal for post automation
requirements
• Seamless snapshot switching (RTAS)
• Automatic phantom channel creation
Page 85

Chapter 10: TL Space TDM and TL Space Native 79
IR Library
• A wide variety of both real and synthetic
reverb spaces and effects
• Mono, stereo, and surround formats
• All reverb impulse responses stored in WAV
file format
Reverb and Convolution
Reverb Concepts
Reverberation is an essential aspect of the sound
character of any space in the real world. Every
room has a unique reverb sound, and the qualities of a reverb can make the difference between
an ordinary and an outstanding recording. The
same reverb principles responsible for the sound
of a majestic, soaring symphony in a concert
hall also produce the booming, unintelligible
PA system at a train station. Recordings of audio
in the studio context have traditionally been
captured with a minimum of real reverb, and
engineers have sought to create artificial reverbs
to give dry recorded material additional dimension and realism.
The first analog reverbs were created using the
‘echo chamber’ method, which is comprised of
a speaker and microphone pair in a quiet, closed
space with hard surfaces, often a tiled or concrete room built in the basement of a recording
studio. Chamber reverbs offered a realistic, complex reverb sound but provided very little control over the reverb, as well as requiring a large
dedicated room.
Plate reverbs were introduced by EMT in the
1950s. Plate reverbs provide a dense reverb
sound with more control over the reverb characteristics. Although bulky by modern standards,
plate reverb units did not require the space
needed by a chamber reverb. Plate reverbs function by attaching an electrical transducer to the
center of a thin plate of sheet metal suspended
by springs inside a soundproof enclosure. An adjustable damping plate allows control of the reverb decay time and piezoelectric pickups attached to the plate provide the return reverb
signal to the console. An alternative and less expensive analog reverb system is the spring reverb, most commonly seen in guitar amplifiers
beginning in the 1960s. Similar to the plate reverb in operation, the spring reverb uses a transducer to feed the signal into a coiled steel spring
and create vibrations. These are then captured
via a pickup and fed back into an amplifier.
Since the advent of digital audio technology in
the 1980s, artificial reverberation has been created primarily by digital algorithms that crudely
mimic the physics of natural reverb spaces by
using multiple delay lines with feedBack. Digital
“synthetic” reverb units offer a new level of realism and control unavailable with older analog
reverb systems, but still fall short of the actual
reverb created by a real space.
Components of Reverb
Reverberation sound in a normal space usually
has several components. For example, the
sound of a single hand clap in a large cathedral
will have the following distinct parts.Initially,
the direct sound of the hand clap is heard first,
as it travels from the hand directly to the ear
which is the shortest path. After the direct
sound, the first component of reverb heard by a
listener is reflected sound from the walls, floor
and ceiling of the cathedral. The timing of each
reflection will vary on the size of the room, but
they will always arrive after the direct sound. For
example, the reflection from the floor will typically occur first, followed typically by the ceiling
and the walls. The initial reflections are known
as early reflections, and are a function of the reflective surfaces, the position of the audio
source and the relative location of the listener.
Page 86
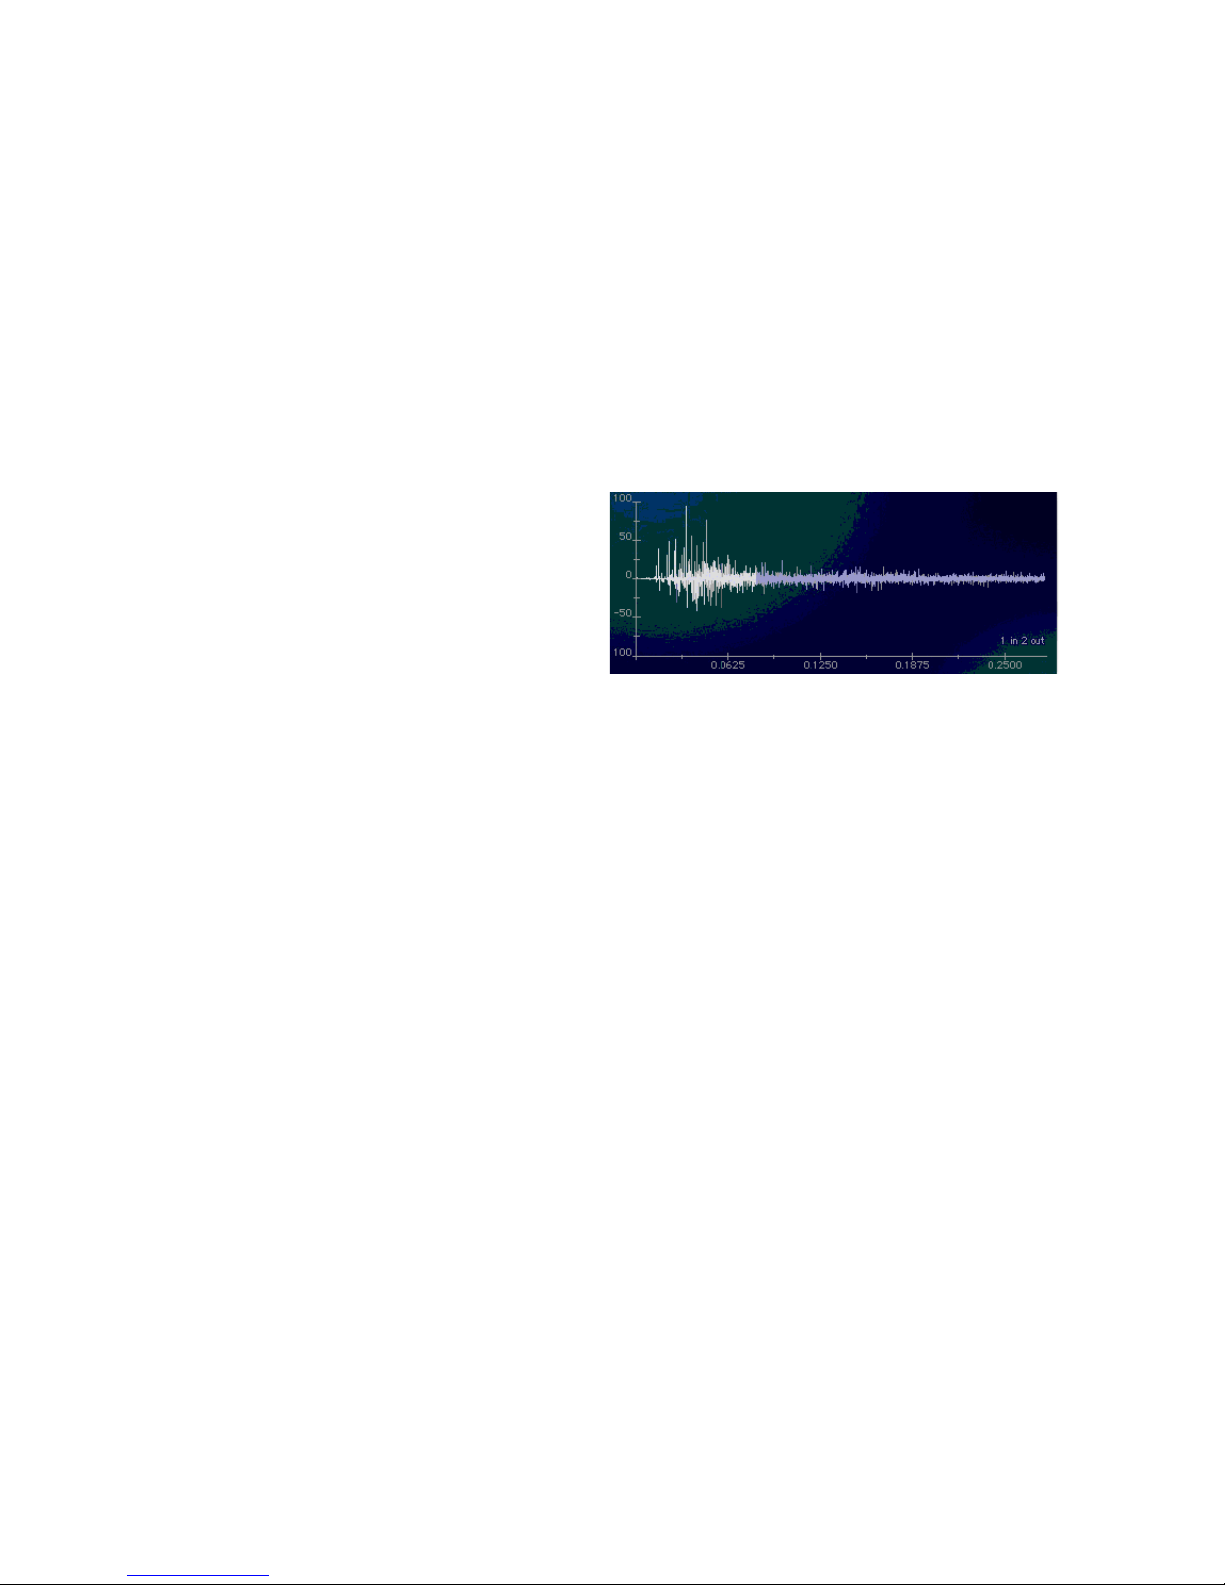
Trillium Lane Labs Plug-ins Guide80
A small room may have only a fraction of a second before the first reflections, whereas large
spaces may take much longer. The elapsed time
of the early reflections defines the perceived size
of the room from the point of view of a listener.
TL Space offers various controls over early reflection parameters.
The time delay between the direct sound and
the first reflection is usually known as Pre Delay.
TL Space lets you adjust Pre Delay. Increasing
the Pre Delay will often change the perceived
clarity of audio such as vocals.
Reflections continue as the audio reaches other
surfaces in a space, and they create more reflections as the sound waves intermingle with one
another, becoming denser and changing in
character depending on the properties of the
room. As the room absorbs the energy of the
sound waves, the reverb gradually dies away.
This is known as the reverb tail and may last
anywhere up to a minute in the very largest of
spaces.
The reverb tail will often vary at different frequencies depending on the space. Cavernous
spaces often produce a booming, bassy reverb
whereas other spaces may have reverb tails
which taper off to primarily high frequencies.
TL Space allows for equalization of the frequencies of the reverb tail in order to adjust the tonal
characteristics of the reverb sound.
A reverb tail is often described by the time it
takes for the sound pressure level of the reverb
to decay 60 decibels below the direct sound and
is known as RT60. Overall, TL Space allows decay to be adjusted as required. For surround processing, decay can be adjusted for individual
channel groups.
Convolution Reverb
Convolution reverb goes beyond traditional analog and synthetic digital reverb techniques to
directly model the reverb response of an actual
reverb space. First, an impulse response (IR) is
taken of an actual physical space or a traditional
reverb unit. An IR can be captured in mono, stereo, surround, or any combination. The IR, as
displayed by TL Space, clearly shows the early
reflections and the long decay of the reverb tail.
TL Space uses a set of mathematical functions to
convolve an audio signal with the IR, creating a
reverb effect directly modeled on the sampled
reverb space. By using non-reverb impulse responses, TL Space expands from reverb applications to a general sound design tool useful for
many types of audio processing.
The downside of traditional software based convolution reverbs is the heavy CPU processing requirement. This has often resulted in earlier
convolution reverbs with unacceptable latency.
Many early software convolution reverbs did
not offer adequate control over traditional reverb parameters such as Pre Delay, EQ, or decay
time.
TL Space redefines reverb processing in
Pro Tools by offering zero and low latency convolution with the full set of controls provided
by traditional synthetic reverbs.
Impulse Response sample
Page 87
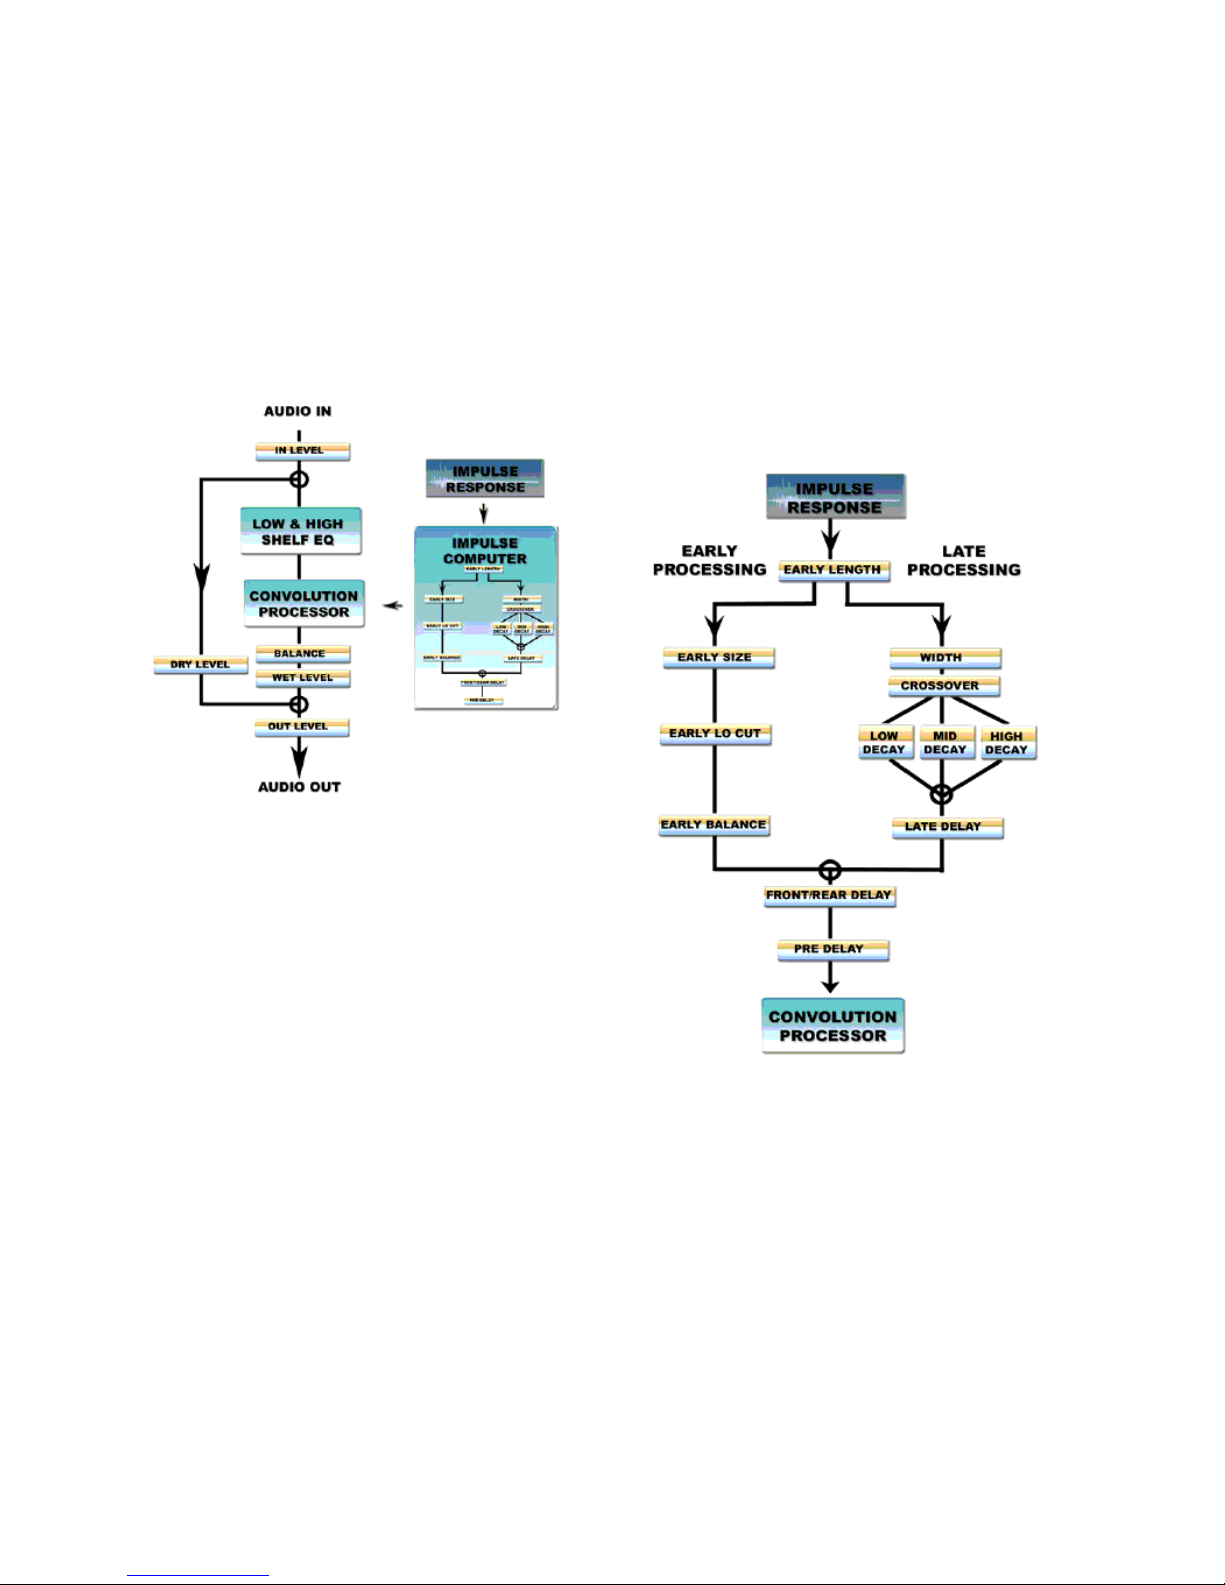
Chapter 10: TL Space TDM and TL Space Native 81
TL Space System Design
TL Space uses advanced DSP algorithms to deliver convolution processing on both TDM and
native host processing. Figure 2 on page 81
shows the internal system design of TL Space
and demonstrates how TL Space processes the
audio signal.
The impulse computer is an internal module of
TL Space that provides extensive user control
over the currently loaded impulse response
waveform. When the user adjusts the parameters shown below, the IR is automatically recalculated by the impulse computer and reloaded
into the convolution processor. Figure 3 on
page 81 shows the internal functions of the impulse computer as it processes the waveform
and loads it into the convolution processor.
Figure 2. TL Space internal system design
Figure 3. TL Space internal functions of the impulse
computer
Page 88
Trillium Lane Labs Plug-ins Guide82
System Performance
Supported Plug-in Formats
TL Space is available as TDM, RTAS, and AudioSuite plug-in formats depending on your
Pro Tools system and version of TL Space.
TL Space TDM Edition includes all plug-in formats. TL Space Native Edition includes RTAS
and AudioSuite plug-in formats only. The characteristics of each plug-in format, including
maximum reverb time, sample rate support, and
latency are shown in Table 1 on page 82.
Latency
Latency is a function of how Pro Tools processes
audio and is typically measured in samples. The
latency of each different mode of TL Space is
shown in Table 1. Latency is displayed in the
Mix window for each track in Pro Tools TDM using Delay Compensation view.
Near zero latency on HD Accel is ideal for recording live, as TL Space latency is kept to five
samples or less. RTAS plug-ins have more inherent latency. However, for some users latency is
not critical and RTAS plug-ins may lend themselves to post production environments with a
requirement to switch seamlessly in real time
between reverb snapshots.
Regardless of the plug-in format, Pro Tools TDM
6.4 or higher can compensate for any latency
automatically on playback using Pro Tools Delay Compensation.
HTDM plug-ins are not supported in
Pro Tools 7.0 or higher. Use the corresponding TDM or RTAS plug-in instead.
Table 1. TL Space Plug-in Format Characteristics
Plug-in Format DSP
Maximum
reverb time
(sec)
Maximum
sample
rate (khz)
Dry latency
(samples)
Wet latency
(samples)
TL Space
Short
TDM HD 1.1 48 kHz 3 1029
TL Space
Medium
TDM HD Accel 2.3 96 kHz 3 5
TL Space
Long
TDM HD Accel 3.4 96 kHz 3 5
TL Space RTAS — 10.0 96 kHz 0 480
TL Space AudioSuite — 10.0 96 kHz — —
Page 89

Chapter 10: TL Space TDM and TL Space Native 83
Channel Support
TL Space supports a variety of channel formats
depending on your Pro Tools system, including
mono, stereo, quad, and 5.0 channels. The following table outlines channel support in specific modes.
Stereo processing is available in both summed
stereo and true stereo. Summed stereo processing
uses the traditional reverb technique of summing the two input channels into a single channel that is processed by the reverb. The stereo
image of the input is not reproduced in the reverb. Instead, the reverb processes the input as if
it is from a single audio source positioned in the
center. An IR used for summed stereo processing
would have a single sound input source and
multiple sound outputs.
True stereo processing processes two separate input signals. This stereo image of the two inputs
is reproduced in the reverb. An IR used for true
stereo requires two sound sources, and hence
the total number of channels in the IR will be
equal to double the number of outputs. True stereo is more CPU and DSP intensive than
summed stereo, consuming twice the resources.
To use true stereo with TL Space on TDM, insert
TL Space in true stereo. Stereo RTAS TL Space automatically switches between summed and true
stereo modes depending on the IR loaded.
True Stereo at 96 kHz is only available in
TL Space Long.
Table 2. TL Space Channel Formats
Plug-in Format
Mono Input Stereo Input True Stereo Input
Mono
Mono
to
Stereo
Mono
to
Quad
Mono
to 5.0
Stereo
to
Stereo
Stereo
to
Quad
Stereo
to 5.0
Tru e
Stereo
to
Stereo
Tru e
Stereo
to
Quad
TL Space
Short
TDMYYYYYYYYY
TL Space
Medium
TDMYYY—YY—YY
TL Space
Long
TDMYYYYYYYYY
TL Space RTAS Y Y (LE
only)
—— Y —— Y —
TL Space AS Y — — — Y — — Y —
Page 90

Trillium Lane Labs Plug-ins Guide84
DSP Usage on TDM Systems
On Pro Tools HD and HD Accel systems,
TL Space can be instantiated as TL Space Short,
Medium and Long. The plug-in name displayed
in the menu refers to the maximum reverb time
as shown in Table 1 on page 82.
The different versions of TL Space have different
DSP usage requirements. A Pro Tools HD card
contains nine identical DSP chips. A Pro Tools
HD Accel card contains nine DSP chips, four of
which offer external SRAM. In some modes,
TL Space requires Accel chips with external
SRAM. Table 3 shows the TL Space DSP requirements by reverb time.
The number of DSP chips required is a function
of the number of inputs and outputs, and the
type of processing in use. The maximum chip
usage is 8 DSP chips across two HD Accel cards.
Table 4 shows the TL Space DSP requirements by
channel.
These numbers represent the maximum possible DSP usage of TL Space Long. For example, TL
Space Medium has only 50% of the DSP requirement in supported stereo and quad channel formats.
CPU Usage
On all Pro Tools systems, TL Space can be instantiated as an RTAS plug-in. This impacts the
performance of the CPU. CPU usage can be
monitored in the System Usage window.
Table 3. TL Space HD DSP requirements
Plug-in Format DSP
TL Space Short TDM Any HD DSP chip
TL Space Medium TDM Any HD Accel chip
with external
SRAM
TL Space Long TDM Any HD Accel chip
with external
SRAM
Table 4. TL Space DSP requirements by channel
Input Output
Maximum
number of
DSP chips
Mono Mono 1
Stereo 2
Quad 4
5.0 5
Stereo Stereo 2
Quad 4
5.0 5
True Stereo Stereo 4
Quad 8
To optimize performance of TL Space for
RTAS processing, set the Hardware Buffer
Size in the Playback Engine to 512 samples.
Page 91

Chapter 10: TL Space TDM and TL Space Native 85
Impulse Responses
IR Processing Overheads
Adjusting some controls in TL Space requires
the impulse computer to recalculate the waveform and reload it into the convolution processor. This operation uses DSP and host processing
capacity. When this occurs, some control lag
may be experienced. This should be kept in
mind if controls are being automated in real
time during a session.
How Impulse Responses Are
Captured
An IR of an actual physical space is captured using a combination of an impulse sound source
and capture microphones. The sound source is
used to excite the physical space to create a reverb, and can be a starter pistol or a frequency
tone played through a speaker. The microphones can be placed in various configurations.
The resulting IR is then processed to create a digital representation of both the physical space,
potentially colored by the sound source and the
type of microphone used. Likewise, an IR can be
captured of effects hardware, such as analog reverbs, by sending a test pulse through the unit
and capturing the result digitally. In addition to
reflecting reverb or delay characteristics, an IR
also reflects tonal character and can be used for
a variety of effects beyond pure reverb applications.
Depending on the capture technique used, the
IR may be suitable for use with mono, stereo,
surround or a combination of those formats. For
example, a capture setup with a single sound
source and two microphones is ideal for a mono
to stereo IR.
Multiple IRs may be taken of a physical space
where the sound source has been moved to
physical locations. Each resulting IR may be
used to create individual reverbs for separate instruments. This effectively allows an engineer to
place each instrument in the reverb sound field
as if the instruments were physically arranged in
the space.
Impulse Response Formats
TL Space reads a wide range of IR formats automatically, including WAV, SDII, and AIFF file
formats, allowing you to import a variety of IRs.
TL Space supports IR sample rates from 22 kHz
up to 96 kHz in bit depths from 16 to 32 bits. In
addition, TL Space supports the display of JPEG
format picture files stored with IRs.
To use third party IR libraries with TL Space:
1 In the IR Browser, select Edit > Import Other IR
Folder.
2 Locate and select the library on your hard
drive.
3 Click Choose.
TL Space will add the new library to the IR
browser.
Page 92

Trillium Lane Labs Plug-ins Guide86
IR Library Installation
If you purchased the boxed version of TL Space,
it includes an installer disc of the standard
TL Space IR Library. If you purchased TL Space
online, you will need to download IR Libraries
from Digidesign’s TL Space Online IR Library.
For more information on downloading and installing IR Libraries from the TL Space Online IR
Library, see “Installing TL Space IR Packages” on
page 95.
To install the TL Space IR Library from disc:
1 Insert the correct TL Space IR library installer
disc for your operating system (Windows or
Macintosh) in your computer’s CD/DVD drive.
2 Double-click the TL Space IR library installer
application to launch it. Read the license agreement. If you agree to the terms, click Accept.
3 Click Install to perform an easy install of the
entire IR library on the system drive.
4 If you want to install only part of the library,
select Custom Install and select the parts of the library you want to install.
5 When the installation is completed, click Quit
to finish the installation.
Multichannel Impulse Response
Formats
TL Space supports IRs in multichannel or multiple mono audio files. IRs with a single input are
used for mono or summed stereo processing and
can be stored as a single interleaved multichannel file, or as multi-mono files. IRs with stereo
inputs used for true stereo processing must be
stored as multi-mono files.
IR channel formats
Input Output
Channel
Order
File format
Mono Mono — Mono file
Mono Stereo L R One 2-channel
file or two mono
files
Mono Quad L R Ls Rs One 4-channel
file or four
mono files
Mono 5.0 L C R Ls Rs One 5-channel
file or five mono
files
Stereo Stereo L R Four mono files
Stereo Quad L R Ls Rs Eight mono
files
Stereo 5.0 L C R Ls Rs Ten mono files
Page 93

Chapter 10: TL Space TDM and TL Space Native 87
For multi-mono files, TL Space understands the
following filename conventions, based on those
used by Pro Tools. The filename format is based
on the impulse name plus two suffixes which indicate input and output channels as follows:
Impulsename.inputchannel.outputchannel.type
• Impulsename is the name of the impulse.
Mixing multiple IR files with the same Impulsename in the same folder is not supported.
• Inputchannel refers to the number of
sources used for the impulse, starting at the
number 1. An IR captured in true stereo
will usually have two input channels numbered 1 and 2. If there is only one input
channel, then inputchannel is optional
and can be omitted. Also, instead of using
numbers 1 and 2, the inputchannel can be
designated as L and R.
• Outputchannel refers to the microphones
used to capture the impulse, and corresponds to your studio monitors. outputchannel is designated using the standard L, C,
R, Ls and Rs extensions.
• Type is optionally .WAV, .AIFF or .SD2. For
best performance, filenames should always
be suffixed with type to avoid TL Space
having to open the file to determine audio
format.
The following examples show how various
multi-mono IR files could be named.
Stereo to Stereo IR
Cathedral.1.L.wav
Cathedral.1.R.wav
Cathedral.2.L.wav
Cathedral.2.R.wav
Stereo to 5.0 IR
Cathedral.1.L.wav
Cathedral.1.C.wav
Cathedral.1.R.wav
Cathedral.1.Ls.wav
Cathedral.1.Rs.wav
Cathedral.2.L.wav
Cathedral.2.C.wav
Cathedral.2.R.wav
Cathedral.2.Ls.wav
Cathedral.2.Rs.wav
Mono to Quad IR.
Cathedral.L.wav
Cathedral.R.wav
Cathedral.Ls.wav
Cathedral.Rs.wav
Stereo to quad IR
Cathedral.1.L.wav
Cathedral.1.R.wav
Cathedral.1.Ls.wav
Cathedral.1.Rs.wav
Cathedral.2.L.wav
Cathedral.2.R.wav
Cathedral.2.Ls.wav
Cathedral.2.Rs.wav
Page 94

Trillium Lane Labs Plug-ins Guide88
Channel Compatibility
TL Space works best with IRs that match your
current channel configuration. For example, if
TL Space is instantiated in a mono to stereo configuration, stereo IRs will be highlighted in the
IR browser. The IR information displayed in the
display area shows how many inputs and outputs an IR has. For example, an IR listed as 2 input 4 output is a stereo to quad IR.
If an IR is loaded that doesn’t match the current
configuration, TL Space will try to create the
best possible match with the IR provided. For
example, if a stereo IR is loaded into a mono instantiation of TL Space, TL Space will sum the
left and right channels in order to mimic a stereo reverb with both channels panned to mono.
If an IR is loaded that is missing a required channel, TL Space will automatically create a phantom channel for the IR if needed. For example, if
a stereo IR is loaded into a quad instantiation,
TL Space will compute left and right surround
channels automatically based on the existing
channels. If a quad IR is loaded into a 5.0 channel instantiation, TL Space will compute a phantom center from the front left and right channels. Phantom channels are indicated by
comparing the IR information displayed in the
display area to the number of channels in use.
For example, a 2 input 4 output IR used with a
5.0 output instantiation of TL Space will automatically have a phantom center channel created.
Presets
TL Space supports the Pro Tools Plug-in Librarian. When an IR file is loaded, all controls remain at their current positions as the IR file only
contains the audio waveform. By default, presets contain both the IR waveform and control
settings and can be saved as required so that specific control settings can be retained for future
sessions. If you save presets without embedding
the IR waveform, be sure that you include the IR
waveform with the session when transferring
the session between different Pro Tools systems.
There are two important items to note about using presets in TL Space:
• TL Space presets do not store information
for the Wet and Dry level controls. This is
to enable you to change presets without
losing level information. Likewise, the
Pro Tools Compare function is not enabled
for these controls.
• A TL Space preset only includes the currently selected snapshot.
IR files are audio files only and do not contain information about TL Space control
settings. If you wish to save specific control
settings for an IR, you should save them using the Pro Tools Plug-in Librarian or using
the snapshot facility of TL Space.
Page 95

Chapter 10: TL Space TDM and TL Space Native 89
Snapshots
In addition to presets, TL Space lets you manage
a group of settings, called snapshots, that can be
switched quickly using a single, automatable
control. Each snapshot contains a separate IR
and settings for all TL Space controls.
IRs in a snapshot have been pre-processed by
the impulse computer and can be loaded instantly into the convolution processor. With
RTAS, switching between snapshots does not
cause audio to drop out. Snapshots are useful,
for example, in post production mixes when the
reverb is changed for different scenes via automation as the picture moves from one scene to
another.
Embedding IRs in Sessions,
Presets, and Snapshots
By default, all IR and snapshot info used by TL
Space (including up to ten IRs) is saved in the
Pro Tools session file. Likewise, plug-in presets
contain a saved copy of the IR and settings in
the currently selected snapshot. Session and preset file sizes will increase as TL Space stores each
IR waveform inside the file. This provides maximum compatibility between different Pro Tools
systems without the need for them to have identical IR libraries.
IR embedding can be disabled in TL Space’s Preferences. If IR embedding is disabled, TL Space
stores only a reference to the name of the IR file.
When the session is transferred to a different
system, TL Space attempts to load the matching
IR file from the TL Space IR library. For maximum compatibility, ensure that all of the appropriate IR files are available on the new system.
When working with an IR that only exists in a
session file, ensure it is saved to a separate snapshot or preset. If the IR is overwritten by loading
a new IR and the session is saved, the original IR
cannot be recovered without access to the original IR file.
By default, Pro Tools presets or session files
created using TL Space automatically include copies of all relevant IR waveforms.
This provides maximum compatibility of
session files between different Pro Tools systems.
It is your responsibility to ensure that you
observe the copyright on any IR transferred
to a third party in this fashion.
Page 96

Trillium Lane Labs Plug-ins Guide90
TL Space Controls and Displays
The TL Space interface is divided into several sections, each of which is described in the following section.
Figure 4.
Page 97
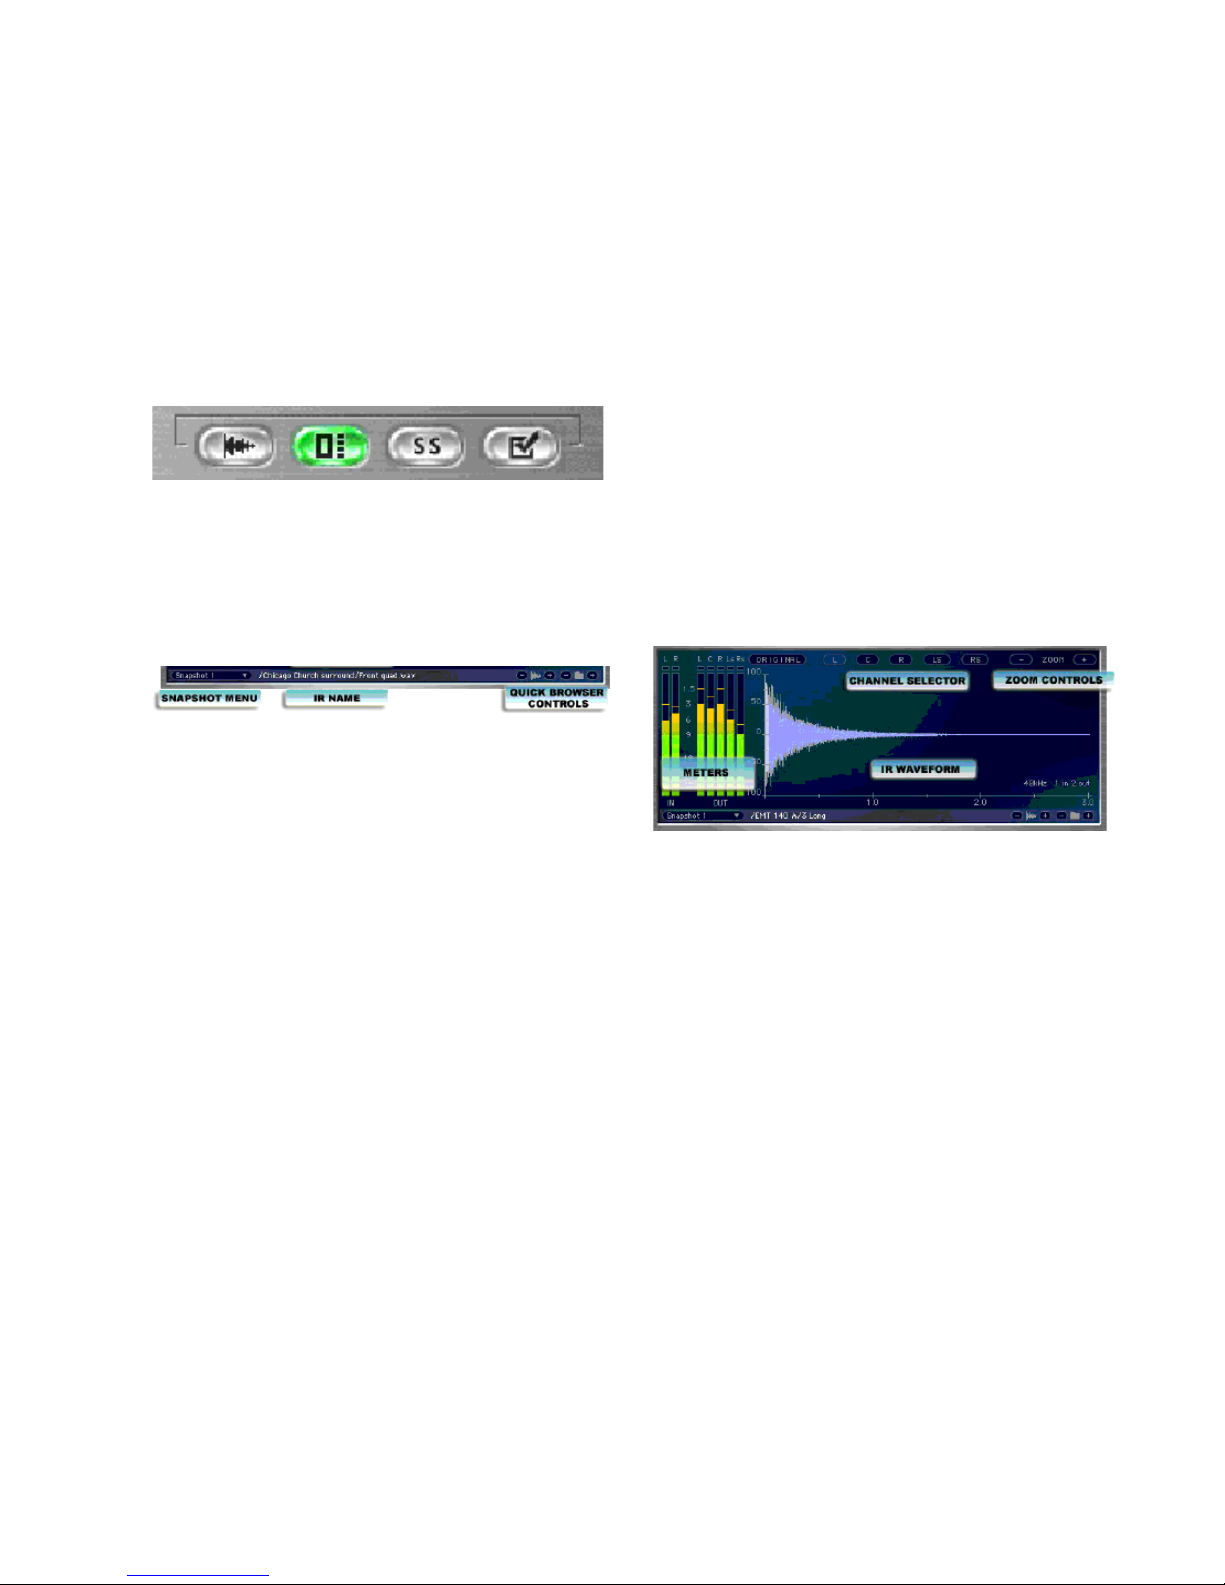
Chapter 10: TL Space TDM and TL Space Native 91
Display Area
The display area of TL Space operates in four
modes, indicated by the Display Mode selectors
at the top right hand corner of the TL Space window. The modes from left to right are Waveform, Picture Preview, Snapshot, and Preferences.
The Display area changes based on the selected
mode. At all times, the Info bar at the bottom of
the display area window shows the following
controls and information.
Snapshot Menu A pop-up menu allowing quick
selection or automation of a snapshot.
IR Name Displays the folder and file name of the
currently loaded IR.
Quick Browser Controls The Quick browser controls allow the IR to be quickly changed even
when the IR browser is closed, automatically
loading each IR sequentially. The Waveform
icons step backwards and forwards through IRs
and automatically load the IR file. The Folder
icons step backwards and forwards through
folders. The Quick browser requires an IR to be
currently loaded from the IR browser. If no such
IR is loaded (for example, the IR in use has been
loaded from a preset or session but does not exist in the IR browser), the Quick browser controls are inoperative.
Wavefor m Mode
Waveform mode is selected using the Waveform
icon at the top of the TL Space window. In
Waveform mode, the display area shows the IR
waveform with the following controls.
Waveform mode displays the IR waveform
along a horizontal axis marked in seconds and
the vertical axis marked in amplitude. The early
section of the waveform is highlighted in a
lighter color. In addition, the channel selector
highlights the current channel in the waveform.
IR information such as sample rate and number
of input and output channels is displayed at the
bottom right of the waveform.
The controls in Waveform mode function as follows:
Original Bypasses all waveform processing, allowing the original IR to be auditioned. This
control effectively bypasses the processing in
the IR computer as shown in the system diagram.
Channel Selectors Displays from one to five
channels (in the order Left, Center, Right, Left
Surround, Right Surround). Click the desired
channel to display the IR waveform for that
channel. In Mono mode, no channel selector is
displayed.
Zoom Zooms in and out on the time axis for the
waveform display.
Display Mode selectors
Info bar
Display area, Waveform mode
Page 98

Trillium Lane Labs Plug-ins Guide92
Picture Preview Mode
Picture Preview mode is selected using the Picture Preview icon at the top of the TL Space window. When selected, Picture Preview mode
shows pictures associated with the IR. For an IR
provided with TL Space, this will usually include
a photograph of the location, and an image with
technical details such as microphones used or
an overview of the microphone setup. Thumbnails of images are displayed in the right hand
column. In this mode, the IR browser can be
used to view the associated pictures without
loading the IR itself.
Snapshot Mode
Snapshot mode is selected using the Snapshot
icon at the top of the TL Space window. TL
Space provides ten snapshots available at all
times. Each snapshot stores a separate IR waveform and all control settings. Snapshots are optimized for quick loading into the convolution
processor, and switching between snapshots is
considerably faster than loading a new IR. Snapshot mode allows all ten snapshots to be viewed
as well as the option to select, rename, copy,
paste, and clear snapshots.
The name of the currently selected snapshot is
always displayed in the Info bar at the bottom of
the display area, and can be automated. This lets
you switch reverb settings during playback and
is useful for post production sessions where the
reverb setting may change as the scene changes.
The active snapshot can be selected in one of
two ways. At any time, a snapshot can be selected by using the snapshot menu in the Info
bar. Alternatively, when the display area is in
Snapshot mode, a snapshot can be selected by
clicking the selection area next to the snapshot
name.
Select Lets you select which snapshot is currently loaded.
Name Displays the name of each snapshot. By
default, snapshots are named “Snapshot 1”
through “Snapshot 10.” Snapshots can be renamed by clicking on the snapshot name and
entering a new name followed by the Enter key
(Windows) or the Return key (Macintosh).
Sample Path Displays the name of the IR selected for each snapshot.
Copy Copies the currently selected snapshot settings into a clipboard.
Paste Pastes the clipboard into the currently selected snapshot. Note that the name of the existing snapshot is not changed by pasting a new
snapshot, in order to avoid duplicate snapshot
names.
Display area, Picture Preview mode
Display area, Snapshot mode
Page 99
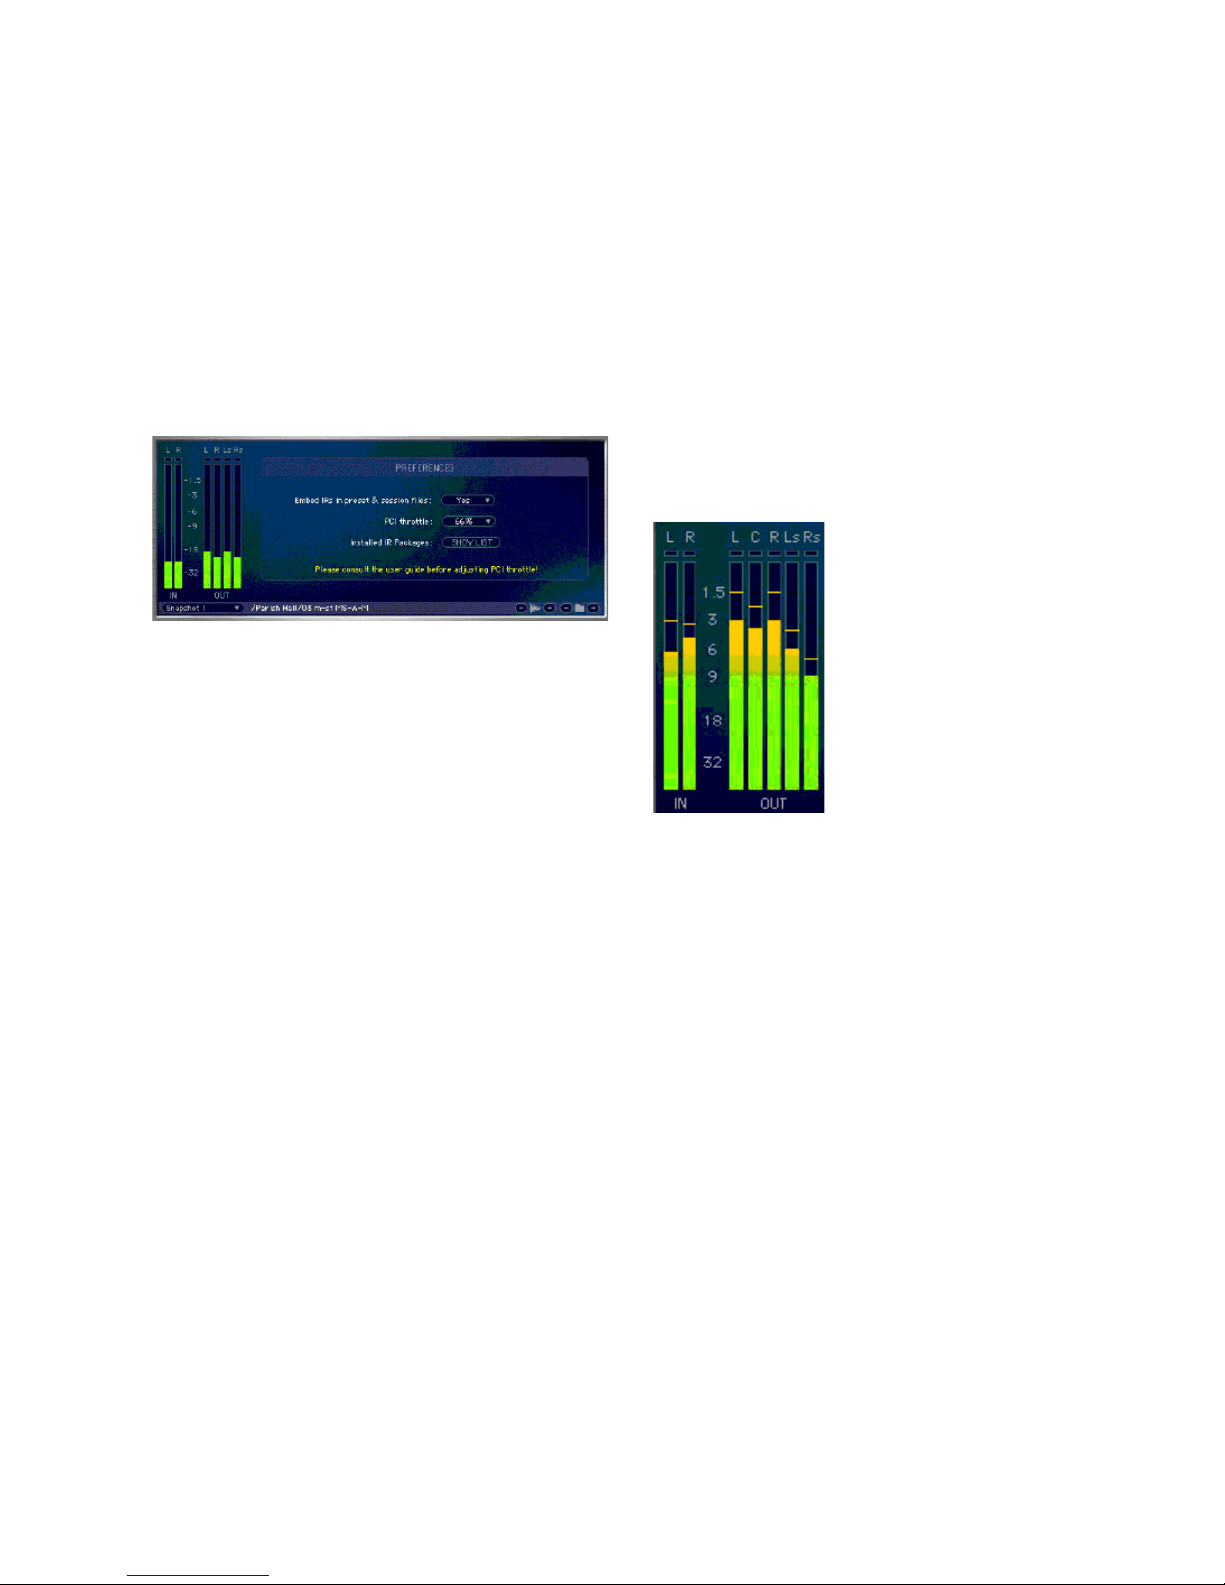
Chapter 10: TL Space TDM and TL Space Native 93
Clear Clears the IR from the currently selected
snapshot.
Preferences Mode
Preferences mode is selected using the Preferences icon at the top of the TL Space window.
This displays a number of preferences settings
for TL Space.
Embed IRs in Preset & Session Files Enables or
disables the embedding of IR waveforms in presets and session file. By default, this is enabled.
PCI Throttle Increasing the PCI throttle control
reduces PCI contention for Pro Tools systems
when using PCI video capture hardware. For
more information, see “PCI Bus Contention” on
page 101.
For most users, this control should not be adjusted. This control is only displayed for TDM
instantiations of TL Space on Pro Tools|24 Mix
and Pro Tools|HD systems.
Installed IR Packages Displays a list of installed
TL Space IR packages and their versions.
Meters
The Meters display the amplitude of the incoming and outgoing audio signals by channel. The
number of meters shown will depend on the
number of input and output channels. Input
meters may be mono or stereo, and output
meters may be mono, stereo, quad, or 5.0 channels. Each meter is marked as either mono, left,
right, center, left surround, or right surround. A
logarithmic scale marked in decibels and momentary peaks are also displayed on the meter.
The red Clip indicator indicates that audio for
that channel has exceeded 0 dB in amplitude.
When a channel has clipped once, the clip indicator remains lit and additional clips will be
shown by a variation in the color of the indicator. The clip indicator for all channels can be
cleared by clicking on any clip indicator, or selecting the Pro Tools Clear All Clip Indicators
command.
The meters do not function when TL Space is
used as an AudioSuite plug-in.
Display area, Preferences mode
Meters, stereo input to 5.0 output shown
Page 100
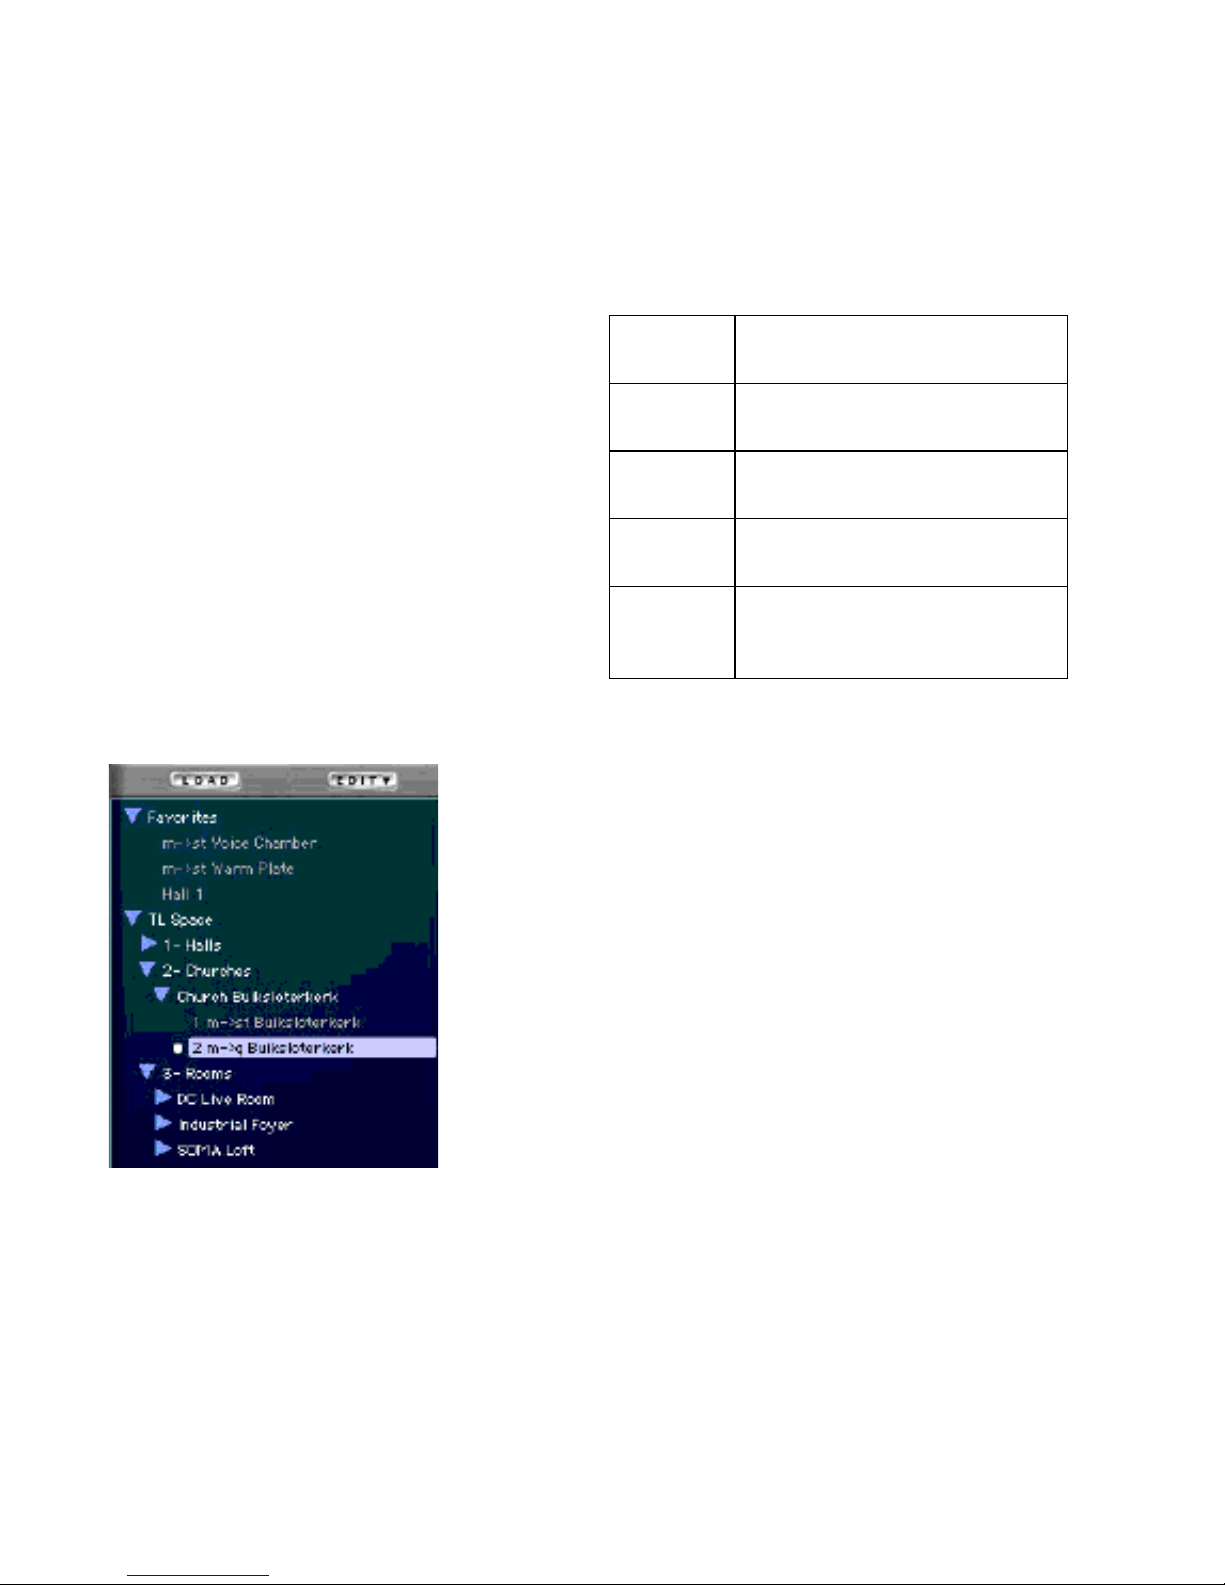
Trillium Lane Labs Plug-ins Guide94
IR Browser
The IR Browser icon at the top right hand corner
of the TL Space window opens the IR browser.
By default, TL Space will display a single IR
group for the TL Space library.
The IR browser lets you quickly and easily install, locate, and organize IRs on local hard
drives. The Load and Edit buttons in the IR
browser let you install and import IRs, create Favorites, and change the IR groups displayed.
TL Space automatically highlights each IR that
matches the current channel configuration. For
example, when using a TL Space Stereo to Quad
inset, each IR with that configuration is highlighted. Impulses that are not highlighted can
still be loaded, and TL Space tries to adapt the IR
to the current channel format (see “Channel
Compatibility” on page 88).
An IR can be loaded by double clicking with the
mouse, or using the Load button displayed at
the top of the IR browser drawer. The currently
loaded IR is highlighted with a small dot next to
the file name in the browser.
The IR browser can be operated using the following shortcuts. When the IR browser has keyboard focus, a blue highlight is displayed
around the edge of the browser window.
The IR browser lets you install and import new
IRs. Each IR folder reflects a folder on the hard
drive. When importing a new IR folder, a standard file dialog will be displayed to enable the
user to choose the folder that contains the desired IR.
The IR browser also provides a Favorites folder,
which is a user defined group of links to IRs in
the IR browser. Favorites can be sorted in any
desired order by dragging and dropping them as
required. In addition, folders can be created in
Favorites using the ‘New Folder in Favorites’
function in the Edit menu.
To add an IR file or folder to the Favorites folder:
1 In the IR browser, select the desired IR file or
folder.
2 From the IR browser’s Edit menu, select Add to
Favorites.
IR Browser
IR browser keyboard shortcuts
Browser
Navigation
Arrow keys
Load IR Enter (Windows)
Return (Macintosh)
Open/close
all folders
Alt-click (Windows)
Option-click (Macintosh)
Edit menu Right-click (Windows or Macintosh)
Control-click (Macintosh)
Return keyboard focus
to Pro Tools
Escape key
 Loading...