

Page 1
Synchronic
Version 7.3
™
Page 2

Copyright
© 2007 Digidesign, a division of Avid Technology, Inc. All rights
reserved. This guide may not be duplicated in whole or in part
without the express written consent of Digidesign.
AudioSuite, Avid, Digidesign, Pro Tools, Pro Tools Academic,
Pro Tools HD, Pro Tools LE, Pro Tools M-Powered, and RTAS
are either trademarks or registered trademarks of Avid
Technology, Inc. in the US and other countries. All other
trademarks contained herein are the property of their
respective owners.
Product features, specifications, system requirements, and
availability are subject to change without notice..
PN 9329-55998-00 REV A 01/07
Page 3

contents
Chapter 1. Introduction
Contents of the Boxed Version of Your Plug-in
System Requirements
Register Your Plug-ins
Working with Plug-ins
Conventions Used in This Guide
About www.digidesign.com
. . . . . . . . . . . . . . . . . . . . . . . . . . . . . . . . . . . . . . . . . . . . . . . . . . . . . . 1
. . . . . . . . . . . . . . . . . . . . . . . . . . . . . . . . . . . . . . . . . . . . . . . . . . . . . 2
. . . . . . . . . . . . . . . . . . . . . . . . . . . . . . . . . . . . . . . . . . . . . . . . . . . . . 3
. . . . . . . . . . . . . . . . . . . . . . . . . . . . . . . . . . . . . . . . . . . . . . . . . . . . . 3
. . . . . . . . . . . . . . . . . . . . . . . . . . . . . . . . . . . . . . . . . . . . . . 3
. . . . . . . . . . . . . . . . . . . . . . . . . . . . . . . . . . . . . . . . . . . . . . . . . 4
Chapter 2. Installation and Configuration
Installing Synchronic
Authorizing Synchronic
Removing Plug-ins
Configuring MIDI
Using Instrument Tracks
Using MIDI and Auxiliary Input Tracks
Chapter 3. Synchronic Overview
Synchronic Modules
Playing Synchronic RTAS
Performance and Edit Modes
Performance Controls
Synchronic Presets
. . . . . . . . . . . . . . . . . . . . . . . . . . . . . . . . . . . . . . . . . . . . . . . . . . . . . . 5
. . . . . . . . . . . . . . . . . . . . . . . . . . . . . . . . . . . . . . . . . . . . . . . . . . . . . 5
. . . . . . . . . . . . . . . . . . . . . . . . . . . . . . . . . . . . . . . . . . . . . . . . . . . . . . . . 7
. . . . . . . . . . . . . . . . . . . . . . . . . . . . . . . . . . . . . . . . . . . . . . . . . . . . . . . . . 8
. . . . . . . . . . . . . . . . . . . . . . . . . . . . . . . . . . . . . . . . . . . . . . . . . . . 8
. . . . . . . . . . . . . . . . . . . . . . . . . . . . . . . . . . . . . . . . . . 8
. . . . . . . . . . . . . . . . . . . . . . . . . . . . . . . . . . . . . . . . . . . . . . 9
. . . . . . . . . . . . . . . . . . . . . . . . . . . . . . . . . . . . . . . . . . . . . . . . . . . . . . . 9
. . . . . . . . . . . . . . . . . . . . . . . . . . . . . . . . . . . . . . . . . . . . . . . . . . 10
. . . . . . . . . . . . . . . . . . . . . . . . . . . . . . . . . . . . . . . . . . . . . . . 13
. . . . . . . . . . . . . . . . . . . . . . . . . . . . . . . . . . . . . . . . . . . . . . . . . . . . 13
. . . . . . . . . . . . . . . . . . . . . . . . . . . . . . . . . . . . . . . . . . . . . . . . . . . . . . 14
. . . . . . . . . . . . . . . . . . . . . . . . . . . . . . . . . . . . 2
. . . . . . . . . . . . . . . . . . . . . . . . . . . . . . . . . . . . . . 5
Contents
iii
Page 4

Chapter 4. Synchronic Parameters
Adjusting Synchronic Parameters
Sound Module
Playback Module
Effect Module
XFade Module
MIDI Module
Keyboard Focus Mode
. . . . . . . . . . . . . . . . . . . . . . . . . . . . . . . . . . . . . . . . . . . . . . . . . . . . . . . . . 18
. . . . . . . . . . . . . . . . . . . . . . . . . . . . . . . . . . . . . . . . . . . . . . . . . . . . . . . 25
. . . . . . . . . . . . . . . . . . . . . . . . . . . . . . . . . . . . . . . . . . . . . . . . . . . . . . . . . . 34
. . . . . . . . . . . . . . . . . . . . . . . . . . . . . . . . . . . . . . . . . . . . . . . . . . . . . . . . . 40
. . . . . . . . . . . . . . . . . . . . . . . . . . . . . . . . . . . . . . . . . . . . . . . . . . . . . . . . . . 42
. . . . . . . . . . . . . . . . . . . . . . . . . . . . . . . . . . . . . . . . . . . . . . . . . . . . 45
. . . . . . . . . . . . . . . . . . . . . . . . . . . . . . . . . . . . . . . . . . . 17
. . . . . . . . . . . . . . . . . . . . . . . . . . . . . . . . . . . . . . . . . . . . 17
Chapter 5. Using the Synchronic AudioSuite Plug-in
Using Synchronic AudioSuite
Synchronic AudioSuite Modules
Previewing Synchronic AudioSuite
Chapter 6. Automating Synchronic RTAS
Using Automation Playlists
Using MIDI
. . . . . . . . . . . . . . . . . . . . . . . . . . . . . . . . . . . . . . . . . . . . . . . . . . . . . . . . . . . . 54
Chapter 7. Synchronic Plug-in Settings
Index
. . . . . . . . . . . . . . . . . . . . . . . . . . . . . . . . . . . . . . . . . . . . . . . . . . . . . . . . . . . . . . . . . . . . . 59
. . . . . . . . . . . . . . . . . . . . . . . . . . . . . . . . . . . . . . . . . . . . . . . 47
. . . . . . . . . . . . . . . . . . . . . . . . . . . . . . . . . . . . . . . . . . . . . 47
. . . . . . . . . . . . . . . . . . . . . . . . . . . . . . . . . . . . . . . . . . . 49
. . . . . . . . . . . . . . . . . . . . . . . . . . . . . . . . . . . . . 53
. . . . . . . . . . . . . . . . . . . . . . . . . . . . . . . . . . . . . . . . . . . . . . . . 53
. . . . . . . . . . . . . . . . . . . . . . . . . . . . . . . . . . . . . . . 57
. . . . . . . . . . . . . . . . . . . . . . . . . . . 47
Synchronic Plug-in Guide
iv
Page 5

chapter 1
Introduction
Congratulations on your purchase of the Digidesign Synchronic plug-in for Pro Tools systems. Synchronic is designed to manipulate audio loops to create new and interesting
rhythmic variations. Synchronic is the ideal recombinatorial rhythm machine for anyone who
works with audio loops.
Synchronic is essentially an instrument plug-in
that is most effective at manipulating (slicing,
dicing, and recombining) rhythmic audio loops.
After you load your loops into Synchronic, you
can control Synchronic using its on-screen interface, Pro Tools MIDI tracks, an external MIDI
controller, or Pro Tools plug-in automation.
Synchronic plays back synchronized to the session tempo (including tempo changes) while
creating modifications in the playback order,
speed, and volume of individual beats and subdivisions of the beat (or “slices”) within a loop.
Synchronic also includes a multi-effects processor that synchronizes to the session tempo to
create in-tempo effects (such as filter sweeps and
delays).
References to Pro Tools LE™ in this guide
are usually interchangeable with Pro Tools
M-Powered™ or Pro Tools Academic™, except as noted in the Pro Tools M-Powered
and Academic Getting Started Guides.
Synchronic Features
• A DJ rig–inspired user interface for live performance, including Sound, Playback, Effect, and XFade presets and performance
parameters
• Control directly through its own plug-in
interface, a MIDI controller, the computer
keyboard (Keyboard Focus mode), MIDI or
plug-in automation, or a Digidesign-qualified Pro Tools control surface
• Support for 44.1 kHz, 48 kHz, 88.2 kHz,
and 96 kHz sessions
• Support for RTAS
sions
®
and AudioSuite™ ver-
Since Synchronic synchronizes to MIDI Beat
Clock, it only sounds during Pro Tools playback.
Chapter 1: Introduction
1
Page 6

Contents of the Boxed Version of Your Plug-in
Your Synchronic plug-in boxed version contains the following components:
• Installation disc
• Digidesign Registration Information Card
• One of the following authorization cards for
authorizing plug-ins with an iLok USB Smart
Key (not supplied):
• Activation Card with an Activation Code
– or –
• License Card
System Requirements
To use Synchronic, you need:
• An iLok USB Smart Key
• An iLok.com account for managing iLok licenses
◆
A Digidesign-qualified Pro Tools system
For complete system requirements, visit the
Digidesign website (www.digidesign.com).
Compatibility Information
Digidesign can only assure compatibility and
provide support for hardware and software it
has tested and approved.
For a list of Digidesign-qualified computers, operating systems, hard drives, and third-party devices, refer to the Digidesign website
(www.digidesign.com).
Synchronic Plug-in Guide
2
Page 7
Register Your Plug-ins
If you purchase a plug-in online from the DigiStore (www.digidesign.com) using Internet Activation, you are automatically registered.
If you purchase a plug-in boxed version, check
the included Digidesign Registration Information Card for information about how to register
online.
Registered users receive periodic software update and upgrade notices.
Please refer to the Digidesign website
(www.digidesign.com) or the Digidesign Registration Information Card for information on
technical support.
Conventions Used in This Guide
All Digidesign guides use the following conventions to indicate menu choices and key commands:
:
Convention Action
File > Save Choose Save from the
File menu
Control+N Hold down the Control
key and press the N key
Control-click Hold down the Control
key and click the mouse
button
Right-click Click with the right
mouse button
Working with Plug-ins
Refer to the
tion on working with plug-ins, including:
• Inserting Plug-ins on Tracks
• Clip Indicators
• The Plug-in Window
• Adjusting Parameters
• Automating Plug-ins
• Using the Plug-in Settings Librarian
DigiRack Plug-ins Guide
for informa-
The following symbols are used to highlight important information:
User Tips are helpful hints for getting the
most from your Pro Tools system.
Important Notices include information that
could affect your Pro Tools session data or
the performance of your Pro Tools system.
Shortcuts show you useful keyboard or
mouse shortcuts.
Cross References point to related sections in
the Pro Tools Guides.
Chapter 1: Introduction
3
Page 8

About www.digidesign.com
The Digidesign website (www.digidesign.com)
is your best online source for information to
help you get the most out of your Pro Tools system. The following are just a few of the services
and features available.
Registration
the enclosed registration form for details.
Support
or Customer Service; download software updates and the latest online manuals; browse the
Compatibility documents for system requirements; search the online Answerbase or join the
worldwide Pro Tools community on the Digidesign User Conference.
Training and Education
courses available online or find out how you can
learn in a classroom setting at a certified
Pro Tools training center.
Products and Developers
products; download demo software or learn
about our Development Partners and their plugins, applications, and hardware.
News and Events
Digidesign or sign up for a Pro Tools demo.
To learn more about these and other resources
available from Digidesign, visit the Digidesign
website (www.digidesign.com).
Register your purchase online. See
Contact Digidesign Technical Support
Study on your own using
Learn about Digidesign
Get the latest news from
Synchronic Plug-in Guide
4
Page 9
chapter 2
Installation and Configuration
When you open Pro Tools, you are prompted to
Installing Synchronic
Installers for your plug-ins can be downloaded
from the DigiStore (www.digidesign.com) or can
be found on the plug-in installer disc (included
with boxed versions of plug-ins). Additionally,
an installer may also be available on a Pro Tools
software bundle installer disc.
Installation steps are essentially the same, regardless of the bundle, package, or system you
purchase.
Installation
authorize your new plug-in.
Authorizing Synchronic
The Synchronic plug-in is authorized using the
iLok USB Smart Key (iLok), manufactured by
PACE Anti-Piracy, Inc.
To install Synchronic:
1
Do one of the following:
• Download the appropriate plug-in installer
for your computer platform from the
Digidesign website (www.digidesign.com).
After downloading, make sure the installer
is uncompressed (.ZIP on Windows or .SIT
on Mac).
– or –
• Insert the Installer disc into your computer.
2
Double-click the plug-in installer application.
3
Follow the on-screen instructions to complete
the installation.
4
When installation is complete, click Finish
(Windows) or Quit (Mac).
iLok USB Smart Key
The iLok is similar to a dongle, but unlike a dongle, it is designed to securely authorize multiple
software applications from a variety of software
developers.
This key can hold over 100 licenses for all of
your iLok-enabled software. Once an iLok is authorized for a given piece of software, you can
use the iLok to authorize that software on any
computer.
The iLok USB Smart Key is not supplied
with your plug-in or software option. You
can use the one included with certain
Pro Tools systems (such as Pro Tools|HDseries systems), or purchase one separately.
Chapter 2: Installation and Configuration
5
Page 10

If you purchased a plug-in online at the
DigiStore (www.digidesign.com), authorize the
plug-in by downloading licenses from iLok.com
to an iLok.
See the iLok Usage Guide for details, or visit
the iLok website (www.iLok.com).
If you purchased a boxed version of a plug-in, it
comes with either an Activation Code (on the
included Activation Card) or an iLok License
card:
• To authorize plug-ins using an Activation
Code, see “Authorizing Plug-ins Using an Activation Code” on page 6.
• To authorize plug-ins using an iLok License
Card, see “Authorizing Plug-ins Using a License Card” on page 6
3
Transfer the licenses from your iLok.com account to your iLok USB Smart Key by doing the
following:
• Insert the iLok into an available USB port
on your computer.
• Go to www.iLok.com and log in.
• Follow the on-screen instructions for transferring your licences to your iLok.
For information about iLok technology and
licenses, see the electronic PDF of the iLok
Usage Guide.
4
Launch Pro Tools.
5
If you have any installed unauthorized plugins or software options, you are prompted to authorize them. Follow the on-screen instructions
to complete the authorization process.
Authorizing Plug-ins Using an Activation Code
To authorize a plug-in using an Activation Code:
1
If you do not have an existing iLok.com account, visit www.iLok.com and sign up for an
iLok.com account.
2
Transfer the license for your plug-in to your
iLok.com account by doing the following:
• Visit http://secure.digidesign.com/
activation.
• Input your Activation Code (listed on your
Activation Card) and your iLok.com User
ID. Your iLok.com User ID is the name you
create for your iLok.com account.
Authorizing Plug-ins Using a License Card
License Cards are specific to each plug-in or software option. You will receive the appropriate License Cards for the plug-ins that you purchase.
License Cards have a small punch-out plastic
chip called a GSM cutout.
The authorization steps in this section must be
repeated for purchased plug-in.
For additional information about iLok technology and authorizations, see the electronic PDF of the iLok Usage Guide.
Synchronic Plug-in Guide
6
Page 11
To authorize a plug-in using a License Card:
1
Insert the iLok into an available USB port on
your computer.
2
Launch Pro Tools. You are prompted to authorize any installed unauthorized plug-ins or software options.
If you are already using a demo version of
the plug-in or software option, launch
Pro Tools before you insert the iLok, then
insert the iLok into any available USB port
when prompted by Pro Tools.
3
Follow the on-screen instructions until you
are prompted to insert the License Card into the
iLok.
4
Separate the GSM cutout from the larger protective card by pulling it up and out with your
thumb. Do not force the cutout down with your
finger.
5
Insert the GSM cutout into the iLok. Visually
verify that the metal portion of the cutout
makes contact with the iLok’s metal card reader.
Removing Plug-ins
If you need to remove a plug-in from your system, follow the instructions below for your
computer platform.
Windows
To remove a plug-in:
1
Click Start.
2
Click Control Panel.
3
Double-click Add or Remove Programs.
4
Select the plug-in from the list of installed ap-
plications.
5
Click the Change/Remove button.
6
Click OK to remove the plug-in.
7
When removal is complete, close the Add or
Remove Programs window.
Mac OS X
iLok with License Card
6
Follow the on-screen instructions to complete
the authorization process for each plug-in.
7
After the authorization has completed, remove the GSM cutout from the iLok. (If you
have to remove the iLok from the computer to
remove the cutout, be sure to re-insert the iLok
in any available USB port on your computer
when you are finished.)
To remove a plug-in:
1 Locate and open the Plug-ins folder on your
Startup drive (Library/Application Support
/Digidesign/Plug-ins).
2 Do one of the following:
• Drag the plug-in to the Trash and empty
the Trash.
– or –
• Drag the plug-in to the Plug-ins (Unused)
folder.
Chapter 2: Installation and Configuration
7
Page 12
Configuring MIDI
(RTAS Only)
To control Synchronic using MIDI (Instrument
track data, an external MIDI controller, or a
MIDI control surface), you must first configure
Pro Tools for MIDI.
See your Pro Tools Getting Started Guide for
instructions on configuring MIDI interfaces,
MIDI devices, and your operating system
(Windows or Mac) for MIDI operation.
Using Instrument Tracks
(Pro Tools 7.0 or HIgher Only)
With Pro Tools 7.0 and higher, Virus Indigo can
be inserted on an Instrument track, which combines Auxiliary Input and MIDI functions into a
single track type. Once you have inserted Virus
Indigo on an Instrument track, MIDI is routed
automatically from the track to the plug-in.
See the Pro Tools Reference Guide for more
information on Instrument tracks.
Using MIDI and Auxiliary Input Tracks
With Pro Tools 7.x, you can use a MIDI track
and an Auxiliary Input, instead of or in conjunction with an Instrument track. With
Pro Tools 6.9.x and lower, you must insert Virus
Indigo on an Auxiliary Input and route MIDI
data from the MIDI track to the Auxiliary Input
in order to play it.
For more information on routing MIDI data
from a MIDI track to an Auxiliary Input
track, see the Pro Tools Reference Guide.
Synchronic Plug-in Guide8
Page 13
chapter 3
Synchronic Overview
This chapter describes an overview of Synchronic features.
Synchronic Modules
Synchronic has a modular configuration for the
import, slicing, playback, and manipulation of
audio files (loops). Synchronic’s five modules
are: Sound, Playback, Effect, XFade, and MIDI.
Sound Module Can load up to twelve different
audio files, either mono or stereo, of any bit
depth and sample rate. After importing a file, it
can be sliced up to play in synchronization with
the Pro Tools MIDI Beat Clock. Any two sounds
(A and B) can be played back simultaneously.
Playback Module Manipulates the output of the
Sound module. Various aspects of sound playback, such as speed, order, and direction are
controlled by the Playback module.
Effect Module Processes the output of the Playback module. Four concurrent effects are available: Gain, Noise, Filter, and Delay.
XFade Module (RTAS Only) Mixes the A and B
sounds after they have been processed by the
Sound, Playback, and Effect modules. The crossfade between the A and B sounds can be controlled either in Preset or Manual mode.
MIDI Module (RTAS Only) Lets you assign and
trigger combinations of sounds and presets using MIDI. You can also map MIDI controllers to
Synchronic controls.
Synchronic, all modules in Performance mode (RTAS)
See Chapter 5, “Using the Synchronic
AudioSuite Plug-in” for detailed information on the AudioSuite version of Synchronic.
Chapter 3: Synchronic Overview 9
Page 14
Playing Synchronic RTAS
See “Previewing Synchronic AudioSuite” on
page 49 for detailed information on playing
the AudioSuite version of Synchronic.
Synchronic RTAS does not play back the sound
(input) on a track as is the case with many plugins. Instead, Synchronic works as follows:
1 Load audio files (loops) into Synchronic’s
Sound module, much like you would add sound
to a sampler.
2 Use the Detection Slider to slice up the loops
into rhythmically logical units (beats and subdivisions of the beat).
3 Play back the sliced-up loop in tempo.
Synchronic’s Playback module lets you manipulate playback of each slice. The RTAS version of
Synchronic also lets you add in-tempo effects
and mix between two different sounds (Sounds
A and B).
Loading a Loop
For detailed information on loading audio
files (loops) into Synchronic see “Importing
a Sound” on page 20.
To load a loop in Synchronic:
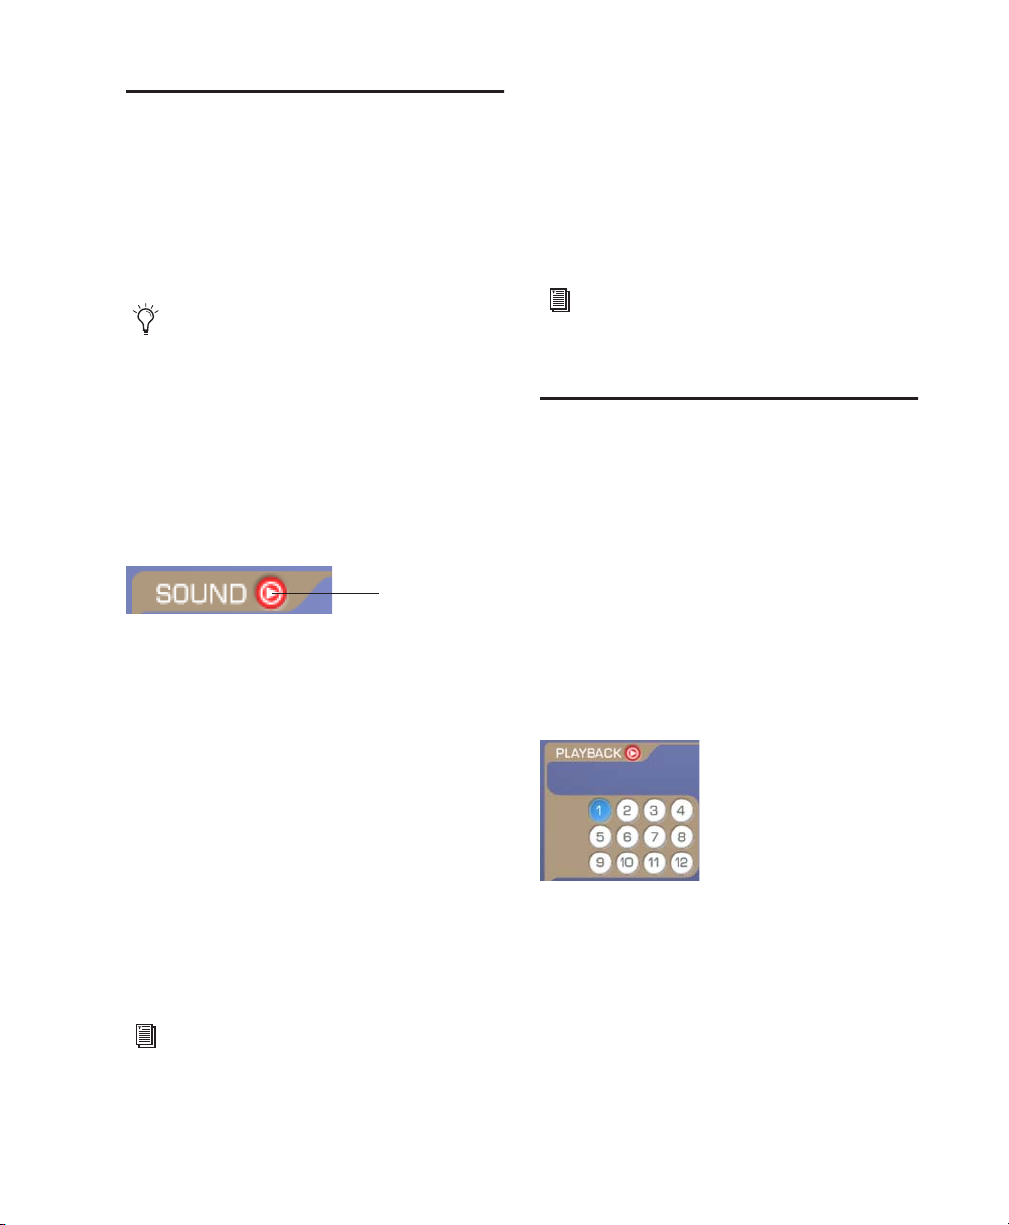
1 Insert Synchronic on an Instrument track.
Synchronic starts and stops playback with the
Pro Tools Transport.
Synchronic Plug-in Guide10
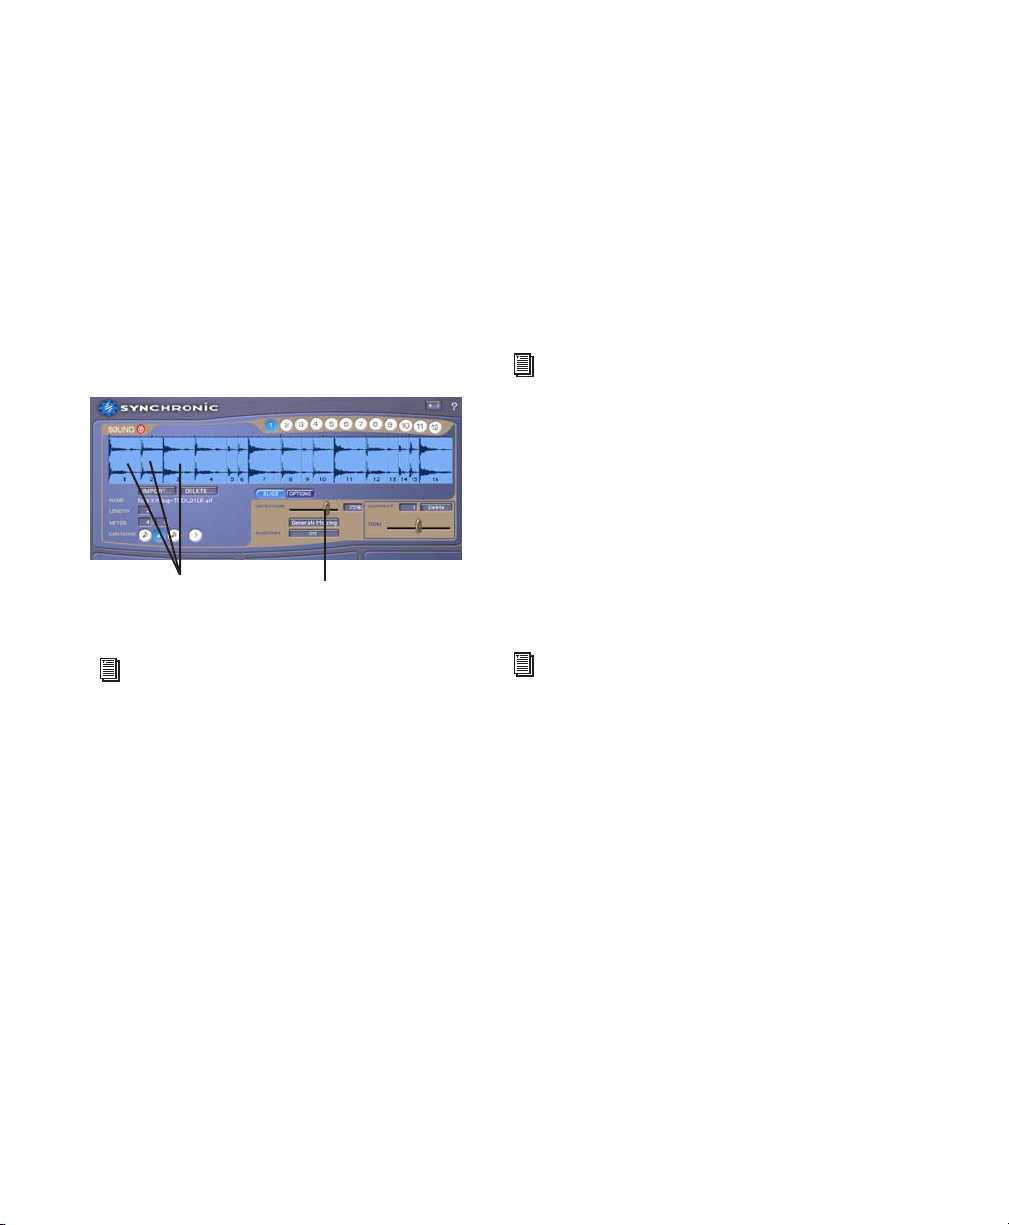
Synchronic Plug-in window (no audio loaded)
When Synchronic is inserted on a track, it is
the sole sound source for that track. If Synchronic is inserted on an audio track containing audio regions, those regions will effectively be muted.
Page 15
2 If necessary, switch the Sound module to Edit
mode. Click the Edit/Performance Mode toggle
to switch between Performance and Edit modes
(see “Performance and Edit Modes” on page 13).
Edit/Performance
Mode toggle
Sound module, Edit mode
3 To import an audio file (mono, dual mono, or
Import
button
Current
preset
stereo) into the Waveform display, do one of the
following:
• Drag an audio file from the Workspace to
the Waveform display.
– or –
• Use the Import button file to import an audio file into the current preset, and click
the Import button. In the Open dialog,
navigate to and select one or more audio
files (loops) for import. Mono files are imported as mono presets, and dual mono (.L
and .R files) and interleaved stereo files are
imported as stereo presets.
Choose an audio file (loop) for import
4 Click Open.
The selected file is loaded into Synchronic and is
immediately stored with the current preset. The
waveform for the loaded file appears in the
Waveform display. When selecting more than
one loop, they are loaded into consecutive available presets.
Waveform display, stereo file, before slicing
Shift-click to choose multiple contiguous
files. Control-click (Windows) or Command-click (Mac) to choose multiple noncontiguous files.
Chapter 3: Synchronic Overview 11
Page 16
Slicing a Loop
Performing Synchronic
Once you have loaded a loop, it is ready to be
sliced up and can be played back in tempo with
the session.
To slice a loop in Synchronic:
■ Adjust the Detection slider until you see the
desired number of slices in the loop. As you increase the detection percentage, slices will appear at detected attack transients in the
waveform.
Detection sliderslices
Loop loaded into Sound preset 1, sliced up
For detailed information on slicing up a
loop, see “Slicing Up a Sound” on page 23.
Playing a Loop
After loading up to twelve loops into Synchronic and slicing them up, you can “perform”
those loops using the Playback, Effects, and
XFade modules.
Slices can be played back in different orders, intempo effects can be added (such as Filter and
Delay), and different combinations of sounds
and effects can be crossfaded.
\
For detailed information on the Playback,
Effect, and XFade modules, see Chapter 4,
“Synchronic Parameters.”
The flexibility of Synchronic’s playback and effects possibilities, along with its DJ-rig inspired
interface, invite real-time performance. You can
play it live using the on-screen interface, a MIDI
controller, your computer keyboard, or a control surface; or you can control it using MIDI
data on a Pro Tools MIDI track or using
Pro Tools plug-in automation.
\
For information on automating Synchronic
see Chapter 6, “Automating Synchronic
RTAS.”
To play a loop in the RTAS version of Synchronic:
■ Click Play on the Pro Tools Transport, or press
the Spacebar.
To play a loop in the AudioSuite version of
Synchronic:
• Click Preview in the Plug-in window.
Synchronic plays back the loaded loop according to the session tempo.
Synchronic Plug-in Guide12
Page 17
Performance and Edit Modes
Each of the Synchronic modules can be independently switched between Edit and Performance modes with the Mode toggle. This lets
you have one module in Edit mode (for example, to fine tune a sound) while playing another
in Performance mode.
The AudioSuite version of Synchronic functions only in Edit mode. Performance mode
is not available, and the Mode toggle does
not exist. See “Synchronic AudioSuite Modules” on page 47 for more information.
To toggle a module between Performance and Edit
mode:
■ Click the Mode toggle to the right of the mod-
ule’s name.
Mode toggle
(Performance mode)
Mode toggle (Sound module)
When the triangle in the Mode toggle points to
the right, it indicates that the module is in Performance mode. When the triangle points
down, it indicates that the module is in Edit
mode.
Edit Mode
Edit mode provides detailed access to the module’s controls. Changing parameters in Edit
mode immediately alters the currently selected
preset. Edit mode lets you load audio files, edit
presets, and make MIDI assignments that can be
instantly recalled in Performance mode.
Detailed information about each module’s
Edit parameters is described in Chapter 4,
“Synchronic Parameters.”
Performance Controls
(RTAS Only)
Synchronic provide several types of controls for
real-time performance, including presets, userassignable performance controls (User Knobs),
the Sound A and B selectors, and an on-screen
keyboard.
Presets Store and recall the Edit mode settings
for each module. Synchronic provides twelve
presets for each module. For more information,
see “Synchronic Presets” on page 14.
Performance Mode
In the Synchronic RTAS, each module can be
viewed in Performance mode to provide presets
and performance controls. Performance mode
lets you select sounds loaded into the Sound
module, select presets and manipulate performance controls for the Playback, Effect, XFade,
and MIDI modules.
Detailed information about each module’s
Performance mode controls is presented in
Chapter 4, “Synchronic Parameters.”
Presets, Playback module
Chapter 3: Synchronic Overview 13
Page 18
User Knobs Control predefined parameters in
the Playback, Effect, and XFade modules. In Edit
mode, you can assign a module’s User Knobs to
control certain performance parameters. The
MIDI module lets you assign MIDI controllers to
each of the User Knobs in each module.
User Knobs, Playback module
Sound A and B Selectors Are available both in
Edit and Performance mode for the Playback
and Effect modules. These buttons toggle which
sound—Sound A or Sound B—the current Playback or Effect preset is processing. Both Sound A
and B selectors can be enabled at the same time,
allowing for a single Playback or Effect preset to
modify both Sound A and Sound B at the same
time. When neither Sound A nor Sound B selectors are enabled, the currently selected Playback
or Effect preset is disabled until one of the
Sound selectors is enabled.
Synchronic Presets
Each module has 12 presets available, as follows:
• Sound module presets are used to load and
store audio files (loops).
• Playback, Effects, and XFade module presets are used to store and recall various Edit
mode settings.
• MIDI module presets store MIDI control assignments (which can include combinations of presets from each of the other
modules).
Plug-in settings and presets can be shared
between the AudioSuite and RTAS versions
of Synchronic. However, the AudioSuite version of the plug-in can import and export
only information stored for the Sound, Playback, and Effect modules in the first preset.
Synchronic presets are unique to each instance
(each insert) of Synchronic in a session. To save
the global state of Synchronic presets in a given
instance, use the plug-in librarian (see
Chapter 7, “Synchronic Plug-in Settings”).
Sound A/B selectors, Playback module
On-Screen Keyboard Can be used to trigger presets in the other four modules. You can also assign the on-screen keyboard, or an external
MIDI keyboard, to trigger different presets. For
more information, see “MIDI Module” on
page 42.
Keyboard, MIDI module
Synchronic Plug-in Guide14
Synchronic presets can be triggered by the MIDI
module in Performance mode, or a Pro Tools
MIDI track or an external MIDI keyboard controller for performance situations (live or in the
studio).
For information about assigning keys and
MIDI controllers in the MIDI module, see
“MIDI Module” on page 42.
Presets can also be selected using plug-in automation or even your computer keyboard.
In Keyboard Focus mode, you can select presets using your computer keyboard (see
“Keyboard Focus Mode” on page 45).
Page 19
To select a preset, do one of the following:
■ In Performance mode, click a Preset button in
any module. MIDI module presets are the “keys”
of the on-screen keyboard.
– or –
■ In Edit mode, click a Preset button in the
Sound module, or select a preset from the Preset
pop-up menu for the Playback, Effects, and
XFade modules. In Edit mode, the MIDI module’s presets are not available on-screen.
Preset pop-up menu, Playback module
To duplicate a Playback, Effect, or XFade preset:
1 Select the preset you want to duplicate.
2 Control-click (Windows) or Command-click
(Mac) the destination preset.
The settings from the selected preset will be copied to the destination preset.
To edit and store a preset:
1 Select the preset you want to edit. For the
Sound module, you must be in Edit mode to select the preset you want to edit (see “Sound
Module” on page 18).
2 If the module is in Performance mode, toggle
to Edit mode and edit as desired (for detailed information on the Edit mode parameters of each
module, see Chapter 4, “Synchronic Parameters”).
Any edits to any module’s parameters are immediately applied and stored in the selected preset.
Chapter 3: Synchronic Overview 15
Page 20

Synchronic Plug-in Guide16
Page 21

chapter 4
Synchronic Parameters
Adjusting Synchronic Parameters
To type a parameter value:
1 Click on the parameter text that you want to
edit.
Editing Parameters Using a Mouse
You can adjust rotary controls with a mouse by
dragging horizontally or vertically. Parameter
values increase as you drag upward or to the
right, and decrease as you drag downward or to
the left.
Editing Parameters Using a Computer Keyboard
Each rotary control has a corresponding parameter text field directly below it. This displays the
current value of the parameter. You can edit the
numeric value of a parameter with your computer keyboard.
2 Change the value.
• Type the desired value.
– or –
• To increase a value, press the Up Arrow on
your keyboard. To decrease a value, press
the Down Arrow on your keyboard.
3 Do one of the following:
• Press Enter on the numeric keyboard to input the value and remain in keyboard editing mode.
– or –
• Press Enter on the alpha keyboard (Windows) or Return (Mac) to enter the value
and leave keyboard editing mode.
To move forward through the different parameters, press the Tab key. To move backward, press Shift+Tab.
Chapter 4: Synchronic Parameters 17
Page 22

Sound Module
The Sound module can store and recall up to
twelve audio files. On import, audio files are
loaded into RAM and are saved with the plug-in
settings file.
In Edit mode, you can import, delete, and
“slice” audio files (loops). When Synchronic
“slices up” an audio file, it automatically edits
the file (loop) into regions—according to its
own sophisticated internal transient detection
algorithms—based on musical criteria, such as
meter, number of bars, and subdivisions of the
beat. In this way, Synchronic can quickly and
easily isolate individual hits in rhythmic loops.
Each slice is played back in tempo by synchronizing to the Pro Tools MIDI Beat Clock.
In Performance mode (RTAS only) the Sound
module can play back any of its twelve presets
independently on both the A and B channels
(Sound A and Sound B).
Performance/Edit
Mode toggle
Sound Performance Mode
(RTAS Only)
Performance mode lets you recall and interact
with different audio files and loops loaded into
Synchronic.
Performance mode applies only to the RTAS
version of Synchronic.
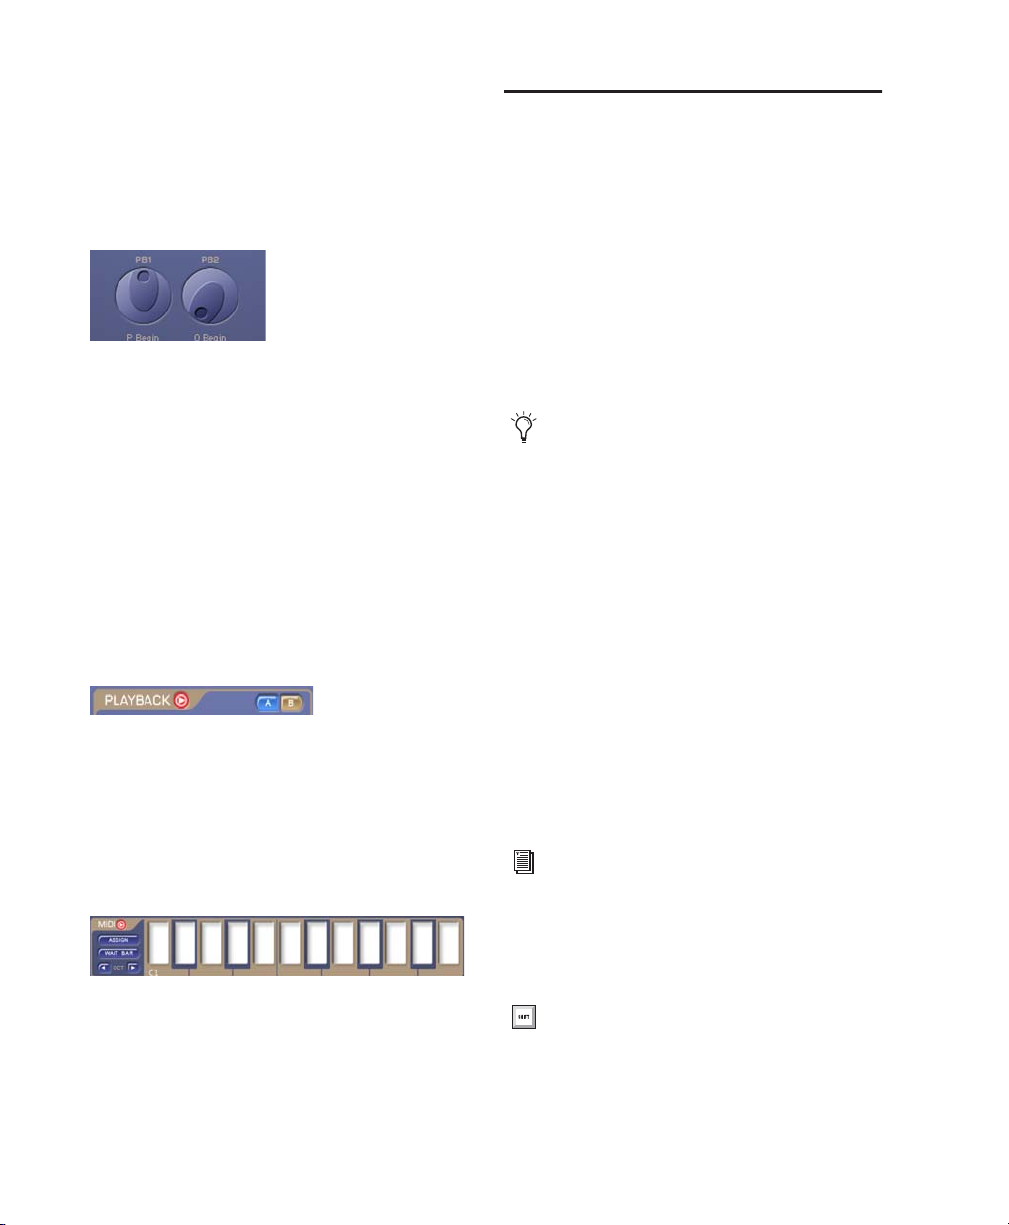
Sound Presets
Sound presets recall audio files loaded in Synchronic. In Performance mode, Sound presets
are numbered from 1–12 and are arranged in
two banks located above and below the Waveform display. Each Sound preset may contain an
individual mono or stereo audio file of any bit
depth or sample rate. Selecting a Sound preset
will instantly recall the audio file (loop) for playback. You can select a Sound preset by clicking
the desired preset button, or by pressing the corresponding key on your MIDI keyboard.
Sound A
presets
Sound A Waveform
display (mono file
loaded)
Sound B Waveform
display (stereo file
loaded)
Sound B
presets
Sound module, Performance mode, with audio files loaded into Sound A preset 4 and Sound B preset 1 (RTAS shown)
Synchronic Plug-in Guide18
Interactive Waveform display
(Sounds A and B loaded and sliced)
Page 23

Sound A and Sound B
Starting and Stopping Playback
In Performance mode, two sounds can be
queued for playback, much like a typical DJ
setup with two turntables: one on the “A Side”
and one on the “B Side.” Both the Sound A and
B use the same twelve sound presets. The waveform for Sound A appears above the waveform
for Sound B; and each waveform is labeled on
the left “A” and “B.”
When Sound A and B are playing simultaneously, you can isolate one of the sounds by
clicking the A or B labels to the left of the Waveform display. The Crossfade fader in the XFade
module will move to one side or the other, effectively muting the non-selected sound.
Interactive Waveform Display
In Performance mode, the Sound module displays two waveforms for the A and B sounds.
The Waveform display shows the currently selected audio file (loop). The Waveform display
can show both mono and stereo audio loops for
the A and B sides.
During playback, the Waveform animates to indicate the pulse of the Pro Tools MIDI Beat
Clock. Clicking on the Sound module’s Waveform display during playback will reposition
playback to that location in the waveform. You
can create syncopated rhythms by repeatedly
clicking the waveform in either the A Sound or
the B Sound during playback. Alt-clicking (Windows) or Control-clicking (Mac) the Waveform
display re-synchronizes playback with the current Pro Tools MIDI Beat Clock location (according to bars and beats).
You can only start or stop Synchronic playback
using the Pro Tools Transport. Any Synchronic
insert will play back when the Pro Tools Transport is engaged.
Use Track Mute to manage multiple Synchronic inserts. You can also use the Synchronic Plug-in Bypass to mute the output
of a Synchronic insert.
Sound Edit Mode
In Edit mode, sounds can be imported, deleted,
sliced-up, and fine-tuned for Synchronic playback. Audio files loaded into Synchronic’s presets are unique to each insert and are saved with
the Pro Tools session file or plug-in settings file.
The global state of all presets, including loaded
audio files, can be stored and recalled using the
Synchronic plug-in librarian (see Chapter 7,
“Synchronic Plug-in Settings”).
When the Sound module is in Edit mode in
Synchronic RTAS, only Sound A is visible
and Sound B is muted. Sound A is effectively soloed (the XFade module only passes
Sound A).
Chapter 4: Synchronic Parameters 19
Page 24

Interactive Waveform
display (stereo file
loaded and sliced)
Sound Attributes
Performance/Edit
Mode toggle
Selected
preset
Sound
presets
Import Sound Delete Sound
Sound module, Edit mode (audio loaded into preset 1) (RTAS shown)
buttonbutton
Preparing Audio Files for Import
To take full advantage of Synchronic’s rhythmic
editing and playback capabilities, you should
prepare your “loops” before importing them
into Synchronic. You can do this in Pro Tools by
editing a region (loop) on a track in the Edit
window and then consolidating the region.
Trim the region (loop) to an exact bar length.
There should be no gap between the start of the
region and the downbeat, and no additional audio at the end of the region. Once you have defined your loop as a region, consolidate the region (Edit > Consolidate Selection) and import
the resulting audio file into Synchronic.
In preparing your loops in the Pro Tools Edit
window, use Tab To Transients to locate
downbeats and use the Separate Region
command (Edit > Separate) to create “loopable” regions from longer regions.
Importing a Sound
You can import one or more audio files into
Synchronic by using the Import button or dragging and dropping from the Workspace.
Supported Audio Formats
Synchronic supports AIFF, BWF (WAV), and
SD II (Mac only) audio file formats, and 8-, 16-,
and 24-bit mono or stereo audio files. Any combination of supported bit rates and audio file
formats can be imported and played back at the
same time. All audio files are converted to 32-bit
floating point (RTAS native format) on import.
However, Synchronic does not convert the sample rate of files on import. For example, if you
Slice Detection slider
For more information about editing regions
in Pro Tools, see the Pro Tools Reference
Guide.
Synchronic Plug-in Guide20
Page 25

import a 44.1 kHz file into a 96 kHz session, it
will playback at the wrong pitch (it will play
back at tempo since each slice is quantized to
MIDI Beat Clock).
To import a sound into a preset:
1 If necessary, switch the Sound module to Edit
mode (see “Performance and Edit Modes” on
page 13).
2 Select the preset where you want to store the
audio file (loop).
3 Click the Import button. If there is already a
file loaded into the current preset, you will be
prompted to delete it.
Control-click (Windows) or Commandclick (Mac) Import button to bypass this
prompt.
4 In the Open dialog, navigate to and select one
or more audio files (loops) for import. Mono
files are imported as mono presets, and dual
mono (.L and .R files) and interleaved stereo files
are imported as stereo presets.
Shift-click to choose multiple contiguous
files. Control-click (Windows) or Command-click (Mac) to choose multiple noncontiguous files.
5 Click Open.
To drag and drop audio files into Synchronic:
1 If necessary, switch the Sound module to Edit
mode (see “Performance and Edit Modes” on
page 13).
3 Open the Workspace, and navigate to and se-
lect one or more audio files (loops) for import.
Mono files are imported as mono presets, and
dual mono (.L and .R files) and interleaved stereo files are imported as stereo presets.
4 Drag the selected audio to the Waveform dis-
play in Synchronic.
Dragging and dropping an audio file works
only from the Workspace, and not from
Windows Explorer, Mac Finder, or the Edit
window.
Selecting Multiple Files for Import
When multiple files are selected, they are loading into the next available unoccupied presets.
For example, if preset 2 is the selected preset,
and preset 3 and 4 already have sounds loaded,
importing three sound files will load them into
presets 2, 5, and 6.
Additionally, all matching .L and .R files are imported as a stereo Sound preset. For example, selecting Happy.L, Happy.R, Kyne.L and Kyne.R
will load two stereo sounds into the selected preset and the next available preset.
After Loading Sound into Synchronic
The selected file will be loaded into Synchronic
and stored with the preset. The waveform for
the loaded file will appear in the Waveform display. In Performance mode, the same preset can
be selected for both Sound A and Sound B.
2 Select the preset where you want to store the
audio file (loop).
Waveform display, stereo file, before slicing
Chapter 4: Synchronic Parameters 21
Page 26

Mono files loaded in a stereo Synchronic insert
are panned center. Stereo files loaded in a mono
Synchronic insert are summed to mono. Dual
mono audio files can be imported if both .L and
.R files are selected (Shift-click) for import. Interleaved stereo audio files can also be imported.
If you try to import a large sound file, Synchronic prompts you to reconsider. Large
files are hard to view in the Waveform display, and will be slow to load, so you may
want use Pro Tools to edit larger files into
multiple smaller files. You can then import
the smaller files into Synchronic.
How Synchronic Stores Sound Presets
Synchronic loads audio files into RAM on import and then stores them with the plug-in settings. The plug-in settings are stored with the
Pro Tools session file or using the Settings Librarian to save a plug-in settings file (.tfx). The
size of the Pro Tools session file or plug-in settings file will increase corresponding to the
number and size of audio files loaded into Synchronic.
When you close and later open a session with
Synchronic inserted and files loaded into it,
Pro Tools will re-load any stored audio files into
RAM when opening the session.
Depending on the number and size of the
audio files loaded into Synchronic, plug-in
settings file sizes will vary in size. Typically, you will only load audio files that are
a few bars long. If you import large files into
Synchronic, saving and restoring settings
files will take more time.
Sound Attributes
After importing an audio file (loop), you need to
enter additional information regarding the following attributes: Length, Time Signature, and
Subdivision of the beat. When accurately defined, these attributes help Synchronic properly
play back the loop in synchronization with the
Pro Tools MIDI Beat Clock (assuming you have
not applied too many of Synchronic’s beat
scrambling processing capabilities). This way
you can play back a loop at nearly any tempo
with reasonable accuracy.
Sound attributes
Name Displays the name of the audio file for the
currently loaded audio loop. The name displayed in File Name will be the same name as
the audio file as it appears on the hard drive or
storage medium from which the file was loaded.
Length Lets you enter the number of bars for the
currently selected loop.
Time Signature Lets you enter the time signature
for the currently selected loop.
Contains Lets you select whether the current audio loop contains eighth, sixteenth, or thirtysecond note subdivisions of the beat, and
whether the loop contains a triplet subdivision.
Importing Acid Files
Synchronic can import audio in the Acid wave
file format. Synchronic will reveal the pre-existing slice data as you adjust the Detection slider
(see “Slicing Up a Sound” on page 23).
Synchronic Plug-in Guide22
Page 27

Deleting a Sound
To delete a sound from a preset:
1 If necessary, switch the Sound module to Edit
mode (see “Performance and Edit Modes” on
page 13).
Once a loop is sliced up, Synchronic can replay
the loop at any tempo with any number of modifications. Furthermore, each slice of the loop
starts playback according to the Pro Tools MIDI
Beat Clock, so it maintains its original rhythmic
pattern at any tempo.
2 Select the preset you want to clear.
3 Click the Delete button.
4 You will be prompted to confirm deletion.
Control-click (Windows) or Commandclick (Mac) the Delete button to bypass this
prompt.
The selected preset will be empty, and the sound
will be deleted from the current settings file.
Slicing Up a Sound
Once you have imported and assigned attributes
to an audio file, the imported sound needs to be
“sliced up.” A slice is like an audio region (internal to Synchronic only) that typically contains
only a single hit (articulated by a clear attach
transient). You can adjust the Detection slider to
automatically slice up the sound file based on
attack transients. Each slice is indicated with a
distinct line in the waveform at the start of the
slice, and the slice number. In most cases, you
can quickly identify the musically significant
rhythmic events in a sound file by adjusting the
Detection slider.
To add a missing slice:
■ Control-click (Windows) or Command-click
(Mac) the Waveform display at the correct point
in the waveform to create a new slice.
To delete an erroneous slice:
■ Alt-click (Windows) or Option-click (Mac) the
slice.
All sound files must contain at least one
slice. consequently, the first slice of a loop
can not be deleted.
Slice Settings
Slice settings let you adjust the sensitivity for
slice detection, generate missing slices, and trim
or delete the current slice. This section also provides controls for auditioning the loop or individual slices.
Slice settings
Waveform display, stereo file, sliced
Detection (0–100%) Automatically slices up the
loaded audio file based on transient detection.
The higher the detection value, the more slices
are identified.
Chapter 4: Synchronic Parameters 23
Page 28

Generate Missing Adds additional slices where
transients appear to be missing. This can be useful when an imported audio loop contains few
transients.
Use Generate Missing to create rhythmically
logical slices on ambient loops or drones,
and apply playback manipulations and effects for interesting results.
Audition Modes Are initiated using the Pro Tools
transport. The default audition mode is Off. To
audition a single slice without starting the
Pro Tools transport, click the slice in the Waveform display. Synchronic provides the following
Audition modes:
• Off: Plays back each slice in a sound synchronized to the Pro Tools MIDI Beat
Clock.
• Original: Loops the audio file at its original
tempo.
• Half Speed: Plays the audio file at half the
original tempo and pitch. This is useful for
listening to slices closely to hear whether
or not a slice has been correctly detected,
• Single Slice: Loops a single slice. This is useful for adjusting the slice end point.
• Double Slice: Loops two consecutive slices.
This is useful for detecting when a false
slice is present and needs to be deleted.
Use Single Slice mode to edit slices in hard to
view waveforms, such as in heavily compressed or extra long loops.
Delete Deletes the currently selected Slice. Option-click can also be used to delete erroneous
slices.
Shift-clicking on a slice will play two consecutive slices. If the second slice played
turns out to erroneous, that is only one true
percussive event is heard when shift-clicking a pair of slices, then you may want to
delete the second slice of the pair. (Be sure to
select the correct slice to delete!)
Trim (–.30 to .30 sec.) Trims the currently selected Slice’s end point. Slices generated during
detection (or by Command-clicking) may need
to be adjusted slightly. For example, if you audition a slice (by clicking on it), and you hear a
click at the end of the slice you will need to trim
the end of the slice. The Trim slider can adjust
the end of any slice (except the last one) by
+/–30 milliseconds. When in Single Slice Audition mode, the Waveform Display zooms to the
currently selected slice, letting you visually adjusted the slice end using the Trim slider.
Certain operations (such as Generate Missing and Delete Slice) can change the number of slices in a Sound preset. Changing the
number of slices during playback may cause
the playback position to jump, and cause
Synchronic to play back out of synchronization. Stopping and starting playback will resynchronize Synchronic playback.
Current Displays the currently selected Slice for
auditioning, trimming, or deleting. Click on a
Slice in the Waveform display to update the
Current slice. A Slice number can also be manually entered in the Current field.
In Keyboard Focus mode, use the Left and
Right arrow keys to increment/decrement
the current slice number.
Synchronic Plug-in Guide24
Page 29

Options
Additional Sound Options let you adjust the
overall gain (+/–24 dB) of the selected preset and
extend the slices to compensate for slower tempos.
Options settings
Gain (–24 through 24 dB) Adjust the gain of a
sound in order to boost or attenuate the current
loop. To achieve a good balance between all
loaded sounds, a “gain” control is available for
each sound with +/– 24 dB of gain.
Slice Extension (Off, Type 1, Type 2) Since a
sliced up sound can be played back at a slower
tempo than its original performance, each slice
may need to play for a longer duration than the
original audio file length. Otherwise, a slice will
stop when it reaches its end point, and sound is
unnaturally truncated. Slice Extension lets you
designate if and how slices can be artificially extended. Synchronic provides the following Slice
Extension types:
• Off: Adds no tail extension, however it
does ramp down any DC offset that may
occur at the last sample of a slice.
• Type 1: Sounds best on loops that predominantly contain high frequencies, such as a
tambourine or a hi-hat loop.
• Type 2: Sounds most natural for most loops
and is the default setting.
Playback Module
The Playback module determines how the
sounds loaded into the Sound module presets
are played back. Each sound slice in the selected
Sound module preset is played back synchronized to the Pro Tools MIDI Beat Clock, and the
the Playback module determines the order, duration, direction, starting slice, and mode by
which each slice is played back.The Playback
module additionally provides controls for the
playback pitch and offset of the selected sound
presets.
Playback Performance Mode
(RTAS Only)
In Performance mode, the Playback module provides Preset, A/B Sound selectors, and User Knob
controls.
Sound A/B
selectors
Performance/Edit
Mode toggle
Presets
User Knobs
(PB1 and PB2)
Playback module, Performance mode
Sound A and B Selectors
The Sound A and B selectors determine whether
or not the A and B sounds are patched into the
Playback module. Click the Sound A or B selectors to toggle the A or B sound on or off.
Chapter 4: Synchronic Parameters 25
Page 30

Playback Presets
Playback Mode
Twelve Playback presets let you recall stored
playback effects.
Selecting a preset recalls the last edited set of parameters for the preset. Playback presets let you
invoke different playback manipulations in
rapid succession, to create a compelling musical
performance. Presets can also be used to store
sound design variations for use in a Pro Tools
session.
Playback User Knobs (PB1 and PB2)
The Playback module provides two assignable
User Knob controls (PB1 and PB2) that provide
direct control over any of the Playback module’s
Edit mode settings. The current control assignment is displayed below each User Knob.
Playback Edit Mode
In Edit mode, you can edit the Playback parameters for the selected preset.
Sound A/B
selectors
Pitch and Offset
Select and Enable
buttons
Pitch or Offset
parameters
Preset selector
Performance/Edit
Mode toggle
User Knob
assignments
Playback module, Edit mode
The Playback module provides five playback
modes: Standard, Stretch, Stab, Spin, and Smear.
These modes determine the character of each
slice as it is played—how each slice is played
back.
Selecting Playback Mode
If the playback tempo is slower than the
original tempo such that it creates a gap between the end of one slice and the beginning
of the next, Synchronic will extend the first
slice according to the setting of the Slice Extension Option in the Sound module (see
“Options” on page 25).
Standard Plays each slice without any additional
manipulation and plays each slice from start to
end.
Stretch Uses a granular time compression/expansion technique to make a slice “fit” the
amount of time the slice has to play. The Playback Offset settings can be used to further increase the stretch factor for extreme granulation
effects (see “Playback Offset” on page 32).
Synchronic Plug-in Guide26
Page 31

Stab Based upon the “stab” scratching gesture
that turntablists use when manually starting
and stopping the turntable with their hand. The
playback of each slice always starts at a speed
and pitch of zero, and then ramps up to full
speed and correct pitch halfway through the
slice, and then returns to zero speed and pitch
by the end of the slice. The “full” speed and
“correct” pitch are determined by the Playback
Pitch settings (see “Playback Pitch” on page 31).
Spin Lets each slice loop asynchronously during
the playback duration of the slice. If Pitch and
Offset manipulations are used, a slice may repeat itself a multiple times before advancing to
the next slice.
Smear Uses crossfading and reverse playback to
“smear” one slice into the next. The Playback
Offset settings control the depth of smearing
(see “Playback Offset” on page 32).
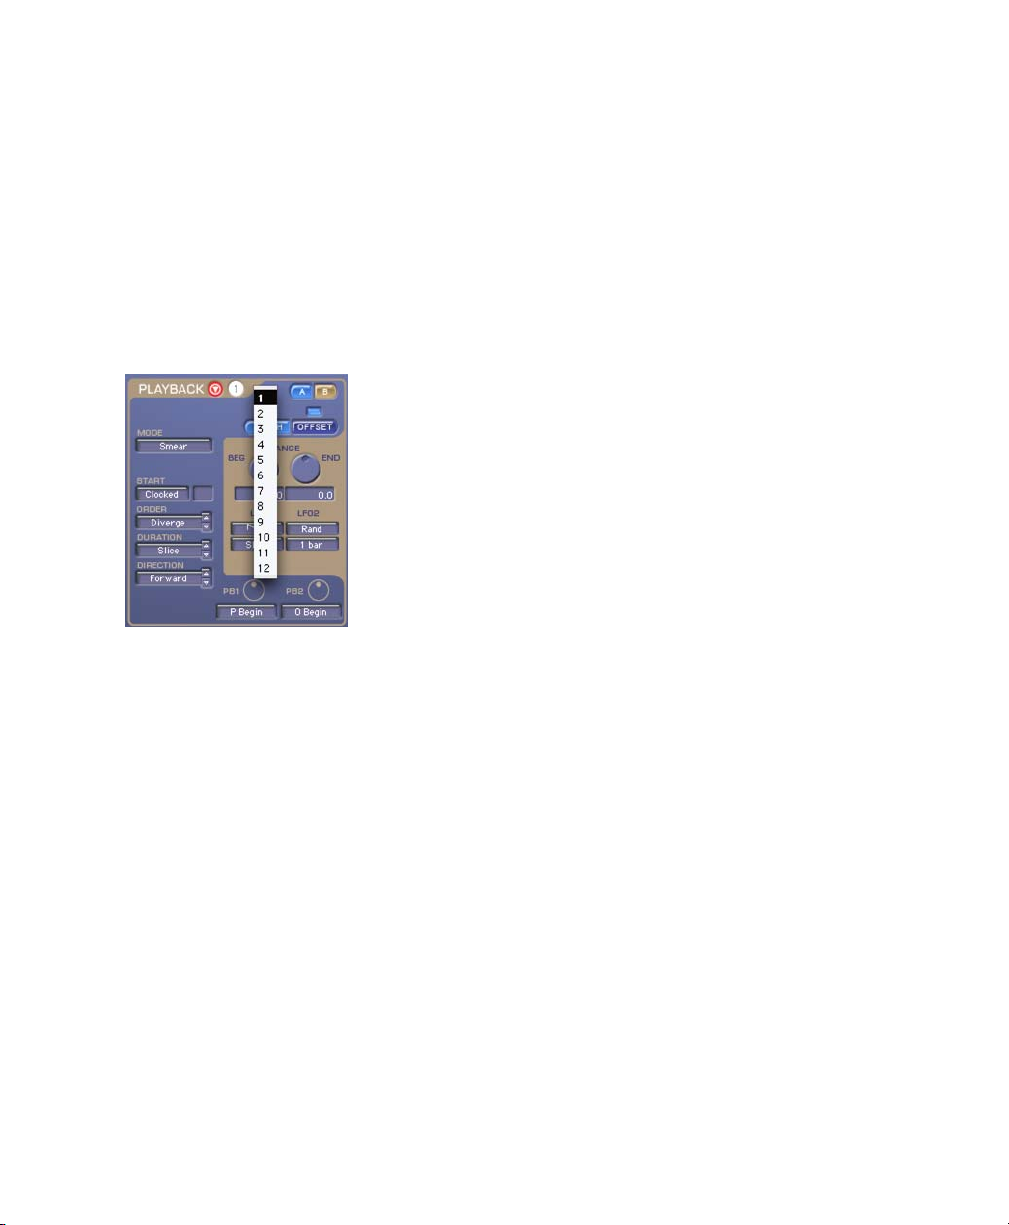
Playback Start
Start determines where to start playback within
a sound, either Clocked to the MIDI Beat Clock
or from a specific slice.
Slice # Sets playback to start at a specific slice regardless of the position of the MIDI Beat Clock.
When Slice # is selected for Playback Start, enter
the number of the slice you want to start with in
the numeric enter field to the right of the Start
pop-up menu.
Playback Start setting, Slice # 7 selected
Playback Order
Order determines the sequence in which the
slices of the selected sound are played back. Synchronic provides several options for Playback
Order: Off, One Slice, Reverse, Diverge, Random, Step, Span, Straddle.
Clocked Sets the start position relative to the
current position of the MIDI Beat Clock. For example, if Pro Tools starts playing back at beat 2
of bar 13, and Synchronic is playing back a two
bar drum loop, then Synchronic will start playback at the slice corresponding to the second
beat of the first bar of the loop.
Selecting Playback Order
Chapter 4: Synchronic Parameters 27
Page 32

Off Plays the sound slices in their original sequence. Each slice increments from the previous
one until the end of the sound is reached, and
then continues to loop from the starting slice.
One Slice Plays back and loops only the selected
Start slice.
Reverse Plays the original sequence of slices in
reverse order. Each slice plays in the specified direction (see “Playback Direction” on page 30),
but order of slices is reversed.
Diverge Plays the Start slice followed by last
slice, followed by the second slice, followed by
the second to last slice, and so on following a divergent order from the Start slice.
Random Plays slices in random order.
Random Swap Randomly selects “sibling” slices
based on a half-note spacing. For example, the
“2 and” of a bar, and the “4 and” of a bar are siblings. Unlike Random, which can sound very
“outside,” Random Swap preserves much of the
original feel of a loop, while simultaneously
adding random variations with each repeat of
the loop.
Step (Step 2–5) Plays slices by stepping over
some number of adjacent slices (2–5). For example, selecting Step 2 with a loop containing
eight slices will play back slices 1, 3, 5, 7, 2, 4, 6,
8, and repeat.
Straddle (Straddle 2–5) Plays slices by stepping
forward then making a small step backward. For
example, selecting Straddle 4 with a loop containing eight slices would play slices 1, 5, 2, 6, 3,
7, 4, 8, and so on.
Depending on where you start playback in
the Pro Tools timeline, the start position
will affect the exact sequence of slices when
using Step, Span, or Straddle. Typically, you
will want to be sure to start playback on the
downbeat of a bar, and that the aligns with
the number of bars in the loop.
Playback Duration
Playback Duration determines how long a slice
will play before the next slice starts. In addition
to the predominant pulse (beat or subdivision of
the beat), rhythmic loops usually contain a variety of durations. Thus, to maintain the character of a rhythm at different tempos, the default
value for Duration is for the duration of the
slice. This means that each slice plays for its
original note length (rhythmic value).
Synchronic also lets you override the original
duration of a slice and impose alternate rhythmic patterns on the sliced-up loop. In addition
to the standard note-value durations of eighth
Span (Span 2–5) Plays slices by stepping forward
some number of slices (2–5) then skipping back
to play the stepped over slices in order. For example, selecting Span 3 with a loop containing
eight slices would play slices 1, 4, 3, 2, 5, 4, 3, 6,
5, 4, 7, 6, 5, 8, 7, 6, and so on.
Synchronic Plug-in Guide28
Page 33

notes, eighth note triplets, and sixteenth notes,
the following groups of rhythmic patterns are
included: Off Beats, Syncopate, Clave, Pick Up,
and Swing.
Selecting Playback Duration
Syncopate (Syncopate 1–5) Five variations featuring dotted rhythms.
Latin (Latin 1–5) Five variations based on AfroCaribbean, Cuban, and Brazilian rhythms.
Off Beats (Off Beats 1–5) Five variations that
generally emphasize the “and” of the beat.
Chapter 4: Synchronic Parameters 29
Page 34

Pick Up (Pick Up 1–5) Five variations that start
steady and then speed up over the course of a
bar.
Playback Direction
Synchronic can play sound slices forward (from
beginning to end) or backward (from end to beginning). Synchronic provides seven possibilities for the direction of the playback of slices:
Forward, Backward, For/Back, Back/For, F/B Diddle, F/B Beats, and Random.
Selecting Playback Direction
Forward Plays all slices forward (from beginning
to end).
Swing (Swing 1–5) Five variations that use incorporate eighth-note swing (Swing 1–2) or sixteenth-note swing (Swing 3–5)
Synchronic Plug-in Guide30
Backward Plays all slices backward (from end to
beginning).
For/Back Plays alternating slices forward then
backward.
Back/For Plays alternating slices backward then
forward.
F/B Diddle Plays consecutive slices forward,
backward, forward, forward, backward, forward,
backward, backward, and so on.
F/B Beats Plays slices on downbeats (quarter
notes) forward, and all other slices are played
backward.
Random Plays back slices forward or backward
randomly.
Page 35

Playback Pitch
Low Frequency Oscillator (LFO)
Pitch transposition can range from –60 to +60
semitones. Synchronic provides two pitch modulating LFOs for Playback Pitch. These LFOs can
be combined to create complex and interesting
modulation patterns.
Pitch Enable
button
Pitch Select
button
Beginning Pitch
(in semitones)
End Pitch
(in semitones)
LFO Waveshape
selectors
LFO Duration
selectors
Playback Pitch settings
Enable (On, Off) Enables or disables Pitch modulation.
BEG and END Range (–60 to +60) Sets the Beginning transposition and End transposition
values (in semitones) referenced by both LFOs.
Playback Pitch and Playback Offset, and Gain,
Noise, Filter, and Delay effects can be continuously modulated by one or more Low Frequency
Oscillators (LFO1 and LFO2). Each LFO has a selectable Waveshape and Duration. The LFO will
sweep through the selected waveshape according to the selected duration.
If an LFO Waveshape is set to Off, that LFO does
not modulate the associated parameter.
If both LFO waveshapes are set to Off, then only
the BEG parameter will affect the playback
pitch. The END parameter will have no affect on
playback pitch.
LFO Waveshapes Select the modulation wave
shape for LFO1 and LFO2. The available wave
shapes include: Off, Sawtooth, Triangle, Vee,
Square, Short Pulse, Long Pulse, Sawtangle,
Staircase, and Random.
LFO Waveshape pop-up menu
Chapter 4: Synchronic Parameters 31
Page 36

The LFO will sweep from the BEG parameter
value to the END parameter value according to
the selected waveshape. It is important to note
that the LFO waveshapes are iconic representations of the type of transitions you can select,
and, depending on the BEG and END values,
they may not necessarily sound like they look.
LFO1 Duration (Slice, 8th, 16th, 32nd, Off Beats,
Syncopate, Latin, Pick Up, Swing) Applies the
LFO according to the selected duration. The LFO
will sweep through the selected waveshape according to the selected rhythm. For more information on the rhythmic patterns, see “Playback
Duration” on page 28.
LFO2 Duration (8 Bars, 4 Bars, 2 Bars, 1 Bar, Half
Note, Quarter Note) Applies the LFO according
to the selected duration.
Selecting the LFO2 Duration for Playback Pitch
Playback Offset
Playback Offset lets you define where in the slice
playback starts. Playback Offset can be continuously modulated by the LFOs. The effect of the
Playback Offset will vary depending on the selected Playback Mode.
Selecting the LFO1 Duration for Playback Pitch
Synchronic Plug-in Guide32
Enable (On, Off) Enables or disables Offset modulation.
Page 37

BEG and END Range (0–100%) The Offset Range
references a “Start” and “End” offset value that
is set using the Range controls.
Offset Enable
button
Offset Select
button
Beginning Offset
(0–100%)
End Offset
(0–100%)
Smear Playback Offset
If Playback Mode is set to Smear, Playback Offset
determines the amount of smearing that occurs
between adjacent slices.
Low Frequency Oscillator (LFO)
LFO Waveshape Selects the modulation wave-
shape for Playback Offset.
LFO2 Duration (8 Bars, 4 Bars, 2 Bars, 1 Bar, Half
Note, Quarter Note) Applies the LFO according
to the selected duration.
LFO Waveshape
selector
LFO Duration
selector
Playback Offset settings
Standard, Spin, and Stab Playback Offset
If Playback mode is set to Standard, Spin, or
Stab, Playback Offset determines where within a
slice playback should start. A slice normally
starts playback at the very first sample of the
slice. However, Synchronic lets you start playback of the slice at a point that is offset by some
percentage into a slice, thus creating some very
interesting effects. The Playback Offset can
range from 0% (the start of the slice) to 100%
(the end of the slice).
Stretch Playback Offset
If Playback Mode is set to Stretch, Playback Offset determines that amount of granular recycling that occurs. Higher Offset percentages result in increased resonance as the beginning of
the slice is recycled more and more to fill the duration of the slice.
For more information on LFO Waveshape
and Duration, see “Low Frequency Oscillator (LFO)” on page 33.
Assigning the Playback User Knobs (PB1 and PB2)
(RTAS Only)
In Edit mode, you can assign the Playback User
Knobs to control any Playback Edit parameter.
User Knob assignments are made on a per preset
basis. This gives you a great deal of flexibility on
how you can control the Synchronic Playback
module in Performance mode.
Chapter 4: Synchronic Parameters 33
Page 38

To assign a User Knob to control Edit parameters:
■ Select the desired Edit parameter assignment
from the User Knob Assignment pop-up menu.
Selecting a User Knob assignment (PB2 assigned to
Offset Beginning)
To select the same User Knob assignment
for all presets, press and hold Alt (Windows) or Option (Mac) while selecting the
User Knob assignment.
Effect Module
Synchronic provides an Effect module that include four effects: Gain, Noise, Filter, and Delay.
Gain, Noise, Filter, and Delay effects can be used
independently or in any combination.
Effect Performance Mode
(RTAS Only)
In Performance mode, the Effect module provides Preset, Sound A/B selectors, and User Knob
controls.
Performance mode applies only to the RTAS
version of Synchronic.
Sound A/B
selectors
Performance/Edit
Mode toggle
Presets
User Knobs
(PB1 and PB2)
Effect module, Performance mode
Sound A and B Selectors
The Sound A and B Sound selectors determine
whether or not the A and B sounds are patched
into the Effect module. Click the Sound A or B
selectors to toggle the A or B sound on or off.
Sound A or B may still be routed through
the Effect module even if it isn’t audible due
to the crossfader position in the XFade
module.
Synchronic Plug-in Guide34
Page 39

Playback Presets
Twelve Playback presets let you recall stored effects. Selecting a preset recalls the last edited set
of parameters for the preset. Effect presets let
you invoke different effects in rapid succession,
to create a compelling musical performance.
Effect User Knobs (FX1 and FX2)
The Effect module provides two assignable User
Knob controls (FX1 and FX2) that provide direct
control over any of the Effect modules Edit
mode settings. The current control assignment
is displayed below each User Knob.
To enable or disable the Gain, Noise, Filter, or
Delay effect:
■ Click the Effect Enable button above the Ef-
fect Select button. The button is illuminated
when the effect is enabled.
Selecting an Effect for Editing
To view the Gain, Noise, Filter, or Delay effect
parameters:
■ Click the Effect Select button (Gain, Noise, Fil-
ter, or Delay). The selected effect’s button will illuminate, and the effect’s parameters will be
available for editing.
Effect Edit Mode
In Edit mode, the Effect module provides easy
access to the Gain, Noise, Filter, and Delay effects and their parameters.
A/B Sound
selectors
Effect Enable and
Select buttons
Preset selector
Performance/Edit
Mode toggle
Selected Effect
parameters
User Knob
assignments
Effect module, Edit mode (Gain shown)
Enabling an Effect
Enabling an effect processes the sound (A/B
Sounds) coming from the Playback module. Disabling an effect essentially bypasses the effect.
Gain Effect
Gain is used to add Volume, Distortion, or Saturation to the sound (A/B Sounds) coming from
the Playback module. Similar to the Playback
section, the Range controls set Beginning and
End values. Range settings can also be modulated by an LFO to create dynamic gain effects.
Gain Enable
button
Gain Select
button
Beginning Gain
amount (in dB)
End Gain
amount (in dB)
LFO Waveshape
selectors
LFO Duration
selectors
Gain Mode
Gain effect
BED and END Range (–96 to 24 dB) Use the BEG
and END parameters to set the amount of Gain
effect. The specified Range settings control the
amount of modulation by LFO1 and LFO2.
Chapter 4: Synchronic Parameters 35
Page 40

LFO1 and LFO2 Set the Waveshape and Duration
for dynamic Gain effects. For static gain effects,
set both LFO1 and LFO2 to Off.
LFO Waveshapes and Durations options
are the same as those provided in the Playback module. See “Low Frequency Oscillator (LFO)” on page 33.
Gain Mode
The Gain effect provides three different modes:
Volume, Distortion, and Saturation.
Noise Effect
Noise modulates the post-Gain signal with a
noise source. There are three different Noise
modes: Dark, White, and Brite, each with two
variations (Osc or AM).
Noise Enable
button
Noise Select
button
Beginning Noise
amount (%)
End Noise
amount (%)
LFO Waveshape
selector
LFO Duration
selector
Noise Mode
Noise effect
BEG and END Range (0–100%) Use the BEG and
END parameters to control the amount of modulation by noise. At 0%, there is no modulation.
At 100%, the input signal is 100% modulated by
the selected noise (mode), such that only the
amplitude envelope of the input signal remains.
Use the Range controls to set the amount of
Noise effect that will be modulated by the LFO1
and LFO2 waveshapes.
Selecting Gain Mode
Volume Applies linear gain with a range of –96 to
+24 dB.
Distortion Applies a non-linear distortion curve
to clip the signal. Distortion is most pronounced from 0 to +24 dB.
Saturation Applies a warmer, fuzzier distortion
than regular Distortion. Unlike Volume and Distortion, when Saturation is selected, lower BEG
and END values do not result in attenuating the
signal. A lower setting (–96 dB) results in a
cleaner, less saturated signal, and a higher setting (+24 dB) results in a more saturated signal.
Synchronic Plug-in Guide36
LFO Set the Waveshape and Duration for dynamic Noise effects. For static noise effects, set
to Off.
LFO Waveshapes and Durations options
are the same as those provided in the Playback module. See “Low Frequency Oscillator (LFO)” on page 33.
Page 41

Noise Mode
Filter Effect
There are three different Noise modes: Dark,
White, and Brite; each with two variations: a
noise generator (Osc) or amplitude modulation
(AM).
Selecting Noise Mode
Dark Modulates the signal with a low pass filtered form of white noise, using either an oscillator or amplitude modulation (AM).
White Modulates the signal with white noise, using either an oscillator or amplitude modulation
(AM).
Brite Modulates the signal with a high pass filtered form of white noise, using either an oscillator or amplitude modulation (AM).
The Filter effect processes the post-Noise signal
using a lowpass filter, a highpass filter, or ring
modulation.
Filter Enable
button
Filter Select
button
Beginning Filter
amount (%)
End Filter
amount (%)
LFO Waveshape
selectors
LFO Duration
selectors
Filter Mode
Filter effect
BEG and END Range (0–100%) Use the BEG and
END parameters to determine the range of a filter frequency sweep when modulated by the
LFO Waveshapes. The actual cutoff frequency in
Hertz varies from between filter types.
LFO1 and LFO2 Set the Waveshape and Duration
for dynamic sweeping filter effects. For static filter effects, set both LFO1 and LFO2 to Off.
LFO Waveshapes and Durations options
are the same as those provided in the Playback module. See “Low Frequency Oscillator (LFO)” on page 33.
Chapter 4: Synchronic Parameters 37
Page 42

Filter Mode
Delay Effect
The Filter effect provides seven different types of
filters: Lowpass Filter (1–5), Highpass Filter, and
Ring Modulation.
Selecting Filter Mode
LPF1 Is a 6 dB per octave lowpass comb filter.
LPF2 Is a 12 dB per octave lowpass filter with no
resonance.
LPF3 Is a 12 dB per octave lowpass filter with a
small amount of resonance.
LPF4 Is a 12 dB per octave lowpass filter with a
moderate amount of resonance.
LPF5 Is a 12 dB per octave lowpass filter with a
high amount of resonance.
HPF Is a 12 dB per octave highpass filter.
The Delay effect processes the post-Filter signal
with modulating delay that synchronizes to the
Pro Tools MIDI Beat Clock.
Delay Enable
button
Delay Select
button
Beginning Delay
amount (%)
End Delay
amount (%)
LFO Waveshape
selector
LFO Duration
selector
Delay Mode
Delay effect
BEG and END Range (0–100%) Use the BEG and
END parameters to control the amount of delay
(which is a combination of delay level and feedback level). At 0% there is no delay. At 100% the
delay forms and “infinite” feedback loop. Use
the Range controls to set the amount of delay effect that will be modulated by the LFO1 and
LFO2 waveshapes.
LFO Set the Waveshape and Duration for dynamic delay effects. For static delay effects, set
to Off.
LFO Waveshapes and Durations options
are the same as those provided in the Playback module. See “Low Frequency Oscillator (LFO)” on page 33.
Ring Mod Is a ring modulator. Ring Modulation,
also known as Amplitude Modulation (AM), results in the sum and difference tones between
the input signal and the modulating signal.
Synchronic Plug-in Guide38
Page 43

Delay Mode
Delay Mode selects a delay time based on a
rhythmic subdivision of the Pro Tools MIDI
Beat Clock (quarter-not, dotted eighth note,
eighth note, eighth note triplet, sixteenth note,
sixteenth note triplet, thirty-second note, or
thirty-second note triplet).
Selecting Delay Mode
Assigning the Effect User Knobs (FX1 and FX2)
(RTAS Only)
In Edit mode, you can assign the Effect User
Knobs to control any Effect Edit parameter. User
Knob assignments are made on a per preset basis. This gives you a great deal of flexibility on
how you can control the Synchronic Effect
module in Performance mode.
To assign a User Knob to control Edit parameters:
■ Select the desired Edit parameter assignment
from the User Knob Assignment pop-up menu.
Selecting a User Knob assignment (FX2 assigned to
Delay Beginning)
To select the same User Knob assignment
for all presets, press and hold Alt (Windows) or Option (Mac) while selecting the
User Knob assignment.
Chapter 4: Synchronic Parameters 39
Page 44

XFade Module
(RTAS Only)
The XFade module mixes the A and B audio signals using either preset crossfade effects, or a
crossfade fader. The XFade module has three
modes: Manual mode, Preset mode, and Edit
mode.
XFade User Knob (XF)
The XFade module provides a single assignable
User Knob control (XF) that provides direct control over any of the XFade module’s Edit mode
settings. The current control assignment is displayed below the User Knob.
XFade Preset Mode
XFade Manual Mode
Manual mode is the default Performance mode
for the XFade module. When in Manual mode,
the currently selected XFade preset is overridden
and can control the mix between the A and B
sounds using a crossfade fader. Click the A or B
labels on either side of the crossfader to solo either sound.
Performance/Edit
Mode toggle
Manual/Preset
Mode toggle
Sound B
Crossfade fader
Sound A
XFade indicator
XFade module, Manual mode
To toggle between Manual and Preset mode:
1 If necessary, click the Performance/Edit Mode
toggle to switch to Performance mode.
The XFade module provides twelve presets to
store and recall crossfade settings.
Performance/Edit
Mode toggle
Manual/Preset
Mode toggle
Presets
XFade indicator
User Knob (XF)
XFade module, Preset mode
Edit Mode
In Edit mode, the XFade module lets you edit
crossfade modulation effects and the XFade
User Knob assignment.
Preset selector
Performance/Edit
Mode toggle
2 Click the Manual/Preset Mode toggle to
switch between Manual and Preset mode.
Manual mode takes precedence over any
XFade preset automation. When switching
out of Manual mode, any XFade automation previously received will take effect.
Synchronic Plug-in Guide40
XFade module, Edit mode
Beginning and End
XFade amount (%)
LFO Waveshape and
Duration selectors
XFade indicator
User Knob
assignment
Page 45

XFade Effects
Crossfade modulations can be used to create
complex crossfades between A and B sounds using two LFOs.
Range (–100 to +100%) Use the Beginning
(BEG) and End (END) parameters to control the
mix between the A and B sounds. You can set
both start and stop points to determine the
range of modulation by the LFOs. A value of
–100% sets the crossfade fader to the full left position (the A sound), 0% is an equal mix of the
and A and B sounds, and 100% sets the crossfade
fader to the full right position (the B sound).
LFO Set the Waveshape and Duration for dynamic crossfade effects. For static crossfade settings, set both LFO1 and LFO2 to Off.
LFO Waveshapes and Durations options
are the same as those provided in the Playback module. See “Low Frequency Oscillator (LFO)” on page 33.
Assigning the XFade User Knob (XF)
To assign a User Knob to control Edit parameters:
■ Select the desired Edit parameter assignment
from the User Knob Assignment pop-up menu.
Selecting the User Knob assignment (XF assigned to
Rate 2, LFO2 Duration)
In Edit mode, you can assign the XFade User
Knob to control any XFade Edit parameter. User
Knob assignments are made on a per preset basis. This gives you a great deal of flexibility on
how you can control the Synchronic XFade
module in Performance mode.
To select the same User Knob assignment
for all presets, press and hold Alt (Windows) or Option (Mac) while selecting the
User Knob assignment.
Chapter 4: Synchronic Parameters 41
Page 46

MIDI Module
(RTAS Only)
The MIDI module lets you assign MIDI note
numbers and continuous controllers to the Presets and User Knobs of the Sound, Playback, Effect, and XFade modules.
Since there are twelve presets for each module, you can comfortably map your MIDI
keyboard controller to the presets for each
module by octaves.
Octave (OCT) Up and Down Arrow Buttons Click
the left arrow to transpose the on-screen keyboard down an octave or click the right arrow to
transpose the on-screen keyboard up an octave.
This lets you readily assign Synchronic preset
snapshots to any and all octaves of your MIDI
keyboard.
Octave Display Displays the current octave
transposition of the on-screen MIDI keyboard.
C3 is middle C.
Pre-Mapped MIDI Keys
MIDI Performance Mode
In Performance mode, the MIDI module displays a one octave on-screen keyboard. Octave
Transpose buttons lets you shift the focus of the
on-screen keyboard to any octave (from MIDI
note number 1 to 127).
Performance/Edit
Mode toggle
Transpose
Octave Up
button
Transpose
Octave Down
button
MIDI module, Performance mode
On-Screen Keyboard
In Performance mode, the MIDI module provides an on-screen keyboard that can be used to
assign MIDI note numbers to store and recall the
current state of Synchronic settings. You can
also recall stored combinations of Synchronic
presets and settings by clicking the corresponding key on the on-screen keyboard.
On-screen Keyboard
Octave
Transposition
display
Wait
button
Assign
button
Synchronic provides a default MIDI keyboard
mapping for triggering Sound, Playback, Effect,
and Crossfade presets.
Synchronic’s default MIDI key mappings are:
• MIDI note numbers 12–23 are reserved for
custom snapshots (see “Assigning MIDI
Keys” on page 43).
• MIDI note numbers 24–35 select Sound
presets A1–A12.
• MIDI note numbers 36–47 select Sound
presets B1–B12.
• MIDI note numbers 48–59 select Playback
presets 1–12.
• MIDI note numbers 60-71 select Effect presets 1–12.
• MIDI note numbers 72-83 select XFade presets 1–12.
These pre-defined mappings can be overwritten in Assign mode.
Synchronic Plug-in Guide42
Page 47

Assigning MIDI Keys
Selective Module Assignment
Synchronic lets you capture all aspects of the
current playback state (including the A Sound
preset, the B Sound preset, the Playback preset,
the Effect preset, and the XFade preset or fader
position), or some sub-set of the playback state
(for example, only the A and B Sound presets).
Once captured and stored (assigned to a MIDI
note number), this combination can be recalled
using either the on-screen keyboard or with a
MIDI controller.
To capture and assign a combination to a MIDI
note number:
1 Edit Syncrhonic’s Sound, Playback, Effect, and
XFade parameters and select presets as desired.
2 If necessary, switch the MIDI module to Per-
formance mode (see “Performance and Edit
Modes” on page 13).
3 Click the Assign button. The Assign button il-
luminates and the on-screen keyboard’s keys
display their module assignment icons (see
“MIDI Key Assignment Icons” on page 43).
4 Enable or disable the Module Assign Enable
buttons as desired (see “Selective Module Assignment” on page 43).
5 Click the MIDI key on the on-screen keyboard
(or press the corresponding key on your MIDI
keyboard).
The current state of the assign-enabled modules
will be stored and assigned to the selected key
and corresponding MIDI note number.
If a MIDI key is used to recall a combination that
does not include all modules, the modules that
are not included in the combination will remain
as they were. For example, a combination that
only includes A and B Sounds presets will have
no effect on the state of the Playback, Effect, or
XFade modules.
A Synchronic combination need not consist of
changes in all Synchronic modules. When the
Assign button is enabled, the Sound, Playback,
Effect, and XFade modules display an Assign Enable button. A module only displays its Assign
Enable button in Performance mode.
Assign
button
Module Assign Enable buttons
Module Assign
Enable buttons
(enabled)
Module Assign
Enable button
(disabled)
MIDI Key Assignment Icons
In Assign mode, the on-screen keyboard displays icons to show which modules to which a
key is assigned. There are five different colored
icons for Sound A, Sound B, Playback, Effect,
and XFade.
(
MIDI Key Assignment icons (Key C1 is assigned to
control Sound A, Sound B, Playback, Effect, and XFade)
Chapter 4: Synchronic Parameters 43
Page 48

Wait Bar Forces recalled combinations to wait
and start at the beginning of the next bar instead of the next beat or slice.
MIDI Edit Mode
In Edit mode, MIDI Pitch Bend or MIDI continuous controller numbers can be assigned to control Synchronic’s five User Knobs and the XFade
crossfade fader.
To assign an external MIDI controller:
1 If necessary, switch the MIDI module to Edit
mode (see “Performance and Edit Modes” on
page 13).
2 Select Pitch Wheel or Controller # from the
Source pop-up menu.
MIDI module, Edit mode
Assigning an External MIDI Controller
Below the five User Knobs and crossfader (XF)
labels are pop-up menus for assigning MIDI controllers.
To save a template of your MIDI control assignments, configure a default Synchronic
insert (with no sounds loaded) for your
MIDI controller and save it as a Synchronic
plug-in settings file using the Settings Librarian (see Chapter 7, “Synchronic Plug-in
Settings”).
Selecting MIDI control source
3 If you selected Controller #, you will also need
to enter the MIDI controller number in the
MIDI Control Number field, either by selecting
the field and typing the number or by jiggling
the MIDI controller.
MIDI Controller # field assignment for PB2 User Knob
(set to MIDI controller #1, the modulation wheel)
Pitch Wheel Assigns MIDI pitch bend (the pitch
wheel) to control the corresponding User Knob
or the XFade crossfade fader.
Controller # Assigns a continuous MIDI controller to control the corresponding User Knob or
the XFade crossfade fader.
If Controller # is selected in the Source popup menu, and the Controller # field is selected, you can jiggle the MIDI controller to
make the correct controller assignment.
Synchronic Plug-in Guide44
Page 49

Keyboard Focus Mode
(RTAS Only)
In Keyboard Focus mode, you can use your computer keyboard to trigger Synchronic presets.
Keyboard Focus shortcuts for Synchronic are:
If Synchronic Keyboard Focus is enabled, designated characters (listed above in QWERT Keyboard Mapping) will control Synchronic and
will not be used otherwise by Pro Tools.
Keyboard Focus has no effect on normal text
entry for Synchronic parameter values.
Keyboard Numbers 1–9, 0 Triggers sounds
A1–10.
Keyboard Characters QWERTYUIOP Trigger Playback presets 1–10.
Keyboard Characters ASDFGHJKL Trigger Effect
presets 1–10.
Keyboard Characters ZXCVBNM,./ Trigger
Crossfade presets 1–10.
To enable or disable Keyboard Focus mode for
Synchronic:
■ Click the “a...z” Keyboard Focus Enable but-
ton (in the upper-right corner of the Synchronic
plug-in window).
“a...z” Keyboard Focus Enable button (enabled)
Although multiple Synchronic Plug-in windows can have Keyboard Focus (“a...z”) enabled, only the last clicked-on Plug-in window will respond to the Keyboard Focus key
commands.
Chapter 4: Synchronic Parameters 45
Page 50

Synchronic Plug-in Guide46
Page 51

chapter 5
Using the Synchronic AudioSuite Plug-in
The AudioSuite version of Synchronic shares
many of the features found in its RTAS counterpart, with some differences as noted in this section.
Using Synchronic AudioSuite
Synchronic AudioSuite is available in the AudioSuite menu in Pro Tools under the Instrument
or Digidesign categories.
To create an instance of Synchronic AudioSuite:
• Choose AudioSuite > Synchronic.
Plug-in settings and presets can be shared
between the AudioSuite and RTAS versions
of Synchronic. However, the AudioSuite version of the plug-in can import and export
only information stored for the Sound, Playback, and Effect modules in the first preset.
Synchronic AudioSuite Modules
The AudioSuite version of Synchronic includes
three of the five modules found in its real-time
counterpart: Sound, Playback, and Effect. Each
of these modules has been modified slightly for
the AudioSuite version.
The XFade and MIDI modules are real-time
based and are included only in the RTAS
version of Synchronic.
Edit Mode Only in AudioSuite Modules
In the RTAS version of Synchronic, each module
can be independently switched between Edit
and Performance modes with the Mode toggle.
Synchronic AudioSuite
In the AudioSuite version of Synchronic, the
modules function only in Edit mode. Performance mode is not available since its features
are not relevant to non-real time functionality,
and the Mode toggle does not exist.
Chapter 5: Using the Synchronic AudioSuite Plug-in 47
Page 52

Sound Module
Playback Module
The Sound module lets you import, delete, sliceup, and fine-tune audio (loops) for Synchronic
playback.
Load Selection
button
Synchronic AudioSuite Sound module
The AudioSuite version of this module replicates
the Edit mode functionality of its real-time
counterpart, with the following differences:
Load Selection button The Load Selection button lets you automatically load a selected portion of audio from the Pro Tools Edit window
into the Waveform display.
The Load Selection button is available only
in the AudioSuite version of Synchronic.
See “Using the Load Selection Button” on
page 49 for detailed information.
The Playback module lets you edit the Playback
parameters.
Pitch and Offset
Select and Enable
buttons
Pitch or Offset
parameters
Synchronic Playback module (AudioSuite version)
The AudioSuite version of this module replicates
the Edit mode functionality of its real-time
counterpart, with the following differences:
Playback user knobs unavailable The Playback
user knobs are only necessary and available in
the RTAS version of Synchronic.
See “Playback Edit Mode” on page 26 for
detailed information on Playback module
controls in Edit mode.
One loop limitation The AudioSuite version of
Synchronic lets you work with one audio loop at
a time, instead of the 12 presets available for
RTAS.
See “Sound Edit Mode” on page 19 for detailed information on using the Sound module in Edit mode
Synchronic Plug-in Guide48
Page 53

Effect Module
The Effect module provides easy access to the
Gain, Noise, Filter, and Delay effects and their
parameters.
Previewing Synchronic AudioSuite
Use the AudioSuite version of Synchronic to
work with and play back audio loops as follows:
1 Load audio files or a selected portion of audio
regions (loops) into the Sound module, much
like you would add sound to a sampler.
2 Use the Detection Slider to slice up the loops
into rhythmically logical units (beats and subdivisions of the beat).
3 Preview the sliced-up loop.
4 When you are finished with a loop, you pro-
cess it to a track.
Synchronic AudioSuite Effect module
The AudioSuite version of this module replicates
the Edit mode functionality of its real-time
counterpart, with the following differences:
Effect user knobs unavailable The Effect user
knobs are only necessary and available in the
RTAS version of Synchronic.
See “Effect Edit Mode” on page 35 for detailed information on Playback module
controls in Edit mode.
Loading Audio into the Waveform Display
In the AudioSuite version of Synchronic, you
can load audio into the Waveform display using
any of the following methods:
• Load Selection button
• Import button
• Drag and drop from Workspace
See “Importing a Sound” on page 20 for detailed information on using the Import button or dragging and dropping from the
Workspace.
Using the Load Selection Button
The AudioSuite version of Synchronic lets you
load a selected portion of a Pro Tools audio track
directly into the Waveform display.
Chapter 5: Using the Synchronic AudioSuite Plug-in 49
Page 54

To load a selection from Pro Tools into Synchronic:
1 Choose AudioSuite > Synchronic.
2 In the Pro Tools Edit window, select the por-
tion of audio you want to loop in Synchronic.
Slicing a Loop
Once you have loaded a loop into the Waveform display, you can slice it up and preview it.
See “Slicing Up a Sound” on page 23 for detailed information on slicing a loop.
Previewing a Loop
Before printing a finished audio loop to a
Pro Tools track, you can preview it in the AudioSuite window.
Making a selection in Pro Tools
3 In the Sound module of Synchronic Audio-
Suite, click Load Selection.
Load
Selection
Making a selection in Pro Tools
The selected portion of audio appears in the
Synchronic Waveform display.
To preview a loop in Synchronic AudioSuite:
• Click Preview in the Plug-in window.
Synchronic plays back the loaded loop according to the session tempo.
Synchronic AudioSuite processing buttons
Processing a Loop to a Pro Tools Track
Once you have finished editing your loop in
Synchronic AudioSuite, you can process it to a
selection in Pro Tools.
Processing an audio loop from Synchronic
AudioSuite to a selection in a Pro Tools audio track overwrites any audio material in
that selection.
Pro Tools selection loaded into Waveform display
Synchronic Plug-in Guide50
Page 55

To process an audio loop to Pro Tools:
1 In the Pro Tools Edit window, select the por-
tion of an audio track where you want to place
the processed audio loop.
If you imported a selection from the Pro
Tools Timeline using the Load Selection
button, you can improve any timing problems that may exist by modifying the Timeline selection before processing the loop
from Synchronic. For example, if a percussive audio event were late at the beginning
of a bar, you might load the bar into Synchronic with the selection exactly at the onset of the event. Then, you can modify the
Timeline selection to start exactly on “the
grid.” Consequently, Synchronic will process the modified loops to the new selection.
2 Click Process to print the audio loop to the se-
lection
Chapter 5: Using the Synchronic AudioSuite Plug-in 51
Page 56

Synchronic Plug-in Guide52
Page 57

chapter 6
Automating Synchronic RTAS
You can automate changes to Synchronic RTAS
parameters in two ways:
• Using Pro Tools automation playlists
• Using MIDI
Using Automation Playlists
Pro Tools creates a separate playlist for each
plug-in parameter that you automate. Pro Tools
automation lets you record your interaction
with Synchronic parameters using the mouse, or
a control surface (including MIDI control surfaces).
To enable plug-in parameters for automation:
1 Open the Plug-in window for the plug-in you
want to automate.
2 Do one of the following:
• Click the Automation Enable button in the
Plug-in window.
– or –
• Control-Start-Alt-click (Windows) or Command-Option-Control-click (Mac) the
Track View Selector in the Edit window.
You can also use this keyboard shortcut to
open the Plug-in Automation dialog: Control-Start-Alt-click (Windows) or Command-Option-Control-click (Mac) any plugin parameter in the Plug-in window, then
choose Open Automation dialog from the
pop-up menu.
3 Choose the parameters to automate and click
Add. If there are multiple plug-ins on the same
track, you can select from among these by clicking their buttons in the Inserts section of this dialog.
Selecting parameters to automate
Chapter 6: Automating Synchronic RTAS 53
Page 58

4 Click OK to close the Plug-in Automation dia-
log.
As an alternative to using the Plug-in Automation window, you can enable individual
plug-in parameters directly from the Plug-in
window by Control-Alt-Start-clicking (Windows) or Command-Control-Option-clicking (Mac) the parameter’s text field or control. See the DigiRack Plug-ins Guide or
Digidesign Plug-ins Guide for more information.
.
Shortcut for enabling a Synchronic parameter for
automation
To record automation:
1 In the Automation Enable window, make sure
that plug-in automation is write-enabled.
2 If using a MIDI control surface, do the follow-
ing: On the MIDI control surface, assign the
MIDI Controller number for the parameter you
want to automate.
For more information on assigning a MIDI
Controller number, see See “To assign MIDI
controller numbers to the Playback, Effects,
and XFade User Knobs:” on page 55.
3 On the track with Synchronic inserted, choose
an automation mode. For an initial pass, choose
Auto Write.
After the initial automation pass, you can write
additional automation to the track without
completely erasing the previous pass by choosing Auto Touch mode or Auto Latch mode.
These modes add new automation only when
you actually move the control for that parameter.
If you use automation to control preset
changes, place automation breakpoints
slightly ahead of the point at which the
change is desired. Since Synchronic triggers
all Sound and Playback changes according
to MIDI Clock boundaries, a thirty-second
note ahead of time is recommended.
For more information on creating and editing automation, see the
Guide
.
Pro Tools Reference
Using MIDI
You can automate Synchronic RTAS parameters
by assigning MIDI note and controller data to
Synchronic presets and performance parameters, and recording them to a MIDI track. You
can also edit and manually enter the MIDI data
on the track as desired, and use it to control Synchronic during playback.
For information on controlling Synchronic
with MIDI note and controller data, see
“MIDI Module” on page 42.
4 Click Play to begin writing automation, and
move the controls you want to automate.
5 When you have finished, click Stop.
Synchronic Plug-in Guide54
Page 59

To assign MIDI notes to combinations of
Synchronic presets:
1 If necessary, switch the MIDI module to Per-
formance mode (see “Performance and Edit
Modes” on page 13).
2 Click the Assign button. The Assign button il-
luminates and the on-screen keyboard’s keys
display their module assignment icons (see
“MIDI Key Assignment Icons” on page 43).
Assign
button
MIDI Assign button
3 Click the MIDI key on the on-screen keyboard
(or press the corresponding key on your MIDI
keyboard).
4 Enable or disable the Module Assign Enable
buttons as desired (see “Selective Module Assignment” on page 43). The MIDI Key Assignment icons update accordingly.
5 Edit Synchronic’s Sound, Playback, Effect, and
XFade parameters and select presets as desired.
The current state of the assign-enabled modules
will be stored and assigned to the selected key
and corresponding MIDI note number.
To assign MIDI controller numbers to the
Playback, Effects, and XFade User Knobs:
1 If necessary, switch the MIDI module to Edit
mode (see “Performance and Edit Modes” on
page 13).
2 Select Pitch Wheel or Controller # from the
Source pop-up menu for the desired User Knob
assignment.
Selecting MIDI control source
3 If you select Controller #, you will also need to
enter the MIDI controller number in the MIDI
Control Number field, either by selecting the
field and typing the number or by jiggling the
MIDI controller.
MIDI Controller # field assignment for PB2 User Knob
(set to MIDI controller #1, the modulation wheel)
To automate Synchronic using MIDI:
1 Insert Synchronic on a mono or stereo Auxil-
iary Input (Pro Tools LE only) or audio track.
2 Create a new MIDI track (File > New Track) for
the automation.
3 Click the MIDI track’s Output selector and
choose the Synchronic plug-in that you want to
automate.
4 Do one of the following:
• Record enable the MIDI track, start playback, and perform the automation on your
MIDI controller.
– or –
• Use the Pencil tool to draw MIDI note and
controller data.
Chapter 6: Automating Synchronic RTAS 55
Page 60

Viewing MIDI Automation
Pro Tools creates a separate playlist for each type
of automation you write. To view MIDI automation for Synchronic parameters, you may need
to add it to the Track Display Format pop-up
menu using the Add/Remove Controller command.
3 In the Automated MIDI Controllers dialog, lo-
cate the parameter by its MIDI Controller number and click Add, then OK.
MIDI Pitch Bend automation controlling Synchronic
To view MIDI automation:
1 In the Edit window, choose the controller that
you want to view.
2 If the desired controller doesn’t appear in the
Track Display Format pop-up menu, select
Add/Remove Controller.
Track Display Format selector
Automated MIDI Controllers dialog
4 Select the new automation type from the
Track Display Format selector of the MIDI track.
For more information on Pro Tools automation, see the
Pro Tools Reference Guide.
Synchronic Plug-in Guide56
Page 61

chapter 7
Synchronic Plug-in Settings
The Settings Librarian makes it easy to create
your own library of Synchronic configurations,
including loaded audio files. Using the Librarian
and Settings pop-up menus, you can copy,
paste, save, and import these patches from plugin to plug-in, or from session to session.
For more information Plug-in Settings files
and using the Librarian, see the DigiRack
Plug-ins guide.
Librarian menu
Pro Tools always saves the current session’s
plug-in settings with the session itself. The
Librarian allows you to access settings
saved during other sessions.
Presets within the Sound, Playback, Effect,
and XFade modules cannot be independently saved using the Pro Tools plug-in
settings librarian. Saving a Synchronic
plug-in setting using the Pro Tools Settings
Librarian will save all of the presets of each
module.
Imported Audio Stored with Settings
Synchronic is unique in that it stores loaded audio files as part of the plug-in settings file. When
you import audio files into Synchronic, it loads
them into RAM and then stores them with the
plug-in settings. The plug-in settings are stored
with the Pro Tools session file or using the Settings Librarian to save a plug-in settings file
(.tfx). The size of the Pro Tools session file or
plug-in settings file will increase corresponding
to the number and size of audio files loaded into
Synchronic.
For more information on importing audio
files in Synchronic, see “Importing a
Sound” on page 20.
Plug-in settings and presets can be shared
between the AudioSuite and RTAS versions
of Synchronic. However, the AudioSuite version of the plug-in can import and export
only information stored for the Sound, Playback, and Effect modules in the first preset.
Chapter 7: Synchronic Plug-in Settings 57
Page 62

Synchronic Plug-in Guide58
Page 63

index
A
Acid wave file format
importing 22
Activation Code 6
adding missing slices 23
adjusting parameters 17
adjusting Sound preset gain 25
Assign Enable buttons 43
assigning a User Knob 34, 39, 41
assigning an external MIDI controller 44
assigning combinations to a MIDI note number 43
assigning MIDI controllers 55
assigning MIDI notes 55
AudioSuite version of Synchronic
about 47
Effect module 49
modules 47
Playback module 48
previewing a loop 50
processing a loop 50
Sound module 48
authorizing plug-ins 6
automating Synchronic using MIDI 55
automation
Auto Latch mode 54
Auto Touch mode 54
creating 54
enabling plug-in parameters 53
plug-in automation
automating Synchronic 53
recording 54
B
Back/For 30
Backward 30
boxed version 2
C
Clocked 27
Controller # 44
crossfade fader 40
D
Delay effect 38
deleting a sound 23
deleting an erroneous slice 23
Detection 23
Detection slider 23
duplicating a preset 15
E
Edit mode 13
and AudioSuite version of Synchronic 47
switching to 13
editing a preset 15
Index 59
Page 64

Effect module 9, 34
Delay 38
delay time 39
LFO 38
Range (level/feedback) 38
Edit mode 35
Effect enable buttons 35
Filter 37
HPF 38
LFO 37
LPF1 38
LPF2 38
LPF3 38
LPF4 38
LPF5 38
Range 37
Ring Mod 38
Gain 35
Distortion 36
LFO 36
Range 35
Saturation 36
Volume 36
in AudioSuite version of Synchronic 49
Noise 36
Brite 37
Dark 37
LFO 36
Range 36
White 37
Performance mode 34
presets 35
selecting effects 35
Sound A and B selectors 34
User Knob (FX1 and FX2) 35
User Knobs 39
enabling an effect 35
enabling Keyboard Focus mode 45
enabling plug-in automation 53
G
Gain effect 35
Generate Missing 24
guide conventions 3
I
importing a sound 21
importing multiple audio files 21
installing Synchronic 5
Instrument tracks 8
K
Keyboard Focus mode 45
L
Latin (Latin 1–5) 29
LFO 31
Delay effect 38
Filter effect 37
Gain effect 36
Noise effect 36
XFade module 41
LFO Duration 32
LFO waveshapes 31
Librarian menu 57
License Card 6
Load Selection button 49
loading a loop 10
loading an audio file 21
loops
loading 10
playing 12
preparing for import 20
slicing 12
Low Frequency Oscillator 31
F
F/B Beats 30
F/B Diddle 30
Filter effect 37
For/Back 30
Forward 30
Synchronic Plug-in Guide60
Page 65

M
MIDI
configuring for Synchronic 8
MIDI automation 54, 55
viewing 56
MIDI controllers
assigning 55
MIDI Key Assignment icons 43
MIDI Keys
default mappings 42
MIDI module 9, 42
Assign Enable buttons 43
assigning MIDI controllers 44
assigning MIDI notes 43
Controller # 44
Edit mode 44
MIDI Key Assignment icons 43
Octave (Oct) 42
Octave Display 42
on-screen keyboard 42
Performance mode 42
Pitch Wheel 44
Pre-Mapped MIDI Keys 42
Wait Bar 44
MIDI notes
assigning 55
N
Noise effect 36
O
Off Beats (Off Beats 1–5) 29
Offset enable button 32
on-screen keyboard 14, 42
Options 25
P
package contents 2
parameters 17
Performance mode 13
and AudioSuite version of Synchronic 47
switching to 13
performing Synchronic 12
Pick Up (Pick Up 1–5) 30
Pitch 31
Pitch enable button 31
Pitch Wheel 44
playback 19
Playback Duration 28
Playback module 9, 25
Direction 30
Back/For 30
Backward 30
F/B Beats 30
F/B Diddle 30
For/Back 30
Forward 30
Random 30
Duration 28
Latin (Latin 1–5) 29
Off Beats (Off Beats 1–5) 29
Pick Up (Pick Up 1–5) 30
Swing (Swing 1–5) 30
Syncopate (Syncopate 1–5) 29
Edit mode 26
in AudioSuite version of Synchronic 48
Mode
Smear 27
Spin 27
Stab 27
Standard 26
Stretch 26
Offset 32
Enable 32
Range 33
Smear mode 33
Standard, Spin, or Stab mode 33
Stretch mode 33
Order 27
Diverge 28
Off 28
One Slice 28
Random 28
Random Swap 28
Reverse 28
Span (Span 2–5) 28
Step (Step 2–5) 28
Straddle (Straddle 2–5) 28
Performance mode 25
Pitch 31
Enable 31
LFO1 and LFO2 31
Range 31
Playback modes 26
presets 26
Sound A and B selectors 25
Index 61
Page 66

Start 27
Clocked 27
Slice # 27
User Knobs (PB1 and PB2) 26, 33
Playback order 27
playing a loop 12
plug-in settings
storing audio 57
plug-in settings file 57
plug-in settings file (.tfx) 22
plug-ins
authorizing 6
preparing audio for import 20
presets 14
deleting a sound 23
duplicating 15
editing 15
Effect module 35
Playback module 26
selecting 15
storing 15
XFade module 40
previewing a loop in the AudioSuite version of
Synchronic
50
Pro Tools session file 22
processing a loop in the AudioSuite version of
Synchronic
50
R
recording automation 54
removing plug-ins
Windows 7
S
selecting a preset 15
selecting an effect 35
Settings Librarian
using 57
slice 23
adding 23
Audition Modes 24
Current 24
Delete 24
deleting 23
detection 23
generating missing 24
playback mode 26
playback order 27
playback start 27
settings 23
Trim 24
Slice # 27
Slice Extension 25
slices
playback direction 30
slicing a loop 12
slicing up a sound 23
Smear playback 27
Sound A 19
Sound A and B selectors 14
Sound B 19
Sound module 9, 18
attributes 22
auditioning slices 24
Contains 22
deleting a sound 23
deleting current slice 24
display current slice 24
Edit mode 19
Gain 25
generating missing slices 24
importing audio 21
importing multiple loops 21
in AudioSuite version of Synchronic 48
interactive waveform display 19
Length 22
Name 22
Options 25
Performance mode 18
presets 18
slice 23
slice detection 23
Slice Extension 25
Sound A and B 19
Time Signature 22
trimming slices 24
Synchronic Plug-in Guide62
Page 67

Sound presets
storing audio 22
Spin playback 27
Stab playback 27
Standard playback 26
storing a preset 15
storing audio in Sound presets 22
Stretch playback 26
subdivisions of the beat 22
Swing (Swing 1–5) 30
Synchronic
adjusting parameters 17
features 1
Synchronic modules 9
Synchronic playback
starting and stopping 19
Synchronic presets 14
Syncopate (Syncopate 1–5) 29
system requirements 2
U
User Knobs 14
assigning 34, 39, 41
Effect module (FX1 and FX2) 35, 39
Playback (PB1 and PB2) 26
XFade module (XF) 41
user-assignable controls 14
W
Wait Bar 44
waveform display 19
website
www.digidesign.com 4
X
XFade module 9, 40
crossfade fader 40
Edit mode 40
LFO 41
Manual mode 40
Preset mode 40
Range 41
User Knob (XF) 40, 41
Index 63
Page 68

www.digidesign.com
DIGIDESIGN
2001 Junipero Serra Boulevard
Daly City, CA 94014-3886 USA
Tel: 650.731.6300
Fax: 650.731.6399
TECHNICAL SUPPORT (USA)
Tel: 650.731.6100
Fax: 650.731.6384
PRODUCT INFORMATION (USA)
Tel: 800.333.2137
INTERNATIONAL OFFICES
Visit the Digidesign website
for contact information
 Loading...