

Page 1

SYNC HD
Firmware Version 2.1.1
™
Page 2

Legal Notices
This guide is copyrighted ©2007 by Digidesign, a division of
Avid Technology, Inc. (hereafter “Digidesign”), with all rights
reserved. Under copyright laws, this guide may not be
duplicated in whole or in part without the written consent of
Digidesign.
003, 003 Rack, 96 I/O, 96i I/O, 192 Digital I/O, 192 I/O,
888|24 I/O, 882|20 I/O, 1622 I/O, 24-Bit ADAT Bridge I/O,
AudioSuite, Avid, Avid DNA, Avid Mojo, Avid Unity, Avid Unity
ISIS, Avid Unity MediaNetwork, Avid Xpress, AVoption,
AVoption|V10, Beat Detective, Bruno, Command|8, Control|24,
D-Command, D-Control, D-Fi, D-fx, D-Show, DAE, Digi 002,
Digi 002 Rack, DigiBase, DigiDelivery, Digidesign, Digidesign
Audio Engine, Digidesign Intelligent Noise Reduction,
Digidesign TDM Bus, DigiDrive, DigiRack, DigiTest,
DigiTranslator, DINR, DV Toolkit, EditPack, Impact, Interplay,
M-Audio, MachineControl, Maxim, Mbox, MediaComposer,
MIDI I/O, MIX, MultiShell, OMF, OMF Interchange, PRE,
ProControl, Pro Tools M-Powered, Pro Tools, Pro Tools|HD,
Pro Tools LE, QuickPunch, Reel Tape, Reso, Reverb One,
ReVibe, RTAS, Smack!, SoundReplacer, Sound Designer II,
Strike, Structure, SYNC HD, SYNC I/O, Synchronic, TL Space,
Velvet, and X-Form are trademarks or registered trademarks of
Digidesign and/or Avid Technology, Inc. All other trademarks
are the property of their respective owners.
Product features, specifications, system requirements, and
availability are subject to change without notice.
PN 9106-56838-00 REV A 08/07
Comments or suggestions regarding our documentation?
email: techpubs@digidesign.com
WARNING: This product contains chemicals, including lead,
known to the State of California to cause cancer and birth
defects or other reproductive harm. Wash hands after
handling.
Communications & Safety Regulation Information
Compliance Statement
The model SYNC HD complies with the following standards
regulating interference and EMC:
• FCC Part 15 Class A
• EN55103 – 1, environment E4
• EN55103 – 2, environment E4
• AS/NZS 3548 Class A
•CISPR 22 Class A
Radio and Television Interference
This equipment has been tested and found to comply with the
limits for a Class A digital device, pursuant to Part 15 of the
FCC Rules.
DECLARATION OF CONFORMITY
We, Digidesign,
2001 Junipero Serra Blvd.
Daly City, California 94014-3886, USA
650-731-6100
declare under our sole responsibility that the product
SYNC HD
complies with Part 15 of FCC Rules.
Operation is subject to the following two conditions: (1) this
device may not cause harmful interference, and (2) this device
must accept any interference received, including interference
that may cause undesired operation.
Communications Statement
NOTE: This equipment has been tested and found to comply
with the limits for a Class A digital device, pursuant to Part 15
of the FCC Rules. These limits are designed to provide
reasonable protection against harmful interference when the
equipment is operated in a commercial environment. This
equipment generates, uses, and can radiate radio frequency
energy and, if not installed and used in accordance with the
instruction manual, may cause harmful interference to radio
communications. Operation of this equipment in a residential
area is likely to cause harmful interference in which case the
user will be required to correct the interference at his own
expense.
Changes or modifications to this product not authorized by
Digidesign, Inc., could void the Certification and negate your
authority to operate the product.
Canadian Compliance Statement:
This Class A digital apparatus complies with Canadian ICES003
Cet appareil numérique de la classe A est conforme à la norme
NMB-003 du Canada
Page 3
Australian Compliance
European Compliance
Safety Statement
This equipment has been tested to comply with USA and
Canadian safety certification in accordance with the
specifications of UL Standards: UL60065 7th /IEC 60065 7th
and Canadian CAN/CSA C22.2 60065:03. Digidesign Inc., has
been authorized to apply the appropriate UL & CUL mark on its
compliant equipment.
Warning
Important Safety Instructions
1) Read these instructions.
2) Keep these instructions.
3) Heed all warnings.
4) Follow all instructions.
5) Do not use this apparatus near water.
6) Clean only with dry cloth.
7) Do not block any ventilation openings. Install in accordance
with the manufacturer’s instructions.
8) Do not install near any heat sources such as radiators, heat
registers, stoves, or other apparatus (including amplifiers) that
produce heat.
9) Do not defeat the safety purpose of the polarized or
grounding-type plug. A polarized plug has two blades with one
wider than the other. A grounding type plug has two blades and
a third grounding prong. The wide blade or the third prong are
provided for your safety. If the provided plug does not fit into
your outlet, consult an electrician for replacement of the
obsolete outlet.
10) Protect the power cord from being walked on or pinched
particularly at plugs, convenience receptacles, and the point
where they exit from the apparatus.
11) Only use attachments/accessories specified by the
manufacturer.
12) Use caution when replacing the Lithium battery in the FOH
Rack unit. There is danger of explosion if battery is incorrectly
replaced. Replace only with the same or equivalent type.
13) Unplug this apparatus during lightning storms or when
unused for long periods of time.
14) Refer all servicing to qualified service personnel. Servicing
is required when the apparatus has been damaged in any way,
such as power-supply cord or plug is damaged, liquid has been
spilled or objects have fallen into the apparatus, the apparatus
has been exposed to rain or moisture, does not operate
normally, or has been dropped.
Page 4

Page 5

contents
Chapter 1. Introduction . . . . . . . . . . . . . . . . . . . . . . . . . . . . . . . . . . . . . . . . . . . . . . . . . . . . . . 1
SYNC HD Features. . . . . . . . . . . . . . . . . . . . . . . . . . . . . . . . . . . . . . . . . . . . . . . . . . . . . . . . 2
System Requirements . . . . . . . . . . . . . . . . . . . . . . . . . . . . . . . . . . . . . . . . . . . . . . . . . . . . . 3
Digidesign Registration . . . . . . . . . . . . . . . . . . . . . . . . . . . . . . . . . . . . . . . . . . . . . . . . . . . . 3
About the Pro Tools Guides . . . . . . . . . . . . . . . . . . . . . . . . . . . . . . . . . . . . . . . . . . . . . . . . . 4
About www.digidesign.com . . . . . . . . . . . . . . . . . . . . . . . . . . . . . . . . . . . . . . . . . . . . . . . . . 5
Chapter 2. Installation and Configuration . . . . . . . . . . . . . . . . . . . . . . . . . . . . . . . . . . . . . . 7
Hardware Connections . . . . . . . . . . . . . . . . . . . . . . . . . . . . . . . . . . . . . . . . . . . . . . . . . . . . . 7
MachineControl. . . . . . . . . . . . . . . . . . . . . . . . . . . . . . . . . . . . . . . . . . . . . . . . . . . . . . . . . . 9
Synchronization and Time Code Connections to Machines, Decks, and Other Devices . . . . . . . 10
Software Installation . . . . . . . . . . . . . . . . . . . . . . . . . . . . . . . . . . . . . . . . . . . . . . . . . . . . . 12
Configuring the Device ID. . . . . . . . . . . . . . . . . . . . . . . . . . . . . . . . . . . . . . . . . . . . . . . . . . 13
Configuring the SYNC HD from Pro Tools HD . . . . . . . . . . . . . . . . . . . . . . . . . . . . . . . . . . . . 14
MachineControl Configuration. . . . . . . . . . . . . . . . . . . . . . . . . . . . . . . . . . . . . . . . . . . . . . . 21
Software Configuration for the SYNC Setup Software Utility . . . . . . . . . . . . . . . . . . . . . . . . . . 21
Troubleshooting . . . . . . . . . . . . . . . . . . . . . . . . . . . . . . . . . . . . . . . . . . . . . . . . . . . . . . . . 22
Chapter 3. SYNC HD Hardware and Software . . . . . . . . . . . . . . . . . . . . . . . . . . . . . . . . . . 23
SYNC HD Front Panel. . . . . . . . . . . . . . . . . . . . . . . . . . . . . . . . . . . . . . . . . . . . . . . . . . . . . 23
SYNC HD Back Panel. . . . . . . . . . . . . . . . . . . . . . . . . . . . . . . . . . . . . . . . . . . . . . . . . . . . . 26
SYNC Setup Software Utility . . . . . . . . . . . . . . . . . . . . . . . . . . . . . . . . . . . . . . . . . . . . . . . . 28
Chapter 4. Using SYNC HD . . . . . . . . . . . . . . . . . . . . . . . . . . . . . . . . . . . . . . . . . . . . . . . . . . 33
SYNC HD Controls in Pro Tools, SYNC Setup Software Utility, and the SYNC HD Front Panel . . . 34
Front Panel Generator/Parameter Switches . . . . . . . . . . . . . . . . . . . . . . . . . . . . . . . . . . . . . 35
Clock References and Options . . . . . . . . . . . . . . . . . . . . . . . . . . . . . . . . . . . . . . . . . . . . . . 36
Positional Reference and Options . . . . . . . . . . . . . . . . . . . . . . . . . . . . . . . . . . . . . . . . . . . . 43
Compensating for Time Code Offsets . . . . . . . . . . . . . . . . . . . . . . . . . . . . . . . . . . . . . . . . . 49
Contents v
Page 6

Generating & Regenerating Time Code. . . . . . . . . . . . . . . . . . . . . . . . . . . . . . . . . . . . . . . . 49
Generating a Window Dub. . . . . . . . . . . . . . . . . . . . . . . . . . . . . . . . . . . . . . . . . . . . . . . . . 57
Chapter 5. Additional Operational Information. . . . . . . . . . . . . . . . . . . . . . . . . . . . . . . . . 59
Front Panel Generator/Parameter Controls . . . . . . . . . . . . . . . . . . . . . . . . . . . . . . . . . . . . . 59
Using Fader Start . . . . . . . . . . . . . . . . . . . . . . . . . . . . . . . . . . . . . . . . . . . . . . . . . . . . . . . 64
Calibrating the SYNC HD Oscillator. . . . . . . . . . . . . . . . . . . . . . . . . . . . . . . . . . . . . . . . . . . 65
Restoring Factory Settings. . . . . . . . . . . . . . . . . . . . . . . . . . . . . . . . . . . . . . . . . . . . . . . . . 66
Managing and Selecting Video Inputs . . . . . . . . . . . . . . . . . . . . . . . . . . . . . . . . . . . . . . . . . 67
Appendix A. Additional Synchronization Information . . . . . . . . . . . . . . . . . . . . . . . . . . . 69
Video and VITC Signals . . . . . . . . . . . . . . . . . . . . . . . . . . . . . . . . . . . . . . . . . . . . . . . . . . . 69
LTC Signals . . . . . . . . . . . . . . . . . . . . . . . . . . . . . . . . . . . . . . . . . . . . . . . . . . . . . . . . . . . 70
Auto-Switch LTC/VITC . . . . . . . . . . . . . . . . . . . . . . . . . . . . . . . . . . . . . . . . . . . . . . . . . . . . 70
Digital Clock Signal Types . . . . . . . . . . . . . . . . . . . . . . . . . . . . . . . . . . . . . . . . . . . . . . . . . 71
Bi-Phase/Tach . . . . . . . . . . . . . . . . . . . . . . . . . . . . . . . . . . . . . . . . . . . . . . . . . . . . . . . . . 72
Pilot Tone . . . . . . . . . . . . . . . . . . . . . . . . . . . . . . . . . . . . . . . . . . . . . . . . . . . . . . . . . . . . 73
Appendix B. Technical Specifications . . . . . . . . . . . . . . . . . . . . . . . . . . . . . . . . . . . . . . . . 75
Appendix C. Wiring Diagrams and Pin Assignments. . . . . . . . . . . . . . . . . . . . . . . . . . . . 83
LTC Connectors . . . . . . . . . . . . . . . . . . . . . . . . . . . . . . . . . . . . . . . . . . . . . . . . . . . . . . . . 83
Bi-Phase/GPI/Pilot Pin Diagram . . . . . . . . . . . . . . . . . . . . . . . . . . . . . . . . . . . . . . . . . . . . 84
Bi-phase/Tach OptoCoupler Input. . . . . . . . . . . . . . . . . . . . . . . . . . . . . . . . . . . . . . . . . . . . 85
GPI Relay Outputs . . . . . . . . . . . . . . . . . . . . . . . . . . . . . . . . . . . . . . . . . . . . . . . . . . . . . . 86
GPI (TTL)/MTC Outputs . . . . . . . . . . . . . . . . . . . . . . . . . . . . . . . . . . . . . . . . . . . . . . . . . . . 87
GPI (opto) Inputs . . . . . . . . . . . . . . . . . . . . . . . . . . . . . . . . . . . . . . . . . . . . . . . . . . . . . . . 88
Connector Pin Assignments. . . . . . . . . . . . . . . . . . . . . . . . . . . . . . . . . . . . . . . . . . . . . . . . 89
SYNC HD Cable Pin Assignments . . . . . . . . . . . . . . . . . . . . . . . . . . . . . . . . . . . . . . . . . . . . 91
Bi-phase/Tach/GPI/Pilot Port Interfacing Notes . . . . . . . . . . . . . . . . . . . . . . . . . . . . . . . . . 92
Index . . . . . . . . . . . . . . . . . . . . . . . . . . . . . . . . . . . . . . . . . . . . . . . . . . . . . . . . . . . . . . . . . . . . . 93
SYNC HD Guidevi
Page 7

chapter 1
Introduction
Welcome to the Digidesign SYNC HD, a multipurpose synchronization peripheral for
Pro Tools HD systems. The SYNC HD supports
all Pro Tools sample rates, and synchronizes to
most major time code and clock reference standards used in audio, video, film, and multimedia production.
The SYNC HD can also be used as a standalone
synchronization device.
SYNC HD with Pro Tools|HD Systems
With a Pro Tools|HD system, the SYNC HD provides highly accurate lock to time code. Most
SYNC HD settings are available directly from
within Pro Tools.
SYNC HD in Standalone Mode
The SYNC HD can be used as a standalone synchronization converter, time code generator,
clock generator and time code character generator. Throughout this guide, the term standalone
refers to systems using the SYNC HD but not using Pro Tools. When used as a standalone device
(known as “Standalone mode”), the SYNC HD is
connected to time code or clock signals, and is
configured from the front panel.
Optionally, while in Standalone mode, the
SYNC HD can be controlled remotely from a
Windows computer using the SYNC Setup
software utility.
SYNC Setup Software Utility
(Windows Only)
The SYNC Setup software utility can be used
with or without Pro Tools to control all
SYNC HD features from any supported Windows computer.
Chapter 1: Introduction 1
Page 8

SYNC HD Features
The SYNC HD supports all Pro Tools HD sample
rates (44.1, 48, 88.2, 96, 176.4, and 192 kHz)
and supports industry standard SD (standard
definition) and HD (high-definition) video reference rates. The SYNC HD provides the following features with Pro Tools HD:
Supported Positional Reference Sources
•LTC
•VITC
•Bi-phase/Tach
• Internal Time Code Generator
• Serial Time Code
Other Features
• SYNC I/O Emulation for legacy software
support
• Front panel controls and a large LED display of time code and parameters
• Integrated control of the SYNC HD from
Pro Tools
• Time Code Character Generator
• Fader start, provided through GPI output,
for remote transport control from select
Pro Tools fader movement
• SYNC Setup software utility (Windows
only)
• Field-updatable firmware
Supported Clock Reference Sources
• Loop Sync
• Reference Video (SD and HD rates)
• Composite Video Input
• Word Clock
•AES/EBU DARS
• Pilot Tone
• Internal Crystal
•Bi-phase/Tach
•LTC
Output and Generation
• Loop Sync
• Digidesign Super Clock (256x sample
clock)
• Word Clock (1x sample clock)
• AES/EBU null clock (AES “digital black”)
• VITC (if a video input is present)
•LTC
•MIDI Time Code (MTC)
• Two 9-pin Sony P-2 protocol ports, for limited serial deck control with MachineControl-enabled systems
Available Controls in Standalone
Mode
If you are using the SYNC HD in Standalone
mode, you can control it with the SYNC Setup
software utility (Windows only), or with the
switches on the front panel of the SYNC HD.
SYNC Setup Software Utility
(Windows Only)
The SYNC Setup software utility gives you access
to all SYNC HD controls. The following
SYNC HD parameters are accessible only
through Pro Tools or the SYNC Setup software
utility:
• Variable Speed Override (VSO)
• Window burn parameters: While you can
turn the Window burn on or off from the
front panel, you cannot configure its display parameters without Pro Tools or the
SYNC Setup software utility.
See “SYNC HD Controls in Pro Tools,
SYNC Setup Software Utility, and the
SYNC HD Front Panel” on page 34.
SYNC HD Guide2
Page 9

System Requirements
Compatibility Information
Digidesign can only assure compatibility and
provide support for hardware and software it has
tested and approved.
For a list of Digidesign-qualified computers, operating systems, hard drives, machine controllers and third-party devices, visit the Digidesign
website (www.digidesign.com).
SYNC HD with Pro Tools
To use the SYNC HD with Pro Tools HD, the following is required:
• A Digidesign-qualified Pro Tools|HD system
• An available DigiSerial port on the system’s
HD Core card
• An 8-pin to 8-pin serial cable (included) to
connect the SYNC HD to the DigiSerial port
on a Pro Tools PCI or PCIe card
SYNC Setup Software Utility
(Windows Only)
The optional SYNC Setup software utility requires the following:
A Digidesign-qualified Windows computer.
An available COM port or serial port on the
computer to connect to the SYNC HD. (You cannot run the SYNC Setup software utility from
the DigiSerial port on Pro Tools cards.)
The computer requirements for the SYNC
Setup software utility are different from the
computer requirements for Pro Tools. You
can run the SYNC Setup software utility
from slower computers.
A non-standard 8-pin to 9-pin cable is re-
quired to connect the SYNC HD to a COM port
or serial port on a Windows computer. Wiring
instructions for making the required cable are in
Appendix C, “Wiring Diagrams and Pin Assignments.”
If you use a custom serial cable between
Pro Tools and the SYNC HD, be sure the
cable supports hardware handshaking.
The maximum supported length for this
cable is 100 ft.
For more information, see Appendix C,
“Wiring Diagrams and Pin Assignments.”
For complete system requirements, visit the
Digidesign website (www.digidesign.com).
Digidesign Registration
Review the enclosed Digidesign Registration Information Card and follow the instructions on it
to quickly register your purchase online. Registering your purchase is the only way you can be
eligible to receive complimentary technical support and future upgrade offers. This is one of the
most important steps you can take as a new user.
Registering your purchase is the only way you
can be eligible to receive:
• Complimentary technical support
• Any available software updates
• Future upgrade offers
Chapter 1: Introduction 3
Page 10
About the Pro Tools Guides
In addition to the printed guides that came with
your system, PDF versions of the Pro Tools
guides are installed automatically with
Pro Tools in the Documentation folder in the
Pro Tools folder. To view or print the PDF
guides, use Adobe Reader.
Conventions Used in This Guide
Digidesign guides use the following conventions to indicate menu choices and key commands:
:
Convention Action
File > Save Choose Save from the File
menu
About This Guide
This guide assumes:
• You understand the basics of synchronization and time code
• You know how to operate devices that send
or receive time code, such as a video deck
• You have an understanding of the time
code requirements for your projects
This Guide covers use of the SYNC HD with
Pro Tools HD version 7.3 and higher.
Use of tri-level synchronization rates requires
Pro Tools HD version 7.4 or higher.
For versions of Pro Tools lower than 7.3, the
SYNC HD can be set to emulate a
SYNC I/O. See the Digidesign website
(www.digidesign.com) for a version of the
SYNC I/O Guide that applies to your system.
Control+N Hold down the Control key
and press the N key
Control-click Hold down the Control key
and click the mouse button
Right-click Click with the right mouse
button
The following symbols are used to highlight important information:
User Tips are helpful hints for getting the
most from your system.
Important Notices include information that
could affect your data or the performance of
your system.
Shortcuts show you useful keyboard or
mouse shortcuts.
Cross References point to related sections in
other Digidesign guides.
SYNC HD Guide4
Page 11

About www.digidesign.com
The Digidesign website (www.digidesign.com) is
your best source for information to help you get
the most out of your Pro Tools system. The following are just a few of the services and features
available.
Product Registration Register your purchase
online. See the enclosed Digidesign Registration
Information Card for instructions.
Support and Downloads Contact Digidesign
Technical Support or Customer Service; download software updates and the latest online
manuals; find the latest system requirements;
search the online Answerbase or join the worldwide Pro Tools community on the Digidesign
User Conference.
Training and Education Become a certified
Pro Tools Operator or Expert; study on your
own using courses available online, or find out
how you can learn in a classroom setting at a
certified Pro Tools Training Center.
Products and Developers Learn about Digidesign
products; download demo software; learn about
our Development Partners and their plug-ins,
applications, and hardware.
News and Events Get the latest news from
Digidesign or sign up for a Pro Tools demo.
To learn more about these and other resources
available from Digidesign, visit the Digidesign
website (www.digidesign.com).
Chapter 1: Introduction 5
Page 12

SYNC HD Guide6
Page 13

chapter 2
Installation and Configuration
Hardware Connections
The following are the primary hardware connections on a SYNC HD:
•AC Power
• Serial to a DigiSerial port on a Pro Tools PCI or
PCIe card, or a serial port on the computer
• Clock to Pro Tools audio interfaces
(Loop Sync or Super Clock)
• 9-pin to external machines (requires the
Digidesign MachineControl option)
• Synchronization, including positional and
clock references to and from remote machines
AC Power
The SYNC HD AC connector accepts a standard
AC Power Cable. The SYNC HD is auto powerselecting (100V to 240V) and will automatically
work with a standard modular cable to connect
to AC power receptacles in any country.
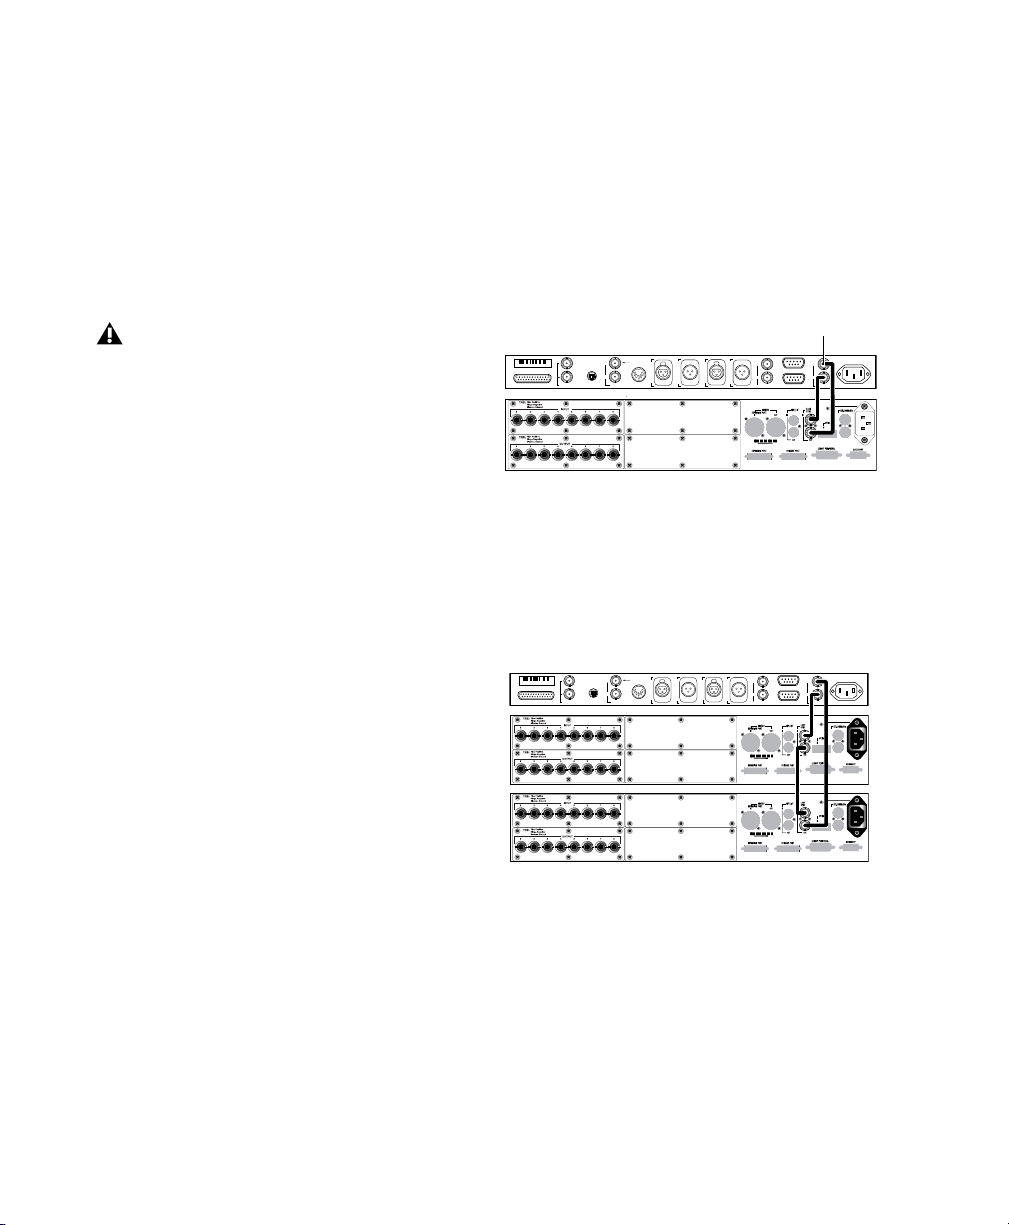
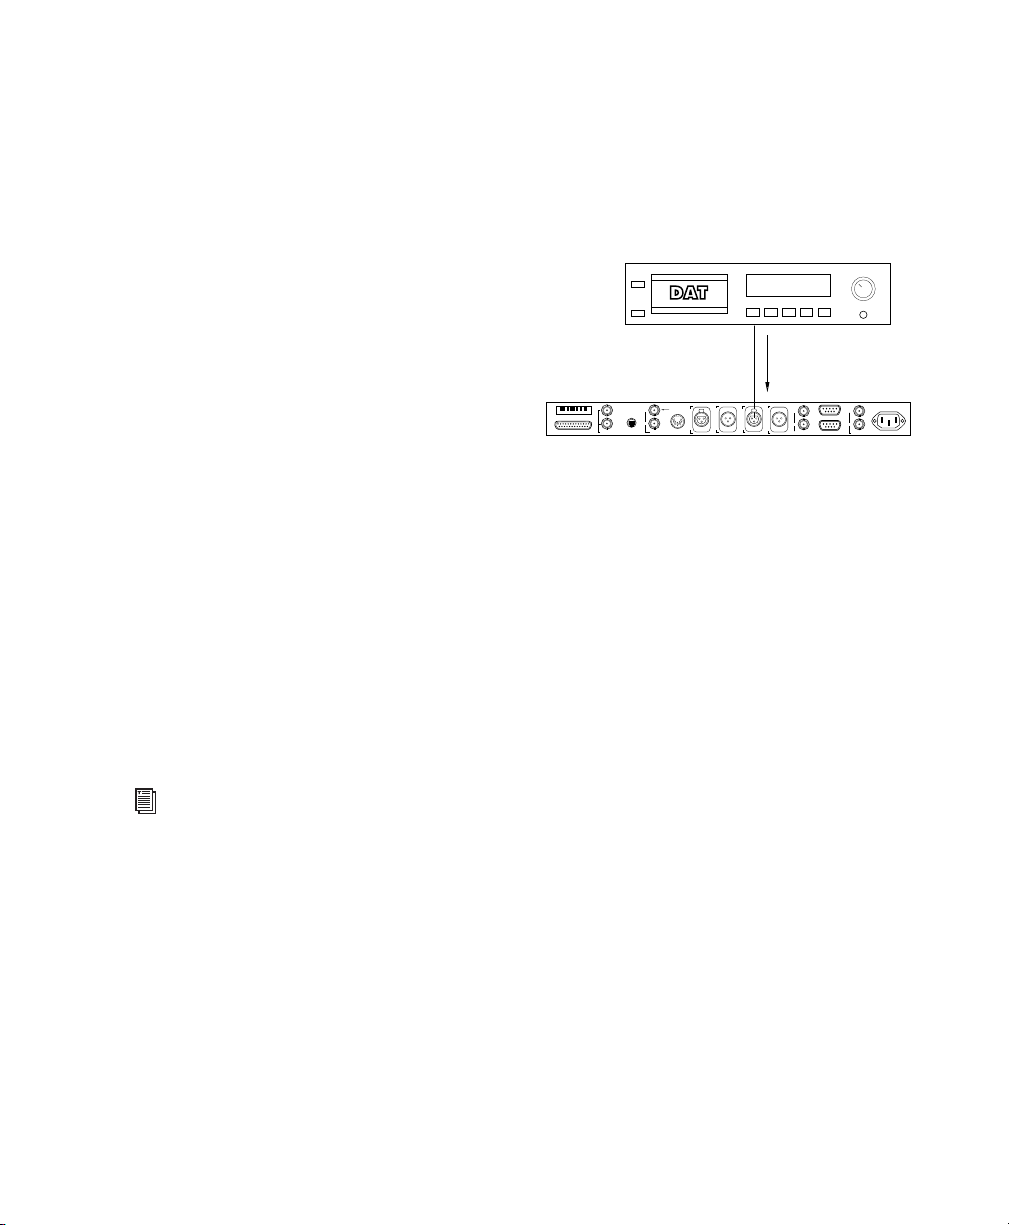
Serial Connections
Serial to Pro Tools Core Card
Pro Tools systems require a serial connection between the SYNC HD and an HD Core or
Accel Core card.
To connect the SYNC HD to an HD Core or
Accel Core card:
1 Make sure power is off on all equipment.
2 Connect one end of the included serial cable
to the SYNC HD Host Serial port.
3 Connect the other end to the DigiSerial port
on your HD Core card.
Do not use the DigiSerial port on any other
Pro Tools HD card in your system.
Chapter 2: Installation and Configuration 7
Page 14
Serial Connections for the SYNC Setup
MTC OUT
HOST SERIAL
AC 100-240V, 50-60HZ, .5A 30W
VIDEO REF
9-PIN OUT 2
9-PIN OUT 1
WORD CLOCK (1x,256x)
VIDEO
L
T
C
I
N
A
E
S
I
N
A
E
S
O
U
T
L
T
C
O
U
T
IN
OUT
IN
OUT
IN
OUT
LOOP SYNC
INTERNALLY
TERMINATED
BI-PHASE / TACH / GPI / PILOT
SERIAL NUMBER
964530300294856
Loop Sync
SYNC HD
96 I/O Interface
MTC OUT
HOST SERIAL
AC 100-240V, 50-60HZ, .5A 30W
VIDEO REF
9-PIN OUT 2
9-PIN OUT 1
WORD CLOCK (1x,256x)
VIDEO
L
T
C
I
N
A
E
S
I
N
A
E
S
O
U
T
L
T
C
O
U
T
IN
OUT
IN
OUT
IN
OUT
LOOP SYNC
INTERNALLY
TERMINATED
BI-PHASE / TACH / GPI / PILOT
SERIAL NUMBER
964530300294856
SYNC HD
HD Interfaces
Software Utility
(Windows Only)
Any system using the optional SYNC Setup software utility requires a serial connection from
the SYNC HD to a supported Windows computer. (For compatibility information, see “System Requirements” on page 3.)
The SYNC Setup software utility will
not control the SYNC HD through the
DigiSerial port.
To connect the SYNC HD to a Windows computer
for the SYNC Setup software utility:
1 Purchase or make the required 9-pin to 8-pin
cable. For wiring details, see “” on page 90.
2 Make sure power is off on all equipment.
3 Connect the SYNC HD Host Serial port to an
available serial or COM port on your computer.
4 Restore power to the SYNC HD, and restart
your computer.
To connect the SYNC HD to Pro Tools|HD
interfaces:
1 Using a BNC cable, connect the Loop Sync
Out of the SYNC HD to the Loop Sync In of your
primary Pro Tools|HD audio interface.
2 Using a second BNC cable, connect the
SYNC HD Loop Sync In to the Loop Sync Out of
your Pro Tools|HD interface.
Loop Sync connections between a SYNC HD and 96 I/O
When using more than one Pro Tools|HD audio
interface, make the SYNC HD the first and last
unit in the Loop Sync chain.
Clock for Pro Tools
Audio Interfaces
The SYNC HD must be connected to all
Pro Tools|HD interfaces in the Loop Sync chain.
Connecting Loop Sync for Pro Tools|HD
Systems
The SYNC HD supports Loop Sync, and can
serve as Loop Sync Master. Loop Sync is a dedicated clock loop for synchronizing multiple
Pro Tools|HD interfaces. Loop Sync should only
be used to connect multiple Pro Tools|HD interfaces.
SYNC HD Guide8
Loop Sync in an expanded Pro Tools|HD system
Page 15
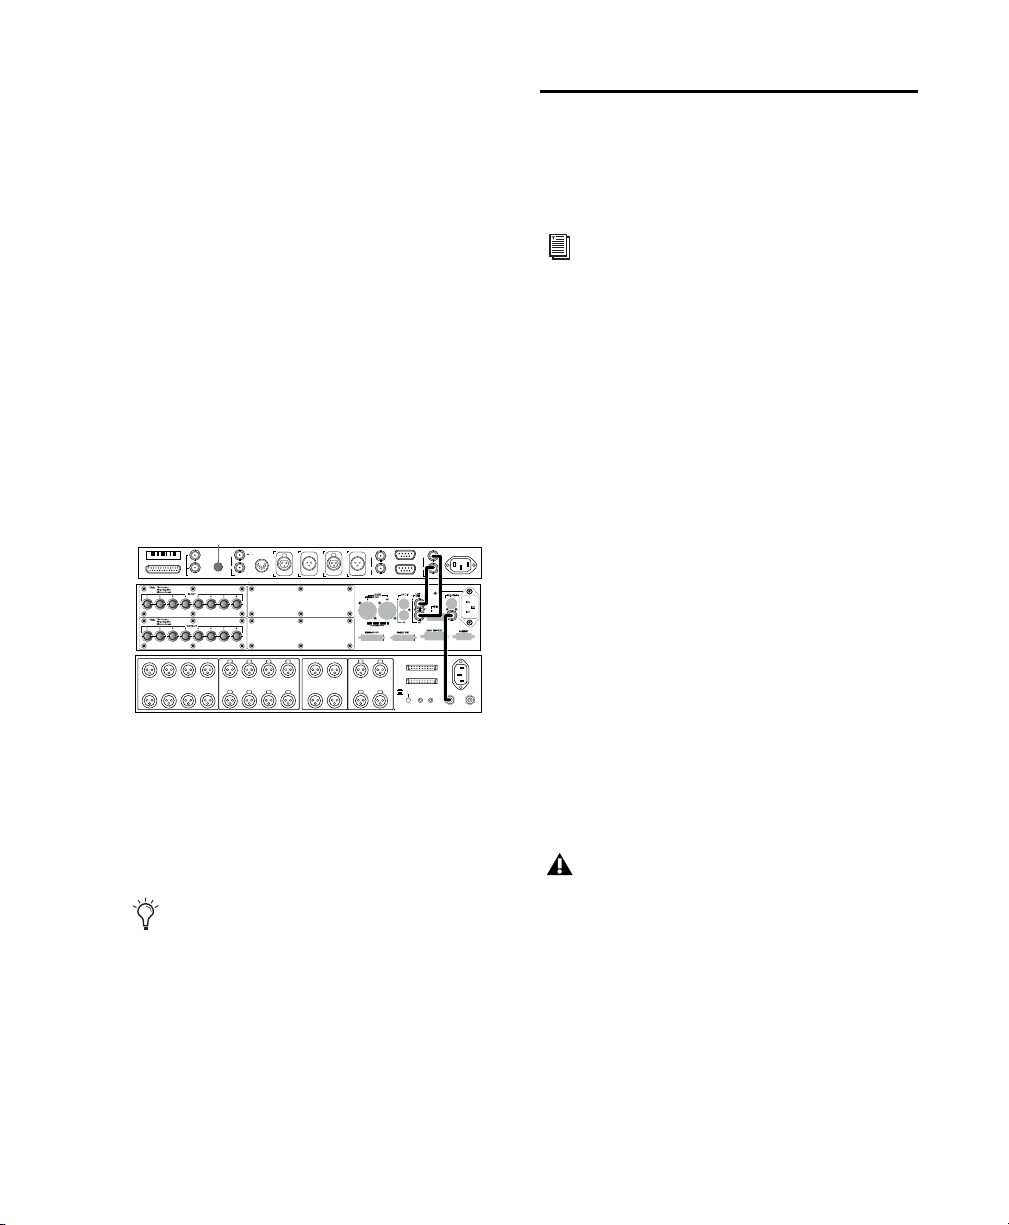
Using Legacy Audio Interfaces with
Computer 1
ANALOG OUTPUT ANALOG INPUT AES/EBU OUTPUT AES/EBU INPUT
Computer 2
8 CH Mode
2 x 4 CH Mode
S/PDIFINS/PDIF
OUT
SLAVE CLOCKINSLAVE CLOCK
OUT
78563412785634125/6
7/8
1/2
3/4
5/6
7/8
1/2
3/4
MTC OUT
HOST SERIAL
AC 100-240V, 50-60HZ, .5A 30W
VIDEO REF
9-PIN OUT 2
9-PIN OUT 1
WORD CLOCK (1x,256x)
VIDEO
L
T
C
I
N
A
E
S
I
N
A
E
S
O
U
T
L
T
C
O
U
T
IN
OUT
IN
OUT
IN
OUT
LOOP SYNC
INTERNALLY
TERMINATED
BI-PHASE / TACH / GPI / PILOT
SERIAL NUMBER
964530300294856
Pro Tools|HD
MachineControl
If you are using a Pro Tools|HD system that includes a legacy audio interface (an 888|24,
882|20, 1622, or ADAT Bridge audio interface),
you will need to connect the Clock output of the
HD system to the Slave Clock Input of the legacy
interface.
To connect a legacy audio interface to an
HD-series system with the SYNC HD:
1 Connect the SYNC HD to the HD-series sys-
tem with Loop Sync as described in the previous
steps.
2 Using a BNC cable, connect the Ext Clock Out
of your primary HD-series interface to the Slave
Clock In of your first legacy interface.
Clock for SYNC I/O, a 96 I/O, and an 888|24 I/O
3 If you are connecting multiple legacy inter-
faces, daisy-chain their Slave Clock connections
by connecting the Slave Clock Out of the first
interface to the Slave Clock In of the next interface.
See the Getting Started with HD Guide for
external clock configuration instructions.
On MachineControl-enabled Pro Tools systems,
the SYNC HD supports limited Serial Deck Control only.
For more information on MachineControl
connections and operation, refer to the
MachineControl Guide.
Serial Deck Control Mode
(Non-Linear Decks Only)
Limited Serial Deck Control mode is available
through a connection to the 9-pin ports on the
SYNC HD. For full Serial Deck Control, a direct
serial connection to the host computer is required. See the MachineControl Guide for more
information.
To connect an external deck to SYNC HD:
Connect a standard 9-pin cable from one of
the 9-pin Out ports on the SYNC HD to the
9-pin connector of the external deck.
As many as two decks can be connected to the
two 9-pin Out ports on the SYNC HD. You can
control one deck at a time, and switch between
them from within Pro Tools. These ports on the
SYNC HD support all MachineControl modes
except 9-Pin Remote (Deck Emulation) mode.
Due to performance limitations, this
configuration should be used primarily
with non-linear decks.
Remote 9-Pin Deck Emulation
Mode
Remote 9-Pin Deck Emulation mode requires a
direct serial connection to the host computer.
See the MachineControl Guide for more information.
Chapter 2: Installation and Configuration 9
Page 16

Synchronization and Time Code Connections to Machines, Decks, and Other Devices
The following sections describe connections required for different applications. For more information on time code applications, see
Appendix A, “Additional Synchronization Information.”
Connecting a Video Source
This section describes connections required
when using house video reference (SD or HD).
To have the SYNC HD resolve to house sync:
Connect the house video reference/black
burst/tri-level sync source to the Video Ref In
port on the SYNC HD.
Character Generator for Window Burn
The SYNC HD can generate a window burn on
SD signals coming in to the Video In port.
Even when you have an HD video reference signal connected to the Video Ref In
connector, you can still connect an SD
video signal to the Video In connector to
provide a window burn.
To use the SYNC HD Time Code Character
Generator to make a window burn (SD signal):
1 Connect an SD video signal to the SYNC HD
Video Ref In port.
2 Connect the SYNC HD Video Ref Out port to
the Video In port.
3 Connect the SYNC HD Video Out port to
other video devices, ensuring that the signal is
terminated by the last device in the chain.
The Video Ref ports are a non-terminated
loop-through connection. If the Video Ref
Out port is not used, then you must
terminate it using the included 75-ohm
BNC terminator.
To have the SYNC HD resolve directly to an
incoming SD video signal:
Connect an SD video signal to the SYNC HD
Video In port.
SYNC HD Guide10
Connecting LTC
The SYNC HD provides LTC input and output
connectors.
To input LTC to the SYNC HD:
Connect the LTC signal from your machine,
synchronizer or other source to the SYNC HD
LTC In port.
To output LTC from the SYNC HD:
Connect the SYNC HD LTC Out port to your
external devices.
Page 17
Connecting Word Clock Devices
MTC OUT
HOST SERIAL
AC 100-240V, 50-60HZ, .5A 30W
VIDEO REF
9-PIN OUT 2
9-PIN OUT 1
WORD CLOCK (1x,256x)
VIDEO
L
T
C
I
N
A
E
S
I
N
A
E
S
O
U
T
L
T
C
O
U
T
IN
OUT
IN
OUT
IN
OUT
LOOP SYNC
INTERNALLY
TERMINATED
BI-PHASE / TACH / GPI / PILOT
SERIAL NUMBER
964530300294856
AES Clock
Connecting AES/EBU Devices
The SYNC HD has Word Clock input and output, both of which can be used simultaneously.
Use Word Clock when you want the SYNC HD
to lock to 1x clock from DAT machines, DA-88s,
and similar digital devices.
Pro Tools|HD audio interfaces each have their
own Word Clock inputs, which provide additional clock options and flexibility. Refer to
Pro Tools|HD documentation for details.
To inpu t Word Clock to the SYNC HD:
Connect Word Clock from the master Word
clock signal or device to the SYNC HD Word
Clock In.
To supply Word Clock from the SYNC HD:
Connect the SYNC HD Word Clock Out to the
Word Clock input of a digital device.
Make sure the SYNC HD Word Clock Out port is
configured to 1x for Word Clock.
Word Clock contains no positional information. If you want devices to play or record in
sync, you’ll still need to provide them with a positional reference.
To input AES/EBU clock reference to the
SYNC HD:
Connect the device’s AES/EBU output to the
SYNC HD AES/EBU input.
Connecting the SYNC HD to an AES/EBU device
To supply AES/EBU clock reference from the
SYNC HD:
Connect the SYNC HD AES/EBU output to the
AES/EBU reference input on a DAT machine or
other digital device. (AES/EBU clock does not
support 176.4 kHz or 192 kHz sample rates.)
The SYNC HD can generate time code to
provide positional reference to other devices.
See “Generating & Regenerating Time
Code” on page 49.
Chapter 2: Installation and Configuration 11
Page 18

Connecting MIDI
The SYNC HD MTC Out port supplies MIDI time
code, derived from conversion (from LTC, VITC
or Bi-Phase) or from MTC generation, to synchronize MTC-compatible consoles, sequencers,
lighting systems, and other devices.
Software Installation
The following sections provide instructions to
install software required to use the SYNC HD
with Pro Tools HD or with the stand alone
SYNC Setup software (Windows only).
MIDI time code from the MTC Out always
matches the time code address displayed on the
SYNC HD front panel. To supply MTC from the
SYNC HD to another MTC-compatible device,
connect the device as described below.
To connect an MTC-compatible device to receive
MTC from the SYNC HD:
Connect the SYNC HD MTC Out port to the
appropriate MIDI input on the device using a
standard MIDI cable.
Pro Tools and MTC
Pro Tools receives MTC from the SYNC HD
through its connection to the SYNC HD Host
Serial port. This signal does not include standard
MIDI time code, but is instead a high-quality,
proprietary time code signal designed for
Pro Tools. A MIDI Interface is not required for
Pro Tools to receive MTC.
MTC is output constantly whenever the
SYNC HD is generating time code. This output
can be muted when time code (LTC) is idle. See
“MTC Output and Idle Muting” on page 56 for
details.
Pro Tools HD
All software required to use SYNC HD options is
installed with Pro Tools HD software.
The availability of SYNC HD features depends
on the version of Pro Tools software you are
running. For details on features available with
your version of Pro Tools, visit the Digidesign
website.
Updating SYNC HD Firmware
You can update SYNC HD firmware from the
DigiTest application.
To update SYNC HD firmware:
1 Confirm that the SYNC HD is properly con-
nected to your computer in one of the following
ways:
• If it is connected to a Pro Tools system, it
sh o uld be c onnecte d to a Di giS erial P ort on
an HD Core card.
• (Windows Only) If it is connected to a computer without Pro Tools, it should be connected to the COM 1 port on the computer
with a standard serial cable.
2 Ensure that Pro Tools is not running.
3 Launch the DigiTest application.
SYNC HD Guide12
Page 19
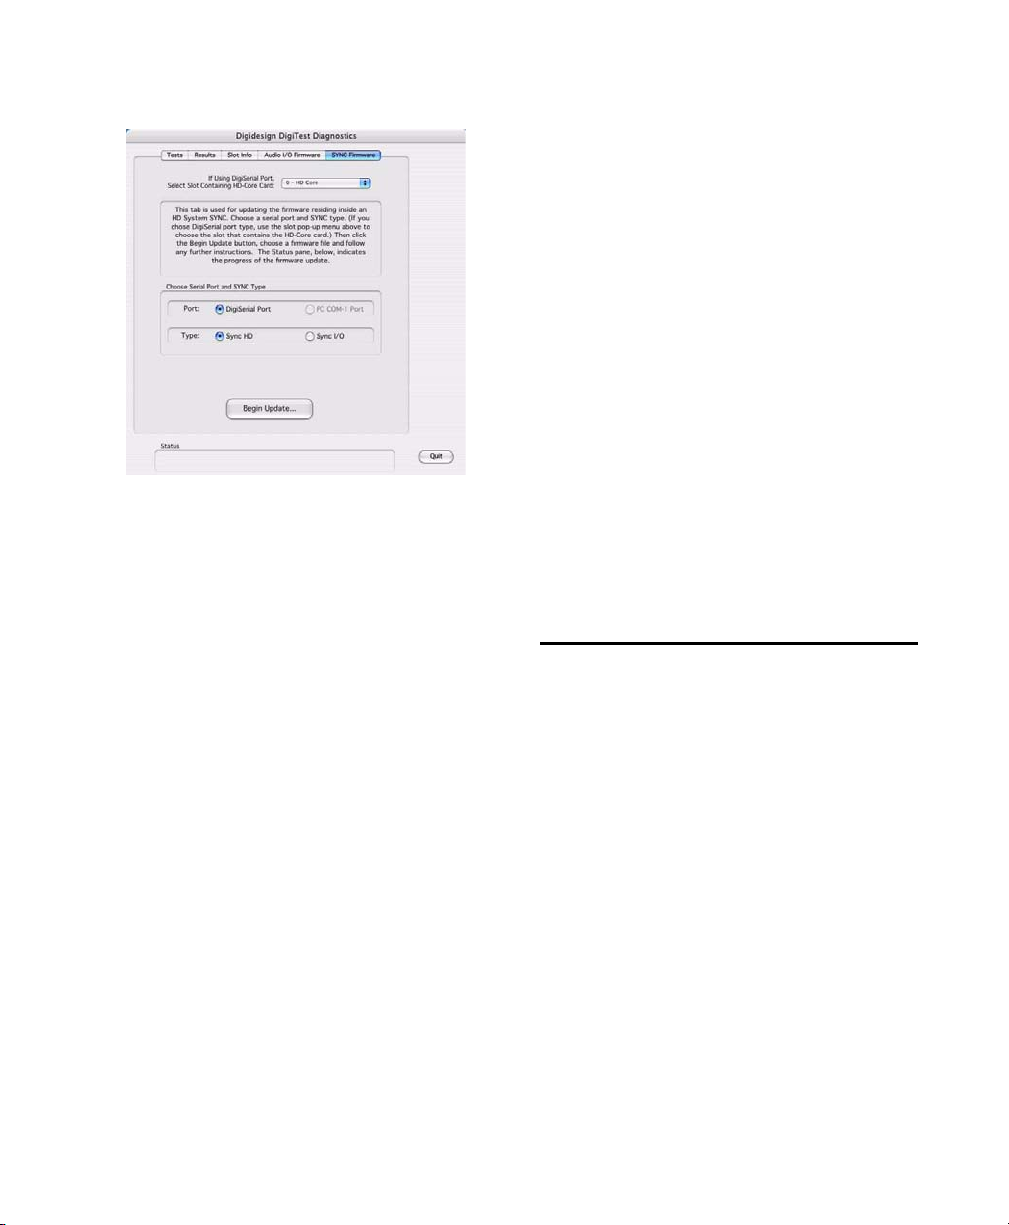
4 Click SYNC Firmware.
SYNC Setup Software Utility
(Windows Only)
When using the SYNC HD in Standalone mode,
the SYNC HD can be controlled remotely using
the SYNC Setup software utility. Updates to this
utility can be downloaded from the Digidesign
website (www.digidesign.com).
To install the SYNC Setup software utility on
Windows:
1 Make sure the SYNC HD is connected to a se-
rial or COM port on your computer. See “Serial
Connections for the SYNC Setup Software Utility” on page 8.
DigiTest SYNC Firmware window
5 If you are using a DigiSerial Port connection,
make sure you have selected the HD Core card
from the pop-up menu.
6 Select the type of port connection for the
SYNC peripheral (DigiSerial Port or COM Port).
7 Select SYNC HD for the Synchronizer Type.
8 Click Begin Update.
9 Follow the on-screen instructions to power cy-
cle the SYNC HD while holding the Set button.
10 Wait for the firmware update to complete.
Do not power off the SYNC HD while the update is in progress.
11 When the update is complete, click Quit.
2 Insert the installer disc containing the latest
SYNC Setup software, or navigate to its location
if you downloaded an update.
3 Launch the installer and follow the on-screen
instructions.
Configuring the Device ID
If you are using SYNC HD with Pro Tools HD
7.4 or higher, Pro Tools will automatically recognize the SYNC HD.
If you are using SYNC HD with Pro Tools HD
version 7.3 or lower, set SYNC HD to emulate a
SYNC I/O.
To set SYNC HD to emulate a SYNC I/O:
1 Press Set, and use the Up or Down switches to
display Device ID (dEuicE id).
2 Press Set. The LED Time Code Display shows
shows the current Device ID for the unit: SYNC
HD (SYnc HD) or SYNC I/O (SYnc IO).
3 Press Up and Down to toggle the Device ID to
read SYNC I/O (SYnc IO).
4 Press Set.
Chapter 2: Installation and Configuration 13
Page 20
Configuring the SYNC HD from Pro Tools HD
Pro Tools HD software provides SYNC HD configuration controls that establish communication between Pro Tools and the SYNC HD.
Loop Sync
The SYNC HD supports Digidesign’s Loop Sync
feature for connecting Pro Tools|HD interfaces.
The SYNC HD can be configured as the Clock
Source (Loop Master) in order to provide Loop
Sync master clock to the rest of your
Pro Tools|HD interfaces.
For system requirements and Loop Sync
connection instructions, see Chapter 1,
“Introduction.”
To check SYNC HD and Pro Tools communication:
1 After installing Pro Tools and connecting the
SYNC HD as described, launch Pro Tools.
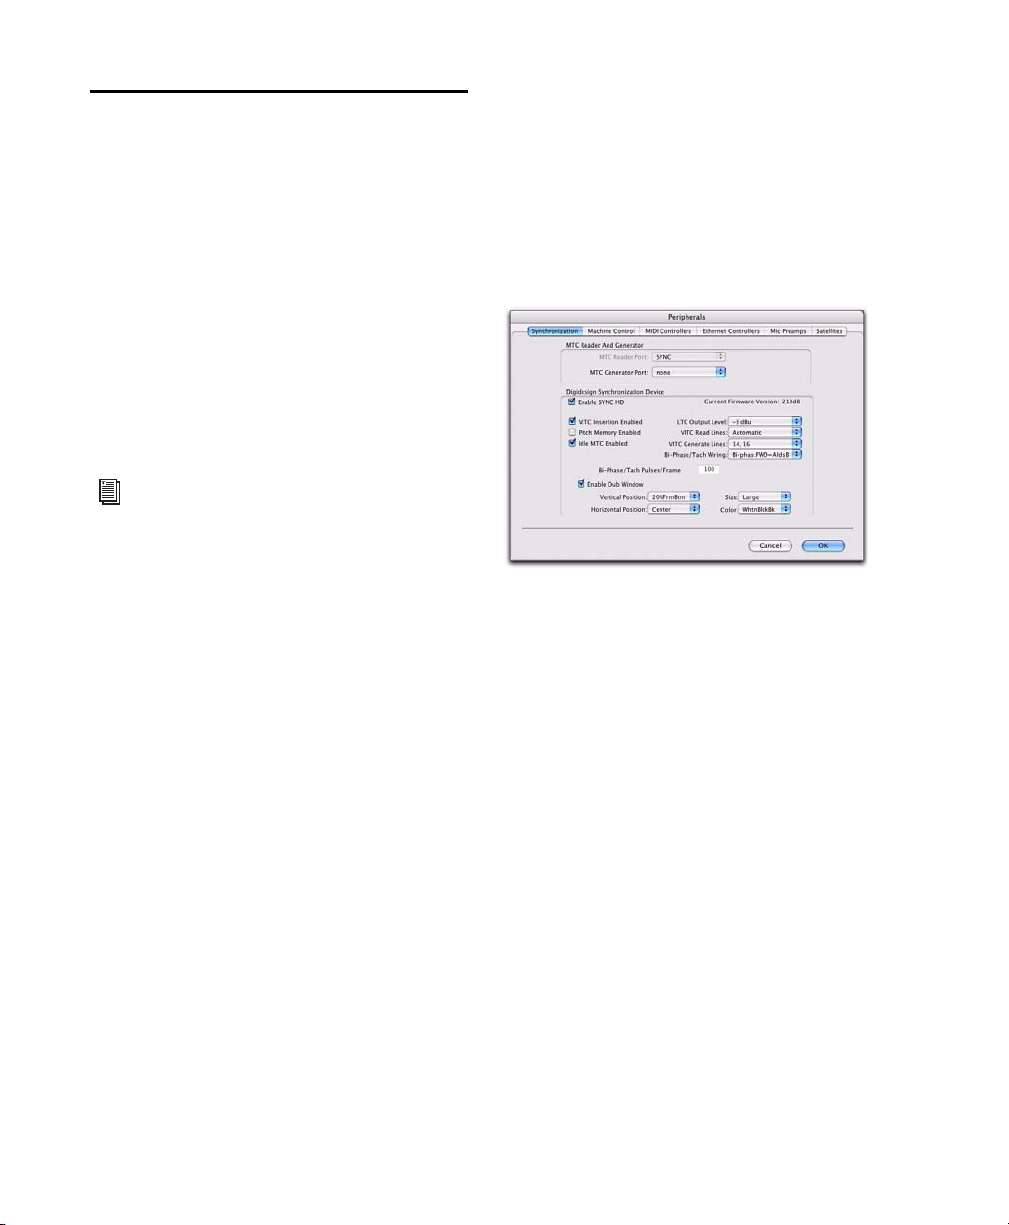
2 Choose Setup > Peripherals, and click the Syn-
chronization tab.
3 Under Digidesign Synchronization Device, se-
lect Enable SYNC Peripheral.
Auto ID of SYNC HD through Loop Sync
Pro Tools HD automatically recognizes if a
SYNC HD is connected to the DigiSerial port
when Pro Tools is launched. When Pro Tools
recognizes the SYNC HD, it automatically configures the Device and Port settings for the
SYNC HD in the Peripherals dialog
SYNC HD Guide14
SYNC HD settings in the Peripherals dialog
Pro Tools scans the DigiSerial port and checks
the SYNC HD firmware.
If you need to update your firmware, use the
DigiTest application included on the SYNC HD
Installer disc. See “Updating SYNC HD Firmware” on page 12.
Page 21
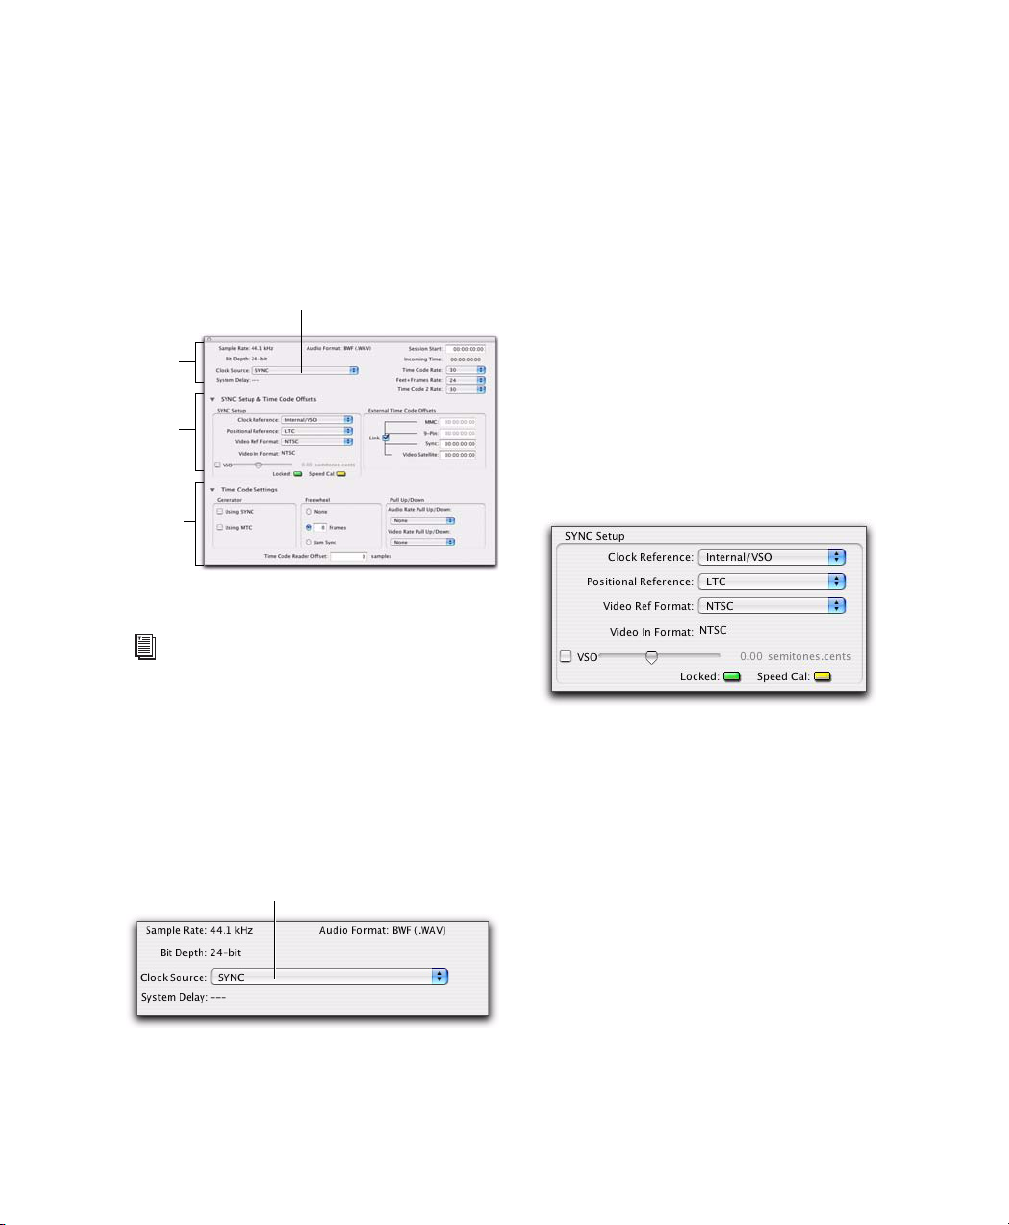
Configuring the SYNC HD in the
Clock Source
Session
settings
SYNC
Setup
Time Code
Settings
Clock Source
Session Setup Window
When the SYNC HD is connected through Loop
Sync and enabled in the Peripherals dialog, its
settings become available in the SYNC Setup
and Time Code Settings sections of the Session
Setup window.
Session Setup window
See the Pro Tools Reference Guide for more
information on the Session Setup Window.
Clock Source can be any device in the Loop Sync
chain. This lets you use any digital input source
available on any Pro Tools|HD interface (including the SYNC HD) simply by selecting that device and source from the Clock Source menu.
Clock Reference
The selected Clock Source device determines
your choices for clock reference.
When Clock Source is the SYNC HD
When the SYNC HD is set to be the Clock
Source, it is the Loop Master. Clock, Positional
Reference, and Video Format selectors become
active in the SYNC Setup section of the Session
Setup window.
Clock Source
When connected and configured in the Loop
Sync chain, the SYNC HD appears (as SYNC)
along with any Pro Tools|HD interfaces in the
Clock Source pop-up menu, located in the Session Setup window.
SY NC HD s elected a s Clock So urce in the S ession Se tup
window
SYNC Setup controls in the Session Setup window
SYNC HD Clock Reference choices include:
• Internal/VSO
•Video In
•Video Reference (SD)
•Video Reference (HD)
•LTC
• Bi-Phase
• Pilot Tone
•AES/EBU
• Word Clock
• Loop Sync
Chapter 2: Installation and Configuration 15
Page 22
When the SYNC HD is not the selected Clock
Source device, the Clock Reference menu in the
SYNC Setup section switches to Loop Sync.
For LTC clock reference, multiple choices
are available from the LTC sub-menu. See
“LTC and Clock Reference” on page 38.
To choose a SYNC HD Clock Reference:
Select a SYNC HD clock choice from the Clock
Reference pop-up menu in the Session Setup
window.
Choosing a SYNC HD Clock Reference
The Clock Source pop-up menu follows your selection of SYNC HD for Clock Reference by automatically switching to the SYNC setting. (You
can also choose SYNC HD as Clock Source first,
then select a Clock Reference.)
To choose a different Loop Sync device as the
Clock Source:
Select a different Loop Sync device and Clock
Source from the Clock Source pop-up menu in
the Session Setup window.
Choosing a Clock Source (96 I/O shown)
When Clock Source is an HD I/O
When a 192 I/O, 192 Digital I/O or 96 I/O is providing the Clock Source, it will be the Loop Master. Clock Source options are available directly
from the Clock Source menu, based on the configuration of that interface in the Hardware
Setup dialog. Choices can include AES, S/PDIF,
Optical, or Word Clock.
See the Getting Started with HD Guide
for more information on audio interface
configuration.
SYNC HD Guide16
Page 23
Locked and Speed Cal Indicators
Positional Reference
The Locked and Speed Cal indicators in the
SYNC Setup and Timecode Offsets section of the
Session Setup window display synchronization
status of the SYNC HD. These indicators reflect
the state of the same LEDs on the front panel.
Locked and Speed Cal Indicators
Locked The Locked indicator stays lit when the
SYNC HD is locked to the selected clock reference. The Locked indicator flashes if the selected
clock reference source is missing or out of lockable frequency range.
Speed Cal The Speed Cal indicator lights to indicate the status of the clock reference:
• Yellow Solid: SYNC HD is locked and that
the clock reference is within 0.025% of the
expected rate
• Yellow Flashing Fast: SYNC HD is locked,
but the clock reference is between 0.025%
and 4% faster than the expected rate
• Yellow Flashing Slow: SYNC HD is locked,
but the clock reference is between 0.025%
and 4% slower than the expected rate
• Red Flashing Fast: SYNC HD is locked, but
the clock reference is more than 4% faster
than the expected rate
• Red Flashing Slow: SYNC HD is locked, but
the clock reference is more than 4% slower
than the expected rate
• Unlit: SYNC HD is not locked to the chosen
clock reference
To select a positional reference:
1 Select a positional reference from the Posi-
tional Reference pop-up menu, located in the
SYNC Setup controls.
When the Positional Reference choices include:
• Auto LTC/VITC
•LTC
•VITC
• Bi-Phase
Sample Rate
The SYNC HD sample rate is determined by the
current Pro Tools session sample rate. In Standalone mode, SYNC HD sample rate can be selected with the SYNC Setup software utility
(Windows only), or using the front panel
switches. Current sample rate is indicated by the
Sample Rate LEDs.
When used with Pro Tools HD, the SYNC HD
supports all available sample rates. Setting the
session rate in Playback Engine or Hardware
Setup dialogs also sets the SYNC HD to that sample rate.
Audio and Video Pull Up and Pull Down
Pro Tools provides up to 4.167% pull up, and
4.0% pull down choices. When working with a
Movie track containing video, a separate Video
Pull-Down menu becomes available in the Session Setup window, allowing you to apply standard or non-standard pull factors to audio and
video separately. This lets Pro Tools synchronize
to most supported SMPTE frame rates and formats.
With Pro Tools HD, 4.167% pull up and
4.0% pull down are not available in
176.4 kHz and 192 kHz sessions.
Chapter 2: Installation and Configuration 17
Page 24

Time Code Rate
Video Ref Format
While using Pro Tools, the SYNC HD Time Code
Rate automatically follows the session Time
Code Rate setting. Session Time Code Rate is set
in the Session Setup window.
To set the session Time Code Rate:
Choose a rate from the Time Code Rate selec-
tor in the Session Setup window.
Choosing a session Time Code Rate
In Standalone mode, the SYNC HD Time Code
Rate can be set using the SYNC Setup software
utility (Windows only), or from the front panel.
SD Video Reference
Choose PAL or NTSC format for the session from
the Video Ref Format pop-up menu in the Session Setup window. If the session already has
video, the format will be set automatically.
Choosing an SD Video Format
SYNC HD Guide18
Page 25
HD Video Reference
Choose the video reference rate for the session
from the Video Ref Format pop-up menu in the
Session Setup window. If the session already has
video, the format will be set automatically.
Choosing an HD Video Format
The following video reference rates are available
in the Video Ref Format pop-up menu:
• Slow PAL 23.976
• Slow PAL 24
• 720p - 23.976
• 720p - 24
• 720p - 25
• 720p - 29.97
• 720p - 30
• 720p - 50
• 720p - 59.94
• 720p - 60
• 1080i - 47.95
• 1080i - 48
• 1080i - 50
• 1080i - 59.94
• 1080i - 60
• 1080p - 23.976
• 1080p - 24
• 1080p - 25
• 1080p - 29.97
• 1080p - 30
• 1080p - 50
• 1080p - 59.94
• 1080p - 60
Chapter 2: Installation and Configuration 19
Page 26

Video In Format Settings at
HD Video Reference Rates
With 24-frame and 48-frame rates only, a popup menu lets you set the Video In Format.
When the Clock Reference is set to Video Reference (HD), SYNC HD automatically sets the
Video In format (NTSC or PAL) appropriate for
the selected Video Reference rate, as shown in
the following table.
Video Reference (HD) Rate Video In Format
Slow PAL 23.976 NTSC
Slow PAL 24 PAL
720p - 23.976 NTSC
720p - 24 PAL (NTSC available)
720p - 25 PAL
720p - 29.97 NTSC
720p - 30 NTSC
720p - 50 PAL
720p - 59.94 NTSC
720p - 60 NTSC
1080i - 47.95 NTSC
1080i - 48 PAL (NTSC available)
Clock Reference, Video Ref In,
and Video In Settings when
Importing Avid Video
When you import Avid video media into a session, Pro Tools automatically sets the Clock Reference (HD or SD), Video Reference rate, and
Video In format appropriate for the imported
media.
1080i - 50 PAL
1080i - 59.94 NTSC
1080i - 60 NTSC
1080p - 24 PAL (NTSC available)
1080p - 25 PAL
1080p - 29.97 NTSC
1080p - 30 NTSC
1080p - 50 PAL
1080p - 59.94 NTSC
1080p - 60 NTSC
SYNC HD Guide20
Page 27

MachineControl Configuration
If you are using Digidesign MachineControl, do
the following to establish basic communication.
To configure MachineControl:
1 Choose Setup > Peripherals, and click the Syn-
chronization tab.
2 In the Synchronization page, ensure the
SYNC HD is the current Synchronization device,
and DigiSerial is the selected port.
3 Click the MachineControl tab to open the Ma-
chineControl page.
4 Enable and configure options for 9-pin Serial
or 9-pin Remote.
Selecting Transport Master
The Pro Tools Transport window provides the
Transport Master selector. This pop-up lets you
select the device that will be controlled by the
Pro Tools transport. Choices include Pro Tools
and any other devices or modes you have enabled in the Synchronization or Machine Control tabs of the Peripherals dialog.
Software Configuration for the SYNC Setup Software Utility
(Windows Only)
To configure the SYNC Setup software on
Windows:
1 Make sure the SYNC HD is connected to your
computer according to the instructions in “Serial Connections” on page 7.
2 Launch the SYNC Setup software utility.
3 Choose Preferences > SYNC Set menu in the
upper left corner of the SYNC Setup application.
4 If not already selected, choose the appropriate
serial port for the SYNC HD-to-computer connection.
5 Close the Preferences window. The SYNC
Setup software utility should now show that it
recognizes the SYNC HD in the information display section. If it does not, check your connections and port selection, and try again.
Transport master
Chapter 2: Installation and Configuration 21
Page 28

Troubleshooting
Incoming Time Code
Status LEDs
The status LEDs (LOCKED and SPEED CAL) on
the SYNC HD front panel and in the Session
Setup window may help you isolate potential
problems.
Use the Incoming Time field in Pro Tools
Session Setup Window as a Reference
Use MTC Click this button if the SYNC HD is
unavailable, to switch to any currently connected MIDI interface for MTC synchronization.
This option requires a compatible device that
supports MTC conversion, and that is already
connected to your CPU and enabled.
Keep SYNC Click this to leave the session configured for the SYNC HD, or to continue searching
for the SYNC HD to re-establish lost communication.
The Incoming Time field in the Session Setup
Window indicates whether or not the SYNC HD
is receiving positional reference. If this field appears to be inactive when inputting time code to
the SYNC HD, check your hardware device settings, serial connection to your computer, and
your software settings.
Incoming Time Code display (Session Setup window)
Lost Communication
If Pro Tools loses communication with the
SYNC HD, a dialog will appear asking you
whether you want to switch to MTC (if available) or continue trying to locate the SYNC HD.
If you see a “lost communication” dialog, first
check power, DigiSerial, and other connections.
Lost Communication Dialog
Synchronization Accuracy
If you are noticing drift or lack of accurate synchronization between your devices, check the
following:
If your system locks up in the wrong place,
make sure you have set the correct frame rate
and format (NTSC or PAL) on all your devices.
If your system locks up in the correct location,
but drifts, check your clock signals and settings.
The Lost Communication dialog provides the
following options for re-establishing synchronization when communication with the
SYNC HD stops:
SYNC HD Guide22
Page 29
chapter 3
Power
Sample Rate
Clock Reference
Switch
Clock Reference
Loop
LEDs
Master
LEDs
Generator/Parameter
Controls
Time Code
Display
Switch
Positional Reference
LEDs
Positional
Drop Frame
Frame Rate
Switch
Reference
LED
LEDs
Frame
Rate
Status LEDs
SYNC HD Hardware and Software
SYNC HD Front Panel
Figure 1. SYNC HD front panel
Controls and Displays
All SYNC HD local controls are on its front
panel. For information on back panel connectors and setup, see Chapter 2, “Installation and
Configuration.”
AC Mains Power Switch
When the SYNC HD power switch is pressed in,
power is on; when the switch is out, power is off.
The LED ring around the power switch is orange
while the SYNC HD is powering up, or while
firmware is being updated. The LED ring is green
when the SYNC HD is ready for use.
Clock Reference Switch and LEDs
This switch selects the SYNC HD clock reference, as indicated by the Clock Reference LEDs.
Available clock reference inputs include:
• Video Ref SD/HD (Green = SD, Yellow = HD)
•VideoIn
•LTC
• Word/AES (Green = Word, Yellow = AES)
• Pilot
•Bi-phase/Tach
• Internal/VSO
• Loop Sync
Loop Master Indicator
When lit, this LED indicates that the SYNC HD
is the current Pro Tools Loop Master device.
Chapter 3: SYNC HD Hardware and Software 23
Page 30

Table 4. Sample Rates at Pull Up and Pull Down Settings
Pull Up/Down
+4.1667%
and +0.1%
+4.1667% 45938 50000 91875 100000 n/a n/a
+4.1667%
and –0.1%
+0.1% 44144 48048 88288 96096 176576 192192
–0.1% 44056 47952 88112 95904 176224 191808
–4.0% and
+0.1%
–4.0% 42336 46080 84672 92160 n/a n/a
–4.0% and
–0.1%
44100 48000 88200 96000 176400 192000
45983 50050 91967 100100 n/a n/a
45892 49950 91783 99900 n/a n/a
42378 46126 84757 92252 n/a n/a
42294 46034 84587 92068 n/a n/a
Sample Rate LEDs
These green or yellow LEDs show the current
SYNC HD sample rate. Pull Up and Pull Down
Sample Rate
Time Code Display
This 7-segment, multifunction LED is the
SYNC HD time code and parameter display.
are available for all sample rate settings, indicated by the corresponding LED. Table 4 (above)
shows the actual sample rates when pulled up or
down.
Time Code The current positional reference (in-
ternal or external), is displayed in hours:min-
utes:seconds:frames. Odd/even field distinction
is indicated using a decimal point to the right of
Generator/Parameter Controls
These four switches provide direct access to
many SYNC HD functions, including time code
generator settings, PAL/NTSC selection, sample
rate and more. The Time Code LED display
shows the current mode, selected parameter, or
setting.
the frames display. A lit decimal point to the
right of frames indicates an even-numbered
field; no decimal point indicates an odd-num-
bered field. When the SYNC HD is in Auto
Switch LTC/VITC mode, the decimal point to
the right of “minutes” illuminates.
The SYNC HD Time Code Display always dis-
plays actual incoming time code, regardless of
any External Time Code Offsets settings that are
applied in Pro Tools.
SYNC HD Guide24
Page 31

Parameters and Values When configuring the
SYNC HD with the Set, Run/Stop and other parameter controls, the LED display shows parameter names, values, and other data.
For a table identifying each LED abbreviation and function, see “Parameters” on
page 59.
Positional Reference Switch
This switch selects the positional reference
source, as indicated by the Positional Reference
LEDs. Choices include LTC, VITC, Auto Switch
Bi-phase, and Generate.
In Auto Switch LTC/VITC mode, both the LTC
and VITC LEDs light while the SYNC HD determi nes whic h source it will use. E ither th e LTC or
the VITC LED will remain lit to indicate the chosen positional reference.
Frame Rate Switch
This switch selects the time code frame rate and
format (drop-frame or non drop-frame). The active choice is displayed by the Frame Rate and
DF (drop frame) LEDs.
Frame Rate LEDs and DF Indicator
These display the current SYNC HD frame rate:
30, 29.97, 25, or 24 fps are indicated by four
green LEDs. The DF LED indicates drop-frame
(lit) or non drop-frame (unlit). The 24 fps LED
will blink to indicate 23.976 fps.
Status LEDs
These LEDs show the current state of the
SYNC HD in relation to clock references. Indicators include:
Locked This LED lights solid green when the
SYNC HD is locked to the selected clock reference. The Locked LED flashes yellow if the selected clock reference source is missing or out of
lockable frequency range.
Speed Cal (Speed Calibration) This LED lights to
indicate the status of the clock reference:
• Yellow Solid: SYNC HD is locked and that
the clock reference is within 0.025% of the
expected rate
• Yellow Flashing Fast: SYNC HD is locked,
but the clock reference is between 0.025%
and 4% faster than the expected rate
• Yellow Flashing Slow: SYNC HD is locked,
but the clock reference is between 0.025%
and 4% slower than the expected rate
• Red Flashing Fast: SYNC HD is locked, but
the clock reference is more than 4% faster
than the expected rate
• Red Flashing Slow: SYNC HD is locked, but
the clock reference is more than 4% slower
than the expected rate
• Unlit: SYNC HD is not locked to the chosen
clock reference
Remote Mode This green LED lights when the
SYNC HD is set to Remote-Only/Front Panel
Lockout mode. While this LED is lit, the front
panel switches will have no effect on the
SYNC HD.
For more information, see “SYNC Setup Dialog Controls and Displays” on page 28.
Chapter 3: SYNC HD Hardware and Software 25
Page 32

SYNC HD Back Panel
Video Ref
Bi-Phase/Tach
Video Word Clock
AC PowerHost Serial
GPI/Pilot
In/Out
Loop Sync
LTC In/ O ut
AES/EBU
In/Out
MTC Out 9-Pin Out 1
In/Out
9-Pin Out 2
In/Out
In/Out
Figure 2. SYNC HD Back Panel
Bi-Phase/Tach/GPI/Pilot
This is an accessory port for Bi-Phase, Tach, and
Pilot signals (specific cables are required for different applications). This connector is also used
for GPI input, output (including Fader Start),
and thru signals. This port handles up to 12 V
Bi-phase.
Refer to Appendix C, “Wiring Diagrams
and Pin Assignments” for wiring information and other specifications for this port.
Video Reference In/Out
Video Ref In Receives a signal from an SD
(NTSC/PAL) or HD (tri-level or bi-level) video
source (such as a black burst (house sync) generator or a standard video signal) for purposes of
clock reference.
This port is configured as an un-terminated
loop-through. When you connect a signal to
this port, you must do one of the following:
• Connect a 75-ohm BNC terminator (included
with the SYNC HD) to the Video Reference
Out on the back panel
– or –
• Make sure another terminated video device is
fed from the Video Reference Out connector.
Video Ref Out A parallel, unbuffered connection
output for any video source connected to the
Video Reference In port. This port allows black
burst or other video reference to be passed to another device, and continues to output whatever
signal is present at the Video Reference In port,
whether the SYNC HD is on or off.
If the SYNC HD is the last device in the
video sync chain, a 75-ohm BNC terminator must be attached to this connector.
Host Serial Port
The Host Serial port is a bidirectional (in/out)
port to connect the SYNC HD to the DigiSerial
Port on a HD Core card. When not being used
with Pro Tools, the SYNC HD Host Serial port
can be connected to a standard serial port on a
supported computer to run the SYNC Setup software utility (Windows only).
SYNC HD Guide26
Page 33

Video In/Out
LTC In/Out
Video In Receives a signal from an SD
(NTSC/PAL) video source for clock or VITC positional reference input, or for generating a window burn. This connector is internally terminated at 75 ohms.
The Video In connector does not accept HD reference signals.
Video Out Output of the current Video In signal.
If the Positional Reference is set to Generate and
the Clock Reference is set to one of the two
video inputs, this will output a copy of the video
signal appearing at the Video Reference In. In either case, this output can also carry VITC and/or
Window Burn information if those features are
enabled.
MTC Out
The MTC Out will output MIDI Time Code
(MTC), only. No other MIDI data appears at this
output. MTC output can be regenerated while
the SYNC HD is locked to any supported positional reference and clock reference, or internally generated in Generate mode, in which
case MTC output follows generator run/stop.
This port is intended to supply MTC from the
SYNC HD to external sequencers or other MIDI
devices.
MTC is output constantly whenever the
SYNC HD is generating time code. This output
can be muted when time code (LTC) is idle. See
“MTC Output and Idle Muting” on page 56 for
details.
LTC I n Receives a Linear Time Code (LTC)
source, balanced or unbalanced analog, for positional and/or clock reference. This port is often
used to receive LTC from an audio track on an
external deck or the address track of a VTR. Adjustable LTC servo gain is available in Pro Tools
and from the front panel.
LTC Out Outputs linear time code, in balanced
or unbalanced analog audio format. See
Appendix C, “Wiring Diagrams and Pin Assignments” for wiring details. LTC output level is
also adjustable using the SYNC Setup software
utility (Windows only), the controls on the
front panel of the SYNC HD, or the Synchronization page of the Peripherals dialog in
Pro Tools.
AES/EBU In/Out
AES/EBU In Receives an AES/EBU digital audio
signal, for clock reference purposes only. The
SYNC HD utilizes only the signal's clock information, not the audio information. If digital audio information is present at this input, it will be
ignored and not passed through to the AES/EBU
digital output connector.
AES/EBU Out Outputs a silent (all bits OFF)
AES/EBU audio signal whose sample rate exactly
matches the SYNC HD sample clock
Chapter 3: SYNC HD Hardware and Software 27
Page 34

Word Clock In/Out
Word Clock In Receives (1x sample rate) Word
Clock, for clock reference purposes only. Word
Clock is often used with external digital consoles and digital tape machines.
Word Clock Out Outputs 1x sample rate Word
Clock information (for Word-clock capable peripherals) or 256x Slave Clock information (for
Legacy peripherals). This port is configured using the SYNC Setup software utility on Windows
(Word Clock Out), or the controls on the front
panel of the SYNC HD.
9-Pin Out 1 and 2
For Digidesign MachineControl-enabled systems, these two ports connect directly to external 9-pin transports, and provide limited Serial
Deck control capability.
For best performance on Windows systems, use
the COM ports on the Windows computer.
For best performance on Mac systems, use a Keyspan USA28XG USB serial adapter.
SYNC Setup Software Utility
(Windows Only)
This section reviews the SYNC Setup controls
and displays included with the SYNC Setup software utility.
For SYNC Setup software utility requirements,
see “Software Installation” on page 12.
SYNC Setup Dialog Controls and
Displays
See the MachineControl Guide for more
information.
Loop Sync In/Out
Loop Sync is the clock signal used to synchronize Pro Tools|HD interfaces.
Loop Sync In Receives Loop Sync from any
Pro Tools|HD interface.
Loop Sync Out Provides Loop Sync. This port
connects to the primary Pro Tools|HD interface.
AC Power
The SYNC HD accepts a standard power cable
and is auto voltage-selecting (100V to 240V).
SYNC HD Guide28
SYNC Setup dialog (SYNC Setup software utility)
SYNC Setup Software Utility Help
Right-click anywhere in the SYNC Setup dia-
log and select Help, or press the F1 key.
Page 35

Time Code Window
Frame Rate
The time code display mirrors the LED Time
Code Display on the SYNC HD front panel, displaying (in hours:minutes:seconds:frames) the
time code address of the current positional reference.
When the SYNC HD is reading odd-numbered
fields, the separator changes from a normal colon (:) to a period (.); when it’s reading evennumbered fields, the punctuation returns to a
colon (:). Odd/even status is only available while
reading VITC, and only when VITC is within a
speed range from zero to about 50% of playback
speed.
Clock Reference
This control selects the SYNC HD clock reference.
Sample Rate
This control selects the SYNC HD sample rate
(or the Pro Tools session sample rate, if applicable).
Pull Rate
This control Enables Pull Up or Pull Down for
the current sample rate.
Word Clock Out
This control configures the SYNC HD Word
Clock Output between 256x (Super Clock) and
the current session rate (1x at 44.1 kHz, or 1x at
48 kHz). Only Legacy audio interfaces require
256x Super Clock.
Positional Reference
This control selects the frames-per-second (fps)
rate of external (or internally generated) time
code.
Status Display
This display shows the current state of the SYNC
Setup software utility in relation to the
SYNC HD and external devices, as follows:
Resolver Locked Lights when the SYNC HD is
locked to the chosen external clock reference, or
to its Internal clock reference.
Speed Calibration Lights when the SYNC HD
system clock and all output clocks are at a frequency that corresponds with the chosen sample rate. Capable of indicating mismatch of pullup, pull-down and frame rate.
For details about Speed Calibration characteristics, see “Status LEDs” on page 25.
Regenerator Locked Lights when the SYNC HD
is regenerating time code at its video, LTC, and
MTC outputs locked with the incoming positional reference source. Also lit whenever the
SYNC HD is generating time code internally.
Connected to SYNC I/O Lights when the SYNC
Setup dialog is the front-most window and is
communicating with the SYNC HD.
Waiting for SYNC I/O Lights when the SYNC
Setup dialog is the front-most window and is
unable to communicate with the SYNC HD.
Port Relinquished Lights when the SYNC Setup
dialog is not the front-most window or is unable
to allocate a serial port with which to communicate with the SYNC HD.
This control selects the SYNC HD positional reference.
Chapter 3: SYNC HD Hardware and Software 29
Page 36

LTC Output Level
VITC Insertion Enabled
This control adjusts the analog audio level of the
SYNC HD LTC output, from –24 dBu to +9 dBu.
Freewheel Duration
This control sets the period of time for which
the SYNC HD will continue to supply positional
reference data after an external source is interrupted or stopped (also referred to as Time Code
Freewheel in Pro Tools).
Video Format
This control selects the format (NTSC or PAL) for
both the incoming and outgoing video signals.
NTSC is used in North and South America, Ja-
pan, and certain other parts of the world.
PAL is used in most of Europe, Asia, and Af-
rica. Users of SECAM video (for France, Russia,
and certain other parts of the world) should select PAL.
VITC Read Lines
This control determines which line pair of incoming video signal is used for the VITC source.
When set to Auto, the SYNC HD will search for
the first valid line pair automatically. Alternatively, this value can be set to specific VITC line
pairs.
VITC Generate Lines
This control determines the line pair of the outgoing video signal onto which the SYNC HD inserts VITC. Normally, this should be left at the
default (and preferred) setting of 14/16.
When selected, VITC will be inserted into the
outgoing video signal—assuming that a video
signal is present at a SYNC HD video input, and
that the SYNC HD is in a valid mode for inserting VITC. The only invalid positional reference
modes are VITC or Auto Switch LTC/VITC. The
SYNC HD can’t read VITC and generate new
VITC at the same time.
Pitch Memory Enabled
When selected, the SYNC HD will remain at a
pitch (sample rate) that corresponds to the last
known incoming time code speed. When deselected, the SYNC HD will revert to the selected
sample rate. If Pitch Memory is disabled and the
selected external clock reference is not available,
then the SYNC HD will revert to the nominal,
selected internal sample rate setting.
Idle MTC Enabled
Controls MTC Output during idle (play
stopped). When enabled, MTC is continuously
output. When not enabled, MTC output is
muted when playback is idle. See “MTC Output
and Idle Muting” on page 56 for details.
Dub Window
Settings for the SYNC HD character generator/window dubbing features. (These controls
are also available from within the Pro Tools Peripherals dialog.) Complete Window Dub instructions are provided in the section “Generating a Window Dub” on page 57.
SYNC HD Guide30
Page 37

Bi-Phase/Tach Parameters
Used for specialized applications that involve
film or other equipment that output BiPhase/Tach information. These parameters must
be set to match the Bi-Phase or Tach source to
achieve lock.
Generator/Bi-Phase Preset
Serves two functions, as determined by the current SYNC HD mode:
Generate Mode Sets the time code start time directly by clicking in the Hrs:Min:Sec:Frm fields
and typing in a value. The Tab key will cycle
though the fields.
Bi-Phase/Tach Mode Zeros the time code
counter, to allow the SYNC HD to generate time
code in relation to the pulses of the incoming
Bi-Phase/Tach information. Establishes a time
code start point (first frame of a reel, for example).
Variable Speed Override (VSO)
Used to varispeed the rate of the SYNC HD internal crystal-referenced clock (±699 cents; a cent is
one-hundredth of a semitone). VSO is available
at any positional reference setting, but only
when the clock reference is Internal/VSO.
Chapter 3: SYNC HD Hardware and Software 31
Page 38

SYNC HD Guide32
Page 39

chapter 4
Using SYNC HD
SYNC HD settings can be controlled in three
ways:
From Pro Tools Provides access to most
SYNC HD controls from within the Pro Tools
Session Setup window or the Synchronization
page of the Peripherals window.
From the SYNC HD Front Panel Provides access
to most controls from the front panel when using the SYNC HD in Standalone mode.
From the SYNC Setup Software Utility (Windows
Only) This optional utility provides remote ac-
cess to all SYNC HD controls from a supported
Windows computer.
For a listing of SYNC HD parameters supported
in each method, see “SYNC HD Controls in
Pro Tools, SYNC Setup Software Utility, and the
SYNC HD Front Panel” on page 34.
About SYNC Setup Software Utility
Remote-Only Mode
When the default Remote-Only Mode (Front
Panel Lockout) is enabled in the SYNC Setup
software utility Preferences window, none of the
SYNC HD front panel switches are operational,
and the Remote Only LED is lit.
To exit Remote-Only mode from the front panel:
Simultaneously press and hold down the
Clock Reference, Positional Reference, and
Frame Rate front panel switches.
This will disengage the SYNC HD from RemoteOnly mode. This is useful when the host computer is not easily accessible.
Chapter 4: Using SYNC HD 33
Page 40

SYNC HD Controls in Pro Tools, SYNC Setup Software Utility, and the SYNC HD Front Panel
Table 5. SYNC HD controls in Pro Tools, SYNC Setup software utility, and the SYNC HD front panel
Available from/in:
Parameters
Device ID
Clock References
Positional References
Sample Rates
Pull Rates
Base Clock
(Word Clock Out)
Frame Rates
LTC Output level
LTC S er v o gain
Freewheel duration
Video Format (NTSC/PAL)
VITC Read Lines
VITC Generate Lines
VITC Insertion Enable
Pitch Memory Enable
Window Dub
Bi-Phase/Tach Pulses/Frame
Bi-Phase/Tach Wiring
Gen/Bi-Phase Preset
GPI
VSO
Idle MTC Enable
Pro Tools Front Panel
no yes no
all (Session Setup) all all
all (Session Setup) all all
all all all
yes (Session Setup) yes yes
no yes
(“Base Clock”)
all (Session Setup) all all
yes (Peripherals/Sync) yes yes
yes (Session Setup) yes no
yes (Session Setup) yes yes
yes (Session Setup) yes yes
yes (Peripherals/Sync) yes yes
yes (Peripherals/Sync) yes yes
yes (Peripherals/Sync) yes yes
yes (Peripherals/Sync) yes yes
all (Peripherals/Sync) on/off only yes, all
yes (Peripherals/Sync) yes yes
yes (Peripherals/Sync) no no
yes (Session Setup) yes yes
yes no no
yes (Session Setup) no yes
yes (Peripherals/Sync) yes yes
SYNC Setup Software
Utility
yes
(“Word Clock Out”)
SYNC HD Guide34
Page 41

Front Panel
DF
SET
DOWN
UP
RUN/STOP
CLEAR
LTC
VITC
BI-PHASE
GENERATE
POSITIONAL
REFERENCE
Generator/Parameter
Switches
The Generator/Parameter Controls are labelled
SET, DOWN, UP, and RUN/STOP/CLEAR/ESC.
In addition to their primary generator functions, these switches provide front panel access
to most SYNC HD parameters.
Features Not Accessible from the SYNC HD
Front Panel Controls
When a parameter value is visible Press Set once
to set the value for that parameter and return
the Display to time code.
Down and Up
These switches scroll through parameter names
or values:
When a parameter name is visible Press the
Down and Up switches to scroll through the parameter names (for example, from “SET GEn” to
“VIdEo SY”).
The front panel provides access to all SYNC HD
features except the following, which can be controlled using Pro Tools or the SYNC Setup software utility (Windows only):
• Remote-Only Mode/Front Panel Lockout
• Changing Window Burn Size, Vertical Position, Horizontal Position, and Color
• GPI (General Purpose Interface) functions
• Variable Speed Offset (VSO)
For a listing of available parameters, see Table 5
on page 34.
Generator/Parameter Switches
Set
The SET switch has three primary functions:
When time code is displayed Press Set once to
change the Display from time code to parameter
names.
When a parameter value is visible Press the
Down and Up switches to scroll through the
range of values for the current parameter.
When entering time code values Press the Down
and Up switches simultaneously to cycle
through the hours:minutes:seconds:frames
fields in the time code display.
Run/Stop/Clear/Esc
This switch has two functions, depending on
the current mode:
While generating time code Press
RUN/STOP/CLEAR/ESC to start or stop the time
code generator when the SYNC HD is in Generator Preset mode.
While time code is being displayed Press
RUN/STOP/CLEAR/ESC to reset the counter
whenever time code is visible in the LED Time
Code display.
Otherwise, the RUN/STOP/CLEAR/ESC switch
serves as a Cancel button.
When a parameter name is visible Press Set once
to change the Display to show parameter values.
Chapter 4: Using SYNC HD 35
Page 42

Edit Mode
To enter Parameter/Value Edit mode:
Press Set (when time code numbers are visible
in the LED Time Code Display). The first press
displays the first parameter name, “Set Gen,”
(for the time code generator).
Clock References and Options
The following sections explain each clock reference choice in detail. For basic instructions on
selecting the clock or positional reference, setting frame rate, or setting the SYNC HD sample
rate, see Chapter 2, “Installation and Configuration.”
The (default) first page of Generator Parameter controls
A different parameter may be displayed, depending on the previous SYNC HD settings.
To scroll through parameter choices:
Press Up or Down to scroll through available
parameters. Holding the switch scrolls through
the parameters.
To select a parameter to edit:
When the desired parameter is displayed,
press Set. This will access that parameter’s current setting.
To edit parameter values:
With parameter values displayed, press Up or
Down to cycle through the available values.
For a complete listing of front panel Generator/Parameter controls, see Chapter 5,
“Additional Operational Information.”
Video Clock Options
The SYNC HD provides two video inputs, Video
Ref In and Video In, which are each selectable for
clock reference. (See “Video and Clock Reference” on page 37).
For House Video Reference (Black Burst) Use the
Video Ref In connector.
The Video Ref ports are a non-terminated
loop-through connection. If the Video Ref
Out port is not used, then you must
terminate it using the included 75-ohm
BNC terminator.
For Incoming Video Use the Video In connector.
Serial Time Code with MachineControl
MachineControl-equipped Pro Tools systems
can utilize serial time code through either of the
SYNC HD 9-pin ports. When using MachineControl with serial time code as the positional
reference, the SYNC HD must be locked to a
Video Reference. In this scenario, the SYNC HD
is set to Generate mode to indicate that posi-
SYNC HD Guide36
Page 43

tional information is acquired by Pro Tools directly over the 9-pin cable, not through the
SYNC HD. Refer to the MachineControl Guide for
complete serial time code information.
MachineControl also provides 9-Pin Deck
Emulation mode, but this mode is not supported through either of the SYNC HD
9-pin ports. See the Digidesign MachineControl Guide for more information.
Digital Clock
To resolve the SYNC HD to external AES/EBU or
Word Clock:
From Pro Tools:
In the SYNC Setup section of the Session
Setup window, select the appropriate digital
clock reference from the Clock Reference popup menu.
Video and Clock Reference
(SD Video Only)
If you have only a single SD (standard definition) video source, you may want to follow the
wiring tip below to ensure that you have full
functionality in all configurations:
To work with a single SD video source:
1 Connect the SD video signal to Video Ref In.
2 Run a short BNC jumper cable from the Video
Ref Out connector to the Video In connector.
3 Connect the Video Out signal to the video in-
put of your destination VTR or video editing system.
The choice of video connector also matters
when choosing a positional reference. For instance, when the SYNC HD is in Generate mode
and Video is the current clock reference, the
time code reference for the generator is always
from the Video Ref In connector. However, if
you select a positional reference other than Generate, then the signal at the Video In connector
can be used.
From the front panel:
1 Press the Clock Reference switch to select DIG-
ITAL.
2 Press Set, and use the Up or Down switches to
display Digital Reference (dI6 rEF).
3 Press Set again. The LED Time Code Display
displays the current digital reference, which will
be:
• AES/EBU (AES-E8U)
– or –
• Word Clock (I CLOC)
4 Press Up or Down to select the digital clock
you want to use.
5 Press Set.
For more video signal information, refer to
“Video and VITC Signals” on page 69 in
Appendix A.
Chapter 4: Using SYNC HD 37
Page 44

From the SYNC Setup software utility
(Windows only):
Select the appropriate Digital clock reference
option from the Clock Ref pop-up menu.
Pro Tools|HD audio interfaces are always connected using Loop Sync (see “Clock for
Pro Tools Audio Interfaces” on page 8 for more
information).
If the chosen clock reference source is unavailable, or the current configuration is not valid,
the Locked LED on the right side of the
SYNC HD front panel flashes.
Additional Digital Clock Information
AES/EBU The SYNC HD AES/EBU In connector
only recognizes and uses the clock portion of an
incoming AES/EBU audio signal. All audio information will be ignored and will not be passed to
the SYNC HD AES/EBU Out connector.
Word Clock Word Clock is a digital clock reference signal that runs at 1x sample rate (44.1, 48,
88.2, 96, 176.4, or 192 kHz). Pro Tools|HD interfaces have dedicated BNC-style Word Clock
connectors. A wide variety of professional audio
devices have Word Clock connectors, including
digital mixing consoles, DASH-standard digital
multitrack tape recorders and MDMs (modular
digital multitrack recorders).
Slave Clock (256x)
Slave Clock (or Super Clock) is a Digidesign proprietary clock format used by legacy Digidesign
audio interfaces (such as 888|24, 882|20, 1622,
and ADAT Bridge) that runs at 256 times the
sample rate.
For additional digital clock signal information, see “Digital Clock Signal Types” on
page 71.
LTC and Clock Reference
LTC can provide both positional and clock information from the same time code signal. LTC
cannot be read when the reference deck is
stopped, or playing back at slow or fast wind
speeds (roughly 10x playback speed). Pro Tools
will not lock until the LTC signal is close to playback speed.
While resolving to LTC as clock reference, the
SYNC HD provides five options to optimize
your system for different types of tasks. This lets
you choose between faster response (for when
fast lock-up time is critical), or highest sound
quality (during critical laybacks, for example).
The Session Setup window provides a sub-menu
for LTC Clock Reference choices. The five
choices provide different servo gain settings to
reduce the effects of jitter when locking to linear
time code. In Standalone mode, these settings
are also available from the front panel.
When using legacy interfaces with SYNC HD
and Pro Tools|HD, your master HD audio interface (192 I/O, 192 Digital I/O, 96 I/O, or 96i I/O)
should supply Slave Clock to the first legacy device through its External Clock Out connector,
configured for 256x Slave Clock (see “Base
Clock” on page 60 for more information).
SYNC HD Guide38
Clock Reference LTC options in Session Setup
Page 45

To resolve the SYNC HD to Linear Time Code from
Pro Tools:
In the Sync Setup section of the Session Setup
window, choose an LTC setting from the Clock
Reference pop-up menu. Choices include:
Adjusting LTC Output Level
To adjust LTC output level from Pro Tools:
1 Choose Setup > Peripherals and click Synchro-
nization.
LTC 0 (fastest) Allows the quickest resolving to
incoming LTC, but with greater jitter. This is the
default setting, and should be used when fast
lock ups are critical.
LTC 1 Provides an intermediate fast setting.
LTC 2 (average) Offers a compromise of lock up
time and jitter quality.
LTC 3 Provides an intermediate slow setting.
LTC 4 (smoothest) Offers the lowest jitter from
LTC resolve, but can take six to ten seconds to
achieve full resolve. This setting is most appropriate when loading audio from an analog master, where reducing or eliminating jitter is more
important than lock speed. Be sure to allow adequate pre-roll before punching in.
To resolve the SYNC HD to Linear Time Code from
the front panel:
Press the Clock Reference switch to select
LTC.
To resolve the SYNC HD to Linear Time Code using
the SYNC Setup software utility (Windows only):
Select Linear Time Code (LTC) from the SYNC
Setup Clock Ref pop-up menu.
2 Choose a value from the LTC Output Level
pop-up menu.
3 Click OK.
To adjust LTC output level from the front panel:
1 Press Set until the LED Time Code Display
shows a parameter name. The first name is Set
Generator (SE7 6En), although you may see a
different name, depending on the previous
SYNC HD settings.
2 Press the Up or Down switches until the LED
Time Code Display shows LTC Level (L7C
LEUL).
3 Press Set. The LED Time Code Display shows
the current value for the LTC Output Level (in
dBu).
4 Press the Up or Down switches to scroll
through the available values (in 3 dBu steps).
5 Press Set.
Additional LTC Information
LTC can provide positional and clock reference.
LTC can be recorded onto and played back from
an analog track, or a VTR audio, address or cue
track.
The SYNC HD provides adjustable LTC
servo gain. See “Servo Gain” on page 62.
For further information on LTC signals, see
“LTC Signals” on page 70.
Chapter 4: Using SYNC HD 39
Page 46

Pilot Tone
The SYNC HD can resolve to an external Pilot
Tone signal for clock reference, for synchronizing to (or transferring audio from) certain types
of open-reel audio tape recorders. Pilot Tone is
basically a 60 Hz (NTSC) or 50 Hz (PAL) sine
wave tone. Pilot Tone is used on location film
shoots to establish a common sync reference between a film or video camera with a portable
1/4-inch analog ATR. Pilot Tone contains no positional information; it provides only clock reference.
The SYNC HD decides whether to use 60 Hz or
50 Hz as the pilot tone reference frequency according to the setting of the Video Format.
When set to PAL, the pilot tone frequency is assumed to be 50 Hz. When set to NTSC, 60 Hz is
assumed.
Connect the Pilot Tone reference source to the
SYNC HD Bi-Phase/Tach/GPI/Pilot port.
To resolve the SYNC HD to Pilot Tone:
From Pro Tools:
In the SYNC Setup section of the Session
Setup window, select Pilot Tone from the Clock
Reference pop-up menu.
From the SYNC Setup software utility
(Windows only):
Select Pilot Tone from the SYNC Setup Clock
Ref pop-up menu.
For additional Pilot Tone information, see
“Pilot Tone” on page 73 in Appendix A.
Bi-Phase/Tach and Clock Reference
The SYNC HD is able to resolve to Bi-Phase/Tach
information for use as a clock reference. BiPhase/Tach can synchronize positional reference, but you must provide a reference start ad-
dress (see “Bi-Phase Position Trimming” on
page 48 for other requirements). Pro Tools will
not lock until the Bi-Phase signal is present.
To configure Bi-Phase/Tach settings, you need
to use the SYNC Setup software utility (Windows only) or the SYNC HD front panel controls.
To configure Bi-Phase/Tach for the SYNC HD
clock reference:
From the SYNC Setup software utility
(Windows only):
1 Select Bi-Phase/Tach from the SYNC Setup
Clock Ref pop-up menu.
From the front panel:
Press the Clock Reference switch to select
PILOT.
SYNC HD Guide40
2 Select the appropriate Pulse Per Frame and In-
put Signals parameters, as described in “BiPhase/Tach Starting Frame” on page 47 and “BiPhase/Tach Signal” on page 47.
Typically, when you use Bi-Phase/Tach as the
clock reference you will also be using it as the
positional reference (see “Bi-Phase/Tach Positional Reference” on page 46.).
Page 47

From the front panel:
1 Press the Clock Reference switch to select
BI-PHASE/TACH.
2 Select the appropriate Pulse Per Frame and In-
put Signals parameters, as described in “BiPhase/Tach Starting Frame” on page 47 and “BiPhase/Tach Signal” on page 47.
If the Bi-Phase/Tach reference clock source
is not valid for any reason (such as a poor
connection or other signal transmission
problem), the Locked LED on the far-right
of the SYNC HD front panel will flash. The
SYNC HD accepts up to 12 volts at the BiPhase input.
To select Bi-Phase/Tach as the positional
reference from Pro Tools:
1 In the SYNC Setup section of the Pro Tools
Session Setup window, select Bi-Phase from the
Positional Reference pop-up menu.
2 Set the Pulse Per Frame and Input Signals from
the Synchronization page of the Peripherals dialog.
Internal Clock: Generating and
Regenerating
The SYNC HD can use its own crystal-referenced
internal clock as a master clock source. When
SYNC HD Clock Reference is set to Internal:
• Word Clock and AES/EBU digital clock outputs are simultaneously driven from the internal crystal reference.
– and –
• If the Positional Reference is set to Generate, generated LTC, MTC, VITC, and Window Dub outputs are resolved to the same
internal crystal reference.
To resolve the SYNC HD to its internal clock:
From Pro Tools:
In the SYNC Setup section of the Pro Tools
Session Setup window, select Internal/VSO from
the Clock Reference pop-up menu.
From the front panel:
Press the Clock Reference switch to select
INTERNAL/VSO.
For additional Bi-Phase/Tach signal information, see “Bi-Phase/Tach” on page 72 in
Appendix A.
From the SYNC Setup software utility
(Windows only):
Select Internal/VSO from the SYNC Setup
Clock Ref pop-up menu.
Chapter 4: Using SYNC HD 41
Page 48

Variable Speed Override (VSO)
To fine-tune the speed (and pitch) of Pro Tools
or any device receiving its clock reference from
the SYNC HD, you can varispeed the rate of the
SYNC HD crystal-referenced internal clock.
VSO is available at any positional reference setting. VSO is not available from the SYNC HD
front panel controls, but can be controlled directly from Pro Tools or with the SYNC Setup
software utility (Windows only).
To varispeed the SYNC HD internal clock from
Pro Tools:
1 In the Sync Setup section of the Session Setup
window, make sure the Clock Reference is set to
Internal/VSO.
2 Select the VSO option.
3 Adjust the varispeed value using the on-screen
slider.
Variable Speed Override controls (Pro Tools)
To varispeed the SYNC HD internal clock from the
SYNC Setup software utility (Windows only):
1 In the Setup Variable Speed Override section,
select VSO Enabled.
Variable Speed Override controls (SYNC Setup software
utility)
2 Use the sliders to adjust the varispeed values
in semitone or cent increments. The actual output word-clock frequency is shown near the sliders.
– or –
Enter the value in semitones and cents using the
editable fields. Varispeed range changes with
sample rate, as shown in the following table.
Effective VSO rates
Sample Rate
(kHz)
44.1 1x 40000 50500
48
88.2 2x 80000 101000
96
176.4 4x 160000 202000
192
Rate
Type
Min. (Hz) Max (Hz)
The SYNC HD will only output rates within the
limits of the current sample rate. If a varispeed
value results in an output frequency (sample
rate) that is below or above the limits for the current sample rate, the frequency display turns
red.
3 Click Set.
SYNC HD Guide42
Page 49

Using Pitch Memory
Pitch Memory holds the output sample rate
steady even when the Clock Reference is unavailable or has gone out of lock range.
When Pitch Memory is not enabled, the out-
put sample rate would return to the nominal
sample rate setting (for example, exactly
44.1 kHz) when the Clock Reference disappears
or goes out of lock range.
When Pitch Memory is enabled, Pro Tools
continues to play and record at the resolved
sample rate even if the Clock Reference source
disappears.
To configure Pitch Memory:
Positional Reference and Options
The following sections provide additional information for each available Positional Reference
format.
Linear Time Code (LTC)
LTC is often striped onto an ATR or VTR audio
track. Professional VTRs typically have an address or cue track, intended for LTC. If you are
working with a standard audio tape, you’ll almost certainly be working with LTC. If you’re
working with a videotape, you may be able to
work with either LTC or VITC, or both.
From Pro Tools:
1 Choose Setup > Peripherals and click Synchro-
nization.
2 Select the Pitch Memory Enabled option.
3 Click OK.
From the front panel:
1 Press Set, and use the Up or Down switches to
display Pitch Hold (PICH HLd).
2 Press Set. The LED Time Code Display shows
On or Off.
3 Press Up and Down to toggle between On and
Off.
4 Press Set.
From the SYNC Setup software utility
(Windows only):
Click Pitch Memory Enabled.
The SYNC HD retains the Pitch Memory setting,
even when the unit is powered off and on again,
until you change it.
LTC can also be generated as an interpolation of
Absolute code. This is how time code DAT machines, DA-88, and many digital VTRs work. In
any case, LTC is delivered to the SYNC HD as a
series of audio pulses, regardless of how it is
stored or generated.
LTC can function simultaneously as a positional
reference and a clock reference.
To use LTC as the SYNC HD positional reference:
From Pro Tools:
In the SYNC Setup section of the Session
Setup window, choose LTC from the Positional
Reference pop-up menu.
From the front panel:
Press the Positional Reference switch to select
LTC.
From the SYNC Setup software utility
(Windows only):
Select Linear Time Code (LTC) from the SYNC
Setup Positional Ref pop-up menu.
Chapter 4: Using SYNC HD 43
Page 50

Make sure you select the appropriate clock reference, sample rate, frame rate, and freewheel duration. Also make sure the LTC signal is routed
properly to the SYNC HD LTC In connector.
3 Use the Up or Down switches to scroll through
available choices (lowest is “4 Fr” or four frames,
highest is “40 Fr” or 40 frames).
4 Press Set.
Freewheel Duration
Freewheel duration (time code freewheel) configures the SYNC HD for a maximum number of
frames it should continue generating if time
code drops out or is otherwise interrupted. Freewheel settings are ignored when the SYNC HD is
in Internal/Generate mode.
Example of Time Code Freewheel
In a 30 fps Pro Tools session, if Freewheel Duration/Time Code Freewheel is 28 frames, the
SYNC HD will continue to generate until either
the incoming time code signal is restored, or until 28 frames elapse, whichever occurs first.
To set the freewheel duration:
From Pro Tools:
In the Time Code Settings section of the Ses-
sion Setup window, enter a number of frames
for time code Freewheel.
SYNC HD accepts Freewheel duration values from 4 to 40 frames, in increments of 4
frames, but Pro Tools allows duration values from 1 to 120 frames (for MTC readers).
If you enter a Freewheel durations value
lower than 4, the SYNC HD will automatically set to 4; if you enter a Freewheel value
greater than 40, SYNC HD will automatically set to 40.
From the front panel:
1 Press Set, and use the Up or Down switches to
display Freewheel Length (FrEE LEn).
From the SYNC Setup software utility
(Windows only):
Choose a value from the Freewheel Duration
menu.
VITC and Positional Reference
VITC is a commonly used positional reference in
professional audio post-production. Since VITC
is time code information that is embedded as
part of the video signal, VITC can be read when
the VTR is paused or crawling slowly. When
working with Pro Tools, this means that VITC
can be used for Auto-Spotting regions to particular video frames.
VITC is less prone to tape drop outs, and in this
sense, is inherently more reliable than LTC.
VITC can be embedded into any video signal,
including digital video signals (tape or nonlinear), without requiring an extra audio track to
carry time code.
Tape Protection Mode and VITC
In order for VITC to be read when a videotape is
paused, the picture must remain visible. However, to reduce wear on the video heads, after a
few minutes of still/pause mode, many VTRs
will automatically drop into stop mode—which
means the tape will be disengaged from the
heads, and VITC can no longer be read off the
tape. To continue reading VITC, you may need
to reengage still/pause, or press play and re-shuttle the tape to the desired frame.
2 Press Set to display freewheel duration
choices.
SYNC HD Guide44
Page 51

Clock Considerations for VITC
To avoid tape protection mode problems and
ensure constant clock referencing, use the Video
Ref In as your clock reference instead of Video
In, whenever possible. When using Video Ref In
(and house sync), if the video picture disappears
the SYNC HD will remain resolved to the black
burst signal at the Video Ref In connector.
You should consider using Video Ref as your
Clock Reference (rather than Video In) when
working with VITC because a black-burst signal
at the Video Ref input will always be there, unlike the video signal at Video In, which may disappear if the videotape disengages.
Auto Switch LTC/VITC Positional
Reference
To use VITC as the SYNC HD positional reference:
From Pro Tools:
In the SYNC Setup section of the Session
Setup window, select VITC from the Positional
Reference pop-up menu.
From the front panel:
Press the Positional Reference switch to select
VITC.
From the SYNC Setup software utility
(Windows only):
Select Vertical Interval Time Code (VITC)
from the SYNC Setup Positional Ref pop-up
menu.
Additional VITC-Related Settings
SYNC HD Settings Make sure to set the appropri-
ate clock reference, sample rate, frame rate, and
freewheel duration.
Connections and Sources Make sure that your
VITC-striped video signal, if any, is routed to the
SYNC HD Video In connector (not the Video Ref
In connector). If you use a black burst signal as
clock reference connect it to the Video Ref In
connector.
In Auto Switch mode, the SYNC HD switches
automatically between LTC and VITC depending upon which is delivering the best time code
signal. This is indicated on the front panel by
the LTC and VITC positional reference LEDs
(both will be lit), and by a decimal point between the minutes and seconds. on the front
panel time code display.
VITC cannot be read at high speeds (shuttle
speeds, for example) while LTC can, and LTC
cannot be read at slow speeds (while VITC can
be read at slow speeds, and when parked). Auto
Switch LTC/VITC provides the best of both LTC
and VITC reading without having to manually
switch settings.
Auto Switch LTC/VITC Requirements
• Make sure the LTC signal is routed properly to
the SYNC HD LTC In connector.
• Make sure the VITC-striped video signal is
routed properly to the SYNC HD Video In
connector (not the Video Ref In connector).
• Make sure to have or stripe matching code on
both your LTC and VITC tracks (and your onscreen video window burn, if any).
• Make sure to select Auto or the correct line
pair for VITC Read.
• Make sure to select the appropriate clock reference, sample rate, frame rate, and freewheel
duration options.
Chapter 4: Using SYNC HD 45
Page 52

• If the same tape has different values for LTC
and VITC signals, make sure to run only
against LTC by disabling Auto LTC/VITC.
Otherwise, Pro Tools may locate to different
places depending on whether the tape is static
or playing back.
To select Auto Switch LTC/VITC for positional
reference:
From Pro Tools:
In the SYNC Setup section of the Session
Setup window, select Auto Switch (LTC/VITC)
from the Positional Reference pop-up menu.
From the front panel:
Press the Positional Reference switch to select
Auto Switch LTC/VITC (indicated when both
the LTC and VITC LEDs are simultaneously lit).
From the SYNC Setup software utility
(Windows only):
Select Auto Switch LTC/VITC from the SYNC
Setup Positional Ref pop-up menu.
For additional information and examples of
Auto Switch LTC/VITC, see “Auto-Switch
LTC/VITC” on page 70 in Appendix A.
Serial Time Code
The SYNC HD provides two 9-pin ports, to be
used with MachineControl-enabled systems to
remotely control, or follow, external 9-pin
transports through the use of serial time code.
For MachineControl-equipped Pro Tools systems, serial time code from either 9-pin port can
be used for positional reference. This option is
configured from the Peripherals dialog. For details on using serial time code with the
SYNC HD, see the MachineControl Guide.
Bi-Phase/Tach Positional Reference
Bi-Phase/Tach signals are clock reference signals, and do not contain positional information
of their own. However, they do contain enough
information for the SYNC HD to calculate positional information.
To calculate positional reference from BiPhase/Tach requires that the SYNC HD be given
a starting frame address, and a specific pulsesper-frame value. Each of these related settings
are explained in the following sections.
To use Bi-Phase/Tach for positional reference:
First, do one of the following:
From Pro Tools:
In the SYNC Setup & Time Code Offsets sec-
tion of the Session Setup window, select BiPhase from the Positional Reference pop-up
menu.
From the front panel:
Press the Positional Reference switch to select
BI-PHASE.
From the SYNC Setup software utility
(Windows only):
Select Bi-Phase/Tach from the SYNC Setup Po-
sitional Ref pop-up menu.
Continue by setting the starting frame as described in “Bi-Phase/Tach Starting Frame” on
page 47, and setting other Input Signals options,
as appropriate.
SYNC HD Guide46
Page 53

Bi-Phase/Tach Starting Frame
In order to use the Bi-Phase/Tach signal as a positional reference, the SYNC HD also needs to
know the time code address for a particular
frame of film. This positional relationship is established by parking the film device at a particular frame and setting the SYNC HD to the
equivalent time code value using the BiPhase/Tach Starting Frame parameter.
To set the Bi-Phase/Tach start frame from
Pro Tools:
1 In Pro Tools, place the playback cursor at the
desired time code location.
2 Choose Setup > Peripherals and click Synchro-
nization.
3 Click the Reset Bi-Phase button.
The Time Code Display on the SYNC HD updates to match the session time code value.
To set the Bi-Phase/Tach start frame from the
front panel:
1 Press Set, and use the Up or Down switches to
display Set Gen (SE7 6En).
2 Press Set to display time code numbers. One of
the time code fields (hours:minutes:seconds:frames) flashes.
3 Press the Up or Down switch to scroll through
the parameter values.
4 To set a time code setting and advance to the
next field, press and release the Down and Up
switches simultaneously.
5 Repeat until you have finished setting the
SYNC HD to the desired generator start time.
6 Press Set.
The LED Time Code Display stops flashing, and
displays the start time.
To set the Bi-Phase/Tach start frame using the
SYNC Setup software utility (Windows only):
1 In the Generator/Bi-Phase Preset section, type
in the time code value of the starting frame, in
hours:minutes:seconds:frames.
2 Click Set.
Bi-Phase/Tach Signal
The Bi-Phase/Tach signal can be set to any of the
following:
Bi-Phase: FWD = A leads B When the A square
wave is ahead of the B square wave, the direction of the Bi-Phase signal is understood to be
“Forward.”
FWD = B leads A When the B square wave is
ahead of the A square wave, the direction of the
Bi-Phase signal is understood to be “Forward.”
Tach: FWD = B is Low When the B signal is in a
“low” state, the rate and direction (“r–n–d”) of
the Tach signal is understood to be “Forward.”
Tach: FWD = B is High When the B signal is in a
“high” state, the rate and direction (“r–n–d”) of
the Tach signal is understood to be “Forward.”
To define the direction for a Bi-Phase/Tach input
signal from Pro Tools:
1 Choose Setup > Peripherals and click Syn-
choronization.
2 Choose one of the following settings from the
Bi-Phase/Tach Wiring pop-up menu:
• Bi-Phase: FWD = A leads B
• Bi-Phase: FWD = B leads A
• Tach: FWD = B is Low
• Tach: FWD = B is High
3 Click OK.
Chapter 4: Using SYNC HD 47
Page 54

To define the direction for a Bi-Phase/Tach input
signal using the front panel controls:
1 Press Set, and use the Up or Down switches to
display Bi-Phase/Tach Input Signal (bIPH 5I6).
To set the pulses per frame value for a BiPhase/Tach signal from Pro Tools:
1 Choose Setup > Peripherals and click Syn-
choronization.
2 Press Set. The LED Time Code Display shows
one of the four parameter values:
• “A LEAd b”: Bi-Phase: FWD = A leads B
• “b LEAd A”: Bi-Phase: FWD = B leads A
• “r–n–d LO”: Tach: FWD = B is Low
• “r–n–d HI”: Tach: FWD = B is High
3 Use the Down and Up switches to scroll be-
tween the parameter values.
4 Press Set.
To define the direction for a Bi-Phase/Tach input
signal using the SYNC Setup software utility
(Windows only):
1 In the Bi-Phase/Tach Parameters section,
choose one of the following settings from the
Wiring pop-up menu:
• Bi-Phase: FWD = A leads B
• Bi-Phase: FWD = B leads A
• Tach: FWD = B is Low
• Tach: FWD = B is High
2 Click Set.
2 In the Bi-Phase/Tach Pulses/Frame field, enter
a value from 2 to 254.
3 Click OK.
To set the pulses per frame value for a BiPhase/Tach signal using the front panel:
1 Press Set, and use the Up or Down switches to
display Bi-Phase/Tach Pulses Per Frame (bIPH
PPF).
2 Press Set. The LED Time Code Display will
switch to display the current PPF value.
3 Use the Down and Up switches to scroll
through the parameter values (from 2 to 254
pulses per frame). Holding either switch will
scroll at a faster speed.
4 Press Set.
To set the pulses per frame value for a BiPhase/Tach signal using the SYNC Setup
software utility (Windows only):
1 In the Bi-Phase/Tach Parameters section, enter
a value from 2 to 254 in the Pulses/Frame field,
Bi-Phase/Tach Pulses-per-frame (PPF)
There are several different standards for the
number of pulses-per-frame output by Bi-Phase
or Tach devices. You can set the SYNC HD to operate from 2 to 254 pulses per frame from
Pro Tools, from the SYNC HD or using the SYNC
Setup software utility’s Pulse Per Frame setting
(Windows only). The setting should match the
PPF rate of the external device’s Bi-Phase/Tach
encoder.
SYNC HD Guide48
2 Click Set.
Bi-Phase Position Trimming
While using bi-phase as your positional reference, you can trim the Bi-Phase-to-time code
translation at any time. Each press of the Up
switch will advance the time address one frame.
Each press of the Down switch will retard the
time address by one frame. Remember how
many presses you've accumulated so that you
can go back and trim the starting address you
previously programmed.
Page 55

Compensating for Time Code Offsets
You can offset the display of incoming time
code in the Pro Tools application. This is useful
when you want to adjust the display of time
code to match the start time of the session (such
as with source material that starts at a different
time), or compensate for source material that is
consistently offset by a fixed number of frames
(such as with some color–corrected video masters).
To apply an offset to the external time code
settings:
In the Session Setup window, in the External
Time Code Offsets section, enter a time in an
offset field.
To apply the same external time code to all
devices:
In the Session Setup window, select Link to
apply the same offset value to all devices.
Pro Tools provides four different types of External Time Code Offset settings. These offsets include:
• MMC (MIDI Machine Control)
• 9-Pin (Deck Control)
• Synchronization peripherals such as the
SYNC HD, SYNC I/O, or other peripherals
(such as MIDI interfaces that provide MIDI
Time Code).
• Video Satellite (Pro Tools with Avid
Media Station|PT)
Unique values can be defined for each of these
types of offsets, or you can link all to adjust in
unison.
Positive and negative offset values can be entered to offset Pro Tools time code display later
or earlier, respectively.
Offsets and SYNC HD Time Code Display
The SYNC HD front panel display continues to
display actual incoming time code, regardless of
any External Time Code Offsets settings that are
applied in Pro Tools.
Generating & Regenerating Time Code
The SYNC HD generates LTC, VITC, and MTC simultaneously, obtaining time addresses from a
variety of sources:
• When the Positional Reference is set to Generate, the SYNC HD generates LTC, VITC, and
MTC from an internal time address clock. This
is referred to as Generator Preset mode.
• When the Positional Reference is LTC, VITC,
or Bi-Phase, the SYNC HD generates LTC,
VITC, and MTC based on the time address of
one of those sources. This is sometimes called
regeneration or translation. For the SYNC HD,
this is referred to as Read/Regeneration mode.
Time code generated by the SYNC HD does
not follow session Pull Up and Pull Down
settings.
Read/Regeneration Mode
In this mode, the SYNC HD regenerates time
code based on external positional reference information (LTC or VITC time code, or a BiPhase/Tach signal). Subject to certain conditions, three types of time code (LTC, VITC, and
MTC) are simultaneously regenerated from the
selected positional reference.
Chapter 4: Using SYNC HD 49
Page 56

Requirements for Read/Regeneration of LTC,
VITC and MTC
LTC The external positional reference must be
moving at normal, 1x forward speed (±8%).
VITC The positional reference must be LTC or BiPhase/Tach, at any readable speed, forward or
reverse, or when the positional reference is set to
Generate. The SYNC HD will not regenerate
VITC if the positional reference is VITC.
MTC In order for the SYNC HD to regenerate
continuous MTC, the external positional reference must be moving at normal, 1x forward
speed (±8%). Outside of this speed range and direction, MTC is generated in bursts every 200
milliseconds. This allows MTC-slaved devices to
read VITC or Bi-Phase properly in either direction, and at speeds down to zero. The SYNC HD
begins regenerating MTC as soon as it again detects a valid positional reference signal.
To optionally mute idle time MTC output,
see “MTC Output and Idle Muting” on
page 56.
If the positional reference is LTC or VITC, the
SYNC HD will regenerate time code addresses
that match the incoming time code addresses. If
the positional reference is a Bi-Phase/Tach signal, the SYNC HD will generate time code addresses starting at the Bi-Phase preset start time.
(See “Bi-Phase/Tach Starting Frame” on page 47
for more information.)
Generator Preset Mode
In this mode, the SYNC HD generates time code
internally from a start time based upon the Generator Preset Time. Using either the SYNC Setup
software utility (Windows only) or the
SYNC HD front panel controls, you can start,
stop, resume, and reset time code generation.
When generating time code in Generator Preset
Mode, the SYNC HD time code generator is resolved (locked) to one of three possible sources,
based upon the following Generator Reference
rule.
Generator Reference Rule
If the Clock Reference is set to Internal, LTC,
Pilot Tone, Bi-Phase/Tach, Digital (AES/EBU), or
Digital (Word Clock), then the time code generator will lock to the selected clock reference.
– or –
If the Clock Reference is set to one of the two
video inputs (Video Ref In or Video In), then the
time code generator will reference the
Video Ref In connector.
SYNC HD Guide50
Page 57

Frame Rate Restrictions with Video Reference
Generator Start Time
In Generator Preset mode, if the Clock Reference
is set to one of the two video inputs
(Video Ref In or Video In), Pro Tools is restricted
to generating time code at the incoming video
frame rate.
With the SYNC HD, the Time Code Rate you
choose is dependent on the video format:
• For NTSC, you can choose only 29.97 FPS
or 29.97 FPS DROP.
• For PAL, you can choose only 25 FPS.
In Generator Preset mode, if the Clock Reference
is set to one of the two video inputs, 24 fps cannot be used as the SYNC HD time code format.
These restrictions are removed when not in
Generator Preset mode.
To set the generator start frame:
From Pro Tools:
Configure the Session Setup window as appro-
priate for your system and the current project.
Refer to the Pro Tools Reference Guide for specific
instructions.
From the front panel:
1 Press Set, and use the Up or Down switches to
display Set Gen (SE7 6En).
2 Press Set. One of the time code fields displayed
will be flashing.
3 Press Up or Down to lower or raise the cur-
rently flashing value.
4 To set a time code setting and advance to the
next field, press and release Down and Up simultaneously.
5 Repeat until you have finished setting the
SYNC HD to the desired generator start time.
6 Press Set.
The SYNC HD retains the setting, even when
the unit is powered off and on again, until you
change it.
Chapter 4: Using SYNC HD 51
Page 58

LTC Generation/Regeneration
Regenerating LTC
The SYNC HD will regenerate LTC whenever the
external positional reference is moving at normal, 1x forward speed (±10%).
Make sure LTC is correctly routed as explained
in Chapter 2, “Installation and Configuration”.
If you need to adjust the level of the SYNC HD
LTC output signal, see “Adjusting LTC Output
Level” on page 39. You can also adjust the
SYNC HD LTC servo gain, as described in “Servo
Gain” on page 62.
Generating LTC
In Generator Preset mode, the SYNC HD can
generate LTC using either an external or internal clock reference. Make sure LTC is correctly
routed and that all your other gear is properly
configured before you begin. If necessary, adjust
the input level for the destination device.
To generate LTC using Pro Tools:
1 In the Time Code Settings section of the Ses-
sion Setup window, select Using SYNC under
Generator.
2 Put Pro Tools online.
To regenerate LTC:
From Pro Tools:
In the Sync Setup section of the Session Setup
window, select any external positional reference
(except Generate).
From the front panel:
Press the Positional Reference switch to select
an external positional reference (do not select
GENERATE).
From the SYNC Setup software utility
(Windows only):
Select an external positional reference from
the SYNC Setup Positional Ref pop-up (except
Generate).
The SYNC HD regenerates LTC as soon as it receives a valid positional reference signal.
3 Start Pro Tools recording or playback.
Pro Tools commands the SYNC HD to begin
generating LTC with time addresses synchronized to the session time line.
To generate LTC using the front panel controls:
1 Press the Positional Reference switch to select
GENERATE.
2 Configure the desired time code start in
hours:minutes:seconds:frames using the Set, Up
and Down switches. See “Generator Start Time”
on page 51 for instructions.
3 To begin generating, press and release the
RUN/STOP/CLEAR/ESC switch.
To generate LTC using the SYNC Setup software
utility (Windows only):
1 Select Generate in the Positional Ref pop-up
menu.
2 In the Generator/Bi-Phase Preset window
(time fields), type in the desired time code start
time, in Hrs:Min:Sec:Frm. To reset, click Zero.
3 To begin generating, click Run.
4 When you have finished generating the de-
sired length of LTC, click Stop.
SYNC HD Guide52
Page 59

VITC Generation/Regeneration
When you use the SYNC HD to regenerate or
generate VITC, you’ll be inserting VITC into an
existing video signal. The input is derived according to the following rule.
The SYNC HD Video Out signal is connected to
the destination device. The SYNC HD is then
able to stripe the second VTR’s videotape with
VITC. (At the same time, you might also want to
insert a window burn. See “Window Dub Display Options” on page 58.)
VITC Video Source Rule
Since the SYNC HD has two video inputs
(“Video In” and “Video Ref In”), the following
rule describes which of these two signals VITC is
applied to.
If the Positional Reference is set to Generate
and the Clock Reference is set to either of the
two video inputs, then VITC will be applied to
the video signal at the Video Ref In connector
and fed to the Video Out connector.
Under all other combinations of Positional
Reference and Clock Reference, VITC will be applied to the video signal at the Video In connector and fed to the Video Out connector.
In addition, the SYNC HD will not insert new
VITC while reading VITC from an external
source. This is a safety feature to prevent the loss
of existing VITC in the video stream. VITC is
never inserted when the Positional Reference is
set to VITC or Auto Switch LTC/VITC.
Example Video Input Configuration
Unlike LTC, the SYNC HD can regenerate
VITC with both forward and reverse time
code addresses.
To prevent destruction of the original VITC
code, the SYNC HD will not re-apply (regenerate) VITC onto the same video stream from
which it is reading VITC.
LTC If you want to use LTC as a positional
source, do not select Auto Switch LTC/VITC.
External In order for the SYNC HD to regenerate
VITC based on an external positional reference,
you’ll need to select both a clock reference and a
positional reference.
To regenerate VITC based on an external
positional reference from Pro Tools:
1 Ensure that the SYNC HD is connected in-line
with a video source and video destination.
2 Ensure that VITC Insertion Enabled is selected
in the Synchronization page of the Peripherals
dialog.
One common situation is transferring video
from a source VTR (or a nonlinear video editing
system) to a destination VTR (or a nonlinear
video editing system). The video source signal is
connected to one of the SYNC HD video input
connectors according to the VITC Video Source
rule.
3 If necessary, choose the line pair from the
VITC Gene rat e Li nes pop-up m enu in the in the
Synchronization page of the Peripherals dialog.
4 In the SYNC Setup section of the Session Setup
window, select valid clock and positional references, and ensure that you have selected the appropriate video format (NTSC or PAL,
depending on your project). For instructions,
see “Video Format/System” on page 63.
Chapter 4: Using SYNC HD 53
Page 60

The SYNC HD will regenerate VITC and insert it
onto the video signal (as soon as it receives a
valid clock reference signal and positional reference signal).
To regenerate VITC based on an external
positional reference from the front panel:
1 Connect the video source to the SYNC HD
Video Ref In connector and loop to the
SYNC HD Video Input connector.
2 Press Set, and use the Up or Down switches to
display VITC Insertion (VI7C In5).
3 Press Set.
4 Use the Down and Up switches toggle be-
tween On and Off.
To regenerate VITC based on an external
positional reference using the SYNC Setup
software utility (Windows only):
1 Ensure that the SYNC HD is connected in-line
with a video source and video destination.
2 Ensure that VITC Insertion Enabled is checked
in the SYNC Setup window and that you have
selected the appropriate video format (NTSC or
PAL).
3 Use the VITC Generate Lines menu to config-
ure the line pair, if necessary.
4 Select the appropriate clock reference.
5 Select either LTC or Bi-Phase/Tach from the
SYNC Setup Positional Reference pop-up menu:
5 Press Set to select VITC Insertion.
6 Ensure that you have selected the appropriate
video format (NTSC or PAL).
7 Press Set, and use the Up or Down switches to
display VITC Generate Lines (6En LInE).
8 Press Set. The default line pair is14/16, which
is also the SMPTE-recommended setting.
9 Use the Down and Up switches to scroll
through the parameter values and select a VITC
line pair.
10 Press Set. The LED Time Code Display will re-
turn to showing time code numbers.
11 Select valid clock and positional references.
The SYNC HD will regenerate VITC and insert it
onto the video signal (as soon as it receives a
valid positional reference signal).
Internal VITC Generation
The SYNC HD can also generate VITC internally, using its integral time code generating
feature. In this mode (Positional Reference
switch = Generate) you can use either an external clock reference, or the SYNC HD internal
crystal as a clock reference with a variable start
time.
When generating VITC internally, if the insertion is not timed based upon an upstream video
reference you may encounter repeated or
skipped VITC frames. Be sure to check “VITC
Timing Rule” on page 69 and “VITC Video
Source Rule” on page 53.
SYNC HD Guide54
Page 61

To generate VITC using Pro Tools:
1 Ensure that the SYNC HD is connected in-line
with a video source and video destination.
2 In the Time Code Settings section of the Ses-
sion Setup window, select Using SYNC under
Generator.
3 Ensure that VITC Insertion Enabled is selected
in the Synchronization page of the Peripherals
dialog.
4 If necessary, choose the line pair from the
VITC Generate Lines pop-up menu in the in the
Synchronization page of the Peripherals dialog.
5 In the SYNC Setup section of the Session Setup
window, select a valid clock reference and ensure that you have selected the appropriate
video format (NTSC or PAL, depending on your
project). For instructions, see “Video Format/System” on page 63.
6 Put Pro Tools online.
6 Press Set. The default line pair is 14/16, which
is also the SMPTE-recommended setting.
7 Use the Down and Up switches to scroll
through the parameter values and select a VITC
line pair.
8 Press Set.
9 Using the Positional Reference switch, select
Generate.
10 Set the time code start time. See “Generator
Start Time” on page 51 for instructions.
11 Arm the destination VTR to record video, so
that VITC can be inserted into the video signal,
and be recorded on the destination videotape.
12 Make sure that your chosen clock reference is
actually present and running, then press the
SYNC HD Run switch.
The time code addresses will begin to increment.
7 Start Pro Tools recording or playback.
Pro Tools commands the SYNC HD to begin
generating VITC with time addresses synchronized to the session time line.
To generate VITC internally using the front panel
controls:
1 Ensure that the SYNC HD is connected in-line
with a video source and video destination.
2 Press Set, and use the Up or Down switches to
display VITC Insertion (VI7C In5). For detailed
instructions, see “VITC Insertion” on page 60.
3 Use the Down and Up switches to toggle VITC
Insertion On and Off.
4 When On is selected, press Set.
5 Press Set, and use the Up or Down switches to
display VITC Generate Lines (6En LInE).
To pause or stop VITC from the front panel:
Press and release the Run/Stop/Clear switch
when you want to pause or stop the generating
process.
To generate VITC Internally using the SYNC Setup
software utility (Windows only):
1 Ensure that the SYNC HD is connected in-line
with a video source and video destination.
2 Ensure that VITC Insertion Enabled is selected
in the SYNC Setup window, and that you have
selected the appropriate format (NTSC or PAL).
3 If necessary, select onto which line pair you’ll
be generating VITC using the VITC Generate
Lines pop-up menu.
4 Select the appropriate clock reference, using
SYNC Setup’s Clock Ref selector.
Chapter 4: Using SYNC HD 55
Page 62

5 From the Positional Ref selector, select Gener-
ate.
6 In the Generator/Bi-Phase Preset window,
type in the desired time code start time, in
Hrs:Min:Sec:Frm. To reset to 00:00:00:00, click
Zero.
7 Click Set. Typically, at this point you would
arm the destination VTR to re cor d video , so that
VITC can be inserted into the video signal, and
be recorded on the destination videotape. Make
sure that your chosen clock reference is actually
present and running, and that it is synchronized
with the incoming video signal.
8 Click Run to start. The time code addresses
will begin to increment.
9 Click Stop when you want to pause or stop the
generating process.
Regardless of whether you are generating or
regenerating, an active video signal will
need to be present at one of the SYNC HD
video inputs. Check to see if the machine is
paused, stopped or unlaced.
MTC Generation/Regeneration
MTC (MIDI Time Code) is a serial digital signal.
In many ways, you can think of it as an inaudible type of LTC that can be used by various MIDI
devices.
MTC is available from the SYNC HD MTC Out
connector, which is a standard DIN-style 5-pin
female MIDI connector.
To use MTC, connect MTC Out to a MIDI In
connector of a device that can recognize and use
MTC. Typically, this would be a console, sequencer, synthesizer or sampler keyboard, a
drum machine or other device.
MTC Output and Idle Muting
MTC is normally output whenever LTC is output. Whenever LTC output stops, the SYNC HD
will continue to output MTC in bursts of one
frame every 200 milliseconds. This allows any
connected MIDI-reading device to be continuously updated as to the position of VITC or BiPhase (either of which might be operating at
slow or still speeds). Thus, you can still use a
connected MIDI device for Auto-Spotting from
VITC or Bi-Phase.
Optionally, this constant output can be set to
mute when time code (LTC) is idle.
To mute idle-time MTC output:
From Pro Tools
1 Choose Setup > Peripherals and click Synchro-
nization.
2 Select the Idle MTC Enabled option.
3 Click OK.
From the front panel:
1 Press the Set, Up and Down switches to dis-
play Idle MTC (IdLE 7C).
2 Press Set to display the current state (On or
Off).
3 Press Up or Down to toggle the Idle MTC set-
ting.
4 Press Set.
From the SYNC Setup software utility
(Windows only):
1 Launch the SYNC Setup.
2 Deselect the Idle MTC Enabled option.
SYNC HD Guide56
Page 63

Generating a Window Dub
The SYNC HD offers time code character generation. This superimposes onto an SD video signal a small area called a window dub (or window
burn, or time code window) that displays time
code in hours:minutes:seconds:frames.
A window dub provides a visual cue to your location in a project, and can be helpful when
spotting regions to video frames in Pro Tools, especially if your only time code reference from
tape is LTC (Auto-Spot requires VITC).
The SYNC HD character generator obtains its
time code address from the chosen Positional
Reference.
Window Dub Requirements
Existing Video Signal The SYNC HD can only insert a time code window into an existing SD
video signal. This means that at least one video
“source” signal (from a VTR, nonlinear editing
system, or other video device) must be present at
one of the SYNC HD video input connectors
(Video In or Video Ref In). When generating a
window dub, the VITC Timing Rule applies (see
“VITC Timing Rule” on page 69.
SYNC HD Output The signal from the SYNC HD
Video Out connector must be routed to a video
destination such as another VTR or nonlinear
editing system.
To insert a time code window into a video signal
using Pro Tools:
1 Choose Setup > Peripherals and click Synchro-
nization.
2 Select Enable SYNC Peripheral to make the
Window Dub controls available.
4 Configure any of the following Window dub
appearance settings from the corresponding
pop-up menu: Vertical Position, Horizontal Position, Size, and Color.
Vertical Position Sets the vertical position of the
window dub, relative to the bottom of the video
picture. The choices range from 10% From Bottom to 50% From Bottom, in 10% increments.
“10% from Bottom” vertical position is outside the standard “safe title” area, which
means it may not be visible on some video
monitors.
Horizontal Position Sets the window dub’s relative horizontal position within the video picture. The choices include Extreme Left, Left,
Center, Right and Extreme Right.
The “Extreme” horizontal positions are outside the standard “safe title” area, which
means they may not be visible on some
video monitors.
Size Sets the relative size of the window dub
(Small or Large).
Color Sets the color of the time code numbers in
the window dub, and the color of the window
dub’s background. The choices include White
on Black Bkgnd; Black on White Bkgnd; White
on Video Bkgnd; or Black on Video Bkgnd.
(Video Bkgnd means that the window dub’s
background is transparent, so that the time code
numbers are displayed directly on top of the
video signal, without a contrasting background
box.) The default setting is White on Black
Bkgnd.
5 Click OK.
3 Select Enable Dub Window.
Chapter 4: Using SYNC HD 57
Page 64

To insert a time code window into a video signal
using the front panel controls:
1 Press Set, and use the Down and Up switches
to display Burn Enabled (burn EnA).
2 Press Set. The LED Time Code Display will
switch to display the current On or Off setting
for Window Burn.
3 Use the Down and Up switches to switch be-
tween the parameter values.
4 Press Set.
Based on the selected positional reference, the
time code character generator burns time code
addresses onto any video signal passing through
the SYNC HD.
Window Dub Display Options
If you need to change the appearance of the
window dub—in terms of size, vertical position,
horizontal position, and color—you need to use
Pro Tools or SYNC Setup software utility (Windows only). These parameters cannot be adjusted from the SYNC HD front panel controls.
Default Window Dub settings are listed in
“Restoring Factory Settings” on page 66.
To insert a time code window into a video signal
using SYNC Setup (Windows only):
1 In t h e Dub Window sec t ion of S YNC Setu p , se-
lect Window Enabled.
2 Specify the appearance of the window dub
with the pop-up menus for Vertical Position,
Horizontal Position, and Color.
SYNC HD Guide58
Page 65

chapter 5
Additional Operational Information
Front Panel Generator/Parameter Controls
This section details the parameters available
from the multi-function SET, UP, DOWN and
RUN/STOP, CLEAR switches (referred to as Set,
Up, Down and Run) on the SYNC HD front
panel. For details on the multi-function Generator/Parameter switches, see “Front Panel Generator/Parameter Switches” on page 35.
Parameters
SYNC HD parameters are selected and edited using the four Generator/Parameter switches.
To select SYNC HD front panel parameters:
1 Press Set.
2 Use the Up and Down switches to scroll
through available parameters, described below.
The 7-segment LEDs in the Generator/Parameter
Display abbreviate some parameter names using
numerals to represent letters (such as “5” to represent “S” or “s”). The following table identifies
each of these abbreviations.
SYNC HD front panel display of parameter names
LED Parameter
SE7 6En Set Generator Start Time
dI6 rEF Digital Reference
SPL FrEC Sample Freq (Rate)
PuLL r7E 1 Pull Up/Down 0.1%
PuLL r7E4 Pull Up 4.167%, Down 4.0%
bASE CLOC External Clock Out
VI7C InS VITC Insertion
rdr LInE (VITC) Reader Line
6En LInE (VITC) Generate Line
burn EnA Window Burn On/Off
FrEE LEn Freewheel Duration
L7C LEUL LTC Output level
SErVo Gn LTC Servo gain
PICH HLd Pitch Hold On/Off
bIPH PPF Bi-Phase Pulse-per-frame
bIPH SI6 Bi-Phase Signal Configuration
VIdEO SY Video Format (NTSC/PAL)
Hd VIdEo HD Video Format
IdLE 7C Idle MTC On/Off
dEvicE id Device ID (SYNC HD or SYNC I/O)
Chapter 5: Additional Operational Information 59
Page 66

Set Generator Start Time
Base Clock
Lets you set a start time for the SYNC HD time
code generator.
See “Generator Start Time” on page 51.
Digital Clock Reference
The SYNC HD can use AES/EBU or Word Clock
(1x) for digital clock reference.
See “Digital Clock” on page 37.
Sample Rate
Selects the SYNC HD sample rate.
See “Sample Rate” on page 17.
Pull Rate
Two Pull Rate settings enable 0.1%, and 4%, Pull
Up or Pull Down for the current sample rate.
Configures the Word Clock Out port. Choices
are Session (1x the base session sample rate), or
256x (for Slave Clock devices).
The base sample rate is 44.1 kHz when session sample rate is 44.1, 88.2, or
176.4 kHz, or 48 kHz when session sample
rate is 48, 96, or 192 kHz.
VITC Insertion
When selected, VITC will be inserted onto the
outgoing video signal—assuming that a video
signal is present at one of the SYNC HD video
inputs, and that the SYNC HD is in a valid mode
for inserting VITC.
To configure the SYNC HD to insert VITC using the
front panel:
1 Select VITC Insertion (VI7C InS) using the Set,
Down, and Up switches.
2 Press Set again. The Time Code Display shows
On or Off.
Pull Rate1 Lets you enable 0.1% pull up or
down.
Pull Rate4 Lets you enable 4.167% pull up, or
4.0% pull down, when available.
SYNC HD Guide60
3 Use Down an Up to toggle the choices.
4 Press Set when the desired choice is shown.
VITC Read Lines
This setting determines which line pair of incoming video is used for the VITC source.
Page 67

To choose the VITC read lines:
1 Select VITC Read Lines (rdr LInE), using the
Set, Down, and Up switches.
2 Press Set. The Time Code Display will shows
one of the parameter values:
• Auto (ALL-LInE)—where the SYNC HD will
search all lines and select the first valid line
pair automatically
• The currently selected read lines, if different.
3 Use Down and Up to scroll parameters.
4 Press Set.
VITC Generate Lines
This setting determines the line pair of the video
signal at the Video Out connector onto which
the SYNC HD inserts VITC. Normally, this
should be left at the default setting of 14/16.
To choose the VITC generate lines:
1 Select VITC Generate Lines (6En LInE), using
the Set, Down, and Up switches.
2 Press Set again. The LED Time Code Display
displays the current lines.
3 Use Down and Up to scroll parameters.
4 When you have chosen your desired option,
press Set. The SYNC HD will retain the setting,
even when the unit is powered off and on again,
until it is changed.
Window Dub/Burn
By enabling this setting, you can superimpose a
window dub onto an incoming video signal.
The front panel lets you enable window dub but
does not let you adjust any window options.
To enable or disable the SYNC HD window dub
from the front panel:
1 Select Burn Enabled (burn EnA), using the Set,
Down, and Up switch.
2 Press Set again.
3 Use Down and Up to toggle between on/off.
4 Press Set. The SYNC HD will retain the setting,
even when the unit is powered off and on again,
until it is changed.
See “Generating a Window Dub” on page 57 for
Pro Tools and the SYNC Setup software utility
window dub instructions. See “SYNC HD Defaults” on page 67 for default display settings.
Freewheel Length/Duration
Freewheel Length sets the period of time for
which the SYNC HD will continue to regenerate
time code when incoming time code is interrupted.
See “Freewheel Duration” on page 44 for an explanation of this feature.
Chapter 5: Additional Operational Information 61
Page 68

To set the freewheel duration:
1 Select Freewheel Length (FrEE LEn), using the
Set, Down, and Up switches.
To set the LTC servo gain:
1 Select Servo Gain (SErVo Gn) using the Set,
Down, and Up switches.
2 Press Set again. The LED Time Code Display
displays the current setting, in frames.
3 Use Down and Up to scroll parameters.
4 Press Set.
LTC Output Level
Adjusts the audio level of the SYNC HD LTC
output, from –24 dBu to +9 dBu.
See “Adjusting LTC Output Level” on page 39
for step-by-step LTC level instructions.
To set the LTC output level:
1 Select LTC Level (L7C LEUL), using the Set,
Down, and Up switches.
2 Press the Set switch again. The LED Time Code
Display shows the current setting, in dBu.
3 Use the Down and Up switches to switch be-
tween the parameter values.
4 Press Set.
Servo Gain
This setting provides a user selectable LTC servo
gain offset. Selectable from the SYNC HD front
panel and the Pro Tools Session Setup window,
this parameter can significantly lessen or remove jitter on word clock while resolving to
LTC (though it can slightly increase lockup
time).
2 Press Set again. The LED Time Code Display
shows the current setting (–001 is the default).
3 Use the Down and Up switches to display an-
other parameter value. Servo gain provides four
gain settings.
4 Press Set.
Pitch Memory/Hold
Pitch Memory is useful when resolving the
SYNC HD to off-speed, free-running LTC. When
Pitch Memory is enabled, the SYNC HD will remain at a pitch (sample rate) that corresponds to
the last known clock reference speed.
Turn off Pitch Memory if you want to digitally transfer to another device and to ensure the receiving device gets the correct
sample rate. Also, turn pitch memory off if
you are doing an analog transfer to
Pro Tools and want to ensure that the recording is made at the exact sample rate set
by the session set up window.
To enable or disable the SYNC HD pitch memory
feature:
1 Select Pitch Hold (PICH HLd), using the Set,
Down, and Up switches.
2 Press Set again. The LED Time Code Display
will display the current setting (on or off).
3 Use Down and Up to scroll parameters.
4 When you have chosen your desired option,
press Set. The SYNC HD retains the setting, even
when powered off, until it is changed.
SYNC HD Guide62
Page 69

Bi-Phase/Tach Pulses Per Frame
Bi-Phase/Tach involve several settings, including pulse per frame. This sets the number of BiPhase/Tach pulses per frame of time code.
To set the pulses per frame value for a BiPhase/Tach signal:
1 Select Bi-Phase/Tach Pulses Per Frame (bIPH
PPF), using the Set, Down, and Up switches.
2 Press Set again. The LED Time Code Display
shows the current parameter values, in pulses
per frame.
3 Use Down Up to scroll parameters. Pressing
and releasing the switches will change the value
by just one pulse per frame. Pressing and holding the switches scrolls at a faster speed.
4 Press Set. The SYNC HD will retain the setting,
even when the unit is powered off and on again,
until it is changed.
Bi-Phase/Tach Input Signal
NTSC The standard for North and South America, Japan, and certain other parts of the world
PAL Used in most of Europe, Asia, and Africa.
Users of SECAM video (for France, Russia, and
other parts of the world) should select PAL.
Be sure you have selected the correct video
format. The SYNC HD will not warn you if
you have chosen the wrong one.
To select the desired video system:
1 Select Video System (VIdEo SY), using the Set,
Down, and Up switches.
2 Press Set again. The LED Time Code Display
will show one of the following:
• NTSC (n75C)
• PAL (PAL)
3 Use Down and Up to toggle parameters.
4 Press Set.
The SYNC HD will retain the setting, even when
the unit is powered off and on again, until it is
changed.
In addition to other Bi-Phase/Tach parameters,
the Input Signal defines the direction of the BiPhase/Tach signal.
For complete instructions, see “Bi-Phase/Tach
Signal” on page 47.
Video Format/System
Selects the format (NTSC or PAL) for both the incoming and outgoing video signals.
Chapter 5: Additional Operational Information 63
Page 70

HD Video Format
MTC Idle Mute
Selects the video reference rate when the Clock
Reference is set to Video Reference (HD).
The following progressive video reference rates
are available from the front panel display:
• Slow PAL 23.976
• Slow PAL 24
• 720p - 23.976
• 720p - 24
• 720p - 25
• 720p - 29.97
• 720p - 30
• 720p - 50
• 720p - 59.94
• 720p - 60
• 1080p - 23.976
• 1080p - 24
• 1080p - 25
• 1080p - 29.97
• 1080p - 30
• 1080i - 47.95
• 1080i - 48
• 1080i - 50
• 1080i - 59.94
• 1080i - 60
• 1080p - 50
• 1080p - 59.94
• 1080p - 60
MTC is output constantly whenever the
SYNC HD is generating time code. Optionally,
this output can be muted when time code (LTC)
is idle.
See “MTC Output and Idle Muting” on page 56.
Device ID
Toggles the device ID of the SYNC HD between
SYNC HD (for use with Pro Tools 7.4 or higher)
and SYNC I/O (for use with Pro Tools 7.3 or
lower).
See “Configuring the Device ID” on page 13.
Using Fader Start
The SYNC HD provides six GPI outputs in total,
two TTL-level and four relays. Together, this
combination of outputs makes it possible for the
SYNC HD to provide Fader Start capability.
Utilization of Fader Start has specific wiring
requirements. See “GPI Relay Wiring for
Fader-Start” on page 92.
Fader Start allows faders in Pro Tools to trigger
external devices to play and stop.
To implement Fader Start, Pro Tools maps the
first two visible auxiliary input channels in a session to GPI Relay outputs 0 and 1 (first being
left-to-right in the Mix window, top-to-bottom
in the Edit window).
SYNC HD Guide64
Page 71

Example Fader Start Application
In a typical scenario, the Fader Start feature controls playback of a CD player. The CD player
outputs are routed into a Pro Tools stereo Aux
Input. As the Aux channel fader is moved above
–120 dB, playback of the CD player is automatically triggered. Likewise, as the fader is moved
below –120 dB, playback is automatically
stopped.
To rearrange tracks, drag the Track Name
left or right in the Mix window, or up or
down in the Edit window. See the
Reference Guide
To configure Pro Tools tracks for Fader Start Play
and Stop:
1 Use the New Track dialog to create two new
auxiliary input tracks. If you already have aux
tracks, you will use the first and second (topmost in the Edit window, left-most in the Mix
window).
2 When the first visible aux input in a Pro Tools
session is above –120 dB, GPI Relay output 3
(Fader Start #1) will be enabled; otherwise, it will
be disabled.
Similarly, when the second visible aux input in a
Pro Tools session is above –120 dB, GPI Relay
output #4 (Fader Start #2) will be enabled; otherwise, it will be disabled.
If you rearrange channel strips in the Pro Tools
Mix or Edit windows, the two GPI outputs will
update dynamically to reflect the current state.
The Fader Start channel must be in a Show Track
state (not hidden). See “GPI Relay Wiring for
Fader-Start” on page 92 for additional GPI information.
for more information.
Pro Tools
Calibrating the SYNC HD Oscillator
The SYNC HD provides a feature for calibrating
the frequency of the on-board crystal oscillator.
This allows the SYNC HD to be used as an extremely accurate frequency reference while in
Internal/VSO mode.
With normal usage, the SYNC HD should never
require recalibrating. Each unit is factory calibrated to within +/– 5 ppm (parts per million).
You may want to recalibrate the SYNC HD in
the following situations:
• If greater than 5 ppm accuracy is required.
• If the unit needs to be matched to a unique
(nonstandard) frequency.
• To precisely compensate for component aging.
– and –
• To restore the original factory setting.
Oscillator recalibration does not occur during firmware updating or when resetting the
SYNC HD to factory defaults (see “Restoring Factory Settings” on page 66).
Oscillator Resolution and Stability
SYNC HD calibration units are in 1/64th of a
sample period. What this means is that the
SYNC HD can theoretically be calibrated to
about 1/3 of a ppm. The unit will maintain calibration across a wide range in temperature.
Long-term drift should be less than 1 ppm per
year due to aging of the crystal. To put this in
perspective, most digital audio products are accurate to within 20 to 50 ppm and drift with
temperature. The SYNC HD’s accuracy is possible because it contains a low-jitter, high-stability
temperature controlled crystal oscillator.
Chapter 5: Additional Operational Information 65
Page 72

Warm Up the SYNC HD Before Recalibrating
Before you begin the calibration procedure,
power on the SYNC HD and allow it to warm up
for at least five minutes. The temperature of the
room (or chassis) isn’t critical during the calibration procedure. However, if you need better
than 3 ppm accuracy, it is recommended that
you allow the SYNC HD to warm up for at least
30 minutes and that the chassis be at normal operating temperature.
The original Oscillator Calibration value is
printed on the factory sticker, on the SYNC HD
bottom panel.
To restore the SYNC HD oscillator calibration to
its factory setting:
1 Press Set, then press Up until Video System
(VIdEo SY) is displayed in the LED readout.
2 With the LED Time Code Display showing
VIdEo SY, press and hold the Up switch. While
you continue to hold that switch, press the
Clock Reference switch momentarily, and then
release both switches. The LED Time Code Display will read:
6 When you reach a value that matches the
sticker’s value, stop scrolling and press Set. The
LED Time Code Display will return to showing
time code numbers. The SYNC HD is now properly calibrated.
The next time you press Set, the LED Time Code
Display will again show O5C CAL. If you then
press the Down switch, you’ll disengage the Oscillator Calibration parameter name. To change
the setting once again, you’ll need to repeat
steps 1 through 6.
Restoring Factory Settings
The SYNC HD can be reset to its default factory
settings.
To reset all parameters to default settings:
1 Switch off power to the SYNC HD and wait at
least 10 seconds.
2 Hold down the Up and Down front panel
switches and turn on power to the SYNC HD.
Do not release the Up and Down switches until
the display reads FAC-CFG.
3 Press Set again. The LED Time Code Display
shows the current parameter value, which
shows a sample rate frequency deviation from
–0999 to 0999.
4 Take note of the Oscillator Calibration value
printed on the factory sticker, on the SYNC HD
bottom panel.
5 Use the Down and Up switches to scroll
through the parameter values.
SYNC HD Guide66
Resetting factory settings does not reset the
SYNC HD oscillator. See “Calibrating the
SYNC HD Oscillator” on page 65 for information.
Page 73

Factory Default Settings
The following table lists the default settings of
each parameter.
SYNC HD Defaults
Parameter Name Default
Set Generator Start Time
Digital Reference
Sample Freq (Rate)
VITC Insertion
Pull Rates
Base Clock
(VITC) Reader Line
(VITC) Generate Line
Window Burn On/Off
Freewheel Duration
LTC Output level
Servo gain
Pitch Hold
Bi-Phase Pulse-per-frame
Bi-Phase Signal
Video System/Format
Idle MTC Enabled
Window Burn options:
Variable Speed Offset
(VSO)
01:00:00:00
AES/EBU
44.1 kHz
On
Off
Session (1x Word)
All
14–16
On (Enabled)
8 frames
+3 dBu
0000
Off
0100
A Lead B
NTSC
On
Enabled
Size: Large
Vertical Position: 20%
from Bottom
Horizontal Position: Center
Color: White on Black
background
Off
Managing and Selecting Video Inputs
(SD Video Rates Only)
The SYNC HD has two independent video inputs, “Video In” and “Video Ref In,” on the
SYNC HD rear panel. These let you use one of
the video inputs as a Clock Reference (the resolver sample clock master reference) and use
the other input for working with VITC time
code and the character generator (window dub).
If you have just a single video source, the
SYNC HD provides a very simple method for
connecting your single video source to both of
the video inputs. See “Using Video Inputs with
VITC and the Character Generator” on page 67.
In a typical video setup, you will supply a reference video signal (black burst or color bars) to
your VCR and to the SYNC HD Video Ref input.
You will then connect the VCR's video output to
the SYNC HD Video In port. Finally, the
SYNC HD Video Out will be fed to your picture
monitor and/or another VCR.
Using Video Inputs with VITC and the Character
Generator
Unlike selecting a video input to use for Clock
Reference, input selection for VITC and character generator functions follows a simple rule.
This rule is explained in the following sections
and in Figure 1 on page 68.
Chapter 5: Additional Operational Information 67
Page 74

Video Ref If the Clock Reference is one of the
two video inputs, and the Positional Reference is
Generate, then VITC and character generator
functions are applied to the video arriving at the
Video Ref input connector. This helps you avoid
re-patching video cables whenever you want to
stripe a videotape with your reference blackburst
or color bars, along with internally generated
time addresses for VITC (and/or LTC, and/or CG
dub window). In Figure 1 on page 68, this scenario is identical to “Route A.”
Video In For all other combinations of Clock Reference and Positional Reference, VITC and character generator functions are applied to the
video signal arriving at the Video In connector.
In this way, the SYNC HD can read VITC from
your videotape, or add VITC with or without
character generation (window burn) while dubbing to a second VCR. In Figure 1 on page 68,
this scenario is identical to “Route B.”
Figure 1. Video Input Flow diagram
SYNC HD Guide68
Page 75

appendix a
Additional Synchronization Information
Simple Setups In a modest setting with one or
Video and VITC Signals
Black Burst and House Video Reference
A black burst signal is essentially a “positionless” video signal. As with any “shared” video
signal, you’ll want to ensure that your video
feed comes from a properly buffered and distributed source, such as a video distribution amplifier, or the house video reference/black burst
output of another device in the chain.
Resolving to video instead of house video
reference (black burst)
There are several reasons why you would resolve
the SYNC HD to a video signal rather than
house synchronization.
When House Video Reference is Unavailable Resolve to a video signal whenever you are synchronizing Pro Tools (or other device) to video,
and you either:
• Do not have a house video reference.
– or –
• Your setup includes equipment that lacks
house video reference input and synchronization capability (including consumer grade
VCR, or some entry-level computer-based editing systems).
two VTRs, Pro Tools, and a SYNC HD, using the
video signal as the clock reference is often satisfactory. In these situations, proper synchronization can be achieved using the video signal as
clock reference.
Why VITC is Unavailable for Clock Reference
VITC itself does not provide clock information
directly as part of its time code information,
only positional information. However, since
VITC is always embedded into a video signal,
that video signal can be used as a clock reference
by selecting Video Input as the clock reference
(or Video Ref In if your facility has a house video
reference).
VITC Timing Rule
The following rule is in effect whenever you are
generating or regenerating VITC.
Inserted VITC should be monotonic, regard-
less of whether it is being regenerated or generated.
By monotonic, it is meant that the VITC should
be smoothly ascending or descending, with no
repeated or skipped frame addresses. In order to
achieve monotonicity, the external positional
reference (while regenerating) or the clock
source (in Generator Preset Mode) must be synchronous with the video signal onto which the
VITC is being inserted.
Appendix A: Additional Synchronization Information 69
Page 76

Example of VITC Timing Rule
Working with Analog Machines
As an example, if you are using LTC as a positional reference from a 3/4-inch U-Matic VTR,
then that VTR should be referenced to the same
video signal that you are applying to the
SYNC HD. As another example, in Generator
Preset Mode (Positional Reference = Generate), a
clock reference of Internal is not a good choice,
simply because the SYNC HD internal crystal
runs asynchronously with respect to the supplied video signal, and thus repeated or skipped
frame addresses are sure to eventually occur.
LTC Signals
Because it’s an analog audio signal, LTC can
sometimes be susceptible to either tape dropouts (tape shedding), or to level mismatches between the LTC source and the LTC input. The
SYNC HD freewheeling feature allows you to
compensate for brief time code dropouts. However, if you have serious dropouts, you may not
be able to sustain accurate synchronization.
If you plan to use LTC as a clock reference
(whether or not you are also using it as a positional reference), you will need to ensure that
your LTC is recorded at as high a level as possible without distortion, and that there are no
dropouts longer than 1/80th of a frame.
The SYNC HD reads LTC most reliably when fed
with a LTC signal of at least –12 dBu (and preferably 0 dBu to +3 dBu.)
LTC Servo Gain
You can adjust the servo gain of the SYNC HD
LTC input from the SYNC HD front panel controls and from the Pro Tools Session Setup window. See “Servo Gain” on page 62 for more information.
It is good practice on a 24-track analog tape machine to record time code on Track 24 at a reference level of –10 dBu (or lower), with Track 23
left blank as a “guard” track. This practice avoids
crosstalk “bleed” that can occur between the
time code track and otherwise adjacent audio
tracks. Time code (which is a mid-frequency alternating pitch square wave) is very sensitive to
crosstalk from adjacent tracks, and conversely
you don’t want audible time code leaking onto
your audio tracks.
If your ATR is under the control of a synchronizer, you must make sure that the synchronizer
and the SYNC HD are both locked to the same
reference source (such as, typically, from a video
black burst generator.)
Auto-Switch LTC/VITC
Auto-Switch LTC/VITC lets the SYNC HD automatically select between these two (time code)
sources.
LTC and VITC both provide useful and unique
capabilities. For instance, it is impossible to read
LTC off a paused videotape. Consequently, using only LTC, there’s no way you can use Pro
Tools to perform Auto-Spotting of regions when
the tape is paused. However, VITC continues to
be read as long as the picture remains visible, so
it can be used as a positional reference when the
VTR is paused. On the other hand, VITC cannot
be read at fast winding speeds (except by broadcast-quality VTRs); LTC can be read at fast winding speeds, as long as its signal remains within
the high-end frequency response of the ATR or
VTR.
SYNC HD Guide70
Page 77

Examples of Auto-Switch LTC/VITC
The SYNC HD will switch to LTC for posi-
tional reference during hi-speed searching and
cueing, for example, or whenever the tape speed
is too high to read VITC.
The SYNC HD will switch to VITC if LTC stops
or is unavailable. This will include, for example,
if a tape is paused or parked.
If both LTC and VITC are available, the
SYNC HD chooses which one to use based on
the speed of playback. The switch-over point is
approximately 75% of full 1x playback speed.
Above 75% playback speed, LTC is favored; below 75% speed, VITC is favored.
If a dropout occurs, the SYNC HD waits until the
freewheel duration has expired before attempting to switch over to the opposite source. If neither source is available, the SYNC HD will stop
reading time code.
Digital Clock Signal Types
A reference clock signal is part of any digital recording system. It is required because whenever
digital audio information is mixed together or
passed between devices, the playback samples
must be aligned with the recording samples. In
some cases (such as with AES/EBU or S/PDIF digital interfaces), the clock signal is embedded in
the data stream itself. In other cases, such as
SDIF, the clock signal is carried as an entirely
separate signal from the digital audio sample
data.
The SYNC HD is able to resolve to AES/EBU and
Word Clock.
AES/EBU
Some professional digital audio products use
AES/EBU “null clock” (which is an AES/EBU data
stream that contains only clock information
only and no audio information) as a system
clock reference source. These systems rely upon
a single AES/EBU master clock source that is distributed throughout a digital audio facility, in
much the same way that house synchronization
is distributed throughout a video facility. If you
are connecting the SYNC HD to such a system,
you will want to use the SYNC HD AES/EBU input as the clock reference connection, so that all
system components are referenced to the same
time base. (Note that AES/EBU does not support
176.4 kHz and 192 kHz sample rates.)
In some cases (such as using the SYNC HD as a
standalone clock resolver or time code generator
without a digital audio workstation), you may
wish to use an audio DAT machine (or other
similar device) as a source of AES/EBU null
clock, and resolve your system to this reference
source. In this case, the audio sample data in the
AES/EBU data stream is stripped off, and only
the clock information is used.
Word Clock
Many professional digital audio products—including open-reel multitrack tape recorders, digital mixing consoles, and the Tascam DA-88
modular digital multitrack—have Word Clock
(1x sample rate) connectors.
Word Clock allows the DA-88 (and other Word
Clock-compatible devices) to send or receive external clock information which controls the
sample rate, which in turn (where applicable)
controls the play and record speed.
Appendix A: Additional Synchronization Information 71
Page 78

Square Wave A
Square Wave B
Using just Word Clock, it is possible to create a
“chain” of digital devices in your studio by picking one source as the Word Clock master, and
configuring other sources as Word Clock slaves.
Bi-Phase/Tach
Bi-Phase and Tach are used with mag machine,16, 35, and 70 mm projectors, flatbed editing systems and other types of motor-driven
film equipment. Bi-Phase (sometimes called
Quadrature Sync) and Tach information are similar, though they do differ.
Bi-Phase A Bi-Phase signal consists of two square
waves, which are generated directly by a device’s
transport mechanism, and which are 90° out-ofphase with one another. As a Bi-Phase-generating device plays it outputs a steady stream of
square waves that the SYNC HD can use as its
clock reference, at nearly any speed including
still/paused.
The SYNC HD uses the phase relationship between the two square waves to determine the
device’s direction (forward or reverse). However,
this is relevant only when the SYNC HD is using
the Bi-Phase signal as a positional reference.
Tach A Tach signal is a variation of Bi-Phase.
With Tach’s two signals, one is used only as the
direction indicator, while the other is used as
the velocity, or rate indicator. The SYNC HD
uses this rate signal when resolving to Tach as a
clock reference.
There are several different standards for the
number of pulses-per-frame for Bi-Phase or Tach
devices. You can set the SYNC HD to match the
PPF rate of the external device’s Bi-Phase/Tach
encoder from Pro Tools, or using the SYNC
Setup software utility’s Pulse Per Frame setting
(Windows only).
SYNC HD Guide72
Strictly speaking, Bi-Phase/Tach signals are clock
reference signals, and do not contain positional
information of their own. However, they do
contain enough information for the SYNC HD
to calculate positional information.
Bi-Phase/Tach signals use two square waves to
generate pulses that can function as a clock reference. The two square waves are 90° out-ofphase, in a pattern that resembles this:
Illustration of Bi-Phase/Tach signals
With a Bi-Phase signal, the SYNC HD can deduce the direction (forward or reverse) of the signal based upon which wave is read “high” relative to the other. For instance, with some film
equipment, when the device is running forward,
it will generate a Bi-Phase signal where the “A”
wave leads the “B” wave—that is, where the A
wave peaks before the B wave peaks. When the
device is in reverse, the B wave will lead the A
wave.
However, some film equipment works in the opposite manner, which is why the SYNC HD Input Signals option lets you make the appropriate
selection (Fwd = A leads B, or Fwd = B leads A).
Calculating the direction of a Tach signal is
slightly different. As you may recall, Tach also
uses two signals. The “A” signal is a square wave
that provides clock information; the “B” signal
is in a steady state (high or low) that indicates
the direction. Unfortunately, not all Tach-generating equipment uses the B signal in the same
way. Fortunately, the SYNC HD Input Signals
options allows you to choose the appropriate
method (Tach: Fwd = B is Low, or Tach: Fwd = B
is High).
Page 79

This explains how the SYNC HD can use a BiPhase/Tach signal to deduce the direction, and
how it also uses the signal as a clock reference—
as long as the SYNC HD is told the starting
frame of the first clock signal.
Pilot Tone
The SYNC HD can resolve to an external Pilot
Tone signal for synchronizing to (or transferring
audio from) certain types of open-reel audio
tape recorders.
In general, Pilot Tone is a sine wave reference
signal running at the “line frequency” or “mains
frequency,” meaning the same frequency transmitted by the AC line voltage from the local
power utility.
Pilot Tone is used on location film shoots to establish a common synchronization reference between a film or video camera with a portable
1/4-inch analog ATR (such as those made by Nagra or Stellavox). On location, Pilot Tone is derived by clock referencing the camera to the local AC line frequency (which is 60 Hz or 50 Hz
depending on the country of origin), and this
same frequency is then used to clock-reference
the ATR. The result is that both the camera and
the ATR will run at the same speed.
You can think of Pilot Tone as a kind of inexpensive and readily available “house sync” for
location production. Increasingly, it’s being replaced by time code, since new-generation film
cameras as well as many portable DAT recorders
are time code-capable.
Please note that Pilot Tone contains no positional information; it is simply a clock reference.
Most 1/4-inch machines have a center track for
time code or pilot.
Appendix A: Additional Synchronization Information 73
Page 80

SYNC HD Guide74
Page 81

appendix b
Technical Specifications
General
Nominal Sample Rates
Pull Up/Down
+4.1667%
and +0.1%
+4.1667% 45938 50000 91875 100000 n/a n/a
+4.1667%
and –0.1%
+0.1% 44144 48048 88288 96096 176576 192192
–0.1% 44056 47952 88112 95904 176224 191808
–4.0% and
+0.1%
–4.0% 42336 46080 84672 92160 n/a n/a
–4.0% and
–0.1%
44100 48000 88200 96000 176400 192000
45983 50050 91967 100100 n/a n/a
45892 49950 91783 99900 n/a n/a
42378 46126 84757 92252 n/a n/a
42294 46034 84587 92068 n/a n/a
Sample Rate
Appendix B: Technical Specifications 75
Page 82

General
Frame Rates 30 fps
30 fps drop-frame
29.97 fps
29.97 fps drop-frame
25 fps
24 fps
23.976 fps
Variable Speed Override ±699 cents (±58.25%)
Aging: ±2 ppm/year typical
Burn-in Window Position: 5 horizontal and vertical positions
Size: Large and small text
Color: Black or white text on white or black
Dimensions Height: 1RU/1.75” (4.45 cm)
Width: 19.0” (48.26 cm)
Depth: 10.5” (26.67 cm)
Weight 5.0 lbs (2.27 kg)
Vibration Resistance 5 mm displacement, 10 to 55 Hz, each axis
SYNC HD Guide76
background or keyed
Page 83

General
Shock 5 G max
Operating Temperature 32 to 131 degrees F (0 to 55 degrees C)
Storage Temperature -40 to 176 degrees F (-40 to 80 degrees C)
Relative Humidity 0 to 95%, non-condensing
Power Requirements Voltage: 85 to 264 VAC
Frequency: 47 to 63 Hz autoswitching
Wattage: 9.5 W typical, 30 W maximum
Agency Compliance
Connector: 3-pin, AC and ground (IEC
950:320;3.2.4)
Meets FCC Part 15 Class A limits, CD EN 55022A, CE EN 60950,
CE EN 55081:1, UL 1419 and CSA 22.2
Appendix B: Technical Specifications 77
Page 84

Rear Panel Connectors
Connector Specifications
LTC In
LTC Out
Format: SMPTE/EBU 80-bit longitudinal, drop frame/non-drop
frame
Connector: 3-pin XLR female per IEC 268-12
Speed Range: 1/30 to 80X play speed, forward or backward
Level: –24 dBu to +9 dBu, differential (pin 2 hot)
Impedance: 200K ohms
Format: SMPTE/EBU 80-bit longitudinal, drop frame/non-drop
frame
Connector: 3-pin XLR male per IEC 268-12
Speed Range: ±10% of play speed
Level: –24 dBu thru +9 dBu RMS, differential (pin 2 hot)
Level Default: 0 dBu RMS, 1.52V p-p ±10mV
Output Impedance: 5K ohms
Load Impedance (minimum):
100 ohms
Video (Main) In
SYNC HD Guide78
Rise/Fall Time: 42us ± 1us measured between 10% and 90% p-p
S/N Ratio: –60 dB RMS at 0 dBu level
Format NTSC or PAL composite video
Level: 1V p-p
Termination: 75 ohms
Page 85

Rear Panel Connectors
Connector Specifications
Video (Main) Out
(VITC In)
(VITC Out)
Video (Ref) In
Video (Ref) Out
Level: 1V p-p
Source Impedance: 75 ohms
Format SMPTE 90-bit, drop frame/non-drop frame
Line Range: 10 to 40 (all-line mode), 10 to 22 (single-line mode)
Format: SMPTE 90-bit, drop frame/non-drop frame
Line Range: Two lines, 10 to 20
Format: NTSC or PAL composite video
Level: 1V p-p
Termination: 100K ohms
Level: 1V p-p
AES/EBU In
AES/EBU Out
Termination: 100K ohms
Description: Passive loop-thru of Video Ref in
Level: 5 V p-p at 110 ohms (pin 2 hot)
Connector: 3-pin XLR female per IEC 268-12
Level: 5 V p-p at 110 ohms (pin 2 hot)
Connector: 3-pin XLR male per IEC 268-12
Appendix B: Technical Specifications 79
Page 86

Rear Panel Connectors
Connector Specifications
Word Clock In
Word Clock Out
Loop Sync In
Loop Sync Out
Bi-phase/Tach/
GPI/Pilot
Level: 0 to .5 V (low), 2.0 to 6.0 V (high)
Connector: BNC Female
Level: TTL (3.3 V typical)
Connector: BNC Female
Level 0 to .5 V (low), 2.0 to 6.0 V (high)
Connector BNC Female
Level TTL (3.3 V typical)
Connector BNC Female
Connector: 25-pin D-subminiature female (DB25)
(Bi-phase/Tach In)
SYNC HD Guide80
Frequency Range: 0 to 76.8 KHz
Level: 4.5 to 12V, opto-isolated
Current: 10 mA max
Polarity (bi-phase): Both inputs are software programmable
Polarity (tach): “Direction” polarity is software programmable
Modulo Range: 2 thru 254
Page 87

Rear Panel Connectors
Connector Specifications
(Pilot In)
(GPI In)
(GPI Out (TTL))
Level: 100 mV to 5.5 V p-p, differential
Frequency Range: 50/60 Hz nominal
Impedance: 200K ohms
Description: Four opto-isolator inputs/returns
Level: 4.5 to 5.5 V
Current: 10 mA max
Frequency: Frame-rate max
Latency: Half frame max
Description: Two TTL-level outputs
Level: TTL (3.3 V typical)
Current: 15 mA
Frequency: Frame-rate max
(GPI (Relay))
Latency: Half-frame max
Description: Four pairs of SPST contacts, normally open
Load (while switching): .5 A max at 200 VDC
Load (continuous): 1.5 A max at 200 VDC
Operate/Release Time: 1 ms
Repetition Rate: Frame-rate max
Latency: Half frame max
Appendix B: Technical Specifications 81
Page 88

Rear Panel Connectors
Connector Specifications
MIDI Time Code
(MTC) Out
Host Serial
Current Rating: 15 mA current loop
Rate: 31.25 Kilobaud
Connector: 5-pin DIN female
Cable Length: 50 feet (15 meters) max
Format: Apple Mac-compatible serial printer port
Connector: 8-pin mini DIN female
Cable Length: 50 feet (15 meters) max
SYNC HD Guide82
Page 89

appendix c
12
3
21
3
+
–
GND
N.C.
+
–
GND
LTC In
LTC Out
Device
Device
21
3
12
3
+
GND
N.C.
+
–
GND
LTC In
LTC Out
Device
Device
Wiring Diagrams and Pin Assignments
If you are connecting an unbalanced signal to the
LTC Connector s
The SYNC HD LTC In and LTC Out connectors
are balanced XLRs with Pin 2 wired “+” or “hot,”
Pin 3 wired “–” or “cold,” and Pin 1 wired to
ground (shield). Depending on whether you are
connecting a balanced or unbalanced signal to
these connectors, different wiring configurations are recommended for optimum signal integrity, especially for long cable runs.
If you are connecting a balanced signal to the
SYNC HD LTC In or LTC Out connectors:
• Pin 1 and ground should be connected at the
input only (not at the output). This will prevent ground loops between the shield and the
Pin 1 conductor.
SYNC HD LTC In or LTC Out connectors:
• Connect only Pin 2 to the “+” signal;
• Connect Pin 1 to ground at all inputs and outputs.
Wiring diagrams for the SYNC HD LTC In and LTC Out
connectors (unbalanced signal)
Wiring diagrams for the SYNC HD LTC In and LTC Out
connectors (balanced signal)
Appendix C: Wiring Diagrams and Pin Assignments 83
Page 90

Bi-Phase/GPI/Pilot Pin Diagram
GPOUT3_B
XREF=9
12V_OUT
VR1
6
7
8
3
2
1
XREF=9
GPOUT0_B
XREF=9
GPOUT1_A
XREF=9
GPOUT1_B
XREF=9
GPOUT2_A
XREF=9
GPOUT2_B
XREF=9
GPOUT3_A
XREF=9
OPTRETURN
XREF=9
BIPHB_I
XREF=9
BIPHA_I
XREF=8
PILOT_IN+
XREF=9
RET0
XREF=9
GPIN0
XREF=9
RET1
XREF=9
GPIN1
XREF=9
RET2
XREF=9
GPIN2
XREF=9
RET3
XREF=9
GPIN3
XREF=9
GPOUT1
XREF=9
GPOUT0
XREF=9
GPOUT0_A
XREF=8
PILOT_IN-
J3
27
26
1
14
25
24
23
22
21
20
19
18
17
16
15
13
12
11
10
9
8
7
6
5
4
3
2
C4
C3
FB33
1
2
3
V.REG,78L12ACM,+12V,0.1A,S0-8
SOL8
480508807-00
VOUT
GND3
GND4
VIN
GND1
GND2
54
NCNC
VCC_P15V
GND
5V
DB25F_RA
0.1UF
1.0UF
GND_C
GND_C
DSS306_55Y271M
FILTER_EMI
270101433
L_3P
Biphase/GPI/Pilot
Bi-Phase/GPI/Pilot
SYNC HD Guide84
Page 91

Bi-phase/Tach OptoCoupler Input
XREF=13
BIPHB
XREF=13
BIPHA
XREF=9
BIPHA_I
XREF=9
BIPHB_I
U5
3
2
5
7
6
XREF=9
OPTRETURN
R79
R77
U6
3
2
5
7
6
R49
C27
C25
R47
R46
5V
GND
6N137_DP
IC, OPTOCOUPLER
320003987
DIP8
+
EN
-
GND
8
VCC
GND
1K
1K
6N137_DP
IC, OPTOCOUPLER
320003987
DIP8
+
EN
-
GND
8
VCC
5V
1K
0.1UF
0.1UF
634
634
GND_C
Bi-phase/Tach
Appendix C: Wiring Diagrams and Pin Assignments 85
Page 92

GPI Relay Outputs
XREF=9
GPOUT2_E2
XREF=9
GPOUT3_E2
XREF=9
GPOUT3_A
XREF=9
GPOUT2_A
XREF=9
GPOUT1_E2
XREF=9
GPOUT1_A
XREF=9
GPOUT0_A
XREF=9
GPOUT0_E2
K1
K2
K3
K4
XREF=9
GPOUT3_B
XREF=9
GPOUT2_B
XREF=9
GPOUT1_B
XREF=9
GPOUT0_B
GND
GND
GND
GND
RELAY
1
3
7
5
RLY_SIP4_DG1A_BW
RELAY
1
3
7
5
RLY_SIP4_DG1A_BW
RELAY
1
3
7
5
RLY_SIP4_DG1A_BW
RELAY
1
3
7
5
RLY_SIP4_DG1A_BW
GPI Relay Output
SYNC HD Guide86
Page 93

NC
FB20
1
2
3R3
J10
742
653
1
XREF=4
MIDI_OUT
XREF=13
GPOUT3_E
XREF=13
GPOUT2_E
XREF=13
GPOUT1_E
XREF=13
GPOUT0_E
XREF=13
GPOUT1_O
XREF=13
GPOUT0_O
XREF=9
GPOUT3_E2
XREF=9
GPOUT2_E2
XREF=9
GPOUT1_E2
XREF=9
GPOUT0_E2
FB21
1
2
3
U26
987
6
11121314151617
18
20
19
1
10
543
2
C87
C86
R4
R119
R121
C85
XREF=9
GPOUT0
XREF=9
GPOUT1
FB30
1
2
3
FB29
1
2
3
NC
NC
GND_C GND_C
DSS306_55Y271M
FILTER_EMI
270101433
L_3P
5V
GND_C
221R
DIN_5F_PIN
210401223
DIN5
DIN5F_DIN5
GND_C
5V
DSS306_55Y271M
FILTER_EMI
270101433
L_3P
GND
GND
74FCT2541_SL
326904606
D0D1D2
D3
GNDVCC
D4D5D6
D7
Y6Y7Y5Y4Y3Y2Y1
Y0
OE1
OE2
GND
220PF
220PF
GND
221R
221R
221R
0.1UF
GND_C
GND_C
DSS306_55Y271M
FILTER_EMI
270101433
L_3P
DSS306_55Y271M
FILTER_EMI
270101433
L_3P
MTC OUT
GPI (TTL)/MTC Outputs
GPI TTL/MTC Output
Appendix C: Wiring Diagrams and Pin Assignments 87
Page 94

GPI (opto) Inputs
XREF=2
GPIN3_I
XREF=2
GPIN2_I
XREF=2
GPIN1_I
XREF=2
GPIN0_I
XREF=9
GPIN0
XREF=9
GPIN2
XREF=9
RET0
XREF=9
RET1
XREF=9
RET2
XREF=9
RET3
R85
R86
XREF=9
GPIN1
XREF=9
GPIN3
R56
R88
R55
R87
R54
R53
R52
U8
3
2
5
7
6
U9
3
2
5
7
6
U10
3
2
5
7
6
U11
3
2
5
7
6
C36
C35
C34
C33
5V
5V
GND
5V
GND
GND
GND
1K
1K
5V
1K
1K
392
1K
392
392
392
6N137_DP
IC, OPTOCOUPLER
320003987
DIP8
+
EN
-
GND
8
VCC
6N137_DP
IC, OPTOCOUPLER
320003987
DIP8
+
EN
-
GND
8
VCC
6N137_DP
IC, OPTOCOUPLER
320003987
DIP8
+
EN
-
GND
8
VCC
6N137_DP
IC, OPTOCOUPLER
320003987
DIP8
+
EN
-
GND
8
VCC
0.1UF
0.1UF
0.1UF
0.1UF
GPI (opto) Input
SYNC HD Guide88
Page 95

Connector Pin Assignments
Mac Serial Port Connector Pin Assignments
Mac Serial Port
Pin # Name Description Mac Connection
1
2
3
4
5
6
7
8
Shell
NC No connection Pin 2 (HSKiB)
RTS_IN Request To Send (input to SYNC HD) Pin 1 (HSKoB)
RX_OUT Transmitted data (output from SYNC HD) Pin 5 input (RXDB–)
GND Chassis ground Ground
TX_IN Received data (input to SYNC HD) Pin 3 output (TXDB–)
GND Chassis ground Pin 8 input (RXDB+)
CTS_OUT Clear To Send (output from SYNC HD) Pin 7 input (GPiB)
NC No connection Pin 6 (TXDB+)
GND Chassis ground Ground
Appendix C: Wiring Diagrams and Pin Assignments 89
Page 96

Bi-phase/Tach/GPI/Pilot Port (Accessory Port) Connector Pin Assignments
Pin # Name Description
1
2
3
4
5
6
7
8
9
10
11
12
13
14
15
16
17
18
19
20
21
22
23
24
25
Shell
GPOUT0 GPI TTL-level output 0
GPOUT1 GPI TTL-level output 1
GPOUT0_A GPI Relay 0, contact A
GPOUT0_B GPI Relay 0, contact B
GPOUT1_A GPI Relay 1, contact A
GPOUT1_B GPI Relay 1, contact B
GPOUT2_A GPI Relay 2, contact A
GPOUT2_B GPI Relay 2, contact B
GPOUT3_A GPI Relay 3, contact A
GPOUT3_B GPI Relay 3, contact B
OPTRETURN Return from Bi-phase/Tach opto-isolators
BIPHB_I Input to Bi-phase/Tach opto-isolator B
BIPHA_I Input to Bi-phase/Tach opto-isolator A
GND Chassis ground
PILOT_IN– Pilot tone input, negative
PILOT_IN+ Pilot tone input, positive
RET0 Return from GPI opto-isolator “0”
GPIN0 Input to GPI opto-isolator “0”
RET1 Return from GPI opto-isolator “1”
GPIN1 Input to GPI opto-isolator “1”
RET2 Return from GPI opto-isolator “2”
GPIN2 Input to GPI opto-isolator “2”
RET3 Return from GPI opto-isolator “3”
GPIN3 Input to GPI opto-isolator “3”
VDD +12V DC
GND Connected to chassis ground
SYNC HD Guide90
Page 97

SYNC HD Cable Pin Assignments
SYNC HD DigiSerial Cable
A 12-foot Serial cable is included with the
SYNC HD to support connection of the
SYNC HD to the DigiSerial port on a
Pro Tools|HD-series core card.
If you need to make a custom DigiSerial cable,
refer to the following pin assignment table for
the SYNC HD-to-DigiSerial port cable.
SYNC HD to DigiSerial cable
Mini DIN 8-pin Male to Mini DIN 8-pin Male
12
21
35
44
53
68
77
86
SYNC Setup Software Utility Cable
(Windows Only)
The following table shows the pin assignments
needed for a SYNC HD-to-COM port cable to
support the SYNC Setup software utility on a
Windows computer.
SYNC HD to COM cable (Windows)
Mini DIN 8-pin Male to 9-pin D-Sub Female
27
32
45
53
78
Shell Shell
1, 6, 8 none 1, 4, 6, 9 none
Appendix C: Wiring Diagrams and Pin Assignments 91
Page 98

Bi-phase/Tach/GPI/Pilot Port Interfacing Notes
The six opto-isolators are 6N137 devices. The
four GPI input ports pass through 390 ohm series resistors to the cathode. The two BiPhase/Tach inputs pass through 634 ohm series
resistors to the cathode.
The two TTL-level GPI outputs are driven by a
74FCT541. Each output passes through a 220
ohm series resistor.
12 volts is supplied at the connector for the
purpose of driving the opto-isolators in film
tach applications. It is regulated and can supply
up to 100mA.
For Tach, the “rate” input is “BIPHA_I” and
the “direction” input is “BIPHB_I.” The polarity
of “BIPHB_I” is software programmable and defaults to “low” for “forward.”
For Bi-phase, the default polarity relationship
between A and B is software programmable. The
default setting for “forward” is “A leads B.” This
means that the rising edge of A (0° phase) must
precede the rising edge of B (90° phase).
For highest signal quality, use a 25-pin cable
with individually shielded conductors.
GPI Relay Wiring for Fader-Start
The SYNC HD provides a total of four Relaylevel GPI outputs on pins 3/4, 3-10 of the DB25
connector (see the circuit diagram GPI
(TTL)/MTC Outputs).
GPI Triggers
GPI output signals information:
0 (relay) = Play
1 (relay) = Record Ready
2 (relay) = fader start #1
3 (relay) = fader start #2
4 (TTL) = Stop
5 (TTL) = Record
Logical GPI numbers 0 through 3 are associated
with GPI relay outputs 0 through 3 (pins 3
through 10). GPI numbers 4 and 5 are associated
with GPI TTL outputs 0 and 1 (pins 1 and 2).
GPI TTL WIring
The circuit can drive approximately 2 mA
through a load of 1.6K and maintain a logic
high level of 3.3V. In an application where the
equipment being controlled has more demanding power requirements, an external buffer or
relay circuit mst be used. This would typically be
constructed as part of a custom electrical interface.
Each GPI TTL output is fully short-circuit protected via a 220-ohm series resistor.
Before attempting to wire any type of custom interface, always check the electrical specifications
provided by the equipment manufacturer, including voltage levels, current, loading and polarity. Incorrect wiring may damage your equipment, the SYNC HD, or cause personal injury.
The GPI Relay outputs are intended to drive Relay loads only.
SYNC HD Guide92
Page 99

index
Numerics
9-pin 21
MachineControl serial time code 36
output ports 28
A
absolute time code (and LTC) 43
AC Power In 28
AES/EBU
as clock reference 37
connecting 11
connectors 27
Auto ID 14
Auto Switch 45
and freewheel duration 71
B
back panel 26
base clock 60
Bi-Phase/Tach 26, 46, 72
for mag, flatbed, projectors 40
front panel 63
GPI Relay Outputs diagram 86
GPI/Pilot pin assignments 90
input wiring diagram 84, 85
positional reference 46
SYNC Setup software utility 31
black burst (house video reference) 10, 26, 36
BNC 38
back panel 26
C
character generation
see window dub
clock reference 15, 71
and clock source 15
choosing digital source 37
front panel 23
LEDs 23
list of supported clock sources 2
SYNC Setup software utility 29
Clock Source 15
color (for window dub) 57
D
DASH 38
DAT signals 71
DF (drop frame) front panel LED 25
digital clock
AES/EBU, Word, SuperClock 71
front panel 60
setting 37
Down switch 35
drop outs
and auto-switch LTC/VITC 71
and time code freewheel 44
LTC troubleshooting 70
E
external clock out 60
Index 93
Page 100

F
factory defaults 66
fader start 64
wiring 92
fields (odd/even) indication 29
flatbed and Bi-Phase/Tach 40
fps 29
frame rate
front panel 25
SYNC Setup software utility 29
freewheel duration 30
and auto-switch LTC/VITC 71
front panel 61
front panel
Lockout mode 33
switches and displays 23
G
generate
time code gen/regen 49
Generator
Bi-phase Preset 31
controls for 35
Preset Mode 50
Reference Rule 50
Generator/Parameter Controls 35
GPI
and fader start 64
back panel connector 26
pinout 84
TTL wiring 92
GPI (opto) Inputs 87
H
Host Serial 26
house sync 10
I
Idle MTC Enabled
front panel 56
in SYNC I/O Setup 56
internal clock 41
L
LED Time Code Display 24
legacy interfaces 9
Locked indicator
front panel 25
Pro Tools 17
Loop Master 23
Loop Sync 14, 28
Auto ID 14
connecting 8
LTC 10
and clock reference 38
generation/regeneration 52
In (back panel) 27
lockup speed settings 39
Out (back panel) 27
output level (front panel) 62
output level (Pro Tools) 39
output level (SYNC Setup software utility) 30
positional reference 43
servo gain 62
wiring diagrams 83
M
Mac Serial Port
pinout 89
MachineControl 21
mag and Bi-phase/Tach 72
monotonic VITC 69
MTC 56
and Idle MTC Output 30
burst mode 56
generation/regeneration 56
Out (back panel) 27
pinout 87
time code output 27
MTC Out 12
SYNC HD Guide94
 Loading...