

Page 1
Strike Plug-in
™
Version 1.0
Page 2

Copyright
© 2006 Digidesign, a division of Avid Technology, Inc. All rights
reserved. This guide may not be duplicated in whole or in part
without the express written consent of Digidesign.
Digidesign, Avid, Pro Tools, Pro Tools|HD, Pro Tools LE,
Pro Tools M-Powered, Digidesign Digi 002,
Digidesign Command|8, Digidesign Control|24,
Digidesign D-Command, Digidesign D-Control,
Digidesign ProControl, RTAS, and Strike are either trademarks
or registered trademarks of Avid Technology, Inc. in the US and
other countries. All other trademarks contained herein are the
property of their respective owners.
Product features, specifications, system requirements, and
availability are subject to change without notice.
PN 9329-55783-00 REV A 7/06
Page 3

Contents
contents
Chapter 1. Introduction
System Requirements . . . . . . . . . . . . . . . . . . . . . . . . . . . . . . . . . . . . . . . . . . . . . . . . . . . . . 1
Register Your Plug-ins . . . . . . . . . . . . . . . . . . . . . . . . . . . . . . . . . . . . . . . . . . . . . . . . . . . . . 2
Working with Plug-ins. . . . . . . . . . . . . . . . . . . . . . . . . . . . . . . . . . . . . . . . . . . . . . . . . . . . . . 2
Conventions Used in This Guide. . . . . . . . . . . . . . . . . . . . . . . . . . . . . . . . . . . . . . . . . . . . . . 2
About www.digidesign.com . . . . . . . . . . . . . . . . . . . . . . . . . . . . . . . . . . . . . . . . . . . . . . . . . 3
Chapter 2. Installation
Installing the Strike Plug-in . . . . . . . . . . . . . . . . . . . . . . . . . . . . . . . . . . . . . . . . . . . . . . . . . 5
Authorizing Strike . . . . . . . . . . . . . . . . . . . . . . . . . . . . . . . . . . . . . . . . . . . . . . . . . . . . . . . . 5
Removing Strike . . . . . . . . . . . . . . . . . . . . . . . . . . . . . . . . . . . . . . . . . . . . . . . . . . . . . . . . . 6
. . . . . . . . . . . . . . . . . . . . . . . . . . . . . . . . . . . . . . . . . . . . . . . . . . . . . . 1
. . . . . . . . . . . . . . . . . . . . . . . . . . . . . . . . . . . . . . . . . . . . . . . . . . . . . . . 5
Chapter 3. Operating Strike
Adjusting Parameters . . . . . . . . . . . . . . . . . . . . . . . . . . . . . . . . . . . . . . . . . . . . . . . . . . . . . 7
Chapter 4. Overview
Structural Overview . . . . . . . . . . . . . . . . . . . . . . . . . . . . . . . . . . . . . . . . . . . . . . . . . . . . . . 10
Strike Glossary . . . . . . . . . . . . . . . . . . . . . . . . . . . . . . . . . . . . . . . . . . . . . . . . . . . . . . . . . 13
. . . . . . . . . . . . . . . . . . . . . . . . . . . . . . . . . . . . . . . . . . . . . . . . . . . . . . . . . 9
. . . . . . . . . . . . . . . . . . . . . . . . . . . . . . . . . . . . . . . . . . . . . . . . . . 7
Contents
iii
Page 4

Chapter 5. Strike Parameters
Keyboard Section. . . . . . . . . . . . . . . . . . . . . . . . . . . . . . . . . . . . . . . . . . . . . . . . . . . . . . . 15
Main Page . . . . . . . . . . . . . . . . . . . . . . . . . . . . . . . . . . . . . . . . . . . . . . . . . . . . . . . . . . . . 18
Style Page . . . . . . . . . . . . . . . . . . . . . . . . . . . . . . . . . . . . . . . . . . . . . . . . . . . . . . . . . . . . 23
Kit Page . . . . . . . . . . . . . . . . . . . . . . . . . . . . . . . . . . . . . . . . . . . . . . . . . . . . . . . . . . . . . 26
Mix Page . . . . . . . . . . . . . . . . . . . . . . . . . . . . . . . . . . . . . . . . . . . . . . . . . . . . . . . . . . . . . 29
Style Editor . . . . . . . . . . . . . . . . . . . . . . . . . . . . . . . . . . . . . . . . . . . . . . . . . . . . . . . . . . . 34
Configuration Window. . . . . . . . . . . . . . . . . . . . . . . . . . . . . . . . . . . . . . . . . . . . . . . . . . . . 37
MIDI Controller Mapping . . . . . . . . . . . . . . . . . . . . . . . . . . . . . . . . . . . . . . . . . . . . . . . . . . 39
. . . . . . . . . . . . . . . . . . . . . . . . . . . . . . . . . . . . . . . . . . . . . . . 15
Appendix A. Mix Page Signal Flow
Appendix B. Strike Insert Effects
. . . . . . . . . . . . . . . . . . . . . . . . . . . . . . . . . . . . . . . . . . . 41
. . . . . . . . . . . . . . . . . . . . . . . . . . . . . . . . . . . . . . . . . . . . 43
Strike Plug-in Guide
iv
Page 5
chapter 1
Introduction
The new Strike™ plug-in is an RTAS plug-in instrument for Pro Tools|HD®, Pro Tools LE™,
and Pro Tools M-Powered™ systems brought to
you by Digidesign®. Strike offers unprecedented
realism, control, and playability for computerbased drum track creation.
For more information on using plug-ins in
Pro Tools, see the DigiRack Plug-ins Guide.
Strike Features
◆
Authentic drum arrangements based on real
recordings
Absolute control—literally every aspect of a
◆
drum performance can be adjusted, controlled
in real-time, and automated
◆
5 high definition drum kits, each with up to
12 instruments and up to 9 different playing
styles per instrument
◆
More than 1,500 flexibly editable patterns for
interactive real-time arranging and composing
Multichannel audio output
◆
◆
Built-in mixing console with controls for adjusting microphone levels, EQ, dynamics, and
output assignments as well as a collection of effects inserts that let you adjust the sound of
Strike to fit any style or taste
◆
Style Editor for in-depth drum pattern editing
System Requirements
To use Digidesign RTAS plug-ins you need one
of the following:
◆
A Digidesign-qualified Pro Tools|HD system,
Pro Tools LE system, or Pro Tools M-Powered
system
◆
A Digidesign-qualified Pro Tools system and a
third-party software application that supports
the Digidesign RTAS plug-in standard
For complete system requirements visit the
Digidesign Web site (www.digidesign.com).
Compatibility Information
Digidesign can only assure compatibility and
provide support for hardware and software it
has tested and approved.
For a list of Digidesign-qualified computers, operating systems, hard drives, and third-party devices, refer to the Digidesign Web site
(www.digidesign.com).
Chapter 1: Introduction
1
Page 6
Register Your Plug-ins
If you purchase a plug-in online from the DigiStore (www.digidesign.com) using Internet Activation, you are automatically registered.
If you purchase a plug-in boxed version, check
the enclosed Digidesign Registration Information Card for information about how to register
online.
Registered users will receive periodic software
update and upgrade notices.
Please refer to the Digidesign Web site
(www.digidesign.com) or the Digidesign Registration Information Card for information on
technical support.
Conventions Used in This Guide
All Digidesign guides use the following conventions to indicate menu choices and key commands:
Convention Action
File > Save Choose Save from the
File menu
Control+N Hold down the Control
key and press the N key
Control-click Hold down the Control
key and click the mouse
button
Right-click Click with the right
mouse button
Working with Plug-ins
Refer to the
tion on working with plug-ins, including:
• Inserting plug-ins on tracks
• Using Clip indicators
• Navigating the Plug-in window
• Adjusting parameters
• Automating plug-ins
• Using the Librarian
DigiRack Plug-ins Guide
for informa-
The following symbols are used to highlight important information:
User Tips are helpful hints for getting the
most from your Pro Tools system.
Important Notices include information that
could affect your Pro Tools session data or
the performance of your Pro Tools system.
Shortcuts show you useful keyboard or
mouse shortcuts.
Cross References point to related sections in
this guide and other Digidesign guides.
Strike Plug-in Guide
2
Page 7

About www.digidesign.com
The Digidesign Web site (www.digidesign.com)
is your best online source for information to
help you get the most out of your Pro Tools system. The following are just a few of the services
and features available.
Registration
the enclosed registration form for details.
Support
or Customer Service; download software updates and the latest online manuals; browse the
Compatibility documents for system requirements; search the online Answerbase or join the
worldwide Pro Tools community on the
Digidesign User Conference.
Training and Education
courses available online or find out how you can
learn in a classroom setting at a certified
Pro Tools training center.
Products and Developers
products; download demo software or learn
about our Development Partners and their plugins, applications, and hardware.
News and Events
Digidesign or sign up for a Pro Tools demo.
To learn more about these and other resources
available from Digidesign, visit the Digidesign
Web site (www.digidesign.com).
Register your purchase online. See
Contact Digidesign Technical Support
Study on your own using
Learn about Digidesign
Get the latest news from
Chapter 1: Introduction
3
Page 8

Strike Plug-in Guide
4
Page 9
chapter 2
Installation
Installing the Strike Plug-in
The Strike plug-in installer can be found on the
first of two plug-in Install Discs.
Installation
To install the Strike plug-in:
Insert the first Install Disc into your computer.
1
Double-click the Strike Installer application.
2
Follow the on-screen instructions to complete
the installation of plug-in and content.
3
When installation is complete, click Finish
(Windows) or Quit (Macintosh).
The Strike Installer installs the Strike plug-in in
the following location:
• Program Files/Common Files/Digidesign/
DAE/Plug-Ins folder (Windows)
– or –
• Library/Application Support/Digidesign/
Plug-Ins folder (Macintosh).
Authorizing Strike
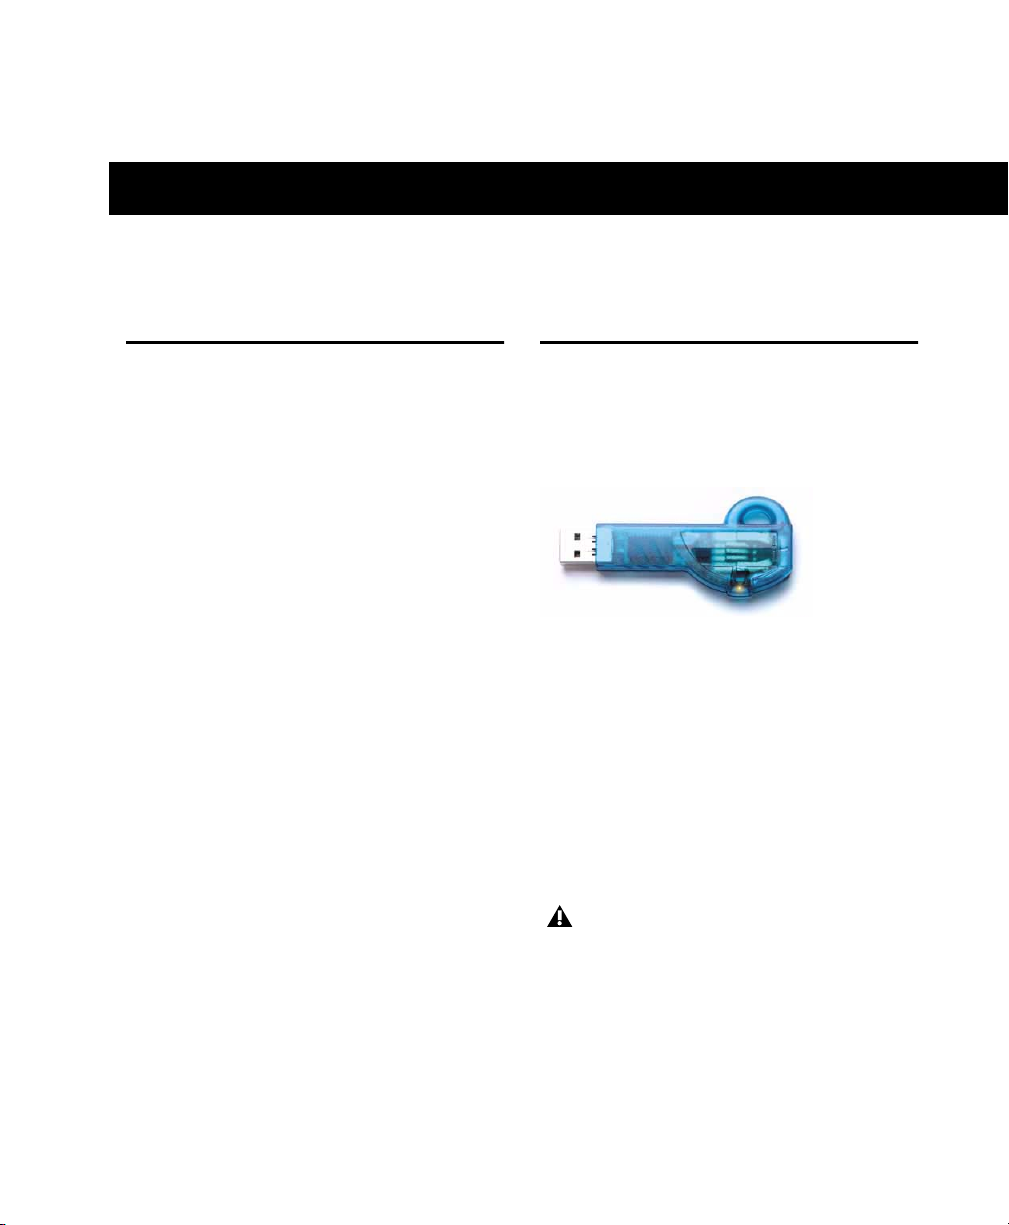
Strike is authorized using the iLok USB Smart
Key (iLok), manufactured by PACE Anti-Piracy,
Inc.
iLok USB Smart Key
The iLok is similar to a dongle, but unlike a dongle, it is designed to securely authorize multiple
software applications from a variety of software
developers.
This key can hold over 100 licenses for all of
your iLok-enabled software. Once an iLok is authorized for a given piece of software, you can
use the iLok to authorize that software on any
computer.
The iLok USB Smart Key is not supplied
with your plug-in or software option. You
can use the one included with certain
Pro Tools systems (such as Pro Tools|HDseries systems), or purchase one separately.
Chapter 2: Installation
5
Page 10
You have to authorize online with the Activation Code included with your purchase (see
“Authorizing Strike Using an Activation Code”
on page 6).
See the iLok Usage Guide for details, or visit
the iLok Web site (www.iLok.com).
Authorizing Strike Using an Activation Code
To authorize Strike using an Activation Code:
1
If you do not have an existing iLok.com account, visit www.iLok.com and sign up for an
iLok.com account.
2
Transfer your Strike license to your iLok.com
account by doing the following:
•Visit http://secure.digidesign.com/
activation.
• Input your Activation Code (listed on the
Activation Card) and your iLok.com User
ID. Your iLok.com User ID is the name you
create for your iLok.com account.
3
Transfer the licenses from your iLok.com account to your iLok USB Smart Key by doing the
following:
• Insert the iLok into an available USB port
on your computer.
• Go to www.iLok.com and log in.
• Follow the on-screen instructions for transferring your licences to your iLok.
For additional information about iLok technology and licenses, see the electronic PDF
of the iLok Usage Guide.
Removing Strike
If you need to remove the Strike plug-in from
your system, follow the instructions below for
your computer platform.
Windows
To remove the Strike plug-in:
1
From the Start menu, choose Settings > Control Panel and double-click Add or Remove Programs.
2
Select the Strike plug-in from the list of installed applications and click the Change/Remove button.
3
Follow the on-screen instructions to remove
the plug-in and content.
4
When removal is complete, click OK to close
the window.
Mac OS X
To remove the Strike plug-in:
1
Locate and open the Plug-Ins folder on your
Startup drive (Library/Application Support
/Digidesign/Plug-Ins).
2
Drag the Strike plug-in to the Trash, or to the
Plug-Ins (Unused) folder.
3
Drag the folder to which you installed the
Strike content (*.big files) to the trash.
4
Launch Pro Tools.
5
If you have any installed unauthorized plugins or software options, you will be prompted to
authorize them. Follow the on-screen instructions to complete the authorization process.
Strike Plug-in Guide
6
Page 11

chapter 3
Operating Strike
Adjusting Parameters
You can adjust all controls by using the computer mouse to drag a control.
Some controls are adjusted by a selecting a value
from a pop-up menu or by activating a button.
Parameter Ranges and Resolution
Most controls have a range of 0–100%. Some
controls are
ative values and usually have a range of –100%
to +100%.
Using a Mouse
You can adjust controls by clicking and dragging
the control’s slider or knob, or by moving over it
with the cursor and scrolling up or down with
the scroll wheel. Adjust rotary controls by clicking and dragging horizontally or vertically. Parameter values increase as you drag upward or to
the right, and decrease as you drag downward or
to the left.
bipolar
, meaning they support neg-
Activating Buttons
Some controls are enabled or disabled using buttons.
To enable a button:
■
Click the button. Click again to disable it.
Enabling a button
Keyboard Shortcuts
◆
For finer adjustments, hold down Control
(Windows) or Command (Macintosh) while
moving the control.
To return a control to its default value, Alt-
◆
click (Windows) or Option-click (Macintosh)
the control.
Displaying Values
Parameter values can be displayed without editing them.
Dragging a knob
To display the value of a control:
■
Click the control without dragging it.
Chapter 3: Operating Strike
7
Page 12
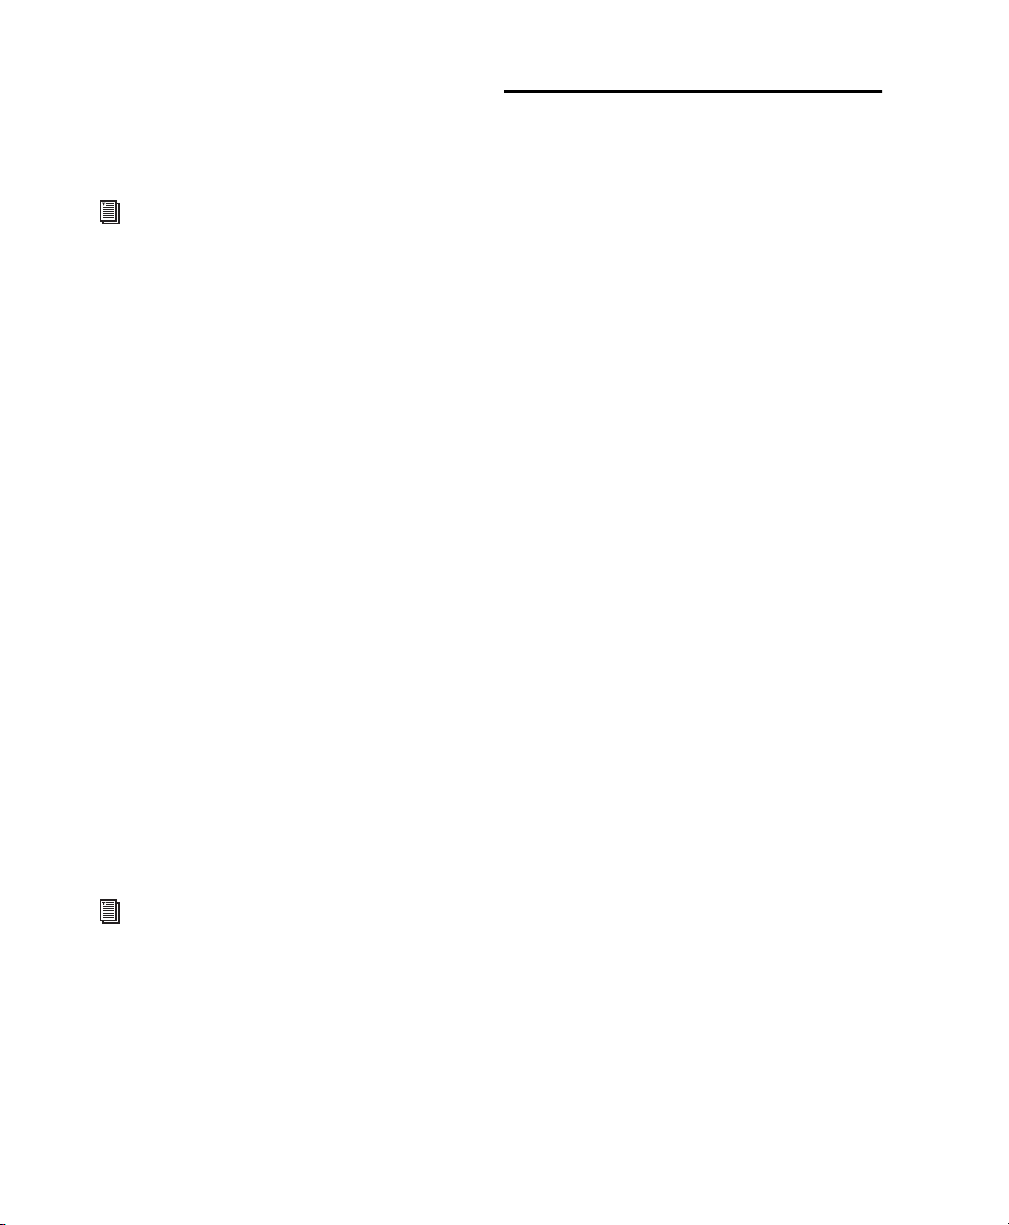
Using Pop-up Menus
Some controls have pop-up menus for selecting
values.
To choose a value from a pop-up menu:
1
Click the parameter’s selector.
2
Select a value from the parameter’s pop-up
menu.
Choosing the Jam density settings from a pop-up menu
Scroll Wheel on Knobs, Faders, and Menus
If your mouse has a scroll wheel, you can use it
to adjust Strike parameters.
To change a value with a scroll wheel:
1
Move the cursor over a rotary knob or fader.
2
Scroll the wheel up to increase values. Scroll
the wheel down to decrease values.
Strike Plug-in Guide
8
Page 13

chapter 4
Overview
Strike is an RTAS plug-in instrument that can be
used to add realistic drum tracks to any
Pro Tools session. Using proprietary technology,
Strike goes beyond the boundaries of conventional MIDI and sampling when it comes to
computer-based playing, arranging, and mixing
of drums.
Strike provides a “professionally-skilled drummer” and a number of drum kits set up in a
professional recording studio. Each instrument
was recorded with up to three close, two overhead, and two room microphones. Strike also
provides a complete mixing console with builtin effects.
Strike puts you in the producer’s chair, providing quick and easy global control, as well as
access to all the nuanced details that influence a
drum track and make it come alive. Use Strike to
play a perfect seamless crescendo, switch the
mix from ballad to crushed punk, or just tweak
the tuning of the snare drum.
Chapter 4: Overview
9
Page 14

Structural Overview
Control sectionBrowser
Navigator section Keyboard section
Strike Main page
Control Section
The Control section provides five Control pages
for creating, editing, and manipulating the
drum performance. Each page provides controls
that correspond to a certain stage or aspect of
drum track production in a real studio situation.
Strike Plug-in Guide
10
Main Page Provides controls that influence the
overall behavior of the drum performance from
a producer’s point of view. Select a musical
style—for example, Rhythm and Blues, and tell
Strike how to play it in terms of overall timing,
intensity, and complexity. For more information, see “Main Page” on page 18.
Style Page Provides controls for changing the
performance of single instruments from the
drummer’s point of view. For example, whether
the kick’s timing should be tight or loose. For
more information, see “Style Page” on page 23.
Page 15
Kit Page Provides controls that affect the sound
of the individual Instruments. You can fine-tune
Strike Kits on the Kit page—for example, tune
the Kick down or adjust the decay of the cymbals. For more information, see “Kit Page” on
page 26.
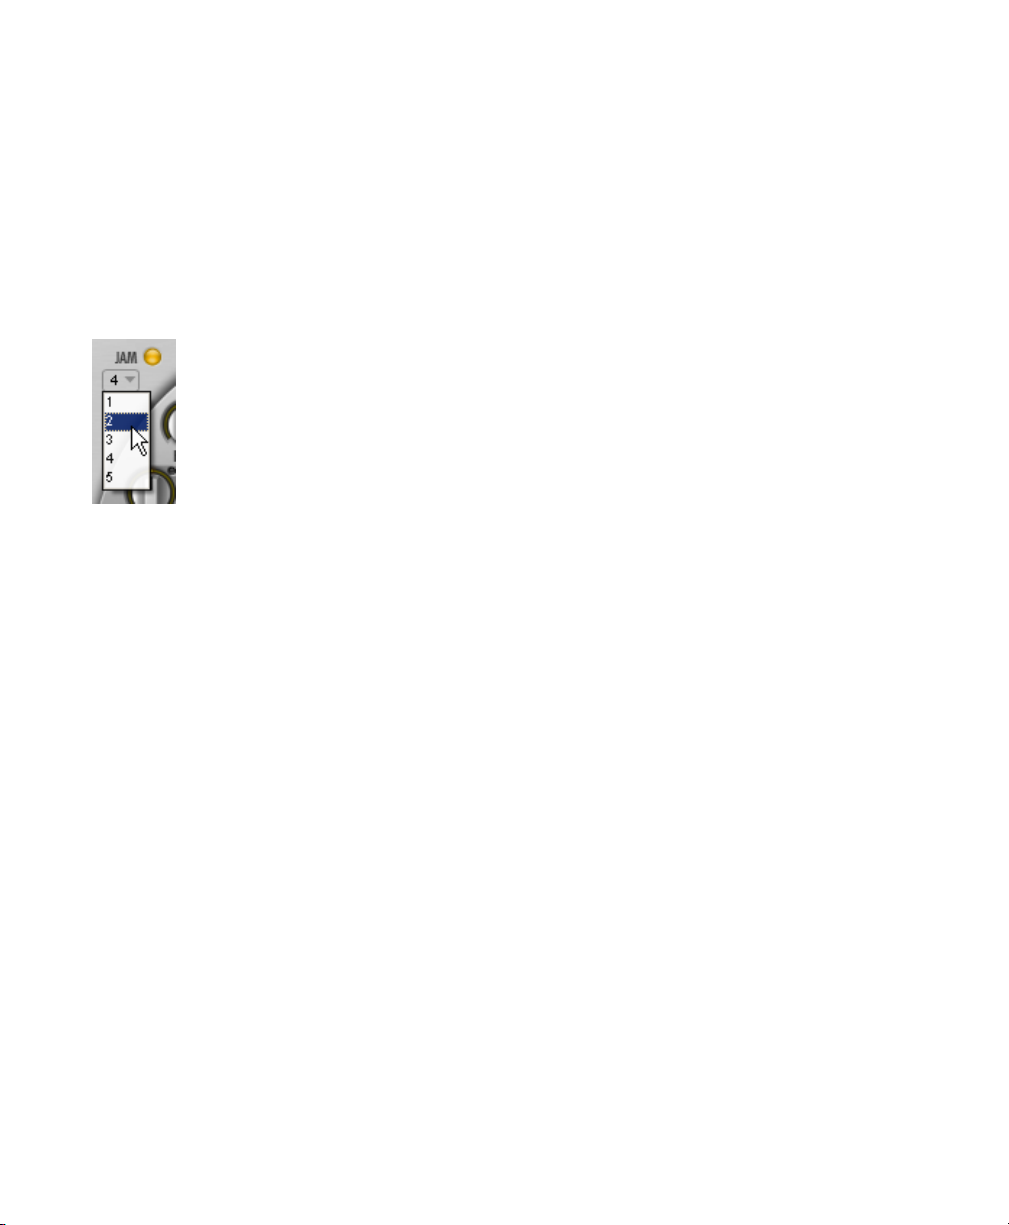
Browser section
Access Configuration page
Main folder
Sub-folder
Mix Page Provides a built-in mixing desk, with
two insert effects and a three-band equalizer for
each Instrument channel. Like in a real drum
recording situation, the channels can be balanced, routed, and processed using equalizer
and effects on the Mix page. For more information, see “Mix Page” on page 29.
Style Editor Provides features for in-depth editing of Styles and the creation of your own Patterns and Parts. You can add or delete events and
change their timing and playing style using the
Style editor. For more information, see “Style
Editor” on page 34.
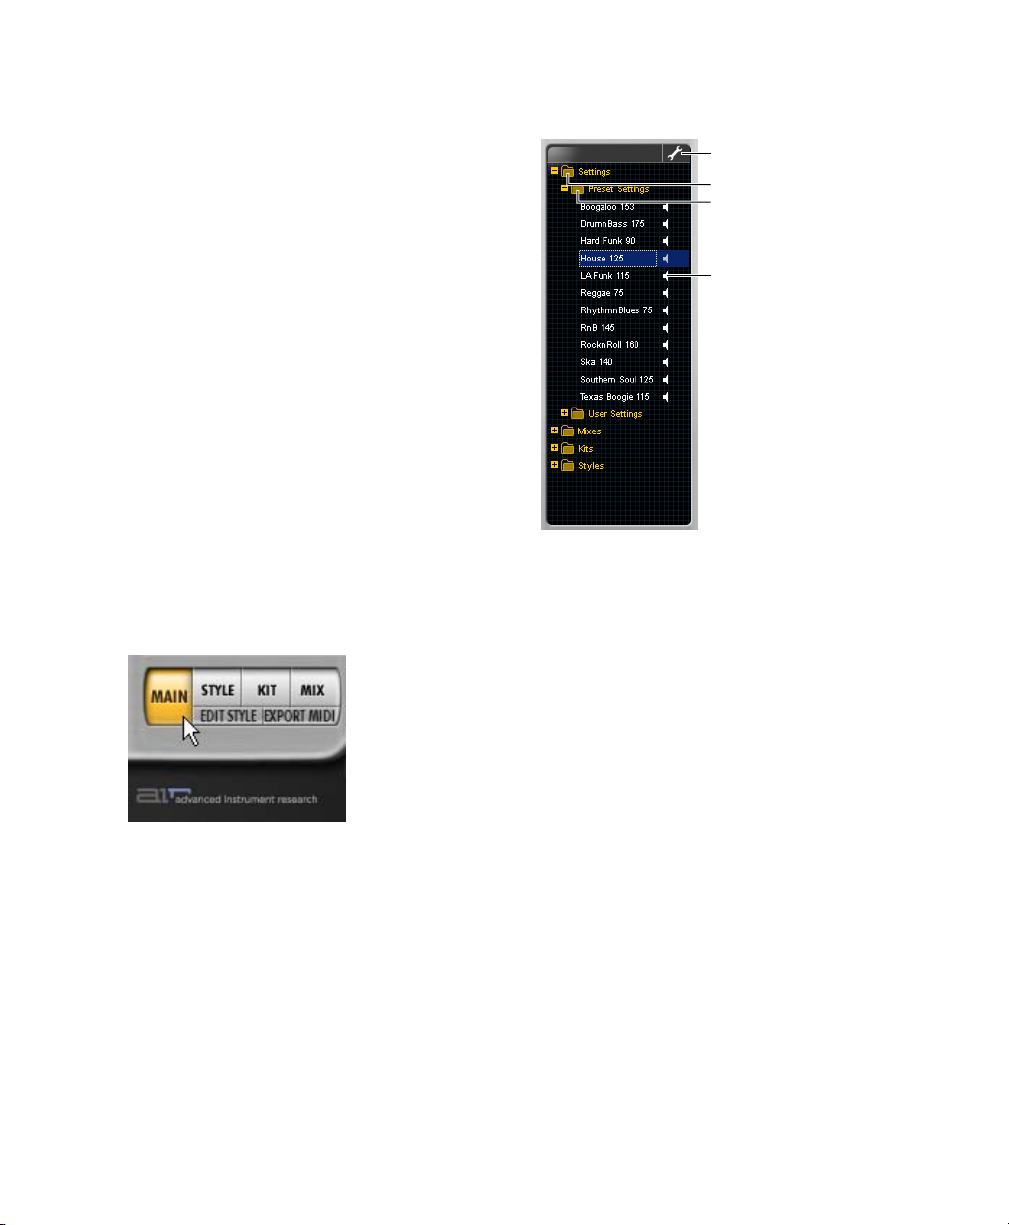
Navigating Pages
Accessing a page
The Strike Plug-in window has a Navigator section with four buttons for accessing different
Control pages Main, Style, Kit, and Mix for editing.
Preview button
Strike offers a broad range of parameters and
controls on four Control pages representing all
stages of drum track production. From the Strike
Browser with its four main Folders, you can load
and save four different types of data which correspond to these stages.
Strike File Types
Setting Saves all Strike parameters including
Style, Kit, and Mix, and their corresponding
Main page parameters.
Style Saves Patterns, Fills, Parts, and Style section parameters from the Style and Main page.
Kit Saves Instruments and Kit section parameters from the Kit and the Main page.
To view a Strike control page:
■ Click one of the Page tabs to display the
corresponding page.
Mix Saves Mix page parameter settings and Mix
section parameters from the Main page.
Chapter 4: Overview 11
Page 16
Using Folders
The Browser provides four main Folders for different data types, each of these include two subfolders: Preset and User. Preset is used for factory
files, and User is for custom files, which can include Settings, Styles, Kits, and Mixes.
Keyboard Section
Keyboard section
To open a (Sub-)Folder (Setting, Style, Kit, Mix):
■ Click the plus icon (+) next to the folder.
To close a (Sub-)Folder (Setting, Style, Kit, Mix):
■ Click the minus icon (–) next to the folder.
To load a file:
■ Double-click the file in the Browser.
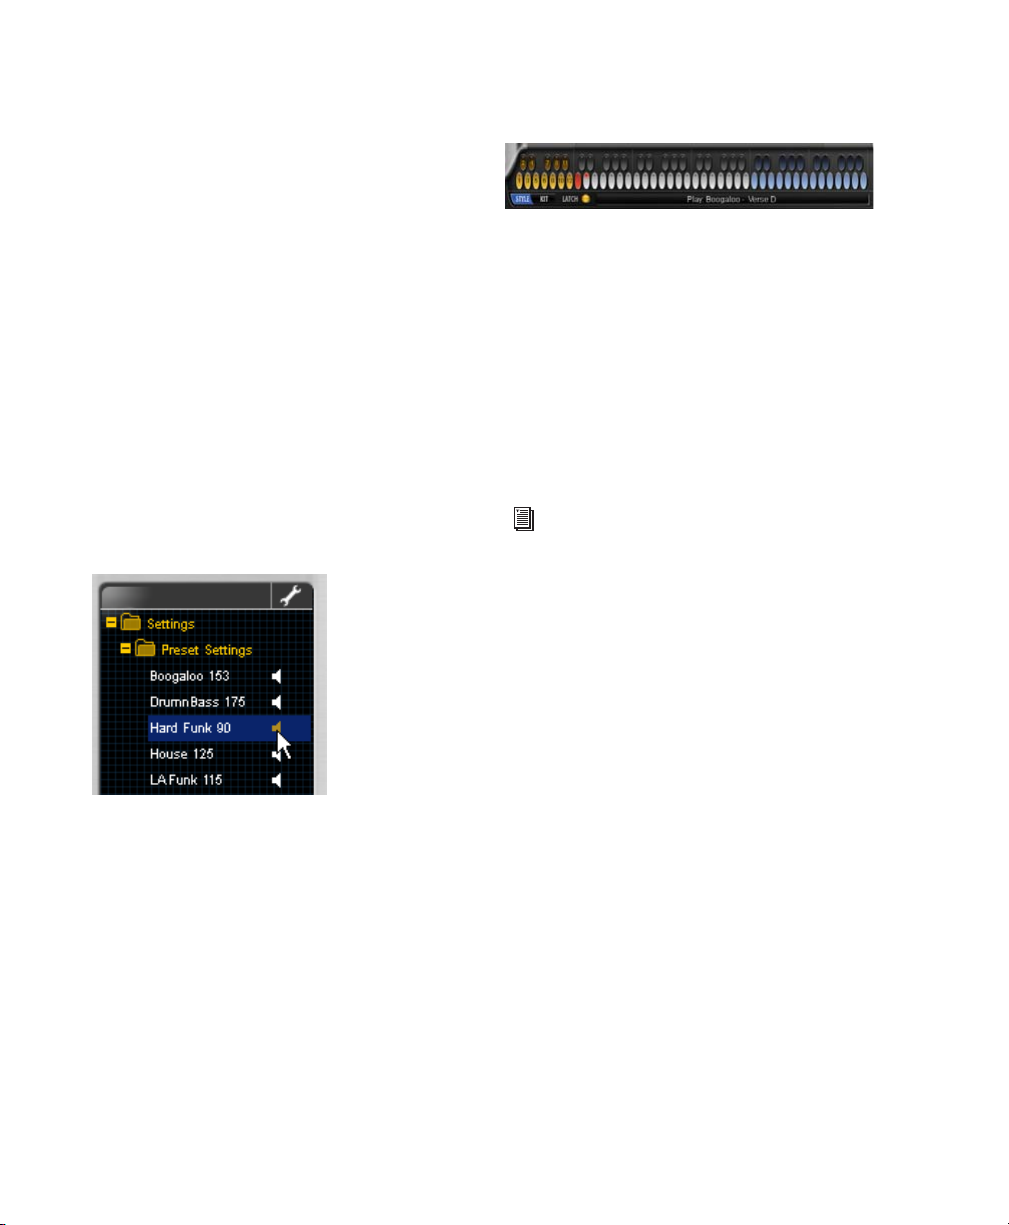
Previewing a Setting
Preview button
In the Browser, you can quickly preview Preset
Settings without having to load them. Clicking
the Preview button plays a short audio example
of the Setting while the mouse button is held.
The Keyboard section provides 72 keys for playing Strike, a Keyboard Layout switch, a Latch
switch, and an information display. The Keyboard section is always available, regardless of
which Control page is currently displayed.
You can control Strike by clicking the keys, using MIDI input from a MIDI keyboard, or from
MIDI data in an Instrument or MIDI track in
Pro Tools.
For more information about the Keyboard
section, see “Keyboard Section” on page 15.
Strike Plug-in Guide12
Page 17

Strike Glossary
Setting
A Setting stores the complete state of the Strike
plug-in. A Setting can be loaded and saved from
the Browser on the Main page or by using the
Plug-in Settings menu.
Setting is another name for the plug-in settings. Refer to the DigiRack Plug-Ins Guide
for information on working with RTAS
plug-ins.
Style
A Style is a musical playing style, like Samba,
Rock, or Ballad. Strike comes with a range of preset Styles that cover the most common musical
genres. Style related parameters can be edited,
loaded, and saved on the Style page. See “Style
Page” on page 23.
Pattern
Patterns are varieties of the drum performance
within a Style assigned to MIDI notes. There are
six types of Patterns for arrangement purposes:
Verse, Bridge, Chorus, Intro, Fills, and Outro.
A Style consists of 35 Patterns. Patterns can be
played in real-time using MIDI. See “Keyboard
Section” on page 15.
Kit
A Kit is the complete collection of Strike Instruments and their settings. You can play the same
Style using different Kits. Strike comes with preset Kits but you can also create, edit, and save
your own Kits on the Kit page. See “Kit Page” on
page 26.
Instrument
An Instrument is, analog to the real world, the
smallest part of a drum Kit. There are all kinds of
different Instruments in Strike, including such
standards as kicks, snares, and hihats. There are
also exotic Instruments, such as darbuka or
trash-ride. You can edit and save your own Instruments in Strike. See “Loading and Saving
Kits” on page 28.
Mix
A Mix is a useful set-up for the built-in Strike
mixing console, including Equalizer (EQ) and
Effect insert settings. You can load, edit, and
save Mix presets on the Mix page. See “Mix
Page” on page 29.
Part
A Part is the smallest selectable unit within a
Style. A Part is what one single Instrument plays
within a Pattern. You can create, edit, and assemble Parts using the Style Editor. See “Style
Editor” on page 34.
Chapter 4: Overview 13
Page 18

Strike Plug-in Guide14
Page 19
chapter 5
Strike Parameters
Keyboard Section
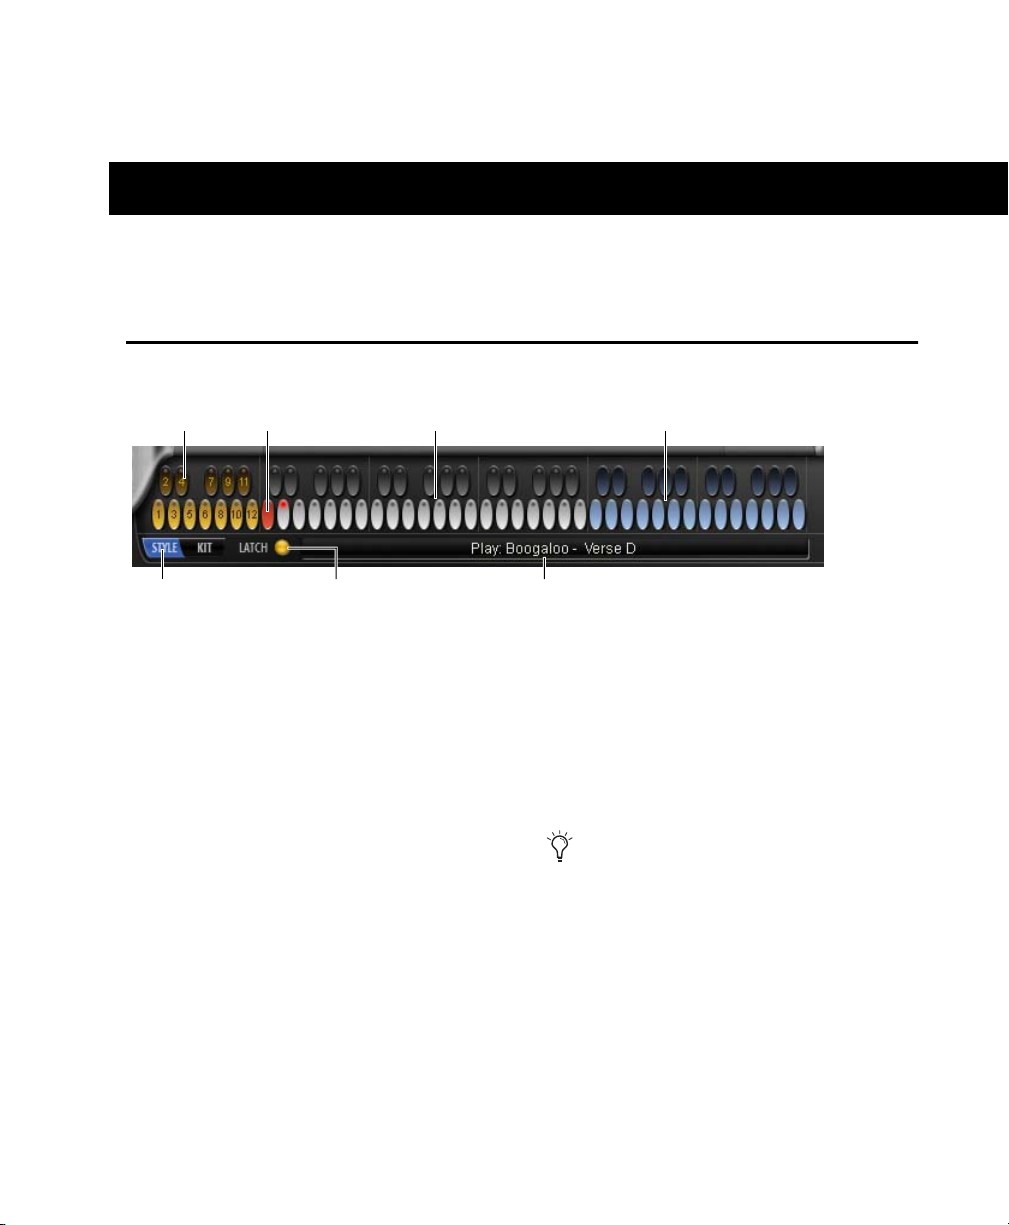
Pause keys Play keys Assignable Trigger keysStop key
Keyboard Layout switch DisplayLatch LED
Style mode Keyboard layout
In the Keyboard section there are 72 keys, the
Keyboard Layout switch, a Latch switch, and an
information display. The Keyboard section is always available, regardless of which Control page
is currently displayed.
The 72 keys in the Keyboard section represent
the keys of a MIDI keyboard and their corresponding MIDI notes starting from C0 on the
left to B5 on the right. You can control Strike by
clicking the keys, using MIDI input from a MIDI
keyboard, or from MIDI data in an Instrument
or MIDI track in Pro Tools.
Latch
In Latch mode, Strike continues playing (even
when you release the notes on the keyboard)
until you hit the Stop key or deactivate Latch
mode. Click the Latch LED to enable or disable
Latch mode.
With Latch disabled, use sustain pedal to
temporarily enable Latch mode.
Display
The display in the Keyboard section is a contextsensitive text display. When you load something from the browser, it displays descriptive
text. When editing controls, it displays the
parameter name and value.
Chapter 5: Strike Parameters 15
Page 20
To display a control’s current value:
■ Click the control without moving the mouse.
The Display does not show parameter values of incoming automation.
Playing Strike
There are two MIDI Trigger modes and corresponding Keyboard layouts when using Strike:
Style mode and Kit mode.
Style Mode
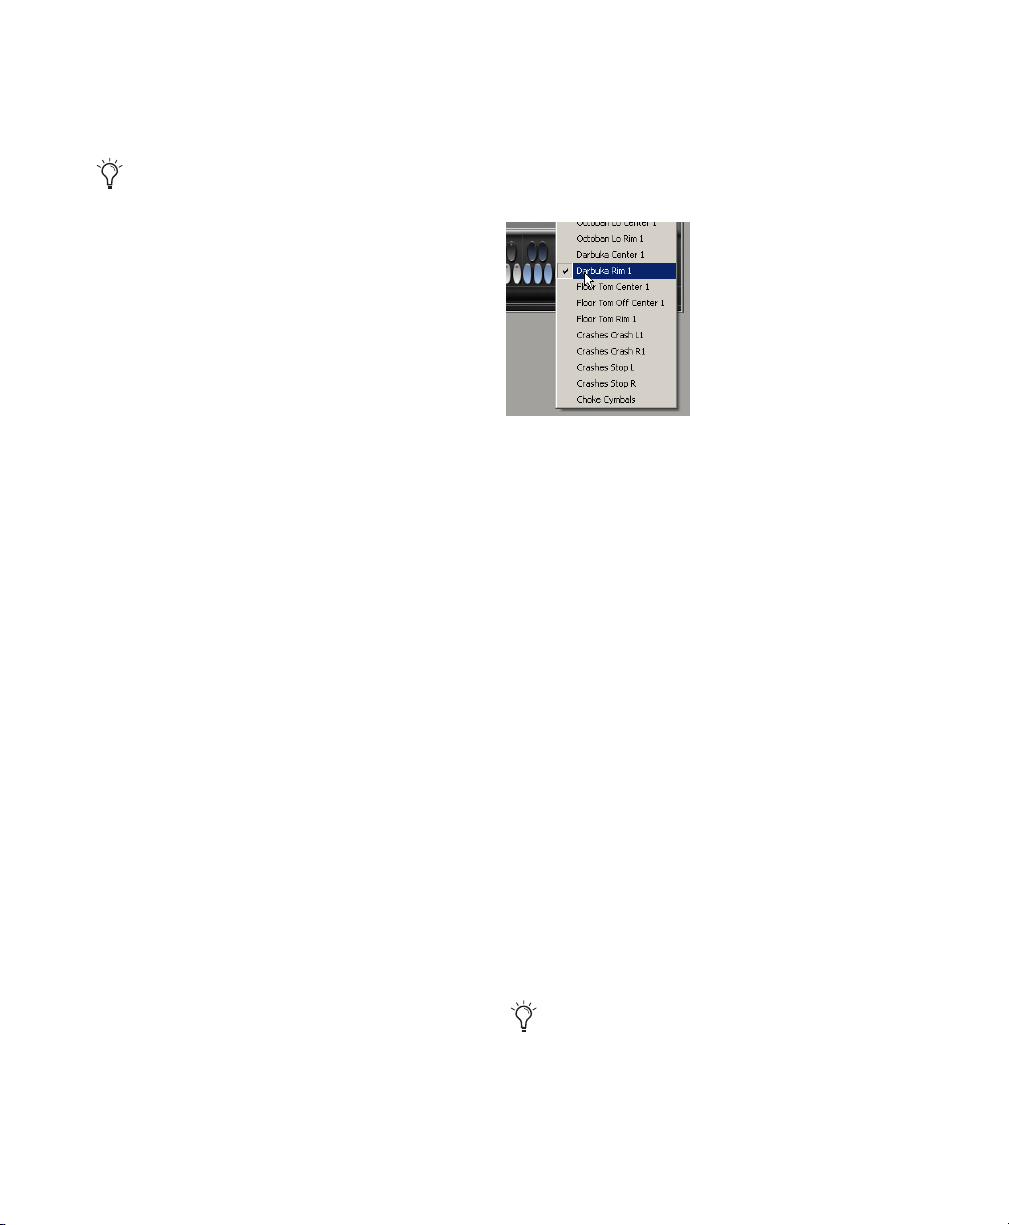
To assign an Instrument to a Trigger key:
1 Right-click (Windows or Mac) or Control-click
(Mac) the key.
2 Select an Instrument from the pop-up menu.
In Style mode, input on MIDI channel 1 controls Strike playback. In Style mode there are
three functional keyboard zones, marked by
color:
Pause Zone The yellow Pause keys, ranging
from C0 to B0, pause an Instrument’s playback.
Click a key to pause the Instrument, click again
to resume playback. The number on the Pause
key indicates the channel of the paused Instrument. A red LED indicates that an Instrument is
paused. There are two additional Pause modes Held and Released. Please see “Configuration
Window” on page 37 for more Information on
Pause modes.
Play Zone The black and white Play keys, ranging from C1 to B3, play the Patterns of the currently selected Style. A special key in this zone is
the red Stop button, it immediately stops the
playback until another Play key is pressed.
Assignable Trigger Zone The blue Trigger keys,
ranging from C4 to B5, trigger single Instrument
hits, letting you use Strike like a drum module.
Instruments used in the currently selected Kit
can be freely assigned to Trigger keys.
Selecting an Instrument from the pop-up menu
Pattern Types
Patterns are variations of the drum performance
within a Style. A Pattern is the Strike counterpart to a drum loop (a repeating phrase played
on multiple Instruments) but not limited to a
loop’s typical static behavior. There are six types
of Patterns in the Play zone serving different
purposes in an arrangement:
Intro Located on the black keys from C#1 to
A#1.
Ver se Located on the white keys from D1 to B1.
Fill Located on the black keys from C#2 to A#2.
Bridge Located on the white keys from C2 to B2.
Chorus Located on the white keys from C3 to
B3.
Outro Located on the black keys from C#3 to
A#3.
Intros, Fills, and Outros behave differently,
depending on the Fill Triggering settings in
the Configuration window. Please see “Configuration Window” on page 37 for more
information.
Strike Plug-in Guide16
Page 21
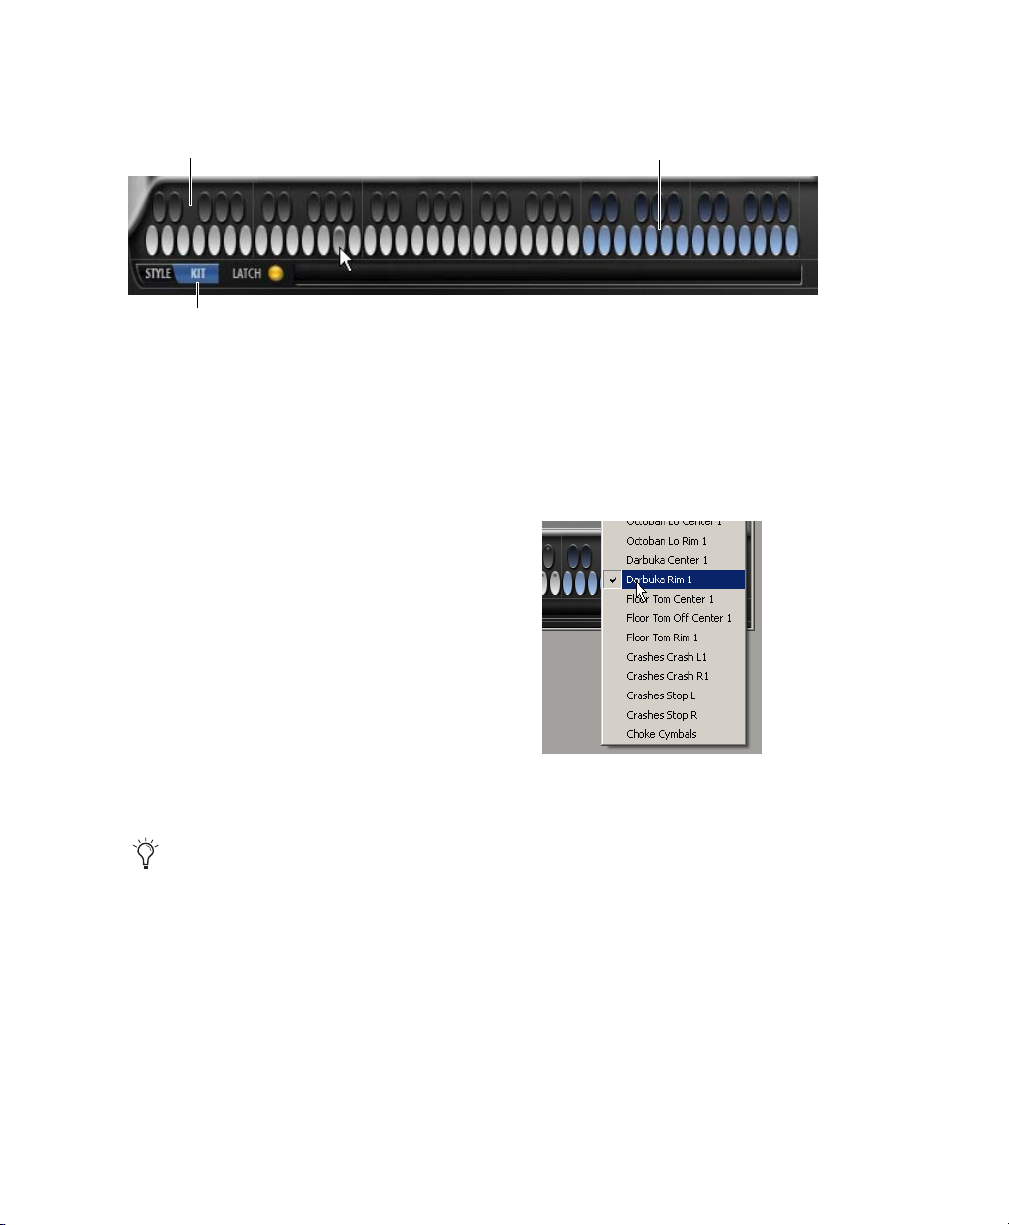
Kit Mode
GM Trigger keys
Keyboard Layout switch
Kit mode Keyboard layout
In Kit mode, input on MIDI channel 2 plays
Strike Instruments similar to a velocity sensitive
drum module. The Instruments are layed out
across the keyboard. Clicking the top of the key
plays at a lower velocity, clicking the bottom of
the key plays at a higher velocity. There are two
functional keyboard zones, marked by color:
Fixed Trigger Zone The black and white Trigger
keys from C0 to B3 trigger individual Instruments from the currently selected Kit. The key
assignment in the Fixed Trigger zone follows the
General MIDI conventions where applicable.
Assignable Trigger Zone The blue Trigger keys,
ranging from C4 to B5, trigger single Instrument
hits, letting you use Strike like a drum module.
Instruments used in the currently selected Style
can be freely assigned to Trigger keys.
Assignable Trigger keys
To assign an Instrument to a Trigger key:
1 Right-click (Windows or Mac) or Control-click
(Mac) the key.
2 Select an Instrument from the pop-up menu.
Assigning an Instrument from the pop-up menu
Switching the keyboard layout to Kit mode,
stops Pattern playback. Nevertheless you
can use input on MIDI channel 2 while
playing Strike in Style mode to trigger single
Kit mode Instrument hits—for example, to
add individual hits to the Pattern currently
playing.
Chapter 5: Strike Parameters 17
Page 22

Main Page
Browser
Navigator section
Strike Main page
Style section Kit section
Kit display
Mix section
Keyboard section
The Main page provides easy access to the most
useful Strike timing and sound parameters. The
parameters in the Style and Kit section of the
Main page are general controls that affect all Instruments. You can edit individual Instruments
on the other Control pages: Style, Kit, and Mix.
Strike Plug-in Guide18
Page 23
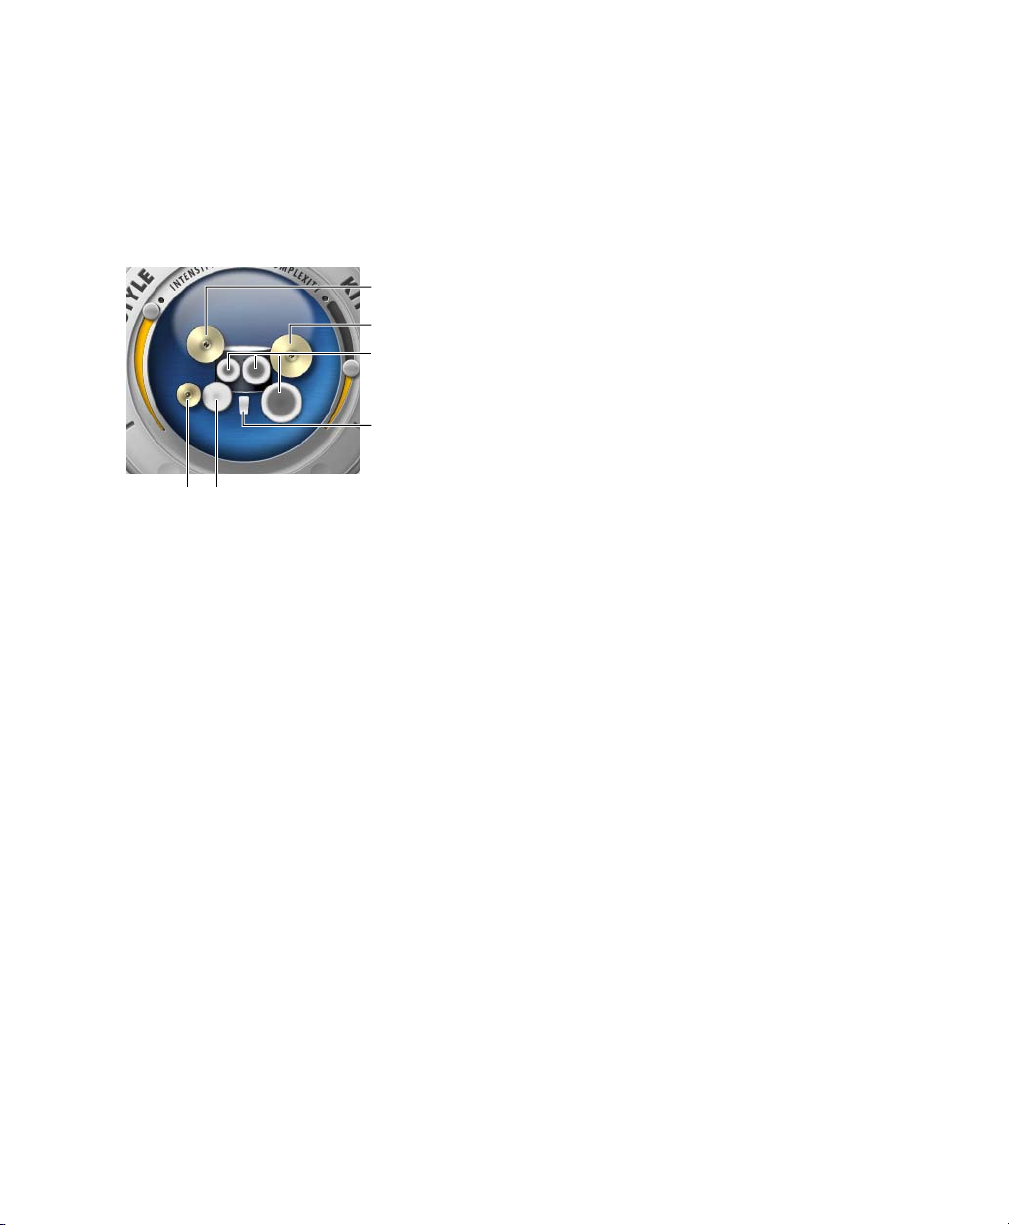
Kit Display
The Kit display provides a graphic representation of a drum set showing the Instruments used
in a Style. The Instrument graphics also dynamically indicate hits, including the intensity (velocity) of each hit.
Crash
Ride
Toms
Kick
HiHat
Snare
Kit display
Style Section Controls
The Style section parameters can be used to adjust the overall Strike playing dynamics and timing behavior.
Grid Quantizes the Strike timing globally by reducing the number of played Instrument hits.
For example, select 1/4 and Strike only plays Instrument hits that fall on quarter notes.
Speed Adjusts the Strike tempo relative to the
tempo of your Pro Tools session. For example,
select Half and Strike plays at half of the session
tempo.
Intensity Adjusts the general strength of the
drumming. Move the Modwheel up for harder
and down for softer playing. Click and drag the
Intensity control up or down to adjust the maximum intensity.
Complexity Adjusts the general playing density
by changing the number of individual Instrument hits used in the Pattern. Move the control
up to increase and down to decrease Complexity. Complexity is assigned to the MIDI Pitchwheel by default.
Playing Dynamics Adjusts the general dynamic
range of the playing. Moving the control to the
right increases the dynamic range, and Instruments hits are played with varying strength.
Moving the control to the left limits the dynamic range, and Instrument hits are played at
the same strength.
Hit Var (Hit Variance) Adjusts the variety of different Instrument hits used. Move the control to
the right to increase the variety of sounds used
for certain Instrument hits during performance.
This makes the performance sound more natural and versatile. Move the control to the left to
limit the variety of sounds, this makes the performance sound less natural, and more like a
drum machine. To affect only certain notes, select a note value from the Hit Variance pop-up
menu. For example, select “1, 2, 3, and 4” to
affect only the corresponding four quarter-note
beats.
Timing Adjusts the general precision of single
drum hits in the Pattern from natural to tight.
To affect only certain notes, select a note value
from the pop-up menu. For example select “1
and 3” to affect only the first and third beat.
Feel Adjusts Strike’s overall timing in relation to
the session tempo. Ahead makes Strike play
slightly ahead of the beat, while Fat produces a
more laid back, behind the beat feel.
Chapter 5: Strike Parameters 19
Page 24
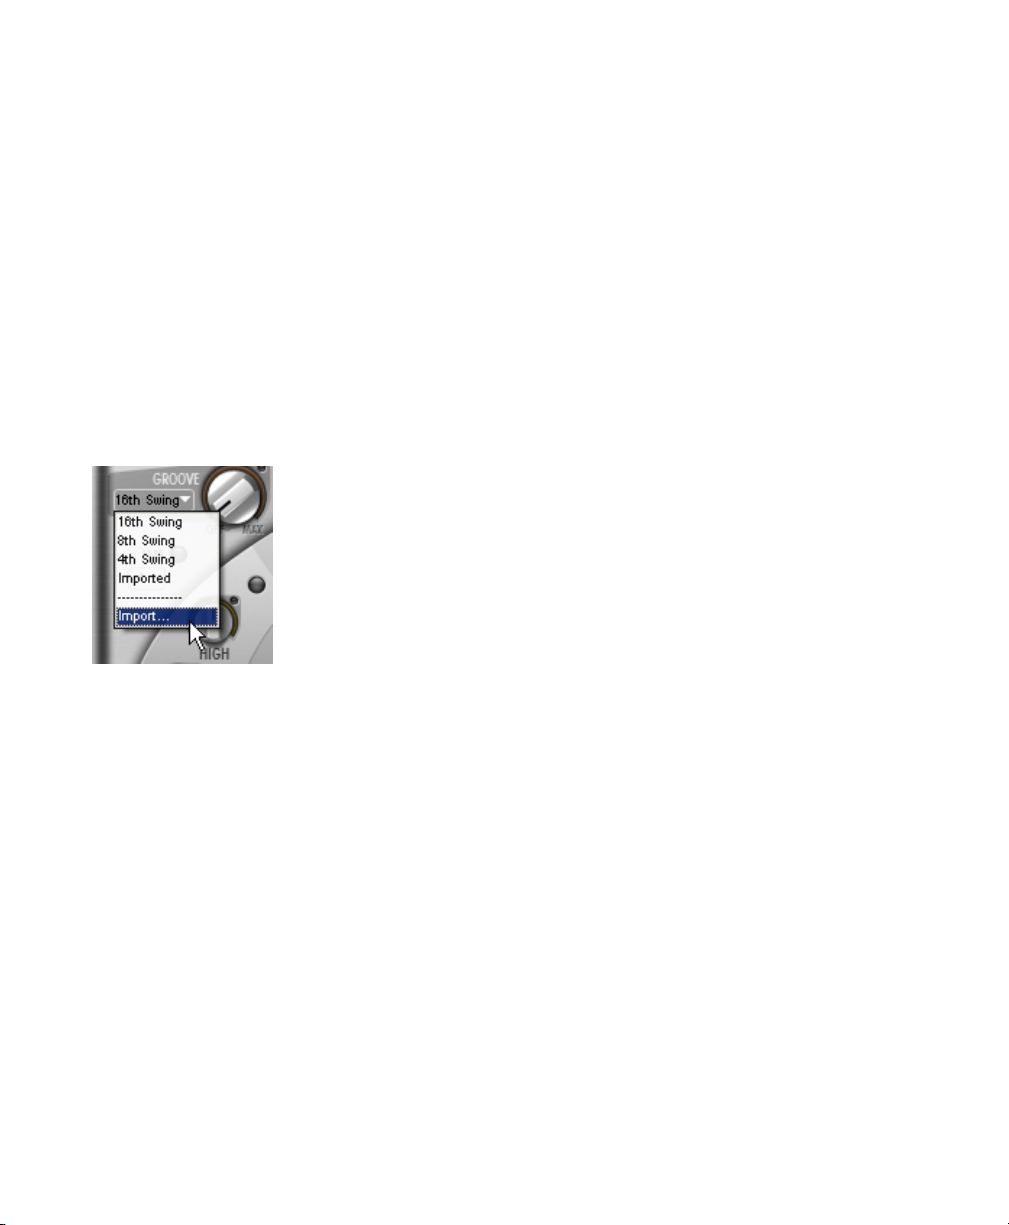
Groove Adjusts the shuffle, or swing feel of
Strike. Moving the control to the right moves
the offbeat drum hits slightly later, creating a
swung feel. Strike plays triplets with this parameter set to 100 %. Select a Groove from the
Groove Template pop-up menu to determine
which notes the Groove parameter affects. You
can also import a Groove template.
Kit Section Controls
The Kit section parameters influence the sound
of the current Kit and its Instruments.
Tuning Adjusts the tuning of the whole drum Kit
by a maximum of five semitones up or down.
Move the control to the right to raise, or to the
left to lower the tuning.
To impor t a Pro Tools Groove template:
1 Select Import from the Groove Template pop-
up menu.
2 Select a Groove template in the Import
Groove file dialog and click Open.
Importing a Groove template
3 Set the Groove Template pop-up menu to Im-
ported.
Jam The Jam function automatically adds variation to “humanize” the performance by subtly
varying playback with each repetition of a Pattern. Adjust the intensity of the Jam function by
selecting a value (1–5) from the Jam Density
pop-up menu, higher values increase the Jam
factor.
Timbre Shift Influences the Kit’s sound character
by simultaneously changing Instrument timbres
and volume levels. Using Timbre Shift, you can
easily change the character of the Kit’s sound
without having to rebalance Instrument levels.
Move the control to the right for a harder timbre
and lower volume, move to the left for a softer
timbre and higher volume.
Snare Adjusts the playing style of the snare
drum by moving the drum stick towards the
center or the rim (edge) of the snare drum. Move
the control to the right to play closer to the rim,
move to the left to play closer to the center.
HiHat Adjusts the playing style of the HiHat.
Move the control to the right for an open, or to
the left for a closed HiHat sound.
Ride Adjusts the sound of the ride by moving
the drum stick towards the edge or the bell of
the ride cymbal. Move the control to the right
for a percussive bell, or to the left for a smoother
edge sound.
Strike Plug-in Guide20
Page 25

Mix Section Controls
All controls in the Mix section provide the same
Channel controls as the Mix page. For more information, see “Mix Page” on page 29.
Overhead Mics (Microphones) Adjusts the level
of the Overhead microphones channel.
Room Mics (Microphones) Adjusts the level of
the Room microphones channel.
EQ (Equalizer) Provides Gain controls for the
low and high band of the Master channel’s
equalizer. Activate the EQ by clicking the LED.
For more information, see “EQ (Equalizer)” on
page 31.
Close Mics (Microphones) Adjusts the level of all
Close microphones.
Talkback Mic (Microphone) Adjusts the level of
the Talkback microphone channel.
Master Adjusts the level of the Master channel,
this is the Strike output volume.
Dynamics Provides controls for the Drive and Attack parameters of the Master channel’s compressor found on the Mix page. Activate the effect Insert by clicking the LED. For more
information, see “Effects Inserts” on page 32.
Chapter 5: Strike Parameters 21
Page 26

Export MIDI
Using the Export MIDI function, you can export
any series of Strike Patterns between the start
and stop of playback—called a Performance in
the following section—as a sequence of individual MIDI notes in your Pro Tools session.
4 In the resulting Import MIDI Settings dialog,
click OK.
Export MIDI button
These MIDI notes can be used to trigger individual Strike Instrument hits, rebuilding the exported Performance as accurately as possible.
You can use this function to create completely
new or additional playing, editing individual
MIDI notes on Pro Tools MIDI tracks. You can
even trigger other plug-ins or external MIDI devices using the MIDI data exported from Strike.
To export a Strike Performance to Pro Tools MIDI
tracks:
1 Play a Performance in Strike. For example,
play a Verse, then a Fill, and then a Chorus. Stop
the playback afterwards. Pro Tools must not be
playing.
2 Go to the Main page.
3 Click the Export MIDI button, hold the mouse
button and drag the cursor onto the Timeline in
the Pro Tools Edit window.
Import MIDI settings
5 Strike automatically creates and names new
Pro Tools MIDI tracks—one for each Strike instrument used in the Performance.
6 Assign the MIDI track outputs to the corre-
sponding Strike MIDI channels. The Pro Tools
MIDI tracks’ names show the MIDI channel
number to which the tracks should be assigned.
Assigning MIDI channel
Strike Plug-in Guide22
Page 27

Style Page
Strike Style page
Style section
Fader section
The Style page provides up to twelve Instrument
channels, corresponding to the Instruments
used in the current Setting—for example, Kick,
Snare, HiHat, and Ride. The dynamics and timing behavior for each Instrument can be adjusted using the Style section parameters. For
convenience, basic controls from the Mix page
are included in the Fader section.
Chapter 5: Strike Parameters 23
Page 28

Style Section Controls
The Style section influences the behavior of all
Parts played by an Instrument in the current
Style.
Intensity Adjusts the dynamics of the Instrument by making it play softer or harder. Move
the control to the right to increase and to the
left to decrease Intensity.
Grid Quantizes the Instrument’s timing. For example, select 1/4 and Strike will only play the
quarter notes of the current Part, removing all
hits not matching the selected grid.
Complexity Adjusts the overall density by changing the number of individual hits used during
playback. Move the control to the right to increase and to the left to decrease complexity.
Playing Dynamics Adjusts the dynamic range of
the Instrument. Moving the control to the right
increases the dynamic range, Instrument hits
are played with varying strength. Moving the
control to the left limits the dynamic range, Instrument hits are always played with the same
strength.
Hit Var (Hit Variance) Adjusts the variety of
drum hits used in the playing. For a natural
sound, move the control to the right to increase
the variety of sounds used for a certain Instrument hit. Move the control to the left to limit
the variety, making the playing sound more like
a drum machine and less natural.
Offset Adjusts the timing offset of the Instrument hits played in a Part. Move the control to
the right to for earlier and to the left for later
hits.
Selecting a Grid value
Fader Section Controls
The Fader section provides the most common
Mix controls, which are also available on the
Mix page. See “Mix Page” on page 29.
Mute Mutes the channel.
Solo Solos the channel.
Fader Adjusts the Channel volume.
Instrument Symbol Triggers the Instrument
when clicked.
Timing Adjusts the timing accuracy of the playing. Move the control to the right for a tight and
to the left for a lose feel.
Strike Plug-in Guide24
Page 29

Loading Saving Styles
Assigning Patterns to Play Keys
You can load Styles and save edited Styles from
the Browser.
To load a Style:
1 Open the Style folder and one of its sub-fold-
ers Preset or User in the Browser.
2 Double-click a Style name from the sub-folder
to load a Style and replace the current Style.
To save a Style:
1 Go to the Style page and click the Save Style
button in the Navigator section.
2 Name the Style in the Save Style dialog and
click Save.
The saved Style’s name appears in the User Style
folder in Strike’s Browser.
You can assemble and edit your own Styles
using the Style editor. See “Style Editor” on
page 34.
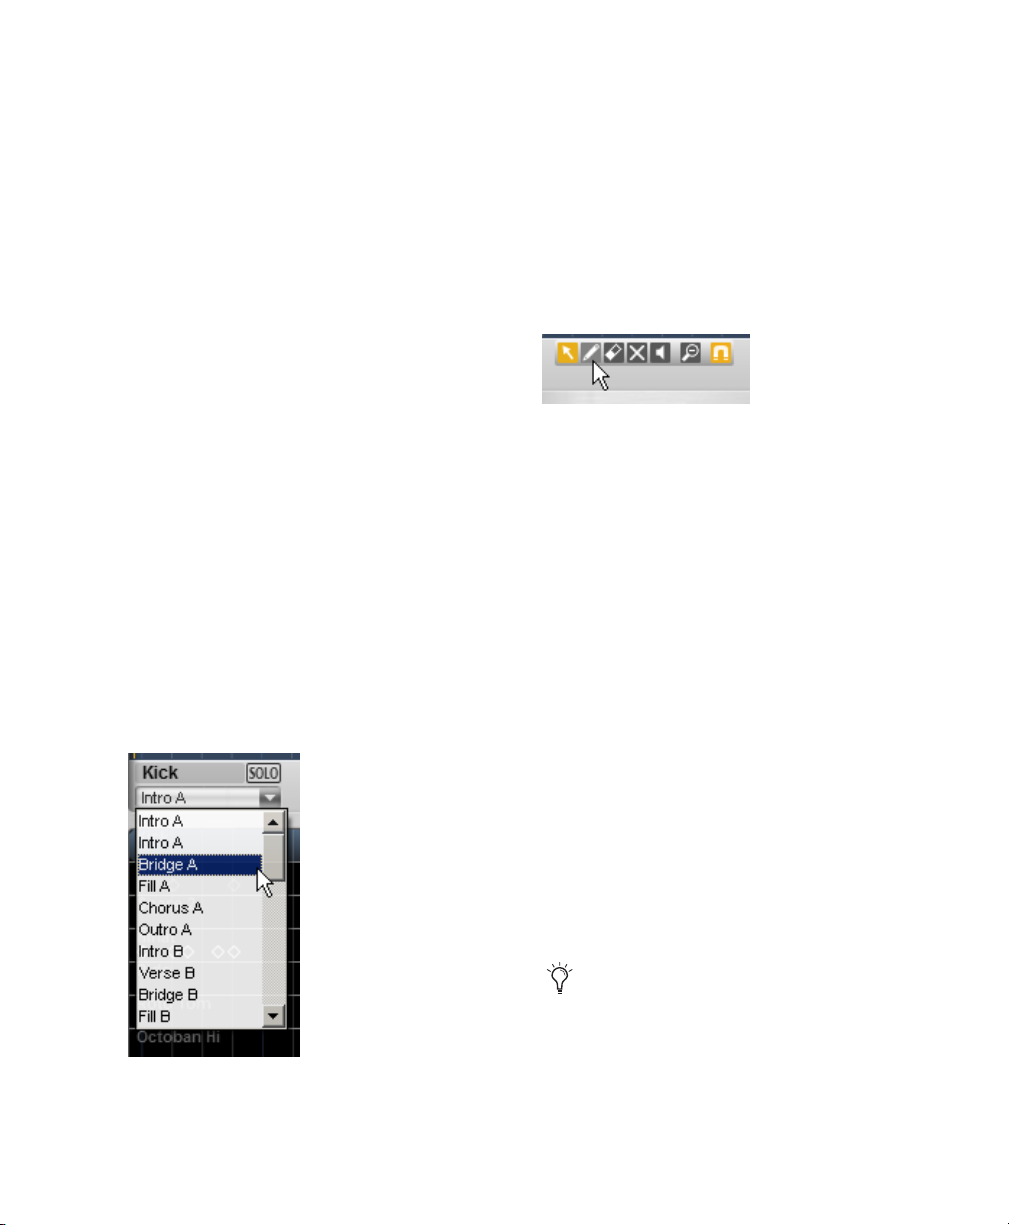
To assign a Pattern to a Play key:
1 Open the Style folder and one of its sub-fold-
ers (Preset or User) in the Browser.
2 Click the plus icon next to the desired Style
name to show the list of included Patterns.
3 Do one of the following:
• Double-click a Pattern in the list to assign it
to the selected Play key.
– or –
• Drag it onto the desired Play key.
Loading a single Instrument
The selected Play key is indicated by a red
LED.
Chapter 5: Strike Parameters 25
Page 30

Kit Page
Strike Kit page
Instrument
Load Size
selector
Kit section
Fader section
The Kit page provides up to twelve Instrument
channels corresponding to the single Instruments used in the current Style, for example,
Kick, Snare, HiHat, and Ride. Adjust the sound
of each Instrument using the controls in the Kit
section. For convenience, basic controls from
the Mix page are included in the Fader section.
Strike Plug-in Guide26
Page 31

Kit Section Controls
Attack
The Kit section influences the sound of Instruments used in the current Kit.
Instrument Load Size
Use this control to adjust the amount of waveform data loaded into your computer’s RAM for
each Instrument.
Instrument Load Size selector
Eco Is the smallest possible Instrument load
size. Eco uses fewer system resources for the Instrument, but also limits the range of expression
available.
Mid Is the Strike default Instrument load size.
Mid provides a good balance between system
load and range of expression available.
XXL Is the largest possible Instrument load size.
XXL provides the maximum range of expression
available, but also places the greatest demands
on system resources.
The Attack control softens the attack phase of
Instruments by applying an amplitude envelope
to the start of each Instrument hit. Move the
control to the right to increase the time needed
for the attack to rise to full amplitude.
Decay
The Decay control shortens the played instrument hits by applying an amplitude envelope to
the end of each Instrument hit. Move the control to the left to decrease the time needed for
the decay to fall from full amplitude to zero.
Timbre Shift
The Timbre Shift control influences the Instrument’s sound character by changing timbre and
volume level. Using Timbre Shift, you can
change the Instrument’s character without having to rebalance levels. Move the control to the
right for harder timbre at lower volume, move
to the left for a softer timbre at higher volume.
Fader Section Controls
Tune
The Tune control adjusts the tuning of the Instrument. The maximum tuning deviation is
five semitones up or down. Move the control to
the right to raise and to the left lower the tuning.
Start Point
The Start Point control changes the attack
sound of Instrument hits by moving their sample start points later. Move the control to the
right to trim the attacks of Instrument hits without delaying them.
The Fader section provides the most common
Mix controls, which are also available on the
Mix page. See “Mix Page” on page 29.
Mute Mutes the channel.
Solo Solos the channel.
Fader Adjusts the Channel volume.
Instrument Symbol Click the Instrument symbol
to trigger the Instrument.
Chapter 5: Strike Parameters 27
Page 32

Loading and Saving Kits
You can load single Instruments from Kits in the
Browser and save your own edited Kits on the
Kit page. This lets you use any Kit or Instrument
with any other Style or Mix.
To load a Kit:
1 Open the Kit folder and one of its sub-folders
Preset or User in the Browser.
2 Double-click a Kit name from the sub-folder to
load a whole Kit and replace the currently used
Kit.
To load a single Instrument:
1 Open the Kit folder and one of its sub-folders:
(Preset or User) in the Browser.
2 Click the plus icon next to the Kit’s name to
show the list of single Instruments used in the
Kit.
To save a Kit:
1 Click the Save Kit button in the Navigator sec-
tion.
2 Choose a name for the Kit from the file
browser and save.
The saved Kit’s name appears in the User Kit
folder in the Browser.
Loading a single Instrument
3 Do one of the following:
• Double-click an Instrument from the list to
load the Instrument into the corresponding channel.
– or –
• Drag an Instrument onto the desired Channel to replace the current Instrument.
When loading Kits or Instruments, up to
several hundred MB of content may be
loaded into RAM. This may take some time
depending on the system resources. It is recommended that you stop playback while
loading an entire Kit.
Strike Plug-in Guide28
Page 33
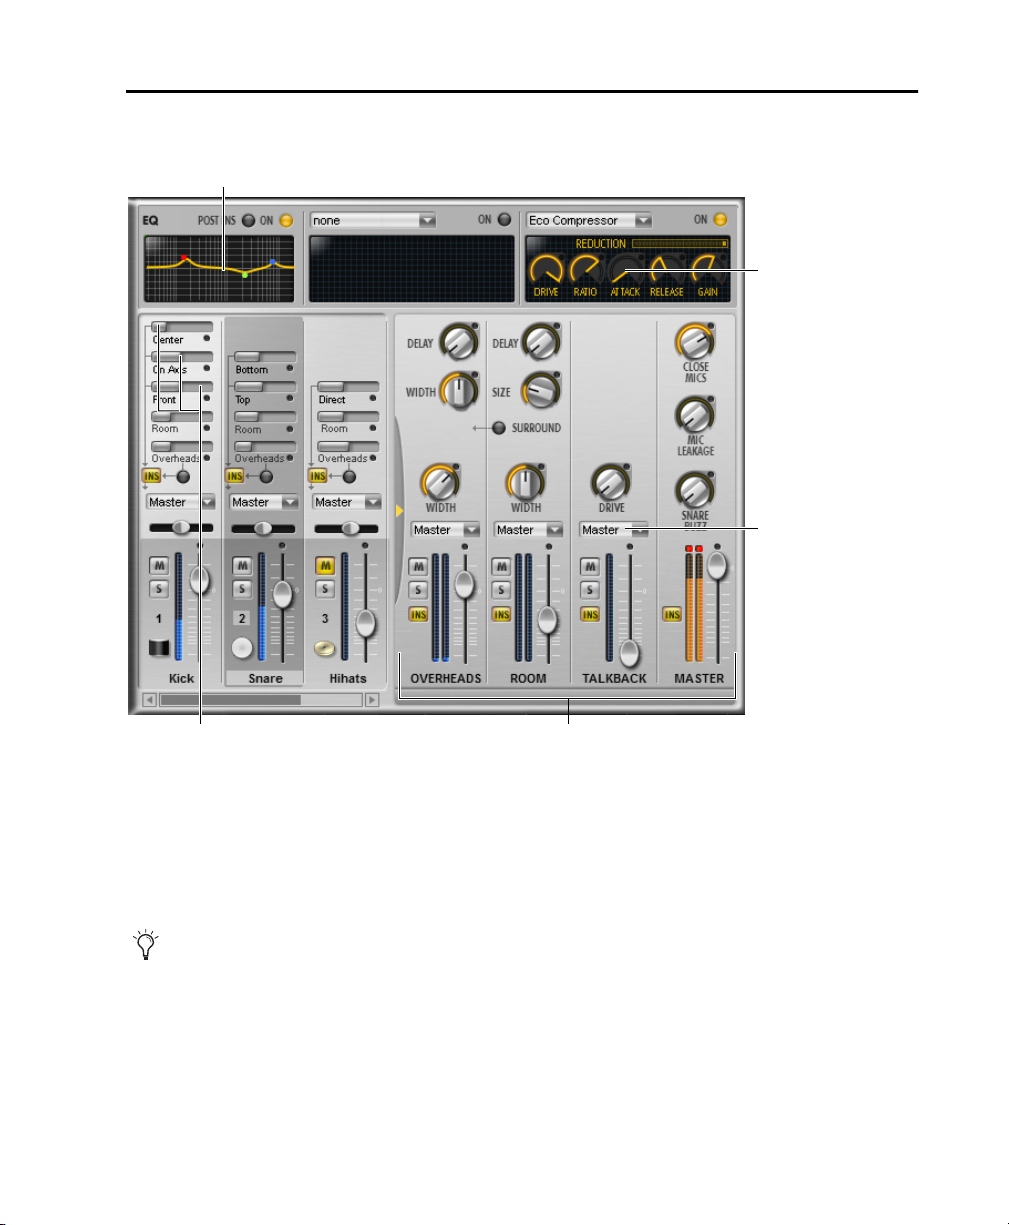
Mix Page
Equalizer
Effects inserts
Channel output
Mix page
The Mix page provides a fully featured mixing
desk for Strike. It includes two effects Inserts and
a three-band equalizer for each channel. Each
channel can be mixed to the Master output or
routed to a separate output.
See Appendix A, “Mix Page Signal Flow” for
a schematic diagram of the Mix page architecture.
Master sectionClose microphones
Instrument Channels
In the Instrument channel section there are
twelve channels for the Instruments used in the
current Setting. Use the controls in the Microphone section to adjust the levels of the different microphones available for each Instrument.
Microphone Section
In the Microphone section you can adjust the
levels of Close, Overhead, and Room microphones.
Chapter 5: Strike Parameters 29
Page 34

Close Microphones Adjusts the levels of up to
three Close microphones per channel. The
Close microphones are named after their position towards the Instrument. Adjust their levels
using the grey horizontal faders. The Close
microphones are sent through the inserts to the
Master channel.
Room Adjusts the amount of Instrument signal
going to the Room microphone channel.
Overheads Adjusts the amount of Instrument
signal going to the Overhead microphone channel.
Unlike a real recording situation, in Strike
you can adjust how much of an individual
Instrument’s signal is going to the Room
and Overhead microphones using the Room
and Overhead faders on Instrument channels.
Downmix Button Routes the Instrument’s Overhead signals through the Inserts to the individual channel output, instead of the Overheads
channel.
Insert Button (INS) Activates and deactivates the
channel Equalizer and Effects inserts. The Insert
button is lit when activated.
Instrument Symbol Indicates the Instrument assigned to the channel. Click the Instrument
symbol to trigger the Instrument.
Master Section Channels
The Master section provides four special channels: Overhead, Room, Talkback, and Master.
The Master section can be shown or hidden by
clicking the small yellow triangle to the left of
the Overheads channel.
Overheads
The Overheads are a pair of stereo microphones
positioned above the Drum Kit capturing a spatial sound containing signals from all Instruments. Unlike a real studio recording, you can
adjust the amount each Instrument contributes
to the Overhead channel using the Overhead
slider in each Instrument channel.
Delay Delays the Overhead signal by up to 20
to simulate different overhead microphone distances.
Cymbal Width Adjusts the stereo width of all
cymbals in the Kit.
Width (Overhead Width) Adjusts the stereo width
of the overhead microphones.
ms
Fader Section Controls
The Fader section provides the most common
Mix controls.
Pan Slider Sets the Instrument channel’s position in the stereo field.
Mute Mutes the channel.
Solo Solos the channel.
Fader Adjusts the Channel volume.
Strike Plug-in Guide30
Room
The Room microphones are stereo microphones
similar to Overheads, but are positioned further
away in the room and capture a more diffuse
sound. Unlike a real studio recording, you can
adjust the amount each Instrument contributes
to the Room channel using the Room slider in
each Instrument channel.
Delay Delays the Room signal by up to 50 ms to
simulate different room microphone distances.
Page 35
Size Adjusts the decay of the Room signal to
simulate smaller or larger recording spaces.
Width Adjusts the stereo width of the Room signal.
Surround Sends an additional two channels of
room ambience into the Overhead channel, so a
total of four channels are available which can be
panned to the front and rear for a surround effect. The surround signal passes through the
Overhead EQ, inserts and fader, and to the audio
output selected for the Overhead channel. The
Surround LED is lit when activated.
Talkback
The Talkback channel is a mono microphone,
originally placed in the recording room near to
the drummer and heavily compressed to hear
what he is saying, but later utilized as an effect.
The Talkback microphone captures a sound similar to Overhead and Room microphones, but
produces a very hard, compressed, and slightly
dirty sound.
Mic Leakage Adjusts the level of “bleed” across
the different microphones. When recording
drums in a studio environment, each microphone picks up some signal of all of the instruments in the drum kit. At the minimum setting,
each microphone only captures the sound from
one Instrument.
Snare Buzz Adjusts the amount of sympathetic
resonance of the snare drum when the kick
drum and toms are played. In a real drum kit the
snares of the snare drum rattle whenever another nearby drum is hit, particularly the kick
drum. In Strike, the level is variable so you can
choose between an ultra-clean kick drum sound
at a lower setting, or a “live” sounding kit at a
higher setting.
EQ (Equalizer)
Drive Adjusts the gain of the Talkback channel
compression. Increased Drive makes the Talkback signal more dense and slightly distorted.
Master
The Master channel is Strike’s main output. All
channels are mixed down to this channel by default, and then output to the Pro Tools Instrument or Auxiliary Input track on which Strike is
inserted.
Close Mics Adjusts the overall level of the Close
microphones routed to the Master channel.
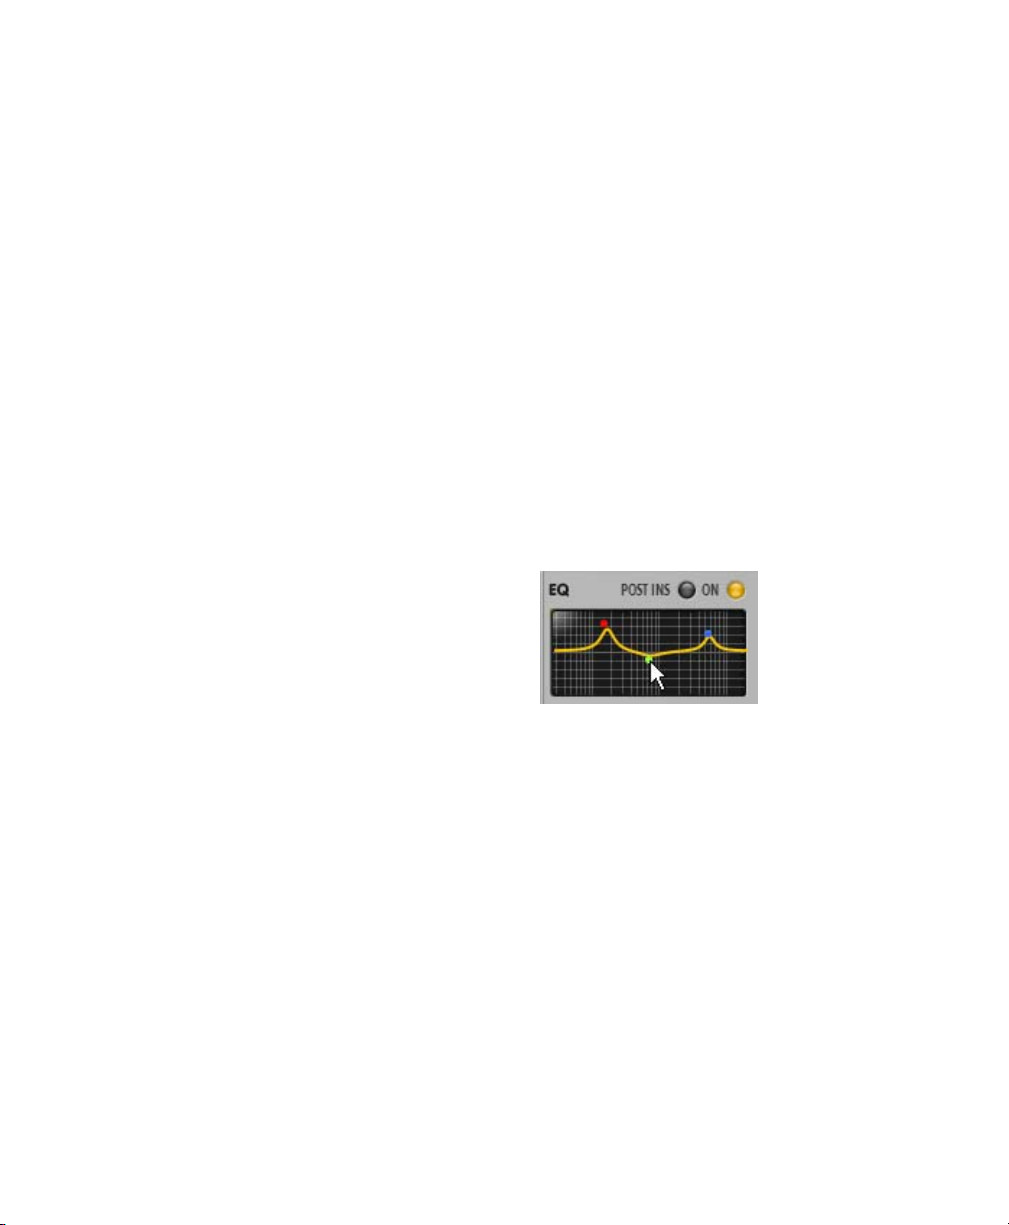
Strike provides a three-band equalizer for each
track. Each of the three colored dots represents
and controls an equalizer band. Click a channel
to select it, and display its Equalizer and Effects
inserts.
To change the gain of an equalizer band:
■ Click one of the three colored dots, hold the
mouse button and drag up to boost, or move
down to attenuate the band’s gain.
To change the frequency of an Equalizer band:
■ Click the desired band dot and drag left or
right.
Chapter 5: Strike Parameters 31
Page 36
To change the Q-value of an equalizer band:
■ Right-click (Windows or Mac) or Control-click
(Mac) the dot, hold the mouse button and move
up to decrease, or move down to decrease the Qvalue.
All three bands have a bell shape, but at the
minimum Q-value setting switch to:
• Red: Low shelf
• Green: High-pass filter
• Blue: High shelf
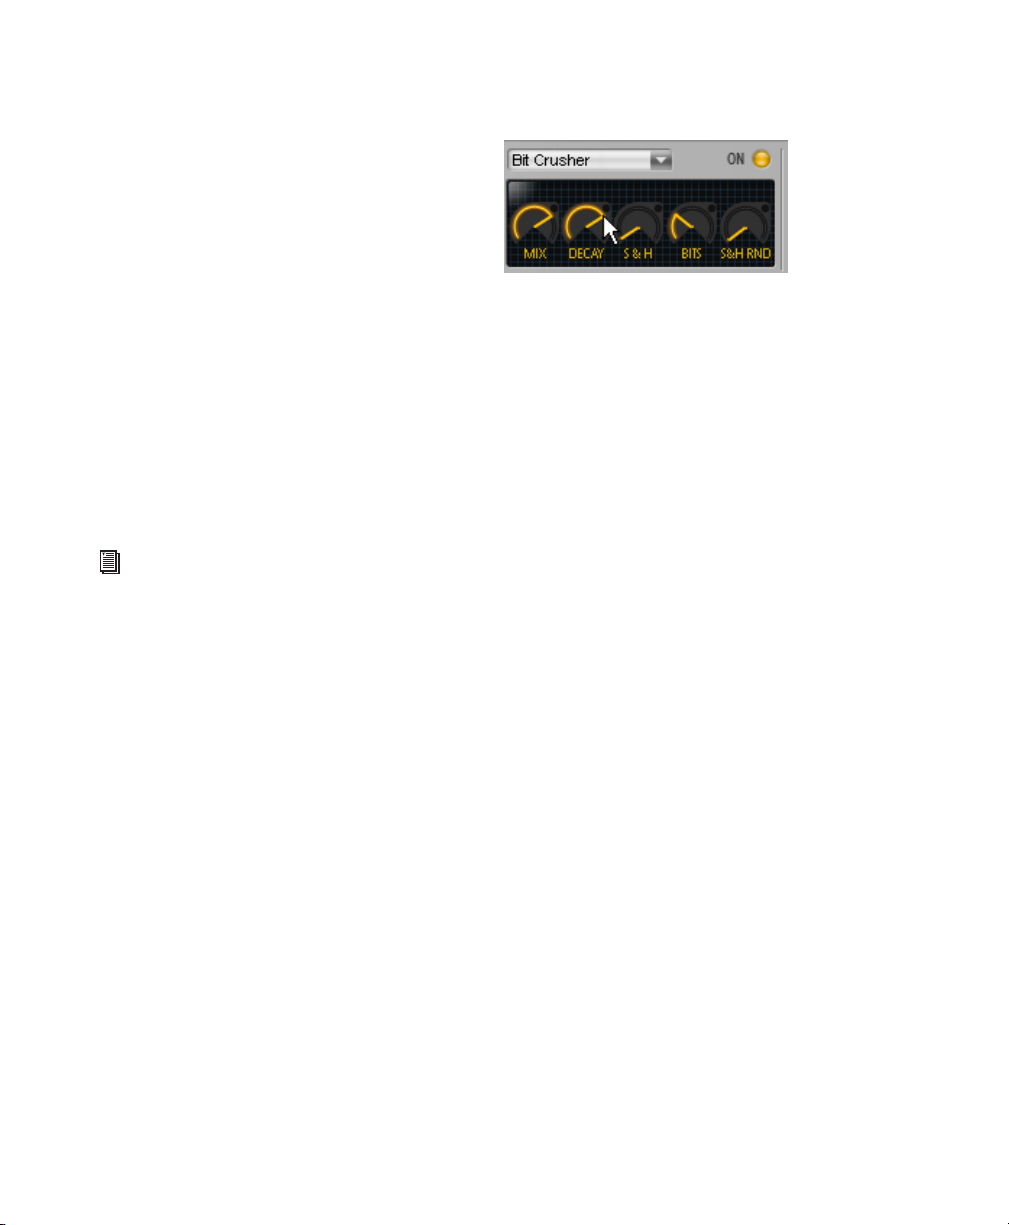
Effects Inserts
Strike provides two Effects inserts connected in
series per channel. Select a channel to display its
Equalizer and Effects settings. Strike includes a
broad range of Insert effects.
See Appendix B, “Strike Insert Effects” for a
complete list of the provided effects and
their parameters.
To select and activate an effect Inser t:
■ Click the Insert selector and select an effect
from the pop-up menu. The Insert On/Off button lights automatically to indicate the effect is
enabled.
Editing Effects
Each effect provides its own set of controls. The
maximum number of controls per effect is five.
To adjust a value of an effects Inser t:
■ Click and drag the rotary controls (up or
down, or left or right) to change the value of the
parameter. The value of the parameter being adjusted is displayed in the Information display
below Strike’s keyboard.
To temporarily deactivate the current insert:
■ Click the Insert On button so that the button
is not lit.
To clear the inser t of any effects:
■ Click the Insert selector and select “none”
from the pop-up menu.
Strike Plug-in Guide32
Page 37
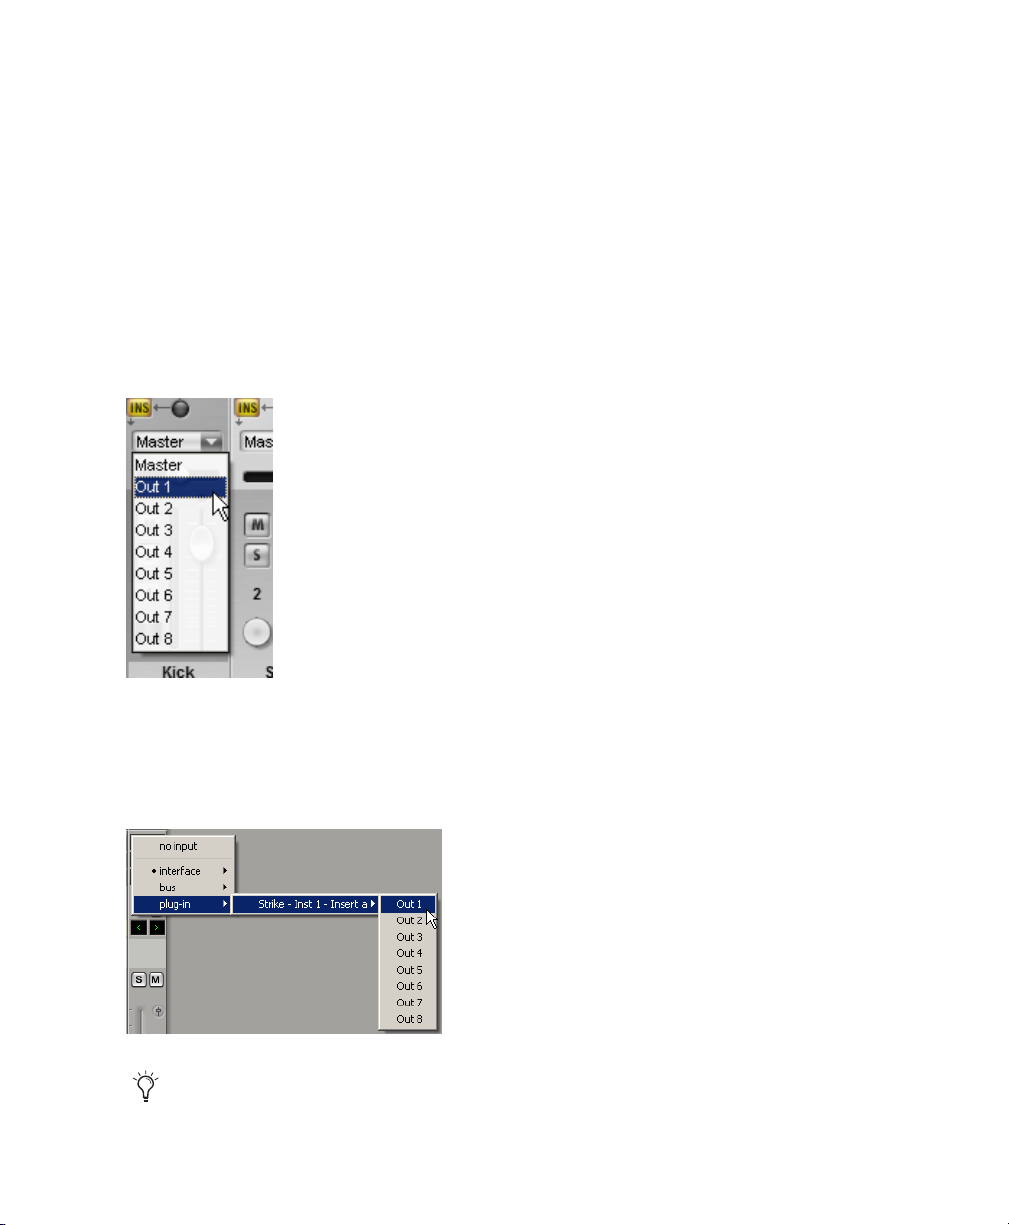
Assigning Individual Channel Outputs
In addition to the Master Output, you can assign the Strike channels to one of eight individual outputs. These can be used as inputs for
Pro Tools Auxiliary Input tracks for further mixing and processing.
To assign a Strike channel to an individual output:
1 Select an output for the channel from the Out-
put pop-up menu in the Routing section.
2 Create an Auxiliary Input track in your
Pro Tools session.
3 Select the Strike output as an input for the
Auxiliary Input Track.
Individual output assignments do not get
saved with Mixes.
Chapter 5: Strike Parameters 33
Page 38

Style Editor
ToolsPart List Instrument hits
Edit section
Pattern display
Style editor
The Style editor provides features for editing
Patterns and Parts. Click the Edit Style button in
the Navigator section to access the Style editor.
There are two main sections:
Edit Section Displays the Instrument hits of the
currently selected Part as horizontally ordered
events. Like a MIDI editor, you can change,
move, and add events to alter or create your
own Patterns.
Pattern Display Displays the entire Pattern and
the rhythmic structure of its events as diamonds
in vertically stacked lines, one for each Instrument. Clicking a line selects that Instrument’s
Part for editing, showing the individual events
in the Edit section.
Strike Plug-in Guide34
General Controls
Key Follow
When the Key Follow button is enabled the
Style Editor automatically changes to always
show the currently playing Pattern. Disable Key
Follow if you don’t want the display to change
when you select other Patterns.
The selected Pattern is indicated by a red
LED on the Strike keyboard.
Page 39
Edit Section Controls
Solo
The Edit section shows the currently selected
Pattern superimposed on a bar|beat grid. Each
vertical bar in the blue area represents an Instrument hit.
Depending on the current Complexity level set
on the Main page, some events in a Part may not
be played. Events that are not played appear
grayed out in the Edit section. Muted events are
shown as an outline only. The selected event is
colored yellow.
Part List
You can import Parts to the currently selected
Pattern from other Patterns within the same
Style using the Part List.
To impor t Parts from other Patterns, using the
Part list:
1 Select the Part you want to replace in the Pat-
tern display—for example, Ride.
2 Click the Part selector and select the Pattern
you want to import for the selected Instrument’s
Part.
Click the Solo button to Solo the Part selected in
the Edit section.
Tools
There are seven tools for editing the events in
the Edit section. The selected tools appear yellow.
Selecting a tool for editing
Pointer Selects events. To move events, drag bars
to the left or right. To change intensity, drag
bars up or down.
Pencil Adds events. Click in the blue area of the
Edit section to add an event.
Eraser Removes events. Click an event to remove it.
Mute Mutes events. Click an event to mute it.
Listen Plays events. Click an event to play it.
Zoom In/Zoom Out Click the Zoom tool to
change the Edit section’s view. Click to zoom in,
and click again to zoom out.
Selecting a Pattern for import to a Part
Snap To Grid If Snap to Grid is active, the time
position of events in the Edit window can only
be modified in eighth note steps. To move
events to any time position, deactivate Snap to
Grid.
Small time offsets are retained when moving events with Snap to Grid active. For
example, a slightly late snare hit will stay
slightly late at the new position to help
preserve the feel of the Style.
Chapter 5: Strike Parameters 35
Page 40
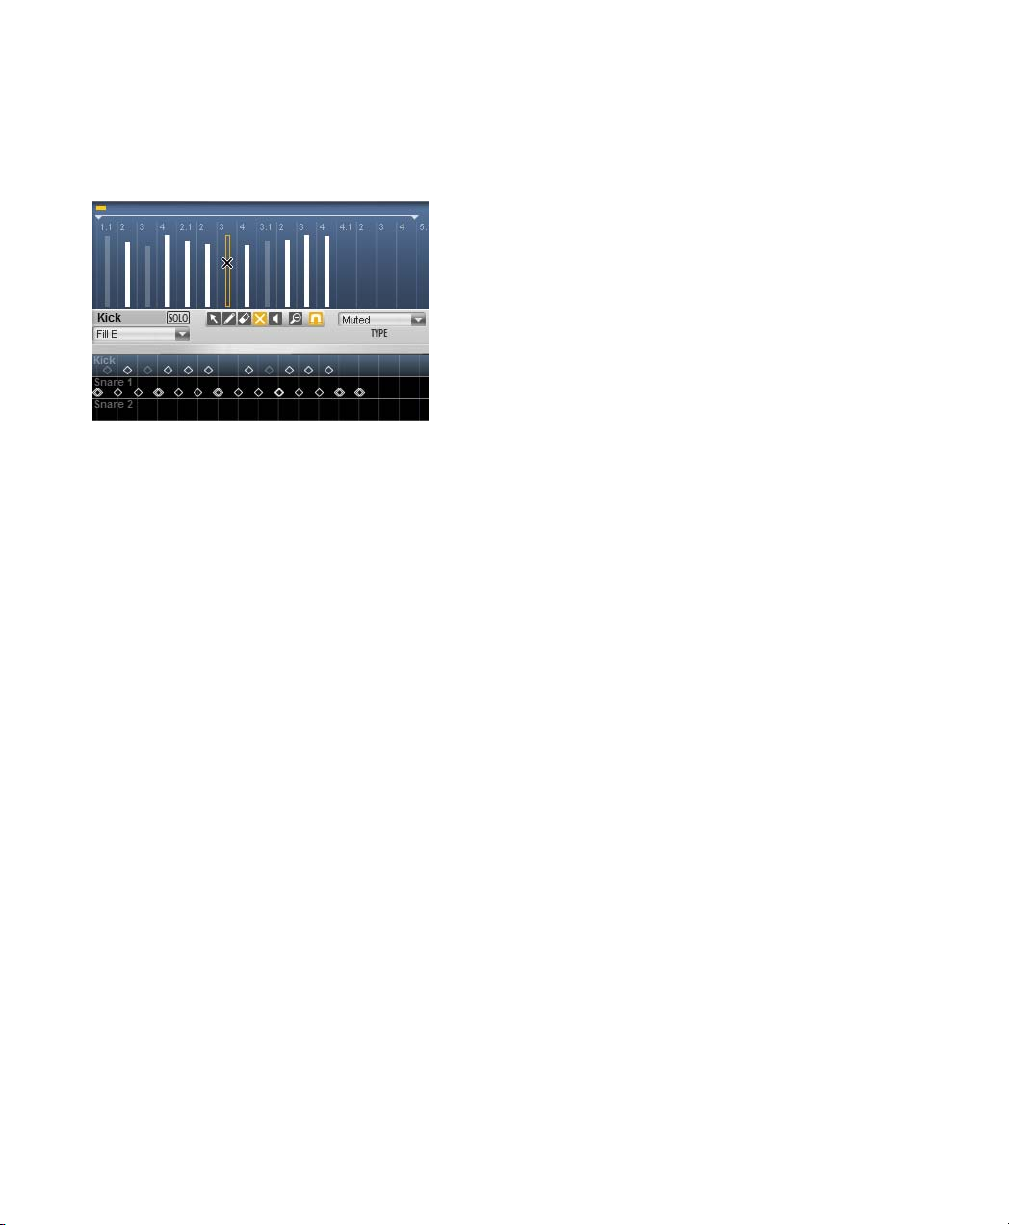
To mute an event:
1 Select the Mute tool.
2 Click the selected event.
Muting an event in the Edit section
Type
All Instruments consist of several types of hits—
for example, center, rim, and sidestick for the
snare drum. Choose a Type for the currently
selected event from the pop-up menu.
Copy Part
The Copy Part button copies the Part to the clipboard.
Paste Part
The Paste Part button pastes the Part from the
Clipboard, replacing all Instrument hits in the
current Part.
Clear Part
The Clear Part button deletes all Instrument hits
from the current Part.
Revert Part
The Revert Part button reverts to the last loaded
Style or Setting, restoring the Part to its original
state.
Copy Pattern
Timing (Beats)
In a real drum performance, small timing offsets
between Instrument hits contribute to the overall feel of the groove. Drag this control to finetune the position of the currently selected
event. Values are shown as a fractional beat
position where 0.125 beats is equivalent to one
32nd note.
Complexity Threshold
Depending on the current Complexity level set
on the Main page, not all events in a Part are
played. Increase an event’s Complexity Threshold level if you want it to play only at high Complexity levels. Decreasing the event’s Complexity Threshold level lets it play even at low
Complexity levels. Setting the Complexity
Threshold to Play Always ignores the Complexity level and always plays the event.
Strike Plug-in Guide36
The Copy Pattern button copies the entire Pattern to the clipboard.
Paste Pattern
The Paste Pattern button pastes the Pattern from
the clipboard, replacing all Parts.
Exit Button
To leave the Style editor, click the Exit button.
Page 41

Configuration Window
Access Configuration
page
Save Configuration
button
Content Size
The Content Size configuration option defines
how much waveform content Strike loads into
RAM by default. To adjust the RAM usage, select
a value from the menu that best fits your computer’s system resources. Because lower values
limit the range of expressive nuance in Strike, it
is recommended that you use higher Content
Size values, if possible.
Oversampling
Using Oversampling can help avoid aliasing
noise when adjusting the tuning of Instruments
like crash cymbals, which can be rich in overtone content. Oversampling increases the plugin’s internal sampling rate to achieve higher
quality at the expense of slightly higher CPU
load.
Polyphony (Voices)
Configure the maximum number of voices (Instrument hits played at a time) that you want to
reserve for Strike, using the Polyphony setting.
Strike intelligently manages the number voices
to suit the current Setting’s requirements. If you
experience problems with system resources such
as audio drop-outs, decrease the number of
voices.
Beat Sync
The Beat Synchronization setting defines how
Strike synchronizes to the Pro Tools session.
There are three settings:
Off Synchronizes to the Pro Tools session tempo,
but not to the bar|beat position. When a Pattern
is triggered, it synchronizes to the currently
playing Pattern, or if no Pattern is playing, it
plays immediately, from the start of the new
Pattern. This is the default setting.
Bar Synchronizes to the Pro Tools session tempo
and to the current bar position. This means a
Pattern that is triggered in the last quarter of a
bar will not play from the start but from the corresponding position in the Pattern, and will
start playing a new bar at the same time
Pro Tools does.
Chapter 5: Strike Parameters 37
Page 42

Beat Synchronizes to the Pro Tools session
tempo and to the nearest beat. This means a Pattern
that is triggered will play from its start point
at the next quarter-note beat in the Timeline.
Crash After Fill
When the Crash After Fill setting is On, Strike
plays a crash cymbal hit at the first beat of the
next bar after a Fill is played.
Pattern Change Grid
The Pattern Change Grid option sets the position in the bar where Strike changes from the
current Pattern to the next. For example, if this
parameter is set to half notes (1/2), the Pattern
change only occurs when the next half note in
the bar is reached, regardless of when the Pattern is actually triggered.
Pattern Retrigger
If Pattern Retrigger is set to On, each time a new
Pattern is triggered, it immediately replaces the
Pattern that is currently playing. If Pattern Retrigger is set to Off, the new Pattern is not played
immediately, but only after the current Pattern
finishes playing, based on the time set in Pattern
Change Grid.
Fill Triggering
The Fill Triggering setting defines how Fills are
triggered. There are three options:
Pause Mode
This configuration defines how the Pause keys
work. There are three options:
Toggle Pauses Instrument playback when a
Pause key is triggered. Playback resumes only
when the Pause key is triggered again. This is the
default setting.
Held Pauses Instrument playback as long as the
Pause key is held.
Released Pauses all Instruments by default, single Instruments are resumed as long as their
Pause keys are held.
Tool Tips
Activates or deactivates Tool Tips for the Strike
plug-in. A Tool Tip is a small window that displays descriptive text for a specific control. It appears next to the cursor when holding the cursor over a control.
Next Triggers the Fill at the next allowed position defined by the Pattern Change Grid setting,
plays the whole Fill, and then changes back to
the previously selected Pattern.
A.S.A.P. Triggers the Fill at the next musically
sensible position for the time the key is held—
changes back to the previously selected Pattern
after the key is released.
While Held Triggers the Fill immediately, and
plays it for the entire time the key is held.
Changes back to the previously selected Pattern
immediately after releasing the key.
Strike Plug-in Guide38
Save Configuration
Saves the plug-in settings and the current MIDI
controller mapping as the plug-in’s default setting for your Pro Tools system. This only applies
to the initialization of new instances of the
plug-in.
In general, plug-in settings are saved with
the session, letting you save different default settings for different sessions (or types
of sessions). Additionally, this guarantees
that the plug-in settings of the current plugin and session transfer to other systems.
Page 43

MIDI Controller Mapping
Strike lets you assign standard MIDI controllers
to virtually any parameter so that you can control Strike from a MIDI controller in real-time.
To assign a MIDI controller to a parameter :
1 Right-click (Windows or Mac) or Control-click
(Mac) a rotary control or fader.
2 Do one of the following:
• Select the desired MIDI controller from the
Assign pop-up menu.
– or –
• Click Learn, and move the desired control
on your MIDI controller. The parameter is
automatically assigned to that control.
Assigning a MIDI controller
To un-assign a MIDI controller :
1 Right-click (Windows or Mac) or Control-click
(Mac) a rotary control or fader.
2 From the pop-up menu, select Forget.
Chapter 5: Strike Parameters 39
Page 44

Strike Plug-in Guide40
Page 45

appendix a
Mix Page Signal Flow
Instrument Channel (× 12)
Close Mic 1
Close Mic 2
Close Mic 3
Talkback Mic
Room Mics
Overheads
Downmix
EQ (Pre)
Insert A
Insert B
EQ (Post)
INS
Pan
Fader
Out 1–8
Overheads Room Mics Talkback Mic Master
Drive
Delay
Delay
EQ (Pre)
Insert A
Insert B
EQ (Post)
INS
Width
Fader
Out 1–8
Surround
EQ (Pre)
Insert A
Insert B
EQ (Post)
Width
Fader
INS
Out 1–8
EQ (Pre)
Insert A
Insert B
EQ (Post)
Fader
EQ (Pre)
Master Dyn
EQ (Post)
INS
Out 1–8
Insert
Fader
Clip
LED
INS
Master
Out
Appendix A: Mix Page Signal Flow 41
Page 46

Strike Plug-in Guide42
Page 47

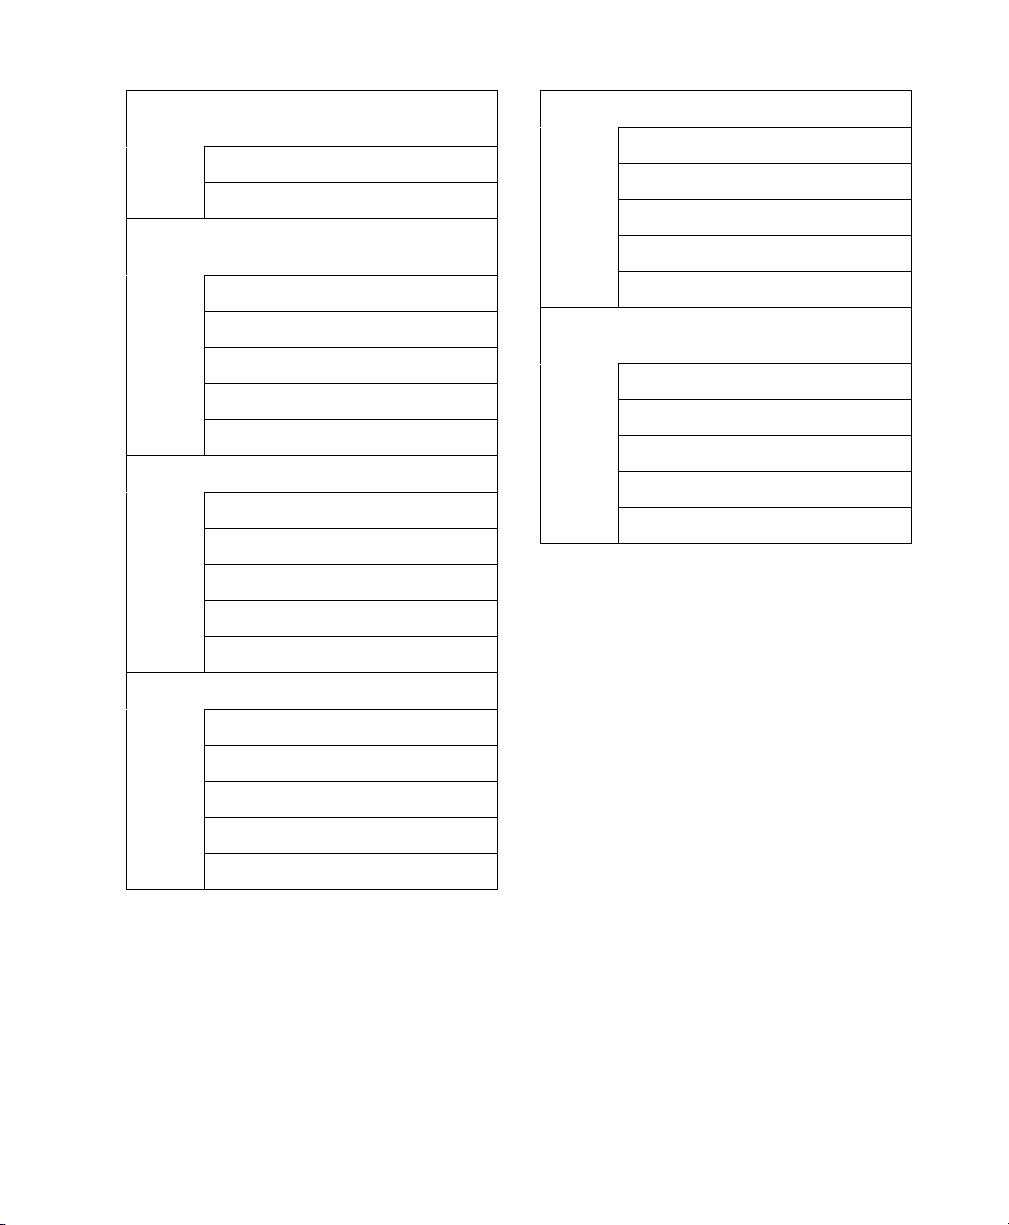
appendix b
Strike Insert Effects
Dynamics 3 Compressor Standard Pro Tools
compressor
Drive
Ratio
Output
Attack
Release
Opto Compressor Vintage-style compressor with
feedback sidechain
Drive
Attack
Release
Output
Eco Compressor Basic compressor, uses fewer
system resources
Drive
Ratio
Attack3
Brickwall Limiter
compressor
Hard-knee, high ratio
Drive
Attack
Release
Output
Gate Classic noise gate
Threshold
Attack
Hold
Release
Depth
Envelope Triggered envelope shaper
Attack
Level
Decay
End Level
Release
Output
Appendix B: Strike Insert Effects 43
Page 48

Dynamic EQ Triggered equalizer, only affecting
attacks
Mic Modeller A range of microphone and speaker
simulations
Freq
Gain
Q
Start
Length
Tube Saturation Warm tape-like overdrive
Drive
Bias
Saturation
Tone
Mix
Distortion Fuzz-like overdrive
Drive
Mix
Output
Bit Crusher Reduces bit depth and sample rate of
the signal
Mix
Decay
Rate
Bits
Classic Cap
Vintage Cap
Large Cap
Small Cap
Standard Dyn
Vocal Dyn
Snare Dyn
Tom Dyn
Kick Dyn
Egg Dyn
Boundary
Ribbon
Radio
Speaker (Used as microphone)
Vari Filter Triggered multi-mode filter for “auto wah”
effects
Mode
Cutoff
Resonance
Decay Rate
Mix
Rand
Enhancer Adds artificial brightness to the signal
Tune
Depth
Drive
Strike Plug-in Guide44
Ring Modulator Adds sum and difference
frequencies to the signal
Mix
Freq
Env
LFO
Rate
Page 49
Frequency Shift Enharmonic shifter, useful for
tuning drums
Coarse
Fine
Delay Adds echoes, adjustable in milliseconds or
beats
Mix
Time
Feedback
Balance
Tone
Reverb Dense 80s style reverb
Shape
Time
Damp
Width
Mix
Chorus Adds stereo width and detuning
On
Mix
Attack
Rate
Depth
Oscillator Triggered sine wave or noise to mix with
or replace drum hits
Mix
Freq
Sweep
Tone
Decay
Phaser A sweeping notch filter effect
Mix
Rate
Depth
Feedback
Width
Appendix B: Strike Insert Effects 45
Page 50
www.digidesign.com
DIGIDESIGN
2001 Junipero Serra Boulevard
Daly City, CA 94014-3886 USA
Tel: 650.731.6300
Fax: 650.731.6399
TECHNICAL SUPPORT (USA)
Tel: 650.731.6100
Fax: 650.731.6384
PRODUCT INFORMATION (USA)
Tel: 650.731.6102
Fax: 800.333.2137
INTERNATIONAL OFFICES
Visit our Digidesign Web site
for contact information
 Loading...