

Page 1
V 2.0
Setup Guide
Setup Guide
Setup GuideSetup Guide
Revised: 13-12-00
Page 2

Pro Tools and the Digital 328
Pro Tools and the Digital 328
Pro Tools and the Digital 328Pro Tools and the Digital 328
Contents
1111Introduction 2
2222 MIDI Setup 3
3333 Pro Tools Configuration 6
4444 Digital 328 Settings 8
5555 Digital 328 Automation 11
6666 Digital 328 Automation
Configuration 12
7777 Automating the Digital 328
With Pro Tools 15
8888 Digidesign Audio Interfaces 18
9999Example Setup 21
Pro Tools Setup Guide
1111
Page 3

2222
Spirit Digital 328 v2.0
Page 4

Introduction
Introduction
IntroductionIntroduction
1
This Setup Guide is for interfacing Digidesign’s Pro Tools with the Digital 328 Digital Mixer. This
guide assumes that you have a working knowledge of the Macintosh environment and a
familiarity with Pro Tools and the Digital 328.
The procedure will show the user how to integrate the MIDI CONTROLLER BANK on the 328
as a limited control surface for the internal mixer within Pro Tools.
This guide will also outline the steps to take to allow automated control of the 328 from Pro
Tools (version 5.0 or later recommended).
Pro Tools uses six different preset “personalities” in its control architecture. This document
outlines possibilities using the Peavey PC-1600 controller personality.
The Pro Tools Internal Mixer
The Pro Tools Internal Mixer
The Pro Tools Internal MixerThe Pro Tools Internal Mixer
Digidesign offers a fully functioning mixing console from within the Pro Tools environment. Pro
Tools duplicates many of the functions found on the Digital 328, offering the ultimate in flexibility
when the two products are joined together. However, to understand the power of this system,
is important to separate the two mixing environments in your mind: the Pro Tools internal
mixer, and the Spirit Digital 328 mixing console.
it
The first part of this guide will explain how to allow the Digital 328 to control the Pro Tools
INTERNAL mixer. We will discuss how Pro Tools can control the Digital 328 in a later section.
In order to integrate the Digital 328 into the Pro Tools environment, we must utilize an existing
“Personality Profile” that Digidesign provides in its DAE folder, found in the System folder of your
Macintosh. Digidesign has made six profiles as of this writing – the JL Cooper CS-10, the Penny &
Giles DC-16 and MM-16, the Mackie HUI, Digidesign’s own Pro Control, and the Peavey PC-1600.
We will be relying on the Peavey PC-1600 profile for communication between the 328 and the
ProTools internal mixer.
Please make sure that the Peavey PC-1600 profile is placed in the Controllers folder
inside the DAE folder on your Macintosh before proceeding.
Pro Tools Setup Guide
3333
Page 5
It is essential that 2-way MIDI
T
communication occurs between
the 328 and Pro Tools.
Using standard MIDI cables,
connect the 328 MIDI Out Port to
your MIDI interface’s MIDI In Port,
and connect the 328’s MIDI In
Port to the interface’s MIDI Out
Port.
OMS Setup
OMS Setup
OMS SetupOMS Setup
MIDI Setup
MIDI Setup
MIDI SetupMIDI Setup
Interface MIDI Out 328 MIDI In
Interface MIDI In
328 MIDI Out
his 2-way communication
configuration will allow full
dynamic automation of the
Digital 328, and it will allow
control of the internal mixer
within Pro Tools from the 328.
2
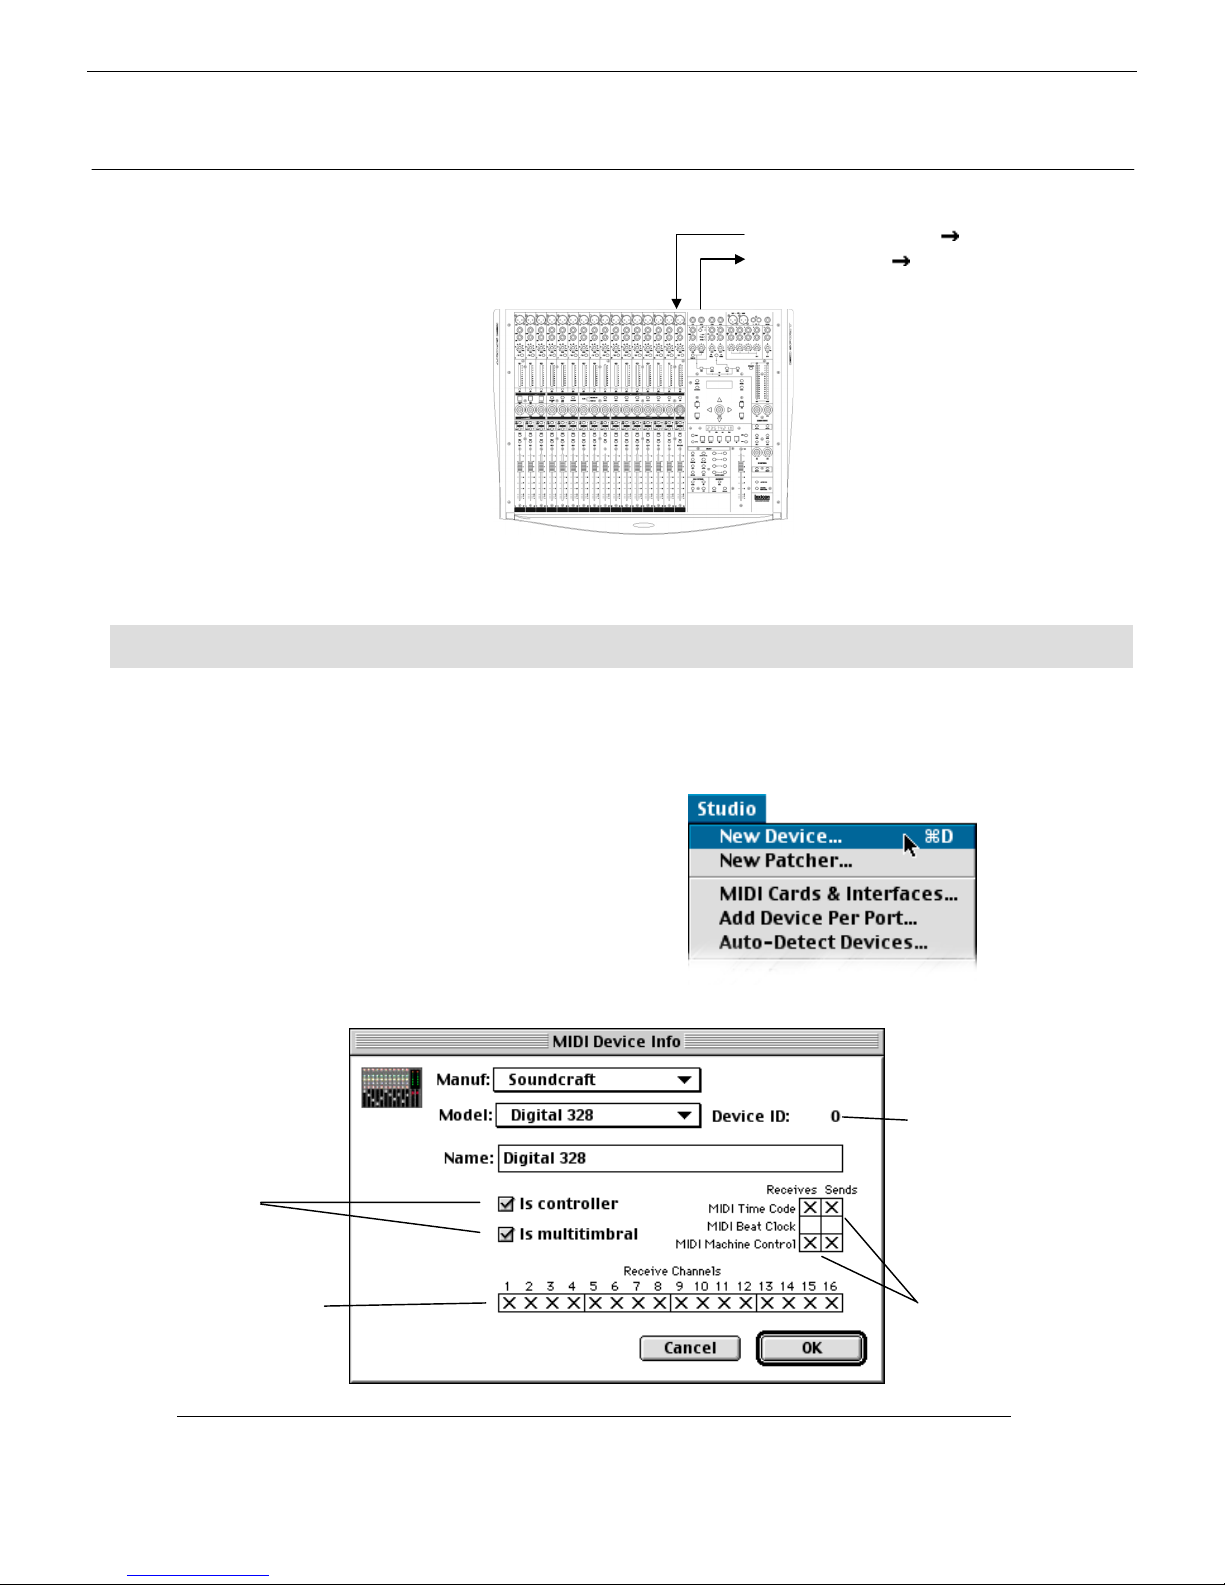
Before launching Pro Tools, we must configure OMS to account for the 328. This
guide will refer to OMS version 2.3.8.
1) Launch the OMS Application.
2) Under “Studio” select New Device
3)
Configure the new device as described below:
Check “Is controller” and
“Is multitimbral”.
Enable all receive channels
Set the Device ID to 0.
Enable MIDI Timecode
(MTC) and MIDI Machine
Control (MMC) as indicated.
4444
Spirit Digital 328 v2.0
Page 6
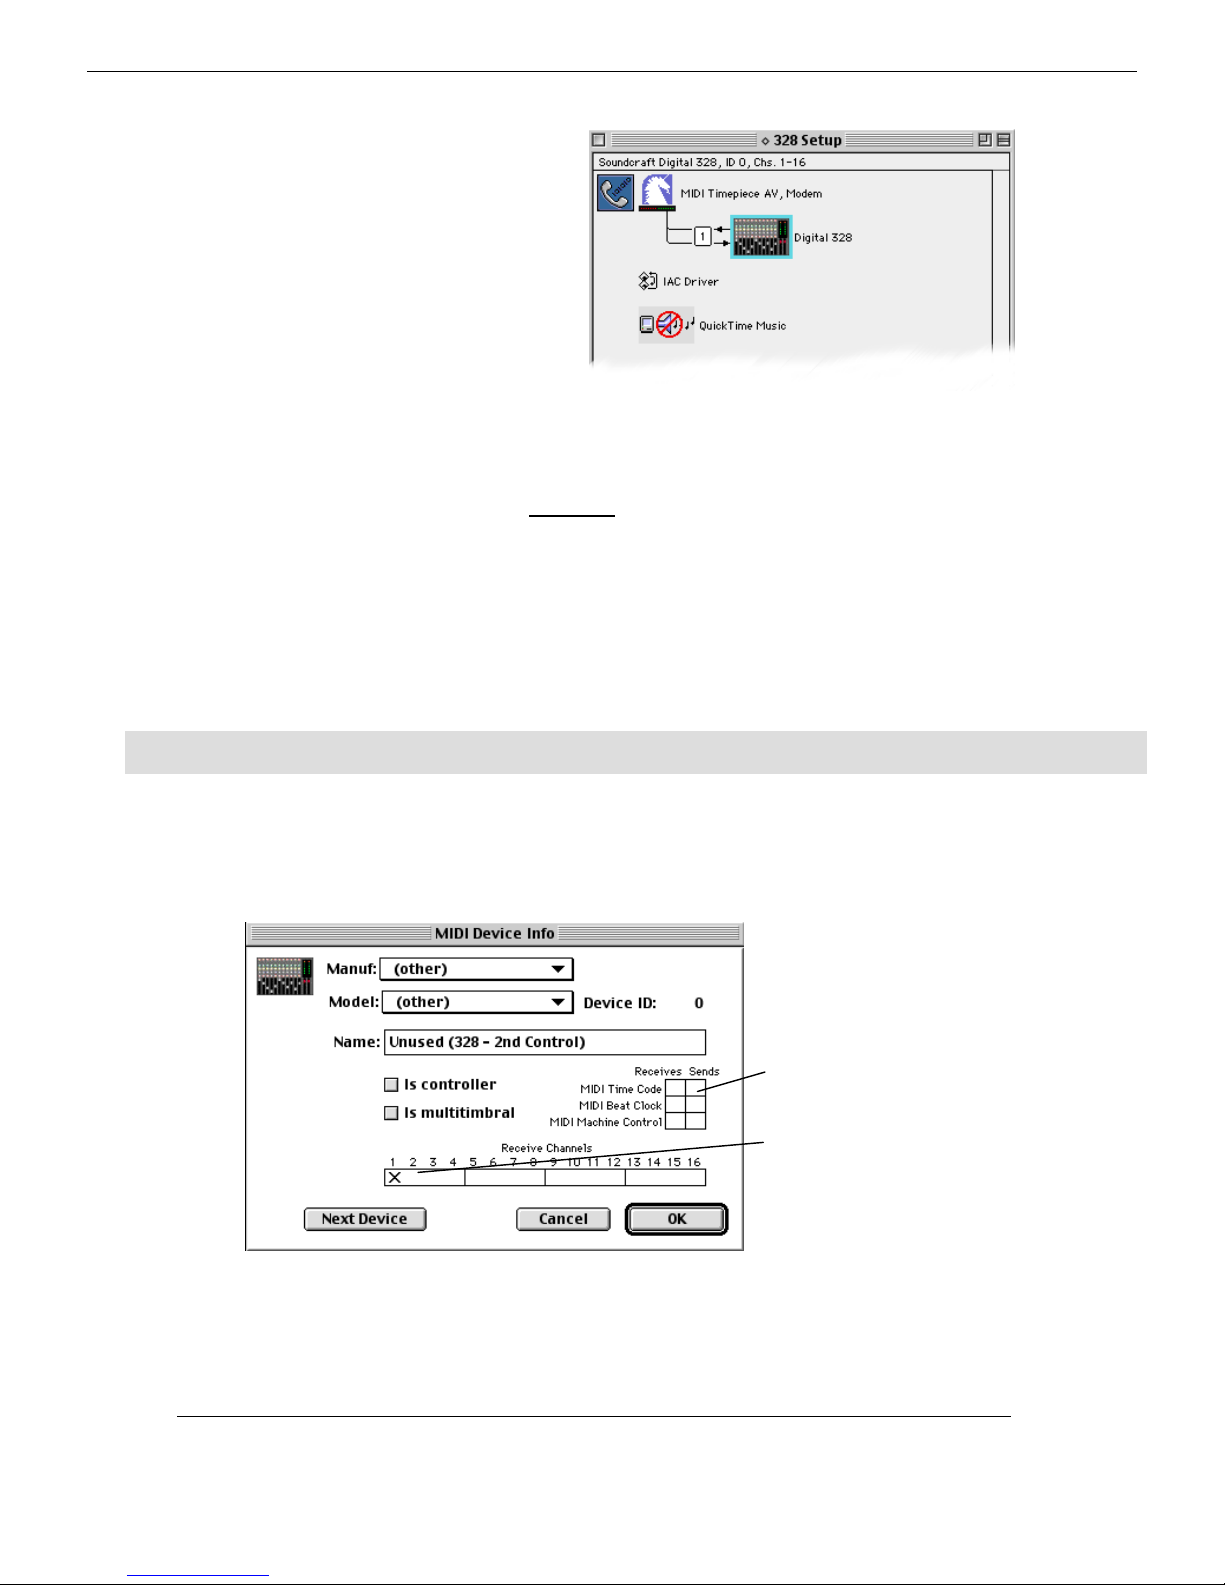
4) Hit OK – the Digital
328 device should now
appear in your OMS
Studio Setup as
indicated here.
Relating to the control of the internal mixer within Pro Tools, since we are
emulating a pre-set Digidesign controller personality, a second “phantom”
328 must be created. This device will not be an actual device – instead it will
act to “emulate” another controller surface, thus gaining access to 16 more
controls in Pro Tools.
Configuring the “phantom” device
Configuring the “phantom” device
Configuring the “phantom” deviceConfiguring the “phantom” device
1) Select NEW DEVICE as in step 2 above
2) Configure the new device as shown:
Do not check any boxes
Make sure channel 1 is enabled
under “Receive Channels”.
Pro Tools Setup Guide
5555
Page 7
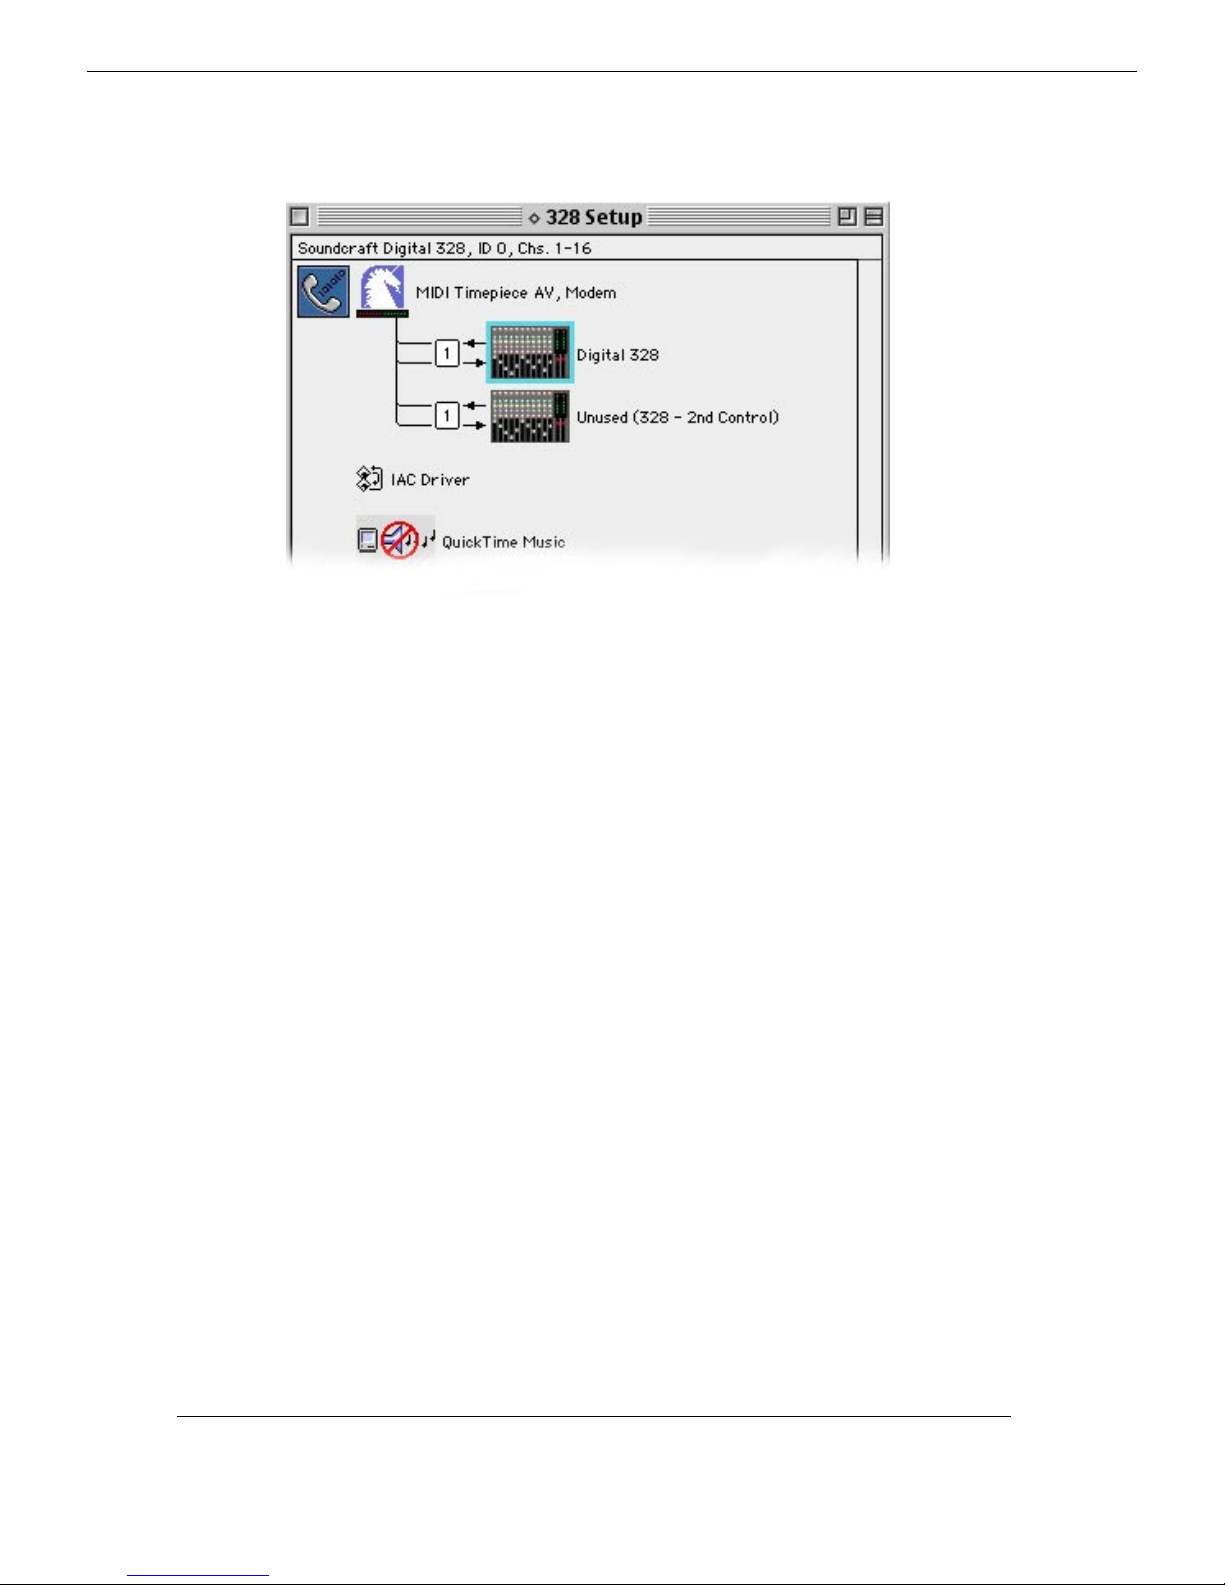
3) Hit OK – the OMS Studio setup will show your new device.
The OMS Setup is now complete. Quit OMS and launch Pro Tools to continue setup.
6666
Spirit Digital 328 v2.0
Page 8
Pro Tools configuration
Pro Tools configuration
Pro Tools configurationPro Tools configuration
3
Using Pro Tools 5.0 or later, devices must be enabled for input control before
they can be used. Pro Tools 4.0 – 4.3.5 users do not need to enable inputs and
may move to the next step, “Enabling Peripherals.”
Enabling Inputs for Pro Tools 5.0 or later
Enabling Inputs for Pro Tools 5.0 or later
Enabling Inputs for Pro Tools 5.0 or laterEnabling Inputs for Pro Tools 5.0 or later
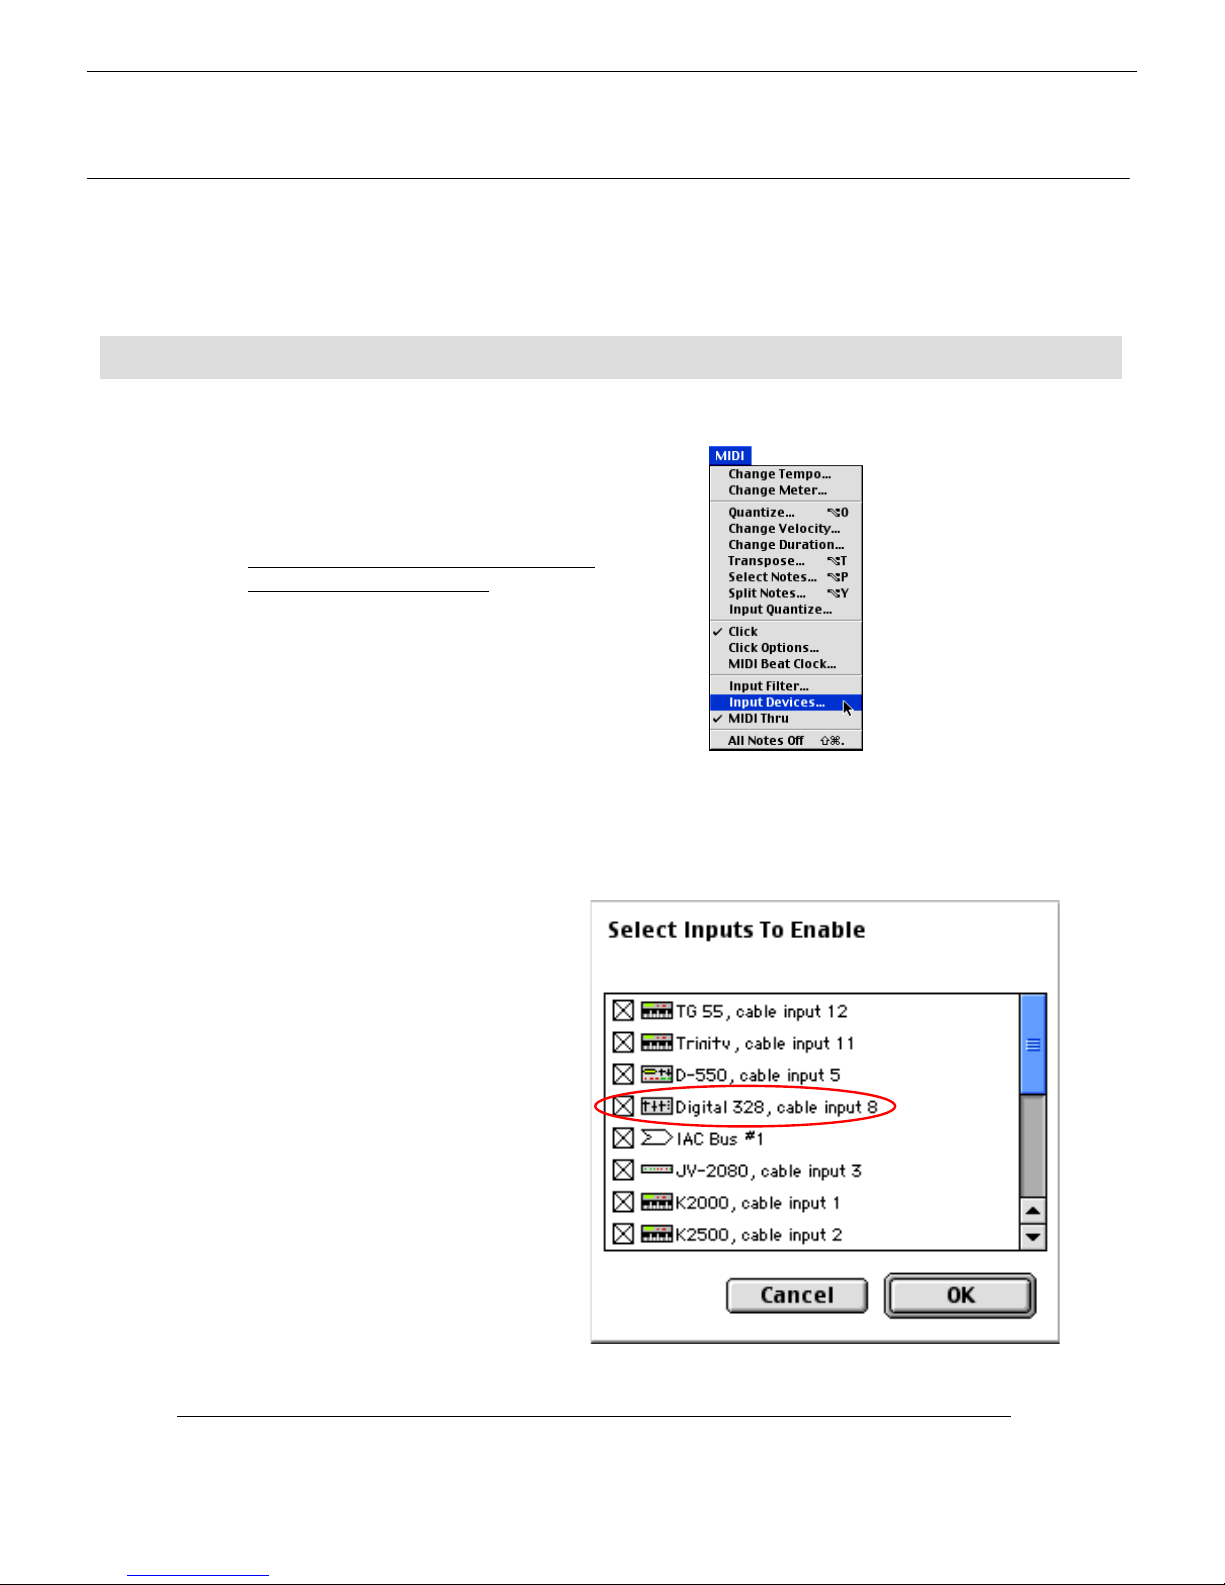
1) Launch Pro Tools and either open an
existing file or create a new one. If you
choose to create a new file, add a few
MIDI tracks to enable the MIDI menu.
The MIDI Menu will be greyed-out until
MIDI tracks become active.
2) Select INPUT DEVICES from the MIDI
Menu.
3) In the Input Devices window, select
“Digital 328” as an input device.
Pro Tools Setup Guide
7777
Page 9

Enabling Peripherals
A
Enabling Peripherals
Enabling PeripheralsEnabling Peripherals
1) From the SETUPS menu,
select PERIPHERALS
2) In the Peripherals window, select
“MIDI Controllers.”
Choose “PC-1600” as the
controller type.
Receive from MIDI channels 15
and 16 respectively.
MIDI Machine Control
MIDI Machine Control
MIDI Machine ControlMIDI Machine Control
1) In the Peripherals window, select “Synchronization.”
2) Check Machine Control.
4)
Make sure you are transmitting MMC commands from the 328 and proceed to the next section.
3) Set device ID to 127 (all).
Send the output of the first device
to “Digital 328 channel 15.”
The output of the second “device”
goes to our “phantom” unit in OMS.
word about Pro Tools, OMS and MMC
Pro Tools will respond to PLAY, STOP and
RECORD commands without fault. However,
REWIND and FAST FORWARD commands are
not received well via MMC, because of the nature
of these commands. Pro Tools responds to
“held” commands, such as a REW or FF button
that transmits until released. At this time MMC
does not support a shuttle “hold” function.
Record Arm commands sent from the 328 are
not recognized in OMS 2.38 and earlier. OMS will
not pass these signals to Pro Tools.
NOTE: If you plan to enable control of Bank-Shifting, Plugin parameters, or Aux
controls, please refer to Page 9 for important information regarding Transport
Control.
8888
Spirit Digital 328 v2.0
Page 10

Chan: 1
Id:OFFChan: 1
Id:OFF
C
Digital 328 Settings
Digital 328 Settings
Digital 328 SettingsDigital 328 Settings
4
This section covers Continuous Controlller settings for the 328. Enter these
Continuous Controller ID’s into the 328 to emulate the Peavey PC-1600.
Entering Controller Settings into the 328
Entering Controller Settings into the 328
Entering Controller Settings into the 328Entering Controller Settings into the 328
1) Press MENU on the 328 – scroll to MIDI CONTROLLERS, then press ENTER.
Controller No: 1
Controller No: 1
Controller No: 1Controller No: 1
Chan: 1 Id:OFF
han: 1 Id:OFF
2) You may choose to download the Pro Tools SYSEX file from the Digital 328 website, or you
may find it quicker to program the changes by hand.
3) The settings are as follows:
Physical
Controller #
1 15 1 17 15 9
2 15 2 18 15 10
3 15 3 19 15 11
4 15 4 20 15 12
5 15 5 21 15 13
6 15 6 22 15 14
7 15 7 23 15 15
8 15 8 24 15 16
9 16 1 25 16 9
10 16 2 26 16 10
11 16 3 27 16 11
12 16 4 28 16 12
13 16 5 29 16 13
14 16 6 30 16 14
15 16 7 31 16 15
16 16 8 32 16 16
4) When the settings are entered correctly, press ENTER – the 328 will prompt you to store the
settings as a MIDI CONTROLLER PRESET.
5) Select an empty location, and press ENTER again to store the new preset. The standard
naming dialogue will appear. Name the preset “Pro Tools” (or similar).
MIDI Channel 328 ID Physical
Controller #
MIDI Channel 328 ID
Pro Tools Setup Guide
9999
Page 11

MIDI Controller Bank on the 328
MIDI Controller Bank on the 328
MIDI Controller Bank on the 328MIDI Controller Bank on the 328
To access the MIDI CONTROLLER bank, follow these steps:
1) Press any of the FADER BANK switches (over the first three Rotary Encoders). The associated
switch should illuminate.
2) Next, press the illuminated switch again (it’s the same switch you just pressed). The faders
should react accordingly, yet there will be no switch illuminated under FADER BANK. This is
the MIDI FADER bank.
3) Feel free to switch in and out of this mode (or bank) as often as you wish. Whenever you
return, Pro Tools control will be at your fingertips.
Using the 328 for Extended Pro Tools control
Using the 328 for Extended Pro Tools control
Using the 328 for Extended Pro Tools controlUsing the 328 for Extended Pro Tools control
*Only TDM systems can take advantage of Plugin and Aux send control
On the Digital 328 under Tape Machine Setup, choose ‘Custom Machine’ and set it as follows:
Timecode src: MTC Rewind: C -1
Status: Slave FF: C# -1
MIDI: Note On Locate 1: PTL+ (all the way up)
Play: E -2 Locate 2: PTL Stop: Eb -2 Shift Key: OFF (all the way up)
Record: F -2 MIDI Channel: 15
Frame Rate: 30
With these settings, pressing LOC 1 moves forward between Fader & Pan control, Plugin control,
Fader and Aux 1 send, Fader and Aux 2 send, Fader and Aux 3 send, Fader and Aux 4 send,
Fader and Aux 5 send, and back again. LOC 2 moves backward between these settings.
Rewind and Fast Forward buttons become ‘bank shift’ controls. Pressing Fast Forward on the
328 moves channel banks to the right 16 at a time. Rewind moves them to the left 16 at a time.
****
Note: Play, Record and Stop Commands only work while Plugin control is activated.
Using the MMC panel on the 328 in ‘Note On’ mode disables MMC transmission from
the 328, but the Timecode display remains active.
10
10
1010
Spirit Digital 328 v2.0
Page 12

Transmitting MIDI
Transmitting MIDI Timecode to the Digital 328
Transmitting MIDI Transmitting MIDI
Under the Session Setup Window in Pro Tools, check ‘MTC To Port’ and select the Digital 328 as
the device. MIDI Timecode will now be routed to the Digital 328.
Checking your efforts for Pro Tools Control
Checking your efforts for Pro Tools Control
Checking your efforts for Pro Tools ControlChecking your efforts for Pro Tools Control
1) Launch Pro Tools
2) Create a New file
3) Create at least 24 Audio tracks.
4) View the Mixer Page in Pro Tools.
5) Enter the MIDI CONTROLLER BANK mode on the 328. Move faders and Rotary Encoders to
check for Fader and Pan control via the 328.
Keep in mind that a controller must move through the “null” point of a fader before it takes control –
this keeps faders from jumping when displayed values differ from actual controller settings.
6) Press LOC 1 once (in a TDM system only) to gain control of assigned Plug-In parameters. The
displayed Plug-in will be the “active” Plug-In, ready for control. Display other Plug-Ins to
make them respond to 328 control.
7) Subsequent LOC 1 presses toggle through AUX Sends 1, 2, 3, 4, and 5 in that order. LOC 2
moves backward through the Auxes, to Plug-In control, and back to Fader & Pan operation.
8) Pressing the Rewind and Fast Forward transport buttons ‘shift’ fader banks 16 at-a-time to
the right or left respectively.
Timecode to the Digital 328
Timecode to the Digital 328Timecode to the Digital 328
This Concludes the section for 328 control of the Pro Tools Mixer environment.
The next section is the reverse: allowing Pro Tools to automate the Digital 328 Mixer
with moving faders.
Pro Tools Setup Guide
11
11
1111
Page 13

Digital 328 Automation
Digital 328 Automation
Digital 328 Automation Digital 328 Automation
The Digital 328 mixing console offers full dynamic automation via MIDI. This means that any
encoder/fader movement, button press, or any other control surface setting can be recorded in
real-time via MIDI to Pro Tools for playback at a later time.
The 328 not only allows every control surface parameter to be automated, but also allows full
automation of both Dynamic Processors and both FX Processors.
This means that a fully automated mix can be integrated into a recording session, containing any
fade-ins, mutes, or snapshot recalls that occur at certain points during a song.
As automation data is recorded, any event may be isolated and edited from within the sequencer
track, or new automation events can be created from within the sequencer itself.
Snapshot Automation
Snapshot Automation
Snapshot AutomationSnapshot Automation
The 328 also offers Snapshot automation: any Snapshot (or User Setup) can be recalled within
an automation track. We use standard MIDI Program Change messages for this function.
The following table indicates the Program Change required to recall each individual Snapshot and
User Setup.
Program
Program
ProgramProgram
Change
Change
ChangeChange
00 (00H) Snapshot 001
01 (01H) Snapshot 002
--- --98 (62H) Snapshot 099
99 (63H) Snapshot 100
100 (64H) User Setup 01
101 (65H) User Setup 02
--- ---
124 (7CH) User Setup 25
125 (7DH) User Setup 26
Recalled
Recalled
RecalledRecalled
5
So, to recall Snapshot #1, Program Change 0 should be sent to the 328. To recall Snapshot #69,
Program Change 68 should be sent to the 328, and so on.
However, there is one other thing to bear in mind. Every individual Snapshot has a ‘MIDI Recall’
selection that can be enabled/disabled. If ‘MIDI Recall’ is turned ‘OFF’ for a particular Snapshot,
then it cannot be recalled via a Program Change command. Therefore, any Snapshot you wish to
recall from within an automation track must have ‘MIDI Recall’ turned ‘ON’, else the Snapshot will
not recall. When the Global ‘MIDI Recall’ of Snapshots is switched to ‘ON’, any Snapshot
subsequently created will automatically have ‘MIDI Recall’ switched to ‘ON’. To do this, enter the
‘Snapshot Setup’ menu and toggle ‘MIDI Recall’ to ‘ON’.
12
12
1212
Spirit Digital 328 v2.0
Page 14

M
M
Digital 328 Automation Configuration
y
M
M
Digital 328 Automation Configuration
Digital 328 Automation ConfigurationDigital 328 Automation Configuration
6
Automation Settings On The 328
Automation Settings On The 328
Automation Settings On The 328Automation Settings On The 328
First, set the MIDI Channel for Snapshot recall. Press MENU on the 328, then scroll to User
Options and press ENTER. Configure the MIDI Channel for the 328.
NOTE: If Omni Mode is enabled then the 328 will respond to Program Change
messages on all MIDI Channels.
< User Options >
< User Options >
< User Options >< User Options >
MIDI Channel
IDI Channel: 1
IDI ChannelMIDI Channel
Next, to make use of automation facilities on the 328, MIDI DYNAUTO must be enabled in the
AUTOMATION SETUP menu.
Press MENU, then scroll to AUTOMATION SETUP and press ENTER. MIDI DYNAUTO must
be enabled for the 328 to transmit or respond to any automation data.
: 1
: 1: 1
<Automation Set>
<Automation Set>
<Automation Set><Automation Set>
IDI Dynauto: On
MIDI D
IDI Dynauto: OnMIDI Dynauto: On
Scroll down one page (
modes are available on the 328: Read Only, Write Only, Read/Write, and Update. Each
mode determines how the 328 will transmit/respond to automation data, and each has its own
applications.
Automation Modes On The 328
Automation Modes On The 328
Automation Modes On The 328Automation Modes On The 328
with your DOWN Arrow
nauto: On
) to the automation ‘Mode’ page. Four automation
Read Only Mode
<Automation Set>
<Automation Set>
<Automation Set><Automation Set>
Mode: READ ONLY
Mode: READ ONLY
Mode: READ ONLYMode: READ ONLY
When the 328 is in Read Only mode, it only responds to automation data. The 328 does not
transmit any automation data in Read Only Mode. This mode may be useful when a final
automation performance has been completed in Pro Tools, and no more automation data is to be
recorded. In this case the desk could be set to Read Only as a ‘safe’ mode, to ensure that no
further automation data is recorded over the final automation performance.
Pro Tools Setup Guide
13
13
1313
Page 15

Write Only Mode
Mode: WRITE ONLY
Mode: WRITE ONLY
<Automation Set>
<Automation Set>
<Automation Set><Automation Set>
When the 328 is in Write Only mode, it only transmits automation data, and ignores any
incoming automation data received at its MIDI IN port. This mode is useful for quickly recording
several versions of an automation take into Pro Tools, where on each recording pass the
previously recorded material is ignored by the 328. Each take can then later be previewed (in
Read mode), and the preferred take kept as a performance.
Read/Write Mode
<Automation Set>
<Automation Set>
<Automation Set><Automation Set>
Mode: READ/WRITE
Mode: READ/WRITE
Mode: READ/WRITE Mode: READ/WRITE
Read/Write mode is simply an amalgamation of Read Only mode and Write Only mode. In this
mode, the 328 transmits automation data and responds to any automation data received at its
MIDI IN port. Read/Write is the most commonly used automation mode – a single automation
take can be recorded into a sequencer, then instantly previewed on playback.
Update Mode
<Automation Set>
<Automation Set>
<Automation Set><Automation Set>
Mode: UPDATE
Mode: UPDATE
Mode: UPDATE Mode: UPDATE
The final automation mode is Update mode. This mode allows live changes to be made to any
individual automation parameter within a previously recorded automation take. For example, say
a complex automated mix had been recorded containing many automation parameters. This
might be the perfect mix if it weren’t for an inaccurate FX2 fade-out just before the end of the
track! Update mode could be used here to ‘punch-in’ a new FX2 fade-out at the desired point
while preserving all other automation data.
Essentially, Update mode is identical to Read mode, only that the automation data received by
the 328 is re-transmitted back to the sequencer. However, the moment a parameter change is
made on the 328, that parameter only enters Write mode, while all other parameters continue to
be passed through into the 328.
This may seem a bit complex in theory, but in practice it is a very simple concept – Update mode
essentially lets you punch-in parameter specific edits into an existing automation mix.
Note: Due to the motorized nature of the 328’s faders, if you wish to update an
automated fader movement, you must not attempt to ‘take over’ the moving fader
when you wish to punch-in your change – always use the rotary encoder equivalent
on the meter controls.
14
14
1414
Spirit Digital 328 v2.0
Page 16

Note: Once an automatable 328 object has been adjusted in Update mode, it will not
enter Read mode again until READ ONLY or READ/WRITE is selected in the 328
Automation Setup menu. This means that the newly adjusted parameter will continue
to be overwritten until recording is stopped, or the mode is changed.
Pro Tools Setup Guide
15
15
1515
Page 17

Automating the Digital 328 with Pro Tool
s
s
Automating the Digital 328 with Pro Tools
Automating the Digital 328 with Pro ToolsAutomating the Digital 328 with Pro Tool
This section deals with settings and proceedures for the final steps in the Pro
Tools/328 marriage – total dynamic automation of the Digital 328.
Pro Tools MIDI Settings
Pro Tools MIDI Settings
Pro Tools MIDI SettingsPro Tools MIDI Settings
1) In Pro Tools, add one new MIDI Track.
2) Under the MIDI Menu in Pro
Tools 5.0, disable MIDI Thru.
Leaving this item checked while
operating the 328 automation,
will result in a MIDI feedback
loop.
7
3) In the Mix window in Pro Tools, locate
the new MIDI track and route its
output to the Digital 328, channel 1
(the “real” 328 – not the “phantom”
device).
16
16
1616
Spirit Digital 328 v2.0
Page 18

4) Make Sure MIDI DYNAUTO is enabled on the 328. Set Automation mode to READ/WRITE.
<Automation Set>
<Automation Set>
<Automation Set><Automation Set>
Mode: READ/WRITE
Mode: READ/WRITE
Mode: READ/WRITE Mode: READ/WRITE
5) In Pro Tools, arm the new MIDI track to record, and verify MIDI data reception.
6) Once MIDI data has been verified, you are free to record a pass of automation. Grab a
handful of faders, and do a test-pass while in MIC/LINE Fader bank.
7) After the test-pass has been recorded, rewind Pro Tools and play the pass back to the 328.
8) Faders should move accordingly – if they do not, verify your settings and try again. If MIDI
data is registering on the ProTools level meter when faders are being recorded, check the
MIDI Cable returning to the 328.
Editing the Automation Pass
Editing the Automation Pass
Editing the Automation PassEditing the Automation Pass
Once your pass has been recorded, you may want to edit it within Pro Tools. If you have Pro
Tools 5.0 or later, editing takes place as follows. If you have Pro Tools 4.3 or earlier, please
continue to read this section, as the proceedure is similar for your version.
1) Go to the Edit window in Pro Tools, and locate the MIDI track containing the automation
pass.
2) Select the way the data is to be displayed – we recommend pure Controller Changes.
Pro Tools Setup Guide
17
17
1717
Page 19

3) In the Display type window, click
“Add/Remove Controller.” This
does not affect Pro Tools
performance, it simply tells Pro
Tools how to display the data.
4) Choose the Controllers that are to be displayed. You may want to come back to this window
often to “filter” conflicting data. It is always easier to edit one parameter at a time. Refer to
the MIDI Specification included in the Digital 328 v2.0 manual.
9) Refer to Section 6 - “Digital 328 Automation Configuration” for detailed explanations
of automation modes and uses.
18
18
1818
Spirit Digital 328 v2.0
Page 20

8
A
A
Digidesign Audio Interfaces
Digidesign Audio Interfaces
Digidesign Audio InterfacesDigidesign Audio Interfaces
Pro Tools systems always require a related audio interface, whether the Audiomedia II, Digi 001,
ADAT Bridge or the 888
side, this section outlines a few possibilities for the ultimate in flexibility.
Using two (or more) 888
Using two (or more) 888
Using two (or more) 888Using two (or more) 888
Digidesign’s 888
Digital (AES) I/O. This is the ultimate interface for marriage to the 328.
To fully utilize the power of these two systems, you can use two Soundcraft AES/EBU Interface
boxes for the Digital 328 (Part #RW5599). These boxes provide up to 16 AES/EBU I/O for the
328 using standard TDIF cables for connection. Connect to the 888
to 16x16 direct I/O with ProTools.
This equpment, when connected, provides 16 Ultra high-quality Microphone pre-amplifiers, 32+
tracks of recording, a control surface for all channels in Pro Tools, a 32 channel hardware mixing
surface, and routing capabilities. For example, a signal can be brought in through the 328’s Mic
pre, routed to tracks inside Pro Tools – post EQ, then routed back out of Pro Tools to a
completely different output on the 888, all while being simultaneously routed through the Lexicon
processors in the 328. At the same time the signal can be compressed by the 328 onboard
compression! This is not to mention the signal output of the 888 – happening 16 times!
24
24
. Since the 328 can (and should) integrate with Pro Tools on the audio
is the flagship interface for Pro Tools. It offers 8 channels of Analog and 24-bit
24
24
2424
interfaces
interfaces
interfaces interfaces
24
using AES/EBU cables for up
Setup is as follows –
TDIF Cable #PW 88-DL
Connect BNC, TDIF, and AES/EBU Cables as shown. Set the 328 Clock Source Sel menu to
External: SClock.
256x Slave Clock – from 888 to 328
ES/EBU I/O
RW 5599 – AES/EBU
ES/EBU I/O
Pro Tools Setup Guide
To Computer
Slave Clock
To Computer
19
19
1919
Page 21

Using the Digidesign ADAT
Using the Digidesign ADAT Bridge
Using the Digidesign ADAT Using the Digidesign ADAT
You will need the ADAT Bridge and a Digital 328; connect the two together using 4 Lightpipe
Cables (for 2-way I/O).
With this configuration, you get 16 channels of XLR Balanced input with added 24-bit Mic
Preamps, 32+ tracks of recording, Lexicon effects, and all of the routing capabilities explained
above, with the exception of the additional output from the 888 itself.
Connect the system as follows –
Bridge
BridgeBridge
TM
TM
TMTM
ADAT Lightpipe I/O
256x Slave Clock – from ADAT Bridge to 328
Connect BNC and ADAT Optical cables as shown. Set the 328 Clock Source Select menu to
External: SClock.
To Computer
20
20
2020
Spirit Digital 328 v2.0
Page 22

Using DIGI 001
Using DIGI 001
Using DIGI 001Using DIGI 001
The Digi 001 interface offers 8 channels of ADAT I/O.
Connect ADAT Optical cables to the 328 bank A or B, and set the 328 to “ADAT” under TAPE
PORT SELECT. Connect MIDI In and Out as discussed in Section 2.
In the Digi 001 Control Panel, set the clock source to External ADAT.
Use the 328 in this scenario as the centerpiece of your studio – mix synthesizers, live musicians,
vocals, and Pro Tools tracks all from the same surface! Automate the Digital 328 from Pro Tools
or control Pro Tools from the 328.
ADAT Lightpipe I/O
MIDI In & Out
To Computer
Pro Tools Setup Guide
21
21
2121
Page 23

Example Setup
Example Setup
Example SetupExample Setup
328 Setup
328 Setup
328 Setup328 Setup
Recommended setup involves the Auxiliary Optical Output port on the 328. In the MENU, scroll
to TAPE PORT SELECT and hit ENTER. Using your Down cursor, scroll to AUX OPTICAL. Set
the Aux Optical port to AUX/MIX as indicated. This will send signal in the following format: Mix
L, Mix R, Aux 1-4, FX1, and FX 2 on tracks 1-8 respectively.
<
< Aux Optical >
Aux Optical >
< <
Aux Optical >Aux Optical >
Send
Send Src:AUX/MIX
Send Send
Next, physically remove the Optical Out of one of your ADAT ports on the 328 (for example Bank
B – 25-32), and connect this cable to the Auxiliary Optical Output port on the 328.
Effects “Rack” setup in Pro Tools
Effects “Rack” setup in Pro Tools
Effects “Rack” setup in Pro ToolsEffects “Rack” setup in Pro Tools
1) In Pro Tools, launch a session and add 1 monophonic Auxilliary Input.
Src:AUX/MIX
Src:AUX/MIXSrc:AUX/MIX
9
2) Display this new Aux track in the Mixing Window in Pro Tools, and add TDM plug-ins as
desired.*
22
22
2222
Spirit Digital 328 v2.0
Page 24

3) In the Mix window in Pro Tools configure inputs and outputs. For this example setup, choose
Inputs as ADAT#2, Input 3 (Aux 1 send on the 328).
4) Repeat this procedure for the Outputs, sending the output back into channels 31 & 32 on the
328 (ADAT#2, output 7 & 8).
Pro Tools Setup Guide
23
23
2323
Page 25

Up to 6 of these Aux sends can be configured, and the outputs returned to any channel.
To utilize this system, simply select an active channel with good signal level and dial in AUX 1 for
that channel. The signal will be routed out of the Digital 328 via the Auxiliary Optical Output port,
and arrive in Pro Tools at the Auxiliary channel created in Step 1 above. Signal level should be
indicated in Pro Tools, and the effected signal will appear back at the 328, on channels 31 & 32.
Spirit by Soundcraft
Harman International Industries Ltd., Cranborne House,
Cranborne Road, Potters Bar, Herts EN6 3JN, England.
Tel: +44 (0)1707 665000 Fax: +44 (0)1707 665461
web: http://www.spiritbysoundcraft.com
e-mail: spiritsupport@soundcraft.com
spiritdig@harman.com (US)
24
24
2424
Spirit Digital 328 v2.0
 Loading...