Page 1

Pro Tools LE & Mbox® 2
Getting Started
Version 8.0
Page 2
Welcome to Pro Tools LE
Read this guide if you are new to Pro Tools® or are just starting out making your own
music. Inside, you’ll find quick examples of how to record, compose, mix, and produce your
own music in Pro Tools.
One quick question: Have you installed Pro Tools yet? If not, follow the
tions or your detailed
Setup Guide
to install Pro Tools software and your Mbox
Quick Setup
®
2 hardware.
instruc-
Do not connect your Mbox 2 to your computer until you’ve installed Pro Tools from your installer DVD as described in the Quick Setup instructions.
Connect Headphones or Speakers
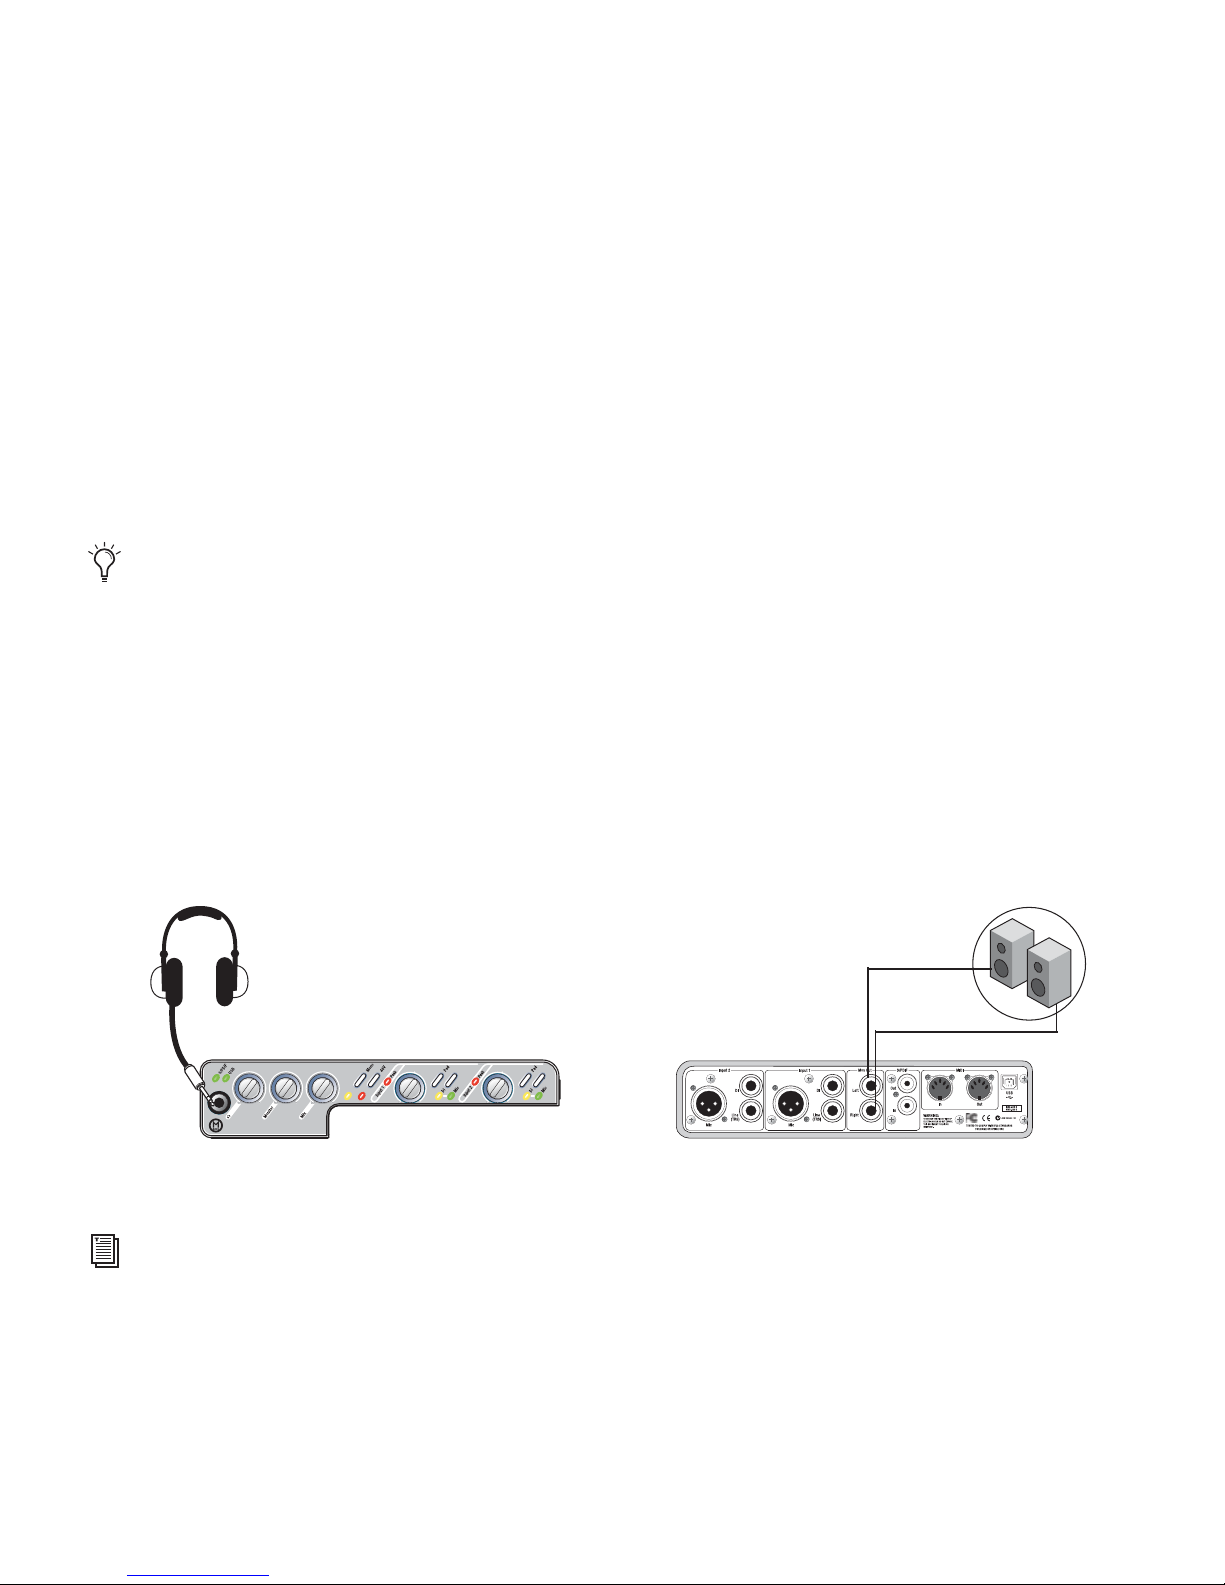
You have to be able to hear your music, so plug in some headphones or speakers.
Plug your headphones into the jack on the front panel. If your headphones have an 1/8-
inch plug, use the 1/8-inch to 1/4-inch adapter.
If you want to use speakers, connect them to the 1/4-inch Monitor outputs
(Mon Out L and R) on the back panel (L to left, R to right).
Monitor Speakers
Headphones
Where to connect headphones and monitor speakers
For detailed instructions on how to connect your Mbox 2 to headphones, speakers,
and instruments, see your system’s Setup Guide.
2
Getting Started with Pro Tools LE & Mbox 2
Page 3
Listen to the Demo Session
To get started, you can use the Demo Session to see and hear many of the things you’ll soon
be doing in Pro Tools. It also gives you sound to play so you can test your headphones or
speakers.
To install and open the Demo Session:
1
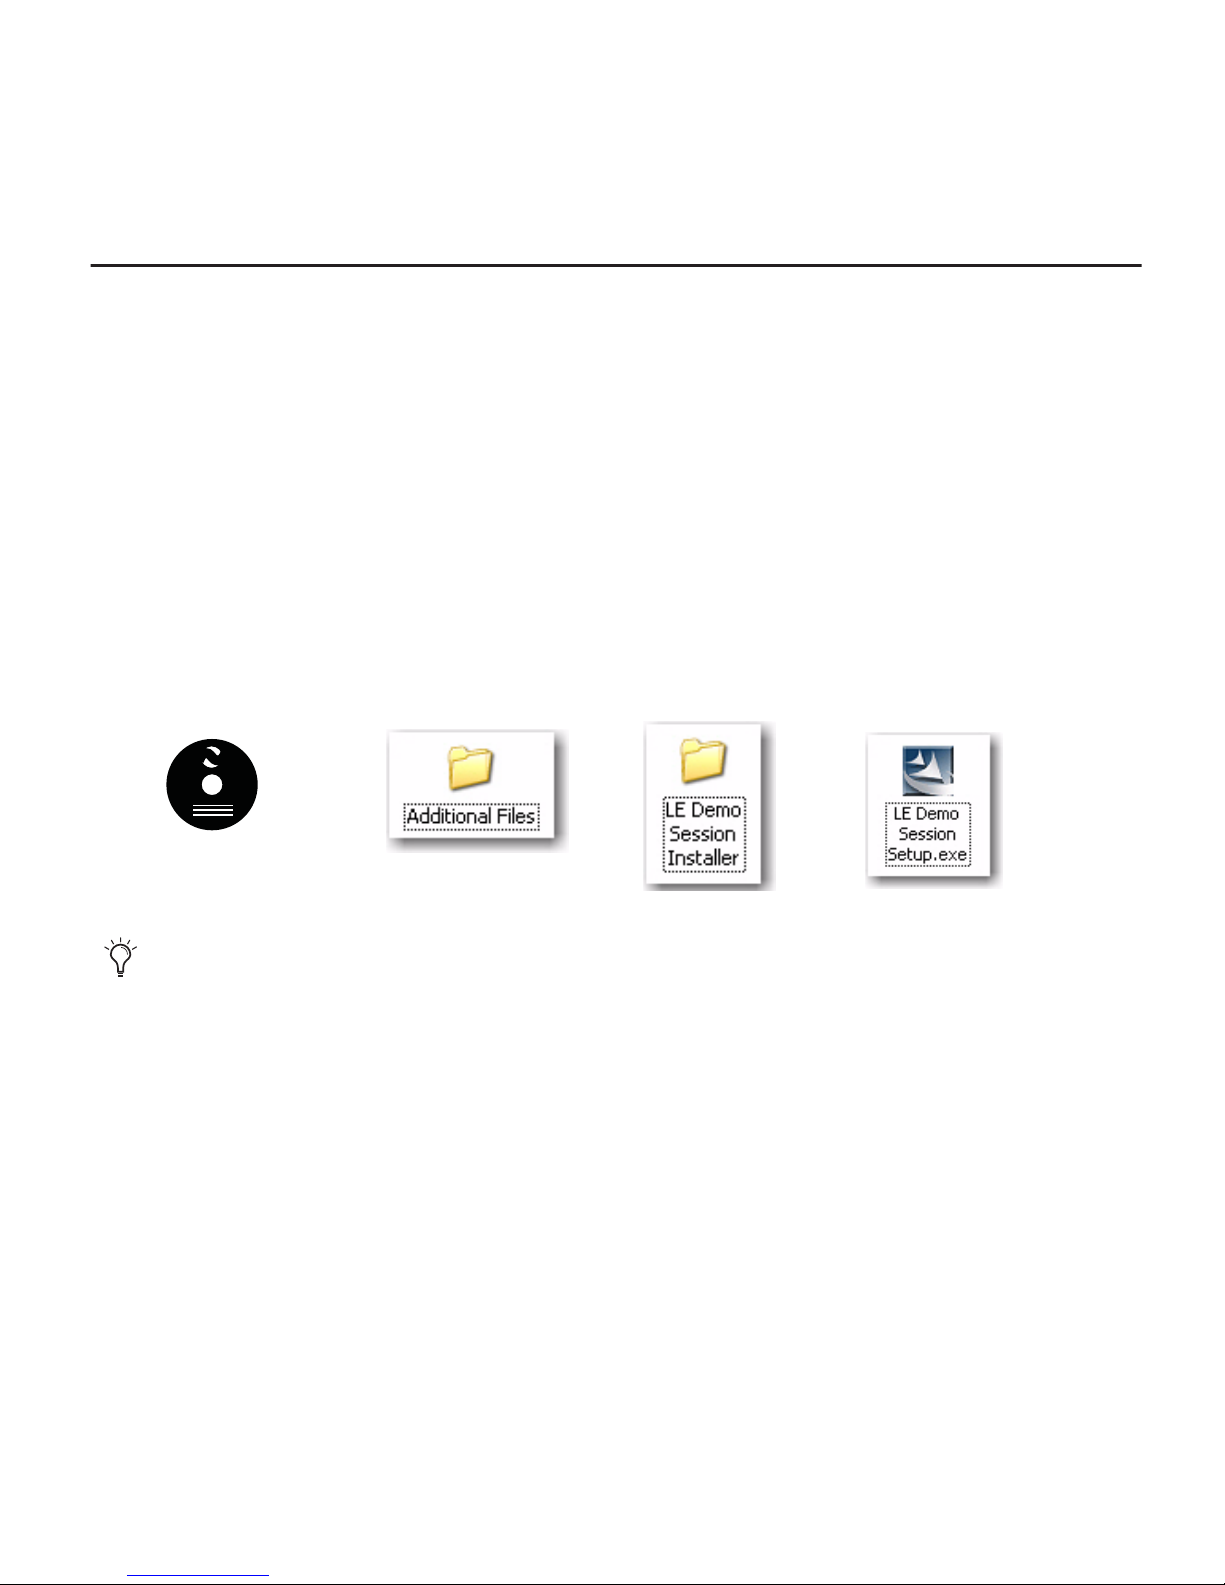
Put the Pro Tools LE® Installer disc in your DVD drive.
2
On the disc, open the Additional Files folder, then open the LE Demo Session Installer
folder.
3
Double-click the LE Demo Session Setup icon, then follow the instructions on-screen to in-
stall the Demo Session. Make a note of where you install it.
123
Pro Tools
Installer disc
For best performance Digidesign
®
recommends using an external hard drive for Pro Tools
recordings. But if you don’t have an external hard drive yet, it’s OK to put the Demo Session
on your system drive.
4
Launch Pro Tools LE by clicking its icon in the Dock (Mac) or double-clicking its icon on
your desktop (Windows). If this is the first time you are launching Pro Tools, enter your Authorization Code (located on the inside front cover of the
Setup Guide
). This is only required
the first time you launch Pro Tools.
Welcome to Pro Tools LE
3
Page 4
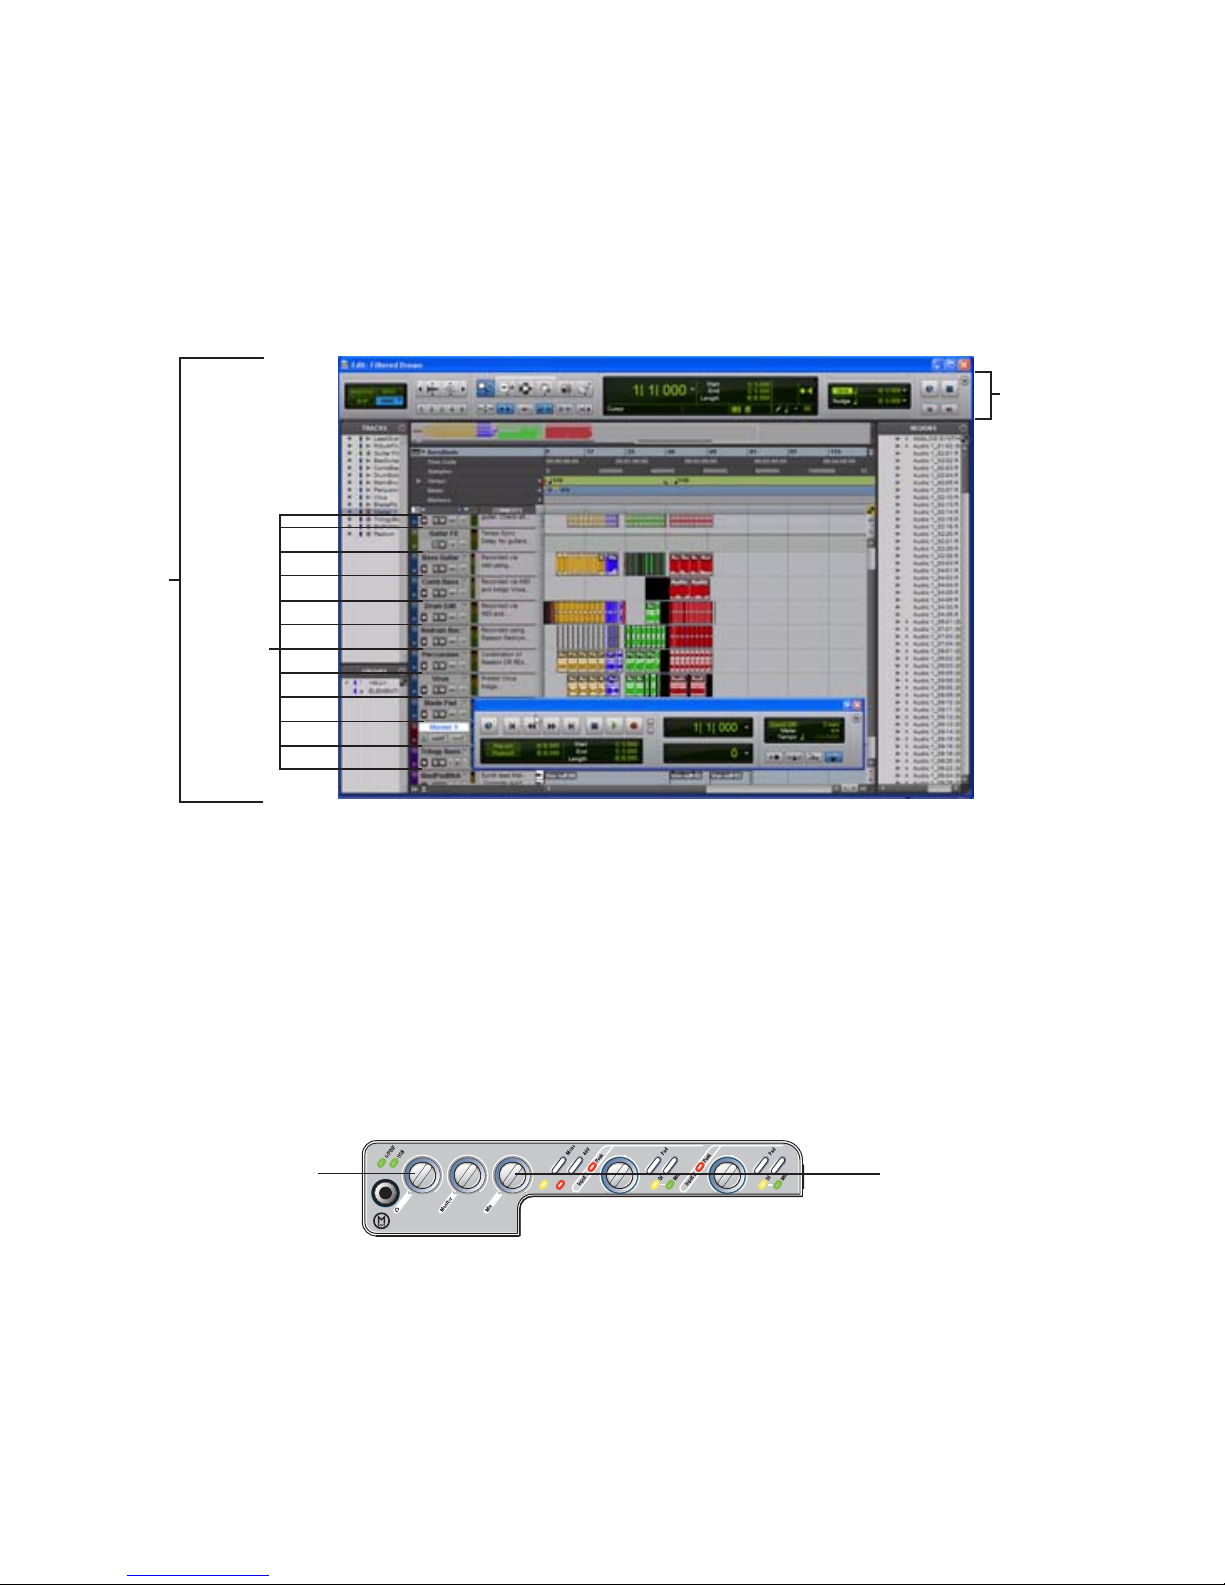
5
Choose
File > Open Session
(click the
File
menu to choose
Open Session
“Filtered Dream” (it’s inside the folder “Filtered Dream Demo Session.”)
Edit
Window
Tracks
), then open the file
Toolbar
Play and Listen
To play the Demo Session:
1
On the front of the Mbox 2, do the following:
• Turn the Headphone/Monitor Level knob fully left (counter-clockwise) to be sure your
volume is at a low enough level.
• Turn the Mix control fully right (clockwise).
Headphone/Monitor
Mix
Level
4
Getting Started with Pro Tools LE & Mbox 2
Page 5
2
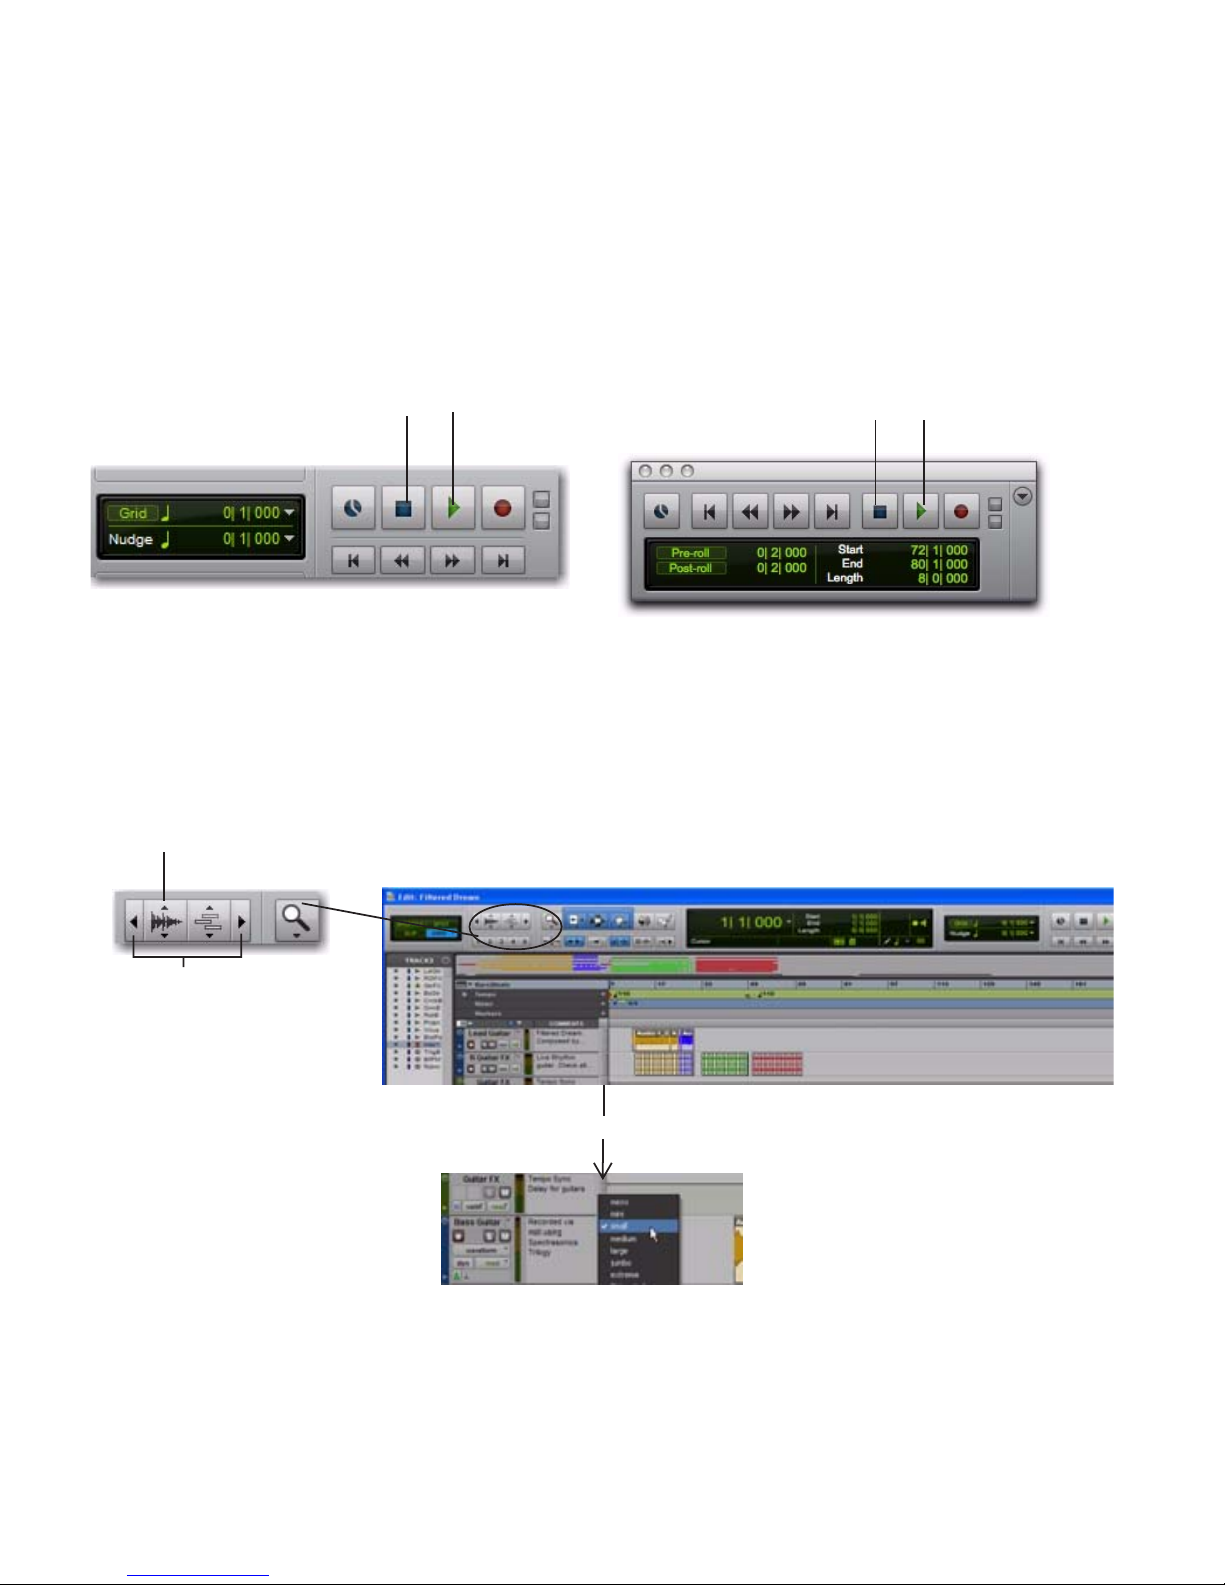
To start and stop Pro Tools, press the Spacebar, or click the Play and Stop buttons on-screen.
(These buttons are located at the top of the Edit window; you can also have them appear in
their own Transport window by choosing
Window > Transport
.)
Stop Play
Stop and Play controls in Edit window (left) and Transport window (right)
3
While the session plays, gradually raise the volume knob.
4
Explore Pro Tools while the demo plays: Use the zoom and Track view controls to zero in on
Stop Play
different tracks.
Vertical
Click to select the Zoomer tool and then drag-select to zoom in.
(Double-click the Zoomer tool to zoom back out again)
Horizontal
Click the Horizontal and
and Vertical Zoom
buttons to adjust size
and length of what is
shown in tracks
Click the Track Height selector and choose
a display height
Welcome to Pro Tools LE
5
Page 6
5
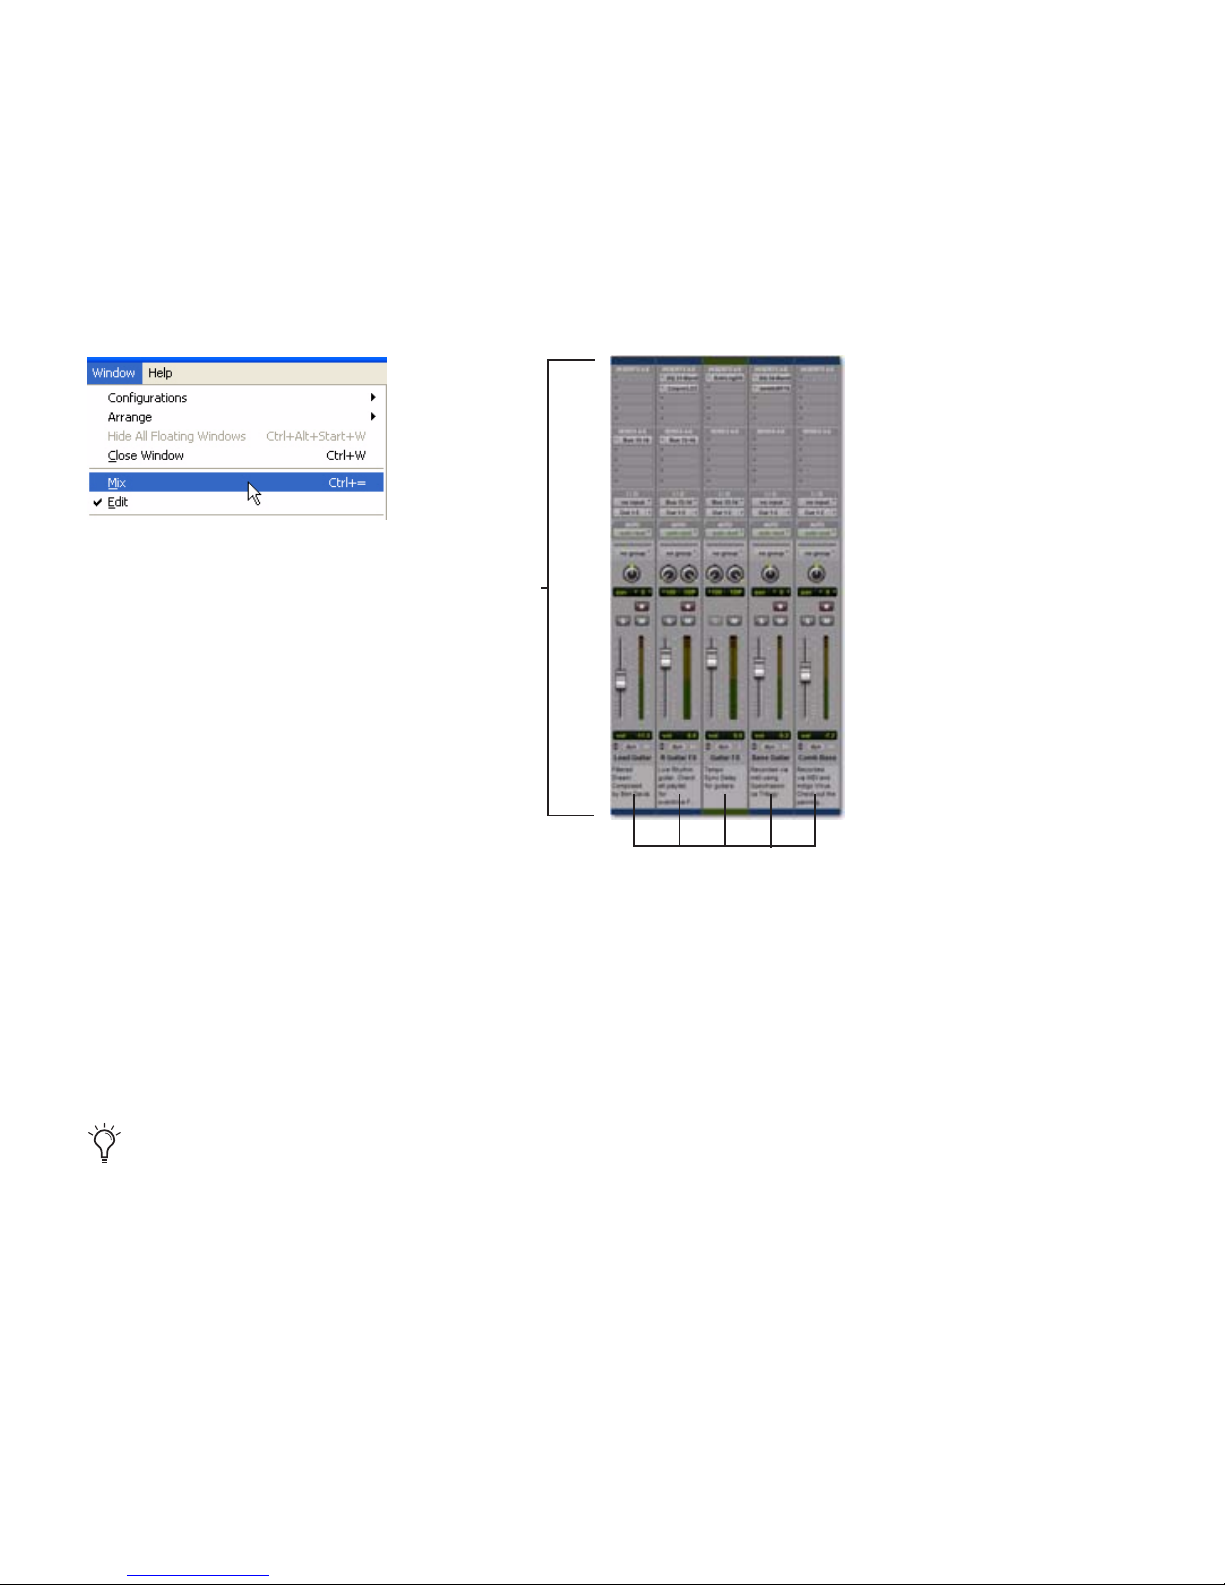
Next, click the
Window
menu and choose
in vertical channel strips.
Mix window
Mix (Window > Mix)
. The Mix window shows tracks
Tracks
The Edit window and the Mix window are the two main work areas in Pro Tools. Throughout
the rest of this guide, you’ll see examples of both windows being used for different types of
production work.
6
Press the Spacebar or click the Stop button to stop playback.
7
When you’re through checking out the Demo Session, choose
File > Close Session
.
The Demo Session is a great example of a complete, finished project that has been
arranged, edited, and mixed. You don’t need to return to the Demo Session for anything else in
this guide, but you might want to check it out again later, after you’ve been introduced to a few
more Pro Tools features. If you want to return to the Demo Session or any recent one,
click File > Recent and choose the Demo Session (if it is still one of your most recently opened
sessions), or choose File > Open and open it that way.
6
Getting Started with Pro Tools LE & Mbox 2
Page 7
Bring in a Song from a CD
This section lets you see how to create a new Pro Tools
session
and then
import
a song from a
CD. You can create a new session after you launch or when you first launch Pro Tools.
To create a new session:
1
If you already have a session open, choose
File > Close
.
The Quick Start Session dialog is an easy way to create a new session; create a new session
from a session template; open any of the last ten most recent sessions; or open any other session. For more information on this feature and on sessions in general, see the
Pro Tools Reference Guide.
2
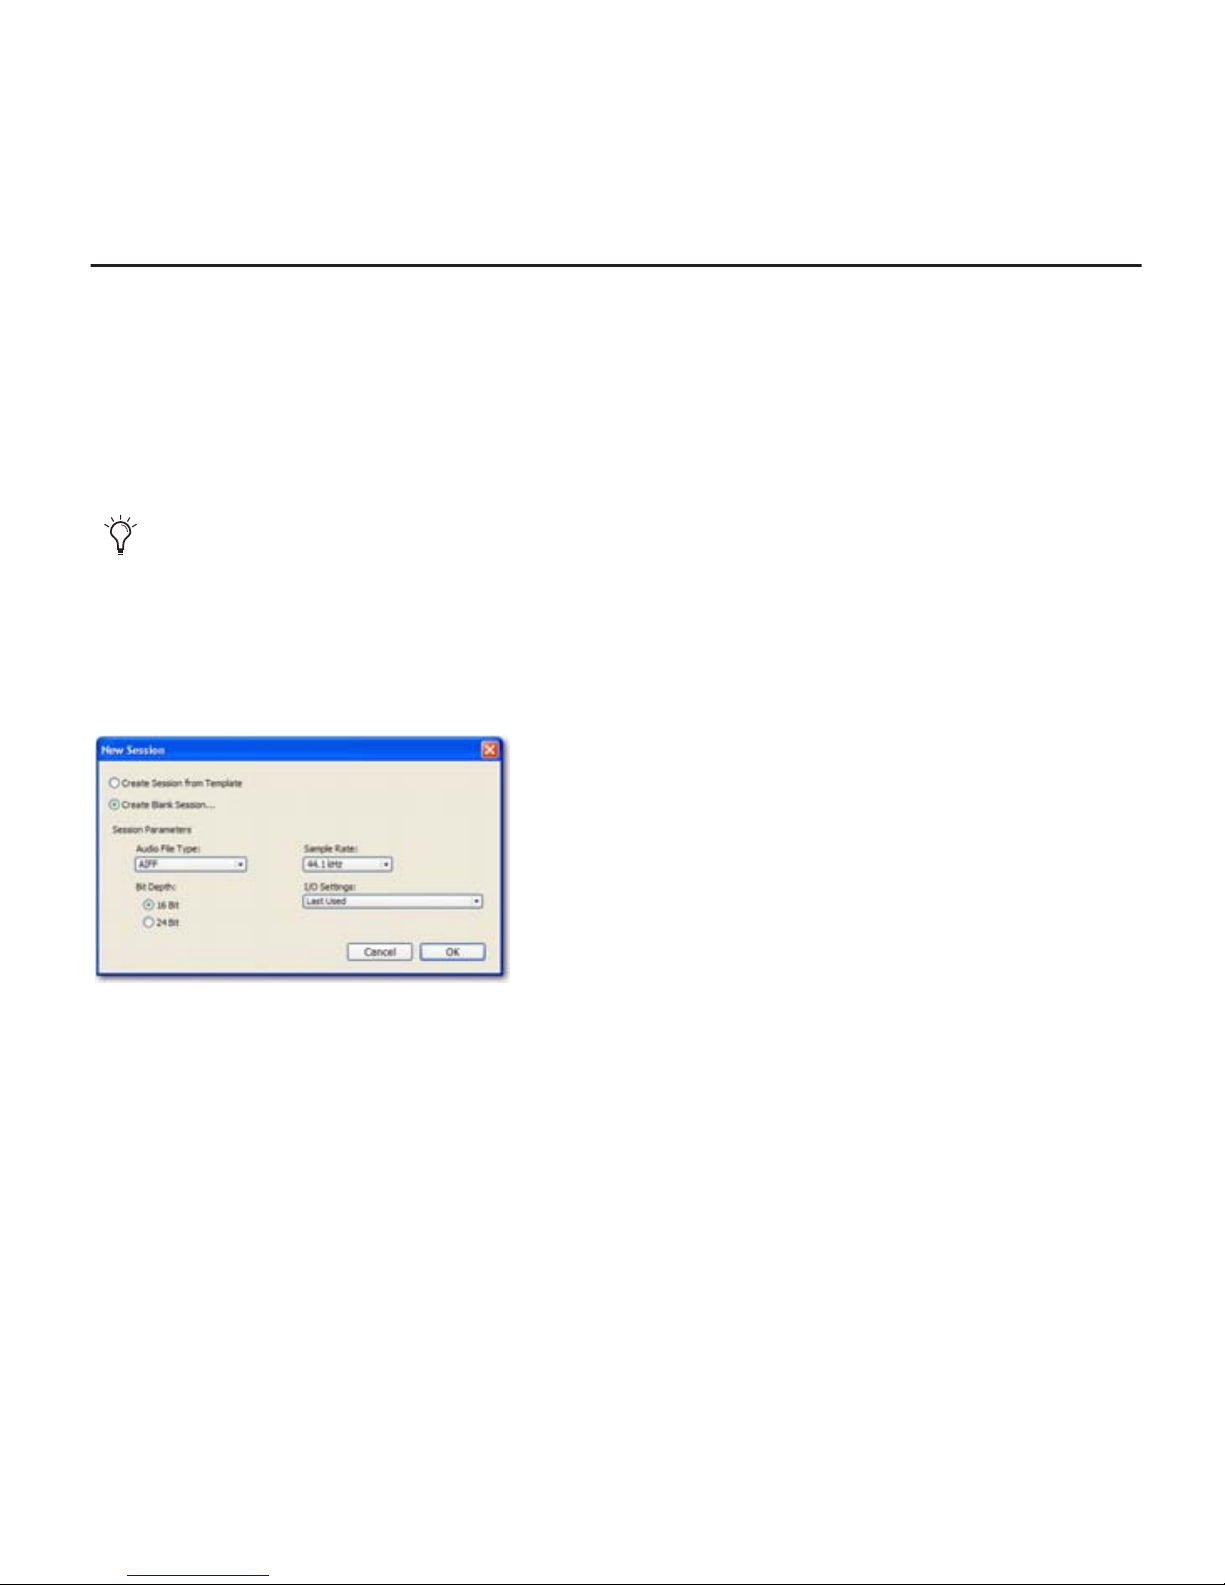
Now choose
File > New Session
.
New Session dialog
3
In the New Session dialog, choose
4
In the Name the Session dialog, choose where you want to save the session, and then name
it and click
Save.
Create a Blank Session
, then click OK.
Welcome to Pro Tools LE
7
Page 8
5
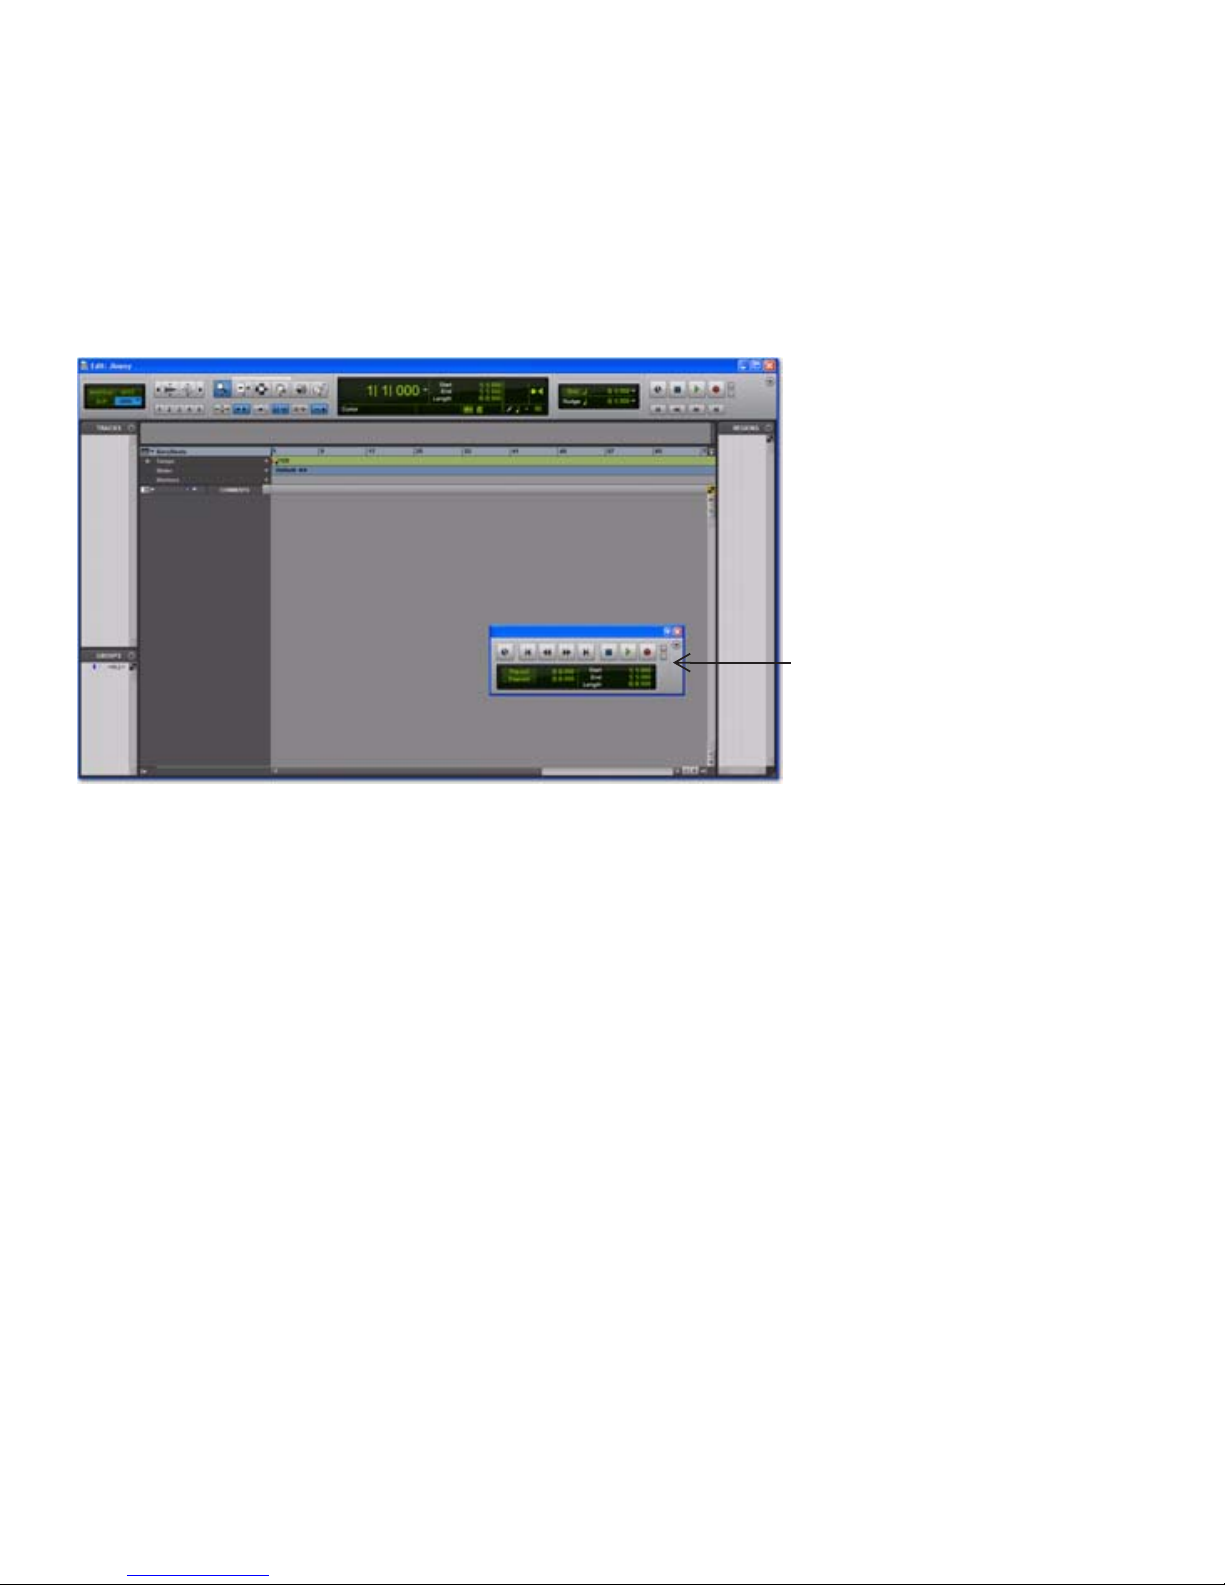
After Pro Tools opens the new session, choose
Window > Edit
It will look something like this:
The Edit window, with the Transport window showing in the foreground
so the Edit window is displayed.
Transport window
To import a song from CD:
1
Put the source CD into your computer’s CD/DVD drive.
2
In Pro Tools, choose
3
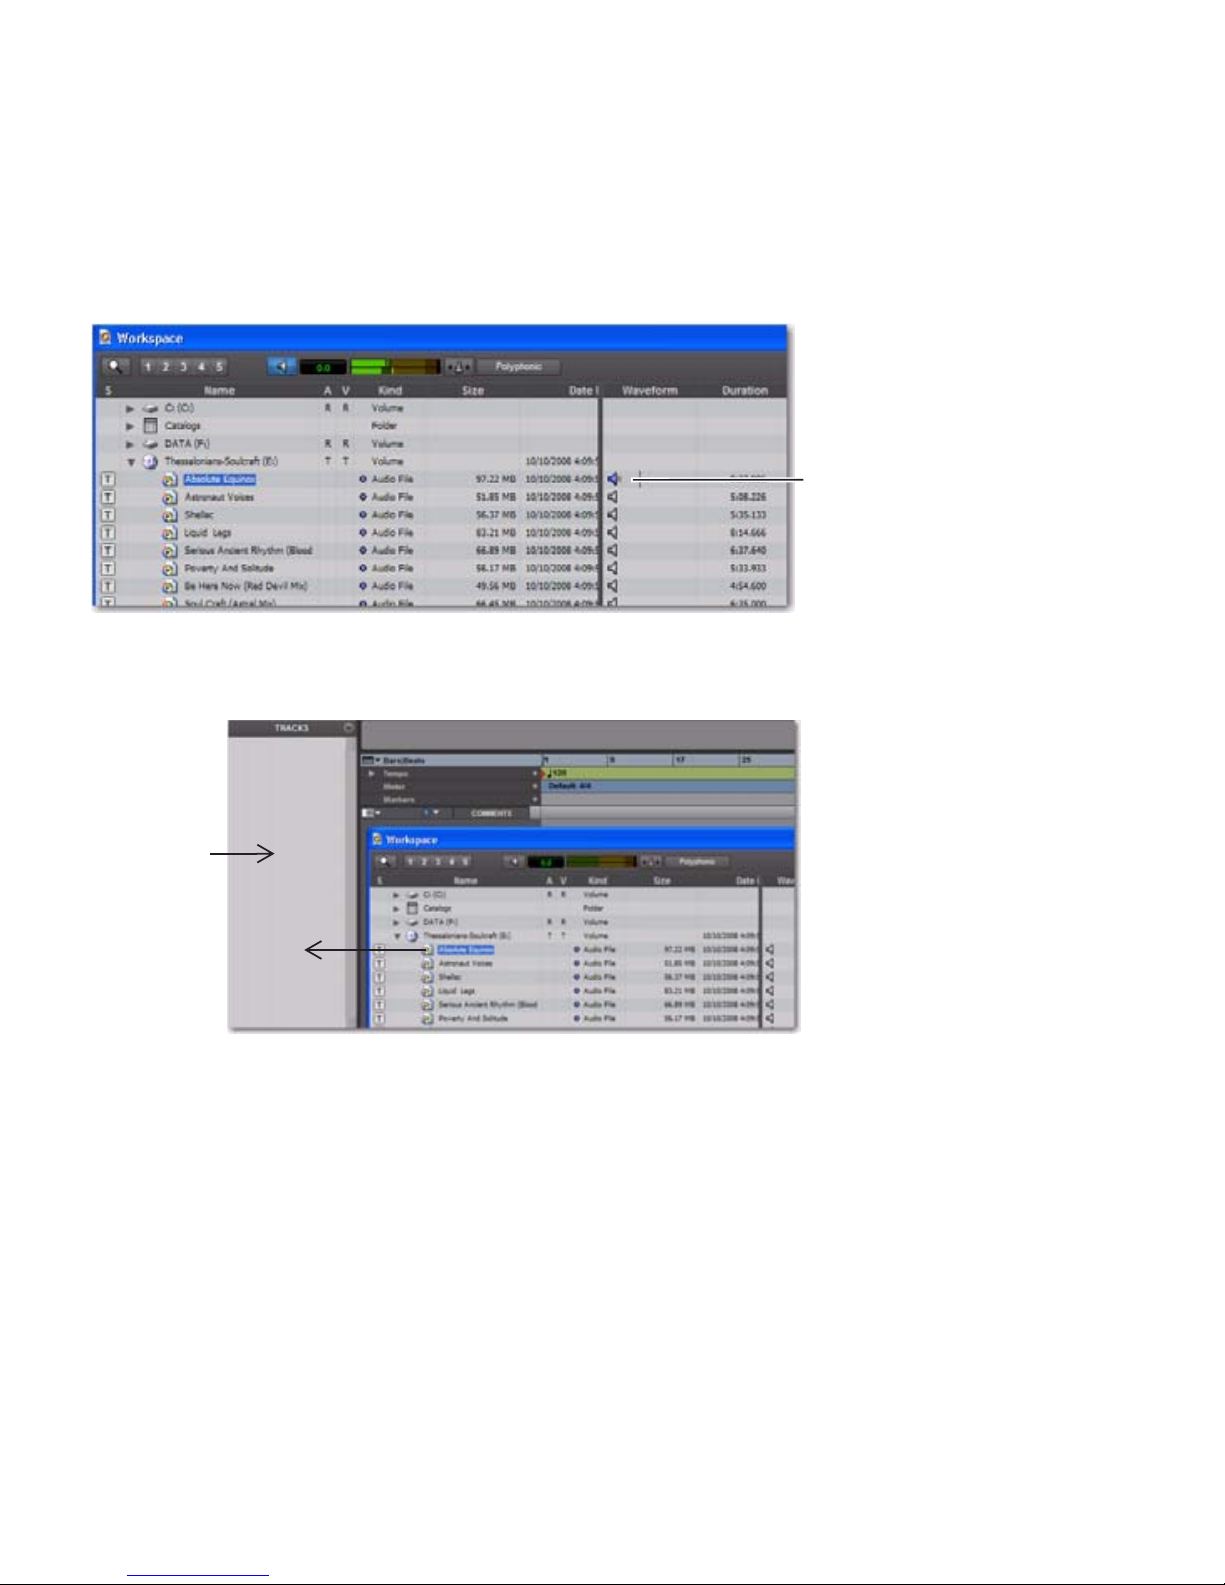
In the Workspace browser, click the Audio CD’s Expand/Collapse icon to show the files on
Window > Workspace to
open the Workspace browser.
the CD.
8
Getting Started with Pro Tools LE & Mbox 2
Page 9
4
Click an item (track) to select a song on the CD.
Tip: Click the speaker icon to
audition a selected song; press
he Spacebar to stop.
t
5
Drag the item from the Workspace to the Track List at the left of the Edit window.
Track List
Tip: You can drag and drop
video, plug-ins, and MIDI, too. If you aren’t
familiar with these terms, don’t worry
you can learn about them later.
6
Pro Tools creates a new audio track, containing the song.
7
Close the Workspace browser, then press the Spacebar to begin playing back the song in
Pro Tools (see “Play and Listen” on page 4).
Welcome to Pro Tools LE
9
Page 10

Make an Audio Edit
In this example we’ll show you how to do a simple edit to change where a song starts. To show
this, we used a song where the drummer is heard “counting off” the tempo (“1...2...1.2.3...”)
before the song starts. Here’s what this song looks like in Pro Tools.
countoff
song start
In the picture, the two
waveforms
let you visualize the different sections. We can take advan-
waveforms
tage of this “what you see is what you hear” aspect of Pro Tools to be able to quickly silence
the countoff by “trimming” the beginning of the song.
To trim:
1
Click to select the Trim tool (located in the toolbar).
2
Click in the track after the countoff and before the start of the song (you’ll see the cursor dis-
play the Trimmer icon). Drag left or right to fine tune the location.
Trim tool
song start
3
For future reference, you can “untrim” the song by clicking and dragging the song start back
to the left with the Trim tool. You’ll see that the previous audio (the countoff) is still there.
This is a small example of how Pro Tools lets you edit
10
Getting Started with Pro Tools LE & Mbox 2
non-destructively
.
Page 11

Record Yourself
This section shows how to connect a microphone and record yourself singing or playing an instrument.
Connect a Mic
To hook up a microphone:
1
Plug a mic into the one of the Mic inputs or one of the DI inputs on the back panel:
• If your mic has an XLR cable, plug into a Mic input.
• If it has a 1/4-inch cable, plug into a DI input.
- Or -
Input 1
Mic input
Connecting a mic to Input 1 with an XLR cable (left) or a 1/4-inch cable (right)
Input 1
DI
Welcome to Pro Tools LE
11
Page 12

2
On the front panel, set the Mic/DI switch in or out, depending on your connection:
• If you’re using XLR, press the Mic/DI switch (Mic position) until the Mic LED is lit.
• If you’re using the DI input, press the Mic/DI switch (DI position) until the DI LED is lit.
Mic/DI
Source selector
Mic
DI
LED
LED
Input 1 Source selector and LEDs
Your Mbox 2 has two input channels, labeled Input 1 and Input 2. Each input channel pro-
-inch Line (TRS) and one π-inch DI (TS). In use, it’s
vides three jacks; one Mic (XLR) one
OK to have things connected to both π-inch connectors of either input channel; use the Source
switch (Mic/DI) to select between Mic/Line, and DI settings. However, whenever a TRS cable
is plugged into the Line (TRS) port, the XLR port on that channel is ignored. To use the XLR
jacks, be sure to unplug anything connected to the Line (TRS) jack for that channel, and set
the
Source
switch to Mic/Line input).
π
12
Getting Started with Pro Tools LE & Mbox 2
Page 13

Create a Track
Pro Tools
tracks
are where audio, MIDI and other elements get recorded and edited within a
session. Before you can record, you need to create one or more tracks.
To prepare an audio track for recording:
1
In a Pro Tools session, choose
2
To record a single mic or instrument (as in our example), set the New Track dialog for
1 Mono Audio Track
Creating a new mono audio track
, in
Samples
Track > New
, and click
.
Create
.
If you want to record both inputs at once, create one or two new tracks depending on what
you’ve got plugged in and what you plan to record:
• To record two different sources (such as one vocal mic and one electric guitar),
create 2
Mono
audio tracks. This lets the two input signals be recorded simultaneously, and
be edited, processed, and balanced independently.
• To record a two-channel stereo source (such as a stereo keyboard, or the left and right outputs from a DJ mixer), create 1
3
Make sure the Mix window is open by choosing
Stereo
audio track.
Window > Mix
.
Welcome to Pro Tools LE
13
Page 14

4
In the middle of the new track’s channel strip, notice where it says “In 1 (Mono).” This
shows which Input channel (Input 1 or Input 2) is assigned to this track. (To specify a different
input channel, click the Input Path selector and choose the other channel.)
Input Path selector
Record a Performance to a Track
To record an audio track:
1
Click the track’s Record Enable button.
Record Enable button
Record enabling a track in the Mix window
2
Choose
“set your levels.”
3
On the front of the Mbox 2, turn the Mix knob fully left (counter-clockwise).
14
Getting Started with Pro Tools LE & Mbox 2
Track > Input Only Monitoring
. This lets you listen to your incoming signal so you can
Page 15

4
Sing into your mic, and watch the meter in the Pro Tools track while you raise the Input 1
gain knob on the front of the Mbox 2. Turn it clockwise until you see the on-screen track meter show green most of the time, or yellow for your louder passages.
• If the track meter shows red, gain is too high; lower the gain knob. If the signal is still too
loud, press the Pad switch to engage the 20 dB pad.
• If you barely see green in the track meter, gain is too low. Don’t move the on-screen fader
to try and adjust your input level, use the front panel Gain knob instead.
Mix control
Gain
Pad
Track meter
5
In the toolbar (or in the Transport window) click the Return to Zero button to jump back
to the start of the session, then click the Record button. This tells Pro Tools that you’re happy
with your levels and are ready to record (think of this as a “master” record enable button).
RecordPlayReturn to Zero
Welcome to Pro Tools LE
15
Page 16

6
Choose
7
When you are ready to start recording, click Play or press the Spacebar. To stop, press the
Window > Edit
so you can watch what happens when you record.
Spacebar or click Stop. Here’s what Pro Tools looks like while it’s recording a track.
Recording a vocal track
If you want to use a click track/metronome, see the “Using a Click (Metronome)” section on
Page 20.
Listen to Your Work
To play back a recorded track:
1
Click the track’s Record Enable button again to take it out of Record mode.
2
On the front of the Mbox 2, turn the Mix control fully to the right.
3
Click Play in the Transport window or press the Spacebar to start playback.
4
When you want to stop, press the Spacebar or click Stop.
Record More Tracks
To record another track:
1
Choose
2
Choose
Track > New
and create 1 Mono audio track.
Track > Auto Input Monitoring.
3 In the new audio track, click its Input path selector and choose the same input (In 1) you
used before.
4 Next, click the track’s Record Enable button, just like you did on the first track.
16
Getting Started with Pro Tools LE & Mbox 2
Page 17

5 In the Transport window, click the Return to Zero button to jump back to the start of the session, then click the Record button (the button flashes) to arm Pro Tools for recording. When
you are ready to start recording, click Play or press the Spacebar. You might need to adjust the
Mix knob until you hear a good balance of track and mic input.
6 Press the Spacebar again to stop playback.
Hard drives are one of the most important components of your Pro Tools system. For best performance, Digidesign recommends using an external hard drive for Pro Tools
recording. Also, hard drives cannot be formatted as “FAT32” (this format does not support the
kind of performance required for audio recording and editing with Pro Tools). To learn more
about hard drives for your Pro Tools system, see the Setup Guide.
Make a Beat
This section shows you how to work with the Xpand!2, a plug-in you can use to build beats and
compose music.
The Xpand!2 Virtual Instrument Plug-in
Xpand!2 is a virtual instrument plug-in, which means it makes sound. Xpand!2 is part of the
Pro Tools Creative Collection suite of plug-ins that comes free with Pro Tools. It's installed automatically during the install, unless you specified to not have it installed. Here’s how to start
utilizing its many drum kits, basses, strings, keyboards, horns, sound effects and other sounds.
You can add all sorts of plug-ins to your system to make sounds (“instrument” plug-ins like
2
Xpand!
) or to change your sound (“processing” plug-ins like reverb, EQ and compression).
For more information on your free plug-ins, see the Creative Collection Plug-ins Guide, and
the DigiRack Plug-ins Guide. (Find them by going to the Help menu in Pro Tools.)
Set Up a Track
You add Xpand!2 to your sessions by inserting it on a specific type of track called an Instrument
track.
Welcome to Pro Tools LE 17
Page 18

To create a track for beats and composition:
1 Choose Track > New. In the New Track dialog, click the pop-up menu that says Mono and
choose Stereo, then click the pop-up menu that says Audio Track and choose Instrument Track.
Leave the other settings as they are and click Create.
Creating a stereo Instrument track
2 Choose View > Mix Window to display the Mix window.
3 Click the track Insert selector near the top of the Instrument track and choose Xpand!
2
from
the Instrument sub-menu.
Insert
selector
2
Inserting Xpand!
18
Getting Started with Pro Tools LE & Mbox 2
Xpand!
2
Page 19

4 Now let’s load a sound. Click the Librarian menu (<factory default>) and choose a preset
from the Loops sub-menu. Presets are pre-configured settings files, and they’re a great way to
see examples of what a plug-in can do.
Click the Librarian menu to
see the list of presets, then
choose an item from a
sub-menu.
5 Make music by doing one of the following:
• If you have a MIDI controller already connected, you can record yourself playing
2
Xpand!
. For more information see “Using a MIDI Controller/Keyboard to Compose” on
page 25.
– or –
• Create MIDI notes using the mouse. To see an example of how you can compose without
a MIDI controller, see the next section.
Welcome to Pro Tools LE 19
Page 20

Make Beats and Compose Without a MIDI Controller
You can make beats and compose in Pro Tools using just the mouse.
To create a note:
1 Close or move the Xpand!2 plug-in window, then choose Window > Edit so you can see the
Instrument track in the Edit window.
2 Click to select the Pencil tool (it’s in the toolbar).
3 Click the Track View selector for the track and select the Notes format from the menu.
Click for Track View pop-up menu
Instrument track
in Notes format
4 Now click in the main Instrument track to “pencil in” some notes.
notes
20
Getting Started with Pro Tools LE & Mbox 2
Page 21

The small horizontal bar created with each mouse click is a MIDI note. The location and length
of each note determines when, and for how long, you’ll hear the sound. Since we’re using a
Loop preset in this example, we need to lengthen this note so we can hear the complete loop
of the Xpand!
2
preset.
Edit a Note
To lengthen a MIDI note:
1 Click to select the Trim tool (located in the toolbar across the top of the Edit window), and
then use it in your Instrument track to click-and-drag the right edge of the MIDI note out to
the right to make it longer. This leaves the note selected (highlighted).
Trim tool being used in a track
2 Press the Spacebar to start playback, which will start from the current selection (in this case,
the MIDI note we lengthened). You should hear the drum loop play for the duration of the
MIDI note.
Using a loop is one fast way to get a beat going, but you can use the same basic
techniques to quickly build a beat piece-by-piece too.
Welcome to Pro Tools LE 21
Page 22

To compose a beat from scratch:
1 Repeat the previous steps to create a stereo Instrument track and insert Xpand!
2
on it.
2 Instead of choosing a Loop preset, choose something from the Drums sub-menu.
3 Now, pencil some notes in on the new drums track. Here’s what our example session looks
2
like after we added another Xpand!
track to the loop track we set up previously.
One long note (for a loop)
Five different notes (kick, snares, and other)
2
4 To add a bass line, create another track, insert Xpand!
One more thing: This example showed how to manually enter and edit notes. For a more musical way to compose, lots of people use an external MIDI controller such as a MIDI keyboard
or M-Audio TriggerFinger to let them play and perform instead of only writing and editing
with the mouse. If you want learn how to do this, see “Using a MIDI Controller/Keyboard to
Compose” on page 25
, then load up a bass tone.
Using a Click (Metronome)
A click track (also known as a metronome) gives you a steady time reference while recording
tracks. Pro Tools lets you create a specialized click track that comes with a the Click plug-in
already inserted on it.
To add a click track:
1 Choose Track > Create Click Track. Pro Tools creates a new Auxiliary Input track named
“Click” with the Click plug-in already inserted.
2 Choose View > Mix Window to display the Mix window.
3 At the top of the track, select the Click plug-in.
22
Getting Started with Pro Tools LE & Mbox 2
Page 23

4 In the Click plug-in window, click the Librarian menu and pick a sound. You can pick a cowbell, sidestick, and other common click sounds.
Librarian menu
Creating a Click Track
5 Select View > Transport > MIDI Controls to view the MIDI controls in the Transport Window.
6 Click the Metronome Click button so it’s highlighted blue.
Highlighted Metronome button
7 Now click Play in the Transport window or press the Spacebar to listen to the click.
Welcome to Pro Tools LE 23
Page 24

Changing the Tempo
You can change the session tempo to speed up or slow down your song.
To adjust the tempo do the following:
Choose View > Rulers > Tempo. See where it says “Tempo” in the Edit window? Click on the
plus symbol (+) that appears next to it. Then type the tempo you want in the Tempo Change
pop-up menu and click OK.
Add Tempo Change symbol (+)
24
Getting Started with Pro Tools LE & Mbox 2
Default tempo is 120 BPM
Page 25

Using a MIDI Controller/Keyboard to Compose
What’s MIDI?
MIDI (Musical Instrument Digital Interface) data isn’t audio, so it has no sound of its own.
MIDI is just a way for musical devices, such as virtual instrument plug-ins, MIDI controllers,
and MIDI sequencers, to talk to one another.
It helps to have a MIDI controller/keyboard when creating a MIDI recording (or MIDI sequence). To create a MIDI recording, there must be a MIDI instrument (real or virtual) available to trigger. Hardware MIDI instruments connect via MIDI cables to the MIDI inputs and
outputs on your audio interface or MIDI interface. Virtual sound modules are inserted as plugins on Instrument tracks in Pro Tools and accessed directly from within Pro Tools.
Make Beats and Compose With a MIDI Controller
Here we’ll show you how to compose with a MIDI controller/keyboard instead of a mouse.
To Record MIDI on an Instrument Track:
1 Make sure your Mbox 2 is connected to your computer.
2 Use MIDI cables to connect your MIDI controller/keyboard directly to the MIDI ports on the
back of the Mbox 2. If you already have some other type of MIDI controller that’s a USB device,
see the Setup Guide.
3 Choose Track > New. In the New Track dialog, click the pop-up menu that says Mono and
choose Stereo, then click the pop-up menu that says Audio Track and choose Instrument Track.
Leave the other settings as they are and click Create.
4 Choose View > Mix Window to display the Mix window.
5 Click the Track Insert selector near the top of the Instrument track and choose Xpand!
2
from
the Instrument sub-menu.
6 Click the Librarian menu and choose a preset sound, like a bass.
7 Select Options > MIDI Thru. (Verify that MIDI Thru is checked, if not select it.)
Welcome to Pro Tools LE 25
Page 26

8 Click the Record Enable button to enable the Instrument track for MIDI recording.
9 In the Transport window, click Return to Zero to start recording from the beginning of the
session. You can also record to a selection in a track or from the cursor location in the Edit window.
10 Click the Record button.
11 Now play your MIDI controller/keyboard and hear the bass sound.
12 When you are ready to start recording, click Play or press the Spacebar. To stop, press the
Spacebar or click Stop.
MIDI data in the Instrument track
13 Click the track Record button again to take it out of record enable and play back what you
just recorded.
If this sort of composition interests you, see the Pro Tools Reference Guide (Help > Pro Tools
Reference Guide) to learn more about Loop Playback, and how you can apply all sorts of other
musical treatments to your rhythms, sounds, and patterns.
26
Getting Started with Pro Tools LE & Mbox 2
Page 27

Mix and Change Your Sounds
Your Pro Tools LE system comes supplied with a wealth of plug-ins that you can use to change
the sounds you’ve recorded. This section shows two examples of how to use plug-ins to process your sound. (The plug-ins used in this chapter are part of the DigiRack suite of plug-ins)
We’re going to show you how to use compression on one track, then we’ll apply reverb to a
bunch of tracks. Lastly, to finish up our song, we’ll apply a fade out to the ending.
Compression
Compression is a way to smooth the dynamics of a track (make your soft and loud parts sound
less uneven). It’s one way to make a vocal sound more intimate.
To apply compression to a track:
1 Choose Window > Mix.
2 In the top part of the track, click the first Track Insert selector and choose Compressor/Lim-
iter Dyn 3 (mono) from the Dynamics sub-menu. Pro Tools inserts the Dynamics 3 Compressor/Limiter plug-in on your track and opens its plug-in window.
Insert
Selector
Inserting a plug-in on an audio track
Welcome to Pro Tools LE 27
Page 28

3 Press the Spacebar to start playback.
4 In the plug-in window, click the Librarian menu (shown below) and choose an available Set-
tings File (preset) from the list.
Librarian
menu
5 Choose other presets and you can hear what their settings do to your sound. Try out different plug-ins to start learning about the different colors you have at your disposal. (The electronic DigiRack Plug-Ins guide is installed in your Documentation folder, and it’s a great place
to learn more about EQ, delay (echo) and other types of effects.)
6 Press the Spacebar again to stop playback.
Reverb
Reverb is a great effect for vocals; it’s what can make you sound like you’re in a big
concert hall. One of the best ways to incorporate reverb in your mix is in a “send-and-return”
configuration. Send/return makes it easy to send multiple vocal tracks or
instruments to and through the same single reverb effect.
To use reverb on one or more tracks:
1 Choose Window > Mix.
28
Getting Started with Pro Tools LE & Mbox 2
Page 29

2 Click the Send selector on your vocal track as shown below and choose Bus 1-2.
Send A
Selector
3 Choose Track > New, and set it to create 1 stereo Auxiliary Input track, then click Create.
4 On the new Auxiliary Input track you just added, do the following:
• Click the Track Insert selector and choose D-Verb from the Reverb sub-menu.
• Click the Track Input selector and choose Bus 1-2.
Insert
Selector
Track Input
Welcome to Pro Tools LE 29
Page 30

5 Click the Send assignment on your vocal track to open the Send Output window.
Send
Raise the Send fader
6 Press the Spacebar and slowly raise the small fader in the Send Output window. This adjusts
how much of the vocal track you are sending to D-Verb.
7 Keep playing and listening, and check out different D-Verb settings. Repeat this section’s basic instructions to try out a Delay, EQ, or other type of plug-in too.
Fade Out the End of the Song
To put the finishing touch on a song it’s sometimes nice to go with the classic fade out. Here’s
an example of how to use mix automation to fade out a track. (There are many other ways to
create fades described in the Pro Tools Reference Guide.)
To do a fade out:
1 In the Edit window, click in a track to place the cursor a few seconds before where you think
you want to start your fade out.
30
Getting Started with Pro Tools LE & Mbox 2
Page 31

2 In the Mix window, click the Automation Mode selector (auto read) for a track and
choose Write.
Automation Mode
Selector
3 Press the Spacebar and use your mouse to lower the fader level and fade out the song. Let
playback continue for a couple extra seconds (after “last sound”), then hit the Spacebar again
to stop playback.
4 Click Automation Mode selector again and put it into Read mode.
5 Press the Spacebar to hear the same section. Pro Tools reads back your fade out.
6 Now choose Window > Edit.
7 Click the Track Display selector (it should say waveform) and choose volume from the pop-up
menu. What you now see is the “breakpoint” data for the fade out.
You can also write breakpoint automation directly into a track, and edit it with many of the
same tools we use to edit audio such as the other Pencil tools, the Grabber, and the Trimmer.
You can learn more about how to record and edit your control moves in the
Pro Tools Reference Guide.
Welcome to Pro Tools LE 31
Page 32

Get Your Music Out to the World
After you’ve finished recording and editing tracks in a Pro Tools session you’re ready to mix
down. In these last few pages you’ll see how to do this using the Pro Tools Bounce to Disk fea-
ture to combine all the tracks that make up a session into a single “master” audio file. After the
new audio file has been bounced to disk, you can burn it to a CD or convert it to MP3 using
a CD burning application, like iTunes.
To create a stereo master from a session:
1 Use the Selector to click-drag the length of the session in the Timeline (or on a track).
Selector
Timeline
Session audio selected
and ready to
Bounce to Disk
2 Choose File > Bounce to > Disk.
32
Getting Started with Pro Tools LE & Mbox 2
Page 33

3 In the Bounce Options dialog, do the following to create a CD-compatible 2-track of your
audio:
• Choose Outputs 1–2 as the Bounce Source.
• Choose BWF (.WAV) for the File Type.
• Choose Stereo Interleaved for the Format.
• Choose 16 for the Resolution and 44100 for the Sample Rate.
Digidesign also offers an MP3 Option that lets you bounce directly to MP3 format. Check the
DigiStore on our website (www.digidesign.com), or contact your Digidesign dealer if you’d like
more information. To learn more about the other options in the Bounce to Disk dialog, see the
Pro Tools Reference Guide.
4 Choose Convert after Bounce, and click Bounce. (If you make no selection, your entire session
will bounce from start to finish.)
Bounce options (shown set to create audio CD burnable tracks)
Welcome to Pro Tools LE 33
Page 34

5 In the Save Bounce As dialog, name your bounce and pick where it should be saved, then
click Save. Pro Tools begins bouncing to disk. Pro Tools bounces are done in real time, so you
hear audio playback of your mix during the bounce process (you cannot adjust any Pro Tools
controls during a bounce).
After Mixdown, Mastering
After the bounce is completed, you will have an audio file that you can convert to MP3 using
most common CD burning software. Converting to MP3 lets you listen to it on your iPod, post
on your site, or send via email. Or, use the burner software to write the file to an audio CD that
can be played on standard CD players. Listening to a reference CD in an environment other
than your studio is a time-tested, professional way to see how your mix translates to other systems or listening environments.
Learn More
We hope this quick introduction has inspired you to make music with Pro Tools. To learn
more about any of the topics presented, check the Pro Tools Reference Guide. Search for any
terms you’re curious about. You can also watch any of the video tutorials included with your
package or online at the Digidesign website (www.digidesign.com).
2008 Avid Technology, Inc., all rights reserved. This guide may not be copied in whole or in part without the written
©
consent of Avid. Product features, specifications, system requirements, and availability are subject to change without
notice. Avid, Digidesign, and Pro Tools are registered trademarks of Avid Technology, Inc. in the U.S. or other
countries. Other trademarks are the property of their respective owners.
Guide Part Number: 9320-59673-00 REV A 11/08
34
Getting Started with Pro Tools LE & Mbox 2
 Loading...