

Page 1

Basics
Digi 002® & Digi 002 Rack™
Version 7.0
Page 2

Copyright
© 2005 Digidesign, a division of Avid Technology, Inc. All rights
reserved. This guide may not be duplicated in whole or in part
without the express written consent of Digidesign.
Avid, Digidesign, Digi 002, Digi 002 Rack, and Pro Tools are
either trademarks or registered trademarks of Avid Technology,
Inc. in the US and other countries. All other trademarks
contained herein are the property of their respective owners.
Product features, specifications, system requirements and
availability are subject to change without notice.
PN 9320-17744-00 REV A 10/05
Page 3

Introduction
Welcome to the
Basics Guide
users specific methods for accomplishing common tasks with the Digi 002 or Digi 002 Rack
desktop audio interface and Pro Tools LE software.
Once you are familiar with basic Digi 002 and
Digi 002 Rack operation, we recommend that
you read the “Working With Pro Tools” tutorial
in the
Digi 002 and Digi 002 Rack Getting Started
Guide
. For the most complete information on
using Pro Tools, see the
Digi 002 and Digi 002 Rack
. This guide is designed to give new
Pro Tools Reference Guide
Online Resources
Many resources for learning to use Pro Tools are
also available online at the Digidesign Web site
(www.digidesign.com), including the following:
DiSK (Digidesign Sound Knowledge)
tional material about how to use Pro Tools, including DiSK Flix movies that show how to do a
number of popular tasks using Pro Tools.
DigiZine
ers, providing all the latest product news, user
stories, and hundreds of tips and ideas.
A magazine for and about Pro Tools us-
Instruc-
Digi 002 and Digi 002 Rack Basics Requirements
Before proceeding, make sure you have:
• Connected the Digi 002 or Digi 002 Rack to
your computer with the FireWire cable
– and –
• Installed Pro Tools LE software as described in
the appropriate Windows or Macintosh installation chapter of the
Rack Getting Started Guide
.
Digi 002 and Digi 002
.
Introduction
1
Page 4
Getting Sound In & Out of Digi 002 or Digi 002 Rack
To hear audio recorded into a Pro Tools session,
you will need to connect headphones or an external sound system (such as powered monitors
or a home stereo) to Digi 002 or Digi 002 Rack.
Sound from Digi 002 and Digi 002 Rack cannot
be played through your computer’s speakers or
your computer’s sound output.
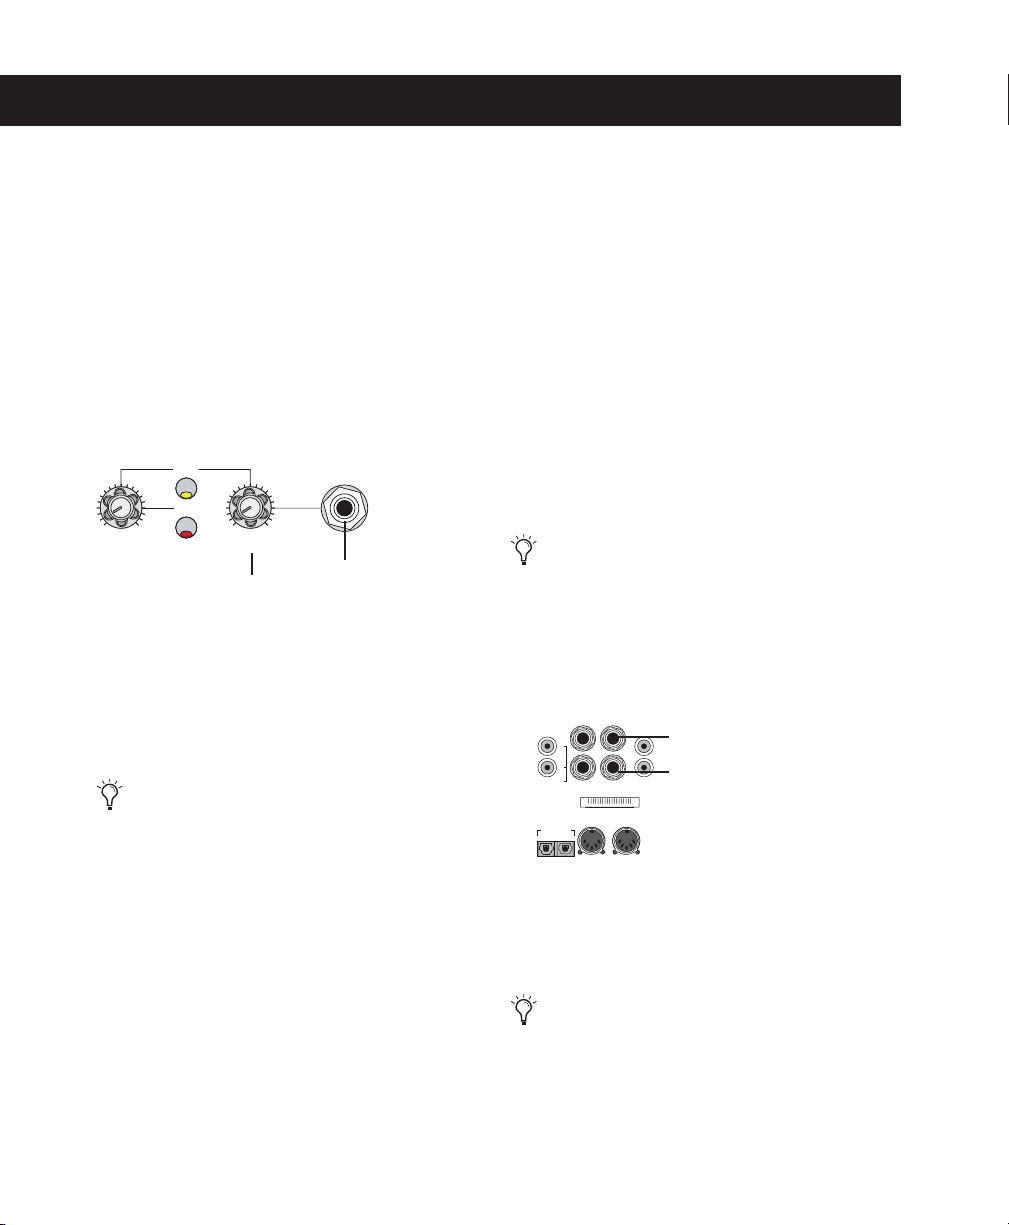
Connecting Headphones
There is one headphone jack, a stereo 1/4-inch
plug, on the Digi 002 and Digi 002 Rack.
MONO
MUTE
MONITOR
LEVEL LEVEL
Headphone Level knob
Headphone jack (located on the top panel of
Digi 002, and on the front panel of Digi 002 Rack)
To connect headphones:
•Connect headphones with a 1/4-inch stereo
connector (or adapter) to the Headphone
jack.
The Headphone Level knob (located on the
top panel of Digi 002, and on the front
panel of Digi 002 Rack) adjusts the volume
level of the Headphone jack.
HEADPHONE
1/4-inch Headphone jack
Connecting a Sound System
The monitor outputs (labeled “Mon”) on the
back of the Digi 002 and Digi 002 Rack support
1/4-inch plugs. These connections can be balanced, TRS (Tip, Ring, Sleeve) style connectors,
or unbalanced connectors. To listen to your
Pro Tools session, these outputs can be connected to any amplification system: powered
speakers, a home stereo system, or an audio
mixer.
When connecting to a stereo system, connect
the left channel (often the white plug) to Mon
Output L, and right channel (often the red plug)
to Mon Output R. “Mon” is short for Monitor.
Home stereo systems often use RCA
connectors. You can use an adaptor or
a special cable to convert from the TRS
or TS connectors used by Digi 002 and
Digi 002 Rack to the RCA connectors
on your home stereo.
L
MON OUTPUT L
MAIN L/1
R
ALT MAIN UNBAL
(-10 dBV OUTPUT)
OPTICAL
OUT
MON OUTPUT R
MAIN R/2
964530300294856
SERIAL NUMBER
IN
Monitor Outputs (back panel)
Mon Output L (left output)
Mon Output R (right output)
ALT SRC
INPUT
MIDI OUT 1MIDI OUT 2
2
Digi 002 and Digi 002 Rack Basics Guide
Mon Outputs Left and Right play the audio that
is routed to analog outputs 1 and 2 within
Pro Tools.
The Monitor Level knob (located on the top
panel of Digi 002, and on the front panel of
Digi 002 Rack) adjusts the volume level of
the Monitor Outputs.
Page 5
Connecting Audio Inputs
Digi 002 and Digi 002 Rack inputs support microphones, guitars, keyboards, and other types
of instruments.
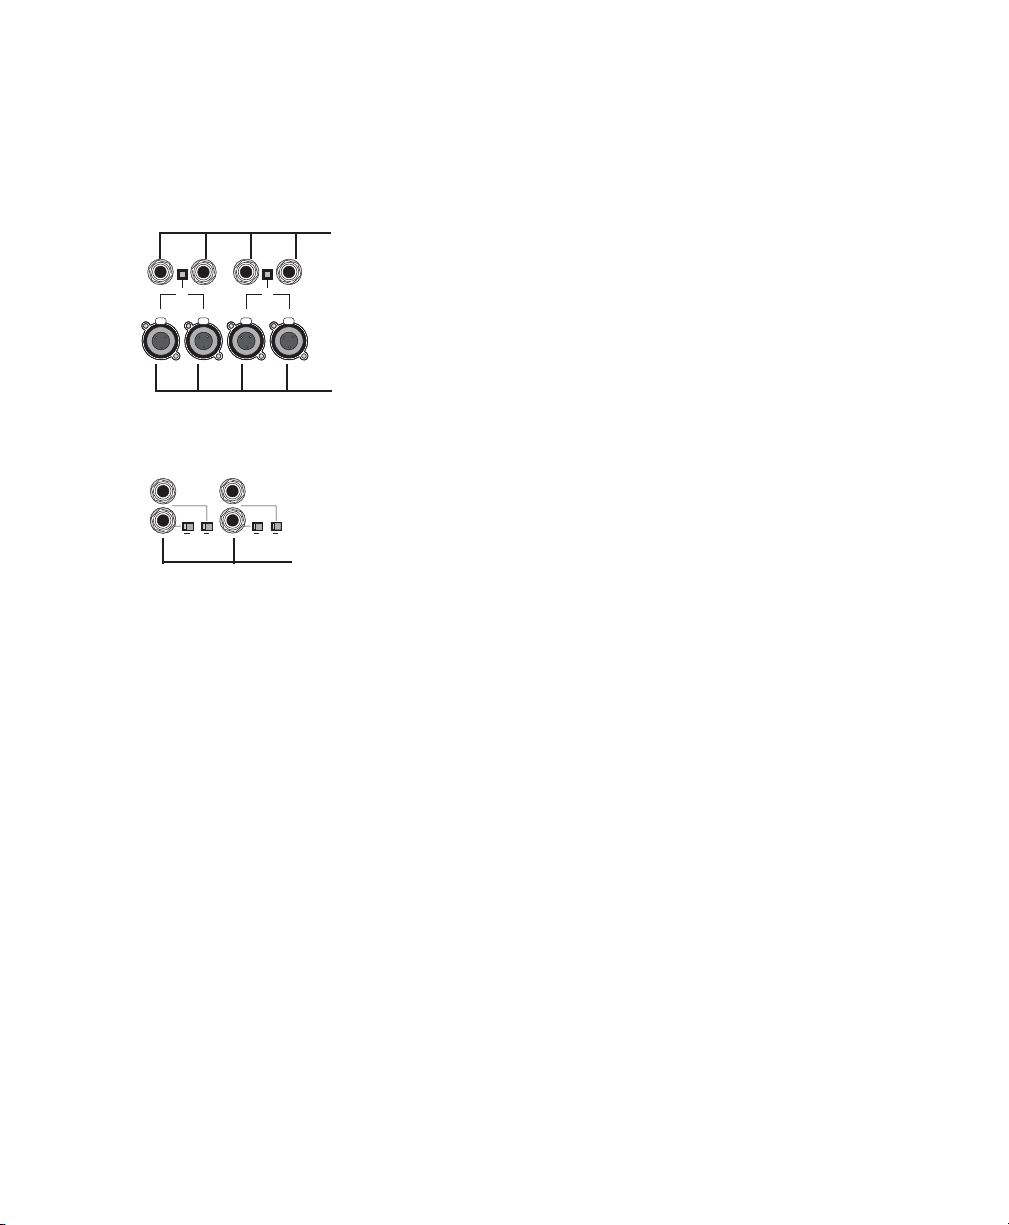
Line/Inst Inputs 1–4
LINE/ INST LINE/ INST LINE/ INST LINE/ INST
48V
MIC MIC
48V
MIC MIC
4
1 23
Mic Inputs 1–4
Four Mic and Line/Inst Inputs (back panel)
INPUT 7
INPUT 8
INPUT 5
INPUT 6
+4 -10 +4 -10 +4 -10 +4 -10
Analog Inputs 5–8
Four Analog Inputs (back panel)
Digi 002 and Digi 002 Rack have eight analog
inputs. One set of inputs is labeled Mic Inputs
1–4 and Line/Inst Inputs 1–4, and the other four
are labeled Inputs 5–8. For stereo inputs, use an
odd/even pair of inputs (for example, Input 5
for the left input, and Input 6 for the right input.
You cannot use both a Mic Input and Line/Inst
Input with the same input number at the same
time.
For information about connecting specific audio sources, see “Connecting a Microphone to
the Digi 002 or Digi 002 Rack” on page 4, and
“Connecting Instruments to the Digi 002 or
Digi 002 Rack” on page 6.
Getting Sound In & Out of Digi 002 or Digi 002 Rack
3
Page 6
Connecting a Microphone
5
There are several ways to use Digi 002 or
Digi 002 Rack with a microphone, depending
on the type of microphone and cables you use.
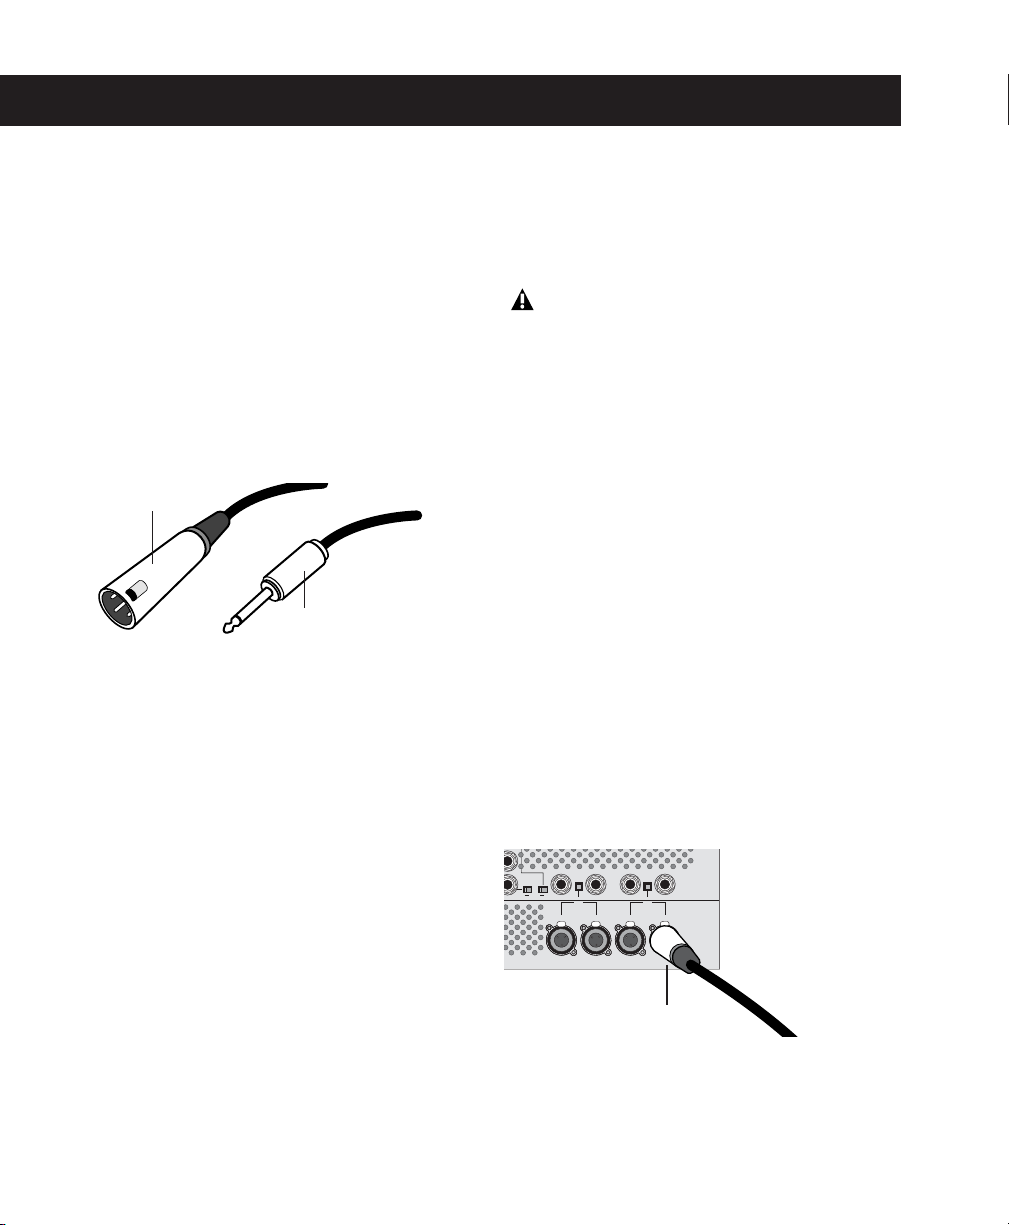
Mic Cables and Connectors
Some microphone cables use an XLR connector
to attach a microphone to an input (such as
those on the Digi 002 and Digi 002 Rack); other
microphones use a 1/4-inch connector. If you
have a choice, use an XLR connector to connect
the microphone to the Digi 002 or Digi 002
Rack to yield better results.
XLR connector
1/4-inch connector
XLR and 1/4-inch connectors
Phantom Power
Some microphones require power to operate.
This power, called
ther by a battery in the microphone, or through
an audio interface (such as Digi 002 and
Digi 002 Rack) that can supply power through
the microphone cable.
phantom power
, is supplied ei-
Most
condenser
C3000) require phantom power to operate.
namic
microphones (such as a Shure SM57) do
microphones (such as an AKG
Dy-
not require phantom power to operate, but are
not harmed by it.
Although phantom power can be used
safely with most microphones, it is possible
to damage some ribbon microphones with
it. Always turn off phantom power and
wait at least ten seconds before connecting
a ribbon microphone.
The Digi 002 and Digi 002 Rack can only supply
power through a microphone cable with XLR
connectors. If you are not sure about the phantom power requirements for your microphone,
refer to your microphone’s documentation or
contact the manufacturer.
Connecting a Microphone to the Digi 002 or Digi 002 Rack
To use a microphone that has an XLR connector:
1
Plug your microphone cable into one of the
Mic inputs on the back of Digi 002 or Digi 002
Rack. The inputs are numbered right to left, so
Mic Input 1 is the rightmost input.
+4 -10 +4 -10
PUT 6
48V
MIC MIC
48V
MIC MIC
LINE/ INST LINE/ INST LINE/ INST LINE/ INST
4
1 23
Mic Input 1
XLR connector plugged into Mic Input 1
4
Digi 002 and Digi 002 Rack Basics Guide
Page 7
2
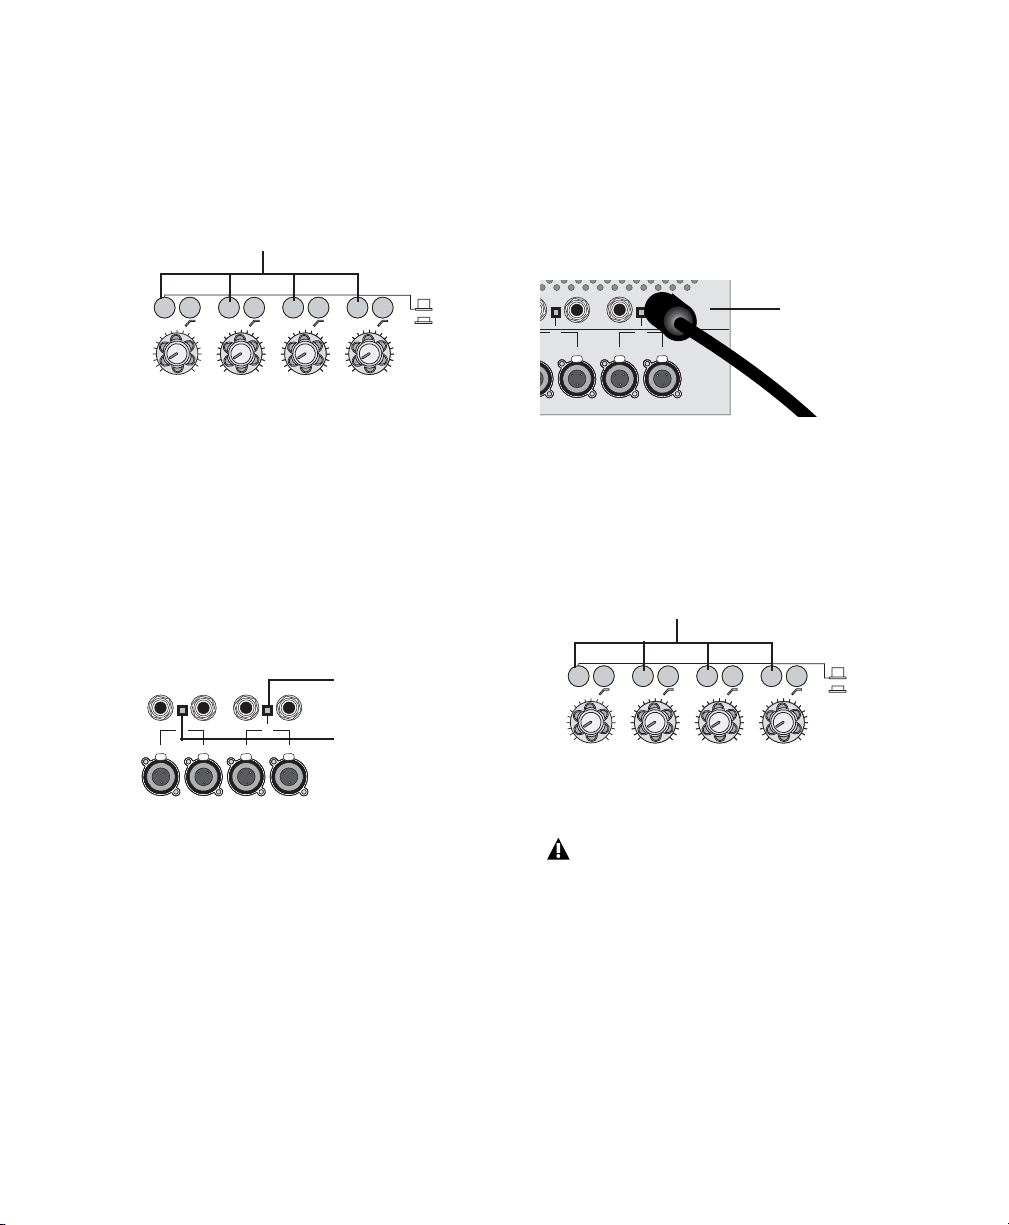
Press the Line/Inst and Mic Selector switch
(located on the top panel of the Digi 002, and
on the front panel of the Digi 002 Rack) for the
corresponding input so that it is in the “Mic”
(down) position.
Line/Inst and Mic Selector switches (Mic position is down)
To use a microphone that has a 1/4-inch
connector:
1
On the back of the Digi 002 or Digi 002 Rack,
plug the 1/4-inch connector from your microphone into one of the Line/Inst inputs. The inputs are numbered right to left, so Line/Inst
Input 1 is the rightmost input.
LINE/ INST
MIC
1 GAIN 2 GAIN 3 GAIN 4 GAIN
Line/Inst and Mic Selector switches (located on the
front panel of Digi 002, and top panel of Digi 002 Rack)
3
If your microphone requires phantom power,
make sure the microphone is connected, then
press the Phantom Power switch on the back of
the Digi 002 or Digi 002 Rack (labeled 48V) for
the corresponding input pair.
Each Phantom Power switch sends 48V to its
corresponding input pair.
Phantom Power
(Mic Inputs 1 and 2)
LINE/ INST LINE/ INST LINE/ INST LINE/ INST
48V
MIC MIC
4
48V
MIC MIC
Phantom Power
(Mic Inputs 3 and 4)
1 23
Phantom Power switches (back panel)
4
When Pro Tools is launched and the input is
routed to a Pro Tools track (see “Recording a
Pro Tools Session” on page 8), you can adjust
the input level with the Gain knob on the top
panel of the Digi 002, and the front panel of the
Digi 002 Rack.
T
48V
MIC
LINE/ INST LINE/ INST LINE/ INST
48V
MIC MIC
1 23
Line/Inst Input 1
1/4-inch connector plugged into Line/Inst Input 1
2
Press the Line/Inst and Mic Selector switch
(located on the top panel of the Digi 002, and
on the front panel of the Digi 002 Rack) for the
corresponding input so that it is in the
“Line/Inst” (up) position.
Line/Inst and Mic Selector switches (Line/Inst position is up)
LINE/ INST
MIC
1 GAIN 2 GAIN 3 GAIN 4 GAIN
Line/Inst and Mic Selector switches (located on the
front panel of Digi 002, and top panel of Digi 002 Rack)
If you are using a microphone with a 1/4inch connector, do not choose the “Mic” input source because the Digi 002 or
Digi 002 Rack will not register any signal.
3
When Pro Tools is launched and the input is
routed to a Pro Tools track (see “Recording a
Pro Tools Session” on page 8), you can adjust
the input level with the Gain knob on the top
panel of the Digi 002, and the front panel of the
Digi 002 Rack.
Connecting a Microphone
5
Page 8

Connecting Instruments
Connecting Instruments to the Digi 002 or Digi 002 Rack
Digi 002 and Digi 002 Rack support two types of
inputs, which correspond to the signal strengths
output by different types of instruments. Instruments such as electric guitar or electric bass usually have a lower level of output than instruments and electronic audio sources such as
mixers, samplers, keyboards, turntables, and
synthesizers.
2
Press the Line/Inst and Mic Selector switch
(located on the top panel of the Digi 002, and
on the front panel of the Digi 002 Rack) for the
corresponding input so that it is in the
“Line/Inst” (up) position.
Line/Inst and Mic Selector switches (Line/Inst position is up)
LINE/ INST
MIC
The higher level of output is commonly called
“line-level” and the instruments that produce
these higher levels are called line-level devices.
On the Digi 002 and Digi 002 Rack, Line/Inst Inputs 1–4 support low-level instruments
and
linelevel instruments. Analog Inputs 5–8 support
line-level instruments only.
To use a guitar with Digi 002 or Digi 002 Rack:
1
Plug your guitar cable into one of the
Line/Inst inputs on the back of the Digi 002 or
Digi 002 Rack. The inputs are numbered right to
left, so Line/Inst Input 1 is the rightmost input.
T
48V
MIC
48V
MIC MIC
LINE/ INST LINE/ INST LINE/ INST
1 23
Line/Inst Input 1
Guitar cable plugged into Mic Input 1
1 GAIN 2 GAIN 3 GAIN 4 GAIN
Line/Inst and Mic Selector switches (located on the
front panel of Digi 002, and top panel of Digi 002 Rack)
3
When Pro Tools is launched and the input is
routed to a Pro Tools track (see “Recording a
Pro Tools Session” on page 8), you can adjust
the input level with the Gain knob on the top
panel of the Digi 002, and the front panel of the
Digi 002 Rack.
6
Digi 002 and Digi 002 Rack Basics Guide
Page 9

To use a keyboard or mixer with Digi 002 or
Digi 002 Rack:
1
Plug your keyboard, mixer, or other audio
source into any of the Line/Inst inputs or analog
Inputs on the back of your Digi 002 or Digi 002
Rack. For stereo inputs, (such as a stereo keyboard or the stereo output from a mixer), use an
odd/even pair of inputs. For example, connect
the left channel (often the white plug) to
Line/Inst 1, and right channel (often the red
plug) to Line/Inst 2.
The Line/Inst inputs are numbered right to left,
so Line/Inst Input 1 is the rightmost input.
Line/Inst Inputs 1–4
2
If you are using any Line/Inst inputs, press the
Line/Inst and Mic Selector switch (located on
the top panel of the Digi 002, and on the front
panel of the Digi 002 Rack) for each corresponding input so that it is in the “Line/Inst” (up) position.
Line/Inst and Mic Selector switches (Line/Inst position is up)
LINE/ INST
MIC
1 GAIN 2 GAIN 3 GAIN 4 GAIN
Line/Inst and Mic Selector switches (located on the
front panel of Digi 002, and top panel of Digi 002 Rack)
+4 -10
48V
MIC MIC
4
48V
MIC MIC
LINE/ INST LINE/ INST LINE/ INST LINE/ INST
1 23
Line/Inst Inputs (back panel)
The analog Inputs are numbered top to bottom,
in pairs.
INPUT 7
INPUT 8
INPUT 5
INPUT 6
+4 -10 +4 -10 +4 -10 +4 -10
Analog Inputs 5–8
Analog Inputs (back panel)
For line-level devices, the Gain knob should
be turned down all the way.
3
If you are using any of the Inputs 5–8, set either a –10 dBV or +4 dBu operating level for the
corresponding input using the Operating Level
switch on the back panel. For information on
the appropriate operating level for your input
device, refer to the manufacturer’s specifications.
INPUT 7
INPUT 8
INPUT 5
INPUT 6
+4 -10 +4 -10 +4 -10 +4 -10
Operating Level switches
Line Inputs 5–8 (back panel)
4
Set your instrument’s volume to its optimal
level. For example, the optimal level for most
keyboards is between 80% and 100% of maximum volume.
Connecting Instruments
7
Page 10

Recording a Pro Tools Session
Before you record with the Digi 002 or Digi 002
Rack, you first create a Pro Tools session, then
prepare an audio track for recording.
To create a Pro Tools session:
1
Verify the connections between the Digi 002
or Digi 002 Rack and your instrument or microphone.
2
Launch Pro Tools.
3
Choose File > New Session.
4
In the New Session dialog, set the session parameters as needed, or leave them at their default settings. (For details on New Session
settings, see the
Getting Started Guide
Digi 002 and Digi 002 Rack
.)
To prepare an audio track for recording:
1
Choose Track > New.
2
Specify 1 Mono Audio Track in Samples, if
your source is mono, or 1 Stereo Audio Track in
Samples, if your source is stereo.
Creating a new Stereo audio track
3
Click Create.
A mono instrument uses one input on the
Digi 002 or Digi 002 Rack, and a stereo instrument uses two. Creating a stereo track
in Pro Tools will not make a mono instrument into a stereo instrument. If a mono instrument is recorded on a stereo track, one
side of the stereo track will show no signal.
4
Make sure the Mix window is open by choosing Window > Mix.
New Session dialog
5
Choose where you want to save your session.
6
Type a name for your session.
7
Click Save.
8
Digi 002 and Digi 002 Rack Basics Guide
Showing the Mix window
5
In the Mix window, click the Input Selector on
the new track.
Input selector
Choosing an input in the Mix window
Page 11

6
From the pop-up menu, select the interface input you want to record. For example, select
Mic/Line 1 if your audio source is plugged into
either the Mic Input 1 or Line/Inst Input 1 jack
on the back of the Digi 002 or Digi 002 Rack. Select Mic/Line 1–2 on any stereo audio track
when your audio source is stereo.
To record an audio track:
1
Click the Track Record Enable button.
Record enabling a track in the Mix window
2
Choose Window > Transport to display the
Transport window. Click Return to Zero to go to
the beginning of the session.
Routing an input to a mono track
7
Play the instrument or sound source at the
volume you will record.
8
Use the Gain controls on the Digi 002 or
Digi 002 Rack to maximize the signal going into
Pro Tools while avoiding clipping.
Clipping occurs when you feed a signal to
an audio device that is louder than the circuitry can accept. To avoid clipping, adjust
the Gain control to a level where the Peak
LEDs (located on the top panel of Digi 002,
and on the front panel of Digi 002 Rack)
flicker occasionally.
For line-level devices, the Gain knob should
be turned down all the way.
9
If you need to lessen the amount of signal delay (latency) that you are hearing, set Pro Tools
to Low Latency Monitoring mode. See “Controlling Delay (Latency) During Monitoring” on
page 18 for specific steps.
Return to Zero
Rewind
Online
Transport window
3
Click Record Enable in the Transport window
Stop
Fast Forward
Go to EndPlay
Record Enable
to arm Pro Tools for recording. The Record button flashes red to indicate that Pro Tools is ready
to record.
4
When you are ready to start recording, click
Play or press the Spacebar.
5
Record your performance.
6 Click Stop in the Transport window or press
the Spacebar when you are finished recording.
To play back a recorded track:
1 If the track’s Record Enable button is lit, click
on it to take it out of Record mode.
2 Click Play in the Transport window or press
the Spacebar to start playback.
3 Click Stop in the Transport window or press
the Spacebar to stop playback.
Recording a Pro Tools Session
9
Page 12

Importing Audio from a CD
To impor t audio from a compact disc:
1 Launch Pro Tools.
2 Choose File > New Session.
3 Set Session Parameters in the New Session di-
alog as needed, or leave at their default settings.
(For details, see the Digi 002 and Digi 002 Rack
Getting Started Guide.)
New Session dialog
4 Choose where you want to save your session.
7 Open the Workspace browser by choosing
Window > Workspace. The Workspace browser
is a window where you can find, audition, and
manage your audio files.
Opening the Workspace browser
8 In the Workspace browser, click the Audio CD
icon to show the files on the CD.
9 Click the speaker icon in the Waveform col-
umn to audition the audio file. Press the Spacebar to stop playback.
5 Type a name for your session and click Save.
6 Put the source CD into your computer’s CD
drive.
10
Digi 002 and Digi 002 Rack Basics Guide
Auditioning an audio file in the Workspace browser
Page 13

10 Drag the audio file from the Workspace
browser to the Track List in the Edit window to
import the file to a new audio track.
Dragging an audio file from the Workspace browser to
the Edit window Track List
To play back the new track:
1 In the Transport window, click Return to Zero
to go to the beginning of the track.
2 Click Play in the Transport window or press
the Spacebar to start playback.
3 Click Stop in the Transport window or press
the Spacebar to stop playback.
Importing Audio from a CD
11
Page 14

Creating an Audio CD from a Pro Tools Session
Pro Tools does not create audio CDs directly,
but you can create stereo audio files from your
Pro Tools sessions that can be used by most CD
burning software.
Bouncing Audio to Disk
Use the Pro Tools Bounce to Disk feature to
combine all your audible tracks into a single
“master” audio file. After the new audio file has
been bounced to disk, you can burn it to a CD.
If you are bouncing down audio from 24-bit resolution to 16-bit (CD resolution), you should
use a dither plug-in on the main output. (For details, see the Digi 002 and Digi 002 Rack Getting
Started Guide.)
To bounce audio to disk:
1 After you have finished recording and mixing
a session in Pro Tools, select the length of the
session in the timeline ruler (or on a track), plus
an additional amount of time to avoid cutting
off any reverb tails that might continue past the
end of the last region.
2 Choose File > Bounce to > Disk.
Choosing Bounce to Disk from the File menu
3 In the Bounce Options dialog, choose Outputs
1–2 as the Bounce Source.
4 Choose BWF (.WAV) for the File Type.
5 Choose Stereo Interleaved for the Format.
6 Choose 16 for the Resolution and 44100 for
the Sample Rate.
Audio session highlighted and ready to bounce
12
Digi 002 and Digi 002 Rack Basics Guide
Page 15

7 If you are changing the sample rate of the
bounced file, choose a Conversion Quality setting. (For details, see the Digi 002 and Digi 002
Rack Getting Started Guide.)
8 Choose “Convert after Bounce,” and click
Bounce.
Pro Tools begins bouncing to disk. Pro Tools
bounces are done in real time, so you hear audio
playback of your mix during the bounce process
(though you cannot adjust it).
.
Bouncing to Disk dialog
Burning a CD
After the bounce is completed, you will have an
audio file that is ready for burning onto a CD.
Quit Pro Tools and launch any common CD
burning application to burn your bounced mix
to CD.
Bounce options for creating CD burnable tracks
9 In the Bounce dialog, give the bounce tracks a
name and choose where they should be saved.
Entering a name for the bounced file
10 Click Save.
Make certain that you configure your CD
burning application to create an audio CD
rather than a data CD.
Creating an Audio CD from a Pro Tools Session
13
Page 16

Digi 002 & Digi 002 Rack and MIDI
What is MIDI?
MIDI (Musical Instrument Digital Interface)
data is not audio, and has no sound. MIDI is a
way for musical devices to communicate. MIDI
is data that can trigger a MIDI device (such as a
keyboard or software synthesizer.).
In order to create or play a MIDI recording, you
must have a MIDI keyboard or sound module
(real or virtual) connected to the computer
through the MIDI ports on the Digi 002 or
Digi 002 Rack, or another MIDI interface. Audio
from your MIDI instrument can be monitored
through the Digi 002 or Digi 002 Rack, or sent
to an external mixer.
MIDI sound module
MIDI
MIDI keyboard (controller)
Audio
Mixer
To amplifier
Signal paths for MIDI instruments
Connecting a MIDI Device to Digi 002 or
Digi 002 Rack
To connect your MIDI device to Digi 002 or
Digi 002 Rack:
1 Connect a standard 5-pin MIDI cable from the
MIDI Out port of your device to the MIDI In
port on the back panel of the Digi 002 or
Digi 002 Rack.
2 Connect another MIDI cable from the
MIDI In port of your device to the MIDI Out
port on the back panel of the Digi 002 or
Digi 002 Rack.
FOOT SWITCH
OUTPUT 7
OUTPUT 8
OUTPUT 5
OUTPUT 6
LINK
L
MAIN L/1
OUTPUT 3
R
ALT MAIN UNBAL
(-10 dBV OUTPUT)
MAIN R/2
OUTPUT 4
IN
OPTICAL
IN
OUT
OUT
S / PDIF
13941394
MON OUTPUT L
MON OUTPUT R
964530300294856
SERIAL NUMBER
L
R
ALT SRC
INPUT
MIDI INMIDI OUT 1MIDI OUT 2
INPUT 5
INPUT 7
+4 -10 +4 -10 +4 -10 +4 -10
LINE/ INST
INPUT 6
INPUT 8
MIC
MIDI In
MIDI Out
Digi 002 or Digi 002 Rack MIDI connections
Monitoring MIDI Instruments with
Digi 002 or Digi 002 Rack
If you have a MIDI instrument that has analog
outputs, you can connect it to the Digi 002 or
Digi 002 Rack to monitor its output.
To connect your MIDI instrument for monitoring in
Pro Tools:
■ Connect the MIDI instrument’s audio output
to a Line/Inst input on the back panel of the
Digi 002 or Digi 002 Rack.
Line/Inst Inputs 1–4
+4 -10
48V
MIC MIC
LINE/ INST LINE/ INST LINE/ INST LINE/ INST
48V
MIC MIC
4
14
Digi 002 and Digi 002 Rack Basics Guide
4
1 23
Line/Inst Inputs on the Digi 002 and Digi 002 Rack)
Page 17

Recording MIDI on an Instrument Track
Pro Tools Instrument tracks provide both MIDI
and audio capabilities, so you can record MIDI
and monitor audio from software and hardware
instruments.
To create an Instrument track and configure it for
recording:
1 Choose Setup > MIDI > Input Devices and
make sure your input device is selected in the
MIDI Input Enable window, and click OK.
3 At the top of the Instrument track in the Mix
window, click the track’s MIDI Input selector
and assign the device and channel to be recorded, or leave it set to All.
MIDI Input selector
1 Choose Track > New and specify 1 Mono In-
strument Track, then click Create.
Creating a new Mono Instrument track
2 Select View > Mix Window > Instruments to
display the MIDI controls for the Instrument
track.
Showing the Instrument View in the Mix window
MIDI Input selector in an Instrument track
4 Do one of the following, depending on the
type of instrument you are using:
• If you are using an instrument plug-in,
click an Insert selector and insert the plugin on the Instrument track. The track’s
MIDI output is automatically assigned to
the instrument plug-in.
Inserting an instrument plug-in on an Instrument track
Digi 002 & Digi 002 Rack and MIDI
15
Page 18

• If you are using an external MIDI device,
click the track’s MIDI Output selector (at
the top of the Instrument track) and assign
the device and channel to receive the MIDI
output (the choices will vary depending on
the device).
MIDI Output selector in an Instrument track
If your connected MIDI device does not appear, check that you have configured your
computer and its MIDI settings. For more
information, refer to the
Digi 002 Rack Getting Started Guide
Digi 002 and
.
5 If you are using an external MIDI device and
connected its audio output to the Digi 002 or
Digi 002 Rack for monitoring in Pro Tools, click
the Input selector of the Instrument track and
choose the corresponding audio input. (This
step is not necessary if you are using an instrument plug-in.)
Choosing an audio input for an Instrument track
6 In the Mix Window, click the Track Record En-
able button to enable the Instrument track for
MIDI recording.
16
Digi 002 and Digi 002 Rack Basics Guide
Track Record Enable button
Enabling an Instrument track for MIDI recording
7 Make sure Options > MIDI Thru is selected.
Page 19

8 Play some notes on your MIDI controller and
look for the track’s MIDI Velocity meter to
move. Remember, MIDI is not audio, and the
MIDI Velocity meter is not registering sound
output, but MIDI activity.
MIDI Velocity meter
MIDI meter in Instrument track showing MIDI activity
9 Adjust the audio output level of the Instru-
ment track with its Volume fader.
Volume fader
3 Click Record Enable in the Transport window.
Return to Zero
Rewind
Online
Transport window
4 Click Play in the Transport window or press
Stop
Fast Forward
Go to EndPlay
Record Enable
the Spacebar to begin recording.
5 Play your MIDI controller or input device.
6 When you have finished recording, click Stop
in the Transport window, or press the Spacebar.
The newly recorded MIDI data appears as a MIDI
region on the track in the Edit window, as well
as in the Region List.
Adjusting the Volume fader on an Instrument track
To record MIDI on the Instrument track:
1 Verify that the Instrument track you want to
record to is record-enabled and receiving MIDI.
2 In the Transport window, click Return to Zero
to start recording from the beginning of the session. You can also record to a selection in a track
or from the cursor location in the Edit window.
MIDI data in the Instrument track
To play back recorded MIDI data:
1 Click the Track Record Enable button to take
the Instrument track out of Record mode.
2 In the Transport window, click Return to Zero
to play back from the beginning of the track.
3 Click Play in the Transport window to begin
playback. The recorded MIDI data plays back
through the track’s assigned instrument and
channel.
Digi 002 & Digi 002 Rack and MIDI
17
Page 20

Controlling Delay (Latency) During Monitoring
Pro Tools LE with Digi 002 or Digi 002 Rack uses
your computer for all audio processing, playback, and recording. This causes a small amount
of audio delay, or latency.
Latency is most obvious when monitoring during recording. You may hear this as a slight delay between when you produce the sound and
when you hear the sound through the speakers
or headphones.
Pro Tools LE for Digi 002 and Digi 002 Rack systems includes Low Latency Monitoring. This
feature allows you to use a built-in mixer in the
Digi 002 unit or Digi 002 Rack unit when recording or monitoring to lessen the effect of latency.
To use Low Latency Monitoring, tracks must be
record-enabled, assigned to an actual audio input (not a bus), and assigned to outputs 1 or 2.
To use Low Latency Monitoring while recording:
1 Launch Pro Tools and set up a session. See
“Recording a Pro Tools Session” on page 8.
2 Select Options > Low Latency Monitoring.
When Low Latency Monitoring is enabled, any
plug-ins and sends assigned to record-enabled
tracks (routed to Outputs 1–2) are automatically
bypassed, and must remain bypassed. Also,
these tracks will not register on meters for Master Faders.
18
Digi 002 and Digi 002 Rack Basics Guide
Page 21

 Loading...