

Page 1
2
Foundations
of DigiCom 2000
Chapter Two
CHAPTER_.2A_ 4/8/00 11:19 PM Page 1
Page 2

2-1
2
8
HELPFUL HINT:
This Chapter is necessary reading for all individuals
wishing to become experienced in programming
the DigiCom using simple or advanced
programming methods.
If you haven’t already, be sure you read Chapter
One, Equipment and its Care, which explains in
detail how to care for the equipment. In it you will
learn about the battery, the touch panel,
overlays, the connecting ports and jacks, and
DigiCom specifications.
Foundations
of DigiCom 2000
To learn how to use your DigiCom, it is important
to read the chapters in order. This chapter will
help you to get the DigiCom up and going.
When you read the next chapters you will learn
about the basic features followed by
information about the many advanced features
of the DigiCom.
CHAPTER_.2A_ 4/8/00 11:19 PM Page 2
Page 3
2-2
2
In this Chapter
In this chapter, you will learn information to help
you make decisions to setup your DigiCom to
program messages. You will also learn some
information important to ‘speak’ messages. These
foundations are for the successful use of your
DigiCom.
You will learn:
❑ How to “set up” the DigiCom hardware and
its accessories including plugging it in, using a
microphone, inserting an overlay, turning
DigiCom on/off and using sleep time.
❑ How to use Keyboard Overlays, function keys
and message keys
❑ How to understand and use “Program” and
“Play” Modes
❑ How to understand and use “Group” and
“Level” features
CHAPTER_.2A_ 4/8/00 11:19 PM Page 3
Page 4

2–3
2
Setting up the Equipment
What You Need
Before you start, check that the following items
are in front of you;
❑ the DigiCom
❑ the power adapter
❑ Programmer Overlays including a 4x8
Programmer’s Overlay
❑ External microphone (optional)
Plugging in the DigiCom
If this is the first time using your new DigiCom, or if
you suspect the batteries might be running low,
plug in the battery charger / power adapter. This
way your DigiCom will have adequate power
while you are learning to use it.
For additional information on charging the
DigiCom, see Charging the Battery in
Chapter One.
DigiCom
Charger
Overlays
CHAPTER_.2A_ 4/8/00 11:19 PM Page 4
Page 5

2–4
2
1
2
3
4
ABCDEFGH
1
2
3
4
4X8
A1
A2
A3
A4
B1
B2
B3
B4
C1
C2
C3
C4
D1
D2
D3
D4
E1
E2
E3
E4
F1
F2
F3
F4
G1
G2
G3
G4
H1
H2
H3
H4
SPEECH
CONTROLS
EDIT
SEQUENCES
COMMAND
CANCEL
ERASE
LEVEL
TRANSFER
AREA MSG
ERASE
KEY
RS-232DISK
PROGRAM/
PLAY
AREA/
SEQUENCE
KEYBOARD
LAYOUT
IMMEDIATE/
LINK
SCAN
CONTROLS
LOCK
LEVELS
KEY
CONTROLS
LOCK
GROUPS
SET UP
OK
SPEAK LEVEL DEFINE RECORD
BACKSPACE/
DELETE SEQ
LINK STOP GROUP
VOLUME
DOWN
<
VOLUME
UP
>
Using a Microphone:
Internal or Exter nal
You can use one of two microphones to record
messages. Your DigiCom has an internal microphone. It is located under a small hole on the
upper right of the front panel and is labeled `Mic’.
If you have purchased an external microphone,
you may find it easier to use since you can hold it
closer to your mouth. To use the external
microphone, be certain it has batteries.
Plug it into the port labeled `EXT Mic’ on the
right side panel. Contact your DigiCom
representative for information on compatible
external microphones.
Inserting an Overlay
If you are not already familiar with DigiCom
overlays or the touch panel, read those sections
of Chapter One before moving on. To use the
DigiCom you need to have an overlay on the
touch panel.
CHAPTER_.2A_ 4/8/00 11:19 PM Page 5
Page 6

2–5
2
Inserting an Overlay (cont.)
Following the instructions, insert a 4x8
Programmer’s Overlay with blank squares
(message keys) on it. This overlay has 12 function
keys labeled across the top row and four more
rows of 8 keys each which are blank.
By putting this overlay in, you can set up the
DigiCom and begin recording so you can
practice basic operations.
Placing An Overlay on the DigiCom
❑ Locate the appropriate Programmer’s Overlay
(in practice example, 4x8)
❑ Lift the protective sheet of plastic by placing
your fingers near the top of the keyboard and
lifting up to release the magnetic hold.
❑ Remove any overlay that might be there,
place a new overlay over the touch panel.
Be sure and center the overlay so it is seated
on the touch panel.
❑ Lower the protective sheet and secure it.
The magnetic strips will hold the protective
plastic cover and overlay in place.
CHAPTER_.2A_ 4/8/00 11:19 PM Page 6
Page 7

2–6
2
Understanding the
“Function Keys” Used for
Programming
Before turning the unit on, look for a moment at
the top row of keys on the overlay. They look like
this:
The top row of keys constitutes the programming
“function keys”. Learn to recognize the following
qualities of these function row keys.
❑ There are 10 function keys in the row. The first
eight keys in this row each have 2 or 3 different
functions assigned to them.
❑ The Function Row keys are color coded gold,
rose and white.
❑ By pressing these keys in various combinations,
you tell the DigiCom what you want it to do.
You will always press function keys in specific
sequences to perform the functions described
on each key.
CHAPTER_.2A_ 4/8/00 11:19 PM Page 7
PROGRAM/
PLAY
SPEAK LEVEL DEFINE RECORD
SPEECH
CONTROLS
A1
1
LOCK
LEVELS
ERASE
LEVEL
AREA/
SEQUENCE
SEQUENCES
B1
KEYBOARD
IMMEDIATE/
SCAN
KEY
LAYOUT
LINK
CONTROLS
BACKSPACE/
LINK STOP GROUP
EDIT
TRANSFER
AREA MSG
C1
DELETE SEQ
RS-232DISK
D1
CONTROLS
E1
LOCK
GROUPS
VOLUME
DOWN
ERASE
KEY
<
F1
VOLUME
G1
SET UP
UP
>
4X8
COMMAND
CANCEL
OK
H1
1
A2
2
A3
3
A4
4
B2
B3
B4
ABCDEFGH
C2
C3
C4
D2
D3
D4
E2
E3
E4
F2
F3
F4
G2
G3
G4
H2
H3
H4
2
3
4
Page 8

2–7
2
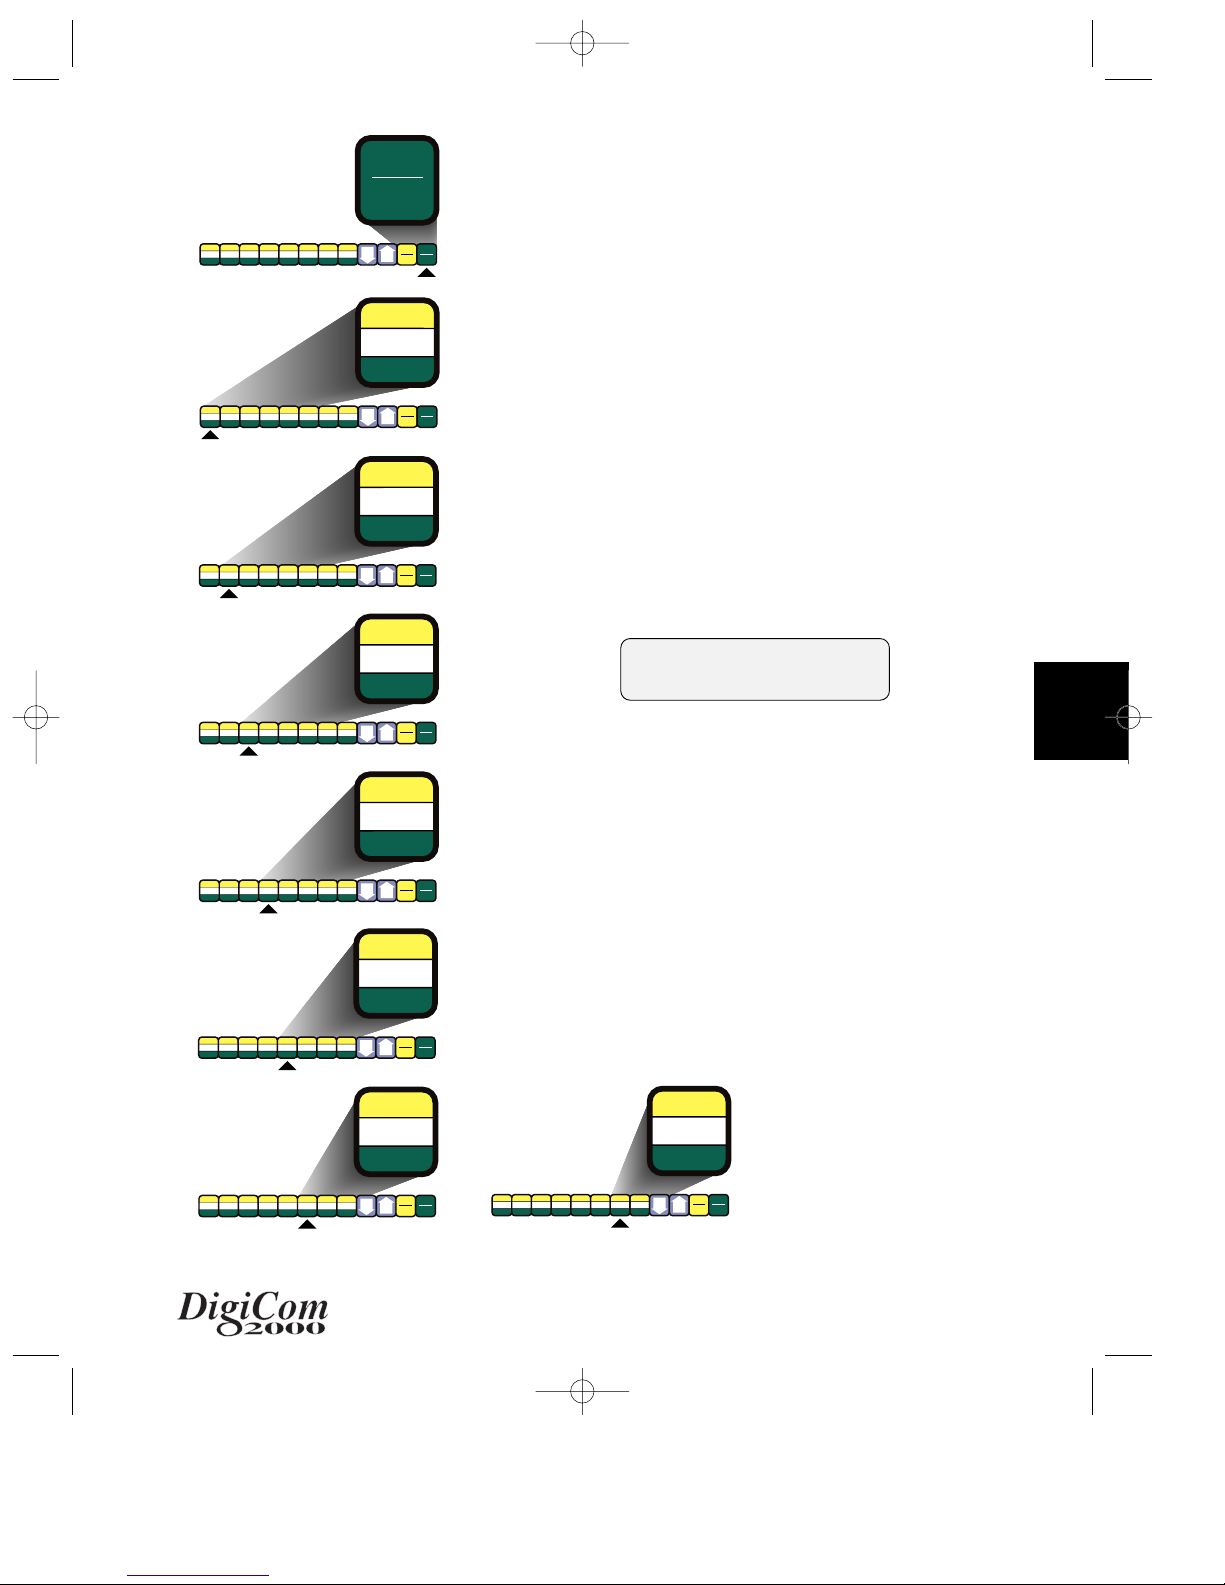
Setup Functions
❑ If you want a function in the gold area of the
function row (upper area), you must first press
the gold [OK/SET UP] key. Now the function row
is actively the gold functions or [SET UP]
Functions. These include:
Program/Play, Lock
Levels, Area/Sequence, Keyboard Layout,
Immediate/Link, Scan Controls, Key Controls
and Lock Groups.
Generally, the steps to use a SET UP
function are:
1. Press the key labeled [Set Up] (it doubles as
the [OK] key).
2. The display will show the following message:
Press a SET UP
Function Key
PROGRAM/
PLAY
AREA/
SEQUENCE
PLAYING
TIME
IMMEDIATE/
LINK
KEYBOARD
LAYOUT
LOCK HOLDTIME SCAN
AUTOSPEAK
SEQUENCE
EDIT
SEQUENCE
SET UPOKCOMMAND
CANCEL
SPEAK LEVEL DEFINE RECORD LINK BACKSPACE STOP REMOVE
ERASE DISK TRANSFER
VOLUME
DOWN
<
VOLUME
UP
>
PROGRAM/
PLAY
SPEECH
CONTROLS
SPEAK
PROGRAM/
PLAY
AREA/
SEQUENCE
PLAYING
TIME
IMMEDIATE/
LINK
KEYBOARD
LAYOUT
LOCK HOLDTIME SCAN
AUTOSPEAK
SEQUENCE
EDIT
SEQUENCE
SET UPOKCOMMAND
CANCEL
SPEAK LEVEL DEFINE RECORD LINK BACKSPACE STOP REMOVE
ERASE DISK TRANSFER
VOLUME
DOWN
<
VOLUME
UP
>
LEVEL
LOCK
LEVELS
ERASE
LEVEL
PROGRAM/
PLAY
AREA/
SEQUENCE
PLAYING
TIME
IMMEDIATE/
LINK
KEYBOARD
LAYOUT
LOCK HOLDTIME SCAN
AUTOSPEAK
SEQUENCE
EDIT
SEQUENCE
SET UPOKCOMMAND
CANCEL
SPEAK LEVEL DEFINE RECORD LINK BACKSPACE STOP REMOVE
ERASE DISK TRANSFER
VOLUME
DOWN
<
VOLUME
UP
>
AREA/
SEQUENCE
EDIT
SEQUENCES
DEFINE
PROGRAM/
PLAY
AREA/
SEQUENCE
PLAYING
TIME
IMMEDIATE/
LINK
KEYBOARD
LAYOUT
LOCK HOLDTIME SCAN
AUTOSPEAK
SEQUENCE
EDIT
SEQUENCE
SET UPOKCOMMAND
CANCEL
SPEAK LEVEL DEFINE RECORD LINK BACKSPACE STOP REMOVE
ERASE DISK TRANSFER
VOLUME
DOWN
<
VOLUME
UP
>
KEYBOARD
LAYOUT
RECORD
TRANSFER
AREA MSG
PROGRAM/
PLAY
AREA/
SEQUENCE
PLAYING
TIME
IMMEDIATE/
LINK
KEYBOARD
LAYOUT
LOCK HOLDTIME SCAN
AUTOSPEAK
SEQUENCE
EDIT
SEQUENCE
SET UPOKCOMMAND
CANCEL
SPEAK LEVEL DEFINE RECORD LINK BACKSPACE STOP REMOVE
ERASE DISK TRANSFER
VOLUME
DOWN
<
VOLUME
UP
>
IMMEDIATE/
LINK
LINK
DISK
3. Press the Set Up key of your choice
(gold labels)
PROGRAM/
PLAY
AREA/
SEQUENCE
PLAYING
TIME
IMMEDIATE/
LINK
KEYBOARD
LAYOUT
LOCK HOLDTIME SCAN
AUTOSPEAK
SEQUENCE
EDIT
SEQUENCE
SET UPOKCOMMAND
CANCEL
SPEAK LEVEL DEFINE RECORD LINK BACKSPACE STOP REMOVE
ERASE DISK TRANSFER
VOLUME
DOWN
<
VOLUME
UP
>
SET UP
OK
PROGRAM/
PLAY
AREA/
SEQUENCE
PLAYING
TIME
IMMEDIATE/
LINK
KEYBOARD
LAYOUT
LOCK HOLDTIME SCAN
AUTOSPEAK
SEQUENCE
EDIT
SEQUENCE
SET UPOKCOMMAND
CANCEL
SPEAK LEVEL DEFINE RECORD LINK BACKSPACE STOP REMOVE
ERASE DISK TRANSFER
VOLUME
DOWN
<
VOLUME
UP
>
SCAN
CONTROLS
RS-232
RS-232
BACKSPACE/
DELETE SEQ
PROGRAM/
PLAY
AREA/
SEQUENCE
PLAYING
TIME
IMMEDIATE/
LINK
KEYBOARD
LAYOUT
LOCK HOLDTIME SCAN
AUTOSPEAK
SEQUENCE
EDIT
SEQUENCE
SPEAK LEVEL DEFINE RECORD LINK BACKSPACE STOP REMOVE
ERASE DISK TRANSFER
STOP
SET UPOKCOMMAND
CANCEL
VOLUME
DOWN
<
VOLUME
UP
>
KEY
CONTROLS
ERASE
KEY
PROGRAM/
PLAY
AREA/
SEQUENCE
PLAYING
TIME
IMMEDIATE/
LINK
KEYBOARD
LAYOUT
LOCK HOLDTIME SCAN
AUTOSPEAK
SEQUENCE
EDIT
SEQUENCE
SET UPOKCOMMAND
CANCEL
SPEAK LEVEL DEFINE RECORD LINK BACKSPACE STOP REMOVE
ERASE DISK TRANSFER
VOLUME
DOWN
<
VOLUME
UP
>
GROUP
LOCK
GROUPS
CHAPTER_.2A_ 4/8/00 11:19 PM Page 8
Page 9
2–8
2
Command Functions
❑ If you want a function in the rose shaded
area of the function row, (lower area) you
must first press the rose shaded
COMMAND key. Now the lower part of the
function row is active. There are several
functions which are directed by COMMAND:
Speech Controls, Erase Level, Edit Sequences,
Transfer Area Msg, Disk, RS-232, and Erase Key.
Generally the steps to use a COMMAND
function are:
1. Press the rose shaded key labeled
[COMMAND] (it doubles as the [Cancel] key).
2. The display will show the following message:
PROGRAM/
PLAY
AREA/
SEQUENCE
PLAYING
TIME
IMMEDIATE/
LINK
KEYBOARD
LAYOUT
LOCK HOLDTIME SCAN
AUTOSPEAK
SEQUENCE
EDIT
SEQUENCE
SET UPOKCOMMAND
CANCEL
SPEAK LEVEL DEFINE RECORD LINK BACKSPACE STOP REMOVE
ERASE DISK TRANSFER
VOLUME
DOWN
<
VOLUME
UP
>
KEYBOARD
LAYOUT
RECORD
TRANSFER
AREA MSG
PROGRAM/
PLAY
AREA/
SEQUENCE
PLAYING
TIME
IMMEDIATE/
LINK
KEYBOARD
LAYOUT
LOCK HOLDTIME SCAN
AUTOSPEAK
SEQUENCE
EDIT
SEQUENCE
SPEAK LEVEL DEFINE RECORD LINK BACKSPACE STOP REMOVE
ERASE DISK TRANSFER
STOP
SET UPOKCOMMAND
CANCEL
VOLUME
DOWN
<
VOLUME
UP
>
KEY
CONTROLS
ERASE
KEY
PROGRAM/
PLAY
AREA/
SEQUENCE
PLAYING
TIME
IMMEDIATE/
LINK
KEYBOARD
LAYOUT
LOCK HOLDTIME SCAN
AUTOSPEAK
SEQUENCE
EDIT
SEQUENCE
SET UPOKCOMMAND
CANCEL
SPEAK LEVEL DEFINE RECORD LINK BACKSPACE STOP REMOVE
ERASE DISK TRANSFER
VOLUME
DOWN
<
VOLUME
UP
>
SCAN
CONTROLS
RS-232
RS-232
BACKSPACE/
DELETE SEQ
PROGRAM/
PLAY
AREA/
SEQUENCE
PLAYING
TIME
IMMEDIATE/
LINK
KEYBOARD
LAYOUT
LOCK HOLDTIME SCAN
AUTOSPEAK
SEQUENCE
EDIT
SEQUENCE
SET UPOKCOMMAND
CANCEL
SPEAK LEVEL DEFINE RECORD LINK BACKSPACE STOP REMOVE
ERASE DISK TRANSFER
VOLUME
DOWN
<
VOLUME
UP
>
COMMAND
CANCEL
Press a COMMAND
Function Key
3. Then press the command key of your choice.
(rose labels)
PROGRAM/
PLAY
AREA/
SEQUENCE
PLAYING
TIME
IMMEDIATE/
LINK
KEYBOARD
LAYOUT
LOCK HOLDTIME SCAN
AUTOSPEAK
SEQUENCE
EDIT
SEQUENCE
SET UPOKCOMMAND
CANCEL
SPEAK LEVEL DEFINE RECORD LINK BACKSPACE STOP REMOVE
ERASE DISK TRANSFER
VOLUME
DOWN
<
VOLUME
UP
>
PROGRAM/
PLAY
SPEECH
CONTROLS
SPEAK
PROGRAM/
PLAY
AREA/
SEQUENCE
PLAYING
TIME
IMMEDIATE/
LINK
KEYBOARD
LAYOUT
LOCK HOLDTIME SCAN
AUTOSPEAK
SEQUENCE
EDIT
SEQUENCE
SET UPOKCOMMAND
CANCEL
SPEAK LEVEL DEFINE RECORD LINK BACKSPACE STOP REMOVE
ERASE DISK TRANSFER
VOLUME
DOWN
<
VOLUME
UP
>
LEVEL
LOCK
LEVELS
ERASE
LEVEL
PROGRAM/
PLAY
AREA/
SEQUENCE
PLAYING
TIME
IMMEDIATE/
LINK
KEYBOARD
LAYOUT
LOCK HOLDTIME SCAN
AUTOSPEAK
SEQUENCE
EDIT
SEQUENCE
SET UPOKCOMMAND
CANCEL
SPEAK LEVEL DEFINE RECORD LINK BACKSPACE STOP REMOVE
ERASE DISK TRANSFER
VOLUME
DOWN
<
VOLUME
UP
>
AREA/
SEQUENCE
EDIT
SEQUENCES
DEFINE
PROGRAM/
PLAY
AREA/
SEQUENCE
PLAYING
TIME
IMMEDIATE/
LINK
KEYBOARD
LAYOUT
LOCK HOLDTIME SCAN
AUTOSPEAK
SEQUENCE
EDIT
SEQUENCE
SET UPOKCOMMAND
CANCEL
SPEAK LEVEL DEFINE RECORD LINK BACKSPACE STOP REMOVE
ERASE DISK TRANSFER
VOLUME
DOWN
<
VOLUME
UP
>
IMMEDIATE/
LINK
LINK
DISK
CHAPTER_.2A_ 4/8/00 11:19 PM Page 9
Page 10

2–9
2
Single Functions
The steps to use the plain (white)
functions are:
❑ Press the key without pressing anything else first.
It is a single step function.
If you do not touch the SET UP or COMMAND
keys first, the key does what is labeled in the
white area. These keys provide control of various
functions useful during both programming and
communication. These keys will perform the
functions: Speak, Level, Define, Record, Link,
Backspace/Delete Seq, Stop, and Group.
8
HELPFUL HINT:
If you press the [SET UP] key or [COMMAND] key,
but don’t need to perform a command or set up
function – don’t panic! The key can be canceled
simply by pressing the same key again.
A Brief Word About Message Keys
The remaining rows on the overlays contain
message keys. These are pressed to record and
play messages. On the blank areas on these
keys you will write words or place pictures (icons,
symbols) to represent recorded messages.
PROGRAM/
PLAY
AREA/
SEQUENCE
PLAYING
TIME
IMMEDIATE/
LINK
KEYBOARD
LAYOUT
LOCK HOLDTIME SCAN
AUTOSPEAK
SEQUENCE
EDIT
SEQUENCE
SET UPOKCOMMAND
CANCEL
SPEAK LEVEL DEFINE RECORD LINK BACKSPACE STOP REMOVE
ERASE DISK TRANSFER
VOLUME
DOWN
<
VOLUME
UP
>
KEYBOARD
LAYOUT
RECORD
TRANSFER
AREA MSG
PROGRAM/
PLAY
AREA/
SEQUENCE
PLAYING
TIME
IMMEDIATE/
LINK
KEYBOARD
LAYOUT
LOCK HOLDTIME SCAN
AUTOSPEAK
SEQUENCE
EDIT
SEQUENCE
SET UPOKCOMMAND
CANCEL
SPEAK LEVEL DEFINE RECORD LINK BACKSPACE STOP REMOVE
ERASE DISK TRANSFER
VOLUME
DOWN
<
VOLUME
UP
>
SCAN
CONTROLS
RS-232
RS-232
BACKSPACE/
DELETE SEQ
PROGRAM/
PLAY
AREA/
SEQUENCE
PLAYING
TIME
IMMEDIATE/
LINK
KEYBOARD
LAYOUT
LOCK HOLDTIME SCAN
AUTOSPEAK
SEQUENCE
EDIT
SEQUENCE
SET UPOKCOMMAND
CANCEL
SPEAK LEVEL DEFINE RECORD LINK BACKSPACE STOP REMOVE
ERASE DISK TRANSFER
VOLUME
DOWN
<
VOLUME
UP
>
PROGRAM/
PLAY
SPEECH
CONTROLS
SPEAK
PROGRAM/
PLAY
AREA/
SEQUENCE
PLAYING
TIME
IMMEDIATE/
LINK
KEYBOARD
LAYOUT
LOCK HOLDTIME SCAN
AUTOSPEAK
SEQUENCE
EDIT
SEQUENCE
SET UPOKCOMMAND
CANCEL
SPEAK LEVEL DEFINE RECORD LINK BACKSPACE STOP REMOVE
ERASE DISK TRANSFER
VOLUME
DOWN
<
VOLUME
UP
>
LEVEL
LOCK
LEVELS
ERASE
LEVEL
PROGRAM/
PLAY
AREA/
SEQUENCE
PLAYING
TIME
IMMEDIATE/
LINK
KEYBOARD
LAYOUT
LOCK HOLDTIME SCAN
AUTOSPEAK
SEQUENCE
EDIT
SEQUENCE
SET UPOKCOMMAND
CANCEL
SPEAK LEVEL DEFINE RECORD LINK BACKSPACE STOP REMOVE
ERASE DISK TRANSFER
VOLUME
DOWN
<
VOLUME
UP
>
AREA/
SEQUENCE
EDIT
SEQUENCES
DEFINE
PROGRAM/
PLAY
AREA/
SEQUENCE
PLAYING
TIME
IMMEDIATE/
LINK
KEYBOARD
LAYOUT
LOCK HOLDTIME SCAN
AUTOSPEAK
SEQUENCE
EDIT
SEQUENCE
SET UPOKCOMMAND
CANCEL
SPEAK LEVEL DEFINE RECORD LINK BACKSPACE STOP REMOVE
ERASE DISK TRANSFER
VOLUME
DOWN
<
VOLUME
UP
>
IMMEDIATE/
LINK
LINK
DISK
PROGRAM/
PLAY
AREA/
SEQUENCE
PLAYING
TIME
IMMEDIATE/
LINK
KEYBOARD
LAYOUT
LOCK HOLDTIME SCAN
AUTOSPEAK
SEQUENCE
EDIT
SEQUENCE
SPEAK LEVEL DEFINE RECORD LINK BACKSPACE STOP REMOVE
ERASE DISK TRANSFER
STOP
SET UPOKCOMMAND
CANCEL
VOLUME
DOWN
<
VOLUME
UP
>
KEY
CONTROLS
ERASE
KEY
PROGRAM/
PLAY
AREA/
SEQUENCE
PLAYING
TIME
IMMEDIATE/
LINK
KEYBOARD
LAYOUT
LOCK HOLDTIME SCAN
AUTOSPEAK
SEQUENCE
EDIT
SEQUENCE
SET UPOKCOMMAND
CANCEL
SPEAK LEVEL DEFINE RECORD LINK BACKSPACE STOP REMOVE
ERASE DISK TRANSFER
VOLUME
DOWN
<
VOLUME
UP
>
GROUP
LOCK
GROUPS
CHAPTER_.2A_ 4/8/00 11:19 PM Page 10
Page 11

2–10
2
Using LCD Messages to
Scroll Through Options
After you turn the DigiCom on and begin
programming, many of the SET UP and
COMMAND functions will require you to choose
from a list of options. Some of the white function
keys will provide options when you are in Program
mode also. You will make selections using the [<],
[>], [OK], and [Cancel] keys. Look at an overlay
now to locate these keys.
The [<] and [>] arrow keys allow you to scroll
through options so you can step forward and
backward through the options. You will be able
to change the display and when the display
shows the desired option, select that choice by
pressing the [OK] key. If you decide to leave
things as they were, press the [Cancel] key.
As you follow the steps in upcoming sections
you will be scrolling through options and
using all you’ve learned to select options. By
understanding these basics, you will be able to go
on to program and customize quickly!
CHAPTER_.2A_ 4/8/00 11:19 PM Page 11
Page 12

2–11
2
Turning the DigiCom On
To turn the DigiCom “on” when it is “off”,
press the Reset button on the right side panel.
Remember, the button is recessed to prevent
it from being pushed accidentally. You will
need to push the button with a pen or some
other narrow object. When the DigiCom
turns on the LCD display will quickly show:
and
Starting
DigiCom...
and
DigiCom
Version X.XX
GROUP A:PROGRAM
LEVEL1 Areas
where XX.XX is the software version such as
`Version 1.00’.
It will then be ready to use. If it was previously
programmed, all message and setting files will be
intact. Most electronic devices have two states,
`on’ and `off’. The DigiCom has three states: on,
off, and sleep. [Note: `Sleep’ is a resting state in
which the DigiCom appears to be `off’ but is
actually in a low power state with all functions
ready and waiting. When your DigiCom first
arrived, it was off.]
If the DigiCom is in sleep state, you can `wake’ it
up by simply pressing any key. When the DigiCom
`wakes’ up, it is ready to be used immediately.
CHAPTER_.2A_ 4/8/00 11:19 PM Page 12
Page 13

2–12
2
< HAVING TROUBLE?
If the DigiCom will not turn on, don’t panic. The
most likely problem is that the battery has drained.
Plug in the charger and then push the Reset button. If the DigiCom still doesn’t turn on, refer to
Chapter Eight, Trouble Shooting.
PROGRAM/
PLAY
AREA/
SEQUENCE
PLAYING
TIME
IMMEDIATE/
LINK
KEYBOARD
LAYOUT
LOCK HOLDTIME SCAN
AUTOSPEAK
SEQUENCE
EDIT
SEQUENCE
SET UPOKCOMMAND
CANCEL
SPEAK LEVEL DEFINE RECORD LINK BACKSPACE STOP REMOVE
ERASE DISK TRANSFER
VOLUME
DOWN
<
VOLUME
UP
>
SET UP
OK
Turning the DigiCom Off
The DigiCom will go into `sleep’ state
automatically when not in use. This will conserve
battery power yet allow DigiCom to be ready for
use. However, there are times when the DigiCom
should be completely switched off, such as for
distance transporting.
To turn off the DigiCom, it must first be in
PROGRAM mode.
Follow these steps to put the DigiCom into
PROGRAM mode. (You will learn more about
PROGRAM mode later.)
1. Press the gold function key labeled [SET UP].
2. Press [PROGRAM/PLAY].
3. Press the [>] key to change the SYSTEM MODE
to “PROGRAM”. (Note: If it is already in
program mode, you can skip these steps.)
4. Press [OK] to confirm your selection.
PROGRAM/
PLAY
AREA/
SEQUENCE
PLAYING
TIME
IMMEDIATE/
LINK
KEYBOARD
LAYOUT
LOCK HOLDTIME SCAN
AUTOSPEAK
SEQUENCE
EDIT
SEQUENCE
SET UPOKCOMMAND
CANCEL
SPEAK LEVEL DEFINE RECORD LINK BACKSPACE STOP REMOVE
ERASE DISK TRANSFER
VOLUME
DOWN
<
VOLUME
UP
>
PROGRAM/
PLAY
SPEECH
CONTROLS
SPEAK
CHAPTER_.2A_ 4/8/00 11:19 PM Page 13
Page 14

2–13
2
Follow these steps to turn off the DigiCom:
1. Put DigiCom into PROGRAM mode.
2. Press the rose shaded key labeled
[COMMAND].
3. Press the [Volume Down] key (it doubles as the
[<] key).
4. The display will prompt the following:
Power Down?
OK Cancel
5. Press the gold key labeled [OK] (it doubles as
the [SET UP] key).
The DigiCom will then power down, turning the
unit off. To turn it back on, press the Reset button
on the right side panel.
Adjusting the “Sleep Time”
The time that the DigiCom waits after the last key
press before `going to sleep’ can be adjusted.
The delay ranges from a half of a minute to 4
minutes.
To change the delay, put the DigiCom into
“Program” Mode and then follow these steps:
1. Press the [SET UP] key.
2. Press the [>] key. It doubles as the
[Volume Up] key.
Sleep Time: 4.0m
< > OK Cancel
where there is a number between 0.5 minute and
4 minutes.
4. Press [<] to shorten the time or [>] to lengthen
the time.
5. When the display indicates the delay you
want, press [OK].
6. Press [Cancel] at any time to quit and leave
the settings as they were.
PROGRAM/
PLAY
AREA/
SEQUENCE
PLAYING
TIME
IMMEDIATE/
LINK
KEYBOARD
LAYOUT
LOCK HOLDTIME SCAN
AUTOSPEAK
SEQUENCE
EDIT
SEQUENCE
SET UPOKCOMMAND
CANCEL
SPEAK LEVEL DEFINE RECORD LINK BACKSPACE STOP REMOVE
ERASE DISK TRANSFER
VOLUME
DOWN
<
VOLUME
UP
>
COMMAND
CANCEL
PROGRAM/
PLAY
AREA/
SEQUENCE
PLAYING
TIME
IMMEDIATE/
LINK
KEYBOARD
LAYOUT
LOCK HOLDTIME SCAN
AUTOSPEAK
SEQUENCE
EDIT
SEQUENCE
SET UPOKCOMMAND
CANCEL
SPEAK LEVEL DEFINE RECORD LINK BACKSPACE STOP REMOVE
ERASE DISK TRANSFER
VOLUME
DOWN
<
VOLUME
UP
>
VOLUME
DOWN
<
VOLUME
UP
>
PROGRAM/
PLAY
AREA/
SEQUENCE
PLAYING
TIME
IMMEDIATE/
LINK
KEYBOARD
LAYOUT
LOCK HOLDTIME SCAN
AUTOSPEAK
SEQUENCE
EDIT
SEQUENCE
SET UPOKCOMMAND
CANCEL
SPEAK LEVEL DEFINE RECORD LINK BACKSPACE STOP REMOVE
ERASE DISK TRANSFER
VOLUME
DOWN
<
VOLUME
UP
>
SET UP
OK
PROGRAM/
PLAY
AREA/
SEQUENCE
PLAYING
TIME
IMMEDIATE/
LINK
KEYBOARD
LAYOUT
LOCK HOLDTIME SCAN
AUTOSPEAK
SEQUENCE
EDIT
SEQUENCE
SET UPOKCOMMAND
CANCEL
SPEAK LEVEL DEFINE RECORD LINK BACKSPACE STOP REMOVE
ERASE DISK TRANSFER
VOLUME
DOWN
<
VOLUME
UP
>
VOLUME
UP
>
CHAPTER_.2A_ 4/8/00 11:19 PM Page 14
Page 15

2–14
2
Using the Correct System
Mode: Program or Play
The DigiCom has two system modes of operation:
Program and Play. It is important to know when to
use each mode. When a user is `speaking’ with
the DigiCom, it should be in Play mode. When
you are programming, it must be in Program
mode. If you have been following along, you
have already experienced a bit of programming
using Program mode.
System Mode: Program
To begin any programming into the DigiCom
you must put it into Program mode. You
cannot record, adjust the sleep time, or perform
other functions unless you are in Program Mode.
Program Mode will be used primarily by
programmers and people helping the DigiCom
augmentative communicator.
To enter Program mode, follow these steps:
1. Press [SET UP].
2. Press [Program/Play]. (It is the first gold colored
function key on left.)
3. If the display shows:
Mode: PLAY
< > OK Cancel
4. Press [<] or [>] and the display will show:
5. Press [OK].
When the DigiCom is in Program mode, you will
have access to all its functions. You will learn
about these functions throughout the next few
chapters.
Mode: PROGRAM
< > OK Cancel
PROGRAM/
PLAY
AREA/
SEQUENCE
PLAYING
TIME
IMMEDIATE/
LINK
KEYBOARD
LAYOUT
LOCK HOLDTIME SCAN
AUTOSPEAK
SEQUENCE
EDIT
SEQUENCE
SET UPOKCOMMAND
CANCEL
SPEAK LEVEL DEFINE RECORD LINK BACKSPACE STOP REMOVE
ERASE DISK TRANSFER
VOLUME
DOWN
<
VOLUME
UP
>
SET UP
OK
PROGRAM/
PLAY
AREA/
SEQUENCE
PLAYING
TIME
IMMEDIATE/
LINK
KEYBOARD
LAYOUT
LOCK HOLDTIME SCAN
AUTOSPEAK
SEQUENCE
EDIT
SEQUENCE
SET UPOKCOMMAND
CANCEL
SPEAK LEVEL DEFINE RECORD LINK BACKSPACE STOP REMOVE
ERASE DISK TRANSFER
VOLUME
DOWN
<
VOLUME
UP
>
PROGRAM/
PLAY
SPEECH
CONTROLS
SPEAK
CHAPTER_.2A_ 4/8/00 11:19 PM Page 15
Page 16

2
System Mode: Play
Play mode is intended for use by the person who
is `speaking’ with the DigiCom. In most instances,
this person should not have access to Program
Mode.
In Play mode, all of the message keys are active.
However, only the following user function keys are
available: Speak, Level, Link, Backspace, Stop,
Group, Volume Down, and Volume Up. This is to
prevent the user from accidentally changing the
DigiCom settings or erasing the message files that
have been recorded.
To enter Play mode, follow these steps:
1. Press [SET UP].
2. Press [Program/Play].
3. If the display shows:
2–15
<
HAVING TROUBLE?
If the DigiCom responds differently than you
would expect when you try to use the SET UP and
function keys, repeat your steps and read
carefully the messages shown in the LCD. If you
do not see what is described in this handbook,
refer to the troubleshooting chapter or call
technical support for assistance.
Mode: PROGRAM
< > OK Cancel
4. Press [<] or [>] and the display will then show:
Mode: PLAY
< > OK Cancel
5. Press [OK].
PROGRAM/
PLAY
AREA/
SEQUENCE
PLAYING
TIME
IMMEDIATE/
LINK
KEYBOARD
LAYOUT
LOCK HOLDTIME SCAN
AUTOSPEAK
SEQUENCE
EDIT
SEQUENCE
SET UPOKCOMMAND
CANCEL
SPEAK LEVEL DEFINE RECORD LINK BACKSPACE STOP REMOVE
ERASE DISK TRANSFER
VOLUME
DOWN
<
VOLUME
UP
>
SET UP
OK
PROGRAM/
PLAY
AREA/
SEQUENCE
PLAYING
TIME
IMMEDIATE/
LINK
KEYBOARD
LAYOUT
LOCK HOLDTIME SCAN
AUTOSPEAK
SEQUENCE
EDIT
SEQUENCE
SET UPOKCOMMAND
CANCEL
SPEAK LEVEL DEFINE RECORD LINK BACKSPACE STOP REMOVE
ERASE DISK TRANSFER
VOLUME
DOWN
<
VOLUME
UP
>
PROGRAM/
PLAY
SPEECH
CONTROLS
SPEAK
CHAPTER_.2A_ 4/8/00 11:19 PM Page 16
Page 17

2–16
2
8
HELPFUL HINT:
This section of the Handbook helps you to
understand groups and levels. However, if you are
a beginner, just remain in one Group. (Group A is
recommended if this is a new device.) From one
group, you can practice setting up levels,
keyboard layouts, and recording messages. Later,
if you want to use other groups, you can.
9
IMPORTANT:
To prevent accidents, you should always put the
DigiCom back in Play mode after programming it.
In Program Mode, with just a few random key
presses, it is possible to erase an entire level or
alter your customized settings. You will usually
want the DigiCom to be in Play mode before you
hand the DigiCom to a person to `speak’ with it.
Understanding “Groups”
and “Levels”
The DigiCom is designed with six user groups.
This is very powerful because it provides you with
more programming options to meet the needs of
the digitized speech communicator. These groups
are categorized or “labeled” by the letters:
A,B,C,D,E,F. Each group gives you access to a
maximum of eight (8) levels at a time. The levels
are listed sequentially: 1, 2, 3, 4, 5, 6, 7, 8. On
each level you can choose the keyboard
layout you want and make other choices to
create communication overlays for a DigiCom
communicator.
CHAPTER_.2A_ 4/8/00 11:19 PM Page 17
Page 18

2–17
2
Understanding “Groups”
and “Levels”
(cont.)
Because DigiCom has 6 user groups (A-F) and 8
levels per group (1-8) the DigiCom offers a total of
forty eight (48) levels. By using groups and
levels, you can program your DigiCom in various
ways to successfully meet the communication
needs of one or more people. Below we have
provided a few examples describing single and
multiple DigiCom communicator situations.
Single User: you could program only one group
(Group A) with anywhere from 1 to 8 levels in that
group. Each level could have the overlay of your
choice with large or small keys on the overlays.
The other groups could be ignored while all
messages are available in the one group.
For another person, you may need more
vocabulary options. You could program up to 8
levels in Group A to be messages about one
topic; up to 8 levels in Group B to be messages
about another topic; up to 8 levels in Group C to
be messages about still another topic, etc. all the
way through the 6 groups. This person would be
using more groups and more messages.
Multiple Users on One DigiCom: If your DigiCom is
to be used for more than one person you can
program groups for up to six different people.
Each person would have access to eight levels.
Another way you could do this, is to program
each user group a bit differently to meet selection
method needs. (You can learn more about
these ideas from this manual and augmentative
communication literature.)
Now that you know a bit about “levels” and
“groups”, it is time to learn how to select these.
CHAPTER_.2A_ 4/8/00 11:19 PM Page 18
Page 19

2–18
2
Selecting “Groups”
and “Levels”
Selecting a Group and Switching
Between Groups
To select a group and switch between
Groups:
Press the [Group] key. (white key next to Volume
Down key)
The first time you press it, you will see the current
group displayed in the LCD. Each time you press
[Group] after that, the DigiCom will advance to
the next group. By pressing the [Group] key you
will move through each group from A through F.
You can record on as few or as many groups as
you wish.
If you wish to remain in only one Group or have
access to only a few Groups, you have options to
“Lock in Groups” or “Lock out Groups”. These
features only become active in Play mode.
If you are a beginner with this device, pay
particular attention to the “Lock in Groups”
feature as you get started.
Lock Groups: Lock in Groups
All six groups are always available to you in
Program mode. All six groups can be available to
the user in Play mode. The DigiCom is shipped to
you with all 6 groups available. If you wish a user
to stay in any one group, you will use the “Lock in
Groups” feature. This will lock that group so you
stay in that group. Generally, you will make this
decision once and keep this programmed for a
lengthy period of time before making changes.
PROGRAM/
PLAY
AREA/
SEQUENCE
PLAYING
TIME
IMMEDIATE/
LINK
KEYBOARD
LAYOUT
LOCK HOLDTIME SCAN
AUTOSPEAK
SEQUENCE
EDIT
SEQUENCE
SET UPOKCOMMAND
CANCEL
SPEAK LEVEL DEFINE RECORD LINK BACKSPACE STOP REMOVE
ERASE DISK TRANSFER
VOLUME
DOWN
<
VOLUME
UP
>
GROUP
LOCK
GROUPS
CHAPTER_.2A_ 4/8/00 11:19 PM Page 19
Page 20

Lock Groups: Lock in Groups
(cont.)
To Lock a User into a Group:
1. Make sure the DigiCom is in Program mode.
2. Press [SET UP] and then [Lock Groups].
3. The display will show:
2–19
2
Lock in Groups
< > OK Cancel
4. Press [OK] to go to the next item. The display
will show:
Lock in:
< > OK Cancel
you have 7 options:
NONE or Groups A, B, C, D, E, F
if you do not want to lock into a group, always
select NONE. (DigiCom is shipped with NONE as
the default setting for Lock Group.)
5. Press the [<] or [>] key to select a group to stay
on and then press [OK]. Once you have made
your decision,
6. Press [OK]. The display will return to:
GROUP _: PROGRAM
LEVEL 1: Areas
* where – shows the Group you selected
7. After locking into a group and changing to Play
mode, [Group] key is disabled so the user is
forced to stay in that Group. While in Program
mode, you will continue to have access to all
groups. (This is an important distinction to
remember!)
8. To Lock in: NONE, return to Program mode and
press [Setup] and [Lock Groups] again. Repeat
the above sequence and select `NONE’ or
another group.
9. The user again has access to all six groups in
Play mode.
PROGRAM/
PLAY
AREA/
SEQUENCE
PLAYING
TIME
IMMEDIATE/
LINK
KEYBOARD
LAYOUT
LOCK HOLDTIME SCAN
AUTOSPEAK
SEQUENCE
EDIT
SEQUENCE
SET UPOKCOMMAND
CANCEL
SPEAK LEVEL DEFINE RECORD LINK BACKSPACE STOP REMOVE
ERASE DISK TRANSFER
VOLUME
DOWN
<
VOLUME
UP
>
SET UP
OK
PROGRAM/
PLAY
AREA/
SEQUENCE
PLAYING
TIME
IMMEDIATE/
LINK
KEYBOARD
LAYOUT
LOCK HOLDTIME SCAN
AUTOSPEAK
SEQUENCE
EDIT
SEQUENCE
SET UPOKCOMMAND
CANCEL
SPEAK LEVEL DEFINE RECORD LINK BACKSPACE STOP REMOVE
ERASE DISK TRANSFER
VOLUME
DOWN
<
VOLUME
UP
>
GROUP
LOCK
GROUPS
CHAPTER_.2A_ 4/8/00 11:19 PM Page 20
Page 21

Lock Groups: Lock out Groups
All six groups are normally available to the user in
Program mode. All six groups can be available to
the user in Play mode.
If you do not want to lock a user into just one
group, but wish a user to have access to a limited
number of groups, you may lock out the remaining groups:
To lock a user out of groups while giving
access to specific groups:
1. Make sure the DigiCom is in Program mode.
2. Press [SET UP] and then [Lock Groups].
3. The display will show:
2–20
2
Lock in Groups
< > OK Cancel
4. Press [<] or [>] key to go to select ‘Lock Out
Groups’. The display will show:
Lock out Groups
< > OK Cancel
5. Press [OK].
6. The display will show:
Lock out: NONE
< > OK Cancel
PROGRAM/
PLAY
AREA/
SEQUENCE
PLAYING
TIME
IMMEDIATE/
LINK
KEYBOARD
LAYOUT
LOCK HOLDTIME SCAN
AUTOSPEAK
SEQUENCE
EDIT
SEQUENCE
SET UPOKCOMMAND
CANCEL
SPEAK LEVEL DEFINE RECORD LINK BACKSPACE STOP REMOVE
ERASE DISK TRANSFER
VOLUME
DOWN
<
VOLUME
UP
>
SET UP
OK
PROGRAM/
PLAY
AREA/
SEQUENCE
PLAYING
TIME
IMMEDIATE/
LINK
KEYBOARD
LAYOUT
LOCK HOLDTIME SCAN
AUTOSPEAK
SEQUENCE
EDIT
SEQUENCE
SET UPOKCOMMAND
CANCEL
SPEAK LEVEL DEFINE RECORD LINK BACKSPACE STOP REMOVE
ERASE DISK TRANSFER
VOLUME
DOWN
<
VOLUME
UP
>
GROUP
LOCK
GROUPS
CHAPTER_.2A_ 4/8/00 11:19 PM Page 21
Page 22

10. In both Program and Play modes, the user
does not have access to those groups locked
out. The [Group] key will beep but will not
change status beyond the groups you have
made available.
11. To have full access to all the groups, return
to Program mode and press [SET UP] and
[Lock Groups] again. Repeat the above
sequence and select `NONE’.
12. The user now has access to all six groups.
2–21
2
Lock out Groups (cont.)
7. Press the [<] or [>] key to select a number of
groups to lock out. Your options are: NONE, F,
E&F, D-F, C-F, and B-F.
8. Press [OK] to confirm your selection.
9. The display will return to:
GROUP A:Program
LEVEL1: Areas
8
HELPFUL HINT:
“Lock in Groups” feature does not become
active until you are in Play mode. “Lock out
Groups” feature becomes available immediately
in Program mode.
CHAPTER_.2A_ 4/8/00 11:19 PM Page 22
Page 23

Selecting a Level and Switching
Between Levels
Once you have decided whether you want to
lock into one group, lock out some groups or
have access to all groups, you are ready to make
decisions about Levels. You will use the Level
feature frequently when using DigiCom. Switching
between levels will be something you will do while
programming and also something a
person communicating with DigiCom will do.
Each Group gives you access to eight (8) Levels
at a time. You can think of it as eight overlays on
top of one another. Each Level is programmed
separately. Therefore, you can program each
Level differently. You can determine different
Keyboard Layouts, messages, topics, etc. for each
Level. To program and speak between Levels you
first need to understand how to switch between
Levels.
To select a Level and switch between
Levels: Press the [Level] key.
The first time you press it, you will see the current
level displayed in the LCD. You will see other
setting information as well (group, system mode,
etc.). Each time you press [Level] after that, the
DigiCom will advance to the next level. By
pressing the [Level] key you will move sequentially
through each level from 1 through 8. You can
record on as few or as many levels as you wish.
If you wish to remain on only one level or have
access to only a few levels you have options to
“Lock In Levels” or “Lock Out Levels”.
If you are working with a very young learner or
person starting with a limited vocabulary, pay
particular attention to both the “Lock in Levels”
and “Lock out Levels” features.
2–22
2
PROGRAM/
PLAY
AREA/
SEQUENCE
PLAYING
TIME
IMMEDIATE/
LINK
KEYBOARD
LAYOUT
LOCK HOLDTIME SCAN
AUTOSPEAK
SEQUENCE
EDIT
SEQUENCE
SET UPOKCOMMAND
CANCEL
SPEAK LEVEL DEFINE RECORD LINK BACKSPACE STOP REMOVE
ERASE DISK TRANSFER
VOLUME
DOWN
<
VOLUME
UP
>
LEVEL
LOCK
LEVELS
ERASE
LEVEL
CHAPTER_.2A_ 4/8/00 11:19 PM Page 23
Page 24

Lock Levels: Lock in Levels
All eight levels are normally available to the user
in Play mode. If you wish a user to stay at any
one level, however; you may lock into that level
so you stay on that level.
To Lock a User into a Level:
1. Make sure the DigiCom is in Program mode.
2. Press [SET UP] and then [Lock Levels].
3. The display will show:
2–23
2
Lock in Levels
< > OK Cancel
4. Press [OK] to go to the next decision. The
display will show:
you have 9 options: NONE or Levels 1, 2, 3, 4, 5, 6,
7, or 8
if you do not want to lock into a level, always
select NONE. (DigiCom is shipped with NONE as
the default setting for Level Lock.)
Lock in:
< > OK Cancel
PROGRAM/
PLAY
AREA/
SEQUENCE
PLAYING
TIME
IMMEDIATE/
LINK
KEYBOARD
LAYOUT
LOCK HOLDTIME SCAN
AUTOSPEAK
SEQUENCE
EDIT
SEQUENCE
SET UPOKCOMMAND
CANCEL
SPEAK LEVEL DEFINE RECORD LINK BACKSPACE STOP REMOVE
ERASE DISK TRANSFER
VOLUME
DOWN
<
VOLUME
UP
>
SET UP
OK
PROGRAM/
PLAY
AREA/
SEQUENCE
PLAYING
TIME
IMMEDIATE/
LINK
KEYBOARD
LAYOUT
LOCK HOLDTIME SCAN
AUTOSPEAK
SEQUENCE
EDIT
SEQUENCE
SET UPOKCOMMAND
CANCEL
SPEAK LEVEL DEFINE RECORD LINK BACKSPACE STOP REMOVE
ERASE DISK TRANSFER
VOLUME
DOWN
<
VOLUME
UP
>
LEVEL
LOCK
LEVELS
ERASE
LEVEL
CHAPTER_.2A_ 4/8/00 11:19 PM Page 24
Page 25

Lock Levels: Lock in Levels
(cont.)
5. Press the [<] or [>] key to select a level to stay
on and then press [OK]. Once you have made
your decision,
6. Press [OK]. The display will return to:
2–24
2
GROUP A:Program
LEVEL1: Areas
7. When the DigiCom is switched to Play
mode, [Level] key is disabled so the
user is forced to stay on that level. While in
Program mode, you will continue to have
access to all levels.
8. To unlock the level, return to Program mode
and press [Lock Levels] again and select
Lock in: `NONE’.
9. The user now has access to all eight levels of
that Group in Play mode.
CHAPTER_.2A_ 4/8/00 11:19 PM Page 25
Page 26

Lock Levels: Lock out Levels
All eight levels of the currently selected user
group are normally available to the user in both
Program and Play mode. If you wish a user to
have limited access to a certain number of
levels, you may “lock out” the remaining levels.
To Lock Out Levels while giving access to
specific levels:
1. Make sure the DigiCom is in Program mode.
2. Press [SET UP] and then [Lock Levels].
3. The display will show:
2–25
2
Lock in Levels
< > OK Cancel
4. Press [<] or [>] key to go to select ‘Lock Out
Levels’. The display will show:
Lock out Levels
< > OK Cancel
5. Press [OK].
6. The display will show:
Lock out: NONE
< > OK Cancel
GROUP A:Program
LEVEL 1: Areas
7. Press the [<] or [>] key to select a number of
levels to keep out. Your options are: NONE, 8,
7&8, 6-8, 5-8, 4-8, 3-8, and 2-8.
8. Press [OK] to confirm your selection.
9. The display will return to:
PROGRAM/
PLAY
AREA/
SEQUENCE
PLAYING
TIME
IMMEDIATE/
LINK
KEYBOARD
LAYOUT
LOCK HOLDTIME SCAN
AUTOSPEAK
SEQUENCE
EDIT
SEQUENCE
SET UPOKCOMMAND
CANCEL
SPEAK LEVEL DEFINE RECORD LINK BACKSPACE STOP REMOVE
ERASE DISK TRANSFER
VOLUME
DOWN
<
VOLUME
UP
>
SET UP
OK
PROGRAM/
PLAY
AREA/
SEQUENCE
PLAYING
TIME
IMMEDIATE/
LINK
KEYBOARD
LAYOUT
LOCK HOLDTIME SCAN
AUTOSPEAK
SEQUENCE
EDIT
SEQUENCE
SET UPOKCOMMAND
CANCEL
SPEAK LEVEL DEFINE RECORD LINK BACKSPACE STOP REMOVE
ERASE DISK TRANSFER
VOLUME
DOWN
<
VOLUME
UP
>
LEVEL
LOCK
LEVELS
ERASE
LEVEL
CHAPTER_.2A_ 4/8/00 11:19 PM Page 26
Page 27

2–26
2
Lock Levels: Lock out Levels (cont.)
10. Now, in both Program and Play modes, the
user does not have access to those levels
locked out. The [Level] key will beep but will
not change status beyond the levels you
made available.
11. To have full access to all the levels, return
to Program mode and press [SET UP and
Lock Levels] again and select `NONE’.
12. The user now has access to all eight levels.
Erase a Level
Because the DigiCom automatically erases a
level as you change methods (Areas, Picture
Sequence, Spell Sequence) or the keyboard
layout is altered, it is seldom necessary to
manually erase a level. However, if you ever wish
to erase a level manually, follow the steps below.
1. Make sure the DigiCom is in Program mode.
Be certain you are in the desired Group on
which you want to erase a level.
2. Press [Level] until the level which you wish to
erase is visible on the display.
3. Press [Command] and then [Erase Level] to
erase a level. The display will prompt you:
Erase Level?
OK Cancel
4. Press [OK] to erase the level or [Cancel] to
leave it intact.
ARE YOU SURE?
OK Cancel
5. Press [OK] to confirm or [Cancel] to leave it
intact.
6. If you erase it, that level will return to the
default setting: 4x8 Areas.
CHAPTER_.2A_ 4/8/00 11:19 PM Page 27
Page 28

Introduction to Areas
and Sequences
There are two ways that messages can be
associated with keys. The first method is through
Areas. Area means only a single message is
recorded within a key Area. The key areas can
be of different sizes (large or small as seen on the
overlays) and the messages can be of different
lengths (from single sounds, words, phrases or full
speeches or songs). There is no relationship
between the length of a message and the size of
a key area. For example, you may program a
large area that says `Hello!’ or a little one that
says `It’s raining today; let’s stay home.’
The number of messages possible on a level
depends on the keyboard layout chosen for that
level. For a 4x8 overlay, we are able to record 32
messages on one level when using Areas. You
can put one message in each key when using
Areas. For information and steps to programming
in Areas, you will read Chapter Three, Set Up and
Basic Programming of the DigiCom: Areas.
The second method of associating messages with
keys is called encoding or message sequencing.
Both Picture Sequencing and Spell Sequencing
use this method. Through sequences, a message is
accessed by pressing a combination of one or
more keys. Programming and communicating
using Picture and/or Spell Sequence is usually
more complex. For information about using
DigiCom in these methods, please refer to
Chapter Five, Picture and Spell Sequences.
( This chapter will also describe the sequence
prediction capabilities available to make these
methods easier to use.)
2–27
2
CHAPTER_.2A_ 4/8/00 11:19 PM Page 28
Page 29

Introduction to Areas
and Sequences (cont.)
Generally speaking, using Areas is easier than
using Picture Sequencing and Spell Sequencing.
Also, if you are just learning to program digitized
devices for the first time, you will probably find it
easier to learn to make overlays and program in
Areas. Using Areas can be a very powerful
method for a person to communicate using the
DigiCom.
When selecting a method, remember that each
level you use can be programmed differently
using whatever method you want: Area
messages, Picture Sequences, or Spell Sequences.
Keyboard Layouts
Selecting a Keyboard Layout
Since the touch panel is programmable, the
DigiCom must be set up with a keyboard
layout matching the overlay that will be used.
(In our example, the 4x8 overlay must match the
keyboard layout.)
To setup the Keyboard Layout, follow the
steps below:
1. Insert a Programmer’s overlay. Make note of
the grid on the overlay that you have inserted.
2. Be certain you are in PROGRAM mode.
(learned previously)
3. Press the [Set Up] key.
4. The display will show the following message:
2–28
2
Press a SET UP
Function Key
PROGRAM/
PLAY
AREA/
SEQUENCE
PLAYING
TIME
IMMEDIATE/
LINK
KEYBOARD
LAYOUT
LOCK HOLDTIME SCAN
AUTOSPEAK
SEQUENCE
EDIT
SEQUENCE
SET UPOKCOMMAND
CANCEL
SPEAK LEVEL DEFINE RECORD LINK BACKSPACE STOP REMOVE
ERASE DISK TRANSFER
VOLUME
DOWN
<
VOLUME
UP
>
SET UP
OK
PROGRAM/
PLAY
AREA/
SEQUENCE
PLAYING
TIME
IMMEDIATE/
LINK
KEYBOARD
LAYOUT
LOCK HOLDTIME SCAN
AUTOSPEAK
SEQUENCE
EDIT
SEQUENCE
SET UPOKCOMMAND
CANCEL
SPEAK LEVEL DEFINE RECORD LINK BACKSPACE STOP REMOVE
ERASE DISK TRANSFER
VOLUME
DOWN
<
VOLUME
UP
>
KEYBOARD
LAYOUT
RECORD
TRANSFER
AREA MSG
CHAPTER_.2A_ 4/8/00 11:19 PM Page 29
Page 30

Selecting a Keyboard Layout
(cont.)
5. Press the [Keyboard Layout] key.
6. The DigiCom will display:
2–29
2
Keyboard: 4x12
OK Cancel
(or another keyboard size, e.g. 2x4, 4x8, 1x3, 2x6,
1x2)
7. Press the [>] key to step forward or [<] to step
back through the possible keyboard layouts.
8. When the display shows the layout that
matches the current overlay, press [OK].
If this keyboard layout is different than before,
9. The DigiCom will display:
Erase Level?
OK Cancel
10. Press [OK] to continue with the keyboard
layout change.
11. You may press [Cancel] at any time to quit
and leave the layout as it was.
8
HELPFUL HINT:
You will notice that menu options `wrap’ around.
If you are at the very beginning and want to get
to the very end, instead if pressing [>] many times
to step through the entire list, press [<] once to
jump to the end. This works in both directions.
CHAPTER_.2A_ 4/8/00 11:19 PM Page 30
Page 31

Types of Keyboard Layouts
The dimensions of a Keyboard Layout correspond
to the number of message keys on an overlay.
Remember the following information from
Chapter One:
❑ Overlays have layouts with a varying number
of message keys on each.
❑ There are 6 layouts/grids of message keys:
4x12, 4x8, 2x6, 2x4, 1x3, and 1x2.
❑ There is a Programmer’s and a User’s overlay
for each layout.
❑ There are two styles of letter keyboards: ABCD
and QWERTY keyboards. Refer to the table in
Chapter One which summarizes the different
overlay types.
2–30
2
4X8 ABCDE
COMMAND
CANCEL
SET UP
OK
UP
>
8
HELPFUL HINT:
The overlays are marked in the upper right hand
corner indicating the Keyboard Layout you should
select. It’s important to mark the message keys as
you record onto them so you recall where you
recorded your specific messages. An easy way
to keep your overlays organized is to put a
programmer’s overlay in the DigiCom and, while
you are programming, write down the messages
on a matching user’s overlay you keep by your
side.
Overlays can be customized to suit the individual
needs of the user. You may want to draw or paste
on small pictures of things to represent vocabulary
you include in the user’s communication
messages. If you find you use many overlays of a
certain type, you can order extra overlays using
the order form included with the overlays or in this
manual.
CHAPTER_.2A_ 4/8/00 11:19 PM Page 31
Page 32

Scanning
Using the scanning mode, a switch or a joystick
can be used to play back messages rather than
the touchpanel. See Chapter Six, Scanning, for
set up and use of scanning.
Programming Exercise 1
Now that you have learned about the equipment
and some fundamentals about programming the
DigiCom, see if you can follow the exercise below
to record your name into the unit. And, as you do
this exercise, think through what you are doing so
you can learn additional skills more easily as you
progress in this manual.
1.) Place a 4x8 programmers overlay on the
DigiCom touch panel.
2.) Plug the unit in if the battery is low.
3.) Turn the DigiCom “on”.
4.) Check to see you are in Group A: System
Mode: Program
5.) Check to be certain the Keyboard Layout
matches the current overlay on DigiCom.
6.) Press [Record] (notice this is a white key so
you do not need to press any other key in
sequence.)
7.) The LCD displays the message:
2–31
2
Press and Hold a
Key to Rec. Upon
*rec. is an abbreviation for “record”
CHAPTER_.2A_ 4/8/00 11:19 PM Page 32
Page 33

Programming Exercise 1
(cont.)
8.) Press any message key on the display and
hold it while you speak the message
into the internal/external microphone.
When you are done speaking, release your
finger from the key. You will hear two beeps.
9.) When you are done recording, press the key
into which you recorded. Your message
will speak back to you. (The quality of your
recording will improve as you learn and
record more. Do not become alarmed if it is
cut off or not clear— just read on!)
10.) If you make a mistake when you press
[record] you can press it again to cancel the
selection. If you make a mistake while you
are recording, repeat the steps and try again.
2–32
2
;
COMING UP NEXT:
Now you have learned about the equipment
and battery charging, and know many things
about the Overlays, Function Keys, Groups,
Levels, Keyboard Layouts and other important
fundamentals to programming. You have even
gotten an opportunity to record your first
message. Your recordings will improve and you
will learn even more in the next chapter.
The next Chapter, Set Up and Basic Programming
of DigiCom: Areas, will teach you how to
setup the DigiCom in the most common
communication mode using basic functions that
provide powerful communication for the AAC
communicator. Here is where you will appreciate
more power with easier programming than you
will find with other digitized products!
CHAPTER_.2A_ 4/8/00 11:19 PM Page 33
Page 34

2–33
2
CHAPTER_.2A_ 4/8/00 11:19 PM Page 34
 Loading...