

Page 1
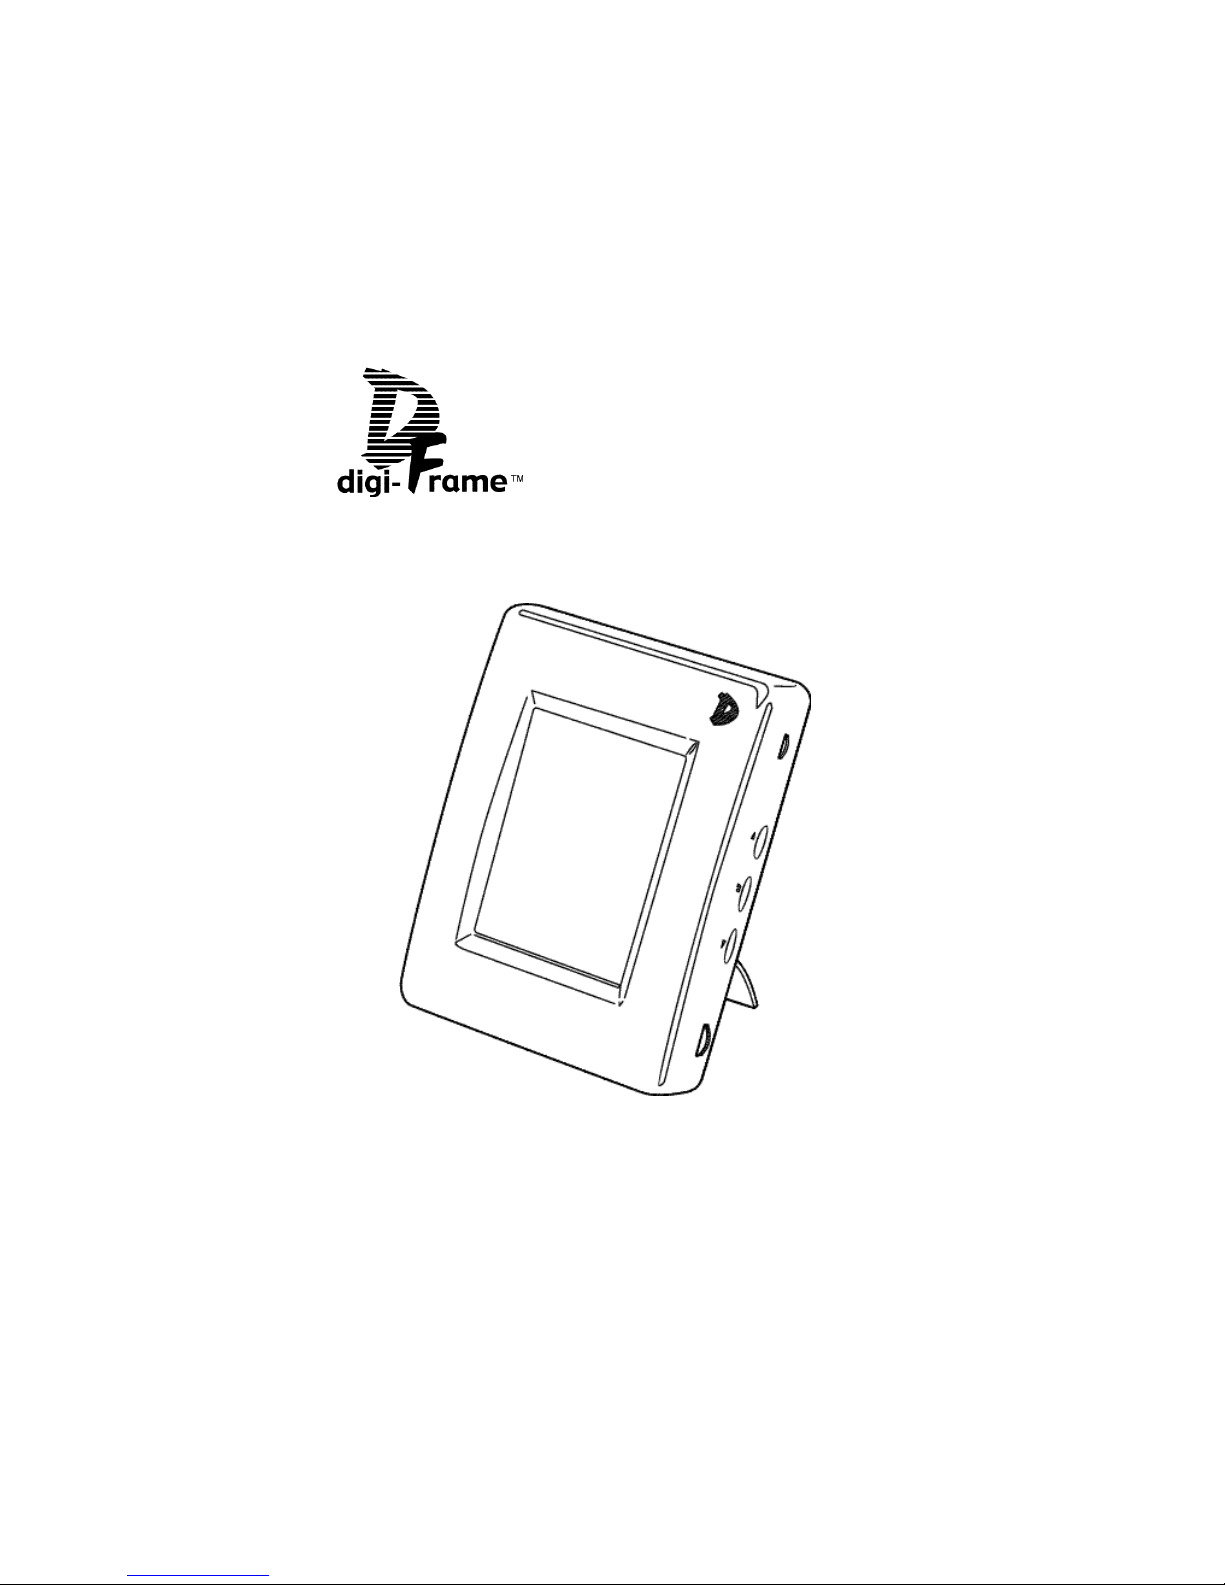
User Manual
Model DF-390
Page 2

Contents..................................................................................................
Feature List.............................................................................................
Ways to Use Your Digi-Frame™....................................................
Digi-Frame™Controls and Connectors.....................................
Warnings.................................................................................................
Getting Started.....................................................................................
Using your Digital Camera with Digi-Frame.............................................
Setting Up for the First Time............................................................................
Using the Rotating Stand...................................................................................
Easy-to-use controls..............................................................................................
Inserting Memory Storage Cards...................................................................
CompactFlash™ Cards.......................................................................................
SmartMedia™ Cards..........................................................................................
Self-Demonstration Mode..................................................................................
Connecting Digi-Frame to your desktop PC .............................................
The Batteries............................................................................................................
Charging the Batteries.........................................................................................
Changing the Batteries........................................................................................
The Menu System...............................................................................
Quick View..............................................................................................................
Preferences................................................................................................................
Slideshow Setup.....................................................................................................
Advanced Slideshow Setup...............................................................................
Picture Orientation................................................................................................
Tools.............................................................................................................................
Exit................................................................................................................................
Tips & Tricks..........................................................................................
Digi-Link PC software........................................................................
For IBM Compatible PCs....................................................................................
For Macintosh®......................................................................................................
Upgrading Digi-Frame Software...................................................
Troubleshooting ...................................................................................
Technical Specifications ....................................................................
1
2
3
5
6
7
7
8
8
9
10
10
11
11
12
13
13
15
16
16
17
19
20
21
22
23
24
25
26
28
30
31
32
1
Contents
390UM.3.6 [7/18/00]
Page 3

3
2
Your Digi-Frame™ can be used in a variety of ways:
Camera Images Direct to Digi-Frame™:
This is the simplest way to use your Digi-Frame™. Take a picture with your digital camera, remove the memory card from the camera, insert it into your DigiFrame™, and view your pictures.
E-mail Images:
When you receive a picture via e-mail, most programs allow you to save the
image file to your computer’s hard disk. If the image is visible on your computer screen, you can often save the image file by clicking and holding the
mouse on the image on Macintosh® computers, or by right-clicking on computers running Windows®. This usually brings up a pop-up menu allowing
you to save the image file. If the image file is contained in an attachment to
the e-mail, there is usually a button or link that requires only clicking once. In
AOL, this is the "Download Now" button. Once the image file is saved to your
hard disk, use Digi-Link™ to send it to your Digi-Frame™ for viewing. It can be
saved onto any memory card inserted into your Digi-Frame™.
Internet Images:
Images found on many websites can be saved to your hard disk and then
downloaded to your Digi-Frame™ in the same way as e-mail images.
Camera Images to PC and then to Digi-Frame™:
Many digital camera users will want to take advantage of their personal computer’s power, memory, and user interface to organize and archive their photos and other images. Many excellent software programs provide facilities for
doing this. Images can be transferred from the camera to the computer by a
serial connection (RS232, USB, or FireWire™) or by use of a card-reader
peripheral. After editing, transfer the images to your Digi-Frame™ using DigiLink™ or a card reader.
Storing Your Images on Memory Cards for Digi-Frame™ Viewing:
Memory cards provide a quick and simple way of storing groups of photos for
instant viewing on your Digi-Frame™. Once images are saved on your hard
disk, they can be organized into groups for display on your Digi-Frame™ as
pre-loaded slideshows. Images can be transferred to memory cards either by
sending them to the Digi-Frame™ with Digi-Link™ or by writing them onto a
memory card with a card reader peripheral. The latter is faster. You could save,
for instance, all your photos for one year on one memory card, or all photos of
a special event. When you want to show your vacation pictures to a friend you
can simply retrieve the "Vacation Pictures" memory card and pop it in your
Digi-Frame™ for instant viewing!
Collecting and Viewing Digi-Frame™ Pre-Loaded Image Cards:
Digi-Frame Inc. will offer collections of pre-loaded images on memory cards. If
you get tired of your own photos, pop in a card of great works of art, professionally-photographed landscapes, sports heroes, you name it! The image collections will also be available for purchase via download from our website.
Check our website or your retailer for availability information.
Ways to use your Digi-Frame™
JPEG picture viewing . View image files in the popular JPEG image format
used by most digital cameras. Picture files may be any size up to the
limit of available memory.
CompactFlash™ and SmartMedia™ (S SFDC) storage card support. Use
storage cards directly from almost all popular digital cameras.
Computer connection. Built in serial (RS-232, RS-422 compatible) interface
allows you to connect Digi-Frame™ to your personal computer
(Windows® or Macintosh®) to transfer images to and from the computer. Download your favorite pictures from E-mail or the Internet and store
them on a CompactFlash™ or SmartMedia™ card for convenient viewing
at any time.
Large, bright color display. DF-390 has 3.9” active-matrix color LCD capa-
ble of displaying thousands of colors. Contrast is user-adjustable.
Automatic orientation sensor. Your pictures will be rotated automatically
as you tilt the frame between landscape (wide) and portrait (tall) modes.
Orient the frame to suit the majority of pictures on your storage card,
and the remaining pictures will be rotated automatically so they appear
the right way up.
Programmable slideshows. Assemble your own slideshows (up to ten dif-
ferent slideshows on each memory card) and show your pictures in any
order you want. Simply select images from a list of thumbnails on the
card. Each slideshow can have its own different pictures, transitions, slide
intervals, effects, etc. During the slideshow you can pause or resume
and manually skip forwards or backwards. The interval between slides is
programmable in ten-second increments up to ten minutes. Further
enhance your slideshows with our variety of selectable transition effects.
Savable slideshow. The DF-390 will save your slideshow preferences to
your CompactFlash™ or SmartMedia™ card allowing you to make individual cards with different shows that can be changed as easily as the
swap of a card.
Instant start. Insert your card full of images, turn on the Digi-Frame™, and
it will immediately begin a cycling slideshow of all available pictures,
with no user interaction necessary.
Simple, graphical menus. Menus are shown as both as large, easily-visible
icons and descriptive text.
User-friendly controls. Navigate menus and lists using a simple thumb-
wheel control. Control slideshow operation using VCR-like buttons –
back, pause/play and forward.
Delete pictures from memory cards. Delete pictures to free up card
space.
Battery powered convenience. Show your pictures anywhere, without
needing a wall outlet.
Audio feedback. Menu commands and other actions are confirmed with
audible tones.
Feature List
Page 4

4
5
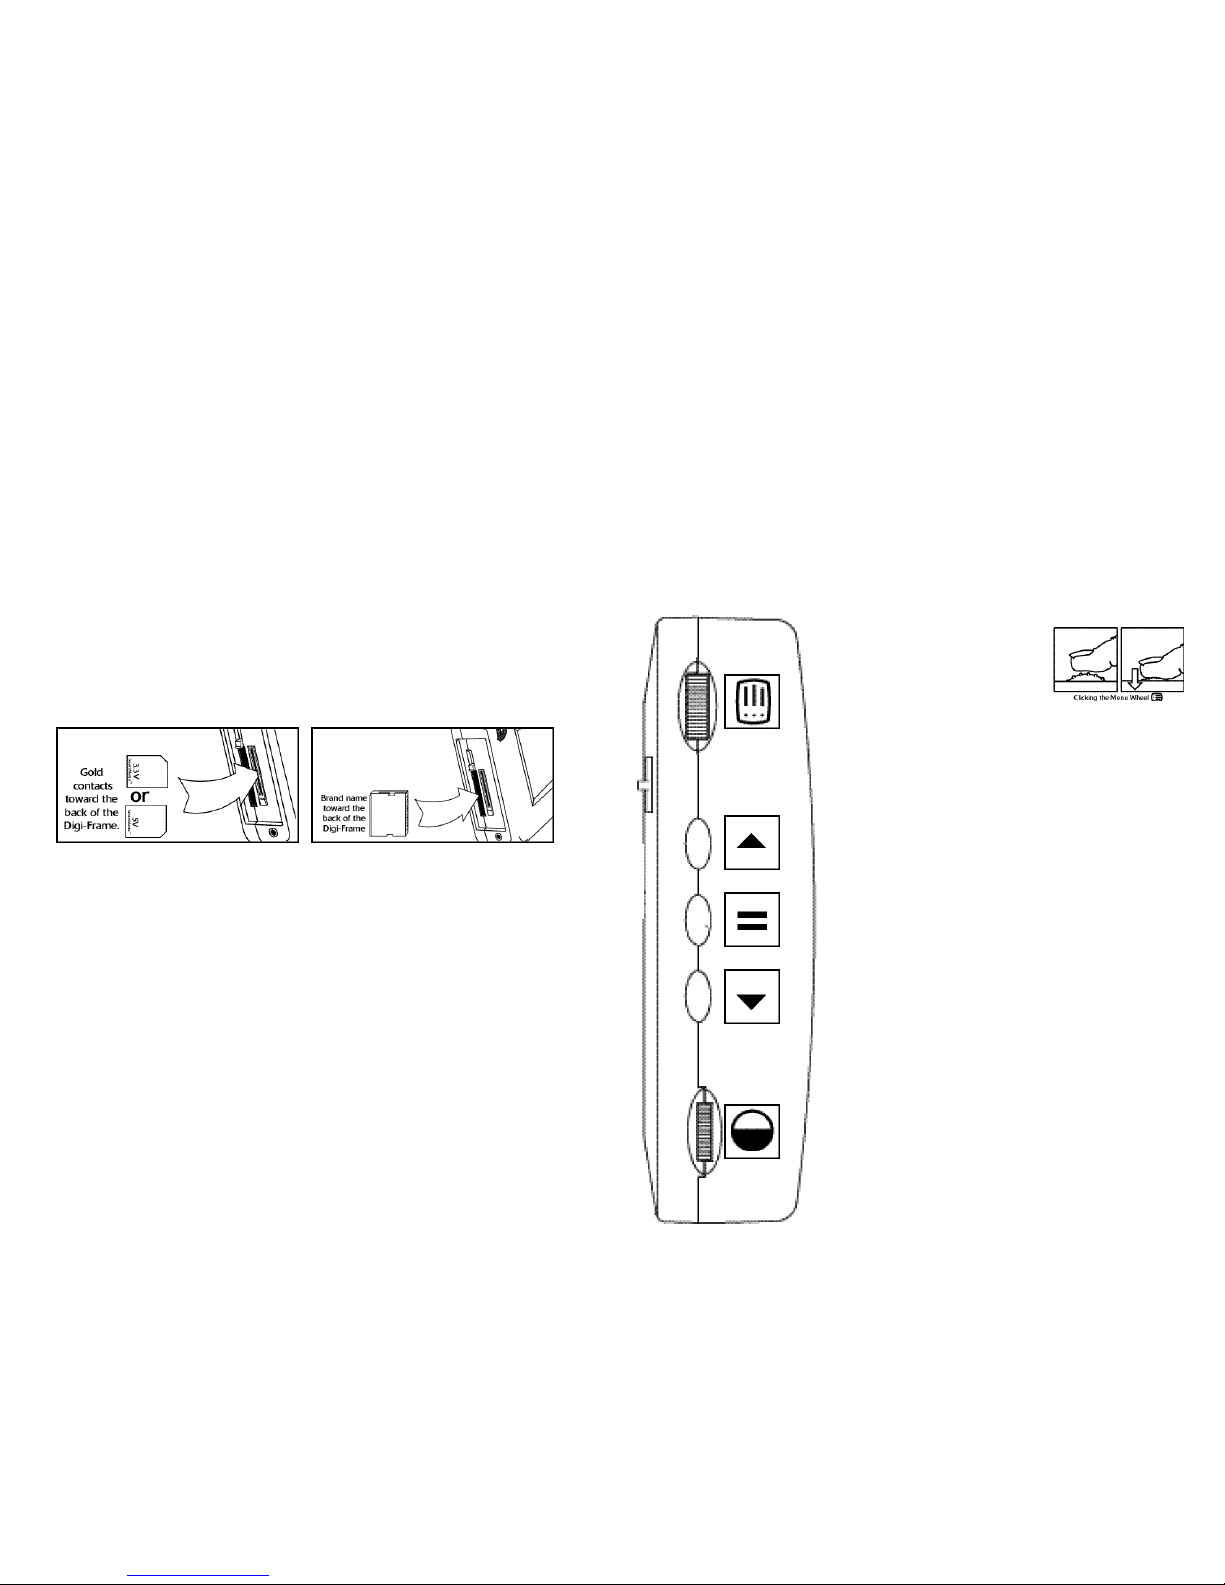
Menu Wheel Rotate this control to navigate menus and lists. Push
(“click”) the control to select or act upon menu or list
items.
Forward Use this button to advance to the next slide in a
slideshow.
Play/Pause Use this button to pause or resume the slideshow at
any time. Press to exit menu system.
Back Use this button to display the previous slide in a
slideshow.
Contrast Wheel Rotate this control to adjust the picture contrast.
CompactFlash™ slot Insert CompactFlash™ storage cards here.
IMPORTANT: Always use the Eject button to
remove cards from the memory card slots.
WARNING: Always turn off Digi-Frame™ before
inserting or removing cards.
SmartMedia™ slot Insert SmartMedia™ (SSFDC) storage cards here.
IMPORTANT: Always use the Eject button to
remove cards from the memory card slots.
WARNING: Always turn off Digi-Frame™ before
inserting or removing cards.
Digi-Link™ port Connect the Digi-Frame™ to your PC or Macintosh®
by attaching the serial link cable between this socket
and the computer’s serial (COM) port.
Power Supply Jack Connects to the Digi-Frame™ charging adapter that
plugs into the wall.
Battery Door Remove to change the batteries.
Power Switch Turns the Digi-Frame™ on and off. Always turn off
the Digi-Frame™ before inserting or removing memory cards.
Rotating Stand Supports the Digi-Frame™ for tabletop use, it can
rotate to support either a vertical or a horizontal
viewing position. It adjusts to change the angle of
the Digi-Frame™.
Screen Displays your pictures in vivid color. Your Digi-
Frame™’s screen is made of glass and should be
treated with care. Use soft cloth and a recommended screen cleaning solution to remove fingerprints.
Rotating Logo The “D” logo on the front of your Digi-Frame™ can
be rotated to match the current orientation of your
Digi-Frame™.
Digi-Frame™Controls and Connectors
4
;
3
Page 5

Do Not Block the Ventilation Holes on the back of the
Digi-Frame™ at any time.
WARNING! USE ONLY RECHARGEABLE NiMH BAT-
TERIES. USE OF ANY OTH ER TYPE OF BATTERY
MAY CAUSE EXPLOSION, FIRE, OR PERSONAL
INJURY. DIGI-FRAME INC. IS NOT LIABLE FOR
LOSS OR DAMAGES RESULTING FROM USE OF
NON-RECOMMENDED BATTERIES.
Keep your Digi-Frame™ out of direct sunlight. Direct
sunlight may cause damage.
Always use the eject buttons on the memory storage
card slots to remove the memory storage cards.
Do not open the case of the Digi-Frame™. There is risk
of electric shock, and there are no user-serviceable
parts inside. Opening the case will void your warranty.
Do not use Digi-Frame™ if conditions could allow
condensation to occur, or damage may result.
The screen on the Digi-Frame™ is made of glass and
can break. It is covered with plastic polarizing material
that can be scratched. Treat it gently, and follow the
screen care instructions in this Manual.
The orientation sensor will rattle if the Digi-Frame™ is
shaken. This is normal.
If no storage card is inserted into the Digi-Frame™, It
will enter Self-Demonstration mode after a brief pause.
WARNINGS!
WARNINGS!
7
6
Getting Started
Unpacking your Digi-Frame™:
The DF-390 includes:
o Digi-Frame™ Electronic Digital Picture Frame
o Executive carrying case
o External power supply, 100-240 VAC, 50/60 Hz
o Macintosh®/PC-compatible serial cable (Digi-Link™ cable)
o Digi-Link™ Macintosh®/PC compatible software on CD-ROM
o Quickstart Card
o User Manual
Make sure all of these parts are included before continuing.
If something is missing contact customer service: 1-800-771-5476
! !
! !
Using your Digital Camera with Digi-Frame:
MOST IMPORTANT:
The digi-frame can only read JPEG images.
Most cameras default to JPEG images.
If your camera has a choice of formats choose JPEG.
If you have images in some other format that you wish to display
on the Digi-Frame, use an image editing software to change the
format of the image to JPEG. DO NOT just change the tag at the
end of the file name to: <your picture>.jpg
Set your camera for lowest resolution.
The low resolution setting on your camera will display beautifully
on the Digi-frame. Higher resolutions will not improve display on
the digi-frame, and may slow down the slideshow.
It is possible that the Memory Card is not in a standard format.
Occasionally, memory cards included with digital cameras are factory formatted in some non-standard way. A badly formatted card
can cause a variety of problems in a Digi-frame. If an individual
card is having problems in the Digi-Frame, try reformatting the
card. Formatting erases the contents of the card, so be sure to
save any images to another storage media or device before reformatting!
Page 6
9
8
Setting up the Digi-Frame™ for the first time:
DF-390 is designed to be used either horizontally (landscape) or vertically
(portrait). The Digi-Frame™ will automatically change the display mode to
match its orientation.
Choose the orientation that you prefer, then rotate the Rotating Stand to
match that orientation. Set the DF-390 on a flat surface, and adjust the
height of the stand to change the viewing angle.
Make sure the Digi-Frame™ is off.
Connect the External Power Supply to the Power Supply jack on the back
of the Digi-Frame™. Be sure to match the arrow on the plug to the arrow
on the case before pressing the plug into the receptacle.
Plug the External Power Supply wall plug into a 110-240 VAC 50/60 Hz
supply. Charge the DF-390 for at least 10 hours before using battery
power only.
Insert a Compact Flash and/or SmartMedia™ Storage card with your digital pictures in JPEG format. Take care to orient the Cards as shown.
Move the Power Switch to the “On” position to turn on the Digi-Frame™.
Enjoy your pictures.
Using the Rotating Stand:
The stand on the back of your Digi-Frame™ rotates 90˚ and securely
clicks into two rotational positions, one for portrait, the other for landscape.
The stand is designed to support the Digi-Frame™ on flat surfaces. Be
sure that the stand is clicked securely into one of the two positions before
placing the Digi-Frame™ on a desk or other flat surface.
Both rotation positions can support the Digi-Frame™ at several viewing
angles, choose the one that looks best.
Orientation of the Digi-Frame™ may be changed at any time, the DigiFrame™ will automatically display your slideshow properly.
The Digi-Frame logo can be rotated to match the current orientation of
the Digi-Frame™.
Easy-to-use controls:
The icon-based menus on the Digi-Frame™ are controlled by a group of
three buttons and a wheel. Except for the Power Switch, all of the controls
are located on one side of the Digi-Frame™. It is the top in landscape
mode, and the right side in portrait mode.
The Menu Wheel:
Click the Menu Wheel at any time
to enter the control menu. From this
menu you can customize slideshows,
and take advantage of the many
features of the Digi-Frame™.
While in the menu system pressing (;) will exit any
menu and return to Slideshow mode.
The menu system is covered in greater detail in the
Digi-Frame™ Menu System chapter.
The Manual Control Buttons:
The three buttons between the wheels on the control
side of the Digi-Frame™ provide control of image
viewing.
Press the (;) button to pause or restart the
slideshow. When the show is paused, the play/pause
(;) resumes the slideshow.
Press the (4) button to advance to the next picture.
Press the (3) button to go back to the previous picture.
The buttons can have a variety of other functions
while in the menu system. Follow the onscreen directions.
The Contrast Wheel:
The Digi-Frame™ is easy to adjust for different ambient lighting conditions.
With the Digi-Frame™ in operation, rotate the contrast
wheel to create the optimum display setting.
Important information about the Screen:
The backlight of the display panel in your Digi-Frame™ has a minimum
life expectancy of at least 10,000 hours. This is equivalent to about 14
months of continuous 24-hour usage. To prolong the life of your DigiFrame's display we suggest turning it off when not in use. If used five
hours or less per day it will last at least five years.
Page 7

1110
SmartMedia™ Cards:
To insert the SmartMedia™ card:
Make sure the Digi-Frame™ is off.
Insert the card with the gold contacts facing toward the back of
the Digi-Frame™, notched end first. Do not force the card into the
slot.
To remove the SmartMedia™ card:
Make sure the Digi-Frame™ is off.
Press the eject, this will dislodge the SmartMedia™ card. Once the
lever is fully depressed, gently pull the card free.
Self-Demonstration Mode:
The Digi-Frame™ is designed to show off its features in a short
demonstration.
If the Digi-Frame™ is powered on with no memory card inserted,
the Digi-Frame™ will start a slideshow of digital pictures stored in
the unit.
All features are available in demonstration mode.
Press any button to skip the wait period.
To get out of Self-Demonstration mode, turn off the Digi-Frame™,
and insert a memory card
The Power Switch:
The Power Switch is located on the back of the Digi-Frame™. It has
two positions, On and Off.
Inserting Memory Storage Cards:
The Digi-Frame™ 390 is designed to read either SmartMedia™ or
Compact Flash memory storage cards.
Turn the Digi-Frame™ off before inserting or removing Memory
Storage Cards.
Both kinds of cards may be inserted into the Digi-Frame™ at the
same time.
If no memory storage cards are inserted, or if no pictures are
found on the card, the Digi-Frame™ it will wait a few moments,
then automatically switch to Self-Demonstration mode.
CompactFlash™ Cards:
To insert the CompactFlash™ card:
Make sure the Digi-Frame™ is off.
Gently slide the card into the CompactFlash™ slot. The card only
goes in one way. Do not force the card into the slot.
To remove the CompactFlash™ card:
Make sure the Digi-Frame™ is off.
Press the eject lever into the Digi-Frame™, this will partially eject
the CompactFlash™ card. Once the lever is pressed inside the DigiFrame™, gently pull the card free.
IMPORTANT:
The Digi-Frame™ will only recognize digital pictures stored
in the JPEG format. Digital Pictures stored in other formats
will be ignored by the Digi-Frame™.
Page 8

13
12
Connecting Digi-Frame™ to your desktop PC:
The Digi-Frame™ can link to your Desktop PC to upload and
download Digital Pictures.
In order to connect to your desktop PC, your Digi-Frame™ comes
with a Macintosh®/PC compatible serial cable (Digi-Link™ cable).
The Digi-Link™ cable has two dedicated connector ends.
The serial connector connects to the serial port on the back of
most IBM- compatible computers.
The serial connector also connects to the included Macintosh®
adapter, that connects to the Printer Port or Modem port on many
Macintosh® computers.
A serial to USB adapter is needed to connect the Digi-Frame™ to
the USB ports used on many newer IBM compatible and
Macintosh® products.
The Digi-Frame™ connector connects to the Digi-Link port on the
Digi-Frame™.
Connecting to an IBM PC compatible:
Attach the serial end of the cable to the serial port on the back of
the computer.
Attach the Digi-Frame™ connector to the Digi-Link port on the
Digi-Frame™.
Connecting to a Macintosh® compatible computer:
Attach the Macintosh® adapter to the serial end of the Digi-link
cable. Attach the Macintosh® adapter to either the Printer or
Modem port on the back of your Macintosh® computer.
Attach the Digi-Frame™ connector to the Digi-Link port on the
Digi-Frame™.
serial connector Digi-Frame™ connector
The Digi-Link Cable
Charging the batteries:
The DF-290 runs on either 4 rechargeable “AA” NiMH Batteries, or
an A/C charger that can also be used to supply power to the unit.
Use only the Supplied Digi-Frame™ external Power Supply connected to a 100-240 VAC 50/60 Hz outlet. Other power adapters
may cause damage to the Digi-Frame™.
Before connecting the power supply make sure the Digi-Frame™
power switch is in the off position.
Connect the External Power Supply to the Power Supply jack on
the back of the Digi-Frame™. Then plug the Charging adapter wall
plug into a standard 100-240 VAC 50/60 Hz source.
The Digi-Frame™ will begin charging automatically.
It is normal for the batteries to become warm while charging. this
is not a defect and need not be reported to customer or technical
support.
Batteries
Page 9

15
14
Changing the Batteries:
From time to time the rechargeable batteries in the Digi-Frame™
will need to be changed.
The DF-390 uses 4 rechargeable “AA” NiMH batteries. Be sure to
replace the batteries with “AA” NiMH rechargeable batteries only.
To change the Batteries:
Make sure that the DF-390 is
turned off.
Remove the door to the battery
storage compartment by pressing
on the arrow and sliding the battery door toward the bottom of
the DF-390.
Remove the batteries from the battery compartment.
Put the new batteries in the battery
compartment, taking care to orient
the batteries as marked on the case.
Once the batteries are in place,
position the door to the battery
compartment on top of the batteries, and push the door toward
the top of the unit until it clicks
in place.
WARNING! USE ONLY RECHARGEABLE NiMH BATTERIES.
USE OF ANY OTH ER TYPE OF BATTE RY MAY CAUSE EXPLO-
SION, FIRE, OR PERS ONAL INJ URY. DIGI-FRAME I NC. IS
NOT LIABLE FOR LOSS OR DAMAGES RESU LTING FROM
USE OF N ON-RECOMMENDED BATTERIES.
Important Information About Your Digi-Frame™ Batteries:
The nickel-metal hydride (NiMH) batteries supplied with your
Digi-Frame™ and its built-in charging circuitry are designed to
provide maximum operating time and charge/discharge cycles.
Please note the following important points:
1) Your Digi-Frame begins a charging cycle each time the power
adapter is plugged into the unit. The charging circuit will charge
the batteries until a full charge is detected or until a period of
approximately three and one-half hours has passed, after which
charging is terminated for safety.
1) Your Digi-Frame™ should provide approximately 45 minutes of
operation after a full charge. It may take several charge/discharge cycles before new batteries provide their maximum
operating time. To cycle your batteries, operate your DigiFrame™ on batteries until it stops functioning, then plug it into
the charger for 10 hours.
2) The brightness of your Digi-Frame’s display will decrease as the
battery power is consumed. This is normal.
3) Never use any batteries other than nickel-metal hydride (NiMH)
type, size AA, 1300-1500 mAH capacity.
4) It is not necessary to have batteries installed in your DigiFrame™ in order to operate it from its AC adapter. It can be
operated without batteries installed.
5) It is not necessary to turn your Digi-Frame™ off in order to
charge the batteries at full charging rate. The batteries will
charge at full rate whether the Digi-Frame™ is switched on or
off.
Page 10

1716
The Digi-Frame™ Menu System:
Clicking the Menu Wheel during the slide show takes you to the
menu system. A list of icons is shown at the left-hand side of the screen,
and the icon’s function is displayed across the top of the screen. Rotating
the Menu Wheel highlights each icon in turn. Click the wheel to enter a
sub-menu for the selected icon. Press (;) to exit the menu system and
return to Slide Show at any time.
Quick View:
Quick View shows a small "thumbnail" for each image on the
memory cards currently inserted. Rotate the wheel to highlight the desired image, then click the wheel to "zoom in" on
the highlighted image. Click the wheel again to return to the
Quick View screen. If more images are stored than will fit on
the screen at one time, keep rotating the wheel past the last
thumbnail, and the thumbnails will scroll to reveal more
images. Clicking the forward button will select the picture
immediately below the currently selected picture, the back
button will select the picture immediately above the selected
picture.
Press (;) to exit Quick View and return to the Slide Show.
Digi-Frame™ Menu System
Important!
On any menu that has thumbnail images, you cannot select pictures until all of the thumbnails are drawn.
Note that in screens involving thumbnail images the thumbnails will take
a few moments to draw the first time. Once they’ve been drawn in any
menu screen, they will redraw rapidly the next time they’re used in a
menu screen.You may also have your Digi-Frame generate all of the
thumbnails at once by selecting “Optimize Card” from the “Tools” menu.
Preferences:
The Preferences sub-menu allows you to select and change
many of the features of your Digi-Frame™. Rotate the wheel
to highlight the feature you want to change. As each feature is
selected, its current setting becomes visible. To change the
current setting, click the wheel again. The setting information’s
color will change to yellow. Rotate the wheel to view the various choices for that feature. Click the wheel again to select the
setting you want. Press Play/Pause (;) at any time to return
to the slideshow, the new preferences are saved automatically.
Transition Effect:
Your Digi-Frame™ features a number of interesting transitions between
images. Here are some examples. The transitions in your Digi-Frame™
may differ from those listed below depending on the version of software
shipped with your Digi-Frame™. Check our website for software upgrades.
Wipe:
The screen is filled with black, then the new image "wipes" down from the top of the
screen.
Scattered Slides:
Images are reduced in size and displayed at random positions on the screen, for a
pleasing “varying border” effect.
Light Box:
Images are reduced and displayed as in Scattered Slides mode, but one on top of
another. As each successive image is displayed, the ones in the background become
dimmer and dimmer.
Black Stripes:
The old image is overwritten with stripes, then the new image wipes down from the
top.
Bouncing Thumbnails:
A random selection of thumbnails from stored images is shown bouncing around the
screen for a few seconds between images.
Fade Out:
The current image quickly darkens to black, the next image in the show then wipes
down to replace it.
Dissolve:
The current picture dissolves into the next picture in the slideshow.
Mosaic:
Large chunks disappear, revealing the next picture in the slide show.
Secret panels:
Panels slide to reveal the next picture in the slideshow.
Random:
A transition effect from the list above, is selected randomly between each picture.
Page 11

18
19
Auto Color Fill:
With Auto Color Fill On, your Digi-Frame™ will fill any unused portion of
the screen with a background color taken from the displayed image. This
reduces the "black bar" effect seen when pictures do not have the same
4:3 proportion as the Digi-Frame™ screen.
Slide Order:
You can choose to display the pictures in your slideshow either in the
order you selected in the Slideshow Setup screen, or in a random order.
Select "User-Defined Order" to show the pictures in sequence, or select
Random (Shuffle)" to display the pictures in a random order.
Note: Whichever setting you choose here, only pictures that you have
added to the currently selected slideshow will be displayed.
Time Between Slides:
You can select the amount of time between image changes, from one second to ten minutes. The time increments by one second for every wheel
"beep" up to five seconds, then 5 seconds per “beep” up to 60 seconds,
after which it increments by 15 seconds per “beep”.
The Time Between Slides defaults to 5 seconds.
Display Quality:
Select between Fastest, Medium, and Best. Fastest will be sufficient for
most images. If you notice a "blockiness" in your images, you might want
to try a higher quality setting.
Special Effect:
The Digi-Frame can display your Slideshow using any of a number of different and exciting special effects. The special effects do not change the
original digital picture on the memory storage card. Some of the special
effects supported are as follows.:
None:
This is the default setting. It displays all of the pictures as slides.
Black and White:
This displays all of the pictures in the slideshow as black & white pictures
Sepia Tone:
This displays all of the pictures in the slideshow as warm brown old-time photos.
Starlight:
This displays the pictures in the slideshow as if they were seen through light intensifier
goggles
Infra-red:
This displays the pictures in the slideshow to appear as if seen through an infra-red
camera.
Random:
A Special effect from the list above, is selected randomly for each picture in the
Sideshow.
Slideshow Setup:
The Slideshow Setup screen is where you select which of
the images stored on your memory cards are displayed in
the slideshow. The column of thumbnails on the left-hand
side of the screen represents all the images stored on the
currently-inserted memory card(s). The thumbnails on the
right-hand column represent the images currently included
in the slideshow. The images will be displayed in top to
bottom order during slideshow playback.
To add an image on a memory card to the slideshow:
Press the (3) button.
Highlight a thumbnail on the left-hand column (scroll down or up to
see more if they aren’t all on the screen at once).
Click the wheel to add the selected image to the Slideshow.
The picture will appear above the highlighted image in the right column. The default position is the first in the slideshow; This can be
changed, see the next section.
A picture may be added to the Slideshow more than once.
To insert an image to a specific location in the slideshow:
Press the (4) button.
In the right hand column, find the space in the slideshow that you
want the picture to appear.
Use the Menu Wheel to select the picture before which you want the
new picture to appear.
Follow the directions above, “To insert an image in the slide show.”
Page 12

20 21
To remove an image from the slideshow:
Press the (4) button
Highlight a thumbnail on the right-hand column.
Click the menu wheel to remove the selected image from the
slideshow (it won’t be deleted from the memory card).
Press the Play/Pause (;) button to exit Slideshow Setup.
Advanced Slideshow Setup:
This screen contains options that let you work with the
contents of the slideshow list quickly and easily. Use the
wheel to select the function you want, and click the
wheel to execute that function. Pressing (;) will exit
the Advanced Slideshow Setup screen and return to
slideshow mode.
Select Slideshow:
You can store up to ten different slideshows on
each card. Each slideshow has its own independent
set of preferences and slide ordering. For example,
you might have pictures from two vacations on the
same card. You could put all the pictures from the
first vacation into one slideshow and the pictures
from the second vacation into another slideshow.
Choosing this option will show you the currently selected
slideshow and allow you to use the wheel to choose a different
slot. Click the wheel when you are satisfied with your choice, or
press (;) to return to the Advanced Slideshow Setup screen without changing the currently selected slideshow.
Note:
It is not recommended to use this feature if you intend to have
both CompactFlash and SmartMedia cards in the unit simultaneously.
Clear Slideshow:
This option removes all pictures from the current
slideshow. It does not delete any pictures off the
card; it simply clears out the slideshow so you can
start over with adding pictures in the order you
prefer.
Add All To Slideshow:
Selecting this option will add all pictures on inserted cards to the current slideshow.
Add Slides By Folder:
Some digital cameras allow you to store pictures in
different folders on the card. You can also organize
your pictures in folders using your computer and
and a card reader device. Selecting this option
allows you to browse the folders available on the
card and add all pictures from a particular folder
into the slideshow.
When you select this option, you may be prompted to choose
which card you want to work with (CompactFlash or SmartMedia).
After this choice is made, you will see a screen containing folder
icons and names if any are present on the card.
Use the wheel to scroll through the list of folders. Clicking the
wheel will add all pictures in the current folder to the slideshow, as
well as those in any folders inside the current folder. Press (;) to
exit.
Picture Orientation:
Some of your pictures will have been taken with the
camera in a horizontal position, and others in a vertical
position. The Picture Orientation screen allows you to
tell your Digi-Frame™ which is the correct position for
each image. A screen of thumbnails is displayed for the
images currently in the slideshow. Highlight images and
click the menu wheel as necessary to rotate all the
images to a vertical orientation. Once this is done, your
Digi-Frame™ will automatically rotate images as necessary when you rotate its position from horizontal to
vertical and vice-versa.
Page 13

22
23
Tools:
Selecting this menu option will take you to a screen
with various tools for working with CompactFlash and
SmartMedia cards. Rotate the wheel to select the
desired function. As you change the selection, a brief
description of the current tool will appear in the lower
portion of the screen.
Clicking the wheel will execute the currently highlighted function;
pressing (;) will exit the Tools menu and return to slideshow
mode.
Clean Up Card:
This function frees up as much space as possible
on your card by deleting thumbnail cache files, old
software updates and other files which Digi-Frame
may have added to your card. Removing thumbnail cache files will slow down operation of the
Quick View, Picture Orientation, Slideshow Setup
and Delete Pictures screens until new thumbnails are redrawn.
A progress bar is shown at the bottom of the screen; the progress
bar is only an estimate of the time remaining, actual time will very
depending on the contents of the card.
If you have both CompactFlash and SmartMedia cards inserted
when you select this function, you will be asked to choose which
card you want to clean up.
Optimize Card(s):
Selecting this function creates saved thumbnail
files (tiny, fast-loading versions of your pictures) for
all the pictures on your card(s). This makes navigating any Digi-Frame screen containing thumbnails (e.g. Quick View and Slideshow Setup) much
faster.
This function creates files that will occupy some card space (the
exact amount depends on a number of factors including the size
of your card and the number of pictures on it) and it may take
some time to finish the process. You can abort this function at any
time by pressing (;) and waiting for the current image to finish
(you can then go back later and resume where you left off). It
sometimes takes as long as 15 seconds to register the abort command. This is normal.
A progress bar is shown at the bottom of the screen, and a
thumbnail of the image currently being processed is shown in the
center of the screen. The progress bar is only an estimate of the
time remaining, actual time will very depending on the contents of
the card.
If you have both CompactFlash and SmartMedia cards inserted
when you select this function, both cards will be optimized.
Delete Pictures:
The Delete Pictures screen allows you to delete
images from your memory cards. Navigate this
menu just like the Quick-view menu. Highlight the
thumbnail of the image to be deleted and click the
Menu Wheel.
You will be asked to confirm deletion. Click again to delete the
image. Press (;) to return to the thumbnails, without deleting the
image.
WARNING:
The delete pictures menu permanently removes images
from the memory card.
Quick-Format Card:
This function quickly erases all files and folders
from your storage card. There is no way to undo
this action, so you should be careful not to erase
important pictures without first backing them up
onto your computer.
This function will also repair minor data corruption,
e.g. the type of corruption that occurs if you switch off the DigiFrame while transferring pictures. For major data corruption (card
not recognized by camera or Digi-Frame, etc), use your camera or
computer to perform a full format on the card.
If you have both CompactFlash and SmartMedia cards inserted
when you select this function, you will be asked to choose which
card you want to quick-format.
System Information:
The System Information screen displays the version
number of the firmware currently in your DigiFrame™ and information on any memory cards
currently inserted.
To Exit the menu system at any time press the (;) button.
Page 14

24
25
Digi-Link PC Software
Digi-Link software runs on your desktop computer. It simply and easily
downloads images to your Digi-Frame™. Digi-Link also allows you to
upgrade the software in your Digi-Frame™ as new features and
enhancements become available (see Upgrading Your Digi-Frame™’s
Software).
In order to connect the Digi-Frame™ to your computer we have included the Digi-Link serial cable. The Digi-Link™ cable has two dedicated
connector ends.
The serial connector connects to the serial port on the back of most
IBM compatible computers.
The serial connector also connects to the included Macintosh®
adapter, that connects to the Printer Port or Modem port on many
Macintosh® computers.
A serial to USB adapter is needed to connect the Digi-Frame™ to the
USB ports used on many newer IBM compatible and Macintosh®
products.
The Digi-Frame™ connector connects to the Digi-Link port on the Digi-
Frame™.
For specific instructions on connecting the Digi-Frame™ to your computer, see “Connecting the Digi-Frame™ to your Desktop PC“ in the
“getting started” chapter.
We recommend connecting the Digi-Frame™ to the computer before
running the Digi-Link Software.
serial connector
The Digi-Link Cable
How to optimize your pictures for display on Digi-Frame™:
The screen resolution of the Digi-Frame™ is 640 x 480 pixels.
Displaying images larger than this will not increase detail or resolution when displayed on the Digi-Frame™.
Shooting pictures at 640 x 480 or adjusting the resolution in
image manipulation software down to this size will increase the
number of pictures that can be stored on a Memory Storage Card.
It will also speed decompression of the pictures, improving
slideshow performance.
Your Digi-Frame™ will automatically reduce the size of large image
files to fit on the screen. Images smaller than 640 x 480 pixels will
not be enlarged. For a pleasing "random border" effect, try using
your image editing software to reduce your images to varying
sizes smaller than 640 x 480. If you want an image to fill the
screen completely, ensure that it has an aspect ratio (ratio of width
to height) of 4:3 (or 3:4 for vertical pictures).
Caring for the screen:
The screen on the Digi-Frame™ is made of glass and is extremely
delicate. It can easily scratch. Treat the screen with care and avoid
touching it. If the screen becomes dirty, use a soft, absorbent
cloth, and a quality glass cleaning solution, or an LCD cleaning
solution to clean it.
The backlight of the display panel in your Digi-Frame™ has a minimum life expectancy of at least 10,000 hours. This is equivalent to
about 14 months of continuous 24-hour usage. To prolong the life
of your Digi-Frame's display we suggest turning it off when not in
use. If used five hours or less per day it will last at least five years
Tips & Tricks
Digi-Frame™ connector
Page 15

26
In the Images To Send window, Find
the Add... button.
Click on the Add... button, locate the
JPEG image that you want to download to the Digi-Frame™.
Select the Image.
Click the Open button.
Digi-Link™ also supports “drag and
drop.”
Find the icon for the JPEG
image that you want to
include in the Slideshow.
Drag the icon from the desktop or any explorer window
to the “Images To Send” window.
The name of the image will
appear in the list.
The original file will remain in the directory where it was.
Repeat this process until you have selected all of the JPEG images
that you wish to download.
Removing images from the Images To Transfer list:
Click on the name of the file to Select the JPEG file that you wish
to remove.
Once it is highlighted, click on the Remove button to remove the
JPEG Image from the list of images to transfer to the Digi-Frame™.
Sending pictures to the Digi-Frame™:
Once all of the JPEG images are listed in the Images To Transfer
window; click the Send button to transfer the images to the DigiFrame™.
Quitting Digi-Link:
Choosing quit from the File menu will quit the Digi-Link program.
Clicking on the close window box in the upper left corner will also
quit the Digi-Link Program.
IMPORTANT: Be sure to transfer all of the images that you want
to transfer before quitting Digi-Link. Digi-Link does not save the
list of items in the “Images To Transfer” box.
The JPEG files on your PC will be left untouched.
For IBM Compatible PCs:
Installing Digi-Link™:
Place the Digi-Link CD that comes with the Digi-Frame™ in your
PC’s CD-ROM drive.
Open the Digi-Link CD.
Read the “Read Me” file for last-minute information that may not
be included in this manual.
Open the Folder “PC”
Drag the Digi-Link icon to wherever you want to save it on your
hard drive.
Running Digi-Link Software:
Left click on the Digi-Link Icon, and select open from the menu.
Click on the Digi-Link splash screen to continue.
Digi-Link will Automatically scan to see if the Digi-Frame™ is connected to the selected COM port.
A window labeled Images To Send will appear. This is the primary
control for Digi-Link Software.
Choosing the COM Port:
Digi-Link should auto-detect which Communications port you
have connected to the Digi-Frame™, in order to transfer digital pictures to it. If it doesn’t you can choose the COM port manually.
Run Digi-Link
Click the Choose button on the
Images to Send window.
A dialogue box will appear, asking you to “Please enter the name
of the Communications port to which the Digi-Frame™ is
attached.” Choose the COM Port that the Digi-Frame™ is attached
to from the pull down menu.
Click OK.
To Download Pictures to the Digi-Frame™:
Connect one end of the Digi-Link serial cable to the serial port on
your PC; then connect the other end to the Digi-Link port on your
Digi-Frame™.
Run Digi-link software.
27
Page 16

28
You will see a window called Images
To Transfer.
Click on the Add... button, locate the
JPEG image that you want to download to the Digi-Frame™. Select the
JPEG image and click the Add button.
This returns you to the Images To
Transfer window, with your selected
image displayed in the window.
Digi-Link™ also supports “drag and
drop.”
Find the icon for the JPEG image
that you want to include in the
Slideshow.
Drag the icon from the desktop or
any finder window to the “Images To Send” window.
The name of the image will appear in the list.
The original file will remain in the folder where it was.
Repeat this process until you have selected all of the JPEG images
that you wish to download.
Removing images from the Images To Transfer list:
Click on the name of the file to Select the JPEG file that you wish
to remove.
Once it is highlighted, click on the Remove button to remove the
JPEG Image from the list of images to transfer to the Digi-Frame™.
Sending pictures to the Digi-Frame™:
Once all of the JPEG images are listed in the Images To Transfer
window; click the Send button to transfer the images to the DigiFrame™.
Quitting Digi-Link:
Choosing quit from the File menu will quit the Digi-Link program.
Clicking on the close window box in the upper left corner will also
quit the Digi-Link Program.
IMPORTANT: Be sure to transfer all of the images that you want
to transfer before quitting Digi-Link. Digi-Link does not save the
list of items in the “Images To Transfer” box.
The JPEG files on your Macintosh® will be left untouched.
For Macintosh®:
Installing Digi-Link™:
Place the Digi-Link CD that comes with the Digi-Frame™ in your
PC’s CD-ROM drive.
Double click on the Digi-Link CD.
Read the “Read Me” file for last-minute information that may not
be included in this manual.
Double click the folder “Macintosh®” to open it.
Drag the Digi-Link program to whatever folder you would like to
install it in on your Hard drive.
Running the Digi-Link Software:
Double click the Digi-Link icon.
Click on the Digi-Link Splash screen to continue.
Digi-Link will Automatically scan to see if the Digi-Frame™ is connected to the selected serial port.
A window labeled Images To Send will appear. This is the primary
control for Digi-Link Software.
Choosing the Modem or Printer Port:
Digi-Link needs to know which port you have connected the DigiFrame™ to in order to transfer digital pictures to it.
Run the Digi-Link software.
Click on the File menu.
Drag the mouse until Choose Port... is
selected.
Release the mouse to select Choose Port.
A new dialogue box will appear that says:
Please select the serial port to which the Digi-Frame™ is attached.
Choose the port from the pull down menu.
Click OK
Transferring pictures to the Digi-Frame™:
Connect the serial end of the Digi-Link serial cable to the printer
or modem port on your mac.; then connect the other end to the
Digi-Link port on your Digi-Frame™.
Double Click the Digi-Link icon to run the program.
29
Page 17

30 31
Q: Digi-Frame™ displays no picture, It makes sounds when turned on,
but the screen remains either black or white.
A: The screen contrast may not be adjusted properly. Rotate the con-
trast wheel fully, from one stop position to the other. This should
correct the problem.
Q: Digi-Frame™ doesn’t display any pictures, even though I know
there are pictures on the storage card I inserted.
A: Your camera may be storing images in a non-standard format.
Digi-Frame™ only supports standard JPEG/JFIF (.JPG) files. Consult
your camera’s documentation to learn if your camera can be configured to store pictures in JPEG (.JPG) format.
Q: Picture display seems to be slow.
A: Your picture files may be very high-resolution. Large picture files
take longer to display. Many cameras allow you to choose between
different picture storage resolutions. To maximize Digi-Frame™‘s
responsiveness, take your pictures with the camera on its lowest
resolution setting.
Q: Digi-Frame™ reports “Bad card” or “Empty card” when I insert a
card containing pictures.
A: Your camera may not be storing pictures in standard MS-DOS
compatible format. Please contact Digi-Frame™ customer support
to see if there is a software upgrade available to support your camera’s storage format.
Some cards shipped with digital cameras have unusual formats.
These cards may cause all sorts of problems in a Digi-Frame™.
If you are having difficulty displaying pictures, you should try formatting the card. This can be done in most Digital Cameras and
will erase the contents of the card. If there are pictures on the card
that you wish to keep, be sure to copy them to a storage device
before reformatting the card.
Troubleshooting
Software Updates May Be Available:
From time to time Digi-Frame™ will make improvements to its
internal software (firmware) to add features or enhancements.
Check www.digi-frame.com for updates to your DF-390 software.
How to download Digi-Frame™ Software updates:
Visit www.digi-frame.com and follow the links to the software
update page.
Read the instructions carefully and download the update that is
appropriate for your model of Digi-Frame. The file you download
will contain detailed, step-by-step instructions for installing the
update.
Enjoy the new firmware.
Upgrading Digi-Frame™ Firmware
Page 18

33
32
Digi-Frame™ & Digi-Link™ are trademarks of
Digi-Frame Inc.
Macintosh® is a trademark of Apple Computer Inc.
MS-DOS® & Windows® 95/98/NT are trademarks of
Microsoft Corporation.
SmartMedia™ is a trademark of Toshiba Corporation.
CompactFlash™ is a trademark of the
CompactFlash Association
CPU: 32-bit RISC microprocessor
Operating System: Custom operating system in upgradable flash mem-
ory
Storage: CompactFlash™ or SmartMedia™ (SSFDC); 3.3V and
5V SmartMedia™ are supported
File System: MS-DOS® compatible
File Format: JPEG/JFIF and Exif (.JPG)
Resolution: 640 x 480 logical resolution. Larger pictures are
automatically scaled to fit screen
Color Depth: Thousands of colors
Serial Connection: RS-232/RS-422 compatible
Power: +5V (Regulated) @2.8A
AC adapter: 100-240 VAC 50/60 Hz, 13.5w
Dimensions: 5.6 x 4.5 x 1.5 in. (143 x 114.8 x 40 mm) (w/h/d)
Mass: 1 lb. / 0.45 kg. (with 4 AA Batteries)
Environment: 0˚C-30˚C, 32˚C-85˚F, 40-65% RH (non-condensing)
Accessories: Serial cable for PC, serial cable for Macintosh®, soft-
ware CD-ROM
All features and specifications are subject to change without notice.
Technical Specifications
Page 19

Digi-Frame Inc.
181Westchester Ave. Unit 408
Port Chester, NY 10573
Customer Service: 1-800-771-5476
Customer Service: custservice@digi-frame.com
Technical Support: techsupport@digi-frame.com
Email: info@digi-frame.com
Website: www.digi-frame.com
Copyright ©2000 Digi-Frame Inc.
390UM.3.6 [7/18/00]
 Loading...