

Page 1

Mounted Exterior Keypad
Features
The Mounted Exterior Keypad is a
battery-operated device that will
operate a Digi-Code receiver or a
Stanley garage door opener using
a four-digit PIN (Personal
Identification Number). Pressing
four preprogrammed numbers on
the keypad sends a radio signal to
the receiver or door opener that
controls the garage door or gate
operator. See Figure 1.
Pressing any key will light the keypad.
The keypad works with both Digi-Code Receivers (DC-5200 & DC-5202) and
Stanley Digital type door openers.(DC-5202 ONLY)
The keypad will store the last PIN entered in its memory, even if the battery is
removed.
Pressing any key within 30 seconds after the door has been activated will
activate the door again.
• Mount the keypad OUT OF THE REACH OF CHILDREN at least five feet
above the ground.
• NEVER allow children to operate the keypad.
• Disconnect power from the door opener before
installation.
• Wear safety glasses to protect your eyes
during installation.
Section 1: General Installation of
Your
Exterior Keypad
Tools Required:
• Drill with 1/8" bit
• Flathead screwdriver
• Pencil
• Measuring tape
Figure 1
Figure 2
1. Choose a location that will not interfere with
the normal operation of the door or gate. See
Figure 2.
2. Hold the keypad at the selected location.
Using your pencil, mark the wall at the center
on the top of the unit.
3. Drill a 1/8" hole 3/4" directly below this mark.
See Figure 3.
4. Tighten a screw in the hole until the head is
sticking out about 1/16".
5. Hang the unit on the screw. Adjust screw as
required for a snug fit.
6. Remove the battery cover to expose the
second screw hole. See Figure 4.
7. Mark the position of the second screw with
the pencil through the screw hole.
8. Drill another 1/8" hole for the second screw.
9. Tighten the second screw in the hole.
10. Install the battery and replace the battery cover.
1 2
Figure 4
Figure 3
72-5200 C
W
ARNINGS
DC-5200A - 300MHz
DC-5202A - 310MHz
(
)
Section 2: Programming to a Digi-Code Receiver (Models DC-5200 & DC-5202) or
a Stanley Digital type Garage Door Opener (Model D
C-5202 ONLY).
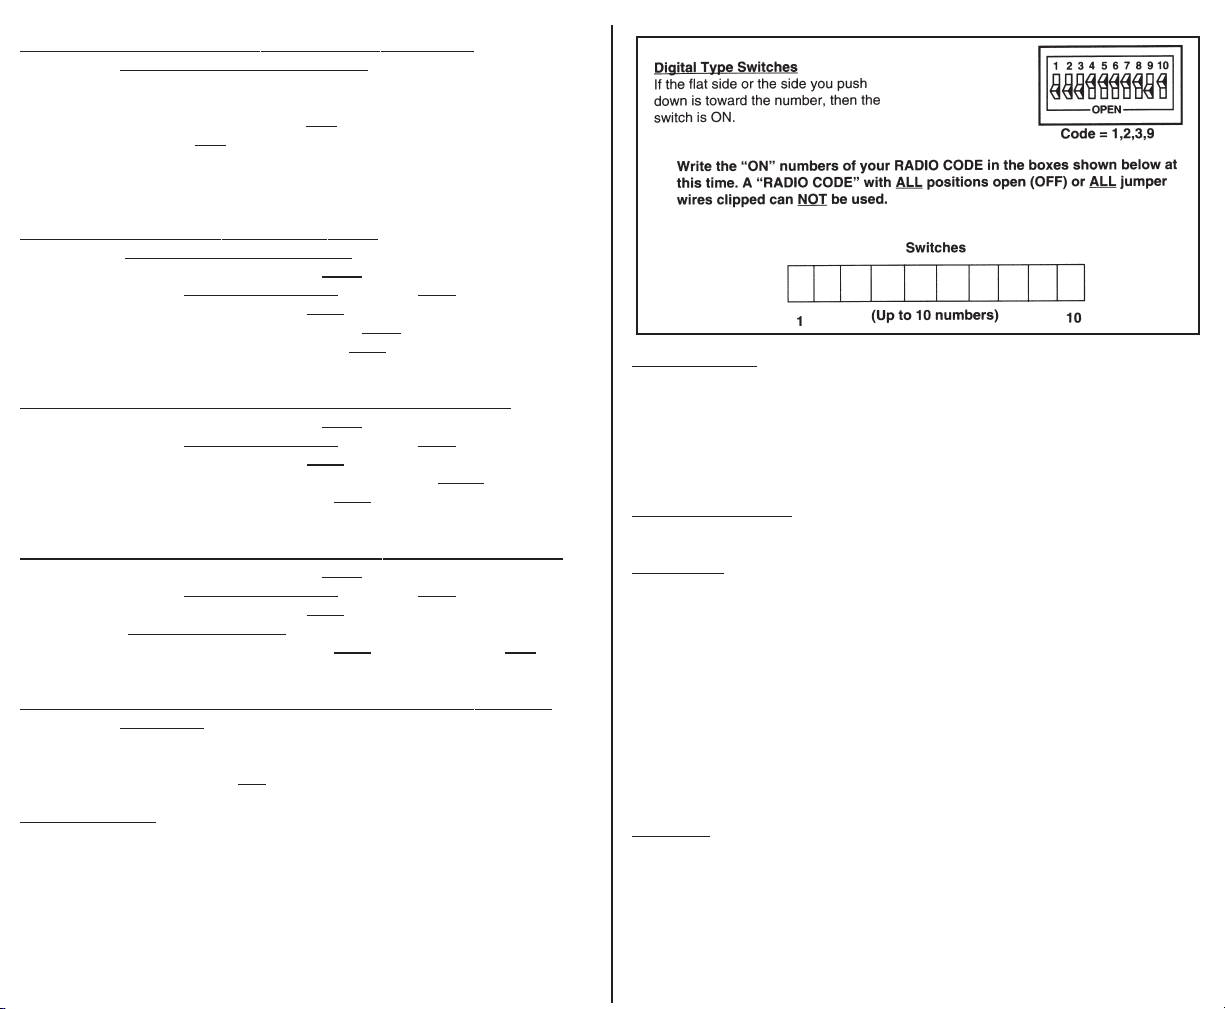
1. Refer to the DIP switch settings in your receiver
or the back of your opener and take notes on the
chart to the upper right which switches are in the
“On” or “Closed” positions. You must have at least
1 of the 10 switches closed.
2. Press the Radio Learn button twice. The light by the
Digi-Code label will come on and stay on.
3. Press the numbers that represent the closed
switches on the receiver or the garage door opener
(i.e. if switches 2,4, and 6 are closed, enter 246. For
switch position 10, use the 0 key).
4. Press the Radio Learn button once.
5. To test if you have properly programmed in the
radio code, enter the factory set PIN (1-2-3-4). The
receiver or opener should operate.
Figure 7
Page 2
SECTION 3: PROGRAMMING A NEW PRIMARY PERSONAL
IDENTIFICATION NUMBER (PIN).
1. Press the Access Learn button twice. After doing this, the light by the
Digi-Code label will come on and stay on.
2. Enter 1-2-3-4 (Factory Default), then your
new 4-digit PIN or if you have
already programmed your PIN - enter this number and then the new PIN you
wish to change it to.
3. Press the Access Learn button once. The light by the Digi-Code label will
turn off. The new PIN number has been accepted.
SECTION 4 : TO ENTER A SECONDARY PIN #
( 14 T
OTAL CAN BE ADDED ).
STEP 1. Press “ACCESS LEARN” button twice ( led lights up )
STEP 2. Enter YOUR primary PIN number _ _ _ _ ( must be four digits )
STEP 3. Press “RADIO LEARN” button once
STEP 4. Enter secondary PIN number _ _ _ _ ( must be four digits )
STEP 5. Press the “ACCESS LEARN” button once ( led goes out ) - the new
secondary PIN is now set and you exit program mode.
SECTION 5: TO CLEAR OUT INDIVIDUAL SECONDARY PIN # ’s:
STEP 1. Press “ACCESS LEARN” button twice ( led lights up )
STEP 2. Enter YOUR primary PIN number
_ _ _ _ ( must be four digits )
STEP 3. Press “RADIO LEARN” button once
STEP 4. Enter secondary PIN number _ _ _ _ you wish to delete
STEP 5. Press the “RADIO LEARN” button once ( led goes out ) -the second-
ary PIN is now deleted and you exit program mode.
SECTION 6: TO CLEAR OUT ALL SECONDARY PIN # ’s AT ONE TIME :
STEP 1. Press “ACCESS LEARN” button twice ( led lights up )
STEP 2. Enter YOUR primary PIN number _ _ _ _ ( must be four digits )
STEP 3. Press “RADIO LEARN” button once
STEP 4. Enter four zero’s ( 0-0-0-0 )
STEP 5. Press the “RADIO LEARN” button once ( led goes out ) - ALL sec-
ondary PIN numbers are now deleted and you exit program mode.
SECTION 7: CLEAR ALL MEMORY - RETURN TO FACTORY DEFAULT
SETTINGS.
1. Press and hold both the Radio Learn and Access Learn buttons for approxi-
mately 10 seconds until the lights on the keypad go off. The unit now has a
factory default PIN of 1234 and ALL radio codes have been erased.
Normal Operation
When the keypad is programmed properly, the gate should operate by pressing
the four digits of your PIN. The gate will activate after pressing the fourth number and the indicator light will stay on for one second to show that the signal is
being sent to the receiver. The keypad will blink on and off.
After each keystroke, the indicator will light.
After pressing any key, all the keys will light up.
T
roubleshooting
The correct PIN must be entered within 20 keystrokes; otherwise the keypad
will stop operation for 5 minutes. The user has 25 seconds between keystrokes
to enter the correct code.
If you forget your PIN, you will have to clear all memory (refer to section 7) and
reprogram your keypad again. (Refer to section 2 and section 3.)
If the keypad lights go off after the first keystroke, the battery needs replacing.
Battery Replacement
The keypad uses a 9-volt battery.
W
ARRANTY
All Digi-code door related products carry an eighteen (18) month warranty
against defects in workmanship or material. This warranty begins at the date of
manufacture, for eighteen months. Digi-Code warrantees our products only to
our authorized dealers and distributors, and not to the end customer. If you
have any questions about our warranty, please ask your dealer to determine
the nature and scope of their warranty. Digi-Code does not assume, and is not
responsible for, any real or consequential damages from claims against the
performance of our product, nor is it liable for any costs related to the loss of
life, property, or revenue. Further, Digi-Code is in no way responsible for
installation of our product, and will assume no cost related to reinstallation or
removal. Digi-Code’s warranty is in lieu of all other warrantees, expressed,
or implied.
CAUTION:
Any changes or modifications in intentional or unintentional radiators which are
not expressly approved by Digi-Code Inc. could void the users authority to operate this equipment. This applies to intentional and unintentional radiators certified per part 15 of the FCC rules and regulations.
43
 Loading...