

Page 1
Installation Instructions
Garage Door Opener Radio Controls
Model 5030 (300 mHz) \ 5032 (310 mHz) Three Button Transmitters
WARNING:
Disconnect operator power before any installation or repair
••••
Always wear safety glasses
••••
Your Digi-Code radio controls are designed specifically to remotely control a garage
door opener from within an automobile and to give years of trouble free service without
adjustment.
“ON” position when they leave the factory, it is recommended that a different code
be selected and set at the time of installation.
Switch” section for instructions. The radio frequency (RF) portion of the controls,
however, are tuned to standard frequencies and are thoroughly tested at the factory. This
permits the addition or replacement of either the transmitter or the receiver by specifying
the Model number and the RF frequency designated on the identification label. RF
adjustments are not needed nor should any be attempted.
Because all radio controls are set with the even numbered switches in the
Please refer to the “Setting the Code
SECTION #1
SETTING THE CODE SWITCHES
On the transmitter the entire front lower half of the case ( “ the battery hatch” ) is
removeable. Use a coin or the curved end of the visor clip to disengage the lower half of
the transmitter front. This will expose both the code switch and the battery compartment.
( SEE FIGURE #1 )
Page 2
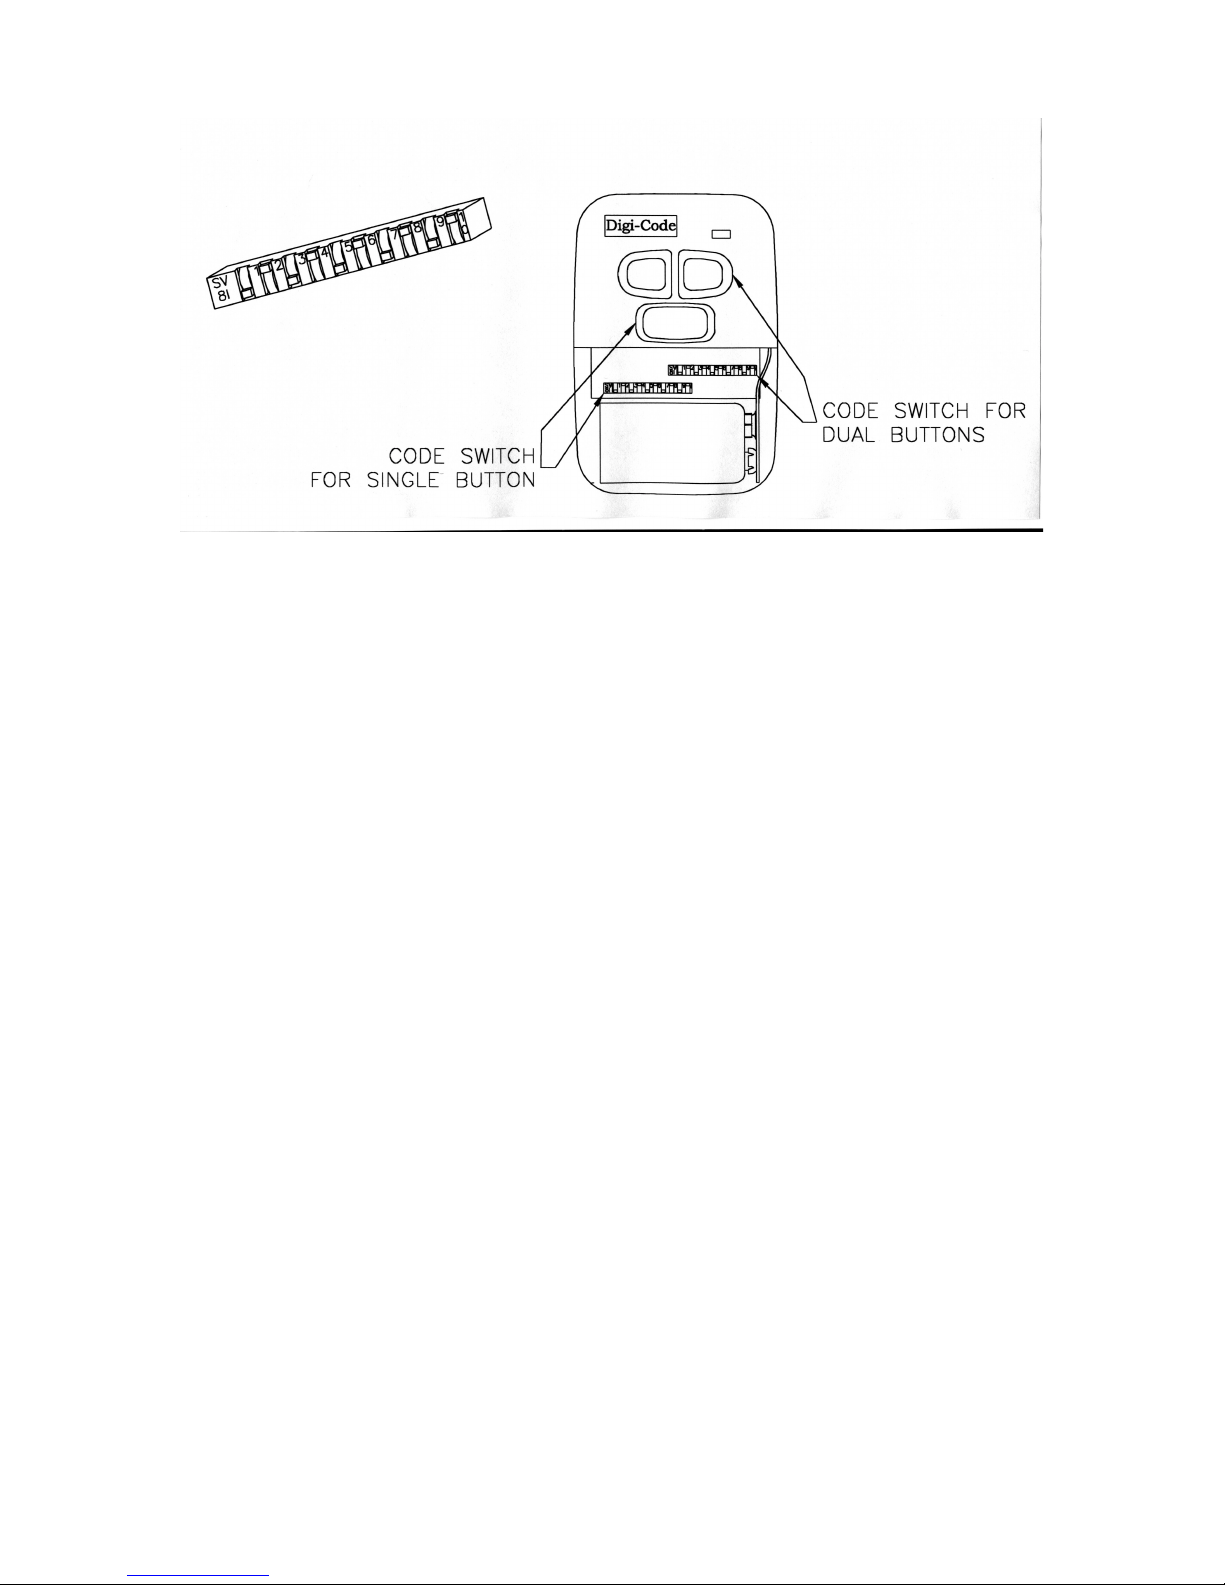
Figure #1
Once you have removed the battery hatch, locate the “CODE SWITCHES” above the
battery. As shown above, the dual buttons are controlled by the right hand switch and the
single button is controlled by the left hand switch.
Before
setting the receiver code switches, you will need to set the transmitter code
switches on your model 5030 or 5032. We strongly suggest that you change the code
from the factory setting to provide security for your own system, and to eliminate
interference with neighboring systems.
SETTING THE DUAL BUTTON CODE SWITCH
Set code switch positions 1 through 9 to your personal code scheme ( THE 10TH
POSITION SWITCH MUST BE SET IN THE CLOSED POSITION “ON”),
The switch is in the “on” position when it is depressed toward the number.)
(Note:
. We
strongly urge that several coding schemes be avoided: ALL ON; 2,4,6,8,10, ON. These
positions are similar to our or other manufacturers test positions, or are frequently used.
SETTING RECEIVER #1 (WORKS WITH LEFT DUAL BUTTON )
Set your receiver code switch positions 1 through 9 to match the dual button code switch.
th
Then make sure that the 10
position “ON”
. The left dual button on the transmitter should now operate this receiver.
position switch on receiver #1 is set in the closed
SETTING RECEIVER #2 (WORKS WITH RIGHT DUAL BUTTON )
Set the receiver code switch positions 1 through 9 to match the dual button code switch.
Then make sure that the 10
position “OFF”
. The right button on the transmitter should now operate this receiver.
th
position switch on receiver #1 is set in the open
Once the codes have been set, check operation.
Page 3

SETTING THE SINGLE BUTTON CODE SWITCH
Set code switch positions 1 through 10 to your personal code scheme, any combination of
“on” or “off” positions can be selected
it is depressed toward the number.)
(Note: The switch is in the “on” position when
. We strongly urge that several coding schemes be
avoided: ALL ON; 2,4,6,8,10, ON. These positions are similar to our or other
manufacturers test positions, or are frequently used.
SETTING RECEIVER – TO WORK WITH SINGLE BUTTON
Set the receiver code switches to match the code settings you entered for the single button
switch in the transmitter, being sure both are set the same since a different setting of just
one switch will prevent operation.
Once the three codes have been set, check operation and reinsert the hatch.
SECTION #2
SETTING THE TRANSMITTER CODE SWITCHES –TO WORK WITH
EXISTING STANLEY GARAGE DOOR OPENERS.
Set the transmitter using “
“SETTING THE SINGLE BUTTON CODE SWITCH”
SETTING THE DUAL BUTTON CODE SWITCH” AND
instructions from section #1
above.
Set the first garage door opener using “
LEFT DUAL BUTTON) “
instructions from section #1 above.
SETTING RECEIVER #1 (WORKS WITH
Set the second garage door opener using “
RIGHT DUAL BUTTON )”
instructions from section #1 above.
SETTING RECEIVER #2 (WORKS WITH
Set the third garage door opener using “
SINGLE BUTTON ”
instructions from section #1 above.
SETTING RECEIVER – TO WORK WITH
SECTION #3
TRANSMITTER BATTERY REPLACEMENT
The battery in the transmitter can be checked or changed by removing the front lower
half of the transmitter. Use a coin or the curved end of the visor clip to disengage the
lower half of the transmitter front. This will expose the battery compartment.
Replacement battery must be a 9-volt.
Page 4

TO REPLACE OR ADD A SET
A replacement or new transmitter or receiver may be purchased by specifying the Model
Number and the RF frequency designated on the serial tag label. The RF frequency is set
at the factory and must not be adjusted in the field. The digital code can be matched to
the companion receiver or transmitter by following the “setting” procedures above.
OPERATIONAL CHECK
To check operation, move back about 50 feet and press the transmitter button. Operation
should be reliable at this distance but environment and location of both the transmitter
and receiver will effect the range. Try different mounting locations and positions in the
vehicle. If operation is still undesirable, the problem may be isolated by:
1. Checking the door operator. If the door will not open when the wall button is
pressed, the problem is likely to be the operator. If the door will open by pressing
the wall button, but not when the radio control button is pressed, the problem is
probably in the radios.
2. Replacing the transmitter battery.
If, after performing the above operational checks, the controls still do not function, they
should be returned to your dealer for repair or replacement.
WARRANTY
All Digi-Code door related products carry an eighteen (18) month warranty against
defects in workmanship or material. This warranty begins at the date of manufacture, for
eighteen months. Digi-Code warrantees our product only to our authorized dealers and
distributors, and not to the end customer. If you have any questions about our warranty,
please ask your dealer to determine the nature and scope of their warranty. Digi-Code
does not assume, and is not responsible for, any real or consequential damages from
claims against the performance of our product, nor is it liable for any costs related to the
loss of life, property, or revenue. Further, Digi-Code is in no way responsible for
installation of our product, and will assume no cost related to reinstallation or removal.
Digi-Code’s warranty is in lieu of all other warrantees, expressed, or implied.
CAUTION
: Any changes or modifications in intentional or unintentional radiators which
are not expressly approved by Digi-Code Inc. could void the users authority to operate this
equipment. This applies to intentional and intentional radiators certified per part 15 of the
FCC rules and regulations.
DIGI-CODE, INC.
307 ROBBINS DR. • TROY, MICHIGAN 48083
(248) 589-3645
Part # 72-5030
 Loading...