

Page 1
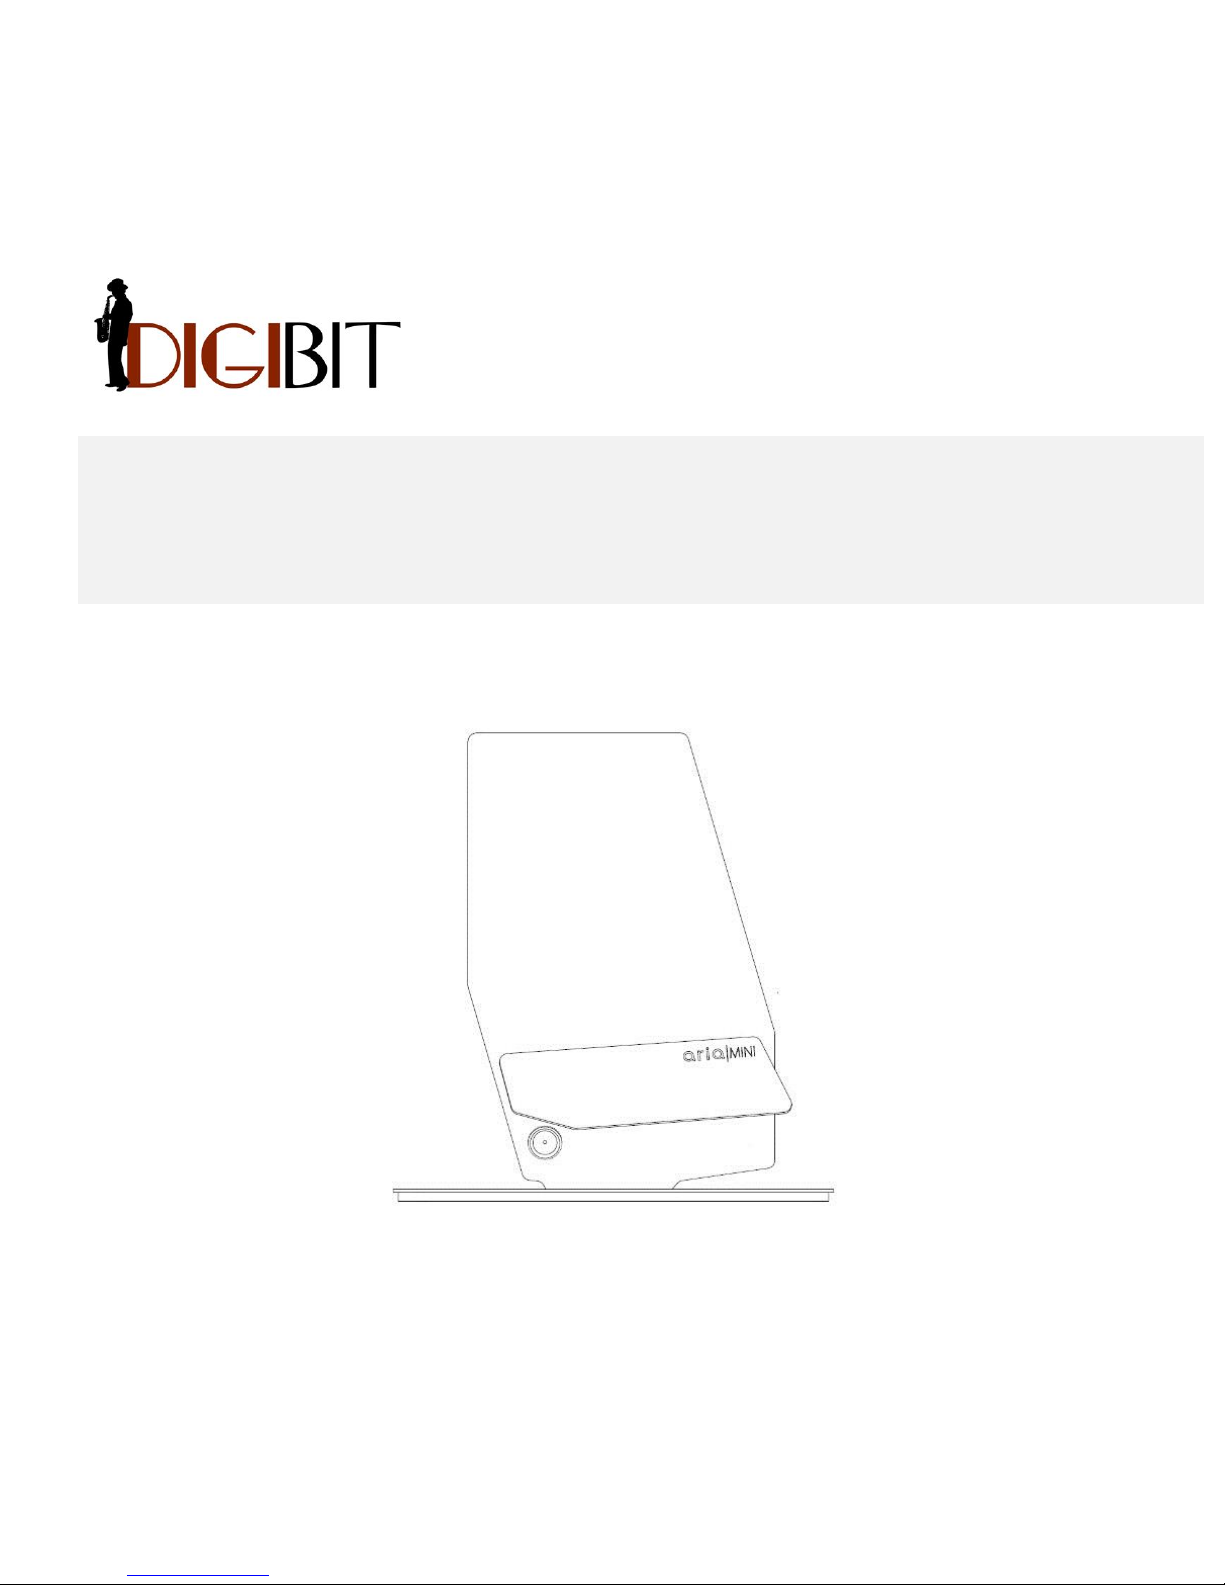
aria | mini
User Manual
READ CAREFULLY BEFORE OPERATION
Page 2

Page 3
DigiBit | Asura 81, 28043 Madrid (SPAIN) | www.digibit.es
3
aria mini | User Manual
Contents
1. WEEE DIRECTIVE
4
2. SAFETY INSTRUCTIONS
5
3. INTRODUCTION
8
4. INSTALATION
9
- Unpack and Install the aria - mini
9
- Conecting the aria | mini
10
- Installing the remote control (iaria)
11
5. HOW USE YOUR SYSTEM
12
- Configuring the initial settings (language)
14
- Playing music
16
- How to select the music playback zone
16
- How to select the music to play
17
- Rip your CDs
19
6. SEARCH
21
7. HOW USE YOUR ARIA SERVER (ADVANCED FEATURES)
21
- Import music
21
- Import from network storage system
22
- Import from a USB device
25
- How to check that music has been imported
25
- Playing music. Selection criteria: A detailed explanation
26
- Playing and adding tracks to the queue
27
- ’Playing Now’ screen: Save and load playlists
28
- Editing metadata
29
8. PLAYLIST
30
9. LINKING MUSIC ZONES
36
10. DELETE MUSIC AND REMOVE LINKED DEVICES
37
11. BACKUP YOUR MUSIC FILES
38
12. FAQs
39
13. Appendix A: How can I play multichannel music with aria
42
14. APPENDIX B: How to automatically add missing covers: PerfecTunes
42
15. APPENDIX C: How to edit the metadata in your library from an external PC
43
16. APPENDIX D: How to see pdf (booklets) in the metadata
45
17. APPENDIX E: How use the I
2
S output
47
Page 4
DigiBit | Asura 81, 28043 Madrid (SPAIN) | www.digibit.es
4
aria mini | User Manual
1 WEEE DIRECTIVE
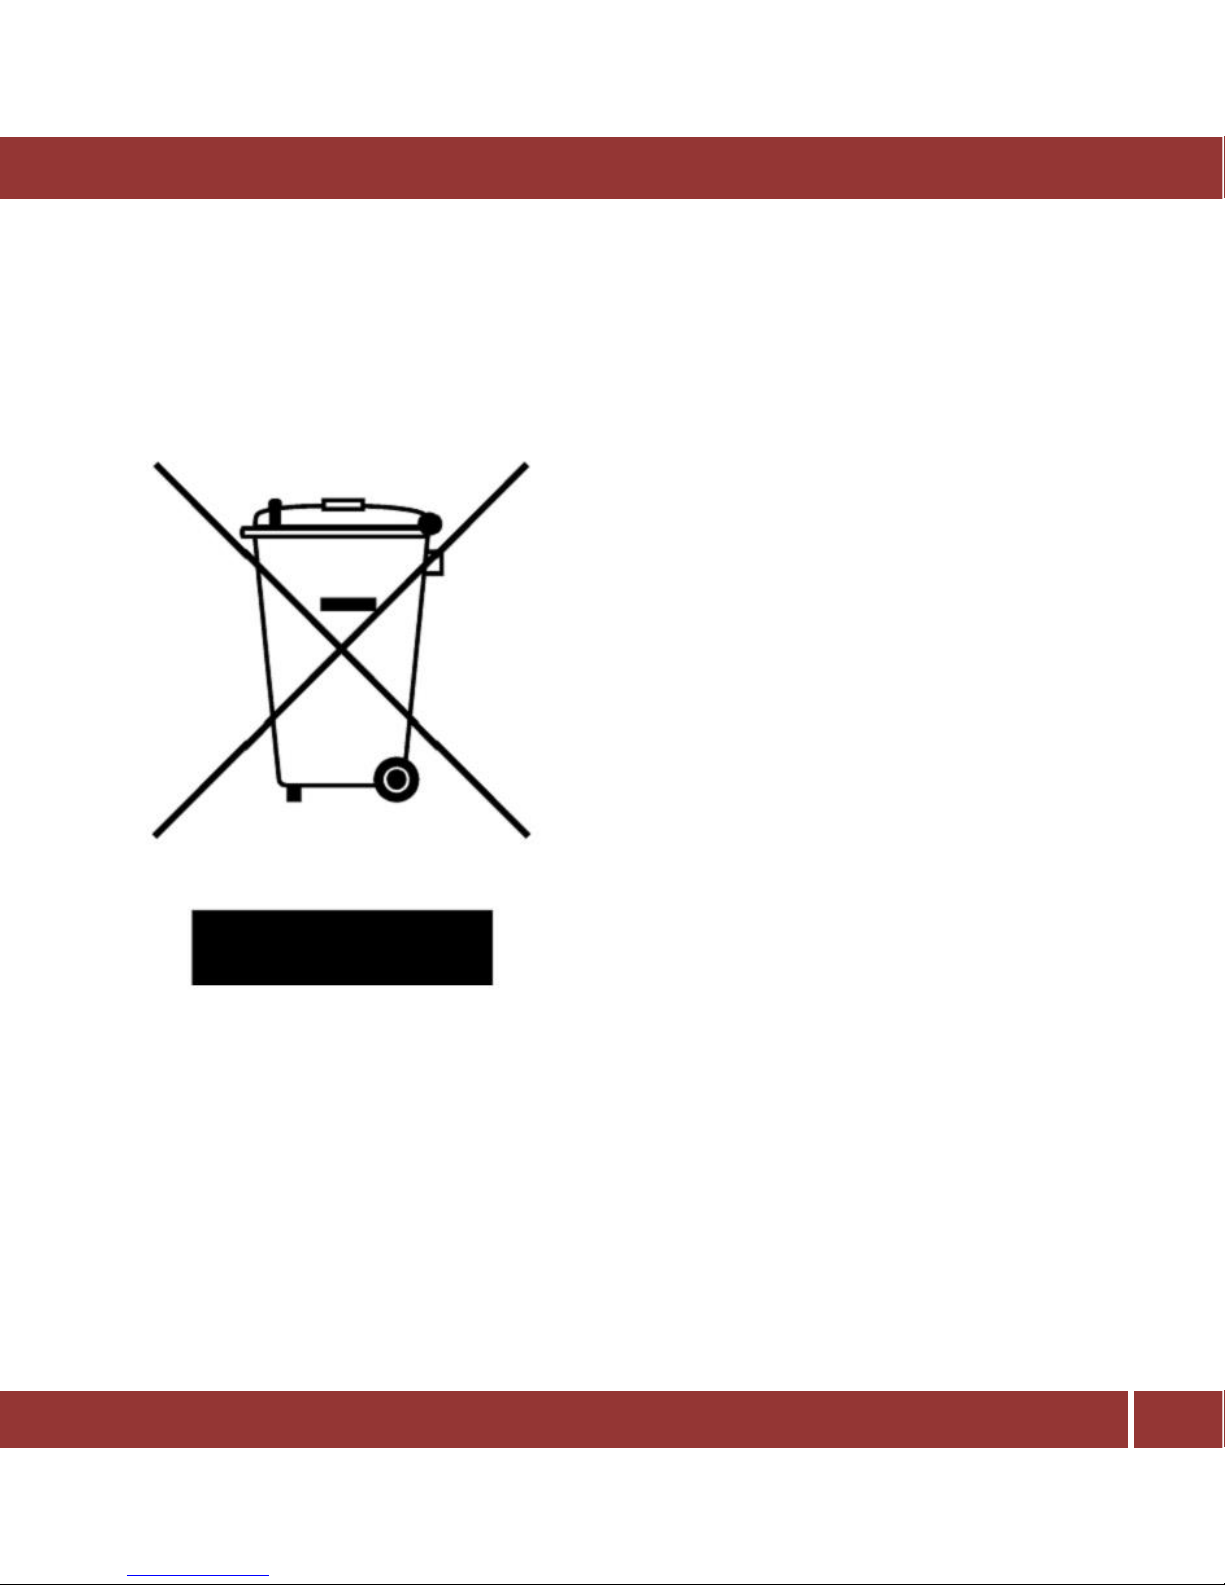
aria music server is marked with the above
symbol to indicate that, at the end of the
equipment’s life time, you must dispose of it
separately at an appropriate collection point
(local recycling center) and not place it with
normal domestic unsorted waste.
This will benefit the environment for all.
[EU Directive 2002/96/EC and EN50419]
Page 5
DigiBit | Asura 81, 28043 Madrid (SPAIN) | www.digibit.es
5
aria mini | User Manual
2 SAFETY INSTRUCTIONS
There are two categories of Safety Instructions included in this manual:
Product Warnings, (i.e., what must never be done to assure avoiding those hazards that could
cause bodily injury or property damage); and
User Directions (i.e., what must always be done to assure the safe use of your device).
The Safety Instructions contained in this manual have been categorized in accordance with the
seriousness of the potential hazards through the use of Signal Words. Those Signal Words, and their
intended meanings, are as follows:
DANGER: Indicates that a failure to observe the Safety Instructions could result in death or catastrophic
bodily injury.
WARNING: Indicates that a failure to observe the Safety Instructions could result in serious bodily injury.
CAUTION: Indicates that a failure to observe the Safety Instructions could result in minor bodily injury or
property damage.
NOTE: Designates important information that relates to activities and/or conditions that might result in
loss of data and/or damage to your device.
Safe Use and Operation of Your Device
This equipment emits stray RF energy and will interfere with the reception of signals by airborne
electronic navigational devices or medical devices. Do not operate this equipment near any sensitive
medical devices.
WARNING: Use only grounded AC power cords.
DANGER: If DigiBit’s equipment and all other equipment connected to it do not have an AC ground, higher
than usual amount of radio frequency emission could occur.
Always immediately disconnect the power to the equipment in the event the device emits an unusual
odor or sound or generates smoke.
Page 6
DigiBit | Asura 81, 28043 Madrid (SPAIN) | www.digibit.es
6
aria mini | User Manual
WARNING: Never attempt to disassemble, repair or make any modification to your device. Disassembly,
modification or any attempt at repair could cause bodily injury or property damage, as well as damage to
the device itself. Furthermore, any such attempt at repair without factory authorization may void your
aria warranty. In the unlikely event that warranty repair is ever needed, please contact your retail dealer,
your in-country importer/distributor or DigiBit directly by E-mail at “[email protected]”
WARNING: Your device is not a toy. Never allow children to play with your device. Misuse, rough or
improper handling of your device by children could result in serious bodily injury for any of the
enumerated safety warnings in this manual. In addition, always keep all accessories and components out
of the reach of small children as small parts might present a choking hazard. Seek immediate medical
attention if choking occurs or if any small part has been swallowed.
CAUTION: Never raise the sound volume level too high when using your device with earphones. An
excessive sound volume level could cause damage to your hearing.
WARNING: To reduce the risk of fire or electric shock, do not expose the unit to moisture or water.
Do not allow foreign objects to get into the enclosure. If the unit is exposed to moisture, or a foreign
object gets into the enclosure, immediately disconnect the power cord from the wall. Take the unit to a
qualified service person for inspection and necessary repairs.
Read all the instructions before connecting or operating the component.
Keep this manual so you can refer to these safety instructions.
Heed all warnings and safety information in these instructions and on the product itself. Follow all
operating instructions.
Do not use this unit near water.
You must allow a minimum 10 cm or 4 inches of unobstructed clearance around the unit. Do not place the
unit on a bed, sofa, rug, or similar surface that could block the ventilation openings. If the unit is placed in
a bookcase or cabinet, there must be ventilation of the cabinet to allow proper cooling. Keep the
component away from radiators, heat registers, stoves, or any other appliance that produces heat.
The unit must be connected to a power supply only of the type and voltage specified on the rear panel.
Connect the component to the power outlet only with the supplied power supply cable or an exact
equivalent. Do not modify the supplied cable.
Page 7
DigiBit | Asura 81, 28043 Madrid (SPAIN) | www.digibit.es
7
aria mini | User Manual
Do not route the power cord where it will be crushed, pinched, bent, exposed to heat, or damaged in any
way. Pay particular attention to the power cord at the plug and where the cord exits the back of the unit.
The power cord should be unplugged from the wall outlet during a lightning storm or if the unit is to be
left unused for a long period of time.
Immediately stop using the component and have it inspected and/or serviced by a qualified service
agency if:
The power supply cord or plug has been damaged.
Objects have fallen or liquid has been spilled into the unit.
The unit has been exposed to rain.
The unit shows signs of improper operation
The unit has been dropped or damaged in any way
Instructions for Use and Security
For your own security and the correct functioning of the system you must follow these instructions:
This device has been exclusively designed to store and reproduce music, do not use it for anything
else.
Place it in a ventilated, dry and secure place, avoiding heat, cold, vibrations, dust, etc.
Do not use this device near water.
Avoid sudden temperature changes that can provoke moisture by condensation.
Do not cover the ventilation slots.
Protect the power wire so it cannot be damaged or stepped on.
Do not force the control buttons or the wires.
Unplug the device if it’s not going to be used for a long period of time.
Unplug the device during electrical storms.
Page 8
DigiBit | Asura 81, 28043 Madrid (SPAIN) | www.digibit.es
8
aria mini | User Manual
Before moving the system, turn it off and disconnect it.
For cleaning, use dry dusters after you have disconnected the unit from its power connnection. Do
not use aerosols or chemical or abrasive products.
Do not try to open the unit, and in case of problems like accidents or malfunction ask for authorized
specialized help from your retailer or installer.
Any modification done without expressed authorization will cancel the warranty.
3 INTRODUCTION
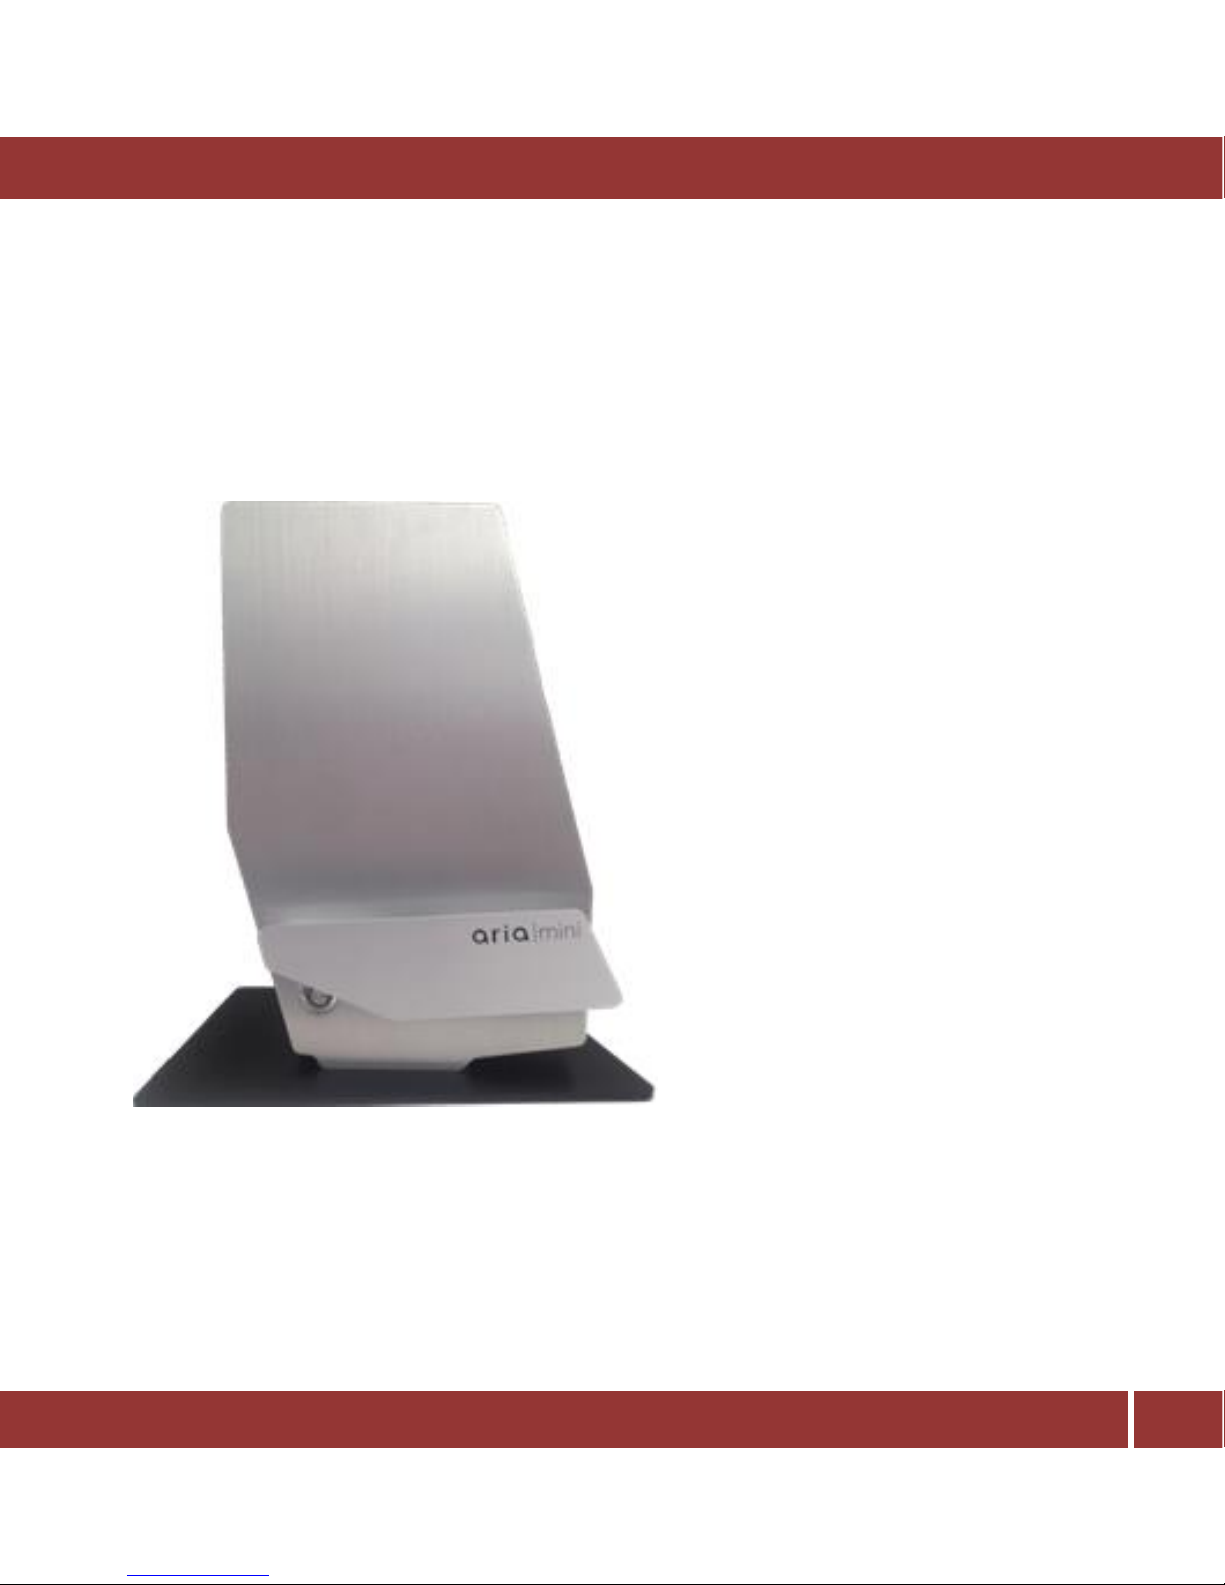
aria is a music server that uses state-of-the art technology and rich features that will please the most
demanding audiophiles and music lovers. Special attention has been devoted to make it easy-to-use by
non-computer skilled users.
aria incudes some unique features, such as the support for unlimited extended metadata fields, (18 fields
by default) compatible with Digibit’s classical music database SonataDB, no moving parts (mSATA disk for
OS and app), support for 32bits-384 KHz PCM/DXD and DSD64/128 music files (that ensures the best
current audiophile quality) The aria mini includes compatibility with UPnP/DLNA standards that allows
streaming to external hi-end and low-cost compatible streamers enabling multiroom listening experience.
aria is controlled by a custom not cost application called iaria running on iPad™.
This User Manual is divided in two different sections: a Basic introduction section and an advanced
section. The Basic section explains the first steps to configure the aria server and to start playing music.
The Advanced section explains how to add music to the server, make a playlist, edit metadata and backup
the stored music.
Page 9
DigiBit | Asura 81, 28043 Madrid (SPAIN) | www.digibit.es
9
aria mini | User Manual
4 INSTALATION
Unpack and Install the aria - mini
1) Connect the AC cable.
2) For operation you will need a Wi-Fi
router with Internet access and an iPad. These
ítems are not included with the aria.
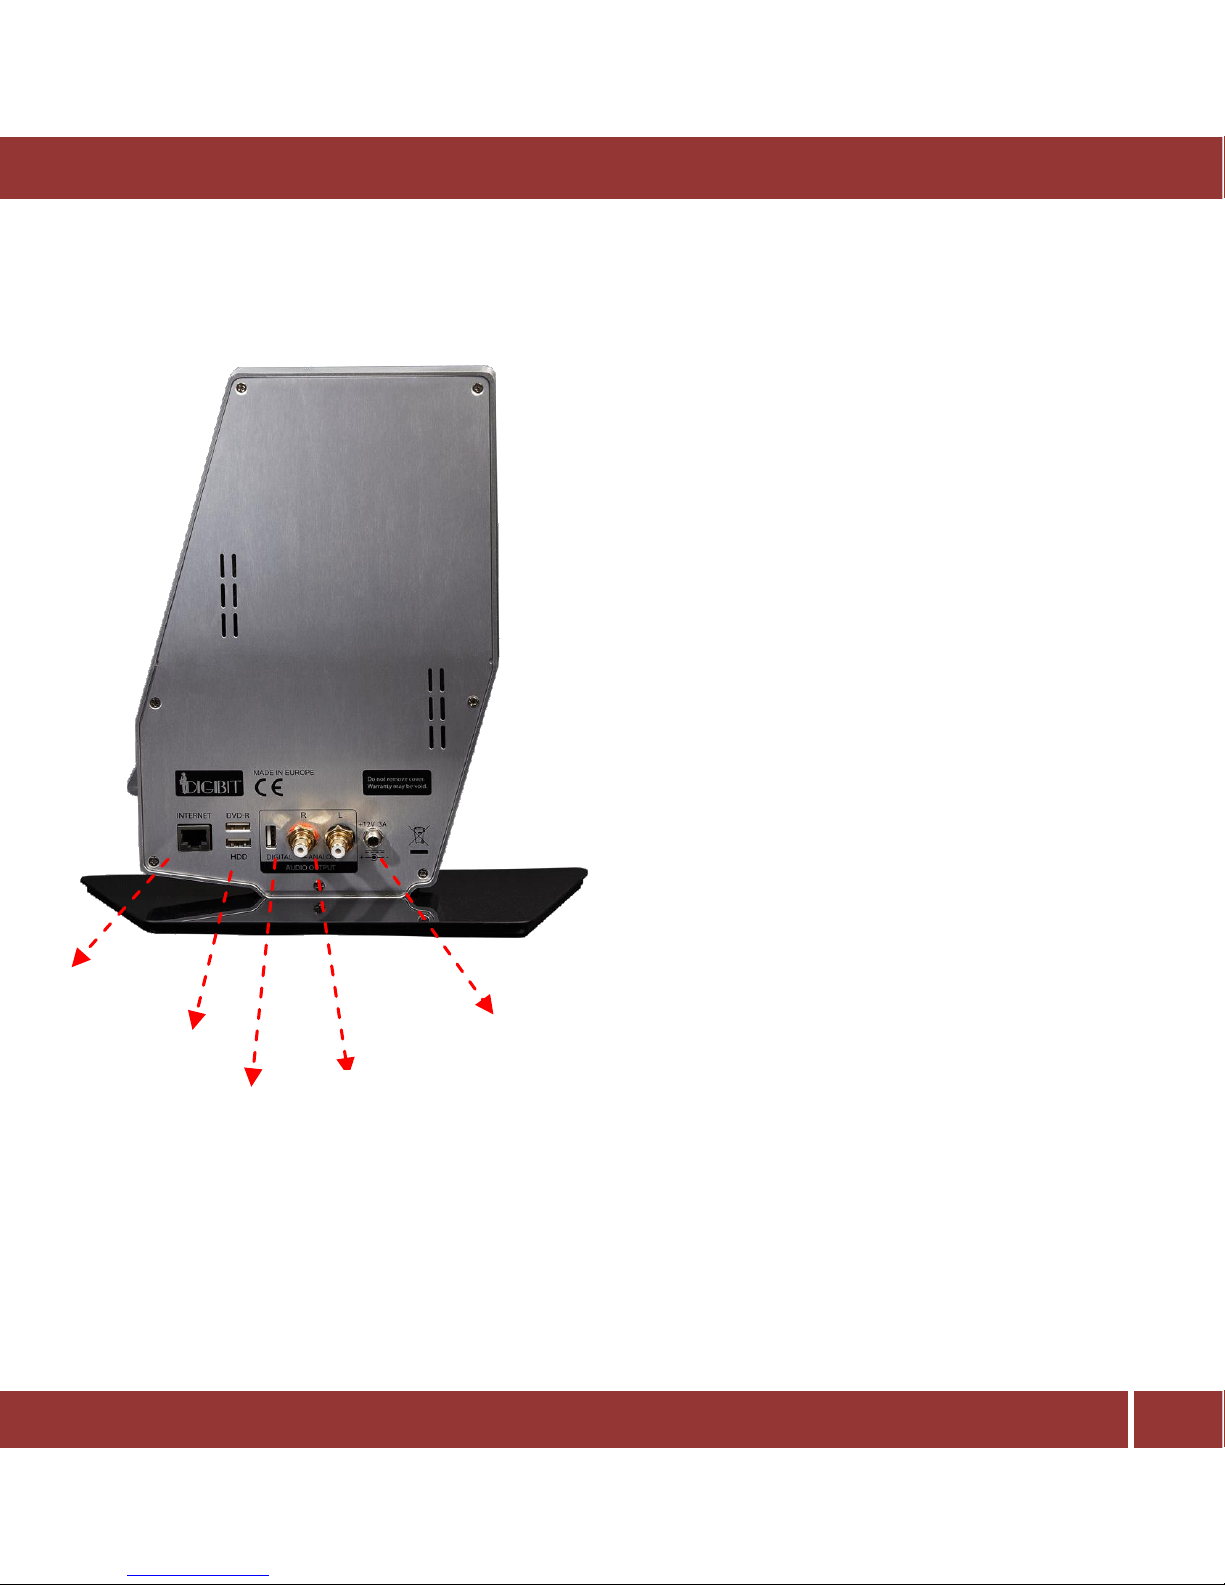
3) Connect a LAN RJ45 (Ethernet)
cable to the LAN (Internet) port on the back
of the aria. This cable can then be connected
to an open access port on your Wi-Fi router.
An internet connection is required to your WiFi router. This is necessary for the iPad-aria
control software and for the optional ripping
process. aria is preconfigured for dynamic IP
addressability (the most common). If you
have a static IP address, please contact your
installer or consult your router.
Page 10
DigiBit | Asura 81, 28043 Madrid (SPAIN) | www.digibit.es
10
aria mini | User Manual
Conecting the aria | mini
4) Connect any of the audio outputs to your
preamplifier, amplifier or receiver: These are the
outputs available:
a) Analog unbalanced output 2 x RCA.
This is the most common output
connection used and utilizes the high
quality internal aria DAC (Digital to
analog converter).
b) USB digital audio output: This allows
you to optionally connect to an
external DAC using a 2.0 USB cable.
You may need to install specific
drivers in to the aria for your external
DAC (Your dealer can do that for you
when installing the aria at home or
remotely).
LAN (RJ45)
AC Input
USB Out
HDD In
RCA Outputs
Page 11
DigiBit | Asura 81, 28043 Madrid (SPAIN) | www.digibit.es
11
aria mini | User Manual
Installing the remote control (iaria)
The aria music server is controlled by an iPad app called iaria.
Please, browse to Apple Store. Then search and install ‘iaria’. Once installed, you should see this icon in
your iPad desktop:
This manual explains the functionality included in iaria version 2.18. Please, update your iaria app if you
are using a previous version.
Your iPad must be connected to the same network as your aria music server to be able to control it. If you
connect the aria music server to the same router that is generating your Wi-Fi signal, it should be enough.
If not, please, contact your aria music server dealer, they will help you.
Page 12
DigiBit | Asura 81, 28043 Madrid (SPAIN) | www.digibit.es
12
aria mini | User Manual
5 HOW USE YOUR SYSTEM
(BASIC FEATURES)
In this basic section you will learn how to
turn on your system and be able to play
back the complimentary tracks included in
the aria mini.
Once the system is correctly connected,
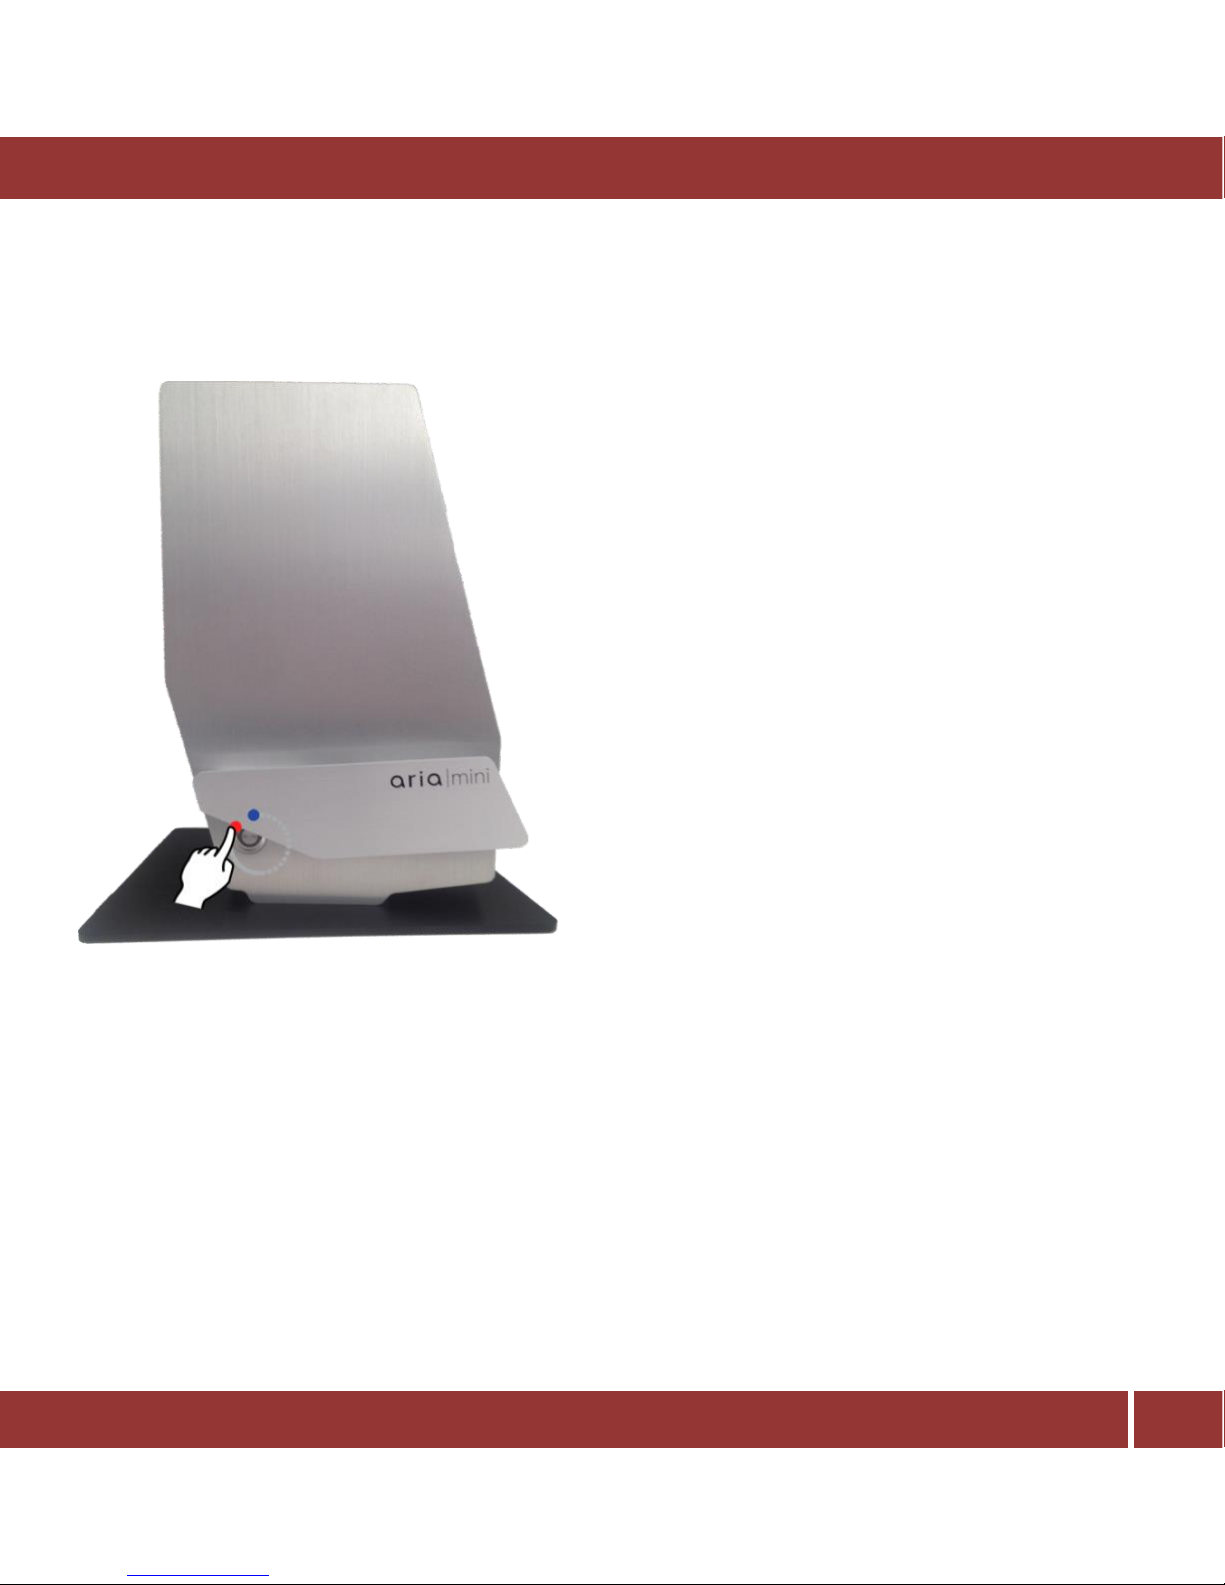
turn on the aria by pushing the power
switch on the back to the ‘On’ position and
then press the ‘On/Off’ button on the
front panel for one second. Please allow
around 4 minutes to finish the startup
process so that the aria is correctly
recognized by your network.
To shut down the aria system, you have two options:
1. Shutdown the system from the aria iPad™ application
2. Press the ‘On/Off’ button for 3 seconds on the front panel and wait until the blue led turns off
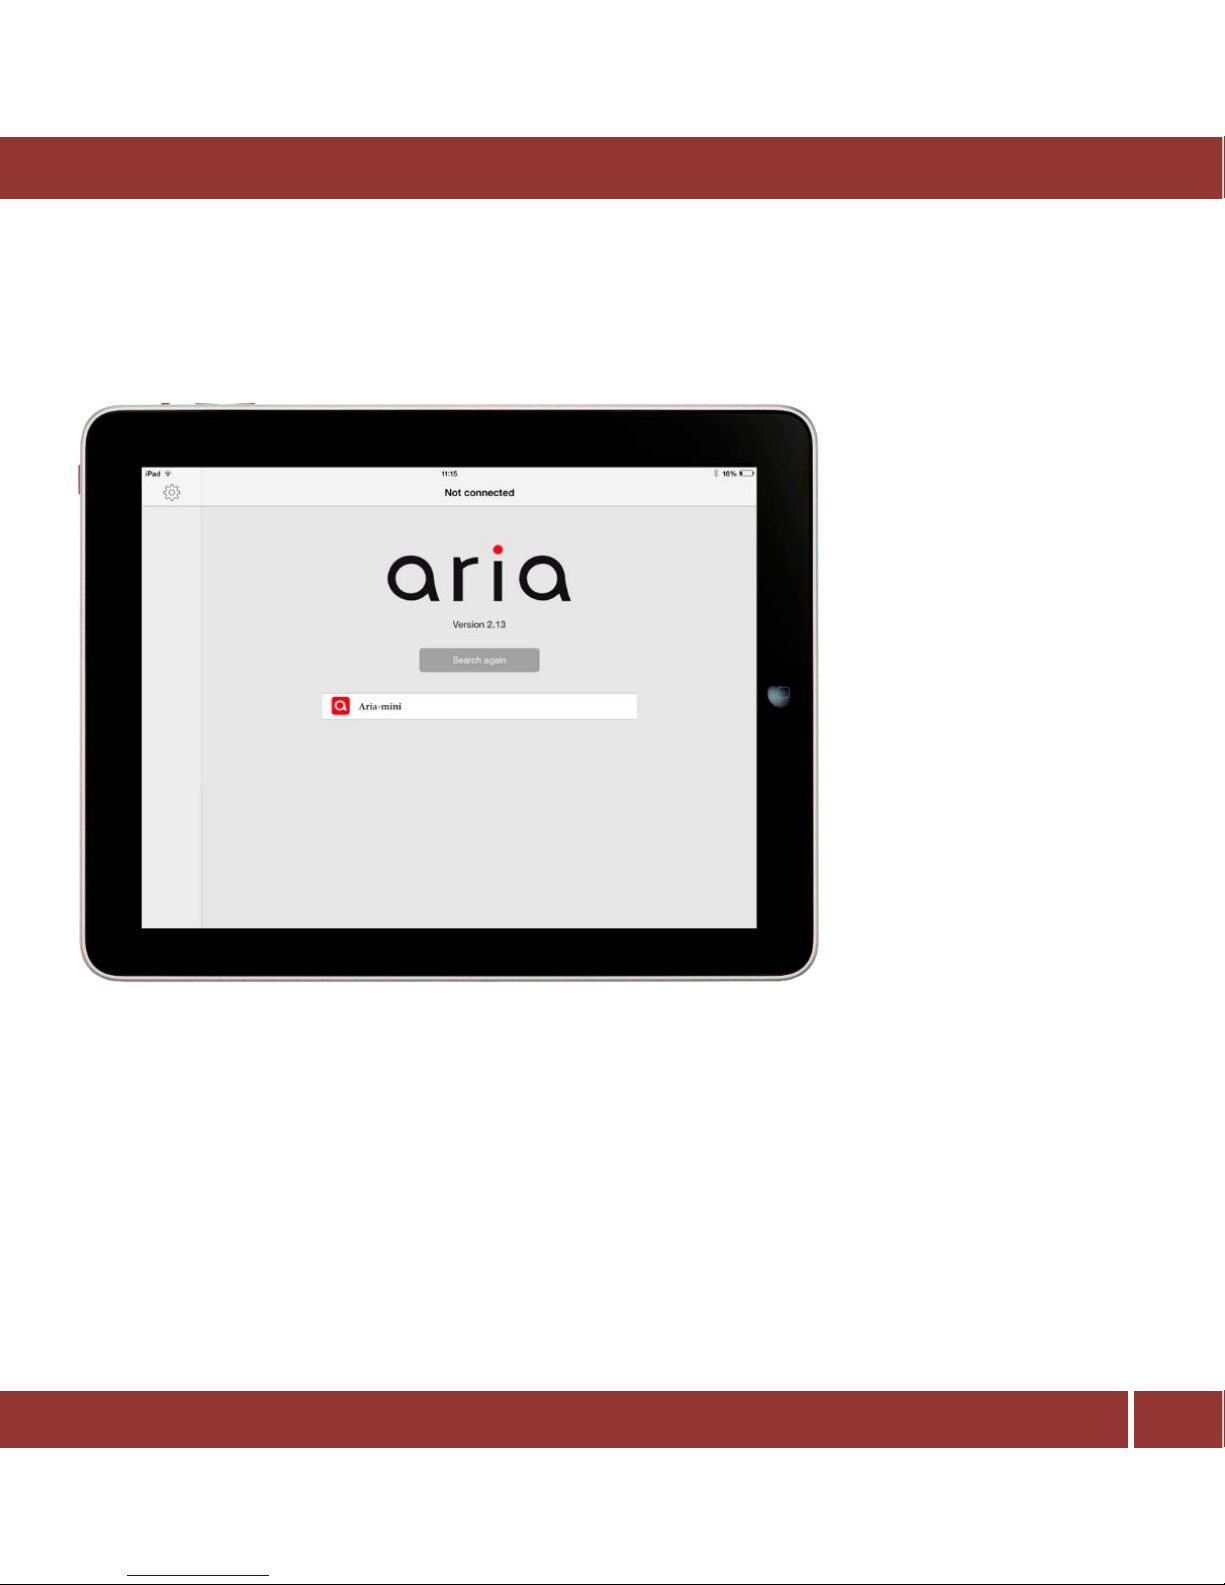
3. After approximately three minutes, run iaria in your iPad™. The first screen you will see will allow
you to select the aria system to control
On/Off
Page 13
DigiBit | Asura 81, 28043 Madrid (SPAIN) | www.digibit.es
13
aria mini | User Manual
Playback Operations
When turning the aria on, after approximately three minutes, run
the iaria application in your iPad™.
The first screen you see will
allow you to choose the aria
you want to connect.
Please, tap in the aria icon
and you’ll be connected to
your aria system
Page 14
DigiBit | Asura 81, 28043 Madrid (SPAIN) | www.digibit.es
14
aria mini | User Manual
Configuring the initial settings (language)
The first time you connect to your aria system, you should configue the language to use in the iPad app.
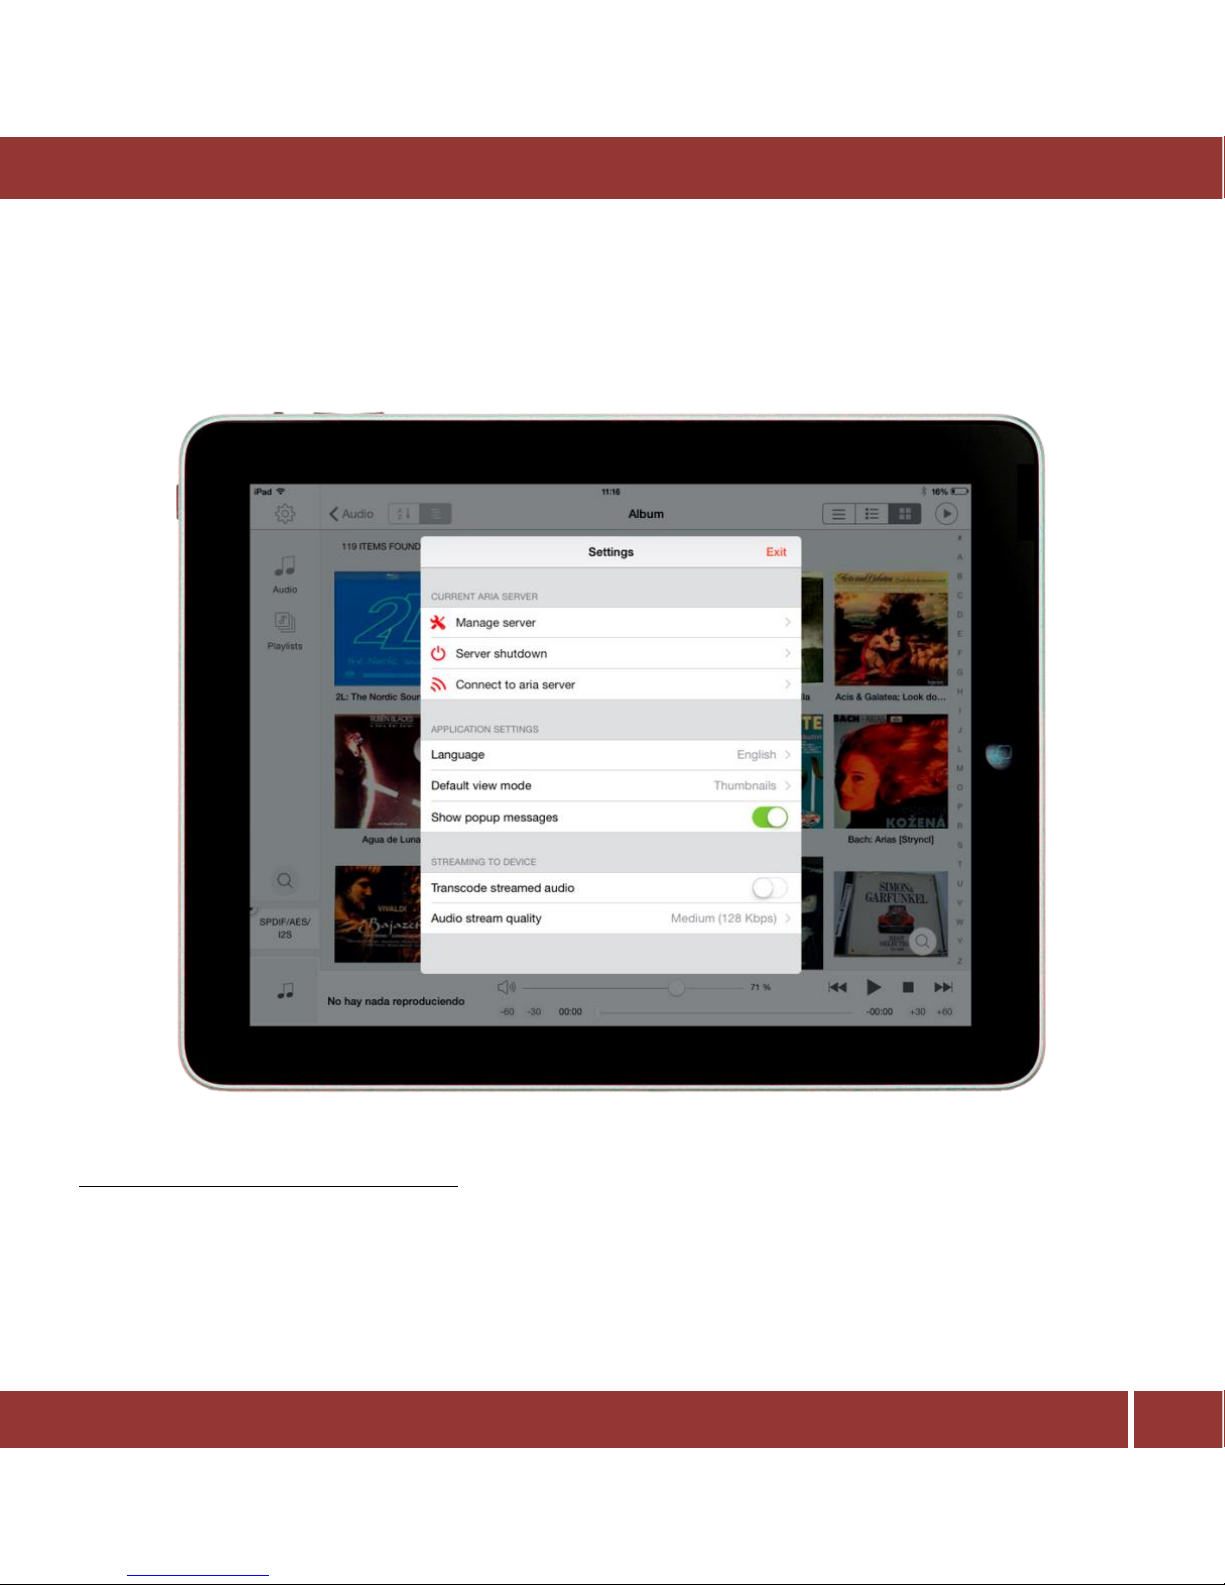
Press the tool wheel in the up left corner to enter the settings menu. You should see the followin screen:
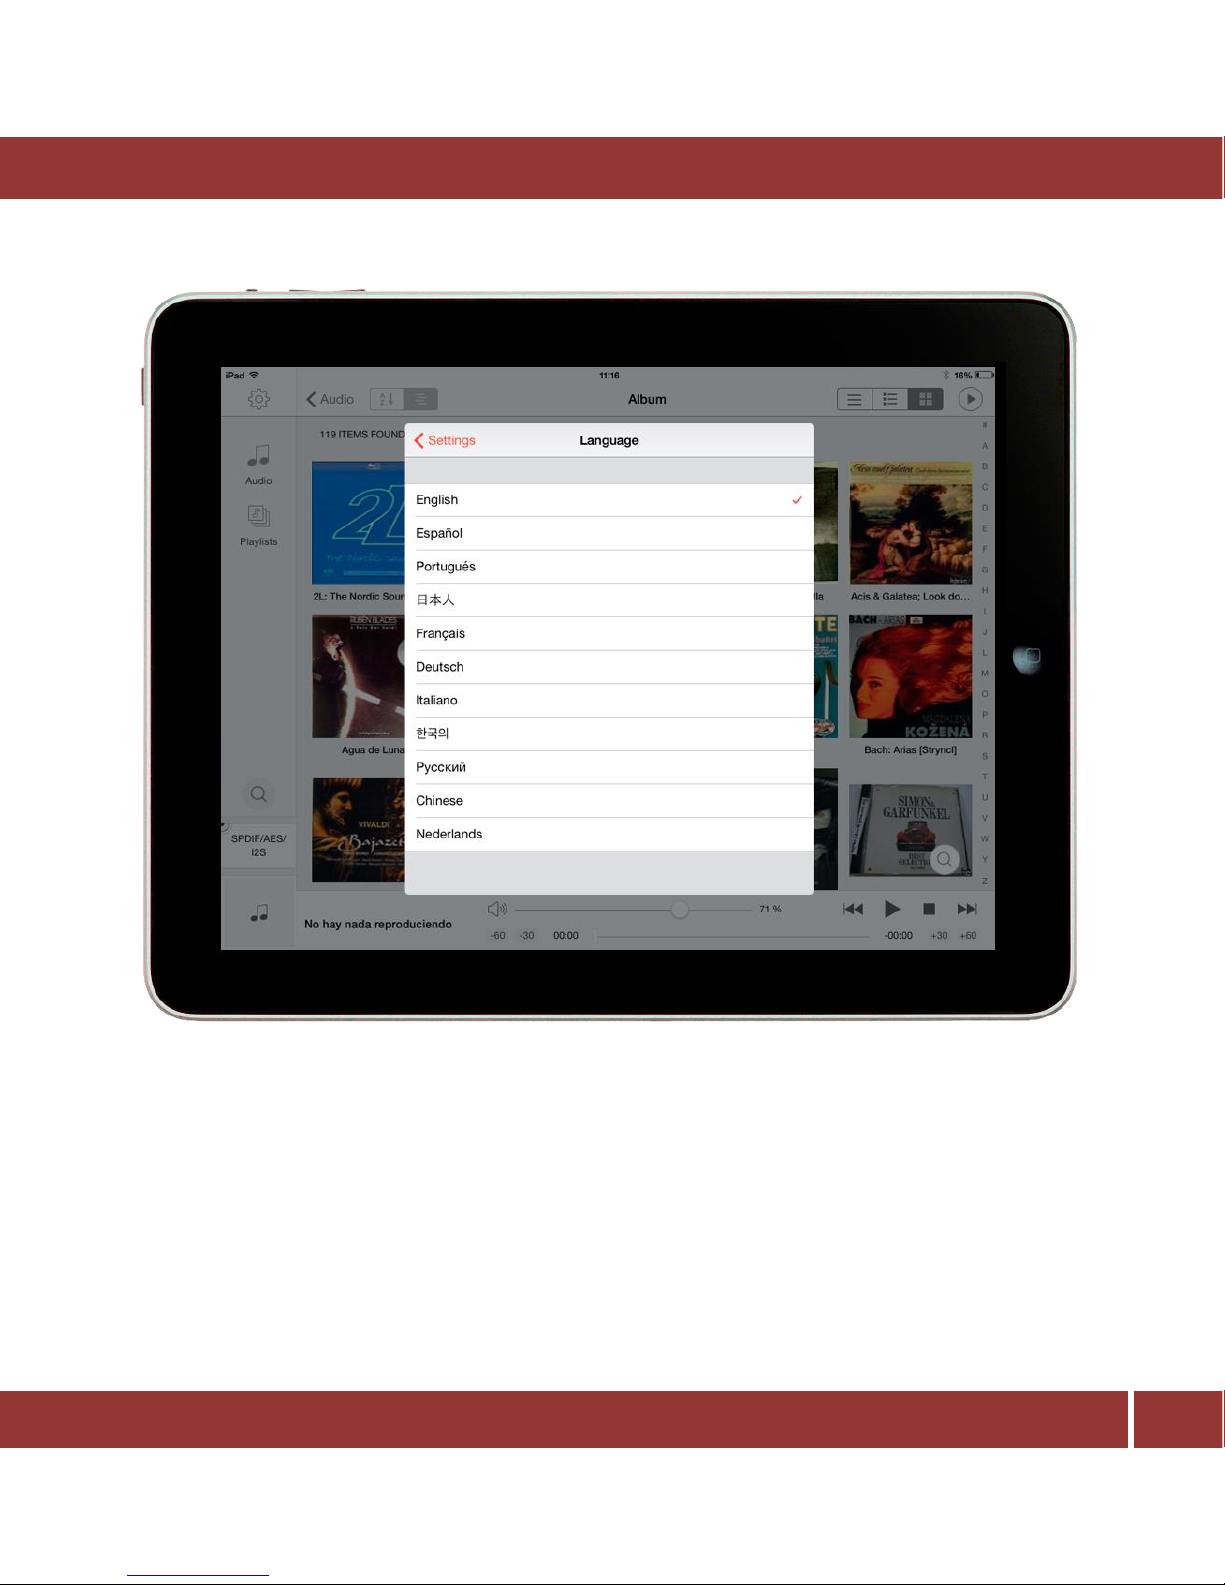
aria is running by default in english. To change the language, press ‘Language’. This screen shows the
available languages.
Page 15
DigiBit | Asura 81, 28043 Madrid (SPAIN) | www.digibit.es
15
aria mini | User Manual
Please, select the language of your choise.
Page 16
DigiBit | Asura 81, 28043 Madrid (SPAIN) | www.digibit.es
16
aria mini | User Manual
Playing music
Now you are able to play music.
The aria server is delivered with some complimentary legal tracks from cooperating music labels so that
you can play music immediately. The music that you have in the aria server and control using the iaria
app is called “the music library”
To play some music, first you must select the audio output (we called it ‘zone’) and then select the music
to play:
How to select the music playback zone
Prior selecting the music you want to hear, select the audio output.
The aria server is able to play the music using four different audio outputs called zones:
1. DAC
2. USB
3. DLNA (Players (renderers) in your network)
4. Your iPad
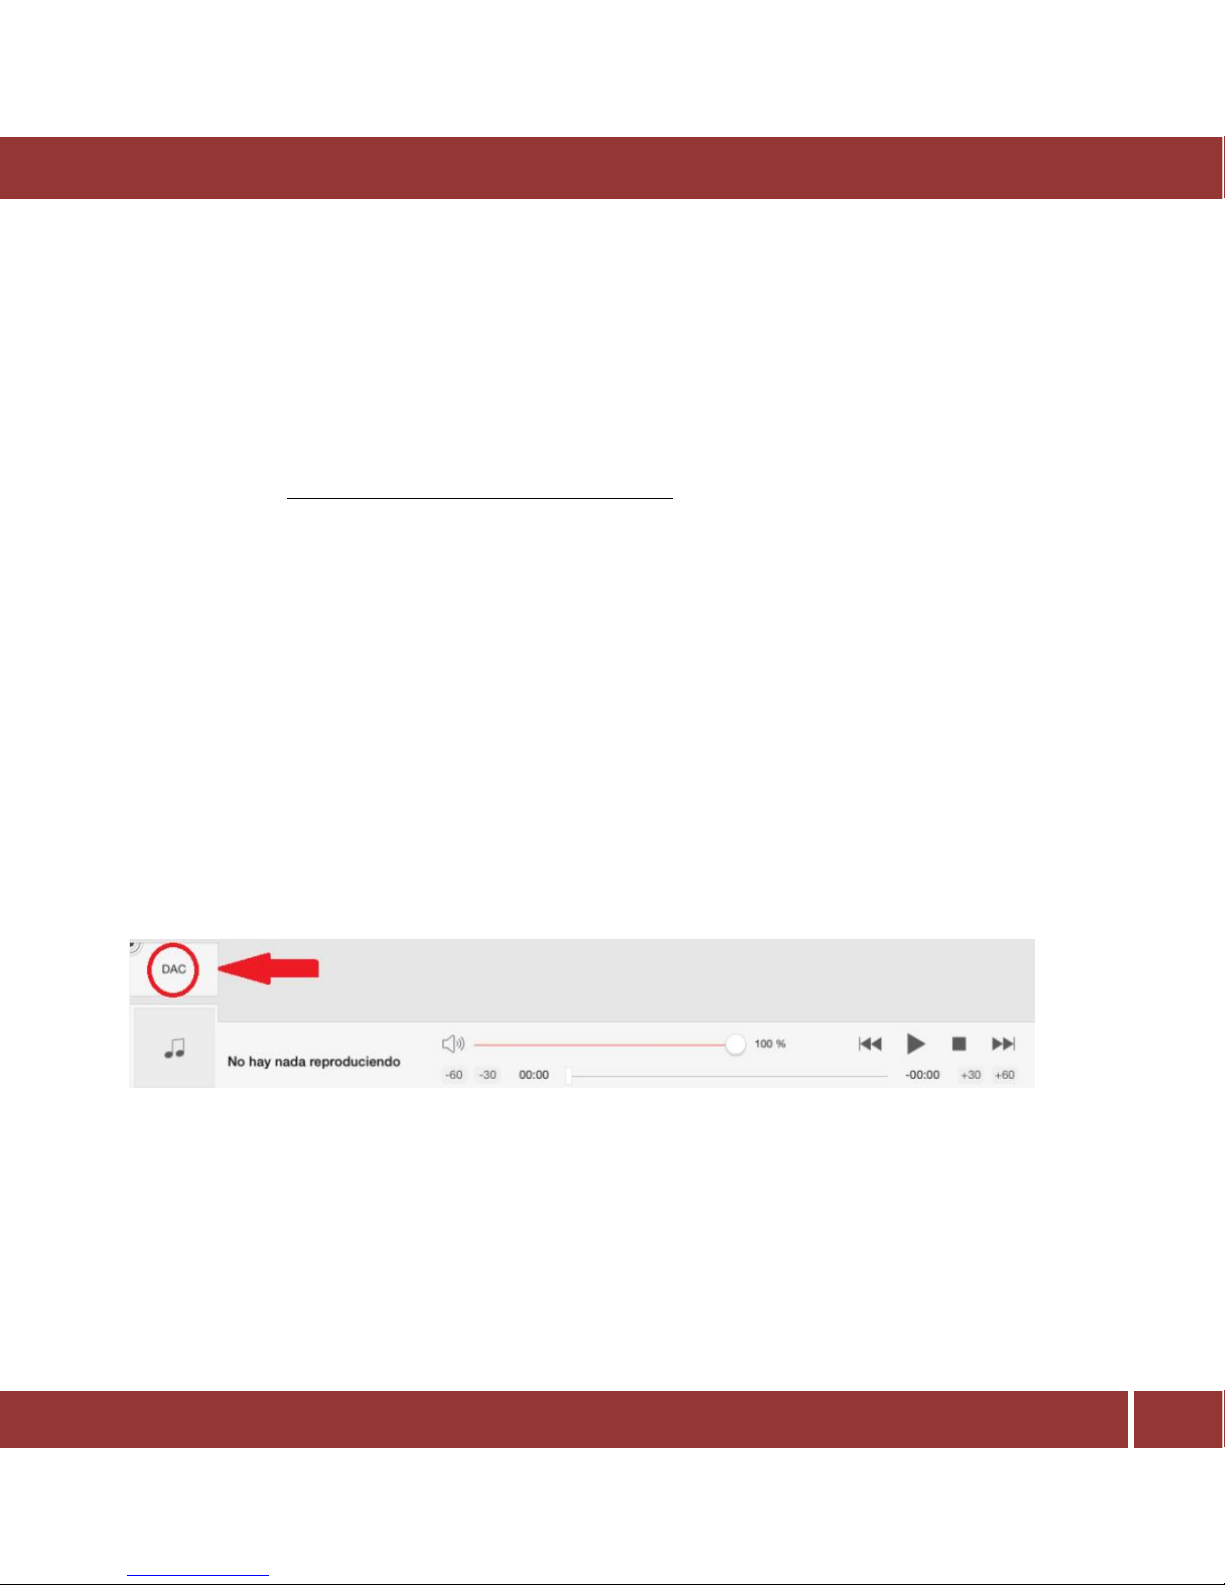
The zone can be chosen using the button on the bottom left corner in the iaria application:
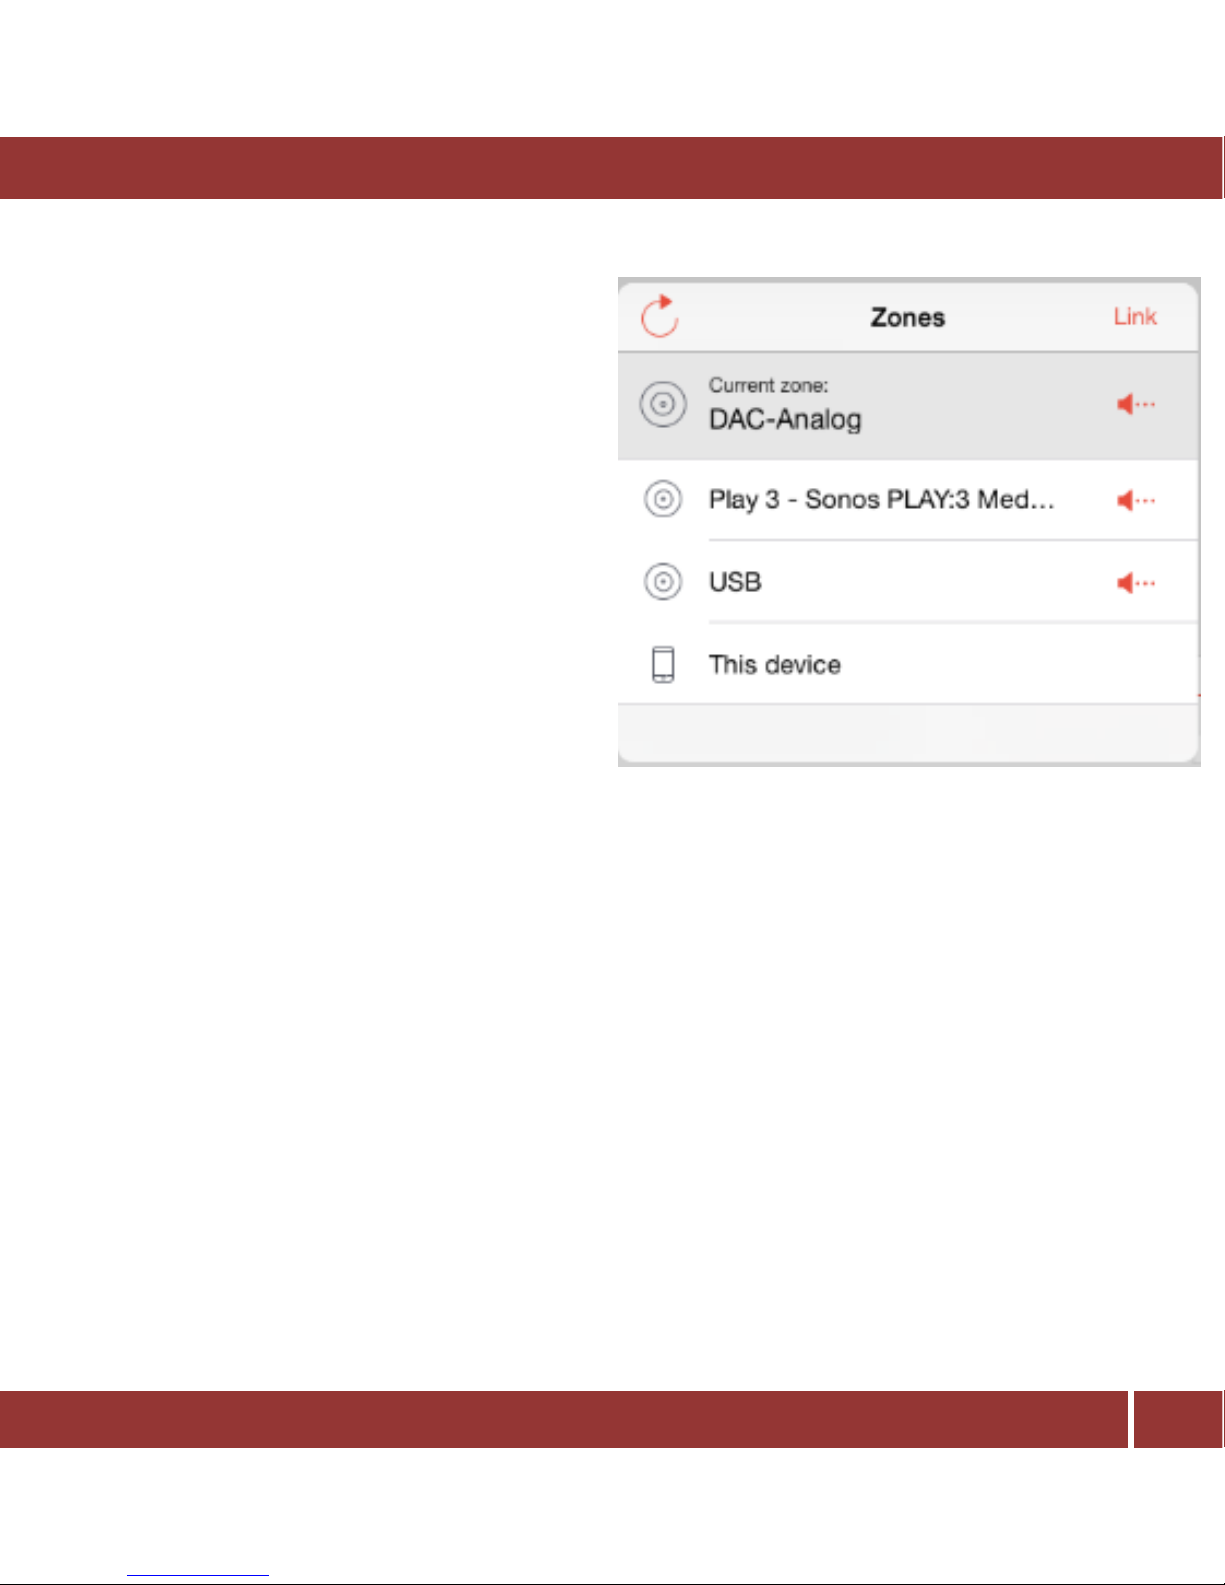
When you tap on this button, you will see three static options as follows:
DAC: plays music through the internal aria DAC connected to any of these outputs.
USB: This is a digital output that bypasses the aria internal DAC and sends music to your USB DAC or
preamp/amp with USB input connected to the aria’s USB audio output (Should you need to install drivers
in the aria server, please ask your dealer and/or DAC/Preamp vendor)
Page 17
DigiBit | Asura 81, 28043 Madrid (SPAIN) | www.digibit.es
17
aria mini | User Manual
This device: This is your iPad, when you select it,
aria will stream music to your iPad and you will be
able to listen it using the iPad’ speakers or
headphones.
Note: the aria supports AirPlay™ too, so you can
stream music to any AirPlay compatible device.
Please check the FAQ section to see how to
configure it.
Besides these three zones, DLNA renderers in your
LAN (local area network) may appear. The aria will
stream music to them by selecting their name in
the zones button.
How to select the music to play
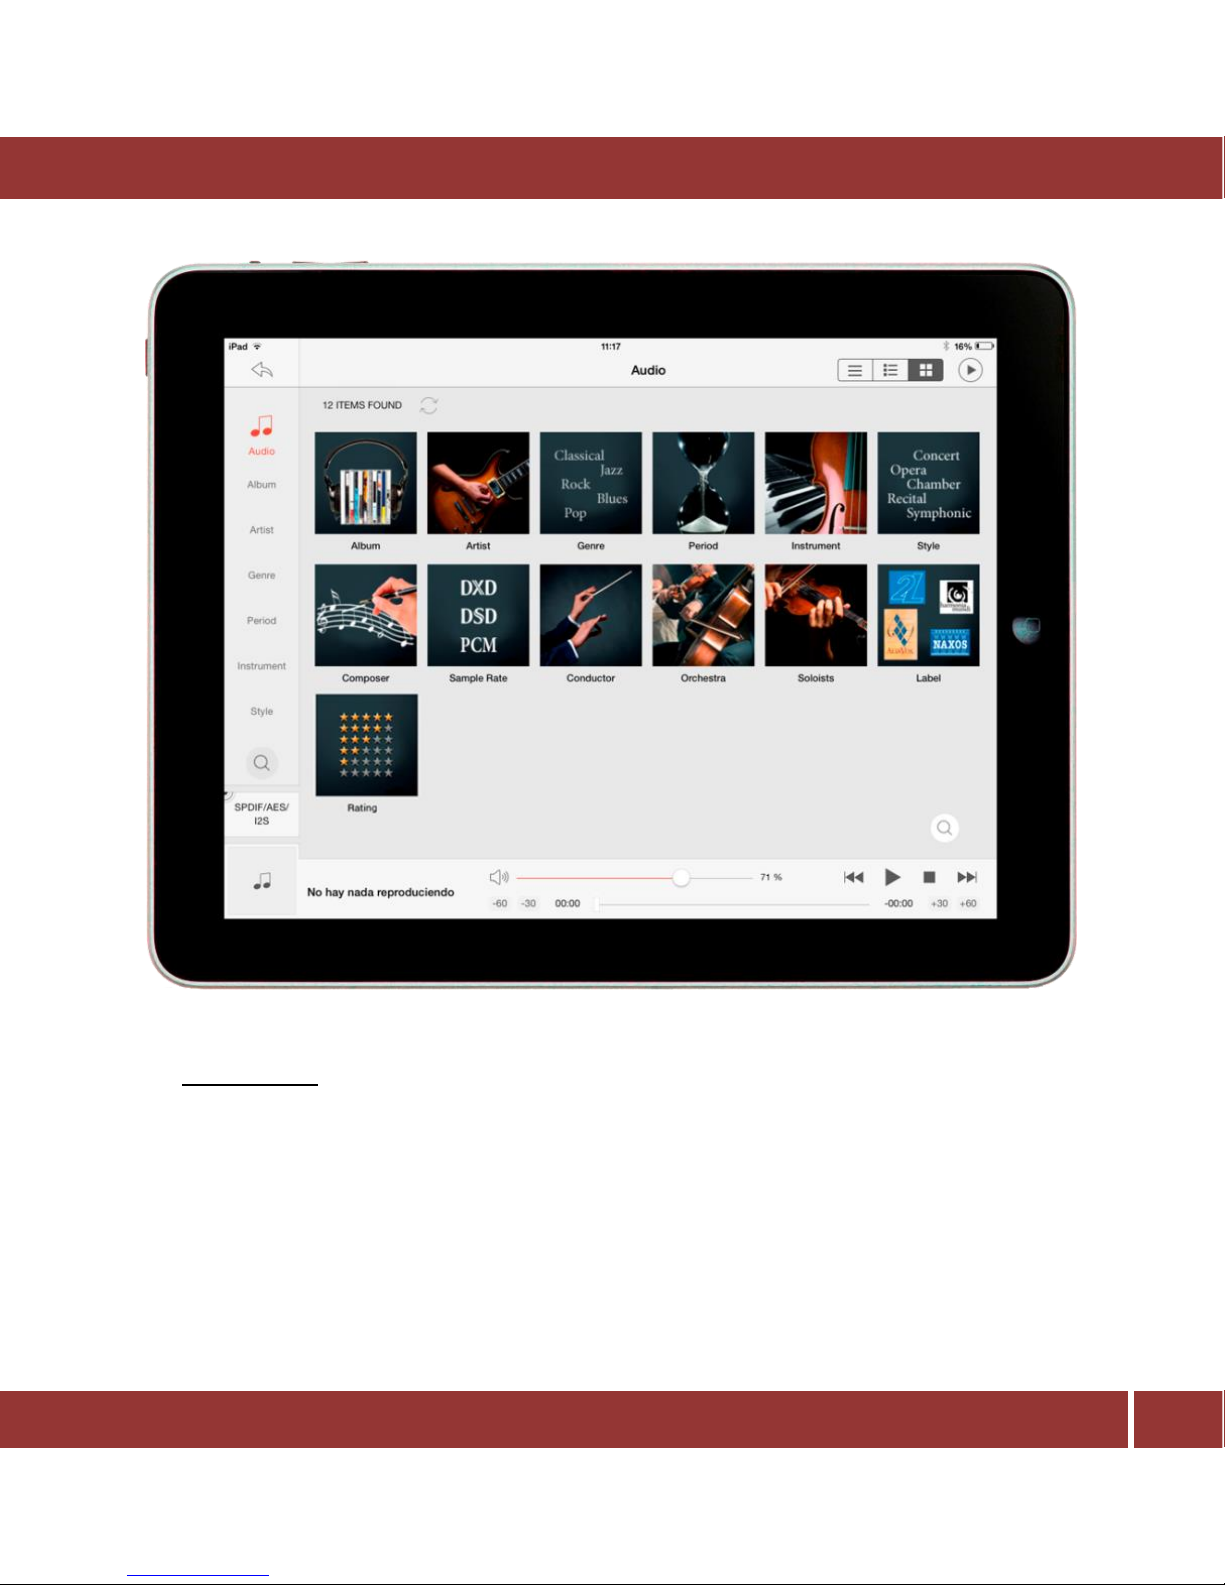
The left bar shows aria’s unique library management tool that sorts the music by our exclusive extended
metadata fields. Classical music is automatically sorted and other genres can have the extended metadata
fields tagged manually.
Page 18
DigiBit | Asura 81, 28043 Madrid (SPAIN) | www.digibit.es
18
aria mini | User Manual
Press the ‘Album’ menu and then select one of the albums that appear in the right side tapping on the
covert art.
To play it, just tap one track in the album. The aria server will play it immediately.
Page 19
DigiBit | Asura 81, 28043 Madrid (SPAIN) | www.digibit.es
19
aria mini | User Manual
Rip your CDs
Now that you are able to play the music included in the aria server, it’s time to add your own music to it.
There are three ways to do it:
- Ripping your CDs
- Copying into the aria music that you have in other devices
- Linking music that you have in other devices.
The two last options are explained in the advanced section. We will see now how to rip your own CDs. For
this, please make sure the aria is connected to the Internet via LAN.
To proceed with ripping it will be necessary to
use an external USB - CD/DVD writer that will be
connected to the aria mini.
Important: The only external USB – CD/DVD
writer model certificated by Digibit Technology is
the ASUS SDRW – 08U5S-U. All other different
marks and models are not included on the aria
mini configuration or certified by Digibit
Technology.
Unpack your ASUS SDRW-085S-U, you will find a
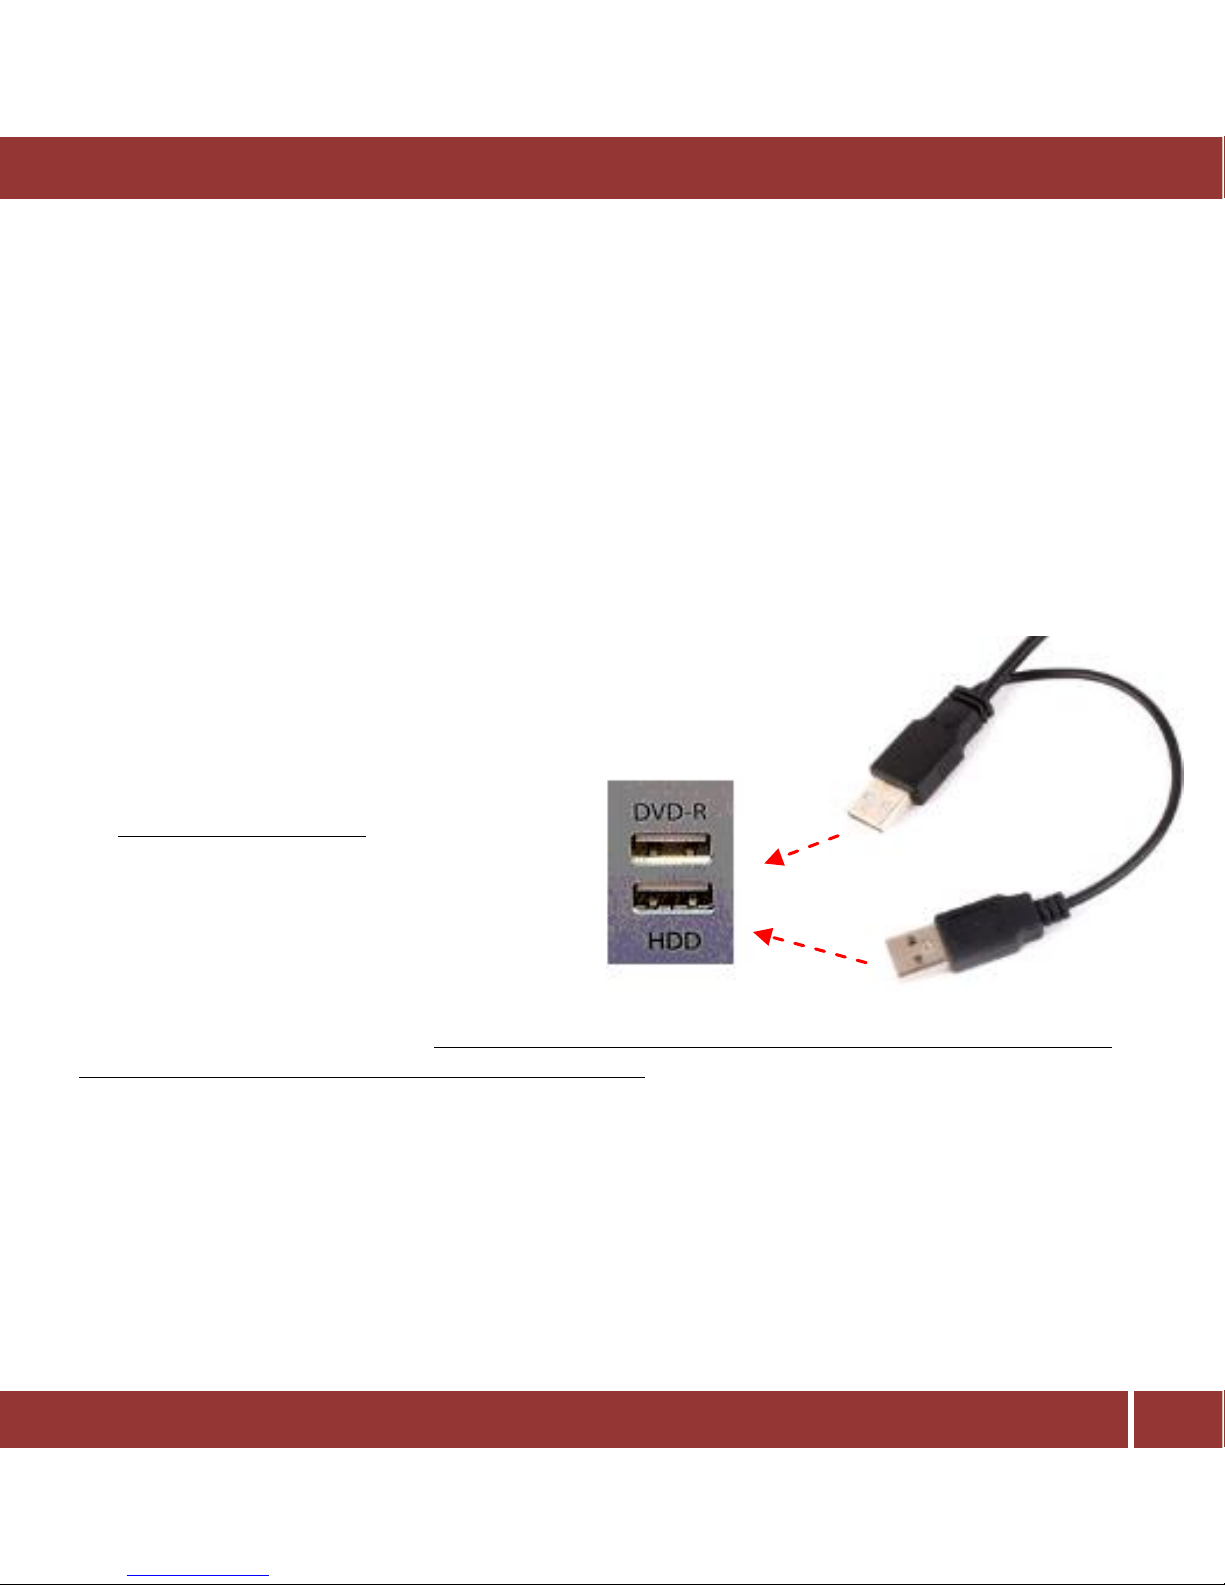
double USB cable. Please connect the mini USB to
the ASUS CD/DVD writer mini port. The double USB cable must be connected to the HDD USB port and
the single USB cable to the DVD-R port to the aria mini. Otherwise we cannot guarantee proper
operation.
Then open the ASUS SDRW´s tray, place the CD in it and close the tray. aria will read it and connect
automatically via Internet with several supported databases to retrieve the available metadata. This is a
fully automatic process.
Once you insert the CD and close the disc tray drawer, two things may happen
Page 20
DigiBit | Asura 81, 28043 Madrid (SPAIN) | www.digibit.es
20
aria mini | User Manual
The CD-reader starts spinning and the CD remains inside. This means aria is ripping the CD.
After a few minutes the CD is ejected and its music and metadata are stored on aria’s hard
disk. You can find the ripped CD content in the iaria app in: Playlists > Recently imported
The CD is ejected after some seconds: this means the CD has not been ripped.
The reasons for not being ripped can be:
1. The CD is dirty. Clean your CD and try again. BUT before retrying, first rip a different CD,
otherwise aria will rip the faulty CD without metadata.
2. aria is not connected to Internet. Please, verify that the aria is connected with the RJ45 cable
to a LAN connector and that you have access to the Internet from another PC in the same local
area network (LAN).
3. Information for the CD (metadata) is not found in any of the databases. In this case, you can rip
it without metadata. To do it, immediately after it has been ejected, insert it again. The CD will
be ripped and stored in the internal hard disk without metadata as an “Unknown” album with
no cover. You can manually tag the album using the Tagging tool in the iaria app. To import a
missing cover please check “Importing Covers” in chapter 8.
By default, the ripping format is FLAC, a bit perfect format that uses less space in the hard disk than other
bit perfect formats such as WAV or AIFF. Besides, and very important, the metadata is inserted in the
audio file, so if you modify the metadata and then copy the FLAC file to any other computer or use
another media player, the metadata will be there. Using a WAV format these changes will be lost.
If you wish change the ripping format to any other, please, contact your dealer, he can do that for you or
instruct you on how to do so.
It is possible to copy the ripped music from the aria server to other computer in your local area network.
This is explained in the FAQ section.
Page 21
DigiBit | Asura 81, 28043 Madrid (SPAIN) | www.digibit.es
21
aria mini | User Manual
6 SEARCH
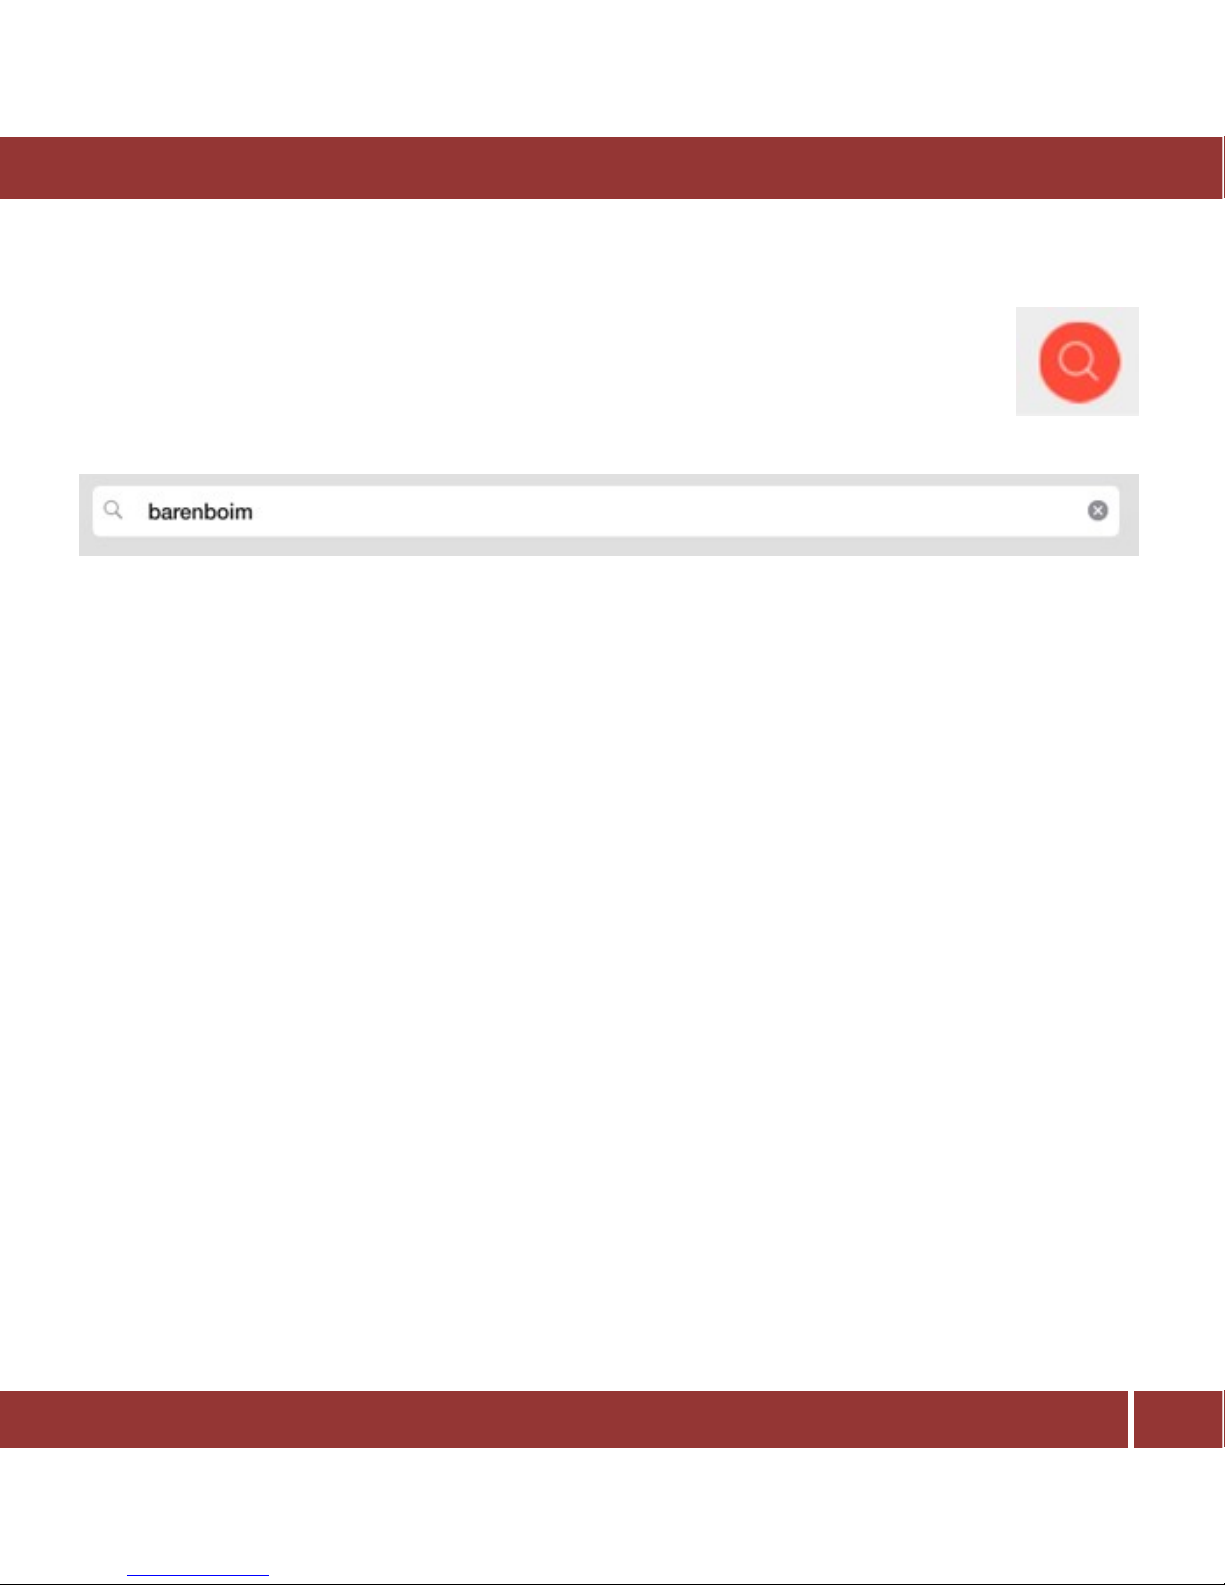
This option will search in the Music Library for any metadata field that matches with the
input introduced by the user. Tap the Search option on the left menu and input the word
in search. It can be the first or last name of a composer, artist, singer, a word included in
the name of a track or album, an instrument, etc.
7 HOW USE YOUR ARIA SERVER (ADVANCED FEATURES)
In this section we will show the advanced usage of the aria server, adding music from external devices,
changing the metadata, creating playlists, etc.
Import music
You can use with the aria server digital music that you have stored in any other device like a NAS, flash
drive stick or a USB HDD*.
The import of music from external devices is done using the iaria app as we will explain later, but first it’s
important to understand that there are two ways to do this: copying the music or linking it.
Important: The copying feature will be available only for aria minis purchased with HDD or SDD (hard
drives options integrated in to the aria when purchased).
Copy music: it means that the tracks that you have in your external device will be copied on to the
internal hard disk of the aria server and included in the aria music library.
Link music: The aria server “saves” the path to the music in your device and the music is not copied from
the device into the internal hard disk. However, it is important that your device (NAS, USB flash stick or
USB HDD) be available each time you play the linked music. If not, the music won’t be played as it is not
stored in the aria. This is simply because you have removed the previously indicated “link.”
Page 22
DigiBit | Asura 81, 28043 Madrid (SPAIN) | www.digibit.es
22
aria mini | User Manual
If you plan to copy or link music from a USB device please:
- The USB device must be connected to the USB input in the rear panel labeled as HDD.
- The USB host port is rated to provide a maximum of 5V, 500mA power to the USB drive. This is
sufficient for all USB thumb drives and flash memory card readers but may not be sufficient for
USB hard disks. It is recommended that you use a USB hard disk with an external power supply
to avoid damaging the USB host ports.
* Unpowered USB HDD may cause the app to crash and the server to reboot.
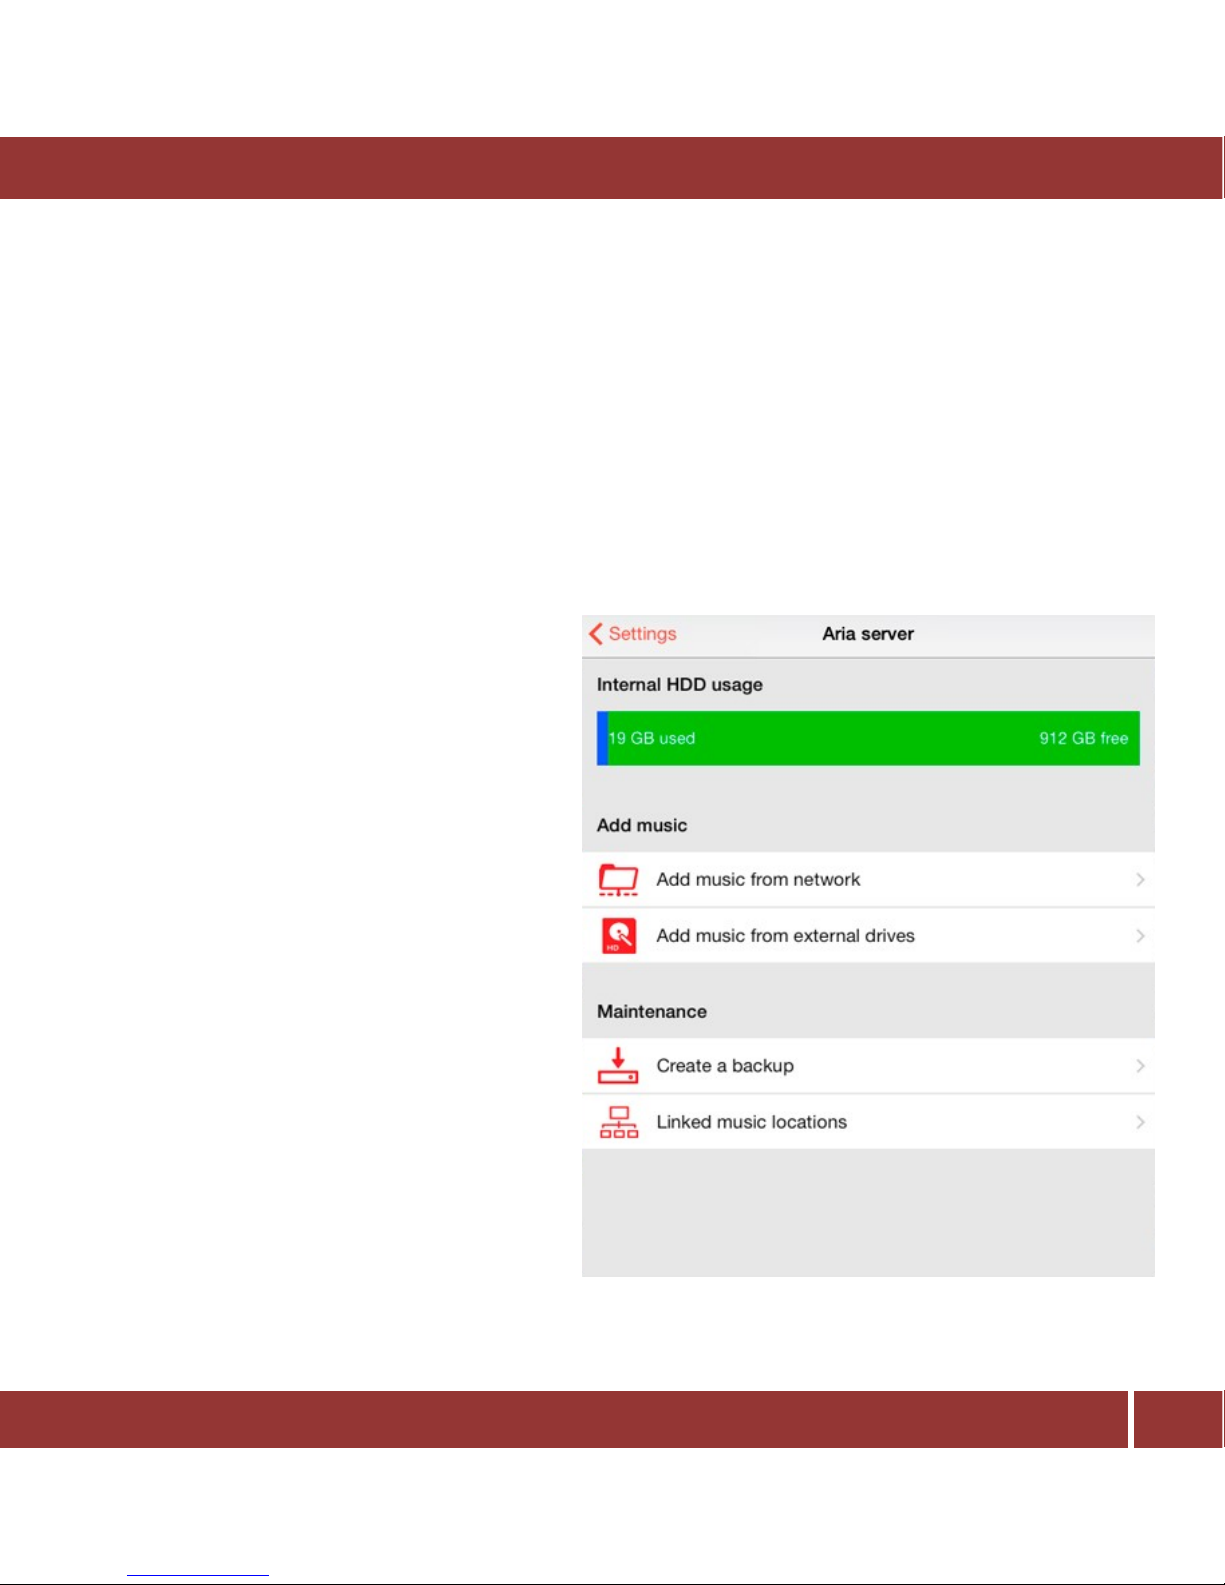
To import music go to Settings and tap on the
‘Manage Server’ menu. You will see a new
screen showing the internal hard disk free
space and the import options.
Import from network storage system
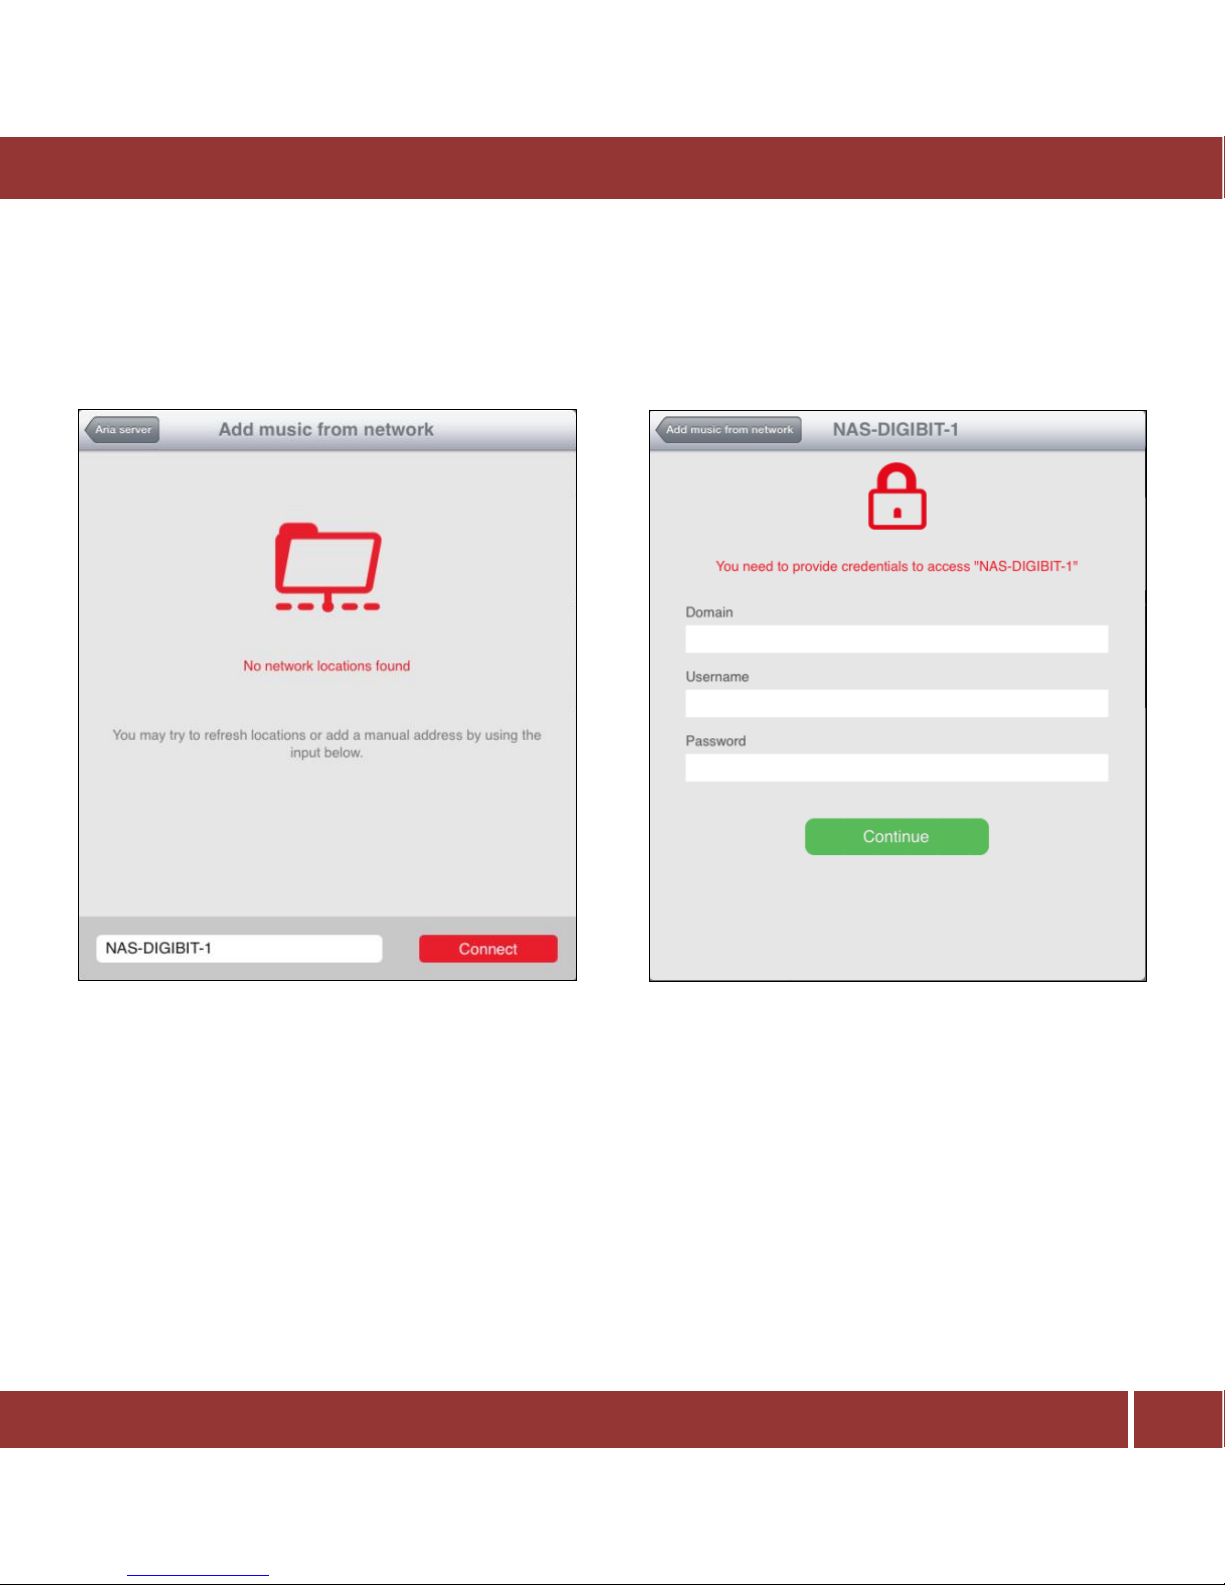
Press in ‘Add music from network’
The application will detect and automatically
show the computers or NASs within your local
area network with shared folders and allow
you to import the music from them. If you find
them in the list just tap on them and the app
will show the folders on them.
If your device is not in the list, you can add it
manually introducing the device name or its IP
address at the bottom.
Page 23
DigiBit | Asura 81, 28043 Madrid (SPAIN) | www.digibit.es
23
aria mini | User Manual
If the network device (a NAS, a shared folder in a third computer, etc.) needs user/password
authentication, the app will request that information from you. If it is not in a Domain, leave the Domain
field empty. Normally the devices used at home are not working in a Domain.
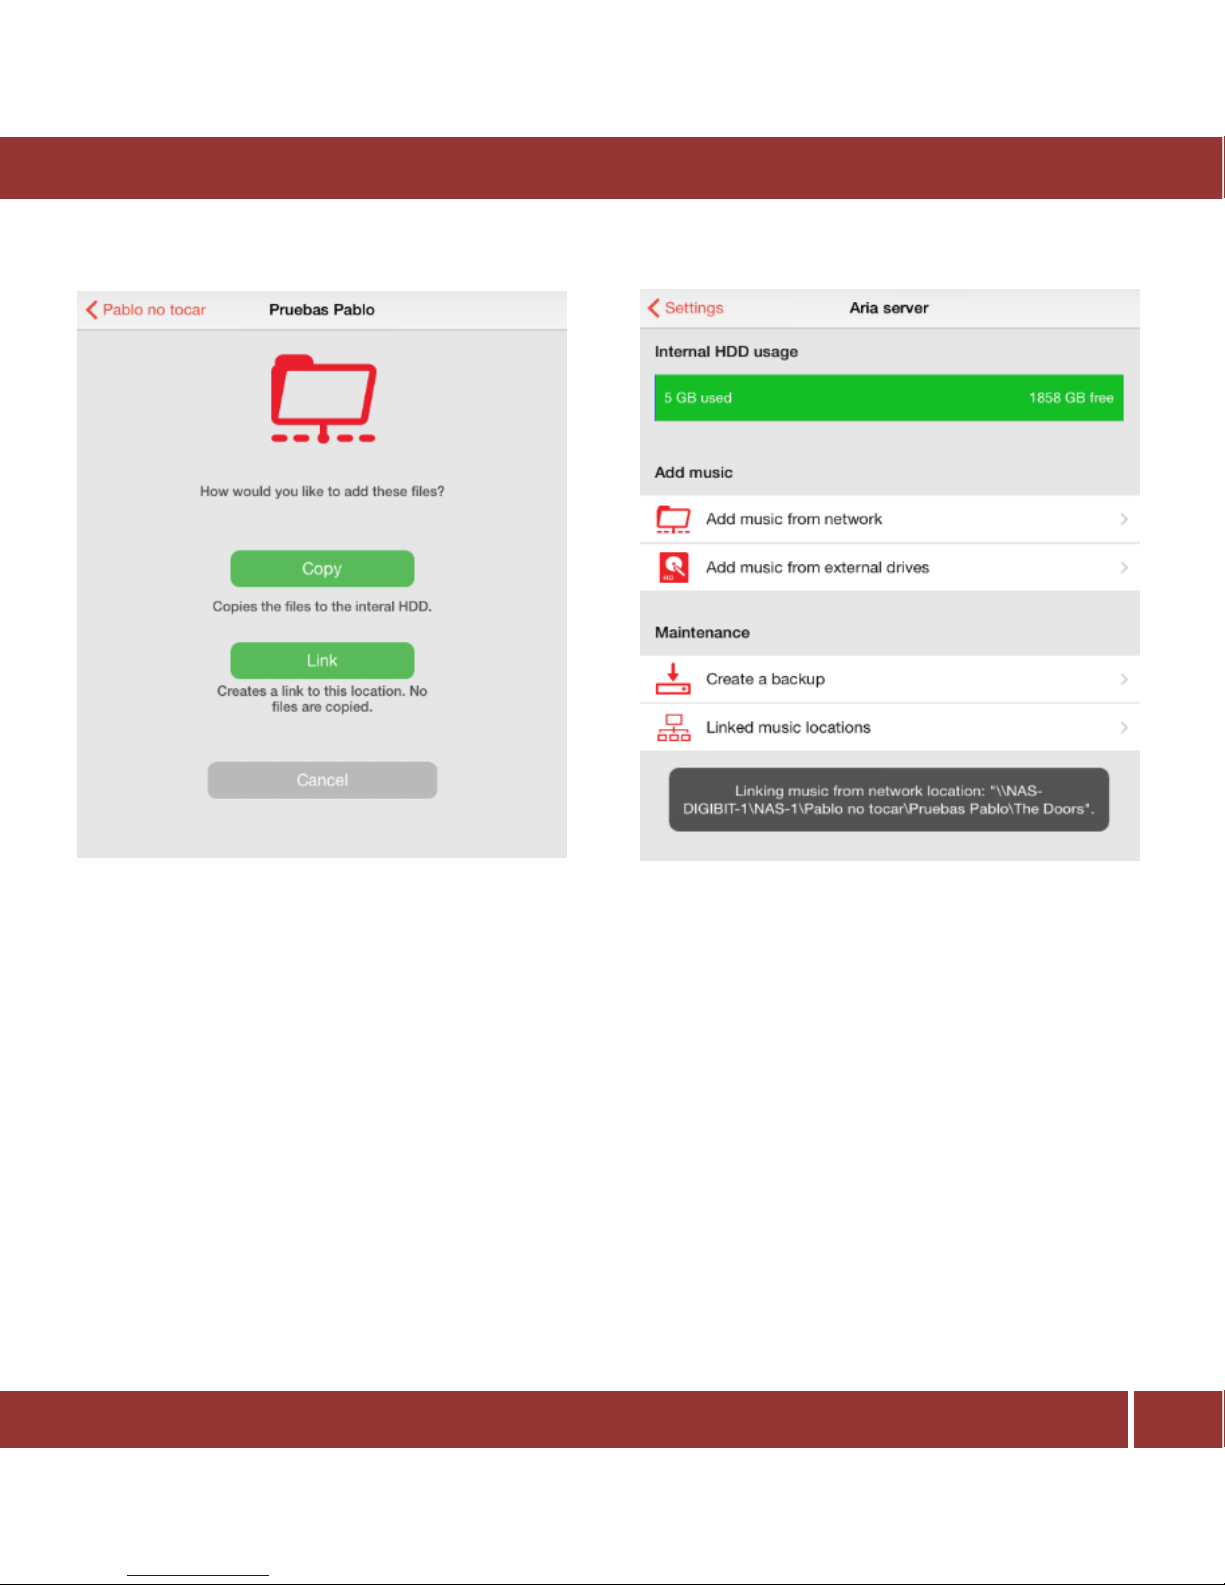
Once the app shows the folder where the music is, tap it and the system will import it. The system will ask
whether you want copy it or link it. Please, make your choice.
Page 24
DigiBit | Asura 81, 28043 Madrid (SPAIN) | www.digibit.es
24
aria mini | User Manual
A message indicating that the action is in progress will appear.
Additionally, if you select the ‘copy’ option, a second message will indicate that the action is finished but it
can take a long time if you copy many tracks (from seconds to hours).
This message is not showed with the ‘link’ option as this action done instantly.
Page 25
DigiBit | Asura 81, 28043 Madrid (SPAIN) | www.digibit.es
25
aria mini | User Manual
Import from a USB device
To import music from a USB device create a folder in the USB ´s memory and copy the music to import
into it. The music mustn’t be in the root path of the USB.
Tap on ‘Add music from external drive’ menu.
The system will show the folders stored in the USB device connected to the HDD input. Go to the folder
where the music is and tap it. The system will ask if you want copy it or link it. Please, make your choice.
The messages we just explained will also appear when you import from a USB device.
How to check that music has been imported
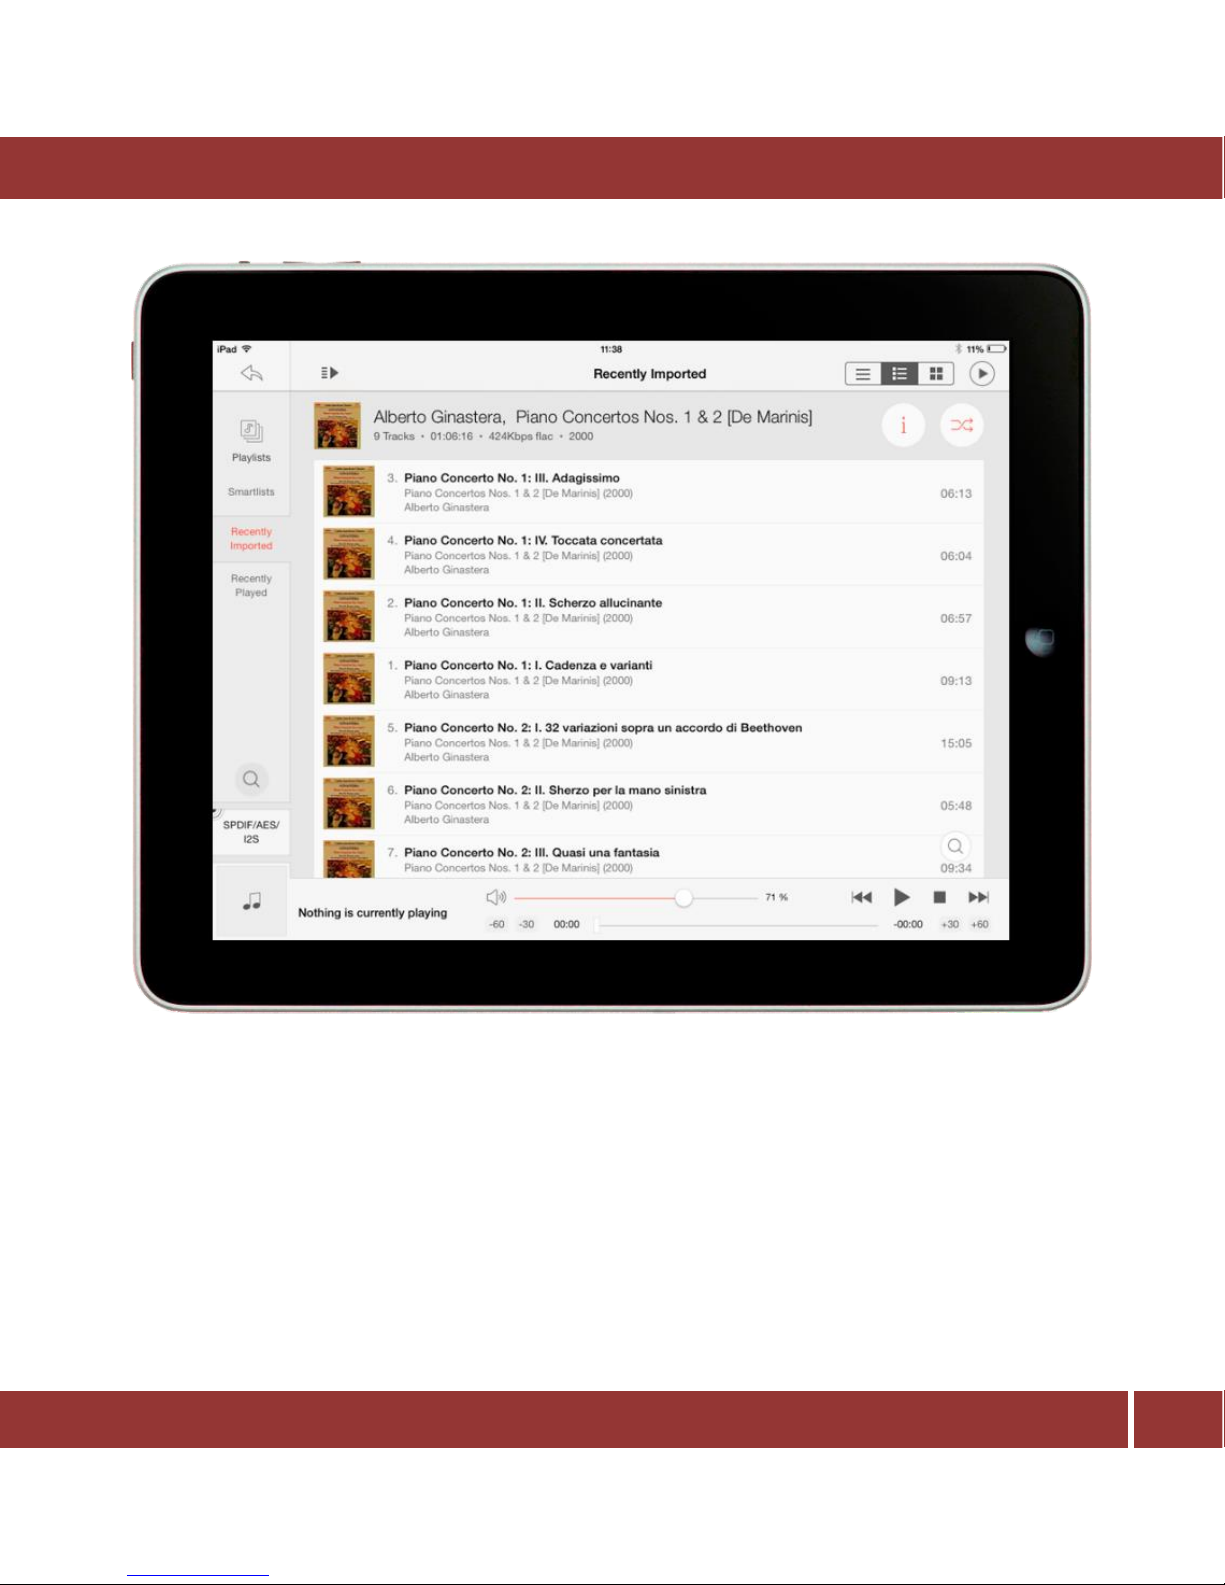
To verify that the music has been added to the Library Music and is ready to be played, you can check the
playlist “Recently Imported” (left menu -> Playlist -> Recently Imported).
The new tracks are added to the bottom of the list.
This playlist is cleared when the aria is shutdown.
Page 26
DigiBit | Asura 81, 28043 Madrid (SPAIN) | www.digibit.es
26
aria mini | User Manual
Playing music. Selection criteria: A detailed explanation
On the left side of the application there is a vertical menu to select how your music will be sorted on the
right side. By default, it is intended to do a first selection based on the genre. This means that when you
tap in any of the metadata fields (ex. composer) you’d then indicate a genre and the app will show the
composer in this genre.
Just tap on the cover art to go one level down and see the albums in this option.
Page 27
DigiBit | Asura 81, 28043 Madrid (SPAIN) | www.digibit.es
27
aria mini | User Manual
Playing and adding tracks to the queue
There are many ways to play the album or tracks of your choice: from
the main screen or from an album:
From the main screen
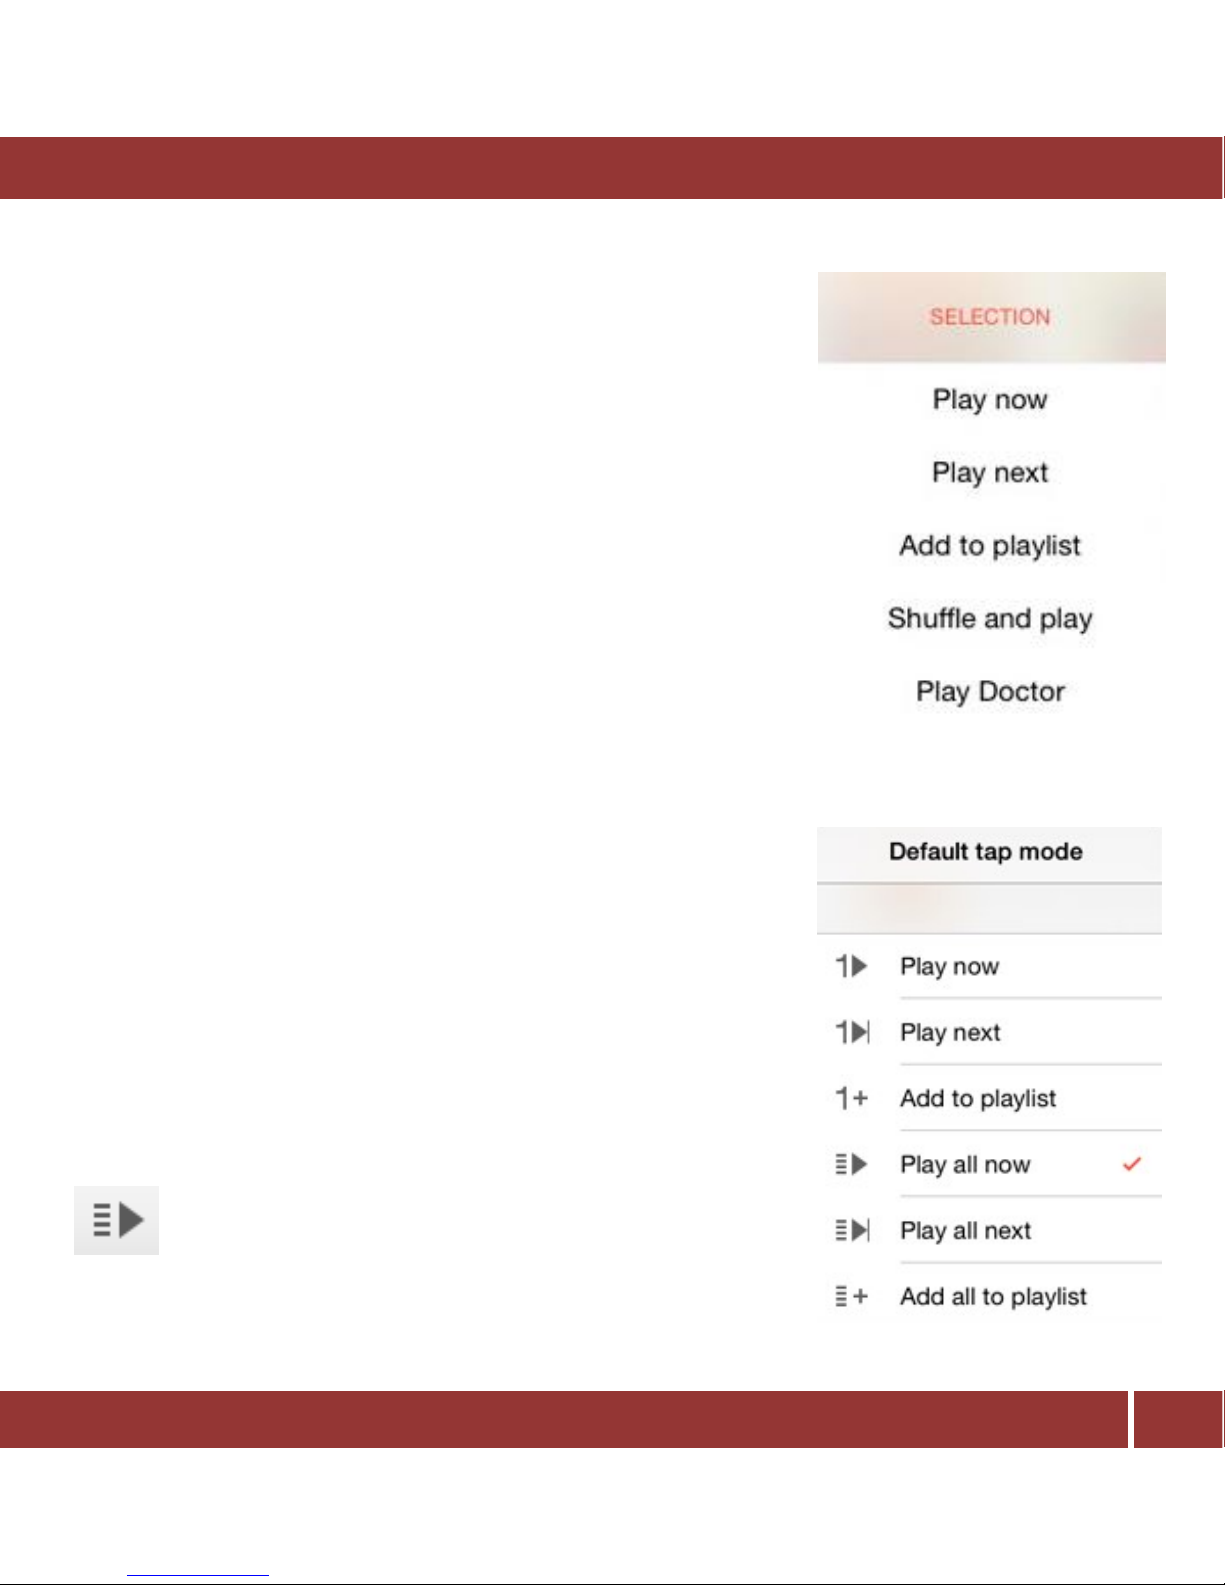
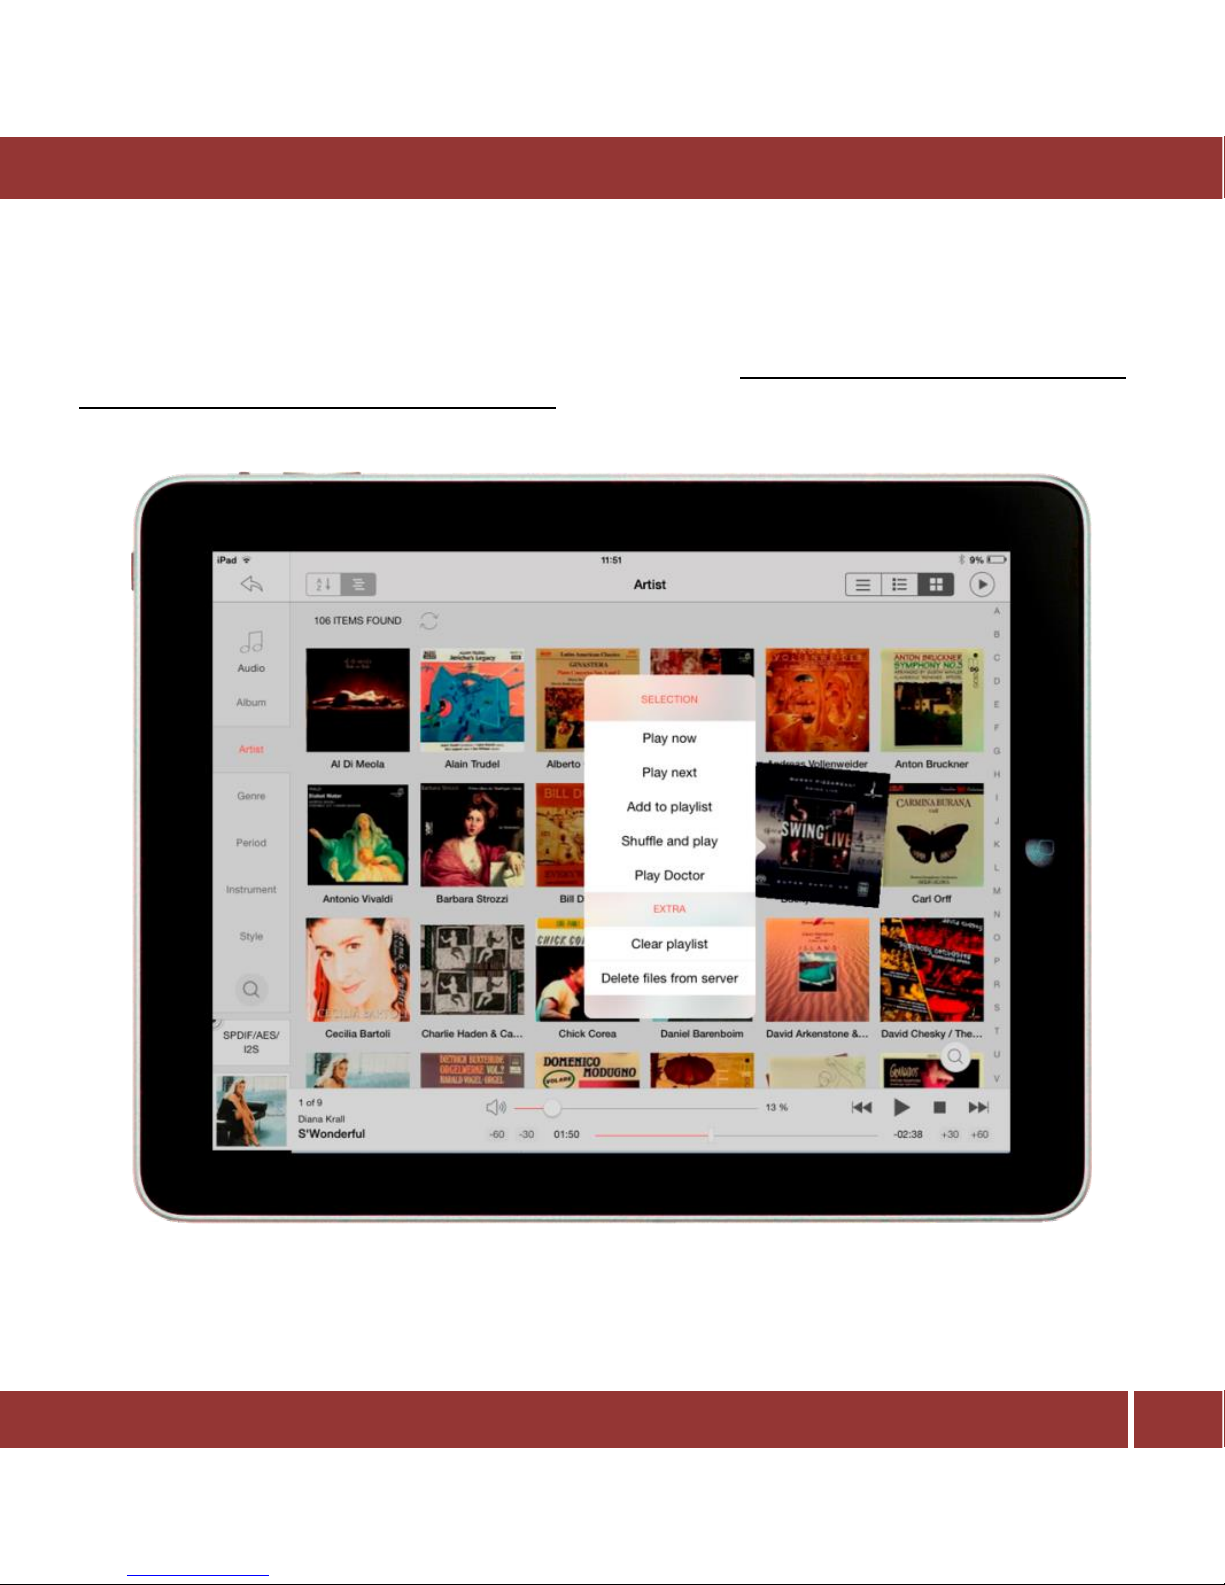
Just tap and keep pressing the selection for a few seconds. A popup
menu will appear with the option to play the music:
Play Now: It stops the music being played in that moment
and starts playing the selection.
Play next: It adds the selection to the playing now list just
after the track being played.
Add to the playlist: It adds the selection to a playlist.
Shuffle and play: It shuffles the selection and starts playing it.
Play Doctor: is an aria feature which intelligently creates
playlists from your library and favorite tracks.
From an album:
If you select an album, the application will show its tracks.
To play just one track, you have to first change the option with the
arrow button on the top, then just tap on the track you want to play.
Page 28
DigiBit | Asura 81, 28043 Madrid (SPAIN) | www.digibit.es
28
aria mini | User Manual
These are the available playback options shown in the next picture.
’Playing Now’ screen: Save and load playlists
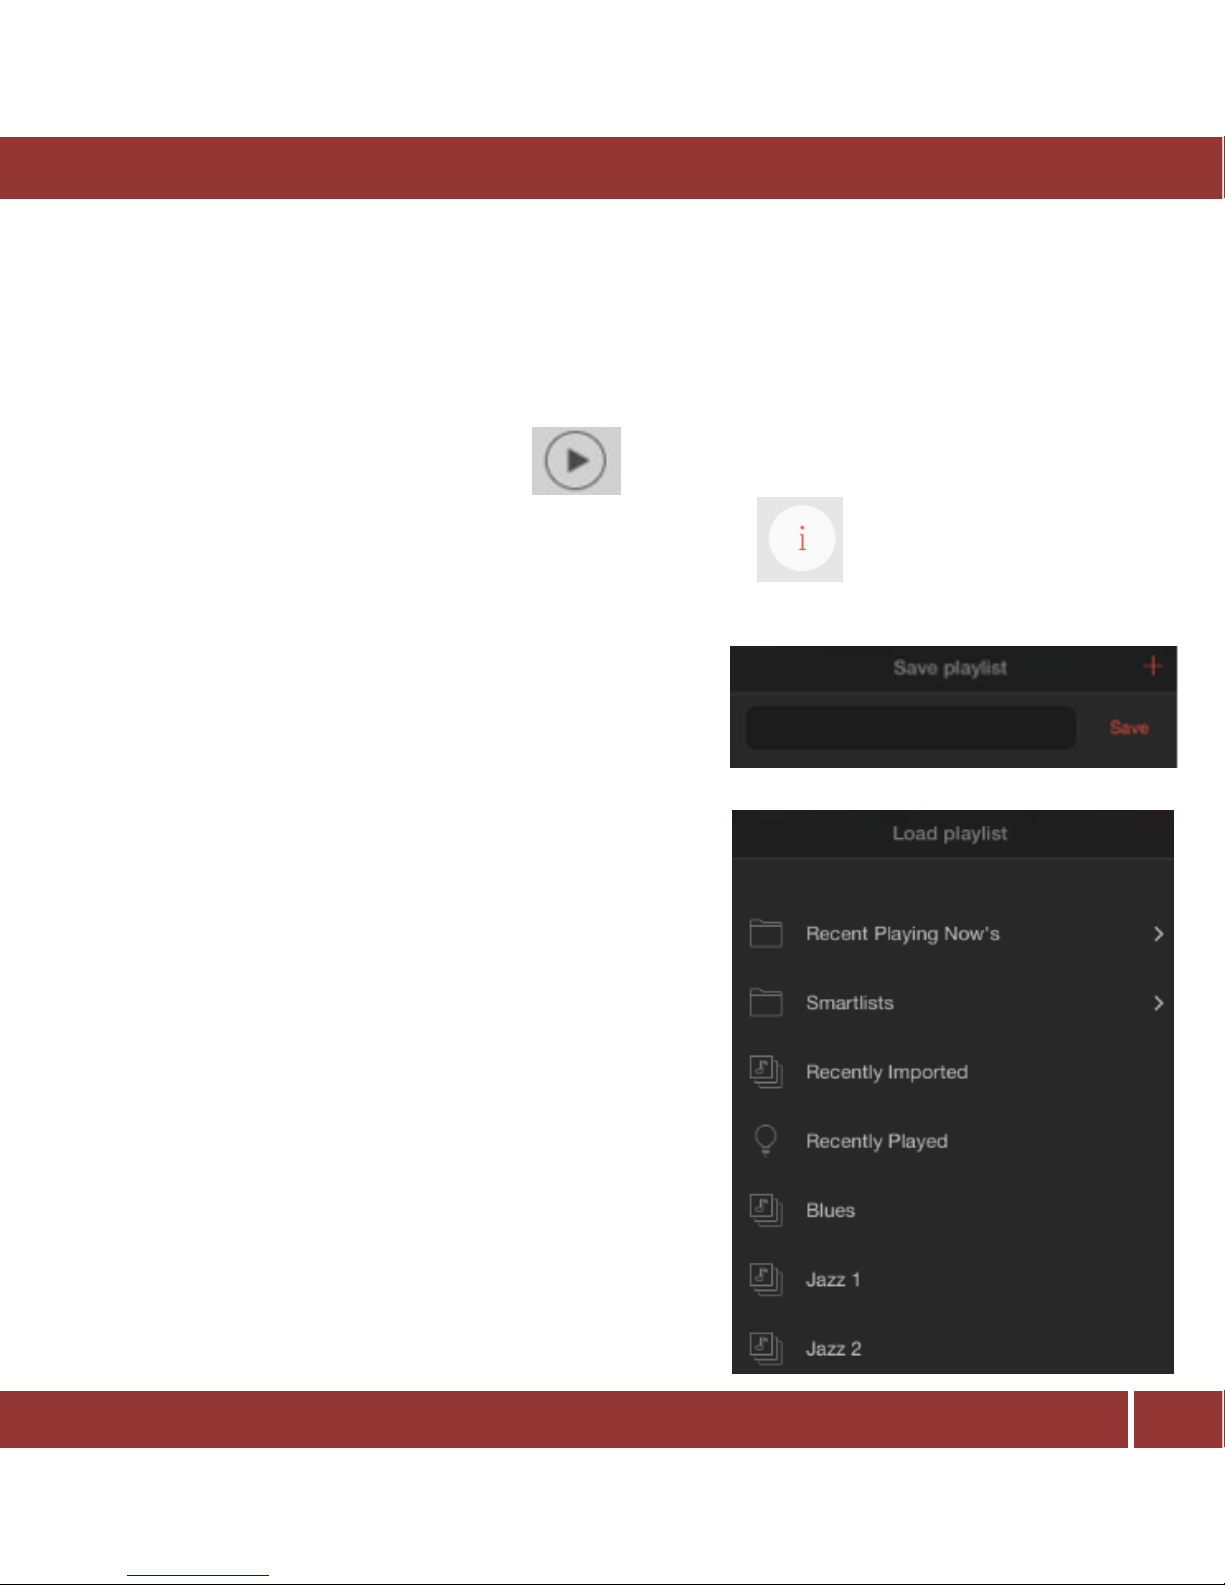
To see the tracks in the queue (active playlist) tap on the play button in the top right corner.
On this screen you will be able:
Edit the metadata. Just tap on the i icon in the top right corner.
We will cover that later.
Save a playlist. Once you have added tracks or albums to the
queue you may want to save them as a personal playlist. Press
the S button in the top bar. A popup message will appear with
the saved playlists you already have. To save the current
playlist press the + button and enter a name of your choice
for this new playlist.
Load a playlist. To load a playlist press the L button on the
top panel, a new popup window will appear with the playlists
you have currently saved. Additionally appears 3 possible
options:
Recent Playing Now´s: Select this option to play the
music you have been listening to recently.
Smartlist: Select this option to play 100 random
songs or the albums you have imported this month.
Recently Imported: Select this option to listen the
albums you have recently imported.
Page 29
DigiBit | Asura 81, 28043 Madrid (SPAIN) | www.digibit.es
29
aria mini | User Manual
This 3 options are also available on the iaria´s left bar by selecting the Playlist button.
See Playlist chapter.
Editing metadata
There are two ways to edit metadata:
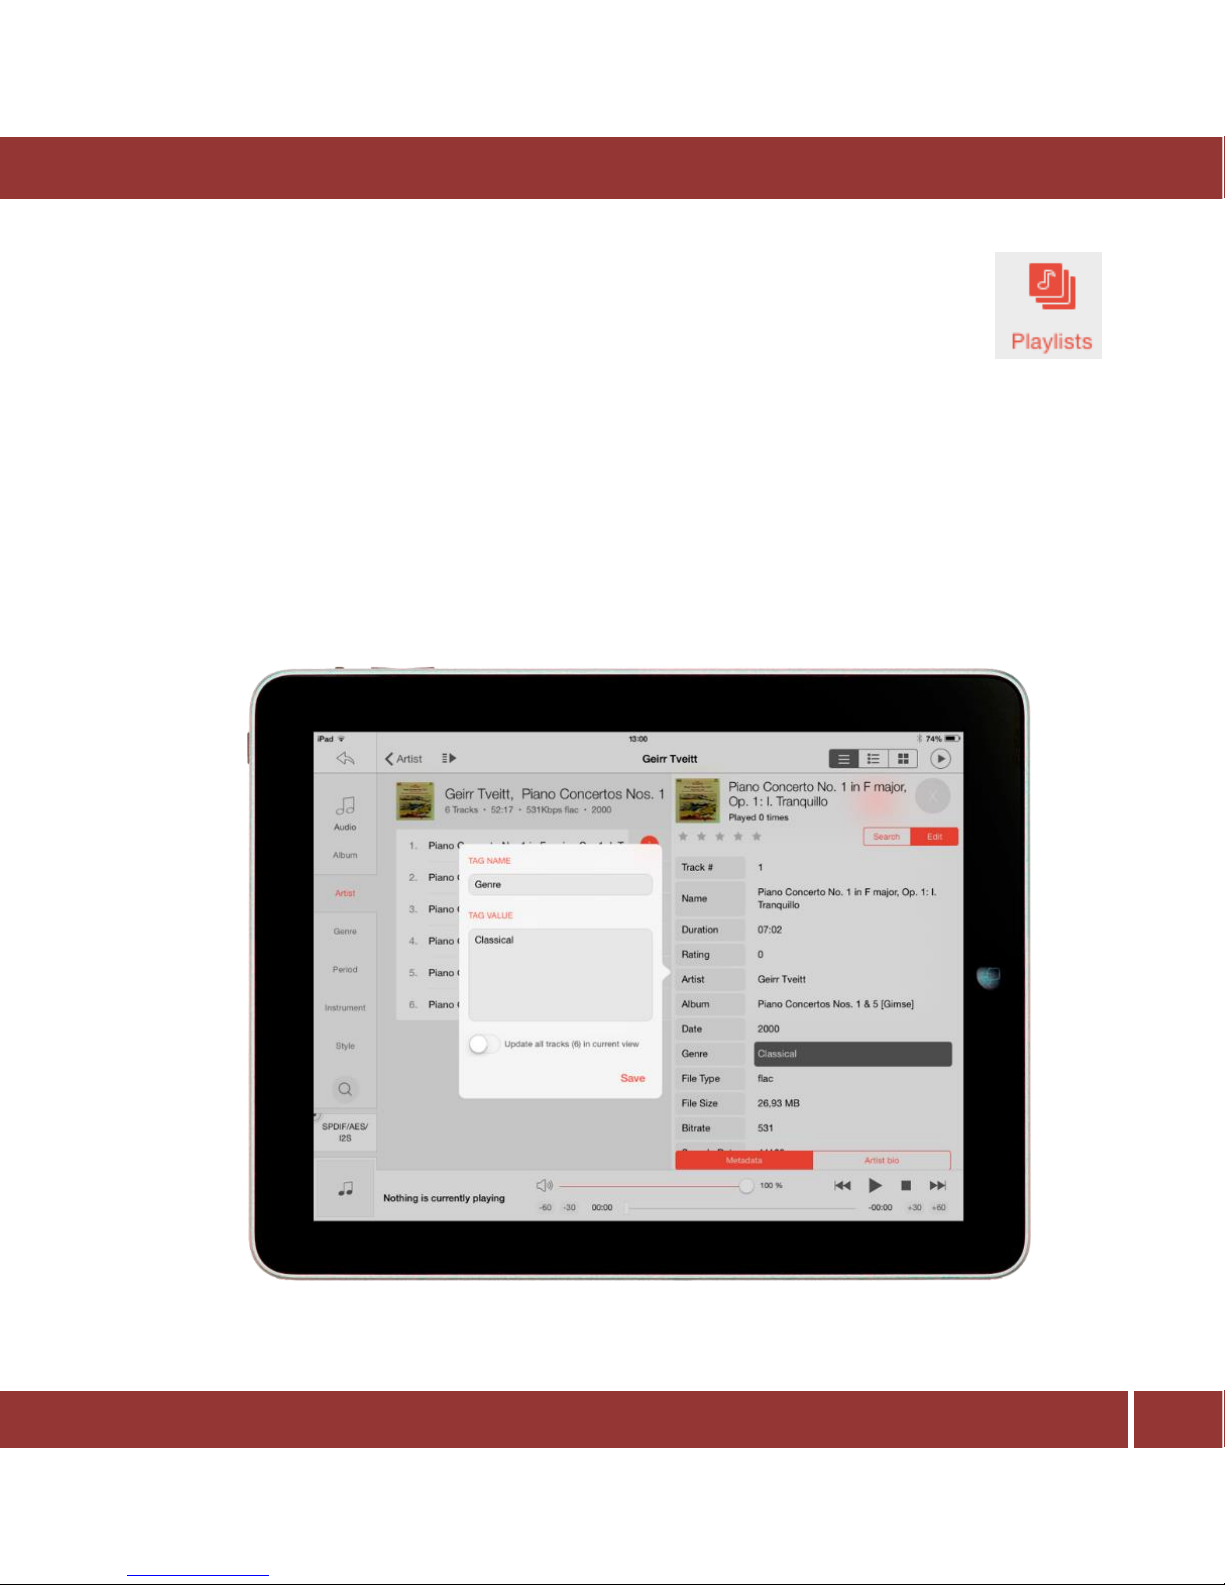
A. From an album: Once you are in an album, press the ( i ) button. A new popup window will
appear with the tracks’ tags. Press the ‘Metadata’ button to view the tags of a particular track.
The ‘Edit’ button will allow you to edit the tags. Now press on the tag you want to edit and a
new window will appear to proceed with the editing process.
Page 30
DigiBit | Asura 81, 28043 Madrid (SPAIN) | www.digibit.es
30
aria mini | User Manual
B. From the playing screen: In the playing now screen, press the ( i ) button in the top right
corner. A new popup window will appear with the tracks’ tags. Press the ‘Metadata’ button to
view the tags of a particular track. The ‘Edit’ button will allow you to edit the tags. Now press
on the tag you want to edit and a new window will appear to proceed with the editing process.
8 PLAYLIST
In this chapter you will learn how to create, manage, playback, edit and delete Playlists.
Automatic playlist
aria creates automatically a few Playlists that can easily be accessed.
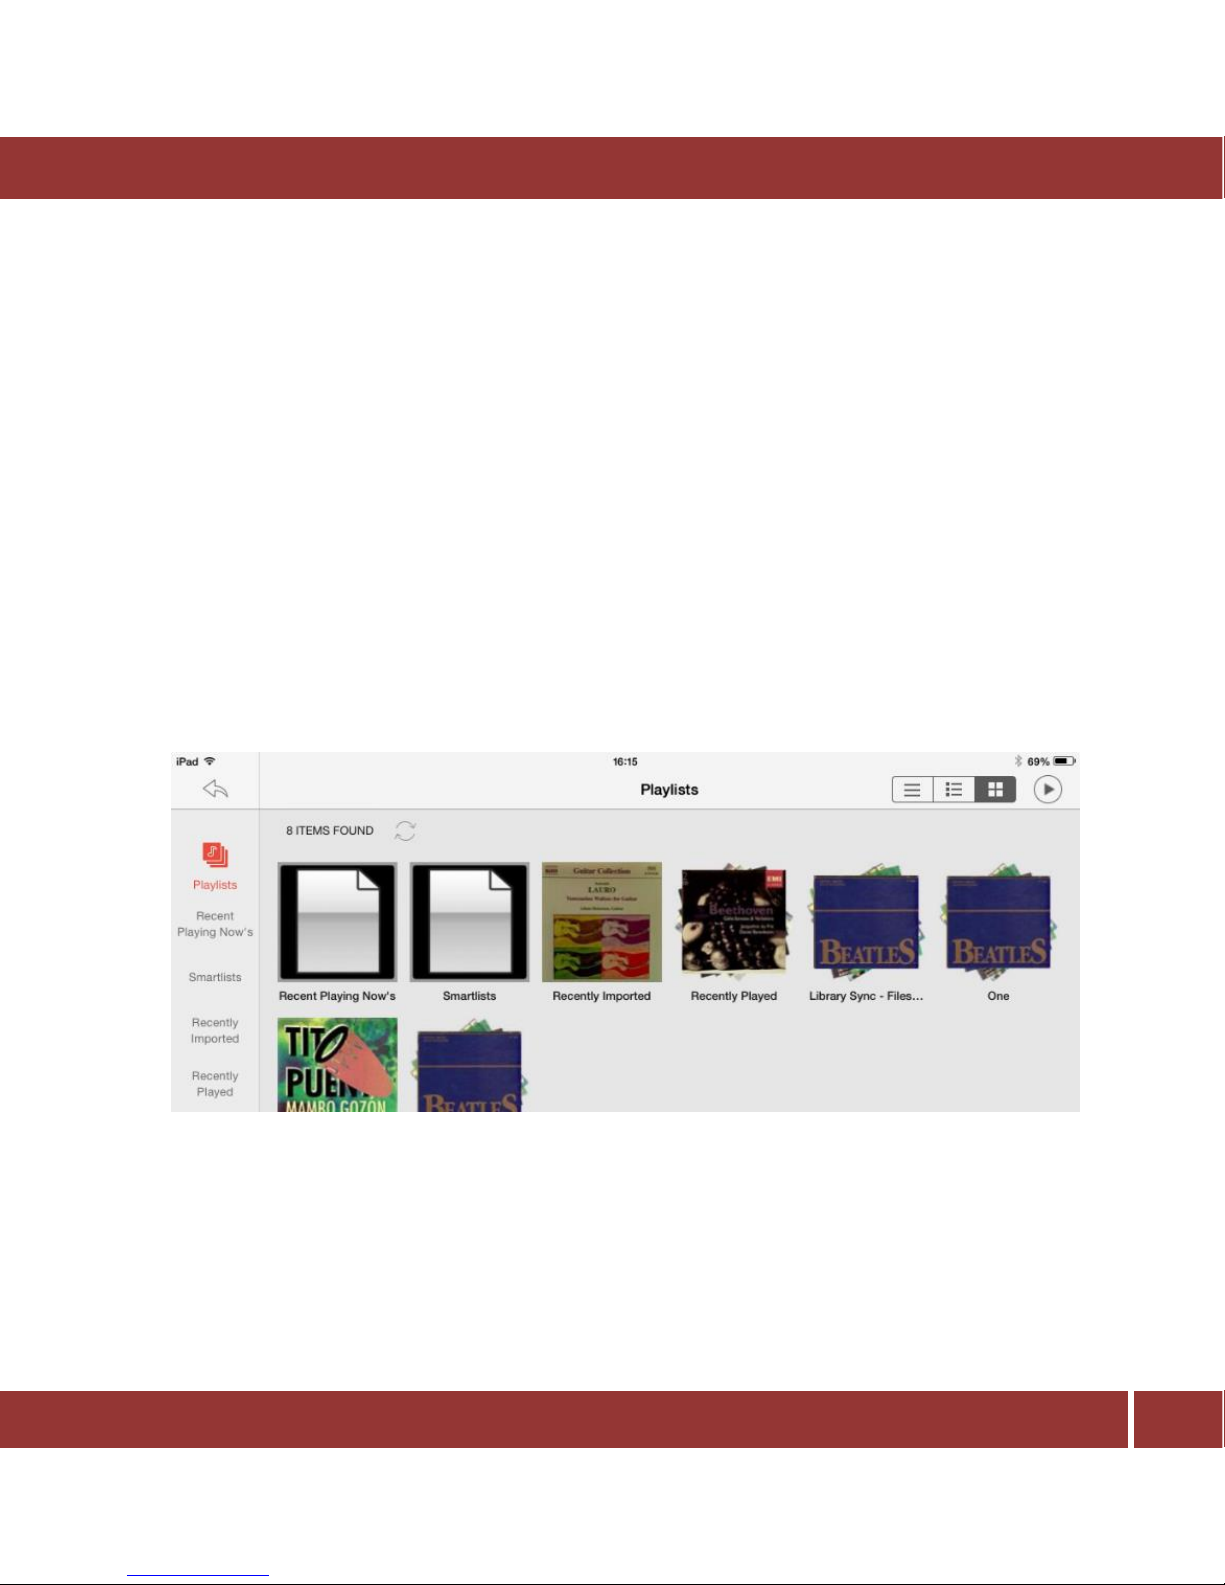
Go to the home screen and select Playlists, you’ll notice four icons named “Recent Playing Now’s”,
“Smartlists” ,”Recently Played” and “Recently Imported”
Recent Playing Now’s is self-explanatory, you can see there the albums/tracks you have recently played
back while the aria server and the control app remain turned ON. Please tap on any album/track to
playback after you’ve selected the time action icon.
Page 31
DigiBit | Asura 81, 28043 Madrid (SPAIN) | www.digibit.es
31
aria mini | User Manual
Recent Played is self-explanatory, you can see there the albums/tracks you have recently played back
even if aria server and the control app have been turned OFF. Please tap on any album/track to playback
after you’ve selected the time action icon.
Recently Imported relates to the albums/tracks you have imported (copied or linked) from external
storage devices and the ones that you’ve also ripped. Please tap on any album/track to playback after
you’ve selected the time action icon. This playlist is refreshed when you turn off-on iaria app.
Smartlists you can see two Playlists:
- 100 Random Songs. aria will pick for you 100 tracks randomly, just tap on this option to start
playing music.
- Imported this month. This is a file that shows you the music files you’ve copied or linked or
ripped the current month. Just tap on one them to start playing music.
Custom Playlist
aria allows you to create your own playlists and immediately listen, save, edit and delete them.
How to create a playlist:
You can do it adding tracks to a playlist, or adding albums:
- How to create a playlist adding albums:
You can select the album from any of the Views category: Albums, Genre, Period, etc.
Page 32
DigiBit | Asura 81, 28043 Madrid (SPAIN) | www.digibit.es
32
aria mini | User Manual
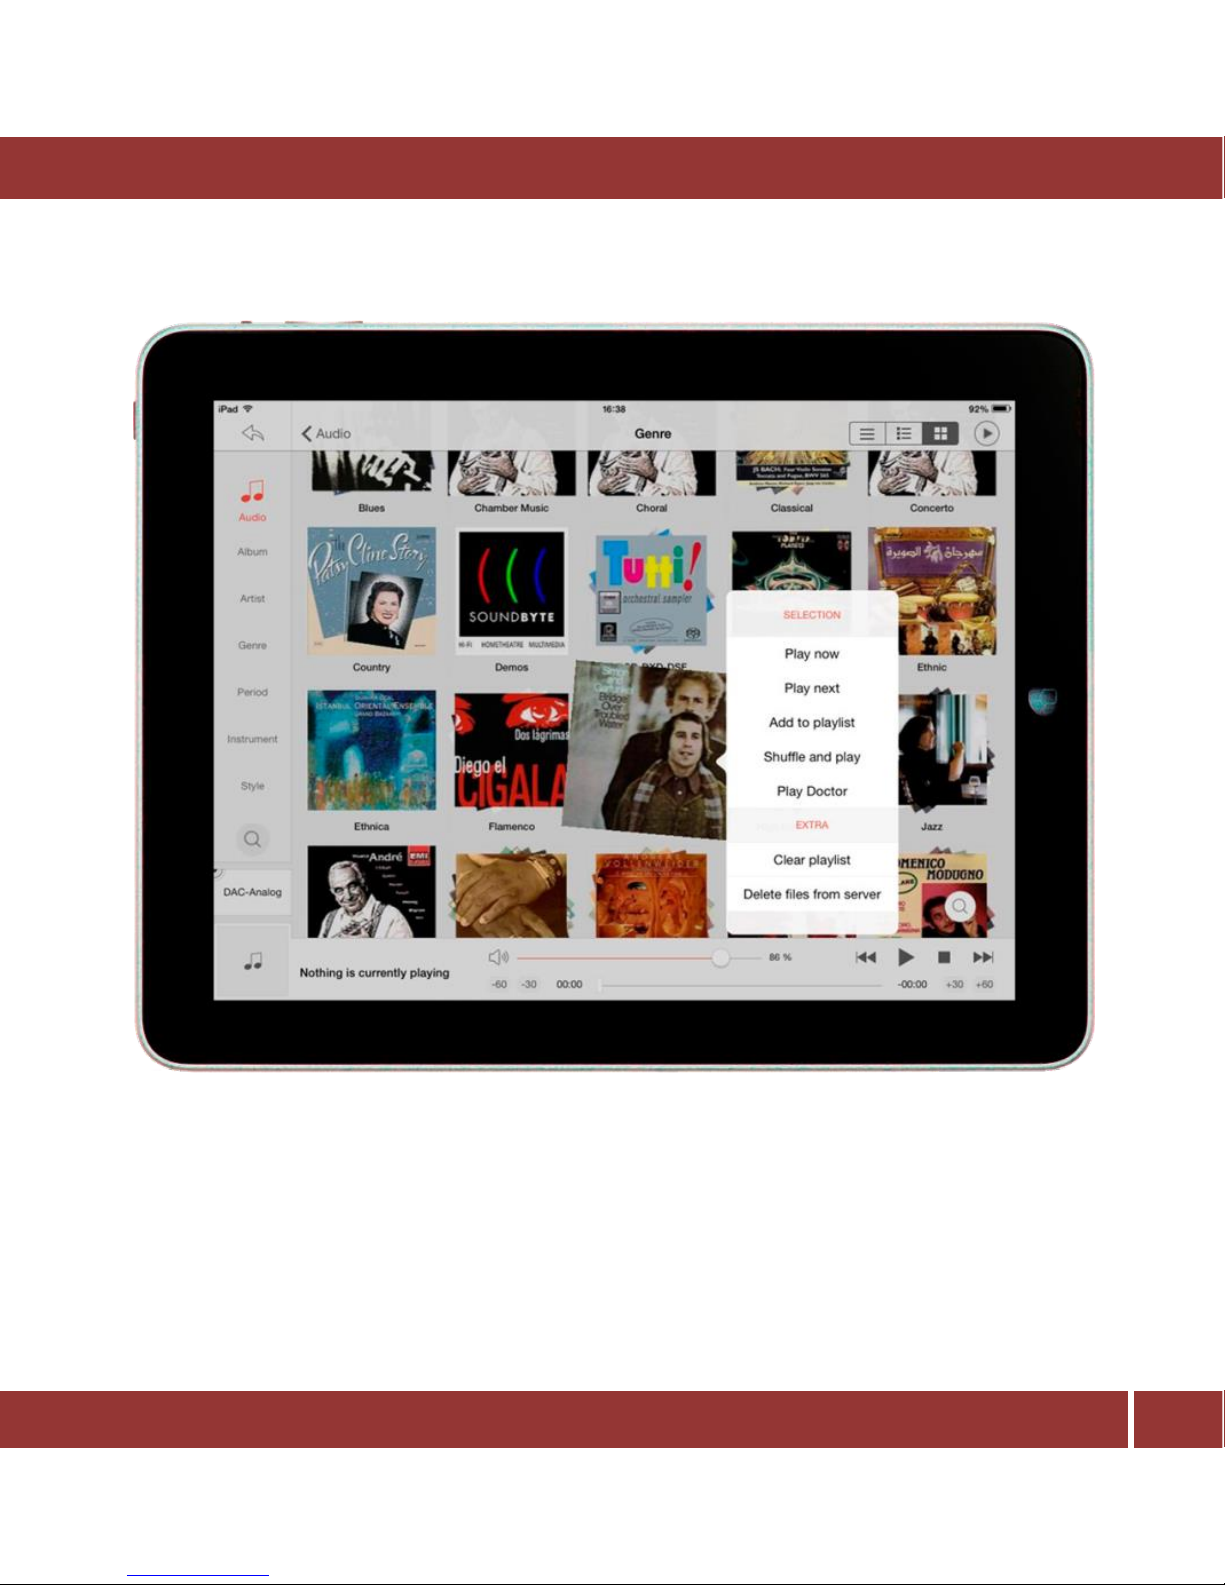
Just hold your finger on the album cover until a popup menu is displayed (see below)
Select “Add to playlist”
Pick other albums you wish to add to the playlist and tap again “Add to playlist”. Then go to the
“Playing now” screen and you´ll see the selected albums for the playlist that will be playing.
If you want to save the Playlist for future playback, tap on the ( S ) button and you´wll see a new
Popup menu.
Page 33
DigiBit | Asura 81, 28043 Madrid (SPAIN) | www.digibit.es
33
aria mini | User Manual
That will show you in a folder mode all the playlists you have in the aria server.
If you want to create a new playlist, tap on the ( + ) sign and enter the name of the playlist you
Want to assign.
To use, then tap in “intro” on the iPad keyboard and the playlist is saved. You will find it in the
Playlist in the home screen main menu.
You can also replace that playlist with another you already have, in that case tap in any other
Playlist that you´ve created in the past and it´ll be saved with the old name you had for the one
being replaced.
- How to create a playlist with tracks and albums
The procedure it’s the same but in this case you need to select the albums and then open the
albums to pick the tracks you want to add as tracks to the playlist.
How to load a playlist:
The button ( L ) in the Playing Now screen allows you to quickly access the playlists saved, and the
automatic ones created. This has been explained on “Playing now´s screen: Save and Load playlist”
How to modify a playlist:
You may want to delete or add tracks/albums from a given playlist. Pls. follow this procedure:
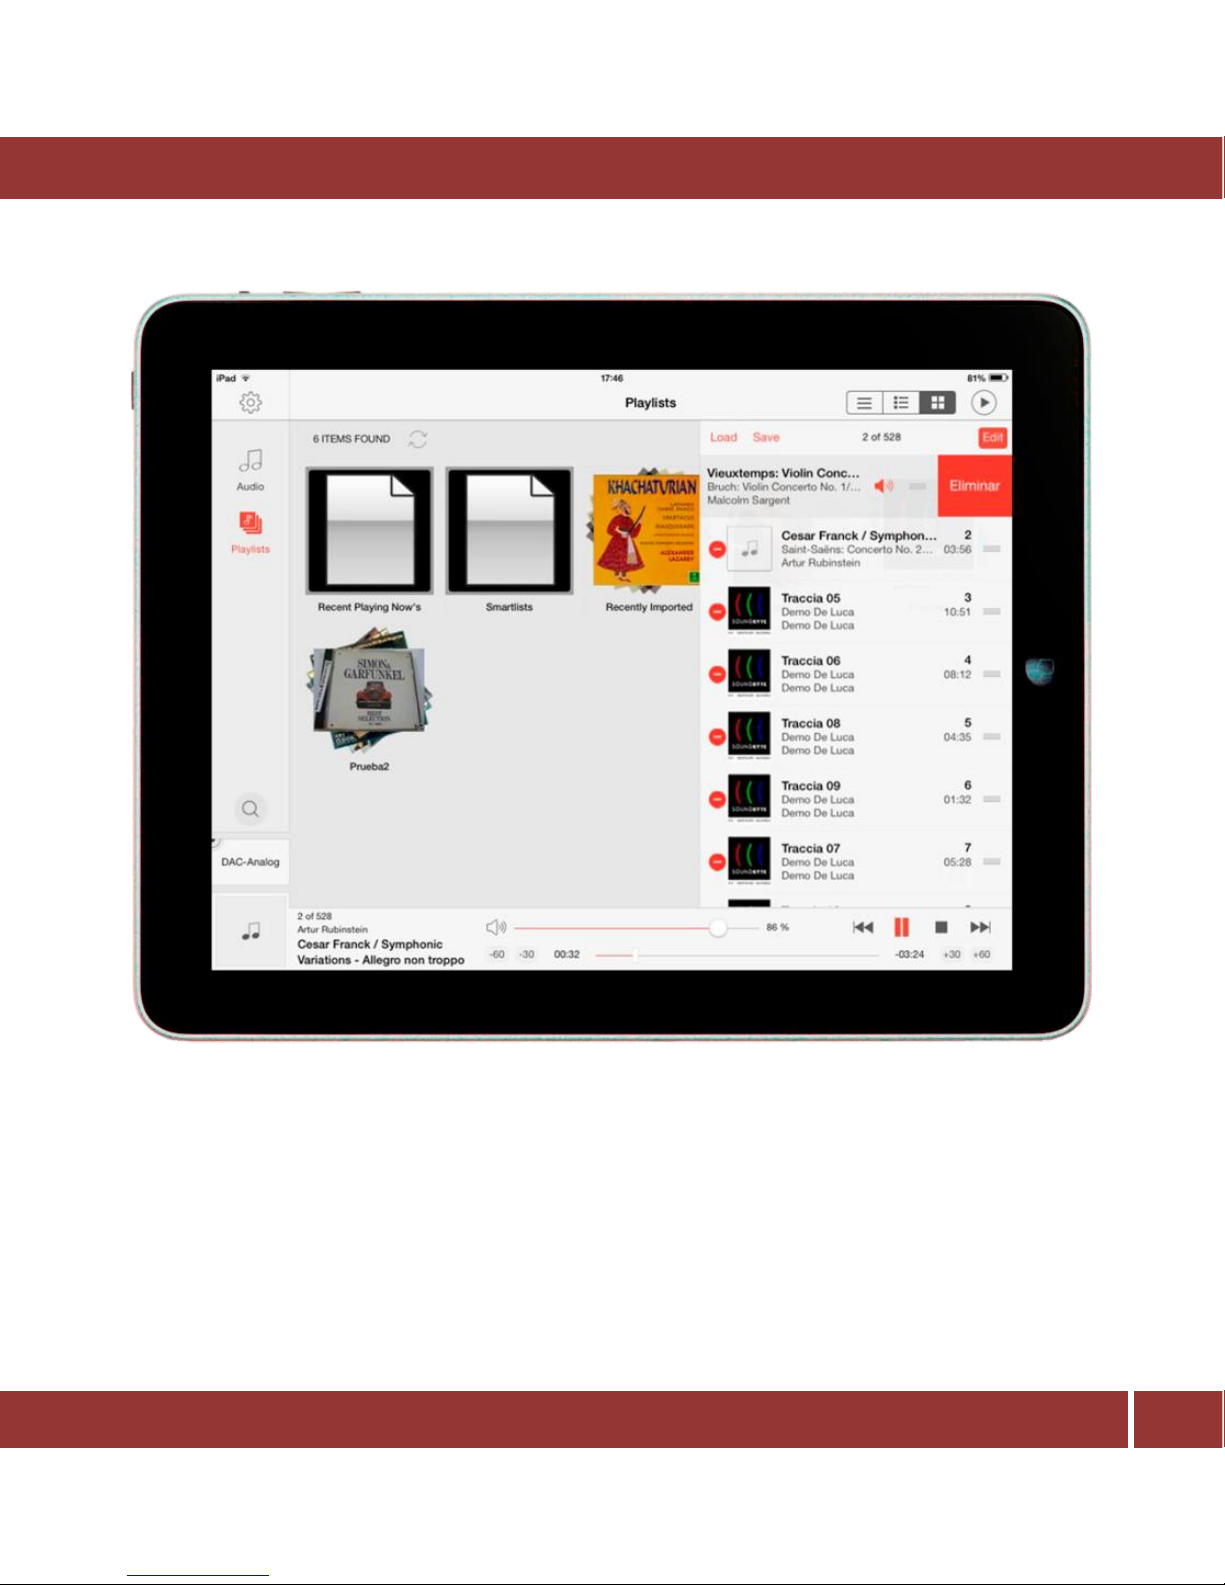
- To delete a track:
Swipe your finger from the right of the iPad to the left and a new window will open with all the
tracks saved, look for the one you want to delete and the tap on “Edit” and then tap on
“delete”. Swipe that window from the left side to right side to hide it.
Page 34
DigiBit | Asura 81, 28043 Madrid (SPAIN) | www.digibit.es
34
aria mini | User Manual
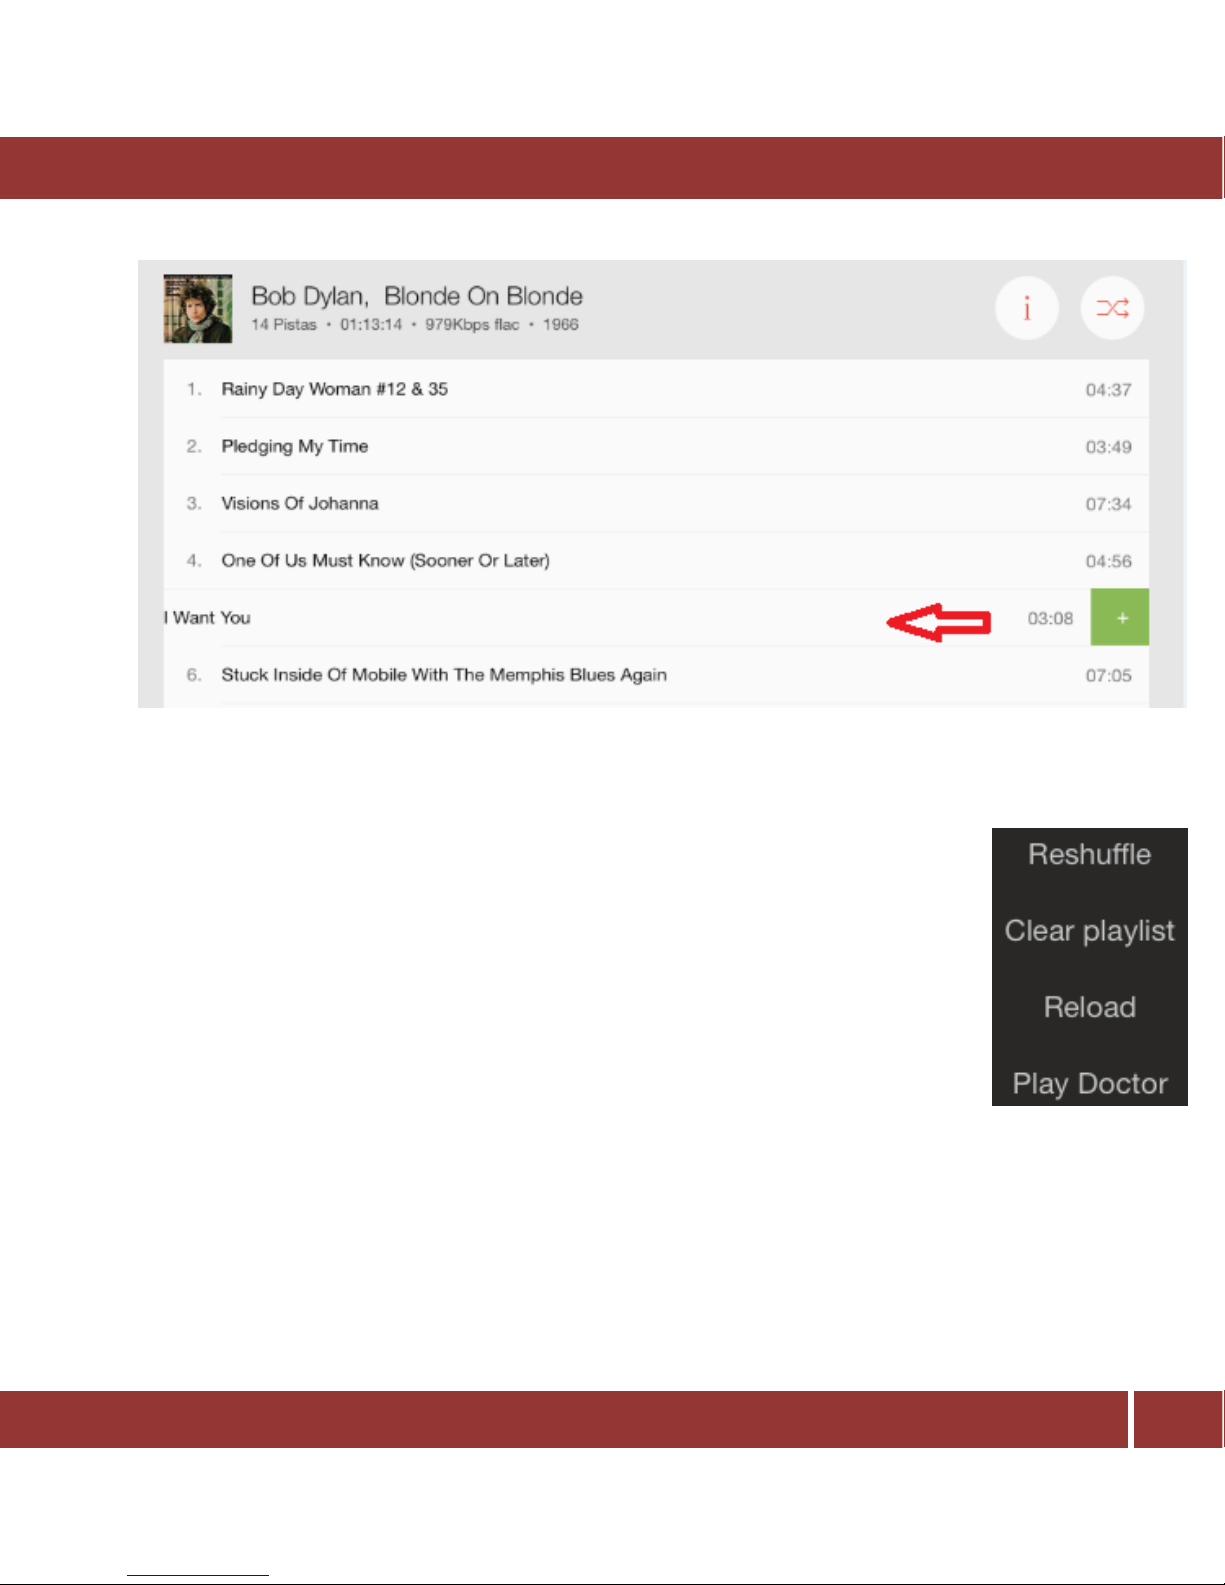
- To add a track to a playlist:
To add a track, first select the playlist to modify. Then go back to the music menu and select an
album. Just slide the track to the left and a ‘+’ symbol will appear.
Page 35
DigiBit | Asura 81, 28043 Madrid (SPAIN) | www.digibit.es
35
aria mini | User Manual
After you press the ‘+’ symbol, a list with all your playlists will appear. Select the playlist, and the
track will be added to the bottom of it.
Important: If you want to preserve the changes in the playlist after edit will be
necessary to save the playlist with the same name.
- To clear a playlist:
If you want to clear the active playlist in the Playing Now screen, tap on the
“Action” menu and a popup menu will open, tap on “Clear Playlist” and the
playlist will stop playing. The other menus: “Reshuffle”, Reload” are self-
explanatory.
Page 36
DigiBit | Asura 81, 28043 Madrid (SPAIN) | www.digibit.es
36
aria mini | User Manual
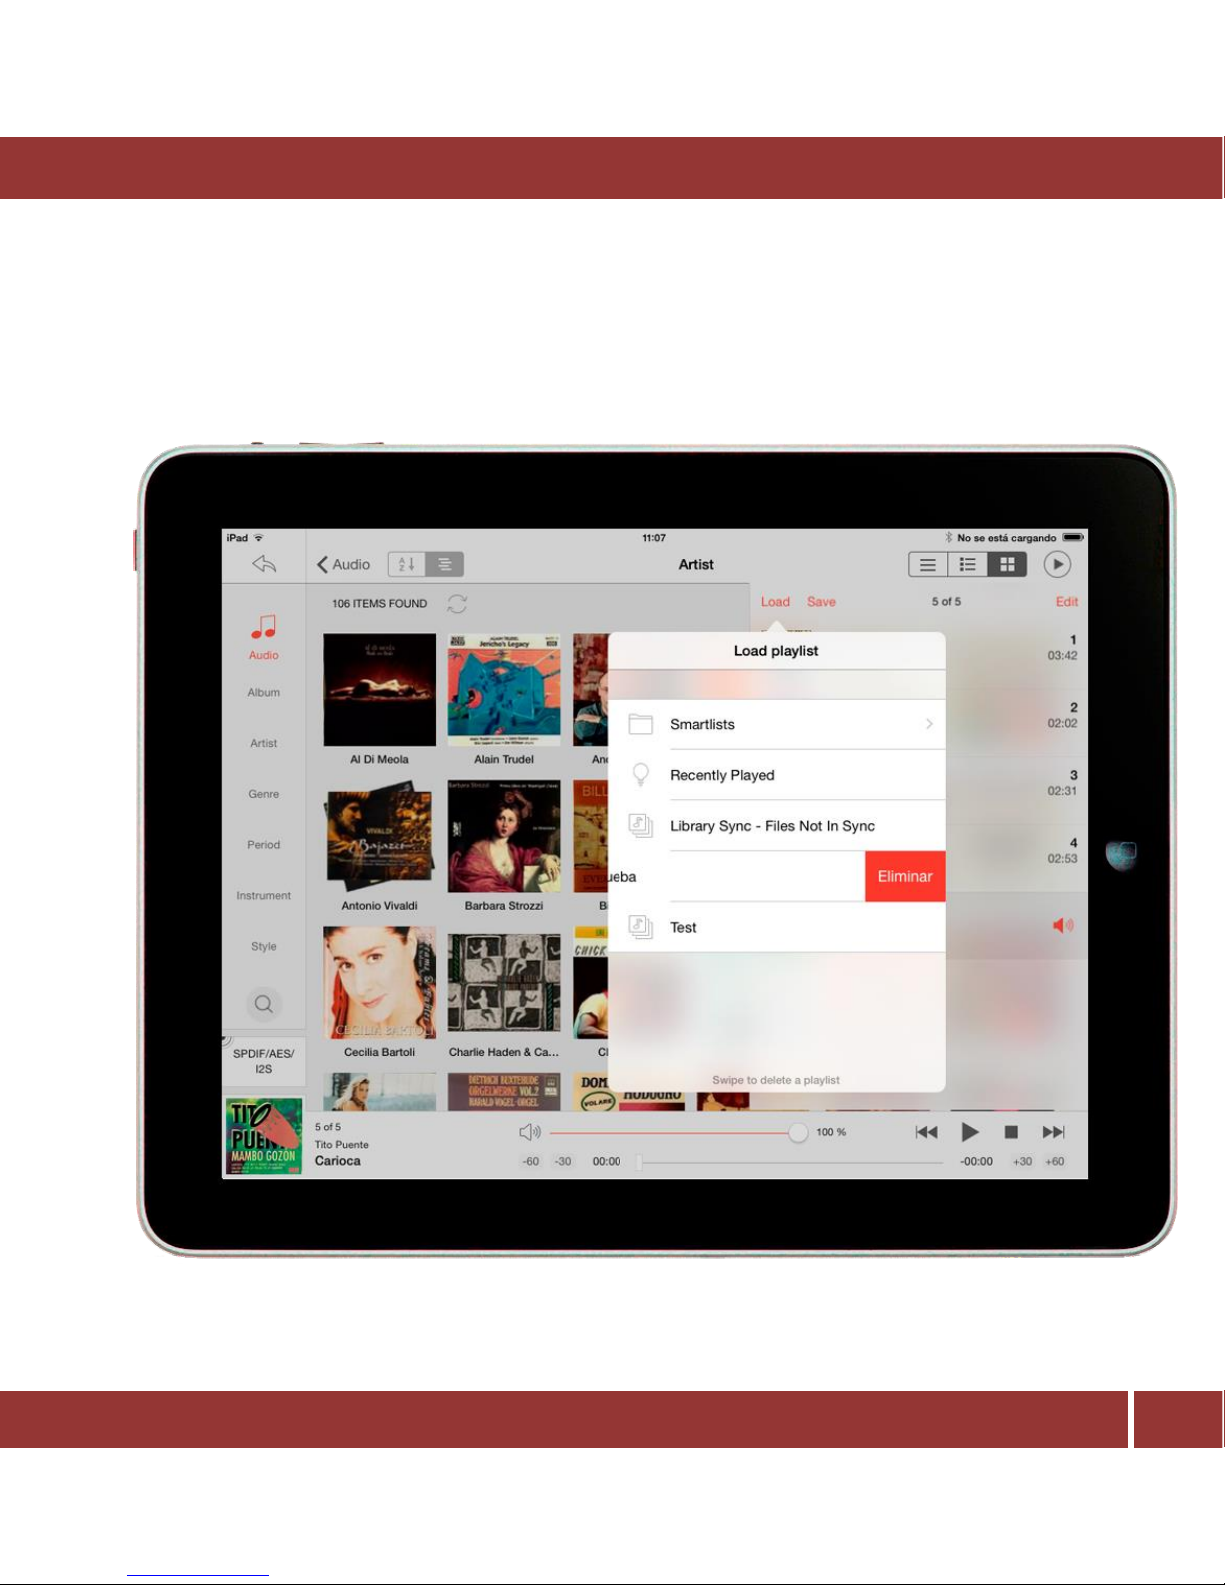
- To delete a playlist:
There are two ways:
From the audio menu, swipe left, tap Load and slide to the left the playlist you want delete. A
Delete button will appear.
Page 37
DigiBit | Asura 81, 28043 Madrid (SPAIN) | www.digibit.es
37
aria mini | User Manual
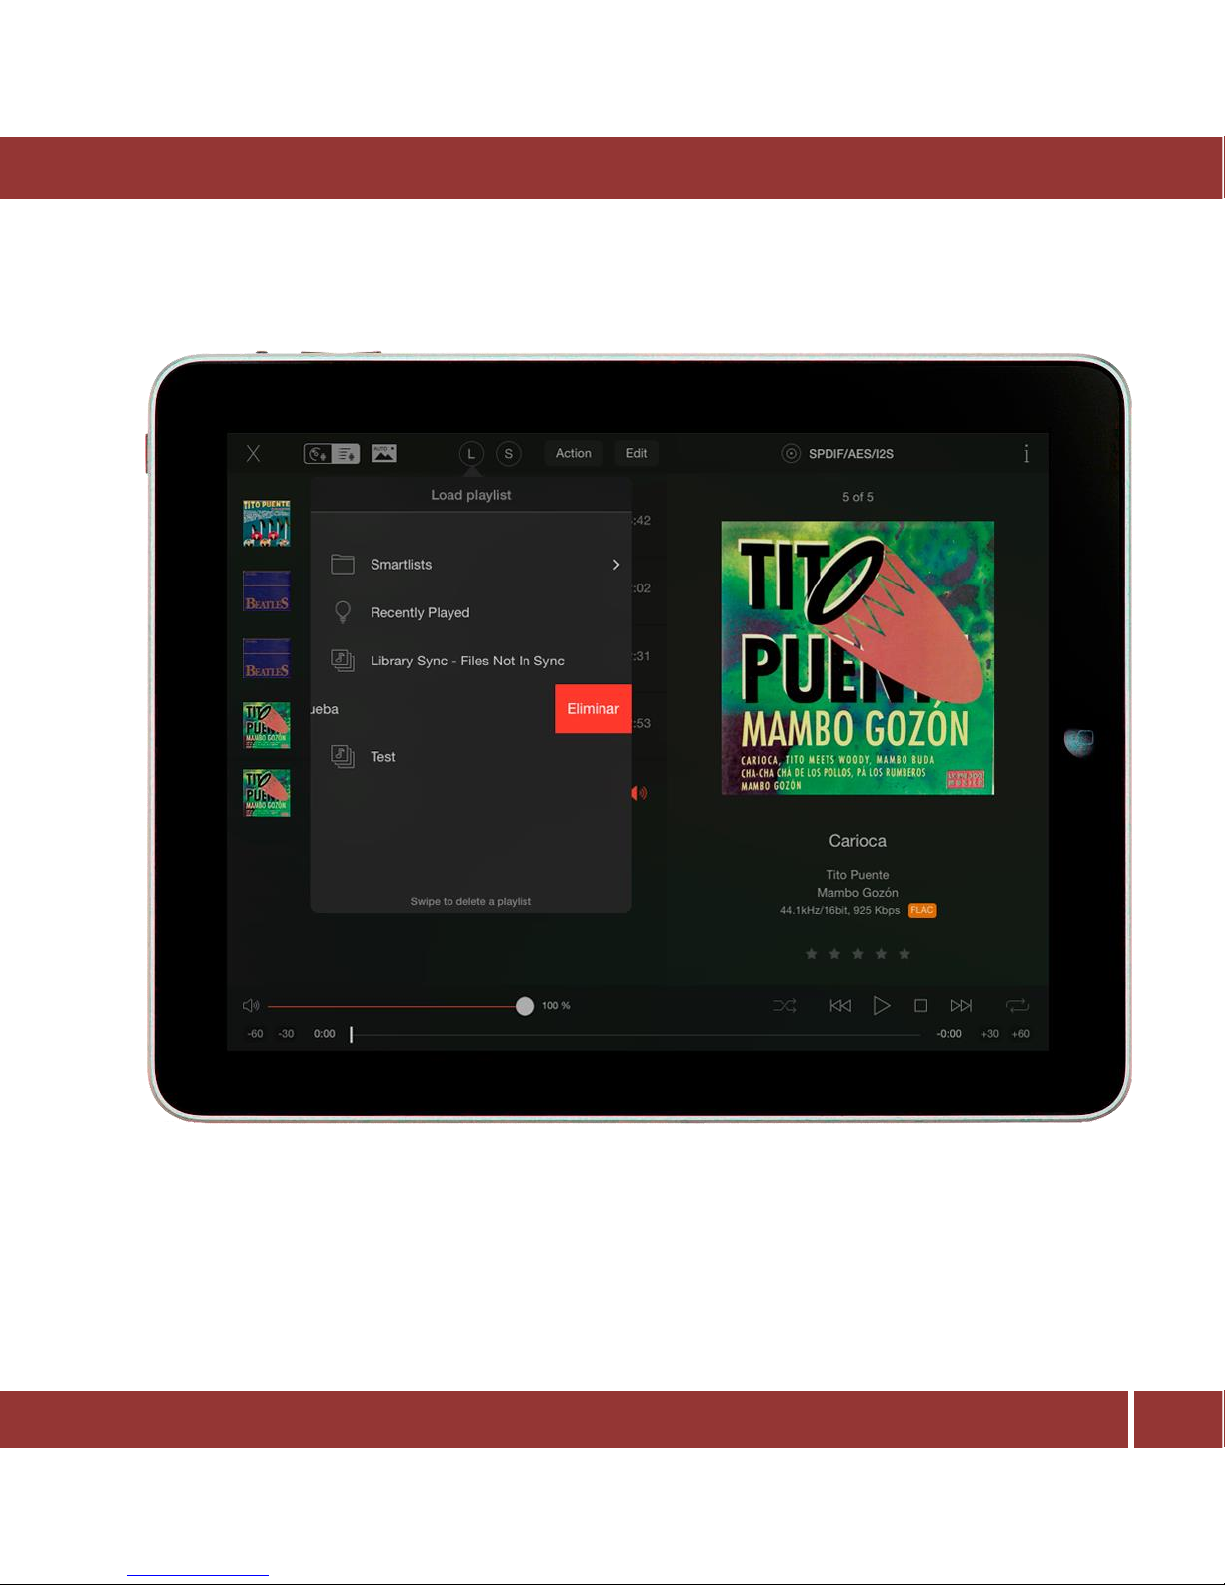
The second way is from the Playing Now screen: Select Load ( L ), and slide to the left the playlist to
delete. A Delete button will appear.
Page 38
DigiBit | Asura 81, 28043 Madrid (SPAIN) | www.digibit.es
38
aria mini | User Manual
9 LINKING MUSIC ZONES
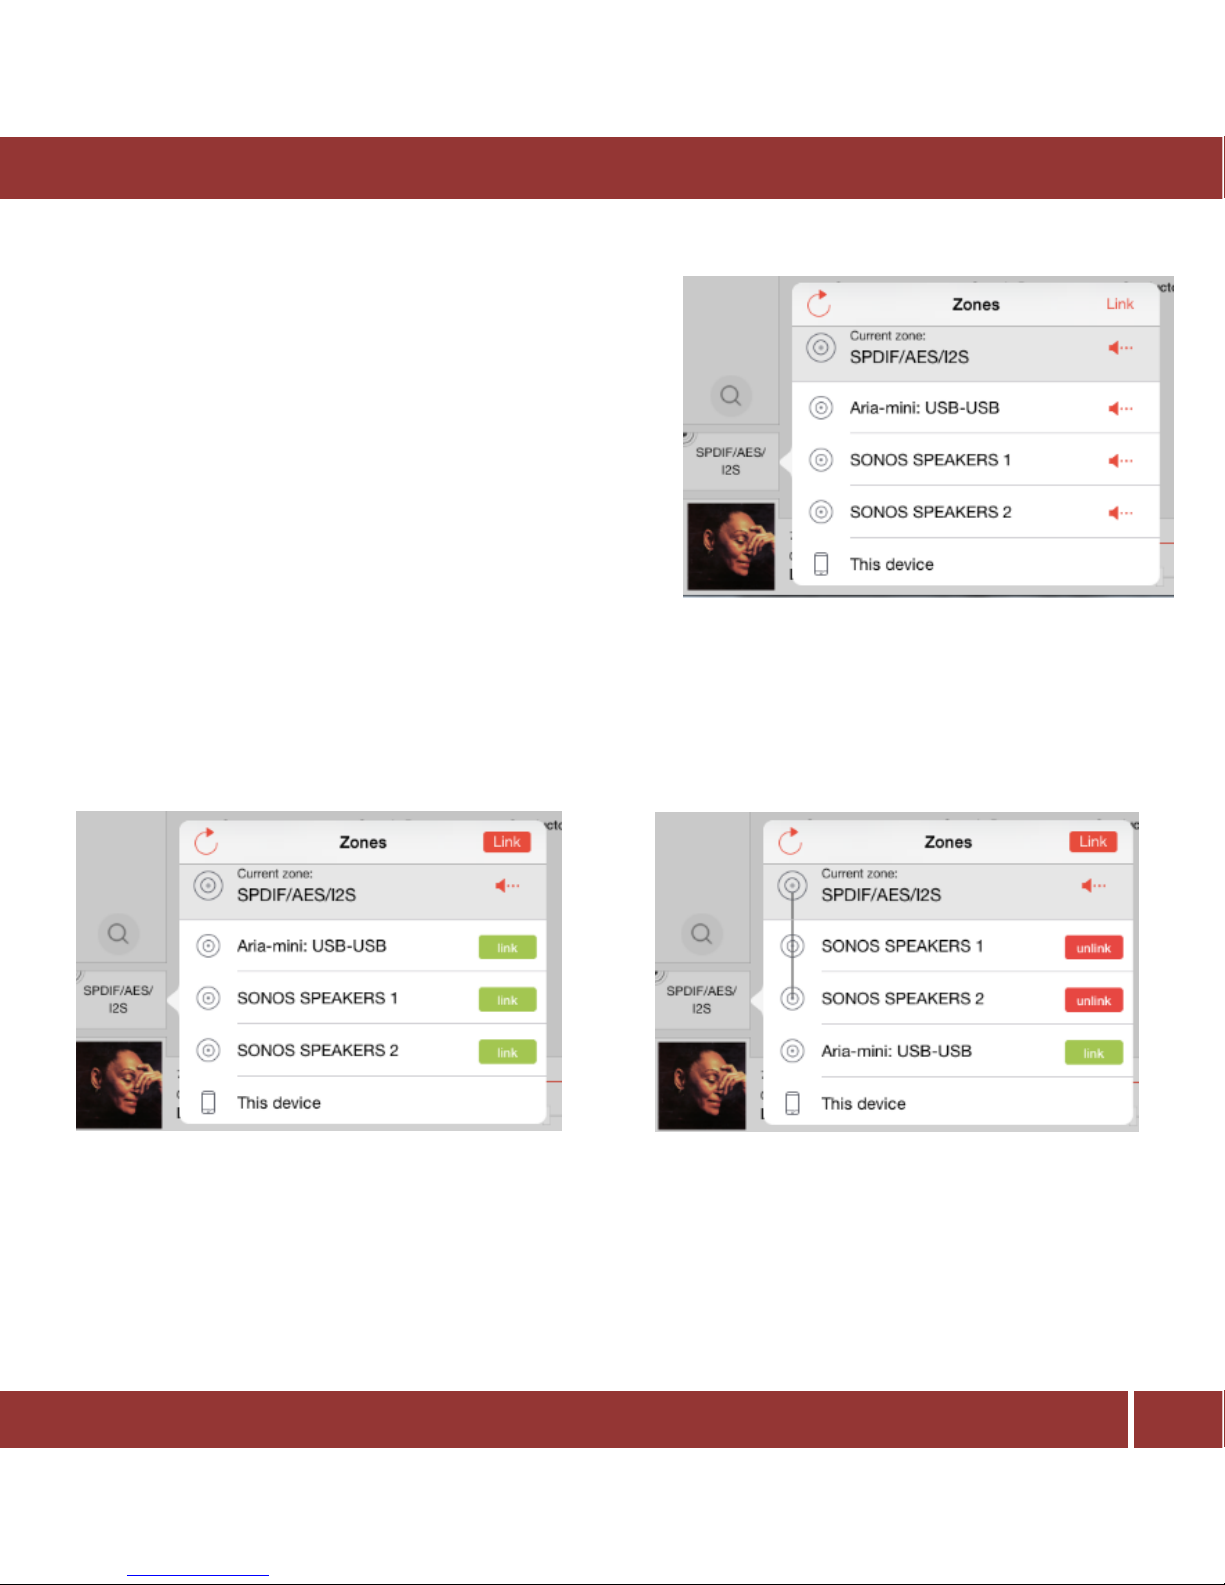
The aria server has the feature to play the same music in
several zones at the same time. That will allow you to
listen the same music by several of your music devices.
In the iaria app press the ‘zones’ button where you will
see a list the music output devices,
Important: Please, make sure that all the devices are
connected in the same local network.
Press the ‘Link’ button and select the devices where you want play the music,
To deselect them press the ‘unlink’ button
Page 39
DigiBit | Asura 81, 28043 Madrid (SPAIN) | www.digibit.es
39
aria mini | User Manual
10 DELETE MUSIC AND REMOVE LINKED DEVICES
To delete music using the iaria app just press and hold on the selection to delete and select delete from
HDD. A message will appear once the files are deleted. After that, the application will take a few minutes
to no longer show the cover art in the iaria app.
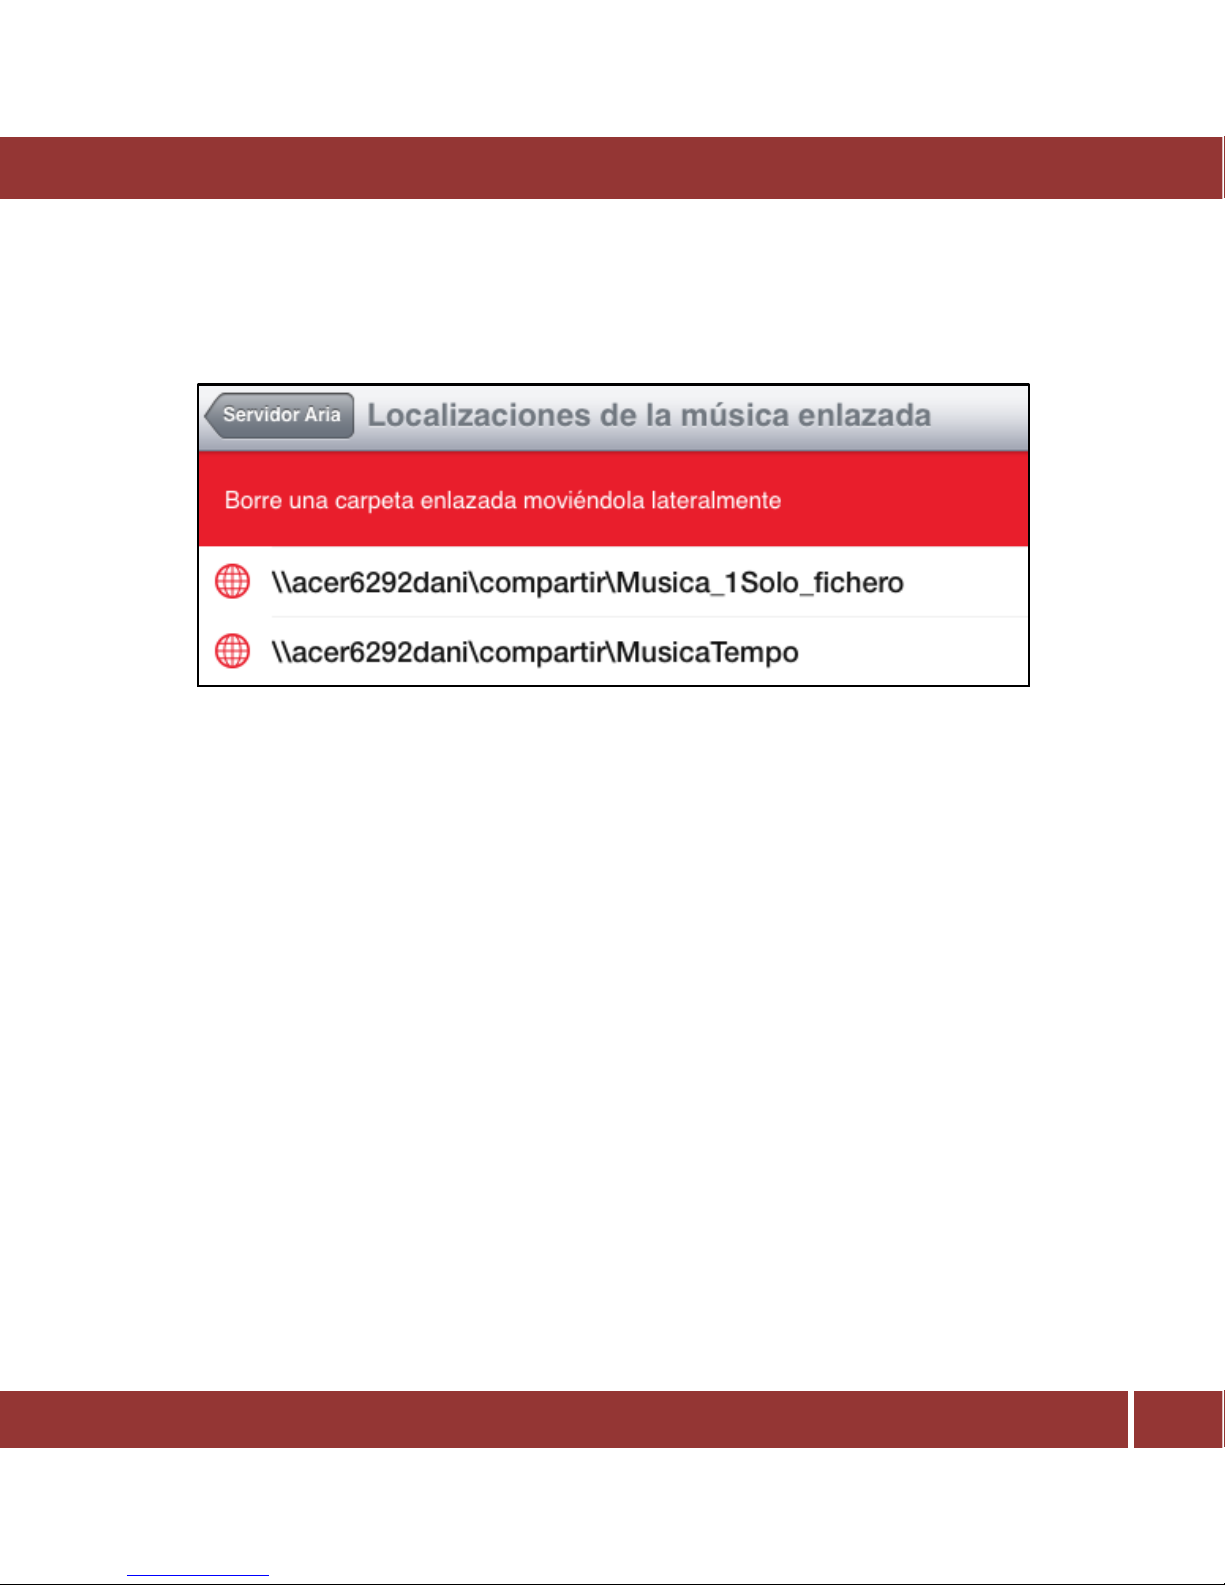
If you have linked a USB or network device and it is not going to be available any more, we recommend
that you remove this connection.
Page 40
DigiBit | Asura 81, 28043 Madrid (SPAIN) | www.digibit.es
40
aria mini | User Manual
To do it, go to Settings -> Manage Server and select Linked Music locations. The app will show the linked
folders. Just select the folder you want remove and tap the delete button
11 BACKUP YOUR MUSIC FILES
It is highly recommended to save your imported music regularly to an external USB hard disk.
The backup feature copies all the music on the internal aria hard disc drive (If so equipped), to an external
USB device
Insert a USB device (like an external HDD) to the USB input labeled as HDD on the rear panel.
Run the iaria application in your iPad.
Go to Settings menu.
Press on Manage Server.
In the new window, you will see a bar in the top. Take a look at the hard disc space used (blue area)
and be sure that the USB device connected to the aria has an equal amount or more free space
available than this size.
Press ‘Create a backup’ and confirm.
The system will copy the music stored on the internal aria hard disk on to the external USB device.
Page 41
DigiBit | Asura 81, 28043 Madrid (SPAIN) | www.digibit.es
41
aria mini | User Manual
12 FAQs
Q: How can I import missing cover art?
A: Sometimes after ripping a CD, the cover art is not downloaded from the Internet or the quality is not
good enough. At this moment it is not possible add a cover art using the iPad iaria application, but this can
be done using a third party application. We recommend Mp3Tag, which is free, multilanguage, available
on the internet and easy to use. With this application you’ll be able to add the cover art.
In ¡Error! No se encuentra el origen de la referencia. You can find instructions about how to use this
application.
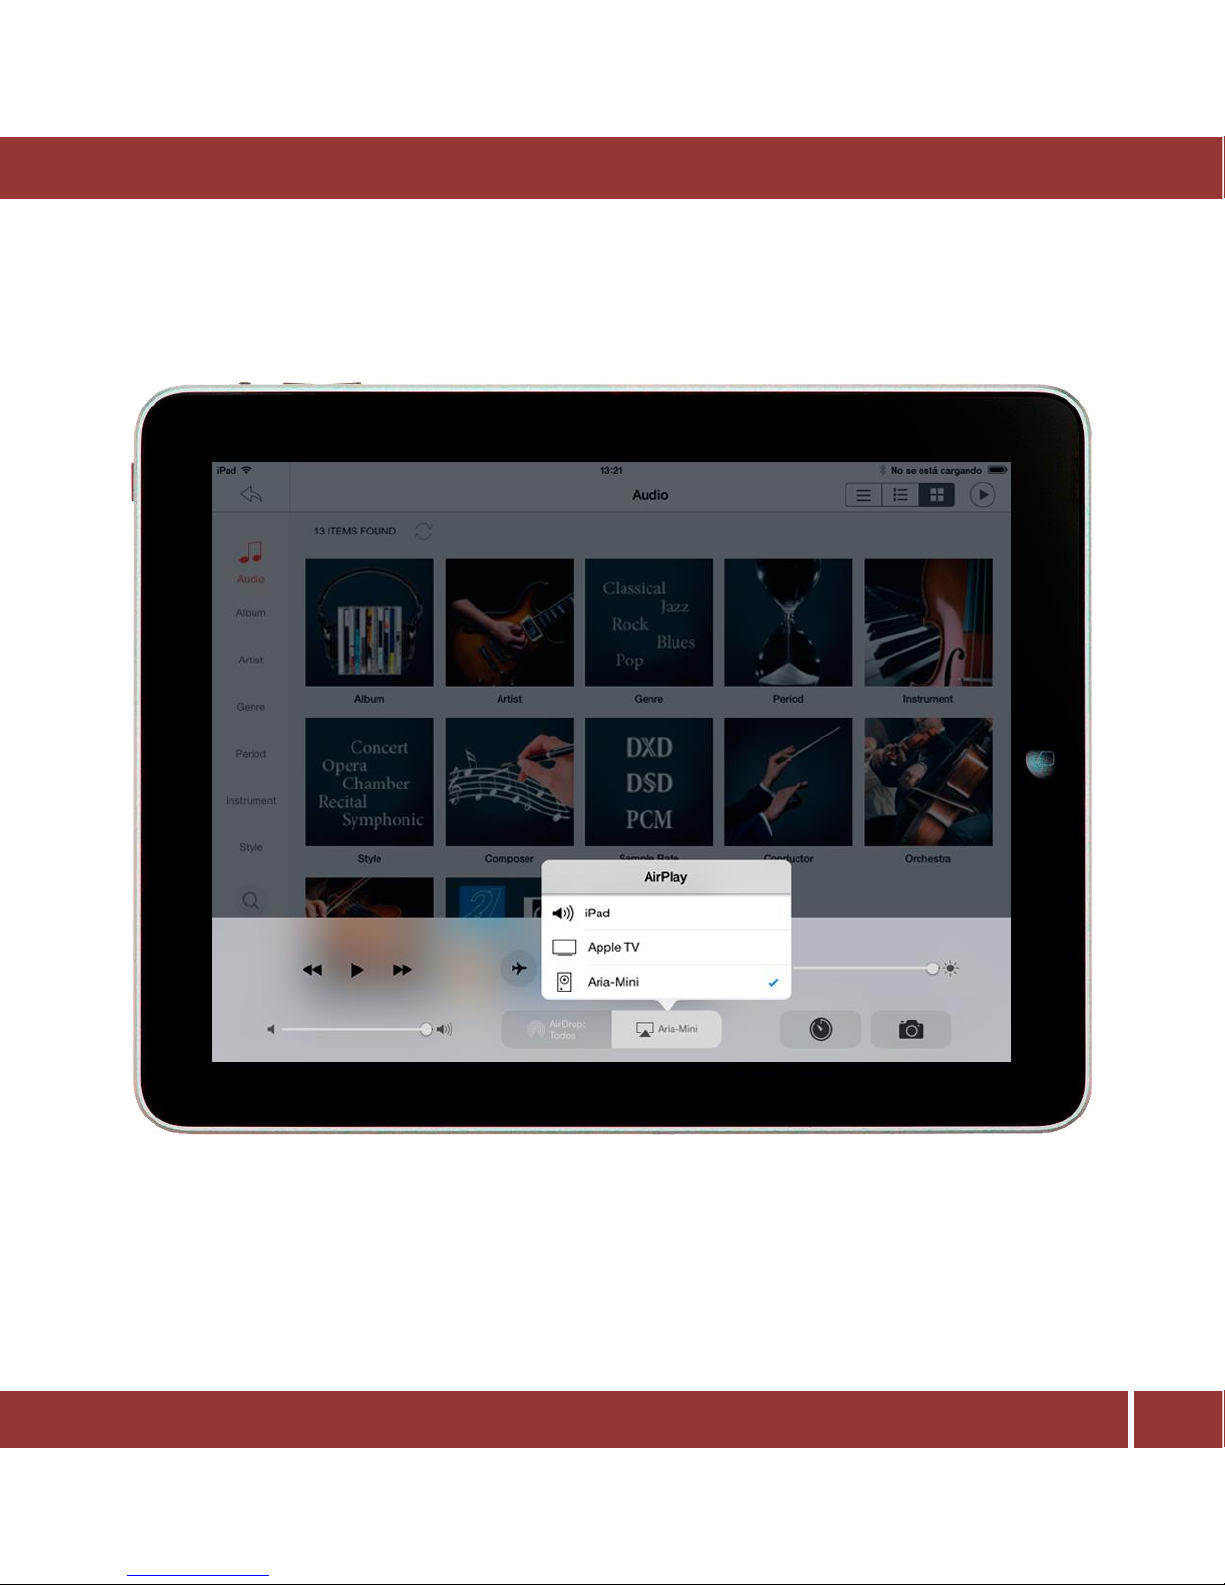
Q: How can I stream music from aria to AirPlay
compatible devices?
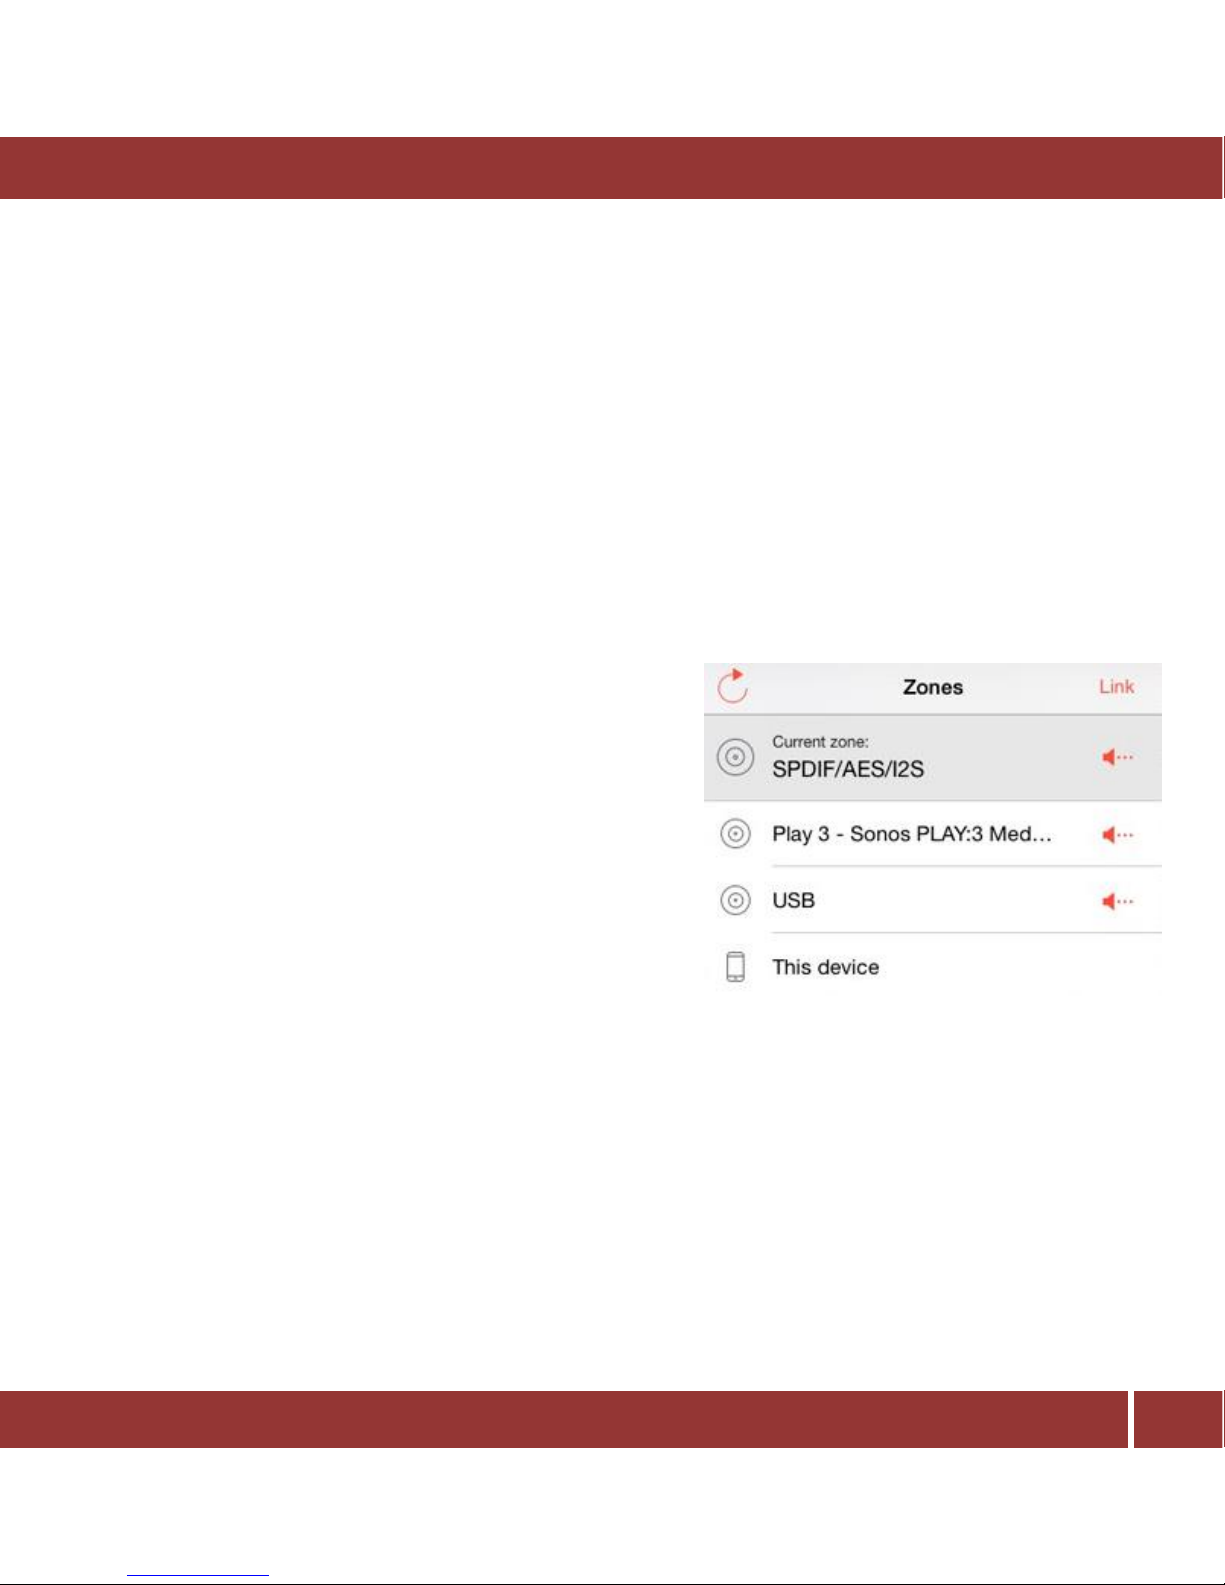
A: First select the ‘This device’ zone in the iaria application
from the zone option menu located on the lower left side
of your application screen.
You should see the Airplay device with its name:
Page 42
DigiBit | Asura 81, 28043 Madrid (SPAIN) | www.digibit.es
42
aria mini | User Manual
Then, exit from the iaria application and go to main iPad screen by tapping on the main iPad button.
Slide your finger from the button to the top. This will show a menu at the bottom of the screen
Move this menu to the left and press the AirPlay button.
Page 43
DigiBit | Asura 81, 28043 Madrid (SPAIN) | www.digibit.es
43
aria mini | User Manual
Q: How can I copy the ripped music to any other computer?
A: The ripped music is stored in a shared folder accessible from other computers in your local area
network.
From a computer that is on your network and running Windows, click in the Windows start button.
In the new popup message, introduce these credentials:
Username: \guest
Password: <leave the password empty>
A new windows explorer screen will appear showing the aria shared folder. The music is stored in Music1
folder.
Q: Why I can’t modify the volume when a DSD file is played?
A: The control of playback volume in an audio DSD file can be done only from the amplifier or the external
DAC. It is not possible do it using the iaria player because DSD has a fixed audio output level.
Page 44
DigiBit | Asura 81, 28043 Madrid (SPAIN) | www.digibit.es
44
aria mini | User Manual
13 Appendix A: How can I play multichannel music with aria
The aria music server also supports multichannel audio, to play multichannel PCM and DSD music files
some settings have to be preselected by your installer/dealer inside the application.
You will also need a multichannel capable DAC and install the Windows ASIO driver for it in to your aria.
There are currently very few multichannel DACs in the market but tests have successfully been done with
exaSound e28 DAC. For details please see: http://exasound.com/e28/Overview.aspx.
The multichannel DAC has to be connected to the aria’s USB audio output.
Excellent recordings in true hi-res are available from several music labels (a list at www.audiostream.com )
but here´re a few good ones: 2L, Itrax, Channel Classics, Blues Coast Records, etc.
14 APPENDIX B: How to automatically add missing covers: PerfecTunes
When you rip a CD with the aria ripper, the aria music server connects to five databases from which it
usually downloads the cover art. Sometimes it is not the correct one or the quality is not very good and
you may want to modify it.
This might also happen if you have imported music from an external or networked device.
PerfectTunes is an application that will try to solve this, replacing with just one click all the missing or low
quality covert art. It also checks lossless tracks for ripping errors and removes duplicated tracks.
PerfectTunes has been developed by Illustrate, the developers of dbpoweramp.
Install PerfectTunes in a computer in the same local area network and run the PerfectTunes Control
Center.
Click in [Add Folder] and click in “Network” in the new window. The aria server should appear. Click on it.
If credentials are requested, introduce:
Page 45

DigiBit | Asura 81, 28043 Madrid (SPAIN) | www.digibit.es
45
aria mini | User Manual
User: \guest
Password: <leave the password empty>
Page 46
DigiBit | Asura 81, 28043 Madrid (SPAIN) | www.digibit.es
46
aria mini | User Manual
15 APPENDIX C: How to edit the metadata in your library from an external PC
When you rip a CD with the aria ripper, your aria music server connects itself to several databases from
which collects information from the disk such as song titles, cover, artist name, composer, genre, etc. This
information is known as the metadata. You can edit this information in order to complete it, correct them
or change fields that are incorrect.
As explained in the section “Editing metadata”, it is possible do some of this using the iaria application but
some things like importing cover art, must be done in an external PC
Please follow these steps:
Install MP3tag in your PC and execute it.
Go to File >> Add directory. In the next window provide the location of the music in your aria
server in the Directory field: \\aria\music1. Select the option Subdirectory and close the
Windows by clicking in Select Directory. Your music files will appear at the right of Mp3tag’s
main screen.
If a popup message appears asking for credential, use:
Username: \guest
Password: <left the password empty>
Select the tracks you want to edit, right click and select Tag
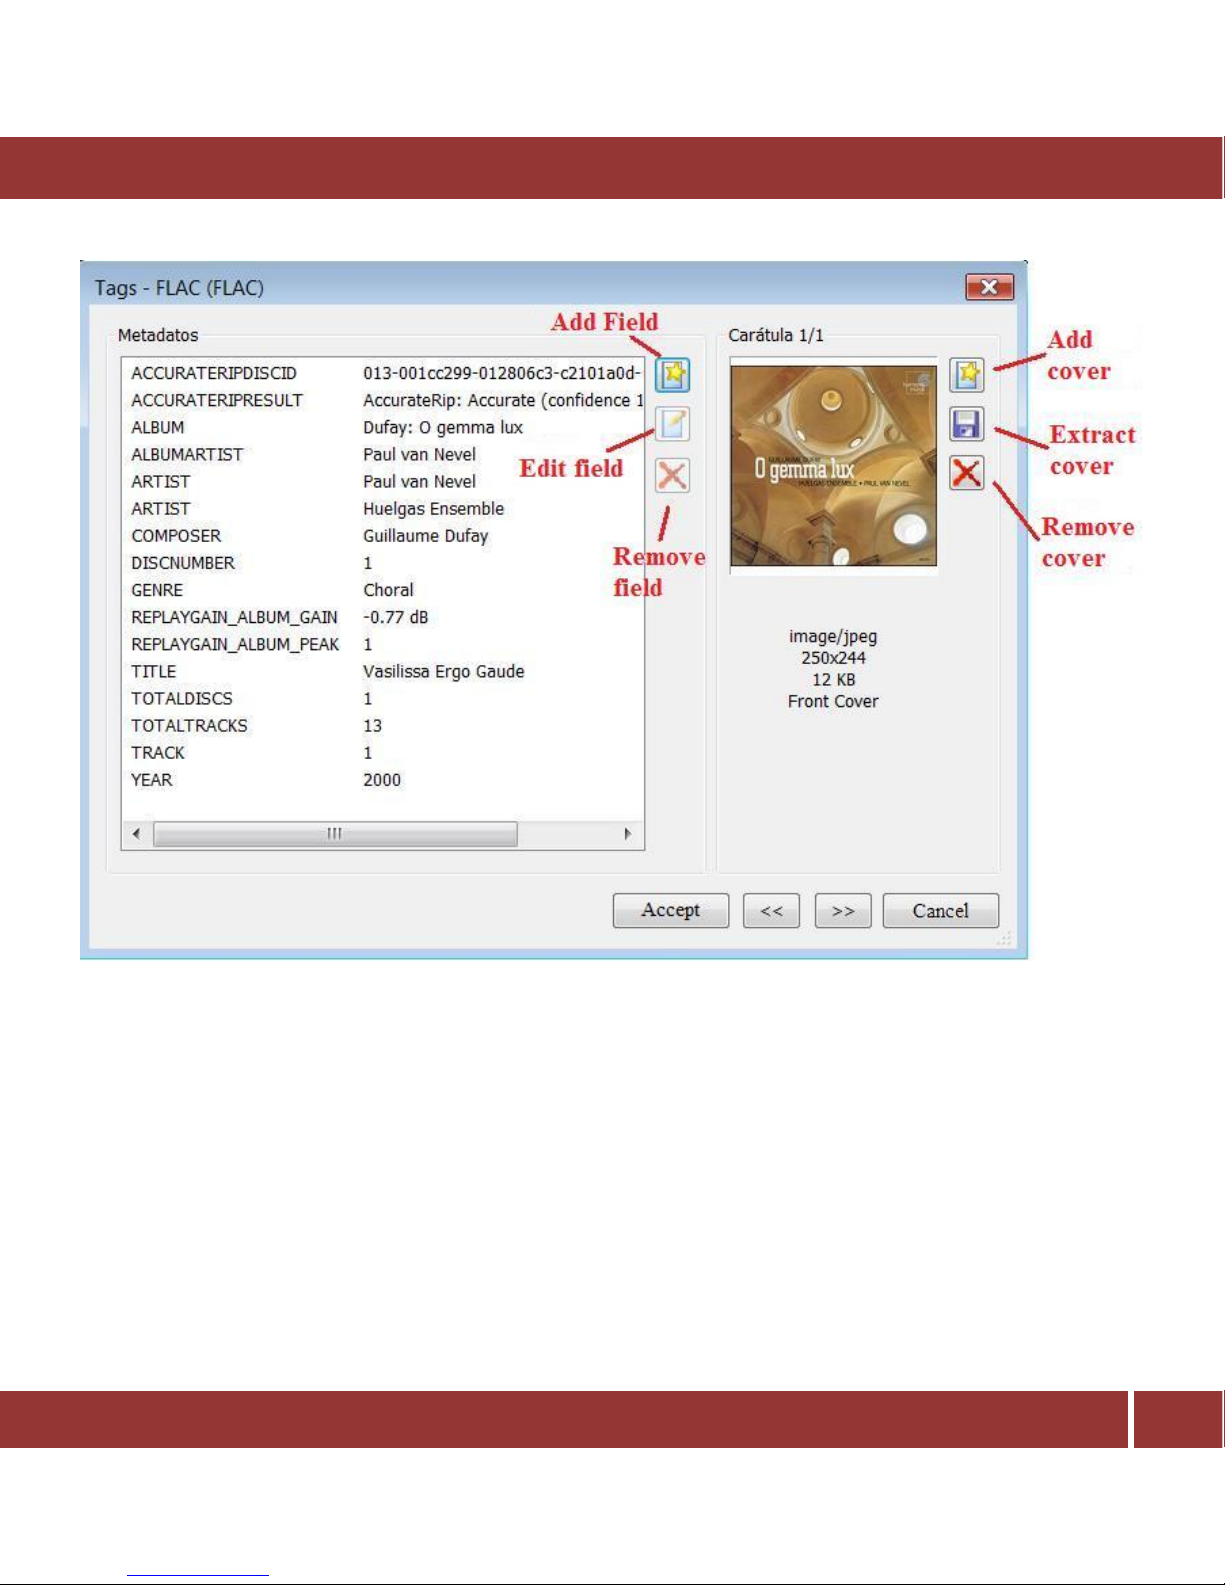
You will see several buttons to create new fields, edit the existing ones, adding a cover, etc.
Simply select and change the data in your files.
Page 47
DigiBit | Asura 81, 28043 Madrid (SPAIN) | www.digibit.es
47
aria mini | User Manual
NOTE: mp3tag is a freeware application with no connection to Digibit. That said, Digibit does not take any
responsibility for any errors that may occur within this application or any inadvertent damage it could do
to your metadata. Although Mp3tag is an excellent application, you use this application at your own risk.
Page 48
DigiBit | Asura 81, 28043 Madrid (SPAIN) | www.digibit.es
48
aria mini | User Manual
16 APPENDIX D: How to see pdf (booklets) in the metadata
To be able to use this feature you must add a pdf file in some of the folders where the aria server stores
the music.
To add the pdf file, from a computer in the same area network, run on windows “Execute” and introduce:
\\aria\Music1
User: guest
Password: <empty, no password>
You will see a list of folders with the music ripped or copied in the aria hard disk. Add the pdf to one of
them.
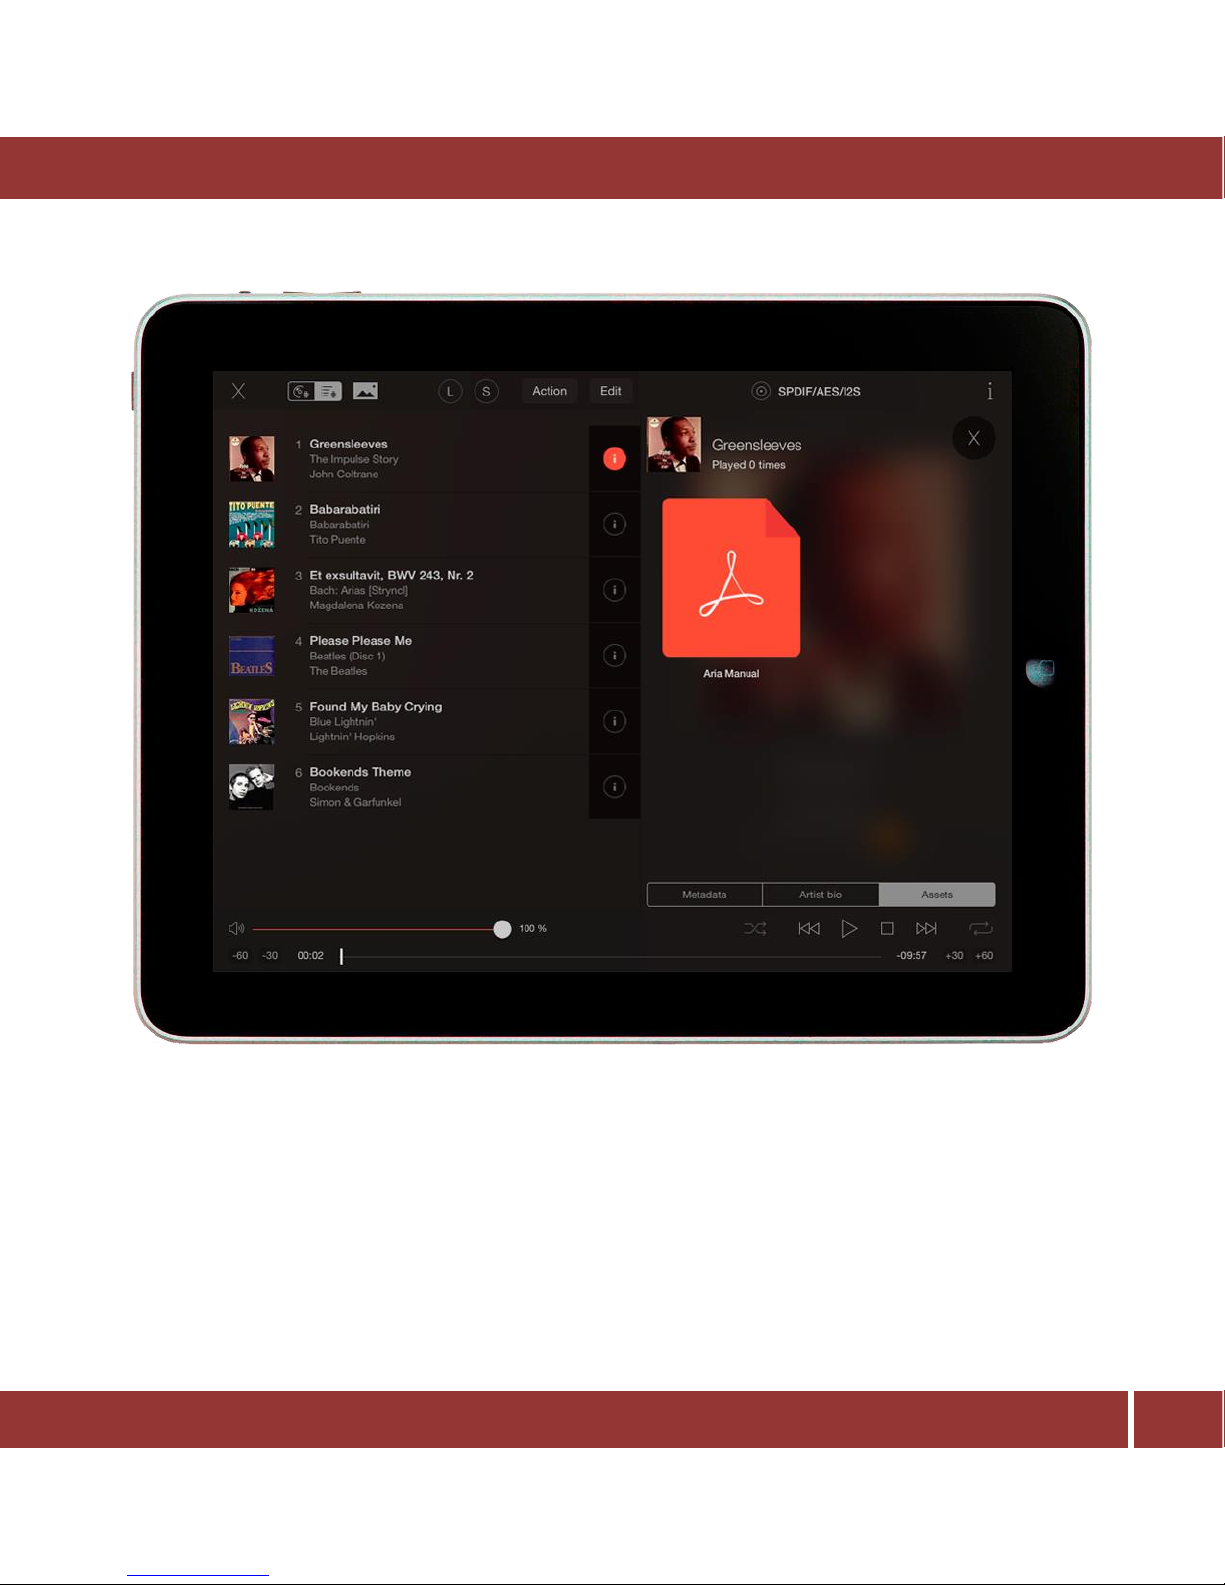
Once the pdf file is copied, open the iaria app and select the album where the pdf is.
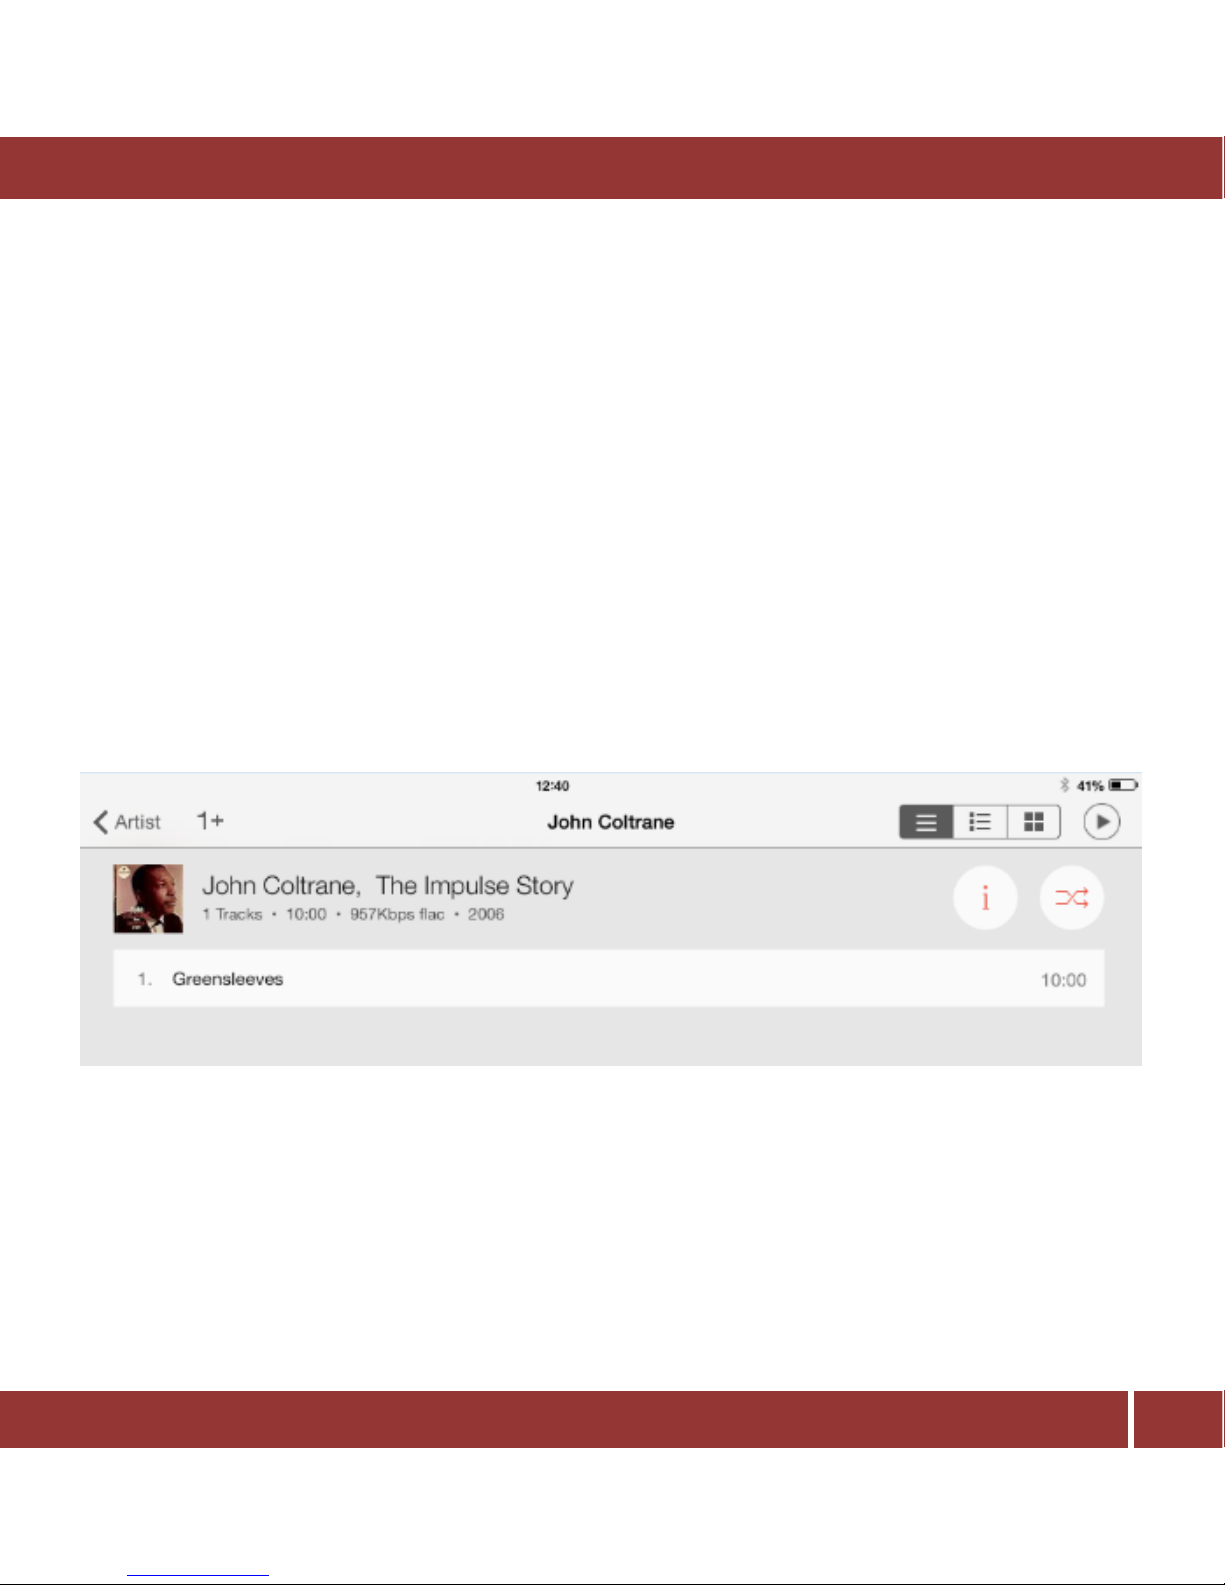
Then click on the ‘i’ button, in the upper right hand corner as shown below.
In the new screen, tap the ‘Assets’ tab. You will see a list of all the pdf files in the folder. To open a file,
just click on the file.
Page 49
DigiBit | Asura 81, 28043 Madrid (SPAIN) | www.digibit.es
49
aria mini | User Manual
17 APPENDIX E: How use the I
2
S output
INTRODUCTION
aria’s audio card is provided with an I2S output which allows for an optional low-jitter, high-quality
connection to D/A converters provided with an I2S input.
Page 50
DigiBit | Asura 81, 28043 Madrid (SPAIN) | www.digibit.es
50
aria mini | User Manual - APHENDIX
Alas, aside the signal set, no standard is provided for equipment with an I2S connection. Various voltage
standards, pin-outs and connectors are used in various D/A converters which make the connection with
aria’s audio card more difficult.
This application note focuses on signal voltage and format adaptation in order to have aria’s audio card
working with all D/A converters on their I2S input. If used, the user should be acquainted with the various
connectors and the most common voltage standards used in this application.
VOLTAGE STANDARDS AND CONNECTORS
Various standards and connectors are used for I2S inputs on D/A converters. Amongst voltage standards:
• TTL/CMOS single-ended
• TTL/CMOS differential
• LVDS
• ECL
LVDS is becoming widely used on commercial D/A converters because of its immunity to noise and
capability to drive long cable runs. TTL/CMOS single-ended is more common on DAC boards for DIY’ers.
aria’s audio card offers a simple 3.3V CMOS (5V TTL compatible) output. Amongst connectors:
RJ-45
HDMI
Strip
The HDMI connector is generally associated with LVDS format (but this is not necessarily true, so please
check specifications before assuming that LVDS levels are carried in on an HDMI connectors), while RJ-45
and the strips are more commonly used with single-ended and differential formats. aria’s audio card uses
an RJ-45, 8 pins connector with the following pinout (left to right):
Page 51
DigiBit | Asura 81, 28043 Madrid (SPAIN) | www.digibit.es
51
aria mini | User Manual - APHENDIX
1) SDATA
2) GND
3) LRCK (FS)
4) GND
5) SCLK (BIT CLOCK)
6) GND
7) MCLK
8) GND
Signals are LVCMOS, that is CMOS levels at 3.3V supply. They are TTL-compatible, that is, they can directly
drive a 5V TTL input stage without need for level translation. The HiFace aria’s audio card’s I2S output is
drive by a high current driver, so it can directly feed an input when no level translation is needed.
MCLK USAGE
The aria’s audio card Master Clock (MCLK) is made available on the audio card I2S output. It may be
necessary on some D/A converters, particularly when no local Master Clock is available. Depending on the
sampling frequency, the aria’s audio card outputs two different Master Clock frequencies: 22.5792MHz
for files with 44.1 kHz, 88.2 kHz and 176.4 kHz sampling frequency and 24.576MHz for files with 48 kHz,
96 kHz and 192 kHz sampling frequency. Thus, the MCLK/LRCK ratio depends on the sampling frequency:
it is 512x with 44.1 kHz and 48kHz files, 256x with 88.2 kHz and 96kHz files and 128x with 176.4 kHz and
192kHz files. Should your D/A converter use the aria’s audio card’s Master Clock from the i2S connection,
and need a fixed ratio (for example, 256x or 128x) at all frequencies, a selectable frequency divider or
multiplier should be used.
A frequency divider is easily made using D-type flip-flops like TI’s SN74LVC74 (double flip-flop which
allows for 2 times and 4 times clock frequency division), while a PLL must be used to double the Master
Clock, such as Cypress’ CY2300 (BTW, the CY2300 is perfect to have a fixed 256x ratio, as it offers both 2x
and 1/2x frequency outputs, along with buffered 1x output).
Page 52
DigiBit | Asura 81, 28043 Madrid (SPAIN) | www.digibit.es
52
aria mini | User Manual - APHENDIX
3.3V TO 5V LEVEL TRANSLATION
When a 5V CMOS input circuit is to be driven, a simple level translation can be done by using a quad non
inverting buffer with TTL input compatibility, such as the SN74HCT125 by Texas Instruments.
SINGLE-ENDED TO DIFFERENTIAL CONVERSION (TTL OR CMOS)
Some D/A converters accept differential signals on their I2S input (such as NorthStar Design units). In this
case, no simple level translation (even if a level translation can be necessary, too) can accommodate the
D/A converter’s input requirement. A format conversion is necessary. It can be performed using an
inverting/non inverting buffer pair in order to achieve an inverted copy of each signal to drive a line in a
balanced fashion. The non-inverting buffer is necessary to introduce a small delay on the original signal to
match (not perfectly, but to a satisfactory extent) that is introduced by the inverting buffer. For noninverting buffers, go for the usual SN74HCT125 (for 3.3V to 5V translation) or the SN74LVC125 (no level
translation). Inversion and buffering can be obtained by simply using four units of a hex inverter such as
TI’s SN74HCT04 (level translation) or SN74LVC04 (no level translation).
SINGLE-ENDED to LVDS (HDMI) CONVERSION
Some D/A converters (such as PS Audio PWD) accept LVDS signals on an HDMI connector. To perform a
single-ended to LVDS conversion, National’s DS90C031B can be used. It is a quad LVDS driver with TTL
input compatibility which can be directly coupled to aria’s audio card’s output.
Page 53

Page 54
 Loading...