

Page 1

Wireless Vehicle Bus Adapter (WVA)
Getting Started Guide
Page 2

Revision history—90001929
Revision Date Description
E September 2017
F November 2017 Added information for reviewing fault codes in the
G June 2019
H January 2021
J February 2021
Trademarks and copyright
Digi, Digi International, and the Digi logo are trademarks or registered trademarks in the United
States and other countries worldwide. All other trademarks mentioned in this document are the
property of their respective owners.
© 2021 Digi International Inc. All rights reserved.
Disclaimers
Information in this document is subject to change without notice and does not represent a
commitment on the part of Digi International. Digi provides this document “as is,” without warranty of
any kind, expressed or implied, including, but not limited to, the implied warranties of fitness or
merchantability for a particular purpose. Digi may make improvements and/or changes in this manual
or in the product(s) and/or the program(s) described in this manual at any time.
n Updated to new format.
n Edited and updated content.
demo application.
Updated graphics in Network Service
Configuration page descriptions.
Added Anatel information.
Updated Anatel information.
Warranty
To view product warranty information, go to the following website:
www.digi.com/howtobuy/terms
Send comments
Documentation feedback: To provide feedback on this document, send your comments to
techcomm@digi.com.
Wireless Vehicle Bus Adapter (WVA) Getting Started Guide
2
Page 3

Customer support
Digi Technical Support: Digi offers multiple technical support plans and service packages to help our
customers get the most out of their Digi product. For information on Technical Support plans and
pricing, contact us at +1 952.912.3444 or visit us at www.digi.com/support.
Wireless Vehicle Bus Adapter (WVA) Getting Started Guide
3
Page 4

Contents
Wireless Vehicle Bus Adapter Getting Started Guide
Features 7
Setting up your Wireless Vehicle Bus Adapter 8
Connect the hardware
Verify product components 10
Optional equipment 10
Communications equipment 10
Recommended CANbus simulator model 11
Connect the WVAto a CANsimulator 11
Connect the WVA to a vehicle's diagnostic port 12
Remove the WVA from the diagnostic port 13
WVALEDs 14
Power LED 14
User-defined LED 14
Connect to the WVA
Connect to the WVA from a smart phone or tablet 16
Connect to the WVAfrom a laptop 16
Access and use the WVA web interface
Apply and save changes 19
Cancel changes to configuration settings 19
Open the web interface 19
Upload a file to the WVA 20
Configure the WVA
Configure wireless settings 22
Configure WVA for Wi-Fi Infrastructure mode 22
Configure WVA for Wi-Fi Direct 24
Configure CANbus baud rate (CANbus simulator use only) 27
Configure Python programs 28
Start or stop an already configured Python application 29
Determine whether Python applications are running 30
Configure network services 30
Wireless Vehicle Bus Adapter (WVA) Getting Started Guide
4
Page 5

Configure power management settings 31
About power management 33
Enable Remote Manager connectivity (optional) 33
Manage the WVA device
Rediscover the WVA 36
Reboot the WVA 37
Reset the WVAto factory defaults 37
Disable and enable the factory reset button 37
Disable the factory reset button 37
Enable the factory reset button 37
WVA filesystem and file management 37
Access/Browse the filesystem from device interfaces 38
View the system log 38
Log files and contents 39
View status information 42
Deployment decisions
Default behavior regarding time 43
Default behavior regarding Wi-Fi network connectivity 43
Default behavior regarding Remote Manager connectivity 43
Default behavior regarding IP address assignment 43
WVA web interface page descriptions
Adapter Status page descriptions 46
CANBus page descriptions 47
Device Information page descriptions 47
File Management page descriptions 49
Network Service Configuration page descriptions 50
Power Management Configuration page descriptions 51
Python Configuration page descriptions 52
Run the WVAdemo application
Get started 54
Learn the demo application software features 54
Build your own application 54
Download the demo application 54
Start the demo application and discover WVA devices 55
Discover the WVA 56
Connect to the WVA 56
Optional: Manually connect to the WVA 57
Review the demo application dashboard 57
Show graph view 58
Configure endpoints: subscriptions and alarms 58
Subscribe to an endpoint 59
Configure an endpoint as an alarm 61
Delete an alarm 63
Change application settings 64
Review fault codes 65
Wireless Vehicle Bus Adapter (WVA) Getting Started Guide
5
Page 6

Demo application issues 67
Demo application error messages 68
Demo application: Wi-Fi hotspot issues 68
Demo application: user login fails 68
Demo application: Connection Refused error (ECONNREFUSED) 69
Demo application: Connection has gone away error 69
Troubleshooting
Power LED is dark 72
Device is not discovered by Digi Device Discovery 73
Cannot open web interface or access web services 75
Cannot receive data from the CANbus 76
WVA does not connect to an access point 77
Wi-Fi access issues 78
Cannot discover device using Wi-Fi Direct 79
Cannot associate with WVA over Wi-Fi Direct in push-button mode 80
Cannot associate with WVA over Wi-Fi Direct in PIN mode 81
Wireless signal strength issues 82
Regulatory information
Anatel 83
Wireless Vehicle Bus Adapter (WVA) Getting Started Guide
6
Page 7
Wireless Vehicle Bus Adapter Getting Started Guide
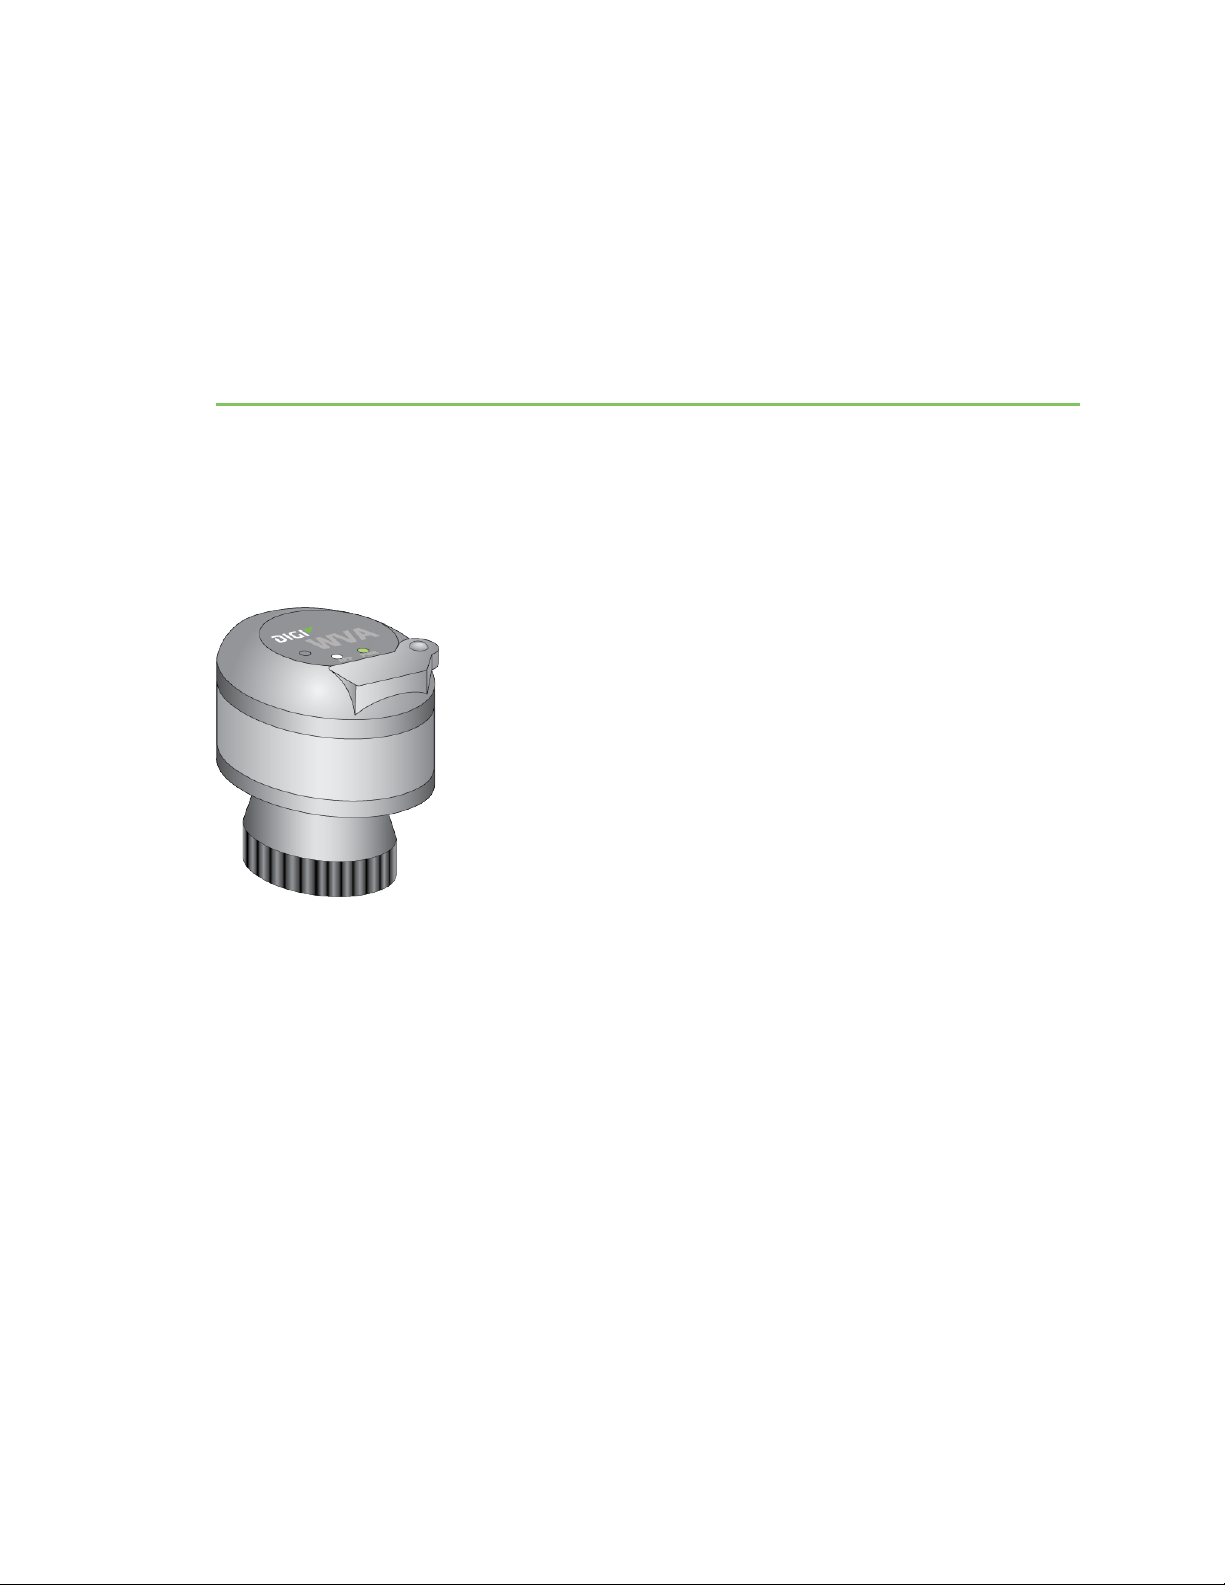
The Wireless Vehicle Bus Adapter (WVA) is a telematics component that makes vehicle bus data
available through wireless communication. Using Wi-Fi, the WVA connects to other intelligent devices
or routers as a client, host, or through a Wi-Fi Direct connection. The WVA can accommodate vehicle
bus data in J1939/CAN or J1587/J1708 form.
You can use the WVA in a desktop development environment with a CAN bus simulator, and can install
it in a vehicle by plugging into the vehicle's diagnostic port.
The WVA provides an option for wireless connectivity within the vehicle cab as an alternative to wired
installation process. If you already have a system that includes an on-board computer (OBC) with Wi-Fi
capabilities in your vehicles, you can integrate the WVA into your existing system. If you have not yet
installed an OBC in your vehicles, you can use a smart phone, tablet, or rugged display combined with
a custom application to interact with the WVA.
Features
n Embedded Wi-Fi with b/g/n Internet speeds
n Standard Deutsch 9-pin diagnostic port connector
n Two J1939/CAN vehicle bus interfaces
n J1587/J1708 vehicle bus interface
n LEDs to indicate power and user-defined functions in applications
n 12 VDC power through a vehicle diagnostic port; can be powered directly from the vehicle
n Basic power management
n Custom buzzer for driver alerts
Wireless Vehicle Bus Adapter (WVA) Getting Started Guide
7
Page 8

Wireless Vehicle Bus Adapter Getting Started Guide Setting up your Wireless Vehicle Bus Adapter
n Web interface for configuration and management, password-protected
n Web services, a RESTful programming interface to vehicle data, password-protected
For detailed hardware specifications, see the Hardware topic of the Wireless Vehicle Bus Adapter (WVA)
Application Developer's Guide.
Setting up your Wireless Vehicle Bus Adapter
This Getting Started Guide walks you through the steps to set up your Wireless Vehicle Bus Adapter.
These steps include:
1. Connect the hardware
2. Evaluate deployment decisions
3. Connect to the WVA
4. Configure the WVA
5. Run the WVAdemo application
In addition, the Troubleshooting section provides troubleshooting tips.
Wireless Vehicle Bus Adapter (WVA) Getting Started Guide
8
Page 9

Connect the hardware
You can use the WVA for desktop development with a CAN simulator, or plug it into a vehicle's
diagnostic port.
Follow the steps in this section to connect the WVA hardware.
Verify product components 10
Recommended CANbus simulator model 11
Connect the WVAto a CANsimulator 11
Connect the WVA to a vehicle's diagnostic port 12
Remove the WVA from the diagnostic port 13
WVALEDs 14
Wireless Vehicle Bus Adapter (WVA) Getting Started Guide
9
Page 10
Connect the hardware Verify product components
Verify product components
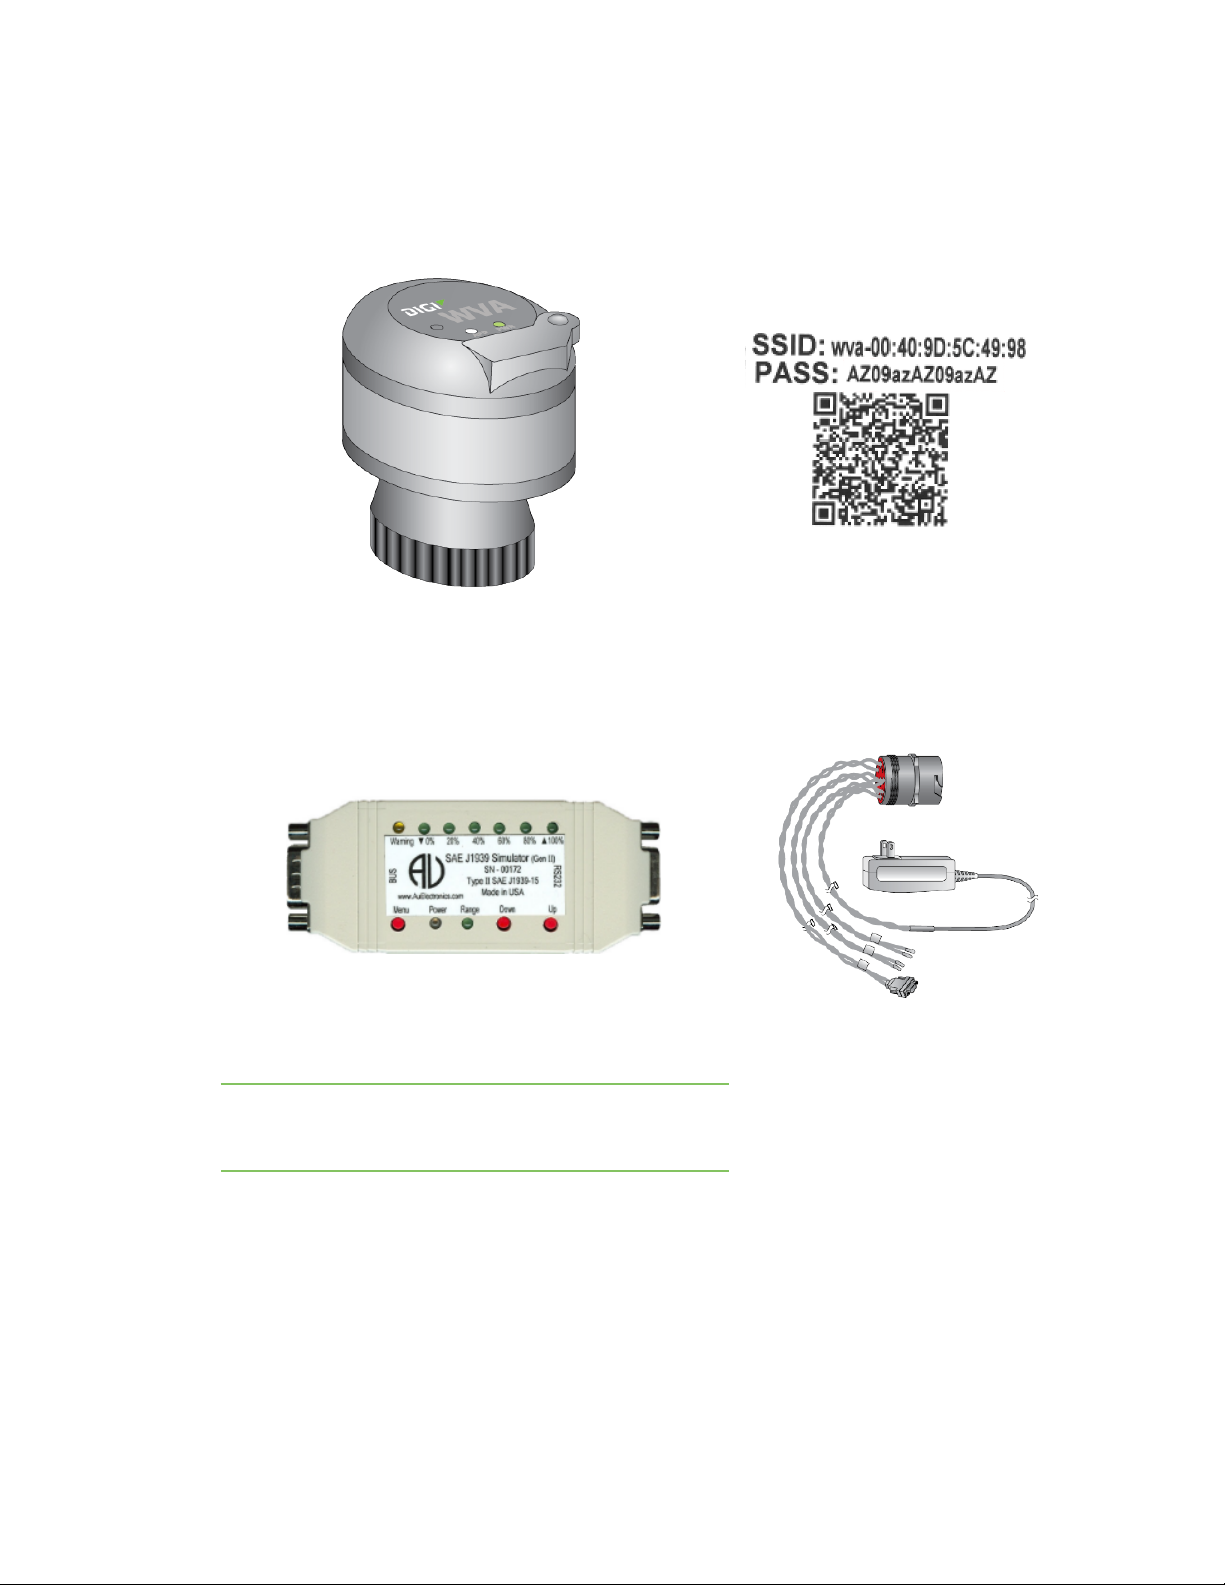
The Wireless Vehicle Bus Adapter includes the following components. Make note of any missing or
damaged item and contact your supplier.
Wireless Vehicle Bus Adapter QR code label
Optional equipment
You can order the following equipment separately, if needed.
CAN bus simulator and optional recommended cabling for
connecting to the computer.
Note This part is not sold by Digi International Inc. See
Recommended CANbus simulator model for ordering
information.
Wiring harness
Digi part number 76000931
Communications equipment
You will need a mobile device to interact with the WVA, such as a laptop, tablet or smart phone.
Wireless Vehicle Bus Adapter (WVA) Getting Started Guide
10
Page 11
Connect the hardware Recommended CANbus simulator model
Recommended CANbus simulator model
For the CAN simulator, Digi recommends the following model and part number, which you can order
from the AU Group Electronics on-line store:
n Model: Au SAE J1939 Simulator-Gen II 1.00A (Engine Basic Edition)
n Part number: SIMJ1939-001
The CAN simulator connects directly to the WVA wiring harness.
You can also purchase cabling to connect the CAN simulator to a PC from AU Group Electronics.
Connect the WVAto a CANsimulator
Follow this process to connect a WVA device to a CAN simulator.
Note You can skip this process if you are connecting the WVA to a vehicle. See Connect the WVA to a
vehicle's diagnostic port.
1. Before you begin, you should manually set the baud rate for the CANsimulator. See Configure
CANbus baud rate (CANbus simulator use only).
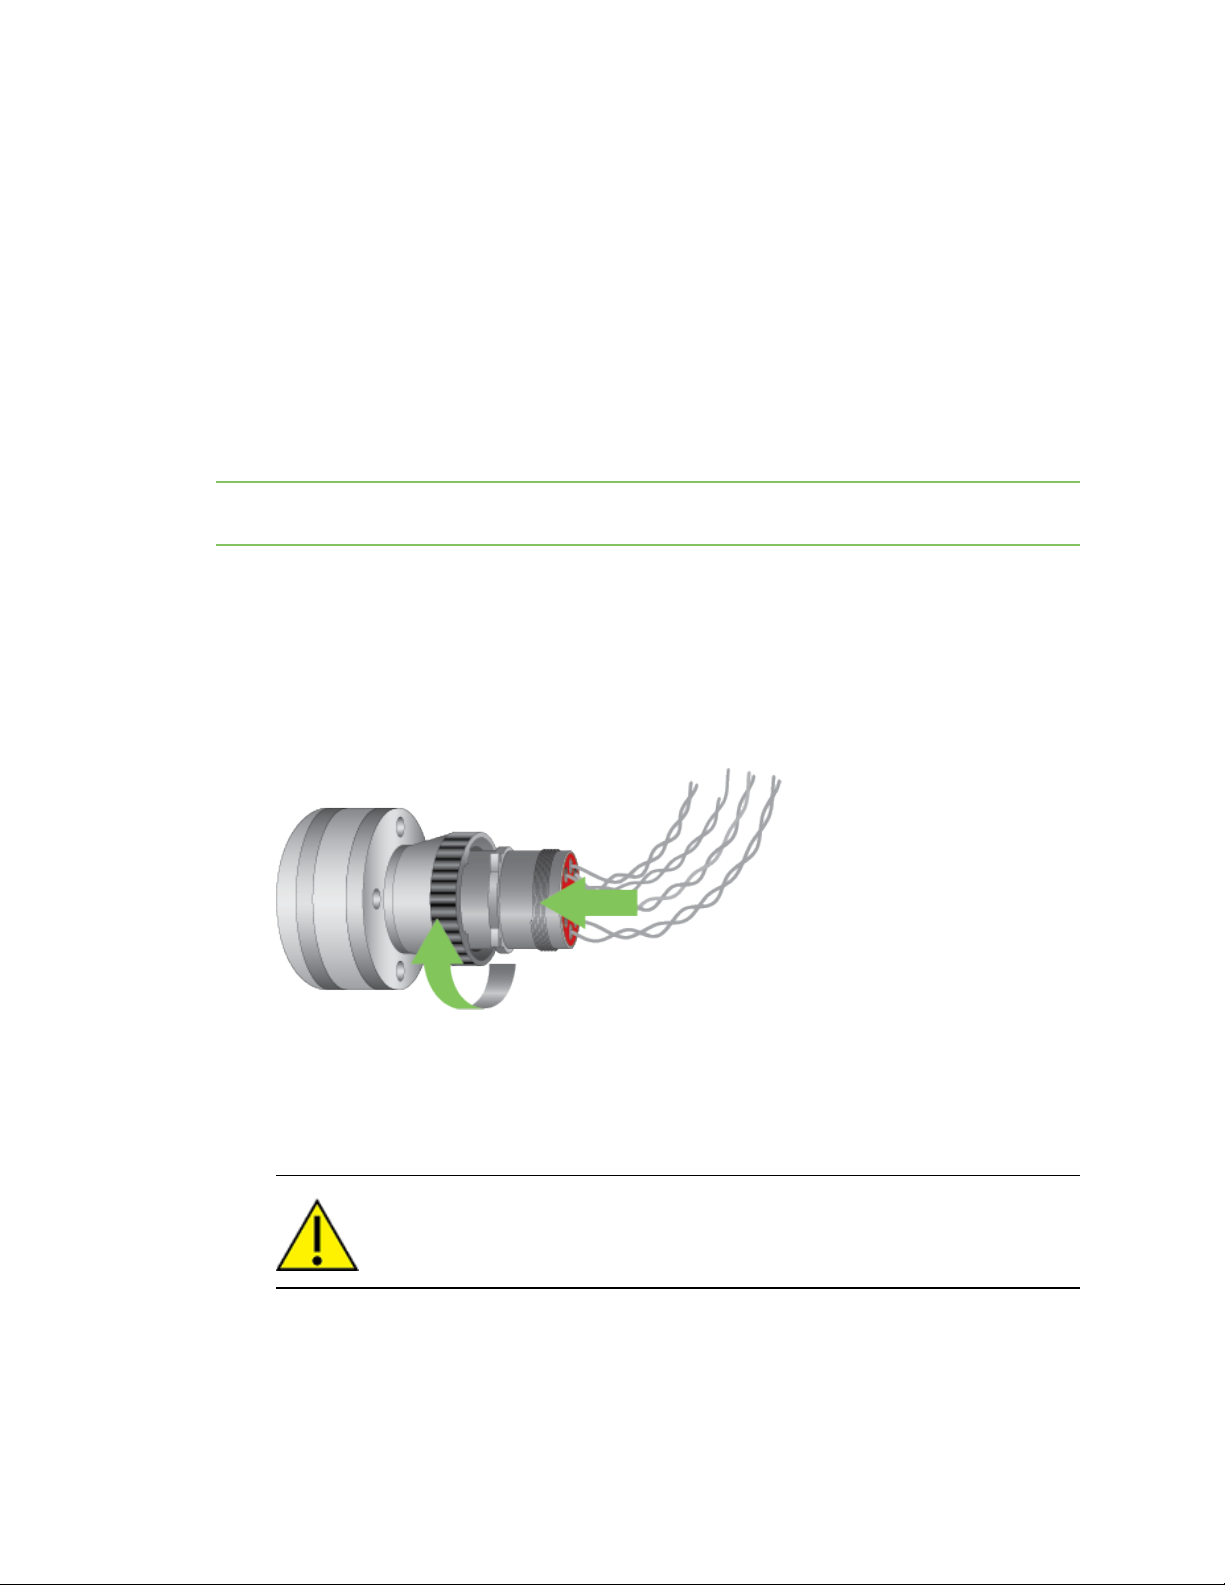
2. Locate the alignment pin on the WVA and the wiring harness.
3. Following the pin alignment indicated by the alignment pin, connect the WVA to the 9-pin
connector of the wiring harness. Locate the locking ring on the base of the WVA and twist it
clockwise to lock in place.
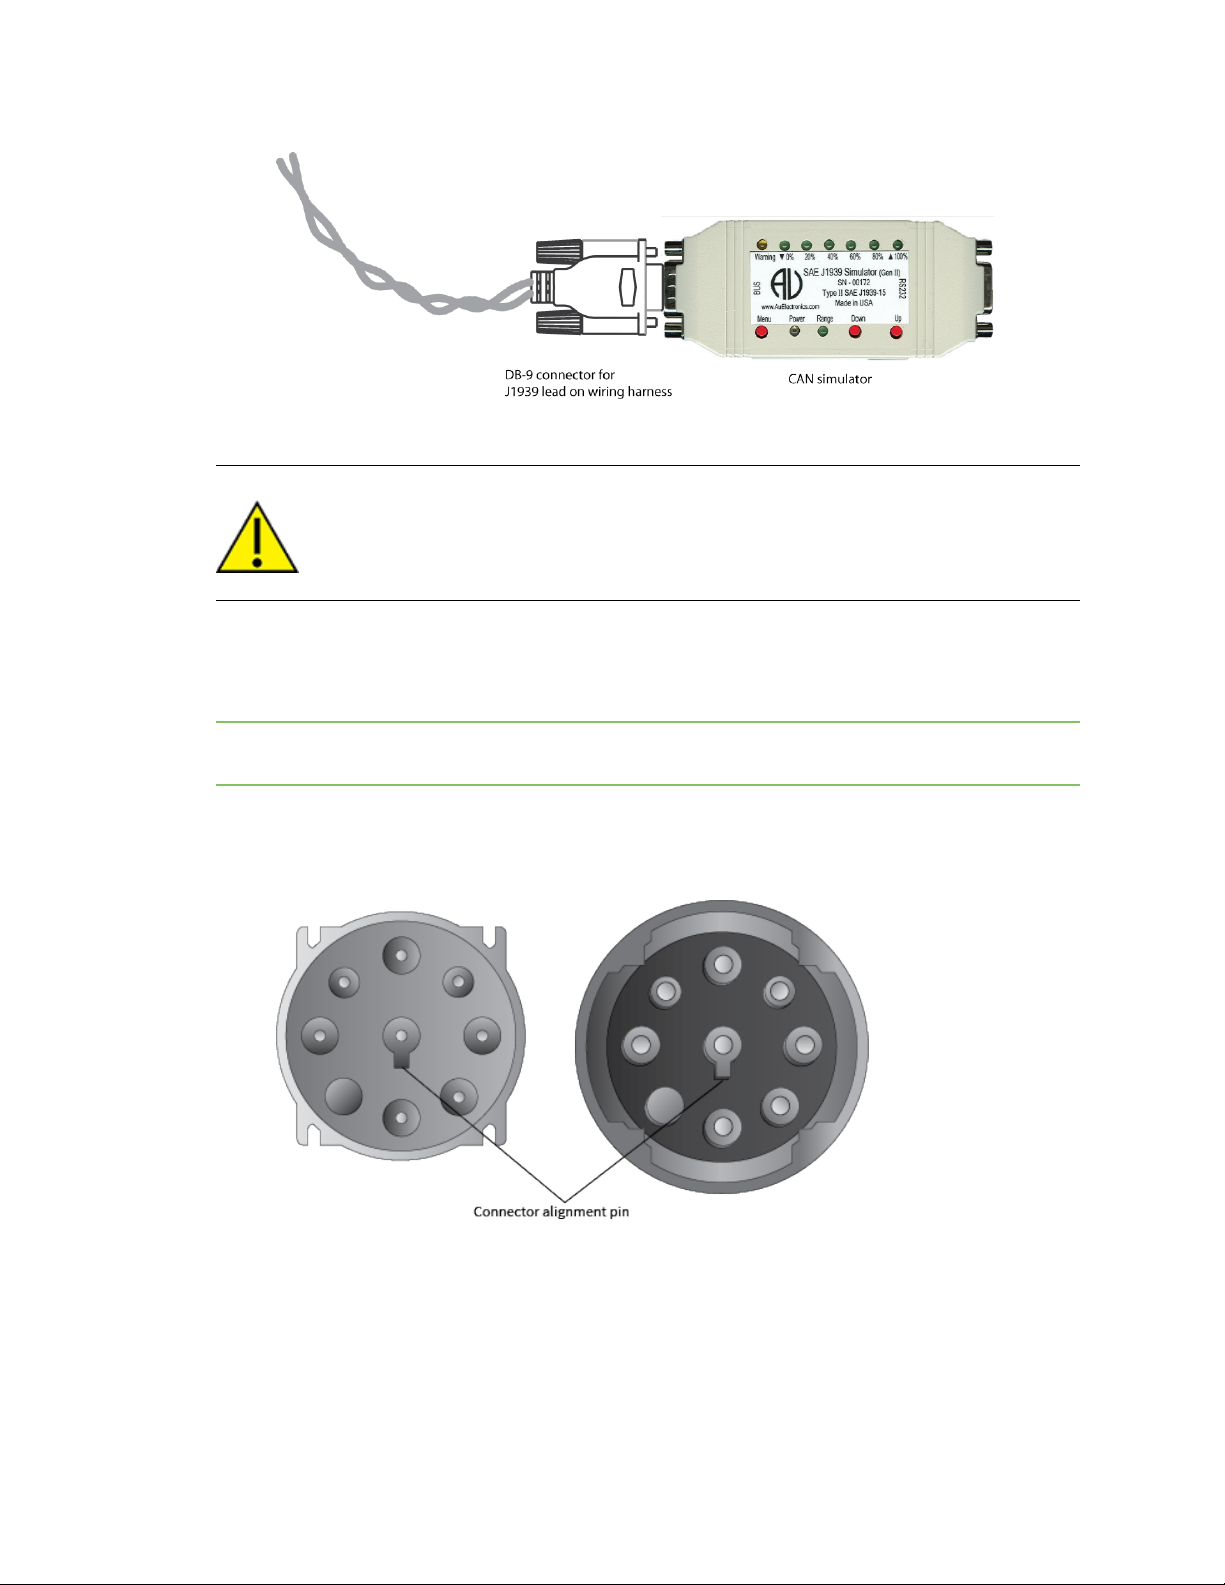
4. On the wiring harness, connect the wiring leads labeled CAN J1939 or J1708 to the BUS
connector of the CAN simulator, following the CAN simulator’s installation instructions. The
image shows only one CAN connection. Connect additional J1939/CAN or J1587/J1708 leads as
required.
CAUTION! Do not allow bare wires of the wiring harness to touch the CAN
simulator. Touching the bare wires to the CAN simulator can cause a short circuit
which can damage the CAN simulator.
Wireless Vehicle Bus Adapter (WVA) Getting Started Guide
11
Page 12
Connect the hardware Connect the WVA to a vehicle's diagnostic port
5. Connect the power supply for the cable harness to a power source.
CAUTION! When the WVA is being used with a CAN simulator, please note that its baud
rate must be manually set to 250000. Failure to set the baud rate to 250000 results in a
baud rate mismatch, which impacts vehicle bus data. An indicator that the baud rate is
set wrong is the apparent absence of vehicle data. See Configure CANbus baud rate
(CANbus simulator use only) and Cannot receive data from the CANbus.
Connect the WVA to a vehicle's diagnostic port
Follow this process to connect a WVA to a vehicle's diagnostic port.
Note You can skip this process if you are connecting a WVA device to a CAN simulator. See Connect the
WVAto a CANsimulator.
The WVA is compatible with 9-pin diagnostic ports only.
1. Consult the vehicle’s owner’s manual to locate the diagnostic port of the vehicle.
2. Locate the alignment pin on the WVA and diagnostic port.
Wireless Vehicle Bus Adapter (WVA) Getting Started Guide
12
Page 13
Connect the hardware Remove the WVA from the diagnostic port
3. Connect the WVA to the diagnostic port. Twist the WVA locking ring clockwise to lock.
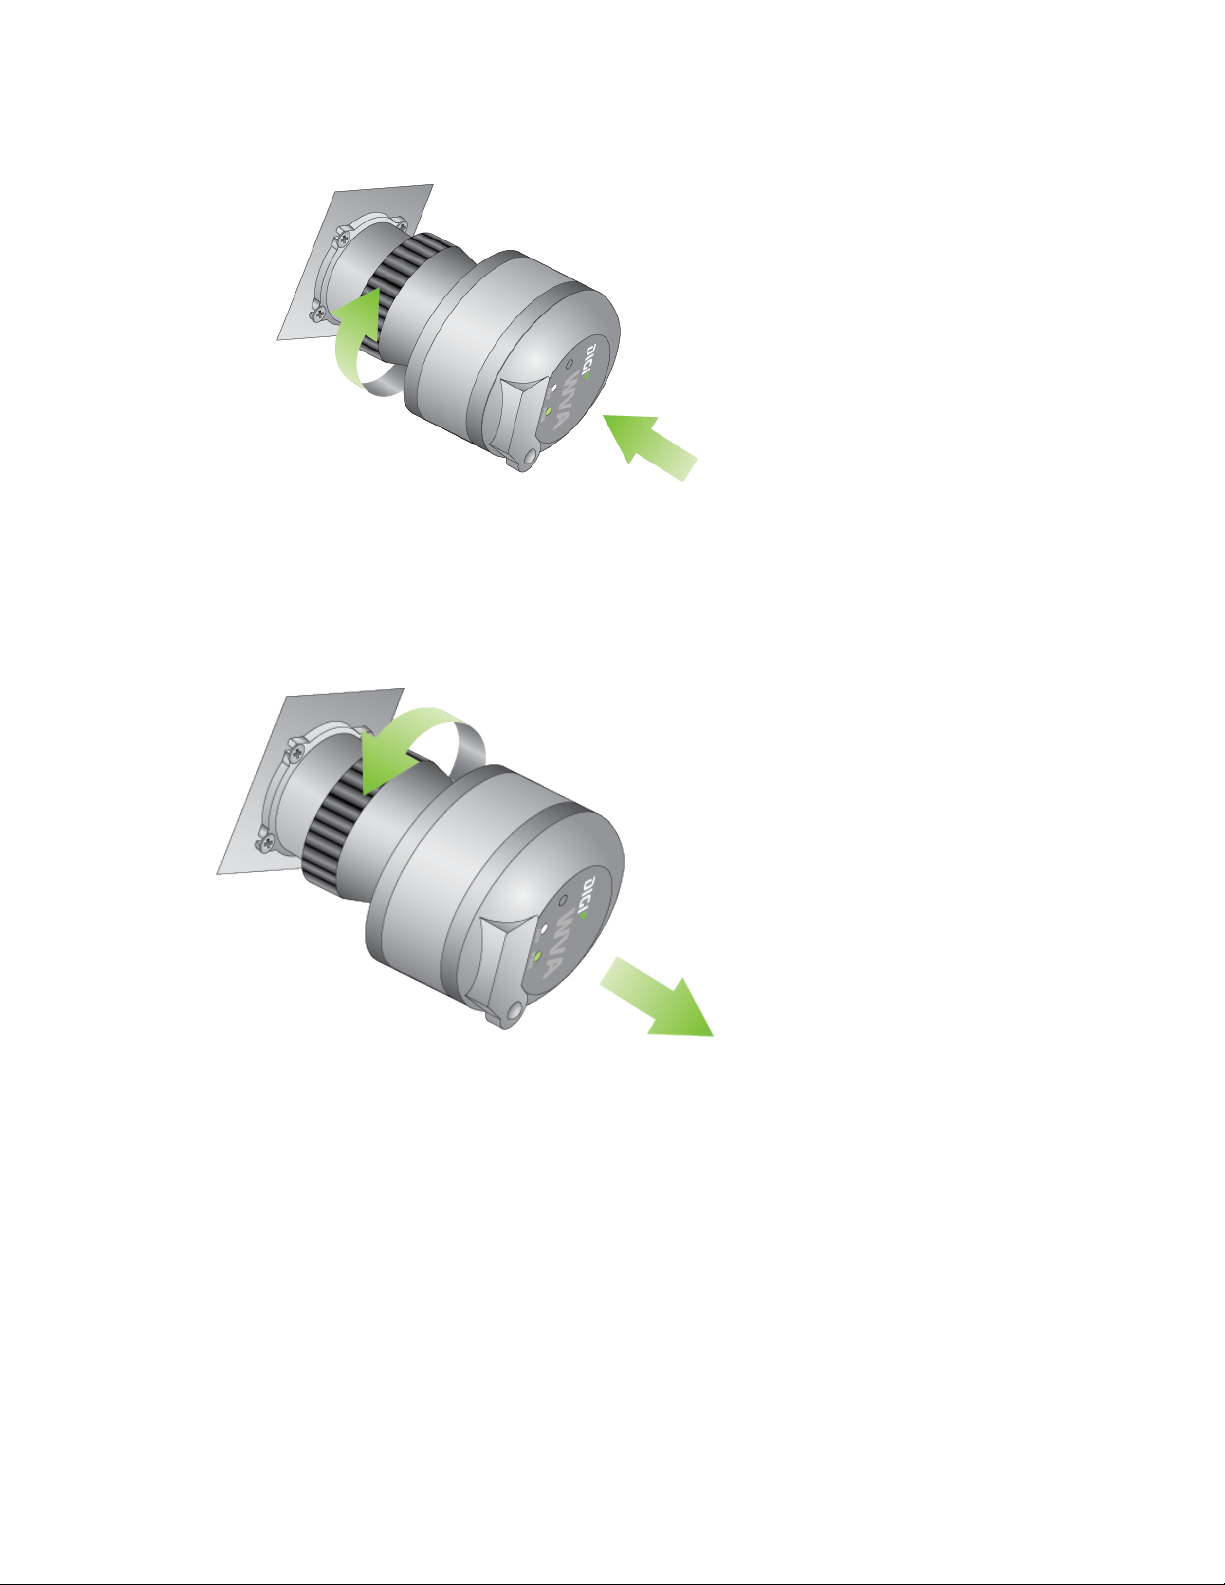
Remove the WVA from the diagnostic port
You can remove the WVA from the diagnostic port in a vehicle.
1. Twist the WVA locking ring counterclockwise.
2. Pull the WVA from the diagnostic port.
Wireless Vehicle Bus Adapter (WVA) Getting Started Guide
13
Page 14
Connect the hardware WVALEDs
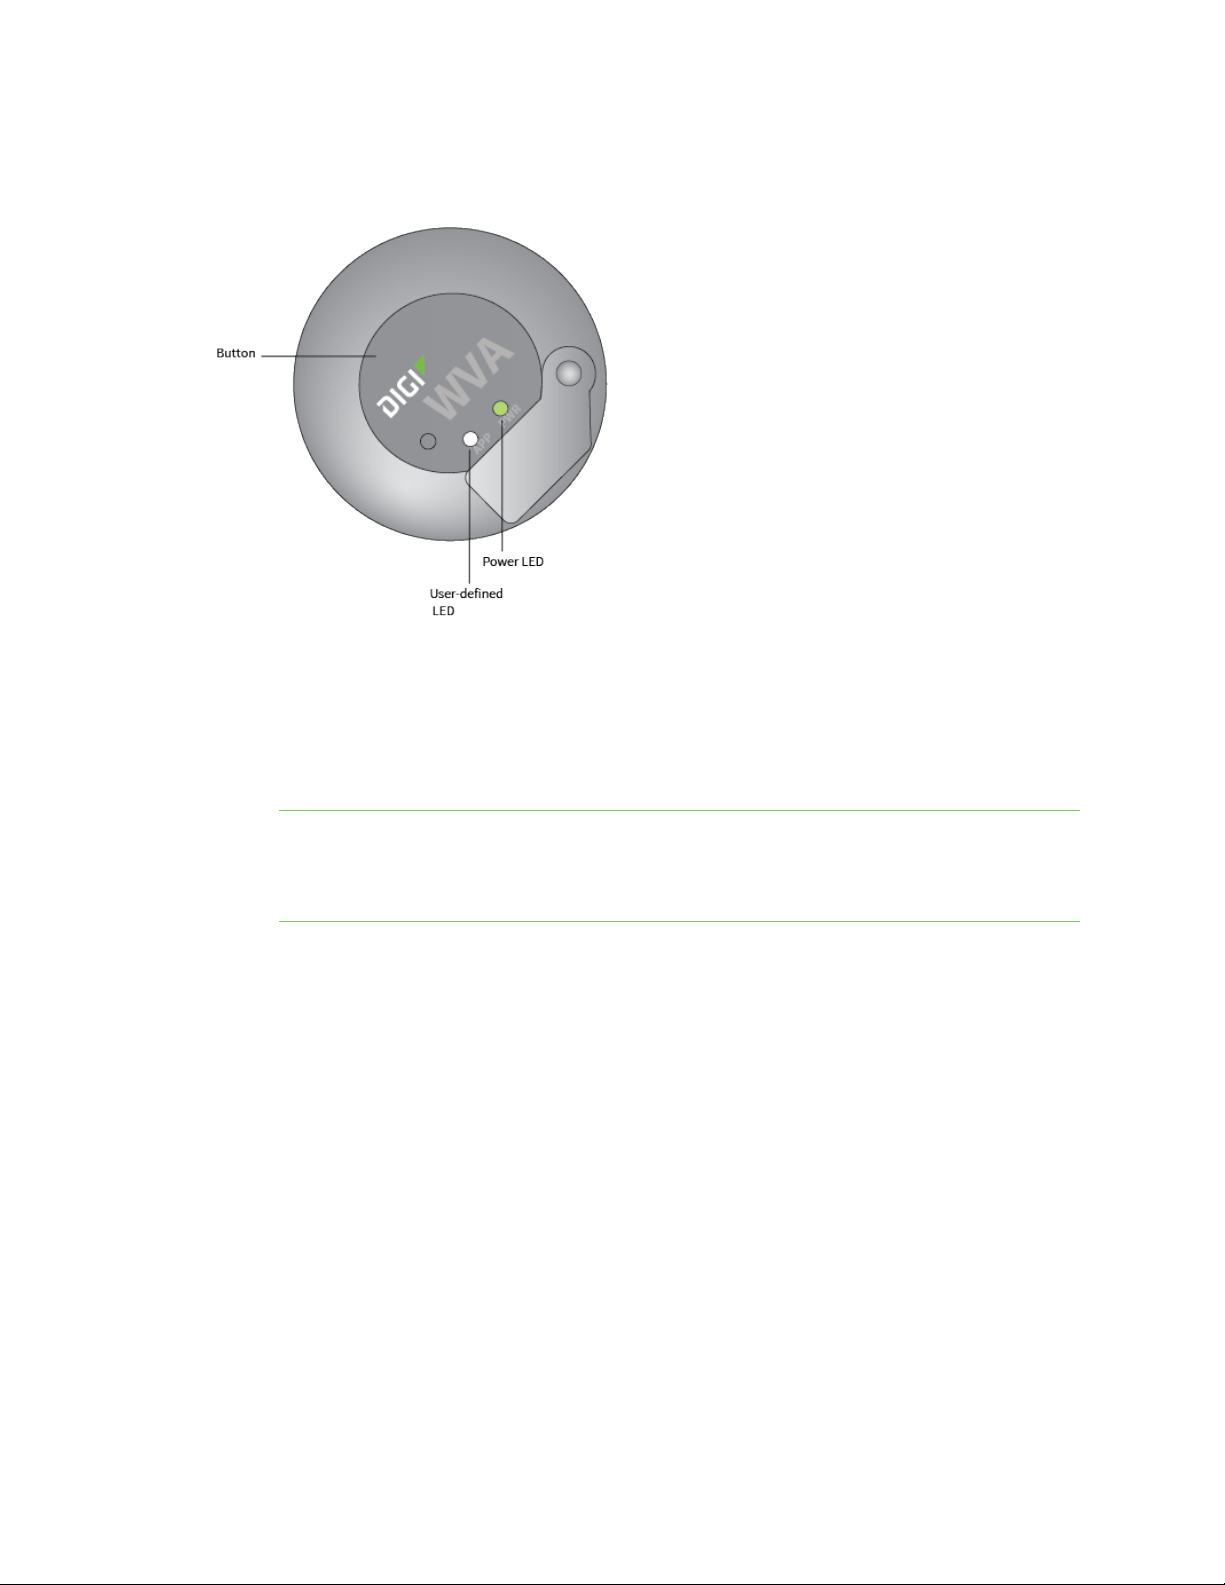
WVALEDs
The WVA has several LEDs on the top of the device:
Power LED
n Off (dark): No power. For more information, see Power LED is dark.
n Solid green: The device is powered.
Note The WVA must be powered on and able to connect with a wireless network to work as
expected. You can confirm that the WVA can connect to a wireless network in the Network
Connectivity Status section in the Device Information page in the web interface. For more
information, see Device Information page descriptions.
n Blinking green: An update of the firmware for the device is in progress.
User-defined LED
The user-defined LED allows you to set LED functionality as needed for your particular application. By
default, this LED is not enabled.
For more information on programming the user-defined LED, see the Wireless Vehicle Bus Adapter
Application Developer's Guide.
Wireless Vehicle Bus Adapter (WVA) Getting Started Guide
14
Page 15

Connect to the WVA
After you have connected the WVA to a CAN simulator or plugged it into a vehicle's diagnostic port, you
can connect to the WVA from a smart phone, tablet, or laptop. This enables you to configure the WVA
settings, view device status, perform firmware updates, and view a log of system events.
Connect to the WVA from a smart phone or tablet 16
Connect to the WVAfrom a laptop 16
Wireless Vehicle Bus Adapter (WVA) Getting Started Guide
15
Page 16

Connect to the WVA Connect to the WVA from a smart phone or tablet
The WVA has several default startup and operation behaviors that should be considered in your own
network's setup and operation. For more information, see Deployment decisions.
Note You will need the QR code label included in the WVA packaging to connect to the WVA. Make sure
you have access to this label before you begin.
Connect to the WVA from a smart phone or tablet
Connecting to the WVA from a smart phone or tablet requires a QR code reader. If you do not already
have a QR code reader available on your phone or tablet, download one for your mobile device or
tablet.Digi recommends the QR code reader by Scan, Inc.
1. From your smart phone or tablet, download a QRCode Reader if you do not have one available.
a. Navigate to www.scan.me.
b. Click the Download App button to start the download process.
2. Set the WVA to factory defaults. Press and hold the button on the device for at least 10 seconds
to return the gateway to its initial state.
3. With the QR code reader, scan the QR code label shipped with your WVA.
4. A prompt appears, asking whether you want to connect to the WVA. Select Yes. Your device
connects to the WVA access point automatically.
If you are unable to connect to the WVA, see WVA does not connect to an access point.
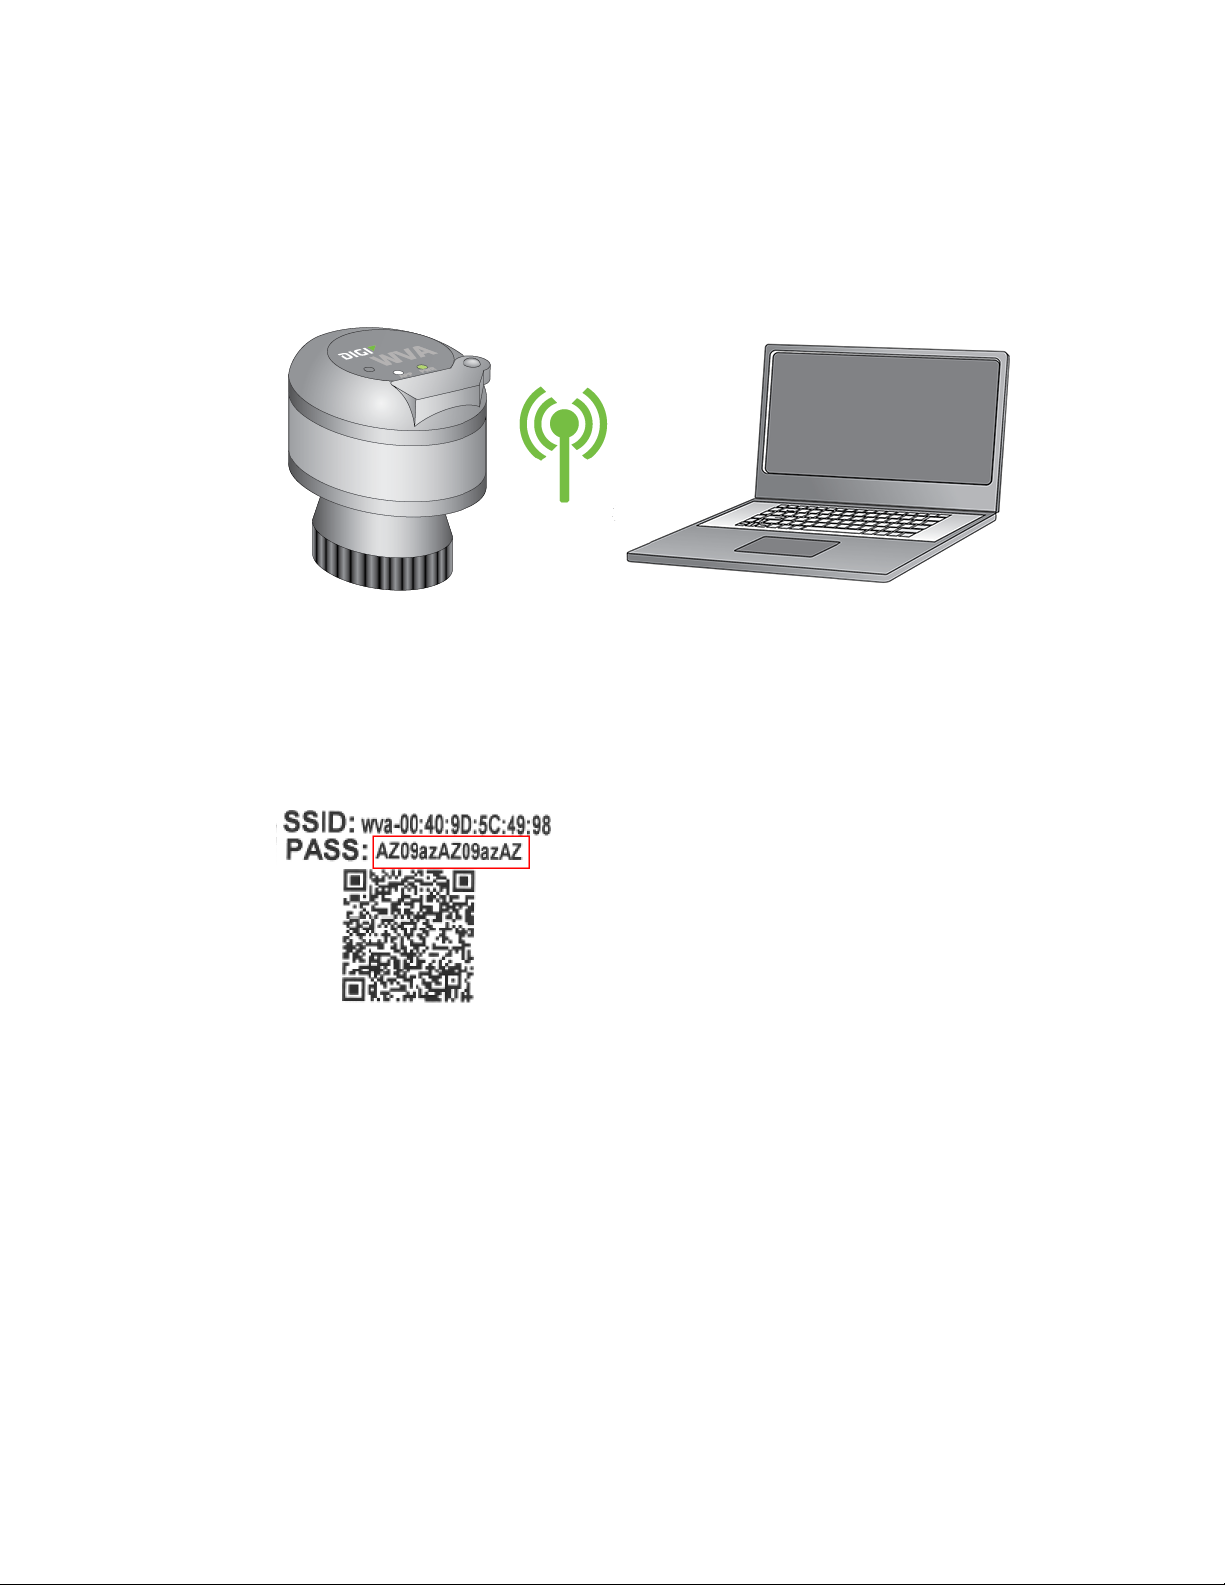
Connect to the WVAfrom a laptop
Connecting to the WVA from a laptop requires the network security key from the QR code label
included in the WVA packaging.
1. Set the WVA to factory defaults before starting this procedure. Press and hold the button on
the device for at least 10 seconds to return the gateway to its initial state.
Wireless Vehicle Bus Adapter (WVA) Getting Started Guide
16
Page 17
Connect to the WVA Connect to the WVAfrom a laptop
2. The WVA appears in the list of available network connections as a wireless network access
point. The access point has a default name derived from the serial address for the device in this
format: wva-mac-address.
On the laptop, search the list of network connections for the access point name wva-mac-
address. For example: wva-00:40:4d:41:88:81
3. Select the access point name and click Connect to connect to the WVA as a wireless access
point. If you do not see the WVA in the connections list, or cannot connect to it, see WVA does
not connect to an access point.
4. Enter the network security key. This network security key is labeled PASS on the QR code label
in the WVA packaging.
Wireless Vehicle Bus Adapter (WVA) Getting Started Guide
17
Page 18

Access and use the WVA web interface
The WVA has a web interface for configuring device settings, viewing device status, performing
firmware updates, and viewing a log of system events.
See the topics below for more detailed information:
Apply and save changes 19
Cancel changes to configuration settings 19
Open the web interface 19
Upload a file to the WVA 20
Wireless Vehicle Bus Adapter (WVA) Getting Started Guide
18
Page 19
Access and use the WVA web interface Apply and save changes
Apply and save changes
The web interface runs locally on the device, which means that the interface always maintains and
displays the latest settings in the Digi device. On each screen, clicking Apply saves any configuration
changes to the Digi device.
Cancel changes to configuration settings
Click the Refresh or Reload button on the web browser to reload the page. Any changes made since
the last time you clicked the Apply button are reset to their original values.
Open the web interface
Use the WVA web interface to configure device settings, view device status and system settings, and
perform firmware updates.
Note Before you can open the web interface, you must connected to the WVA. For more information
see Connect to the WVA.
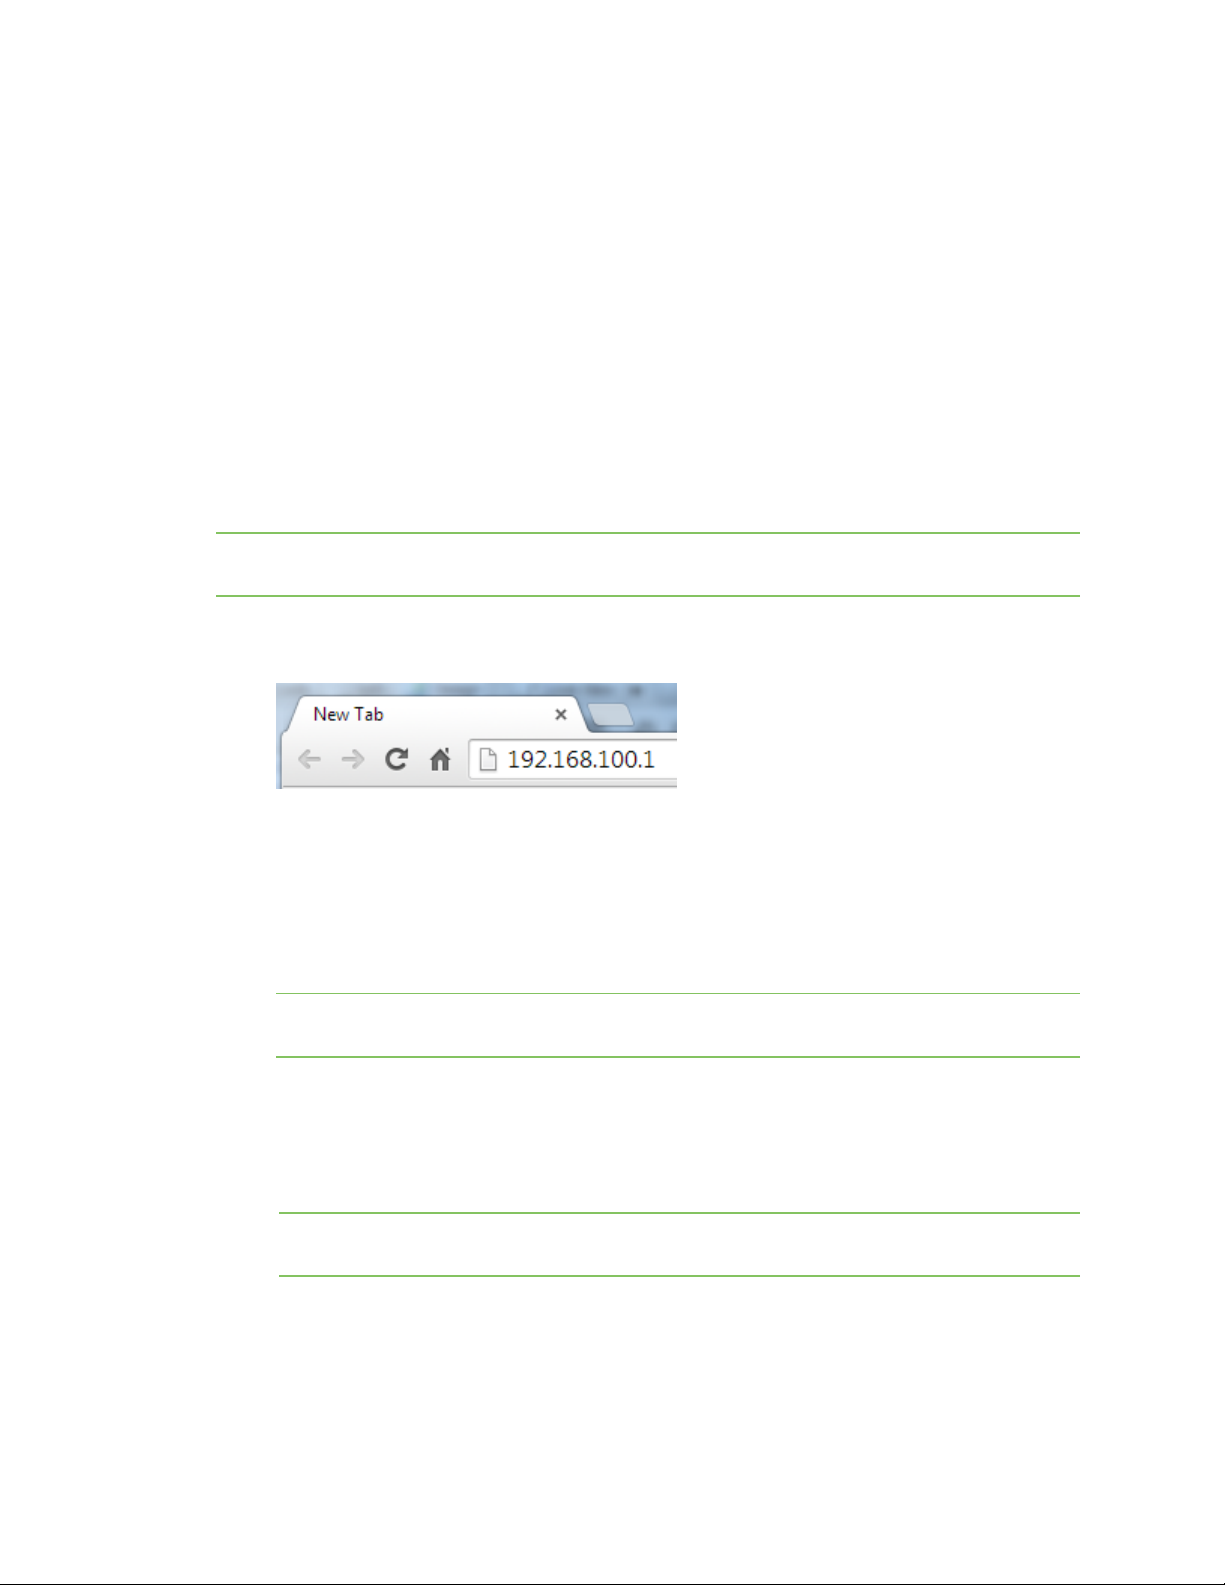
1. Go to a browser and access the web interface using the default IP address for the WVA access
point: 192.168.100.1
2. The first time you attempt to access the WVA, a certificate management prompt appears. Click
Proceed Anyway.
3. A login prompt appears.
n For username, enter admin.
n For password, enter admin.
Note You can change the password from the default at a later time on the Configuration >
Admin Password page.
4. The Device Information page appears. This page is also known as the Home page. You can
return to it at any time in the interface by clicking Home in the menu on the left side. For
information about the sections in the Device Information page, see Device Information page
descriptions.
Note If you cannot open this page for the WVA, see Cannot open web interface or access web
services.
5. You can make the configuration changes as needed by clicking a menu option in the left-hand
pane. When a change is made, click Apply to save any changes to the WVA device. For more
information, see Apply and save changes.
Wireless Vehicle Bus Adapter (WVA) Getting Started Guide
19
Page 20

Access and use the WVA web interface Upload a file to the WVA
Upload a file to the WVA
In the File Management page, you can manage custom applications, their associated data files, and
other files. You can also push firmware upload files to the device filesystem, pull log files from the
device filesystem, and load files onto the WVA. The File Management page also displays current
information about loaded files.
For more information about the File Management page, see File Management page descriptions.
This process explains how to upload files to the WVA, such as a Python script.
1. Open the WVA web interface. For instructions, see Open the web interface.
2. Click the Administration > File Management link in the WVA web interface. The File
Management page appears.
3. Click the Browse button to locate the file on your computer that you want to upload to the
WVA.
4. Click Update file to begin the file upload process.
Wireless Vehicle Bus Adapter (WVA) Getting Started Guide
20
Page 21

Configure the WVA
You can configure settings for the WVA in the web interface. You must first connect to the WVA. See
Connect to the WVA and Open the web interface to get started.
Once you have accessed the web interface, you can configure the WVA settings. The following topics
describe how to configure your WVA’s wireless settings and perform other set up and management
tasks.
Configure wireless settings 22
Configure CANbus baud rate (CANbus simulator use only) 27
Configure Python programs 28
Configure network services 30
Configure power management settings 31
Enable Remote Manager connectivity (optional) 33
Wireless Vehicle Bus Adapter (WVA) Getting Started Guide
21
Page 22

Configure the WVA Configure wireless settings
Configure wireless settings
Configure the WVA's wireless settings from the web interface to establish the wireless network
method.
Choose one of the following wireless network communication methods:
n As an access point. Wireless communication is possible with an access point that uses the
default IP address, an SSID, and a pre-shared key. The access point is always accessible at the
address 192.168.100.1 when devices connect to it.
n As a client device in a wireless network infrastructure: You must set up this type of
configuration for each type of wireless network in which you want the WVA to operate. The
web interface has a wizard for configuring the WVA as a client device. By default, when the WVA
connects to another access point as a client, which it can do in parallel with devices connecting
to it as an access point, it gets its IP address via DHCP. IP address assignment via DHCP is
enabled by default. For instructions on configuring the WVA as a client device, see Configure
WVA for Wi-Fi Infrastructure mode.
n Using Wi-Fi Direct. Wi-Fi Direct is a Wi-Fi standard that enables devices to connect easily with
each other without requiring a wireless access point and to communicate at typical Wi-Fi
speeds. Wi-Fi Direct requires a one-time configuration for WVA units, where you set how the
WVA user establishes a Wi-Fi Direct connection: by pressing the button on the WVA, or by
entering a PIN. After this configuration, users establish a Wi-FI Direct connection by a button
press or entering a PIN. In Wi-Fi Direct mode, the default IP address is 192.168.43.1 when
devices connect to it. For instructions on configuring the WVA to use Wi-Fi Direct, see Configure
WVA for Wi-Fi Direct.
CAUTION! Switching the WVA to Wi-Fi Direct mode disables access point mode. This
means the only way that you can access the WVA is through a device supporting Wi-Fi
Direct. If you cannot access the WVA, reset the device to factory defaults. For more
information, see Reset the WVAto factory defaults.
Configure WVA for Wi-Fi Infrastructure mode
To configure the WVA as a client device in a wireless network infrastructure:
1. Open the web interface.
2. In the web interface, go to Configuration > Wireless Network.
Wireless Vehicle Bus Adapter (WVA) Getting Started Guide
22
Page 23
Configure the WVA Configure wireless settings
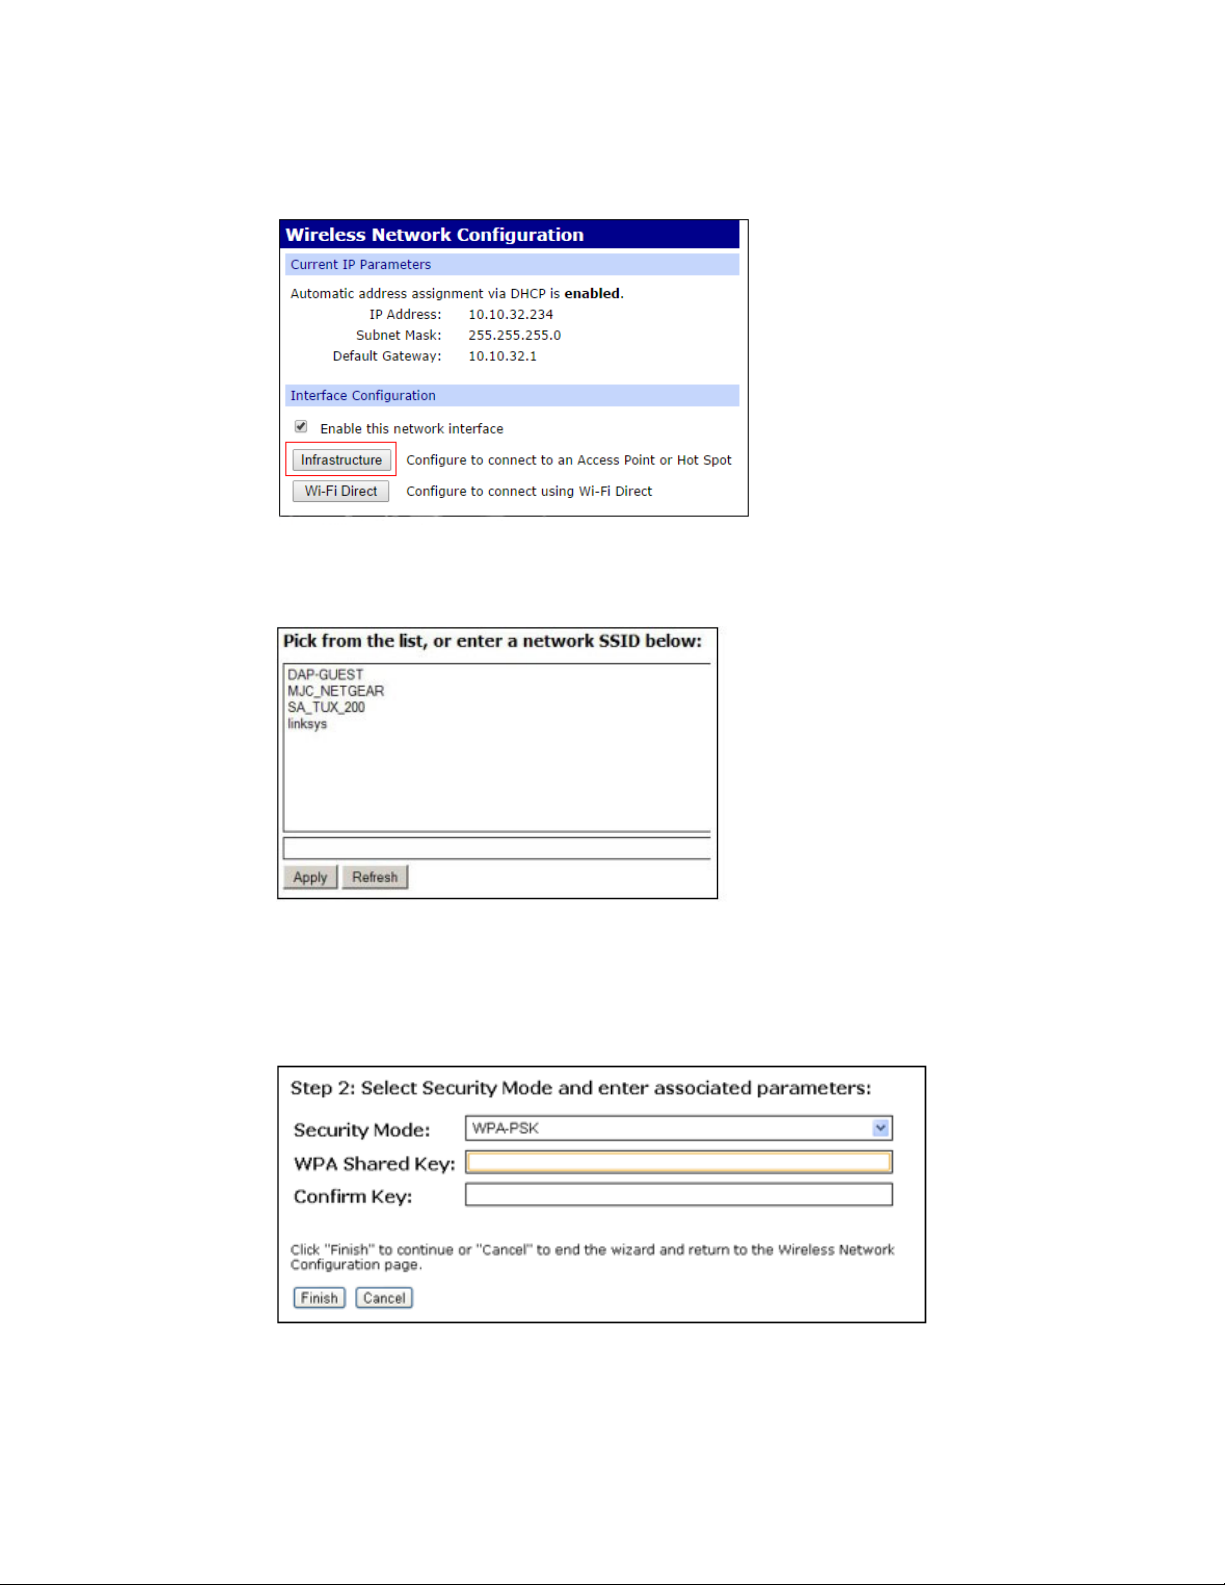
3. The Wireless Network Configuration page appears. In the Interface Availability
Configuration section, click Infrastructure.
4. The Wi-Fi Infrastructure Wizard appears.
a. The wizard scans for available wireless networks, and displays them in a list.
b. Click Apply.
5. Select the security mode and enter the associated parameters for the security mode. If you do
not know these values, contact your network administrator. The default security mode for the
WVA is WPA-PSK.
Wireless Vehicle Bus Adapter (WVA) Getting Started Guide
23
Page 24
Configure the WVA Configure wireless settings
6. When the wizard completes, the WVA connects as a client to the wireless network you selected
in step 4. The WVA gets its IP address via DHCP.
Configure WVA for Wi-Fi Direct
To configure the WVA for access by Wi-Fi Direct:
1. Open the web interface.
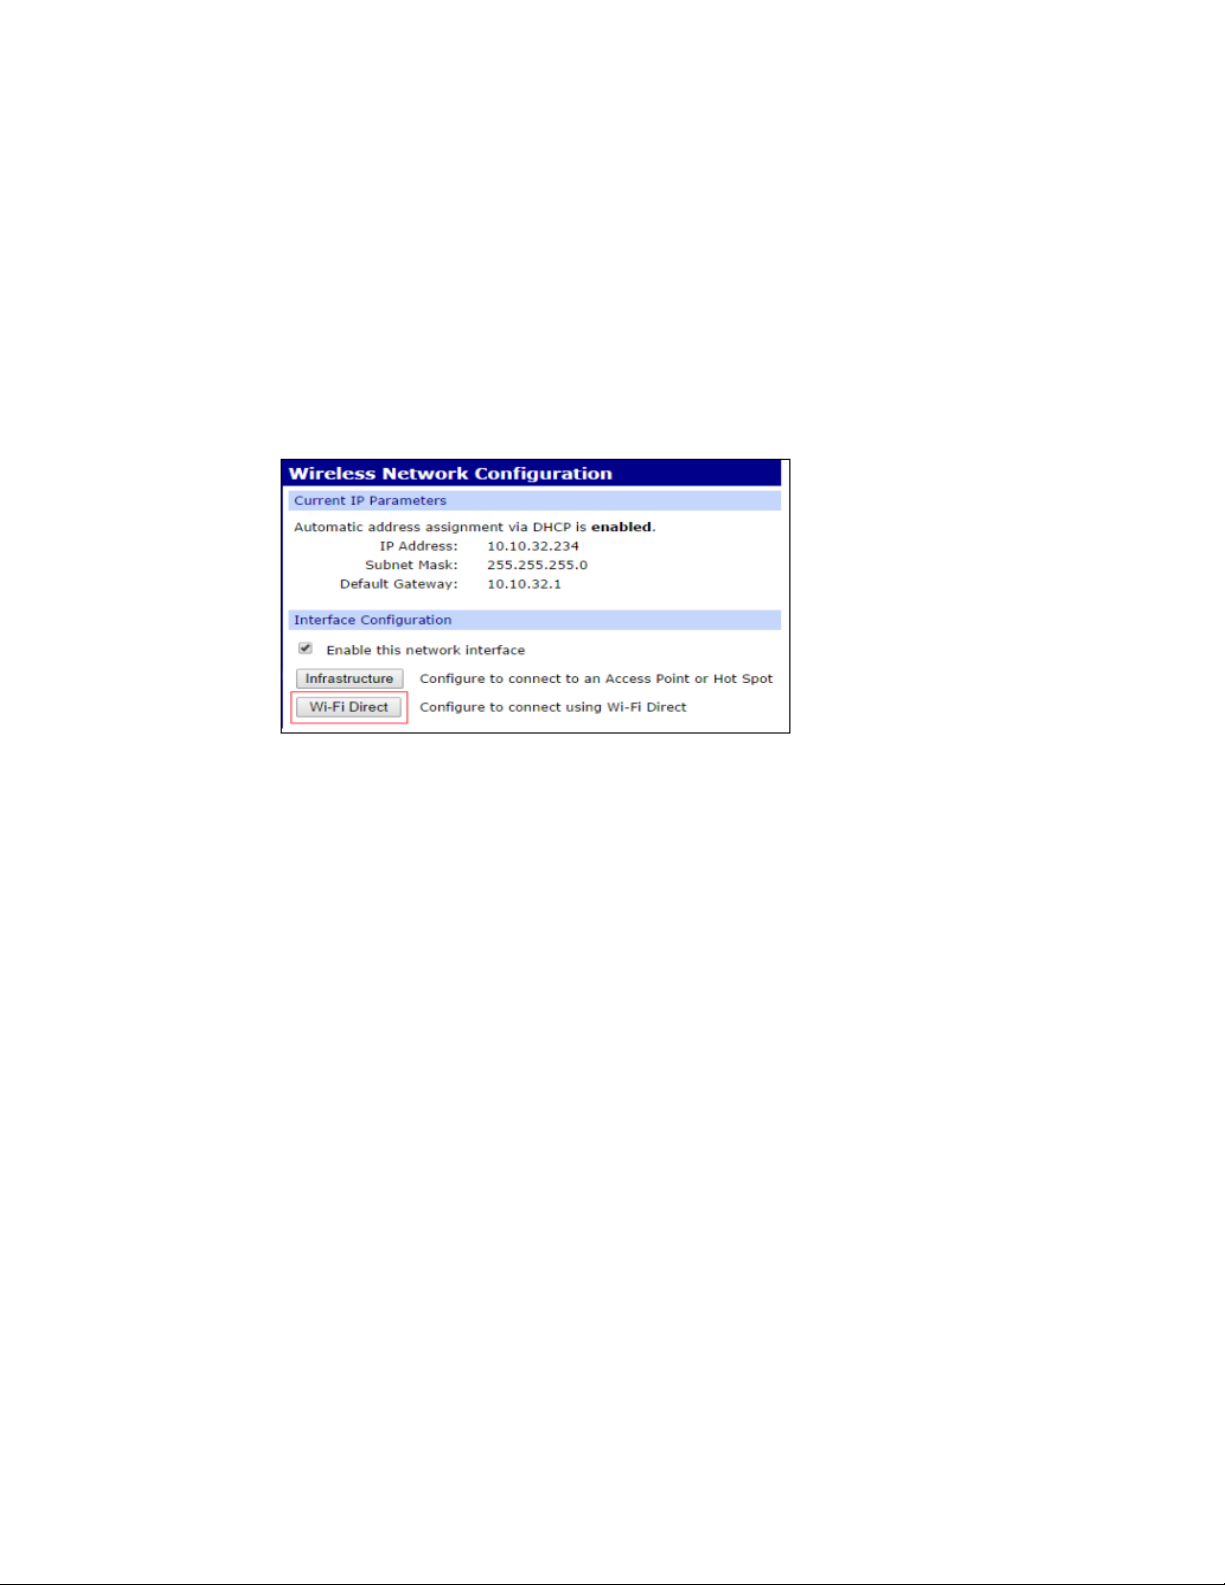
2. In the web interface, go to Configuration > Wireless Network. The Wireless Network
Configuration page appears.
3. Under Interface Availability Configuration, click Wi-Fi Direct.
Wireless Vehicle Bus Adapter (WVA) Getting Started Guide
24
Page 25

Configure the WVA Configure wireless settings
4. The Wi-Fi Direct Wizard launches. The wizard prompts you for a device name and the method
for establishing the Wi-Fi Direct connection.
a. In the Device Name field, enter an identifier associated with the WVA. The
recommended name is the fleet ID for the vehicle, such as truck326:
Wireless Vehicle Bus Adapter (WVA) Getting Started Guide
25
Page 26

Configure the WVA Configure wireless settings
b. In the WPS Method field, select the Wi-Fi Protected Setup (WPS) method that Wi-Fi
Direct users will use to connect to the WVA. Options are:
n Push Button: Configures the Wi-Fi Direct connection to be established by a
user pressing the WVA button. The Push Button method establishes the Wi-
Fi Direct connection from the phone/tablet side with no data entry required.
Because most phone/tablet devices remember the connection, the
connection needs to be established only once. However, users must locate
the WVA in the vehicle to press the button, which can be difficult to do in
some vehicles.
n Enter PIN: Configures the Wi-Fi Direct connection to be established by a user
entering a PIN on the connecting device (phone or tablet). Using the Enter
PIN method eliminates the need to locate the WVA in the vehicle to press
the button. However, it requires users to enter the PIN from the connecting
device every time the user accesses the WVA.
n WPS PIN: Selecting a value for the WPS Method option displays the next
field, WPS PIN. This is the PIN users enter to establish the Wi-Fi Direct
connection. This PIN is an eight-digit code. Enter the first seven digits of the
PIN. The eighth digit is calculated and displayed.
n Checking the Reconfigure IP addresses for Wi-Fi Direct checkbox forces
the WVA's IP addressing to a mode that always works for Wi-Fi Direct. Digi
recommends keeping this checkbox check.
5. Click Finish to complete the wizard.
6. When the wizard completes, if a reboot is required, click Reboot to complete the configuration.
The WVA enables Wi-Fi Direct mode and is configured with a default IP address of 192.168.43.1
Wireless Vehicle Bus Adapter (WVA) Getting Started Guide
26
Page 27

Configure the WVA Configure CANbus baud rate (CANbus simulator use only)
Note The settings on the Wireless Access Point page are advanced settings, intended for
experienced WVA users only. Take care in changing settings on that page, as they can invalidate
standard Wi-Fi settings.
Configure CANbus baud rate (CANbus simulator use only)
If you are using the WVA connected to a CAN simulator, you need to configure the CAN bus baud rate.
CAUTION! When connected to a CAN bus with multiple active devices, such as in a
vehicle, the WVA can automatically select the CAN bus baud rate. However, when
connected to a single device, such as the recommended CAN simulator for the WVA,
specifying the baud rate is necessary to prevent a baud rate mismatch.
To configure the CAN bus baud rate, follow these steps:
1. Open the WVA web interface.
2. In the web interface, go to Configuration > CAN Bus. There are two groups of settings for the
two CAN bus interfaces.
3. In the CAN Bus 1 Settings section:
a. Verify that the Enable CAN Bus option is selected.
b. Change the Baud Rate setting from its default, Auto Baud, to 250000.
Wireless Vehicle Bus Adapter (WVA) Getting Started Guide
27
Page 28

Configure the WVA Configure Python programs
CAUTION! If any single device is set to the wrong rate, the entire CAN bus can be
affected negatively.
4. If also using the second CAN bus interface, in the CAN Bus 2 Settings section:
a. Verify that the Enable CAN Bus option is selected.
b. Change the Baud Rate setting from its default, Auto Baud, to 250000.
5. Click Apply.
Configure Python programs
You can configure the WVA to automatically run a specified set of Python programs each time the WVA
starts up and when the Python applications exit. You access the Python Configuration page in the
WVA web interface.
To configure a new Python application in the WVA:
1. Open the WVA web interface.
2. Upload the desired Python file to the WVA device from the File Management page. For
instructions, see Upload a file to the WVA.
3. In the web interface, go to Configuration > Python. The Python Configuration page appears.
The page displays a list of Python processes or applications that are currently configured in the
WVA. The status of each process and the action that will be executed when the Python
applications exit also appears. The list is empty if no Python processes or applications have
been configured.
Wireless Vehicle Bus Adapter (WVA) Getting Started Guide
28
Page 29

Configure the WVA Configure Python programs
4. In the Command Line field, enter the name of the Python file to be configured, and any
program arguments.
5. Configure the application to automatically run when the WVA device starts up by clicking the
corresponding checkbox in the Enable column.
Note When you check this option, the Python application also runs when the configuration
changes are saved.
6. In the corresponding Action On Exit combo box, select the action option that should run when
the Python application exits.
n No action taken: Continue device operation without doing anything about the program.
n Restart the application: Restart the Python application.
n Reboot the device: Reboot the WVA.
7. Click Apply to save the changes.
8. After a Python application has been configured, the indicators in the Active column change
color to show the status of the Python application.
n Gray: Application is not running.
n Green: Application is running.
Start or stop an already configured Python application
You can immediately start or stop a Python application that has been configured in the Python
Configuration page in the WVA web interface.
Note You must have previously configured a Python application in the Python Configuration page.
For instructions, see Configure Python programs.
Wireless Vehicle Bus Adapter (WVA) Getting Started Guide
29
Page 30

Configure the WVA Configure network services
1. Open the WVA web interface.
2. In the web interface, go to Configuration > Python. The Python Configuration page appears.
n Immediately stop a Python script: De-select the Enable checkbox that corresponds
to the configured Python application.
n Immediately start a Python script: Select the Enable checkbox that corresponds to
the configured Python application.
3. Click Apply to save the changes.
Determine whether Python applications are running
The colored indicators in the Active column in the Python Configuration page in the WVA web
interface indicate whether the corresponding application is running.
Note You must have previously configured a Python application in the Python Configuration page.
For instructions, see Configure Python programs.
1. Open the WVA web interface.
2. In the web interface, go to Configuration > Python. The Python Configuration page appears.
3. View the indicator in the Active column for each configured Python application:
n Green: Application is running.
n Gray: Application is not running.
Configure network services
You can configure network services in the Network Service Configuration page in the WVA web
interface. Settings on this page enable or disable common network services on the WVA, and configure
the network port on which the service is listening. You can disable network services to improve device
security, so the device runs only specifically needed network services.
1. Open the WVA web interface.
2. In the web interface, go to Configuration > Network Services to display the Network
Services page.
Wireless Vehicle Bus Adapter (WVA) Getting Started Guide
30
Page 31

Configure the WVA Configure power management settings
3. Enable/disable the network services as needed. See Network Service Configuration page
descriptions for more information about each service and its default TCP port number. It is
usually best to use the default TCP port numbers for these services because they are well-
known by most applications.
4. Click Apply.
Configure power management settings
You can configure power management settings in the Power Management Configuration page in the
WVA web interface. With these settings, you can control whether the WVA powers down once it has
been determined that the vehicle is not running, and choose from a variety of mechanisms for waking
the WVA again. For more detailed information, see About power management.
To configure power management using the web interface:
1. Open the WVA web interface.
2. In the web interface, go to Configuration > Power Management. The Power Management
Configuration page appears.
Wireless Vehicle Bus Adapter (WVA) Getting Started Guide
31
Page 32

Configure the WVA Configure power management settings
3. The power management service is disabled by default. To enable it, check the Enable Power
Management checkbox:
When Power Management is enabled, all the Power Management settings appear:
4. View and change the power management settings as needed. See Power Management
Configuration page descriptions for information about the settings and defined defaults.
5. Click Apply to save the changes.
Wireless Vehicle Bus Adapter (WVA) Getting Started Guide
32
Page 33

Configure the WVA Enable Remote Manager connectivity (optional)
About power management
The WVA has a configurable power management service. You can use the power management settings
to control whether the WVA powers down ("sleeps") when the vehicle is not running, and choose from
a variety of mechanisms for waking the WVA again. During the time the WVA is sleeping, its power
consumption is dramatically reduced, which prevents the device from draining the vehicle battery.
When you enable power management, the WVA detects that the engine is not running, then waits a
specified amount of time and goes to sleep. The specified time is configurable and can be delayed if
there is an important operation on the vehicle. Instances where a delay would be desirable include:
n To allow a web services-based application to interact with the device (and, in a sense, the
vehicle) for a certain period of time after no engine activity.
n To reduce the latency involved in responsiveness while the WVA boots if the vehicle is only shut
off for a brief period. For example, if the vehicle were turned off and then back on quickly, such
a delay could cause the WVA to avoid its own boot time by simply staying awake.
You can configure the WVA to wake under one or more of the following conditions:
n When a configurable timer expires.
n When the alternator is generating power.
n When the WVA detects sufficient vibration; for instance, slamming the driver door or starting
the engine.
n When a user presses the WVA button.
The power management service is integrated with the standard device settings. There are two ways
to configure these settings:
n Using the settings on the Power Management Configuration page. See Configure power
management settings.
n Through the WVA web services. See Wireless Vehicle Bus Adapter Application Developer's Guide
for more information on web services.
Enable Remote Manager connectivity (optional)
By default, the connectivity of the WVA device to Remote Manager for remote device management is
disabled.
Digi Remote Manager® connectivity is typically only available when the WVA is in Infrastructure mode,
operating as a Wi-Fi client, and the device acting as the access point for the WVA forwards traffic to
the Internet.
Note To serve our customers most effectively, Digi International Inc. is consolidating its cloud
services, Digi Device Cloud and Digi Remote Manager®, under the Remote Manager name. This phased
process does not affect device functionality or the functionality of the web services and other
features. However, you will find instances of both Device Cloud and Digi Remote Manager in some
documentation, firmware, and user interfaces.
To enable Remote Manager connectivity:
1. If enabling Remote Manager, you must set the WVA real-time clock through web services. See
Default behavior regarding time. An example of setting time via web services is included in the
WVA demo application.
Wireless Vehicle Bus Adapter (WVA) Getting Started Guide
33
Page 34

Configure the WVA Enable Remote Manager connectivity (optional)
2. Open the WVA web interface.
3. In the web interface, go to Configuration > Device Cloud Connectivity. The Device Cloud
Configuration page displays.
4. Select the Enable Device Cloud Connectivity option. Do not change the default values in the
dialog.
5. Click Apply.
6. When Remote Manager connectivity is enabled, several network connection states are added
to the Network Connectivity Status list on the Device Information page. For descriptions of
each option, see Device Information page descriptions.
Wireless Vehicle Bus Adapter (WVA) Getting Started Guide
34
Page 35

Manage the WVA device
The topics in this section explain how to manage the WVA devices.
Rediscover the WVA 36
Reboot the WVA 37
Reset the WVAto factory defaults 37
Disable and enable the factory reset button 37
WVA filesystem and file management 37
View the system log 38
View status information 42
Wireless Vehicle Bus Adapter (WVA) Getting Started Guide
35
Page 36

Manage the WVA device Rediscover the WVA
Rediscover the WVA
To determine the IP address of a WVA connected to a network in Infrastructure mode, you can use the
Digi Device Discovery Utility to rediscover the device.
1. Download the Digi Device Discovery Utility.
a. Access the WVA Support Services page.
b. Scroll down to the Support Downloads section.
c. Click Diagnostics, Utilities & MIBS to expand that section of the page.
d. Search for "Wireless Vehicle Bus Adapter".
e. Click the Wireless Vehicle Bus Adapter option when it appear in the All Products
window. The Wireless Vehicle Bus Adapter (WVA) product support page appears.
f. From the Operating System Specific Utilities list box in the Diagnostics, Utilities
& MIBS section, select your operating system. A list of options appears in the
Operating System Specific Diagnostics, Utilities and MIBs section.
g. Click on the desired option to download the utility.
2. Run the Digi Device Discovery Utility from your PC’s Start Menu: Start > Digi > Digi Device
Discovery > Digi Device Discovery. The Digi Device Discovery window appears.
3. In the Digi Device Discovery device list, locate your WVA in the list of devices by matching the
MAC Address on your WVA label to the corresponding value in the MAC Address column.
4. Use one of the following methods to open the web interface for the device:
n Double-click the device.
n Select the device, and choose Open web interface from the Device tasks section.
Wireless Vehicle Bus Adapter (WVA) Getting Started Guide
36
Page 37

Manage the WVA device Reboot the WVA
Reboot the WVA
You can reboot the WVA device from the WVA web interface.
You may need to reboot the WVA if you have lost your network connection and are unable to reconnect
to the network. When you reboot, you will lose any CAN traffic information that occurs during the
reboot process.
1. Open the WVA web interface.
2. In the Device Information (Home) page, choose Administration > Reboot.
Reset the WVAto factory defaults
In some situations, you may need to reset the WVA to factory defaults. For example, if you reboot the
WVA and it doesn't recover, you can reset the WVA to force it to recover.
A factory reset clears all custom configuration settings since the device was last reset. After the
reboot, you must reenter and reapply any configuration settings unique to your device.
To reset the WVA to factory defaults, press and hold the button on the top of the WVAfor 10 seconds.
Note You can disable the factory reset by button press, if needed. For instructions, see Disable and
enable the factory reset button.
Disable and enable the factory reset button
If desired, you can disable the factory reset by button press. Once you have disabled this feature, you
will not be able to reset the WVA to factory defaults. You can re-establish this feature by enabling the
factory reset button.
You can use the WVA web services configuration resource config/button to disable and enable the
factory reset button.
See the description of this resource in the Wireless Vehicle Bus Adapter (WVA) Application Developer
Guide.
Disable the factory reset button
Set the config/button resource to "none" to disable.
<button>
<reset_to_factory>none</reset_to_factory>
<button>
Enable the factory reset button
Set the config/button resource to "default" to re-enable.
<button>
<reset_to_factory>default</reset_to_factory>
<button>
WVA filesystem and file management
The WVA has a Linux-based filesystem.
Two directory folders are available:
Wireless Vehicle Bus Adapter (WVA) Getting Started Guide
37
Page 38

Manage the WVA device View the system log
n The /WEB/python/ directory is for user-specific files, such as custom applications. This area is
read-write and you can add additional files as needed for your application.
n The /WEB/logging directory is read-only and contains system log files, including eventlog.txt,
python.log, and digi.log. For more information on these files, see View the system log.
For more information on the filesystem, see the Filesystem interfaces topic in the Wireless Vehicle Bus
Adapter (WVA) Application Developer Guide.
Access/Browse the filesystem from device interfaces
There are several ways in which you can interact with the filesystem on the WVA:
n File Management page in the web interface. See File Management page descriptions.
n Remote Manager File Management functions. See Enable Remote Manager connectivity
(optional).
n Web services filesystem interfaces. These resources are used to browse and create directories
and manipulate files. See Configure network services.
n The web interface when performing several operations, including firmware updates and
backup/restore operations. See WVA web interface page descriptions.
View the system log
The System Message Log File Browser in the WVA web interface is a diagnostic tool that allows you
to view entries in a system log file. The default log file that you can view from this browser is
eventlog.txt. This file is the primary message log for informational notices.
Logging is always enabled and is not user-configurable. When the WVA operates in an unexpected
manner, the log entries can be sent to Digi for analysis by Technical Support and Engineers. The event
log cannot be turned off, to ensure that Digi receives an accurate view of all aspects of the operation
of the device.
Wireless Vehicle Bus Adapter (WVA) Getting Started Guide
38
Page 39

Manage the WVA device View the system log
Log files and contents
There are other system log files that are available for debugging specific parts of the system. These
log files have a fixed size and roll over when the maximum size is reached. When the file rolls over, a
single secondary file is created with the extension .0 . For example, when eventlog.txt rolls over, the
older data will be stored in file eventlog.txt.0. When both files reach their maximum size, the older file
is overwritten.
Many of the log files are stored in persistent memory (flash) and contain data from multiple boots.
Log file Contents
eventlog.txt
eventlog.txt.0
Wireless Vehicle Bus Adapter (WVA) Getting Started Guide
High-level system messages.
39
Page 40

Manage the WVA device View the system log
Log file Contents
python.log
python.log.0
digi.log
digi.log.0
messages.log
messages.log.0
cherokee.log
cherokee.log.0
The options in the Message Filters for Displayed Log File section allow Digi Technical Support
working with customers on troubleshooting issues to more quickly focus on areas of interest in the
log file as needed.
To view these other log files in the System Message Log File Browser page, enter the file name in the
field below Log File and click Get File. Or, or select Other log; enter the desired log file, and click Get
File. The following example shows digi.log being selected and the messages in digi.log.
Note that digi.log involves several more message filters:
Captures any output of Python programs that were started with the
Python auto-start feature.
For internal use only. Digi Technical Support may request that you send
this file when assisting you with troubleshooting.
For internal use only.
For internal use only.
Wireless Vehicle Bus Adapter (WVA) Getting Started Guide
40
Page 41

Manage the WVA device View the system log
Wireless Vehicle Bus Adapter (WVA) Getting Started Guide
41
Page 42

Manage the WVA device View status information
View status information
Several pages in the WVAweb interface indicate device status information.
n Network Connectivity Status section in the Device Information (Home) page. For detailed
information, see Device Information page descriptions.
n Adapter Status page. This page includes information about the wireless network and vehicle
status. Choose Administration > Adapter Status to display the page. For detailed information
about the options in this page, see Adapter Status page descriptions.
Wireless Vehicle Bus Adapter (WVA) Getting Started Guide
42
Page 43

Deployment decisions
The WVA has several default startup and operation behaviors to be considered in your own network's
setup and operation. If these behaviors present any conflicts with your network's configuration and
operation, you may need to make adjustments to the WVA or the network.
Default behavior regarding time
The WVA has a real-time clock. This clock must be set using the web services interface resource
hw/time by the connected device (phone, tablet, PC). See the description of the hw/time resource in
the Wireless Vehicle Bus Application Developer's Guide.
For information about accessing the web services interface, see Access and navigate the web services
section in the Wireless Vehicle Bus Application Developer's Guide.
When disconnected from a power source, either in a desktop environment or a vehicle's diagnostic
port, the real time clock keeps its time for two hours. After that point, the time is lost and the real
time clock must be reset.
As long as the WVA is installed in the vehicle, you can assume the WVA clock is accurate. Once the WVA
is disconnected from the vehicle and not powered by any other source, some drift in the time can
occur.
Note that in any application code developed for the WVA, the system time must be set by the hw/time
resource before any firmware update operations.
Default behavior regarding Wi-Fi network connectivity
To ensure that you can easily connect to the WVA device during initial configuration, the WVA Wi-Fi is
temporarily in access point mode.
The SSID for the WVA access point is wva-mac-address. It is strongly recommended that the WVA be
configured to communicate in your local wireless network. See Configure wireless settings.
Default behavior regarding Remote Manager connectivity
The WVA's connection to Remote Manager is disabled by default. You can enable Remote Manager if
needed. For more information, see Enable Remote Manager connectivity (optional).
Default behavior regarding IP address assignment
IP addresses that the WVA uses depend on the network type:
n IP address of the Wi-Fi access point interface: The access point is accessible at the address
192.168.100.1 when the WVA is in Infrastructure mode.
Wireless Vehicle Bus Adapter (WVA) Getting Started Guide
43
Page 44

Deployment decisions Default behavior regarding IP address assignment
n IP address of the Wi-Fi client interface: By default, when the WVA connects out to another
access point in Infrastructure mode, it gets its IP address via DHCP. The WVA can do this in
parallel with devices connecting to it as an access point. The IP address assignment via DHCP
is enabled by default.
n IP address in Wi-Fi Direct mode: The default IP address in Wi-Fi Direct mode is 192.168.43.1.
Wireless Vehicle Bus Adapter (WVA) Getting Started Guide
44
Page 45

WVA web interface page descriptions
You can find information about the options in the WVA web interface pages in this section.
Adapter Status page descriptions 46
CANBus page descriptions 47
Device Information page descriptions 47
File Management page descriptions 49
Network Service Configuration page descriptions 50
Power Management Configuration page descriptions 51
Python Configuration page descriptions 52
Wireless Vehicle Bus Adapter (WVA) Getting Started Guide
45
Page 46

WVA web interface page descriptions Adapter Status page descriptions
Adapter Status page descriptions
You can view information about the wireless network and vehicle status in the Adapter Status page.
The following table describes each of the options in the Adapter Status page.
Current Wireless Networks Status section
The items in this section show the status of the wireless connection.
Status field Description
Configured SSID The configured wireless network access point for the device.
Active SSID The active wireless network access point being used by the device.
Access Point
Signal Level The average power measurement of frames that the WVA receives
Link Quality An indicator of the quality of the wireless signal, taking into account
If the WVA is currently connected to a wireless network access
point, this field contains the MAC address of the access point to
which the WVAis connected.
from the access point, in dBM. See Wireless signal strength issues
for troubleshooting information.
n Excellent: A signal level from -40 to -30 dBm.
n Good: A signal level from -60 to -70 dBm is good.
n Poor: Any signal level lower than -75 dBm.
background noise. Link quality is usually displayed as a fraction with
70 being the denominator; for example, 47/70. The larger the
numerator, the better the signal. A signal quality of 70/70 indicates
a perfect signal, while 10/70 indicates a poor one.
Current Vehicle Status section
This section includes status items about the vehicle or simulated vehicle to which the WVA is
connected. These values are set when the page appears and are not dynamically updated.
Status field Description
VIN
Engine Speed
Vehicle Speed
CAN Bus Statistics
Wireless Vehicle Bus Adapter (WVA) Getting Started Guide
Vehicle identification number.
The current speed of the vehicle's engine, in RPM.
The current speed of the vehicle, in KPH.
The number of bytes/packets sent and received from each CAN bus.
This section of the status display should be updating while the
vehicle is running. You can use this section to verify that the
connection from the WVA to the CAN bus is correct.
46
Page 47

WVA web interface page descriptions CANBus page descriptions
Status field Description
Refresh Once Click Refresh Once to immediately update the status information in
the screen.
Refresh Automatically Click Refresh Automatically to automatically update the status
information in the screen every 5 seconds.
CANBus page descriptions
The following table describes each of the sections in the CAN Bus page. You can configure up to two
CAN bus devices. The options in each section are the same.
For configutation information, see Configure CANbus baud rate (CANbus simulator use only).
Note For vehicle use, the baud rate should always be Auto Baud, which is the default.
Item Description
Enable CANBus Select this option if you are using a CANbus device.
Baud Rate Select the correct baud rate.
n Auto Baud: This is the default. For vehicle use,
n 250000: Select this option if you are using a
Device Information page descriptions
The following table describes each of the sections in the Device Information (Home) page.
For more information about this page, see Open the web interface.
the baud rate should always be Auto Baud.
CANbus device.
Wireless Vehicle Bus Adapter (WVA) Getting Started Guide
47
Page 48

WVA web interface page descriptions Device Information page descriptions
Item Description
Home link Click Home in the menu on the left side to return to the
Device Information page.
Current System Status
Summarizes current system parameters and network
connectivity status.
Network Connectivity Status Indicates the readiness of the WVA to communicate in
a wireless network using a colored indicator. Options
are:
n Orange: Not ready
n Green: Ready
Refresh button Click Refresh to refresh the information on the page.
Configuration menu
Displays pages for configuring settings for various
features. Some configuration settings are organized on
sets of linked screens. The choices in this menu may
vary based on product and supported features.
Administration menu
Displays pages for common device administration
tasks.
The Network Connectivity Status bar display includes a list of status indicators.
If Remote Manager connectivity is not enabled, the status conditions are as follows:
If Remote Manager connectivity is enabled, the status conditions are as follows:
Wireless Vehicle Bus Adapter (WVA) Getting Started Guide
48
Page 49

WVA web interface page descriptions File Management page descriptions
Note For information about enabling Remote Manager connectivity, see Enable Remote Manager
connectivity (optional).
Status field Description
Network interface detected
Connected to local network
IP address assigned
Prepared to contact Device Cloud
server
Contacted Device Cloud server
Ready for Device Cloud
communication
Wi-Fi AP or Ad-Hoc network detected. Connecting to WiFi. Waiting for association.
Connected to Wi-Fi. Establishing LAN connection. Waiting
for IP address.
An IP address has been assigned to the gateway.
Connected to Wi-Fi network.
The device is waiting for Remote Manager service to
take control, and for DNS resolution of server chosen by
the Remote Manager service; that is, the server
specified in the Configuration > Device Cloud
Connectivity settings, in the Device Cloud Server field.
The device is establishing a Remote Manager
connection. It is waiting for protocol level “connection”
with the Remote Manager server, which might include
authentication.
The device is connected to the Remote Manager server.
File Management page descriptions
The following table describes each of the sections in the File Management page.
Item Description
Volume information Displays the current directory for loading files and free space
remaining. Digi recommends using no more than 20 MB for
custom applications, as the WVA requires a portion of the same
space to be capable of managing persistent system logs and
firmware updates.
Upload to Current Directory Uploads files to the current directory. Use the Browse button
to find a file on your computer to be uploaded to the WVA. Click
Update file to begin the file upload process.
For more information, see Upload a file to the WVA.
File List A listing of the “current directory” (as noted in the Volume
Information area) on the device.
Open
Make Directory
Save As
Opens a directory after it is selected in the file list. The “current
directory” changes and the file list is updated.
Creates a new, empty directory in the “current directory.”
Downloads a regular file from the filesystem to your local PC.
Wireless Vehicle Bus Adapter (WVA) Getting Started Guide
49
Page 50

WVA web interface page descriptions Network Service Configuration page descriptions
Item Description
Remove Select a file or an empty directory and click Remove to delete
the file or directory.
Refresh Click Refresh to reload all the information on the page.
Network Service Configuration page descriptions
The following table describes each of the sections in the Network Service Configuration page.
For information about configuring this page, see Configure network services.
Network
Service
setting Services provided
Enable
Secure Shell
Server (SSH)
Enable Web
Server
(HTTP)
Enable
Secure Web
Server
(HTTPS)
Reserved for remote device access by Digi personnel for debugging
purposes.
HyperText Transfer Protocol (HTTP), also known as Web Server. HTTP
provides access to web pages for configuration and web services. HTTP
and HTTPS are also referred to as Web Server or Secure Web Server.
These services control the use of the web interface. If HTTP and HTTPS
are disabled, device users cannot use the web interface to configure,
monitor, and administer the device.
HyperText Transfer Protocol over Secure Socket Layer (HTTPS), also
known as Secure Web Server. HTTPSuses encryption to improve the
security of web data transfers.
Default
TCP port
number
22
80
443
Wireless Vehicle Bus Adapter (WVA) Getting Started Guide
50
Page 51

WVA web interface page descriptions Power Management Configuration page descriptions
Network
Service
setting Services provided
Enable Web
Services
Events
In the web services, the Event Channel is the mechanism for delivering
asynchronous, out-of-band data, such as alarms and periodic updates
from subscriptions to vehicle data endpoints. For more information
about the web services, see the Wireless Vehicle Bus Adapter Application
Developer Guide.
This setting is disabled by default. Set the port number to a value
between 1025 and 65535 that is not already assigned to another service.
The example below shows the TCP port being set to 5000, which is the
TCP port number set in the WVA demo application.
Advanced
Device
Discovery
Protocol
(ADDP) Mode
Digi's Advanced Device Discovery Protocol allows devices to be found on
a network, regardless of protocol. You can also use ADDP to change
network settings, or disable the service completely.
There are three settings for this network service:
n Read-Write: Allows discovery of devices and the ability to change
network settings. This is the default setting.
Default
TCP port
number
0
n Read-Only: Allows discovery of devices only.
n Off: Turns off the ADDP network service. This setting completely
closes the network port used for device discovery.
Power Management Configuration page descriptions
The following table describes each of the options in the Power Management Configuration page.
For more information about configuring power management settings, see Configure power
management settings.
Section Option Description
Current Settings
Enable Power Management
Enables the Power Management feature and
displays all Power Management settings.
Wireless Vehicle Bus Adapter (WVA) Getting Started Guide
51
Page 52

WVA web interface page descriptions Python Configuration page descriptions
Section Option Description
Sleep Settings
Wake on Movement
Settings
Wake on Alternator
Settings
Wake on Button
Settings
Enable Sleep on No Engine
Activity
Sleep Delay Timeout: n
seconds before sleeping
Enable Wake on Movement
Enable Wake on Alternator
Power
Enable Wake on Button
Press
Enables or disables the WVA going into sleep
mode when no engine activity (RPM=0) is
detected. The default is disabled (off).
The number of seconds the WVA should wait
before going to sleep when there is no
engine activity detected. The default is 120
seconds.
Enables or disables the WVA waking upon
detection of vibration, typically a sharp
vibration to the vehicle frame. The default is
disabled (off).
Enables or disables the WVA waking from
sleep mode upon detection of the alternator
running on alternator power rather than the
vehicle battery. The default is disabled
(off).
Enables or disables waking from sleep mode
by a button press. The default is disabled
(off).
Note The button press should be momentary
and not a press-and-hold, which could cause
the unit to reset to factory defaults.
Periodic Wake
Settings
Enable Periodic Wake Enables or disables periodic or timed wake
from sleep mode for the device. The default
is disabled (off).
Wake Timer The time, in minutes, for the sleeping WVA to
wait before waking. The time can range from
1 to 1440 minutes (24 hours). The default, if
enabled, is 5 minutes.
Python Configuration page descriptions
The following table describes each of the sections in the Python Configuration page.
For more information about configuring Python applications, see Configure Python programs.
Item Description
Enable Click the check box in the Enable column for the Python application
that should run when the WVA device starts up. When you check this
option, the Python application also runs when the configuration
changes are saved.
Wireless Vehicle Bus Adapter (WVA) Getting Started Guide
52
Page 53

WVA web interface page descriptions Python Configuration page descriptions
Item Description
Command Line The Python application name and any arguments.
Active The indicators in the Active column change color to show the status
of the Python application.
n Gray: Application is not running.
n Green: Application is running.
Action On Exit The action option that should run when the Python application exits.
Options are:
n No action taken: Continue device operation without doing
anything about the program.
n Restart the application: Restart the Python application.
n Reboot the device: Reboot the WVA.
Wireless Vehicle Bus Adapter (WVA) Getting Started Guide
53
Page 54

Run the WVAdemo application
Digi provides a demo Android application for the WVA that demonstrates several capabilities available
in the WVA and its software.
Get started
Use the topics below to get started using the demo application:
n Download the demo application
n Start the demo application and discover WVA devices
n Connect to the WVA
n Review the demo application dashboard
Learn the demo application software features
After you have connected the demo application to a WVA, you can learn how to use the software
features:
n View a live graph view of vehicle speed and engine RPMs. See Show graph view.
n Use the Event Channel to deliver alarms and notifications about the alarms and other events
to the demo application. See Configure endpoints: subscriptions and alarms.
n Configure the demo application settings. See Change application settings.
Build your own application
Digi created the demo application using the WVA Android library. For information on building your own
application with this library, see the WVA Android Library Tutorial, available from the Documentation
section in the WVA support page.
Download the demo application
1. Navigate to the WVA Product Support page.
2. Scroll to the Software section and click Demo Application: WVA Sample Application,
Android. The demo application is in a .apk file, and downloads automatically.
Wireless Vehicle Bus Adapter (WVA) Getting Started Guide
54
Page 55

Run the WVAdemo application Start the demo application and discover WVA devices
3. Install the .apk file on the Android device.
There are three installation scenarios:
Install the .apk file from an Android device:
Transfer the .apk file to the Android device via email or USB drive.
Install the .apk file from a Non-Android device:
a. Save the .apk file locally.
b. Transfer the .apk file to the Android device via email or USB drive.
Install the .apk file from the Android OS:
a. Open the .apk file. When downloading directly from an Android device, you can skip
this step.
b. Follow installation instructions on the screen.
4. Once the .apk file is on the Android device, follow the device's standard process for installing
the .apk file.
Note Your security settings on the Android device may block installations of applications that are not
from the Google play store. You may need to modify your security settings to run the application.
When the application installation completes, there are two choices: Done and Open.
n Click Open to start the application immediately. See Start the demo application and discover
WVA devices for more information.
n Click Done to close the application.
n To launch the application later, navigate to the Android device's Home screen, then to the
application drawer, and click the WVA application icon:
Start the demo application and discover WVA devices
After you have installed the demo application, you can run it.
1. Before you run the demo application, verify that the device is connected to the WVA. For data
to be displayed in the WVA demo application, the WVA must be connected to a CAN simulator or
connected to an actual vehicle bus, as described in Connect the hardware.
2. Navigate to the Android device's Home screen.
3. Navigate to the Android device's application drawer.
4. Click the WVA application icon:
Wireless Vehicle Bus Adapter (WVA) Getting Started Guide
55
Page 56

Run the WVAdemo application Connect to the WVA
Discover the WVA
The first time the WVA demo application is launched, it automatically performs a discovery of all
devices on your local network that are discoverable through a Digi-proprietary protocol called ADDP.
This is the same type of discovery operation performed in Rediscover the WVA. The discovery
operation is indicated by the progress spinner on the screen and action bar. For more information on
how the WVA uses ADDP, see the WVA Android Library Tutorial and accompanying ADDP information.
When devices are discovered, the devices appear on the right side of the screen. If no devices are
discovered, the message No devices found appears.
To perform another device discovery, click the circular arrows button in the top right corner of the
screen.
Connect to the WVA
After you have discovered devices, you can connect to a WVAin the discovered devices list.
Note The code for the WVA demo application can automatically detect when the WVA device closed its
end of the event channel socket. The WVA demo application waits 15 seconds before attempting to
reconnect.
1. In the discovered devices list, connect to the WVA by clicking the device name in the device
pane. This opens the dashboard.
Note Alternatively, you can connect to the WVA manually. See Optional: Manually connect to
the WVA.
2. A login prompt appears. For username, enter admin; for password, enter admin. Under
HTTPS Security, in most cases, select Use HTTPS.
Note If the login is unsuccessful, it is possible that the default Network Services setting on the
WVA for Enable Secure Web Server (HTTPS) changed from the default setting (enabled) to
use Enable Web Server (HTTP) or is disabled. The demo application and the WVA must sync in
their use of HTTPS or HTTP. See Demo application: user login fails.
Wireless Vehicle Bus Adapter (WVA) Getting Started Guide
56
Page 57

Run the WVAdemo application Review the demo application dashboard
3. When the login completes, if your network is set up properly, the demo application attempts to
initiate a connection to the selected device. Once the connection is initiated, the Review the
demo application dashboard appears.
Optional: Manually connect to the WVA
You can manually connect to the WVA, if you prefer this method over using the discovery method.
1. On the action bar, click the action overflow button:
2. Select Settings. The Applications settings dialog appears.
3. Under Connection Settings, select IP address for manual connection.
4. Enter the IP address of the WVA and click Save.
5. Once the IP address is set, anytime you want to make a manual connection, click the action
overflow button and select Manually connect.
Review the demo application dashboard
The first time the demo application opens, the demo application dashboard is empty. After the
application discovers all available data endpoints, and optionally subscribes to them, the dashboard
populates with data endpoints.
The dashboard has three panels:
Wireless Vehicle Bus Adapter (WVA) Getting Started Guide
57
Page 58

Run the WVAdemo application Show graph view
n Vehicle Data: Displays the most recent vehicle bus data for which subscriptions have been
made.
n Event Log: Displays a log of vehicle bus data updates and alarms sent over the Event Channel.
n Alarms and Subscriptions: Displays all vehicle bus data endpoints, which can be subscribed to
or set for alarms.
You can also see a graph view that plots several endpoints. See Show graph view.
Show graph view
The demo application has a graph view. Click the action overflow button and select Show graph.
The graph is built from two vehicle bus data endpoints, VehicleSpeed and EngineSpeed. Whenever
any new data for the endpoints come in to the application through the Event Channel, the graph view
plots these endpoints.
Note To use the Graph View from the demo application, you must perform a Sync Time operation to
synchronize the WVA system time with the Android device clock. Click the action overflow button and
select Sync time.
Configure endpoints: subscriptions and alarms
The dashboard has several options for handling vehicle bus data endpoints:
Wireless Vehicle Bus Adapter (WVA) Getting Started Guide
58
Page 59

Run the WVAdemo application Configure endpoints: subscriptions and alarms
n Subscribe to an endpoint. You can subscribe to individual endpoints or to all vehicle data
endpoints automatically in the application settings.
n Configure an endpoint as an alarm.
n Delete an alarm.
Subscribe to an endpoint
The following example uses an endpoint named BatteryPotential.
Wireless Vehicle Bus Adapter (WVA) Getting Started Guide
59
Page 60

Run the WVAdemo application Configure endpoints: subscriptions and alarms
1. In the dashboard's Alarms and Subscriptions panel, select the endpoint.
The Endpoint dialog appears:
Wireless Vehicle Bus Adapter (WVA) Getting Started Guide
60
Page 61

Run the WVAdemo application Configure endpoints: subscriptions and alarms
2. Subscribe to the endpoint.
a. Select Subscription enabled.
b. In the Interval value, specify the desired number of seconds between updates for
the endpoint.
3. When the endpoint is configured, it appears in the Vehicle Data panel:
Configure an endpoint as an alarm
You can configure an endpoint to act as alarm. When the alarm threshold is met, the alarm appears in
the Event Log, and an alarm notification is sent to the Android device's notification drawer.
The following example uses an endpoint named BatteryPotential.
1. In the dashboard's Alarms and Subscriptions panel, select the endpoint.
2. Select Alarm enabled.
3. Select an alarm threshold option.
n Above: When the data exceeds a certain value. A threshold value must also be entered.
n Below: When the data falls below a certain value. A threshold value must also be
entered.
n Change: Any change in value. Selecting Change disables the Threshold field.
n Delta: When the data changes by a certain amount.
Wireless Vehicle Bus Adapter (WVA) Getting Started Guide
61
Page 62

Run the WVAdemo application Configure endpoints: subscriptions and alarms
For example, this endpoint is configured for an alarm when the value of BatteryPotential
drops below 30:
Wireless Vehicle Bus Adapter (WVA) Getting Started Guide
62
Page 63

Run the WVAdemo application Configure endpoints: subscriptions and alarms
4. Click Save. The alarm appears in the Event Log, and an alarm notification is sent to the Android
device's notification drawer.
Delete an alarm
The following example uses an endpoint named BatteryPotential.
1. In the dashboard's Alarms and Subscriptions panel, select the endpoint.
2. Select the endpoint. The endpoint dialog appears.
Wireless Vehicle Bus Adapter (WVA) Getting Started Guide
63
Page 64

Run the WVAdemo application Change application settings
3. Select Remove alarm.
4. Click Save.
Change application settings
The demo application has several settings and preferences.
To access these settings:
1. Click the action overflow button and select Settings. The Application settings page appears.
2. On the Settings activity, you can configure application preferences such as alarm notification
sound.
The demo app settings are as follows:
n Notifications: Preferences on notifications.
l Alarm tone: The sound played when an alarm is triggered on the device.
n Connection Settings: Settings for network connections.
Wireless Vehicle Bus Adapter (WVA) Getting Started Guide
64
Page 65

Run the WVAdemo application Review fault codes
l IP address for manual connection: Identifies the IP address that is the destination for a
manual device connection. Once set, the manual connection can be established by
selecting Manual.
l TCP port for events: The TCP network port number used for the Event Channel. The WVA
demo application is set to use port number 5000, but this number can be changed.
n Application Settings: Settings for subscriptions and the Event Log.
l Endpoint auto-subscription: After successfully connecting to a device, there are
essentially two options for subscribing to vehicle bus data endpoints: automatically
subscribe to all available data endpoints, or subscribe to no data endpoints at all. This
option allows you to specify which subscription option should be used. To subscribe to no
vehicle bus data endpoints when the application dashboard is opened, select Don't
subscribe to anything. To subscribe to all vehicle bus data endpoints for a specified
interval, select one of the available time intervals.
l Auto-scroll event log: In the Event Log, new events are displayed at the top of the log. This
setting causes the log display to automatically scroll to the top of the log when new log
events occur.
Review fault codes
After you have connected to the WVA and collected data, you can review the fault codes.
Note You can create alarm conditions on a fault code. See Create an alarm on vehicle data in the WVA
Android Library Tutorial for more information.
1. In the application menu, click Fault Codes.
2. The Fault Code Browser screen displays.
Wireless Vehicle Bus Adapter (WVA) Getting Started Guide
65
Page 66

Run the WVAdemo application Review fault codes
3. Click on one of the CAN bus headings to query the WVA for the list of ECU units on that CAN
bus. You can click the Refresh icon to update the list.
4. From the list of ECU units, click on the ECU for which you want to inspect fault codes. Fetching
fault code options appear in the right-hand pane.
5. Click Fetch active fault code to query the WVA for the most recently reported active fault
codes. The active fault codes appear on the screen. If there are no active fault codes, the
message "No active fault codes have been reported" displays on the screen.
Wireless Vehicle Bus Adapter (WVA) Getting Started Guide
66
Page 67

Run the WVAdemo application Demo application issues
6. Click Fetch inactive fault code to query the WVA for the most recently reported inactive fault
codes. The inactive fault codes appear on the screen. If there are no inactive fault codes, the
message "No inactive fault codes have been reported" displays on the screen.
Demo application issues
In some conditions, the demo application has error-handling built in. You can click OK on some to
initiate error handling, However, some errors and conditions may require action on your part.
For more information about demo application error messages, see Demo application error messages.
Refer to the following topics for demo application troubleshooting issues:
n Demo application: Wi-Fi hotspot issues
n Demo application: user login fails
n Demo application: Connection Refused error (ECONNREFUSED)
n Demo application: Connection has gone away error
Wireless Vehicle Bus Adapter (WVA) Getting Started Guide
67
Page 68

Run the WVAdemo application Demo application issues
Demo application error messages
If any errors occur with the data connection, an error dialog appears. Click OK and the error is handled
according to the design of the application.
Failure to connect to device
This error occurs if you cannot connect to the WVA device.
Lost network connection
This error occurs while you are connected to the discovered WVA and the network connection is lost.
Android device not connected to Wi-Fi network
If your Android device is not properly connected to a Wi-Fi network, a message displays indicating that
you cannot attempt to connect to the device without first checking your connection: "Must be on Wi-Fi
or serving as a hotspot to use this application".
Demo application: Wi-Fi hotspot issues
In the demo application, during the Connect to the WVA step, this message may appear:
Must be on Wi-Fi or serving as hotspot to use this application.
Possible cause
The Android device is not connected to the WVA, or is not in Access Point (mobile hotspot) mode.
Solution
Make sure the Android device is connected to the WVA before trying to connect to the demo
application.
Demo application: user login fails
Your user login to the demo application fails.
Wireless Vehicle Bus Adapter (WVA) Getting Started Guide
68
Page 69

Run the WVAdemo application Demo application issues
Possible cause
n The demo application and the WVA must synchronize their use of security and authentication.
The WVA's Network Services settings for security and authentication may have been changed
from their defaults but the demo application is assuming a use of the defaults.
n There is also a chance that the Secure Web Server (HTTPS) and Web Server (HTTP) network
services have been disabled entirely.
Solution
If possible, review how the Network Services settings for HTTPS/HTTP are set for the WVA in the web
interface.
1. Attempt to open the web interface on the WVA.
2. If you can open the web interface, go to Configuration > Network Services. Check the
settings for Enable Secure Web Server (HTTPS) and Enable Web Server (HTTP) and make
these changes in the demo application:
n If HTTPS is on (checked) and HTTP is off (unchecked) (the default), make sure to check
Use HTTPS.
n If HTTPS is off (unchecked), make sure to deselect Use HTTPS.
3. If you cannot open the web interface, both HTTP and HTTPS may have been disabled on the
WVA. In this case, you cannot access a web browser to display and change settings. The only
way to return the WVA to the default setting of HTTP being enabled is to reset the device to
factory defaults. See Reset the WVAto factory defaults.
Demo application: Connection Refused error (ECONNREFUSED)
In the demo application, this connection error appears:
Connection with the WVA device encountered an error: failed to connect to device address (port 5000):
Connect failed
ECONNREFUSED (Connection Refused)
Possible cause
n The demo application was not able to set the Event Channel port properly.
n The demo application attempted to connect to the named port before the port was set, or
during the approximately 15 seconds the web service daemon requires for restart after setting
the port.
Solution
Try connecting to the WVA again. See Connect to the WVA.
Demo application: Connection has gone away error
In the demo application, you see the following connection error:
Connection has gone away
Wireless Vehicle Bus Adapter (WVA) Getting Started Guide
69
Page 70

Run the WVAdemo application Demo application issues
Possible cause
The Android device has been disconnected from the WVA. The demo application detects that condition
owing to a change in the Android device's network state. For example, the Android device was
connected to the WVA's Wi-Fi network, but the current state is not connected to Wi-Fi or connected to
another network type.
Solution
Try connecting to the WVA again. See Connect to the WVA.
Wireless Vehicle Bus Adapter (WVA) Getting Started Guide
70
Page 71

Troubleshooting
See the following topics for assistance if you run into issues with your WVA, such as connectivity
problems. If you need further assistance, contact Digi Technical Support at www.digi.com/support.
Power LED is dark 72
Device is not discovered by Digi Device Discovery 73
Cannot open web interface or access web services 75
Cannot receive data from the CANbus 76
WVA does not connect to an access point 77
Wi-Fi access issues 78
Cannot discover device using Wi-Fi Direct 79
Cannot associate with WVA over Wi-Fi Direct in push-button mode 80
Cannot associate with WVA over Wi-Fi Direct in PIN mode 81
Wireless signal strength issues 82
Wireless Vehicle Bus Adapter (WVA) Getting Started Guide
71
Page 72

Troubleshooting Power LED is dark
Power LED is dark
The Power LEDon the WVAis dark.
Note For more information about the WVA LEDs, please refer to WVALEDs.
Possible cause
Power is not applied.
Solution
Make sure the power supply is properly connected to a power source and the device.
Possible cause
Hardware failure.
Solution
1. Disconnect the WVAfrom the power source.
2. Reconnect the WVA to the power source.
3. If the Power LED remains dark, return the WVAto your supplier.
Wireless Vehicle Bus Adapter (WVA) Getting Started Guide
72
Page 73

Troubleshooting Device is not discovered by Digi Device Discovery
Device is not discovered by Digi Device Discovery
Possible cause
Another device user may have disabled the Device Discovery Service (ADDP) network service.
Solution
Check the Network Services settings. In the web interface, go to Configuration > Network Services
and check the Device Discovery Service (ADDP) Mode setting.
If the setting is Off, change it to either Read-Write (enable Device Discovery Service and allow
network settings to be changed) or Read-Only (enables Device Discovery Service only) and click
Apply.
Possible cause
Firewalls, either software or physical, are in place.
Solution
Make sure that any software firewalls are disabled, as software firewalls can block the discovery
process. Any physical firewall will almost certainly block the discovery process.
Possible cause
A router between the computer running the Digi Device Discovery utility and the WVA. Normally,
routers will block the discovery process.
Solution
If possible, remove any routers between the computer and the WVA and use a hub instead.
Possible cause
A switch between the computer and the WVA the Digi Device Discovery utility is configured to block the
discovery traffic.
Solution
Occasionally switches are configured to block the discovery traffic. If unsure, use a hub or a direct
Ethernet cable connection.
Possible cause
Bad port on your router/switch/hub.
Solution
Try using a different port.
Wireless Vehicle Bus Adapter (WVA) Getting Started Guide
73
Page 74

Troubleshooting Device is not discovered by Digi Device Discovery
Possible cause
Unknown.
Solution
If you have a second Digi device, try discovering it instead to see if you have the same problem.
Though it may not solve your original discovery problem, it should provide you with some additional
troubleshooting clues.
Wireless Vehicle Bus Adapter (WVA) Getting Started Guide
74
Page 75

Troubleshooting Cannot open web interface or access web services
Cannot open web interface or access web services
Problem
Cannot open the WVA web interface or access any of the web services.
Possible cause
Password has been changed from the default: admin.
Solution
Check whether another user of the device changed the password. To change the password back to
the default, Reset the WVAto factory defaults.
Possible cause
The Web Server network service (HTTP or HTTPS) is disabled.
Solution
Reset the WVAto factory defaults. See Configure network services for more information on HTTP and
HTTPS services.
Wireless Vehicle Bus Adapter (WVA) Getting Started Guide
75
Page 76

Troubleshooting Cannot receive data from the CANbus
Cannot receive data from the CANbus
When the WVAis connected wither to a CANsimulator or a vehicle diagnostic port, it does not receive
data from the CANbus.
Possible cause
When connecting to a CAN simulator, the baud rate was set to Auto Baud or an incorrect baud rate.
Solution
In the web interface, go to Configuration > CAN Bus. Make sure the Baud Rate setting is set to
250000. For more information, see Configure CANbus baud rate (CANbus simulator use only).
Possible cause
When connecting to a vehicle diagnostic port, the WVA is using the incorrect baud rate.
Solution
For vehicle use, the baud rate should always be Auto Baud. In the web interface, go to Configuration
> CAN Bus. Make sure the Baud Rate setting is set to Auto Baud. For more information, see CANBus
page descriptions.
Wireless Vehicle Bus Adapter (WVA) Getting Started Guide
76
Page 77

Troubleshooting WVA does not connect to an access point
WVA does not connect to an access point
The WVA does not connect to an access point.
Possible cause
n Device is already configured as an access point only.
n The SSID changed.
Solution
1. Determine and verify the new access point to which the WVA should connect.
2. Use the Digi Device Discovery Utility to rediscover the WVA. See Rediscover the WVA.
3. If the problem persists, reset device to factory defaults. See Reset the WVAto factory defaults.
Wireless Vehicle Bus Adapter (WVA) Getting Started Guide
77
Page 78

Troubleshooting Wi-Fi access issues
Wi-Fi access issues
Cannot access the WVA via Wi-Fi.
Possible cause
You entered an incorrect WPA passkey.
Solution
Determine the correct WPA passkey and enter it. You can also reset the WPA passkey to the default by
resetting the device to factory defaults. See Reset the WVAto factory defaults.
Wireless Vehicle Bus Adapter (WVA) Getting Started Guide
78
Page 79

Troubleshooting Cannot discover device using Wi-Fi Direct
Cannot discover device using Wi-Fi Direct
Cannot discover the WVAusing the Wi-Fi Direct method.
Possible cause
n The WVAmay not be configured for Wi-Fi Direct.
n The Wi-Fi Direct device name may have changed.
Solution
1. Reset the WVAto factory defaults to force it to a known, accessible state.
2. Connect to the device via its access point.
3. Run the Wi-Fi Direct wizard to enable Wi-Fi Direct mode, assign a known Wi-Fi Direct device
name, and select the appropriate association method. See Configure wireless settings.
4. If authentication via PIN has been selected, record the correct PIN.
Wireless Vehicle Bus Adapter (WVA) Getting Started Guide
79
Page 80

Troubleshooting Cannot associate with WVA over Wi-Fi Direct in push-button mode
Cannot associate with WVA over Wi-Fi Direct in push-button mode
Cannot associate with the WVA over Wi-Fi Direct when in push-button mode.
Possible cause
n The WVA might not be configured for Wi-Fi Direct.
n Authentication via push-button is not enabled.
Solution
1. Reset the WVAto factory defaults to force it to a known, accessible state.
2. Connect to the device via its access point.
3. Run the Wi-Fi Direct wizard to enable Wi-Fi Direct mode, assign a known Wi-Fi Direct device
name, and select the appropriate association method. See Configure wireless settings.
4. If authentication via PIN is selected, record the correct PIN.
Wireless Vehicle Bus Adapter (WVA) Getting Started Guide
80
Page 81

Troubleshooting Cannot associate with WVA over Wi-Fi Direct in PIN mode
Cannot associate with WVA over Wi-Fi Direct in PIN mode
Cannot associate with the WVA over Wi-Fi Direct when in PIN mode.
Possible cause
n The WVA is not configured for Wi-Fi Direct.
n Authentication via PIN is not enabled.
n Forgotten or changed PIN.
Solution
1. Reset the WVAto factory defaults to force it to a known, accessible state.
2. Connect to the device via its access point.
3. Run the Wi-Fi Direct wizard to enable Wi-Fi Direct mode, assign a known Wi-Fi Direct device
name, and select the appropriate association method. See Configure wireless settings.
4. If authentication via PIN is selected, record the correct PIN.
Wireless Vehicle Bus Adapter (WVA) Getting Started Guide
81
Page 82

Troubleshooting Wireless signal strength issues
Wireless signal strength issues
Poor to no wireless signal strength.
Possible cause
Wireless signal strength issues can stem from a number of factors.
n Environmental factors: Various factors can slow down the data rate, lose data, or even ruin
the connection. For example:
l Materials can interfere with communications. Metal, silvering (mirrors), thick glass,
concrete, ceramic, walls, and even large groups of people can absorb or reflect wireless
signals.
l Metal enclosures can block the Wi-Fi signal.
l Other types of signals can interfere with communications: microwaves, fluorescent lights,
motors, 2.4 GHz phones, other Wi-Fi devices, and some military equipment, such as radar
devices.
n Range: As the distance between two devices increases, the received signal between them is
reduced. This distance also affects the speed of the connection (throughput). If the devices
have a strong signal between them, their transmit speeds will be highest. As distance
increases and signals get weaker, the devices will lower their speed. This decrease will have
the effect of extending their range. At some point, when the range is too great, the connection
does not work well or is lost entirely.
n Security features: Security on a Wi-Fi device introduces several factors that can go wrong. For
example, it is easy to introduce errors when enabling security features, such as the WPA Pre-
Shared Key. These errors can cause the Wi-Fi module to not associate with anything and stop
responding. In such a scenario, the only resolution is to reset the device to factory defaults and
repeat the device configuration process.
Solution
When installing the WVA in a vehicle, it is not recommended to mount the WVA under the dash. If you
must mount the WVAunder the dash, make sure there are no metal enclosures near it.
If a security feature causes you to be locked out of the WVA, reset the device to factory defaults and
repeat the device configuration process. For more information, see Reset the WVAto factory defaults.
Wireless Vehicle Bus Adapter (WVA) Getting Started Guide
82
Page 83

Regulatory information
Anatel
MODELO: WVA-J200
Para maiores informações, consulte o site da ANATEL www.anatel.gov.br.
Este equipamento não tem direito à proteção contra interferência prejudicial e não pode causar
interferência em sistemas devidamente autorizados.
Este produto não é apropriado para uso em ambientes domésticos, pois poderá causar interferências
eletromagnéticas que obrigam o usuário a tomar medidas necessárias para minimizar estas
interferências.
Wireless Vehicle Bus Adapter (WVA) Getting Started Guide
83
 Loading...