

Page 1

M o d e l S M - 5 3 0 0 U s e r M a n u a l | 1
USER MANUAL
SM-5300
PC SCALE PRINTER
Edition 2
COPYRIGHT © 2016 TERAOKA WEIGH-SYSTEM PTE. LTD. 21/JAN/2016
Page 2

M o d e l S M - 5 3 0 0 U s e r M a n u a l | 1
Tables of Content
–––––––––––––––––––––––––––––––––––––––––
Model: SM-5300
Table of Content
Table of Content ..................................................................................................... 1
Notice ...................................................................................................................... 3
Safety Information ................................................................................................. 4
Safety Regulation ................................................................................................... 5
Product Information ............................................................................................... 7
1.1 Specification ......................................................................................................... 7
1.2 Overall View of SM-5300 ....................................................................................... 9
1.2.1 SM-5300 Bench Type ........................................................................................9
1.2.2 SM-5300 Pole Type ........................................................................................ 10
1.3 Product Layout .................................................................................................... 11
1.3.1 Overall Layout SM-5300LL............................................................................... 11
1.3.2 Overall Layout of SM-5300P ............................................................................ 12
1.3.3 Overall Layout of SM-5300SSP 19” ................................................................... 13
1.3.4 Interface ....................................................................................................... 14
1.3.5 Indicator Display ............................................................................................ 14
1.3.6 Keys & Key Function ....................................................................................... 16
1.4. Printer Setting ................................................................................................... 17
1.4.1 Receipt, Label and Linerless Specification ......................................................... 17
1.4.2 Character Size & No. of Characters available for Label Printing ........................... 18
1.4.3 Receipt, Label and Linerless Setting ................................................................. 19
Typical Operation.................................................................................................. 23
2.1 Product Setup ..................................................................................................... 23
2.2 Date and Time Setup ........................................................................................... 24
2.3 Registration Mode ............................................................................................... 26
2.3.1 PLU Call Up.................................................................................................... 26
2.3.2 Item Label Printing in Manual Mode ................................................................. 29
2.3.3 Total Label or Receipt Printing ......................................................................... 31
2.3.4 Data Correction .............................................................................................. 37
2.3.5 Item Label Printing in Prepack Mode ................................................................ 43
2.3.6 Tare Operation............................................................................................... 46
2.4 Self Service Mode ................................................................................................ 53
2.4.1 Software Tenkey ............................................................................................ 53
2.4.2 Mechanical Tenkey ......................................................................................... 55
Report Mode ......................................................................................................... 57
3.1 Report Mode Description .................................................................................... 57
Page 3

M o d e l S M - 5 3 0 0 U s e r M a n u a l | 2
Table of Content
––––––––––––––––––––––––––––––––––––––––
Model: SM-5300
3.2.1 PLU Report .................................................................................................... 60
3.2.2 Dept Report ................................................................................................... 62
3.2.3 Clerk Report .................................................................................................. 64
3.2.4 Clerk LOG ...................................................................................................... 66
3.2.5 Terminal Report ............................................................................................. 68
3.2.6 Store Summarized Report ............................................................................... 70
3.2.7 24 Hour Report .............................................................................................. 72
3.2.8 Void Report ................................................................................................... 74
3.2.9 Tax Report .................................................................................................... 76
3.2.10 Queue Report ................................................................................................ 78
3.2.11 Store Report .................................................................................................. 80
3.2.12 MG Report ..................................................................................................... 82
3.2.13 Inventory Report ............................................................................................ 84
3.2.14 Traceability Report ......................................................................................... 86
3.2.15 Prepack Report .............................................................................................. 88
3.2.16 Grand Total Report ......................................................................................... 90
3.2.17 ABC Analysis Report ....................................................................................... 92
3.2.18 Void Label Report ........................................................................................... 94
3.2.19 Batch Report .................................................................................................. 96
Product Maintenance ............................................................................................ 98
4.1 Thermal Head Cleaning ....................................................................................... 98
Appendices......................................................................................................... 100
5.1 Error Messages .................................................................................................. 100
Release Note ...................................................................................................... 103
Page 4

M o d e l S M - 5 3 0 0 U s e r M a n u a l | 3
Notice
–––––––––––––––––––––––––––––––––––––––––––––––––––––––––––––
Model: SM-5300
Notice
DIGI®
The material contained in this document is proprietary and for information only and is subject to
change without notice. Teraoka Weigh-System assumes no responsibility for any errors or
damages arising from misinterpretation of any procedure. Screen displays, operating procedures
and supporting features might vary with different software version releases. This document shall
not be reproduced whether in part or whole without the written consent from Teraoka WeighSystem Pte Ltd.
Teraoka Weigh-System Pte Ltd,
4, Leng Kee Road,
#06-01 SIS Building,
Singapore 159088.
Page 5

M o d e l S M - 5 3 0 0 U s e r M a n u a l | 4
Safety Information
––––––––––––––––––––––––––––––––––––––
Model: SM-5300
Safety Information
The operator of the equipment shall comply with the safety and warning indications and procedures
outlined in this document. Teraoka Weigh - System Pte Ltd assumes no responsibility or liability for
failure to comply with these requirements.
- To avoid electric shock, use only the supplied power cords and ensure product is connected
to a properly grounded supply.
- Ensure product is placed on a firm and level surface before operation.
- Avoid overloading the product beyond its rated maximum capacity.
- Ensure commodity to be weighed is loaded centrally on the platter, avoid placing commodity
on corners or edges.
- Care shall be taken during the following operations
~ Receipt paper tearing - to prevent injuries from cutting from paper cutter
~ Changing of labels and receipt paper - to prevent injuries from cutting from paper cutter
and movable printer mechanism.
- Repair and servicing of product shall only be carried out by trained and qualified personnel.
Disclaimer:
Specifications are subject to change without notice. All dimensions shown are approximate. Please
be aware that Teraoka has indicated that its hardware and software used in the product may
require additional updates in the future as our product is continually under development. The need
for such updates most likely applies to the Printer software.
CAUTIONS:
FOR PLUGGABLE EQUIPMENT, THAT THE SOCKET-OUTLET SHALL BE INSTALLED
NEAR THE EQUIPMENT AND SHALL BE EASILY ACCESSIBLE.
FOR CONTINUED PROTECTION AGAINST RISK OF FIRE, REPLACE ONLY WITH SAME
TYPE AND RATING OF FUSE.
POUR NE PAS COMPROMETTRE LA PROTECTION CONTRE LES RISQUES D'INCENDIE,
REMPLACER PAR UN FUSIBLE DE MÊME TYPE ET DE MÊME CARACTÉRISTIQUES
NOMINALES.
DANGER OF EXPLOSION IF BATTERY IS INCORRECTLY REPLACED. REPLACE ONLY
WITH THE SAME OR EQUIVALENT TYPE RECOMMENDED BY THE MANUFACTURER.
DISCARD USED BATTERIES ACCORDING TO THE MANUFACTURER'S INSTRUCTIONS
IL Y A DANGER D'EXPLOSION S'IL Y A REMPLACEMENT INCORRECT DE LA BATTERIE.
REMPLACER UNIQUEMENT AVEC UNE BATTERIE DU MÊME TYPE OU D'UN TYPE
RECOMMANDÉ PAR LE CONSTRUCTEUR. METTRE AU RÉBUT LES BATTERIES USAGÉES
CONFORMÉMENT AUX INSTRUCTIONS DU FABRICANT.
LASER RADIATION DO NOT STARE INTO BEAM CLASS 2 LASER PRODUCT
RAYONNEMENT LASER NE PAS REGARDER DANS LE FAISCEAU APPAREIL À LASERDE
CLASSE 2
Page 6

M o d e l S M - 5 3 0 0 U s e r M a n u a l | 5
Safety Regulation
––––––––––––––––––––––––––––––––––––––––
Model: SM-5300
Safety Regulation
Federal Communication Commission Interference Statement
This equipment has been tested and found to comply with the limits for a Class B digital device,
pursuant to Part 15 of the FCC Rules. These limits are designed to provide reasonable protection
against harmful interference in a residential installation. This equipment generates uses and can
radiate radio frequency energy and, if not installed and used in accordance with the instructions,
may cause harmful interference to radio communications. However, there is no guarantee that
interference will not occur in a particular installation. If this equipment does cause harmful
interference to radio or television reception, which can be determined by turning the equipment off
and on, the user is encouraged to try to correct the interference by one of the following measures:
- Reorient or relocate the receiving antenna.
- Increase the separation between the equipment and receiver.
- Connect the equipment into an outlet on a circuit different from that to which the receiver is
connected.
- Consult the dealer or an experienced radio/TV technician for help.
This device complies with Part 15 of the FCC Rules. Operation is subject to the following two
conditions: (1) This device may not cause harmful interference, and (2) this device must accept any
interference received, including interference that may cause undesired operation.
FCC Caution: Any changes or modifications not expressly approved by the party responsible for
compliance could void the user's authority to operate this equipment.
IMPORTANT NOTE:
FCC Radiation Exposure Statement: (US)
This equipment complies with FCC RF radiation exposure limits set forth for a portable uncontrolled
environment. To maintain compliance with FCC RF exposure compliance requirements:
1) Please do not attach any decorative components with metal parts to this equipment.
2) The antenna must not be co-located or operating in conjunction with any other antenna or
transmitter.
FCC Radiation Exposure Statement: (Canada)
This equipment complies with FCC RF radiation exposure limits set forth for an uncontrolled
environment. To comply with FCC RF exposure compliance requirements:
1) The antenna used for this transmitter must be installed and operated with minimum 20cm
between the antenna and users.
2) The antenna must not be co-located or operating in conjunction with any other antenna or
transmitter.
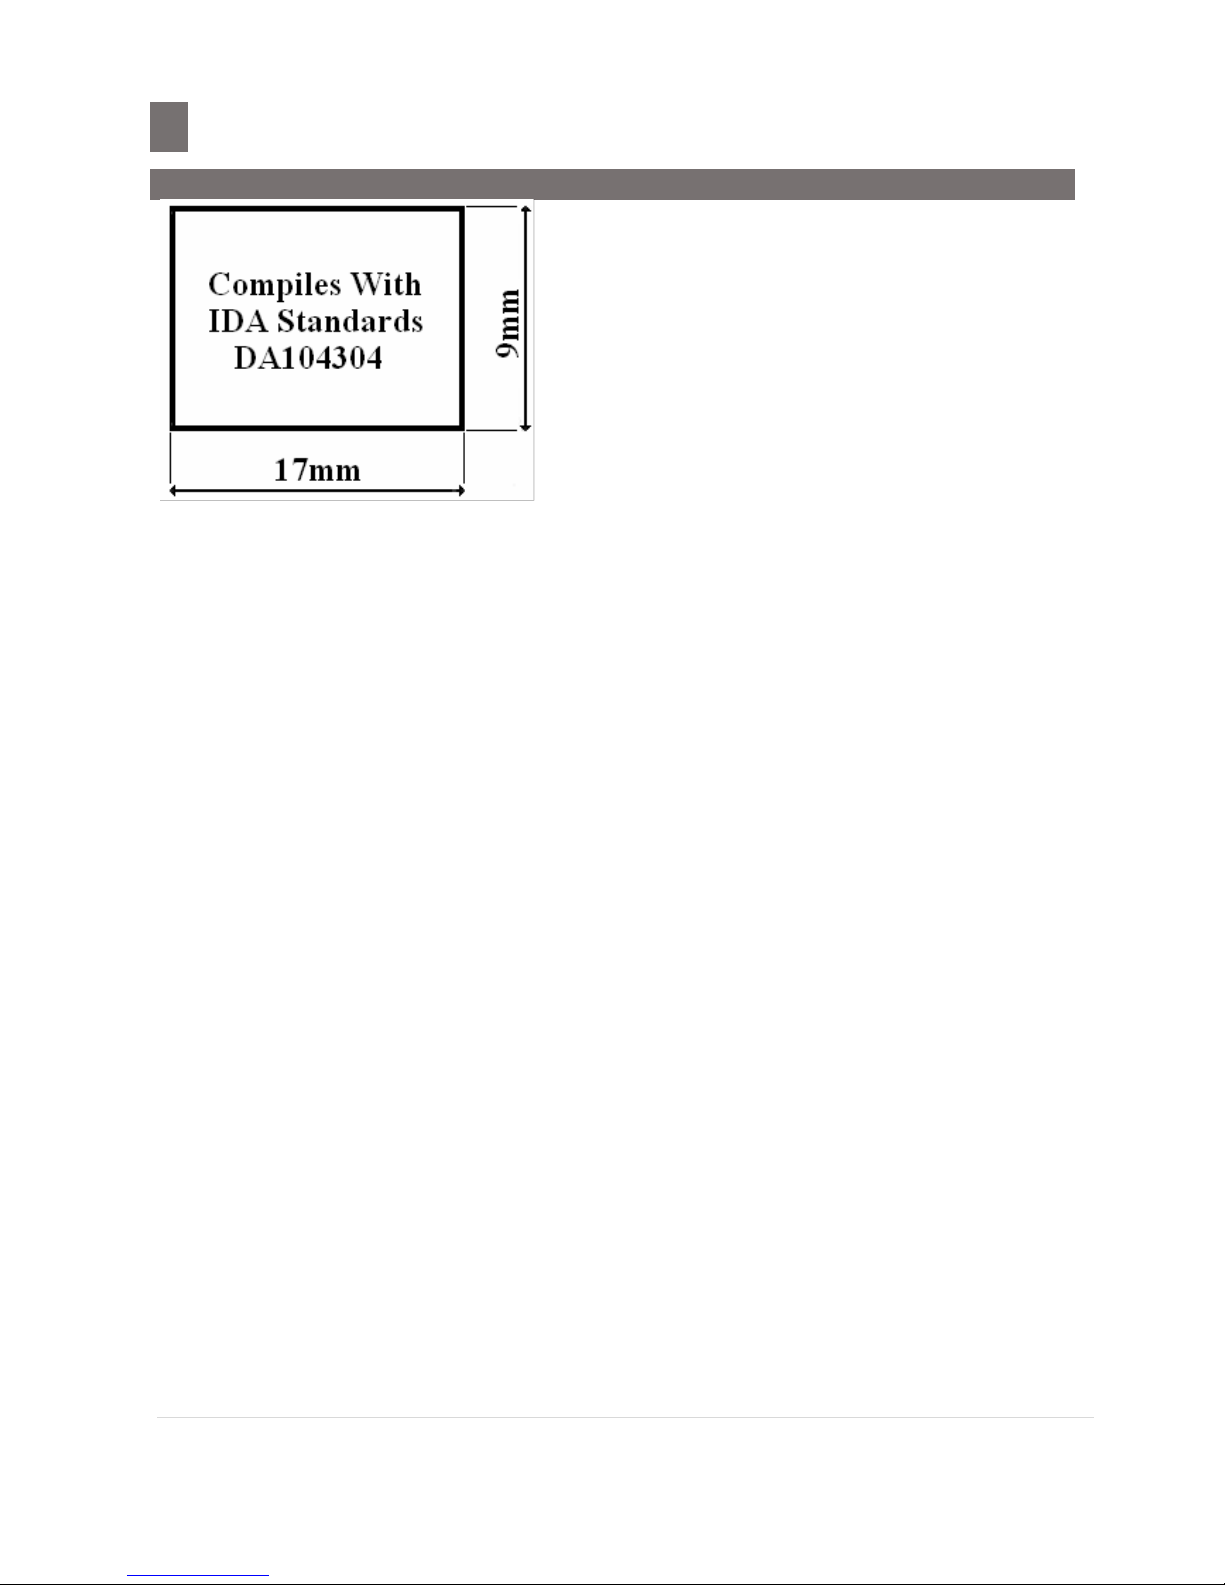
IDA Compliance Statement: (Singapore)
This equipment registered to comply with IDA (Info-Communications Development Authority of
Singapore) Standard under Dealer's Class License.
Page 7
M o d e l S M - 5 3 0 0 U s e r M a n u a l | 6
Safety Regulation
––––––––––––––––––––––––––––––––––––––––
Model: SM-5300
IDA Label
Page 8

M o d e l S M - 5 3 0 0 U s e r M a n u a l | 7
Product Information
––––––––––––––––––––––––––––––––––––
1.1 Specification
Product Information
1.1 Specification
Variation
:
Description
Model
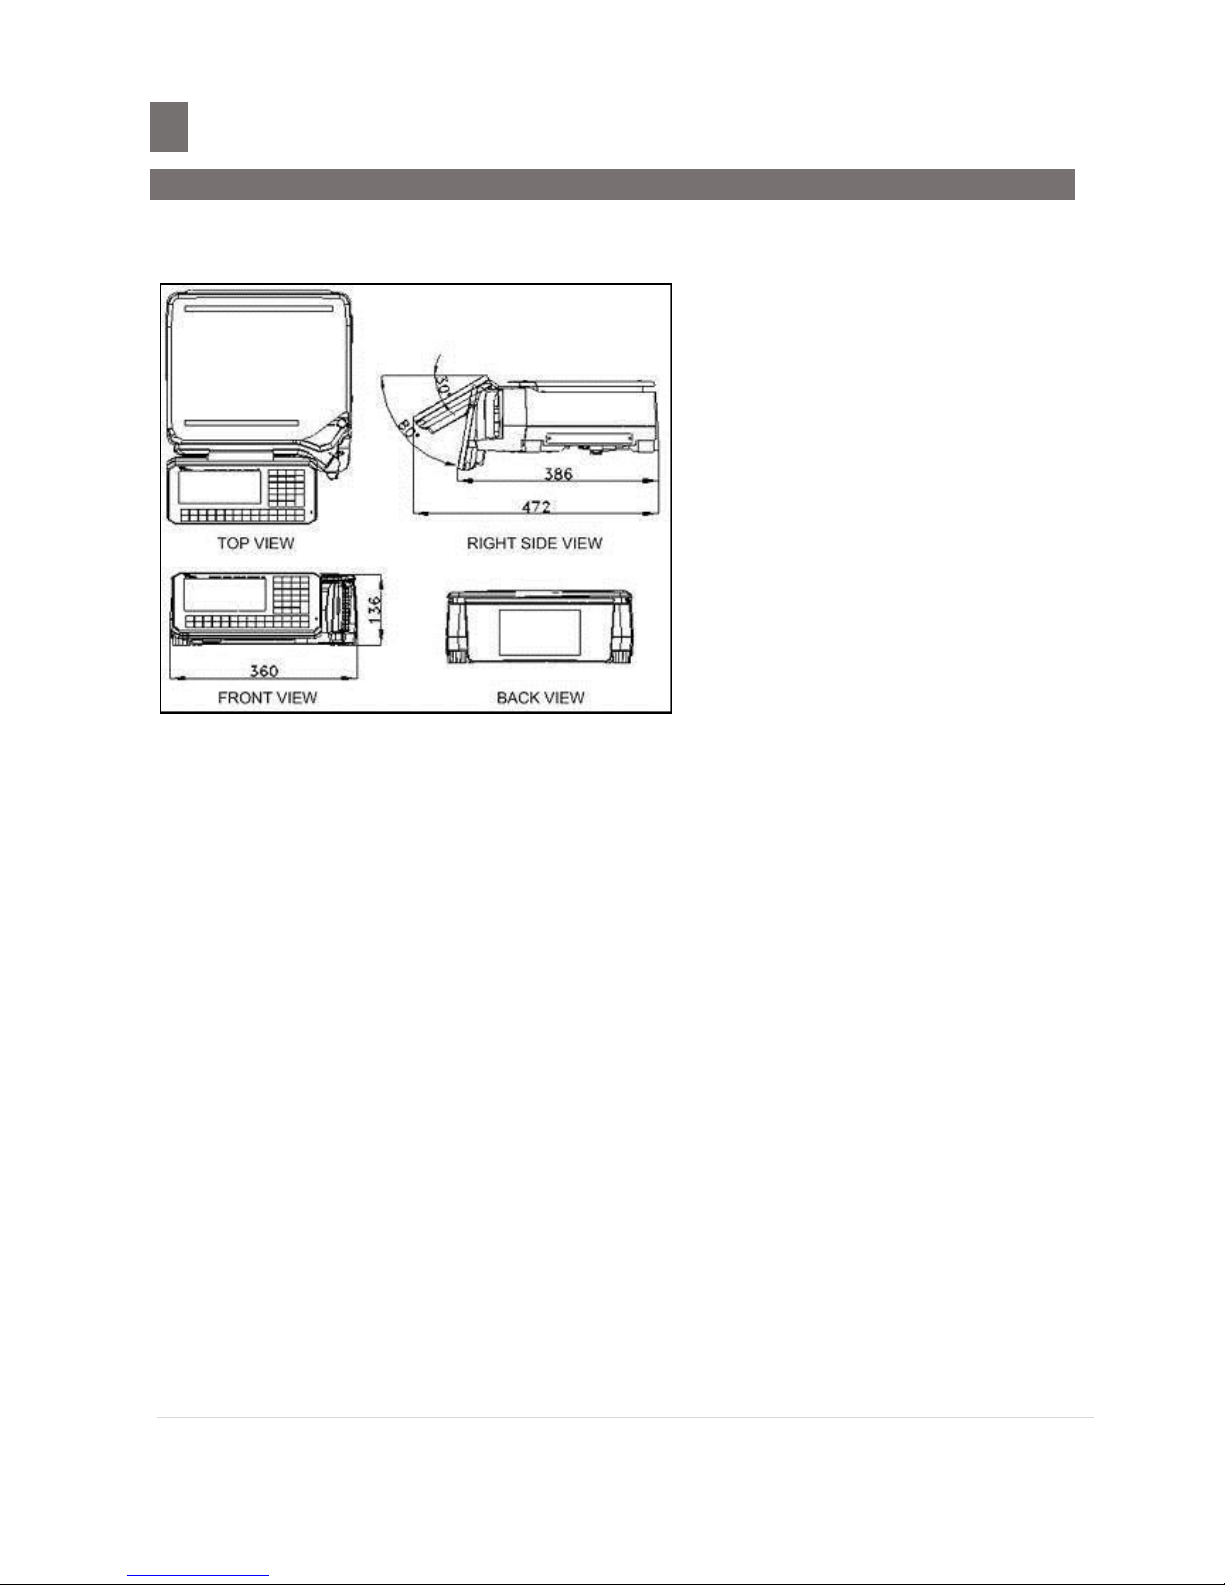
Dimension (D x W x H in mm)
Bench
SM5300LL
472 (adjustable) x 360 x 136
SM5300B
472 (adjustable) x 360 x 136
Pole
SM5300LL
500 (adjustable) x 360 x 542
SM5300P
500 (adjustable) x 360 x 542
SM5300SSP 19”
500 (adjustable) x 360 x 542
Capacity
:
15kg (Less than 6kg, e= 2g increment, 6kg to 15kg, e= 5g increment)
Display Resolution
:
1/6000
Display
:
SM5300
Operator
:
7” TFT WVGA LCD with Touch Panel (800 RGB x
480)
Customer
:
7” TFT WVGA LCD (RGB 800 x 480)
SM5300-SSP 19”
Operator
:
19” (1280 x 1024) TFT SXGA LCD with LED
Printing
:
Direct Thermal Printer
Base Printer
Media
:
Label with Liner and Linerless and Receipt Paper
Media Size
:
Max Width = 56mm
Speed
:
100mm/s (double strobe for 100% duty)
: 120mm/s (double strobe for 50 – 60% duty)
Print Width
:
56mm, 200dpi
Print Length
:
240mm
Media Roll Size
:
Max Roll = 105mm
Power Source
:
AC Supply 110V / 240V
(Set by Power Unit Jumper Setting)
Power Consumption
:
50W max. (20W nominal)_0.5A max. (0.2A nominal)
Operating Temperature
:
-10 °C to + 40 °C
Operation Humidity
:
15% to 85%RH
Page 9

M o d e l S M - 5 3 0 0 U s e r M a n u a l | 8
Product Information
––––––––––––––––––––––––––––––––––––
1.1 Specification
Operation Humidity
:
15% to 85%RH
CPU
:
ARM Cortex A9 (iMX6 Solo) Single Core 1GHz
System Memory
:
Built-in NAND Flash 1GB
Storage
:
512MB DDR3
OS : LINUX
I/O Interface
:
1 x Ethernet 10/100 Base T
: 4 x USB Ports
Optional Interface
:
USB WLAN
* Specifications are subject to change without notice
Page 10
M o d e l S M - 5 3 0 0 U s e r M a n u a l | 9
Product Information
––––––––––––––––––––––––––––––––––––
1.2 Overall View of SM-5300
1.2 Overall View of SM-5300
1.2.1 SM-5300 Bench Type
Page 11

M o d e l S M - 5 3 0 0 U s e r M a n u a l | 10
Product Information
––––––––––––––––––––––––––––––––––––
1.2 Overall View of SM-5300
1.2.2 SM-5300 Pole Type
Page 12

M o d e l S M - 5 3 0 0 U s e r M a n u a l | 11
Product Information
––––––––––––––––––––––––––––––––––––
1.3 Product Layout
1.3 Product Layout
1.3.1 Overall Layout SM-5300LL
1. Front and Back View
2. Left and Right Side View
3. Top View Display
Page 13
M o d e l S M - 5 3 0 0 U s e r M a n u a l | 12
Product Information
––––––––––––––––––––––––––––––––––––
1.3 Product Layout
1.3.2 Overall Layout of SM-5300P
1. Front View
2. Left and Right Side View Display
Page 14

M o d e l S M - 5 3 0 0 U s e r M a n u a l | 13
Product Information
––––––––––––––––––––––––––––––––––––
1.3 Product Layout
1.3.3 Overall Layout of SM-5300SSP 19”
1. Front View
2. Left and Right Side View
Page 15
M o d e l S M - 5 3 0 0 U s e r M a n u a l | 14
Product Information
––––––––––––––––––––––––––––––––––––
1.3 Product Layout
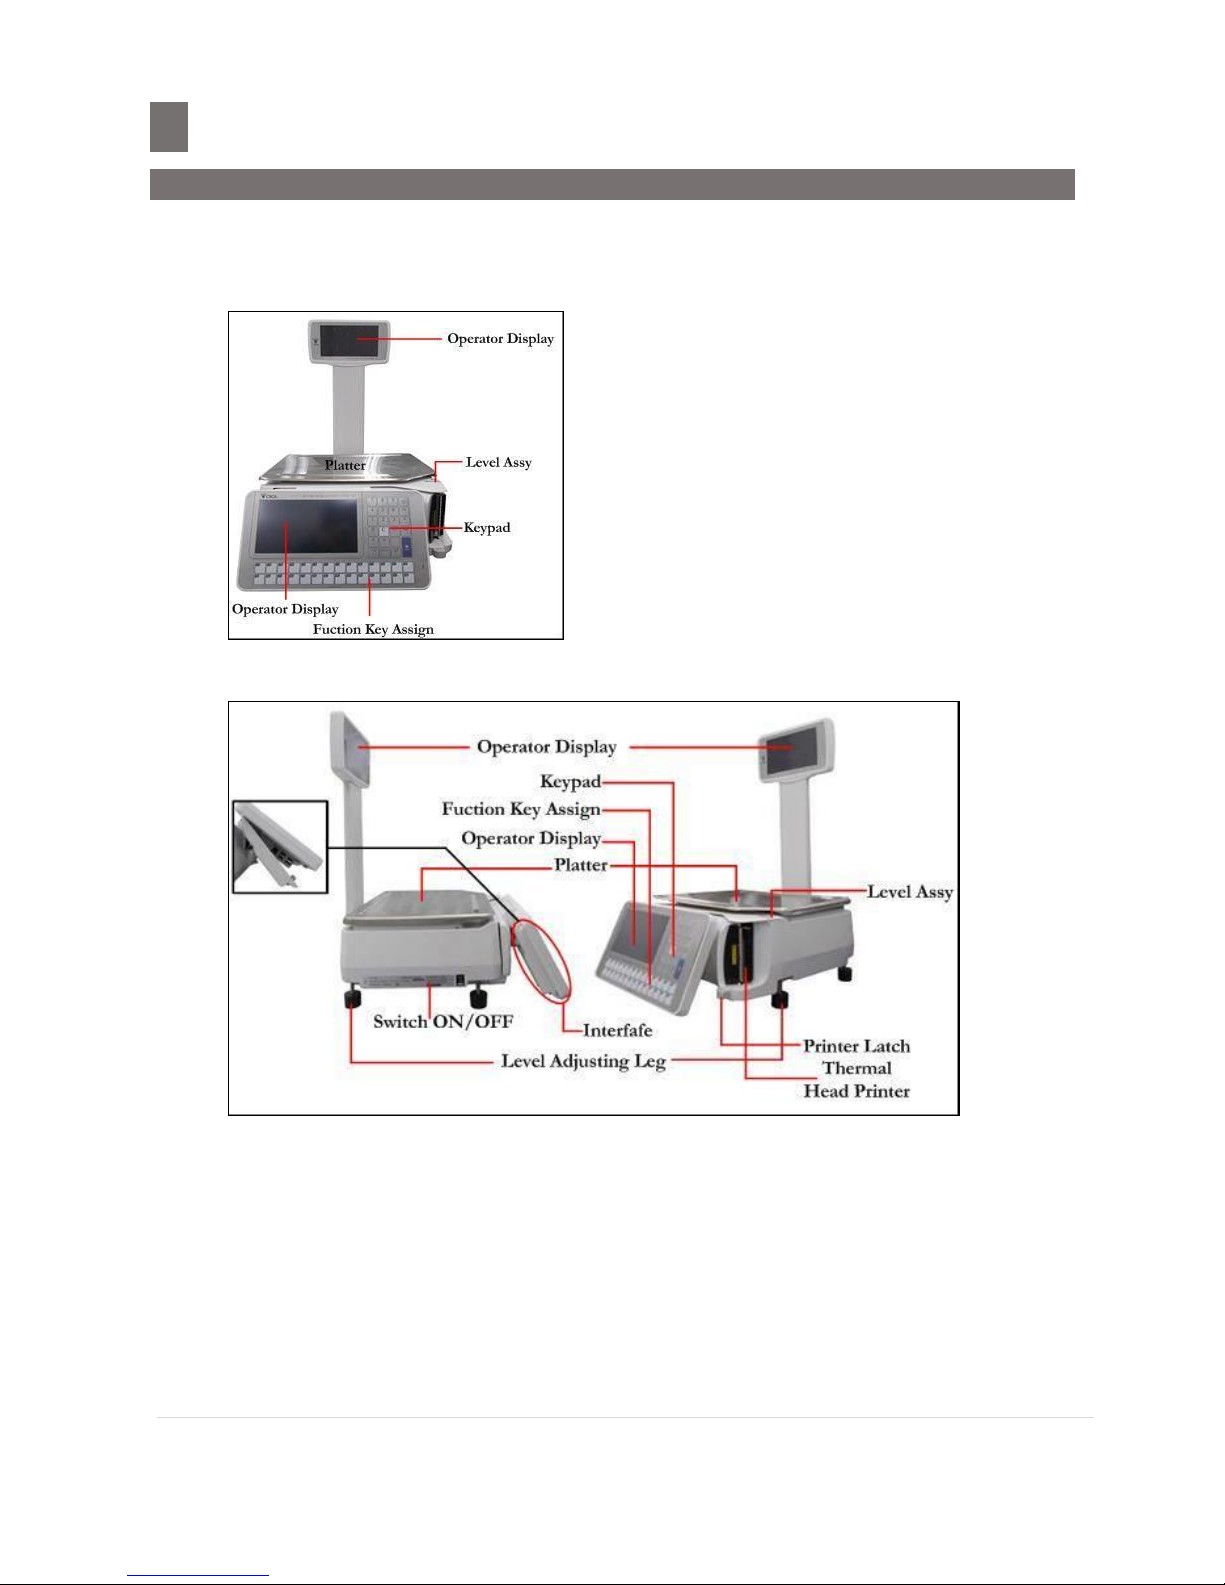
1.3.4 Interface
1.3.5 Indicator Display
1. Registration Mode Screen
No.
Area /Function
USAGE
1
Preset Tare Display
Display Preset Tare
2
Weight Display
Display Weight value
3
Unit Price Display
Display Unit Price amount
4
Date and Time
Display Current Date And Time
5
Total Price Display
Display Total Price amount
6
Commodity Name
Shows the Commodity Name of the called up PLU
7
Scale Indicator
Shows S when Scale is SERVER
Shows C when Scale is CLIENT
Shows L when Client is OFF LINE/LOCAL
8
Reg. Preset keys
Used for calling up PLU / Function keys
9
Reg. Secondary key
Used to call PLU, Function, and etc, except clerk
10
Reg. Clerk/Function keys
Used for calling up Clerk / Function keys
11
Next Page keys
Turn to next page of Preset / Function keys
Page 16

M o d e l S M - 5 3 0 0 U s e r M a n u a l | 15
Product Information
––––––––––––––––––––––––––––––––––––
1.3 Product Layout
REMARKS:
1. PREV & NEXT keys will appears when there's more than 1 page of Preset/Function keys.
2. When in Prepack Mode, the Clerk/Function keys at the bottom of the screen will not be
shown.
3. When in Manual Mode, the indicator will not be shown.
4. Can display image in Reg. Preset keys, need to select in Programming of Preset Keys.
2. Customer Display
No.
Area /Function
USAGE
1
Commodity Name
Shows the Commodity Name of the called up PLU
2
Image Display
Shows the image of the called up PLU
3
Preset Tare Display
Display Preset Tare
4
Weight Display
Display Weight value
5
Unit Price Display
Display Unit Price amount
6
Total Price Display
Display Total Price amount
Page 17

M o d e l S M - 5 3 0 0 U s e r M a n u a l | 16
Product Information
––––––––––––––––––––––––––––––––––––
1.3 Product Layout
1.3.6 Keys & Key Function
Panel Key
*Actual legends and symbols may differ depending on local regulations and requirements.
Key Function
Turn on/off the display.
to
Enter numeric data.
Reset the weight to "0".
CLEAR key is used for clearing entered data.
Set/Clear the tare value.
Mode key is used for some special operations together with
other keys
Multiply the number of non-weighing product.
Used as escape key in Programming mode.
Not available
PLU key is used for calling up a PLU in Registration mode.
Used as entered key in Programming mode.
Switch mode status, Manual Mode or Pre-pack Mode.
Used for feeding label or receipt.
PRINT key is used for printing label / receipt in Registration
mode.
to
Call up Preset data such as PLU Data.
Call up Preset Function Key.
Page 18

M o d e l S M - 5 3 0 0 U s e r M a n u a l | 17
Product Information
––––––––––––––––––––––––––––––––––––
1.4 Printer Setting
1.4. Printer Setting
1.4.1 Receipt, Label and Linerless Specification
Outer diameter of rolls
Maximum 105mm
Inner diameter of rolls
Minimum 40mm
Wide of receipt roll
Maximum 60mm
Wide of label roll
Maximum 60mm
LABEL TYPE
LABEL SIZE
PCS/ROLL
T1
60 x 28
1400
T2
60 x 31
1300
T3
60 x 34
1200
T4/T10
60 x 40
1000
T5/T11
60 x 43
960
T6
60 x 46
900
T7/T12
60 x 49
840
T8
60 x 55
750
T9
60 x 37
1100
S
40 x 28
1400
A / B
40 x 46
900
C
40 x 62
670
F1- F99 (Free format)
Standard: 60 (max) x 240 (max)
-
REMARKS:
1. LABEL SIZE is in W (width) X L (length) and in unit of millimeter.
2. F1 to F99 is self design free format label to design own label. Please note the maximum
size.
Page 19

M o d e l S M - 5 3 0 0 U s e r M a n u a l | 18
Product Information
––––––––––––––––––––––––––––––––––––
1.4 Printer Setting
1.4.2 Character Size & No. of Characters available for Label Printing
10 kinds of letter sizes are available as follows:
The number of letters per line for Commodity name depends on the label format:
Label Format: A and C
S1 --- the smallest, 45 letters
M1 --- middle size, 27 letters
S2 --- smaller size, 39 letters
M2 --- large size, 19 letters
S3 --- small size, 34 letters
M3 --- large size, 19 letters
S4 --- small size, 34 letters
M4 --- larger size, 15 letters
S5 --- middle size, 27 letters
M5 --- the largest, 12 letters
Label Format: T1 ~ T12
S1 --- the smallest, 70 letters
M1 --- middle size, 42 letters
S2 --- smaller size, 60 letters
M2 --- large size, 30 letters
S3 --- small size, 53 letters
M3 --- large size, 30 letters
S4 --- small size, 53 letters
M4 --- larger size, 23 letters
S5 --- middle size, 42 letters
M5 --- the largest, 19 letters
Note: When selected label format without print area for Commodity Name. Maximum 1 line of 74 letters can
be entered for printing in receipt and not allow to change the character size.
Page 20

M o d e l S M - 5 3 0 0 U s e r M a n u a l | 19
Product Information
––––––––––––––––––––––––––––––––––––
1.4 Printer Setting
1.4.3 Receipt, Label and Linerless Setting
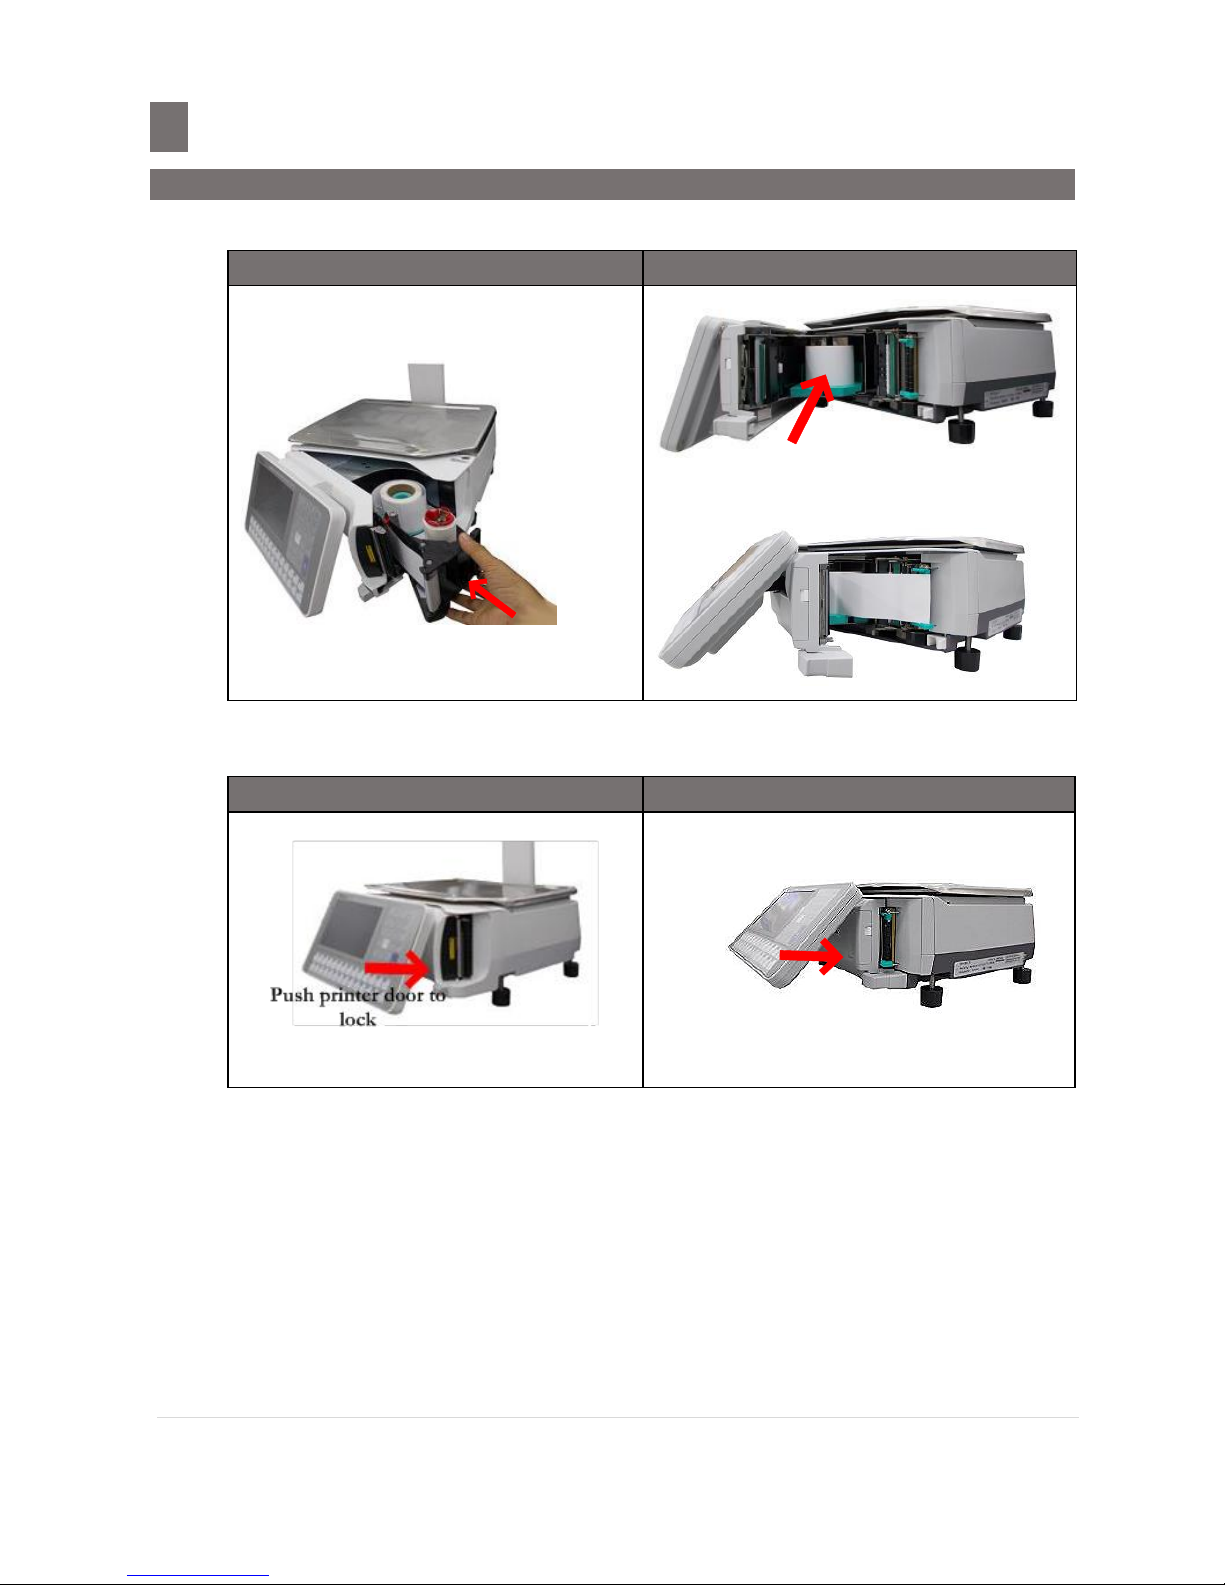
CAUTION
There is a cutter at the printer door near the dispenser. Take care not to touch or cut
your fingers against the cutter during this process.
1. Open the printer door by sliding the printer latch to left side.
SM5300P
SM5300LL
Sliding to
left side
Sliding to Left Side
2. Swing open the printer door.
3. Pull out the cassette and remove the empty roll.
SM5300P
SM5300LL
Page 21

M o d e l S M - 5 3 0 0 U s e r M a n u a l | 20
Product Information
––––––––––––––––––––––––––––––––––––
1.4 Printer Setting
4. Insert a new label/receipt roll and then setting cassette For SM5300P
a. Set the cassette a label, receipt or linerless as per diagram below:
Note: Can skip this step if have set the cassette
Label: (∆ ×)
This sticker is paste and set as the default factory setting.
Receipt: (O)
This sticker is given together with the accessory items, for customer to set as an option.
Paste the sticker to the third hole without removing the original label sticker.
Linerless: (∆ O)
This sticker (O) is given together with the accessory items, for customer to set as an
option. Paste the sticker to the ∆ third hole and remove the middle (×, original) label
sticker.
b. For label, take the end of the label and run it across guide [1] and above dispenser [2]
and set back paper in reel [3], and turn the reel clockwise direction to tighten the label
paper tension. Refer to the diagram below:
Page 22

M o d e l S M - 5 3 0 0 U s e r M a n u a l | 21
Product Information
––––––––––––––––––––––––––––––––––––
1.4 Printer Setting
c. For linerless , take the end of the linerless stock and run it through guide [1] and pull
the receipt paper up to the dispenser [2] without rolling it to the reel. Refer to the
diagram below:
d. For receipt, take the end of the receipt stock and run it through guide [1] and pull the
receipt paper up to the dispenser [2] without rolling it to the reel. Refer to the diagram
below:
Page 23
M o d e l S M - 5 3 0 0 U s e r M a n u a l | 22
Product Information
––––––––––––––––––––––––––––––––––––
1.4 Printer Setting
5. Push back the cassette into the main unit until a lock sound is heard, For SM5300LL insert
new linerless roll then pull linerless point to thermal head.
SM5300P
SM5300LL
Push the
Cassette
6. Close the printer door by pushing at the lower area of the printer door until a lock sound is
heard. Refer to diagram below:
SM5300P
SM5300LL
Push printer door to
lock
7. Depress [FEED] key to feed label/receipt, for SM5300LL the printer door will auto feed the
linerless when printer door is lock.
Page 24

M o d e l S M - 5 3 0 0 U s e r M a n u a l | 23
Typical Operation
–––––––––––––––––––––––––––––––––––––––––
2.1 Product Setup
Typical Operation
2.1 Product Setup
1. Place product on a firm and level surface.
2. Set scale leveling by adjusting the stands (Refer to Pictures 1).
3. Connect scale to power supply.
4. Switch on scale and wait for completion of display checking.
5. Upon completion of display checking, confirm scale is at zero (zero lamp/indicator on),
6. Please refer Touch Screens. If zero lamp not on, press the re-zero key.
7. Install label receipt or linerless according to instruction indicated on the label in the scale,
8. Please refer Receipt / Label Setting.
9. Press the feed key several times.
10. Scale is now ready for use.
Page 25

M o d e l S M - 5 3 0 0 U s e r M a n u a l | 24
Typical Operation
––––––––––––––––––––––––––––––––––––––––
2.2 Date and Time Setup
2.2 Date and Time Setup
The built-in clock automatically works once they are set:
Date (Month/Day/Year) ------- 2 digits for each part.
Time -------------------------------- 4 digits (24 Hours).
OPERATION
DISPLAY
1. MENU MODE ~> [MAINTENANCE
MENU] ~> [MAINTENANCE]
2. Touch the [DATE AND TIME] key to
enter DATE AND TIME screen.
3. Enter current Date by numeric keypad or
touch date on Calendar box. (e.g. 100814
= 10 August 2014) – this depend on date
format setting
Page 26

M o d e l S M - 5 3 0 0 U s e r M a n u a l | 25
Typical Operation
––––––––––––––––––––––––––––––––––––––––
2.2 Date and Time Setup
OPERATION
DISPLAY
4. Touch [TIME] tab
Then enter current Time by numeric
keypad.
(e. g. 1130 = 11:30 AM)
5. Touch [SAVE] key or press [PLU] button
to save the programming data and time
and the screen will return to MAINTENANCE
MODE.
Note: When save date (by pressing [SAVE]
or [PLU] key), it will exit Date and Time
Screen.
Note: Touch [MENU] key to exit without save
the data. A message will appear "SAVE
CHANGES?” select desire choice.
Page 27

M o d e l S M - 5 3 0 0 U s e r M a n u a l | 26
Typical Operation
–––––––––––––––––––––––––––––––––––––––––
2.3 Registration Mode
2.3 Registration Mode
2.3.1 PLU Call Up
To call up programmed PLU for weighing.
1. Manual PLU Call Up.
2. Automatic PLU Call
3. By Registration Mode Preset Keys.
Note:
The machine will display the following error messages if incorrect operation is performed. "PLEASE
REMOVE WEIGHT" error message, when tried to call Non-Weighed PLU up when something is on
the platter. ~> Remove the item from the platter and try again. "PLU NOT EXIST" error message,
when tried to call a Non Programmed PLU Number. ~> Check the PLU Number and try again.
1. Manual PLU Call Up
This can be programmed at PLU Programming mode, by creating a PLU with PLU code and this PLU
code can be use to call the PLU at Registration Mode. Manual PLU call up can be done by entering
the correct PLU code at Registration (In Self Service Manual PLU call up use only on PLU
Programming)
OPERATION
DISPLAY
1. In REGISTRATION MODE.
Press the PLU Number of the LEMON (e.g. 3)
by numeric keypad and then press [PLU] key
at keypad.
Note: Press [C] key to clear the PLU data.
Page 28

M o d e l S M - 5 3 0 0 U s e r M a n u a l | 27
Typical Operation
––––––––––––––––––––––––––––––––––––––––
2.3 Registration Mode
2. Automatic PLU Call Up
Automatic PLU Call up also can use the scanner to scan the barcode. Wherever the Barcode has
programmed in PLU Program and Barcode programming (Please refer to PLU Program and Barcode
Programming on SM5300 Operation Manual (Part 1 - Main) – Edition 01 [DOC]).
OPERATION
DISPLAY
1. In Registration Mode.
2. Please scan the barcode to automatic PLU
call up.
Page 29
M o d e l S M - 5 3 0 0 U s e r M a n u a l | 28
Typical Operation
––––––––––––––––––––––––––––––––––––––––
2.3 Registration Mode
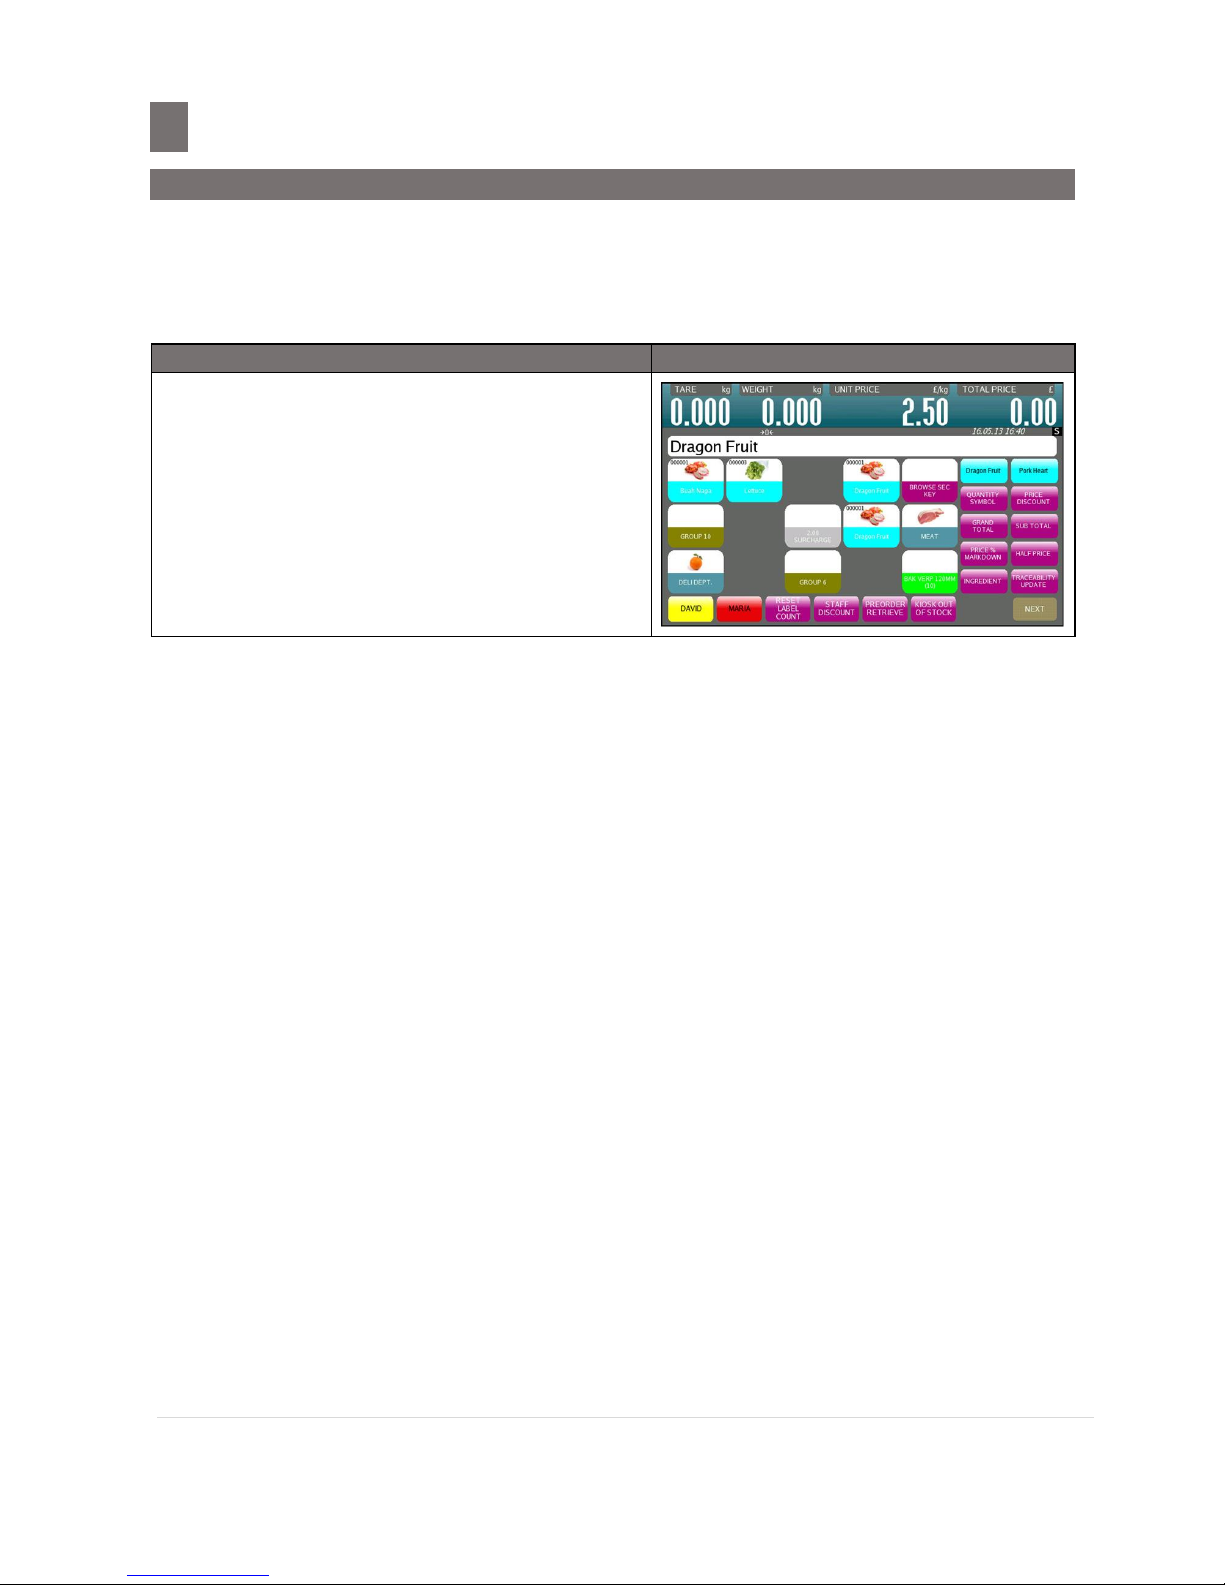
3. PLU Call Up by Preset Key of Registration Mode
To enable this function, the PLU must assign on the Preset Key of Registration Mode in advance
(Please refer to PLU Program and Barcode Programming on SM5300 Operation Manual (Part 1 Main) – Edition 01 [DOC]).
OPERATION
DISPLAY
1. In REGISTRATION MODE, touch the
PRESET KEY with the desired PLU assigned
from Registration Mode Preset Key.
(e.g. The 1st Preset Key – Dragon Fruit)
Note: Press [C] key on keypad to clear the PLU
data.
Page 30
M o d e l S M - 5 3 0 0 U s e r M a n u a l | 29
Typical Operation
––––––––––––––––––––––––––––––––––––––––
2.3 Registration Mode
2.3.2 Item Label Printing in Manual Mode
You can use this operation to print out item labels for a PLU or Non-PLU of Weighing Item or Nonweighing Item. Before the operation, check the following point.
- Make sure cassette is set to LABEL or LINERLESS setting (For SM5300P).
- Check whether the Label Size fits the programmed PLU when label is used.
Note:
1) SPEC 142A012 "Actuation Weight for Registration Mode", to set minimum weight for
registration mode.
1. Label Printing for PLU Item
Example:
Sell one pack of GRAPES (Non-weighing Item) and Sell 1kg of GREEN APPLE 1
(Weighing Item).
OPERATION
DISPLAY
1. In REGISTRATION MODE, Call up PLU of
GRAPES
2. Touch [PRINT] key to issue out a label.
Then call up item of GREEN APPLE and place
the product on platter (e.g. 1kg).
3. Touch [PRINT] key to issue out a label and
then remove the product from platter.
Page 31

M o d e l S M - 5 3 0 0 U s e r M a n u a l | 30
Typical Operation
––––––––––––––––––––––––––––––––––––––––
2.3 Registration Mode
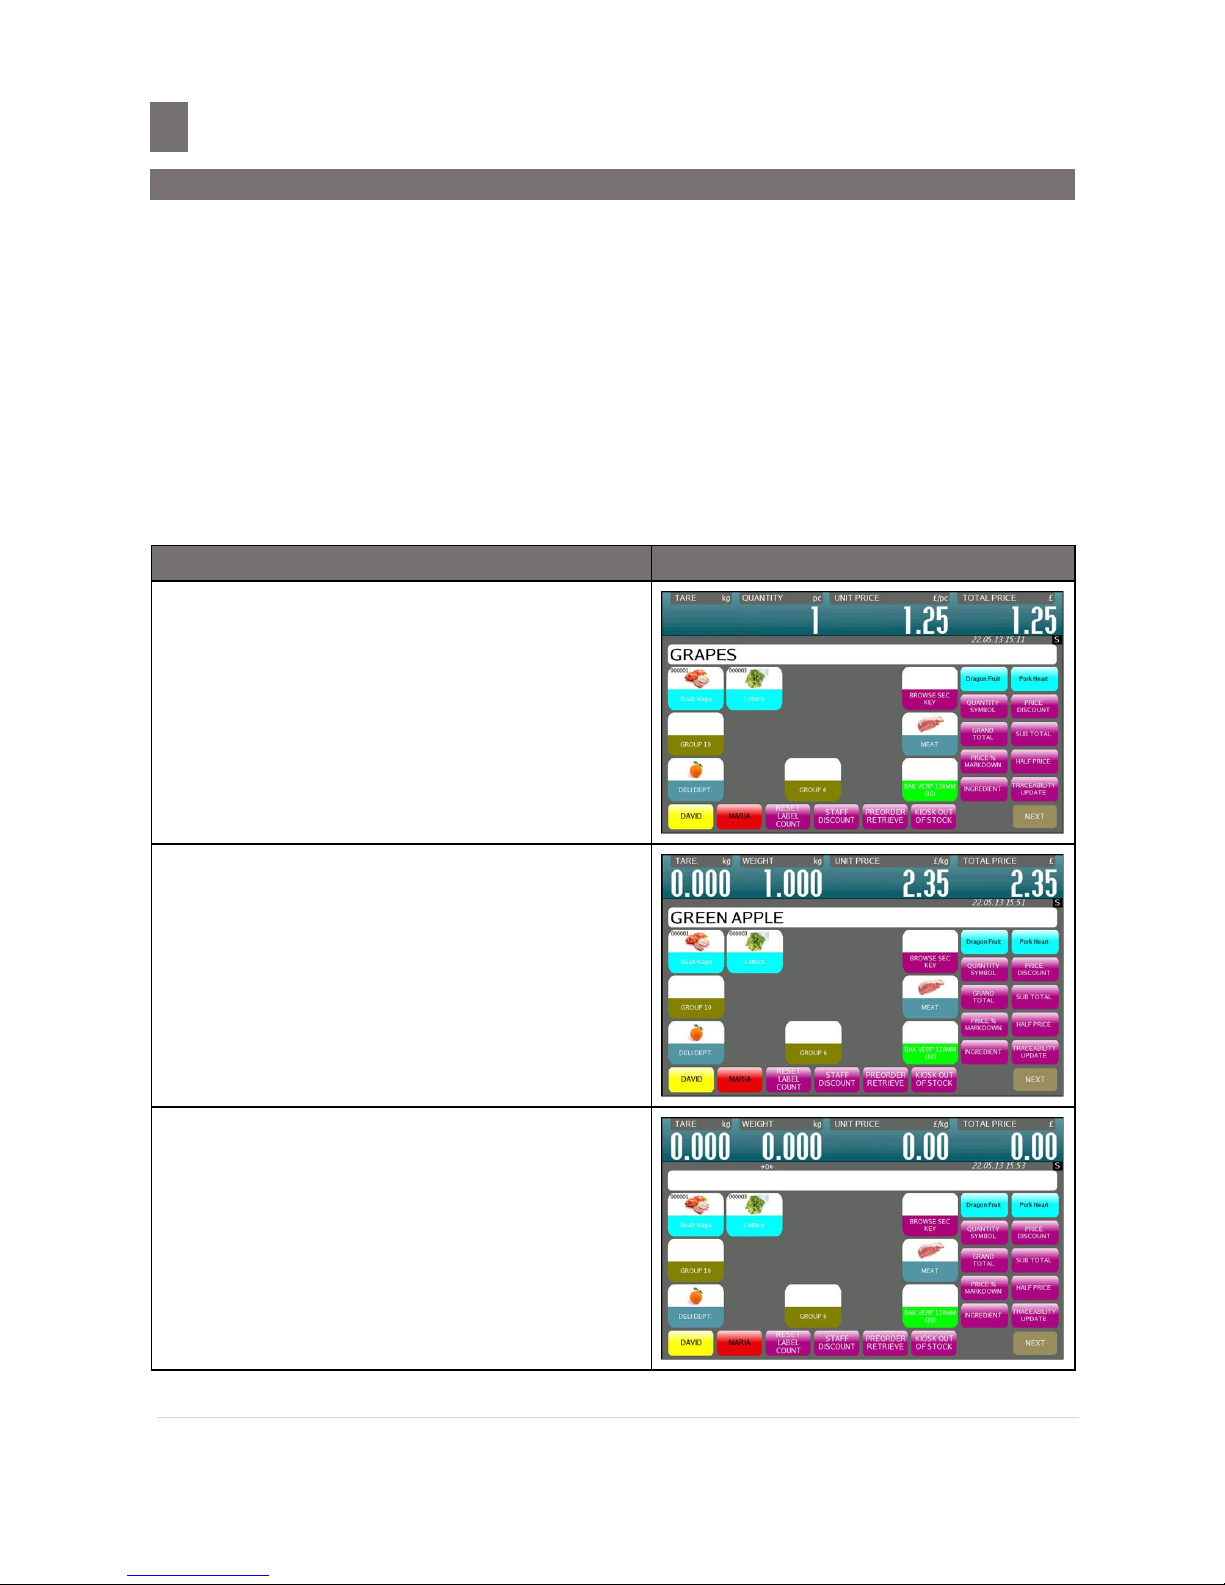
2. Label Printing for Non-PLU Item
It is possible to print item label for Non-PLU Item at Manual Mode. The Non-PLU Item will be
cleared if a PLU is called up or [CLEAR] key is pressed.
Note:
1) SPEC 141D002 "Manual Price Entry" set to "Allow" - to enable manual price entry.
2) SPEC 142E004 "Manual Weight Entry" set to "Normal and Prepack Mode" - to enable manual
Weight entry.
OPERATION
DISPLAY
1. In REGISTRATION MODE, enter the Price for
Non-PLU item, (e.g. 5.00) by numeric key.
Note: For Non-weight Item, just press [PRINT]
key to issue out a label or press [X] key
to enter multiply mode, then enter sale
quantity and press [PRINT] key to issue
label. For Non-weight of Non-PLU item,
will be registered to PLU # 999999.
2. Place the product on platter (e.g. 1kg) and
then Touch [PRINT] key to issue a label.
Then remove the product from platter.
Note: For Weighing of Non-PLU and PLU Item,
will be registered to PLU # 999998).
Page 32

M o d e l S M - 5 3 0 0 U s e r M a n u a l | 31
Typical Operation
––––––––––––––––––––––––––––––––––––––––
2.3 Registration Mode
2.3.3 Total Label or Receipt Printing
This operation is used for printing total label or receipt for counter sales in Manual Mode. For
SM5300P, make sure cassette is set to LABEL for Total Label Printing or set to RECEIPT for Receipt
Printing or set to LINERLESS setting for Total Label and Receipt Printing.
Note:
1) SPEC 141B008 "Total Label Printing" entry the numeric value, to enable total label printing.
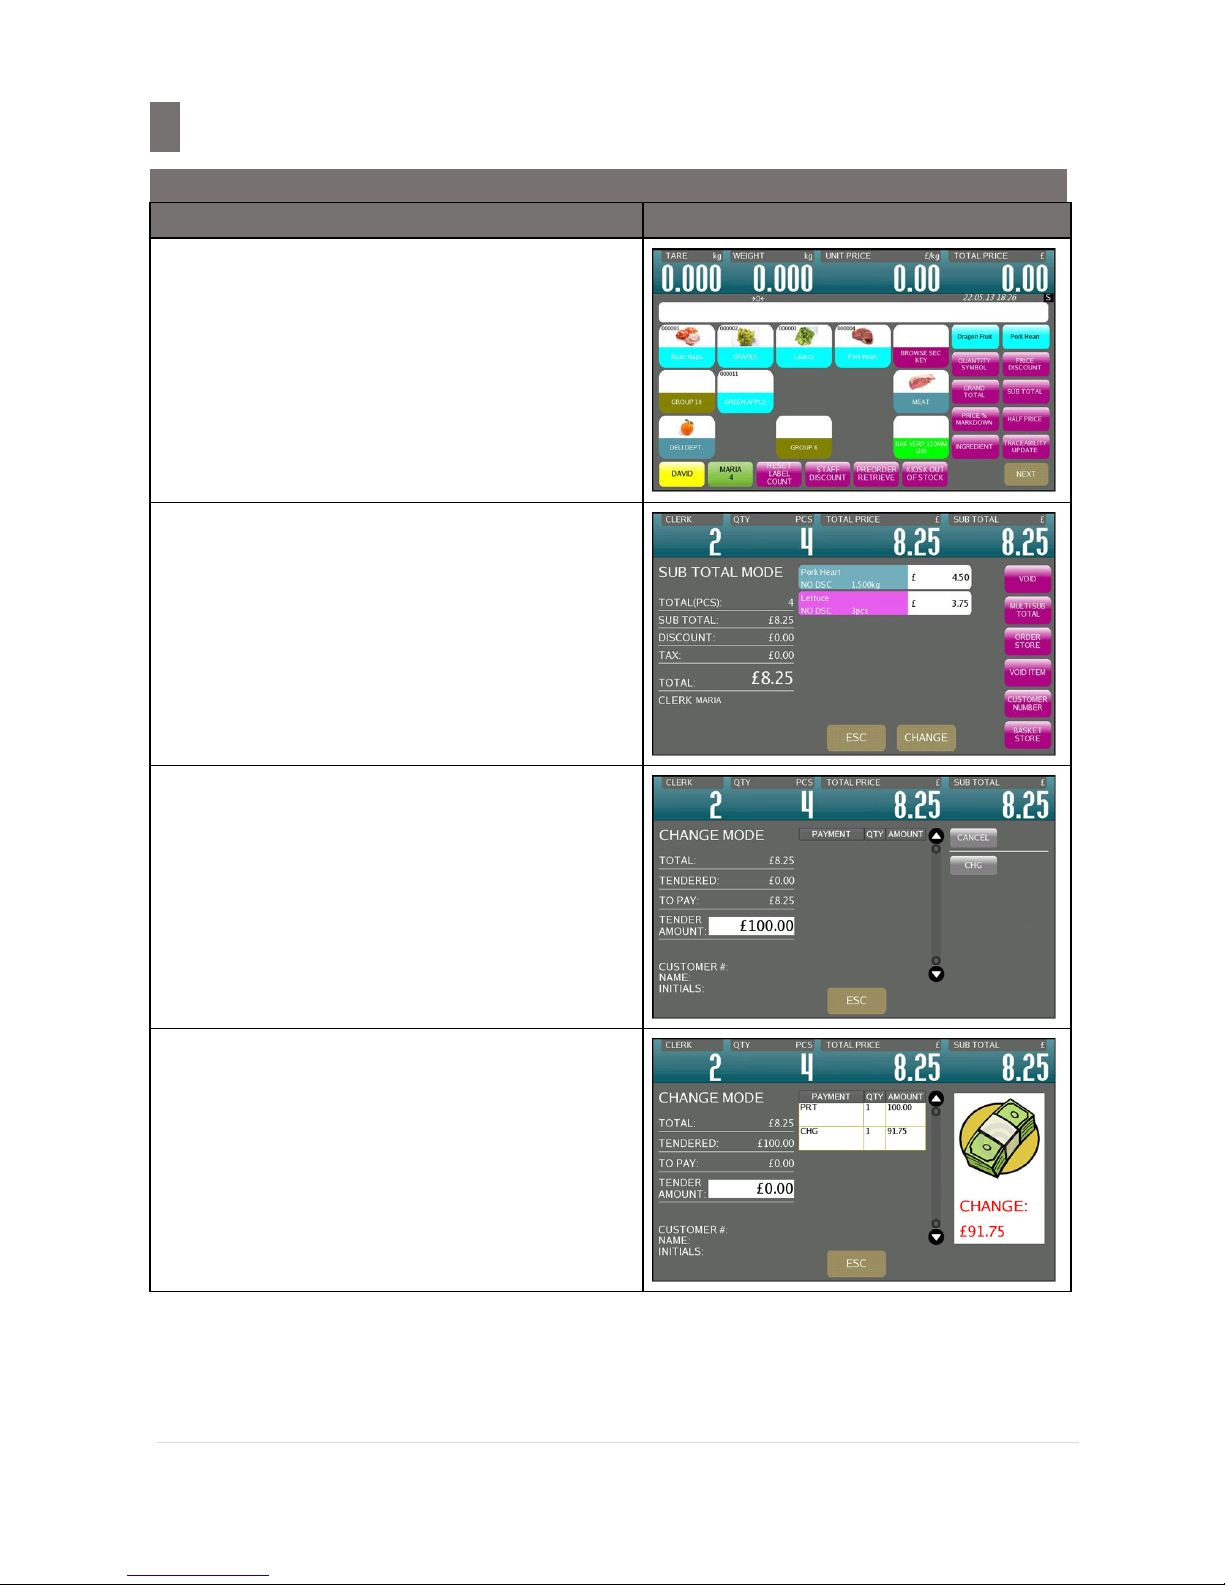
1. Sales Transaction and Change Calculation
This section shows how to operate the transactions with Clerk key. The designated Clerk key
accumulates each transaction data and the Receipt or Total Label will be issued.
Example:
Sells 1.5 kg of PORK HEART and 3 packs of LETTUCE for customer A.
OPERATION
DISPLAY
1. In REGISTRATION MODE, call up a PLU
weight item (e. g. PORK HEART) and place
the product on platter (e.g. 1.500 kg).
2. Touch [MARIA] key to add the sales data.
3. Remove the product from the platter and
call up a PLU non weight item (e. g.
LETTUCE), then Touch [X] key to enter
multiply mode and enter the sell Qty (e.g. 3
packs).
Page 33
M o d e l S M - 5 3 0 0 U s e r M a n u a l | 32
Typical Operation
––––––––––––––––––––––––––––––––––––––––
2.3 Registration Mode
OPERATION
DISPLAY
4. Touch [MARIA] key to add the sales data.
5. Touch [MARIA] key again to go into the
Accumulation Mode.
Note:
1. After printing of Total Label or Receipt,
display will return to Registration Mode.
2. Press [PRINT] key to Print Total Label.
6. Touch [CHANGE] key to enter to CHANGE
MODE screen.
Enter the amount received by numeric
keypad. (e.g. $100.00)
Note: Touch [ESC] key to escape the CHANGE
MODE.
7. Press [PRINT] key to issue a Receipt.
Note:
1. After printing of Receipt or Total Label,
display will return to Registration Mode.
2. All transaction in Registration mode had
clear.
Page 34

M o d e l S M - 5 3 0 0 U s e r M a n u a l | 33
Typical Operation
–––––––––––––––––––––––––––––––––––––––––
2.3 Registration Mode
2. [Price Discount] Function Key in Accumulation Mode
This is used to discount the total price by the following formula.
PRICE TO PAY = ORIGINAL TOTAL PRICE - ENTERED DISCOUNT VALUE
Note: [PRICE DISC] function key must be assigned in advance, please refer to preset key programming in
Operation Manual Advance
Example: Giving Price Discount of $10.00 for buying 2.5kg of CABBAGE.
OPERATION
DISPLAY
1. In REGISTRATION MODE, call up a PLU
weight item (e. g. LEMON) and place the
product on platter (e.g. 2.500kg).
2. Touch [PRICE DISCOUNT] key to enter to
the PRICE DISCOUNT setting screen and
then enter the discount amount (e.g.
$10.00) by numeric keypad.
Note: Touch [ESC] key to cancel PRICE
DISCOUNT function.
3. Touch [ENTER] key.
Note:
1. $10.00 has been deducted from the
Original Total Price.
2. It will show that customer has got
discount $10.00
Page 35

M o d e l S M - 5 3 0 0 U s e r M a n u a l | 34
Typical Operation
–––––––––––––––––––––––––––––––––––––
2.3 Registration Mode
OPERATION
DISPLAY
4. Press [PRINT] key to issue a Label and
then remove product from platter.
Page 36

M o d e l S M - 5 3 0 0 U s e r M a n u a l | 35
Typical Operation
––––––––––––––––––––––––––––––––––––––––
2.3 Registration Mode
3. [Unit Price % Disc] Function Key in Accumulation Mode
This is used to discount the total price by the following formula.
PRICE TO PAY = ORIGINAL TOTAL PRICE x (100% - ENTERED %)
Note: [%PRICE DISC] function key must be assigned in advance, please refer to preset key programming
in Operation Manual Advance
Example: Giving % Price Discount of 25% for buying 2.5kg of IRISH BACON.
OPERATION
DISPLAY
1. In REGISTRATION MODE, call up a PLU
weight item (e. g. IRISH BACON) and place
the product on platter (e.g. 2.5kg).
2. Touch [UNIT PRICE % DISCOUNT] key
to enter to the Unit Price % Discount setting
screen and then enter the discount %
value (e.g. 25.00%) by numeric keypad.
Note: Touch [ESC] key to cancel UNIT PRICE %
DISCOUNT function.
3. Touch [ENTER] key.
Note: 25.00% have been deducted from the
Original Total Price.
Page 37

M o d e l S M - 5 3 0 0 U s e r M a n u a l | 36
Typical Operation
––––––––––––––––––––––––––––––––––––––––
2.3 Registration Mode
OPERATION
DISPLAY
4. Press [PRINT] key to issue a Label and then
remove product from platter.
Page 38

M o d e l S M - 5 3 0 0 U s e r M a n u a l | 37
Typical Operation
––––––––––––––––––––––––––––––––––––––––
2.3 Registration Mode
2.3.4 Data Correction
The data correction during accumulating operation is to correct sales transaction data when
customer canceled the purchases or operators make a mistake before issuing Total Label or
Receipt. The corrected item data is printed with two lines crossed on the Total Receipt.
Data correction has 2 correcting functions as follows:
1) Void by Item Correction is to void sales data by tracing transaction number.
2) Void by PLU Number Correction is to void sales data by tracing PLU Number.
1. Void by Item Correction
This function is to void the specified transaction during an accumulating operation. Operator
can designate the Number of transaction to be voided even if plural transactions for the same item
are performed.
Note: [VOID ITEM] function key must be assigned in advance, please refer to preset key programming in
operation manual.
Example: Sells 2packs of GRAPES, 1kg of WATER MELON and sell more 1.5kg of MANGO for
customer A. But customer canceled 1kg of WATER MELON accumulated in the operation.
OPERATION
DISPLAY
1. In REGISTRATION MODE, call up PLU of
Grapes then press [X] key to enter multiply
mode and enter the sell Qty (e.g. 2 packs).
2. Touch [SANDRA] key to add the sales data.
Page 39

M o d e l S M - 5 3 0 0 U s e r M a n u a l | 38
Typical Operation
––––––––––––––––––––––––––––––––––––––––
2.3 Registration Mode
OPERATION
DISPLAY
3. Call Up PLU of MANGO and Place the product
on the platter (e.g. 1.500kg)
4. Touch [SANDRA] key to add the sales data.
5. Remove the product from the platter and Call
up PLU of WATER MELON and place the
product on platter (e.g. 1.000 kg).
6. Touch [SANDRA] key to add the sales data.
Touch [SANDRA] key again to go into the
Accumulation Mode.
Page 40

M o d e l S M - 5 3 0 0 U s e r M a n u a l | 39
Typical Operation
–––––––––––––––––––––––––––––––––––––––
2.3 Registration Mode
OPERATION
DISPLAY
7. Select transaction item (e.g. Touch the 1st
accumulated item MANGO).
Note: Item No. 1 MANGO will be highlighted.
8. Touch [VOID ITEM] key to cancel the
selected Item.
9. Press [PRINT] key to issue a Receipt or
Total Label and then remove product from
platter.
Note: After printing of Receipt or Total Label,
display will return to Registration Mode.
Page 41

M o d e l S M - 5 3 0 0 U s e r M a n u a l | 40
Typical Operation
–––––––––––––––––––––––––––––––––––––––
2.3 Registration Mode
2. Void by PLU Number Correction
This function is to void the specified item during an accumulating operation, by specifying a PLU
Number in the accumulating operation mode. All transaction data of the PLU number will be
canceled.
Note: [VOID PLU] function key must be assigned in advance, please refer to preset key programming in
Operation Manual Advance
Example: Sells 2packs of GRAPES, 1.500kg of Mango and sell more 2packs of GRAPES for
customer A. But customer canceled all the data of GRAPES.
OPERATION
DISPLAY
1. In REGISTRATION MODE, call up PLU of
Grapes then press [X] key to enter multiply
mode and enter the sell Qty (e.g. 2 packs).
2. Touch [SANDRA] key to add the sales data.
3. Call Up PLU of MANGO and Place the
product on the platter (e.g. 1.500kg)
Page 42

M o d e l S M - 5 3 0 0 U s e r M a n u a l | 41
Typical Operation
––––––––––––––––––––––––––––––––––––––––
2.3 Registration Mode
OPERATION
DISPLAY
4. Touch [SANDRA] key to add the sales data.
5. Call up PLU of GRAPES again, then press [X]
key to enter multiply mode and enter the sell
Qty (e.g. 2 packs).
6. Touch [SANDRA] key to add the sales data.
7. Touch [SANDRA] key again to go into the
Accumulation Mode.
Page 43

M o d e l S M - 5 3 0 0 U s e r M a n u a l | 42
Typical Operation
–––––––––––––––––––––––––––––––––––––––
2.3 Registration Mode
OPERATION
DISPLAY
8. Then touch [VOID PLU] key to entry
Transaction Correction Mode
Enter the PLU number of GRAPES by
numeric keypad. (e.g. 2) and Touch
[ENTER] key
Note: [ESC] key used to abort the transaction
9. All the transaction data of PLU2 (GRAPES)
will be canceling.
10. Press [PRINT] key to issue a Receipt or
Total Label and then remove product from
platter.
Note: After printing of Total Label or Receipt,
display will return to Registration Mode.
Page 44

M o d e l S M - 5 3 0 0 U s e r M a n u a l | 43
Typical Operation
–––––––––––––––––––––––––––––––––––––––
2.3 Registration Mode
2.3.5 Item Label Printing in Prepack Mode
Pre-pack Mode can be switched from Manual mode by pressing [AUTO] key on keypad. In this
mode, the following functions are available for:
(1) For weighing item, label is automatically issued (without pressing [PRINT] key) after the
weight of the item gets stable. The machine keeps the PLU data until [CLEAR] key is
pressed.
(2) For non-weighing item, the next label is automatically issued (without pressing [PRINT]
key) after a label is taken away. The machine keeps the PLU data until [CLEAR] key is
pressed.
Note:
1) SPEC146A033 "Selection of Prepack Mode" set to "Enable", to enable prepack mode.
2) SPEC141D149 "Continuous print in prepack mode", to enable or disable continuous printing
in prepack mode and set SPEC141B617.
Item Label Issue for PLU Item
Example: To weight (e.g. 1kg) and label 20 packs of GREEN BELL PEPPERS (Weighing Item) and
to issue 20 labels of BANANA (Non-Weighing Item).
OPERATION
DISPLAY
1. In REGISTRATION MODE, press [AUTO]
key until the display change to the PREPACK
MODE screen.
Call up PLU of GREEN BELL PEPPERS
2. Place product on platter. (e.g. 1.500kg of
GREEN BELL PEPPERS)
Note: Label automatically issued after weight
stable.
Page 45
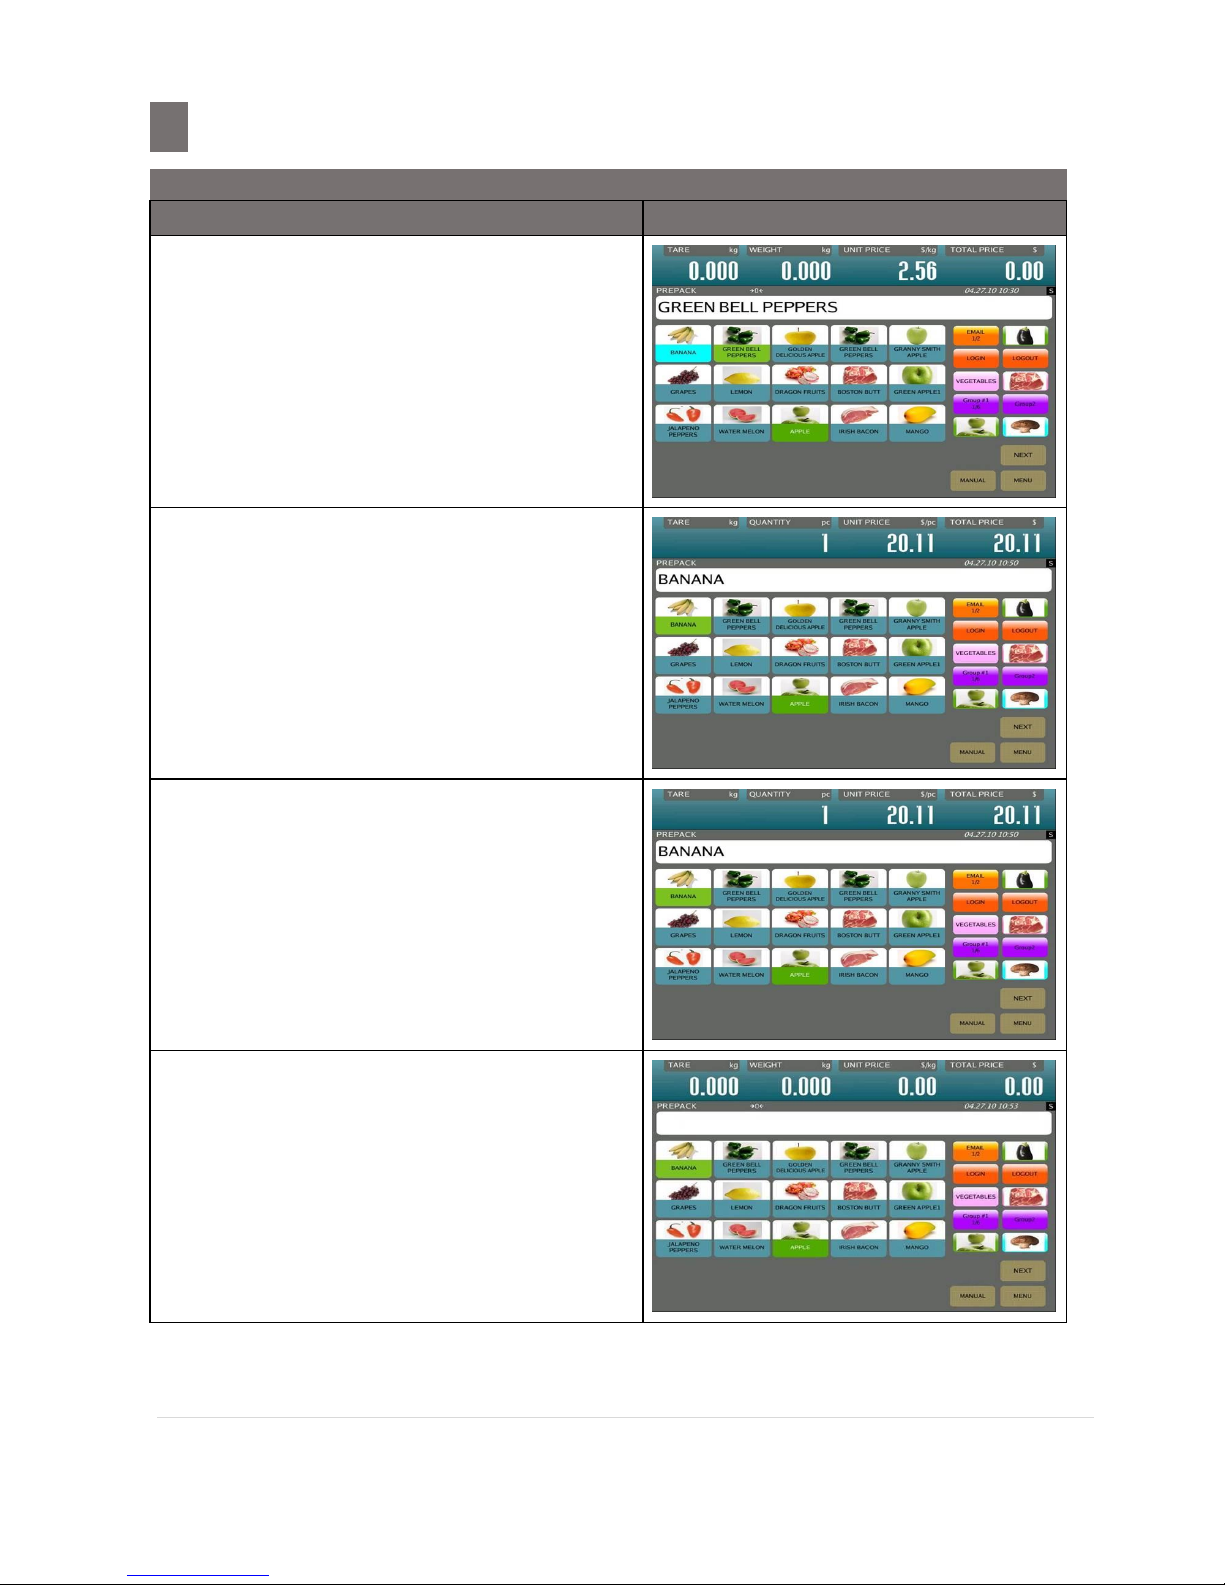
M o d e l S M - 5 3 0 0 U s e r M a n u a l | 44
Typical Operation
–––––––––––––––––––––––––––––––––––––––
2.3 Registration Mode
OPERATION
DISPLAY
3. Remove the product from the platter and
take the label off.
4. Repeat the above step 2 and 3 to weigh the
next pack, until the last packed is weighed.
Then call up a PLU of BANANA
5. Press [PRINT] key to start issue the first
label.
Take the label away and next label
automatically issued out.
6. After issue last label out, press [CLEAR]
key to stop issuing label.
Then press [CLEAR] key again to clear the
PLU.
Page 46

M o d e l S M - 5 3 0 0 U s e r M a n u a l | 45
Typical Operation
–––––––––––––––––––––––––––––––––––––––
2.3 Registration Mode
1. Item Label Issue for Non-PLU Item
It is possible to print item label for Non-PLU Item at Pre-pack Mode. The Non-PLU Item will be
cleared if a PLU is called up or [CLEAR] key is pressed.
OPERATION
DISPLAY
1. In PREPACK MODE, enter the Price for NonPLU item (e.g. $5.00) by numeric key.
Note:
1. For Non-weight Item, just press
[PRINT] key to start issuing out a label.
2. For Non-weight of Non-PLU item, will be
registered to PLU # 999999.
2. Place the product on platter. (e.g. 1.500kg)
Note: The label automatically issued after
weight stable. For Weighing of NonPLU Item, will be registered to PLU #
999998
3. Remove the product from platter.
Note: To change back to MANUAL MODE, press
[AUTO] key, until the display change to
MANUAL MODE screen.
Page 47

M o d e l S M - 5 3 0 0 U s e r M a n u a l | 46
Typical Operation
–––––––––––––––––––––––––––––––––––––––
2.3 Registration Mode
2.3.6 Tare Operation
There are 2 ways to set Tare Weight at Registration Mode:
(1) One Touch Tare (Weight Tare)
(2) Digital Tare
Tare value subtracted will be displayed on "TARE" window. The following operation examples
show 2 ways of subtracting the Tare weight of a 20g tray.
1. SPEC142B008 "Tare Display" set "Allow" to enable tare display.
1. One Touch Tare
This function is to weight the actual weight of tare then subtract its weight to get the tare value
for all of PLU.
OPERATION
DISPLAY
1. In REGISTRATION MODE, place the weight
on center of the platter (e.g. 20g).
2. Press [TARE] key to subtract the tare
weight.
3. Remove the weight from platter.
Page 48

M o d e l S M - 5 3 0 0 U s e r M a n u a l | 47
Typical Operation
–––––––––––––––––––––––––––––––––––––––
2.3 Registration Mode
OPERATION
DISPLAY
4. Press [TARE] key to clear the Tare
value.
Page 49

M o d e l S M - 5 3 0 0 U s e r M a n u a l | 48
Typical Operation
–––––––––––––––––––––––––––––––––––––––
2.3 Registration Mode
2. Digital Tare
This function can be used when tare weight is decided in advance. The knowing tare value
(weight of the tray) can be entering by numeric keys.
SPEC: SPEC 142B002 "Digital Tare" set "Yes" to enable this function.
OPERATION
DISPLAY
1. In REGISTRATION MODE, enter Tare Value
by numeric key. (e.g. 200)
2. Press [TARE] key to subtract the tare
weight.
3. Press [TARE] key to clear the Tare value.
Page 50

M o d e l S M - 5 3 0 0 U s e r M a n u a l | 49
Typical Operation
–––––––––––––––––––––––––––––––––––––––
2.3 Registration Mode
3. Tare Value Exchange
There are two ways to do tare value exchange, Tare Accumulation and Tare Subtraction. One
Touch Tare and Digital Tare can be used to do Tare Accumulation or Tare Subtraction.
1. Tare Accumulation
SPEC: SPEC 142B003 "Tare Accumulation" must be set to "Yes" in advance to enable Tare
Accumulation function.
OPERATION
DISPLAY
1. In REGISTRATION MODE, put weight on the
e.g. 200g
Note: Also can use digital tare
2. Press [TARE] key to subtract the tare
weight
3. Place another tare weight on the platter
(e.g. 500g)
Note: Also can use digital tare, for digital tare
the next tare accumulation value should
not be lower than the previous tare value.
Page 51

M o d e l S M - 5 3 0 0 U s e r M a n u a l | 50
Typical Operation
––––––––––––––––––––––––––––––––––––––––
2.3 Registration Mode
OPERATION
DISPLAY
4. Press [TARE] key to subtract the tare
weight
5. Remove all weight from the platter and
press [TARE] key to clear the tare.
Page 52

M o d e l S M - 5 3 0 0 U s e r M a n u a l | 51
Typical Operation
–––––––––––––––––––––––––––––––––––––––
2.3 Registration Mode
2. Tare Subtraction
SPEC 142B005 "One Touch Tare subtraction" must be set to "Allow" in advance, to enable
this function.
OPERATION
DISPLAY
1. In REGISTRATION MODE, put weight on the
platter e.g. 200g
Note: Also can use digital tare.
2. Press [TARE] key to subtract the tare
weight
3. Remove e.g. 100g from the platter.
Note: For Digital Tare, subtracted tare value
should not be bigger than the total tare
value.
4. Press [TARE] key to subtract the tare
weight
Page 53

M o d e l S M - 5 3 0 0 U s e r M a n u a l | 52
Typical Operation
–––––––––––––––––––––––––––––––––––––––
2.3 Registration Mode
OPERATION
DISPLAY
5. Remove the balance weight and press
[TARE] key to clear the tare weight.
Page 54

M o d e l S M - 5 3 0 0 U s e r M a n u a l | 53
Typical Operation
–––––––––––––––––––––––––––––––––––––––
2.4 Self Service Mode
2.4 Self Service Mode
SPEC: Spec 146A017 Self Service “set to YES, to active the Self service mode in Menu mode.
SPEC: Spec 141D072 Tenkey for Self Service Mode, to select the self service mode using
which tenkey.
SPEC: Spec 141D148 Auto Print in Self Service Mode, must set to “YES” because ten key
button will not active.
Note: Self Service available on SM5500 Alpha BS
2.4.1 Software Tenkey
Software Tenkey function only used for weight item in the Self Service mode.
SPEC: SPEC 141D072 TENKEY FOR SELF SERVICE MODE, set to Software Tenkey.
Manual PLU Call up is by enter the PLU Number by numeric Keys. To use the manual PLU call up,
set spec as below:
SPEC: SPEC141D041 Auto PLU Call must set to By Number of Digits.
SPEC: SPEC141D042 Auto PLU Call (By Digits/ By Timeout (0.1 Sec)), this spec depend
on our own setting, for example set to 2.
OPERATION
DISPLAY
1. In SELF SERVICE MODE, touch [01] and it
will prompt PLU Number of the Dragon Fruit
(e.g. 1).
Note: Only used for weight item.
2. The put item on the platter will auto issue
out the label.
Page 55

M o d e l S M - 5 3 0 0 U s e r M a n u a l | 54
Typical Operation
–––––––––––––––––––––––––––––––––––––––
2.4 Self Service Mode
OPERATION
DISPLAY
3.
After issue out the label will prompt out
message "PEEL LABEL".
Take out the label,the message will be back
to “PLEASE INPUT PLU CODE” and can
continue next transaction.
4.
Exit from Self Service mode will prompt out
to TENKEY mode.
Press ESC button will back to Self Service
mode.
Note: To exit from this mode must touch the
CLEAR button twice, 0 button twice, and
CLEAR button once touch and 0 buttons
once touch.
5.
Press [MENU] key will go out from ten key
mode to MENU MODE
Page 56

M o d e l S M - 5 3 0 0 U s e r M a n u a l | 55
Typical Operation
–––––––––––––––––––––––––––––––––––––––
2.4 Self Service Mode
2.4.2 Mechanical Tenkey
This Mechanical Tenkey function also used for weight item only, this mechanical tenkey self service
mode we can see the image of the item product.
SPEC: SPEC141D143 Self Service Preset Group, this spec depends on our own setting, for
example we set to 1.
Note: The group setting is set in the preset group; this function is used by mechanical tenkey.
Note: The tenkey is working in this mechanical keypad self service mode.
SPEC: SPEC 141D072 TENKEY FOR SELF SERVICE MODE set to Mechanical Keypad.
Manual PLU Call up is by touch the image button and then follow by put item on the platter will
auto issue out label or touch item image first then put item on the platter will auto issue out label.
OPERATION
DISPLAY
1. In Menu Mode Touch [SELF SERVICE] key
2. Select the PLU by Touch the image button
(e. g. LEMON PLU #3)
3. Put the product on the platter and it will
auto issue the label
Page 57

M o d e l S M - 5 3 0 0 U s e r M a n u a l | 56
Typical Operation
–––––––––––––––––––––––––––––––––––––––
2.4 Self Service Mode
OPERATION
DISPLAY
4. After issue out label will direct prompt out
message "PEEL LABEL".
Note: Please take out the label before continue
to do next transaction.
5. Press [MENU] button will back to Original
MENU mode.
Note: We can used auto run self service mode when scale start up by set the SPEC 141D040 AUTO
ENTRY TO OPERATION MODE set to SELF SERVICE, set to YES
Page 58

M o d e l S M - 5 3 0 0 U s e r M a n u a l | 57
Report Mode
–––––––––––––––––––––––––––––––––––––––––––––––––
3.1 Report Mode Description
Report Mode
3.1 Report Mode Description
Report mode function is to view and print out various kinds of sales transaction reports for analysis.
The following reports are available.
Report Type
Report Type
1.
PLU Report
11.
Store Report
2.
Dept Report
12.
MG Report
3.
Clerk Report
13.
Inventory Report
4.
Clerk Log Report
14.
Traceability Report
5.
Terminal Report
15.
Prepack Report
6.
Store Summarized Report
16.
Grand Total Report
7.
24 Hour Report
17.
ABC Analysis Report
8.
Void report
18.
Void Label
9.
Tax Report
19.
Batch Report
10.
Queue Report
20.
PLU Price Change Report*
*To print PLU Price Change Report, user must use AQT (Advance Query Tool) on PC.
The desirable report can be view and printed out according to the following printing order
selections.
DATE RANGE
For setting the date range, FROM date and TO date have to be entered.
PERIODIC REPORT RANGE
TODAY
:
To select current of day range to day.
LAST 7 DAYS
:
To select from current day to past day of total = 7 day.
TERM 1
:
To select from terminal 1
TERM 2
:
To select from terminal 2
TERM 3
:
To select from terminal 3
REPORT TYPE
STOCK
TAKING
:
To select Report based on Stock Tacking Transaction
WASTE
:
To select Report based on Waste Transaction
ORDER
:
To select Report based on Order Transaction
RECEIVE
:
To select Report based on Receive Transaction
ACCUMULATED
:
To select Report based on Accumulated Transaction
NORMAL
:
To select Report based on Normal Transaction
SALES
:
To select Report based on Sales Transaction
ALL
:
To select Report based on All Transaction
SORT BY
PRICE
:
Actual Total Price order prints (Unit Price Base).
WEIGHT
:
Weight Total order print.
QUANTITY
:
Quantity Total order print.
PROFIT
:
Gross Profit Total order print.
PLU NO
:
PLU number order print
Page 59

M o d e l S M - 5 3 0 0 U s e r M a n u a l | 58
Report Mode
–––––––––––––––––––––––––––––––––––––––––––––––––
3.1 Report Mode Description
ORDER TYPE
ASCENDING
:
Ascending order print.
DESCENDING
:
Descending order print.
PRINT TYPE
TRUNK
:
Printing Grand Total of Main Group.
BOUGH
:
Printing Grand Total of Main Group and PLU Total.
PRINT LIMIT
For setting the report range, Department Number, Main Group Number, PLU Number,
Clerk number to start and finish is to be entered.
LEVEL TYPE
DEPT
:
Department.
MG
:
Main Group.
Page 60

M o d e l S M - 5 3 0 0 U s e r M a n u a l | 59
Report Mode
–––––––––––––––––––––––––––––––––––––––––––––––––
3.2 Entry to Report Mode
OPERATION
DISPLAY
1. In MENU MODE screen.
2. Touch [REPORT] key to enter to REPORT
GENERATOR screen
Note:
1. Touch [MENU] key o to exit REPORT
GENERATOR screen.
2. [CONFIG] key used to configure which
printer that will use to print a report
3. Touch the desired key to go to the desired
Programming Mode. (e.g. PLU Report)
Note:
1. Touch [EXIT] key to exit REPORT
MODE screen.
2. Touch [VIEW] key to view report.
3. Touch [PRINT] key to print report.
Page 61

M o d e l S M - 5 3 0 0 U s e r M a n u a l | 60
Report Mode
–––––––––––––––––––––––––––––––––––––––––––––––––
3.2 Entry to Report Mode
3.2.1 PLU Report
PLU Report is used to view/print transaction data separated by PLU number. On PLU Report, Sales
transaction report is printed depending on the date range selection.
Example:
Printing report for PLU Report (LAST 7 DAYS).
OPERATION
DISPLAY
1. In REPORT GENERATOR screen.
Touch [PLU REPORT] key to enter to PLU
REPORT MODE screen.
2. Set the printing order by touching the boxes
and select the desired data or by using the
numeric key to enter in number.
For example:
- DATE RANGE: 23-05-12 to 29-05-12
Note: Also can select by pressing
[TODAY] or [LAST 7 DAYS]
button
- PRINT TYPE: NORMAL
- SORT BY: PLU NO
- ORDER: DESCENDING
- PLU RANGE: 1 to 20
- MG RANGE : 1 to 999
3. Touch [PREVIEW] key to view the report.
Note:
1. Touch [UP] or [DOWN] key, to view
continues of report.
2. Touch [EXIT] key to exit view PLU Total
Report.
3. Touch [ZOOM IN] or [ZOOM OUT] key
to zoom in or zoom out preview report.
Page 62

M o d e l S M - 5 3 0 0 U s e r M a n u a l | 61
Report Mode
–––––––––––––––––––––––––––––––––––––––––––––––––
3.2 Entry to Report Mode
OPERATION
DISPLAY
4. Touch [PRINT] key to print out the report.
Note:
1. Touch [MENU] key, to back to Menu
Mode display.
Sample: PLU Report
Page 63

M o d e l S M - 5 3 0 0 U s e r M a n u a l | 62
Report Mode
–––––––––––––––––––––––––––––––––––––––––––––––––
3.2 Entry to Report Mode
3.2.2 Dept Report
Department Total Report is used to view/print transaction data separated by Department number.
On Department Total Report, Sales transaction report is printed depending on the date range
selection.
Example:
Printing report for Department Total Report (TODAY).
OPERATION
DISPLAY
1. In REPORT GENERATOR screen.
Touch [DEPT REPORT] key to enter to
DEPT REPORT MODE screen.
2. Set the printing order by touching the boxes
and select the desired data
For example:
- DATE RANGE: 29-04-10 to 29-04-10
Note: Also can select by pressing
[TODAY] or [LAST 7 DAYS]
button
- PRINT TYPE: TRUNK
- SORT BY: PRICE
- ORDER: ASSCENDING
3. Touch [PREVIEW] key to view the report.
Note:
1. Touch [UP] or [DOWN] key, to view
continues of report.
2. Touch [EXIT] key to exit view PLU Total
Report.
3. Touch [ZOOM IN] or [ZOOM OUT]
key to zoom in or zoom out preview
report.
Page 64

M o d e l S M - 5 3 0 0 U s e r M a n u a l | 63
Report Mode
–––––––––––––––––––––––––––––––––––––––––––––––––
3.2 Entry to Report Mode
OPERATION
DISPLAY
4. Touch [PRINT] key to print out the report.
Note:
1. Touch [MENU] key, to back to Menu
Mode display.
Sample: Department Report
Page 65

M o d e l S M - 5 3 0 0 U s e r M a n u a l | 64
Report Mode
–––––––––––––––––––––––––––––––––––––––––––––––––
3.2 Entry to Report Mode
3.2.3 Clerk Report
Clerk Report is used to view/print transaction data separated by Clerk Number. On Clerk Report,
Sales transaction report is printed depending on the date range selection.
Example:
Printing report for Clerk Report (TODAY).
OPERATION
DISPLAY
1. In REPORT GENERATOR screen.
Touch [CLERK REPORT] key to enter to
CLERK REPORT MODE screen.
2. Select the date range and use numeric key
to entry in the number
For example:
- DATE RANGE: 29-05-12 to 29-05-12
Note: Also can select by pressing
[TODAY] or [LAST 7 DAYS]
button
- CLERK RANGE: 1 to 999999
3. Touch [PREVIEW] key to view the report.
Note:
1. Touch [UP] or [DOWN] key, to view
continues of report.
2. Touch [EXIT] key to exit view PLU Total
Report.
3. Touch [ZOOM IN] or [ZOOM OUT] key
to zoom in or zoom out preview report.
Page 66

M o d e l S M - 5 3 0 0 U s e r M a n u a l | 65
Report Mode
–––––––––––––––––––––––––––––––––––––––––––––––––
3.2 Entry to Report Mode
OPERATION
DISPLAY
4. Touch [PRINT] key to print out the report.
Note:
1. Touch [MENU] key, to back to Menu
Mode display.
Sample: Clerk Report
Page 67

M o d e l S M - 5 3 0 0 U s e r M a n u a l | 66
Report Mode
–––––––––––––––––––––––––––––––––––––––––––––––––
3.2 Entry to Report Mode
3.2.4 Clerk LOG
Clerk Report is used to view/print all transaction that had done by CLERK
Example:
Printing report for Clerk LOG Report (TODAY).
OPERATION
DISPLAY
1. In REPORT GENERATOR screen.
Touch [CLERK LOG REPORT] key to enter
to CLERK LOG REPORT MODE screen.
2. Set the printing order by touching the boxes
and select the desired data
For example:
- DATE RANGE: 19-12-15 to 19-12-15
Note: Also can select by pressing
[TODAY] or [LAST 7 DAYS]
button
- Select Printer Type [ALL]
3. Touch [PREVIEW] key to view the report.
Note:
1. Touch [UP] or [DOWN] key, to view
continues of report.
2. Touch [EXIT] key to exit view PLU Total
Report.
3. Touch [ZOOM IN] or [ZOOM OUT]
key to zoom in or zoom out preview
report.
Page 68

M o d e l S M - 5 3 0 0 U s e r M a n u a l | 67
Report Mode
–––––––––––––––––––––––––––––––––––––––––––––––––
3.2 Entry to Report Mode
OPERATION
DISPLAY
4. Touch [PRINT] key to print out the report.
Note:
1. Touch [MENU] key, to back to Menu
Mode display.
Sample: Clerk Log
Page 69

M o d e l S M - 5 3 0 0 U s e r M a n u a l | 68
Report Mode
–––––––––––––––––––––––––––––––––––––––––––––––––
3.2 Entry to Report Mode
3.2.5 Terminal Report
Terminal Report is used to view/print transaction data separated by Terminal Number. On Terminal
Report, Sales transaction report is printed depending on the date range selection.
Example:
Printing report for Terminal Report (TODAY).
OPERATION
DISPLAY
1. In REPORT GENERATOR screen.
Touch [TERMINAL REPORT] key to enter
to TERMINAL REPORT MODE screen.
2. Set the printing order by touching the boxes
and select the desired data or by using the
numeric key to enter in number.
For example:
- DATE RANGE: 29-05-12 to 29-05-12
Note: Also can select by pressing
[TODAY] or [LAST 7 DAYS]
button
- PRINT TYPE: TRUNK
- TERM: 1 to 256
3. Touch [PREVIEW] key to view the report.
Note:
1. Touch [UP] or [DOWN] key, to view
continues of report.
2. Touch [EXIT] key to exit view PLU Total
Report.
3. Touch [ZOOM IN] or [ZOOM OUT] key
to zoom in or zoom out preview report.
Page 70

M o d e l S M - 5 3 0 0 U s e r M a n u a l | 69
Report Mode
–––––––––––––––––––––––––––––––––––––––––––––––––
3.2 Entry to Report Mode
OPERATION
DISPLAY
4. Touch [PRINT] key to print out the report.
Note:
1. Touch [MENU] key, to back to Menu
Mode display.
Sample:
TERMINAL REPORT
Page 71

M o d e l S M - 5 3 0 0 U s e r M a n u a l | 70
Report Mode
–––––––––––––––––––––––––––––––––––––––––––––––––
3.2 Entry to Report Mode
3.2.6 Store Summarized Report
Store Summarized Report is used to view/print transaction data separated by Store. On Store
Summarized Report, Sales transaction report is printed depending on the date range selection.
Example:
Printing report for Store Summarized Report (LAST 7 DAYS).
OPERATION
DISPLAY
1. In REPORT GENERATOR screen.
Touch [STORE REPORT] key to enter to
STORE REPORT MODE screen.
2. Set the printing order by touching the boxes
and select the desired data
For example:
- DATE RANGE: 23-05-12 to 29-05-12
Note: Also can select by pressing
[TODAY] or [LAST 7 DAYS]
button
3. Touch [PREVIEW] key to view the report.
Note:
1. Touch [UP] or [DOWN] key, to view
continues of report.
2. Touch [EXIT] key to exit view PLU Total
Report.
3. Touch [ZOOM IN] or [ZOOM OUT] key
to zoom in or zoom out preview report.
Page 72

M o d e l S M - 5 3 0 0 U s e r M a n u a l | 71
Report Mode
–––––––––––––––––––––––––––––––––––––––––––––––––
3.2 Entry to Report Mode
OPERATION
DISPLAY
4. Touch [PRINT] key to print out the report.
Note:
1. Touch [MENU] key, to back to Menu
Mode display.
Sample: Store Summarized Report
Page 73

M o d e l S M - 5 3 0 0 U s e r M a n u a l | 72
Report Mode
–––––––––––––––––––––––––––––––––––––––––––––––––
3.2 Entry to Report Mode
3.2.7 24 Hour Report
24 Hour Report is used to view/print transaction data separated by 24 hour transaction. On 24
Hour Report, Sales transaction report is printed depending on the date range selection.
Example:
Printing report for 24 Hour Report (TODAY).
OPERATION
DISPLAY
1. In REPORT GENERATOR screen.
Touch [24 HOUR REPORT] key to enter to
24 HOUR REPORT MODE screen.
2. Set the printing order by touching the boxes
and select the desired data
For example:
- DATE RANGE: 29-05-12 to 29-05-12
Note: Also can select by pressing
[TODAY] or [LAST 7 DAYS]
button
3. Touch [PREVIEW] key to view the report.
Note:
1. Touch [UP] or [DOWN] key, to view
continues of report.
2. Touch [EXIT] key to exit view PLU Total
Report.
3. Touch [ZOOM IN] or [ZOOM OUT] key
to zoom in or zoom out preview report.
Page 74

M o d e l S M - 5 3 0 0 U s e r M a n u a l | 73
Report Mode
–––––––––––––––––––––––––––––––––––––––––––––––––
3.2 Entry to Report Mode
OPERATION
DISPLAY
4. Touch [PRINT] key to print out the report.
Note:
1. Touch [MENU] key, to back to Menu
Mode display.
Sample: 24 Hour Report
Page 75

M o d e l S M - 5 3 0 0 U s e r M a n u a l | 74
Report Mode
–––––––––––––––––––––––––––––––––––––––––––––––––
3.2 Entry to Report Mode
3.2.8 Void Report
Void Report is used to view/print transaction data separated by Void transaction. On Void Report,
Sales transaction report is printed depending on the date range selection.
Example:
Printing report for Void Report (TODAY).
OPERATION
DISPLAY
1. In REPORT GENERATOR screen.
Touch [VOID REPORT] key to enter to
VOID REPORT MODE screen.
2. Set the printing order by touching the boxes
and select the desired data or by using the
numeric key to enter in number.
For example:
- DATE RANGE: 29-05-12 to 29-05-12
Note: Also can select by pressing
[TODAY] or [LAST 7 DAYS]
button
- PLU RANGE: 1 to 999999
3. Touch [PREVIEW] key to view the report.
Note:
1. Touch [UP] or [DOWN] key, to view
continues of report.
2. Touch [EXIT] key to exit view PLU Total
Report.
3. Touch [ZOOM IN] or [ZOOM OUT] key
to zoom in or zoom out preview report.
Page 76

M o d e l S M - 5 3 0 0 U s e r M a n u a l | 75
Report Mode
–––––––––––––––––––––––––––––––––––––––––––––––––
3.2 Entry to Report Mode
OPERATION
DISPLAY
4.
Touch [PRINT] key to print out the report.
Note:
1. Touch [MENU] key, to back to Menu
Mode display.
Sample: Void Report (Today)
Page 77

M o d e l S M - 5 3 0 0 U s e r M a n u a l | 76
Report Mode
–––––––––––––––––––––––––––––––––––––––––––––––––
3.2 Entry to Report Mode
3.2.9 Tax Report
Tax Report is used to view/print Label data separated by Tax. On Tax Report, Sales transaction
report is printed depending on the date range selection.
Example:
Printing report for Tax Report (TODAY).
OPERATION
DISPLAY
1. In REPORT GENERATOR screen.
Touch [TAX] key to go to Tax Report Mode
screen.
2. Set the printing order by touching the boxes
and select the desired data or by using the
numeric key to enter in number.
For example:
- DATE RANGE: 19-12-15 to 19-12-15
Note: Also can select by pressing
[TODAY] or [LAST 7 DAYS]
button
- TERMINAL: TERM1(--)
3. Touch [PREVIEW] key to view the report.
Note:
1. Touch [UP] or [DOWN] key, to view
continues of report.
2. Touch [EXIT] key to exit view PLU Total
Report.
3. Touch [ZOOM IN] or [ZOOM OUT] key
to zoom in or zoom out preview report.
Page 78

M o d e l S M - 5 3 0 0 U s e r M a n u a l | 77
Report Mode
–––––––––––––––––––––––––––––––––––––––––––––––––
3.2 Entry to Report Mode
OPERATION
DISPLAY
4. Touch [PRINT] key to print out the report.
Note:
1. Touch [MENU] key, to back to Menu
Mode display.
Sample: Tax Report
Page 79

M o d e l S M - 5 3 0 0 U s e r M a n u a l | 78
Report Mode
–––––––––––––––––––––––––––––––––––––––––––––––––
3.2 Entry to Report Mode
3.2.10 Queue Report
Queue Report is used to view/print Label data separated by Queue. On Queue Report, Sales
transaction report is printed depending on the date range selection.
Example:
Printing report for Queue Report (LAST 7 DAYS)
OPERATION
DISPLAY
1. In REPORT GENERATOR screen.
Touch [QUEUE] key to go to Queue Report
Mode screen.
2. Set the printing order by touching the boxes
and select the desired data or by using the
numeric key to enter in number.
For example:
- DATE RANGE: 15-12-15 to 21-12-15
Note: Also can select by pressing
[TODAY] or [LAST 7 DAYS]
button
- PRINT TYPE: SUMMARY
- SORT BY: DAY (BRIEF)
3. Touch [PREVIEW] key to view the report.
Note:
1. Touch [UP] or [DOWN] key, to view
continues of report.
2. Touch [EXIT] key to exit view PLU Total
Report.
3. Touch [ZOOM IN] or [ZOOM OUT] key
to zoom in or zoom out preview report.
Page 80

M o d e l S M - 5 3 0 0 U s e r M a n u a l | 79
Report Mode
–––––––––––––––––––––––––––––––––––––––––––––––––
3.2 Entry to Report Mode
OPERATION
DISPLAY
4. Touch [PRINT] key to print out the report.
Note:
1. Touch [MENU] key, to back to Menu
Mode display.
Sample: Queue Report (Today)
Page 81

M o d e l S M - 5 3 0 0 U s e r M a n u a l | 80
Report Mode
–––––––––––––––––––––––––––––––––––––––––––––––––
3.2 Entry to Report Mode
3.2.11 Store Report
Store Total Report is used to view/print transaction data separated by store. On Store Total
Report, Sales transaction report is printed depending on the date range selection.
Example:
Printing report for Store Total Report (LAST 7 DAYS).
OPERATION
DISPLAY
1. In REPORT GENERATOR screen.
Touch [STORE TOTAL REPORT] key to
enter to STORE REPORT MODE screen.
2. Set the printing order by touching the boxes
and select the desired data
For example:
- DATE RANGE: 23-05-12 to 29-05-12
Note: Also can select by pressing
[TODAY] or [LAST 7 DAYS]
button.
- PRINT TYPE: TRUNK
- INCLUDE CLEARED TRANSACTION: NO
3. Touch [PREVIEW] key to view the report.
Note:
1. Touch [UP] or [DOWN] key, to view
continues of report.
2. Touch [EXIT] key to exit view PLU
Total Report.
3. Touch [ZOOM IN] or [ZOOM OUT]
key to zoom in or zoom out preview
report.
Page 82

M o d e l S M - 5 3 0 0 U s e r M a n u a l | 81
Report Mode
–––––––––––––––––––––––––––––––––––––––––––––––––
3.2 Entry to Report Mode
OPERATION
DISPLAY
4. Touch [PRINT] key to print out the report.
Note:
1. Touch [MENU] key, to back to Menu
Mode display.
Sample: Store Total Report
Page 83

M o d e l S M - 5 3 0 0 U s e r M a n u a l | 82
Report Mode
–––––––––––––––––––––––––––––––––––––––––––––––––
3.2 Entry to Report Mode
3.2.12 MG Report
MG Report is used to view/print transaction data separated by MG number. On MG Report, Sales
transaction report is printed depending on the date range selection.
Example:
Printing report for PLU Total Report (TODAY).
OPERATION
DISPLAY
1. In REPORT GENERATOR screen.
Touch [MG REPORT] key to enter to MG
REPORT MODE screen.
2. Set the printing order by touching the boxes
and select the desired data or by using the
numeric key to enter in number.
For example:
- DATE RANGE: 21-12-15 to 21-12-15
Note: Also can select by pressing
[TODAY] or [LAST 7 DAYS]
button
- PRINT TYPE: TRUNK
- SORT BY: PRICE
- ORDER: ASCENDING
- DEPT RANGE: 1 to 99
3. Touch [PREVIEW] key to view the report.
Note:
1. Touch [UP] or [DOWN] key, to view
continues of report.
2. Touch [EXIT] key to exit view PLU
Total Report.
3. Touch [ZOOM IN] or [ZOOM OUT]
key to zoom in or zoom out preview
report.
Page 84

M o d e l S M - 5 3 0 0 U s e r M a n u a l | 83
Report Mode
–––––––––––––––––––––––––––––––––––––––––––––––––
3.2 Entry to Report Mode
OPERATION
DISPLAY
4. Touch [PRINT] key to print out the report.
Note:
1. Touch [MENU] key, to back to Menu
Mode display.
Sample: MAIN GROUP Total Report
Page 85

M o d e l S M - 5 3 0 0 U s e r M a n u a l | 84
Report Mode
–––––––––––––––––––––––––––––––––––––––––––––––––
3.2 Entry to Report Mode
3.2.13 Inventory Report
Inventory Report is used to view/print transaction data separated by Inventory. On Inventory
Report, inventory transaction report is printed depending on the date range selection. In Registration
mode use Inventory function key to select type of mode (Normal Sales, Inventory, Garbage,
Ordering and Reception) and do operation. Other than Normal Sales Mode, all other mode will
record to Inventory report.
Example:
Printing report for Inventory Report (TODAY).
OPERATION
DISPLAY
1. In REPORT GENERATOR screen.
Touch [INVENTORY REPORT] key to
enter to INVENTORY REPORT MODE screen.
2. Set the printing order by touching the boxes
and select the desired data or by using the
numeric key to enter in number.
For example:
- DATE RANGE: 29-05-12 to 29-05-12
Note: Also can select by pressing
[TODAY] or [LAST 7 DAYS]
button
- PRINT TYPE: STOCKTAKING
- PLU RANGE: 0 to 999999
3. Touch [PREVIEW] key to view the report.
Note:
1. Touch [UP] or [DOWN] key, to view
continues of report.
2. Touch [EXIT] key to exit view PLU Total
Report.
3. Touch [ZOOM IN] or [ZOOM OUT]
key to zoom in or zoom out preview
report.
Page 86

M o d e l S M - 5 3 0 0 U s e r M a n u a l | 85
Report Mode
–––––––––––––––––––––––––––––––––––––––––––––––––
3.2 Entry to Report Mode
OPERATION
DISPLAY
4. Touch [PRINT] key to print out the report.
Note:
1. Touch [MENU] key, to back to Menu
Mode display.
Sample: Inventory Report
Page 87

M o d e l S M - 5 3 0 0 U s e r M a n u a l | 86
Report Mode
–––––––––––––––––––––––––––––––––––––––––––––––––
3.2 Entry to Report Mode
3.2.14 Traceability Report
Traceability Report is used to view/print transaction data separated by Traceability. On
Traceability Report, Sales transaction report is printed depending on the SPEC setting.
Example:
Printing report for Traceability Report.
OPERATION
DISPLAY
1. In REPORT GENERATOR screen.
Touch [TRACEABILITY REPORT] key to
enter to TRACEABILITY REPORT MODE
screen.
2. Set the SORT BY printing.
For example:
- DATA SOURCE: MANUAL AND
PREPACK
- SORT BY: PLU
- TRACEABILITY: 1
3. Touch [PREVIEW] key to view the report.
Note:
1. Touch [UP] or [DOWN] key, to view
continues of report.
2. Touch [EXIT] key to exit view PLU Total
Report.
3. Touch [ZOOM IN] or [ZOOM OUT]
key to zoom in or zoom out preview
report.
Page 88

M o d e l S M - 5 3 0 0 U s e r M a n u a l | 87
Report Mode
–––––––––––––––––––––––––––––––––––––––––––––––––
3.2 Entry to Report Mode
OPERATION
DISPLAY
4. Touch [PRINT] key to print out the report.
Note:
1. Touch [MENU] key, to back to Menu
Mode display.
Sample: Traceability Report
Page 89

M o d e l S M - 5 3 0 0 U s e r M a n u a l | 88
Report Mode
–––––––––––––––––––––––––––––––––––––––––––––––––
3.2 Entry to Report Mode
3.2.15 Prepack Report
Prepack Report is used to view/print transaction data separated by Prepack Mode transaction. On
Prepack Report, Sales transaction report is printed depending on the date range selection.
Example:
Printing report for Prepack Total Report (TODAY).
OPERATION
DISPLAY
1. In REPORT GENERATOR screen.
Touch [PREPACK TOTAL REPORT] key to
enter to PREPACK REPORT MODE screen.
2. Set the printing order by touching the boxes
and select the desired data or by using the
numeric key to enter in number.
For example:
- DATE RANGE: 30-05-12 to 30-05-12
Note: Also can select by pressing
[TODAY] or [LAST 7 DAYS]
button
- PRINT TYPE: BOUGH
- LEVEL: DEPT
- DEPT RANGE: 1 to 99
3. Touch [PREVIEW] key to view the report.
Note:
1. Touch [UP] or [DOWN] key, to view
continues of report.
2. Touch [EXIT] key to exit view PLU Total
Report.
3. Touch [ZOOM IN] or [ZOOM OUT] key
to zoom in or zoom out preview report.
Page 90

M o d e l S M - 5 3 0 0 U s e r M a n u a l | 89
Report Mode
–––––––––––––––––––––––––––––––––––––––––––––––––
3.2 Entry to Report Mode
OPERATION
DISPLAY
4. Touch [PRINT] key to print out the report.
Note:
1. Touch [MENU] key, to back to Menu
Mode display.
Sample: Prepack Total Report
Page 91

M o d e l S M - 5 3 0 0 U s e r M a n u a l | 90
Report Mode
––––––––––––––––––––––––––––––––––––––––––––––––––
3.2 Entry to Report Mode
3.2.16 Grand Total Report
Grand Total Report is used to view/print transaction data separated by Grand Total Transaction.
On Grand Total Report, Sales transaction report is printed depending on the date range selection.
Example:
Printing report for Grand Total Report (TODAY).
OPERATION
DISPLAY
1. In REPORT GENERATOR screen.
Touch [GRAND TOTAL REPORT] key to
enter to GRAND TOTAL REPORT MODE
screen.
2. Set the printing order by touching the boxes
and select the desired data or by using the
numeric key to enter in number.
For example:
- DATE RANGE: 30-05-12 to 30-05-12
Note: Also can select by pressing
[TODAY] or [LAST 7 DAYS]
button
3. Touch [PREVIEW] key to view the report.
Note:
1. Touch [UP] or [DOWN] key, to view
continues of report.
2. Touch [EXIT] key to exit view PLU Total
Report.
3. Touch [ZOOM IN] or [ZOOM OUT] key
to zoom in or zoom out preview report.
Page 92

M o d e l S M - 5 3 0 0 U s e r M a n u a l | 91
Report Mode
––––––––––––––––––––––––––––––––––––––––––––––––––
3.2 Entry to Report Mode
OPERATION
DISPLAY
4. Touch [PRINT] key to print out the report.
Note:
1. Touch [MENU] key, to back to Menu
Mode display.
Sample: Grand Total Report
Page 93

M o d e l S M - 5 3 0 0 U s e r M a n u a l | 92
Report Mode
––––––––––––––––––––––––––––––––––––––––––––––––––
3.2 Entry to Report Mode
3.2.17 ABC Analysis Report
ABC Analysis Report is used to view/print transaction data separated by ABC Analysis. On ABC
Analysis Report, Sales transaction report is printed depending on the date range selection. ABC Report
is used to check the sales situation of every MG or PLU. The share of every MG or PLU against total
sales price is printed on ABC Analysis Report by descending order.
The printed shares by descending order are divided into 3 ranks: A rank, B rank and C rank.
(1) Rank A includes the MG or PLU whose accumulated share is less than 75%.
Even if the accumulated share exceeds 75%, the last added MG or PLU will be included in Rank A.
(2) Rank B includes the MG or PLU whose accumulated share is between 75% ~ 95%.
Even if the accumulated share exceeds 95%, the last added MG or PLU will be included in Rank B.
(3) Rank C includes the MG or PLU whose accumulated share is between 95% ~ 100%.
Even if the accumulated share exceeds 95%, the last added MG or PLU will be included in Rank B.
Example:
Printing report for ABC Analysis Report (TODAY).
OPERATION
DISPLAY
1. In REPORT GENERATOR screen.
Touch [ABC ANALYSIS REPORT] key to
enter to ABC ANALYSIS REPORT MODE
screen.
2. Set the printing order by touching the boxes
and select the desired data or by using the
numeric key to enter in number.
For example:
- DATE RANGE: 30-05-12 to 30-05-12
Note: Also can select by pressing
[TODAY] or [LAST 7 DAYS]
button
SORT BY: PRICE
- LEVEL: MG
- MG RANGE: 1 to 999
Page 94

M o d e l S M - 5 3 0 0 U s e r M a n u a l | 93
Report Mode
–––––––––––––––––––––––––––––––––––––––––––––––––
3.2 Entry to Report Mode
OPERATION
DISPLAY
3. Touch [PREVIEW] key to view the report.
Note:
1. Touch [UP] or [DOWN] key, to view
continues of report.
2. Touch [EXIT] key to exit view PLU Total
Report.
3. Touch [ZOOM IN] or [ZOOM OUT] key
to zoom in or zoom out preview report.
4. Touch [PRINT] key to print out the report.
Note:
1. Touch [MENU] key, to back to Menu
Mode display.
Sample: ABC Analysis Report
Page 95

M o d e l S M - 5 3 0 0 U s e r M a n u a l | 94
Report Mode
–––––––––––––––––––––––––––––––––––––––––––––––––
3.2 Entry to Report Mode
3.2.18 Void Label Report
Void Label Report is used to view/print Label data separated by Void Label. On Void Label Report,
Sales transaction report is printed depending on the date range selection.
Example:
Printing report for Void Report (TODAY).
OPERATION
DISPLAY
1. In REPORT GENERATOR screen.
Touch [VOID LABEL REPORT] key to go
to VOID REPORT MODE screen.
2. Set the printing order by touching the boxes
and select the desired data or by using the
numeric key to enter in number.
For example:
- DATE RANGE: 18-12-15 to 18-12-
15
Note: Also can select by pressing
[TODAY] or [LAST 7 DAYS]
button
- PLU RANGE: 1 to 999999
3. Touch [PREVIEW] key to view the report.
Note:
1. Touch [UP] or [DOWN] key, to view
continues of report.
2. Touch [EXIT] key to exit view PLU Total
Report.
3. Touch [ZOOM IN] or [ZOOM OUT] key
to zoom in or zoom out preview report.
Page 96

M o d e l S M - 5 3 0 0 U s e r M a n u a l | 95
Report Mode
––––––––––––––––––––––––––––––––––––––––––––––––––
3.2 Entry to Report Mode
OPERATION
DISPLAY
4. Touch [PRINT] key to print out the report.
Note:
1. Touch [MENU] key, to back to Menu
Mode display.
Sample: Void Label Report
Page 97

M o d e l S M - 5 3 0 0 U s e r M a n u a l | 96
Report Mode
––––––––––––––––––––––––––––––––––––––––––––––––
3.2 Entry to Report Mode
3.2.19 Batch Report
Batch Report is used to view/print transaction data separated by setting done in Batch Report
Programming. On Batch Report, Sales transaction report is printed depending on the setting done
in BATCH REPORT PROGRAMMING under Programming Mode [SETUP]. Please refer to Batch
Report File under Setup Programming Mode.
OPERATION
DISPLAY
1. In REPORT GENERATOR screen touch
[BATCH] key and select 2: BATCH 2
2. Touch [PREVIEW] key to view the report.
Note:
1. Touch [UP] or [DOWN] key, to view
continues of report.
2. Touch [EXIT] key to exit view PLU Total
Report.
3. Touch [ZOOM IN] or [ZOOM OUT] key
to zoom in or zoom out preview report.
3. Touch [PRINT] key to print out the report.
Note:
1. Touch [MENU] key, to back to Menu
Mode display.
Page 98

M o d e l S M - 5 3 0 0 U s e r M a n u a l | 97
Report Mode
––––––––––––––––––––––––––––––––––––––––––––––––
3.2 Entry to Report Mode
Sample:
Batch Report of STORE TOTAL REPORT in REPORT MODE
Page 99

M o d e l S M - 5 3 0 0 U s e r M a n u a l | 98
Product Maintenance
––––––––––––––––––––––––––––––––––
4.1 Thermal Head Cleaning
Product Maintenance
4.1 Thermal Head Cleaning
To maintain good quality print-outs and long life span for the thermal print head, regular cleaning
of the thermal print head is required. Please use the cleaning kit supplied with the product.
Instruction
(1) Turn OFF Scale by Main Power Switch.
(2) Open the printer door by pulling the printer latch outward horizontally.
(3) Swing open the printer door in a clockwise direction.
(4) Pull out the cassette horizontally
(5) Use the tip of the cleaning pen to clean the thermal head portion (Black part) as shown in
Fig. 1:
CAUTION
Use only the cleaning pen from the provided cleaning kit.
Do not clean or try to remove dirt or anything sticking on thermal head.
With sharp objects-this will DAMAGE the thermal print head.
CAUTION
There is a cutter at the printer door near the dispenser.
Take care not to touch or cut your fingers against the cutter.
(6) After cleaning, push back the cassette into the main unit until a lock sound is heard.
(7) Close the printer door by pushing at the lower area of the printer door until a lock sound is
heard.
(8) Refer to diagram below:
Page 100

M o d e l S M - 5 3 0 0 U s e r M a n u a l | 99
Product Maintenance
––––––––––––––––––––––––––––––––––
4.1 Thermal Head Cleaning
(9) Turn ON the scale, and depress [FEED] key to feed label/receipt.
 Loading...