

Page 1

Service Manual
Model : SM -5100
July,2009 2nd Version
SHANGHAI TERAOKA ELECTRONIC CO., LTD
SERVICE AND SUPPORT DEPT.
3rd Floor of 2nd Building, Jia Yuan Business Center,
51# Long Wu Road, Shanghai China 200232.
TEL : +86-21-6408-5151 FAX : +86-21-6408-3468
EMAIL ADDRESS :steservice@digi-scale.com
Page 2
SM 5100 GENERAL
1. GENERAL
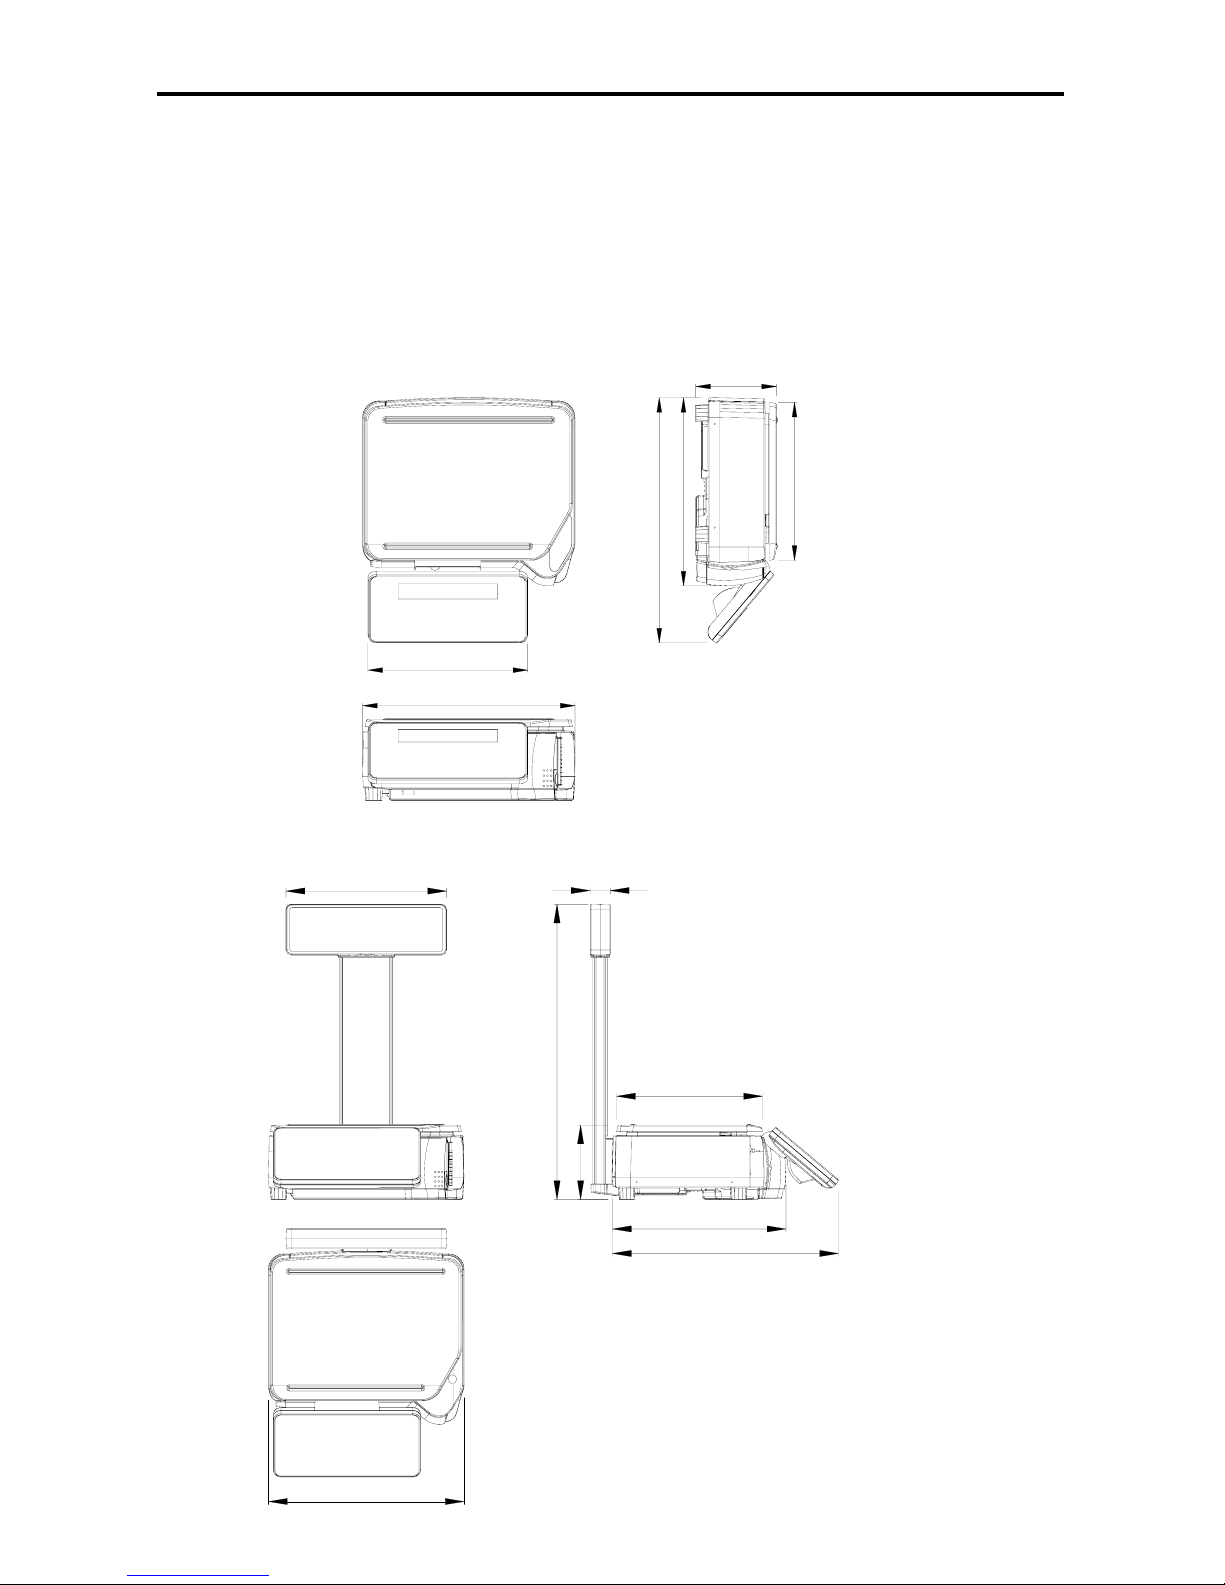
1.1 OVERALL VIEW
Bench
Pole
385
341.5
445
146.6
287
581.7
40
316
287
146.6
445
341.5
385
290
1
Page 3

SM 5100 GENERAL
Elevated
317
146.6
385
492
470
130
1.2 DISPLAY PANEL
2
Page 4

SM 5100 GENERAL
1.3 KEY PANEL
z 32 Preset Key
TOTAL PRICE
$
$/kg
UNIT PRICEWEIGHT
FIX
PLU
7C
LABEL
FIX P
NET
FIX T
ZERO
kgkg
TARE
z 56Preset Key
C
FIX
7
PLU
3
Page 5

SM 5100 GENERAL
1.4 KEY DEFINE
ON/OFF KEY
Turn display "ON" or "OFF".
PRESET KEY
P1~P32(BCS)
P1~P32(BCS+)
P1~P56(PCS)
P1~P56(PCS+)
Set up or call either unit price and tare value.
NUMERIC KEYS
0 ~ 9
Enter numeric data.
TARE KEY
Set or Clear Tare value.
Select "NO" in S and Z Mode.
Item test print in S Mode.
CLEAR KEY
C
For Back space or Clear numeric value.
Select "YES" in S and Z Mode.
RE-ZERO KEY
Reset weight to ZERO.
PREPACK KEY
AUTO
Switch Manual mode and Pre-pack mode alternatively.
(The mode status will be indicated in the P and M indicator.)
▪P - PRE-PACK MODE ▪ M - MANUAL MODE
CHANGE KEY
Calculate the Changed Amount.
Escape the Programming screen without saving data in S Mode.
4
Page 6

SM 110 GENERAL
MULTIPLLE KEY
X
Register the number of Non-Weight products.
Select programming item such as PLU data, Shop Name in S Mode.
Select Report Type in X Mode.
Select Data Transaction Type in Z Mode.
CLERK KEY
V1~V4
Accumulate the Total Price.(PCS/PCS+ version)
VOID KEY
−
Correct the sales data.
PLU KEY
PLU
Call up PLU data in R Mode.
Store the programmed data in S Mode.
FEED KEY
Feed Label or Receipt paper
PRINT KEY
Print out Label or Receipt.
MODE SELECT KEY
Five Modes can be selected using this key.
• Indicator R - REGISTRATION MODE (All the sales transactions are
performed.)
• Indicator X - CHECK MODE (Printing out and sales report.)
• Indicator S - PROGRAM MODE (Programming preset data, such as
products, data, shop name, etc.)
• Indicator Z - TOTAL MODE (Clear sales data stored.)
• Indicator X (Blink) - Password Setting Mode (Set PASS WORD for X,
S, Z mode, set PASSWORD for PASSWORD MODE when all
indicators(R, X, S, Z) blink)
8
Page 7

SM 110 GENERAL
Decrease/Increase Specification Count key
︽,︾
Decrease/Increase Only used when Setting SPEC 141 & 142
<<,>>
Select parameter data such as SPEC data. Move cursor left or right.
1.5 Indicators
z ZERO : On when zero point is adjusted and weight is stable.
z NET : On when tare subtraction is performed.
z FIX T : On when tare weight is fixed.
z FIX P : On when PLU or unit price is fixed.
z P : On when pre-pack mode is chosen; indicate capital letter is use in PLU programming.
z M : On when manual mode is chosen.
z V1 ~ V4 : On when vendor transaction entries (department entry or PLU entry) are performed.
z LABEL : On when label printing mode is chosen.
z R : On when in R (normal operation) mode.
z X : On when in X (read report) mode.
z S : On when in S (programmable item setting) mode.
z Z : On when in Z (reset report and system maintenance) mode.
1.6 FEATURES
z Digital printing scale consists of electronic cash registers function and label printing function.
z High-speed, high reliability thermal head printer.
z Easy paper handing achieved special designed mechanism.
z Built-in clock automatically updates date and time.
z Quick response to weight changes.
z Capacity : 3kg, 6kg, 12kg, 15kg, 30kg, 6lb, 12lb, 15lb and 30lb.
z Resolution : Display Resolution 1/3,000.
z : Internal Resolution 1/90,000.
z Calibrating by software.
z Customer and operator displays (optional customer pole display).
z Character type with back-light for numeric and character display.
z Matrix type with back-light for numeric and character and Chinese character display.
z 55 (bench and pole type) / 83 membrane keys
z a. ON/OFF key.
z b. 10 Numeric keys, to key in numeric data.
9
Page 8

SM 110 GENERAL
z c. 32/56 Preset keys, to preset PLU or function into the key.
z d. 23/27 Operational keys, to perform various functional operations.
z 18 data files for Department, Main Group, PLU, etc.
z Various reports.
z Ethernet function.
z Optional wireless Ethernet card.
z RS232C interface for data communication and barcode scanner connection.
z Optional cash drawer.
z Compact housing.
1.7 SPECIFICATION
1.7.1 Display
z Matrix type with back-light for numeric and character and Chinese character display.
z Tare Weight display : 4 digits.
z Weight display : 5 digits.
z Unit Price display : 6 digits.
z Total Price display : 7 digits.
1.7.2 Operating Conditions
z Power Source : AC 176V ~ 264V, 47~63Hz.
z Operating Temperature : -10 °C ~ +40 °C.
z Operating Humidity : 15% ~ 85% RH.
z Power Consumption : 0.15A.
10
Page 9

SM 5100 INITIAL SETUP
2. INITIAL SETUP
2.1 Paper Handing
Please press the button and take out the cassette to fix the paper when you need to use new
paper.
标签纸
收据纸
Cassette
Button
11
Page 10

SM 5100 INITIAL SETUP
2.2 Bubble Adjustment and SPAN Switch
Place the scale on the flat surface and adjust the
four legs until the bubble on the level is in the
centre as shown above 1
Please remove the screw and use a insulate rod
to enable the Span SW when the scale is power
on and please do not power off it.
2.3 Memory Initialisation
Clear all of the memory.
DISPLAY
OPERATION
TARE lb
$/lb $
REMARK
Z1.0 RESET SALES DAILY
Z mode.
Lamp Z turns on.
[Re-zero]+[2][3][0] CLEAR PLU FILE PLU file.
[︾]
CLEAR VENDER DATA
Vender transaction data.
[︾]
CLEAR REPORT FILES
Report files.
[︾]
CLEAR MEMORY DATA
All files in memory.
[*] CLEAR MEMORY Y-C N-T
[C] to clear file data,[T] to
quit.
[C] or [T] Z1.0 RESET SALES DAILY Return to Z mode.
12
Page 11

SM 5100 INITIAL SETUP
2.4 DEFAULT SPECIFICATION SETTING
Default SPEC setting of individual country.
(Please turn on the span switch before proceed this process.)
¾ Country Set
DISPLAY
OPERATION
TARE lb
$/lb
TARE
REMARK
lb
Z1.0 RESET SALES DAILY Z mode.Lamp Z turns on.
[Rezero]+[8][8][2][2] SPEC 2-STD COUNTRY Set country setting.
[>>] SPEC 1-U1 COUNTRY
[>>],[<<] or [X] to select country.[*]
to update country setting.
[*] LOAD DEFAULT SPEC Y-C N-T
[C] to load default SPEC
setting,[T] to skip.
[C] SCALE TYPE → POLE Set scale type.
[X] … [X] SCALE TYPE → BENCH
[X],[-] to select type [11] or [12]
5100B or 5100P ,[*] to update type
setting.
[*] SCALE CAP. → 3KG Set scale capacity.
[X] SCALE CAP. → 15lb
[X],[ - ] to select capacity,[*] to
update capacity setting.
[*] SCALE RES. → 1/3000S Set resolution.
[X] SCALE RES. → 1/3000M
[X],[- ] to select resolution,[*] to
update resolution setting.
[*] CLEAR MEMORY Y-C N-T [C] to clear memory,[T] to skip.
[C] Z1.0 RESET SALES DAILY Return to Z mode.
Note 1:
For the first using of SM-5100, please take this operation for initialization.
Note 2: Enter a number that represent a country in the country list (refer to the table below)
to initialise and country set.
13
Page 12

SM 5100 INITIAL SETUP
COUNTRY LIST
No. Country Code Country No. Country Code Country
0 AA Japan 41 SA Saudi Arabs
1 U1 U.S.A. 42 IC Iceland
2 STD Standard 43 IE Indonesia
3 CN China 44 CB Cuba
4 HK Hong Kong 45 KY Kenya
5 TW Taiwan 46 IR Israel
6 EX Export 47 VY Slovenia
7 KE Korea 48 MS Malaysia
8 AR Australia And New Zealand 49 SN Spain
9 SF South Africa 50 VZ Venezuela
10 CS Cyprus 51 CO Croatia
11 GC Greece 52 MA Macedonian
12 TU Turkey 53 FR France
13 CV Czech Republic 54 WG Germany
14 HG Hungary 55 BL Bulgaria
15 PL Poland 56 BW Botswans
16 UR Russia 57 CP Comores
17 AS Austria 58 LS Lesotho
18 DM Denmark 59 MU Mauritius
19 FL Finland 60 MW Malawi
20 NW Norway 61 MZ Mozambique
21 SD Sweden 62 NM Namibia
22 PG Portugal 63 RE Reunion
23 UK United Kingdom 64 SH Seychelles
24 IL Ireland (Kg) 65 SW Swaziland
25 IL (LB) Ireland (Lb) 66 WZ Zimbabwe
26 CA Canada (Kg) 67 ZW Zambia
27 CA (LB) Canada (Lb) 68 AE U.A.E
28 AG Argentina 69 TT Trinidad and Tobago
29 MX Mexico 70 UD Uganda
30 BZ Brazil 71 LV Latvia
31 CE Chile 72 CVS Slovakia
32 EA Egypt 73 SK Sri Lanka
33 JD Jordan 74 SV Slovenia
34 LN Lebanon 75 UA Ukraine
35 IRN Iran 76 KZ Kazakhstan
36 CR Canary Islands 77 IT Italy
37 TL Thailand 78 SZ Switzerland
38 EC European Community 79 ID India
39 NL Netherlands 80 CD New Caledonia
40 BG Belgium
14
Page 13

SM 5100 CALIBRATION
3. CALIBRATION
Prior to Calibration, please refer that the specification indicating weight capacity, minimum
graduation, and load cell sensitivity are correctly set.
Caution:
z It can only work when SPAN SWITCH is on (ENABLE).
Before Calibrating, please enter Z mode.
3.1 CALIBRATION OPERATION
DISPLAY
OPERATION
TARE lb
$/lb $
REMARK
Press SPAN
SWITCH
Z1.0 RESET SALES DAILY
SPAN SWITCH is on
(ENABLE).
[Rezero]+[8][7][1][5] CAL 00
Enter [8][7][1][5] while
depressing [Rezero].
Ensure no weight on
platter,[*]
------
Calibrating zero point.
After storing the zero
Point ‘IR’ count
CAL SP
Put full capacity
weight on platter.[*]
------
Calibrating Span.
After calibration Z1.0 RESET SALES DAILY
Go back to Z mode. Lamp Z
always light.
15
Page 14

SM 5100 CALIBRATION
3.2 EXIT CALIBRATION
DISPLAY
OPERATION
TARE lb
$/kg
TARE
REMARK
lb
Press SPAN
SWITCH
Z1.0 RESET SALES DAILY
SPAN SWITCH is
on(ENABLE).
[Rezero]+[8][7][1][5] CAL 00
Enter [8][7][1][5] while
depressing [Rezero].
[T] Z1.0 RESET SALES DAILY
Escape to Z mode. Lamp Z
always light
[Rezero]+[8][7][1][5]
[*]
CAL 00
------
The ‘IR’ count will be taken
as the zero point ‘IR’ count.
After storing the zero
Point ‘IR’ count
CAL SP
Calibrating Span.
[T] Z1.0 RESET SALES DAILY
Escape to Z mode. Lamp Z
always light.
16
Page 15

SM 5100 SOFTWARE SETTING
4 SOFTWARE SETTING
4.1 SOFTWARE VERSION UPGRADE
Update Method Introduction
SM-5100 use flash RAM instead of EPROM for the main program storage of the scale.
Our boot program is above Version 2.00, we have two method to update the scale’s
software: update the scale by Ethernet or RS-232 So you can choose either method
between these two ones to update your scale.
Now we will set two parts to introduce the steps of these two updating methods.
Update Steps Introduction
1. Ethernet Update Method
1. Cable & Connection
There are also two ways to connect the PC and the scale in updating the scale by
ethernet.
1) PC to Scale
2) Connect by Hub
17
Page 16

SM 5100 SOFTWARE SETTING
These two twisted cable obey the EIT/TIA 568 standard.
T568B line series
1 Orange & White
2 Orange
3 Green &White
4 Blue
5 Blue & White
6 Green
7 Brown & White
8 Brown
T568A line series
1 Green &White
2 Green
3 Orange & White
4 Blue
5 Blue & White
6 Orange
7 Brown & White
8 Brown
crossing twisted cable: one end with T568A line series, another with T568B line
series
normal twisted cable: two ends both with T568B line series
2 .PC Setting & Programmer Version
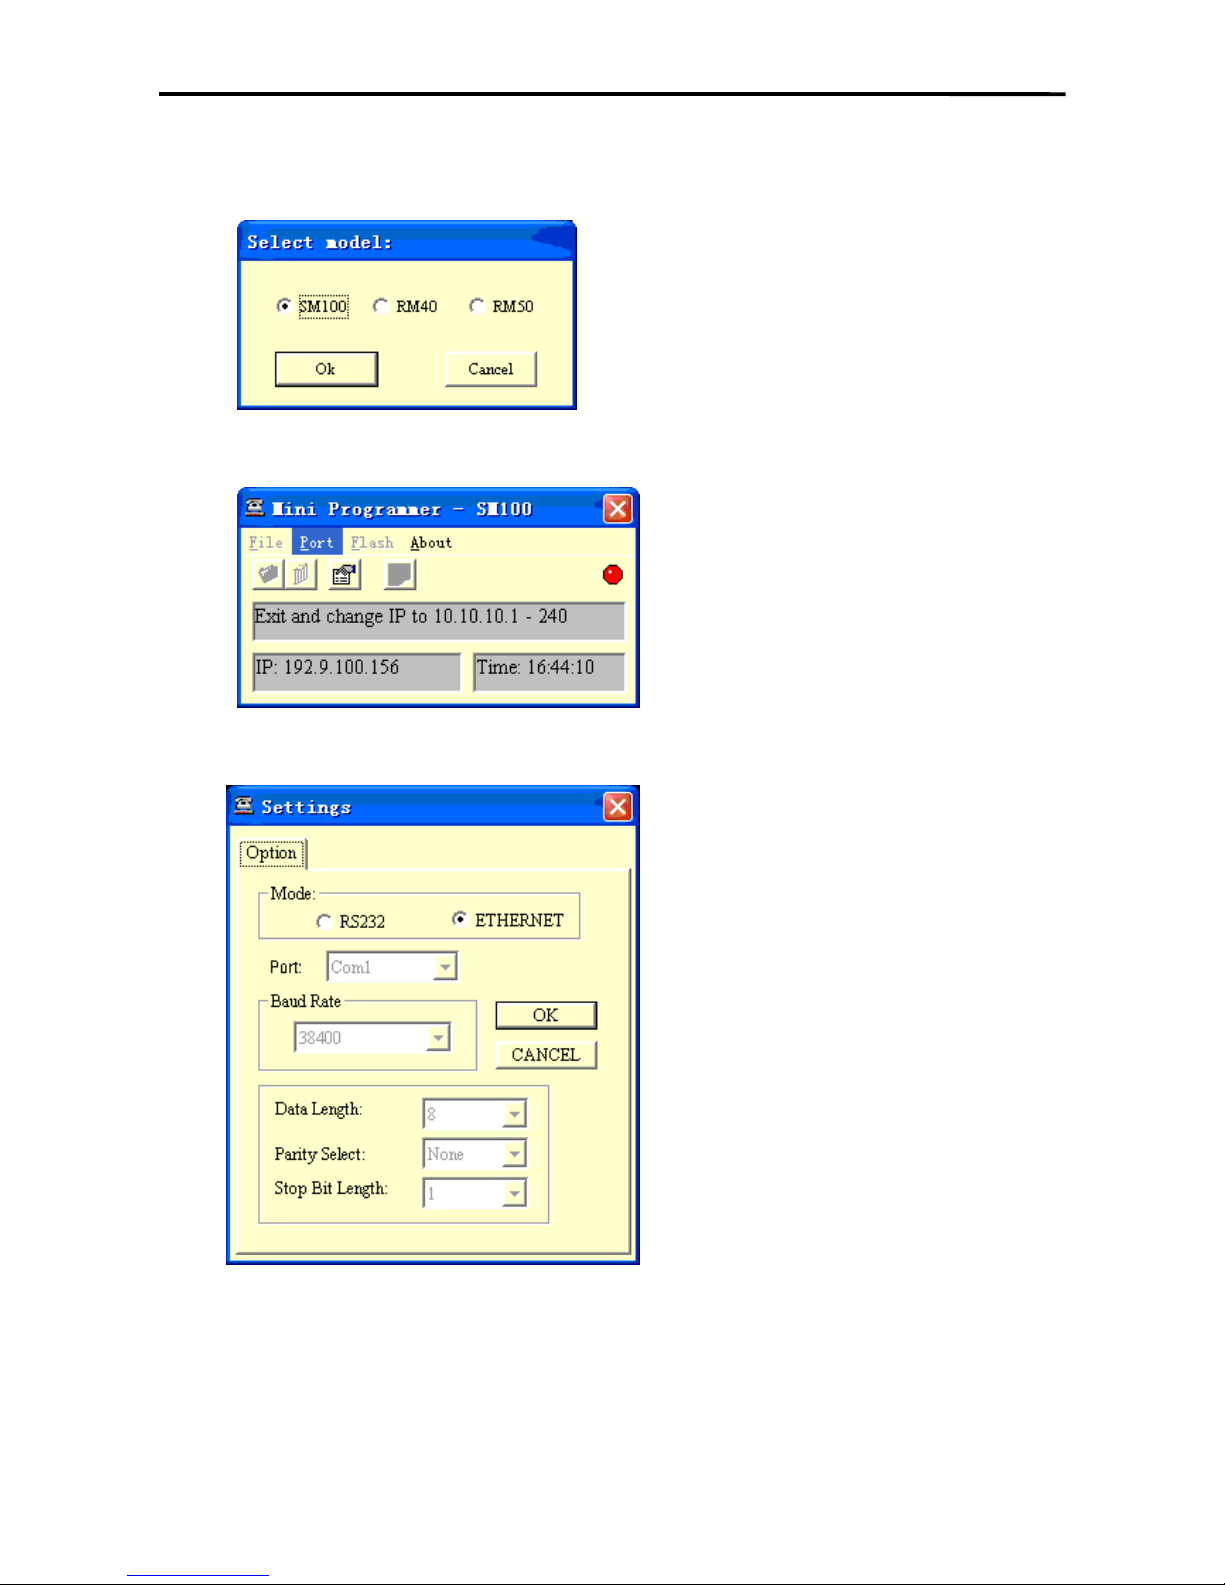
We use “Mini Programmer (Version 2.00)” as the tool to update the scale. As it
needs a default visual IP address for the PC by this kind of update method, You must
set your PC’s IP address within the range of 10.10.10.1-----10.10.10.240, before you
start the software to update the scale.
If you don’t set the IP address like this, you can see an alarm window as Pic. 1 when
you start “Mini Programmer”.
Pic. 1
2. Updating Steps
1) How to start ethernet updating?
A. Turn on the switch on the bottom of the scale.
B. Power off the scale by pressing On/Off Key.
C. After that, press and hold [Re-Zero] and [Preset 22], then start the scale by
pressing the On/Off Key.
D. The screen will display the version of the current boot program for two seconds.
E. Only in new versions(version of the boot program newer than 1.10), you
can choose 2-ethernet.
2) Display on the scale’s screen
A. If you choose 2 and the scale’s connection is correct, it will display “waiting for
connect”.
B. Then the message on the scale’s screen is “getting IP address”.
C. After this, it will display “001 scale ready update”.
D. You can’t stop it unless you press On/Off key. If you want to continue
updating. You also don’t need to press any key on the scale until Mini
Programmer begin to run.
18
Page 17
SM 5100 SOFTWARE SETTING
3) How to upload the scale by Mini Programmer?
A. Select SM-5100 and press “ok”
B. Set the port
Select “ethernet” and press “OK”
19
Page 18

SM 5100 SOFTWARE SETTING
C. Download boot program and update the scale
Select menu “
File->Load File To Programmer Buffer”
Open the source file of boot program (SM100+_Bv200.hex)
You can see a speed mode select window here.
Select menu “Flash->Program”
20
Page 19

SM 5100 SOFTWARE SETTING
Notice: The message “001 scale ready update” must be displayed on the
screen of the scale before pressing the “run” button.
After the transmission has completed, select menu “File->Clear Buffer”.
Notice: 1.If the boot program of this version is already in the scale, you don’t
need to upload it again, skip it and upload the main program.
2.If the scale is updated from 1.xx to 2.xx,firstly you must update the
boot program of the version.
D. Download main program file
You must power off the scale and start the ethernet upload method again when
you have finished a program uploading.
The steps of uploading the main program file is also like uploading the boot
program file. The file you need to open is like Pic. 2
Pic. 2
21
Page 20

SM 5100 SOFTWARE SETTING
E. Download word-stock file
The steps of uploading the word-stock file is also like uploading the boot program
file. The file you need to open is like Pic. 3
Pic. 3
F. Download const text file
The steps of uploading the const text file is also like uploading the boot program.
The file you need to open is like Pic. 4
Pic. 4
G. Exit Mini Programmer
Note: please update the scale according to sequence above.
22
Page 21

SM 5100 SOFTWARE SETTING
4.3 RS232C Method
3. Cable Connection
3 Pins are used for data transmission between PC and SM-5100
9 Pin D-Sub Female Connectors for this cable:
PC Serial Port SM-5100 RS-232C
9 Pin D-Sub (Female) 9 Pin D-Sub (Female)
Pin Signal Signal Pin
1 N.C. N.C. 1
2 RXD RXD 2
3 TXD TXD 3
4 N.C. N.C. 4
5 GND GND 5
6 - 9 GND N.C. 6 - 9
4. Update Steps
1) How to start RS232C updating
A. Turn on the switch on the bottom of the scale.
B. Power off the scale by pressing the On/Off Key.
C. After that press and hold [Re-Zero] & [Preset 22], then start the scale by press
ing the On/Off Key.
D. It will display the version of the current boot program for two seconds.
E.
¾ If the scale boot version is newer than 1.10, it will display a updating method
choice like “1-RS232 2-ETHERNET” on the screen. you can press Numeric 1
to choose 1-RS232C.
¾ If the boot version is older than 1.10, the scale will not display the choice.
F. Then the Scale will display “PROGRAM”. You can’t stop it, unless you press
Tare or On/Off Key.
2) Start Mini Programmer
23
Page 22

SM 5100 SOFTWARE SETTING
1. Select SM-5100 and press “Ok”
2. Set the Port:
Select RS232 and press “OK”
3. Download the boot program and update the scale
Select menu “File->Load File To Programmer Buffer”
24
Page 23

SM 5100 SOFTWARE SETTING
Open the source file of the boot program (e.g. sm100bv100.hex)
Select menu “Flash->Program”
Notice: The message “001 scale ready update” must be displayed on the
scale before pressing the “run” button.
25
Page 24

SM 5100 SOFTWARE SETTING
After the transmission has completed, select menu “File->Clear Buffer”.
Notice: If the boot program of this version is already in the scale, you don’t
need to upload it again, skip it and upload the main program.
26
Page 25

SM 5100 SOFTWARE SETTING
4. Download main program file
You must power off the scale and start the ethernet upload method again when
you have finished a program uploading.
The steps of uploading the main program file is also like uploading the boot
program file. The file you need to open is like Pic. 2
Pic. 2
5. Download word-stock file
The steps of uploading the word-stock file is also like uploading the boot program
file. The file you need to open is like Pic. 3
Pic. 3
6. Download const text file
The steps of uploading the const text file is also like uploading the boot program.
The file you need to open is like Pic. 4
27
Page 26

SM 5100 SOFTWARE SETTING
Pic. 4
7. Exit Mini Programmer
4.2 SPECIFICATION SETTING
Before Specification setting, please press the mode button to enter Z mode.
The detail specification list , please see the appendix.
4.2.1 Customer SPEC Setting
To change setting of the Customer SPEC if there are some SPEC setting in it need to be alter.
DISPLAY
OPERATION
TARE lb
$/lb $
REMARK
Z1.0 RESET SALES DAILY
Z mode.
Lamp Z turns on.
[Rezero]+[1][4][1]
SPEC
000
XXX
(setting)
XXX
(former)
Enter [1][4][1] while depressing
[Rezero].
XXX:SPEC data
[︾]
SPEC
001
XXX XXX
[︾]key only increase specification
count, it does not update SPEC
data.
[︽]
SPEC
000
XXX XXX
[ ︽ ]key only decrease
specification count, it does not
update SPEC data.
[1][7]
[X]
SPEC
000
017
XXX
XXX
XXX
It goes to a designed specification
count.
28
Page 27

SM 5100 SOFTWARE SETTING
SPEC
017
(000~441 is enabled)
[>>]
SPEC
017
XXX XXX
[>>] key select SPEC data.
Move cursor right.
[<<]
SPEC
017
XXX XXX
[<<] key select SPEC data.
Move cursor left.
[1]
[*]
SPEC
017
SPEC
018
001
XXX
XXX
XXX
[C]
SPEC
018
000 XXX
Clear the enter data.
[PLU]
* Note 1
Z1.0 RESET SALES DAILY
Store the updated specification
and escape to Z mode.
* Remark: The Weight in the display window will display the SPEC number. The Unit
Price window will display the new value setting entered. The Total Price
window will display the old value setting. The selection you have made will
be highlighted in the dot matrix display. Please use [︾] to increase spec
count, [︽] to decrease spec count, [*] to store a new value and [PLU] to save
spec setting.
4.2.2 Weight & Measurement SPEC Setting
To change the setting of the Weight & Measurement SPEC if there are some SPEC need to alter.
(Please turn on the span switch when using this process)
DISPLAY
OPERATION
TARE lb
$/lb $
REMARK
Press SPAN
SWITCH
Z1.0 RESET SALES DAILY SPAN SWITCH is on(ENABLE).
[Rezero]+[1][4][2]
SPEC
600
XXX
(setting)
XXX
(former)
Enter [1][4][2] while depressing
[Rezero].
XXX:SPEC data
[︾]
SPEC
601
XXX XXX
[︾]key only increase specification
count, it does not update SPEC
data.
[︽]
SPEC
600
XXX XXX
[ ︽ ]key only decrease
specification count, it does not
update SPEC data.
[6][1][5] SPEC 615 XXX It goes to a designed specification
29
Page 28

SM 5100 SOFTWARE SETTING
[X] 600
SPEC
615
XXX XXX count.
(600~709 is enabled)
[>>]
SPEC
615
XXX XXX
[>>] key select SPEC data.
Move cursor right.
[<<]
SPEC
615
XXX XXX
[<<] key select SPEC data.
Move cursor left.
[1]
[*]
SPEC
615
SPEC
616
001
XXX
XXX
XXX
[*] key to update specification,
increase specification count.
[2]
SPEC
616
002 XXX
[C]
SPEC
616
000 XXX
Clear the enter data.
[PLU]
* Note 1
Z1.0 RESET SALES DAILY
Store the updated specification
and escape to Z mode.
Note 1: If press [T] key, it does not store the updated specification and escape to Z mode.
* Remark: The Weight in the display window will display the SPEC number. The Unit
Price window will display the new value setting entered. The Total Price
window will display the old value setting. The selection you have made will
be highlighted in the dot matrix display. Please use [︾] to increase spec
count, [︽] to decrease spec count, [*] to store a new value and [PLU] to save
spec setting.
30
Page 29

SM5100 INTERFACE
5. INTERFACE
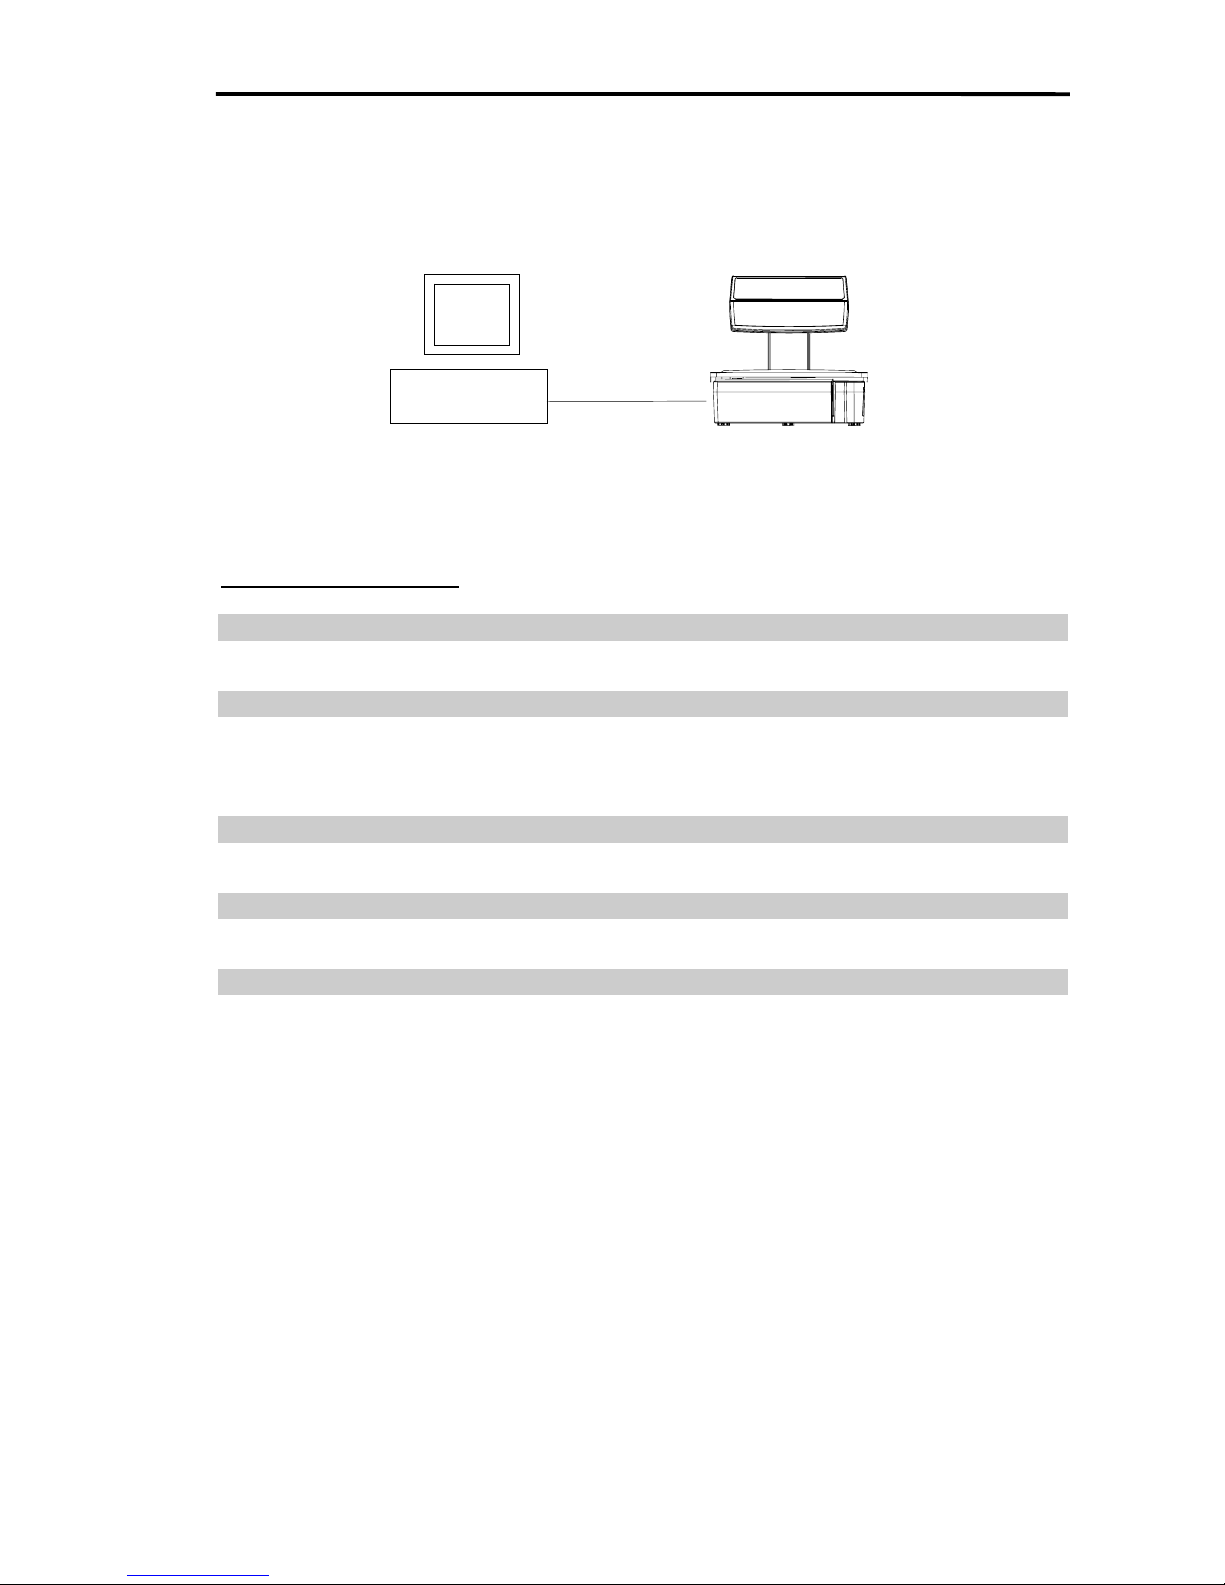
5.1 PC INTERFACE
SM 5100 can be connect to PC through Ethernet interface and RS232C. See below for the
connection method.
CONFIGURATION OF PC ETHERNET CARD
Window version client driver
Any Ethernet cards can be used for PC running the Window version client driver
Windows 98
My Computer → Control Panel → Network→TCP/IP of Ethernet card (Select
Properties)
IP address : 192.168.1.XXX ------ XXX - can be any number. But preferable 100 to 255.
Submask : 255.255.255.0
Above IP address is use as a standard address to use for SM 5100 Ethernet
communication.
If whatever reason, the IP address had to be change, it may do so. But the scale IP address
had to be change at the SM 5100 scale also so that they are within the same network. Eg. If
the computer IP address is 192.168.1.XXX, the SM 5100 scale IP address has to be change
to 192.168.1.XXX. The last three digits of the IP address should not be similar within the
computer and scales at all time. As can see the first three set of number of the IP address of
the computer and scale must be the same.
31
Page 30

SM5100 INTERFACE
Before setting the SPEC setting of the scale, please check below.
5.2 SCALE ETHERNET ADDRESS
The main board have a Scale Ethernet Address that is set during production. This address
is a hardware setting for Ethernet communication. But when changing a new main board,
the new main board did not have any this address. If the scale is using Ethernet
communication, a Scale Ethernet Address is needed apart from software IP address.
Please take note that the Scale Ethernet Address can only input once after saving. Please
view and note down the Scale Ethernet Address of the old main board before changing the
new main board. Below procedure is to view and input the Scale Ethernet Address. Please
turn on the span switch before proceed.
KEY TO PRESS DISPLAY OPERATION
TARE lb
$/lb $
Go to Z mode Z1.0 RESET SALES Daily At Z mode
[REZERO] +
[0][6][1][2]
ETHER NET ……. ……. Viewing of Ethernet
address For new main
board, it can act as input
of the address if the
address shown ……..
Else it would not let you to
input
.
[0][0][0][6][C][0]
[0][0][0][0][2]
[4]
ETHER NET 0006C 0000024 For input only. Enter
Ethernet address e.g.
0006C 0000024
[PLU] Z1.0 RESET SALES Daily Save address and escape
to Z mode. After saving it
will not be able to input
again.
[T] Z1.0 RESET SALES Daily Escape to Z mode without
saving.
Power off the
scale
Turn off the power and do
the memory clear
process.
* IMPORTANT : Please take note that this is a one time setting. It cannot be change after
setting it. Please check the old address and input accordingly. As same
internal Ethernet address in a network may conflict during
communication.
32
Page 31

SM5100 INTERFACE
5.3 SCALE IP ADDRESS
This is to set the IP address for PC communication using Ethernet for specific IP address. It
should not be confused with the Scale Ethernet Address as above. The Scale Ethernet
Address is mainly for hardware and Scale IP Address is for software. The software when
communicating to the scale must specify the same IP address on the scale else it will give
error. The default is 192.168.000.000 where the last three digit will change when SPEC 135
change. Please turn on the span switch before proceed.
KEY TO PRESS DISPLAY OPERATION
TARE lb
$/lb $
Go to Z mode Z1.0 RESET SALES Daily At Z mode
[REZERO] +
[0][4][1][6]
SCALE IP ……. ……. Input or viewing of IP
address
[1][9][2][1][6][8]
[0][0][1][0][1][6]
SCALE IP 192168 001016 Enter IP address e.g.
192.168.001.016
( The last 3 digits cannot
be input as it will change
when SPEC 135 change)
[PLU] Z1.0 RESET SALES Daily Save address and escape
to Z mode
[T] Z1.0 RESET SALES Daily Escape to Z mode without
saving.
33
Page 32
SM5100 INTERFACE
5.4 CONNECTION METHOD
5.4.1 RS232C Interface with PC
PC Scale
Com 1 / Com 2 RS232C Port
* Note : Only 1 scale can be connect in this method.
SPEC setting on scale :
SPEC 48 Scale number (For 4 line / RS232C port)
Enter number between 1 to 999,999
SPEC 51 Baud rate for SIO (RS232C port)
0 1200 2 4800 4 19200
1 2400 3 9600 5 38400
6 76800
SPEC 52 Data length for SIO (For RS232C port)
0 7 bit 1 8 bit
SPEC 53 Parity for SIO (For RS232C port)
0 None 1 Odd 2 Even
SPEC 54 Stop bit for SIO (For RS232C port)
0 1 bit 1 2 bits
34
Page 33

SM5100 INTERFACE
5.4.2 Ethernet Connection (Ethernet Interface)
Scale #1 Scale #2 Scale #3 Scale #4
Scale #5
PC
HUB
SPEC setting on scale :
SPEC 49 CLIENT / SERVER INTERFACE
0 No interface 3 Not used
1 Ethernet - Coaxial Cable 4 4 lines, RS485 (For future use)
2 Ethernet - Twisted Cable
SPEC 50 CLIENT / SERVER
0 Client 2 Back-up server
1 Server / Workstation
SPEC 135 PORT NUMBER
* Enter number from 1 to 254
35
Page 34

SM5100 INTERFACE
5.5 WIRE CONFIGURATION
5.5.1 Ethernet Wire - Straight Cable and Crossover Cable
Straight cable is for Client / Server connection. Crossover cable is for Hub to Hub
connection. (Some models of the hub do not need crossover cable for hub to hub
connection. Please refer to the hub operation manual if in doubt)
Telephone Modular Plug (Category 5) -
Preferable type : CviLux CJP3 / CviLux CJP4 (with insert bar)
CABLE TYPE -
Cable type : 4 pair 100MHz Cat.5 AWG 24 or 26 UTP / FTP / STP.
Preferable type : Cat. 5 AWG 24 or 26 FTP / Cat. 5 AWG 24 or 26 STP
(Recommended for CISPR 22B conformance)
PIN CONFIGURATION
1 8
SM 5100 HUB
8 1
Solder to braid wire of the Ethernet
wire if using plug without insert bar
1 8
SM 5100 HUB
8 Solder the braid wire of the Ethernet 1
wire if using plug with insert bar
STRAIGHT CONNECTION CROSSOVER CONNECTION
SCALE HUB HUB HUB
PIN SIGNAL SIGNAL PIN PIN SIGNAL SIGNAL PIN
1 TX+ TX+ 1 1 TX+ TX+ 3
2 TX- TX- 2 2 TX- TX- 6
3 RX+ RX+ 3 3 RX+ RX+ 1
6 RX- RX- 6 6 RX- RX- 2
5,7,8 N.A. N.A. 5,7,8 5,7,8 N.A. N.A. 5,7,8
36
Page 35

SM5100 INTERFACE
5.5.2 RS232C Wire
PC (9 PIN) TO SCALE RS232C PORT
5.5.3 Cash Drawer Connector
SM-5100 uses normal phone mike plug to connect cash drawer and the scale.
Plug in the scale Connector of Cash Drawer
Pin Output
Input Pin
1 Not used.
Not used 1
2 + 8 V
Voltage + 2
3 GDD
GDD 3
4 Not used.
Not used 4
RS-232 PC
Pin
输出 输入
Pin
1
Not used
Not used 1
2 RXD TXD 2
3
TXD
RXD 3
4 DTR Not used 4
5 GND GND 5
6 DSR Not used 6
7 DTR Not used 7
8 DSR Not used 8
9 Not used
Not used 9
PC COM Port(9 Pin) RS232C Port(9 Pin)
4 pin
1 pin
1 pin
4 pin
37
Page 36

SM 5100 MISCELLANEOUS
6. MISCELLANEOUS
6.1 MODE CHANGE
To toggle between R, X, S, Z and Password mode.
DISPLAY
OPERATION
TARE lb
$/lb $
REMARK
0.000 0.000 0.00 0.00 Weight mode. Lamp R turns on.
[MODE],[MODE]
(within 3 seconds)
XMODE
Enter X mode. Lamp X turns on.
[MODE] S1 → PLU FILE Enter S mode. Lamp S turns on.
[MODE] Z1.0 RESET SALES DAILY Enter Z mode. Lamp Z turns on.
[MODE] PWD X 0 SET
Enter Password Set mode. Lamp
X flicker
[MODE] 0.000 0.000 0.00 0.00
Back to Weight mode. Lamp R
turns on.
* The “X ” mark on the X, S, Z and R mean the indicator light is on. When in Password mode,
the indicator light will be blinking.
** The scale goes back to R mode as normal when the net weight is 0.
***If the scale weight is not equal to 0, error message "E18 PLEASE REMOVE WEIGHT" is
displayed.
1) There is some items on the platter. The scale will go back to R mode if the item is removed.
2) There is nothing on the platter, but the net weight is not equal to 0.
The operator has to press [Rezero] key manually (Tare will auto clear when rezero), then the scale
will go back to R mode if rezero operation is successful.
6.2 SPAN SWITCH STATUS
Check the status of span switch.
DISPLAY
OPERATION
TARE lb
$/lb $
REMARK
Go to Z mode Z1.0 RESET SALES DAILY
Z mode.
Lamp Z turns on.
[Rezero]+[2][8][4] STE16 VX.XX S-OFF
Enter [2][8][4] while depressing
[Rezero].
Z1.0 RESET SALES DAILY Exit after 3 seconds.
38
Page 37

SM 5100 MISCELLANEOUS
6.3 CLEAR ALL PLU DATA
To clear all the PLU data only, the span switch status must be on.
DISPLAY
OPERATION
TARE lb
$/lb $
REMARK
Go to Z mode Z1.0 RESET SALES DAILY
Z mode.
Lamp Z turns on.
[Rezero]+[2][3][0] CLEAR PLU FILE
Enter [2][3][0] while depressing
[Rezero].
* CLEAR PLU Y--C N--T Enter C for Yes, Enter T for No..
C(T) Z1.0 RESET SALES DAILY Back to Z mode
6.4 THERMAL HEAD USAGE
To check how many times the thermal head had been printing.
DISPLAY
OPERATION
TARE lb
$/lb $
REMARK
Z1.0 RESET SALES DAILY
Z mode.
Lamp Z turns on.
[Rezero]+[0][8][2][3]
PRINTE
R
USAGE 5
Display thermal printer usage
condition(meter).
[T] Z1.0 RESET SALES DAILY [T] key to exit.
6.5 IP ADDRESS
To check and modify the scale IP address.
DISPLAY
OPERATION
TARE lb
$/lb $
REMARK
Z1.0 RESET SALES DAILY
Z mode.
Lamp Z turns on.
[Rezero]+[0][4][1][6] Scale IP
192168
00
000
Display the scale IP address.
[1][9][2][0][0]
[9][1][0] [0]
Scale IP
192009
10
000
Modify the IP address.
[#] ----------
Save the new IP address.
Press [T] key to exit.
39
Page 38

SM 5100 MISCELLANEOUS
6.6 SERVER IP ADDRESS
To check and modify the server IP address.
DISPLAY
OPERATION
TARE lb
$/lb $
REMARK
Z1.0 RESET SALES DAILY
Z mode.
Lamp Z turns on.
[Rezero]+[0][4][1][7] SERVER IP
2552552
5
5000
Display the server IP address.
[1][9][2][0][0]
[9][1][0] [0]
SCALE IP
1920091
0
0000
Modify the server IP address.
[#] ----------
Save the new IP address.
Press [T] key to exit.
6.7 SUBNET MASK
To check and modify the subnet mask.
DISPLAY
OPERATION
TARE lb
$/lb $
REMARK
Z1.0
RESE
T
SALES DAILY
Z mode.
Lamp Z turns on.
[Rezero]+[0][4][1]8] SERVER IP
2552552
5
5000
Display the server IP address.
[1][9][2][0][0]
[9][1][0] [0]
SCALE IP
1920091
0
0000
Modify the server IP address.
[#] ----------
Save the new IP address.
Press [T] key to exit.
6.8 MAC ADDRESS
To check the MAC address.
Please turn on the span switch before proceed.
DISPLAY
OPERATION
TARE lb
$/lb $
REMARK
Z1.0 RESET SALES DAILY
Z mode.
Lamp Z turns on.
[Rezero]+[0][6][1]2]
ETHERN
ET
0006C07
1
96BE
Display the
MAC address.
[T] Z1.0 RESET SALES DAILY Press [T] key to exit.
40
Page 39

SM 5100 MISCELLANEOUS
* It can only work when SPAN SWITCH is on (ENABLE).
Before Calibrating, please enter Z mode.
6.9 SERIAL NO.
To check the serial NO.
DISPLAY
OPERATION
TARE lb
$/lb $
REMARK
Z1.0 RESET SALES DAILY
Z mode.
Lamp Z turns on.
[Rezero]+[1][1][1] SCALE S/N 05386686 Display the serial NO..
[T] Z1.0 RESET SALES DAILY Press [T] key to exit.
6.10 ASCII CHARACTER
Below are the common use of characters of ASCII code in HEX value. Please enter the
hex value when entering commodity name, advertisement, shop name, clerk name,
special message, ingredient, text etc. when using the SM-5100.
A B C D E F G H I J K L M
41 42 43 44 45 46 47 48 49 4A 4B 4C 4D
N O P Q R S T U V W X Y Z
4E 4F 50 51 52 53 54 55 56 57 58 59 5A
a b c d e f g h i j k l m
61 62 63 64 65 66 67 68 69 6A 6B 6C 6D
n o p q r s t u v w x y z
6E 6F 70 71 72 73 74 75 76 77 78 79 7A
0 1 2 3 4 5 6 7 8 9 ! @ #
30 31 32 33 34 35 36 37 38 39 21 40 23
$ % ^ & * ( )
: ; " '
+ <
24 25 5D 26 2A 28 29 3A 3B 22 27 2B 3C
> = / ?
·
,
Spac
3E 3D 2F 3F 2E 2C 20
41
Page 40

SM5100 ERROR MESSAGE
7. SM5100 ERROR MESSAGE
The machine beeps and following error messages appear on display, if
incorrect operation is performed.
No. Error Message Cause
1 PAPER END
Label sensor sense no label. No more labels.
Replace label roll
2 FEED PAPER FIRST Label miss feed, press FEED key to align label.
3 PEEL LABEL Peel sensor activated, remove label away from sensor.
4 CHANGE PAPER Change paper mode between label and receipt.
6 NON PRINT No manual printing.
7 UNIT PRICE OVERFLOW Please check unit price.
9 NON LABEL
No free format is programs. Set a free format or
use standard format.
12 MEMO NOT INITIALIZED Memory problem. Please clear the memory.
14 HEAD IS NOT CLOSED Thermal head no closed. Please close thermal head.
16 FILE MEMORY FULL
Not enough memory. Expand memory or
delete unnecessary data.
18 PLEASE REMOVE WEIGHT Fixed price item, please remove weigh.
19 PLU NOT EXIST No such PLU data or number exists.
20 TOTAL PRICE IS 0
No total price for item. Unit price, weight or quantity is
0.
24 WEIGHT OF Weight over maximum capacity when print.
26 TOTAL PRICE OVERFLOW Total price over the limit to display or print.
29 PLEASE SET TARE VALUE When force tare is enable, a tare weight must be
39 PLEASE PRESS PLU KEY Press PLU(#) key. To save data in some procedure.
44 KEY ALREADY ASSIGNED Preset key already been assigned with function or
48 PLU DATA INVALID U1 only. Quantity setting incorrect when using FOR.
49 QTY OF Quantity data over the limit.
54 BELOW MIN WEIGHT Weight is below min weight set when printing.
57 PRICE ACC OF Accumulated quant ity over the limit.
59 PLEASE SEE LABEL QTY Set print label quantity when the function is use.
61 GRAND TOTAL OF Grand total price over the limit.
71 PRINT INHIBITED Cannot print weigh item at Prepack mode.
74 SELF SERVICE MODE Can only use Self-service procedure only.
95 CAL00 ERROR Zero point calibration error.
96 CALSP ERROR Full scale point Calibration error.
97 FORMAT ERROR No free format is program.
98 NO DATA IN REPORT There is no data in report when printing report.
99 EXCEED WEIGHT QUOTA CN only. Please reset weight quota.
42
Page 41

SM5100 ERROR MESSAGE
SM5100 FATAL MESSAGE
No. Fatal Error Message
F002 External flash memory erase error
F003 External flash memory program error
F004 External flash memory program error
F005 Internal RAM read/write error
F006 External RAM read/write error
F007 External Ethernet IC read/write error
43
Page 42
SM5100 SERVER/CLIENT MANUAL
SM5100 SERVER/CLIENT MANUAL
1. Summary
SM5100 SERVER/CLIENT has three functions:
1) Floating clerk. (SPEC61)
2) Data file synchronization. (SPEC491)
3) Call PLU from server. (SPEC492)
In SERVER/CLIENT system, the maximum count of scales is 5 (1 SERVER and 4 CLIENTs).
Making all functions effective is in recommendation, and these 3 functions also can be used
independently in need.
2. SPEC
50 Setting of Client / Server
0 Client 2 Backup Server
1 Server / Workstation
61 Floating Clerk
0 Inhibit 1 Allow
194 Server IP Address
Enter a value between 1 to 254
For Client scale only.
208 Network Time Out
0 3 sec 2 x4
1 x2 3 x10
254 Auto Update of Client Off-line Report
0 Disable 1 Enable
Effective when SPEC61
= 1.
491 Data File Synchronization
0 Disable 1 Enable
492 Call PLU from Server
0 Disable 1 Enable
44
Page 43

SM5100 SERVER/CLIENT MANUAL
3. Setting
1) Assure network settings of all scale are effective. IP-address of all scales must be set in same
subnet and different from each scale.
2)SPEC141
SPEC number SERVER CLIENT NOTICE
50 1 0
61 1 1
194 Not effective for SERVER
Port Number of SERVER
(SPEC135)
208 Use default value Use default value
254 1 1
491 1 1
492 1 1
1. SPEC61,491,492 can
be set independently, but
the settings on the
SERVER must be same as
the settings on the
CLIENT.
2. SPEC254 is Effective
only when SPEC61 = 1. It
also must be set the same
value on SERVER and
CLIENT.
3. Using SPEC208 default
value is in
recommendation. It may
be set to other value
according to the condition
of network. If wireless
communication is used,
please don’t set SPEC208
as 0. If the setting of
SPEC208 on SERVER is
different from the setting
on CLIENT, the largest
value of SPEC208 will be
used automatically.
4. Effect
When the functions are effective, the operation on SERVER is still same as stand-alone scale.
CLIENT will connect to SERVER automatically after power on. CLIENT becomes into online
status when connection is succeeded. And CLIENT will display “SERVER OFF-LINE” before
finishing connection. CLIENT could turn into offline status via [C] key while it’s displaying
“SERVER OFF-LINE”.
Effect on CLIENT
SPEC61 SPEC491 SPEC492
STATUS online offline online offline online offline
EFFECT
Reports of
CLIENT are only
stored in
SERVER.
When connection
is
succeeded,
machine-setting
and tax file of
CLIENT will be
updated once by
SERVER.
Reports are
stored in
CLIENT.
If SPEC254=1,
CLIENT will
upload the
Off-line reports
to SERVER
after next
successful
connection.
In S mode, only S4, S8
and S20 can be
operated. Rezero+230
and updating file by
PC functions are
forbidden. After
connection is
succeeded, CLIENT
will synchronize data
files from SERVER
automatically. Max
synchronization time is
5 minutes*.
(1000PLUs)
CLIENT
calls up
PLU from
SERVER
instantly.
The PLU
in CLIENT
is invalid.
CLIENT
calls up
PLU from
its own
memory.
*The synchronization time shall be influenced by the counts of PLU.
45
Page 44
SM 5100 FLEXIBLE BARCODE SETTING
SM-100 Flexible Barcode Setting Guide
DISPLAY
OPERATION
TARE lb
$/lb $
REMARK
Press [mode] third times S1 -- -->
PLU
FILE
Enter programmer.
Press numeric 4 and 6 S46 -- -->
FLEXI
BARCOD
E
Enter Flexible Barcode
programme.
Press [*] S46.0 F BAR 0 NO SET Program Flexible Barcode.
Enter numeric 1 S46.0 F BAR 1 NO SET Program Flexible Barcode 1.
Press [*] S46.1 F BAR 0 FLAG
Program Flag Code.(0 for F2,
1 for F1F2,2 for non.)
Press [*] S46.2 F BAR 0
ITEM
CODE
Enter item code length.
Press [*] S46.3 F BAR 0 DATA1
Enter data format for DATA1.( 0
for weight,1 for quantity,2 for unit
price.3 for weight/quantity,4 for
total price,5 for original price,6
for user programmable.)
Press [*] S46.4 F BAR 0 DIGIT Enter DATA1 length.
Press [*] S46.5 F BAR 0 SHIFT
Shift for DATA1.( 0 for no right
shift,1 for right shift, 2 for right
shift x2, 3 for left shift, 4 for left
shift x2, 5 for left shift x3.)
Press [*] S46.6 F BAR 0 DATA2
Enter data format for DATA2.( 0
for weight,1 for quantity,2 for unit
price.3 for weight/quantity,4 for
total price,5 for original price,6
for user programmable.)
DISPLAY
OPERATION
TARE lb
$/lb $
REMARK
Press [*] S46.7 F BAR 0 DIGIT Enter DATA2 length.
Press [*] S46.8 F BAR 0 SHIFT
Shift for DATA2.( 0 for no right
shift,1 for right shift, 2 for right
shift x2, 3 for left shift, 4 for left
shift x2, 5 for left shift x3.)
Press [*] S46.9 F BAR
NO
MIDDLE
CD
Press [ⅹ] to select the middle
check digit.
Press [*] S46.1 F BAR
NO LAST
CD
Press [ⅹ] to select the last
check digit.
Press [*] S46.1 F BAR
ITF
BARCOD
E
Press [ⅹ] to swith ITF and EAN
barcode.
Press [#] S46 -- -->
FLEXI
BARCOD
E
Save the flexible barcode 1.
Note: See the Flexible Barcode Usage Note at 《3.6.1 PLU programming》 in SM-100 Operation manual
46
Page 45

SM 5100 FLEXIBLE BARCODE SETTING
47
Page 46

SM 5100 TRACEABILITY SETTING
SM-5100 Traceability Setting
Prepare
z Set SPEC258 to “1”
Traceability Programming
DISPLAY
OPERATION
TARE lb
$/lb $
REMARK
[Mode] [Mode] [Mode] S1
Æ
PLU
FILE
Enter S mode
[3] [4] S34
Æ
COUNTR
Y FILE
Enter country file programming
[*] [1] S34.0 1 NO SET Program country No. 1
[*][C][H][I][N][A] S34.1 COUN CHINA Name 5 Program country name “CHINA”
[#] S34
Æ
COUNTR
Y FILE
Save Country No. 1
[3] [5] S35
Æ
CUTTIN
G HALL
Enter cutting hall programming
[*] [1] S35.0 HALL 1 NO SET Program cutting hall No. 1
[*][1] S35.1 HALL 1
COUNTRY Program cutting hall country No.
1
[*][C][U][T] S35.2 HALL CUT Name 3
Program cutting hall name
“CUT”
[#] S35
Æ
CUTTIN
G HALL
Save cutting hall No. 1
48
Page 47

SM 5100 TRACEABILITY SETTING
DISPLAY
OPERATION
TARE lb
$/lb $
REMARK
[3][6] S36
Æ
SLAUGH
TER
HOUSE
Enter slaughter house
programming
[*][1] S36.0 HOUSE 1 NO SET Program slaughter house No. 1
[*][1] S36.1 HOUSE 1
COUNTRY Program slaughter house
country No.1
[*][S][L][A][U][G] S36.2 HOUSE SLAUG NAME 5
Program slaughter house name
“SLAUG”
[#] S36
Æ
SLAUGH
TER
HOUSE Save slaughter house No. 1
[4][7] S47
Æ
KIND
FLIE
Enter kind file programming
[*][1] S47.0 KIND 1 NO SET Program kind file No. 1
[*][M][E][A][T] S47.1 KIND MEAT NAME 4 Program kind name “MEAT”
[#] S47
Æ
KIND
FILE
Save kind file No. 1
[4][8] S48
Æ
CATEGO
RY FILE
Enter category file programming
[*][1] S48.0 CATEG 1 NO SET Program category No. 1
[*][B][E][E][F] S48.1 CATEG BEEF NAME 4 Program category name “BEEF”
[#] S48
Æ
CATEGO
RY FILE
Save category file No. 1
49
Page 48

SM 5100 TRACEABILITY SETTING
DISPLAY
OPERATION
TARE lb
$/lb $
REMARK
[4][9] S49
Æ
BREED
FILE
Enter breed file programming
[*][1] S49.0 BREED 1 NO SET Program breed file No. 1
[*][B][U][L][L] S49.1 BREED BULL NAME 4 Program breed name “BULL”
[#] S49
Æ
BREED
FILE
Save breed file No. 1
[3][7] S37
Æ
TRACEA
BILITY
Enter traceability programming
[*][1] S37.0 TRACE 1 NO SET Program traceability No. 1
[*][1] S37.1 TRACE 1 BORN Choose born country No. 1
[*][1] S37.2 TRACE 1 FATTEN Choose fatten country No. 1
[*][1] S 37.3 TRACE 1
S
HOUSE
Choose slaughter house No. 1
[*][1] S37.4 S CNT 1 LNK 1
Choose link country No. 1 for
slaughter house
[*][1] S37.5 TRACE 1 C HALL Choose cutting house No. 1
[*][1] S37.6 C CNT 1 LNK 1
Choose link country No. 1 for
cutting hall
[*][1] S37.7 TRACE 1 ORIGIN Choose original country No. 1
50
Page 49

SM 5100 TRACEABILITY SETTING
DISPLAY
OPERATION
TARE lb
$/lb $
REMARK
[*][R][C][D] S37.8 R-CD RCD NAME 3 Program R-CD content “RCD”
[*][G][T][I][N] S37.9 GTIN GTIN NAME 4 Program GTIN content “GTIN”
[*][L][O][T] S37.10 LOT LOT NAME 3 Program LOT content “LOT”
[*][1] S37.11 TRACE 1 KIND Choose kind No. 1
[*][1] S37.12 TRACE 1 CATEG Choose category No. 1
[*][1] S37.13 TRACE 1 BREED Choose breed No. 1
[*][C][O][N][T] S37.14 CONT CONT NAME 4 Program cont content “CONT”
[*][0][6][0][3][1][0] S37.15 TRACE 060310 EAT D Program eat by date “06/03/10”
[*][5][0][0][0] S37.16 TRACE 5.000 WEGHT Program maximum weight “5kg”
[*][S][C][D] S37.17 S CD SCD NAME 3 Program S CD content “SCD”
[*][S][N][M] S37.18 S NM SNM NAME 3 Program S NM content “SNM”
[*][S][A][D][1] S37.19 S AD1 SAD1 NAME 4 Program S AD1 content “SAD1”
[*][S][A][D][2] S37.20 S AD2 SAD2 NAME 4 Program S AD2 content “SAD2”
[#] S37
Æ
TRACEA
BILITY
Save traceability No. 1
Free Format Programming
z Enter “S12 Æ FREE FORMAT”, press [*]
z Edit the correlative items for traceability in free format
PLU ITEM Programming
z Enter “S19 Æ PLU ITEM”, press [*]
z Set “ Item TRACE” to “PROGRAM” and press [#] to save
PLU Programming
z When you edit PLU, set “S1.64 PLU” to “TRACE ALLOW” and press [*]
z Input traceability number and press [#] to save
z In the end, when you call the PLU and print label, you’ll see the traceability information on the label
51
Page 50

SM 5100 Nutrition Fact Setting
SM-5100 Nutrition Fact Setting
Concept
Nutrition uses fix template to print. Totally It has 12 fix templates(No. 70 ~ No. 81).
Setting Method
1. Enter S mode
2. Enter “S19 --- PLU ITEM” and set “IMAGE” and “NUTRI” to “PROGRAM”
3. Enter “S12 --- FREE FORMAT”
4. Enter “S12.5 IMG 1 Å 47 F ITEM” to “S12.5 IMG 10 Å 56 F ITEM” to set the print area of Nutrition. (In
each label format, totally you can print 10 images)
5. Enter “S1 --- PLU FILE” to create PLU.
6. Enter “S1.50 PLU 0 IMAGE 1” to choose the template number for IMAGE 1 (From No. 70~ No. 81).
…
7. Enter “S1.59 PLU 0 IMAGE 10” to choose the template number for IMAGE 10 (From No. 70~ NO. 81).
8. Set “S1.81 PLU PRINT NUTRI” to set nutrition print status to “Print”.
9. Enter from S1.82 to S1.10 to input nutrition contents.
10. For extra details on the Nutrition Fact, Enter S11: TXT form to edit by hands.
11. Enter “S12 --- FREE FORMAT” to set up the TXT position.
12. Press [PLU] key to save.
52
Page 51

SM 5100 PC-FL1 OPERATION
PC-FL1 OPERATION
Note: this guide is available just for SM series expect the SM-5100.
1. The link of the hardware
Link the PC with scale via RS232C.
2. Operation
1. The Spec setting in the scale
3 for SPEC51 (The SIO baud rate is 9600. )
1 for SPEC52 (The SIO data length is 8.)
0 for SPEC53 (No SIO parity digit.)
0 for SPEC54 (1 bit stop bit.)
2 for SPEC60 (SIO work via PCFL-1)
2. The setting in the software
1) open the software
2) the com port setting
53
Page 52

SM 5100 PC-FL1 OPERATION
Please note:
a) The com port should be the same as the one used in your computer.
b) The com port setting must be same as setting in the scale.
3) the folder for save
54
Page 53

SM 5100 PC-FL1 OPERATION
Note: You could set the default folder for save the data received from the scale.
3. Operation
1) receive the data from the scale
55
Page 54

SM 5100 PC-FL1 OPERATION
Note: You could press the key to receive the data from scale.
2) send the data to scale
Note: You could press the key to send the data to scale.
1) the operation in the scale
DISPLAY
OPERATION
TARE lb
$/lb $
REMARK
[M][0][M][M]
DAIL
Y
0 CLR X
Enter the [Z] mode
[zero]+[0][1][0] BAC PLU FILE X
Preset key [8] BAC FOR FILE X
Preset key [8] BAC OTH FILE X
Preset key [8] BAC ALL FILE X
Press preset key [7]or [8] to
select the transmit item:
PLU, Format, Others or All.
[*] BAC
SA
TO
FL-1 X
Preset key [8] BAC
RD
FR
FL-1 X
Preset key [8] BAC
COM
P
FL-1 X
Press preset key [7]or [8] to
select the transmit method:
save data to FL-1,read
data from FL-1,verify data
with FL-1.
[*]
T-
OUT
OPN GOOD X
Transmit successfully.
[Tare]
DAIL
Y
0 CLR X
Back to Z mode.
56
 Loading...