

Page 1

OPERATION MANUAL
MODEL : SM-110
EDITION
Month Year
1
st
January 2008__
2nd ___________
3rd ___________
4
th
_____
SHANGHAI TERAOKA ELECTRONIC CO., LTD
TECHNICAL SUPPORT DEPARTMENT
3rd Floor of 2nd Building, Jia Yuan Business Center,
51# Long Wu Road, Shanghai China 200232.
TEL : +86-21-6408-5151 FAX : +86-21-6408-3468
EMAIL ADDRESS :steservice@digi-scale.com
Page 2

Notice
Welcome to use DIGI’s product. Please see the operation manual and learn how
to use our products. Thank you!
Page 3

Table of Content
1. GENERAL......................................................................................................................1
1.1 Overall View......................................................................................................1
1.2 Display Panel.....................................................................................................3
1.3 Key Panel ...........................................................................................................3
1.4 Thermal Printer Head......................................................................................8
1.5 Features ..............................................................................................................9
1.6 Specifications.................................................................................................. 10
1.6.1 Display........................................................................................................................................................10
1.6.2 Operating Conditions.....................................................................................................................10
1.6.3 Dimensions.............................................................................................................................................10
1.7 Label Type....................................................................................................... 11
2. INITIAL SETUP.....................................................................................................12
2.1 Setup ................................................................................................................ 12
2.2 Location of Switches and Connectors........................................................ 14
2.3 Mode Change.................................................................................................. 14
2.4 Memory Initialization.................................................................................... 15
2.5 Specification Setting...................................................................................... 15
2.6 Password Setting...........................................................................................16
2.6.1 Procedures of Password Setting.............................................................................................16
2.6.2 Password Using....................................................................................................................................16
2.7 Clear Files........................................................................................................ 17
3. PROGRAM MODE...............................................................................................18
3.1 Programmable Files....................................................................................... 18
3.2 General Explanation...................................................................................... 19
3.3 Department Files ........................................................................................... 20
3.3.1 Program Department File...........................................................................................................20
3.3.2 Delete Department File.................................................................................................................21
Page 4

3.4 Main Group Files........................................................................................... 22
3.4.1 Program Main Group File...........................................................................................................22
3.4.2 Delete Main Group File................................................................................................................23
3.5 Program / Skip Item Data........................................................................... 24
3.6 PLU Programming ........................................................................................ 26
3.6.1 Program PLU File(weighing item)........................................................................................30
3.6.2 Program PLU File(non-weighing item).............................................................................33
3.6.3 PLU [COPY] Function..................................................................................................................37
3.6.4 Delete PLU File...................................................................................................................................38
3.6.5 Volume Discount & Mark Down print function.......................................................39
3.7 Memory Status................................................................................................ 41
3.8 Key Assignment............................................................................................. 42
3.8.1 PLU Assignment.................................................................................................................................42
3.8.2 Function Key Assignment...........................................................................................................42
3.8.3 Delete Preset Key Assignment................................................................................................43
3.9 Shop Name File.............................................................................................. 44
3.9.1 Program Shop Name File............................................................................................................44
3.9.2 Delete Shop Name File.................................................................................................................45
3.10 Advertisement File ...................................................................................... 46
3.10.1 Program Advertisement File...................................................................................................46
3.10.2 Delete Advertisement File ........................................................................................................47
3.11 Vender File.................................................................................................... 48
3.12 Program Date And Time............................................................................ 49
3.13 Special Message File.................................................................................... 50
3.13.1 Program Special Message File...............................................................................................50
3.13.2 Delete Special Message File.....................................................................................................51
3.14 Ingredient File.............................................................................................. 52
3.14.1 Program Ing redient File.............................................................................................................52
3.14.2 Delete Ingredient File..................................................................................................................53
3.15 Text File ........................................................................................................ 54
3.15.1 Program Text File...........................................................................................................................54
Page 5

3.15.2 Delete Text File.................................................................................................................................55
3.16 Free Format File.......................................................................................... 56
3.16.1 General Information.....................................................................................................................56
3.16.2 Print Area, Print Position and Print Angles................................................................57
3.16.3 Programming Parameter Of Print Items......................................................................59
3.16.4 Free Format Entry..........................................................................................................................61
3.16.5 Free Format Copy Function...................................................................................................66
3.16.6 Free Format Delete Function................................................................................................66
3.16.7 Sample of program a format by modifying the existing format................67
3.17 Place File....................................................................................................... 70
3.17.1 Program Place File.........................................................................................................................70
3.17.2 Delete Place File...............................................................................................................................70
3.18 Machine Setting............................................................................................ 71
3.19 Logo File....................................................................................................... 72
3.19.1 Pre-programming Logo Data................................................................................................72
3.19.2 Program Display & Keys Function...................................................................................73
3.19.3 Programming Order......................................................................................................................74
3.19.4 Program Log o File.........................................................................................................................74
3.19.5 Delete Logo File..............................................................................................................................75
3.20 Tax File.......................................................................................................... 76
3.20.1 Program Tax File.............................................................................................................................76
3.20.2 Delete Tax File..................................................................................................................................77
3.21 Scroll Message File ...................................................................................... 78
3.21.1 Program Scroll Message File..................................................................................................78
3.21.2 Delete Scroll Message File........................................................................................................78
3.22 Scroll Sequence File..................................................................................... 79
3.22.1 Program Scroll Sequence File................................................................................................79
3.22.2 Enable or Disable Scroll Sequence File.........................................................................80
3.22.3 Delete Scroll Sequence Number..........................................................................................81
3.23 ASCII Character Input Method................................................................ 82
3.24 ASCII Code Input Method........................................................................ 83
Page 6

4. REGISTRATION MODE.............................................................................. 84
4.1 ON/OFF........................................................................................................ 84
4.2 Reset and Weighing Check........................................................................... 84
4.3 Tare Subtraction............................................................................................. 85
4.3.1 One touch Tare Subtraction......................................................................................................85
4.3.2 Digital tare Subtraction..................................................................................................................85
4.4 PLU Call Up................................................................................................... 86
4.4.1 Manual PLU Call Up.......................................................................................................................86
4.4.2 PLU Call Up by Preset Key........................................................................................................86
4.4.3 PLU Call by Numeric Key (Auto PLU Call) .................................................................86
4.5 Fix Operation................................................................................................. 87
4.5.1 Fix Tare by FIX Key........................................................................................................................87
4.5.2 Fix PLU by FIX Key.......................................................................................................................87
4.5.3 Fix Unit Price by FIX Key..........................................................................................................87
4.6 Operation Mode Change.............................................................................. 88
4.7 Item Label Printing in Manual Mode......................................................... 89
4.7.1 Label Printing for PLU Item.....................................................................................................89
4.7.2 Label Printing for NON-PLU Item.....................................................................................90
4.8 Total Label Printing in Manual Mode........................................................ 91
4.8.1 Sales Transaction................................................................................................................................91
4.8.2 [PRICE DISCOUNT] Function Key in Add Mode...............................................92
4.8.3 [PRICE % DISCOUNT] Function Key in Add Mode........................................92
4.9 Data Correction.............................................................................................. 93
4.9.1 On The Spot Correction..............................................................................................................93
4.9.2 Void by Item Correction...............................................................................................................94
4.10 Item Label Printing in Pre-pack Mode .................................................... 95
4.10.1 Item Label Issue for PLU Item............................................................................................95
4.10.2 Item Label Issue for NON-PLU Item............................................................................96
Page 7

5. READ REPORT MODE................................................................................. 97
5.1 Report Factor Select...................................................................................... 97
5.2 Report Type Selection................................................................................... 97
5.2.1 Main Group Report..........................................................................................................................99
5.2.2 PLU Report............................................................................................................................................99
5.2.3 Department Report........................................................................................................................100
5.2.4 Sales Report........................................................................................................................................101
5.2.5 24Hour Report...................................................................................................................................101
5.2.6 ABC Report..........................................................................................................................................101
5.2.7 Clerk Report.........................................................................................................................................102
5.2.8 Pre-pack Report.................................................................................................................................103
5.2.9 Tax Report.............................................................................................................................................104
5.2.10 Store Summarized Report.......................................................................................................104
6. RESET REPORT MODE.............................................................................105
7. Apendix.........................................................................................................................106
A. Specification List
B. Flexible Barcode Setting Guide
C. Traceability Setting Guide
D. Nutrition Setting Guide
E. Operational Menu Tree
Page 8

SM 110 GENERAL
1
1. GENERAL
1.1 Overall View
z Bench Type
z Pole Type
Page 9

SM 110 GENERAL
2
1.2 Display Panel
z 25 digits × 19 segments TN type LCD
z 32 × 202 full dot Martix Green LCD
1.3 Key Panel
z 32 Preset Keys Type
z 56 Preset Keys Type
Page 10
SM 110 GENERAL
3
ON/OFF KEY
Turn display "ON" or "OFF".
PRESET KEY
P1 ~ P40 (B)
P1 ~ P74 (EV)
Set up or call either unit price and tare value.
NUMERIC KEYS
0 ~ 9
Enter numeric data.
TARE KEY
Set or Clear Tare value.
Select "NO" in S and Z Mode.
Item test print in S Mode.
CLEAR KEY
C
For Back space or Clear numeric value.
Select "YES" in S and Z Mode.
RE-ZERO KEY
Reset weight to ZERO.
PREPACK KEY
AUTO
Switch Manual mode and Pre-pack mode alternatively.
(The mode status will be indicated in the P and M indicator.)
▪P - PRE-PACK MODE ▪ M - MANUAL MODE
CHANGE KEY
Calculate the Changed Amount.
Escape the Programming screen without saving data in S Mode.
Page 11

SM 110 GENERAL
6
MULTIPLLE KEY
X
Register the number of Non-Weight products.
Select programming item such as PLU data, Shop Name in S Mode.
Select Report Type in X Mode.
Select Data Transaction Type in Z Mode.
CLERK KEY
V1~V4
Accumulate the Total Price.
VOID KEY
−
Correct the sales data.
PLU KEY
PLU
Call up PLU data in R Mode.
Store the programmed data in S Mode.
FEED KEY
Feed Label or Receipt paper
PRINT KEY
Print out Label or Receipt.
Page 12

SM 110 GENERAL
7
MODE SELECT KEY
Five Modes can be selected using this key.
• Indicator R - REGISTRATION MODE (All the sales transactions are
performed.)
• Indicator X - CHECK MODE (Printing out and sales report.)
• Indicator S - PROGRAM MODE (Programming preset data, such as
products, data, shop name, etc.)
• Indicator Z - TOTAL MODE (Clear sales data stored.)
• Indicator X (Blink) - Password Setting Mode (Set PASS WORD for X, S, Z
mode, set PASSWORD for PASSWORD MODE when all indicators(R, X, S,
Z) blink)
Decrease/Increase Specification Count key
︽,︾
Decrease/Increase Only used when Setting SPEC 141 & 142
<<,>>
Select parameter data such as SPEC data. Move cursor left or right.
Page 13

SM 110 GENERAL
8
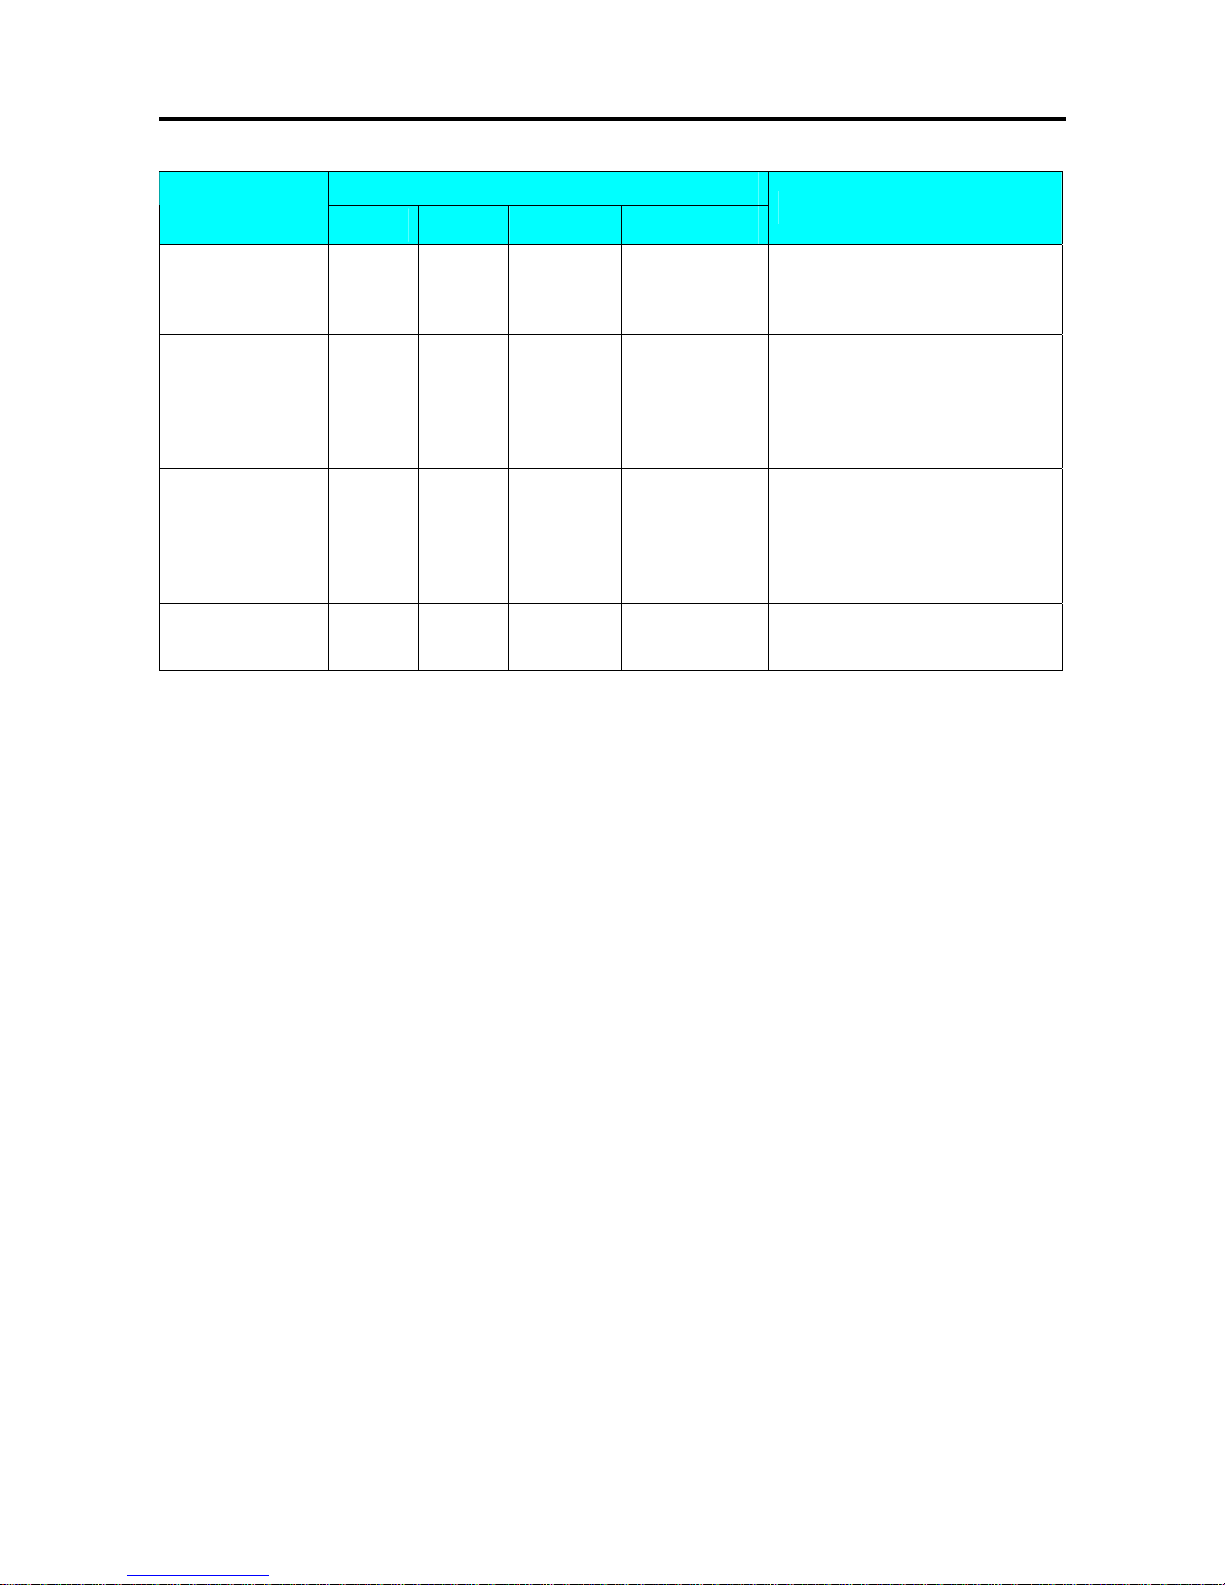
1.4 Thermal Printer Head
z Thermal Head Model: TDK LHE4253SU
z Max Printing With: 56mm
z Compare of Two Thermal Head Types of SM Series Scales
SM-100, SM-80L, SM-300 SM-80, SM-500
Thermal Head Model TDK LHE4253SU TDK LH-3139K
Max Printing Width 56mm 60mm
Thermal Head Photo
Page 14

SM 110 GENERAL
9
1.5 Features
y Digital printing scale consists of electronic cash registers function and label printing function.
y High-speed, high reliability thermal head printer.
y Easy paper handing achieved special designed mechanism.
y Built-in clock automatically updates data and time.
y Quick response to weight changes.
y Capacity : 15lb and 30lb.
y Resolution : Display Resolution 1/3, 000
: Internal Resolution 1/90,000
y Calibrating by software.
y Customer and operator display (optional customer pole display).
y 25 digits x 19 segments TN type LCD with back-light for numeric digit and character display.
32 x 202 full dot Martix Green LCD display.
y 55/83 membrane keys
a. ON/OFF key
b. 10 Numeric keys, to key in numeric data.
c. 32/56 Preset keys, to preset PLU or function into the key.
d. 23/27 Operational keys, to perform various functional operations.
y 18 data files for Department, Main Group, PLU, etc.
y Various reports.
y Ethernet function.
y Optional wireless Ethernet card.
y RS232C interface for data communicate and barcode scanner connection.
y Optional cash drawer.
y Compact housing.
Page 15

SM 110 GENERAL
10
1.6 Specification
1.6.1 Display
25 digits × 19 segment TN type LCD with back-light for numeric digit and character display.
y Tare weight display : 4 digits.
y Weight display : 5 digits.
y Unit price display : 6 digits.
y Total price display : 7 digits.
32 x 202 full dot Martix Green LCD display.
y Tare weight display : 4 digits.
y Weight display : 5 digits.
y Unit price display : 6 digits.
y Total price display : 7 digits.
1.6.2 Operating Conditions
z Power Source : AC 176V ~ 264V, 47~63Hz.
z Operating Temperature : -10 °C ~ +40 °C.
z Operating Humidity : 15% ~ 85% RH.
z Power Consumption : 0.15A.
1.6.3 Dimensions
z Platter size
359(W) x 277(D) mm.
z Overall size
a) Bench : 383.4(W) x 389.3(D) x 162(H) mm.
b) Pole : 383.4(W) x 419.3(D) x 552.6(H) mm.
Page 16

SM 110 GENERAL
11
1.7 Label Type
Note: Labels must be winding outwards (on top backing paper) and not inwards (under backing paper) within the
core (see diagram above). If labels are wound wrongly, printing problem may result. We do not recommend the
use of varnish labels.
Label Type Dimension (mm)
T1 28 X 56
T2 31 X 56
T3 34 X 56
T4 40 X 56
T5 43 X 56
T6 46 X 56
T7 49 X 56
T8 55 X 56
T9 37 X 56
T10 40 X 56
T11 43 X 56
T12 49 X 56
S 28 X 37
A 46 X 37
B 46 X 37
C 62 X 37
F1 – F99 Free Format
Page 17

SM 110 INITIAL SETUP
12
2. INITIAL SETUP
2.1 Setup
¾ Indication of Assemble
(1) Use 4 screws to fix the Pole.
(1) Use 1 flat screws to fix the Pole.
Page 18

SM 110 INITIAL SETUP
13
¾ Bubble Adjustment
Place the scale on the flat surface and adjust the four legs until the bubble on the level is in the
centre as shown above.
Bubble
Page 19

SM 110 INITIAL SETUP
14
2.2 Location of Switches and Connectors
2.3 Mode Change
DISPLAY
OPERATION
PT kg
$/kg $
REMARK
0.000 0.000 0.00 0.00 Weight mode.Lamp R turns on.
[MODE],[MODE]
(within 3 seconds)
XMODE
Enter X mode.Lamp X turns on.
[MODE] S1
→
PLU FILE
Enter S mode.Lamp S turns on.
[MODE] Z1.0 RESET SALES DAILY Enter Z mode.Lamp Z turns on.
[MODE] PWD X 0 SET Enter Password Set mode.Lamp X flicker
[MODE] 0.000 0.000 0.00 0.00 Back to Weight mode.Lamp R turns on.
2.4 Memory Initialization
To clear all memory.
DISPLAY
OPERATION
PT kg
$/kg $
REMARK
Z1.0 RESET SALES DAILY
Z mode.
Lamp Z turns on.
DISPLAY
OPERATION
PT kg
$/kg $
REMARK
Power
Switch
Cash Drawer Port
RS232 Port
Ethernet Port
Fuse
Holder
Page 20

SM 110 INITIAL SETUP
15
[Rezero]+[2][3][0] CLEAR PLU FILE PLU file.
[︾]
CLEAR VENDER DATA
Vender transaction data.
[︾]
CLEAR REPORT FILES
Report files.
[︾]
CLEAR MEMORY DATA
All files in memory.
[*] CLEAR MEMORY Y-C N-T [C] to clear file data,[T] to quit.
[C] or [T] Z1.0 RESET SALES DAILY Return to Z mode.
2.5 Specification Setting
Before setting 141, please enter Z mode.
DISPLAY
OPERATION
PT kg
$/kg $
REMARK
Z1.0 RESET SALES DAILY
Z mode.
Lamp Z turns on.
[Rezero]+[1][4][1] SPEC 000
XXX
(setting)
XXX
(former)
Enter [1][4][1] while depressing
[Rezero].
XXX:SPEC data
[︾]
SPEC 001 XXX XXX
[︾]key only increase specification
count, it does not update SPEC
data.
[︽]
SPEC 000 XXX XXX
[︽]key only decrease specification
count, it does not update SPEC
data.
[1][7]
[X]
SPEC 000
SPEC 017
017
XXX
XXX
XXX
It goes to a designed specification
count.
(000~441 is enabled)
[>>] SPEC 017 XXX XXX
[>>] key select SPEC data.
Move cursor right.
[<<] SPEC 017 XXX XXX
[<<] key select SPEC data.
Move cursor left.
[1]
[*]
SPEC 017
SPEC 018
001
XXX
XXX
XXX
[C] SPEC 018 000 XXX Clear the enter data.
[PLU]
* Note 1
Z1.0 RESET SALES DAILY
Store the updated specification and
escape to Z mode.
Note: Please see Appendix A for the detail specification list
Page 21

SM 110 INITIAL SETUP
16
2.6 Password Setting
2.6.1 Procedures of Password Setting
DISPLAY
OPERATION
PT kg
$/kg $
REMARK
Z1.0 RESET SALES DAILY Z mode. Lamp Z turns on.
[MODE] PWD X XXXX SET
Display password for X mode .
XXXX: former password
0: Not set
(1~4 bits are enable)Lamp X
flicker.
[1][2][3][4]
[*]
PWD X
PWD S
1234
XXXX
SET
SET
Set password for X mode as 1234.
Press [*] to save password for X
mode.
Lamp S flicker.
[*] PWD Z XXXX SET
Display password for Z mode.
Lamp Z flicker.
[3][3]
[C]
PWD Z
PWD Z
33
0
SET
SET
Clear the password for Z mode.
[*] PWD P XXXX SET
Display password for PWD mode.
Lamp R X S Z flicker.
[1][1][1][1] PWD P 1111 SET
Set password for PWD mode as
1111.
Lamp R X S Z flicker.
[*] 0.000 0.000 0.00 0.00
Return R mode after password
setting.
2.6.2 Password Using
{Hypothesis: PWD X: 1111; PWD S: No Set; PWD P: 1234}
DISPLAY
OPERATION
PT kg
$/kg $
REMARK
0.000 0.000 0.00 0.00
Weight mode.
Lamp R turns on.
[MODE],[MODE]
(within 3 seconds)
ENTER PWD X
Need X mode password.
Lamp X turns on.
OPERATION DISPLAY REMARK
Page 22

SM 110 INITIAL SETUP
17
PT kg
$/kg $
[1][2][3][4]
[*]
ENTER
ENTER
PWD X
PWD X
****
Incorrect password.
Retry.
[1][1][1][1]
[*]
X1.0
ENTER
READ
PWD X
SALES
****
DAILY
Correct password.
Enters X mode.
[MODE] S1 → PLU FILE
Enters S mode.
Lamp S turns on.
[MODE] ENTER PWD Z
Need Z mode password.
Lamp Z turns on.
[3][3]
[*]
Z1.0
ENTER
RESET
PWD Z
SALES
**
DAILY
Correct password.
Enters Z mode.
[MODE] ENTER PWD P Need PWD mode password.
[1][2][3][4]
[*]
ENTER
PWD X
PWD P
1111
****
SET
Correct password.
Enters PWD mode.
[MODE] 0.000 0.000 0.00 0.00
Back to Weight mode.
Lamp R turns on.
2.7 Clear Files
This function is used to clear files in Memory.
DISPLAY
OPERATION
PT kg
$/kg $
REMARK
Z1.0 RESET SALES DAILY
Z mode.
Lamp Z turns on.
[Rezero]+[2][3][0] CLEAR PLU FILE PLU file.
[︾]
CLEAR VENDER DATA
Vender transaction data.
[︾]
CLEAR REPORT FILES
Report files.
[︾]
CLEAR MEMORY DATA
All files in memory.
[*] CLEAR MEMORY Y-C N-T [C] to clear file data,[T] to quit.
[C] or [T] Z1.0 RESET SALES DAILY Return to Z mode.
Page 23

SM 110 PROGRAM MODE
18
3. PROGRAM MODE
3.1 Programmable Files
In Programming Mode, there are two ways to select the Programming File by using different keys such as:
• Enter the Number key.
• Press [︽] key or [︾] key to select the Data File.
The files listed below can be programmed in PROGRAM Mode (S Mode).
Key To Press Data files Key To Press Data files
[1] PLU Programming [1] [7]
Logo Programming
[2]
Department Programming
[1] [8]
Tax Programming
[3]
Main Group Programming
[1] [9]
Program or Skip Item Data
[4]
Key Assignment
[2] [0]
Memory Status
[5]
Shop Name Programming
[2] [1] I/F Test
[6]
Advertisement Programming
[2] [2] File Load
[7]
Vender Programming
[8]
Date and Time Programming
[9]
Special Message Programming
[1] [0]
Ingredients Programming
[1] [1]
Text Programming
[1] [2]
Free Format Programming
[1] [3]
Scrolling Message Programming
[1] [4]
Scroll Sequence Programming
[1] [5]
Place Programming
[1] [6]
Machine setting
Page 24

SM 110 PROGRAM MODE
19
3.2 General Explanation
DEPARTMENT, MAIN GROUP and PLU files are connected as shown below. By the following
linking method, more detail and concrete information on sales transaction or pre-pack data can be got by
printing various reports.
DEPARTMENT FILE
DEPARTMENT file is the largest category whose items are like MEAT, FISH, VEGETABLE or
DELICATESSEN etc.
MAIN GROUP FILE
MAIN GROUP file is the middle category includin g items suc h as BEEF, PORK , CHICKE N, etc.
You can link a Main Group to a Department in the Main Group file. Tax Number can be assigned to
a Main Group. The assigned Tax Number will apply for all the PLU’s assigned to the Main Group.
PLU FILE
PLU File is the smallest category including items such as BEEF SLICE, BEEF SHOULDER and
BEEF SIRLOIN. You can link the PLU to a Main Group in the PLU programming file.
Connection of DEPARTME NT, MAIN G RO UP and PLU:
SHO P
DEPT.
M.G.
PLU
DEPT.
M.G. M.G. M.G.
PLUPLUPLUPLUPLUPLUPLU
Departm ent File
Main Group File
PLU File
Page 25

SM 110 PROGRAM MODE
20
3.3 Department Files
Department file is used for categorizing Main Groups. Department Number between 1 ~ 99 are
available for programming. The Main Groups that are not linked to any Department will be assigned to
Department Number 97 automatically. Maximum 16 characters per file are available and each with 1
line.
3.3.1 Program Department File
DISPLAY
OPERATION
PT kg
$/kg $
REMARK
[MODE][MODE]
[MODE]
S1
→
PLU FILE
Enter S mode.
Lamp S turns on.
[2] or [X]、[︾]
S2
→
DEPT FILE
Select Department Programming.
[*] S2.0 DEPT 0 NO SET
$ /kg window displays DEPT.
code.
[1] S2.0 DEPT 1 NO SET Enter department No.(Ex. [1])
[*] S2.1 DEPT NAME 0
Enter department programming,
set the department name.
[M][E][A][T] S2.1 DEPT MEAT NAME 4
Enter DEPT. name(use letter
keys)(Ex. “MEAT” for Dept. No
1)
The methods of ASII letter input
refer to 3.23 ASSII Character Input
Method.
[PLU] S2 → DEPT FILE
Store the department file, back to S
mode.
Note1: Number after "NAME" in Total display shows the position of the cursor.
Note2: The DEPT. No.1 to No.99 are available for programming.
(No.97 is default No. for PLU pr ogramm ing, a nd th e PLU s whi ch a re no t lin ked to an y DEP T No. are assign ed
to No.97)
(Non-PLU files (Weighing items) are assign ed to DEPT code No.98)
(Non-PLU files (Non-weighing items) are assigned to DEPT code No.99)
Note3: The Department names programmed are not printed on the label/receipt but are for reporting.
Page 26

SM 110 PROGRAM MODE
21
3.3.2 Delete Department File
DISPLAY
OPERATION
PT kg
$/kg $
REMARK
[MODE][MODE]
[MODE]
S1
→
PLU FILE
Enter S mode.
Lamp S turns on.
[2] or [︾]
S2
→
DEPT FILE
Select Department Programming.
[*] S2.0 DEPT 0 NO SET
$/kg window indicates DEPT.
code.
[1] S2.0 DEPT 1 NO SET
Enter department No.(Ex. [1])
Delete Dept. No.1 for “MEAT”.
[-]
S2.0 DEPT
DEL ?
Y-C N-T
[C] for Yes, [T] for No.
[C] S2 → DEPT FILE
Delete the Dept. file 1,
back to S mode.
Note1: When the MAIN GROUP FILE exists under the Department File, the Department Number cannot be
deleted. In addition, the Department Number 97, 98 and 99 cannot be deleted.
Page 27

SM 110 PROGRAM MODE
22
3.4 Main Group Files
Main Group is the middle category and can be assigned to a Department. The Main Group file is used
for categorizing the PLU's. Main Group Number of 1 ~ 999 are available for programming. PLU's that
are not linked to any Main Group Number will be assigned to the Main Group Number 997
automatically. TAX is assigned to every Main Group. The assigned TAX will apply for all the PLU's
assigned to the Main Group. Up to 250 data can be programmed in Main Group file. Maximum 16
characters per file are available and each with 1 line.
3.4.1 Program Main Group File
DISPLAY
OPERATION
PT kg
$/kg $
REMARK
[MODE][MODE]
[MODE]
S1
→
PLU FILE
Enter S mode.
Lamp S turns on.
[3] or [︾]
S3
→
MGROUP FILE
Select Main Group Programming.
[*] S3.0 MG 0 NO SET
$ /kg window indicates Main
Group code.
[1][1][1] S3.0 MG 111 NO SET
Select Main Group No.
(Ex. [1][1][1])
[*] S3.1 MG
97
(default)
DEPT NO
Enter Main Group programming,
Set the Department number.
[1]
[*]
S3.1
S3.2
MG
MG
1
DEPT NO
NAME 0
Link Main Group 111 to
Department 1.
[B][E][E][F]
[*]
S3.2
S3.3
MG
MG
BEEF
0
NAME 4
TAX NO
Name of the Main Group 111 is
“BEEF’.
Set the Tax number.
[1] S3.3 MG 1 TAX NO
Tax of Main Group 111 is tax
number 1.
[PLU] S3 → MGROUP FILE
Store the Main Group file, back to S
mode. If you want to exit without
saving data, press [◇] key and then
follow by [C] key
Note1: For tax rate programming, refer to 3.20 Tax File in S Mode. if not necessary to link the Tax Number, press [*]
key to enter next selection. This procedure will skip if SPEC 603 is set to "NO TAX".
Note2: Number after "NAME" in Total display show s the po sition of the curso r.
Note3: The Main Group No.1 to No.997 are availab le for PL U progr amming .
Page 28

SM 110 PROGRAM MODE
23
(No.997 is default No. for PLU programming, and the PLUs which are not linked to any Main Group No. are
assigned to No.997)
(Non-PLU files (Weighing items) are assigned to Main Group code No.998)
(Non-PLU files (Non-weighing items) are assigned to Main Group code No.999)
Note4: The Main Group names programmed are not printed on the label/receipt but are for reporting.
Note5: Each Main Group No. must be linked to the exiting Dept. No.(Refer to 3.3 Department File).
3.4.2 Delete Main Group File
DISPLAY
OPERATION
PT kg
$/kg $
REMARK
[MODE][MODE]
[MODE]
S1
→
PLU FILE
Enter S mode.
Lamp S turns on.
[3] or [︾]
[*]
S3
S3.0
→
MG
MGROUP
0
FILE
NO SET
Select Main Group Programming
and
Enter it.
[1][1][1] S3.0 MG 111 NO SET
Enter Main Group No.
(Ex. [1][1][1])
[-]
S3.0 MG
DEL ?
Y-C N-T
[C] for Yes, [T] for No.
[C] S3
→
MGROUP FILE
Delete M.G. file 111,back to S
mode.
Note1: When the PLU FILE exists under the Main Group File, the Main Group Number cannot be deleted. In
addition, the Main Group Number 997, 998 and 999 cannot be deleted.
Page 29

SM 110 PROGRAM MODE
24
3.5 Program / Skip Item Data
Unnecessary PLU parameters will be skipped automatically due to auto-skip function, it is possible to
set only necessary PLU parameter in PLU programming procedure "Program PLU File". The following
parameters are available for Program/ Skip function
No.
Display Parameter
Symbol
1
[LABFR1] 1. Label format 1
LABFR1
2
[LABFR2] 2. Label format 2
LABFR2
3
[BACODE] 3. Barcode Selection
BACODE
4
[FLAG] 4. Barcode Flag data
FLAG
5
[ITCODE] 5. Barcode Item Code
ITCODE
6
[MGCODE] 6. Main Group Code
MGCODE
7
[SELLDT] 7. Sell by Date
SELLDT
8
[SELLTM] 8. Sell by Time
SELLTM
9
[USEDDT] 9. Used by Date
USEDDT
10
[PACKDT] 10. Packed Date
PACKDT
11
[PACKTM] 11. Packed Time
PACKTM
12
[COST] 12. Cost
COST
13
[TARE] 13. Tare
TARE
14
[QTY] 14. Quantity
QTY
15
[Q.UNIT] 15. Quantity Unit
QUNIT
16
[DISCNT] 16. Discount Status
DISCNT
17
[SCH DT] 17. Discount Schedule date
SCHDT
18
[SCH TM] 18. Discount Schedule time
SCHTM
19
[MARKDN] 19. Mark Down Status
MARKDN
20
[1STLMT] 20. 1st target for discount 1
FSTLMT
21
[2NDLMT] 21. 2nd target for discount 2
SNDLMT
22
[SMGNUM] 22. Special Message #
SMGNUM
23
[INGNUM] 23. Ingredients #
INGNUM
24
[COMNAM] 24. Commodity Name
COMNAM
25
[SP MG] 25. Special Message
SPMG
26
[INGR] 26. Ingredients
INGR
27
[PLCNUM] 27. Place of Production
PLCNUM
28
[IMAGE] 28. Image
IMAGE
29
[BONUS] 29. Bonus
BONUS
30
[NUTRI] 30. Nutrition
NUTRI
31
[ITFSEL] 31. ITF Selection
ITFSEL
32
[REFPLU] 32. Reference PLU No.
REFPLU
33
[SECPLU] 33. Security PLU
SECPLU
34
[COUPLU] 34. Coupled PLU
COUPLU
Page 30

SM 110 PROGRAM MODE
25
No.
Display Parameter
Symbol
35
[DAY WK] 35. Discount day of the week
DAYWK
36
[ADD-ON] 36. EAN 5 Digit ADD-ON
ADDON
37
[TAX] 37. TAX No.
TAX
38
[PRICE2] 38. 2nd Price
PRICE2
39
[% TARE] 39. Proportional Tare
PROTARE
40
[CUSDIS] 40. Customer Discount
CUSDIS
41
[RESDIS] 41. Restaurant Discount
RESDIS
42
[STADIS] 42. Staff Discount
STADIS
43
[TRACE] 43. Traceability Discount
TRACE
44
[TEMP] 44. Storage Temperature
TEMP
45
[PACK.I] 45. Pack. Indicator
PACKI
46
[M1BARC] 46. Multi Barcode 1
M1BARC
47
[M2BARC] 47. Multi Barcode 2
M2BARC
48
[TM1BAR] 48. Total Multi Barcode 1
TM1BAR
49
[TM2BAR] 49. Total Multi Barcode 2
TM2BAR
50
[U.PRIC] 50. Unit Price Selection
UPRIC
51
[PLUSCR] 51. PLU Scroll (U1 only)
PLUSCR
52
[PLUTEX] 52. PLU Linked Text Field
PLUTEX
Program/Skip Item Data
DISPLAY
OPERATION
PT kg
$/kg $
REMARK
[MODE][MODE]
[MODE]
S1
→
PLU FILE
Enter S mode.
Lamp S turns on.
[1][9] or [︾]
S19
→
PLU ITEM
Select PLU item Selection Mode
and enter
[*] S19.1 ITEM LABFR1 PROGRAM
Enter Program or Skip parameter
selection mode.
[*][*][*][*][*] S19.1 ITEM MGCODE SKIP Select parameter of Main Group.
[X] S19.1 ITEM MGCODE PROGRAM
Select PROGRAM for the
parameter of Main Group.
[PLU] S19 → PLU ITEM
After finish setting, save it.
Back to S mode.
Note1: Press [*] key to next parameter or [−] key to previous parameter and press [X] key to select PROGRAM or
SKIP for each parameter, if necessary.
Note2: If you want to exit without saving, press [◇] key follow by [C] key.
Page 31
SM 110 PROGRAM MODE
26
3.6 PLU Programming
The following items can be programmed in PLU PROGRAMMING mode. The format chosen for the
PLU will decide what items can be programmed in the PLU file. The items which print areas are not set
on the selected format will skip automatically or not printed on label. (If the item doesn't appear on the
PLU programming, check whether the parameter is set to ENABLE in Program / Skip Item Data).
PLU file for weighing item and non-weighing item listed below can be programmed according to the
following order.
Weighing Item
Step PLU File (weighing Item) Remarks
S1.0 PLU No.
S1.1 Unit Price (6 digits)
S1.2 Label Format for the 1st label Refer to Label Format List.
S1.3 Label Format for the 2nd label Free format No.1~99 only.
S1.4 Commodity Name Font Size
S1.4 Commodity Name
S1.5 Selection of ITF Barcode Format
S1.6 Bar Code Selection
S1.7 Flag data
S1.8 Item Code No.
* Digits of Flag and Item data can be selected in the barcode type
selection in S1.6.
S1.9 Item Code No. (Lower 4 digits) Only when Item Code is more than 6 digits.
S1.10 Right Side Data of Item Barcode Only when Spec02 set to 3.
S1.11 Selection of EAN ADD-ON
S1.12 Main Group No.
S1.13 Select whether to print Sell by date
S1.14 Sell by date (Days after the current date)
* If No Print is selected, Sell- by Date in S1.12 is skipped.
S1.15 Select whether to print Sell by time
* If No Print is selected, Key in selection in S1.14 Sell-by time in
S1.15 is skipped.
S1.16 Select key-in data or present time
S1.17 Sell by Time (If Key-In is selected)
* If S1.14 select CLOCK TIME, Key in selection in S1.15 is
skipped.
S1.18 Select whether to print Used by date
S1.19 Used by date (days after Packed date)
* If No Print is selected, Used- by Date in S1.17 is skipped.
S1.20 Select whether to print Packed date
S1.21 Packed Date (days after actual packed date)
* If No Print is selected, Packed Date in S1.19 is skipped.
S1.22 Select whether to print Packed time
* If No Print is selected, Key-in selection in S1.21 Packed time in
S1.22 are skipped.
Page 32

SM 110 PROGRAM MODE
27
Step PLU File (weighing Item) Remarks
S1.23 Select to print Key-In data or actual time
S1.24 Packed Time (if key-In is selected)
* If S1.21 select CLOCK TIME, Key in selection in S1.22 is
skipped.
S1.25 Cost price
S1.26 PLU Tare * Depends on SPEC: 647 SETTING.
S1.29 Type of Volume Discount * Depends on SPEC: 100 SETTING.
S1.30 The 1st target of volume discount
S1.31 The discount value for the 1st target
S1.32 The 2nd target of volume discount
S1.33 The discount value for the 2nd target
* If No Volume discount is selected, the parameters in S1.27 ~
S1.36 are skipped.
S1.34 Print type of Discount price (Mark Down) *Entering by Number keys (0~3)
S1.35 Schedule of Volume Discount (The start date)
S1.36 Schedule of Volume Discount (The start time)
S1.37 Schedule of Volume Discount (The end date)
S1.38 Schedule of Volume Discount (The end time)
S1.39 Selection of Discount Day of The Week.
S1.40
Special message No. (Select No. from SP message
file)
S1.41 Ingredient No. (Select No. from Ingredient file)
S1.42 Special message (Program original Special Message)
S1.43 Ingredient (Program original Ingredient)
* If selected Label Format without PRINT AREA, S1.40 ~
S1.43 are skipped.
S1.44 Place of production (Select No. from Place file)
* If selected Label Format without PRINT AREA, the
PLACE message will print on 1
st
line of Commodity Name.
S1.45 Coupled PLU Number
S1.46 TAX Number (Select Number from TAX File) *Depend on SPEC: 603 SETTING.
S1.47 Reference PLU Number
S1.48 Proportional Tare *Depend on SPEC: 687 SETTING.
Page 33

SM 110 PROGRAM MODE
28
Non-Weighing Item
Step PLU File (Non-weighing Item) Remarks
S1.0 PLU No.
S1.1 Unit Price (6 digits)
S1.2 Label Format for the 1st label Refer to Label Format List.
S1.3 Label Format for the 2nd label Free format No.1~99 only.
S1.4 Commodity Name Font Size
S1.4 Commodity Name
S1.5 Selection of ITF Barcode Format
S1.6 Bar Code Selection
S1.7 Flag data
S1.8 Item Code No.
* Digits of Flag and Item data can be selected in the barcode type
selection in S1.6.
S1.9 Item Code No. (Lower 4 digits) Only when Item Code is more than 6 digits.
S1.10 Right Side Data of Item Barcode Only when Spec02 set to 3.
S1.11 Selection of EAN ADD-ON
S1.12 Main Group No.
S1.13 Select whether to print Sell by date
S1.14 Sell by date (Days after the current date)
* If No Print is selected, Sell- by Date in S1.12 is skipped.
S1.15 Select whether to print Sell by time
* If No Print is selected, Key in selection in S1.14 Sell-by time in
S1.15 is skipped.
S1.16 Select key-in data or present time
S1.17 Sell by Time (If Key-In is selected)
* If S1.14 select CLOCK TIME, Key in selection in S1.15 is
skipped.
S1.18 Select whether to print Used by date
S1.19 Used by date (days after Packed date)
* If No Print is selected, Used- by Date in S1.17 is skipped.
S1.20 Select whether to print Packed date
S1.21 Packed Date (days after actual packed date)
* If No Print is selected, Packed Date in S1.19 is skipped.
S1.22 Select whether to print Packed time
* If No Print is selected, Key-in selection in S1.21 Packed time in
S1.22 are skipped.
S1.23 Select to print Key-In data or actual time
S1.24 Packed Time (if key-In is selected)
* If S1.21 select CLOCK TIME, Key in selection in S1.22 is
skipped.
S1.25 Cost price
S1.27
Unit Symbol (PCS / FOR / kg / lb / g / NO
SYMBOL)
S1.28 Quantity
S1.29 Type of Volume Discount * Depends on SPEC: 100 SETTING.
Page 34

SM 110 PROGRAM MODE
29
Step PLU File (Non-weighing Item) Remarks
S1.30 The 1st target of volume discount
S1.31 The discount value for the 1st target
S1.32 The 2nd target of volume discount
S1.33 The discount value for the 2nd target
* If No Volume discount is selected, the parameters in S1.27 ~
S1.36 are skipped.
S1.34 Print type of Discount price (Mark Down) *Entering by Number keys (0~3)
S1.35 Schedule of Volume Discount (The start date)
S1.36 Schedule of Volume Discount (The start time)
S1.37 Schedule of Volume Discount (The end date)
S1.38 Schedule of Volume Discount (The end time)
S1.39 Selection of Discount Day of The Week.
S1.40
Special message No. (Select No. from SP message
file)
S1.41 Ingredient No. (Select No. from Ingredient file)
S1.42
Special message (Program original Special
Message)
S1.43 Ingredient (Program original Ingredient)
* If selected Label Format without PRINT AREA, S1.40 ~
S1.43 are skipped.
S1.44 Place of production (Select No. from Place file)
* If selected Label Format without PRINT AREA, the PLACE
message will print on 1
st
line of Commodity Name.
S1.45 Coupled PLU Number
S1.46 TAX Number (Select Number from TAX File) *Depend on SPEC: 603 SETTING.
S1.47 Reference PLU Number
Page 35

SM 110 PROGRAM MODE
30
3.6.1 Program PLU File(weighing item)
PLU data(weighing item) is programmed by following procedure as below.
If the selected 1st or 2nd label format does not have print area for the PLU items, the item will be skipped
automatically or not printed on label.
DISPLAY
OPERATION
PT kg
$/kg $
REMARK
[MODE][MODE]
[MODE]
S1
→
PLU FILE
Enter S mode.
Lamp S turns on.
[*] S1.0 PLU 0 NO SET
Enter PLU programming mode.
$/kg window displays PLU number.
[1][0][0] S1.0 PLU 100 NO SET Enter new PLU Number (Ex. 100) you want.
[*] S1.1 PLU 0.00 PR-KG
Enter PLU programming.
Enter unit price.(Ex.5.80$/kg)
[5][8][0][*] S1.2 PLU DFT 0 LAB FR1
Select Label format for 1
st
Label by press [<<]
or [>>] key.
(T1~T12,S,A,B,C,F1~F8 is available)
[<<] or [>>] S1.2 PLU T6 6 LAB FR1
Set the Label format (Ex.T6) by press [6] or[>>]
key.
[*] S1.3 PLU NO 0 LAB FR2
Select Label format for 2
nd
Label by press [<<]
or [>>]key.
(F1~F8 only)
[<<] or [>>]
[*]
S1.4 C01.01 S1 A 100 Enter commodity name.(Ex. “SLICE”)
[S][L][I][C][E]
[*]
S1.4 C02.01 S1 A 100 Enter the 2
nd
line of commodity name.
[*] S1.5 PLU EAN BARCODE
Select the type of BARCODE by press [X] or
[>>].(EAN or ITF)
[*] S1.6 PLU DFLT BARCODE
Select barcode format by press [<<] or [>>]
key.(Ex.2f5c4i4wD)
[<<] or [>>]
[*]
S1.7 PLU 20 FLAG
Set flag data.(Ex.29)
The Default Flag Data can be set at SPEC 3 ~ 6
and the Flag data consists of one or two digits,
which depends on the selected Barcode type.
[2][9]
[*]
S1.8 PLU 00000 IT CODE Enter item code.(Ex.10010)
Page 36

SM 110 PROGRAM MODE
31
DISPLAY
OPERATION
PT kg
$/kg $
REMARK
[1][0][0][1][0]
[*]
S1.9 PLU 00000 EX CODE No appended item code of PLU 100.
[*] S1.10 PLU EAN
ADD
OFF
Select EAN ADD-ON or EAN ADD-OFF.(Ex.
EAN ADD-OFF)
[*] S1.12 PLU 997 MG NO
Set the Main Group number.(default MG 997)
Enter Main Group No.(Ex.111)
Link PLU 100 to Main Group 111.
[1][1][1]
[*]
S1.13 PLU NPRINT SELL DT
Press [<<] or [>>] key to change whether print
sell-by-date.
(Ex. Print sell by date)
[<<] or [>>]
[*]
S1.14 PLU 0 SELL DT
Set sell-by-date.(Ex.3 days)
3 digits can be set.(0~999)
[3]
[*]
S1.15 PLU NPRINT SELL TM
Press [<<] or [>>] key to change whether print
sell-by-time.
(Ex. No print sell by time)
[*] S1.18 PLU NPRINT USED DT
Press [<<] or [>>] key to change whether print
used by date.
(Ex. No print used by date)
Set used-by-date,
used-by-time
… … … …
Setting way of used-by-date, used-by-time are
same as setting sell-by-date and sell-by-time.
[*] S1.20 PLU NPRINT PACK DT
Press [<<] or [>>] key to change whether print
packed date.
[<<] or [>>]
[*]
S1.21 PLU 0 PACK DT
If necessarily, packed date can set the day after
present date.
(Ex. 1 day after present day)
[1][*] S1.22 PLU NPRINT PACK TM
Press [<<] or [>>] key to change whether print
packed time.
[<<] or [>>]
[*]
S1.23 PLU TIME PRESENT
Press [<<] or [>>] key to change key-in time or
present time.
[<<] or [>>]
[*]
S1.24 PLU 0000 PACK TM
Set the packed time.
(Ex. 18:00)
[1][8][0][0]
[*]
S1.25 PLU 0.00 COST
[*] S1.26 PLU 0.000 TARE Enter Preset Tare of PLU 10.(Ex.0.100kg)
Page 37

SM 110 PROGRAM MODE
32
DISPLAY
OPERATION
PT kg
$/kg $
REMARK
[1][0][0]
[*]
S1.29 PLU NO DISCONT
6 kinds discount type can be selected by press
[<<] or [>>] key.
(Ex. UNIT PRICE discount)
[<<] or [>>]
[*]
S1.30 PLU 0.000 1
ST
LMT Set 1st limit weight is 0.1kg.(Ex.0.100kg)
[1][0][0]
[*]
S1.31 PLU 0.00 1
ST
AMT
Set 1
st
amount of discount is $0.30.
[3][0]
[*]
S1.32 PLU 99.999 2
ND
LMT Set 2nd limit weight is 1.000kg.
[1][0][0][0]
[*]
S1.33 PLU 0.00 2
ND
AMT
Set 2
nd
amount of discount is $0.50.
[5][0]
[*]
S1.34 PLU NO
MARK
DOWN
Change selection by [<<] or [>>]:
No mark down/Unit price mark down
/Total price mark down/all mark down
[<<] or [>>]
[*]
S1.35 PLU 000000 ST DATE
Set discount start day.(Ex.10-01-04,
MM-DD-YY)
[1][0][0][1][0][4]
[*]
S1.36 PLU 0000 ST TIME Set discount start time.(Ex. 09:00, HH-MM)
[0][9][0][0]
[*]
S1.37 PLU 000000 ED DATE Set discount end date.(Ex.11-01-04)
[1][1][0][1][0][4]
[*]
S1.38 PLU 0000 ED TIME Set discount end time.(Ex. 09:00)
[0][9][0][0]
[*]
S1.40 PLU 0 SMG NUM
Set special message file number.(Ex. Number 1)
Special message file 1 is linked to this PLU.
[1][*] S1.41 PLU 0 ING NUM
Set ingredients file number.(Ex. Number 1)
Ingredients file 1 is linked to this PLU.
[1]
[PLU]
S1
→
PLU ITEM
After finish setting, save it.
Back to S mode.
Note1: Press [*] key to next parameter or [−] key to previous parameter.
Note2: The letter before "A" in Total Price display shows the letter font size of the commodity name, and the number
after "A" in Total Price display shows the number of letters can be programmed for commodity name.
Page 38
SM 110 PROGRAM MODE
33
Note3: The 2 digits after "C" in Weight display shows the line of the commodity name, and the next 2 digits in Weight
display shows the position of the cursor.
Note4:
The PLU No.1 to No.999999 are available for PLU programming.
Note5: The programmed PLU commodity name are printed on the label or receip t.
Note6: Max.100 letters for commodity name per file are available.
Note7: Each PLU No. must be linked to the exiting Main Group No.(Refer to 3.4 Main Group File).
3.6.2 Program PLU File(non-weighing item)
PLU data(non-weighing item) is programmed by following procedure as below.
*If th e selected 1st or 2nd label format does not have print area for the PLU items, the it em w ill be skipped
automatically or not printed on label
DISPLAY
OPERATION
PT kg
$/kg $
REMARK
[MODE][MODE]
[MODE]
S1
→
PLU FILE
Enter S mode.
Lamp S turns on.
[*] S1.0 PLU 0 NO SET
Enter PLU programming mode.
$ /kg window displays PLU
number.
[2][0][0] S1.0 PLU 200 NO SET
Enter new PLU Number (Ex. 200)
you want.
[*] S1.1 PLU 0.00 PR-KG
Enter PLU programming.
Enter unit price.(Ex.5.80$/kg)
[<<] or [>>]
[5][8][0]
S1.1 PLU 5.80 PR-PCS
Change Unit price of PLU 200 to
non-weighing item.
[*] S1.2 PLU DFT 0 LAB FR1
Select Label format for 1
st
Label by
press [<<] or [>>] key.
(T1~T12,S,A,B,C,F1~F8 is
available)
[<<] or [>>] S1.2 PLU T6 6 LAB FR1
Set the Label format (Ex.T6) by
press [6] or[>>] key.
[*] S1.3 PLU NO 0 LAB FR2
Select Label format for 2
nd
Label
by press [<<] or [>>]key.
(F1~F8 only)
[<<] or [>>]
[*]
S1.4 C01.01 S1 A 100
Enter commodity name.(Ex.
“CAKE”)
Page 39
SM 110 PROGRAM MODE
34
DISPLAY
OPERATION
PT kg
$/kg $
REMARK
[C][A][K][E]
[*]
S1.4 C02.01 S1 A 100
Enter the 2nd line of commٛddity
name.
[*] S1.5 PLU EAN BARCODE
Select the type of BARCODE by
press [X] or [>>].(EAN or ITF)
[*] S1.6 PLU DFLT BARCODE
Select barcode format by press
[<<] or [>>] key.(Ex.2f5c4i4wD)
[<<] or [>>]
[*]
S1.7 PLU 20 FLAG
Set flag data.(Ex.29)
The Default Flag Data can be set at
SPEC 3 ~ 6 and the Flag data
consists of one or two digits, which
depends on the selected Barcode
type.
[2][9]
[*]
S1.8 PLU 00000 IT CODE Enter item code.(Ex.20020)
[2][0][0][2][0]
[*]
S1.9 PLU 00000 EX CODE
No appended item code of PLU
100.
[*] S1.10 PLU EAN ADD OFF
Select EAN ADD-ON or EAN
ADD-OFF.(Ex. EAN ADD-OFF)
[*] S1.12 PLU 997 MG NO
Set the Main Group
number.(default MG 997)
Enter Main Group No.(Ex.222)
Link PLU 200 to Main Group 222.
[2][2][2]
[*]
S1.13 PLU NPRINT SELL DT
Press [<<] or [>>] key to change
whether print sell-by-date.
(Ex. Print sell by date)
[<<] or [>>]
[*]
S1.14 PLU 0 SELL DT
Set sell-by-date.(Ex.3 days)
3 digits can be set.(0~999)
[3]
[*]
S1.15 PLU NPRINT SELL TM
Press [<<] or [>>] key to change
whether print sell-by-time.
(Ex. No print sell by time)
[*] S1.18 PLU NPRINT USED DT
Press [<<] or [>>] key to change
whether print used by date.
Set used-by-date,
used-by-time
… … … …
Setting way of used-by-date,
used-by-time are same as setting
sell-by-date and sell-by-time.
Page 40

SM 110 PROGRAM MODE
35
DISPLAY
OPERATION
PT kg
$/kg $
REMARK
[*] S1.20 PLU NPRINT PACK DT
Press [<<] or [>>] key to change
whether print packed date.
[<<] or [>>]
[*]
S1.21 PLU 0 PACK DT
If necessarily, packed date can set
the day after present date.
(Ex. 1 day after present day)
[1][*] S1.22 PLU NPRINT PACK TM
Press [<<] or [>>] key to change
whether print packed time.
[<<] or [>>]
[*]
S1.23 PLU TIME PRESENT
Press [<<] or [>>] key to change
key-in time or present time.
[<<] or [>>]
[*]
S1.24 PLU 0000 PACK TM
Set the packed time.
(Ex. 18:00)
[1][8][0][0]
[*]
S1.25 PLU 0.00 COST
[*] S1.27 PLU PCS USYMBOL
Press [<<] or [>>] to select unit
symbol.
Selection: PCS/FOR/kg/lb/g/NO
[<<] or [>>]
[*]
S1.28 PLU 0 QTY
4 digits can be set.(0~9999).
(Ex. 10 pcs/PLU)
[1][0]
[*]
S1.29 PLU NO DISCONT
6 kinds discount type can be
selected by press [<<] or [>>] key.
(Ex. UNIT PRICE discount)
[<<] or [>>]
[*]
S1.34 PLU NO MARK DOWN
Change selection by [<<] or [>>]:
No mark down/Unit price mark
down
/Total price mark down/all mark
down
[<<] or [>>]
[*]
S1.35 PLU 000000 ST DATE
Set discount start day.(Ex.10-01-04,
MM-DD-YY)
[1][0][0][1][0][4]
[*]
S1.36 PLU 0000 ST TIME
Set discount start time.(Ex. 09:00,
HH-MM)
[0][9][0][0]
[*]
S1.37 PLU 000000 ED DATE
Set discount end
date.(Ex.11-01-04)
Page 41
SM 110 PROGRAM MODE
36
DISPLAY
OPERATION
PT kg
$/kg $
REMARK
[1][1][0][1][0][4]
[*]
S1.38 PLU 0000 ED TIME Set discount end time.(Ex. 09:00)
[0][9][0][0]
[*]
S1.40 PLU 0 SMG NUM
Set special message file
number.(Ex. Number 1)
Special message file 1 is linked to
this PLU.
[1][*] S1.41 PLU 0 ING NUM
Set ingredients file number.(Ex.
Number 1)
Ingredients file 1 is linked to this
PLU.
[1]
[PLU]
S1
→
PLU ITEM
After finish setting, save it.
Back to S mode.
Note1: Press [*] key to next parameter or [−] key to previous parameter.
Note2: The letter before "A" in Total Price display shows the letter font size of the commodity name, and the number
after "A" in Total Price display shows the number of letters can be programmed for commodity name.
Note3: The 2 digits after "C" in Weight display shows the line of the commodity name, and the next 2 digits in Weight
display shows the position of the cursor.
Note4:
The PLU No.1 to No.999999 are available for PLU programming.
Note5: The programmed PLU commodity name are printed on the label or receip t.
Note6: Max.100 letters for commodity name per file are available.
Note7: Each PLU No. must be linked to the exiting Main Group No.(Refer to 3.4 Main Group File).
Page 42

SM 110 PROGRAM MODE
37
3.6.3 PLU [COPY] Function
The programmed PLU data can be easily copied into a new PLU. The function is very useful to save
time or avoid mistake for the similar PLU data programming, especially in case of long description of
Ingredients.
Example: PLU No.124 is programmed with most data of the PLU No. 100 already in memory.
DISPLAY
OPERATION
PT kg
$/kg $
REMARK
[MODE][MODE]
[MODE]
S1
→
PLU FILE
Enter S mode.
Lamp S turns on.
[*] S1.0 PLU 0 NO SET
Enter PLU programming mode.
$/kg window displays PLU number.
[1][2][4] S1.1 PLU 124 NO SET Select PLU 124,enter PLU programming.
[X] S1.1 PLU 0 COPY
Press [X] key to enter PLU copy function.
[1][0][0]
[*]
S1.1 PLU 5.80 PR-KG Copy PLU 100 data to PLU 124.
[4][8][0]
[*]
S1.2 PLU T6 6 LAB FR1
Unit price of PLU 124 is 4.80$/kg.
[*] S1.3 PLU NO 0 LAB FR2 The 1st Label format is T6.
[*] S1.4 C01.01 SLICE S1 A 95 Commodity Name of PLU 124 is “SLICE”.
Press [*] key 5
times
S1.8 PLU 10100 IT CODE Item code of PLU 124 is 10124.
[1][0][1][2][4] S1.8 PLU 10124 IT CODE
[*] S1.9 PLU 00000 EX CODE
[PLU] S1 → PLU FILE
Store the PLU 124 file, back to S mode.
Page 43

SM 110 PROGRAM MODE
38
3.6.4 Delete PLU File
DISPLAY
OPERATION
PT kg
$/kg $
REMARK
[MODE][MODE]
[MODE]
S1
→
PLU FILE
Enter S mode.
Lamp S turns on.
[*] S1.0 PLU 0 NO SET
Enter PLU programming mode.
$ /kg window displays PLU
number.
[1][2][4] S1.0 PLU 124 NO SET
Select PLU 124.(Ex. Delete PLU
No.124)
[-]
S1.0 PLU DEL ? Y-C N-T
Press [-] key to delete PLU 124.
[C] for Yes, [T] for No.
[C] S1 → PLU FILE
Delete PLU file No.124, back to S
mode.
Note1: Only the programmed PLU file can be deleted.
Note2: In the last operation, pressing [T] key can back to the S Mode without deleting PLU file 124.
Page 44

SM 110 PROGRAM MODE
39
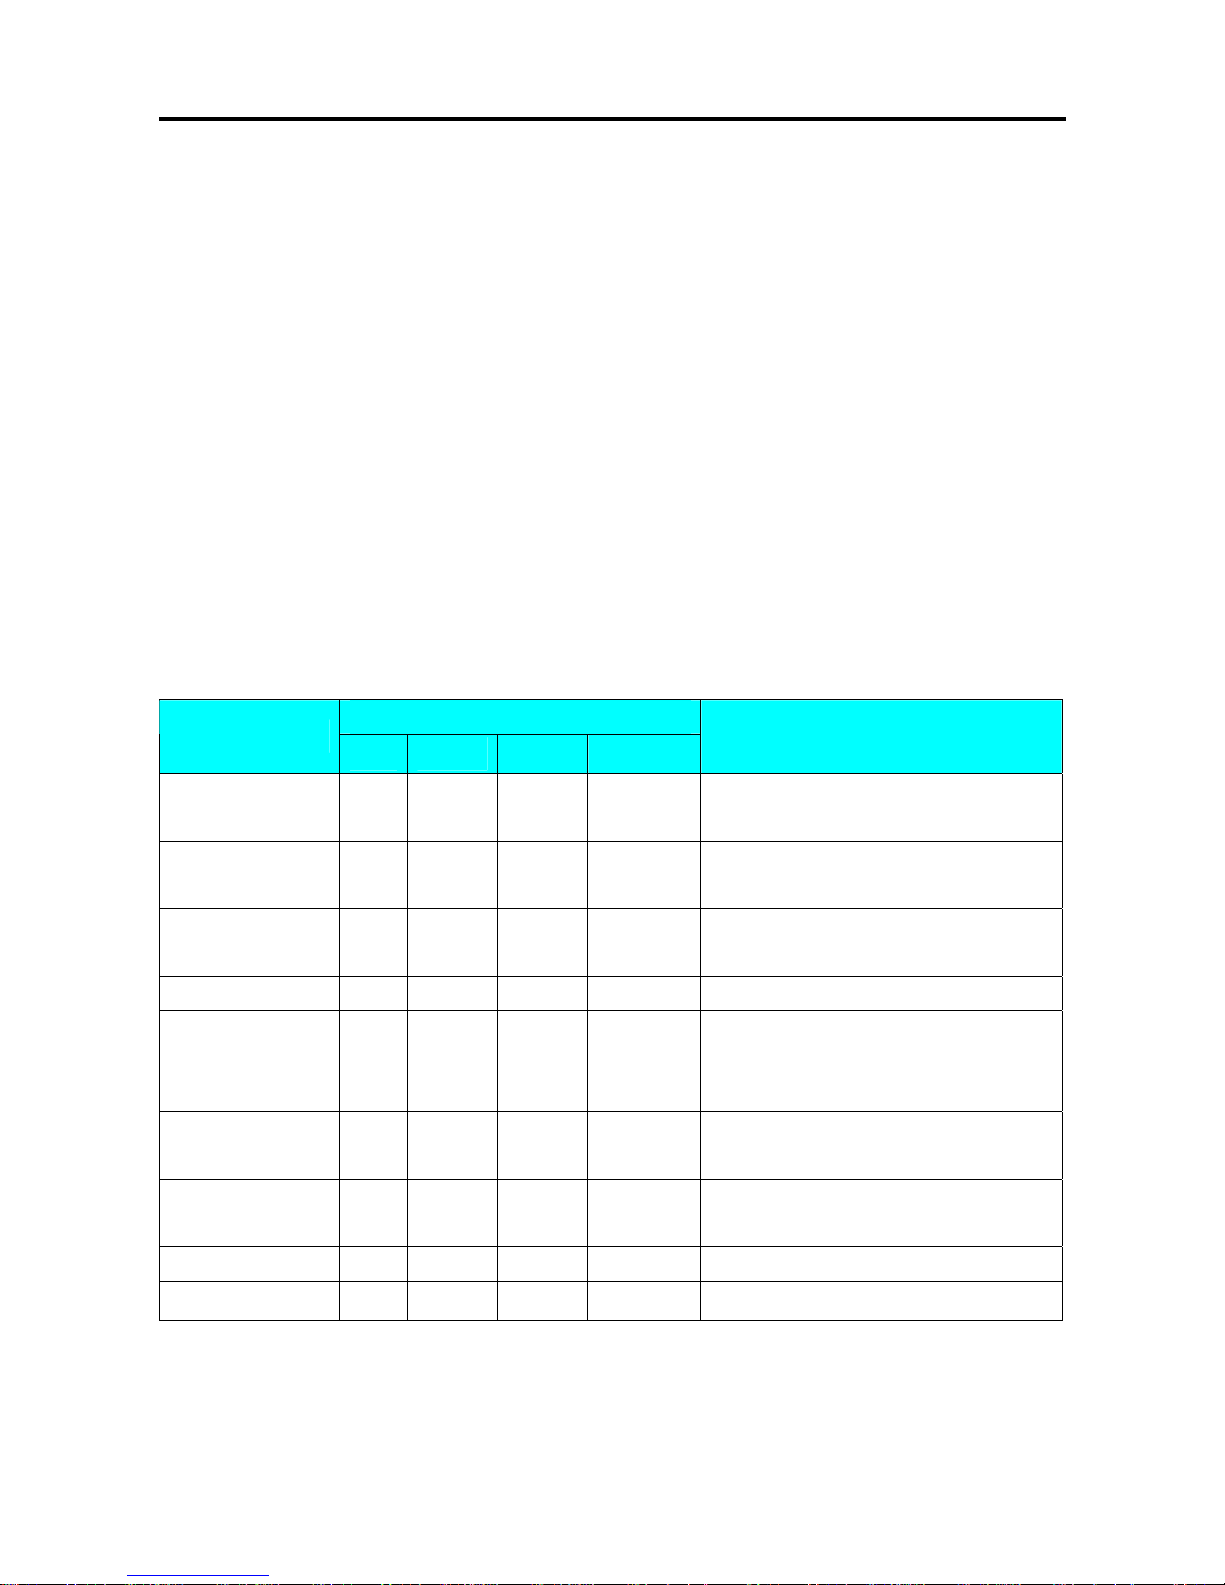
3.6.5 Volume Discount & Mark Down print function
Volume Discount function is used to set up special price during a sales period. Shop manager may
program the discount price during a sales period, and the Shop manager can avoid sales loss caused by
not returning the discount price back to the original price even after the sales period.
Type of Volume Discount
Shop manager can select a discount type from 5 types of volume discount. The formulas of 5 discount
type are shown in the following table.
Formula of Discount price
Discount Type Formula Example
Free Item
To called up PLU with 0
Unit Price and allow
issuing a receipt or label,
SPEC 231 must set to
"ALLOW" in advance.
Price = 0 Total Price = 0
Unit Price Discount
To select Formula (1) or
Formula (2) can be
decided by SPEC 124
Setting.
(1) Unit Price = Original Unit Price -
Unit Price discount amount.
(2) Unit Price = Unit Price discount
amount.
Original Unit Price = $ 10.00
Unit Price discount amount = $2.00
(1) Unit Price = $10.00 - $2.00 = $8.00
(2) Unit Price = $2.00
Unit Price % Discount Unit Price = Original Unit Price x
(100% - % Discount)
Original Unit Price = $ 10.00
% Discount = 20%
Unit Price = $10.00 x (100% - 20%) = $8.00
Total Price Discount Total Price = Original Price - Price
Discount Amount
Original Total Price = $10.00
Price Discount Amount = $2.00
Total Price = $10.00 - $2.00 = $8.00
Total Price % Discount Total Price = Original Total Pr ice x
(100% - % Discount)
Original Total Price = $10.00
% Discount = 20%
Total Price = $10.00 x (100% - 20%) = $8.00
Fixed Price Discount Total Price = Fixed Price Amount Original Tot al Price = $ 10.00
Fixed Price Amount = $8.00
Total Price = $8.00
Page 45

SM 110 PROGRAM MODE
40
Mark Down Print Function (How to print discount price)
Mark Down Print function is used to print the discount price as well as the original price with double
lines crossed when item is discounted. Mark Down Print function can be selected from the following
4 types, No Mark down / Unit Price Mark down/ Price Mark down / Unit Price & Price Mark down.
Type of Sales price function Description of Sales Price data on label
Unit Price Total Price
No Mark Down $1.50 $15.00
Unit Price Mark Down 2.00
1.50
$15.00
Total Price Mark Down
$1.50
Refer to Note 1
20.00
15.00
Unit & Total Price Mark Down 2.00
1.50
20.00
15.00
Note 1: Since discount unit price cannot be calculated if Total Price discount is used, it is not able to use Unit Price
Mark Down function, when using Total Price discount and Free item discount.
$
$ $
$
Page 46

SM 110 PROGRAM MODE
41
3.7 Memory Status
The function is used for checking the number of existing PLU and remaining programmable PLU.
DISPLAY
OPERATION
PT kg
$/kg $
REMARK
[MODE][MODE]
[MODE]
S1
→
PLU FILE
Enter S mode.
Lamp S turns on.
[2][0] S20
→
MEMORY STATUS
Select memory status check mode.
You can press [︽] or [︾] key to
select this mode.
[*] S20.0 PLU P 7 LF 4544
[T] S20
→
MEMORY STATUS
Back to S mode.
Page 47

SM 110 PROGRAM MODE
42
3.8 Key Assignment
The Preset keys can be used for assignment of PLUs and Function keys to speed up the operation in R
mode.
3.8.1 PLU Assignment
PLU Number can be assigned to a preset key to call up PLU data by pressing the assigned preset key on
Registration Mode.
For example:
Assign PLU Number 100 to Preset Key Number 1.
DISPLAY
OPERATION
PT kg
$/kg $
REMARK
[MODE][MODE]
[MODE]
S1
→
PLU FILE
Enter S mode.
Lamp S turns on.
[4] or [︾] three times
S4
→
KEY ASSIGNMENT
Key Assignment mode is MENU 4
in S mode.
[*] S4.0 PS AS 0 NO SET Enter PLU assignment mode.
[1][0][0] S4.0 PS AS 100 NO SET Enter PLU No.100
[PRESET 1] S4.0 PS AS 0 NO SET
PLU No.100 had been assigned to
Preset Key 1.
[◇][C]
S4
→
KEY ASSIGNMENT
Back to S mode.
Note1: Non-existing PLU No. can not be assigned.
Note2: If assigning PLU Number 50 to the Preset key No. 1 has been already programmed, the PLU No. 50 will
replace the old data of Preset Key No. 1, but PLU Number cannot replace the preset key are already assign for
Function Key, Vender Key or Preset Tare.
3.8.2 Function Key Assignment
By assigning the following function keys to Preset keys, the functions can be used by touching the assigned
keys
DISPLAY
OPERATION
PT kg
$/kg $
REMARK
[MODE][MODE]
[MODE]
S1
→
PLU FILE
Enter S mode.
Lamp S turns on.
[4] or [︾] three times
S4
→
KEY ASSIGNMENT
Key Assignment mode is MENU 4
in S mode.
[*] S4.0 PS AS 0 NO SET Enter PLU assignment mode.
Page 48

SM 110 PROGRAM MODE
43
DISPLAY
OPERATION
PT kg
$/kg $
REMARK
[*] S4.1 VR AS 0 NO SET Enter Vender Key assignment status.
[*] S4.2 FN AS 0 CLEAR
Enter Function Key assignment
status.
[X][X] S4.0 FN AS 2 -PRICE Select PRICE DISCOUNT function
[PRESET 25] S4.2 FN AS 0 CLEAR
PRICE DISCOUNT function had
been assigned to Preset Key number
25.
[◇][C]
S4
→
KEY ASSIGNMENT
Back to S mode.
Note1: Non assigned Preset Key can be set as f uncti on k ey.
3.8.3 Delete Preset Key Assignment
The following operation as below is to delete the Preset Key Assignment for PLU preset key, Function
Key and Vender key.
DISPLAY
OPERATION
PT kg
$/kg $
REMARK
[MODE][MODE]
[MODE]
S1
→
PLU FILE
Enter S mode.
Lamp S turns on.
[4] or [︾] three times
S4
→
KEY ASSIGNMENT
Key Assignment mode is MENU 4
in S mode.
[*] S4.0 PS AS 0 NO SET Enter PLU assignment mode.
[*] S4.2 FN AS 0 CLEAR
Enter Function Key assignment
status.
[PRESET 25] S4.0 FN AS DEL ? Y-C N-T
Enter deleting mode.
[C] for Yes, [T] for No.
[C] S4.0 FN AS 0 CLEAR
[◇][C]
S4
→
KEY ASSIGNMENT
Back to S mode.
Note1: Non assigned Preset Key can no t be cl eare d.
Note2: In the last operation, pressing [T] key can back to Assigned key clear mode and do not clear the assigned key
Page 49

SM 110 PROGRAM MODE
44
3.9 Shop Name File
Shop Name data will be printed on Label or Receipt can be programmed in this file. The maximum
number of characters possible to enter varies according to the size of print area or character size entry. Up
to 32 Shop Names can be programmed with each 3 lines as maximum and number of line is depends on
the Character Size entry.
The default Shop Name print on label can be set at SPEC 46 & print centering of shop name on label can
be select at SPEC 250 and default Shop Name print on Receipt can be set at SPEC 47 & printing position
can be select at SPEC251.
3.9.1 Program Shop Name File
At Programming Mode, select Shop Name programming mode and then enter new Shop Name
number (Ex. 1) programming mode.
DISPLAY
OPERATION
PT kg
$/kg $
REMARK
[MODE][MODE]
[MODE]
S1
→
PLU FILE
Enter S mode.
Lamp S turns on.
[5] or [︾] four times
S5
→
SHOP NAME FILE
Shop name File mode is MENU 5
in S mode.
[*] S5.0 SHOP 0 NO SET
Enter Shop Name File
programming mode.
[1][*] S5.1 S01.01 S1 A 100 Enter shop name code.(Ex.No.1)
[SIZE][D][I][G][I][SP
][S][H][O][P]
S5.1 S01.10 SHOP S2 A 76
Press [SIZE] key to change font
size of the shop name.
Enter the shop name .(Ex. “DIGI
SHOP”)
[*] S5.1 S02.01 S1 A 100
Program 2
nd
line of this shop
name.
[T][E][L][:]…… S5.1 S02.13 S1 A 88
Enter shop name for the 2
nd
line.(Ex. “TEL:57234888”)
[PLU] S5 → SHOP NAME FILE
Store Shop Name File 1,Back to S
mode.
Page 50

SM 110 PROGRAM MODE
45
3.9.2 Delete Shop Name File
At Shop Name programming mode, enter existing Shop Name Number (Ex. 1) to be deleted.
DISPLAY
OPERATION
PT kg
$/kg $
REMARK
[MODE][MODE]
[MODE]
S1
→
PLU FILE
Enter S mode.
Lamp S turns on.
[5] or [︾] four times
S5
→
SHOP NAME FILE
Shop name File mode is MENU 5
in S mode.
[*] S5.0 SHOP 0 NO SET
Enter Shop Name File
programming mode.
[1] S5.0 SHOP 1 NO SET Enter shop name file 1.(Ex. No.1)
[-]
S5.0 SHOP DEL ? Y-C N-T
Enter deleting mode.
[C] for Yes, [T] for No.
[C] S5
→
SHOP NAME FILE
Delete Shop Name File 1,back to S
mode.
Note1: If you want to cancel the deletion, press [T] key to exit.
Note2: Non-existing Shop Name File can not be deleted.
Page 51
SM 110 PROGRAM MODE
46
3.10 Advertisement File
Advertisement message is the sales promotional description on the label, such as “FOR BARBECUE”
or “FRESH”. Advertisement message is printed in the print area of the Commodity Name. If
Commodity Name occupies all of the print area, there will be no room for the Advertisement Message
and it will therefore not be printed. Maximum 2 lines can be programmed for each Advertisement
Message and up to 64 (Advertisement # 1~64) advertisement messages are available.
To print advertisement message on a label, [ADVERTISEMENT] Function Key must be assigned to
a preset key in advance.
Note: Advertisement message print on all label can be set at SPEC 96, printing position can be set at
SPEC 14 and printing method can be set at SPEC 15.
3.10.1 Program Advertisement File
At Programming Mode, select Advertisement programming mode and then enter new Advertisement
number (Ex. 1) programming mode.
DISPLAY
OPERATION
PT kg
$/kg $
REMARK
[MODE][MODE]
[MODE]
S1
→
PLU FILE
Enter S mode.
Lamp S turns on.
[6] or [︾] five times
S6
→
ADVER MESSAGE
Select advertisement file programming
mode.
[*] S6.0 ADVER 0 NO SET
Enter advertisement File programming
mode.
[1][*] S6.1 A01.01 S1 A 100 Enter the advertisement File No.1(Ex.No.1)
[T][H][A][N][K][SP]
[Y][O][U]
S6.1 A01.10 K YOU S1 A 91
Enter the advertisement as the same
procedures as Commodity Name Entry.
(Ex. “THANK YOU”)
[SIZE] S6.1 A01.10 K YOU S2 A 76
Press [SIZE] key to change font size of the
advertisement file.
[SIZE]…[SIZE] S6.1 A01.10 K YOU L5 A 21
Change font size to L5.
(S1~S5; M1~M5; L1~L5)
[*] S6.1 A02.01 S1 A 100 Program 2nd line of this advertisement file.
[PLU] S6 → ADVER MESSAGE
Store Advertisement File 1,back to S mode.
Note1: Max.2 line per file are available, max.100 letters per line are available. (letters per line depends on font size)
Page 52

SM 110 PROGRAM MODE
47
3.10.2 Delete Advertisement File
At Advertisement programming mode, enter existing Advertisement Number (Ex. 1) to be deleted.
DISPLAY
OPERATION
PT kg
$/kg $
REMARK
[MODE][MODE]
[MODE]
S1
→
PLU FILE
Enter S mode.
Lamp S turns on.
[6] or [︾] five times
S6
→
ADVER MESSAGE
Select advertisement file
programming mode.
[*] S6.0 ADVER 0 NO SET
Enter advertisement File
programming mode.
[1] S6.0 ADVER 1 NO SET
Enter advertisement File 1.(Ex.
No.1)
[-]
S6.0 ADVER DEL ? Y-C N-T
Enter deleting mode.
[C] for Yes, [T] for No.
[C] S6
→
ADVER MESSAGE
Delete advertisement File 1,back to
S mode.
Note1: If you want to cancel the deletion, press [T] key to exit.
Note2: Non-existing Advertisement File can not be deleted
Page 53
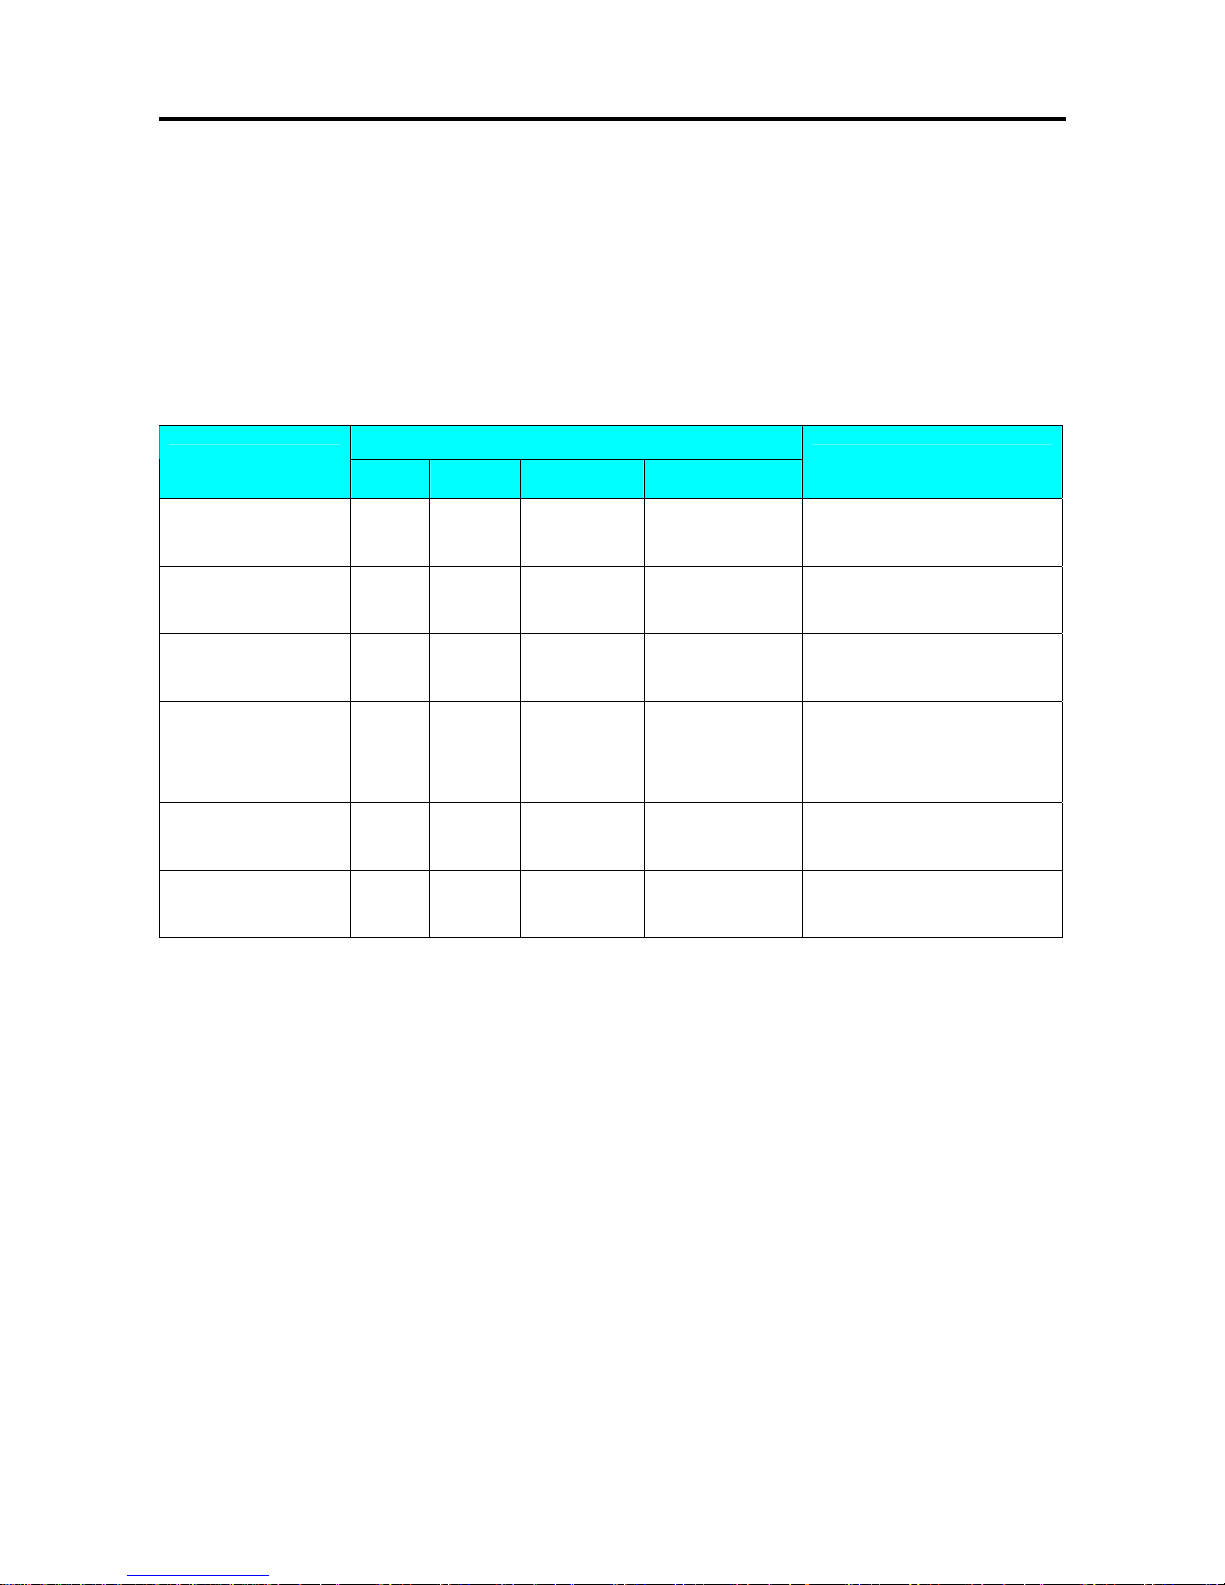
SM 110 PROGRAM MODE
48
3.11 Vender File
Vender file is used for programming names of operators. Maximum 16 characters can be entered per
Vender name. A programmed Vender number can be assigned to a preset key. The Vender Number or
Name (Depend on Spec 21 setting) will be printed on the label, if selected label format with print area
for Vender Number and the programmed Vender name can be printed on receipt when SPEC 21 set
to NAME.
DISPLAY
OPERATION
PT kg
$/kg $
REMARK
[MODE][MODE]
[MODE]
S1
→
PLU FILE
Enter S mode.
Lamp S turns on.
[7] or [︾] six times
S7
→
VENDER FILE
Select Vender file
programming mode.
[*] S7.0 CLERK 0 NO SET
Enter Vender File
programming mode.
[1][*] S7.1 CLERK 1 NAME 0
Select vender key.(Ex. V1)
Program operator name for
Vender 1.
[M][I][K][E] S7.1 CLERK MIKE NAME 4
Enter operator name for
V1.(Ex. “MIKE”)
[PLU] S7 → VENDER FILE
Store Vender File V1,back to S
mode.
Note1: V1 – V99 can be programmed
Page 54
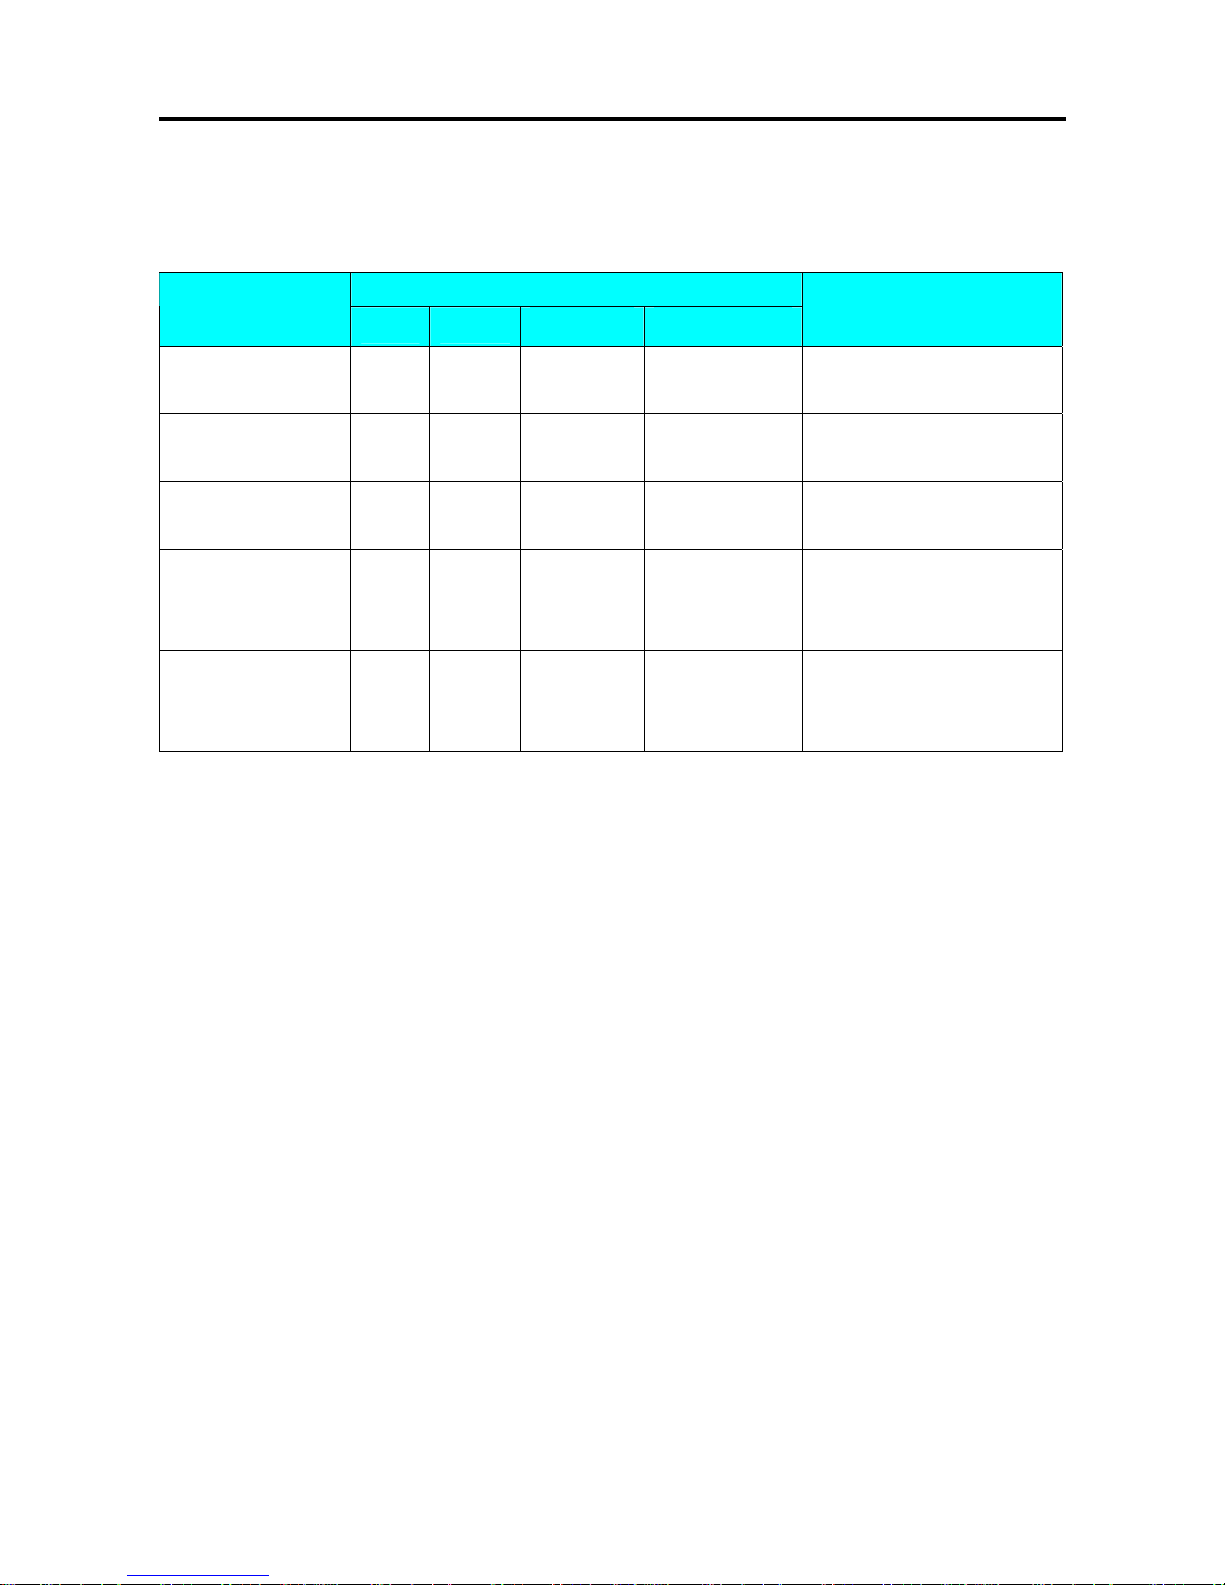
SM 110 PROGRAM MODE
49
3.12 Program Date And Time
The built-in clock system can automatically work once they are set. Date (Month/Day/Year): 2 digits for
each part; Time (Hour/Minute): 2 digits for each part.
DISPLAY
OPERATION
PT kg
$/kg $
REMARK
[MODE][MODE]
[MODE]
S1
→
PLU FILE
Enter S mode.
Lamp S turns on.
[8] or [︾] seven times
S8
→
DATE AND TIME
Select Date and Time
programming mode.
[*] P8.0 DATE 010100 MMDDYY
Enter Date and Time
programming mode.
[0][8][1][9][0][4][*] P8.1 TIME 0000 HHMM
Set Month 08, Day 19 and
Year 04.
(Ex. 2004-08-19)
[9][0][0][*] S8 → DATE AND TIME
Set Hour 9,Minute 05.
Store Date and Time, back to
S mode.
Page 55

SM 110 PROGRAM MODE
50
3.13 Special Message File
Special Message can be used as a description on the label such as receipt, which can be assigned in each
PLU. Since standard format does not have a print area set for Special Message, Special Message cannot
be printed when using these formats. To print Special Message on the label, it is required to use a Free
Format with a Special Message print area programmed. Maximum 16 special messages can be
programmed with each up to 8 programmable lines. Number of line is depends on the size of the print
area or Character Size entry. The default Special Number print on Receipt can be set at SPEC 112 and
printing position can be set at SPEC 125.
Note: If SPEC 43 set to RECEIPT, maximum 8 lines can be programmable for each Special Message
Number and without select a required Free Format.
3.13.1 Program Special Message File
At Programming Mode, select Special Message programming mode and then enter new Special
Message number (Ex. 1) programming mode. *For edit, enter existing Special Message number.
DISPLAY
OPERATION
PT kg
$/kg $
REMARK
[MODE][MODE]
[MODE]
S1
→
PLU FILE
Enter S mode.
Lamp S turns on.
[9] or [︾] eight times
S9
→
SP MESSAGE
Select special message file programming
mode.
[*] S9.0 SP MG 0 NO SET
Enter special message File programming
mode.
[1][*] S9.1 M01.01 S1 A 100
Enter the special message File
No.1.(Ex.No.1)
[M][A][D][E][SP][I][N
][SP][C][H][I][N][A]
S9.1 M01.14 CHINA S1 A 87
Enter the special message File as the same
procedures as Commodity Name Entry.
(Ex. “MADE IN CHINA”)
[SIZE] S9.1 M01.14 CHINA S2 A 72
Press [SIZE] key to change font size of the
special message File.
[SIZE]…[SIZE] S9.1 M02.01 CHINA M3 A 62
Change font size to M3.
(S1~S5; M1~M5; L1~L5)
[*] S9.1 M02.01 S1 A 56
Program 2
nd
line of this special message
File.
[PLU] S9 → SP MESSAGE
Store special message File 1,back to S
mode.
Page 56

SM 110 PROGRAM MODE
51
3.13.2 Delete Special Message File
At Special Message programming mode, enter existing Special Message Number (Ex. 1) to be deleted.
DISPLAY
OPERATION
PT kg
$/kg $
REMARK
[MODE][MODE]
[MODE]
S1
→
PLU FILE
Enter S mode.
Lamp S turns on.
[9] or [︾] eight times
S9
→
SP MESSAGE
Select special message file
programming mode.
[*] S9.0 SP MG 0 NO SET
Enter special message File
programming mode.
[1] S9.0 SP MG 1 NO SET
Enter special message File 1.(Ex.
No.1)
[-]
S9.0 SP MG DEL ? Y-C N-T
Enter deleting mode.
[C] for Yes, [T] for No.
[C] S9 → SP MESSAGE
Delete special message File 1,back
to S mode.
Note1: If you want to cancel the deletion, press [T] key to exit.
Note2: Non-existing Special Message File can not be deleted.
Page 57
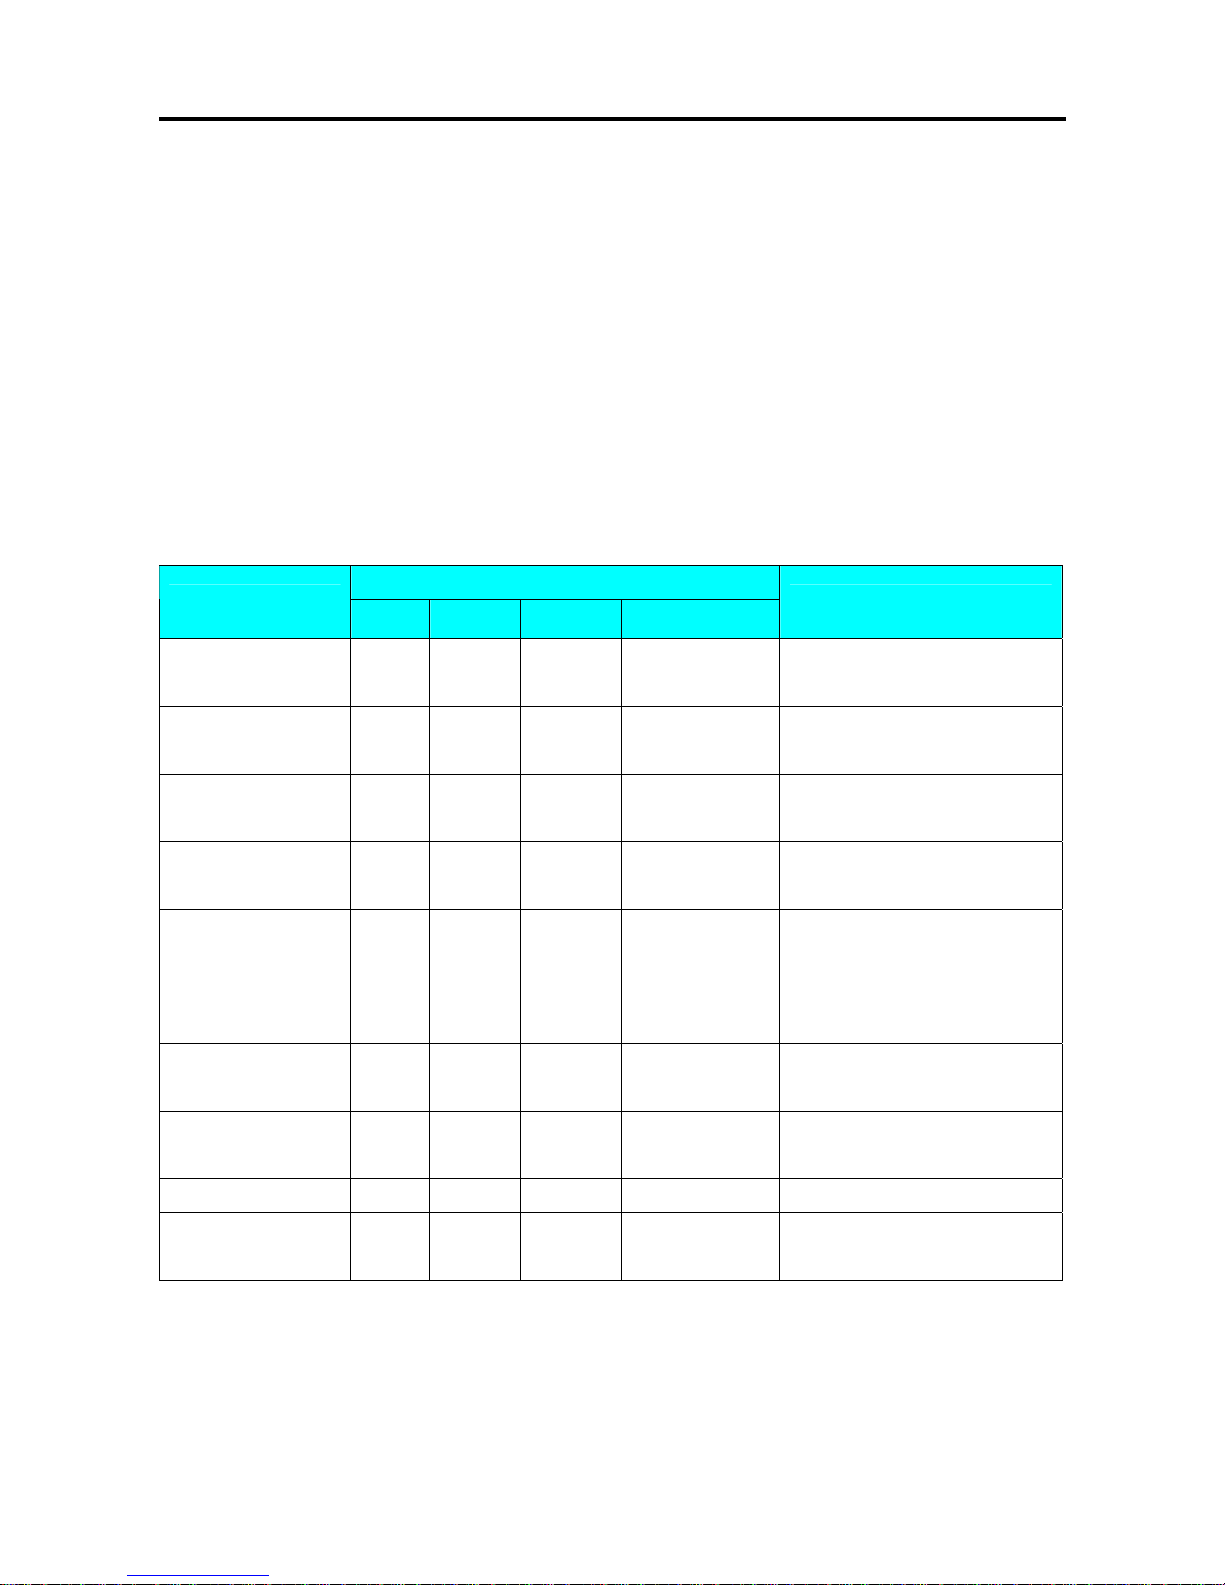
SM 110 PROGRAM MODE
52
3.14 Ingredient File
Ingredients data programmed in this Master Ingredient file can be printed on the Free Format (F1-F99)
with ingredient print area. The size of print area will decide the numbers of lines and characters of
every line. Maximum 15 lines can be programmed for each Master ingredient data and up to 16 Master
Ingredients data can be programmed in this file.
Note: Maximum 39 lines can be programmed for each Master Ingredient data when SPEC 43 set to 0.
3.14.1 Program Ingredient File
At Programming Mode, select Ingredient programming mode and then enter new Ingredient number
(Ex. 1) programming mode.
*For edit, enter existing Ingredient number.
DISPLAY
OPERATION
PT kg
$/kg $
REMARK
[MODE][MODE]
[MODE]
S1
→
PLU FILE
Enter S mode.
Lamp S turns on.
[10] or [︾] nine times
S10
→
INGR FILE
Select Ingredient file
programming mode.
[*] S10.0 INGR 0 NO SET
Enter Ingredient File
programming mode.
[1][*] S10.1 G01.01 S1 A 100
Enter the Ingredient File
No.1.(Ex.No.1)
[S][U][G][A][R] S10.1 G01.06 SUGAR S1 A 100
Enter the Ingredient File as the
same procedures as Commodity
Name Entry.
(Ex. “SUGAR”)
[SIZE] S10.1 G01.06 SUGAR S2 A 95
Press [SIZE] key to change font
size of the Ingredient File.
[*] S10.1 G02.01 S1 A 100
Program 2
nd
line of this
Ingredient File.
[F][L][O][U][R] S10.1 G02.06 FLOUR S1 A95
[PLU] S10 → INGR FILE
Store Ingredient File 1,back to S
mode.
Page 58
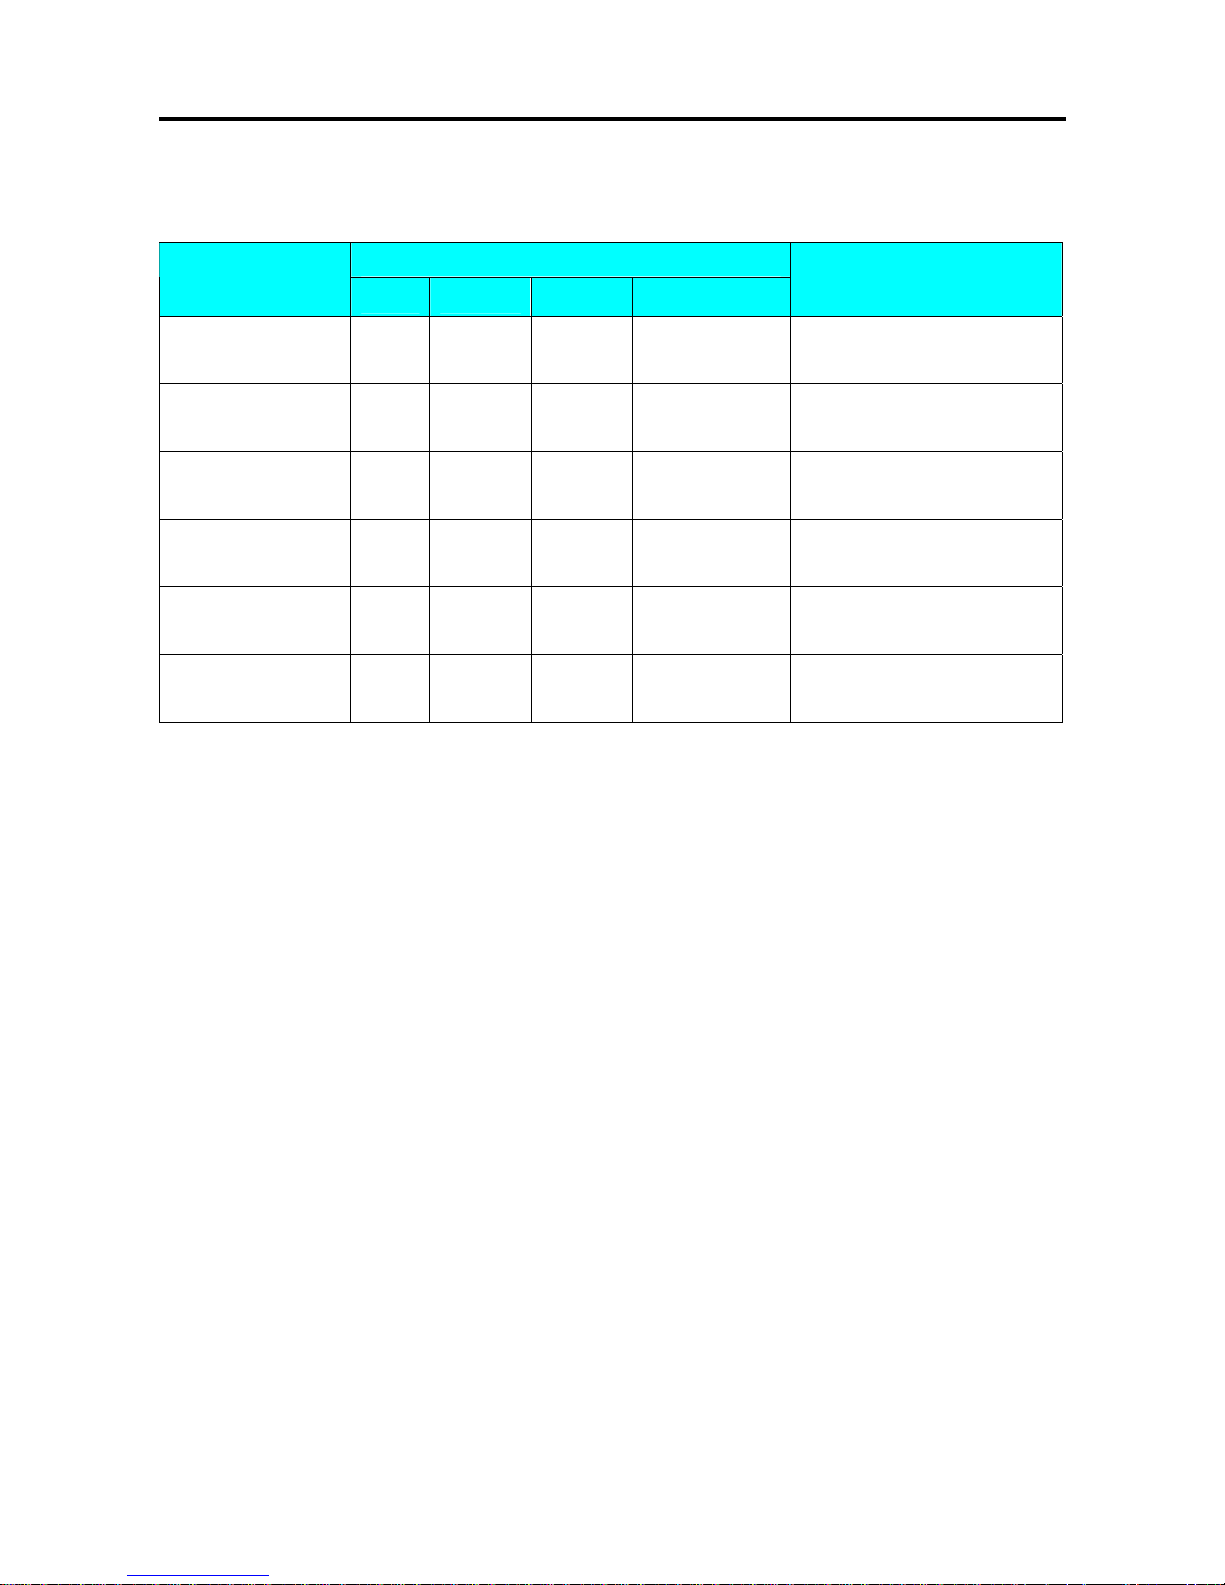
SM 110 PROGRAM MODE
53
3.14.2 Delete Ingredient File
At Ingredient programming mode, enter existing Ingredient Number (Ex. 1) to be deleted.
DISPLAY
OPERATION
PT kg
$/kg $
REMARK
[MODE][MODE]
[MODE]
S1
→
PLU FILE
Enter S mode.
Lamp S turns on.
[10] or [︾] nine times
S10
→
INGR FILE
Select Ingredient file
programming mode.
[*] S10.0 INGR 0 NO SET
Enter Ingredient File
programming mode.
[1] S10.0 INGR 1 NO SET
Enter Ingredient File 1.(Ex.
No.1)
[-]
S10.0 INGR DEL ? Y-C N-T
Enter deleting mode.
[C] for Yes, [T] for No.
[C] S10 → INGR FILE
Delete Ingredient File 1,back to
S mode.
Note1: If you want to cancel the deletion, press [T] key to exit.
Note2: Non-existing Ingredients File can not be deleted.
Page 59
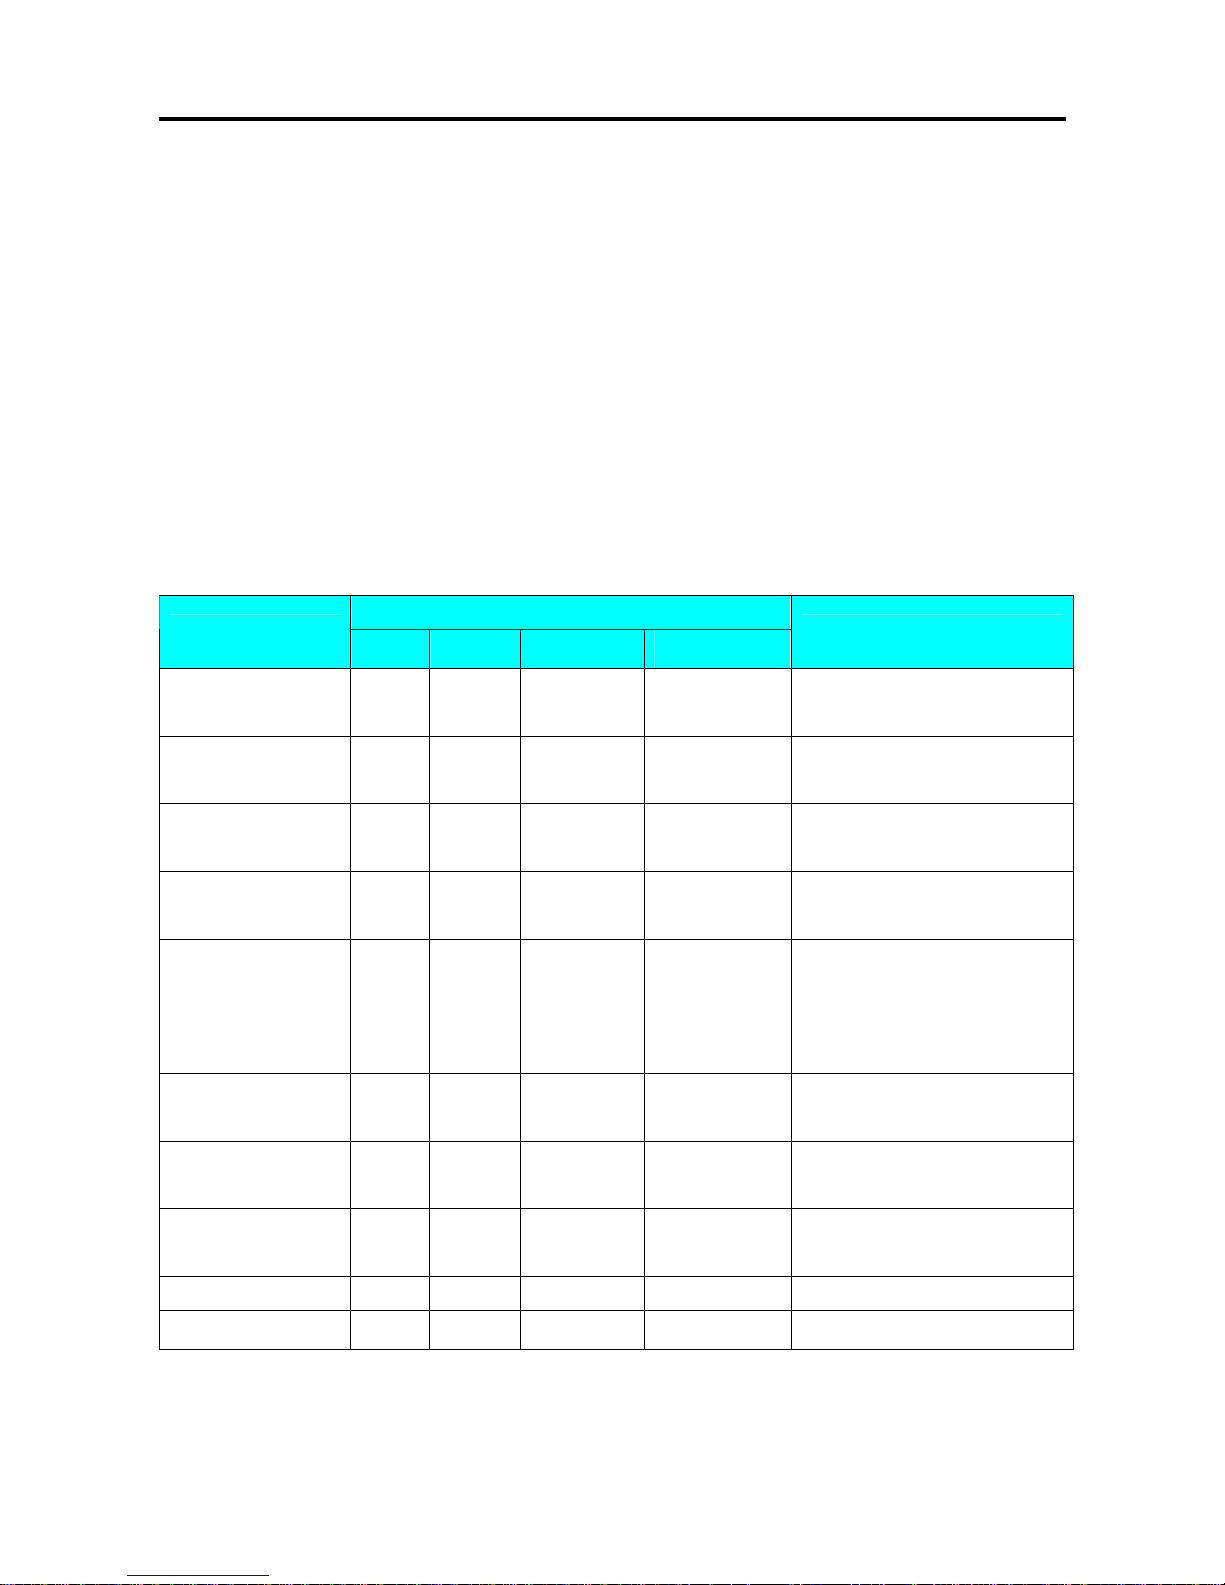
SM 110 PROGRAM MODE
54
3.15 Text File
Maximum 20 Texts are available (Text 1~16 are for Item label and text 17~20 are for Total label). Text
is used for printing the fixed data on label such as “Unit Price”, “packed date”. Text cannot be printed
when using standard format since they do not have any text print area set. You must use a Free Format
with a Text print area programmed. Maximum 2 lines per text can be programmed and number of line
is depends on the size of print area of the selected label format or Characte r Size entry.
Note: Print Text 5 to 16 on Total label can be set at SPEC 332 setting.
3.15.1 Program Text File
At Programming Mode, select Text programming mode and then enter new Text number (Ex. 1)
programming mode. *For edit, enter existing Text number.
DISPLAY
OPERATION
PT kg
$/kg $
REMARK
[MODE][MODE]
[MODE]
S1
→
PLU FILE
Enter S mode.
Lamp S turns on.
[11] or [︾] ten times
S11
→
TEXT FILE
Select Text file programming
mode.
[*] S11.0 TEXT 0 NO SET
Enter Text File programming
mode.
[1][*] S11.1 T01.01 S1 A 100
Enter the Text File
No.1.(Ex.No.1)
[P][A][C][K][A][G][E] S11.1 T01.08 CKAGE S1 A 93
Enter the Text File as the same
procedures as Commodity Name
Entry.
(Ex. “PACKAGE”)
[SIZE] S11.1 T01.08 CKAGE S2 A 78
Press [SIZE] key to change font
size of the Ingredient File.
[SIZE]…[SIZE] S11.1 T01.08 CKAGE S5 A 53
Change font size to S5.
(S1~S5; M1~M5; L1~L5)
[*] S11.1 T02.01 S1 A 56
Program 2
nd
line of this
Ingredient File.
[D][A][T][E] S11.1 T02.05 DATE S1 A 52
[PLU] S11 → TEXT FILE
Store Text File 1,back to S mode.
Page 60
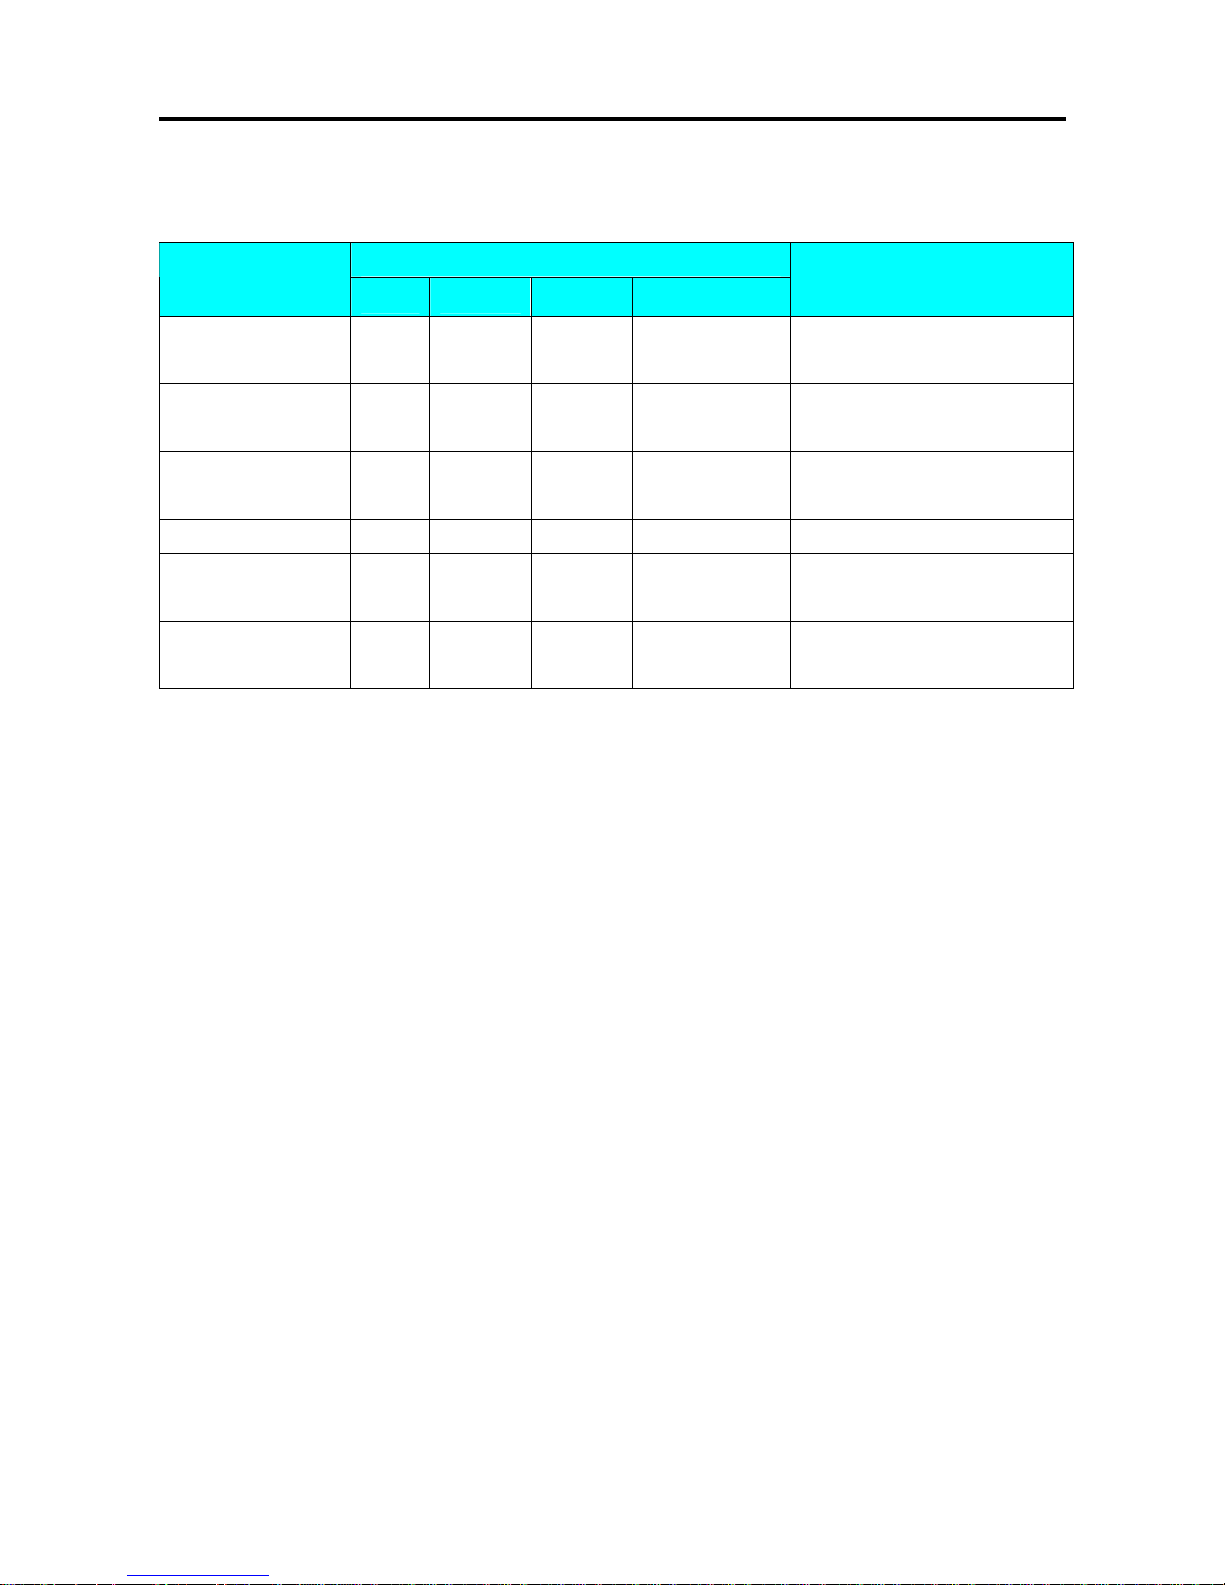
SM 110 PROGRAM MODE
55
3.15.2 Delete Text File
At Text programming mode, enter existing Text Number (Ex. 1) to be deleted.
DISPLAY
OPERATION
PT kg
$/kg $
REMARK
[MODE][MODE]
[MODE]
S1
→
PLU FILE
Enter S mode.
Lamp S turns on.
[11] or [︾] ten times
S11
→
TEXT FILE
Select Text file programming
mode.
[*] S11.0 TEXT 0 NO SET
Enter Text File programming
mode.
[1] S11.0 TEXT 1 NO SET Enter Text File 1.(Ex. No.1)
[-]
S11.0 TEXT DEL ? Y-C N-T
Enter deleting mode.
[C] for Yes, [T] for No.
[C] S11 → TEXT FILE
Delete Text File 1,back to S
mode.
Note1: If you want to cancel the deletion, press [T] key to exit.
Note2: Non-existing Text File can not be deleted.
Page 61

SM 110 PROGRAM MODE
56
3.16 Free Format File
The Free Format enables you to design your own label format, by setting print angles, print positions,
character size and other programmable items. You can create a new format by copying an existing label
format and use it as a base or make a totally new label format.
3.16.1 General Information
Label format within the following height and width can be created.
• Up to 99 Free Formats can be stored in the memory, apart from the other 16 standard formats.
• Standard format can be used as a basic format for creating a new format.
• Print position of each item is programmed using "mm".
• One Item label or one Total label is available for each Free Format number (F1~F99).
• 4 Print Angles can be set for all item data: 0, 90, 180 and 270 degrees.
Page 62
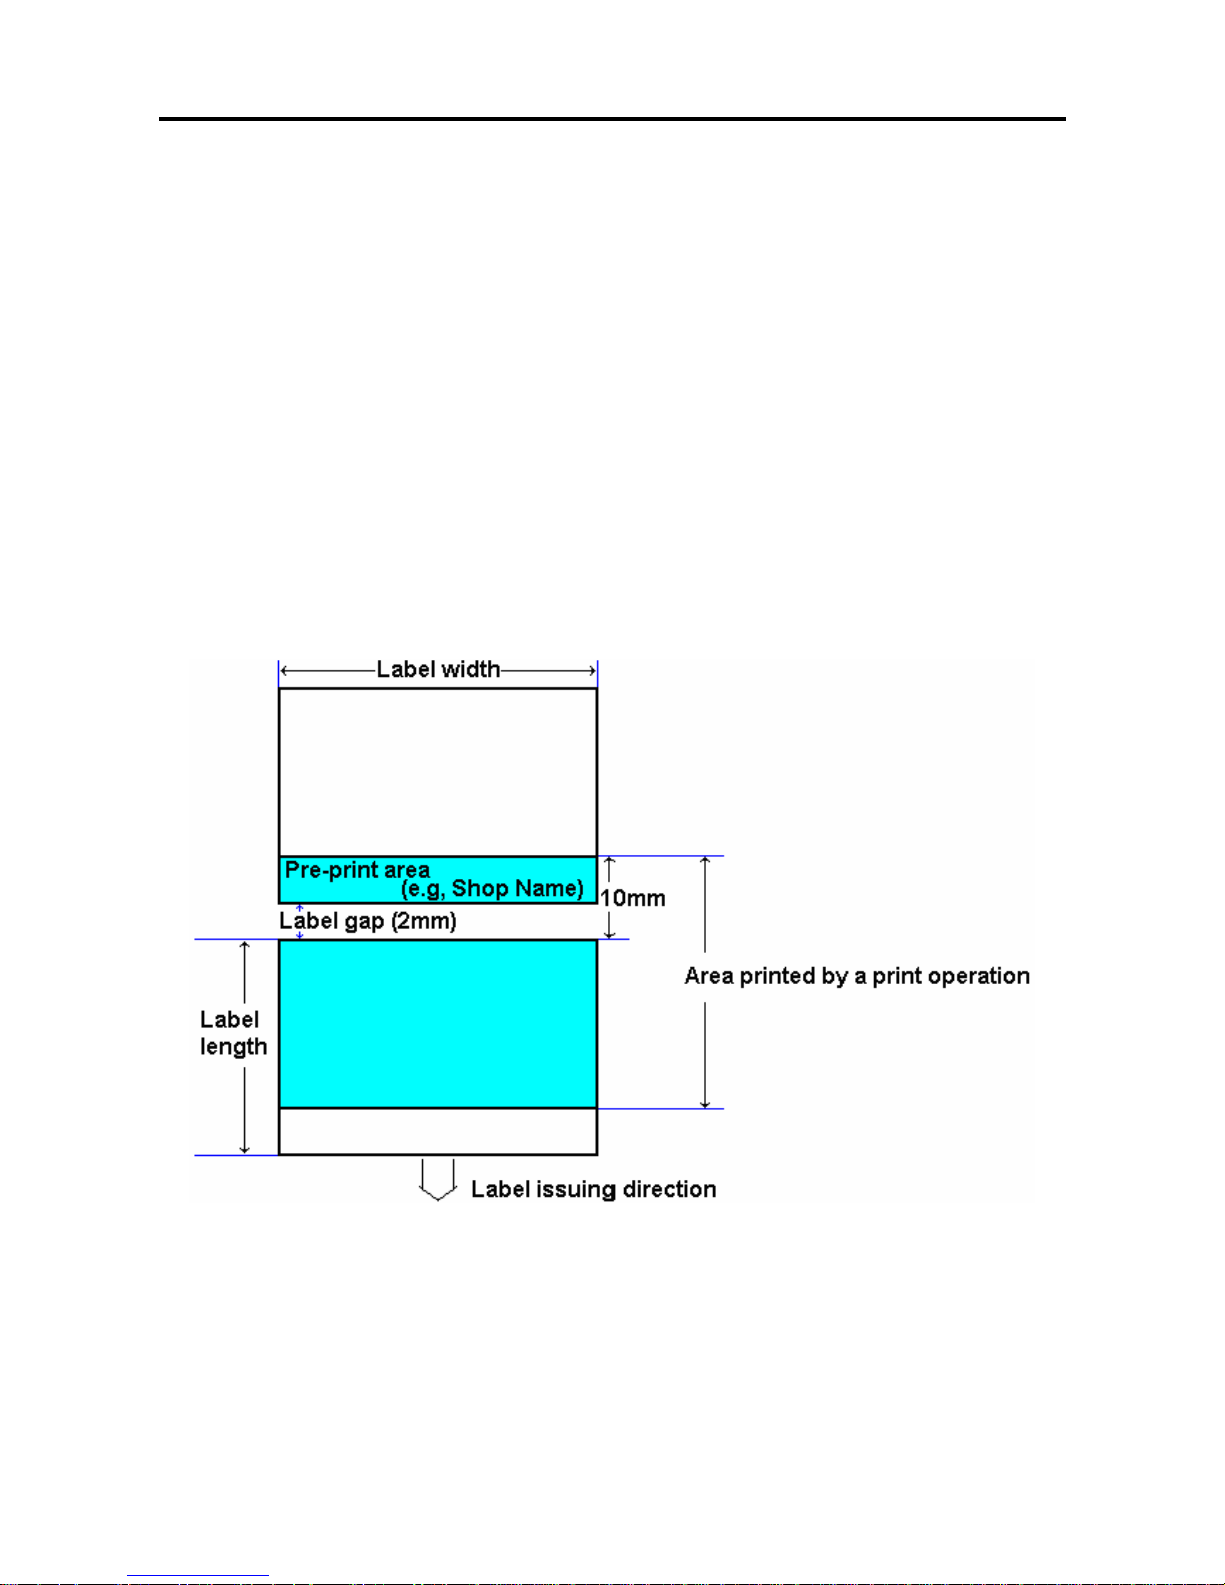
SM 110 PROGRAM MODE
57
3.16.2 Print Area, Print Position and Print Angles
All changeable item data should be programmed 8mm above the bottom of the label. The bottom 8
mm of the label should be used for invariable data such as shop name, since this area is printed when
issuing the last label. Please do not program any item closer than 1mm to the edges of the label.
The print position of each item is determined by setting the interval from "0" point (X=0, Y=0) to the
base position of the programmed item. X and Y values need to be entered by "mm".
Print Area
The item data cannot be printed at the bottom 10 mm of labels. Pre-print data such as shop name or
logo data is programmed at the bottom 10mm. Also the item data should not be printed within 1mm
from the left edge or the right edge of the label as the following drawing shows.
Page 63
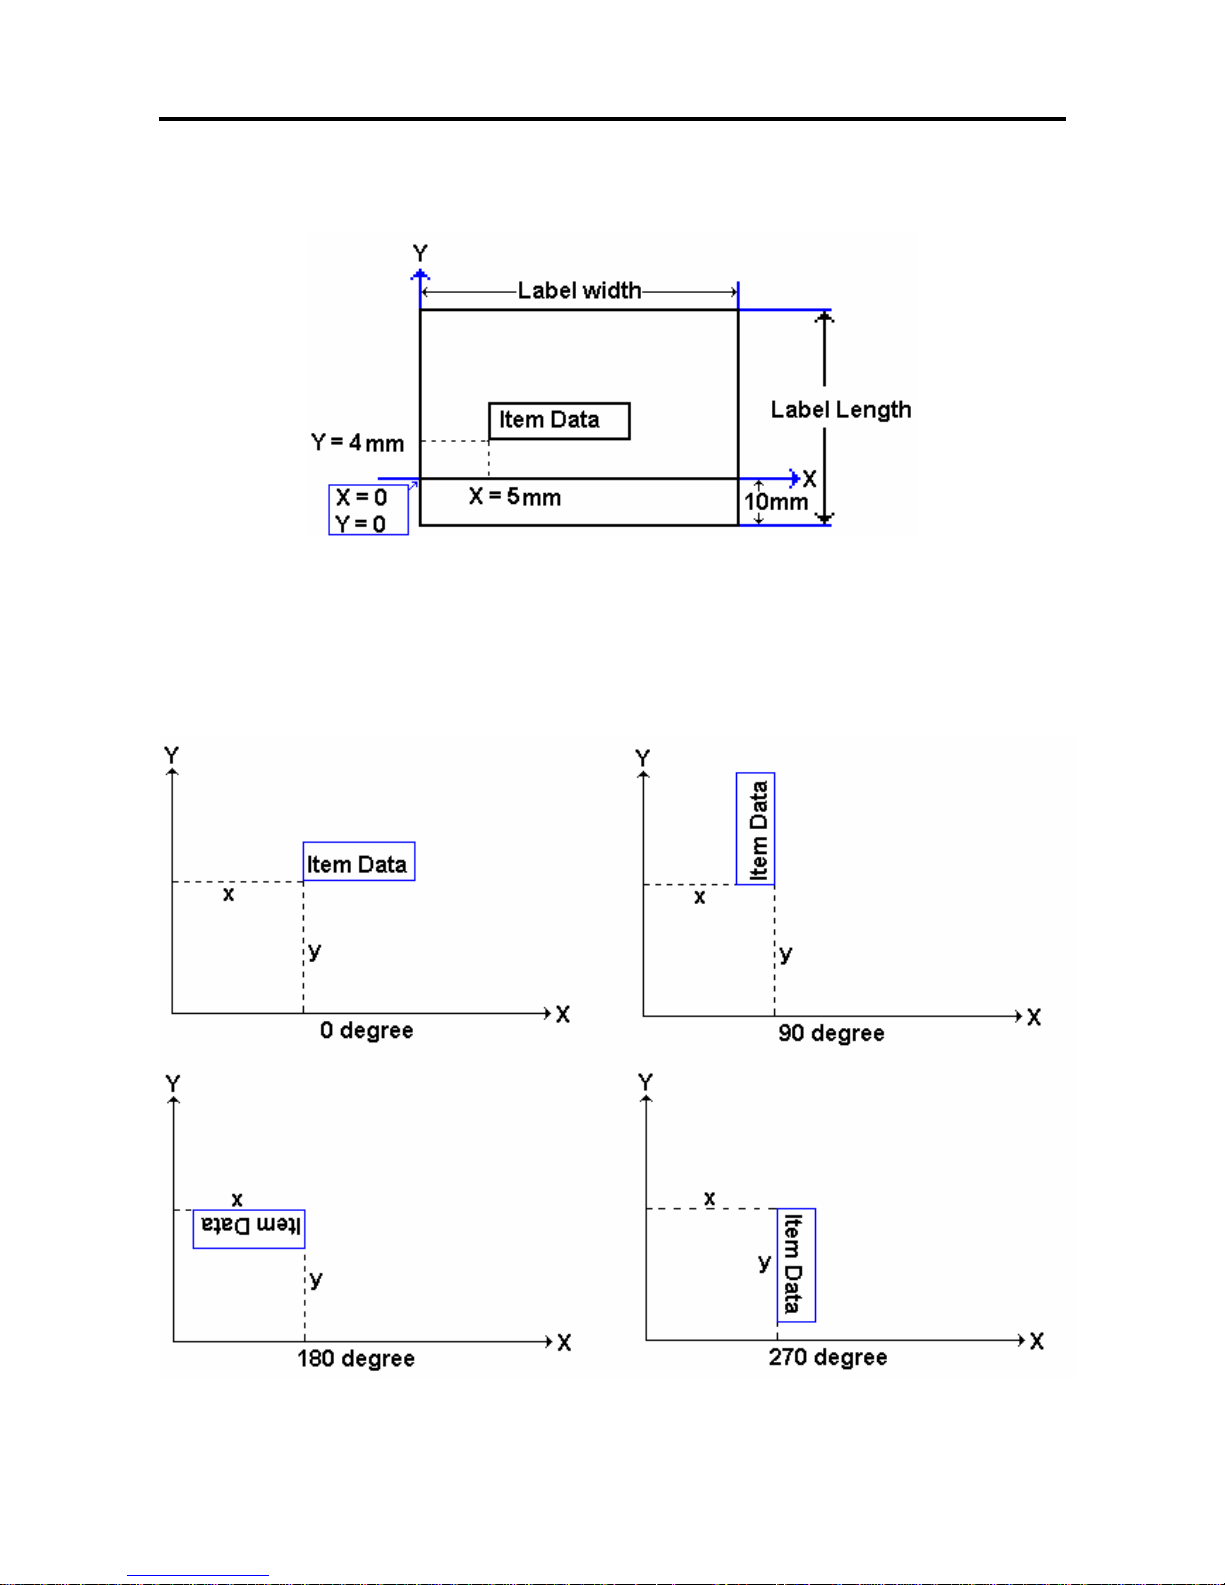
SM 110 PROGRAM MODE
58
Print Position
The printing position of each item data is decided by setting the distance from 0 point (X=0, Y=0) to
the base position (X value, Y value).
Print Angle
Print angle of each Print Item can be selected from 4 different angles, 0 degree, 90 degree, 180 degree,
and 270 degree. A whole format base or each Item Data-base may set print angle. According to the
selected print angle, the status of print position differs as the following samples.
Page 64

SM 110 PROGRAM MODE
59
3.16.3 Programming Parameter Of Print Items
Print Item for Item Label
Up to 82 different item data can be programmed in Item Label Format and is used for printing at
Manual mode and pre-pack mode.
Item Data
Ty
pe
Display Item Data
Ty
pe
Display
1. PLU NO 1 PLUno 45. PRICE BEFORE DISCOUNT 1
2. PRICE (-TAX) 1 PRICE 46. UNIT PRICE BEFORE DISCOUNT 1
3. UNIT PRICE 1 UN PR 47 ~ 56.IMAGE 1 ~ IMAGE 10 2 IMG??
4. WEIGHT 1 WT 57. AVERAGE PRICE 1
5. QUANTITY 1 QTY 58. AVERAGE WEIGHT 1
6. PACKED DATE 1 PDATE 59. BONUS POINT 1 BONUS
7. PACKED TIME 1 PTIME 60. EURO UNIT PRICE 1 EUR U
8. COMMODITY 2 COMM 61. EURO TOTAL PRICE 1 EUR T
9. QUANTITY UNIT 1 QTYSY 62. EURO CALULATION 1 EUR C
10. SELL BY DATE 1 SDATE 63. DUPLICATE TOTAL PRICE 1
11. SELL BY TIME 1 STIME 64. DUPLICATE UNIT PRICE 1
12. BARCODE 3 BARCD 66. BORN COUNTRY 1 BORN
13. SHOP NAME 2 SHOPN 67. FATTEN COUNTRY 1 FAT
14. DISCOUNT VALUE 1 DISCT 68. SLAUGTHER HOUSE 1 SLAUG
15. USED BY DATE 1 UDATE 69. CUTTING HALL 1 CUT H
16. LOGO 2 LOGO 70. REFER NO 1 FEF D
17. MAIN GROUP CODE 1 MG CD 71. ORIGIN 1 ORIGI
18. DEPARTMENT CODE 1 DEPT 72. TEMPERATURE 1 TEMP
19. SCALE NUMBER 1 SCLNO 73. MULTI BARCODE 1 3 M1BAR
20. INGREDIENT 2 INGR 74. MULTI BARCODE 2 3 M2BAR
21. SPECIAL MESSAGE 2 SP MG 75. SERIAL NO 1
22. FRAME 1 4 FRM 1 76. GROSS WEIGHT 1
23. FRAME 2 4 FRM 2 77. REWRAP 1
24. TARE 1 TARE 78. KIND 1
25. CLERK 1 CLERK 79. CATEGORY 1
26 ~ 41. TEXT 1 ~ TEXT 16 2 TXT?? 80. BREED 1
42. PRICE (+ TAX) 1 PRTAX 81. CONTACT 1
43. TAX RAGE 1 TAX R 82. GTIN 1
44. PLACE 2 PLACE
Note: When SPEC 158 set to "ENABLE" the Screen of Item no.2 will change to "DISCOUNT PRICE" & item
Number 3 change to "DISCOUNT UNIT PRICE", and Item Number of 45 & 46 will appears.
Page 65
SM 110 PROGRAM MODE
60
Print Item for Total Label
Up to 28 different item data can be programmed in Total Label Format and is used for printing
multiple transaction labels for counter sales at Manual mode, Sub-Total and Grand Total at Pre-pack
mode.
Item Data Type Display Item Data Type Display
1. PLU NO 1 PLUno 15. PRICE (- TAX) 1 P-TAX
2. PACK DATE 1 PDATE 16. EXCLUDED TAX AMOUNT 1 ATX
3. WEIGHT 1 WT 17. INCLUDED TAX AMOUNT 1 VTX
4. QUANTITY 1 QTY 18. EURO TOTAL PRICE 1 ERUO
5. QUANTITY UNIT 1 QTYSY 19. USED DATE 1 UDATE
6. PRICE (+ TAX) 1 PRTAX 20. BORN COUNTRY 1 BORN
7. PACKED TIME 1 PTIME 21. FATTEN COUNTRY 1 FAT
8. TOTAL TITLE 1 TOTAL 22. SLAUGTHER HOUSE 1 SLAUG
9. BARCODE 3 BARCD 23. CUTTING HALL 1 CUT H
10. CLERK 1 CLERK 24. REFER DATE 1 REF D
11. TEXT 17 2 TXT17 25. ORIGINAL COUNTRY 1 ORIGI
12. TEXT 18 2 TXT18 26. MULTI BARCODE 1 3 M1BAR
13. TEXT 19 2 TXT19 27. MULTI BARCODE 2 3 M2BAR
14. TEXT 20 2 TXT20 28. SERIAL NO 1
Programmable Data Type
Programmable data Type 1 Type 2 Type 3 Type 4
X position YES YES YES YES
Y position YES YES YES YES
Angle YES YES YES NO
Status YES YES YES YES
Character Size YES NO NO NO
Width NO YES NO NO
Height NO YES YES NO
Thickness NO NO NO YES
Page 66

SM 110 PROGRAM MODE
61
3.16.4 Free Format Entry
At Programming Mode, select Free Format programming mode and then enter new Free Format
number (Ex. 1) programming mode. *For edit, enter existing Free Format number.
Basic Setting: (width, height, angle and label type)
DISPLAY
OPERATION
PT kg
$/kg $
REMARK
[MODE][MODE]
[MODE]
S1
→
PLU FILE
Enter S mode.
Lamp S turns on.
[1][2] S12 → FREE FORMAT
Select Free Format setting
programming mode.
[*] S12.0 FREE 0 1-99
Enter Free Format setting
programming mode.
Select Free Format File
Number.
[1][*] S12.1 LABEL 0 WT MM
Enter the Free Format File
No.1.(Ex.No.1)
[4][8][*] S12.2 LABEL 0 HT MM
Enter Label print
width.(Ex.48mm)
[3][5][*] S12.3 LABEL 0 DG ANGLE
Enter Label print
height.(Ex.35mm)
[<<] or [>>] S12.3 LABEL 90 DG ANGLE
[<<] or [>>] key can change the
selection of label angle.
(0,90,180,270 degree)
[*] S12.4 LABEL ITEM LABEL Label angle is turned 90 degree.
[<<] or [>>] S12.4 LABEL TOTAL LABEL
Select label type.
(Item Label; Total Label)
[*] S12.5 PLUno
← 1
F ITEM
Enter item setting.
Refer to Base Type 1 to 4
setting.
Page 67

SM 110 PROGRAM MODE
62
Base Type 1:
Item data in Data Base Type1 are Numeric data or Fixed data. The print position of item data can be
programmed by setting X / Y value, Print angle and Character size.
Item Label
: PLU No., Price, Unit Price, Weight, Quantity, Packed date, Packed Time, Quantity
Symbol, Sell by date, Sell by time, Discount Price, Used by date, MG No., Dept. No., Scale No., Tare
Weight, Clerk No., and Text data.
Total Label
: PLU No., Packed date, Total Weight, Total quantity, Quantity symbol, Total Price,
Packed time, Letter of TOTAL, Clerk No., and Text data.
DISPLAY
OPERATION
PT kg
$/kg $
REMARK
Continued from the procedure Basic Setting: (width, height, angle and label type)
S12.5 PLUno
←
1
F ITEM Item setting: PLU No.
[*] S12.5 PLUno 0 X MM Enter X value.(Ex.1mm)
[1][*] S12.5 PLUno 0 Y MM Enter Y value.(Ex.1mm)
[1][*] S12.5 PLUno 0 DG ANGLE Select print angle.(Ex.90 degree)
[>>][*] S12.5 PLUno 0 STATUS Enter print status.(Ex. All item print)
[7][*] S12.5 PLUno S1 CHAR SIZE Select the character size.(Ex. S5)
[>>] four times S12.5 PLUno S5 CHAR SIZE
[<<] or [>>] key can change the
selection of the character size.
(S1~S5; M1~M5; L1~L5)
[*] S12.5 PLUno
←
1
F ITEM
Enter next item setting.
Note 1: STATUS TYPE: 0: NO Print 3: Weighing Item 4: Non-weighing Item 7: All Item Print
Note 2: Up to 41 different item data can be programmed in Item Label Format and is used for printing at
Manual Mode and Pre-pack Mode.
Note 3: Up to 14 different item data can be programmed in Total Label Format and is used for printi ng multiple
transaction labels for counter sales at Manual Mode, Sub-Total and Grand Total at Pre-pack Mode.
Note 4: There are two ways to select the Item Data in Free Format programming by usin g different ke ys such as:
• Enter the Item data number key.
• Press [X] key or [−] key to search the Item data.
Page 68

SM 110 PROGRAM MODE
63
Base Type 2
Item data in Base Type 2 are Alpha-numeric data. The print position of item data can be programmed
by setting the max. print area , X / Y value, width of print area from X value, height of print area
from Y value and print angle.
Item Label
: Commodity Name, Shop Name, Logo, Ingredient, and Special Message.
DISPLAY
OPERATION
PT kg
$/kg $
REMARK
Continued from the procedure Basic Setting: (width, height, angle and label type)
S12.5 SHOPN
←
13
F ITEM Item setting: Shop name.
[*] S12.5 SHOPN 0 X MM Enter X value.(Ex.10mm)
[1][0][*] S12.5 SHOPN 0 Y MM Enter Y value.(Ex.1mm)
[1][*] S12.5 SHOPN 0 DG ANGLE Select print angle.(Ex.180 degree)
[>>][>>][*] S12.5 SHOPN 0 WT MM
Enter width value.
The width of shop name printing area is
20mm.(Ex. 20mm)
[2][0][*] S12.5 SHOPN 0 HT MM
Enter height value.
The height of shop name printing area is
15mm.(Ex. 15mm)
[1][5][*] S12.5 SHOPN 0 STATUS Enter print status.(Ex. All item print)
[7] S12.5 SHOPN 7 STATUS
The status of shop name printing area is all
item printing.
[*] S12.5 SHOPN
←
13
F ITEM
Enter next item setting.
Page 69

SM 110 PROGRAM MODE
64
Base Type 3
Item data in Data Base 3 is Barcode data. The print position of bar-code data can be programmed by
setting X / Y value, width of Barcode from X value, height of Barcode from Y value and print angle.
DISPLAY
OPERATION
PT kg
$/kg $
REMARK
Continued from the procedure Basic Setting: (width, height, angle and label type)
S12.5 BARCD
←
12
F ITEM Item setting: Barcode.
[*] S12.5
BARCD
0 X MM Enter X value.(Ex.5mm)
[5][*] S12.5
BARCD
0 Y MM Enter Y value.(Ex.20mm)
[2][0][*] S12.5
BARCD
0 DG ANGLE Select print angle.(Ex.90 degree)
[>>][*] S12.5
BARCD
0 HT MM
Enter height value.
The height of shop name printing area is
25mm.(Ex. 25mm)
[2][5][*] S12.5
BARCD
0 STATUS Enter print status.(Ex. All item print)
[7] S12.5
BARCD
7 STATUS
The status of BARCODE printing area is
all item printing.
[*] S12.5
BARCD
←
12
F ITEM
Enter next item setting.
Page 70

SM 110 PROGRAM MODE
65
Base Type 4
Item data in Data Base 4 is Frame data. The print position of Frame data may be programmed by
setting X value, Y value, X1 value, Y1 value [the opposite point against the point (X,Y) on a diagonal
line], and line weight.
DISPLAY
OPERATION
PT kg
$/kg $
REMARK
Continued from the procedure Basic Setting: (width, height, angle and label type)
S12.5 FRM 1
←
22
F ITEM Item setting: Frame 1.
[*] S12.5 FRM 1 0 X MM Enter X value.(Ex.10mm)
[1][0][*] S12.5 FRM 1 0 Y MM Enter Y value.(Ex.1mm)
[1][*] S12.5 FRM 1 0 X1 MM
Enter X1 value.
The X1 of frame 1 printing area is
20mm.(Ex. 20mm)
[2][0][*] S12.5 FRM1 0 Y1 MM
Enter Y1 value.
The Y1 of frame 1 printing area is
15mm.(Ex. 15mm)
[1][5][*] S12.5 FRM 1 0 STATUS Enter print status.(Ex. All item print)
[7][*] S12.5 FRM 1 0 T MM
Enter line weight.
The line weight of frame 1 printing area is
2mm.(Ex. 2mm)
[2][*] S12.5 FRM 1
←
22
F ITEM
Enter next item setting.
Page 71

SM 110 PROGRAM MODE
66
3.16.5 Free Format Copy Function
At Free Format programming mode, Select Copy existing Label Format and then select the existing
label format you want to be copy (Ex. T7) and go to next selection.
DISPLAY
OPERATION
PT kg
$/kg $
REMARK
S1
→
PLU FILE Enter S mode.
[1][2][*] S12.0 FREE 0 1-99 Enter X value.(Ex.10mm)
[1] S12.0 FREE 1 1-99
Enter the Free Format File
No.1.(Ex.No.1)
[X] S12.0 FREE NO 0 COPY
Press [X] key to enter free
format copy function.
[7] or
[<<] and [>>]
S12.0 FREE T7 7 COPY
Press [7] or [<<] and [>>] to
select the existing label format
you want to be copy.(Ex. T7)
[*][PLU] S12 → FREE FORMAT
Store the free format file 1, back
to S mode.
Note1: Another way to select the existing label format to copy by press [<<] Key or [>>] Key.
3.16.6 Free Format Delete Function
The Free Format Label cannot be deleted when the label is linked to existing PLU file.
At Free Format programming mode, enter existing Free Format Number (Ex. 1) to be deleted.
DISPLAY
OPERATION
PT kg
$/kg $
REMARK
S12.0 FREE 0 1-99
Enter Free Format
programming mode.
[1] S12.0 FREE 1 1-99 Enter free format file number 1.
[-]
S12.0 FREE DEL ? Y-C N-T
Enter delete mode.
[C] for Yes,[T] for No.
[C] S12.0 → FREE FORMAT
Delete free format file 1, back to
S mode.
Note1: If you want to cancel the deletion, press [T] key to exit.
Note2: Non-existing Free Format File can not be deleted.
Page 72
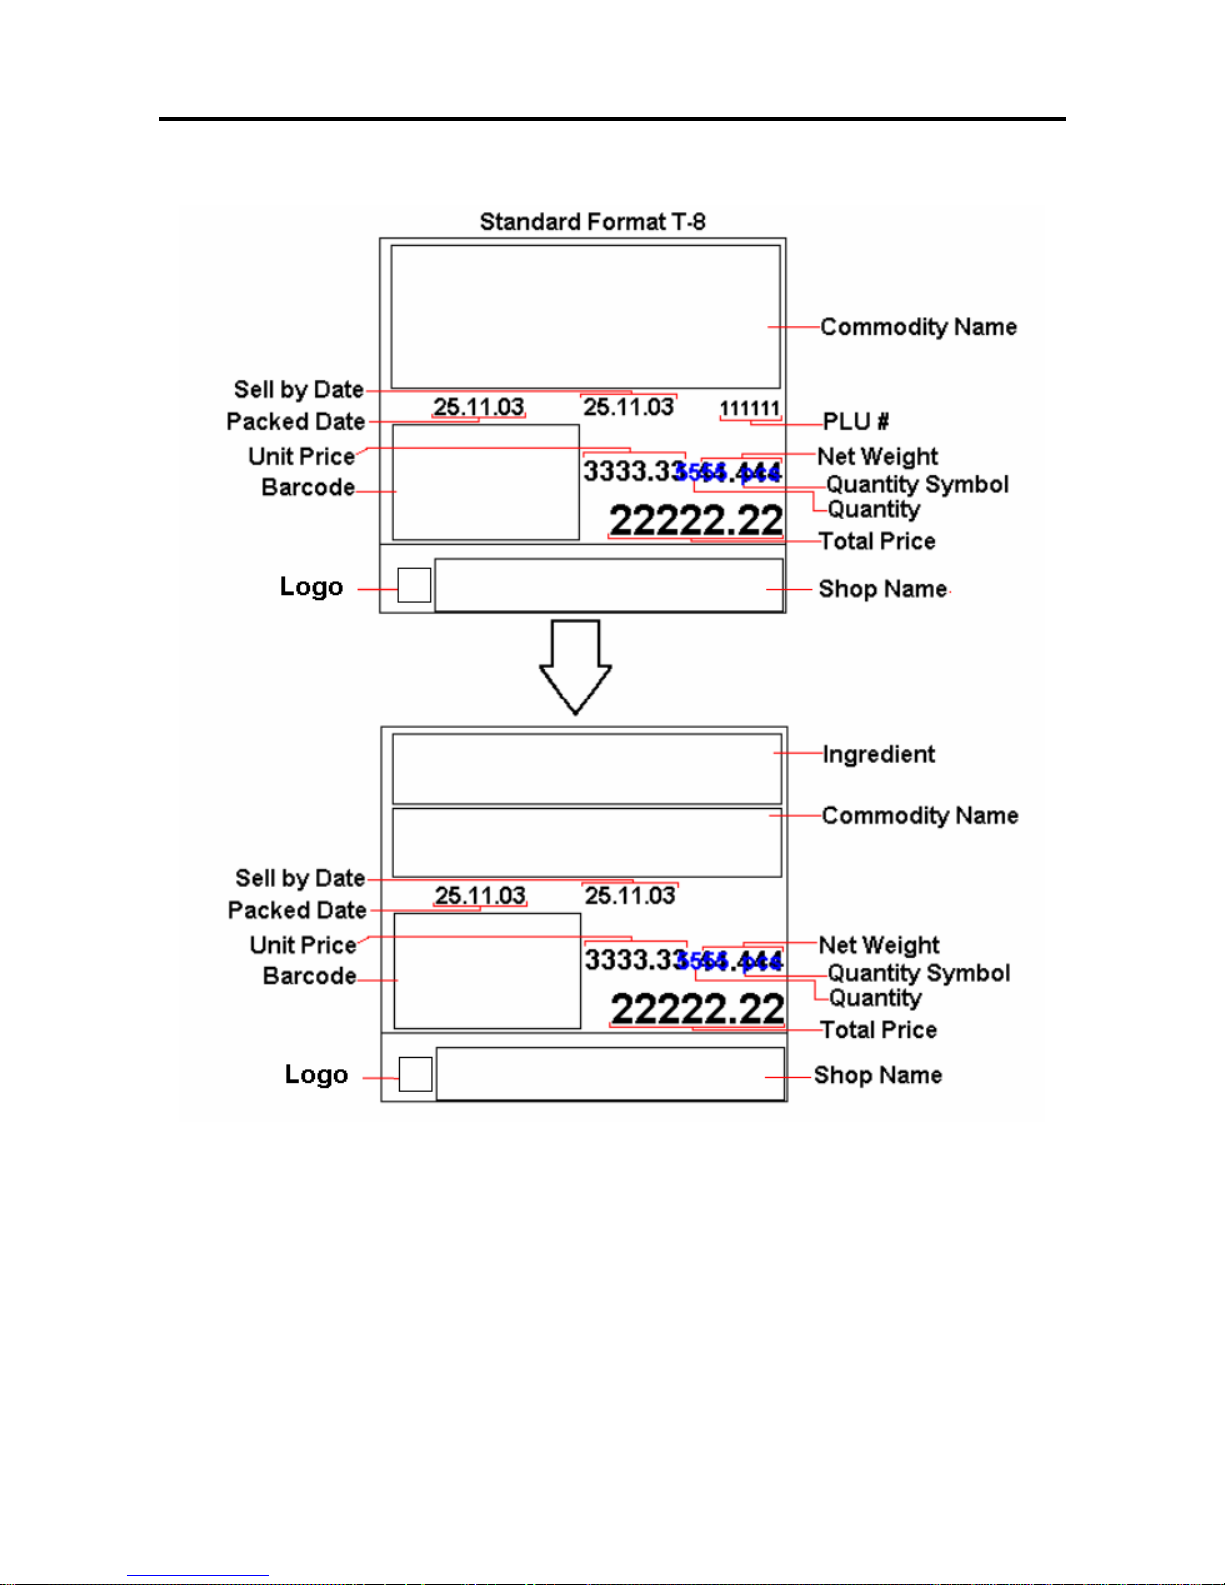
SM 110 PROGRAM MODE
67
3.16.7 Sample of program a format by modifying the existing format
You can create your desired label format by copying an existing format and modifying it to your needs.
Page 73

SM 110 PROGRAM MODE
68
Following is the example on how to customize standard format T8 to your needs. E.g. Add an
ingredient text and remove the PLU # from the standard Item Label Format
DISPLAY
OPERATION
PT kg
$/kg $
REMARK
S12 → FREE FORMAT
At Free Format program mode
[*] S12.0 FREE 0 1-99
Enter Free Format setting
programming mode.
Select Free Format File Number.
[8] S12.0 FREE 8 1-99
Enter the Free Format File
No.1.(Ex.No.8)
[X] S12.0 FREE
NO
0
COPY
Press [X] key to enter free format
copy function.
[8] or
[<<] and [>>]
S12.0 FREE T8 8 COPY
Press [8] or [<<] and [>>] to
select the existing label format
you want to be copy.(Ex. T8)
[*] S12.1 LABEL 56 WT MM
Change label width (Ex. No
change).
[*] S12.2 LABEL 55 HT MM
Change label height (Ex. No
change).
[*] S12.3 LABEL 0 DG ANGLE
Change print angle.( Ex. No
change)
[*] S12.4 LABEL ITEM LABEL Select Item Label.
[*] S12.5 PLUno
← 1
F ITEM
Enter item setting.
[*][*][*][*] S12.5 PLUno 7 STATUS
Enter PLU Number print Status
mode.
[C]or[0] S12.5 PLUno 0 STATUS Change the status to NO PRINT
[*][*] S12.5 PLUno
← 1
F ITEM
Save the setting and go to next
selection.
[8] S12.5 COMM
← 8
F ITEM
Select Commodity Name
program mode.
[*][*][3][2] S12.5 COMM 23 Y MM
Enter Y position setting mode
and change it from 23 mm to 32
mm and go to next selection.
[*] S12.5 COMM 0 DG ANGLE
Change print angle.( Ex. No
change)
Page 74

SM 110 PROGRAM MODE
69
DISPLAY
OPERATION
PT kg
$/kg $
REMARK
[*][*][1][5] S12.5 COMM 15 HT MM
Enter TTL Height setting mode,
change the height from 21 mm to
15 mm and go to next selection.
[*] S12.5 COMM 7 STATUS
Enter print status. ( Ex. No
change)
[*] S12.5 COMM
← 8
F ITEM
Save the Commodity Name print
setting.
[2][0] S12.5 INGR
← 20
F ITEM
Select Ingredient program mode.
[*] S12.5 INGR 0 X MM
Enter Ingredient programmable
mode.
[2][*] S12.5 INGR 0 Y MM
Enter X Position value (Ex.
2mm) and go to next selection.
[2][3][*] S12.5 INGR 0 DG ANGLE
Enter Y Position value (Ex.
23mm) and go to next selection.
[*] S12.5 INGR 0 WT MM
Change print angle (Ex. No
change).
[5][4][*] S12.5 INGR 0 HT MM
Enter WIDTH value (Ex. 54mm)
and go to next selection.
[1][0][*] S12.5 INGR 0 STATUS
Enter HEIGHT value (Ex.
10mm) and go to next selection.
[7][*] S12.5 INGR
← 20
F ITEM
Select print status (Ex. 7 = ALL
PRINT) and go to next selection.
[PLU] S12 → FREE FORMAT
Save the Free Format number 8.
Page 75
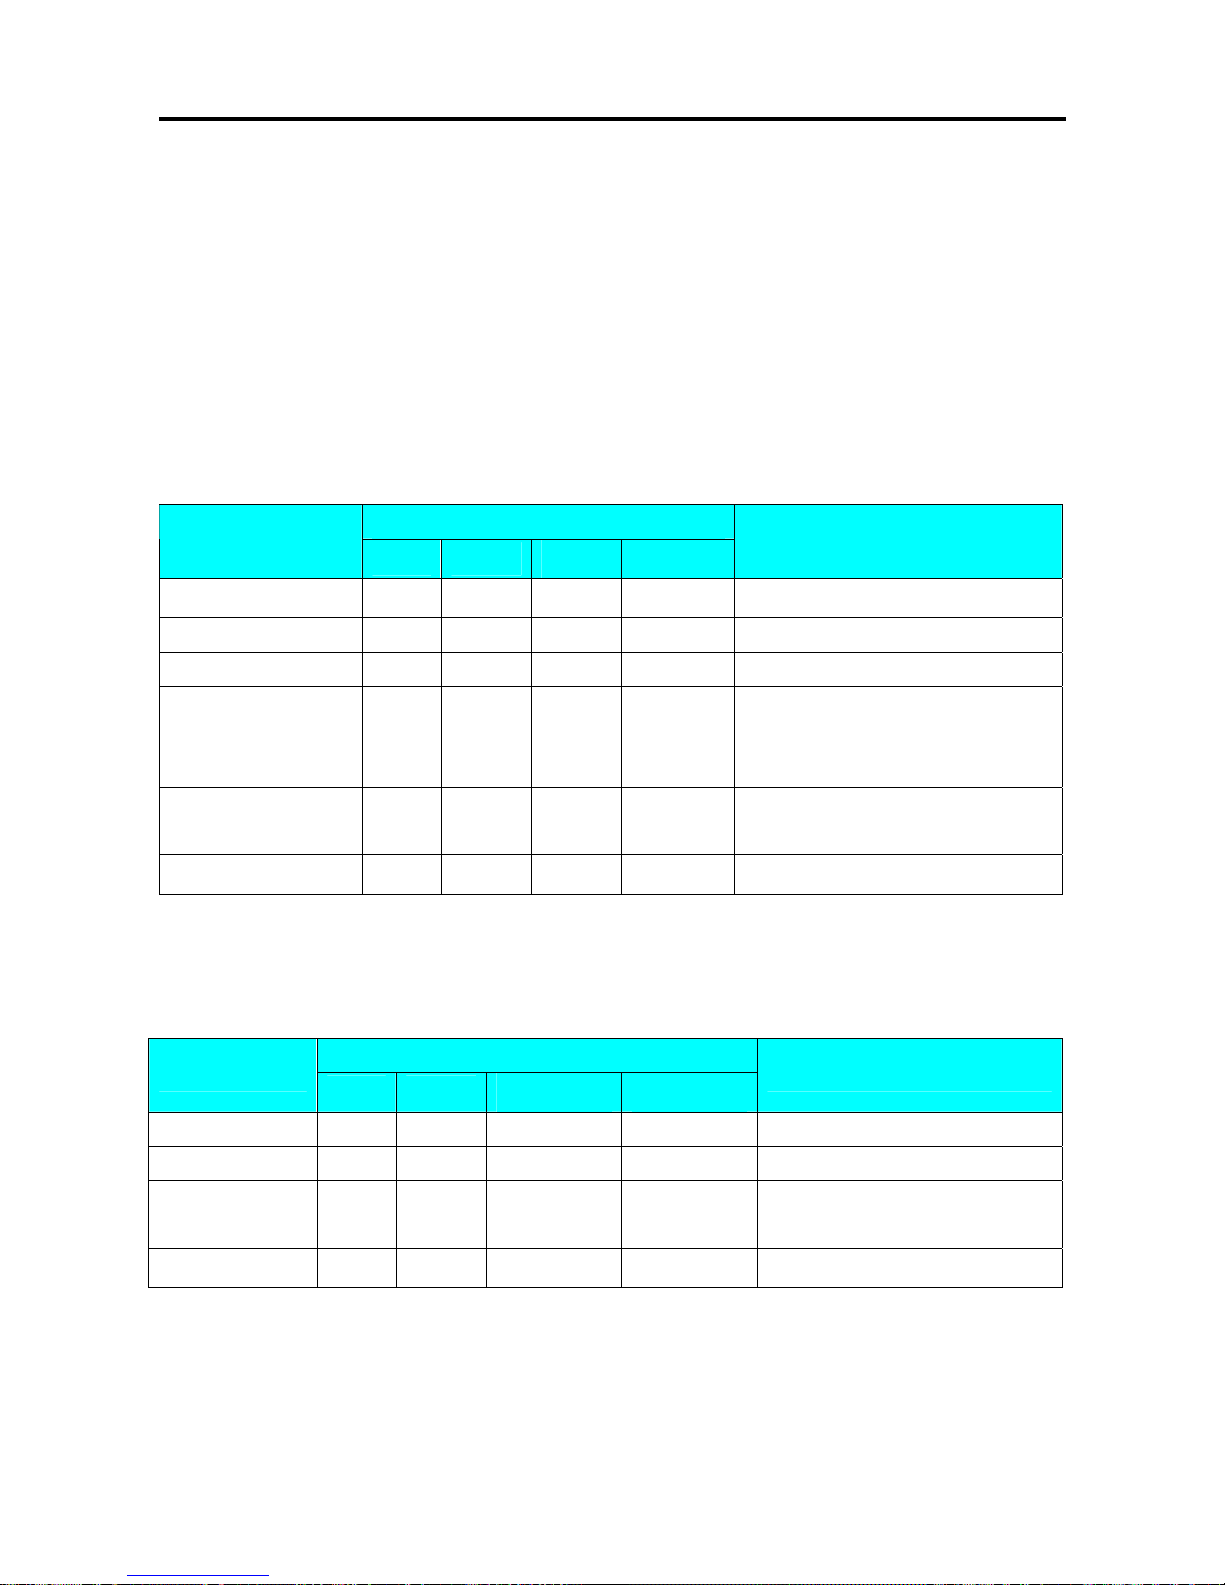
SM 110 PROGRAM MODE
70
3.17 Place File
PLACE file is used for programming a short text describing the place of production. The number of
Characters possible to enter depends on the PLACE print area size and the character size used. Place
will be printed in the free room of Commodity Name print area if selected label format without Place
print area. Maximum 99 places (Place number 1 ~ 99) can be programmed, each with 1 line.
3.17.1 Program Place File
At Programming Mode, select Place programming mode and then enter new Place number (Ex. 1).
*For edit, enter existing Place number.
DISPLAY
OPERATION
PT kg
$/kg $
REMARK
S1
→
PLU FILE Enter S mode.
[1][5][*] S15.0 PLACE 0 NO SET Enter Place File programming mode.
[1][*] S15.1 P01.01 S1 A100 Enter place file No.(Ex. No.1)
[M][A][D][E][SP]…… S15.1 P01.13 DIGI S1 A 88
Enter the Place File as the same
procedures as Commodity Name Entry.
(Ex. “MADE IN DIGI”)
[SIZE][SIZE]… S15.1 P01.13 DIGI S5 A 48
Change font size to S5.
(S1~S5; M1~M5; L1~L5)
[PLU] S15 → PLACE FILE
Store Place File 1,back to S mode.
3.17.2 Delete Place File
At Place programming mode, enter existing Place Number (Ex. 1) to be deleted.
DISPLAY
OPERATION
PT kg
$/kg $
REMARK
S15.0 PLACE 0 NO SET Enter Place File programming mode.
[1] S15.0 PLACE 1 NO SET Enter Place File number 1.
[-]
S15.0 FREE DEL ? Y-C N-T
Enter delete mode.
[C] for Yes,[T] for No.
[C] S15 → PLACE FILE
Delete Place File 1, back to S mode.
Note1: If you want to cancel the deletion, press [T] key to exit.
Note2: Non-existing Place File can not be deleted.
Page 76

SM 110 PROGRAM MODE
71
3.18 Machine Setting
DISPLAY
OPERATION
PT kg
$/kg $
REMARK
S1
→
PLU FILE Enter S mode.
[1][6][*] S16.0 RATE 0.00 DISC Program Machine Code.
[5][0][0] S16.0 RATE 5.00 DISC
Enter default discount rate.(Ex.
5.00%)
[*] S16
→
MACHIN SETTING
Store machine setting, back to S
mode.
Note1: 0% to 99.99% are available for Default Discount Rate.
Page 77

SM 110 PROGRAM MODE
72
3.19 Logo File
Logo is the trademark of the shop, which will be printed in Label or Receipt. Logo will be printed on
the top of receipt and on the left side of shop name on label. (When printing Logo data on Free
Format Label, set the print area of Logo data on the Free Format in advance.)
Logo data can be programmed up to 4 logos. When using 4 logos for label, assign the LOGO KEY to
preset key in advance. A logo data is formed by a pattern of dots (128 horizontal dots and 64 vertical
dots.) However, since the Label logo data is printed within the limits, which are programmed in label
formats, program the logo data within the limits of print area on the format.
Note: All standard formats have 37 dots x 30 dots for logo print area.
3.19.1 Pre-programming Logo Data
1) Prepare a section paper with 128 horizontal dots and 64 vertical dots.
2) When programming Label Logo, draw the limit of the Logo print area.
3) Draw the desired logo design in the section paper by filling the section with dot. (The dots are
necessary to seize the image of the actual logo before programming.)
Example:
DIGI Logo for label (37 x 30 dots)
Page 78

SM 110 PROGRAM MODE
73
3.19.2 Program Display & Keys Function
Program Display for Logo Set Up
The following display appears when entering Logo Program Mode.
Key Function for LOGO Set Up
[0]
------- Clear a dot.
[1]
------- Fill a dot.
[<<]
------- Move the cursor to left. [I]
[>>]
------- Move the cursor to right. [J]
[︽]
------- Move the cursor to up. [K]
[︾]
------- Move the cursor to down. [L]
[*]
------- Move up to the first dot in the next line.
[PLU]
------- Store the Data.
Page 79

SM 110 PROGRAM MODE
74
3.19.3 Programming Order
1) After filling a section, programming status (the position of the cursor) moves to the next dot
automatically.
2) When the programming status reached to the last dot (128 horizontal dots), or [*] key is depress,
the programming status moves to the first left section on the next upper line automatically.
3.19.4 Program Logo File
At Programming Mode, select Logo programming mode and enter new Logo number. (Ex. 1)
*For edit, enter existing Logo number.
DISPLAY
OPERATION
PT kg
$/kg $
REMARK
S1
→
PLU FILE Enter S mode.
[1][7][*] S17.0 LOGO 0
NO
SET
Enter Logo File programming mode.
Enter Logo File number.(Ex. 1)
[1][*] S17.1 LOGO 0 X-POS Enter X position.(Ex. 7 dots)
[7][*] S17.2 LOGO 0 Y-POS Enter Y position.(Ex. 1dots)
[1][*] S17.3 LOGO 000000 007-01
Set Fill or Clear dots you want and the save the
setting and go to next upper line (Y
02).(Ex.11101110001)
[1][1]……[0][1][*] S17.3 LOGO 000000 001-02 Press [>>] key to move the cursor to next dot.
Press[>>]key 6 times S17.3 LOGO 000000 007-02
If necessary to change the position of the
cursor been set, the following procedure is
required.
[-][-]
S17.3 LOGO 7 X-POS
Change the Horizontal start position (Ex. 5
dots).
[5][*] S17.3 LOGO 2 Y-POS
Change the Vertical start position (Ex. NO
CHANGE).
[*] S17.3 LOGO 000000 005-02 After complete program Logo data, save it.
[PLU] S17 → LOGO FILE
Store the Logo 1 data, back to S mode.
Note1: If you want to exit without saving, press [◇] key follow by [C] key.
Page 80

SM 110 PROGRAM MODE
75
3.19.5 Delete Logo File
At Logo programming mode, enter existing Logo Number (Ex. 1) to be deleted.
DISPLAY
OPERATION
PT kg
$/kg $
REMARK
S17.0 LOGO 0 NO SET
Enter Logo File programming
mode.
[1] S17.0 LOGO 1 NO SET Enter Logo File number 1.
[-]
S17.0 LOGO DEL ? Y-C N-T
Enter delete mode.
[C] for Yes,[T] for No.
[C] S17 → LOGO FILE
Delete Logo File 1, back to S
mode.
Note1: If you want to cancel the deletion, press [T] key to exit.
Note2: Non-existing Logo File can not be deleted.
Page 81

SM 110 PROGRAM MODE
76
3.20 Tax File
This function enables you to program consumption tax rate included or excluded in the price. Up to 10
Tax Numbers (1 - 10) can be programmed. The programmed Tax rates (Tax Number) that are linked
to a Main Group will apply for all PLU's in that Main Group or set the Tax Number in individual PLU
File. Tax Rates can be entered between 00.00 % - 99.99 %. To enable TAX programming mode, SPEC
603 must set to 1 (TAX) in advance.
There are two types of Taxes:
• ADD ON TAX: Tax is added to the Total Price.
• VAT TAX: Tax is included in the Total Price.
Note: If you want print PRICE WITH TAX on Item Label, the selected label format must has print area for
Price + Tax and SPEC 659: SELECTION OF ITEM PRICE PRINTING must set to ITEM PRICE
AFTER TAX in advance.
3.20.1 Program Tax File
At Programming Mode, select TAX programming mode and then enter new Tax number (Ex. 1)
programming mode. *For edit, enter existing Tax number.
DISPLAY
OPERATION
PT kg
$/kg $
REMARK
S1
→
PLU FILE Enter S mode.
[1][8][*] S18.0 TAX 0 NO SET
Enter Tax File programming
mode.
Enter Tax File number.(Ex. 1)
[1][*] S18.1 TAX 0.00 INCLUDE
Enter default tax rate.(Ex.
3.00%)
[3][0][0] S18.1 TAX 3.00 INCLUDE Select tax type.
[<<] or [>>] S18.1 TAX 3.00 EXCLUDE Tax File 1 is value added tax.
[PLU] S18 → TAX FILE
Store the Tax File 1 data, back
to S mode.
Note1: 0 % to 99.99 % are available for Default Tax Rate.
Note2: [<<] and [>>] key can change the tax type. (Include / Ex clude)
Page 82
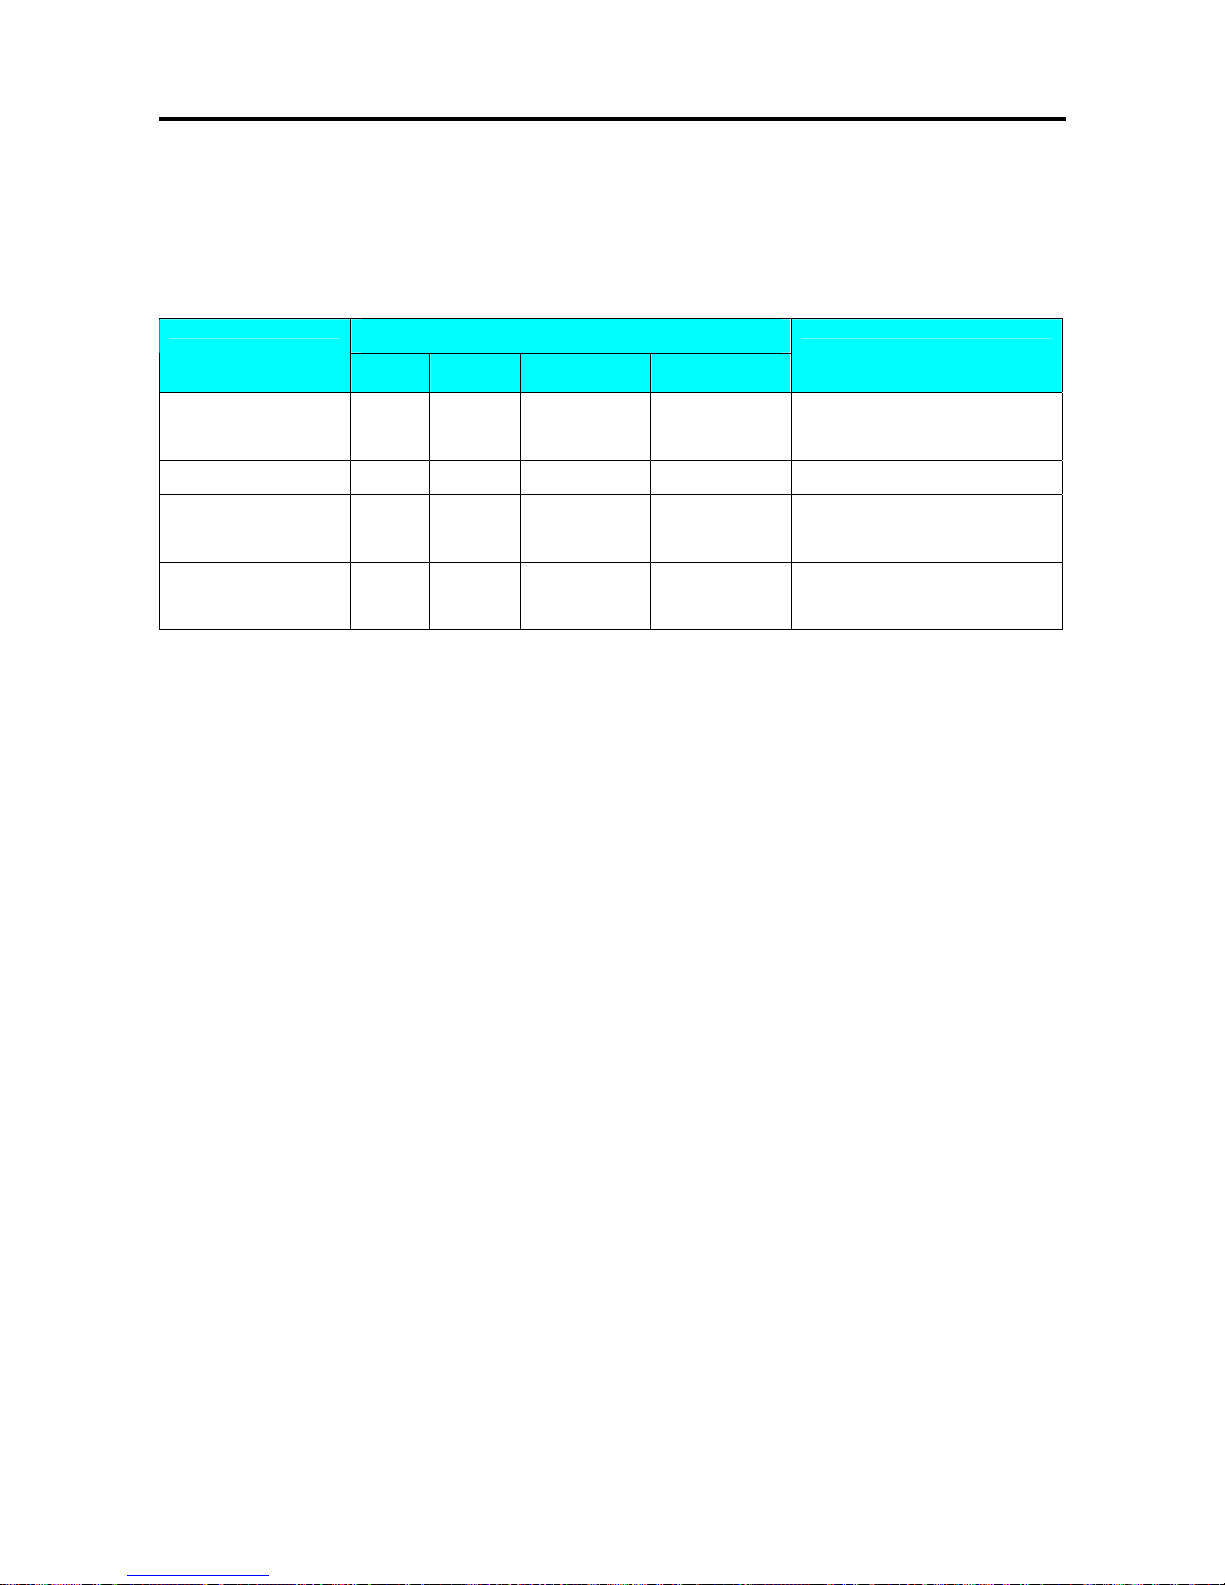
SM 110 PROGRAM MODE
77
3.20.2 Delete Tax File
When the Tax Number linked to the existing Main Group File or PLU File, the Tax Number cannot
be deleted. In addition, the Tax Number 1 cannot be deleted.
At Tax programming mode, enter existing Tax Number (Ex. 1) to be deleted.
DISPLAY
OPERATION
PT kg
$/kg $
REMARK
S18.0 TAX 0 NO SET
Enter Tax File programming
mode.
[1] S18.0 TAX 1 NO SET Enter Tax File number 1.
[-]
S18.0 TAX DEL ? Y-C N-T
Enter delete mode.
[C] for Yes,[T] for No.
[C] S18 → TAX FILE
Delete Tax File 1, back to S
mode.
Note1: If you want to cancel the deletion, press [T] key to exit.
Note2: Non-existing Tax File can not be deleted.
Page 83

SM 110 PROGRAM MODE
78
3.21 Scroll Message File
Maximum 100 characters can be programmed for each scroll message and up to 9-scroll message data
are available in scroll message file.
3.21.1 Program Scroll Message File
At Programming Mode, select Scrolling Message programming mode and then enter new Scroll
Message number (Ex. 1) programming mode. *For edit, enter existing Scroll Message Number.
DISPLAY
OPERATION
PT kg
$/kg $
REMARK
S1
→
PLU FILE Enter S mode.
[1][3][*] S13.0 SC MG 0 NO SET
Enter Scrolling Message programming
mode.
Enter Scrolling Message number.(Ex. 1)
[1][*] S13.1 SC MG 0
[W][E][L][C][O][M][E
][SP][T][O]……
S13.1 SC MG STORE 21
Enter Scroll Message.
(Ex. “WELCOME TO DIGI
STORE”)
[PLU] S13 → SCROLL MESSAGE
Store the Scroll message 1 data, back to
S mode.
3.21.2 Delete Scroll Message File
When the Scroll message number is linked to Scroll Sequence, it can’t be deleted.
At Scrolling Message program mode, enter existing Scroll Message Number (Ex. 1) to be deleted.
DISPLAY
OPERATION
PT kg
$/kg $
REMARK
S13.0 SC MG 0 NO SET
Enter Scrolling Message programming
mode.
[1] S13.0 SC MG 1 NO SET
Enter Scrolling Message number.(Ex.
1)
[-]
S13.0 SC MG DEL ? Y-C N-T
Enter delete mode.
[C] for Yes,[T] for No.
[C] S13 → SCROLL MESSAGE
Delete Scrolling Message File 1, back
to S mode.
Note1: If you want to cancel the deletion, press [T] key to exit.
Note2: Non-existing Scroll Message File can not be deleted.
Page 84
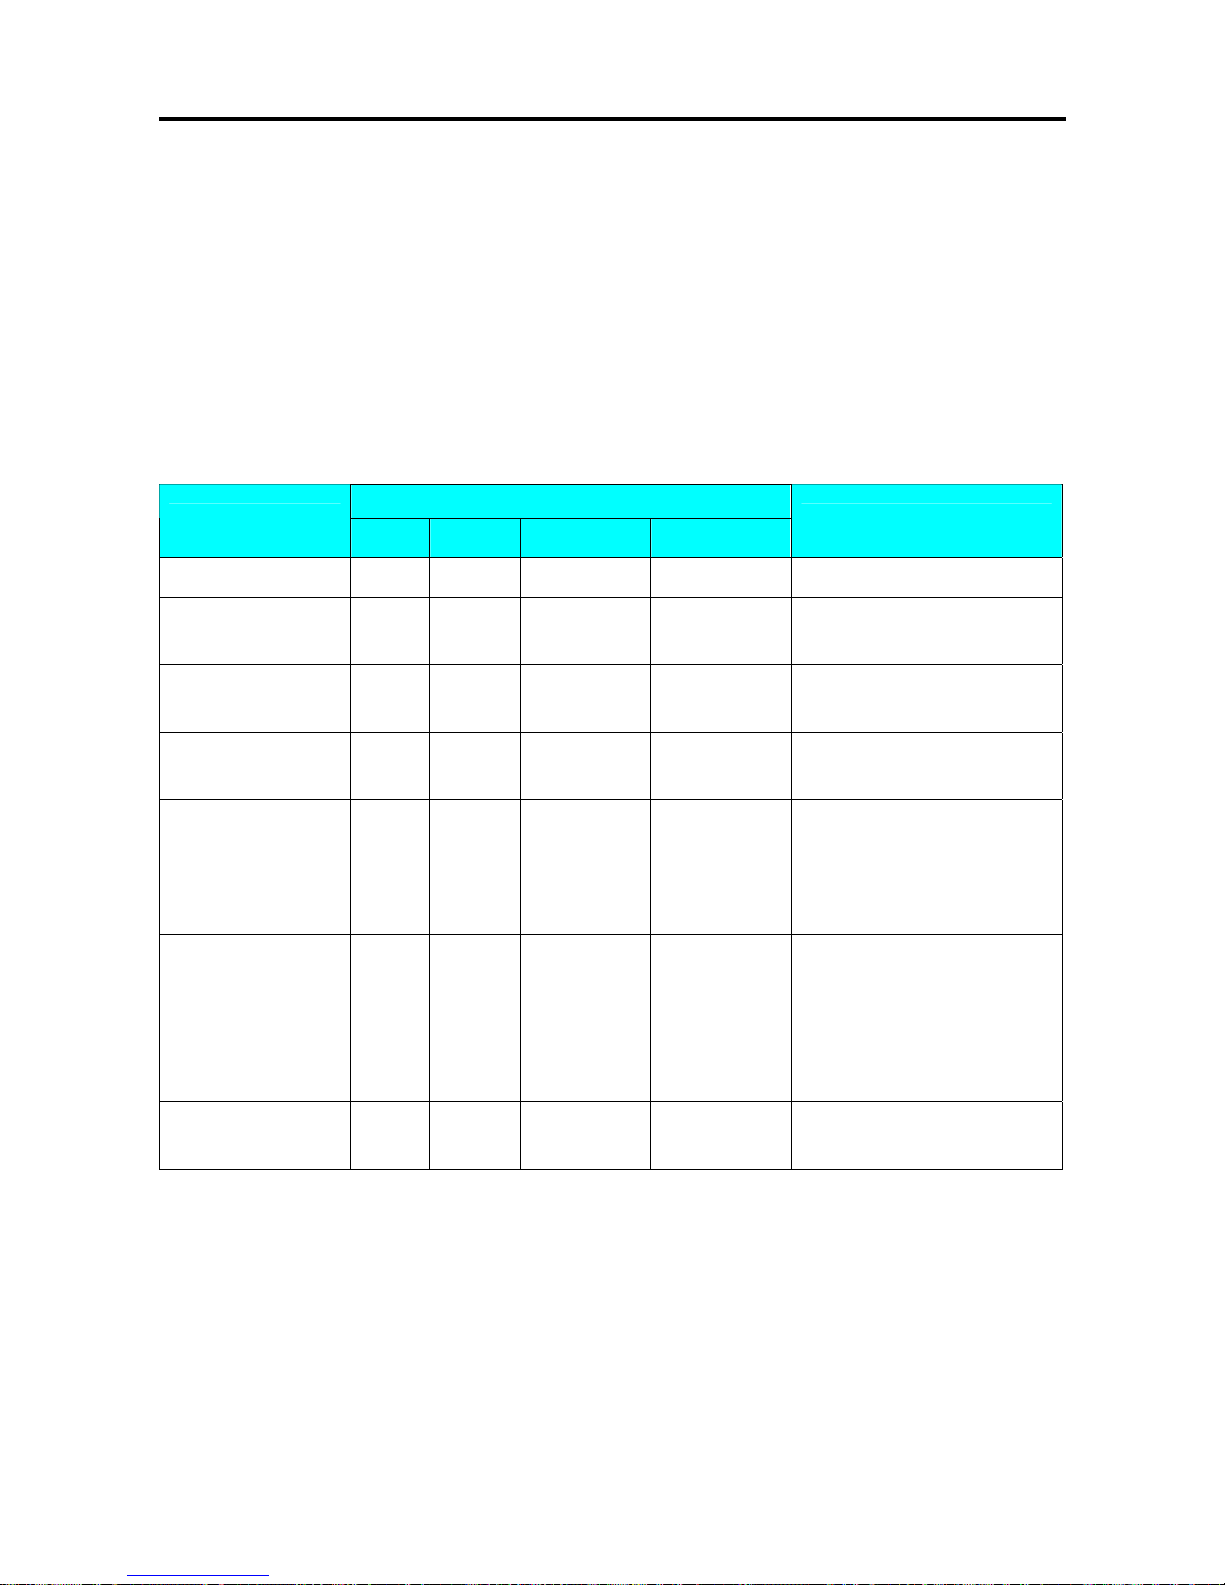
SM 110 PROGRAM MODE
79
3.22 Scroll Sequence File
Scroll Sequence # 1 to # 3 is available. Each scroll sequence consists of up to three kinds of Messages.
Scroll Sequence means the scroll display order and display appearance of the programmed scroll
message.
3.22.1 Program Scroll Sequence File
At Programming Mode, select Scrolling Sequence programming mode and then enter new Scroll
Sequence number (Ex. 1) programming mode. *For edit, enter existing Scroll Sequence Number.
DISPLAY
OPERATION
PT kg
$/kg $
REMARK
S1
→
PLU FILE Enter S mode.
[1][4][*] S14.0 SC SQ 0 NO SET
Enter Scrolling Sequence
programming mode.
[1][*] S14.1 SC SQ MSG NO 000
Enter Scrolling Sequence file
number.(Ex. 1)
[1][2][3][*] S14.2 SC SQ ATTRIB 123 000
Enter existing Scrolling Message
Number.(Ex. 1, 2, 3)
[1][2][3][*] S14.2 SC SQ SPEED 123 000
Select Scrolling pattern for each
Scrolling Message.
(Ex. MSG#1=1, MSG#2=2 &
MSG#3=3)
[1][2][0] S14.2 SC SQ SPEED 123 120
Select Scrolling Rate.
(Ex.
MSG#1=1:NORMAL,MSG#2
=2:FAST and
MSG#3=0:SLOW)
[PLU] S14 → SCROLL SEQUENC
Store the Scroll message 1 data,
back to S mode.
The scrolling pattern is as following.
0: L–SCROLL: Maximum100 characters
1: BLINKING: Maximum 25 characters
2: STATIS: Maximum 25 characters
3: R –SCROLL: Maximum100 characters
4: WIPE IN: Maximum 25 characters
Page 85
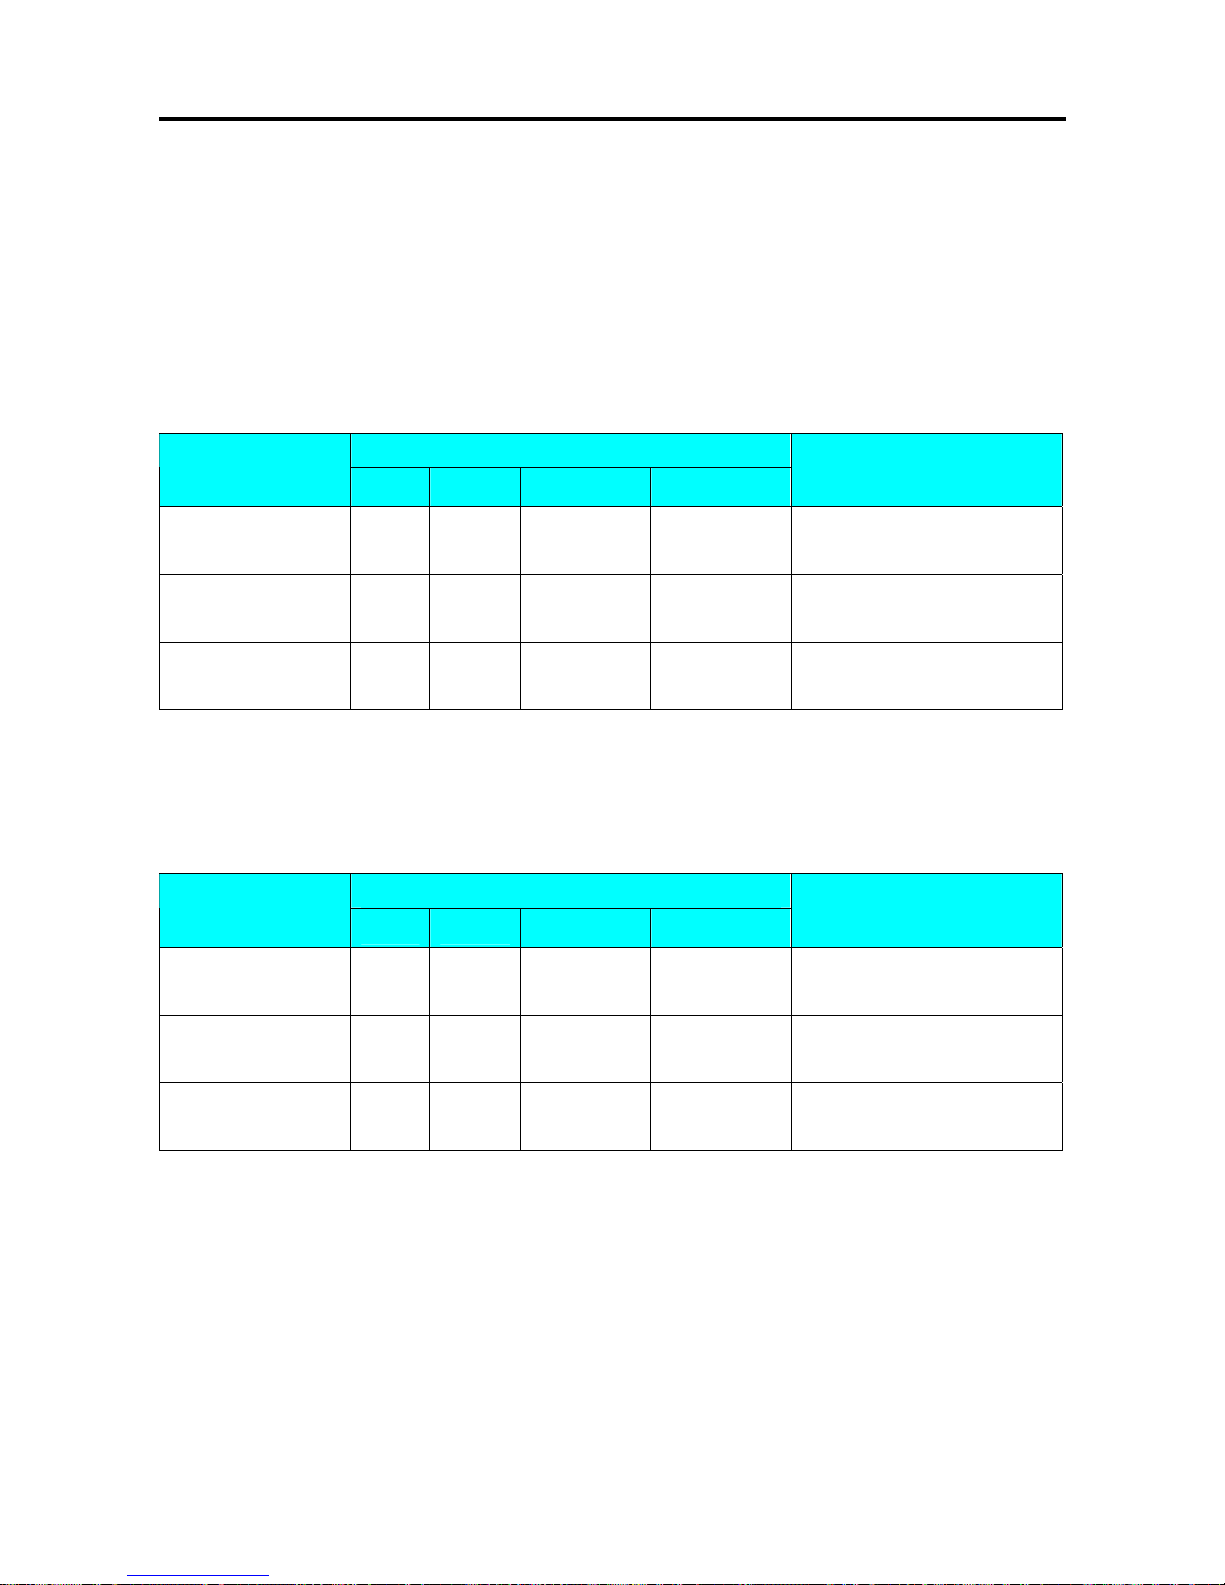
SM 110 PROGRAM MODE
80
3.22.2 Enable or Disable Scroll Sequence File
This Function is used to enable the programmed Scroll Message data by Scroll Sequence Number
shows on the Display in Registration Mode when scale in idle time. The Scroll Message, Scrolling
Pattern and Speed will follow Scroll Sequence Number setting.
Enable Scroll Sequence File
At Scroll Sequence programming Mode, enter Scroll Sequence Number you want (Ex. 1).
DISPLAY
OPERATION
PT kg
$/kg $
REMARK
S14.0 SC SQ 0 NO SET
Enter Scrolling Sequence
programming mode.
[1] S14.0 SC SQ 1 NO SET
Enter Scrolling Sequence file
number.(Ex. 1)
[PLU] S14 → SCROLL SEQUENC
Enable Scrolling Sequence
Number 1, back to S mode.
Note1: If you want to change the Scroll Sequence number, enter new sequence number follow by press [PLU] key.
Disable Scrolling Message
At Scroll Sequence programming Mode, enter Scroll Sequence Number you want (Ex. 0).
DISPLAY
OPERATION
PT kg
$/kg $
REMARK
S14.0 SC SQ 0 NO SET
Enter Scrolling Sequence
programming mode.
[0] S14.1 SC SQ 0 NO SET
Enter Scrolling Sequence file
number.(Ex. 0)
[PLU] S14 → SCROLL SEQUENC
disable Scrolling Sequence
Number 1, back to S mode.
Page 86

SM 110 PROGRAM MODE
81
3.22.3 Delete Scroll Sequence Number
When the Scroll Sequence Number to be deleted is in Used, it can’t be deleted.
At Scroll Sequence programming mode, enter existing Scroll Sequence Number (Ex. 1) to be deleted.
DISPLAY
OPERATION
PT kg
$/kg $
REMARK
S14.0 SC SQ 0 NO SET
Enter Scrolling Sequence
programming mode.
[1] S14.0 SC SQ 1 NO SET
Enter Scrolling Sequence file
number.(Ex. 1)
[-]
S14.0 SC SQ DEL ? Y-C N-T
Enter delete mode.
[C] for Yes,[T] for No.
[C] S14 → SCROLL SEQUENC
Delete Scrolling Sequence
Number 1, back to S mode.
Note1: If you want to cancel the deletion, press [T] key to exit.
Note2: Non-existing Scroll Sequence File can not be deleted.
Page 87

SM 110 PROGRAM MODE
82
3.23 ASCII Character Input Method
Insert Key-sheet for ASCII Character Input: (For standard version)
?/?é/é
+
?<
.
>
,
?/?
ü/ü
?/?
?/?
à/á ? /í
€ ó
←
(
S/s Y/y
-
X/x
/
W/w
"
V/v
=
U/u
:
T/t
)
Z/z
\
&
Q/q
^
P/p
%
O/o
$
N/n
M/m
@
L/l
!
K/k
0
J/j R/r
*
A/a
12
B/b
3
C/c
4
D/d
5
E/e
6
F/f
7
G/g
8
H/h I/i
9
→
Each key includes 3-4 ASCII character.
Example: Key [A/a/1/!] includes ASCII character: A, a and 1.
Operation ASCII Display Indicate Remarks
Depress the key one time INPUT ‘A’ A Lamp P turns on *note 1
Depress the key two times INPUT ‘a’ a Lamp P turns off *note2
Depress the key three times INPUT ‘1’ 1 Lamp P turns off *note3
Note1: Lamp P turning on indicates capital letter is use in PLU programming.
Note2: After one letter input, the indicator under the letter is flicker 1.5 seconds.
Note3: When the indicator under the letter is flicker, depress the same key can change the input to the next ASCII
character.
Page 88
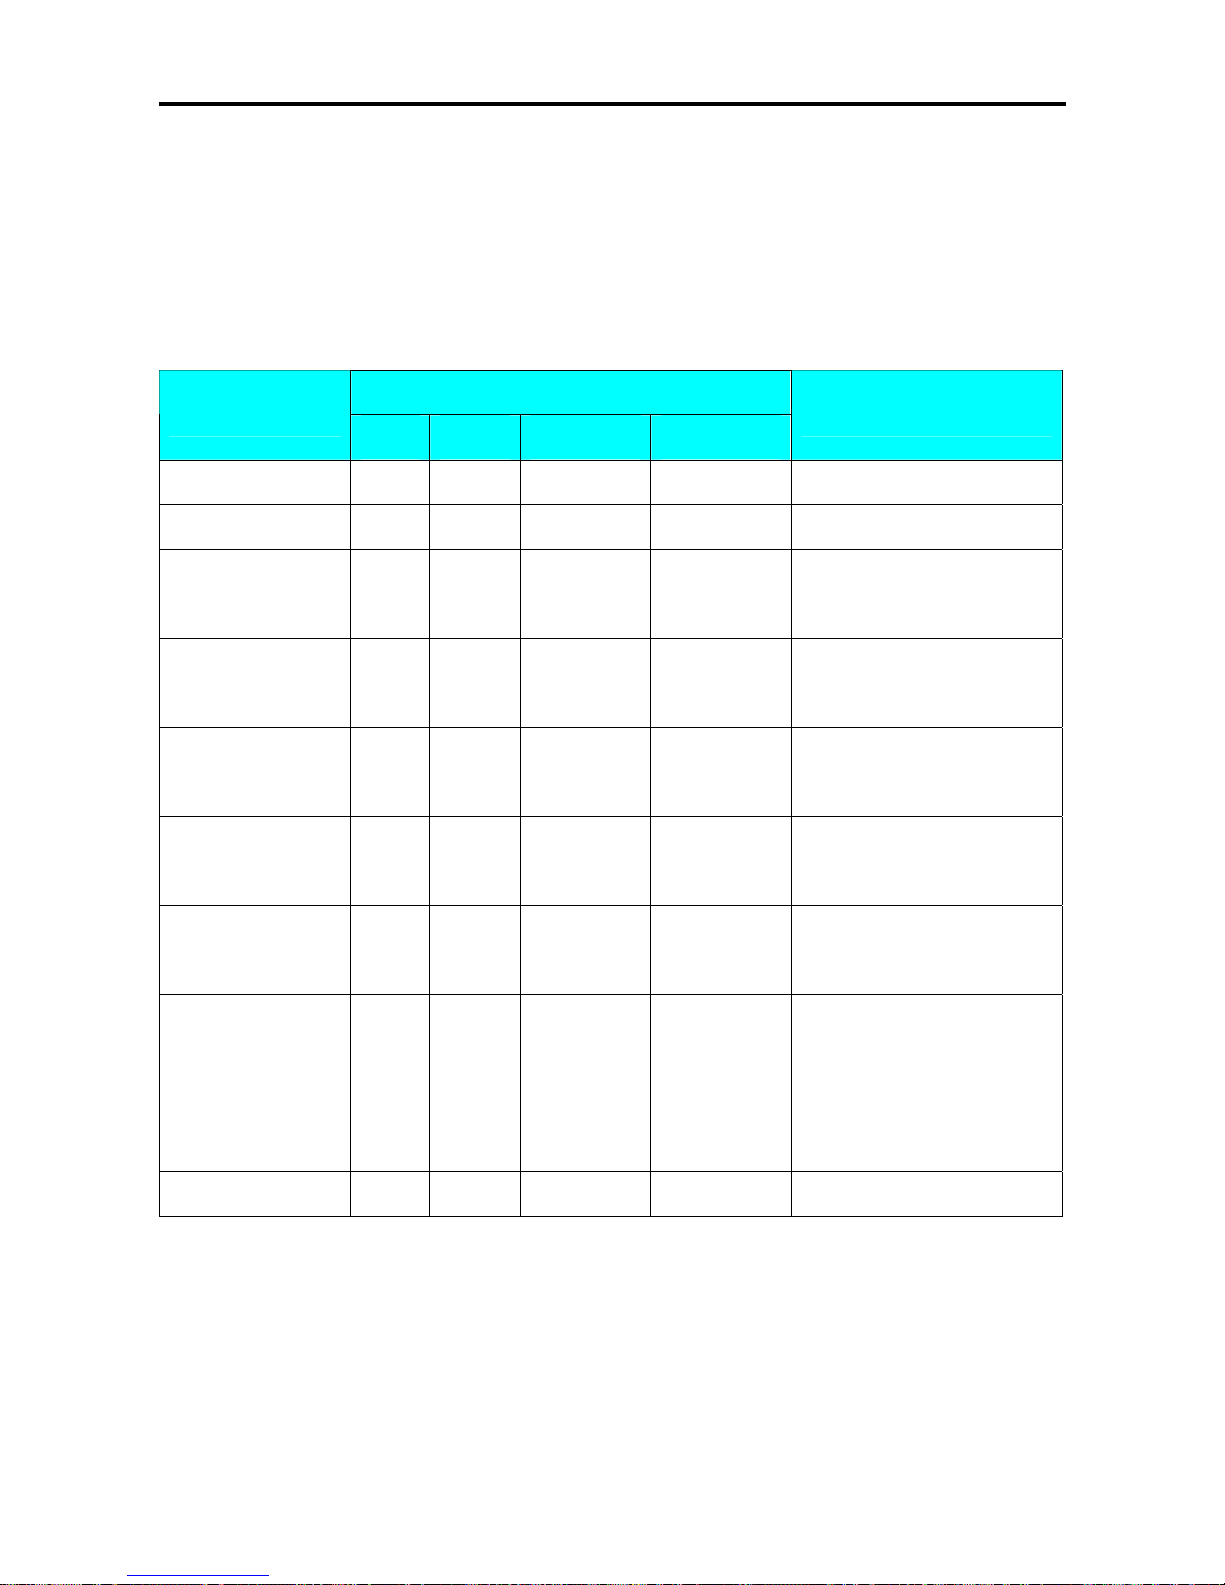
SM 110 PROGRAM MODE
83
3.24 ASCII Code Input Method
ASCII Code Input Method is another kind of input method for ASCII character entry. [CODE] Key
can switch the input method between ASCII Code Input Method and ASCII Character Key In
Method.
Example: Use the ASCII Code Input Method to entry commodity name. (CAKE)
DISPLAY
OPERATION
PT kg
$/kg $
REMARK
…… …… …… …… …… ……
S1.3 C01.01 S1 A 22 Enter commodity name.
[CODE] S1.3 C01.01 A- S1 A 22
Press [CODE] to switch to
ASCII Code Input .
[6][7] S1.3 C01.02 A- S1 A 21
ASCII Code 67 figures
Character ‘C’.
[6][5] S1.3 C01.03 A- S1 A 20
ASCII Code 65 figures
Character ‘A’.
[7][5] S1.3 C01.04 A- S1 A 19
ASCII Code 75 figures
Character ‘K’.
[6][9] S1.3 C01.05 A- S1 A 18
ASCII Code 69 figures
Character ‘E’.
[CODE] S1.3 C01.01 CAKE S1 A 18
Switch to key in method.
The inputted characters will be
displayed in the Unit Price
window.
…… …… …… …… …… ……
Note1: Decimal digital from 32 to 255 can be entered. Each Decimal digital figures one ASCII Character.
Note2: Different Countries can refer to the local ASCII Code List.
Page 89

SM 110 REGISTRATION MODE
84
4. REGISTRATION MODE
4.1 ON/OFF
1 - ZERO 2 - NET 3 - FIX T 4 - FIX P
OPERATION KEYS PT
kg
Kg $/kg $ 1 2 3 4
Power on. [ON/OFF] 0 0 0 0 0 0 0 0 0 0 0 0 0 0 0
0 0 0 0 0 0 0
1 1 1 1 1 1 1 1 1 1 1 1 1 1 1
1 1 1 1 1 1 1
2 2 2 2 2 2 2 2 2 2 2 2 2 2 2
2 2 2 2 2 2 2
1 3 3 3 3 3 3 3 3 3 3 3 3 3 3
3 3 3 3 3 3 3
4 4 4 4 4 4 4 4 4 4 4 4 4 4 4
4 4 4 4 4 4 4
5 5 5 5 5 5 5 5 5 5 5 5 5 5 5
5 5 5 5 5 5 5
6 6 6 6 6 6 6 6 6 6 6 6 6 6 6
6 6 6 6 6 6 6
7 7 7 7 7 7 7 7 7 7 7 7 7 7 7
7 7 7 7 7 7 7
8 8 8 8 8 8 8 8 8 8 8 8 8 8 8
8 8 8 8 8 8 8
9 9 9 9 9 9 9 9 9 9 9 9 9 9 9
9 9 9 9 9 9 9
* * * * * * * * * * * * * * * * * * * * * *
. . .
.
. . .
. .
. . . .
. .
. . . .
. . .
, , ,
,
, , ,
, ,
, , , ,
, ,
, , , ,
, , ,
^ ^ ^ ^ ^ ^ ^ ^ ^ ^ ^ ^ ^ ^ ^ ^ ^ ^ ^ ^ ^ ^
8 8 8 8 8 8 8 8 8 8 8 8 8 8 8
8 8 8 8 8 8 8
Stand-by-status. 0.0 0 0 0.0 0 0 0.0 0 0.0 0
Power off. [ON/OFF]
4.2 Reset and Weighing Check
All weighing operations will be performed based on the procedure shown below. Operator should
check this operation before any transactions.
1 - ZERO 2 - NET 3 - FIX T 4 - FIX P
OPERATION KEYS PT
kg
Kg $/kg $ 1 2 3 4
Stand-by-status. 0.0 0 0 0.0 0 0.0 0 0.0 0
Reset the zero point. [REZERO] 8 8 8 8 8 8 8 8 8 8 8 8 8 8 8
8 8 8 8 8 8 8
0.0 0 0 0.0 0 0.0 0 0.0 0
Place an item on the platter. (e.g. 1.00kg) 0.0 0 0 1.0 0 0 0.0 0 0.0 0
[1] [2] [0] 0.0 1 0 1.0 0 0 1.2 0 1.2 0
Remove the item from platter. 0.0 0 0 0.0 0 0 0.0 0 0.0 0
Page 90

SM 110 REGISTRATION MODE
85
4.3 Tare Subtraction
4.3.1 One touch Tare Subtraction
1 - ZERO 2 - NET 3 - FIX T 4 - FIX P
OPERATION KEYS PT
kg
Kg $/kg $ 1 2 3 4
Stand-by-status. 0.0 0 0 0.0 0 0 0.0 0 0.0 0
Put tare (e.g 30 g) on platter. 0.0 0 0 0.0 3 0 0.0 0 0.0 0
Subtract the tare weight. [T] 0.0 3 0 0.0 0 0 0.0 0 0.0 0
Remove the tare weight 0.0 3 0 - 0.0 3 0 0.0 0 0.0 0
Clear the tare weight. [T] 0.0 0 0 0.0 0 0 0.0 0 0.0 0
4.3.2 Digital tare Subtraction
1 - ZERO 2 - NET 3 - FIX T 4 - FIX P
OPERATION KEYS PT
kg
Kg $/kg $ 1 2 3 4
Stand-by-status. 0.0 0 0 0.0 0 0 0.0 0 0.0 0
Key in the tare weight (e.g 5g). [5] 0.0 0 0 0.0 0 0 0.0 5 0.0 0
Subtract the tare weight (Assume 15kg). [T] 0.0 0 5 - 0.0 0 5 0.0 0 0.0 0
Clear the tare weight. [T] 0.0 0 0 0.0 0 0 0.0 0 0.0 0
Page 91
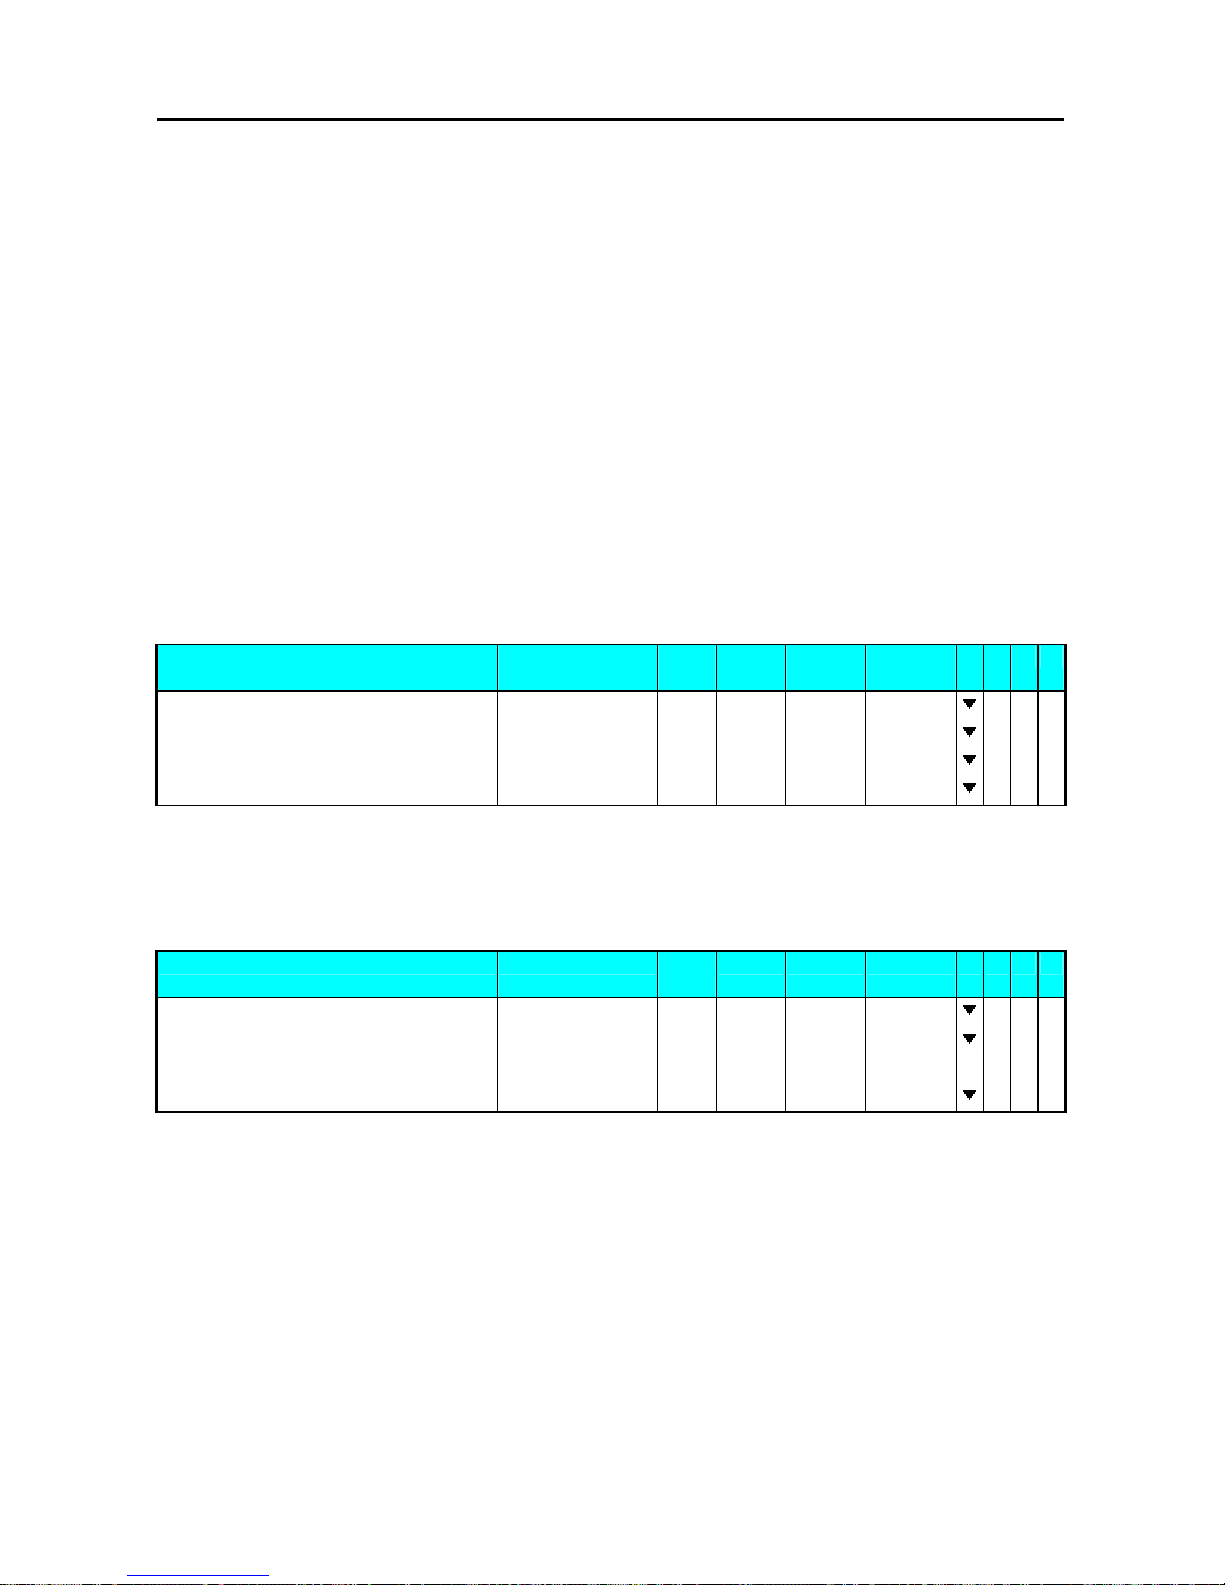
SM 110 REGISTRATION MODE
86
4.4 PLU Call Up
There are three ways to cal up programmed PLU:
z
Manual PLU Call Up
z
By press assigns to the preset key that desired PLU.
z
Auto PLU Call Up.
Note: The machine beeps if incorrect operation is performed when during PLU calls up.
z
call Non-Weighed PLU up when something is on the platter.
z
Non-PLU with the entered number exists.
z
PLU Preset Key not set.
4.4.1 Manual PLU Call Up
Manual PLU Call up is by enter the PLU Number by numeric Keys and then follow by pressing [PLU]
key on Keypad.
1 - ZERO 2 - NET 3 - FIX T 4 - FIX P
OPERATION KEYS PT
kg
Kg $/kg $ 1 2 3 4
Stand-by-status 0.0 0 0 0.0 0 0 0.0 0 0.0 0
Enter the PLU No. of the Beef steak.(Ex.No.10) [0] [1] [0] 0.0 0 0 0.0 0 0 1.00 0.0 0
Press PLU key. [PLU] 0.0 0 0 0.0 0 0 1.2 0 0.0 0
Clear the PLU and return to Stand-by-status. [C] 0.0 0 0 0.0 0 0 0.0 0 0.0 0
4.4.2 PLU Call Up by Preset Key
To enable this function, the PLU must assign on the Preset Key in advance.
1 - ZERO 2 - NET 3 - FIX T 4 - FIX P
OPERATION KEYS PT
kg
Kg $/kg $ 1 2 3 4
Stand-by-status 0.0 0 0 0.0 0 0 0.0 0 0.0 0
Press the Preset key where desired PLU is
assigned.
[P1] 0.0 0 0 0.0 0 0 1.2 0 0.0 0
Clear the PLU and return to Stand-by-status. [C] 0.0 0 0 0.0 0 0 0.0 0 0.0 0
4.4.3 PLU Call by Numeric Key (Auto PLU Call)
There are two type of Auto PLU Call, by enter the Specification Digits of the PLU Number or by
TIME-OUT is depending on Spec Setting.(Spec39 and Spec40)
Page 92

SM 110 REGISTRATION MODE
87
1 - ZERO 2 - NET 3 - FIX T 4 - FIX P
OPERATION KEYS PT
kg
Kg $/kg $ 1 2 3 4
Stand-by-status 0.0 0 0 0.0 0 0 0.0 0 0.0 0
Enter the PLU No. of the Beef steak [0] [1] [0] 0.0 0 0 0.0 0 0 0.1 0 0.0 0
BEEF STEAK
0.0 0 0 0.0 0 0 1.20 0.00
Clear the PLU and return to Stand-by-status. [C] 0.0 0 0 0.0 0 0 0.0 0 0.0 0
4.5 Fix Operation
4.5.1 Fix Tare by FIX Key
1 - ZERO 2 - NET 3 - FIX T 4 - FIX P
OPERATION KEYS PT
kg
Kg $/kg $ 1 2 3 4
Stand-by-status. 0.0 0 0 0.0 0 0 0.0 0 0.0 0
Put tare (e.g 30 g) on platter. 0.0 0 0 0.0 3 0 0.0 0 0.0 0
Subtract the tare weight. [T] 0.0 3 0 0.0 0 0 0.0 0 0.0 0
Fix tare. [FIX] 0.0 3 0 0.0 0 0 0.0 0 0.0 0
Cancel fix tare by FIX key. [FIX] 0.0 3 0 0.0 0 0 0.0 0 0.0 0
Add tare (e.g 10 g) on platter. 0.0 3 0 0.0 1 0 0.0 0 0.0 0
Subtract the tare weight. [T] 0.0 4 0 0.0 0 0 0.0 0 0.0 0
Fix tare. [FIX] 0.0 4 0 0.0 0 0 0.0 0 0.0 0
Remove the tare weight. 0.0 4 0 - 0.0 4 0 0.0 0 0.0 0
Key in the tare weight (e.g 50g). [5] [0] 0.0 4 0 - 0.0 4 0 0.5 0 0.0 0
Set new tare and cancel fix tare by T key. [T] 0.0 5 0 - 0.0 5 0 0.0 0 0.0 0
Fix tare. [FIX] 0.0 5 0 - 0.0 5 0 0.0 0 0.0 0
Clear the tare weight and fix tare. [T] 0.0 0 0 0.0 0 0 0.0 0 0.0 0
4.5.2 Fix PLU by FIX Key
1 - ZERO 2 - NET 3 - FIX T 4 - FIX P
OPERATION KEYS PT
kg
Kg $/kg $ 1 2 3 4
Stand-by-status. 0.0 0 0 0.0 0 0 0.0 0 0.0 0
Enter the PLU No. of the Beef steak [1] [0] 0.0 0 0 0.0 0 0 0.1 0 0.0 0
Press PLU key. [PLU] 0.0 0 0 0.0 0 0 1.2 0 0.0 0
Fix PLU. [FIX] 0.0 0 0 0.0 0 0 1.2 0 0.0 0
Cancel fix PLU by FIX key. [FIX] 0.0 0 0 0.0 0 0 1.2 0 0.0 0
Enter the PLU No. of the Beef steak [1] [0] 0.0 0 0 0.0 0 0 0.1 0 0.0 0
Press PLU key. [PLU] 0.0 0 0 0.0 0 0 1.2 0 0.0 0
Fix PLU. [FIX] 0.0 0 0 0.0 0 0 1.2 0 0.0 0
Enter the PLU No. of the Roast Beef. [2] [0] 0.0 0 0 0.0 0 0 0.2 0 0.0 0
Call up PLU and cancel fix P. [PLU] 0.0 0 0 0.0 0 0 2.4 0 0.0 0
Fix PLU [FIX] 0.0 0 0 0.0 0 0 2.4 0 0.0 0
Clear PLU and fix PLU. [C] 0.0 0 0 0.0 0 0 0.0 0 0.0 0
Page 93
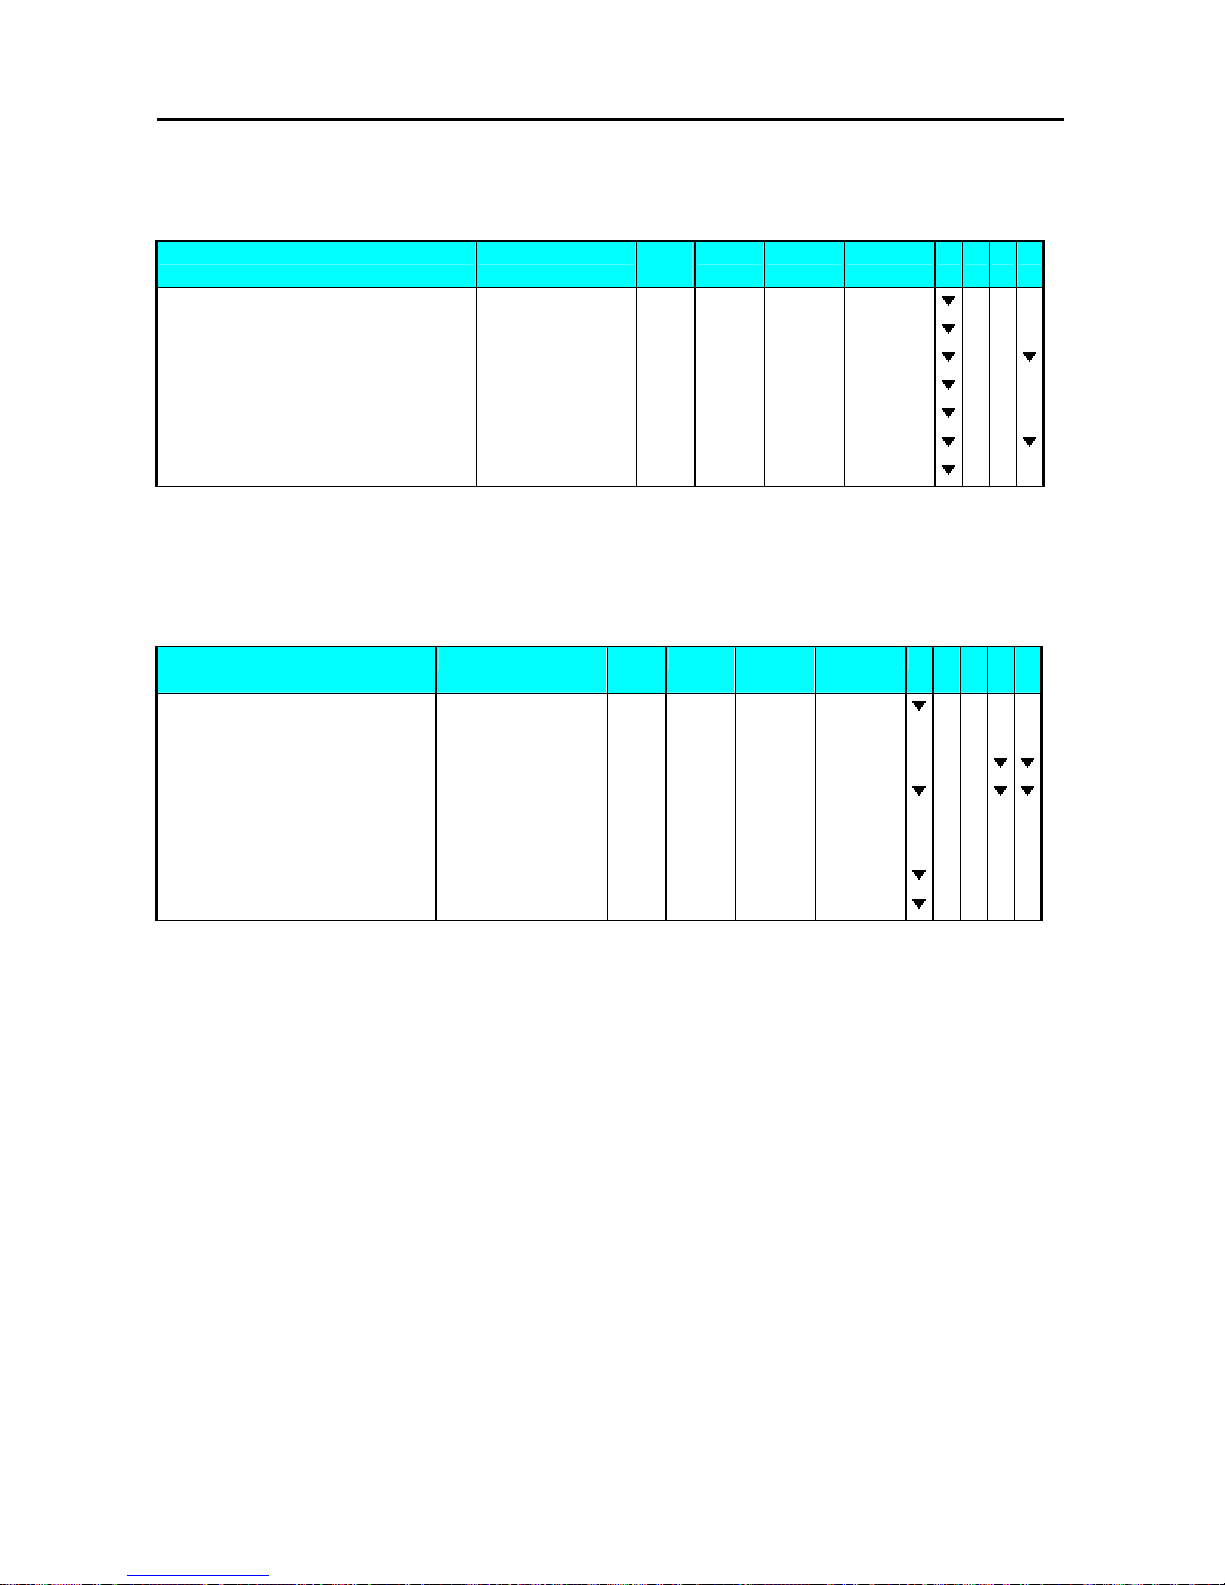
SM 110 REGISTRATION MODE
88
4.5.3 Fix Unit Price by FIX Key
1 - ZERO 2 - NET 3 - FIX T 4 - FIX P
OPERATION KEYS PT
kg
Kg $/kg $ 1 2 3 4
Stand-by-status. 0.0 0 0 0.0 0 0 0.0 0 0.0 0
Enter unit price. [1] [0] [0] 0.0 0 0 0.0 0 0 1.0 0 0.0 0
Fix unit price. [FIX] 0.0 0 0 0.0 0 0 1.0 0 0.0 0
Cancel fix unit price. [FIX] 0.0 0 0 0.0 0 0 1.0 0 0.0 0
Enter unit price. [2] [0] [0] 0.0 0 0 0.0 0 0 2.0 0 0.0 0
Fix unit price. [FIX] 0.0 0 0 0.0 0 0 2.0 0 0.0 0
Clear unit price and fix unit price. [C] 0.0 0 0 0.0 0 0 0.0 0 0.0 0
4.6 Operation Mode Change
1 - ZERO 2
- NET 3 - PREPACK 4 - MANUAL 5 - LABEL
OPERATION KEYS PT
kg
Kg $/kg $ 1 2 3 4 5
Receipt mode. 0.0 0 0 0.0 0 0 0.0 0 0.0 0
Depress [MODE] key while depressing [REZERO] 8 8 8 8 8 8 8 8 8 8 8 8 8 8 8
8 8 8 8 8 8 8
[REZERO] key. [REZERO]+[MODE] LABEL MODE
Set to label manual mode. 0.0 0 0 0.0 0 0 0.0 0 0.0 0
Depress [MODE] key while depressing [REZERO] 8 8 8 8 8 8 8 8 8 8 8 8 8 8 8
8 8 8 8 8 8 8
[REZERO] key. [REZERO]+[MODE] RECEIPT MODE
0.0 0 0 0.0 0 0 0.0 0 0.0 0
Set to receipt mode. 0.0 0 0 0.0 0 0 0.0 0 0.0 0
Page 94
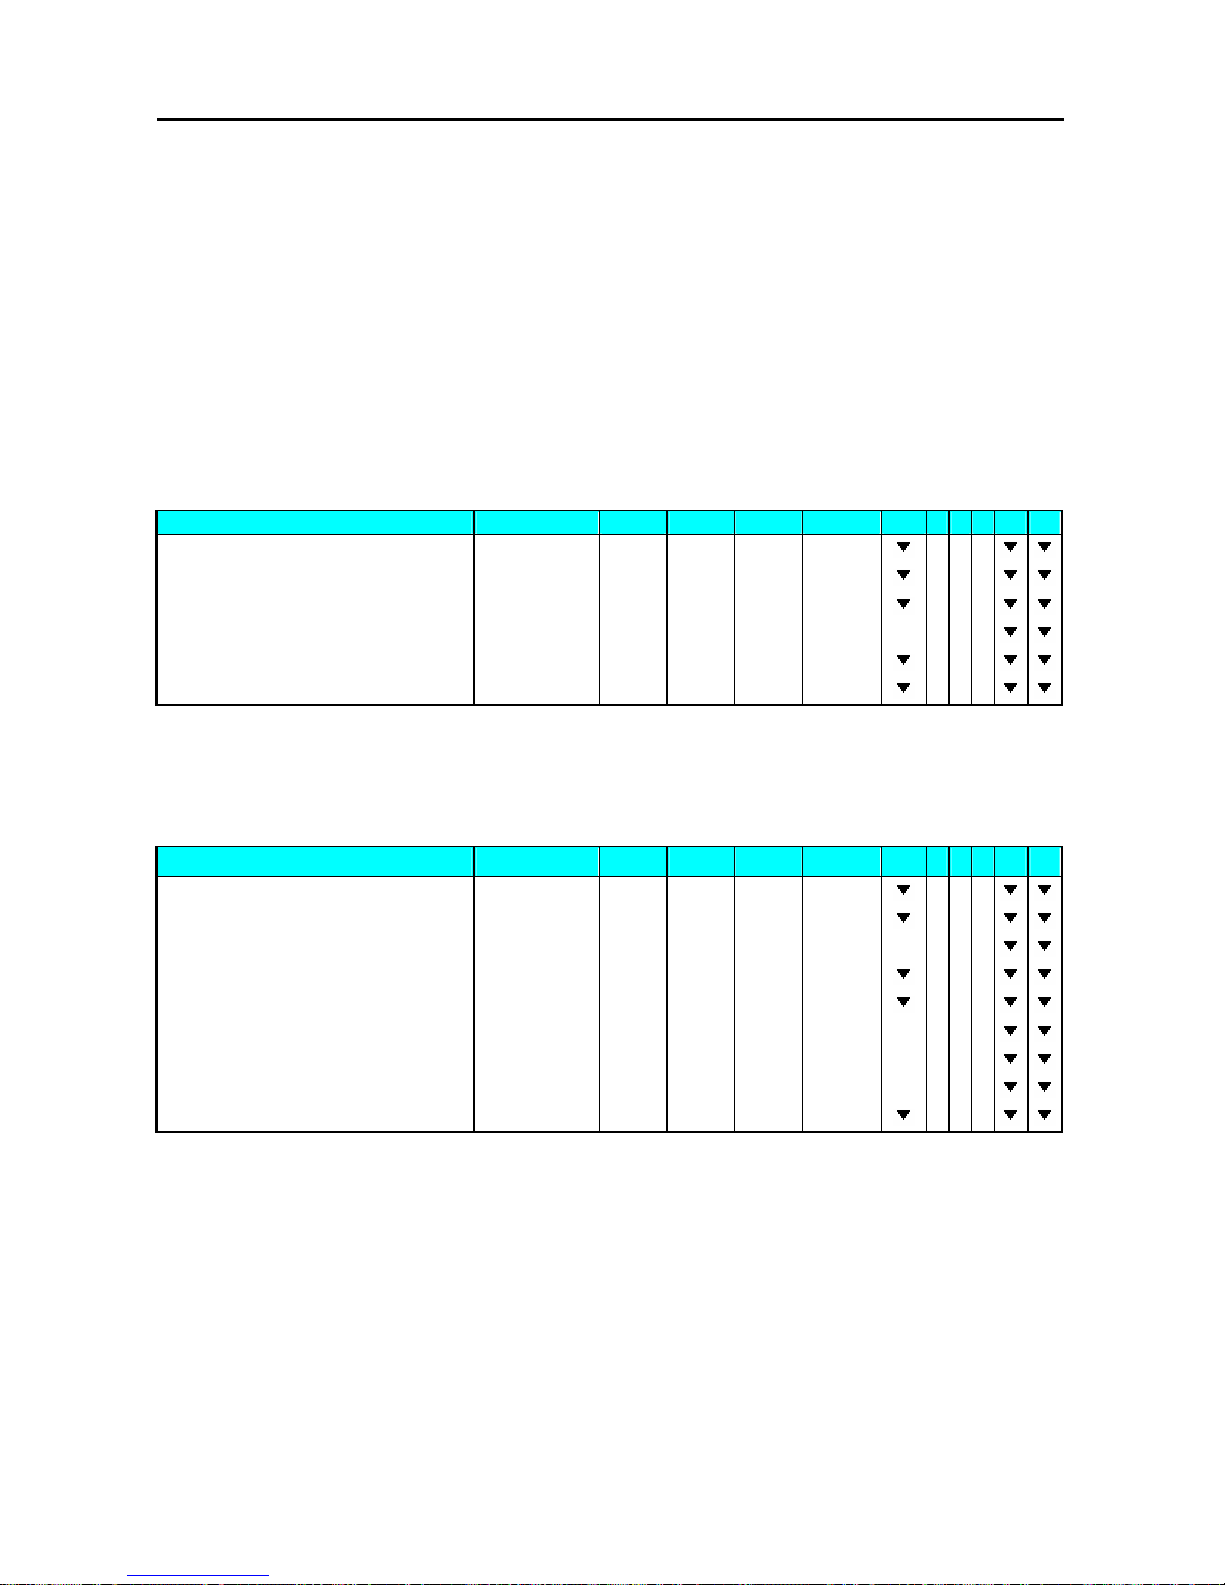
SM 110 REGISTRATION MODE
89
4.7 Item Label Printing in Manual Mode
You can use this operation to print out item labels for a PLU or Non-PLU of Weighing Item or
Non-weighing Item. Before the operation, check the following point.
Press [REZERO] and [MODE] to select LABEL mode.
Check whether the Label Size fits the programmed one in PLUs when label is used.
4.7.1 Label Printing for PLU Item
For example:
Sell 1kg of BEEF STEAK(Ex. PLU #: 10) (Weighing Item).
1 - ZERO 2 - NET 3 - FIX T 4 - FIX P 5 - MANUAL 6 - LABEL
OPERATION KEYS PT kg Kg $/kg $ 1 2 3 4 5 6
Stand-by-status. 0.0 0 0 0.0 0 0 0.0 0 0.0 0
Enter the PLU No. of the Beef steak. [1] [0] 0.0 0 0 0.0 0 0 0.1 0 0.0 0
Press PLU key. [PLU] 0.0 0 0 0.0 0 0 1.2 0 0.0 0
Place the product on the platter. (e.g. 1kg) 0.0 0 0 1.0 0 0 1.2 0 1.2 0
Print out one item label. [*] 0.0 0 0 1.0 0 0 1.2 0 1.2 0
Remove the product from the platter. [C] 0.0 0 0 0.0 0 0 0.0 0 0.0 0
For example:
Sell one pack of SMOKED SAUSAGE (Ex. PLU #: 30) and sell five packs of
SLICED BACON (Ex. PLU #: 40). (Non-weighing Item)
1 - ZERO 2 - NET 3 - FIX T 4 - FIX P 5 - MANUAL 6 - LABEL
OPERATION KEYS PT kg Kg $/kg $ 1 2 3 4 5 6
Stand-by-status. 0.0 0 0 0.0 0 0 0.0 0 0.0 0
Enter the PLU No. of the Smoked Sausage. [3] [0] 0.0 0 0 0.0 0 0 0.3 0 0.0 0
Press PLU key. [PLU] 2.5 0 PR-PCS
Press [*] key to print label. [*] 0.0 0 0 0.0 0 0 0.0 0 1.2 0
Enter the PLU No. of the Sliced Bacon. [4] [0] 0.0 0 0 0.0 0 0 0.4 0 0.0 0
Press PLU key. [PLU] 3.2 0 PR-PCS
Multiply. [X] QTY 1 3.2 0 3.2 0
5 packs. [5] QTY 5 3.2 0 1 6.0 0
Print out one item label. [*] 0.0 0 0 0.0 0 0 0.0 0 0.0 0
Page 95

SM 110 REGISTRATION MODE
90
4.7.2 Label Printing for NON-PLU Item
It is possible to print item label for Non-PLU Item at Manual Mode. The Non-PLU Item will be
cleared is a PLU is called up or [C] key is pressed.
Note: For Weighing of Non-PLU Item will be registered to PLU # 999998.
For Non-weight of Non-PLU item, will be registered to PLU # 999999.
For example:
Enter the Price for Non-PLU item (Ex. 5.00) by numeric key.
Note: For Non-weight Item, just press [*] key to issue out a label or press [X] key to enter multiply
mode, then enter sale quantity and press [*] key to issue label.
1 - ZERO 2 - NET
3 - FIX T 4 - FIX P 5 - MANUAL 6 - LABEL
OPERATION KEYS PT kg Kg $/kg $ 1 2 3 4 5 6
Stand-by-status. 0.0 0 0 0.0 0 0 0.0 0 0.0 0
Enter the unit price [5] [0] [0] 0.0 0 0 0.0 0 0 5.0 0 0.0 0
Multiply.
[X] QTY 1 5.00 5.00
5 packs.
[5] QTY 5 5.0 0 25.0 0
Print out one item label.
[*] 0.0 0 0 0.0 0 0 0.0 0 0.0 0
Page 96

SM 110 REGISTRATION MODE
91
4.8 Total Label Printing in Manual Mode
This operation is used for printing total label in Manual Mode.
4.8.1 Sales Transaction
This section shows how to operate the transactions with Clerk key. The designated Clerk key
accumulates each transaction data and Total Label will be issued.
For example:
Sells 1.5 kg of HERB CHEESE(Ex. PLU #: 3) and 2 packs of SKIM MILK(Ex. PLU
# 302) for customer A.
1 - ZERO 2 - NET 3 - V1 4 - V2 5 - V3 6 - V4
OPERATION KEYS PT kg Kg $/kg $ 1 2 3 4 5 6
Stand-by-status. 0.0 0 0 0.0 0 0 0.0 0 0.0 0
Enter the PLU No. of the HERB CHEESE [3][PLU] 0.0 0 0 0.0 0 0 5.0 0 0.0 0
Place the product on the platter. (1.5kg) 0.0 0 0 1.5 0 0 5.0 0 7.5 0
Register sales item to Vender1. [V1] -V1- TOTAL 1PCS 7.5 0
[C] 0.0 0 0 0.0 0 0 0.0 0 0.0 0
Enter the PLU No. of the SKIM MILK [3][0][2][PLU] 3.0 0 PR-PCS
Enter the sell Qty (Ex. 2 packs) [X][2] QTY 2 3.0 0 6.0 0
Register sales item to Vender1. [V1] -V1- TOTAL 3PCS 13.5 0
Print out one total label. [*] 0.0 0 0 0.0 0 0 0.0 0 0.0 0
Page 97

SM 110 REGISTRATION MODE
92
4.8.2 [PRICE DISCOUNT] Function Key in Add Mode
This function key is used to get the desirable discounted total price in Add. Mode by subtracting the
discount value from the original total price when issuing total label or receipt. The formula is shown as
follows
PRICE TO PAY = ORIGINAL TOTAL PRICE - ENTERED DISCOUNT VALUE
Note: Prior to this operation, [PRICE DISCOUNT] Function should be assigned to Preset Key in
advance (Ex. Assign to Preset Key No.2).
1 - ZERO 2 - NET 3 - V1 4 - V2 5 - V3 6 - V4
OPERATION KEYS PT kg Kg $/kg $ 1 2 3 4 5 6
Stand-by-status. 0.0 0 0 0.0 0 0 0.0 0 0.0 0
Enter the PLU No. of the Beef steak. [1] [0] 0.0 0 0 0.0 0 0 0.1 0 0.0 0
Press PLU key. [PLU] 0.0 0 0 0.0 0 0 1.20 0.0 0
Place the product on the platter. (e.g. 1kg) 0.0 0 0 1.0 0 0 1.20 1.2 0
Register sales item to Vender1. [V1] -V1- TOTAL 1PCS 1.2 0
Press [P2] key. [P2] -V1- DISC 0.00
Enter discount value. (Ex.$0.20) [2] [0] -V1- DISC 0.20
Confirm. [*] -V1- TOTAL 1PCS 1.00
[C] 0.0 0 0 0.0 0 0 0.0 0 0.0 0
4.8.3 [PRICE % DISCOUNT] Function Key in Add Mode
This function key is used to get the desirable discounted total price in Add Mode by setting the
discount % value from the original total price when issuing total label or receipt. The formula is shown
as follows
PRICE TO PAY = ORIGINAL TOTAL PRICE x (100% - DISCOUNT % VALUE)
Note: Prior to this operation, [PRICE % DISCOUNT] Function should be assigned to Preset Key in
advance (Ex. Assign to Preset Key No.3).
1 - ZERO 2 - NET 3 - V1 4 - V2 5 - V3 6 - V4
OPERATION KEYS PT kg Kg $/kg $ 1 2 3 4 5 6
Stand-by-status. 0.0 0 0 0.0 0 0 0.0 0 0.0 0
Enter the PLU No. of the Beef steak. [1] [0] 0.0 0 0 0.0 0 0 0.1 0 0.0 0
Press PLU key. [PLU] 0.0 0 0 0.0 0 0 1.20 0.0 0
Place the product on the platter. (e.g. 1kg) 0.0 0 0 1.0 0 0 1.20 1.2 0
Register sales item to Vender1. [V1] -V1- TOTAL 1PCS 1.2 0
Press [P3] key. [P1] -V1- DISC RATE 0.00
Enter discount rate. (Ex.10%) [1] [0] [0] [0] -V1- DISC RATE 10.00
Confirm. [*] -V1- TOTAL 1PCS 1.08
[C] 0.0 0 0 0.0 0 0 0.0 0 0.0 0
Page 98
SM 110 REGISTRATION MODE
93
4.9 Data Correction
The data correction during accumulating operation is to correct sales transaction data when customer
canceled the purchases or operators make a mistake before issuing Total Label or Receipt. The
corrected item data is printed with two lines crossed on the Total Receipt.
SM-100 has 2 correcting functions as follows:
1) On-the-spot Correction
Is to void the last item data during accumulating operation.
2) Void by Item Correction
Is to void sales data by tracing transaction number during accumulating operation.
4.9.1 On The Spot Correction
This function is to void the last item data of an accumulating operation, when an operator noticed it
was a mistake or a customer canceled purchase before issuing a Receipt or Total Label. It is effective
for either weighed or non-weighted item in the last transaction.
Transaction Example
Vender 1: (1) 1kg of BEEF STEAK.
(2) One pack of Smoked Sausage.
(3) More 5kg of BEEF STEAK.
But customer canceled 5kg of BEEF STEAK accumulated in the last operation.
1 - ZERO 2 - NET 3 - V1 4 - V2 5 - V3 6 - V4
OPERATION KEYS PT kg Kg $/kg $ 1 2 3 4 5 6
Stand-by-status. 0.0 0 0 0.0 0 0 0.0 0 0.0 0
Enter the PLU No. of the Beef Sirloin. [1] [0] [PLU] 0.0 0 0 0.0 0 0 1.2 0 0.0 0
Place the product on the platter. (e.g. 1kg) 0.0 0 0 1.0 0 0 1.2 0 1.2 0
Register sales item to Vender1 [V1] -V1- TOTAL 1PCS 1.2 0
Remove the product from the platter. 0.0 0 0 0.0 0 0 0.0 0 0.0 0
Enter the PLU No. of the Smoked Sausage. [3] [0] [PLU] 2.5 0 PR-PCS
Register sales item to Vender1 [V1] -V1- TOTAL 2PCS 3.7 0
Enter the PLU No. of the Beef Sirloin. [1] [0] [PLU] 0.0 0 0 0.0 0 0 1.2 0 0.0 0
Place the product on the platter. (e.g. 5kg) 0.0 0 0 5.0 0 0 1.2 0 6.0 0
Register sales item to Vender1 [V1] -V1- TOTAL 3PCS 9.7 0
Delete the last item entry. [-] -V1- TOTAL 2PCS 3.7 0
[C] 0.0 0 0 0.0 0 0 0.0 0 0.0 0
Page 99

SM 110 REGISTRATION MODE
94
4.9.2 Void by Item Correction
This function is to void the specified transaction during an accumulating operation. Operator can
designate the number of transaction to be voided even if plural transactions for the same item are
performed.
Transaction example
Vender 1: (1) 1kg of BEEF STEAK.
(2) One pack of Smoked Sausage.
(3) More 5kg of BEEF STEAK.
But customer canceled One pack of Smoked Sausage in the 2nd transaction.
1 - ZERO 2 - NET 3 - V1 4 - V2 5 - V3 6 - V4
OPERATION KEYS PT
kg
Kg $/kg $ 1 2 3 4 5 6
Stand-by-status. 0.0 0 0 0.0 0 0 0.0 0 0.0 0
Enter the PLU No. of the Beef Sirloin. [1] [0] [PLU] 0.0 0 0 0.0 0 0 1.2 0 0.0 0
Place the product on the platter. (e.g. 1kg) 0.0 0 0 1.0 0 0 1.2 0 1.2 0
Register sales item to Vender1 [V1] -V1- TOTAL 1PCS 1.2 0
Remove the product from the platter. [C] 0.0 0 0 0.0 0 0 0.0 0 0.0 0
Enter the PLU No. of the Smoked Sausage. [3] [0] [PLU] 2.5 0 PR-PCS
Register sales item to Vender1 [V1] -V1- TOTAL 2PCS 3.7 0
Enter the PLU No. of the Beef Sirloin. [1] [0] [PLU] 0.0 0 0 0.0 0 0 1.2 0 0.0 0
Place the product on the platter. (e.g. 5kg) 0.0 0 0 5.0 0 0 1.2 0 6.0 0
Register sales item to Vender1 [V1] -V1- TOTAL 3PCS 9.7 0
[C] 0.0 0 0 0.0 0 0 0.0 0 0.0 0
Delete the selected item. [-] VD 1 1PCS 1.2 0
[<<] or [>>] to search the item. [>>] VD 2 1PCS 2.5 0
Delete the selected item. [*] 0.0 0 0 0.0 0 0 0.0 0 0.0 0
Check Vender1 sale total. [V1] -V1- TOTAL 2PCS 7.2 0
[C] 0.0 0 0 0.0 0 0 0.0 0 0.0 0
Page 100

SM 110 REGISTRATION MODE
95
4.10 Item Label Printing in Pre-pack Mode
Pre-pack Mode can be switched from Manual mode by pressing [AUTO] key. In this mode, the
following functions are available,
(1) For weighing item, label is automatically issued (without pressing [*] key) after the weight
of the item gets stable. The machine keeps the PLU data until [C] key is pressed.
(2) For non-weighing item, the next label is automatically issued (without pressing [*] key) after
a label is taken away. The machine keeps the PLU data until [C] key is pressed.
4.10.1 Item Label Issue for PLU Item
For example:
To weighing (Ex. 1kg) 20 packs of FRIED POTATOES (Weighing Item, PLU #8)
1 - ZERO 2 - NET 3 - FIX T 4 - FIX P 5 - PREPACK 6 - LABEL
OPERATION KEYS PT kg Kg $/kg $ 1 2 3 4 5 6
Stand-by-status. 0.0 0 0 0.0 0 0 0.0 0 0.0 0
Press [AUTO] key [AUTO] 0.0 0 0 0.0 0 0 0.0 0 0.0 0
Enter the PLU No. of the FRIED
POTATOES (Ex. PLU#8).
[8][PLU] 0.0 0 0 0.0 0 0 2.2 3 0.0 0
Place the product on the platter. (e.g. 1kg) (The
label automatically issued)
0.0 0 0 1.0 0 0 2.2 3 2.2 3
Remove the product from platter and take the
label off..
0.0 0 0 0.0 0 0 2.2 3 0.0 0
Repeat the above 3 and 4 step to weighing the
next pack, until the last packed is weighed.
0.0 0 0 0.0 0 0 0.0 0 0.0 0
For example:
issue 20 labels of SMOKED SAUSAGE (Non-Weighing Item, PLU #30).
1 - ZERO 2 - NET 3 - FIX T 4 - FIX P 5 - MANUAL 6 - LABEL
OPERATION KEYS PT kg Kg $/kg $ 1 2 3 4 5 6
Stand-by-status. 0.0 0 0 0.0 0 0 0.0 0 0.0 0
Enter the PLU No. of the Smoked Sausage. [3] [0] [PLU] 2.5 0 PR-PCS
Prepare to issue label for non-weighing item. [*] LABEL NUMBER 1
Enter number of labels to be printed, e.g. 20 [2][0] LABEL NUMBER 2 0
Print out the first label… [*] LABEL COUNT 2 0
Print out the second label… *Note LABEL COUNT 1 9
……
Print out the last label. LABEL COUNT 1
Stand-by-status. 0.0 0 0 0.0 0 0 0.0 0 0.0 0
Note1: To cancel printing, depress C key.
 Loading...