

Page 1

Digi Remote Manager
Version 3.0
Help
Page 2

Revision history—Digi Remote Manager 3.0 Help
Date Description
February2021 See What's new in February 2021 for details.
Trademarks and copyright
Digi, Digi International, and the Digi logo are trademarks or registered trademarks in the United
States and other countries worldwide. All other trademarks mentioned in this document are the
property of their respective owners.
© 2021 Digi International Inc. All rights reserved.
Disclaimers
Information in this document is subject to change without notice and does not represent a
commitment on the part of Digi International. Digi provides this document “as is,” without warranty of
any kind, expressed or implied, including, but not limited to, the implied warranties of fitness or
merchantability for a particular purpose. Digi may make improvements and/or changes in this manual
or in the product(s) and/or the program(s) described in this manual at any time.
Warranty
To view product warranty information, go to the following website:
www.digi.com/howtobuy/terms
Customer support
Gather support information: Before contacting Digi technical support for help, gather the following
information:
Product name and model
Product serial number (s)
Firmware version
Operating system/browser (if applicable)
Logs (from time of reported issue)
Trace (if possible)
Description of issue
Steps to reproduce
Contact Digi technical support: Digi offers multiple technical support plans and service packages.
Contact us at +1 952.912.3444 or visit us at www.digi.com/support.
Feedback
To provide feedback on this document, email your comments to
Digi Remote Manager 3.0 Help
2
Page 3

techcomm@digi.com
Include the document title and part number (Digi Remote Manager 3.0 Help, 90002349 A) in the
subject line of your email.
Digi Remote Manager 3.0 Help
3
Page 4

Contents
Welcome
What's new in February 2021 7
New features 7
Enhancements 8
Resolved issues 9
About Digi Remote Manager 10
Quick start 10
Menus and icons 10
Search and filters for lists 13
Simple search 13
Advanced filter 13
Export data as CSV 15
Copy device ID to clipboard 15
Select table spacing 15
Select how to display device ID 16
User menu options 16
Subaccounts menu 17
Dashboard
Connection status 18
Health status 19
Alerts 20
Signal strength 21
IPsec status (1-4) 21
Inventory status 21
Customize your dashboard 21
Devices
Add or remove device list columns 23
Export device list to CSV 24
Show devices on map 24
Add a device 24
Remove a device 25
Refresh device information 25
Reboot a device 25
Ping a device 25
Update device firmware 26
Turn on/off maintenance mode 26
Digi Remote Manager 3.0 Help
4
Page 5

View and edit device details 27
Edit device configuration 28
View device summary dashboard 28
View and manage device files 29
Use a device console 29
View configuration scan history 30
Organize devices: groups, tags, and notes 30
Device groups 30
Device tags 30
Device notes 30
Create device groups 31
Add devices to a group 31
Edit a device group name 31
Remove a device from a device group 32
Show or hide device groups 32
Add or edit device tags 32
Add or edit device notes 32
Configurations
Configurations, device types, and groups 33
When are devices scanned? 34
Create a configuration 35
Include device overrides in a configuration 38
Include file systems in a configuration 38
Schedule automatic scans 38
View configuration status 39
View configuration scan history for a device 40
Alerts
View alert details and alert definition 41
View the status history of an alert 43
Acknowledge an alert 43
Reset an alert 43
Activities
Job details 44
Users
User roles 45
User information 45
Add a user 46
Edit a user 46
Change password 47
Remove a user 47
API explorer
Get a list of available v1 APIs 47
Digi Remote Manager 3.0 Help
5
Page 6

Get an API summary 48
Copy and paste a device ID 48
Get help 49
Previous release notes
What's new in November/December 2020 50
New features 50
Enhancements 50
Security issue 51
Resolved issues 51
November hotfix 52
December hotfix 52
What's new in August 2020 52
New features 53
Enhancements 53
Resolved issues 54
What's new in June 2020 55
Features and enhancements 55
Known issues 56
Resolved issues 56
Security-related issues 56
What's new in October 2019 56
Display device configuration as a tab in Device Details view 56
Improved search options: simple and advanced 57
Display the total number of selected items within all table displays 57
Replaced column text headings with icons 57
Added export options for table views 58
Added options for custom table spacing 58
Added toggle for device ID display in tables: friendly or full 59
Digi Remote Manager 3.0 Help
6
Page 7

Welcome
It’s Official! Welcome to the new Digi Remote Manager®!
We are taking the Digi RM platform to the next level with a focus on usability, functionality, and
management, so that you can focus on your business needs. Here you will see all the new features for
the Digi RM Platform. The classic UI has not gone away. You still have the ability to use the classic UI
by clicking your username in the upper right-hand corner and then clicking Open Classic Remote
Manager.
Click What's new in February 2021 for details on what's new in this release.
Click Quick start for a walk-through of the new Digi Remote Manager.
What's new in February 2021
Welcome to the new Digi Remote Manager®! We've focused on Remote Manager usability and
functionality so you can focus on your business needs. You can, however, still use classic Remote
Manager:Click your username in the upper right-hand corner and select Open Classic Remote
Manager.
This release provides features, enhancements, and general fixes. There are no security-related fixes in
this release.
New features
Enhancements
Resolved issues
New features
n Sub-account views: If you are a primary account user, you can remove subaccounts and
identify the account owner.
n Automations: Create custom tasks and scripts for target devices to run immediately or on a
custom schedule. See the results of the automations as a quick summary or drill down for
details.
n Useability enhancements and fixes: We've incorporated customer feedback to continually
improve your Remote Manager experience. To provide feedback to our team, click on your
username in the upper right, and select Feedback.
Digi Remote Manager 3.0 Help
7
Page 8

Welcome What's new in February 2021
Enhancements
n Added ws/v1/automations web services to create, update, and delete automations, scheduled
automations, as well as retrieve run results. In the API Explorer, use GET ws/v1/automations
to see all automations web services. Note that if an account does not include the Device
Automations service or the service has ended, all scheduled automations are automatically
disabled.
n Automation steps are referenced by 1-based indexing, so step 1 is the first step.
n An automation can sleep (or pause) for a maximum of 3 days.
The sleep step accepts a “value” parameter of the form “2s”, “2m”, “2h”
or “2d” to sleep for 2 seconds, minutes, hours or days respectively. If no
suffix character is used, the sleep value is interpreted as seconds.
n Use automations to manage a subset of device properties: tags, description,
notes, maintenance_mode, and group.
n Exposed additional parameter for RCI cache step in automations (cache_mode)
to allow selectable cache behavior with values of: use_cache, ignore_cache,
cache_only. The RCI step uses the ignore_cache mode by default so requests go
to the device.
n Added the DELETE /ws/v1/subaccounts/inventory/{id} web service to delete subaccounts. By
default, devices within a subaccount are moved to the parent account. You can delete devices
when you delete a subaccount using the delete_devices parameter.
DELETE /ws/v1/subaccounts/inventory/{id}?delete_devices=true
If devices exist in the subaccount, the default action is to move them to the parent
account. To delete them instead, specify delete_devices=true.
Note that the DELETE /ws/v1/subaccounts/inventory/{id} web service starts a
background job. The web service returns a context_id HTTP header. Use the value of
the context_id header to query the context_id field of /ws/v1/events/inventory to find
events recording the progress of the deletion. For example, to find the status of a
previously submitted delete request less than 10 minutes ago:
/ws/v1/events/inventory?query=context_id=‘xxxxxxxx-xxxx-xxxx-xxxxxxxxxxxxxxxx’&start_time=-10m.
n Added the GET /ws/v1 to get a list of available web services.
n Added ability to perform bulk import/update devices with a csv file and provided an example
CSV file to download.
n Corresponding data streams page is linked from the data streams tab in device details.
n Added priority text and icon to the slide-in notifications menu.
n Added an id field to the ws/v1/events/inventory web service to uniquely identify an event log
entry.
n Provide more details in the RCI request error message when the problem is related to device
descriptors.
n Improved message returned when a user tries to register more devices than the license limit
for the account.
Digi Remote Manager 3.0 Help
8
Page 9

Welcome What's new in February 2021
Resolved issues
n Fixed an issue with displaying more than 100 users within the user list.
n Fixed an issue where some configuration settings were not being applied to DigiIX/TX devices
when the settings were not exposed by the conditional/dependsVal setting. The hidden
settings are not managed by the config anymore, so the system will not try to apply them to a
device (if they are not visible in the UI).
n Fixed lack of error message for decimal input in integer fields.
n Fixed a bug that caused the csv export of the data streams table to fail when sorting by
Stream ID. Fixed a bug that prevented the data streams table from being sorted properly.
n Fixed a problem with Add Group validation.
n Fixed a problem with the next_uri field for the paging related /ws/v1/notifications/* web
services. The next_uri field would sometimes have two cursor values in it and would not
correctly URL-encode the output cursor values.
n Fixed a problem with the 'Firmware Status' column in the device list. Devices running the latest
firmware may have shown a firmware status of ‘Non Production’. Now they will show ‘Up to
Date’ as intended.
n Fixed a problem that caused a query_state request to fail when a device listed a cellular sim
with an invalid phone number of a certain format.
For previous release notes, see Previous release notes.
Digi Remote Manager 3.0 Help
9
Page 10

About Digi Remote Manager
Digi Remote Manager is a cloud-based device management and data enablement platform that
makes it easy to connect your application to the data on which your business relies. With Digi Remote
Manager, you can efficiently interact with any device or device data in your Remote Manager
inventory. You can:
n Ensure your devices are up to date by automatically applying security patches, firmware, and
configurations.
n Monitor the state of all of your devices to quickly identify, assess, and respond to issues.
n Set up custom alerts to inform you that an issue requires your attention.
n Automate remediation for devices out of compliance.
n Deploy application logic to any devices, such as routers and gateways.
Quick start
When you log into Digi Remote Manager 3, the dashboard appears.
Screen item Desciption
Show/hide menu
Menu
User menu User account options.
Tools Tools available for the current option.
Display area
Menus and icons
Digi Remote Manager uses the following icons throughout the interface.
Digi Remote Manager 3.0 Help
Toggle to show/hide the main menu.
Digi Remote Manager options.
Display area for the current option.
10
Page 11

Menus
Icon Description
Activity
Alerts
Dashboard
Menus and icons
Icons
Icon Description
Add
Advanced search on/off toggle
Barchart
Column selector
Devices
Users
Digi Remote Manager 3.0 Help
Configuration
11
Page 12

Icon Description
Menus and icons
/
Success
Pending
Failed
Connection status
Connected
Disconnected
Copy to clipboard
Dark mode/Light mode
Delete/cancel
Disconnected
Download
Edit
Groups
Health status
Home
Job status
List view
Lock
Maintenance mode
Map view
Connected devices
Disconnected devices
Never connected devices
Menu
More actions (Select Columns, Export as CSV, and so on)
Refresh
Save
Search
Table view
Trash
Unlock
Upload
Digi Remote Manager 3.0 Help
12
Page 13

Icon Description
Search and filters for lists
User
Users
Search and filters for lists
Many Digi Remote Manager pages display lists—device lists, user lists, alerts lists, and so on. There are
two modes for filtering lists: simple and advanced.
You toggle between simple and advanced using the following button:
Simple search
When you use the simple search, you can enter any text free-form. Remote Manager searches all
columns using your search string. If you toggle to advanced search, Remote Manager converts the
simple search to an advanced filter. For example, if you searched for "mydevice" and then toggle to
advanced search, Remote Manager displays the followings:
You can then edit the filter as needed. See Advanced filter.
Advanced filter
You can filter lists using relevant attributes, and you can build complex filters by combining multiple
filters.
Note Filters apply to all list columns, both displayed and hidden.
Toggle to advanced search:
Filter lists using attributes and comparison operators
Each Digi Remote Manager list page offers a set of attributes associated with the list items. For
example, device attributes include name, description, notes, and so on. User attributes include user
name, role, policies, and so on.
Digi Remote Manager 3.0 Help
13
Page 14

Search and filters for lists
Once you select an attribute to use as a filter, add a comparison operator and a value.
Use any of the following comparison operators:
Operator Description
= Equal to
Note This is the default comparison operator. That is, if you don't specify a comparison,
Remote Manager uses =.
> Greater than
< Less than
>= Greater than or equal to
<= Less than or equal to
<> Not equal to
Note Values are not case sensitive. For example, Warning, WARNING, and warning are equivalent.
For example, to create a filter that returns all devices with a Health Status equal to warning:
1. Click in the filter bar and select Health Status.
2. Type warning.
3. Press Enter.
Build a complex filter using logical operators AND/OR
You can combine multiple filters together to build one complex filter. For example, to view all devices
with a Health Status of warning and a Connection Status of connected:
Digi Remote Manager 3.0 Help
14
Page 15

Toggle between AND and OR
By default, each additional filter you enter is joined to the existing filter by the AND operator. Toggle
between AND and OR by clicking on AND or OR within the filter.
Edit or delete a filter
n To edit a filter, click .
n To delete a filter, click . Or use BACKSPACE to remove one or more filters.
Export data as CSV
You can export all the data in a view to a CSV file. The export includes all objects in the current view.
If you filter a view, the export includes only the objects included in the filtered view.
To export data to a CSV file
1. Click Devices, Activity, or Users.
2. If you want to filter the display before exporting, use either a simple search or advanced filter
to display a set of objects.
3. Click and select Export as CSV.
Export data as CSV
Copy device ID to clipboard
When a device ID is displayed in table data, you can copy the device ID to the clipboard.
To copy the device ID to the clipboard
1. Click Devices.
2. Click . The full device ID is copied to your clipboard.
Select table spacing
You can select the amount of space (leading) used to display table data: Compact, Comfy, or Roomy.
The default is Comfy.
The table spacing you select is used as the default table spacing for all Remote Manager displays.
To select table spacing
Digi Remote Manager 3.0 Help
15
Page 16

1. Click Devices, Activity, or Users.
2. Click and select Table Preferences > Table Spacing.
3. Select the amount of spacing to use: Compact, Comfy, or Roomy.
Select how to display device ID
You can select to display the full device ID or a shortened (friendly) device ID in table displays.
Note Regardless of the device ID display (friendly or full), the Copy device id copies the full device ID
to the clipboard.
To select how device IDs are displayed in tables
1. Click Devices.
2. Click and select Table Preferences > Device ID.
3. Select Friendly or Full.
User menu options
The upper-right corner of the display includes the User menu:
Select how to display device ID
From the User menu, you can:
n Get help
n Open Classic Remote Manager
n Provide Feedback for the Remote Manager service
n Display the What's New dialog
n Toggle dark mode on or off
n Change your password
n Edit your user profile
n Logout
Digi Remote Manager 3.0 Help
16
Page 17

Subaccounts menu
Note Only users assigned an administrator role can view and manage subaccounts. At this time, the
new Remote Manager allows administrators the ability to scope using subaccounts. To create and
manage subaccounts, return to classic Remote Manager. See About subaccounts for more
information.
The upper-right corner of the display includes the Subaccounts menu:
Subaccounts menu
From the Subaccount menu, you can set the subaccount for your Remote Manager session.
When you set the subaccount, Remote Manager displays devices and processes for that subaccount
only.
Digi Remote Manager 3.0 Help
17
Page 18

Dashboard
The Dashboard shows device health and status information charts:
Connection status
Health status
Alerts
Signal strength
IPsec status (1-4)
Inventory status
Each chart is a widget you can include or exclude, position, and size on your dashboard. See Customize
your dashboard.
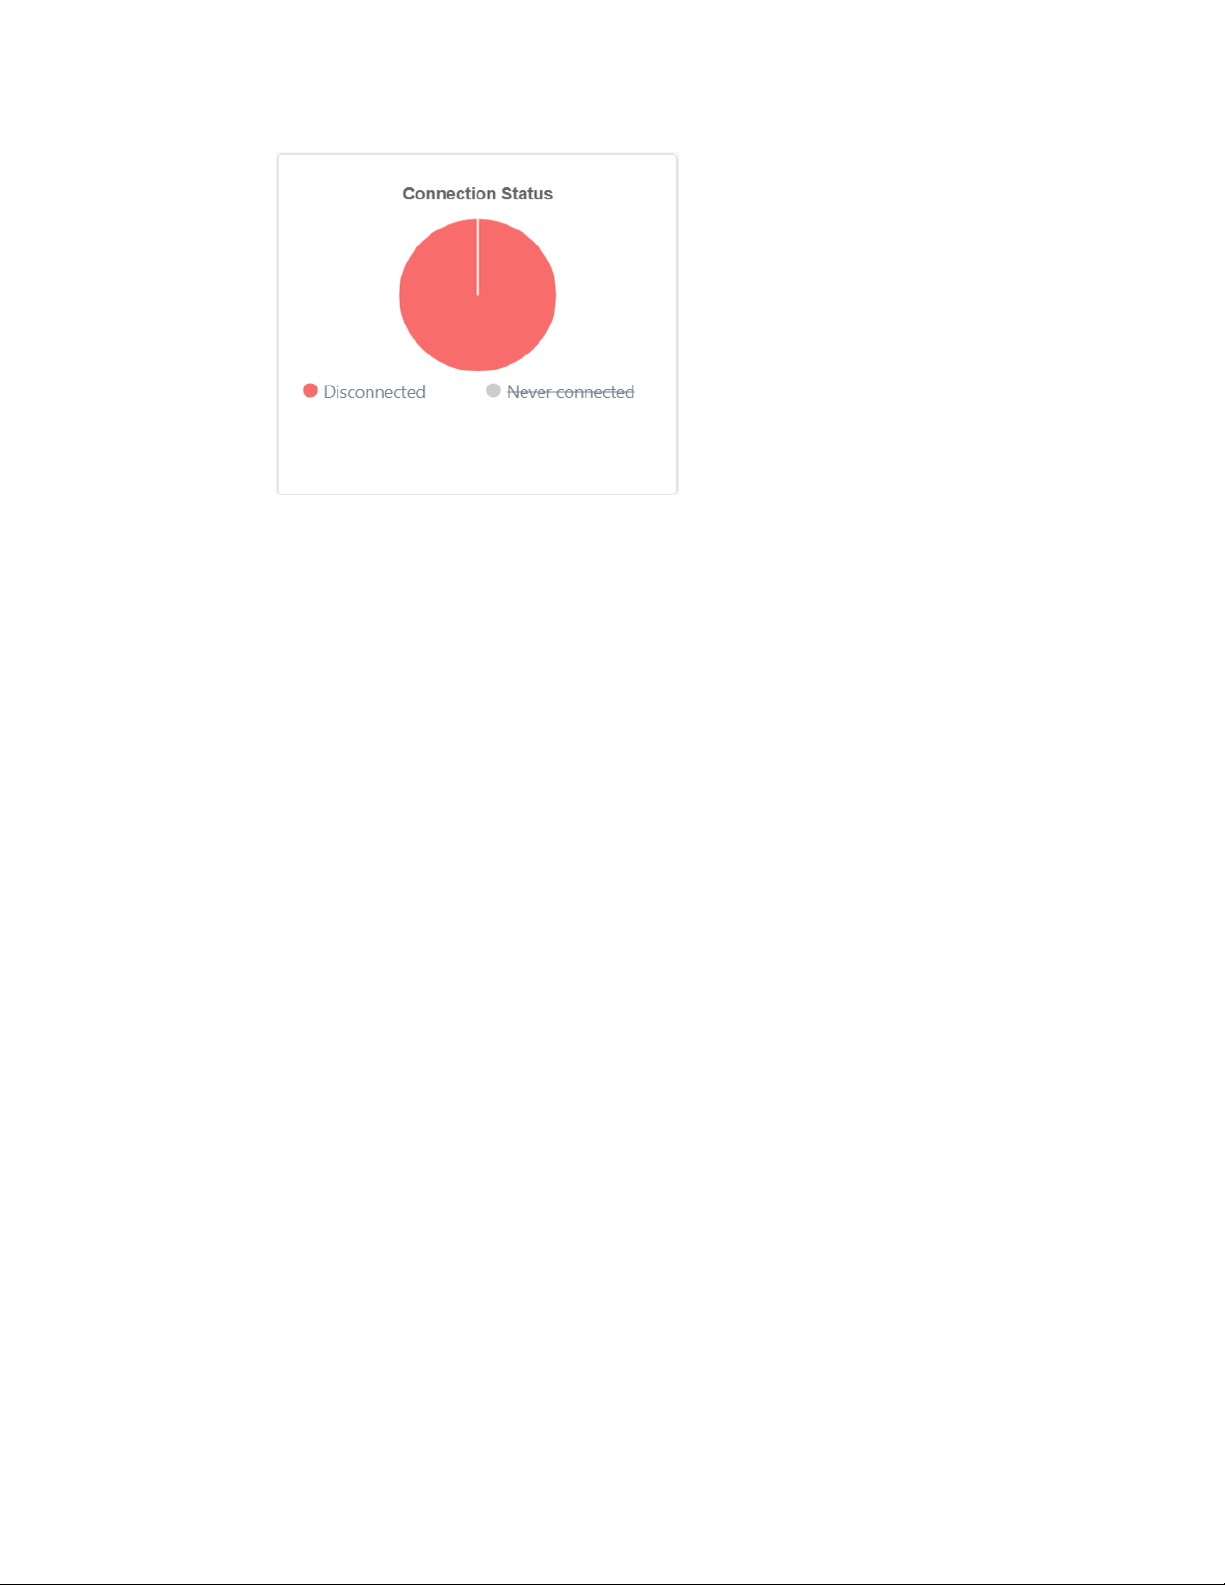
Connection status
Connection status shows a summary of the number of devices connected, disconnected, or never
connected. Never connected denotes a registered device that has not yet connected to Remote
Manager.
To filter data included in the chart
n Click a status label beneath the chart to include or exclude that status. For example, to exclude
the devices with a status of Never connected, click the Unknown label:
Digi Remote Manager 3.0 Help
18
Page 19
Dashboard Health status
To view filtered device list represented in a chart view
You can immediately jump to the Devices page filtered by the devices represented within a chart.
For example, if you want to see the list of all connected devices, click on the Connected slice of the
Connection status chart. The Devices page displays filtered by connected devices.
Health status
Health status shows a summary of the health of all devices in your inventory. Health status is
determined by a set of metrics reported by your devices. Sample health metrics include cellular signal
strength and quality, CPU and memory usage, and local network performance statistics.
The overall health of a device is reported as an aggregate of all health metrics for the device:
n Normal: All health metrics for the device are within configured normal thresholds.
n Warning: At least one health metric for the device is within a configured warning threshold,
and no health metrics are within a configured error threshold.
n Error: At least one health metric for the device is within a configured error threshold.
n Unknown: Device health information is not found and the device state is unknown.
To filter data included in the chart
n Click a status label beneath the chart to include or exclude that status. For example, to exclude
the devices with a status of Unknown, click the Unknown label:
Digi Remote Manager 3.0 Help
19
Page 20

Dashboard Alerts
To view filtered device list represented in a chart view
You can immediately jump to the Devices page filtered by the devices represented within a chart.
For example, if you want to see the list of all connected devices, click on the Connected slice of the
Connection status chart. The Devices page displays filtered by connected devices.
Alerts
Alerts shows a summary of all alert events by alert type:
n Device offline
n Device heath
n Dia channel data point condition match
n Smart energy data point condigion match
n Device offline
n Other
To filter data included in the chart
n Click a status label beneath the chart to include or exclude that status. For example, to exclude
the devices with a status of Other, click the Other label:
To view filtered device list represented in a chart view
You can immediately jump to the Devices page filtered by the devices represented within a chart.
For example, if you want to see the list of all connected devices, click on the Connected slice of the
Connection status chart. The Devices page displays filtered by connected devices.
Digi Remote Manager 3.0 Help
20
Page 21

Dashboard Signal strength
Signal strength
Signal strength shows a bar graph with the reported signal strength percentage of all devices in your
inventory.
To view filtered device list represented in a chart view
You can immediately jump to the Devices page filtered by the devices represented within a chart.
For example, if you want to see the list of all connected devices, click on the Connected slice of the
Connection status chart. The Devices page displays filtered by connected devices.
IPsec status (1-4)
IPsec status charts show the current status of an IPsec tunnel/VPN: Upstatus of Connection status
shows a summary of the number of devices connected, disconnected, or never connected. Never
connected denotes a registered device that has not yet connected to Remote Manager.
Inventory status
Inventory status shows four summary charts to give you a quick, at-a-glance summary of your device
inventory:
n Total devices
n Connected devices
n Disconnected devices
n Devices in maintenance mode
Customize your dashboard
To add a widget to your dashboard
1. Click .
2. Select Add Widget to display the list of available dashboard widgets.
3. Select the widget you want to add to the display.
4. Click to save your edits.
To remove a widget from your dashboard
Digi Remote Manager 3.0 Help
21
Page 22

Dashboard Customize your dashboard
1. Click .
2. Each widget is now in edit mode.
3. In the top right of the widget you want to remove, click .
4. Click to save your edits.
To change the size and position of dashboard widgets
1. Click .
2. Resize and position each of the widgets in your dashboard.
3. When you are finished adjusting the layout, click to save your edits.
Digi Remote Manager 3.0 Help
22
Page 23
Devices
The Devices page lists all devices registered in your Remote Manager account.
Add or remove device list columns
Using filters
Export device list to CSV
Add a device
Remove a device
Refresh device information
Reboot a device
Ping a device
Update device firmware
Turn on/off maintenance mode
Edit device configuration
View and edit device details
View device summary dashboard
View and manage device files
Use a device console
Organize devices: groups, tags, and notes
Add or remove device list columns
You can configure the columns to include in the device list page.
To add or remove device list columns
Digi Remote Manager 3.0 Help
23
Page 24

Devices Export device list to CSV
1. Click Devices.
2. Click and select Select Columns.
3. Select the columns to include in the display.
4. To change the order of the columns, click and drag the (Reorder column selector) for a
column and position it to a new location in the list.
5. Click Close.
Export device list to CSV
You can export the device list to CSV:
To export the device list
1. Click Devices.
2. Click and select Export to CSV.
Show devices on map
You can show devices as pins on a map and you can filter the devices you want to plot on the map.
Note Only devices that have connected to Remote Manager can be shown. Remote Manager cannot
plot devices that have never connected.
To show devices on a map
1. Click Devices.
2. Click .
3. You can select Map (with or without Terrain) or Satellite (with or without labels).
4. To switch back to the List view, click .
Add a device
To manage a device, add the device to your Remote Manager inventory. Once a device is in your
inventory, you can view and manage the device using any Remote Manager feature.
Note At this time, the Remote Manager 3 interface allows you to add only one device at a time. If you
want to quickly add multiple devices or add multiple devices using an uploaded file, use the Remote
Managerclassic interface.
To add a device
1. Click Devices.
2. Click Add Device.
Digi Remote Manager 3.0 Help
24
Page 25

Devices Remove a device
3. Enter device information, and click Add Device.
Remove a device
If you no longer need to monitor or manage a device in your Remote Manager inventory, you can
remove the device from Remote Manager.
To remove a device
1. Click Devices.
2. Select one or more devices to remove.
3. Click Actions, and select Remove.
4. Click Remove.
Refresh device information
The device list automatically refreshes every ?? seconds.
To refresh device information
1. Click Devices.
2. Click .
Reboot a device
To reboot one or more devices
1. Click Devices.
2. Select one or more devices to reboot.
3. Click Actions, and select Reboot.
4. Click Reboot.
Ping a device
You can ping a device from your Remote Manager account to determine the round trip latency of a
device connection. The result gives the actual time used to send a simple command to the device and
Digi Remote Manager 3.0 Help
25
Page 26

Devices Update device firmware
receive a reply.
To ping a device
1. Click Devices.
2. Select one or more devices to ping.
3. Click Actions, and select Ping.
4. Click Ping.
Update device firmware
You can update device firmware on one or more devices in two ways:
n Update using a firmware file available in the Remote Manager firmware repository.
n Update using a firmware file on you local device. Visit Digi firmware to get a firmware file not
available in the Remote Manager firmware repository.
To update firmware
1. Click Devices.
2. Select one or more devices to update.
3. Click Actions > Update Firmware.
4. For each selected device, specify an available firmware file, Upload Firmware File, or Skip this
update.
Note If the firmware file is not available in the Remote Manager firmware repository,
download firmware available at Digi firmware.
5. Click Update.
To view the status of device firmware updates
n Click Activities
Each update is represented as a job in the Activities page.
Turn on/off maintenance mode
In Remote Manager, devices can be put into maintenance mode. When a device is in maintenance
mode, alerts for the device fire and reset, but alert notifications for the device are not sent. Devices in
maintenance mode show a in the Connection Status column and the message Maintenance Mode
On in device details for connection status.
Note Devices in maintenance mode are excluded from all dashboard charts.
To turn on maintenance mode for a device
1. Click Devices.
2. Select a device.
Digi Remote Manager 3.0 Help
26
Page 27

Devices View and edit device details
3. Click Actions > Turn On Maintenance Mode.
4. Click Turn On.
5. If you want to turn on Maintenance mode for additional devices, repeat steps 1 - 4 for each
device.
To turn off maintenance mode for a device
1. Click Devices.
2. Select the device.
3. Click Actions > Turn Off Maintenance Mode. All alerts for the device, if any, are displayed.
n If you want to Acknowledge or Reset one or more of the device alerts, select the alerts
and actions from this dialog.
n If you need to review alert details before you turn off maintenance mode, click Review
Alerts to go to the Alerts page filtered for the selected device. When you've finished
viewing alert details, click Details to return to the Details page, and then click Actions >
Turn Off Maintenance Mode.
4. Click Turn Off.
5. If you want to turn off Maintenance mode for additional devices, repeat steps 1 - 4 for each
device.
View and edit device details
Device details include:
n Device metadata: Device Name, Notes, Group, and Tags. You can edit device metadata for
connected and disconnected devices and the data is stored in Remote Manager, not on the
device.
n Device status: Connection Status, Device ID, Model, Primary IP, Firmware Version, MAC
Address, and Health Status.
n Device alerts: Lists of fired alerts for the device. Click on an alert to view the alert in the Alerts
page.
Digi Remote Manager 3.0 Help
27
Page 28

Devices View and edit device details
To view device details
1. Click Devices.
2. In the device list, double-click the device you want to view.
Edit device configuration
To edit the configure for a device
1. Click Devices.
2. Double-click the device you want to configure.
3. Click Configuration.
4. Edit configuration settings as needed.
5. Click Apply.
View device summary dashboard
The device summary dashboard shows bar and table charts for the device connection history.
To view the device summary dashboard
1. Click Devices.
2. In the device list, double-click the device you want to view.
3. Click Summary Dashboard.
n To view a bar chart of connection history, click .
n To view tabular data for connection history, click .
Digi Remote Manager 3.0 Help
28
Page 29
Devices View and edit device details
View and manage device files
For devices that provide a file system, Remote Manager allows you to view and manage device files
for connected devices. If you attempt to view files for a device that is not currently connected to
Remote Manager, the message Device Not Connected is displayed.
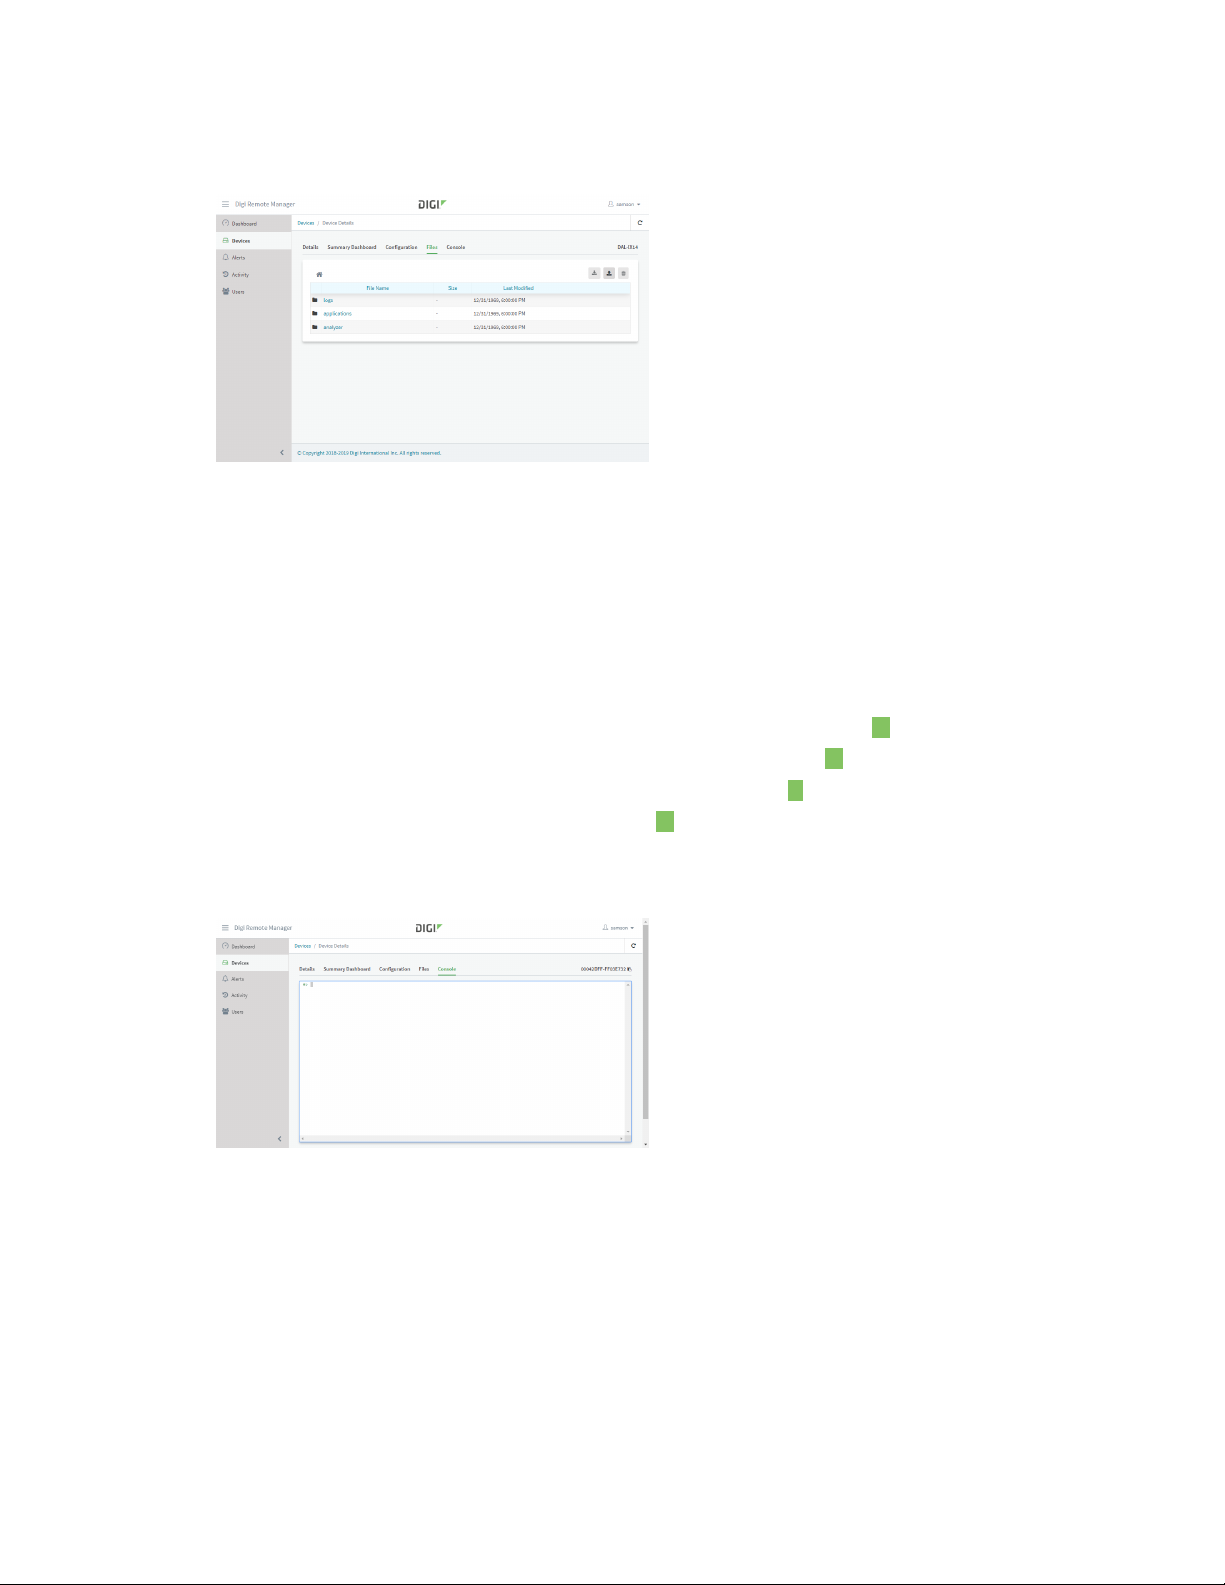
To view and manage device files
1. Click Devices.
2. In the device list, double-click the device you want to view.
3. Click Files.
n To download a file from the device to your local computer, click .
n To upload a file from your local system to the device, click .
n To delete a file or directory, select the item, and click .
n To return to the home directory, click .
Use a device console
For devices that provide terminal access, Remote Manager allows you to access a device console and
execute commands. If you attempt to access a console for a device that is not currently connected to
Remote Manager, the message Device Not Connected is displayed.
To use a device console
1. Click Devices.
2. In the device list, double-click the device you want to view.
3. Click Console.
Digi Remote Manager 3.0 Help
29
Page 30
Devices Organize devices: groups, tags, and notes
View configuration scan history
From the device details page, you can view the configuration scan history for a device.
Organize devices: groups, tags, and notes
This section describes how to organize devices using device groups, device tags, and metadata.
Device groups
You can create groups within Remote Manager to organize and manage your devices.
n To organize devices, create a hierarchical structure of groups and then move devices into the
desired groups.
n To manage devices, create a Configuration for a group and then move devices into the group
with the desired Configuration. In this way, all devices of the same type within the group will
automatically comply with the Configuration for the group. See Configurations.
Create device groups
Add devices to a group
Edit a device group name
Remove a device from a device group
Show or hide device groups
Device tags
Remote Manager uses tags to categorize devices. You can sort devices by tags in screens that have a
device list, such as the Devices page or when adding a schedule. This feature is useful if you want to
create a set of devices that are in different device groups.
Add or edit device tags
Device notes
Notes provide unstructured information associated with a device and can help to identify a device, find
a device, or simply provide additional information about a device.
Add or edit device notes
Digi Remote Manager 3.0 Help
30
Page 31
Devices Organize devices: groups, tags, and notes
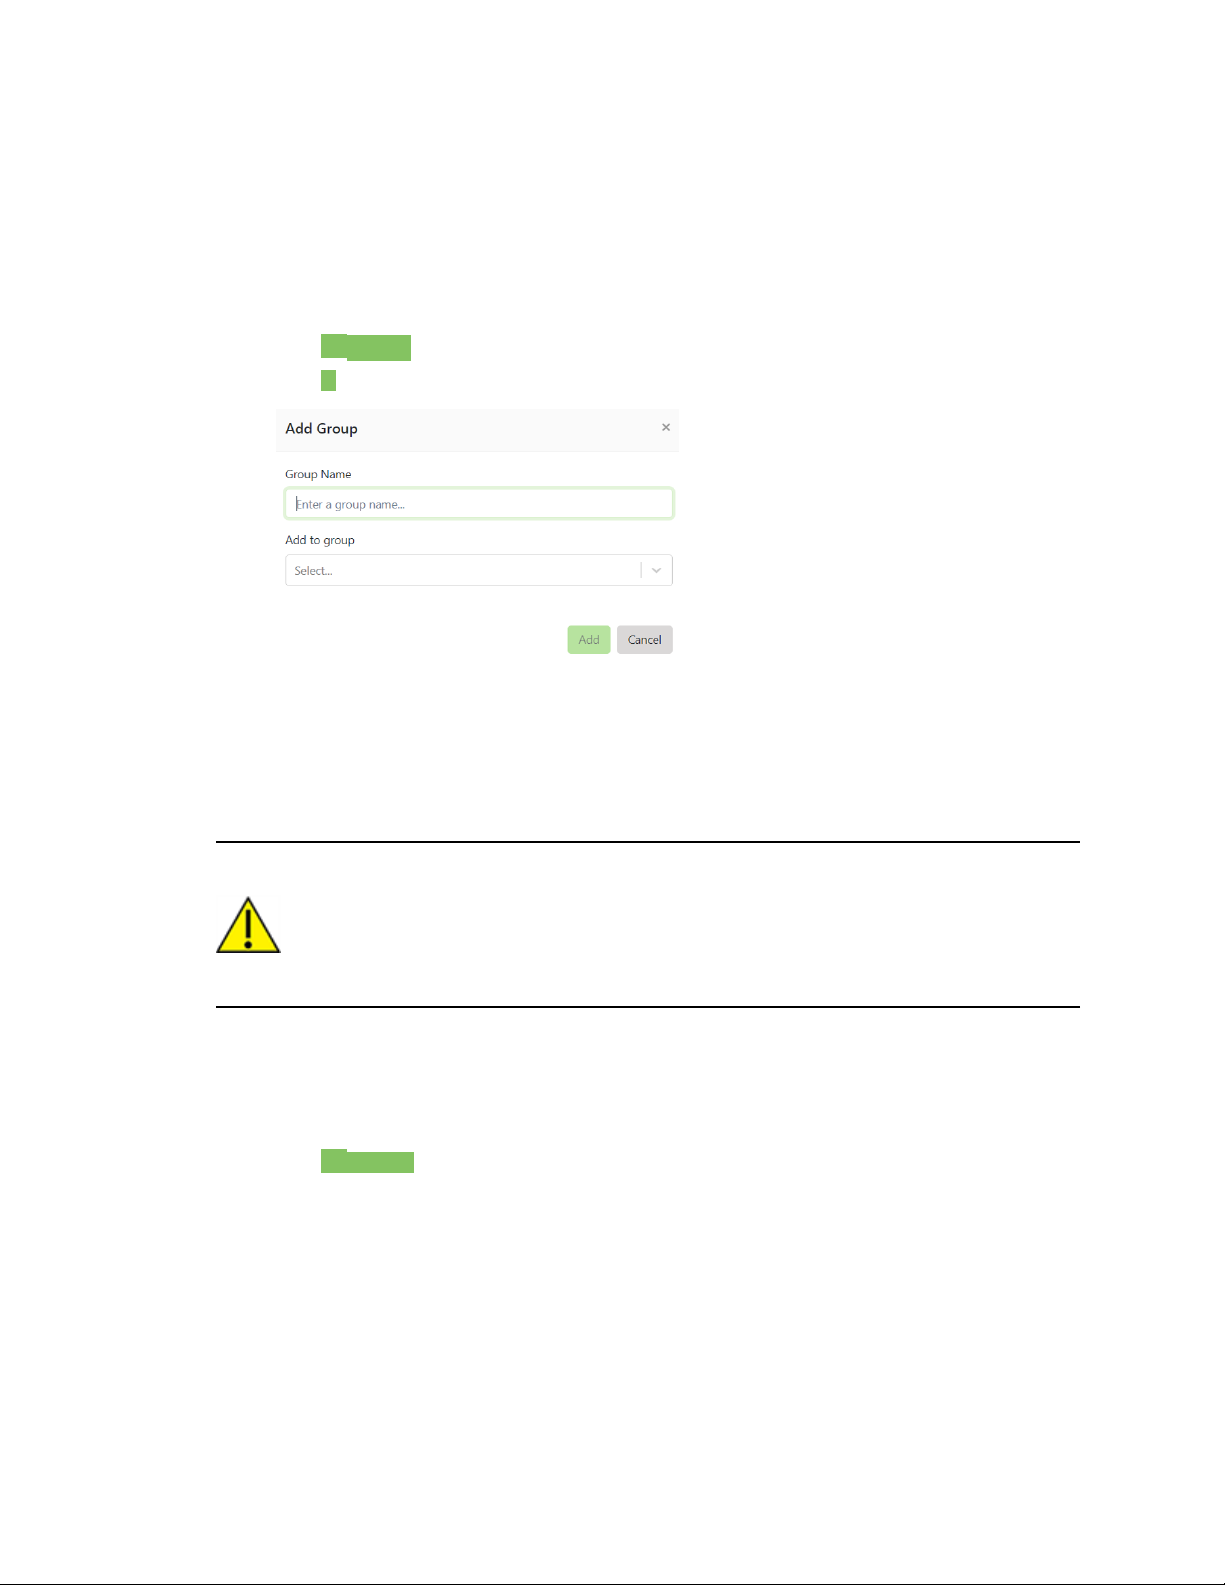
Create device groups
The groups feature allows you to add or create a group and assign a list of devices to that group. You
can create a hierarchical structure of device groups to help organize your device inventory.
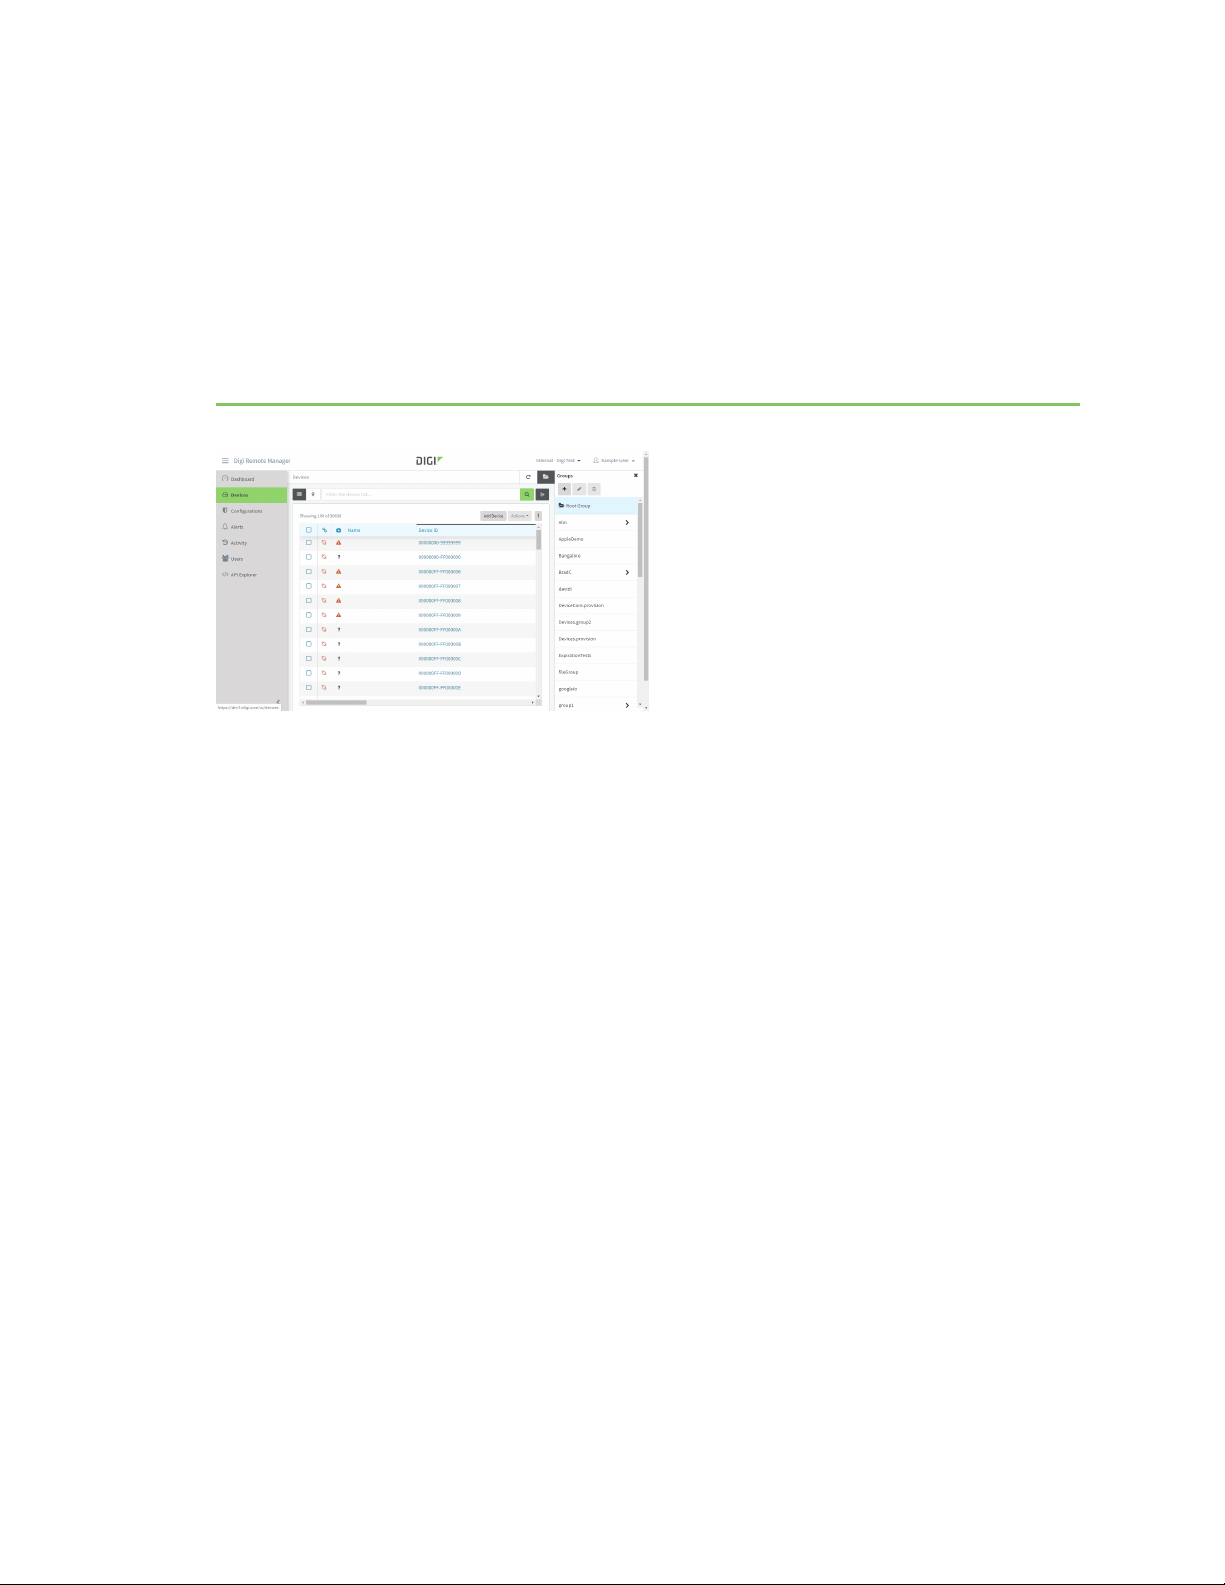
To create a group for one or more devices
1. Click Devices.
2.
Click Groups to display device groups.
3. Click .
4. Click Add.
Add devices to a group
You can add one or more devices to a device group, and can add up to 500 devices to a group at one
time. Create at least one device group before adding devices to groups.
CAUTION! Some groups are managed by one or more Configurations. If a group is managed
by an active configuration, use caution when adding a device to the group because the device
configuration will be automatically updated to match the group configuration for that device
type. If you do not intend to change the device configuration, do not move the device to a
group associated with a managed configuration.
To add a device to a group
1. If needed, create the device group. See Create device groups.
2. Click Devices.
3.
Click Groups to display device groups.
4. Do one of the following:
n While viewing the Devices page, drag-and-drop devices onto a group in the Groups list.
n While viewing Device details for a device, add or change the group in the Groups field.
Edit a device group name
You can edit device group properties, including the group name and its parent in the groups hierarchy.
To edit the name of a device group
Digi Remote Manager 3.0 Help
31
Page 32

Devices Organize devices: groups, tags, and notes
1. Click Devices.
2.
Click Groups to display device groups.
3. Click on the group you want to rename, and click .
4. Type a new name for the group and click Save.
Remove a device from a device group
You can remove a device group by moving it to the root folder or to another device group.
CAUTION! Some groups are managed by one or more Configurations. If a group is managed
by an active configuration, use caution when removing a device from the group because the
device configuration will cease to be managed. If you want to continue managing the device
configuration using the group, do not remove the device from the group.
To remove a device from a device group
1. Click Devices.
2. Double-click on the device you want to remove from a group.
3. In the Groups field, select / (slash) to remove the device from the group.
4. Click Apply.
Show or hide device groups
You can choose to show or hide the list of device groups.
To show or hide device groups
1. Click Devices.
2.
Click Groups to display device groups.
3.
Click Groups again to hide the groups pane.
Add or edit device tags
You can add tags to a device to help categorize that device.
Note Device tags are stored in Remote Manager, not on the device.
To add or edit a device tag
1. Click Devices.
2. Double-click on the device you want to edit.
3. In the Tags field, type one or more tags to add to the device.
4. Click Apply.
Add or edit device notes
You can add notes to a device to help categorize or identify the device.
Digi Remote Manager 3.0 Help
32
Page 33

Configurations Configurations, device types, and groups
Note Device notes are stored in Remote Manager, not on the device.
To add or edit device notes
1. Click Devices.
2. Double-click on the device you want to edit.
3. In the Notes field, type notes for the device.
4. Click Apply.
Configurations
Use Configurations to automatically manage device firmware, settings, and files. For example, you
can automatically provision or update multiple devices with one common configuration which includes
firmware, settings, and file systems. In addition to the common settings included in a configuration,
you can provide device-specific settings to override one or more settings.
Configurations, device types, and groups
Create a configuration
Creating a configuration using a device
Include device overrides in a configuration
Include file systems in a configuration
Schedule automatic scans
View configuration status
View configuration scan history for a device
Configurations, device types, and groups
A Remote Manager configuration is a named set of device firmware, settings, and file system options.
You use the configuration to automatically update multiple devices and to periodically scan devices to
check for compliance with the configuration.
Groups are the organizational unit used to apply configurations. First, organize your devices into
groups. Then, create configurations for the device types in the group. You can create multiple
configurations for a device type in a group, but only one configuration per device type can be enabled
at one time.
Digi Remote Manager 3.0 Help
33
Page 34

Configurations When are devices scanned?
If you move a device into group that is managed by an active configuration for that device type, the
device is immediately scanned for compliance. If the device is not compliant and you have opted to
automatically perform remedial action, the device is automatically updated to match the
configuration. If you move a device out of a group that is managed by an active configuration, the
device is no longer managed.
When are devices scanned?
When you enable a configuration for a device type and within a group, Remote Manager scans devices
in the group matching the device type during the next scheduled scan window. The next scan window
starts between 7-10 UTC. Devices are rescanned on the interval specified in the configuration.
In addition to scheduled scans, you can initiate a scan immediately using Scan Now. When you start a
scan using Scan Now, any existing scan for the device is canceled and the new scan starts.
The following table summarizes how changes to the configuration, device group, or device affect
scanning operations.
When . . . Scan operations
Settings, files, or automation
values are edited
Scan is started via schedule or
Scan Now
Group the device is in is
removed from the
configuration
Device name is unset or
changed
Device is removed from an
account
Device is moved to a different
group
Device is in maintenance
mode
Device is disconnected Offline jobs are created based on cached data. The offline jobs runs
Device goes into maintenance
mode
Device connects for the first
time and the device type is
determined to match the
configuration
Depending on the progress the device has made through an
existing scan, the device may get the old or the new values.
For this reason, we recommend you disable a configuration when
you are editing the configuration to prevent scanning devices
during the editing. After completing your changes, enable the
configuration.
All outstanding jobs from the previous scan are canceled and the
scan restarts.
All scans in progress for devices in the group are canceled.
If the previous device name or new name has device settings
overrides, the device is scanned.
All scans in progress are canceled.
If the new group is part of the same configuration, no change.
If the new group has an enabled configuration, any previous scan in
progress is canceled and a new scan is started.
Device is not scanned.
when the device connects.
All scans in progress are canceled.
Device is scanned.
Digi Remote Manager 3.0 Help
34
Page 35

Configurations Create a configuration
When . . . Scan operations
Device comes out of
maintenance mode
Configuration is disabled or
deleted
Create a configuration
You can create a configuration using defaults taken from the device firmware repository.
To create a configuration using device defaults:
1. Click Configurations.
2. Click Create and enter details for the configuration:
Option Description
Name Enter a name for the configuration.
Description Enter a description for the configuration to help you identify the
purpose of the configuration.
Groups Select one or more groups of devices to manage. You can have
multiple configurations for a group, but only one configuration for
each device type within the group can be enabled at the same time.
Device type Select the device type.
Device is scanned.
All scans in progress are canceled.
Firmware
version
3. Click Save and Continue.
Note Once you save the device type and firmware version for a configuration, you cannot
change these selections.
4. By default, the Initially make all settings managed option is selected, and you can remove
some of the settings once you start editing the configuration settings. If, however, you are
creating a configuration to manage only a select number of settings, deselect the Initially
make all settings managed option. Then you can include the settings you want to manage
one-by-one.
Select the firmware version for the device type.
Digi Remote Manager 3.0 Help
35
Page 36

Configurations Create a configuration
5. Click Use default values or Import from Device. If you select Use default values, Remote
Manager uses the default values provided by the firmware version for the selected device type.
If you select Import from a Device, you are prompted to identify the device in your inventory
you want to use to gather initial settings.
The managed configuration settings appear, showing a summary list of all the settings
selected for management.
6. Select and configure the settings you want to manage in this configuration:
n Select/deselect individual configuration options using the checkbox next to the option.
For example:
n Once a settings is selected to manage, you can edit the value of the setting by clicking on the
setting in the summary display. For example, to set a value for the cloud/1 option, click on the
setting and the current value appears:
Digi Remote Manager 3.0 Help
36
Page 37

Configurations Create a configuration
n To view the all configuration settings in hierarchical view, click on the Settings menu:
And the configuration menu slides out in the right panel:
n Once a setting is included in the managed configuration (that is, the checkbox next to the
option is selected), you select the disposition for the setting:
Option Description
Common
value
Use the value as the common value for all devices managed by this
configuration.
When a device is scanned, Remote Manager compares the device value
to this common value.
Allow
override
Allow individual devices to override the setting.
When a device is scanned, Remote Manager checks to see if the override
file provides a value for this device. If a value is provided, the device value
must match the value in the override file.
See Include device overrides in a configuration.
Require
override
Require all devices to provide an override value.
When a device is scanned, Remote Manager compares the device value
to the value in a device override file.
You must provide the override values for each device via an override file.
See Include device overrides in a configuration.
Set as
default
Set the value of this option to the default value taken from the firmware
version for the device type.
value
n Continue setting the configuration options as needed for this managed configuration. When
you finish with settings, click Save and Continue. The File System settings appear. Go to
Include file systems in a configuration.
Digi Remote Manager 3.0 Help
37
Page 38
Configurations Include device overrides in a configuration
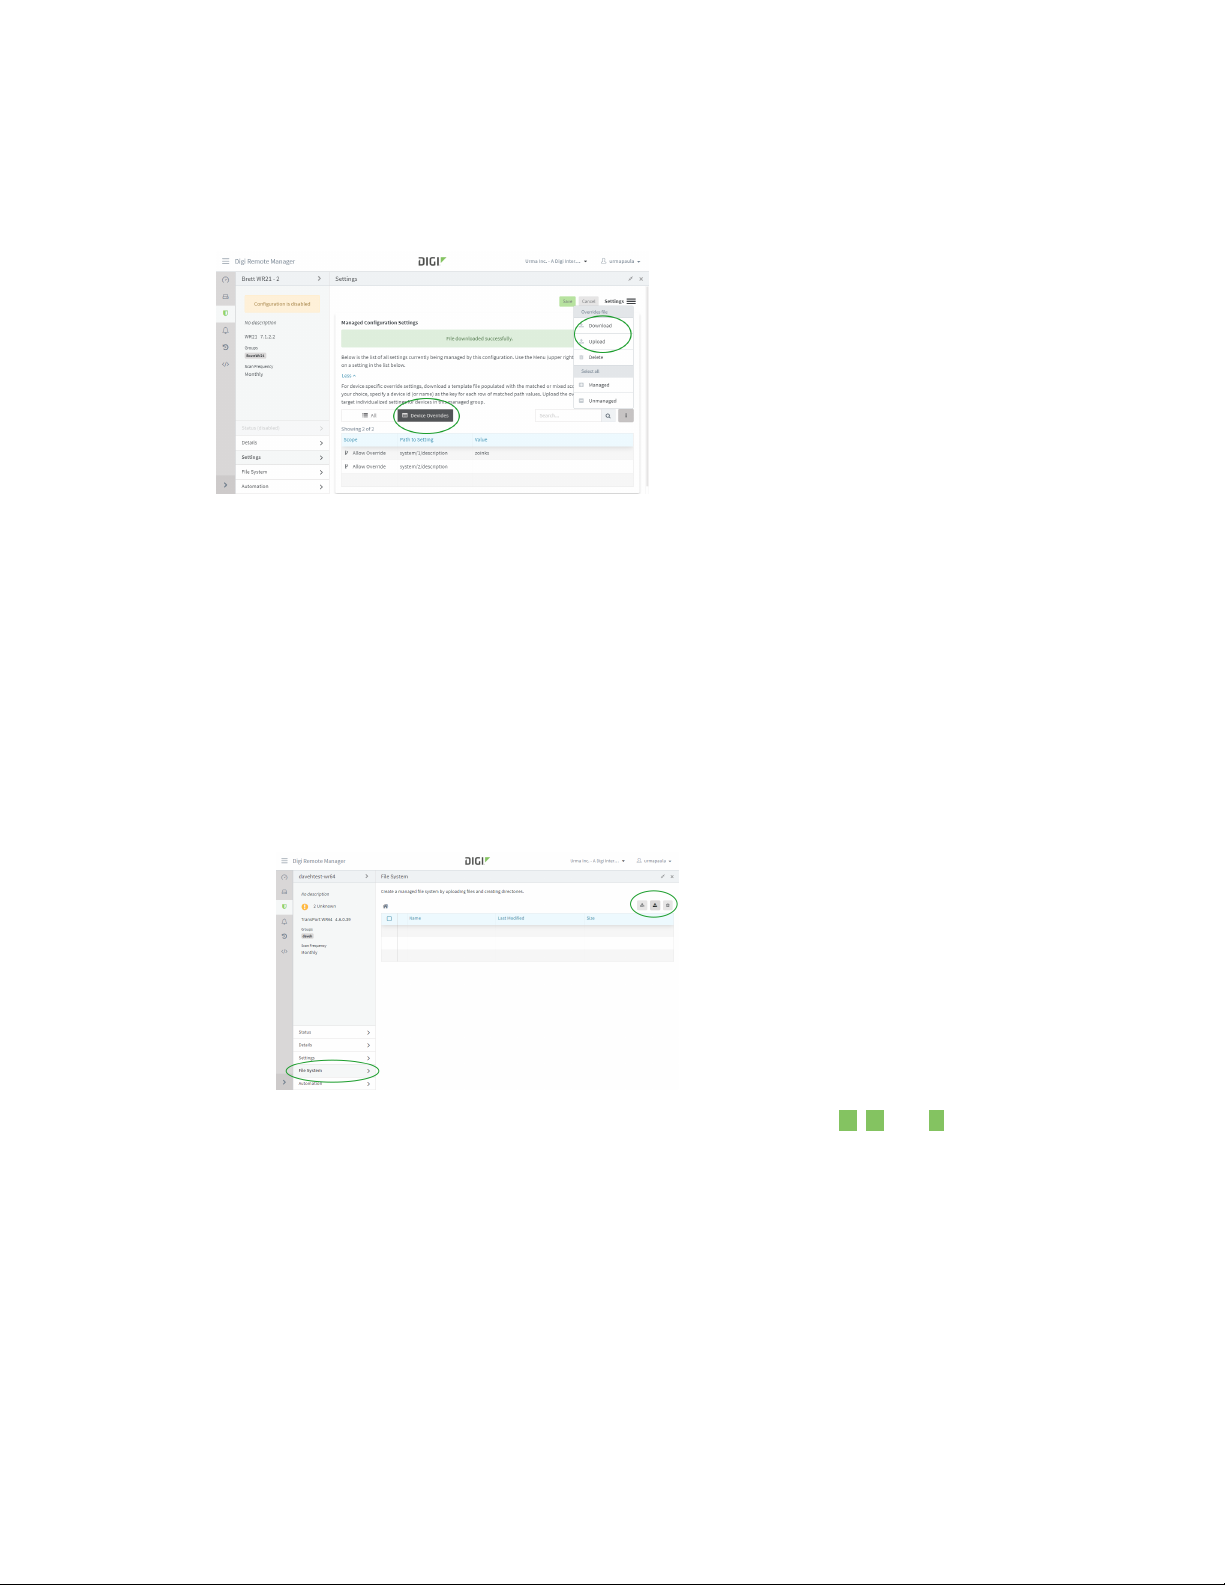
Include device overrides in a configuration
If you designate a setting in a configuration as Allow Override or Require Override, Remote
Manager includes the setting in the summary of the override settings in the Device Overrides tab:
To provide override settings for devices:
1. Click More Actions and select Download. Remote Manager downloads a file for you to enter
device values.
2. Open the file using an editor and provide override values for each device as needed. Use the
Device ID or device Name to identify individual devices.
3. Click More Actions and select Upload to upload the file of overrides.
Include file systems in a configuration
To include files in the managed configuration:
1. While creating or editing a Configuration, click File System.
2. The main display shows the files included in the configuration. Use , , and to add and
remove files you want to include in the configuration.
3. When you have finished adding and removing files to manage with the configuration, click Save.
Schedule automatic scans
To set of a schedule for scanning devices and configure remedial actions for non-compliant devices,
use the Automation options.
Digi Remote Manager 3.0 Help
38
Page 39

Configurations View configuration status
1. While creating or editing a configuration, click Automation.
2. Select the frequency and action plan for the configuration.
Automation
option Description
Frequency
Action plan
Select monthly, weekly, or daily.
Select alert, remediate, or both.
n If you set the plan to alert, Remote Manager triggers an alert
for a device that is not compliant when the configuration scan
is run
n If you set the plan to remediate, Remote Manager updates the
device to match the configuration.
n If you set the action plan to both, Remote Manager triggers an
alert for each non-compliant device and automatically updates
devices to match the configuration.
Enable
Enable or disable the configuration.
scanning
3. If you are ready to scan devices, enable the configuration and click Save. Remote Manager will
immediately start scanning devices of the specified type.
View configuration status
The configuration status display provides a summary list of all devices managed by the configuration.
Digi Remote Manager 3.0 Help
39
Page 40

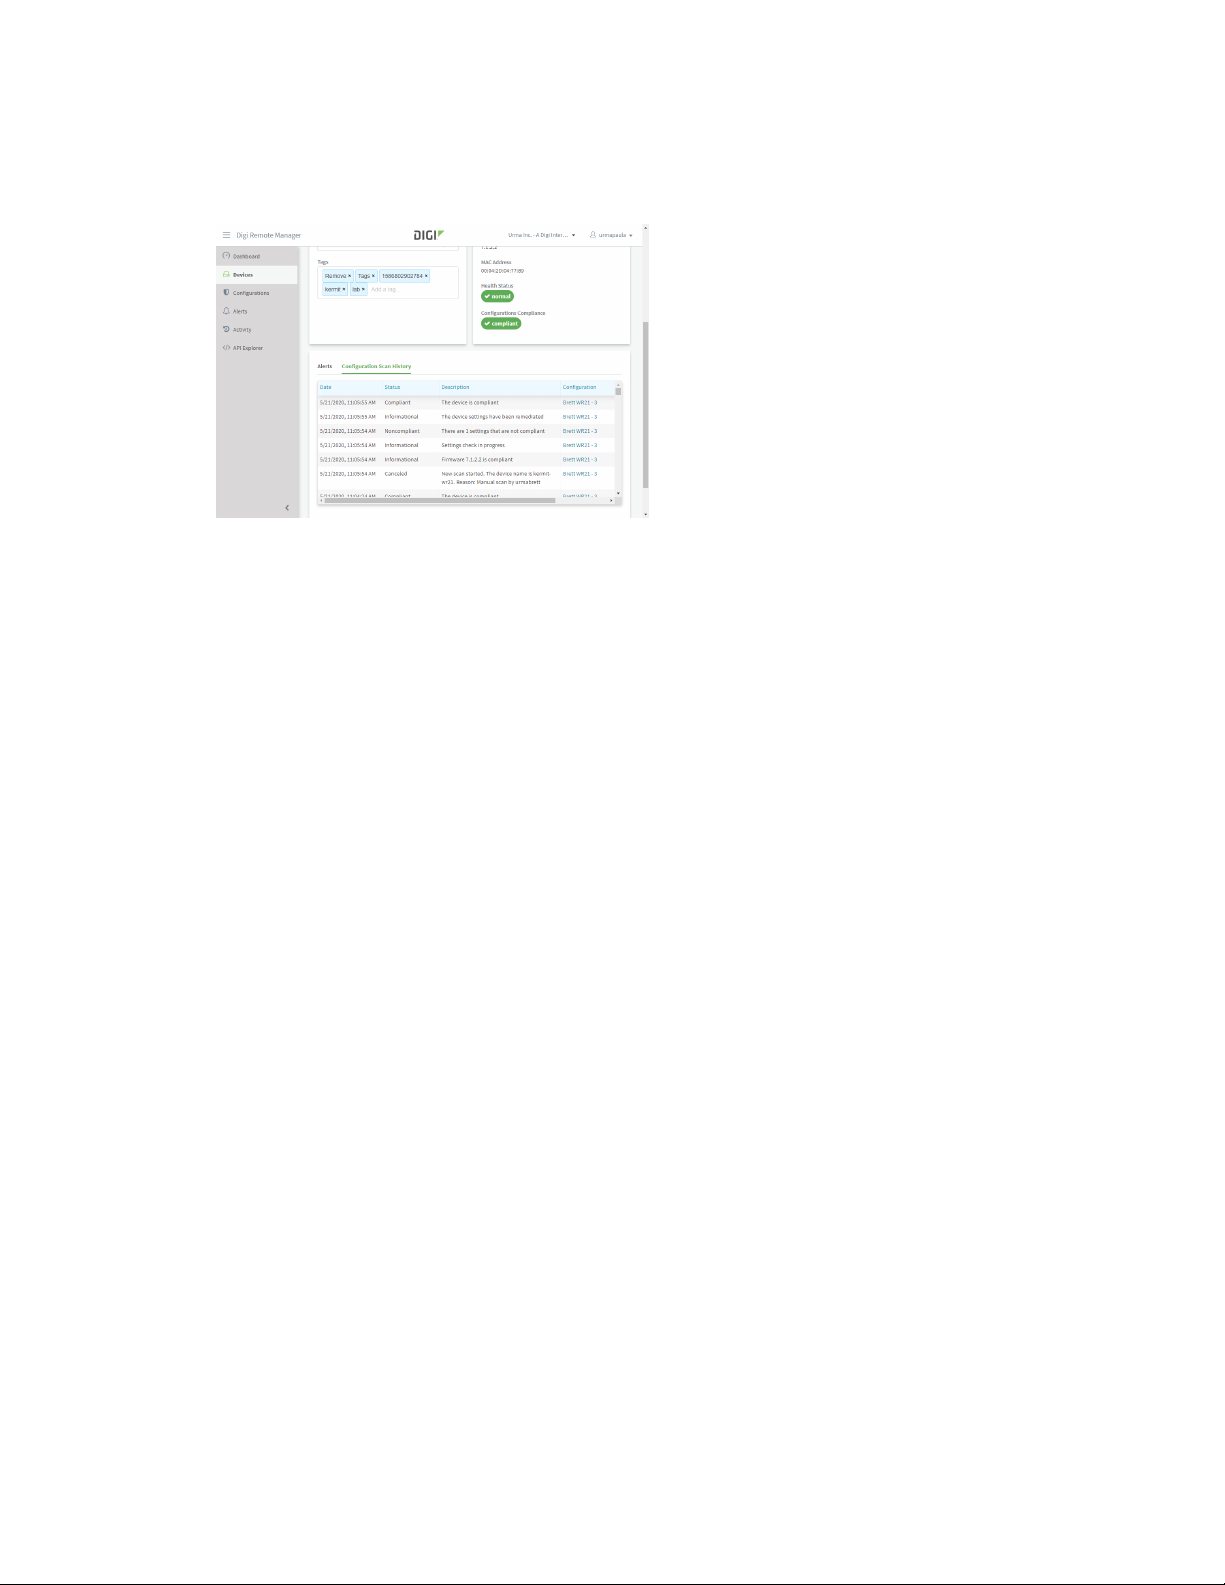
Configurations View configuration scan history for a device
When a Remote Manager scans devices managed by a configuration, it determines the configuration
status for each device. The configuration scan status for a managed device can be one of the
following:
n Compliant: Device currently complies with the configuration.
n Non-compliant: Device currently does not comply with the configuration.
n Informational: Remote Manager provides an informational message about scan actions.
n Unknown: Configuration scan status is unknown.
n Canceled: Configuration scan was cancelled.
View configuration scan history for a device
From the configuration status display, you can click on a device in the summary list to display the
configuration scan details for an individual device:
Digi Remote Manager 3.0 Help
40
Page 41

Alerts
The Alerts page lists all acknowledged, fired, and reset alerts for your Digi Remote Manager account.
For all alerts, you can:
View alert details and alert definition
View the status history of an alert
For fired alerts, you can:
Acknowledge an alert
Reset an alert
View alert details and alert definition
To view alert details and alert definition
1. Click Alerts.
2. Double-click on the alert you want to view.
Alert details
Item Description
Alert Id Unique identifier for the alert.
Description Description of the alert.
Details
Device Id Id of the device for which the alert was fired.
Enabled Whether the alert is enabled or disabled.
Digi Remote Manager 3.0 Help
41
Page 42

Alerts View alert details and alert definition
Item Description
Last update Date and time the alert was last updated.
Name Name of the alert.
Priority Priority of the alert based on the Severity level of the alert definition.
Severity
Source Data source for the alert.
Status Status of the alert: Fired, Normal, Acknowledged, Reset.
Type
Alert definition
Item Description
Type
Severity level of the alert definition.
Alert type:
Device offline
XBeeNode offline
Device excessive disconnects
XBeeNode excessive deactivations
DIA channel data point condition match
Smart energy data point condition match
Data point condition match
Subscription usage
Missing data point
Missing DIA channel data point
Missing smart energy data point
Name Name assigned to the alert.
Description Description for the alert.
State State of the alert definition: Enabled or disabled.
Priority Priority assigned to the alert definition: High, Medium, or Low. The
Digi Remote Manager 3.0 Help
Priority determines the severity level of the fired alarm.
42
Page 43

Alerts View the status history of an alert
View the status history of an alert
You can view historical alert status events by selecting the History tab.
To view the status history of an alert
1. Click Alerts.
2. Double-click on the alert you want to view.
3. Click the History tab. The Alert history page appears.
Acknowledge an alert
You can acknowledge an alert when you want Remote Manager to stop devoting resources to an alert
while still leaving it in a fired state.
To acknowledge an alert
1. Click Alerts.
2. Select one or more alerts to acknowledge.
3. Click Actions > Acknowledge.
Reset an alert
You can manually reset an alarm that has been fired. The status of the alarm is cleared and returned
to the normal state.
Note You can only reset the alarms that you have added. You cannot reset alarms that were added by
another user.
To reset an alert
1. Click Alerts.
2. Select one or more alerts you want to reset.
3. Click Action > Reset.
Digi Remote Manager 3.0 Help
43
Page 44

Activities
The Activities page lists all jobs for your Digi Remote Manager account. For example, when you
initiate a firmware update for one or more devices, the activity is listed in the Activities page.
Job details
For each activity, the following job information is displayed:
Column Description
Job ID
User ID
Job targets
Job description
Job status
Job submitted
Job completed
Request Shows the request submitted for the activity.
Response Shows the response for the activity.
Unique identifier assigned to the job.
Unique system-assigned identifier for the account user who submitted the job.
Device targets for the job.
Description of the job.
Status of the job:
Success
Pending
Failed
Date and time when the job was submitted.
Date and time the job completed.
Digi Remote Manager 3.0 Help
44
Page 45

Users
Administrators of a Digi Remote Manager account can create one or more users for the account.
User roles
Each user must be assigned a role that dictates what the user can access in the account:
n Administrator: The Administrator role allows the user full read/write access to the account. In
n User: The User role allows full read/write access to the account.
n Read-only user: A read-only user can only view account information.
n Application: An application user is restricted to access view Digi Remote Manager web
n Read-only application: A read-only application user is restricted to read access only via Digi
addition, an administrator can add, edit, and remove account users.
services.
Remote Manager web services.
User information
Item Description
Address Street address of the user.
City City of the user.
Country Country of the user.
Digi Remote Manager 3.0 Help
45
Page 46

Users Add a user
Item Description
Email Email address of the user.
Enabled State of the user:enabled or disabled.
First name First name of the user.
Job title Job title of the user.
Last login Date and time of user's last login.
Last name Last name of the user.
Password Password for the user name.
Phone number Telephone number for the user.
Postal code Postal code for the user address.
Registration date Date and time on which the user account was registered.
Role Role of the user. See
Security policy Security policy assigned to the user.
State State of the user address.
Username Unique username for the user.
Add a user
If you are an administrator, you can add, edit, or remove users from your account.
To add a user to your Digi Remote Manager account
1. Click Users.
2. Select Add user.
3. Fill out the form including all required information. See Users.
4. Click Add User.
Edit a user
If you are an administrator, you can add, edit, or remove users from your account.
To edit a user in your Digi Remote Manager account
User roles
.
1. Click Users.
2. Select Actions > Edit.
3. Edit the user information as needed.
4. Click Update User.
Digi Remote Manager 3.0 Help
46
Page 47
API explorer Change password
Change password
If you are an administrator, you can add, edit, or remove users from your account. You can also reset
the pasword for a user.
To change the password for a user in your Digi Remote Manager account
1. Click Users.
2. Select Action > Change password.
3. Enter the new password in the Password and Confirm Password fields.
4. Click Change Password.
Remove a user
If you are an administrator, you can add, edit, or remove users from your account.
To remove a user from your Digi Remote Manager account
1. Click Users.
2. Select Actions > Remove.
3. Click Remove.
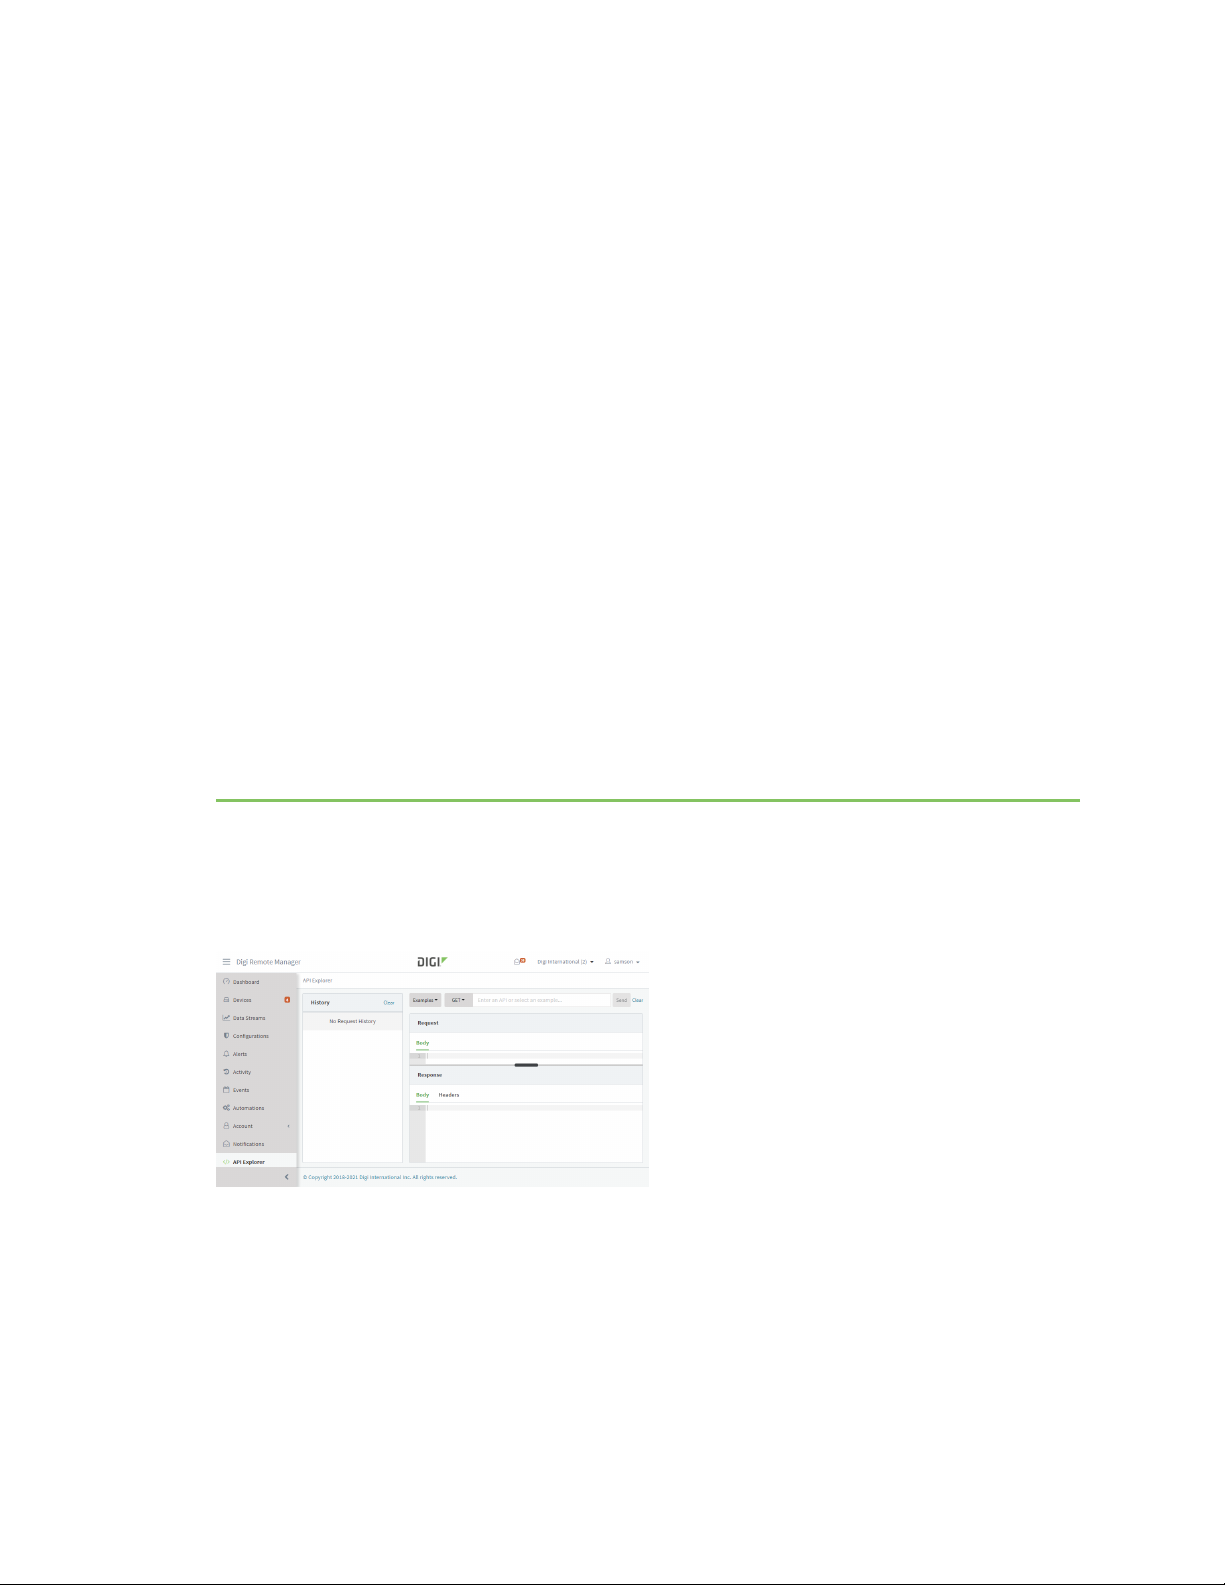
API explorer
Use the API explorer to request an API web service on behalf of your Remote Manager logon user
account.
n From the menu, click API Explorer.
Get a list of available v1 APIs
To retrieve a list of all the v1 APIs available for your logged-in account:
Digi Remote Manager 3.0 Help
47
Page 48

API explorer Get an API summary
1. From the menu, click API Explorer.
2. Enter /ws/v1/ and click Send.
A list of available v1 APIs is returned.
Get an API summary
Digi Remote Manager web services provide a summary of all the allowable forms for a web service.
To retrieve an API summary, issue a GET request on an API without any parameters or fields. The
Examples drop-down offers a summary menu item for each API.
For example, to get a summary of the v1/devices APIs:
1. From the menu, click API Explorer.
2. Click Examples > v1/devices > API summary.
3. Click Send. A summary of the v1/devices API is returned.
Copy and paste a device ID
You can copy and paste a device ID from the Devices display to use as a target in an API request.
To do so:
Digi Remote Manager 3.0 Help
48
Page 49

Previous release notes Get help
1. From the menu, click Devices.
2. Locate the device you want to use as a target and click to copy the device ID to the
clipboard.
3. From the menu, click API Explorer.
4. Click Examples and select the API you want to run.
For example, to get information on a device, select Examples > v1/devices > Retrieve a
device.
5. Paste the device ID in the clipboard into the API call:
6. Click Send.
Get help
To get help creating scripts using Remote Manager web services, see Web services reference.
Previous release notes
The Digi Remote Manager team is enhancing Remote Manager by offering a much-improved user
experience. Enhancements are scheduled to roll out incrementally, feature-by-feature and view-byview, throughout the upcoming year. Check these release notes for details as we systematically build
and release the next generation of Digi Remote Manager.
What's new in November/December 2020 50
What's new in August 2020 52
What's new in June 2020 55
What's new in October 2019 56
Digi Remote Manager 3.0 Help
49
Page 50

Previous release notes What's new in November/December 2020
What's new in November/December 2020
It’s Official! Welcome to the new Digi Remote Manager®!
We've focused on Remote Manager usability and functionality so you can focus on your business
needs. You can, however, still use classic Remote Manager:Click your username in the upper righthand corner and select Open Classic Remote Manager.
This release provides features, enhancements, a security fix, and general fixes.
New features
Enhancements
Security issue
Resolved issues
November hotfix
December hotfix
New features
n Sub-account views: Primary account users can view resources from all sub-accounts in a
combined view.
n Data streams: Data streams page with filter, edit, chart, and export capabilities.
n SM/UDP commands: Configure devices for SM/UDP commands and send request connect
messages to wake up devices that are asleep.
Enhancements
n Added SM/UDP Request Connect as a device list action.
n Improved dark mode in datastreams chart view.
n Support for viewing groups for all of your subaccounts at the same time in the groups display.
n Support for filtering views to a single account/subaccount.
n Display the number of days remaining in free trial account, as well as the number of days until
the free trial expires.
n Support export/download data stream history charts and data as csv, xlxs, png, jpg, or svg.
n Configuration manager supports WVA devices.
n Improved data streams darkmode in chart view.
n Support raw data and rollup in data stream charts.
n Queries across subaccounts involving groups must include a customer_id to appropriately
scope the group. If a customer_id is omitted, then the group refers to the parent account.
n A device cannot be provisioned if the user does not have a device management subscription.
n Signup and manage services buttons in classic user interface link to the new customer portal.
n The v1/subaccounts API supports the device_count field to show the current number of
devices registered in the parent and each subaccount.
n ICCIDs that are set manually for a device can now be assigned to a Verizon LTE account in the
classic user interface via Carrier -> Management.
n Updated SIM population code for devices to support multiple SIMs per modem when devices
report the information.
Digi Remote Manager 3.0 Help
50
Page 51

Previous release notes What's new in November/December 2020
n Configurations support for Wireless Vehicle Bus Adapter.
n Added the customer_id field to v1/streams/inventory and bulk APIs.
n Added the device_id and extended_address fields to the v1/streams/inventory and
DataStream APIs.
n Added ttl and rollup_ttl fields to ws/v1/streams/inventory and ws/v1/streams/bulk APIs.
n Added orderby sorting parameter to the v1/streams/inventory API.
n Added customer_id to v1/groups API.
n Customers with subaccounts can list inventory using web services that include items in the
parent and subccounts.
An Account-Filter header was added to web service calls. For example, with
v1/devices/inventory, when the header is set to “all’, the devices list will include devices in
the parent account and all subaccounts. The header can also contain a list of comma separated
customer IDs.
n Added Forwards column to CSV output result from bulk streams API.
n Added the "fields" attribute to the notifications API to describe field values used to build the
notes content.
The fields value is a freeform map value of the constituent parts of the message constructed
for a notification. You can use this to take actions on a notification. For example, the firmware
notification might have a device_type and a version fields value to describe what the
firmware notification is relating to. The fields value may change from release to release or
even during interim releases and describe details of a notification as served by the UI.
n Added security related information to notifications.
All notifications now have a priority field associated with them. Firmware notifications now
have a CVSS rating associated with them if there are security related fixes in the firmware.
Firmware with security related fixes are rated important or critical, depending on the severity
of the CVSS ratings included in the firmware.
n The /ws/v1/streams/inventory API now supports queries with the query parameter.
Security issue
n CVSS: Medium/CVSS 6.5
When using the new user interface, Remote Manager now passes the IP address from the
client browser to the DUO client during two-factor authentication.
Resolved issues
n Corrected the device connection history chart display errors in dark mode.
n Actor and Account-Filter headers validation with errors return the expected HTTP 400 code
rather than HTTP 200.
n Issues of updates to a user account not being applied have been resolved.
n Simplified error message for device updates when no changes are found. In addition, you can
now update the device SKU and type for a device.
n Fixed file remediation for SarOS devices using Configurations.
n A PUT to the v1/streams/inventory API correctly updates the "forwards" field for a target
data stream.
Digi Remote Manager 3.0 Help
51
Page 52

Previous release notes What's new in August 2020
n SCI requests sent to multiple devices do not overwrite valid responses by error messages
when a request times out or is canceled.
n A GET from the /ws/Schedule API no longer reports a Task contained in the schedule as not
found.
n Saved notifications are no longer deleted after 90 days.
n Summary alarm email notifications no longer prevent alarm details from being included in the
email if any of the details required device information to be included.
n When requesting XML format and content contains invalid XML characters, the
/ws/v1/streams/inventory now returns invalid XML characters encoded to base 64.
November hotfix
The November 2020 hotfix resolves the following issues:
n Fixed scan history view to correctly display history when filtered to a subaccount.
n Corrected the Data Streams Received Time column to correctly display the time data was
received.
n Fixed issue with displaying Data Streams charts in Firefox.
n Added setting for cache control of HTTP security headers to no-store in addition to no-cache
and max-age 0.
n Fixed issue updating Data Stream chart with stream data from a different account.
n Fixed an issue with displaying job results when filtered to a single account.
n Fixed an issue with the Managed Tag action that caused a device to be moved back to a parent
account.
n Fixed an issue with the group selector when using Add to Group action.
December hotfix
The December 2020 hotfix resolves the following issues:
n Fixed an issue with uploading site specific settings while creating a configuration in the web UI.
n Added /ws/v1/reports/devices/firmware_status to get a summary of the firmware status of
devices { “count”: 2, “size”: 2, “list”: [ { “value”: “up_to_date”, “count”: 15 }, { “value”: “critical”,
“count”: 1 } ] }.
n Add firmware_status property to firmware inventory and device inventory. Value for firmware_
status:
Not identified
Up to date
Newer firmware available with NO security fixes
Newer firmware available with LOW security fixes
Newer firmware available with MEDIUM security fixes
Newer firmware available with HIGH security fixes
Newer firmware available with CRITICAL security fixes
Firmware is NON PRODUCTION
What's new in August 2020
It’s Official! Welcome to the new Digi Remote Manager®!
Digi Remote Manager 3.0 Help
52
Page 53

Previous release notes What's new in August 2020
We've focused on Remote Manager usability and functionality so you can focus on your business
needs. You can, however, still use classic Remote Manager:Click your username in the upper righthand corner and select Open Classic Remote Manager.
This release provides features, enhancements, and fixes. There are no security-related fixes in this
release.
New features
Enhancements
Resolved issues
New features
n Notifications: Added Notifications feature that allows you to view and manage notifications.
Click Notifications to view current notifications, choose columns to display, and manage
notifications.
n Sub-accounts: Added ability to create sub-accounts in Remote Manager 3.0.
Enhancements
n Added the Reboot after remediation option for configuration automation.
n Changed the install code label on the Add Device dialog to Device Default Password to match
label typically included on the physical device.
n Repositioned the Users option from the main menu to under the Account menu.
n Renamed Help option to User Guide.
n Added ability to download multiple device files at the same time.
n Added Customer ID column to Alerts table.
n Added ability to edit account name, notes, and tags.
n Added ability to manage messages with Mark as Read, Mark as Unread, Delete, and Save
actions.
n Added messaging widget to the User menu.
n Added messaging feature to manage notification events such as adding/removing devices, new
firmware releases, Digi Remote Manager newsletters, and so on.
n Added indexes for User Preferences, Device File Structure, and Session Activity.
n Notifications created only for users that have either logged into Digi Remote Manager within
the last year or have enabled emails of unread notifications.
n Added query support to the Event Log tab in the Classic UI. To use queries, prefix the search
with the query and use the query language covered in the Programmer Guide for v1 APIs.
n Added customer_id to the /ws/v1 APIs for devices, users, jobs, alerts, configs, and
subaccounts.
n Added an SCI command get_connection_info that can be used to retrieve information about a
device's active connection. This can be used to determine the number of bytes sent/received to
aid in estimating cellular data usage for different operations.
n Added ability for users to subscribe to receive daily emails with unread notifications.
Notifications included in daily emails will be considered read when the email is sent.
n Added the ws/v1/notifications and ws/v1/notifications/bulk APIs
Digi Remote Manager 3.0 Help
53
Page 54

Previous release notes What's new in August 2020
n Added support for add and remove device notifications for user accounts
n Parent accounts can now transparently move devices to, from, or between sub-accounts.
A parent account can add a single device or a group of devices (bulk add) in the UI for devices
that already exist in the parent account or any sub-accounts. If the parent is scoped to a child
account, then the devices added or updated will be automatically assigned to the scoped child
account. If the parent is not scoped to a child account, then the devices will be automatically
assigned back to the parent account.
Similarly, a parent account can use the POST ws/v1/devices/inventory API with the Actor
HTTP header to assign devices from the parent or another sub-account to the actor account.
Note The POST ws/v1/devices/inventory API can accept a payload defining other attributes of the
device (for example the group). Those attributes will be applied with the assignment operation. In the
group example, the group targets the group name in the sub-account.
When these actions move already provisioned devices between accounts, no installation code
or default device password is required even if the device originally required a default device
password to be added to the system.
n Increased maximum password length to 64.
n For the Configurations feature, improved the error messages used when file system
operations fail.
n Added ws/v1/subaccounts/inventory API that returns the current account and all sub-
accounts.
n Added new support in the Remote Manager firmware repository to record CVE security scores,
secure hash, and release notes fields.
n Added ws/v1/subaccounts API for retrieving, creating, and updating sub-accounts. Not all
accounts can create sub-accounts. Note that special licensing and service contracts are
required to be able to create sub-accounts.
n Display the previous value when querying monitor history.
n Configuration scans are now staggered during the nightly scheduling window. To load balance,
some configurations run early in the window and others later. An individual configuration
generally runs at approximately the same time each night.
Resolved issues
n Corrected label of Customer ID column.
n Fixed Connect Sensor Plus menu to correctly display menu labels that include colons.
n Fixed MAC search for both basic and advanced search.
n Fixed IPSec Device Summary dashboard chart to show all data points. In previous releases,
the chart included only the first 1000 data points.
n Fixed Connection History dashboard chart to display regions as either connected or
disconnected in the hover tooltip.
n Changed the label for a device install code to Device Default Password and changed the
prompt to Enter a device default password. Updated the Add Devices dialog in the classic UI
to label the field Device Default Password/Install Code to match labels that typically refer to
the install code as a unique password.
Digi Remote Manager 3.0 Help
54
Page 55

Previous release notes What's new in June 2020
n Fixed a problem where, when invalid settings or missing required override settings were
specified for a configuration, the configuration manager would still update firmware.
n Fixed issue with summary alarm notifications not being sent using UTC time (off by 1 hour
during CDT).
What's new in June 2020
It’s Official! Welcome to the new Digi Remote Manager®!
We've focused on Remote Manager usability and functionality so you can focus on your business
needs. You can, however, still use classic Remote Manager:Click your username in the upper righthand corner and select Open Classic Remote Manager.
This release provides features, fixes, and one security-related fix.
Features and enhancements
Known issues
Resolved issues
Security-related issues
Features and enhancements
n Digi Remote Manager 3.0 is the default user interface experience
The new user interface for Digi Remote Manager is now the default user interface. When you
log into Remote Manager, the new interface is presented. If you need to revert to the classic
interface, click your username in the upper right-hand corner and select Open Classic Remote
Manager.
n Configuration management
Configuration management allows you to automate the management of device firmware,
settings, and file systems. (Configurations replaces the functionality known as Profiles in
classic Remote Manager.)
n Sub-account functionality
You can scope (filter) your view of Remote Manager devices and processes by sub-accounts. If
you need to create or remove a sub-account, return to classic Remote Manager. Sub-account
management will be made available in the new Remote Manager in a future release.
n API additions and updates
To support configuration management and other features available in the new Digi Remote
Manager, we've added many new APIs and updated existing APIs. Use the API Explorer to see
all available APIs.
n Added configuration management APIs
n Added query support for the v1/devices cellular_modem_id field to allow it to be
used to sort and filter results
n Added v1/firmware/inventory_with_list
n Added sku to v1/devices/inventory populated from the query_state system/sku
or system/part_number field
Digi Remote Manager 3.0 Help
55
Page 56

Previous release notes What's new in October 2019
n Allow Actor header for API requests to scope to a subaccount
n Updated v1/devices/inventory map location from query_state/location latitude
and longitude values if they are reported
Known issues
n Some features available in classic Remote Manager are not yet available in the new Remote
Manager. During this transition, you can access the classic Remote Manager using the user
menu in the upper-right corner of the display.
n Some legacy devices (for example, NDS devices) are not supported in the initial release of
configuration management.
n On some tablets and mobile devices, the popup blocker prevents the classic Remote Manager
display. To fix the problem, change the OS setting to allow popups.
Resolved issues
n Fixed issue with v1/devices/inventory failing if tags contained a string of commas.
n Fixed issue with v1/groups query path parameter ignoring the customer account prefix when
doing the contains operation
n Added support for pre-release and deprecated firmware in the firmware repository
Security-related issues
n CVSS: Medium/SVSS Score: 4.3
Fixed a security issue with user access to Remote Manager APIs.
What's new in October 2019
Display device configuration as a tab in Device Details view
Improved search options: simple and advanced
Display the total number of selected items within all table displays
Replaced column text headings with icons
Added export options for table views
Added options for custom table spacing
Added toggle for device ID display in tables: friendly or full
Display device configuration as a tab in Device Details view
Prior to v3.7, device configuration displayed in a new browser tab. With DRM 3.7, device configuration
displays on a tab within the Device Details display.
Digi Remote Manager 3.0 Help
56
Page 57
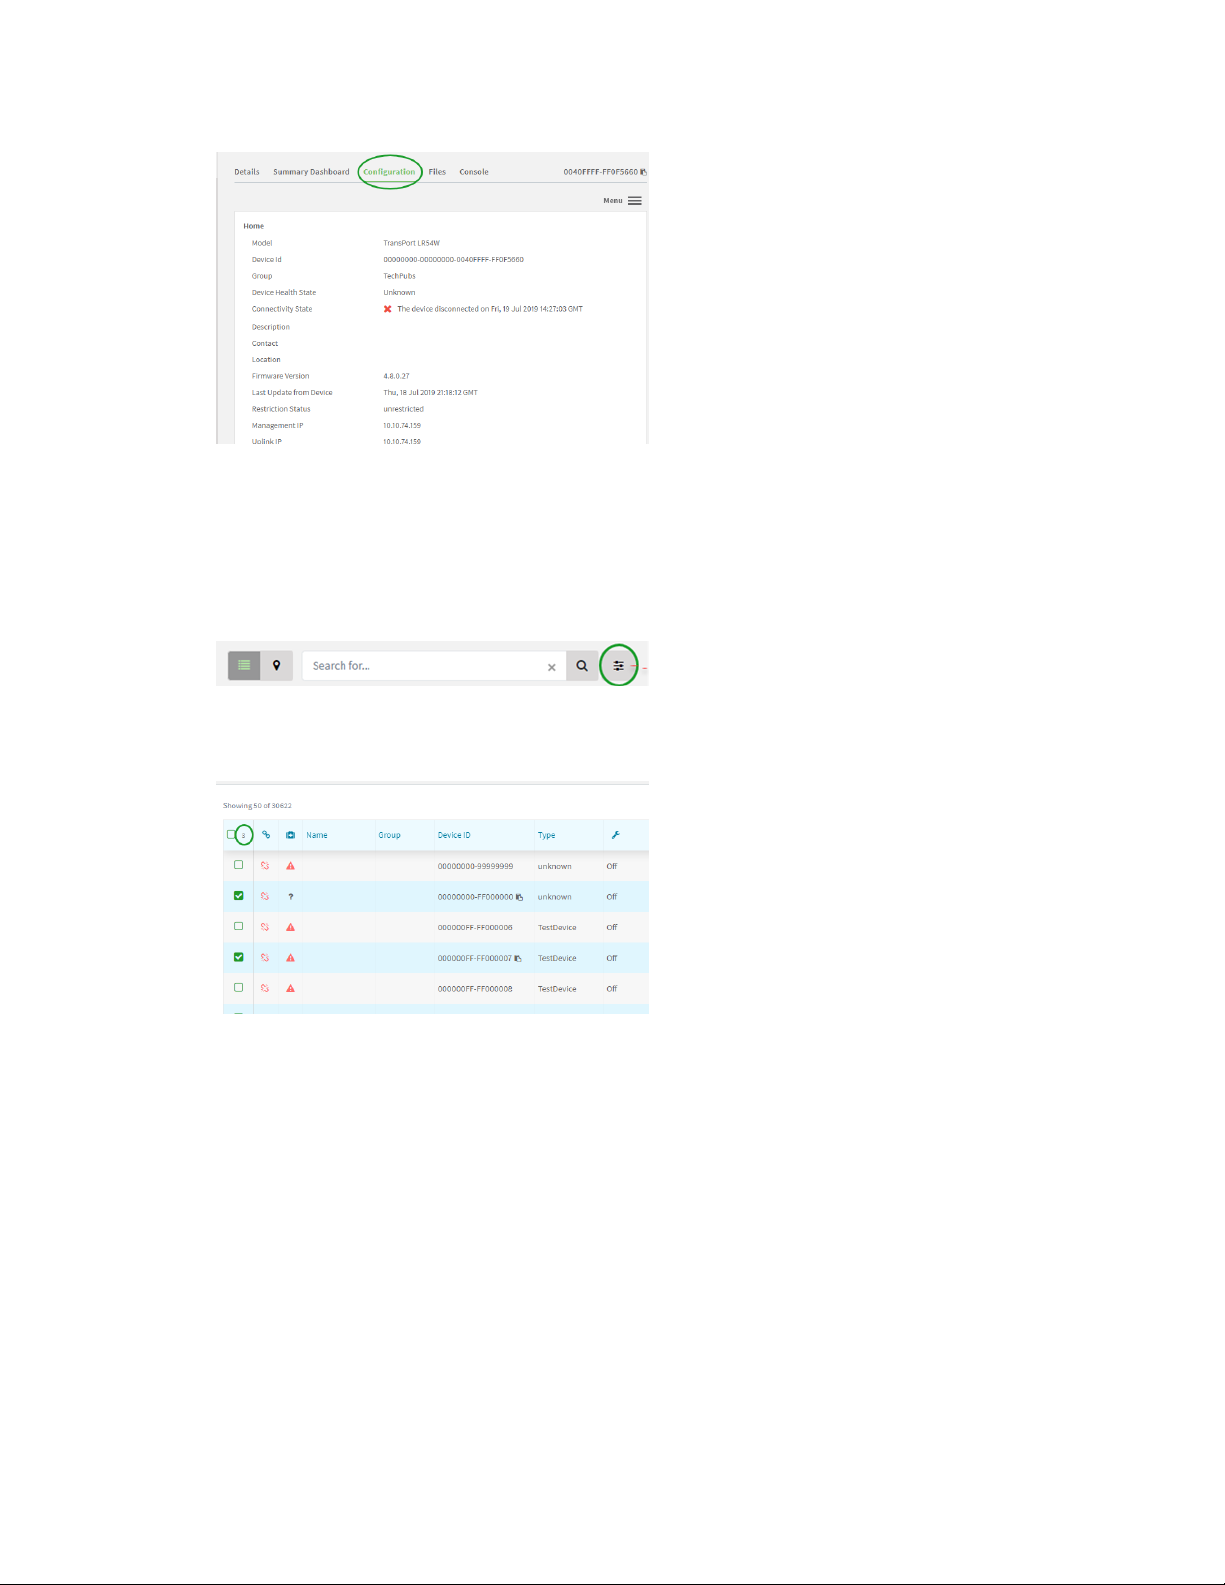
Previous release notes What's new in October 2019
Improved search options: simple and advanced
DRM 3.7 offers two modes of searching data within tables: simple and advanced. Use the toggle
button to toggle between the options. The advanced is the faceted search available before DRM 3.7.
The simple search allows a user to enter a simple text string to automatically search common fields.
In the future, simple search will search all fields for a simple text entry.
Display the total number of selected items within all table displays
Replaced column text headings with icons
To conserve space in table displays, we've replaced the Connection status, health status, Maintenance
mode, IPsec tunnels 1-4 columns with icons.
Digi Remote Manager 3.0 Help
57
Page 58

Previous release notes What's new in October 2019
Added export options for table views
Added options for custom table spacing
Digi Remote Manager 3.0 Help
58
Page 59

Previous release notes What's new in October 2019
Added toggle for device ID display in tables: friendly or full
Digi Remote Manager 3.0 Help
59
 Loading...