

Page 1

MIL-3000FTX Series of FastPort
Print Servers
CD-ROM User’s Guide
For...
gal”: Click here
“Le
“Table of Contents”: Click here
“Introduction and Installation”: Click here
“Setting the IP Address”: Click here
“Installing and Printing in a MS Windows and IBM OS/2 Environment”: Click here
“Installing and Printing on NetWare”: Click here
“Installing and Printing on a UNIX Environment”: Click here
“Installing and Printing on an Apple Network”: Click here
“Print Management Features of FastPort”: Click here
“FastManage Installation”: Click here
“Discovery Application”: Click here
“FastPort Application”: Click here
“Ping and BOOTP Server”: Click here
“Resetting FastPort to Factory Defaults”: Click here
“Troubleshooting MS Windows”: Click here
“Troubleshooting NetWare”: Click here
“Troubleshooting UNIX”: Click here
“Troubleshooting AppleTalk”: Click here
“Upgrading Flash EEPROMs”: Click here
“Telnet, NBMON and Serial Connection Diagnostic Console Options”: Click here
“Troubleshooting FastManage”: Click here
“Technical Support Services”: Click here
“Index”: Click here
Page 2

Legal
Trademark Rights
Digi International™, FastPort™, Print Server Software™, and the Digi logo are trademarks of
brand and product names are the trademarks of their respective holders.
© Digi International, 1998. All Rights Reserved.
Information in this document is subject to change without notice and does not represent a commitment on the part of Digi
International.
Digi International provides this document “as is,” without warranty of any kind, either expressed or implied, including, but not
limited to, the implied warranty of fitness or merchantability for a particular purpose. Digi International may make improvements
and/or changes in this manual or in the product(s) and/or the program(s) described in this manual at any time.
This document could include technical inaccuracies or typographical errors. Changes are periodically made to the information
herein; these changes may be incorporated in new editions of the publication.
Restricted Rights
For non-U.S. Government use
These programs are supplied under a license. They may be used, disclosed, and/or copied only as permitted under such license
agreement. Any copy must contain the above copyright notice and this restricted rights notice. Use, copying, and/or disclosur e of
the programs is strictly prohibited unless otherwise provided in the license agreement.
For U.S. Government use
Use, duplication, or disclosure by the Government is subject to restrictions as set forth in sub-paragraph (c)(1)(ii) of the Rights in
Technical Data and Computer Software clause of DFARS 52.227-7013.
The Digi Five-Year Limited Warranty
Digi International warrants to the original consumer or purchaser that each of its products, and all components thereof, will be
free from defects in material and/or workmanship for a period of five years from the original factory shipment date. Any
warranty hereunder is extended to the original consumer or purchaser and is not assignable.
Digi International makes no express or implied warranties including, but not limited to, any implied warranty of merchantability
or fitness for a particular purpose, except as expressly set forth in this warranty. In no event shall Digi International be liable for
incidental or consequential damages, costs, or expenses arising out of or in connection with the performance of the product
delivered hereunder. Digi International will in no case cover damages arising out of the product being used in a negligent fashion
or manner.
Digi International, Inc
. All other
Regulatory Approvals
• FCC Class A
• UL 1950
• CSA 22 No. 950
• EN60950
•CE
– EN55022 Class B
– EN50082-1
Canadian EMI Notice
This Class A digital apparatus meets all the requirements of the Canadian Interference-Causing Equipment Regulations.
Cet appareil numérique de la classe A respecte toutes les exigences du Règlement sur le matériel brouilleur du Canada.
European Notice
Products with the CE Marking comply with both the EMC Directive (89/336/EEC) and the Low Voltage Directive (73/23/EEC)
issued by the commission of the European Community. Compliance with these directives implies conformity to the following
European Norms:
• EN55022 (CISPR 22) - Radio Frequency Interference
• EN50082-1 (IEC801-2, IEC801-3, IEC801-4) - Electromagnetic Immunity
• EN60950 (IEC950) - Product Safety
To Contact Digi
For prompt response when calling for service information, have the following information ready:
• Product serial number
• Date of purchase
• Vendor or place of purchase
You can reach Digi LAN technical support at 408/744-2751 or
sun-tech@dgii.com
P/N: 90000105, Rev. B
Page 3

Table of Contents
Chapter 1:Introduction and Installation
Overview of the MIL-3000FTX Print Servers..............................................................................................1-1
Features of the Print Servers..........................................................................................................................1-1
Physical Features.....................................................................................................................................1-1
Configuration Features ..........................................................................................................................1-1
Shared Printer Features..........................................................................................................................1-2
Utilities..............................................................................................................................................................1-2
Firmware Update............................................................................................................................................1-2
First Time Users ..............................................................................................................................................1-3
Installation Requirements..............................................................................................................................1-3
Installing FastPort...........................................................................................................................................1-4
Chapter 2:Setting the IP Address
Assigning the IP Address ..............................................................................................................................2-1
Setting an IP Address with Install Script.....................................................................................................2-2
Setting the IP Address using Telnet on UNIX............................................................................................2-2
Setting IP Address with Windows 95, 98, and NT.....................................................................................2-3
Setting the IP Address Using RARP.............................................................................................................2-3
Setting the IP Address Dynamically with BOOTP.....................................................................................2-4
Setting the IP address with BOOTP on Sun........................................................................................2-4
Setting the IP address using BOOTP on HP/UX...............................................................................2-4
DHCP Support (NT 4.0 server).....................................................................................................................2-5
Setting an IP Address Using the DHCP Manager..............................................................................2-5
Using Digi's ACT to Assign an IP Address.................................................................................................2-7
Using Appletalk to Assign an IP Address...................................................................................................2-7
Using Digi’s NetBIOS to Assign IP Address...............................................................................................2-8
About the Digi Utilities..........................................................................................................................2-8
Using The Digi Utilities..........................................................................................................................2-8
Verifying IP Address is Set Properly ...........................................................................................................2-10
Chapter 3:Installing and Printing in a MS Windows and IBM OS/2
Environment
Printing From a NetBIOS Workstation........................................................................................................3-1
Introduction.............................................................................................................................................3-1
Printing from Windows for Workgroups............................................................................................3-2
Printing from Windows NT (3.5x)........................................................................................................3-2
Printing from Windows 95/98 or Windows NT 4.x (via SMB)........................................................3-3
Printing From NetBIOS-supported DOS Workstation......................................................................3-4
Net View...........................................................................................................................................3-4
Net Use .............................................................................................................................................3-4
Spooling Versus Non-Spooling Printing.............................................................................................3-5
Introduction.....................................................................................................................................3-5
Configuring Windows 95/NT to “Mimic” Spooling.................................................................3-5
DOS and OS/2.........................................................................................................................................3-5
Printing from a TCP/IP Workstation...........................................................................................................3-6
Introduction.............................................................................................................................................3-6
Printing from Windows NT 3.5x ..........................................................................................................3-6
Installing LPD Support on Windows NT 3.5..............................................................................3-6
Adding an LPD Printer to Windows NT 3.5...............................................................................3-7
Printing from Windows NT 4.0 ............................................................................................................3-7
Installing Microsoft TCP/IP Printing Services...........................................................................3-7
Installing a Printer on Windows NT 4.0......................................................................................3-7
MIL-3000FTX Series of FastPort Print Servers iii
Page 4

Printing using a Third Party TCP LPR/LPD Stack............................................................................3-8
Printing from Windows 95/98 Using DigiLpr...................................................................................3-8
Installing the DigiLpr Program.....................................................................................................3-8
Adding Queues in DigiLpr............................................................................................................3-10
Adding a New Printer....................................................................................................................3-11
Printing from NT using the HP DLC Protocol ...........................................................................................3-12
Printing from Windows using TFTP Client................................................................................................3-12
Management Tools Used with NetBIOS and TCP/IP...............................................................................3-12
FastManage..............................................................................................................................................3-12
NetBIOS-DOS Tools: NBMON and showprn.....................................................................................3-12
Chapter 4:Installing and Printing on NetWare
Introduction.....................................................................................................................................................4-1
Configuring in a Bindery Environment.......................................................................................................4-2
Using Act to Install the Print Server.....................................................................................................4-2
Using PCONSOLE to Install a Print Server ........................................................................................4-3
Adding Users to the Notify List with PCONSOLE............................................................................4-3
Installing a Print Server in an NDS Environment......................................................................................4-3
Installing a Print Server on NDS using PCONSOLE.........................................................................4-4
Additional Queues..........................................................................................................................4-4
Installing Print Server in NDS Using NWadmin ...............................................................................4-5
Creating a New Print Server .........................................................................................................4-5
Creating a New Printer ..................................................................................................................4-6
Creating a Print Queue...................................................................................................................4-6
Connecting the print server to a Printer......................................................................................4-6
Assigning a Print Queue to FastPort............................................................................................4-7
Configuring in a Bindery and NDS Environment .....................................................................................4-8
Printing to FastPort.........................................................................................................................................4-9
Printing Specific File Formats .......................................................................................................................4-9
Chapter 5:Installing and Printing on a UNIX Environment
Introduction.....................................................................................................................................................5-1
Host Software Versus LPD............................................................................................................................5-1
Digi Installation Software..............................................................................................................................5-2
Installing Logical Printers......................................................................................................................5-2
Installing on System V UNIX................................................................................................................5-2
Install Script on IBM RS/6000...............................................................................................................5-3
Installation on BSD UNIX Systems ......................................................................................................5-4
Manual Installation on LPD Systems...........................................................................................................5-4
Getting Started on an LPD System.......................................................................................................5-5
Pre-defined Queue Names ....................................................................................................................5-5
User Defined Queue Names..................................................................................................................5-6
LPR Options.............................................................................................................................................5-6
Manual Installation With LPD on a BSD UNIX System....................................................................5-6
Manual Installation with LPD on System V Machines......................................................................5-7
Manual Installation with LPD on RS/6000.........................................................................................5-8
Manual Installation Using Host SoftWare (fpfilter)...................................................................................5-8
F
pfilter Command Line Options............................................................................................................5-8
Printer Options File (.fpconfig).............................................................................................................5-9
About Option Classes.....................................................................................................................5-10
About Options Startstring and Endstring...................................................................................5-11
Manual Installation for System V Machines.......................................................................................5-11
Manual Installation on IBM RS/6000...................................................................................................5-12
Manual Installation on BSD UNIX Systems........................................................................................5-13
Printing to FastPort.........................................................................................................................5-15
Customizing BSD Installation.......................................................................................................5-15
Banner Pages and Accounting Information................................................................5-15
MIL-3000FTX Series of FastPort Print Servers iv
Page 5

Installing and Printing from Data General's DG/UX................................................................................5-16
Assigning Host Name and IP Address................................................................................................5-16
Installing and Printing with DG/UX...................................................................................................5-17
Additional UNIX Utilities: Using pstext and NeWSprint........................................................................5-18
Deleting Printers .............................................................................................................................................5-18
Chapter 6:Installing and Printing on an Apple Network
Introduction to the Apple Workstation.......................................................................................................6-1
EtherTalk Features..................................................................................................................................6-1
Newly Supported Apple Printer Utility Functionality .............................................................6-1
Apple Applications: How FastPort Operates .....................................................................................6-2
Printer Communications Handling......................................................................................................6-2
Plug & Play Operation: Printing to FastPort...............................................................................................6-2
Advanced Utilities ..........................................................................................................................................6-3
Tips on Using the Configuration File...................................................................................................6-3
Using the Apple Printer Utility for Configuration.....................................................................................6-3
Using the Apple Printer Utility to Download a Config. Files ..........................................................6-3
Using Setup Printer Information File...........................................................................................6-4
Using Setup Defaults File ..............................................................................................................6-4
Using Setup Font List.....................................................................................................................6-5
Using Namer to Rename the FastPort Printer............................................................................................6-6
Renaming FastPort Using Namer.........................................................................................................6-6
Printing PostScript Binary Files....................................................................................................................6-6
Selecting Binary PostScript Encoding..................................................................................................6-6
Bi-directional Printing from Macintosh Systems .......................................................................................6-8
Issues Regarding Bi-Directional Macintosh Printing ........................................................................6-9
Chapter 7:Print Management Features of FastPort
Managing Print Server ...................................................................................................................................7-1
Serial Port Console Monitoring.....................................................................................................................7-1
Enabling or Disabling the Console Monitor .......................................................................................7-1
Managing FastPort from Networked Workstations..................................................................................7-2
Multi-Protocol and SNMP Stations......................................................................................................7-2
TCP/IP Stations.......................................................................................................................................7-2
Using FastManage...........................................................................................................................7-2
Using Telnet Diagnostic Monitoring............................................................................................7-2
SYSLOG on FastPort.......................................................................................................................7-3
Digi’s fpstatus for TCP/IP UNIX .................................................................................................7-4
AppleTalk Stations..................................................................................................................................7-5
NetWare Client Stations.........................................................................................................................7-5
NetBIOS / NetBEUI Stations.................................................................................................................7-6
Chapter 8:FastManage Installation
FastManage Applications ..............................................................................................................................8-1
FastManage MIBs....................................................................................................................................8-1
FastManage Requirements ....................................................................................................................8-1
IP Configuration......................................................................................................................................8-2
IPX Configuration...................................................................................................................................8-2
NetBIOS Configuration..........................................................................................................................8-2
Installing FastManage ....................................................................................................................................8-2
Express Installation.................................................................................................................................8-2
Custom Installation.................................................................................................................................8-3
General Parameters.........................................................................................................................8-4
Discovery Parameters.....................................................................................................................8-5
SNMP Agent Parameters...............................................................................................................8-7
MIL-3000FTX Series of FastPort Print Servers v
Page 6

Chapter 9:Discovery Application
Introduction to Discovery..............................................................................................................................9-1
Discovery Features..................................................................................................................................9-1
Launching Discovery......................................................................................................................................9-2
Tool bar.....................................................................................................................................................9-3
Status Bar..................................................................................................................................................9-3
System Information ................................................................................................................................9-3
FastPort Icon Names.......................................................................................................................................9-3
Discovery Application Tools.........................................................................................................................9-4
Renaming a Discovery Map ..................................................................................................................9-4
Host Name/Address..............................................................................................................................9-4
Changing from the Node Name to an Address..........................................................................9-5
Send Broadcast ........................................................................................................................................9-5
Refresh Map.............................................................................................................................................9-5
Discover Host ..........................................................................................................................................9-5
Using the Ping Manager ........................................................................................................................9-5
TFTP Icon: Flash Download..................................................................................................................9-6
Close All Windows Icon ........................................................................................................................9-6
Show Node Properties............................................................................................................................9-6
SNMP Fault Trace...................................................................................................................................9-7
Parameters Pull-Down Menu........................................................................................................................9-8
General Parameters.................................................................................................................................9-8
Discovery Parameters.............................................................................................................................9-10
Application Launch Parameters ...........................................................................................................9-12
Mib2 System Parameters........................................................................................................................9-12
Chapter 10:FastPort Application
FastPort Application.......................................................................................................................................10-1
Overview of Managing FastPort...................................................................................................................10-2
FastPort Application.......................................................................................................................................10-2
Traps .........................................................................................................................................................10-2
Uptime......................................................................................................................................................10-3
Reset..........................................................................................................................................................10-3
Digi Logo..................................................................................................................................................10-3
Serial Port.................................................................................................................................................10-4
Parallel Port..............................................................................................................................................10-4
Configuration Sub-menus..............................................................................................................................10-4
TCP/IP Config.........................................................................................................................................10-5
Novell Config. .........................................................................................................................................10-6
General Config. .......................................................................................................................................10-7
Ethertalk Config......................................................................................................................................10-7
SMB Config..............................................................................................................................................10-8
NetBIOS Config.......................................................................................................................................10-9
Status Menu .....................................................................................................................................................10-9
Help Menu .......................................................................................................................................................10-9
Chapter 11:Ping and BOOTP Server
Launching the Ping Application...................................................................................................................11-1
Updating the Ping Settings....................................................................................................................11-1
Troubleshooting Ping.....................................................................................................................................11-2
BOOTP Configuration....................................................................................................................................11-2
Appendix A: Resetting FastPort to Factory Defaults
Resetting by Toggling the DIP Switches......................................................................................................A-1
Resetting by Console Option.........................................................................................................................A-1
Hardware Features .........................................................................................................................................A-1
MIL-3000FTX Series of FastPort Print Servers vi
Page 7

Serial Printer and Terminal ...........................................................................................................................A-2
Connectors .......................................................................................................................................................A-3
Serial Port Connector..............................................................................................................................A-3
RJ-45 Connector.......................................................................................................................................A-3
Parallel Port Connector..........................................................................................................................A-3
Environmental Operating Conditions .........................................................................................................A-3
System LEDs
.................................................................. A-3
Appendix B: Troubleshooting MS Windows
MS Windows-Level Browsing and Sharing Abilities................................................................................B-1
Troubleshooting DOS Tools..........................................................................................................................B-2
DOS Tools ................................................................................................................................................B-2
After Upgrade..................................................................................................................................................B-2
Appendix C: Troubleshooting NetWare
ACT-- Advance Configuration Tool.............................................................................................................C-1
Benefits of ACT .......................................................................................................................................C-1
Features ....................................................................................................................................................C-1
Requirements...........................................................................................................................................C-2
Setup .........................................................................................................................................................C-2
Navigating in ACT..................................................................................................................................C-2
Advanced Configuration Menu in ACT......................................................................................................C-2
NetWare Configuration Menu..............................................................................................................C-3
Configuring the Print Server (FastPort Side)......................................................................C-3
Configuring the Print Server (File Server Side)..................................................................C-4
Configuring a Queue..............................................................................................................C-4
Example 1.................................................................................................................................C-4
Example 2.................................................................................................................................C-5
Print Server Configuration ....................................................................................................................C-5
Status Menu in ACT .......................................................................................................................................C-7
Monitor Menu in ACT....................................................................................................................................C-7
Troubleshooting Tips .....................................................................................................................................C-8
FastPort does not power up...................................................................................................................C-8
FastPort does not show up in ACT ......................................................................................................C-8
FastPort fails POST after upgrading firmware...................................................................................C-8
FastPort does not login to bindery Novell 4.x server ........................................................................C-8
FastPort does not login to the file server.............................................................................................C-9
FastPort does not print via serial port..................................................................................................C-9
No Form Feed is sent after the print job..............................................................................................C-9
PostScript jobs have trouble printing...................................................................................................C-9
Autosensing printer has trouble printing............................................................................................C-10
MS Windows jobs print with an extra page........................................................................................C-10
File server displays an Incomplete Packet error message.................................................................C-10
Notification not Working if Created by PCONSOLE................................................................................C-10
FastPort Console Messages............................................................................................................................C-10
Could not attach QUEUE1.............................................................................................................................C-10
Attaching queue QUEUE1 on server SERVER1.................................................................................C-10
Read Configuration File.........................................................................................................................C-10
Could not Read Configuration file from SERVER1...........................................................................C-11
Trying to read file SYS:login/milan/FPXXXXXX on SERVER1......................................................C-11
No such object FAKEQ...........................................................................................................................C-11
Failed to login to file server SERVER1 for server FAKEPS...............................................................C-11
ACT Error Messages.......................................................................................................................................C-11
Appendix D: Troubleshooting UNIX
Introduction.....................................................................................................................................................D-1
Troubleshooting Tips .....................................................................................................................................D-1
MIL-3000FTX Series of FastPort Print Servers vii
Page 8

No Lights on the Unit.............................................................................................................................D-1
ASCII Text File Prints as a Single Line.................................................................................................D-1
SYS LED Flashes Quickly.......................................................................................................................D-2
Cannot Print to the serial printer..........................................................................................................D-2
NET LED flashes, But User Cannot Print or Ping the Unit...............................................................D-2
UNIX Configuration Files..............................................................................................................................D-3
Using fpfilter Configuration Files.........................................................................................................D-3
Sample Entries for Direct and Remote Spooling........................................................................................D-4
DHCP Troubleshooting .........................................................................................................................D-4
Appendix E: Troubleshooting AppleTalk
Troubleshooting Tips .....................................................................................................................................E-1
Reset Time................................................................................................................................................E-1
Configuration to Use the ACK Signal..................................................................................................E-1
Situation 1: Printing Over Ethertalk Using Driver 7.x.......................................................................E-1
Situation Two: Setting Serial Port Options..........................................................................................E-2
Setup for AppleTalk .......................................................................................................................................E-3
For a Serial Printer ..................................................................................................................................E-3
PostScript Binary print...........................................................................................................................E-4
Troubleshooting......................................................................................................................................E-4
Changing the FastPort Settings.............................................................................................................E-4
Troubleshooting Setup on AppleTalk..................................................................................................E-5
More Troubleshooting............................................................................................................................E-6
Downloading the Setup Defaults File to Change FastPort...............................................................E-7
Appendix F: Upgrading Flash EEPROMs
Using the Network Upload Procedure........................................................................................................F-1
Uploading the Flash Image ...................................................................................................................F-1
Recovering from a Failed Upload.........................................................................................................F-1
Restoring the Alternate Bank Image ....................................................................................F-2
Completing the Upload..........................................................................................................................F-2
Flash Upload Commands ......................................................................................................................F-3
Troubleshooting Tips .............................................................................................................................F-3
Appendix G: Telnet, NBMON and Serial Connection Diagnostic Console
Options
Diagnostic and Configuration Commands: Commands...........................................................................G-1
C—Configure Console (for status monitoring)..........................................................................................G-1
D—Display Summary Configuration Parameters, Including..................................................................G-2
E—Display/Set Ethernet Options................................................................................................................G-2
F—Flash Firmware Load Enable/Disable...................................................................................................G-2
I—Display/set IP Address ............................................................................................................................G-3
L—Limit monitor Network Access by Password.......................................................................................G-3
N—Network Protocols Menu .......................................................................................................................G-3
Network Protocols Menu:......................................................................................................................G-3
A—AppleTalk Options ..........................................................................................................G-3
M—Microsoft Windows Print Services Options................................................................G-4
N—Netware Options..............................................................................................................G-4
T—TCP/IP (Sockets, LPD, RARP, BOOTp, TFTP) Options.............................................G-5
TCP/IP Menu Options: (S) Socket Options ........................................................................G-5
TCP/IP Menu Options: (L) LPD Options............................................................................G-6
P—Display/Set Parallel Port Parms and Status.........................................................................................G-6
Display/Set for MIL-3200FTX...............................................................................................................G-6
Display/Set for MIL-3110FTX and MIL-3111FTX,.............................................................G-7
S—Display/set Serial Port Parms.................................................................................................................G-7
Z—Reset NVRAM to Factory Defaults........................................................................................................G-8
MIL-3000FTX Series of FastPort Print Servers viii
Page 9

*—Print ASCII Test Page ...............................................................................................................................G-8
+—Print PostScript Test Page .......................................................................................................................G-8
Appendix H: Troubleshooting FastManage
General Messages............................................................................................................................................H-1
General Problems............................................................................................................................................H-1
IP address Validation Messages ...................................................................................................................H-1
Discovery Application Messages..................................................................................................................H-2
Ping Application Message.............................................................................................................................H-2
BOOTP Server Application Messages..........................................................................................................H-2
Appendix I: Technical Support Services
WWW and FTP Sites ......................................................................................................................................I-1
Contacting Technical Support.......................................................................................................................I-1
Expediting Technical Support Service.........................................................................................................I-1
Returning Procedures.....................................................................................................................................I-1
How to access Digi’s FTP Sites......................................................................................................................I-2
UNIX Binary Files Available.........................................................................................................................I-2
Support Documents Available......................................................................................................................I-4
Index
MIL-3000FTX Series of FastPort Print Servers ix
Page 10

Chapter 1
Chapter 1 gives a description on the MIL-3000FTX FastPort print servers.
1.1 Overview of the MIL-3000FTX Print Servers
The MIL-3000FTX FastPort print servers are 10/100 Mbps, stand-alone
print servers. These print servers are to be connected directly to multiple
printers on Ethernet and/or Fast Ethernet networks. Versions include:
Introduction and Installation
MIL-3100FTX : One RJ-45 (UTP), 10/100 Mbps port; one parallel port
•
and one serial port
MIL-3200FTX : One RJ-45 (UTP), 10/100 Mbps port; two parallel port
•
and one serial port
MIL-3310FTX : One RJ-45 (UTP), 10/100 Mbps port; three parallel port
•
and one serial port
All FastPorts recognize the speed of a network using auto-negotiation.
1.2 Features of the Print Servers
1.2.1 Physical Features
• 10/100BASE-TX, RJ-45 connector
• Centronics compatible parallel port(s)
• RS-232 serial port
• Four position DIP switch
1.2.2 Configuration Features
• FastManage SNMP manager for Windows
• On-board diagnostic utilities can also be accessed on-line
• Apple users can configure FastPort by downloading configuration files
MIL-3000FTX Series of FastPort Print Servers 1-1
Page 11

1.2.3 Shared Printer Features
FastPort gives you a wide access to shared printers, including:
• Windows 95®, Windows NT, and Windows for Workgroups systems,
Windows NT using HP DLC
• PCs networked with Novell® NetWare
• UNIX® support
• Apple® Macintosh® using EtherTalk®
• OS/2® machines with TCP/IP
• PCs running a TCP/IP protocol stack over Ethernet networks
The MIL-3000FTX print servers are configured by using FastManage,
which is an SNMP management tool. The MIL-3000FTX also supports
SNMP MIB-II (RFCs 1213) and parallel/serial MIBs (RFCs 1318 and 1317).
1.3 Utilities
To make the units easier to manage, Digi supplies the FastManage suite of
software and the Advanced Configuration Tool™ (ACT). FastManage is a
windows-based menu software application and ACT is a DOS-based menu
software application. Configuration of devices can be done by using print
utilities on UNIX systems. Firmware upgrades of the flash EEPROMs can
be done via network connections.
®
1.4 Firmware Update
The software and firmware used by FastPort print servers support MS
Windows, IBM OS/2, NetWare, UNIX, and Apple operating environment.
New features of the firmware include:
• Complete Novell NDS support
• Bi-directional Centronics (parallel) printing
• Native SMB/MS Windows printing: Includes support for Windows for
Workgroups®, Windows 95®, Windows NT®
• FastManage™ SNMP manager for Windows: This offers management
over IP, IPX or NetBIOS/NetBEUI
MIL-3000FTX Series of FastPort Print Servers 1-2
Page 12

1.5 First Time Users
1. Physically install FastPort to the network.
a. Connect the device to the printer(s) it will be servicing.
b. Print a test page by putting the DIP switches in “test page” mode.
2. Write down the FastPort twelve digit hardware address (MAC
address). The number is located on a label on the underside of the unit,
as well as on the test page just printed (for example,
00:40:c8:XX:XX:XX
3. Using the information in the hardware manual, set the DIP switches in
a normal printing mode and power up the unit.
).
4. Check FastPort’s LEDs to verify that the unit is functioning on the
network.
5. Locate the type of driver on the CD-ROM for your operating systems
where the installation will be performed (e.g., MS Windows, UNIX,
NetWare, or MAC).
6. Turn to the specific chapter in this document for the specific network
operating system and continue installation.
7. Configure FastPort to be managed by FastManage.
1.6 Installation Requirements
Before installing FastPort, make sure you have the following:
• A MIL-3000FTX series of FastPort print servers
• Use a switchable power supply. For the USA, set at 120 VAC
• Appropriate Ethernet cabling (CAT 5)
• Serial or parallel printer(s) with the proper cabling. FastPort is shipped
with a 3 ft. parallel port cable
• Four rubber feet to keep the print server from sliding. These are also
included in the packaging
MIL-3000FTX Series of FastPort Print Servers 1-3
Page 13
1.7 Installing FastPort
Do the following to physically install the MIL-3000FTX series of FastPort
printer servers. Contact Digi’s LAN technical support if you have
problems or questions when installing the print server (see Appendix I).
1. Attach the Rubber feet to the bottom of the print server. Place one on
each corner of the device.
2. Record the Ethernet address (located on the bottom of the unit) for
future reference.
3. Attach the Ethernet cabling. The MIL-3000FTX supports 10/100BASE-
TX and has an RJ-45 connector. Use CAT 5 (UTP).
4. Select an operating mode with the front panel switches. Use Table 1-1.
Table 1-1: Operating Mode
D3 D4 Mode Description
Up
Down Up Telnet diagnostic
Down Down Serial diag.
Up Down Test page A test page prints on a power cycle. Print jobs are not accepted.
Up Normal Does not allow a telnet session. Users can print to the unit. The
monitor
monitor
(system) and
Allows a telnet session to monitor FastPort or change its parameters.
Users can print to the unit. The
A terminal can be attached to the serial port to run a serial monitor.
Print jobs are not accepted. The
(network) LEDs blinks.
NET
and
SYS
LED blinks.
NET
LEDs blink.
NET
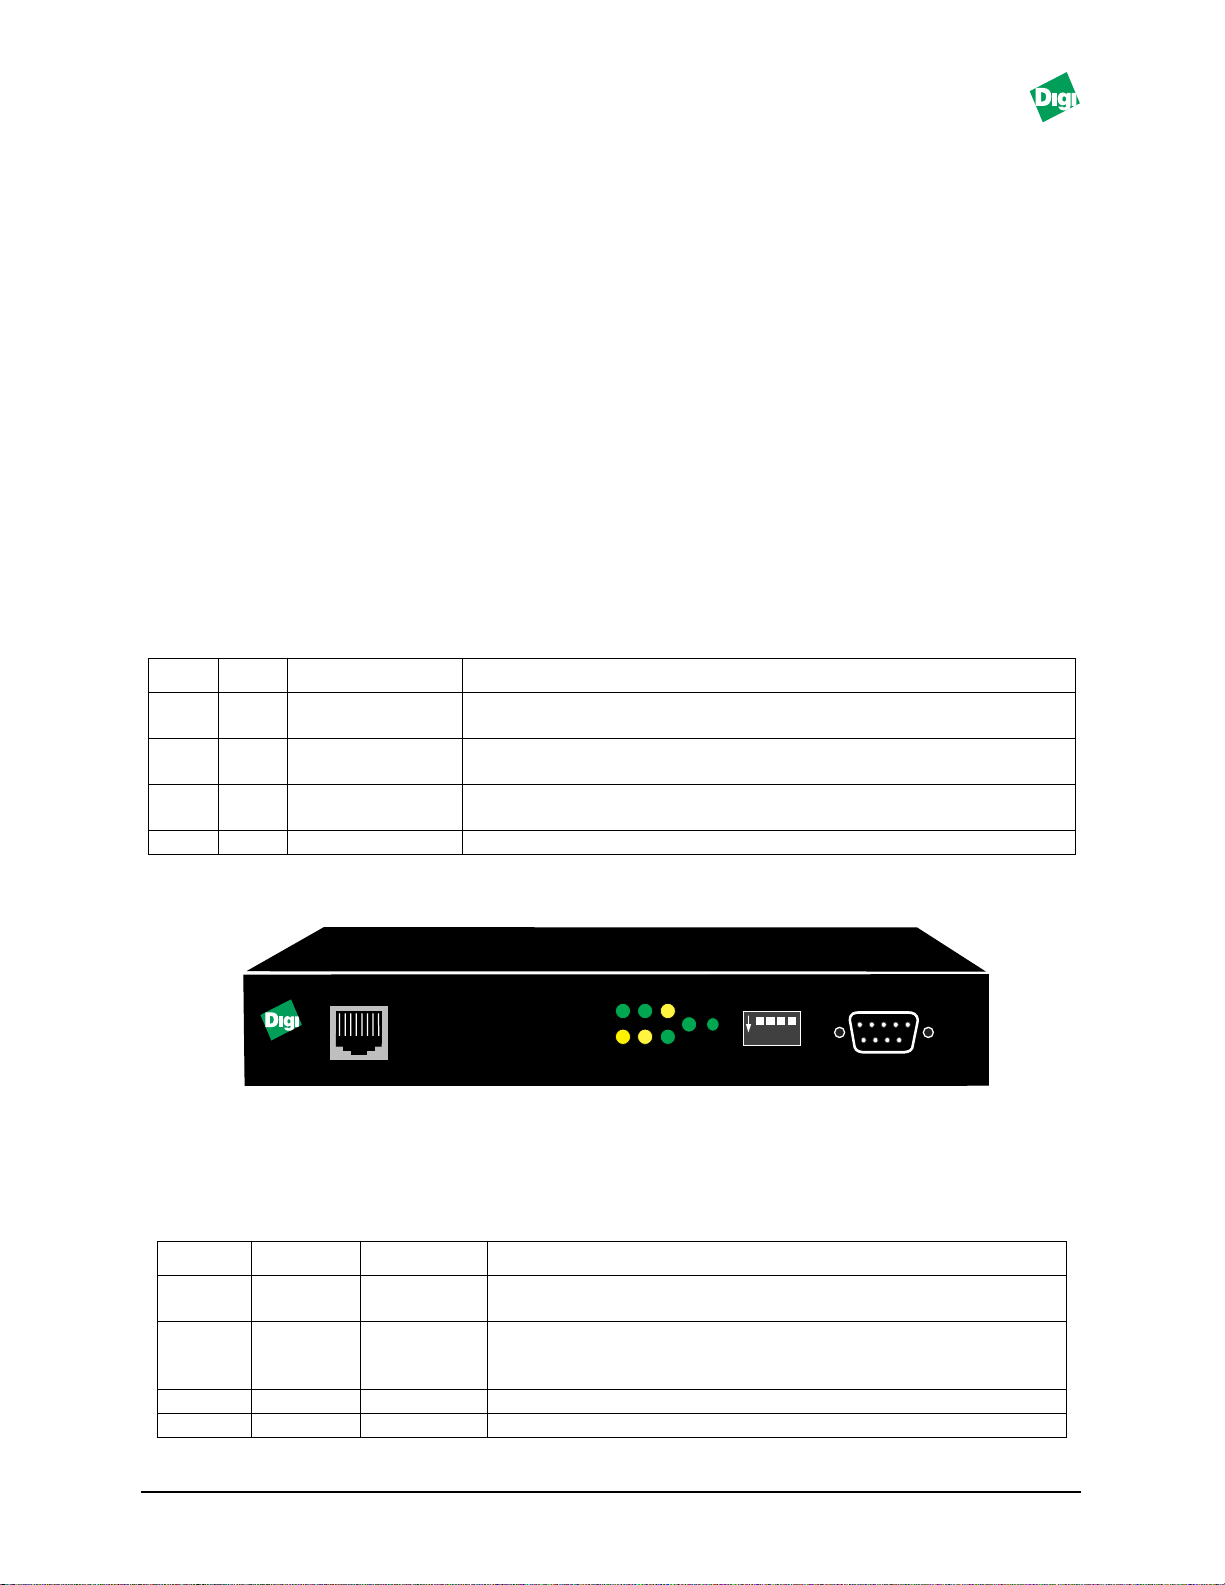
Front
RX TX P1
LNK NET SYS SER PWR
SWITCH
1 2 3 4
ON
SERIAL
Note:
10/100
MIL•3100FTX
FastPort 10/100 Mb/s
PRINT SERVER
Figure 1-1. MIL-3100FTX Front Panel
The MIL-3200FTX will have one e xtra LED: “P2.” The MIL-3310FTX will ha v e two e xtra
LEDs: “P2” and “P3.”
SYS
Table 1-2: Flash/Test Page Settings
Switch
D1
D1 Down Selects bank 1 to run the 4Mb flash EEPROMs for uploading. If the
D2 Up Test Page FastPort prints a test page: parallel 2 and serial 1.
D2 Down FastPort prints a test page: parallel 1 and serial 1.
Position Mode Description
Up Flash Bank Selects bank 0 (upper) to run the 4 Mb Flash EEPROMs for
uploading the new firmware image.
upgrade process fails, use this setting and power cycle the unit
to return FastPort to its default settings.
MIL-3000FTX Series of FastPort Print Servers 1-4
Page 14
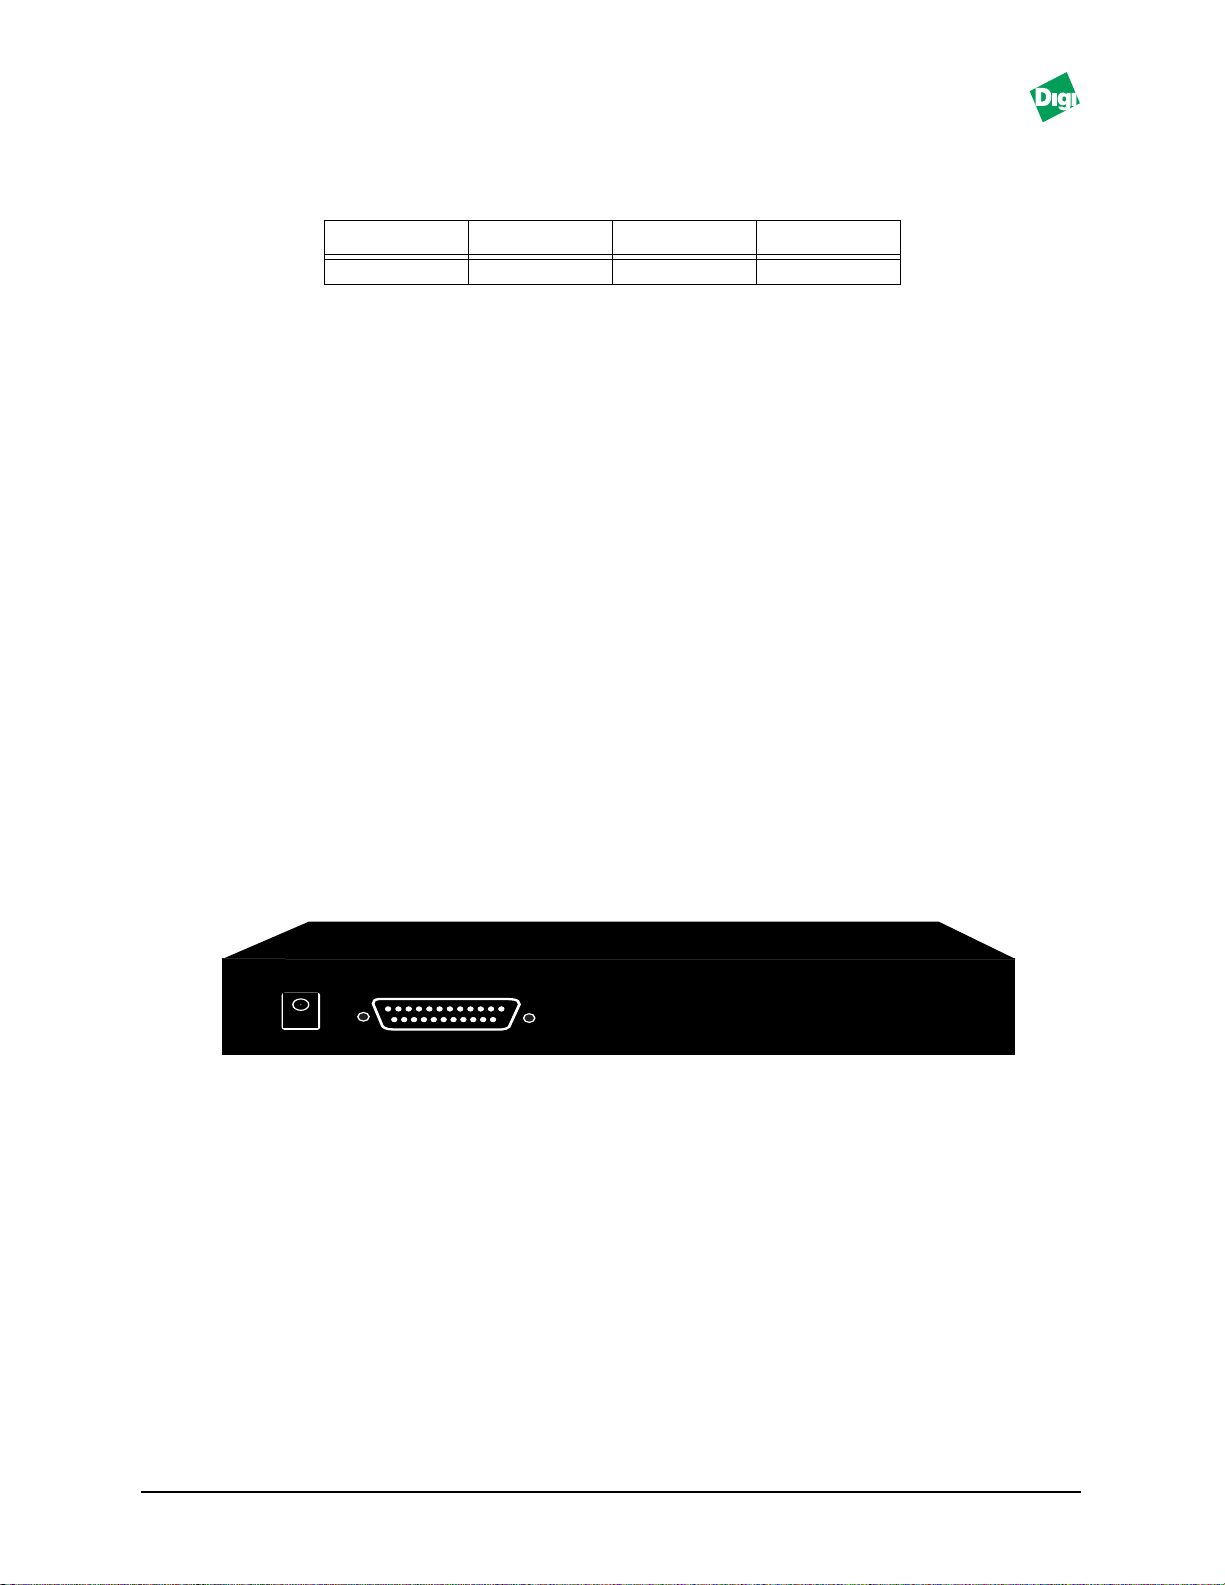
Table 1-3: Default Settings
D1 D2 D3 D4
Up Down Down Up
5. Attach the parallel printer(s) cable(s).
Attach the parallel cable to the female DB25 parallel port on the back of
the FastPort. Connect the other end of the cable to a standard,
centronics port on the printer.
6. Attach the serial printer cable.
Attach the serial cable to the male DB9 port on the front of the unit. The
other end of the cable should be connected to a female DB9 with the
standard serial interface pinout.
A null modem cable or adapter is necessary if the printer’s serial port is
a DTE device. If the cable works for an IBM PC attached to a printer,
then it will work for FastPort.
Note:
See Appendix A for the parallel and serial port pinouts.
7. Set the printer to the defaults for the serial port:
, no parity bits , 1 stop bit , and Xon/Xoff for flow control.
bits
Rear
POWER
Note:
The MIL-3200FTX will have two parallel ports. The MIL-3310FTX will have three
parallel ports.
PARALLEL 1
Figure 1-2. Rear Panel of MIL-3100FTX
8. Connect the power supply:
9600 baud ,
8 data
a. Select the proper voltage for the specific country.
b. Place the unit near the printer.
c. Plug the power connector into the receptacle marked
Power
on the
rear of the unit.
MIL-3000FTX Series of FastPort Print Servers 1-5
Page 15

9. V erify normal boot-up. The unit performs POST (power -on self-test) at
start-up and tries to resolve its IP addresses:
– If the IP address is set, the
– If the IP address is not set, the
SYS LED blinks once per second.
SYS LED blinks five times per second
until the address is set either manually or by using
DHCP .
FastPort should now be functioning on the network
RARP , BOOTP , or
MIL-3000FTX Series of FastPort Print Servers 1-6
Page 16

Chapter 2
2.1 Assigning the IP Address
Devices on a TCP/IP network are identified by two addresses:
• Hardware (mac) address: A 6-byte address assigned to the FastPort
device by the manufacturer
Setting the IP Address
• IP address: A 4-byte address assigned by the administrator
FastPort stores its IP address in its NVRAM. The default IP addr ess is set to
0.0.0.0
IP address has been set.
Warning:
Use any of the following methods to assign the IP address:
• Run the install script from the CD-ROM (UNIX)
• Set a static
• Use the ARP
• Use RARP
• Use FastManage from a Windows system
• Use BOOTP or DHCP to set the address every time the device is powered
. When FastPort is in normal mode, the LEDs blink to indicate the
0.0.0.0 is not a valid IP address. When the address in is 0.0.0.0 , the device uses
RARP, BOOTP and DHCP to acquire a valid address.
ARP
entry. Make a telnet connection to port 2002, then set the
IP address with UNIX workstation
and telnet commands to set the IP address with MS
Windows workstations
to set the address when the device powers up
up. This is preferred in larger networks
• On a Macintosh, use the Apple Printer utility to download a
configuration file containing the new IP address
• For a Novell NetWare server, use ACT to set the IP address
• Use nbmon
Note:
MIL-3000FTX Series of FastPort Print Servers 2-1
ARP
and
through a router on a different subnet from FastPort.
and NetBEUI
RARP
do not work if the
to make a Telnet-type connection
RARP
server or a system using
ARP
is connected
Page 17

2.2 Setting an IP Address with Install Script
1. Use “TAR” to get the files from the CD-ROM.
2. Run the
unpack.sh
command. This launches
install.sh
assigns an address from “Installation Options.”
3. Choose “Configure a New FastPort.”
Install.sh
IP address. Refer to:
asks for the IP addresses, edits applicable files and assigns an
/examples/install.doc for a sample session.
2.3 Setting the IP Address using Telnet on UNIX
Note:
arp -s ether alpha 0:40:C8:0:1:2B (no leading zeros: RS-6000)
arpbypass set alpha 0X00.0X40.0XC8.0X00.0X01.0X02 (AT&T and NCR)
Telnet only works if a device is on the same subnet as the host.
1. To set an IP address using telnet, use a text editor to open the /etc/
hosts file and add the following line:
192.115.2.1 alpha (Save this file)
a. Enter the following at the command prompt. This sets static ARP:
b. arp -s alpha 0:40:C8:0:1:2B (no leading zeros: most UNIX systems)
, which
Note:
The assigned IP address must be on the same local subnet as UNIX.
2. Set the switches to the telnet diagnostic mode and power cycle
FastPort.
3. Make a telnet connection to maintenance port 2002. Type telnet
alpha 2002. If a connection is successful:
Connected to 204.23.13.4
Escape character is ^]
Vers. 6.0.18 Datecode 10/23/98
Type “S” to see status
Type “!” to enter monitor
4. Press [!] and press [return].
Note:
A warning message appears: Entering monitor will lock out other
Ethernet access.Type yes to get to the command prompt.
5. At the “menu” option, Press [I] and then press [return].
6. Press [Y] when prompted. This address is stored in NVRAM.
7. Reboot the device by pressing [R].
MIL-3000FTX Series of FastPort Print Servers 2-2
Page 18

2.4 Setting IP Address with Windows 95, 98, and NT
Using ARP or telnet on a Windows systems only works if there is a TCP/IP
stack on the system and if FastPort is on the same subnet as the system.
Disable DHCP before installation.
1. Enter the MS-DOS prompt.
2. Ping a known machine on the network (required).
3. Set the static ARP entry with the following command:
arp -s x.x.x.x 00-40-C8-yy-yy-yy and press [return]
Where x.x.x.x is the IP address to assign for FastPort, and yy-yy-yy is the
last 6 digits of the hardware address.
4. Type: arp -a and press [return]. Two entries should be listed: one for
the host that was pinged and one for the FastPort just entered.
5. Make a telnet connection to maintenance port 2002.
Type telnet alpha 2002. If a connection is successful:
Connected to 204.23.13.4
Escape character is ^]
Vers. 6.0.18 Datecode 10/23/98
Type “S” to see status
Type “!” to enter monitor
6. At the menu option, Press [I] and then press [return].
7. Press [Y] (for yes) when asked to confirm the modification. This address
is now stored in the device’s NVRAM.
8. Reboot the device by pressing [R].
2.5 Setting the IP Address Using RARP
1. RARP queries a server for their IP addresses at start-up. Find the
Ethernet address of FastPort.
2. Add the address to /etc/ethers, or add it to NIS/YP master Ethers
database. If a device named “alpha” has address: “0040C802ABCD,”
then put in entry: 00:40:C8:02:ab:cd alpha.
3. Add the IP address and the hostname to the /etc/hosts.
4. After using NIS for the hosts/ethers, rebuild the database:
a. Enter the “YP” directory.
MIL-3000FTX Series of FastPort Print Servers 2-3
Page 19

b. Type make and press [return].
c. Power cycle FastPort.
5. Verify that the RARP daemon is running:
a. For BSD UNIX, type ps -ax | grep rarp
b. For System V UNIX, type ps -ef | grep rarp
c. Type /usr/etc/rarpd -a to start the rarp daemon.
d. The LED flashes 5 times per second until it resolves its IP address. It
then flashes once per second.
2.6 Setting the IP Address Dynamically with BOOTP
BOOTP allows a client machine to find its own IP address. BOOTP is IP/
UDP based and it can pass through routers.
2.6.1 Setting the IP address with BOOTP on Sun
1. Use a text editor to open the /etc/hosts file.
2. Add a host name and hardware address on a single line (A device
named “alpha” with an address “192.115.2.1,” enter:
192.115.2.1 alpha (Save the file)
3. Create a bootptab in the /etc directory. To do this, type:
<hostname of FastPort>:ht=1:ha=<hardware addr.>:ip=<ip addr.>
4. Start the BOOTP daemon by typing.
/usr/etc/bootp
5. Power cycle FastPort. It will broadcast the BOOTP packets, obtain a
response, and then uses the IP address specified in /etc/bootptab.
2.6.2 Setting the IP address using BOOTP on HP/UX
1. Log in as root on the system.
2. Start “SAM” by typing sam &. Press [return].
3. Use a text editor to open the /etc/hosts file.
4. Add the following line: Type: 192.115.2.1 alpha and save the file.
5. From the “Networking” menu select Communication.
MIL-3000FTX Series of FastPort Print Servers 2-4
Page 20

6. From the this menu, select Device Connectivity.
7. From the “Boot Protocol” menu, select Actions.
8. Select Add. And add the following information:
BOOTP Device Name: <specify the hostname of the device>
Internet address: <specify the IP address of the device>
Subnet address: <specify the subnet mask>
Station Address (hex):<specify the hardware address>
Boot file name: <specify the full path of this file>
9. When prompted for the “BOOTP Device Adapter Type,” select
Ethernet and then select Apply.
10. Exit out of SAM and restart BOOTP.
11. Power cycle FastPort. It broadcasts the BOOTP packets and obtain a
response from the server to use the IP address specified.
2.7 DHCP Support (NT 4.0 server)
FastPort operates as a client with a DHCP server. Setup is not necessary.
After POST (power on self-test), it sends out DHCP packages. The server
scrolls through a list of addresses allocated for clients and then assigns the
first available number. The IP address stays until power-off or its lease
expires. The DHCP server must be on the same subnet as the client. If not
on the same subnet, a helper is needed on the router.
2.7.1 Setting an IP Address Using the DHCP Manager
The following step show how to use the DHCP Manager to set an IP
address for FastPort.
1. From “Start,” select Programs-->Administrative Tools-->DHCP
Manager
2. In the DHCP Manager menu, double-click the DHCP server you want
to manage.
3. Click the scope in which you want to add reservations.
4. From the “Scope” menu, click Add Reservations.
5. Enter the IP address and MAC address as shown in Figure 2-1. The
MAC address is printed on a label on FastPort.
MIL-3000FTX Series of FastPort Print Servers 2-5
Page 21
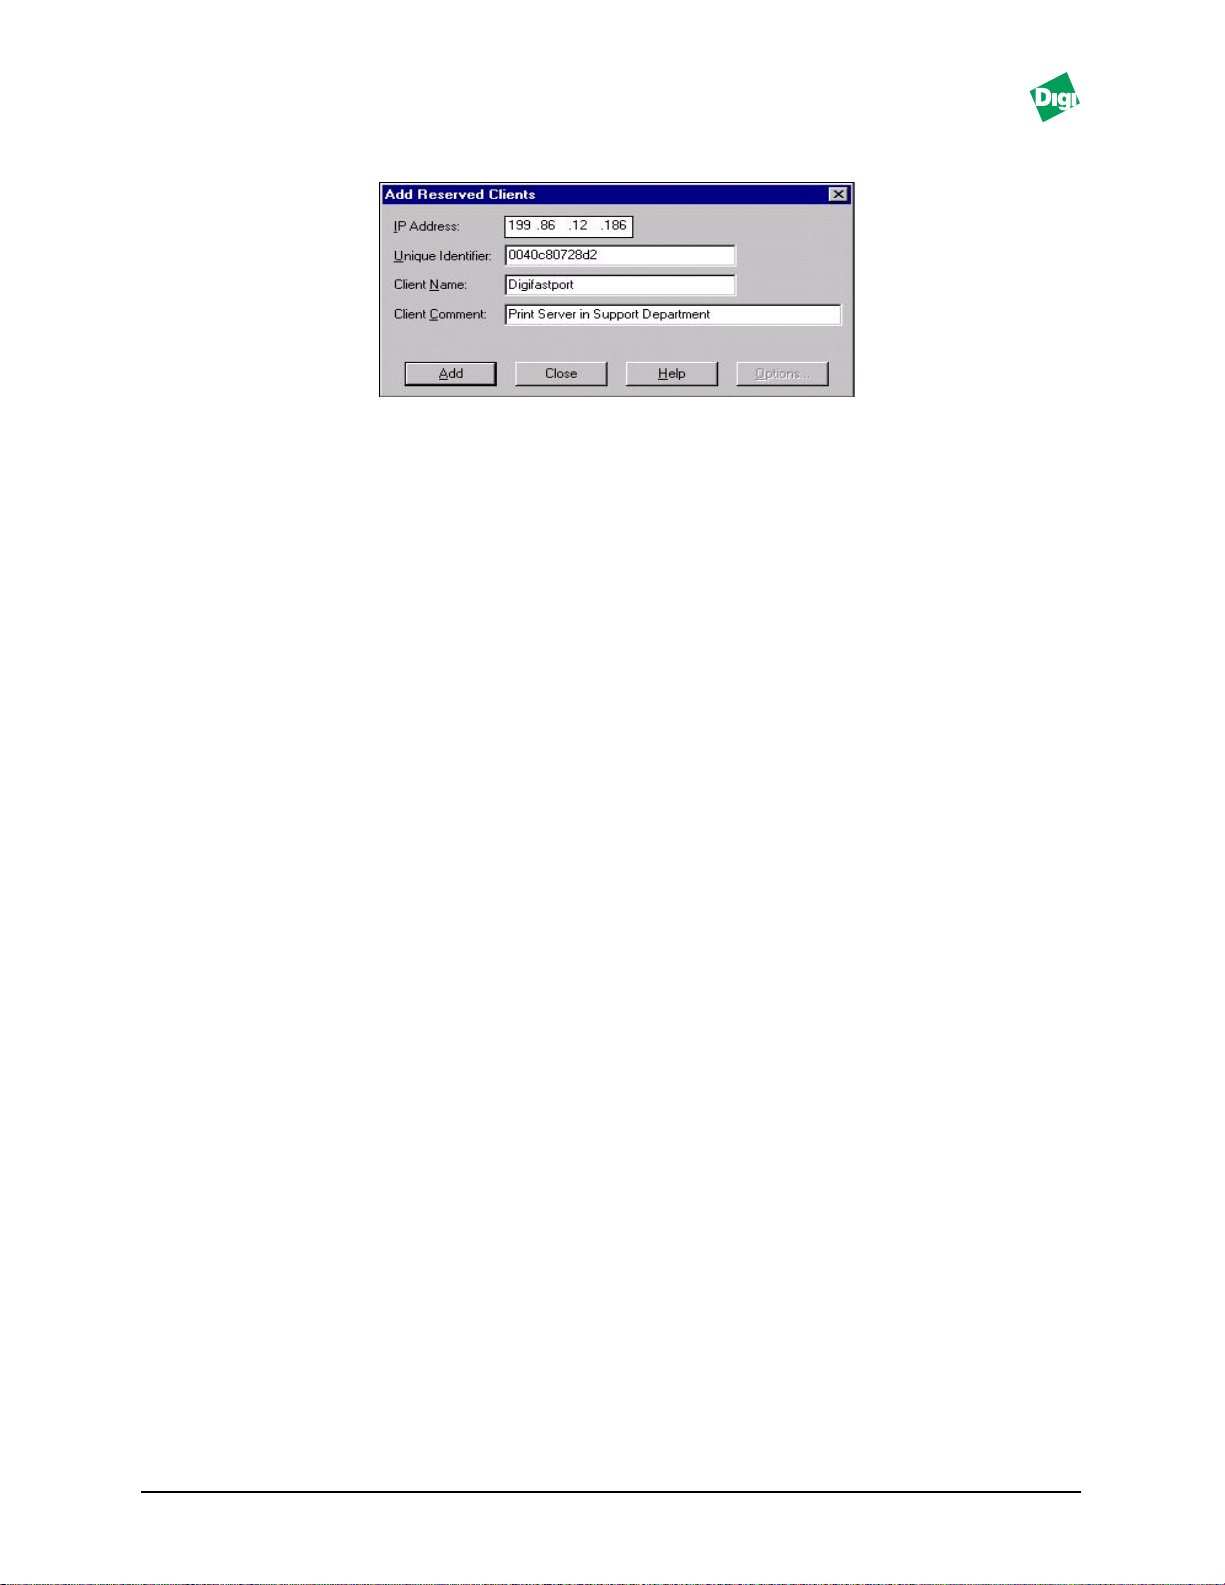
Figure 2-1. Add Reserved Clients Menu
6. Set the DIP switches to the telnet diagnostic monitor position as
described in the hardware guide and reboot the print server. The
system request an IP address fr om the DHCP Server. The server returns
the reserved IP address.
Note:
Note:
Values added to the “Unique Identifier” (Figure 2-1) must be entered correctly. This
entry is the MAC address for FastPort. FastPort sends this MAC address in a request
to the DHCP server for an IP address. If it is entered incorrectly, it will not match the
value sent by FastPort. The DHCP server then assigns it any available IP address
instead of the IP address reserved.
If FastPort does not respond to the reserved IP address, print a test page. Verify the
MAC address from the test page.
7. Do the following to set the IP address permanently:
a. Verify that FastPort is responding with the new IP address by
pinging the IP address reserved. From a DOS prompt, type: ping
xx.xx.xx.xx and press [return] (where xx.xx.xx.xx is the IP
address reserved).
b. If ping is successful, type: telnet xx.xx.xx.xx 2002 and press
[return] (where 2002 is the telnet diagnostic socket port address for
FastPort).
c. The following displays (if the connection is successful):
Vers. 6.1.18, Datecode 10/23/1998 18:50
Type “S” to see current status
Type “D” to see current configuration
Type “!” to enter monitor
Type “A” to abort connection
d. Select [!] and press [return]
e. Select [I] and press [return]. Enter the IP address that was reserved
by the DHCP Manager. This stores the IP address permanently in
FastPort’s NVRAM.
f. Select the [R] command to reboot the FastPort.
MIL-3000FTX Series of FastPort Print Servers 2-6
Page 22

2.8 Using Digi's ACT to Assign an IP Address
Digi's ACT can be used to configure options on FastPort.
Note:
If ACT has not been extracted from the utility portion of the CD-ROM to your local
drive, do so now.
1. Select Advanced Configuration in the “Configure” pull-down
menu.
2. In the next menu, select Print Server Configuration.
3. From the list of print servers, choose the appropriate print server that is
to be configured and press [return].
4. In the next menu, scroll down to select the IP address field and press
[return] to enter new IP address.
5. When finished with the configuration, press the [esc] key to close all the
open windows.
6. To exit and save the configurations:
a. Select Reset Print Server in the “Configure” pull-down
window.
b. Select the print server just configured. This resets FastPort.
7. Exit out of ACT and ping the server to verify the new IP address
responds correctly.
FastPort is now ready for use on the IP network.
2.9 Using Appletalk to Assign an IP Address
Download the Setup Defaults file and the Apple Printer Utility
from the Appletalk portion of the CD-ROM. See Chapter 6 for more
information on the Apple Printer Utility. To assign the IP address using
Appletalk:
1. Double click on the SetUp Defaults file to edit it.
2. Scroll down and select the IP address option under “General
Parameters.” Change the values of the IP address in parentheses.
Remove the % sign before the IP Address option.
Warning:
Do not edit the top three lines of the file.
3. Save the changes and quit the editor.
MIL-3000FTX Series of FastPort Print Servers 2-7
Page 23

4. Open the Apple Printer Utility.
5. Select Download Postscript File from the “Utilities.”
6. Select Setup Defaults that were just modified.
7. When the file has downloaded, quit the utility.
8. Power cycle FastPort. These settings are stored in NVRAM and remain
there until changed.
Note:
If there is an error, the postscript log returned by the utility contains an error message.
To avoid errors, do not add extra spaces in the
shown in the parentheses.
setup default
2.10 Using Digi’s NetBIOS to Assign IP Address
2.10.1About the Digi Utilities
Digi distributes a pair of utilities that are for any DOS system with a
NetBEUI stack. Systems include Windows for Workgroups, Windows 95/
98, Windows NT, and DOS LAN Manager clients. The two utilities are:
• SHOWPRN.EXE: Finds any FastPort(s) on the network
• NBMON.EXE: Allows users to configure FastPort
These utilities require a NetBEUI stack to be installed on the client
machine. If not already done so, install NetBEUI first before using either
utility. Copy the utilities to the “local” system from the CD-ROM or by
retrieving them from Digi’s ftp sites: FTP.MILAN.COM. Files are located in
the following directory:
file other than the options
/pub/fastport/software
2.10.2Using The Digi Utilities
Run the showprn.exe utility first to make sure:
• FastPort is available on the network
• NetBEUI stack on is properly configured
1. Open a DOS prompt and enter the directory where the utility is located
(e.g. cd \digi_ins\win_95).
2. Run the utility by typing showprn.exe and pressing [return]. The
following output appears:
MIL-3000FTX Series of FastPort Print Servers 2-8
Page 24

Group Server Service Status
Workgroups FP0F0FBA Parallel1 No active parallel job
Note:
If an error message “0x23 error with add name” appears, this means the NetBEUI
stack is not configured correctly. If showprn.exe did not return a list of printers, or if it
returned with an error, try executing the utility again. This time with a special option
that tells the utility to try a different “logical LAN layer”:
showprn.exe -d1
If a Windows-based system has multiple protocols and/or multiple network interfaces,
a user needs to specify the LAN layer, by typing:
-d1 or -d2 or -d3, etc...
3. Once showprn.exe displays FastPort, the nbmon utility can be used to
connect and modify settings. Using the example above, type in the
following line:
nbmon.exe FP0F0FBA
Note:
If the -d1 or -d2 option was used with showprn.exe, you will need to type that -d1 or
-d2 option on the nbmon.exe command line as well.
If the connection is successful, the following is displayed:
v.1.0.102
Press <ESC> to exit
Ver 6.1 Build 18, Datecode 10/23/1998 18:50
Type “S” to see current status
Type “D” to see current configuration
Type “!” to enter monitor
Type “A” to abort connection
FastPort is now connected. If the above information does not appear , r echeck the switches and LEDS. Contact Digi’s LAN technical support if
necessary.
4. Type [!] and then press [return].
5. Type in [Y] for yes to enter monitor.
6. A a list of options appear:
Command [?, C, D, E, F,...., Z]: -->
Type in the command to set the IP address: [I]
7. A display of current IP address appear. Type [Y] for yes to modify this
address.
MIL-3000FTX Series of FastPort Print Servers 2-9
Page 25

8. At the next prompt, type in the IP address as such:
Enter new IP address: 204.23.13.4
9. At the next prompt, press [R] to reset the system.
The nbmon session closes, while FastPort reboots itself. When the system
comes back up, the LEDs blinks steady (1 second manner). This indicates
that FastPort now has an IP address set.
2.11 Verifying IP Address is Set Properly
To see if FastPort is up and running on the network, use the ping
command, type: ping <
hostname
appears. If there is a problem, try using ping with the IP address:
>. A message that the host is alive
ping <
ip-address
>
On some systems, the ping command continuously displays:
64 bytes from <
To discontinue ping, press the Del key or Control+C
hostname
> (192.115.2.1) icmp_seq=0 time=3ms
MIL-3000FTX Series of FastPort Print Servers 2-10
Page 26

Chapter 3
Installing and Printing in a MS Windows and IBM
OS/2 Environment
Chapter 3 provides detailed instructions on configuring and printing with
MS Windows and IBM OS/2 clients.
3.1 Printing From a NetBIOS Workstation
3.1.1 Introduction
FastPort supports native printing from Windows and IBM NetBIOS clients
using the NetBEUI protocol. To perform an installation on a NetBIOS
workstation:
1. Verify that
a. The network settings on the workstation include the NetBEUI
protocol.
b. The SMB or Windows Print and File client services are “bound” to
the NetBEUI protocol. This should have been done by default when
the protocol was first installed onto the system.
2. For Windows programs, refer to:
Printing from Windows for Workgroups” on page 3-2
“
“Printing from Windows NT (3.5x)” on page 3-2
“Printing from W indows 95/98 or Windows NT 4.x (via SMB)” on page
3-3
This section describes how to install a logical Windows printer that will
send print jobs to FastPort.
3. For both DOS and Windows programs, refer to:
Printing From NetBIOS-supported DOS Workstation” on page 3-4
“
This section describes how to use the net use command, which
redirects the LPT ports to FastPort.
MIL-3000FTX Series of FastPort Print Servers 3-1
Page 27

4. To configure a system to perform local spooling, refer to:
“Spooling Versus Non-Spooling Printing” on page 3-5
Configuration on this section is now complete.
3.1.2 Printing from Windows for Workgroups
Perform the following to set up FastPort to work with MS Windows for
Workgroups, version 3.11:
1. From “Control Panel,” double-click on the Printer icon.
2. Click on the Connect button.
3. Click on the Network icon. Browse screen displays FastPort and other
workstations.
4. Find the device name and path fields.
These fields show the local port to redirect and the network device to
receive the print job, respectively.
5. Fill in the path with the FastPort printer name (e.g.,
\\FP042384\PARALLEL1). Or, use the window labeled “show
shared printers on…” to browse the network.
6. When choosing to “Browse” the network, a list of all the shared
windows systems in the workgroup appears. Double-click on
FastPort (all its printer ports display).
7. Double-click on a printer port, and that FastPort Printer name will be
displayed in the path field above.
Workgroups is configured to print for FastPort once the fields are filled in
and the drivers for the printer are loaded.
3.1.3 Printing from Windows NT (3.5x)
1. Open the Print Manager.
2. Choose Printer.
3. Click Connect to from the menu. A window displays a list of all
network devices.
4. Double-click on the workgroup where FastPort is located.
5. Double-click on FastPort (one only).
MIL-3000FTX Series of FastPort Print Servers 3-2
Page 28
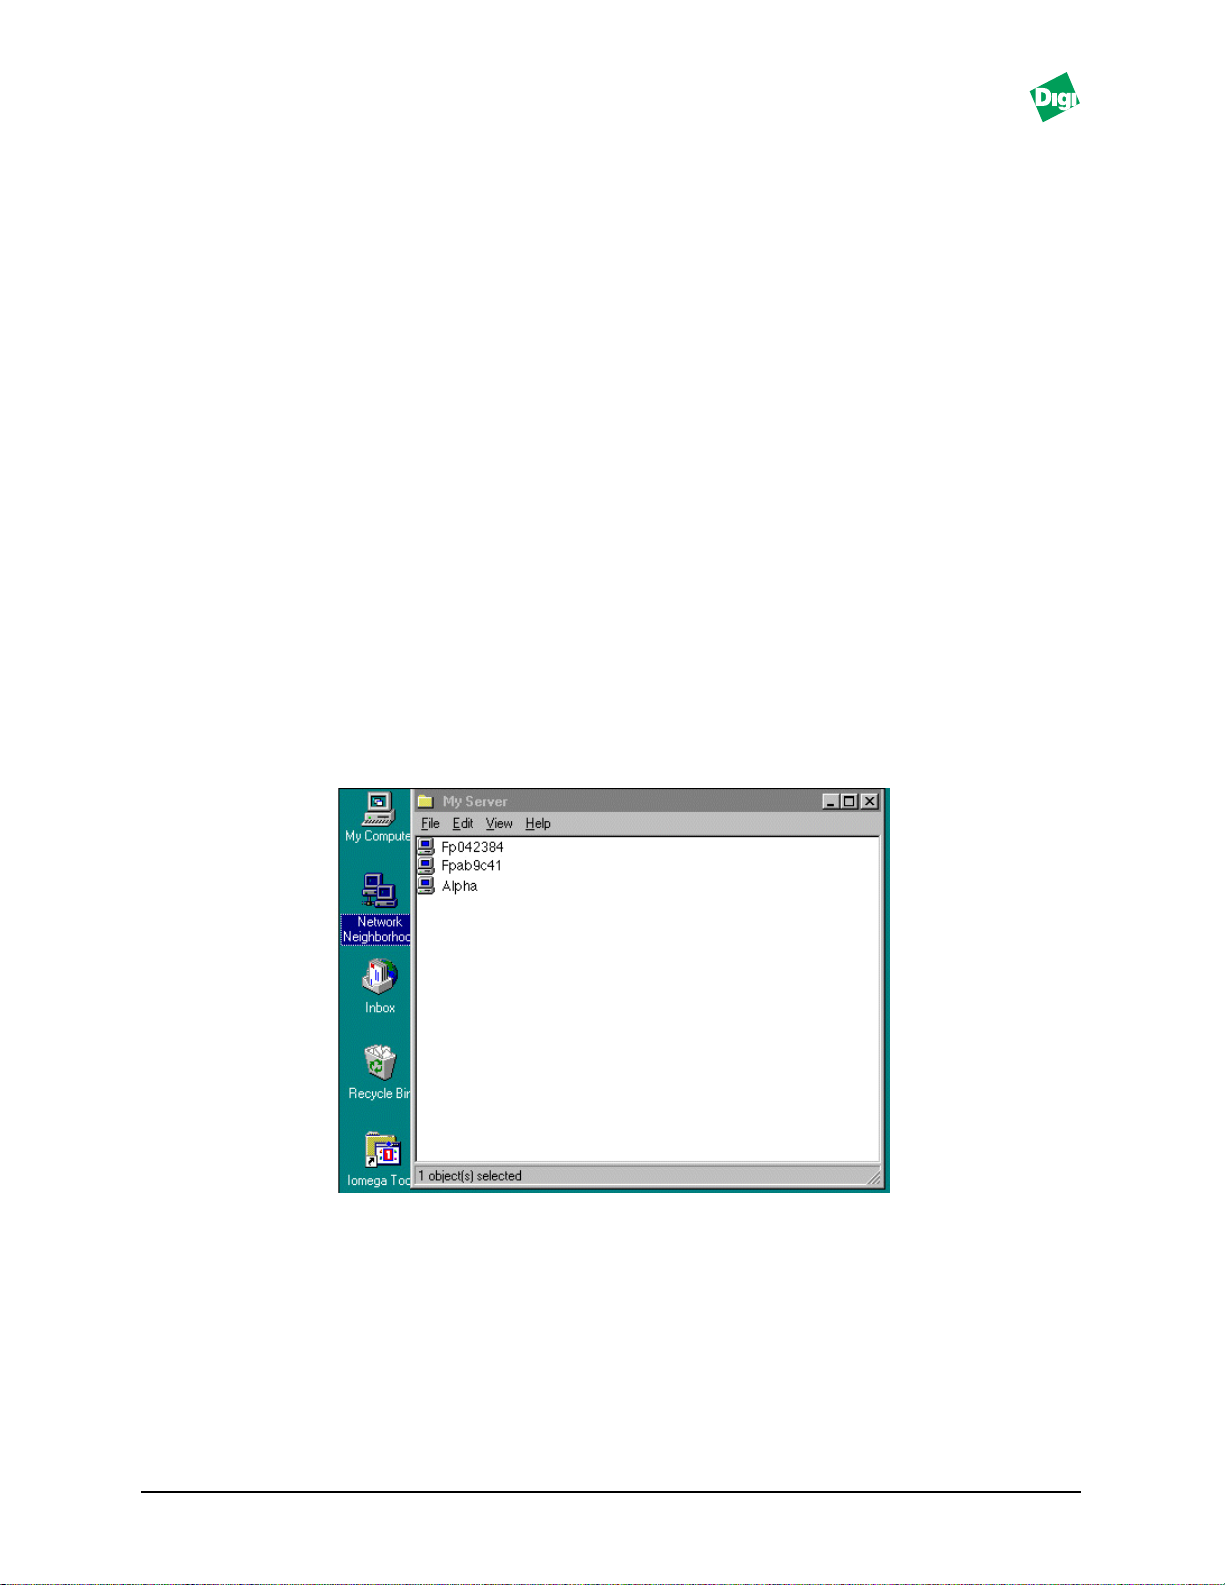
6. Double-click on its displayed port (service) where the printer is
connected. A “Select Driver” dialog appears.
7. Choose a name for the printer.
8. Choose the driver for the printer that is connected to the FastPort port.
The “Printer Setup” dialog box displays.
9. Change any of the desired printer-specific settings.
10. Choose OK.
Windows NT systems is now configured to print to FastPort.
3.1.4 Printing from Windows 95/98 or Windows NT 4.x (via SMB)
Note:
This installation requires FastPort firmware 6.1 or higher.
1. Open Network Neighborhood.
2. Choose the workgroup where FastPort is located.
3. Double-click on FastPort. FastPort appears as FPXXXXXX; where
XXXXXX is the last six digits of the MAC address.
Figure 3-1. FastPort Menu Select
4. Double-click the port where the print job will go.
5. The “Do you want to create a printer on your local machine that prints
to this device” dialog box appears. Click Yes on this dialog box.
6. When prompted, select the driver for the printer connected to the
specific printer port.
MIL-3000FTX Series of FastPort Print Servers 3-3
Page 29

7. Choose a local name to call this printer.
8. When prompted, choose to print a test page. A test page is printed out
on the FastPort-connected printer.
The Windows system is now configured to print to FastPort.
3.1.5 Printing From NetBIOS-supported DOS Workstation
NetBIOS workstations support the DOS-level Net commands for locating
and redirecting local ports to shared printers. These DOS-level commands
include net view and net use.
3.1.5.1 Net View
• net view: This command shows all devices within a workgroup
communicating on the network with the same networking protocol as
the client workstation.
• net view /workgroup:<wgname>: This command shows all devices
within the workgroup <wgname> communicating with the same
protocol as the workstation.
• net view \\FP042384: This command shows all the shared
resources on a Digi print server with hardware address
00:40:c8:04:23:84. Net view displays the following:
Shared resources at FP042384
Sharename
Type Comment
PARALLEL1 Print parallel-port #1 (ON-LINE)
PARALLEL2 Print parallel-port #2 (OFF-LINE)
SERIAL1 Print serial-port #1 (ON-LINE)
SERIAL2 Print serial-port #2 (ON-LINE)
The command was completed successfully. Print Server Name
FP042384 and share names PARALLEL1, are user configurable from the
FastManage or NBMON tool (both described in the chapter 6).
3.1.5.2 Net Use
• NET USE LPT1: \\FP042384\SERIAL1—This redirects printing
from the LPT1 port to the serial 1 port on FastPort.
• NET USE LPT1: /D—This deletes the redirect (that is, stops the
redirection to FastPort).
MIL-3000FTX Series of FastPort Print Servers 3-4
Page 30

Note:
During configuration, a dialog box may appear saying: “The printer that you’ve
connected to doesn’t have a driver for that printer.” This is normal. FastPort does not
know how to format the data for the printer. Formatting is done on the workstation
“before” being sent to FastPort.
3.1.6 Spooling Versus Non-Spooling Printing
3.1.6.1 Introduction
NetBIOS machines normally support either spooling or non-spooling
printing to network printers. Spooling is when a print job is sent to the
hard drive as a printable file and is printed in the background, while the
application returns to a normal state. Non-spooling is when a print job
starts and finishes before the application returns to a normal state.
The Windows methods described previously are generally non-spooling
methods. One way to tell if a workstation is spooling or not, is to print to
the same printer twice in a row. Open the print manager, if both jobs are in
the list, the system is spooling the print job. But, if the first print command
does not return until the job is printed (not printing two jobs in a row) the
system is non-spooling print jobs.
3.1.6.2 Configuring Windows 95/NT to “Mimic” Spooling
1. From “Start,” select S
2. Click once on the specific printer.
3. From the “File” pull-down menu, select Properties.
4. From the “Properties” menu, select Details
5a. Windows 95: From “Details,” select Spool Settings...
5b. Windows NT: From “Scheduling,” click once on Spool Settings...
6. Click on Spool print jobs so program finishes faster to
make the printer “spooling”. Click on the Print directly to the
printer to make the printer “non-spooling.”
3.1.7 DOS and OS/2
To force a printer to spool for DOS or OS/2 (LAN Manager - LAN Server):
1. Open a command prompt box.
2. Use the NET USE LPT1 \\<FASTPORT>\<PORT> command to redir ect
an LPT port.
ettings and then Printers to create a printer.
Print jobs are now spooled. When configuring a printer, choose the LPT1
port as the printer destination.
MIL-3000FTX Series of FastPort Print Servers 3-5
Page 31

3.2 Printing from a TCP/IP Workstation
3.2.1 Introduction
Windows-based systems support a variety of protocols, such as TCP/IP,
IPX/SPX, or DLC. This section describes installing a FastPort printer on
Windows workstations or servers with LPD support over TCP/IP
protocol. Before starting, make sure of the following:
• An IP address has been added to FastPort, and that you are able to
“ping” the device (see Chapter 2 to assign an IP address)
• FastPort has firmware version 3.5 or higher (to support LPD printing)
3.2.2 Printing from Windows NT 3.5x
Windows 3.5 supports printing to LPD printers. To install:
Note:
Print a test page to find out the firmware version of FastPort.
1. Load the “TCP/IP Protocol and Related Components” software. Do
this only once for each system that uses LPD.
2. Add the LPD printer to Windows NT 3.5.
3.2.2.1 Installing LPD Support on Windows NT 3.5
1. Open the “Control Panel” and select the Network icon.
2. Click the Add Software button.
3. Select TCP/IP Protocol and Related Components from the
Network Software pull-down list.
4. Click Continue and check TCP/IP Network Printing Support.
5. Click Continue.
6. Insert the CD-ROM to load drivers.
7. Select TCP/IP and click Configure.
8. Select an IP address and a subnet mask. Do not choose DHCP unless it is
used.
9. Click Ok.
10. When they are loaded, reboot the system.
MIL-3000FTX Series of FastPort Print Servers 3-6
Page 32

3.2.2.2 Adding an LPD Printer to Windows NT 3.5
1. From the “Control Panel,” select the Printers icon.
2. From the menu bar, click on Printers.
3. Select Create Printers.
4. Enter a name for the printer in the “Name” field.
5. Select the driver from the list next to Printer Driver.
6. In the “Print To:” box, scroll down and select Other.
7. Select LPR Port. If the LPR Port does not appear, restart from 1.
8. Click OK.
9. Enter the host name or IP address of the FastPort in the “Name or
address of host providing LPD” field.
10. Enter the queue name in the “Name of printer on that
machine” field. Type name in all lower case letters.
11. Click OK.
3.2.3 Printing from Windows NT 4.0
3.2.3.1 Installing Microsoft TCP/IP Printing Services
TCP/IP printing is not default service on NT and is required to print to
FastPort via TCP/IP. Do the following to add TCP/IP printing services:
1. From “Start,” select-->Settings-->Control Panel.
2. Select the Network icon.
3. Select Services and click A
dd.
4. Select Microsoft TCP/IP Printing and click Ok.
5. Reboot the PC.
3.2.3.2 Installing a Printer on Windows NT 4.0
1. From “Start,” select-->Settings--> Printers.
2. Click on Add Printer.
3. Click on My Computer.
4. Click Next.
MIL-3000FTX Series of FastPort Print Servers 3-7
Page 33

5. Click on Add Port-->LPR Port-->New Port.
6. In the “Name or address of server providing lpd:” field, enter the
FastPort’s IP address.
7. In the “Name of printer or print queue on that server:” field, enter in
the pre-defined queue name from Table 5-1 (page 5-5 in Chapter 5). If a
remote queue was added, enter the queue name.
8. Click Close and click Next.
9. Select a printer from the list and click Next.
10. Enter in a new printer name and click Next.
11. Select whether or not the printer will be shared. Skip to Step 19 if the
printer is not shared.
12. Click Next and enter a share name.
13. Select the appropriate operating system and click Next.
14. Select whether or not a test page will be printed.
15. Select Finish.
3.2.4 Printing using a Third Party TCP LPR/LPD Stack
If the systems has a third party TCP/IP stack, use an LPR client. LPR
clients allow users to send print jobs to an LPR host (an “LPR/LPD host”).
FastPort acts as an LPR host. Check your TCP/IP documents to verify that
LPR/LPD can be used to print. Most LPR clients require two values:
• IP address of the FastPort
• Name of the remote printer.
If the IP address field has FastPort’s IP address, then the remote printer
name will be one of the list of names that FastPort supports. See Table 5-1
(page 5-5 in Chapter 5) for pre-defined queue names.
3.2.5 Printing from Windows 95/98 Using DigiLpr
3.2.5.1 Installing the DigiLpr Program
1. Configure the TCP/IP protocol. Refer to the Windows 95 documents.
2. Assign an IP address to the FastPort (Using: telnet, RARP, DHCP, etc.).
3. Run the digilpr.exe file to extract DigiLpr.
MIL-3000FTX Series of FastPort Print Servers 3-8
Page 34

4. Run the Setup program for DigiLpr.
5. Choose a directory to install the software package (Default is
C:\digilpr. Click Browse to select another directory.
Figure 3-2. Choose a Destination Directory
6. Enter a name of a directory to spool the jobs. Default is c:\spool.
Click Browse to select another directory (Digi recommends that the
default directory, C:\spool be selected).
7. Type in a name and a host name of the PC.
8. Select a folder for the program items.
Figure 3-3. Select a Folder
9. The DigiLpr files are now copied to the system. Reboot to start DigiLpr.
MIL-3000FTX Series of FastPort Print Servers 3-9
Page 35

3.2.5.2 Adding Queues in DigiLpr
To create a print queue:
1. Double-click on the LPR Utility icon. In the “Queues” pull-down
window, click Add New Queue.
Figure 3-4. Add New Queue Menu
2. In the “Add a new queue” menu, fill in FastPort’s host name or its
TCP/IP address. Choose from the list of Print Queues on the
FastPort.
Note:
Digi recommends that you use the default queue raw_p1. The _p1 designates
parallel port #1. If you are using a serial port on the print server, the ending would be
_s1 as in “raw_s1.”
Figure 3-5. Essential Setup Information Menu
3. In the next field, select the name for the printer port. Digi recommends
using a port name of six characters or less.
4. Click once on the Add button to add the queue created.
5. The DigiLpr window appears displaying the queue created.
MIL-3000FTX Series of FastPort Print Servers 3-10
Page 36

3.2.5.3 Adding a New Printer
To add a new printer using “Add Printer Wizard”:
1. From Start-->S
ettings-->(open) Printers.
2. In the “Printers” menu, double-click Add Printer.
3. In the “Add Printer Wizard” menu, click Next to begin.
4. In the next menu, check Local Printer and click Next.
5. In the next menu, scroll down and select the appropriate printer. If the
designated printer came with an installation disk, click Have Disk. If
the designated printer did not come with an installation disk, see that
printer’s documentation for a compatible printer.
Figure 3-6. Select Printer Screen
6. Click the appropriate port for the printer and then click Next (e.g.,
Figure 3-8 shows “c:\spool\Epson-4300” as the designated port).
Figure 3-7. Select Port Screen
7. Type in a name for the printer and select this printer as the default
printer for Windows-based pr ograms. Adding a name is optional. Click
Next.
MIL-3000FTX Series of FastPort Print Servers 3-11
Page 37

8. A new printer has now been added. Print a test page to make sure the
FastPort is correctly configured.
9. Click Finish when done.
3.3 Printing from NT using the HP DLC Protocol
With Windows NT, if the HP DLC protocol was installed through the
Control Panel, Networks, choose HP DLC printer from the “other
network device” dialog box.
A list of hardware (Ethernet or Token Ring) addresses for DLC compliant
devices appear. FastPort will show up in this list.
3.4 Printing from Windows using TFTP Client
As a final TCP/IP option, FastPort supports the TFTP protocol for printing
data or flash jobs. If the workstation has a TFTP client, open a session with
FastPort’s IP address, and PUT a file from the station to FastPort. FastPort
will print jobs on its first parallel port (example for NT:tftp -i x.x.x.x
PUT flash.hex).
3.5 Management Tools Used with NetBIOS and TCP/IP
This section focuses on network management utilities that are based on the
NetBIOS/NetBEUI and TCP/IP protocol.
3.5.1 FastManage
The FastPort print server supports configuration from the Digi’s
FastManage suite of software. With this software, FastPorts on a network
can be located and managed. See the Chapters 9 thru 1 1 for information on
how to use FastManage.
3.5.2 NetBIOS-DOS Tools: NBMON and showprn
FastPort devices also support configuration from DOS. Digi supplies two
DOS tools: NBMON and showprn. They are included on the CD-ROM or can
be downloaded from our FTP site. To install these tools, copy them from
the CD-ROM to a local drive and run them (see Appendix I).
MIL-3000FTX Series of FastPort Print Servers 3-12
Page 38

Chapter 4
Chapter 4 describes how to use ACT (Advanced Configuration Tool) and
PCONSOLE for installing, configuring, and managing FastPort on
NetWare networks.
Installing and Printing on NetWare
Note:
For users of the MIL-3300 series of FastPort, use the ACT3300.EXE utility to
configure FastPort.
4.1 Introduction
Note:
When using Novell NetWare’s client utilities refer to NetWare’s docs.
1. Identify whether FastPort will be installed in:
a. NetWare 2.x, 3.x bindery environments, or
b. NetWare 4.x NDS environment.
2. Either way, copy ACT from the CD-ROM to your system (refer to
Appendix C for installing and configuring ACT).
3. Install FastPort in a 2.x or 3.x bindery mode, steps includes:
a. Creating a print server and print queue object on the NetWare
server, then attaching the two together.
b. Creating a config. file that describes the file server and print queue
to service. Store this file on the preferred server: sys:/login/
milan directory as FPXXXXXX.
c. Storing the name of the server in NVRAM, so it knows where to
search for its configuration file. Do this with ACT or FastManage.
4. Install in a NetWare 4.x NDS, steps include:
a. Creating a print server, printer, and print queue in the NDS
database using either NWADMIN or PCONSOLE.
b. Storing context/tree where the print server object was created in
NVRAM. This can be done with ACT, FastManage, or most other
Digi configuration utilities.
MIL-3000FTX Series of FastPort Print Servers 4-1
Page 39

5. Once configuration is done, power cycle FastPort. Wait a few minutes
to allow it to login.
6. Use PCONSOLE to verify that FastPort has logged in:
a. Run PCONSOLE and choose one of the queues created.
b. Choose Currently Attached Print Servers.
The FastPort name appears.
7. Use NetWare’s “capture” or “nprint” to send data to a NetWare queue.
For Windows, use the “Print Manager” to redirect output to one of the
NetWare print queues.
4.2 Configuring in a Bindery Environment
FastPort can be configured to service up to 16 print queues on 16 bindery
style NetW ar e servers (NetWare 2.x, 3.x). If configuring FastPort for queues
on NetWare 4.x servers, use an alternate method (see section 4-4).
4.2.1 Using Act to Install the Print Server
Quick Configuration provides options when creating FastPort. Information
is stored in a configuration file called FPXXXXXX (where XXXXXX are the
last six digits of its address). The file is stored in the \LOGIN\MILAN on the
file server.
1. Highlight Quick Configuration and press [Enter]. The program
displays the available FastPort systems.
2. Use the arrow keys to select FastPort and press [Enter].
3. Highlight FastPort and press [Enter]. Select a file server.
4. Select a queue to be serviced: [ins] key to add a queue.
5. Repeat Steps 2-4 for all queues that use this FastPort.
6. Specify the printer type (serial or parallel).
7. Select a file server location to store the configuration file.
8. In the next screen, select from the available printer ports.
9. The “Print Server Configuration Summary” screen appears. Review
and write the configuration file to disk.
10. Use the [esc] key to return to the main menu. Power cycle FastPort to
implement the changes.
MIL-3000FTX Series of FastPort Print Servers 4-2
Page 40

4.2.2 Using PCONSOLE to Install a Print Server
FastPort can be configured for printing without a config. file. This
eliminates the need for the directory SYS:LOGIN\MILAN, its configuration
files, and the ACT software.
1. Create a print server called FPXXXXXX with PCONSOLE (where
XXXXXX is the unit’s six digits Ethernet address).
2. Create a queue for FastPort using PCONSOLE.
3. Assign the queue created to the print server FPXXXXXX. and power
cycle FastPort.
4. To send data to the serial port instead of parallel (default), create a
queue name ending with -S using PCONSOLE. To send data to parallel
port 2/3 or serial port 2, create a queue name ending with -P2, -P3, or
-S2, respectively.
4.2.3 Adding Users to the Notify List with PCONSOLE
1. In PCONSOLE, select the following sequence of options:
a. Select Print Server Information and choose a print server.
b. Select Print Server Configuration.
c. Select Printer Configuration.
2. From the configured printers list, select Printer0 Configuration.
The “Define Printer Type” box appears.
3. Select the printer description Defined elsewhere.
4. Press [esc] until the Print Server Configuration menu appears.
5. Select Notify List for Printer.
6. Select Printer0 from the Defined Printers list.
7. Press [ins] and select a user from the pull-down menus.
4.3 Installing a Print Server in an NDS Environment
1. Create the print server, printer, and print queue (use PCONSOLE or
NWADMIN).
2. Configure a DS Tree Name and DS Context Name in FastPort.
Note:
MIL-3000FTX Series of FastPort Print Servers 4-3
ACT can be used to configure parameters on FastPort. FastManage can also be used
to configure those two parameters on FastPort.
Page 41

4.3.1 Installing a Print Server on NDS using PCONSOLE
1. Run PCONSOLE using the following command (from the
/public directory on the server):
pconsole
2. Using the keys, select Quick Setup and press [Enter].
3. In the “Print Services Quick Setup” menu, select Print Server and
press [Enter].
4. Press [ins] to create the Print Server Object. Name created must
be eight characters long. Begin with “FP,” and end with the last six
digits of the hardware address (on the bottom).For example, FastPort
with “0040C8DEAD00” address, creates device: FPDEAD00.
Note:
The print server name is not case sensitive.
5. Select New Printer and press [Enter].
6. Enter a name for the new printer object. The name should be less than
256 characters, including the context. The print server will service only
one printer per NDS Server.
7. Select New Print Queue and press [Enter].
8. Type in the name of a Queue. The queue name is less than 256
characters, including the context. Default: queues are serviced by the
printer attached to FastPort’s parallel port. To force FastPort to service
queues with the serial port, the name must end with an “-S.” For a
four-port print server, force it to service the queue with the second
parallel or serial port, append the queues with “-P2” or “-S2.”
9. Select Printer Type and press [Enter].
10. Select Other/Unknown.
11. When finished, press [esc] to Save changes.
The volume field is filled in by PCONSOLE with the name of the nearest
volume. This field contains the name of the server volume that will hold
the queued jobs for the print server.
4.3.1.1Additional Queues
FastPort has the name of a printer to service. The printer contains a list of
print queues belonging to it. To add queues to the print server service:
1. From the “Available Options” menu, select Printers.
MIL-3000FTX Series of FastPort Print Servers 4-4
Page 42

2. Select the printer created and press [Enter].
3. Select Print Queues Assigned. Pressing [ins] allows a user to
choose from a list of created queues.
4. Create new print queues by pressing [ins], again. Once an object is
created, it must remain in that context until deleted. By default, quick
setup creates these objects in the same context, but users have full
control of the object context. Note the context name at the top of the
screen.
5. Press [esc] to Exit. Once done, run ACT to set up a DS Context Name
and DS Tree Name (see Appendix C).
4.3.2 Installing Print Server in NDS Using NWadmin
The following procedures describe how to create a print server, a new print
queue using NWadmin:
4.3.2.1Creating a New Print Server
1. From the “NetWare Tools” menu, select NWadmin.
Figure 4-8. Running NWadmin
2. Highlight the Organizational Unit where the Print Server, Printer,
and Print Queue will be created.
3. From the “O
bject” pull-down window, click Create. The New Object
window appears.
4. Select print server and click OK. The Create Print Server window
appears.
5. Type in the FastPort name. The name must be eight characters long,
beginning with FP and ending with the last six digits of the hardware
address.
6. After typing in the name, click Create.
MIL-3000FTX Series of FastPort Print Servers 4-5
Page 43

4.3.2.2Creating a New Printer
1. Under the “Object” pull-down window, click Create. The New Object
window appears.
2. Select Printer and click OK.
3. Type in the Printer Name and click Create.
4.3.2.3Creating a Print Queue
1. Under the “Object” pull-down menu, click Create. The New Object
menu appears.
2. Select Print Queue and click OK.
3. The Create Print Queue menu appears. Select the Select Object
icon.
4. In the “Select Object” window, highlight the Directory Context
where the print queue will be held and click OK. The Create Print
Queue window appears with the selected object filled in the “Print
Queue Volume” box.
5. Type in the Print Queue Name and click Create.
– Queue name (and context) is less than 256 characters
– All queues are serviced by the printer attached to FastPort’s parallel
port
– To for ce FastPort to service the queue with the serial port, the queue
name must end with an -S.
– For a 4-port FastPort, force it to service the queue with the second
parallel or second serial port, append the queues with -P2 or -S2,
respectively.
A new print server, printer, and print queue has been created. Continue to
the next procedure to connect these objects.
4.3.2.4Connecting the print server to a Printer
1. In the “Context Tree” menu, select the print server created.
2. Click Assignments in the following window (Figure 4-2).
3. In the next window, click Add.
4. Highlight the printer created and click OK.
MIL-3000FTX Series of FastPort Print Servers 4-6
Page 44

Figure 4-9. Print Server
The printer is now connected to FastPort. Continue to the next section to
assign a print queue to the print server.
4.3.2.5Assigning a Print Queue to FastPort
1. Double-click the recently assigned printer (Figure 4-3).
Figure 4-10. Context Tree
2. In the next window, click Assignments.
3. In the “Assignments” menu, click Add.
4. When the Select Object menu appears, select the print queue created
and click OK.
5. Click OK (if this is correct).
The print queue to a printer is now assigned. Now use ACT to set up a DS
Tree Name and DS Context Name.
MIL-3000FTX Series of FastPort Print Servers 4-7
Page 45

4.4 Configuring in a Bindery and NDS Environment
FastPort can operate in a mixed Bindery/NDS environment. Use one of the
previous methods to install it. Adhere to the following restrictions:
• FastPort can service up to 16 queues on a total of 16 servers.
• FastPort cannot service bindery queues and NDS queues on the same
server (i.e., two connections—one bindery, one NDS—on the same
server). If using NDS on a server and there is a fpxxxxxx configuration
for this FastPort in the login/milan directory, then remove it.
• FastPort can service NDS queues in only one tree.
• When logged into NDS as an NDS print server, configure FastPort with
only one NDS printer object. Specifies such things as which port to send
data (LPT or COM) by creating special queue name suffixes.
The difference between configuring bindery or NDS queues:
• When servicing Bindery queues, FastPort will read a configuration file
stored in the sys:\login\milan directory. In addition, users may
modify the setting in FastPort called “Preferred Server.” This
refers to the Bindery File Server that holds the configuration file.
• When servicing NDS queues, FastPort must be configured with a
context name, and may be configured with a tree name. This can be
done with FastManage or ACT.
• When configured for NDS, FastPort does not use a config. file. It logs
into the context where it was configured, locates the printer and queues
that it should service.
• Regarding manual configuration of print server, queues, and printers
for FastPort (within PCONSOLE or NWadmin): Bindery print servers are
directly attached to bindery print queues. NDS servers are attached to a
single printer, which is attached to (possibly) many print queues.
When configured to service both Bindery and NDS queues, FastPort does
the following:
1. At boot-up, FastPort tries to locate an NDS server.
2. It now looks at the context it has been configured with and tries to login
as print server FPXXXXXX.
3. It now gets the printer attribute from the print server, and gets a list of
print queues that the printer should service.
MIL-3000FTX Series of FastPort Print Servers 4-8
Page 46

4. It attaches to those print queues and goes to the next phase.
Note:
If a context was not specified in the NVRAM, it will not logon to NDS.
5. FastPort then tries to locate normal Bindery file servers.
6. Once it locates one, it looks in its “preferred server” NVRAM
value, and if it exists, gets a route to that server.
7. It then looks on the preferred server in the sys:\login\milan
directory for its configuration file (FPXXXXXX - last six digits of
hardware address).
8. It then reads its configuration file and logs in and attaches to the queues
and servers listed in that configuration file.
9. If a preferred server was not specified in its NVRAM, it will search up
to 24 file servers on the network for a config. file.
10. If a config. file is not found, FastPort will go through a list of servers
and try to log in as print server FPXXXXXX. If successful, it gets the list
of queues and attaches to them.
4.5 Printing to FastPort
Print to FastPort as if it were a Novell print server. For example, use
Novell’s CAPTURE command to capture a local PC port to the FastPort
print queue. For example (assuming a host name of raisa on LPT 1):
CAPTURE /S=raisa /Q=lp1
Or, use NPRINT to print to FastPort:
NPRINT myfile /S=raisa /Q=lp1
4.6 Printing Specific File Formats
If you are having difficulty printing postscript files using binary emulation,
review section 3.2.2.1. Example 1. Add b=ps (from Table 4-1) in the
FPXXXXXX configuration file. Or when printing “HP/GL” files, turn the
banner off by adding b=off after the two colons on the FPXXXXXX
configuration file.
For printing through NPS, use NWADMIN. Add two colons before the
entries in Table C-1 (in Appendix C) to the description field.
MIL-3000FTX Series of FastPort Print Servers 4-9
Page 47

Chapter 5
Installing and Printing on a UNIX Environment
5.1 Introduction
To perform installation on a UNIX TCP/IP client workstation:
1. Decide whether to use:
a. LPR/LPD support, which is native to UNIX systems, or
b. Digi’s host software.
2. Also, decide whether to print directly to FastPort from each client
workstation, or to spool through a single server.
3. Load the UNIX contents onto the local system. The CD-ROM contains
an install script and compiled host software for UNIX systems. It also
has example config. files, system files, and additional utilities.
4. Configure FastPort with a proper IP address (refer to Chapter 2 for
information on assigning an IP address).
5. Refer to the section in this chapter for the specific type of installation:
LPR/LPD or host software.
5.2 Host Software Versus LPD
There are two ways to install FastPort print server onto UNIX (Both
methods can print with UNIX print commands):
• Direct LPD support
• Host software
Direct LPD is used on UNIX systems that support remote printing to BSD
UNIX spoolers. On System V systems, system administration utilities built
into the OS provide quick set-up menus for printing to remote systems.
Host software allows for customize print jobs. It can be integrated into
environments to do tasks such as ASCII-to-PS conversion, banner
generation, and status reporting.
MIL-3000FTX Series of FastPort Print Servers 5-1
Page 48

5.3 Digi Installation Software
1. Log in as root onto the system.
2. Create a directory to load the software (e.g., type mkdir Digi and
press [Enter]) and enter that new directory.
3. Load the software from the disk and type:
tar -xvf /dev/
where
4. Type ls to list the files. The following information appears:
5. Type ./unpack.sh to launch the install script.
5.3.1 Installing Logical Printers
Logical printers can be created with characteristics that print to the same
printer. To install a second printer:
1. Run the install.sh.
2. At the “Installation Options” menu, choose Option #2.
3. Specify a second printer and answer the prompts as before.
<device>
README.FIRST
unpack.sh
dist.tar.Z
licence.txt
<device>
is the name of the drive (usually FD0).
5.3.2 Installing on System V UNIX
The install.sh creates a dummy device, adds a printer, and starts the
“lpsched” process. To install System V:
1. Run the install.sh.
2. Choose FastPort by its model number.
3. Choose Option #3, lpsched-based systems.
4. Select Option #1, Configure New FastPort to assign an IP
address. If an IP address was assigned, go to step 5. The script prompts:
– Host naming method (usually the /etc/hosts file)
– Exact type of system
MIL-3000FTX Series of FastPort Print Servers 5-2
Page 49

– Whether or not the IP information about FastPort has been entered
into the host naming method
– Ethernet address (on the bottom of the device)
– IP address given FastPort
– The method for assigning FastPort its IP address
5. The main menu appears, select Option #2, Install a printer
or plotter. The software prompts for:
– Method of installation. Either LPD or host software
– Hostname or IP address for FastPort
– Printer name of the device (may be same as hostname)
– Type of printer (PCL, PostScript, or ASCII)
– Printer is connected to the serial or parallel port
– Type of banner page
5.3.3 Install Script on IBM RS/6000
Use the install.sh to install FastPort on an IBM AIX system. This
modifies the /etc/gconfig file to add a printer entry and specifies using
rembak for remote spooling, To install:
1. If not already done so, load the install.sh software.
2. Type: ./install.sh to run the install script.
3. Select a FastPort by its model number.
4. Choose Option #2. qdaemon-based systems.
5. If not already done so, assign an IP address to FastPort by selecting
Option 1, Configure a Fastport.
6. Choose Option #3, install a Printer or Plotter. Enter:
– Hostname of FastPort
– Queue name to create
– Directory for the back end script
– Directory to load the host software
– Host naming method
– Type of data sent to the printer (ASCII, Graphics, PS or PCL)
MIL-3000FTX Series of FastPort Print Servers 5-3
Page 50

5.3.4 Installation on BSD UNIX Systems
Install.sh creates a spool directory and makes a config. file /usr/
spool/<
1. Load the install.sh software.
2. Type ./install.sh to run the install script.
3. Choose FastPort by its model number.
4. Choose Option #1, LPD-based systems.
5. If an IP address has not been assigned, select Option #1, Configure
a FastPort. If one has been, go to step 7.
6. Choose the following:
a. Host naming method (/etc/hosts/file).
b. Host name and IP address for FastPort.
c. Hardware (Ethernet) address of FastPort.
printer name
>/.fpconfig. To install:
d. UNIX system type.
e. Enter monitor mode and press [i] to assign an IP address.
f. Press [r] to issue a command to reset FastPort.
g. Continue to step 7 to install the printer.
7. At the main menu, select Option #2, Install a printer or
plotter. The software prompts for:
a. Whether to install host software or use direct LPD.
b. Type of data sent to the printer (pcl, ps, or ascii).
c. Where the printer port is connected to: serial or parallel.
d. Type of banner page.
Select Option X to Exit. BSD installation is complete.
5.4 Manual Installation on LPD Systems
Printing to LPD allows users to print as if they were directly attached to a
remote UNIX system. Configuration requires assigning an IP address and
setting up a remote BSD UNIX-like printer.
MIL-3000FTX Series of FastPort Print Servers 5-4
Page 51

Digi provides an install script to configure UNIX for FastPort. UNIX
systems that support LPD include:
• BSD UNIX systems
• System V Release 4 machines
• IBM, HP, or DEC mainframe machines that run TCP/IP
5.4.1 Getting Started on an LPD System
1. Install FastPort on the network and assign it an IP address.
2. Verify that LPD and fpfilter socket is enabled.
Two items are required to configure an LPD printer:
• Remote system name (device’s host name) or IP address
• Remote printer/queue name (a queue listed in Table 5-1)
5.4.2 Pre-defined Queue Names
Table 5-1: Printer/Queue Types
Printer Types Description
raw Sends data with no header and no translation.
ascii Writes data as ASCII, substitutes carriage-return, line-feed pairs for the line feeds sent by
UNIX, and sends a text banner and a final form feed.
ascii_landscape Like ASCII, but sets the printer in the landscape mode before printing.
pcl_landscape Like PCL, but sets the printer in the landscape mode before printing.
pcl Assumes the data is PCL and sends a text banner. Carriage returns are not added. Form feed
is sent at the end of the job.
psb_tek Prints PostScript binary files on a Adobe PostScript Level 2 printers.
ps Writes PostScript and sends a Contr ol+D at the end of the print job. Sends a PostScript banner
page at the end of the print job.
psb_hp Prints PS binary files on newer HP printers that support PostScript level 2. Use this queue-
type only if PostScript binary data is being printed.
autosense Data is checked. For ASCII, line feeds are translated into carriage r eturn feeds. Final form feed
is sent. For PS, a Control+D is sent at the end. Either way, a PS banner is sent at the end.
To use a printer attached to the serial or parallel port, add an _s1, _s2,
_p1, _p2, and _p3. Default: Parallel 1. FastPort supports multiple
queues by printing via LPD from a maximum of 8 LPD connections (no
limits for host software). The device listens for LPD connections
simultaneously; if they are being used, the 9th LPD connection will not
connect
MIL-3000FTX Series of FastPort Print Servers 5-5
Page 52

5.4.3 User Defined Queue Names
The remote printer name is used by UNIX to tell FastPort which port to
send a print job. Some UNIX systems only support eight character names.
If so, user’s can create a remote printer name called user1. To enable this:
1. Telnet into FastPort’s diagnostic port (2002).
2. At the main command prompt, press [N] for network.
3. Press [T] for TCP/IP or press [L] for LPD.
4. Follow the instructions to add a user defined queue name.
5. Configure the remote printer name on the workstation to be the userdefined queue name just created on FastPort.
5.4.4 LPR Options
The number of copy options with LPR is not supported. To suppress
banner pages for individual print jobs, use LPR with the -h option or turn
off the banner printing via telnet. In BSD UNIX systems, the suppress
header (sh) option in /etc/printcap file does not work.
5.4.5 Manual Installation With LPD on a BSD UNIX System
Note:
The following installs a printer named “beta” that is attached to a FastPort named
“alpha.” When installing LPD, replace “beta” and “alpha” with your printer’s name and
host names, respectively.
1. Copy the following entry into your /etc/printcap file.
beta|FastPort LPD printer:\
:lp=:\
:mx#0:\
:lf=/usr/adm/beta-errs:\
:af=/usr/adm/beta-acct:\
:sd=/usr/spool/beta:\
:rm=alpha:\
:rp=ascii:
Note:
The rp= entry refers to the “remote printer” name. This tells FastPort to do special
formatting for the printer. If there is an ascii printer attached, use ascii. If the printer
is postscript, use ps. If it is a plotter or you are configuring a PC-NFS printer , use raw.
2. Create the spool directory. Change ownership to daemon:
mkdir /usr/spool/beta
chown daemon /usr/spool/beta
chmod 755 /usr/spool/beta
MIL-3000FTX Series of FastPort Print Servers 5-6
Page 53

3. Create log/accounting files. Change ownership to daemon:
touch /usr/adm/beta-errs
touch /usr/adm/beta-acct
chown daemon /usr/adm/beta-errs
chown daemon /usr/adm/beta-acct
chmod 644 /usr/adm/beta-errs
chmod 644 /usr/adm/beta-acct
4. Start the printer and queue by typing the following:
lpc start beta
5. You can now print files with the lpr or lp command:
lpr -Pbeta <filename>, or
lpr -dbeta <filename>
5.4.6 Manual Installation with LPD on System V Machines
Access printers in System V systems through LP scheduler. System V
administration commands allow users to create a printer description file
called an “interface” filter . This filter is designed to customize the data for a
printer. Enable LPD on System V systems by using SAM on HP/UX,
admintool on Solaris, or any other system admin. tool. For SCO UNIX,
refer to the readme.lpd file in the /SCO directory.
1. Use lpshut command to shut down the printer.
/usr/lib/lpshut
2. Add a line in this format to the /etc/lp/systems file.
alpha
:x:-:bsd:-:1:10:-:-:
where alpha is the host name of the FastPort.
3. Use the lpadmin command to add a new printer.
/usr/lib/lpadmin -p <
where printer is the printer’s name, host name is the host name, and
remote queue is a predefined queues (Table 5-1).
4. Start the print scheduler by entering:
/usr/lib/lpsched
5. Enable the printer.
enable <
printer
> -s <
printer name
host name
>
>! <
remote queue
>
MIL-3000FTX Series of FastPort Print Servers 5-7
Page 54

accept <
printer name
>
5.4.7 Manual Installation with LPD on RS/6000
1. Determine the remote system/queue. Use Rembak for remote spooling.
2. Add FastPort to the network and assign an IP address to it.
3. Edit the /etc/qconfig file, for example:
test_q:
device =
host =
rq =
sample:
ps
sample
alpha
backend = /usr/lib/lpd/remback
Legend:
• Queue is “test_q”
• Host file is “alpha”
• Printing to “ps” (From Table 5-1)
4. Stop queue services with the following command:
stopsrc -s qdaemon
5. Restart the remote queue using the command.
startsrc -s qdaemon
LPR and LP are now set to print to the device.
Note:
The
qconfig
printer types (rp=).
file, valid queue names (rq=) may have the same names as used for
5.5 Manual Installation Using Host SoftWare (fpfilter)
Digi’s host software is called fpfilter. This program sends print jobs to
printers connected to FastPort in two ways:
• Command line options
• Printer options file (.fpconfig)
5.5.1 Fpfilter Command Line Options
Table 5-2: fpfilter Command Line Options
Option Function
-P <hostname> Send file to the hostname
-s1, -s2, -p1, -p2, -p3 Send data to serial ports: 1 or 2. Default: Sends to parallel port 1
MIL-3000FTX Series of FastPort Print Servers 5-8
Page 55

Table 5-2: fpfilter Command Line Options
-b Send a banner file (BSD only)
-f Send a final form feed
-m Send CR/LFs for UNIX LFs
-D <dir name> Look in the <dir. name> directory for the .fpconfig file
-A <a2ps filter> Use the “a2ps” filter for ASCII to PostScript conversion
-d Send a Control+D at the beginning/end of a job (PS printers only)
-startfile <file> Send file before print job
-endfile <file> Send file after print job
-startstring “<str>” Send “str” (string in quotes) before print job
-endstring “<str>” Send “str” (string in quotes) after the print job
-syslog Print the error messages into the “syslog” file
-mail <user> Send E-mail to user at the end of print job if there is an error
-prog <prog-name> Executes at the end of a job; sends the returned error code to it
-errorfile <file> Use file to log errors
CLASS <hostname:port, List> If the current printer is unavailable, tries printing to the device listed in the
(e.g., CLASS alpha:p1 CLASS alpha:p2)
-closewait Closes all sent data before the socket closes
-pba Adobe PostScript conversion for non-binary printers
-pbh HP PostScript binary conversion for non-binary printers
The fpfilter software supports Adobe TranScript command line
arguments. To use these options, rename fpfilter as:
List
• fpcomm: Print to parallel port 1
• fpcomm_s: Print to serial port 1
• fpcomm_p2: Print to parallel port 2
• fpcomm_s2: Print to serial port 2
• fpcomm_p3: Print to parallel port 3
When no -P is given, fpfilter uses the directory for its name. If the
directory for alpha is /usr/spool/fastport, it tries FastPort as the host
name and prints with LPR or LP:
./fpfilter -P alpha -m -f /etc/hosts
5.5.2 Printer Options File (.fpconfig)
fpconfig can be used instead of command line option.This simple text
file can be modified using an ASCII text editor. fpfilter checks the
directory specified by the -D command; if it is not present, it checks the
current directory for the .fpconfig file. If present, it changes the
fpfilter behavior.
fpfilter is executed by the spooling when using LPR. fpfilter’s
directory is not that of the users. fpfilter is the spool directory. Syntax is
shown in Table 5-3. Entries appear and in any order.
MIL-3000FTX Series of FastPort Print Servers 5-9
Page 56

Table 5-3: .fpconfig Options
fpfilter
hostname <name> Specify the IP name for FastPort
serial1 or serial 2 Send to the serial port
ctrld Send a Control+D before and after the job (PostScript only)
formfeed Send a form feed after the job
parallel 1, parallel 2, or parallel 3 Send to the parallel port
mapcrlf Map line feeds to carriage return/line feeds
asciifilter <program> Call program to convert PostScript from ASCII
bannerfirst Look for file .banner in current directory. Submit it before the job
bannerlast Look for file .banner in current directory. Submit it after the job
startfile <file> Send file before the job
endfile <file> Send file after the job
startstring <string> Send string before the job
endstring <string> Send string after the job
CLASS <hostname: port list> If printer is unavailable, program tries to print to the FastPort port as listed
mail <user name> Sends E-mail after the job is printed or in case of error
errorfile <filename> Stores errors that occurred in filename.
program <program> Execute program after the job prints or in case of error. Passes the error code.
syslog Records error messages in the syslog file.
checkserial Sends a Control+T to check the serial printer’s status before sending a print
checkparallel Checks for the parallel printer before sending a print job. Some parallel
acctg Performs accounting on printers. For serial printers, it reports the number of
closewait Ensures that all data is sent before the socket is closed. It is required in some
dobanner Look for file .banner in the current directory and submit it before the job
pba Adobe PostScript binary conversion for non-binary printers.
pbh HP PostScript binary conversion for non-binary printers.
Option Function
left to right (CLASS alpha:p1 alpha:p2 beta:p beta:s)
job. Only for PostScript printers. If no printer is attached, data is not sent.
printers do not make the parallel status “Busy” when turned off. If this option
is not used while FastPort is in standard mode, then print jobs will be lost.
pages printed. For parallel printers, it reports the name of user, machine, file,
and date and time the job was sent.
System V machines.
(.banner is normally generated by an output filter program.
5.5.2.1About Option Classes
Class (Table 5-3) supports printing to the first available printer from a list
of printers according to the following:
• The first printer is the one specified on the command line.
• Next one is hostname: port in the .fpconfig file.
• Subsequent printer names are taken from the Class list.
fpfilter connects to the first printer . If not, it tries to connect to the next
printer. If still unsuccessful, fpfilter goes back to the first printer.
MIL-3000FTX Series of FastPort Print Servers 5-10
Page 57

5.5.2.2About Options Startstring and Endstring
If “startstring” and “startfile” are specified, then startstring is sent before
the startfile. “Endfile” is sent before the endstring.
• To indicate “Escape,” use M-. To indicate “Control,” use C^.
• To set an HP LaserJet IIIsi to landscape mode, type:
startstring “M-&l1O”
5.5.3 Manual Installation for System V Machines
1. Log in as root and create a dummy device in /dev:
touch /dev/
2. Change its ownership, group and access rights:
chown lp /dev/alpha
chgrp lp /dev/alpha
chmod 660 /dev/alpha
3. Shut down the lp scheduler.
/usr/lib/lpshut
4. Use /usr/lib/lpadmin command to create a printer. Use the local
system admin. tools to type the following:
/usr/lib/lpadmin -p<
where printer name is alpha, device name is /dev/alpha and model is either
standard or dumb in our example.
5. Issue the following when adding postscript for Solaris:
lpadmin -p<
printer name
alpha
printer name
> -I any
> -v<
device name
> -m<
model
>
Interface directory usually has these paths:
– SCO, Solaris, DG/UX, UNIXWare 2.X and Interactive: /usr/
spool/lp/admins/lp/interfaces
– HP/UX and Silicon Graphics systems: /usr/spool/lp/
interface
– SGI Irix system: /varspool/lp/interface
– AT&T and Sequent: /usr/spool/lp/admins/lp
MIL-3000FTX Series of FastPort Print Servers 5-11
Page 58

Edit the interface file so its contents function as a sub-shell. Output is then
piped to the fpfilter program. To do so:
a. First line of the interface file usually is #!/bin/sh. Add a single
open parenthesis in the second line of the file.
#!/bin/sh
(
# your existing interface script
b. Add a line to the second-to-last line (see example). This line closes
the parenthesis to make it a sub-shell.
) | /usr/local/milan/fpfilter -P alpha <
exit 0
options
>
Host software is in /usr/local/milan. The host name is “alpha” in
/etc/hosts.
For System V Release 4, place the following on the line after the
comments lines (“#”)
FILTER=“/usr/local/milan/fpfilter -P fastport <options>”
Options field contains any option listed in Table 5-3. To use a printer
-D
config. file; use the
option with fpfilter, followed by directory name
containing the .fpconfig file. For example:
-D /usr/local/milan
6. Enable the printer and accept these print job commands:
enable <
accept <
printer name
printer name
>
>
5.5.4 Manual Installation on IBM RS/6000
1. Edit file /usr/lpd/qconfig that specifies options for virtual printers.
2. Add the following lines:
milan:
device = lp0
lp0:
file = FALSE
header = never
trailer = never
access = both
backend = /usr/local/milan/commfilter.sh
where queue name is “milan”; host is in /usr/local/milan.
MIL-3000FTX Series of FastPort Print Servers 5-12
Page 59

3. Create a script commfilter.sh in the /usr/local/milan.
#!/bin/sh
/usr/local/milan/fpfilter -P alpha <
exit 0
options
To use a printer config. file (i.e., .fpconfig file) located in the /usr/
local/milan directory (see Table 5-3)
-D /usr/local/milan
4. Make the script executable:
chmod 755 commfilter.sh
5. Stop and restart the qdaemon (s_stat filter and l_stat filter
options are not supported).
stopsrc -s qdaemon
startsrc -s qdaemon
5.5.5 Manual Installation on BSD UNIX Systems
Host software is installed as an “input” filter. Host sends a print job to
FastPort and provides a transparent printing environment. Install host on
every host that prints to FastPort. Install.sh can be used to install a
FastPort printer/plotter using either host software or LPD support. A
sample install session is available in /examples/install.doc directory.
Using Digi's host software, fpfilter:
> $*
Note:
The following installs a printer named “beta” that is attached to a FastPort named
“alpha.” When installing LPD, replace “beta” and “alpha” with your printer’s name and
host names, respectively.
1. Copy the following entry into your /etc/printcap file.
beta|FastPort host software printer:\
:lp=/dev/beta:\
:mx#0:rw:sb:\
:lf=/usr/adm/beta-errs:\
:af=/usr/adm/beta-acct:\
:sd=/usr/spool/beta:\
:if=/usr/local/Digi/fpfilter:
2. Create a new dummy device, with these commands:
touch /dev/beta
chmod 755 /dev/beta
chown daemon beta
chgrp daemon beta
MIL-3000FTX Series of FastPort Print Servers 5-13
Page 60

3. Create the spool directory. Change it ownership to daemon
mkdir /usr/spool/beta
chown daemon /usr/spool/beta
chgrp daemon /usr/spool/beta
chmod 755 /usr/spool/beta
4. Create log/accounting files: Change ownership to daemon:
touch /usr/adm/beta-errs
touch /usr/adm/beta-acct
chown daemon /usr/adm/beta-errs
chmod 644 /usr/adm/beta-errs
chown daemon /usr/adm/beta-acct
chmod 644 /usr/adm/beta-acct
5. Create a directory called /usr/local/Digi and place the fpfilter
program there. (Or change the path of the input filter “:if=” to point to
any directory containing fpfilter.)Make sure that the directory
containing fpfilter and fpfilter itself have at least access rights of 755.
mkdir /usr/local/Digi
chmod 755 /usr/local
cp fp* /usr/local/Digi
chmod 755 /usr/local/Digi/fp*
6. Create an options file called .fpconfig in the spool directory
(specified by “:sd=”). This file should be at least 644 and owned by
daemon.
For a parallel ascii text printer, a sample .fpconfig file would contain:
parallel
hostname alpha
mapcrlf
formfeed
For a postscript printer on the serial port:
serial
hostname alpha
ctrld
For a serial plotter:
serial
hostname alpha
MIL-3000FTX Series of FastPort Print Servers 5-14
Page 61

For a parallel printer which will be used by PC-NFS:
parallel
hostname alpha
7. Start the printer and queue by typing the following:
lpc start beta
8. You can now print files with the lpr, or lp command.
lpr -Pbeta <filename>, or
lp -dbeta <filename>
5.5.5.1Printing to FastPort
After installing both hardware and software, FastPort is ready to print.
Commonly used BSD print commands include:
Table 5-4: BSD Print Commands
Command Function
lpr -p <printer> <file> Prints the file to the printer
lpq -P <printer> Displays any active queues for the printer
lpc stat <printer> Interactive program for printer management
lpc clean <printer> *Remove all print jobs for the printer
lpc restart <printer> *Restart this <printer> queue
lprm -p <printer> <job#> *Removes the <job#> from the print queue
Note:
* These parameters require root access.
5.5.5.2Customizing BSD Installation
Create the .fpconfig file in the spool directory (i.e.,:sd= entry in
printcap), since this is where daemon executes fpfilter. The .fpconfig file
should be owned by the daemon.
5.5.5.2.1Banner Pages and Accounting Information
To print a banner page, the install script must be told to print a banner. It
adds the command bannerfirst to the .fpconfig file. To configure an
existing printer to send a banner, remove the existing printer and run the
installation script again.
Note:
The banner-generating programs are supplied “as is.”
To print accounting info., add the line acctg to the .fpconfig file. This
causes accounting information to be written to the file specified
by:af=<
filename
> in the printcap entry.
MIL-3000FTX Series of FastPort Print Servers 5-15
Page 62

5.6 Installing and Printing from Data General's DG/UX
FastPort supports DG/UX™ 5.4 Release 2.01 and above. Current versions
of DG/UX fully support FastPort; meaning that an interface script or filter
command do not need to be loaded. These files are:
• /usr/lib/lp/bin/fpfilter
• /usr/lib/lp/model/fastport
5.6.1 Assigning Host Name and IP Address
Use the sysadm to add FastPort’s IP/Ethernet address, via:
Networking -> TCP/IP -> hosts -> Add
1. Add FastPort to the local hosts database (/etc/hosts) or the Network
Information Services (NIS).
e.g., Host name: fastport2-pr
2. Add the Internet address that the system admin. assigned.
e.g., Internet Address: 128.222.55.55
3. Add an alias (optional). Or press [Enter] to continue.
e.g., Alias List: <press Enter>
4. Confirm the choices.
OK to perform operation? [yes]. Press [Enter].
fastport2-pr has been added
5. Add an Ethernet address by modifying the local ethers database (/
etc/ethers) or the NIS ethers database. Follow the ensuing path:
Networking -> TCP/IP -> Ethers -> Add
6. Enter the name of the host that was specified in Step 1.
Host Name: fastport2-pr
7. Enter the FastPort’s Ethernet address:
Ethernet Address: 00:40:c8:55:55:55
8. Confirm the choices.
OK to perform operation? [yes]. Press [Enter].
fastport2-pr has been added.
MIL-3000FTX Series of FastPort Print Servers 5-16
Page 63

5.6.2 Installing and Printing with DG/UX
After adding the IP/Ethernet addresses, define a printer. Before doing so,
configure FastPort (if not already done so). Use the “Use-ACK” setting for
the parallel port when printing to impact printers. Define the printer by
using sysadm:
Device -> Printer -> Devices -> Add
1. Enter the printer name (for example, “laser”).
Printer name: laser
2. Add a connection: “remote to networked printer device.”
Connection type: [Local /dev/tty or /dev/lp] Remote
to networked printer device
3. Accept the Quick Add feature by pressing Enter.
Quick Add using default values? [yes].
4. Supply a printer type (e.g., DG model 6773 PS printer). To view a list of
valid printer types, type [?] and press [Enter].
Printer type: [printer-80] PS-b
5. Enter an input type. For PostScript printers, type “PS.”
Input types: [simple] PS
6. Enter the interface script name.
Interface script: [termprinter] fastport
7. Enter the name of the printer device.
For a list of attached devices, check the file /etc/hosts or use sysadm
to list the host names that NIS provides.
Networked printer device name: fastport2-pr
8. Enter the port number of the printer on the network printer server. Port
numbering for FastPort includes:
– 3100FTX: 2000 for the parallel port and 2001 for the serial port
– 3200FTX: 2010 (2000) and 2011 for parallel ports 1 & 2; 2020 (2001)
for the serial port
– 3310FTX: 2010 (2000) and 2011 for parallel ports 1 & 2, 2012 for
parallel port 3; 2020 (2021) for the serial port
MIL-3000FTX Series of FastPort Print Servers 5-17
Page 64

9. Supply a printer description, which can include the phone number of
the system admin. or location of the printer.
Printer Description: Laser Printer on doc hallway
10. Confirm your choices by pressing [Enter].
OK to perform operation? [yes]. Press [Enter].
laser has been added.
Printer laser has been enabled.
5.7 Additional UNIX Utilities: Using pstext and NeWSprint
ASCII files must be converted to PS format before being printed.
NeWSprint and Digi’s pstext perform ASCII-to-PostScript conversion.
Pstext is located in the software disk in binary source code forms. For
NeWSprint information, contact the Digi LAN technical support via our
FTP site or by phone.
5.8 Deleting Printers
Run the “install.sh” and select Option #4 to delete a printer.
Note:
Log in as root to use this option.
MIL-3000FTX Series of FastPort Print Servers 5-18
Page 65

Chapter 6
Installing and Printing on an Apple Network
Chapter 6 describes installation and configuration of FastPort to print from
Apple environments using the AppleTalk printing protocol.
6.1 Introduction to the Apple Workstation
6.1.1 EtherTalk Features
• Support for both EtherTalk Phase 1 and Phase 2
• Operation in multi-zone networks
• Indirect printing support for LocalTalk networks connected via routers
to Ethernet networks
• Simultaneous printing to all ports
• Support for Apple LaserWriter drivers versions 6.0 and up (including
the setup function of the LaserWriter Printer 8.0)
• Support for Apple Namer and Apple Printer Utility
• Supports Aldus drivers and Plug and Play installation
• Support for a serial or centronics parallel port style printer
• Utilities for changing FastPort’s default settings, such as IP address,
font list, serial and parallel port parameters
• Supports Adobe/HP postscript binary encoding schemes
• AppleTalk configuration via ACT from NetWare system
6.1.1.1Newly Supported Apple Printer Utility Functionality
• “Utility: Restart printer”: Performs a soft reset on FastPort
• “Utility: Get page count”: Gives page count since last reset
• “Utility: Print configuration page”: Prints a page showing all the
current non-volatile parameters on FastPort
• “Utility: Name printer”: Changes the printer’s name
• “File: Display available fonts”: Shows a list of offered fonts
MIL-3000FTX Series of FastPort Print Servers 6-1
Page 66

FastPort stores all options in NVRAM, including font lists, and LaserW riter
8 values (PostScript version, etc.). Therefore, these variables will not need
to be downloaded at each power cycle.
6.1.2 Apple Applications: How FastPort Operates
FastPort performs POST and then advertises its ports to AppleTalk.
FastPort operates as an AppleTalk node. Any PS printer connected to
FastPort emulates a laserwriter printer. Select the FastPort-connected
printer from Chooser, and print to it as if it were a LaserWriter printer.
6.1.3 Printer Communications Handling
Apples require a response fr om the printer. When printing to a LaserWriter
6.x or 7.x driver for the first time, its application resets the printer and
sends a laser prep file. This file contains the PS initialization for the printer.
On the serial port, the printer and the Apple system maintain two-way
communication. Any printer queries from the Apple system go directly to
the printer, as they do with a PS printer connected via AppleTalk.
However, the parallel port is uni-directional and FastPort has one-way
communication with the printer. To correct this, FastPort answers any
queries from the Apple system on behalf of the printer. (see “
from Macintosh Systems” on page 6-8). FastPort must have the appropriate info. about
the printer to answer the queries correctly. Use the Apple Printer utility
described in this chapter to modify the parameters.
Bi-directional Printing
6.2 Plug & Play Operation: Printing to FastPort
Before printing, select the FastPort-connected printer from Chooser.
1. From the “Apple” menu, select Chooser.
2. If there is a router on the network, select the correct zone for FastPort.
3. Select the LaserWriter icon or any other LaserWriter driver, such as
LaserWriter 8.0. FastPort appears in the LaserWriter selection as FPxxxxxx, where xxxxxx is the last six digits of the address. With old
firmware 4.0 and up, FastPort appears as either DIGI-XXXXXX or
MiLAN-XXXXXX.
4. Select FastPort and click on the setup button to configure a printer.
5. Close Chooser. FastPort’s connected printer is now available.
Note:
If the FastP ort-does not appear in the LaserWriter selection list, then either FastP ort or
its printers are not connected correctly. By default, if the printer connected to FastPort
has faulted, FastPort will not advertise the port to the Chooser.
MIL-3000FTX Series of FastPort Print Servers 6-2
Page 67

6.3 Advanced Utilities
The advanced utilities portion of the CD-ROM includes:
• Readme file
• Apple TeachText editor for reading the configuration files
• Apple Printer Utility version 2.2
The following files can be downloaded using the utility:
• Setup Font List file: Lists new fonts for the parallel printer
• Setup Defaults file: Changes the FastPort configuration
• Setup Printer Info file: Changes the parallel printer info
Copy the contents of these files onto the hard disk.
6.3.1 Tips on Using the Configuration File
• Always download the config. file to FastPort’s parallel port.
• If mistakes are made, FastPort returns it as an error message. If there is
a log-file back after downloading, FastPort detects this as an error.
6.4 Using the Apple Printer Utility for Configuration
6.4.1 Using the Apple Printer Utility to Download a Config. Files
When an Apple and FastPort try to establish a printing session, FastPort
responds with queries on behalf of the printer. Sometimes the values that
respond are not correct. Users can modify these values by using the Apple
Printer utility to download config. files. FastPort holds other values not
associated with printing that can be changed by modifying the config. files.
This section describes when to modify these config. files, and how to
download them using the laserwriter utility:
1. From the “Apple” menu, select Chooser.
2. If there is a router, select the appropriate zone for FastPort.
3. Select LaserWriter or any other laserwriter driver.
4. Open Advanced Utilities or the FastPort utilities folder.
5. Click on the icon for one of the config. files. It opens “TeachText.” If not,
use an editor that saves in ASCII text.
MIL-3000FTX Series of FastPort Print Servers 6-3
Page 68

6. Edit the list of configuration choices.
7. Save the list and quit “TeachText.”
8. Open the “Apple Printer Utility” menu.
9. Select Download PostScript File from this menu.
10. Select the file to download.
11. When downloading is complete, quit the program.
If FastPort finds a syntax error, it sends a file with the error information.
The error file is stored as a postscript log.
6.4.1.1Using Setup Printer Information File
Use Setup Printer Info to modify the variables for the parallel port.
The info. is stored until the unit is powered off. FastPort does not know the
characteristics of the parallel printer unless it is specifically loaded.
Note:
This information is important when using the LaserWriter 8.0 drivers.
6.4.1.2Using Setup Defaults File
Downloading Setup Defaults will change the following FastPort
configuration options. Table 6-1 lists the configuration options (Default is
in parentheses).
Table 6-5: Option (Default is in Parenthesis)
Option Choice Description
EtherTalk Phase 1 or (2) AppleTalk revision level.
Wait Times Wait time before reset (15)
Wait time after reset (45)
Note: 200 max for both
(Appear) In the
Chooser
Turn off the
Serial port
Parallel port
type
Parallel port
mode
Yes (Sense) or No No: Parallel printer always shows up in the Chooser regardless of
Yes (Sense) or No Yes: Serial port does not show up in the Chooser.
(No Binary) or Binary
adobe or Binary hp
(1), 2, 3, 4, or 5 1) Standard (Default) makes FastPort rely on Busy to determine if the
Amounts of time (measured in multiples of five sec) that FastPort waits
after and before a reset is sent to the printer prior to printing the first
print job.
whether there is a printer connected.
Yes: FastPort senses whether a parallel printer is connected. If one is, it
shows up in the Chooser.
No: Serial port shows up in the Chooser whether or not there is a printer
connected to the serial port
Parallel port type is based on the traffic type and whether or not the port
is handling Binary PS
port can receive a byte.
2) Fast-DMA enables the DMA chip.
3)AutoStrobe enables a hardware timer to generate the strobe pulse on
the parallel port.
4) Disabled is reserved.
5) Use-ACK checks both the Busy and ACK signals on the parallel port
when sending bytes.
MIL-3000FTX Series of FastPort Print Servers 6-4
Page 69

Table 6-5: Option (Default is in Parenthesis)
Option Choice Description
Serial Port Parameters
Type (No Binary) or Binary
adobe or Binary hp
Stop bits (1) or 2 Number of stop bits required.
Speed 300,600,1200,4800,(9600),
19200, 38400
Parity Yes or (No) Use of parity bit checking.
Xon (Yes) or No Use of Xon/Xoff for flow control.
Serial type is based on the traffic type and whether or not the port is
handling Binary PostScript.
Transmission speed (in bps).
Network Protocols Enabled
Sockets (Yes) or No
LPD (Yes) or No
NetWare (Yes) or No
EtherTalk (Yes) or No
Operational Parameters
Reset the Print
Server
Set IP address Set IP Address (0.0.0.0) Use to specify an IP address for FastPort using dotted-decimal format.
Reset NVRAM
to defaults
Yes or (No) Forces the print server to reboot when FastPort is power cycled.
Yes or (No) Forces NVRAM values to be returned to their defaults when FastPort is
power cycled.
Parallel Port Parameters
Enable Bi-direct.
Interface
Yes or (No) Enables bi-directional printing (see chapter 11)
6.4.1.3Using Setup Font List
FastPort can be told the fonts available for printers connected to the
parallel port. If the printer fonts do not match the defaults, download a
modified Font List file to the FastPort.
1. Locate the Setup Font List file in the “Advanced Utilities” or “FastPort
Utilities” folder.
2. Double-click on the Setup Font List icon.
3. Edit the list of fonts to match your printer’s.
4. Save the list and quit “TeachText.”
5. Open the LaserWriter Utility.
6. Select Download PostScript File from “Utilities.”
7. Select the file Setup Font List. When the file completes
downloading, quit the utility.
The font list remains in FastPort’s memory until it restarted.
Note:
MIL-3000FTX Series of FastPort Print Servers 6-5
The font list for the serial port of FastPort does not need to be changed.
Page 70

6.5 Using Namer to Rename the FastPort Printer
FastPort stores the names of printers connected to its ports. The printer
may have a different name when accessed by a different interface. By
default, the MIL-3000FTX syntax is:
For older versions of FastPort:
• DIGIXXXXXX-par (for the parallel port)
• DIGIXXXXXX-ser (for the serial port)
For newer versions of FastPort (including the MIL-3000FTX):
• FPXXXXXX-par (for the parallel port)
• FPXXXXXX-ser (for the serial port)
Rename the parallel printer to a different name (up to 32 characters). For
the serial port, use the parallel printer’s name with an “-ser” extension.
6.5.1 Renaming FastPort Using Namer
1. Open Advanced Utilities.
2. Run Namer. Icons appear for each installed printer type.
3. Click on a LaserWriter icon. FastPort appears.
4. Select the printer you want to rename.
5. Type in the new name and click Rename. When done, click the Quit
button.
Note:
You can also rename printers using the LaserWriter Utility.
FastPort stores printer names in NVRAM, until they are specifically change
again (even after restarting the FastPort). If you have problems, return to
the Chooser and use a LaserWriter 7.x driver to choose FastPort. Some
versions of Namer are “driver version-dependent.”
6.6 Printing PostScript Binary Files
6.6.1 Selecting Binary PostScript Encoding
Some graphics programs generate data that is binary encoded. If so, low
graphics may print fine, but high graphics may not. To prevent this, enable
the binary capabilities. FastPort does not support binary printing (default).
MIL-3000FTX Series of FastPort Print Servers 6-6
Page 71

1. Edit the following two lines to the “Setup Defaults” file. Insert the
binary name within the parentheses:
Parallel Port Type (
Binary hp
) // can be: No Binary or Binary
adobe or Binary hp.
Serial Port Type (
Binary hp
) // can be: No Binary or Binary
adobe or Binary hp.
2. For each port (serial or parallel), choose one of the options:
No Binary / Binary adobe / Binary tek / Binary hp.
3. Download the new setup file with the “Apple Printer” utility.
4. Reboot FastPort.
5. Verify the new setting in Chooser. Non-binary printers appear as
before. Default names are:
FP
FP
XXXXXX
XXXXXX
-par-PS
-ser-PS
All queue names are based on the parallel ports name. If a printer is named
“Alpha” and is configured for binary support for serial/parallel, the
following printers appears in Chooser:
Alpha
Alpha—PS Binary
Alpha—S
Alpha—S—PS Binary
Note:
Only use the Namer utility to change regular names. The name of the PS Binary
printer does not need to be changed directly.
Before a standard Adobe PostScript Level 2 printer can be used with the
binary encoding, the following PostScript fragment may need to be
downloaded to the printer as a separate file:
^D (%Parallel_NV%)
<</Password (0) /Interpreter/PostScript/Protocol/Binary>>
setdevparams
^D
This file is on the Advanced Utilities as force_parallel_ binary and
force_serial_binary. For serial printers, replace Parallel_NV with
Serial_NV. This needs to be done once per port during the life of the
printer. For HP printers, FastPort automatically encode PS binary if that
mode has been configured by setting the parallel port type to binary hp.
MIL-3000FTX Series of FastPort Print Servers 6-7
Page 72

Only download this file if the postscript binary FastPort printer has been
enabled and is unsuccessful at printing.
6.7 Bi-directional Printing from Macintosh Systems
Firmware 6.1 supports bi-directional printing to any printer that supports
the IEEE 1284 bi-tronics nibble mode specifications. AppleTalk printing
protocols are currently the only mainstream printing protocol that query
the printer for parameters, fonts, etc. That is why bi-directional printing is
discussed only in the AppleTalk chapter.
FastPort has bi-directional support disabled for each parallel printer
(default), but can be enabled by using a management tool. Using a utility
establishes a connection to FastPort.
1. Press [N] for networks
2. Press [A] for Apple. There will be an “enable bi-directional port”
message for each of the parallel ports.
To enable this support using the “Apple Printer” utility:
1. Copy the “Apple Printer” utility and setup defaults files from the CDROM.
2. Edit the setup defaults file by double-clicking on the file.
3. Within this file, there is a section for each parallel port and separate
parameters for each parallel port (name, time-outs, bi-tronics enable).
In the section for the particular parallel port to be enabled, modify the
line that says:
Enable BiDirectional Interface = (No)
change this line to the following …
Enable BiDirectional Interface = (Yes)
4. Save the file and close the editor.
If FastPort is not installed on the network, do so now.
1. Choose one of the FastPort parallel ports as it shows up in the Chooser.
2. Double-click on the Apple Printer Utility.
3. When it opens, choose Utility and then Download PostScript
file.
MIL-3000FTX Series of FastPort Print Servers 6-8
Page 73

4. When the dialog box opens, choose the recently modified setup
defaults file. The configuration page downloads.
5. Reset FastPort and print out a test page:
a. Put switch D1 down and switch D2 up.
b. Power cycle FastPort.
c. Put the switches back to their original position (D1 up, D2 up or
down) after the test page prints.
6. Re-choose FastPort from the Chooser.
A Mac can now communicate directly with the printer connected to
FastPort’s parallel port.
6.7.1 Issues Regarding Bi-Directional Macintosh Printing
• Bi-directional printing may cause slower printing because of the extra
queries that go back and forth.
• Some printers don’t support bi-directional printing on the parallel port.
Some Macs with parallel ports do not respond to queries on that
parallel port. Check the printer’s documentation to verify that it
supports IEEE 1284 bi-directional specification
• Some printing modes on certain FastPort models cannot support bidirectional printing.
FastPort devices support 3 or more handshaking modes on the parallel
port. Users can modify these handshaking modes to speed up printing.
However , with bi-directional printing, car e must be taken to ensure that
handshaking supports bi-directional printing. Table 6-2 shows the
devices and the modes that support bi-directional printing:
Table 6-6: Support of Bi-directional on FastPort Print Servers
FastPort Standard FastDMA Use ACK FIFO-BUSY FIFO-ACK
MIL-3100FTX No Yes* Yes* N/A N/A
MIL-3200FTX Yes N/A N/A No No
MIL-3310FTX Yes N/A N/A No No
Note:
*May only work with certain printer models.
MIL-3000FTX Series of FastPort Print Servers 6-9
Page 74

Chapter 7
Print Management Features of FastPort
Chapter 7 contains print management and status monitoring for FastPort.
This chapter includes:
7.1 Managing Print Server
There are many methods to manage FastPort: remotely across the network
or by attaching a serial/parallel device. FastPort also has real-time status
tools to resolve errors that may occur with another device. FastPort can be
configured to generate messages as they occur and direct them to:
• Parallel port printer
• Serial port printer
• Dumb terminal
• Telnet session, nbmon
Information includes the start/finish of a print job, step-by-step boot
procedure, and why a printer failed.
7.2 Serial Port Console Monitoring
FastPort serial port can be used to configure the device while in a nonnetworked mode.
7.2.1 Enabling or Disabling the Console Monitor
1. Put all the front panel switches: down (On).
2. Connect an ASCII terminal to the serial port of the FastPort.
3. Set the terminal: 9600 baud, no parity, 8 data bits, 1 stop
bit and Xon/Xoff flow control.
4. Power cycle FastPort. The “Ready for command” message appears.
5. Establish a serial terminal.
MIL-3000FTX Series of FastPort Print Servers 7-1
Page 75

6. At the command prompt, press [C] from the selection.
7. Press [Y] for yes at the query message Do you want to configure
for console status monitoring?
8. Choose the output port where the console info. is sent.
9. Disable the information forwarding by selecting off. The program
defaults back to the command prompt.
10. Power cycle FastPort.
For serial/parallel port monitoring, ASCII data is sent to the device
describing the actions occurring. If the serial port was chosen in Step 8, do
not use that port as normal, since status messages may show up when
printing (disabled by default).
7.3 Managing FastPort from Networked Workstations
FastPort has many ways to remotely configure itself. Features are mostly
redundant, so that FastPort can be managed regardless of the type of
system being connected. Users can access FastPort to view/store settings
inside the device. Or, users may access it to do real-time monitoring.
7.3.1 Multi-Protocol and SNMP Stations
FastPort supports SNMP management over TCP/IP, IPX, NetBIOS/
NetBEUI, and AppleTalk network protocols. FastPort supports MIB 2, IEEE
parallel and serial MIBs, and Digi’s private MIB. The IEEE parallel, serial
MIBS, and Digi’s MIB can all be downloaded from our FTP site.
7.3.2 TCP/IP Stations
7.3.2.1Using FastManage
For Windows with TCP/IP station, use FastManage to identify and
configure FastPort on the network (Chap. 9 through 12).
7.3.2.2Using Telnet Diagnostic Monitoring
Once a telnet session is established, a new screen appears:
Press [!] to enter monitor, or press [S] to get status.
If nothing is pressed, messages will be received as they appear. If [S] is
pressed, status for each port is received. Press [!] to exit.
MIL-3000FTX Series of FastPort Print Servers 7-2
Page 76

1. Set the front switches on the FastPort: D1 up and D2 down.
2. Run the telnet command. Specifying port 2002 as the connection port
(usually: telnet <
hostname
> 2002). Options (!, D, S, A) appear.
At this point, the user is not interfering with FastPort.
1. To start the command mode, press [!] and press [Y] for yes.
2. The following commands should appear:
Command [C, D, E, F, G, H, I, L, N, R, P, S, Z, *, +]:
3. At the command prompt, press [C] from the selection.
4. Press [Y] for yes at the query message Do you want to configure
for console status monitoring?
5. Choose the output port where the console info. is sent.
6. Disable the information forwarding by selecting off. The program
defaults back to the command prompt.
Note:
FastPort only responds to the current telnet session.
7. Press [R] to exit. The device will perform a soft-reboot.
Users can telnet into the parallel/serial devices by specifying port 2000
and 2010 (par1), 2011 (par2), 2012 (par3), 2020 and 2001 (ser1), or 2021
(ser2) on the command line. Anything typed now appears on the printer.
8. To exit, press [Control]+ []] (right bracket) and type quit.
7.3.2.3SYSLOG on FastPort
T o monitor and keep status, Digi supports “SYSLOG.” Enabling this, for ces
FastPort to send messages to a designated SYSLOG HOST on the network
(See Chapter 6). FastPort now supports SYSLOG protocol, allowing them
to alert a SYSLOG host machine to certain events occurring on FastPort. To
enable this on FastPort:
1. Establish a serial terminal, a telnet, or a NBMON session.
2. Once established, press [N] from the main menu.
3. Press [T] for TCP/IP.
4. Press [E] for Engine.
5. Once inside, choose Yes to modify parameters.
6. Press [L] for syslog.
MIL-3000FTX Series of FastPort Print Servers 7-3
Page 77

7. Enter the IP address of the SYSLOG host and the priority of the
message(s). Priority level are between 2 and 7. These numbers
correspond to the types of events that are logged.
a. 2 or 7: Sends critical messages only, including paper errors and
printer faults.
b. 4 thru 7: Sends both critical and warning notices, including start/
end of a print job or when the IP address is set.
To disable the feature, set the IP address of the SYSLOG host to 0.0.0.0.
Default for SYSLOG on FastPort is 0.0.0.0. The syslog messages that
FastPort sends generally get sent to the usr/adm/LPD-errs file on
systems running BSD UNIX. It is configurable on most System V machines.
See the UNIX system documentation for more information.
7.3.2.4Digi’s fpstatus for TCP/IP UNIX
Digi includes an FPSTATUS binary on its UNIX portion of the CD-ROM.
This is a UDP-based utility that can get real-time status and is commonly
used in shell scripts. fpstatus program supports:
• Display of serial and parallel printer status
• Display of all currently printing jobs defined protocols
fpstatus uses a UDP connection to communicate with FastPort. For
printer information, use the fpstatus command:
fpstatus <
hostname
>
When reporting, the program uses these terms:
• Active or Not Active: Whether FastPort is printing
• On-line, Not Busy, ACK: A typical status report
Device states may alter from Busy to Not Busy or ACK to Not ACK. The
number of bytes is totaled from the last power cycle. A parallel port status
of Off-line, Fault, or Paper_Fault suggests that user intervention can
resolve the problem. Check the basic cabling when any Off-line or
Fault message appears. For example, a typical response from fpstatus:
Active parallel data session from india (128.192.8.184)
PARALLEL STATUS: On-line NOT Busy, ACK
Total parallel bytes sent: 324444554
Active serial data session from NetWare
SERIAL STATUS: flow control FROM Printer by: XOFF
Total serial bytes sent: 102
MIL-3000FTX Series of FastPort Print Servers 7-4
Page 78

7.3.3 AppleTalk Stations
Digi includes an Apple Printer utility on the CD-ROM. AppleTalk users
have a limited status-checking support with the Apple standard printing
utilities. To cause a status window to remain up when printing:
1. From the Apple pull-down menu, select the Chooser.
2. Choose a LaserWriter 8.x driver.
3. Disable background printing.
This window tells the Mac user if FastPort is being used by some other
protocol, or how many bytes of a job has been sent. LaserWriter 8 users can
also choose setup and get info to get information on the printer
connected to FastPort.
If the printer is parallel, users can either use the Apple Printer utility to
change the settings permanently or enable Digi’s bi-directional printer port
and “talk” directly to the printer. Copy the Apple Printer utility and its set
of download-able files. Modify the setup defaults file (FastPort settings) or
setup printer info file (LaserWriter 8 get info query data),
appropriately. After modifying these files:
1. Choose the FastPort.
2. Run the Apple Printer Utilities.
3. From the “Utilities” pull-down menu, choose Utilities—send
PostScript File.
4. Click on the just modified file. This downloads the file to FastPort,
which parses, validates, and stores the values.
Note:
Choosing Utility and then Restart Printer will soft reset FastPort. Reset will
take approximately 60 seconds.
7.3.4 NetWare Client Stations
NetWare has two utilities to monitor and configure FastPort: Fast Manage
suite and ACT version 3.0. FastManage can be installed on any Windows
client machine that has the IPX protocol enabled. NetWare users on DOS
can also use ACT version 3.X. This utility has two functions:
• It allows users to configure the FastPort settings, like FastManage or
any other described utility.
• It mimics PCONSOLE for bindery style networks and allows users to
create print queues and print servers.
MIL-3000FTX Series of FastPort Print Servers 7-5
Page 79

As it creates print queues and servers on Bindery servers, it creates/stores
a configuration file in the [SERVER/SYS]\login\milan directory of the
server . ACT allows users to see the real-time messages on FastPort’s status.
See Appendix C for monitor menu options in ACT.
7.3.5 NetBIOS / NetBEUI Stations
FastManage uses the built-in IPX, IP or NetBIOS/NetBEUI stack of
Windows to send packets on the net. Refer to the FastManage User’s Guide
for more detail. Digi also ships two NetBIOS utilities in the distribution
package—NBMon and showprn.exe. These utilities offer DOS-level
sessions to be established with FastPort. To run:
1. Open up a DOS shell on a NetBEUI machine
2. Run the showprn.exe utility from the prompt. A list of FastPorts on
the local network appears.
3. Once there is a device name, run the nbmon utility as such:
nbmon <
fastport_name
> -d#
Where the # is a number between 0-7 and NetBEUI is running. Once
done, a telnet-like session is established. This interface is almost
identical to a serial/telnet sessions.
Users may have problems running the showprn.exe utility, because of the
multi-protocol nature of Windows. If the showprn does not display
FastPort, try issuing the command with a -d0, -d1, -d2, -d3,... or -d7
switch:
showprn.exe -d1
This makes showprn use an alternate stack to send the packet.
If an IPX protocol is loaded on a Windows 95 system, make sure the checkbox marked Send NetBIOS over IPX is not checked. This is located in
Control Panel-->Network-->IPX. Verify that the NetBEUI protocol is
loaded onto the client machine, and if it is Windows, make sure it is set
as the default protocol. This is done by opening up the Control
Panel, Networks screen and looking at the NetBEUI options.
MIL-3000FTX Series of FastPort Print Servers 7-6
Page 80

Chapter 8
Chapter 8 has information for the FastManage software.
8.1 FastManage Applications
• Discovery Application: This is used to find devices that have an SNMP
agent on the network.
• Ping Application: This is a stand-alone program for debugging. Users
“ping” to an IP address
• BOOTP Server: This allows users to assign IP addresses dynamically to
the devices on the network
• FastPort PrintServer Mgr: This application is used to find and maintain
FastPort print servers
• On-line Help: A list of available help option appear
FastManage Installation
• Uninstall FastManage: Removes FastManage
• Stackable HUB_MCS Mgr: This application is used to find and
maintain hubs and media converters
• Readme: Notes the latest features of FastManage
8.1.1 FastManage MIBs
FastManage utilizes the RFC 1517 MIB for SNMP compliance. FastManage
also uses the repeater.mib and the private.mib for the hub line, as
well as the parallel.mib, serial.mib, and private.mib for the print
server line.
8.1.2 FastManage Requirements
FastManage runs as a stand-alone tool (i.e., no other TCP/IP packages
required). However, if a system has any Winsock™ compatible TCP/IP
stacks (i.e., PC/TCP™, Chameleon™, or LAN Workplace™) or Microsoft
TCP/IP stack, it can co-exist with these packages. FastManage runs on the
top of public domain packet drivers as well as on the top of ODI drivers.
MIL-3000FTX Series of FastPort Print Servers 8-1
Page 81

8.1.3 IP Configuration
1. Load Packet or ODI drivers for the NIC card
2. Add the following line to the net.cfg file for ODI Drivers:
Frame Ethernet_II
8.1.4 IPX Configuration
• Novell 4.1 Drivers for Windows and DOS. Refer to the Novell Netware
Documentation for information
• ODI Driver for the network interface card loaded
8.1.5 NetBIOS Configuration
NetBIOS over NetBEUI network configuration for Win 3.11 and/or Win 95.
8.2 Installing FastManage
There are two different modes of installation:
• Express installation
• Custom installation
8.2.1 Express Installation
Express install is the fastest way of setting up the FastManage software and
is recommended for first time users. For detailed installation, go to
“Custom Installation” on page 8-3. Do the following to install FastManage:
1. From “Start” (or “F
2. Type d:setup.exe (or the drive wher e the CD-ROM is located) on the
command line and click OK.
3. Register FastManage and click N
4. Confirm that the registration is correct and click Yes.
5. Choose the type of installation. In this case, select Express Install
(for first-time installation) and click N
Note:
Go to Section 8.2.2 for Custom Installation (or Advanced) instructions.
ile”), select Run.
ext.
ext.
6. Choose a network protocol: IP, IPX, or NetBIOS
Note:
MIL-3000FTX Series of FastPort Print Servers 8-2
IPX requires Novell 4.1 DOS and Windows drivers already installed on the system.
Page 82

7. Specify the system’s IP address and its subnet mask. The gateway
selection is optional (Figure 8-1).
Figure 8-1. IP Parameters
8. Choose a location to install the FastManage application and click Next.
Default is c:\fm.
9. A message appears asking if a menu item for FastManage is to be
added to the “NWADMIN” utility. Select Yes and snap-fp.dll file is
copied to the Windows directory and the nwadmin.ini file is updated.
10. Choose to have the system rebooted and click F
8.2.2 Custom Installation
Custom installation configures the Discovery and/or SNMP parameters.
Custom install follows the same procedure as the express, except for a
extra steps. To begin custom installation:
7. After step 6 in section 8.2.1, choose Custom Installation and click
Next.
8. Choose a network protocol: IP, IPX or NetBIOS.
9. If IP was selected, specify the system’s IP address and its subnet mask.
The gateway selection is optional.
10. In the “Configure Advanced Parameters” menu (Figure 8-2), configure
the following:
• General Parameters and click N
configure the general parameters.
• Discovery Parameters and click N
configure the discovery parameters.
inish.
ext. Refer to section 8.2.2.1 to
ext. Refer to section 8.2.2.2 to
• SNMP Agent Parameters and click N
ext.Refer to section 8.2.2.3 to
configure the SNMP agent parameters.
MIL-3000FTX Series of FastPort Print Servers 8-3
Page 83

• Maximum Retry Time and click Next. Default is 5.
Figure 8-2. Configuring Advanced Parameters
8.2.2.1General Parameters
The “General Parameters” has more options to configure.
Figure 8-3. General Parameters
• Show Node Name: If selected, this parameter displays a host name for
all the devices discovered. FastManage needs a hosts file in the C:\ETC
directory for a host name to be displayed. Checked by default.
• Show Node Address: If this selection is checked, FastManage displays
IP and IPX addresses for all the devices discovered. Not checked by
default.
• Load Saved Maps: If this parameter is selected, the software loads the
saved Map when starting the Discovery Application. Checked by
default.
MIL-3000FTX Series of FastPort Print Servers 8-4
Page 84

• Save Maps On Exit: If this parameter is selected, the software saves
the Map when Discovery Application is exited. Checked by default.
• Save Parameters On Exit: If selected, this option saves preferences
when Discovery is exited. Checked by default.
• Refresh every: This selection “refreshes” the Map every <n>
seconds. Default: 60 seconds.
• Discover: This selection “re-discovers” hosts every <n> seconds.
Default: 90 seconds.
• Dead: This selection is the number of attempts the software makes
before marking the node as “dead.” Default: 2.
• Wait: This selection signifies the amount of time the software waits for
a reply from a node. Default: 1 second.
• Default Map: This selection will enter the name of the default Map
file: map.map.
• Map File: This selection will enter the path for the Map files. Default:
c:\fm.
• Hosts File: This selection enters the path for the host file. Default:
C:\ETC.
• Bootptab File Path: This selection enters the path for the bootptab
file. Default: C:\FM.
• Allow To Edit “Hosts” File: If selected, Discovery updates the
“hosts” file if a new host file is discovered. Checked by default.
efault: Initialize all the parameters to default values.
• D
• Save Options: Saves all changes to the issnmp.ini file.
• Cancel: Cancels the changes.
8.2.2.2Discovery Parameters
The “Discovery Parameters” menu (Figure 8-4) configures the parameters
used for the discovery nodes (Chapter 9). The following section gives
information about the discovery.
• Enable IP: When selected, this enables IP protocol. If not selected,
FastManage will not perform any SNMP over IP operation. Checked by
default.
MIL-3000FTX Series of FastPort Print Servers 8-5
Page 85

Figure 8-4. Discovery Parameters
• Use DNS: When checked and the IP/NetBIOS protocols are all
enabled, FastManage may be unable to resolve a NetBIOS name (e.g.,
SNMPA0702CA). Turn this parameter “Off” if this is the case. The
“Enable IP” parameter must be selected to enable this option. Not
checked by default.
• Poll IP Range: When this option is selected, the software “polls” all
254 hosts of the subnet (from X.Y.Z.1 to X.Y.Z.254). The “Enable IP”
parameter must be selected to enable this option. Checked by default.
• Do IP Broadcast: If this parameter is selected, the software will
performs discovery through SNMP over IP broadcast. The “Enable IP”
parameter must be selected to enable this option. Checked by default.
• Every: If this parameter is selected, the software broadcasts every <n>
seconds to discover new devices. The “Enable IP” parameter must be
selected to enable this option. Not checked and 120 seconds by default.
• Times: This option is the number of times the system will “broadcast”
before giving up discovery of a node. The “Enable IP” parameter must
be selected to enable this option. Checked and 3 times by default.
• Poll “hosts” List: If this is selected, the software reads through the
list, if a name is in the hosts file, the software then uses SNMP to
discover each host. Checked by default.
• Poll Map List: If selected, the software “discovers” each host in Map
1 through SNMP. Checked by default.
• Find Only Digi Devices: If this checked, Discovery finds/displays
only Digi devices. Not checked by default.
MIL-3000FTX Series of FastPort Print Servers 8-6
Page 86

• Enable IPX: When selected, FastManage enables IPX protocol. If not
selected, FastManage will not perform any SNMP over IPX operation.
Not checked by default.
• Do IPX Routing: When enabled, users can manage IPX devices across
the router. If the device name is specified in the host file, then that
device will be discovered (Enable IPX, Do IPX routing, and the
Poll “hosts” file all have to be enabled). The “Enable IPX”
parameter must be selected to enable this option. Checked by default.
• Do IPX Discovery: Use SNMP over IPX and find all devices that
respond. The “Enable IPX” parameter must be selected to enable this
option. Not checked by default.
• Enable NetBIOS: When this option is chosen, this enables NetBIOS
using the NetBeui protocol. If not selected, this will not perform any
SNMP over NetBIOS operation.
• Strict Name Resolution: When this is enabled, all device names
starting with SNMPA will be treated as NetBIOS names. The “Enable
NetBIOS” parameter must be selected to enable this option. Checked by
default.
• Do NetBIOS Discovery: Uses SNMP over NetBIOS and finds all
devices that respond. The “Enable NetBIOS” parameter must be
selected to enable this option.
• Default: Initialize all the parameters to default values.
• Save Options: Saves all changes to the issnmp.ini file.
• Cancel: Cancels the changes.
8.2.2.3SNMP Agent Parameters
Figure 8-5. SNMP Agent Parameters
MIL-3000FTX Series of FastPort Print Servers 8-7
Page 87

• Get Community: This is required. Default is public.
• Set Community: This is required. Default is private.
• System Description: This is returned by FastManage in response to
an SNMP query. Default is FastManage S.
• System Name: This is returned by FastManage in response to an SNMP
query. Field is blank by default.
• System Contact: This is returned by FastManage in response to an
SNMP query. Field is blank by default.
• System Location: This is returned by FastManage software in
response to an SNMP query. Blank by default.
• Save: Saves all changes to the issnmp.ini file.
• Cancel: Cancels the changes.
At this point, complete the installation procedure (same as described in the
express installation procedures).
MIL-3000FTX Series of FastPort Print Servers 8-8
Page 88

Chapter 9
Chapter 9 describes the features of Discovery, including features for the
MIL-3000FTX FastPort.
9.1 Introduction to Discovery
Discovery detects SNMP manageable devices over IP, IPX, and NetBEUI
(NetBIOS) networks. On IP networks, Discovery supports and performs
the following:
• Reads entries from a local host table and sends an SNMP query to each
one of them
• Pings to a local broadcast address to detect all devices
• Using the subnet mask and the IP address of the device, detects all of
the devices in the current subnet
Discovery Application
• Through SNMP traps, FastPort sends a “power-on trap” at power-up if
they are configured with a manager address
Discovery options are user configurable and are stored in the issnmp.ini
file. Discovery uses icons to identify an SNMP device on the Map:
• Click once on the icon to display information for a device
• Double-click on the thumbnail to launch a device
9.1.1 Discovery Features
• Discovery supports a limited amount of placement so that users can
position the device on the Map
• Users can make devices invisible
• Store or restore a Map
• Contains a “TFTP” client
• Users can download flash image to upgrade the device to a different
firmware level
MIL-3000FTX Series of FastPort Print Servers 9-1
Page 89

9.2 Launching Discovery
Figure 9-1. FastManage for FastPort menu
1. Double-click on the Discovery Application icon. The software
“discovers” all of the SNMP devices on the subnet.
2. Devices will now appear on Map 1 as “thumbnails,” which represents
each SNMP device (Figure 9-2).
3. Double-click on a thumbnail to display a full-screen image of that
particular SNMP device (refer to Chapter 10).
Figure 9-2. Map 1 Discovery Application
Note:
MIL-3000FTX Series of FastPort Print Servers 9-2
Discover uses three protocols to find SNMP devices: IP, IPX, and NetBIOS. This
means that if a device uses all three of these protocols, that de vice will be “disco vered”
three different times on the Map.
Page 90

9.2.1 Tool bar
The tool bar displays above the Map field. Figure 9-3 displays a close-up
view of the Discovery Application tool bar. To r emove the tool bar fr om the
field: From the “O
ption” pull-down menu, deselect Tool bar.
Open
map
New
map
9.2.2 Status Bar
By default, the “Status Bar” displays below the Map field (Figure 9-2). This
displays current information, including:
• Searching...: Means the software is looking for more SNMP hosts
over the subnet.
• XX Host: Number of hosts found.
• XX Dead: Number of host found that were off-line.
• Type of device found, for example, FastPort Network Print
Server Model 3000FTX.
To remove the status bar from the field: From the Option pull-down
menu, deselect S
Save
map
Rename
map
host name or
IP address
broadcast
View as
Send
Refresh
map
Discover
host
Ping
TFTP
Close all
windows
Node
properties
Figure 9-3. Discovery Application Tool bar
tatus bar.
Help
9.2.3 System Information
Click once on a thumbnail. The object selected is highlighted with a box.
Click on the same object once again and its system information appears.
9.3 FastPort Icon Names
The name or address of a host is displayed below the device in the Map
(Figure 9-2). Names are based on certain criteria:
• FPXXXXXX: This device was discovered by the SNMP over IPX protocol
(where XXXXXX are the last six digits of the Ethernet address. Thus, a
device with an Ethernet address of “0040C800702CA,” has an IPX SAP
name of FP0702CA).
MIL-3000FTX Series of FastPort Print Servers 9-3
Page 91

• SNMPAXXXXXX: This device was discovered by the SNMP over NetBIOS
(where XXXXXX are the last six digits of the Ethernet address. Thus, a
device with an Ethernet address of “0040C800702CA,” has a NetBIOS
name of SNMPA0702CA).
Note:
FastPorts with firmware of 6.1 or higher are required for SNMP over NetBIOS
manageability.
• UNKNOWN: The device was discovered by the SNMP over IP protocol;
however, there was no entry in the host table relating to this device.
Add a name in the “Show Node Properties” menu (refer to section
9.4.9).
9.4 Discovery Application Tools
9.4.1 Renaming a Discovery Map
Maps can be renamed and saved for future use. Do the following to
rename a Map.
1. Click the Rename Map icon (fourth from the left). The “Map Title
Editor” menu appears.
2. Delete the old name and type in a new Map name.
3. Click OK.
To perform this task from the pull-down menu, select C
ptions pull-down menu.
the O
9.4.2 Host Name/Address
For each thumbnail shown on the Map, there will be a name below device.
Each protocol has its own criteria, for example:
• For an IP device, the address is its IP Address.
The name for an IP device is Host Name. This is derived from the host
file. If an entry for an IP address is not found, UNKNOWN is displayed.
See Section 9.4.9 to change a name.
• For an IPX device, the address is its IPX address.
The name for an IPX device is the IPX SAP Name. This name cannot be
changed.
• A NetBIOS unit doesn’t have an address, so 0:0 is shown.
The name for a NetBIOS device is the NetBIOS Name. This cannot be
changed.
hange title from
MIL-3000FTX Series of FastPort Print Servers 9-4
Page 92

9.4.2.1Changing from the Node Name to an Address
1. Click the Node/Address icon (fifth from left on the tool bar). The node
switches to the address.
2. To change to a name, click the Node/Address icon again.
To perform this task from the pull-down menu, select Show Node
Address/Name from the O
ptions pull-down menu.
9.4.3 Send Broadcast
To the right of the “View as host name or IP address” icon, is the “Send
Broadcast” icon. This will discover new host on the subnet. When clicked
on, an IP broadcast over the network. Host that reply are displayed on the
current Map.To perform this task from the pull-down menu, select Send
roadcast from the Action pull-down menu.
B
9.4.4 Refresh Map
Directly to the right of the “Send Broadcast” icon, is the “Refresh Map”
icon. This option checks the status of each host discovered on the Map. A
packet exchange is done for each host. A red (cross-out) mark displays if a
host did not reply. To perform this task from the pull-down menu, select
resh map from the Action pull-down menu.
Ref
9.4.5 Discover Host
To the right of the “Refresh Map” icon, is the “Discover hosts” icon. This
will rediscover all host on the subnet. To perform this task from the pulldown menu, select Discover hosts from the Action pull-down menu.
9.4.6 Using the Ping Manager
Ping allows a user to check if a host is accessible on a network or not. A
package exchange is done to accomplish this task.
1. Click the Ping icon (fifth from the right on the tool bar). The “Ping
Manager” menu appears.
2. Click once on an IP address to highlight it.
3. Click the Ping button. The host that was contacted will respond in the
“Report” box.
To perform this task from the pull-down menu, select Ping
ction pull-down menu.
the A
hosts from
MIL-3000FTX Series of FastPort Print Servers 9-5
Page 93

9.4.7 TFTP Icon: Flash Download
Obtain a flash upgrade from Digi’s LAN technical support (see Appendix
F). Do the following to update a flash file:
1. Click on the TFTP icon (fourth from right). The “Flash Download
(TFTP)” menu appears (Figure 9-4).
2. Type the device’s file name into the “Download File Name” field, or
click Browse to search for the files to download.
Figure 9-4. Flash Download (TFTP)
3. If the devices IP address does not show up in the HOST LIST, cancel
out of the TFTP screen and click on the Show Node Properties icon
(refer to section 9.4.9).
4. When the desired IP address is entered, click Download to download a
file with .hex or .chx extension.
To perform this task from the pull-down menu, select T
ction pull-down menu.
A
9.4.8 Close All Windows Icon
On the tool bar, to the right of the “Show Node Properties” icon, is the
“Close All Windows” icon. When clicked on, this icon simply closes all
current windows on the Map.
9.4.9 Show Node Properties
The Show Node Properties allow users to change a name of a node, make a
device invisible, or display traps for a device. To display the “Node
Properties” menu (Figure 9-5), click the Show Node Properties icon
(second from right)
FTP from the
MIL-3000FTX Series of FastPort Print Servers 9-6
Page 94

Figure 9-5. Node Properties
To view this menu from the pull-down menu, select Show node
roperties from the Window pull-down menu.
p
• To change a nodes name:
a. Click once on the desired node. The line is highlighted and the
current name appears on the right-hand side of the screen. Unless
given a name, UNKNOWN is displayed.
b. Enter a name into the box. The new name now appears in the node
property field.
• To make a device invisible, deselect the Visible box. Again, located on
the right-hand side of the menu.
• Click on Show Traps to display traps for a device. For this function to
work on this parameter, your system must be designated to receive
trap. See Chapter 10 for more information on Traps (page 10-4).
Click O
K when you are finished.
9.4.10SNMP Fault Trace
From the W
indow menu, select SNMP Fault Trace to be “On” or “Off”
(default). There are times when an SNMP session cannot be opened
because of a variety of errors. When this happens, an error message
appears. With this option selected, the software counts the times that error
occurred “without” displaying the error message. The number of times the
error occurred is displayed on the status bar (Figure 9-6).
MIL-3000FTX Series of FastPort Print Servers 9-7
Page 95

Note:
This only works if IPX is enabled in the General Parameters (under the
Parameters pull-down menu).
Figure 9-6. SNMP Fault Trace Message
9.5 Parameters Pull-Down Menu
There are a variety of options that can be configured from the Parameters
pull-down menu, including:
9.5.1 General Parameters
To configure the General Parameters section: From the “Parameters” pulldown window, select General Parameters (Figure 9-7). The following
are its options:
Figure 9-7. General Parameters Menu
MIL-3000FTX Series of FastPort Print Servers 9-8
Page 96

• Show Node Name: When this option is selected, the software displays
host names for all the devices discovered. Checked by default.
• Show Node Address: When this parameter is chosen, FastManage
displays IP and IPX addresses for all the devices discovered. Not
checked by default.
• Load Saved Maps: When this option is selected, FastManage loads a
saved Map when starting the Discovery Application. Checked by
default.
• Save Maps On Exit: When selected, this option saves the Map when
Discovery is exited. Checked by default.
• Save Parameters On Exit: This selection saves the options when
the Discovery is exit. Checked by default.
• Refresh every: When chosen, this option refreshes the Map every
<n> seconds. Default is 60 seconds.
• Discover: When this parameter is selected, the software re-discovers
hosts every <n> seconds. Default is 90 secs.
• Dead: This parameter signifies the number of attempts FastManage
tried before marking the node as “dead” (off-line). Default is 2 unicasts.
• Wait: The selection denotes the amount of time the software waits for a
reply from a node. Default is 1 second.
• Default Map: This parameter selects the name of the default Map file:
map.map.
• Map File: This parameter enters the path for the Map file. Default is
C:/fm.
• Hosts File: This parameter enters the path for the hosts file. Default
is C:/ETC.
• Bootptab File: This selection enters the path for the bootptab file.
Default is C:/FM.
• Allow To Edit “Hosts” File: When this parameter is selected, the
software updates the “hosts” file if a new host is discovered. Checked
by default.
efault: Initialize all the parameters to default values.
• D
• Save Options: Saves all changes to the issnmp.ini file.
• Cancel: Cancels the changes.
MIL-3000FTX Series of FastPort Print Servers 9-9
Page 97

9.5.2 Discovery Parameters
From the “Parameters” pull-down window, select D
Parameters (Figure 9-8). Options include:
Figure 9-8. Discovery Parameters menu
iscovery
• Enable IP: This option enables the IP protocol. If not, FastManage will
not perform any SNMP over IP operation. This protocol is checked if IP
was selected during setup.
• Use DNS: If the Use DNS is checked and the IP/NetBIOS protocols are
all enabled, FastManage may be unable to resolve a NetBIOS name (for
example, SNMP0702CA). Turn the Use DNS option “Off” if this is the
case.
The “Enable IP” parameter must be selected to enable this option. Not
checked by default.
• Poll IP Range: If this selection is selected, the software “polls” all
254 hosts of the subnet (from X.Y.Z.1 to X.Y.Z.254). The “Enable IP”
parameter must be selected to enable this option. Checked by default.
• Do IP Broadcast: If this parameter is chosen, the software performs
discovery through SNMP over IP br oadcast. The “Enable IP” parameter
must be selected to enable this option. Checked by default.
• Every: If this parameter is enabled and a time is set, the software
“broadcasts” every <n> seconds to discover new devices. The “Enable
IP” option must be selected to enable this option. Not checked and 120
seconds are the defaults.
MIL-3000FTX Series of FastPort Print Servers 9-10
Page 98

• Times: If this is enabled and a time is set, this option sets the number of
times FastManage “broadcasts” before giving up finding a node.
“Enable IP” must be selected to enable this option. Checked and 3
times are the default.
• Poll “hosts” List: If this is checked, FastManage reads through a
Map list, if a name is in the hosts file, it will then use SNMP to discover
a host. Checked by default.
• Poll Map List: If selected, this option “discovers” each host in a Map
through SNMP. Checked by default.
• Find Only Digi Devices: If checked, this option finds and displays
only Digi devices. Not checked by default.
• Enable IPX: If this option is selected, FastManage enables IPX
protocol. If not selected, FastManage will not perform any SNMP over
IPX operation. This protocol is checked if IP was selected during setup.
• Do IPX Routing: If this is enabled, user’s can manage IPX devices
across the router. If the device name is specified in the host file, then
that device will be discovered (the Enable IPX, Do IPX routing,
and the Poll “hosts” list all have to be enabled).
The “Enable IPX” parameter must be selected to enable this option.
Checked by default.
• Do IPX Discovery: Use SNMP over IPX and find all devices that
respond. The “Enable IPX” parameter must be selected to enable this
option. Not checked by default.
• Enable NetBIOS: When selected, this option enables NetBIOS using
the NetBEUI protocol. If not, FastManage will not perform any SNMP
over NetBIOS operation. This protocol is checked if IP was selected
during setup.
• Strict Name Resolution: If this is enabled, all device names
starting with SNMPA will be treated as NetBIOS names. The “Enable
NetBIOS” parameter must be selected to enable this option. Checked by
default.
• Do NetBIOS Discovery: If this parameter is chosen, the software
uses SNMP over NetBIOS to find all devices that respond. The “Enable
NetBIOS” parameter must be selected to enable this option. Not
checked by default.
efault: Initialize all the parameters to default values.
• D
• Save Options: Saves all changes to the issnmp.ini file.
• Cancel: Cancels the changes.
MIL-3000FTX Series of FastPort Print Servers 9-11
Page 99

9.5.3 Application Launch Parameters
The “Application Launch Parameter” allows users to name and then
launch any other SNMP device. To configure the Edit Launch Parameters:
1. Select Application Launch Parameters.
2. The “Edit Launch Parameters” menu appears.
3. In the Object Indentifier of the Device line, enter the SNMP
device’s unique SNMP identifier.
4. In the Launch App and Cmd Line Paras line, enter the name of the
application to be launched. For Digi devices, add an %s at the end.
5. Click A
dd when you are finished.
User’s are now able to launch that SNMP device.
9.5.4 Mib2 System Parameters
The Mib2 system parameter allows users to identify a workstation.
Note:
If the FastPort print servers has a telnet pass w ord enabled, users cannot manage the
device with the FastManage software.
1. From “Parameters,” select Mib2 System Parameters. The “Mib2
System Parameters” menu appears.
2. Fill in the required parameters:
• Get Community: This parameter is required to be set. Default: public.
• Set Community: This parameter is required to be set. Default: private.
• Description: This information will be returned by the FastManage
software in response to an SNMP query. Default is the FastManage’s
SNMP agent.
• Name: This information will also be returned by the FastManage
software in response to an SNMP query. Field is blank by default.
• Location: This information will also be returned by the FastManage
software in response to an SNMP query. Field is blank by default.
• Contact: This information will also be returned by the FastManage
software in response to an SNMP query. Field is blank by default.
• Enable Agent: Checked by default.
• Save: Saves all changes to the issnmp.ini file.
• Cancel: Cancels the changes.
MIL-3000FTX Series of FastPort Print Servers 9-12
Page 100

Chapter 10
Chapter 10 gives an description of the FastPort Application. The FastPort
Application is used to manage SNMP devices.
10.1 FastPort Application
FastManage supports most SNMP devices, including the MIL-3000FTX.
The software detects devices during Discovery (see Chapter 10). The
FastPort PrintServer MGR. icon allows users to open a specific
FastPort. To do so:
1. From the “FastManage for FastPort” Windows menu, double-click onto
the FastPort PrintServer Mgr. (Figure 10-1) icon.
2. When prompted for an “IP Address/Alias,” “IPX Address/Name,” or a
“NetBIOS Name,” enter the device’s name or address and click Ok.
Enter in the name or address exactly as it appears in the network.
FastPort Application
3. A graphic displaying the device’s front and rear panel appears (Figure
10-2). This graphic is the same as displayed during Discovery.
Figure 10-1. FastPort PrintServer Mgr. Icon
MIL-3000FTX Series of FastPort Print Servers 10-1
 Loading...