

Page 1
Electronic Component Distributor. Source::Digi International
P.N:ERT-X2-SE1-BD1 Desc:BUNDLE X2 GATEWAY GRID NOW AMR+
Web:http://www.hotenda.cn E-mail:sales@hotenda.cn Phone:(+86) 075583794354
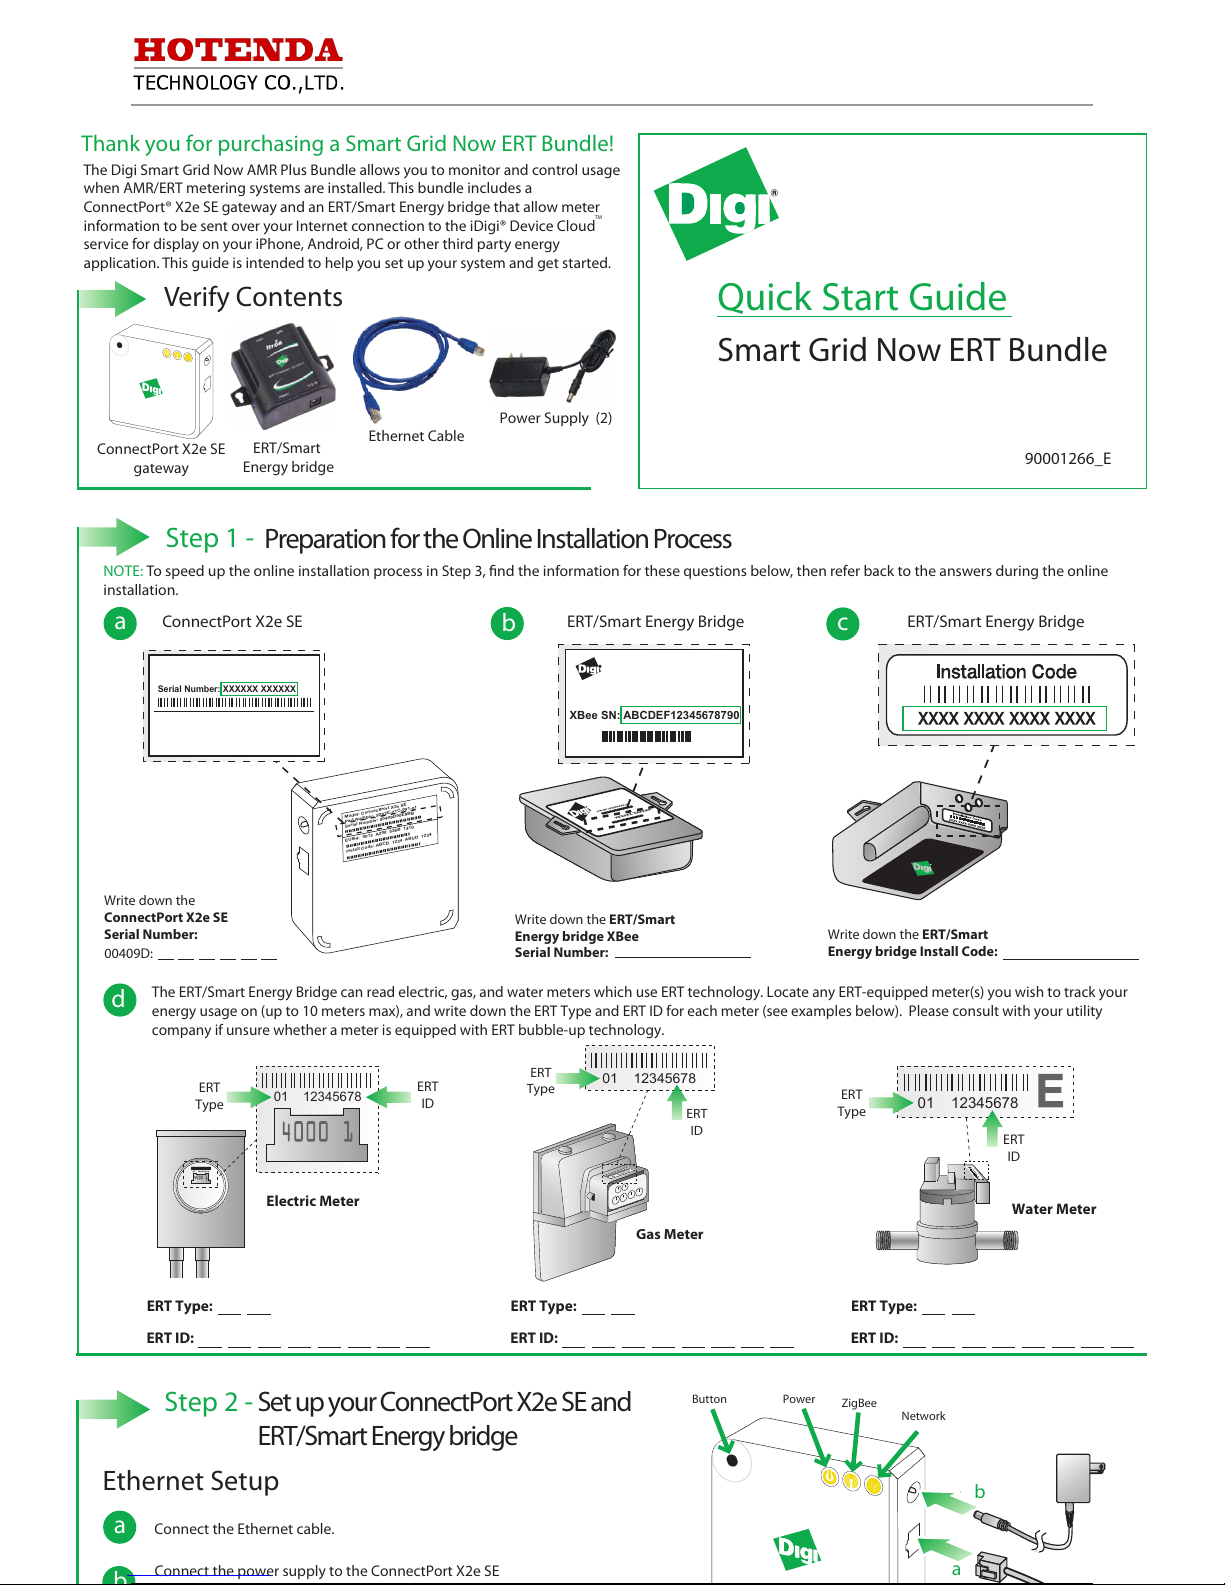
The Digi Smart Grid Now AMR Plus Bundle allows you to monitor and control usage
when AMR/ERT metering systems are installed. This bundle includes a
ConnectPort® X2e SE gateway and an ERT/Smart Energy bridge that allow meter
information to be sent over your Internet connection to the iDigi® Device Cloud
service for display on your iPhone, Android, PC or other third party energy
application. This guide is intended to help you set up your system and get started.
Quick Start Guide
Smart Grid Now ERT Bundle
a
Write down the ERT/Smart
Energy bridge Install Code:
c
Thank you for purchasing a Smart Grid Now ERT Bundle!
Verify Contents
Power Supply (2)
ERT/Smart
Energy bridge
ConnectPort X2e SE
gateway
Ethernet Cable
Step 1 -
Preparation for the Online Installation Process
NOTE:
To speed up the online installation process in Step 3, nd the information for these questions below, then refer back to the answers during the online
installation.
a
Step 2 -
Set up your ConnectPort X2e SE and
ERT/Smart Energy bridge
d
01 12345678
Gas Meter
ERT
Type
ERT
ID
01 12345678
Electric Meter
ERT
Type
ERT
ID
01 12345678
Water Meter
ERT
Type
ERT
ID
ConnectPort X2e SE
ERT/Smart Energy Bridge
Write down the
ConnectPort X2e SE
Serial Number:
00409D:
ERT Type:
ERT ID:
ERT Type:
ERT ID:
ERT Type:
ERT ID:
The ERT/Smart Energy Bridge can read electric, gas, and water meters which use ERT technology. Locate any ERT-equipped meter(s) you wish to track your
energy usage on (up to 10 meters max), and write down the ERT Type and ERT ID for each meter (see examples below). Please consult with your utility
company if unsure whether a meter is equipped with ERT bubble-up technology.
TM
b
ERT/Smart Energy Bridge
Write down the ERT/Smart
Energy bridge XBee
Serial Number:
XBee SN: ABCDEF12345678790
Model: ConnectPort X2e SE
Part Number: 50X2E-Z1C-001-01
Serial Number: 00409D50E9BB
EUI64: 0013 A200 526B 1410
Install Code: ABCD 1234 ABCD 1234
Serial Number: XXXXXX XXXXXX
Power
ZigBee
Network
Button
Connect the Ethernet cable.
Connect the power supply to the ConnectPort X2e SE
b
a
Ethernet Setup
90001266_E
Page 2
Electronic Component Distributor. Source::Digi International
P.N:ERT-X2-SE1-BD1 Desc:BUNDLE X2 GATEWAY GRID NOW AMR+
Web:http://www.hotenda.cn E-mail:sales@hotenda.cn Phone:(+86) 075583794354
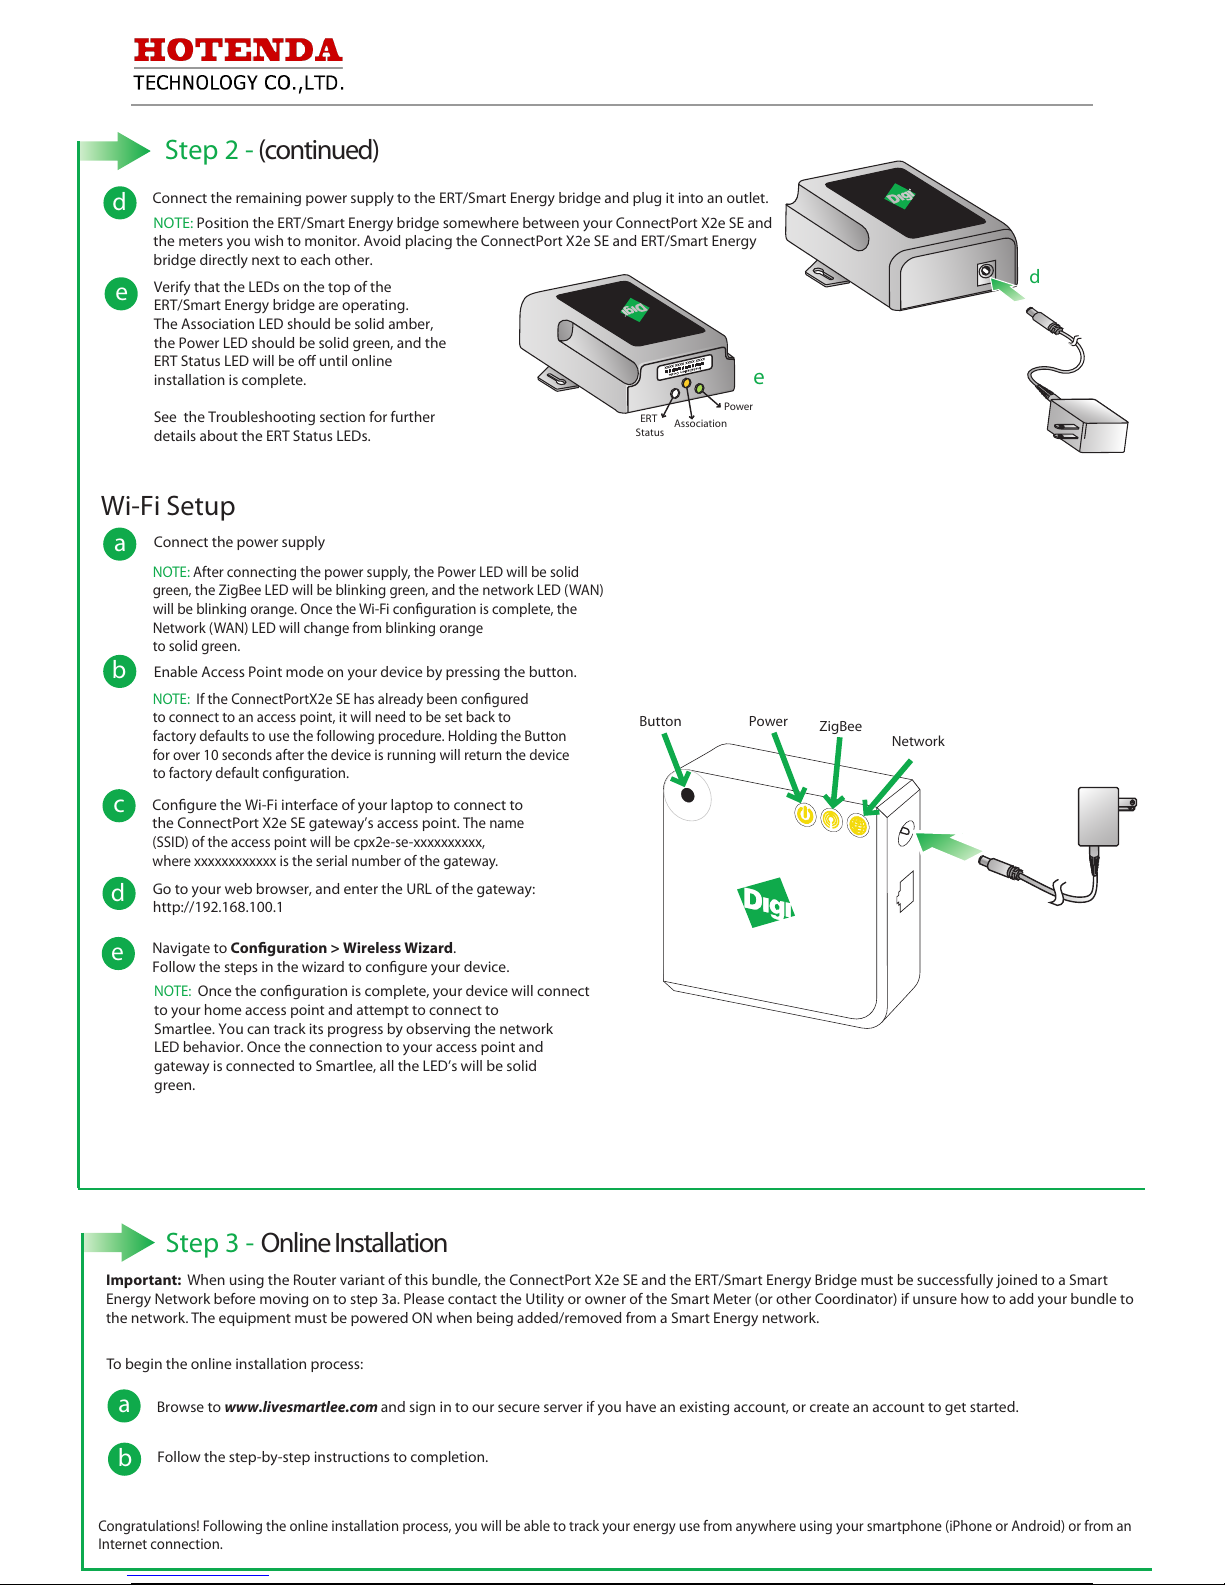
Step 2 -
(continued)
Connect the remaining power supply to the ERT/Smart Energy bridge and plug it into an outlet.
Verify that the LEDs on the top of the
ERT/Smart Energy bridge are operating.
The Association LED should be solid amber,
the Power LED should be solid green, and the
ERT Status LED will be o until online
installation is complete.
See the Troubleshooting section for further
details about the ERT Status LEDs.
d
e
d
NOTE:
Position the ERT/Smart Energy bridge somewhere between your ConnectPort X2e SE and
the meters you wish to monitor. Avoid placing the ConnectPort X2e SE and ERT/Smart Energy
bridge directly next to each other.
e
ERT
Status
Association
Power
Wi-Fi Setup
Power
ZigBee
Network
Button
Connect the power supply
Enable Access Point mode on your device by pressing the button.
NOTE: After connecting the power supply, the Power LED will be solid
green, the ZigBee LED will be blinking green, and the network LED (WAN)
will be blinking orange. Once the Wi-Fi conguration is complete, the
Network (WAN) LED will change from blinking orange
to solid green.
NOTE: If the ConnectPortX2e SE has already been congured
to connect to an access point, it will need to be set back to
factory defaults to use the following procedure. Holding the Button
for over 10 seconds after the device is running will return the device
to factory default conguration.
Congure the Wi-Fi interface of your laptop to connect to
the ConnectPort X2e SE gateway’s access point.
The name
(SSID) of the access point will be cpx2e-se-xxxxxxxxxx,
where xxxxxxxxxxxx is the serial number of the gateway.
Go to your web browser, and enter the URL of the gateway:
http://192.168.100.1
Navigate to Conguration > Wireless Wizard.
Follow the steps in the wizard to congure your device.
a
b
c
d
e
NOTE:
Once the conguration is complete, your device will connect
to your home access point and attempt to connect to
Smartlee. You can track its progress by observing the network
LED behavior. Once the connection to your access point and
gateway is connected to Smartlee, all the LED’s will be solid
green.
Step 3 -
Online Installation
Important: When using the Router variant of this bundle, the ConnectPort X2e SE and the ERT/Smart Energy Bridge must be successfully joined to a Smart
Energy Network before moving on to step 3a. Please contact the Utility or owner of the Smart Meter (or other Coordinator) if unsure how to add your bundle to
the network. The equipment must be powered ON when being added/removed from a Smart Energy network.
To begin the online installation process:
a
Browse to www.livesmartlee.com and sign in to our secure server if you have an existing account, or create an account to get started.
b
Follow the step-by-step instructions to completion.
Congratulations! Following the online installation process, you will be able to track your energy use from anywhere using your smartphone (iPhone or Android) or from an
Internet connection.
Page 3

Electronic Component Distributor. Source::Digi International
P.N:ERT-X2-SE1-BD1 Desc:BUNDLE X2 GATEWAY GRID NOW AMR+
Web:http://www.hotenda.cn E-mail:sales@hotenda.cn Phone:(+86) 075583794354
Troubleshooting
The Smartlee website does not recognize my gateway.
a
Ensure that you have properly connected the Ethernet and power cables (as described in Step 2)
Verify that your Internet access is working by opening a browser on your PC and connecting to a web page (e.g. www.google.com)
Your router/access point security conguration settings may need to be modied in a home network.
Common causes are:
DHCP is not enabled
MAC ltering is enabled (you will need to add the ConnectPort X2e SE gateway MAC address to the lter table). Please note that the gateway’s MAC address is the
same as its serial number.
You have exceeded the number of DHCP addresses (you will need to increase the allotment)
Are the status LED lights operating correctly?
c
Ensure that you have properly connected the Ethernet and power cables (as described in Step 2)
Need Help? Call 1-877-693-7849 or visit www.digi.com/support.
Additional Smart Energy documentation can be found at:
http://idigi-se.appspot.com/edocs/index.html.
ConnectPort X2e SE
Though unusual for a home network, it’s not unusual for corporate networks to block outgoing trac from unknown devices on the network with a
rewall. Please ensure that outbound TCP port 3199 (iDigi SSL) and UDP port 123 (NTP server access) are available to the gateway.
ERT
Status
Association
Power
ERT/Smart
Energy Bridge
Installation of the iPhone/Android application through the Web is failing.
b
You may manually install the iPhone/Android phone application directly from your phone by:
Using your iPhone, go to the App Store
Using your Android phone, go to the Market
Searching for Digi Smartlee
Once found, install the application. Sign in with the same login and password you created when you opened your Smartlee account online.
LED light behavior by device:
LED Status Description
Next Step
ERT
No ERT meter congured
All ERT meters successfully read in the last
30 minutes
At least one ERT meter has not been read
in the last 30 minutes
Initial 30 minute setup blink, at least one
meter has not been read
OFF
ON
Fast Blink
(2 x second period)
Slow Blink
(once every 2 seconds)
Association
Complete Step 3: Online Installation. The “add meter”
step will guide you through ERT meter conguration.
No further action required
1. Verify that the ERT Smart Energy bridge is close
enough to the meter
2. If blinking persists, call Digi technical support for
assistance
Wait one minute. If after one minute the LED is not
solid, follow “Next step” for “Fast Blink” above.
OFF
Not functioning correctly
1. Verify that the power supply is connected to the
device and outlet
2. If still not operating, call Digi technical support
for assistance
ON
OK however, online installation is not
complete
Complete Step 3: Online Installation
Blink
OK
No further action required
Power
OFF
No power
1. Verify that the power supply is connected to the
device and outlet
2. If still not operating, call Digi technical support
for assistance
ON
OK
No further action required
ZigBee
Power
Network
Network
Description
Status
No power
Solid green
Device is powered
OFF
Description
Status
Radio disabled
Blinking green (slow)
Searching for other ZigBee devices on the network
OFF
Blinking green (fast)
Establishing a Smart Energy network
Solid green
Connected to a Smart Energy network
Description
Status
Powered OFF
Blinking yellow (slow) Powered ON, no Ethernet link
OFF
Blinking yellow (fast)
Ethernet link, no IP address
Solid yellow
IP address assigned
Blinking green (slow)
Attempting a connection to the iDigi server
Blinking green (fast)
iDigi server found, authenticating
Solid green
Connected to iDigi server
Power
ZigBee
Powered by TCPDF (www.tcpdf.org)
 Loading...