

Page 1

Edgeport®
USB Expansion Modules
Installation Guide
Page 2

Revision history—90000403
Revision Date Description
K July 2013 Removed the DoC section.
L November 2013 Updated driver support information for newer Windows OS.
M December 2017 Updated branding and made editorial enhancements.
N March 2020
P October 2020
Added information about Edgeport/216.
Add RS232 DB9 Connector information.
Removed information about obsolete models: Edgeport 4r, 8r, and 22c.
Trademarks and copyright
Digi, Digi International, and the Digi logo are trademarks or registered trademarks in the United
States and other countries worldwide. All other trademarks mentioned in this document are the
property of their respective owners.
© 2018 Digi International Inc. All rights reserved.
Disclaimers
Information in this document is subject to change without notice and does not represent a
commitment on the part of Digi International. Digi provides this document “as is,” without warranty of
any kind, expressed or implied, including, but not limited to, the implied warranties of fitness or
merchantability for a particular purpose. Digi may make improvements and/or changes in this manual
or in the product(s) and/or the program(s) described in this manual at any time.
Warranty
To view product warranty information, go to the following website:
www.digi.com/howtobuy/terms
Send comments
Documentation feedback: To provide feedback on this document, send your comments to
techcomm@digi.com.
Customer support
Digi Technical Support: Digi offers multiple technical support plans and service packages to help our
customers get the most out of their Digi product. For information on Technical Support plans and
pricing, contact us at +1 952.912.3444 or visit us at www.digi.com/support.
Edgeport USB Expansion Modules Installation Guide
2
Page 3

Contents
Edgeport products
Edgeport/1, Edgeport/2, Edgeport/4, Edgeport/8
Cabling Edgeport 5
Edgeport/216, Edgeport/416
Cabling Edgeport 6
Edgeport mounting diagrams
Edgeport driver installation
RS232 DB9 connector pin assignments
RS232 DB9 Connector 11
RS232 DB9 Diagnostics loop-back plug for Edgeport/1, 2, 4, 8, 16 11
Edgeport configuration utility
General tab 13
Information tab 14
Configuration tab 15
Port Flag Configuration tab 16
Confidence Test tab 18
Power Management tab 19
Port Status tab 20
Version tab 21
Advanced tab 22
Edgeport system status light
Understanding hubs
Regulatory information
Edgeport USB Expansion Modules Installation Guide
3
Page 4
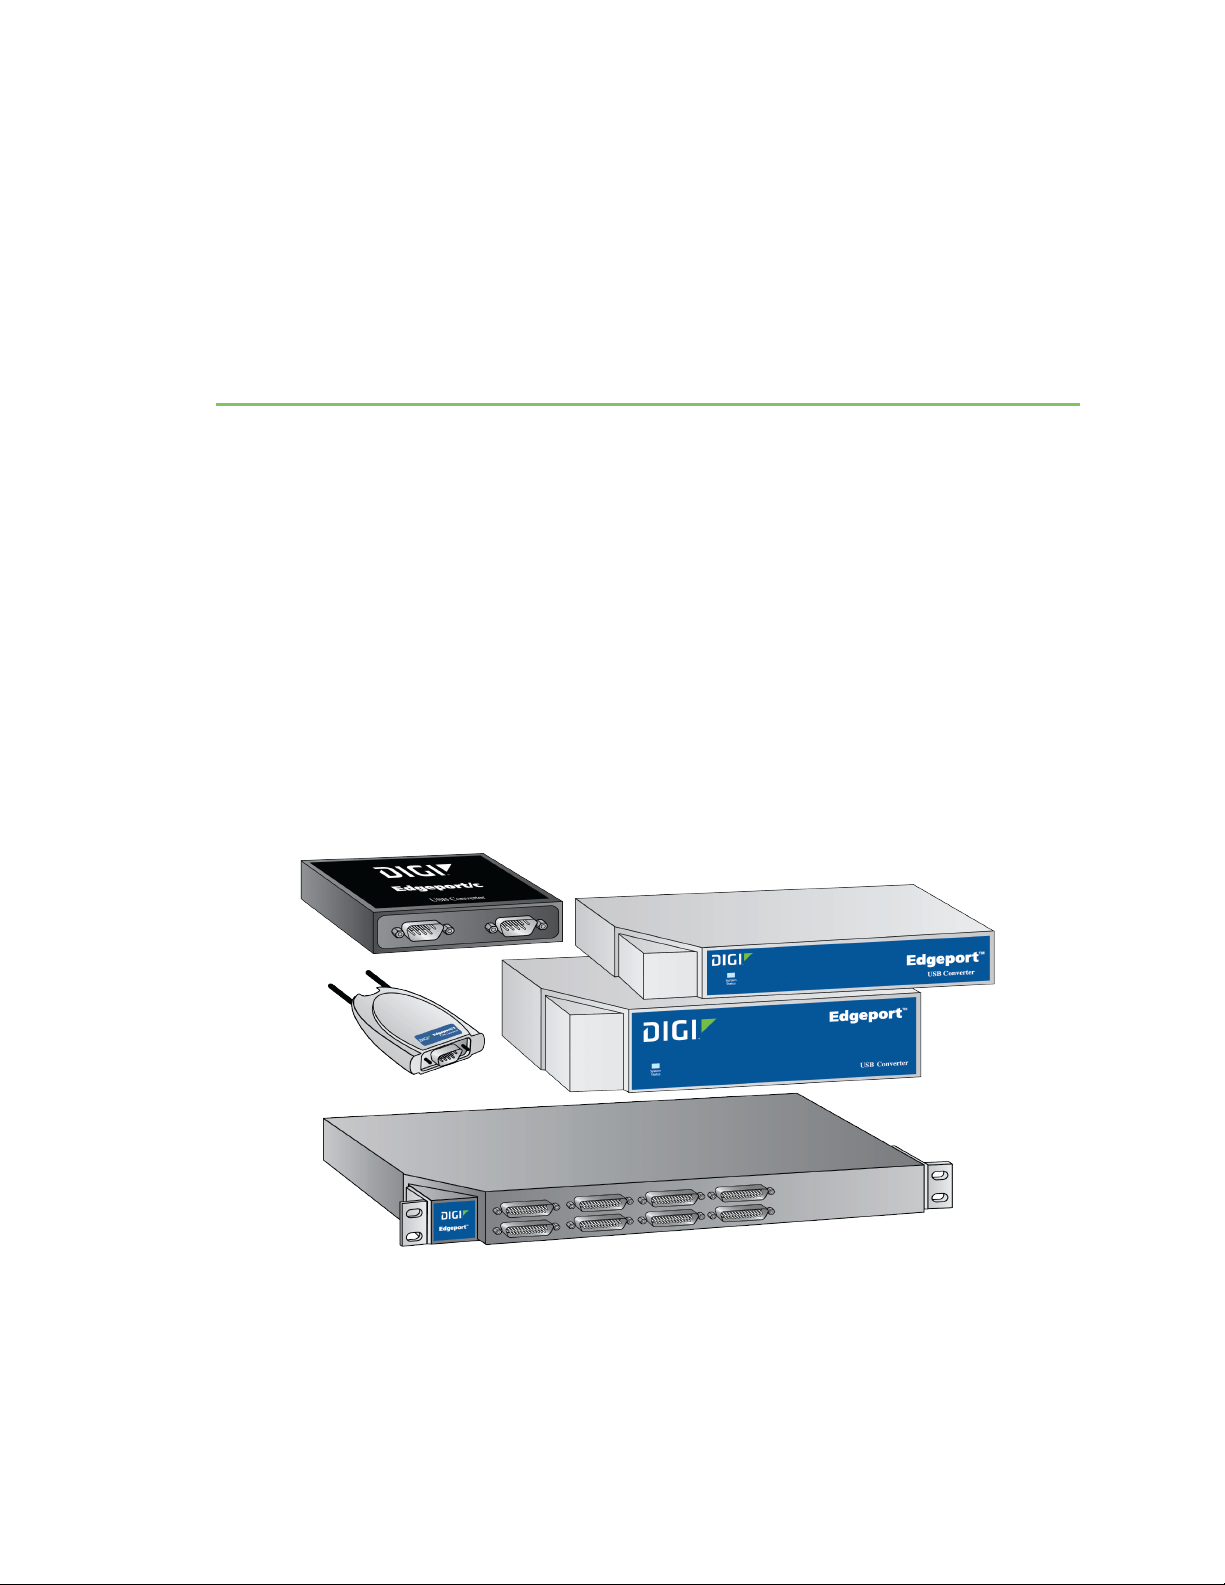
Edgeport products
This installation guide covers the following models:
n Edgeport/1
n Edgeport/2
n Edgeport/4
n Edgeport/8
n Edgeport/216
n Edgeport/416
n Edgeport/2c
Edgeport USB-to-Serial Converters offer an out-of-the-box alternative to serial cards for easy plugand-play COM port expansion. Multiple serial and USB ports can be added to a PC, thin client or server
in minutes — without opening the chassis or reconfiguring and rebooting the system. Its feature-rich
design, reliable performance and operating system support make the Edgeport an excellent choice for
mission-critical enterprise applications.
Edgeport USB Expansion Modules Installation Guide
4
Page 5
Edgeport/1, Edgeport/2, Edgeport/4, Edgeport/8
The Edgeport/2, Edgeport/4, and Edgeport/8 from Digi International are intelligent, stackable
expansion modules that connect to a PC or server running Windows XP, Server 2003 (R2), Server 2008
(R2), Windows 7, Windows 8, Windows Server 2012 (R2), Windows 10 and Windows Server 2016, via the
Universal Serial Bus (USB), providing high-speed serial connectivity. For more detailed information as
well as the latest manual and technical updates, visit www.digi.com/support.
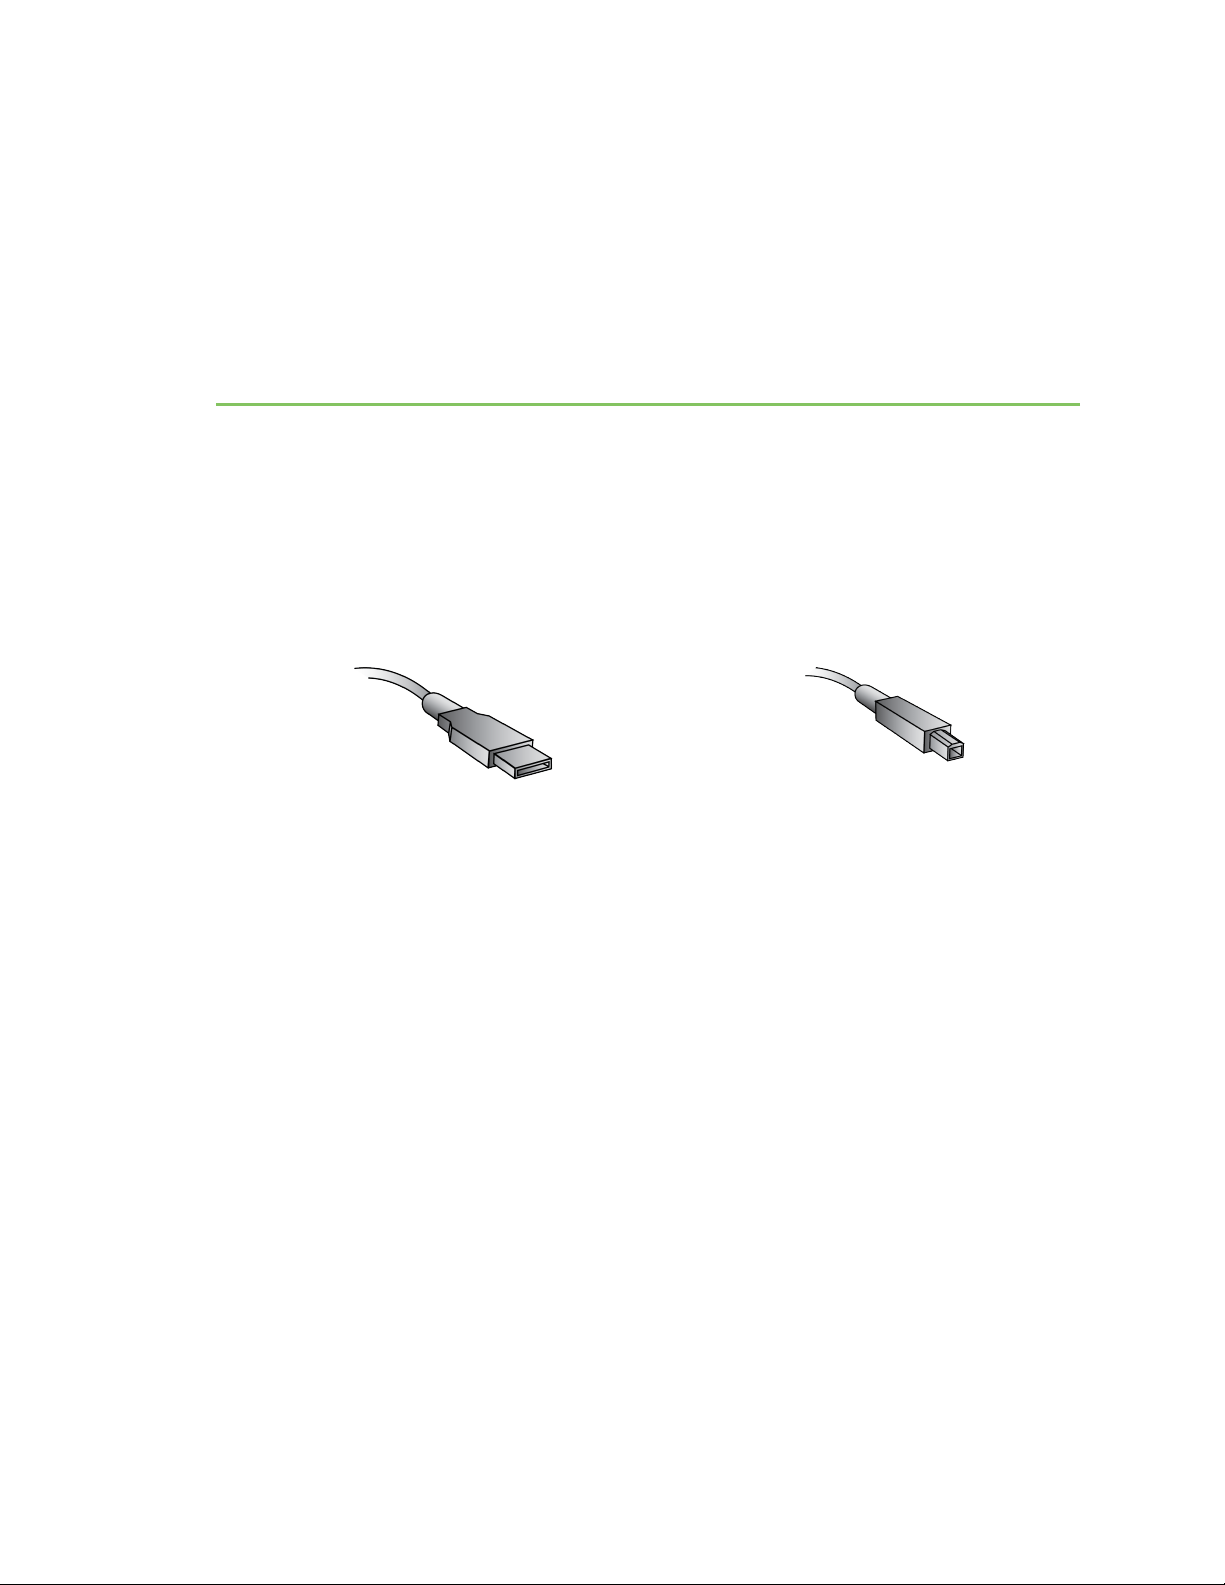
Cabling Edgeport
Type A
Plug the Type A end of the USB cable into the USB port located in the back of your PC or into an
available USB port on a standard hub or into a Digi Hubport. Plug the Type B end of the USB cable into
the back of the Edgeport.
If the drivers are not already installed, go to Edgeport driver installation.
Type B
Edgeport USB Expansion Modules Installation Guide
5
Page 6

Edgeport/216, Edgeport/416
The Edgeport/216 and the Edgeport/416 both use a standards-based USB bus for connectivity, unlike
many serial card products that require additional external proprietary hardware to support the same
number of devices.
Edgport/216
The Edgeport/216 also supplies two USB ports, providing users with a built-in migration path as
peripherals become USB-ready. The converters can be rack mounted and easily daisy-chained
together. This Edgeport converter is available with DB9 connectors.
Edgeport/416
The Edgeport/416 also supplies four USB ports, providing users with a built-in migration path as
peripherals become USB-ready. The converters can be rack mounted and easily daisy-chained
together. This Edgeport converter is available in two models: one with DB25 connectors and one with
DB9 connectors. The two models are functionally equal, but differ in the type and placement of the
connectors.
Cabling Edgeport
Type A
Connect one end of the power supply into the back of your Edgeport and the other end into an AC
1
outlet.
To connect your Edgeport to a PC or Hub, plug the Type A end of the USB cable into the USB port
located in the back of your PC or into an available USB port on a standard hub or into a Digi Hubport.
Plug the Type B end of the USB cable into the back of the Edgeport/416.
1
Power to the Edgeport-DB25 and Edgeport-DB9 may be supplied by a UL Listed Direct Plug-In Power
Unit or Information Technology Equipment Rated Power Unit rated 5 VDC, at least 2.9 A if used in the
U.S. and Canada or a power supply with + - similar rating and approved by your local safety code if it is
used elsewhere.
For polarity, see diagram to the right.
Edgeport USB Expansion Modules Installation Guide
Type B
6
Page 7

Edgeport/216, Edgeport/416 Cabling Edgeport
To connect a USB device to your Edgeport, plug the Type A end of the USB cable into one of the
Edgeport’s USB Type A slots and the Type B end of the USB cable into the device (such as a Rapidport
or Hubport ).
If the drivers are not already installed, go to Edgeport driver installation.
Edgeport USB Expansion Modules Installation Guide
7
Page 8

Edgeport mounting diagrams
The following mounting diagram applies to the Edgeport/2, Edgeport/4 and /4R, and Edgeport 8 and
/8R. Edgeport/416 is shown on a subsequent page.
Under-Shelf Mounting Bracket
1
Nuts, bolts, and screws are not included.
Rack Mount Kit
1
1
Edgeport USB Expansion Modules Installation Guide
8
Page 9
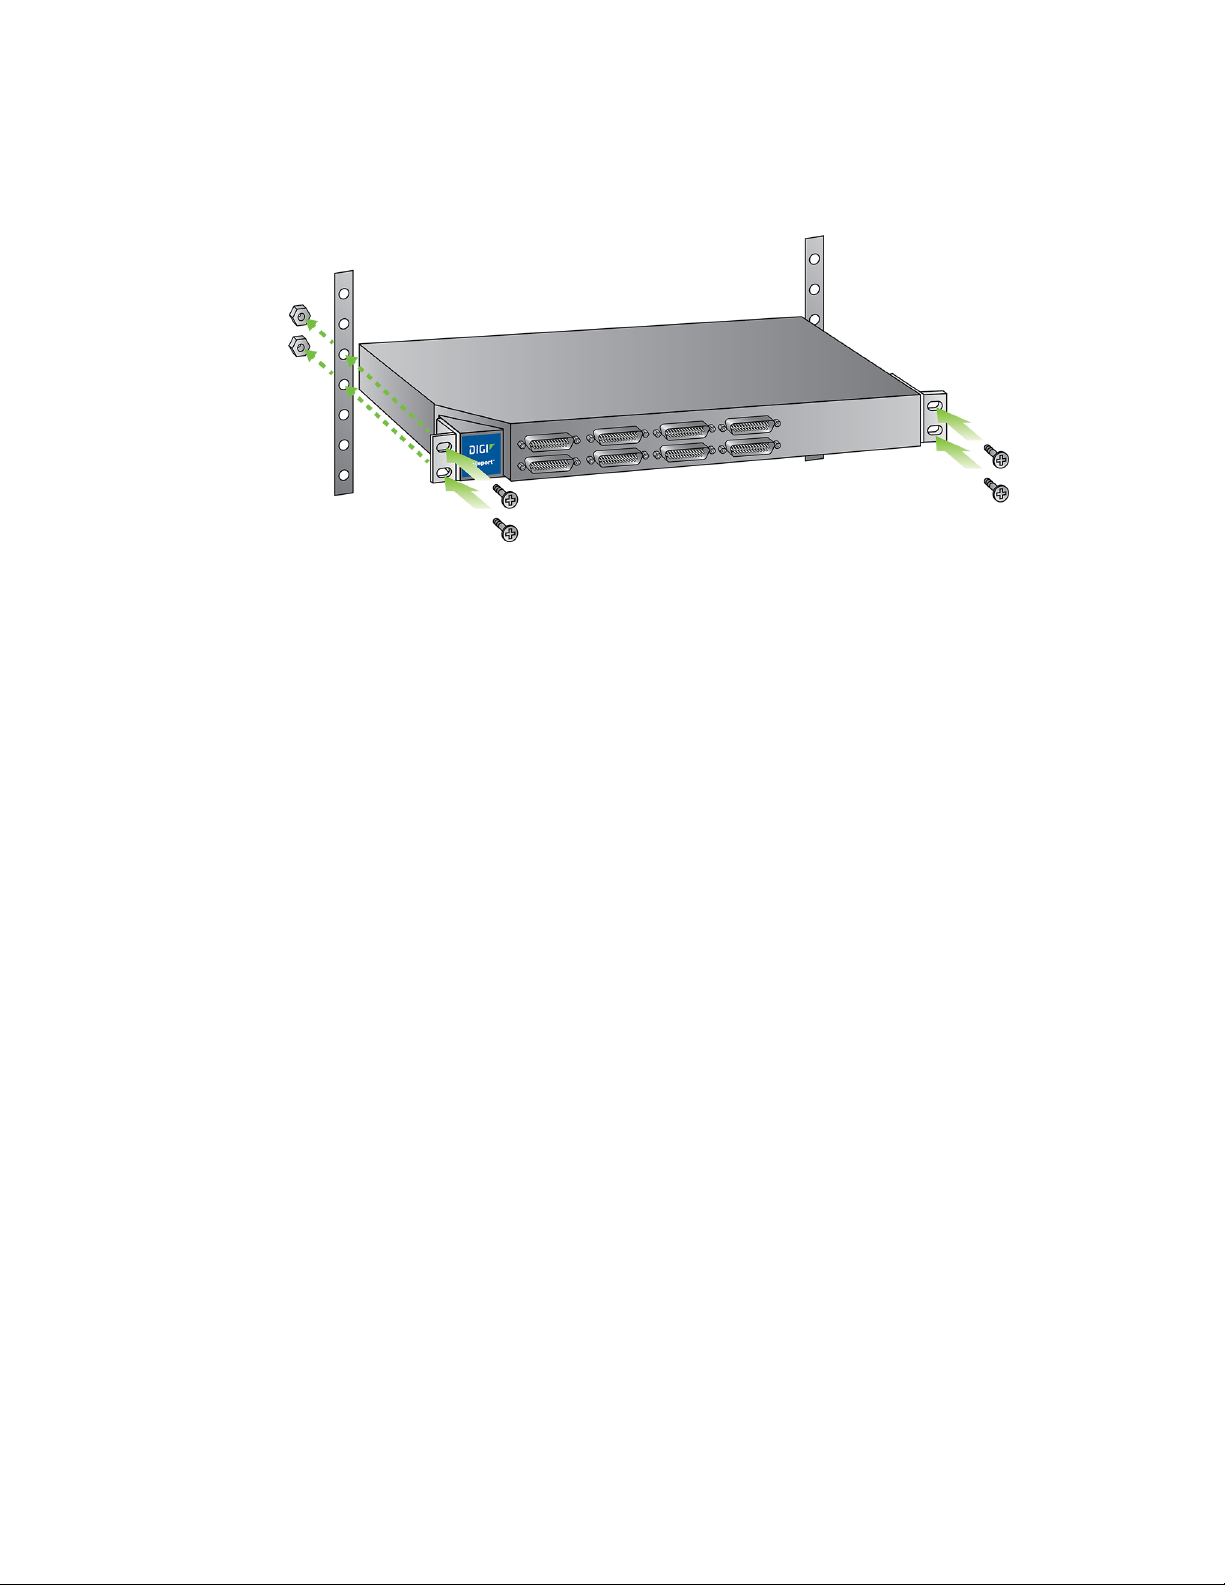
Edgeport mounting diagrams
Edgeport/416
1
Nuts, bolts, and screws are not included.
For Edgeport/416
1
Edgeport USB Expansion Modules Installation Guide
9
Page 10

Edgeport driver installation
The following instructions apply to Windows 7, Windows 8.1, Windows Server 2012 (R2), Windows 10,
Windows Server 2016, and Windows Server 2019.
Note Please go to www.digi.com to download software for older operating systems.
You must be logged into an account with administrator privileges before proceeding.
1. Make sure the Edgeport device is not connected to the computer.
2. If you have installed a previous Edgeport driver, use the Edgeport configuration utility that
came with your driver package to uninstall the driver:
a. Click the Uninstall button from the Advanced tab.
b. Reboot the computer when prompted.
3. Download the most current Edgeport drivers from the Digi website:
a. Navigate to www.digi.com using a web browser.
b. Select Support Tools from the Support menu.
c. Under the Support Downloads menu, select Drivers.
d. Select Edgeport USB from the list.
e. Select the appropriate Windows Operating System from the dropbox.
f. The driver download link will appear underneath the OS dropbox. Save this .exe file
somewhere convenient such as your desktop.
4. Install the Edgeport driver:
a. Log into Windows with the administrator user account, or another account with
administrative privileges.
b. Run the downloaded .exe file and wait until the installation is complete.
c. Connect the Edgeport to the computer with a USB cable. Or, if the Edgeport is
already connected to the computer via USB, unplug and plug it in again.
d. The Edgeport drivers will automatically install.
Your new COM port(s) are ready and are numbered sequentially following the existing ports in your
system. You can now run the Edgeport configuration utility, described in the next section.
Edgeport USB Expansion Modules Installation Guide
10
Page 11

RS232 DB9 connector pin assignments
Use the table to find the RS232 DB9 connector pin assignments.
RS232 DB9 Connector
DB-9M Function Abbreviation
Pin 1 Data Carrier Detect CD
Pin 2 Receive Data RD or RX or RXD
Pin 3 Transmitted Data TD pr TX or TXD
Pin 4 Data Terminal Ready DTR
Pin 5 Signal Ground GND
Pin 6 Data Set Ready DSR
Pin 7 Request To Send RTS
Pin 8 Clear To Send CTS
Pin 9 Ring Indicator RI
RS232 DB9 Diagnostics loop-back plug for Edgeport/1, 2, 4, 8, 16
Function Pin
RTS to CTS, RI Pins 7, 8, 9
DTR to DSR, CD Pins 1, 4, 6
TXTto RXD Pins 2, 3
Edgeport USB Expansion Modules Installation Guide
11
Page 12

Edgeport configuration utility
The following instructions apply to all Windows operating systems.
The Edgeport configuration utility program allows you to manage the serial ports of your Edgeport
product. The Edgeport configuration utility is available from the computer's Start menu after you
install the Edgeport drivers.
Follow these steps to access the configuration utility:
1. Download the Edgeport drivers, following the instructions in Edgeport driver installation.
2. Once the drivers are installed, launch the Edgeport configuration utility from the Digi USB
program group on the computer's Start menu.
Edgeport USB Expansion Modules Installation Guide
12
Page 13

Edgeport configuration utility General tab
General tab
The General tab in this utility allows you to perform tasks such as configuring the device's COM ports,
setting port flags and testing the ports. See the subsections that follow for additional details.
Edgeport USB Expansion Modules Installation Guide
13
Page 14

Edgeport configuration utility Information tab
Information tab
The Information tab allows you to review the manufacturing information pertaining to your device.
Edgeport USB Expansion Modules Installation Guide
14
Page 15

Edgeport configuration utility Configuration tab
Configuration tab
The Configuration tab allows you to reassign the physical port on your device to any available
Windows COM port number from 1 to 255 and give your device a user friendly device name. This
capability is particularly helpful if you have more than one device.
Edgeport USB Expansion Modules Installation Guide
15
Page 16

Edgeport configuration utility Port Flag Configuration tab
Port Flag Configuration tab
The Port Flag Configuration tab allows you to configure performance options and special
functionality on a per-port basis.
n Low Latency (930-based Edgeport only):
Normally the UART will interrupt when the receiver has been idle for 4 character times
(for example, 4ms at 9600). As long as data is being received, the UART will continue to
buffer them until its internal FIFO is full (~56 bytes). This flag causes the Edgeport to
poll the RX FIFO for received bytes. If any bytes are available, they will be sent to the
driver without any delay.
n Remap Baud: Setting the baud rate to 1200 baud results in 230400 baud.
n Ignore Flush:
If an application sends IRP_MJ_FLUSH_BUFFERS, it will be ignored. The following is an
excerpt from Microsoft documentation:
Drivers of devices with internal caches for data and drivers that maintain internal buffers
for data must handle this request.
Edgeport USB Expansion Modules Installation Guide
16
Page 17

Edgeport configuration utility Port Flag Configuration tab
n When Sent
Receipt of a flush request indicates that the driver should flush the
device's cache or its internal buffer, or, possibly, should discard the data
in its internal buffer.
n Operation
The driver transfers any data currently cached in the device or held in the
driver's internal buffer(s) before completing the flush request. The driver
of an input-only device that buffers data internally might simply discard
the currently buffered device data before completing the flush IRP,
depending on the nature of its device.
n Fast Writes:
When an application sends a write to the driver, by default the Edgeport driver will wait
until all data has been transmitted out of the Edgeport device before completing the
write. When the Fast Writes flag is set, we complete the write even if data is still
buffered in the driver and the Edgeport device.
n Fast Reads:
This flag is used when an application requires that a read complete immediately. In the
read immediate case, the Edgeport driver will send a request to the Edgeport device
asking for any buffered data to be sent up. This buffered data will be included when the
read completes. If this flag is set, the driver will not query the Edgeport device for
additional data.
n Disable Plug & Play:
Uncheck this to allow Windows to detect Plug and Play serial devices, such as most modems.
n Timer Logic: (Windows 9x only)
If the application uses PortSetReadCallBack(), the notification routine will only be called
when the number of bytes in the receive buffer is greater then the RX trigger. The
Microsoft serial VxD also implements a timer that will trigger and call the notification
routine if some amount of data is available in the RX buffer but no new data has been
received for ~200ms (receiver is no longer active).
We do not enable this behavior by default because of the nature of Edgeport buffering.
But if you set the flag we will complete the read when we detect ~200 ms no activity.
The code specifies that if the receiver is active, the read will not be completed.
The problem is that the Edgeport buffers the RX bytes and we poll the driver. If we do
not receive any bytes in 200ms we may report an erroneous event even if there are
available bytes in the Edgeport device or driver.
Edgeport USB Expansion Modules Installation Guide
17
Page 18

Edgeport configuration utility Confidence Test tab
Confidence Test tab
The Confidence Test tab allows you to perform a confidence test on the internal workings of the
serial ports.
Edgeport USB Expansion Modules Installation Guide
18
Page 19

Edgeport configuration utility Power Management tab
Power Management tab
The Power Management tab allows you to turn the power on and off for select model Hubports with
USB PlusPower ports.
Note This applies to Compact (/c) or PCI card PlusPower Hubport models. This feature does not
toggle the 5 V standard USB port. It only applies to the 12 V and 24 V USB ports.
Edgeport USB Expansion Modules Installation Guide
19
Page 20

Edgeport configuration utility Port Status tab
Port Status tab
The Port Status tab provides the status of a selected (highlighted) serial port.
The Poll Interval is the number of seconds between updates of this window. This is also the number of
seconds between each entry in the log file.
To create a log file, click the Start Logging button and enter a filename for the log file. This file will
contain all of the information displayed in the Port Status window until you click Stop Logging button.
Edgeport USB Expansion Modules Installation Guide
20
Page 21

Edgeport configuration utility Version tab
Version tab
The Version tab allows you to review the file information pertaining to the software.
Edgeport USB Expansion Modules Installation Guide
21
Page 22

Edgeport configuration utility Advanced tab
Advanced tab
The Advanced tab allows you to do several advanced tasks. See the subsections that follow for more
detailed information.
n Uninstall - Uninstall the Edgeport drivers.
Note You must reboot the computer after uninstalling the drivers.
n Enable Event Logging – Place event messages in the system event log.
Edgeport USB Expansion Modules Installation Guide
22
Page 23

Edgeport configuration utility Advanced tab
n COM Port Assignment - Configure how COM ports will be assigned.
l Assign COM ports based on converter serial number.
This is the default setting. In this mode, the driver uses the serial number of each converter
to uniquely identify it, and the COM port assignments for a given converter are based on its
serial number. No matter which physical USB port a converter is plugged into, it will
maintain its assigned COM port numbers.
l Assign COM ports based on physical USB port.
In this mode, the driver identifies a converter based on the physical USB port it is plugged
into. This effectively assigns COM port numbers to physical USB ports. No matter which
converter is plugged into a given USB port, it will use the COM port numbers assigned to
that USB port. This permits a converter to be replaced with a new unit, and, although the
new unit has a different serial number, it will receive the same COM port assignments as
the old unit because they were both plugged into the same USB port.
When using this mode, converters are identified not by their serial number, but by a 2-7
digit number that identifies which USB port it is plugged into.
When the COM ports are assigned, click OK. You must reboot the computer before the change
takes effect.
Edgeport USB Expansion Modules Installation Guide
23
Page 24

Edgeport system status light
For all Edgeport devices except the Edgeport/1
The functionality of the system status light is as follows for multi-port Edgeport products, with the
exception of the Edgeport/1, which does not have LED indicators.
Off - No light indicates that the Edgeport driver is not properly installed.
Red - This light may flash briefly during installation.
Orange - Blinking orange indicates Edgeport serial port activity. This light may also flash briefly during
installation.
Green - Blinking green indicates that the Edgeport driver is properly installed and operating normally,
and the unit is idle, ready for use.
Edgeport USB Expansion Modules Installation Guide
24
Page 25

Understanding hubs
Hubs, which are critical components in the USB architecture, are wiring concentrators that enable the
attachment of multiple devices, thus converting a single attachment point into multiple attachment
points. USB architecture allows a cascaded multiple hub configuration with certain power limitations
(explained later in this section).
Each hub has an upstream port, connecting to the host, and multiple downstream ports, connecting to
downstream devices, possibly including other hubs. A hub can detect attachment and detachment of
downstream devices and enable and monitor the distribution of the power to downstream devices via
their integral hardware and the operating system.
Each USB device reports its power requirements to the operating system, which then enables and
disables the device as a function of its power requirements and the amount of available power. High
powered devices typically need to be connected to a self-powered hub, such as the Hubport, which
obtains power from its external power supply and provides up to 500 mA for each downstream port. A
low-powered device, such as a mouse, can be connected to a bus-powered hub, which obtains power
from its upstream host and provides up to 100 mA for each downstream port.
Due to the limited available power for bus-powered hubs, cascading two bus-powered hubs is an
illegal topology, and devices connected to the second hub will not function. USB specifications limit the
connection of a bus-powered hub to a self-powered hub or host only. Since Edgeport/421, Edgeport/42,
Edgeport/42+, and Edgeport/416 operate as self-powered hubs, they are not affected by this
limitation.
According to the USB Specification, the maximum limit of hubs cascaded in a series cannot exceed
five. In other words, you may have a maximum of five hubs between any device and the host. This does
NOT mean that the maximum number of hubs in a system is five. You can parallel-connect up to seven
hubs can be connected parallel at any given level. You must tally both external and embedded hubs
when counting downstream hubs.
Edgeport USB Expansion Modules Installation Guide
25
Page 26

Regulatory information
Digi complies with all U.S. federal regulations for digital devices as well as the international
regulations described below.
Regulatory statements
For U.S. Government use:
Computer software is furnished with Restricted Rights in accordance with FAR 52.227-14. Technical
Data is furnished with Limited Rights in accordance with DFAR 252.227-7013 (b) (3) of the clause
entitled RIGHTS IN TECHNICAL DATA – NONCOMMERCIAL ITEMS.”
For non-U.S. Government use:
These programs are supplied under a license. They may be used, disclosed, and/or copied only as
supplied under such license agreement. Any copy must contain the above copyright notice and
restricted rights notice. Use, copying, and/or disclosure of the programs is strictly prohibited unless
otherwise provided for in the license agreement.
Radio Frequency Interface (RFI) (FCC 15.105)
This device has been tested and found to comply with the limits for Class B digital devices pursuant to
Part 15 Subpart B, of the FCC rules. These limits are designed to provide reasonable protection
against harmful interference in a residential environment. This equipment generates, uses, and can
radiate radio frequency energy, and if not installed and used in accordance with the instruction
manual, may cause harmful interference to radio communications. However, there is no guarantee
that interference will not occur in a particular installation. If this equipment does cause harmful
interference to radio or television reception, which can be determined by turning the equipment off
and on, the user is encouraged to try and correct the interference by one or more of the following
measures:
n Reorient or relocate the receiving antenna.
n Increase the separation between the equipment and receiver.
n Connect the equipment into an outlet on a circuit different from that to which the receiver is
connected.
n Consult the dealer or an experienced radio/TV technician for help.
Labeling Requirements (FCC 15.19)
This device complies with Part 15 of FCC rules. Operation is subject to the following two conditions: (1)
this device may not cause harmful interference, and (2) this device must accept any interference
received, including interference that may cause undesired operation.
If the FCC ID is not visible when installed inside another device, then the outside of the device into
which the module is installed must also display a label referring to the enclosed module FCC ID.
Modifications (FCC 15.21)
Edgeport USB Expansion Modules Installation Guide
26
Page 27

Regulatory information
Changes or modifications to this equipment not expressly approved by Digi may void the user’s
authority to operate this equipment.
Industry Canada
This digital apparatus does not exceed the Class B limits for radio noise emissions from digital
apparatus set out in the Radio Interference Regulations of the Canadian Department of
Communications.
Le present appareil numerique n’emet pas de bruits radioelectriques depassant les limites applicables
aux appareils numeriques de la class B prescrites dans le Reglement sur le brouillage radioelectrique
edicte par le ministere des Communications du Canada.
Europe
For OEM labeling, the "CE" mark must be affixed to a visible location on the OEM product. The
following figure shows CE labeling requirements.
The CE mark shall consist of the initials “CE” taking the following form:
n If the CE marking is reduced or enlarged, the proportions given in the above graduated
drawing must be respected.
n The CE marking must have a height of at least 5 mm except where this is not possible on
account of the nature of the apparatus.
n The CE marking must be affixed visibly, legibly, and indelibly.
Conforms to the relevant EU Directives listed here:
If the Edgeport® USB is incorporated into a product, the manufacturer must ensure compliance of the
final product with articles 3.1a and 3.1b of the RE Directive (Radio Equipment Directive).
Declaration of Conformity (DoC)
Digi has issued Declarations of Conformity for the Digi Edgeport products concerning emissions,
EMC, and safety.
China RoHS statement
The Table of Toxic and Hazardous Substances/Elements and their Content shall apply to any product
covered by this manual and labeled with the following symbol:
Edgeport USB Expansion Modules Installation Guide
27
 Loading...