

Page 1

D isclaimer
Installation Guide
Transport DR Series Installation Guide
Wireless GSM/GPRS/EDGE/UMTS/HSPA/HSUPA
DSL
Celular Routers
Transport DR
DDRR664
4 - U-
PSTN
Router/Switch
802.11b/g WiFi
Installation Guide
1
Digi International makes no representations or warranties with respect to the contents or
use of this manual, any software drivers or associated application software provided with
this product and specifically disclaims any expressed or implied warranties of
merchantability or fitness for any particular purpose.
Digi International reserves the right to modify or revise all or part of this document, its
contents, and any products described herein at any time without prior notification and
shall not be responsible for any loss, cost, or damage, including consequential damage,
caused by reliance on these materials.
Product disposal instructions
The WEEE (Waste Electrical and Electronic Equipment: 2002/96/EC) directive has been
introduced to ensure that electrical/electronic products are recycled using the best
available recovery techniques to minimise the impact on the environment.
This product contains high quality materials and components which can be recycled. At
the end of it’s life this product MUST NOT be mixed with other commercial waste for
disposal. Check with the terms and conditions of your supplier for disposal information.
Copyright
© 2009 Digi International. All rights reserved. No part of this document covered by
copyright may be reproduced or copied in any form or by any means graphic, electronic,
or mechanical, including photocopying, recording, taping, or information and retrieval
systems without written permission of Digi International.
4 - U4 - U
Page 2
simply as ‘wireless’ networks. Th
ferred to as either GSM, CDMA or
HSDPA and HSUPA data transmission
standard. CDMA networks support the 1xRtt
GSM networks support the GPRS, EDGE, UMTS,
The Transport DR series routers sipport both GSM and CDMA networks..
1 x 802.11 b/g or PSTN options
1 x 3G/HSDPA/HSUPA or EVDO wireless options
1 x ADSL2/2+, Annex A
1 x 4-port 10/100Base-T Ethernet switch
The Transport DR features:
ocedure for Transport DR series products. It is
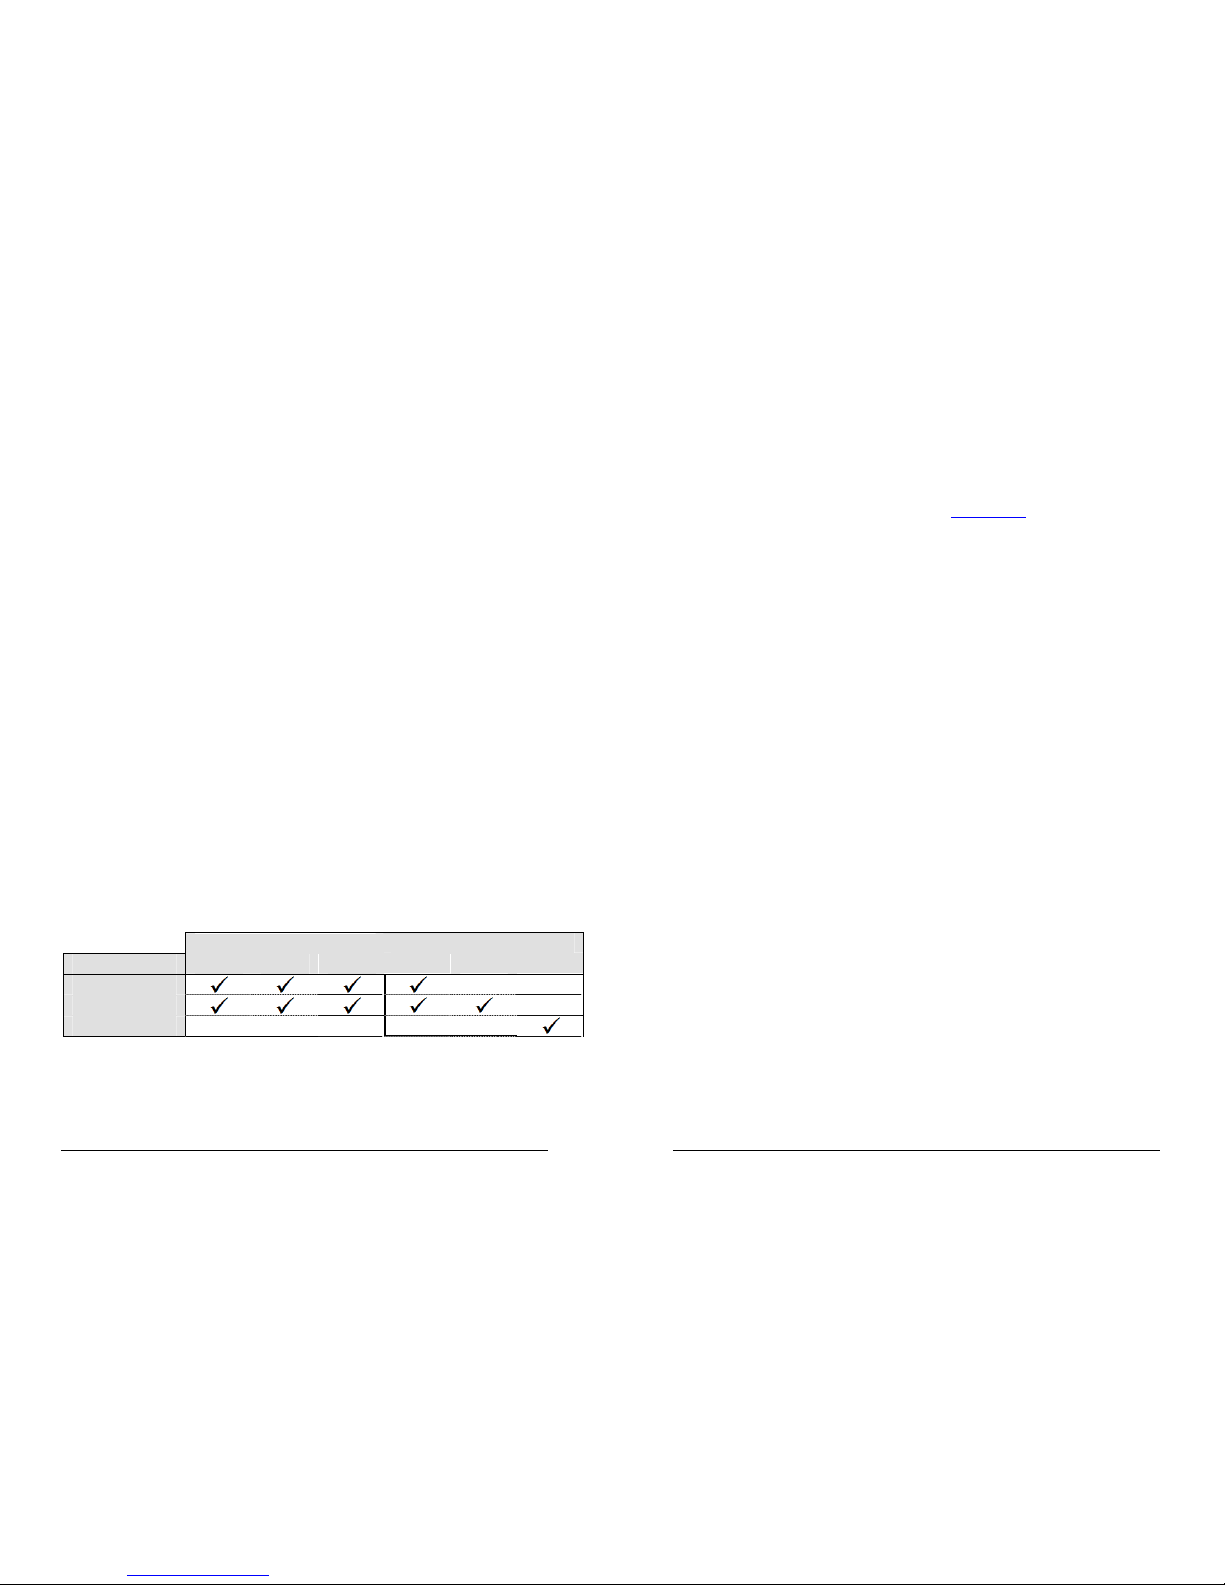
in the table below:
e type of network by each model is summarized
and EVDO data transmission standards.
2) The DR64-U series use a 12V DC/1.5A pow
Transport DR Series Installation Guide Transport DR Series Installation Guide
2
Safety Notices
1) Please read all instructions before installing and powering the unit. You should keep
these instructions in a safe place for future reference.
er supply (mains adapter). If the mains
adapter shows signs of damage or malfunction, you should stop using it immediately
– turn off the power at the mains and disconnect it from the mains supply before
contacting your supplier for a repair or replacement.
3) Changes or modifications not expressly approved by the party responsible for
compliance could void the user’s authority to operate the equipment. Use only the
accessories, attachments, and power supplies provided by the manufacturer –
connecting non-approved antennas or power supplies may damage the unit, cause
interference or create an electric shock hazard, and will void your warranty.
4) Do not attempt to repair the products. They contain no electronic components that
can be serviced or replaced by the user. Any attempt to service or repair the unit by
the user will void the product warranty.
5) These products are designed for indoor use only and should be used in an
environment that is suitable for computers and other electronic equipment.
6) Ports that are capable of connecting to other apparatus are defined as SELV ports.
To ensure conformity with IEC60950 ensure that these ports are only connected to
ports of the same type on other apparatus.
Note on Wireless Networks
Throughout this manual these networks will be re
3
Preface
This guide describes the installation pr
intended to provide sufficient information for you to be able to connect the unit to your
terminal equipment and power supply. A complete reference guide to the software
features that are available on the product is available separately in PDF format that can
be downloaded from the Digi International website (www.digi.com
).
♦
♦ 1, 2 or 6 RS232 serial ports (depending on model)
♦ 2 x USB 2.0 host ports
♦
♦
♦
Network
DR64-H
DR64-U
DR64-C
Model
GSM
GPRS
GSM
EDGE
WCDMA
UMTS
WDCMA
HSDPA
WCDMA
HSUPA
CDMA
EVDO 1x Rtt
Page 3
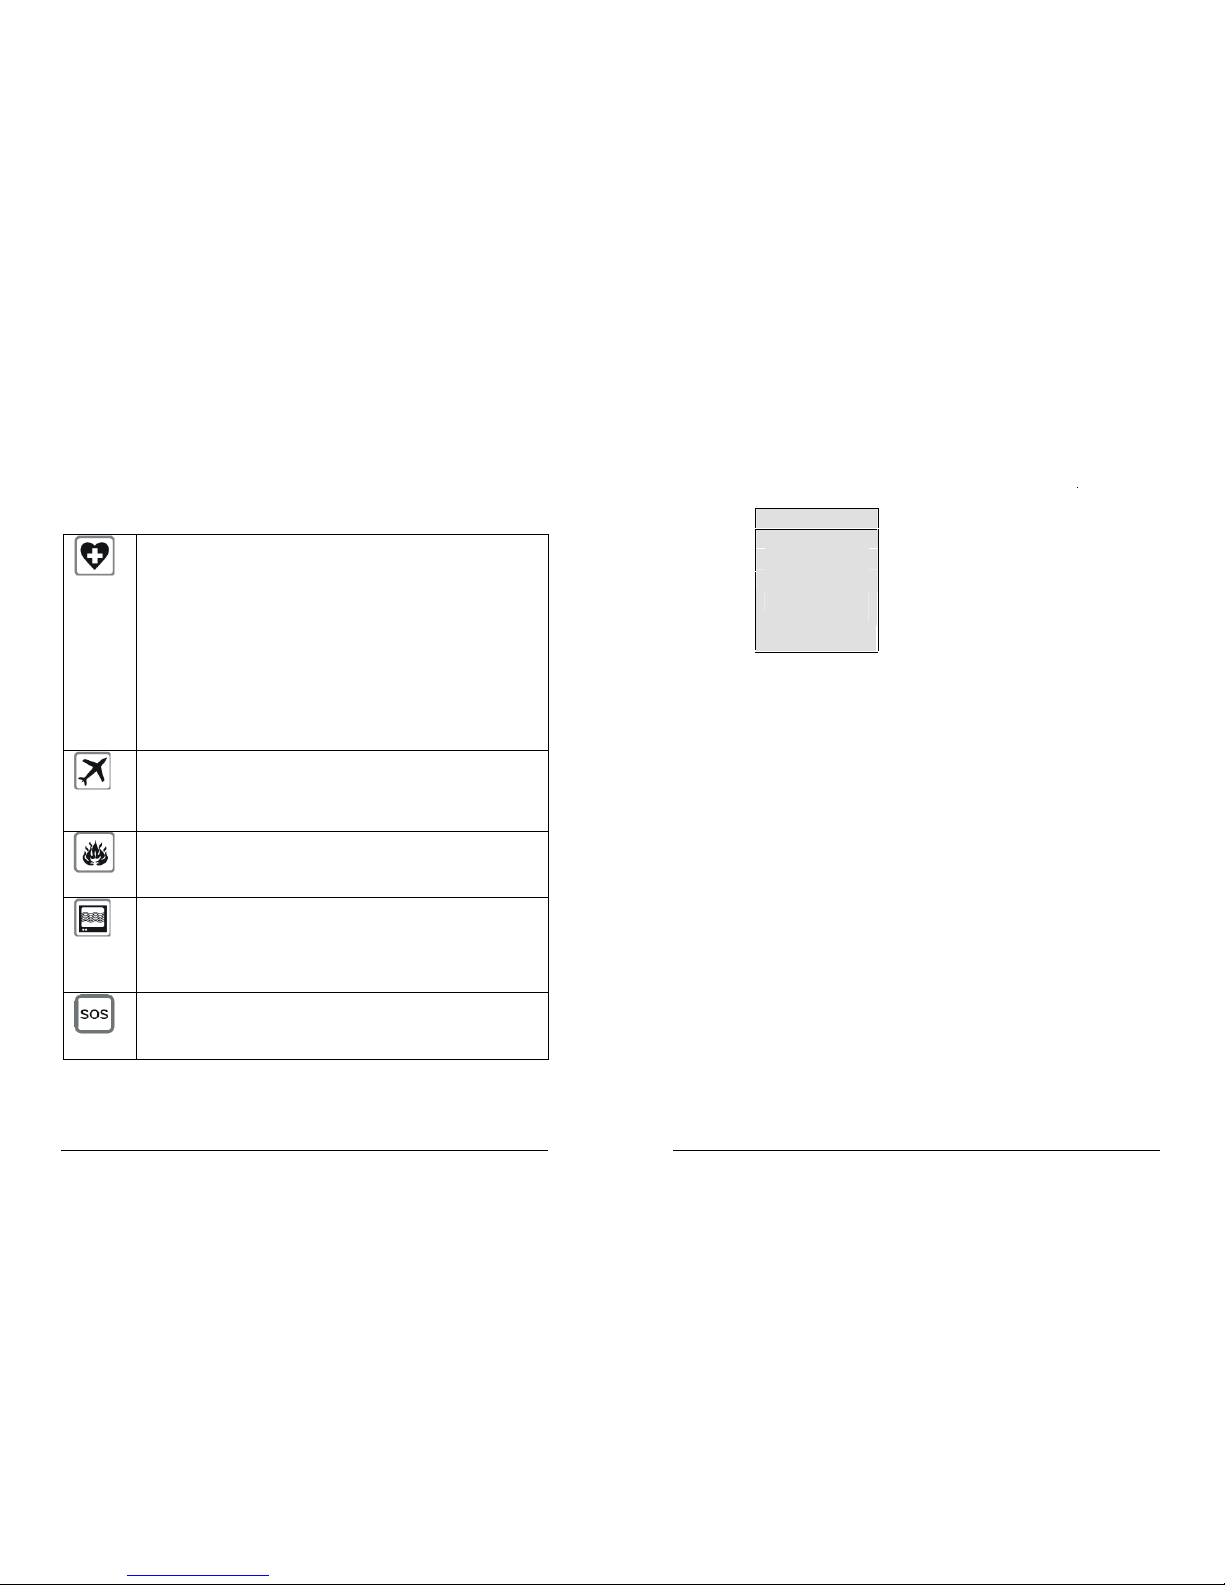
Special Notes on Wireless Safety
System Unit
Transport DR Series Installation Guide Transport DR Series Installation Guide
4
Digi International products are designed to the highest standards of safety and
international standards compliance for the markets in which they are sold. However, GSM
based products contain radio devices which require specific consideration. Please take
the time to read and understand the following guidance. Digi International assumes no
liability for an end user’s failure to comply with these precautions.
Wireless routers incorporate a wireless radio module. Users should
ensure that the aerial is positioned at least 1 metre away from
themselves and other persons in normal operation.
When in a hospital or other health care facility, observe the restrictions on
the use of mobile phones. Do not use the router in areas where
guidelines posted in sensitive areas instruct users to switch off mobile
phones. Medical equipment may be sensitive to RF energy.
The operation of cardiac pacemakers, other implanted medical
equipment and hearing aids can be affected by interference from cellular
terminals such as the wireless routers when placed close to the device. If
in doubt about potential danger, contact the physician or the
manufacturer of the device to verify that the equipment is properly
shielded. Pacemaker patients are advised to keep the wireless router
away from the pacemaker while it is on.
Wireless routers must NOT be operated on aircraft. The operation of
wireless appliances in an aircraft is forbidden to prevent interference with
communications systems. Failure to observe these instructions may lead
to the suspension or denial of cellular services to the offender, legal
action, or both.
As with any electrical equipment, you should not operate your wireless
router in the presence of flammable gases, fumes or potentially explosive
atmospheres. Radio devices should not be used anywhere that blasting
operations are taking place.
Wireless routers receive and transmit radio frequency energy while
switched on. Remember that interference can occur if it is used close to
TV sets, radios, computers or inadequately shielded equipment. Follow
any special regulations and always switch off your wireless router
wherever forbidden or when you suspect that it may cause interference
or danger.
SOS IMPORTANT! – Wireless routers operate using radio signals and
cellular networks cannot be guaranteed to connect in all possible
conditions. Therefore, you should never rely solely upon any wireless
device for life critical communications.
5
Package Contents
When you receive the router carefully unpack it and check the contents. These should
include as a minimum:
Item
Installation guide
CAT5 STP LAN cable
Depending on the model you have ordered other items may be included. If any item is
missing or damaged, please contact your supplier. You should also make a record of any
damage that may have occurred during shipping and report it to the carrier.
DSL cable
12V mains adapter
Antena for Cellular
and Wifi
Page 4

802.11 b/g wireless LAN or PSTN network connectivity.
switch. Optional features include 3G/EVDO or 3G/HSDPA wireless capability and
The Transport DR provides an ADSL/2/2+ interface along with a 4-port 10/100 Ethernet
PSTN or wireless WAN networks.
cilitate the transmission of data over DSL, ISDN,The Transport DR series IP routers fa
Transport DR Series Installation Guide
model, as shown in the following illustration (DR64-U):
HSUPA routing is available as an optional upgrade on the DR64-U. HSUPA is able to
Transport DR Series Installation Guide
6
1 Introduction
The wireless network types and data rates supported depend on the option purchased.
GPRS (General Packet Radio System) is an IP-based data transmission service that runs
over GSM wireless networks. It is an “always-on” protocol which means that once the
router has “attached” to the network, data can be transmitted and received on demand,
i.e. it is not necessary to make a call first.
EDGE is an enhanced version of GPRS which offers increased data transfer rates.
UMTS and HSDPA are the 3
rd
generation (3G) of GSM wireless networks, and as such
have much higher data transmission rates.
GPRS/EDGE routing is ideal for applications that are characterised by frequent
transmission of relatively small amounts of data, e.g. ATMs (cash-dispenser), remote
monitoring and data collection (telemetry) and credit/debt card authorisation.
UMTS/HSDPA routing is ideal for larger amounts of data or for situations where the speed
of data transfer is critical. Typical applications include backup for broadband wireline
services, video transmission, etc.
provide a much greater amount of upstream bandwidth than HSDPA. In addition, the
downstream bandwidth is increased too. This makes HSUPA ideal for live broadcast
quality video transmissions.
The routers can be configured either by using commands entered at the serial port (much
like a modem), or via the built-in Web interface. We recommend that you use the Web
interface whenever possible.
In addition to many standard LAN and Internet protocols such as PPP, DR series products
provide a combination of powerful but easy to use configuration, management and
diagnostic tools. This makes it a simple and cost-effective solution for migrating existing
terminal or telemetry equipment from older networks to DSL broadband.
1.1 Front Panel Features
The front panel of the unit incorporates a number of LED indicators depending on the
7
USB Host Connectors
The USB host connectors may be used to connect compatible USB 2.0 client devices
such as memory sticks, serial adapters, etc. Note that the total current available to power
USB devices is collectively 0.5A (i.e. for both ports).
Status Indicators
The status indicators operate as follows:
ON
Illuminates steady red when power is applied.
LAN 0, 1, 2, 3
Illuminate steady when there is a network connection to the
associated LAN port and flash when data is transmitted/received.
WLAN
Flashes green when WiFi is in use.
DTE
Illuminates steady if a terminal is connected to the serial port and
the DTR signal is on. Flashes when data is transmitted/received.
DSL
Constant red - no DSL is detected.
Quick red flash - DSL is detected and unit is trying to train up to
the DSL signal.
Constant green - DSL is active.
Flashing green - Data is being transferred.
W-WAN
NET - Illuminates steady when a wireless network has been
detected.
SIM - Illuminates steady when a valid SIM card is installed in the
unit.
DAT - Flashes to indicate that data is being transferred over the
wireless network.
Page 5

SIM Card Sockets (GSM models only)
only)
diversity antenna for improved receiver sensitivity (Wi-Fi models
used to fit the wireless LAN
antenna. (Wi-Fi models only).
ed to fit the wireless LAN (Wi-Fi)This male SMA connector is us
antennas this connector will not be present.
two stub antennas. On models that do not support diversity
capability to improve perfomnace and are there supplied with
with the unit. The receiver supports "diversity" antenna
celullar antenna suppliedand C models to fit the second
ed on the Transport DR64-U
W-LAN ANT 1
W-LAN ANT 2
purchased separately.
suitable alternative for use in different applications may be
Note: Stub antennas are provided as standar but a range of
a stub antenna which should be fitted to this connector
antenna. The Transport DR - E and H models are supplied with
ed to fit the wireless cellular
aux
main
2 (aux )
1 (main)
W-WAN
DR64 model with WiFi show above.
Transport DR Series Installation Guide Transport DR Series Installation Guide
8
SIGNAL
The three indicators labelled SIGNAL illuminate to indicate the
GSM signal strength as follows:
None illuminated < -113 dBm (effectively no signal)
1 LED illuminated >= -112 dBm and <= -87 dBm (weak)
2 LED’s illuminated >= -86 dBm and <= -71 dBm (medium)
3 LED’s illuminated >= -70 dBm and <= -51 dBm (strong)
PSTN:
OH, CD, DAT
OH - Illuminates green when the modem has gone off-hook.
CD - Illuminates green when the unit has connected to a remote
modem and asserted the Carrier Detect signal at the serial port.
DAT - Flashes green when the unit has connected to a remote
modem and data is being transferred.
The two sockets at the left side of the front panel are for the GSM/3G SIM card(s) that you
will receive from your service providers when you subscribe to a wireless data service.
Details of how to insert these correctly are given in section 2 below.
9
Rear Panel Features
These functions of these connectors are described in the following table:
12V DC
This jack socket is used to connect the unit to the power supply
using the 12V DC mains adapter.
LAN 0, 1, 2, 3
The LAN sockets are used to connect the unit to 10/100-BaseT
LANs using the 2-metre STP (Shielded Twisted Pair) cable
supplied or a suitable alternative. These ports are auto-sensing
for speed and wiring (straight-through or cross-over). To comply
with EMC requirements they should not be used with non-STP
cable.
ANTENNA
This female SMA connector is us
This male SMA connector is
W-WAN
ANTENNA
This female SMA connector is us
Page 6

Step 1 - Installing the SIM card(s) (GSM models only)
reception. Digi International can supply a range of suitable antennas.
the W-WAN network if there is a good signal.
indoor use (office or home). The router The Transport DR series products are designed for
Transport DR Series Installation Guide Transport DR Series Installation Guide
nous serial ports (DR64- U-XN only)
10
SERIAL
Port 0 & 1 - 25-way D socket provides an asynchronous RS2322
serial port which may be used to connect the router to a
compatible serial device.
Port 2, 3, 4, 5 - RJ45 asynchro
ISDN/PSTN
This RJ45 socket, labelled ISDN or PSTN as appropriate, is used
to connect the unit to the ISDN or PSTN line as necessary.
DSL
This RJ12 socket is used to connect the unit to an ADSL line
socket.
Reset Switch
This is located on the underside of the unit near the front. Pressing the switch gently with
the tip of a pen or other suitable implement will generate a hardware reset.
11
2 Installation
should be positioned on a smooth, level surface making sure that there is adequate
ventilation. Do not expose the router to extremes of heat or cold, strong magnetic fields or
liquids.
It is important to remember that these products are wireless devices just like a mobile
phone, so they will only operate reliably over
For many applications the stub aerial provided will be suitable but in some circumstances
it may be necessary to use a window-mounted or magnetically mounted aerial with an
extended cable to allow the aerial itself to be positioned to provide the best possible signal
Safety notice
A separation distance of at least 20cm should be maintained at all times between the
W-WAN antenna (if used) and personnel using the unit.
The router incorporates two separate SIM card holders so that if your application
demands it, you may install SIM cards for two different networks. This means that one
wireless service may be used as a back-up service in the event that the primary service
fails in some way. By default, SIM 1 is the default SIM used for access to the primary
network and SIM 2 is used for the back-up network.
Note:
SIM 1 and SIM 2 cannot be used to access two networks simultaneously.
The SIM card(s) should be inserted into SIM cardholders on the right of the front panel as
illustrated below.
Page 7

Step 7 – Connecting the power supply
Step 6 – Connecting to the PSTN line (if applicable)
device(s) to these ports. The 6 serial ports ar
use standard DB25 sockets. Asuitable cable will be required to connect your terminal
ice, the Transport DR units with 1 or 2 serial ports
SMA aerial connector on the rear of the unit.
Step 2 – Fitting the wireless antenna (if applicable)
e presented as RJ45 connectors. A range
Transport DR Series Installation Guide Transport DR Series Installation Guide
12
In both cases, the end of the SIM card with the chamfered corner should be inserted first.
For SIM 1 the contacts should be face down. For SIM 2 the contacts should be face up.
The router is supplied with a “stub” antenna suitable for the model you have ordered.
Alternatively you may have ordered a different type of antenna separately. In either case
this should be screwed onto the
Step 3 – Connecting the LAN cable
Plug one end of one of the supplied CAT5 cable into the RJ45 socket labelled LAN 0.
Plug the other end into the LAN socket on your PC or notebook.
Step 4 – Connecting the serial cable
For connection to a serial terminal dev
of suitable cables and adapters are available from Digi International for connecting
terminal devices to these ports.
13
Step 5 – Connecting the ADSL cable
Plug one end of the supplied cable, or a suitable alternative, into the RJ12 socket labelled
ADSL. Plug the other end into the ADSL line socket.
Plug one end of the supplied PSTN cable into the RJ45 socket labelled PSTN. Plug the
other end into the PSTN wall socket.
Plug the jack plug on the mains adapter into the socket labelled 12V DC BEFORE
connecting the power adapter to the mains supply and applying power. When power is
first applied, the ON indicator will illuminate and the unit will initiate a series of diagnostic
self-tests. During this process one or more of the other indicators will flash to show that
the unit is busy. When the flashing stops, the unit is ready to use.
The unit is now ready to be configured.
Page 8

. Serial Port Configuration: Configuration > Serial > ASY Ports
. Ethernet Port Mode: Configuration > Interface > Eth x > Configure
. VRRP: Configuration > Interfaces > Eth x > Configure
. Alarms: Configuration > Alarms
. Users: Configuration > Security > Users
. Firewall Configuration > Security > Firewall
. Rounting: Configuration > Rounting
. VPN: Configuration > VPN
Advanced Configuration:
comprehensive Refrence Guide available on the Digi Suppot website (www.digi.com)
For greater description on all the features and settings available on the device, there is a
STEP 5 - Finish Device Configuration
host or router within the carrier's network or on the corporate network to verify connectivity.
carrier for a recommended host to test against. For example you may be able to ping a
web site. For non-Internet connected plans consult your IT administrator and/or wireless
A simple test for most Internet connected plans is to open a browser and connect to a
"ipconfig /renew" in your worstation's command window.
comand. If the worstation does not obtain an IP address of 192.168.1.100 enter
gateway and DNS server information. Verify this on the workstation by using the "ipconfig"
worstation an IP address of 192.168.1.100 via DHCP. DHCP will pass the proper default
remote host or bbrowse the Internet,. By default the Digi Transport should have issued your
Depending on the wireless plan being used, you should be able to perform a test to a
Step 4 – Test Mobile Connection
Diagnostics -> Event Log
Viewing the Event Log can also be used to view the connection status.
" 98" 1 *
10.203.65.68
10.94.78.128
ASY - 2
OFF
0x 0
1500
Outgoing Call to
DNS Server IP Address
IP Address
Link Active withEnbty
VJ Compression
ACCM
MRU
Remote
Local
Option
Diagnostics -> Status -> PPP -> PPP 0-4 -> PPP 1 -> View
Verify the mobile connection is estabilished and view the mobile IP address by going to
Step 3 – Verify Cellular Connection
Enter the APN of your module operator and SIM PIN if you have one. Click OK
Configure the APN by going to:
Transport DR64-E, H, U - GSM Devices.
the device is a GSM or CDMA device.
The method used to activate the device on a cellular network varies depending on whether
Step 2 – Configure Mobile Interface
Step 1 – Connect to the Web Interface
configurad to communicate to the internet or Wireless WAN provided by your wireless center.
Once the unit has been installed and powered up, The mobile interface should now be
Transport DR Series Installation Guide Transport DR Series Installation Guide
14
3 Configuration
Note: The default IP address for the LAN 0 port is 192.168.1.1, with a subnet of mask
(255.255.255.0). DHCP server is enable by default on the device, so make sure your host
computer is setup to obtain IP addresses automatically.
Open a browser and connect to the Web interface by connecting to http://192.168.1.1
It is recommended to change the default username and password on the device.
PC, run it from the Windows Start menu.
15
Alternatively, setting your PC's IP address to one on the same subnet (192.168.1.*) will
enable you to connect to the unit's Web interface.
Default User ID: username.
Default Password: password
This setting can be changed by going to:
Configuration -> Security -> Users -> User 0-9 -> User 1
Configuration -> Interfaces -> Mobile -> W-WAN Module -> SIM 1
1500
0x 0
OFF
Page 9

17
Forward and reverse link speeds up to 153,6 Kbps
1 x Rtt (IS-2000)
Reverse link 153,6 Kbps
Forward link up to 2,4 Mbps
1 x EVDO Revision O (IS-85L
Reverse link 1,8 Mbps
Forward link up to 31 Mbps
1 x EVDO Revision A (IS-856-A)
Supports Rx diversity in both 800 MHz and 1900 MHz
Dual Board 800 MHz Cellular / 1900 MHz PCs
CDMA 1 x Rtt
CDMA 1 x EV-DO
DR64-C
DR64-U
multi-slot class 12 (max 236.8 kbps downlink), mobile
MO 0201: 850 / 1900 / 2100 ( Rx diversity) MHz
DR64-H
DR64-E
W9,29 x D6.75 x H1.65 inches
W9,29 x D6.75 x H1.14 inches
DR64 ( 6 serial port version)- W236 x D146 x H42 mm
Dimensions DR64 - (1 or serial port versions) W236 x D146 x H29 mm
16
Transport DR Series Installation Guide
4 General Specifications
Power supply 12V DC / 1.5A
Weight 0.8Kg – 1.1Kg dependant on model and options installed
Operating temp. range -20 to +55 degree Celsius
ADSL modem ADSL Full rate ANSI T1.413 Issue 2, G.dmt and G.lite ITU-T
G.992.3 and G.992.1
ADSL2 G.992.3 and G.992.4
ADSL2+ G.992.5
Supports PPPoA, PPPoE, Bridged/Routed Ethernet over
ATM, IP over ATM. Maximum downstream rate 50Mbps,
maximum upstream rate 3Mbps dependant on exchange.
GSM/GPRS/EDGE
modem
Quad-band GSM 850/900/1800/1900 MHz EDGE (E-GPRS)
multi-slot class 10 (max 236.8 kbps downlink), mobile
station class B, modulation and coding scheme MCS1-9
GPRS multi-slot class 12, mobile station class B, PBCCH
support, coding schemes CS 1-4
GSM/GPRS/EDGE/
UMTS/HSDPA/HSUPA
modem
HSDPA 1.8: Categories 1-4, 11 and 12
HSDPA 3.6: Categories 5 and 6
UMTS: 384 Kbps operation in downlink, 384 Kbps in uplink
Quad-band GSM 850/900/1800/1900 MHz EDGE (E-GPRS)
station class B, modulation and coding scheme MCS1-9
GPRS multi-slot class 12, mobile station class B, PBCCH
support, coding schemes CS 1-4
PSTN modem 14.4 kbps fax modem
. V.92 compliant, backwards
compatible with earlier protocols. V.44 data compression,
v.42 LAPM and MNP 2-4 error correction.
USB ports 2 x USB 2.0 Full-speed Host (OHCI) (12 Mbits per second
maximum throughput)
Ethernet interface 10/100Base-T auto-sensing, auto-MDI/MDX (RJ45)
Serial interface Sync/Async RS232 compatible via 25-way D socket
Async serial port via RJ45 socket (DR6460 only)
Transport DR Series Installation Guide
GSM/GPRS/EDGE/
UMTS/HSDPA/HSUPA
modem
HSDPA 1.8: Categories 1-4, 11 and 12
HSDPA 3.6: Categories 5 and 6
HSDPA 7.2: Category 7 and 8
UMTS: 384 Kbps operation in downlink, 384 Kbps in uplink
MO 0301: 850 / 1900 / 2100 ( Rx diversity) MHz
MO 0302: 850 (Rx Diversity) / 1900 (Rx Diversity) / 2100
MHz
Equalization and Rx Diversity at the same time
Quad-band GSM 850/900/1800/1900 MHz EDGE (E-GPRS)
multi-slot class 10 (max 236.8 kbps downlink), mobile
station class B, modulation and coding scheme MCS1-9
GPRS multi-slot class 12, mobile station class B, PBCCH
support, coding schemes CS 1-4
 Loading...