

Page 1

OPERATION MANUAL
Model: DI-162
Edition Month Year
1st November 2005
2nd March 2006
3rd May 2006
4th June 2006
5th Dec. 2007
SHANGHAI TERAOKA ELECTRONIC Co., Ltd. --- Technical Support Dept.
3rd Floor of 2nd Building, Jia Yuan Business Center,
51# Long Wu Road, Shanghai China 200232.
Tel: +86-21-64085151 Fax: +86-21-64083468 E-mail: steservice@digi-scale.com
Page 2

DI-600 Operation Manual
1
CONTENTS
1. General Specification
1.1. General Layout ------------------------------------------------------------------------------------------- 1
1.2. Features ----------------------------------------------------------------------------------------------------- 4
1.3. Operating Conditions ------------------------------------------------------------------------------------- 5
1.4. Charging Conditions ------------------------------------------- ------------------------------------------- 5
1.5. Analog Specification -------------------------------- ------------------------------------------------------ 5
1.6. Display and Indicators -------------------------------------------- -------------------------------------- 6
1.7. Dimensions ------------------------------------------------------------------------------------------------ 10
1.8. External Connectors ------------------------------------------------------------------------------------ 10
2. Main Operation
2.1. Zero Resetting ------------------------------------------------------------------------------------------- - 11
2.2. One-touch Tare Weight Reduction ---------------------------------------------------------------- 12
2.3. Digital Tare Weight Reduction ---------------------------------------------------------------------- 12
2.4. Change Weight Unit --------------------------------------------------------------------------------- 13
2.5. Span SW ON / OFF Check ---------------------------------------------------------------------------- 13
2.6. Internal Count Display --------------------------------------------------------------------------------- 14
2.7. Spec Data Setting For Weigh & Measure -------------------------------------------------------- 14
2.8. Setpoint Set -------------------------------------------------------------------------------------- 16
3. Initial Setup
3.1. Prepare ---------------------------------------------------------------------------------------------- ----- 17
3.2. Setup ---------------------------------------------------------------------------------------- -------------- 17
3.2.1. Weight Caliberation ----------------------------------------------------------------------------- 18
3.2.2. G Caliberation ------------------------------------------------------------------------------------ 20
4. Specification List ----------------------------------------------------------------------------------- 21
5. Error Message --------------------------------------------------------------------------------------- 25
Page 3
1
1. General Specification
1.1 General Layout
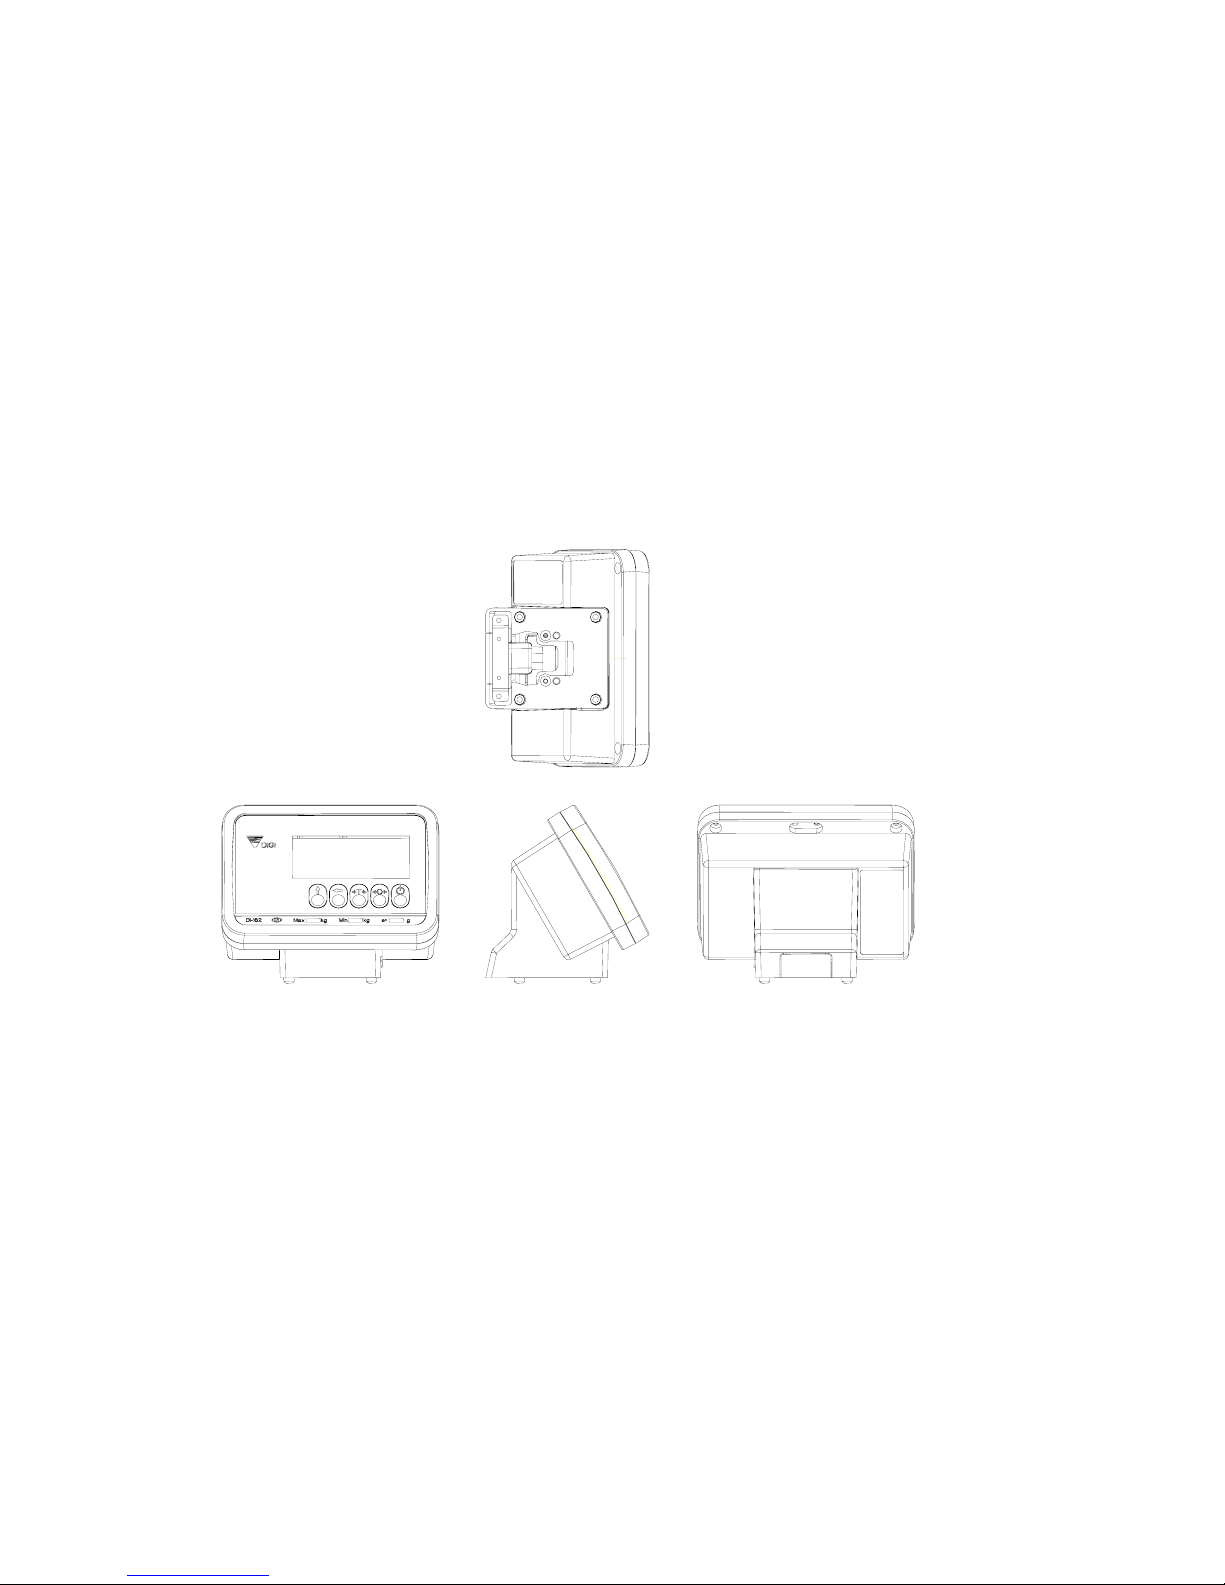
¾ DI-162
Page 4
2
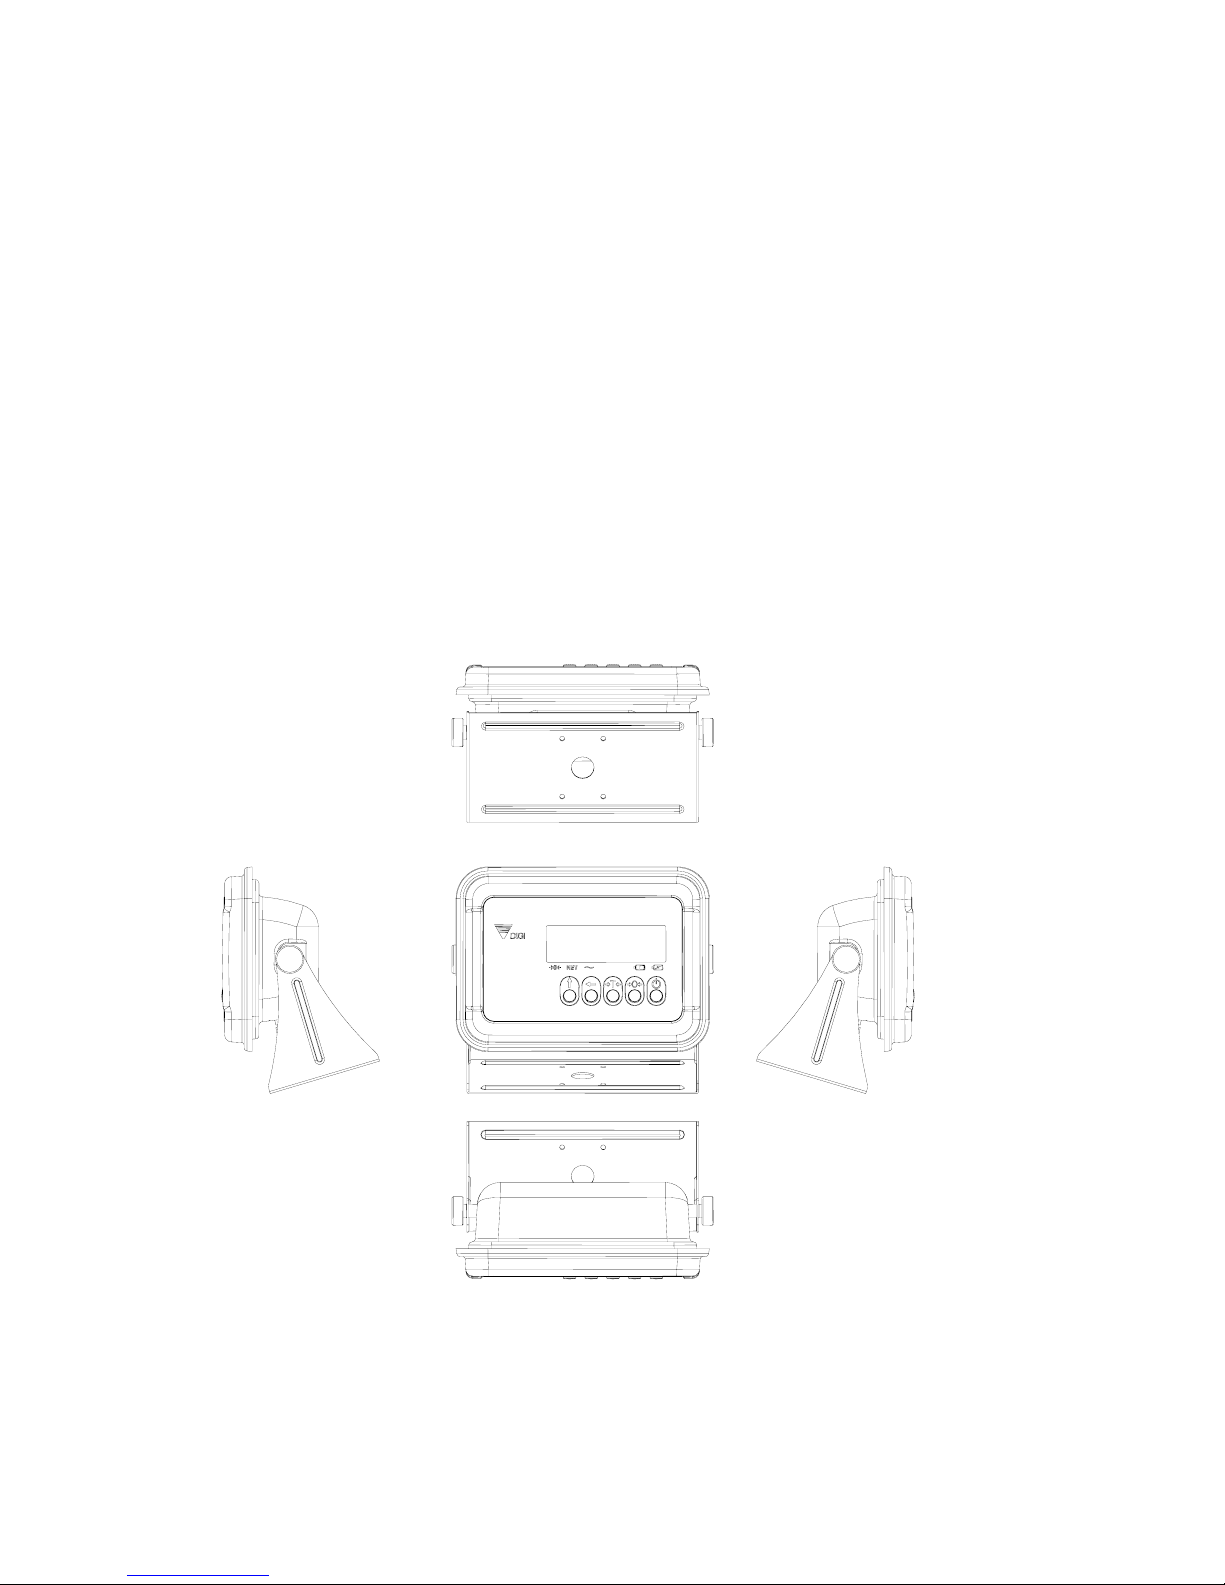
DI-162SS
Page 5

3
DI-162C
Page 6
4
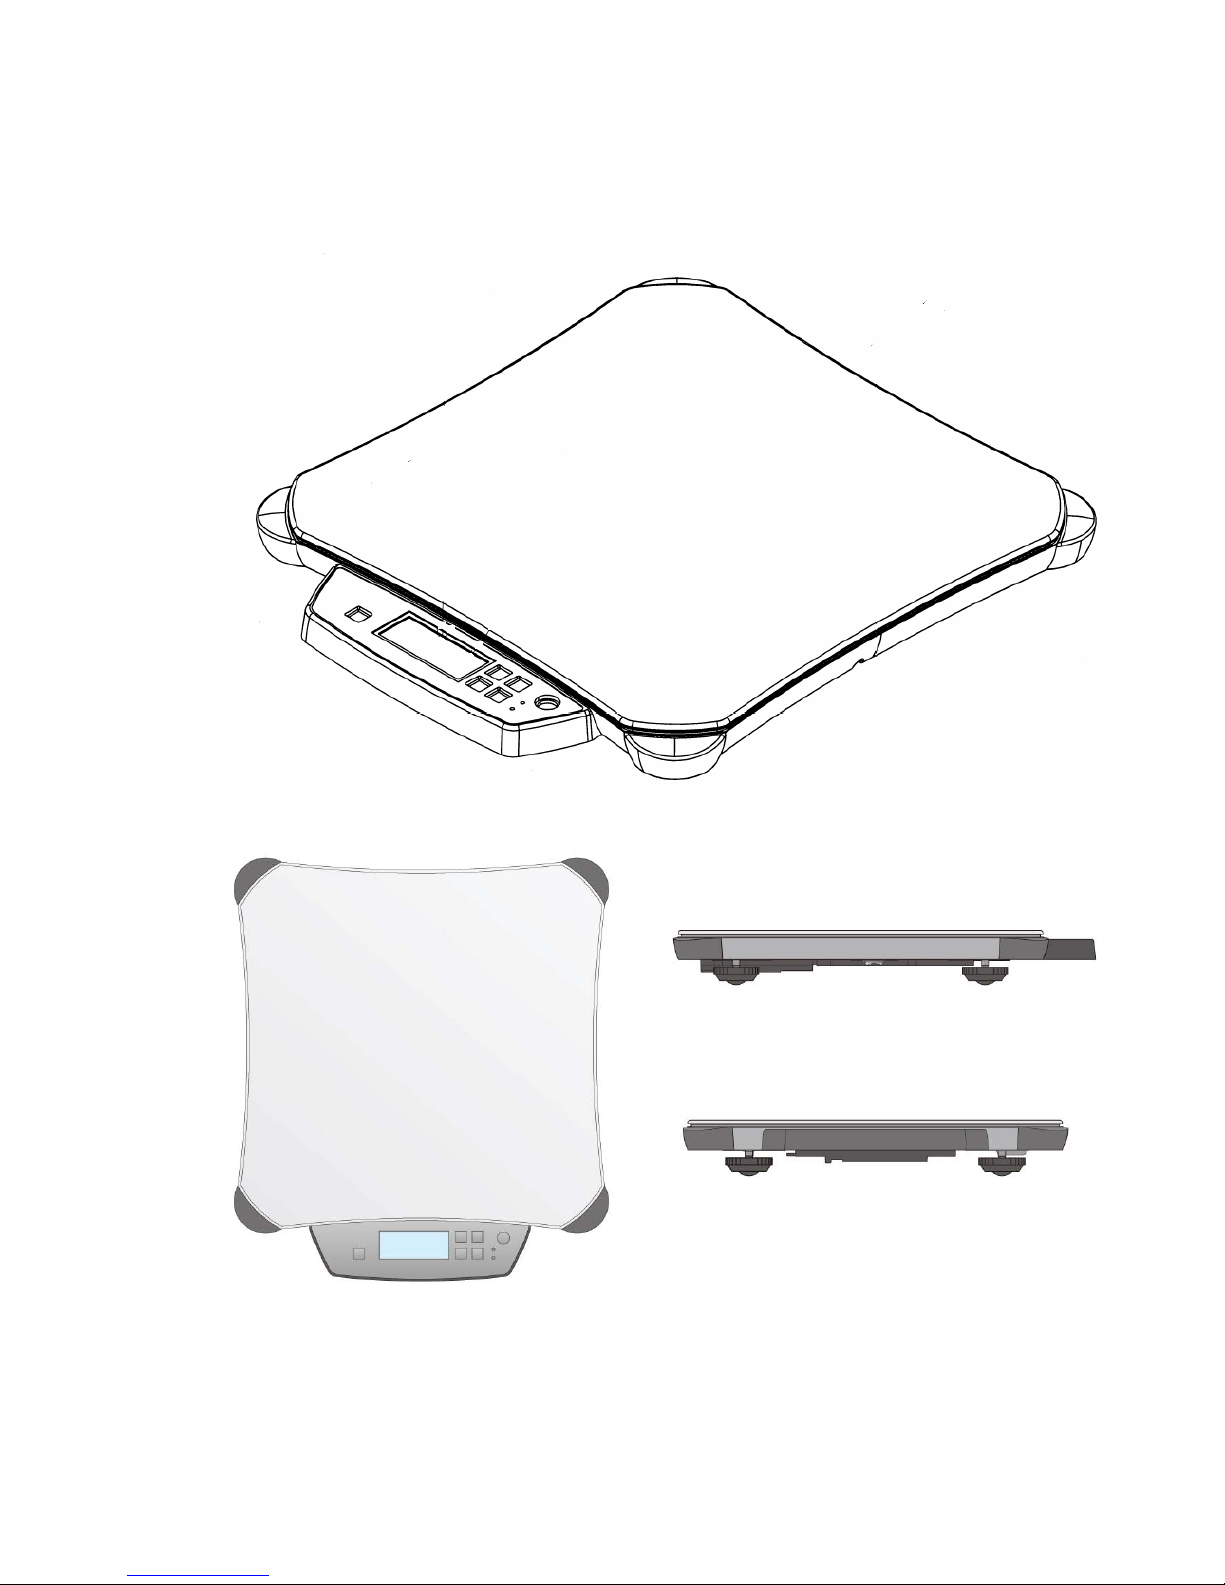
DS-162 HD
Page 7
5
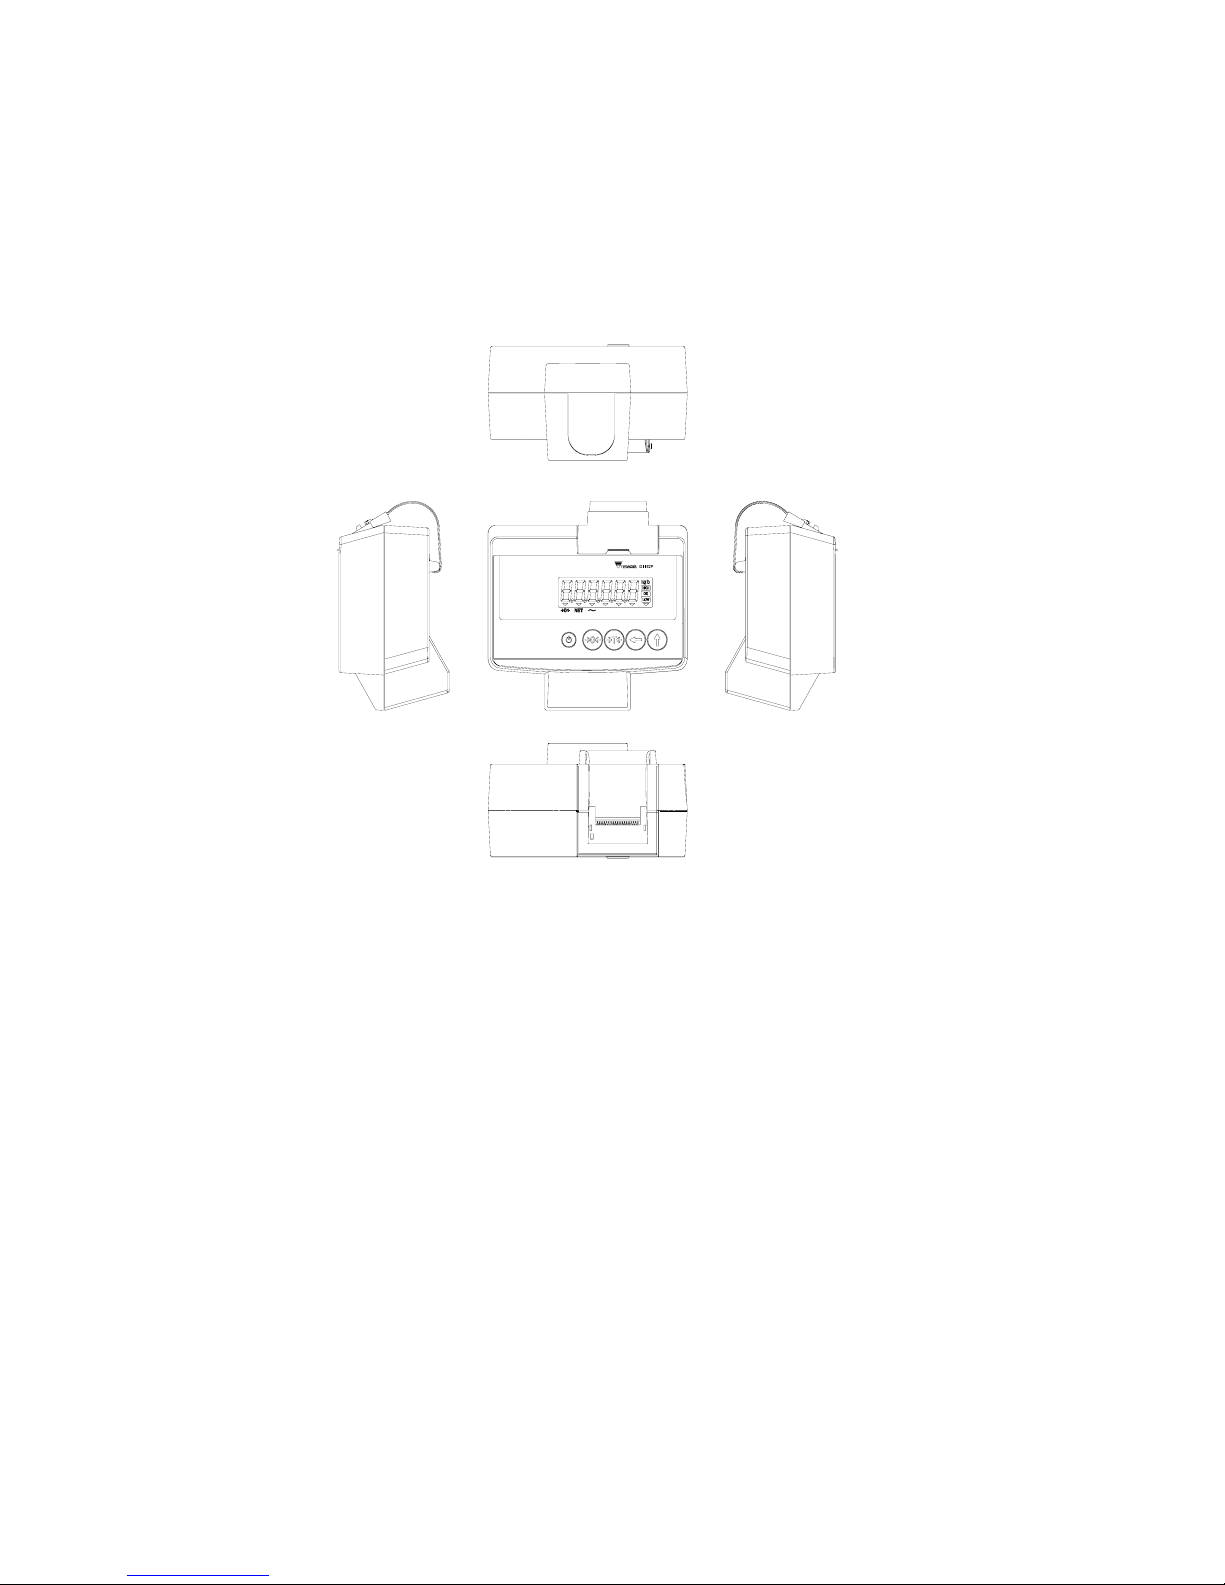
DI-162 P
Page 8

6
1.2 Features
* Low cost digital indicator.
* Quick response to weight changes.
* Resolution : Display Resolution: variable
: Internal Resolution: 1/300,000.
*Low power consumption.
* Auto Power Off
* Calibration by software.
* 6 digits with 8 segments LCD Operator displays.
* 5 operational keys:
UP; LEFT; TARE; ZERO; ON/OFF;
* One scale channels for remote weighing platforms
connection.(14 pin Am phenol)
* Support 4x load cells 350 Ohm.
* RS-232C interface for data communication
*Two set point(Hi/OK/Low).
* External Remote Display.
* IP67 waterproof, moisture-proof, mist-proof and dustproof
(DI-162SS)
* Waterproof keyboard and splash proof housing
(DI-162SS)
Page 9

7
DI-162 P:
* Low cost digital indicator.
* Quick response to weight changes.
* Resolution : Display Resolution: variable
: Internal Resolution : 1/300,000.
* Calibration by software.
* 6 digits with 8 segments large size LCD Operator displays
with backlight. (figure size: 23×10.9 mm).
* Waterproof keyboard and splash proof housing.
* 5 operational keys:
UP; LEFT; TARE; ZERO; ON/OFF;
* Plastic housing or Stainless housing.
* One scale channels for remote weighing platforms
connection .(14 pin Am phenol)
* Support 4x load cells 350 Ohm.
*Two set point(Hi/OK/Low).
* External Remote Display.
Page 10

8
DS-162 HD
* Quick response to weight changes.
* Low power consumption: Rechargeable Battery backup for
30 hours (Backlight Off) 5 hours (Backlight On)of continuous
usage .
* Intelligent power control
A. When AC power is available, scale will use AC power only
whatever rechargeable battery is installed or not. When AC
power is shut off, scale will use battery automatically.
B. When scale works on rechargeable battery, if the battery is
weak, the battery indictor will light up. When the power
from battery becomes low such that the scale cannot
compute accurately, all Displays will shut off except the
Battery indicator. The power is then shut off completely after
1 minute.
C. Scale detects rechargeable battery voltage and control battery
charge process automatically. The battery charge indicator
lights up when rechargeable battery is being charged.
* Calibration by software.
* 6 digits with 8 segments large size LCD Operator displays
with backlight. (figure size: 19×9 mm).
* Waterproof keyboard and splash proof housing.
Page 11

9
* 5 operational keys:
UP; LEFT; TARE; ZERO; ON/OFF;
* RS-232C interface for data communication .
* Capacity: 60kg/(10~20)g, 150kg/(20~50)g
* Platter size: 429mmx429mm
* Waterproof rating: IPX5
*,Net weight: 6.4 kg
Page 12

10
1.3 Operating Conditions
* Power Source : AC 240/230/220V,
117/100V(+10%,-15%).
: Rechargeable battery (6V 1.2Ah).
* Operating Temperature : -10 /14 ~ +40 /+104 ℃℉ ℃ ℉
(OIML).
* Operating Humidity : 15 ~ 85% RH.
* Power Consumption : 18W when using AC power.
: 0.5W when using rechargeable battery.
1.4 Charging Conditions (for Rechargeable battery only)
* Power Source : AC 240/230/220V,
117/100V(+10%,-15%).
* Charge Current : 300 mA.
* Charge Time : 5 - 6 hours.
1.5 Analog Specification
* Input sensitivity : 0.4mV/V~ 4mV/V.
* Zero adjust range : 0 ± 5mV.
* Zero balance range : 0 ± 0.5mV.
* L/C applied voltage : DC 5V.
* Speed of A/D conversion : 20times/sec ~ 30 times/sec.
* Internal Resolution : 300,000.
Page 13

11
1.6 Display and Indicators
¾ DI-162
* Weight Display : 6 digits
Page 14

12
DI-162SS
* Weight Display : 6 digits
DI-162 SS Max kg gMin e=d=
g
Page 15

13
DI-162C
* Unit Price : 5 digits (Display when use
Checkout-Dialog 02/04/06 protocol)
*Total Price : 6 digits (Display when use
Checkout-Dialog 02/04/06 protocol)
* Tare : 4 digits (Display when use
Checkout-Dialog 02/04/06 protocol)
* Weight Display: 6 digits
Page 16

14
¾ Indicators
-------▼sign will light up when current zero
point is within 1/4d of true zero and true zero.
------- ▼sign will light up when tare weight is
set.
-------▼sign will light up when weight/scale is
in stable condition.
-------▼sign on when Battery is weak and
needs to charge (only for rechargeable battery type).
-------▼sign on when Battery is charging
(only for rechargeable battery type).
-------sign on when the display unit of weight
is kg.
-------sign on when the display unit of weight
is lb.
-------sign on when weight is high than
setpoint2.
-------sign on when weight is between
setpoint1 and setpoint2
------- sign on when weight is below setpoint1
Page 17

15
and high than 1d.
1.7 Dimensions
DI-162: 200mm/7.9in (W) × 164mm/6.5in (H)
×150mm/5.9in (D)
DI-162SS: 200mm/7.9in (W) × 164mm/6.5in (H)
×150mm/5.9in (D)
DI-162C: 130mm (W) × 110mm (H) ×35mm (D)
1.8 External Connectors
* AC plug.
* Load cell connect.
* RS-232C interface.
* Remote Display interface
Page 18

16
DS-162HD
* Weight Display : 6 digits
DS-162HD
Max 60/150 kg e=d= 20/50 gMin 400 g
Indicators
-------▼sign will light up when current zero point
is within 1/4d of true zero and true
zero.
------- ▼sign will light up when tare weight is set.
-------▼sign will light up when weight/scale is in
stable condition.
-------▼sign on when Battery is weak and needs to
charge (only for rechargeable
battery type).
-------▼sign on when Battery is charging (only for
rechargeable battery type).
Page 19

17
External Dimensions
External Connectors
* AC plug.
* RS-232C interface.
Page 20

18
DS-162 P
Display and Indicators
Display Specifications
* Weight Display : 6 digits
Indicators
-------▼sign will light up when current zero point
is within 1/4d of true zero and true zero.
------- ▼sign will light up when tare weight is set.
-------▼sign will light up when weight/scale is in
stable condition.
Page 21

19
-------sign on when the display unit of weight is kg.
-------sign on when the display unit of weight is lb.
-------sign on when weight is high than
setpoint2.
-------sign on when weight is between setpoint1
and setpoint2
------- sign on when weight is below setpoint1 and
high than 1d.
Dimensions
200mm/7.9in (W) × 16
External Connectors
* AC plug.
* Load cell connect.
* Remote Display interface
Page 22

11
2. Main Operation
[ON/OFF] ------To turn on or off the display.
[REZERO] ------To re-zero the scale.
[TARE] -------To set tare weight.
[Í] -------To set digital tare weight value, /To shift the digital
which to be edit.
[Ï] -------To change weight unit, /To change numeric data for
set-up mode.
2.1 Zero Resetting
OPERATION Key-in WEIGHT ZERO NET STABLE
Weighing mode.
0.0 0 0
Put tare (e.g. 3 g) on platter 0.0 0 3
Zero resetting. [REZERO] 888888
0.0 0 0
Remove the weight - 0.0 03
Zero resetting.
[REZERO] 888888
0.0 0 0
Note: 1) If the weight is within the available range of zero
resetting, the display will return to 0.
If it is out of the range, the weight will remain in the display, the
buzzer will beep alarm.
Page 23

12
2.2 One-touch Tare Weight Reduction
OPERATION Key-in WEIGHT
ZERO NET
STABLE
Weighing mode.
0.0 0 0
Put tare (e.g. 30 g) on platter 0.0 3 0
Subtract the tare weight. [TARE] 0.0 0 0
Remove the weight - 0.0 3 0
Clear the tare weight.
[TARE] 0.0 0 0
Note: 1) If the tare weight is within the available rang of
tare reduction, the display will return to 0 and NET lamp
will light up .
If it is out of the range, the weight will remain in the
display, the buzzer will beep alarm.
2.3 Digital Tare Weight Reduction
OPERATION Key-in WEIGHT ZERO NET STABLE
Weighing mode.
0.0 0 0
Press [Í] to shift a digit to where tare weight to be
set.
Digit to set the tare will blink
[Í] 0.0 0 0
Press [Ï] to input the weight.
Each time [Ï] is pressed, the figure will advance 1
only.
[Ï] 0.0 0 1
Repeat step # 1 and # 2 until desired tare weight is
set at each digit.
0.0 3 5
Set the tare weight. [TARE] -0.0 3 5
Clear the tare weight.
[TARE] 0.0 0 0
Note: 1) If the tare weight is within the available rang of
tare reduction, the display will return to 0 and NET lamp
will light up .
Page 24

13
If it is out of the range, the weight will remain in the
display, the buzzer will beep alarm.
2.4 Change Weight Unit
OPERATION Key-in WEIGHT ZERO NET STABLE
Weighing mode.
0.0 0 0
kg
Put tare (e.g. 400 g) on platter 0.4 0 0
kg
Press [Ï] to shift weight unit alternately
between kg and lb.
[Ï] 0.8 8 0
lb
Return to kg mode [Ï] 0.4 0 0
kg
Remove the weight
0.0 0 0
kg
2.5 SPAN SW ON/OFF Check
OPERATION Key-in WEIGHT ZERO NET STABLE
Weighing mode.
0.0 0 0
kg
Press [REZERO]
[REZERO] 8 8 8 8 8 8
Press [T][Í][Í] by holding [REZERO]
Displays software code for 2 seconds.
[REZERO]+
[T][Í][Í]
STE20
If the SPAN SW is at off status, it will display
“S-OFF”.
S-OFF
If the SPAN SW is at on status, it will display
“S-ON”.
S-ON
Returns to weight mode after 3 seconds. 0.0 0 0
kg
Page 25

14
2.6 Internal Count Display
OPERATION
Key-in
WEIGHT
ZERO NET STABLE
Weighing mode.
0.0 0 0
kg
Press [REZERO]
[REZERO] 8 8 8 8 8 8
Press [Í][Í][T] by holding [REZERO]
To display A / D row data
[REZERO]+
[Í][Í][T]
1,2,0,2,3,4
Press[Ï] key. To display internal Count,
1.0.0.0.0.0
Press[Ï] key. To display A / D row data.
1,2,0,2,3,4
Press[ T ]key returns to weight mode. [ T ] 0.0 0 0
kg
2.7 SPEC Data Setting for Weigh & Measure
Turn on the SPAN SW. (JP1 on Main Board.)
OPERATION Key-in WEIGHT ZERO NET STABLE
Weighing mode.
0.0 0 0
kg
Press [REZERO]
[REZERO] 8 8 8 8 8 8
Press [Í] 3 times by holding [REZERO]
SP No. and SP data alternately display
[REZERO]+
[Í][Í][Í]
SP00/ 1 1 0 0
Press [Í] to shift a digit to where SPEC data
to be set.
Digit to set the SPEC will blink.
[Í] 1 1 0 0
Press [Ï] to select SPEC set.
Each time [Ï] is pressed, the figure will shift
between 1 and 0.
[Ï] 1 1 1 0
Press [REZERO] to save SPEC change. [REZERO] SP01/ 0 0 0 0
Press [TARE] to store the SPEC setting and
exit to weight mode
0.0 0 0
kg
Note:
1): Press [TARE] key to go back to weighing mode without save
change.
Page 26

15
2):As introduced at the previous section, there are 2 kinds of
key-operation when entering SPEC setting mode.
a . [REZERO] + [T] [T] [T] ------- for SPEC No.0-No.19
b . [REZERO] + [Í] [Í] [Í] -------for SPEC No.20-No.39
When SPEC setting operation , the following display will
appear.
Bit3 Bit2 Bit1 Bit0
1 1 0 0
SPEC data
*The SPEC No. such as “SP01” and SPEC data such as “1100”
alternately display at start.
*After any key is pressed , it stop alternately display.
*The blinking digit indicates the current programmable
position.
When setting or changing SPEC data, key switches function are
as follows.
[REZERO] -----------SPEC No. skips each time this key is
pressed.
[ T ] ------------ To renew the data and exit this mode.
[Í] ------------ To move digit position. The blinking position
Page 27

16
will move to next digit.
[Ï] ------------ To change SPEC data to either “0” or “1”.
2.8 Set point Set
OPERATION Key-in WEIGHT ZERO NET STABLE
Weighing mode.
0.0 0 0 0
kg
Press [REZERO]
[REZERO] 8 8 8 8 8 8
Press [Ï][Ï][Ï] by holding [REZERO] [REZERO]+
[Ï][Ï][Ï]
SPT1/ 0 0.0 0 0
0
Move the position to edit according to
capacity by[Í].
[Í][Í][Í] 0 0.0 0 0 0
Enter the setpoint1 weight at the blink digit
by press [Ï].
[Ï][Ï] 0 0.2 0 0 0
Press [REZERO] to next step.
[REZERO] SPT2/0 0 0. 0 0
0
Move the position to edit according to
capacity by[Í].
[Í][Í][Í][Í]0 0.0 0 0 0
Enter the capacity weight at the blink digit
by press [Ï].
[Ï] 0 1.0 0 0 0
Press [REZERO] to save setting and return
to weight.
[REZERO] 0.0 0 0 0
kg
Put weight (e.g. 0.1kg) on platter. 0.1 0 0 0
kg LOW
Add weight (e.g. 0.2kg) on platter. 0.3 0 0 0
kg OK
Add weight (e.g. 0.8kg) on platter. 1.1 0 0 0
kg HIGH
Remove the weight on platter. 0.0 0 0 0
kg
Note: This function depends on SPEC3 bit0.
Page 28

17
3. Initial Setup
3.1 Prepare
¾ Connect DI-162 with the weighing platform
¾ Plug in the power supply
3.2 Setup
¾ Set the relative specification
¾ Calibration
z Turn on the SPAN SW first (JP1 on Main Board.)
SPAN SWITCH
Page 29

18
3.2.1. Weight Calibration (SPAN Adjustment)
OPERATION Key-in WEIGHT ZERO NET STABLE
Weighing mode.
0.0 0 0
kg
Press [REZERO]
[REZERO] 8 8 8 8 8 8
Press [Í] [T] [T] by holding [REZERO] [REZERO]+
[Í][T][T]
CAL
“G0” and “0.0000” alternately display G0 / 9.7 9 4 6
Move the position to edit G by press [Í].
[Í][Í][Í][Í] 0. 0 0 0 0
Select the G value at the blink digit by press
[Ï].
[Ï][Ï][Ï][Ï][Ï][Ï]
[Ï][Ï][Ï]
9. 0 0 0 0
Press [REZERO] to save setting and exit to
next step.
“DP” and “00000.0” alternately display
DP / 0 0 0 0 0.0
Change the position of Decimal Point by press
[Í].
[Í][Í] 0 0 0.0 0 0
OPERATION Key-in WEIGHT ZERO NET STABLE
Press [REZERO] to save setting and exit to
next step.
[REZERO] CAP1 /0 0 0. 0 0 0
Move the position to edit capacity by press
[Í].
[Í][Í][Í][Í] 0 0 0. 0 0 0
Select the capacity weight at the blink digit by
press [Ï].
[Ï][Ï] 0 2 0. 0 0 0
Press [REZERO] to save setting and exit to
next step.
[REZERO] d1 / 1
Press [Ï]to select set minimum display figure.
[Ï][Ï] 5
Press [REZERO] to save setting and exit to
next step.
[REZERO] CAP2 /0 0 0. 0 0 0
Move the position to edit according to capacity
by[Í].
[Í][Í][Í][Í] 0 0 0. 0 0 0
Enter the capacity weight at the blink digit by
press [Ï].
[Ï] 0 1 0. 0 0 0
Press [REZERO] to save setting and exit to
next step.
[REZERO] d2 / 1
Press [Ï] to select set minimum display figure. 2
Press [REZERO] to save setting and exit to
next step.
Select weight unit by press [Ï].
[REZERO] UNIT / kg kg
Press [REZERO] to save setting and exit to
next step.
[REZERO] CAL00 kg
Page 30

19
Press [REZERO] to insure the zero point. [REZERO] - - - - - - kg
CALSP /2 0.0 0 0 kg
Put weight (e.g. 10kg) on platter.
Enter the weight which is used to calibrate by
taking the same steps as above.
1 0.0 0 0 kg
Press [REZERO] to take SPAN calibration. [REZERO] - - - - - - kg
Return to weight mode. 1 0.0 0 0
kg
Note:
1): G value entry may be skipped if G calibration inhibit (depends on
SPEC23 bit1).
9.976 is the default G value of Shanghai.
2): If calibrate with FS weight, skip enter weight by press [REZERO], the
default calibration weight is FS.
3): You had better use more than 1/3 capacity weight to calibrate the full
SPAN. If using less 30 % of capacity weight, weight error may be created
incidentally.
4): Check to see if the displayed weight is correct when placing 1 / 3, 2 / 3,
and full capacity weight.
Page 31

20
z 3.2.2. G Calibration (Gravity Adjustment)
Turn on the SPAN SW. (JP1 on Main Board.)
OPERATION Key-in WEIGHT ZERO NET STABLE
Weighing mode.
9.0 0 0
kg
Press [REZERO]
[REZERO] 8 8 8 8 8 8
Press [Í][T][Ï] by holding [REZERO] [REZERO]+ [Í][T][Ï] G1/ 0.0 0 0 0
“G1” and “0.0000” alternately display G1/ 0.0 0 0 0
Move the position to edit G by press
[Í].
[Í][Í][Í][Í] 0. 0 0 0 0
Select the G value at the blink digit by
press [Ï].
[Ï][Ï][Ï][Ï][Ï][Ï][Ï][Ï] 8. 0 0 0 0
Press [REZERO] to calibration and exit
to weight mode.
8.0 0 0
kg
Note: This function depends on SPEC23 bit1.
Page 32

Specification List DI-162 V1.09 07-2-1
Operational Specification List
For The Customer - (1 4 1)
SPEC NO. BIT 3 BIT 2 BIT 1 BIT 0
0
Auto Power-off function
(for no key operation & weigh operation)
0000 - Auto power-off disable when scale is not in use
0001 - 3 minute
0010 - 10 minutes
0011 - 30 minutes
0100 - 1 hour
0101 - 3 hours
0110 ~ 1111 - Not used
1
Buzzer
0 - On
1 - Off
Error alarm
0 - On
1 - Off
Set point alarm
0 - On
1 - Off
2
Control of LCD Backlight
00 - Always ON
01 – Always OFF
10 - Auto
11 - Not used
Stable and weight
change > =[10e, RS232C Standard stream
type only output one
data
0 – Yes (V1.13)
1 - No
Set point type
0 - % Weight
1 – Weight
3
RTS/CTS handshaking
of RS-232C
0 - On
1 - Off
Baud rate of RS-232C
000 - 1200 bps 100 - 19200 bps
001 - 2400 bps 101 - Not used
010 - 4800 bps 110 - Not used
011 - 9600 bps 111 - Not used
4
Stop bit of RS-232C
0 - 1 bit
1 - 2 bit
Data length of RS232C
0 - 7 bit
1 - 8 bit
Parity of RS-232C
00 - None
01 - Odd
10 - Even
11 - Not used
5
RS-232C PC protocol
0000 - Inhibit data transfer 0110 - type S
(ICL CS500)
0001 - Standard stream type (Continuous output) 0111~1011not used
0010 - Standard manual type 1100 – Printer GP460Pro (V1.12)
0011 - Standard command type 1101 – Printer LP2844 (V1.12)
0100 - type M
(Checkout-Dialog 02/04)
1110 - Printer GP460R or LableDoctor
0101 - type P(Checkout-Dialog 06) 1111 - Printer EPSON TM-U220
6
Interval of time out error of RS-232C
00 - 1 second
01 - 3 second
10 - 5 second
11 - 10 second
Transmission
condition of RS-232C
0 - Weight stable
1 – Unconditional
Additional parity code
in text of RS-232C
0 - No
1 – Yes
7
Tare weight in text of
RS-232C
0 - No
1 – Yes
Scale No. in text of
RS-232C
0 - No
1 – Yes
Header Code in text of
RS-232C
0 - No
1 – Yes
Weight range of data
output
0 – Always
1 – Over 20e
8
Key operation for tare
in POS-weight-mode.
(for checkout
Dialog02/04 and Dialog
06 only.)
0 - Allow
1 - Inhibit
Calculate and check
CS, KW validly.
(for checkout Dialog 06
only.)
0 - No
1 – Yes
STATUS data in text
of RS-232C
0 - No
1 – Yes
RS-232C Manual t
y
pe
output when weight is
0.
(V1.13)
0 - No
1 - Yes
Page 33

2
9
PC send “w” in
Standard command
mode
0 - Allow
1 - Inhibit(V1.09)
PC send “t” in
Standard command
mode
0 - Allow
1 - Inhibit(V1.09)
RS232C High speed
output when baud
rates >=9600
(V1.13)
0 – high speed
1 – low speed
Wei
g
ht unit after net
wei
g
ht and tare weight
in the text of RS-232C
0 - Allow
1 - Inhibit(V1.11)
10
Scale No.
Low 4 digit
(0000~1111)
(
V1.03)
11
Scale No.
High 4 digit
(0000~1111)
(
V1.03)
12
Output RS232 data
condition
(V1.13)
0 – Set Point ok
1 - Always
External printer print format for LP2844 or GP460Pro
000 - Default Format
001 - Customer Format 1 101 - Customer Format 5
010 - Customer Format 2 110 - Customer Format 6
011 - Customer Format 3 111 - Customer Format 7
100 - Customer Format 4 (V1.12)
13
Set Point buzzer type
(V1.13)
0 – beep between SP
1 – beep outside SP
Total weight printing
when weight is zero
(V1.13)
0 - Inhibit
1 - Allow
Sending default format
to the LP2844 or
GP460Pro (V1.13)
0 - Inhibit
1 - Allow
Output data when
SPEC 2 bit 1 is enable
or using printer
(V1.13)
0 - Net weight > 0
1 - Always
For Weight & Measure - (1 4 2)
NOTE: It can only work when the SPAN Switch is on (Enable)
SPEC NO. BIT 3 BIT 2 BIT 1 BIT 0
20
Version display when
power on
0 - Allow
1 – Inhibit
Type of Decimal
point
0 - .(Standard)
1 - ,(Europe)
Start range
00 - ±10% F.S.
01 - ±20% F.S.
10 - ±50% F.S.
11 - ±100% F.S.(V1.02)
21
Negative weight display
mask
0 - Minus gross > 9e
1 - Minus gross
Weight
Re-call Last zero data
0 - Allow
1 – Inhibit
GAIN
00 – 16 /* 3mV/V */
01 – 32 /* 2mV/V */
10 – 64 /* 1mV/V */
11 – 128 /* 0.4mV/V */
22
Weight stability condition
00 - Loose
01 - Normal
10 - Tight
11 – Stringent
G Calibration
0 - Allow
1 – Inhibit
IR mode protected by
SPAN SW
0 - NO
1 – YES
23
Manual tare
cancellation
0 - Allow
1 – Inhibit
Tare subtraction
0 - Allow
1 – Inhibit
Tare accumulation
0 - Allow
1 – Inhibit
Auto tare clear when
rezero
0 - Allow
1 – Inhibit
Page 34

3
24
Digital tare
0 - Allow
1 – Inhibit
Priority of Tare
Operation
0 – One Touch Tare
Priority
1 –Digit Tare Priority
Zero tracking when
tare
0 - Allow
1 – Inhibit
Weight reset when tare
0 - Allow
1 – Inhibit
25
Tare auto clear
0 - Allow
1 – Inhibit
Auto clear condition
0 - >= Gross 21e
& >= Net 5e
1 - >=Net 1e &
Price not 0
(Remote display
version set to 1 only)
Unit price auto clear
0 - Allow
1 – Inhibit
Animal Mode
0 - Allow
1 – Inhibit
26
Decimal point position on unit price and total
price display
00 - No decimal point for Unit & Total Price
01 - 2nd digit (0000.0) for Unit,
2nd digit (00000.0) for Total Price
10 - 3rd digit (000.00) for Unit,
3rd digit (0000.00) for Total Price
11 - 4th digit (00.000) for Unit,
4th digit (000.000) for Total Price
Rounding for total price
00 - Rounding
01 - Truncation
10 - Cut up
11 - Not used
27
Weight change or
remove check of data
output
0 - Change
1 - Remove
Additional rounding for total price
000 - No additional rounding
001 - 1/4 rounding (25 step)
010 - Special rounding (5 step)
011 - 5 floor rounding (0-4 -> 0, 5-9 -> 5)
100 - Rounding for 1
st
digit
101 - Truncate 1
st
digit
110 - Cut up 1
st
digit
111 - Not used
28
UP key function
0 – Weight unit convert
1 – Data send
(
V1.04
)
Re-zero function
0 - Allow
1 – Inhibit
(
V1.02
)
Re-Zero range
00 - ±2% F.S.
01 - ±4% F.S.
10 - ±10% F.S.
11 - ±100% F.S.
(V1.02)
29
Motion Detection
000 Set inhibit
001 Weak
010 Little bit weak
011 Standard
100 Little bit strong
101 Strong
110
111 (SP_29_321)(V1.05
)
Internal Count Display
0 - 15000
1 - 30000
(SP_29_0)
(V1.04)
30
Auto Hold
0 – Off
1 – On
(
V1.08)
Remote display indicate
type
0 - Icon
1 – Triangle
(V1.08)
Page 35

25
5. Error Message
¾ Error Message Display
Please following the solution when you see the error message
ERROR Probable Cause Solution
8 8 8 8 8 8 (Lock-up) Zero-point is out of range. Need to re-calibrate the scale.
O F
When displayed weight exceeded
capacity +9d, or something is on the
platter when power on.
Remove the item on the
platter.
U F When displayed minus weight >= 9d. REZERO or ON/OFF again.
 Loading...