

Page 1

DC-782
To be the best by every measure
Counting Scale
Counting Scale
Operation Manual
Version 1.006
109429
Page 2

Page 3

Contents
5FDIOJDBMUSBJOJOHTFNJOBSTBSFBWBJMBCMFUISPVHI3JDF-BLF8FJHIJOH4ZTUFNT
$PVSTFEFTDSJQUJPOTBOEEBUFTDBOCFWJFXFEBUXXXSJDFMBLFDPNPSPCUBJOFE
CZDBMMJOHBOEBTLJOHGPSUIFUSBJOJOHEFQBSUNFOU
About This Manual ................................................................................................................................... 1
1.0 Introduction.................................................................................................................................. 1
1.1 Capacities and Resolutions . . . . . . . . . . . . . . . . . . . . . . . . . . . . . . . . . . . . . . . . . . . . . . . . . . . . . . . . 1
1.2 Modes of Operation . . . . . . . . . . . . . . . . . . . . . . . . . . . . . . . . . . . . . . . . . . . . . . . . . . . . . . .
1.3 Keyboard and Display . . . . . . . . . . . . . . . . . . . . . . . . . . . . . . . . . . . . . . . . . . . . . . . . . . . . . . .
1.3.1 Display Specifications . . . . . . . . . . . . . . . . . . . . . . . . . . . . . . . . . . . . . . . . . . . . . . . . . . . . . . . . . . . . . . 2
1.3.2 Indicator Lamps . . . . . . . . . . . . . . . . . . . . . . . . . . . . . . . . . . . . . . . . . . . . . . . . . . . . . . . . . . . . . . . . . . 2
1.3.3 Key Functions . . . . . . . . . . . . . . . . . . . . . . . . . . . . . . . . . . . . . . . . . . . . . . . . . . . . . . . . . .
2.0 Installation ................................................................................................................................... 5
2.1 Unpacking . . . . . . . . . . . . . . . . . . . . . . . . . . . . . . . . . . . . . . . . . . . . . . . . . . . . . . . . . . . . . . . . . . . . . 5
2.2 Repacking . . . . . . . . . . . . . . . . . . . . . . . . . . . . . . . . . . . . . . . . . . . . . . . . . . . . . . . . . . . .
2.3 Setting Up . . . . . . . . . . . . . . . . . . . . . . . . . . . . . . . . . . . . . . . . . . . . . . . . . . . . . . . . . . .
2.4 Powering Up the DC-782 . . . . . . . . . . . . . . . . . . . . . . . . . . . . . . . . . . . . . . . . . . . . . . . . . . . . . .
2.4.1 AC Power Source . . . . . . . . . . . . . . . . . . . . . . . . . . . . . . . . . . . . . . . . . . . . . . . . . . . . . . . . . . . . . . . . . 6
2.4.2 DC Battery Pack Replacement/Installation. . . . . . . . . . . . . . . . . . . . . . . . . . . . . . . . . . . . . . . . . . . . . . . 7
2.4.3 Battery Charging . . . . . . . . . . . . . . . . . . . . . . . . . . . . . . . . . . . . . . . . . . . . . . . . . . . . . . . .
2.4.4 Start-Up Screens . . . . . . . . . . . . . . . . . . . . . . . . . . . . . . . . . . . . . . . . . . . . . . . . . . . . . . . . . . . . . . . . . 8
2.5 Replacement Parts . . . . . . . . . . . . . . . . . . . . . . . . . . . . . . . . . . . . . . . . . . . . . . . . . . . . . . . . . . . . . . . 9
2.6 Block Diagram of Electrical Connections . . . . . . . . . . . . . . . . . . . . . . . . . . . . . . . . . . . . . . . . . . . . . 10
2.7 Physical Layout of Electrical Connections . . . . . . . . . . . . . . . . . . . . . . . . . . . . . . . . . . . . . . . . . . . . . 11
. . . . . . . 1
. . . . . 2
. . . . . . . . . . 3
. . . . . . . . . 5
. . . . . . . . . . 5
. . . . 6
. . . . . . . . . . 8
3.0 Configuration Settings ............................................................................................................... 12
3.1 Putting the Scale in Maintenance Mode . . . . . . . . . . . . . . . . . . . . . . . . . . . . . . . . . . . . . . . . . . . . . . 12
3.2 Configuring Specification 141 and 142 Settings from the Scale Keyboard . . . . . . . . . . . . . . . . . . . . 12
3.2.1 Customer Specification (141 Settings). . . . . . . . . . . . . . . . . . . . . . . . . . . . . . . . . . . . . . . . . . . . . . . . . 12
3.2.2 Weight and Measurement Specifications (142 Settings). . . . . . . . . . . . . . . . . . . . . . . . . . . . . . . . . . . . 14
4.0 Calibration ................................................................................................................................. 17
5.0 Scale Operations........................................................................................................................ 19
5.1 Counting Scale Accuracy . . . . . . . . . . . . . . . . . . . . . . . . . . . . . . . . . . . . . . . . . . . . . . . . . . . . . . . . . 19
5.2 Setting Tare Weights in Weighing Mode . . . . . . . . . . . . . . . . . . . . . . . . . . . . . . . . . . . . . . . . . . . . . . 19
5.2.1 One Touch Tare (When the Tare Weight is Unknown) . . . . . . . . . . . . . . . . . . . . . . . . . . . . . . . . . . . . . 20
5.2.2 Digital Tare (When Tare Weight is Known in Advance) . . . . . . . . . . . . . . . . . . . . . . . . . . . . . . . . . . . . . 20
5.2.3 Tare Addition or Subtraction . . . . . . . . . . . . . . . . . . . . . . . . . . . . . . . . . . . . . . . . . . . . . . . . . . .
. . . . . 20
5.3 Entering Unit Weights . . . . . . . . . . . . . . . . . . . . . . . . . . . . . . . . . . . . . . . . . . . . . . . . . . . . . . . . . . . . 20
5.3.1 Unit Weight Operation by Sampling. . . . . . . . . . . . . . . . . . . . . . . . . . . . . . . . . . . . . . . . . . . . . . . . . . . 21
5.3.2 Unit Weight Operation by Key Entry. . . . . . . . . . . . . . . .
. . . . . . . . . . . . . . . . . . . . . . . . . . . . . . . . . . . 21
5.4 Operations Without Recalling an Item Code . . . . . . . . . . . . . . . . . . . . . . . . . . . . . . . . . . . . . . . . . . . 22
5.4.1 A Single Counting Operation - Without Recalling an Item Code . . . . . . . . . . . . . . . . . . . . . . . . . . . . . . 22
5.4.2 Part Accumulation or Subtraction and Negative Counting - Without Recalling an Item Code . . . . . . . . 22
5.5 Using Item Codes in Weighing Mode . . . . . . . . . . . . . . . . . . . . . . . . . . . . . . . . . . . . . . . . . . . . . . . . 24
5.5.1 Recalling Item Codes using Item Code Number . . . . . . . . . . . . . . . . . . . . . . . . . . . . . . . . . . . . . . . . . 24
5.5.2 Delete Item Memory . . . . . . . . . . . . . . . . . . . . . . . . . . . . . . . . . . . . . . . . . . . . . . . . . . . . . . .
. . . . . . . 24
6.0 Scale Programming................................................................................................................... 25
6.1 Checking Memory Status . . . . . . . . . . . . . . . . . . . . . . . . . . . . . . . . . . . . . . . . . . . . . . . . . . . . . . . . . 25
6.2 Program Item Code, Tare Weight, Unit Weight, Setpoint 1 and 2 . . . . . . . . . . . . . . . . . . . . . . . . . . . 25
© 2012 Rice Lake Weighing Systems. All rights reserved. Printed in the United States of America.
Specifications subject to change without notice. Version 1.006, January 2012
i
Page 4

6.3 Program a General Setpoint . . . . . . . . . . . . . . . . . . . . . . . . . . . . . . . . . . . . . . . . . . . . . . . . . . . . . . 27
6.4 Programming a Preset Key . . . . . . . . . . . . . . . . . . . . . . . . . . . . . . . . . . . . . . . . . . . . . . . . . . . . . .
6.5 Delete Item Memory . . . . . . . . . . . . . . . . . . . . . . . . . . . . . . . . . . . . . . . . . . . . . . . . . . . . . . . . . .
. 27
. . 28
7.0 RS-232C Communication with PC ............................................................................................. 29
7.1 Connection . . . . . . . . . . . . . . . . . . . . . . . . . . . . . . . . . . . . . . . . . . . . . . . . . . . . . . . . . . . . . . . . . . . 29
7.2 General Specifications of the RS-232C Interface . . . . . . . . . . . . . . . . . . . . . . . . . . . . . . . . . . . . . . . 29
7.3 Setting the Scale Specifications for Communication to a PC . . . . . . . . . . . . . . . . . . . . . . . . . . . . . . 29
.
7.4 Communication Method . . . . . . . . . . . . . . . . . . . . . . . . . . . . . . . . . . . . . . . . . . . . . . . . . . . . . . .
7.4.1 Standard Stream Data Transmission (Continuous) . . . . . . . . . . . . . . . . . . . . . . . . . . . . . . . . . . . . . . . 30
7.4.2 Standard Manual Data Transmission. . . . . . . . . . . . . . . . . . . . . . . . . . . . . . . . . . . . . . . . . . . . . . . . . . 31
7.4.3 Standard Command Data Transmission . . . . . . . . . . . . . . . . . . . . . . . . . . . . . . . . . . . . . . . . . . . . . . . 32
7.5 Characters That Can Be Transmitted by RS-232C. . . . . . . . . . . . . . . . . . . . . . . . . . . . . . . . . . . . . . 32
7.6 RS-232C Data Transmission Formats . . . . . . . . . . . . . . . . . . . . . . . . . . . . . . . . . . . . . . . . . . . . . . . 33
. 30
8.0 Appendix .................................................................................................................................... 37
8.1 DC-782 Specifications . . . . . . . . . . . . . . . . . . . . . . . . . . . . . . . . . . . . . . . . . . . . . . . . . . . . . . . . . . . 37
8.2 DC-782 Error Message List . . . . . . . . . . . . . . . . . . . . . . . . . . . . . . . . . . . . . . . . . . . . . . . . . . . . . . . 38
9.0 DC-782 Limited Warranty........................................................................................................... 39
ii DC-782 Operation Manual
Page 5

About This Manual
#AUTION
This manual contains operating procedures for the DC-782 counting scale and provides the user with all the
information necessary for setup and operation. It is organized based on the procedures you will likely follow
when setting up and using your counting scale. This manual applies to Version 1.006 of the DC-782 counting
scale series.
Some procedures described in this manual require work inside the scale base. These procedures are to
be performed by qualified ser
Authorized distributors and their employees can view or download this manual from the
DIGI distributor site at www.ricelake.com.
vice personnel only.
1.0 Introduction
The DC-782 is a low cost counting scale that offers practical solutions for a full range of counting applications.
Its counting resolution of 1/500,000 gives you maximum counting precision and accuracy. Its backlit LCD
display enables operators to easily see weights and quantities. The DC-782 can also store an item code, tare
weight, unit weight, and setpoint value for 25 of your pieces, parts, or items and recall 10 of them with the
pressing of a single preprogrammed key. The RS-232 output allows you to transmit data from the scale to a PC.
When portability is required, choose the battery operation opt ion of the DC-782 for over 300 ho urs of continuo us
use in mobile workstations, outdoor applications, and rental fleets. The DC-782 is rugged enough to operate
reliably in many environments and withstand transport from one area of the plant to another or from one business
to the next.
1.1 Capacities and Resolutions
Table 1-1 lists the scale capacities, minimum graduations, and tare ranges for all models of the DC-782 counting
scales. The display resolution is 1/6,000 with an internal or
Part No. Capacity
108248 6 lb x 0.001 lb
108249 15 lb x 0.002 lb
108250 30 lb x 0.005 lb
108251 60 lb x 0.01 lb
Table 1-1. DC-782 Capacities and Resolutions
counting resolution of 1/500,000.
1.2 Modes of Operation
The DC-782 has three modes of operation:
• Weighing Mode – where all weighing, counting and outputting of data operations take
• Programming Mode – where item data can be programmed into the
will show ProG to indicate that you are the Programming Mode.
• Maintenance Mode - where your DIGI dealer can set specific
other maintenance functions.
memory of the scale. The display
ations, perform scale calibration and
place.
Introduction 1
Page 6

1.3 Keyboard and Display
Figure 1-1 shows the DC-782 console with its indicator lamps, the function keyboard and the numeric keypad.
Annunciators are described in Section 1.3.2. Section 1.3.3 describes the DC-782 keyboard and keypad.
Figure 1-1. DC-782 Display
1.3.1 Display Specifications
Weight display 5 digits
Unit weight display 5 digits
Quantity display 6 digits
Table 1-2. DC-782 Display Specifications
1.3.2 Indicator Lamps
Table 1-3 shows a list of the indicator lamps that the DC-782 uses to provide additional information about the
value being displayed. The indicator lamps are illuminated when t
he specific function is being performed.
Indicator Lamp Function or Meaning
0
NET
GROSS
RECOMP
INSUFF
MEM
batt
On when the gross weight is zero and is stable
On when the display shows net weight (when a tare weight is entered or recalled and subtracted)
On when the GROSS/NET key has been pressed and gross weight is being shown
On when unit weight recomputing is enabled
On when the net weight is below the specified percentage of scale capacity
On when carrying out accumulation and subtraction
Battery warning when weak and needs charging (blinks while charging)
Table 1-3. DC-782 Indicator Lamps and Function
2 DC-782 Operation Manual
Page 7

1.3.3 Key Functions
to
The DC-782 features many functions for managing inventory information and scale operation. Figure 1-2 shows
the key-sheet and Table 1-4 lists the keys and key functions of the DC-782 keyboard.
Figure 1-2. Key Sheet Layout
Some keys have different functions depending on what mode or function you are in.
Key Description
ON/OFF - Turns the scale display on or off
Numeric keys - Used to enter numeric values. When using the scale, first enter a numeric
value, then press the appropriate function key.
DECIMAL key - Used to set the decimal point.
CLEAR key.
Weighing Mode - Used to clear the Unit Weight. Used to return to the weighing display when
doing accumulation.
Programming Mode - Used to delete an Item Code or assoc
codes. Used to Cancel input in programming SPEC codes.
iated value when programming item
Pieces key - Used for computing unit weight by sampling.
TARE key.
Weighing Mode - Used to set or clear the tare value.
Programming Mode - Used to store SPEC changes and escape to the Weighing Mode when
programming specifications.
Maintenance Mode - Used to escape to the W
eighing Mode from the Maintenance Mode.
REZERO key.
Weighing Mode - Used to reset the weight display to zero.
- (Minus) key.
Weighing Mode - Used to delete a character entered during operations. Used to subtract a
quant
ity during accumulation. Also prompts outputting data to a PC if one
is connected.
Programming Mode - Used to navigate to the pr
codes.
evious specification when programming SPEC
Table 1-4. DC-782 Key Functions
Introduction 3
Page 8

Key Description
to
+ (Plus) key.
Weighing Mode - Used to accumulate data. Also prompts outputting of data to a PC if one is
connected.
Programming Mode - Used to navigate to the next specification when programming SPEC codes.
MODE key - Used to enter the programming mode from the weighing mode.
UNIT WEIGHT key - Used to set the unit weight from the numeric keypad and display all digits of
the unit weight.
CONFIRM key - Used to confirm the data to be saved or deleted. Also sends the data to the
RS-232C port if the specifications are set to send data.
NET/GROSS key - Used to change the display between net and gross weights.
PRESET keys - Used to set up and recall specific item codes and their associated data
from memory.
Number Key - Used to call up item codes
Table 1-4. DC-782 Key Functions
4 DC-782 Operation Manual
Page 9

2.0 Installation
#AUTION
#AUTION
This section describes the procedure for the installation and setup of the DC-782 counting scale.
2.1 Unpacking
Do not turn scale upside down. Always work with scale on its side! Damage to the load cell can occur if
the scale is turned upside down.
1. Immediately after unpacking, visually inspect the DC-782 counting scale to ensure all components are
included and undamaged. If any were damaged in shipment, notify Rice Lake Weighing Systems and the
shipper immediately.
2. The DC-782 counting scale is carefully packed for protection during shipping. After ope ning the box,
remove all
pieces. The package should include the following:
• DC-782 counting scale
• Stainless steel platter
• AC power cord
• Operation manual
the components. Check the insides of the box carefully to make sure you have all of the
3. Remove the bag protecting the scale and the protecti
4. Seat the stainless steel platter on the platter supports, with the
rubber stops.
5. After ensuring that all parts are present, store the
ve film covering the front panel and platter.
four corner pins inserted into the corner
DC-782 scale box for possible future use.
2.2 Repacking
If the DC-782 counting scale must be returned for modification, calibration or repair, it must be properly packed
with sufficient cushioning materials. Whenever possible, use the original carton when shipping the DC-782.
Damage caused by improper packaging is not covered by the warranty.
2.3 Setting Up
Place the scale on a solid, level surface away from fans, breezes, and sources of electrical interference.
Level the scale by turning the four adjustabl
level located on the front of the scale (see Figure 2-1).
NOTE: To ensure a higher degree of scale stability, turn in all four adjustable legs before leveling. Turn out adjustable legs to
level as needed.
e legs located on the bottom of the scale while referencing the bubble
Installation 5
Page 10

Figure 2-1. Leveling Bubble
Leveling
Bubble
2.4 Powering Up the DC-782
The DC-782 can be operated either from an AC power source or with a rechargeable battery pack (DC power).
The DC power allows the unit to be completely portable. Instructions for DC operation are contained in
Section 2.4.2.
2.4.1 AC Power Source
NOTE: Production units manufactured after February 2011 have a standard power cord.
To power up the DC-782 using the AC power cord:
1. Connect the AC power cord under the scale base as shown in Figure 2-2.
Figure 2-2. AC Plug-in Location on Underside of DC-782
2. Plug the AC power cord into a grounded 115 VAC receptacle.
3. Press the ON
display’s segments. How thorough the segment check is depends on the setting of SPEC 20, Bit 2. The
default is 0: Fast (For further instructions on how to set the scale’s specifications, see Section 3.2.1):
• If SPEC 20, Bit 2 is set to 0: Fast, the scale display
seconds. It then displays 888’s again followed by a blank display for another 1.5 seconds before
going into the normal weighing mode.
6 DC-782 Operation Manual
• If SPEC 20, Bit 2 is set to 1: Standard, the scale’
numeral from 0 to 9, asterisks, decimal points and annunciators before going into the normal
weighing mode.
/OFF key located on the front of the scale. The scale will run through a check of the LCD
’s 888’s for 1.5 seconds, then blanks for 1.5
s display will test the LCD segments for each
Page 11

4. Once the scale is on, the time interval before the scale will automatically power itself off, if there no key
#AUTION
12
3
6
45
30mm
is pressed and no weight is placed on the platter, is determined by SPEC 00- Auto Power-Off Function.
The default is 0000: Disabled. (For further instructions on how to set the scale’s specifications, see
Section 3.2.1)
2.4.2 DC Battery Pack Replacement/Installation
An optional DC battery pack (PN 108516) for the DC-782 is available and can be purchased from RLWS to ship
with the scale or retrofit in the field. The rechargeable 6V 5.0 AH battery pack allows for up to 300 hours of
scale use without an AC power supply (with the backlight off). It is located in the bottom of the scale base. Use
the following procedure to install or replace the battery pack.
1. Unplug the scale from power source.
2. Place scale its left side.
Do not turn the scale upside down. Always work with the scale on its side. Damage to the load cell can
occur if the scale is turned upside down.
3. Unscrew the thumb screw (4 below) holding the battery compartment door (5 below) closed.
4. Unscrew the two screws (3 below) holding on the batte
bracket.
ry holding bracket (2 below) and remove the
5. If you are removing a battery previously installed, remove the battery from its compartment, then
disconnect the black (-) and red (+) electrical leads from the battery (6 above). If you are installing a new
battery, go to step 6.
6. Attach the red lead to the
negative (-) terminal. Place new DC battery pack in battery compartment.
7. Replace the battery holding bracket (2 above) and fasten it
8. Replace the battery compartment door (5 above) and fa
9. Put the scale back upright on its feet.
10. Press the ON/OFF key located
display’s segments. How thorough the segment check is depends on the setting of SPEC 20, Bit 2. The
default is 0: Fast (For further instructions on how to set the scale’s specifications, see Section 3.2.1):
• If SPEC 20, Bit 2 is set to 0: Fast, the scale display
seconds. It then displays 888’s again followed by a blank display for another 1.5 seconds before
Figure 2-3. Installing the Battery
positive (+) terminal of the new DC battery pack, and the black lead to the
with its two screws (3 above).
sten it with its thumb screw (4 above).
on the front of the scale. The scale will run through a check of the LCD
’s 888’s for 1.5 seconds, then blanks for 1.5
Installation 7
Page 12

going into the normal weighing mode.
• If SPEC 20, Bit 2 is set to 1: Standard, the scale’
s display will test the LCD segments for each
numeral from 0 to 9, asterisks, decimal points and annunciators before going into the normal
weighing mode.
2.4.3 Battery Charging
A fully charged battery allows for approximately 300 hours of continuous use (with the backlight off). When the
battery is low the battery indicator light will light up. It will take approximately 12-14 hours to fully recharge a
battery that has been completely dissipated. To charge the battery, plug in the AC power cord.
2.4.4 Start-Up Screens
1. If SPEC 20, Bit 3 - Version Display When Power On is set to 0: Allow, the scale will display the current
version of the firmware it is using as it powers up (For further instructions on how to set the
specifications, see Section 3.2.1).
2. After a test of the different elements of the display
, the scale takes you to the stand-by screen in the
Weighing Mode. SPEC 20, Bit 2 - Selection of Segment-Check Style controls whether the startup test of
the segments is Fast or Standard. At the stand-by screen the
QUANTITY, WEIGHT, and UNIT WEIGHT
displays show zeroes.
From this stand-by screen all of the basic weighing, c
3. If there is anything on the platform(s)
and it exceeds the scale start range, the display will show the error
ounting and inventory operations can be performed
message OF indicating “weight overflow”.
Note: The Initial Start Range settings are controlled by SPEC 20, Bit 1. The default setting is 0: ± 10% OF FULL SCALE.
If this error appears, remove the weight from the platform and the scale will continue its startup
sequence.
8 DC-782 Operation Manual
Page 13

2.5 Replacement Parts
The following list contains the part numbers and descriptions of replacement parts available for the DC-782
counting scale.
RLWS Part Number Description
108516 Rechargeable Battery Pack, 6 V, 5.0AH
108517 AC Adapter 110VAC
108518 AC Adapter 230VAC
109429 Operating Manual
109241 Display Overlay
109242 Keyboard Underlay
73524 Weighing Platter
109243 Display Window Overlay 6 lb Capacity
109244 Display Window Overlay 15 lb Capacity
109245 Display Window Overlay 30 lb Capacity
109246 Display Window Overlay 60 lb Capacity
109247 Keyboard Overlay
109248 Platter Support Bracket
73438 Platter Support (Black)
109249 Center Support (Black)
109250 Foot
109251 Hexagonal Nut T3 M6 for Foot
109252 Loadcell, 6 lb (3 kg)
109253 Loadcell, 15 lb (6 kg)
109254 Loadcell, 30 lb (12 kg)
109255 Loadcell, 60 lb (30 kg)
109256 Main Board
109257 A/D Board
109258 DC Power Board
Table 2-1. DC-782 Replacement Parts
Installation 9
Page 14

2.6 Block Diagram of Electrical Connections
The following block diagram illustrates the electrical connections.
10 DC-782 Operation Manual
Page 15

2.7 Physical Layout of Electrical Connections
The following diagram illustrates the actual layout of the electrical connections.
Installation 11
Page 16

3.0 Configuration Settings
SPAN SWITCH
FRONT OF SCALE
This section presents the setup and configuration of the DC-782 counting scale to be used specifically by
distributors and service technicians. Configuring these specifications allow you to tailor the DC-782 to your
specific applications.
Setting the specifications allows you to modify the functionality of the DC-782. Use the tables in this section to
iew the options you can modify.
v
3.1 Putting the Scale in Maintenance Mode
Before you can configure the specification settings of the DC-782 scale, you must first place the scale in
Maintenance Mode by pressing the span switch.
NOTE:
Turn the scale on, then press the span switch to reset it. (See Figure 3-1 below.)
You can exit the Maintenance Mode and return to the Weighing Mode at any time by pressing the TA R E key.
Figure 3-1. Location of Span Switch
3.2 Configuring Specification 141 and 142 Settings from the Scale Keyboard
The following tables list the DC-782 specifications, their corresponding default values, and the other possible
values to which they can be programmed. The default values are set at the factory when the scale is shipped.
SPEC 0 through SPEC 10 (Table 3-1) are customer specifications and use the 141 ac
through SPEC 29 (Table 3-2) are weight and measurement specifications, and use the 142 access code
In programming specifications, the + (P
specification. The CLEAR key cancels any input you have made. The * CONFIRM key temporarily stores to
memory any changes you have made. The TAR E
you to the weighing mode. Note also that w hen programming specifications, only th e 0 and 1 keys on the
numeric keypad are enabled, since those are the only valid entries.
lus) and – (Minus) keys allow you to move to the next or previous
key saves to memory the changes you have made and returns
cess code, while SPEC 20
3.2.1 Customer Specification (141 Settings)
1. To configure customer specifications, press and hold the REZERO key and enter 141 using the numeric
keypad. The first SPEC code is displayed.
The Quantity display shows what specification yo
shows how this specification is currently programmed (Bit 3 = 0; Bit 2 = 0; Bit 1 = 0, and Bit 0 = 1 in this
example, while the Unit Weight display will show any changes you enter.
12 DC-782 Operation Manual
u are in (in this case, SPEC00). The Weight display
Page 17

If this is the SPEC that you want to modify, enter the new setting from the numeric keypad and press the
* CONFIRM key to enter the change into temporary memory and move to the next SPEC code.
2. Use the + (plus) and – (minus) keys to scrol
l through the specifications until you find the one you want.
Then make your changes per the instructions in Step 1. Alternatively, you can go directly to a specific
specification by entering that specification’s number and pressing the # key (Example: 9 + # will bring
up SPEC 09; 11 + # will bring up SPEC 11).
3. To change another SPEC code before exiting, repeat Steps 1 and 2.
4. To save all the changed SPEC settings currently in temporary
memory and exit to the Weighing Mode,
press the TARE key.
5. Turn off Power and restart the scale.
SPEC No. Bit 3 Bit 2 Bit 1 Bit 0
00 Auto Power-off Function (for no key operation and weighing operation)
0000: Auto power-off disable when scale is not in use (DEFAULT)
0001: 3 minutes
0010: 10 minutes
0011: 30 minutes
0100: 1 hour (DEFAULT0
0101: 3 hours
0110 ~ 1111 - not used
01 Buzzer
Error Alarm
Set Point Alarm
Not Used
0: On (DEFAULT)
1: Off
02 Tare Override
0: Allow (DEFAULT)
1: Inhibit
03 Back-Light Function
00: Auto (DEFAULT)
01: Always On
10: Always Off
11: Not Used
04 Extent of Insufficient Samples
00: 0.1% (DEFAULT)
01: 0.2%
10: 0.0%
11: Not Used
05 Sampling Time for Unit
06 RTS/CTS Handshaking of
eight Calculation
W
0: 10 times
1: 5 times (DEFAULT)
RS-
232C
0: On
1: Off (DEFAULT)
0: On (DEFAULT)
1: Off
Unit Weight Override
0: Allow(DEFAULT)
1: Inhibit
Negative Counting
0: Allow (DEFAULT)
1: Inhibit
Baud Rate of RS-232C
000: 1200 bps 100: 19200 bps
001: 2400 bps 101: 38400 bps
010: 4800 bps 110: Not used
011: 9600 bps (DEFAULT) 111: Not used
0: On (DEFAULT)
1: Off
Zero Unit Weight Override
0: Allow (DEFAULT)
1: Inhibit
Auto Back-Light Function
00: 6 seconds (DEFAULT0
01: 15 seconds
10: Not Used
11: Not Used
Set Point Type
00: % quantity (DEFAULT)
01: % weight
10: Quantity
11: Weight
Re-Zero Function
0: Allow (DEFAULT)
1: Inhibit
0: (DEFAULT)
Not Used
0: (DEFAULT)
Transmission Condition
of RS-
232
0: Weight Stable
1: Unconditional (DEFAULT)
Table 3-1. DC-782 (141) Settings
Configuration Settings 13
Page 18

SPEC No. Bit 3 Bit 2 Bit 1 Bit 0
07 Stop bit of RS-232C
Data length of RS-232C
Parity of RS-232C
0: 1 bit (DEFAULT)
1: 2 bit
08 Interval of Time-Out Error of RS-232C
00: 1 second
01: 3 seconds (DEFAULT)
10: 5 seconds
11: 10 seconds
09 Tare Weight in Text of
232C
RS-
0: No
1: Yes (DEFAULT)
10 RS-232C PC Protocol
0000: Inhibit data transfer (DEFAULT)
0001: Standard Stream Type (Continuous Output)
0010: Standard Manual Type
0011: Standard Command Type
0100 ~ 1111: Not Used
11 ~ 19
Not Used (reserved for future use)
0: 7 bits
1: 8 bits (DEFAULT)
Unit Weight in Text of
RS-
0: No
1: Yes (DEFAULT)
232C
00: None (DEFAULT)
01: Odd
10: Even
11: Not Used
Additional Parity Code in
ext of RS-232C
T
0: No (DEFAULT)
1: Yes
Quantity in Text of
-232C
RS
0: No
1: Yes (DEFAULT)
Status and Weight
Conditio
RS-232C
0: No (DEFAULT)
1: Yes
Header Code in Text of
R
0: No
1: Yes (DEFAULT)
n Flag in Text of
S-232C
Table 3-1. DC-782 (141) Settings
3.2.2 Weight and Measurement Specifications (142 Settings)
To make changes to the Weight and Measurement Specifications, the span switch must be on. (For instructions
on how to turn the span switch on, see Section 4.0.)
1. To configure customer specifications, pres
s and hold the REZERO key and enter 142 using the numeric
keypad. The first SPEC code is displayed.
The Quantity display shows what specification yo
u are in (in this case, SPEC20). The Weight display
shows how this specification is currently programmed (Bit 3 = 1; Bit 2 = 0; Bit 1 = 0, and Bit 0 = 0),
while the Unit Weight display will show any changes you enter.
If this is the SPEC that you want to modify, enter the
new setting from the numeric keypad and press the
* CONFIRM key to enter the change into temporary memory and move to the next SPEC code.
2. Use the + (P
lus) and – (Minus) keys to scroll through the specifications until you find the one you want.
Then make your changes per the instructions in Step 1. Alternatively, you can go directly to a specific
specification by entering that specification’s number and pressing the # key (Example: 25 + # will bring
up SPEC 25).
14 DC-782 Operation Manual
Page 19

3. To change another SPEC code before exiting, repeat Steps 1 and 2.
4. To save all the changed SPEC settings currently in temporary
memory and exit to the Weighing Mode,
press the TARE key.
5. Turn off Power and restart the scale.
SPEC No. Bit 3 Bit 2 Bit 1 Bit 0
20 Version Display When
wer On
Po
Selection of
Segment-C
heck Style
Start Range
0: Allow (DEFAULT)
1: Inhibit
21 Wight Stability Condition
00: Loose
01: Nornal (DEFAULT)
10: Tight
11: Stringent
22 Decimal Point Position on Weight Display
00: No Decimal Point
01: 2nd Digit (0000.0)
10: 3rd Digit (000.00) (DEFAULT 50 lb)
11: 4h Digit (00.000) (DEFAULT for 6 lb, 25 lb)
23 Weight Single Interval
or Multi-Interval
0: Single Interval (DEFAULT
6 lb)
1: Multi-Interval (DEFAULT
25 lb, 50
24 Negative Weight
Disp
lb)
lay Mask
0: Fast (DEFAULT)
1: Standard
Selection of Resolution
000: 1/2,500
001: 1/5,000 (DEFAULT 25 lb, 50 lb)
010: 1/10,000
011: Not Used
100: 1/3,000 (DEFAULT 6 lb)
101: 1/6,000
110: 1/7,500
111: Not Used
Gross Mode
00: ±10% of Full Scale (DEFAULT)
01: ± 5% of Full Scale
10: ± 3% of Full Scale
11: ± 2% of Full Scale
IR Mode Protected by
Span Sw
0: No (DEFAULT)
1: Yes
Minimum Display
00: 1 ((DEFAULT 6 lb)
01: 2
10: 5 (DEFAULT 25 lb)
11: 10 (DEFAULT 50 lb)
PLU Tare
itch
Password Setting
0: Allow
1: Inhibit (DEFAULT)
Tare R a n g e
0: Minus gross > 9e
1: Minus gross weight
(DE
FAULT)
25 Manual Tare
26 Digital Tare
Ca
ncellation
0: Allow
1: Inhibit
0: Allow (DEFAULT)
1: Tare
Table 3-2. DC-782 Weight and Measurement Specifications
0: Allow (DEFAULT)
1: Inhibit
Ta r e S u b t r a c t i o n
0: Allow
1: Inhibit
Accumulation When Tare
0: Allow (DEFAULT)
1: Inhibit
0: Allow (DEFAULT)
1: Inhibit
Tare Accumulation
0: Allow
1: Inhibit
Zero Tracking When
re
Ta
0: Allow (DEFAULT)
1: Inhibit
0: 50% of full scale
(DEF
AULT)
1: 100% of full scale
Auto Tare Clear When
-Zero
Re
0: Allow
1: Inhibit
Weight Reset When
re
Ta
0: Allow (DEFAULT)
1: Inhibit
Configuration Settings 15
Page 20
SPEC No. Bit 3 Bit 2 Bit 1 Bit 0
27 Ta re A u t o C l e a r
Unit Weight Auto Clear
Auto Clear Condition
Net/Gross
i-Interval
Mult
0: Allow
1: Inhibit (DEFAULT)
28 Accumulation
0: Allow (DEFAULT)
1: Inhibit
29 Exit From Accumulation
After 15 Second
Mode
Time Out
0: Allow (DEFAULT)
1: Inhibit
30 ~ 47
Not Used (reserved for future use)
0: .Allow
1: Inhibit (DEFAULT)
Subtraction
0: >=Gross 21e & >=Net 5e
1: >=Net 1e & Quantity Not
AULT)
0 (DEF
Accumulation Number
Display
0: Allow (DEFAULT)
1: Inhibit
Exit From Accumulation
Mode When W
eight
Change
0: Allow (DEFAULT)
1: Inhibit
0: Allow (DEFAULT)
1: Inhbit
Quantity Accumula
Without Removing
Weight
0: Allow (DEFAULT)
1: Inhibit
Table 3-2. DC-782 Weight and Measurement Specifications
0: Gross
1: Net (DEFAULT)
Weight Range of Data
Output
0: Allow (DEFAULT)
1: Inhibit
tion
Quantity Accumula
Without Change Weight
(for >=±
0: Allow (DEFAULT)
1: Inhibit
tion
16 DC-782 Operation Manual
Page 21

4.0 Calibration
SPAN SWITCH
FRONT OF SCALE
The DC-782 scale is a high-precision instrument. Although the scale needs very little maintenance, you may
want to check the calibration after every month or so of normal usage. To do this you will need to have a test
weight of approximately the total capacity of the scale (i.e. a 10 lb weight if you have a 10 lb capacity scale).
After the scale is initially installed, put the weight on the platform and record the weight displayed. Then every
month or so put the same weight on the scale and verify that it still reads the same.
Many facilities have a technician come in and check
you are ISO certified, you will want to check to see if your certification specifies more stringent requirements in
order to stay in compliance. Your DIGI scale dealer has the calibrated test weights, expertise and experience to
perform this task for you as well as to check other op erating parameters of yo ur scale and help you effectively
integrate scales into your operations. If you do not know who your local DIGI dealer is, call us at
1-715-736-0002 and we will help you find someone who can provide you with on-site support.
Follow the instructions below to calibrate your DC-782
their units with certified test weights four times a year. If
scale to ensure its continued accuracy.
NOTE:
have a remote scale attached to the DC-782, you must first set the SPECs for that remote scale before beginning the calibration
process.
You can exit the Maintenance Mode and return to the Weighing Mode at any time by pressing the TAR E key. If you
1. Turn the scale on, then press the span switch to reset it. (See Figure 4-1 below.)
Figure 4-1. Location of Span Switch
2. While pressing the REZERO key, enter 8715 from the numeric keypad to enter the calibration mode.
Calibration 17
Page 22

3. The scale display will confirm that you are in the Calibration Mode.
4. Make sure that there is no weight on the platform of the scale you are calibrating and press the
* CONFIRM key. The scale will flash briefly as it searches for the zero point and then will toggle
between CAL SP and the capacity.
5. Place a reference weight on the platform. It is preferable to calibrate the scale using a weight equal to the
full capacity of the scale (i.e. a 15 lb weight for 15 lb capacity scale, etc.) If the reference weight is not
equal to the full capacity of the scale, it must at least be greater than 10% of the full scale capacity.
If the reference weight is equal to the full capacity of the scale, press the * CONFIRM key. If the
reference weight is less than the full capacity of the scale, press the * CLEAR key to toggle between
different calibration choices. The weight you enter will appear in the Weight display, press the
* CONFIRM key.
6. The display will flash briefly again as the span settings for calibration of the scale are being temporarily
saved. Then the display will return to the weighing mode with the calibrated weight showing in the
Weight window..
7. To exit the Maintenance Mode and save your calibration, power down your DC-782 scale. To exit the
Maintenance Mode and return to the Weighing Mode without saving your calibration, press the TAR E
key.
18 DC-782 Operation Manual
Page 23

5.0 Scale Operations
The following sections contain detailed operator instructions for the DC-782 counting scale (see Figure 5-1).
Included are instructions on how to enter tare weights, how to enter unit weights, and how to perform counting
erations.
op
Figure 5-1. DC-782 Counting Scale
5.1 Counting Scale Accuracy
Counting scale accuracy is primarily determined by the following factors:
• Sample size (number of pieces)
• Total sample size as a percentage of full scale capacity
• Piece-to-piece weight variation
As a general rule when determining sample si
total sample weight, therefore, the better the counting accuracy. Selecting the smallest capacity scale that can
obtain the highest counting resolution should be considered, but should not sacrifice the capacity required for the
heaviest container of parts.
There is a direct relationship between piece-to-piece weight variation (non-uniformity) and counting
Therefore, elimination of the piece-to-piece weight variations can be accomplished by:
1. Isolating the sample used to calculate th
2. Recalculating the unit weight from lot-to-lot of parts. Parts manufactured on one machine
slightly from another machine relative to weight.
3. Tightening the manufacturing tolerances on the parts
accuracy.
Parts can vary greatly in their value. With parts of les
trying to achieve 100% accuracy as opposed to 99.5% may not be cost-effective. However, with high value
items, 100% accuracy is vital. The DC-782 Counting Scale has the precision to help you with both situations.
ze of fairly uniform pieces, the larger the sample siz e the greater the
accuracy.
e unit weight and use the same sample to re-check the scale.
may vary
reduces piece weight variations and increases count
ser value per piece, the extra sampling and time involved in
5.2 Setting Tare Weights in Weighing Mode
This section will describe the different tare-related operations you can perform from the weighing mode. Tare
weight can be set by one touch tare using the TARE key or, if the value is known ahead of time, can be entered
digitally using the digital tare function. Tare addition and subtraction can also be done digitally or by using the
TARE key. Finally, an existing tare stored with an Item Code can be overridden temporarily in the Weighing
Mode if needed.
Scale Operations 19
Page 24

Note: The following SPEC codes must be set properly to allow these operations before continuing: SPEC 25, Bit 3 - MANUAL
TARE CANCELLATION sets whether or not the tare weight can be cancelled from the keyboard. SPEC 25 also controls whether
TARE SUBTRACTION (Bit 2) and TARE ACCUMULATION (Bit 1) are allowed or inhibited and whether AUTO TARE CLEAR WHEN
REZERO (Bit 0) takes place or not. SPEC 26 controls whether the scale allows DIGITAL TARE entry (Bit 3), whether the scale can
do ACCUMULATION WHEN TARE (Bit 2), if there will be ZERO TRACKING WHEN TARE (Bit 1) and WEIGHT RESET WHEN
TARE (Bit 0). SPEC 27 sets whether or not TARE AUTO CLEAR is activated (Bit 3). (For further instructions on how to set the
specifications, see Section 3.2.1)
5.2.1 One Touch Tare (When the Tare Weight is Unknown)
1. While in the weighing mode, place a bin, box or other weight to be tared out on the platform.
2. Press the TA
RE key to subtract the tare weight. The Net annuciator will light up and the Weight display
should now show 0.
3. If you remove the tare weig ht from the platform, the
tare weight will show as a negative weight in the
weight window and the Net annunciator will remain lit.
NOTE: This tare weight will be overridden by the weight stored with an Item Code when you call up an Item Code.
4. To clear this tare weight and return to the Weighing Mode, press the TA RE key again. The Net
annunciator will not longer be lit.
5.2.2 Digital Tare (When Tare Weight is Known in Advance)
1. While at the stand-by screen, enter the known tare weight by using the numeric keypad.
2. Press the TA
will be displayed in the weight display.
NOTE: This tare weight will be overridden by the weight stored with an Item Code when you call up an Item Code.
3. To clear this tare weight and return to the Weighing Mode, press the TAR E key again. The net
annunciator will no longer be lit.
NOTE: For digital tare entry, the decimal must be in the appropriate place as it would be displayed in the weight display. For
example, .250 would be entered as 0.250, not .250. The weight display shows weight entered with a negative sign indicating that
it is a tare weight.
RE key to subtract the tare weight. The Net annunciator will light up and the tare weight
5.2.3 Tare Addition or Subtraction
Two tares can be accumulated or subtracted using the TA RE key as well. Tare weights cannot be accumulated or
subtracted by digital entry.
NOTE: SPEC 25, Bits 2 and 1 must be set to 00 to enable Tare Accumulation and Tare Subtraction. (For further
instructions on how to set the specifications, see Section 3.2.1)
1. Place the container, box or item to be tared on the platform and press the TA
RE key. The weight display
should show 0, the Net annunicator will illuminate and the tare weight will appear in the Tare display.
2. Place another tare weight on the platform and press the TA
RE key again. This will add the two tare
weights together (Tare Addition).
3. Tare weights can be subtracted individually by r
emoving one from the platform and pressing the TAR E
key again. T o clear all the tare weights and return to the Weighing Mode, remove all the tare weights and
press the TARE key. The Net annunicator will no longer be lit.
5.3 Entering Unit Weights
Entering unit weights can be done either by samp ling, as presented in Section 5.3.1, or by key entry as described
in Section 5.3.2.
NOTES: SPEC 04 - EXTENT OF INSUFFICIENT SAMPLES controls unit weight sampling. The default setting for the SPEC is 00:
The Benefit of Unit Weight per 1000 Pieces Over Unit Weight per 1 Piece
Your DIGI DC-782 scale displays the unit weight calculated per 1000 pieces. Why is this a more accurate way to
display unit weight than the more common unit weight per individual piece? The scale’s internal microprocessor
calculates unit weights to 7 or 8 decimal places. However, the scale display generally can only show Unit Weight
to 5 characters. If this Unit Weight is recorded from the scale display and entered by key entry, this can introduce
errors in the Unit Weight and consequently in the counts. This error increases a s the Unit Weight of the parts
being counted decreases.
0.1 percent. (For further instructions on how to set the specifications, see Section 3.2.1)
20 DC-782 Operation Manual
Page 25

Example: A sample of 10 zener diodes is placed on the scale. The Unit Weight is computed by the scale to be
0.0006536 lbs. However, the scale has a 5 character display for Unit Weight so the scale can only display .0065 as
the Unit Weight. If this Unit Weight were recorded and keyboard entered in future counting operations, the
resulting error would be: 00065 =.55%
.0006536
On the other hand, with entry of the Unit Weight as “weight pe
r 1000 pieces” the decimal place is, in effect,
moved three places to the right, allowing 3 more decimal places of accuracy. In this example, the entry would be
made as 0.6536 per 1000 pieces, eliminating the error.
As a practical note, entering unit weights per 1000 pieces also le
ssens the chances of entering the wrong number
of zeros when keying in weights with many leading zeros. Misentry of unit weights is a common cause of
inaccurate counting.
5.3.1 Unit Weight Operation by Sampling
Unit weight operation by sampling is accomplished by placing a 10 piece sample on the scale and then pressing
the PIECES key. The scale calculates a unit weight based on the capacity of the scale compared to the weight of
the sample. If you wish to use a sample of more than 10 pieces, place the sample on the scale, then input the
sample size before pressing the PIECES key.
If the sample size is insufficient to give an
lamp will be illuminated. To get to an adequate sample size :
• You can add pieces to the sample (keeping
out Key in the new total sample quantity and press the PIECES key. The scale will compute and
display the unit weight.
• If yo u press the PIECES key while the INSUFF lamp is lit, the scale wil
Unit Weight display and a number of pieces to add in the Quantity display..
accurate unit weight, no unit weight will be displayed, the INSUFF
track of how many you add) until the INSUFF lamp goes
l show the word ADD in the
• Add exactly the suggested number of pieces shown to bring the
calculation of a more accurate unit weight. The Quantity display will go down to zero, then press the
PIECES key. The scale will recompute and display the total weight in the Weight display, the unit
weight per thousand in the Unit Weight display, and the number of pieces in the Quantity display.
You can ignore or override the INSUFF indica
to the sample. However, it may affect counting accuracy to use a Unit Weight calculated on the basis of an
insufficient sample. If you do press the PIECES key again, the scale will compute and display the unit weight
based on the original sample you gave it.
If the RECOMP indic
ator is lit, the accuracy of the unit weight computation can be improved by adding
approximately double the number of pieces currently on the scale and pressing the
will flash as it recomputes the unit weight, after which it will display the new Unit Weight.
5.3.2 Unit Weight Operation by Key Entry
Unit weight operation by key entry is accomplished by using the numeric keypad to enter the known value of the
unit weight and then pressing the UNIT WEIGHT key. An example of unit weight operation by key entry is
shown below:
1. With the display in the weighing
5.2578.
2. Press UN
3. Press the CLEA
IT WEIGHT key to enter the unit weight.
R key to clear the Unit Weight.
sample up a weight that allows
tor by pressing the PIECES key again without adding more pieces
PIECES key again. The scale
mode, enter the known unit weight using the keyboard, for example,
Scale Operations 21
Page 26

5.4 Operations Without Recalling an Item Code
The following sections describe ways to carry out operations without having to recall the Item codes.
5.4.1 A Single Counting Operation - Without Recalling an Item Code
At times you may want to perform a weighing and counting operation without recalling an Item Code from
memory. This can be done from the keyboard in the Weighing Mode.
1. Place a 10 piece sample on the scale and press the PIECES key o
numeric keypad and press the UNIT WEIGHT key. The display will flash briefly, then return to normal.
2. To set a tare value, enter the tare from the numeric keypad and press the TA
to be tared on the platter and press the TARE key.
3. Place the product to be weighed and counted on the platter
. The total weight and pieces count will be
displayed. If a PC is connected to the DC-782, you can send the data to it by pressing the * CONFIRM *
key.
4. To perform another weighing and counting operation
, remove the product from the scale platter and
press the CLEAR key.
5.4.2 Part Accumulation or Subtraction and Negative Counting - Without Recalling an Item Code
The DC-782 has the capability to calculate the total number of parts using the accumulation or reduction function
of the scale (similar to the add/subtract functions of a calculator).
5.4.2.1 Part Accumulation or Subtraction
To find the total accumulated quantity of similar containers filled with parts, use the accumulation procedure
detailed below. To add or subtract from inventory, see Section 5.5.2.
1. Enter the unit weight of the pieces (if kno
the unit weight of the pieces. Press the PIECES key.
2. Enter the known tare weight, or place an empty container on the sc
(Section 5.2). Press the TA
NOTE: If SPEC 3, Bit 1 - Negative Counting is set to 0: Allow, a quantity of pieces may be displayed if a tare is entered with no
weight on the scale. (For more information on how to set customer specifications, see Section 3.2.1.)
RE key.
3. Place container 1 (full of parts) on the scale.
4. Press the + (
Plus) key to store the total in container 1. The Memory annunicator is now illuminated. The
weight display briefly shows totAL 1 and the quantity display shows the total pieces in the first
container.
wn) or conduct a sampling process (Section 5.3.1) to determine
r enter the unit weight from the
RE key or place the container
ale to perform tare function
NOTE: If the DC-782 is connected to a PC, the data will be outputted each time the + (plus), - (minus) or * CONFIRM keys are
pressed. If SPEC 29, Bit 3 - Exit From Accumulation Mode After 15 Sec Time Out is set to 0: Allow, the display will return to the
weighing mode automatically after 15 seconds. If it is set to 1: Inhibit, you must press the CLEAR key to return to the weight
display. (For more information on how to set the Weight and Measurement specifications, see Section 3.2.2.)
5. Remove container 1 and place container 2 (full of parts) on the scale.
6. Press the + (Plus) key (T
otal 2 is equal to container 1 plus container 2) The Memory indicator will be
illuminated.
22 DC-782 Operation Manual
Page 27

7. Continue with the remainder of the containers to be counted. The total number of parts stored in all the
containers will be stored in the accumulation register.
8. To subtract pieces from the accumulation, place the containe
r to be subtracted on the platform and press
the - (Minus) key. The display will show CORR and the number of pieces being subtracted. The Memory
indicator will continue to be illuminated.
Wait for the Total screen to clear and return to the
9. You can also accumulate or subtract by key entry. T
Weighing Mode or press the CLEAR key.
o add pieces to the accumulated total, enter the
number of pieces from the keypad and press the + (Plus) key . As with placing pieces on the platform, the
display will show totAL and the total number of pieces in the Quantity display increases to reflect the
new total. To subtract pieces from the accumulation, enter the number of pieces from the keypad and
press the - (Minus) key.
10. When done with accumulation and su
btraction, remove all products from the platter and press the
CLEAR key to clear the Unit Weight.
11. Press the + (Plus) key to display the accumulated total when the Unit W
eight is zero. Wait for the Total
screen to clear and return to the Weighing Mode or press the CLEAR key.
12. Press the TA
13. To output the accumulated data and clear
RE key to clear the Tare Weight.
the accumulation register, press the * CONFIRM key while the
totals are on the display (by having pressed the + (Plus) key. The Memory indicator will no longer be lit,
indicating that the accumulation registers have been cleared.
5.4.2.2 Negative Counting
Just as you can count by adding parts to the scale, you can also count by removing parts from the scale. This is
called “negative counting” because a negative weight is displayed while counting. Contrary to what may seem
intuitively logical, you do not use the (-) key to do negative counting. The (-) key is only used to delete an entry
in accumulation mode that you want to erase.
NOTE: To utilize the negative counting feature, SPEC 5, Bit 2 - Negative Counting must be set to “0: ALLOW”. (For information
on setting Customer specifications, see Section 3.2.1.)
There are two ways to do this depending on whether at the end you want to see the total amount remaining in the
container or the total amount removed from the container.
5.4.2.3 Counting Out of a Full Container - See Total Amount Remaining in the Container
To carry out this operation you must know the tare weight ahead of time.
1. Place the full container on the scale. Press the TA
2. Remove a 10 piece sample to the container and press the PI
calculated, return the 10 piece sample to the container.
3. Remove a number of parts from the container. The QUANTITY window of the scale display will show
the
number of pieces you have removed. This process can be repeated as many times as desired.
RE key.
ECES key. After the unit weight has been
Scale Operations 23
Page 28

4. If at the end of the procedure, if you want to see how many remain in the bin or container, you first have
to know the tare weight of the bin or container. After removing the parts you want to take out of the bin,
simply digitally enter the tare weight of the bin and press the TARE key. The scale will display how
many parts were left in the bin.
If a PC is connected to the DC
5.4.2.4 Negative Counting - Total Removed Displayed at the End
-782, pressing the * CONFIRM key will output the data to the PC.
With this procedure you can count accurately out of a full container for kiting, shipping, etc.without having to
know the tare weight of the container.
1. Place a full container on the scale and press TA
RE.
2. Remove a 10 piece sample from the container and press PIECES. After the unit weight has been
calculated, return the
3. Remove the number of pieces you need for kiting, shipping, etc. The amount re
10 piece sample to the container.
moved will be displayed
in the QUANTITY window. The Memory indicator will be illuminated and the scale displays the
accumulated total of pieces removed so far. Then press the TAR E key while the total is still shown on
the display.
4. After removing each batch of pieces, press the + (Plus) ke
y, then the TA RE key (while the total is still
showing on the display).
5. When you have removed the last batch of pieces, press the * CONFI
RM key to show the total number of
pieces you have counted out of the full container. (Again you must press the * CONFIRM key while the
total is shown on the display.) If a PC is connected to the DC-782, pressing the * CONFIRM key will
output the data to the PC. The Memory indicator will no longer be illuminated.
5.4.2.5 Clearing Accumulated Data
To clear accumulated data, press the *CONFIRM key. The Memory indicator will no longer be illuminated.
5.5 Using Item Codes in Weighing Mode
The following paragraphs describe the procedure to recall item codes, view the information stored in memory
with an Item Code, carry out inventory operations related to the item code quantity, and delete an item code.
NOTE: For these functions to work, information has to ha
being recalled. For more information on how to program an item code, see Section 6.2.
5.5.1 Recalling Item Codes using Item Code Number
The following procedure allows you recall item codes stored in memory.
1. Enter a numeric Item Code using the numeric keypad.
2. Press the # key t
If an Item Code not stored in memory is
o call up the item.
entered, the scale will beep to indicate that the action cannot be
completed.
If an Item Code existing in memory
is entered, the stored Unit W eight will be displayed after the # key is pressed.
Weighing operations can now be carried out utilizing the Tare Weight, Unit Weight, and Set Poi nt stored with
that Item Code.
Press the CLEAR key
to clear the item information and return to stand-by status.
5.5.2 Delete Item Memory
Deletion of an Item Code with all of its associated information (Tare Weight, Unit Weight, and Setpoints) can
only be done from the item programming mode. See Section 6.5 for procedures on deleting item codes or
specific items associated with item codes.
ve been previously programmed for the item code
24 DC-782 Operation Manual
Page 29

6.0 Scale Programming
The DC-782 can store information for the parts you count most frequently, eliminating the need for re-entering
data during parts counting. With each Item Co de you can specify a Tare Weight, Unit W eight, and Setpoin t Value.
Up to 25 items can be programmed into your DC-782 counting scale, with as many as 10 of those being able to
be assigned to the preset keys (P1 to P10).
6.1 Checking Memory Status
To see how many items of the 25 capacity have already been programmed, press the MODE key twice to enter
the Programming Mode. The display will show ProG and the scale will display the
that you are in the programming mode, will illuminate. The total number of Item Codes currently in memory
will appear in the Quantity column on the display.
6.2 Program Item Code, Tare Weight, Unit Weight, Setpoint 1 and 2
The DC-782 has the capacity to store information on up to 25 items (10 of which can be assigned to the preset
keys 1-10). This section details the procedure for storing the item code, tare weight, unit weight, and set points to
be associated with and item code. You can enter all of this information for each item code or only the data
pertinent to your application. The memory fields associated with item codes can be programmed subject to the
following parameters:
PRG indicator, indicating the
Parameters Format and Maximum Length
Item Code 2 digits numeric
Tare W e ig h t 5 digits plus the decimal point
Unit Weight 5 digits plus the decimal point
Setpoint Value 5 digits plus the decimal point
Table 6-1. Format and Length of Item Code Memory Fields
1. Press MODE key twice t
o enter the Programming Mode. The display will show ProG. The number of
items currently programmed into memory will appear in the QTY column on the scale display.
2. Enter the Item Code number and press the * key
NOTE: If you enter an Item Code that has already been stored in memory, the scale will display the Unit Weight associated with
that item code. To keep the current settings, press the
. (The maximum length of the field is 2 characters.)
* key to move through the fields or press the MODE key once
Scale Programming 25
Page 30

to exit the Programming Mode. To change the previously entered data in any field, enter it from the keypad or, in the
case of the unit weight you can use the scale to sample for the unit weight. Press the * key after each entry to move to
the next field. Once you’ve completed the reprogramming of the item code, press the
and exit the Programming Mode.
MODE key to save the changes
3. The display will prompt you to enter a tare weight for this item by displaying tare in the Weight
column. The tare weight is limited to 5 digits plus the decimal symbol and must be entered numerically
(i.e. you cannot place a container on the platform in the Item Programming Mode and press the TARE
key). Note that if you enter a tare weight here to be associated in memory with this Item Code, when you
recall an Item Code this stored Tare Weight will override any Tare W eight you h ave digitally entered into
the scale or entered using the TARE key. Press the * key to store the tare weight and move to the Unit
Weight.
4. Enter Unit Weight (refer to Section 5.5). The unit weight is limited to 5 digits plus the decimal symbol.
This can be done by sampling if the unit weight is unknow
n or by digital entry if known. Press the * key
to store the unit weight and move to the programming of the setpoints.
5. SPEC 04, Bits 1 and 0 - Setpoint Type determines what type of setpoint you are programmin g: 00: %
Quantity
, 01: % Weight, 10: Quantity, or 11: Weight. The setpoints are programmed by entering and
storing a value (Setpoint 1) and then entering and storing a percentage or amount (Setpoint 2). Enter the
value for Setpoint 1 (Ex. 100 pcs) and press the * key to advance to Setpoint 2. (For instructions on how
to program Customer specifications, see Table 3.2.1.)
6. Enter a value for Setpoint 2 (Ex. 85%) and press the * key to store the value and complete
the
programming cycle for this item number.
NOTE:
•There are four types of setpoints which can be selected by setting SPEC 04, Bits 1 and 0: % of Quantity (%QTY), % of Weight
(%WT), Over/Under Quantity (QTY), or Over/Under Weight (WT).
• When entering weight setpoints, be sure that you enter in the weight values with decimal point and all leading and trailing zeros.
• All percentage values must be rounded
• Setpoints involving % of quantity or weight are limited by the dec
value 1 specifies a Quantity of 9999999, then a Set Point value 2 of % of Quantity cannot be set for more than 100% because all
7 digits of the display are already in use.
Tabl e 6-2 below shows what to enter in each of the two set point va
with a rhythmic beeping at setpoint one and with a rapid beeping at setpoint two. Fo
02: SET POINT ALARM must be set to “0: ON”. See Section 3.2.1 for instructions on how to se
to the nearest whole number, fractional percentages are not allowed.
imal places available on the display. For example: if Set Point
lues to program each type of set point. The alarm sounds
r the Setpoint Alarm to be activated, SPEC
t Customer specifications.).
% QTY QTY % WEIGHT WT
Program Set Point 1 value with . . . target quantity low value target weight low value
Program Set Point 2 value with . . . % of quantity target value % of weight target value
Table 6-2. Setpoint Configuration
Here are some examples of how the setpoints can be programmed. These examples can be adjusted to fit your
application.
Setpoint Types % QTY QTY % WEIGHT WT
Setpoint 1 80 pieces (target) 50 pieces 2.0 lb (target) 1.2 lb
Setpoint 2 80% 75 pieces (target) 50% 1.5 lb (target)
Equation 80 x 80% = 64 N/A 2.0 x 50% = 1.0 N/A
Slow Beeping Occurs At 64 pieces 50 pieces 1.0 lb 1.2 lb
Rapid Beeping Occurs At 80 pieces 75 pieces 2.0 lb 1.5 lb
Table 6-3. Setpoint Examples
7. If you wish to program another Item Code’s informa
8. When you are finished programming ite
m codes, press the MODE key to exit the Programming Mode
tion, enter a new Item Code and press the * key.
and return to the Weighing Mode.
26 DC-782 Operation Manual
Page 31

6.3 Program a General Setpoint
You can program the DC-782 with a setpoint that will be enabled either when no Item Code is called up or when
an Item Code is called up from memory that has no setpoint already associated with it in programming.
1. Press the MO
2. SPEC 04, Bits 1 and 0 - Setpoint Type determines what type of setpoint you are programming: 0 0: %
Quantity
specifications, see Section 3.2.1.) The setpoints are programmed by entering and storing a value
(Setpoint 1) and then entering and storing a percentage or amount (Setpoint
Setpoint 1 (Ex. 100 pcs) and press the + (Plus) key to save the change and advance to Setpoint 2.
3. Enter a value for Setpoint 2 and press the + (Plus) k
Mode Screen
NOTE:
•There are four types of setpoints which can be selected by setting SPEC 04, Bits 1 and 0: % of Quantity (%QTY), % of Weight
(%WT), Over/Under Quantity (QTY), or Over/Under Weight (WT).
• When entering weight setpoints, be sure that you enter in the weight values with decimal point and all leading and trailing zeros.
• All percentage values must be rounded
• Setpoints involving % of quantity or weight are limited by the dec
value 1 specifies a Quantity of 9999999, then a Set Point value 2 of % of Quantity cannot be set for more than 100% because all
7 digits of the display are already in use.
Tabl e 6-4 below shows what to enter in each of the two set point va
with a rhythmic beeping at setpoint one and with a rapid beeping at setpo
02: SET POINT ALARM must be set to “0: ON”. See Section 3.2.1 for instructions on how to set
Program Set Point 1 value with . . . target quantity low value target weight low value
Program Set Point 2 value with . . . % of quantity target value % of weight target value
DE key twice to enter the Programming Mode. The scale display will show ProG.
, 01: % Weight, 10: Quantity, or 11: Weight. (For instructions on how to program Customer
2). Enter the value for
ey to store the value and return to the Programming
to the nearest whole number, fractional percentages are not allowed.
imal places available on the display. For example: if Set Point
lues to program each type of set point. The alarm sounds
int two. For the Setpoint Alarm to be activated, SPEC
Customer specifications.
% QTY QTY % WEIGHT WT
Table 6-4. Setpoint Configuration
Here are some examples of how the setpoints can be programmed. These examples can be adjusted to fit your
application.
Setpoint Types % QTY QTY % WEIGHT WT
Setpoint 1 80 pieces (target) 50 pieces 2.0 lb (target) 1.2 lb
Setpoint 2 80% 75 pieces (target) 50% 1.5 lb (target)
Equation 80 x 80% = 64 N/A 2.0 x 50% = 1.0 N/A
Slow Beeping Occurs At 64 pieces 50 pieces 1.0 lb 1.2 lb
Rapid Beeping Occurs At 80 pieces 75 pieces 2.0 lb 1.5 lb
Table 6-5. Setpoint Examples
4. Press the MO
DE key to quit the Programming Mode and return to the Weighing Mode.
6.4 Programming a Preset Key
The DC-782 has 10 preset keys that can have items assigned to them so that their tare weight, unit weight and
setpoints can be recalled by simply pressing the preset key.
To program an item code to one of the preset keys:
1. Press the MO
2. Enter the Item Code you wish to program to a preset key and press the # key to
3. Press the preset key you wish to program this item code to (P1 to P10).
4. Press the MO
DE key twice to enter the Programming Mode.
recall the item.
DE key once to exit the Programming Mode and return to the Weighing Mode.
Scale Programming 27
Page 32

6.5 Delete Item Memory
The DC-782 allows you to delete individual items from memory.
The following procedure describes the steps used
associated information (tare weight, unit weight, and set point).
1. Press MODE key twice to
enter the Programming Mode. The scale display will show ProG.
2. Enter the Item Code you wish to delete
Item Code you entered does not exist in memory, the scale will beep twice to indicate that this operation
is not available.
3. Press the - (MINUS) key to del
ete the item. The display will show Clear, asking you to confirm that you
want to delete or clear this item from memory.
to delete a single specific Item Code together will all of its
(the Item Code will appear in the Unit Weight display). If the
4. To complete the deletion of this item and al l of its data, press the CLEAR key
, or press the MODE key to
cancel the deletion. If you pressed the CLEAR key, the Item Code will be deleted and the scale will
return to the Programming Mode screen.
5. To return to the Weighing Mode, press the MODE key
once.
28 DC-782 Operation Manual
Page 33
7.0 RS-232C Communication with PC
CN6 (5 pins)
PIN SIGNAL
1RXD
2RTS
3TXD
4CTS
5 GND
DC-782 Side
9 PIN DIN
PIN SIGNAL
RXD 2
RTS 7
TXD 3
CTS 8
GND 5
PC Side
TXD
RXD
GND
The DC-782 Counting Scale is equipped with an RS-232C port that allows the scale to send data to a PC.
7.1 Connection
Below are the pin assignments for the connectors to a PC.
7.2 General Specifications of the RS-232C Interface
Baud Rate: 1200 / 2400 / 4800 / 9600 / 19200 / 38400 BPS
Start Bit: 1 Bit
Stop Bit: 1 / 2 Bits
Date Bit: 7 / 8 Bits
Parity Bit: Even / Odd / None
7.3 Setting the Scale Specifications for Communication to a PC
The DC-782’s RS-232C port can be used to connect the scale to a PC and output the data string to the computer.
The following specifications must be set for the data transfer to take place: (for more information on setting
specifications, see Section 3.2.1)
• SPEC05, Bit 0 Transmission Condition of RS-232C sets whether you want the data output only
when the weight is stable or to be output unconditionally
• SPEC06, Bit 3 RTS/CTS Handshaking of RS-232C must be set to 0: On or 1: Off depending on the
applicat
ion receiving the data.
• SPEC06, Bits 0, 1 and 2-Baud Rate of RS-232C must be
application.
• SPC07, Bit 3-Stop Bit of RS-232C must be set to the proper S
• SPC07, Bit 2-Data Length of RS-232C must be set to the proper Data Length for your
• SPC07, Bits 1 and 0-Parity of RS-232C must be set to the proper Parity for your application.
• SPEC08, Bits 3 and 2 - Interval of Time Out Error of RS-232C must be set to the proper Time Out
Interval for your app
• SPEC08, Bit 1 - Additional Parity Code in Text of RS-2
to allow an additional parity code in the text of the transmission.
• SPEC08, Bit 0 - Status and Weight Condition Flag in
condition flag will be included in the transmission.
lication.
.
set for the proper Baud Rate for your
top Bit for your application.
application.
32C must be set to determine whether or not
Text of RS-232C determines whether or not the
RS-232C Communication with PC 29
Page 34
7.4 Communication Method
SPEC10-RS-232C PC Protocol configures whether the data transfer to the computer is inhibited (0000: Inhibit
Data Transfer); is transmitted continuously to the computer (0001: Standard Stream Type (continuous output); is
transmitted when pressing the + (Plus), - (Minus), or * CONFIRM keys (0010: Standard Manual Type); or is
transmitted only when a command is received from the PC (0011: Standard Command Type).
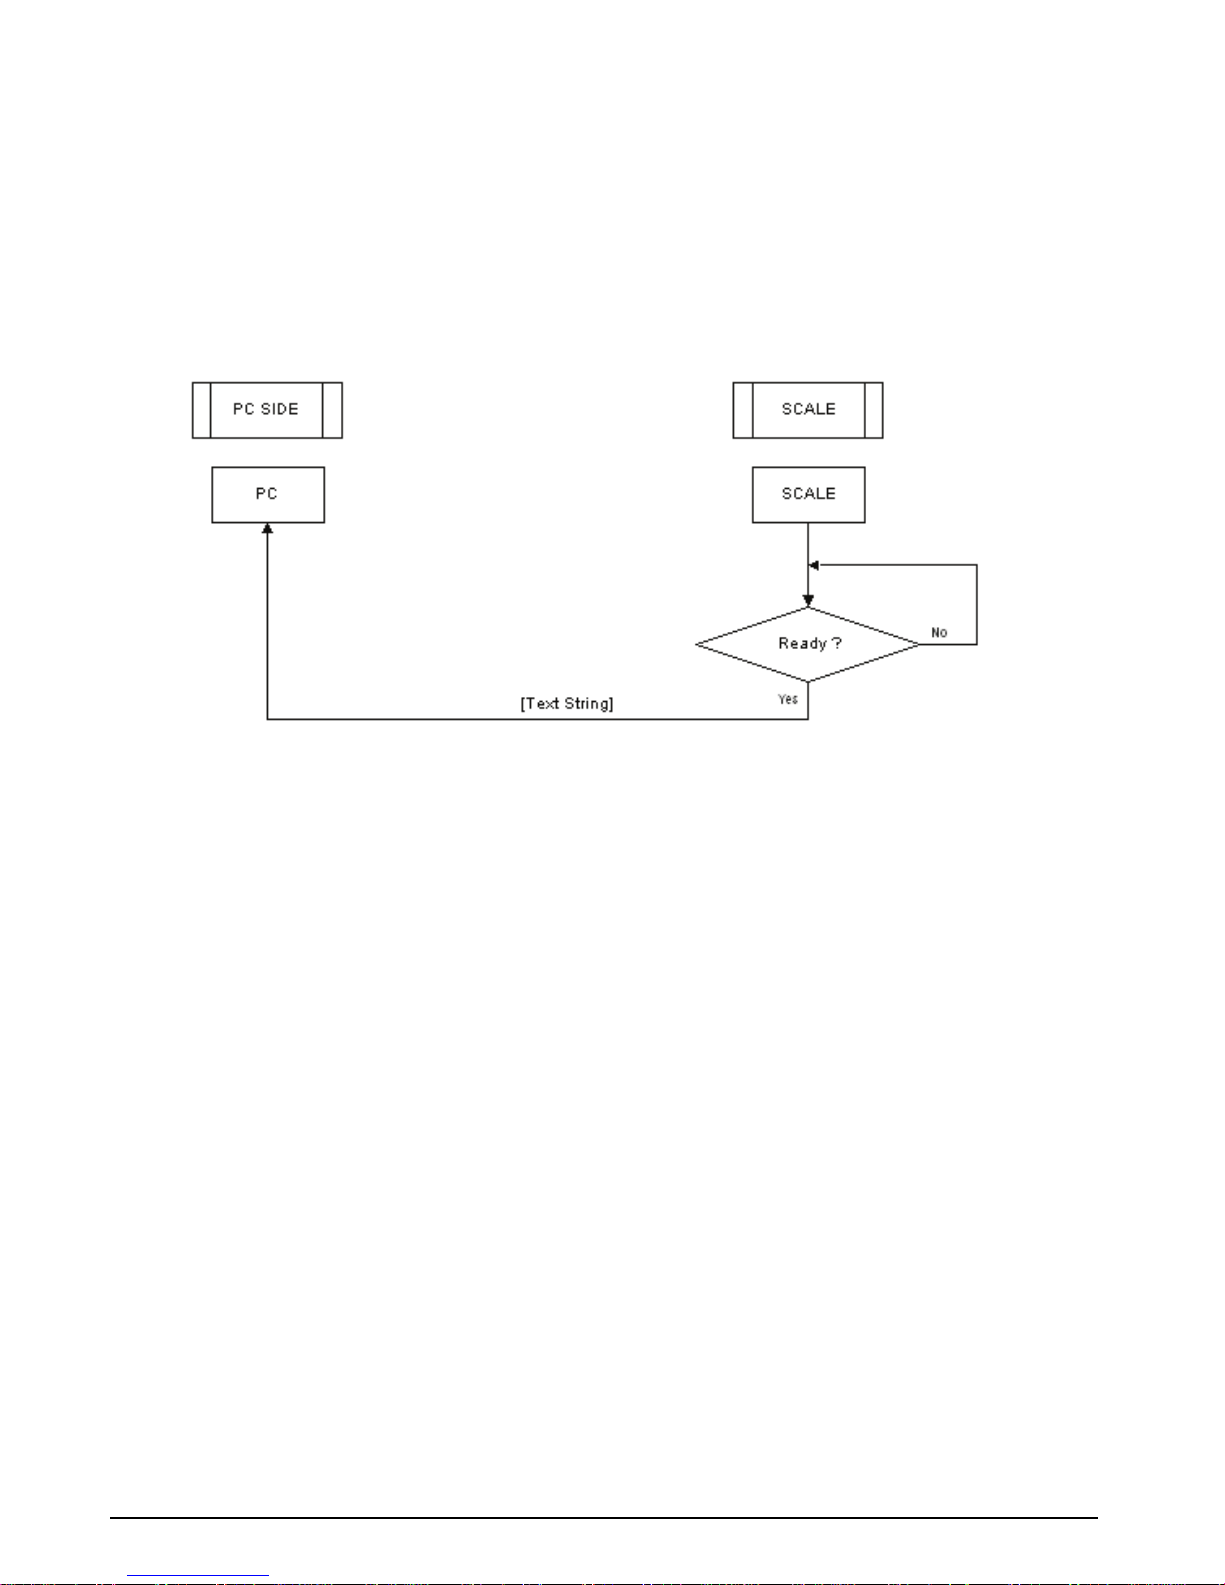
7.4.1 Standard Stream Data Transmission (Continuous)
Set SPEC10-RS-232C PC Protocol to 0001: Standard Stream Type (continuos output). The communication
between the DC-782 and the computer flows as follows:
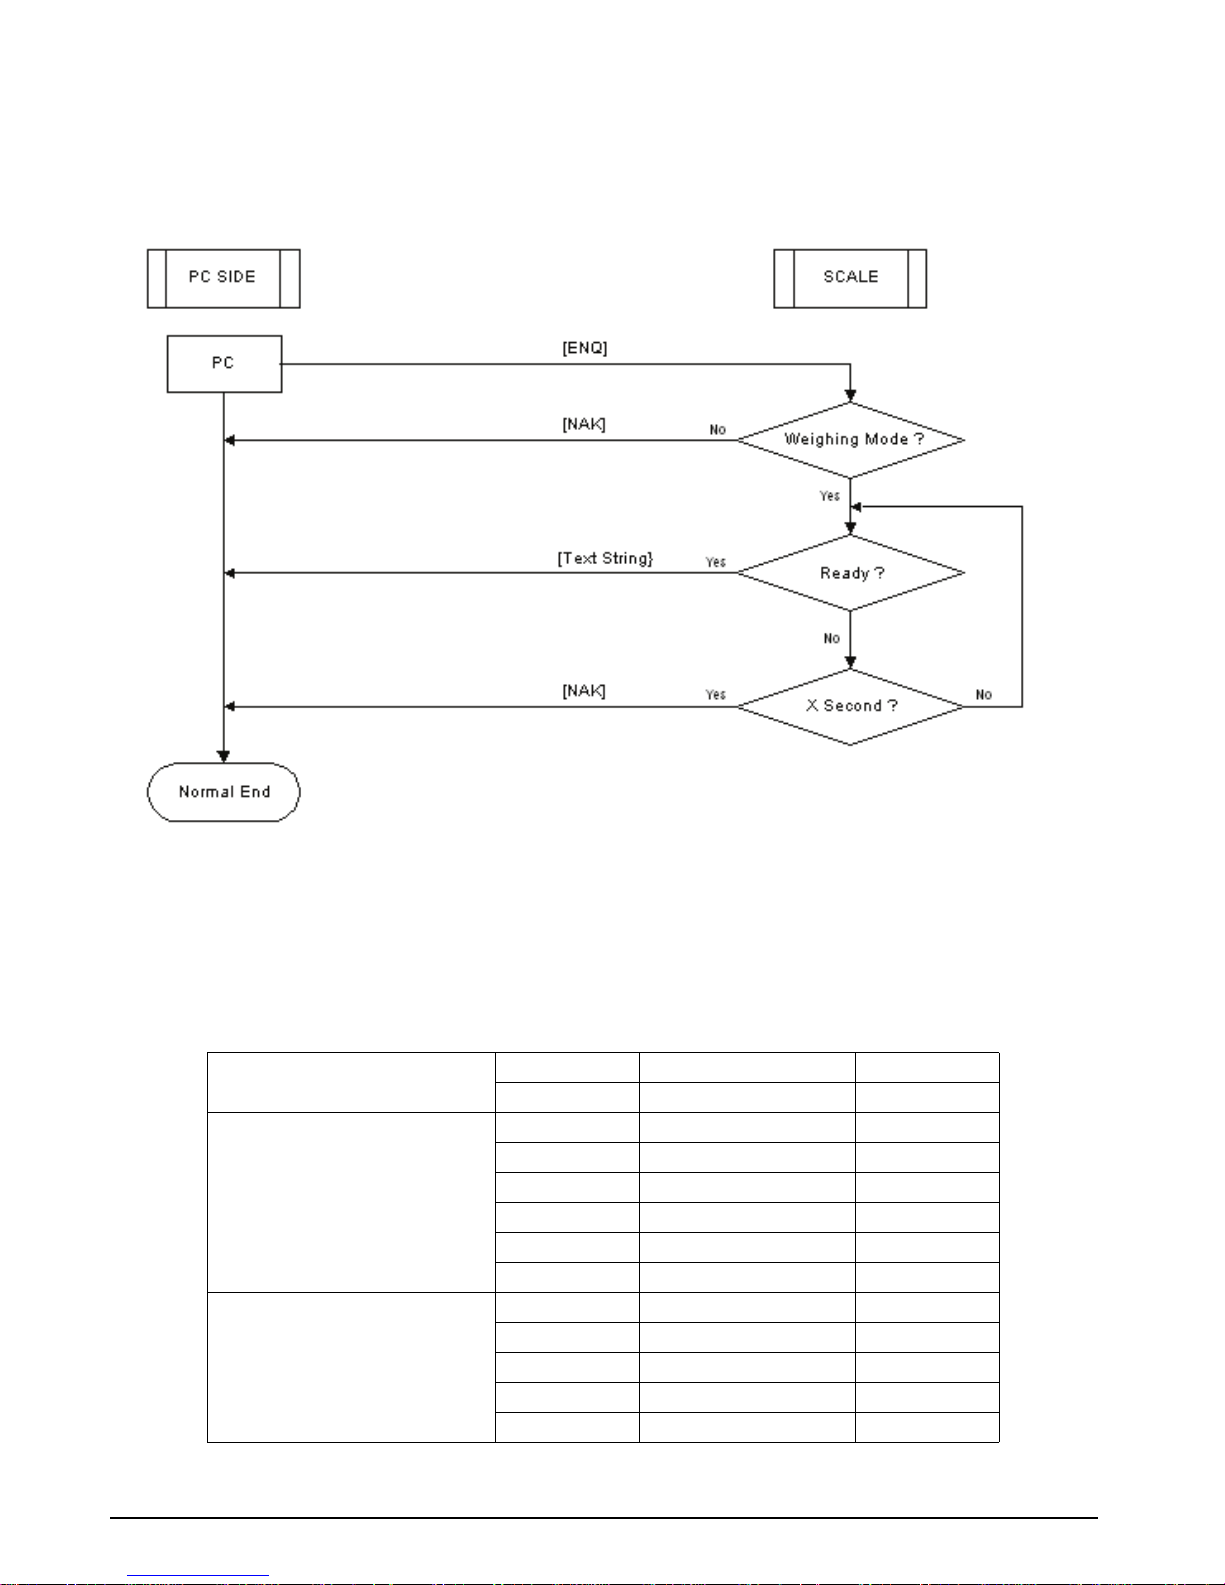
Figure 7-1. Continuous Stream Data Transmission Flowchart
30 DC-782 Operation Manual
Page 35
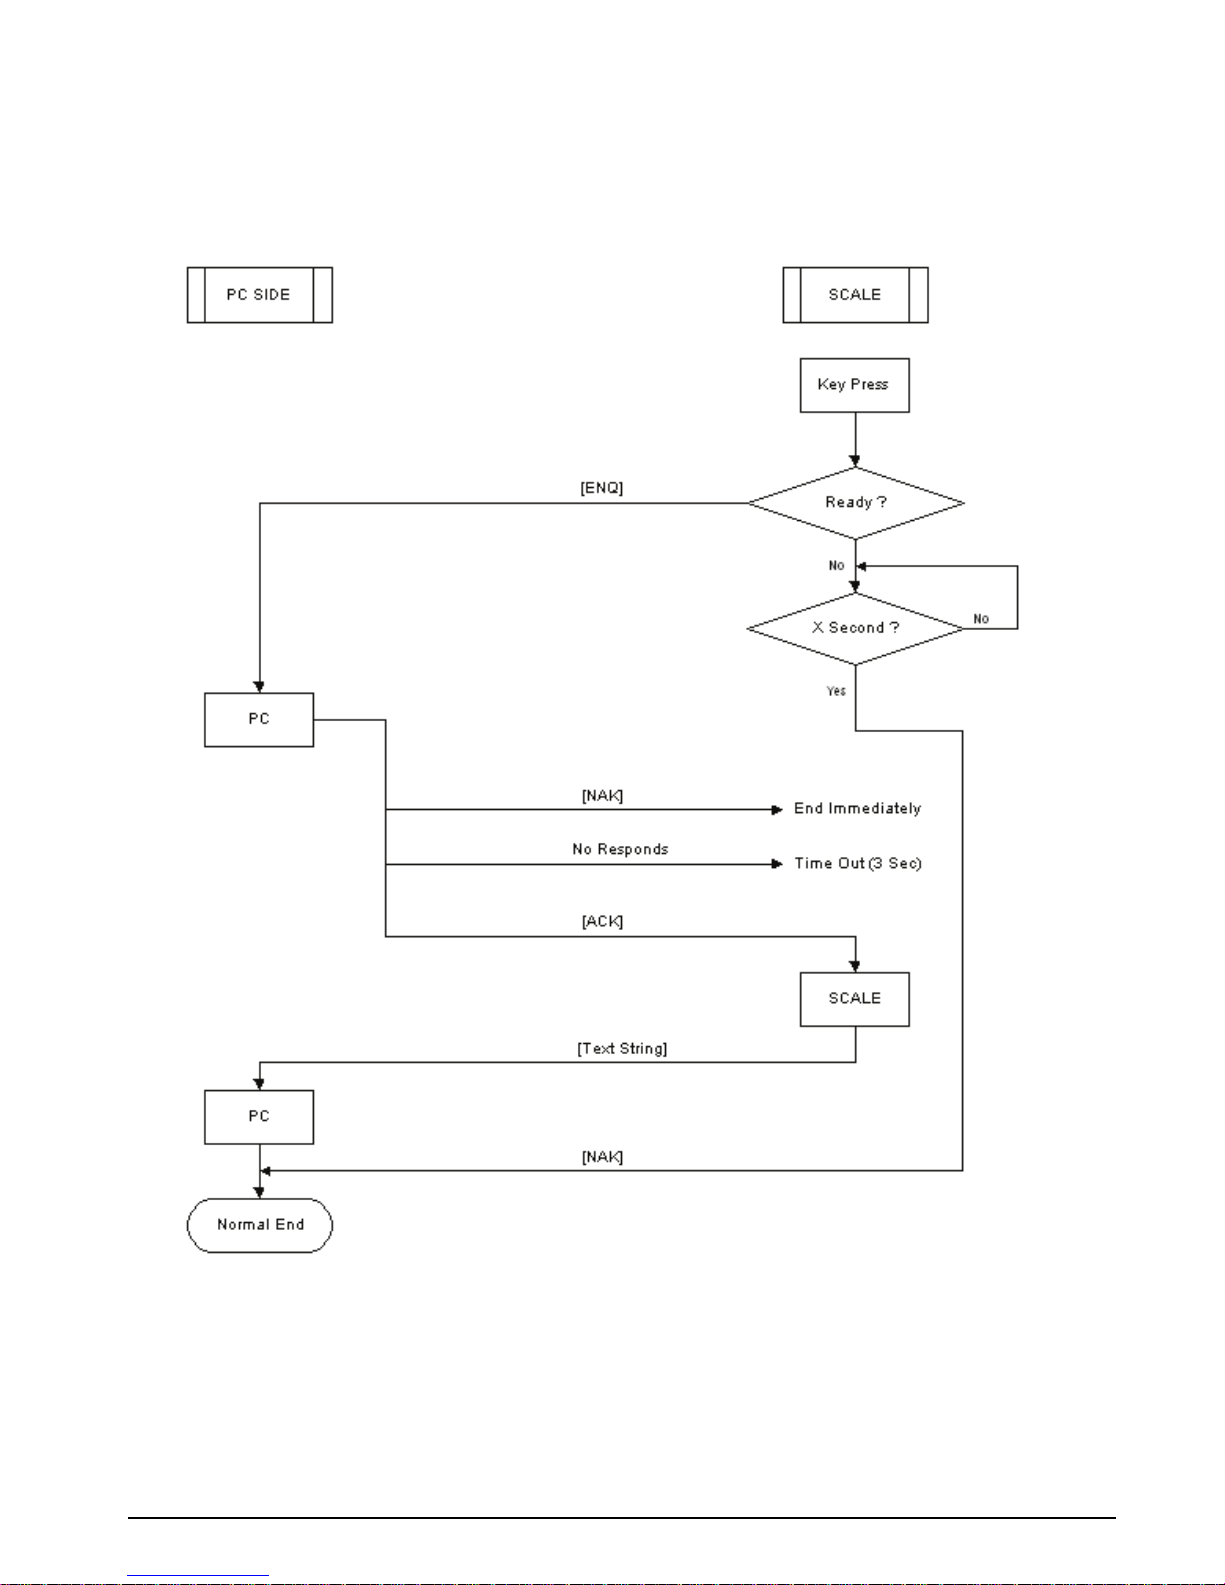
7.4.2 Standard Manual Data Transmission
Set SPEC10-RS-232C PC Protocol to 0010: Standard Manual Type. The communication between the DC-782
and the computer flows as follows. SPEC05, Bit 0 determines whether the data is transmitted only when the
weight is stable or to output it right away when the * key is pressed.
Figure 7-2. Standard Manual Data Transmission Flowchart
RS-232C Communication with PC 31
Page 36
7.4.3 Standard Command Data Transmission
Set SPEC10-RS-232C PC Protocol to 0011: Standard Command Type. The data transmission starts by receiving
the command from the PC. The communication between the DC-782 and the computer flows as follows:
Figure 7-3. Standard Command Data Transmission Flowchart
If handshaking is not required for your RS-232 communication with the computer, the RTS and CTS do not need
to be connected in the cable and SPC06, Bit 3 - RTS/CTS Handshaking of RS-232C can be set to 1: Off.
7.5 Characters That Can Be Transmitted by RS-232C
Table 7-1 shows the codes, headers, fields, and commands that can be transmitted from the RS-232C port.
Termination Code CR The end of the data 0x0d
LF The end of a line of text 0x0a
Data 0 - 9 Numeric data 0x30 ~0x39
- (Minus) Minus sign 0x2d
. (Decimal) Decimal point 0x2e
Space Data error or empty 0x20
OF Overflow 0x4f 0x46
UF Underflow 0x55 0x46
Header Codes 0 Net Weight 0x30
1 Unit Weight 0x31
2 Quantity 0x32
4 Ta r e We i g ht 0x34
B Status 0x42
Table 7-1. RS-232C Codes, Headers, Fields and Commands
32 DC-782 Operation Manual
Page 37
Command ENQ Enquiry 0x05
ACK Acknowledge 0x06
NAK Not Acknowledge 0x15
Table 7-1. RS-232C Codes, Headers, Fields and Commands
7.6 RS-232C Data Transmission Formats
The basic data transmission string format output by the DC-782 is as follows (with a more detailed discussion of
each element below)
Data Format Without Additional Parity (Total 37 Bytes):
Header
Code
1 Byte 1 Byte 1 Byte 1 Byte 1 Byte 6 Bytes 1 Byte 1 Byte 6 Btye
CR Header
1 Byte 1 Byte 6 Bytes 1 Byte 1 Byte 6 Bytes 1 Byte 1 Byte
Status
Flag
Code
Weight Condition
Flag
Unit
Weight
CR Header
CR Header
Code
Net
Code
Weight
Quantity CR LF
CR Header
Code
Data Format With Additional Parity (Total 38 Bytes)
Header
Code
1 Byte 1 Byte 1 Byte 1 Byte 1 Byte 6 Bytes 1 Byte 1 Byte 6 Btyes
CR Header
1 Byte 1 Byte 6 Bytes 1 Byte 1 Byte 6 Bytes 1 Byte 1 Byte 1 Byte
Status
Flag
Code
Weight Condition
Flag
Unit
Weight
CR Header
CR Header
Code
Net
Code
Weight
Quantity CR Additional
CR Header
Code
Parity
Ta re
Weight
Ta re
Weight
LF
NOTE: If the additional parity is 0x0d, 0x0a or 0x00, it will be changed to 0x1d, 0x1a or 0x10 respectively.
Status Flag:
Not
Used
Fixed to
1
Bit 7: Not used; always set to zero.
Bit 6: Fixed to 1.
Bit 5: Not used.
Bit 4: Not used.
Bit 3: Not Used
Bit 2: Quantity Overflow - 0: when
Bit 1: Net - 0: when tare subtraction not performed, 1: when tare subtraction performed
Bit 0: Additional Parity Flag - 0: when additional parity flag not added i
Not
Used
Not
Used
no
overflow, 1: when overflow
Not
Used
Quantity
Overflow
Net Additional
Parity
n text, 1: when flag is added
RS-232C Communication with PC 33
Page 38

Weight Condition Flag:
Not
Used
Bit 7: Not used; always set to zero
Bit 6: Fixed to 1
Bit 5: Not used
Bit 4: Weight UF - 0: when no weight underflow; 1: when weight underflow
Bit 3: Weight OF - 0: when no weight overflow; 1: when weight overflow
Bit 2: Negative Net Weight - 0: when net weight is not negati
Bit 1: Weight Stable - 0: when weight is stable; 1: when weight is not
Bit 0: Zero Sign - 0: when zero sign is not set; 1: when zero sign is set.
CR:
A carriage return “CR” must appear at th
Header Code:
Header codes in the RS-232C data output can be turned on and off using SPEC09, Bit 0 - Header
Co
de in Text of RS-232C (0: No; 1: Yes). For a list of the possible header codes, please see
Table 7-1.
ID Code Data:
Data about an ID Code is only transmitted
The data transmitted (if present in memory and unless modified by the specifications discussed
below) is as follows:
Specifications can be set to turn on and off the transmission
combinations:
Additional Parity:
If needed, additional parity can be added to the RS-232C
Additional Parity Code in Text of RS-232C (0: No; 1: Yes). Note that if the additional parity is equal
to 0DH, 0AH, or 00H, it will be automatically changed to 1DH, 1AH, or 10H.
LF:
A Line Feed (“LF”) must be added at the end a
Fixed to
1
Not
Used
Weight UFWeight OFNegative
Net
Weight
Weight
Stable
ve; 1:
e end
of the data for each ID Code.
if an ID Code has been recalled from the scale’
1) ID Code
2) Set Point
3) Gross Weight
4) Net Weight
5) Unit Weight
6) Tare Weight
7) Quantity
8) Total Quantity
9) Status
of certain data
• SPEC09, Bit 3 - Tare Weight in the Text of RS-232C
• SPEC09, Bit 2 - Unit Weight in the Text of RS-232C
• SPEC09, Bit 1 - Quantity in the Text of RS-232C
• SPEC09, Bit 0 - Header Code in the Te
xt of RS-232C
• SPEC08, Bit 0 - Status and Weight Condition Flag in T
• SPEC08, Bit 1 - Additional Parity Code in T
ext of RS-232C
data string. It is set in SPC10, Bit 0 -
s a transmission termination code.
Zero Sign
when net weight is negative
stable
s memory.
fields in different
ext of RS-232C
34 DC-782 Operation Manual
Page 39

Data Transmission Examples
Example 1:
If the following are true: Net Weight = 3.400 lb
The data transmission will be as follows:
Status Flag: 0x42
Weight Condition Flag: 0x42
By ASCII Code:
Tare Weight = 1.200 lb
Unit Weight = 1.7000 (lb/1000 pcs)
Quantity = 2000 (pieces)
Weight Status = Stable
onal
(with header codes and without additi
0 1 0 0 0 0 1 0
0 1 0 0 0 0 1 0
0x42 0x42 0x42 0x0d 0x30 0x30 0x33 0x2e 0x34 0x30
parity)
Example 2:
If the same parameters are true as above but only transmitting the net weight and quantity
The data transmission will be as follows:
0x30 0x0d 0x34 0x30 0x31 0x2e 0x32 0x30 0x30 0x0d
0x31 0x31 0x2e 0x37 0x30 0x30 0x30 0x0d 0x32 0x30
0x30 0x32 0x30 0x30 0x32 0x0d 0x0a
.
0x30 0x30 0x33 0x2e 0x34 0x30 0x30 0x0d 0x32 0x30
0x30 0x32 0x30 0x30 0x30 0x0d 0x0a
RS-232C Communication with PC 35
Page 40
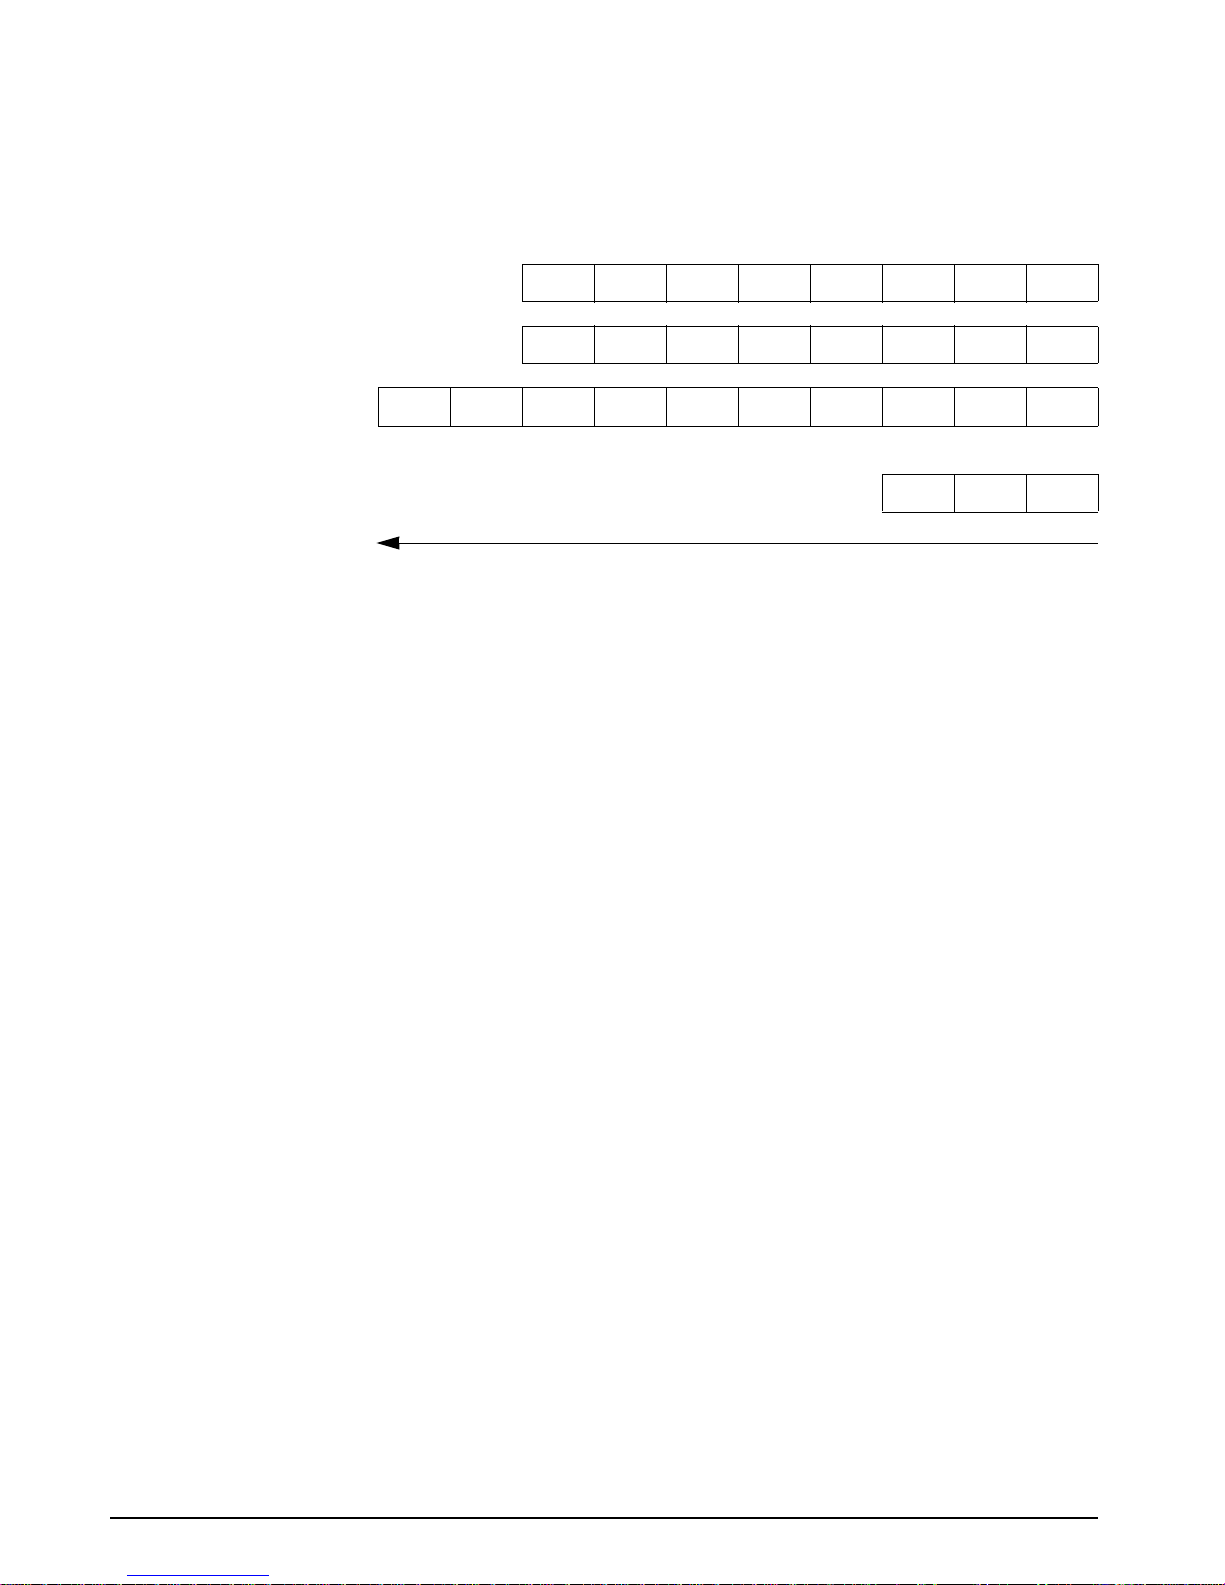
Example 3:
In this example there is a weight overflow and only the status, weight
weight are transmitted.
condition flag and net
0 1 0 0 0 0 1 0
0 1 0 0 1 0 0 0
0x42 0x42 0x48 0x0d 0x30 0x20 0x20 0x20 0x20 0x4f
0x46 0x0d 0x0a
36 DC-782 Operation Manual
Page 41

8.0 Appendix
8.1 DC-782 Specifications
Operating Conditions
• Power Source - AC117/100V
• Operating Temperature- -10°C ~ +40°C (OIML)
• Operating Humidity - 15 ~ 85% RH
• Power Consumption - 18W when using AC power
1.2W when using rechargeable battery
Charging Conditions (for rechargeable battery only)
• Battery Power - DC 6V 5Ah
• Power Source - AC117/100V
• Charge Current - 800 mA
• Charge Time - 12-14 hours
Analog Specification
• Input Sensitivity - 1mV/V
• Zero Adjust Range - 0 ± 5mV
• Zero Balance Range - 0 ± 0.5mV
• L/C Applied Voltage - DC 3.3V
• Speed of A/D Conversion - 10 times/second
• Internal Resolution - 1,000,000
External Connectors
• AC Receptacle
• RS-232C Interface
Main Components
• Microcomputer - R5F21257 (16 bit, 48K ROM) / R5F21258 (16 bit, 64K ROM)
• Display Device - Back-Lit LCD
• Loadcell Sensitivity - 1mV/V
Appendix 37
Page 42

8.2 DC-782 Error Message List
The DC-782’s alphanumeric display allows for detailed error messages. Use Table 8-1 below to find the error
message, possible causes for the error and ways to correct the problem. If these
situation, please contact your DIGI dealer for assistance.
Error Message Possible Causes Corrective Action
.
suggestions fail to correct the
O F When the displayed weight exceeded
capacity+
when the power is on.
U F When the displayed minus weight > = 9d. Rezero the scale or power the on/off button again.
ERR 01 When the communication between the main
board and the A/D board is not complete.
ERR 02 When there’s a data flash erase error Contact your RLWS Distributor
ERR 03 When there’s a data flash program error Contact your RLWS Distributor
8 8 8 8 8 8 Happens when the scale is not stable when
e power is on.
th
tOtAl FULL When the current total overflows the register Clear the current total.
9d, or something is on the platter
Remove the item on the platter.
Contact your RLWS Distributor
Place the scale on a firm, flat surface.
Table 8-1. DC-782 Error Message List
38 DC-782 Operation Manual
Page 43

9.0 DC-782 Limited Warranty
Rice Lake Weighing Systems (RLWS) warrants that all RLWS equipment and systems properly installed by a
Distributor or Original Equipment Manufacturer (OEM) will operate per written specifications as confirmed by
the Distributor/OEM and accepted by RLWS. All systems and components are warranted against defects in
materials and workmanship for two (2) years.
RLWS warrants that the equipment sold hereunder will conform
by RLWS. RLWS warrants the equipment against faulty workmanship and defective materials. If any equipment
fails to conform to these warranties, RLWS will, at its option, repair or replace such goods returned within the
warranty period subject to the following conditions:
• Upon discovery by Buyer of such nonconformity
, RLWS will be given prompt written notice with a
detailed explanation of the alleged deficiencies.
• Individual electronic components returned to RL
WS for warranty purposes must be packaged to
prevent electrostatic discharge (ESD) damage in shipment. Packaging requirements are listed in a
publication, Protecting Your Components From Static Damage in Shipment, available from RLWS
Equipment Return Department.
• Examination of such equipment by RLWS confirms that
not caused by accident, misuse, neglect, alteration, improper installation, improper repair or
improper testing; RLWS shall be the sole judge of all alleged non-conformities.
• Such equipment has not been modified, altered, or ch
duly authorized repair agents.
• RLWS will have a reasonable time to repair or replac
for shipping charges both ways.
• In no event will RLWS be responsible for travel time or on-location r
disassembly of equipment, nor will RLWS be liable for the cost of any repairs made by others.
T
HESE WARRANTIES EXCLUDE ALL OTHER WARRANTIES, EXPRESSED OR IMPLIED, INCLUDING WITHOUT
LIMITATION WARRANTIES OF MERCHANTABILITY OR FITNESS FOR A PARTICULAR PURPOSE. NEITHER
RLWS
RLWS
REPAIR OR REPLACEMENT OF SUCH GOODS. IN ACCEPTING THIS WARRANTY, THE BUYER WAIVES ANY AND
ALL OTHER CLAIMS TO WARRANTY.
S
WARRANTY CLAIMS.
N
WARRANTY SHALL HAVE ANY LEGAL EFFECT UNLESS MADE IN WRITING AND SIGNED BY A CORPORATE
OFFICER OF RLWS AND THE BUYER.
NOR DISTRIBUTOR WILL, IN ANY EVENT, BE LIABLE FOR INCIDENTAL OR CONSEQUENTIAL DAMAGES.
AND BUYER AGREE THAT RLWS’S SOLE AND EXCLUSIVE LIABILITY HEREUNDER IS LIMITED TO
HOULD THE SELLER BE OTHER THAN RLWS, THE BUYER AGREES TO LOOK ONLY TO THE SELLER FOR
O TERMS, CONDITIONS, UNDERSTANDING, OR AGREEMENTS PURPORTING TO MODIFY THE TERMS OF THIS
to the current written specifications authorized
the nonconformity actually exists, and was
anged by any person other than RLWS or its
e the defective equipment. Buyer is responsible
epairs, including assembly or
© 2009 Rice Lake Weighing Systems, Inc. Rice Lake, WI USA. All Rights Reserved.
RICE LAKE WEIGHING SYSTEMS • 230 WEST COLEMAN STREET • RICE LAKE, WISCONSIN 54868 • USA
DC-782 Limited Warranty 39
 Loading...