

Page 1

CCCCoooouuuunnnnttttiiiinnnngggg SSSSccccaaaallllee
ee
DC-688
When Accuracy Counts
OO
OO
pp
pp
ee
ee
rr
rr
aa
aa
ttiiii
tt
oo
oo
nn
nn
MM
MM
aa
aa
nn
nn
uu
uu
aallll
aa
73353
Page 2

Page 3

DC- 688 SERIES OPERATING MANUAL
SECTION INDEX
NUMBER
PAGE
1.0. GENERAL
1.1. Unlocking Procedure and location of span (calibration) switch 2
2.0. DC-688 USER’S TECHNICAL GUIDE 3
2.1. Display & Keyboard Panels 3
2.1.1. Location of Keys 3
2.1.2. Location of Indicator Lamps 3
2.2. Setting up 3
2.3. Indicator Lamps 4
2.4. Key Functions 5
3.0. OPERATION MODE 6
3.1. One Touch Tare 6
3.2. Digital Tare 6
3.3. Unit Weight Entry 6
3.3.1. Unit Weight Entry By Sampling 6
3.3.2. Digital Unit Weight Entry 7
3.3.3. Assign Unit Weight To Preset Key 7
3.4. Clearing Unit Weight 7
3.5. Gross Weight Operation 7
3.6. Counting And Accumulation 8
3.7. Operation Example 8
4.0. MAINTENANCE MODE 9
4.1. Specification List 9-11
4.2. Specification Setting 12-13
4.3. Internal Count 13
4.4. Span Adjustment 14
4.5. Maintenance, Calibration, Test Procedure & Service 15
4.6. Shop Notes
5.0
The DC-688 counting scale offers a practical solution to a full range of precision counting applications. There
is a variety of models available ranging from a weight capacity of 6 lb. through 60 lb.
This manual will provide the user with information necessary to operate and program the DC-688. Included in
this manual are examples, descriptions, specifications, operating instructions and service guide.
QUICK GUIDE
16
17-18
1
Page 4
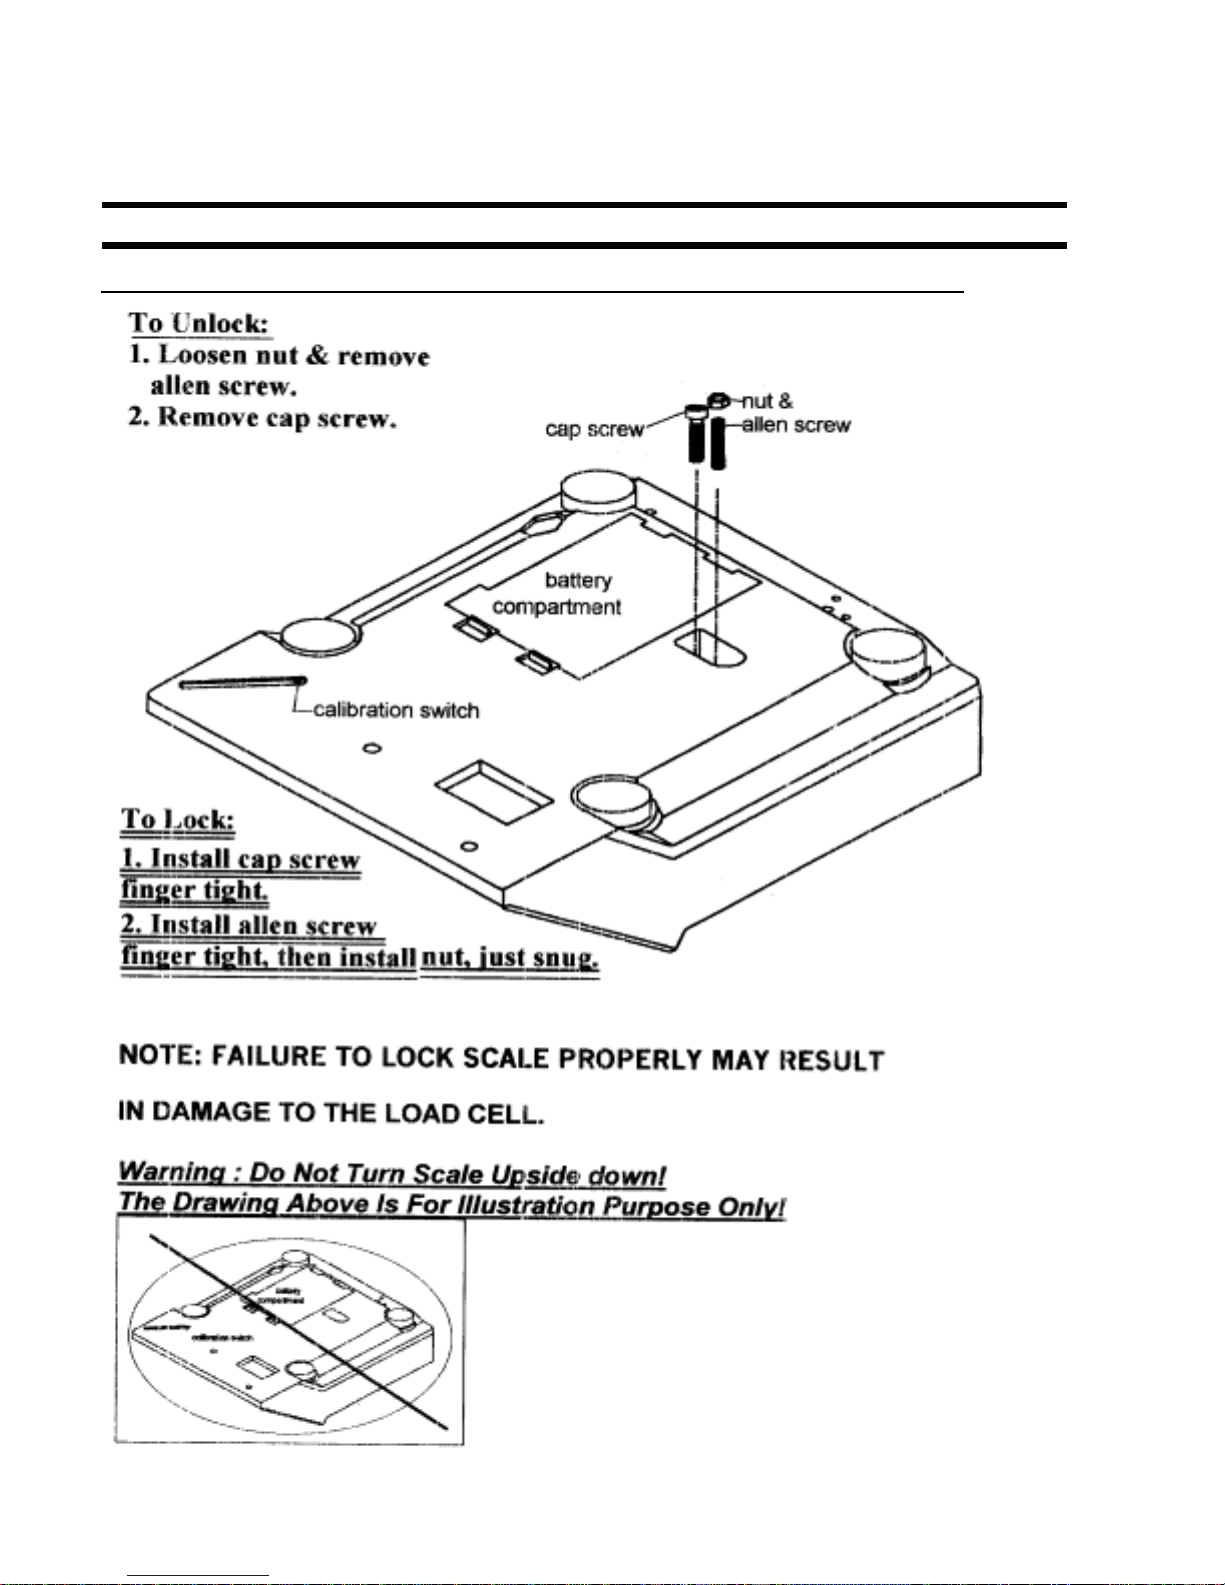
1.0. GENERAL
1.1. UNLOCKING PROCEDURE & SPAN SWITCH LOCATION:
NOTE: Turn Scale On Side, Do Not Turn Scale Upside DOWN!
2
Page 5

g
DC-688 USER’S TECHNICAL GUIDE
2.1. DISPLAY & KEYBOARD PANELS:
2.1.1. LOCATION OF KEYS:
(1) ON/OFF key : Turn display ON/OFF. (7) Net/Gross Key : Switch between Net and Gross
(2) Preset Keys : Recall Unit Weight data. weight display.
(3) Plus Key : Add parts in total accumulation. (8) Re-zero Key : Reset weight display to zero.
(4) Minus Key : Subtract parts in total accumulation. (9) Tare Key : Set or clear tare value.
(5) Enter Key : Clear data in total accumulation. (10) Pieces Key : Enter unit weight by sampling.
(6) Unit Weight Key : Set unit weight after numeric data entry. (11) Numeric Keys : Input Numeric data.
(12) Clear Key : Clear the entry data or unit weight.
2.1.2. LOCATION OF INDICATOR LAMPS:
! Zero Lamp : Light on when zero point is " Insufficient Lamp : Light on when sampling
adjusted and weight is stable. quantity is too small
# Net Lamp : Light on when tare $Recomputin
weight is present Recalculated by pressing PIECES key.
% Gross Lamp : Light on when Gross weight is & Memory Lamp : Light on when accumulated data is
displayed. in memory.
Lamp : Light on when Unit Weight may be
2.2. SETTING UP:
2.2.1. See Page 2 For Unlocking Procedure
2.2.2. Level Adjustment:
a. Place scale on firm and flat base.
b. Level the scale by turning adjusting legs until
air bubble is at the center of the Level Indicator.
Not Level Level
2.2.3. Place the platter onto scale:
a. Place the platter on the scale. Ensure that the platter
is properly aligned.
2.2.4. Power Supply:
a. Connect to power supply. Or install 6 pcs of “D” cell
Battery (DC1.5V)
b. With nothing placed on the platter, depress ON/OFF key.
c. Scale is ready for operation after segment checking.
3
Page 6

2.3. INDICATOR LAMPS:
LAMP “ON”
Zero When the gross weight is zero.
Tare When tare weight is set.
Gross When [Gross/Net] key is pressed.
Insuff When the net weight is below a specific percentage
of capacity weight.
Recomp When unit weight recomputing is possible.
Memory When quantity is being accumulated or when
memory overflows.
Batt When battery’s power level is low.
4
Page 7

2.4. KEY FUNCTIONS:
KEY FUNCTIONS
[0] to [9] Numeric Keys.
For turning the machine ON and OFF.
[.]
[RE-ZERO] Used to reset the scale to zero.
[TARE] Used for setting and clearing tare weight and used to exit
[C] Used to clear the key entries and unit weight.
[NET/GROSS] Used to change between Gross and Net.
[UNIT WEIGHT] Used to enter the unit weight using numeric key board.
[+]
[−−−−]
Decimal Point.
Used to enter the maintenance mode along with other keys
SPEC setting mode and save spec changes.
Used for Accumulation function and for incrementing SPEC
numbers (without changing the spec data) in SPEC setting
mode.
Used for Subtraction function and for decrementing SPEC
numbers in SPEC setting mode.
['''']
[PIECES] Used for computing unit weight by sampling.
Used for clearing accumulated quantity and for storing new
specification data when making spec changes .
5
Page 8

3.0. OPERATION MODE:
3.1. TARE SUBTRACTION:
3.1.1. One Touch Tare:
Display in the weighing mode
1. Place the container on scale.
2. Press [TARE] key to subtract the container (tare) weight.
Note () To clear tare value, press [TARE] key after removing the tare.
3.1.2. Preset (Digital) Tare:
Display in the weighing mode
1.
Enter the known weight of the container. Example: Press [ 0 ] [ •••• ] [ 2 ] [ 3 ]
2. Press [TARE ] key.
3.2. UNIT WEIGHT ENTRY:
3.2.1. Unit Weight Entry by sampling:
Display in the weighing mode
1. Place sample on scale. example. 45 pcs.
2. Enter a sample number with numerical keys. [ 4 ] [ 5 ]
3. Press [ PIECES ] key. To compute Unit weight.
When sample pieces are not sufficient, step 4 & 5 are required.
The number of pieces to be added appears in display. *(2
4. Add the required sample.
Press [ PIECES ] key. To compute Unit Weight with sufficient sample
The accuracy of the computation can be improved by increasing the sample size with the
following procedure.
5. Re-compute Unit Weight. (note *
pieces on the scale. Press [PIECES] key.
Note *1() If using a sample of 10 pcs., press [PIECES ] key without entering a number of sample
pieces.
Note *2() This procedure can be skipped by pressing [PIECES] key without adding additional parts.
However, it may affect counting accuracy to use an insufficient number of samples.
Note *3() Re-computing function is available when RECOMP lamp is on.
Note 4() A unit weight up to 4 decimal places is determined by sampling. To display the
complete unit weight, press [UNIT WEIGHT] key.
(3) Add approximately double the number of
6
Page 9

3.3.2. Digital Unit Weight Entry:
Display in the weighing mode
1. Press [ 1 ] [ •••• ] 7 ] [ 2] [ 6 ] [ 6 ] to enter Unit Weight.
2. Press [ UNIT WEIGHT ] key
Note ((((: Unit weight per 1,000 pieces should be entered and displayed in the Unit Weight display
window.
3.3.3. ASSIGN UNIT WEIGHT TO PRESET KEY:
Unit weight can be assigned to each preset key. The programmed value can be re-called in
Operation Mode
by pressing the preset key. Assign unit weights, which will be used frequently.
Display in the weighing mode
1. Enter Unit Weight by any means. (see 3.21. & 3.2.2.)
2. Press [ UNIT WEIGHT ] key. to store displayed Unit Weight.
3.
Press [ P1 ] to assign the data to Preset key. e.g. P1
3.4. Clearing Unit Weight :
Display in the weighing mode
1. Press [ 1 ] [ •••• ] 7 ] [ 2] [ 6 ] [ 6 ] to Enter Unit Weight. Example only 1.7266
2. Press [ UNIT WEIGHT ] key.
3. Press [ C ] key to Clear Unit Weight.
3.5. GROSS WEIGHT OPERATION:
Display in the weighing mode
1. Place the empty container on scale.
2. Press [TARE ] key to subtract the tare weight of the container
3. Place Sample on platter.Example: 1.00 lb.
4. Press [NET/GROSS] key to change to Gross display.
5. Press [NET/GROSS] key to return to Net weight display.
Note ((((: Counting operation is not available in Gross Weight display.
7
Page 10

3.6. COUNTING AND ACCUMULATION:
3.6.1. Single counting:
Display in the weighing mode
1. Enter the unit weight by any methods in section 3.
2. Place parts on platter, the quantity will be displayed.
3.6.2. Quantity Accumulation:
Display in the weighing mode
1. Enter the unit weight by any methods in section 3.
2. Place parts on platter, the quantity will be displayed.
3. Press [ + ] key to accumulate the data.
4. Remove the parts, the display will clear the total display.
5. Place parts on platter, the quantity will be displayed.
6. Press [ + ] key to accumulate the data.
7. Remove the parts, the display will clear the total display.
8. Place parts on platter, the quantity will be displayed.
9. Press [ −−−− ] key to subtract the data.
10. Press [ ∗∗∗∗ ] key clear total quantity.
Note((((: See spec 16 page 11, Exit From Accumulate Mode, for the method that fits the
application.
3.7. OPERATION EXAMPLE:
TASK PROCEDURE
1. Enter Tare value, Place an empty container on platter and press [TARE] key.
2. Compute Unit Weight, Place a number of pieces on platter, enter the quantity of samples
and press [PIECES] key.
3. Re-compute Unit Weight, Add a number of pieces to the samples and press [PIECES]
key.
4. Accumulate quantity, With the first quantity on platter, press [ + ] key. Remove them and
the display returns to the weighing mode. Place the second quantity on platter , press [ + ]
key and count them. Repeat the same procedure until all items have been counted. If a
mistake is made during the accumulation, press [ −−−− ] key with the over count on the scale.
5. Clear Accumulated data, Press [ ∗∗∗∗ ] key.
8
Page 11

4.0. MAINTENANCE MODE:
4.1.1. For The Customer - (1 4 1)
SPEC No. BIT 3 BIT 2 BIT 1 BIT 0
0
0 0 0 0
1
Power Auto Off function (for no key operation & weigh operation)
0000 - Auto power off disable when scale is not in use
0001 - 3 minute
0010 - 10 minutes
0011 - 30 minutes
0100 - 1 hour
0101 - 3 hours
0110 ~ 1111 - Not used
Buzz
Error Beep
Not used
Not used
0 0 0 0
2
0 - On
1 - Off
Sampling time
for Unit Weight
0 - On
1 - OFF
Negative
Counting
0
Unit Weight
Rounding
0
Not used
Calculation
0
0 - 10 times
1 1 0 0
3
0 0 0 0
Default Specs
[re-zero] [1] [4] [1] [re-zero] [1] [4] [2]
Spec 0 0 0 0 0 to 0 1 0 1 Spec 8 0 0 0 1
Spec 1 0 0 0 0 Spec 9 1 1 0 1 1 1 0 1 1 1 0 1 1 0 0 1
Spec 2 0 1 1 0 Spec 10 0 0 0 1 0 0 1 1 0 1 0 1 0 0 0 1
Spec 3 0 0 0 0 Spec 11 1 1 0 0
1 - 5 times
Not used
0
0 - NO
1 - YES
Not used
0
Capacity 6 lb. 15 lb. 30 lb. 60 lb.
Spec 12 0 0 0 0
Spec 13 0 0 0 0
Spec 14 1 0 0 0
Spec 15 0 0 1 1
Spec 16 1 1 1 0
Spec 17 0 1 0 0
Spec 18 0 0 0 1
Spec 19 0 0 0 0
0 - NO
1 - YES
Not used
Not used
0
0
9
Page 12

4.1.2. FOR WEIGHT & MEASURE - (1 4 2)
* NOTE((((: It can only work when the SPAN Switch is on (Enable)
SPEC NO. BIT 3 BIT 2 BIT 1 BIT 0
8
0 0 0 1
9
ZERO Lamp
Scale Start
"ON"
0 - Gross 0
1 - Net 0
0 - Automatic
1 - Manual
Decimal Point Position On Weight
Display
00 - No decimal point
01 - Not used
10 - 3rd digit (000.00)
11 - 4th digit (00.000)
Selection Of
Selection Of Model
Segment-Check
Style
0 - Fast
0 - DC-685
1 - DC-688
1 - Standard
Negative Weight Display Mask
00 - Minus gross > 9e
01 - Minus gross Weight
10 - Minus Net Weight
11 - Not used
10
11
1 0 0 0
12
0 0 0 0
Selection Of Capacity
B3 B2 B1 B0 Capacity Increment (Single/Multi-
Interval)
0 0 0 1
0 0 1 1
0 1 0 1
Selection Of Resolution
00 - Single Interval
01 - Multi Interval
10 - 1/7500 Or 1/6000
11 - Not Used
(6.000lb, 60.00lb)
(15.000lb)
(30.000lb)
1
2
5
Multi-Interval
Setting
0 - Net MultiInterval
1 -Gross Multi-
View Internal
Count Protected
By SPAN SW
0 - NO
1 - YES
Interval
Manual Tare
Cancellation
1 - NO
0 - YES
Tare Subtraction
1 - NO
0 - YES
Tare
Accumulation
1 - NO
0 - YES
Tare Value
Exchange
1 - NO
0 - YES
10
Page 13

4.1.3. WEIGHT & MEASURE - (1 4 2) CONTINUED
SPEC NO. BIT 3 BIT 2 BIT 1 BIT 0
13
Digital Tare
Accumulation
When Tare
Zero Tracking
When Tare
Weight Reset
When Tare
0 0 0 0
14
1 0 0 0
15
0 0 1 1
16
1 1 1 0
17
1 - NO
0 - YES
AUTO Tare Clear
When Rezero
0 - NO
1 - YES
Accumulation
Using [+] Key
1 - NO
0 - YES
Exit From
Accumulation
Mode After 15
Sec Time Out
0 - NO
1 - YES
Gross Mode
1 - NO
0 - YES
Tare AUTO Clear
0 - NO
1 - YES
Subtraction
Using [−−−−] Key
1 - NO
0 - YES
Exit From
Accumulation
Mode When
Weight Change
0 - NO
1 - YES
Tare Range
1 - NO
0 - YES
Unit Weight
AUTO Clear
0 - NO
1 - YES
Accumulation
Number Display
0 - NO
1 - YES
NO Quantity
Accumulation
Without
Removing
Weight
0 - NO
1 - YES
Not used
1 - NO
0 - YES
AUTO Clear
Condition
0 - >= Gross 21e
& >= Net 5e
1 - >=Net 1e
& Quantity > 10
WT Data
Synchronization
(+ Key only)
0 - NO
1 - YES
NO Quantity
Accumulation
Without Change
Weight
for >= +/- 10e
0 - NO
1 - YES
Not used
0 1 0 0
18
0 - YES
Not used
0
1 - NO
0 0 0 0
19
Not used
0
0 0 0 0
0 - 50% of F.S.
1 - 100% of F.S.
Not used
0
Not used
0
11
Not used
Not used
0
0
Not used
0
0
Not used
0
0
Page 14

4.2.1. Spec 141 Setting:
Spec 141 Setting: Spec 141(Customer Specifications)
can be accessed from the weighing mode.
1
Display in the weighing mode
2
Enter [1] [4] [1] while pressing the [REZERO] Key.
3
4
5
6
7
8
9
10
11
Press the
[++++] Key increases to the next SPEC number without
changing spec data.
Enter 1011 as the new value for SPEC01 using the [Numeric] Keys
as example only enter : 1011
Press the
Press the
[C] Key clears the [Numeric] Entry.
[∗∗∗∗] Key increases to the next SPEC number. and also stores
temporarily the SPEC data in the RAM location.
Press the
Press the
Press the
[−−−−] Key decreases to the previous SPEC number.
[−−−−] Key decreases from SPEC 01 to SPEC 00.
[−−−−] Key decreases the SPEC number from SPEC00 to
SPEC03
Press the
[TARE] Key stores the new SPEC values to the EEPROM
and exits from the SPEC setting mode.
Scale returns to Weighing Mode.
12
Page 15

4.2.2. SPEC 142 SETTING:
((
((
: Spec 142 Setting: To access the Spec 142 (W & M Spec) mode the [SPAN] Switch
must be "ON". The rest of the procedure is the same as Spec 141 setting.
1 Display in the weighing mode
2 Press the [SPAN] Switch. The S-On message comes on.
3 Enter [1] [4] [2] while depressing the [REZERO] Key.
4
[∗∗∗∗] Key increases to the next SPEC number and also stores temporarily the SPEC data
in the RAM location.
5
6 Press the [C] Key clears the [Numeric] Entry.
7
8
9
10
11
[1][0][1][1] as the new value for SPEC09 using the [Numeric] Keys
Enter
as example only enter : 1011
Press the [++++] Key increases to the next SPEC number without making any changes to
spec data.
Press the [−−−−] Key decreases to the previous SPEC number.
Press the [−−−−] Key decreases from SPEC 09 to SPEC 08.
Press the [−−−−] Key decreases the SPEC number from SPEC08 to SPEC19
Press the
[TARE] Key stores the new SPEC values to the EEPROM and exits
from the SPEC setting mode.
12
Scale returns to the Weighing Mode.
4.3. INTERNAL COUNT AND A/D COUNT DISPLAY :
((
((
:If the SPEC 11, bit 0 is set to 1, then the [SPAN]
Switch must be "ON" to enter this mode.
1
2
3
Display in the weighing mode
Enter [0] [0] [9] while pressing the [REZERO] Key. Unit Weight Window will
display the Internal Count and the Quantity Window will display the A/D Count.
Press [TARE] Key to exit from Internal Count Mode.
13
Page 16

4.4. SCALE CALIBRATION :
Prior to the calibration of the scale, please note that the SPEC settings
corresponding to Minimum Display, Weight Decimal Point Position for
that particular scale have to be correctly set. Ensure
is ON.
1 Display in the weighing mode
1
Press the [SPAN] Switch which is located at the bottom of the machine.
See page 2 for details.
2
Enter [8] [7] [1] [5] while depressing the [REZERO] Key. The
display will show CAL00
3
Press the [∗∗∗∗] Key in order to compute the zero point. It takes a
few seconds for the zero calibration.
5
7.1.
After computing the zero point, the Weight Window shows CALSP
Place capacity weight of 60 lb on the platter. In this illustration,
capacity weight of 60 lb is taken as an example.
--- OR ---
OR
that the [SPAN] Switch
7.2.
Using less than capacity weight .Enter the weight placed on the
platter using the [Numeric] Keys. Example: enter [5][0][••
8
Press the [∗∗∗∗] Key to start span calibration.
14
••
][0][0]
Page 17

4.5. MAINTENANCE, CALIBRATION, TEST PROCEDURE & SERVICE
This section contains information and instructions concerning maintenance of the DC-688 Counting
Scale. Preventive maintenance consists of periodically cleaning the external surfaces of the
instrument and should be performed as often as operating conditions warrant. The calibration
procedure is designed to be an aid in maintaining the scale accuracy within specifications. The
calibration procedure may also serve as a performance test procedure.
CAUTION: DO NOT ATTEMPT ANY SERVICE WHILE THE
INSTRUMENT IS CONNECTED TO THE POWER LINES.
4.5.1. MAINTENANCE PROCEDURES
4.5.1.1. EXTERIOR MAINTENANCE
The exterior surfaces of the counting scale can be easily cleaned using soap and water. However,
extreme caution should be used so that there is no possibility of water penetration into the scale
electrical or mechanical sections. A damp cloth or sponge is suggested. NEVER USE ACETONE,
MEK, OR SIMILAR SOLVENTS ON THE PLASTIC HOUSING AS THEY WILL ETCH THESE
SURFACES. For grease or other difficult spots, a chlorothane or naptha based cleaner may be used.
Never use any solvents on the front or rear panels. Accumulations of dust or direct particles between
the pins of the connectors may be removed by using dry forced air or a small dry brush.
4.5.1.2. INTERNAL MAINTENANCE
Internal maintenance is not normally required and if it is, should not be attempted except by a
qualified, authorized
service technician.
4.5.2. CALIBRATION
The following procedure should be followed periodically (every six to twelve months is suggested) to
determine that the scale is functioning in all modes.
a. Electrical
Follow section 4.0 through all its steps
b. ACCURACY
Weighing: The scale weighing accuracy can be determined by applying various known
weights to the platform. Because of the scale's very high accuracy, only weights that are
certifiably more accurate than the scale's specifications should be used in testing for accuracy.
(NBS class "F" or higher) Since the scale owner does not normally have such certifiable
weights available to him, it is suggested that the customer call their authorized DIGI dealer.
4.5.3. SERVICE & REPAIR
No service or repair should be attempted except by qualified personnel, and not until it has
been positively determined that the counting scale requires such service. All service should be
done in a clean, dry, dust-proof area.
15
Page 18

5.0. QUICK GUIDE
OPERATION PROCEDURE
Tare out an empty container Place an empty container on the scale, press [TARE] key
Enter a known tare Enter the tare weight as it would appear in the window,
press [TARE] key.
Change to gross weight display
Change back to net wt.
Compute a unit weight Place 10 pieces on scale, press [PIECES] key
Re-compute a unit weight (only as long
as the RECOMP light is on after pcs. are
added)
Enter a known unit weight Enter the weight /1000 pcs, press
Accumulate a quantity
(temporary memory)
Press [NET/GROSS] key
Press [NET/GROSS] key again
or
Place an arbitrary number of pieces on the scale, enter
the number of pieces and press the [PIECES] key.
Add a number of pieces to the sample and press the
[PIECES] key.
[UNIT WEIGHT] key.
With first quantity on the scale, press [++++] key. When
display returns to normal, remove parts from the scale
and count second quantity. Repeat until all items have
been counted. Press [∗∗∗∗] key to end accumulation. (((( If a
mistake is made during accumulation, press [−−
−−]]]]
key to
Clear a unit weight in the display Press [CLEAR] key.
Clear a tare weight in the display Press [TARE] key.
delete that quantity.
or
Enter [0], then press the [UNIT WEIGHT] key.
or
Press the [REZERO] key. ((((1 (See note 1 below.)
16
Page 19

5.1. OPERATION
QUICK GUIDE DC-688
Sample & Count
A.
Sampling Procedure (To develop the Unit Weight with Negative Counting)
1. Press [REZERO] & [TARE] keys to set up the procedure.
2. Press [CLEAR] key to clear unit weight.
3. Place full container onto scale platform; press [TARE] key.
(The weight display will zero)
4. Remove 10 piece sample from container; press [PIECES] key.
The unit weight will be computed, and shown in the unit
weight window.
5. For increased sampling accuracy, you can re-compute unit weight by
removing additional pieces (about 10-20 at a time)
from the container. If the “RECOMP” indicator is “on”, then pressing
[PIECES] key will recalculate the unit weight. It is not necessary to
hand count the additional pieces. (You may re-compute again and
again if the parts are not very uniform. )
6. Place the sample pieces back into the container.
B. Counting Procedure ( To count the in parts the full container)
7. Key in the known tare weight. Press the [TARE] key.
The net weight of the container will be displayed, and the total
Quantity in the container will be shown in the quantity window.
17
Page 20

DC-688 Limited Warranty
Rice Lake Weighing Systems (RLWS) warrants that all RLWS equipment and systems properly installed by a
Distributor or Original Equipment Manufacturer (OEM) will operate per written specifications as confirmed
by the Distributor/OEM and accepted by RLWS. All systems and components are warranted against defects
in materials and workmanship for one year.
RLWS warrants that the equipment sold hereunder will conform to the current written specifications
authorized by RLWS. RLWS warrants the equipment against faulty workmanship and defective materials. If
any equipment fails to conform to these warranties, RLWS will, at its option, repair or replace such goods
returned within the warranty period subject to the following conditions:
• Upon discovery by Buyer of such nonconformity, RLWS will be given prompt written notice with a detailed explanation
of the alleged deficiencies.
• Individual electronic components returned to RLWS for warranty purposes must be packaged to prevent electrostatic
discharge (ESD) damage in shipment. Packaging requirements are listed in a publication, “Protecting Your Components
From Static Damage in Shipment,” available from RLWS Equipment Return Department.
• Examination of such equipment by RLWS confirms that the nonconformity actually exists, and was not caused by
accident, misuse, neglect, alteration, improper installation, improper repair or improper testing; RLWS shall be the sole
judge of all alleged non-conformities.
• Such equipment has not been modified, altered, or changed by any person other than RLWS or its duly authorized repair
agents.
• RLWS will have a reasonable time to repair or replace the defective equipment. Buyer is responsible for shipping charges
both ways.
• In no event will RLWS be responsible for travel time or on-location repairs, including assembly or disassembly of
equipment, nor will RLWS be liable for the cost of any repairs made by others.
THESE WARRANTIES EXCLUDE ALL OTHER WARRANTIES, EXPRESSED OR IMPLIED,
INCLUDING WITHOUT LIMITATION WARRANTIES OF MERCHANTABILITY OR FITNESS
FOR A PARTICULAR PURPOSE. NEITHER RLWS NOR DISTRIBUTOR WILL, IN ANY EVENT,
BE LIABLE FOR INCIDENTAL OR CONSEQUENTIAL DAMAGES.
RLWS AND BUYER AGREE THAT RLWS’S SOLE AND EXCLUSIVE LIABILITY HEREUNDER
IS LIMITED TO REPAIR OR REPLACEMENT OF SUCH GOODS. IN ACCEPTING THIS
WARRANTY, THE BUYER WAIVES ANY AND ALL OTHER CLAIMS TO WARRANTY.
SHOULD THE SELLER BE OTHER THAN RLWS, THE BUYER AGREES TO LOOK ONLY TO
THE SELLER FOR WARRANTY CLAIMS.
No terms, conditions, understanding, or agreements purporting to modify the terms of this warranty shall have any legal effect unless
made in writing and signed by a corporate officer of RLWS and the Buyer.
© 2002 Rice Lake Weighing Systems, Inc. Rice Lake, WI USA. All Rights Reserved.
RICE LAKE WEIGHING SYSTEMS
• 230 WEST COLEMAN STREET • RICE LAKE, WISCONSIN 54868 • USA
 Loading...