

Page 1
DC-530
Counting Scale
Counting Scale
Operation Manual
Version 2.01
95145
Page 2

Page 3

Contents
1.0 Introduction.................................................................................................................................. 1
1.1 Capacities and Resolutions . . . . . . . . . . . . . . . . . . . . . . . . . . . . . . . . . . . . . . . . . . . . . . . . . . . . . . . . 1
1.2 Modes of Operation . . . . . . . . . . . . . . . . . . . . . . . . . . . . . . . . . . . . . . . . . . . . . . . . . . . . . . . . . . . . . . 2
1.3 Keyboard and Display . . . . . . . . . . . . . . . . . . . . . . . . . . . . . . . . . . . . . . . . . . . . . . . . . . . . . . . . . . . . 2
1.3.1 Display Specifications . . . . . . . . . . . . . . . . . . . . . . . . . . . . . . . . . . . . . . . . . . . . . . . . . . . . . . . . . . . . . . 2
1.3.2 Indicator Lamps . . . . . . . . . . . . . . . . . . . . . . . . . . . . . . . . . . . . . . . . . . . . . . . . . . . . . . . . . . . . . . . . . . 2
1.3.3 Display Elements. . . . . . . . . . . . . . . . . . . . . . . . . . . . . . . . . . . . . . . . . . . . . . . . . . . . . . . . . . . . . . . . . . 3
1.3.4 Key Functions . . . . . . . . . . . . . . . . . . . . . . . . . . . . . . . . . . . . . . . . . . . . . . . . . . . . . . . . . . . . . . . . . . . . 4
2.0 Installation ................................................................................................................................... 6
2.1 Unpacking . . . . . . . . . . . . . . . . . . . . . . . . . . . . . . . . . . . . . . . . . . . . . . . . . . . . . . . . . . . . . . . . . . . . . 6
2.2 Repacking . . . . . . . . . . . . . . . . . . . . . . . . . . . . . . . . . . . . . . . . . . . . . . . . . . . . . . . . . . . . . . . . . . . . . 6
2.3 Setting Up . . . . . . . . . . . . . . . . . . . . . . . . . . . . . . . . . . . . . . . . . . . . . . . . . . . . . . . . . . . . . . . . . . . . . 7
2.4 Powering Up the DC-530 . . . . . . . . . . . . . . . . . . . . . . . . . . . . . . . . . . . . . . . . . . . . . . . . . . . . . . . . . . 7
2.4.1 AC Power Cord and On/Off Switch . . . . . . . . . . . . . . . . . . . . . . . . . . . . . . . . . . . . . . . . . . . . . . . . . . . . 7
2.4.2 Start-Up Screens . . . . . . . . . . . . . . . . . . . . . . . . . . . . . . . . . . . . . . . . . . . . . . . . . . . . . . . . . . . . . . . . . 8
2.5 Setting the Date and Time . . . . . . . . . . . . . . . . . . . . . . . . . . . . . . . . . . . . . . . . . . . . . . . . . . . . . . . . . 8
2.6 Replacement Parts . . . . . . . . . . . . . . . . . . . . . . . . . . . . . . . . . . . . . . . . . . . . . . . . . . . . . . . . . . . . . . . 9
2.7 Scale Dimensions. . . . . . . . . . . . . . . . . . . . . . . . . . . . . . . . . . . . . . . . . . . . . . . . . . . . . . . . . . . . . . . . 9
3.0 Configuration Settings ............................................................................................................... 10
3.1 Configuring Customer Specifications . . . . . . . . . . . . . . . . . . . . . . . . . . . . . . . . . . . . . . . . . . . . . . . . 10
3.2 Configuring Weight and Measurement Specifications (Dealer/Technician Maintenance) . . . . . . . . . . 13
4.0 Calibration ................................................................................................................................. 20
5.0 Scale Operations........................................................................................................................ 22
5.1 Factors Affecting Counting Scale Accuracy . . . . . . . . . . . . . . . . . . . . . . . . . . . . . . . . . . . . . . . . . . . 22
5.2 Teraoka Error Prediction (TEP) Function . . . . . . . . . . . . . . . . . . . . . . . . . . . . . . . . . . . . . . . . . . . . . . 23
5.3 The Mode Menu Screen . . . . . . . . . . . . . . . . . . . . . . . . . . . . . . . . . . . . . . . . . . . . . . . . . . . . . . . . . . 23
5.4 Tare Operation . . . . . . . . . . . . . . . . . . . . . . . . . . . . . . . . . . . . . . . . . . . . . . . . . . . . . . . . . . . . . . . . . 23
5.4.1 One-Touch Tare, Tare Unknown . . . . . . . . . . . . . . . . . . . . . . . . . . . . . . . . . . . . . . . . . . . . . . . . . . . . . 23
5.4.2 Digital Tare, Tare Weight Known . . . . . . . . . . . . . . . . . . . . . . . . . . . . . . . . . . . . . . . . . . . . . . . . . . . . . 24
5.4.3 Tare Value Accumulation and Subtraction . . . . . . . . . . . . . . . . . . . . . . . . . . . . . . . . . . . . . . . . . . . . . . 24
5.4.4 Tare Accumulation . . . . . . . . . . . . . . . . . . . . . . . . . . . . . . . . . . . . . . . . . . . . . . . . . . . . . . . . . . . . . . . 25
5.4.5 Tare Subtraction . . . . . . . . . . . . . . . . . . . . . . . . . . . . . . . . . . . . . . . . . . . . . . . . . . . . . . . . . . . . . . . . . 25
5.5 Operations in Normal Counting Mode. . . . . . . . . . . . . . . . . . . . . . . . . . . . . . . . . . . . . . . . . . . . . . . . 25
5.5.1 Normal Counting Mode - Unit Weight Operation by Sampling . . . . . . . . . . . . . . . . . . . . . . . . . . . . . . . 25
5.5.2 Normal Counting Mode - Unit Weight Operation by Key Entry. . . . . . . . . . . . . . . . . . . . . . . . . . . . . . . 26
5.5.3 Normal Counting Mode - Part Accumulation and Part Subtraction . . . . . . . . . . . . . . . . . . . . . . . . . . . 27
5.5.5 Normal Counting Mode - Part Subtraction. . . . . . . . . . . . . . . . . . . . . . . . . . . . . . . . . . . . . . . . . . . . . . 28
5.5.6 Normal Counting Mode - Negative Counting . . . . . . . . . . . . . . . . . . . . . . . . . . . . . . . . . . . . . . . . . . . . 29
5.5.7 Counting Out of a Full Container - See Total Amount Remaining in the Container . . . . . . . . . . . . . . . . 30
5.5.8 Negative Counting - Total Removed Displayed at the End. . . . . . . . . . . . . . . . . . . . . . . . . . . . . . . . . . 30
5.5.9 Normal Counting Mode - Clearing Accumulated Data . . . . . . . . . . . . . . . . . . . . . . . . . . . . . . . . . . . . . 30
5.6 Operations in TEP (Teraoka Error Prediction) Mode . . . . . . . . . . . . . . . . . . . . . . . . . . . . . . . . . . . . . 30
5.6.1 TEP Mode - Unit Weight Operation by Sampling . . . . . . . . . . . . . . . . . . . . . . . . . . . . . . . . . . . . . . . . . 30
5.6.2 TEP Mode - Unit Weight Operation by Key Entry. . . . . . . . . . . . . . . . . . . . . . . . . . . . . . . . . . . . . . . . . 33
5.6.3 TEP Mode - Parts Counting . . . . . . . . . . . . . . . . . . . . . . . . . . . . . . . . . . . . . . . . . . . . . . . . . . . . . . . . 33
5.6.4 TEP Mode - Part Accumulation and Part Subtraction . . . . . . . . . . . . . . . . . . . . . . . . . . . . . . . . . . . . . 34
5.6.5 TEP Mode - Negative Counting. . . . . . . . . . . . . . . . . . . . . . . . . . . . . . . . . . . . . . . . . . . . . . . . . . . . . . 35
5.6.6 TEP Mode - Clearing Accumulated Data . . . . . . . . . . . . . . . . . . . . . . . . . . . . . . . . . . . . . . . . . . . . . . . 35
5.7 Toggle Between Scales . . . . . . . . . . . . . . . . . . . . . . . . . . . . . . . . . . . . . . . . . . . . . . . . . . . . . . . . . . 35
5.8 Recalling Item Codes in Counting Mode . . . . . . . . . . . . . . . . . . . . . . . . . . . . . . . . . . . . . . . . . . . . . . 35
Page 4

5.9 Sample, Count and Print a Label . . . . . . . . . . . . . . . . . . . . . . . . . . . . . . . . . . . . . . . . . . . . . . . . . . . 35
5.10 Scan ID Bar Code, Count and Print a Label . . . . . . . . . . . . . . . . . . . . . . . . . . . . . . . . . . . . . . . . . . 36
6.0 Scale Programming................................................................................................................... 37
6.1 Programming a New Item Code (Item Registration) . . . . . . . . . . . . . . . . . . . . . . . . . . . . . . . . . . . . . 37
6.2 Updating the Record of an Existing Item . . . . . . . . . . . . . . . . . . . . . . . . . . . . . . . . . . . . . . . . . . . . . 39
6.2.1 Update the Unit Weight of an Existing Item From the Counting Mode . . . . . . . . . . . . . . . . . . . . . . . . . 39
6.2.2 Update the Tare Weight of an Existing Item From the Counting Mode. . . . . . . . . . . . . . . . . . . . . . . . . 39
6.2.3 Update an Existing Item From the Programming Mode . . . . . . . . . . . . . . . . . . . . . . . . . . . . . . . . . . . . 40
6.3 Deleting Item Codes . . . . . . . . . . . . . . . . . . . . . . . . . . . . . . . . . . . . . . . . . . . . . . . . . . . . . . . . . . . . 42
6.3.1 Clearing an Individual Field . . . . . . . . . . . . . . . . . . . . . . . . . . . . . . . . . . . . . . . . . . . . . . . . . . . . . . . . . 42
6.3.2 Deleting a Single Item Code . . . . . . . . . . . . . . . . . . . . . . . . . . . . . . . . . . . . . . . . . . . . . . . . . . . . . . . . 42
6.3.3 Deleting All Item Codes. . . . . . . . . . . . . . . . . . . . . . . . . . . . . . . . . . . . . . . . . . . . . . . . . . . . . . . . . . . . 43
6.4 Setting a General Setpoint . . . . . . . . . . . . . . . . . . . . . . . . . . . . . . . . . . . . . . . . . . . . . . . . . . . . . . . . 44
7.0 External Devices: Printers, PCs, Scanners and Scales ............................................................ 46
7.1 Printer Connection. . . . . . . . . . . . . . . . . . . . . . . . . . . . . . . . . . . . . . . . . . . . . . . . . . . . . . . . . . . . . . 46
7.1.1 Zebra LP2824. . . . . . . . . . . . . . . . . . . . . . . . . . . . . . . . . . . . . . . . . . . . . . . . . . . . . . . . . . . . . . . . . . . 46
7.1.2 Epson TM-U220 Tape Printer or Epson TM-U295 Ticket Printer . . . . . . . . . . . . . . . . . . . . . . . . . . . . . 47
7.2 Printer Label Formats . . . . . . . . . . . . . . . . . . . . . . . . . . . . . . . . . . . . . . . . . . . . . . . . . . . . . . . . . . . 47
7.2.1 No Printer . . . . . . . . . . . . . . . . . . . . . . . . . . . . . . . . . . . . . . . . . . . . . . . . . . . . . . . . . . . . . . . . . . . . . . 47
7.2.2 ZEBRA LP2844 Barcode Printer . . . . . . . . . . . . . . . . . . . . . . . . . . . . . . . . . . . . . . . . . . . . . . . . . . . . . 48
7.2.3 Epson TM-U220 Tape Printer . . . . . . . . . . . . . . . . . . . . . . . . . . . . . . . . . . . . . . . . . . . . . . . . . . . . . . . 49
7.2.4 Epson TM-U295 Ticket Printer . . . . . . . . . . . . . . . . . . . . . . . . . . . . . . . . . . . . . . . . . . . . . . . . . . . . . . 49
7.3 Connecting to a PC . . . . . . . . . . . . . . . . . . . . . . . . . . . . . . . . . . . . . . . . . . . . . . . . . . . . . . . . . . . . . 49
7.3.1 Setting the Scale Specifications for Communication to a PC. . . . . . . . . . . . . . . . . . . . . . . . . . . . . . . . 49
7.3.2 Communication Method . . . . . . . . . . . . . . . . . . . . . . . . . . . . . . . . . . . . . . . . . . . . . . . . . . . . . . . . . . . 49
7.3.3 Pin Assignments . . . . . . . . . . . . . . . . . . . . . . . . . . . . . . . . . . . . . . . . . . . . . . . . . . . . . . . . . . . . . . . . . 50
7.3.4 Data Formats . . . . . . . . . . . . . . . . . . . . . . . . . . . . . . . . . . . . . . . . . . . . . . . . . . . . . . . . . . . . . . . . . . . 50
7.3.5 Output Data Formats With Headers . . . . . . . . . . . . . . . . . . . . . . . . . . . . . . . . . . . . . . . . . . . . . . . . . . 51
7.3.6 Output Data Formats Without Headers . . . . . . . . . . . . . . . . . . . . . . . . . . . . . . . . . . . . . . . . . . . . . . . . 51
7.4 Setpoint Connector . . . . . . . . . . . . . . . . . . . . . . . . . . . . . . . . . . . . . . . . . . . . . . . . . . . . . . . . . . . . . 52
7.5 Bar Code Scanner . . . . . . . . . . . . . . . . . . . . . . . . . . . . . . . . . . . . . . . . . . . . . . . . . . . . . . . . . . . . . . 52
7.6 Remote Scale Channel . . . . . . . . . . . . . . . . . . . . . . . . . . . . . . . . . . . . . . . . . . . . . . . . . . . . . . . . . . 53
7.6.1 Setting the Specifications for Scale 2 . . . . . . . . . . . . . . . . . . . . . . . . . . . . . . . . . . . . . . . . . . . . . . . . . 53
7.6.2 Remote Platforms Available . . . . . . . . . . . . . . . . . . . . . . . . . . . . . . . . . . . . . . . . . . . . . . . . . . . . . . . . 54
8.0 Appendices ................................................................................................................................ 55
8.1 Error Message List. . . . . . . . . . . . . . . . . . . . . . . . . . . . . . . . . . . . . . . . . . . . . . . . . . . . . . . . . . . . . . 55
8.2 Troubleshooting. . . . . . . . . . . . . . . . . . . . . . . . . . . . . . . . . . . . . . . . . . . . . . . . . . . . . . . . . . . . . . . . 56
8.3 Specifications . . . . . . . . . . . . . . . . . . . . . . . . . . . . . . . . . . . . . . . . . . . . . . . . . . . . . . . . . . . . . . . . . 57
9.0 DC-530 Limited Warranty........................................................................................................... 58
2
Page 5

About This Manual
This manual contains operating procedures for the DC-530 counting scale and provides the user with all the
information necessary for its setup and operation. It is organized based on the procedures you will likely follow
when setting up and using your counting scale. This manual applies to Version 2.01 of the DC-530 counting scale
series.
Some procedures described in this manual require work inside the scale base. These procedures are to
#AUTION
be performed by qualified service personnel only.
Authorized distributors and their employees can view or download this manual from the
DIGI distributor site at www.ricelake.com.
1.0 Introduction
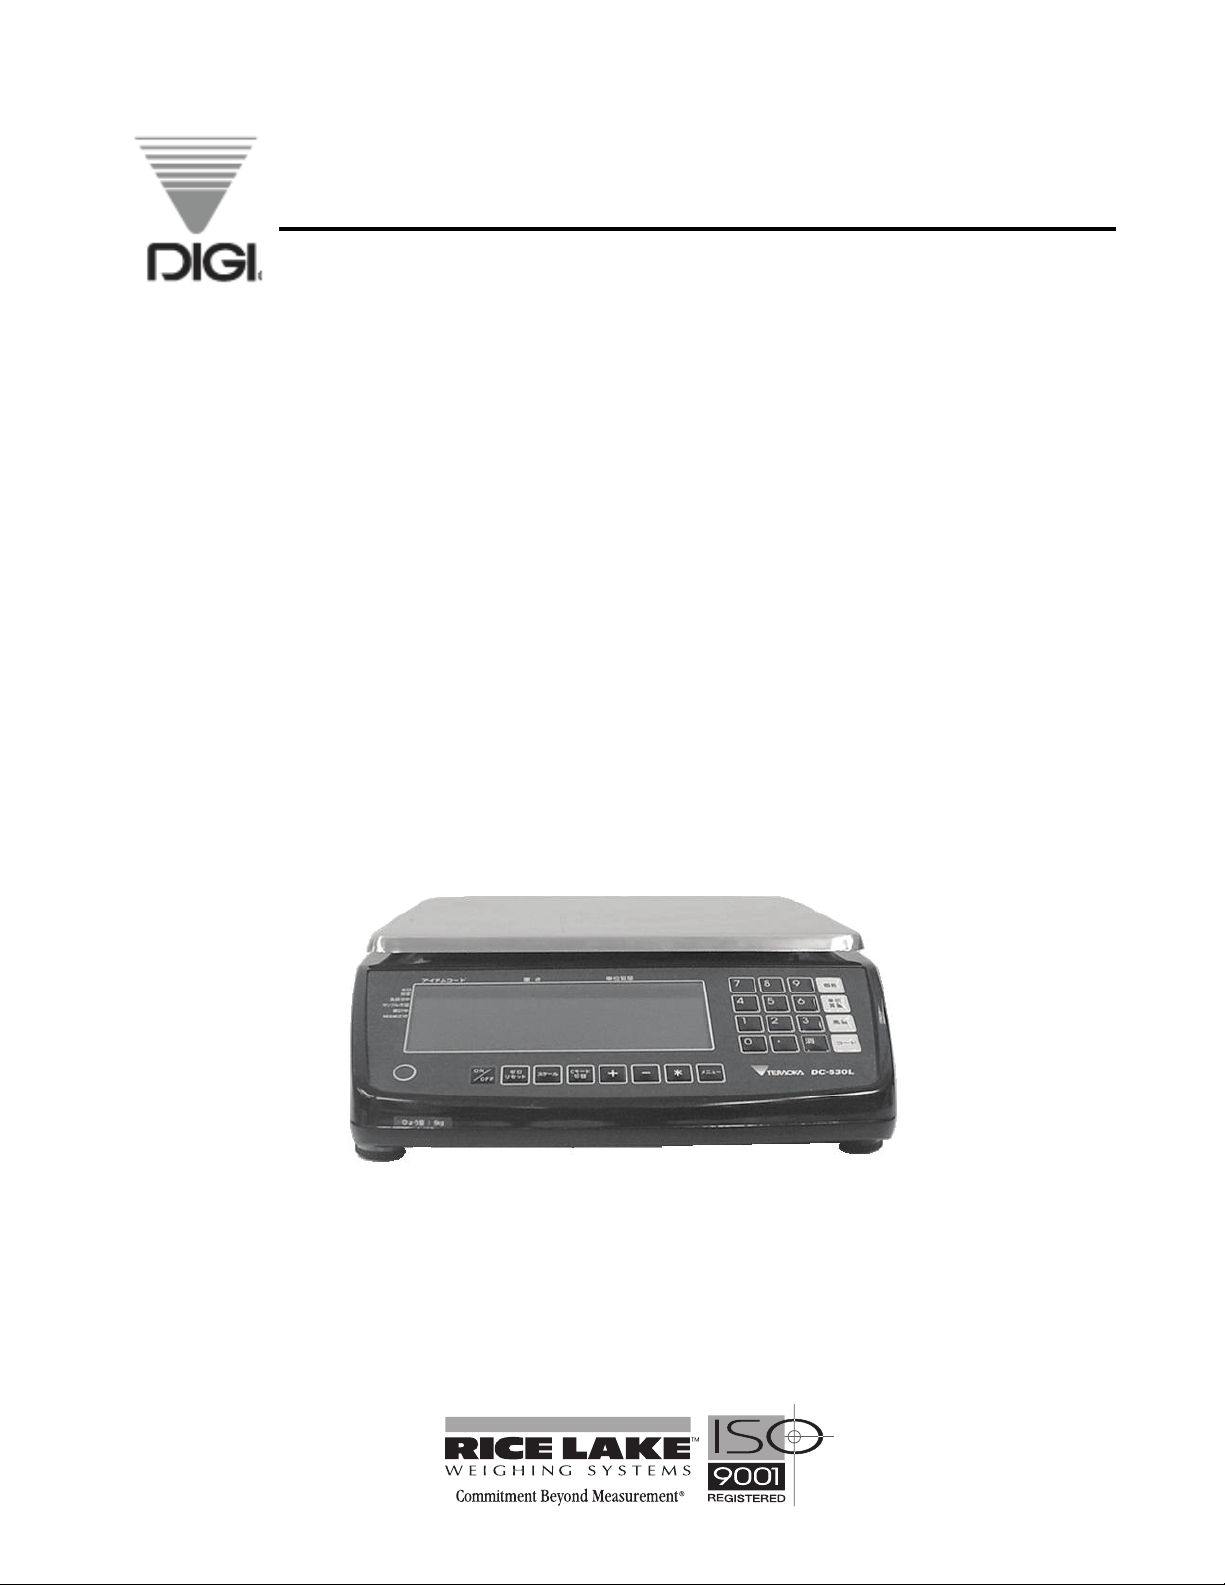
The DC-530 is high-precision counting scale that offers practical solutions for a full range of counting
applications. With an internal counting resolution of 1/1,000,000, the UniBloc one-piece force cell design
provides quick response, stability against temperature change, and outstanding durability on top of maximum
counting precision and accuracy. Its high-visibility full dot color LCD display enables operators to easily see
weights and quantities. Counting and weighing operations are greatly speeded by the DC-530’s ability to store
and recall the item code, tare weight, unit weight, and three setpoint values for 200 of your pieces, parts, or items.
The RS-232 ports allow you to connect to a printer, PC, or barcode scanner, while the optional remote scale
channel lets you add another weighing platform.
The DC-530 Counting Scale includes the DIGI TEP (Teraoka Error Prediction) Function which detects weight
variances in sample quantities and calculates the maximum quantity of that piece that can be counted without
introducing error. To make the operator’s job easier, the scale’s display will change from green to yellow or red
when the maximum safe quantity has been exceeded. This function works by performing a series of sampling
operations which the scale uses to plot the weight variances of the pieces being weighed. By then accumulating
counting results within the calculated safe quantity, the counting operation can be completed without a counting
error.
1.1 Capacities and Resolutions
Table 1-1 lists the scale capacities, minimum graduations, and tare ranges for all models of the DC-530 counting
scales. The internal count span and display resolution can be set by the user in the weight and measurement
specifications (See Section 3.X). Weight units can also be set between lb and kg using the scale’s weight and
measurement specifications.
DC-530 Single Scale
DC-530 Capacity Minimum Graduation Platter Size
10 lb 0.0001 lb 13” x 9.3”
20 lb 0.0002 lb 13” x 9.3”
Table 1-1. DC-530 Capacities, Minimum Graduations and Platter Sizes
Introduction 1
Page 6

1.2 Modes of Operation
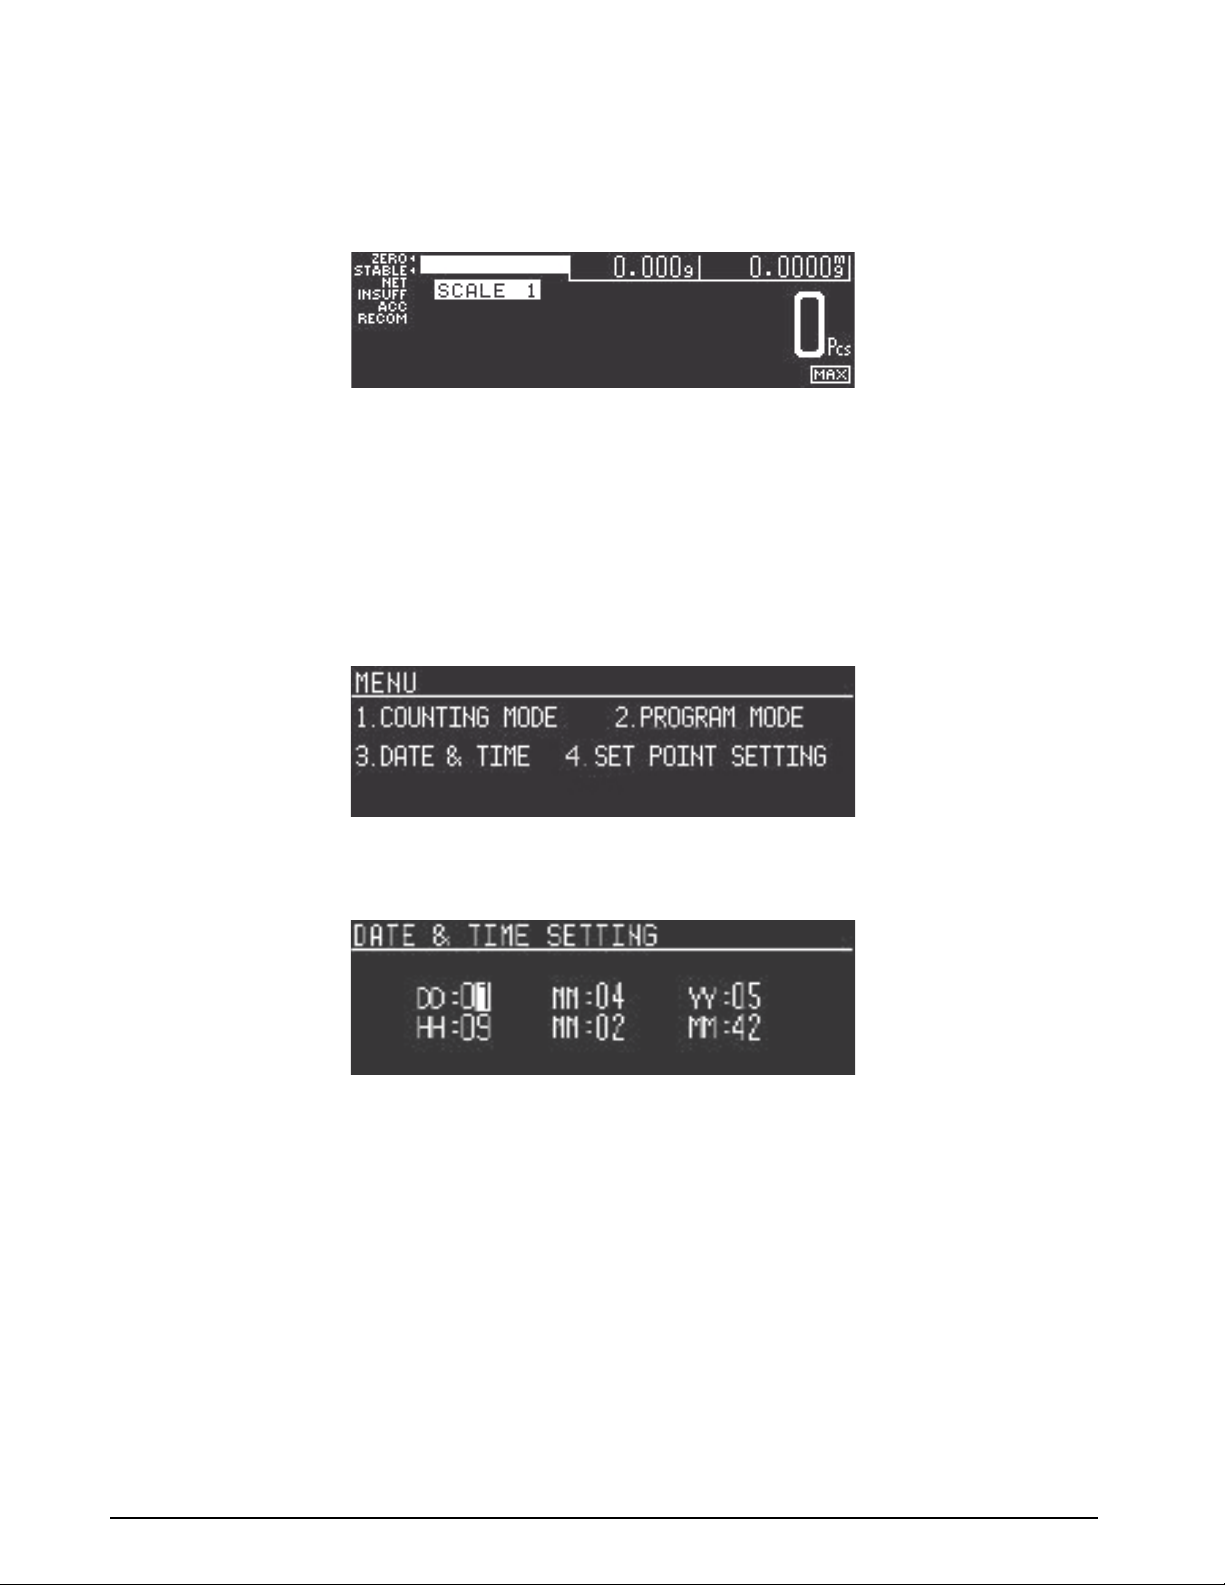
The DC-530 has four modes of operation that are accessed from the MODE key:
• Counting Mode – where all weighing, counting and printing operations take place.
• Program Mode – where item data can be programmed into the memory of the scale and edited.
• Date & Time - where you can set the date and time used in printing on labels and reports.
• Set Point Setting - where you can program general set points.
1.3 Keyboard and Display
Figure 1-1 shows the DC-530 console with its indicator lamps, the main function keys and the numeric keypad.
Indicator lamps are described in Section 1.3.2. Section 1.3.3 shows the two main counting displays (Normal and
TEP); while Section 1.3.4 describes the DC-530 keys and keypad.
Figure 1-1. DC-530 Display
1.3.1 Display Specifications
Weight display 6 digits
Unit Weight display 5 digits
Quantity display 7 digits
Table 1-2. DC-530 Display Specifications
1.3.2 Indicator Lamps
Table 1-3 shows a list of the indicator lamps that the DC-530 uses to provide additional information about the
value being displayed. The indicator lamps are illuminated when the specific function is being performed.
Indicator Lamp Function or Meaning
Zero
STABLE
NET
INSUFF
ACC
RECOM
On when the gross weight is at zero and is stable
On when the weight on the platter is stable.
On when the display shows net weight (when a tare weight is entered or recalled)
On when the net weight is below the specified percentage of scale capacity
Indicates that an accumulated quantity is stored in memory.
On when unit weight recomputing is possible
Table 1-3. DC-530 Indicator Lamps and Function
2 DC-530 Operation Manual
Page 7

1.3.3 Display Elements
The DC-530’s display shows different elements depending on whether it is in “Normal Counting Mode” or “TEP
(Teraoka Error Prediction) Counting Mode”.
Figure 1-2. Normal Counting Mode Display Elements
Figure 1-3. TEP Counting Mode Display Elements
Introduction 3
Page 8

1.3.4 Key Functions
The DC-530 features many functions for managing item information and scale operation. Table 1-4 lists the keys
and key functions of the DC-530 keyboard and keypad.
Some keys have different functions depending on what mode or function you are in.
Key Description
ON/OFF - Turns the scale display on or off.
REZERO key - Used to reset the weight display to zero.
SCALE key - Used to select between Scale 1 and Scale 2 if an external scale is connected.
TEP key - Used to toggle between “Normal Counting Mode” and “Teraoka Error
Prediction (TEP) Counting Mode”.
+ (Plus) key -
Counting Mode - Used to accumulate quantity data. Also prompts printing of a label if an
external printer is connected.
Program Mode - Used to navigate to the next editable data in all modes except Normal and
TEP counting modes.
- (Minus) key -
Counting Mode - Used to subtract a quantity during accumulation.
Program Mode - Used to navigate to the previous editable data in all modes except Normal
and TEP counting modes.
* PRINT key -
Counting Mode - Used to output data to print a label when an external printer is connected.
Used to show and then clear accumulated TOTAL data when doing
accumulation.
Program Mode - Used to save changes in data in all mode operations except Normal and
TEP Counting modes.
MODE key - Used to access the MODE menu for Program Mode, Date & Time Setting,
and Set Point Setting.
to
Numeric keys - Used to enter numeric values. When using the scale, first enter a numeric
DECIMAL key - Used to set the decimal point.
PCS key - Used for computing Unit Weight by sampling.
TARE key -
Counting Mode - Used to set or clear the tare value.
Program Mode - Used to store SPEC changes and escape to the Weighing Mode when
Maintenance Mode - Used to escape to the Weighing Mode from the Maintenance Mode.
4 DC-530 Operation Manual
value, then press the appropriate function key.
programming specifications.
Table 1-4. DC-530 Key Functions
Page 9

Key Description
UNIT WEIGHT key -
Counting Mode - Used to set the Unit Weight.
Program Mode - Used to register an item code being entered into memory.
POUND key- Used to call up or recal an item code from memory.
Table 1-4. DC-530 Key Functions
Introduction 5
Page 10
2.0 Installation
This section describes the procedure for the installation and setup of the DC-530 counting scale.
2.1 Unpacking
Do not turn scale upside down. Always work with scale on its side! Damage to the load cell can occur if
#AUTION
1. Immediately after unpacking, visually inspect the DC-530 counting scale to ensure all components are
included and undamaged. If any were damaged in shipment, notify Rice Lake Weighing Systems and the
shipper immediately.
2. The DC-530 counting scale is carefully packed for protection during shipping. After opening the box,
remove all the components. Check the insides of the box carefully to make sure you have all of the
pieces. The package should include the following:
• DC-530 counting scale
• Platter support
• 4 rubber caps
• 4 screws for platter support
• Stainless steel platter
• AC power cord
• Operation Manual
• Warranty card
the scale is turned upside down.
3. Remove the bag protecting the scale and the protective film covering the front panel and platter.
4. Put the 4 supplied rubber caps on the ends of the platter support.
5. Set the platter support on the scale, lining up the screw holes on the support with the corresponding holes
on the scale. Use the 4 screws supplied to fix the platter support to the scale, taking care not to put strong
pressure down on the platter support while screwing it down to avoid damage to the force balance.
6. Seat the stainless steel platter on the platter supports, making sure that the rubber caps are completely
seated in the corners of the platter.
7. Connect the AC power cord to the plug on the bottom right-hand side of the scale.
8. Store the DC-530 scale box for possible future use.
2.2 Repacking
If the DC-530 counting scale must be returned for modification, calibration or repair, it must be properly packed
with sufficient cushioning materials. Whenever possible, use the original carton when shipping the DC-530.
Damage caused by improper packaging is not covered by the warranty.
6 DC-530 Operation Manual
Page 11
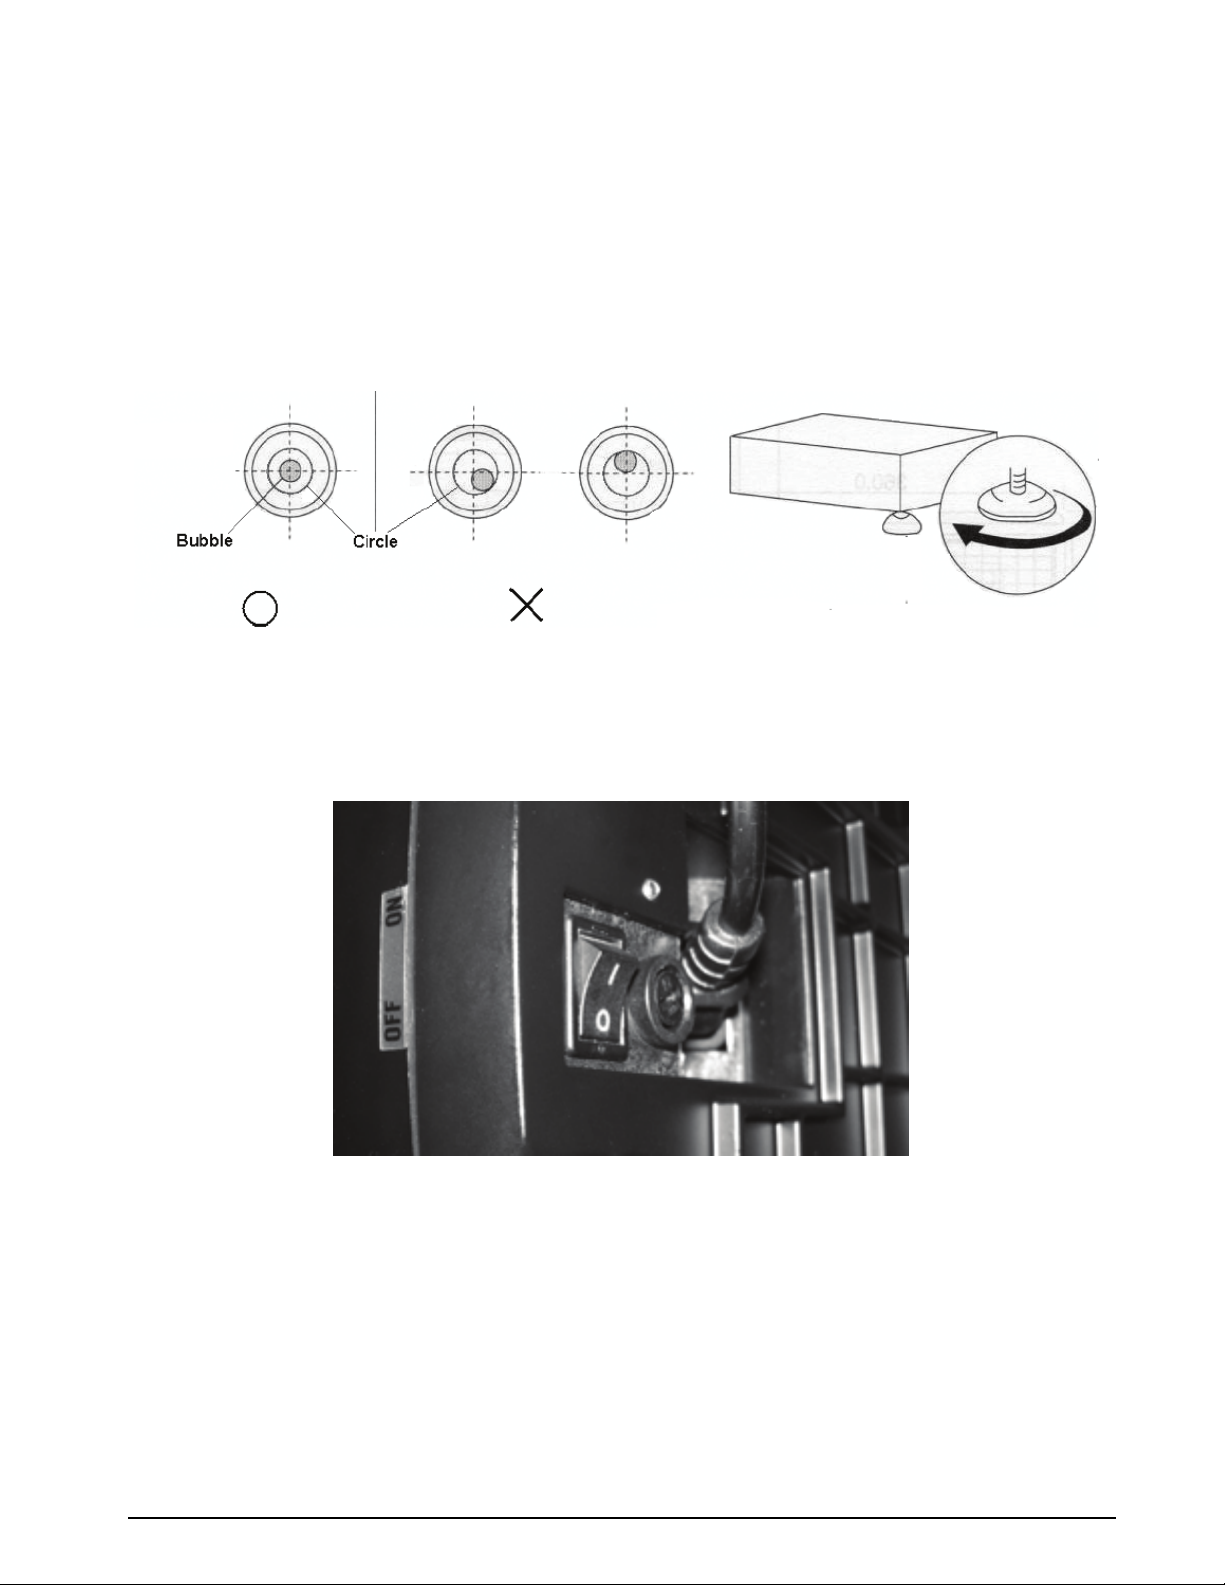
2.3 Setting Up
Place the scale on a solid, level surface away from fans, breezes, and sources of electrical interference or
magnetic fields. The installation location should also be free from high humidity, direct sunlight, or excessive
dust. The operating temperature is 0 - 40º C.
Level the scale by turning the four adjustable legs located on the bottom of the scale while referencing the bubble
level located on the front of the scale (see
NOTE: To ensure a higher degree of scale stability, turn all four adjustable legs al the way in before leveling. Turn the adjustable
legs out to level as needed.
Figure 2-1).
Figure 2-1. Leveling Bubble
2.4 Powering Up the DC-530
2.4.1 AC Power Cord and On/Off Switch
1. Connect the AC power cord under the scale base as shown in Figure 2-2.
Figure 2-2. AC Plug-in and ON/OFF Switch Location on Underside of DC-530
2. Plug the AC power cord into a grounded 115 VAC receptacle and switch the ON/OFF rocker switch on
the bottom right-hand side of the scale to the “On” position.
3. Press the ON/OFF key located on the front of the scale. This key turns the scale display on and off. To
turn AC power to the scale on and off, use the
ON/OFF rocker switch.
Installation 7
Page 12
2.4.2 Start-Up Screens
1. When powering up, the DC-530 will display the model number and firmware version.
2. Next, the scale tests the color modes of the display and says SEARCHING SCALE before bringing you to the
Normal Counting Mode screen
.
3. If there is anything on the platform(s) and it exceeds the scale start range, the display will show the error
message Out of start range. If this error appears, remove the weight from the platform and the scale
will continue its startup sequence.
2.5 Setting the Date and Time
Once the date and time have been set, the internal clock will be maintained by the main board battery even when
the DC-530 is not plugged in or turned off. The procedure below can also be used to adjust the time when
moving from Standard to Daylight Savings Time or when the scale is moved to a new facility in a different time
zone.
1. Press the MODE key until the display shows the Menu Screen.
2. Press the 3 key to enter the Date and Time Setting Screen.
(NOTE: The order in which the day/month/year fields appear on the screen may vary depending on how you scale is
programmed.).
3. Use the numeric keypad to enter the current date (2 digit format). Then press the + (Plus) key to move to
the setting of the month.
4. Use the numeric keypad to enter the current month (in 2 digit format). Continue forward to the other
fields by pressing the + (Plus) key. To move backwards to a modify a previous field, press the [-]
(minus)
key. To move to the next field without making any change, simply press the + (Plus) key
without entering data.
5. When all the date and time fields have been entered, press the * PRINT key to save the date and time
setting. To exit without saving the changes, press the TAR E key to return to the Mode Menu screen.
6. Press the [1] key to exit the menu and return to the Counting Mode Screen.
8 DC-530 Operation Manual
Page 13
2.6 Replacement Parts
The following table lists the part numbers and descriptions of replacement parts available for the DC-530
Counting Scale.
RLWS Part Number Description
97002 Platter
97003 Platter Support (without rubber stops)
97004 Rubber Stops for Platter Support (97003)
97005 Overlay
97006 Overlay Lens
97007 Display Board
97008 Loadcell Block, 10 lb
97009 Loadcell Block, 20 lb
97010 A/D Assembly
97011 Power Supply
97012 Main CPU Board
15438 Power Cord
Table 2-1. DC-530 Replacement Parts
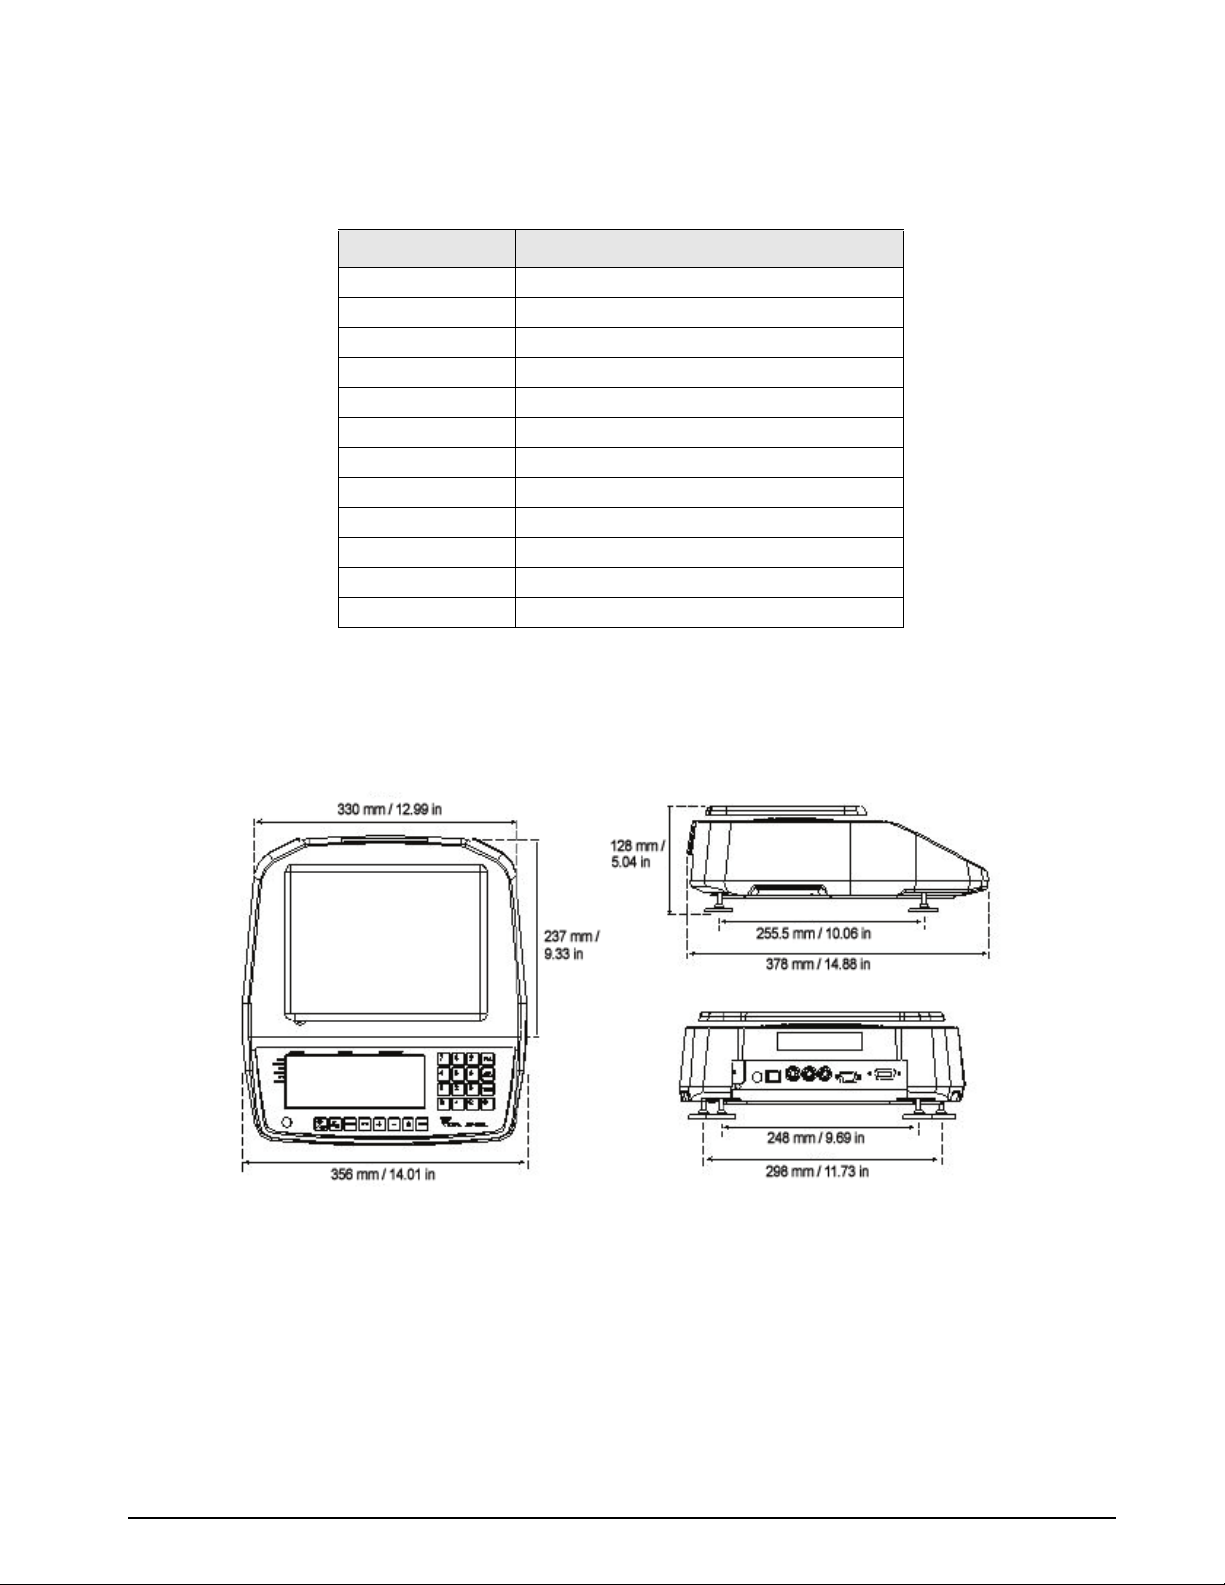
2.7 Scale Dimensions
The following diagram illustrates the external dimensions of the DC-530 Counting Scale.
Installation 9
Page 14

3.0 Configuration Settings
This section presents the setup and configuration of the DC-530 Counting Scale to be used specifically by
distributors and service technicians. Configuring these specifications allow you to tailor the DC-530 to your
specific applications.
Setting the specifications allows you to modify the functionality of the DC-530. Use the tables in this section to
view the options you can modify. For example, if you want to deactivate the DC-530’s ability to enter Tare
weights digitally, refer to the specification table and locate SPEC 35, Bit 2. The default for SPEC 35 is 1, which
means it is enabled. To turn it off or disable it, change the SPEC setting to 0: No.
The following tables list the DC-530 specifications and their corresponding default values. The default values are
automatically set when the scale’s memory is initally set by the dealer.
SPEC 00 through SPEC 12, and SPEC 51 through SPEC 55 (Table 3-1) are Customer Specifications while SPEC
20 through SPEC 49 (Tab le 3-2) are Weight and Measurement specifications. In programming specifications, the
+ (Plus) and – (minus) keys allow you to move to the next or previous specification while saving changes to the
SPEC code you were just in. To exit from a specification without saving your changes, press the TARE key. To
save the changes when exiting, press the
3.1 Configuring Customer Specifications
1. To configure customer specifications, press the MODE key to enter the Menu Screen.
* PRINT key.
2. In the Mode Menu Screeen, hold down the REZERO key while entering 141 from the numeric keypad.
The first SPEC code,
3. Press the + (Plus) key until the specification you want to modify is displayed. (You can use the (Minus) key to move backwards through the list.)
4. Enter the new value for the specification. You must enter values for all four bits of this specification
even if you are only changing one of the bits, so your entry must be 4 digits long. Your new entry will be
displayed in the
5. Once you have entered your change, you have the following options:
• press the + (Plus) key to temporarily store the change and move to the next specification, then press
* PRINT key to permanently record the change and leave the SPEC setting mode.
the
• Press the TARE key to exit without saving the change.
SPEC 00 is displayed along with its OLD SETTING meaning its current setting.
NEW SETTING field.
10 DC-530 Operation Manual
Page 15

6. To change another SPEC code before exiting, repeat Steps 3 and 4.
If you power off the scale while the saving process in going on, you can clear the entire memory of the
scale! Wait until the scale has returned to the Menu Screen before performing any other functions.
#AUTION
7. After returning to the Normal Weighing Mode, power the scale down completely by using the ON/OFF
rocker switch on the bottom of the scale to complete the registering of the changes.
SPEC No Bit 3 Bit 2 Bit 1 Bit 0
00
01 Set Point Operation
00: No Operation [DEFAULT]
01: Common Setpoint
10: Item Setpoint
11: Not Used
02 Buzzer Output Type
Setpoint Selection
Setpoint Buzzer Output
LAN
[not currently used - for
future expansion]
0: Disable [DEFAULT]
1: Enable
Setpoint Range
03
RS232B for
Printer
04
RS232A for
Scanner
05
RS232C for PC
06
RS232C Output
07
RS232C1 Force
Balance
08
RS232C1 Force
Balance
0: Proper [DEFAULT]
1: Scare/Over
Printer Model
00: No Connection [DEFAULT]
01:DIGI TVP1000/ Zebra LP2824
10: EPSON CTM290/TM-U295/TM-U220
11: FL-2
Output Protocol
00: No Output
01: Continuous (this affects the printer output)
10: Manual [by key press] Key [DEFAULT]
11: Not Used
Baud Rate
000: 19200
001: 9600
010: 4800 [DEFAULT]
011: 2400
100: 1200
Parity
00: Even [DEFAULT]
01: Odd
10: None
11: None
0: Pieces [DEFAULT]
1: Weight
Connection Type
00: No Connection [DEFAULT]
01: Barcode Scanner
Connection Type
00: No Connection [DEFAULT]
01: PC
0: No
1: Yes [DEFAULT]
Header Type
NOTE: The header type SPEC only affects output
to a PC, not communication to a printer.
00: No Header
01: Code [DEFAULT]
10: Title
11: Not Used
Stop Bit
0: 1 [DEFAULT]
1: 2
0: Negative
1: Positive [DEFAULT]
Data Length
0: 7 [DEFAULT]
1: 8
Table 3-1. DC-530 Customer Specifications
Configuration Settings 11
Page 16

SPEC No Bit 3 Bit 2 Bit 1 Bit 0
09
RS232C2
10
RS232C2
11
RS232C3
12
RS232C3
13 - 19 not currently in use
51 Insufficient Range for Load Cell
Baud Rate
000: 19200
001: 9600 [DEFAULT]
010: 4800
011: 2400
100: 1200
Parity Bit
00: Even
01: Odd
10: None [DEFAULT]
11: None
Baud Rate
000: 19200
001: 9600 [DEFAULT]
010: 4800
011: 2400
100: 1200
Parity Bit
00: Even
01: Odd
10: None [DEFAULT]
11: None
Stop Bit
0: 1 [DEFAULT]
1: 2
Stop Bit
0: 1 [DEFAULT]
1: 2
Insufficient Sample
Data Length
0: 7
1: 8 [DEFAULT]
Data Length
0: 7
1: 8 [DEFAULT]
Insufficient Range for
Force Balance
00: 0.1% of Full Scale [DEFAULT]
01: 0.2% of Full Scale
10: None
11: None
52 Unit Weight Sampling
Times
0: 5 times [DEFAULT]
1: 10 times
53 Gross Weight Output
0: Display [DEFAULT]
1: Internal
54 Wait for Stable Weight
During Unit Weight
Calculating
0: No [DEFAULT]
1: Yes
Table 3-1. DC-530 Customer Specifications
Change Scale When
Weight Stable
0: No [DEFAULT]
1: Yes
Normal Counting Mode
Auto Re-Computing
0: Manual
1: Automatic [DEFAULT]
Work Filter Function
0: No
1: Yes [DEFAULT]
0: Disable
1: Enable [DEFAULT]
Negative Counting
0: No
1: Yes [DEFAULT]
Exit the Total Mode
0: Manual
1: Automatic [DEFAULT]
Uni Bloc Average Sample (filter function)
00: 16 samples
01: 32 samples
10: 64 samples [DEFAULT]
11: 128 samples
0: 0.01% of Full Scale
[DEFAULT]
1: 0.1% of Full Scale
Sampling Times
0: 5 times
1: 10 times [DEFAULT]
TEP Sampling Method
0: Manual
1: Automatic [DEFAULT]
12 DC-530 Operation Manual
Page 17

SPEC No Bit 3 Bit 2 Bit 1 Bit 0
55 Scan Quantity Type
Buzzer at Error
(activates the buzzer
when an operational
error is performed)
USA Pharmacy
Download Print Format
When Power On
0: Item Quantity
[DEFAULT]
1: Accumulate Quantity
56 - 59 not currently in use
0: Open [DEFAULT]
1: Close
0: Disable [DEFAULT]
1: Enable
NOTE: This SPEC must
be enabled for use in
pharmaceutical
applications. When this
SPEC is enabled, if the
Unit Weight is less than
3d or the sample size is
less than 10 the error
message “UNIT WEIGHT
BELOW LIGHT RANGE,
PLEASE RESAMPLE”
will appear.
0: No
1: Yes
Table 3-1. DC-530 Customer Specifications
3.2 Configuring Weight and Measurement Specifications (Dealer/Technician Maintenance)
1. To configure customer specifications, press the MODE key to enter the Menu Screen.
2. In the Mode Menu Screeen, hold down the REZERO key while entering 142 from the numeric keypad.
The first SPEC code, SPEC 20 is displayed along with its OLD SETTING meaning its current setting.
3. Press the + (Plus) key until the specification you want to modify is displayed. (You can use the -
(Minus)
key to move backwards through the list.)
4. Enter the new value for the specification. You must enter values for all four bits of this specification
even if you are only changing one of the bits, so your entry must be 4 digits long. Your new entry will be
Configuration Settings 13
Page 18

displayed in the NEW SETTING field.
5. Once you have entered your change, you have the following options:
• press the + (Plus) key to temporarily store the change and move to the next specification, then press
the * PRINT key to permanently record the change and store it and leave the SPEC setting mode.
• Press the TARE key to exit without saving the change.
6. To change another SPEC code before exiting, repeat Steps 3 and 4.
If you power off the scale while the saving process in going on, you can clear the entire memory of the
scale! Wait until the scale has returned to the Menu Screen before performing any other functions.
#AUTION
7. After returning to the Normal Weighing Mode, power the scale down completely by using the ON/OFF
rocker switch on the bottom of the scale to complete the registering of the changes.
SPEC No Bit 3 Bit 2 Bit 1 Bit 0
20 Minimum Display (Uni Bloc)
00: 1 [DEFAULT]
01: 2
10: 5
11: 10
Display Resolution (Uni Bloc)
(when internal count span is 500,000)
00: 1/10,000
01: 1/5,000 [DEFAULT]
10: 1/2,500
11: 1/12,500
(when internal count span is 1,000,000)
00: 1/100,000
01: 1/50,000 [DEFAULT]
10: 1/25,000
11: 1/20,000
21 Internal Count Span (Uni
Bloc)
0: 500,000
1: 1,000,000 [DEFAULT]
22 not currently in use
Weight Decimal Point Position (Uni Bloc)
(when internal count span is 500,000)
000: 00000
001: 0000.0 [DEFAULT]
010: 000.00
011: 00.000
100: 0.0000
Weight Decimal Point Position (Uni Bloc)
(when internal count span is 1,000,000)
000: 000000
001: 00000.0 [DEFAULT]
010: 0000.00
011: 000.000
100: 00.0000
101: 0.00000
Table 3-2. DC-530 Weight and Measurement Specifications
14 DC-530 Operation Manual
Page 19

SPEC No Bit 3 Bit 2 Bit 1 Bit 0
23 Minimum Display (Load Cell 1)
00: 1
01: 2
10: 5
11: 10
24 Internal Count Span
(Load Cell 1)
Weight Decimal Point Position (Load Cell 1)
(when internal count span is 500,000)
Display Resolution (Load Cell 1)
(when internal count span is 500,000)
00: 1/10,000
01: 1/5,000 [DEFAULT]
10: 1/2,500
11: 1/12,500
(when internal count span is 1,000,000)
00: 1/100,000
01: 1/50,000 [DEFAULT]
10: 1/25,000
0: 500,000 [DEFAULT]
1: 1,000,000
25 Weight Stable Condition for Load Cell 1 - waiting time 0.5 seconds to 10 seconds
0000: 0.5 seconds 1000: 4.5 seconds
0001: 1.0 seconds 1101: 5.0 seconds
0010: 1.5 seconds 1010: 5.5 seconds
0011: 2.0 seconds [DEFAULT] 1011: 6.0 seconds
0100: 2.5 seconds 1100: 7.0 seconds
0101: 3.0 seconds 1101: 8.0 seconds
0110: 3.5 seconds 1110: 9.0 seconds
0111: 4.0 seconds 1111: 10.0 seconds
26 Weight Stable Condition for Load Cell 1 - Limit No Check to ± 10.0d
000: 00000
001: 0000.0 [DEFAULT]
010: 000.00
011: 00.000
100: 0.0000
Weight Decimal Point Position (Load Cell 1)
(when internal count span is 1,000,000)
000: 000000
001: 00000.0 [DEFAULT]
010: 0000.00
011: 000.000
100: 00.0000
101: 0.00000
0000: No Check 1000: ± 5.0d
0001: ± 0.1d 1001: ± 10.0d
0010: ± 0.2d
0011: ± 0.3d
0100: ± 0.4d
0101: ± 0.5d [DEFAULT]
0110: ± 1.0d
0111: ± 2.0d
Table 3-2. DC-530 Weight and Measurement Specifications
Configuration Settings 15
Page 20

SPEC No Bit 3 Bit 2 Bit 1 Bit 0
27 Minimum Display (Load Cell 2)
00: 1 [DEFAULT]
01: 2
10: 5
11: 10
28 Internal Count Span
(Load Cell 2)
Weight Decimal Point Position (Load Cell 2)
(when internal count span is 500,000)
Display Resolution (Load Cell 2)
(when internal count span is 500,000)
00: 1/10,000
01: 1/5,000 [DEFAULT]
10: 1/2,500
11: 1/12,500
(when internal count span is 1,000,000)
00: 1/1,000,000
01: 1/50,000 [DEFAULT]
10: 1/25,000
0: 500,000 [DEFAULT]
1: 1,000,000
29 Weight Stable Condition for Load Cell 2 - waiting time 0.5 seconds to 10 seconds
0000: 0.5 seconds 1000: 4.5 seconds
0001: 1.0 seconds 1101: 5.0 seconds
0010: 1.5 seconds 1010: 5.5 seconds
0011: 2.0 seconds [DEFAULT] 1011: 6.0 seconds
0100: 2.5 seconds 1100: 7.0 seconds
0101: 3.0 seconds 1101: 8.0 seconds
0110: 3.5 seconds 1110: 9.0 seconds
0111: 4.0 seconds 1111: 10.0 seconds
000: 00000
001: 0000.0 [DEFAULT]
010: 000.00
011: 00.000
100: 0.0000
Weight Decimal Point Position (Load Cell 2)
(when internal count span is 1,000,000)
000: 000000
001: 00000.0 [DEFAULT]
010: 0000.00
011: 000.000
100: 00.0000
101: 0.00000
30 Weight Stable Condition for Load Cell 2 - Limit No Check to +/- 10.0d
0000: No Check
0001: ± 0.1d
0010: ± 0.2d
0011: ± 0.3d
0100: ± 0.4d
0101: ± 0.5d [DEFAULT]
0110: ± 1.0d
0111: ± 2.0d
1000: ± 5.0d
1001: ± 10.0d
31 - 34 not currently in use
Table 3-2. DC-530 Weight and Measurement Specifications
16 DC-530 Operation Manual
Page 21

SPEC No Bit 3 Bit 2 Bit 1 Bit 0
35 Enble Tare
Digital Tare Setting
Tare R a n ge
0: No
1: Yes [DEFAULT]
36 Weight Stable Timeout
37 Digital Tare Rounding
00: As Entered
01: Round to Nearest Increment [DEFAULT]
10: Not Used
11: Not Used
38 Digital Tare When
Loaded
0: No
1: Yes [DEFAULT]
39 Rezero on Power-Up
0: No
1: Yes [DEFAULT]
00: 2 10:6
01: 4 11:8 [DEFAULT]
This SPEC sets how many seconds it is before the
scale sounds its error buzzer if the weight does not
stabilize within that time after a function key (TARE,
REZERO, PCS, * PRINT, + (plus), - (minus).
Auto Tare Weight Clear
0: No [DEFAULT]
1: Yes
Condition of Auto Item Clear
00: 100% of Full Scale [DEFAULT]
01: 50% of Full Scale
10: 5% of Full Scale
Zero Reset When Scale
Change
0: No
1: Yes [DEFAULT]
NOTE: If both this SPEC
and SPEC 37 BIT 1 Clear Tare When ReZero Operation are set to
1: Yes, the tare value will
be changed when
changing scales even if
SPEC 45 Bit 1 - Clear
Tare on Scale Change
and SPEC 47 Bit 0 Keep Tare are both set to
0: No.
Clear Tare When ReZero Operation
0: No [DEFAULT]
1: Yes
NOTE: If both this SPEC
and SPEC 36 BIT 0 Zero Reset When Scale
Change are set to 1: Yes,
the tare value will be
changed when changing
scales even if SPEC 45
Bit 1 - Clear Tare on
Scale Change and SPEC
47 Bit 0 - Keep Tare are
both set to 0: No
Zero Tracking With Tare
0: No
1: Yes [DEFAULT]
Clear Unit Weight on
Scale Change
0: No [DEFAULT]
1: Yes
Zero Tracking
0: No
1: Yes [DEFAULT]
Auto Item Clear in
Normal Counting Mode
0: No
1: Yes [DEFAULT]
Table 3-2. DC-530 Weight and Measurement Specifications
00: >=Net 5d & gross 21d [DEFAULT]
01: >=Net 1d & stable
10: >=Net 1d & stable & quantity=0
NOTE: For auto tare clear, 10: >=net 5d & stable
0: No [DEFAULT]
1: Yes
Configuration Settings 17
Page 22

SPEC No Bit 3 Bit 2 Bit 1 Bit 0
40 Load Cell 1 Sensitivities Selection (mV/V)
1000(8 H): 2.08
1001(9 H): 1.84
1010(A,H):1.60
1011(B H): 1.36
1100(C H): 1.12 [DEFAULT]
1101(D H): 0.88
1110(E H): 0.64
1111(F H): 0.40
41 Load Cell 2 Sensitivities Selection (mV/V)
1000(8 H): 2.08
1001(9 H): 1.84
1010(A H): 1.60
1011(B H): 1.36
1100(C H): 1.12 [DEFAULT]
1101(D H): 0.88
1110(E H): 0.64
1111(F H): 0.40
42 Scale 4 Connection
Scale 3 Connection
Scale 2 Connection
Scale 1 Connection
0: Not Connected
[DEFAULT]
1: Connected
43 SCALE 1
00: UniBloc [DEFAULT]
01: Load Cell 1
10: Force Balance
11: Load Cell 2
44 SCALE 3
00: UniBloc
01: Load Cell 1
10: Force Balance
11: Load Cell 2 [DEFAULT]
45 Tare Decrease
0: No
1: Yes [DEFAULT]
0: Not Connected
[DEFAULT]
1: Connected
Item Tare Subtraction
0: No
1: Yes [DEFAULT]
0: Not Connected
[DEFAULT]
1: Connected
SCALE 2
00: UniBloc
01: Load Cell 1 [DEFAULT]
10: Force Balance
11: Load Cell 2
SCALE 4
00: UniBloc
01: Load Cell 1
10: Force Balance [DEFAULT]
11: Load Cell 2
Clear Tare on Scale
Change
0: No
1: Yes [DEFAULT]
NOTE: Even if this SPEC
is set to 0: No to keep
the tare value, the tare
value will be changed
when changing scales if
SPEC 36 Bit 0 - Zero
Reset When Scale
Change and SPEC 37
Bit 1 - Clear Tare When
Re-Zero Operation are
both set to 1: Yes
0: Not Connected
1: Connected [DEFAULT]
Do Tare Operation When
No Stability
0: No
1: Yes [DEFAULT]
Table 3-2. DC-530 Weight and Measurement Specifications
18 DC-530 Operation Manual
Page 23

SPEC No Bit 3 Bit 2 Bit 1 Bit 0
46 Tare Increase
Weight Unit
Overwrite the Tare Value
Do Tare Operation When
No Stability
0: No
1: Yes [DEFAULT]
47 Minus Mask Limit
0: Gross Weight
[DEFAULT]
1: Net Weight
48 Rezero Operation Range
0: kg
1: g [DEFAULT]
NOTE: This SPEC does
not affect the units
displayed unless SPEC
49 Bit 1 - Weight Base is
set to 0: Kg/g.
Minus Display
0: Mask
1: Minus [DEFAULT]
0: No
1: Yes [DEFAULT]
Zero Lamp Condition
0: Gross [DEFAULT]
1: Net
Scale Start Range
0: No [DEFAULT]
1: Yes
Keep Tare When
Changing Scale
0: No [DEFAULT]
1: Yes
NOTE: Even if this SPEC
is set to 1: Yes to keep
the tare value, the tare
value will be changed
when changing scales if
SPEC 36 Bit 0 - Zero
Reset When Scale
Change and SPEC 37
Bit 1 - Clear Tare When
Re-Zero Operation are
both set to 1: Yes
00: 100% of Full Scale [DEFAULT]
01: 10% of Full Scale
10: 2% of Full Scale
49 Disable Scale
Connection Check
0: No [DEFAULT]
1: Yes
50 not currently in use
Too Light Range for
Sampling
0: No [DEFAULT]
1: Yes
00: 100% of Full Scale [DEFAULT]
01: 10% of Full Scale
10: 2% of Full Scale
Weight Base
0: kg/g
1: lb [DEFAULT]
Table 3-2. DC-530 Weight and Measurement Specifications
Mask Condition at
Overflow
0: 1d
1: 9d [DEFAULT]
Configuration Settings 19
Page 24

4.0 Calibration
The DC-530 Counting Scale is a high-precision instrument. Although the scale needs very little maintenance,
you may want to check the calibration after every month or so of normal usage. To do this you will need to have
a test weight of approximately the total capacity of the scale (i.e. a 10 lb weight if you have a 10 lb capacity
scale). After the scale is initially installed, put the weight on the platform and record the weight displayed. Then
every month or so put the same weight on the scale and verify that it still reads the same.
Many facilities have a technician come in and check their units with certified test weights four times a year. If
you are ISO certified, you will want to check to see if your certification specifies more stringent requirements in
order to stay in compliance. Your Rice Lake Weighing Systems scale dealer has the calibrated test weights,
expertise and experience to perform this task for you as well as to check other operating parameters of your scale
and help you effectively integrate scales into your operations. If you do not know who your local Rice Lake
Weighing Systems dealer is, call us at 1-715-736-0002 and we will help you find someone who can provide you
with on-site support.
Follow the instructions below to calibrate your DC-530 scale to ensure its continued accuracy.
NOTE: You can exit the Maintenance Mode and return to the Counting Mode at any time by pressing the TAR E key.
1. Ensure that there is no weight on the platter and turn the scale on. It will display the model number and
current firmware version number.
2. With the scale in the Counting Mode, press the MODE key to go to the Mode Menu.
3. While at the Mode Menu, press and hold the REZERO key while entering 8715 from the numeric
keypad to enter the calibration mode.
4. You can select which scale you are calibrating, Scale 1 or Scale 2, by pressing the SCALE key. (If a 2nd
scale is not installed and set in the specifications, pressing the
5. The scale display will ask you to make sure that there is no weight on the platter then press the #
[CODE] key to set the zero point..
6. The scale will briefly flash the message ZERO POINT SETTING, please WAIT...Once the zero point is set, the
display returns to the Calibration Screen.. Press the * PRINT key to move to the span weight calibration.
The display will change to the following:
SCALE key has no effect.)
7. Place a reference weight on the platform. It is preferable to calibrate the scale using a weight equal to the
20 DC-530 Operation Manual
Page 25

full capacity of the scale (i.e. a 10 lb weight for 10 lb capacity scale, etc.) If the reference weight is not
equal to the full capacity of the scale, it must at least be greater than 10% of the full scale capacity.
Enter the value of the weight placed on the platter using the numeric keys before pressing the # [CODE]
key. The weight you enter will appear at the bottom of the display. Press the # [CODE] key.
8. The display will flash briefly again as the span settings for calibration of the scale are being saved, then
the display will return to Mode Menu.
9. Press 1 exit the Mode Menu and return to the Counting Mode.
Calibration 21
Page 26

5.0 Scale Operations
The following sections contain detailed operator instructions for the DC-530 counting scale. Included are
instructions on how to enter tare weights, accumulate tare weights, establish unit weights, accumulate item
counts, perform negative counting, and count parts in both Normal Counting Mode and TEP (Teraoka Error
Prediction) Mode.
When performing all weighing and counting operations, the scale must be stable before it will accept an entry.
The scale will indicate that the weight reading or count is stable by illuminating the Stable indicator lamp. If you
press a function key when the scale is not stable you will hear a double beep indicating that the function cannot
be performed yet. Once the Stable indicator lamp is lit, then perform the function.
Figure 5-1. DC-530 Counting Scale
5.1 Factors Affecting Counting Scale Accuracy
Counting scale accuracy is primarily determined by the following factors:
• Sample size (number of pieces)
• Total sample size as a percentage of full scale capacity
• Piece-to-piece weight variation
As a general rule, when determining sample size of fairly uniform pieces, the larger the sample size the greater
the total sample weight and therefore the better the counting accuracy. Selecting the smallest capacity scale that
can obtain the highest counting resolution should be considered, but should not sacrifice the capacity required for
the heaviest container of parts. For some applications, a dual-platform scale utilizing the DC-530’s optional
capability to connect a second scale may be the best selection.
There is a direct relationship between piece-to-piece weight variation (non-uniformity) and counting accuracy.
Therefore, elimination of the piece-to-piece weight variations will greatly improve accuracy. This can be
accomplished by:
• Isolating the sample used to calculate the unit weight and use the same sample to re-check the scale.
• Recalculating the unit weight from lot to lot of parts. Parts manufactured on one machine may vary
slightly from another machine relative to weight.
• Tightening the manufacturing tolerances on the parts reduces piece weight variations and increases
count accuracy.
22 DC-530 Operation Manual
Page 27

5.2 Teraoka Error Prediction (TEP) Function
The DC-530 counting scale includes the DIGI TEP (Teraoka Error Prediction) Function which detects weight
variances in sample quantities and calculates the maximum quantity of that piece that can be counted without
introducing error. To make the operator’s job easier, the scale’s display will change from green to yellow or red
when the maximum safe quantity has been exceeded. This function works by performing a series of sampling
operations which the scale uses to plot the weight variances of the pieces being weighed. By then accumulating
counting results within the calculated safe quantity, the counting operation can be completed without a counting
error. Although the TEP Function can be used at any time the scale owner or operator deems it appropriate, the
extra sampling involved to derive the plot make it most logical for high-value items.
Coupled with the DC-530’s internal counting resolution of 1/1,000,000, the TEP Function assures your precise
counting of high-value items.
5.3 The Mode Menu Screen
The starting point for using the DC-530 scale is the Mode Menu Screen. From this screen you have four options
to choose from:
1. Counting Mode - to enter the Counting Mode Screen on which weights and counts are displayed;
2 - Program Mode - to enter the Program Mode Screen where you will be able to further choose between
editing and deleting items in memory;
3 - Date and Time - to enter the Date and Time Setting Screen; and
4 - Set Point Settings - to enter the General Set Point Setting Screen in which you can establish set points
not associated with specific items in memory.
Figure 5-2. Mode Menu Screen
To select the option desired, simply press the number key for the corresponding number on the numeric keypad.
The display will change to the screen for that option.
5.4 Tare Operation
Tare weights can be entered in the scale by one of two methods: one-touch tare or digital tare. Digital tare is used
when the tare weight is already known, while one-touch tare is used when the tare weight is unknown. If you call
up an Item Code already programmed into the DC-530’s memory and you have a Tare Weight stored for that
Item Code, the Tare Weight stored with the Item Code will override one entered digitally or by using the TARE
key. The procedures illustrated below are the same for the Normal Counting Mode and the TEP Counting Mode
although only Normal Counting Mode displays are shown in the examples.
NOTES:
• SPEC 35, Bit 2 DIGITAL TARE SETTING must be a “1: YES” to allow digital tare.
• SPEC 35, Bits 1 and 0 TARE RANGE must be set to the appropriate tare range value. The default is “00: 100 PERCENT OF
FULL SCALE”.
• SPEC 37, Bits 3 an 2 DIGITAL TARE ROUNDING determines if a digital tare is stored as entered or rounded to the nearest
increment. The default is “01: Round to Nearest Increment.”
• SPEC 47, Bit 1 ZERO LAMP CONDITION determines whether the zero indicator lamp lights when a gross weight is being
displayed or a net weight. The default is “0: GROSS”.
5.4.1 One-Touch Tare, Tare Unknown
1. Press the REZERO key to zero the scale.
2. If the tare weight value is not known, place the container, box, or item to be tared on the scale and press
Scale Operations 23
Page 28

the TA R E key. The weight display will now show 0 and the Net and Zero indicator lamps will
illuminate.
3. Remove the container, box, or item from the scale. The weight display should show a negative weight
value (weight of the tared container, box, or item).
4. To clear the tare weight, press the TARE key. The Net indicator lamp will no longer be illuminated.
5.4.2 Digital Tare, Tare Weight Known
1. Press the REZERO key to zero the scale.
2. If the tare weight value is known, use the numeric keypad to key in the value and then press the TARE
key. The Tare Weight value must be entered without a decimal point. The Weight field is 5 digits long
and the placement of the decimal point is determined by Bits 2, 1, and 0 of Specification 21 - Weight
Decimal Point Position. The digits you enter for the tare weight will fill the field starting from the right.
(Example: if the decimal point is set as 0.0000 and you enter the digits 125, the net weight will show as
0.0125.) The Net indicator lamp will illuminate.
3. To reset the tare to zero, press the TARE key again.
5.4.3 Tare Value Accumulation and Subtraction
Tare weights can be accumulated or subtracted using the TARE key by the One Touch Tare method. Tare
weights can also be accumulated using the Digital Tare method, but not subtracted.
NOTES:
• SPEC 35, Bit 2 DIGITAL TARE SETTING must be a “1: YES” to allow digital tare.
• SPEC 35, Bits 1 and 0 TARE RANGE must be set to the appropriate tare range value. The default is “00: 100 PERCENT OF
FULL SCALE”.
• SPEC 37, Bits 3 an 2 DIGITAL TARE ROUNDING determines if a digital tare is stored as entered or rounded to the nearest
increment. The default is “01: Round to Nearest Increment.”
• SPEC 38, Bit 3 DIGITAL TARE WHEN LOADED must be set to “1: YES” in order for bo t h O n e To u c h Ta r e a n d D i g it a l Ta r e
functions to be used at the same time.
• SPEC 46, Bit 3 TARE INCREASE and SPEC 46, Bit 1 OVERWRITE THE TARE must both be set to “1: YES” to allow
24 DC-530 Operation Manual
Page 29

accumulation of tare values. To allow Tare Subtraction, SPEC 45, Bit 3 TARE DECREASE must be set to “1: YES”.
5.4.4 Tare Accumulation
1. Press the REZERO key to zero the scale.
2. At the Counting Mode Screen, place the container, box or item to be tared on the platform and press the
TARE key. The Weight Display should now show 0 and the NET indicator lamp will illuminate. If you
enter the Tare Weight digitally and press the TARE key, the Tare Weight will show in the Weight
Display with a minus sign in front of it and the NET indicator lamp will illuminate.
3. Place another item to be tared on the platform and press the TA R E key again. This will add the two tare
weights together (Tare Accumulation). When using Digital Tare entry, the next tare weight value should
not be lower than the previous one. If you enter another tare weight digitally and press the TARE key,
the Weight Display will show the accumulated Tare Weight.
4. Repeat Step 2 until you have accumulated all the tare weights necessary for your weighing and counting
operation.
5. If you remove all the tare weights from the platter, the Weight Display will show the accumulated Tare
Weight.
6. To clear the accumulated tare weights, press the TARE key after removing all the tare weights from the
platter. The NET indicator lamp will no longer be illuminated.
5.4.5 Tare Subtraction
1. Press the REZERO key to zero the scale.
2. At the Counting Mode Screen, place the container, box or item to be tared on the platform and press the
TARE key. The weight display should now show 0 and the NET indicator lamp will illuminate. Tare
subtraction cannot be done digitally.
3. Remove the amount of the tare that you want to subtract and press the TAR E key to subtract it.
4. Repeat Step 3 to subtract more tare weights until you have the desired tare weight.
5. To clear all the tare weight, remove all tare weights from the platter and press the TARE key. The NET
indicator lamp will no longer be illuminated
5.5 Operations in Normal Counting Mode
Unit Weight Entry, Counting Operations, and Accumulation and Subtraction can be done either in Normal
Counting Mode or in TEP (Teraoka Error Prediction) Mode. This section (
the Normal Counting Mode. For operations under TEP Mode, see Section 5.6.
5.5.1 Normal Counting Mode - Unit Weight Operation by Sampling
Entering unit weights can be done either by sampling, as presented in Section 5.5.1, or by manual key entry as
described in Section 5.5.2.
NOTE: SPEC 53, Bit 2 NORMAL COUNTING MODE AUTO-RECOMPUTING controls whether or not you have to push the PCS
key to recompute the Unit Weight after resampling. The default is “1: Auto” which means that you do not have to press the PCS
key except after placing the very first sample in the sampling process.
Unit Weight operation by sampling is accomplished by placing a 10 piece sample on the scale and then pressing
PCS key. The scale calculates a Unit Weight based on the capacity of the scale compared to the weight of the
the
sample.
1. Press REZERO to zero the scale.
2. Place a number of pieces of the item to be sampled on the scale. The DC-530 assumes that you are using
a 10 piece sample unless you indicate otherwise in the next step. For maximum accuracy, count the
sample into your hand and then add the entire sample to the bin at one time, instead of adding them one
or two at a time.
3. If you are using a 10 piece sample, simply press the PCS key. The scale will display the total Weight,
Unit Weight, and number of Pieces. If you are using a sample size other than 10 pieces, enter the sample
Section 5.5) will cover operations in
Scale Operations 25
Page 30

quantity using the numeric keypad before pressing the PCS key.
4. To improve the accuracy of the Unit Weight calculation, add another sample of the same pieces. This
second sample should be of a number of pieces equal to or fewer than the first one. Press the
(NOTE: If Specification 53, Bit 2 is set to the default setting of 1: Automatic, the scale will automatically begin
recomputing.)
PCS key.
The scale display will display RECOMPUTING for a few seconds, then automatically display the new total
Weight, Unit Weight, and number of Pieces.
NOTE: If you place too large a second sample on the platform, the error message OUT OF RECOMPUTE RANGE, PLEASE
REDUCE SAMPLES
the bar graph along the bottom of the display. When it reaches all the way to the
side of the display, you have reached the maximum. Remove some of the pieces in the second sample until the number
of pieces is below that of the first sample.
will appear. You can also tell if you are under the maximum recomputing sample size by observing
MAX marker on the bottom right-hand
If you place too small a sample on the platform for the scale to accurately calculate a Unit Weight, the
INSUFF indicator lamp will illuminate and the display will indicate how many more pieces have to be
added to the sample in order to be able to calculate the Unit Weight. Add the necessary pieces to the
sample until the scale returns you to the Normal Counting Mode screen. The screen will then show
RECOMPUTING before showing the Unit Weight.
5. If you wish to continue to refine the Unit Weight, repeat Step 4, adding another sample.
6. When done with calculating the Unit Weight you can begin counting operations by placing a quantity of
the pieces to be counted on the platform. The scale will display the number of pieces as well as the Total
Weight, based on the Unit Weight established by the sampling process. To store this Unit Weight in the
DC-530’s memory associated with an Item Code so that you can recall it in the future, see
Section 6.2.
7. To clear the Unit Weight, remove all weight from the scale platter and press the C (Clear) key.
5.5.2 Normal Counting Mode - Unit Weight Operation by Key Entry
Unit weight operation by key entry is accomplished by using the numeric keypad to enter the known value of the
Unit Weight and then pressing the
UNIT WEIGHT key. An example of Unit Weight operation by key entry is
shown below:
1. Press the REZERO key to zero the scale.
2. With the display in the Normal Counting Mode, enter the known Unit Weight using the keyboard, for
example, 200.00.
(NOTE: the Unit Weight is entered and displayed per 1000 pieces. To enter a Unit Weight of 0.0125 lbs, for example,
multiply 0.0125 x 1000 = 12.5. For a Unit Weight of 0.0125, therefore, you would enter 12.5 on the numeric keypad.
When entering Unit Weights you must enter the decimal point where appropriate.)
3. Press UNIT WEIGHT key to enter the Unit Weight.
26 DC-530 Operation Manual
Page 31

4. You can now begin counting operations by placing a quantity of the pieces to be counted on the
platform. The scale will display the number of pieces as well as the Total Weight, based on the Unit
Weight you keyed in. To store this Unit Weight in the DC-530’s memory associated with an Item Code
so that you can recall it in the future, see
Section 6.2.1.
5. To clear the Unit Weight, remove all weight from the scale platter and press the C (Clear) key.
5.5.3 Normal Counting Mode - Part Accumulation and Part Subtraction
Once a Unit Weight has been established for an part, the DC-530 Counting Scale has the capability to
accumulate and subtract total item quantities by using its accumulation memory.
5.5.4 Normal Counting Mode - Part Accumulation
To find the total accumulated quantity of similar containers filled with parts, use the accumulation procedure
detailed below.
1. Conduct a sampling process (Section 5.5.1) to determine the Unit Weight of the pieces and enter a
known tare weight, or place the empty container on the scale to perform the tare function ().
Alternatively, you can enter the Item Code of an item previously programmed into memory and press the
# [CODE] key to recall the data. If you enter an Item Code that is not currently programmed into the
scale’s memory, the message ITEM NOT FOUND will appear at the bottom of the display. For more
information on how to program item data into the DC-530’s memory, see Section 6.1.
2. Place Container 1 (full of parts) on the scale.
3. Press the + (Plus) key to store the total in Container 1. The Acc (Accumulation) indicator lamp will now
be illuminated. The display will show the total quantity of pieces accumulated for 3 seconds, then return
to the Counting Mode screen.
4. Remove Container 1 and place Container 2 (full of parts) on the scale.
5. Press the + (Plus) key (the total displayed is equal to Container 1 plus Container 2, etc).
6. Continue with the remainder of the containers to be counted. The total number of parts stored in all the
containers will be stored in the accumulation register.
Scale Operations 27
Page 32

7. To print a label showing the total, press the * PRINT key.
Figure 5-1. Total Accumulation Label Sample
8. This will also clear the accumulation register. The ACC (Accumulation) indicator lamp will no longer
be illuminated.
9. To clear the Unit Weight, remove all weight from the scale platter and press the C (Clear) key.
5.5.5 Normal Counting Mode - Part Subtraction
Just as you can accumulate total quantities by adding parts to the scale, you can also count by removing parts
from the scale, subtracting them from the total you began with.
1. Conduct a sampling process (Section 5.5.1) to determine the Unit Weight of the pieces and enter a
known tare weight, or place the empty container on the scale to perform the tare function (Section 5.4).
Alternatively, you can enter the Item Code of an item previously programmed into memory and press the
# [CODE] key to recall the data. If you enter an Item Code that is not currently programmed into the
scale’s memory, the message
ITEM NOT FOUND will appear at the bottom of the display. For more
information on how to program item data into the DC-530’s memory, see Section 6.1.
2. Place Container 1 (full of parts) on the scale and press the + (Plus) key to store the total in Container 1.
The Acc (Accumulation) indicator lamp will now be illuminated. The display will show the total
quantity of pieces accumulated for 3 seconds, then return to the Normal Counting Mode screen.
.
28 DC-530 Operation Manual
Page 33

3. Remove Container 1 from the platform.
4. Place Container 2 (full of parts) on the scale.
5. Press the - (Minus) key to subtract the new quantity from the total. The display will show the total
which will be the difference between Container 1 and Container 2, then return to the Normal Counting
Mode screen.
6. Repeat steps 4 and 5 for all the containers to be subtracted from the total.
7. To print a label showing the total after all the subtractions, press the * PRINT key.
Figure 5-2. Total After Subtraction Sample Label
This will also clear the accumulation register. The ACC (Accumulation) indicator lamp will no longer be
illuminated.
8. To clear the Unit Weight, remove all weight from the scale platter and press the C (Clear) key.
5.5.6 Normal Counting Mode - Negative Counting
There are two ways to do this depending on whether at the end you want to see the total amount remaining in the
container or the total amount removed from the container.
Scale Operations 29
Page 34

NOTE: To perform Negative Counting, SPEC 52, Bit 1 must be set to 1: Yes. This is the default setting.
5.5.7 Counting Out of a Full Container - See Total Amount Remaining in the Container
To carry out this operation you must know the tare weight ahead of time.
1. Press the REZERO key to zero the scale.
2. Place the full container on the scale. Press the TAR E key.
3. Remove a 10 piece sample from the container and press the PCS key. After the Unit Weight has been
calculated, return the 10 piece sample to the container.
4. Remove a number of parts from the container and press the + (Plus) key. The memory indicator lamp
(ACC) is illuminated and the display shows the quantity of parts taken out.
5. Remove a number of parts from the container and press the + (Plus) key again. The memory indicator
lamp (ACC) will be illuminated and the display shows the quantity of parts removed.
6. If at the end of the procedure, if you want to see how many parts are still in the bin you first have to know
the tare weight of the bin or container. After removing the parts you want to take out of the bin, simply
digitally enter the tare weight of the bin and press the TA RE key. The scale will display how many parts
were left in the bin. To print a label to put on the bin showing the new, lower, total quantity in the bin ,
press the
5.5.8 Negative Counting - Total Removed Displayed at the End
+ (Plus) key.
With this procedure you can count accurately out of a full container for kitting, shipping, etc. without having to
know the tare weight of the container.
1. Press the REZERO key to zero the scale.
2. Place a full container on the scale and press the TA RE key.
3. Remove a 10 piece sample from the container and press the PCS key. After the Unit Weight has been
calculated, return the 10 piece sample to the container.
4. Remove the number of pieces you need for kitting, shipping, etc. The amount removed will be
displayed. If you need a label for each kit or container, press the + (Plus) key after removing each batch
of pieces. Then press the
TAR E key.
5. When you have removed the last batch of pieces, press the * PRINT key to show the total number of
pieces you have counted out of the full container.
5.5.9 Normal Counting Mode - Clearing Accumulated Data
To clear accumulated data, press the * PRINT key.
5.6 Operations in TEP (Teraoka Error Prediction) Mode
Unit Weight Entry, Counting Operations, Accumulation and Subtraction can be done either in Normal Counting
Mode or in TEP (Teraoka Error Prediction) Mode. This section (
For operations under Normal Counting Mode, see Section 5.5.
The TEP Counting Mode is generally used for high-value parts for which you want to avoid even the generally
very small counting errors introduced by sample variances. A repeated sampling procedure allows the DC-530
scale to develop weight variance plots and thereby calculate a maximum safe quantity that can be counted
without error. The extra sampling effort required has to be balanced against the need for the greatest possible
accuracy.
5.6.1 TEP Mode - Unit Weight Operation by Sampling
Entering unit weights can be done either by sampling, as presented in Section 5.6.1, or by manual key entry as
described in Section 5.6.2.
NOTE: SPEC 53, Bit 0 TEP SAMPLING METHOD controls whether or not you have to push the PCS key to recompute the Unit
Weight after resampling. The default is “1: Automatic” which means that you do not have to press the PCS key except after
placing the very first sample in the sampling process.
Unit Weight operation by sampling is accomplished by placing a sample on the scale, entering the sample
quantity, and then pressing the
PCS key. The scale calculates a Unit Weight based on the capacity of the scale
compared to the weight of the sample.
Section 5.6) will cover operations in TEP Mode.
30 DC-530 Operation Manual
Page 35

1. Press REZERO to zero the scale.
2. Press the TEP key to enter the Teraoka Error Prediction Mode.
3. Count out a number of parts to be sampled and place them on the scale (for example 10 pieces). For
maximum accuracy, count the 10 piece sample into your hand and then add the entire sample to the bin
at one time, instead of adding them one or two at a time.
4. Enter the sample quantity using the numeric keypad, then press the PCS key. (Unlike in Normal
Counting Mode, the scale does not assume that the sample size is 10 pieces. You must enter the sample
quantity.) The scale will display the total Weight, Unit Weight, and number of Pieces and will indicate
that you have performed
SAMPLING 1 TIMES.
5. To improve the accuracy of the Unit Weight calculation, add another sample of the same pieces
according to the number indicated on the display (10 Pcs and below in the example above). Press the
PCS key. (If the Auto-Recomputing SPEC is set to 1: Auto, the scale will automatically begin
recomputing.)
As you add parts for the next sample, the scale display will indicate how many more pieces can be added
before reaching the maximum allowable for the resampling. If you add more pieces in the next sample
than the scale requests for its resampling, the scale display will turn red and the message
ITEMS
will appear, along with the number of items it suggests that you remove from the sample.
PLEASE REDUCE
If you add too few items for the scale to recompute the Unit Weight, the display will not change. Once
you add enough parts for another sample, the recomputing will take place. You can also gauge whether
your sample size is too small or too large by watching the bar graph at the bottom of the scale display. If
you add a sample and it does not register on the graph, it is too small. If you add a sample and the bar
graph goes all the way to the
MAX marker on the bottom right-hand side of the display you have exceeded
the maximum and need to remove some parts.
Scale Operations 31
Page 36

6. When the sample weight is within the required range, the scale will recompute the Unit Weight and
return to the TEP Sampling screen. The scale display will show the new total Weight, Unit Weight, and
number of Pieces. It will also now indicate that you have been
SAMPLING 2 TIMES.
7. Continue resampling by repeating Step 5, adding another sample below the amount shown on the TEP
Mode display. If the Auto-Recomputing SPEC is not set to 1: Auto, you will need to press the PCS key
to recompute the Unit Weight after each sample is added. Repeat the procedure until the scale reads
SAMPLING 9 TIMES.
8. As you continue sampling, at the bottom of the display the DC-530 will show a bar graph of the Unit
Weight curve it is developing. After the ninth sample, the scale’s display will turn red indicating that the
sampling operation is complete.
9. Remove all the sample parts from the platter. The DC-530 will now calculate and display the maximum
Safe Quantity Limit that can be counted without error in the Limit field.
10. You can now begin counting operations by placing a quantity of the pieces to be counted on the
32 DC-530 Operation Manual
Page 37

platform. The scale will display the number of pieces as well as the Total Weight, based on the Unit
Weight established by the sampling process. To store this Unit Weight in the DC-530’s memory
associated with an Item Code so that you can recall it in the future, see
Section 6.2.1.
If you press the TEP key to exit the TEP Mode after having established a Unit Weight and Safe Limit
Quantity, the scale will display the following message:
Enter 1 to clear the Safe Limit Quantity that you have established and go to Normal Counting Mode.
Enter 9 to keep the Safe Limit Quantity and stay in TEP Mode.
11. To clear the Unit Weight, remove all weight from the scale platter and press the C (Clear) key.
5.6.2 TEP Mode - Unit Weight Operation by Key Entry
Unit Weight operation by key entry is accomplished by using the numeric keypad to enter the known value of the
Unit Weight and then pressing the
UNIT WEIGHT key. An example of Unit Weight operation by key entry is
shown below:
1. Press the REZERO key to zero the scale.
2. With the display in the weighing mode, enter the known Unit Weight using the keyboard, for example,
200.00.
3. Press UNIT WEIGHT key to enter the Unit Weight.
4. You can now begin counting operations by placing a quantity of the pieces to be counted on the
platform. The scale will display the number of pieces as well as the Total Weight, based on the Unit
Weight you keyed in. To store this Unit Weight in the DC-530’s memory associated with an Item Code
so that you can recall it in the future, see
Section 6.2.1.
5. To clear the Unit Weight, remove all weight from the scale platter and press the C (Clear) key.
5.6.3 TEP Mode - Parts Counting
After you have established the Unit Weight of the part to be counted either by sampling (See Section 5.6.1
above) or by digital entry (See Section 5.6.2 above) and have entered a Tare Weight, you are ready to carry out
counting operations for that part. Alternatively, you can call up the data for an Item Code previously
programmed into the DC-530’s memory by entering the Item Code number and pressing the
# [CODE] key. If
you enter an Item Code for which the Safe Quantity Limit has not yet been established, you will see the
following error message.
If you receive this error message, you must use the scale to calculate the Safe Quantity Limit and edit the Item
Code record to include it. For more on how to establish the Safe Quantity Limit, see
Section 5.6.1.
1. The TEP Counting Mode display will show the maximum safe quantity of the part that can be counted
Scale Operations 33
Page 38

without error.
2. Press the REZERO key to zero the scale.
3. Place on the platter a quantity of parts to be counted.
4. If the quantity is less than the accuracy limit, the scale will display the count of the number of pieces and
reduce the maximum limit to how many more can be counted under the limit.
Add pieces up until the quantity limit is reached, then remove the parts from the platter and begin
counting again.
5. If the quantity you place on the platter exceeds the maximum safety quantity by 1-9 pieces, the display
will show the total count but will change to yellow. If you have exceeded the maximum safety quantity
by more than nine pieces, the display will turn red. In both cases the Limit field will go blank to indicate
that no more pieces can be added without error.
Remove pieces from the platter until you are at or below the maximum safety quantity again. When the
scale is stable, the Limit field on the display will reset back to the maximum safe quantity and the
characters will change back to white.
6. When done counting this part, remove all weight from the platter and press the C (Clear) key to clear the
Unit Weight.
5.6.4 TEP Mode - Part Accumulation and Part Subtraction
Part accumulation and part subtraction in TEP Mode follow the same procedures as in Normal Counting Mode.
Please see
34 DC-530 Operation Manual
Section 5.5.3
Page 39

5.6.5 TEP Mode - Negative Counting
Negative Counting in TEP Mode follows the same procedure as in Normal Counting Mode but you must first
establish a Unit Weight by sampling in the TEP Mode. For more information on establishing TEP unit weights,
please see
5.6.6 TEP Mode - Clearing Accumulated Data
To clear accumulated data, press the * PRINT key.
Section 5.6.1. For information on negative counting procedures, please see Section 5.5.6
5.7 Toggle Between Scales
The external scale option for the DC-530 Counting Scale can be ordered by ordering Part #94911 at the time you
purchase your scale. To toggle between Scales 1 and 2, press the
platform being used for weighing. Only scales present will be selected (i.e. A two-scale system switches
between Scale A and Scale B only.) If no external scales are connected, this function will not work. If you press
SCALE key when no other scale is connected, the error message NO SCALE CHANGED will appear.
the
SCALE key. The display will show the
5.8 Recalling Item Codes in Counting Mode
The DC-530’s 200 item memory allows you to store the Unit Weight, Tare Weight, preferred Scale, and
Setpoints for up to 200 Item Codes for quick retrieval. This greatly speeds your weighing and counting
operations.
1. Enter the three digit Item Code number using the numeric keypad and press the # [CODE] key to call
up the data.
2. If an Item Code is entered which is not stored in memory, the scale will beep and display the error
message
If you are in TEP Counting Mode, you can only recall an Item Code which has had the Safety Quantity
Limit calculated. If you enter an Item Code for which the Safety Quantity Limit has not yet been
calculated, the following error message will appear.
ITEM NOT FOUND at the bottom of the screen. Enter a different three digit Item Code.
You must enter the TEP Mode, perform a TEP sampling process to establish a Unit Weight and Safe
Quantity Limit (see
If an item code existing in memory is entered, the stored settings will be displayed after the # [CODE]
key is pressed.
You can now begin to carry out weighing and counting operations.
3. To clear the recalled Item Code and its data, remove all weight from the platform and press the C (Clear)
key.
Section 5.6.1), and then save the Item Code in memory.
Scale Operations 35
Page 40

5.9 Sample, Count and Print a Label
NOTE: For this function to be used on the DC-530, an external printer must be connected to the scale. For more information on
how to connect an external printer, see
1. Press the REZERO key to zero the scale.
2. Place the empty bin on the scale and press the TAR E key.
3. Place a 10 piece sample of the item in the bin and press the PCS key. (For maximum accuracy, count
the 10 piece sample into your hand and then add the entire sample to the bin at one time, instead of
adding them one or two at a time.) If 10 pieces are not enough for the scale to get an accurate sample, the
scale will prompt you to add a specific additional number of pieces. Add these pieces and press the
key again.
4. Add the remaining pieces to be counted into the bin.
5. Press the * PRINT key. The scale will print a label in the default label format.
Section 7.1.
PCS
Figure 5-3. Weight Label Without Entering or Recalling an Item Code
5.10 Scan ID Bar Code, Count and Print a Label
NOTE: For this function to be used on the DC-530, an external printer and a barcode scanner must be connected to the scale.
For more information on how to connect an external printer, see
see Section 7.5.
1. Enter the ID Code by scanning the ID Bar Code.
1. Press the REZERO key to zero the scale.
2. Place the container of the product on the scale platter.
3. Press the * PRINT key. The scale will print a label in the default label format.
Figure 5-4. Weight Label with Item Code
Section 7.1 . For information on connecting a barcode scanner,
36 DC-530 Operation Manual
Page 41

6.0 Scale Programming
The DC-530 can store information for up to 200 of the parts you count most frequently, eliminating the need for
re-entering data during parts counting and greatly speeding up your counting operations.
6.1 Programming a New Item Code (Item Registration)
Before beginning to enter data about an item, you need to know the Tare Weight and the Setpoints you want to
set for this Item Code. If you are going to store a Tare Weight, it must be known in advance because it cannot be
established from the scale platform during Item Registration mode, it must be entered digitally.
When programming the DC-530, you can use the following functions of its keyboard.
Key Function
To move the cursor to the next field without changing the value of the current field or to move to the
next field in Edit Item Mode after entering new data.
To move the cursor back to the previous field without changing the value of the current field.
To save the data entered and exit the Programming Mode. You will be prompted to confirm
whether or not you want to save any changes you have made to the data.
To exit the Programming Mode without saving the data entered.
This section details the procedure for storing the Unit Weight, Tare Weight, and Set Points to be associated with
an Item Code. You can enter all of this information for each Item Code or only the data pertinent to your
application. You can enter the Programming mode from either the Normal Counting Mode or the TEP Mode.
1. First establish a Unit Weight for the item by either a sampling process or manual entry and press the
UNIT WEIGHT key. (See Section 5.5 or Section 5.6). This will bring you to the Item Programming
screen. The upper right hand corner of the screen will show you how many of the 200 Item Codes the
DC-530’s can store have already been programmed.
2. Enter the three-digit Item Code for the item you want to store in memory and press the # key. The Item
Code will appear in the upper left of the Item Screen. The cursor will then move to the next field which
is entering the Tare Weight (The Unit Weight will have been already recorded by the scale from the
sampling operation or digital entry of the Unit Weight. If you started from the TEP Mode, the Limit
field will also have been automatically filled in).
Scale Programming 37
Page 42

If you enter an Item Code that has already been programmed, the display will flash red and the error
message
ITEM XXX, EXISTING ITEM will appear. Then the screen will ask you if you are trying to update the
data associated with this item already existing in memory.
If you enter a 1 from the numeric keypad the screen will flash red and show the message:
You will then be returned to whichever Counting Mode screen you began with - Normal Counting Mode
or TEP Mode.
If you enter a 9 from the numeric keypad to indicate you do not want to take the data you are entering
and associate it with the Item Code already in memory, you will be returned to the Item Registration
screen where you can enter a new Item Code to save the data under.
3. Enter the tare digitally using the numeric keypad. The Tare Weight value must be entered without a
decimal point. The Weight field is 5 digits long and the placement of the decimal point is determined by
Bits 2, 1, and 0 of Specification 21 - Weight Decimal Point Position. The digits you enter for the tare
weight will fill the field starting from the right. (Example: if the decimal point is set as 0.0000 and you
enter the digits 125, the net weight will show as 0.0125.) Note that you cannot establish the Tare Weight
from the scale during Item Registration mode, it must be entered manually.
Press the + (Plus) key. The cursor will move to the field for Set Point 1.
4. You cannot edit the Scale Number field in Item Registration mode. The DC-530 will automatically set
the Scale Number field to the scale the item sample was taken on. The Scale Number field can be edited
in the Edit Item mode (See
Section 6.2.3).
5. If Specification 01 Bits 3 and 2 are set to 00:No Operation or 01:Common Set Point then setpoints
cannot be entered for an individual Item Code here. If Bits 3 and 2 are set to 10: Item Set Point, then the
cursor will move to the field for Setpoint 1. Remember that Specification 02, Bit 2 - Setpoint Selection
sets whether the setpoint is programmed on the basis of pieces or weight. The default is 0: Pieces. Enter
a quantity for Setpoint 1 and press the + (Plus) key to move to Setpoint 2. Repeat for Setpoints 2 and 3.
6. When you have finished entering the data for this Item Code, press the * PRINT key to save it. The
display will confirm that the scale is saving the new Item Code to memory and then return you to
whichever Counting Mode screen you began with - Normal Counting Mode or TEP Mode..
38 DC-530 Operation Manual
Page 43

6.2 Updating the Record of an Existing Item
There are two ways to edit or update the data in the record of an Item Code already programmed in memory:
from the Counting Mode screen or from the Programming Mode menu. If you want to update an existing item’s
Unit Weight from a sampling operation, use the process from the Counting Mode in
Tare Weight associated with an existing Item Code, use the process from the Counting Mode in Section 6.2.2. If
you want to change any other data in the existing record and/or want to enter a new Unit Weight digitally, use the
process from the Programming Mode in
6.2.1 Update the Unit Weight of an Existing Item From the Counting Mode
Section 6.2.3.
1. After completing a sampling operation in either the Normal Counting Mode or the TEP Mode, press the
UNIT WEIGHT key to go to the Item Programming screen.
2. Enter existing three digit Item Code for the item to be updated and press the DC-530 key. The screen
will flash red and then indicate that the Item Code you have entered already exists in memory.
Section 6.2.1. To update the
After a moment, the screen will ask you to confirm that you want to update the data for this existing Item
Number.
3. To exit back to the Item Registration screen without updating the Unit Weight of the existing Item Code,
press 9. To change the Unit Weight associated with this Item Code from the weight previously
programmed in memory to the new Unit Weight from your sampling operation, press 1. The scale will
confirm that it is updating before returning you to whichever Counting Mode screen you began at, either
Normal Counting Mode or TEP Mode.
6.2.2 Update the Tare Weight of an Existing Item From the Counting Mode
1. Press the REZERO key to zero the scale.
Scale Programming 39
Page 44

2. Enter the three digit Item Code for an item you have previously programmed into the DC-530’s item
memory and press the
# key. The scale will recall the Unit Weight and Tare Weight (if any) previously
programmed for ths item.
3. Place the container, box, or item to be tared on the scale platform and press the TARE key. The weight
display will now show
0 and the Net and Zero indicator lamps will illuminate.
4. Press the UNIT WEIGHT key. The screen will flash red and then indicate that the Item Code you have
entered already exists in memory.
After a moment, the screen will ask you to confirm that you want to update the data for this existing Item
Number.
5. To exit back to the Item Registration screen without updating the Tare Weight of the existing Item Code,
press 9. To change the Tare Weight associated with this Item Code from the weight previously
programmed in memory to the new Tare Weight from the platform, press 1. The scale will confirm that
it is updating before returning you to whichever Counting Mode screen you began at, either Normal
Counting Mode or TEP Mode.
6.2.3 Update an Existing Item From the Programming Mode
1. From the Counting Mode screen (either Normal Counting Mode or TEP Mode) press the MODE key to
move to the Mode Menu.
2. In the Mode Menu Screen, press the 2 key to enter the Item Programming Mode. The upper right hand
part of this screen will show much of the 200 item memory is currently programmed. In the example
40 DC-530 Operation Manual
Page 45

below, 25 items have already been entered, 175 can still be entered
3. In the Item Programming Screen press the 1 key to enter Edit Item Screen. .
4. At the flashing cursor enter the three digit Item Code for the existing item to be updated and press the #
key. The DC-530 will retrieve the data already programmed into memory for this Item Code and display
it, moving the cursor to the Unit Weight field
5. Enter the new Unit Weight using the numeric keypad and press the + (Plus) key to move to the next
editable field. To leave the Unit Weight unchanged and move to the next editable field, just press the +
(Plus) key.
6. Modify any other data for this Item Code that you want to edit. Note that the Scale Number field, not
editable in Item Registration Mode, can be edited here if you want to establish an external platform as
the primary for this item. Use the + (Plus) key to move to the next editable field or the - (Minus) key to
move to the previous editable field. To exit the Item Edit mode without making any changes, press the
TARE key at any time.
7. When done making changes, press the * PRINT key to update the record for this Item Code. The display
will first ask you to confirm that you want to update this record.
8. If you press 9, the scale will return you to the Edit Item Code screen without saving the changes (i.e.
takes you back to step 4 above). You can then enter another Item Code to be edited or go to step 9 below
to exit the Programming Mode.
Scale Programming 41
Page 46

If you press the 1 key to save the changes to the Item Code record the display will turn red and confirm
that the record’s data is updating.
9. When the update is done, the display will return to the Edit Item Code Screen. You can enter another
three digit Item Code to edit or press the TAR E key twice to exit the Program Mode and return to the
Mode Menu.
10. Press the 1 key to return to the Weigh Mode.
6.3 Deleting Item Codes
6.3.1 Clearing an Individual Field
To just clear an individual field associated with an Item Code, follow the programming instructions in
Section 6.2.3 above and enter zeroes in the fields you want to clear. Be sure to save your changes at the end of
the programming mode by pressing the * PRINT key.
6.3.2 Deleting a Single Item Code
The following procedure describes the steps used to delete ALL information stored for a specific Item Code (unit
weight, tare weight, and setpoints).
1. At the Counting Mode screen, press the MODE key to enter the Mode Menu.
2. In the Menu Menu Screen, press the 2 key to enter the Program Mode screen. The upper right hand
corner of this screen will show how much of the 200 item memory is currently programmed. (In the
example below, 25 items have already been programmed and 175 can still be entered.)
3. In the Item Programming Screen, press the 2 key to enter the Delete Item Screen.
42 DC-530 Operation Manual
Page 47

4. Enter the three digit Item Code of the item to be deleted, then press the # key to call up that item. The
scale will display the information stored for that Item Code.
5. Press the C (Clear) key to delete this Item Code. The display will ask the operator to confirm that he
really wants to delete this item.
6. To cancel the deletion of this Item Code, press 9. To complete the deletion of this Item Code, press 1.
The display turn red and will read PLEASE WAIT while carrying out the deletion, then return to the Item
Delete Screen.
7. To exit the Program Mode, press the TAR E key twice.
8. Press the 1 key to return to the Weigh Mode.
6.3.3 Deleting All Item Codes
The following procedure describes the steps used to delete ALL of the Item Codes stored in memory.
1. From the Counting Mode screen (either Normal Counting Mode or TEP Mode) press the MODE key to
move to the Mode Menu.
2. In the Mode Menu Screen, press the 2 key to enter the Item Programming Mode. The upper right hand
part of this screen will show how much of the 200 item memory is currently programmed. (In the
example below, 25 items have already been entered, 175 can still be entered.) The procedure below will
Scale Programming 43
Page 48

delete all data associated with the 25 items in memory.
3. In the Item Programming menu, press the 3 key to enter the Delete All Items mode. The scale will
prompt you to confirm that you want to delete all items in memory.
4. To exit without deleting all Item Codes in memory, press 9 and you will be returned to the Item
Programming Menu. To confirm the deletion of all Item Codes in memory, press 1. The display will turn
red and confirm that the deletion is in process, then return you to the Item Programming Menu.
5. To exit the Program Mode, press the TAR E key twice.
6. Press the 1 key to return to the Weigh Mode.
6.4 Setting a General Setpoint
User Specifications 01 and 02 set the parameters of the DC-530’s use of any setpoints that are programmed.
User Specification 01, Bits 3 and 2 - Set Point Operation, establish whether setpoints will be associated with
individual Item Codes or be general or common setpoints applied to all items. The specification can also be set
to not allow any setpoints to be programmed.
• If Specification 01, Bits 3 and 2 are set to 10: Item Set Point, the setpoints must be programmed in
the Item Registration or Item Edit procedures (See Section 6.1 or Section 6.2). In this case Option 4
on the Mode Menu - Set Point Setting is disabled.
• If Specification 01, Bits 3 and 2 are set to 01: Common Set Point, the setpoints must be programmed
in the Set Point Setting screen as described below and the cursor will not move to the Setpoint fields
in the Item Registration and Edit Item modes.
• If Specification 01, Bits 3 and 2 are set to 00: No Operation, Option 4 on the Mode Menu - Set Point
Setting, is disabled and the cursor will not move to the Setpoint fields in the Item Registration and
Edit Item modes.
User Specification 02 sets the rest of the parameters of the DC-530’s use of the setpoints programmed:
• Specification 02, Bit 0 - Setpoint Range, sets whether the range is negative or positive. The default
is 1: Positive. If set to 0: Negative, the buzzer only sounds on negative numbers.
• Specification 02, Bit 1 - Setpoint Buzzer Output, sets whether the scale sounds an audible buzzer
when a setpoint is reached. The default is 1: Yes.
44 DC-530 Operation Manual
Page 49

• Specification 02, Bit 2 - Setpoint Selection, sets whether the setpoint is programmed on the basis of
pieces or weight. The default is 0: Pieces.
• Specification 02, Bit 3 - Buzzer Output Type, sets whether the buzzer sounds as “Proper” or “Scare/
Over”. The default is 0: Proper. (Example: If the Buzzer Output Type is set to 0: Proper and you
have set point values of 50, 75, and 100, a fast beep will sound at 75 and turn off when you reach
100. If Buzzer Output Type is set to 1:Scare/Over, and you have the same set point values of 50, 75,
and 100, a slow beep will begin at 50 and stop when you reach 75. When you reach 100 there will be
a fast beep.)
1. While in the Counting Mode screen (either Normal Counting Mode or TEP Mode) press the MODE key
to go to the Mode Menu screen.
2. In the Mode Menu screen, press 4 to enter the Set Point Setting screen.
(NOTE: If Specification 01 Bits 3 and 2 are set to 10: Item Set Point or 00: No Operation, this menu option is disabled.)
3. Enter the data for Set Point 1 (Example: 500.000). Even though the cursor appears at the rightmost digit
of the field, the digits you enter will be filled in from the left of the field. (i.e. to enter a set point of 50,
enter 50; to enter 500, enter 500, etc.) Remember that Specification 02, Bit 2 determines whether the
setpoints are by pieces or by weight.
4. Press the + (Plus) key to temporarily store Set Point 1 in memory and move to Set Point 2 and then to
Set Point 3. You can press the - (Minus) key at any time to move to a previous setpoint or press the
TARE key at any time to exit the Set Point Setting screen without saving any data.
5. When you are done programming the setpoints, press the * PRINT key to save your setpoints. The scale
will return you to the Mode Menu. Press the TARE key twice to return to whichever Counting Mode
screen you started in - Normal Counting Mode or TEP Mode.
Scale Programming 45
Page 50

7.0 External Devices: Printers, PCs, Scanners and Scales
The DC-530 Counting Scale is equipped with three RS-232C ports that allow the scale to communicate with an
external printer, a PC, or a barcode scanner plus an additional port for the setpoint output. The DC-530 also
offers an option (Part No. 94911) for a second scale channel that will allow you to connect a second platform
with up to four 350 ohm load cells.
Figure 7-1. DC-530 Ports
7.1 Printer Connection
External printers are connected to the RS232C-2 port on the DC-530 (see Figure 7-1). Because the DC-530
downloads label formats to external printers in some circumstances (see Section 7.2 below) external printers
should be connected to the DC-530 and powered on before powering up the DC-530. The type and configuration
of the printer cable needed will vary by printer. Below are the pin assignments for the connectors to the external
printers that can be specified in SPEC 09 - External Printer Type.
7.1.1 Zebra LP2824
To use the Zebra LP2824 Printer with your DC-530 (or a printer that emulates the LP2824), set the scale’s
specifications as follows:
• SPEC 03 - Printer Model to 0100
• SPEC 09 - RS232C1 Baud Rate to 0010
• SPEC 10 - RS232C2 Parity Bit/Stop Bit/Data Length to 1001
• SPEC 55 - Download Print Format to 0001
The DC-530 can be connected to an external printer using the RS-232C-2 port on the scale. You can order a
printer cable from the DC-530 to the LP2824 by ordering Rice Lake Part No. 64661.
Figure 7-2. Connection from Scale to Printer
46 DC-530 Operation Manual
Page 51

Printer Side
9 PIN D-SUB MALE
DC-530 Side
8 PIN DIN MALE
Pin Function
3RXD
5GND
7RTS
8CTS
7.1.2 Epson TM-U220 Tape Printer or Epson TM-U295 Ticket Printer
Pin Function
TXD 5
GND 2
RTS 7
CTS 6
To use the Epson TM-U220 Tape Printer or TM-U295 Ticket Printer with your DC-530 (or printers that emulates
them or are compatible), set the scale’s specifications as follows:
• SPEC 03 - Printer Model to 1000
• SPEC 06 - Header Type to 1010
• SPEC 09 - RS232C1 Baud Rate to 0010
• SPEC 10 - RS232C2 Parity Bit/Stop Bit/Data Length to 1001
• SPEC 55 - Download Print Format to 0000
You can order a printer cable from the DC-530 to the Epson printers by ordering Rice Lake Part No. 32810.
Printer Side
25 PIN D-SUB MALE
DC-530 Side
8 PIN DIN MALE
PIN SIGNAL
2TXD
3RXD
7GND
The following pins are shorted: on the 25-pin
D-SUB - Pin 6 (DSR) to 20 (DTR); and Pin 4
(RTS) to 5 (CTS).
The following pins are shorted on the 8-pin DIN
- Pin 1 (DTR) to 3 (DSR); and Pin 6 (CTS) to 7
PIN SIGNAL
RXD 4
TXD 5
GND 2
(RTS).
7.2 Printer Label Formats
SPEC09 - External Printer Type sets the type of printer that is connected to the scale. This determines the format
and content of the data that is transmitted to the printer. You have the following options:
7.2.1 No Printer
Set SPEC09 to 0000, meaning that no printer is connected. No data will be output.
External Devices: Printers, PCs, Scanners and Scales 47
Page 52

7.2.2 ZEBRA LP2844 Barcode Printer
Set SPEC09 to 0010. The Zebra LP2844 Barcode Printer offers three default label formats for a 60 x 120 mm
labels with Code 39 standard barcodes, one for an label without entering or recalling an Item Code, one for an
Item Label, and the other for a Total Accumulation Label.
Figure 7-3. Zebra Sample Weight and Count Label Without Entering or Recalling an Item Code
Figure 7-4. Zebra Sample Item Label
Figure 7-5. Zebra Sample Total Label When Not Entering or Recalling an Item Code
48 DC-530 Operation Manual
Page 53

7.2.3 Epson TM-U220 Tape Printer
Set SPEC09 to 0011. This tape printer uses a default format which is downloaded to the printer when powering
up The default format looks like the following:.
Figure 7-6. Sample Report Formats for Epson TM-U200 orTM-U295
7.2.4 Epson TM-U295 Ticket Printer
Set SPEC09 to 0100. This ticket printer uses the same default format as the Epson TM-U220 tape printer in
Section 7.2.3. See Figure 7-6 for a sample of the format.
7.3 Connecting to a PC
7.3.1 Setting the Scale Specifications for Communication to a PC
The DC-530’s RS-232C-3 port (see Figure 7-1) can be used to connect the scale to a PC and output the data
string to the computer. The following specifications must be set for the data transfer to take place. (For more
information on setting specifications, see
• SPEC05, Bits 2 and 1-Connection Type, must be set to 01: PC.
• SPEC06, Bits 3 and 2-Output Procedure for RS-232C can be set to 01:Continuous or 10:* Key
depending on the application receiving the data.
• SPEC06, Bits 1 and 0-Head Type can be set to 00:No Header or 01:Code or 10:Title.
• SPEC07, Bits 3, 2 and 1 are used to set the Baud Rate for your application.
• SPEC08, Bits 3 and 2 are used to set the Parity Bit for your application.
• SPEC08, Bit 1 is used to set the Stop Bit for your application.
• SPEC09, Bits 3, 2 and 1 are used to set the Baud Rate for your for your application.
7.3.2 Communication Method
SPEC06-RS232C Output Protocol configures whether the data transfer to the computer is shut off (00: No
Output); is transmitted continuously at a fixed interval to the computer (01:Continuous) or is transmitted when
pressing the
+ (Plus), - (Minus), or * PRINT keys (10: Manual).
Section 3.0.):
External Devices: Printers, PCs, Scanners and Scales 49
Page 54

7.3.3 Pin Assignments
The DC-530 counting scale is connected to a PC using a 9 pin D-SUB connector configured as follows:
PC Side
9 PIN D-SUB (female)
PIN SIGNAL
2RXD
3TXD
5GND
7RTS
8CTS
DC-530 Side
DIN8 Connector
PIN SIGNAL
TXD 5
RXD 4
GND 2
CTS 6
RTS 7
7.3.4 Data Formats
General Data Format
All data values are in ASCII format.
ID Code
The ID Code data string is 12 digits.
Set Points
Item Set Points are transmitted when an Item Code is recalled from memory. When no Item Code has been
recalled from memory, General Set Point data is transmitted. The type of setpoint is determined by the header
code of Setpoint 1. When the output is set to include Header Codes, an “F” header indicates a weight setpoint
while a “G” header indicates a quantity setpoint. When the output is set to include Titles instead of Header
Codes, a “Q” title will indicate a quantity setpoint and a “W” title will indicate a weight setpoint. Setpoint data
can consist of either 7 digits or 6 digits plus a decimal point.
Weight Variables
Gross Weight, Unit Weight, Tare Weight, and Net Weight data can be either 7 digits or 6 digits plus a decimal
point.
Quantity Variables
Total Quantity and Quantity data can consist of up to 6 digits, with a range between -99999 and 999999.
Date and Time Variables
The data string for Date and Time variables is ordered as follows:
HEADER
(C)
DATE
(3 digits)
MONTH
(5 digits)
YEAR
(6 digits)
HOUR
(3 digits)
MINUTE
(2 digits)
PM (AM)
(2 digits)
CR
The specified number of digits for the data lengths include any blanks and colons.
50 DC-530 Operation Manual
Page 55

7.3.5 Output Data Formats With Headers
The DC-530 can output two types of headers - Header Codes and Titles.
The data transmission string format when output with Header Codes is as follows:
HEADER DATA CR HEADER ........... CR LF
One data block consists of a header, the data, and a carriage return. A carriage return (“CR”) must appear at the
end of the data. A line feed (“LF”) must be added as a transmission termination code.
The data transmission string format when output with Titles is as follows:
TITLE DATA CR LF Title ............ CR LF
One data block consists of a title, the data, a carriage return, and a line feed. A carriage return (“CR”) must
appear at the end of the data. A line feed (“LF”) must be added as a transmission termination code.
Table 7-1 shows the codes, headers, fields, and commands that can be transmitted from the RS-232C port.
Header Code
Header Code ASCII Code
0 0 x 30 NET WEIGHT Net Weight 9
1 0 x 31 UNIT WEIGHT Unit Weight 7
2 0 x 32 QUANTITY Quantity 6
3 0 x 33 ID CODE ID Code 12
4 0 x 34 TARE WEIGHT Ta re W e i ght 9
A 0 x 41 GROSS WEIGHT Gross Weight 9
J 0 x 4A UNIT Weight Base 2
Title Data
C 0 x 43 DATE Date & Time 21
F 0 x 46 SET P1 (W) Set Point 1 (Weight) 7
G 0 x 47 SET P1 (Q) Set Point 1 (Quantity) 7
H 0 x 48 SET P2 Set Point 2 7
I 0 x 49 TOTAL QUANTITY Total Quantity 6
Q 0 x 51 SET P3 Set Point 3 7
T 0 x 54 PIECE Total Pieces 6
Table 7-1. Data Sent in RS-232 Communications
7.3.6 Output Data Formats Without Headers
The data transmission string format when output without Header Codes is as follows:
Maximum Data
Length (bytes)
DATA CR DATA CR ........... CR LF
One data string consists of the data and a carriage return. A carriage return (“CR”) must appear at the end of the
data. A line feed (“LF”) must be added as a transmission termination code.
External Devices: Printers, PCs, Scanners and Scales 51
Page 56

7.4 Setpoint Connector
Your DC-530 has a setpoint output that can be attached to output relays for setpoint control of external
equipment when setpoint conditions are satisfied. The device receiving the signal is connected to the DC-530’s
Setpoint Connector (see
Figure 7-1).
To set up the DC-530 to output when the setpoint conditions are satisfied, program the customer specifications as
detailed in
Section 6.4.
Pin Signal
1 Set Point 1
2 Set Point 3
3 +24V Ext
4 Set Point 2
5 Set Point 4
6 FRAME Ground
7 Short to Pin 3
8 Short to Pin 6
Table 7-2. Setpoint Connector Pin Assignments
7.5 Bar Code Scanner
A laser scanner allows for instantaneous and accurate input of basic data for an item. The DC-530 has bar code
scanning capabilities by plugging the optional QS-6000 Bar Code Scanner (Part No. 65619) into the RS232C-1
port on the scale (see
Tare Weight, and the Item Code. In the Programming Mode you can scan in the Part Code, Unit Weight, Tare
Weight, and Setpoints.
To setup the necessary specifications for bar code scanning, set the DC-530’s specifications as follows:
• SPEC 04 - Bar Code Scanner to 0010
• SPEC 06 - RS232C Output to 1001
• SPEC 07 - RS232C1 Baud Rate to 0100
• SPEC 08 - RS232C2 Parity/Bit/Stop Bit/Data Length to 0000
• SPEC 55 - Scan Quantity Type must be set for either Item Quantity (the default) or Accumulation
Quantity.
Figure 7-1). In the Counting Mode the scanner can be used to enter the Unit Weight, the
52 DC-530 Operation Manual
8 PIN DIN TO RJ
RJ CONNECTOR 8 PIN DIN
RED 8
WHITE 7
YELLOW 6
ORANGE 5
BLUE 4
(no connection) 3
BROWN
and
BLACK
(no connection) 1
Table 7-3. DC-530 Barcode Scanner Pin Configuration
2
Page 57

7.6 Remote Scale Channel
The Remote Scale option for the DC-530 can be ordered as Rice Lake Part No. 9491. When this option is
installed, a remote scale platform can be connected at the right-hand side of the ports and connectors strip on the
back of the DC-530.
Figure 7-7. DC-530 Ports and Connectors with Remote Scale Channel Connector Installed
Pin (Color) Signal
BRN RS+
BLU RS-
GRN IN+
YEL IN-
WHT VEX+
RED VEX-
BLK FRAME GND
Table 7-4. Remote Scale Channel Pin Configuration
7.6.1 Setting the Specifications for Scale 2
A scale connected to the Remote Scale Channel will be recognized by the DC-530 as Scale 2. The specifications
that need to be set to configure the communication with the second scale are as follows:
• SPEC 14, Bit 1 - Auto Scale Switching sets whether or not a Unit Weight established on the built-in
platform is automatically transferred to Scale 2. When Auto Scale Switching is enabled, the scale
also automatically switches to Scale 2 once a stable Unit Weight is calculated.
• SPEC 14, Bit 2 - Rezero When Swap Scale sets whether the scale is rezeroed automatically when the
SCALE key is pressed to move from weighing on one scale to weighing on the other
• SPEC 14, Bit 3 - Clear Unit Weight When Swap Scale sets whether the Unit Weight is cleared
automatically when the SCALE key is pressed to move from weighing on one scale to weighing on
the other.
• SPEC 21, Bits 1 and 0 - Minimum Display (Scale 2) sets the display divisions displayed for Scale 2.
• SPEC 24 - Selection of Resolution of 2nd Scale (Scale 2) sets the display resolution for Scale 2.
• SPEC 25, Bits 2 through 0 - Weight Decimal Point Position of 2nd Scale (Scale 2) sets which digit
the decimal point appears after in the Weight display.
• SPEC 26, Bit 1 - 2nd Scale sets whether or not the Remote Scale Channel is enabled. Please note
that the scale switch is not activated until the 2nd scale has been calibrated.
• SPEC 30 - Set the Tare and Unit Weight Auto Clear conditions.
• SPEC 34 - Loadcell Sensitivities Selection mV/V (2nd Scale) sets the loadcell sensitivity range for
Scale 2.
• SPEC 35, Bit 2 - 2nd Scale Weight Unit sets whether the basic weight units for Scale 2 will be lbs or
kgs.
For information on how to set the above User and Weight and Measurement specifications, see Section 3.0.
External Devices: Printers, PCs, Scanners and Scales 53
Page 58

7.6.2 Remote Platforms Available
Platform Capacity Platform Dimensions
100.00 lbs 13" x 17" (DIGI S-SL Platform)
250.00 lbs 17" x 21" (DIGI S-TL Platform)
500.00 lbs 17" x 21" (DIGI S-TL Platform)
1500.0 lbs 24" x 28" (DIGI S-UL Platform)
2500.0 lbs 36" x 36” or 48" x 48" (DIGI Summit 3000 Platform)
5000.0 lbs 48" x 48" (DIGI Summit 3000 Platform)
10000.0 lbs 48" x 48" or 60" x 60" (DIGI Summit 3000 Platform)
25000.0 lbs 42" x 72" or 60" x 84" (DIGI Summit 3000 Platform)
50000.0 lbs 60" x 84" (DIGI Summit 3000 Platform)
NOTE: Other platform sizes are available; consult the factory or your dealer for more information.
Table 7-5. DC-530 External Platform Capacities
54 DC-530 Operation Manual
Page 59

8.0 Appendices
8.1 Error Message List
The DC-530’s alphanumeric display allows for detailed error messages. Use Table 8-1 below to find the error
message, possible causes for the error and ways to correct the problem. If these suggestions fail to correct the
situation, please contact your DIGI dealer for assistance.
Error Message Possible Causes Corrective Action
TEP SAMPLING ERR
INVALID MAX LIMIT
PLEASE RESAMPLE
LOAD CELL 1
OUT OF START RANGE
OUT OF ZERO RANGE
PLEASE REDUCE WEIGHT
UNIT WEIGHT BELOW LIGHT
RANGE, PLEASE RESAMPLE
ITEM LIMIT = 0 pCS,
INVALID ENTER TEP MODE
There is too big a weight variance between
pieces for an accurate counting operation to
take place
The scale was started while something was
on the platter and the weight was unstable.
The REZERO key was pressed while
something was on the platter and and the
weight was unstable.
The Unit Weight in use is too light (smaller
than the light range) for an accurate counting
operation.
You are trying to recall an Item Code from
memory in TEP Counting Mode that has not
had its Safe Quantity Limit established yet.
Redo the sampling operation and increase
the sampling times.
Remove all items from the platter and
restart the scale.
Remove all items from the platter and
restart the scale.
Use a larger Unit Weight.
Use the scale in TEP Counting Mode to
calculate the Safe Quantity Limit and edit
the Item Code Record to add that limit to
the data stored for that Item Code.
Table 8-1. DC-530 Error Message List
Appendices 55
Page 60

8.2 Troubleshooting
Table 8-2 shows some potential problems that might arise while using your scale, their possible causes, and the
corrective action that can be taken to resolve them.
Error Message Possible Causes Corrective Action
The scale does not power on. The main switch on the bottom of the scale
is off.
The AC cord is not completely plugged in. Push the connector for the AC cord firmly
The fuse is burned out. Replace the fuse.
When pressing the TARE key a
beep sounds indicating an error
and the entry is refused.
When pressing the PCS key
The scale is unstable. Check that the Stable indicator lamp is on
The scale is unstable. Check that the Stable indicator lamp is on
while carrying out a sampling
operation, a beep sounds
indicating an error and the
operation terminates.
Table 8-2. Solutions in Troubleshooting
Turn on the main switch.
into its socket.
before pressing the TARE key. If the scale
is having difficulty maintaining a stable
weight reading, check to see whether it is
in a place where it is being affected by air
movements. Also make sure that the scale
is on a stable sureface. Move the scale to
another location if necessary.
before pressing the PCS key. The scale
will reject the sampling operation if the
scale is unstable for 3 seconds after
pressing the PCS key. If the scale is
having difficulty maintaining a stable weight
reading, check to see whether it is in a
place where it is being affected by air
movements. Also make sure that the
scale is on a stable surface. Move the
scale to another location if necessary.
56 DC-530 Operation Manual
Page 61

8.3 Specifications
Operating Conditions
• Operating Temperature- -10°C ~ +40°C (OIML)
• Operating Humidity - 15%~ 85% RH
Electrical Specifications
• Power Source - AC117/100V
• Charge Current - 800 mA
• Main Board Backup Battery-Lithium rechargeable battery for data protection
• Clock - Built-In Real-Time Clock
• Memory - 200 Items
Unibloc Force Cell Specifications
• Input Sensitivity - 0.5mV/V~4mV/V
• Minimum Impedance - 4 x 350 ohm
Resolution Specifications
• Display Device - Dot Matrix Three Color LCD Backlit Display
• Internal Resolution - 1/1,000,000
• Display Resolution - 25,000/50,000/100,000
Communications/External Devices Specifications
• Number of Scales - 1 internal and 2 external
• RS-232C Interface- RS232C-1 for connection to a laser barcode scanner
RS232C-2 for connection to a printer
RS232C-3 for connection to a personal computer
• 14 pin female amphenol for external loadcells
Appendices 57
Page 62

9.0 DC-530 Limited Warranty
Rice Lake Weighing Systems (RLWS) warrants that all RLWS equipment and systems properly installed by a
Distributor or Original Equipment Manufacturer (OEM) will operate per written specifications as confirmed by
the Distributor/OEM and accepted by RLWS. All systems and components are warranted against defects in
materials and workmanship for one year.
RLWS warrants that the equipment sold hereunder will conform to the current written specifications authorized
by RLWS. RLWS warrants the equipment against faulty workmanship and defective materials. If any equipment
fails to conform to these warranties, RLWS will, at its option, repair or replace such goods returned within the
warranty period subject to the following conditions:
• Upon discovery by Buyer of such nonconformity, RLWS will be given prompt written notice with a
detailed explanation of the alleged deficiencies.
• Individual electronic components returned to RLWS for warranty purposes must be packaged to
prevent electrostatic discharge (ESD) damage in shipment. Packaging requirements are listed in a
publication, Protecting Your Components From Static Damage in Shipment, available from RLWS
Equipment Return Department.
• Examination of such equipment by RLWS confirms that the nonconformity actually exists, and was
not caused by accident, misuse, neglect, alteration, improper installation, improper repair or
improper testing; RLWS shall be the sole judge of all alleged non-conformities.
• Such equipment has not been modified, altered, or changed by any person other than RLWS or its
duly authorized repair agents.
• RLWS will have a reasonable time to repair or replace the defective equipment. Buyer is responsible
for shipping charges both ways.
• In no event will RLWS be responsible for travel time or on-location repairs, including assembly or
disassembly of equipment, nor will RLWS be liable for the cost of any repairs made by others.
THESE WARRANTIES EXCLUDE ALL OTHER WARRANTIES, EXPRESSED OR IMPLIED, INCLUDING WITHOUT
LIMITATION WARRANTIES OF MERCHANTABILITY OR FITNESS FOR A PARTICULAR PURPOSE. NEITHER
RLWS
RLWS AND BUYER AGREE THAT RLWS’S SOLE AND EXCLUSIVE LIABILITY HEREUNDER IS LIMITED TO
REPAIR OR REPLACEMENT OF SUCH GOODS. IN ACCEPTING THIS WARRANTY, THE BUYER WAIVES ANY AND
ALL OTHER CLAIMS TO WARRANTY.
SHOULD THE SELLER BE OTHER THAN RLWS, THE BUYER AGREES TO LOOK ONLY TO THE SELLER FOR
WARRANTY CLAIMS.
NO TERMS, CONDITIONS, UNDERSTANDING, OR AGREEMENTS PURPORTING TO MODIFY THE TERMS OF THIS
WARRANTY SHALL HAVE ANY LEGAL EFFECT UNLESS MADE IN WRITING AND SIGNED BY A CORPORATE
OFFICER OF RLWS AND THE BUYER.
NOR DISTRIBUTOR WILL, IN ANY EVENT, BE LIABLE FOR INCIDENTAL OR CONSEQUENTIAL DAMAGES.
© 2006 Rice Lake Weighing Systems, Inc. Rice Lake, WI USA. All Rights Reserved.
RICE LAKE WEIGHING SYSTEMS • 230 WEST COLEMAN STREET • RICE LAKE, WISCONSIN 54868 • USA
58 DC-530 Operation Manual
 Loading...