


Copyright ⓒ 2018, Movon Corporation. All rights Reserved.
User Manual
English
Basic Operation
Starting the System Turning the System O
1. Press the engine start button or set the
ignition key to ON or ACC.
3. Press the [Agree] button to display the most
cent mode. (Default mode is Radio FM1)
re-
2. Once the system is turned on, the booting
process will start and the logo screen is
displayed.
1. While the
(over 1.5 seconds) the POWER/VOL button to
turn the power o. When the system power is
turned o, the nal operating mode is saved.
system is operating, press and hold
2. Current time is displayed when power o.
Information
- When the
will automatically turn on the most recently oper-
ated mode.
-
The system
3 minutes has passed in ignition o state and the
driver-side door is opened.
ignition is turned on again, the system
will automatically turn o if more than
9
English
Resetting the System Audio O
1.
Press the RADIO and SETUP button
simultaneously
.
2. The system will turn o and reboot.
Information
- Resetting the system will restore existing settings and
congurations back to their default states.
ensure device stability and is not a system defect.
10
This is to
1. When the A
V is on, shortly press (under 1.5
seconds) the PWR/VOL button to turn the
AV o.
English
Starting Radio Mode
Starting Radio Mode
1. Press the MODE button to display the
main menu screen, then press [Radio].
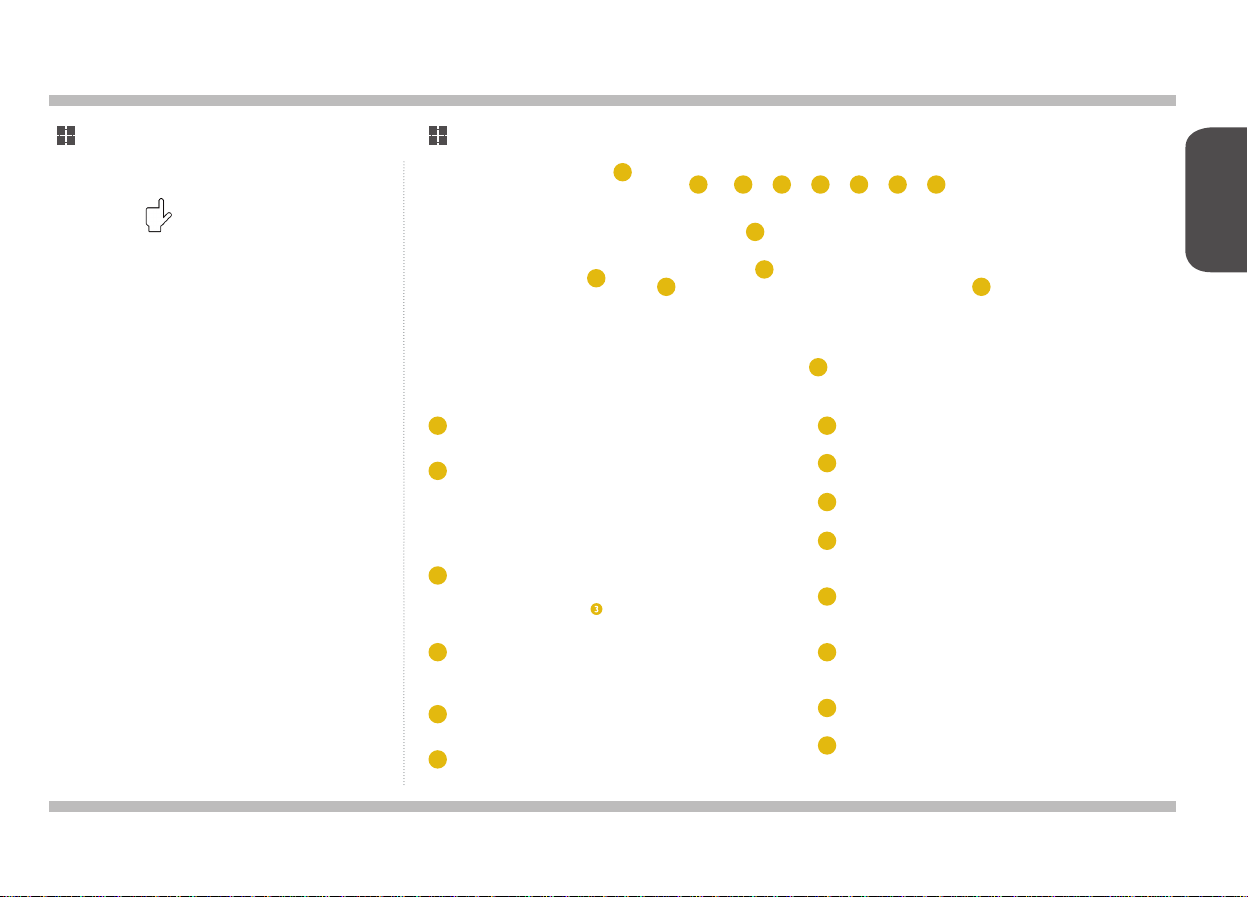
Radio Screen
1
2
Mode Display
1
Displays the currently operating mode.
Preset
2
Displays the preset list.
* Press and hold the preset button to save current
frequency to the selected preset button.
* Up to 12 preset frequencies each can be saved for
FM1/FM2/AM modes.
Frequency Info
3
Displays the current frequency.
* Each time this area is dragged to the right, the mode
is changed in the order FM1 → FM2 → AM → FM1.
Indicator
4
Displays the On/O state of the REG/AF/TP/PTY/
SCAN/AST/STEREO features.
Tune Up
5
Press to tune up by FM: 0.1MHz, AM : 9KHz)
Tune Down
6
Press to tune down by FM: 0.1MHz, AM : 9KHz)
8
6
9 10 11 12 13 14
4
3
7
Radio Band T ab
7
If you select the desired tab, the selected Radio mode will operate.
Back
8
Moves to the previous screen.
DAB
9
Operates DAB mode.
TA On / O
10
Turns Trac Announcement On/O. (for details,
refer to the “DAB” section.)
DLS On / O
11
Turns DLS Text On/O. (or details, refer to the
“DAB” section.)
Scan
12
Plays frequencies with superior reception for 5
seconds each.
AST
13
Saves frequencies with superior reception to Preset buttons.
Recording Radio
14
Records currently operating radio broadcast.
5
11
English
Using Presets & Recording Radio
Saving Preset Automatically
(Autostore)
1. In the radio screen, press [AST].
2. Saves frequencies with superior
reception to preset buttons in
ascending order.
Information
- If there are less than 12 radio frequencies with superior reception states, then the
previously saved presets will be saved into the remaining preset channels.
- While Autostore is operating, pressing the AST button again will cancel the func-
tion and play the previous frequency.
Saving Preset Manually
1. Select frequency to save.
2. Press and hold the preset button
you want to save. The current
frequency to the desired preset
button with a beep.
Recording Radio
1. In the radio screen, press . 2. In the screen that asks whether
3. Pressing the stop button will stop recording and save audio automatical-
ly in My Music Radio folder.
Information
- Recordings must be more than 5 seconds and up to 60 minutes can be recorded with one
recording.
- Recorded radio les can be played in My Music.
- Up to 100 les can be saved. If the storage capacity becomes exceeded with less than 100 les,
then recording will automatically terminate and additional recordings will not be supported.
to record radio, press [OK] to
start recording.
12
English
Starting DAB Mode DAB Screen
2
1. In the radio screen, press DAB
to operate DAB mode.
Mode Display
1
Displays the currently operating mode.
Preset
2
Displays saved station for user selection.
* Press and hold the preset button to save current station to the selected
preset button.
* Up to 12 stations can be saved.
Station Info
3
Displays the current station.
Indicator
4
Displays the on/o state of the DAB/TP features.
Channel Down
5
Moves to previous station.
Channel Up
6
Moves to next station.
1
7 8 9 1110 12
5 6
3
DAB
Back
7
Moves to the previous screen.
FM/AM
8
Operates FM/AM radio mode.
4
Service Follow On / O
9
SF(AF) ON / OFF
* SF(AF) : This feature provides continuous recep-
tion by automatically searching for the identical
channel in nearby frequencies when the current
channel reception becomes weak.
TA(Trac Announcement) On / O
10
Turns Trac Announcement on/o.
* TA : This feature provides trac announcements
and bulletins in real-time.
DLS Text(Dynamic Label Segment Text) On / O
11
Turns DLS Text on/o.
* DLS Text : This feature displays text transmitted
by the current radio station on the device. Types
of information include programme information,
including station slogans or the title and artist of
the currently playing song.
List
12
Displays automatically updated lists.
13

English
Media Mode
About USB Memory Devices
1. Connect the USB device after starting the ignition. The USB device may become damaged if it is already connected when the ignition is turned on.
USB devices are not automotive electronic components.
2. Turning the ignition on or o with the USB device connected may result in improper USB operation.
3. Heed caution to static electricity when connecting/disconnecting external USB devices.
4. Encoded MP3 players will not be recognized when connected as an external device.
5. When connecting an external USB device, the system may not recognize the USB device in certain conditions.
6. This system recognizes USB devices formatted in F
Some USB devices may not be supported due to compatibility issues. Before starting use, check to see that the device is operating normally.
7.
8. Repeatedly connecting/disconnecting USB device in a short period of time may result in product damage.
9. An abnormal sound may occasionally occur when disconnecting the USB device.
10. Disconnecting the USB device while playing media in USB mode may result in USB device damage or improper operation. When disconnecting the
USB device, rst turn the system o or change the mode to a dierent mode.
11. The amount of time required to recognise the external USB device may dier depending on the type, size, or le formats stored on the USB. Such
dierences in required time do not indicate a malfunction.
12. Using USB devices for purposes other than playing music or image les is prohibited.
13. Do not use the USB cable to charge batteries or USB accessories that generate heat. Such acts may lead to worsened performance or cause sys-
tem damage.
14. The device may not recognise the USB device if separately purchased USB hubs and extension cables are being used. Connect the USB directly
with the multimedia terminal of the vehicle.
15. When using mass storage USB devices, there are cases when the logical drives are separated for user convenience. In such a case, only les with-
in the logical drive of the root directory will be played. When using a USB with separate partitions (logical drives), save les you wish to play within
the root directory. When application programs are installed to specic USBs, the les within such USBs may not play properly for reasons described
above.
16. The device may not operate properly if MP3 players, mobile phones, digital cameras or other electronic devices (USB devices not recognised as
portable disk drives) are connected with the device.
17. Charging through the USB may not work for some mobile devices.
18. Normal operation is warranted for only metal cover type USB memory devices.
19. The device may not operate properly when using formats such as HDD Type, CF
USB memory sticks used by connecting an adapter, including SD
20.
recognized.
AT16/32 le formats. USB media with NTFS or exFAT type le systems are not supported.
, or SD Memory.
Type USB memory sticks and CF Type USB memory sticks, may not be properly
14
English
Starting Music Mode Saving music le
Music Mode
1. Press the MODE button to display main
menu screen then press [Media].
2. The default Media mode is Music.
Information
The feature will not operate unless there is at least one music
le in the USB device or SD card. (The feature will not operate if
there is no media le in the USB device or SD card)
- Audio Codec : MP3, OGG(Vorbis), AAC-LC, WMA9/10,
LPCM, FLAC
- Extension : MP3, M4A, APE, OGG, WMA, FLAC, WAV
- Sampling Frequency : 32KHz, 44.1KHz, 48KHz
- Bit Rate : 32Kbps~320Kbps
- Caution : This device supports audio les using 320Kbps
bit rate range and the use of les in 192kbps bit rate
range is recommended. When using les without xed bit
rates, some features (FF/REW features) may not properly
operate.
press in the Music screen.
2. In the Save Music File window, press [OK].1. After playing the le you wish to save,
3. You can check les you have saved in My
Music.
Information
- It is possible to save up to 100 songs.
15

English
Music Screen
Music Screen
1
2
3
5
4
7 68
13
Mode Display
1
Displays the currently operating mode.
Parent Folder
2
Moves to the Parent Folder
Folder Name
3
Displays the current folder.
Music List
4
Displays the music le list of the current folder.
* Currently playing song name becomes highlighted
Song Info
5
Displays the folder, artist, title, album, and album art information of the current le.
9 101211
14
Next File
6
Plays the next le.
* Press and hold the key to search the next le quickly in USB device. And le name
is displayed. Once the key is released, the le will begin playing at normal speed.
Previous File
7
Plays the previous le.
* Press and hold the key to search the previous le quickly in USB device. And le
name is displayed. Once the key is released, the le will begin playing at normal
speed.
Pausing/Playing
8
Plays/pauses the current le.
Repeat
9
Repeats the current le or all les in USB device.
* Each time the button is pressed, the option is changed from Repeat File →
Repeat Folder → Repeat One.
Shue
10
Plays les in random order.
Saving Music File
11
Saves the current le to My Music.
File Index
12
Displays the current le/total les in the current folder.
Play Time
13
Displays the current play time/total play time.
* Drag or touch the bar to move to the desired time.
USB Mode T
14
If you select the desired tab, the selected mode will operate.
ab
16

English
Starting Video Mode
Starting V
1. Press the MODE button to display
main menu screen then press
[Media].
Information
The feature
- Video Codec : MPEG2, MPEG4, Xvid, H.264, MJPEG, VC-1, VP8, WMV7/8
- Extensions : MP4, MOV
- Image Resolution: D1 720X480(729X590), HD 1280X720P(1289X729)
- Subtitles : SMI (Subtitles may not properly operate if the name of the video le is dierent from the name of the subtitle le.)
- Caution : High resolution les using bit rates over 2Mbps may not operate properly.
ideo Mode
2 - 1. When Music screen is
will not operate unless there is at least one video le in the USB device. (The feature will not operate if are no media les in the USB device )
, 3GP, AVI, ASF, MKV, FLV, MPG, MPEG, TS, WMV
displayed, drag the screen to
right to operate Video mode.
2 - 2. Or touch the Video tab to
operate V
ideo mode.
3. Once video control panel is
displayed, Video will be played in
full screen.
17

English
Video Screen
ideo Screen
V
1
2
4
Mode Display
1
Displays the currently operating mode.
Parent Folder
2
Moves to the Parent Folder
File/Folder Name
3
Displays the current le and folder.
Video List
4
Displays the video le list of the current folder.
* Currently playing video name becomes highlighted
3
11
12
813 9
10
Next File
5
Plays the next le.
* While the button is being pressed, the current le is played and next le name is
displayed.
Previous File
6
Plays the previous le.
* While the button is being pressed, the current le is played and previous le name
is displayed.
Pausing/Playing
7
56 7
Plays/pauses the current le.
Subtitle Size
8
Changes the subtitle size.
*
This button is available only when there is subtitle.
Full Screen
9
Changes display from normal screen to full screen.
* Upon touching a non-button area on the screen, the screen will convert into Full
Screen mode..
File Index
10
Displays the current le/total les in the current folder.
Play Time
11
Displays the current play time/total play time.
* Drag or touch the bar to move to the desired time.
USB Mode T
12
If you select the desired tab, the selected mode will operate.
ab
18
English
Starting Image Mode
Starting Image Mode
1. Press the MODE button to
display main menu screen then
press [Media].
Information
The feature
will not operate unless there is at least one image le in the USB device. (The feature will not operate if there is no media le in the USB device )
- When changing from Music mode to Image mode, the playing Music sound will continue to be played.
- When changing from Video mode to Image mode, the playing V
- Supported Image format : JPEG, JPG, BMP, PNG, GIF
2 - 1. When Music screen is
displayed, drag the screen to
right to operate Image mode.
(Music → Video → Image)
ideo sound will continue to be played.
2 - 2. Or touch the Image tab to
operate Image mode.
3. Once image control panel is
displayed, image will be played
in full screen.
19
English
Image Screen
Image Screen
1
2
4
Mode Display
1
Displays the currently operating mode.
Parent Folder
2
Moves to the Parent Folder
File/Folder Name
3
Displays the folder, le name, le type and resolution of current image.
3
11
12
87 9
10
Image List
4
Displays the Image list of the current folder.
* Currently displayed image name becomes highlighted
Next File
5
Plays the
Previous File
6
56
Plays the next le.
Slide Show
7
All images
selected time interval
Rotate
8
Rotates image in a clockwise direction.
Saving Image
9
Saves the image shown when the display is turned o.
File Index
10
Displays the current le/total les in the current folder
next le.
the button is being pressed, the current le is played and next le name is
* While
displayed.
* While
the button is being pressed, the current le is played and previous le name
is displayed.
within the USB device are shown sequentially accordingly the
* Zoom in/out feature is not supported.
* Slides sow is not available while driving.
.
20
USB Mode T
11
If you select the desired tab, the selected mode will operate.
ab
English
Bluetooth Mode
Before Using Bluetooth
1. Before connecting the head unit to the mobile phone, turn Bluetooth on and and disable the hidden state of mobile phone.
2. Up to ve Bluetooth devices can be paired.
3. Only one Bluetooth device can be connected at a time.
4. For Handsfree volume, min. volume is 6 and max. volume is 40.
Starting Bluetooth Mode
1. Press the MODE button to
display main menu screen then
press [Bluetooth].
Information
- To add more devices, you must delete one of the previously added devices.
2. Bluetooth connection notice is
displayed. (When no phones
have been paired)
3-1. Press [Yes] to display Blue-
tooth connection screen.
3.-2. If the [No] button is pressed,
Bluetooth Phone screen(key-
pad) will be displayed. You
can also pair a device by
pressing [Connect] within this
screen.
21

English
Bluetooth Main Menu
Bluetooth Main Menu
1 7
2
3
4
5
6
8
Mode Display
1
Displays the currently operating mode.
Call History
2
Displays recent dialled/received/missed call history.
Contacts
3
Displays contacts list screen.
* Contacts can be viewed only when contacts have been downloaded.
Keypad
4
Displays the dial pad screen.
Connect
5
Displays Bluetooth connection screen.
Bluetooth Settings
6
Displays Bluetooth Settings Screen.
Status Icons
7
Display the current phone status in the top right side of the display.
Phone Name
8
Displays name of currently connected device.
22

English
Pairing Bluetooth Devices
Search from Car
1. Press [Search from Car]. 3. Select the name of the device to
4. Verify the passkey and proceed
with pairing from your Bluetooth
device.
Information
- Max. search time : 15 seconds, max. searched devices : 20 devices
- The passkey is created randomly.
- If the device is not found, please check the following.
* Is the Bluetooth feature turned on in your Bluetooth device?
* Has the Bluetooth been set to hidden state?
- If search and connection continues to not work, please reboot your Bluetooth device and try again.
- If the device has been paired before, select the device from the list to connect.
2. Search devices. (Disable the hidden state of mobile phone.)
5. The Bluetooth connection screen
is displayed.
connect.
6. Once Bluetooth connection is
successful, the name of the
connected mobile phone is
displayed.
Auto Connection
- The Bluetooth device will automatically be connected according to
the set option when the car ignition
is turned on(ACC ON).
- When the user selected phone
cannot be connected, the system
automatically attempts to connect the most recently connected
phone. When the most recently
connected phone cannot be con-
nected, the system attempts to
connect all paired phones sequentially. (If connection fails after at-
tempting for 1 cycle, then attempting Auto Connection will end.)
23

English
Search from Device
1. Press [Search from Device]. 2. Search for the car name and pair
the device. Verify the passkey
and proceed with pairing from
your Bluetooth device.
Information
- The passkey is created randomly.
- If the device is not found, please check the following.
* Is the Bluetooth feature turned on in your Bluetooth device?
* Has the Bluetooth been set to hidden state?
- If search and connection continues to not work, please reboot your Bluetooth device and try again.
24
3. The Bluetooth connection screen
is displayed.
4. Once Bluetooth connection is
successful, the name of the
connected mobile phone is
displayed.

English
Disconnecting and Deleting Bluetooth Devices
Disconnecting a Device
1. In the Bluetooth Phone screen,
press [Connect].
3. Press [OK] to disconnect.
2. Select the name of the device to
disconnect.
Deleting a Device
1. In the Bluetooth Phone screen,
press [Connect].
3. Select the enabled trash bin icon to to select the device within the Delete
Device screen.
2. Check the box with the name of
the device to delete.
Information
- A device cannot be deleted if it is connected. (Only disconnected devices can be deleted.)
25

English
Bluetooth Call Screen
Bluetooth Call Screen
1 2
Phone Name and Contact Name/Number
1
3 4 5
7
6
Displays name of currently connected device and other party’s name/number during a call.
Call Time
2
Displays the call time.
3
Handsfree Call / Private Call
Displays the current call state (press to switch from the Handsfree to the
Bluetooth mobile phone).
MIC Volume
4
Adjusts outgoing volume during calls. Sets call volume as heard by the
other party (Levels 1~5). (This feature can be used only during a Hands-
free call)
Mute
5
Turns the Mic On/O. (This feature can be used only during a Handsfree
call)
Send / Call / End
6
Calls the number / Ends a call.
Keypad
7
Used to enter/delete numbers.
26

English
Making a Call
Making a Call
1. Enter number.
3. Displays call time during a call.
2. Press the call button.
Downloading Contacts
1. Select the contact button. Press
[Download Contacts].
3. Press [OK]
Information
- Upon downloading, phones require additional conrmation. (Can be set separately
within your mobile device)
- This feature may not be supported for some contact types (Google, T Contacts, etc).
- Download will continue even if you change to a dierent mode while downloading is
in progress.
- Up to 1,000 contacts can be downloaded.
- Contacts can only be downloaded from the phone. Deleting or adding is not supported.
- Upon downloading contacts, the most recent 150 call histories are also downloaded.
(Up to 50 dialled, incoming, and missed call history lists are each saved.)
2. Please check your phone and accept
the download request. (Phones
require additional conrmation.)
4. Contacts are downloaded.
(Maintains previous state upon
cancelling)
27

English
Making a Call from Contact
1. In the Bluetooth Phone screen,
press [Contacts].
4. Enter a name or phone number and press [Search].
28
2. Press the call button to make a
call from the list screen.
3. Press the magnifying glass icon
to search contacts.
5. Press the call button to make a
call from the list screen.
6. The Bluetooth call will be start.

English
Answering a Call
Answering a Call
1. When there is an incoming call, displays
information of the other party on incoming
call pop-up. Press [Handsfree] or [Private]
to answer a call. (Pressing [Reject] will end
notice and restore the previously operated
mode.)
Information
- When the incoming call pop-up is displayed, most functions within AV mode will not operate. After ends a call, the previously operated media will be played.
- However, USB Image Slideshow will end.
- Handfree volume can be adjusted separately from AV mode volume.
2. Displays other party’s information and call
time.
3. After ends a call, the previously operated
mode will be restored.
29

English
Bluetooth Settings
Turning Bluetooth On/O
1. In the Bluetooth Phone screen, press
[Bluetooth Settings].
Information
- If you press [Do Not Use], the most features will be disabled except [Use Bluetooth] and [Reset].
2. Press [Use Bluetooth].
Changing Device Name
1. In the Bluetooth Phone screen, press
[Bluetooth Settings].
2. Press [Change Device Name].
30
3. Sets whether to use Bluetooth Auto Con-
nection, (Default state : Use)
3. Press the name and press [Done]. (The
default device name is SSANGYONG
AVN)

English
Auto Connection Settings
1. In the Bluetooth Phone screen, press
[Bluetooth Settings].
Contacts Settings
1. In the Bluetooth Phone screen, press
[Bluetooth Settings].
2. Press [Auto Connection].
2. Press [Contacts].
3. Sets whether to automatically download
Contacts upon Bluetooth connection.
(Default state : [Do not use].)
31

English
Deleting Call History.
1. In the Bluetooth Phone screen,
press [Bluetooth Settings].
Reseting Bluetooth
1. In the Bluetooth Phone screen,
press [Bluetooth Settings].
32
2. Press [Delete Call History]. 3. Press [OK]. 4. Call history is deleted.
2. Press [Reset]. 3. When the resetting notication
pop-up is displayed, press [OK].

English
Ringtone Settings
[Bluetooth Settings].
Information
- Upon selecting a ringtone, a preview of the ringtone will be played once.
2. Press [Ringtone]. 3. Select the desired ring tone.1. In the Bluetooth Phone screen, press
33

English
Bluetooth Music
Before Using Bluetooth Music
1. Bluetooth Music Mode can be used only when a Bluetooth phone has been
connected.
2. When Bluetooth is connected, music will automatically play when you enter
Bluetooth Music Mode.
- If Auto Play does not work, re-press the play button.
- Music may not automatically play depending on the music player program
within the connected device.
Bluetooth Music Screen
1
2
3 4 5
Mode Display
1
Displays the currently operating mode.
Song Info
2
Displays the song, artist, album information.
Previous File
3
Plays the previous le.
Pausing/Playing
4
Plays/pauses the current le.
Next File
5
Plays the next le.
Bluetooth Phone
6
Operates Bluetooth Phone mode.
6
34

English
My Music
What is My Music?
- My Music refers to a feature
where music les within USB
memory drives or radio recording
les are saved into the system to
play them within in vehicle.
- The feature will not operate
unless there is at least one music
le in the system.
Starting My Music
1. In the Main Menu screen, press
[My Music].
My Music Screen
1
2
4
3
Mode Display
1
Displays the currently operating mode.
Radio Recording Folder
2
Displays radio recording les saved in My Music.
Music List
3
Displays the music list of the current folder.
* Currently playing song name becomes highlighted
File Info
4
Displays the current le information.
*song, artist and album.
Previous File
5
Plays the previous le.
* While the button is being pressed, the current le is played and next le
name is displayed.
Pausing/Playing
6
Plays/pauses the current le.
5
6 7
12
9 10 11
Next File
7
Plays the next le.
* While the button is being pressed, the current le is
played and next le name is displayed.
8
Album Art
8
Displays album art.
Repeat
9
Repeats the current le or all les in My Music.
* Each time the button is pressed, the option is
changed from Repeat File → Repeat Folder →
Repeat One.
Shue
10
Plays les in random order.
Deleting File
11
Deletes the current le.
Play Time
12
Displays the current play time/total play time.
* Drag or touch the bar to move to the desired time.
35

English
Settings
Displaying Radio Settings Screen
1. From the system hard keys, press
and hold the SETUP
2. In the Settings screen, press
[Radio].
button.
RDS Settings
1. Press [RDS] and sets whether to
use RDS feature.
button at the top right side
to initialize the settings. (Default
state : AF)
Press the reset
PTY Seek Settings
1. Press [PTY Seek] and select the
desired options. Press the reset
button at the top right side
to initialize the settings. (Default
state : None)
37

English
Displaying Clock Settings Screen
Time Settings
1. From the system hard keys, press and
hold the SETUP button.
2. In the Settings screen, press [Clock].
38
1. Press [Time] to set the current time. Press
e reset
th
initialize the settings. (Default state : 201501-01, time is as shown within the system)
button at the top right side to
Clock Settings
1. Press [Clock] to set the clock type. Press
the reset
to initialize the settings.
Analog, 12 hour)
button at the top right side
(Default state:

English
Displaying Sound Settings Screen Balance/Fade Settings EQ Settings
1. From the system hard keys, press and hold the
SETUP button.
2. In the Settings screen, press [Sound].
1. In the Balance/Fader settings screen, press the up/down/
left/right button or touch the position to set the desired sound
position. Press the reset button at the top right side to
initialize the settings. (Default state : Fader 00, Balance 00)
Information
- Fader/Balance is used to set the intensity of the speak-
ers by location.
Sound Settings
1. Used to set sound fader/balance, E
sound settings. Press the
right side to initialize the settings.
Q and other
button at the upper
1. In the EQ settings screen, press +/- button to set
the Bass/Middle/Treble levels. Press the reset
button at the top right side to initialize the
settings. (Default state : T
Bass 00)
reble 00, Middle 00,
Other Settings
1. Press [Others] to set the Beep and A
Press the reset
initialize the settings. (Default state: Beep - On,
AVC - O)
Information
- Beep : sounds with each touch of the button.
- AVC(Auto V
controlled automatically according to vehicle speed.
button at the top right side to
olume Control) : When AVC is on, volume is
VC settings.
39

English
Displaying Language Settings Screen
Language Settings
1. From the system hard keys, press and
hold the SETUP button.
2. In the Settings screen, press [Language].
40
1. In the Language settings screen, select the
desired language and press the Conrm
button at the top right side. The system
will automatically restart and the system
language is changed. Press the reset
button at the top right side to initialize the
settings. (Default state : English)

English
Displaying Radio Settings Screen
Illumination Settings
1. From the system hard keys, press
and hold the SETUP
button.
2. In the Settings screen, press
[Display].
1. In the Illumination settings screen,
press +/- button to adjust the display
brightness. (Default state :
Illumination)
Auto
4. Night Mode
- Maintains the display brightness
on dark and map colors in Night
mode.
2. Auto Illumination
- Automatically adjusts the display
brightness and colors.
3. Day Mode
- Maintains the display brightness
on bright and map colors in Day
mode.
41

English
Ratio Settings Screen O Settings Other Settings
Displaying System Settings Screen
1. Press [Ratio] to set the video
display ratio. Press the reset
button at the top right side
to initialize the settings. (Default
state : Full Screen)
42
1. Press [Screen O] to turn o
the display. Press the reset
button at the top right side to
1. This feature is used to set the
blank screen, image, clock and
parking guide settings.
initialize the settings. (Default
state : O)
2. Press the reset button at
the top right side to initialize the
settings. (Default state: display
Clock and Parking Guide)
Information Information
- While only using the device to listen
to audio, this feature can be very
helpful.
- Even when the screen is o, sound
will be played.
-
Touch anywhere on the touch screen
to turn the display back on.
In the Other settings, you can set the
view when power o.
Image feature be available when
-
user save images to the system.
Displays the user selected image.
-
1.
From the system hard keys,
press and hold the SETUP
button.
2. In the Settings screen, press
[System].

English
Version Reset Update
1. Press [Version] to display the system
information. This feature is used to
display boot loader, OS, application,
rmware and other system version
information.
1. In the System settings screen, press
[Reset].
1. In the System settings screen, press
[Update].
2. Press [OK]. 2. Press [OK] to update the system.
3. Initialization will proceed after selecting
whether to delete music les in My Music.
Caution!
- Upon resetting the system, the user-gen-
erate system data and the user specied
settings are restored to the factory release
state.
Feature Mode State
Radio FM1 89.1 MHz
Music
Media
Bluetooth Handsfree
Video
Image
Shue O
Repeat All
Subtitle
Size
Screen
Size
Slide
Show
Rotate Default
Disconnects a device
and deletes all paired
Small
Full Screen
O
devices
Information
- Resetting the system will restore existing
settings and congurations back to their
default states.
- It is possible for the user to select whether
to delete music les saved in My Music.
Information
- A USB memory with the update les is
required.
43

English
iPod Mode
Before Using iPod
The use of genuine iPod cables supplied by Apple is recommended.
Apple CarPlay is unavailable when iPod is being used.
When using iPod mode through an iPhone, the Use CarPlay setting
in iPhone Settings must be disabled.
iPod Screen
1
2
3
4
5
Mode Display
1
Displays the currently operating mode.
Category
2
Displays the current category.
Category List
3
Displays all category lists.
* The category list may dier depending
on type of iPod device.
File Info
4
Displays the current le information.
*song, artist, album and total les.
Previous File
5
Plays the previous le.
* when pressed and held, operation fol-
lows the iPod device operation.
Pausing/Playing
6
Plays/pauses the current le.
11
8
6
Next File
7
Plays the next le.
* when pressed and held, operation follows
the iPod device operation.
Album Art
8
Displays album art.
Repeat
9
Repeats the current le or all les in My Music.
* Each time the button is pressed, the option
is changed from Repeat O → Repeat One
→ Repeat All.
Shue
10
Plays les in random order.
Play Time
11
Displays the current play time/total play time.
* Drag or touch the bar to move to the desired
time. (This features may not be supported depending on device.)
7
9
10
44

English
Starting iPod Mode
Starting iPod
1. Use an iPod connector cable to connect
the iPod device with the USB connection
terminal.
2. Once an iPod is connected, iPod mode will
operate automatically.
Automatically
Starting iPod Manually
1. From the system hard keys, press the
MODE button.
3. Press [iPod] to operate the iPod mode.
2. Slide from the bottom to the top side of the
screen or press the page display area on
the left-side of the screen.
4. The song information is displayed and the
song is played automatically.
Information
If the iPod is already connected and you wish to play iPod from a dierent mode, refer to the “Starting iPod
Manually”.section.
45

English
Apple CarPlay
What is Apple CarPlay?
1. By connecting your iPhone with the system, you can conveniently
use various features, including Phone, Navigation, Messages,
Music, and Siri.
2. Available functions and operations may dier depending on the
iPhone model.
3. Apple CarPlay may not be available in your country or region.
(http://www.apple.com/ios/feature-availability/#applecarplay-applecarplay)
Before Using Apple CarPlay
1. Before connecting your mobile phone, check whether Apple CarPlay is set to be used in Setting → General → Restrictions.
2. Before connecting your mobile phone, check whether Siri is set to
be used in Setting → General → Siri.
3. Apple CarPlay works with iPhone 5 or higher.
4. Apple CarPlay works with iOS 7.1 but the most recent version is
recommended.
5. It is not possible to use oncar, iPod and Apple CarPlay at the same
time.
6. The use of genuine iPhone cables supplied by Apple is recommended.
7. Upon connecting and entering Apple CarPlay, the sound of the
previous mode is maintained. Only the screen will be converted.
8. It is not possible to use Apple CarPlay and Bluetooth Audio at the
same time.
9. Most features of Apple CarPlay require data usage. Before using
Apple CarPlay, make sure that your phone is on a data plan.
10. Upon connecting Apple CarPlay, voice recognition operates based
on Siri. The vehicle voice recognition feature will not operate.
11. For more information, refer to the Apple website (http://www.apple.
com/kr/ios/carplay/)
Apple CarPlay Screen
3
1
Home
1
Moves to the Apple CarPlay home screen
Home Screen
2
Apple CarPlay home screen
Now Playing
3
Moves to the current audio source.
2
46

English
Apple CarPlay Mode
How to use Siri
1. Press the voice control button on the steer-
ing wheel to operate Siri.
3. Or press and hold the home button on the
iPhone to operate Siri.
2. Or press and hold the home button on the
Apple CarPlay home screen to operate
Siri.
Starting Apple CarPlay Mode
1. Connect your iPhone to your car using a
USB cable.
2. Press [Apple CarPlay].
Information
- If Bluetooth was connected, Bluetooth will be
disconnected upon connecting Apple CarPlay.
47

English
Android Auto
Before Using Android Auto
1. Download the Android Auto app to your Android phone with Android
5.0 Lollipop or higher.
2. The use of genuine Android phone cables is recommended.
3. Upon connecting Android Auto, Bluetooth will be automatically
connected.
- Upon exceeding the max. number of registered devices, a device
that had not been recently connected will be deleted.
4. Bluetooth Music is not connected.
5. It is not possible to use CarLink, iPod, Apple CarPlay and Android
Auto at the same time.
6. Android Auto may not be available in your country or region. Please
refer to the site: (http://www.android.com/auto/#what-you-need)
7. Upon connecting and entering Android Auto, the sound of the previ-
ous mode is maintained. Only the screen will be converted.
8. Most features of Android Auto require data usage. Before using
Apple CarPlay, make sure that your phone is on a data plan.
9. For details about Android Auto, Please refer to the Google support
site : (http://support.google.com/androidauto)
Android Auto Screen
7
1 2 3 4 5
Map
1
Operates map(navigation) feature.
Phone
2
Operates phone feature.
Home Screen
3
Moves to he home screen.
Music
4
Operates music feature.
Returning to the system
5
Moves to the Main Menu screen of
the system.
Voice Recognition
6
Operates voice recognition feature.
Home Screen
7
Home screen of Android Auto.
* Displays music and weather widget.
6
48

English
e-Manual
What is e-Manual?
This feature allows you to conveniently check methods of using
key system features.
This e-manual may dier from the actual feature of the product.
1. Select the desired menu on the left-side. For detailed operation meth-
ods, use the / buttons to move between pages.
50

English
Restrictions on Features for Safety Measures
Restrictions on Features for Safety Measures
The video and some other features will be disabled for your safety when the
vehicle is in motion.
- Video is not available while driving. The audio player is not aected when
video is o.
- Slideshow is not available while driving.
The restriction screen will disappear when putting the parking brake on.
51

Hereby, [DIGEN] declares that the radio equipment type [DGU-8745-C300SA] is in compliance with Directive 2014/53/EU.
The full text of the EU declaration of conformity is available at the following internet address: http://www.idigen.com
A copy of the DoC in the original language is enclosed with the equipment
This radio equipment has been constructed so that it can operate in at least one Member State.
There are no restrictions of use.
BE BG CZ
DK DE EE
IE EL ES
FR HR IT
CY LV LT
LU HU NL
AT UK PT
DIGEN CO., LTD.
89, Seongseo4chacheomdan-ro, Dalseo-gu, Daegu, 704-801, Korea

FCC Information to User
This equipment has been tested and found to comply with the limits for a Class B digital device,
pursuant to Part 15 of the FCC Rules. These limits are designed to provide reasonable protection
against harmful interference in a residential installation. This equipment generates, uses and can
radiate radio frequency energy and, if not installed and used in accordance with the instructions, may
cause harmful interference to radio communications. However, there is no guarantee that interference
will not occur in a particular installation. If this equipment does cause harmful interference to radio or
television reception, which can be determined by turning the equipment off and on, the user is
encouraged to try to correct the interference by one of the following measures:
5HRULHQWRUUHORFDWHWKHUHFHLYLQJDQWHQQD
,QFUHDVHWKHVHSDUDWLRQEHWZHHQWKHHTXLSPHQWDQGUHFHLYHU
&RQQHFWWKH HTXLSPHQW LQWRDQRXWOHW RQ DFLUFXLWGLIIerent from that to which the receiver is con-
nected.
&RQVXOWWKHGHDOHURUDQH[SHULHQFed radio/TV technician for help.
Caution
0RGLILFDWLRQV QRWH[SUHVVO\ DSSURYHG E\WKH SDUW\ UHsponsible for compliance could void the user’s
authority to operate the equipment.
FCC Compliance Information : This device complies with Part 15 of the FCC Rules. Operation is
subject to the following two conditions: (1) This device may not cause harmful interference, and (2)
this device must accept any interference received, including interference that may cause undesired
operation
IMPORTANT NOTE:
FCC RF Radiation Exposure Statement:
This equipment complies with FCC RF radiation H[SRVXUH OLPLWV VHW IRUWK IRU DQ XQFRQWUROOHG
environment. This equipment should be installed and operated with a minimum distance of 20
centimeters between the radiator and your body.This transmitter must not be co-located or operating
in conjunction with any other antenna or transmitter.
 Loading...