

Page 1
DIFFRACTION LIMITED
1
SBIG® StarChaser SC-2
Off-Axis Guiding Camera
User’s Manual
Version 1.0 - December 04, 2019
Page 2

DIFFRACTION LIMITED
2
This equipment has been tested and found to comply with the limits for a Class A digital device
pursuant to Part 15 of the FCC Rules. These limits are designed to provide reasonable protection
against harmful interference in a residential installation. This equipment generates, uses, and can
radiate radio frequency energy, and if not installed and used in accordance with the instructions,
may cause harmful interference to radio communications. However, there is no guarantee that
interference will not occur in a particular installation. If this equipment does cause harmful
interference to radio or television reception, which can be determined by turning the equipment
off and on, the user is encouraged to try to correct the interference by one or more of the
following measures:
Reorient or relocate the receiving antenna.
Increase the separation between the receiver and the equipment.
Connect the equipment into an outlet on a circuit different from that to which the receiver
is connected.
Consult the dealer or an experienced radio/TV technician for help.
Use shielded I/O cables when operating this equipment.
You are also warned that any changes to this certified device will void your legal right to
operate it.
Industry Canada Compliance Statement
This Class A digital apparatus complies with Canadian ICES-003.
European Union - Compliance to the Electromagnetic Compatibility Directive
This product is in conformity with the protection requirements of EU Council Directive
2004/108/EC on the approximation of the laws of the Member States relating to electromagnetic
compatibility. This product has been tested and found to comply with the limits for Class A
Information Technology Equipment according to European Standard EN 55022. Warning: This
equipment is compliant with Class A of CISPR 32. In a residential environment this equipment
may cause radio interference.
Visit us at:
http://diffractionlimited.com
and
http://forum.diffractionlimited.com/
Diffraction Limited
59 Grenfell Crescent, Unit B, Ottawa, ON Canada, K2G 0G3
Telephone: 613-225-2732
Fax: 613-225-9688
© 2019 Diffraction Limited. All rights reserved. Cyanogen Imaging® and SBIG® are registered
trademarks of Diffraction Limited. ST-4, STF, MaxIm DL, MaxIm LT are trademarks of Diffraction
Limited. ON Semiconductor, product, and service names profiled herein are trademarks of
Semiconductor Components Industries, L.L.C. Windows is a registered trademark of Microsoft
Corporation. Macintosh is a registered trademark of Apple Corporation. The Linux trademark is
owned by Linus Torvalds. Ubuntu and Canonical are registered trademarks of Canonical Ltd.
ACP is a trademark of DC-3 Dreams, SP. All other trademarks, service marks, and trade names
appearing in this guide are the property of their respective owners.
Page 3

DIFFRACTION LIMITED
3
SBIG StarChaser SC-2 User’s Manual
Table of Contents
1 - The SBIG StarChaser SC-2 Guider ................................................................... 4
2 – Supplied components ....................................................................................... 6
3 – Installing the software ...................................................................................... 7
3.1 System requirements .................................................................................................. 7
3.2 Windows installation ................................................................................................. 7
3.3 MacOS and Linux Drivers .......................................................................................... 8
3.4 Software Development Kit ......................................................................................... 8
4 – Installing the StarChaser SC-2 hardware ........................................................ 9
5 – Setting up the StarChaser SC-2 ..................................................................... 11
5.1 Configuration and connection ................................................................................. 11
5.2 Pick-off mirror adjustment and focusing ................................................................ 16
6 – Installing an AO-8A Adaptive Optics Unit ..................................................... 18
7 – Maintenance .................................................................................................... 21
8 – Specifications .................................................................................................. 22
Page 4
DIFFRACTION LIMITED
4
1 – The SBIG StarChaser SC-2 Guider
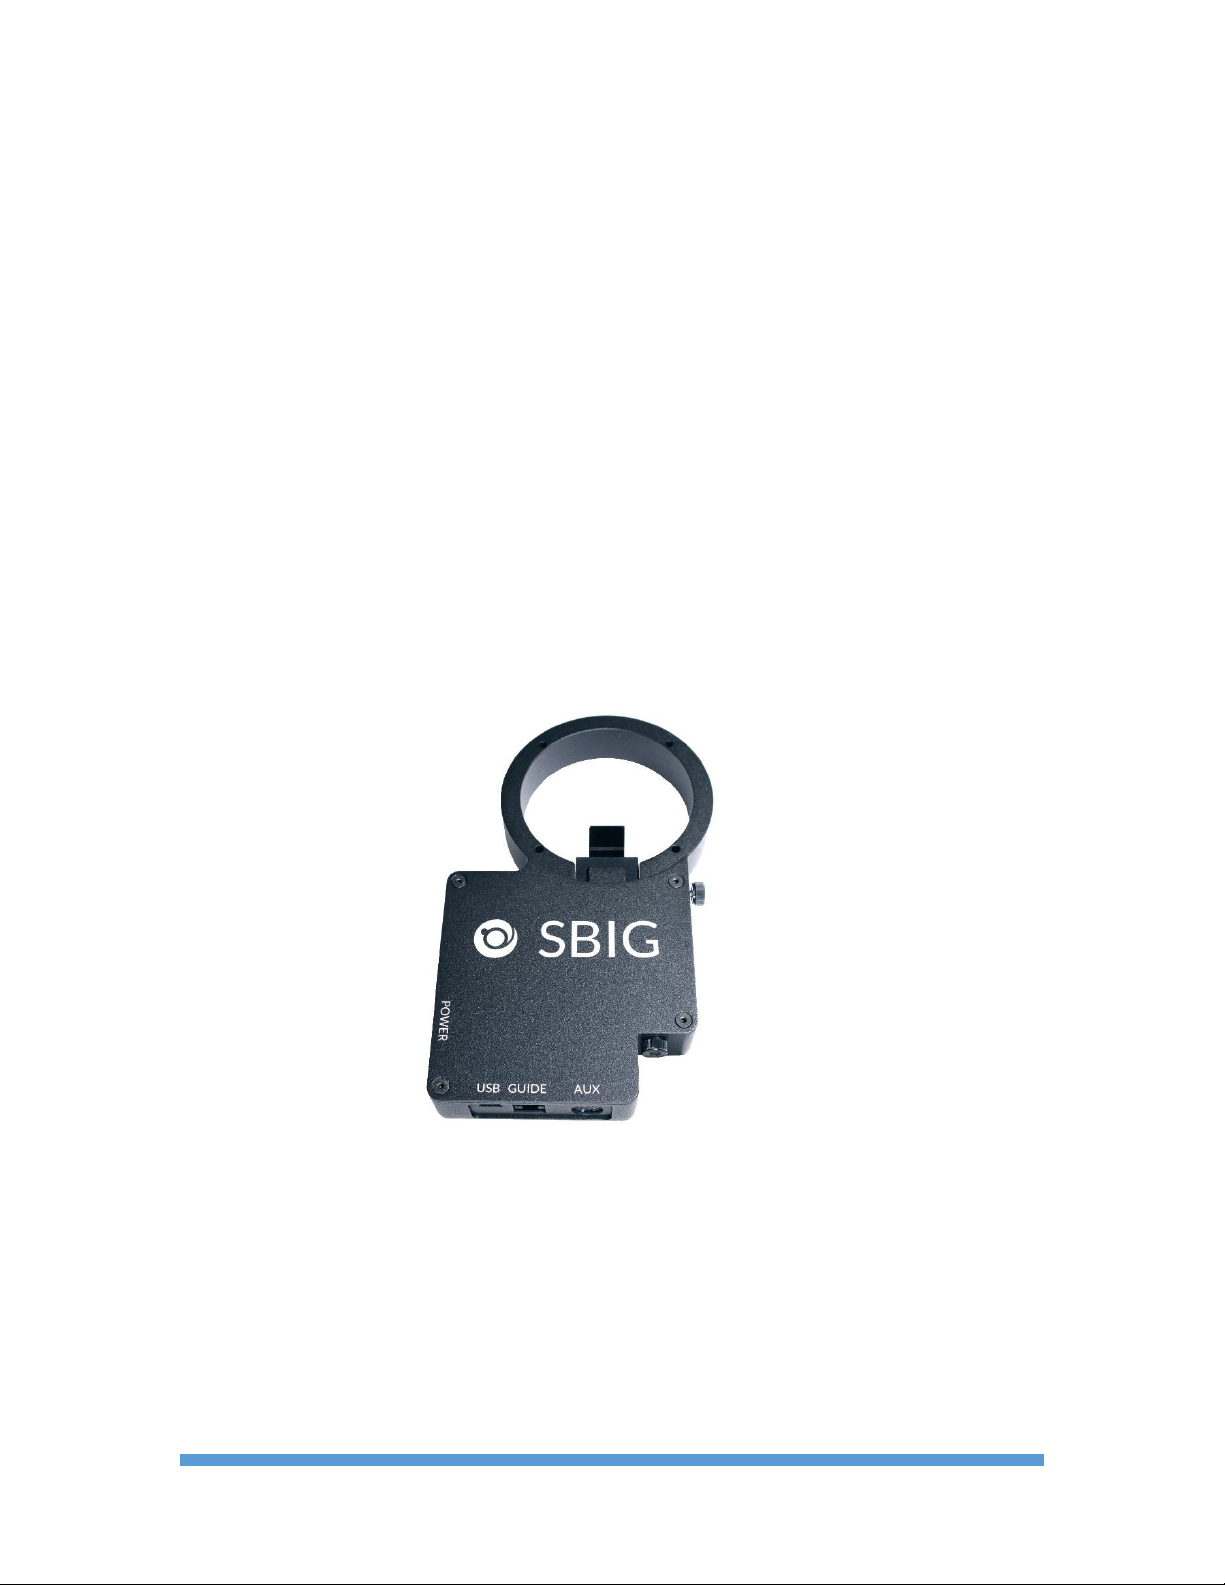
Diffraction Limited's SBIG StarChaser SC-2 is the world's first all-in-one
independent off-axis guiding camera with adaptive optics support. The
StarChaser SC-2 operates independently of the main camera. It combines a
pick-off mirror, guider camera, guide port and adaptive optics control. Off-axis
guiding eliminates the problem of flexure between the imaging camera and a
separately mounted guider by using the same optical path for both the main
camera and the guider.
The StarChaser works with the STF and Aluma series cameras and filter
wheels, as well as the FW8S-STT filter wheel for STT cameras. The StarChaser
SC-2 acts both as an off-axis guider and a controller for the optional AO-8A
Adaptive Optics Unit.
Most off-axis guider assemblies are awkward to use, consume too much back
focus, and require you to focus by sliding a camera in and out of an eyepiece
holder. SBIG pioneered simplified off-axis guiding, with guide sensors built into
CCD cameras. Later, we created the self-guiding filter wheel, placing the guide
sensor in the light path, ahead of photon-robbing narrowband filters.
Next Generation Off-Axis Guiding
The StarChaser represents our next generation of off-axis guiding technology.
The SC-2 attaches to the front of your filter wheel and adds only 0.8" (20.3 mm)
of back focus distance and it weighs only 0.6 lb (273 g). It features a high-
sensitivity 1.3 megapixel Global Shutter CMOS sensor with 4.8 micron pixels.
Unlike competing autoguiders, the StarChaser has a mechanical shutter for
easy dark frame correction. This feature, standard on all SBIG guiders,
optimizes sensitivity and eliminates hot pixels that can degrade guiding
accuracy.
Page 5

DIFFRACTION LIMITED
5
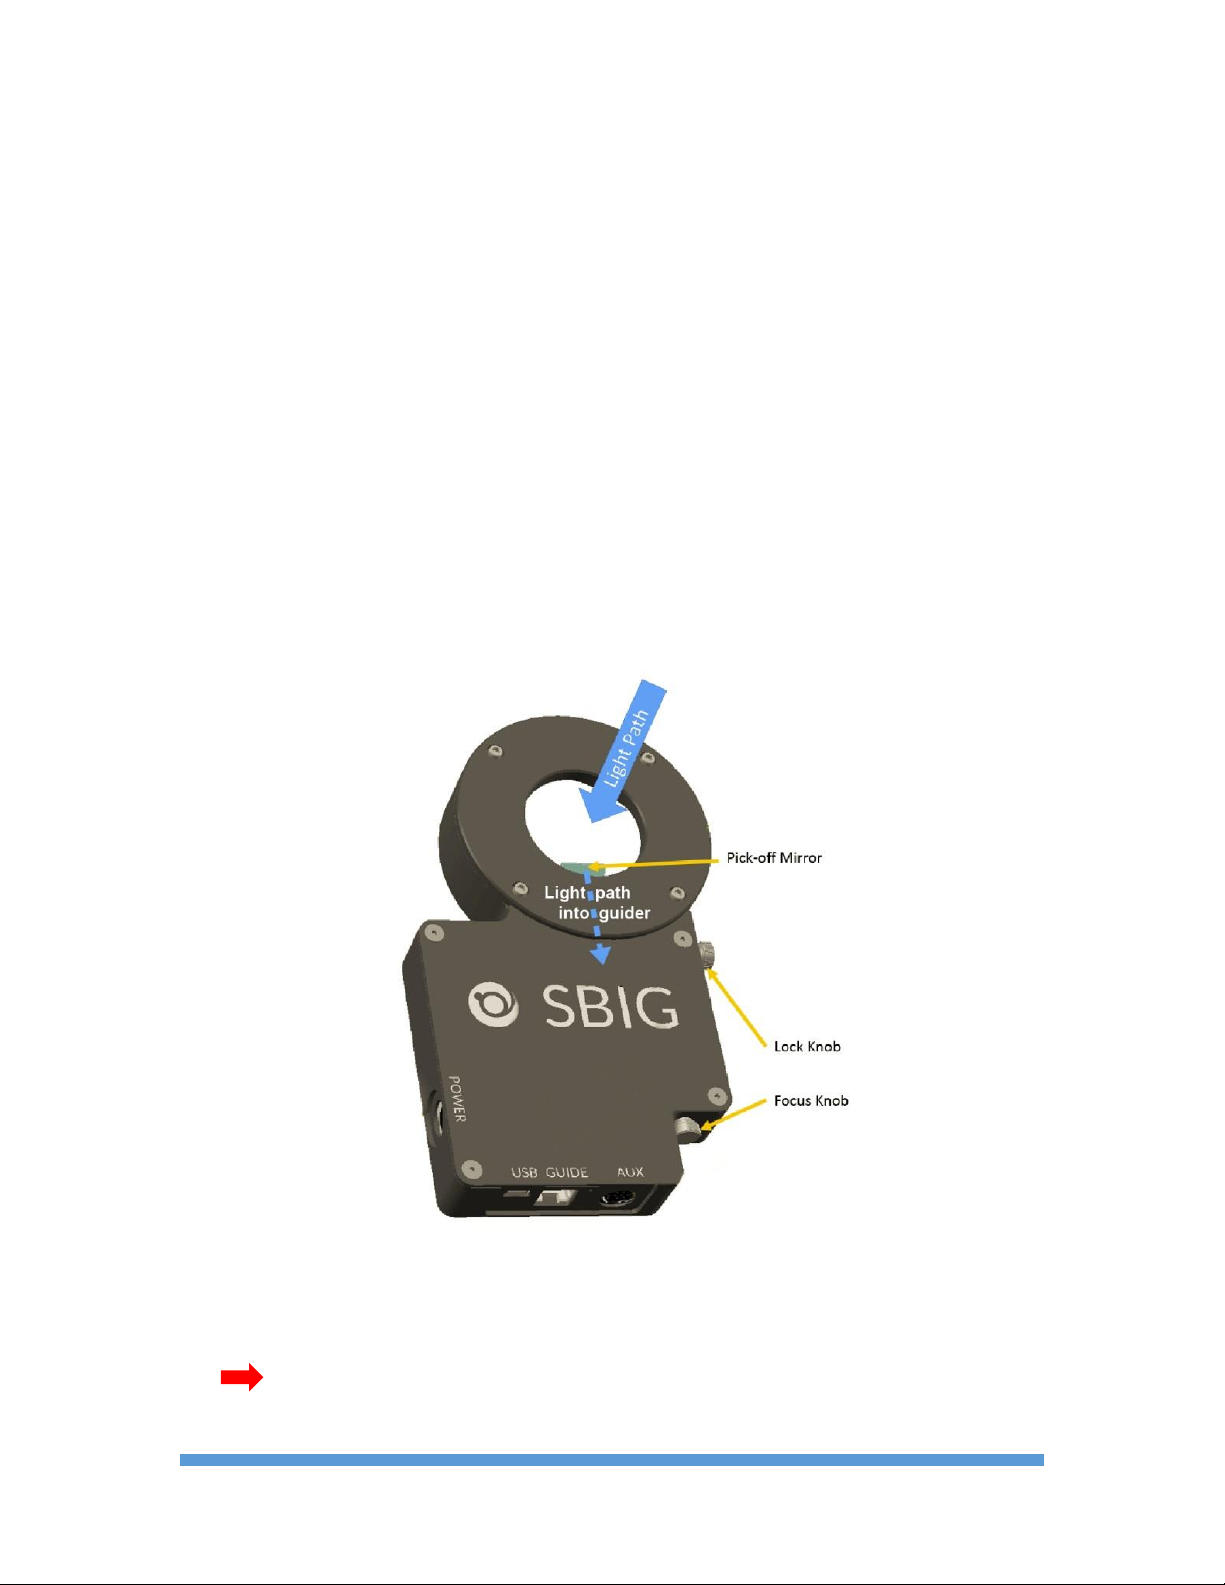
The pick-off mirror position is adjustable by loosening a locking knob and
sliding the mirror into or out of the housing. This allows you to avoid vignetting
the main sensor while optimizing the light path into the guide sensor. Once that
is set, focus is adjusted simply by turning a second knob.
Adaptive Optics Control
Thanks to the SBIG StarChaser, our renowned Adaptive Optics (AO) technology
is now available for virtually our entire camera line! Our AO-8A bolts onto the
front of the StarChaser, which in turn is attached to your SBIG standard filter
wheel and camera. Adaptive optics technology eliminates guiding errors caused
by common mount problems such as stiction, periodic error, and wind loads.
It can even reduce "slow seeing" effects resulting in higher resolution images.
Supports Your SBIG Investment
Our renowned MaxIm LT software is included with your purchase, providing
integrated control of your StarChaser and SBIG main camera. We also provide
API interfaces for third-party software running under Windows, MacOS, or
Linux. An ASCOM standard camera interface is also included. Note however
that ASCOM does not currently support adaptive optics.
Supported SBIG cameras include the STF-8300, STF-8050, STF-3200, STF1603, STF-4070, ALUMA 47-10, ALUMA 77-00, ALUMA 8300, ALUMA 3200,
ALUMA 814 and ALUMA 694. The SC-2 attaches to the FW8-8300 or FW8SALUMA filter wheel. You can also attach it directly to the front of the camera if
you wish, by using an available filter wheel spacer. It is also compatible with
older SBIG STT equipment.
All cameras supported by the SC-2 can now be used with our AO-8A Adaptive
Optics unit. This brings AO capability to our STF camera line for the first time.
The StarChaser SC-2 connects directly to our AO-8A Adaptive Optics unit. All
guiding and AO operations take place independently of the main camera.
On the telescope side, the SC-2 uses the same adapter plates that are used on
our FW8-8300 and FW8S-Aluma filter wheels. This includes "STL" thread,
"Small SCT" thread, T-thread, M48x0.75, and of course, 2" nosepiece interfaces.
The SC-2 requires only a +12V power supply (included) and a USB 2.0 mini
cable (6 foot / 2 meter cable included). The SC-2 can send guider commands to
the telescope either via ASCOM PulseGuide or the included ST-4 style guide
cable.
Page 6

DIFFRACTION LIMITED
6
2 – Supplied components
Observe proper handling procedures for sensitive electronic equipment and
unpack your StarChaser and accessories carefully in a clean, dry, static-free
area. Inspect the contents to ensure all components are present and in good
order. You should find the following:
StarChaser SC-2 Off-Axis Guiding Camera
Power supply:
o Universal +12V (60014A)
o Power cable with US plug (51089), European plug (50392), or
Australia/New Zealand plug (50390) (type specified on ordering)
o Power extension cable (68007)
ST-4 style guider-to-telescope mount interface cable (TIC) RJ12-RJ12.
NOTE: This cable has its pin connections flipped from one end to the
other – they are not straight-through connections.
USB 2.0 A to Mini-B cable, 6 feet (2 meters)
Four 4-40 x 1-inch socket head cap screws
7/64-inch hex key wrench
Flat adapter plate 2.156 x 24 (40-12053-00)
2” Nosepiece adapter with cap (40-12121-00)
USB flash drive
Page 7

DIFFRACTION LIMITED
7
3 – Installing the software
The MaxIm LT imaging application supplied with your SBIG StarChaser allows
you to operate it using a Windows computer. The application is found on the
flash drive included with your camera. Drivers (excluding application software)
are also provided for the Mac and Linux operating systems.
3.1 System requirements
The following hardware and software is required for MaxIm LT:
MS Windows (applicable versions: 7, 8, 8.1, 10)
Recommended minimum memory size: 1 GB or larger.
Processing larger images or opening multiple images simultaneously will
require correspondingly more memory. 2 GB memory is recommended for
processing large arrays, including images larger than 6 megapixels.
Disk space: 100 MB for program installation
Video display: 1024x768, 16-bit color or higher
Mouse
Internet browser
3.2 Windows installation
1. Proceed to step 8 if you are an SBIG camera owner who already has MaxIm
DL Pro or MaxIm LT installed.
2. Go to the Registration page on the Diffraction Limited website at:
https://diffractionlimited.com/maxim-lt-registration
3. Enter the requested information and serial number to register the MaxIm LT
application. Use your camera’s serial number for this. You will then
automatically be emailed a license key.
4. Insert the supplied USB flash drive into an available USB port on your
computer.
5. Open Windows Explorer and navigate to the DL Imaging Driver (Aluma)
folder on the flash drive.
6. Double-click Launcher.exe, then choose Install MaxIm DL. This applies
whether you are installing the included MaxIm LT application or a licensed
version of the fully-featured MaxIm DL program.
7. Follow the on-screen instructions and enter the license key you received
when prompted.
NOTE 1:
To enter your license key properly, you must select all the text from the
email you receive and copy it to the clipboard. You then start MaxIm LT and
open the Enter License dialog. The license key will be entered automatically
– there is no need to paste it since MaxIm LT finds it on the clipboard and
pastes it for you.
Page 8

DIFFRACTION LIMITED
8
NOTE 2:
The required USB drivers are available through Windows Update. The
drivers will automatically be downloaded when the device is plugged in and
if an internet connection is present. For computers with no internet
connection, the drivers are located on the supplied USB flash drive in the DL
Imaging Driver (Aluma) folder. Browse to this folder when prompted during
the installation.
8. StarChaser uses the DL Imaging driver package. Download the latest drivers
and camera configuration utility from the Diffraction Limited website at:
https://diffractionlimited.com/down/SetupDLAPI.exe
9. When the download is complete, open Windows Explorer and navigate to
your Downloads folder, then double-click the SetupDLAPI.exe file. Follow
the on-screen instructions to install the DL Config Utility application.
10. When the installation is complete, an entry named DL Config Utility will
appear on the Start menu under the DL Config folder icon.
NOTE:
In addition to being a standalone program, this utility is also accessible from
within MaxIm LT.
Click OK to finish.
11. Proceed to section 4 – Installing the StarChaser SC-2 hardware to install the
guider.
3.3 MacOS and Linux Drivers
Drivers for the Mac and Linux operating systems are available by request.
Please post your request in our Support forum, ALUMA section at:
https://forum.diffractionlimited.com/forums/aluma-series.49
3.4 Software Development Kit
A software development kit for all DL Imaging cameras is available by request.
Please post your request in our Support forum, ALUMA section at:
https://forum.diffractionlimited.com/forums/aluma-series.49
Page 9

DIFFRACTION LIMITED
9
4 – Installing the StarChaser SC-2 hardware
This procedure presumes that you have either an FW8S-ALUMA, FW8-8300, or
FW8S-STT Filter Wheel and accessory mounting ring plate currently installed
on your imaging camera. An FW8S-ALUMA filter wheel is shown in the following
photographs for illustrative purposes. However, the procedure for mounting a
StarChaser to any of these filter wheels is identical.
If you are installing a new filter wheel along with your StarChaser, follow the
instructions in your camera user manual to install the wheel before installing
the StarChaser.
NOTE:
If you want to attach the StarChaser SC-2 or other accessory directly to the
camera in place of a filter wheel, you can purchase a Filter Wheel Spacer from
Diffraction Limited.
If you are also installing an AO-8A Adaptive Optics unit, then complete the
entire procedure in this section first, followed by the procedure in
5.1 Configuration and connection, and then steps 1 to 9 in procedure
5.2 Pick-off mirror adjustment and focusing. You can then proceed to section
6 – Installing an AO-8A Adaptive Optics Unit.
If you currently have an AO unit installed with your camera and filter wheel,
this must be removed from your filter wheel before installing the StarChaser.
1. Carefully remove the StarChaser guider and other components from their
packaging. Retain the packaging materials for future use, if ever required.
2. Place your imaging camera and filter wheel assembly on a clean flat surface,
with the telescope opening facing upwards.
3. Ensure that the power into the camera is disconnected.
CAUTION:
Never “hot plug” cables into or from units. This is especially important
for AUX and I2C connectors. Always disconnect power before
connecting or disconnecting accessories or cables.
4. Remove the four 4-40 x 1-inch screws that fasten the accessory mounting
ring plate to the front of the filter wheel. Set the accessory mounting ring
plate aside.
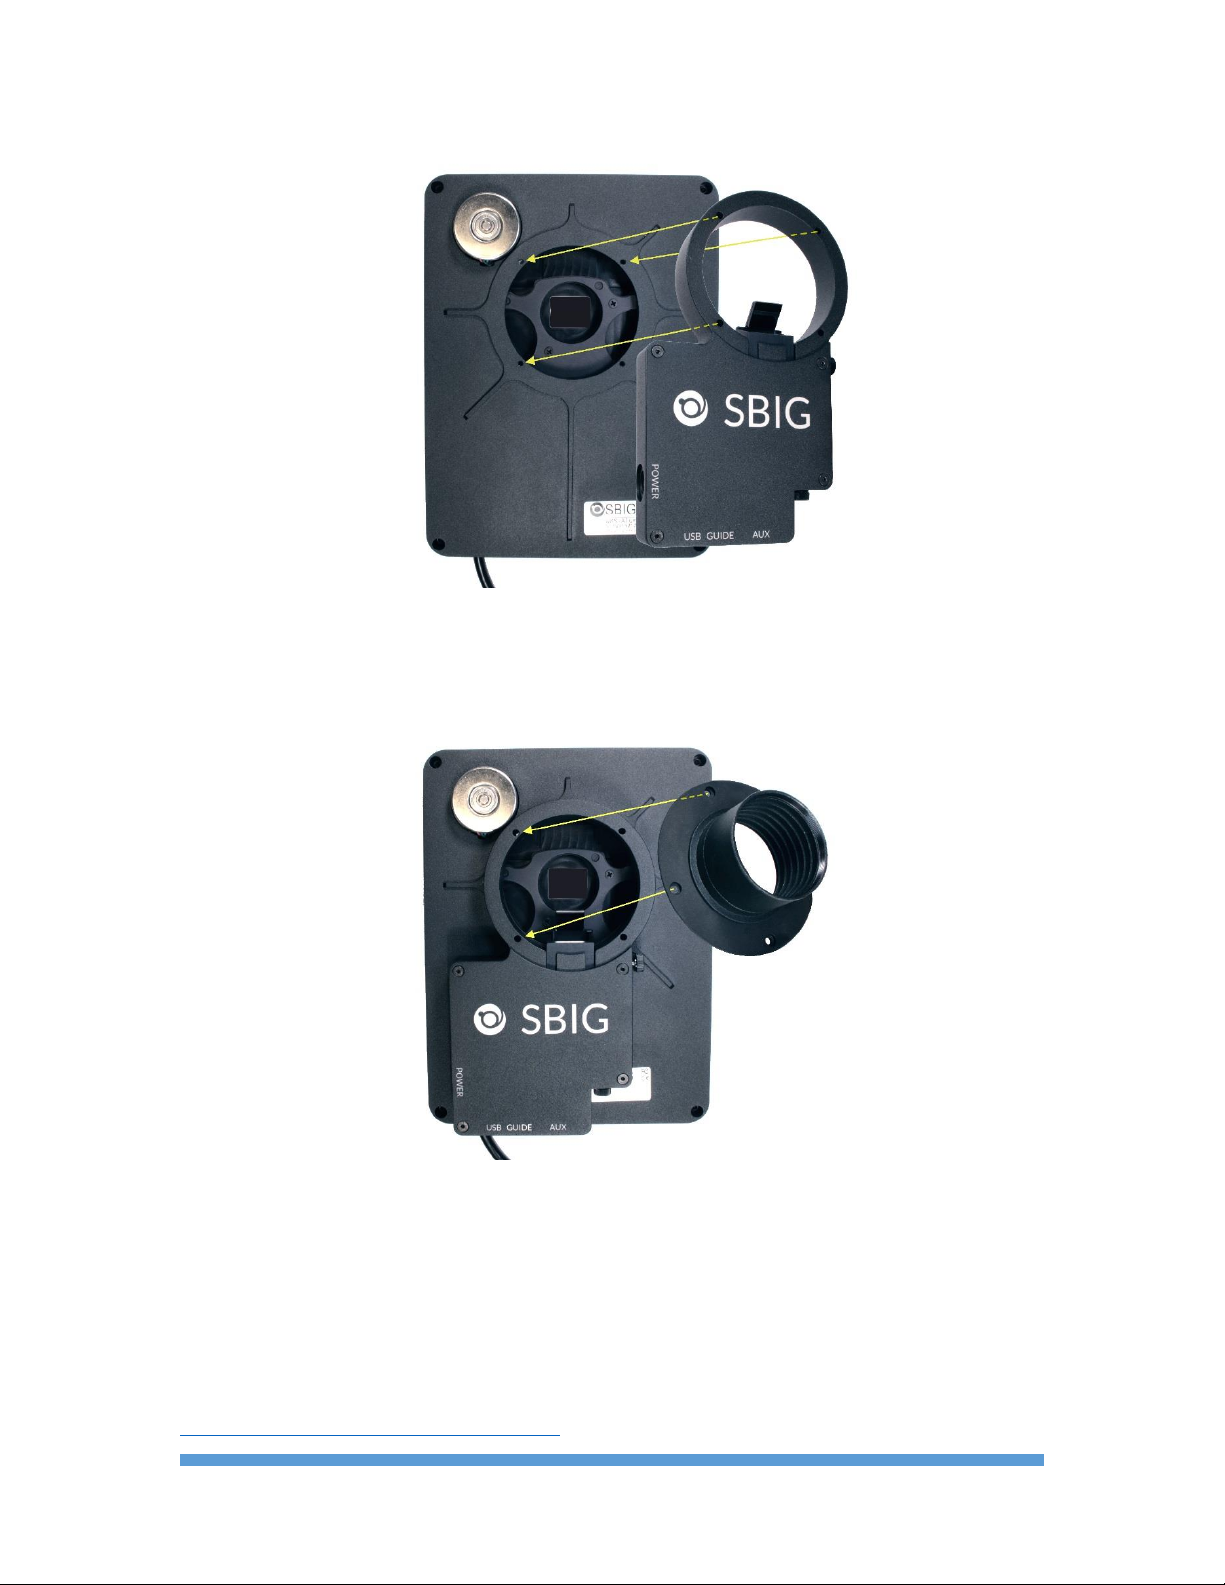
5. Place the StarChaser onto the filter wheel, with the silkscreened SBIG logo
facing away from the filter wheel. Align the four screw holes of the guider
with those on the filter wheel. Note the orientation of the StarChaser and
filter wheel.
Page 10
DIFFRACTION LIMITED
10
6. Attach the supplied 2” nosepiece to the supplied flat plate adapter.
7. Place the flat plate adapter and nosepiece over the StarChaser and align the
four mounting holes with those on the guider.
8. Insert the four 4-40 x 1-inch screws that you removed in step 4 in through
9. Thread and tighten the four screws into the filter wheel.
The StarChaser is now ready to be configured and adjusted. Proceed to section
5 – Setting up the StarChaser SC-2.
the top of the flat plate adapter. We recommend using the supplied 2.156"
adapter plate and the included nosepiece, as the larger aperture reduces the
chance of vignetting the guide camera. You can optionally use the original Tthread adapter plate instead.
Page 11
DIFFRACTION LIMITED
11
5 – Setting up the StarChaser SC-2
The SBIG StarChaser includes the MaxIm LT application, and this section
describes how to set up the guider with that software. MaxIm LT allows full
configuration and control of the SBIG StarChaser SC-2.
This procedure details the basic steps to configure and adjust the StarChaser to
get it ready for autoguiding. Click on Help Topics or PDF Manual under the
program’s Help menu for detailed information on performing autoguiding,
parameter descriptions, and for various tutorials. Please note however that
since MaxIm LT and MaxIm DL Pro both share the same PDF Manual and Help
files, not all of the program features detailed in those files will be enabled in
MaxIm LT. Full program feature access requires MaxIm DL Pro.
5.1 Configuration and connection
1. Loosen the LOCK knob on the side of the SC-2 guider assembly by turning it
counter clockwise.
2. Start with the pick-off mirror fully extended into the optical axis. You can
move the mirror outwards into this position by simply tilting the unit.
Tighten the LOCK knob by turning it clockwise.
CAUTION:
Do not touch the reflective surface of the mirror.
Page 12
DIFFRACTION LIMITED
12
For most optical systems this will provide an unvignetted view. However, for
very fast optical systems there is a possibility of vignetting. A test for
vignetting is provided following this connection procedure.
3. Mount the camera+filter wheel+StarChaser equipment assembly onto your
telescope.
4. Attach your camera and filter wheel cables in their usual manner and then
power the units up.
5. Connect the supplied USB cable between the StarChaser’s USB port and
your computer.
6. If you plan to use the supplied ST-4 telescope mount interface cable to send
autoguider commands to the telescope mount, connect the cable between
the StarChaser's GUIDE port and the telescope mount's guider port. If your
telescope mount has an ASCOM driver that supports "Pulse Guide" then you
can alternatively send the autoguider commands through that interface.
Additional information is provided in step 10 below.
7. Connect the StarChaser’s power supply to the POWER port and apply
power.
8. Launch MaxIm LT to connect to and configure the main camera, filter wheel,
and guider.
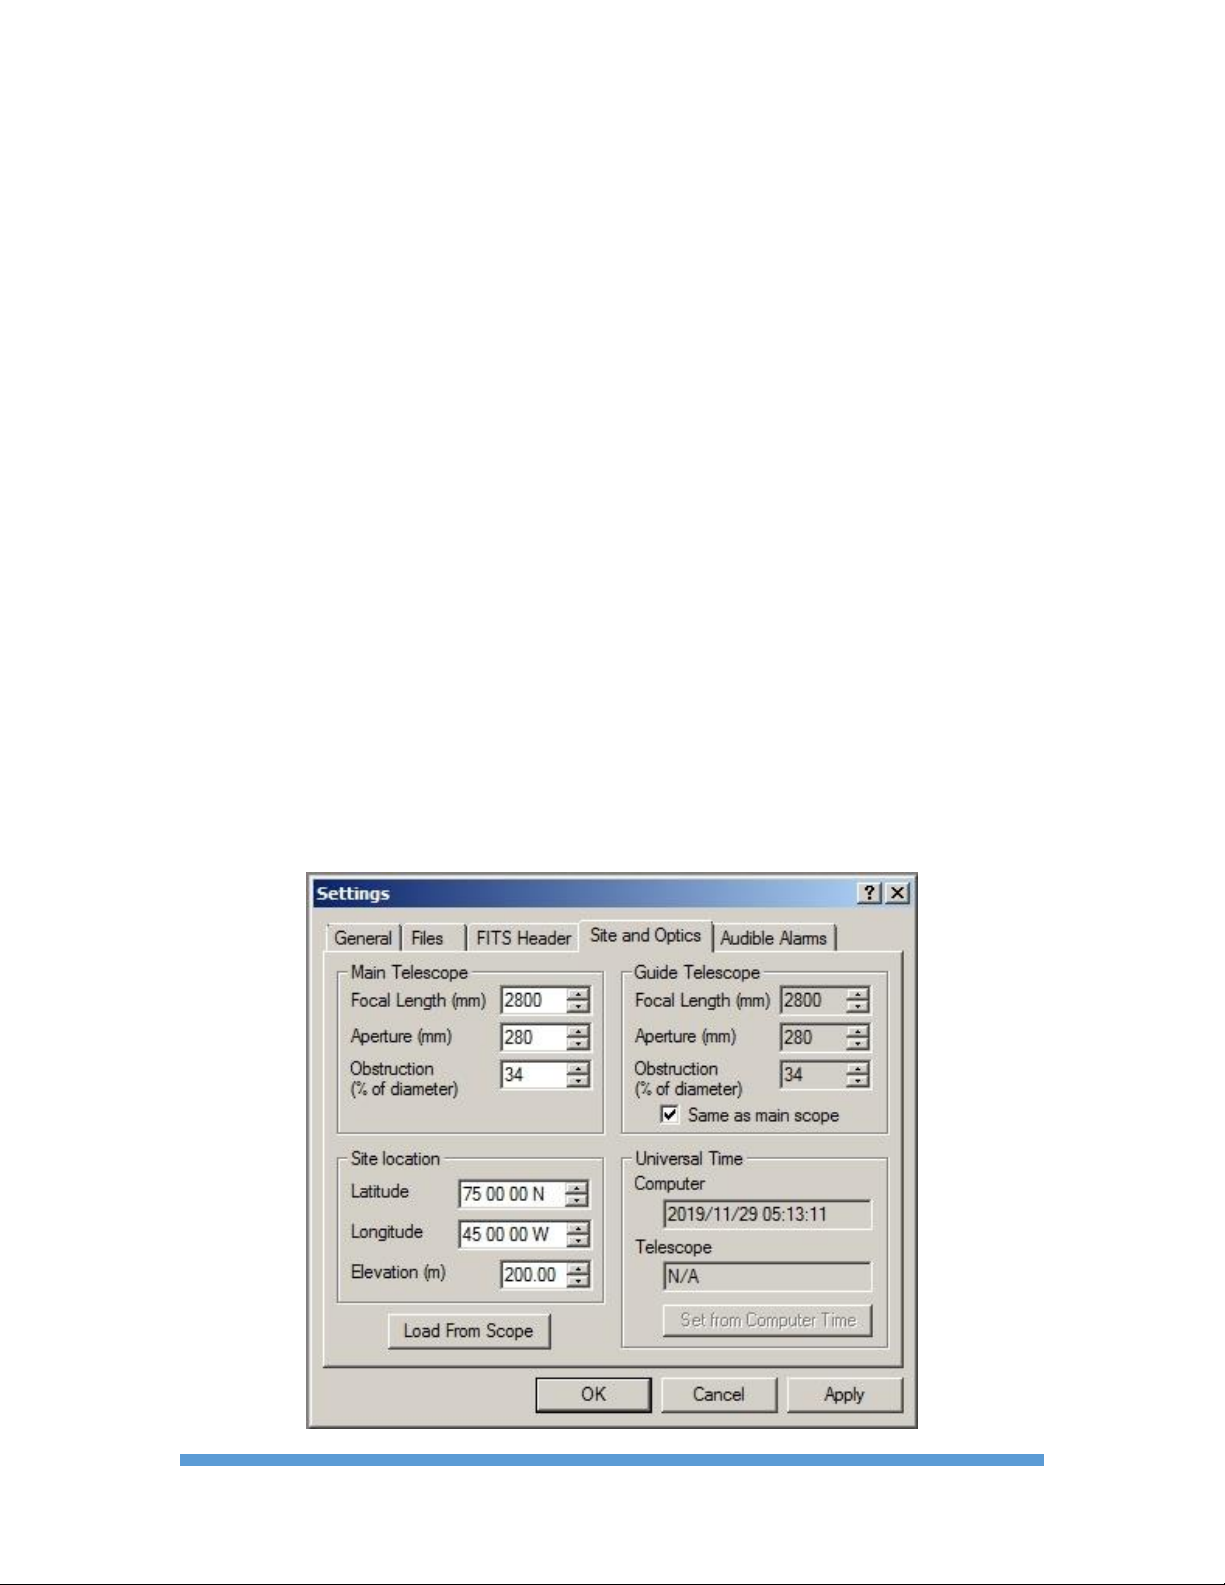
9. Click the Settings item under the main File menu. In the Settings window
click the Site and Optics tab and enable the Same as main scope checkbox in
the Guide Telescope block. Click OK to finish.
Page 13
DIFFRACTION LIMITED
13
10. You have several options for sending the autoguider commands from the
StarChaser to your telescope mount. If you connected the ST-4 style
telescope mount interface cable in step 6, commands can be sent directly
from the StarChaser to the mount. Alternatively if your telescope has an
ASCOM standard driver for computer control via USB, serial port, or other
means, then you do not need to connect that cable.
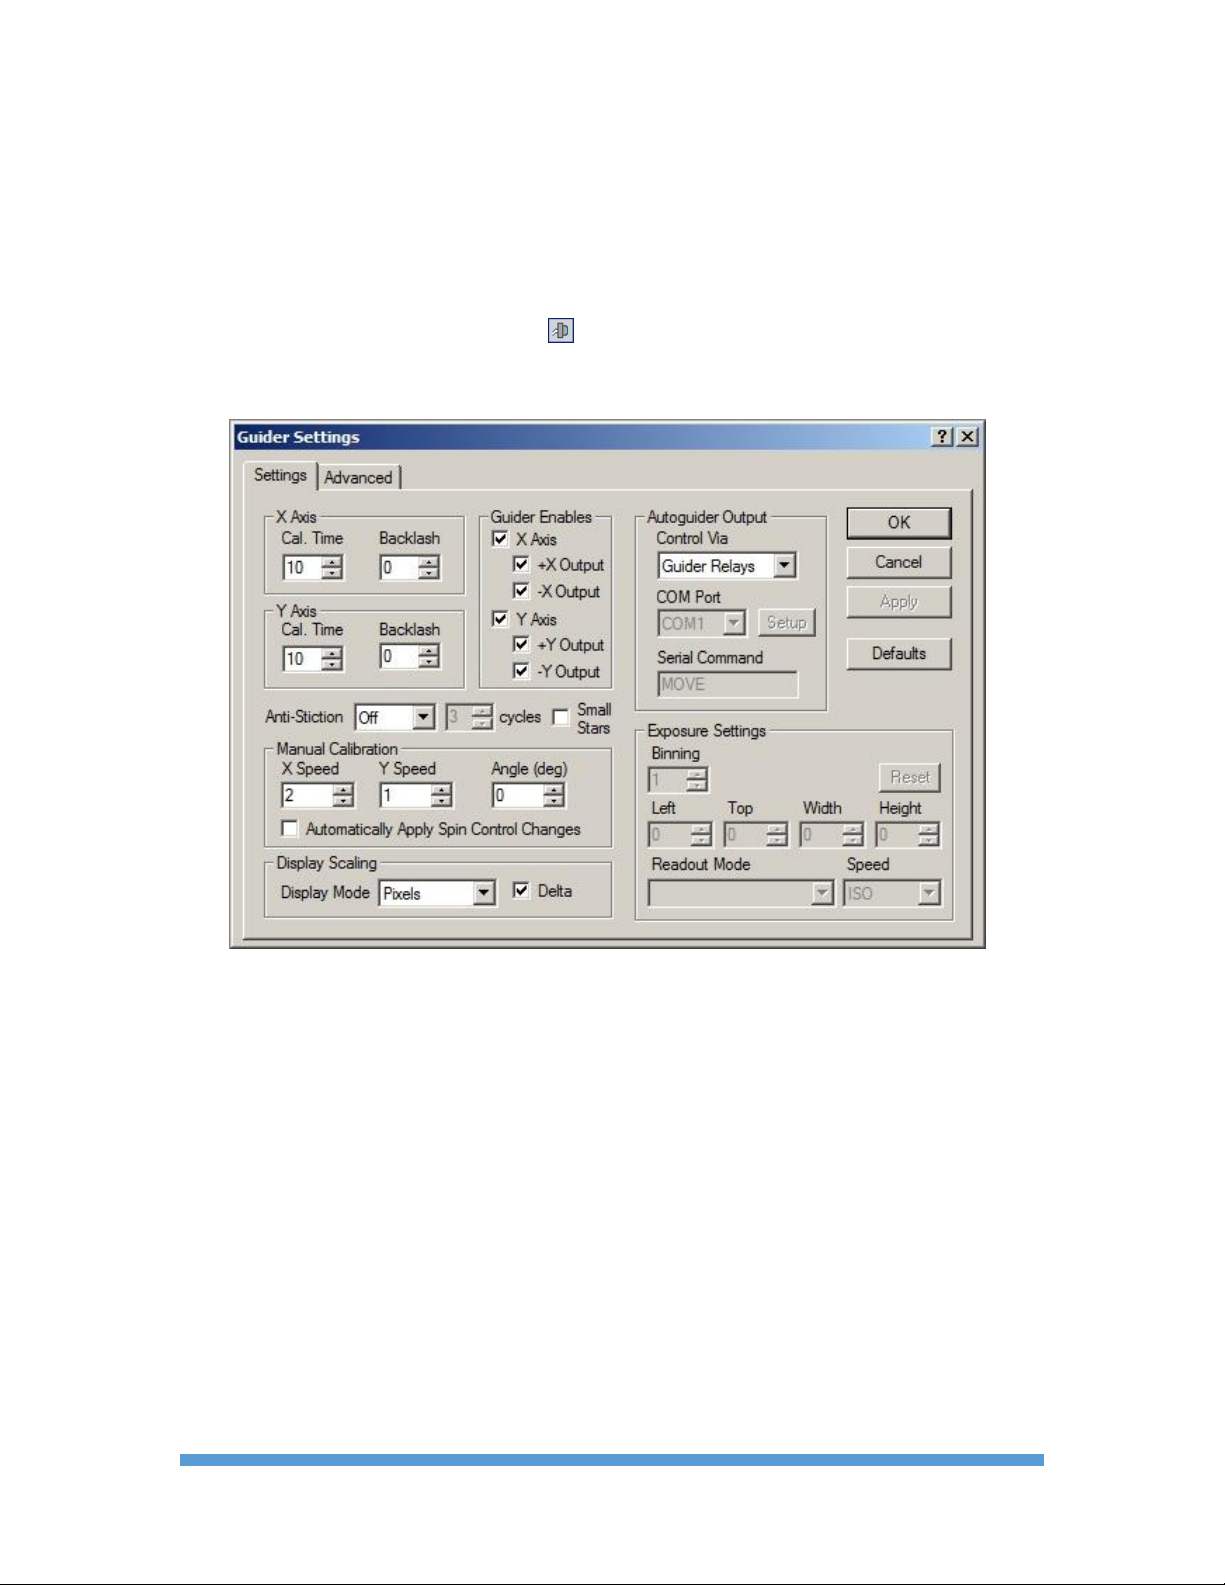
Click the Camera Control icon to open the Camera Control window and
then click the Guide tab. Click the Settings button to open the Guider
Settings form.
Set the Autoguider Output Control Via drop-down menu to your preferred
method:
To send commands directly from the StarChaser to the mount via the
ST-4 telescope mount interface cable, select Guider Relays.
If you are using MaxIm DL Pro to control the telescope mount via the
Observatory Control window and ASCOM driver, then select Telescope.
This allows you to use a single cable to control the mount and send
autoguider commands, and so the ST-4 cable is not necessary.
If you are using MaxIm LT then the Observatory Control window is not
available. In this case, select ASCOM Direct and click the Setup button to
configure your ASCOM driver. Note that this method is also recommended
for MaxIm DL Pro if you are using the DC-3 Dreams ACP Observatory
Control software to control the telescope. The ST-4 cable is not necessary
for this option either.
Choose your desired method and then click OK to finish.
Page 14
DIFFRACTION LIMITED
14
11. Click the Setup tab in the Camera Control window.
If you are configuring an ALUMA imaging camera with the StarChaser
then go to step 12.
If you are configuring an STF, STT, STX, or STXL imaging camera with
the StarChaser then go to step 13.
12. For ALUMA imaging cameras with the StarChaser:
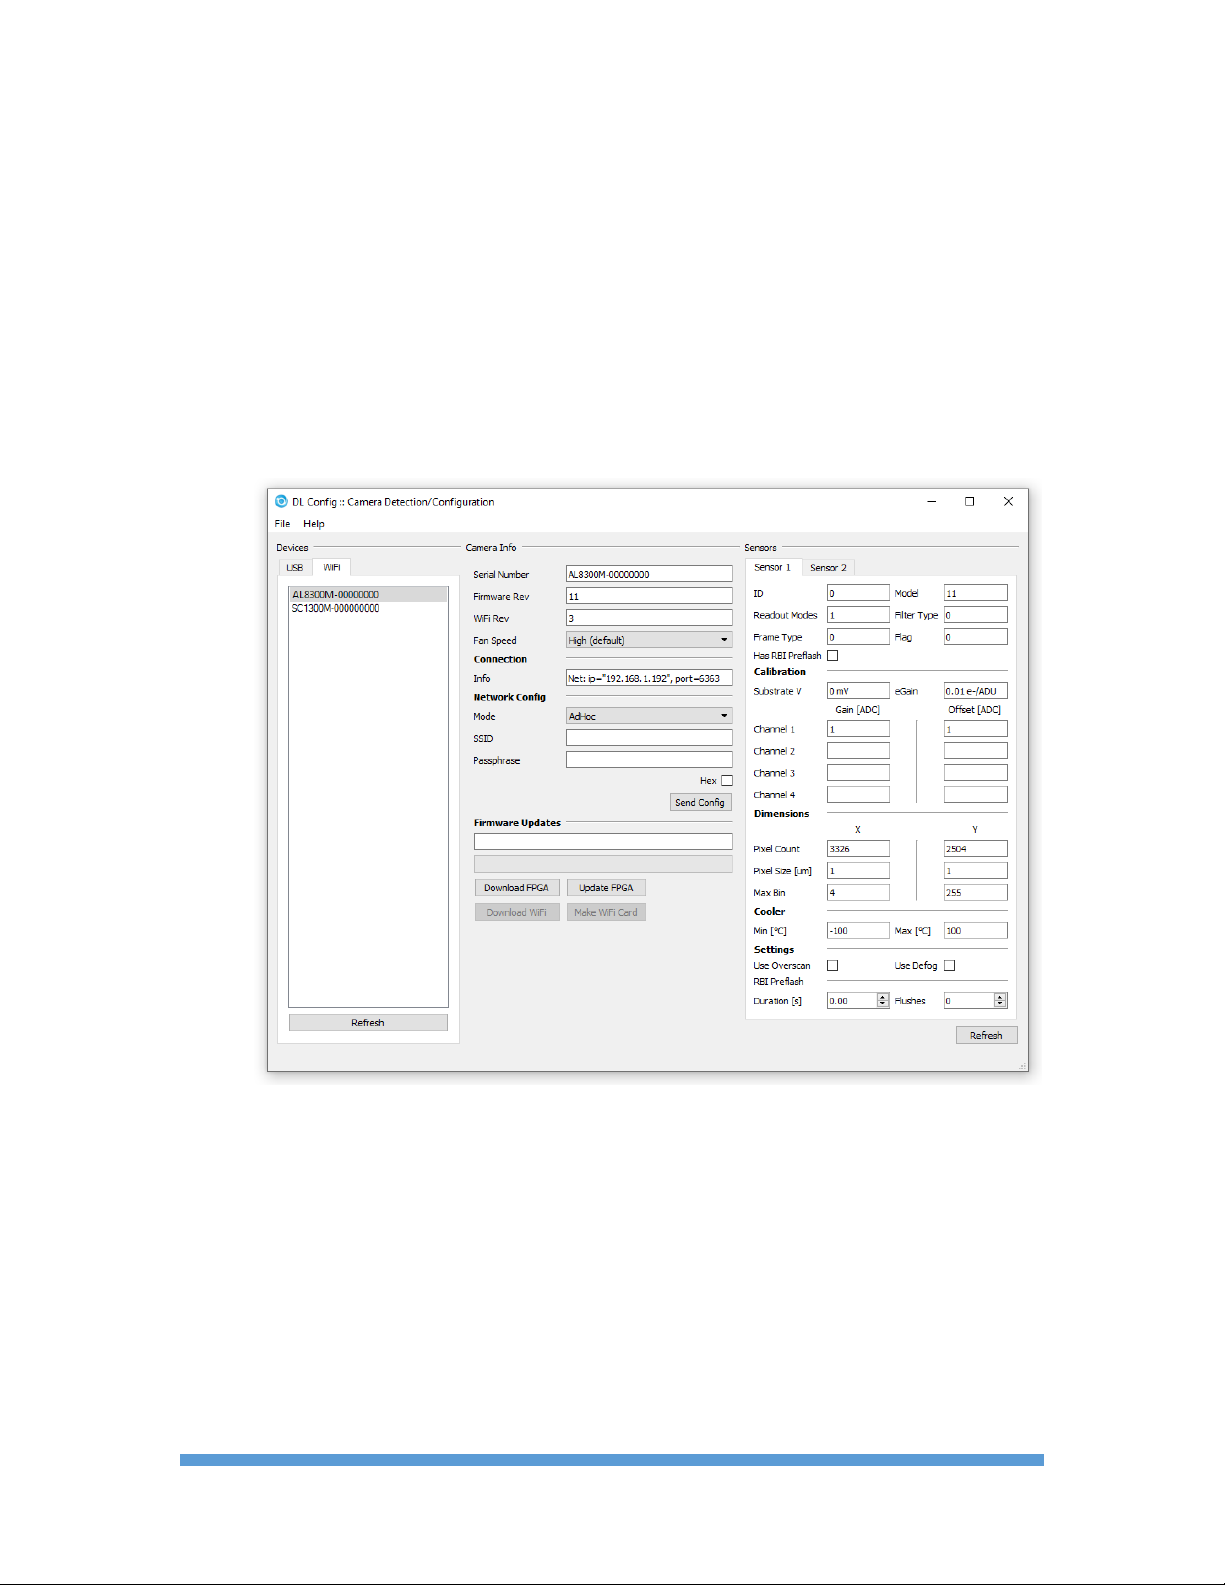
a. Set up the main imaging camera under Camera 1 as DL Imaging and
click the Advanced button. The DL Config form opens. This form allows
you to check camera parameters and also to perform firmware updates
and additional camera configuration.
b. Select your camera from the Devices list. Various camera parameters will
auto-populate the display fields under the Sensor 1 tab. Use the default
values and close the form.
c. Back in the Camera Control window, ensure that the Dual Chip Mode
checkbox is not selected.
d. Click the Setup Filter button under Camera 1 and set the Filter or
Controlling Camera Model parameter to DL Imaging+FW.
e. Configure your filter positions, names, and focus offsets as desired in the
list. Click the OK button to accept your settings and close the form.
f. Configure the StarChaser under Camera 2. Click the Setup Camera
button and select DL Imaging as the Camera Model.
Page 15

DIFFRACTION LIMITED
15
g. If you will be using an adaptive optics unit, select Sensor 2 from the AO
drop-down menu. Otherwise select Off.
h. Press the Advanced button to open the DL Config form.
i. Select the StarChaser from the Devices list. Various parameters will
auto-populate the display fields. Use the default values and close the
form.
j. Back in the Camera Control window, click the Connect button. This
connects your main imaging camera and the StarChaser.
k. Proceed to 5.2 Pick-off mirror adjustment and focusing.
13. For STF, STT, STX, or STXL imaging cameras with the StarChaser:
a. Set up the main imaging camera under Camera 1. Select SBIG Universal
from the Camera Model dropdown menu and USB from the Connect To
menu, then click OK to accept your settings and close the form.
b. Back in the Camera Control window, ensure that the Dual Chip Mode
checkbox is not selected.
c. Click the Setup Filter button under Camera 1 and set the Filter or
Controlling Camera Model parameter to SBIG Universal.
d. Configure your filter positions, names, and focus offsets as desired in the
list. Click the OK button to accept your settings and close the form.
e. Configure the StarChaser under Camera 2. Click the Setup Camera
button and select DL Imaging as the Camera Model.
f. If you will be using an adaptive optics unit, select Sensor 2 from the AO
drop-down menu. Otherwise select Off.
g. Press the Advanced button to open the DL Config form.
h. Select the StarChaser from the Devices list. Various parameters will
auto-populate the display fields. Use the default values and close the
form.
i. Back in the Camera Control window, press the Connect button. This
connects your main imaging camera and the StarChaser.
j. Proceed to 5.2 Pick-off mirror adjustment and focusing.
Page 16

DIFFRACTION LIMITED
16
5.2 Pick-off mirror adjustment and focusing
Prior to using the StarChaser for autoguiding, the position of the pick-off mirror
may need to be adjusted to eliminate or minimize any possible vignetting in
your optical system. Perform the following procedure to determine if you need to
make an adjustment for use in your system. This should be done prior to
installing an adaptive optics unit, if applicable.
1. Point the telescope at a nearby wall or flat field screen illuminated by
ambient light or artificial light of some kind. Total darkness is not
necessary.
2. Click the Expose tab in the Camera Control window and enable the
Camera 1 radio button. Start the main camera in Continuous mode, with an
exposure duration adequate to get a uniform but not saturated field. A
count level of 5,000 to 50,000 should be fine. Use the Information window
to view the pixel values in the images.
3. If you see a shadow on one side of the camera’s image, this is the shadow of
the guider mirror vignetting the camera’s CCD. Since this is undesirable, it
requires adjustment. The amount of adjustment varies with the telescope
design and focal ratio. The goal of this adjustment is to get the mirror as far
into the field of view as possible without vignetting the main imager. If you
do not see a shadow, proceed to step 9.
4. Disconnect the units in MaxIm LT, power them down, and remove the
equipment assembly from the telescope. Place it on a flat surface with the
telescope side facing up. A flat surface is required here, otherwise the pickoff mirror may shift position on its own when you loosen the LOCK knob in
the next step.
5. Loosen the LOCK knob on the side of the SC-2 guider assembly by turning it
counter clockwise.
6. Push the pick-off mirror downwards into the guider body by a small amount
- the entire range of motion for the pick-off mirror is only about ¼-inch
(6 mm). Move the mirror by gently grasping its sides and sliding it down.
CAUTION:
Do not touch the reflective surface of the mirror.
Tighten the LOCK knob by turning it clockwise.
7. Reinstall the equipment assembly onto the telescope, power the units back
up, and reconnect to them in MaxIm LT. Repeat steps 2 and 3.
8. If vignetting is still present, repeat steps 4 to 7 until the vignetting is
removed or minimized. Otherwise, proceed to step 9.
Once the pick-off mirror has been properly positioned, it should only require
re-adjustment if you mount your camera assembly on another telescope
type or otherwise change your optical configuration.
Page 17

DIFFRACTION LIMITED
17
9. If you are installing an adaptive optics unit, then proceed to section
6 – Installing an AO-8A Adaptive Optics Unit to complete your installation.
Otherwise, complete this procedure to focus the StarChaser.
10. Point the telescope at a star-rich region in the night sky. Select the desired
main camera filter to use and ensure that the Camera 1 radio button is
enabled. Start the main camera in Continuous mode and focus it using the
telescope focuser controls. Stop the exposures when focusing is completed.
11. Enable the Camera 2 radio button and start the StarChaser in Continuous
mode with an exposure duration of 1 to 3 seconds.
12. Focus the StarChaser’s image by turning the FOCUS knob on the unit until
a good focus is achieved.
Finding guide stars initially can sometimes be a bit difficult, so target an
open cluster or other star-rich area of the sky to facilitate this. Also, as is
typical for off-axis guiders, the off-axis arrangement without correcting
optics may not yield perfectly round stars on the guide sensor. This is
normal and will not affect performance.
NOTE 1:
Once you have obtained a good initial focus, it is sometimes beneficial to
slightly defocus a guide star image when actually guiding. This may allow
the system to perform more consistent centroid calculations.
NOTE 2:
You may see a gradient in the guider image’s sky background. This is due to
the various apertures upstream from the guider assembly limiting its field of
view, but this does not affect guiding. It merely causes stars that are farther
off-axis to be dimmer.
13. Perform the standard guider calibration procedure in your MaxIm LT or
MaxIm DL Pro software to calibrate the StarChaser. Refer to the online Help
file for procedural details.
When the calibration is complete, your StarChaser is ready for guided
imaging!
Page 18
DIFFRACTION LIMITED
18
6 – Installing an AO-8A Adaptive Optics Unit
You must perform the procedure in 5.1 Configuration and connection, and then
steps 1 to 9 in procedure 5.2 Pick-off mirror adjustment and focusing prior to
installing an AO-8A unit.
NOTE:
If you want to use an AO-8T (the STT version) instead of the AO-8A, note that
the connector is a different type. You can purchase an adapter cable from
Diffraction Limited.
1. Disconnect the camera and guider in the Camera Control window of MaxIm
LT. Then turn off the AC power to both the camera and StarChaser units.
2. Detach required cables and remove the camera+filter wheel+StarChaser
assembly from your telescope. Place it on a clean flat surface, with the
telescope opening facing upwards.
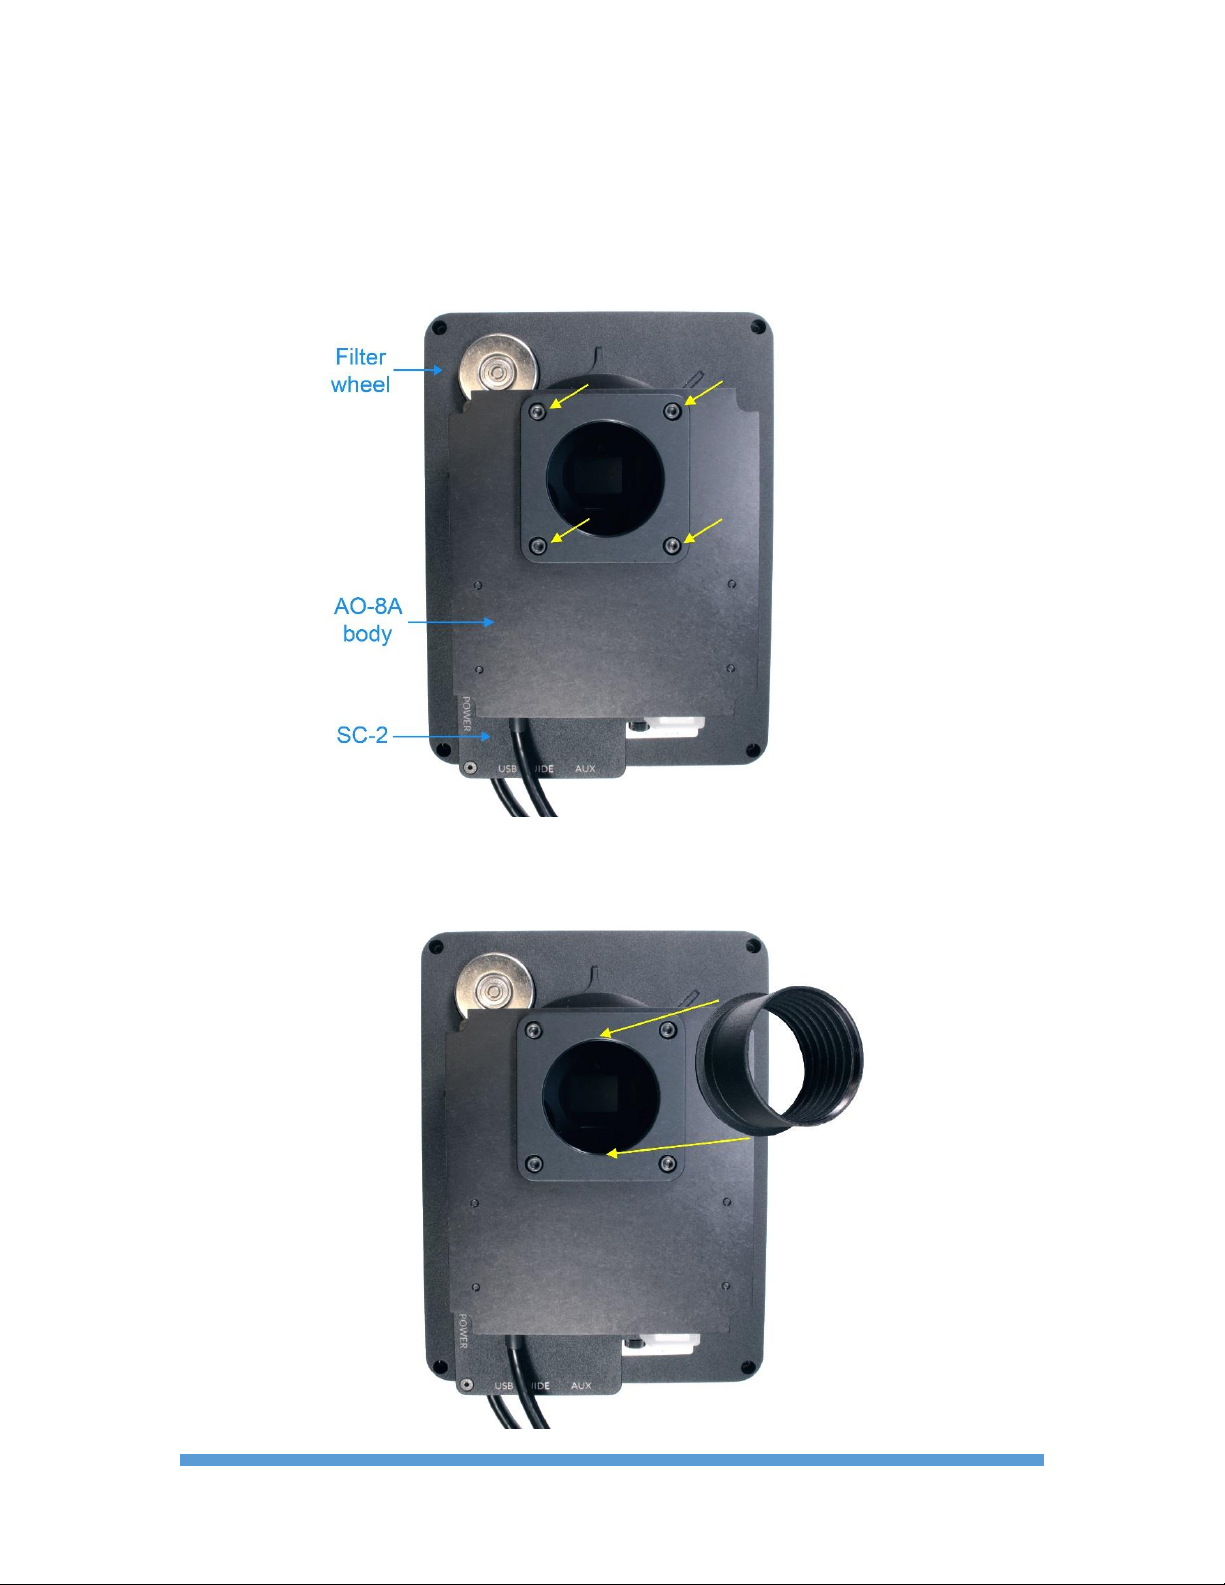
3. Detach and remove the flat plate adapter and nosepiece from the StarChaser
by removing the four supplied 4-40 x 1-inch screws. Set the supplied flat
plate adapter and nosepiece aside. Only the nosepiece will be required again,
so you can detach that from the flat plate adapter.
4. Place your AO-8A unit on a clean flat surface, with the telescope opening
facing upwards.
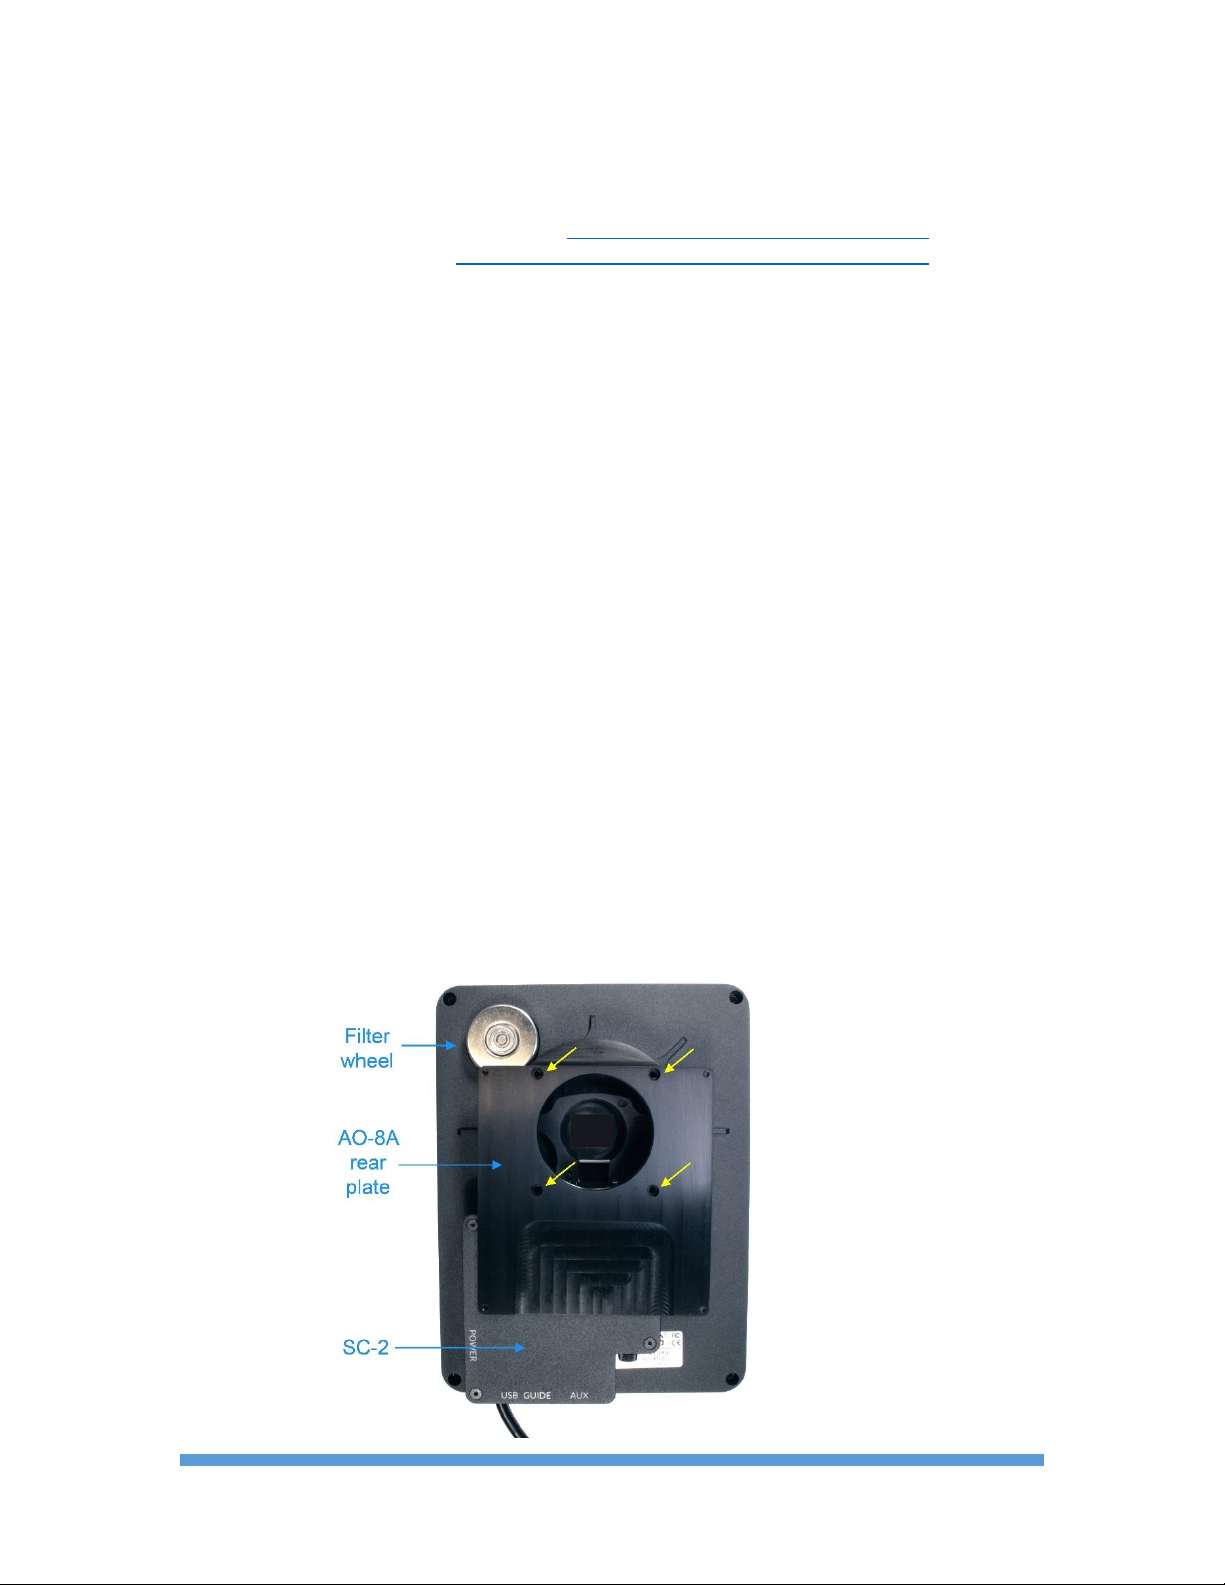
5. On the front (telescope side) of the AO-8A there are four screws that hold the
unit together. Remove the screws and lift off both the front plate and the
body of the AO-8A from the rear plate. Place them aside on a flat surface.
6. Place the AO-8A rear plate on top of the StarChaser and align the four
mounting holes.
Page 19
DIFFRACTION LIMITED
19
7. Fasten the AO-8A rear plate and the StarChaser to the filter wheel using the
four supplied 4-40 x 1-inch screws.
8. Place the AO-8A body and front plate back onto the rear plate and fasten
them together using the four screws removed in step 3.
9. Attach the T-thread nosepiece that was supplied with your camera to the
front of the AO-8A unit. No accessory plate is required here.
Page 20

DIFFRACTION LIMITED
20
10. Re-install the completed equipment assembly onto your telescope.
11. Re-attach your camera, filter wheel, and StarChaser cables.
CAUTION:
Never “hot plug” cables into or from units. This is especially important
for AUX and I2C connectors. Always disconnect power before
connecting or disconnecting accessories or cables.
12. Connect the fixed cable on the AO-8A unit to the StarChaser’s AUX port.
13. Apply power to the main imaging camera and the StarChaser.
14. Launch MaxIm LT and click the Camera Control icon to open the Camera
Control window.
15. In the Setup tab, click the Connect button. You configured all of your
components in 5.1 Configuration and connection and MaxIm LT retains
those settings, so no additional configurations are required.
16. Point the telescope at a star-rich region in the night sky. Select the desired
main camera filter to use and ensure that the Camera 1 radio button is
enabled. Start the main camera in Continuous mode and focus it using the
telescope focuser controls. Stop the exposures when focusing is completed.
17. Enable the Camera 2 radio button and start the StarChaser in Continuous
mode with an exposure duration of 1 to 3 seconds.
18. Focus the StarChaser’s image by turning the FOCUS knob on the unit until
a good focus is achieved. Finding guide stars initially can sometimes be a bit
difficult, so target an open cluster or other star-rich area of the sky to
facilitate this. Also, as is typical for off-axis guiders, the off-axis arrangement
without correcting optics may not yield perfectly round stars on the guide
sensor. This is normal and will not affect performance.
NOTE 1:
Once you have obtained a good initial focus, it is sometimes beneficial to
slightly defocus a guide star image when actually guiding. This may allow
the system to perform more consistent centroid calculations.
NOTE 2:
You may see a gradient in the guider image’s sky background. This is due to
the various apertures upstream from the guider assembly limiting its field of
view, but this does not affect guiding. It merely causes stars that are farther
off-axis to be dimmer.
19. Perform either the standard guider or AO calibration procedure in your
MaxIm LT or MaxIm DL Pro software to calibrate the StarChaser. Refer to
the online Help file for procedural details.
When the calibration is complete, your StarChaser is ready for guided
imaging!
Page 21

DIFFRACTION LIMITED
21
7 – Maintenance
The StarChaser SC-2 Off-Axis Guiding Camera requires only minimal
maintenance. Use cotton swabs and isopropyl (rubbing) alcohol to clean the
pick-off mirror if it becomes necessary. Never re-use a cotton swab - use only
fresh ones. Apply only gentle pressure with the cotton swab during cleaning.
Page 22
DIFFRACTION LIMITED
22
8 – Specifications
Sensor:
Power:
Dimensions:
1.3 megapixel global shutter CMOS
1280 x 1024 pixels, 4.8 micron square pixels
Approximately 300 mA
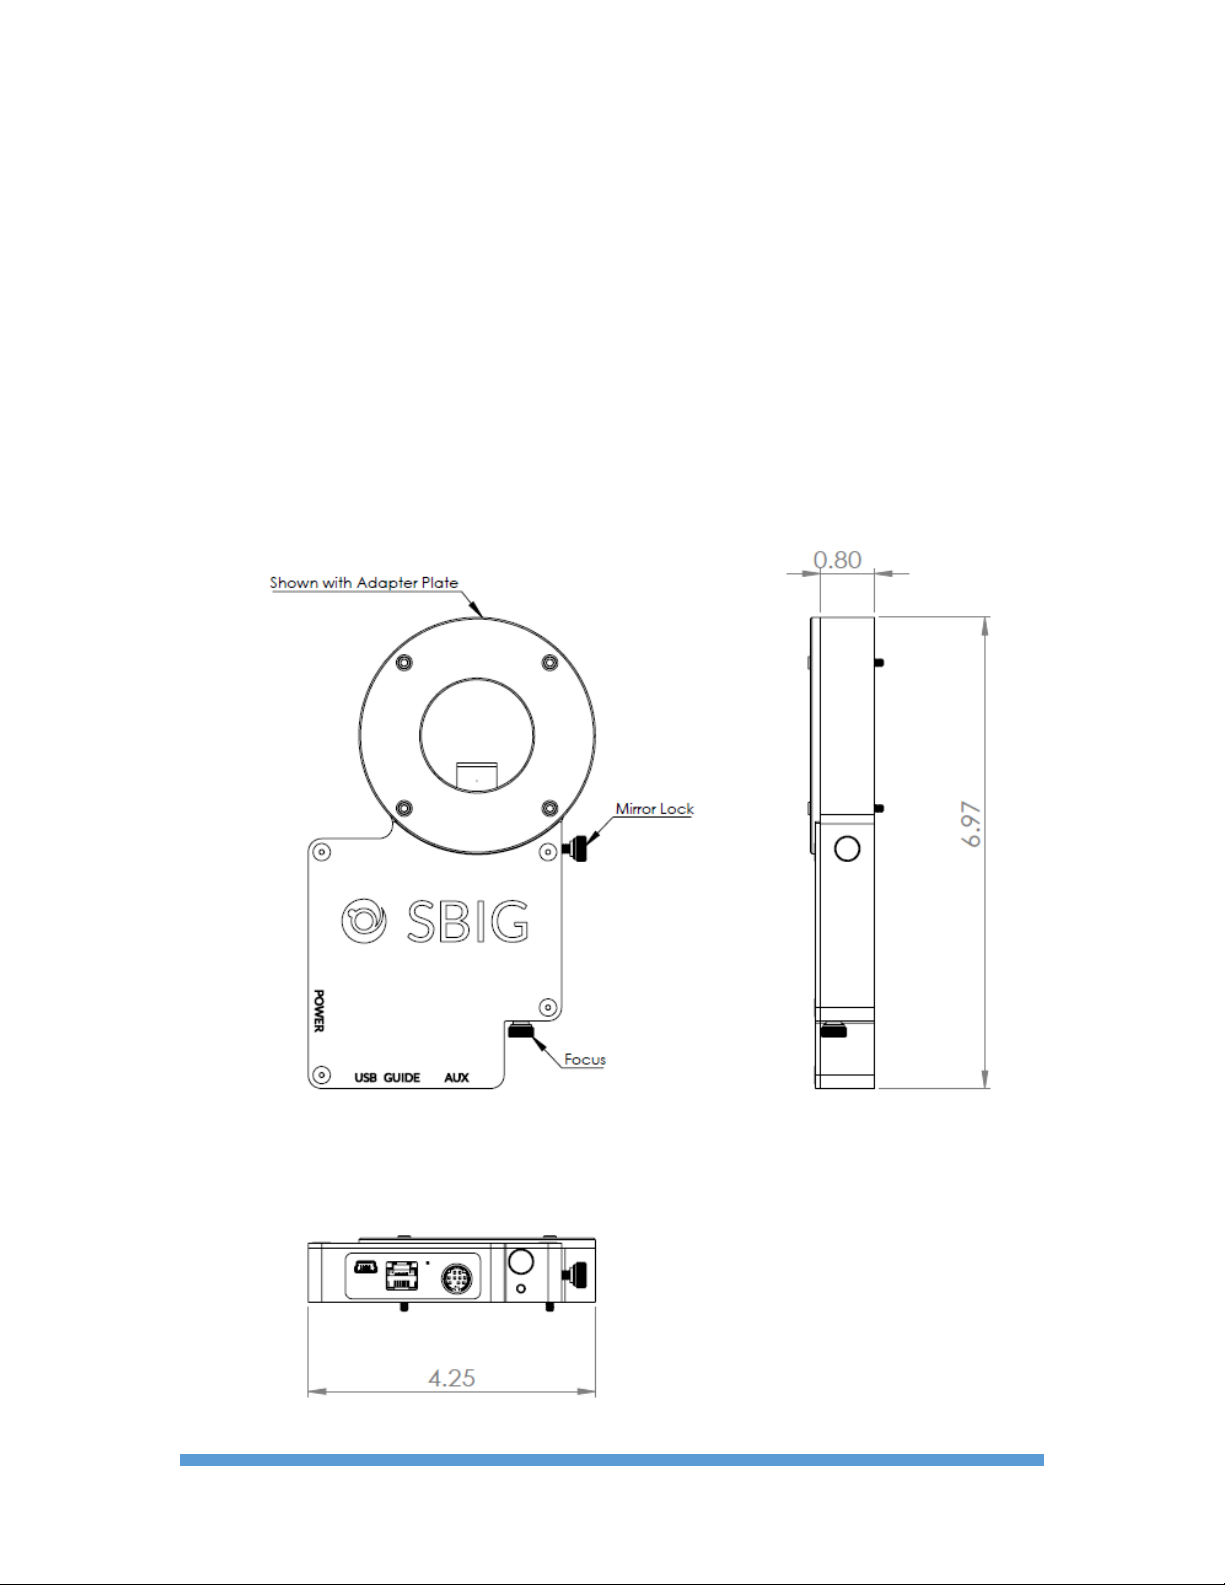
6.97 x 4.25 x 0.80 inches (177 x 108 x 20.3 mm)
Weight:
Approximately 0.6 pounds (273 gm)
Optical back focus:
0.80 inch (20.3 mm)
Page 23

DIFFRACTION LIMITED
23
 Loading...