

Dietz SANGO ADVANCED Series, SANGO SLIMLINE Series, Sango Slimline M, Sango Advanced R, Sango Advanced F User Manual
...Page 1
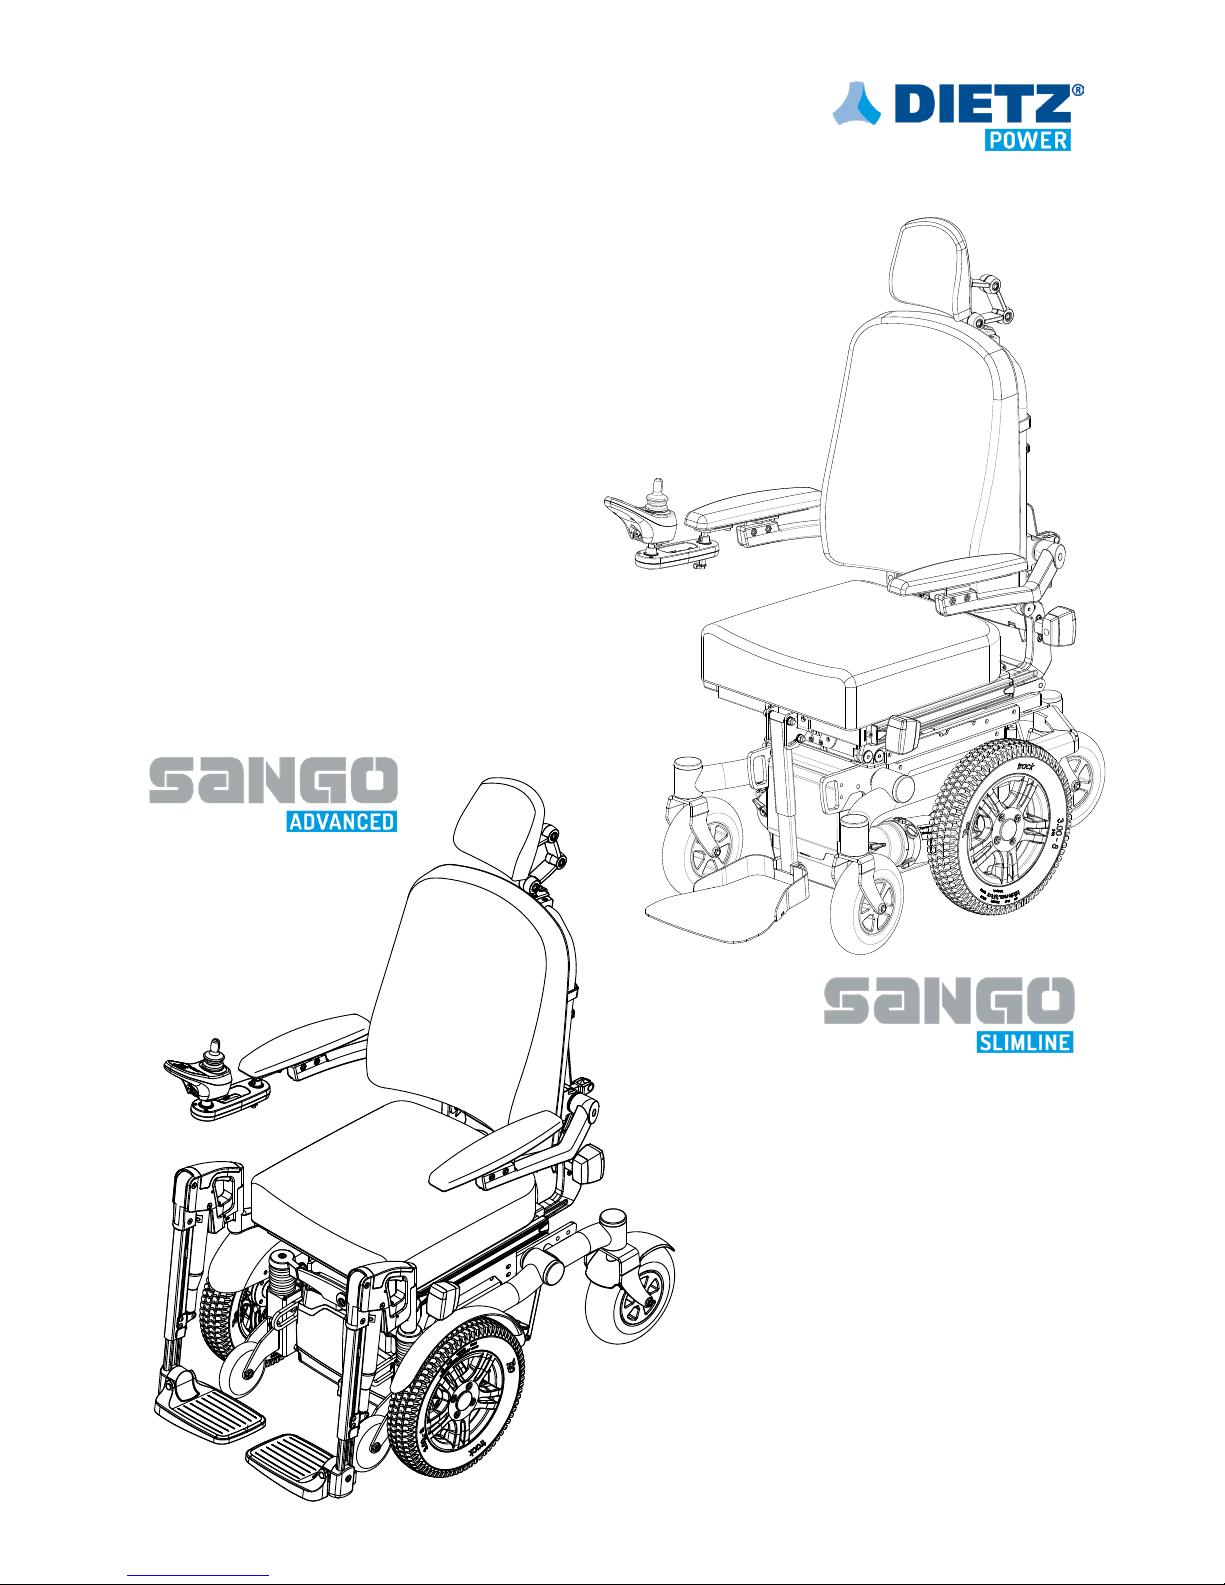
Sango Advanced R
Sango Advanced F
Sango Advanced M
Sango Slimline M
USER MANUAL
Page 2

2 - SANGO ADVANCED / SLIMLINE
© 2017 DIETZ-Power BV
All rights reserved.
The information provided may in no way be reproduced and/or published in any
form or by any means (electronically or mechanically) without the express prior
written consent of DIETZ-Power BV.
The information provided is based on general data pertaining to constructions
known at the time of issue. DIETZ-Power BV pursues a policy of continuous
product development and therefore reserves the right to make changes.
The information provided applies to the standard version of the product.
DIETZ-Power BV can therefore not be held liable for any damage resulting from
specications deviating from the standard version of the product.
The information made available has been compiled with the greatest care.
However, DIETZ-Power BV cannot be held liable for any errors in the information
or for the consequences thereof. DIETZ-Power BV cannot be held liable for any
damage resulting from work carried out on the wheelchair by third parties.
Under legislation relating to the protection of trademarks, those commercial
names, trade names, trademarks, etc. used by DIETZ-Power BV may not be
regarded as being free of rights.
Page 3

SANGO ADVANCED / SLIMLINE - 3
Table of contents
1 Preface ............................................................................................................ 5
1.1. About this manual 5
1.2. Symbols used in this manual 5
2 Safety ............................................................................................................... 6
2.1. Temperature 6
2.2. Moving parts 6
2.3. Electromagnetic radiation 7
2.4. Markings on the wheelchair 8
3 General description ....................................................................................... 9
3.1. Congurations 9
3.2. The user 10
3.3. Operating environment 11
4 General procedures ..................................................................................... 12
4.1. Seat cushion 12
4.2. Back cushion 12
4.3. Leg rests 13
4.4. Headrest 13
5
Wheelchair settings (qualied specialists only) .............................................14
5.1. Tools 14
5.2. Adjusting the centre of gravity (seat position) 14
5.3. Seat height and seat angle setting 15
5.4. Seat depth setting 15
5.5. Seat width setting 15
5.6. Backrest angle setting 15
5.7. Leg rest settings 16
5.8. Armrest settings 18
5.9. Controller settings 19
5.10. Headrest settings 20
5.11. The positioning belt (option) 20
6 Wheelchair adjustments ............................................................................. 21
6.1. Powered adjustments 21
6.2. Mechanical adjustments 22
7 Using the wheelchair .................................................................................. 23
7.1. Checking the wheelchair 23
7.2. Getting into and out of the wheelchair 23
7.3. Driving the wheelchair 24
Table of contents
Page 4

4 - SANGO ADVANCED / SLIMLINE
7.4. Driving on slopes or ramps 25
7.5. Obstacles 26
7.6. Pushing the wheelchair 26
7.7. Storage of the wheelchair after use 27
8 Transport ...................................................................................................... 28
8.1. Transporting the wheelchair in motor vehicles 28
8.2. The wheelchair as a driver’s seat in a car with Dahl docking system
(option) 30
8.3. Special transport 31
9 Wheelchair maintenance ........................................................................... 32
9.1. Cleaning the wheelchair and its upholstery 33
9.2. Batteries 33
9.3. Tyres 34
9.4. Disposing of the wheelchair 35
10 Technical specications ........................................................................... 36
10.1. Standards and requirements 36
10.2. Specications operating force 36
10.3. Specications Sango Advanced Sego Comfort 37
10.4. Specications Sango Slimline Sego Comfort 38
10.5. Specications batteries 39
10.6. Electrical diagrams 39
11 Warranty conditions .................................................................................. 40
11.1. Warranty period 40
11.2. Warranty provisions 41
11.3. Warranty procedure 41
Table of contents
Page 5

1 Preface
1.1. About this manual
The user manual for this powered wheelchair consists of three separate booklets:
• The general user manual (this booklet)
• The manual for the controller
• The manual for the battery charger
Read through these user manuals carefully before using the wheelchair for the
rst time. The information they contain is essential for the safe use and proper
maintenance (cleaning) of the wheelchair. If any of the manuals are missing on
delivery of your wheelchair, please contact your dealer immediately.
A service manual for qualied specialists is also available.
1.2. Symbols used in this manual
Warning
Follow the instructions given under warnings! Failure to exercise due care in
following these instructions may result in physical injury, damage to the wheelchair
or damage to the environment. Where possible, the warnings are given in the
section that is most relevant.
Section references
A reference to another chapter or section in this manual is given in parentheses
enclosing the phrase ‘see’. Example (see 2) or (see 2.4).
Cross-reference symbol
Where required, this general manual makes reference to the other manuals. This
is done in the following way:
CONTROLLER Please refer to the user manual for the controller.
CHARGER Please refer to the user manual for the battery charger.
SERVICE Please refer to the service manual of the product (qualied specialists
only).
If you have a visual impairment, you can nd a PDF version of
this user manual at www.DIETZ-Power.com.
You can also request a large-print paper version by contacting
DIETZ-Power. Contact information can be found on the back
cover of this user manual.
SANGO ADVANCED / SLIMLINE - 5
1 Preface
Page 6
2 Safety
All of the very latest information relating to product safety and any product recalls
can be found on our website at www.DIETZ-Power.com.
Warning
Follow the instructions given under warnings! Failure to exercise due care in
following these instructions may result in physical injury, damage to the wheelchair
or damage to the environment.
2.1. Temperature
Warning
• Avoid any physical contact with the motors of the wheelchair at all times. When
the wheelchair is in use, the motors are in constant motion and can reach high
temperatures. Any physical contact with the motors could result in burns. After
use, the motors cool down slowly.
• Ensure that the wheelchair is not exposed to direct sunlight for long periods of
time when not in use. Some parts of the wheelchair (such as the seat, backrest
and armrests) can become hot if exposed to the sun for too long. This may
result in burns or skin sensitisation.
2.2. Moving parts
Warning
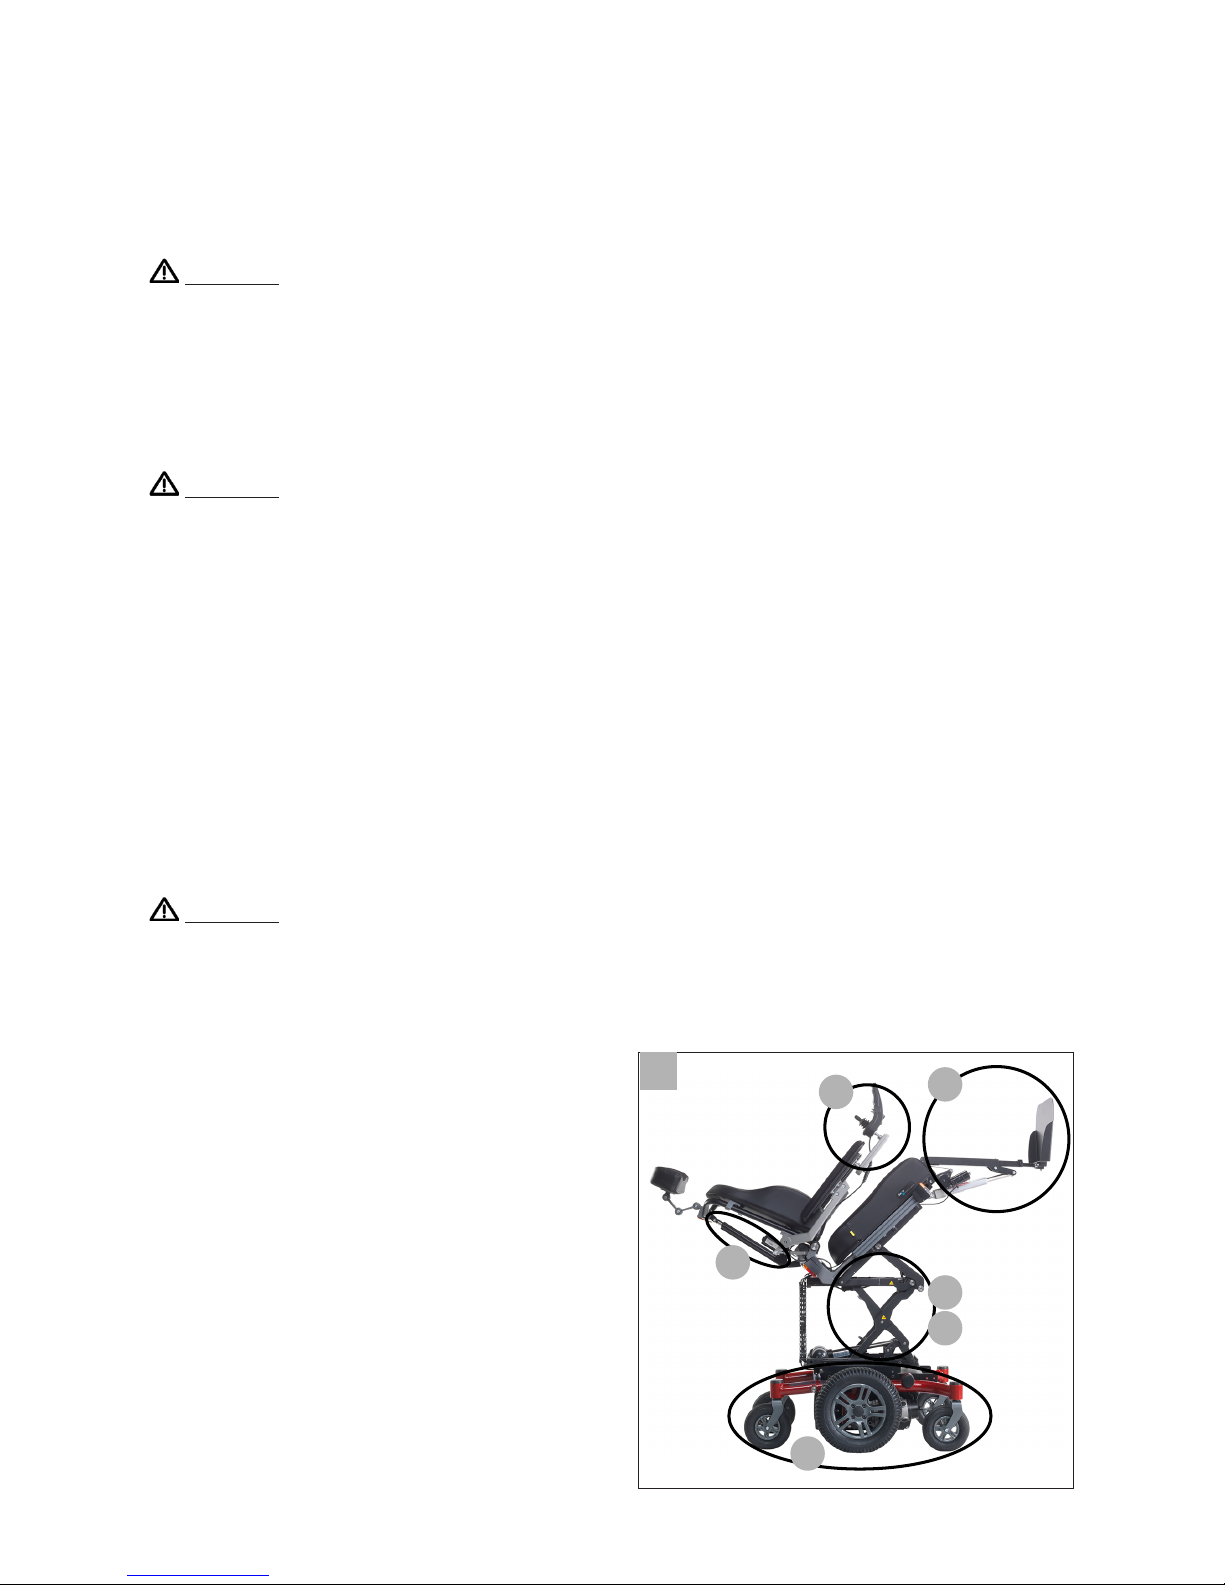
Wheelchairs contain moving and rotating parts (gure 1). Contact with moving
parts may result in serious physical injury or damage to the wheelchair. You should
avoid any contact with the moving parts of the wheelchair.
A. Wheels (turning and pivoting)
B. Swing-away controller arm
C. Powered backrest adjustment
D. Powered tilt adjustment
E. Powered leg rests
F. Powered lift adjustment
6 - SANGO ADVANCED / SLIMLINE
A
F
D
C
B
E
1
2 Safety
Page 7

2.3. Electromagnetic radiation
The standard version of your powered wheelchair has been tested for compliance
with the applicable requirements relating to electromagnetic radiation (EMC
requirements).
Warning
Despite testing, the following cannot be ruled out:
• electromagnetic radiation interfering with the wheelchair. For example mobile
telephones, large medical devices or other sources of electromagnetic radiation
• the powered wheelchair interfering with electromagnetic elds. For example
shop doors, burglar alarm systems in shops or garage door openers.
• in some congurations equipped with a R-net controller, where it is possible
that extreme electrical discharge situations due to static electricity, may cause
a fault message (‘ISM over-current’) ashing on the screen. If this occurs simply
turn o your wheelchair for a few seconds and back on to clear the fault.
In the unlikely event of such problems arising, please notify your dealer
immediately.
SANGO ADVANCED / SLIMLINE - 7
2 Safety
Page 8
2.4. Markings on the wheelchair
Warning
• The markings, symbols and instructions on the wheelchair are part of the safety
features. They must not be covered up or removed. They must remain on the
wheelchair and be clearly legible for the whole lifespan of the wheelchair.
• Immediately replace or repair any markings, symbols or instructions that
become damaged or illegible. Contact your dealer in such cases.
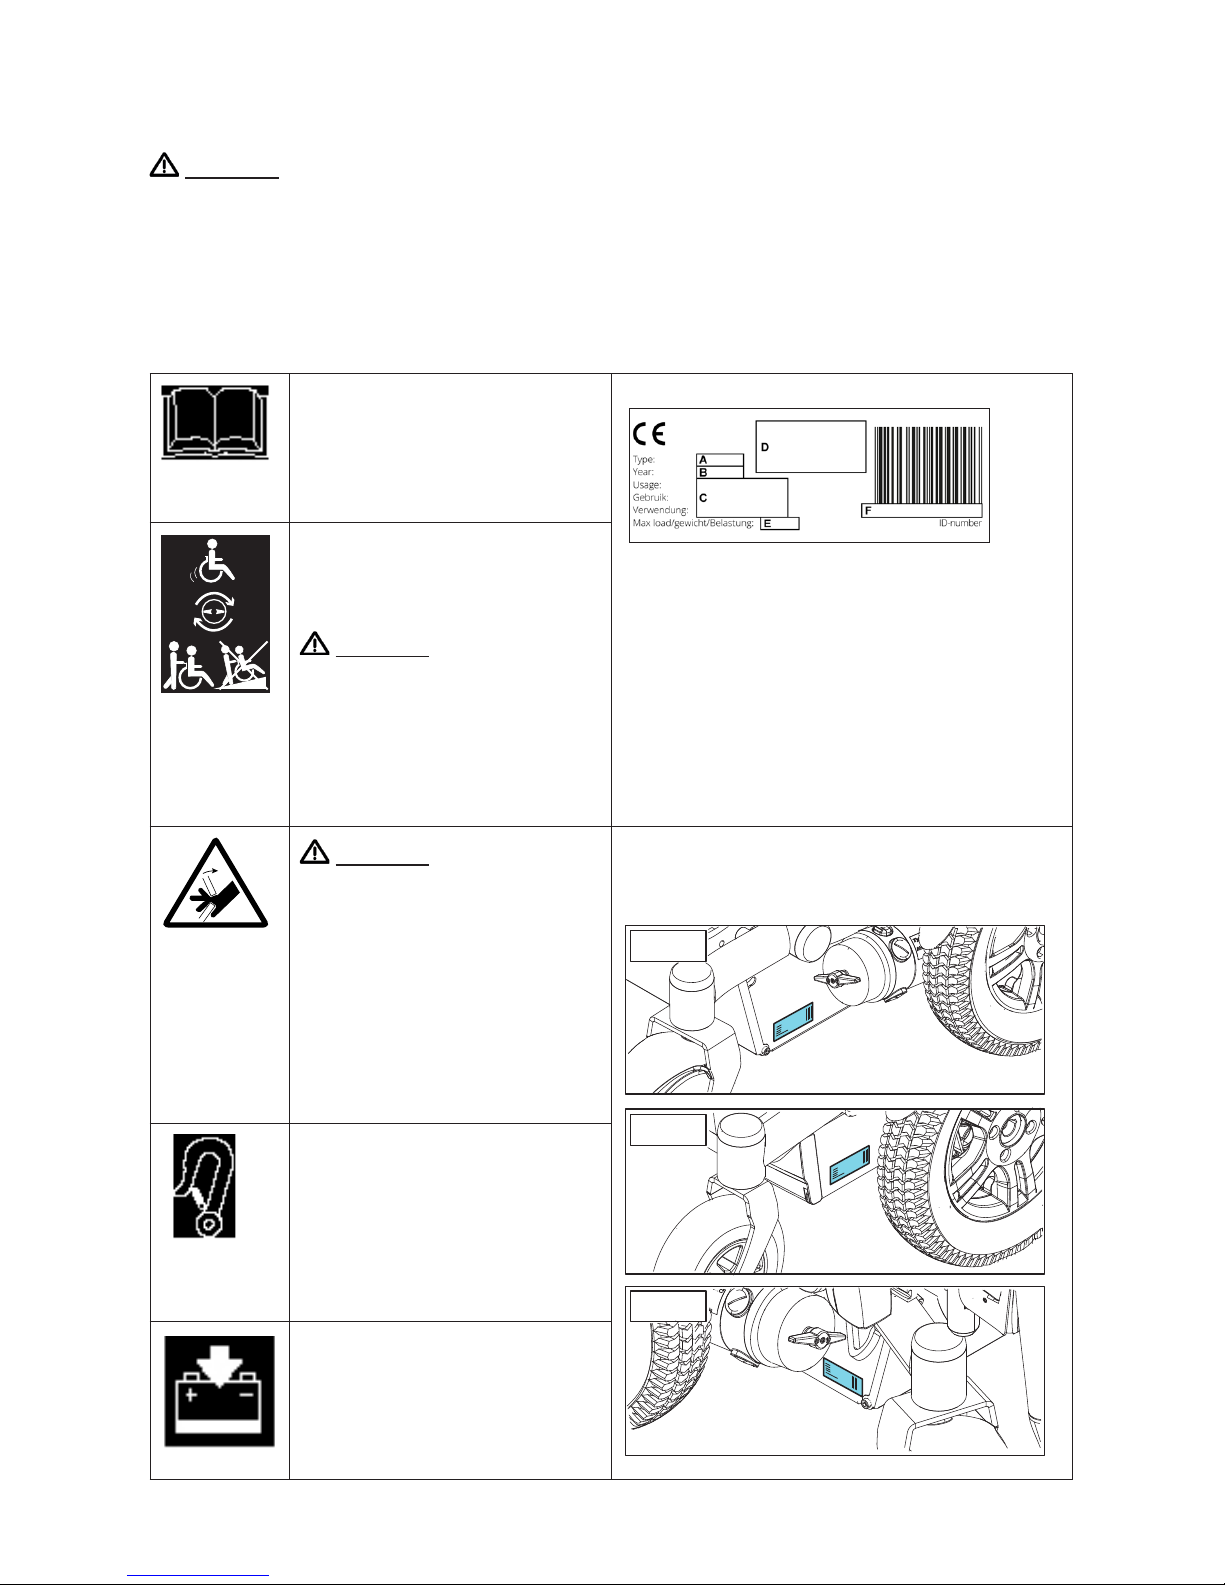
Symbols used on the wheelchair
Consult the manual before
use.
Identication plate
A. Type
B. Year of manufacture
C. Usage indoor or outdoor
D. Manufacturer
E. Maximum load in kg
F. Identication number
Freewheel switch
• Drive position
• Push position
Warning
Never set the freewheel
switch to the 'Push'
position when the
wheelchair is on a slope.
Warning (yellow-black)
Pinch point hazard: Keep
hands and ngers away
from moving parts when
adjusting the height
and/or tilt angle of the
wheelchair.
Location identication plate:
on the batterybox at the right side
Securing point for
transportation inside a
vehicle.
CONTROLLER
Battery charging point.
8 - SANGO ADVANCED / SLIMLINE
MWD
FWD
RWD
2 Safety
Page 9
3 General
description
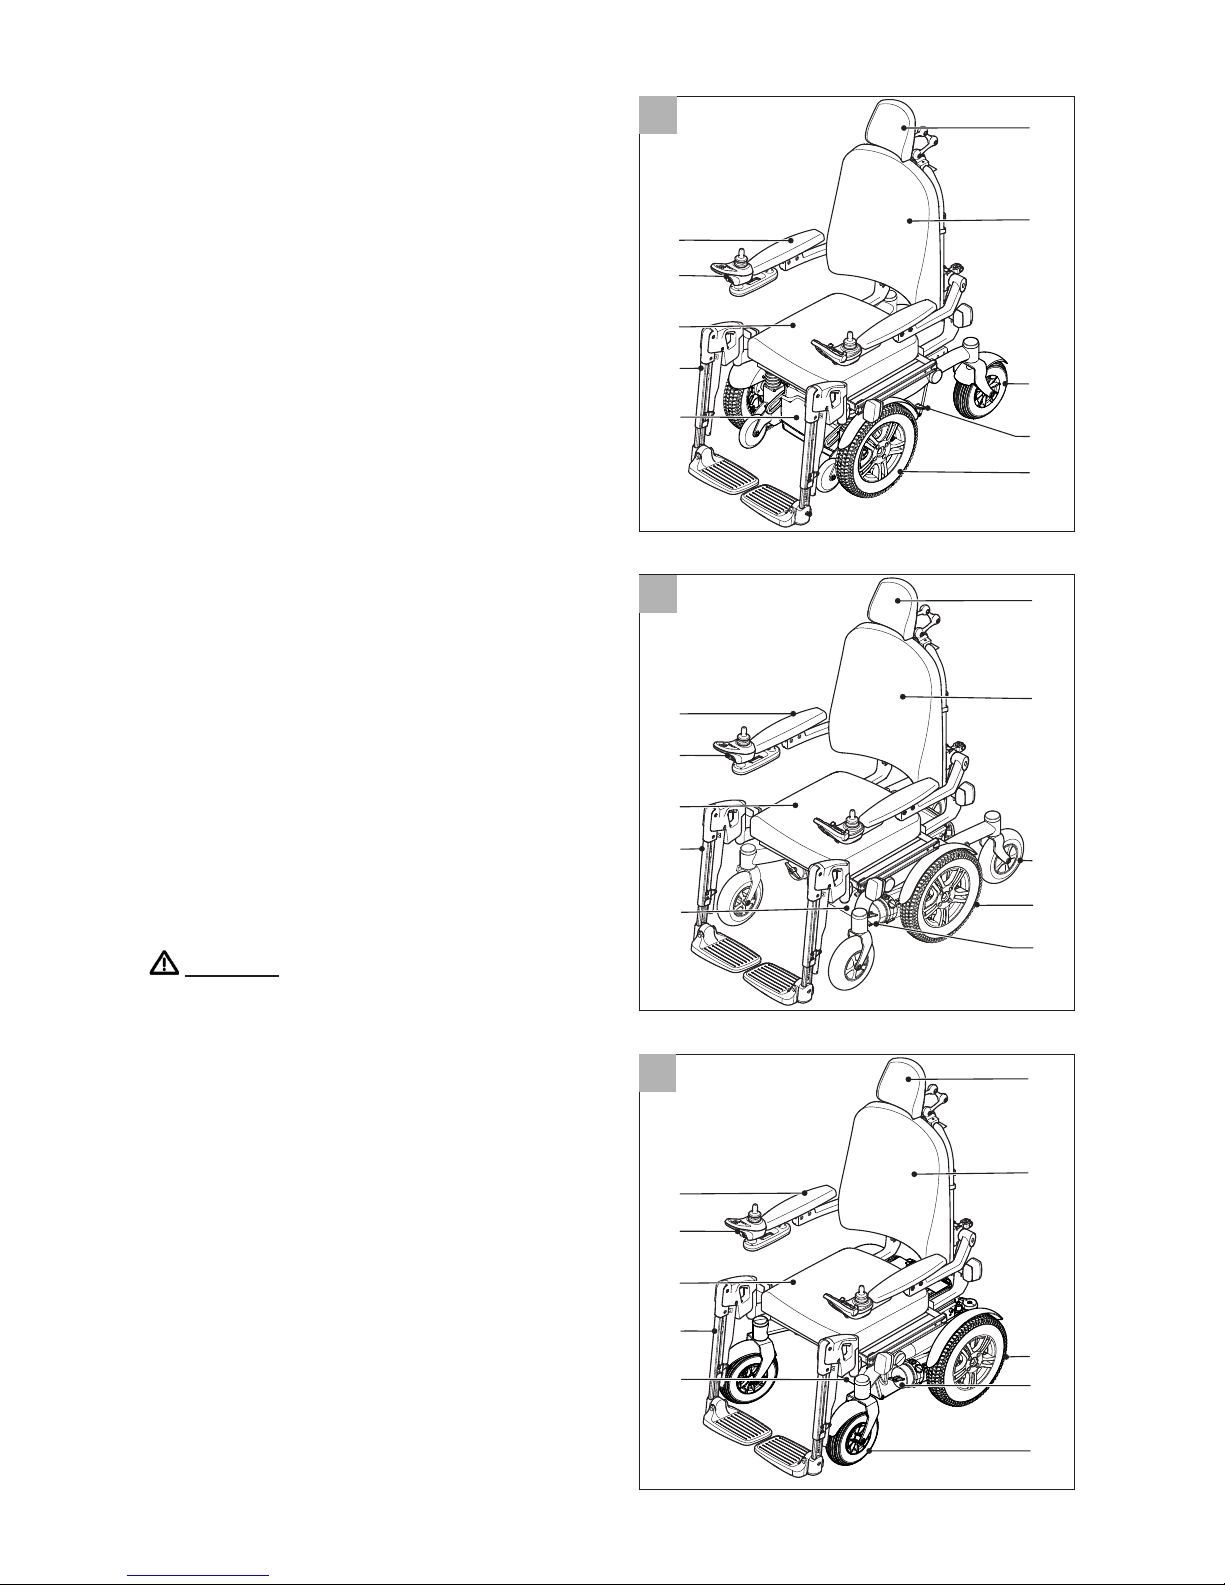
Front-, mid- and rear-wheel drive
wheelchairs and their major components
(gures 2, 3 and 4)
A. Drive wheels
B. Castor wheels
C. Freewheel switch
D. Controller
E. Battery
F. Seat cushion
G. Backrest
H. Armrest
I. Leg rest
J. Headrest
3.1. Congurations
Broadly speaking, the wheelchair is made
up of an undercarriage with the SEGO
seating system on top of it for excellent
support for the head, torso, arms and
legs.
The wheelchair is available as a frontwheel drive (FWD), rear-wheel drive (RWD)
or mid-wheel drive (MWD) in dierent
speeds (6 km/h, 10 km/h and 12,5 km/h).
Warning
• No changes may be made to the
technical specications.
• Do not make any adjustments to the
electrical circuit.
• Modication of the wheelchair or its
component parts is not permitted.
C
F
B
J
G
I
E
H
A
D
A
C
J
G
B
F
I
E
H
D
C
F
A
J
G
I
E
H
B
D
4
2
3
3 General description
SANGO ADVANCED / SLIMLINE - 9
Page 10

3.2. The user
Driving a powered wheelchair requires the user to have cognitive, physical and
visual abilities. The user must be capable of estimating the consequences of any
action taken while driving the wheelchair and of correcting action where required.
The wheelchair must not carry more than one person. The maximum user
weight is 160 kg, unless otherwise stated on the identication plate (see 2.4). Any
additional weight in the form of a bag, accessories or medical equipment must
be added to the user's weight, with the resulting total weight not exceeding the
maximum user weight.
The user must also be aware of the contents of this manual before using the
wheelchair for the rst time. The wheelchair user must also have received
thorough instruction from the dealer before using public roads. A trainer/
consultant must supervise the user's rst experience of driving the wheelchair.
Warning
• The wheelchair user shall at all times be fully responsible for compliance with
locally applicable safety regulations and guidelines.
• You must not drive the wheelchair while under the inuence of any substances
that may aect your driving ability.
• Your eyesight must be good enough to allow you to use the wheelchair in any
particular situation safely.
• Do not seat more than one person in the wheelchair.
• Do not allow children to drive the wheelchair without supervision.
3 General description
10 - SANGO ADVANCED / SLIMLINE
Page 11

3.3. Operating environment
This wheelchair has been developed for both indoor and outdoor use (EN 12184
(2014) class B). When outdoors, drive only on paved roads, pavements, footpaths
and cycle paths. Always adjust your speed to your surroundings.
Warning
• A wheelchair should be regarded as a replacement for the walking function.
Users must therefore travel among pedestrians and not on streets with trac.
• The use of the wheelchair on walk ways and roads may be subject to the
applicable legal requirements of National Road Laws or Road Trac Laws.
• Drive carefully on roads that are slippery due to rain, ice or snow!
• Prevent the wheelchair from coming into contact with seawater, as it is
aggressive and has a corrosive eect.
• Prevent the wheelchair from coming into contact with sand. Sand can get into
the moving parts of the wheelchair, causing unnecessarily rapid wear.
• When visibility is limited, the use of lights is compulsory.
• Exercise additional care when driving at high speeds. Adjust to a lower
maximum speed when driving indoors, on pavements and in pedestrianised
areas.
• Do not drive o of high obstacles.
• Do not use the wheelchair at temperatures below -10˚C or above +50˚C.
• Do not attach any weights to the wheelchair without consulting a specialist. You
may otherwise inuence the stability of the product.
• Do not use the wheelchair to push and/or pull any objects along.
• Do not open doors using the leg rests.
• Do not drive through puddles of water.
3 General description
SANGO ADVANCED / SLIMLINE - 11
Page 12
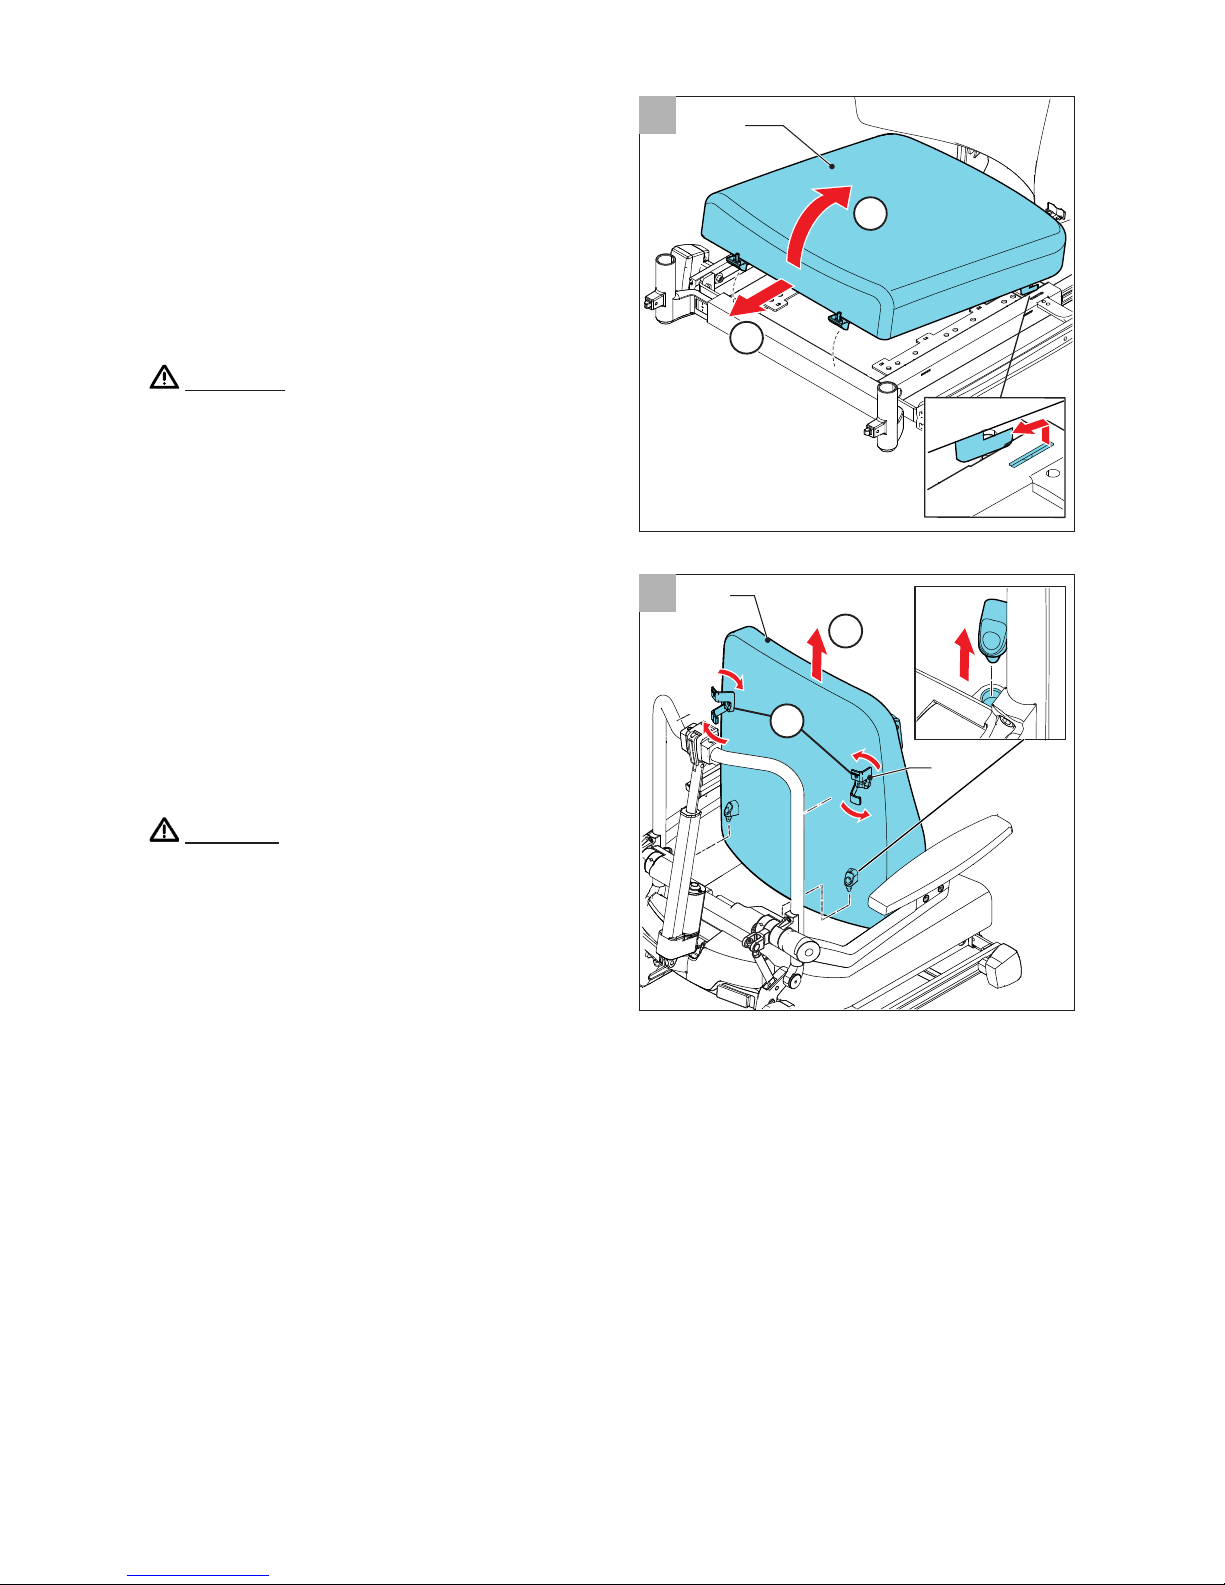
4 General
procedures
Some parts can be removed without the
use of tools. The wheelchair can easily be
reduced in size. For example to transport
the wheelchair (see 8).
Warning!
The removal of parts might have adverse
or benecial eects on the wheelchair.
4.1. Seat cushion
(gure 5)
To remove
Pull the seat cushion (A) upwards and
then forwards.
To replace
Place the seat cushion on the chair and
push it backwards and downwards.
Warning
The seat is not locked into place until you
hear a click.
4.2. Back cushion
(gure 6)
To remove
1. Loosen the clips (A).
2. Pull the back cushion (B) upwards.
To replace
1. Place the back cushion on the attachment points.
2. Pull the back cushion backwards.
3. Tighten the clips.
12 - SANGO ADVANCED / SLIMLINE
A
B
2
1
A
2
1
6
5
4 General procedures
Page 13
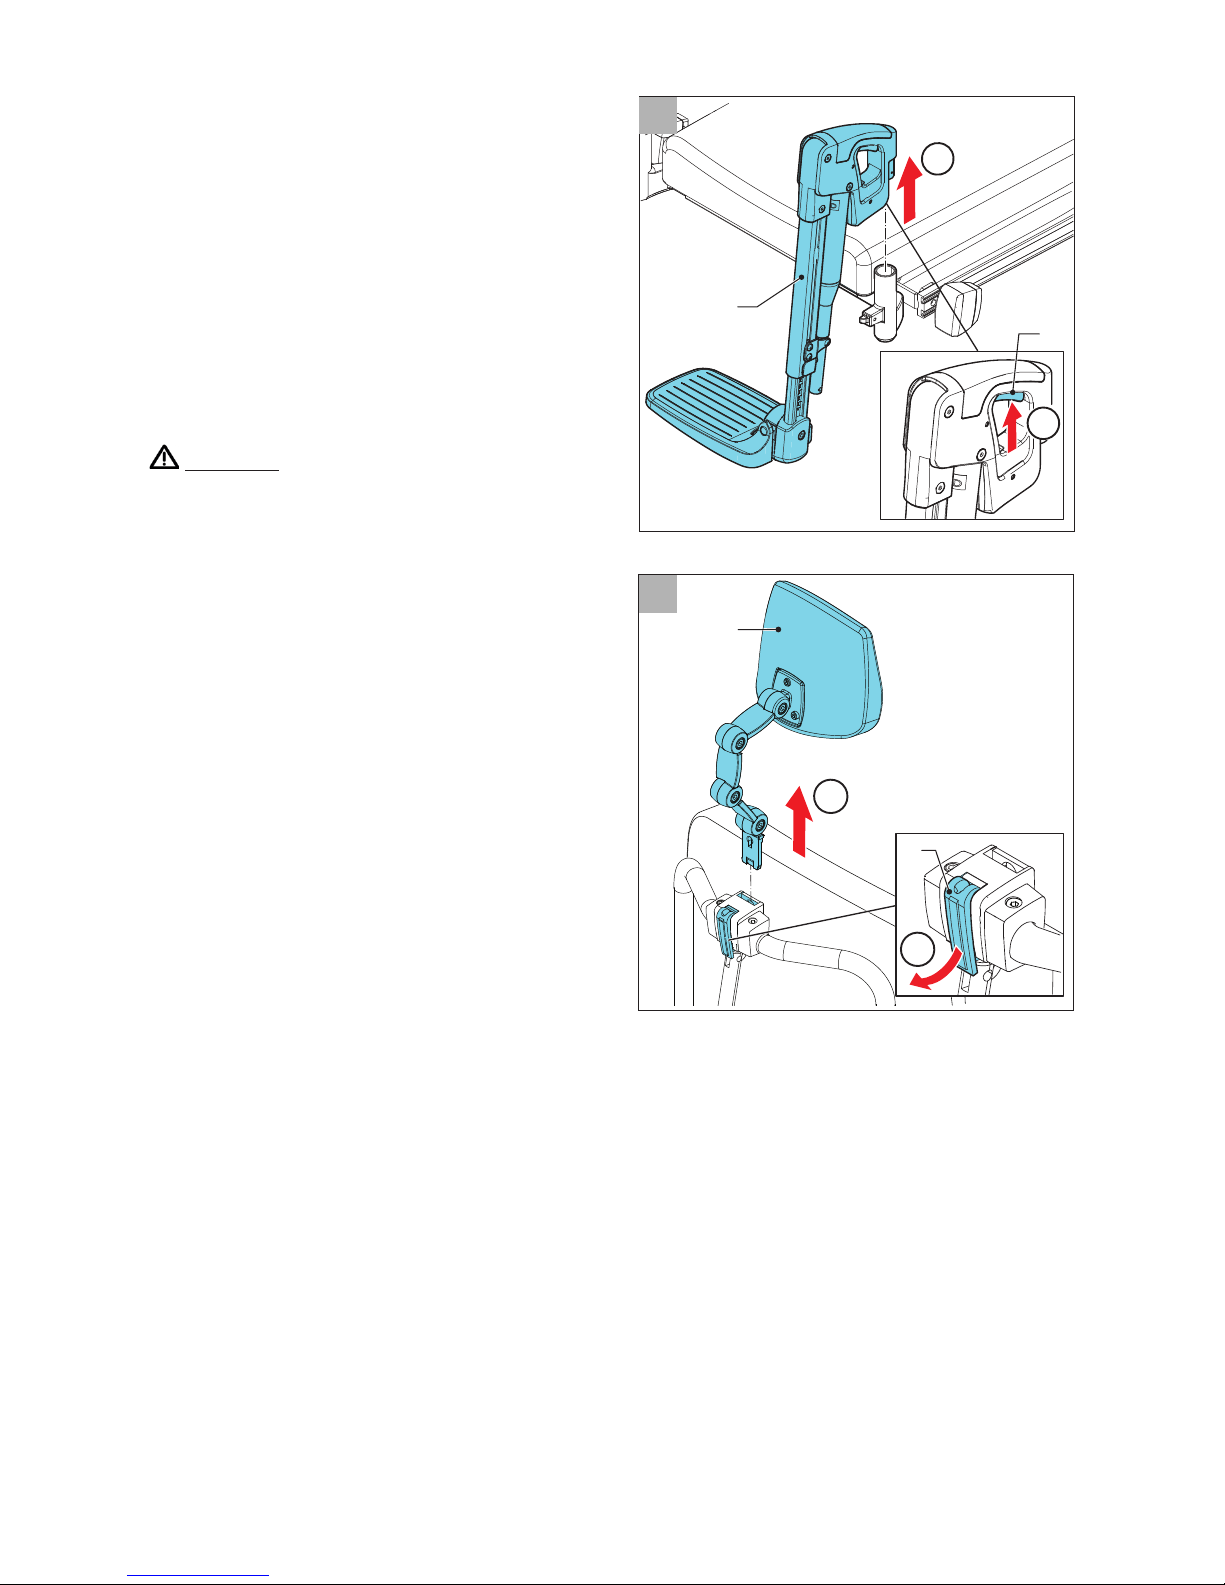
4.3. Leg rests
(gure 7)
To remove
1. Press the handle (A) upwards to
release the leg rest.
2. Remove the leg rest (B) by lifting it out
of the bracket.
To replace
Place the leg rest in the bracket.
Warning
• The leg rest is not locked into place
until you hear a click.
• Removing the leg rest may aect the
stability of the wheelchair.
4.4. Headrest
(gure 8)
To remove
1. Loosen the lever (A) by half a turn.
2. Remove the headrest (B).
To replace
1. Place the headrest in the desired
position.
2. Lock the headrest in place by
tightening the lever.
SANGO ADVANCED / SLIMLINE - 13
1
A
B
2
A
B
2
1
8
7
4 General procedures
Page 14
5
Wheelchair settings (qualied specialists only)
There is no such thing as an average wheelchair user. This is why DIETZ-Power
wheelchairs can be adjusted to a specic user's individual situation.
We make a distinction between user adjustments and permanent settings.
• User adjustments can be made by the user himself/herself without the need
for any tools.
• Permanent settings must be altered by a dealer, unless expressly stated
otherwise.
Warning
A number of permanent settings are described in the following paragraphs. Only
qualied service technicians or dealers may alter these.
SERVICE for more adjustments and replacement information
5.1. Tools
The following tools are needed to do the
settings as described in this paragraph:
• Spanner, size 13
• Allen key, size 4, 5 and 6
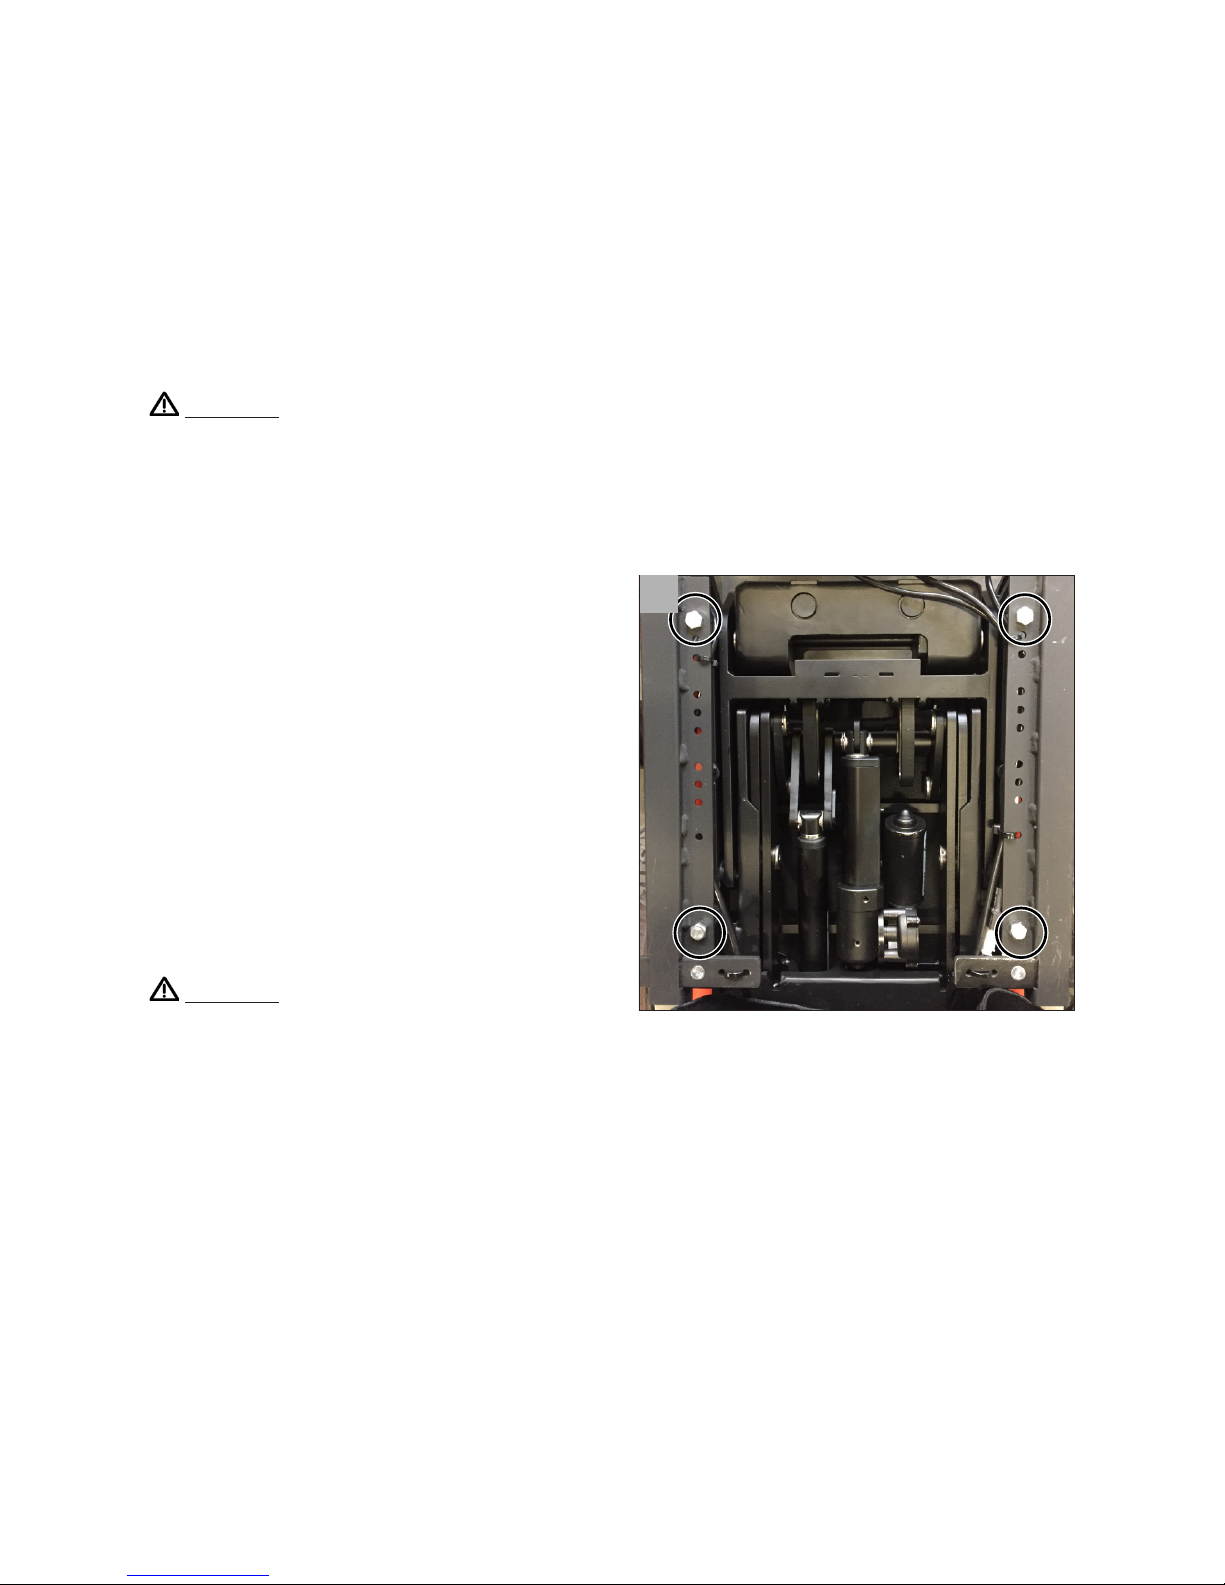
5.2. Adjusting the centre of
gravity (seat position)
The centre of gravity of the wheelchair can
be moved/adjusted by moving the seat.
There are a number of positions on the
seat slide for this purpose (gure 9).
Warning
Only change the position of the seat
and the centre of gravity in order to compensate for specic user situations. One
example might be compensation for a user with no legs.
Moving the centre of gravity:
• will have a negative eect on the handling of the wheelchair if not carried out
correctly.
• will have a negative eect on dynamic stability if not carried out correctly;
• For FWD do not position the seating frame in the most front position
• For RWD + MWD move seating frame in most front position when Seat
depth is maximum.
• should be made by professionals only.
If in any doubt, contact DIETZ-Power technical support department.
9
5 Wheelchair settings (qualied specialists only)
14 - SANGO ADVANCED / SLIMLINE
Page 15
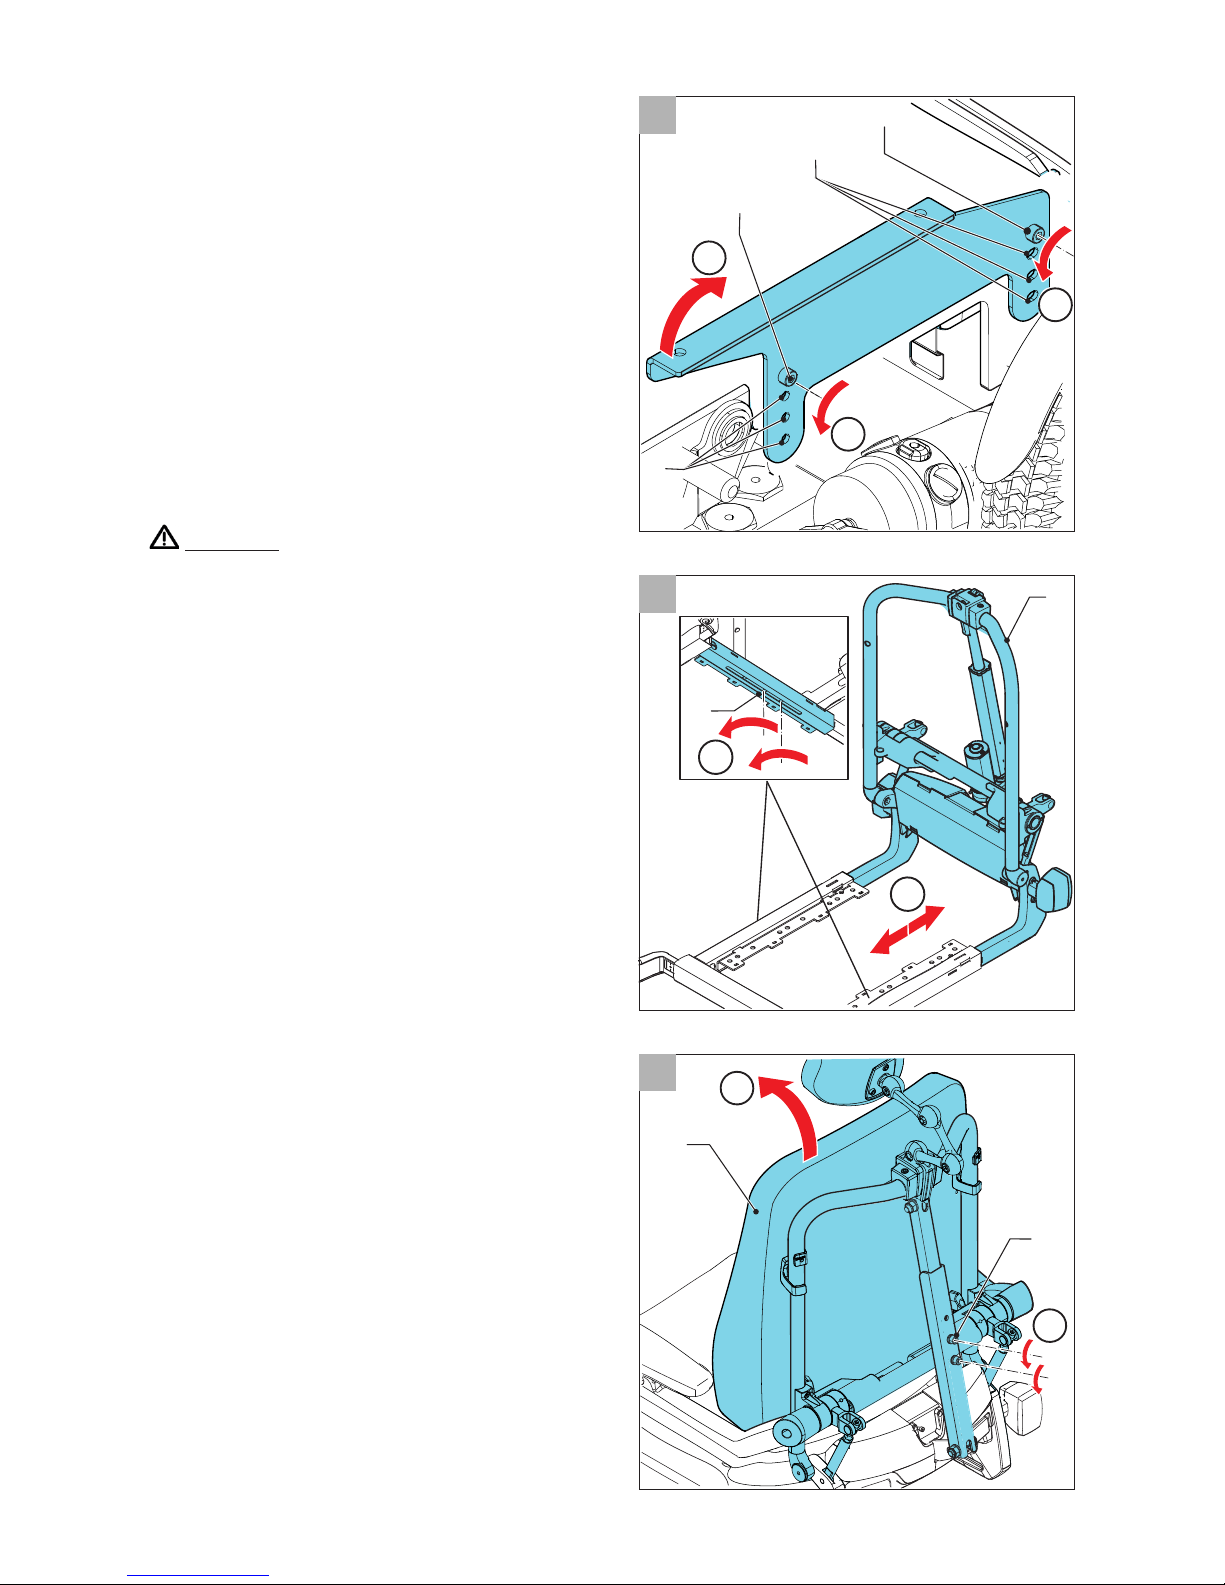
5.3. Seat height and seat angle
setting
The seat height can be permanently
adjusted according to the user's specic
situation. All of the optional seat heights
fall within the maximum safe slope of
6˚ (10.5%), as set out in EN 12184 (2014)
class B. Lowering the seat height will have
a positive eect on overall and dynamic
stability.
1. Loosen the bolt (A gure 10).
2. Position the bolt in the hole (B)
corresponding to the desired position.
3. Tighten the bolt.
Warning
By increasing the seat height you also
raise the centre of gravity. This has a
negative eect on overall and dynamic
stability.
5.4. Seat depth setting
1. Loosen the allen screws (A) on each
side by one turn (gure 11).
2. Slide the seat frame (B) into the
desired position.
3. Tighten the allen screws.
5.5. Seat width setting
The seat width can be adjusted by
changing the leg rest and/or armrest
width (see 5.8 and 5.9).
5.6. Backrest angle setting
1. Loosen the two allen screws (A) by one
turn (gure 12).
2. Adjust the backrest (B) to the desired
angle.
3. Tighten the allen screws.
1
2
A
B
B
A
2
1
B
A
1
2
1
A
B
11
10
12
5 Wheelchair settings (qualied specialists only)
SANGO ADVANCED / SLIMLINE - 15
Page 16
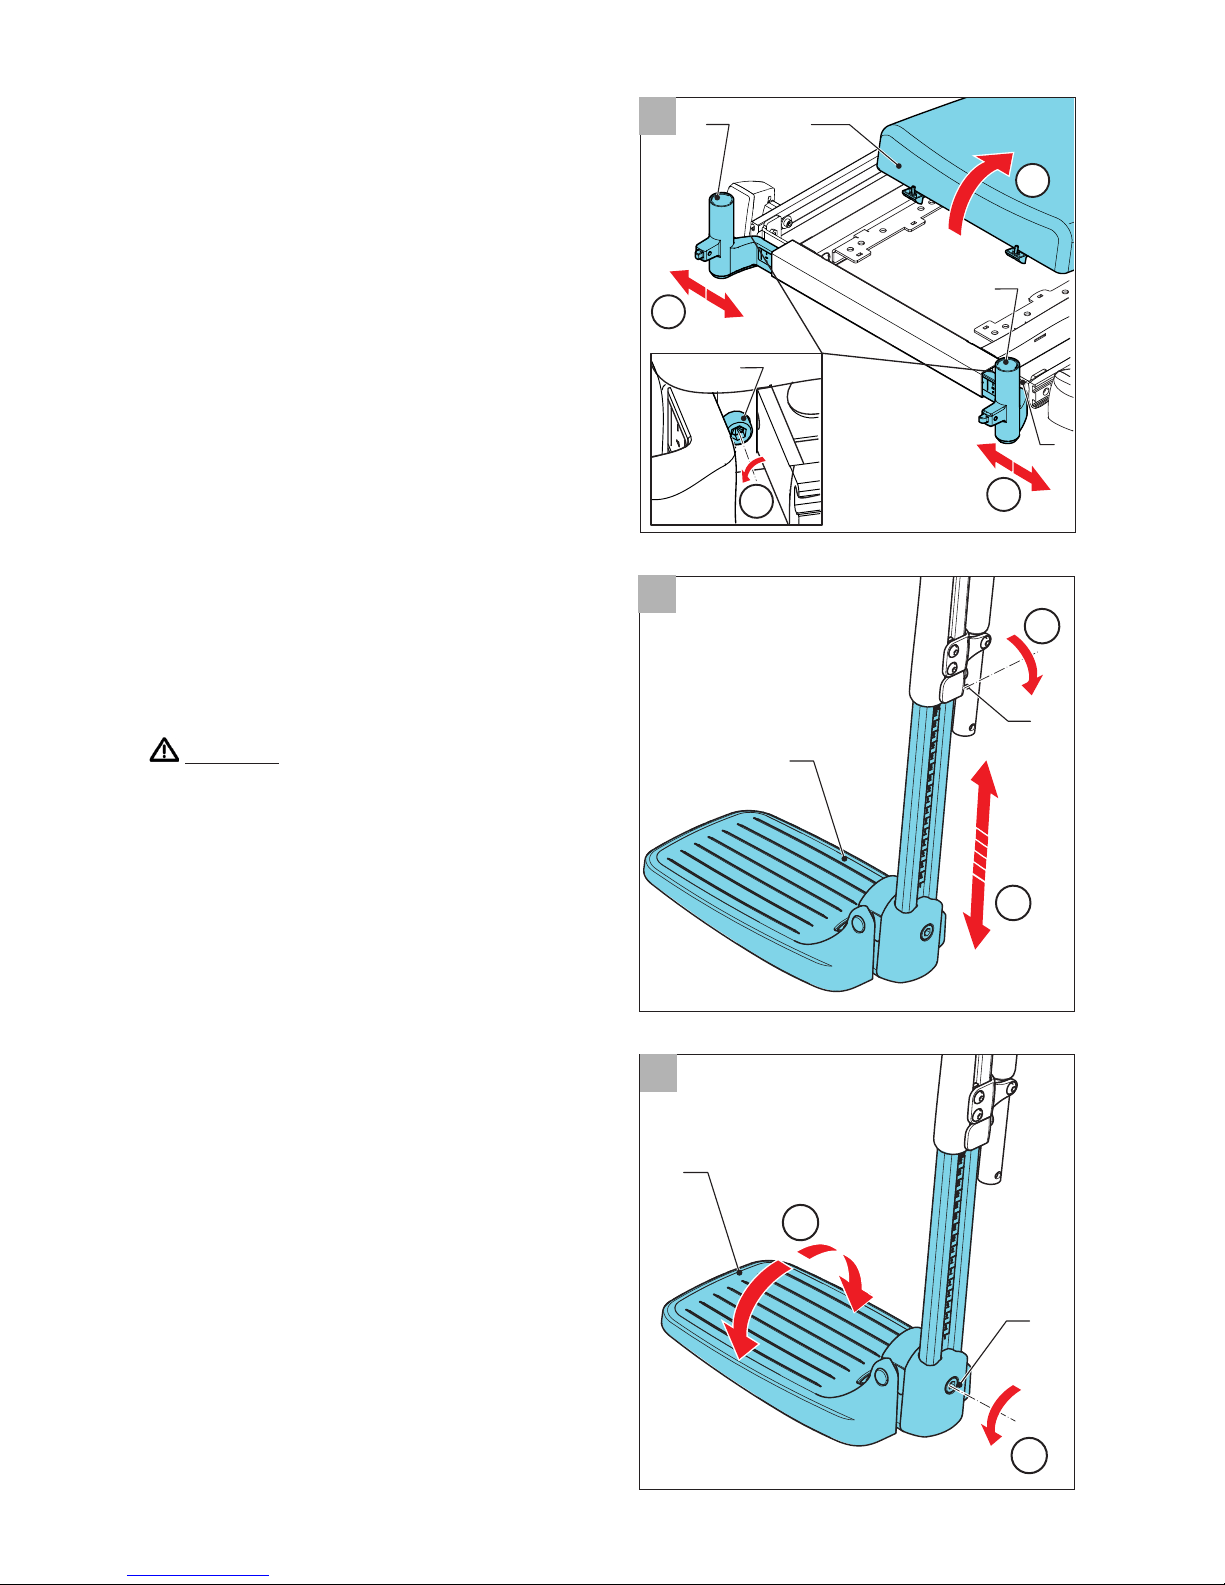
5.7. Leg rest settings
Leg rest width (also aects seat width)
1. Remove the seat cushion (A gure 13).
2. Loosen the allen screws (B) by one
turn.
3. Slide the leg rest bracket (C) into the
desired position.
4. Tighten the allen screws.
Lower leg length
1. Loosen the allen screw (A gure 14).
2. Slide the footplate (B) into the desired
position.
3. Tighten the allen screw.
Warning
Ensure that there is enough space
underneath the footplate for the
wheelchair to drive over obstacles.
Footplate angle
1. Loosen the allen screw (A gure 15).
2. Move the footplate (B) into the desired
position.
3. Tighten the allen screw.
B
A
1
2
A
B
1
2
15
C
C
B
3
2
3
B
1
A
14
13
5 Wheelchair settings (qualied specialists only)
16 - SANGO ADVANCED / SLIMLINE
Page 17
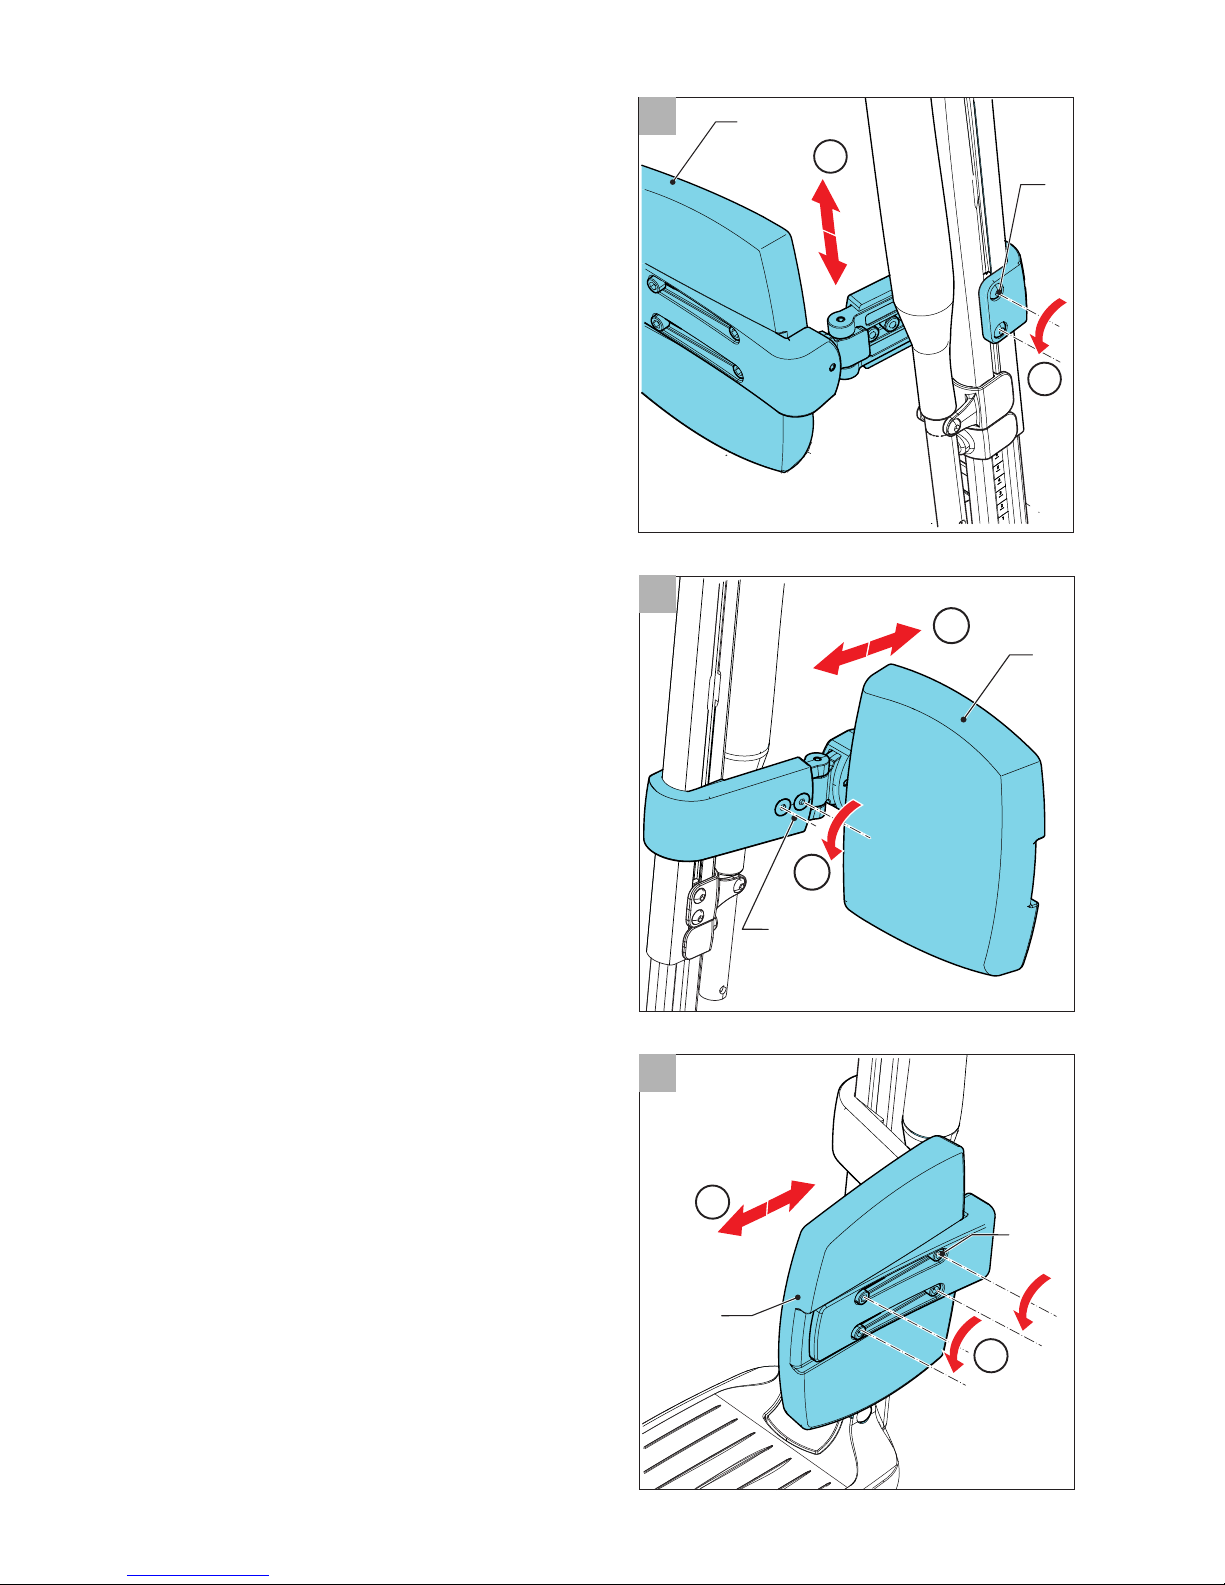
Height of the calf support
1. Loosen the two allen screws (A) by a
few turns (gure 16).
2. Slide the calf support (B) into the
desired position.
3. Tighten the allen screws.
Calf support depth (option)
1. Loosen the allen screws (A gure 17).
2. Position the calf support (B) in the
desired position.
3. Tighten the allen screws.
Calf support width (option)
1. Loosen the 4 allen screws (A gure 18).
2. Move the calf support (B) into the
desired position
3. Tighten the allen screws.
B
1
2
A
B
A
2
1
A
2
1
B
16
17
18
5 Wheelchair settings (qualied specialists only)
SANGO ADVANCED / SLIMLINE - 17
Page 18
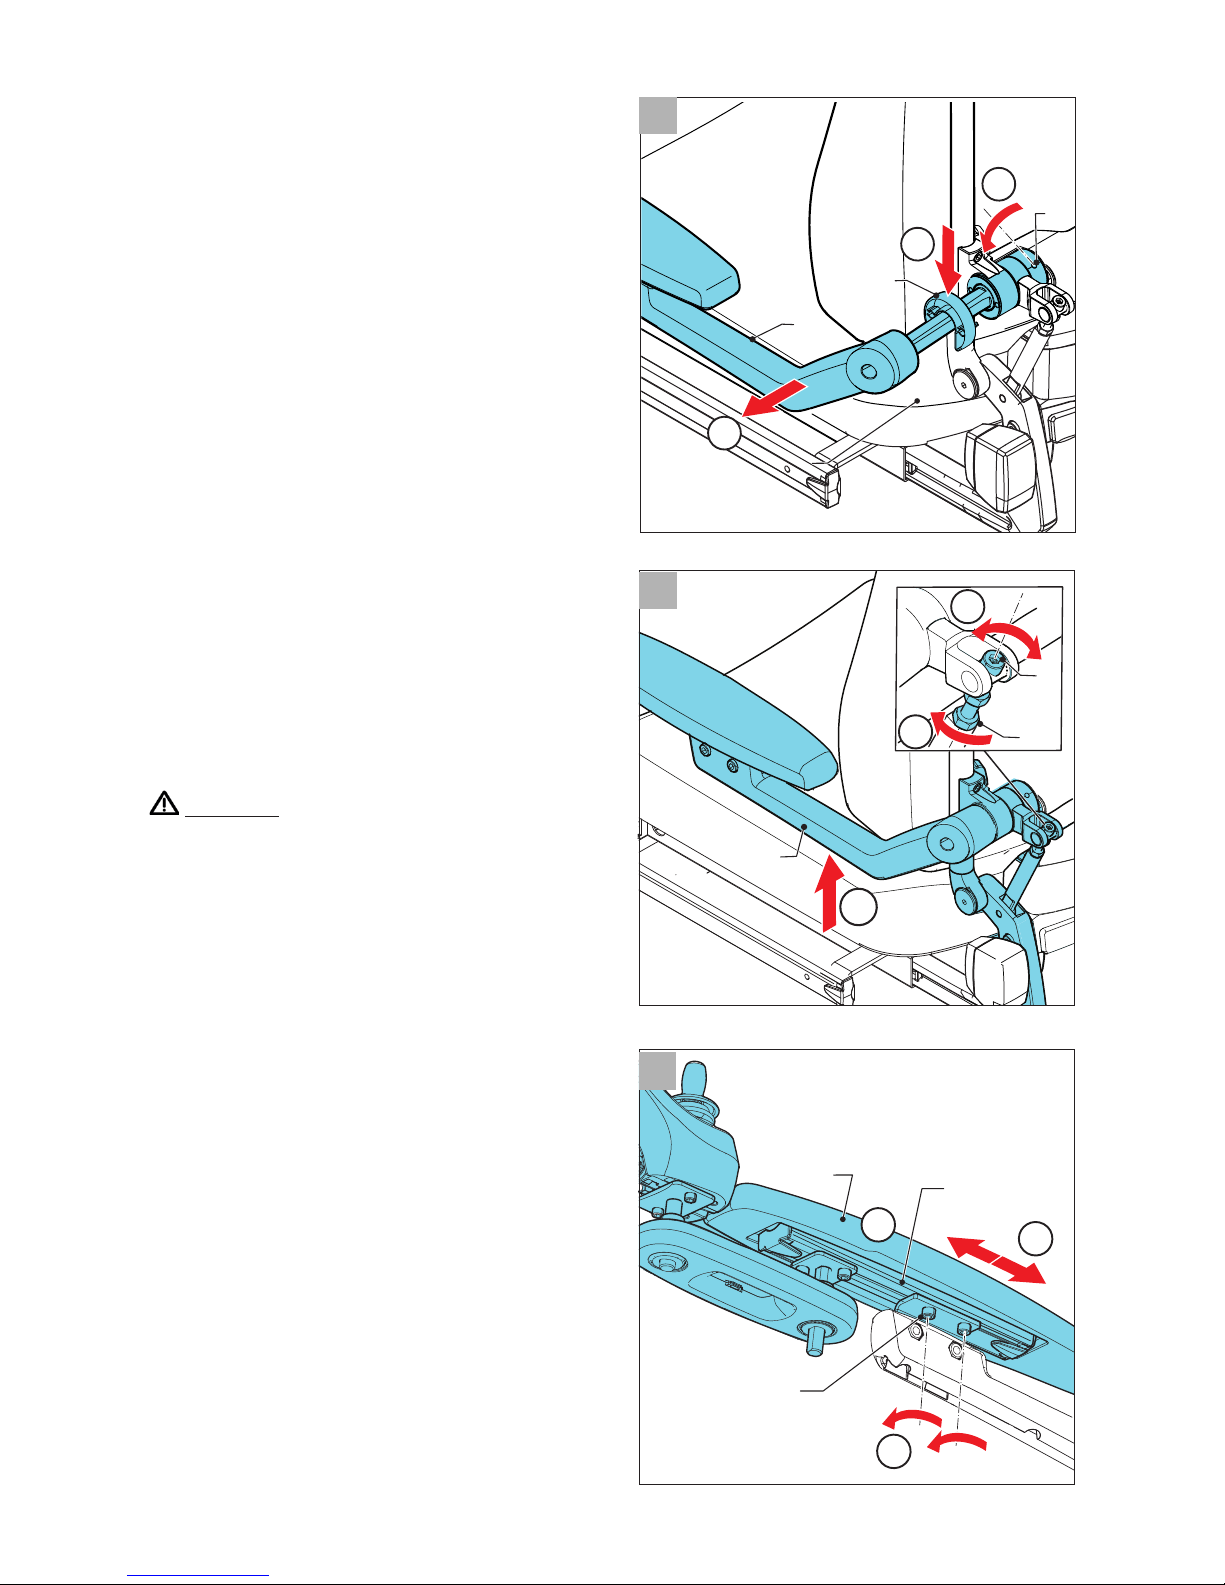
5.8. Armrest settings
Armrest width (also aects seat width)
1. Loosen the allen screw (A) by two turns
(gure 19).
2. Slide the armrest (B) to the side.
3. If required, remove or position the
spacer ring (C).
4. Slide the armrest back.
5. Tighten the allen screw.
Armrest height
1. Loosen the bolt (A + B gure 20).
2. Slide the armrest (C) into the desired
position.
3. Tighten the bolt.
4. If required, adjust the armrest pad
angle (gure 22).
Warning
Ensure that the arms are well supported,
without the shoulders being pushed
upwards.
Armrest pad width and depth
1. Loosen the two allen screws (A gure
21).
2. Slide the bolts with the armrest pad (B)
into the other guide bar (C) to adjust
the armrest pad width.
3. Adjust the armrest pad depth to the
desired position.
4. Tighten the allen screws.
C
B
A
3
2
1
3
B
2
A
C
1
21
3
1
C
B
2
A
B
19
20
5 Wheelchair settings (qualied specialists only)
18 - SANGO ADVANCED / SLIMLINE
Page 19
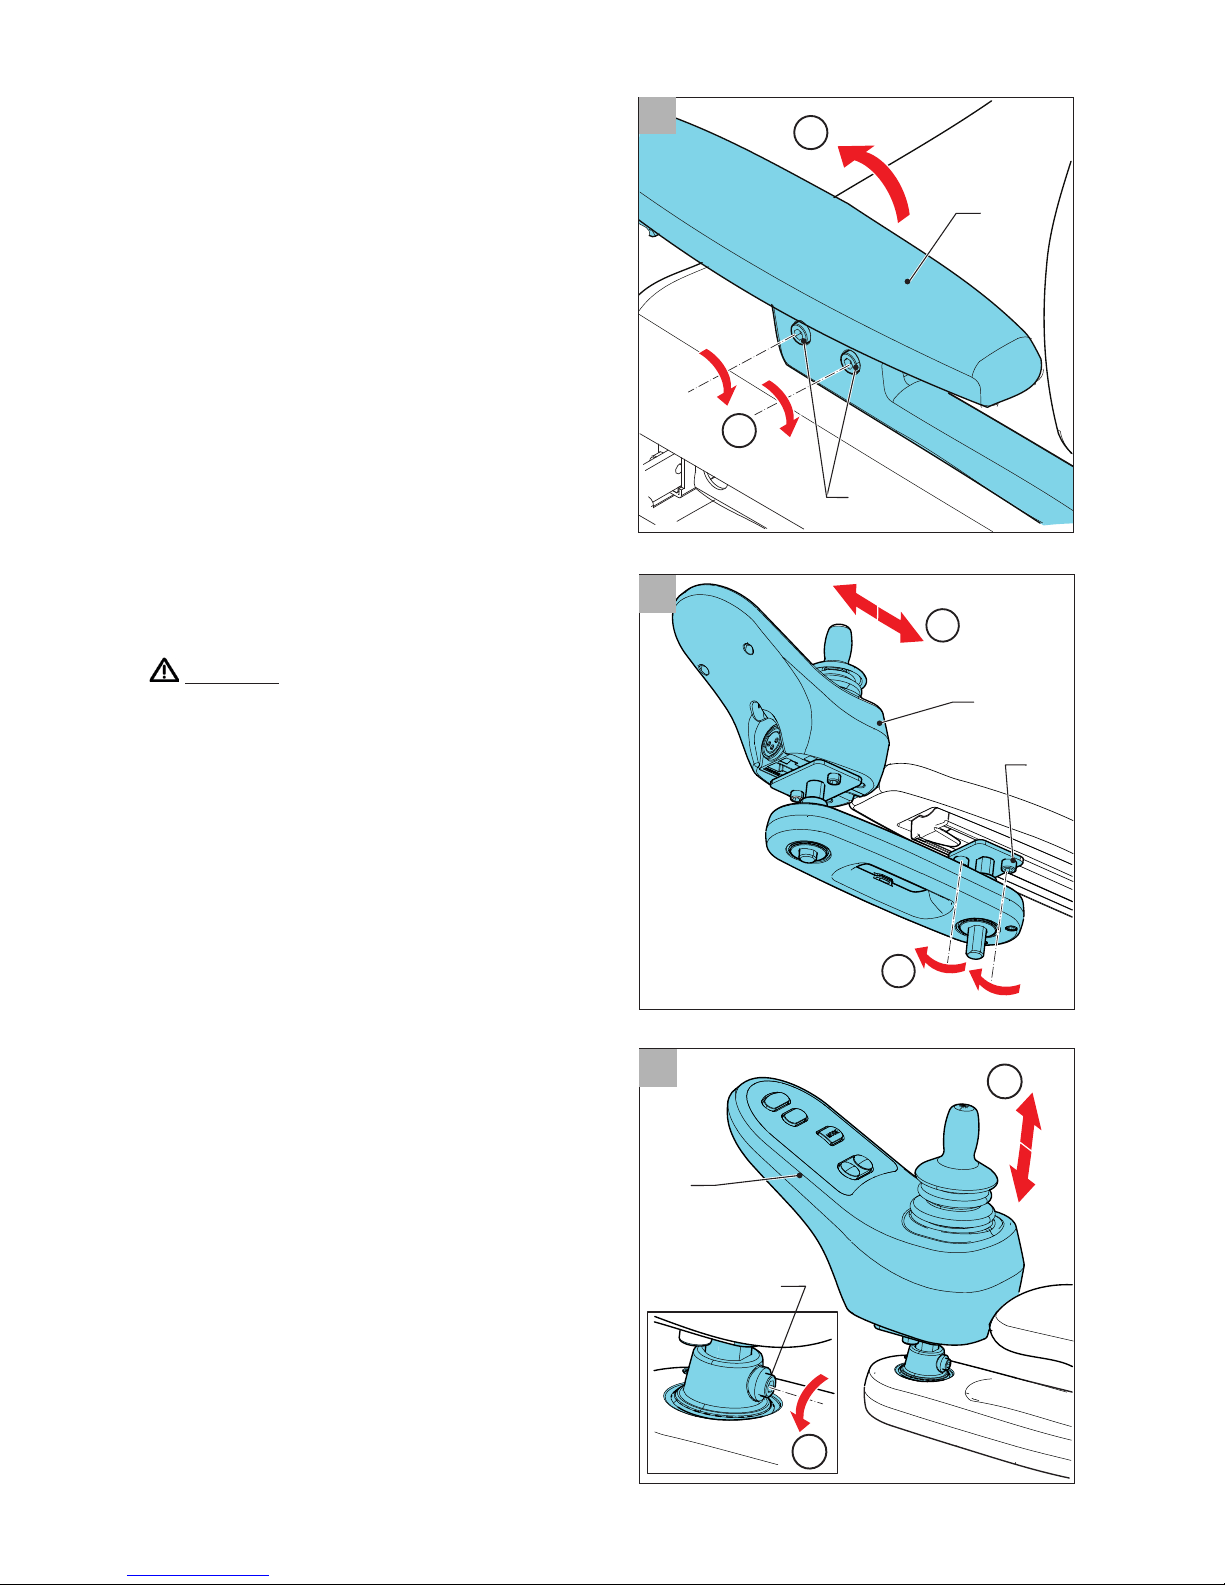
Armrest pad angle
1. Loosen the allen screws (A gure 22).
2. Slide the armrest pad (B) into the
desired position.
3. Tighten the allen screw.
5.9. Controller settings
Control system programme
Warning
Making incorrect adjustments to the
control system parameters can lead to
extremely dangerous situations. These
adjustments only may be carried out by
qualied specialists.
Controller depth (option)
1. Loosen the allen screws (A gure 23).
2. Slide the controller (B) into the desired
position.
3. Tighten the allen screws.
Controller height (option)
1. Loosen the allen screws (A gure 24).
2. Slide the controller (B) into the desired
position.
3. Tighten the allen screws.
B
A
1
2
B
A
2
1
A
2
B
1
22
23
24
5 Wheelchair settings (qualied specialists only)
SANGO ADVANCED / SLIMLINE - 19
Page 20
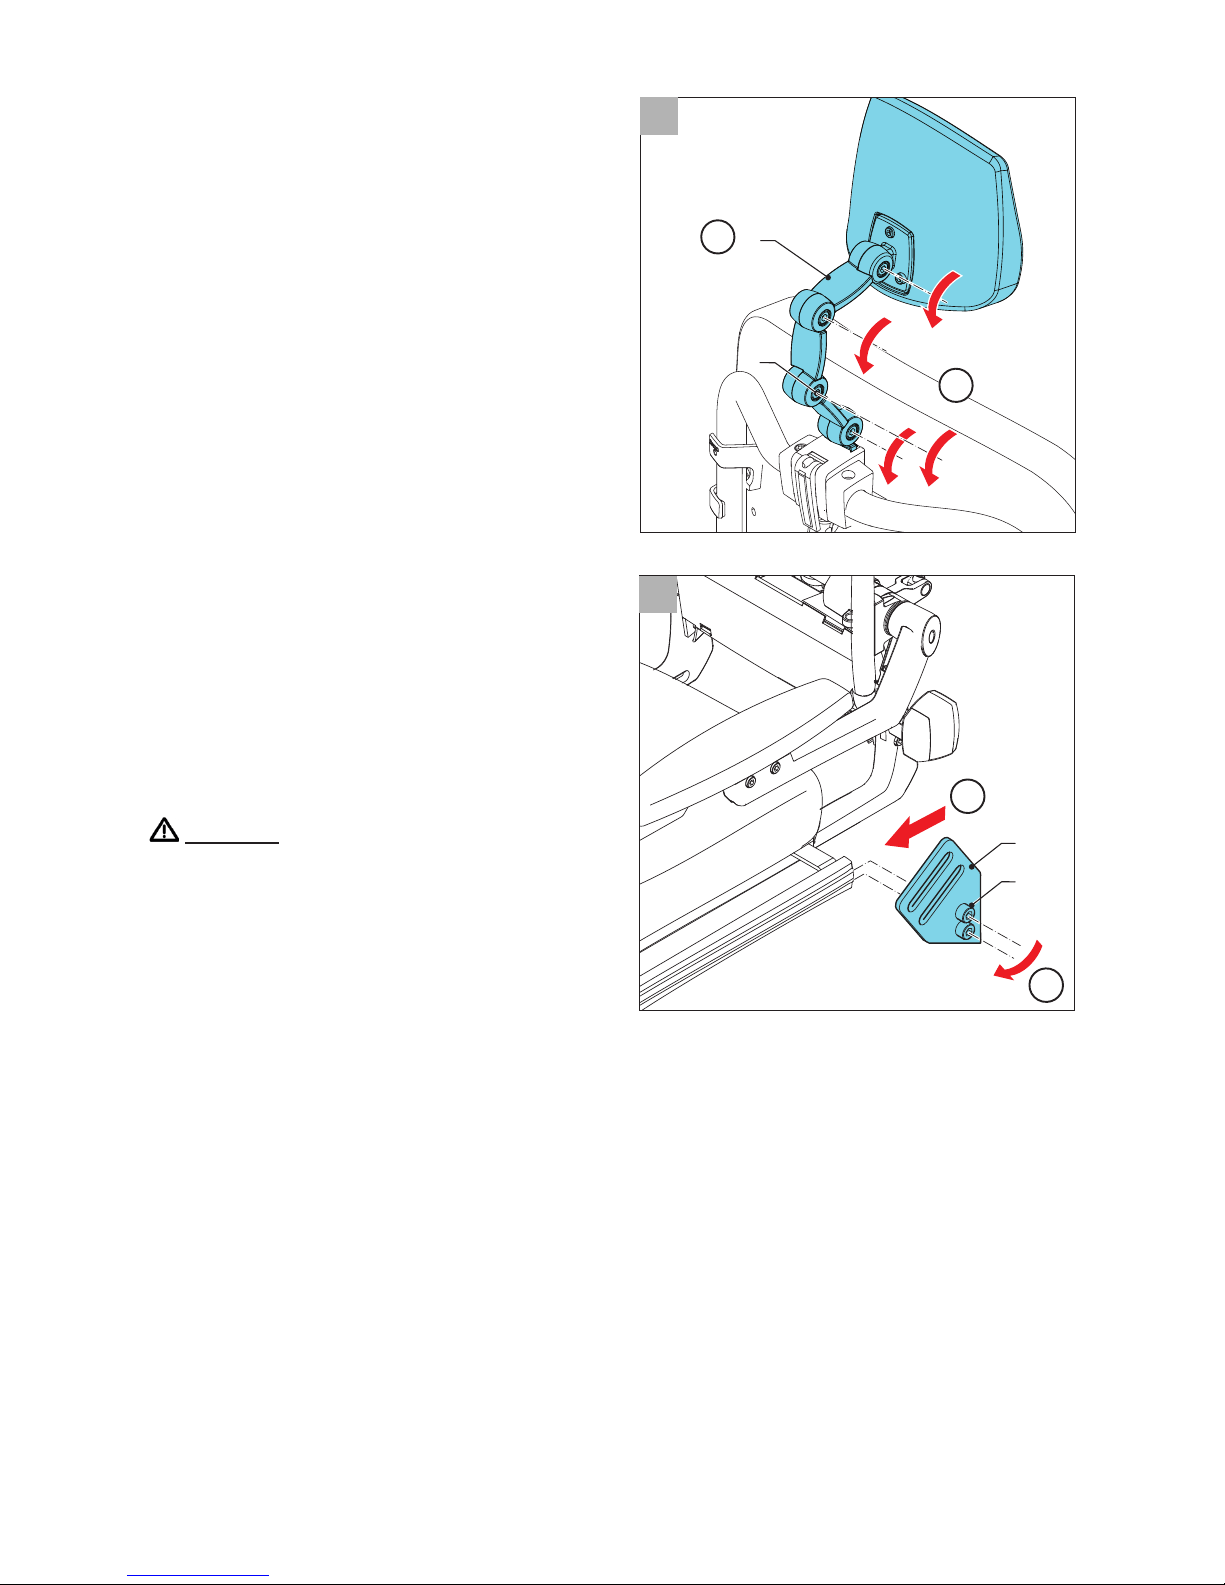
5.10. Headrest settings
Headrest height and position
1. Loosen the 4 allen screws (A gure 25).
2. Adjust the segments (B) to the right
position.
3. Tighten the allen screws.
5.11. The positioning belt
(option)
The wheelchair can be tted with a
positioning belt. This provides additional
seating stability under normal use. The
belt does not function as a safety belt for
transportation purposes.
Warning
• Ensure that the positioning belt is
adjusted to the wheelchair user. The
components of the wheelchair must
not interfere with the belt, which
should t snugly across the upper legs.
• Ensure that the positioning belt is
always clean and that its locking
mechanism works properly. The belt and the locking mechanism can be
cleaned using a damp cloth.
• If the positioning belt is placed above hip level (over the soft part of the belly)
this may lead to an incorrect sitting posture and the user slumping in the chair.
• Never use the positioning belt as a safety belt during transportation.
Mounting the positioning belt
1. Slide the bolts (A gure 26) with the belt bracket (B) into the guide.
2. Tighten the bolts.
A
B
1
2
B
1
2
A
26
25
5 Wheelchair settings (qualied specialists only)
20 - SANGO ADVANCED / SLIMLINE
Page 21
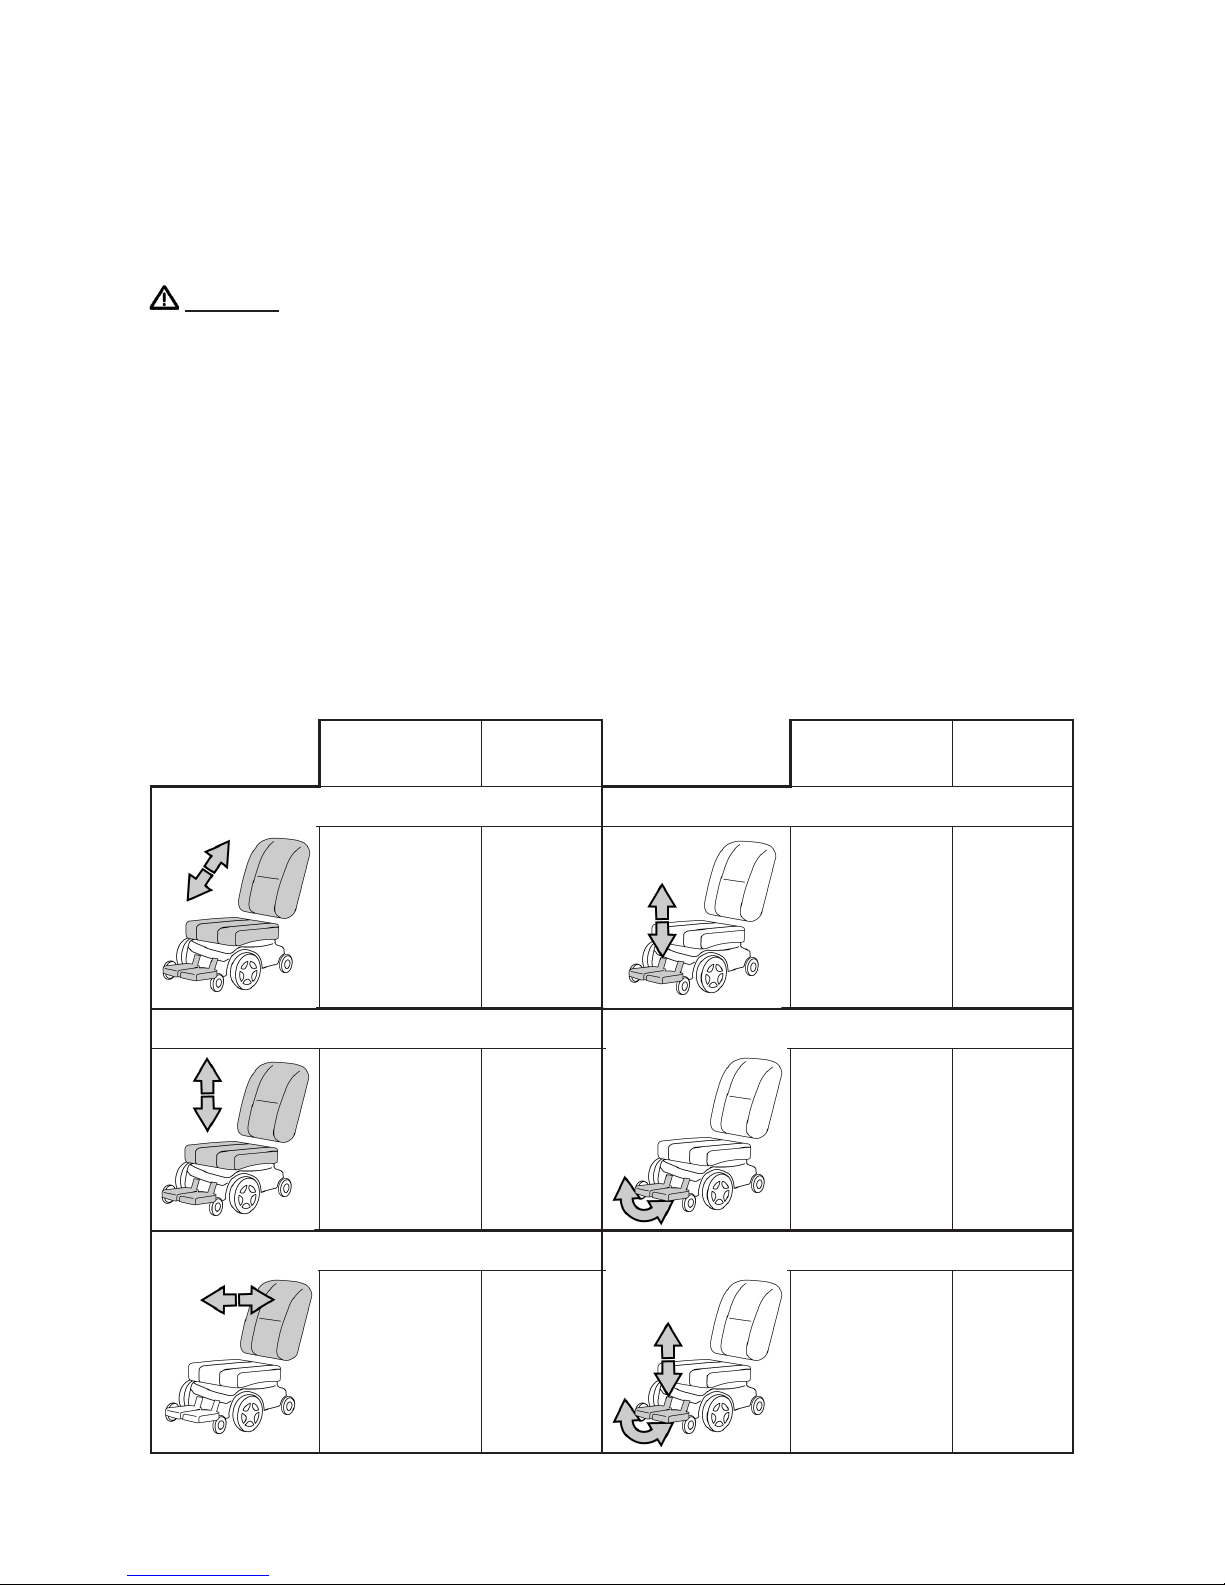
6 Wheelchair adjustments
Wheelchair adjustments are those components that the user can adjust without
the use of tools. The wheelchair may be tted with powered and/or mechanical
adjustment options.
Warning
• The centre of gravity is aected when adjustments are made. Adjustments
should therefore only be made when the wheelchair is on a at surface.
• Powered adjustments involve parts of the wheelchair moving and/or rotating.
Contact with such moving parts may result in serious physical injury or damage
to the wheelchair. You should avoid any contact with the moving parts of the
wheelchair.
• When adjustments are made, the standard size of the wheelchair increases.
Make sure that the wheelchair does not block any escape routes.
6.1. Powered adjustments
CONTROLLER how to operate the powered adjustments by use of the controller.
The following powered adjustments are possible:
Adjustment Neutral
position
Adjustment Neutral
position
Adjustable seat tilt Adjustable footrest extended
Entire seat
will tilt
forwards/
backwards.
Upright The legrest
length will
increase/
decrease.
Close to
the feet
Adjustable seat lift Adjustable footrest lift
Entire seat
will be
lowered/
raised.
Lowest
position
The legrest
angle will
increase/
decrease.
Vertical
as
possible
Adjustable backrest recline Footrest length compensating
The
backrest
will tilt
forwards/
backwards.
Upright The legrest
length and
angle will
increase/
decrease
Vertical
as
possible
SANGO ADVANCED / SLIMLINE - 21
6 Wheelchair adjustments
Page 22
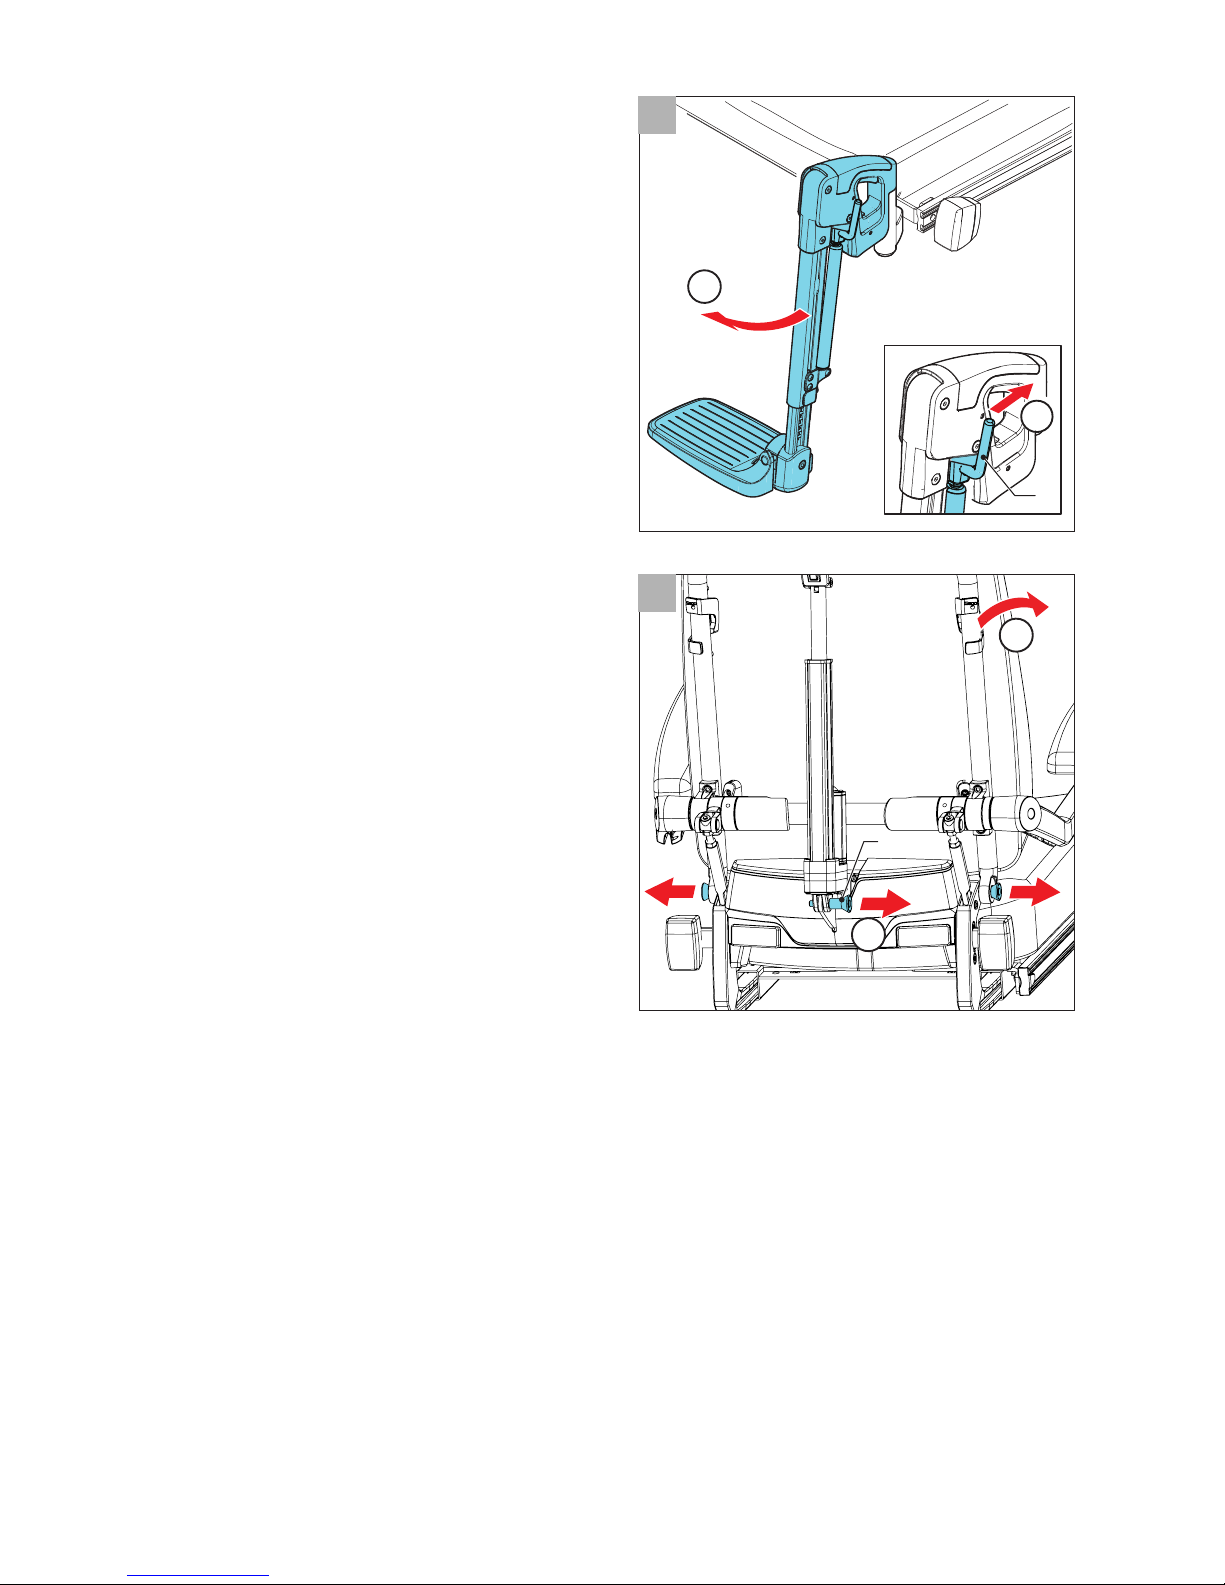
6.2. Mechanical adjustments
The following mechanical adjustments are
possible:
Comfort leg rest knee angle
The angles of the comfort leg rests can be
adjusted independently of each other.
1. Push the lever (A) forwards (gure 27).
2. Raise your leg up or push your leg
down.
3. Release the lever when in the required
position.
Swing-away controller arm
Push the controller arm to the desired
position.
Back frame (option)
(gure 28)
To fold down
1. Remove the quick-release shafts.
2. Fold down the backrest.
Upright position
1. Open out the backrest to an upright
position.
2. Replace the quick-release shafts.
22 - SANGO ADVANCED / SLIMLINE
2
1
A
2
1
A
28
27
6 Wheelchair adjustments
Page 23
7 Using the wheelchair
7.1. Checking the wheelchair
Warning
Carry out the following checks before using the wheelchair:
•
CONTROLLER check whether the batteries are suciently charged: if they
are, the green lights on the battery indicator will be on.
•
CONTROLLER check whether the lights and the indicators are working.
• Check whether the tyres are suciently inated (see 9.3).
• Ensure that the freewheel switch is in the 'drive' position (see 7.6).
Warning
When using the wheelchair:
• Take the length of your clothing into account. Before using the wheelchair,
check to see whether any garments or accessories could come into contact with
the wheels or any other moving and/or rotating parts and become entangled in
them.
• Battery capacity is reduced in winter. When there is a light frost, capacity
is around 75% of normal capacity. At temperatures below -5˚C, capacity is
reduced by approximately 50%. This reduces the operating range.
7.2. Getting into and out of the wheelchair
Getting into and out of a wheelchair is also described as making a transfer.
Warning
Do not stand on the footplates when making a transfer. They are not designed to
carry a person’s full weight. Standing on them may also cause the wheelchair to tip
over. Before making a transfer, ensure that:
• The controller is turned o
• The freewheel switch is in the 'drive' position (see 7.6)
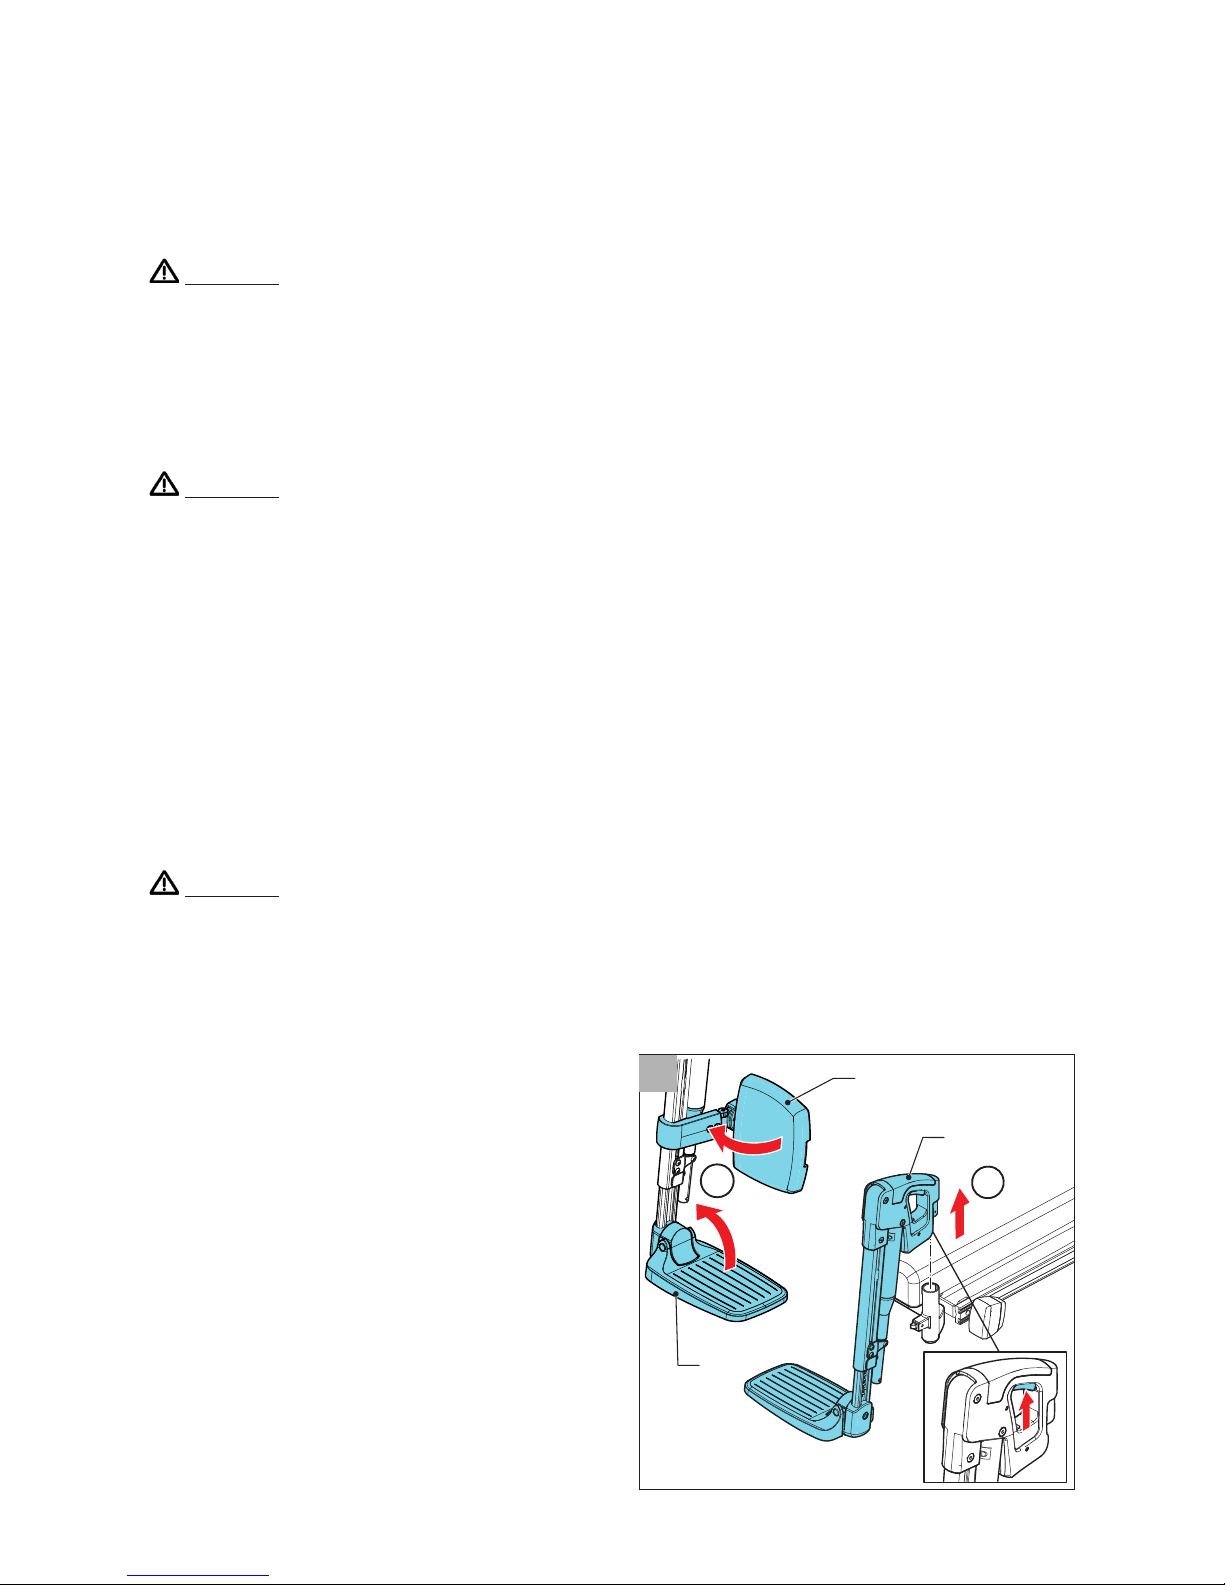
Forward transfer
1. Flip up the footrests (A gure 31) and
swing-away the calf supports (B) (if
applicable).
2. If possible, swing-away the leg rests (C)
or remove them from the bracket.
3. Sit down in the wheelchair
SANGO ADVANCED / SLIMLINE - 23
B
1
2
C
A
31
7 Using the wheelchair
Page 24
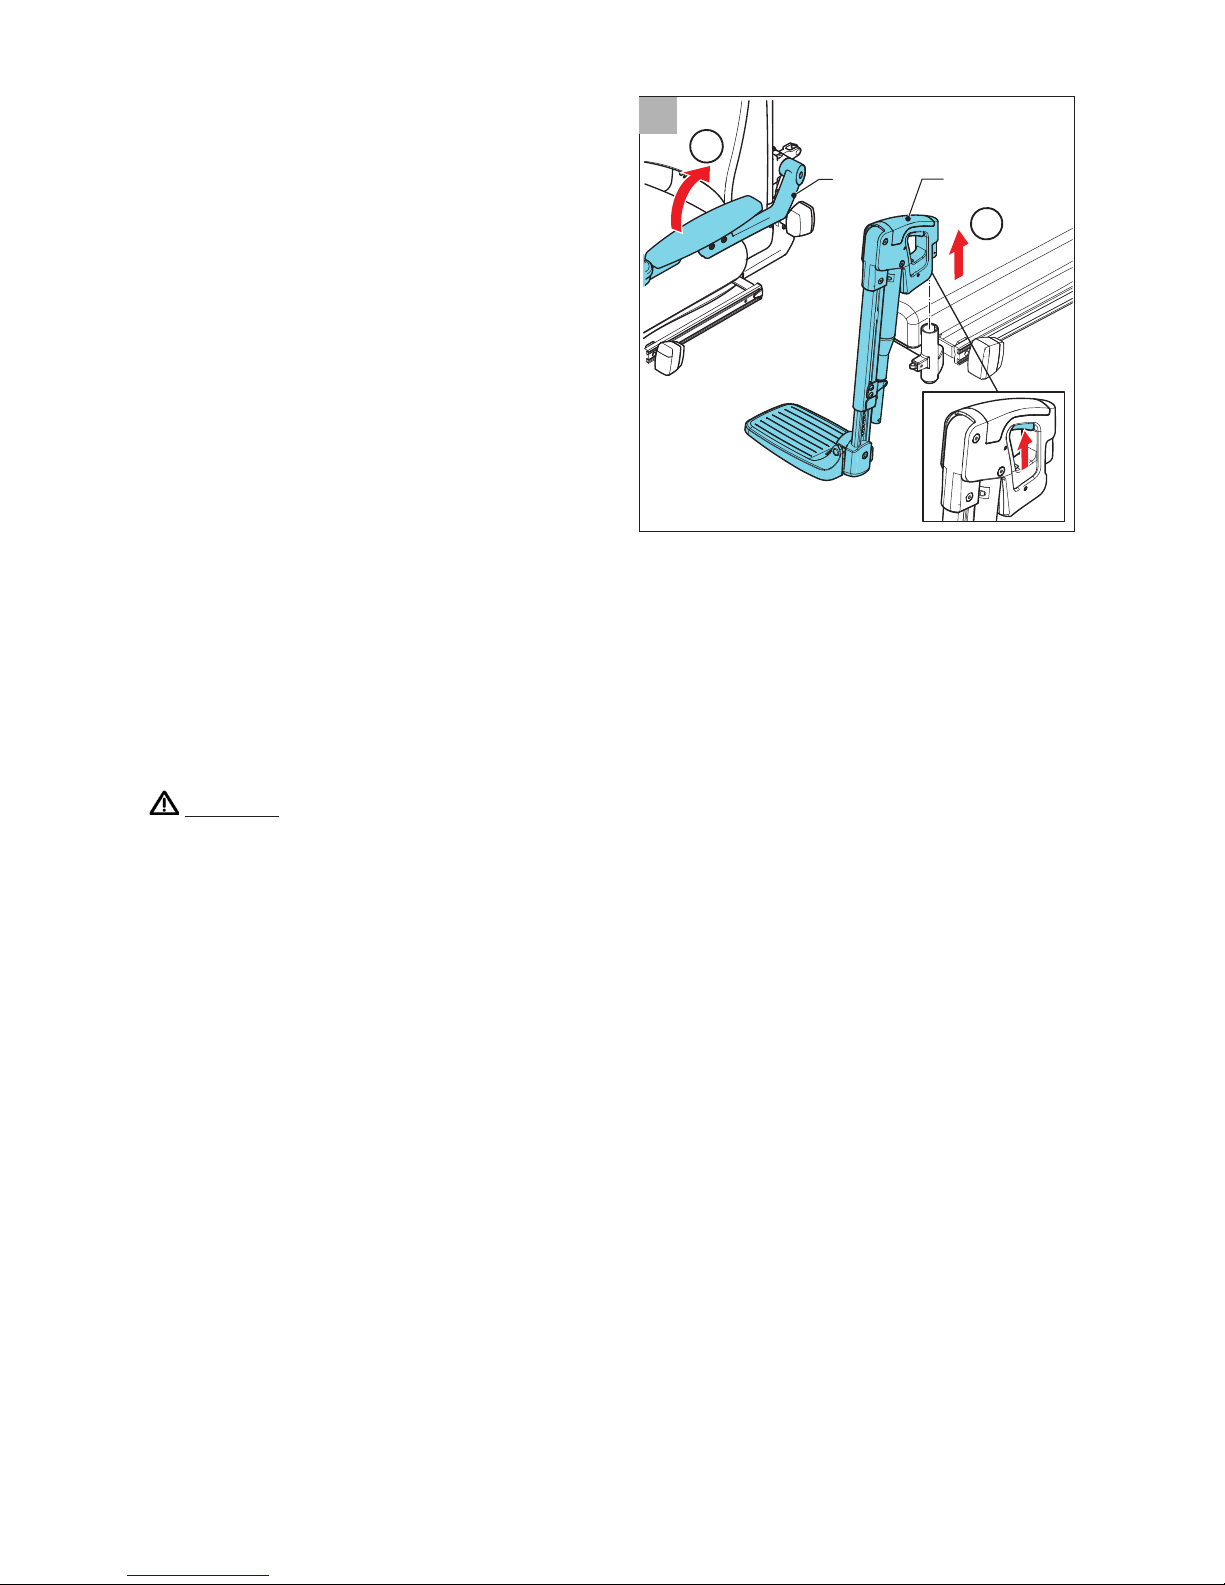
Side transfer
1. Flip up / remove the armrest (A gure
32).
2. If possible, swing-away the leg rest (B)
or remove it from the bracket.
3. Sit down in the wheelchair
7.3. Driving the wheelchair
CONTROLLER A controller is used for driving a powered wheelchair. There
is a separate manual for the controller and this is supplied with the wheelchair.
Read through all the user manuals carefully before using the wheelchair for the
rst time. The information they contain is essential for the safe use and proper
maintenance (cleaning). If any of the manuals are missing on delivery of your
wheelchair, please contact your dealer immediately.
Warning
• As a wheelchair user, you are vulnerable when on the road. Remember that
other road users may not always notice you.
• Observe trac regulations.
• Avoid taking any deserted routes so that help is always on hand in any
emergency situation.
• Adjust your speed and driving style to the conditions.
• To stop or to make an emergency stop, move the joystick to the neutral
position or let go of it. The wheelchair will then brake automatically.
• Never take corners at full speed. Reduce your speed when cornering.
• Use the indicators when changing direction.
• When driving:
• Do not press the on/o button.
• Do not suddenly start driving in the opposite direction.
If you do, the wheelchair will stop abruptly and jolt. Not only is this unpleasant,
it can also lead to the wheelchair tipping over.
24 - SANGO ADVANCED / SLIMLINE
1
2
B
A
32
7 Using the wheelchair
Page 25
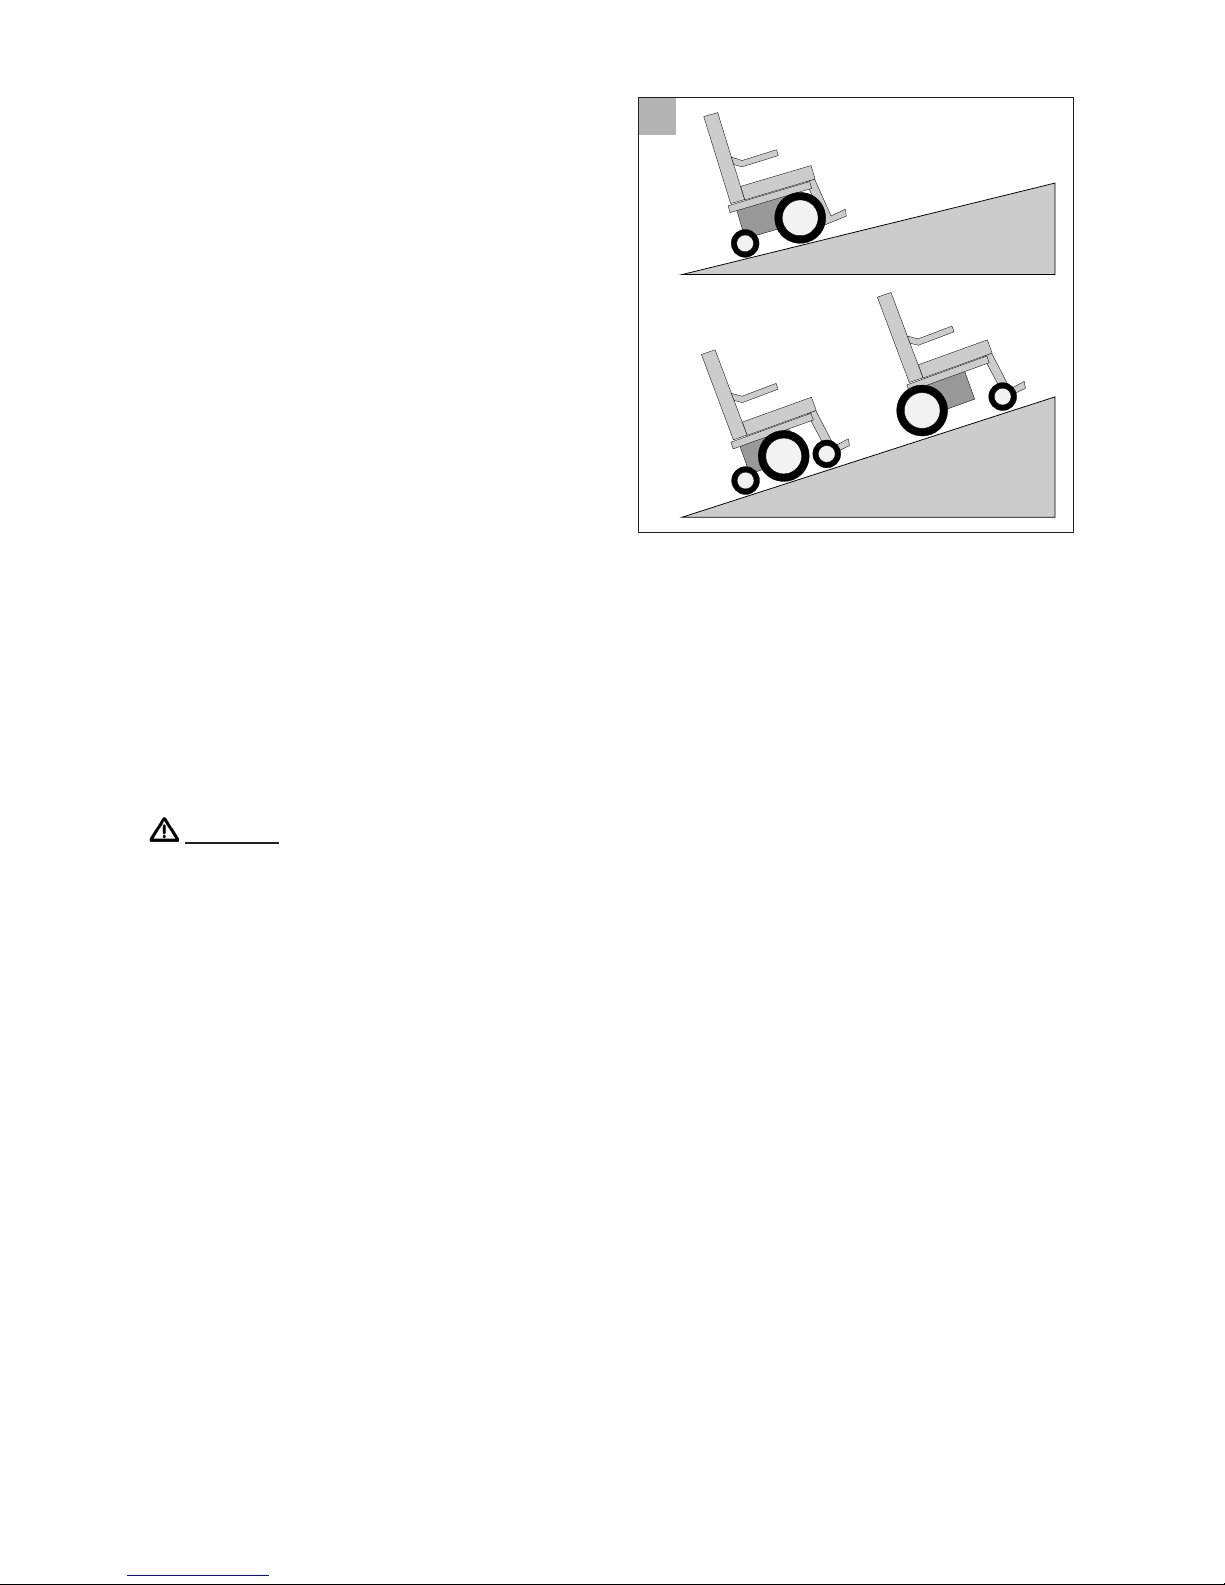
7.4. Driving on slopes or ramps
With all settings in the neutral position
(see 6.1), slopes/ramps of ≤6˚ (10.5%) are
deemed to be part of the standard user
environment for the FWD without stability
being aected (gure 33). For the RWD
and MWD the applicable gradient is ≤10˚
(17.6%).
Slopes or ramps outside the standard
user environment
Driving on slopes/ramps that are steeper
than the maximum safe slope may lead
to safety risks in terms of stability. Driving
on such slopes/ramps requires the user to
practise extreme caution and full control.
Always drive carefully and never experiment! Follow the instructions given under
warnings!
The stability and performance of the wheelchair depend on many variables.
Wheelchairs are adapted to individual users. For this reason these variables will be
dierent from one wheelchair to another. You should therefore ensure that your
dealer provides you with sucient information about how to use the wheelchair
and that the dealer informs you whether the specic adjustments or adaptations
for your situation will aect the handling of the wheelchair.
Warning
• Always drive up and down slopes/ramps slowly, concentrating on what you are
doing.
• Avoid any sudden, jolting movements.
• Avoid making an emergency stop on a slope/ramp.
• The braking distance on a slope can be considerably greater than on a at
surface.
• When on slopes/ramp, try to avoid changing direction as much as possible.
• Do not turn on a slope.
• Drive on slopes/ramps only when all adjustments (lift, tilt, recline) are in the
neutral position.
• Never drive up or down a slope/ramp backwards.
• Do not drive on slopes/ramp with loose gravel or a sandy surface, as one of the
drive wheels may slip or spin.
• Driving up or down a slope for long periods of time may result in the motor
overheating.
• We always recommend an anti-tip device for driving down slopes in a FWD
wheelchair.
• If you notice that your speed is being greatly reduced when driving up a slope,
select a route that is less steep.
• Prevent the wheelchair from reaching high speeds when driving down slopes.
SANGO ADVANCED / SLIMLINE - 25
≤10˚
≤6˚
33
7 Using the wheelchair
Page 26
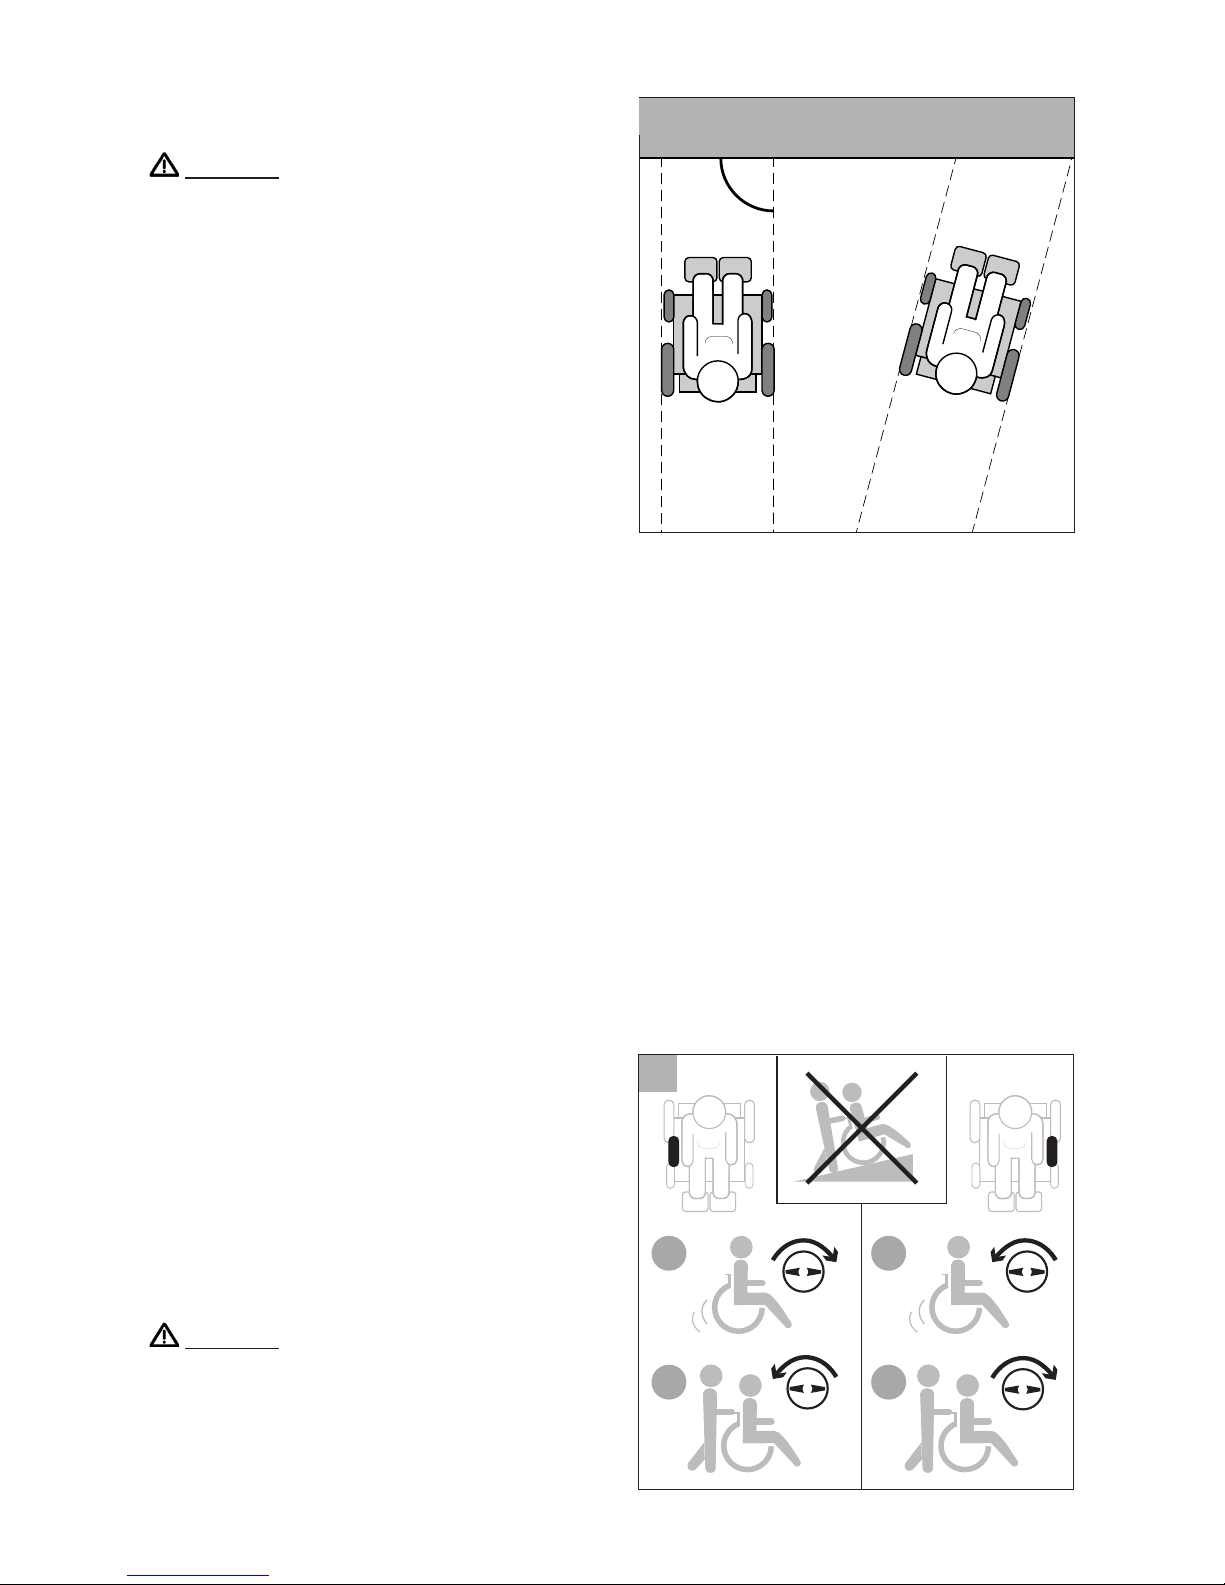
7.5. Obstacles
Warning
• Never descend steps/a ight of stairs
in a wheelchair.
• Do not drive o of obstacles higher
than 50 mm.
• Always drive onto or o an obstacle in
forward direction.
• Drive on slopes/ramps only when all
adjustments (lift, tilt, recline) are in the
neutral position.
Mounting pavements
• Select the lowest section of the kerb.
• Position the wheelchair so it is facing
the kerb, 20 cm in front of it. (gure
34).
• Move the joystick forwards. Drive onto the pavement without changing
direction.
• Once the front wheels have mounted the pavement, you will need to maintain
speed to get all of the wheels up onto it. If you are not able to mount the
pavement, select a section where the kerb is lower.
Dismounting pavements
• Select the lowest section of the kerb. If in any doubt, do not take any risks and
choose a dierent route.
• Position the front wheels so that they are facing the kerb.
• Slowly move the joystick forwards. Drive o of the pavement as carefully and as
slowly as possible without changing direction.
7.6. Pushing the wheelchair
The wheelchair can also be moved by pushing it. The motors need to be
disengaged in order to make this possible.
This is done using a freewheel switch, one
for the left and one for the right motor
(gure 35).
A. ‘Drive’ position. The wheelchair can
be moved by use of the controller, it
cannot be pushed.
B. 'Push' position. The wheelchair can be
pushed, the controller cannot be used
to drive the wheelchair.
Warning
• The freewheel lever was developed for
the attendants of wheelchair users.
The freewheel lever must never be
operated by the user himself/herself. It
should be used only by an attendant.
26 - SANGO ADVANCED / SLIMLINE
90°
X√
A
B
A
B
34
35
7 Using the wheelchair
Page 27

• The automatic parking brake works only in the 'Drive' position.
• The freewheel lever must be set to the 'Push' position only if the wheelchair
is to be actually pushed. Set the freewheel switch to the 'Drive' position
immediately after pushing is nished.
• Never use the 'Push' position on a slope! When the freewheel lever is in the
'Push' position, the automatic parking brake is turned o. This could then result
in the wheelchair rolling downhill accidentally.
7.7. Storage of the wheelchair after use
When the wheelchair is not in use:
• It must be stored in a dry place where it will not be aected by the weather.
• Do not position the wheelchair in direct sunlight. Parts of the wheelchair could
then become so hot that they could burn you.
• The ambient temperature for storage should be no lower than -20˚C and no
higher than +65˚C.
• Disconnect batteries in case of longer storage without usage.
If you start using the wheelchair again after it has been in storage for a while, you
must check it again (see 7.1).
SANGO ADVANCED / SLIMLINE - 27
7 Using the wheelchair
Page 28
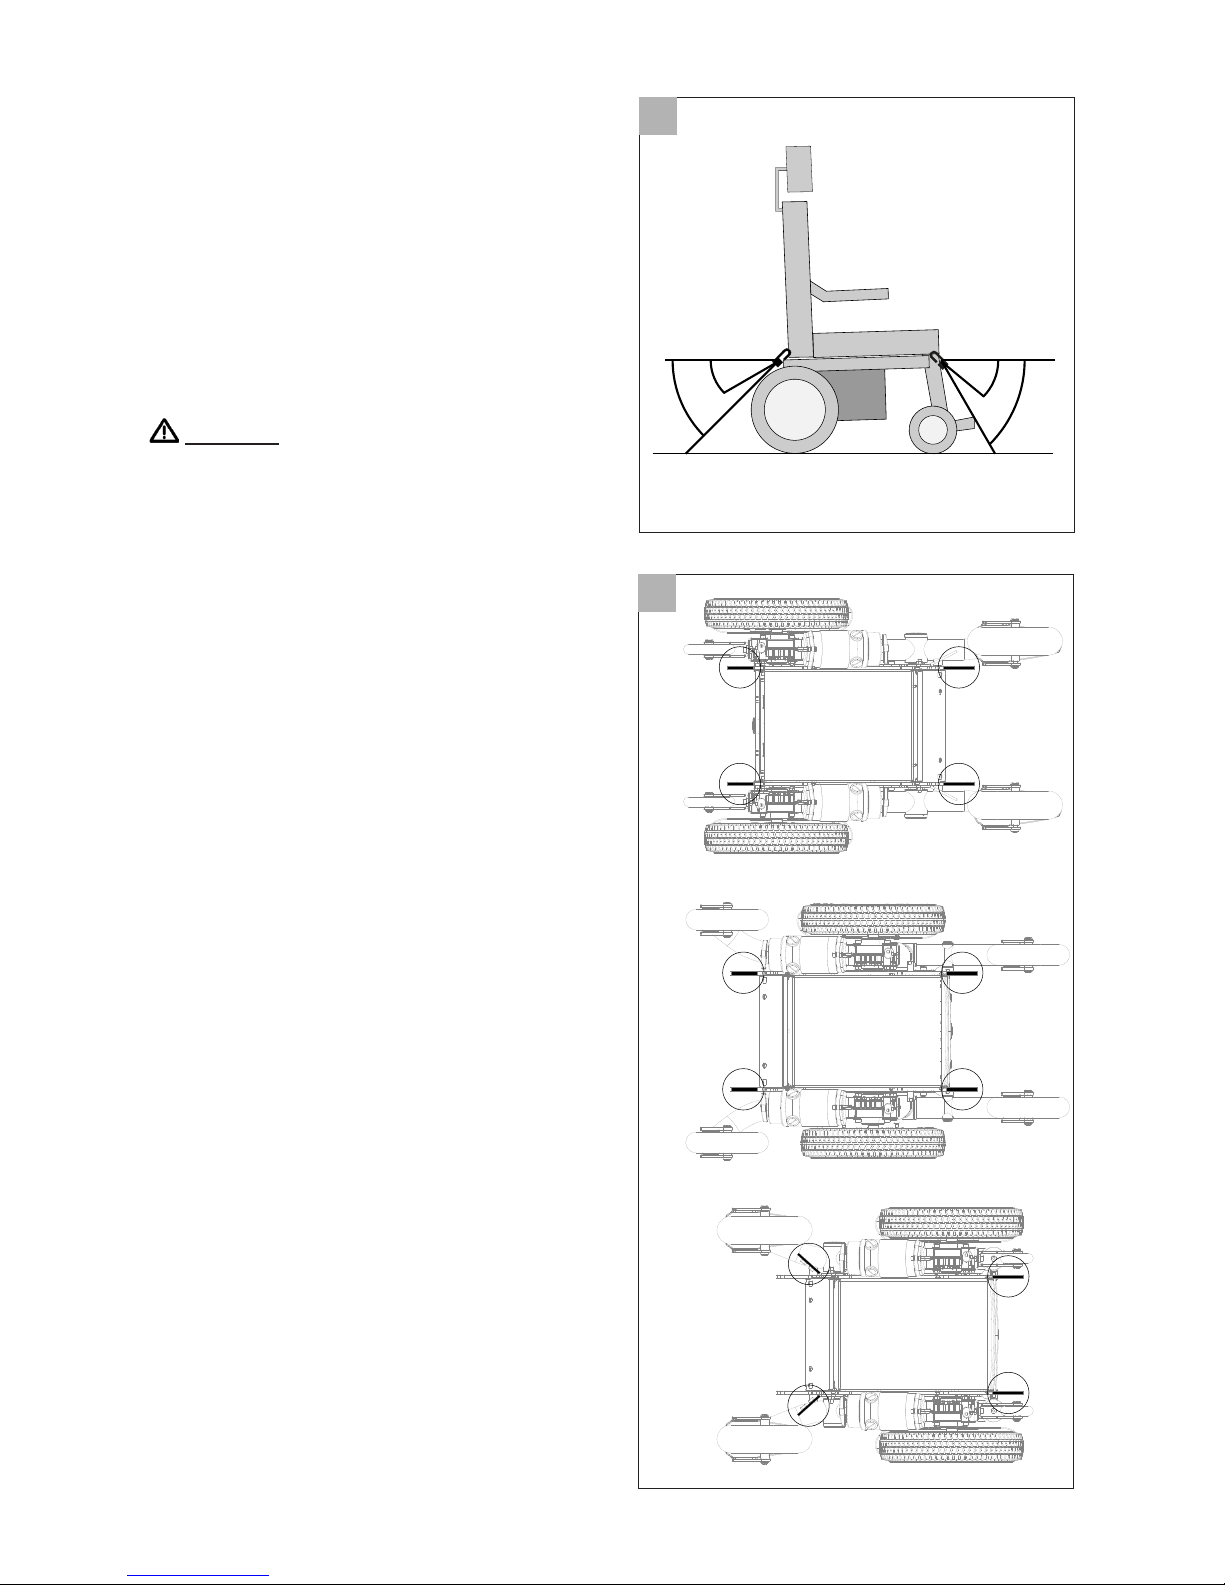
8 Transport
8.1. Transporting the
wheelchair in motor
vehicles
Powered wheelchairs are too heavy to
lift. Use suitable ramps for getting the
wheelchair into a vehicle.
Warning
Always take the following into account:
• Position the wheelchair in a forward-
facing direction inside the vehicle.
• Any components that can easily be
detached from the wheelchair must be
removed (see 4). Store away any such
components properly.
• The wheelchair should be secured
only by using the particular provided
securing points on the frame (gure
37).
• No changes or replacements must
be made to the anchorage points on
the wheelchair, or to constructional
elements or parts of the frame without
consulting DIETZ-Power.
• Use a 4-point strap tiedown system
approved to ISO10542 standards
and suitable for the total weight
of the wheelchair. The weight of
the wheelchair will depend on its
composition. A list of some of the
options and how much they contribute
to the total weight of the wheelchair
can be found in the specication table
(see 9). Always take the total weight of
the wheelchair into account in order to
ensure that the tiedown system is the
correct one.
• The tiedown straps should be
attached as close as possible to the
wheelchair at an angle of 45 degrees
(gure 36) and tightened securely in
accordance with the instructions of the
manufacturer of the tiedown system.
• The wheelchair should be inspected
by a DIETZ-Power authorised dealer
before re-use following involvement in
any type of vehicle impact.
28 - SANGO ADVANCED / SLIMLINE
45°
30°
40°
60°
36
FWD
MWD
RWD
37
Page 29
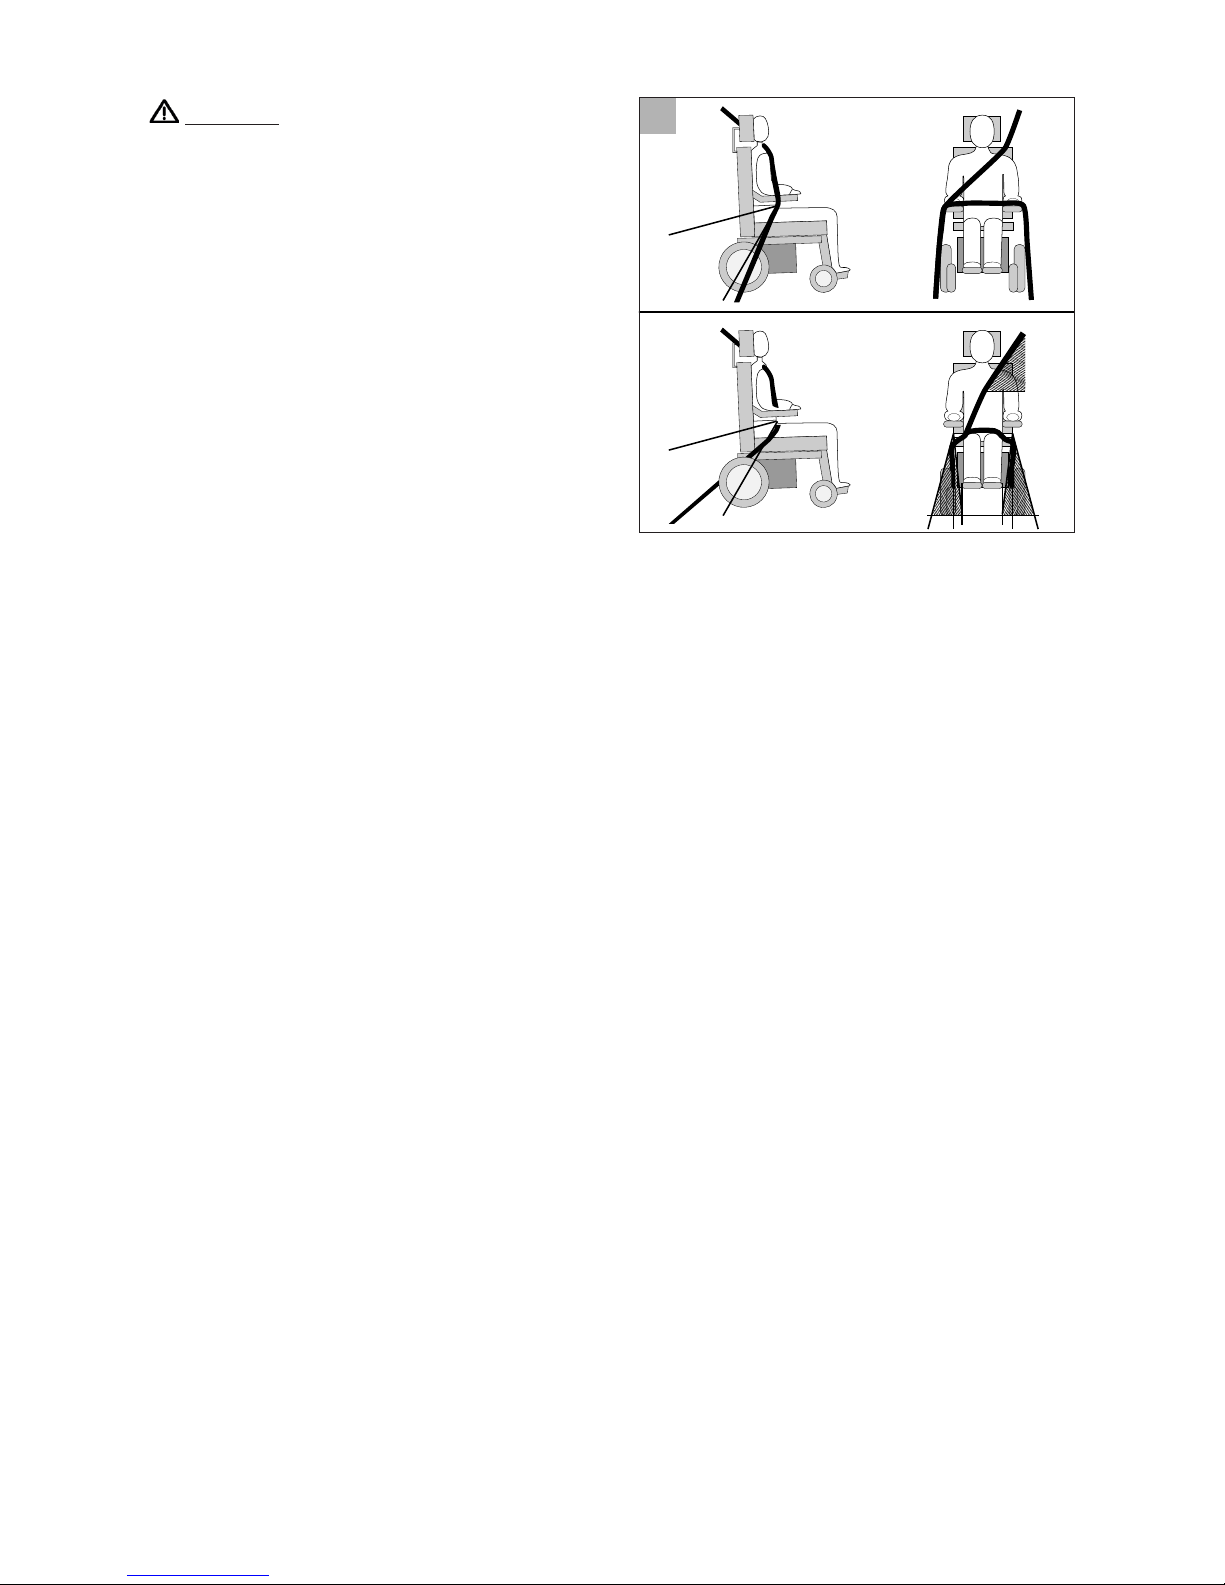
Warning
Wheelchairs are not designed to function
as seats inside a vehicle and do not
provide the same level of safety as a
normal seat, irrespective of how well they
are secured inside the vehicle. DIETZPower recommends that wheelchair users
transfer to a standard seat whenever
possible. If this is not possible, then the
following should be taken into account:
• This wheelchair is crashtested with
a 4-point strap tiedown system
according to ISO 7176-19 (2008)
considering a maximum passenger
weight of 102 kg.
• Ask the vehicle operator whether
the vehicle is suitable, insured and
equipped for the transportation of a user seated in a wheelchair.
• Set all adjustments of the wheelchair in the neutral position (see 6.1).
• Ensure that the controller is turned o.
• DIETZ-Power recommends tting and using the headrest during transportation.
• Any belt attached to the wheelchair will be purely for positioning purposes and
should not be used or relied on for occupant restraint in a moving vehicle.
• It is vital that you are secured with a three-point seat belt attached to the oor
and the wall of the vehicle during transportation.
• The pelvis part of the three-point seat belt must be adjusted as tightly as
possible consistent with user comfort, at an angle between 30° and 75° and
should not be held away from the body by wheelchair components (gure 38).
• Both the pelvic and chest belts should be used to reduce the risk of head and
chest injuries in the event of colliding with parts in the car.
SANGO ADVANCED / SLIMLINE - 29
38
30°-75°
30°-75°
X
√
300
55°
15° 15°
Page 30
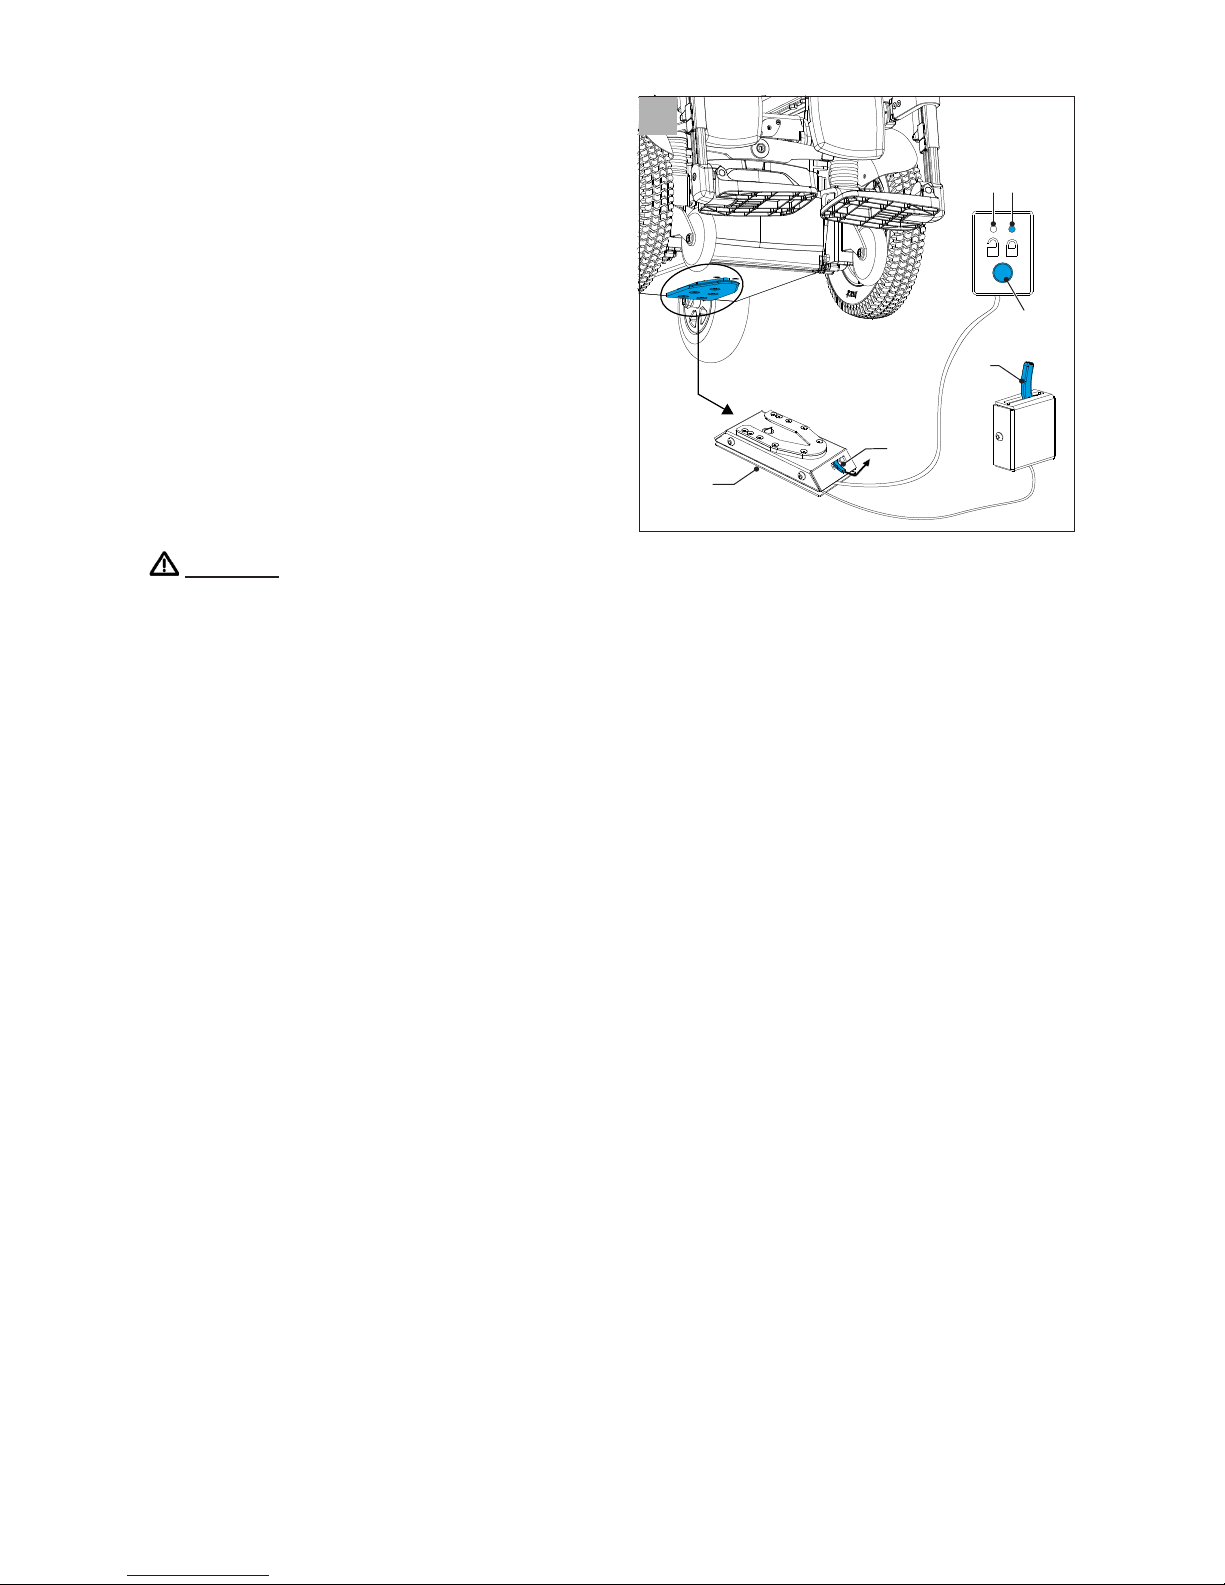
8.2. The wheelchair as a
driver’s seat in a car with
Dahl docking system
(option)
Securing the wheelchair (gure 39)
1. Drive the wheelchair into the car
docking station (A). When the
wheelchair is correctly positioned, the
locking plate that is mounted under
the wheelchair automatically clicks into
the docking station.
2. The LED light (B) on the control panel
indicates that the wheelchair is locked
and remains as long as the locking
plate is in the docking station.
Warning
• A crash test with Dahl was performed on this wheelchair according to ISO 7176-
19 (2008) with a dummy weight of max. 77 kg.
• The docking station must always be clean, free of durt and there must be no
objects that may obstruct the locking of the locking plate in the docking station.
• The wheelchair must always be secured according to current regulations. The
docking system must be checked regularly and must be replaced if damaged.
• A warning tone sounds when the lock plate is not properly locked in the
docking station.
Unlock the wheelchair
To unlock commence by driving the wheelchair forward to release pressure on
the lock pin and press the release button (C). Do not attempt to reverse out of the
docking station until the red LED on the control module (F), which indicates the
unlock position, has been illuminated. Attempting to reverse the wheelchair before
the red LED has been illuminated will result in blocking the docking stations lock
mechanism which makes it impossible to reverse. If this happens repeat above
unlocking procedure.
In case of power failure use the manual release lever (D or E).
30 - SANGO ADVANCED / SLIMLINE
A
B
C
D
E
F
39
Page 31
8.3. Special transport
In addition to being transported by road,
the wheelchair can also be transported
by rail, sea or air. Its batteries may be
transported in accordance with IATA
regulations.
Warning
• Before travelling, contact the
organisation providing transport. Your
tour operator will be able to provide
you with information about any special
requirements/instructions.
• Take all the user manuals delivered
with your wheelchair with you. For
more information about
• reducing the wheelchair in size (see 4).
• driving or pushing the wheelchair (see 7.6).
• the batteries in your wheelchair (see 9.2).
• the dimensions and weight of the wheelchair (see 10).
• CONTROLLER for locking the controller (see 4).
• Ensure that all detachable components are mounted on your wheelchair
properly or that they are packed separately and labelled so that they do not get
lost during loading and unloading.
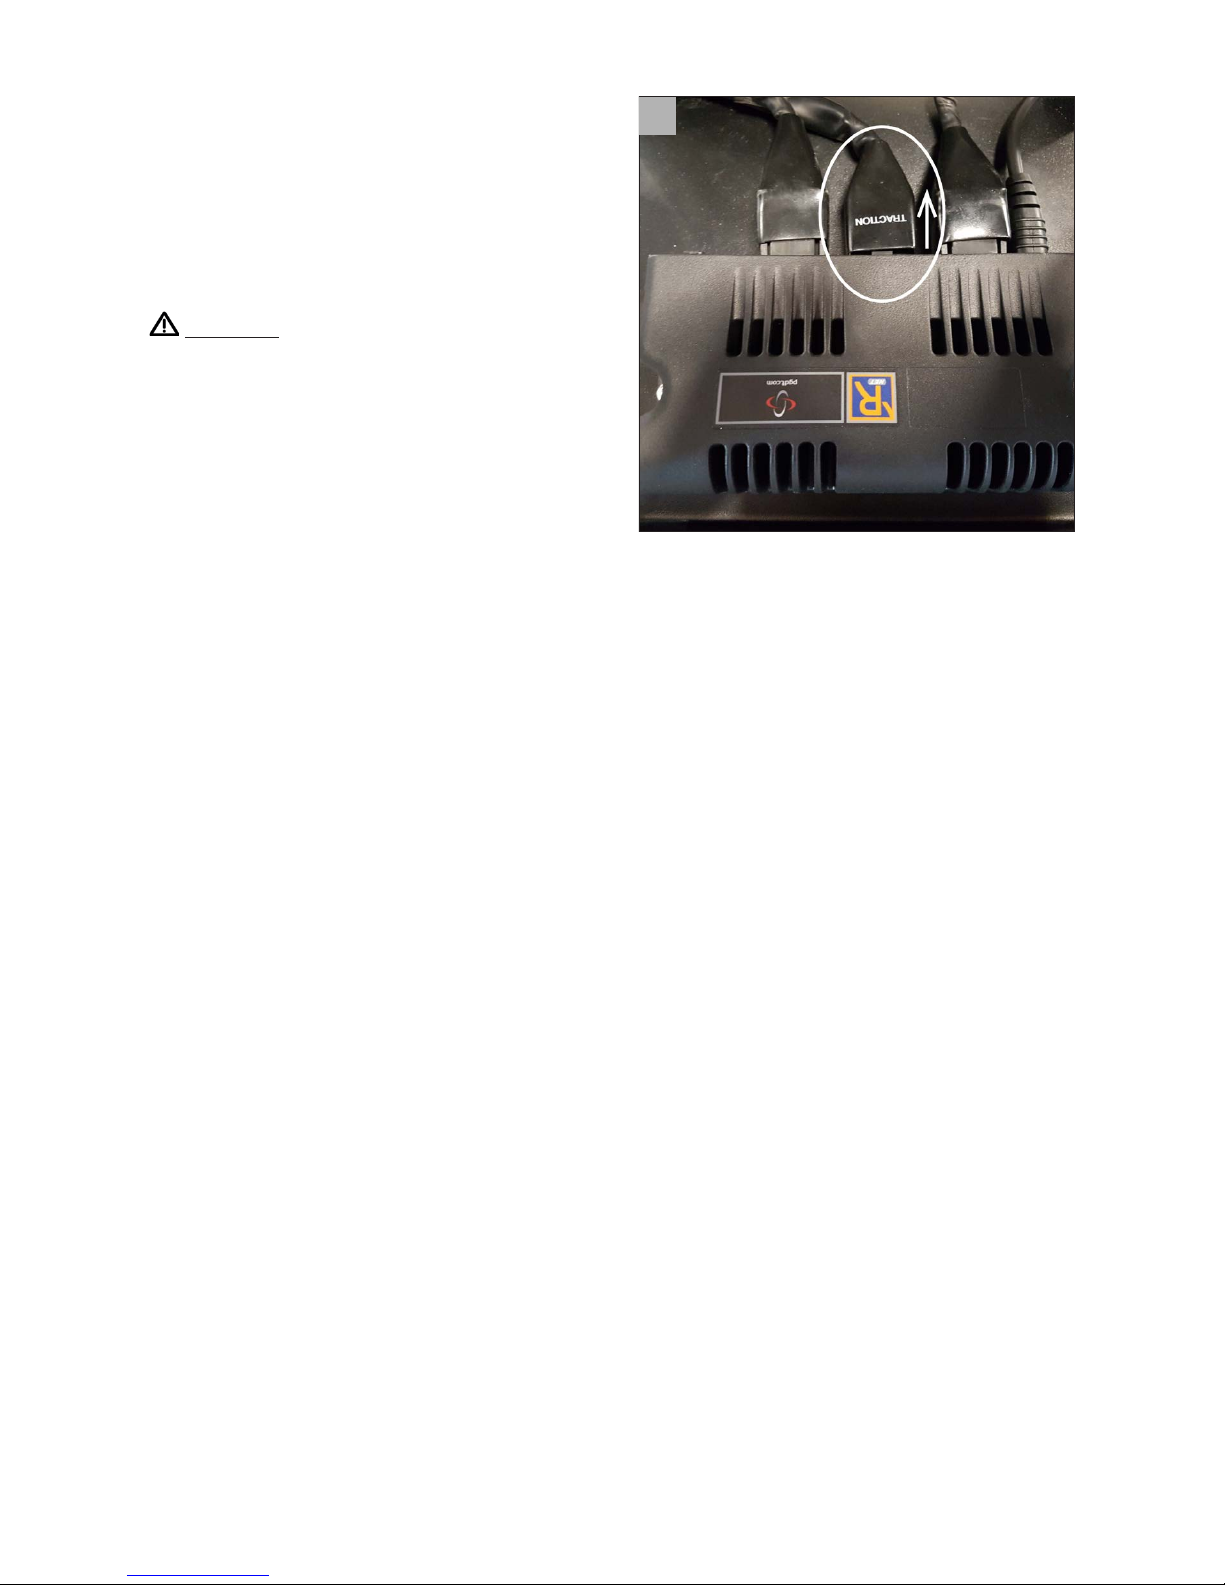
In some cases the power cable of the controller needs to be disconnected (see
gure 40):
1. Loosen the two knobs of the cover between the wheels.
2. Remove the fuse cover.
3. Remove the fuse cable.
SANGO ADVANCED / SLIMLINE - 31
40
Page 32
9 Wheelchair maintenance
Contact your dealer for information regarding specic adjustments, maintenance
and repairs. Always state the wheelchair type, year of construction and
identication number. These can be found on the identication plate (see 2.4).
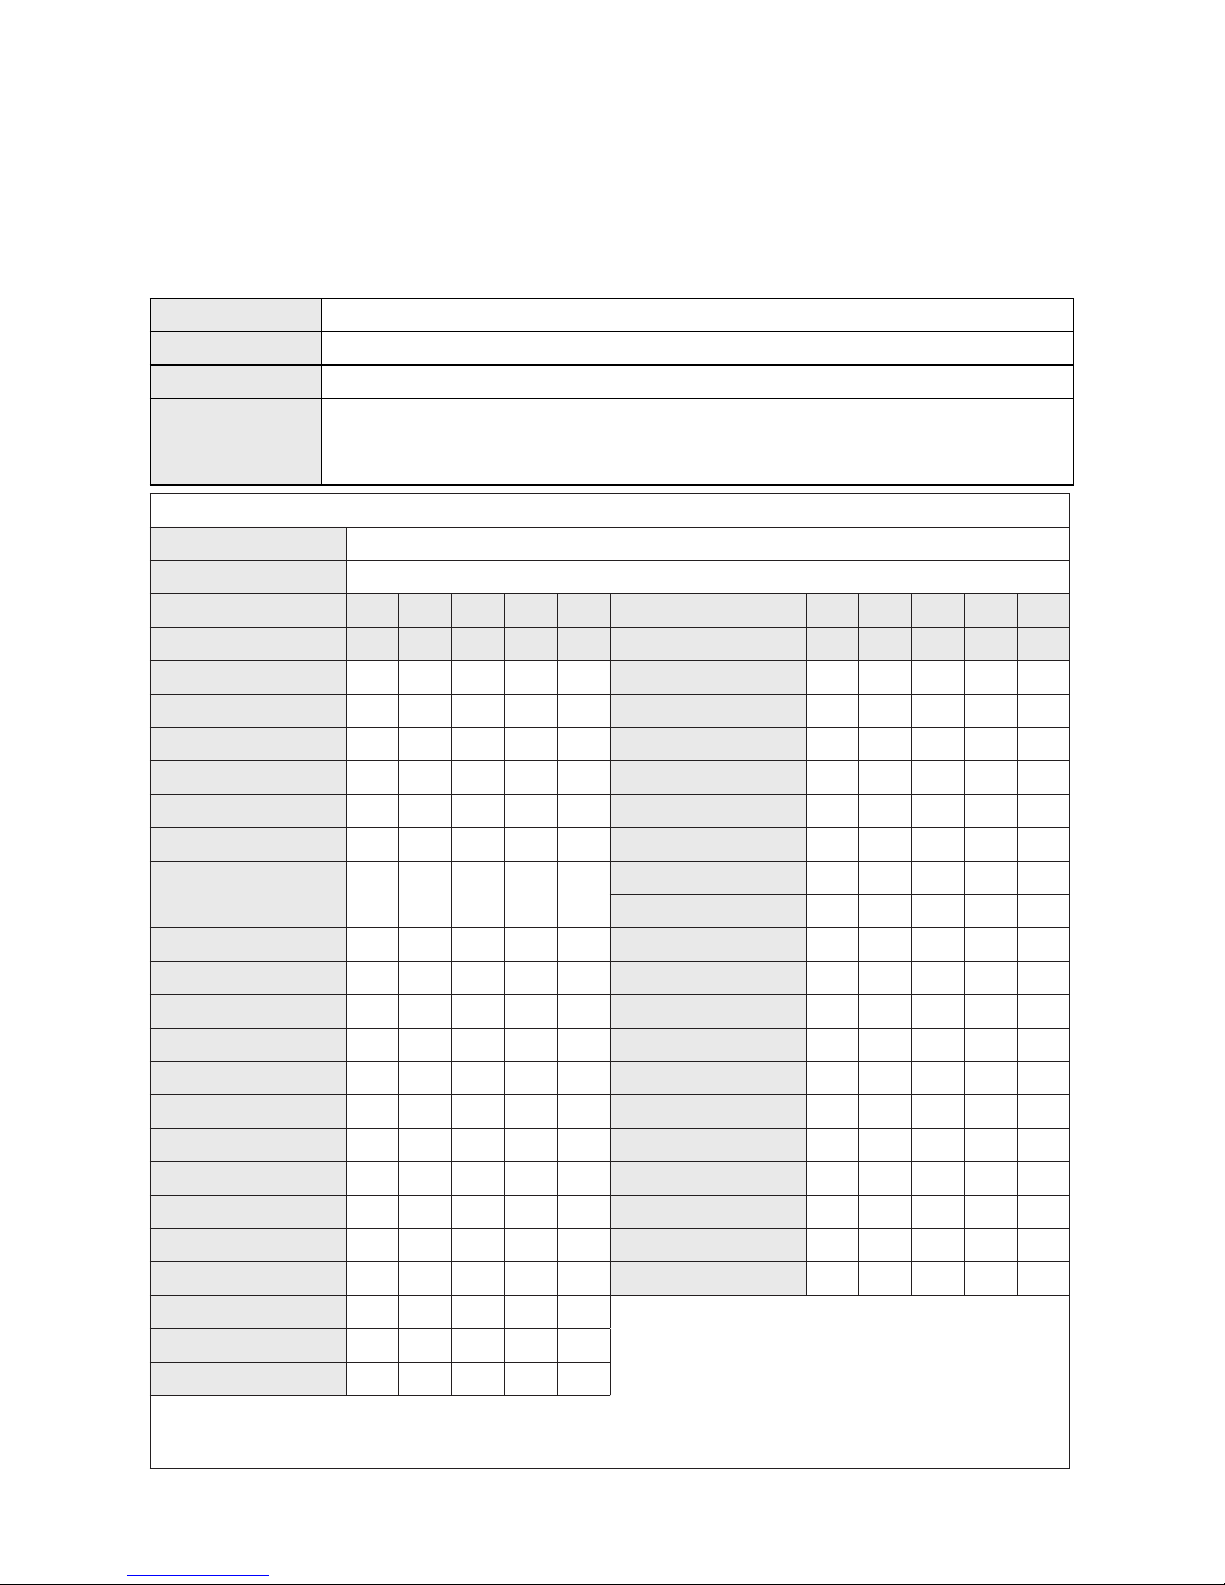
For the proper maintenance of your wheelchair, adhere to the following schedule:
Daily Charge batteries after each use (see 9.2)
Weekly Check tyre pressure and inate tyres if necessary (see 9.3)
Monthly Clean the wheelchair and its upholstery (see 9.1)
Annually Have your wheelchair checked by your dealer once a year or, if
under intensive use, once every six months. Take this manual
with you and have the dealer ll in details on the schedule below.
Use only original DIETZ-Power parts for maintenance and repairs.
Model
Serial number
Year 1 2 3 4 5 Year 1 2 3 4 5
Date Date
Operation Chassis
Horn Parts tightened
On/o switch Condition
Output plug Controls
Joystick Upholstery
Brakes Seating system
Programme
conguration
Backrest
Armrests
Batteries Electronics
Level Cable condition
Connectors Connectors
Discharge level Driving
Wheels Forwards
Wear Reverse
Pressure Emergency stop
Bearings Turning
Wheel nuts Uphill/downhill
Motors Obstacles
Wiring Parking brake
Connectors
Noise
Brakes
Remarks:
32 - SANGO ADVANCED / SLIMLINE
9 Wheelchair maintenance
Page 33

9.1. Cleaning the wheelchair and its upholstery
Warning
• When cleaning the wheelchair, ensure that the controller is turned o. If the
joystick is accidently touched, this may cause the wheelchair to start moving or
the powered options to be operated.
• Take care when using water because of the system being electronic.
• Clean the upholstery and the dirty parts of the wheelchair using a damp cloth
and household soap. Then rub dry using a soft, dry cloth.
• Never use abrasive or aggressive detergents, as these may scratch surfaces.
• Do not use any organic solvents, such as thinner, benzine or white spirit.
• Do not chemically clean the upholstery.
• Do not iron or spin-dry the upholstery.
9.2. Batteries
The wheelchair is tted with 'dry' gel batteries. The batteries are fully sealed and
require no maintenance.
Warning
• The use of ‘wet’ batteries is not permitted.
• Battery capacity is reduced in winter. When there is a light frost, capacity
is around 75% of normal capacity. At temperatures below -5˚C, capacity is
reduced by approximately 50%. This reduces the operating range.
• Ensure that the batteries are always well charged. Long-term non-usage of the
batteries can damage them.
• Do not use the wheelchair if the batteries are almost at and never drive until
the batteries are completely at. Doing so can seriously damage them and you
would also mean running the risk of coming to a standstill.
• The batteries contain gel. Damaged batteries pose a serious threat to health.
Always follow the instructions on the batteries.
Charging
Technical specications (see 10).
CHARGER to check if the charger is suitable for use with the wheelchair
batteries and for instructions on how to activate the battery charger.
CONTROLLER for the right connection for the charger plug.
The contents of the manuals are vital in terms of the safe use of the wheelchair. If
any of the manuals are missing on delivery of your wheelchair, please contact your
dealer immediately.
Under normal use, the batteries will need to be charged every night. The battery
charger indicates when the batteries are fully charged. Depending on how at the
batteries are, it can take up to 12 hours to fully charge them.
Replacement
If the battery capacity is steadily decreasing and the wheelchair can only be used
for very short trips, this means that the batteries have reached the end of their
lifespan. They then need to be replaced. Consult your dealer.
SANGO ADVANCED / SLIMLINE - 33
9 Wheelchair maintenance
Page 34

9.3. Tyres
In order to ensure optimum performance of your wheelchair, it is very important
to keep its tyres at the right pressure. The correct pressure can also be found on
the side of the tyres.
Wheel
Maximum tyre
pressure
8” castor wheel 2,5 bar
9” castor wheel 3,5 bar
10” castor wheel 3,5 bar
12” drive wheel 2,8 bar
14” drive wheel 3,5 bar
Warning
Never exceed the maximum tyre pressure.
If tyres are too soft, the handling of the wheelchair will be reduced. Propelling
the wheelchair will also require more energy, resulting in a greater drain on the
batteries. Driving with soft tyres also unnecessarily increases tyre wear.
Warning
SERVICE for comprehensive details relating to tyre repairs (qualied specialists
only). Before starting any repair work on the tyres, rst fully deate them.
34 - SANGO ADVANCED / SLIMLINE
9 Wheelchair maintenance
Page 35

9.4. Disposing of the wheelchair
The technical lifetime of the wheelchair is inuenced by the extent to which it
is used. Under normal use and with the prescribed maintenance, the expected
technical lifetime of the wheelchair is approximately seven years. In order to derive
maximum benet from the lifetime of the wheelchair, ensure that it undergoes
regular maintenance (see 9).
If your wheelchair is no longer required or needs to be replaced, it will
usually be possible to arrange for your dealer to take it back. If this
should not be possible, consult with your local authority to nd out if
it can be recycled or if the materials used in it can be processed in an
environmentally friendly way.
Various plastics and metals were used in the manufacture of the wheelchair. It
also contains electronic components that should be disposed of appropriately. The
batteries constitute chemical waste.
SANGO ADVANCED / SLIMLINE - 35
9 Wheelchair maintenance
Page 36
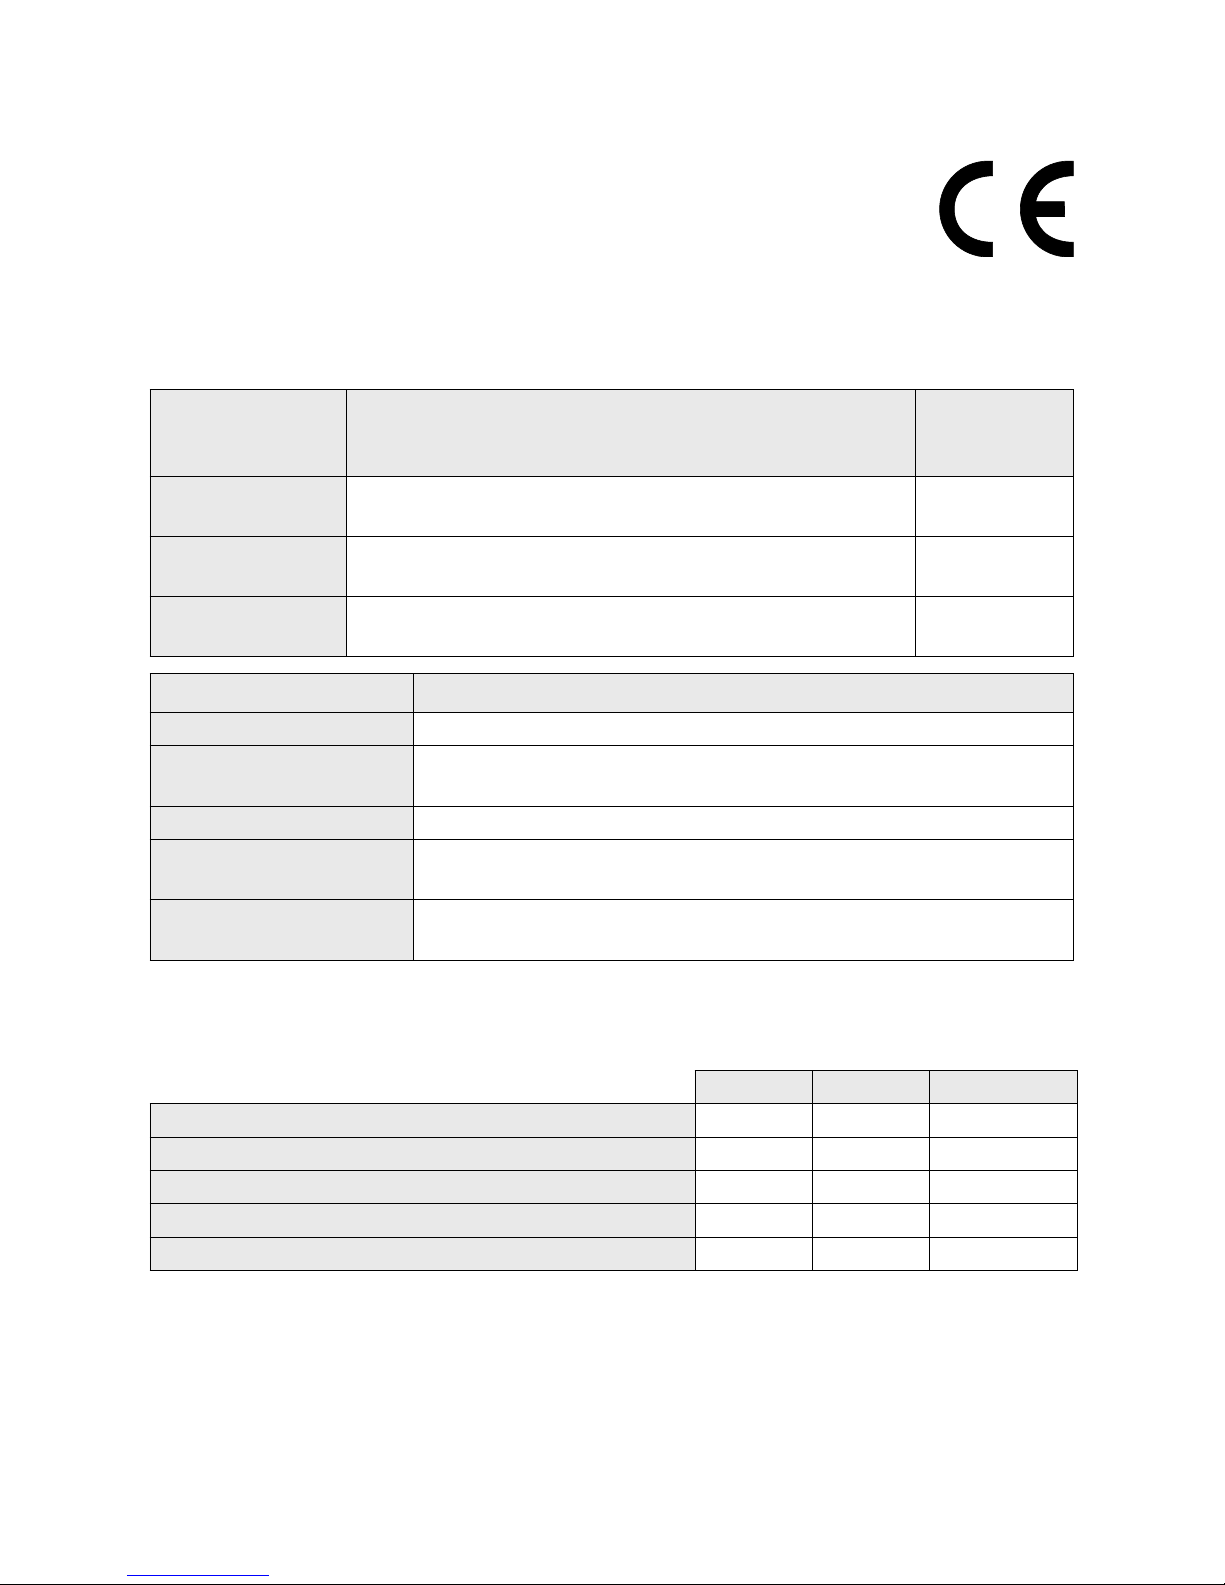
10 Technical specications
10.1. Standards and requirements
This product complies with the provisions of the Medical Devices
Directive and therefore carries the CE mark.
The wheelchair conforms to the following standards and requirements. This has
been veried by independent test institutes.
Standard Description Weight
of test
dummy
NEN-EN 12182
(2012)
Assistive products for persons with disability General requirements and test methods
160 kg
NEN-EN 12184
(2014) Class B
Electrically powered wheelchairs, scooters and
their chargers – Requirements and test methods
160 kg
ISO 7176-19
(2009)
Wheeled mobility devices for use as seats in
motor vehicles
102 kg
Standard Description
EU directive 93/42/EEC Applicable requirements as stated in Annex 2
ISO 7176-8 Requirements and test methods for static, impact and
fatigue strengths
ISO 7176-9 Climatic tests for powered wheelchairs
ISO 7176-14 Power and control systems for electric wheelchairs -
Requirements and test methods
ISO 7176-16 Requirements for resistance to ignition of postural
support devices
10.2. Specications operating force
Min. Max. Unit
Joystick 2,5 3,5 N
Swinging away the controller 20 50 N
Electronic switches 2,1 3,5 N
Parking brake 34,77 44,27 N
Attaching the charger plug 7,8 13,9 N
10 Technical specications
36 - SANGO ADVANCED / SLIMLINE
Page 37
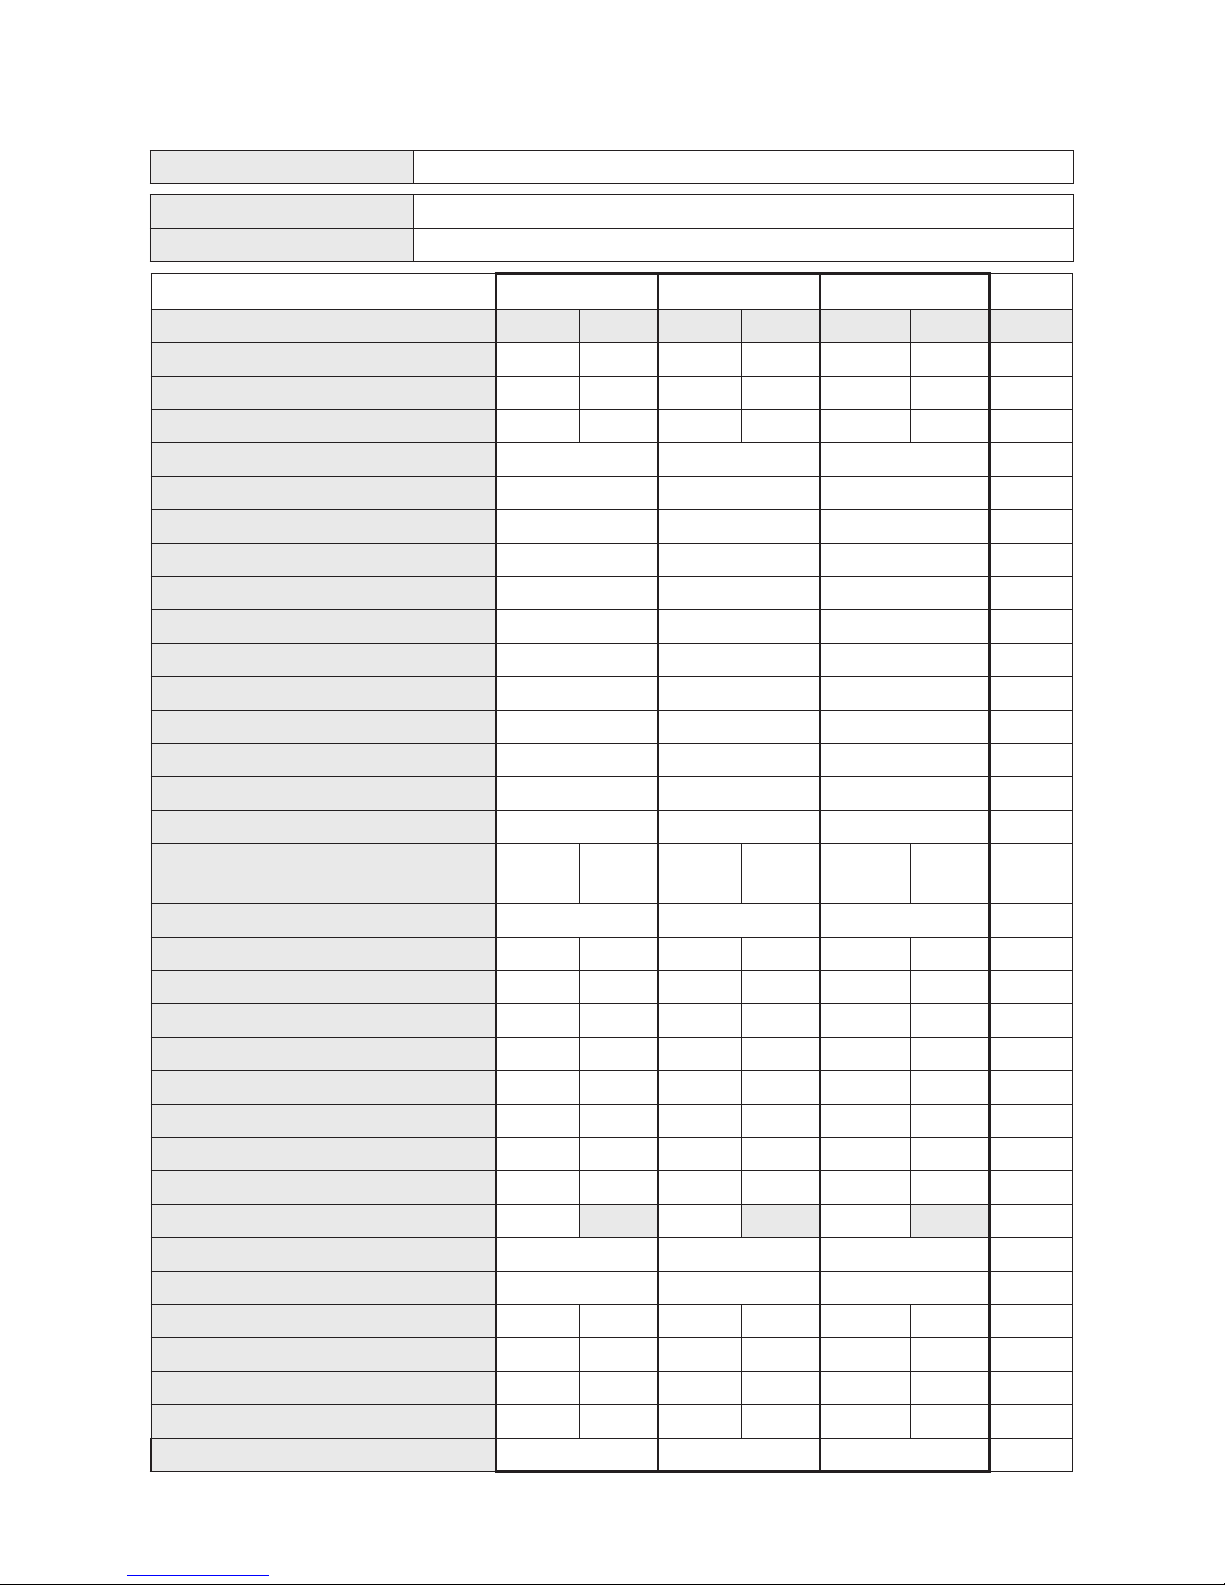
10.3. Specications Sango Advanced Sego Comfort
Manufacturer DIETZ-Power B.V. - Vlamovenweg 12 - 5708 JV Helmond
User weight max. 160 kg
Class B
SANGO ADVANCED Type FWD RWD MWD
Specications
* min. max. min. max. min. max. Unit
Overall length incl. leg rest 985 1680 980 1680 1070 - mm
Overall width 615 700 615 700 615 700 mm
Overall height excl. headrest 1010 1340 1010 1340 1010 1340 mm
Transport length incl. leg rest 985 980 1150 mm
Transport width 615 615 615 mm
Transport height 650 650 650 mm
Total mass incl. batteries
** 154,5 155 158,5 kg
Mass of the heaviest part 110 110,5 114 kg
Static stability downhill
*** 10 / 17,5 10 / 17,5 10 / 17,5 ° / %
Static stability uphill
*** 10 / 17,5 10 / 17,5 10 / 17,5 ° / %
Static stability sideways
*** 10 / 17,5 10 / 17,5 10 / 17,5 ° / %
Theoretical distance range
****
30 30 30 km
Dynamic stability uphill 6 / 10,5 6 / 10,5 6 / 10,5 ° / %
Obstacle climbing
***** 50 50 50 mm
Forward speed 6 / 10 / 12,5 6 / 10 / 12,5 6 / 10 / 12,5 km/h
Braking distance at
maximum speed
1 2,9 1 2,9 1 2,9 m
Seat plane angle 0 / 4 / 8 0 / 4 / 8 0 / 4 / 8 °
Eective seat depth 420 560 420 560 420 560 mm
Eective seat width 420 540 420 540 420 540 mm
Seat surface height at front 390 480 390 480 390 480 mm
Backrest angle 90 120 90 120 90 120 °
Backrest height 500 570 500 570 500 570 mm
Footrest to seat distance 380 550 380 550 380 550 mm
Leg rest to seat surface angle 10 75 10 75 10 75 °
Armrest to seat distance 220 350 220 350 220 350 mm
Turning radius
****** 620 815 420 mm
Safe slope 6 / 10,5 6 / 10,5 6 / 10,5 ° / %
Ground clearance
***** 60 60 60 mm
Seat cushion weight 1,6 3,4 1,6 3,4 1,6 3,4 kg
Backrest cushion weight 1,5 2,5 1,5 2,5 1,5 2,5 kg
Leg rest weight 2 4,2 2 4,2 2 4,2 kg
Headrest weight 2,5 2,8 2,5 2,8 2,5 2,8 kg
Measured sound level 63,2 63,2 63,2 dB
10 Technical specications
SANGO ADVANCED / SLIMLINE - 37
Page 38

10.4. Specications Sango Slimline Sego Comfort
Manufacturer DIETZ-Power B.V. - Vlamovenweg 12 - 5708 JV Helmond
User weight max. 136 kg
Class B
SANGO SLIMLINE Type MWD
Specications
* min. max. Unit
Overall length incl. leg rest 1070
1265
mm
Overall width 530 700 mm
Overall height excl. headrest 1010 1340 mm
Transport length incl. leg rest 1070 mm
Transport width 530 mm
Transport height 650 mm
Total mass incl. batteries
**
135
kg
Mass of the heaviest part
90,5
kg
Static stability downhill
*** 10 / 17,5 ° / %
Static stability uphill
*** 10 / 17,5 ° / %
Static stability sideways
*** 10 / 17,5 ° / %
Theoretical distance range
****
30 km
Dynamic stability uphill 6 / 10,5 ° / %
Obstacle climbing
***** 50 mm
Forward speed 6 / 10 / 12,5 km/h
Braking distance at maximum speed 1 2,9 m
Seat plane angle 0 / 4 / 8 °
Eective seat depth 420 560 mm
Eective seat width 420 500 mm
Seat surface height at front
410
480 mm
Backrest angle 90 120 °
Backrest height 500 570 mm
Footrest to seat distance 380 550 mm
Leg rest to seat surface angle 10 75 °
Armrest to seat distance 220 350 mm
Turning radius
****** 420 mm
Safe slope 6 / 10,5 ° / %
Ground clearance
***** 60 mm
Seat cushion weight 1,6 3,4 kg
Backrest cushion weight 1,5 2,5 kg
Leg rest weight 2 4,2 kg
Headrest weight 2,5 2,8 kg
Measured sound level 63,2 dB
10 Technical specications
38 - SANGO ADVANCED / SLIMLINE
Page 39

* Specications were measured with 9» and 14» wheels, powered legrests and in most extreme
positions (for min. most stripped version and max. most extended version)
**
Measured with powered legrest, lift/tilt module and powered backrest.
*** Measured with the powered adjustments in the neutral position. With the powered
adjustments in the most extreme positions the specications will be 9° / 15.8%.
**** The following will have a negative impact on the operating range: obstacles, rugged terrain,
driving up or down slopes, temperatures below freezing point and frequent use of powered
options.
*****
Specications mentioned are measured with the max user weight (160 kg).
****** Measured without legrest. The turning radius for the MWD with central legrest will be 26 cm
more.
10.5. Specications batteries
Battery capacity 60 Ah
(Slimline)
68 Ah 78 Ah Unit
Battery dimensions
(w x d x h)
225 x 136 x 177 258 x 168 x 175 258 x 168 x 210 mm
Battery weight, set 29,6 43 48,4 kg
Maximum charging
current
8 8 12 A
Maximum charging
voltage
24 24 24 VDC
Connector type CONTROLLER
Insulation Class 2 double insulated
10.6. Electrical diagrams
CONTROLLER for the battery diagram
SERVICE for the electrical wiring diagram (see 5).
10 Technical specications
SANGO ADVANCED / SLIMLINE - 39
Page 40

11 Warranty conditions
Dealers and/or users have statutory (legal) rights in relation to the purchase of
consumer products. The warranty conditions applying to products/parts sold by
DIETZ-Power B.V. are set out below. The warranty applies to any product/part
that becomes defective or needs to be repaired or replaced as the result of a
manufacturing fault or material defect within the stated warranty period.
Term Denition
Manufacturer The warranty provider:
DIETZ-Power B.V.
Vlamovenweg 12
5708 JV Helmond
The Netherlands
Dealer the other party with which DIETZ-Power B.V. enters into
a Contract for the (re)sale of Products, on the basis of a
distribution agreement or otherwise
User the party by whom the Products are intended to be used;
Warranty period Duration of the warranty
Product/part The product or part supplied by DIETZ-Power B.V.
Option/accessory Part supplied along with the original product as an add-on to
the standard model.
Reserve part Durable part bought after the original product was
purchased.
Wear part Part subject to natural wear under normal usage.
11.1. Warranty period
The warranty period starts on the date the manufacturer supplies the product/part
to the dealer. The warranty period shall not be extended following repair.
Product/part Warranty period
Frame/assembly, including supplied options and
accessories
2 years
Drive system 1 year
Electronics, such as the controller and electronic
components
1 year
Reserve parts 1 year from invoice date
Wear parts, including upholstery 40 days from invoice date
Batteries
BATTERY
Tyres no warranty
40 - SANGO ADVANCED / SLIMLINE
11 Warranty conditions
Page 41

11.2. Warranty provisions
The manufacturer shall not provide any warranty if:
• the product has been passed on to a dierent owner. The warranty applies
only to the rst owner to whom the manufacturer supplied the product/parts.
The warranty is not transferable and applies only to those models bought from
the manufacturer;
• the product/part is damaged as a result of carelessness, an accident or
improper use;
• the product/part has not been maintained in accordance with the maintenance
instructions stated in the user manual;
• non-original parts have been used;
• the original type plate is no longer attached to the product;
• external/internal changes have been made to the product features. If a dealer
wants to modify a product/part contrary to the instructions given in the user
manual, the dealer must rst consult with the manufacturer;
• force majeure, such as ooding or re, is involved.
If the provisions stated provide no resolution, the manufacturer's decision shall be
nal.
11.3. Warranty procedure
If a defect is identied in a product or part and it needs to be sent to the
manufacturer, the dealer must ll in the returns form in full. The returns form will
be used as the guiding document for the whole warranty procedure.
Procedure for making claims under the warranty:
• If a product/part becomes defective or needs to be repaired or replaced, the
user should contact his/her local dealer. The dealer can then make a claim
under the warranty if required.
• On identifying the defect, the dealer informs the manufacturer immediately,
providing full information relating to the nature of the defect aecting the
product/part supplied by the manufacturer;
• If it is possible for the warranty claim to be dealt with by telephone or e-mail
and the manufacturer deems the warranty claim to be legitimate, the dealer
and the manufacturer consult with each other to determine whether the
manufacturer will send a replacement product or part to the dealer free of
charge. In such cases, the dealer must
• destroy the defective product/part on the instructions of the manufacturer.
• Alternatively, the defective product/part must be returned to the
manufacturer. In the case of a return, the manufacturer shall be responsible
for arranging and paying for transport;
• If it is not possible to deal with a warranty claim by telephone or e-mail, the
dealer and the manufacturer consult with each other to determine:
• whether the dealer should send the defective product/part back to the
manufacturer. The manufacturer then assesses the product/part in
question. If the manufacturer deems the claim to be justied, the product
or part is repaired and/or replaced. The costs for returning the product/part
to the dealer are to be borne by the dealer;
SANGO ADVANCED / SLIMLINE - 41
11 Warranty conditions
Page 42

• whether the dealer should order a new product/part from the
manufacturer. The dealer then receives an invoice detailing the shipping
costs involved. The dealer arranges and pays for the defective product/
part to be sent to the manufacturer. Once the manufacturer has received
the defective product/part, it is assessed. If the manufacturer deems the
warranty claim to be justied, the dealer receives a credit note for the new
product/part ordered and the shipping costs involved.
If the warranty claim is deemed to be unjustied, the dealer is informed and the
manufacturer makes an oer for the costs of replacement parts and/or provides
an indication of the cost of repair. Once the dealer agrees to this, the product/part
is repaired and/or replaced at the dealer's expense and returned at the dealer's
expense. The dealer can also opt to have the product/part returned without repair
at the dealer's own expense.
2017-05
42 - SANGO ADVANCED / SLIMLINE
11 Warranty conditions
Page 43

SANGO ADVANCED / SLIMLINE - 43
Page 44

If you have any questions, please contact your local dealer:
Sango is a product manufactured by:
DIETZ-Power B.V.
Vlamovenweg 12
5708 JV Helmond
The Netherlands
+31 492 792 196
[email protected]
www.DIETZ-Power.com
If there is no authorised dealer near you, please contact DIETZ-Power.
6000251 / Version 4 - 201901
 Loading...