

DieHard 71232 Owner's Manual
Table Of Contents
Warranty .................................................................... 1
Important Safety Instructions ................................. 2
Parts .......................................................................... 3
Before Using Your Battery Charger ........................ 4
Assembling your charger ..................................... 4
Plugging it in ........................................................ 5
Using an extension cord ....................................... 6
Preparing your battery to be charged .................. 6
Using Your Battery Charger ..................................... 7
Setting the controls .............................................. 7
Charging your battery .......................................... 9
Calculating charge times .................................... 12
Using the engine start feature ............................ 13
Maintenance and care ....................................... 13
Troubleshooting ..................................................... 14
Please read this Manual before using your Battery Charger
The DieHard model 71232 Automatic Battery Charger/Engine Starter, offers a wide range of features to
accommodate the needs for home or light commercial use. This manual will show you how to use your
charger safely and effectively, Please read and follow these instructions and precautions carefully.
For information about troubleshooting, call toll-free from anywhere in the U.S.A. 7 am to 4:30 pm CT
Monday through Friday.
1-800-SEARS-64 (1-800-732-7764).
For repair pads or the location of a Sears Parts and Repair Center call:
1-800-4-MY-HOME e (1-800-469-4663).
Warranty
FULL THREE-YEAR WARRANTY
If, within three years from the date of purchase this battery charger fails due to a defect in material or
workmanship, RETURN IT TO THE NEAREST SEARS STORE IN THE UNITED STATES, and Sears will
repair or replace it, free of charge.
This warranty gives you specific legal rights,and you may also have other rights which vary from state to
state.
Sears, Roebuck and Co., Dept 817WA,
Hoffman Estates, IL 60179
Important Safety Instructions
- SAVE THESE INSTRUCTIONS -
• Read all instructions and cautions printed on the
battery charger, battery, and vehicle or equipment
using battery.
• Use charger only on lead-acid type reehargeable
batteries, such as those used in cars, trucks,
tractors, airplanes, vans, RV's, trolling motors, etc.
This charger is not intended to supply power to a
low voltage electrical system other than in an
automotive application.
• Use only attachments recommended or sold by
manufacturer. The use of attachments not recom-
mended by the manufacturer may result in fire,
electric shock, or injury.
• Do not disassemble charger. Take it to a
qualified service professional if service or repair
is required. Incorrect assembly may result in fire
or electrical shock.
• To reduce risk of electrical shock, unplug the
charger from the outlet before attempting any
maintenance or cleaning.
• Always charge battery in a well ventilated area.
Help us help you
Remember:
• Place charger as far away from battery being
charged as the charger cables will permit.
• Do not expose charger to rain or snow.
• Never charge a frozen battery. If battery fluid
(electrolyte) becomes frozen, bring battery into a
warm area to thaw before you begin charging.
• Never allow battery acid to drip on charger when
reading specific gravity or _ling battery.
• Never set a battery on top of the charger.
• Never place charger directly above battery being
charged. The gases from the battery will corrode
and damage the charger.
• Never use charger for charging dry-ceil batteries
that are commonly used with home appliances.
These batteries may burst and cause personal
injury.
• Never touch the battery clamps together when the
charger is energized.
• Never operate charger if it has received a hard blow,
been dropped, or otherwise damaged. Take it to a
qualified professional for inspection and repair.
• Be sure to position the charger power cord to
prevent it from being stepped on, tripped over, or
damaged.
• Never pull out the plug by the cord when unplugging
the charger. Pulling on the cord may cause damage
to the cord or the plug.
• Do not operate the charger if it has a damaged
power cord or plug. Have the cord replaced.
Personal Safety Precautions
For your own personal safety, please foltow the
following precautions:
Wear complete eye and clothing protection when
working with lead-acid batteries.
Be sure that someone is within range of your voice
to come to your aid if needed while you work with or
are near a lead-acid battery.
Have plenty of fresh water and soap nearby for
use in case battery acid contacts your eyes, skin, or
clothing. If this happens, wash immediately with
soap and water. Then get medical attention.
Avoid touching your eyes while working with a
battery. Acid particles (corrosion) may get into your
eyes. If this occurs, flush eyes immediately with
running cold water for at least 10 minutes. Then
immediately get medical attention.
Remove all personal metal Items from your body,
such as rings, bracelets, necklaces, and watches
while working with a lead-acid battery. A battery can
produce a short circuit current high enough to weld a
ring (or the like) to metal, causing a severe burn.
"rake care not to drop any metal tool or metal object
onto the battery. This may spark or short circuit the
battery or another electrical device that may cause
an explosion.
Always operate your battery charger in an open,
well ventilated area.
Never smoke or allow a spark or flame inthe vicinity
of the battery or engine. Batteries generate explo-
sive gases.
Neutralize any acid spills thoroughly with baking
soda before attempting to clean up.
WARNING: Handling the cord on this product or
cords associated with accessories sold with this
product, will expose you to lead, a chemical known
to the State of California to cause cancer and birth
defects or other reproductive harm. Wash hands
after handling.
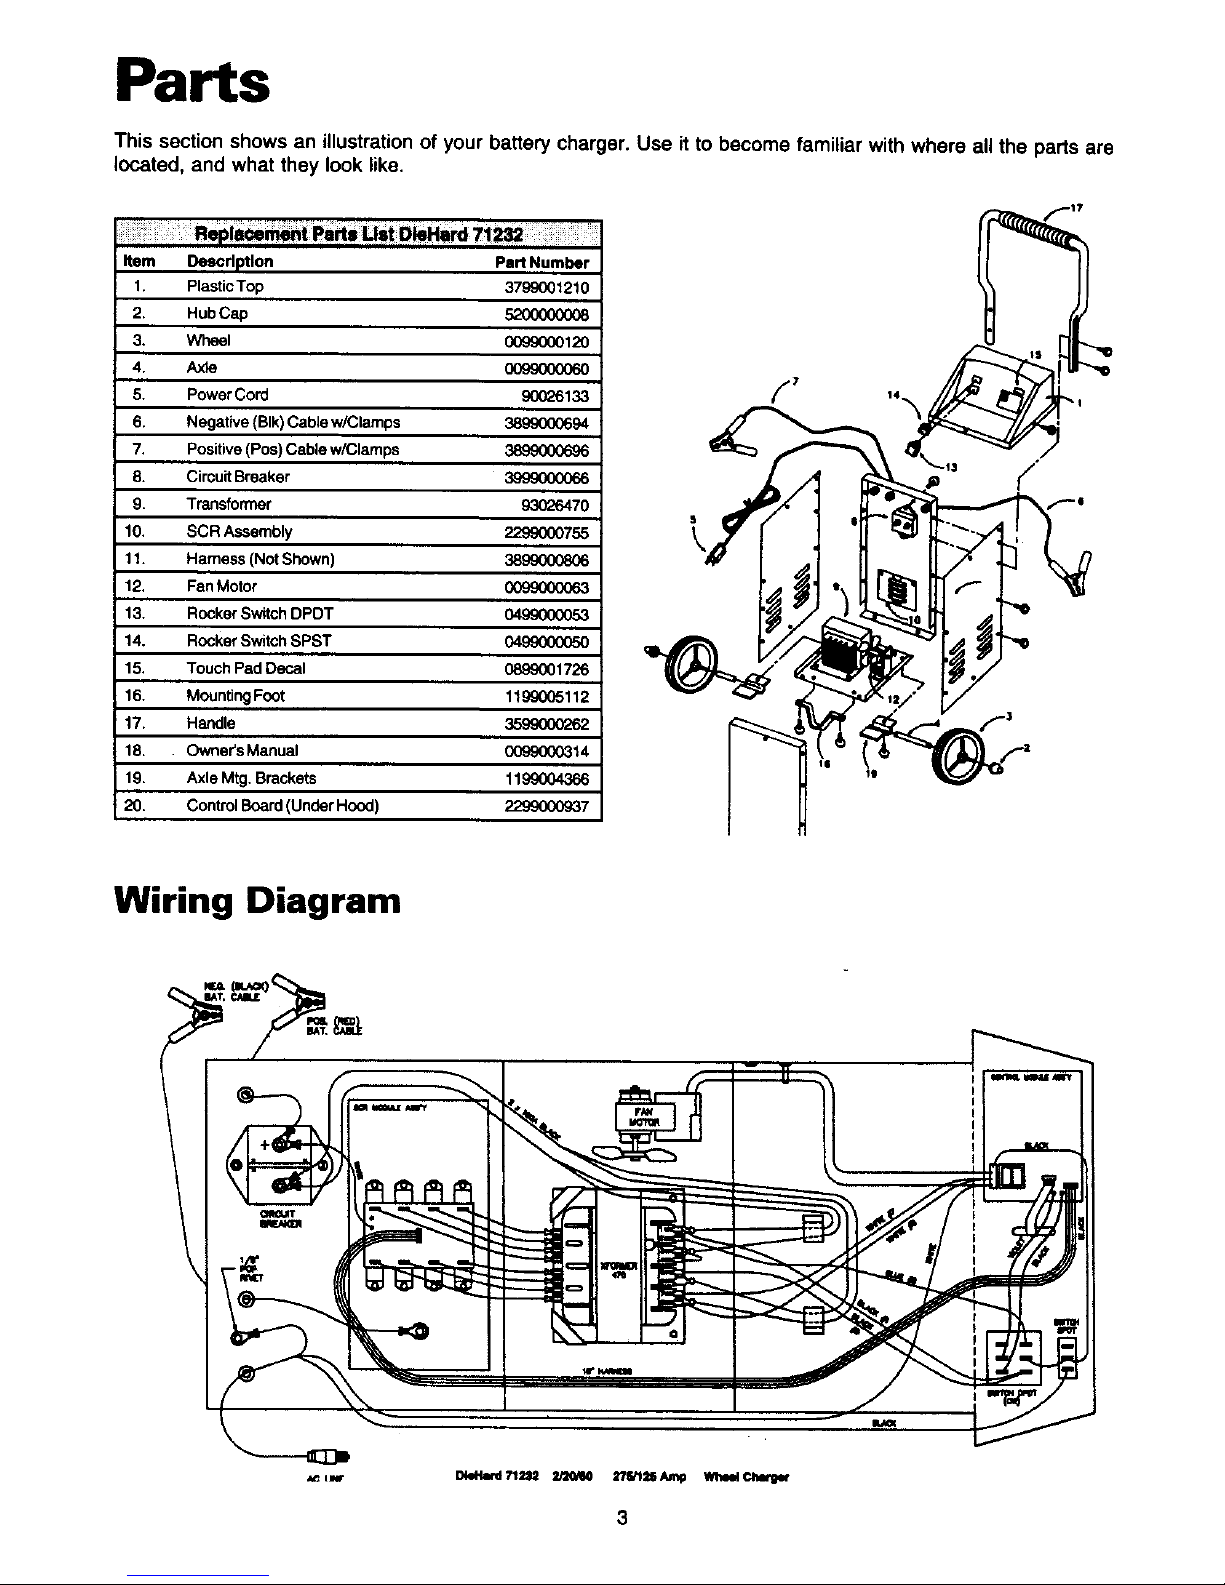
Parts
This section shows an illustration of your battery charger. Use it to become familiar with where all the parts are
located, and what they look like.
Item Descdptlon Pert Number
1. Plastic Top 3799001210
2. Hub Cap 5200000008
3, Wheel 0099000120
4. Axe 009S00(XTo0
5. Power Cord 9(X_6133
6. Negative (BIk) Cable w/Clamps 3899000694
7. Positive (Pos) Cable w/Clamps 3899000696
8. Circuit Breaker 3999000066
9. Transforn_r 9,3026470
10. SCR Assembly 2299000755
11. Harness (Not Shown) 3899000806
12. Fan Motor 0099000063
13. Rocker Switch DPDT 0499000053
14. Rocker Switch SPST 0499000050
15. Touch Pad Decal 0899001726
16. MountingFoot 119g0_5112
17. Handle 3599(XX)262
18. Owner'sManual 0099000314
19, Axle Mtg. Brackets 1199004366
20, Control Board (Under Hood) 2299000937
Wiring Diagram
3
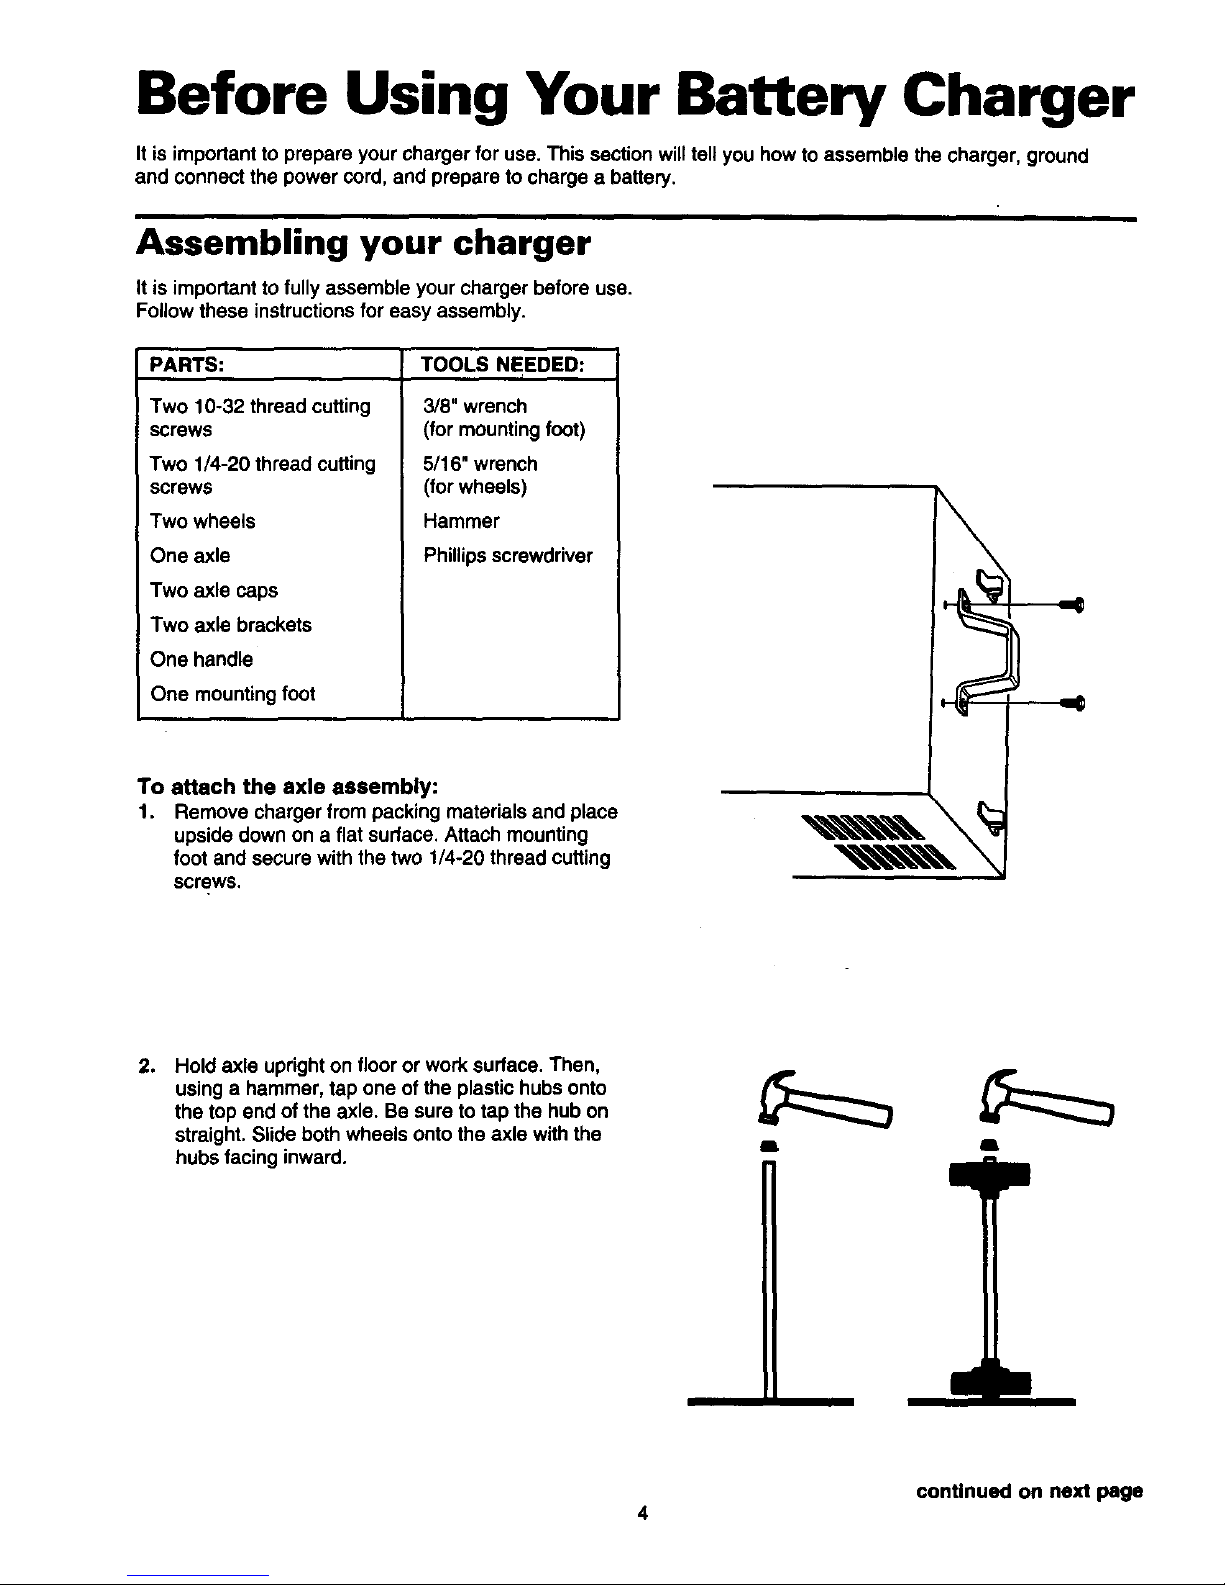
Before Using Your Battery Charger
It is important to prepare your charger for use. This section willtell you how to assemble the charger, ground
and connect the power cord, and prepare to charge a battery.
Assembling your charger
It is important to fully assemble your charger before use.
Follow these instructions for easy assembly.
PARTS:
Two 10-32 thread cutting
Screws
Two 1/4-20 thread cutting
screws
Two wheels
One axle
Two axle caps
Two axle brackets
One handle
One mounting foot
TOOLS NEEDED:
3/8" wrench
(for mounting foot)
5/16" wrench
(for wheels)
Hammer
Phillips screwdriver
To attach the axle assembly:
1. Remove charger from packing materials and place
upside down on a flat surface. Attach mounting
foot and secure with the two 1/4-20 thread cutting
screws.
o
Hold axle upright on floor or work surface. Then,
using a hammer, tap one of the plastic hubs onto
the top end of the axle. Be sure to tap the hub on
straight. Slide both wheels onto the axle with the
hubs facing inward.
I I
continued on next page
4
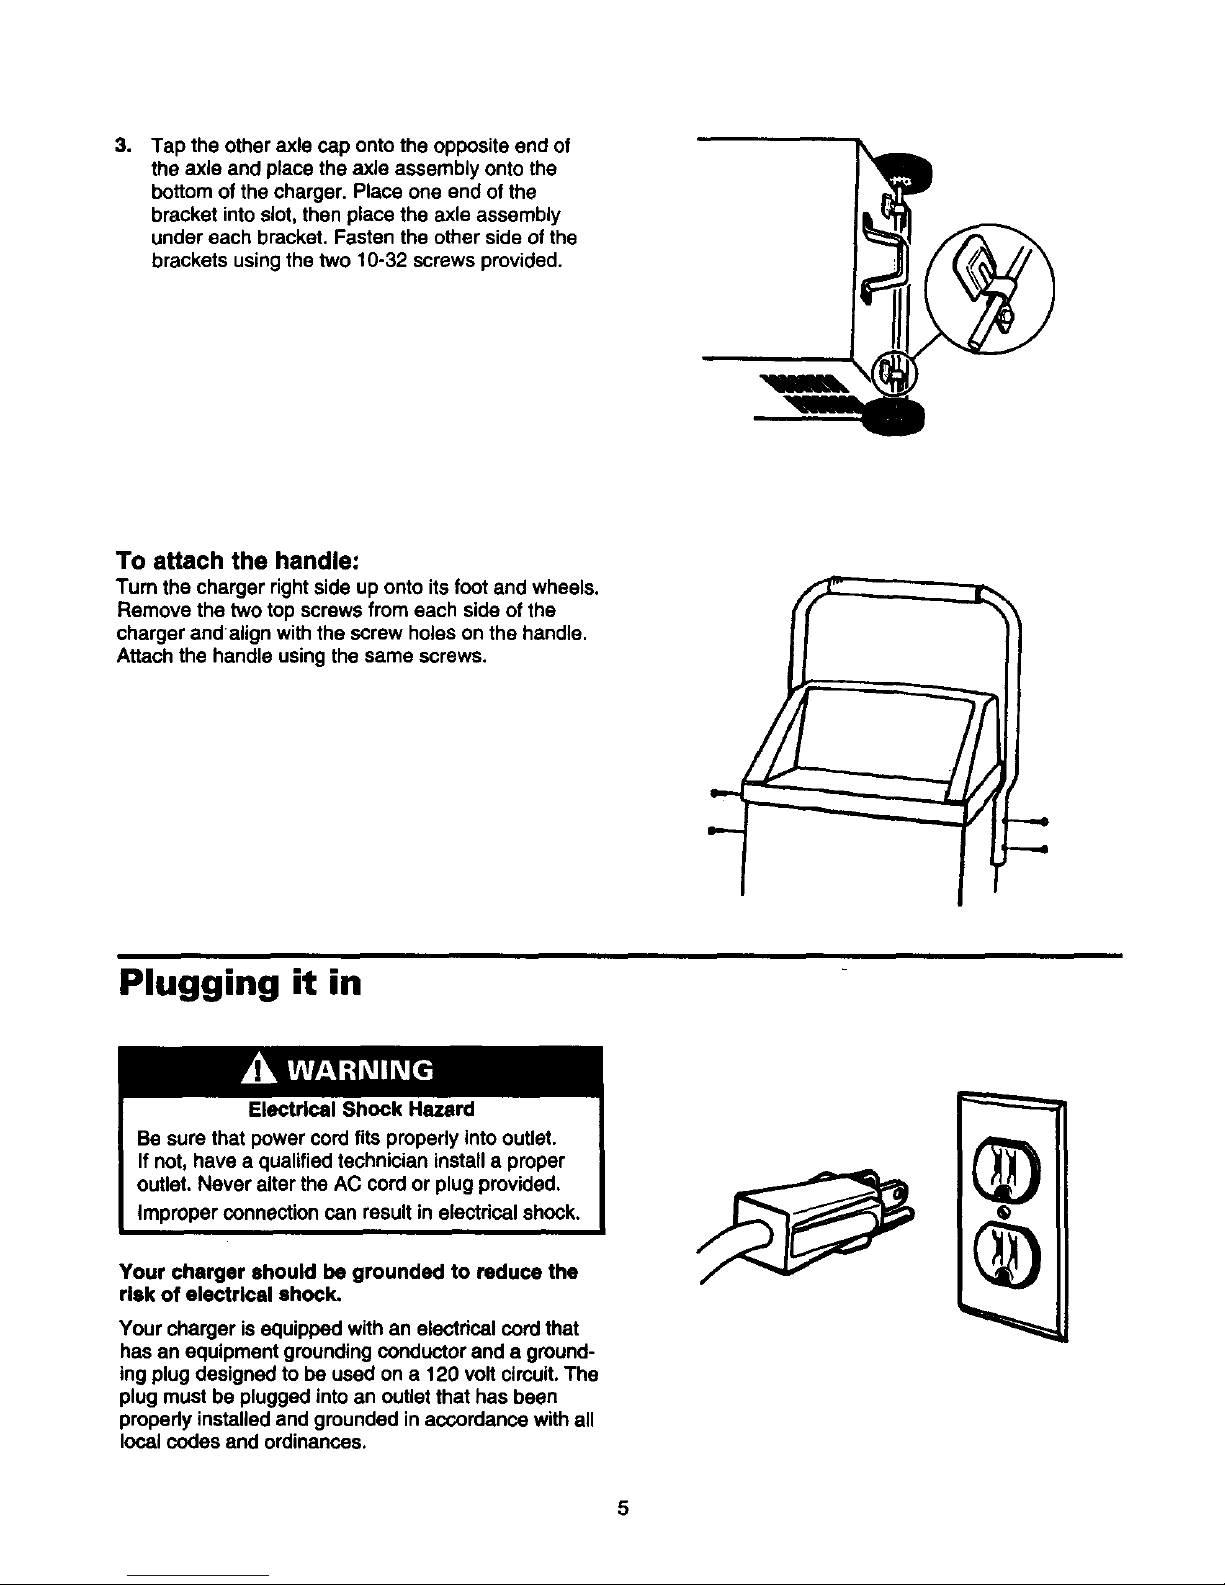
,
Tap the other axle cap onto the opposite end of
the axle and place the axle assembly onto the
bottom of the charger. Place one end of the
bracket into slot, then place the axle assembly
under each bracket. Fasten the other side of the
brackets usingthe two 10-32 screws provided.
To attach the handle:
Turn the charger rightside up onto its foot and wheels.
Remove the two top screws from each side of the
charger and align with the screw holes on the handle.
Attach the handle using the same screws.
Plugging it in
Electrical Shock Hazard
Be sure that power cord fits propedy into outlet.
If not, have a qualified technician install a proper
outlet. Never alter the AC cord or plug provided,
Improper connection can result in electrical shock,
Your charger should be grounded to reduce the
rlak of electrical shock.
Your charger is equipped with an electrical cord that
has an equipment grounding conductor and a ground-
ing plug designed to be used on a 120 volt circuit. The
plug must be plugged into an outlet that has been
properly installed and grounded in accordance with all
local codes and ordinances.
 Loading...