

Page 1
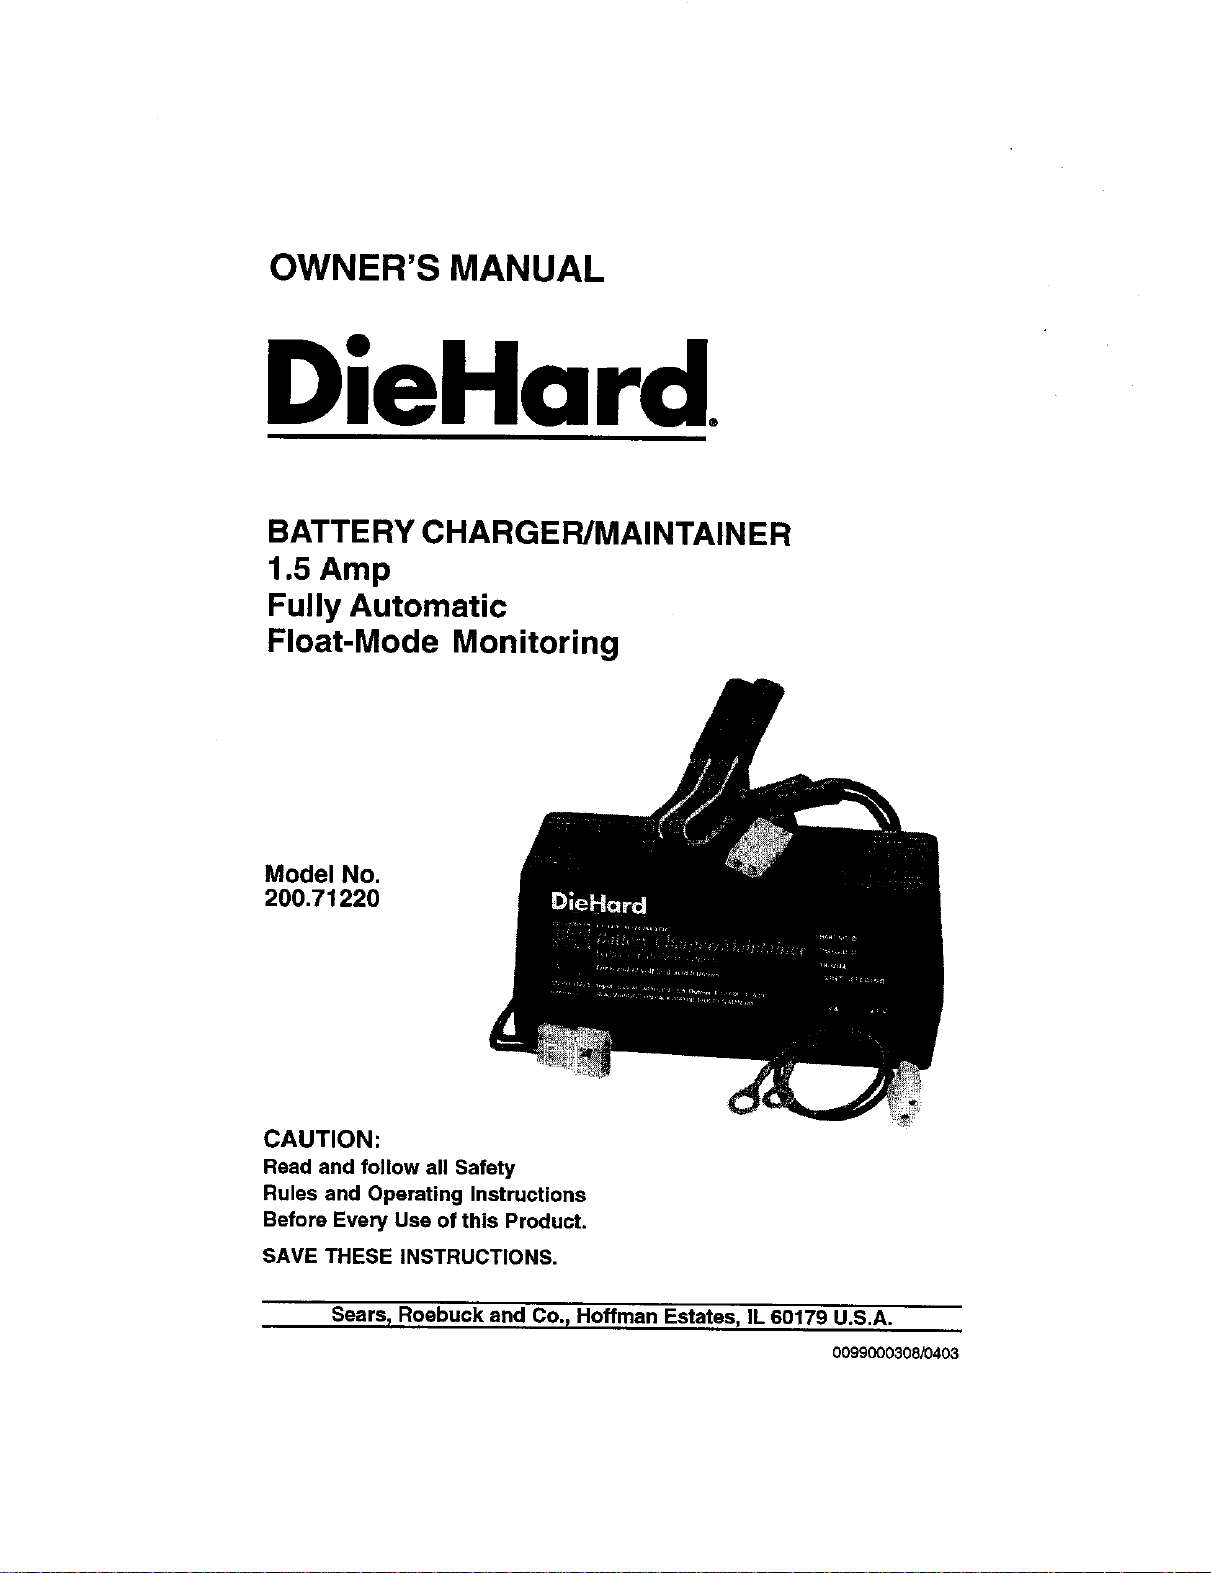
OWNER'S MANUAL
DieHard.
BATTERY CHARGER/MAINTAINER
1.5 Amp
Fully Automatic
Float-Mode Monitoring
Model No.
200.71220
CAUTION:
Read and follow all Safety
Rules and Operating Instructions
Before Every Use of this Product.
SAVE THESE INSTRUCTIONS.
Sears_ Roebuck and Cov Hoffman Estates_ IL 60179 U.S.A.
0099CO0308/_403
Page 2
Warranty .................................................................................................................... 2
Important Safety Instructions ................................................................................ 3
Personal Safety Precautions ....................................................................... 4
Before using your Battery Charger ....................................................................... 5
Quick disconnect harness ........................................................................... 5
Plugging _tin ................................................................................................ 5
Using an extension cord .............................................................................. 5
Preparing your battery to be charged ................................................................... 6
Using your Battery Charger .................................................................................... 6
Setting Controls ........................................................................................... 6
Charging your battery ............................................................................................. 7
Inside vehicle ............................................................................................... 7
Outside vehicle ............................................................................................ 7
Operating Instructions ............................................................................................ 8
Maintenance and care ............................................................................................. 9
Please read this Owner's Manual before using your Battery Charger
The 71220 Automatic Battery Charger/Maintainer offers features to accommodate the
needs for home or light commercial use. This manual will show you how to use your
charger safely and effectively. Please read and follow these instructions and precau-
tions carefully.
For information about troubleshooting, call toll-free from anywhere in the U,S.A. 7 am
to 4:30 pm CST Monday through Friday.
1-800-SEARS-64 (1-800-732-7764).
For repair parts or the location of a Sears Parts and Repair Center call:
1-800-4-MY-HOME(R) (1-800-469-4663).
FULLTHREEYEAR WARRANTY
If, within three years from the date of purchase, this battery charger fails due to a
defect in materials or workmanship, return the charger to the piece of purchase and it
will be replaced free of charge.
This warranty gives you specific legal rights, and you may also have other rights
which vary from state to state.
Sears, Roebuck and Co., Dept. 817WA, Hoffman Estates, IL 60179
2
Page 3
WARNING:Toreducetherisk of
explosion, explosive gases, or injury
while using your battery charger, follow
the precautions listed below:
• Read all instructions and cautions
printed on the battery charger,
battery, and vehicle or equipment
using battery.
• Use charger only on lead-acid type
rechargeable batteries, such as those
used in cars, trucks, tractors, air-
planes, vans, RV'a, trolling motors,
etc. This charger is not intended to
supply power to a low voltage
electrical system.
• Use only attachments recommended
or sold by manufacturer. The use of
attachments not recommended by the
manufacturer may result in fire,
electric shock, or injury.
• Do not disassemble charger. Take it
to a qualified service professional if
service or repair is required. Incorrect
assembly may resuif in fire or
electrical shock.
• To reduce risk of electrical shock,
unplug the charger from the outlet
before attempting any maintenance
or cleaning.
• Always charge battery in a well
ventilated area.
• Battery chargers get hot during
operation and must have proper
ventilation. Air needs to flow around
entire charger.
• Do not set charger on flammable
materials like carpeting, upholstery,
paper, cardboard, etc. Charger may
damage leather and melt plastic and
rubber.
HELP US HELP YOU --
Remembe_
• Place charger as far away from the
battery being charged as the charger
cables will permit.
• Do not expose charger to rain or
snow.
• Never charge a frozen battery. If
battery fluid (electrolyte) becomes
frozen, bring battery into a warm area
to thaw before you begin charging.
• Never allow battery acid to drip on
charger when reading specific gravity
or filling battery.
• Never set a battery on top of the
charger.
• Never place charger directly above
battery being charged. The gases
from the battery will corrode and
damage the charger.
• Never use charger for charging dry-
cell batteries that are commonly used
with home appliances like radios,
stereos, remote controls, etc. These
batteries may burst and cause
personal injury.
• Never touch the battery clamps
together when the charger is on. You
will cause a spark.
• Never operate charger if it has
received a hard blow, been dropped,
or otherwise damaged. Take itto a
qualified professional for inspection
and repair.
• Be sure to position the charger power
cord to prevent it from being stepped
on, tripped over, or damaged.
• Never pull out the plug by the cord
when unplugging the charger. Pulling
on the cord may cause damage to the
cord or the plug.
• Do not operate the charger if it has a
damaged power cord or plug. Have
the cord replaced.
Page 4

Personal Safety Precautions
For your own personal safety, please follow the following precautions:
• Wear complete eye and clothing
protection when working with lead-
acid batteries.
• Be sure that someone is within range
of your voice to come to your aid if
needed while you work with or are
near a lead-acid battery.
• Have plenty of fresh water and
soap nearby for use in case battery
acid contacts your eyes, skin, or
clothing. If this happens, wash
immediately with soap and water.
Then gst medical attention.
• Avoid touching your eyes while
working with a battery. Acid particles
(corrosion) may get into your eyes. If
this occurs, flush eyes immediately
with running cold water for at least 10
minutes. Then immediately get
medical attention.
• Remove all personal metal items
from your body such as rings,
bracelets, necklaces and watches,
while working with a lead-acid battery.
A battery can produce a short circuit
current high enough to weld a ring (or
the like) to metal, causing a severe
burn,
• Take care notto drop any metal tool
or metal object onto the battery. This
may spark or short circuit the battery
or another electrical device that may
cause an explosion.
• Always operate your battery charger
in an open, well ventilated area.
• Never smoke or allow a spark or
flame in the vicinity of the batten] or
engine. Batteries generate explosive
gases.
• Neutralize any acid spills thoroughly
with baking soda before attempting to
clean up.
• WARNING: Handling the cord on this
product or cords associated with
accessories sold with this product, will
expose you to lead, a chemical known
to the State of California to cause
cancer and birth defects or other
reproductive harm. Wash hands after
handling,
4
Page 5

It is important to understand your charger's requirements. This section will tell you
about your charger's electrical requirements and how to prepare a battery for
charging.
2
QUICK DISCONNECT HARNESS
To permanently attach to a small
battery (i.e. motorcycle), connect the red
POSITIVE harness wire eyelet to the
POSITIVE battery terminal. Then
connect the black NEGATIVE eye[et to
the NEGATIVE battery terminal.
Loosen and remove each nut from bolts
at battery terminal. One at a time, slip
the eyelets of the harness wires over the
bolt at battery terminal. Replace and
tighten nuts to secure.
ELECTRICAL INSTALLATION
Route and secure the output away from
gas line, carburetor, or other hot, sharp
or moving parts to avoid damaging the
wire insutation. Secure the wiring to the
frame or cable using a self locking cable
tie or equivalent.
PLUGGING IT IN
Your charger requires a 120V receptacle
installed according to all local cedes
and ordinances.
NEGATIVEGROUNDEDSYSTEM
USING AN EXTENSION CORD
The use of an extension cord is not
recommended. If you must use an
extension cord, please make sure
that you follow these guidelines:
• Make sure that the pins on charger's
power cord fit firmly into the extension
cord, and that the extension cord fits
firmly into the receptacle.
• Check that the extension cord is
properly wired and in good electrical
condition.
Make sure that the wire size is large
enough for its length and for the AC
ampere rating, as specified in the
chart below.
WARNING: Electrical Shock Hazard. Be
sure that the power cord fits properly
into the outlet, If not, have a qualified
technician install a proper outlet. Never
alter the AC cord or plug provided.
Improper connection can result in
electrical shock.
AWG* Size of COrd 18 18 16 14
*AWG=Amsfican W_e Gauge
5
128 I
Page 6

It is important that you read and follow these guidelines while you are preparing to
charge your battery.
• Make sure that you have a 12 volt or
6 volt lead-acid battery. Set the
selector switch to match the voltage
rating of the battery to be charged.
• Clean the battery terminals. Be
careful to keep corrosion from getting
in or around your eyes.
• For batteries with removable cell
caps, if required, add distilled water to
each cell until the battery acid
reaches the level recommended by
the manufacturer. This will help purge
excessive gases from the cells. Be
careful not to overfill. If you have a
sealed battery without cell caps, no
action is necessary. Continue to the
next step listed below.
• Take time to read all battery
manufacturer's specific precautions,
such as removing or not removing
cell caps while charging, and recom-
mended rates of charge.
• Wear safety glasses. See additional
"Personal Safety Precautions" on
page 4.
• Be sure that the area around the
battery is well ventilated while it is
being charged.
• If it is necessary to remove the battery
from the vehicle to charge it, always
remove the grounded terminal from
the battery first. Turn off all vehicle
accessories to avoid sparks from
occurring.
NOTE: A marine battery installed in a
boat must be removed and charged on
shore.
To obtain the best results from your battery charger, you must know how to use it
properly. This section will tell you how to set the controls, how to charge a battery in
or out of a vehicle, and how to use the engine start feature.
SETTING THE CONTROLS
SELECTOR SWITCH:
A 2-way switch is used to set the
charger for a 6 VOLT or 12 VOLT
battery,
Page 7

Follow these steps when battery is in-
stalled in vehicle. A spark near battery
may cause battery explosion. To re-
duce the risk of a spark near the battery:
a)Position AC power cord and DC output
cord to reduce risk of damage by hood,
door, or moving engine parts.
b)Stay clear of fan blades, belts, pulleys
and other parts that can cause injuryto
persons.
c) Check polarity ofbattery posts. Positive
battery post usually has a larger diam-
eter than the Negative post.
d)Determine which post of battery is
grounded (connected) to the chassis. If
Negative post is grounded to the chas-
sis (as in most cases), see Item e. If
Positive post is grounded to the chas-
sis, see Item f.
e) For negative grounded vehicle, connect
Positive clamp from charger to Positive
ungrounded post. Connect Negative
(Black) clamp to vehicle chassis or en-
gine block away from battery. Do not
connect to carburetor, fuel lines or sheet
metal body parts. Connect to a heavy-
gauge metal part of the frame or engine
block.
f) For positive-grounded vehicle, connect
Negative (Black) clamp from charger to
ungrounded Negative (Black) post of
battery. Connect Positive (Red) clamp
to vehicle chassis or engine block away
from battery. Do not connect to carbure-
tor, fuel lines, orsheet metal body parts.
Connect to a heavy-gauge metaFpart of
the frame or engine block.
g)When disconnecting charger, discon-
nect at wall receptacle, remove clamp
from vehicle chassis and then remove
clamp from battery post.
h)Always disconnect the charger before
starting the vehicle.
Follow these steps when battery is
outside of vehicle.
a)Check polarity of battery posts. Positive
battery post usually has a larger diam-
eter than the Negative post,
b)Attach at least a24" long, 18-gauge or
heavier insulated jumper cable to the
Negative battery post.
o) Connect Positive (Red) charger clamp
to Positive post of the battery.
d)Position yourself and free end of the
cable as far away from the battery as
possible, then connect the Negative
charger clamp to the free end of the
cable. Do not face battery when making
this final connection.
e)When disconnecting charger, always
doso inreverse sequence of connecting
procedure and disconnect the first con-
nection while as far away from the bat-
tery as possible.
f) A marine (boat) battery must be re-
moved and charged onshore. To charge
it onboard requires equipment specialty
designed for marine use.
POSITIVE NEGA'nVE
GROUNDED
POWER
OUTLET
Page 8

OPERATION INSTRUCTIONS
a)Set the 6 and 12 Volt selector switch to
match the voltage of the battery being
charged.
b)Connect charger to a battery as out-
lined.
c) Plug AC power cord into 120 Volt, 60 Hz
receptacle.
d)The amber light indicates battery is
being charged, the green light indicates
battery is fully charged, and the red light
indicates trouble. See more detailed
exPlanation below.
• When properly connected, the amber
LED indicator should illuminate, This
indicator will stay illuminated until the
battery voltage has reached approxi-
mately 14,4 Volt and the charge cur-
rent has decreased to 0.5 Amps. At
this point, the amber indicator turns
off and the green indicator turns on.
Also at this point, the internal voltage
reference of the charger will change
in order to maintain the battery volt-
age at 13.2 Volt. At this lower voltage,
charger current istypically a few mil-
liamperes (mA) (1 mA = 0.001 A).
Under this condition called maintain,
most batteries can be left charging
indefinitely. If the battery is loaded
with 0.5 Amps or greater white in the
maintain condition, the charger will
change back to the normal charging
condition described above.
• Never leave the battery connected to
the charger while the charger is un-
plugged from the AC outlet. The
charger draws a few milliamperes
(mA) from the battery and will eventu-
ally rundown the battery.
The Red LED indicates an overload
condition. Common causes are short-
ing of the battery clamps, reverse-
polarity connection to a battery, and
charging a problem battery. An over-
load condition could also be caused
by charging two or more batteries in
parallel or charging a battery larger
than the size commonly used in a car
or truck. Once the charger goes into
the overload state, it will not auto-
matically reset to the normal charge
state. One of the battery clamps must
first be disconnected from the battery
for at least 5 seconds.
CHARGING TIMES
This charger has a rated output of 1.5
Amps. This output will vary with the age
and condition ofthe battery being charged.
Approximate
Ampere Hour Average Charge
Battery Capacity Times in Hours
10 10-12.5
12 12-15+0
20 20-25,0
Page 9

Tokeep your battery charger working properly for years:
1.CLean the clamps each time you are
finished charging. Wipe off any battery
fluid that may have come in contact w_th
the clamps to prevent corrosion.
2. Coil the input and output cords neatly
when storing the charger. This will help
prevent accidental damage to the cords
and oharger.
THIS CHARGER IS NOT SUBJECT TO
REPAIR.
RETURN CHARGER TO PLACE OF
PURCHASE FOR REPLACEMENT UN-
DER WARRANTY.
9
Page 10

 Loading...