

Page 1

Bedienungsanleitung
Instruction manual
SIMON
SOLAR LED SPOTS
(10144)
Die Bold GmbH
Auf dem Liethberge 26
38690 Goslar - Germany
www.die-bold.com
(10164)
(10165)
BJ 04-2021
Page 2

Inhaltsverzeichnis
Content
Bestimmungsgemäßer Gebrauch / Intended Use ……………...........................1
Inhalt / Content……………………………………...........................…................2
Montageanleitung / Mounting instructions……...........................….............2-6
Standort / Location…………………………………......................................…....7
Aufladen / Charge………………………………........................………...............8
Pflege und Wartung / Care and Maintenance ……..........................................8
Akkuwechsel / Battery change ………………………........................….............9
Behebung von Störungen / Elimination of malfunctions ………...…............10-11
Entsorgung und Umweltschutz / Disposal and environmental protection ........12
TechnischeDaten / Technical data……………………………………………………13
Sicherheitshinweise / Safety instructions……………………………............14-19
Bestimmungsgemäßer Gebrauch
Intended Use
Bitte lesen Sie diese Bedienungsanleitung vollständig und
sorgfältig durch. Diese Anleitung gehört zu diesem Produkt und enthält
wichtige Hinweise zur Inbetriebnahme und Handhabung. Beachten Sie immer
alle Sicherheitshinweise. Prüfen Sie vor Inbetriebnahme, ob die korrekte
Spannung vorhanden ist und ob alle Teile richtig montiert sind. Sollten Sie
Fragen haben oder unsicher in Bezug auf die Handhabung des Produktes sein,
setzen Sie sich bitte mit Ihrem Fachhändler in Verbindung. Bewahren Sie
diese Anleitung bitte sorgfältig auf und geben Sie diese ggf. an Dritte weiter.
Please read these operating instructions completely and carefully. These
instructions belong to this product and contain important information on
commissioning and handling. Always follow all safety instructions. Before
commissioning, check that the correct voltage is available and that all parts are
correctly installed. If you have any questions or are unsure about how to handle
the product, please contact your dealer. Please keep these instructions
carefully and pass them on to third parties if necessary.
1
Page 3
Art.-Nr.:10144
Art.-Nr.:10164
Art.-Nr.:10165
Inhalt / Content
1x
1x
1x
1x
1x
1x
2x
3x
5x
1x
1x
1x
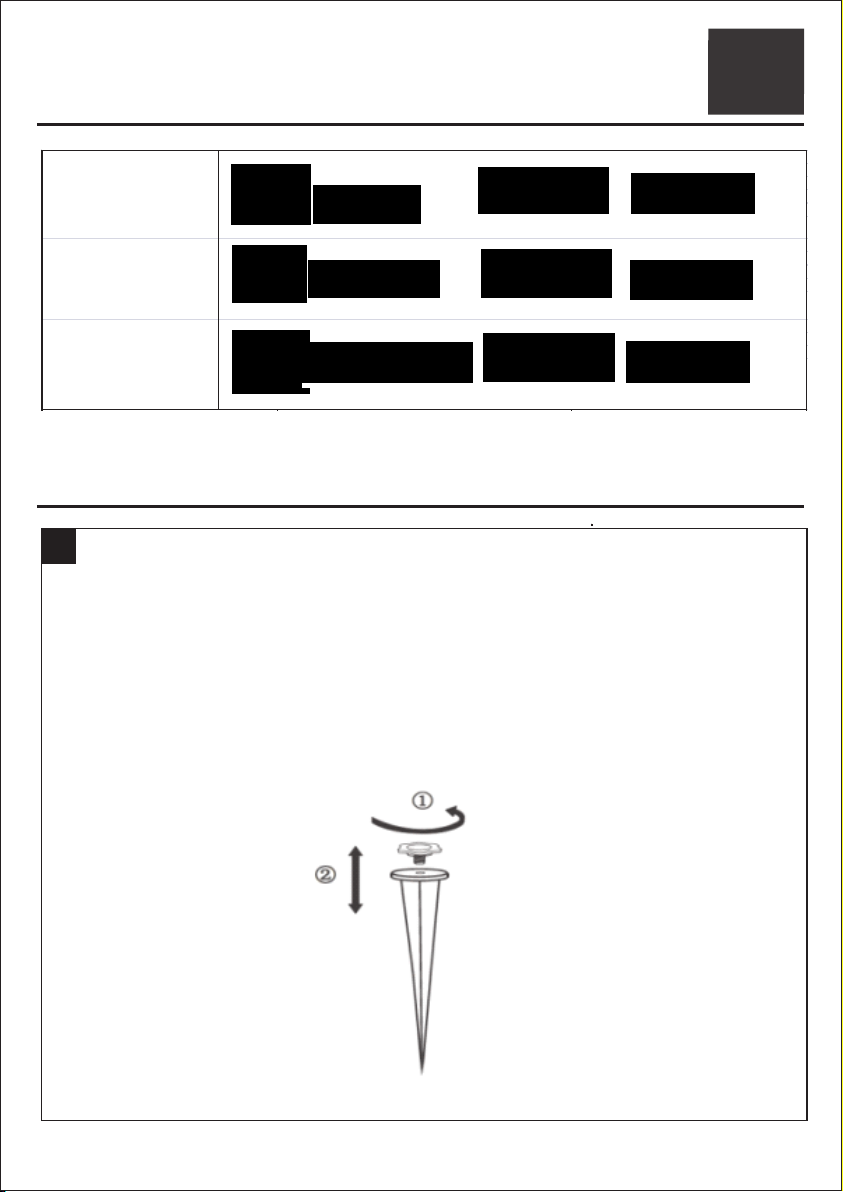
Montageanleitung / Mounting instructions
A
Entfernen Sie die Befestigungsschrauben von den Erdspießen der LEDGartenspots gegen den Uhrzeigersinn.
Remove the fastening screws from the ground spikes of the LED garden spots
in an anti-clockwise direction.
2
Page 4
Montageanleitung / Mounting instructions
Montageanleitung / Mounting instructions
B
B
ühren
ühren
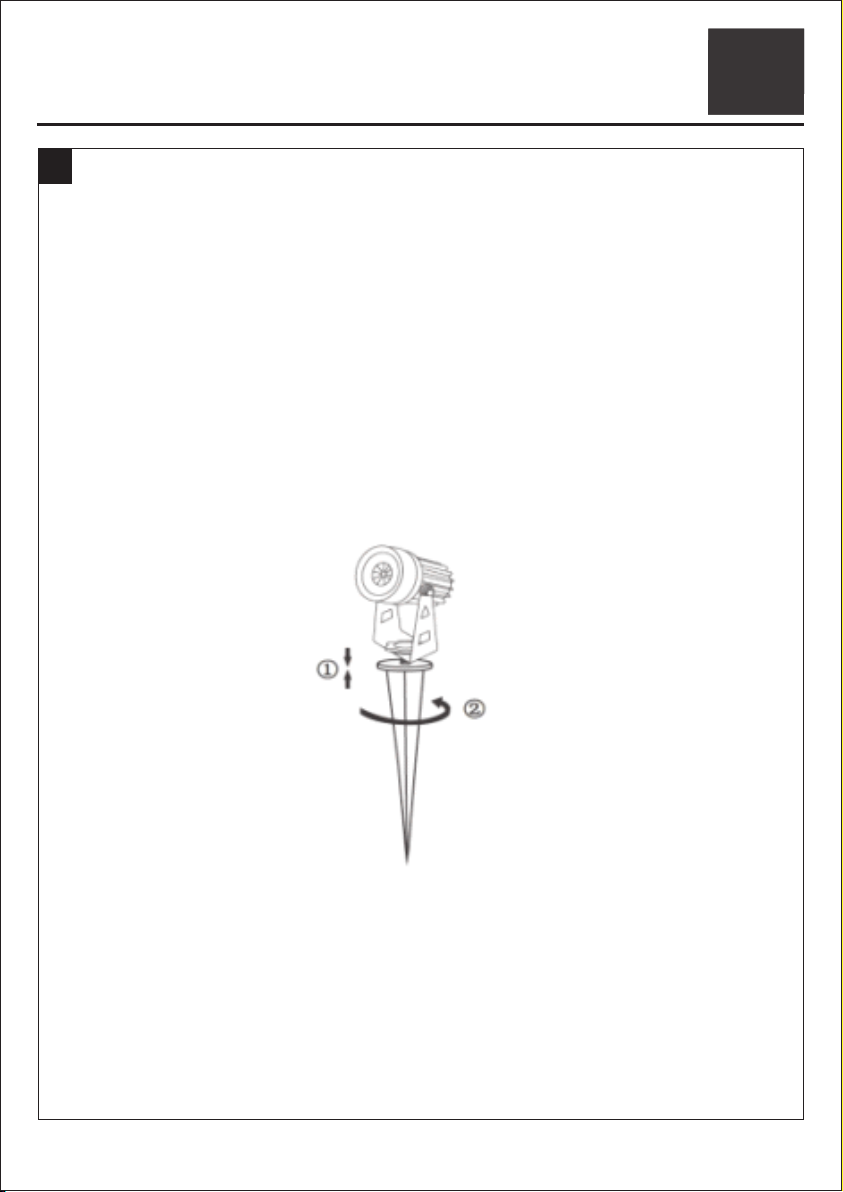
F Sie die Befestigungsschraube durch das Befestigungsloch an der
F Sie die Befestigungsschraube durch das Befestigungsloch an der
Leuchtenhalterung. Richten Sie die Schraube mit dem Erdspieß aus und drehen Sie
Leuchtenhalterung. Richten Sie die Schraube mit dem Erdspieß aus und drehen Sie
den Erdspieß gegen den Uhrzeigersinn, um die Leuchtenhalterung festzuziehen.
den Erdspieß gegen den Uhrzeigersinn, um die Leuchtenhalterung festzuziehen.
Guide the mounting screw through the mounting hole on the lamp bracket. Align the
Guide the mounting screw through the mounting hole on the lamp bracket. Align the
screw with the ground spike and turn the ground spike counterclockwise to tighten the
screw with the ground spike and turn the ground spike counterclockwise to tighten the
light bracket.
light bracket.
3
3
Page 5
Montageanleitung / Mounting instructions
C
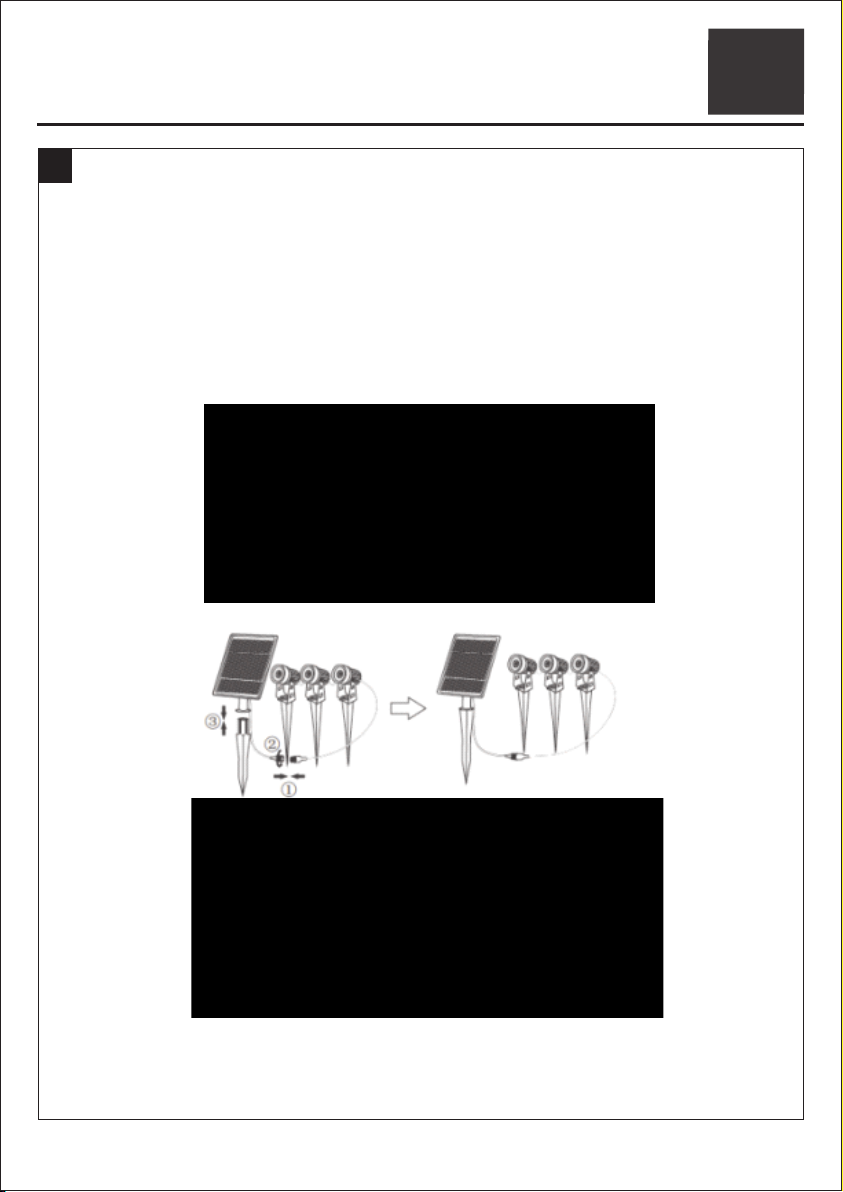
Verbinden Sie, wie in der Abbildung gezeigt, die Stecker und Buchsen und drehen
Sie die Befestigungskappe gegen den Uhrzeigersinn fest. Führen Sie den
Kunststoff-Erdspieß in das Befestigungsloch am Solarpanel ein.
Connect the plugs and sockets as shown in the illustration and tighten the mounting
cap counterclockwise.Insert the ground spike into the mounting hole on the solar
panel.
(10144)
(10164)
(10165)
4
Page 6
Montageanleitung / Mounting instructions
D
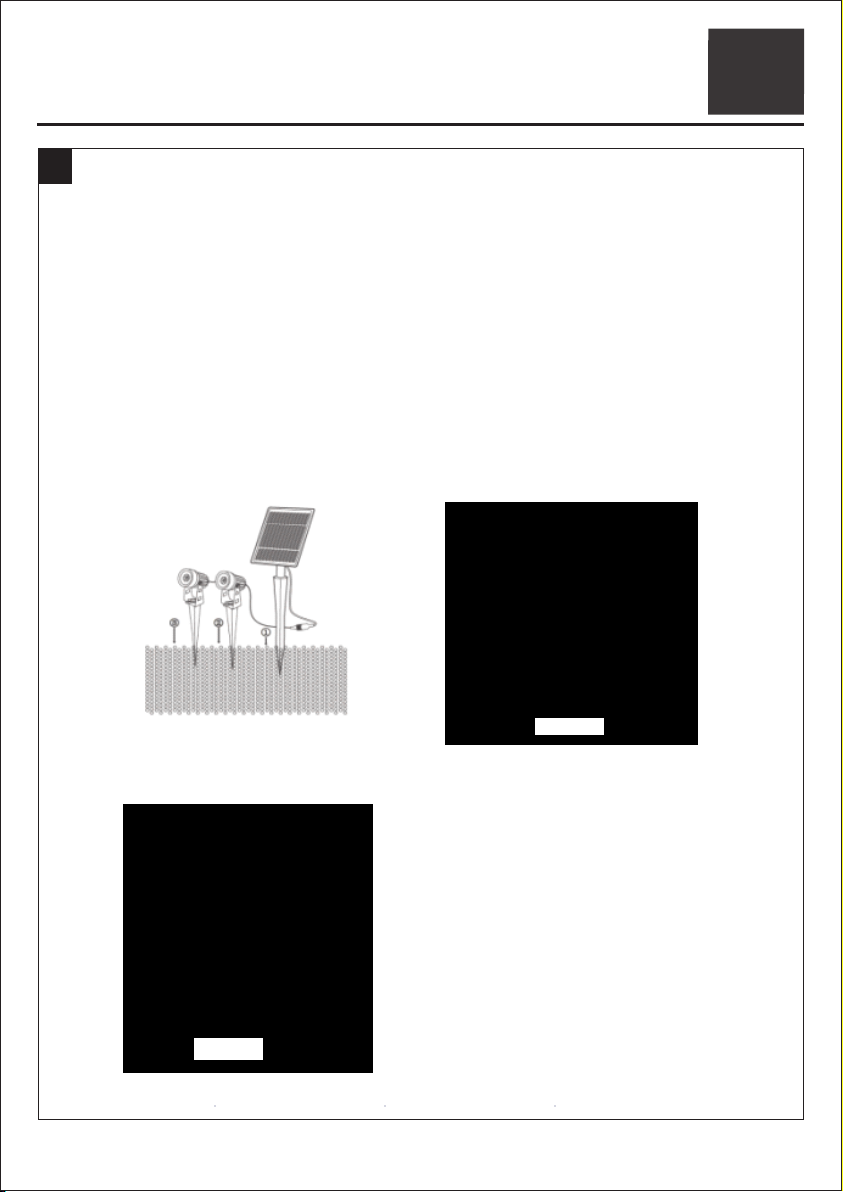
Setzen Sie das Solarpanel und die LED-Leuchten nacheinander in den Boden ein.
Sollte der Boden zu fest sein, wässern Sie diesen zunächst ausgiebig, um
anschließend die Erdspieße der Gartenspots und des Solarpanels problemlos
positionieren zu können.
Insert the solar panel and the LED lights into the ground one after the other. If the
ground is too firm, first water it thoroughly so that you can then easily position the
ground spikes for the garden spots and the solar panel.
(10144)
(10165)
(10164)
5
Page 7

Montageanleitung / Mounting instructions
E
Drücken Sie den " " -S c halte r auf d er Rückseit e des S olarp anels , damit
sich d as Licht bei Dun kelhe i t einzuschal tet. Hinweis: Das Licht wird n achts
automatisch ein- und tagsüber ausgeschaltet.
Press the " " switch on the back of the solar panel so thatthe light switches
on when it gets dark.
Note: The light is automatically switched on at night and switched off during
the day.
(10144 )
(10165 )
(10164 )
6
Page 8
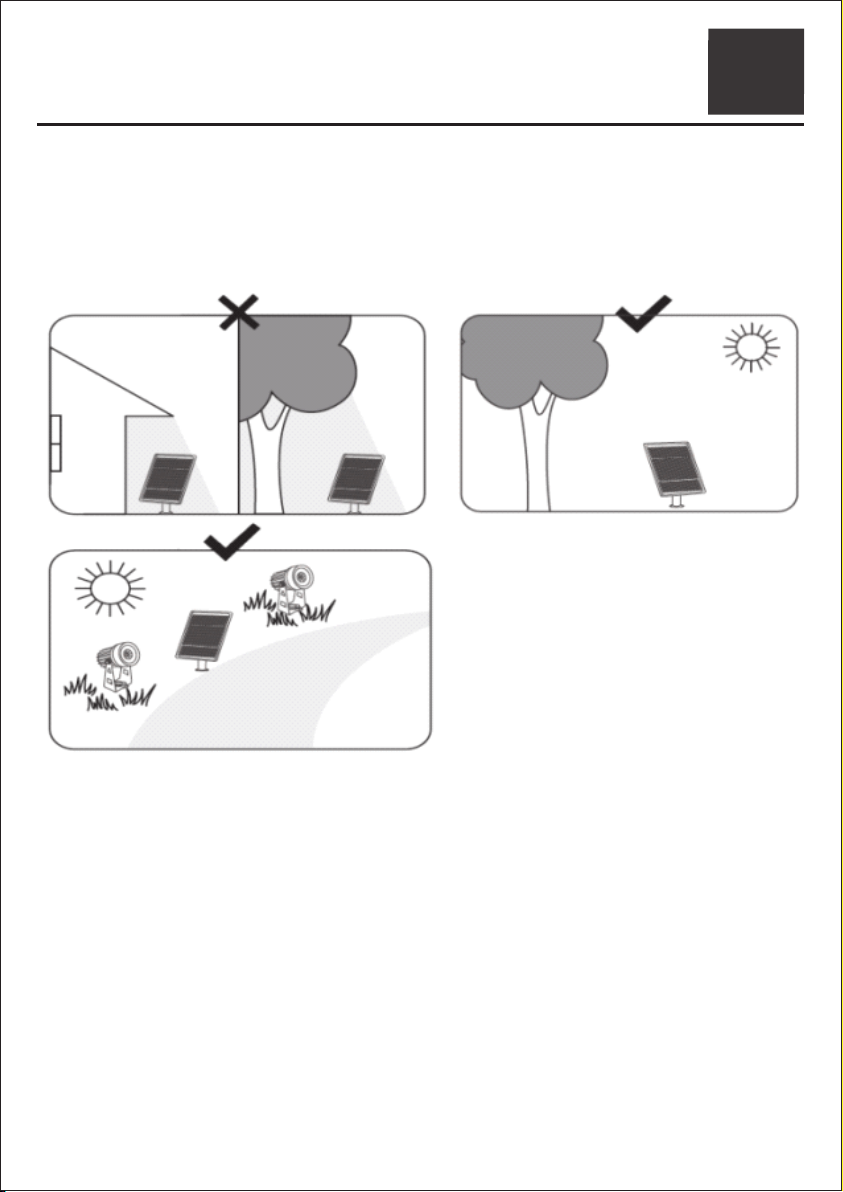
Standort / Location
7
Page 9
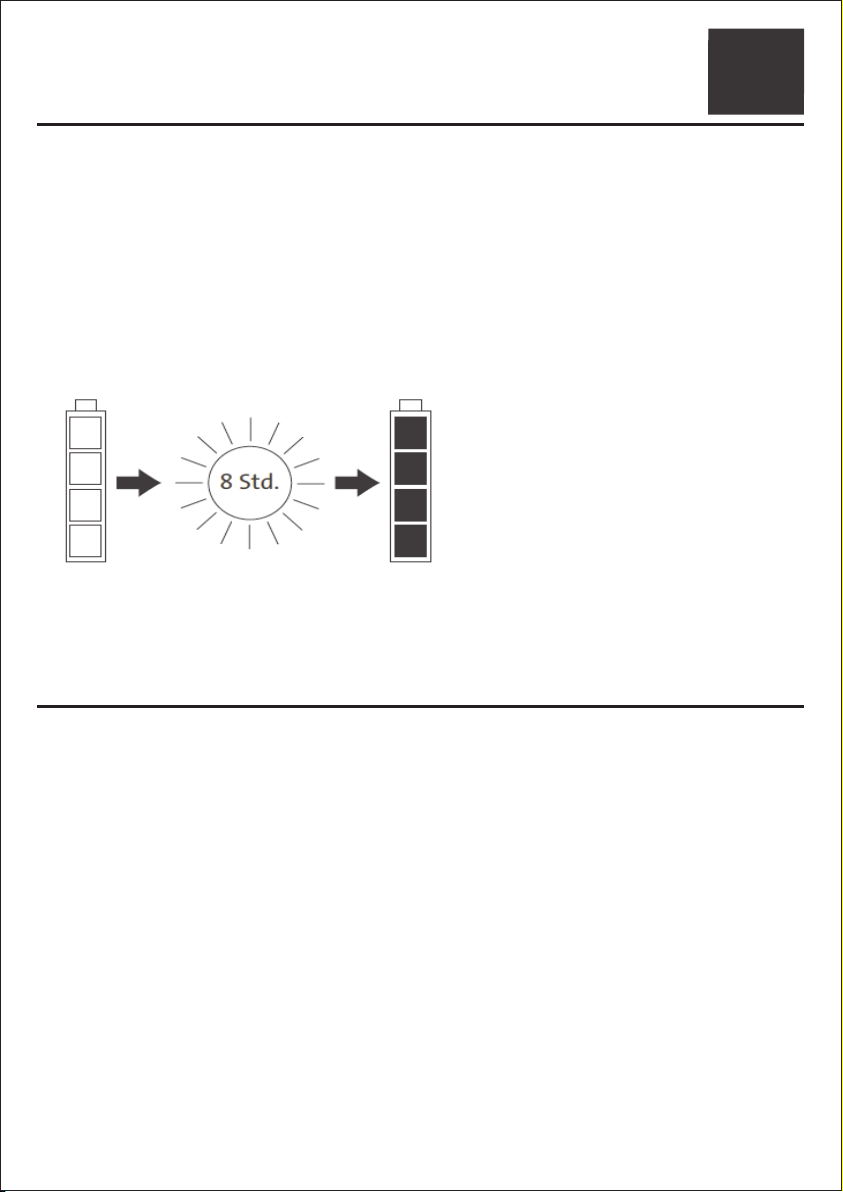
Aufladen / Charge
Laden Sie die Solarleuchte vor der ersten Inbetriebnahme im direkten
Sonnenlicht für 8 Stunden auf, um sicherzustellen, dass der Akkumulator
vollständig aufgeladen ist. Für diesen Ladevorgang muss der Ein-/Aus(ON/OFF) Schalter auf Position "ON" geschaltet sein.
Before using the solar lamp for the first time in direct sunlight, charge it for 8
hours to ensure that the battery is fully charged.The ON / OFF switch must
be set to the "ON" position for this charging process.
Pflege und Wartung/ Care and Maintenance
Reinigen Sie die Solarleuchte nur äußerlich und verwenden Sie ein weiches
Tuch.Verwenden Sie auf keinen Fall Scheuer- oder Lösungsmittel! Bei
längerer Nichtbenutzung den Akku herausnehmen und an einem kühlen,
trockenen Ort aufbewahren.
Only clean the outside of the solar light and use a soft cloth. Never use
abrasives or solvents! If the battery is not going to be used for a long time,
remove it and store it in a cool, dry place.
8
Page 10

Akkuwechsel / Battery change
Akkuwechsel
Entfernen Sie die hintere Abdeckung vom Solarpanel, indem Sie die
Schraube gegen den Uhrzeigersinn drehen.
Entfernen Sie die Befestigungsplatte des Li-Ionen-Akkus, indem Sie die
Schraube gegen den Uhrzeigersinn drehen..
Entfernen Sie den Akku und ersetzen Sie ihn durch einen neuen
identischen Akku (siehe technische Daten). Achten Sie auf die richtige
Polarität (+/-).
Bringen Sie die Befestigungsplatte wieder an, um die Batterie zu
befestigen
Befestigen Sie die hintere Abdeckung des Solarpanels, indem Sie die
Schrauben im Uhrzeigersinn festziehen.
Battery change
Remove the back cover from the solar panel by turning the screw
counterclockwise.
Remove the mounting plate of the Li-ion battery by turning the screw
counterclockwise.
Remove the battery and replace it with a new, identical battery(see
technical data). Pay attention to the correct polarity (+/-).
Replace the mounting plate to secure the battery in place
Secure the back cover of the solar panel by tightening the screws
clockwise.
9
Page 11

Behebung von Störungen / Elimination of malfunctions
Behebung von Störungen
Sollte die Leuchte auch nach 8 Stunden Erstaufladung nicht funktionieren,
gehen Sie bitte wie folgt vor:
- Stellen Sie sicher, dass der Schalter auf ON steht.
- Eventuell ist die Intensität des Sonnenlichts am ausgewählten Standort zu
gering. Stellen Sie die Leuchte an einen geeigneteren Ort. Vermeiden Sie
tags üb e r Sc ha tt en . Verm ei de n Si e na c ht s he ll en L i ch te in fa l l( z. B.
Straßenlaterne).
- Halten Sie das Solarmodul schonend sauber und trocken. Schmutz
verringert die Leistung des Solarmoduls ebenso wie eine stumpfe oder
zerkratzte Oberfläche.
- Die Dauer des einfallenden Sonnenlichts könnte zu kurz sein.
- Mögliche Ursachen hierfür sind ungünstige Witterungsverhältnisse oder
unerwarteter Schattenwurf.
- Lassen Sie die Leuchte bei klarem Wetter aufladen. Der Akkumulator
sollte nach 8 Stunden Sonnenschein wieder seine volle Leistung erreicht
haben.
- Leuchtet die LED schwächer als zuvor und nimmt die Leuchtdauer stark
ab, so sollte der Akkumulator ersetzt werden. Verwenden Sie nur
Akkumulatoren der im Abschnitt “Technische Daten” angegeben Bauart und
Kapazität.
Elimination of malfunctio ns
If the light does not work after 8 hours of initial charging, please proceed as
follows:
- Make sure the switch is in the ON position.
- The intensity of the sunlight at the selected location may be too low. Move
the light to a more suitable location. Avoid shade during the day. Avoid bright
incidence of light at night (e.g. street lights).
10
Page 12

Behebung von Störungen / Elimination of malfunctions
- Keep the solar module gently clean and dry. Dirt will reduce the
performance of the solar module, as will a dull or scratched surface.
The duration of the incident sunlight could be too short.
-
- Th e possible reasons for this are unfavorable weather conditions or
unexpected shadows.
- Let the lamp charge in clear weather. The accumulator should have
reached its full capacity again after 8 hours of sunshine.
- If the LED lights up weaker than before and the lighting time decreases
significantly, the battery should be replaced. Only use batteries of the type and
capacity specified in the “Technical data” section.
11
Page 13
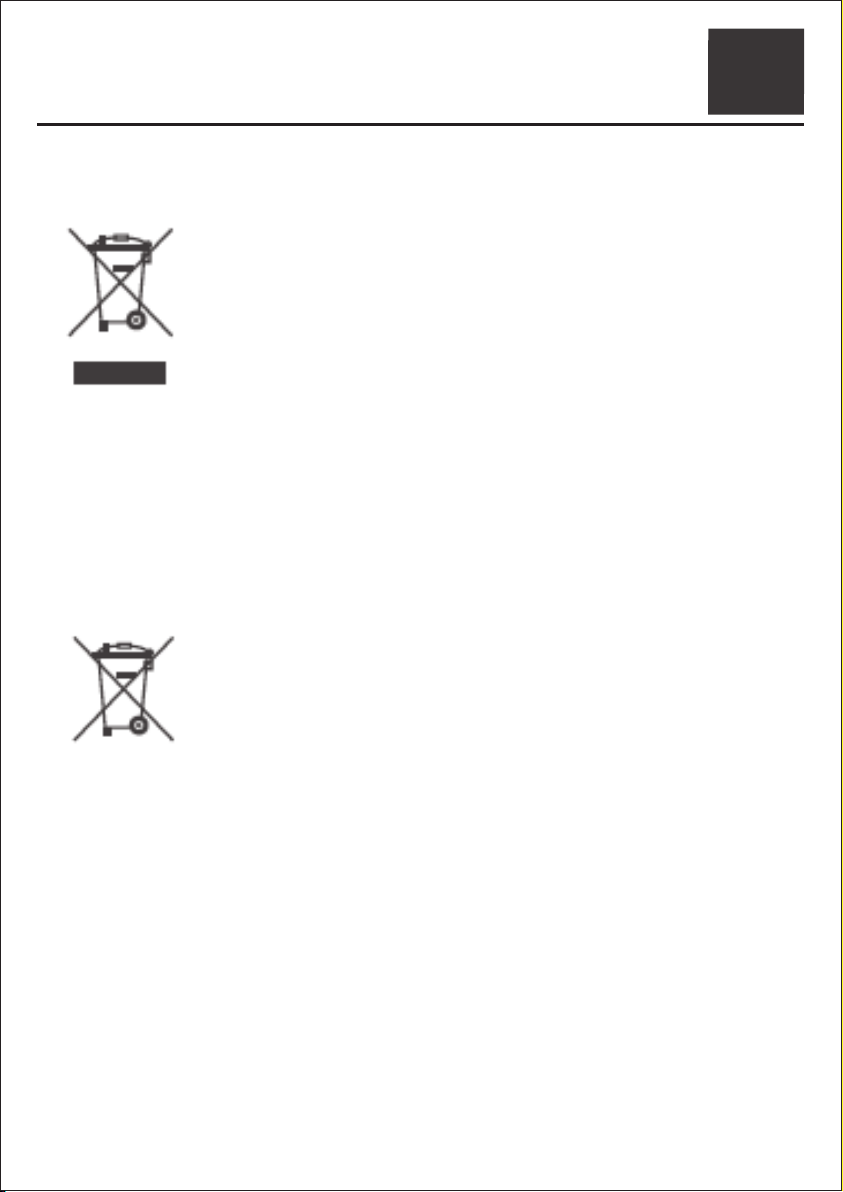
Entsorgung und Umweltsch utz
Disposal and environment al protection
a) Product
Elektronische Geräte sind Wertstoffe und gehören nicht in
den Hausmull. Entsorgen Sie das Produkt am Ende seiner
Lebensdauer gemäß den geltenden gesetzlichen
Bestimmungen. Sie erfullen damit die gesetzlichen
Verpflichtungen und leisten lhren Beitrag zum Unweltschutz.
Electronic devices are recyclable and do not belong in the
household waste. At the end of its service life, dispose of the
pro du ct i n a cc or da nce wi th t he app li ca bl e s ta tu to ry
provisions. In doing so, you meet the legal obligations and
make your contribution to protecting the environment.
b) (Rechargeable) batteries
Bitte entsorgen Sie die Batterien und Akkus umweltgerecht.
Werfen Sie Batterien und Akkus nicht in den Hausmüll.
Benutzen Sie bitte die Rückgabe- und Sammelsysteme in
Ihrer Gemeinde oder wenden Sie sich an den Händler.
Please dispose of batteries and rechargeable batteries in an
environmentally friendly manner. Do not throw batteries and
rechargeable batteries in the trash. Please use the return and
collection systems in your community or contact the dealer.
12
Page 14

Technische Daten / Technical data
Akku / Battery pack:
Leuchtmitteltyp / Lamp type:
Maximale Leuchtdauer /
Maximum burn time:
1 x Li-Ion, 2600 mAh, 3,7 V/DC, Typ:18650
2 x 1 W LED(für 10144)
3 x 1 W LED(für 10164)
5 x 1 W LED(für 10165)
Farbe: warmweiß
Leuchtmittel sind nicht auswechselbar.
2 x 1 W LED (for 10144)
3 x 1 W LED (for 10164)
5 x 1 W LED (for 10165)
Color: warm white
The light sources are not exchangeable.
1)2er Set LED-Gartenspots (10144) leuchtet
ca. 9 Stunden
mit 100% und weitere ca. 3 Stunden mit ca.
20% Helligkeit.
2)3er Set LED-Gartenspots (10164) leuchtet
ca. 8 Stunden
mit 100% und weitere ca. 3 Stunden mit ca.
20% Helligkeit.
3)5er Set LED-Gartenspots (10165) leuchtet
ca. 6 Stunden
mit 100% und weitere ca. 3 Stunden mit ca.
20% Helligkeit.
1) Set of 2 LED garden spots (10144) lights
up for approx. 9 hours with 100% and another
approx. 3 hours with approx. 20% brightness.
2) Set of 3 LED garden spots (10164) lights
up for approx. 8 hours with 100% and another
approx. 3 hours with approx. 20% brightness.
3) Set of 5 LED garden spots (10165) lights
up for approx. 6 hours with 100% and another
approx. 3 hours with approx. 20% brightness.
IP-Schutzklasse /
IP protection class:
Schutzklasse / Protection class:
Gewicht / Weight:
IP65 - Strahlwasser-geschütz / IP65 protected
against water jets
III
0,74 kg (10144)
0,90 kg ( 10164)
1,23 kg (10165)
13
Page 15

Sicherheitshinweise / Safety instructions
D Sicherheitshinweise
Die be i gefügten Anleitungen sin d Voraus s etzung für die ordnun g s gemäße
In sta ll a ti o n, d en Ei nba u o d er Mo nta ge un d I nbe tri eb n ah m e. A nl e it ung
aufbewahren!Die technischen Daten auf dem Produkt sind zu beachten. Technische
Änderungen vorbehalten. Studieren Sie gründlich die beigefügten Anleitungen und
Sicherheitshinweise!
1.Erforderliche IP-Schutzart IP-x5 (Schutz vor Wasser) am Einsatzort beachten.
2.Die Lichtquelle dieser Leuchte ist nicht ersetzbar; wenn die Lichtquelle ihr
Lebensdauerende erreicht hat, ist die gesamte Leuchte zu ersetzen.
3.Elektrostatische Aufladungen können die LED vorschädigen oder zerstören. Der
LED-Chip, LEDKontakte Leiterbahnen oder Steckerkontakte dürfen nicht berührt
werden.
4.Schäden die durch unsachgemäßen Gebrauch, Handhabung, Installation oder von
durchgeführten Veränderungen oder Umbauten verursacht wurden,sind von der
Gewährleistung / Garantie und Haftung ausgeschlossen.
CE-Kennzeichnung
Der Hersteller bescheinigt mit einer EU-Konformitätserklärung, dass das Produkt
den anwendbaren Richtlinien der Europäischen Union entspricht.
GB Safety instructions
The following instructions are essential for proper installation, assembly, mounting
and operation. Please keep these instructions for future reference!Always refer to
the technical data on the product.Subject to technical alterations. Please read the
following (safety) instructions carefully!
1.IP Protection requirements in the area of use must be met - IPx5 (protection
against water).
2.The light source of this luminaire cannot be replaced; when the light source has
reached the end of its service life, the entire luminaire must be replaced.
3.Electrostatic charges can damage or destroy the LED. Do not touch the LED chip,
LED contacts, conductors or connector pins.
4.We are not liable for damage caused by improper use, handling, installation,
modification or alteration,nor is it covered by the guarantee/warranty.
CE conformity marking
The manufacturer shall certify with an EC declaration of conformity, that the product
complies with all applicable European Community Directives.
14
Page 16

F Consignes de sécurité
Les instructions jointes sont la condition préalable à une installation conforme,
l'encastrement ou le montageet la mise en service. Conserver les instructions ! Tenir
compte des caractéristiques techniques mentionnées sur le produit. Sous réserve de
modifications techniques.Veuillez lire intégralement et attentivement les instructions
jointes et les consignes de sécurité !
1.Respecter le type de protection IP requis IP-x5 (Protection contre l'eau) en fonction
de l’emplacement d’utilisation.
2.La source lumineuse de cette lampe n'est pas remplaçable; lorsqu'elle a atteint sa
durée de vie, toute la lampe doit être remplacée.
3.Les surcharges électriques peuvent endommager ou détruire les LED. Ne pas
toucher la puce ni les contacts des LED, les cartes de circuits imprimés ni les
contacts de la fiche.
4.Les dommages imputables à une utilisation, un maniement, des modifications ou
des transformations non-conformes sont exclus de la garantie légale / constructeur
qui décline toute responsabilité en pareil cas.
Marquage CE
Le fabricant certifie, par la déclaration de conformité EU, que le produit est conforme
aux directives applicables de l'Union Européenne.
I Indicazioni per la sicurezza
I manuali allegati costituiscono la premessa fondamentale per un’installazione,
un’integrazione o un montaggio, nonché per una messa in funzione, realizzati in
modo corretto. Conservare il manuale! Prestare sempre attenzione alle specifiche
te c nic h e ri p ort a te s u l pr o dot t o. M o dif i che tec n ich e ri se rva t e. S t udi a re
accuratamente i manuali e le istruzioni di sicurezza forniti!
1.Controllare quale sia la protezione IP necessaria IP-x5(protezione dall’acqua) sul
luogo di utilizzo.
2.La fonte luminosa di questo apparecchio non è sostituibile: una volta raggiunta la
fine della sua vita utile, è necessario sostituire l’intero apparecchio.
3.Le cariche elettrostatiche possono danneggiare o distruggere i LED. I chip LED, i
contatti LED, materiali conduttori o contatti a spina non devono essere toccati.
4.Danni dovuti a un utilizzo scorretto o a manipolazione e installazione non conformi,
o ancora a modifiche e conversioni sono esclusi dalla garanzia.
Marchio CE
Il produttore certifica con una dichiarazione di conformità UE che il prodotto è
conforme alle direttive applicabili dell'Unione Europea.
15
Page 17

F Consignes de sécurité
Les instructions jointes sont la condition préalable à une installation conforme,
l'encastrement ou le montageet la mise en service. Conserver les instructions ! Tenir
compte des caractéristiques techniques mentionnées sur le produit. Sous réserve de
modifications techniques.Veuillez lire intégralement et attentivement les instructions
jointes et les consignes de sécurité !
1.Respecter le type de protection IP requis IP-x5 (Protection contre l'eau) en fonction
de l’emplacement d’utilisation.
2.La source lumineuse de cette lampe n'est pas remplaçable; lorsqu'elle a atteint sa
durée de vie, toute la lampe doit être remplacée.
3.Les surcharges électriques peuvent endommager ou détruire les LED. Ne pas
toucher la puce ni les contacts des LED, les cartes de circuits imprimés ni les
contacts de la fiche.
4.Les dommages imputables à une utilisation, un maniement, des modifications ou
des transformations non-conformes sont exclus de la garantie légale / constructeur
qui décline toute responsabilité en pareil cas.
Marquage CE
Le fabricant certifie, par la déclaration de conformité EU, que le produit est conforme
aux directives applicables de l'Union Européenne.
S Säkerhetsföreskrifte r
De bifogade bruksanvisningarna är en förutsättning för korrekt installation,
inbyggnad eller montering samt idrifttagning. Spara bruksanvisningen! Den tekniska
informationen på produkten måste beaktas. Med reservation för tekniska ändringar.
Läs de bifogade bruksanvisningarna och säkerhetsföreskrifterna noggrant!
1.Iaktta den IP-klass IP-x5 (skydd motvatten) som krävs på platsen.
2.Ljuskällan i denna armatur kan inte bytas; när ljuskällan inte längre fungerar måste
hela armaturen ersättas.
3.Elektrostatiska laddningar kan skada eller förstöra LED:n. LED-chipet, LED
kontakter, ledare eller stickkontakter får inte beröras.
4.Skador på grund av felaktig användning, hantering,installation eller på grund av
genomförda förändringar eller ombyggnationer omfattas inte av garantin.Paulmann
tar inget ansvar för denna typ av skador.
CE-märkning
Tillverkaren intygar med en EU-försäkran om överensstämmelse, att produkten
motsvarar EU-direktiven.
16
Page 18

RO Indicaţii de siguranţă
Instrucţiunile anexate reprezintă o condiţie preliminară pentru o instalare, integrare
sau montare şi punere în funcţiune regulamentară. Păstraţi instrucţiunile de utilizare!
Trebuie respectate datele tehnice de pe produs. Sub rezerva modificărilor tehnice.
Studiaţi temeinic instrucţiunile şi indicaţiile de siguranţă anexate!
1.La locul de utilizare respectaţi clasa IP de protecţienecesară IP-x5 (protecţie la
apă).
2.Sursa de lumină a acestei lămpi nu poate fi înlocuită;când sursa de lumină şi-a
epuizat durata de viaţă funcţională, trebuie schimbată lampa în ansamblu.
3.Încărcările electrostatice pot să deterioreze înainte de utilizare sau distruge LEDurile. Nu este permisă atingerea chip-ului LED-urilor, contactelor LED-urilor,
traseelor conductorilor sau contactelor ştecherelor.
4.D au ne le c a re au fos t ca u zate pri n uti l izar e a,ma ni pu lare a , in s ta lare a
necorespunzătoare, modificări sau demontări efectuate sunt excluse de la garanţie
şi răspunderea producătorului produsului.
Marcaj CE
Producătorul confirmă printr-o declaraţie de conformitate CE faptul că produsul
îndeplineşte cerinţele din directivele aplicabile din Uniunea Europeana.
SK Bezpečnostné pokyny
Priložené návody sú predpokladom pre riadnu inštaláciu, zabudovanie alebo montáž
a uvedenie do prevádzky. Návod uschovajte! Je potrebné prihliadať na technické
údaje uvedené na vyrobku. Technické zmeny vyhradené. Preštudujte si dôkladne
priložené návody a bezpečnostné pokyny!
1.Rešpektujte potrebny IP druh krytia IP-x5 (ochrana pred vodou) na mieste
nasadenia.
2.Zdroj svetla v tomto svietidle sa nedá vymeniť. Keď sa skončí životnosť zdroja
svetla, je potrebné vymeniť celé svietidlo.
3.Elektrostatické náboje môžu LED priebežne poškodiť alebo zničiť. LED čip, LED
kontakty , vodičové trasy alebo kontakty konektorov sa nesmú dotykať.
4.Škody, ktoré by boli spôsobené v dôsledku neodborného použitia, manipulácie,
inštalácie alebo prevedených zmien alebo prestavieb, sú vylúčené z poskytnutia
záruky/záruky a ručenia.
Označenie CE
Výrobca potvrdzuje vyhlásením o zhode s normami EÚ, že výrobok zodpovedá
aplikovateľným smerniciam Európskej únie.
17
Page 19

CZ Pokyny k bezpečnosti
Přiložené instrukce jsou předpokladem pro správnou instalaci, vestavbu nebo
montáž a uvedení do provozu. Instrukce uschovejte! Dodržujte technické údaje
uvedené na výrobku. Technické změny vyhrazeny. Přečtěte si pozorně přiložené
instrukce a pokyny k bezpečnosti!
1.Na místě montáže dodržte potřebné krytí IP-x5 (ochrana před vodou).
2.Světelný zroj tohoto svítidla nelze vyměnit; jakmile světelný zdroj dosáhne konce
své životnosti, musí být vyměněno celé svítidlo.
3.Elektrostatické náboje mohou poškodit nebo zničit LED diody. Nedotykejte se LED
chipu, LED kontaktů, vodivych drah ani konektorů.
4.Na poškození způsobené nesprávným používáním, manipulací, instalací nebo
provedenými změnami či přestavbami se nevztahuje záruka/garance ani ručení.
Označení CE
Výrobce Prohlášením o shodě EU potvrzuje, že výrobek odpovídá příslušným
směrnicím Evropské unie.
PL Inf orm acj e dot ycz ące b ezp iec zeń stwa
Przestrzeganie załączonych instrukcji stanowi warunek
prawidłowej instalacji, zabudowy lub montażu i oddania do użytku. Instrukcję należy
zachować! Przestrzegać danych techniczny ch umieszczonych na produkcie.
Zastrzega się prawo do zmian technicznych. Załączone instrukcje i informacje
dotyczące bezpieczeństwa należy uważnie przeczytać!
1.W miejscu montażu zachować wymagany stopień ochrony IP-x5 (ochrona przed
szkodliwymi skutkami wnikania wody).
2.Źródło światła tej oprawy nie podlega wymianie; jeżeli źródło światła wyczerpie
swoją żywotność, należy wymienić całą oprawę.
3.Ładunki elektrostatyczne mogą powodować wczesne uszkodzenie lub zniszczenie
LED. Chipów i styków LED,ścieżek przewodzących i styków złącz wtykowych nie
wolno dotykać.
Oznaczenie CE
Producent poświadcza w deklaracji zgodności UE, że produkt spełnia wymogi
stosowanych dyrektyw Unii Europejskiej.
18
Page 20

ES Ad vertencias de seguridad
Las indicaciones adjunt as son co ndicio nes previas ind ispens ables para la
instalación, el empotrado o el montaje y la puesta en funcionamiento adecuados.
¡Conserve estas indicaciones! Han de observarse los datos técnicos indicados en el
produ c t o . Re s ervado el derecho a realizar modificaciones téc n i c a s . ¡Lea
detenidamente las indicaciones y advertencias de seguridad adjuntas!
1.Debe tenerse en cuenta la clase de protección IP-x5 (protección contra el agua)
requerida en el lugar de instalación.
2.La fuente de luz de esta luminaria no es reemplazable; una vez alcanzado el fin de
su vida útil,se debe sustituir toda la luminaria.
3.Las cargas electrostáticas pueden dañar o estropear los LED. No debe tocar el
chip LED, los contactos LED, las pistas conductoras ni los contactos enchufables.
4.Los daños derivados de un uso, manejo o instalación inadecuados o de
modificaciones o reformas realizadas quedan excluidos de la garantía y la
responsabilidad.
Marcado CE
El fabricante certifica con una declaración de conformidad CE que el producto
corresponde a las directivas aplicables dela Unión Europea.
19
 Loading...