


Operating Instructions
Digital portable recorder for Enterprise Express
™

ii
Contents
Overview. . . . . . . . . . . . . . . . . . . . . . . . . . . . . . . . . . . . . . . . 1
Controls & Indicators . . . . . . . . . . . . . . . . . . . . . . . . . . . . . 3
Getting Started. . . . . . . . . . . . . . . . . . . . . . . . . . . . . . . . . . . 5
Installing the Battery . . . . . . . . . . . . . . . . . . . . . . . . . . . . . . . . . . . . . 5
Installing the Voicedata™ M card . . . . . . . . . . . . . . . . . . . . . . . . . . . 5
Turning On the Express Portable. . . . . . . . . . . . . . . . . . . . . . . . . . . . . 5
Formatting the Voicedata™ M card . . . . . . . . . . . . . . . . . . . . . . . . . . 6
Setting the Date… Time . . . . . . . . . . . . . . . . . . . . . . . . . . . . . . . . . . 6
Additional Set up Procedures. . . . . . . . . . . . . . . . . . . . . . . . . . . . . . . 7
Record Operations . . . . . . . . . . . . . . . . . . . . . . . . . . . . . . . . 8
Starting a New Recording . . . . . . . . . . . . . . . . . . . . . . . . . . . . . . . . . 8
Quick Start - Recording Dictation. . . . . . . . . . . . . . . . . . . . . . . . . . . . 9
Record-Lock. . . . . . . . . . . . . . . . . . . . . . . . . . . . . . . . . . . . . . . . . . . 9
Reviewing Dictation . . . . . . . . . . . . . . . . . . . . . . . . . . . . . . . . . . . . . 10
Playback. . . . . . . . . . . . . . . . . . . . . . . . . . . . . . . . . . . . . . . . . . . . . 10
Saving a Recording. . . . . . . . . . . . . . . . . . . . . . . . . . . . . . . . . . . . . 10
Deleting a Recording. . . . . . . . . . . . . . . . . . . . . . . . . . . . . . . . . . . . 11
Editing a Recording. . . . . . . . . . . . . . . . . . . . . . . . . . . . . . . . . . . . . 11
Additional Record Operations . . . . . . . . . . . . . . . . . . . . . . 12
Adjusting the Playback Speed . . . . . . . . . . . . . . . . . . . . . . . . . . . . . 12
Fast Forward. . . . . . . . . . . . . . . . . . . . . . . . . . . . . . . . . . . . . . . . . . 12
Moving to the Start or End of a Recording (BOF/EOF) . . . . . . . . . . . . . 12
Voice-Activated Recording (VOX/VOF) . . . . . . . . . . . . . . . . . . . . . . . . 13
Conference Recording (CONF/DICT) . . . . . . . . . . . . . . . . . . . . . . . . . 14
Find Operations . . . . . . . . . . . . . . . . . . . . . . . . . . . . . . . . . 15
Finding and Playing Saved Files. . . . . . . . . . . . . . . . . . . . . . . . . . . . 15
Editing Headers . . . . . . . . . . . . . . . . . . . . . . . . . . . . . . . . . . . . . . . . 15
Optional Keypad and Barcode Reader . . . . . . . . . . . . . . . 16
Appendix . . . . . . . . . . . . . . . . . . . . . . . . . . . . . . . . . . . . . . 17
SET Menu Selections, Messages,Accessories,Charging Station,Soft-key
Quick Reference
Contents

1
Overview
Overview
Introducing the Walkabout™ Express digital portable recorder,
designed for medical and legal professionals. The Walkabout™
Express portable is a digital recorder that provides outstanding
standalone functionality and compatibility with the Enterprise
Express™ system. Together, the Express portable and Enterprise
Express™ system offer completely integrated voice and text
processing.
Voice files are recorded on the digital Voicedata™ M card, delivering
superior sound quality and fast access to files. Each recording is saved
with the text summary that indicates the author ID, time/date stamp
and header information (e.g., Patient, Record number, etc).
Portable Features:
• A unique design —engineered for medical and legal professionals
• The 2MB Intel® Voicedata™ M card with up to 23 minutes of
recording and optional cards with even more recording time
• The ability to locate files quickly at the touch of a key
• Customizable options, allowing you to adapt the Express portable to
your individual dictation needs
The Walkabout™ Express portable comes with:
• A portable AC adapter
• An Voicedata™ M card for recording
• An NiMH battery
• A Battery Charging Station and AC Adapter

2
Controls & Indicators
1
2
3
4
5
6
7
8
9
18
17
16
15
14
13
12
11
10

3
Controls & Indicators
Controls & Indicators
1 Record Indicator Lights during record.
2 Display (See Display heading on next page.)
3 Soft-keys (3) Press one of these keys to select the function
appearing above it on the display.
4 Menu Use this button to display the Main menu.
5 Record Bar (Located on the Slide Control)
Record: Press to record and release to stop
Record-Lock: Press and slide bar up until it
latches into record. To unlatch, move it to Stop.
6 Slide Control Slide this control up or down to select
Stop, Play or Rewind/Playback.
To initiate playback from Rewind, just
release the Slide Control.
7 Thumb-wheel/Button Volume Control - Rotate this control to
adjust the playback volume.
Locate & Select Control - Rotate this
control to locate information, and press it,
like a button, to select information.
8 Speaker
9 Battery Compartment (Rear)
10 Recharge Connector (Bottom) Recharges the battery when the
portable is in the Charging Station.
11 Power AC Adapter Jack
12 Ear Earphone Jack
13 Mic Microphone Jack
14 On/Off Turns the portable On or Off
15 Backlight Illuminates the display
16 Boot Indicator Lights after a fresh battery is installed
17 In Use (Rear - above M card) Do not remove the M
card when the In Use indicator is lit.
18 Voicedata™ M card Compartment (Rear)

Display
21 MEM The unshaded area indicates the amount of memory
currently available for recording.
22 Battery The shaded area indicates the amount of power
(i.e., charge) remaining in the battery.
23 Time This area indicates either the current time, file length, file
location or date the file was last saved.
24 Messages This area displays menus, prompts, functions and other
file information.
25 Soft-keys This area shows the operation assigned to each soft-key.
(To select NEW, FIND or SET, the Slide Control must
be in the Stop position.)
.
Thumb-wheel/Button
Rotate to Locate and Press to Select
The Thumb-wheel/Button is a thumb wheel
and button merged into one control. Rotate
the Thumb-wheel to quickly locate
information and then press it to select or set
information.
Conventions Used in this Guide
Thumb-Wheel: The statement, “…use the Thumb-wheel to locate and
select items,” refers to rotating and pressing the Thumb-wheel to
display and select items.
Menu Button: Use this button to exit most operations.
Soft Keys: The instructions to press NEW, FIND, SET, etc. are
references to the portable’s soft keys.
4
Controls & Indicators
21 22 23
24
25
Menu
Press to select
Press to select

5
Getting Started
Getting Started
Before you power-up the portable and begin recording, you must
perform the following operations:
• Install a fully charged battery.
• Format the Voicedata™ M card.
• Set the portable’s Date and Time.
• Perform the Additional Set Up Procedures, page 7, as needed.
Installing the Battery
• Remove the battery compartment cover, and install the NiMH battery.
Charging the Battery—See the Appendix for charging information.
Installing the Voicedata™ M card
1 Seat the Voicedata™ M card (label face-up) in the M card
compartment as shown.
2 Gently push the M card down until it locks into place.
Removing the Voicedata™ M card
The arrow on the M card compartment
latch shows the direction to push the
latch in order to remove the M card.
Warning: Avoid touching any of the
components inside the M card
compartment. Dust and oil can damage
the contacts through which the portable
transfers M card data.
Turning On the Express Portable
• Press the On/Off Button to turn the portable either on or off.
The portable will display a power-up message followed by the Main
menu (NEW, FIND, SET).
You can operate the portable while it is plugged into an AC Adapter
The adapter plugs into the portable’s Power Jack.

Formatting the Voicedata™ M card
When you install a new M card in your
portable, you must format it before you can use
it for recording dictation.
Warning: Formatting erases all of the dictation
stored on the M card.
1 Press SET, and locate M CARD FORMAT
using the Thumb-wheel.
2 Press the Thumb-wheel to select M
CARD FORMAT.
3 Press YES to format and YES to confirm.
A “Formatting Please Wait” message
appears. The SET MENU will return when
formatting ends.
4 Press the Menu Button to return to the
Main menu.
Setting the Date
1 Press SET, and select DATE using the Thumb-wheel.
2 Use the Thumb-wheel to set the month, day and year.
First rotate the Thumb-wheel to locate a value and then press it to set
the value and move to the next field.
3 Press the Menu button to return to the Main menu.
Setting the Time
1 Press SET, and select TIME using the Thumb-wheel.
2 Use the Thumb-wheel to set the hours and minutes.
Note: Select AM or PM by scrolling through the hours setting.
3 Press the Menu button to return to the Main menu.
SET Menu
6
Getting Started
Additional Set Up Procedures
If you intend to upload files to an Enterprise Express system using the
Voicedata™ M card Reader, perform the following SET HEADERS and
AUTHOR ID procedures.
(See the Appendix for a complete list of SET MENU procedures.)
1 Press SET.
2 Use the Thumb-wheel to locate, select and set the following
items as needed:
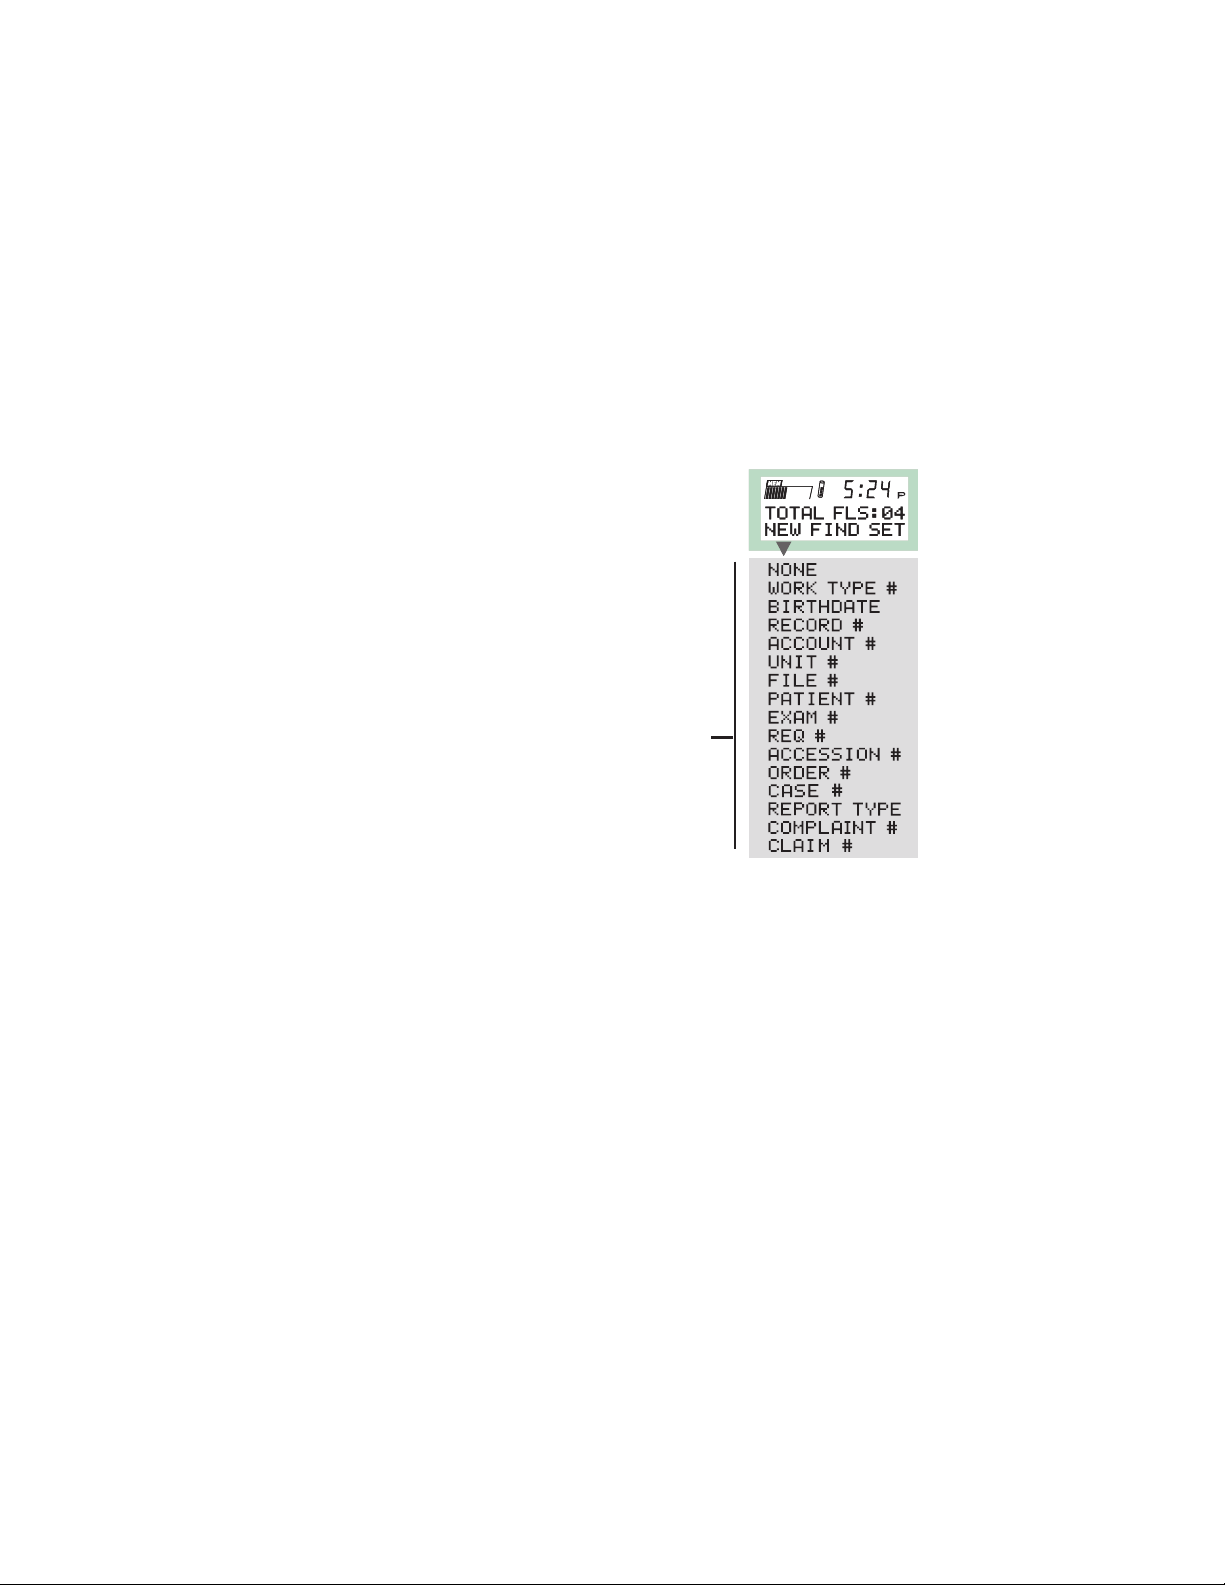
SET HEADERS
Headers are those Work type, Record and
Account ID numbers, to name a few, that you
key in at the start of each new recording.
Headers help to define your dictation. You can
fill in ID numbers for as many as six headers at
the start of each new recording. There are
sixteen header topics to select from
(i.e., NONE to CLAIM #.).
You can eliminate the header prompts
by setting all of the headers to NONE.
AUTHOR ID
Use this setting to identify your dictation with your user ID. If you
share your portable with other dictators, you can set up multiple
user IDs. Just make sure your Author ID is set and selectedwhen
you are using the portable. See Appendix for setting an Author ID.
3 Press the Menu button to return to the Main menu.
7
Getting Started
Header
Settings

Record Operations
Starting a New Recording
The figure (shown below) illustrates the Main menu and the header
prompts that may appear when you start a new recording.
The Slide Control must be in the Stop position to select NEW, FIND
or SET.
1 Press NEW.
The message, "Creating New File ## (1-
99)" appears briefly and then is replaced by
the first header selection.
2 Set each digit of the header ID number
by rotating and then pressing
the Thumb-wheel,
or
press END to bypass the remaining
headers and begin dictating.
3 Press DONE to save your entry and
display the next header.
The Save/Delete menu appears. You can
begin recording.
8
Record Operations
Possible
Headers
Save/Delete
Menu
Tips
SET HEADERS, found in the SET menu,
determines which headers you will see.
To scroll the headers without entering IDs:
• Press the Thumb-wheel.
To edit a Header ID number, press:
• CLR to delete the entire number or
BSP to backspace and delete a number.

9
Record Operations
Quick Start - Recording Dictation
This procedure contains all of the information you will need to quickly
start and end a basic recording. First you will select and set each
Header ID number. Next you will record and play back your message,
and finally, you will save it as complete (COMP).
Start
1 Press NEW.
2 Select each Header, set its ID number and then press DONE.
Press the Thumb-wheel to select a Header.
Rotate and press the Thumb-wheel to select and set each number.
Record
3 Press the Record Bar to record, and release it to stop.
During record, REC appears on the display and the record indicator
lights.
Playback
4 Pull the Slide Control down to Rewind, and then release it to
begin playback.
End
5 Move the Slide Control to the Stop position.
6 Press SAVE, and then COMP.
The portable displays “Done Saving
FILEXX” and “Reclaiming Space…Wait”
before returning to the Main menu.
Record-Lock
To record without having to continually press and release the record
bar, use Record-Lock.
• Press the Record Bar and slide it up until it latches.
The REC menu appears, and the record indicator lights continuously.
You can release the Record Bar and begin dictating.
To End Record-Lock
• Move the Slide Control to the Stop position.

10
Record Operations
Reviewing Dictation
1 Pull down and hold the Slide Control in Rewind.
The portable displays “REWIND.” Rewind stops automatically and
“BOF GO TO PLAY” appears when you reach the beginning of the
file. (If you continue rewinding, the portable will beep three times.)
2 Release the Slide Control at any time to begin playback.
The slide moves back into Play and “PLAY FILE/FPB/FF” menu
appears. If you reach the end of the file during playback, the
portable plays a tone and displays an “END OF FILE!” prompt.
Playback
To start and stop playback without rewinding.
• Move the Slide Control to the Play position to begin playback
and to the Stop position to end playback, as needed.
Saving a Recording
1 Move the Slide Control to the Stop position.
The portable displays the Save/Delete menu.
2 Press SAVE, and select one of the
following options:
INC Incomplete- Use this selection if
you want to finish this dictation at
another time. You can retrieve and
edit this recording. (See the Find
Operations.) Incomplete recordings
cannot be uploaded to the Enterprise
Express®system.
PCM Priority Complete- Saves the recording as complete and
assigns a priority status to it. You can retrieve and edit this
recording. (See the Find Operations.)
COMP Complete- Saves the recording as complete. You can
retrieve and edit this recording. (See the Find Operations.)
The portable displays “DONE SAVING FILEXX” and
“RECLAIMING SPACE…WAIT” before returning to the Main menu.
Note: You must either save or delete a file to exit a recording.

11
Record Operations
Deleting a Recording
1 Press DEL.
2 Select YES to delete the recording or
NO to cancel.
If you select YES, you will return you to the
Save/Delete menu.
The portable displays “DELETING FILEXX” and “RECLAIMING
SPACE…WAIT” before returning to the Main menu.
Note: You must either save or delete a file to exit a recording.
Editing a Recording
Uses these procedures to edit a recording that is currently active. This
can be a new recording or one that you retrieved using FIND.
Recording Over Dictation
Use this procedure to replace existing dictation.
1 Use the Slide Control to locate the beginning of the dictation
you want to replace.
2 Press and hold the Record Bar, or use Record-Lock, to record over
the existing dictation.
Appending Dictation
Use this procedure to add dictation to a recording.
1 Press EOF to go to the end of file.
You can also go to the end of the file through playback or fast forward.
2 Press and hold the Record Bar, or use Record-Lock, to add
dictation at the end of your recording.
DEL

12
Additional Record Operations
Additional Record Operations
Adjusting the Playback Speed
During playback you can use the following procedure to adjust the
speed at which the portable plays a recording.
1 Move the Slide Control down to rewind
and then release it to start playback.
The portable displays “FPB” (Fast
Playback) and “FF” (Fast Forward).
2 Press FPB to select another playback
speed.
There are six speeds expressed in
multiples of normal speed (X1.25, X1.5,
etc.). To return to normal speed during
playback, select the speed following the
X.75 (a blank).
3 Move the Slide Control to Stop.
Note: Selecting Stop ends playback and resets the speed to normal.
Fast Forward
The FF control appears when the portable is in playback.
1 Begin playback from the Slide Control.
The portable displays the “PLAY FILE/FPB/FF” menu.
2 Press FF to start and stop fast forward.
The Counter (upper right) advances during fast forward.
Moving to the Beginning or End of a Recording (BOF/EOF)
Use the BOF and EOF controls to move to the beginning or the end of
a recording. These controls are available when the Slide Control is in
the stop position.
• Press either BOF to go to the beginning or EOF to go to the end
of a recording.
Selecting EOF will toggle the display to BOF, and vice versa.

13
Additional Record Operations
Voice-Activated Recording (VOX/VOF)
You can set the portable to record only when you are speaking. To
set voice-activated recording you must be in record.
1 Press NEW, and fill in the header IDs, if
you are not already in a recording.
2 Press the Record Bar (Slide Control) and
move it up until it latches into
Record lock.
The REC menu appears.
3 Press VOX to turn on voice-activated
recording.
The portable displays VOF to indicate VOX is on, VOX also
appears above the MEM indicator. During VOX, the record
indicator lights when you speak and goes off during silence.
4 Press VOF cancel voice-activated recording.
The VOF option changes to VOX.
Adjusting VOX Sensitivity
1 Press the Record Bar and move it up until it latches into
Record lock.
2 Press VOX and then ADJ.
The VOX sensitivity gauge appears.
Note. Dictation cannot be recorded when the portable is in VOX
ADJ mode.
3 Use the Thumb-wheel to adjust VOX sensitivity.
You can add up to 12 blocks to the VOX sensitivity gauge to
decreases the VOX sensitivity. The more blocks you add, the
louder you’ll have to speak to trigger record. Remove blocks as
needed to adjust VOX to your normal speaking voice.)
Note: If VOX is always recording, even during silence, then
decrease its sensitivity by adding blocks to the gauge.
4 Press the Thumb-wheel set your adjustment.

14
Additional Record Operations
Conference Recording (CONF/DICT)
To increase the sensitivity of your portable for recording a meeting or
conference, follow these steps to turn conference recording on.
1 Move the Slide Control up into Record lock.
2 Press CONF to turn conference recording on.
If DICT is on the display and CONF appears next to the MEM
indicator, then conference recording is on.
Canceling Conference Recording
• Press DICT to cancel conference record, and move the Slide
Control to Stop.

15
Find Operations
Finding and Editing Saved Files
Use FIND, located on the Main menu, to open, playback and edit
saved files. You can delete or save the files when you are done.
1 Press FIND.
The Find menu appears, indicating the total number of files.
2 Press INC, PCM or COMP to locate the appropriate files.
INC Incomplete files
PCM Priority-complete files
COMP Complete files
If there are no files of the type you selected, "FILE NOT FOUND"
appears. If the portable locates files, it displays the first file found
by its file number and the date and time it was created.
3 Rotate the Thumb-wheel to locate a specific file.
4 Press the Thumb-wheel to open a file and display the Record menu.
Once the file is open, you can review it, record over it, and/or append
it. (Refer to Editing a Recording.)
5 Press SAVE or DEL to exit the file and return to the Main menu.
Editing Headers
Use this procedure if you need to review and edit the headers assigned
to a saved recording.
1 Press FIND and then INC, PCM or COMP.
2 Use the Thumb-wheel to locate the file number and
press HDRS.
3 Press the Thumb-wheel to scroll through the headers.
You can check each Header ID.
4 Use the Thumb-wheel to edit a header.
5 Press DONE, END and then SAVE to exit.
Find Operations

16
Optional Keypad and Barcode Reader
Optional Keypad and Barcode Reader
Using the Optional Keypad
If the Thumb-wheel method is too slow for
entering Header IDs , then you should add a
keypad (optional) to the portable.
The keypad operates in the same way as a
telephone keypad with the following exceptions:
[#] Press the [#] key, or DONE, to complete an entry.
[*] Press the [
*
] key, or CLR, to clear the entry and start over.
Keypad Dictation
1 Press NEW.
2 Use the keypad to enter the Header ID numbers.
Use the [*] key, if needed, to clear your entry and start over.
3 Press [#], or DONE, to save your entry and move the next header.
Using the Optional Barcode Reader
Attaching a Barcode Reader to your portable
can dramatically increase the speed at which
you can enter Header IDs. The Barcode
Reader consists of a wand (left) and a
Diagnostic button (right). The Thumb-wheel
will activate the wand (visible red light) for
scanning.
Barcode Reader Dictation
1 Press NEW to start a new recording.
2 Press the Thumb-wheel to activate the wand.
3 Starting from either side of the barcode, pass the wand across
the barcode while maintaining contact with it.
You’ll hear a beep if the scan is good.
4 Press the Thumb-wheel to save the scanned IDs and move to the
next header.
Diagnostic
Button
Wand

17
Appendix
SET MENU Selections
You can use the SET MENU to customize
your portable’s settings. However, before you
attempt any changes, make sure you review
the appropriate SET MENU information.
To Access the SET MENU-
1 Press SET.
2 Rotate the Thumb-wheel to locate a
specific option.
3 Press the Thumb-wheel to select the option.
4 Use the Thumb-wheel and soft keys to
edit your selection.
Refer to the SET MENU information.
Selection Option
Description
DSP VOCODER Sets the recording capacity
and audio quality
OK1 32 ADPCM High quality
Less record time
2MB M card: 6min.
4MB M card: 13min.
8MB M card: 26min.
TRUESPECH8.5 Good quality
More record time
2MB M card: 23min.
4MB M card: 49min.
8MB M card: 98min.
USER PROFILE (For future use.) Indicates the type of dictation
and portable.
PHYS: W BCOD Physician w/Barcode Reader
PHYS: NO BCOD Physician/No Barcode Reader
ATTY: NO BCOD Attorney No Barcode Reader
Appendix

18
Appendix
Selection Option Description
DATE Month/Day/Year Set the current date
DATE FORMAT Sets the date format
MM/DD/YY MM:Month
DD/MM/YY DD:Day
YY/MM/DD YY:Year
TIME Hour/Minute Sets the current time
TIME FORMAT AM/PM
24-HOUR
M CARD FORMAT YES Formats the Voicedata™
M card (erases all information)
NO Exits format menu
DAYLIGHT SAV YES Resets time to daylight savings
NO Exits menu
VOLUME Sets a minimum volume
level for playback. You can
use the Thumb-wheel to
override this setting at any
time during playback.
SET HEADERS HEADER1 These are the headers that
HEADER2 you may be required to fill
HEADER3 in when you press NEW to
HEADER4 begin a recording. There are
sixteen possible settings for
each header. You can
eliminate the header prompts
by setting all of the headers
to NONE.
16 header settings

19
Appendix
Selection Option Description
INACTIVE T/O 2 to 60min. Sets the inactivity time-out.
This will turn the portable off
automatically when it is not
being used.
AGC SETUP ON Best audio quality (default)
OFF Good audio quality + more gain
WARNING TONE ON Plays warning tone
OFF No warning tone
BACKLITE T/O 3 to 60 sec. This is the number of seconds
the Backlight remains on after
you use a soft key or the
Thumb-wheel.
VOX HOLDOVER .25 to 5 sec. When the portable detects
silence during VOX, this is
the number of seconds it will
wait before stopping record.
FND CRITERIA Filename Defines how your files are
Newest File First organized and presented when
Oldest First you initiate a FIND
Author ID
AUTHOR ID Identifies your dictation with
the Author ID you set and
select here. You can set as
many as five user IDs for
yourself and others. Make sure
you select your Author ID
when you are using the
portable for dictation.
NEW Displays the NEW menu for
setting up new Author IDs.
EDIT Displays existing IDs. Use
the Thumb-wheel to select
and edit ID.
SEL Select the Author ID here that
identifies you as the dictator.

20
Appendix
Display Messages
TOTAL FLS: ## Total files on the Voicedata™ M card
REC Recording
PLAY FILE Playback
MEDIA FULL… The Voicedata™ M card is full. To
GO TO STOP
increase space you can delete files, format
the installed card (erases all files) or install
and format a new M card.
ERROR:NO MINI CARD Make sure a formatted Voicedata™ M card
is installed.
Parts and Accessories
The following is a list of the optional accessories that are available for
your Walkabout™ Express portable:
2MB Voicedata™ M card
4MB Voicedata™ M card
8MB Voicedata™ M card
Express Barcode Reader
Express Portable Keypad
Express Voicedata™ M card Reader
AC Adapter
To operate the portable from the AC Adapter, plug the adapter into the
portable’s Power jack and an AC outlet.
Note: The fast charging station (Part Number 210512) should only be
used with the following adapters: 501601 (USA), 501602 (UK) and
501603 (Europe). Make sure you use the correct AC adapter
for your locale.

Charging Station
The two ports on the charging station give you the
option of charging the portable’s NiMH battery
either in or out of the portable.
Charging Station Setup
• Plug the AC Adapter into the Charging
Station’s AC jack and an electrical outlet.
To charge the battery while it is in the portable—
• Insert the portable into the front charging port.
The portable’s Main menu appears. The
Charging Station’s Portable indicator lights
while the battery is charging and goes off when
it is done.
The portable does not have to be off when you insert it into the
charging port.
To charge an individual battery—
• Insert the battery into the back charging port.
The Charging Station’s Battery indicator lights
while the battery is charging and goes off when it
is done.
To charge both the Portable and a battery—
Insert a battery in the back charging port and the
portable containing battery in the front charging port.
The Charging station will charge the portable first
and then automatically switch to charging the battery next.
• Charging Times
The Charging Station can charge one item at a time, either the battery
or portable, in one hour, or it can charge both items in up to two hours.
21
Appendix
NiMH
rechargeable
Stop
4.8v DC
550mAh
P/N 501530
battery pack
made in U.S.A.

Soft-Key Quick Reference
Main Menu
Menu Option Description
NEW Creates a NEW File for your next recording.
ENTER:
Header # Rotate and press the Thumb-wheel
to select a work type.
DONE Saves the header #.
FIND Retrieves saved recordings
INC Displays all incomplete recordings
PCM Displays all Priority complete recordings
COMP Displays all complete recordings
SET SET MENU Displays the seventeen SET Menus.
Save/Delete Menu
Menu Option Description
DEL Deletes a recording
BOF Goes to the beginning of a recording
EOF Go to the end of a recording
SAV Save a recording
INC Save as Incomplete
PCM Save as Priority Complete
COMP Save as Complete
22
Appendix

Record Menu
Available when you press the Slide Control’s Record bar.
Menu Option Description
VOX Turns voice-activated recording on
ADJ Adjust VOX recording sensitivity
VOF Turns VOX off
CONF Indicates conference is off.
DICT Indicates conference is on.
Play Menu
Available when you initiate playback with the Slide Control.
Menu Description
FPB Adjusts playback speed
FFFast forward
23
Appendix

www.dictaphone.com
Dictaphone products are manufactured under the
International Standard ISO 9002 approved quality process.
Dictaphone®is a registered trademark of the
Dictaphone Corporation, Stratford, CT.Boomerang,
™
Walkabout,™and Voicedata™are trademarks of the
Dictaphone Corporation. DSP Group and TrueSpeach are
trademarks of IBM corporation.Windo ws
®
and Microsoft®are
registered trademarks of the Microsoft Corporation.
Sound Blaster
®
is a
registered trademark
of Creative
Technology Ltd.
©
1999 Dictaphone Corporation. All rights reserved.
L-2411 01/99
 Loading...