

Page 1
1 3
Table of contents
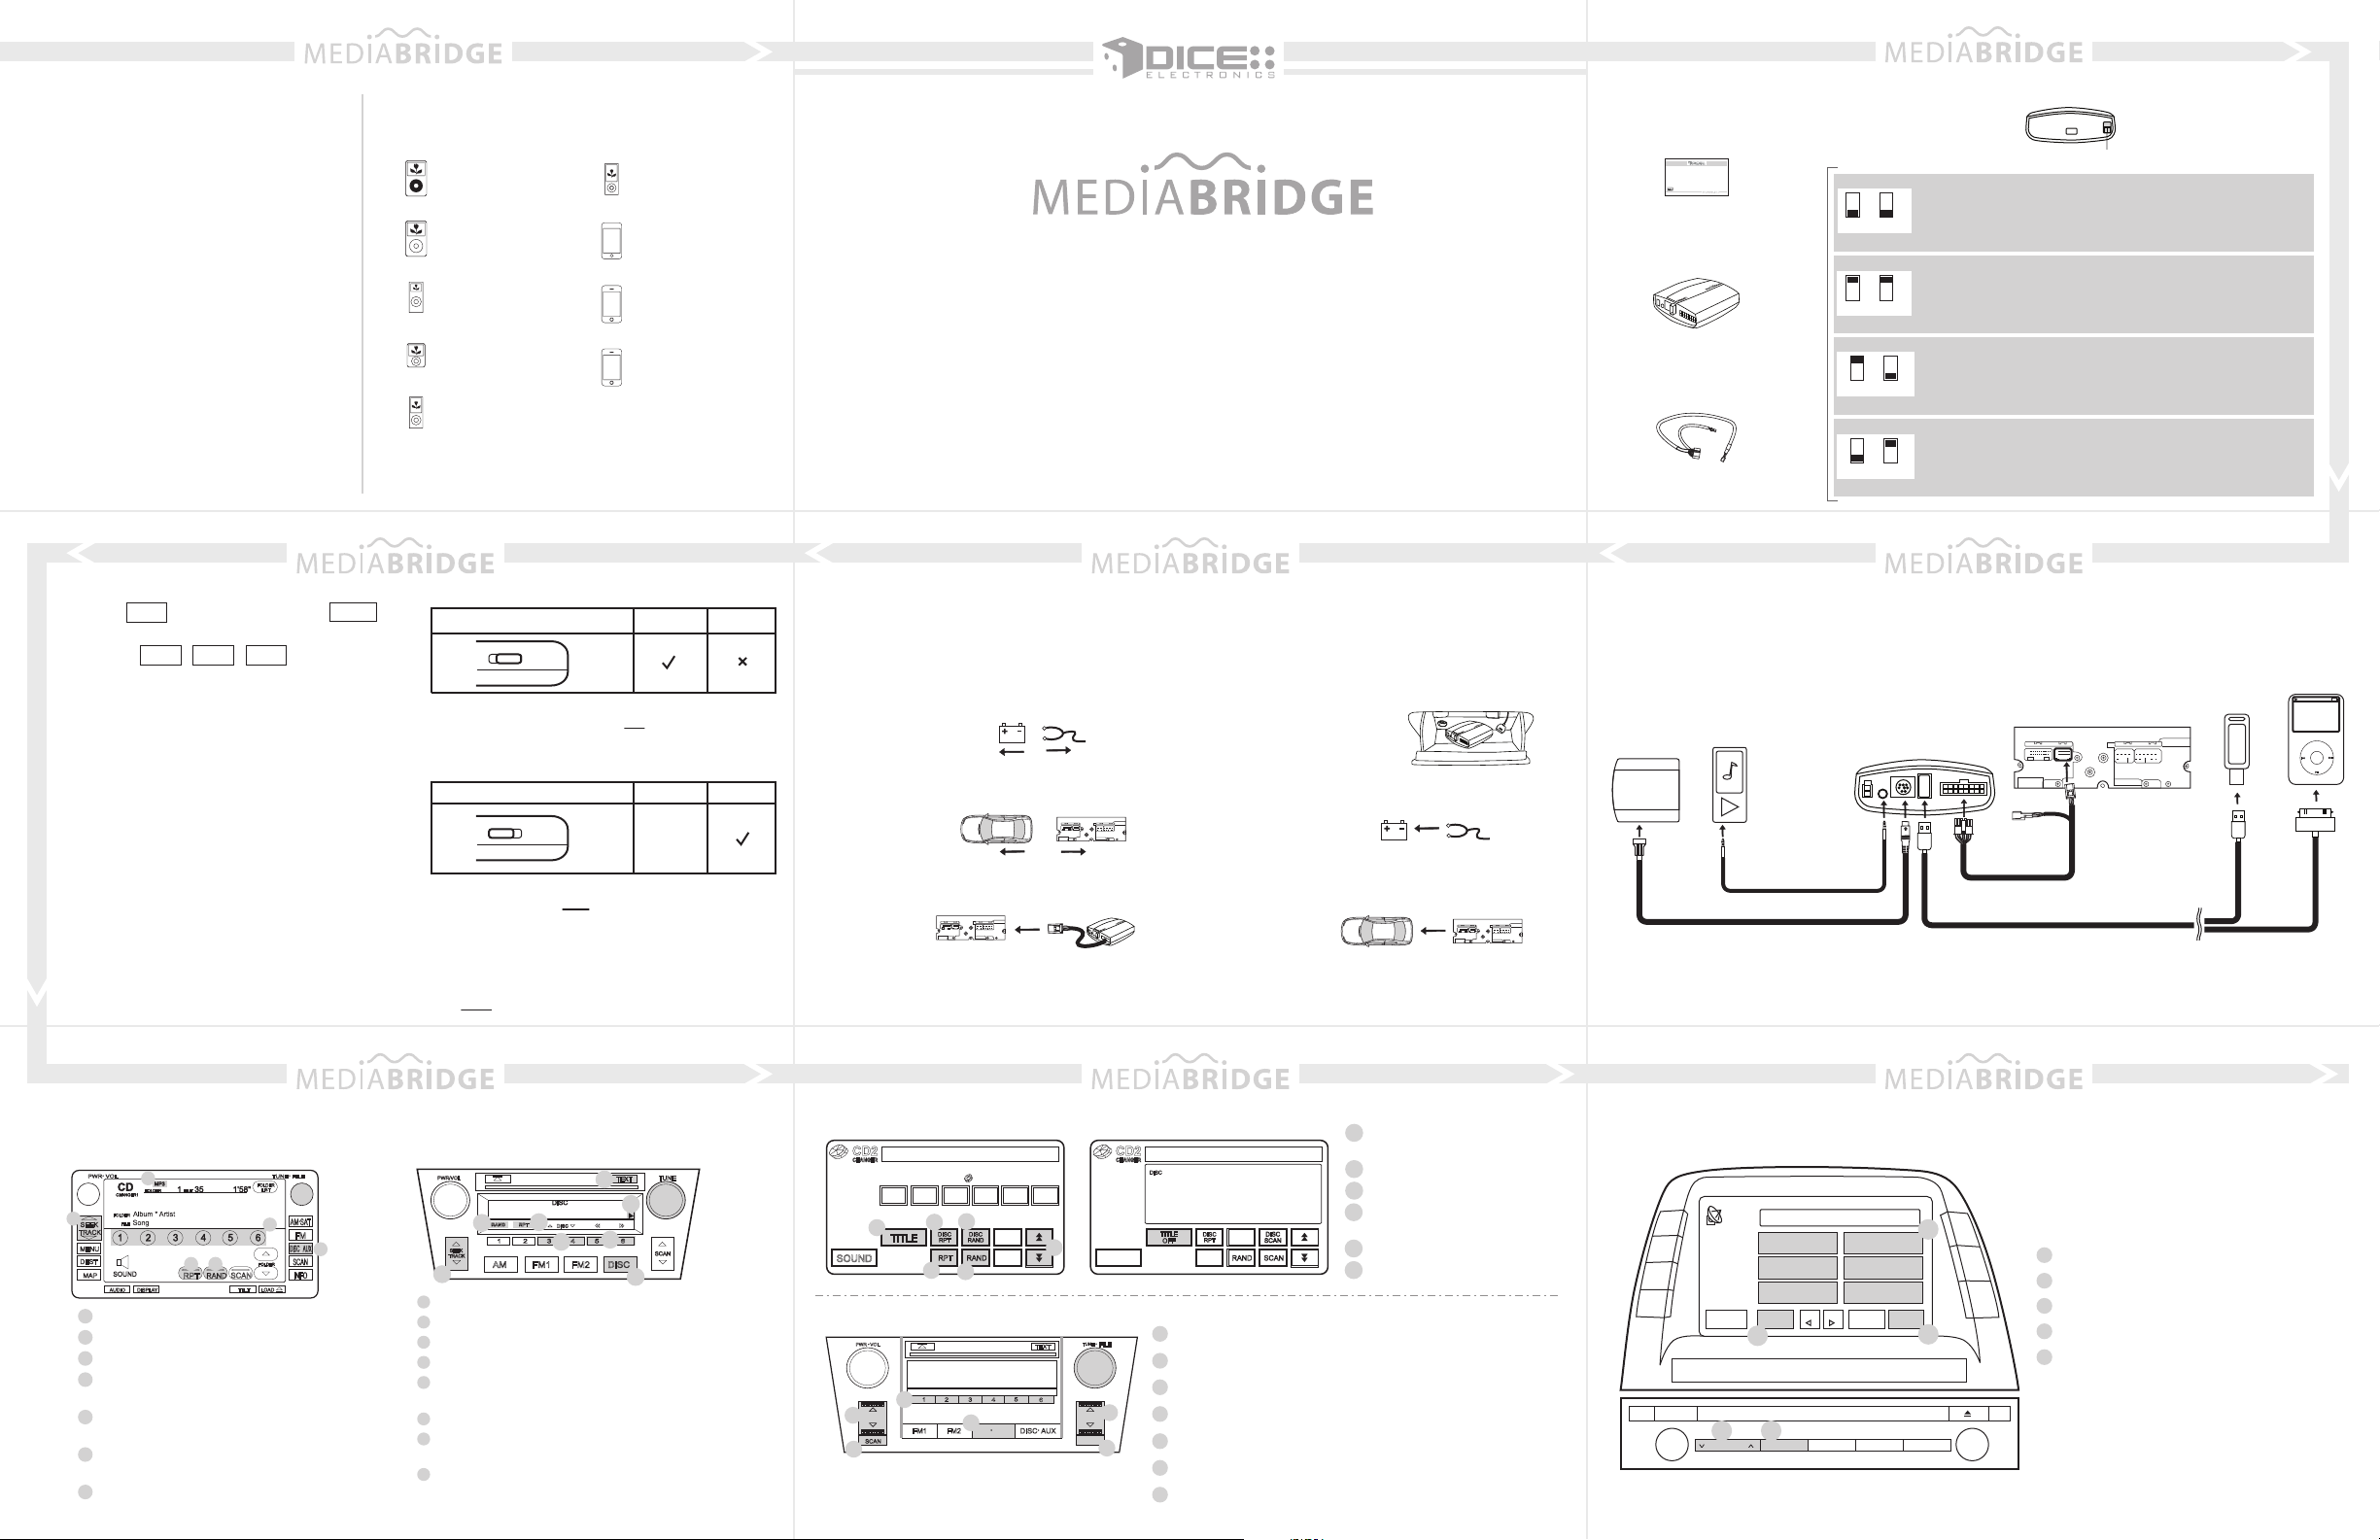
Compatible iPod & iPhone
Media Bridge kit contents
Dip switch setting
.........................................3
Connection diagram
Installation
Basic operation
....................................................5
.............................................6
...........................1
............................3
.....................................4
Selecting Media Bridge as an
audio source
USB memory operation
USB iPod operation
AUX operation
...........................................7
..............................10
....................................11
...........................................12
Sirius ConnectTM operation (on
Satellite radio)
Troubleshooting
Firmware update
Disclaimer and warrenty
.......................................13
.........................................14
........................................16
............................17
Compatible iPod & iPhone
iPod
5th generation (video)*
30GB 60GB 80GB
iPod classic
80GB, 120 GB, 160GB
iPod nano
2nd generation (aluminum)
2GB 4GB 8GB
iPod nano
3rd generation (video)
4GB 8GB
iPod nano
4th generation (video)
8GB 16GB
* Must be used in locked mode.
iPod nano
5th gen. (video camera)
8GB 16GB 32GB
iPod touch
1st gen
8GB 16GB 32GB
2nd gen
8GB 16GB 32GB 64GB
iPhone & iPhone 3G
4GB 8GB 16GB
iPhone 3GS
16GB 32GB
Basic operation
1. Press (for SAT emulation) or (for
SAT
CDC/MD/MP3 emulation) to select Media Bridge.
2. Use the / / within the first 5
SEEK TRACK TUNE
seconds to cycle between USB iPod/Memory >
AUX > factory SAT > Sirius while in
PRESET/DISC 1
You may press PRESET/DISC 2 to set charge
time after ignition off (for iPod).
You may press PRESET/DISC 3 to change
volume.
You may press PRESET/DISC 4 to set up
scrolling text option.
You may press PRESET/DISC 5 to set up radio
line display type.
You may press PRESET/DISC 6 to view Media
Bridge firmware version.
Although the audio from the selected source is active, you must wait for 5 seconds before any button press
would apply to the selected mode. Button presses during the first 5 seconds will change options as described
above.
Note: Changing the hold switch on iPod to ON/OFF must be done prior to connecting the dock cable.
DISC
iPod hold ON
Lock
Radio control iPod control
Before connecting the iPod to the Media Bridge
module, turn the hold switch ON to fully control and
browse the songs from factory radio. The iPod is
locked in this state.
iPod hold OFF
Lock
Radio control iPod control
limited
Before connecting the iPod to the Media Bridge module,
turn the hold switch OFF to fully control and browse the
songs from iPod. The factory radio control and browsing
capablities are limited.
MB-1000-Toyota integration solution
for Toyota/Lexus/Scion vehicles
Installation Guide/User Manual
DICE logo is a trademark of DICE Electronics, LLC. SiriusConnect, Sirius and XM logos are trademark of SiriusXM. The Made for iPod logo is a trademark of Apple Inc. Apple iPod is not included in the package. For our detailed
terms and conditions please visit our website at www.diceelectronics.com.
1. VERIFY COMPATIBILITY
2. DISCONNECT BATTERY
3. REMOVE RADIO FROM CAR
4. INSTALL MEDIA BRIDGE CABLE
5. ROUTE KIT TO GLOVEBOX OR OTHER
ACCESSIBLE LOCATION
6. CONNECT BATTERY & TEST
7. COMPLETE INSTALL BY RE-INSTALLING
RADIO
REV. 021110
Media Bridge kit
contents
DICE interface for iPod
Installation Guide/User Manual
user manual
Media Bridge Module
Media Bridge Connector
456
Connection diagramInstallation
AUX audio device
Sirius SC1 SAT Tuner
Sirius SC1 factory cable
emulation modes
AUX connector
ON ON
SAT
OFF OFF
CDC
OFF
ON
MP3
OFF
ON
MD
Media Bridge module
Dip switch setting
Car configuration switches
Use on radios with SAT button for best experience. Must be
selected to support external SiriusConnect tuner. Available on
North American radios.
Use to retain factory Sirius/XM module, or on radios with integrated
satellite tuner. Also for radios that do not support SAT mode.
External CDC (trunk, or glove box) must be disconnected.
Use with late model navigation radios where factory Sirius/XM
module is present (integrated) and CDC emulation is not supported
(i.e. no text).
Use with early model year radios with external CD changer. MD text is
only supported on a selected few radios, typically navigation models.
iPod
MENU
Toyota radio with small connector
cable receptacle*
Media Bridge vehicle connector
USB cable or iPod docking cable
USB
thumb drives
* If factory harness present, connect to receptacle
Selecting Media Bridge as an audio source
MP3 emulation
7
2
6
5
Media Bridge source selector
1
Press to change Track.
2
Turn to change Track.
3
Press to select DISC numbers
4
1 - 6 (modes/folders).
Press RPT short to repeat one, long
5
to repeat all.
Press RAND short to Shuffle Songs,
6
long to Shuffle Albums.
Source indicator
7
3
4
1
CDC/MD emulation (without Navigation)
2
1
Media Bridge source selector
2
Press to change Track.
3
Press to change modes/folders.
4
Press to RW or FFW.
5
Press RAND short to Shuffle Songs, long to Shuffle
Albums.
6
Press RPT short to repeat one, long to repeat all.
7
Arrow shows if additional information is available. Hold
TEXT button for more information.
8
Press the TEXT button to cycle between
display fields.
CD1 Album * Artist
5
7 8 9
CDC/MD emulation (with Navigation)
CD2
DISC 1 TRACK 99 1' 24"
CHANGER
8
DISC
7
6
4
3
1 2 3 4 5 6
1
TITLE
SOUND
1
DISC
4
2
DISC
DISC
RPT
RAND
RPT RAND SCAN
3
5
DISC
SCAN
6
SAT emulation (without Navigation)
SAT1 Album * Artist
4
2
SCAN
5
1
FM1 FM2 AM SAT DISC AUX
FOLDER
TEXT
TYPE
3
CD2
DISC 1 TRACK 99 1' 24"
CHANGER
DISC
Playlist Name
TRACK
PLAYLIST
TITLE
SOUND
FILE
6
OFF
Media Bridge source selector
1
Press to change Track.
2
Turn to change Track.
3
7
4
Use Presets to change modes/folders
Use Scan to enable Shuffle and Repeat.
5
Press the TEXT button to toggle between available TEXT fields.
6
Use the TYPE button to engage/disengage RW or FFW
7
DISC
DISC
RPT
RAND
RPT RAND SCAN
DISC
SCAN
Press TITLE to toggle between
1
screens.
Press DISC RPT to Repeat All.
2
Press RPT to Repeat One.
3
Press DISC RAND to shuffle
4
Albums.
Press RAND to Shuffle Songs.
5
Press to change Track.
6
SAT emulation (with Navigation)
SAT1
DISPLAY
INFO
CLIMATE
AUDIO
SOUND TEXT
USB MEMORY CH001
1
PRESET
2
PRESET
3
PRESET
TYPE
5
LOAD
VOL
1 2
SEEK•TRACK AM/SAT FM TAPE•DISC SCAN
3 4 5 6
12
ROOT
4
PRESET
5
PRESET
6
PRESET
TYPE
TYPE
TYPE
SEEK
SCAN
MENU
3
Media Bridge source selector
DEST
MAP
4
1
Press to change tracks
2
Use PRESETS for different modes.*
3
4
Press to enable Random
Press to toggle between text fields
5
TUNE
* Depending on operating mode, preset buttons will
have specific labels
See back for more
Page 2
10 11 12
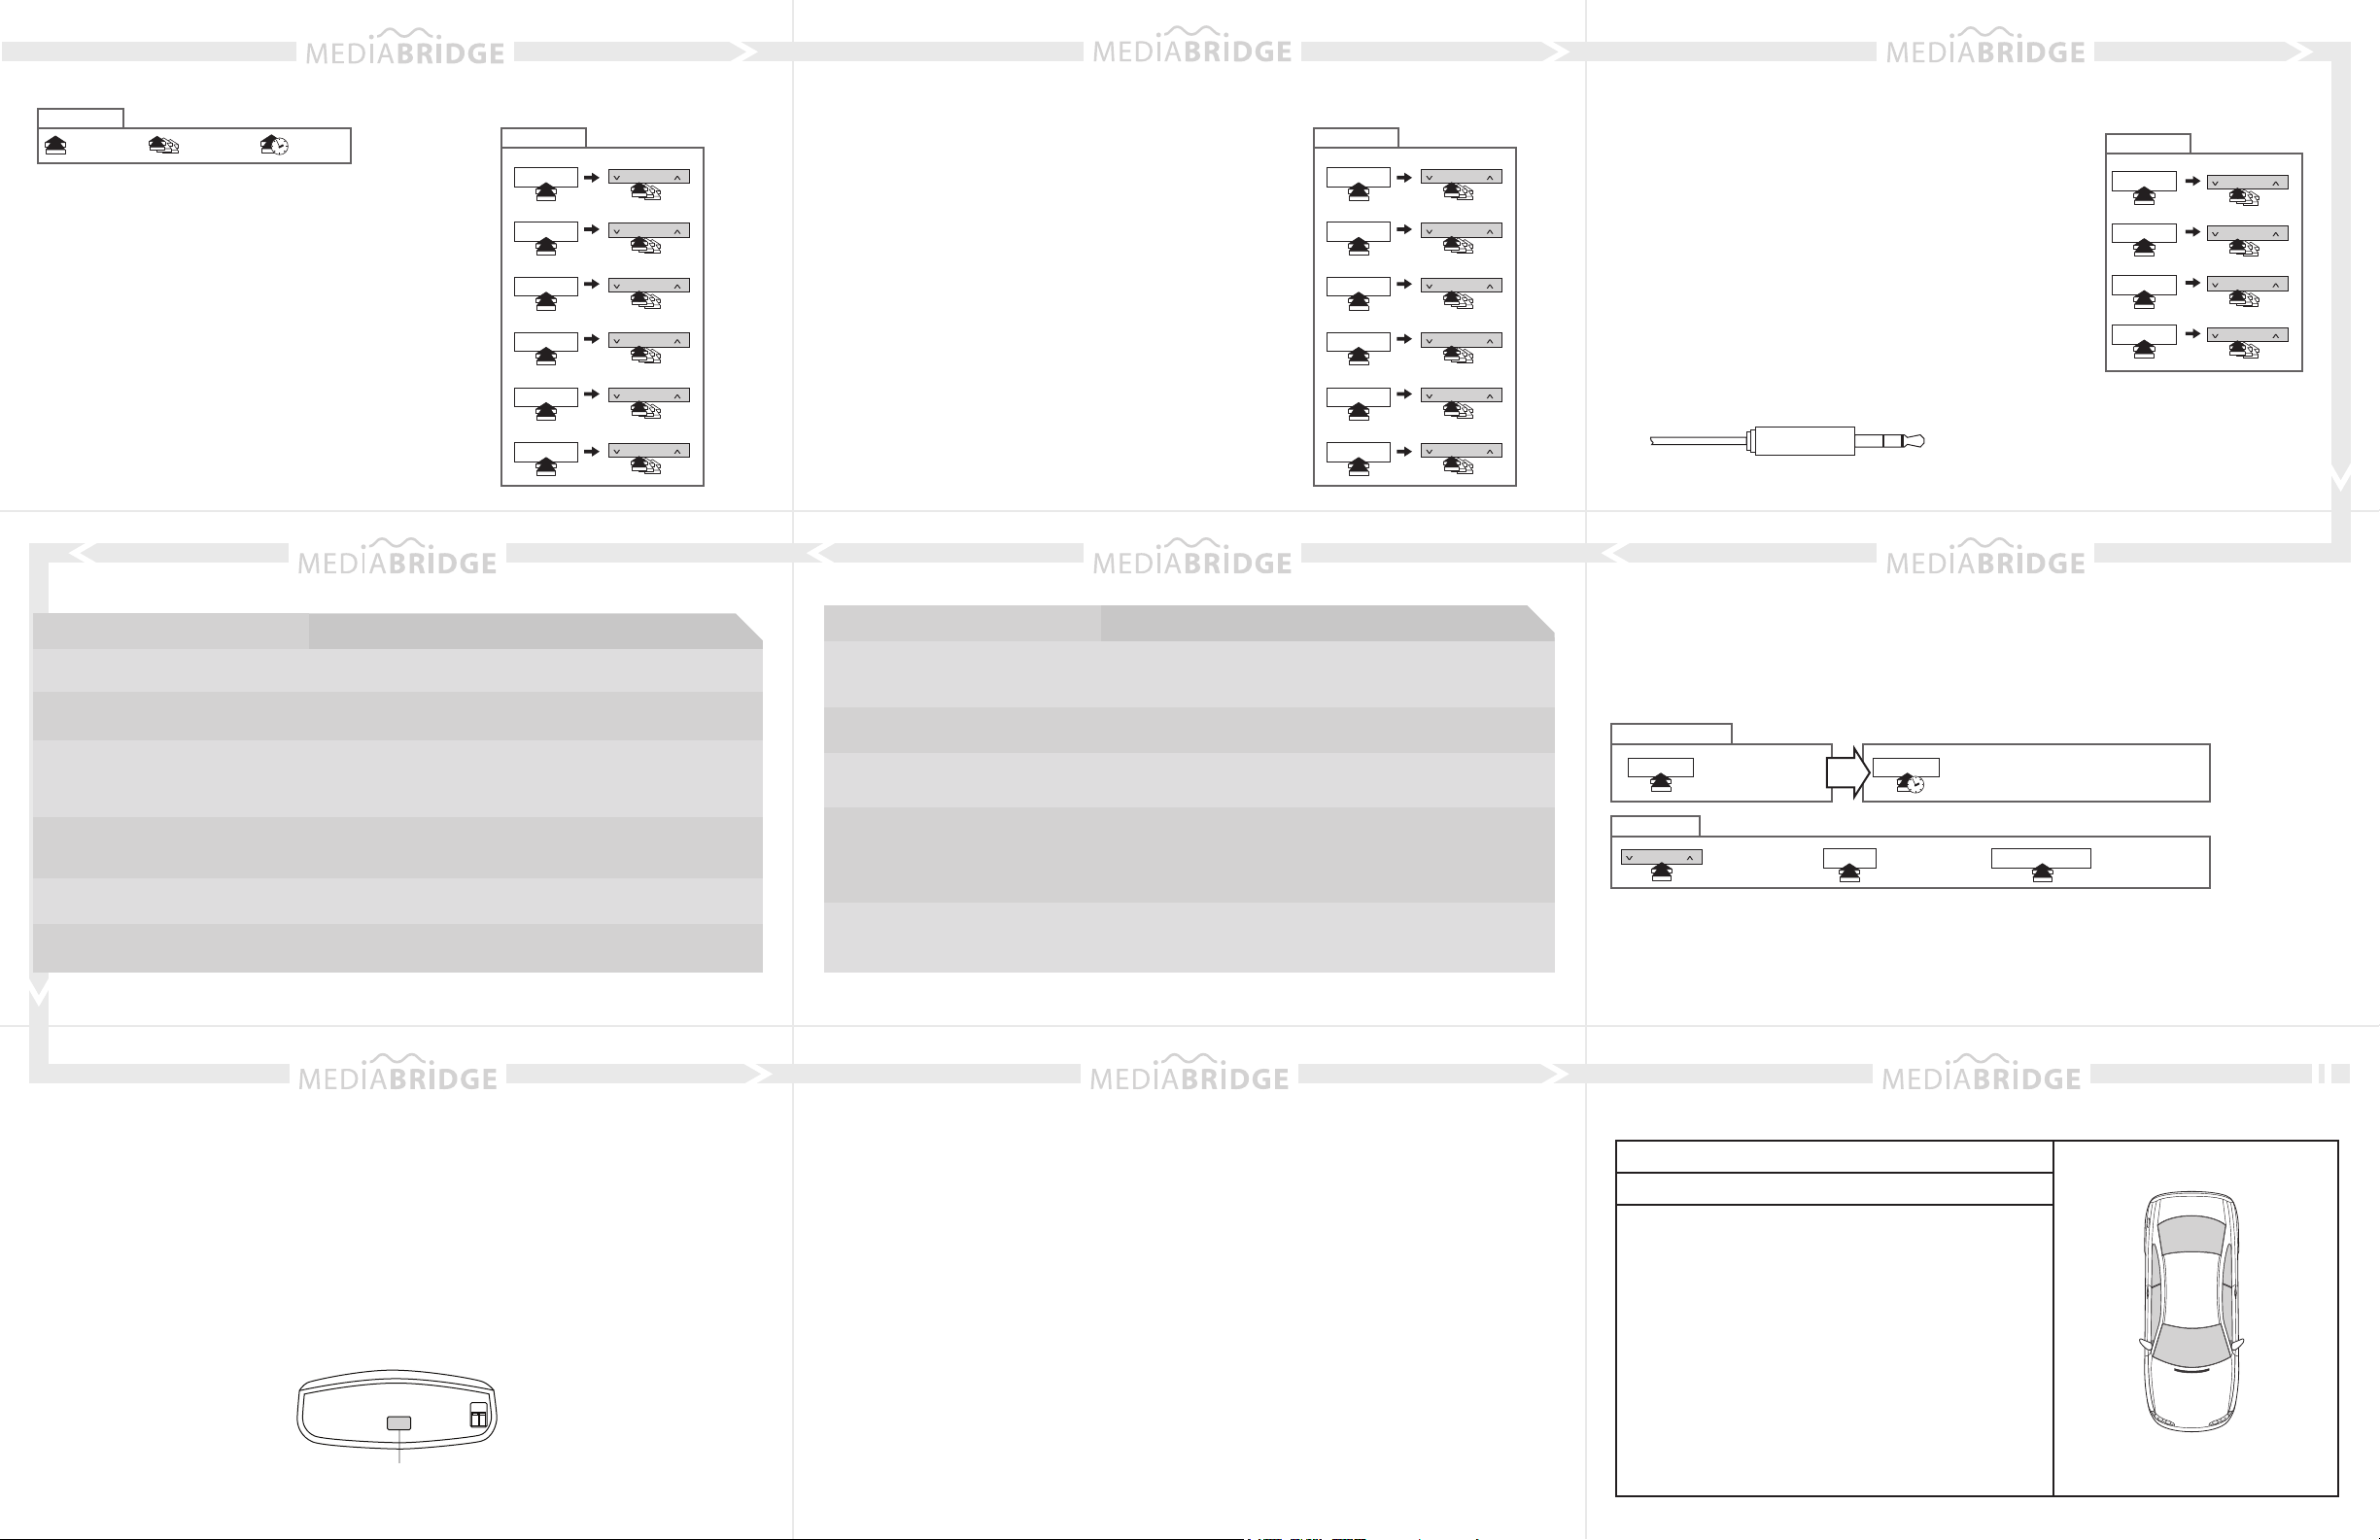
USB memory operation
Icon Legend
press button
press button
repeatedly
press & hold
button
• Select PRESET/DISC 1, then use the seek/track/tune buttons
to change from song to song.
• Select PRESET/DISC 2-6 to access Folders and use the
seek/track/tune buttons to navigate through the folders on your
USB flash drive.
• The Media Bridge unit will recognize the first 8 levels of
folders, with up to 200 accessible folders within each folder.
Only the first 1000 files will be read in each folder, the rest will
be ignored.
• Songs play in order of when they were added to the flash
drive.
• Use the RANDOM and REPEAT buttons on the radio/display
Problem
No audio from iPod source.
Why does the radio display show
“EMPTY/STOP” and no music plays?
Cannot select the interface.
Radio/ steering wheel controls do not
operate iPod.
Why does category read
“PRESELCTD”?
What size of USB flash drive
should I use?
Reset the iPod. Verify proper connection to iPod/interface. Check
for compatibility. Older iPod models don’t support USB audio.
End of a playlist or folder is reached. Please select a new
Playlist or Folder using Preset 2/DISC 2.
Check DIP switch settings. With the ignition OFF disconnect
vehicle harness from module for a few seconds and reconnect.
Verify that the correct button is used to access the interface.
On some cars the AM button is used to access SAT emulation.
Reset iPod and make sure the most recent iPod firmware is
installed. Check vehicle user manual on how steering wheel
controls work, long presses may toggle alternate function.
Playback of content selected on the iPod before connected to
the interface continues until new content is selected.
Large capacities are supported, however up to 4GB is
recommanded for optimal user experience.
USB iPod mode
PRESET/DISC1
PRESET/DISC2
PRESET/DISC3
PRESET/DISC4
PRESET/DISC5
PRESET/DISC6
Solution
change songs
SEEK•TRACK
change folder
SEEK•TRACK
change folder
SEEK•TRACK
change folder
SEEK•TRACK
change folder
SEEK•TRACK
change folder
SEEK•TRACK
USB iPod operation (SAT & CDC/MP3/MD emulation) AUX operation
• Use PRESET 1-6 (DISC 1-6) to enter specific modes (SONG,
PLAYLIST, ARTIST, ALBUM, PODCAST and AUDIO BOOK).
• Within each mode, use the seek/track/tune buttons to browse the
items available
• Use RND/RPT buttons in CDC/MP3/MD modes and SCAN followed
by TRACK +/- and SCAN again to set random and repeat.
Note: if the iPod is unlocked for direct control, radio control will be
limited to Songs, Playlists, and Albums. Text display will also be
limited to show only current song information.
TIP: In CDC/MP3/MD emulation, selecting DISCS is done by using
the DISC +/- buttons.
USB iPod mode
PRESET/DISC1
PRESET/DISC2
PRESET/DISC3
PRESET/DISC4
PRESET/DISC5
PRESET/DISC6
change songs
SEEK•TRACK
change playlist
SEEK•TRACK
change artist
SEEK•TRACK
change album
SEEK•TRACK
change podcast
SEEK•TRACK
change audio book
SEEK•TRACK
• An auxiliary audio device can be connected to the Media Bridge
unit through the 1/8” mini-jack
• Audio device must be controlled manually.
• Audio level can be adjusted while in auxiliary mode by selecting
PRESET 1-4 (DISC 1-4) and using seek/track/tune buttons to
increase or decrease levels.
TIP: In CDC/MP3/MD emulation, selecting DISCS is done by using
the DISC +/- buttons.
131415
Troubleshooting
Sirius ConnectTM operation (on Satellite radio)
Problem
Text is not displaying in selected
emulation.
iPod does not charge.
Music is distorted or sound level
is too low with iPod connected.
Why is the interface not controlling
the iPod/USB drive?
Sirius tuner can’t be selected.
Identify your audio system (refer to Installation tip section) first and set
switches accordingly. Note that your vehicle may support more than
one mode. Use the TEXT button on radio/display to toggle text fields.
Check all connections. See if iPod charges while connected to
computer or wall charger. You may need to reset the iPod.
Make sure all EQ and BASS boost options are turned off on your iPod.
Please make sure that the USB connection is not loose. Make sure
that an iPod case is not preventing the dock connector from being fully
seated. Disconnect and reconnect the device. If iPod is not responding
please try resetting it. USB device must also be FAT16/32 format and
contain supported MP3, WMA or AAC content.
Unit must be in SAT emulation. Check for proper connection to the
mini DIN 8 receptacle.
Solution
• Stations can be saved to PRESET 1-6 by holding the desired PRESET button, while listening to the
station.
• TEXT button will toggle between the text fields.
Sirius mode in SAT radio
PRESET 1-6
Common Control
SEEK•TRACK
recall PRESET 1-6 stations
change channel
• If a Sirius Connect compatible tuner is not detected, then either a “No Tuner” vehicle message is
displayed, or the SIRIUS option will not be selectable. Please refer to the factory manual of your radio
system about operating the Satellite mode.
• Go to Channel 000 to view the Sirius Tuner ID for activation. The 12 digit ID is displayed in two halves as
SID “123456-” followed by “-789ABC”.
1/8” mini stereo jack (not included)
to store
station
SCAN
Ring (Right audio)
Sleeve (Ground)
PRESET 1-6
scan channels
Tip (Left audio)
store current station to PRESET 1-6
FOLDER/CAT/TYPE
AUX mode
PRESET/DISC1
PRESET/DISC2
PRESET/DISC3
PRESET/DISC4
change satellite category
change volume setting
SEEK•TRACK
change bass setting
SEEK•TRACK
change mid EQ setting
SEEK•TRACK
change treble EQ setting
SEEK•TRACK
Firmware update
STEP 1:
STEP 2:
STEP 3:
STEP 4:
STEP 5:
Disconnect the Media Bridge module from the vehicle.
Download and install necessary software from www.diceelectronics.com
Open software to follow instructions for updating Media Bridge unit.
Plug in Media Bridge via mini USB cable and update.
Disconnect and reinstall the unit into the vehicle.
Mini USB port for software update
16 17 18
Disclaimer and warranty Installation notes:
Important disclaimer, please read!
Unauthorized reproduction or reverse engineering is strictly prohibited! Intellectual property included is distributed
under specific license agreement with respective owners and is licensed only, not sold. No warranty, explicit or
implied, is stated. Neither DICE Electronics, LLC., nor any of its agents, distributors, dealers or vendors shall be
liable for damages.
IN NO EVENT SHALL DICE ELECTRONICS' LIABILITY EXCEED THE PRICE PAID FOR THE PRODUCT
FROM DIRECT, INDIRECT, SPECIAL, INCIDENTAL, OR CONSEQUENTIAL DAMAGES RESULTING FROM
THE USE OF THE PRODUCT, ITS ACCOMPANYING SOFTWARE OR ITS DOCUMENTATION.
Warranty and Support
Products carry a 90 day limited warranty that protects you from defects in material and workmanship of products
sold by DICE Electronics, or its authorized agents, distributors and dealers. The warranty period begins the day a
product is purchased by the end user. Products found to be defective during the warranty period will either be
repaired or replaced by DICE Electronics at no charge unless warranty is void. Unauthorized attempt of repair or
alteration of the product in any way immediately voids this warranty. Warranty does not extend to cosmetics or
finish. A DICE product specialist must determine that defect is present in the product and issue an RMA. Be sure
that all wiring is connected as described in the user manual and all related equipment is functioning properly.
DICE Electronics disclaims any liability for other incurred damages resulting from product defects. Any expenses
in the removal and reinstallation of products are not covered by this warranty.
If experience any problems or need help, please contact your local dealer or call 888-342-3999, or visit our
support site at http://www.diceelectronics.com/support.
Installed by: Illustration:
Installed date:
Other notes:
 Loading...