

Page 1
integration guide
09
DRIVE LIVE ACCESSORIZE
www.diceelectronics.com | 888.342.3999
Page 2

WELCOME
to the world of DICE
ICE Electronics has been
an industry leader in
D
OEM vehicle integration
for years. Our commitment to
quality drives us to continuously
develop cutting edge devices
that meet and push toward the
next steps in the quickly evolving vehicle technology market.
We concentrate our expertise
on engineering and design.
nvesting into new emerging technologies through
in-house engineering,
I
technology licensing, and partnerships has contributed to our
success over the years. We stand
strong and will continue to lead
the integration market by increasing resources and recruiting
talented managers and engineers.
Page 3

oming to your home is our
new line of home audio
C
success, we continue to develop
and add new and unique features
to the units. The iTPA 220 and
iTR 100 both provide great sound
quality and their classic design
will accent any home or office
decor.
products. Due to their
volving into a new era of
manufacturing, we value the
concept of maintaining our
E
surroundings and pride ourselves
in using eco-friendly designs in
packaging and component selection. Our US based engineering,
design, and marketing teams
enable us to forward the same
value to our business partners.
We focus on providing professional support, incentives, and
care to all of our customers.
WWW.DICEELECTRONICS.COM
Page 4

of
CONTENTS
Vehicle Specific Integration for iPod
• Acura
• Audi
• BMW / Mini Cooper
• Honda
• Lexus
• Mazda
• Mercedes
• Porsche
• Scion
• Toyota
• Volkswagen
Universal Integration for iPod
• AUX universal integration
• FM-RDS universal integration
Accessories
• Integration accessories for iPod
4
8
14
20
26
32
38
44
50
56
62
68
74
76
82
Home Audio
• iTR-100 desktop HD radio receiver
• iTPA-200 vacuum tube amplifier system for iPod
DICE Electronics, LLC. (herein “DICE”) believes that all information contained within are correct and true, however accepts no responsibility for the accuracy, completeness or
Information contained within including but not limited to compatibility guidelines are not a guarantee of suitability, performance, merchantability, or fitness. Diagrams, FAQs and tips
No warranty, express or implied, and no liability in connection with the use of the information contained in this catalogue shall be assumed by DICE. You further agree that DICE is
not liable for any direct, indirect, incidental, consequential or punitive damages arising out of the use of this catalogue or any DICE products. This catalogue does not contain any
DICE shall not be held responsible for alleged misrepresentation or other wrongful practices of its dealers, distributors, or installers. DICE’s obligations and responsibilities regarding
This catalog, as a whole or any sections of it may not be modified or copied for commercial use or distribution. All content, including but not limited to line art, illustrations, logos,
images, pictures, graphics, remarks, notes and texts in this catalogue whether printed, published on the internet or contained in electronics format are subject to copyright and other
intellectual property rights of DICE Electronics, LLC. and/or its affiliates. Copyright law governs the use of trademarks and copyrighted content; any unauthorized use without written
3
are provided for educational purposes only, not guaranteed to be error free, and are intended to assist skilled professionals with proper experience.
its products are governed solely by the agreements under which they are sold. Information contained herein does not become part of these agreements.
consent from DICE or misuse shall constitute a violation of the law, and may be subject to prosecution. All images are for illustration purpose only.
DICE, at its sole discretion, may revise the information contained herein at any time with or without notice.
The content of this catalogue is provided “as is” under the following terms and conditions.
timeliness of the information published or otherwise stated.
guarantee or agreed quality of DICE products or any warranty and non-infringement.
The use of this catalog constitutes your acceptance of these terms and conditions.
Copyright © 2008 DICE Electronics, LLC. All rights reserved.
Terms and conditions
1-888-342-3999
www.diceelectronics.com
8
4
86
88
Page 5
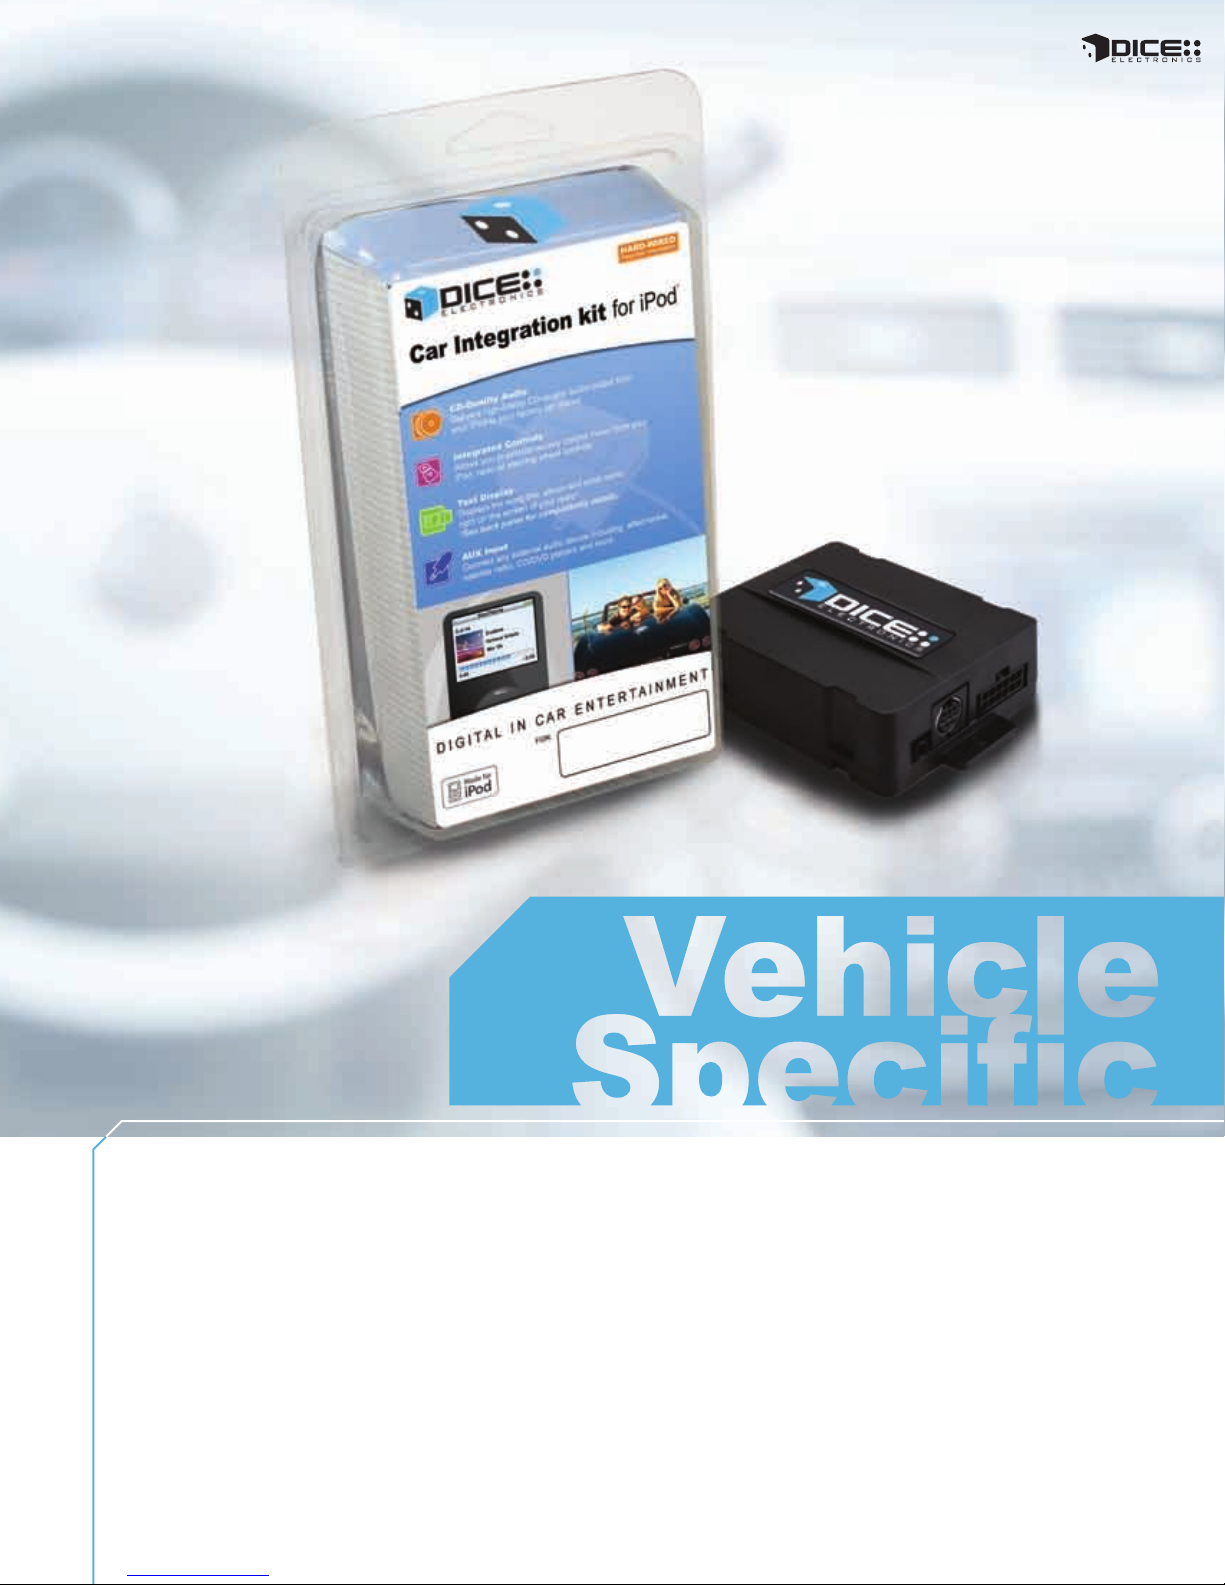
Digital In Car Entertainment
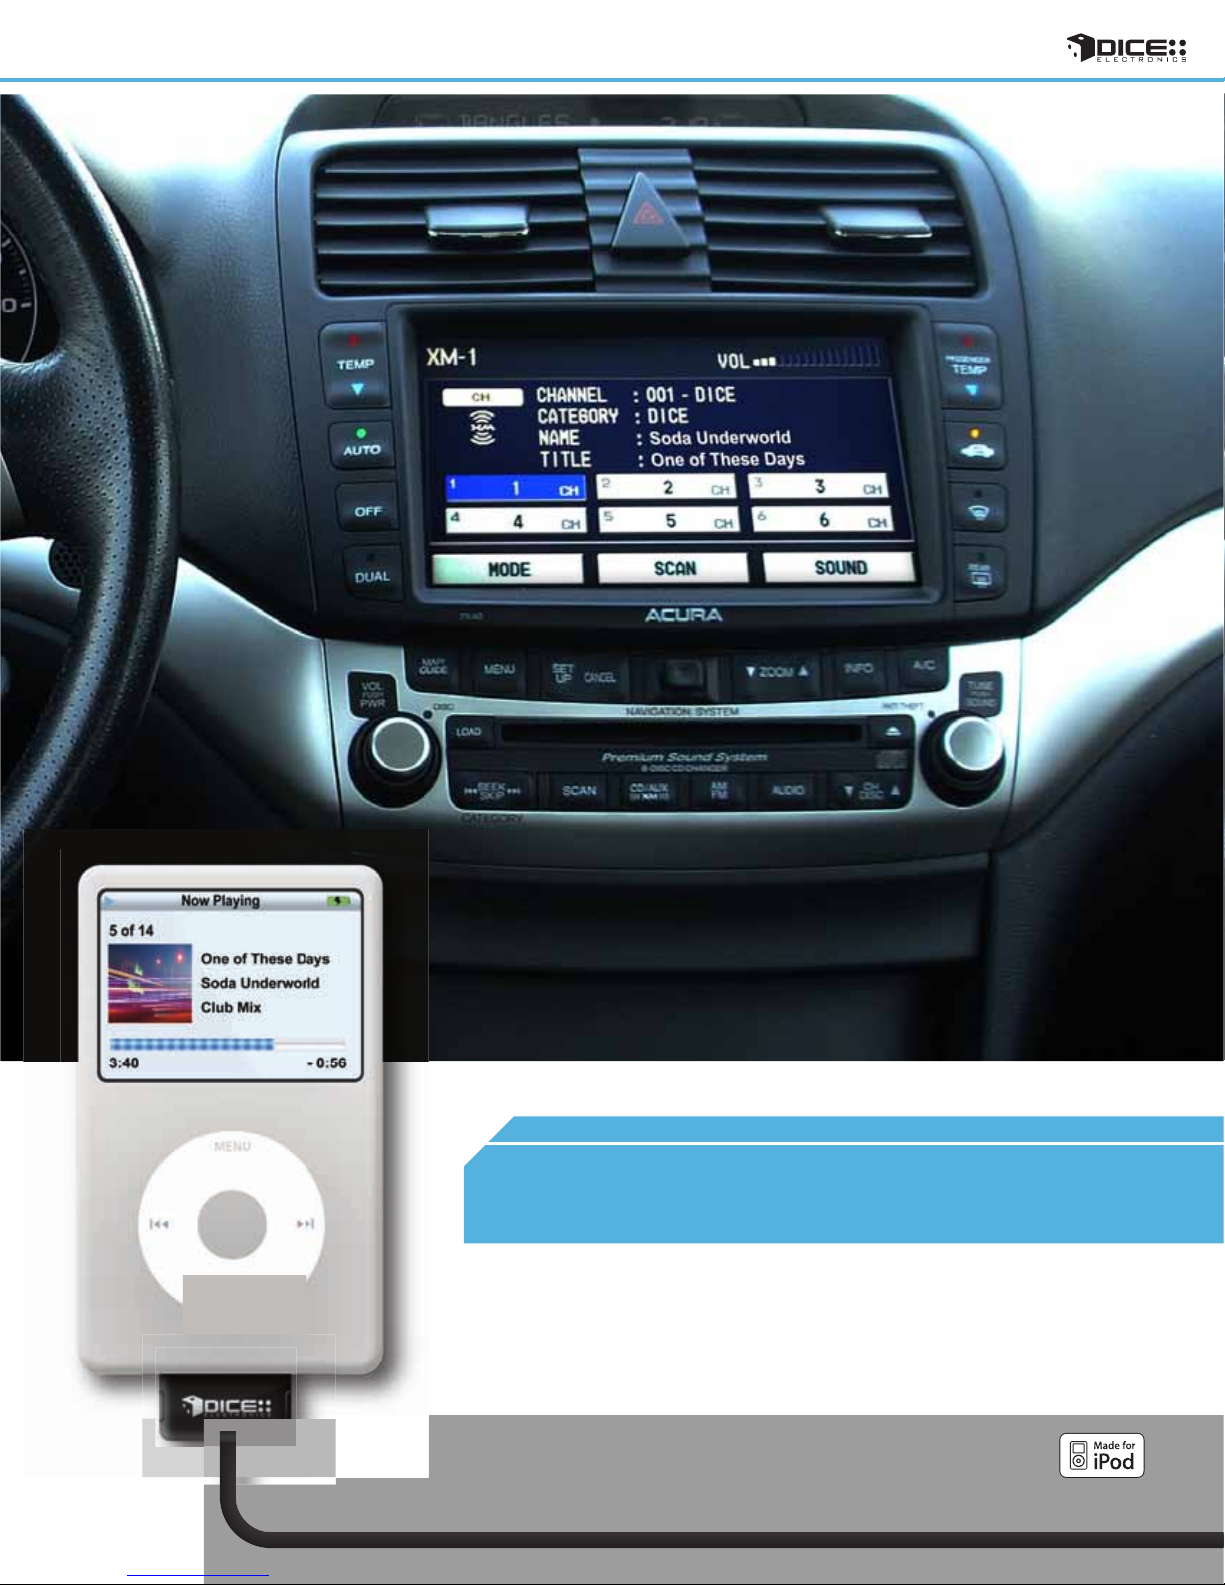
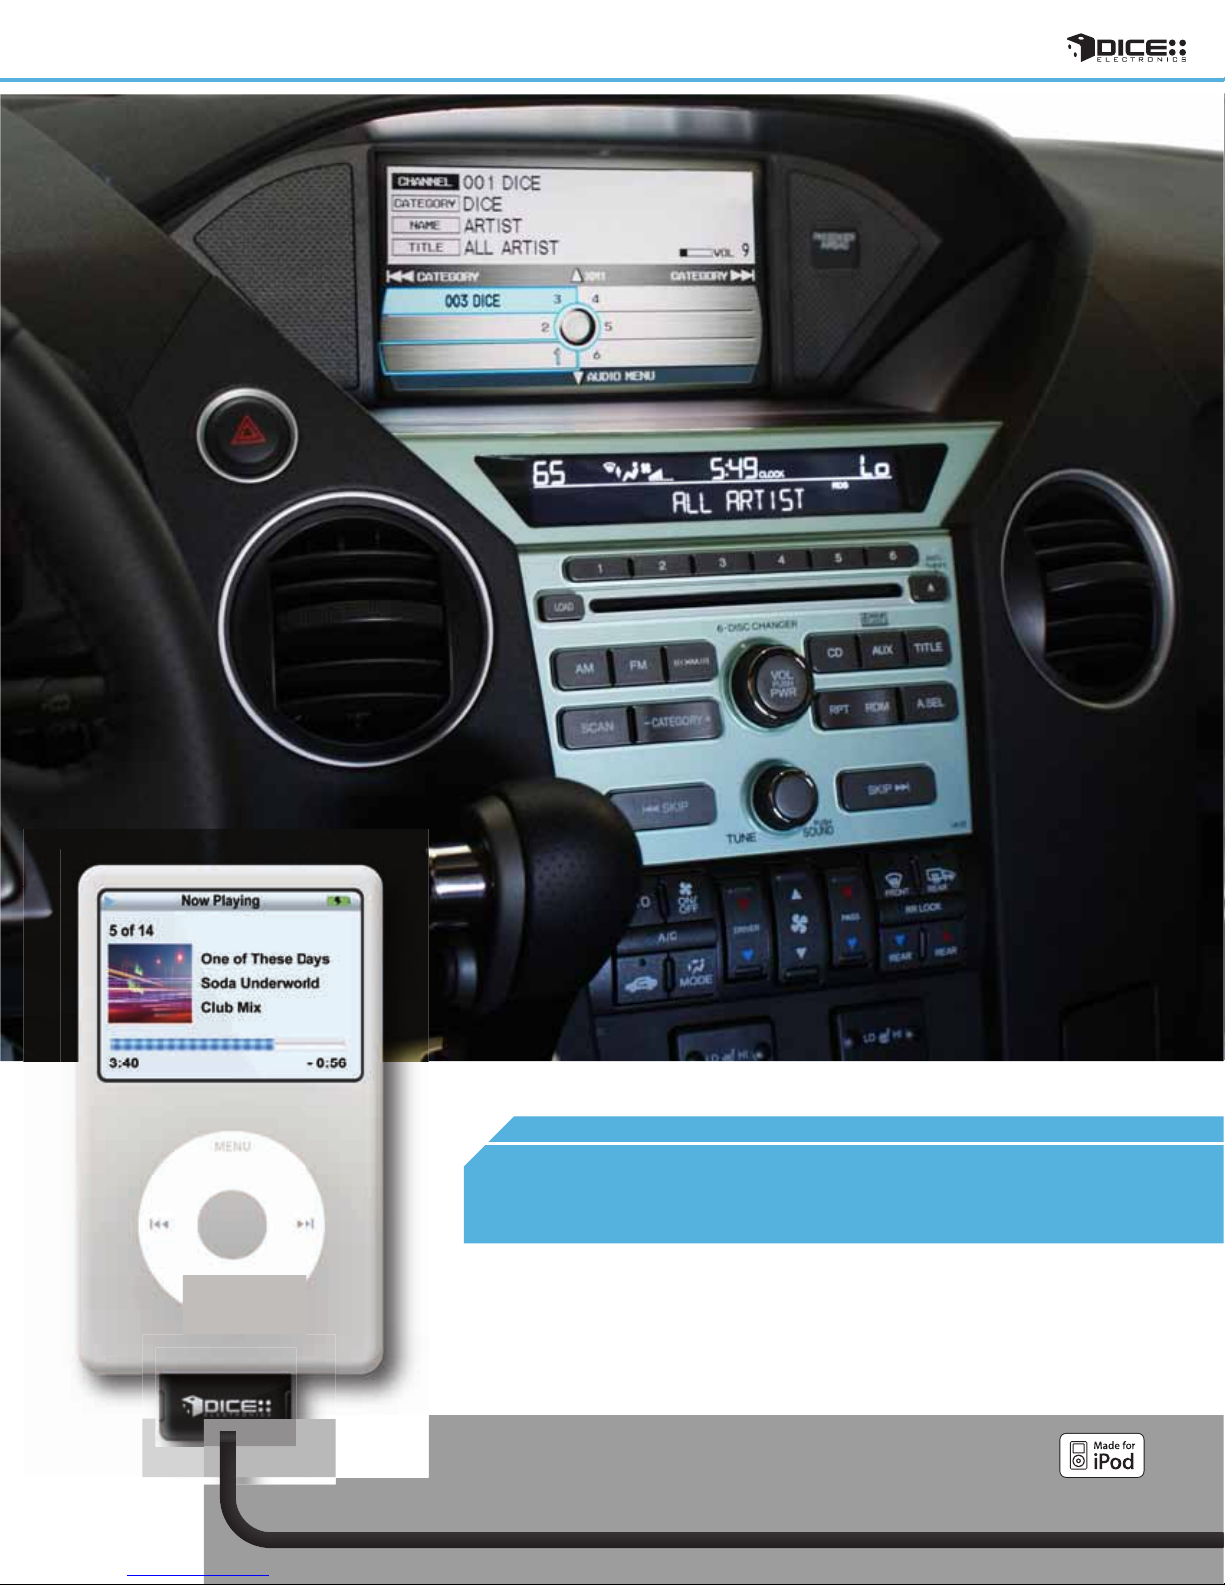
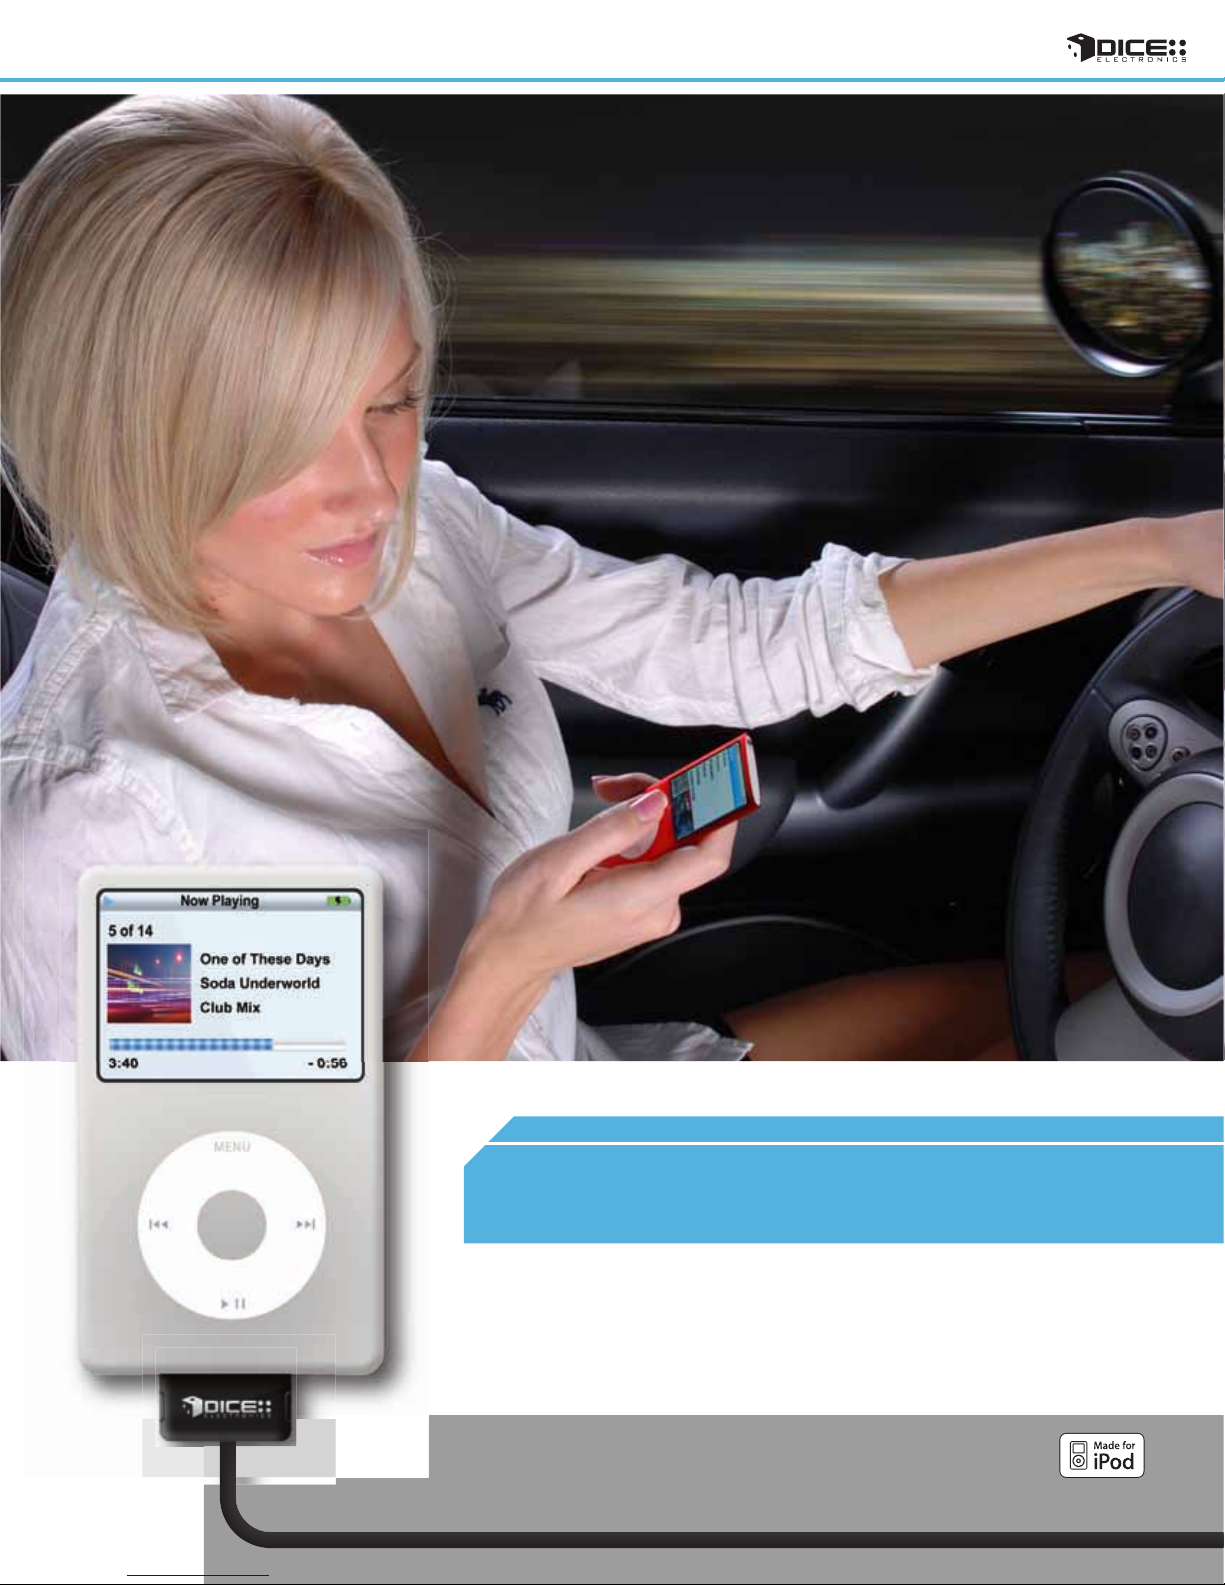
The vehicle-specific car integration kit for iPod connects the iPod to the vehicle's
factory entertainment system. The interface provides CD-quality sound and creates a
seamless interconnection between iPod and the entertainment system of the vehicle.
Text display is available on radio systems where CD or SAT text is supported. The
interface also features integrated controls from the radio, steering wheel or the iPod
and always keeps the iPod charged and ready to go.
4
Page 6
Features
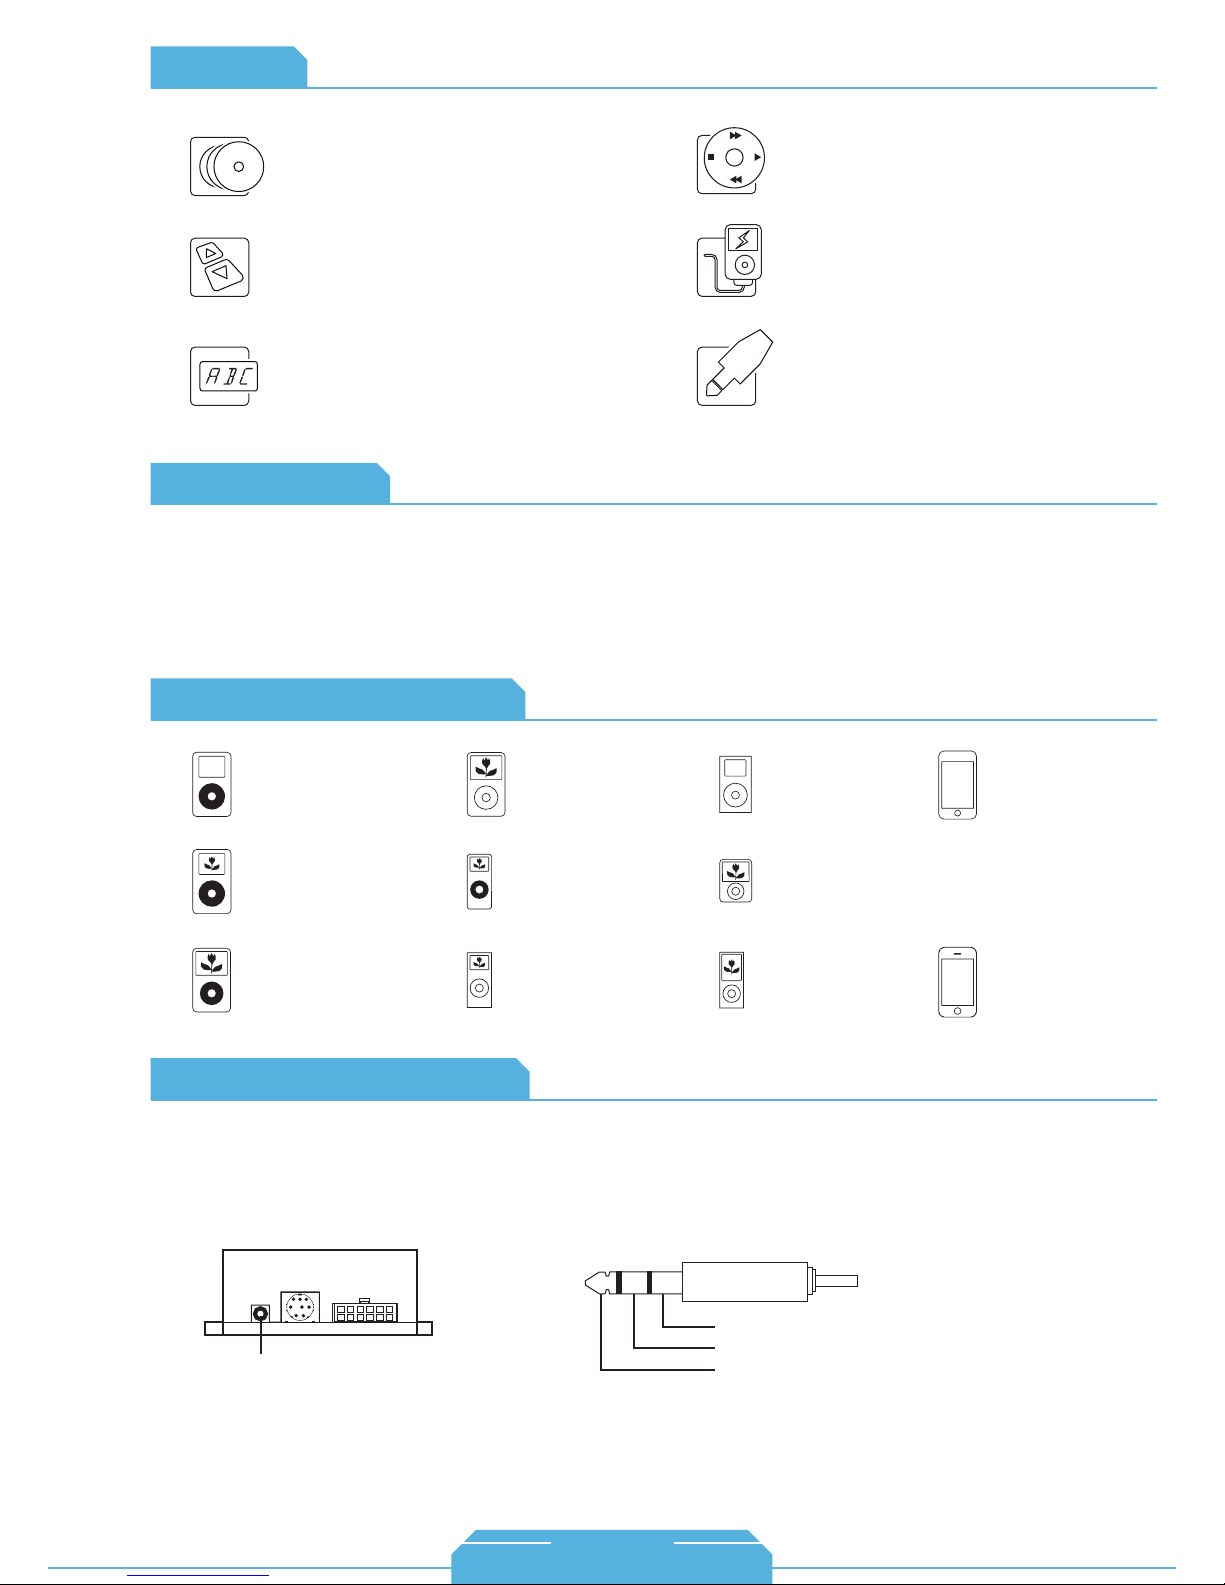
CD-Quality Audio
Delivers high-fidelity CD-quality audio output from
your iPod to your factory car stereo.
Integrated Controls
Allows you to control music from your iPod, or radio
and steering wheel controls.
Text Display
Displays the song title, album and artist name right
on the screen of your radio.
Specifications
Note: It is recommended that installation leaves module accessable to end-user.
• Designed and manufactured in the USA
• Standby current consumption: ~25mA
• Maximum current consumption: ~1A
• Storage temperature: 0-150F
• Operating ambient temperature: 30-120F
iPod/iPhone Ecosystem
iPod-like Browsing
Browse through all the available content like you
would on your iPod
Charges iPod
Always keeps your iPod charged and ready to go.
AUX Input
Connect any external audio device including:
aftermarket satellite radio, CD/DVD players and
more.
iPod
4th generation
20GB 40GB
12 Volt / 5 Volt
iPod
4th generation (color display)
20GB 30GB 40GB 60GB
12 Volt / 5 Volt
iPod
Vehicle Specic
5th generation (video)
30GB 60GB 80GB
12 Volt / 5 Volt
Auxiliary Audio Source
The interface is equipped with a 1/8” AUX jack to connect an auxiliary device such as an MP3 player,
DVD player or other audio sources. To access the AUX audio source, select DISC 5, Track 2 or Mode 5,
Channel 2.
Module
1/8" AUX
integration for iPod
input
iPod classic
80GB, 160GB:12 Volt / 5 Volt
120GB: 5Volt
iPod nano
1st generation
1GB 2GB 4GB
12 Volt / 5 Volt
iPod nano
2nd generation (aluminum)
2GB 4GB 8GB
12 Volt / 5 Volt
1/8" mini stereo jack (not included)
iPod mini
4GB 6GB
12 Volt / 5 Volt
iPod nano
3rd generation (video)
4GB 8GB
12 Volt / 5 Volt
iPod nano
4th generation (video)
8GB 16GB
5 Volt only
Sleeve (Ground)
Ring (Right audio)
Tip (Left audio)
iPod touch
1st gen (5 Volt/12Volt)
8GB 16GB 32GB
2nd gen (5 Volt)
8GB 16GB 32GB
iPhone & iPhone 3G
4GB 8GB 16GB
5 Volt
Making the adjustments:
While listening to the auxiliary device, adjust the volume (gain), bass, mid and treble by
turning the Tune dial or pressing the Seek button. DISC/Mode 1-4 modes select what
adjustment the Tune/Seek buttons perform. See next page for illustration.
5
1-888-342-3999
www.diceelectronics.com
Page 7
Comparison Chart
AUX Audio Source Setting
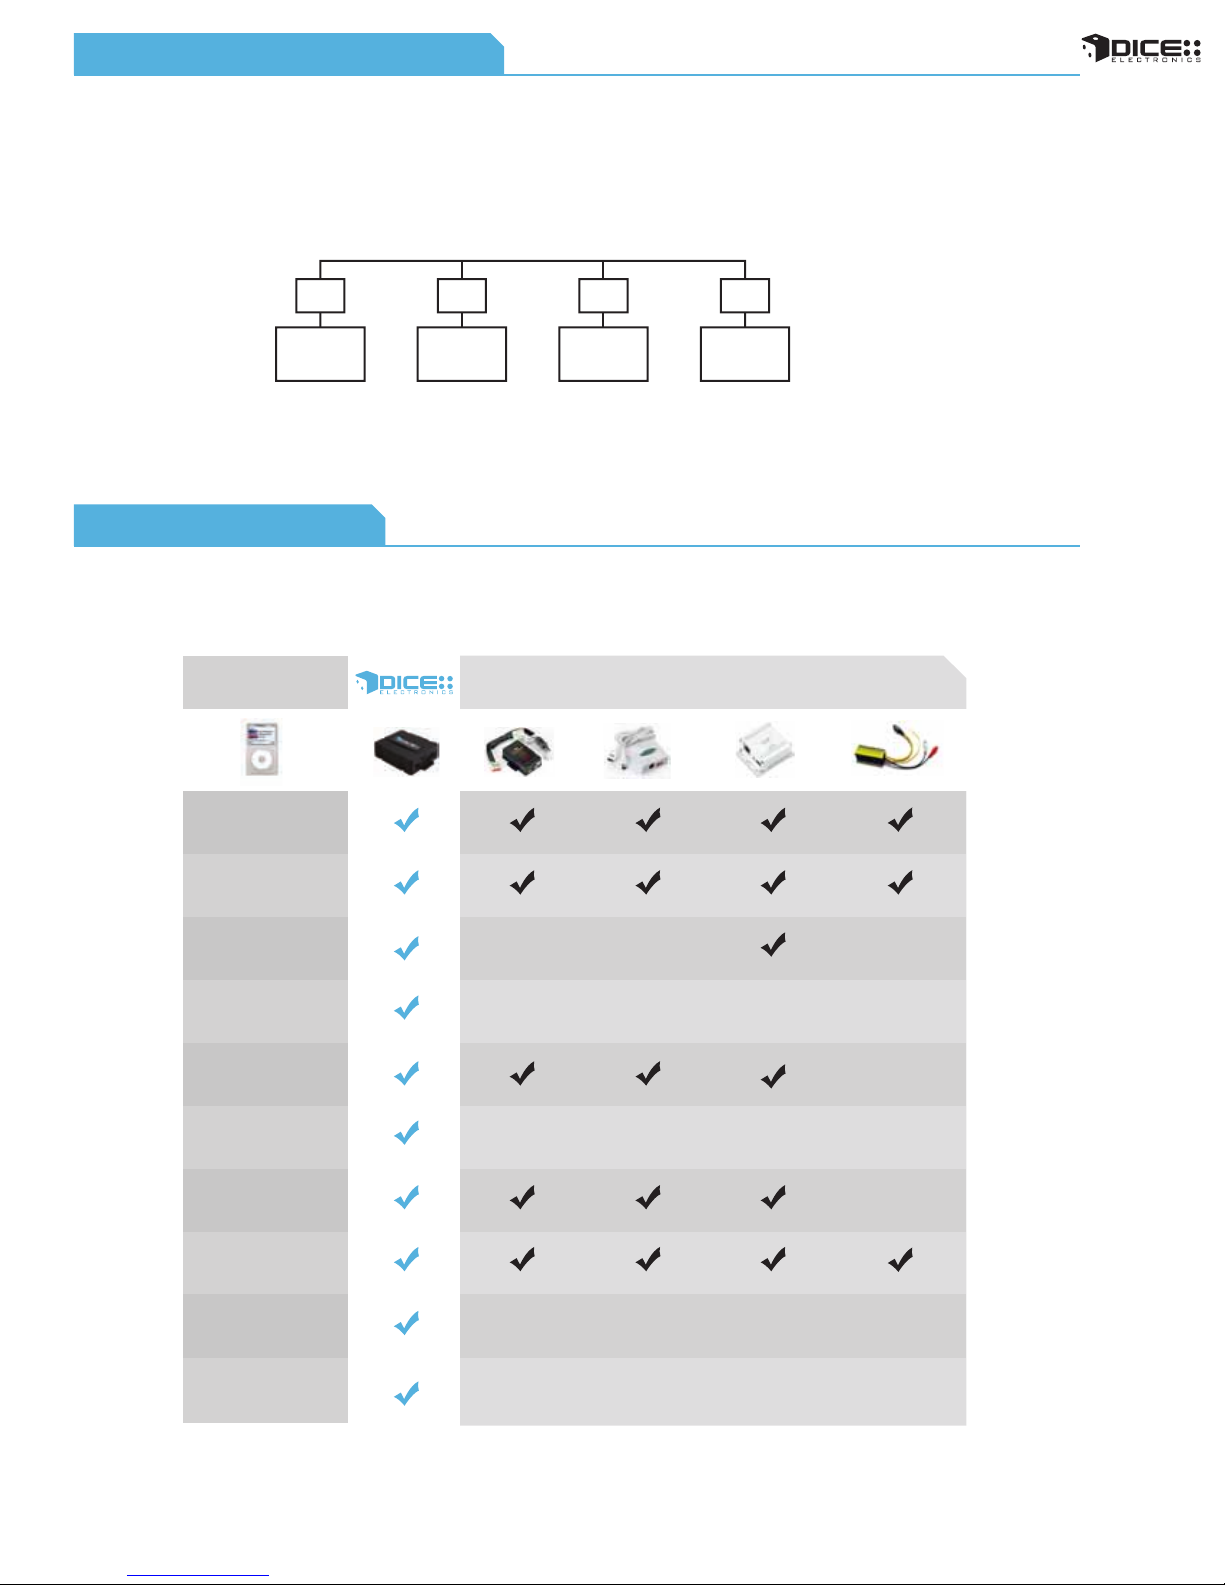
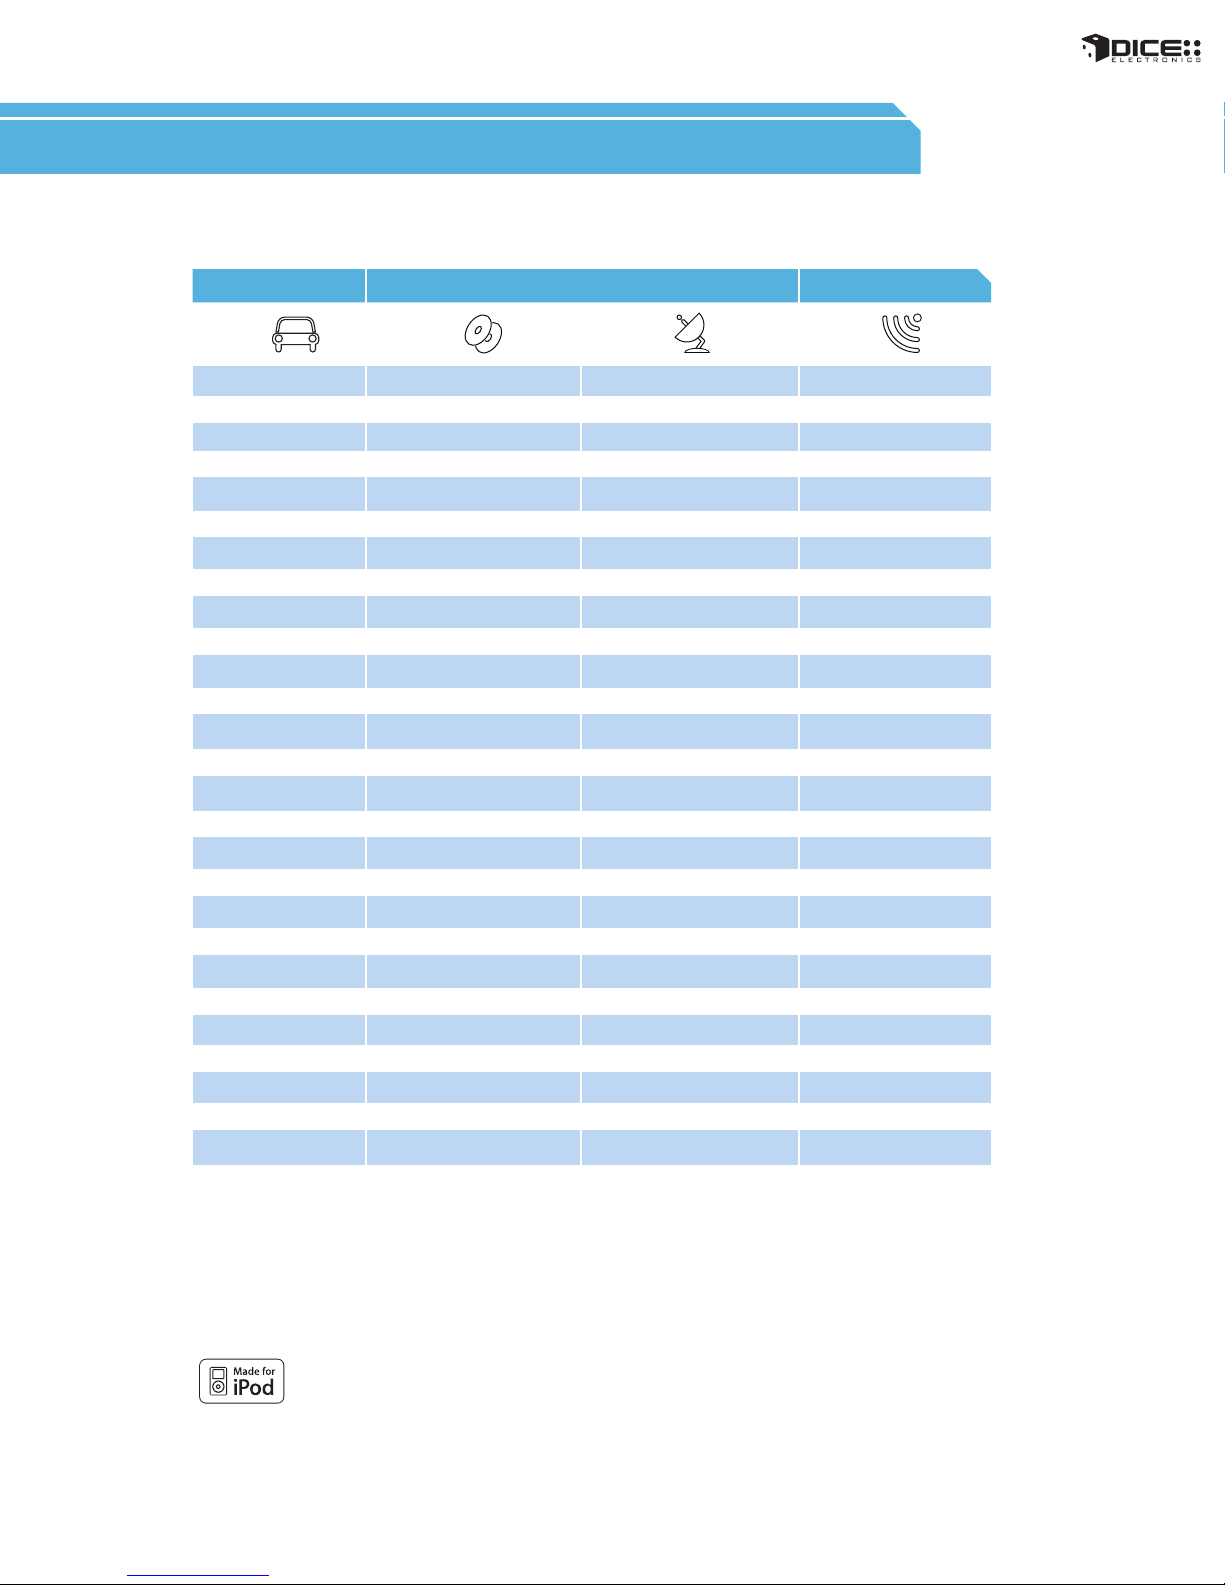
The vehicle specific, hard-wired integration kit from DICE is packed with features. Compare it to any other
product on the market and see for yourself how great it is. Our kit offers CD-quality sound, text display, integrated
controls, iPod like browsing and much more!
6
CD quality
sound
AUX input
Full text display
purchase
separately
Full control from radio,
steering wheel, or iPod.
Browsing by playlist,
artist, album, and song
Switchable, functional
iPod Screen
Vehicle-specific
Charges iPod
(both 5 volt & 12 Volt)
Optional iPod
holder/cradle
• Comparison data based on products avaiable as of Summer, 2008. Information listed is as-is. DICE Electronics is not responsible for any misprints or the accuracy of the data.
Customizable
text display
Company
1
Company
2
Company
3
Company
4
Features
integration for iPod
The auxiliary input has settings for gain, bass, mid and treble in order to optimize sound.
Volume (Gain) should be adjusted if the audio level from the auxiliary device is too low or to high. If you hear
distorted audio while playing the auxiliary device, you need to reduce (-) the gain. If you notice that the audio is
too quiet then the gain setting should be increased (+). Default settings are "50" ("68" for gain) and values may
be adjusted in increments between 01-99. Bass, Mid and Treble should be adjusted to compensate for the
acoustic presets of the radio.
Note:
If you are using an AUX device that uses the vehicle’s power source and not its own battery, you may have to
use a GROUND-LOOP isolator to avoid grounding and engine noise.
1 2
3
4
Volume
setting
Bass EQ
setting
Mid EQ
setting
Treble EQ
setting
Page 8

FAQ for iPod integration
Will my factory radio support text display?
Yes, select CD-text and/or SAT capable radios
can support text display.
Do I have to disconnect the CD changer in
my vehicle?
Externally mounted CD-changers (glovebox,
trunk, etc.) need to be disconnected. In-dash CD
changers built-in to the radio however, are
retained.
Can I keep the factory satellite radio in my
vehicle?
Yes, various operating modes are supported with
the DICE integration kit to allow for the most
flexible install. See specific kits for more details.
Do I need to have a navigation radio to be
able to operate the kit?
No, non-nav and navigation head units are both
supported.
Will the DICE integration kit charge my
iPod/iPhone?
Yes, all iPod models and iPhone models are
supported for charging, including the latest 5 volt
iPod/iPhone models.
It appears that the DICE kit uses the same
mini-din connector for the iPod dock cable as
other kits. Can I use an iPod cable from
another 3rd party system?
No. While cables may appear identical, the
internal connections can be very different. Using a
non-DICE branded cable can damage both the
integration kit and the iPod.
What makes the DICE iPod integration kit
different from others available on the market?
Our kits offer multi-source integration (can
operate as CD/MP3/MD/SAT), text display on
various vehicles, user-friendly interface, and
more!
In any way can the DICE kit void my vehicle
manufacturer’s warranty?
No, when the DICE kit is properly installed and
operated, the vehicle’s warranty will not be
voided.
If my vehicle has a CD-changer connection in
the glovebox, can it be utilized for DICE
integration for iPod?
For most vehicles, the glovebox connection can
be used to integrate the DICE kit.
Can I use older iPod kits with my new iPod?
While control and music are available from older
integration kits, they will only provide 12 volt
charging which is no longer supported by new
iPod models. New iPod cables are available for
5 volt charging.
Vehicle Specic
Can I keep the iPod controls active?
Yes, the iPod can be controlled directly if the
DICE unit is set up in iPod mode. In this mode,
text display may not be supported.
Which iPod does the kit work with?
4th generation and newer models (excluding
Shuffle) are supported.
Can I install the kit myself?
Yes, the kit is end-user installable with the proper
tools. However, we do recommend professional
installation.
Will the kit direct my phone call through the
car radio?
integration for iPod
No, however the iPhone will pause the music for
the duration of the phone call and resume once
the call has ended.
What does “made for iPod” logo mean?
The MFi logo can only be used by Apple licensed
product developers who certified the product to
comply with guidelines set by Apple. Only
licensed developers have access to authentic
dock connectors that ensure the highest quality
connection and longest reliability.
What does the “works with iPhone” logo
mean?
The WWi logo is an extention of the MFi program
with even tougher certification requirements
ensuring interference-free operation with iPhone.
Will the DICE kit support video playback on
my navigation screen?
No, our iPod kit can only transfer the audio and
information for the audio through your stereo
system.
7
1-888-342-3999
www.diceelectronics.com
Page 9
ACURA
Integration for iPod
8
Page 10
9
ACURA
vehicle specific integration for iPod
Page 11
chart
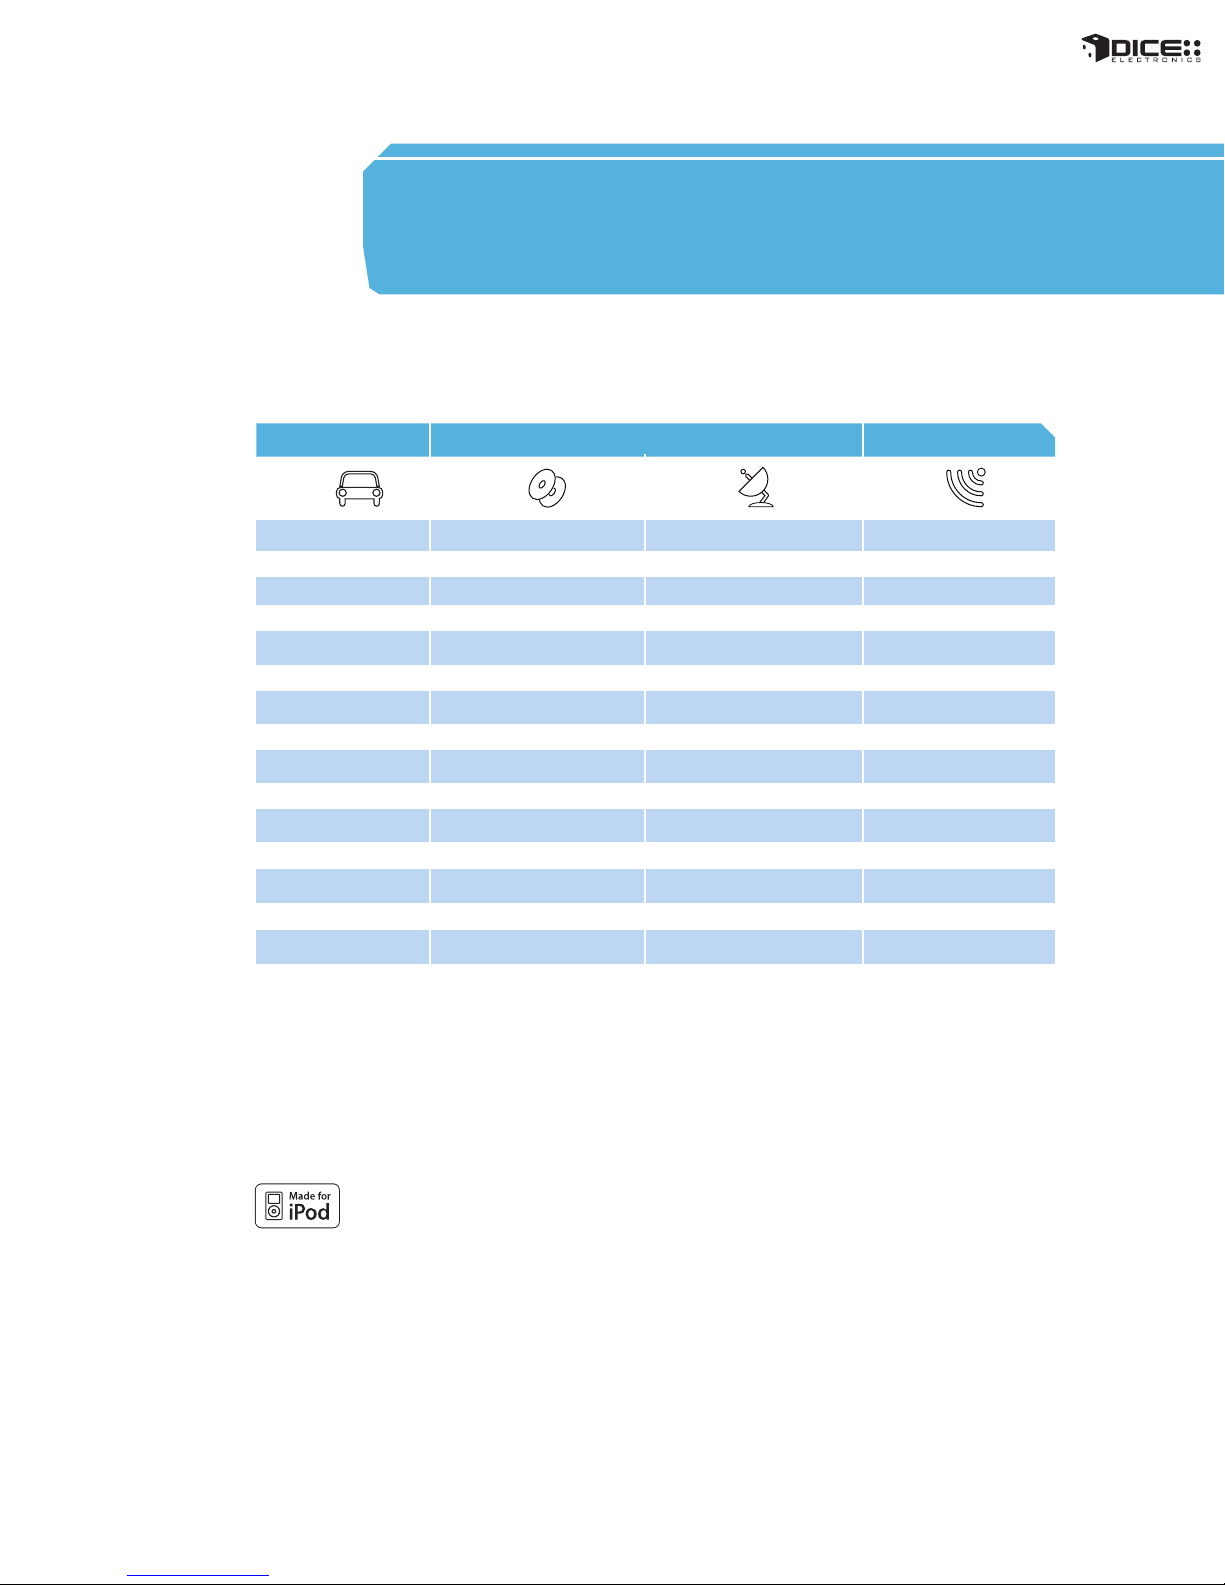
Vehicle Vehicle Specific Integration Kits Universal Kit
iPod CDC KitAcura CDC Note iPod FM Kit
Integra
1998 - 2001 FMRDS
MDX
2005 - 2009 FMRDS
2001 - 2004
RDX
RL
2005 - 2009
RSX
2002 - 2006
TL
2004 - 2008
1998 - 2003
TSX
2004 - 2008
Note:
• The DICE i-Honda-R series supports both Honda and Acura vehicles, therefore the part numbers are shared (i-Honda-R2,
i-Honda-R3/R4).
• Text display not available in CDC mode.
1. Navigation-equipped vehicles or factory satellite retention requires i-Honda-R4 kit.
2. Text available only in SAT emulation mode - Radio must have XM button and factory XM must be disconnected.
3. Not compatible with in-dash 6 CD system; external CD-changer must be disconnected.
i-Honda-R2 3 N/A
i-Honda-R3/R4 1
N/A
i-Honda-R3/R4 1 i-Honda-R3/R4 1, 2
N/A
i-Honda-R2 3
i-Honda-R3/R4 1 i-Honda-R3/R4 1, 2
N/A
i-Honda-R3/R4 1 i-Honda-R3/R4 1, 2
iPod SAT Kit SAT Note
i-Honda-R3/R4
N/A
i-Honda-R3/R4 1, 2
N/A
N/A
N/A
1, 2
FMRDS
FMRDS2007 - 2009
FMRDSi-Honda-R3/R4 1
FMRDS1996 - 2004
FMRDS
FMRDS
FMRDS
FMRDS
10
Page 12
FAQs Before Purchasing the Kit
Acura
How can I tell if my factory Acura radio will
support text?
The factory radio must have an XM or SAT button.
Can the factory XM be retained?
Yes, factory XM can be retained with our
Y-harness that is included in the i-Honda-R4 kit.
Retaining XM requires the kit to be in CDC
emulation mode.
Content Identifier
DICE interface for iPod
Installation Guide/User Manual
user manual
for i-Honda-R2 kit:
Are any of the operational features different
between SAT-mode and CD-mode of the DICE
unit?
Operating the iPod through the factory radio is
nearly identical in both emulation modes.
SAT-mode has the benefit of text display.
Can the steering wheel controls operate my
iPod?
Yes, the steering wheel controls can operate the
iPod. Note: pressing and holding of the steering
wheel button triggers its secondary funtion.
for i-Honda-R3 kit: for i-Honda-R4 kit:
docking
vehicle specific
interface module
cable
Honda-R2
Bus Connector
Honda-R3
Bus Connector
(regular harness that is used
for non-nav Acura and
disables XM (if equipped))
Honda-R4
Bus Connector
(Y-harness required for
navigation-equipped Acura or to
retain factory XM)
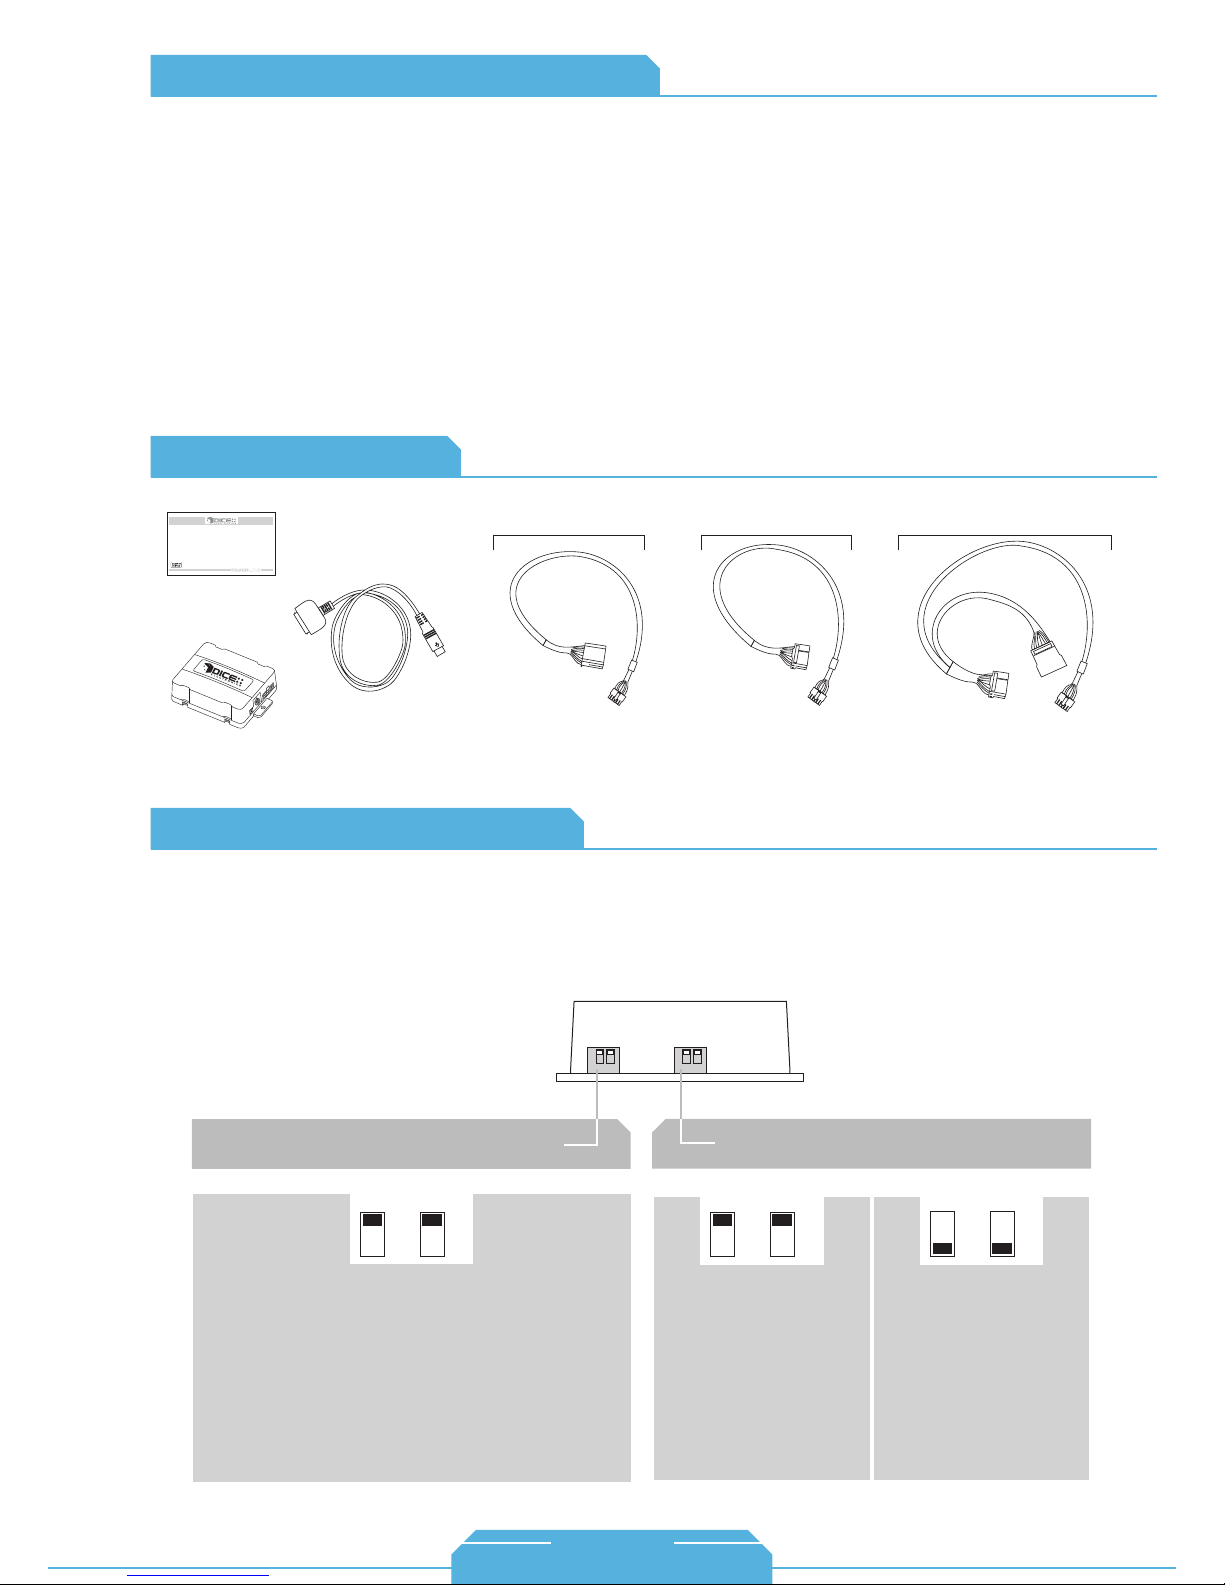
About Dip Switch Settings
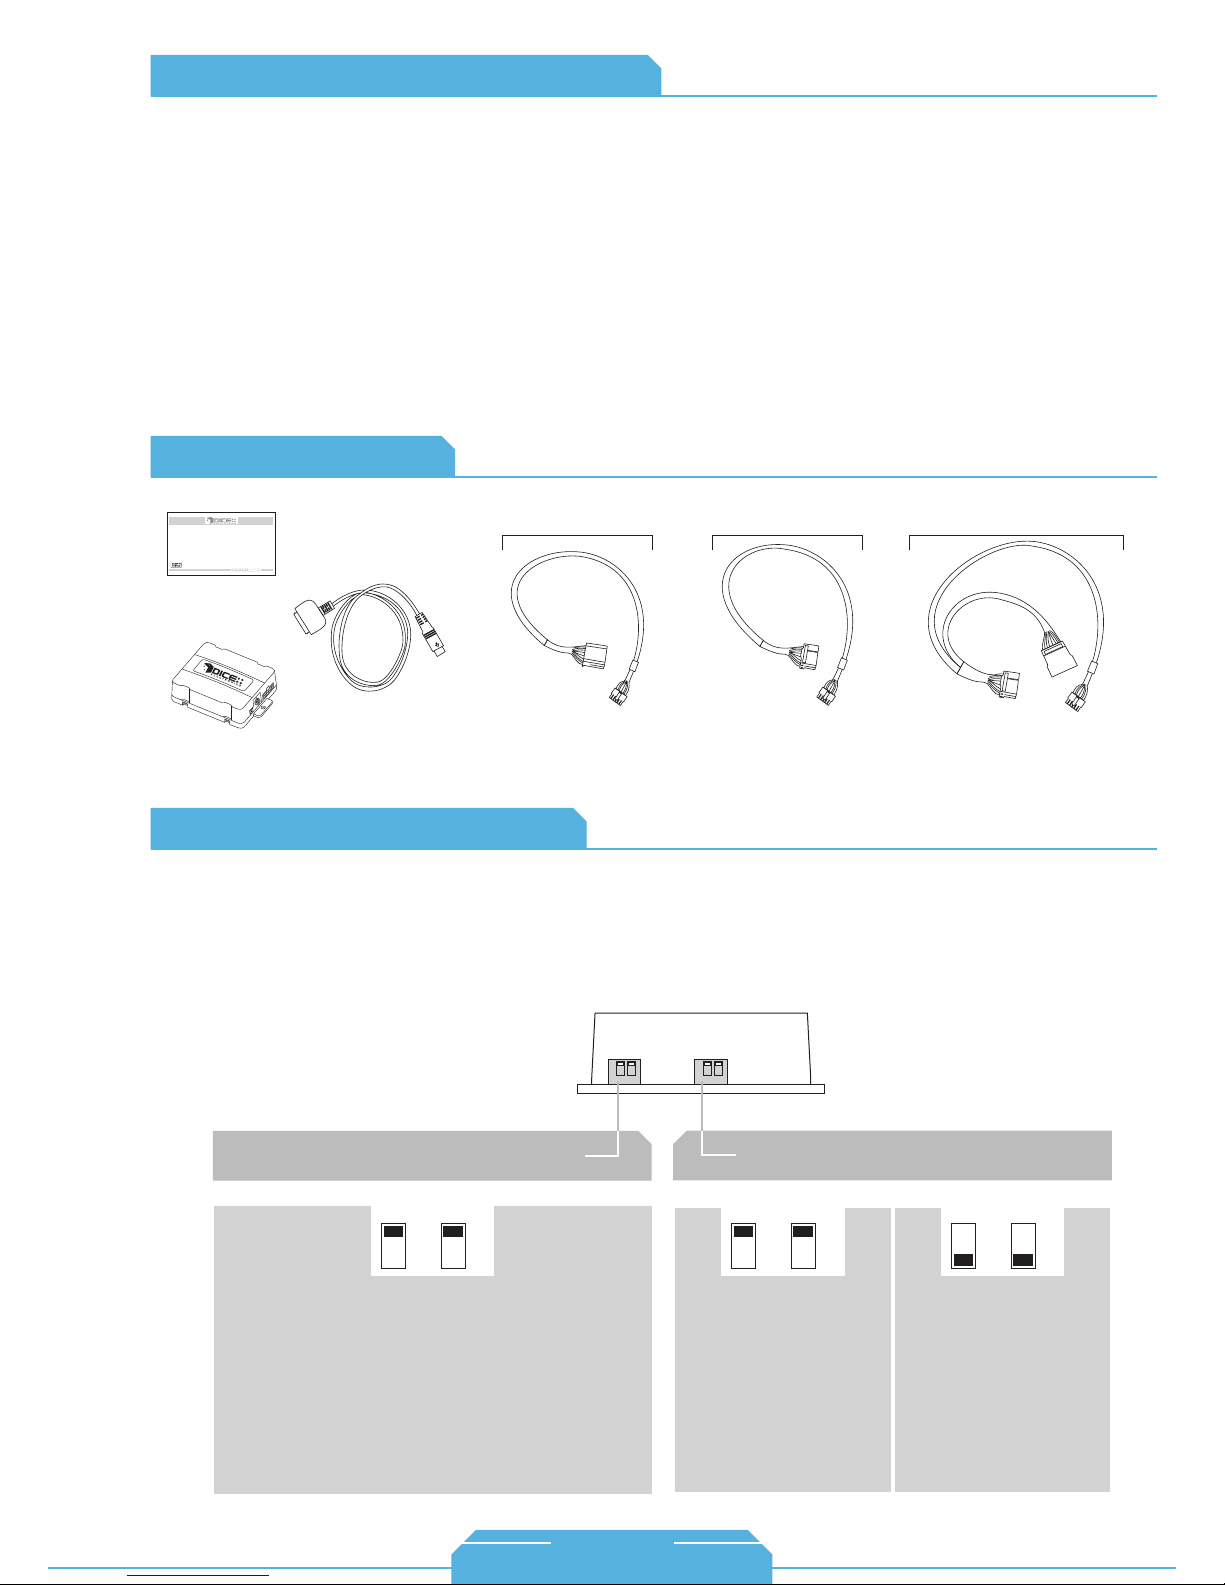
The configuration switches located on the DICE module are used to set the operation of the interface by
the installer. Incorrect dip switch settings may cause the DICE interface not to work properly or not to
operate at all. Disconnect the vehicle harness from module and cycle ignition off for 50 seconds
after changing the switches!
DICE module
for i-Honda-R2 kit:
Car configuration switches
CD Changer (CDC)
OFF OFF
Default
Switches should remain in the default OFF position.
iPod configuration switches
“Locked” “iPod”
OFF OFF
Default
It is best selected when text
display is supported by the
radio. After the initialization
the iPod will be locked for
increased interface
functionality
Selected emulation
It is best selected when text
display is NOT supported
by the radio. Track
numbers and times are not
synchronized between the
iPod and radio. Because
there is less data transfer
between the iPod and radio,
this mode has the fastest
response time. Content is
selected on the iPod only.
ON ON
11
1-888-342-3999
www.diceelectronics.com
Page 13
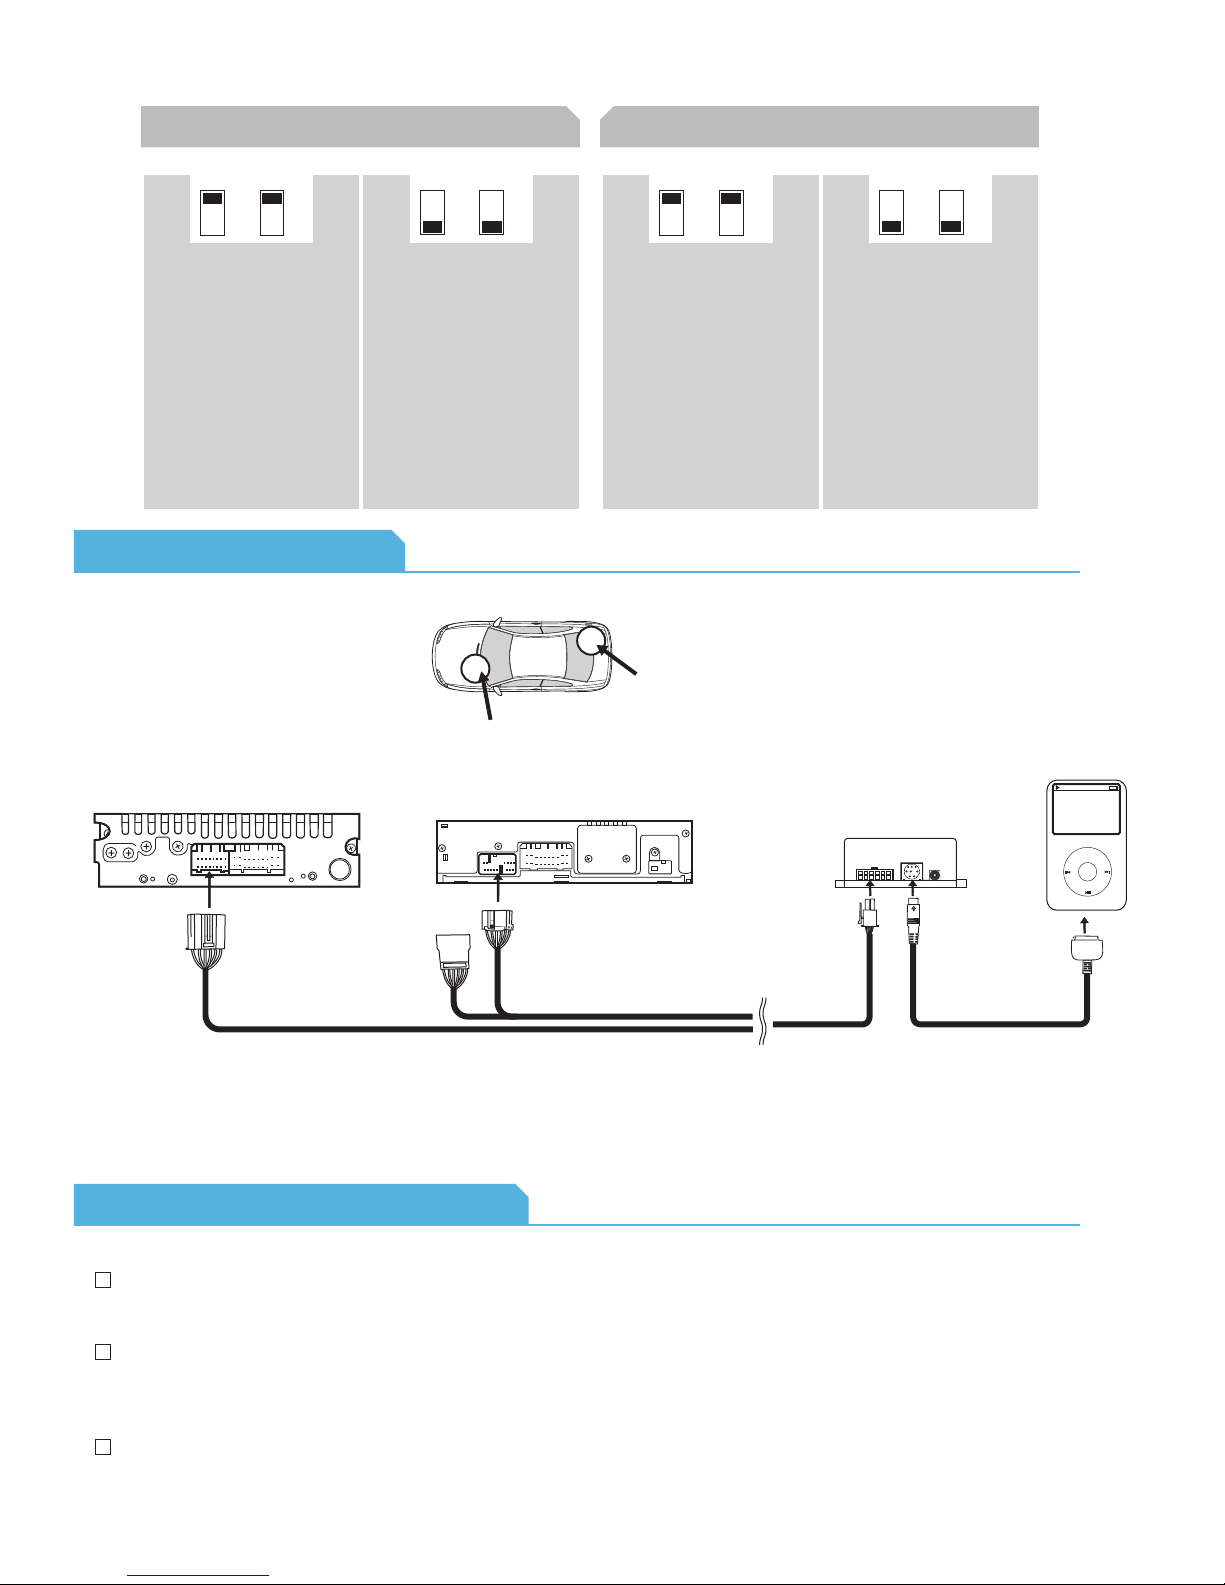
(About Dip Switch Settings continued)
for i-Honda-R3/R4 kit:
Car configuration switches
CD Changer (CDC) Satellite (SAT)
OFF OFF
Default
Recommended for radios
NOT supporting Satellite
(XM) or if factory SAT is
installed and user wishes to
retain it.
Connection Diagram
ON
ON
Recommended for Satellite
(XM) capable radios. This
type of emulation provides
full text display on the
radio. If Satellite (XM) is
equipped it must be
disconnected to operate
flawlessly in this mode.
radio location
iPod configuration switches
“Locked” “iPod”
OFF OFF
Default
recommended in SAT
emulation:
It is best selected when text
display is supported by the
radio. After connecting the
iPod you will see the DICE
logo on the screen. After the
initialization the iPod will be
locked for an increased
interface functionality.
Factory XM tuner
(if installed)
ON ON
recommended in CDC
emulation:
It is best selected when text
display is NOT supported
by the radio. Track numbers
and times are not
synchronized between the
iPod and radio. Because
there is less data transfer
between the iPod and radio,
this mode has the fastest
response time. Content is
selected on the iPod.
Old Acura BUS system New Acura BUS system
module
docking
Honda R2
BUS connector
cable receptacle
(R4 only)
Honda R3 / R4 BUS connector
•
Note that in some vehicles the physical location of
vehicle specific
connector
the CD changer / SAT connector is on the bottom
of the radio
Installation Tips / Check List
To operate in SAT mode, the XM tuner must be physically disconnected. The tuner is usually located in the
trunk area on the left or right side near the wheel-well. In the Acura RDX, it is behind the glovebox up front.
iPod
MENU
cable
Installation on the Acura TSX can be done without removing the radio. Simply press the inner sides of the
storage bin of the lower part of the dash and gently pull out. The CD/SAT connection is on the bottom of
the radio; this is where the i-Honda-R3/R4 will connect.
On the Acura TL (2004-2008), the radio normally does not need to be removed. When the driver-side
panel on the console is removed, you can get to the CD/SAT connection through the side.
12
Page 14
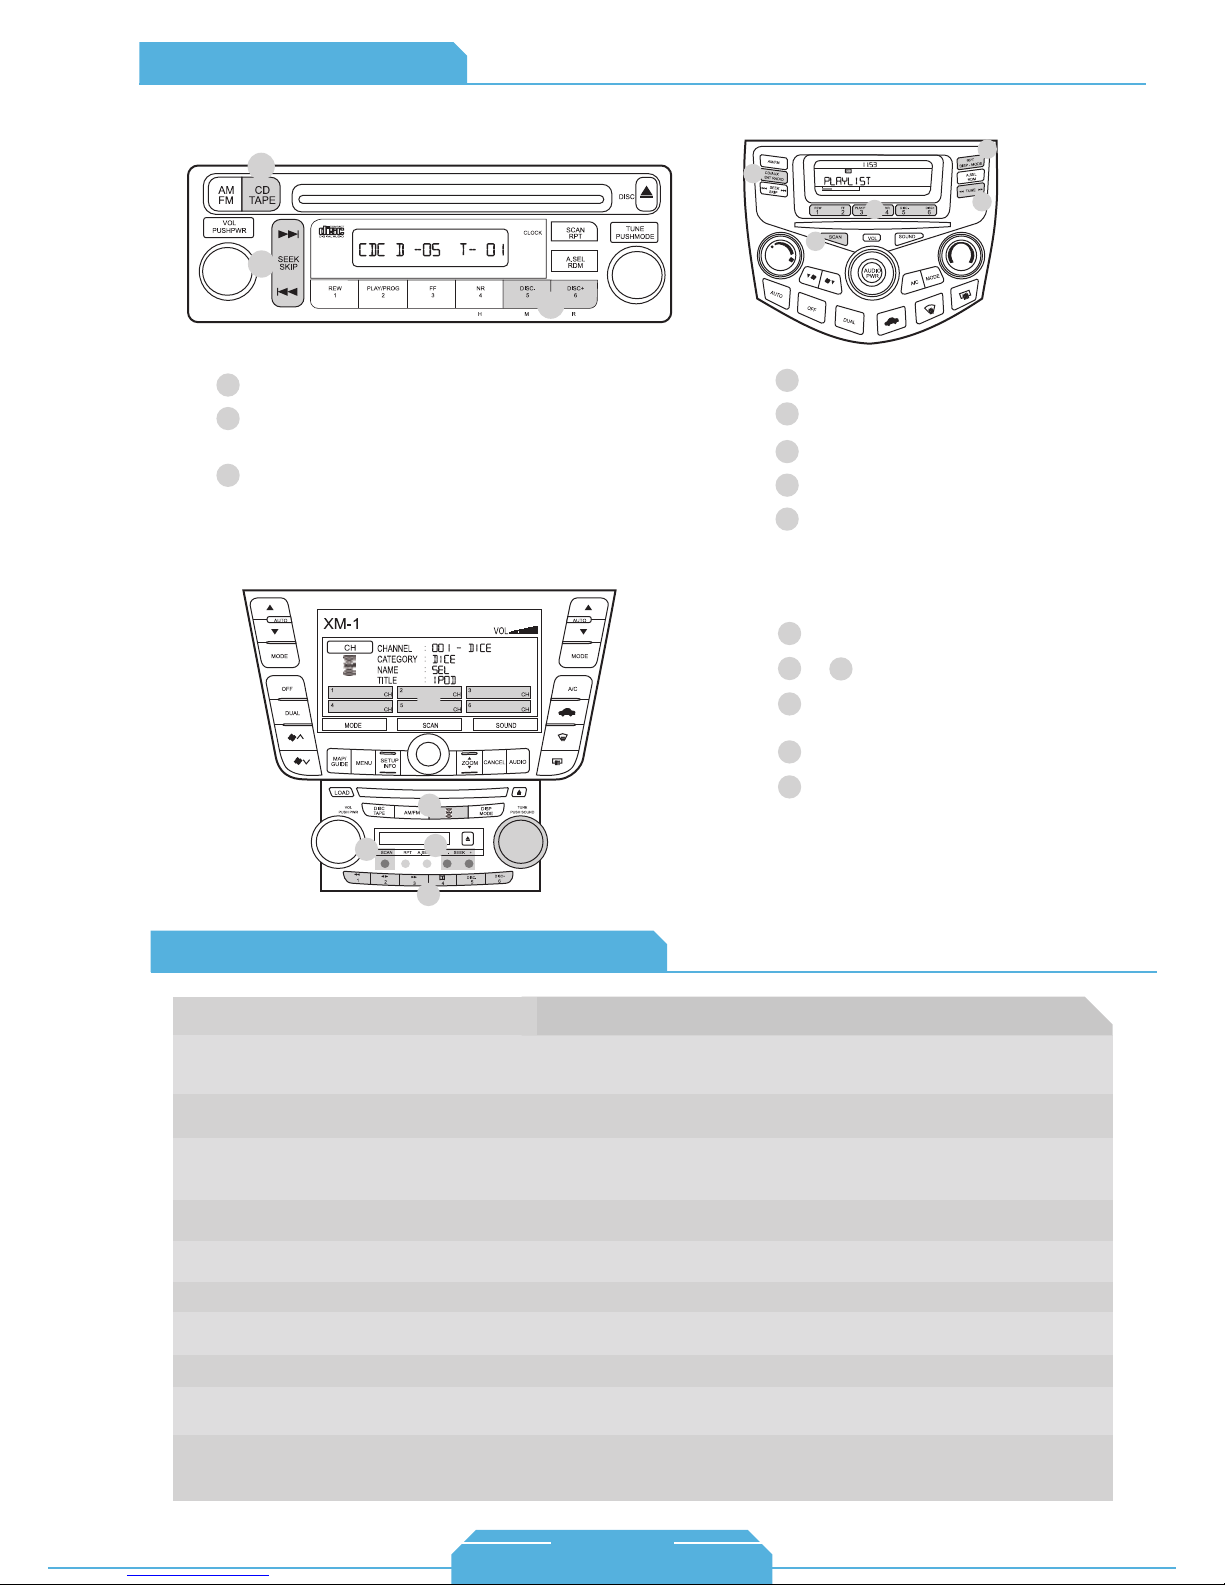
Operation Overview
Acura
CDC emulation
1
2
Source selector
1
Press to change track, press and hold
2
to RW or FFW.
Press to change modes.
3
SAT emulation with navigation system
2
SAT emulation
3
1
2
5
4
3
Source selector
1
Use Presets to change modes.
2
Toggle between available text fields.
3
Press to change track.
4
Press to enable shuffle song.
5
Source selector
1
2
3
4
Use Presets to change modes.&
6
Press to change track.
or
Turn to change track.
1
5
3
4
6
Acura Specific Technical Notes
Problem
Cannot fit i-Honda-R2 kit into any of the ports
on the radio or cannot fit i-Honda-R3/R4 into
any of the ports on the radio
iPod does not display the DICE logo when
connected.
Cannot select CD changer or SAT source.
Radio/ steering wheel controls do not operate
iPod.
No text display.
No audio from iPod source.
iPod does not charge.
Music is distorted or sound level is too low.
Cannot find SAT mode.
Sound of factory installed satellite radio is
bleeding through when the iPod audio source
is selected.
Various vehicle trim models (EX, LX, DX, etc.) can have different radios for a specific
year. If the i-Honda-R2 connection doesn’t fit into any ports, the i-Honda-R3/R4 will be
required and vice versa.
Reset iPod and make sure most recent iPod firmware is installed. Make sure all cables
are connected properly. Note that iTouch does not display the logo.
Check DIP switch settings. With the ignition OFF disconnect vehicle harness
from module for a few seconds and reconnect. Verify that the correct button is
used to access the interface.
Reset iPod and make sure most recent iPod firmware is installed.
Make sure DIP switch settings are correctly set for text display.
Reset the iPod. Verify proper connection to the interface.
Check all connections. See if iPod charges while connected to computer or wall
charger. You may need to reset the iPod.
Check and make sure all EQ and BASS boost options are turned off on your iPod.
If the radio does not have a SAT or XM button, then it will not support SAT emulation of
the DICE module. Have the DICE module configured for CDC emulation.
The factory XM module must be disconnected. It is usually located in the trunk of the
vehicle.
5
Solution
Press to enable Shuffle Song.
13
1-888-342-3999
www.diceelectronics.com
Page 15
AUDI
Integration for iPod
14
Page 16
15
AUDI
vehicle specific integration for iPod
Page 17
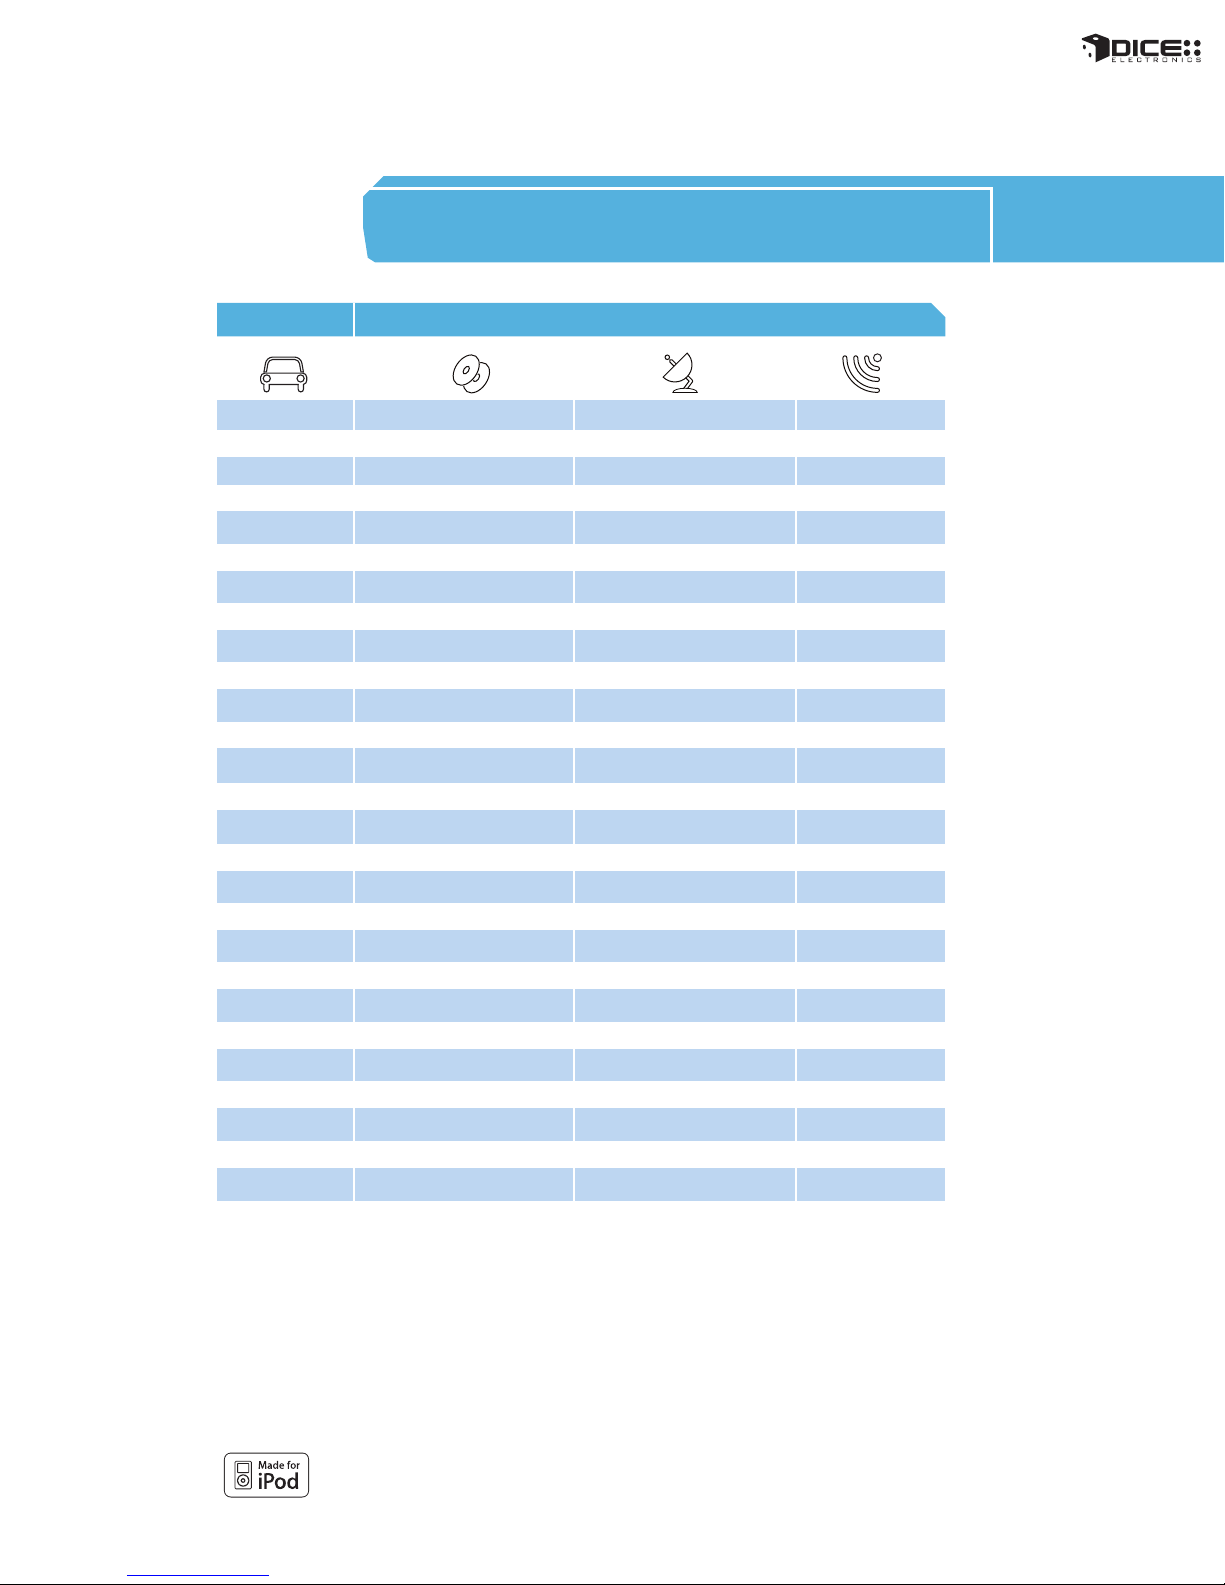
COMPATIBILITY
chart
Vehicle Vehicle Specific Integration Kits Universal Kit
iPod CDC KitAudi CDC Note iPod SAT Kit SAT Note iPod FM Kit
A3
2008 - 2009 i-VW-R 2, 3 i-Audi/VW-SAT 4, 5 FMRDS
2006 - 2007 i-Audi-R 1, 2 i-Audi/VW-SAT
A4/S4/RS4
N/A N/A
i-VW-R 2, 3 i-Audi/VW-SAT 4, 5 FMRDS2007 - 2008
i-Audi-R 1, 2 i-Audi/VW-SAT 4, 5 FMRDS2004 - 2006
i-Audi-R 1, 2 FMRDS1998 - 2004
A5/S5
please call FMRDS2008 - 2009
A6/S6/RS6
2005 - 2009
2004 i-Audi-R 1 i-Audi/VW-SAT 4 FMRDS
1998 - 2003
Q7
2007 - 2009
A8/S8
2002 - 2009
1998 - 2001
Allroad
2004 - 2005 i-Audi-R 1 i-Audi/VW-SAT 4 FMRDS
2000 - 2003 i-Audi-R 1 FMRDS
TT
2008 i-VW-R 2, 3 i-Audi/VW-SAT 4, 5 FMRDS
2004 - 2006 i-Audi-R 1, 2 i-Audi/VW-SAT 4 FMRDS
2000 - 2003 i-Audi-R 1, 2 FMRDS
N/A N/A
i-Audi-R 1 FMRDS
please call FMRDS
N/A N/A
i-Audi-R FMRDS
N/A
N/A
N/A
N/A
N/A
N/A
N/A
4, 5 FMRDS
FMRDS2009
FMRDS
FMRDS
Note:
• Text is not supported on i-Audi-R & i-VW-R kits.
1. If the vehicle is equipped with the factory navigation system (RNS-E), please choose the i-VW-R kit.
2. Optional mating connector available if glove box CDC plug connection is present. This also retains factory SAT radio.
3. If the vehicle requires i-VW-R kit, please contact us for detail on SAT retention.
4. Radio must have a SAT button.
5. i-Audi/VW-SAT kits allow for retaining factory SAT tuner, if present.
16
Page 18
FAQs Before Purchasing the Kit
Audi
Does factory satellite radio need to be
disabled with the DICE kit?
No, the i-Audi/VW-SAT kit retains factory satellite
radio.
How can I tell if my Audi radio will support the
text-capable i-Audi/VW-SAT kit?
If your factory Audi radio has a SAT button , it is
compatible with our i-Audi/VW-SAT kit and will
support text display.
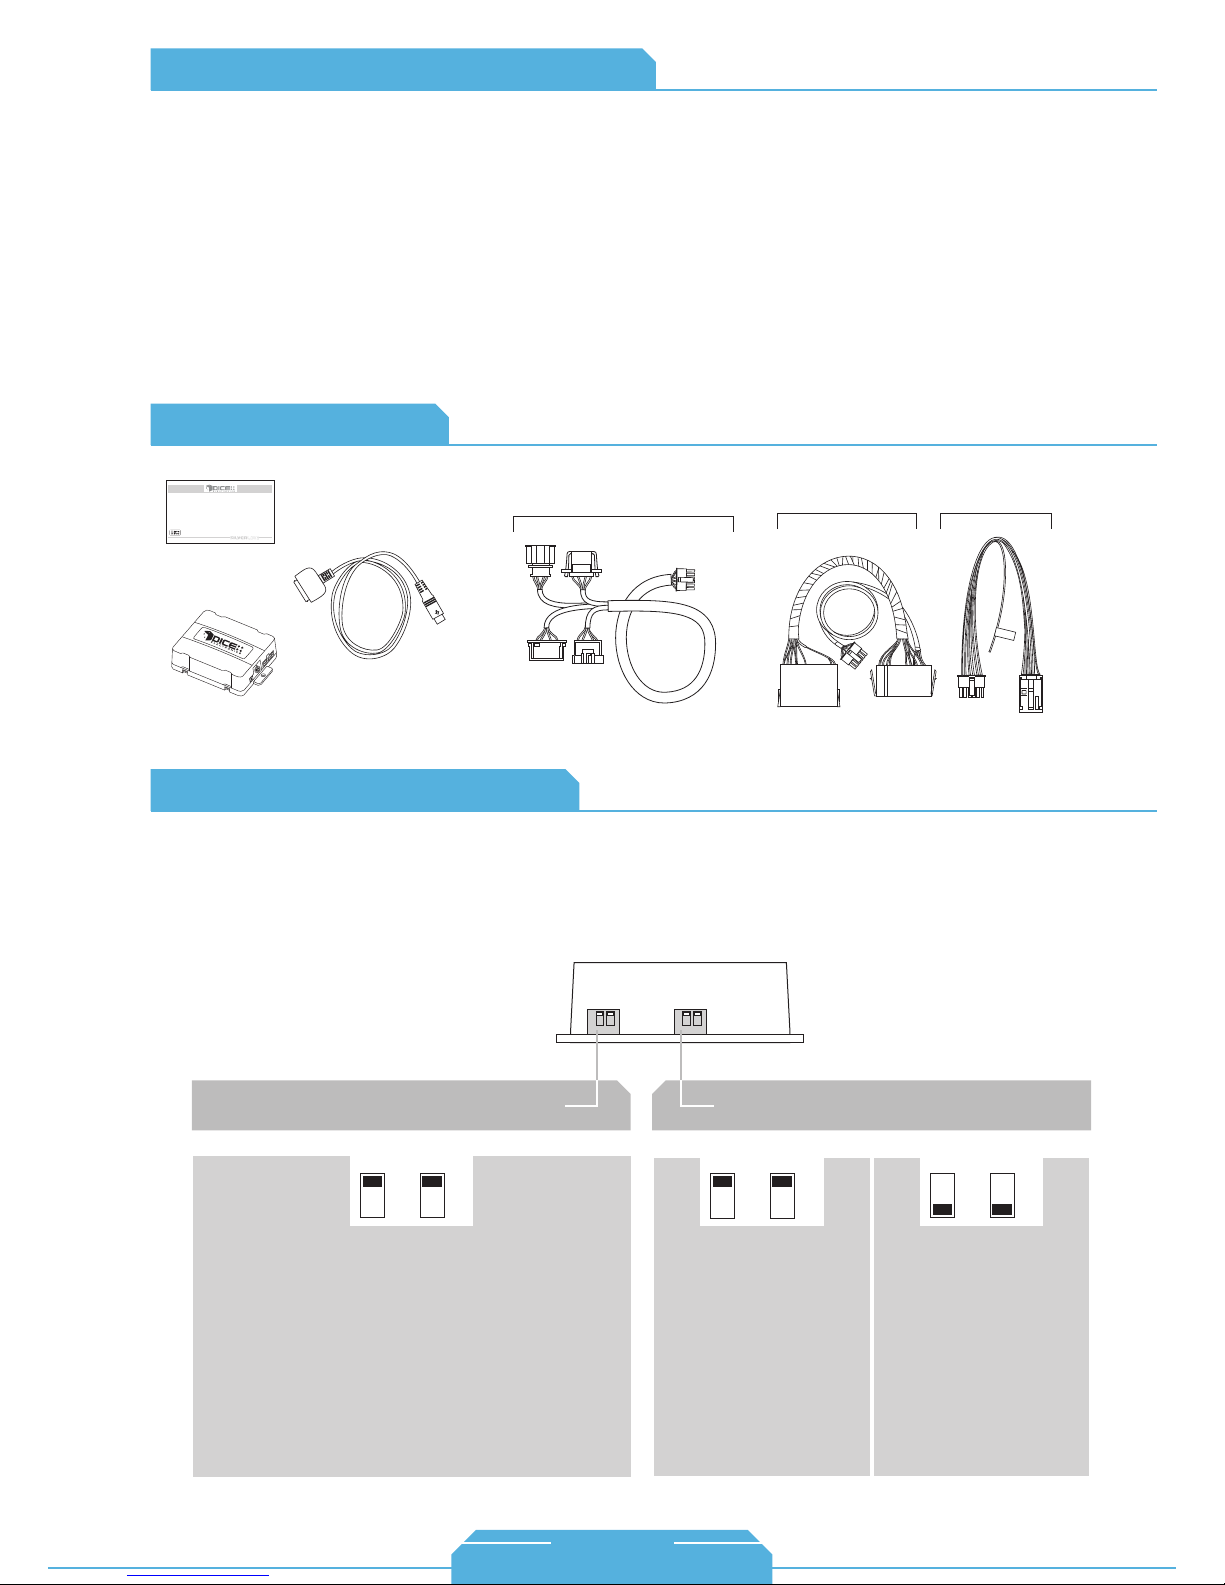
Content Identifier
DICE interface for iPod
Installation Guide/User Manual
user manual
vehicle specific
interface module
docking
cable
for i-Audi/VW-SAT kit:
i-Audi/VW-SAT harness
I upgraded my older Audi’s factory radio to a
newer factory radio/navigation. Will this still
work and how do I know which kit I need?
This will still work as long as the newer head unit
came out of a compatible Audi. Navigation
(RNS-E) radios take the i-VW-R harness. Other
radios may need to be verified for CD
Changer/SAT connection.
for i-Audi-R kit:
Audi-R harness
for i-VW-R kit:
Ground
wire
VW-R2
harness
About Dip Switch Settings
The configuration switches located on the DICE module are used to set the operation of the interface by
the installer. Incorrect dip switch settings may cause the DICE interface not to work properly or not to
operate at all. Disconnect the vehicle harness from module and cycle ignition off for 50 seconds
after changing the switches!
DICE module
for i-Audi-R/i-VW-R kit:
Car configuration switches
CD Changer (CDC)
OFF OFF
Default
Switches should remain in the default OFF position.
iPod configuration switches
Selected emulation
“Locked” “iPod”
OFF OFF
Default
It is best selected when
advanced controls on the
radio are used. After the
initialization the iPod will be
locked for increased interface
functionality.
It is best selected when text
display is not supported
by the radio and user
wishes to retain iPod
control. Track numbers
and times are not
synchronized between the
iPod and radio. Because
there is less data transfer
between the iPod and radio,
this mode has the fastest
response time. Content is
selected on the iPod only.
ON ON
17
1-888-342-3999
www.diceelectronics.com
Page 19
(About Dip Switch Settings continued)
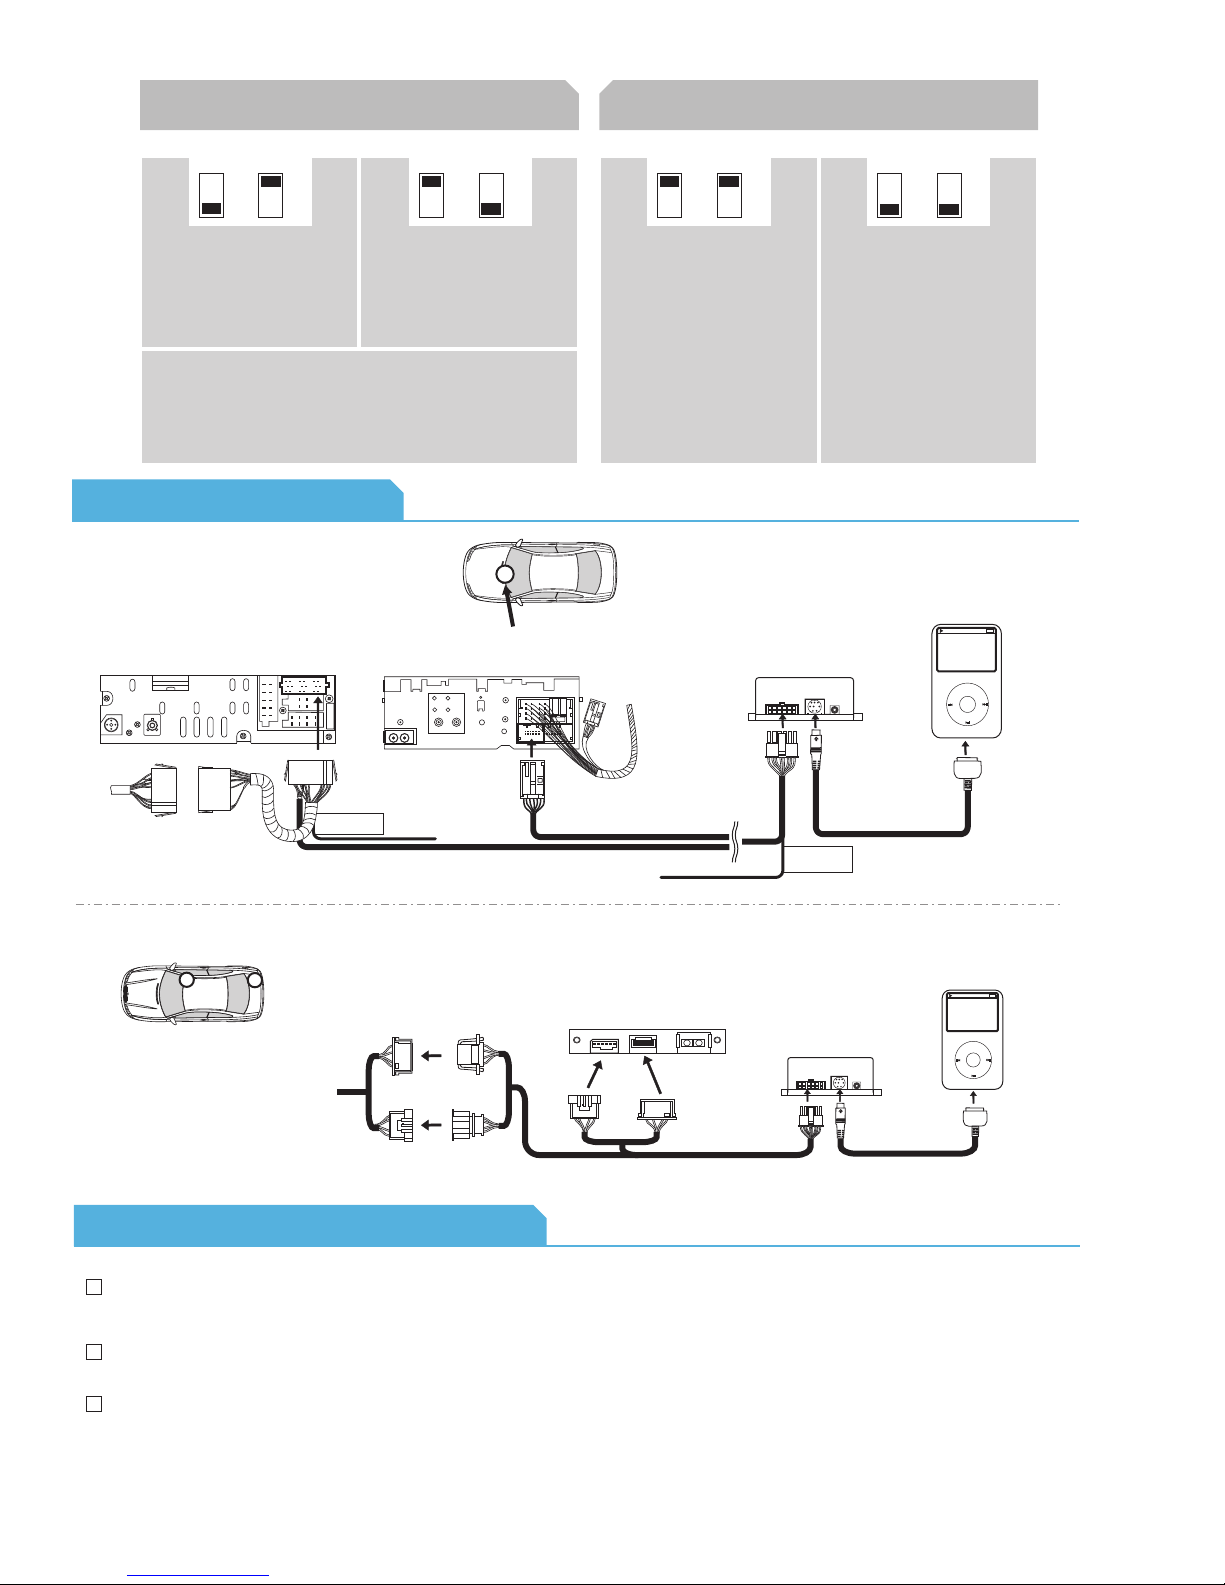
for i-Audi/VW-SAT kit:
Car configuration switches
Multi-line display Single-line display
OFF
ON
Default
This is the recommended
setting for radios that have
multiple text fields
displayed in Satellite
emulation mode.
This type of emulation provides full text display on the radio. If
Satellite (XM/Sirius) is equipped it must be disconnected to
operate integration in this emulation mode. XM/Sirius receiver is
usually located in the trunk or under the passenger seat.
Note: Please call to confirm vehicle support prior to installation.
Connection Diagram
for Audi-R/i-VW-R kit:
older radio (non-satellite capable)
10
10
factory harness
in vehicle
receptacle
Audi-R connector
ground
wire
OFF
ON
This setting is
recommended for radios
where there is only one
text field displayed in
Satellite emulation mode.
radio location
to ground
This is best selected when
text display is supported by
the radio. After connecting the
iPod you will see a logo or a
checkmark indicating that the
iPod is locked. After the
initialization the iPod will be
locked for increased interface
functionality.
10
VW-R2 harness
iPod configuration switches
“Locked” “iPod”
OFF OFF
ON ON
Default
module
vehicle specific
connector
This is best selected when
text display is NOT
supported by the radio.
Track numbers and times
are not synchronized
between the iPod and radio.
Because there is less data
transfer between the iPod
and radio, this mode has
the fastest response time.
Content is selected on the
iPod.
docking
cable
Ground
wire
to ground
iPod
MENU
for i-VW-SAT2 (retains satellite radio) kit:
2
Possible Tuner Location
1
From factory radio
factory SAT
harness in vehicle
SAT Tuner
vehicle specific
connector
module
iPod
iPod docking
cable
MENU
Installation Tips & Check List
For the wiring harness(es) that plug into the back of the radio, the extra ground wire must be attached to
the chassis. The extended screw on the back of the radio is a sufficient ground point.
To remove Audi radios and/or glovebox CD changers, you must have proper radio removal keys.
To enhance the user experience, it is recommended to set the iPod configuration switches to iPod mode on
non-text capable radios as this configuration will keep the direct iPod controls unlocked.
18
Page 20
Operation Overview
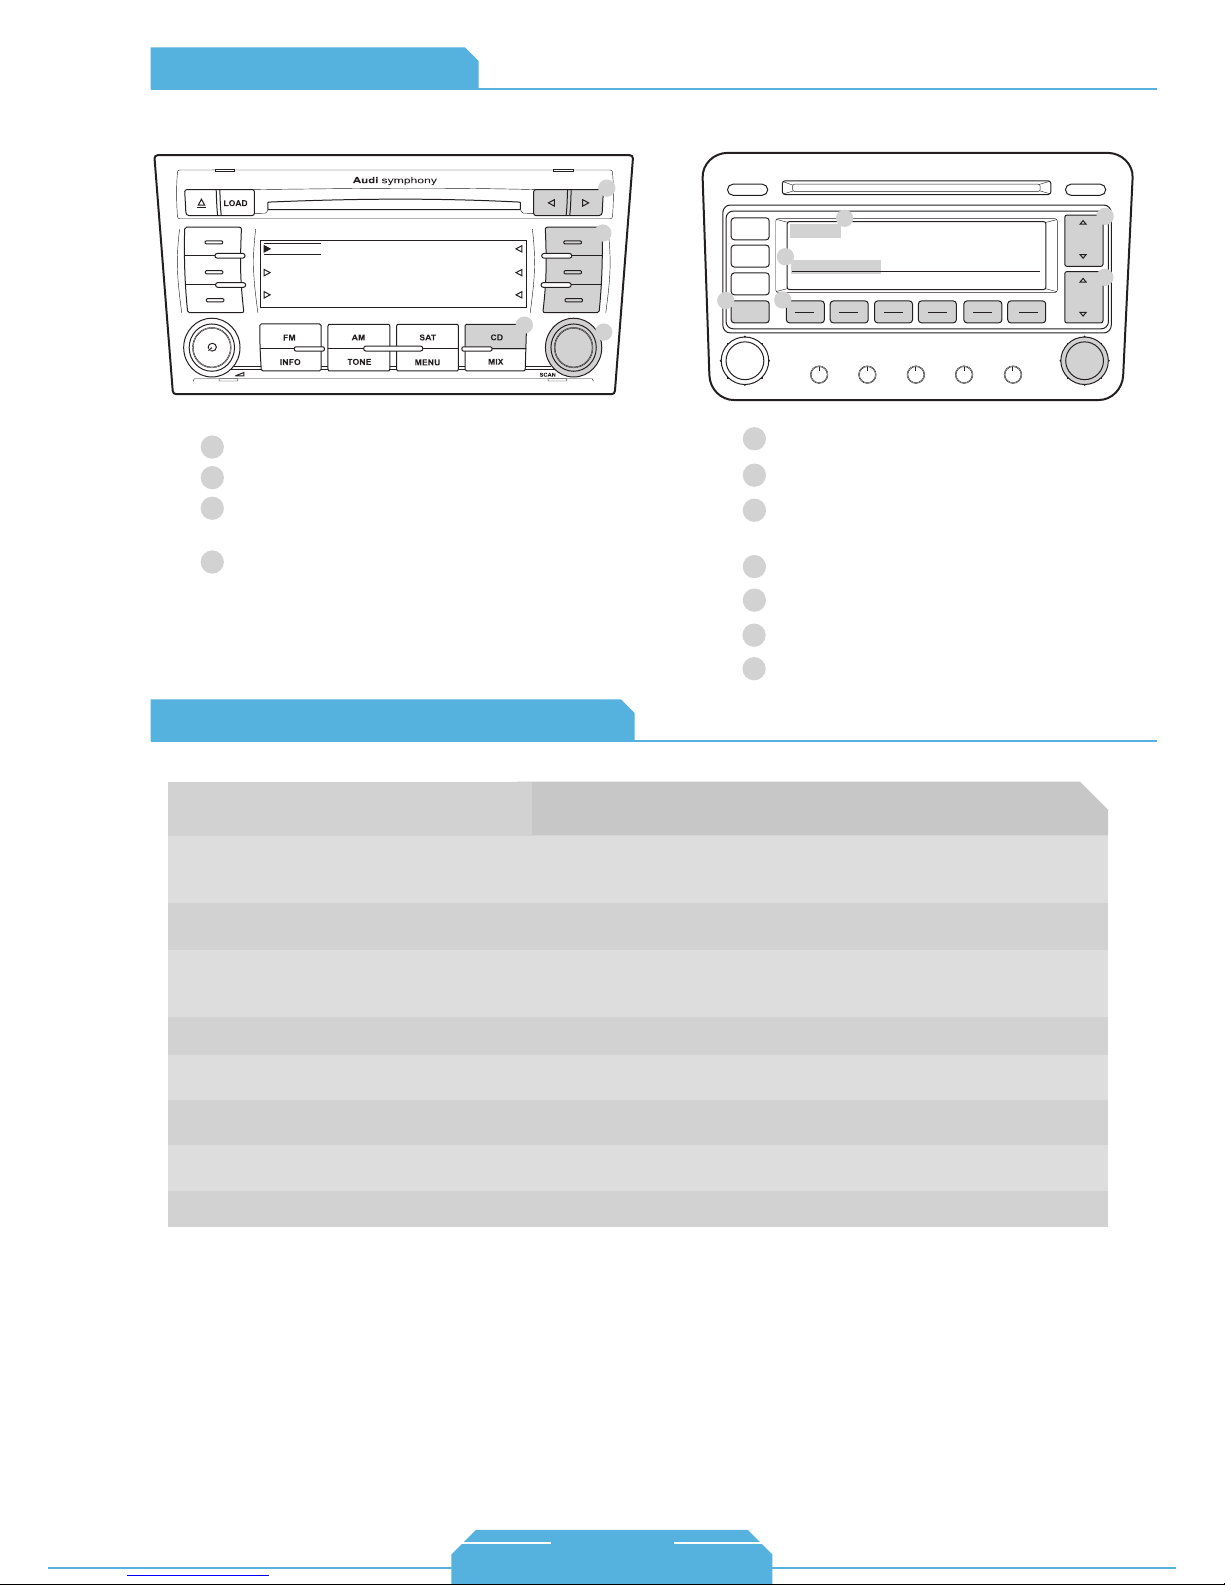
SAT emulationCDC emulation
Audi
3
1 CD EXT
2 CD EXT
3 CD EXT
Source selector
1
Press to change mode.
2
Press to change Track, hold to Rewind
3
TRACK 12
CD 01:52
CD EXT 4
CD EXT 5
CD EXT 6
1
2
4
or Forward.
Turn to change track.
4
Audi Specific Technical Notes
LOAD EJECT
FM
AM
7
CD
3
1
SAT
ON
VOL
Source selector
1
Press to cycle through Modes 1-6.
2
On selected radios you may use
3
6
XM 1 001
ARTIST * ALBUM
001 002 003 004 005 006
BASS MIDDLE TREBLE BALANCE FADER
Club Mix
SCAN
TUNE
these buttons to select Modes 1-6
Press to change track.
4
Turn to change track.
5
Source indicator
6
This text field may not be shown on
7
all radios.
CAT
FLDR
SEEK
TRACK
5
2
4
Problem
Cannot select the interface.
Radio/ steering wheel controls do not operate
iPod.
Radio/ steering wheel controls do not operate
iPod, but audio is still present.
Interface has erratic recognition or none at all.
No text display.
No audio from iPod source.
iPod does not charge.
Music is distorted or sound level is too low.
Solution
Check DIP switch settings. With the ignition OFF disconnect vehicle harness
from module for a few seconds and reconnect. Verify that the correct button is
used to access the interface (CDC or SAT).
Reset iPod and make sure most recent iPod firmware is installed. Check vehicle’s user
manual on how steering wheel controls work.
Select DISC/Mode 5 and Track/Channel 1. Switch back to DISC/Mode 1 and try
changing Tracks. DISC 5 (Mode 5) Track 02 (Channel 02) is AUX mode and not correct
for the iPod.
Make sure that the ground wire harness is attached to the back of the radio.
Set iPod switches to OFF for "Locked" mode. Text display is only supported on
SAT-capable radios with the i-Audi-SAT kit.
Reset the iPod. Verify proper connection to interface.
Check all connections. Reset iPod and make sure iPod charges while connected to
computer or wall charger.
Check and make sure all EQ and BASS boost options are turned off on your iPod.
19
1-888-342-3999
www.diceelectronics.com
Page 21
BMW/MINI COOPER
Integration for iPod
20
Page 22

21
BMW/MINI COOPER
vehicle specific integration for iPod
Page 23

Vehicle Vehicle Specific Integration Kits Universal Kit
iPod CDC KitBMW CDC Note iPod FM Kit
3-series/M3
2007 - 2009 FMRDS
2006 (coupe & convertible) i-BMW-T 1 FMRDS
1998 - 2005 i-BMW-T
5-Series/M5
1997 - 2003
7-Series
2002 - 2009
1998 - 2001
X3
2004 - 2009
X5
2007 - 2009
2000 - 2006
Z3/M-Coupe/M-Roadster
1996 - 2002 i-BMW-T 1
Z4/M-Coupe/M-Roadster
2003 - 2008
Z8
2000 - 2003 i-BMW-T 1, 2 FMRDS
please call
1 FMRDS
please call
i-BMW-T 1, 2
please call
i-BMW-T
i-BMW-T 1, 2
please call
i-BMW-T FMRDS
i-BMW-T
1, 2
1, 2
1, 2
FMRDS2004 - 2009
FMRDS
FMRDS
N/A
FMRDS
FMRDS
FMRDS
FMRDS
chart
Mini Cooper
Cooper/Cooper S
2007 - 2008 FMRDS
2002 - 2006 i-BMW-T 3 FMRDS
BMW motorcycle
K1200LT
2000-2008
Note for ALL:
• Vehicles listed above must be pre-wired for factory CD changer (most USA and Canadian models are pre-wired)
• Text is supported on all text-capable radios.
• BMW 3-series never had DSP amplifier.
1. If equipped with factory SAT module then BMW SAT cable option is required (see chart below).
2. If equipped with digital DSP amplifier then BMW DSP adapter option is required (see chart below).
3. CD text is only available on selected September 2005 and newer Cooper S.
4. Text display is limited on 05-06 models.
Optional Interfaces
Part number
i-BMW-SAT
i-BMW-DSP
please call
i-BMW-T 4
Description
BMW SAT Cable
BMW DSP Adapter
N/A
22
Page 24
FAQs Before Purchasing the Kit
Do BMW/Mini radios support text display?
Yes, CD Text capable BMW radios support text display
with the DICE kit. This normally includes 1998-2007
supported BMW models and the 2006 Mini Cooper.
Does my factory CD-Changer have to be
disconnected?
Yes, the factory BMW CD-Changer connections are
utilized to integrate the DICE system.
My car is not pre-wired. What can I do?
We have radio-end kits available for selected model.
Contents Identifier
DICE interface for iPod
Installation Guide/User Manual
user manual
docking
cable
If the vehicle is equipped with factory satellite radio,
can it be retained?
Yes, the factory satellite radio can be retained with an
additional satellite harness.
My vehicle is equipped with a digital DSP amplifier,
is this supported?
Yes, digital DSP amplifiers are supported; however the
additional DSP kit (i-BMW-DSP) is required. DSP can be
verified by checking the factory CD Changer connections: if
3-pin and mini coax connectors are present, the DSP kit is
required. However, if a 3-pin and 6-pin connectors are
available, then DSP most likely will not be needed.
for DSP kit:
BMW Mini Cooper
vehicle specific
interface module
vehicle specific
connector
DSP
interface module
coax cable power adapter RCA 6-pin harness
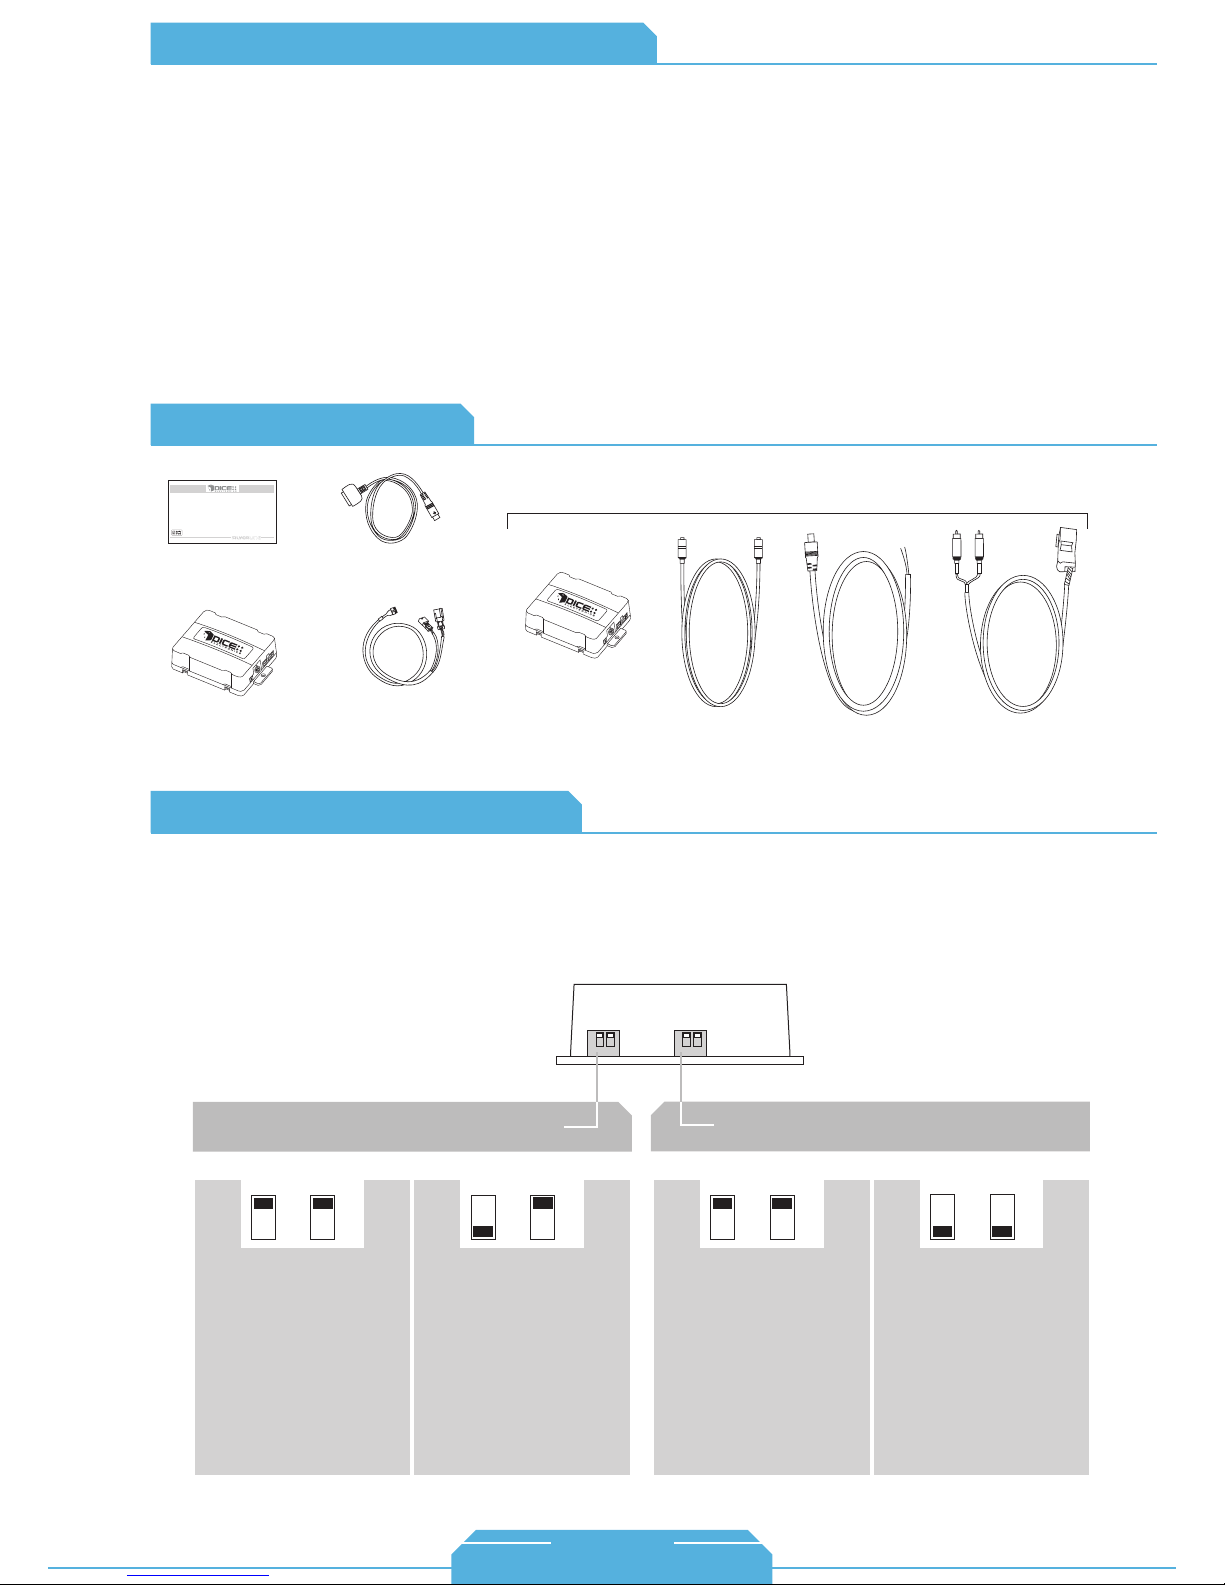
About Dip Switch Settings
The configuration switches located on the DICE module are used to set the operation of the interface by
the installer. Incorrect dip switch settings may cause the DICE interface not to work properly or not to
operate at all. Disconnect the vehicle harness from module and cycle ignition off for 50 seconds
after changing the switches!
DICE module
Car configuration switches
CD changer 1 CD changer 2
OFF OFF
Default Default
Recommended for late model
Business CD and Navigation
radio systems.
This setting is to be used on
early model Business CD
and Business cassette
head units. This mode
provides slower text
refreshing to allow flawless
operation of these radios.
Note: The first button
press only clears the text
from the radio, the second
executes the command.
ON
OFF
iPod configuration switches
“Locked” “iPod”
OFF OFF
It is best selected when text
display is supported by the
radio. After connecting the
iPod you will see the DICE
logo on the screen. After the
initialization the iPod will be
locked for increased interface
functionality.
Selected emulation
It is best selected when text
display is not supported
by the radio. Track numbers
and times are not
synchronized between the
iPod and radio. Because
there is less data transfer
between the iPod and radio,
this mode has the fastest
response time. Content is
selected on the iPod.
ON ON
23
1-888-342-3999
www.diceelectronics.com
Page 25
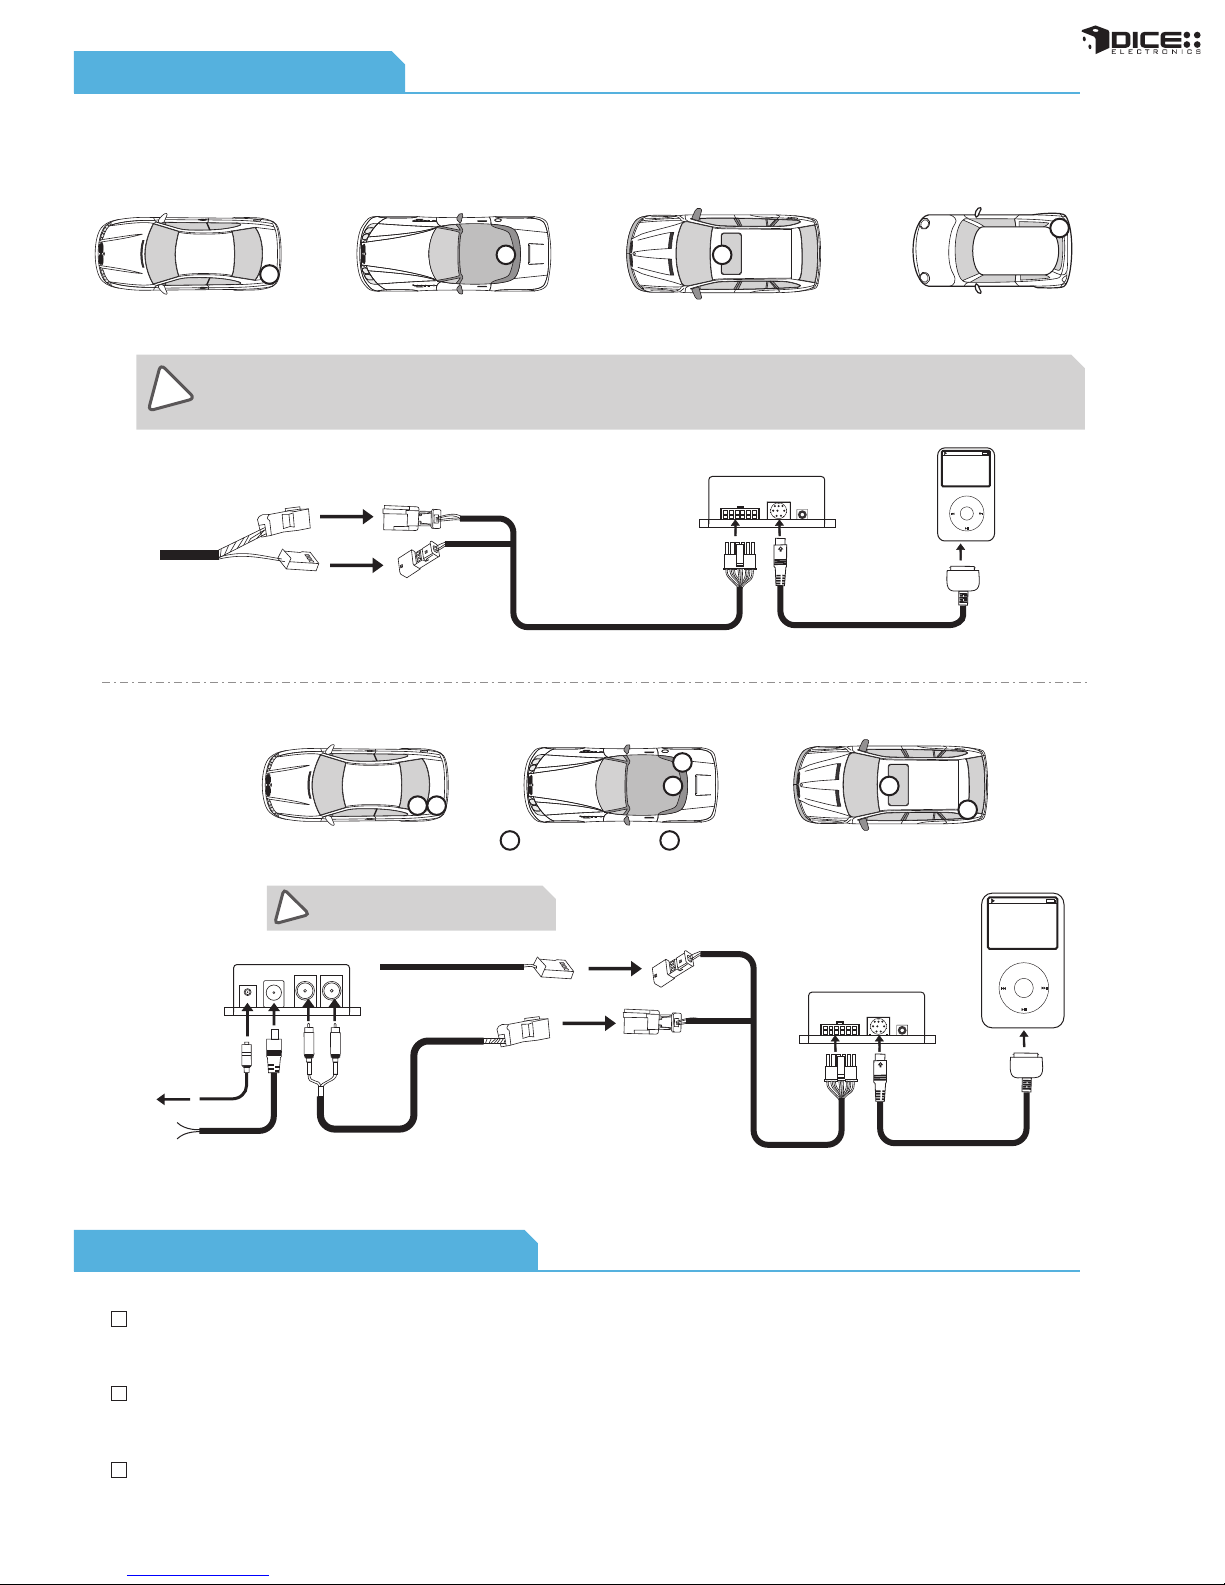
Connection Diagram
for i-BMW-T kit:
BMW 3, 5, 7 series,
M3, M5 & X5
2006-2008 M-Coupe & M-Roadster
BMW Z4
Note: CD Changer of BMW Z8 is located right behind the driver’s seat.
CD Changer locations:
BMW X3
BMW 1999-2002 M-Coupe & M-Roadster
Z3, and Mini Cooper
(left hand side of the trunk)
During installation, make sure that the 3 pin connector from the vehicle does not have a brown wire in the middle. The 3 pin connector of the
phone pre-wiring looks identical to the 3 pin connector of the CD changer pre-wiring! Do not use the 3pin connector that has a brown wire in
!
the middle, but locate the one that has the brown wire on the side! Incorrect connection will result in permanent damage to the unit and will
not be covered by warranty!
CD Changer cable
(3-pin and 6-pin BMW cables)
for DSP kit:
(between seats, underneath
BMW 5, 7 series, M5 & X5
subwoofer)
12
(underneath carpeting under
the center console)
module
vehicle specific
connector
BMW Z4 BMW X3
2
1
3-pin connector DSP amplifier
1 2
(right hand side of the trunk)
iPod
MENU
docking
cable
1
2
Make sure the 3-pin connector has a
!
RED middle wire!
factory CDC harness
connect to
amplifier
coax cable
+12V
ground
DSP converter
power adapter
RCA 6-pin harness
Installation Tips / Check List
When routing the vehicle specific harness to the front of the vehicle, some BMW models have a panel
below the glovebox where the DICE module can be stored for easy access.
When installing a DSP kit, you can temporarily attach it to the battery for constant power for testing
purposes, but it should NOT be installed this way.
CD changer connections are normally coiled up and hidden well when a CD changer is not present.
Please make sure to use the CDC connections and not the wiring harness of the phone system—as they
both look the same! Check Connection Diagram above for detailed information.
module
vehicle specific
connector
iPod
MENU
docking
cable
24
Page 26
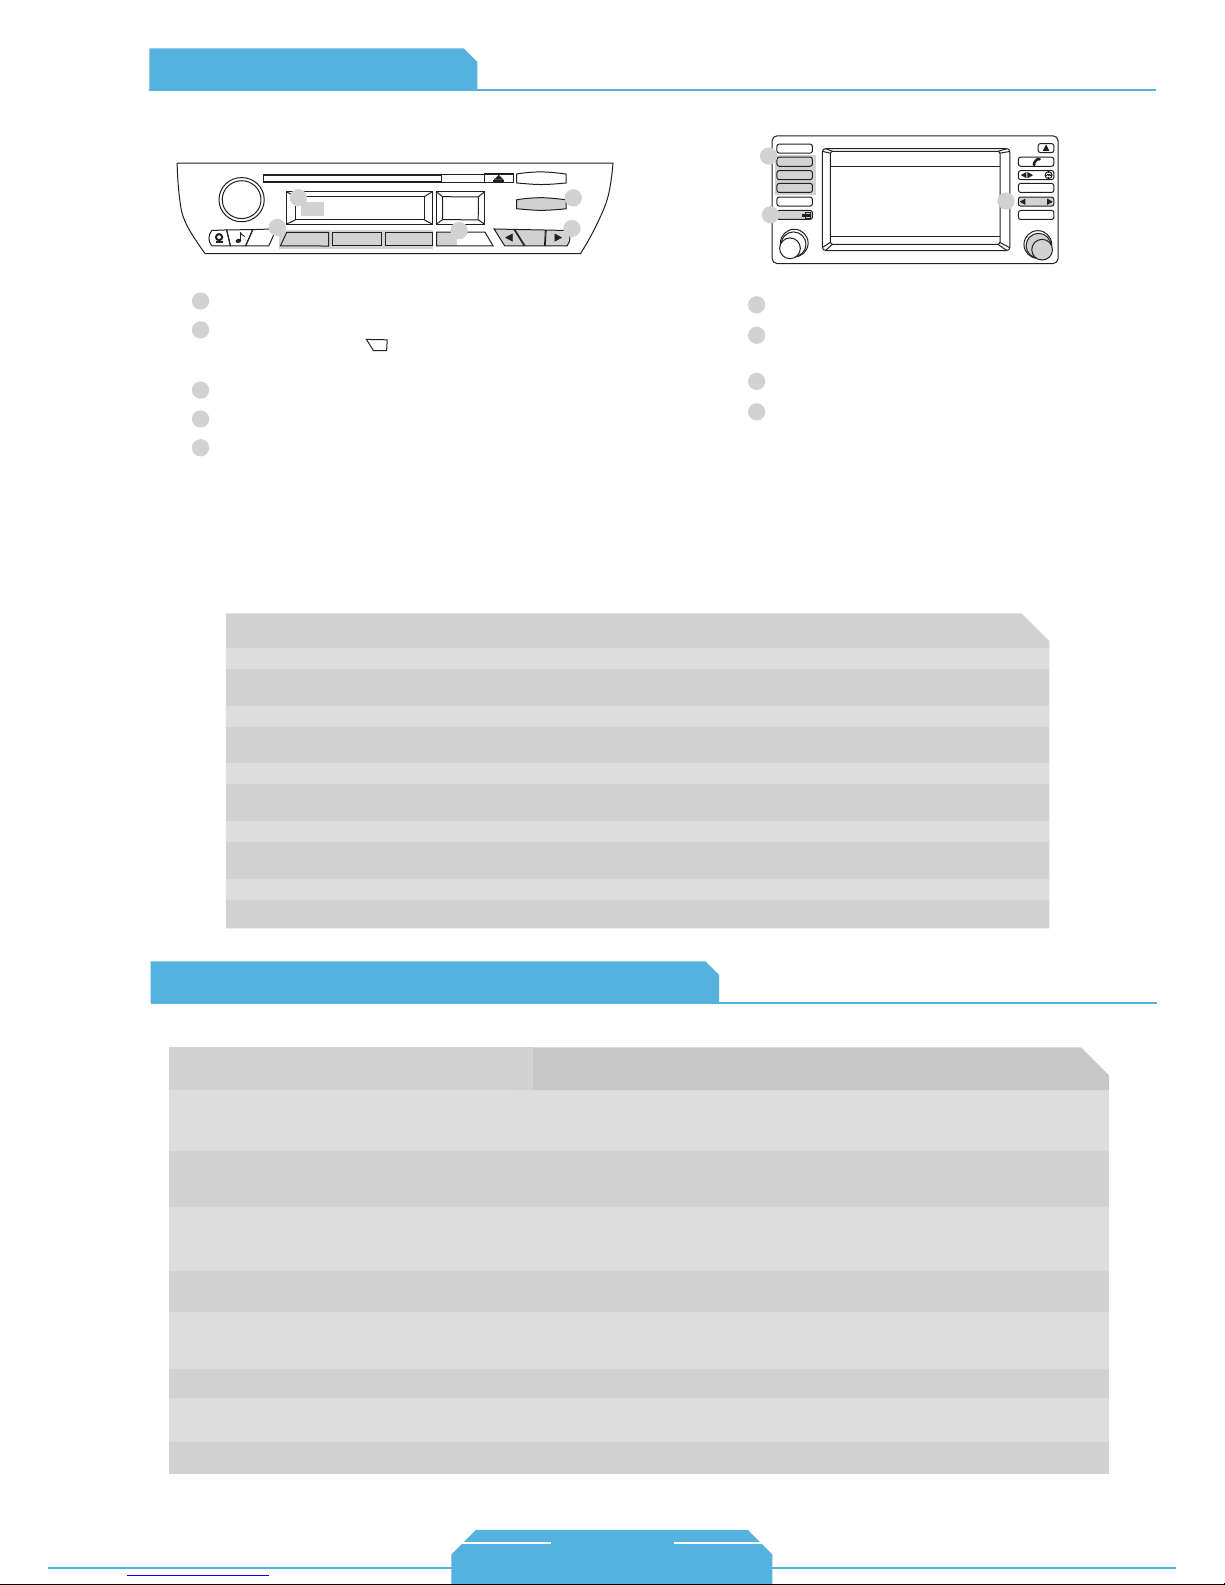
Operation Overview
BMW radio with Navigation
BMW business CD radio
AM FM
5
CDC 1 Song * Artist *Album
3
2
1
+
Press the MODE button to access the interface.
1
Press and hold the Track buttons to RW or FFW. On some
2
older BMW radios the button must be engaged to perform
the same function.
Use buttons 1 - 6 to change between modes.
3
Use Random to enable Shuffle Songs.
4
Source indicator
5
4
3
m
RND TP
4
6
5
- -
SC MODE
m
1
2
Text display settings
Make sure to select the appropriate text display setting during the initial setup of the DICE kit. You must configure the text option by pressing
DISC 6 then selecting a Track number that corresponds to the designated display:
INFO
3
1
1
2
3
4
CDC 2-01
1 4
2 5
3 6
FM AM
MODE
Press the MODE button to access the interface.
Press this button to change track, press and hold
it to RW or FFW
Use button 1 - 6 to change between modes.
Turn the jog dial to change track. Note that a 9
second timeout is engaged once any of the
alternate display buttons are pressed. If exiting
from any of these sub-screens without waiting for
the normal timeout, you MUST wait for 9 seconds
before being able to use the jog dial again to
navigate content.
PLAYLIST NAME
* DICE *
01/02/2008
TONE SELECT
2
MENU
4
Track #
99 No Text All ---01 Radio 3-Series/Z3/Z4/X3/'04-K1200 12
02 Navigation All with nav. 15
03 Cluster/OBD 5-Series/7-Series/X5 w/o nav. 20
04 MID Alternate for 5-Series/7-Series/X5 11
05 Alternate Location All with nav. 8
06 Alt Locat.(large font) All with nav. 8
07 Resume Text Use if text does not resume after phone call ---08 Motorcycle 05+ K1200 12
09 No Text All ----
Text Displayed On
BMW/Mini Specific Technical Notes
Problem
Why do the radio buttons need to be
double-clicked on my early model 3-Series?
Radio/Nav display only shows DISC and Track
number, but there is no iPod control.
On earlier models of 3-Series and Z3 (1999-2002) vehicles, double-clicking is required
when text is being displayed because the first button press clears the text and the
second button press performs the command.
Select DISC 5 and make sure it is set to Track 01. Here you are making sure that iPod
mode is selected, and not AUX mode (Track 02)
Application
Solution
Characters
BMW Mini Cooper
Cannot select CD changer source.
Radio/ steering wheel controls do not operate
iPod.
No text display.
No audio from iPod source.
iPod does not charge.
Music is distorted or sound level is too low.
25
Check DIP switch settings. With the ignition OFF disconnect vehicle harness
from module for a few seconds and reconnect. Verify that the correct button is
used to access the interface (CDC or DSP).
Reset iPod and make sure most recent iPod firmware is installed.
Make sure DIP switch settings are correctly set for text display. Note that early
model Mini Cooper vehicles do not support text. You must also configure the
text as described above
Reset the iPod.
Check all connections. See if iPod charges while connected to computer or wall
charger. You may need to reset the iPod.
Check and make sure all EQ and BASS boost options are turned off on your iPod.
1-888-342-3999
www.diceelectronics.com
Page 27
HONDA
Integration for iPod
26
Page 28
27
HONDA
vehicle specific integration for iPod
Page 29
COMPATIBILITY
Vehicle Vehicle Specific Integration Kits Universal Kit
iPod CDC KitHonda CDC Note iPod SAT Kit SAT Note iPod FM Kit
Accord
2003 - 2009 i-Honda-R3/R4
1998 - 2002 i-Honda-R2 3
Civic
i-Honda-R3/R4
i-Honda-R2 3
CRV
2005 - 2009
1999 - 2004
Element
2003 - 2009 (EX/SC) i-Honda-R3/R4 1 i-Honda-R3/R4 2
2003 - 2009 (DX/LX)
Insight
2000 - 2003
Odyssey
2005 - 2009
1998 - 2004 i-Honda-R2 3, 4 FMRDS
Pilot
2006 - 2009
2003 - 2005 i-Honda-R2 3, 4
Prelude
1998 - 2002 i-Honda-R2 3 FMRDS
Ridgeline
2006 - 2009 i-Honda-R3/R4 1 FMRDS
S2000
2004 - 2009 i-Honda-R3/R4 1 FMRDS
2000 - 2003 i-Honda-R2 3 FMRDS
i-Honda-R3/R4 1 FMRDS
i-Honda-R2 3, 4
i-Honda-R2 3, 4 FMRDS
i-Honda-R2 3
i-Honda-R3/R4 FMRDS
i-Honda-R3/R4 1 FMRDS
1 FMRDS
1
1
i-Honda-R3/R4
N/A
i-Honda-R3/R4 2
N/A
i-Honda-R3/R4 2
N/A
N/A
N/A
i-Honda-R3/R4 2
N/A
i-Honda-R3/R4 2
N/A
N/A
i-Honda-R3/R4 2
i-Honda-R3/R4 2
N/A
2
chart
FMRDS
FMRDS2006 - 2009
FMRDS1998 - 2005
FMRDS
FMRDS
FMRDS
FMRDS
Note for ALL:
• Text display not available in CDC emulation.
1. Navigation-equipped vehicles or factory satellite retention requires i-Honda-R4 kit.
2. Text available only in SAT emulation mode - Radio must have XM button and factory XM must be disconnected.
3. Not compatible with in-dash 6 CD system; external CD-changer must be disconnected.
4. Not compatible with Navigation system or Rear-Seat DVD Entertainment system.
28
Page 30
FAQs Before Purchasing the Kit
Honda
How can I tell if my factory Honda radio will
support text?
The factory radio must have an XM or SAT button.
Can factory XM be retained?
Yes, factory XM can be retained with our
Y-harness that is included in the i-Honda-R4 kit.
Retaining XM requires the kit to be in CDC
emulation mode.
Content Identifier
DICE interface for iPod
Installation Guide/User Manual
user manual
for i-Honda-R2 kit:
Are any of the operational features different
between SAT-mode and CD-mode of the DICE
unit?
Operating the iPod through the factory radio is
nearly identical in both emulation modes.
SAT-mode has the benefit of text display.
Can the steering wheel controls operate my
iPod?
Yes, the steering wheel controls can operate the
iPod.
for i-Honda-R3 kit: for i-Honda-R4 kit:
docking
vehicle specific
interface module
cable
Honda R2
Bus Connector
Honda R3
Bus Connector
(regular harness that is used for
non-nav Honda and disables XM (if
equipped))
Honda R4
Bus Connector
(Y-harness required for navigationequipped Honda and/or to retain
factory XM)
About Dip Switch Settings
The configuration switches located on the DICE module are used to set the operation of the interface by
the installer. Incorrect dip switch settings may cause the DICE interface not to work properly or not to
operate at all. Disconnect the vehicle harness from module and cycle ignition off for 50 seconds
after changing the switches!
DICE module
for i-Honda-R2 kit:
Car configuration switches
CD Changer (CDC)
OFF OFF
Default
Switches should remain in the default OFF position.
iPod configuration switches
“Locked” “iPod”
OFF OFF
Default
It is best selected when text
display is supported by the
radio. After the initialization
the iPod will be locked for
increased interface
functionality
Selected emulation
It is best selected when text
display is NOT supported
by the radio. Track
numbers and times are not
synchronized between the
iPod and radio. Because
there is less data transfer
between the iPod and radio,
this mode has the fastest
response time. Content is
selected on the iPod only.
ON ON
29
1-888-342-3999
www.diceelectronics.com
Page 31
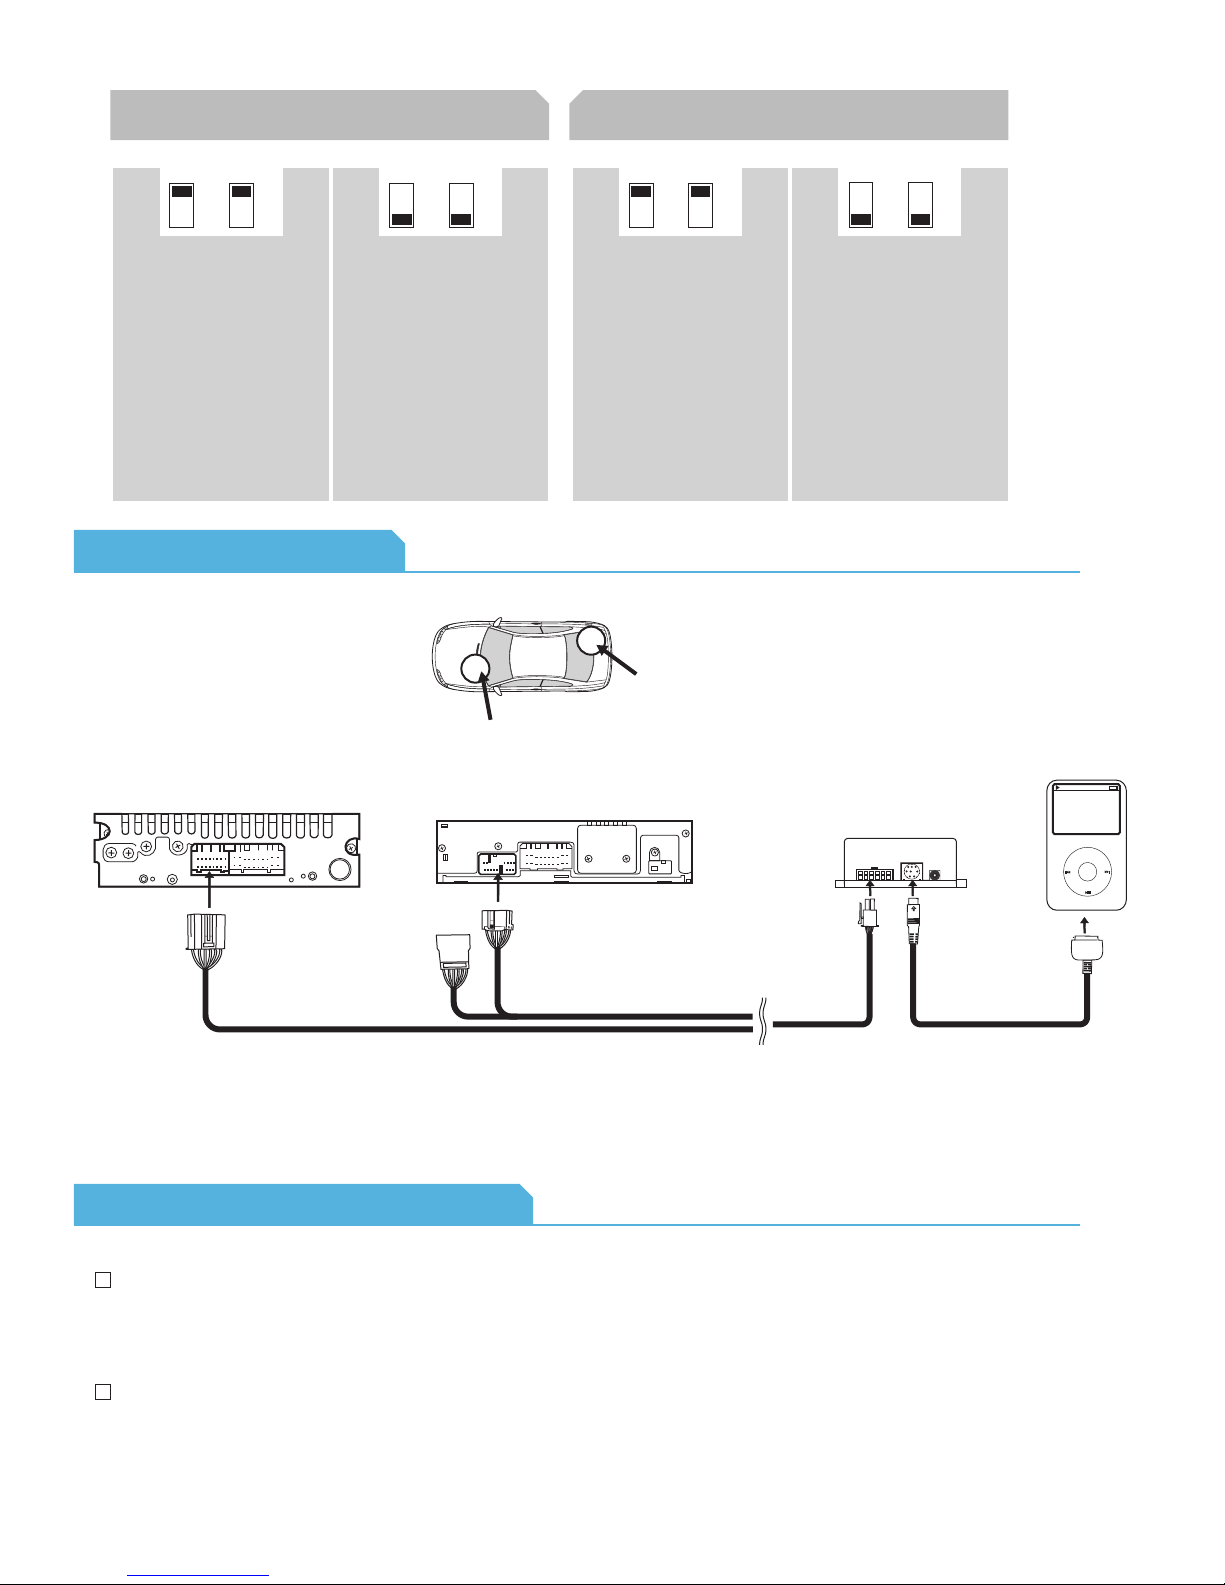
(About Dip Switch Settings continued)
for i-Honda-R3/R4 kit:
Car configuration switches
Selected emulation
CD Changer (CDC) Satellite (SAT)
OFF OFF
Default
Recommended for radios
NOT supporting Satellite
(XM) or if factory SAT is
installed and user wishes to
retain it.
Recommended for Satellite
(XM) capable radios. This
type of emulation provides
full text display on the
radio. If Satellite (XM) is
equipped it must be
disconnected to operate
flawlessly in this mode.
Connection Diagram
ON
ON
radio location
iPod configuration switches
Selected emulation
Selected emulation
“Locked” “iPod”
OFF OFF
Default
recommended in SAT
emulation:
It is best selected when text
display is supported by the
radio. After connecting the
iPod you will see the DICE
logo on the screen. After the
initialization the iPod will be
locked for an increased
interface functionality.
Factory XM tuner
(if installed)
ON ON
recommended in CDC
emulation:
It is best selected when text
display is NOT supported
by the radio. Track numbers
and times are not
synchronized between the
iPod and radio. Because
there is less data transfer
between the iPod and radio,
this mode has the fastest
response time. Content is
selected on the iPod.
OLD Honda BUS system NEW Honda BUS system
module
docking
cable
Honda R2
BUS connector
cable receptacle
(R4 only)
Honda R3 / R4 BUS connector
Note that in some vehicles the physical location of
•
vehicle specific
connector
the CD changer / SAT connector is on the bottom
of the radio
Installation Tips / Check List
To operate in SAT mode, the XM tuner must be physically disconnected. On Honda vehicles, this is usually
located in the trunk area on the left or right side near the wheel-well. The newer (2007+) CR-V has it
behind the glovebox up front. The Honda Ridgeline and Accord Hybrid (2005-07) have it behind the rear
passenger seat.
iPod
MENU
On 2004 Accord, if removing the storage bin in the lower part of the dash, have the door closed and it will
be much easier to remove.
30
Page 32

Operation Overview
Honda
CDC emulation
1
2
3
Source selector
1
Press to change track, press and hold
2
to RW or FFW.
Press to change modes.
3
SAT emulation with navigation system
SAT emulation
1
5
Source selector
1
Use Presets to change modes.
2
Toggle between available text fields.
3
Press to change track.
4
Press to enable Shuffle Song.
5
Source selector
1
2
6
3
2
4
Use Presets to change modes.&
2
1
5
3
4
6
Honda Specific Technical Notes
Problem
Sound of factory installed satellite radio is
bleeding through when the iPod audio source
is selected.
iPod does not display the DICE logo when
connected.
Cannot select CD changer or SAT source.
Radio/ steering wheel controls do not operate
iPod.
No text display.
The factory XM module must be disconnected. It is usually located in the trunk of the
vehicle.
Reset iPod and make sure most recent iPod firmware is installed. Make sure all cables
are connected properly. Note that iTouch does not display the logo.
Check DIP switch settings. With the ignition OFF disconnect vehicle harness
from module for a few seconds and reconnect. Verify that the correct button is
used to access the interface.
Reset iPod and make sure most recent iPod firmware is installed.
Make sure DIP switch settings are correctly set for text display.
3
4
5
Solution
Press to change track.
Turn to change track.
Press to enable Shuffle Song.
No audio from iPod source.
iPod does not charge.
Music is distorted or sound level is too low.
Cannot find SAT mode.
Cannot fit i-Honda-R2 kit into any of the ports
on the radio or cannot fit i-Honda-R3/R4 into
any of the ports on the radio.
31
Reset the iPod.
Check all connections. See if iPod charges while connected to computer or wall
charger. You may need to reset the iPod.
Check and make sure all EQ and BASS boost options are turned off on your iPod.
If the radio does not have a SAT or XM button, then it will not support SAT emulation of
the DICE module. Have the DICE module configured for CDC emulation.
Various vehicle trim models (EX, LX, DX, etc.) can have different radios for a specific
year. If the i-Honda-R2 connection doesn’t fit into any ports, the i-Honda-R3/R4 will be
required and vice versa.
1-888-342-3999
www.diceelectronics.com
Page 33
LEXUS
Integration for iPod
32
Page 34
33
LEXUS
vehicle specific integration for iPod
Page 35
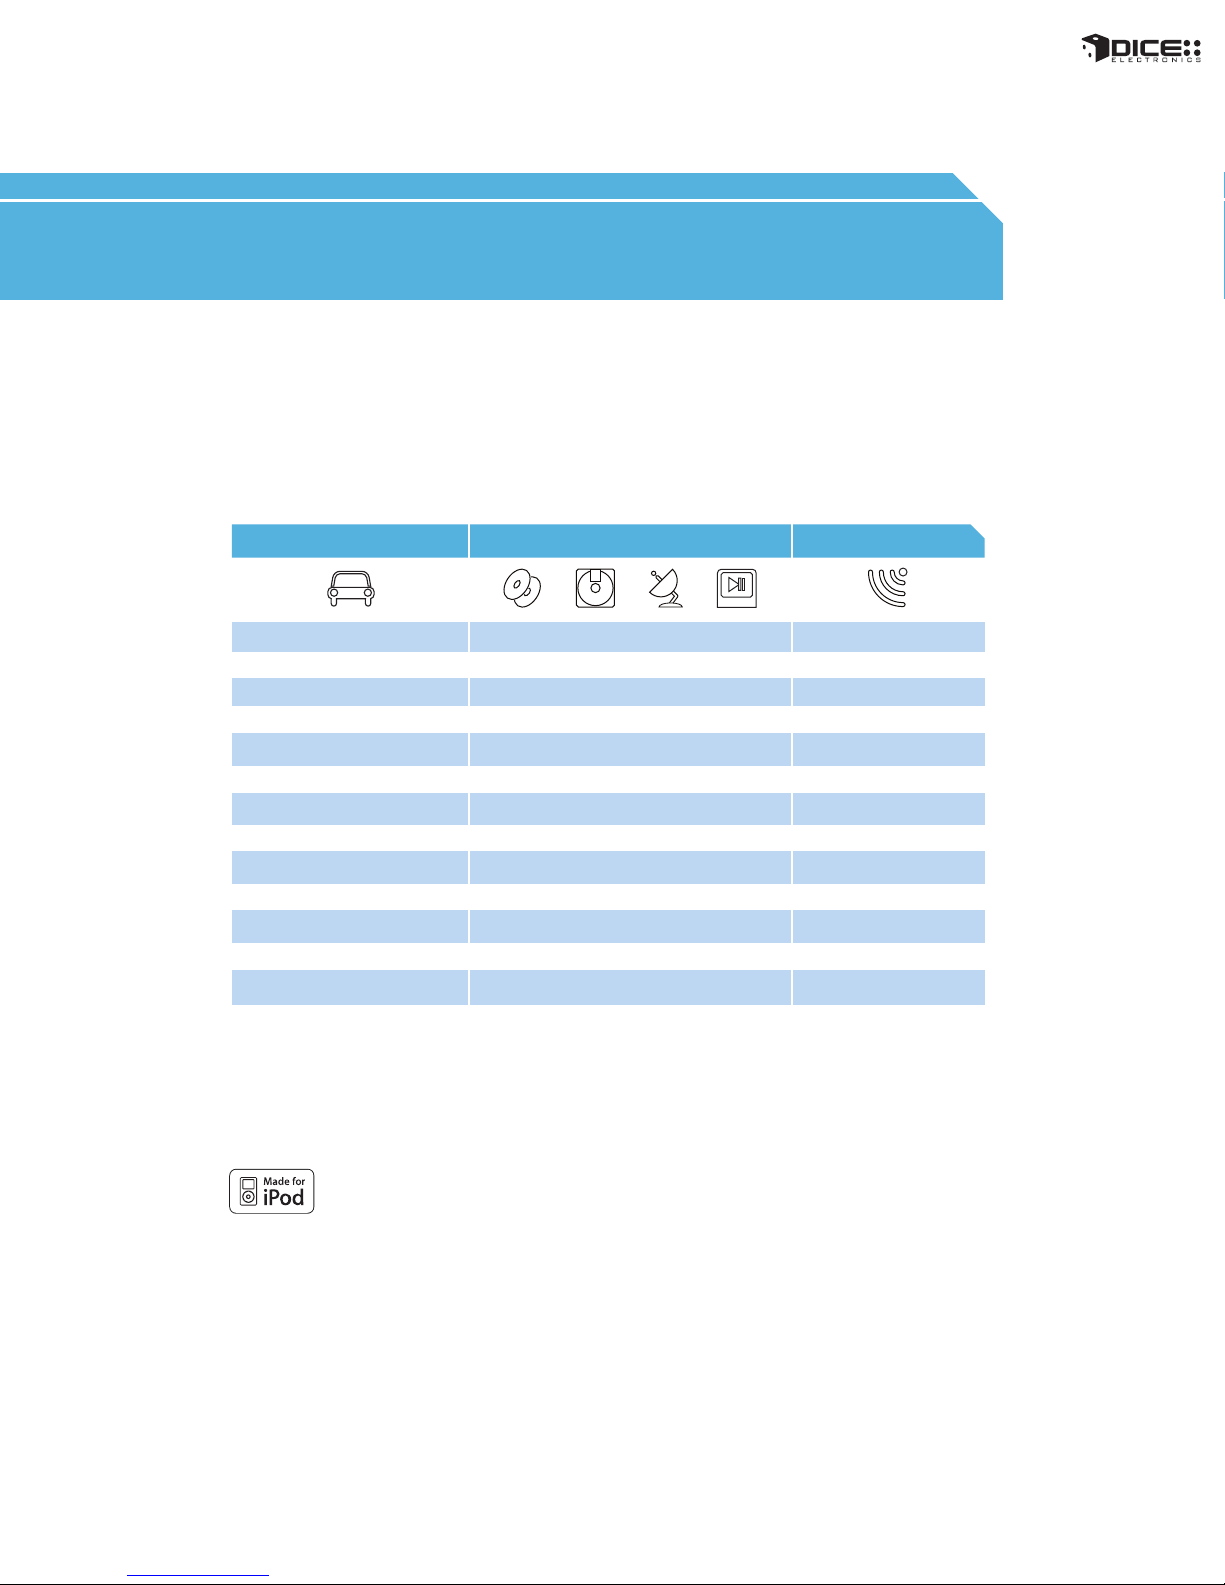
COMPATIBILITY
Vehicle Vehicle Specific Integration Kits Universal Kit
chart
Lexus Note iPod FM Kit
IS250/300/350
2005 - 2009 FMRDS
ES300/330/350
2005 - 2009
GS300/350/430/450h
RX300/330/350/400h
2004 - 2009
LS430/460/600h
2003 - 2009
LX470/570
2003 - 2009
Note:
1. Text display supported on 2003+ vehicles equipped with a CD-text, MP3-text, MD-text, or SAT capable factory radio (if your
radio only supports RDS text (i.e. 2004 cars) with a MSG button, then consider the FMRDS kit if text is more important
feature than radio control).
2. External CD-changer must be disconnected. Factory SAT can be retained.
iPod (CDC, MD, SAT, MP3) Kit
i-Toyota-R 1, 2
i-Toyota-R 1, 2 FMRDS
i-Toyota-R 1, 2
i-Toyota-R
i-Toyota-R
i-Toyota-R 1, 2 FMRDS
1, 2
1, 2
FMRDS2006 - 2009
FMRDS
FMRDS
34
Page 36
FAQs Before Purchasing the Kit
Do I lose functionality of any devices in my
vehicle that were factory installed?
External CD-changers are disabled (mainly on
some 2002-2004 models), other factory options
can be retained.
What are the different emulation modes for?
The i-Toyota-R kit offers four different modes of
operation (CD-changer, Mini-DISC, Satellite,
and MP3). Depending on the radio in your
Lexus
vehicle, one or the other will offer TEXT display
support.
Can this kit be used on vehicle sold outside
the US?
MD changer emulation is ideal for customers in
the U.K. and Japan.
Content Identifier
DICE interface for iPod
Installation Guide/User Manual
user manual
If my vehicle’s factory radio does not have a
TEXT button present, does this mean my
radio won’t support text display?
No, it does not. Many late-model touch-screen
navigation systems in Toyota/Lexus (2005-2008)
will have a TEXT button appear on screen to
cycle between text-fields.
Will the i-Toyota-R support video playback on
my navigation screen?
No, our iPod kit only transfers the audio and text
information for the audio through your stereo
system.
vehicle specific
interface module
iPod docking
cable
Toyota03 BUS connectorToyota01 BUS connector
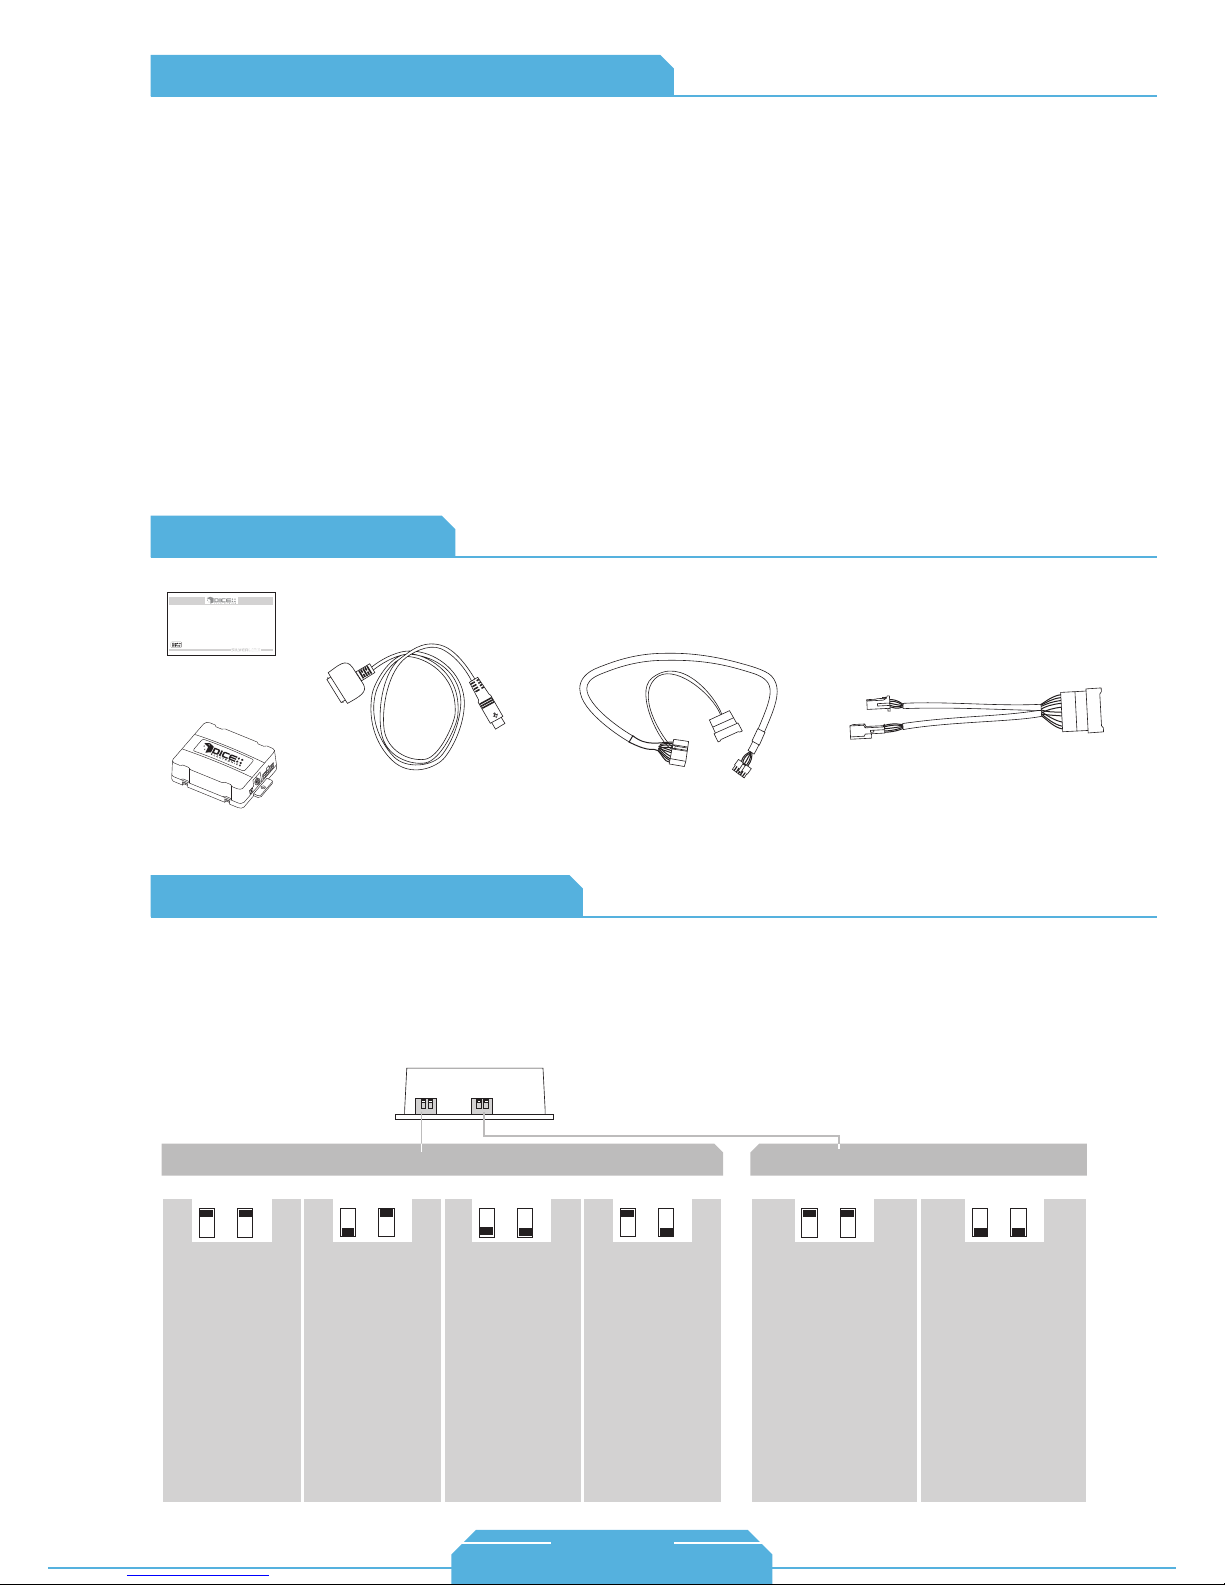
About Dip Switch Settings
The configuration switches located on the DICE module are used to set the operation of the interface by
the installer. Incorrect dip switch settings may cause the DICE interface not to work properly or not to
operate at all. Disconnect the vehicle harness from module and cycle ignition off for 50 seconds
after changing the switches!
DICE module
Car configuration switches
CD Changer (CDC)35Mini DISC (MD) Satellite (SAT) MP3
OFF OFF
Recommended for
radios NOT
supporting
Satellite (XM) or if
factory SAT is
installed and user
wishes to retain it.
Selected vehicles
from 2003 offer CD
Text - these radios
have a Text button.
OFF
ON
Recommended for
early model year
radios with
external CDchanger. MD Text
is only available
on very few radios,
typically navigation
ones.
ON ON
Recommended for
radios if SAT
module is not
present or
disconnected and
an external CD
changer is used.
SAT mode is
supported by
high-end radios in
selected models
from 2003 in the
US only.
OFF
Recommended for
late model
Navigation radios
only where
factory SAT is
installed and user
wishes to retain it.
Radios must
support MP3 text.
New MP3
navigation cars
support only MP3
text not CD Text.
ON
iPod configuration switches
“Locked” “iPod”
OFF OFF
DefaultDefault
It is best selected when
text display is
supported by the
radio. After connecting
the iPod you will see
the DICE logo on the
screen. After the
initialization the iPod
will be locked for an
increased interface
functionality.
ON ON
It is best selected when
text display is NOT
supported by the
radio. Track numbers
and times are not
synchronized between
the iPod and radio.
Because there is less
data transfer between
the iPod and radio, this
mode has the fastest
response time.
Content is selected
on the iPod.
1-888-342-3999
www.diceelectronics.com
Page 37
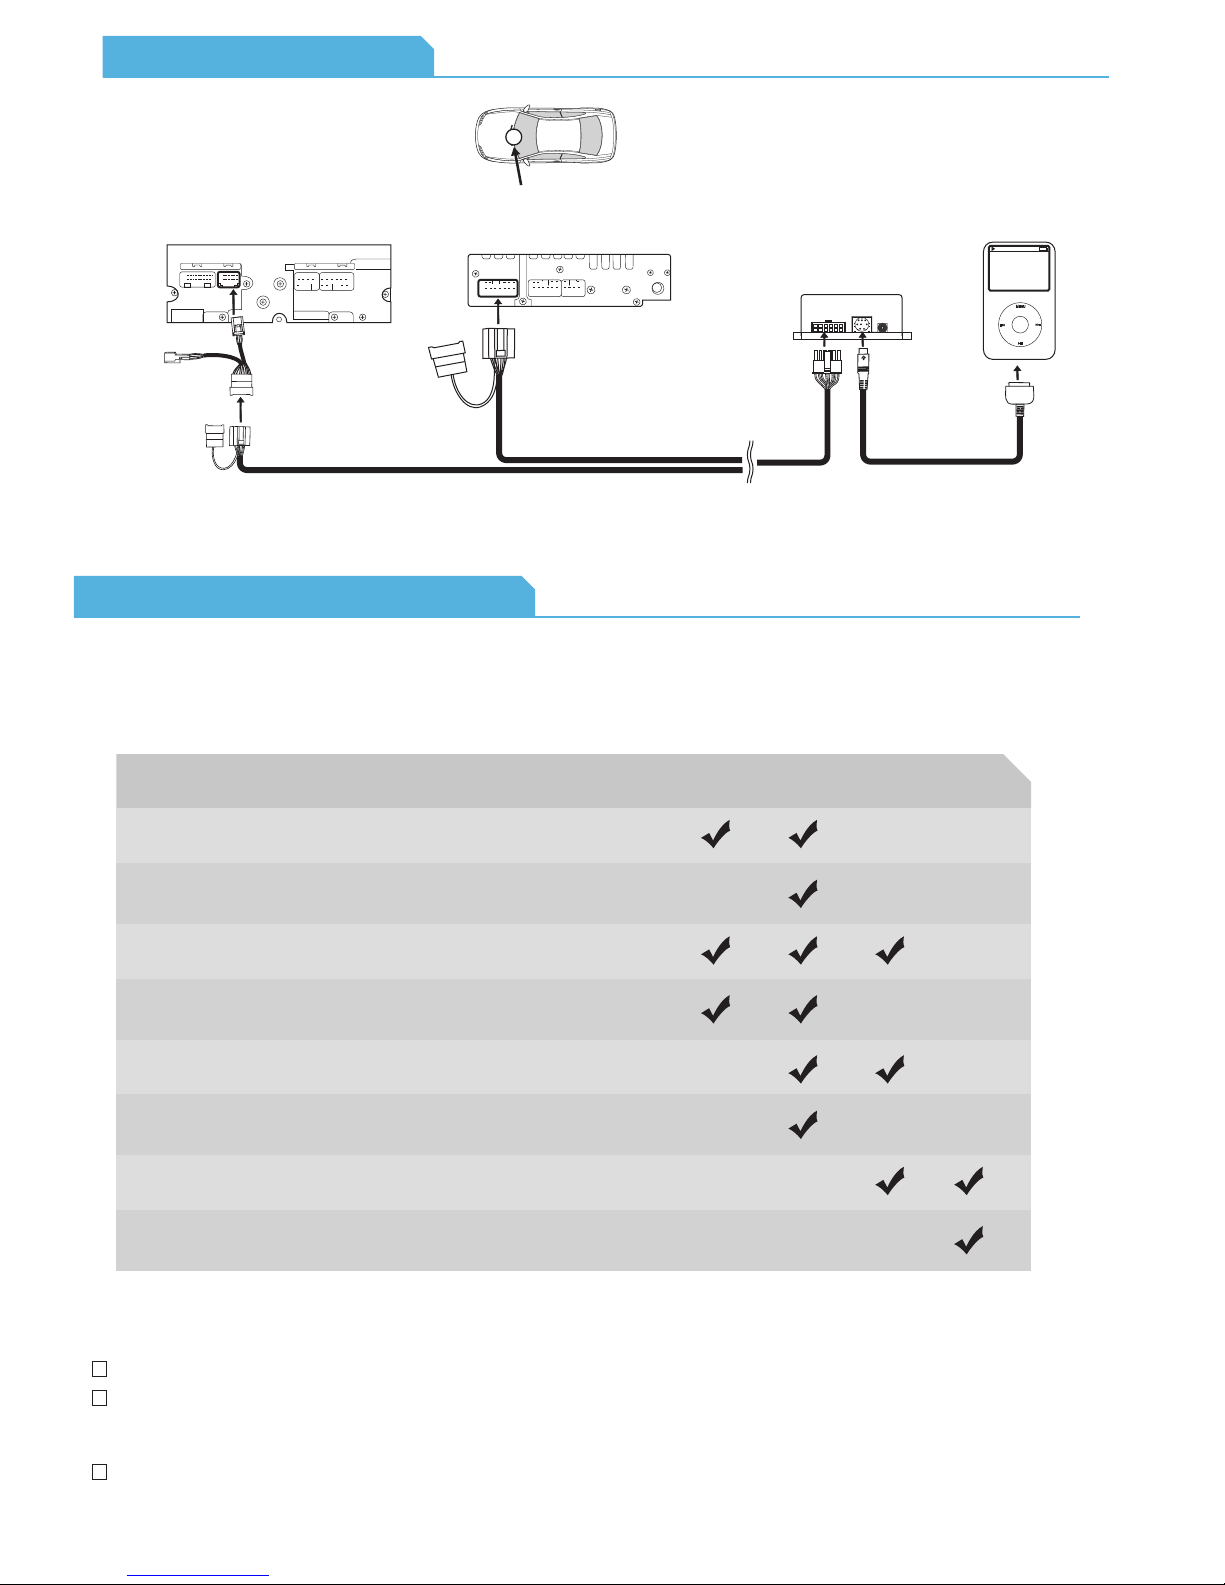
Connection Diagram
radio location
new style radio with small connector
Toyota03 BUS connector
cable receptacle
Toyota01 BUS connector
extension
receptacle
cable receptacle
older style radio with large connector
Toyota01 BUS connector
Toyota01 BUS
Installation Tips / Check List
Identify your audio system
Select the mode that best suits your vehicle. The following chart identifies the
recommended mode for the listed radios. Note that your vehicle may support more
than one mode.
Radios External CDC Factory SAT CDC MD
iPod
module
connector
Note:
Plug the factory connection to the cable receptacle
if it was removed from the radio.
*
iPod docking
SAT
cable
**
MP3
MENU
98-02 Tape/in-dash CD
98-02 Tape/in-dash CD
03-06 Tape/CD
03-06 Tape/CD
03-06 Tape/CD
03-06 Tape/CD
06-07 MP3 Navigation
06-07 MP3 Navigation
not installed or
disconnected
present not available
not installed or
disconnected
not installed or
disconnected
present not installed
present present
not available
not installed
present
not presentnot available
presentnot available
* Not all radios support MD mode. If an external MD changer is present, it must be disconnected.
Set the DICE unit to SAT mode for a slightly more intuitive interface.
For 2004-2009 Lexus RX models, after removing the panel in front of the shifter there are four bolts (10mm)
to be removed for the radio to slide out. Two are easily visible, but the other two are deeper inside at an
upward angle.
Toyota/Lexus radios are generally held in with 10mm bolts.
36
Page 38
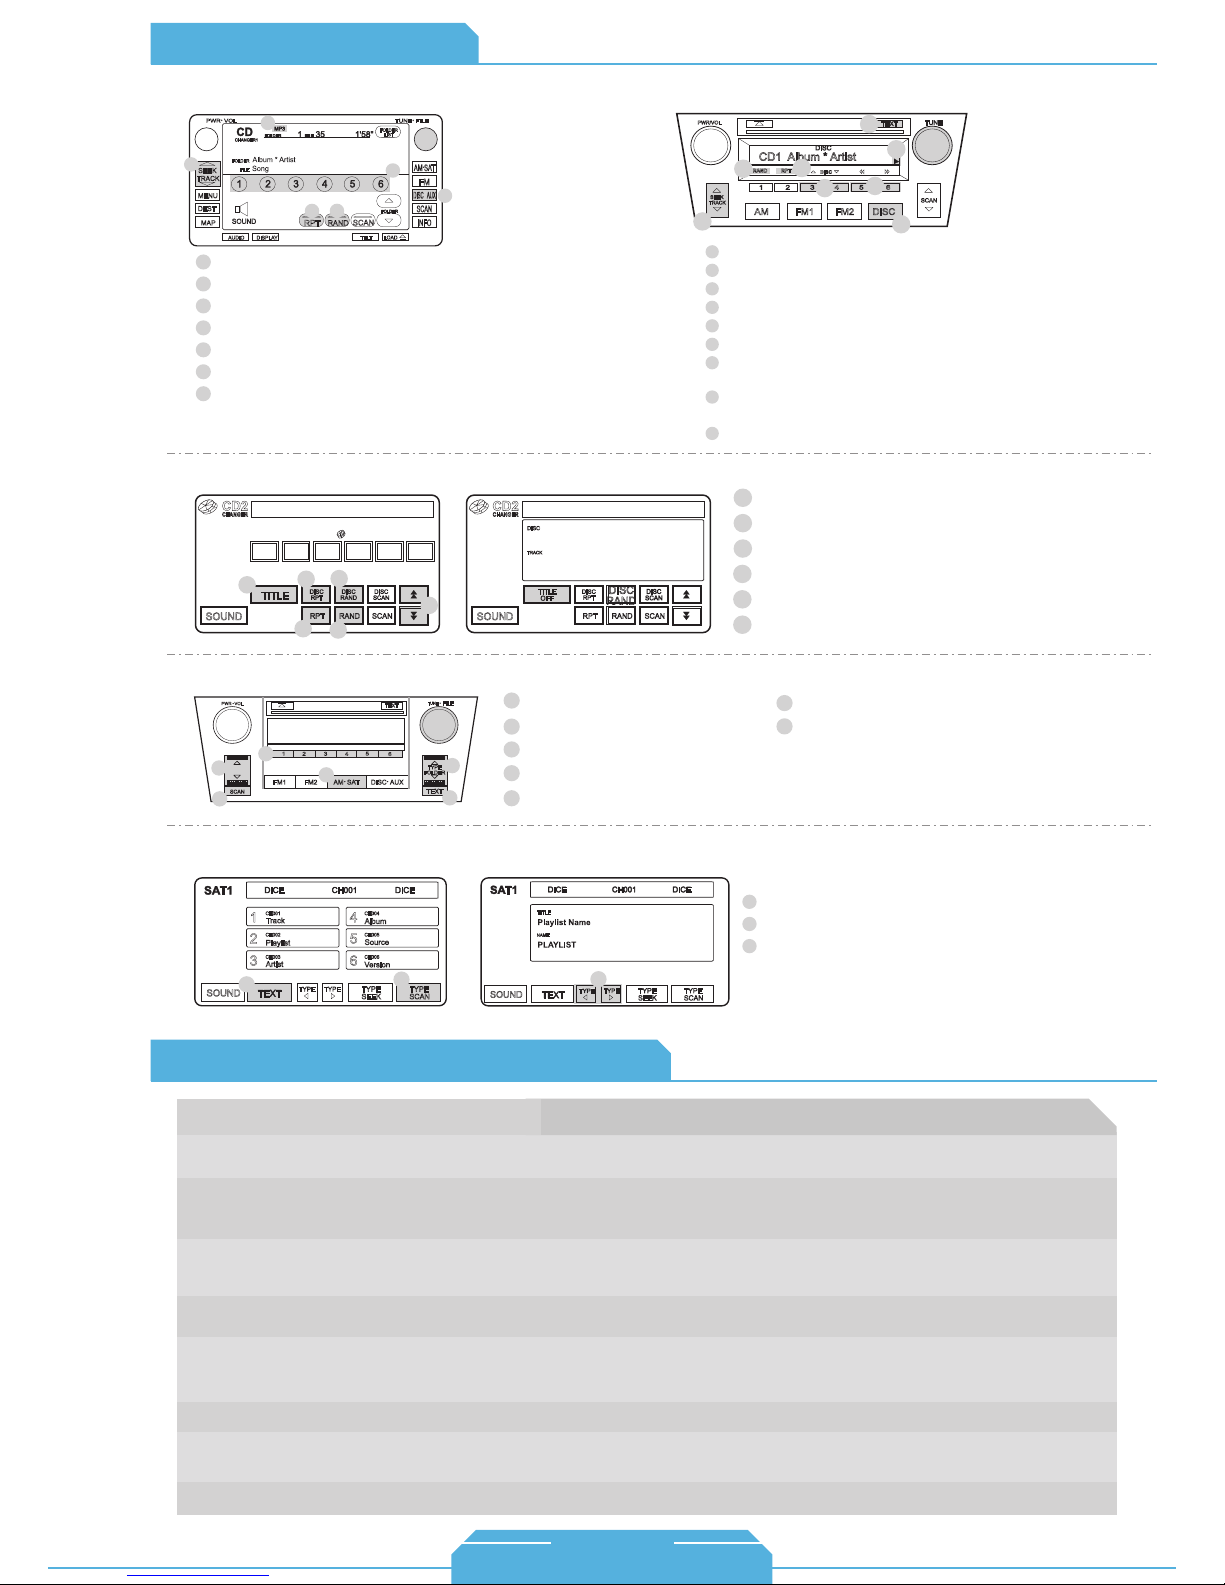
Operation Overview
MP3 emulation CDC/MD emulation (without Navigation)
1
2
Source indicator
1
Press to change Track.
2
Press to select PRESET numbers 1 - 6.
3
Press RPT short to repeat one, long to repeat all.
4
Press RAND short to Shuffle Songs, long to Shuffle Albums.
Lexus
5
Source selector
6
Turn to change Track.
7
CDC/MD emulation (with Navigation)
CD2
DISC 1 TRACK 99 1' 24"
CHANGER
1 2 3 4 5 6
1
TITLE
SOUND
5
4
DISC
4
2
DISC
DISC
RPT
RAND
RPT RAND SCAN
3
5
SCAN
7
3
6
CD1 Album * Artist
1
2
3
1
Press RAND short to Shuffle Songs, long to Shuffle Albums.
2
Press RPT short to repeat one, long to repeat all.
3
Press to change Track.
4
Press to change modes.
5
Press to RW or FFW.
6
Source selector
7
Arrow shows if additional information is available. Hold TEXT
DISC
8
9
7
5
4
6
button for more information.
8
Press the TEXT button to cycle between
display fields.
9
Turn to change Track.
Press TITLE to toggle between screens.
CD2
DISC 1 TRACK 99 1' 24"
CHANGER
DISC
Playlist Name
TRACK
PLAYLIST
TITLE
DISC
DISC
DISC
6
SOUND
OFF
RPT
RPT RAND SCAN
RAND
DISC
SCAN
1
Press DISC RPT to Repeat All.
2
Press RPT to Repeat One.
3
Press DISC RAND to shuffle Albums.
4
Press RAND to Shuffle Songs.
5
Press to change Track.
6
SAT emulation (without Navigation)
1
Press to change Track.
2
Use Scan to enable Shuffle Songs.
3
Use Presets to change modes.
4
Source selector
5
Press the TEXT button to toggle between available TEXT fields.
SAT1 Album * Artist
3
1
SCAN TEXT
2
4
FM1 FM2 AM SAT DISC AUX
TYPE
FOLDER
FILE
7
6
5
SAT emulation (with Navigation)
1
2
3
Lexus Specific Technical Notes
Problem
Text is not displaying in selected emulation.
Radio/Nav display only shows DISC/Preset and
Track/Channel numbers, but there is no iPod
control
Cannot select the interface.
Radio/ steering wheel controls do not operate
iPod.
The interface operates very intermittently and
erratically in SAT mode.
No audio from iPod source.
iPod does not charge.
Music is distorted or sound level is too low.
Identify your audio system (refer to Installation tip session) first and set switches
accordingly. Note that your vehicle may support more than one mode.
Select DISC/Preset 5 and make sure it is set to Track/Channel1.
Check DIP switch settings. With the ignition OFF disconnect vehicle harness
from module for a few seconds and reconnect. Verify that the correct button is
used to access the interface.
Reset iPod and make sure the most recent iPod firmware is installed. Check vehicle
user manual on how steering wheel controls work.
If the unit is being operated in SAT mode, make sure the factory satellite tuner is
disconnected in the vehicle. Otherwise, the unit will have to be set up in a different
emulation mode (CD, MP3, MD).
Reset the iPod. Verify proper connection to iPod/interface.
Check all connections. See if iPod charges while connected to computer or wall
charger. You may need to reset the iPod.
Make sure all EQ and BASS boost options are turned off on your iPod.
6
Use the TYPE button to engage/disengage RW or FFW
7
Turn to change Track.
Press to TEXT button to toggle between available
1
Use TYPE SCAN to enable Shuffle Songs.
2
Use the TYPE button to engage/disengage RW or FFW
3
Solution
37
1-888-342-3999
www.diceelectronics.com
Page 39
MAZDA
Integration for iPod
38
Page 40
39
MAZDA
vehicle specific integration for iPod
Page 41
COMPATIBILITY
chart
Vehicle Vehicle Specific Integration Kits Universal Kit
iPod CDC KitMazda CDC Note iPod SAT Kit SAT Note iPod FM Kit
3
2004 - 2007 i-Mazda-R 1 FMRDS
5
2005 - 2007
6
Miata/MX-5
MPV
2005 - 2006
RX8
2004 - 2008
Tribute
2005 - 2008
i-Mazda-R 1
i-Mazda-R 1, 3 FMRDS2003 - 2008
i-Mazda-R
i-Mazda-R
i-Mazda-R 1 FMRDS
i-Mazda-R 1 FMRDS
1 FMRDS2005 - 2008
1
i-Mazda-R2 1, 2
i-Mazda-R2 1, 2
i-Mazda-R2 1, 2
i-Mazda-R2 1, 2
i-Mazda-R2 1, 2
i-Mazda-R2 1, 2
i-Mazda-R2 1, 2
FMRDS
FMRDS
Notes:
• Text display not available in CDC emulation.
• Mazda RX8 radio requires firmware version 9.55 or higher.
1. Factory satellite radio and/or external CD-changer must be disconnected if equipped.
2. Text display supported but radio MUST have SAT button present for i-Mazda-R2 compatibility.
3. 2004 model may not accept external CDC input and requires radio modification.
40
Page 42
FAQs Before Purchasing the Kit
Mazda
How can I check the firmware of my radio in
my Mazda RX-8?
When on FM source, hold TEXT and Preset 1 at
the same time and the firmware version should
appear on the radio screen.
I have factory satellite radio, can I retain this
option?
No, the factory satellite radio must be
disconnected when integrating one of our
Mazda iPod kits.
Content Identifier
DICE interface for iPod
Installation Guide/User Manual
user manual
What kind of modification is required on the
2004 Mazda6?
The modification required is soldering a
component onto the radio’s circuit board, which
can be done by a professional audio shop. This
modification is not always required.
Will the text scroll on my Mazda’s radio
display with the i-Mazda-R2 kit?
Yes, the default setting of the i-Mazda-R2 kit is to
auto-scroll the title and artist of the song.
vehicle specific
interface module
Mazda
connector
iPod docking
cable
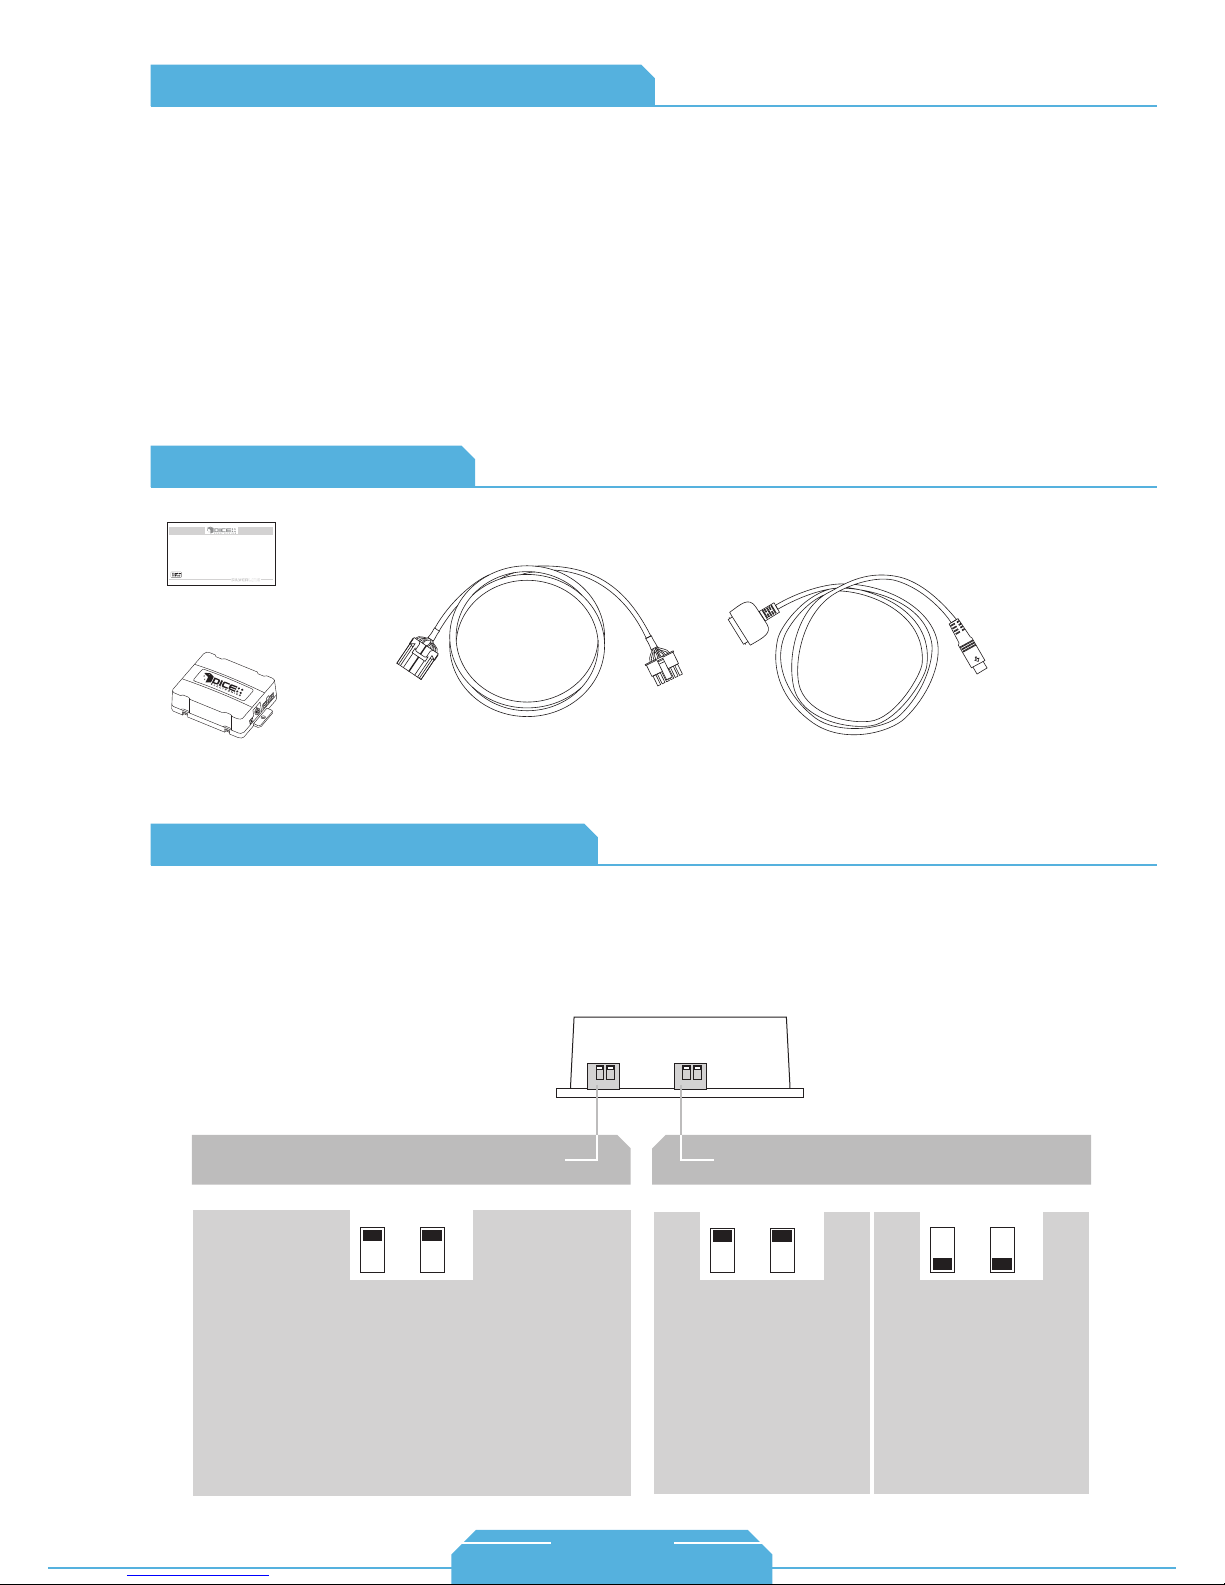
About Dip Switch Settings
The configuration switches located on the DICE module are used to set the operation of the interface by
the installer. Incorrect dip switch settings may cause the DICE interface not to work properly or not to
operate at all. Disconnect the vehicle harness from module and cycle ignition off for 50 seconds
after changing the switches!
DICE module
for i-Mazda-R (CDC) kit:
Car configuration switches
CD Changer (CDC)
OFF OFF
Default
Switches should remain in the default OFF position.
iPod configuration switches
Selected emulation
“Locked” “iPod”
OFF OFF
This is best selected when
controls from the radio are
preferred. Use this mode to
browse within the contents of
the iPod by category.
Default
This is best selected when
text display is NOT
supported by the radio.
Track numbers and times
are not synchronized
between the iPod and radio.
Because there is less data
transfer between the iPod
and radio, this mode has
the fastest response time.
ON ON
41
1-888-342-3999
www.diceelectronics.com
Page 43
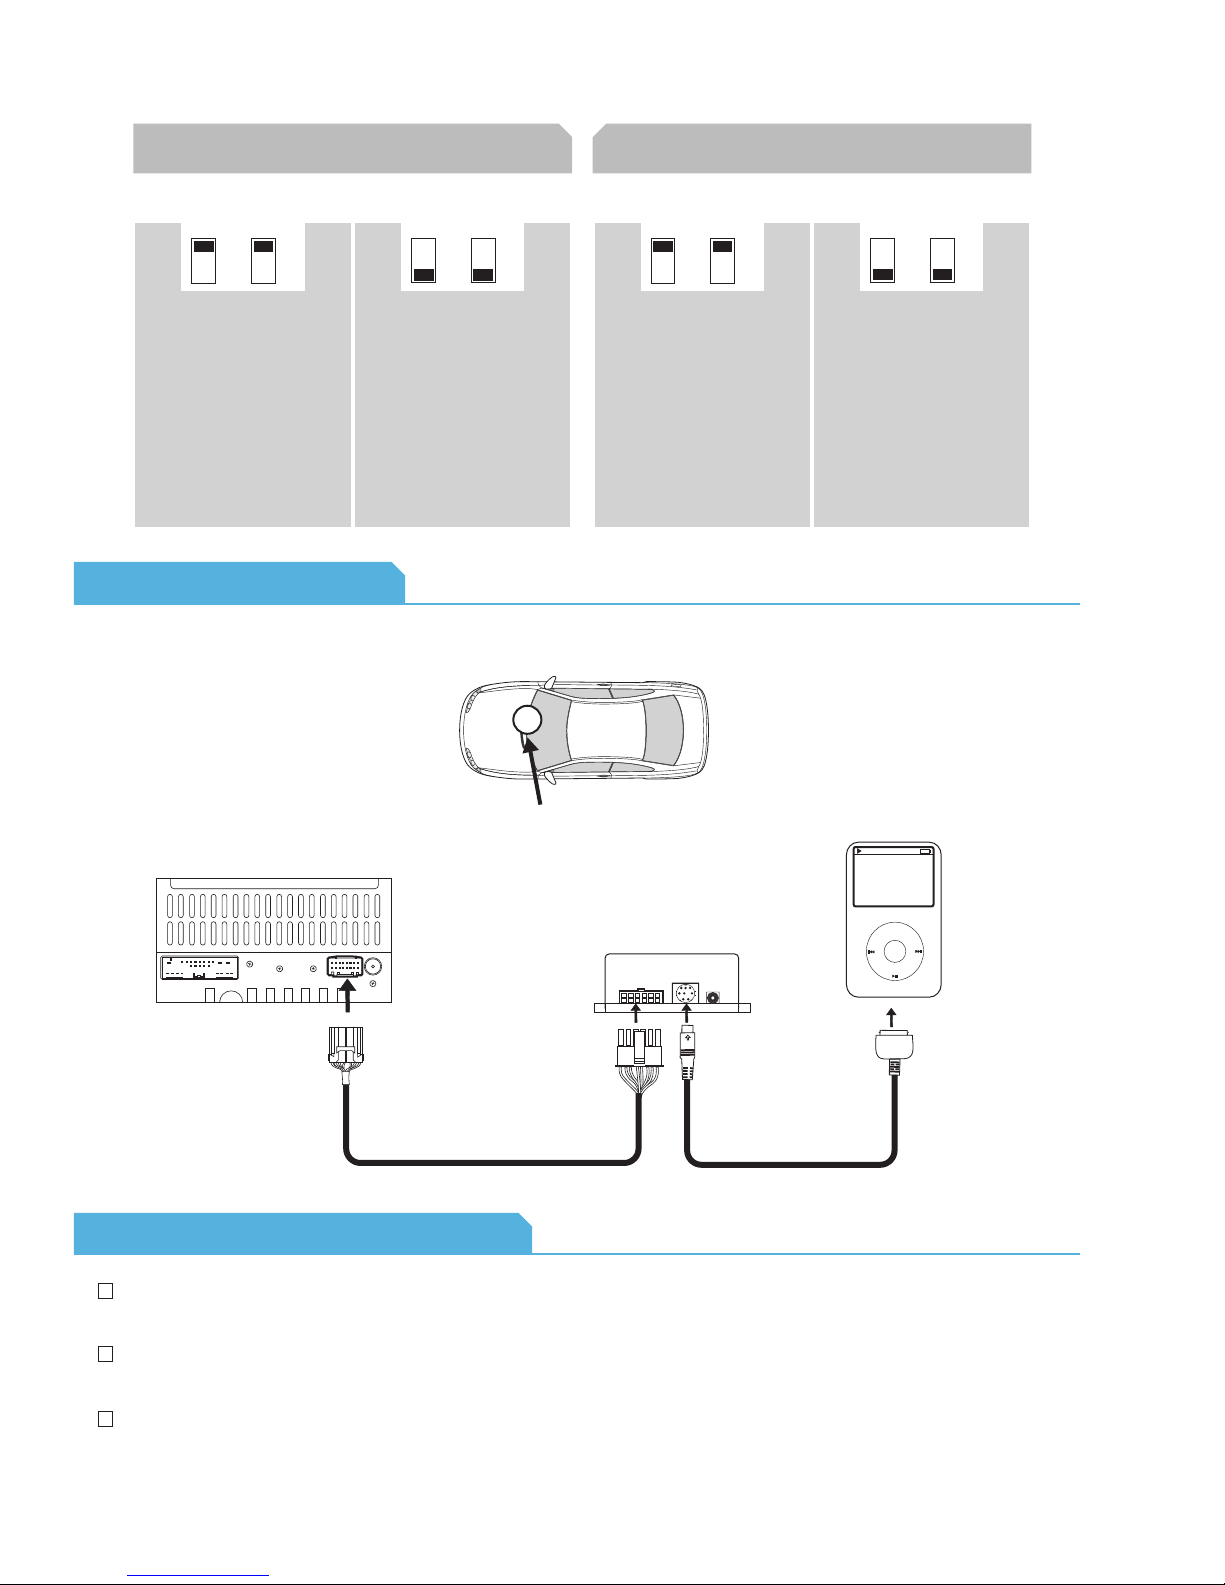
(About Dip Switch Settings continued)
for i-Mazda-R2 (SAT) kit:
Car configuration switches
Single text fields
(recommended for non-navi radios) (recommended for navi radios) (recommended in SAT emulation) (recommended in CDC emulation)
OFF OFF
Default
This is the recommended
setting for Non-Nav radios.
In this setting the Name and
Title text fields displays
identical song information.
(Song name*Album*Artist)
Only Short Scrolling can be
selected in Preset 6.
Dual text fields
ON
ON
This setting is recommended
for Navigation radios or for
Non-Nav radios when
manual scroll feature is
preferred.
In this setting, the Title text
field will display "Album *
Artist" and the Name text field
will display "Song name".
Both Short scrolling and Long
Static can be selected in
Preset 6.
iPod configuration switches
“Locked” “iPod”
OFF OFF
Default
It is best selected when
controls from the radio are
preffered. Use this mode to
browse within the contents of
the iPod by category.
Selected emulation
It is best selected when text
display is NOT supported
by the radio. Track numbers
and times are not
synchronized between the
iPod and radio. Because
there is less data transfer
between the iPod and radio,
this mode has the fastest
response time. Content is
selected on the iPod.
ON ON
Connection Diagram
iPod
MENU
Mazda Radio with CDC/SAT port
Mazda CDC/SAT
connector
radio location
module
iPod docking
cable
Installation Tips / Check List
On the CX-9, the trim pieces around the radio/dash and console need to be popped off first; then you
access the screws holding the radio.
The Mazda3’s center console pops up with clips. The shift knob can be removed by rotating it
counter-clockwise.
To enhance the user experience, it is recommended to set the iPod configuration switches to iPod mode on
non-text capable radios as this configuration will keep the direct iPod controls unlocked.
42
Page 44
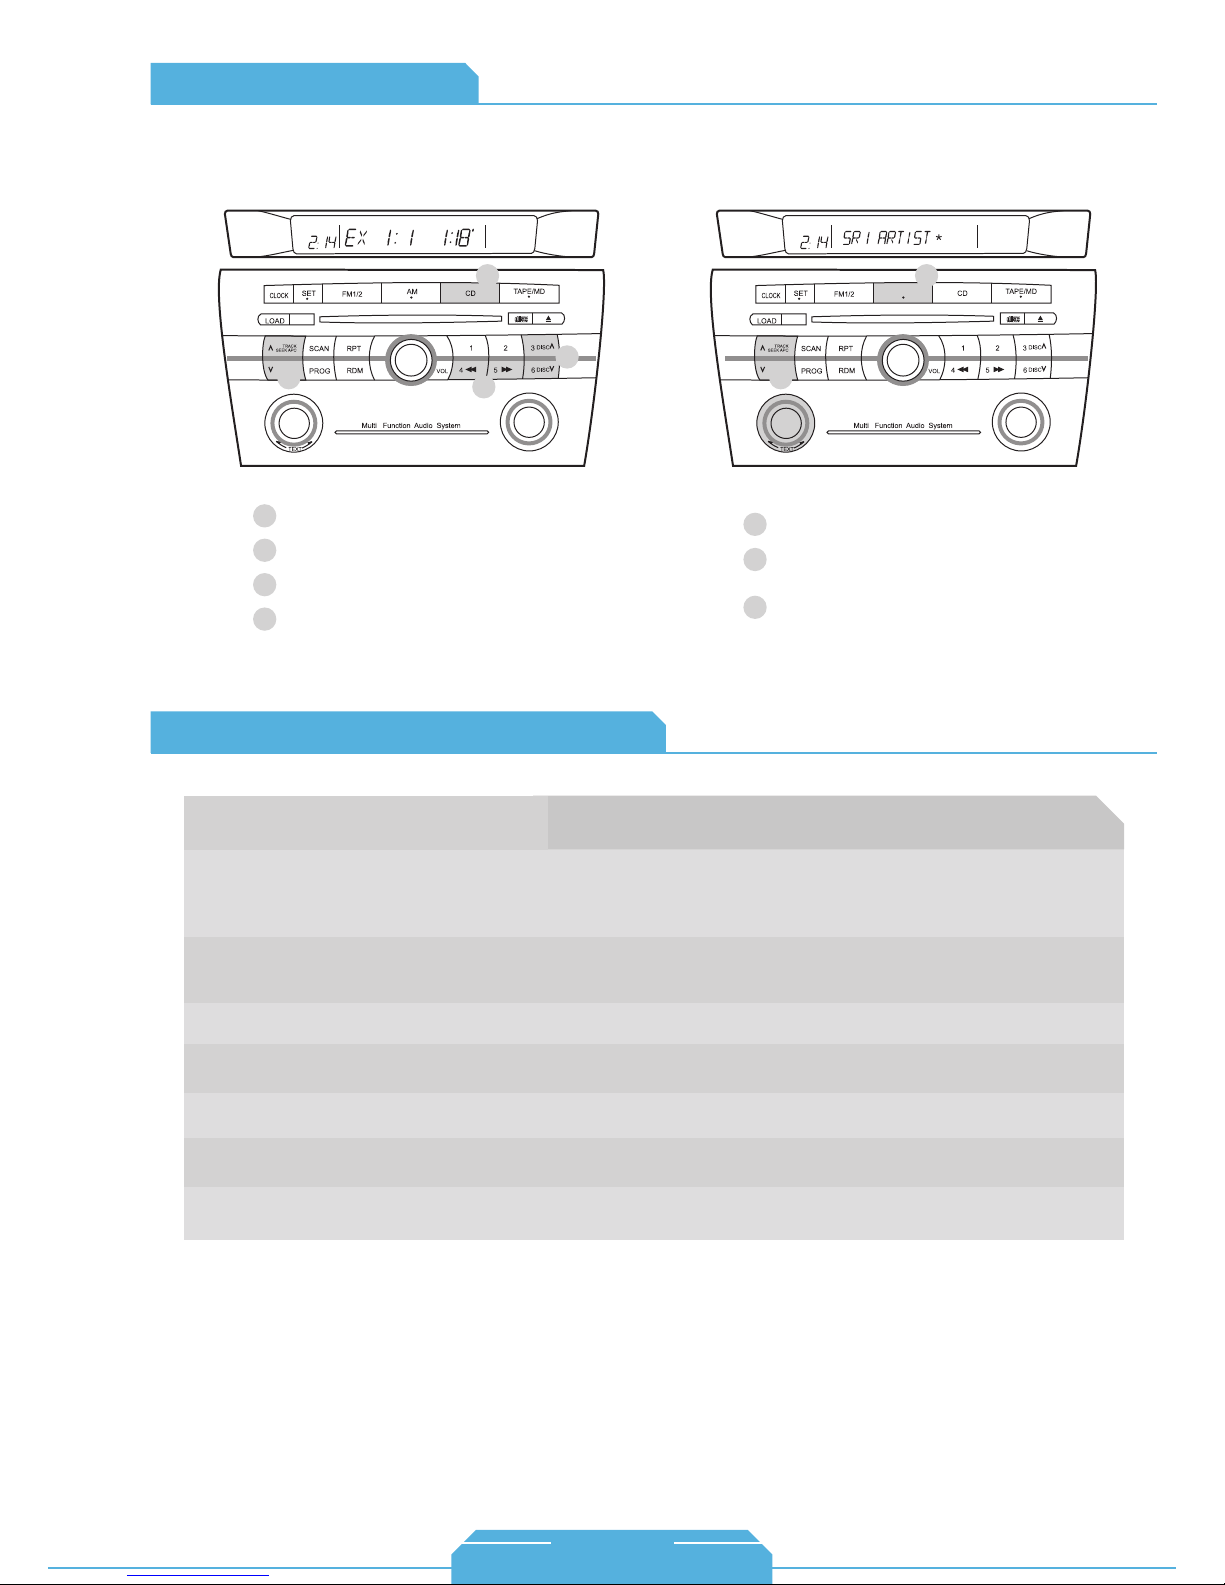
Operation Overview
CDC emulation SAT emulation
Mazda
1
PUSH
2
U
T
O
A
-
H
M
S
-
U
D
P
I
S
E
P
N
-
E
U
S
T
N
Source selector
1
Press to change Track
2
Press to change modes.
3
Press to RW or FFW.
4
PWR
4
3
D
U
I
A
O
H
C
S
O
U
N
P
T
Mazda Specific Technical Notes
Problem
1
SAT
PUSH
2
U
T
O
A
-
H
M
S
-
U
D
P
I
S
E
P
N
-
E
U
S
T
N
PWR
3
Source selector
1
Next / Previous track. Double-click
2
to change modes.
Press to toggle between available
3
text fields. TURN to scroll text.
Solution
D
U
I
A
O
H
C
S
O
U
N
P
T
Cannot select the interface.
Radio/ steering wheel controls do not operate
iPod.
No text display.
Text not showing or cannot cycle between text
fields.
iPod does not charge.
Radio continues to display “UPDATING” for
more than one minute.
Unexpected operation in SAT mode.
Check DIP switch settings. With the ignition OFF disconnect vehicle harness
from module for a few seconds and reconnect. Verify that the correct button is
used to access the interface. 2004 Mazda6 may require radio modification to
accept external CD changer connection.
Reset iPod and make sure most recent iPod firmware is installed. Check vehicle user
manual on how steering wheel controls work. Not all Mazda vehicles support track
changing from the steering wheel.
Make sure DIP switch settings are correctly set for text display.
On some Mazda vehicles (Mazda 6), the DISP button is used for cycling the
different text fields. Also check dip switch settings.
Check all connections. Reset iPod and make sure iPod charges while connected to
computer or wall charger.
Turn the power off to the radio and then back on again.
The control interface in SAT mode is very different from the interfaces used on other
vehicles, please carefully check the user manual.
43
1-888-342-3999
www.diceelectronics.com
Page 45
MERCEDES
Integration for iPod
44
Page 46
45
MERCEDES
vehicle specific integration for iPod
Page 47
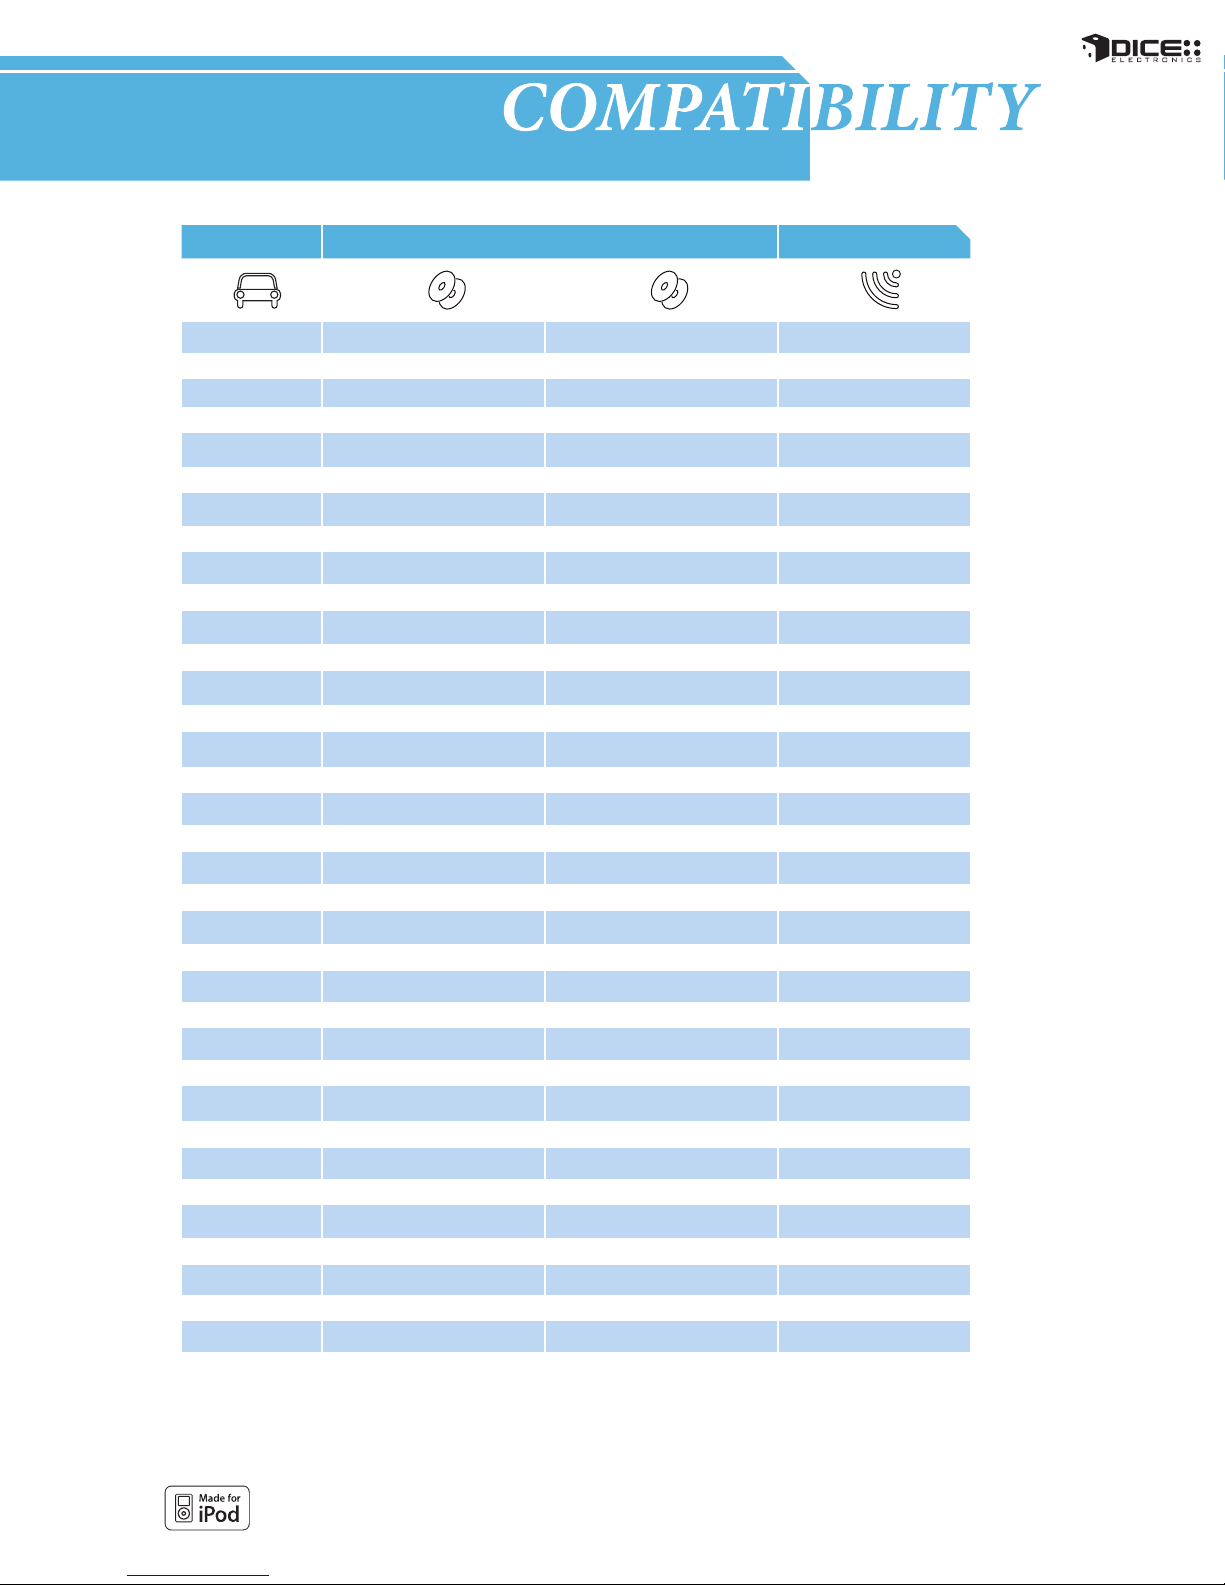
chart
Vehicle Vehicle Specific Integration Kits Universal Kit
iPod D2B KitMercedes D2B Note iPod MOST Kit MOST Note iPod FM Kit
C-Class
2005 - 2008 FMRDS
1999 - 2004 i-Mercedes-D2B
CL-Class
CLK-Class
2005 - 2008
1999 - 2004
CLS-Class
2005 - 2008 i-Mercedes-MOST 2, 3
E-Class
2004 - 2008
G-Class
2007
1999 - 2005
GL-Class
2007
Maybach
2004 - 2008 FMRDS
ML-Class
2006 - 2008
2001 - 2005
R-Class
2006 - 2008
S-Class
2004 - 2006 FMRDS
2001 - 2003
SL-Class
2006 - 2008
2001 - 2004
SLK-Class
2005 - 2008
1999 - 2004 i-Mercedes-D2B
Notes:
1. Only compatible with Audio 10, Audio 30, COMAND 2.0, or COMAND 2.5 radio. Audio is non-nav, COMAND is navigation.
2. CD-Changer must be disconnected. In-dash 6-CD changer radios not compatible.
3. Only compatible with navigation radio-system.
N/A
1, 2 FMRDS
N/A
N/A
N/A
i-Mercedes-D2B 1, 2
N/A
N/A
N/A
i-Mercedes-D2B
N/A
N/A
N/A
i-Mercedes-D2B
N/A
N/A
i-Mercedes-D2B FMRDS
N/A
i-Mercedes-D2B 1, 2
N/A
1, 2
1, 2
1, 2
1, 2
i-Mercedes-MOST
N/A
i-Mercedes-MOST 2, 3
N/A
i-Mercedes-MOST 2, 3
N/A
i-Mercedes-MOST 2, 3
i-Mercedes-MOST 2, 3
N/A
i-Mercedes-MOST 2, 3
i-Mercedes-MOST 2, 3
i-Mercedes-MOST 2, 3
N/A
i-Mercedes-MOST 2, 3
i-Mercedes-MOST 2, 3
N/A
i-Mercedes-MOST 2, 3
N/AN/A2005 FMRDS
N/A
i-Mercedes-MOST 2, 3
N/A
2, 3
FMRDS2004 - 2006
FMRDS2000 - 2003
FMRDS
FMRDS
FMRDS
FMRDS
FMRDS
FMRDS
FMRDS
FMRDS
FMRDS
FMRDS
FMRDS
FMRDS
FMRDS
FMRDS
46
Page 48
FAQs Before Purchasing the Kit
Mercedes
Will my factory 6-CD changer be disabled with
this unit installed?
Yes, the factory CD changer must be disabled to
have the iPod kit integrated into the factory radio
system.
Can I install this unit myself?
It is recommended that this integration kit be
installed by a professional that has experience
installing fiber-optic systems. It can be installed
directly behind the navigation unit, or at the
CD-changer location.
Content Identifier
for D2B kit: for MOST kit:
Interface
DICE interface for iPod
Installation Guide/User Manual
user manual for
D2B or MOST kit
fiber optic interface
iPod
docking cable
What will my navigation screen display while
operating my iPod?
The display will allow you to see and browse
Playlists, Artists, Albums, Genre, and songs within
these categories for i-Mercedes-MOST kit.
Can I set the unit to a mode where I can use
my iPod directly?
Yes, through the radio you can set up the unit for
iPod control, and the iPod becomes unlocked,
but this disables text and browsing controls
through the radio.
adapter cable
fiber optic
cable
power/AUX cable
vehicle specific
interface module
power cable
fiber optic
cable
interface module
iPod
docking cable
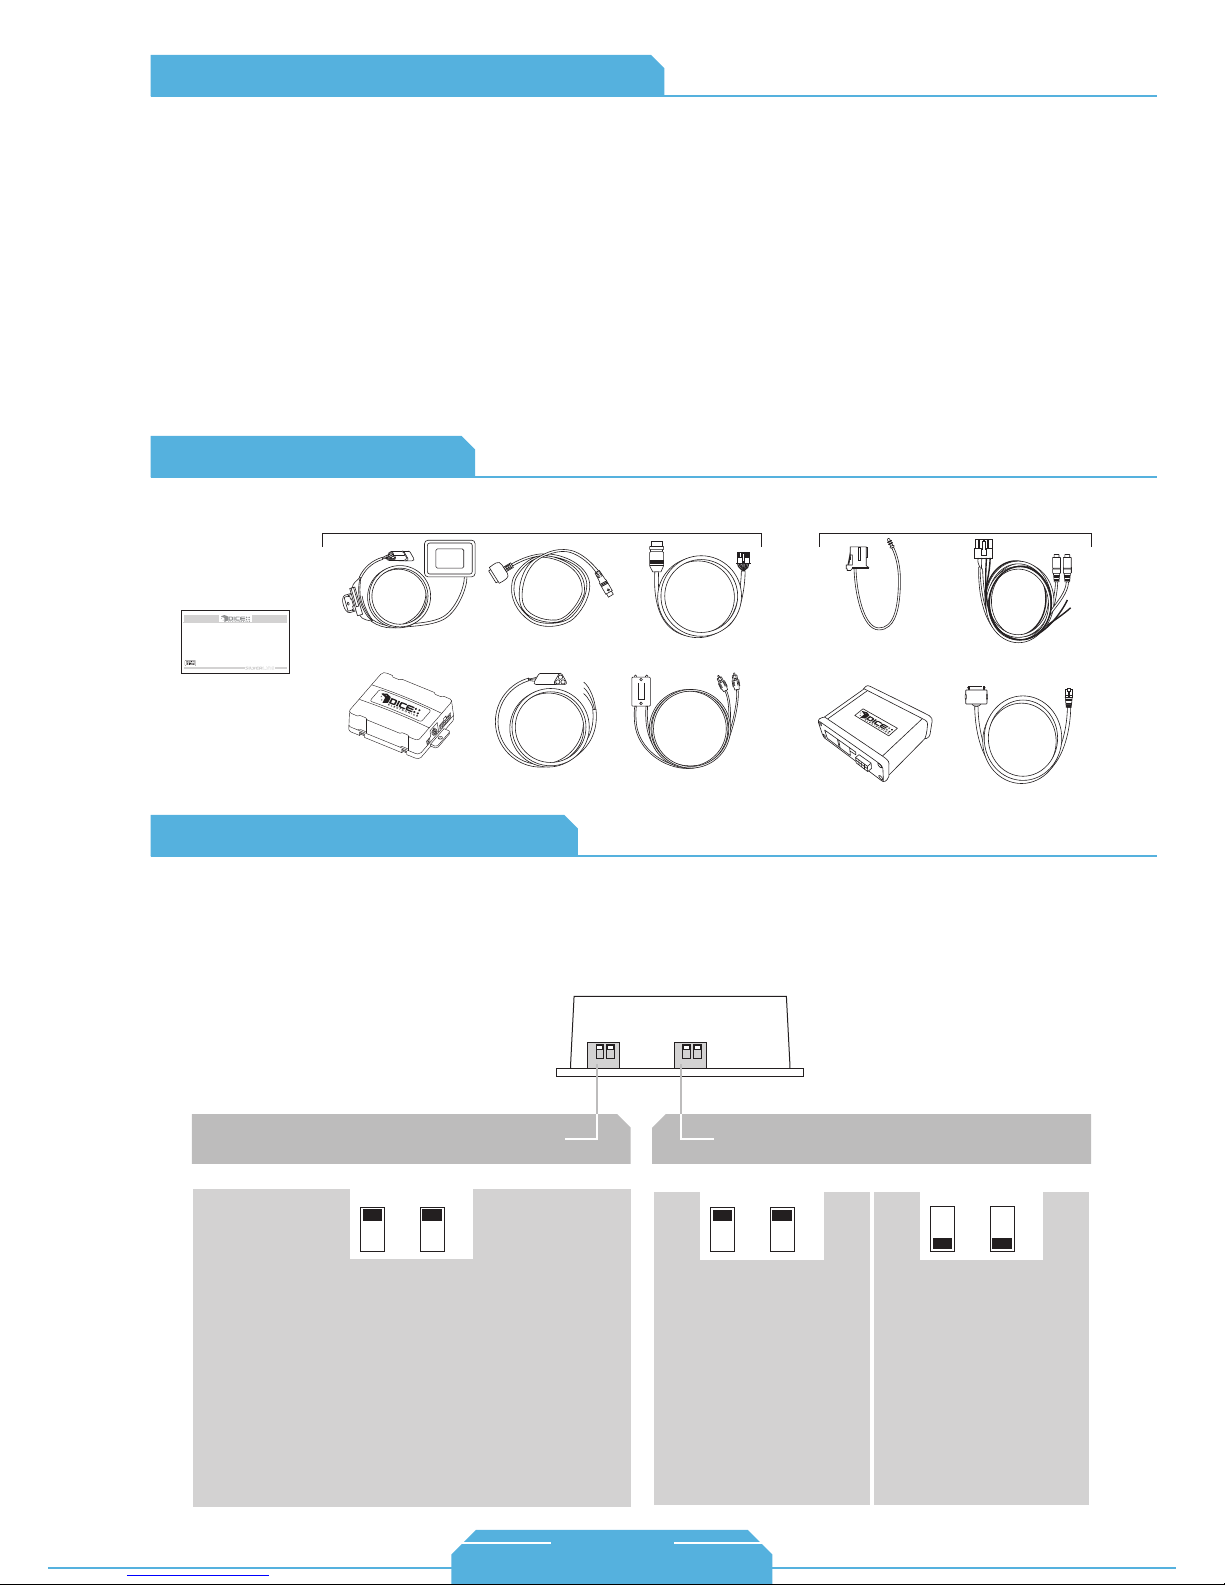
About Dip Switch Settings
The configuration switches located on the DICE module are used to set the operation of the interface by
the installer. Incorrect dip switch settings may cause the DICE interface not to work properly or not to
operate at all. Disconnect the vehicle harness from module and cycle ignition off for 50 seconds
after changing the switches!
for i-Mercedes-D2B:
Car configuration switches
CD Changer (CDC)
OFF OFF
Default
Switches should remain in the default OFF position.
DICE module
iPod configuration switches
Selected emulation
“Locked” “iPod”
OFF OFF
Default
This is best selected when
advanced controls on the
radio are used. After the
initialization the iPod will be
locked for an increased
interface functionality.
ON ON
This is best selected when
text display is not
supported by the radio and
user wishes to retain iPod
control. Track numbers
and times are not
synchronized between the
iPod and radio. Because
there is less data transfer
between the iPod and radio,
this mode has the fastest
response time. Content is
selected on the iPod.
47
1-888-342-3999
www.diceelectronics.com
Page 49
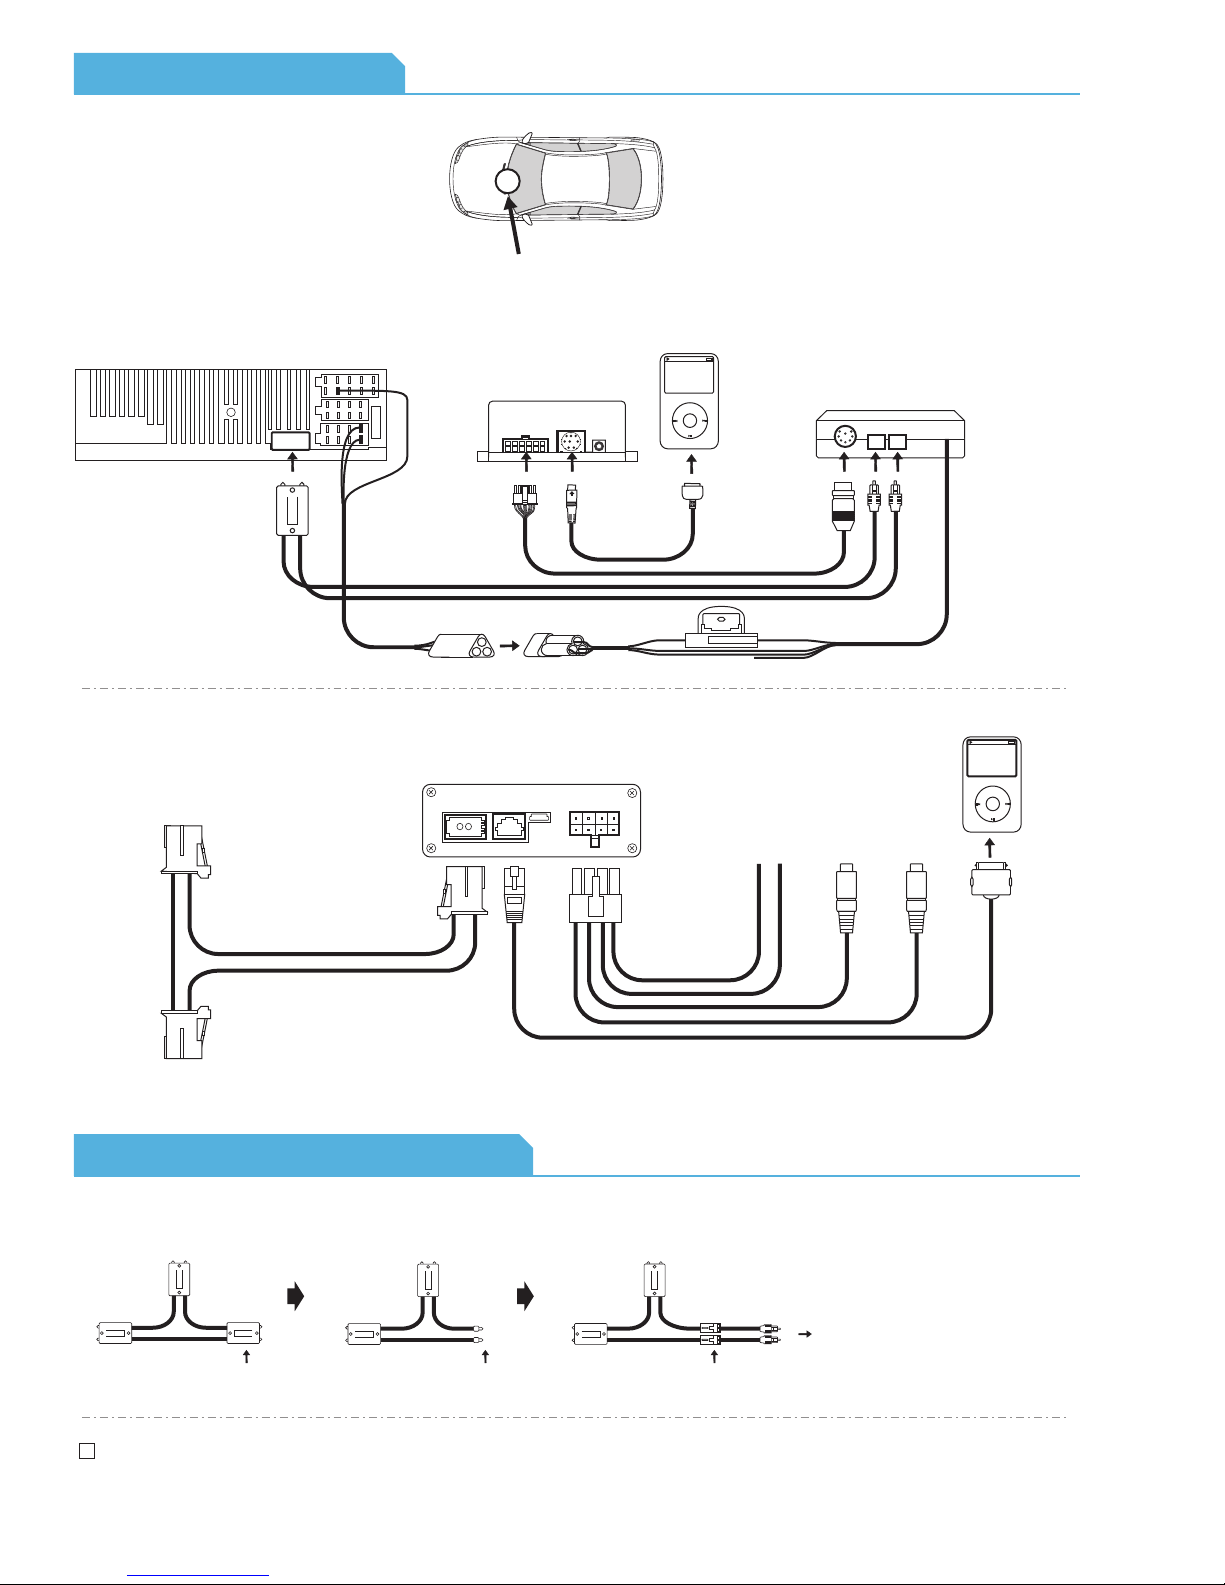
Connection Diagram
for D2B kit:
Note: further instruction in the installation tips/check list
radio location
head unit
TX
for MOST kit:
to navigation system
12Vdc
RX
10
10
Gnd
Abilit.
interface module
module
iPod
MENU
12Vdc ground
interface
RX TX
iPod
MENU
AUX cables
to car side
Installation Tips / Check List
For D2B kit, if the CD changer is present in the vehicle, please follow the steps below:
Head Unit
TX
RX
Amplifier
RX
TX
TX
RX
Disconnect the connector
from the CD changer
Amplifier
RX
TX
Installation can sometimes easily be done at the CD changer location. Since the CD changer is
disconnected anyway, the integration can take place there.
Head Unit
TX
RX
TX
RX
Open the connector
and extract the fibers
Amplifier
RX
TX
Head Unit
TX
RX
Use the couplers to connect
the OEM lens to the interface lens
TX
Conected to the interface
RX
48
Page 50
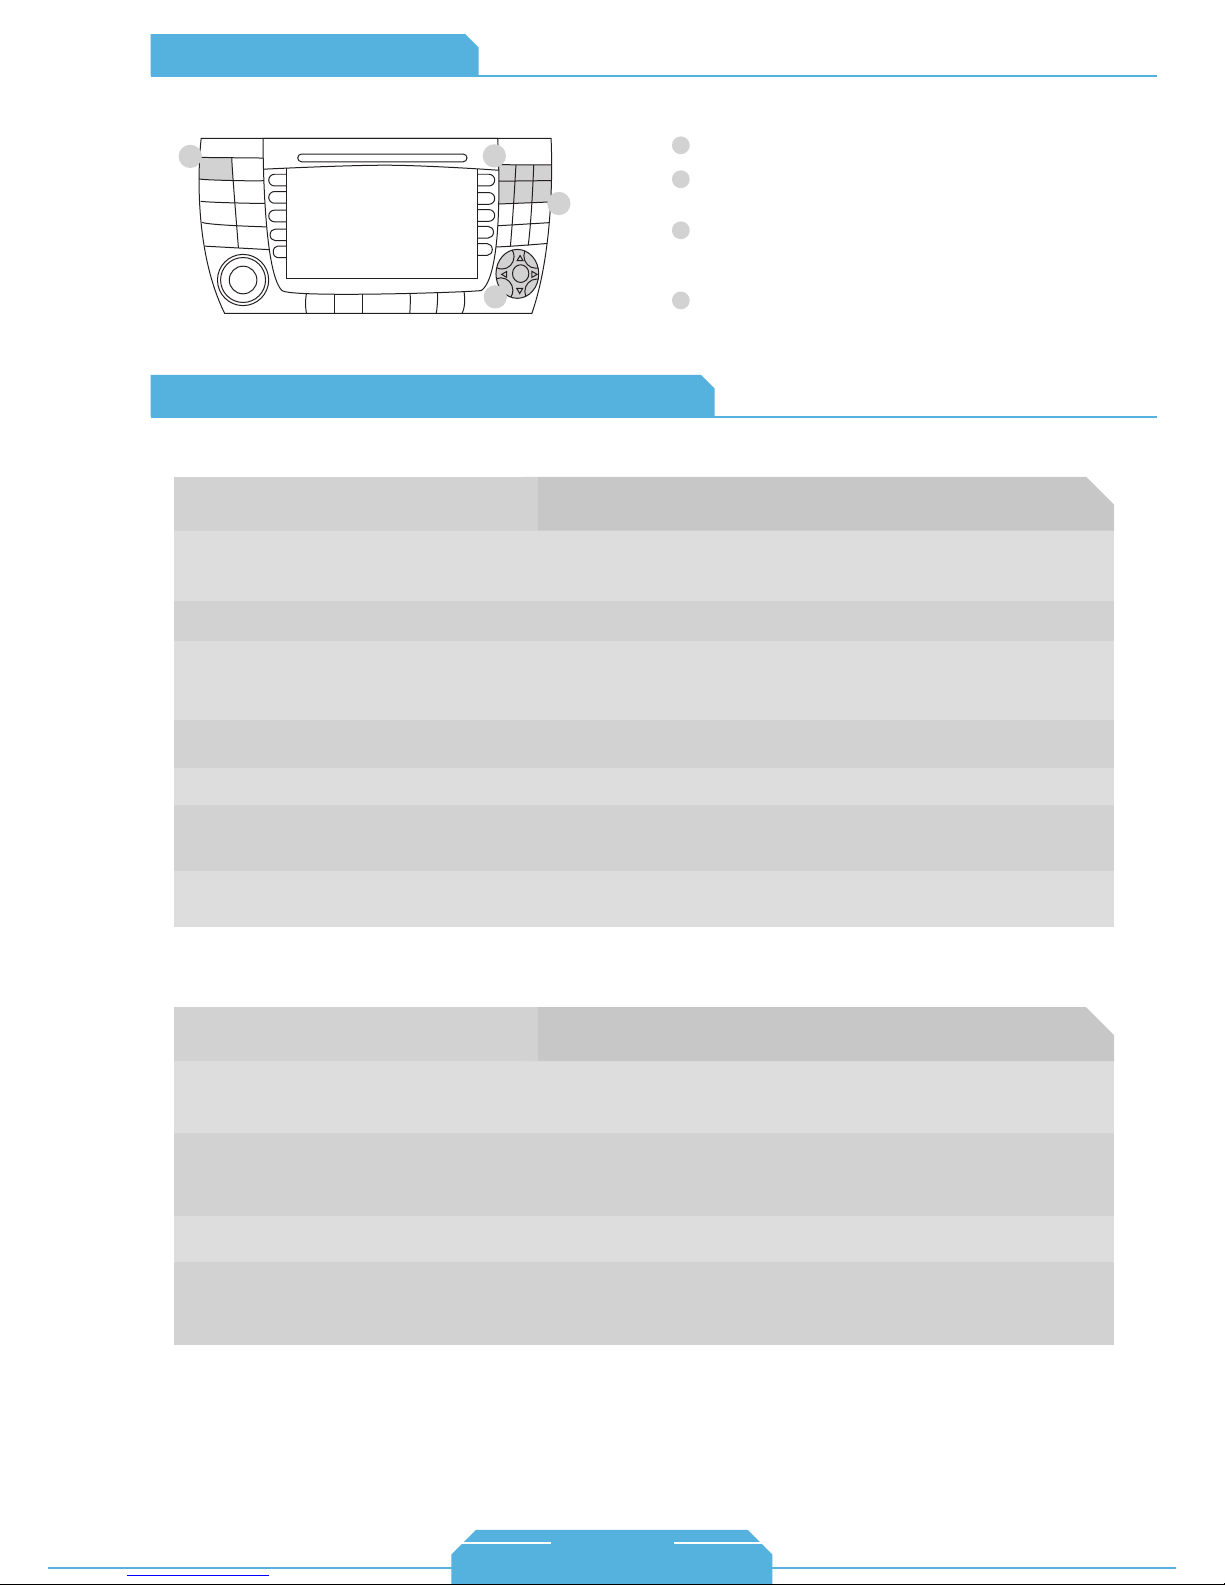
Operation Overview
MOST navigation radio
1
AUDIO
SAT
NAV
MAP
TEL
SERV
SEEK
SEEK+
PWR
RPT MUTE EJECT END SEND
4
2
1
3
4
6
5
2
9
7
8
#
0
*
OK
3
1
2
3
4
Mercedes Specific Technical Notes
for D2B kit:
Brings up audio sources on screen. Select CDC.
Pressing the 6 button brings up the Mode menu (Options/Aux-In).
Pressing the 1 button selects the highlighted option.
Use up/down arrows to scroll through menu options.
Use left/right arrows for next/previous track.
Center OK button used for selecting highlighted option.
Buttons 1-5 loads the consecutive selections within the selected category.
1 also pages backward to previous 5 consecutive selections (if available).
5 also pages forward to next 5 consecutive selections (if available).
Mercedes
Problem
Cannot select the interface from the radio.
There is no audio from the iPod source.
Audio is present, but controls from
radio/steering wheel do not operate iPod.
The iPod does not charge.
Music is distorted or sound level is too low.
Pressing the next track button only cuts out the
audio for a brief second and continues on the
same song.
Unit is connected directly to head unit, but is
not being detected.
for MOST kit:
Problem
My iPod does not charge or synchronize with
the DICE system.
Solution
Make sure dip switches are set correctly according to the dip switch setting diagram.
Use CD button to access the DICE unit. Also check connections, making sure power,
ground, and wake-up wires are all attached/tapped in properly.
Try resetting the iPod and insure that the iPod cable connections are tightly connected.
The unit may be stuck in Auxiliary mode.Select DISC 5 and set to Track 01. Switch back
to DISC 1 and try changing track.
Check all connections. Try resetting the iPod and make sure iPod charges while
connected to computer or wall charger.
Make sure all EQ and BASS boost options are turned off on your iPod.
Double-click the next track button or hold the next track button for a little longer and it
will skip to the next song.
Make sure the factory CD-Changer (if equipped) is disconnected and by-passed with
the fiber-optic cabling.
Solution
Reset the iPod by holding down the Menu button and center button together until the
Apple logo appears on screen. New models of iPod may not charge because of altered
charging method (4th gen. Nano, 2nd gen. Touch, 3G iPhone).
The navigation screen does not come up with
the regular menu, it just stays on the
“Mercedes” display and will not operate
anything.
Where do the red and black wires need to be
attached to?
My navigation system comes on and the
sources are operable, however I cannot
consistently operate or access the CD-Changer
source.
49
This may be because the fiber-optic in and out cables are put in backwards. Just swap
the two fiber optic cables in the connector from the DICE kit and the flow of light should
be back to normal.
The red wire must be connected to Constant 12V power, and the black wire needs to
be attached to a ground source.
Make sure the factory CD-changer is disconnected and the fiber-optic cables that were
disconnected from it are connected to our unit properly.
1-888-342-3999
www.diceelectronics.com
Page 51
PORSCHE
Integration for iPod
50
Page 52
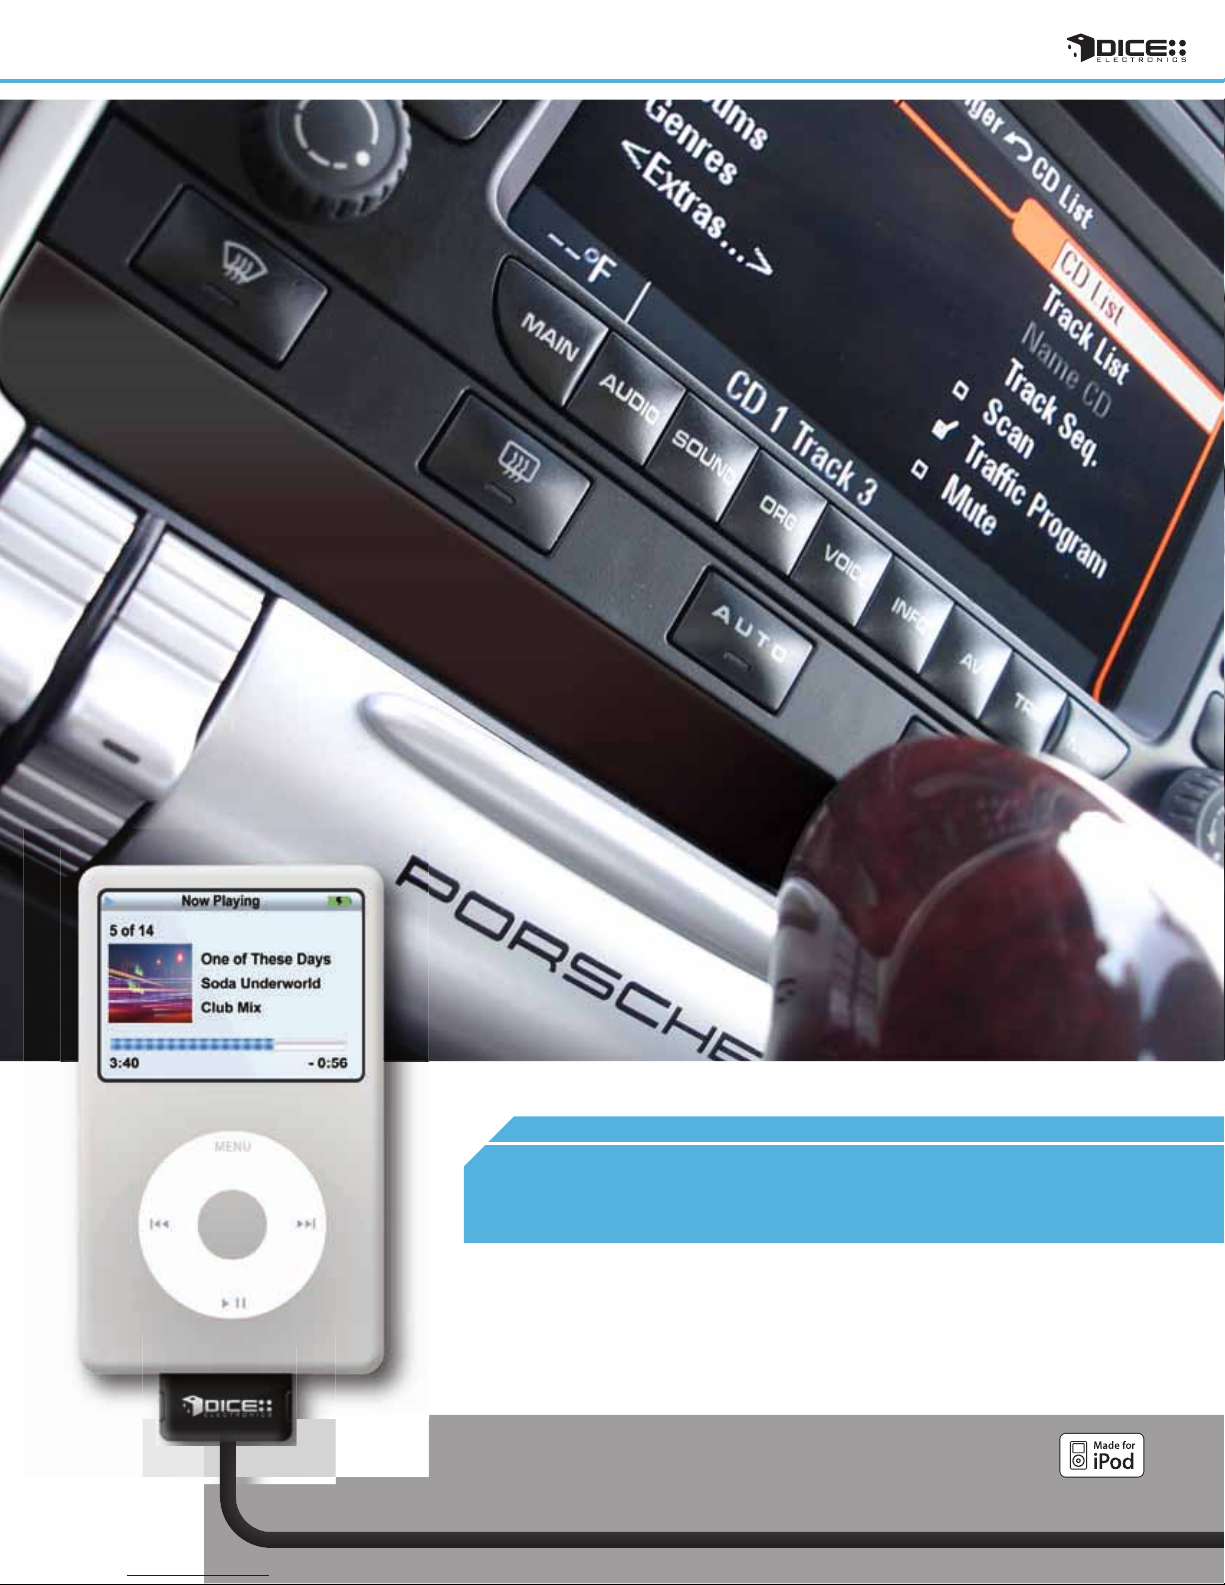
51
PORSCHE
vehicle specific integration for iPod
Page 53
COMPATIBILITY
chart
Vehicle Vehicle Specific Integration Kits Universal Kit
iPod MOST KitPorsche MOST Note iPod FM Kit
911
2007 - 2009
Boxster
2003 - 2008
Carrera
2003 - 2008
Cayenne
2003 - 2008
Cayman
2006 - 2008
i-Porsche-MOST 1, 2, 3 FMRDS
i-Porsche-MOST 1, 2, 3 FMRDS
i-Porsche-MOST 1, 2, 3 FMRDS
i-Porsche-MOST 1, 2, 3 FMRDS
i-Porsche-MOST 1, 2, 3 FMRDS
Notes:
• 2004 models require an additional fiber-optic harness (#800007)
1. Only compatible with navigation radio-system.
2. CD-changer must be disconnected.
3. If CD-changer not present, radio must be programmed for CD-changer by dealer.
52
Page 54
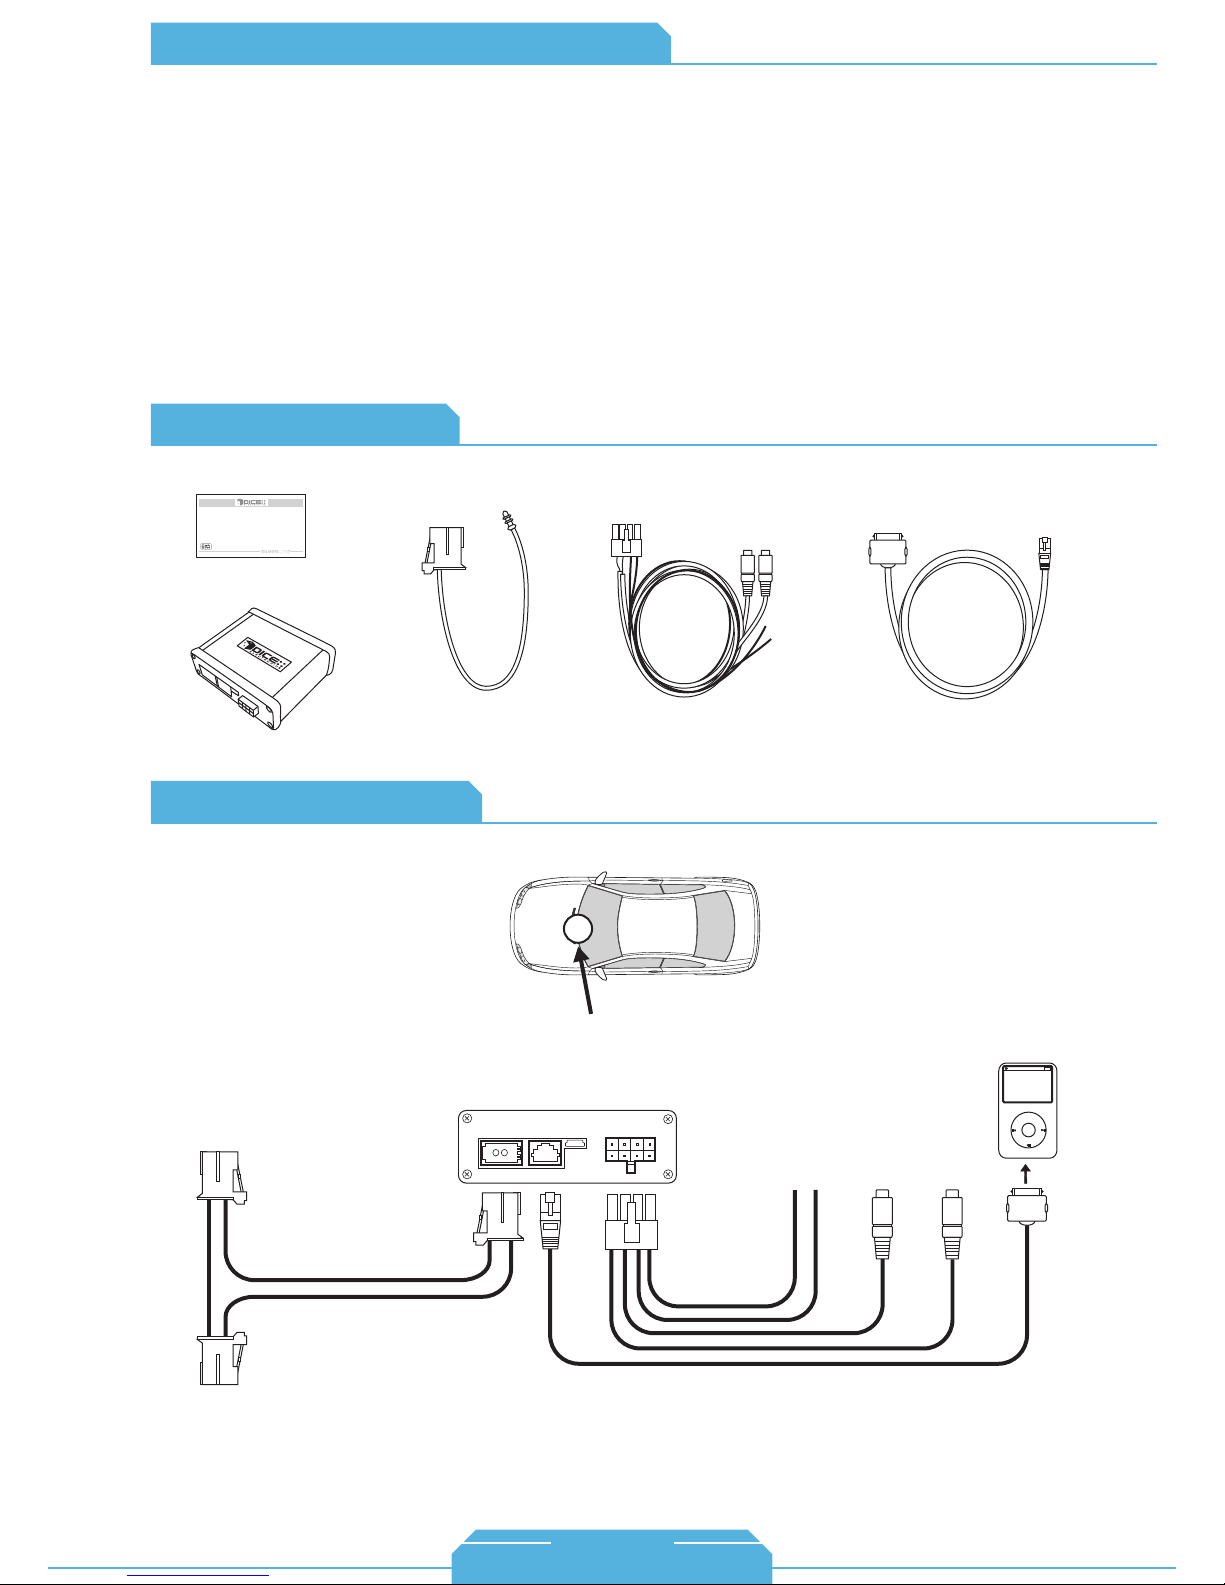
FAQs Before Purchasing the Kit
Will my factory 6-CD changer be disabled with
this unit installed?
Yes, the factory CD changer must be disabled to
have the iPod kit integrated into the factory radio
system.
If I do not have a CD-changer factory
installed can I still have this integration kit
installed?
Yes, however your factory radio will have to be
programmed forthe radio to recognize our kit as
an audio source. This can be done at your local
Porsche dealership.
Content Identifier
Pors che
DICE interface for iPod
Installation Guide/User Manual
user manual
What kind of information will I see on my PCM
display?
You will see Playlists, Artists, Albums, Genre, and
songs. These categories show up as lists on the
factory navigation screen.
Can I install this unit myself?
It is recommended that this integration kit be
installed by a professional that has experience
installing fiber-optic systems. It can be installed
directly behind the navigation unit or at the
CD-changer location.
interface module
Connection Diagram
interface module
to navigation system
fiber optic
cable
radio location
power/AUX cable
12Vdc ground
docking cable
AUX cables
iPod
iPod
MENU
to car side
53
1-888-342-3999
www.diceelectronics.com
Page 55

Installation Tips / Check List
Installation can sometimes easily be done at the CD-Changer location. Since the CD-Changer is
disconnected anyway, the integration can take place there.
Operation Overview
1
4
3
2
Source selector
1
Use the jog dial to browse and select lists
2
Use the buttons to go to next/previous track.
3
Press and hold the buttons to RW or FFW.
Note:
To change between various modes, you can either
select from the CD list or just press and hold preset 1-6.
Porsche Specific Technical Notes
Problem Solution
The fiber-optic cables in my 2004 Porsche do
not fit the fiber-optic set in the kit, what can I
do?
There is few seconds of delay when selecting
to browse playlists, artists, albums or genre.
The navigation screen does not come up with
the regular menu, it just stays on the “Porsche”
display and will not operate.
Where do the red and black wires need to be
attached to?
My navigation system comes on and the
sources are operable, however I cannot
consistently operate or access the CD-changer
source.
My iPod does not charge or synchronize with
the DICE system.
For 2004 model Porsche vehicles, an additional fiber-optic cable set is required
(#800007).
This is normal. Loading content from the iPod to the radio takes some time.
This may be because the fiber-optic in and out cables are put in backwards.
Just swap the two fiber optic cables in the connector from the DICE kit and the
flow of light should be back to normal.
The red wire must be connected to Constant 12V power, and the black wire needs to
be attached to a ground source.
Make sure the factory CD-changer is disconnected and the fiber-optic cables that were
disconnected from it are connected to our unit properly.
Reset the iPod by holding down the Medu button and center button together until the
Apple logo appears on screen. New models of iPod may not charge because of altered
charging method (4th gen. Nano, 2nd gen. Touch, 3G iPhone).
DISC 1 = Play selection
4
DISC 2 = Playlists
DISC 3 = Artists
DISC 4 = Albums
DISC 5 = Genres
DISC 6 = <Extras...>
54
Page 56
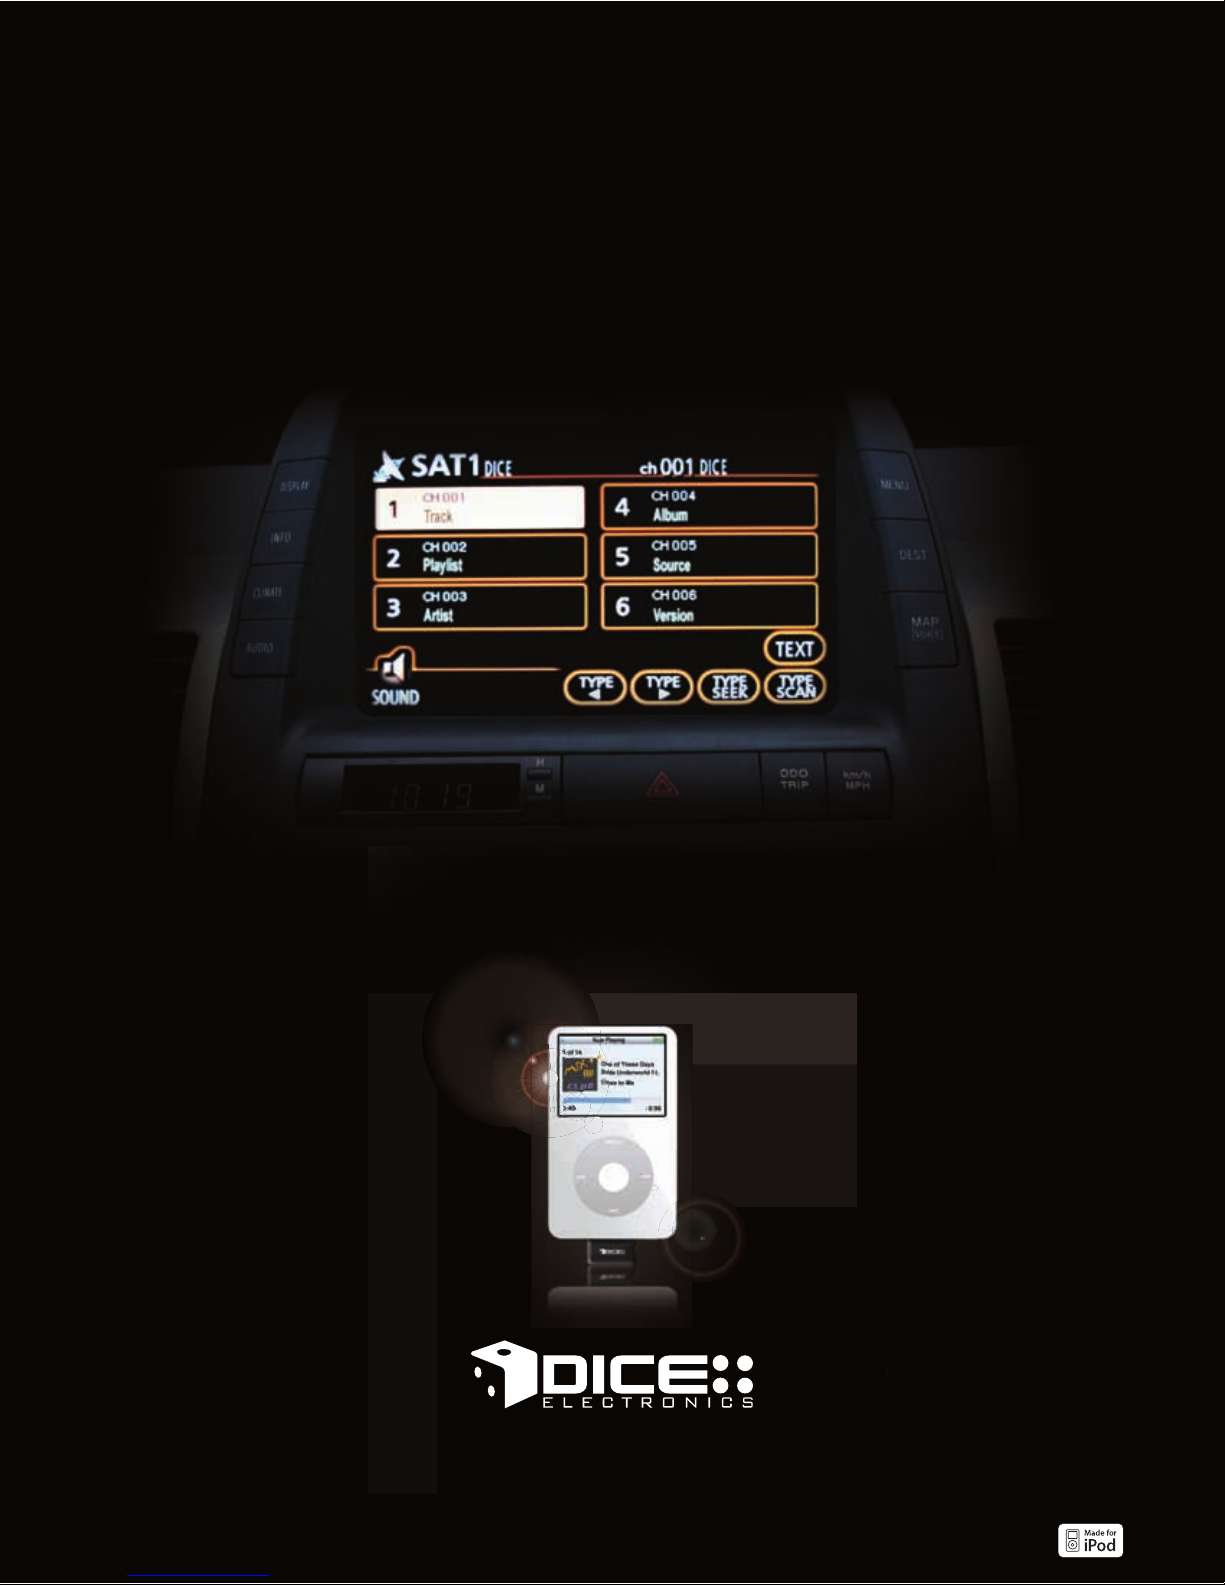
Acura • Audi • Bentley • Buick • BMW • Cadillac • Chevrolet • GMC • Honda • Hummer
Lexus • Mazda • Mercedes • MINI • Pontiac • Porsche • Scion • Toyota • Volkswagen
iPod • iPod classic • iPod mini • iPod nano • iPod shuffle • iPod touch
See things the way
they should be...
big and clear.
The ultimate integration for iPod for your car.
www.diceelectronics.com 888.342.3999
Page 57
SCION
Integration for iPod
56
Page 58
V. No. 1008
57
SCION
vehicle specific integration for iPod
Page 59
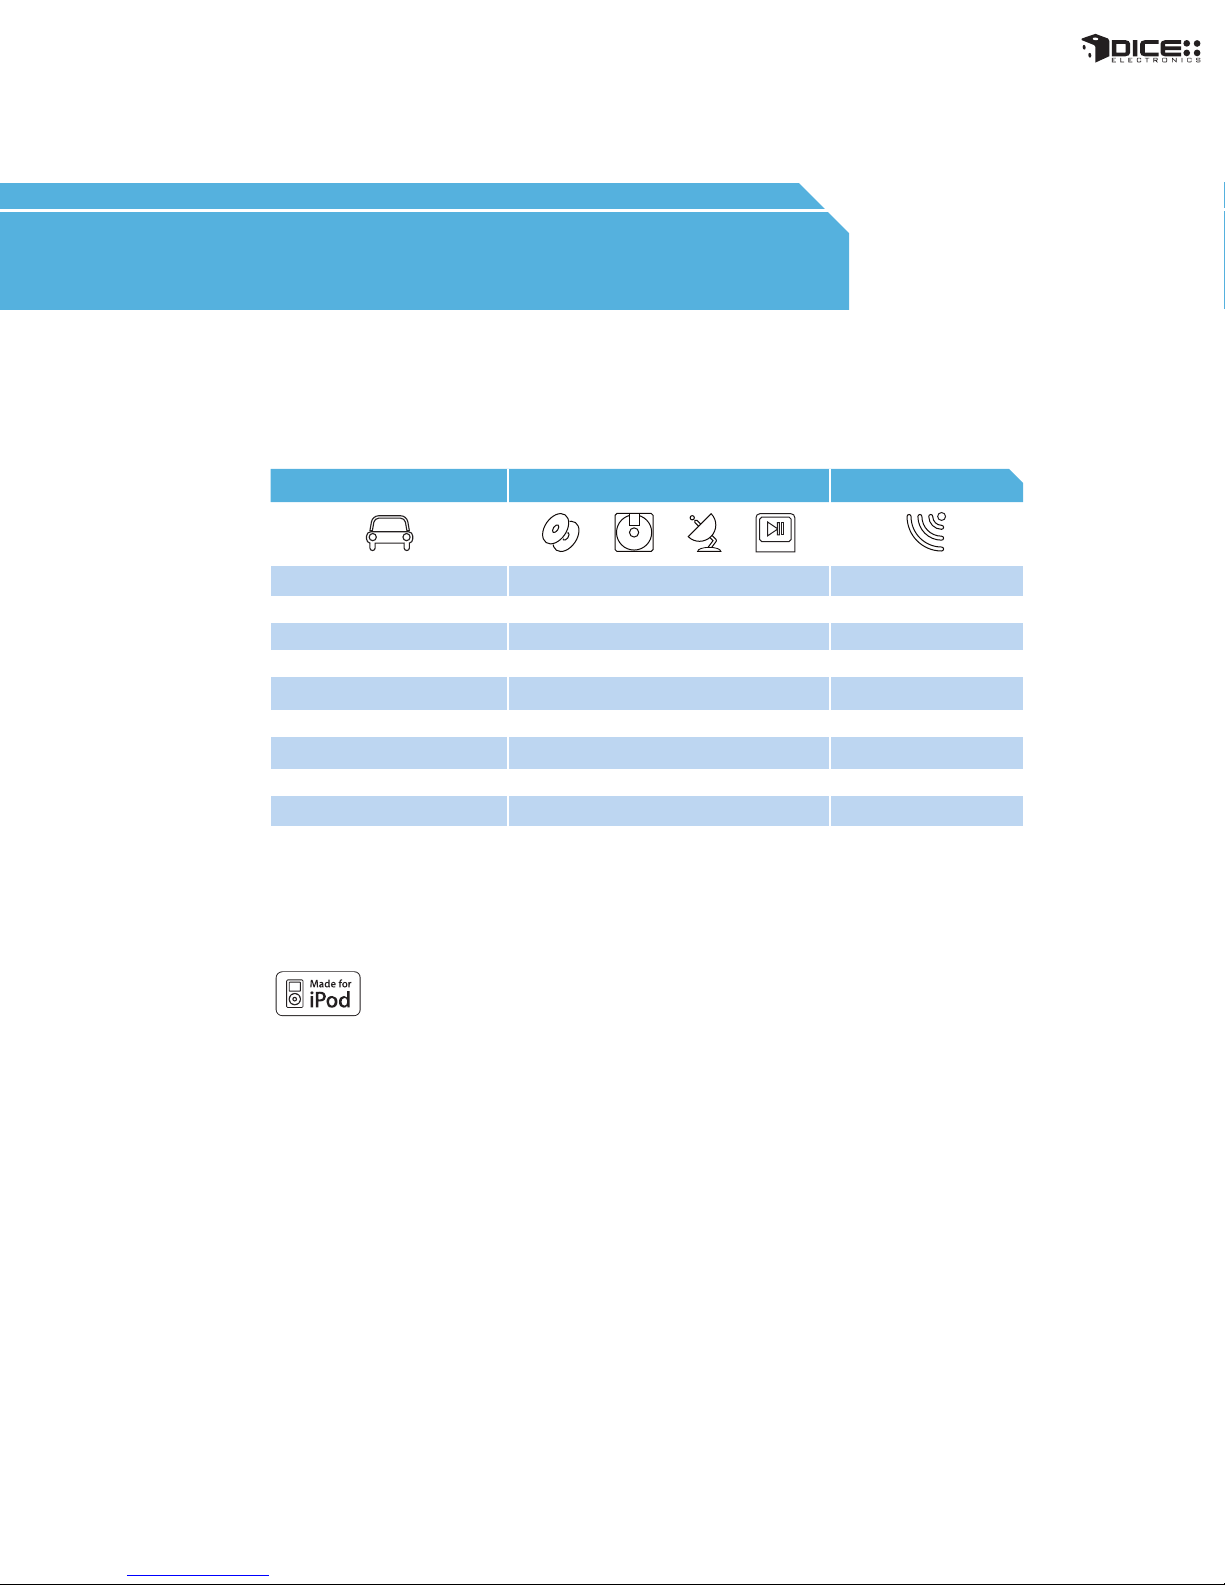
COMPATIBILITY
Vehicle Vehicle Specific Integration Kits Universal Kit
chart
Scion Note iPod FM Kit
xA
2004 - 2009 FMRDS
xB
2004 - 2009
xD
tC
Notes:
1. Text dislay supported on 2003+ vehicles equipped with a CD-text, MP3-text, MD-text, or SAT capable factory radio.
2. External CD-changer must be disconnected. Factory SAT can be retained.
iPod (CDC, MD, SAT, MP3) Kit
i-Toyota-R 1, 2
i-Toyota-R 1, 2 FMRDS
i-Toyota-R 1, 2
i-Toyota-R
1, 2
FMRDS2007 - 2009
FMRDS2004 - 2009
58
Page 60

FAQs Before Purchasing the Kit
Do I lose functionality of any factory-installed
devices in my vehicle that were factory
installed?
External CD-changers are disabled. Other
factory options can be retained.
What are the different emulation modes for?
The i-Toyota-R kit offers four different modes to
be operated in (CD-changer, Mini-DISC,
Scion
Satellite, and MP3). Depending on the radio in
your vehicle, one or the other will offer TEXT
display support.
Content Identifier
DICE interface for iPod
Installation Guide/User Manual
user manual
If my vehicle’s factory radio does not have a
text button present, does this mean my radio
won’t support the text display?
No, it does not. Many late model touch-screen
navigation systems in Toyota/Lexus (2005-2008)
will have a TEXT button appear on screen to
cycle between text fields.
Will the DICE support video playback on my
navigation screen?
No, our iPod kit only transfers the audio and
information for the audio through your stereo
system.
vehicle specific
interface module
iPod docking
cable
Toyota03 BUS connectorToyota01 BUS connector
About Dip Switch Settings
The configuration switches located on the DICE module are used to set the operation of the interface by
the installer. Incorrect dip switch settings may cause the DICE interface not to work properly or not to
operate at all. Disconnect the vehicle harness from module and cycle ignition off for 50 seconds
after changing the switches!
DICE module
Car configuration switches
CD Changer (CDC)59Mini DISC (MD) Satellite (SAT) MP3
OFF OFF
Recommended for
radios NOT
supporting
Satellite (XM) or if
factory SAT is
installed and user
wishes to retain it.
Selected vehicles
from 2003 offer CD
Text - these radios
have a Text button.
OFF
ON
Recommended for
early model year
radios with
external CD
changer. MD Text
is only available
on very few radios,
typically navigation
ones.
ON ON
Recommended for
radios if SAT
module is not
present or
disconnected and
an external CD
changer is used.
SAT mode is
supported by
high-end radios in
selected models
from 2003 in the
US only.
OFF
Recommended for
late model
Navigation radios
only where
factory SAT is
installed and user
wishes to retain it.
Radios must
support MP3 text.
New MP3
navigation cars
support only MP3
text not CD Text.
ON
iPod configuration switches
“Locked” “iPod”
OFF OFF
DefultDefult
This is best selected
when Text display is
supported by the
radio. After connecting
the iPod you will see
the DICE logo on the
screen. After the
initialization the iPod
will be locked for an
increased interface
functionality.
ON ON
This is best selected
when Text display is
NOT supported by the
radio. Track numbers
and times are not
synchronized between
the iPod and radio.
Because there is less
data transfer between
the iPod and radio, this
mode has the fastest
response time.
Content is selected
on the iPod.
1-888-342-3999
www.diceelectronics.com
Page 61
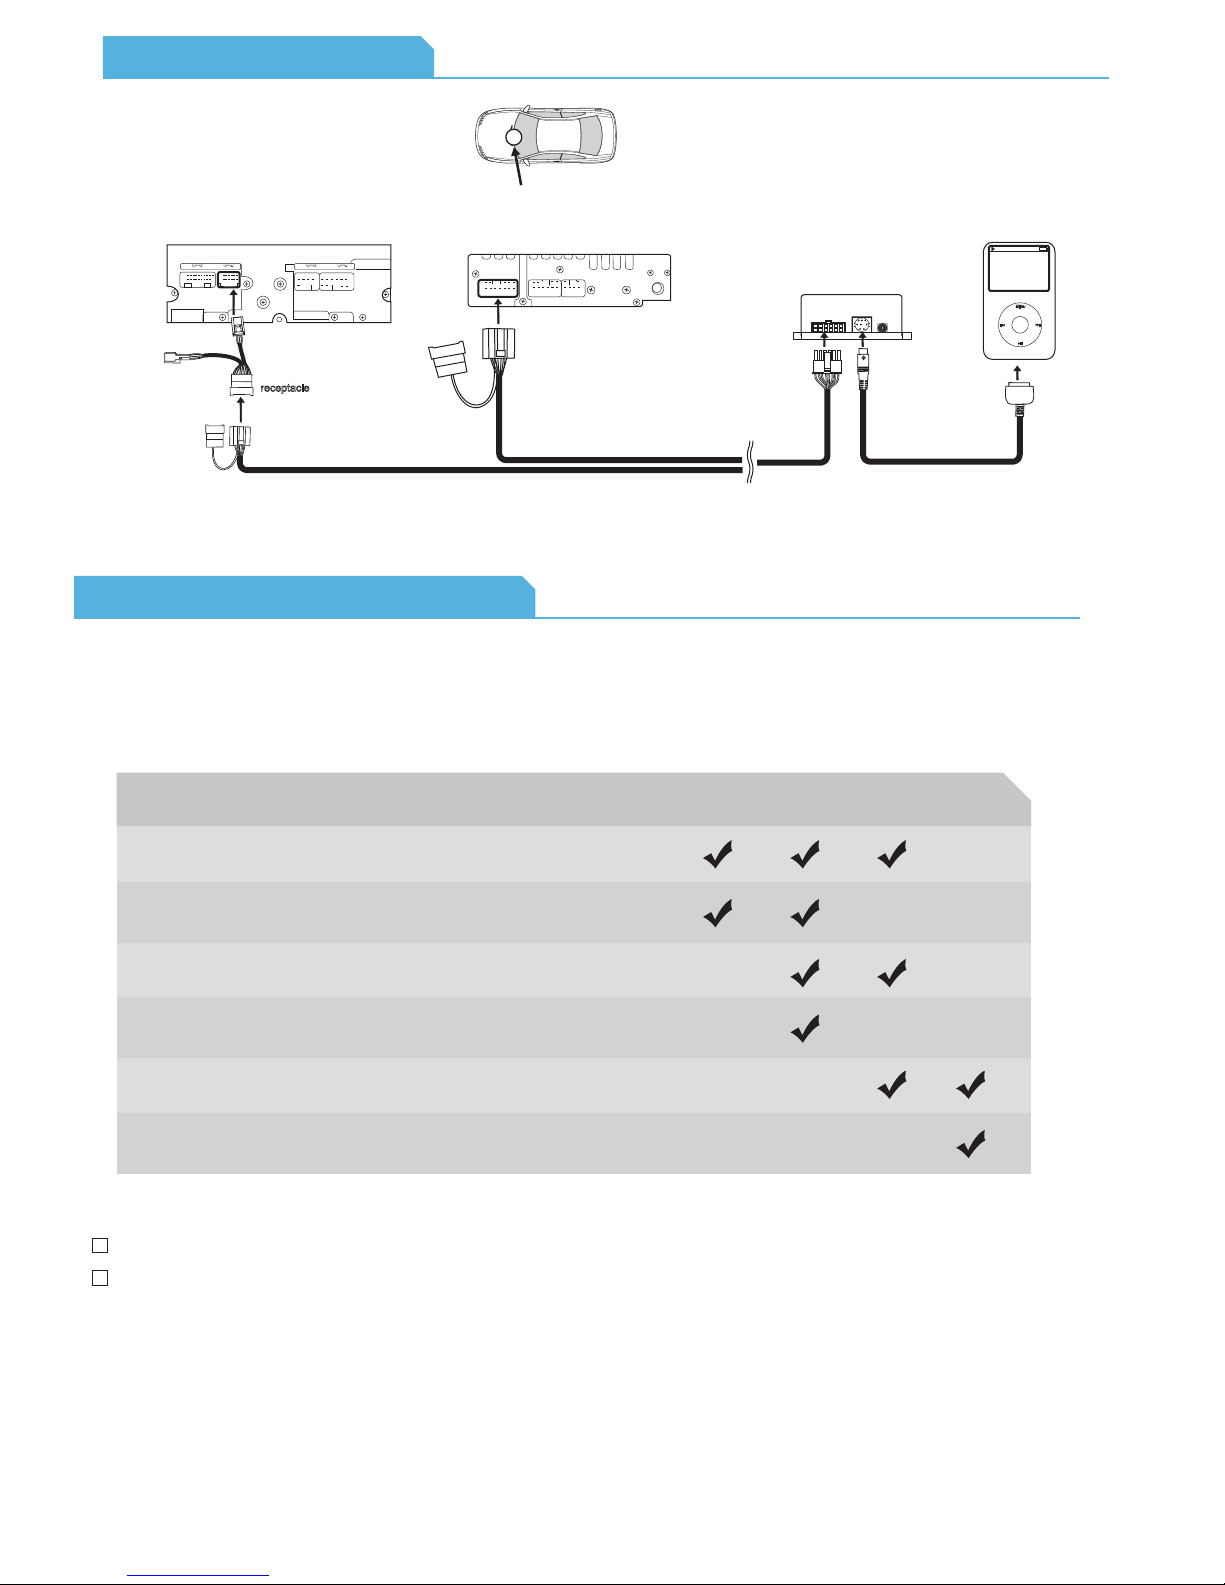
Connection Diagram
radio location
new style radio with small connector
Toyota03 BUS connector
cable receptacle
Toyota01 BUS connector
extension
receptacle
cable receptacle
older style radio with large connector
Toyota01 BUS connector
module
Toyota01 BUS
connector
Note:
Plug the factory connection to the cable receptacle
if it was removed from the radio.
Installation Tips / Check List
Identify your audio system
Select the emulation that best suits your vehicle. The following chart identifies the
recommended emulation for the listed radios. Note that your vehicle may support more
than one type of emulation.
Radios External CDC Factory SAT CDC MD
iPod
MENU
iPod docking
cable
*
SAT
**
MP3
04-06 Tape/CD
04-06 Tape/CD
04-06 Tape/CD
04-06 Tape/CD
06-08 MP3 Navigation
06-08 MP3 Navigation
not installed or
disconnected
not installed or
disconnected
present not installed
present present
not installed
present
not presentnot available
presentnot available
* Not all radios support MD mode. If an external MD changer is present, it must be disconnected.
Setting the DICE unit to SAT mode for a slightly more intuitive interface.
Toyota/Lexus/Scion radios are generally held in with 10mm bolts.
60
Page 62
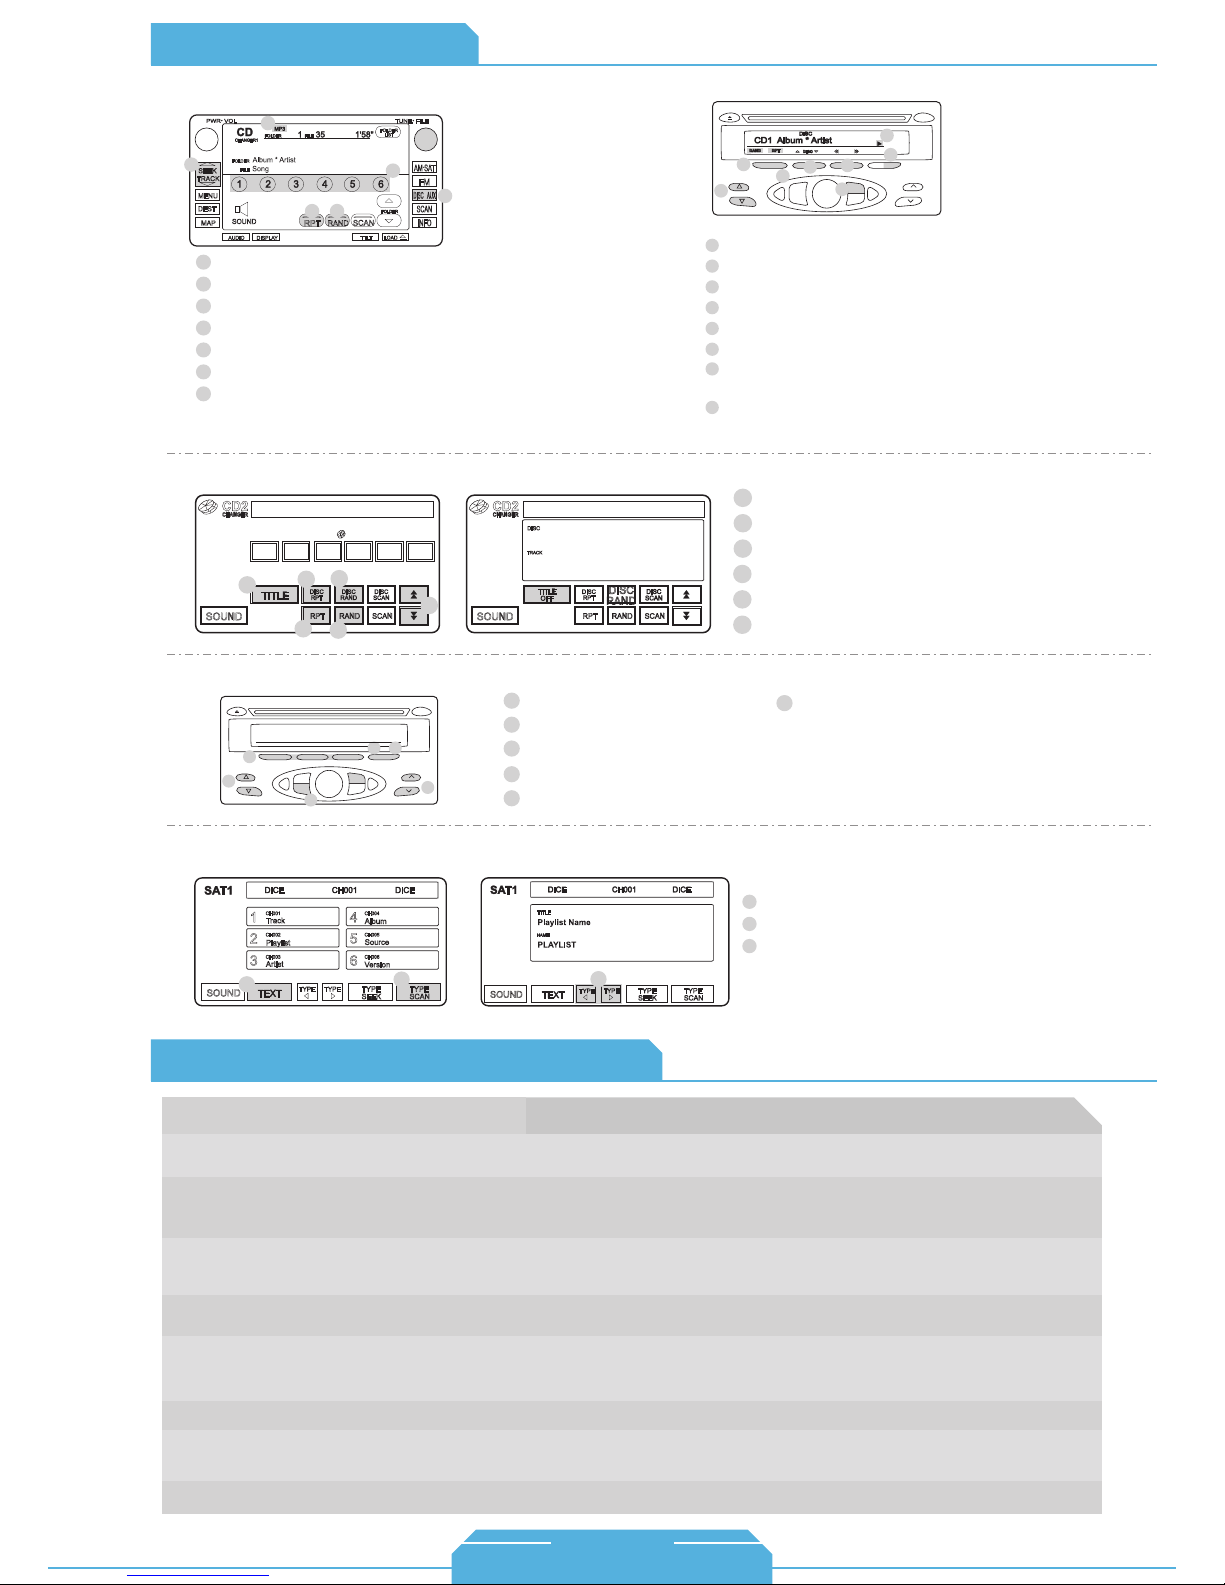
Operation Overview
MP3 emulation
2
Source indicator
1
Press to change Track.
2
Press to select PRESET numbers 1 - 6.
3
Press RPT short to repeat one, long to repeat all.
Scion
4
Press RAND short to Shuffle Songs, long to Shuffle Albums.
5
Source selector
6
Turn to change Track.
7
CDC/MD emulation (with Navigation)
CD2
CHANGER
1
SOUND
1
3
5
4
DISC 1 TRACK 99 1' 24"
1 2 3 4 5 6
TITLE
DISC
4
2
DISC
DISC
RPT
RAND
RPT RAND SCAN
3
5
SCAN
DISC
DISC
7
6
CD1 Album * Artist
1 2 3 4 5 6
4
TUNE/TRK/FILE
5
MUTE
2
1
Source selector
2
Press to change Track.
3
Press to change modes.
4
Press RAND short to Shuffle Songs, long to Shuffle Albums.
5
Press RPT short to repeat one, long to repeat all.
6
Press to RW or FFW.
7
Press the TEXT button to cycle between
6
3
DISC
FM1/2
1
AUX
AM SAT
POWER
8
7
SCAN
TEXT
FOLDER/TYPE
SSP
display fields.
8
Arrow shows if additional information is available. Hold TEXT
button for more information.
Press TITLE to toggle between screens.
CD2
DISC 1 TRACK 99 1' 24"
CHANGER
DISC
Playlist Name
TRACK
PLAYLIST
TITLE
DISC
DISC
RAND
DISC
SCAN
RPT
6
SOUND
OFF
RPT RAND SCAN
1
Press DISC RPT to Repeat All.
2
Press RPT to Repeat One.
3
Press DISC RAND to shuffle Albums.
4
Press RAND to Shuffle Songs.
5
Press to change Track.
6
SAT emulation (without Navigation)
1
Source selector
2
Press to change Track.
3
Use Presets to change modes.
4
Use Scan to enable Shuffle Songs.
5
Press the TEXT button to toggle between available TEXT fields.
1 2 3 4 5 6
3
TUNE/TRK/FILE
2
SAT1 Album * Artist
FM1/2
MUTE
AM SAT
POWER
5
4
SCAN
TEXT
FOLDER/TYPE
DISC
SSP
AUX
1
6
SAT emulation (with Navigation)
1
2
3
Scion Specific Technical Notes
Problem
Text is not displaying in selected emulation.
Radio/Nav display only shows DISC/Preset and
Track/Channel numbers, but there is no iPod
control
Cannot select the interface.
Radio/ steering wheel controls do not operate
iPod.
The interface operates very intermittently and
erratically in SAT mode.
No audio from iPod source.
iPod does not charge.
Music is distorted or sound level is too low.
Identify your audio system (refer to Installation tip section) first and set switches
accordingly. Note that your vehicle may support more than one mode.
Select DISC/Preset 5 and make sure it is set to Track/Channel1.
Check DIP switch settings. With the ignition OFF disconnect vehicle harness
from module for a few seconds and reconnect. Verify that the correct button is
used to access the interface.
Reset iPod and make sure the most recent iPod firmware is installed. Check vehicle
user manual on how steering wheel controls work.
Make sure that if the unit is being operated in SAT mode, the factory satellite tuner is
disconnected in the vehicle. Otherwise, the unit will have to be set up in a different
emulation mode (CD, MP3, MD).
Reset the iPod. Verify proper connection to iPod/interface.
Check all connections. See if iPod charges while connected to computer or wall
charger. You may need to reset the iPod.
Make sure all EQ and BASS boost options are turned off on your iPod.
6
Use the TYPE button to engage/disengage RW or FFW
Press to TEXT button to toggle between available
1
Use TYPE SCAN to enable Shuffle Songs.
2
Use the TYPE button to engage/disengage RW or FFW
3
Solution
61
1-888-342-3999
www.diceelectronics.com
Page 63
TOYOTA
Integration for iPod
62
Page 64
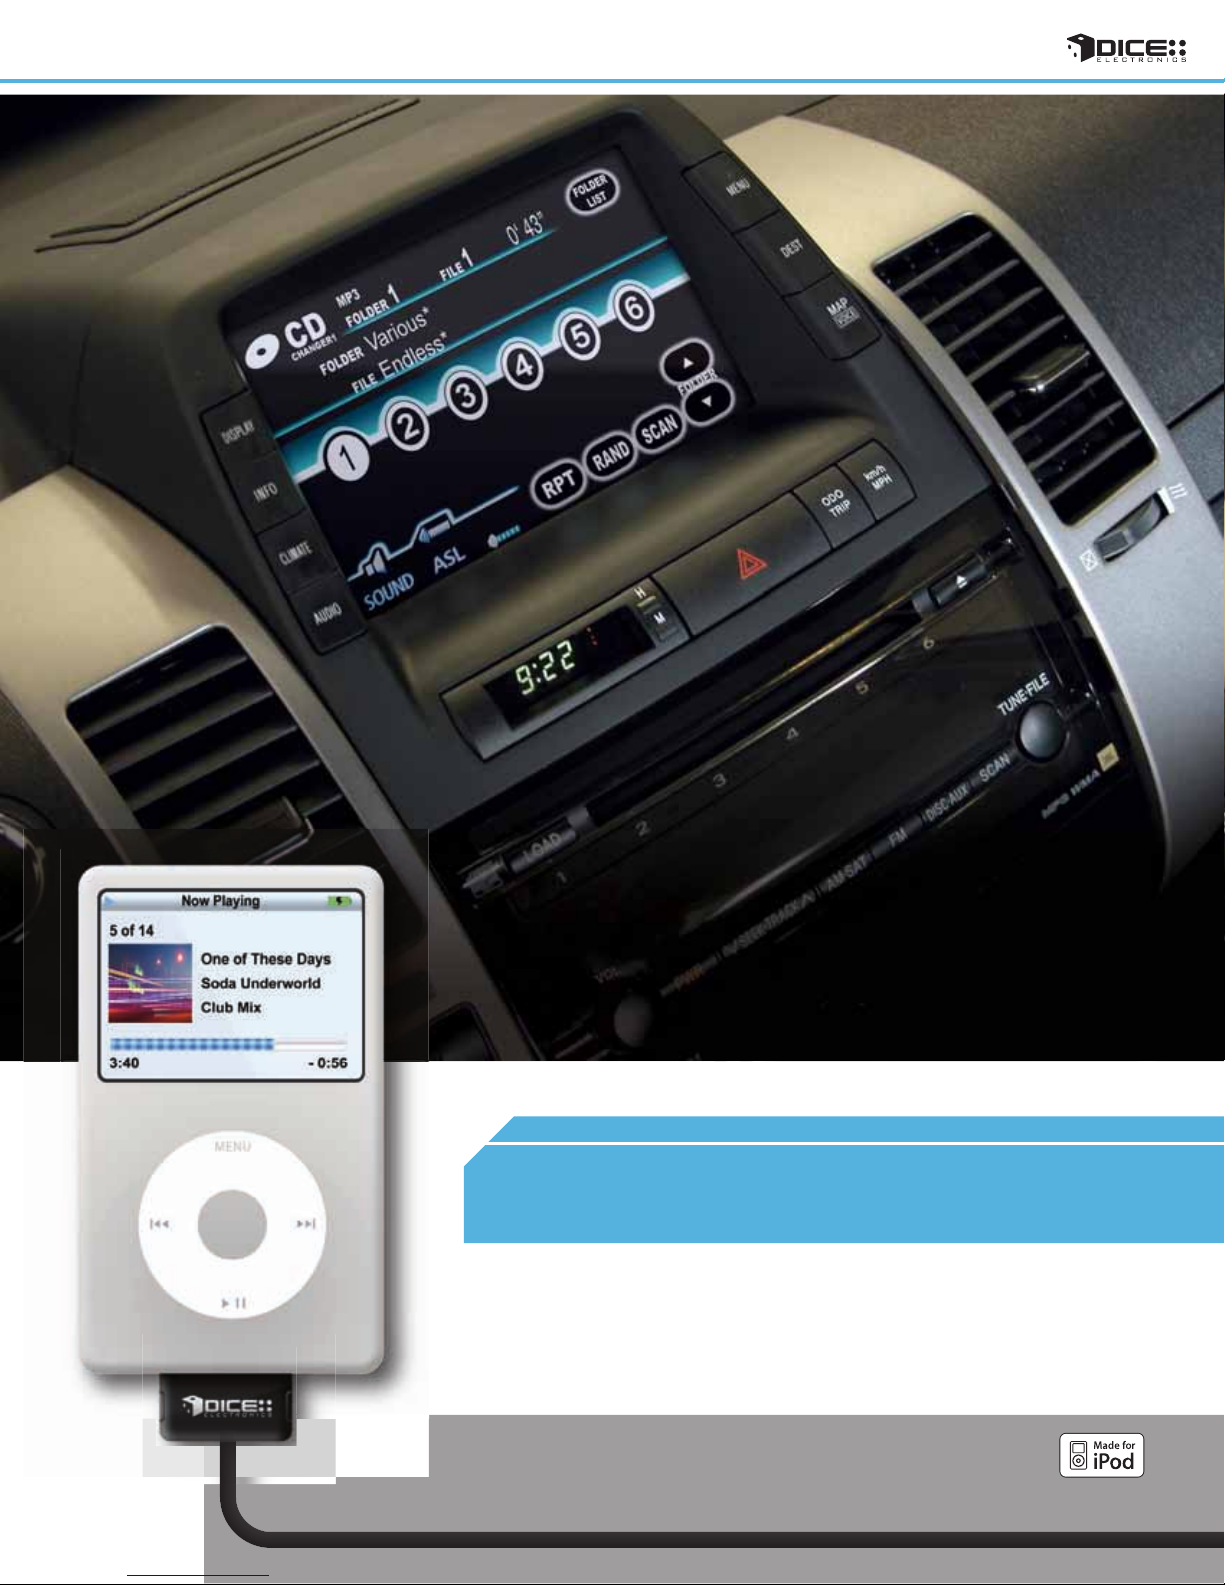
63
TOYOTA
vehicle specific integration for iPod
Page 65
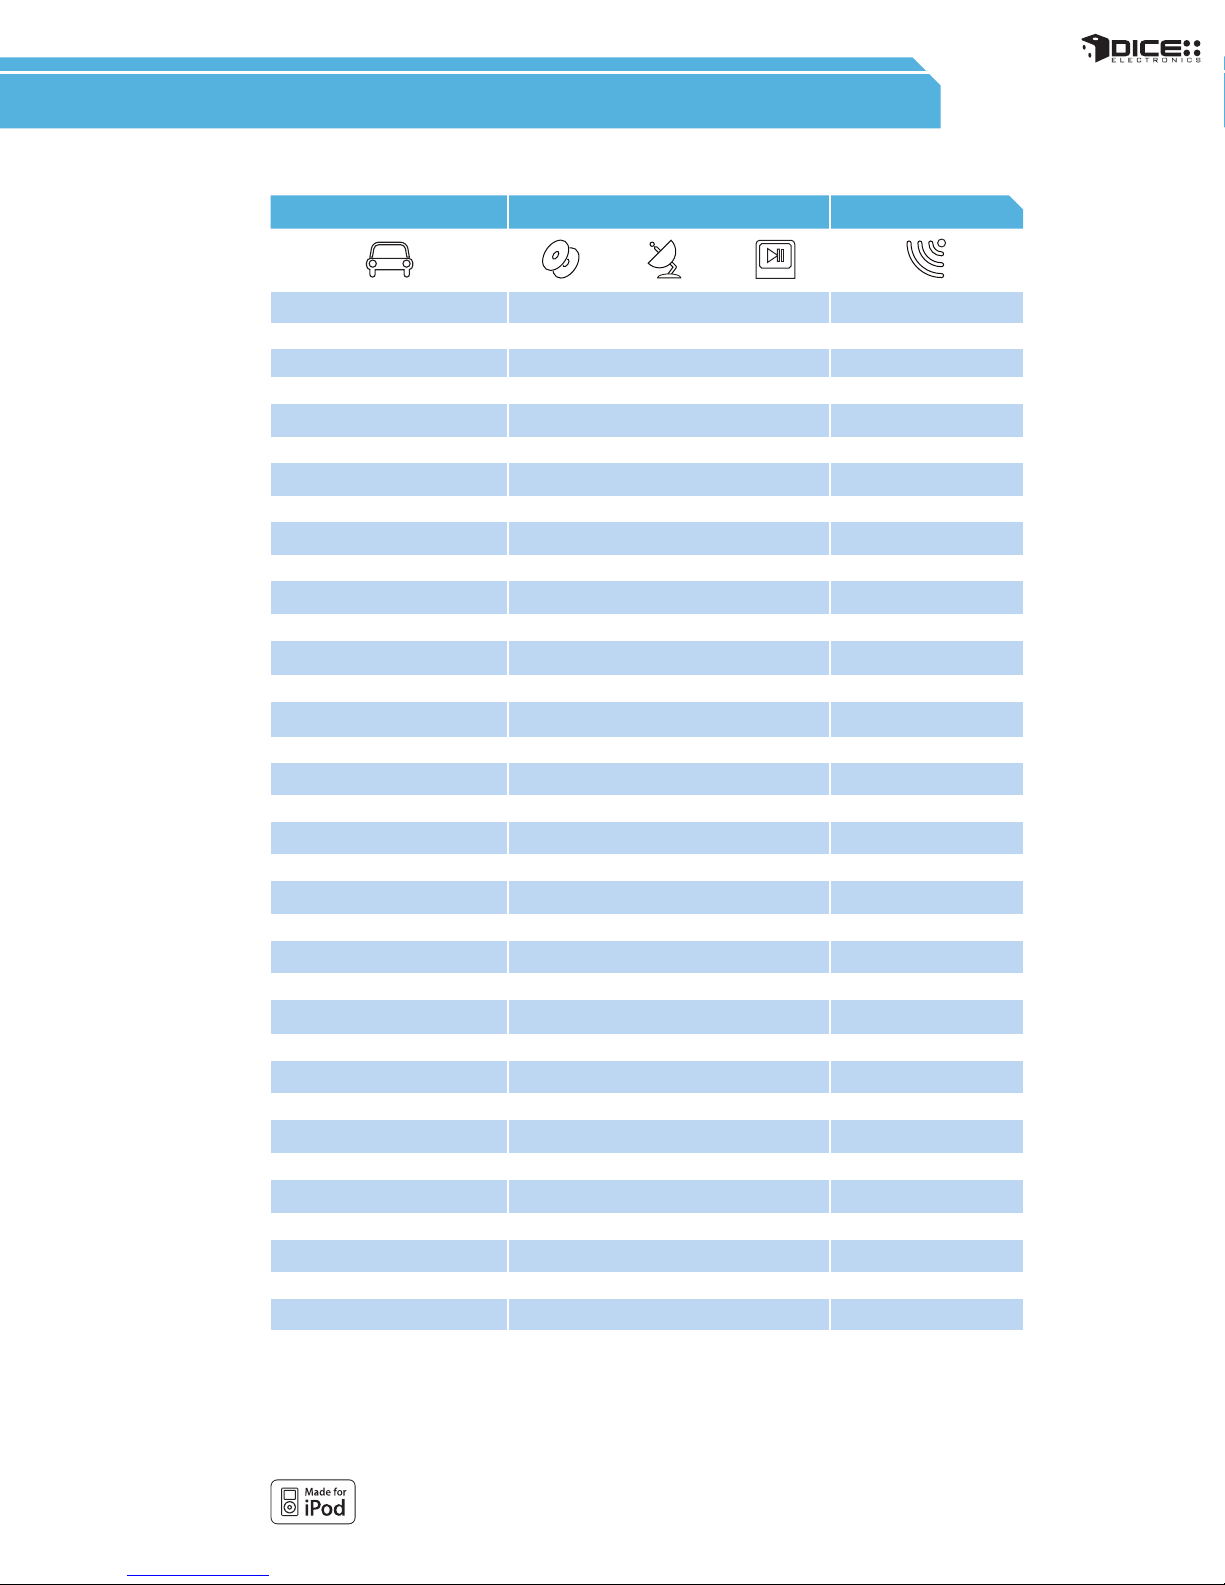
COMPATIBILITY
Vehicle Vehicle Specific Integration Kits Universal Kit
iPod KitToyota Note iPod FM Kit
4-Runner
2002 - 2009 FMRDS
Camry
2003 - 2009
Celica
Corolla
2003 - 2009
Echo
2000 - 2005
FJ Cruiser
2006 - 2009
Highlander
2002 - 2009
Landcruiser
2002 - 2009
MR2
2000 - 2005
Prius
2004 - 2009
Rav4
2003 - 2009
Sequoia
2001 - 2008
Sienna
2003 - 2009
Solara
2003 - 2009
Tacoma
2002-2009
Yaris
2007 - 2009
Tundra
2002 - 2008
i-Toyota-R 1, 2, 3
i-Toyota-R 1, 3 FMRDS
i-Toyota-R 1, 3
i-Toyota-R
i-Toyota-R
i-Toyota-R 1, 3 FMRDS
i-Toyota-R 1, 3 FMRDS
i-Toyota-R 1, 3 FMRDS
i-Toyota-R 1, 3 FMRDS
i-Toyota-R 1, 3 FMRDS
i-Toyota-R 1, 3 FMRDS
i-Toyota-R 1, 3 FMRDS
i-Toyota-R 1, 3 FMRDS
i-Toyota-R 1, 3 FMRDS
i-Toyota-R 1, 3 FMRDS
i-Toyota-R 1, 3 FMRDS
i-Toyota-R 1, 3 FMRDS
1, 3
1, 3
FMRDS2003 - 2005
FMRDS
FMRDS
chart
Notes:
• For model year between 1998 - 2001 please call for legacy support.
1. Text dislay supported on 2003+ vehicles equipped with a CD-text, MP3-text, MD-text, or SAT capable factory radio.
2. Not compatible with Navigation on 2004 model OR 2009 Portable Nav option.
3. External CD-changer must be disconnected. Factory SAT can be retained.
64
Toyo ta
Page 66
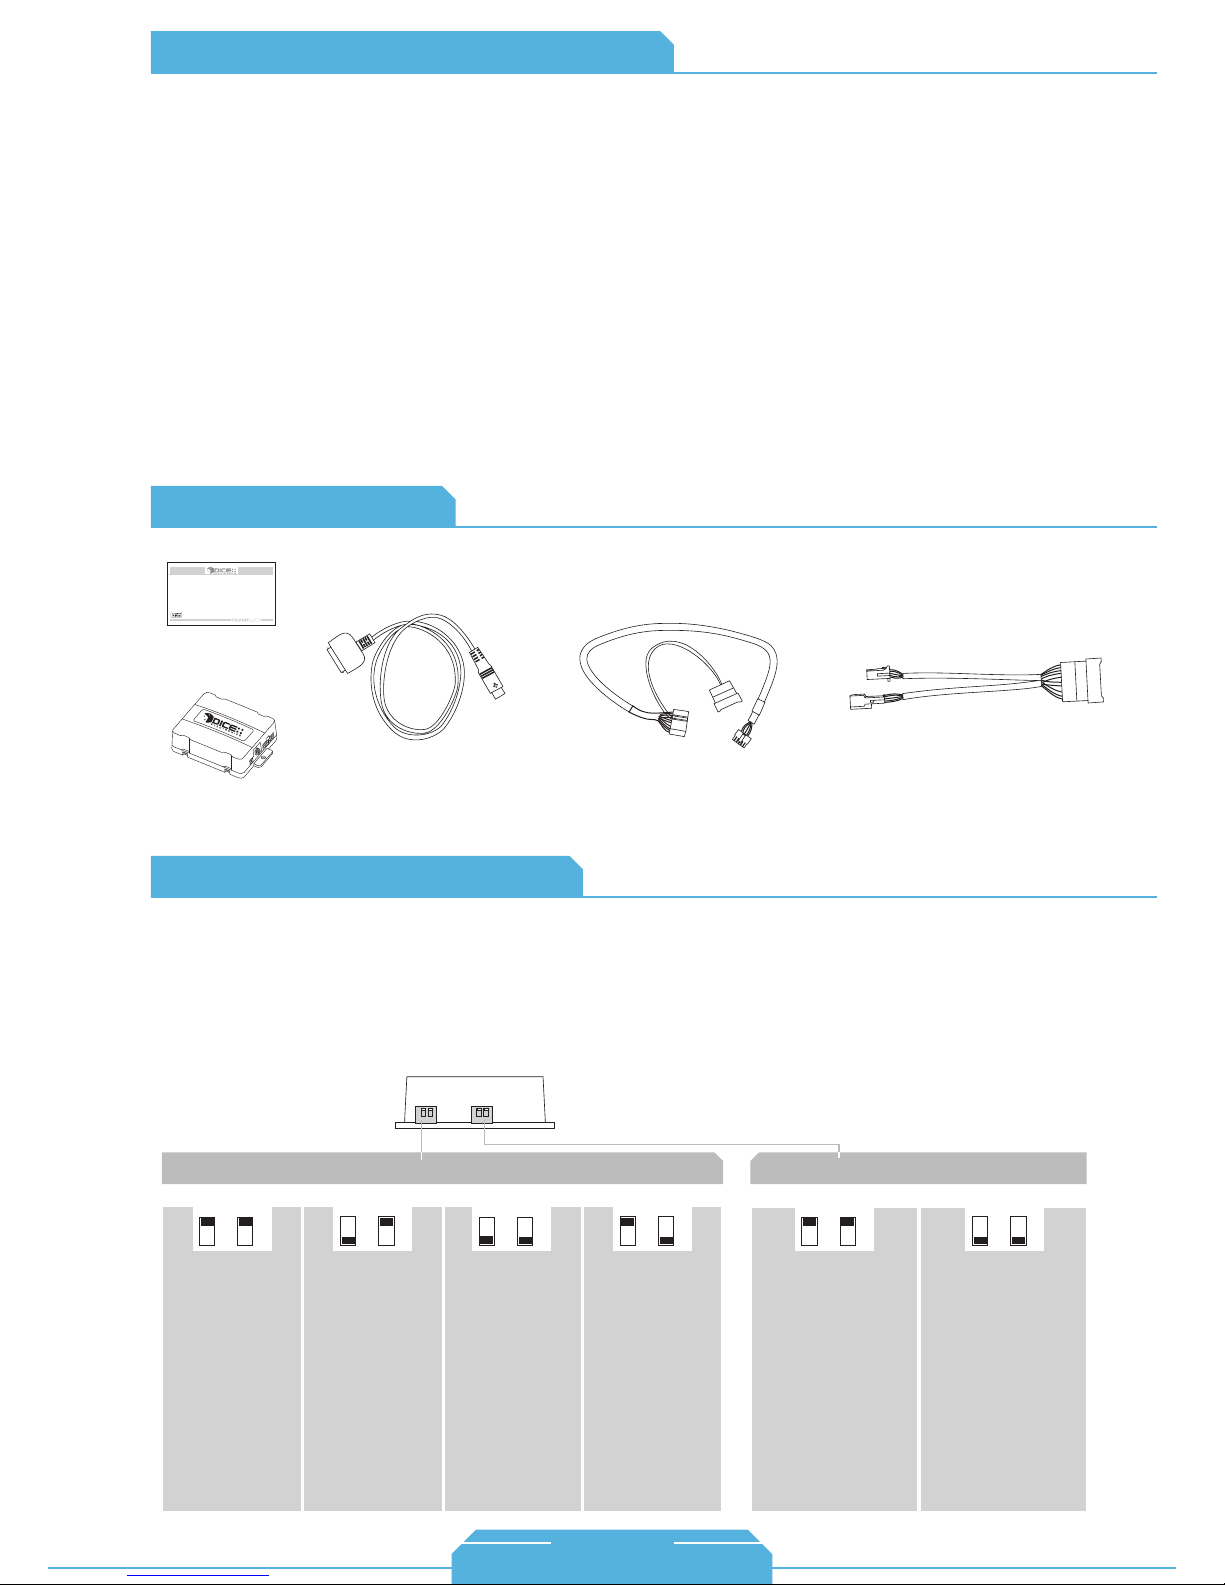
FAQs Before Purchasing the Kit
Toyo ta
Do I lose functionality of any factory-installed
devices in my vehicle that were factory
installed?
Only an external CD-changer needs to be
disabled (mainly 2004 and earlier models), other
factory options can be retained because of
DICE’s multi-source integration.
What are the different emulation modes for?
The i-Toyota-R kit offers four different modes to
be operated in for retaining factory options (the
mode options are CD-changer, Mini-DISC,
Satellite, and MP3). Depending on the radio in
your vehicle, one mode or another will offer
TEXT display support.
Content Identifier
DICE interface for iPod
Installation Guide/User Manual
user manual
If my vehicle’s factory radio does not have a
TEXT button present, does this mean my
radio won’t support text display?
No, it does not. Many late model touch-screen
navigation systems in Toyota/Lexus (2005-2009)
will have a TEXT button appear on screen to
cycle between text fields.
vehicle specific
interface module
iPod docking
cable
Toyota03 BUS connectorToyota01 BUS connector
About Dip Switch Settings
The configuration switches located on the DICE module are used to set the operation of the interface by
the installer. Incorrect dip switch settings may cause the DICE interface not to work properly or not to
operate at all. Disconnect the vehicle harness from module and cycle ignition off for 50 seconds
after changing the switches!
DICE module
Car configuration switches
CD Changer (CDC)65Mini DISC (MD) Satellite (SAT) MP3
OFF OFF
Recommended for
radios NOT
supporting
Satellite (XM) or if
factory SAT is
installed and user
wishes to retain it.
Selected vehicles
from 2003 offer CD
Text - these radios
have a Text button.
OFF
ON
Recommended for
early model year
radios with
external CD
changer. MD Text
is only available
on very few radios,
typically navigation
ones.
ON ON
Recommended for
radios if SAT
module is not
present or
disconnected and
an external CD
changer is used.
SAT mode is
supported by
high-end radios in
selected models
from 2003 in the
US only.
OFF
Recommended for
late model
Navigation radios
only where
factory SAT is
installed and user
wishes to retain it.
Radios must
support MP3 text.
New MP3
navigation cars
support only MP3
text not CD Text.
ON
iPod configuration switches
“Locked” “iPod”
OFF OFF
DefaultDefault
This is best selected
when Text display is
supported by the
radio. After connecting
the iPod you will see
the DICE logo on the
screen. After the
initialization the iPod
will be locked for an
increased interface
functionality.
ON ON
This is best selected
when Text display is
NOT supported by the
radio. Track numbers
and times are not
synchronized between
the iPod and radio.
Because there is less
data transfer between
the iPod and radio, this
mode has the fastest
response time.
Content is selected
on the iPod.
1-888-342-3999
www.diceelectronics.com
Page 67
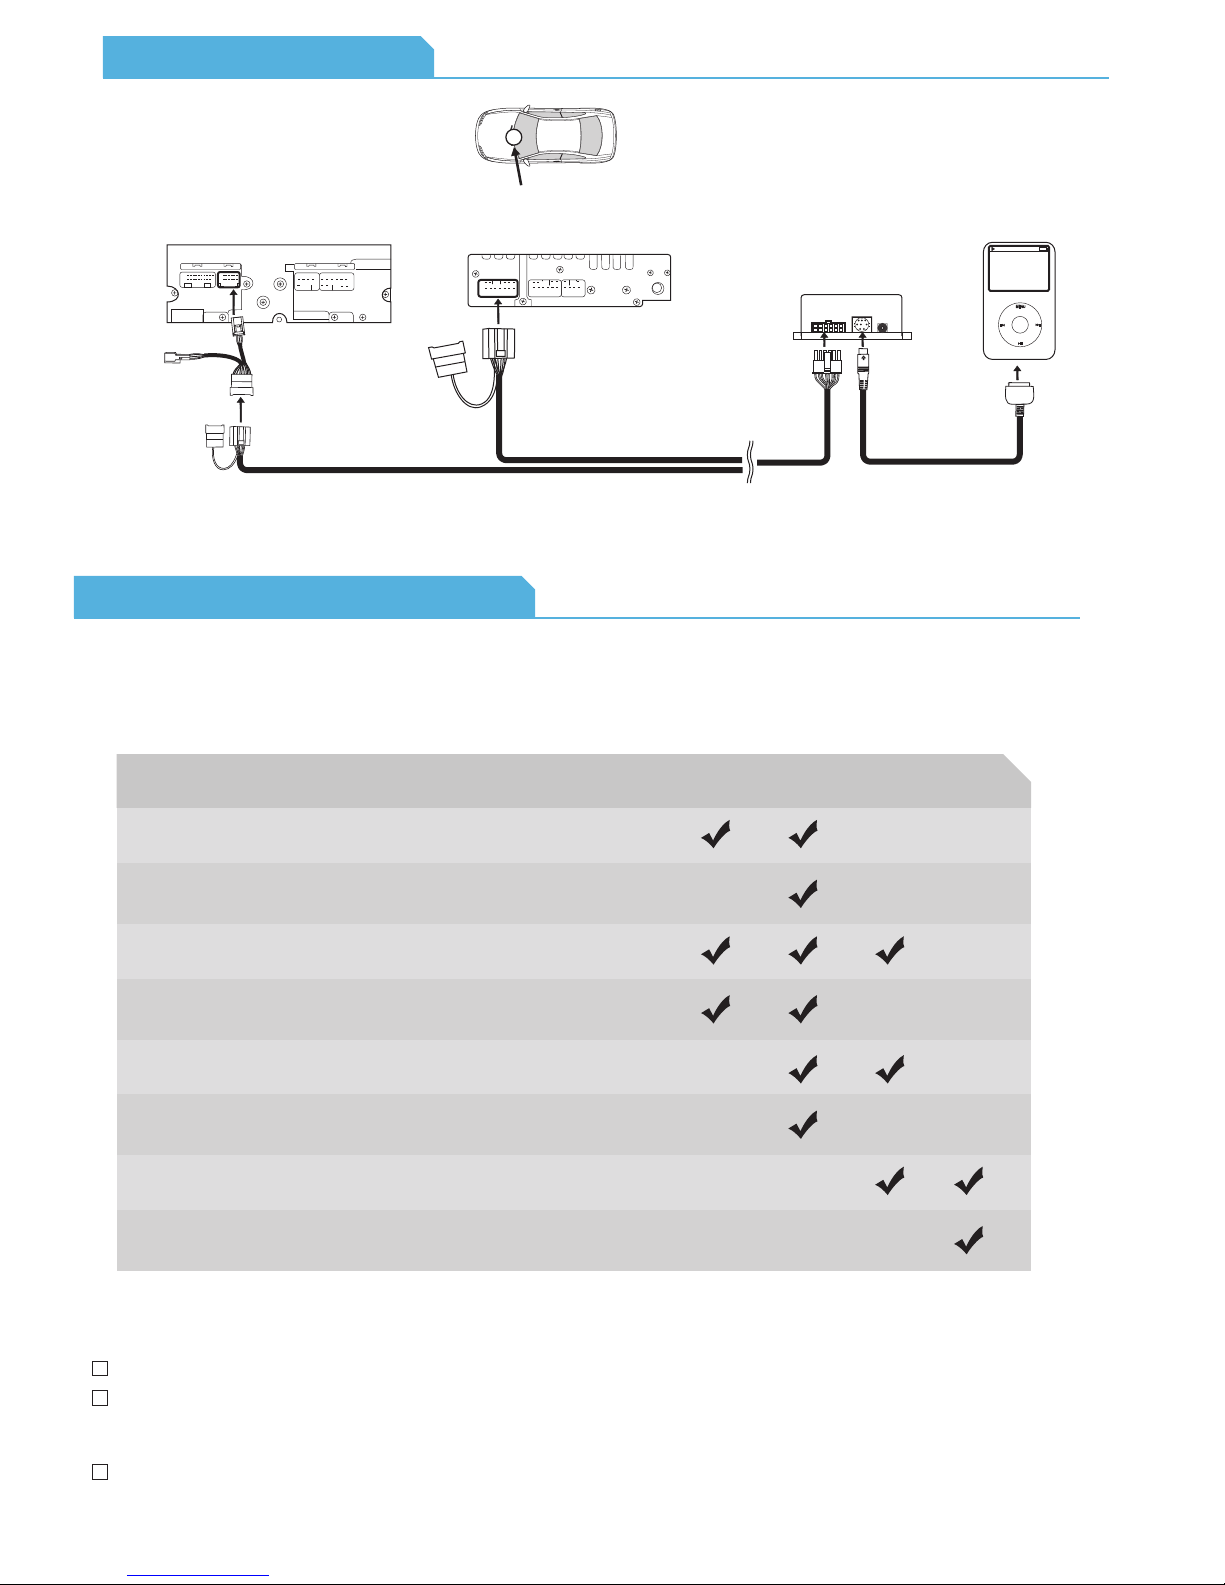
Connection Diagram
radio location
new style radio with small connector
Toyota03 BUS connector
cable receptacle
Toyota01 BUS connector
extension
receptacle
cable receptacle
older style radio with large connector
Toyota01 BUS connector
module
Toyota01 BUS
connector
Note:
Plug the factory connection to the cable receptacle
if it was removed from the radio.
Installation Tips / Check List
Identify your audio system
Select the emulation that best suits your vehicle. The following chart identifies the
recommended emulation for the listed radios. Note that your vehicle may support more
than one type of emulation.
Radios External CDC Factory SAT CDC MD
iPod
MENU
iPod docking
cable
*
SAT
**
MP3
00-02 Tape/in-dash CD
00-02 Tape/in-dash CD
03-06 Tape/CD
03-06 Tape/CD
03-06 Tape/CD
03-06 Tape/CD
06-09 MP3 Navigation
06-09 MP3 Navigation
not installed or
disconnected
present not available
not installed or
disconnected
not installed or
disconnected
present not installed
present present
not available
not installed
present
not presentnot available
presentnot available
* Not all radios support MD mode. If an external MD changer is present, it must be disconnected.
Toyota/Lexus radios are generally secured in with 10mm bolts.
For 2004-2009 Lexus RX models, after removing the panel in front of the shifter there will be four (10mm)
bolts that need to be removed for the radio to slide out. Two are easily visible, but the other two are deeper
inside at an upwards angle.
Setting up the i-Toyota-R in SAT mode can offer a more intuitive (user-friendly) interface.
66
Toyo ta
Page 68
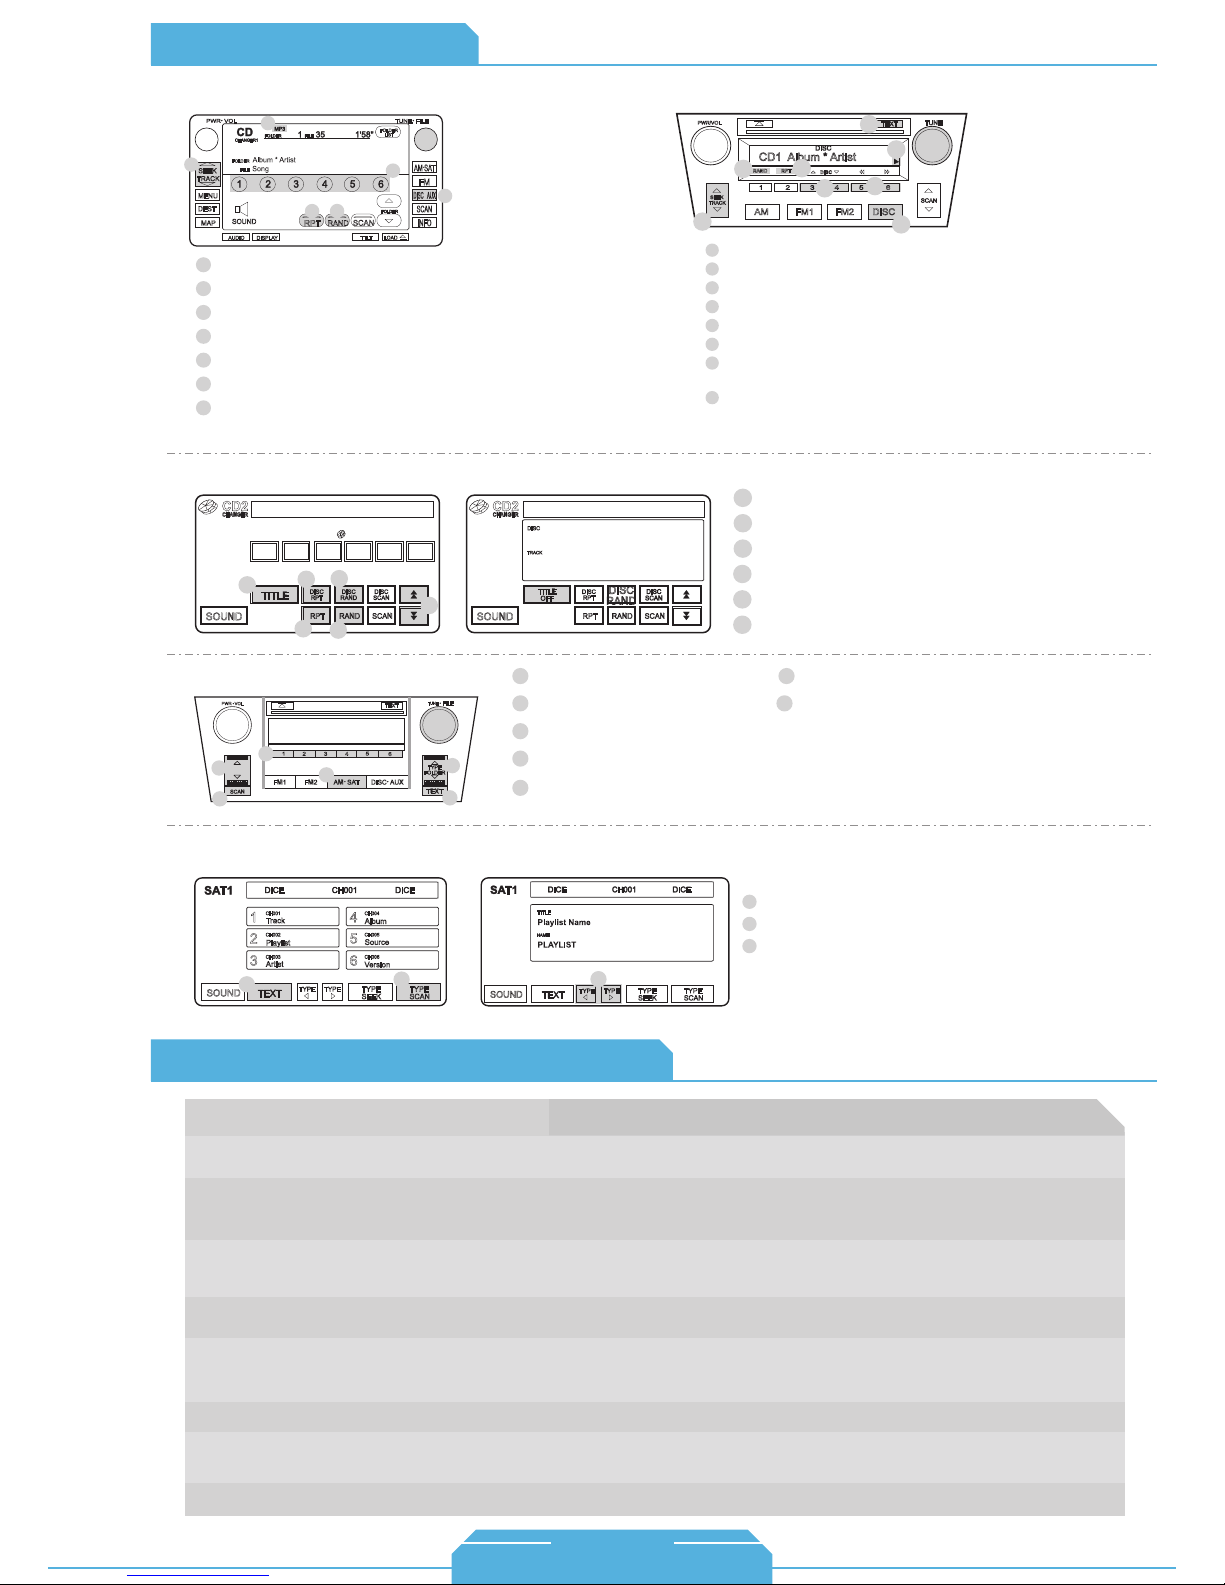
Toyo ta
Operation Overview
MP3 emulation CDC/MD emulation (without Navigation)
7
2
6
5
Source selector
1
Press to change Track.
2
Turn to change Track.
3
Press to select PRESET numbers 1 - 6.
4
Press RPT short to repeat one, long to repeat all.
5
Press RAND short to Shuffle Songs, long to Shuffle Albums.
6
Source indicator
7
3
4
1
CDC/MD emulation (with Navigation)
CD2
DISC 1 TRACK 99 1' 24"
CHANGER
1 2 3 4 5 6
TITLE
2
3
1
SOUND
DISC
4
DISC
DISC
RAND
SCAN
DISC
RPT
RPT RAND SCAN
5
6
CD2
CHANGER
SOUND
2
1
2
3
4
5
6
7
8
DISC 1 TRACK 99 1' 24"
DISC
Playlist Name
TRACK
PLAYLIST
TITLE
DISC
DISC
OFF
RPT
RPT RAND SCAN
RAND
DISC
SCAN
CD1 Album * Artist
5
6
Source selector
Press to change Track.
Press to change modes.
Press to RW or FFW.
Press RAND short to Shuffle Songs, long to Shuffle Albums.
Press RPT short to repeat one, long to repeat all.
Arrow shows if additional information is available. Hold TEXT
button for more information.
Press the TEXT button to cycle between
display fields.
Press TITLE to toggle between screens.
1
Press DISC RPT to Repeat All.
2
Press RPT to Repeat One.
3
Press DISC RAND to shuffle Albums.
4
Press RAND to Shuffle Songs.
5
Press to change Track.
6
DISC
8
7
4
3
1
Source selector
SAT emulation (without Navigation)
FILE
TYPE
FOLDER
3
7
6
SAT1 Album * Artist
4
2
SCAN TEXT
5
1
FM1 FM2 AM SAT DISC AUX
1
Press to change Track.
2
Turn to change Track.
3
4
Use Presets to change modes.
Use Scan to enable Shuffle Songs.
5
SAT emulation (with Navigation)
1
2
3
Toyota Specific Technical Notes
Problem
Text is not displaying in selected emulation.
Radio/Nav display only shows DISC/Preset and
Track/Channel numbers, but there is no iPod
control
Cannot select the interface.
Radio/ steering wheel controls do not operate
iPod.
The interface operates very intermittently and
erratically in SAT mode.
No audio from iPod source.
iPod does not charge.
Music is distorted or sound level is too low.
Identify your audio system (refer to Installation tip section) first and set switches
accordingly. Note that your vehicle may support more than one mode.
Select DISC/Preset 5 and make sure it is set to Track/Channel1.
Check DIP switch settings. With the ignition OFF disconnect vehicle harness
from module for a few seconds and reconnect. Verify that the correct button is
used to access the interface.
Reset iPod and make sure the most recent iPod firmware is installed. Check vehicle
user manual on how steering wheel controls work.
Make sure that if the unit is being operated in SAT mode, the factory satellite tuner is
disconnected in the vehicle. Otherwise, the unit will have to be set up in a different
emulation mode (CD, MP3, MD).
Reset the iPod. Verify proper connection to iPod/interface.
Check all connections. See if iPod charges while connected to computer or wall
charger. You may need to reset the iPod.
Make sure all EQ and BASS boost options are turned off on your iPod.
Press the TEXT button to toggle between available TEXT fields.
6
Use the TYPE button to engage/disengage RW or FFW
7
Press TEXT button to toggle between mode screen and title screen
1
Use TYPE SCAN to enable Shuffle Songs
2
Use the TYPE button to engage/disengage RW or FFW
3
Solution
67
1-888-342-3999
www.diceelectronics.com
Page 69
VOLKSWAGEN
Integration for iPod
68
Page 70
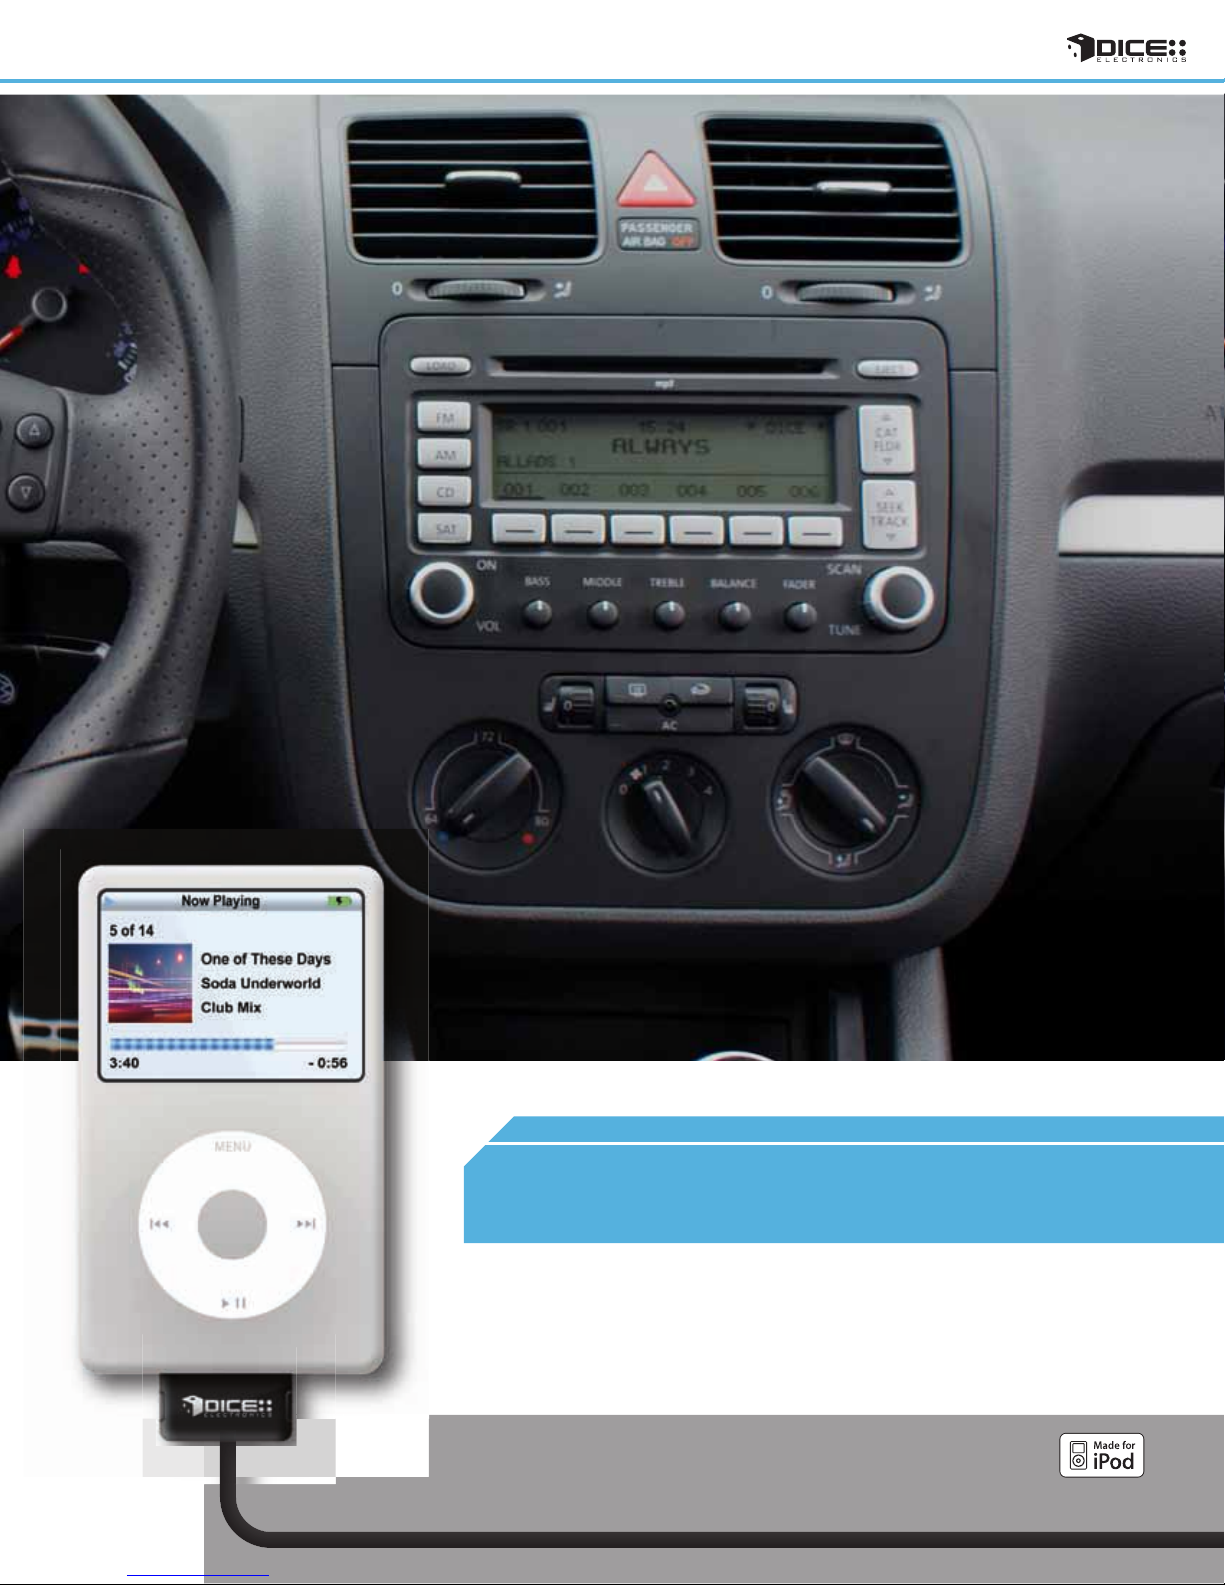
69
VOLKSWAGEN
vehicle specific integration for iPod
Page 71
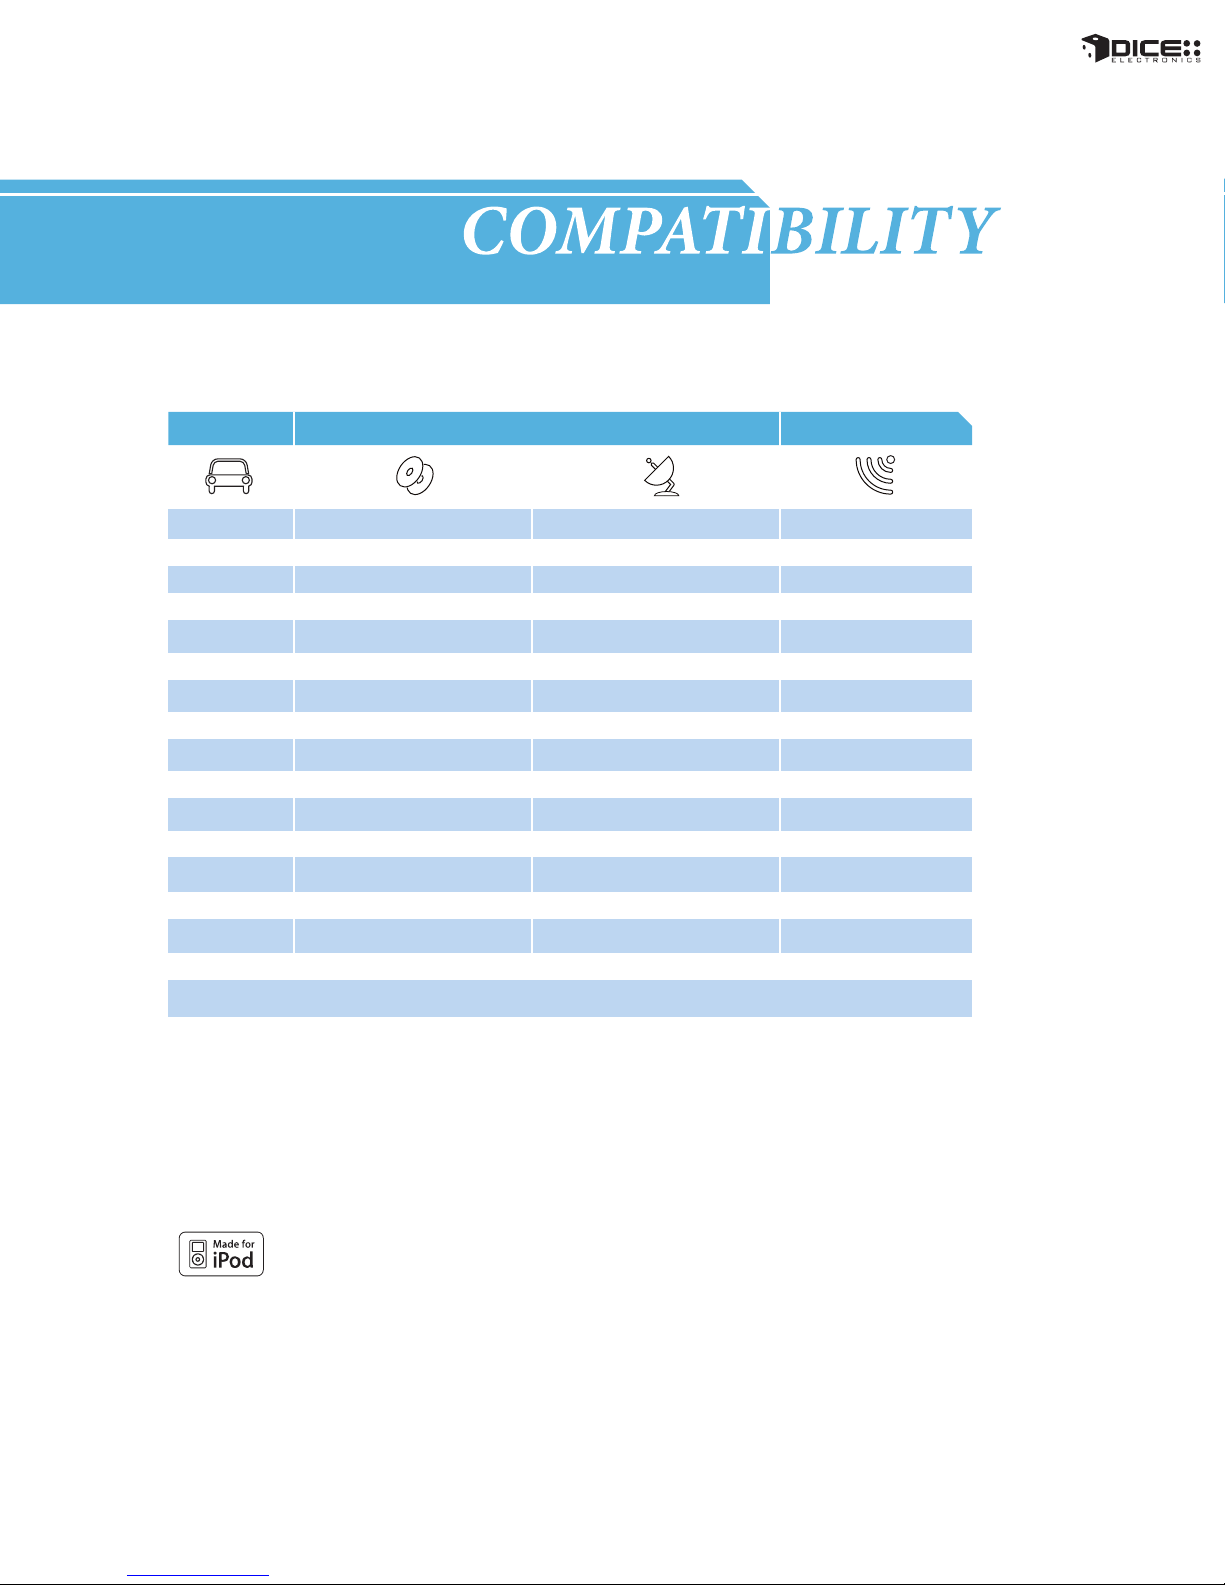
chart
Vehicle Vehicle Specific Integration Kits Universal Kit
iPod CDC KitVolkswagen CDC Note iPod FM Kit
Beetle
2004 - 2008
EOS
2006 - 2008
Golf/GTI/R32
2005 - 2008
2002 - 2004
Jetta
2005 - 2008
2002 - 2004
Passat
2005 - 2008
2002 - 2004
Rabbit
2006 - 2009
Touareg
2004 - 2008
Note:
1. Standard kit requires that factory satellite be disconnected. Wiring harness must be modified to retain satellite radio.
See diagram on “Installation Tips/Check List” on the following pages.
2. No Text display.
3. The radio must have a SAT button.
4. Text display supported.
5. External CD-changer is disabled.
6. 2008 Touareg does not accept the harness modification, satellite radio must be disabled.
i-VW-R 1, 2, 5
i-VW-R 1, 2, 5
iPod SAT Kit SAT Note
i-Audi/VW-SAT 3, 4
3, 4
N/A
i-Audi/VW-SAT 3, 4
N/A
i-Audi/VW-SAT 3, 4
N/A
FMRDS
FMRDSi-VW-R 1, 2, 5 i-Audi/VW-SAT 3, 4
FMRDSi-VW-R 1, 2, 5 i-Audi/VW-SAT
FMRDSi-VW-R 1, 2, 5
FMRDSi-VW-R 1, 2, 5
FMRDSi-VW-R 1, 2, 5
FMRDSi-VW-R 1, 2, 5
FMRDS
FMRDSi-VW-R 1, 2, 5 i-Audi/VW-SAT 3, 4
FMRDSi-VW-R 2, 5, 6 i-Audi/VW-SAT 3, 4
70
Volkswagen
Page 72
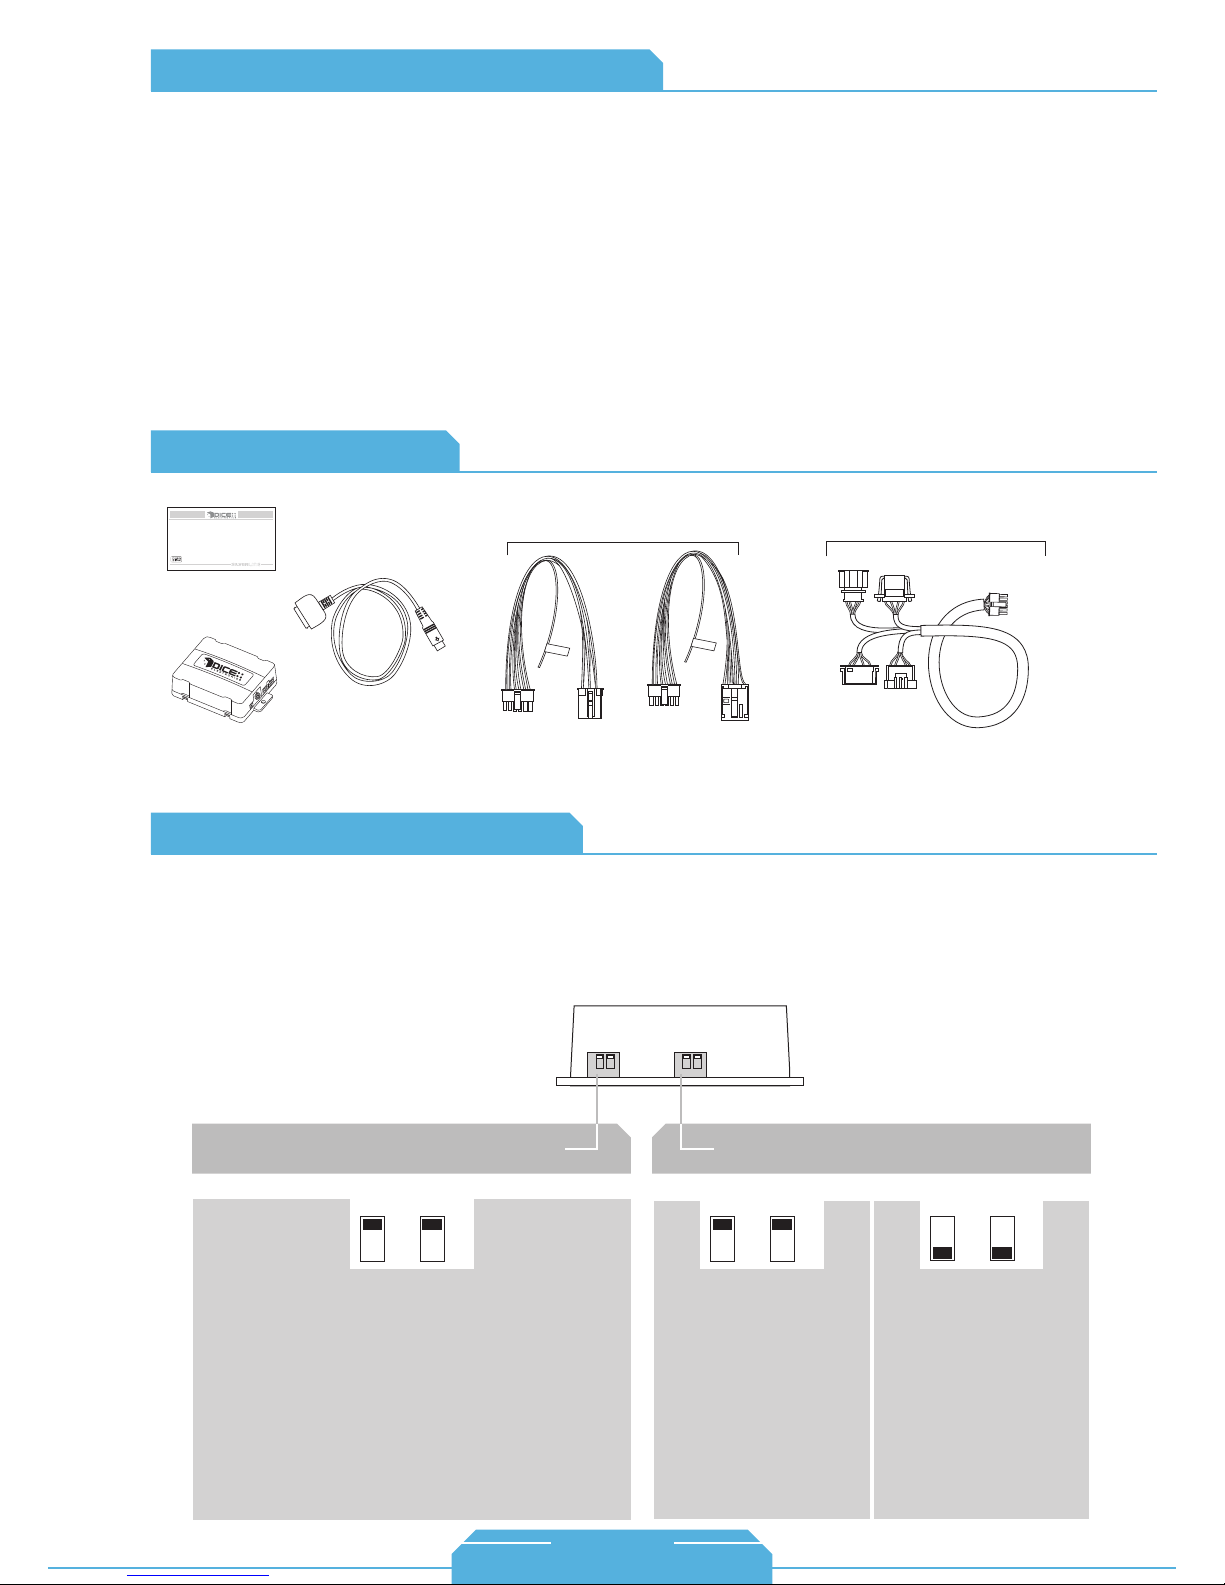
FAQs Before Purchasing the Kit
Content Identifier
Volkswagen
Is factory satellite radio retainable in my
Volkswagen?
Yes, with the i-VW-R the satellite radio can be
retained by removing three wires from the factory
connector and plugging them into our connector.
Please check Installation Tips/Check List.
How can I tell if my VW radio will support the
text-capable i-Audi/VW-SAT kit?
If your factory VW radio has a SAT button
present, it is compatible with our i-VW-SAT and
will support text display.
DICE interface for iPod
Installation Guide/User Manual
user manual
vehicle specific
interface module
iPod docking
cable
for i-VW-R kit:
VW-R1
harness
(blue)
Where is the Satellite tuner located in my
vehicle?
On VW vehicles, the SAT tuner is normally
located either under the front passenger seat or
in the trunk behind the trunk lining.
for i-Audi/VW-SAT kit:
Ground
wire
VW-R2
harness
(white)
i-Audi/VW-SAT harness
About Dip Switch Settings
The configuration switches located on the DICE module are used to set the operation of the interface by
the installer. Incorrect dip switch settings may cause the DICE interface not to work properly or not to
operate at all. Disconnect the vehicle harness from module and cycle ignition off for 50 seconds
after changing the switches!
DICE module
for i-Audi-R/i-VW-R kit:
Car configuration switches
CD Changer (CDC)
OFF OFF
Defult
Switches should remain in the default OFF position.
iPod configuration switches
Selected emulation
“Locked” “iPod”
OFF OFF
Defult
This is best selected when
advanced controls on the
radio are used. After the
initialization the iPod will be
locked for an increased
interface functionality.
This is best selected when
text display is not
supported by the radio and
user wishes to retain iPod
control. Track numbers
and times are not
synchronized between the
iPod and radio. Because
there is less data transfer
between the iPod and radio,
this mode has the fastest
response time. Content is
selected on the iPod.
ON ON
71
1-888-342-3999
www.diceelectronics.com
Page 73
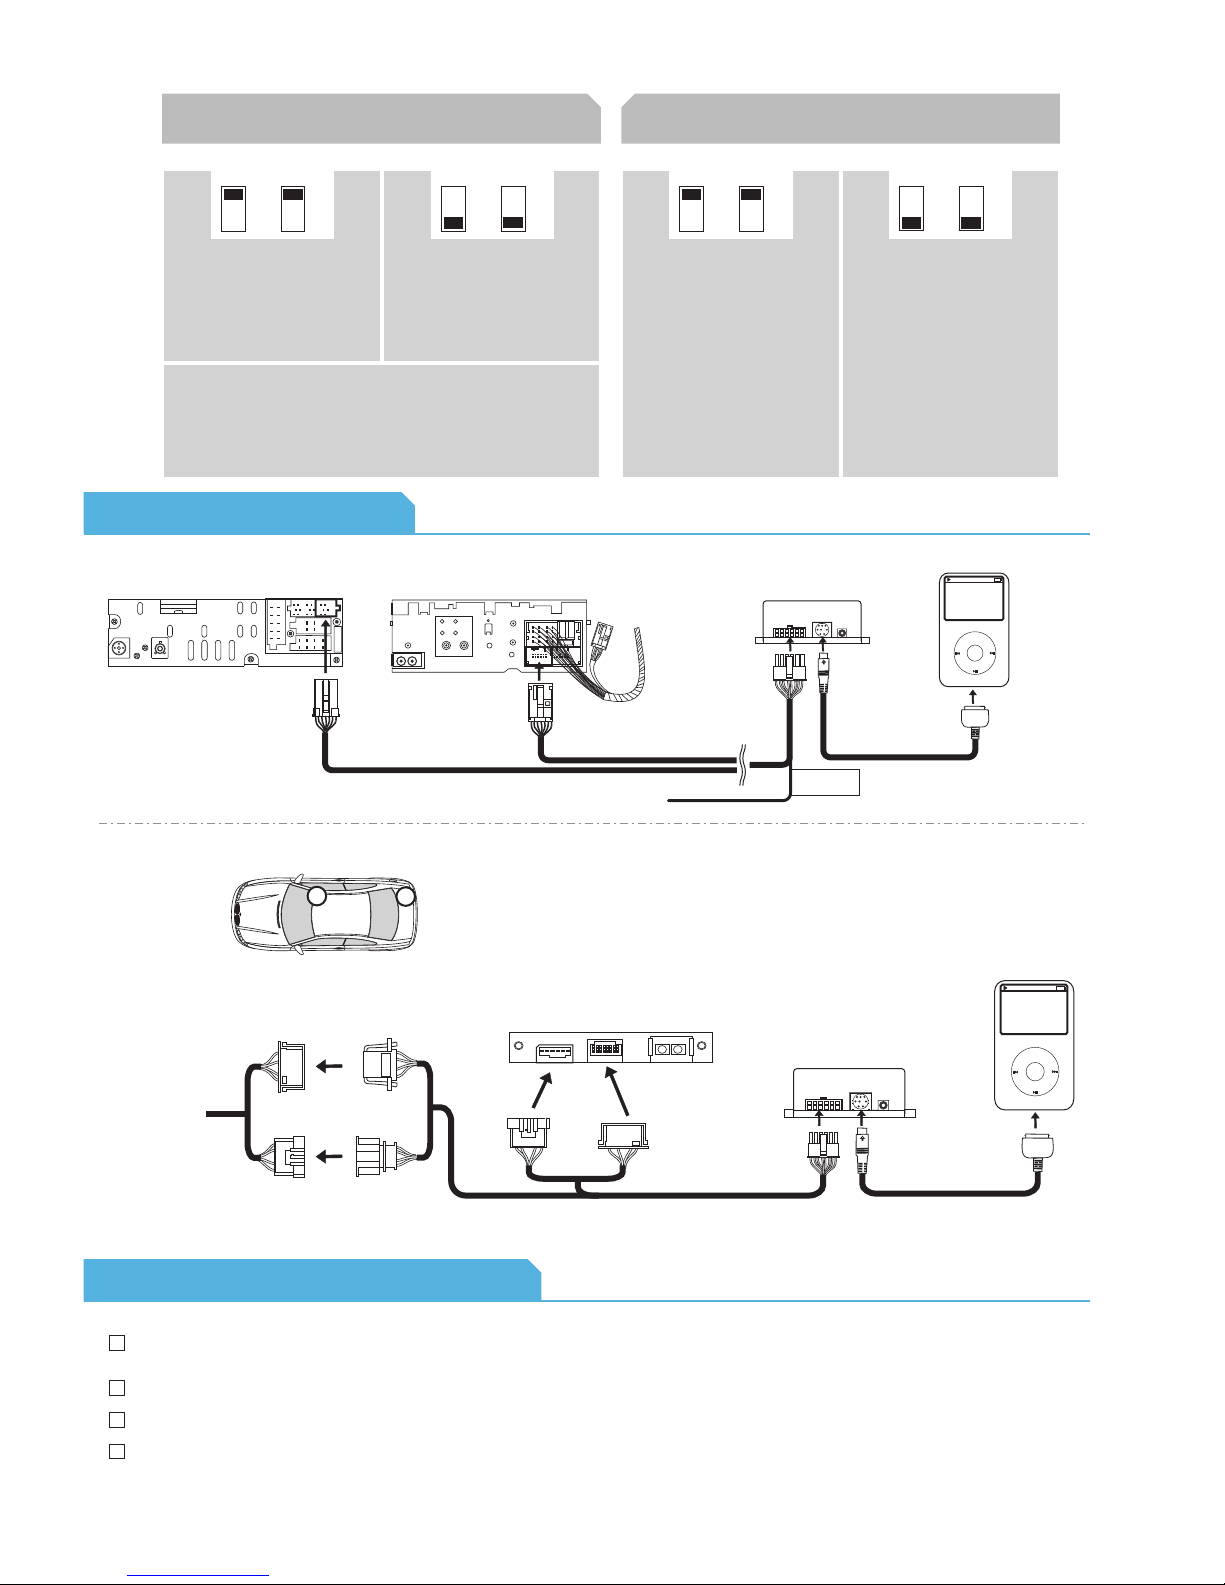
(About Dip Switch Settings continued)
for i-Audi-SAT kit:
Car configuration switches
Multi-line display Single-line display
OFF OFF
This is the recommended
setting for radios that have
multiple text fields
displayed in Satellite
emulation mode.
This type of emulation provides full text display on the radio. If
Satellite (XM/Sirius) is equipped it must be disconnected to
operate integration in this emulation mode. XM/Sirius receiver is
usually located in the trunk or under the passenger seat.
Note: Please call to confirm vehicle support prior to installation.
Default
Connection Diagram
for i-VW-R kit:
older radio (not satellite capable)
10
10
VW-R1 harness VW-R2 harness
ON ON
This setting is
recommended for radios
where there is only 1 text
field displayed in Satellite
emulation mode.
10
iPod configuration switches
“Locked” “iPod”
OFF OFF
It is best selected when text
display is supported by the
radio. After connecting the
iPod you will see a logo or a
checkmark indicating that the
iPod is locked. After the
initialization the iPod will be
locked for an increased
interface functionality.
Default
module
vehicle specific
connector
It is best selected when text
display is NOT supported
by the radio. Track numbers
and times are not
synchronized between the
iPod and radio. Because
there is less data transfer
between the iPod and radio,
this mode has the fastest
response time. Content is
selected on the iPod.
iPod docking
cable
ON ON
iPod
MENU
ground
wire
to ground
for i-Audi/VW-SAT (retains satellite radio) kit:
1
iPod
SAT Tuner
module
vehicle specific
connector
iPod docking
cable
From factory radio
Possible Tuner Location
factory SAT
harness in vehicle
2
Installation Tips / Check List
For the wiring harness(es) that plug into the back of the radio, the ground wire can be attached to the extended screw on the back of the radio for a
sufficient ground point.
Earlier model VW’s (2001-2005) can be easily removed with proper radio removal keys.
With the non-text i-VW-R, the kit will be more user-friendly when installed in iPod mode because it will keep the direct iPod controls unlocked.
2006-2008 Jetta and Golf have the same dash setup which makes the installation process similar. The trim around the radio needs to be popped off first,
then the top vent. The screws needed to be removed are Torx size T15.
MENU
72
Volkswagen
Page 74
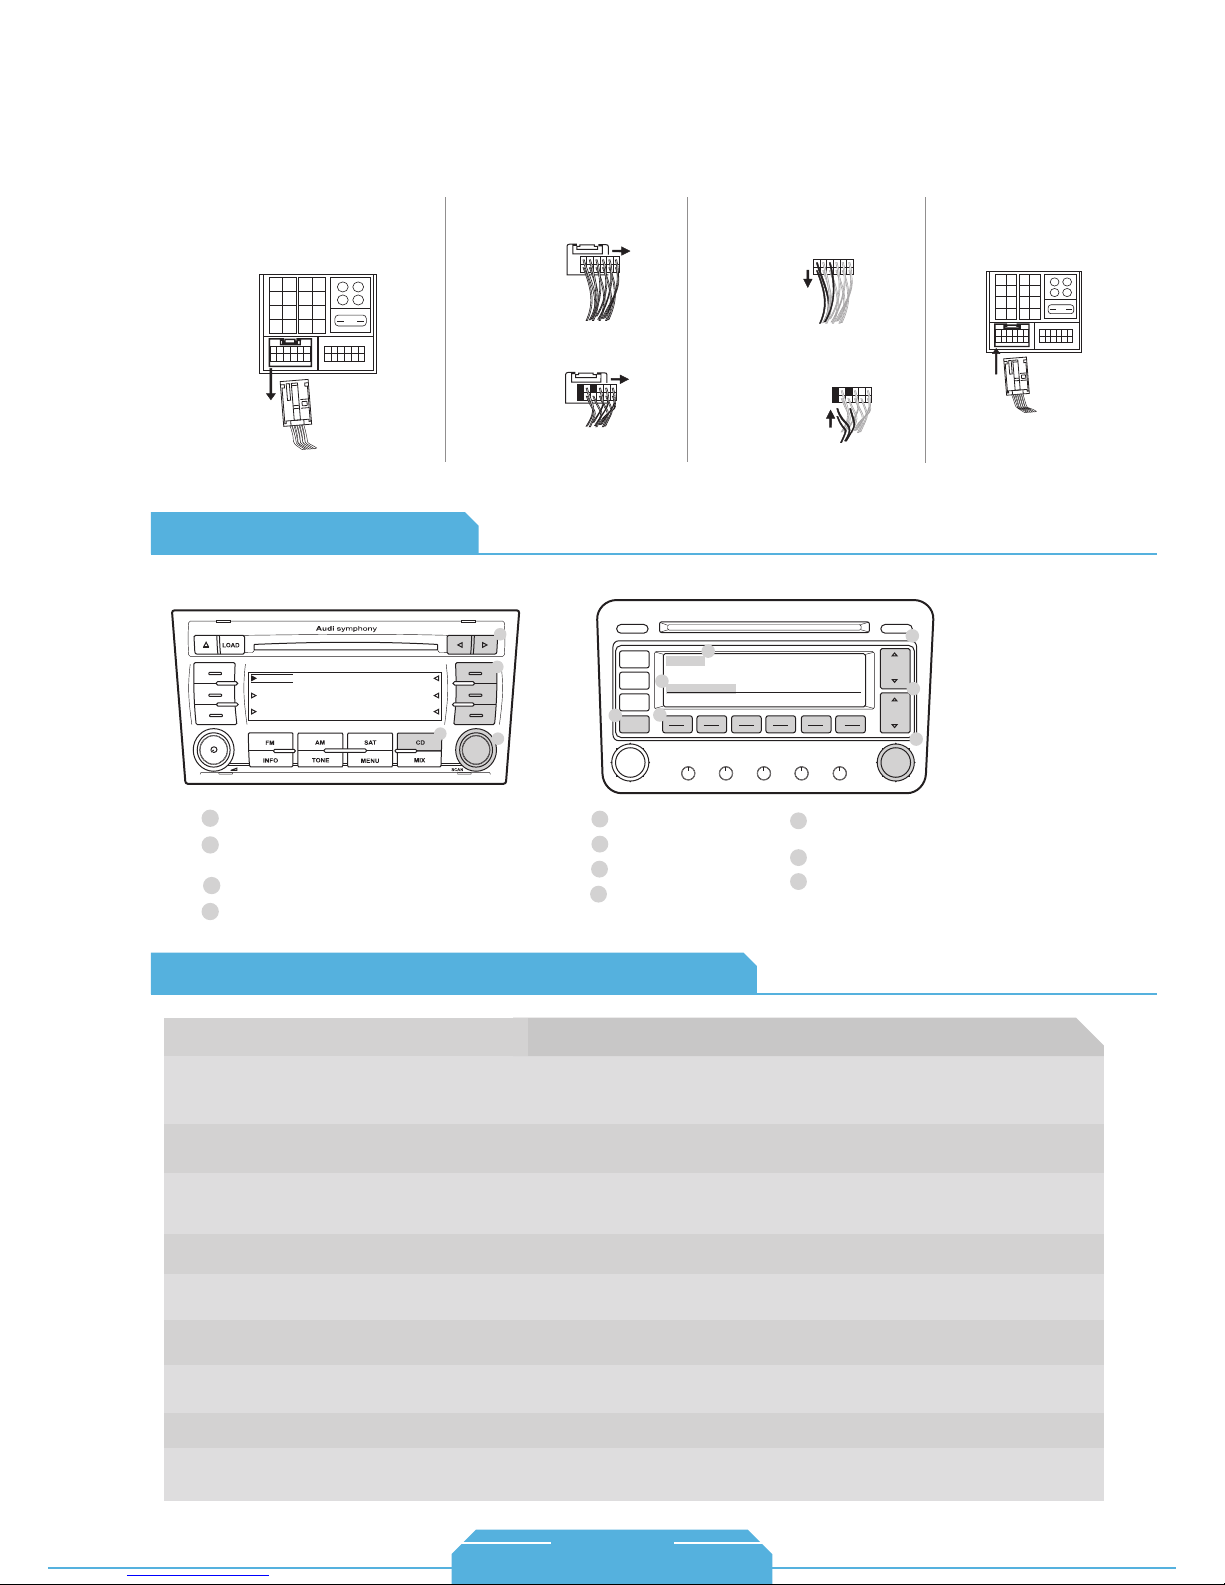
(Installation Tips/Check List continued)
Cable modification (only for i-VW-R):
• If vehicle is equipped with factory Satellite radio and desired to be retained, a harness modification is required
• 2008 Touareg does not accept this modification, satellite radio must be disabled.
Operation Overview
Volkswagen
Disconnect main radio harness and
1.
locate SAT connector. Remove it from
main harness by pressing on the
release tab of the SAT connector.
10
1 CD EXT
2 CD EXT
3 CD EXT
CD 01:52
TRACK 12
Slide out the inner part of the
2. 4.
SAT connector from plastic
housing.
3.
Disassemble the VW-R2 connector
the same way as the factory SAT
connector.
2
CD EXT 4
CD EXT 5
CD EXT 6
3
1
4
Remove the SAT wires from the
factory connector by releasing the
pins with a small screw driver or
ball-point pen.
Relocate wires to VW-R2
5.
connector keeping the same
order and location.
SAT emulationCDC emulation
LOAD EJECT
FM
AM
CD
1
SAT
2
XM 1 001
7
ARTIST * ALBUM
001 002 003 004 005 006
5
ON
VOL
Club Mix
BASS MIDDLE TREBLE BALANCE FADER
SCAN
TUNE
FLDR
SEEK
TRACK
Put plastic connector covers back
6.
on. Insert VW-R2 connector to
factory VW main harness.
7.
Connect ground wire to chassis
of radio.
6
CAT
3
4
10
Source selector
1
Press to change Track, hold to Rewind
2
or Forward.
Press to change DISC.
3
Turn to change Track.
4
Source selector
1
Source indicator
2
Press to change track.
3
Turn to change track.
4
Volkswagen Specific Technical Notes
Problem
Check DIP switch settings. With the ignition OFF disconnect vehicle harness
Cannot select the interface.
Radio/ steering wheel controls do not operate
iPod.
Radio/ steering wheel controls do not operate
iPod, but audio is still present.
Interface has erratic recognition or none at all.
No text display.
No audio from iPod source.
iPod does not charge.
Music is distorted or sound level is too low.
from module for a few seconds and reconnect. Verify that the correct button is
used to access the interface (CDC or SAT).
Reset iPod and make sure most recent iPod firmware is installed. Check vehicle user
manual on how steering wheel controls work.
Select DISC/Mode 5 and Track/Channel 1. Switch back to DISC/Mode 1 and try
changing Tracks. DISC5 (Mode 5) Track 02 (Channel 02) is AUX mode and not correct
for the iPod.
Make sure that the ground wire harness is attached to back of radio.
Set iPod switches to OFF for "Locked" mode. Text display is only supported on
SAT-capable radios, with the i-Audi/VW-SAT kit
Reset the iPod. Verify proper connection to interface.
Check all connections. Reset iPod and make sure iPod charges while connected to
computer or wall charger.
Check and make sure all EQ and BASS boost options are turned off on your iPod.
5
6
7
Solution
On selected radios you may use
these buttons to select Modes 1-6
Press to cycle through Modes 1-6.
This text field may not be shown on
all radios.
Correct DIP switch settings, but still no text
display.
73
Select DISC 6 to set text output to the correct location.
1-888-342-3999
www.diceelectronics.com
Page 75
AUX
universal
The perfect solution for aftermarket head units.
DICE AUX kits target specialty installers who want to have a high quality audio output
from an iPod and need an additional AUX input. This product offers an easy upgrade
path to customers who use third party vehicle interfaces for SAT radio integration and
now want an iPod without losing the existing SAT integration. For users of aftermarket
head units featuring direct audio input, this solution delivers rock solid audio from the
iPod. The extra AUX port allows the connection of other MP3 players or any other
audio device. 5 volt (USB) charge circuitry is built in to support even the latest
iPod/iPhone models!
74
Page 76

FAQs Before Purchasing the Kit
Auxiliary
How is the DICE Aux kit different from the
car’s factory AUX jack?
The DICE kit offers 5 volt (USB) charge of the
iPod, allows for audio level matching /
adjustment, and employ isolation amplifiers to
remove any digital noise caused by the hard
drive and communication.
If my radio system has only a 3.5mm
auxiliary input, can I still connect the DICE
AUX kit?
Yes, however an additional audio cable is
required that connects from RCA output to
3.5mm mini-jack.
Content Identifier
DICE interface for iPod
Installation Guide/User Manual
user manual
Is there any control offered from the radio?
Volume control must be adjusted from the
radio/steering wheel. Other controls are done
directly through the iPod.
Since all music control is done through the
iPod directly, where is the best location for
the iPod?
Generally, routing the iPod cable to the center
console provides the easiest access to the iPod.
However, with our iPod cradle you can have the
iPod mounted right on the dash for the simplest
accessibility.
+12V
GND
REM
universal
vehicle specific
interface module
Connection Diagram
AUX Radio
Note: some radios will not
have RCA inputs and
will require custom installation.
iPod docking
cable
RCA connectors:
-Red: Right channel
-White: Left channel
+12V GND REM
AUX audio/power cable
module
vehicle specific
connector
iPod docking
cable
iPod
MENU
75
1-888-342-3999
www.diceelectronics.com
Page 77
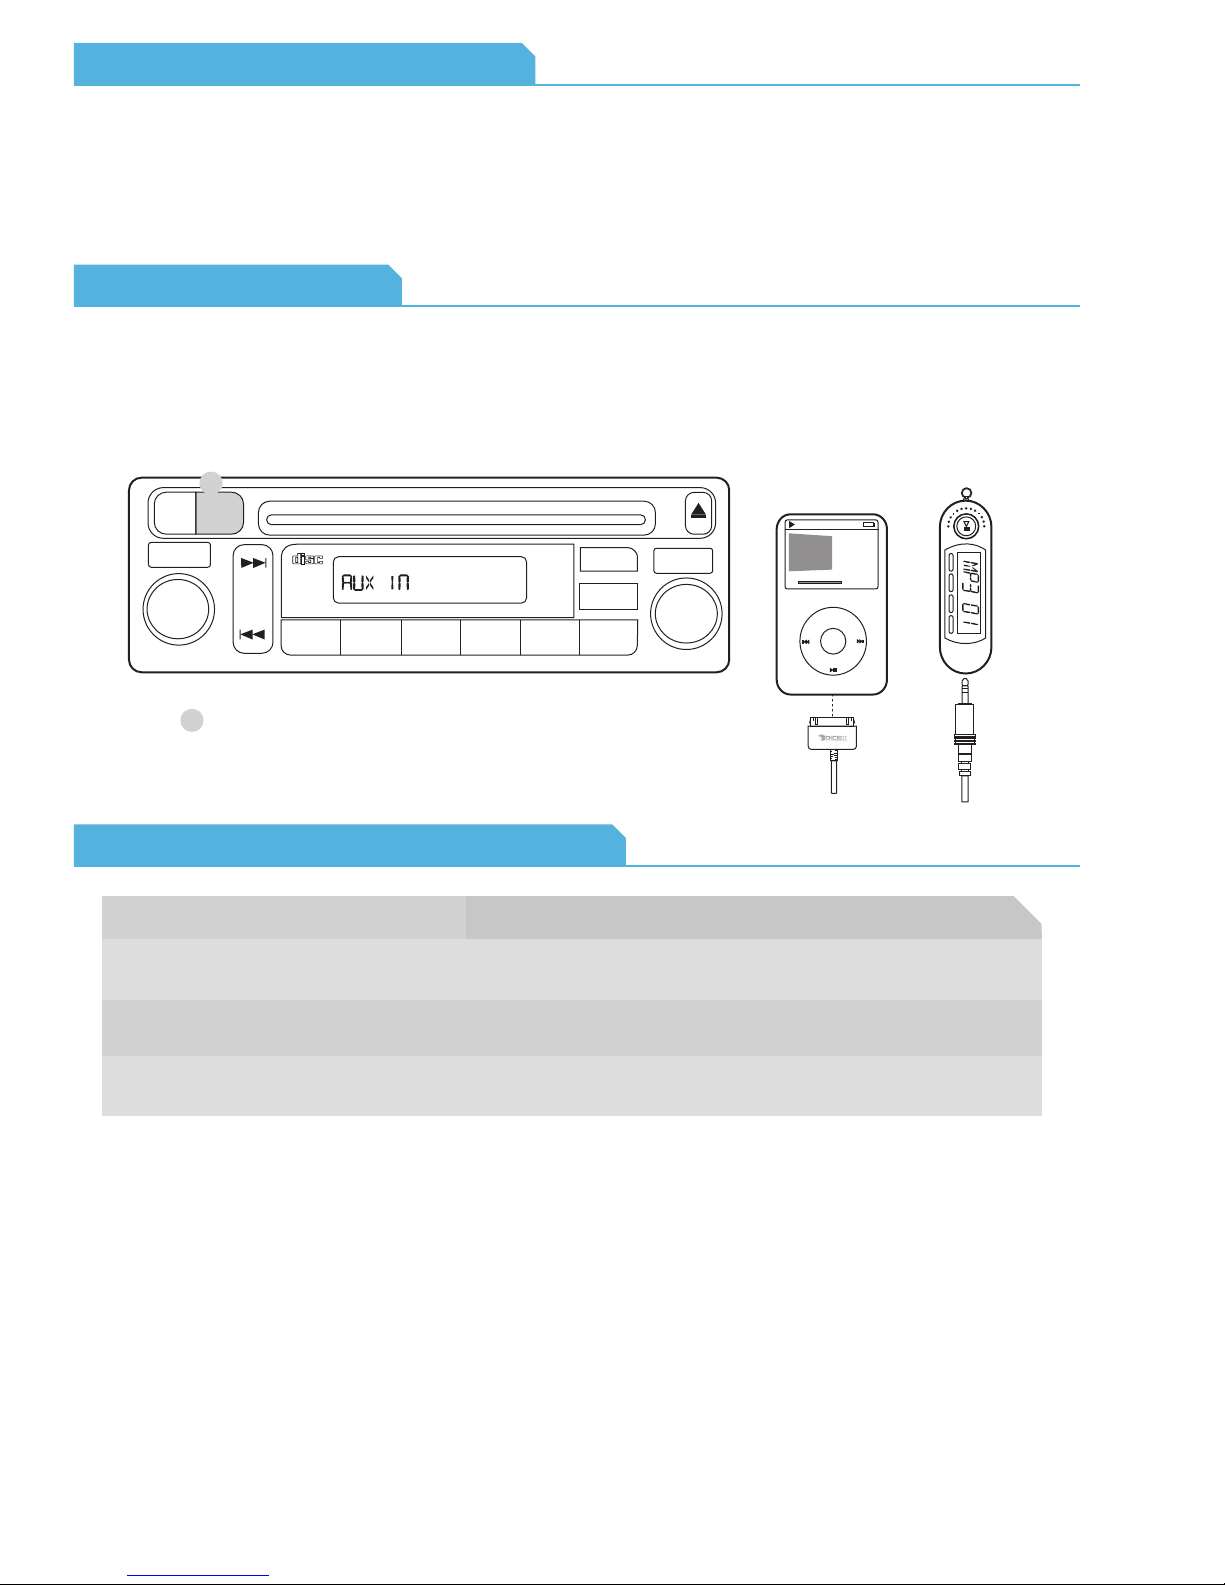
Benefits of the DICE AUX kit
• 5V USB iPod charging is supported as well as the original 12V firewire charging
• Signal conditioning is implemented that removes noise from the iPod
• Connect any other audio device to AUX input
• When the iPod is disconnected, an automatic switch initiates the auxiliary input on the DICE module
• Dual potentiometers are integrated into the DICE module for setting desired iPod and AUX audio levels
Operation Overview
Using the AUX integration
Connect the iPod to the dock cable and select the auxiliary source on the radio. The charging indicator should appear on the iPod
and a selected song will start to play. If an additional audio device is connected through the 1/8” mini-jack, it will become active
when the iPod is disconnected.
1
AMFMCD
AUX
VOL
PUSHPWR
SEEK
SKIP
COMPACT
DIGITAL AUDIO
REW1PLAY/PROG2FF
3
CLOCK
NR
DISC-
4
5
H M R
SCAN
RPT
A.SEL
RDM
DISC+
DISC
Song Title
Artist Name
TUNE
PUSHMODE
6
Album Name
1 of 12
2:42 -1:16
MENU
AUX source selector
1
NOTE: Some vehicles require the ignition to be in the on position to provide
ACC power. In this case the interface unit will not function until ignition is
turned on.
Auxiliary Specific Technical Notes
Problem
iPod and auxiliary input sound levels are much
different.
iPod will not stop charging if left connected
with the vehicle shut off.
Auxiliary device is connected to the 3.5mm
mini-jack, but the iPod continues to play.
Adjust sound level through potentiometers on DICE module.
Make sure the ignition wire (REM) is attached to a 12V switched source so that the
DICE unit receives a shut-off signal.
The iPod must be disconnected for the auxiliary input on the DICE module to be
activated.
Solution
universal
76
Auxiliary
Page 78
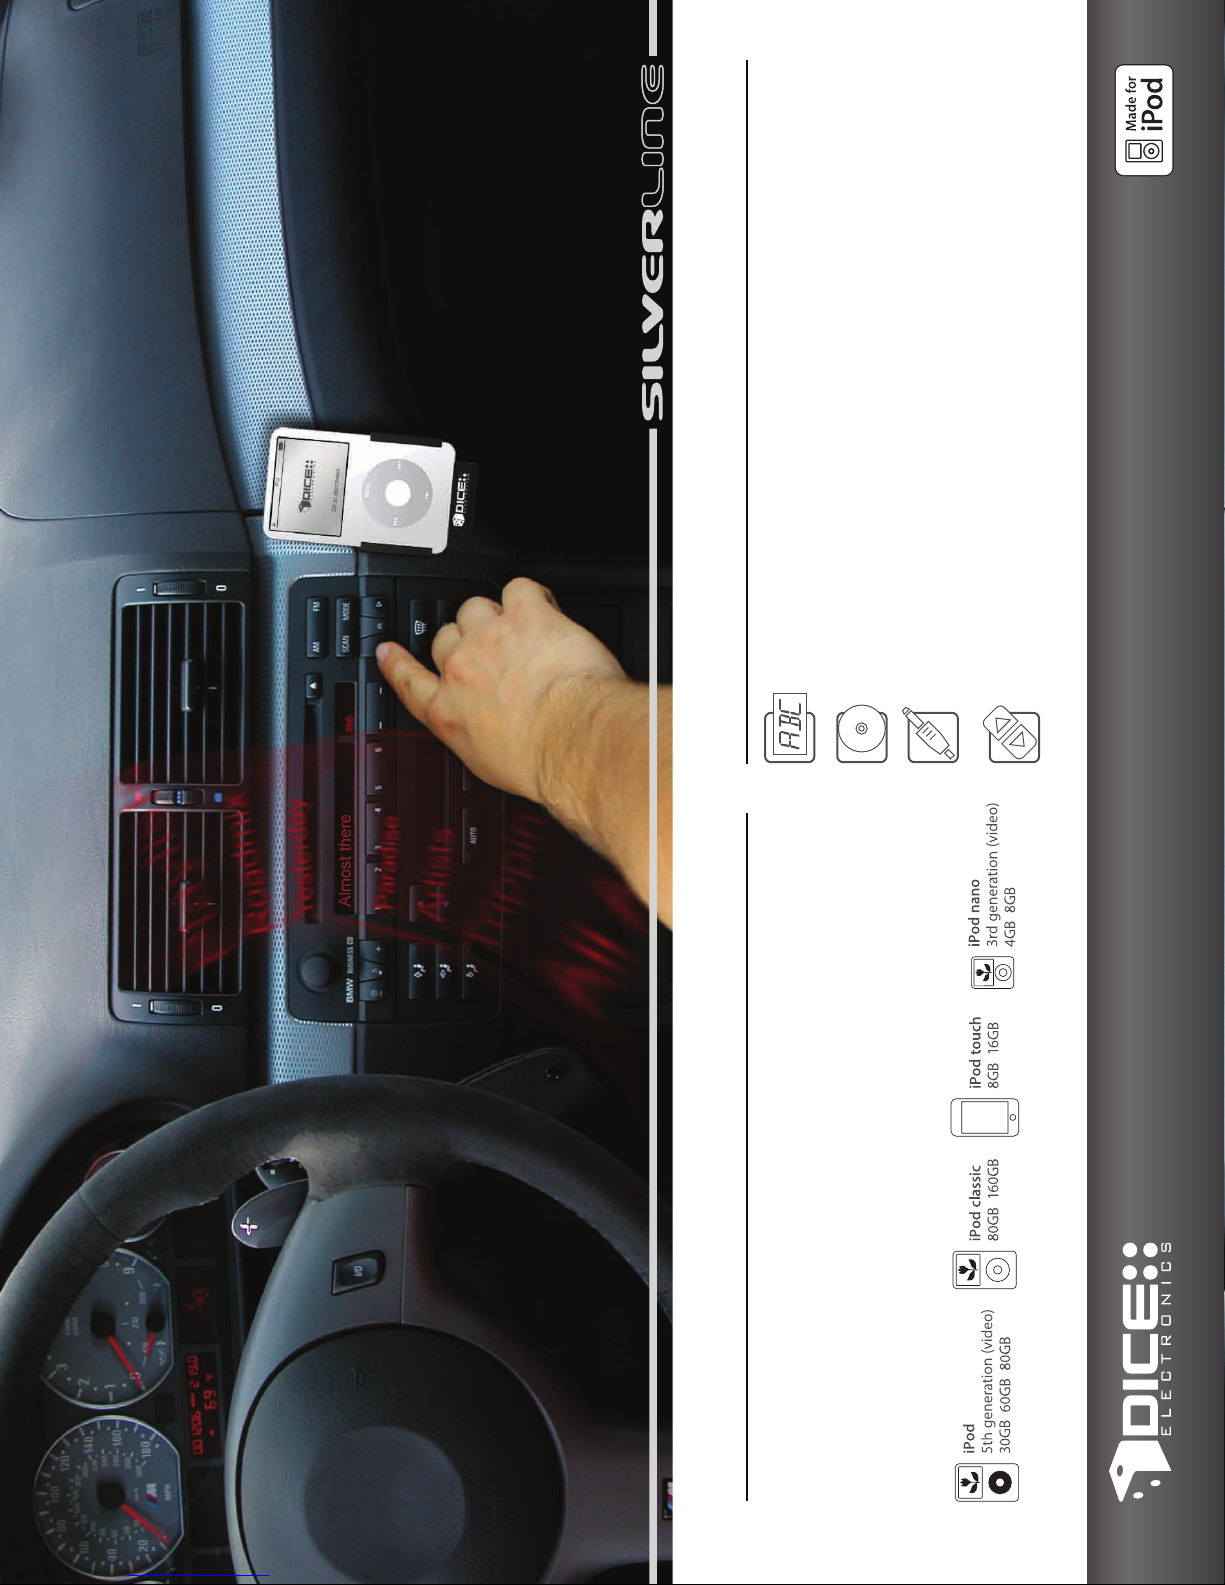
Main Features
CD-text display on all compatible BMW radio systems
Displays currently playing song and artist on the screen of the radio
CD quality audio output
Hard-wired connection allows for the highest possible sound quality
AUX input
Connect additional audio devices through the 1/8” AUX input
Integrated controls
Control the iPod directly from the radio or steering wheel
www.diceelectronics.com 888.342.3999
Copyright 2008 DICE Electronics, LLC. All Rights Reserved. iPod is a registered trademark of Apple, Inc. Specications listed may change without notice. Please visit us online for vehicle compatibility.
Factory integration for iPod from DICE! Connect your iPod to your
vehicle's factory entertainment system and hear what an iPod should
sound like in your car. The new Silverline series offers new features
including browsing by Album and a quick browse and select feature
that lets you easily skip through songs in those endless playlists.
Enhanced browsing features.
DICE Silverline car integration kit for iPod
Supported iPod models*:
*For complete iPod compatibility, please visit us online
Page 79
Yes, it’s compatible!
We are proud to be the first to introduce universal integration solutions using FM RDS
technology that features both wireless and wired connectivity. The DICE FM-RDS kit
for iPod features a fully digital FM transmitter which delivers deeper base and sharper
highs. The plug & play kit includes a “self-install” cable that connects to the standard
12V DC outlet of any car. This enables users to listen to their iPod right away! For those
craving the ultimate static and interference-free experience, the hardwired “pro-install”
cable satisfies their hunger!
No car is left behind.
78
Page 80
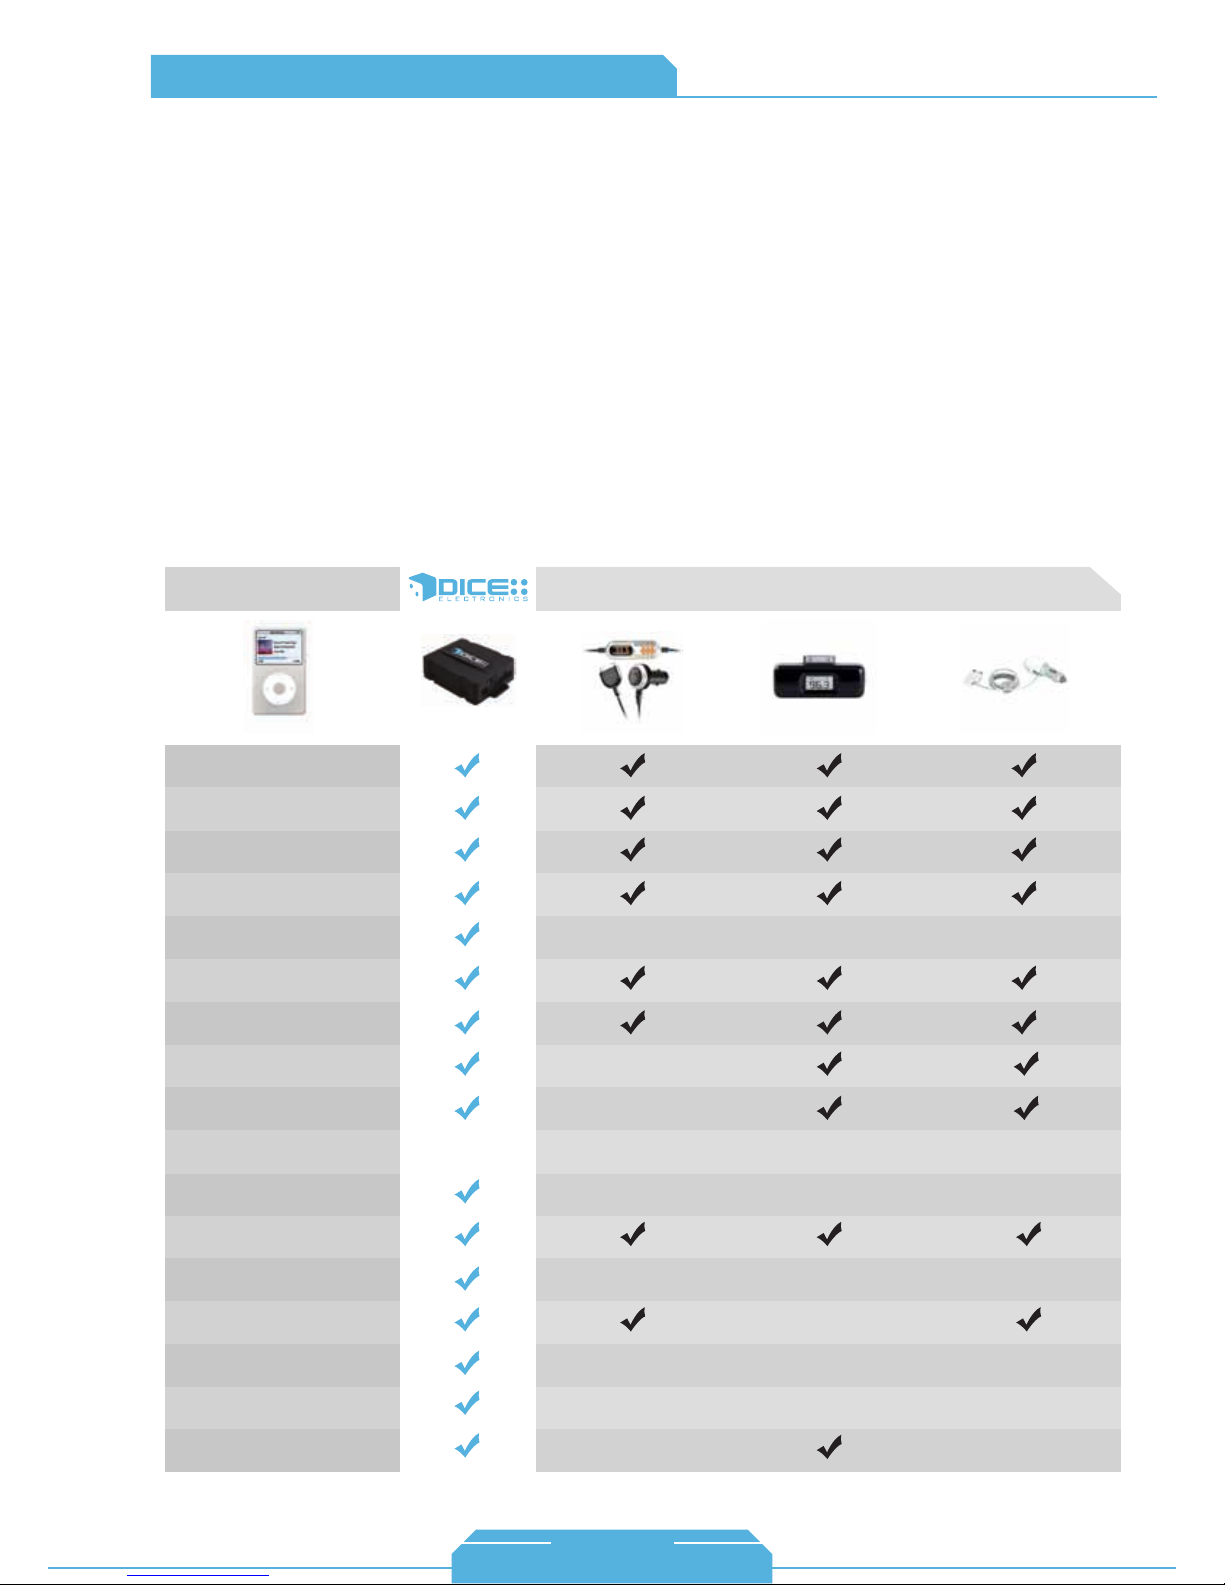
FAQs Before Purchasing the Kit
The DICE FM-RDS kit is the first to offer static free, hard-wired integration for iPod creating unparalleled
audio quality in the market. The FM-RDS kit is compatible with all iPod models and provides text display on
RDS capable radios.
iPod mini
iPod nano 2nd
iPod 4th Gen. color
iPod Classic
RDS support
Direct wired install
iPod charging
Optional iPod cradle
Static free
Hidden installation
Transmits over the air
Feature
iPod nano
iPod nano 3rd
iPod 5th Gen. (video)
iPod Touch
iPod nano 4th Gen.
Company 1 Company 2 Company 3Compatibility
79
www.diceelectronics.com
1-888-342-3999
FM-RDS
universal
How do I know the DICE FM-RDS can connect
to my vehicle’s head unit?
If your vehicle’s head unit supports FM radio, an
antenna connection will be available. Antenna
adapters (sold separately) may be required for
proper connection.
Between the Self-install and Pro-install
FM-RDS kits, what reason(s) would I pick one
over the other?
With the Self-install, you can plug it into the 12V
DC outlet in a matter of seconds! The Pro-install
kit offers static-free and interference-free audio
and is hidden in the vehicle since it is installed
behind the radio.
With the DICE FM-RDS kit, is my regular FM
radio affected?
No, you can still use your regular radio and tune
through all the stations with the iPod disconnected.
How can I tell if my radio supports RDS-text?
RDS-capable radios may have an “RDS” logo
stamped on the face of it or an RDS button. If
neither are present, you can tune to a popular
FM station to verify if any RDS information shows
up on the display (station name, song/artist
names, etc.).
• Comparison data based on products avaiable as of Summer, 2008
Page 81
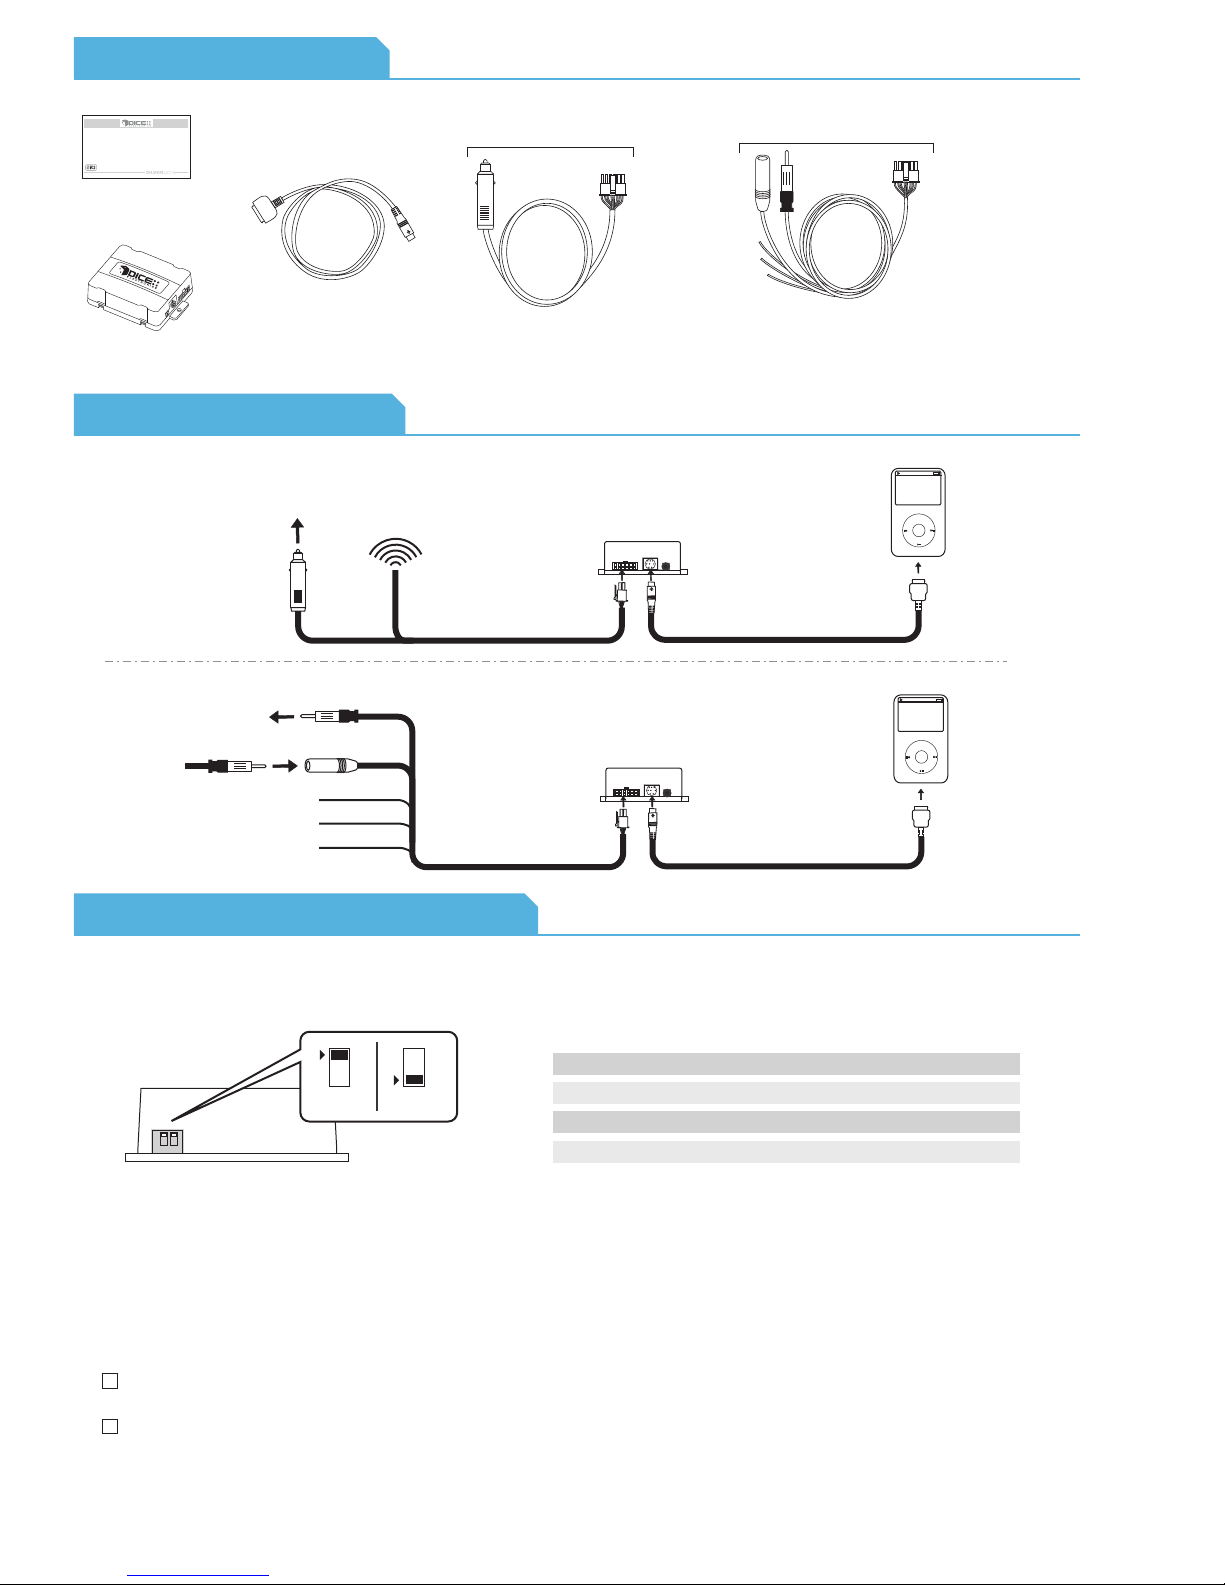
Content Identifier
DICE interface for iPod
Installation Guide/User Manual
user manual
iPod docking
cable
vehicle specific
interface module
Connection Diagram
Self Install:
To cigarette
lighter
antenna
power
adapter
Pro Install:
To radio antenna port
factory antenna connector
+ 12
ground
ignition
wire
for Self Install kit:
plug and play antenna/ power adapter
(Not available outside US/Canada markets)
module
iPod docking
module
pro-install antenna
/power cable
iPod docking
for Pro Install kit:
pro-install antenna/power cable
iPod
MENU
cable
iPod
MENU
cable
Installation Tips / Check List
Frequency configuration settings:
ON/OFF Switch Positions
FM (MHz) Dip switch 1
88.7
93.3
97.5
107.7
OFF
ON
ON
OFF
Interface unit
ON 1 2
frequency
selector
OFF
ON
1 2
Note:
1. Disconnect the vehicle harness from module and cycle ignition off for 5 seconds after changing
the switches.
2. Try to select a transmitting frequency that is not occupied by a local FM radio station.
With the Pro-install kit, easy access to 12V constant/switched power can be found at the 12V DC outlet.
If T-taps are being used for splicing power/ground, make sure the correct size T-taps are used so it has
good contact with the wiring. Loose wire will cause unexpected operation.
Dip switch 2
OFF
OFF
universal
ON
ON
80
Page 82
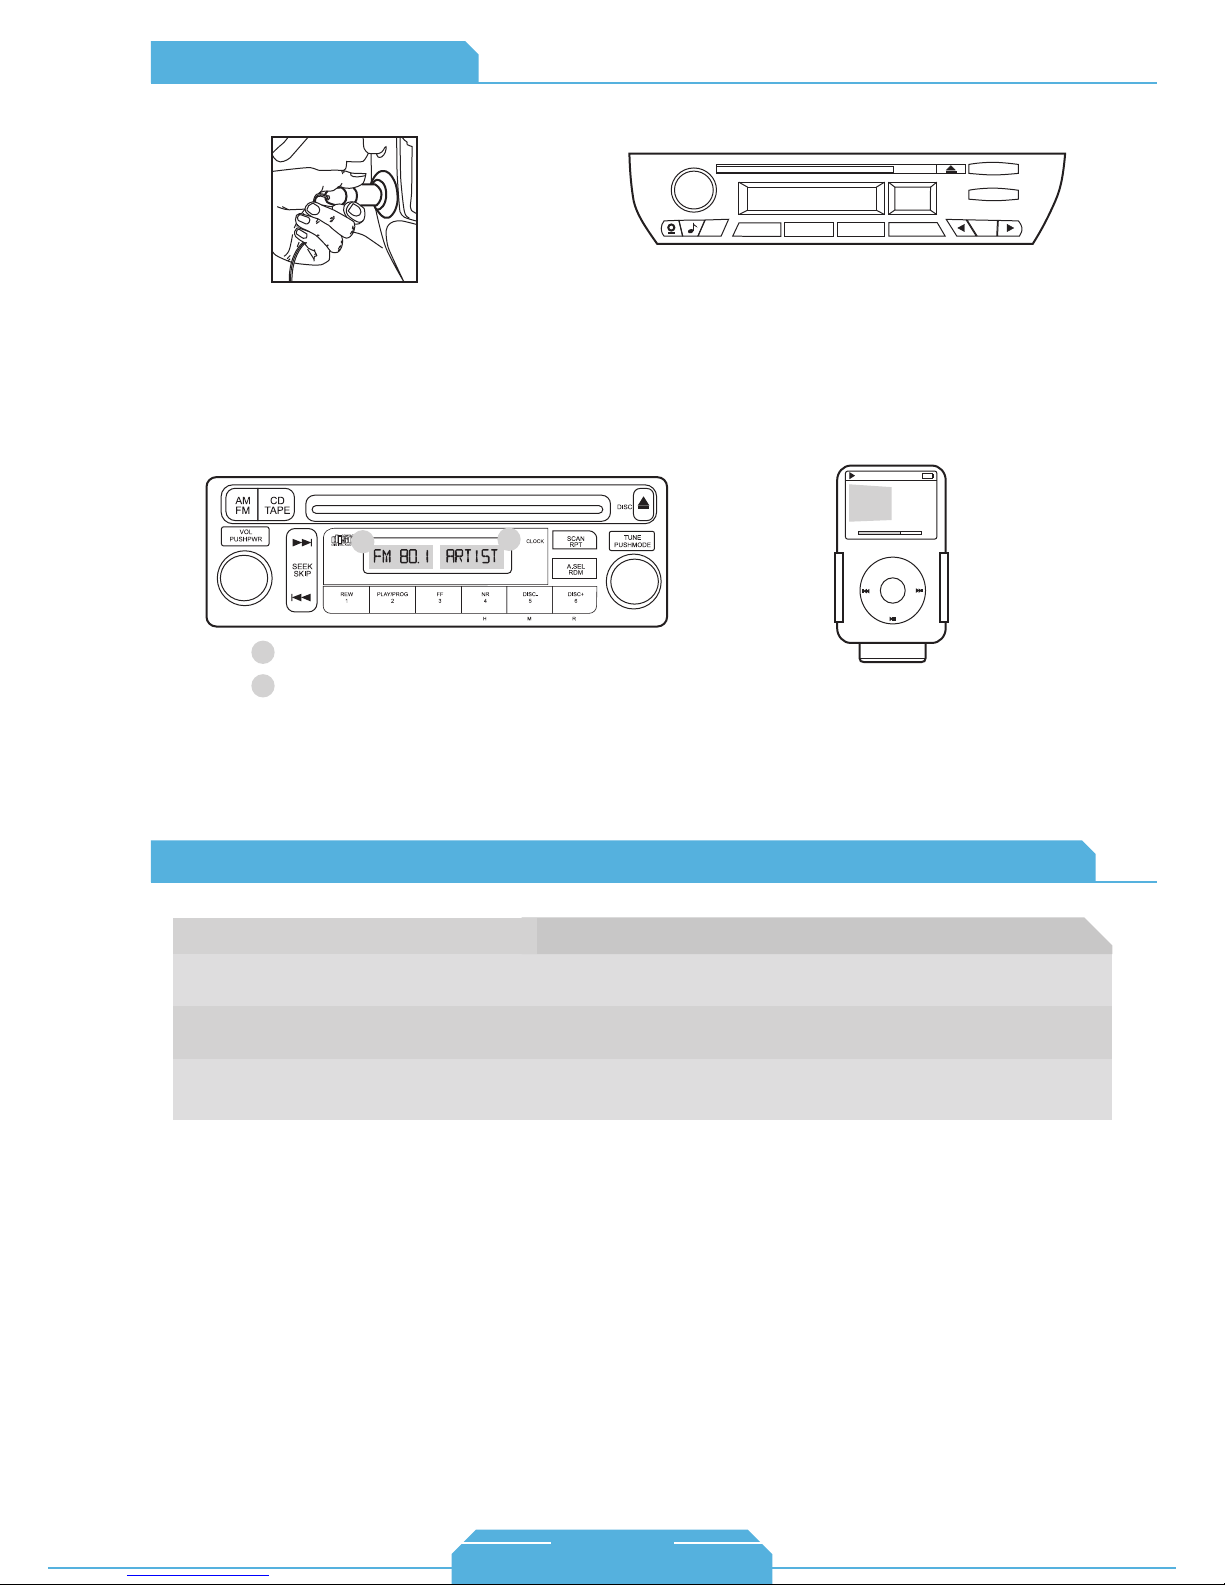
Operation Overview
Plug and Play Operation Overview:
Note: Many radio support RDS/RDBS. Using the FMRDS kit will display song text
information, but will not allow radio control.
AM FM
SC MODE
m
+
FM 1 88.7 MHz
2
1
RND TP
4
3
6
5
- -
1. Plug the power adapter into a
cigarette lighter socket.
Pro-install Operation Overview:
Select the FM radio source on the radio and tune to the frequency that was selected on the interface
unit. As soon as the radio is tuned to the appropriate frequency, audio from the iPod will be heard.
FM-RDS
FM frequency
1
RDS text
2
1
2
About RDS:
universal
Radios with RDS capability allow the currently playing song title and artist name to be displayed on the
screen of the radio. To find out if a radio has RDS, tune to a popular radio station and if the station name
is displayed then the radio has RDS capability.
FM-RDS Universal Integration Specific Technical Notes
2. Turn on the radio and tune to the FM frequency that
was selected on the module. Connect the iPod to the
dock cable. Select and start to play a song and the
music should now be playing through the factory radio.
Song Title
Artist Name
Album Name
1 of 12
2:42 -1:16
MENU
Problem
With the pro-install kit, I get static on any of the
selected presets.
The iPod will not stop charging if I leave it
connected and shut off my vehicle.
With the self-install kit, is there any way to
reduce static or interference?
Solution
The vehicle’s ignition may need to be started to supply power to the DICE unit.
If there is still static, try another 12V power source.
Make sure the Ignition wire (IGN) is attached to a 12V switched source so that the
DICE unit is receiving a shut-off signal.
Try relocating or adjusting the position of the DICE module/antenna closer to
the factory antenna.
81
1-888-342-3999
www.diceelectronics.com
Page 83
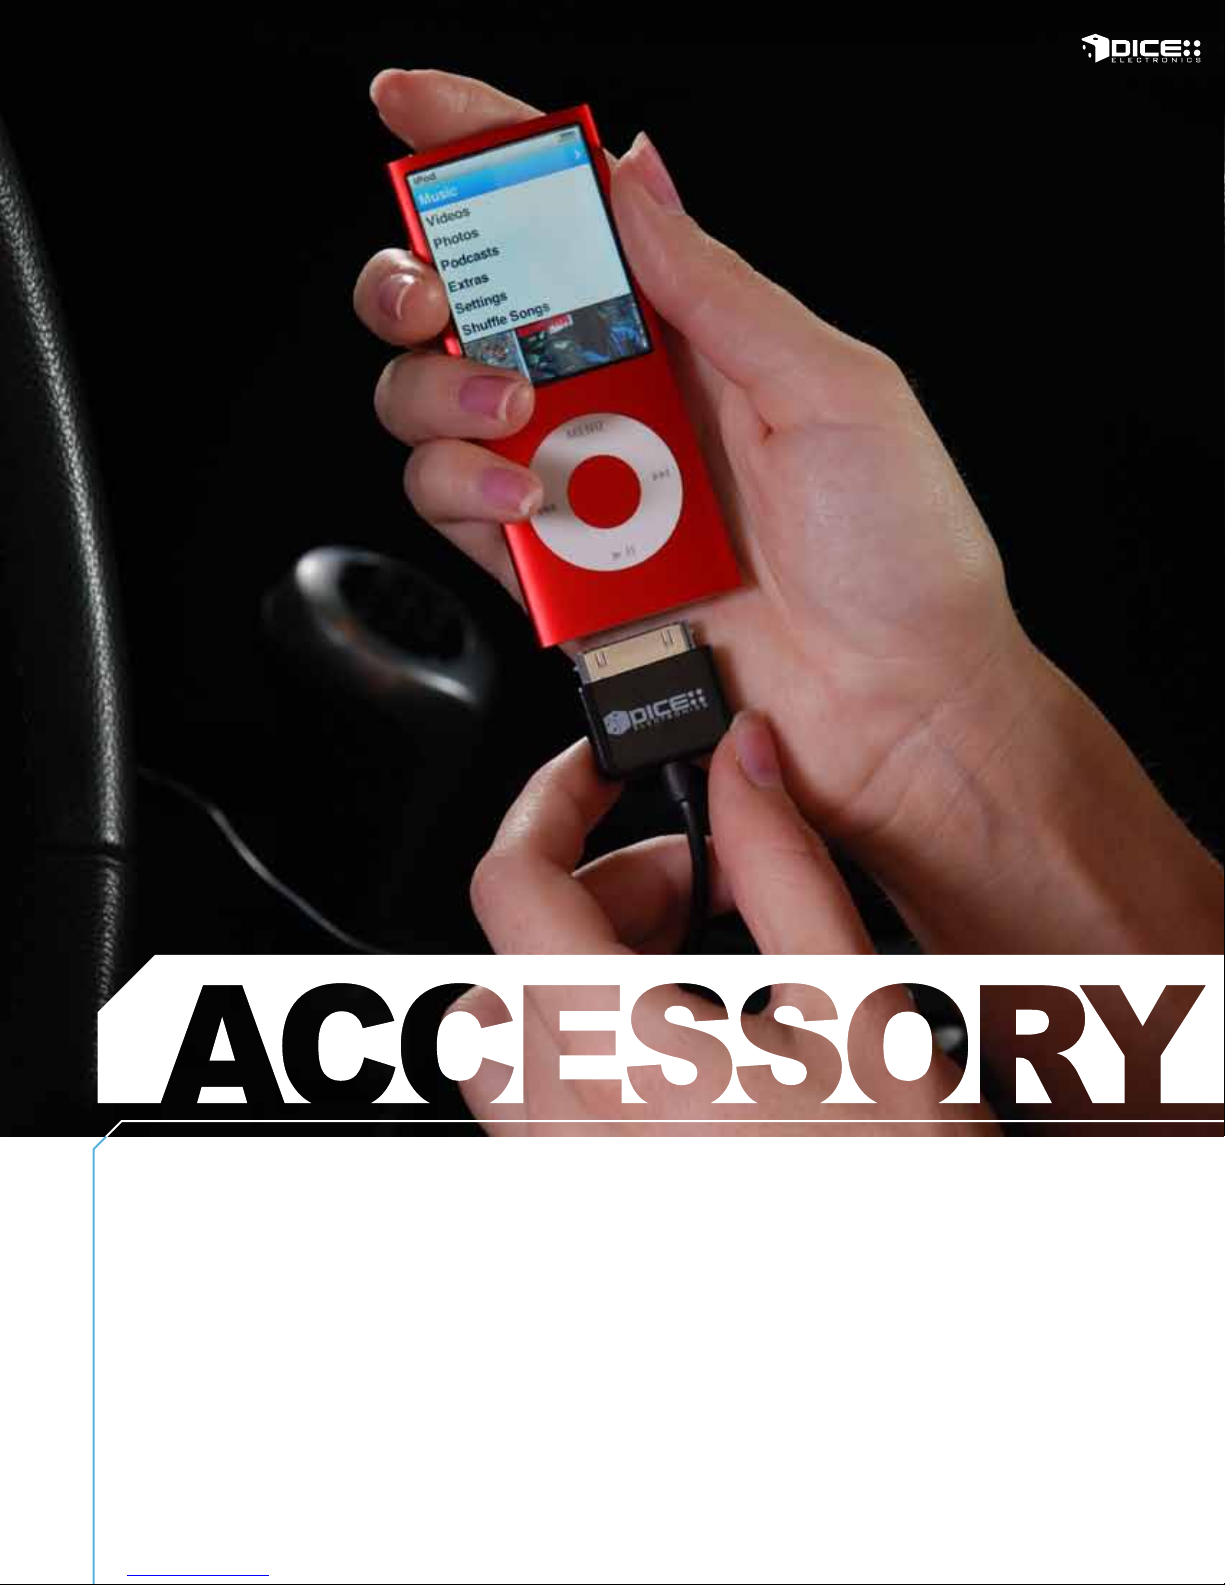
DICE cradle for a more convenient and safer ride.
The DICE Cradle for iPod unites all the features that a holder can possible have. This
docking Cradle with its sleek design blends like it is part of your car. The cradle can be
mounted almost anywhere thanks to its unique ball-and-cup mount solution, allowing it
to be angled and rotated. This Cradle is the only solution on the market that includes
interchangeable iPod holders to perfectly match the fit and style of the iPod models
including 3G/4G, Photo, Video, Classic, Touch, mini and nano.
82
Page 84
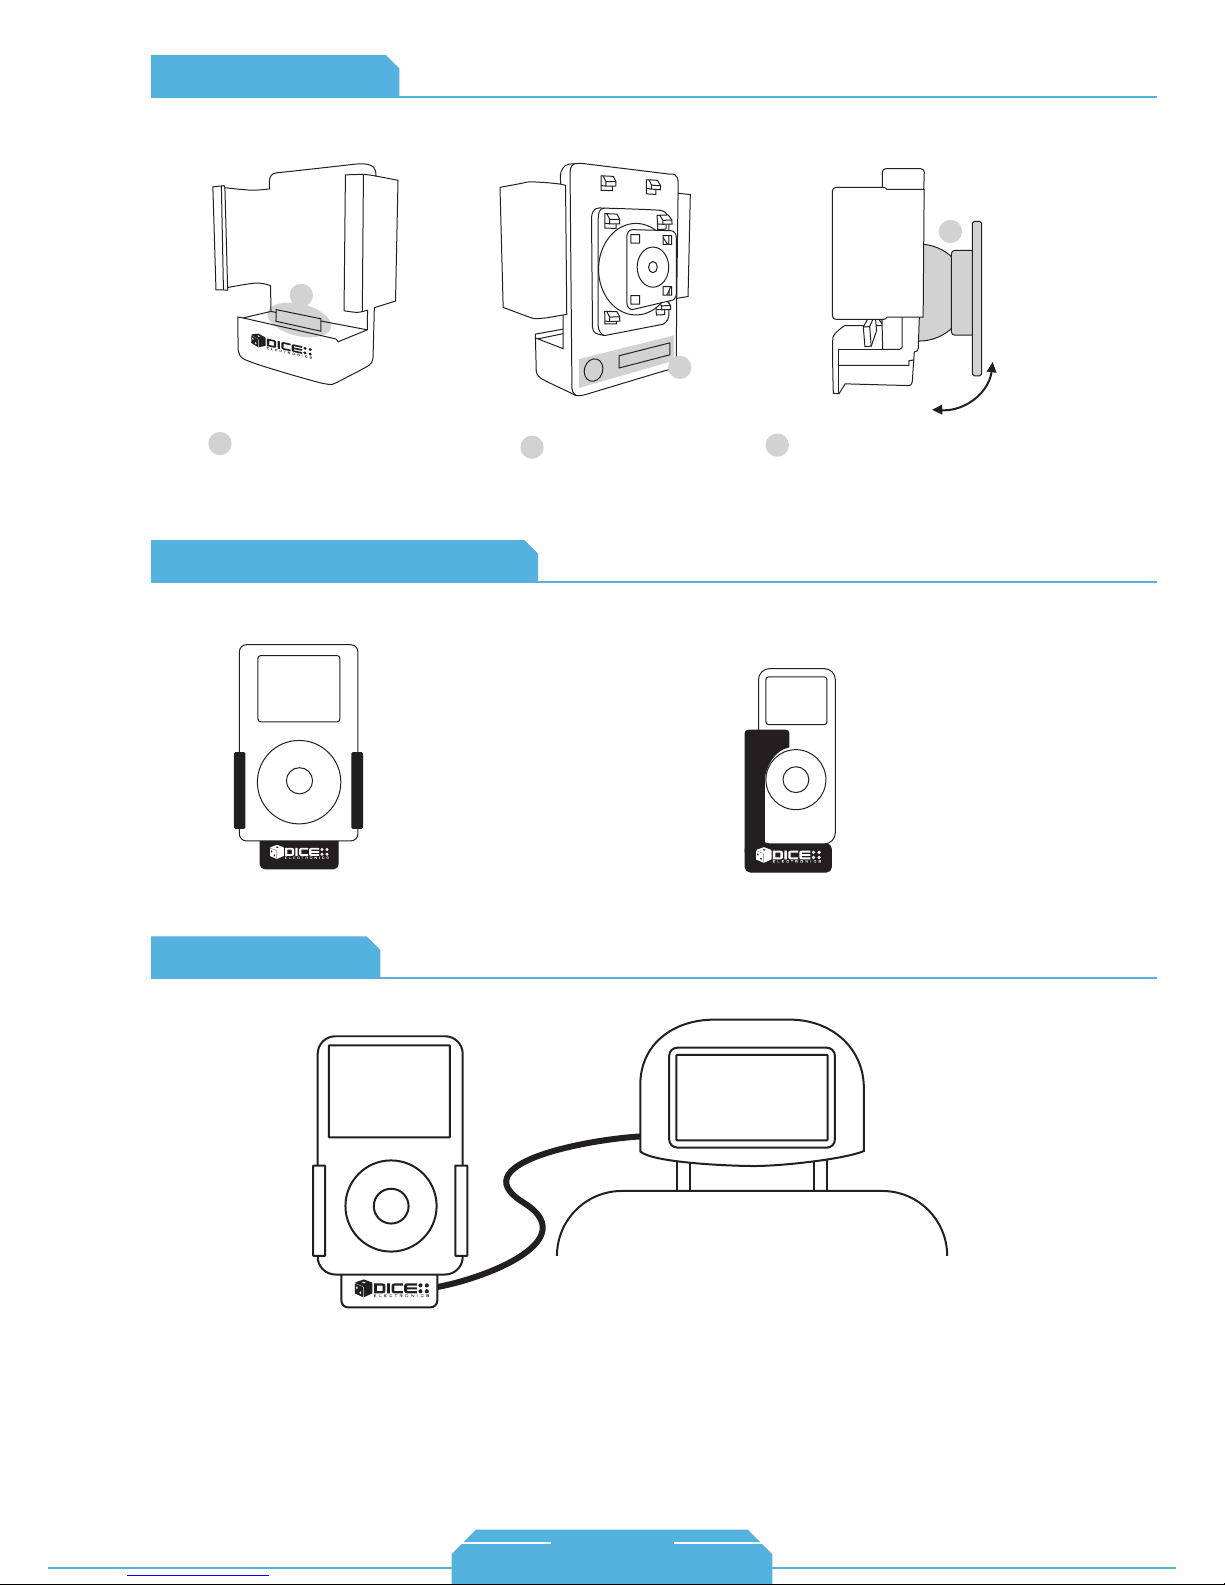
Cradle for iPod
1
Built in dock
1
connector provides a
quick, high quality
connection.
Interchangeable Holder
Dock cable
2
receptacle and
1/8” video out jack*
* video out of recent iPod models require authentication which must
be done by external interface.
3
2
AMPS mounting pattern
3
pivots +/- 45o in all direction
for easy mounting
Accessory
Variety of spacer and mount are included to support:
iPod 3G
iPod 4G & Classic
iPod Photo & Video
iPod mini
Video Output
video
playing
iPod nano 1G
iPod nano 2G
video
playing
The DICE video cradle can be mounted almost anywhere thanks to its unique ball and
cup mount solution, allowing it to be angled 70o and rotated 360o. Featuring a universal
iPod dock connector and 1/8” video out jact for use with the 5th gen. iPod. An iPod
compatible video cable can be used to connect the DICE video cradle to a TV screen.
83
1-888-342-3999
www.diceelectronics.com
Page 85
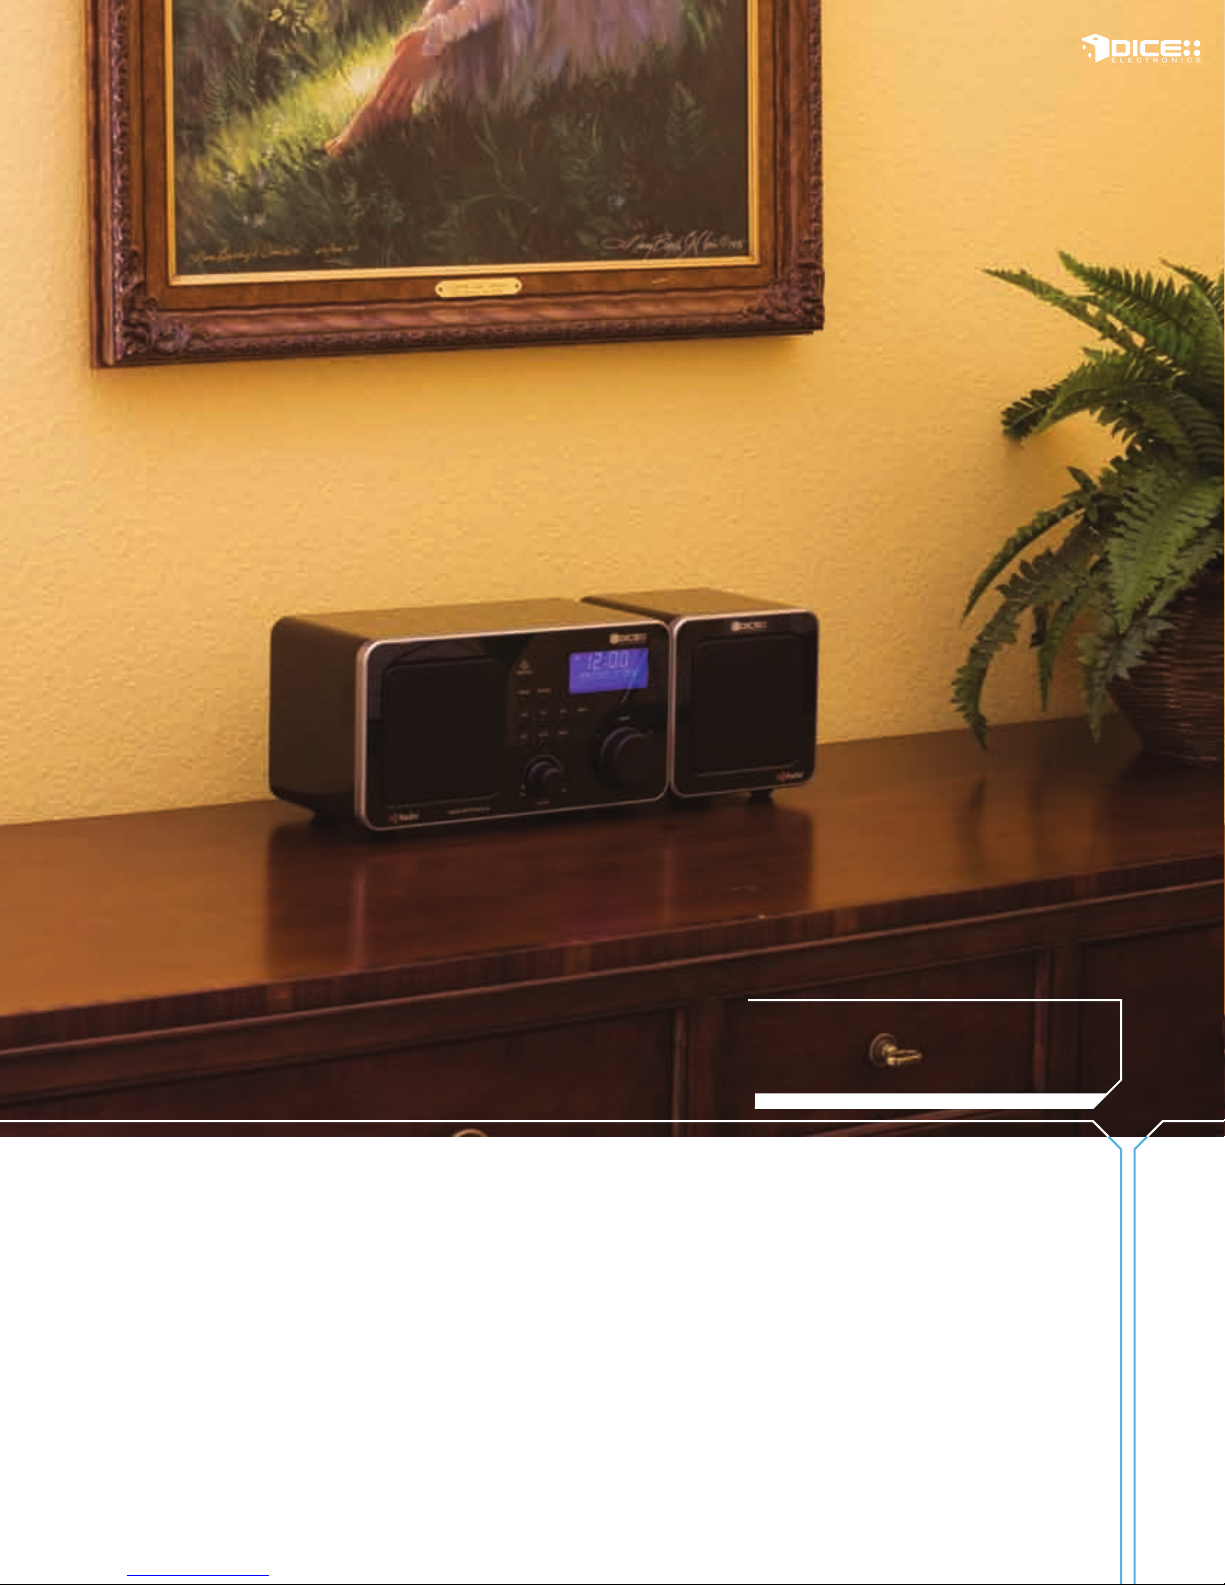
HOME
From the road to your home
After several successful years in the automotive industry, we are proud to present our
home audio products: the iTR-100, tabletop HD Radio receiver and the iTPA-220
vacuum tube amplifier system. The iTR-100 fills the space with crystal clear digital HD
Radio while its HD multicast capability allows listeners to enjoy more content
broadcasted simultaneously from their local radio stations. The tube amplifier system
integrates the iPod and adds true audiophile-satisfying, rich and warm tone to the
digital sound. Not only do these products provide great features, they both accent
every home and office decor.
84
Page 86
How does music
move you?
iTPA-220
Vacuum Tube Amplifier System for iPod
2x20
WATTS
INPUT
AUX
VACUUM
TUBES
6N3
REMOTE
R
Vacuum Tube Amplifier System for iPod
2x20
WATTS
INPUT
AUX
www.diceelectronics.com
888.342.3999
Page 87
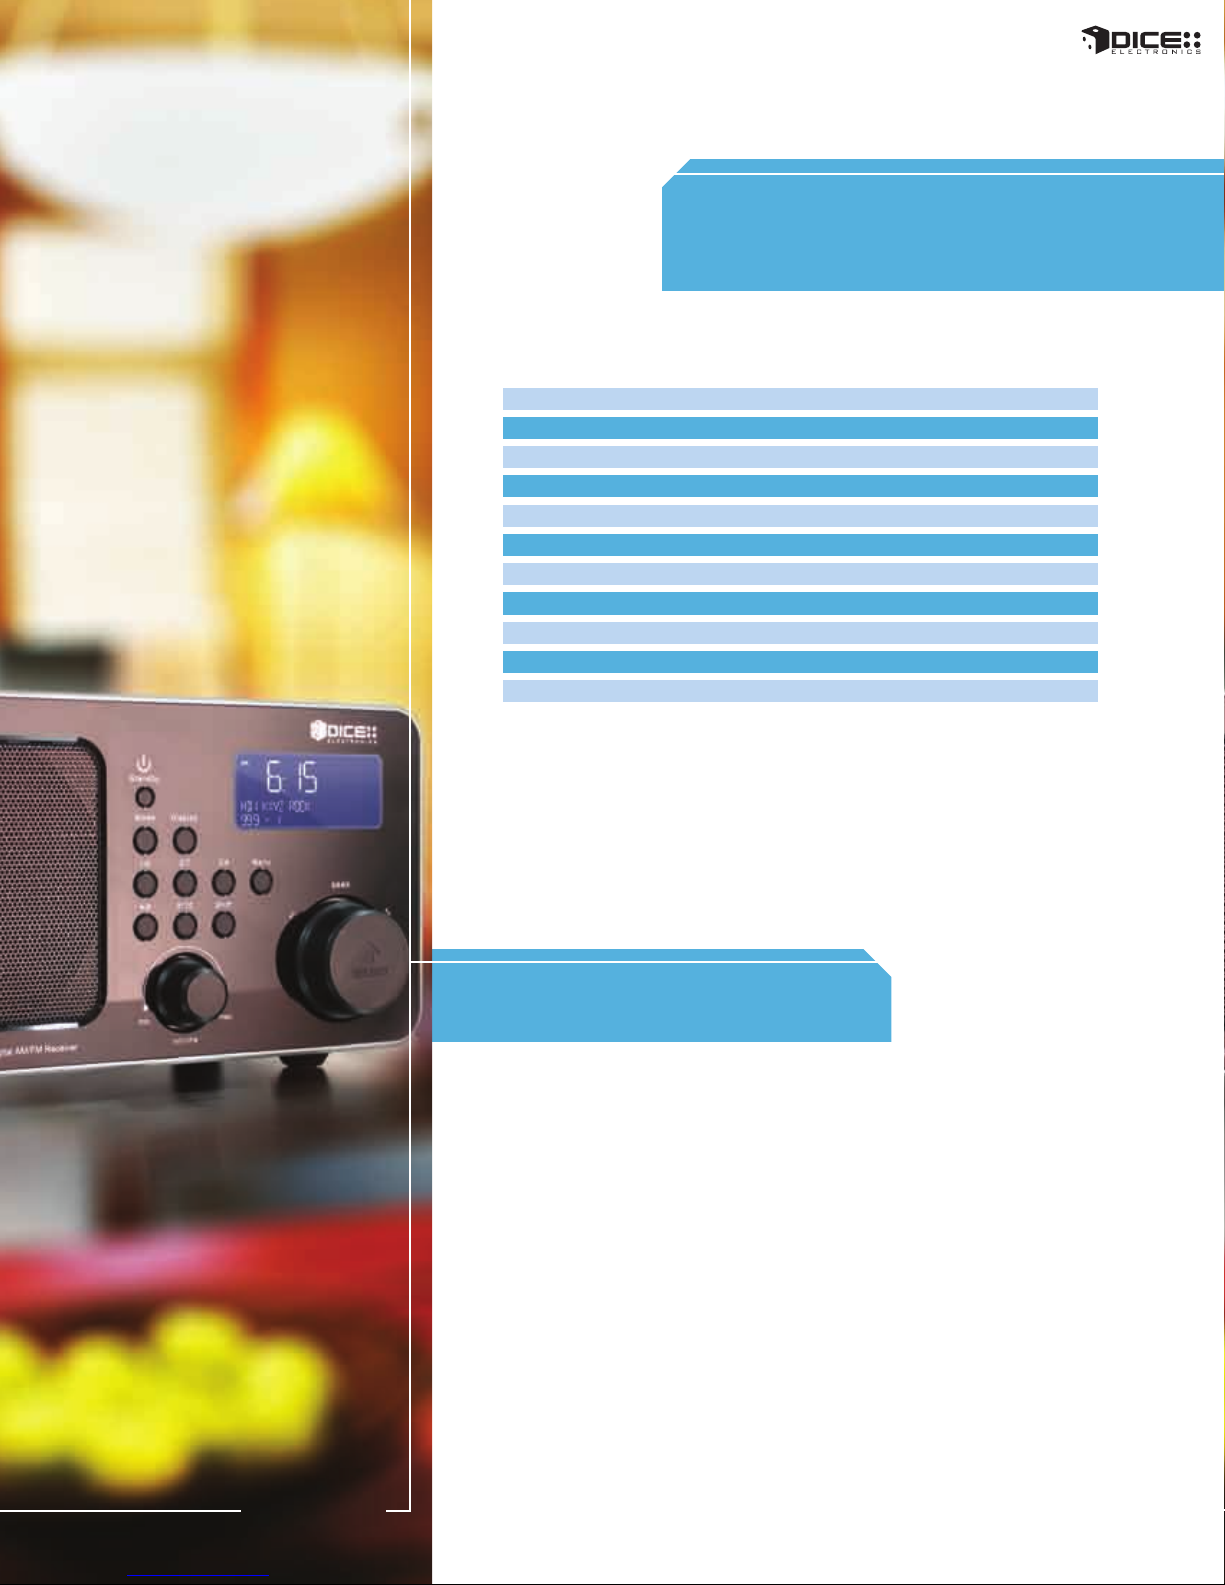
future
Specification list
Power output
Driver
Impedance
Frequency response
Inputs
Outputs
Height
Width
Depth
Station memory
Tuner type
Sound travel to the
2x5 Watts RMS
4” full range driver
4Ohms
40 Hz - 18kHz
1/8” for optional spkr
1/8” AUX, RF, AM loop ant.
5.50”
9.75”
5.25”
10 presets for AM, FM and HD1, 2, 3
AM / FM / HD Radio tuner
DICE is introducing the DICE iTR-100 tabletop HD Radio
receiver. Thanks to the solid construction of the acoustic wood
structure, you can enjoy the enhanced sound quality of HD
Radio at home or in your office. With its classic retro design, the
receiver accents any space.
features
• AM/FM HD Radio receiver - Listen to AM channels in FM
quality and FM channels in near CD quality
• HD multicast compatible - Enjoy more content
simultaneously broadcasts from your local radio stations
• HD station seek - Quickly find and tune into available HD
Radio stations in your area
• Excellent acoustic performance - The solid construction of
desktop HD radio receiver
iTR-100
the acoustic wood structure further enhances the listening
experience
• Alarm clock - Start your morning with your favorite HD radio
station
86
Page 88
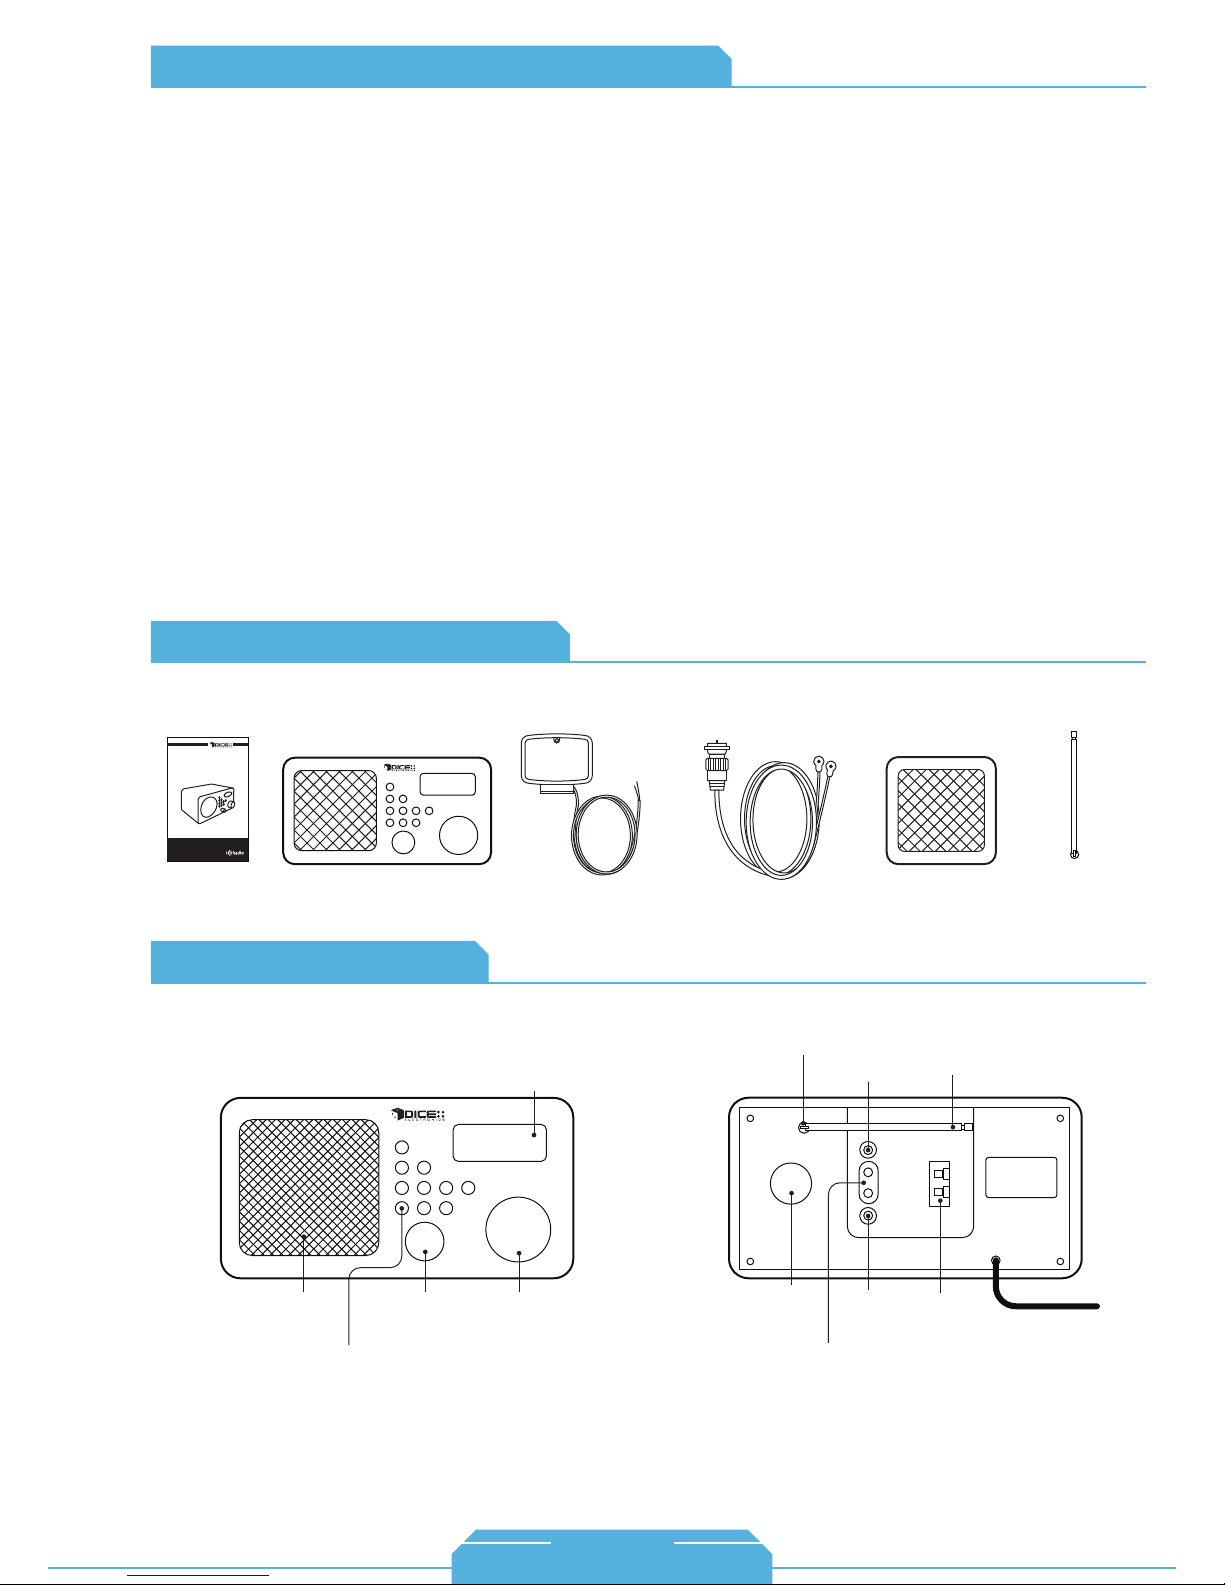
FAQs Before Purchasing the iTR-100
What does HD Radio have to offer?
• Your favorite local station in the same place on
the radio dial, but provides dramatically higher
audio quality through digital reception of AM and
FM stations.
• More content, more program choices via HD2
and other multicast channels.
• Program text information may include titles,
artists, album info and even weather
• HD Radio is subscription free!
Where can I find HD Radio stations?
HD radio stations are all across the country and
all you need is this HD Radio receiver to enjoy it.
Approximately 1,500 HD Radio stations broadcast HD Radio programming nationwide. There
are over 2,500 channels of music, including
iTR-100
multicast stations featuring your favorite local
news, sports and music programs. To find out
which stations broadcast in HD in your area, visit
www.hdradio.com
iTR-100 Content Identifier
What is Multicasting?
HD Radio technology enables an FM broadcaster
to offer more than one program stream on its
existing frequency. Simultaneously, one station can
offer several audio channels as well as program
associated text information. Stations may transmit
one channel of music and one of news, or even two
different music programs. Be prepared to experience new music and news formats, showcases by
young artists and local bands, or even foreign
language programs.
What can I do to improve reception of distant
radio stations?
Try to reposition the antenna, or for better reception
you may purchase an optional amplified or roof top
antenna.
iTR - 100
Desktop HD Radio receiver
Sound travel to the future
with digital audio
user manual
iTR-100 unit
Connection Diagram
Front
4” Speaker
Radio Buttons including:
• Standby: turn on and off the unit.
• Display: select different display information.
• Mode: select between AM, FM and AUX mode.
• Menu: select between different functions, i.e: HD scan,
auto preset, clock, and alarm.
• Presets 1-10: memorize favorite radio stations.
• Shift: press to select preset 6-10.
Volume knob Tuning knob
AM loop antenna FM wire antenna optional speaker
“F” connector
antenna connection
Display screen
Back
Bass
output
port
(MP3, DVD, computer)
Audio input
Headphone
output
Optional
speaker
output
(sold separately)
Removable
telescope
antenna
AM loop
antenna
connection
Removable
telescope
antenna
Power cable
87
1-888-342-3999
www.diceelectronics.com
Page 89
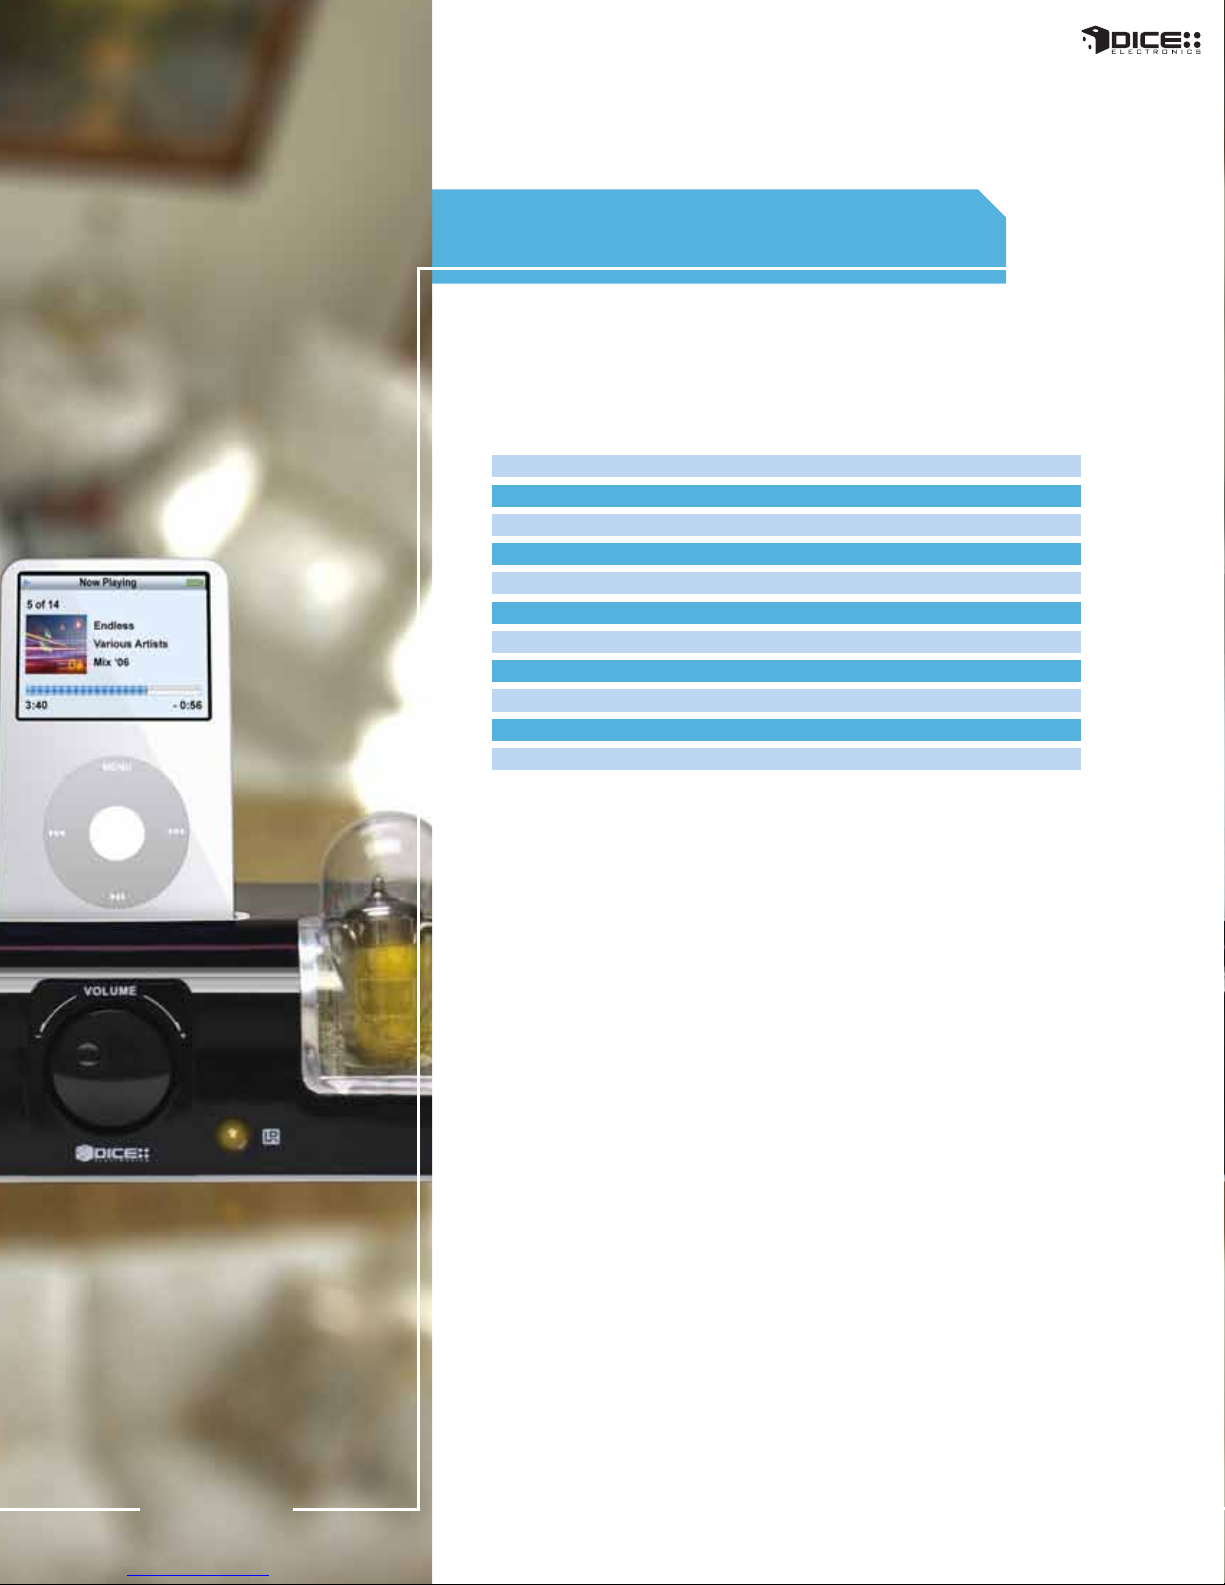
a classic sound
IN THE DIGITAL AGE
Specification list
Amplifier
Preamp
Drivers
Impedance
Frequency response
Inputs
Outputs
Speaker enclosure
Height
Width
Depth
Active Speaker System
• Built in 2x20 Watt solid state amplifier
• 4" mid/bass driver and 1" dome tweeter for full
dynamic range
• Solid constructed wood acoustic structure
enhances the audio quality
• Bass reflex port for increased bass response
• 1/8" audio in.out connectors for preamplifier
• audio cables included
2x20 Watts solidstate
vacuum tube equipped 2 x 6N3
4” composite mid/bass, 1” tweeter
4Ohms
40 HZ -18kHz
iPod dock, 1/8” auxiliary
1/8” stereo
1/2” MDF with tuned bass reflex port
speaker 8.00” / preamp 3.75”
speaker 4.75” / preamp 8.00”
speaker 10.00” / preamp 6.00”
vacuum tube amplifier system for iPod
iTPA-220
iPod tube preamplifier
• True, audiophile quality music
• iPod charging
• Video output for use with Video iPods
• Remote control functions include: volume control,
mute, next/previous track, play/pause
• Dual 6N3 tubes for a warm analog sound
• iPod compatible docking station
• Auxiliary input for additional audio devices such as
computers, and non-Apple MP3 players.
88
Page 90

FAQs Before Purchasing the iTPA-220
Other than playing my iPod’s music library,
does the iTPA-220 system offer any other
cool features?
The preamplifier has an 1/8” audio input for any
additional audio device to play through a great
sound system. There is also a video output on
the preamplifier for use with 5th generation
Video iPod models.
What kind of iPod controls does the iTPA-220
offer other than controlling the iPod directly?
The iTPA-220’s preamplifier has a centered knob
for volume control and there is also a remote
control included with the system that allows for
volume control, track changing, play/pause, and
mute to be controlled/adjusted.
iTPA-220 Content Identifier
iTPA-220
iTPA - 220
iPod tube amplier system
Are the vacuum tubes just for display on the
preamplifier, or are they actually functional?
The dual 6N3 vacuum tubes are functional and the
reason the audio quality has such a rich and warm
tone.
Is charging supported with the newer iPod
models?
The 5V (USB) charging is currently not
supported with this system. This includes 4th
generation Nano, 2nd generation Touch, and 3G
iPhone. All other iPod models DO charge.
Please inquire about the availability of a
converter module.
a classical sound in the digital age
user manual iTPA-220 unit
(2 Speakers & 1 Vacuum tube preamplifier)
Connection Diagram
Speaker A
to power outlet
power-link cable
AUX IN Video
mini-jack to
mini-jack cable
Vaccum Tube Pre-amplifier
RCA to mini-jack
cable
remote control
Speaker B
mini-jack to mini-jack cable
speaker B audio cable
89
1-888-342-3999
www.diceelectronics.com
Page 91
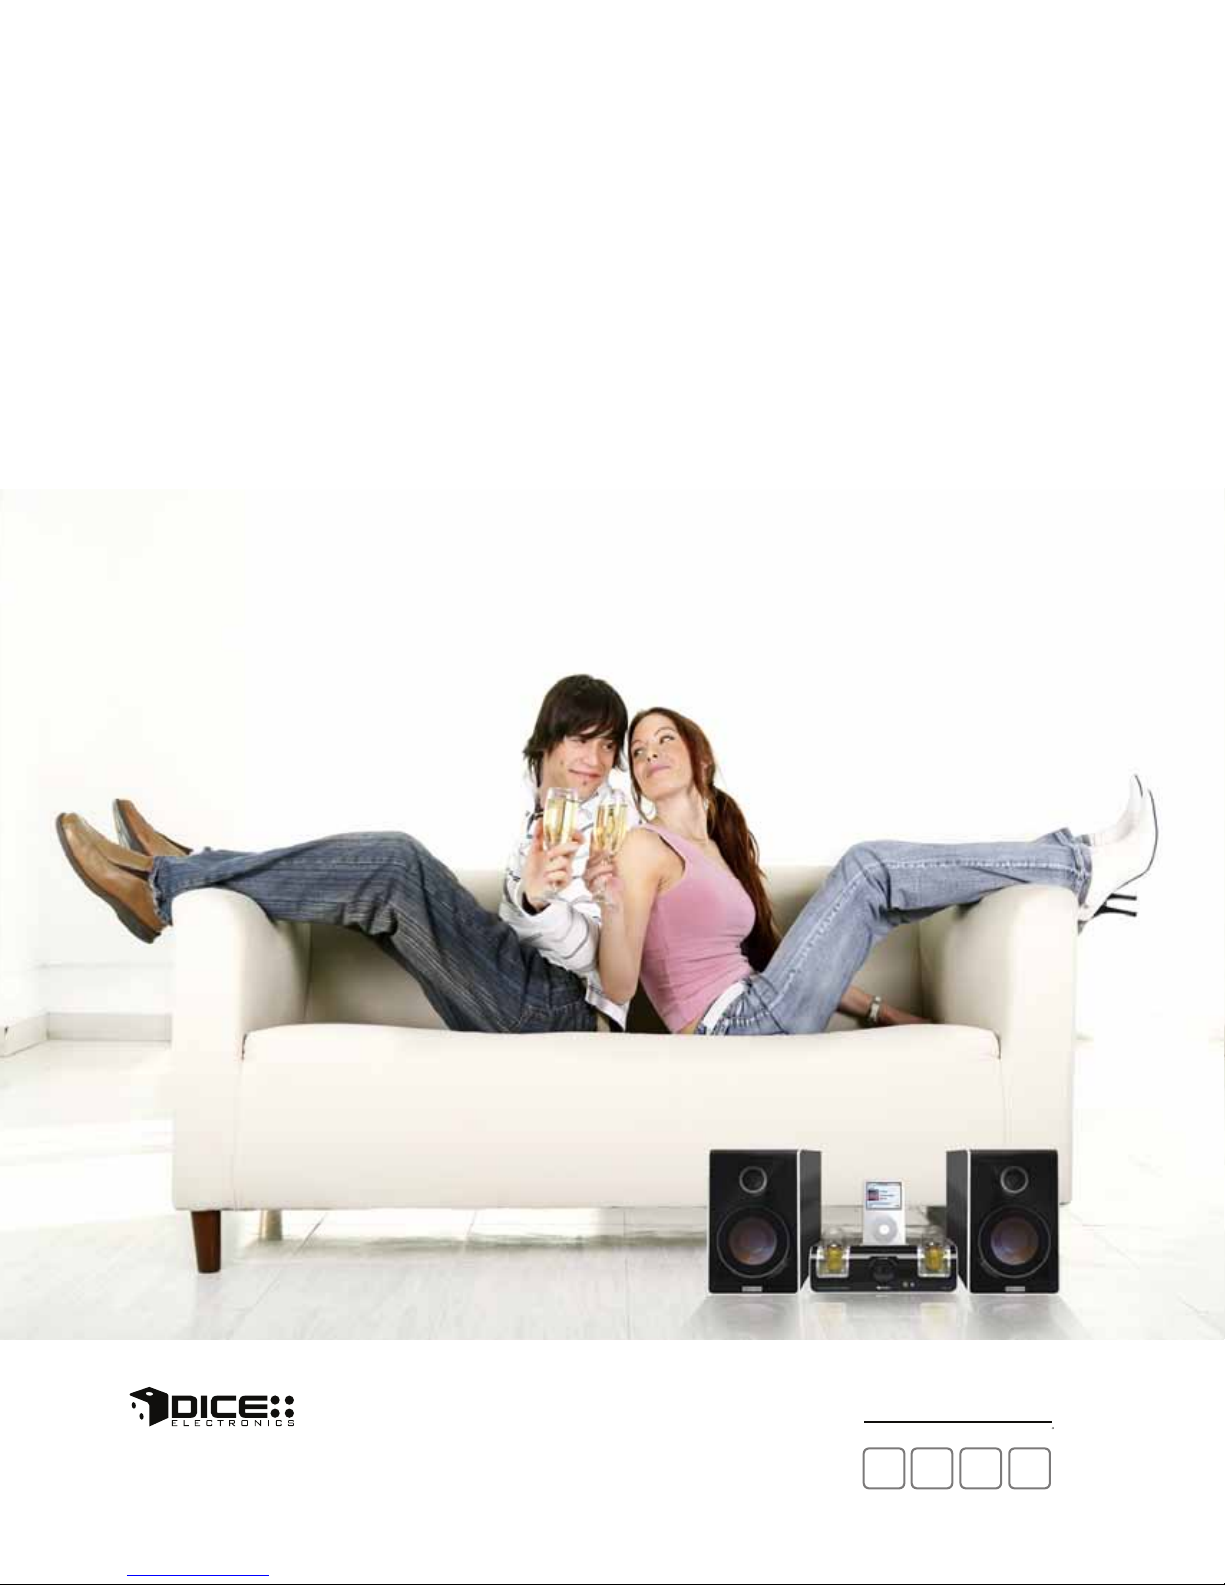
iTPA-220
Vacuum Tube Amplifier System for iPod
2x20
WATTS
INPUT
AUX
VACUUM
TUBES
6N3
REMOTE
R
Cheers to a richer, warmer sound of tomorrow.
www.diceelectronics.com
888.342.3999
The iTPA-220 fills your home with great audiophile sound and its classic retro design accents any décor. This vacuum tube amplifier system takes you
back in time while using today’s and tomorrow’s digital technology.
Page 92
Authorized Dealer
www.diceelectronics.com | 888.342.3999
Although every effort is made to insure compatibility, this guide/catalog is not guarantee for suitability in all applications.
Please consult your dealer for information on additional accessories and product specifications. DICE Electronics, LLC. believes the
information in this document to be correct at the time of printing. However, availability, pricing, specifications, features and appearance are
subject to change without notice. All trademarks, registered trademarks and copyrights belong to their respective owners.
Copyright 2009 DICE Electronics, LLC. All Rights Reserved. Volume 1, Q1/09
 Loading...