

Page 1

P/N: 500-087G
Page 2

Wide LCD-TV
Instruction Manual
Please read this manual carefully before operating your set.
●
LT-40H6MVH
●
LT-40T6MVH
●
LT-46T6MVH
Page 3

Page 4
Warnings
Warnings
3
TO PREVENT FIRE OR SHOCK HAZARD DO NOT EXPOSE THE SET TO RAIN OR MOISTURE.
NOTE TO CABLE/TV INSTALLER:
This reminder is provided to call the cable TV system installer’s attention to Article 820-40 of
the National Electric Code (U.S.A.). The code provides guidelines for proper grounding and,
in particular, specifies that the cable ground shall be connected to the grounding system of
the building, as close to the point of the cable entry as practical.
REGULATORY INFORMATION:
This equipment has been tested and found to comply with the limits for a Class B
DIGITAL device, pursuant to part 15 of the FCC Rules. These limits are designed to
provide
reasonable protection against harmful interference when the equipment is operated in a
residential Installation. This equipment generates, uses and can radiate radio frequency
energy and, if Not installed and used in accordance with the instruction manual, may cause
harmful interference to radio communications.
However, there is no guarantee that interference will not occur in a particular
installation. If
this equipment does cause harmful interference to radio or television
reception, which can be
determined by turning the equipment off and on, the user
is encouraged to try to correct the
interference by one or more of the following measures:
• Reorient or relocate the receiving antenna.
• Increase the separation between the equipment and receiver.
•
Connect the equipment into an outlet on a circuit different from that to which the
receiver
is connected.
• Consult the dealer or an experienced radio/TV technician for help.
CAUTION:
Do not attempt to modify this product in any way without written authorization. Unauthorized
modification could void the user’s authority to operate this product.
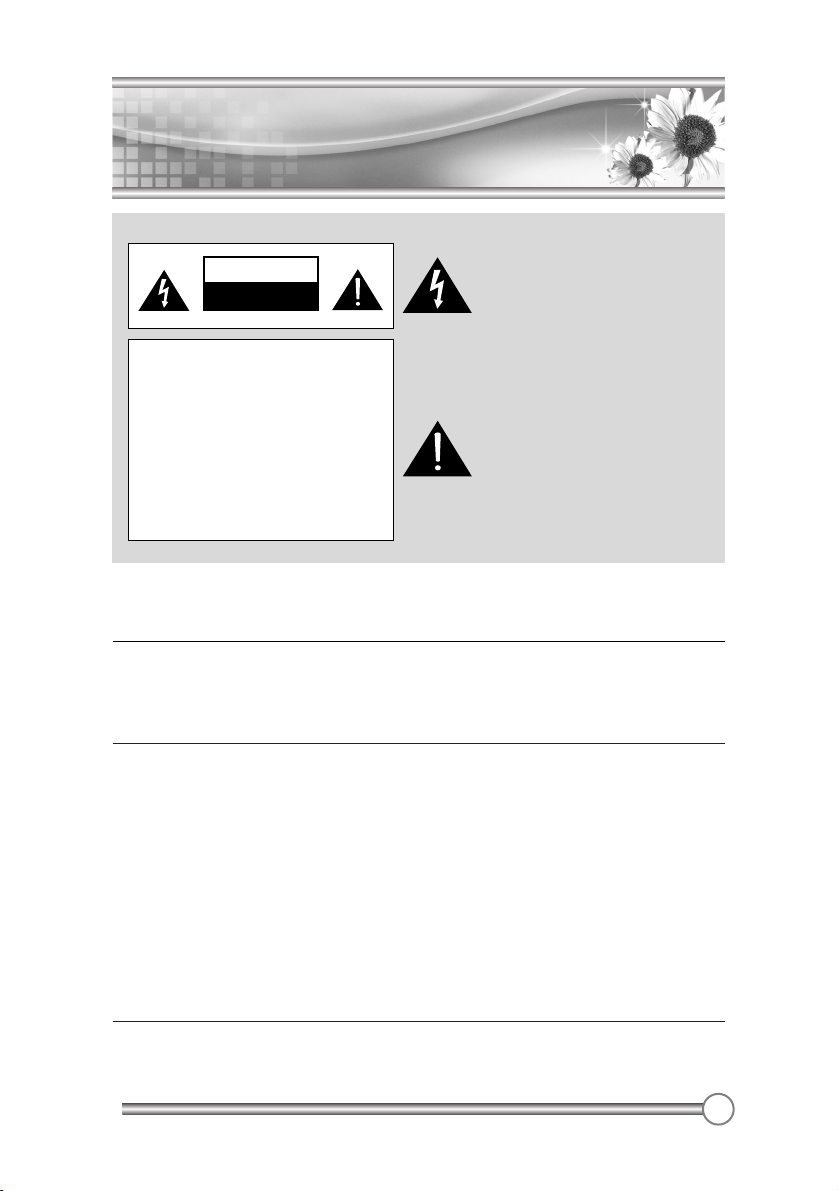
The lightning flash with arrowhead
symbol, within an equilateral triangle,
is intended to alert the user to the
presence of uninsulated
“dangerous voltage” within the
product’s enclosure that may be of
sufficient magnitude to constitute a
risk of electric shock to persons.
The exclamation point within an
equilateral triangle is intended to alert
the user to the presence of important
operating and maintenance (servicing)
instructions in the literature
accompanying the appliance.
WARNING
RISK OF ELECTRIC SHOCK
DO NOT OPEN
WARNING :
The unit is operated at dangerous
voltages. The unit may only be
opened by an authorised specialist.
All maintenance and servicing work
must be carried out by an
authorised company. Repairs that
are carried out incorrectly could
result in fatal injuries to the user.
Page 5
4
Warnings
Warnings
Cleaning
Unplug the TV before cleaning the face of the LCD Screen. Dust the TV by wiping the screen
and cabinet with a soft, clean cloth. If the screen requires additional cleaning, use a clean,
damp cloth. Do not use liquid or aerosol cleaners.
POWER
The main plug should be inserted fully into the power outlet to avoid a fire hazard.
Hold the plug firmly when unplugging. If you pull the cord, the cord may be damaged.
Prevent dust collecting on the power plug pins or outlet. And do not use too many
plugs on the Mains multi-outlet. It may result in overheating of the outlet and causes
a fire hazard.
Never touch the power plug with a wet hand. This may cause an electric shock
hazard.
Unplug the set from the wall outlet when it is left unattended and unused for long
periods of time. Accumulated dust may cause a fire or an electric shock from
deterioration or electric leakage.
Trademark Information
This TV incorporates High-Definition Multimedia
Interface (HDMI)™ technology.
HDMI, the HDMI logo and High-Definition Multimedia
Interface are trademarks or registered trademarks of
HDMI Licensing LLC.
The logo “HD ready” is a trademark of EICTA.
The logo “HD ready” is awarded to display equipment
capable of presenting HD sources with a
much higher resolution than standard PAL (576i).
WOW, SRS and
®
symbol are trademarks of SRS
Labs, Ins.
SRS WOW technology is incorporated under license
from SRS Labs, Inc.
Page 6
5
Warnings
Warnings
Safety
This LCD TV have been engineered and manufactured to assure your safety.
You can prevent serious electrical shock and other hazards by keeping in mind the following.
Do not place anything heavy, wet or magnetic on the LCD TV or the power cord.
Never cover the ventilation openings with any material and never touch them with metallic or
inflammable materials.
Avoid operating the LCD TV in extreme heat, humidity or areas affected by dust.
+ Temperature:0~50 ºC + Humidity:20~90RH
Be sure to turn the LCD TV off before plugging the power cord into the socket.
Make sure that the power cord and the other cords are securely and correctly connected.
Overloaded AC outlets and extension cords are dangerous, as are frayed power cords and
broken plugs, which may cause electric shock or fire.
Call your service technician for replacement.
Do not sharp tools such as a pin or a pencil near the LCD TV, as they may scratch the LCD
surface.
Do not use a solvent, such a benzene, to clean the LCD TV, as it will damage the LCD surface.
The apparatus shall not be exposed to dripping or splashing.
TV Wall mounting bracket
Use the following appliance(s) only with the following wall mounting bracket. Use with other Wall
mounting bracket may cause instability and result in possible injury.
APPLIANCE MODEL NO:
LT-40T6MVH
LT-40H6MVH
LT-46T6MVH
TV WALL MOUNTING BRACKET MODEL NO:
KT-90(Use for 40inch.)
KT-100(Use for 46inch.)
This product is designed and manufactured with high quality
materials and components which can be recycled and reused.
This symbol means that electrical and electronic equipment, at
their end-of-life, should be disposed of separately from your
household waste.
Please, dispose of this equipment at your local community waste
collection/recycling centre.
In the European Union there are separate collection systems for
used electrical and electronic product.
Please, help us to conserve the environment we live in!
Note
✽
The illustrations used in this manual are of the LT-40T6MVH unless otherwise state.
Page 7
IMPORTANT SAFETY INSTRUCTIONS
IMPORTANT SAFETY INSTRUCTIONS
6
Important safeguards for you and your new product
Your product has been manufactured and tested with your safety in mind. However, improper use
can result in potential electrical shock or fire hazards. To avoid defeating the safeguards that have
been built into your new product, please read and observe the following safety points when
installing and using your new product, and save them for future reference.
Observing the simple precautions discussed in this operating guide can help you get many years
of enjoyment and safe operation that are built into your new product.
This product complies with all applicable U.S. Federal regulations and voluntary safety standards.
1. Read Instructions
All the safety and operating instructions should be read
before the product is operated.
2. Follow Instructions
All operating and use instructions should e followed.
3. Retain Instructions
The safety and operating instructions should be
retained for future reference.
4. Heed Warnings
All warnings on the product and in the operating
instructions should be adhered to.
5. Cleaning
Unplug this product from the wall outlet before
cleaning. Do not use liquid cleaners or aerosol
cleaners. Use a damp cloth for cleaning.
6. Water and Moisture
Do not use this product near water for example, near a
bathtub, washbowl, kitchen sink, or laundry tub, in a
wet basement, or near a swimming pool.
7. Accessories, Carts, and Stands
Do not place this product on a slippery or tilted surface,
or on an unstable cart, stand, tripod, bracket, or table.
The product may slide or fall, causing serious injury to
a child or adult, and serious damage to the product.
Use only with a cart, stand, tripod, bracket, or table
recommended by the manufacturer, or sold with the
product. Any mounting of the product should follow the
manufacturer’s instructions, and should use a mounting
accessory recommended by the manufacturer.
8. Transporting Product
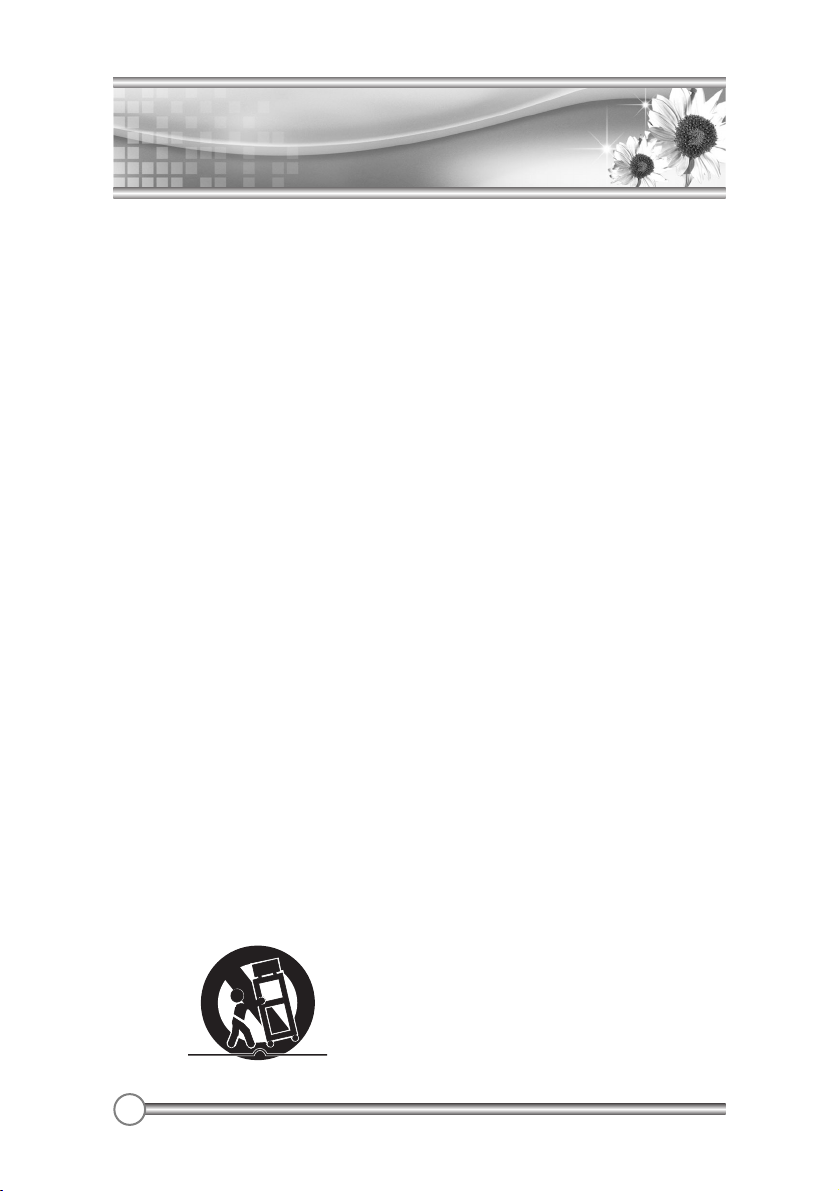
A product and cart combination should be moved with
care. Quick stops, excessive force, and uneven
surfaces may cause the product and cart combination
to overturn.
9. Attachments
Do not use attachments not recommended by the product
manufacturer as they may cause hazards.
10. Ventilation
Slots and openings in the cabinet are provided for
ventilation and to ensure reliable operation of the product
and to protect it from overheating, and these openings
must not be locked or covered. The openings should never
be blocked by placing the product on a bed, sofa, rug, or
other similar surface. This product should not be placed in a
built-in installation such as a bookcase or rack unless
proper ventilation is provided or the manufacturer ’s
instructions have been adhered to.
11. Power Sources
This product should be operated only from the type of
power source indicated on the marking label. If you are not
sure of the type of power supply to your home, consult your
product dealer or local power company. For products
intended to operate from battery power, or other sources,
refer to the operating instructions.
12. Power Cord Polarization
This product is equipped with a three-wire grounding-type
plug, a plug having a third (grounding) pin This plug will only
fit into a grounding-type power outlet. . This is a safety
feature. If you are unable to insert the plug into the outlet,
contact your electrician to replace your obsolete outlet. Do
not defeat the safety purpose of the grounding-type plug.
13. Power Cord Protection
Power-supply cords should be routed so that they are not
likely to be walked on or pinched by items placed upon or
against them, paying particular attention to cords at plugs,
convenience receptacles, and the point where they exit
from the product.
PORTABLE CART WARNING
Page 8
IMPORTANT SAFETY INSTRUCTIONS
IMPORTANT SAFETY INSTRUCTIONS
7
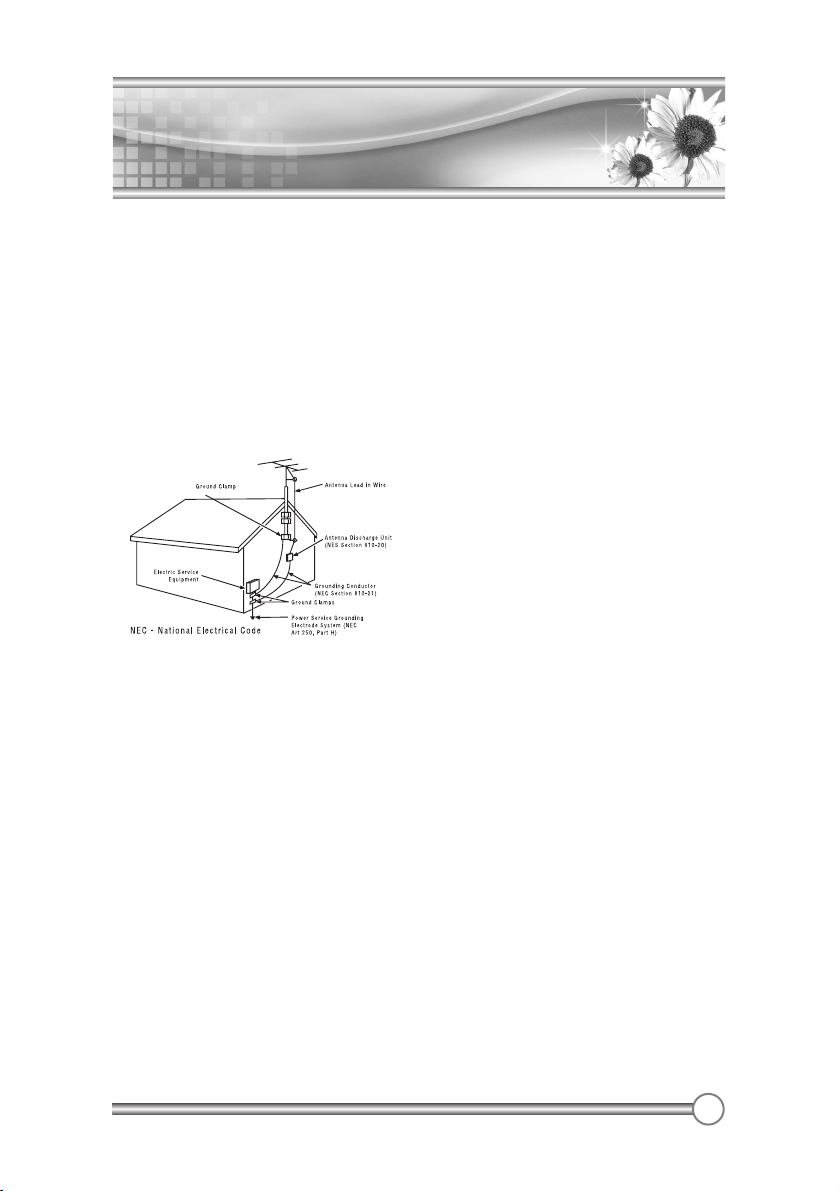
14. Outdoor Antenna Grounding
If an outside antenna or cable system is connected to the
product, be sure the antenna or cable system is
grounded so as to provide some protection against
voltage surges and built-up static charges. Article 810 of
the National Electrical Code (U.S.A.), ANSI/NFPA 70
provides information with regard to proper grounding of
the mast and supporting structure, grounding of the leadin wire to an antenna discharge unit, size of grounding
conductors, location of antenna-discharge unit,
connection to grounding electrodes, and requirements for
the grounding electrode.
Example of Grounding According to National
Electrical Code Instructions
15. Lightning
For added protection for this product (receiver) during a
lightning storm, or when it is left unattended and
unused for long periods of time, unplug it from the wall
outlet and disconnect the antenna or cable system.
This will prevent damage to the product due to
lightning and power-line surges.
16. Power Lines
An outside antenna system should not e located in the
vicinity of overhead power lines or other electric light or
power circuits, or where it can fall into such power lines
or circuits. When installing an outside antenna system,
extreme care should be taken to keep from touching
such power lines or circuits, as contact with them might
be fatal.
17. Overloading
Do not overload wall outlets and extension cords as
this can result in a risk of fire or electric shock.
18. Object and Liquid Entry
Never push objects of any kind into this product
through openings as they may touch dangerous
voltage points or short-out parts that could result in a
fire or electric shock. Never spill liquid of any kind on
the product.
19. Servicing
Do not attempt to service this product yourself as opening or
removing covers may expose you to dangerous voltage or
other hazards. Refer all servicing to qualified service
personnel.
20. Damage Requiring Service
Unplug this product from the wall outlet and refer servicing to
qualified service personnel under the following conditions:
a. If the power-supply cord or plug is damaged.
b. If liquid has been spilled, or objects have fallen
into the product.
c.
If the product has been exposed to rain or water.
d. If the product does not operate normally by f
ollowing the operating instructions. Adjust only
those controls that are covered by the operating
instructions as an improper adjustment of other
controls may result in damage and will often
require extensive work by a qualified technician
to restore the product to its normal operation.
e. If the product has been dropped or the cabinet
has been damaged.
f. If the product exhibits a distinct change in
performance.
21. Replacement Parts
When replacement parts are required, be sure the service
technician has used replacement parts specified by the
manufacturer or have the same characteristics as the original
part. Unauthorized substitutions may result in fire, electric
shock, or other hazards.
22. Safety Check
Upon completion of any service or repairs to this product,
ask the service technician to perform safety checks to
determine that the product is in proper operating condition.
23. Wall Mounting
The product should be mounted to a wall only as
recommended by the manufacturer. The product may slide
or fall, causing serious injury to a child or adult, and serious
damage to the product.
24. Heat
The product should be situated away from heat sources
such as radiators, heat registers, stoves, or
other products
(including amplifiers) that produce heat.
Page 9

8
Contents
Contents
uWarnings
······················································································································································
3~5
uIMPORTANT SAFETY INSTRUCTIONS
·····························································································
6~7
uContents
····················································································································································
8~9
uSupplied Accessories
·····························································································································
10
uInstallation
···················································································································································
11
uConnecting Speaker
···································································································································
12
uControls
···················································································································································
13~16
Front Panel
·················································································································································
13
Rear Panel
··················································································································································
14
Remote controller
······························································································································
15~16
uBasic Operation
···································································································································
17~18
Turning the TV On and Off
·····················································································································
17
Program selection
····································································································································
17
Volume adjustment
··································································································································
17
P
ÏP
·····························································································································································
17
Sound mute function
·······························································································································
17
On screen menu language selection
····································································································
18
Changing the Input mode
·······················································································································
18
Displaying Information
·····························································································································
18
uOn Screen Menus and Display
···············································································································
19
uSetting up TV Program
······················································································································
20~22
Auto Program
············································································································································
20
Manual Program
·······································································································································
21
Manual Picture Control
···························································································································
22
uPicture Control
············································································································································
23
PICTURE Effect
·········································································································································
23
Auto Picture Control
································································································································
23
uSound Control
·······································································································································
24~25
Manual Sound Control
····························································································································
24
SOUND Effect
···········································································································································
25
Auto Sound Control
·································································································································
25
uParental Control
···································································································································
26~27
uINFORMATION
·····································································································································
28~29
uCaptions
·························································································································································
30
uOther functions
····································································································································
31~35
Clock
···························································································································································
31
N.R.(Noise Reduction)
·····························································································································
31
Blue Back
···················································································································································
31
Auto Sleep
··················································································································································
32
Childlock
·····················································································································································
33
ARC(Aspect Ratio Control)
·····················································································································
33
Sleep timer
·················································································································································
34
PIP function
···············································································································································
34
Calling the program list
···························································································································
35
uBefore operating the set, please read this manual carefully.
Page 10

9
Contents
Contents
uBefore operating the set, please read this manual carefully.
uExternal Equipment Connection
····································································································
36~38
Antenna connection
·································································································································
36
A/V IN
··························································································································································
36
A/V OUT
······················································································································································
37
COMPONENT 1 IN / COMPONENT 2 IN
····························································································
37
Connecting to HDMI (High Definition Multimedia Interface)
···························································
38
S-VIDEO IN
················································································································································
38
Headphone jack
········································································································································
38
Coaxial OUT
···············································································································································
38
uConnecting the PC as a monitor
····································································································
39~42
Picture adjustment
···································································································································
39
Sound adjustment
····································································································································
40
Setup
···························································································································································
41
Auto
·····························································································································································
41
PC INPUT
··················································································································································
42
uProduct Specifications
·····························································································································
43
uTroubleshooting
··········································································································································
44
Page 11
10
Supplied Accessories
Supplied Accessories
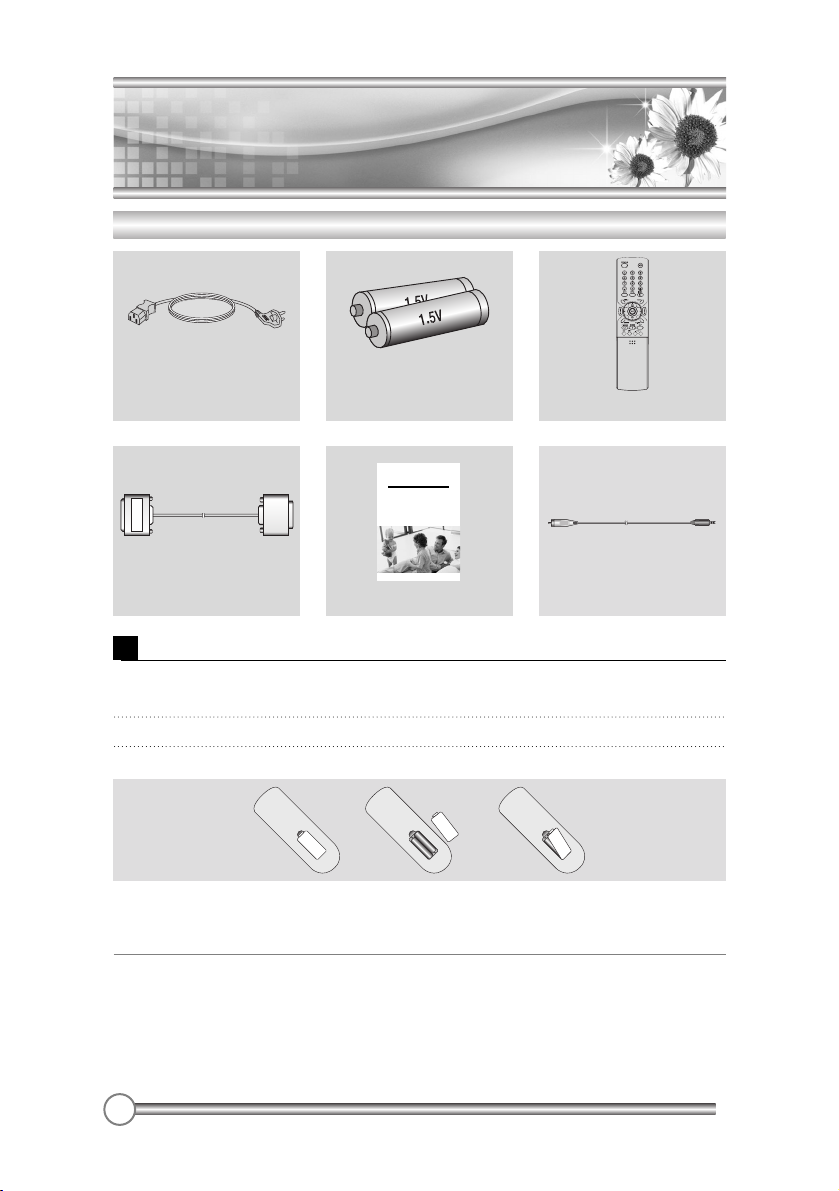
uMake sure the following accessories are provided with Product.
Battery installation
Wide LCD-TV
Instruction Manual
Please read this manual carefully before operating your set.
●
LT-40H6MVH
●
LT-40T6MVH
●
LT-46T6MVH
AC cord Batteries (2EA) Remote controller
VGA cable Instruction manual PC AUDIO IN cable
uInserting batteries
1 Remove the battery cover by pulling it
upward in the direction shown by the arrow.
2 Insert the batteries with correct polarity.
3 Replace the battery compartment cover.
-Install two high-quality 1.5V "AAA" alkaline batteries. Don't mix old batteries with new batteries.
-Remove batteries when you won't use the remote controller for long time. Liquid
leakage from old batteries may cause operation failure.
uNotes for using remote controller
• Make sure there are no objects between the remote controller and its sensor.
• Don't place the remote control near a heater or in damp place. Strong impact to the remote
control may cause operation failure.
• Signal from the remote control may be disturbed by sun light or other bright light. In this case,
darken the room or move the TV.
Page 12
11
Installation
Installation
uYou can install the TV on a wall or place it on a table-like surface.
uTo eliminate any risk of injury from the TV falling, it should be mounted securely.
Installation Options
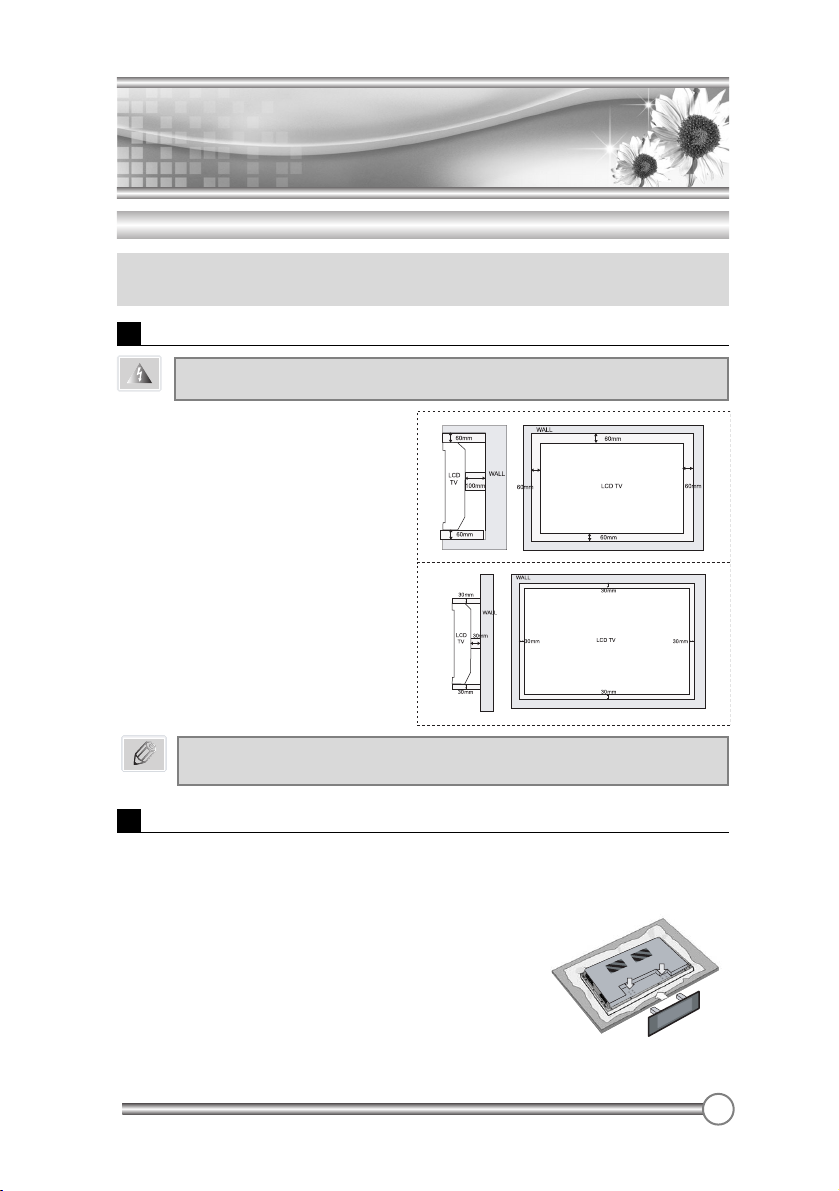
When the TV is placed into a cupboard,
the distance between the TV and the wall
have to leave minimum 60mm square
as below.
When the TV is mounted on the wall,
the distance between the TV and the
wall have to leave minimum 30mm
square as below.
Wall Installation
Caution
Do not install the TV on a weak wall surface, like plaster etc.
For detailed information, refer to the wall mount bracket instruction
(not included in delivery) supplied with wall mount bracket.
Note
Desktop Installation
3
The TV and stand may now be placed upright, ready
for
viewing.
2 Locate the stand on its mounting position and use
the supplied screws to attach the stand to the TV.
Ensure that all of them are securely tightened.
1
Lay down the TV as pictured right. Please ensure that the table/box has a
protection sheet to avoid any scratch or damage to the TV screen.
Please ensure that there is no pressure directly applied to the front surface of
the TV screen when laying the product down on its face.
Page 13
12
Connecting Speaker
Connecting Speaker
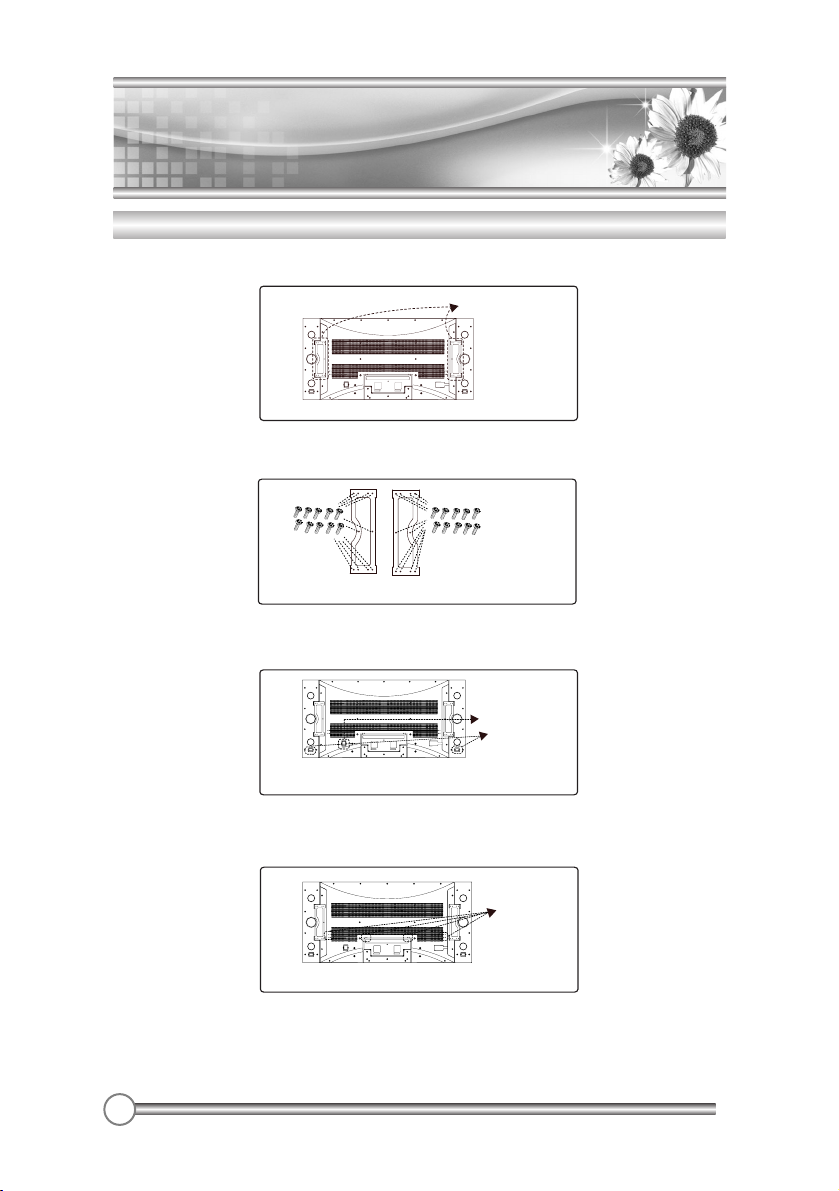
L Connecting TV and Speaker(LT-40T6MVH/LT-46T6MVH)
1 Fix the bracket onto the guide pole located on the rear of TV and Speaker.
2 Clamp the speaker and the TV together fasten the screws.
3 Connecting the speaker audio cable to the external speaker output jack on the TV.
4 Fix the speaker audio cable on the quick clamp
✽
located on the rear of TV.
✽
Quick clamp✽: Attach the offered quick clamp on each position
speaker joint bracket
External speaker
output jack
External speaker
input jack
✽
Quick clamp
Page 14
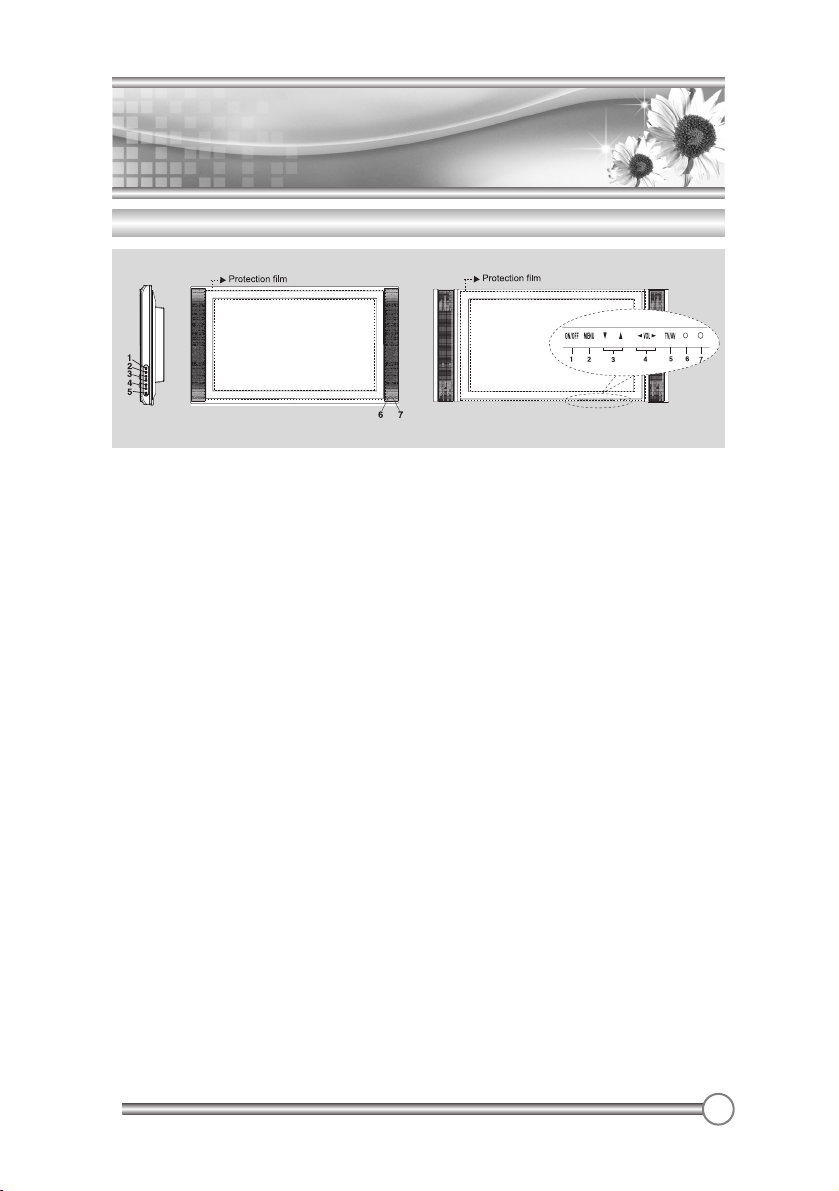
13
Controls
Controls
1. ON/OFF
Switches TV set on or off.
2. MENU
Displays a menu.
3. ▼CH▲ (Channel Up/Down)
Selects a channel or a menu item.
4. ◀VOL▶ (Volume Up/Down)
Adjusts the volume./ Adjusts menu settings.
5. TV/AV
Selects TV, VIDEO, S-VIDEO, COMPONENT1, COMPONENT2, PC ANALOG, HDMI./ Clears the
menu from the screen.
6. Power Indicator
Illuminates in red when the TV is in standby mode./ Illuminates in green when the
TV is switched on.
7. Remote control sensor
Accepts the IR signal of remote controller.
Front Panel
[LT-40T6MVH, LT-46T6MVH][LT-40H6MVH]
CH
Page 15
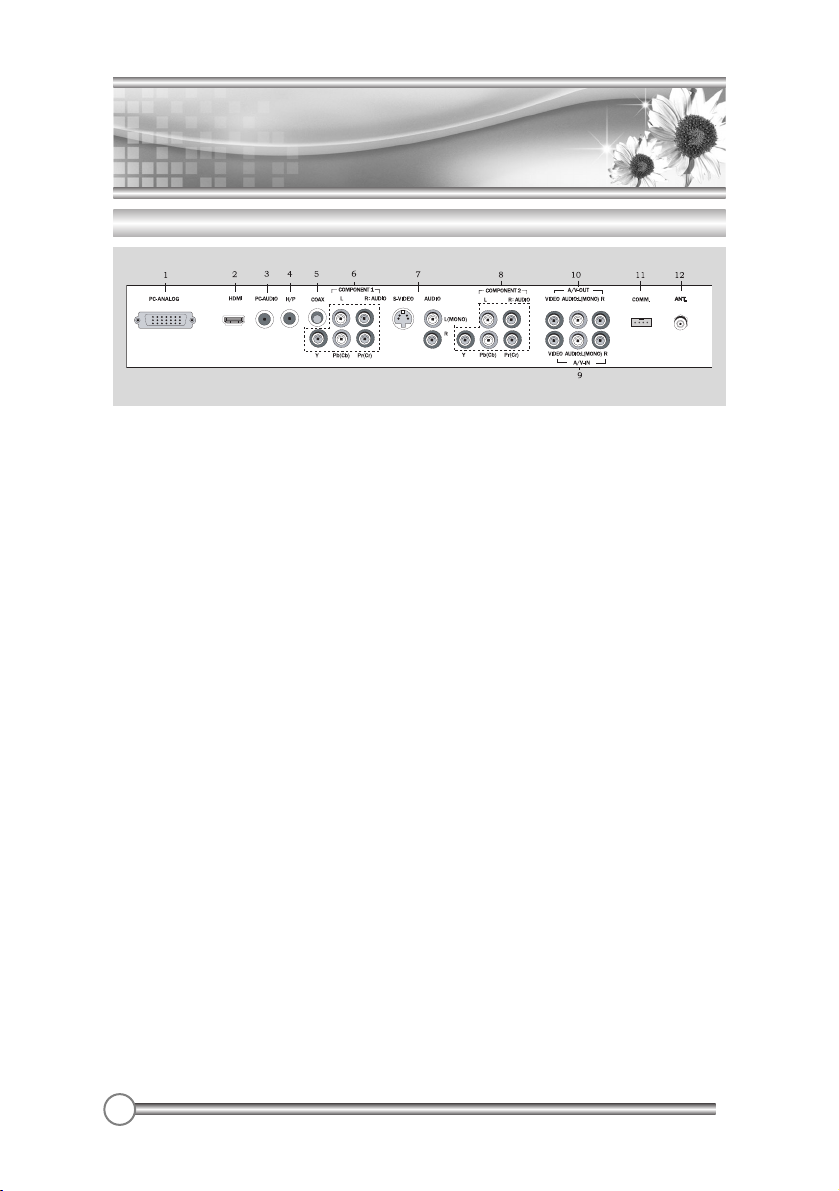
14
Controls
Controls
1. PC ANALOG IN (D-SUB)
2. HDMI (High Definition Multimedia Interface) IN
Connect to the HDMI jack for device with HDMI output.
3. PC AUDIO IN
Connect the audio cable from the PC to the PC AUDIO IN of the set.
4. H/P (Headphone out)
Connect a headphone to this socket.
5. Coaxial OUT
Connect the coaxial audio cable from the digital audio device to the Coaxial OUT of the set.
6. COMPONENT1 IN
Connect the COMPONENT1 audio/video output sockets of the DTV set top box to the
COMPONENT audio/video Input sockets of the set.
7. S-VIDEO IN
Connect the output of an S -VIDEO VCR to the S-VIDEO input.
Connect the S -VIDEO Audio cable for sound.
8. COMPONENT2 IN
Connect the COMPONENT2 audio/video output sockets of the DTV set top box to the
COMPONENT audio/video Input sockets of the set.
9. A/V-IN
Connect the Audio/Video outputs of external equipment to these inputs.
10. A/V-OUT
Connect the Audio/Video inputs of external equipment to these outputs.
11. COMM.
Communicaton port.
12. ANT.
Rear Panel
Page 16
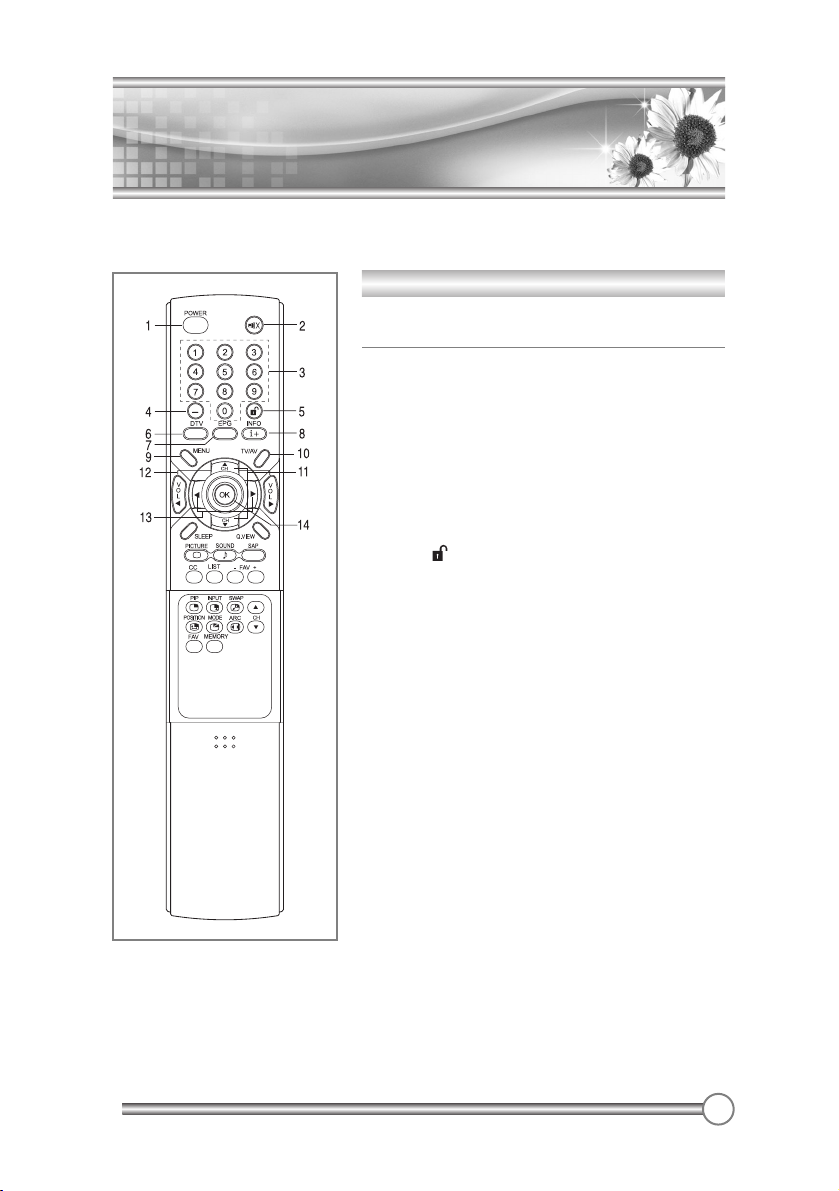
15
Controls
Controls
All the functions can be controlled with the remote controller. Some functions can also be
adjusted with the buttons on the side panel of the set.
Remote controller
Before you use the remote controller, please install the
batteries.
1. POWER
Turns the TV on from standby or off to standby mode.
2. MUTE
Turns the sound on and off.
3. NUMBER buttons
Selects Channel numbers.
4. Hyphen (*only DTV mode)
Press to select DTV channels. For example, to select
channel '54-3', press '54', then press '-' and '3'.
5. Lock ( ) button
When the parental control function is locked, press the
lock button, then parental control function is unlocked.
6. DTV (*Only DTV mode)
This button is direct access to the DTV input.
7. EPG (*only DTV mode)
Displays a receiving broadcast information.
8. INFO (*only DTV mode)
Use to see information on the current broadcast.
9. MENU
Displays a main menu.
10. TV/AV
Selects TV, VIDEO, S-VIDEO, COMPONENT1,
COMPONENT2, PC ANALOG or HDMI mode.
Clears the menu from the screen.
11. CHx/CHy (Channel Up/Down)
Selects next Channel or a menu item.
12. ÏVOLq (Volume Up/Down)
Adjusts the sound level.
Adjusts menu settings.
13. Ïq
Adjusts the sound level.
Adjusts menu settings.
14. OK
Press OK button to activate a particular item.
Page 17
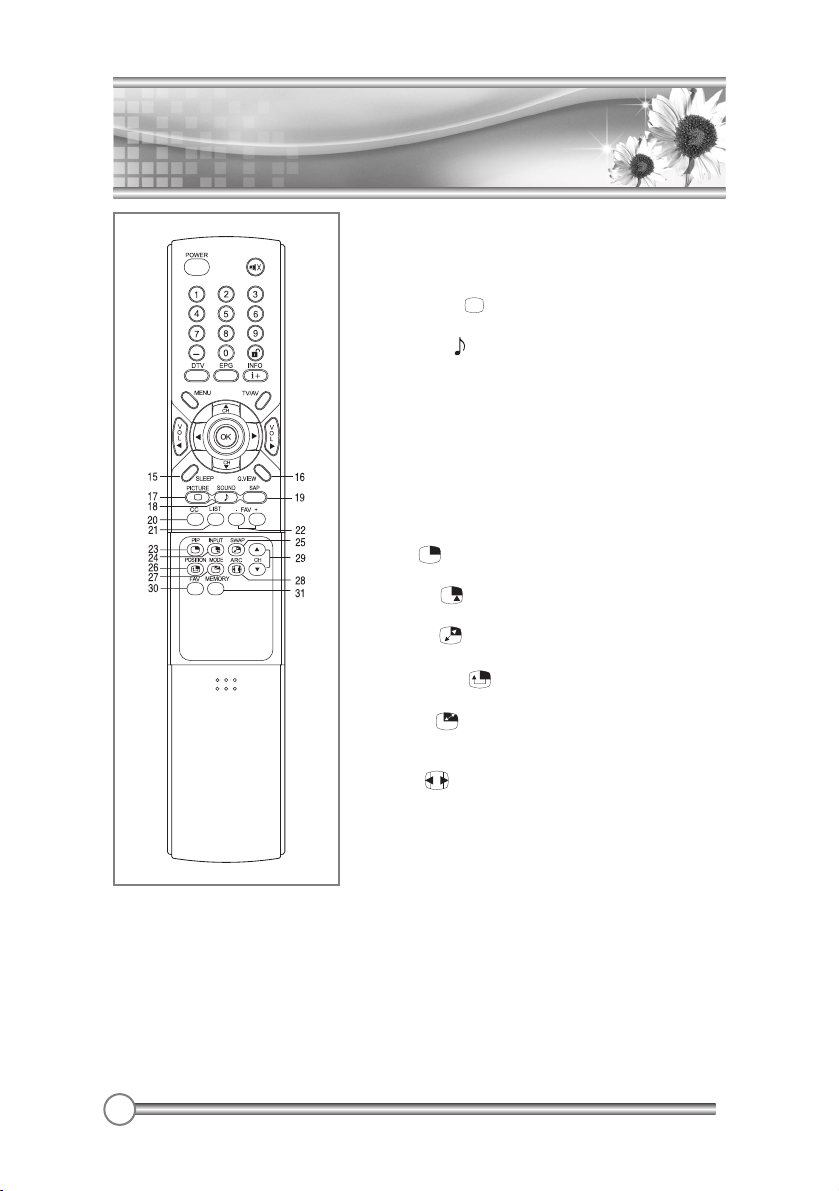
16
Controls
Controls
15. SLEEP
Sets the sleep timer.
16. Q.VIEW
Returns to the previously viewed Channel.
17. PICTURE( )
Recalls your preferred picture setting.
18. SOUND( )
Recalls your preferred sound setting.
19. SAP
Adjusts the MTS-stereo, Mono, SAP
20. CC
Set the caption function.
21. LIST
Displays the program list menu.
22. FAV+/-
Press to switch to your favorite channels.
23. PIP( )
Displays a PIP(Picture In Picture) screen.
24. INPUT( )
Selects the AV source of sub picture in PIP mode.
25. SWAP( )
Switches a main picture for sub picture in PIP mode.
26. POSITION( )
Selects a position of PIP screen.
27.MODE( )
Selects a PIP screen mode. – 16:1, 9:1, Double Window
mode.
28. ARC( )
You can watch TV in various picture formats; 16:9, 14:9,
4:3, 16:9 Zoom, 14:9 Zoom, 4:3 Zoom and Auto.
Repeatedly press the ARC button to select your desired
picture format.
29. xCHy
Selects a channel when RF signal is displayed in PIP
mode.
30. FAV
Stores or deletes the favorite channel.
31. MEMORY
Stores or deletes the current channel.
Page 18
17
Basic Operation
Basic Operation
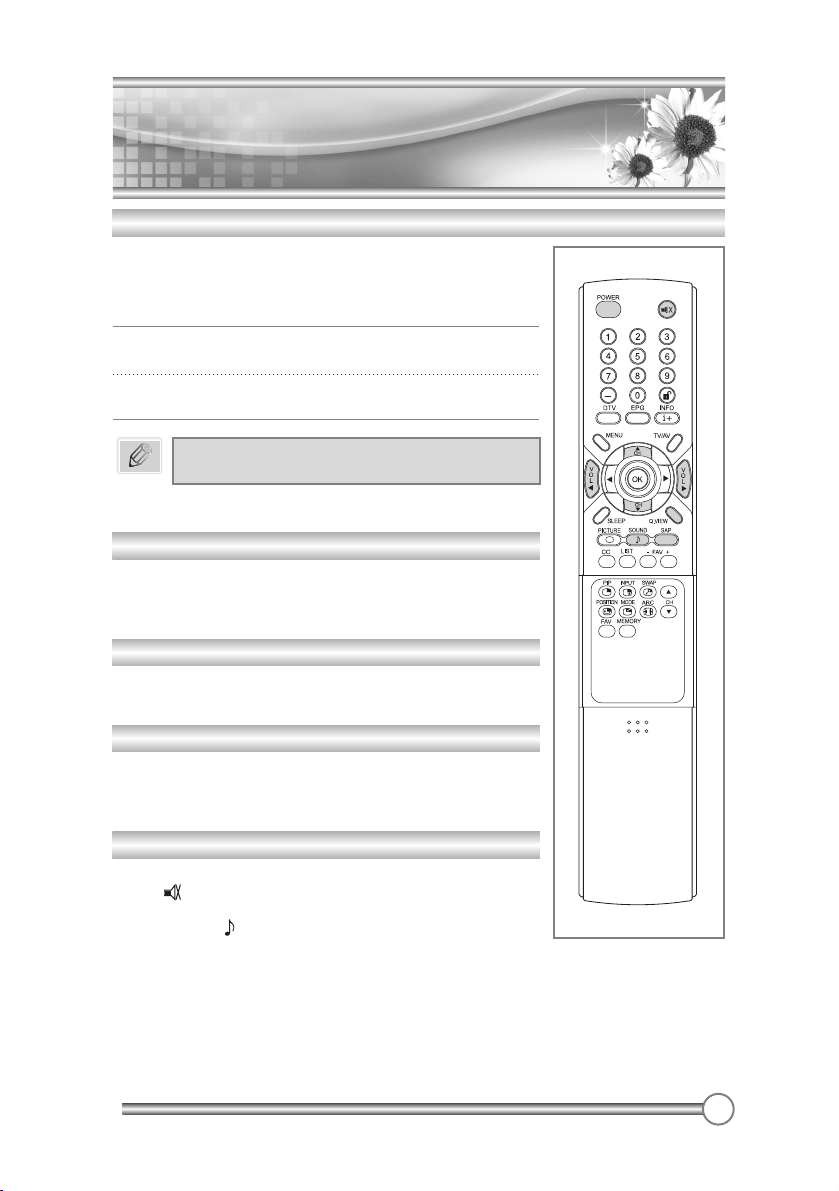
Program selection
You can select a Program number with the CHxx/CHyybutton or
NUMBER buttons.
Volume adjustment
Press the VOLÏÏ/VOLqqbutton to adjust the sound level.
Q.VIEW
Press the Q.VIEW button to view the last program you were
watching.
Sound mute function
Press the MUTE button. The sound is switched off and the mute
display appears.
To cancel mute mode, press the MUTE button again, VOLÏÏ/VOLqq,
SAP or SOUND( ) button.
Standby Setup: The AC power cord must be set up and connected
to have the TV in standby mode ready to be turned on. Press the
ON/OFF button on the front panel of the TV to go into standby
mode.
1 If the TV is in standby mode, press the POWER button
on the
remote controller or the TV itself to turn the TV on.
2 Press the POWER button again on the remote controller or
the TV itself to turn the TV off.
Turning the TV On and Off
If the TV is on and the POWER button is pressed
to turn the TV off, the TV goes into standby mode.
Note
Page 19
18
Basic Operation
Basic Operation
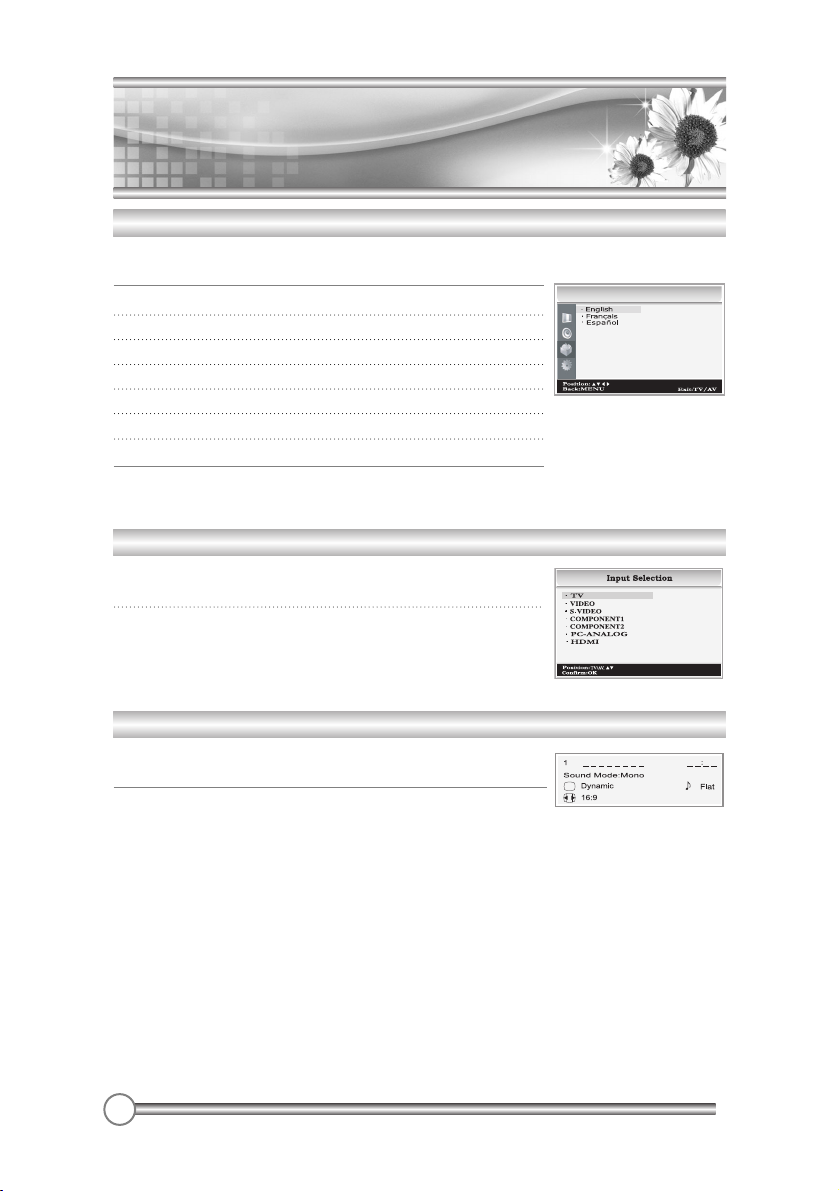
On screen menu language selection
The menu can be displayed on the screen in desired language.
First select your language.
1 Press the MENU button.
2 Select the Setup menu with CHxx/CHyybutton.
3 Press the
ÏÏqq
button to select the Setup menu.
4 Select the Language with CHxx/CHyybutton.
5 Press the
ÏÏqq
button to select the Language.
6 Press the CHxx/CHyybutton to select your desired language.
7 Press the TV/AV button.
All the on screen menu will appear in the selected language.
1 Press the TV/AV or CHxx/CHyybuttons to change the input
mode.
2 Press the OK button to select your desired mode.
You can display the Channel information and setting status you
selected.
Press the OK button
Changing the Input mode
Displaying Information
Setup
Language
Page 20
19
On Screen
Menus and Display
On Screen
Menus and Display
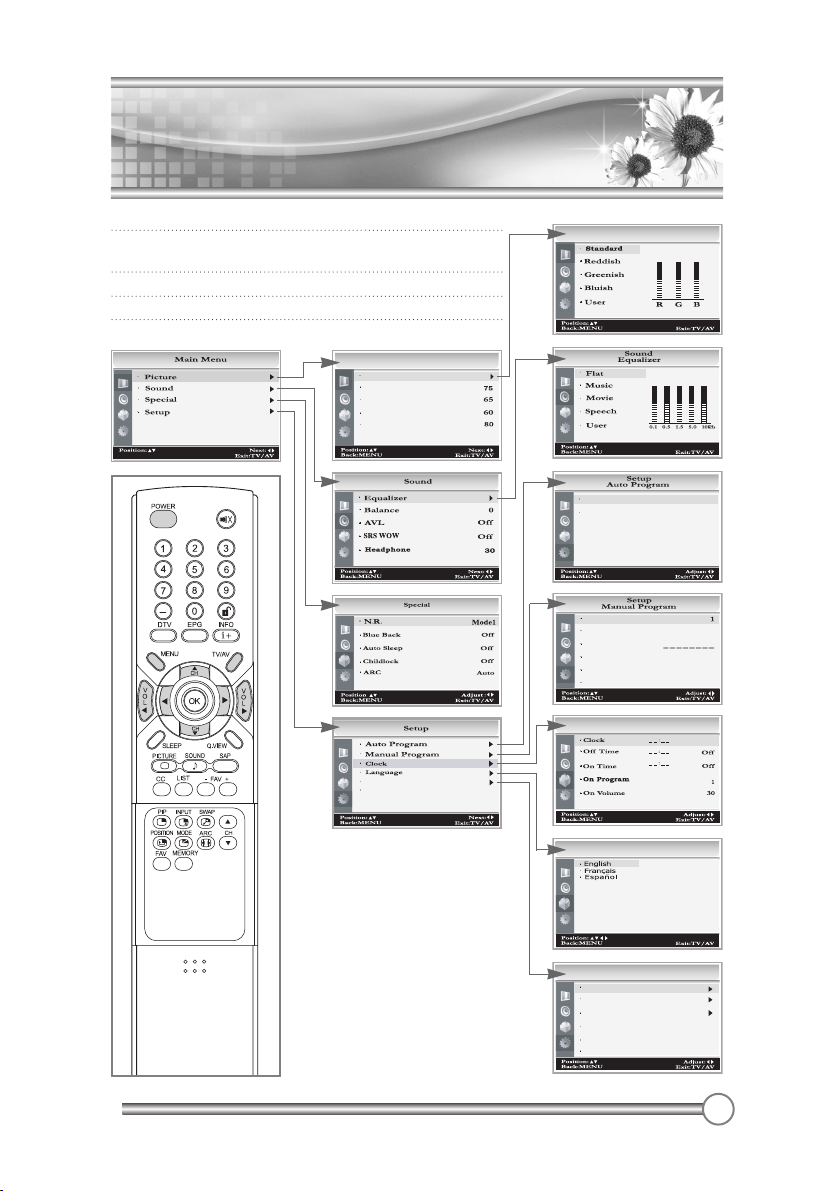
1 Press the MENU button to display main menu.
2 Press the CHxx/CHyybutton to select menus-Picture,
Sound, Special, Setup.
3 Adjust each menu with the
ÏÏqq
button.
4 Press the MENU button to return to preceding menu.
5 Press the TV/AV button to finish adjusting menu.
Picture
Color Temperature
Contrast
Brigheness
Color
Sharpness
Parental Control
Caption Off
Picture
Color Temperature
Table V/UHF
START
Channel
Tabl e V/UHF
Name
Finetune
Skip
Memorize
Setup
Clock
0
On
Setup
Language
Setup
Parental Control
TV Rating
MPAA Rating
Change Password
Aux. Block Sources Unblocked
Block Hour
Parental Lock
Always
Off
Page 21
20
Setting up TV Program
Setting up TV Program
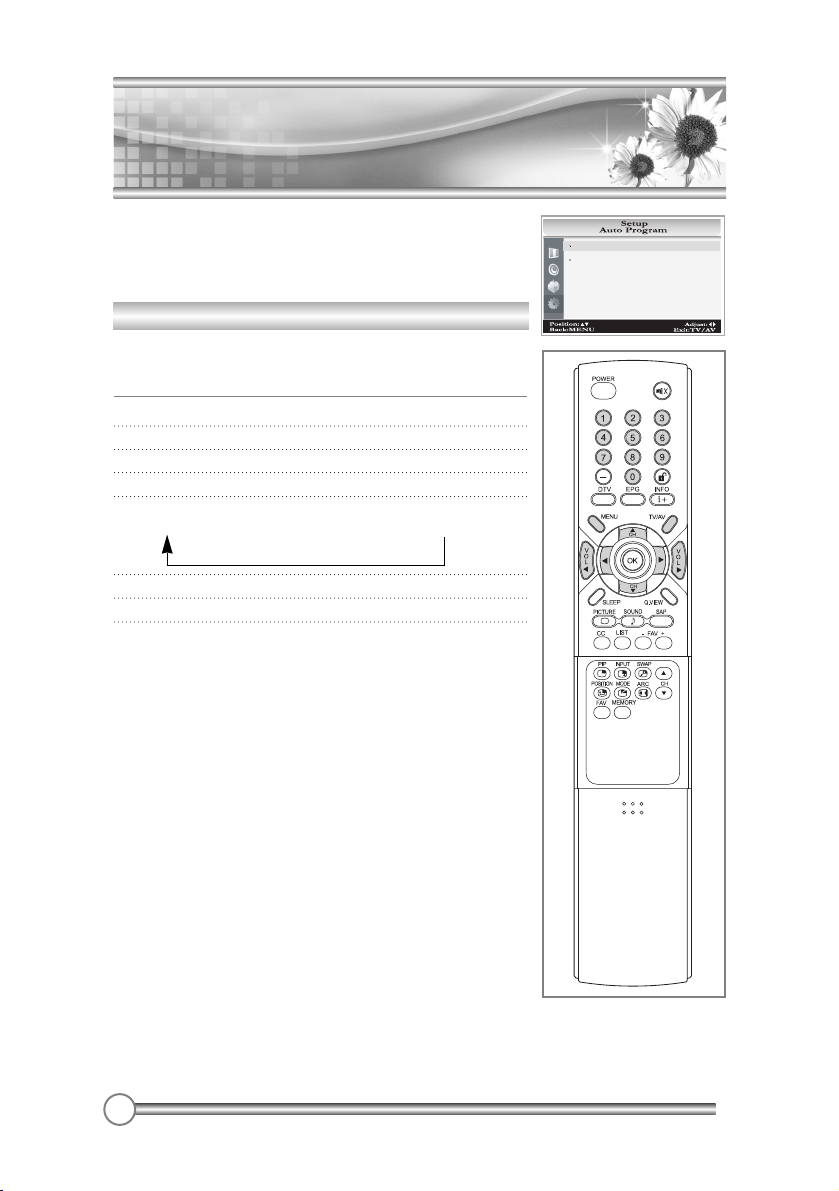
Once you have preset the program, you will be able to use the
CHxx/CHyyor NUMBER buttons to scan the program you
programmed.
Program can be tuned using Auto or Manual program menu.
Auto Program
All programs that can be received are stored by this method. It is
recommended that you use Auto program during installation of
this set.
1 Press the MENU button.
2 Select the Setup menu.
3 Select the Auto Program menu.
4 Select the CH
xxyy
button to select Table mode.
5 Select a Table mode with the VOL
ÏÏqq
button.
V/UHF => Cable STD => Cable HRC => Cable IRC
6 Select the Start menu to start Auto Program.
7 Press the MENU button to stop Auto program.
8 Press the TV/AV button to return to normal TV viewing.
Table V/UHF
START
Page 22
21
Setting up TV Program
Setting up TV Program
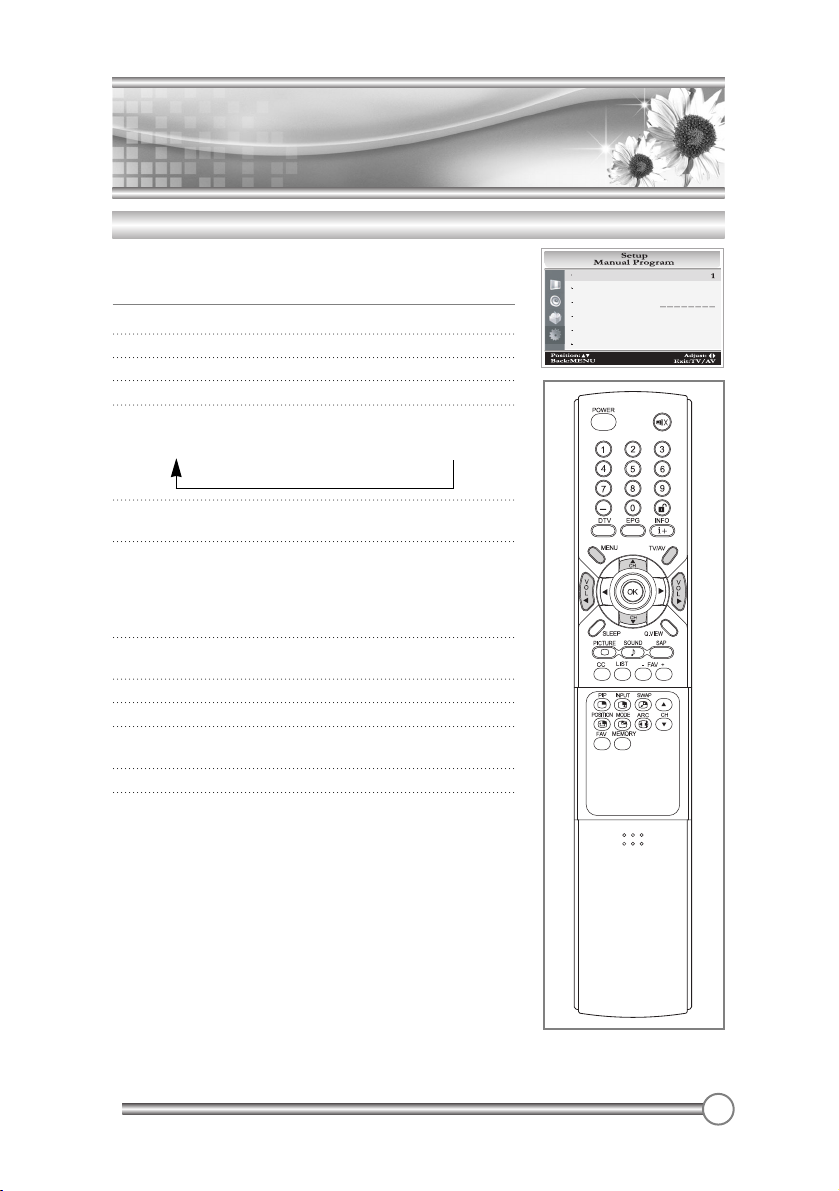
Manual Program
Manual Program lets you manually tune and arrange the
Channels in whatever order you desire. Also you can assign a
Channel name with 8 characters to each channel number.
1 Press the MENU button.
2 Select the Setup menu.
3 Select Manual Program menu.
4 Press the CH
xxyy
button to select Channel .
5 Select the Table menu. Then select a tuner mode with the
VOL
ÏÏqq
button.
V/UHF => Cable STD => Cable HRC => Cable IRC
6 Select the Name with CH
xxyy
button.
Then press the VOL
ÏÏqq
button.
7 Press the CH
xxyy
button repeatedly to edit program
name. You can use the numeric 0 to 9, the alphabet A to z
(capital and small letters.)
a blank and -. With the VOL
ÏÏqq
button you can select in
the opposite direction.
8 Press the CH
xxyy
button to select the Finetune.
Press the VOL
ÏÏqq
button to commence finetuning.
9 Select the Skip with CH
xxyy
button.
10 Press the VOL
ÏÏqq
button to select the “On” or “Off”.
11 Press the CH
xxyy
button to select the Memorize. Then
press the VOL
ÏÏqq
button.
12 Press the MENU button to return to prior menu.
13 Press the TV/AV button to return to normal TV viewing.
Channel
Table V/UHF
Name
Finetune
Skip
Memorize
0
On
Page 23
22
Picture Control
Picture Control
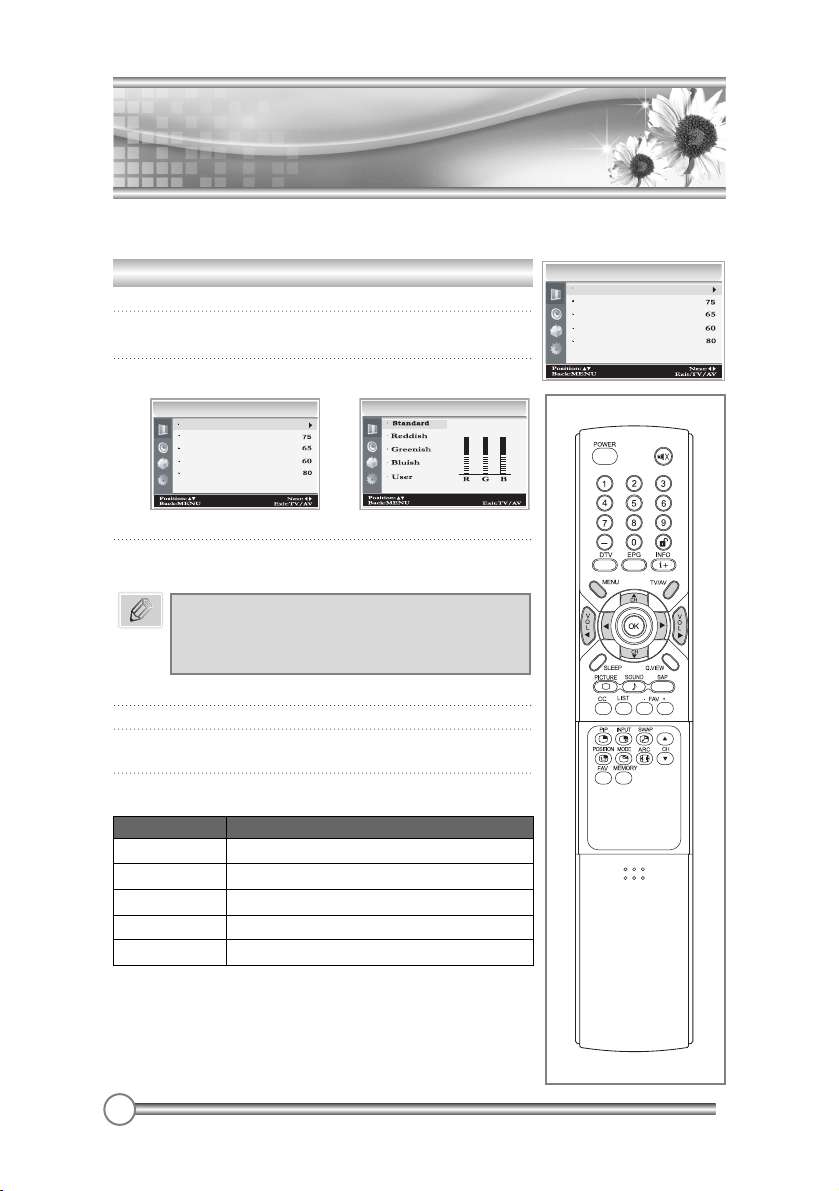
You can adjust Color Temperature, Contrast, Brightness, Color, Sharpness and
Tint(Only in NTSC mode) to the levels you prefer.
Selected Item
Sharpness
Tint*
Color
Brightness
Contrast
Setting Change
More darkness Ï 0~100 q More light
Less bright Ï 0~100 q More bright
Lower color intensity Ï 0~100 q Higher color intensity
Soft picture Ï 0~100 q Hard picture
More purple Ï-50~50 q More green.
Manual Picture Control
1 Press the MENU button.
2 Select Picture using the CHxx/
CHyybutton, and
press the
ÏÏqq
button.
3
Select Color Temperature using the
ÏÏqq
button.
4
Press the
CHxx/
CH
yy
button to select a particular color tone.
If you select User, you can control the value manually.
5 Press the MENU button to return to the prior menu.
6
Press the
CHxx/
CH
yy
button to select a picture item.
7 Press the
ÏÏqq
button to adjust the picture condition as
you want.
8 Press the TV/AV button to store it.
a. On the Standard, Reddish, Greenish, Bluish,
the value of the R/G/B is changed automatically.
b. If you change the value of the R/G/B, the User
is selected automatically.
Note
Picture
Color Temperature
Contrast
Brigheness
Color
Sharpness
Color Temperature
Picture
Picture
Color Temperature
Contrast
Brigheness
Color
Sharpness
Page 24
23
Picture Control
Picture Control
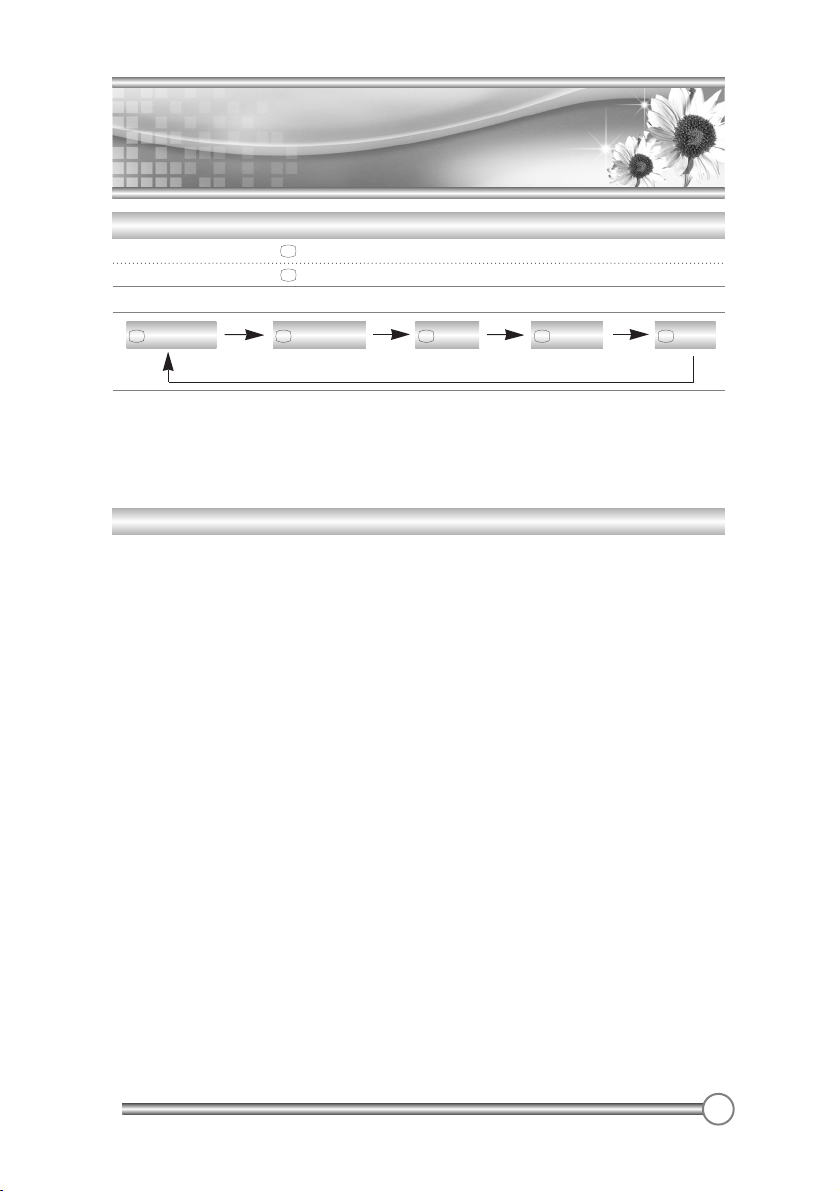
PICTURE Effect
1 Press the PICTURE( ) button.
2 Press the PICTURE( ) button repeatedly to select Picture effect.
Each press of the button changes the screen display as below.
• Dynamic : Vivid Picture Appearance
• Standard : Standard Picture Appearance
• Mild : Softer Picture Appearance
• Game : External Video Game Picture Setup
• User : Manual Picture Setup
Auto Picture Control
*The Picture options - Dynamic, Standard, Mild and Game are programmed for good picture
reproduction at the factory and cannot be changed.
Dynamic Standard Mild Game User
Page 25
24
Sound Control
Sound Control
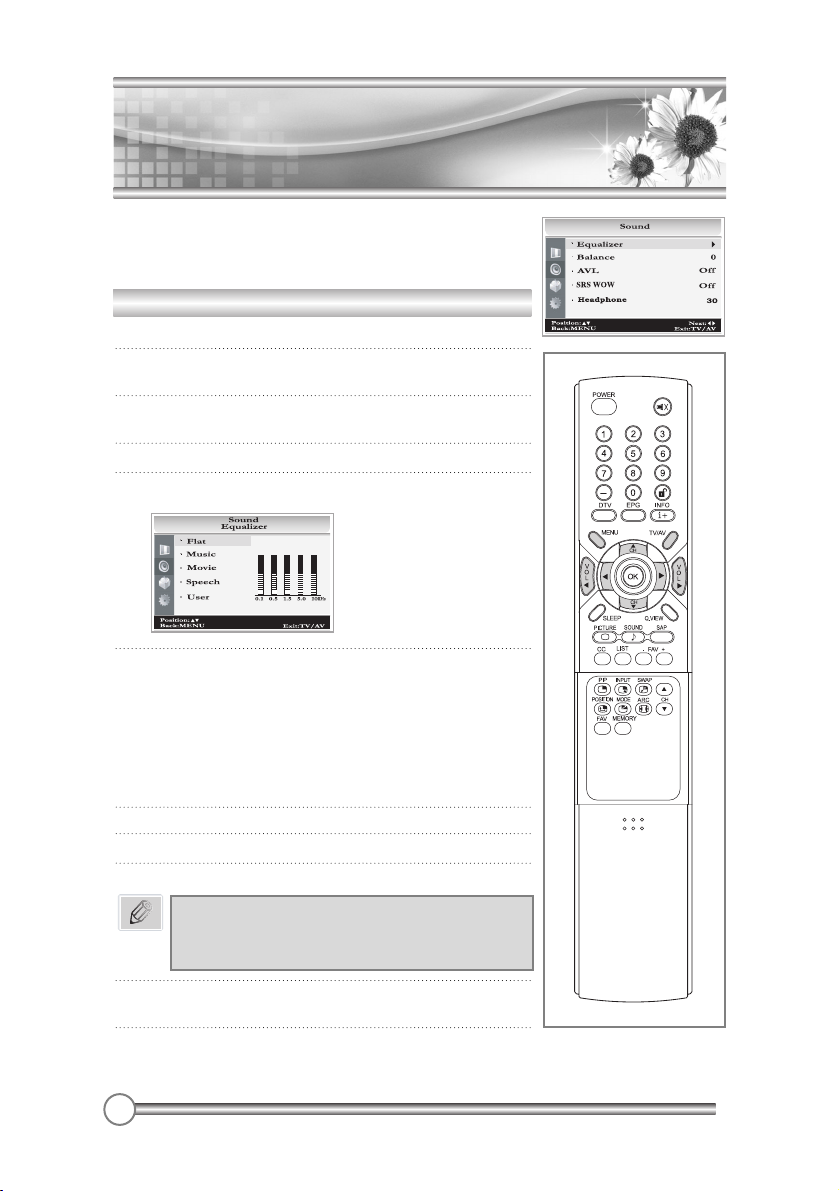
Manual Sound Control
1 Press the MENU button.
2 Select the Sound using the CH
xx
/
CHyybutton, and press
the
ÏÏqq
button.
3
Press the
CHxx/
CHyybutton to select the desired sound item;
Equalizer, Balance, AVL, SRS WOW or Headphone Volume.
4 Press the
ÏÏqq
button to make desired adjustment.
5 Press the
ÏÏqq
button in Equalizer to set the Equalizer.
6 Press the CHxx/CHyybutton to select your
preferred setting ;
Flat, Music, Movie, Speech or User.
To set the Equalizer User.
a. Select User by pressing the CHxx/CHyybutton.
b. Select a sound band by pressing the
ÏÏqq
button.
c.
Make appropriate sound level with the
CHxx/
CHyybutton.
d. Press the MENU button to return to preceding MENU and
the TV/AV button to return to normal TV viewing.
7
Select the Balance menu and adjust the balance of speakers.
8
Select the AVL(Automatic Volume Leveler) menu On or Off.
9
Select the SRS WOW menu On or Off.
10 Select the Headphone menu and adjust the volume from
headphone.
11 Press the MENU button to return to preceding MENU and the
TV/AV button to return to normal TV viewing.
You can select your preferred sound setting; Flat, Music, Movie or
Speech and you can also adjust the sound frequency of equalizer,
balance. If you switch AVL to on, the set automatically keeps on
an equal volume level even if you change program.
1. The benefits of SRS WOW sound are enormous.
You can be completely enveloped in sound.
2. The Equalizer menu is not available when
SRS WOW is set to On.
Note
Page 26
25
Sound Control
Sound Control
SOUND Effect
1 Press the SOUND( ) button.
2 Press the SOUND( ) button repeatedly to select.
Each press of the button changes the screen display as below.
Auto Sound Control
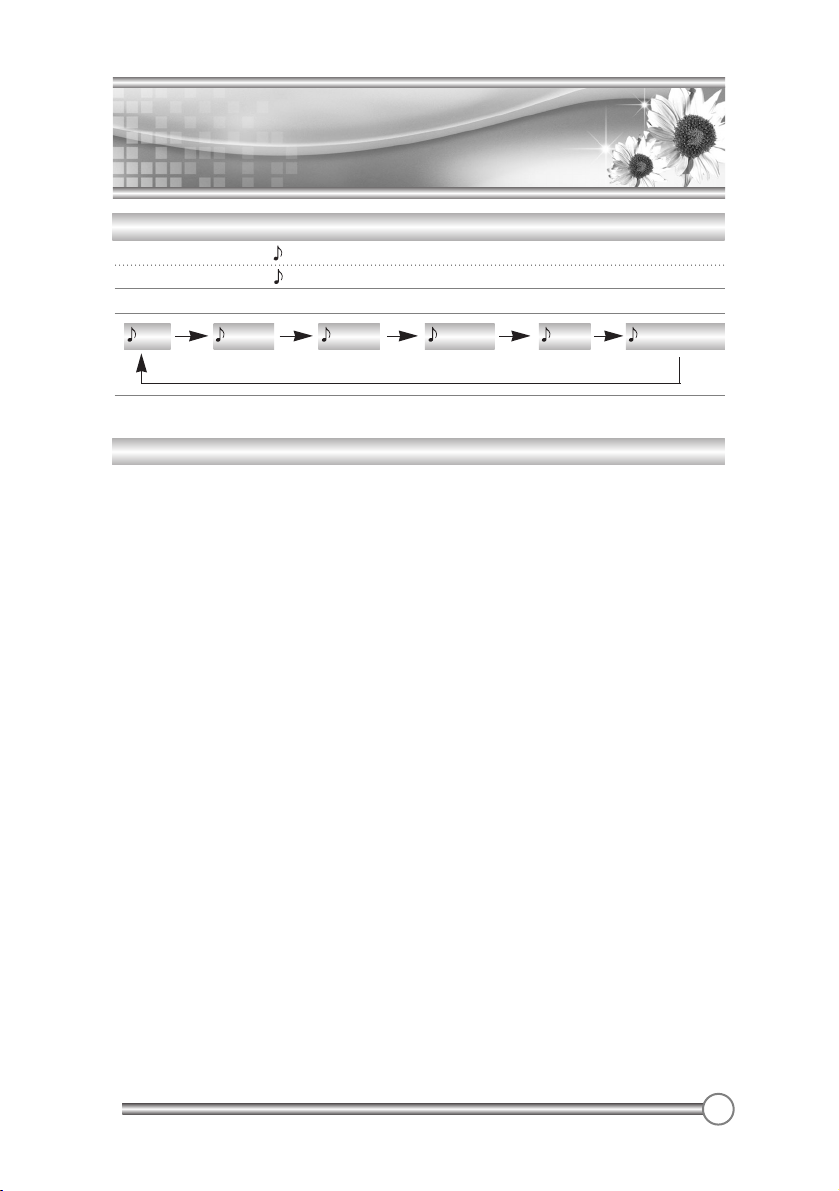
* The sound Flat, Music, Movie and Speech are programmed for good sound reproduction
at the factory and cannot be changed.
Flat Music Movie Speech User SRS WOW
Page 27
Parental Control
Parental Control
26
If used, this optional feature can “block” undesirable programming from appearing on the TV.
Parental Control offers the user a wide variety of options and settings that restrict or “block” the
programming that can appear on the TV. Parental control allows the user the capability of
defining which program rating they consider accept-able, to the younger or more sensitive
viewer. It can be preset and turned either on or off by the user who specifies the secret 4-number
code, the password. The number of hours blocked are specified. General audience and children
viewer blocks should both be programd into the TV’s memory. Viewer ratings are specified for
both TV and the motion picture industry; both rating systems should be used, for complete
coverage.
The ratings are based on the ages of children.
Overview
To insure complete coverage for all TV programs, (movies and regular TV shows) choose a rating
for MPAA, from the selections below. And choose ratings from the TV Parental Guidelines Rating
System on the next page, using the Age Block option for General Audiences, and for Children. In
addition to those, you may wish to add additional restrictions from the Content Block menu. See
the Parental Control menu, and submenus example on the next page.
Things to Consider before Setting Up Parental Control
Determine which rating you consider acceptable to the viewer. (For example, if you choose TVPG, all more restrictive ratings will be automatically blocked; the viewer will not be able to see:
TV-PG, TV-14, or TV-MA rated programming.)
Do you want to block the auxiliary video source entirely? (Blocks the signal sent by the
equipment, such as a VCR, connected to the TV Audio/Video input jacks) Or leave unblocked,
then choose allowable ratings.
Block program “Content” based on individual parameters such as: Strong Dialog, Bad Language,
Sex Scenes, Violence Scenes, or Fantasy Violence Scenes; in the Content Blk option.
How many hours do you want Parental Control to be active? You can set the Hours option for up
to 99 hours.
If you want to set the hours option all the time, select the always.
Select a secret password; in the Set Password option. Use the number keys on the remote. Don’t
forget the password, it is the only way you can access the Parental Control menu and change
rating selections, or turn Parental Control off.
Do you want Parental Control to be active all the time? If not, you can turn it on or off with the
Lock On/Off option.
* You can set different Parental Control viewing restrictions for general audiences and for children
- - both can be active at the same time.
* Simply specifying one content block such as Sex Scenes, will not automatically block another
content in the programs from appearing.
* Even if you choose to leave the Aux inputs unblocked, the ratings you specify will automatically
restrict the programming that appears from the video sources.
* You can not disable Parental Control by disconnecting the TV from power. Block hours will
automatically reset to the original block time setting specified if power is disconnected.
Page 28
Parental Control
Parental Control
27
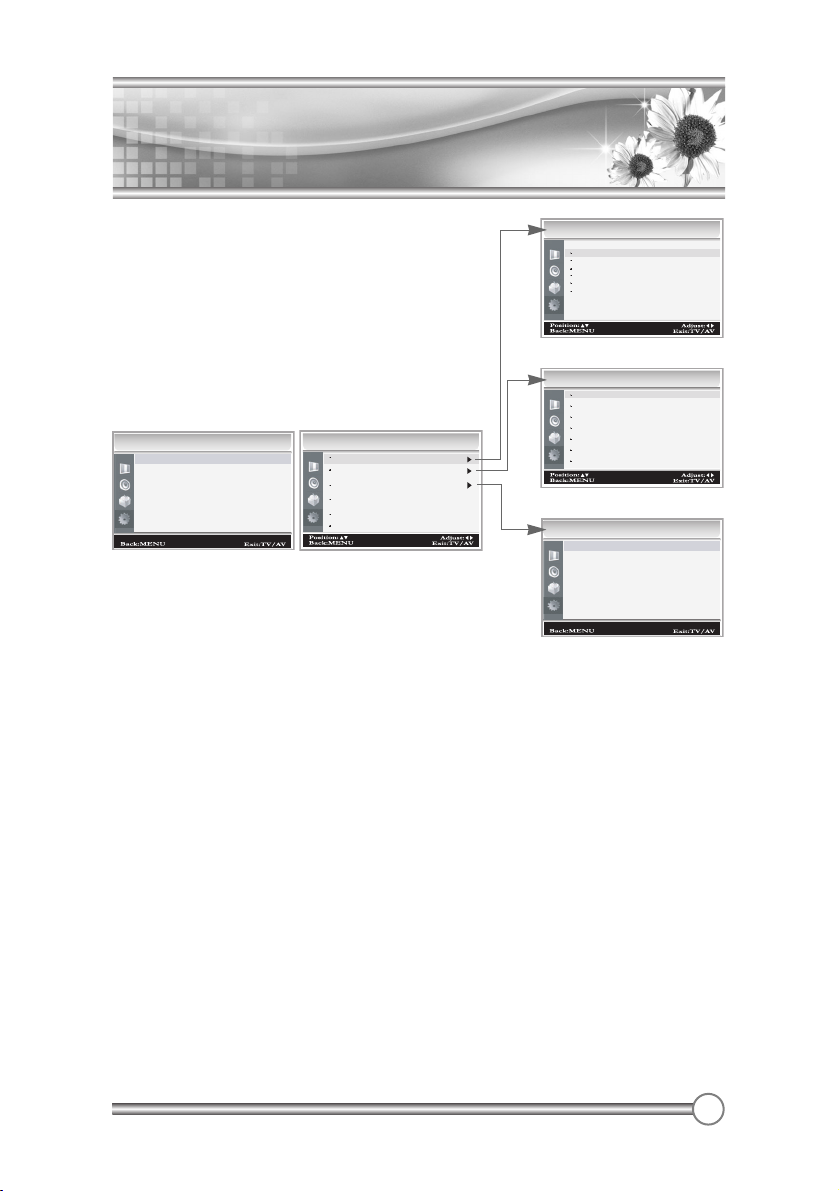
1. Press the MENU button.
2. Select the Setup menu.
3. Press the CHxy button to select the Parental
Control, then press the Ïqbutton.
4. The “Enter Password” screen will appear.
Enter your 4-digit password.
Note: The default Input password for a new TV
set is “0000”.
5. After entering a valid Enter password, the
“Parental Control” screen will appear.
6. Use the VOLÏqand CHxybutton to select and
adjust or set the rating for the TV or MPAA.
7. Press the VOLÏqbuttons to select the TV Rating.
Then press the CHxybuttons to move to one of the
six age-based categories in column and press the VOLÏqbuttons to move to one
of the levels in each row.
8. At this point, one of the TV-Ratings is selected.
Press the CHxybuttons:
Depending on your existing setup, a letter ‘U’ or ‘B’ will be highlighted.
(U=Unblocked, B=Blocked)
9. While the ‘U’ of ‘B’ is highlighted, press the VOLÏqbuttons to block or unblock
the category.
To select a different TV-Rating, press the CHxybuttons with cusor in the first
column.
10. Press the VOL
Ïq
buttons to select the MPAA Rating. Then press the CHxy
buttons to select particular MPAA Rating.
Press the VOLÏqbuttons to change the ‘U’ or ‘B’.
11. If you want to change password, select the Change Password menu. Then press
the VOLqbutton.
12. Then enter your new password.
Re-enter the same 4 digits. Press the OK button to memorize your new password.
13. If you want to block AUX. SOURCES, select the Aux.Block Sources with the
CHxybuttons.
14. Press the VOLÏqbuttons to change the ‘Uublocked’ or ‘Blocked’.
15. Press the CHxy buttons to select the Block Hour menu.
16. Set Hours with VOLÏqbuttons.
17. Press the CHxy buttons to select the Parental Lock menu.
18. Press the VOLÏqbuttons to change the ‘On’ or ‘Off’.
Setup
TV Rating
ALL FV V S L D
TV-Y
U
TV-Y7
UU
U
TV-G
TV-PG
UUUUU
UUUUU
TV-14
UUUU
TV-MA
Setup
Parental Control
TV Rating
MPAA Rating
Change Password
Aux. Block Sources Unblocked
Block Hour
Parental Lock
Enter Password
Setup
Enter Password
_ _ _ _
Always
Off
G
PG
PG-13
R
NC-17
X
No Rating
Enter Password
MPAA
Rating
Setup
Enter Password
_ _ _ _
U
U
U
U
U
U
U
Page 29
INFORMATION
INFORMATION
28
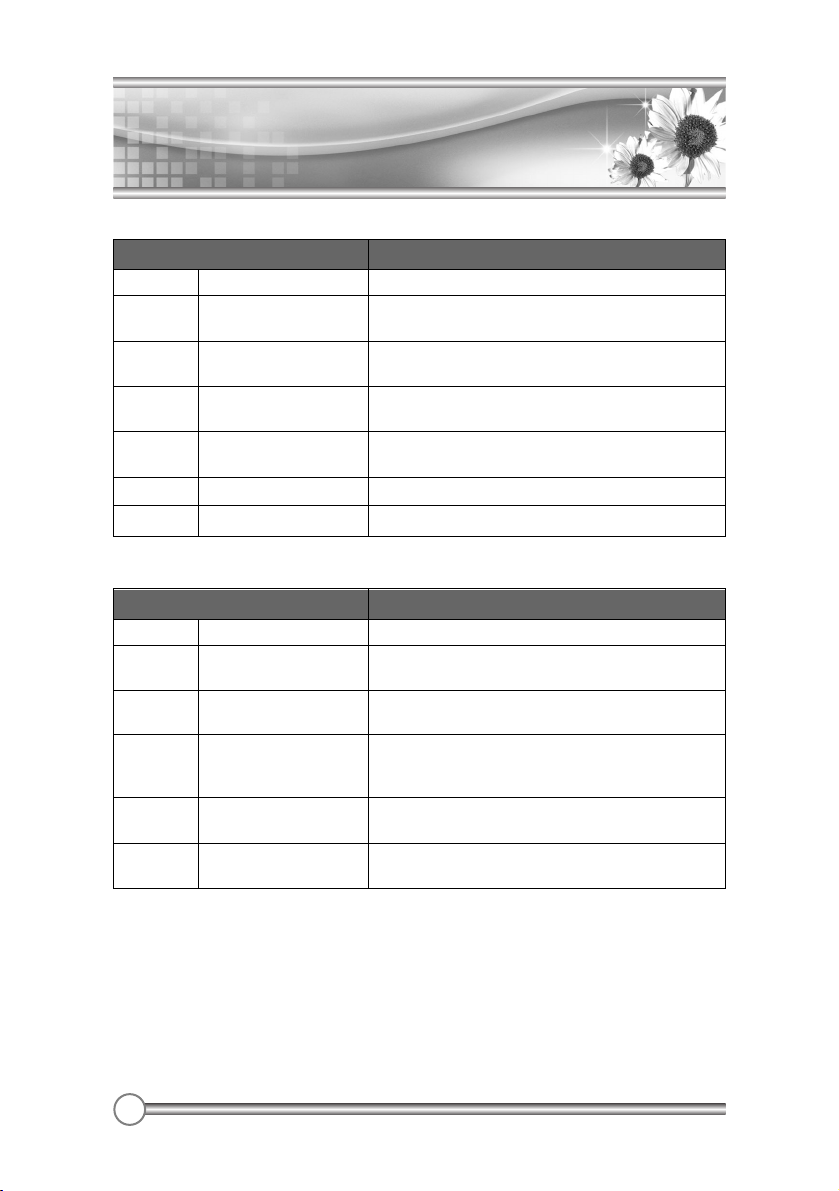
GGeneral Audiences Content not offensive to most viewers
PG
PG-13
R
NC-17
X
No Rating
Parental Guidance
Suggested
Parental Strongly
Cautioned
Restricted viewing
No children under
age 17
Hard Core Films
No Rating
Content is such that parents may not want their
children to view the program.
Program is inappropriate for preteens, with a greater degree
of offensive material Suggested than a PG rated program
Not for children under age 17.
Strong elements of sex and/or violence.
Not for children under age 17 under any
circumstances. Strong sexual content.
Same as NC-17 rating.
MPAA Not Rated
MeaningGrade
MOTION PICTURE ASSOCIATION OF USA (MPAA) RATING SYSTEM
TV-Y Young Children
Considered suitable for all children under 7 years old.
TV-G
TV-PG
TV-14
TV-MA
TV-Y7
Parental Audience
Parental Guidance
Parents Strongly
Cautioned
Mature Audience Only
Children 7 and over
Considered suitable for all audiences; children
may watch unattended.
Suggested Unsuitable for younger children, may
contain: Suggestive Dialog, Bad Language, Sex,
and Violence Scenes
Unsuitable for children under 14, may contain: Strong
Dialog, Bad Language, Sex, and Violence Scenes.
Adults only, may contain: Strong Dialog, Bad
Language, Sex, and Violence Scenes.
Considered suitable for children over 7, may
contain Fantasy Violence Scenes.
MeaningGrade
TV PARENTAL GUIDELINE RATING SYSTEM
Note : The V-Chip will automatically block certain categories that are ‘more
restrictive’.
If you block TV-Y category, then TV-Y7 will be automatically blocked.
Similarly, if you block TV-G category, then all the categories in the ‘young adult’ will
be blocked(TV-G, TV-PG, TV-14 and TV-MA).
Page 30
INFORMATION
INFORMATION
29
The sub-rating of TV rating
Note ; The TV-Y7, TV-PG, TV-14 and TV-MA have additional options. See the next
step to change.
To set the FV, D, L, S and V sub-ratings, first select one of these TV-Ratings:
TV-Y7, TV-PG, TV-14 and TV-MA
Next, while the TV-Ratings is highlighted, repeatedly press the
ÏÏqq
buttons.
This will cycle through the available sub-ratings(FV, D, L, S or V).
A highlighted letter(‘U’ or ‘B’) will be displayed or each sub-ratings.
While the ‘U’ or ‘B’ is highlighted. Press the CH
xxyy
buttons to change the
sub-ratings.
FV
Fantasy Violence
Violence
Sexual Situation
Adult Language
Sexual Suggestive Dialog
V
S
L
D
MeaningGrade
Page 31
Captions
Captions
30
The captions is a process which converts the audio portion of a television program
into written words which then appear on the television screen in a form similar to
subtitles. Closed captions allow viewers to read the dialogue and narration of
television programs.
Poor reception conditions are encountered:
• IGNITION:
Picture may flutter, drift, suffer from black spots or horizontal streaking. Usually
caused by interference from automobile ignition systems, neon lamps, electrical drills,
and other electrical appliances.
• GHOSTS:
Ghosts are caused when the TV signal splits and follows two paths. One is the direct
path and the other is reflected off tall buildings, hills or other objects. Changing the
direction or position of the antenna may improve reception.
• SNOW:
If your receiver is located at the weak, fringe area of a TV signal, your picture may be
marred by small dots. It may be necessary to install a special antenna to improve the
picture.
An old, bad, or illegally recorded tape is played.
Strong, random signals from a car or airplane interference with the TV signal.
The signal from the antenna is weak.
The program wasn't captioned when it was produced, transmitted or taped.
1. Press the MENU button.
2. Select the the Setup menu
3. Press the CH
xxyy
buttons to select Caption menu.
4. Press the
ÏÏqq
button, select the Caption mode.
5.
Each time you press the
ÏÏqq
buttons, the caption
mode is displayed one by one as shown below.
→ OFF ↔ CC1 ↔ CC2 ↔ CC3 ↔ CC4 →
↑↓
← TEXT4 ↔ TEXT3 ↔ TEXT2 ↔ TEXT1 ←
6. Press the TV/AV button
* This TV is programed to remember which mode it was last set to, even if you
switch the POWER off.
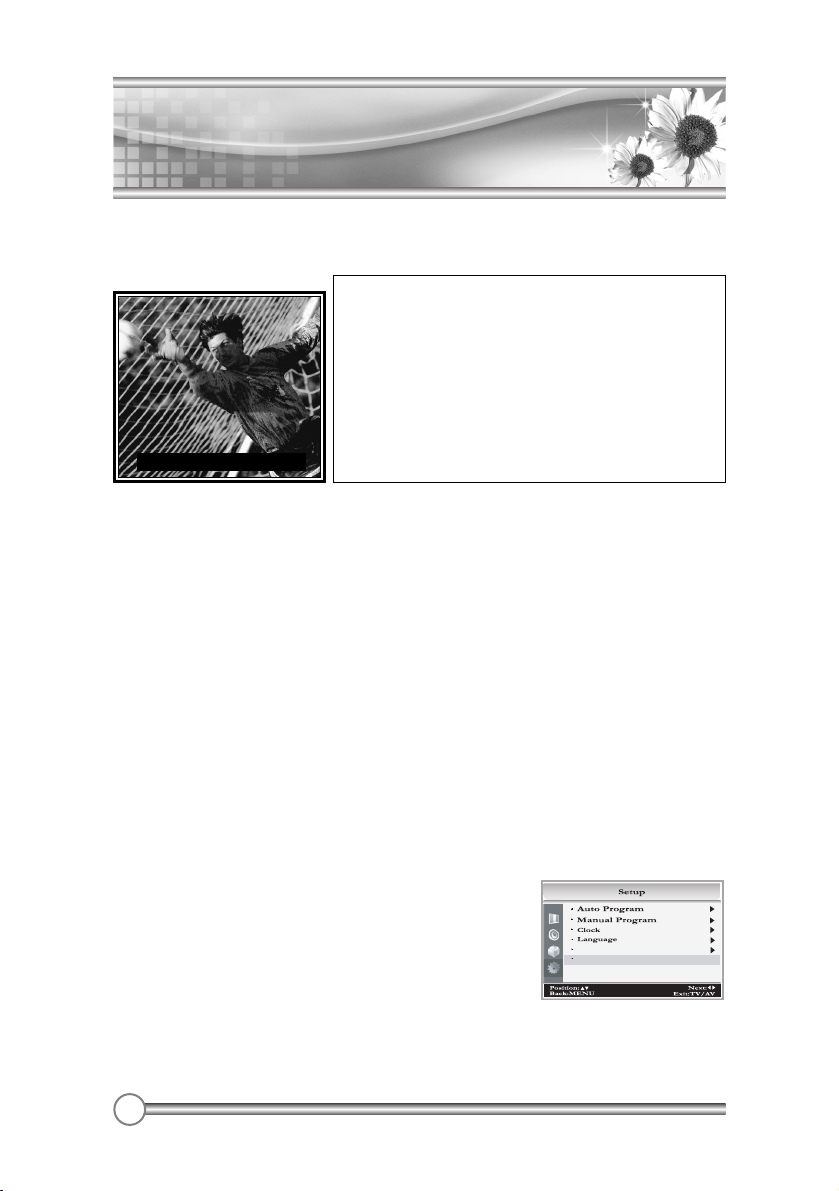
Captions are the subtitles of the dialogue and narration of
television programs. For prerecorded programs, program
dialogue can be arranged into captions in advance. It’s
possible to caption a live program by using a process called
real-time captioning, which creates captions instantly.
Professional reporters using a machine shorthand system
and computer for translation into English normally do realtime captioning.
Captioning is an effective system for the hearing-impaired,
and it can also aid in teaching language skills.
The picture at left shows a typical caption.
Shooting... Goal in.....
Parental Control
Caption Off
Page 32
31
Other functions
Other functions
The present time must be set for using the Clock
function.
Note
Clock
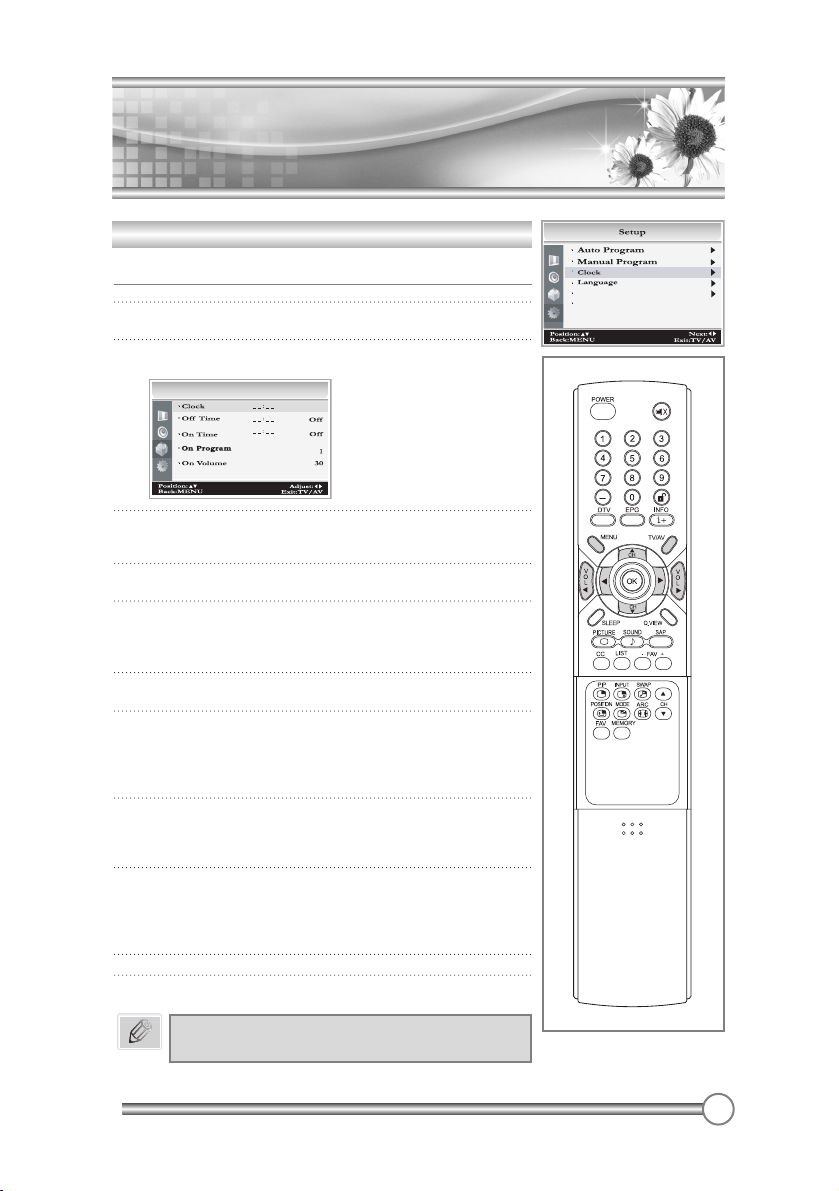
Setting the clock is necessary in order to use the various
timer features of the TV. You can set automatic TV On or Off time.
1 Press the MENU button.
2 Press the CHxx/CHyybutton to select the Setup menu.
Then press the
ÏÏqq
button.
3 Press the CHxx/CHyybutton to select Clock menu.
Then press the
ÏÏqq
button.
4 Set the present time with the CHxx/CHyyor number buttons
on remote controller.
Store a time value between 00:00 … 23:59(hours:minutes)
5 Press the CHxx/CHyybutton to select Off Time.
Then press the
ÏÏqq
button.
6 Set the TV off time with the CHxx/CHyyor number buttons.
Then press the
ÏÏqq
button.
Select On or Off with CHxx/CHyybutton.(When the setting is
On, the TV set will be switched off to stand by mode.)
7 Press the CHxx/CHyybutton to select On Time.
Then press the
ÏÏqq
button.
8 Set the TV on time with theCHxx/CHyyor number buttons.
Then press the
ÏÏqq
button.
Select On or Off with CHxx/CHyybutton. (When the setting
is On, the set will be switched On automatically to the last
saved program in the On Program menu.)
9 Select the On Program using the CHxx/CHyybutton,
and press the
ÏÏqq
button.
You can select the first displayed program with the
ÏÏqq
or
number buttons when the set is switched on automatically.
10 Press the CHxx/CHyybutton to select On Volume.
Then press the
ÏÏqq
button.
You can select the volume of the first displayed program
with the
ÏÏqq
button when the set is switched on
automatically.
11 Press the MENU button to the prior menu.
12 Press the TV/AV button to return to normal TV viewing.
Setup
Clock
Parental Control
Caption Off
Page 33
32
Other functions
Other functions
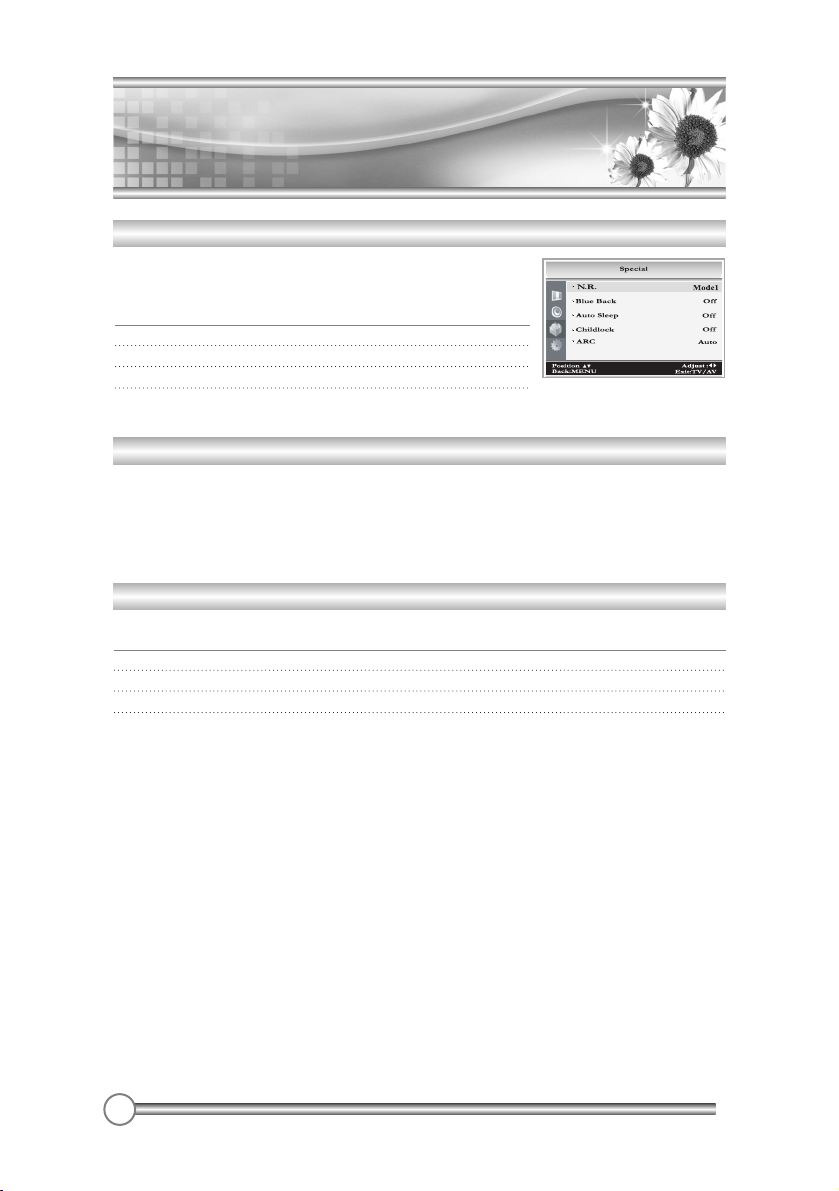
Auto Sleep
If you select Auto sleep on the set will automatically switch itself to standby mode approximately
ten minutes after a TV program stops broadcasting.
1 Press the MENU button, select the Special.
2 Press the CHxx/CH button to select Auto sleep.
3 Press the
ÏÏqq
button to select On.
4 Press the TV/AV button to return to normal TV viewing.
N.R.(Noise Reduction)
The N.R feature improves the picture quality by setting to
Mode1 or Mode2. If you experience noise on a certain
program, set the N.R to Mode1 or Mode2 for this
program, to obtain the optimum picture.
1 Press the MENU button, select the Special.
2 Press the
ÏÏqq
button to select N.R..
3 Press the
ÏÏqq
button to select Off, Mode1 or Mode2.
4 Press the TV/AV button to return to normal TV viewing.
Blue Back
If no signal is being received or the signal is very weak, a blue screen automatically replaces the
noisy picture background.
If you wish to continue viewing the poor picture, you must select the Blue Back Off.
(Pressing the
ÏÏqq
button will alternate between “On” and “Off”.)
Page 34
33
Other functions
Other functions
Childlock
Childlock menu is necessary in order to disable the buttons on the front/side panel of the set.
Especially it is useful to prevent unauthorized viewing.
1 Press the CHxx/CH button to select Childlock.
2 Press the
ÏÏqq
button repeatedly to select On or Off.
* When the setting is Childlock On, the buttons except ON/OFF button on the front/side panel of
the set is disabled.
* When the setting is Childlock Off, the buttons on the front/side panel of the set is enabled.
ARC(Aspect Ratio Control)
You can watch TV in various picture formats; Auto, 16:9, 14:9, 4:3, 16:9 Zoom, 14:9 Zoom, 4:3 Zoom.
Repeatedly press the ARC button to select your desired picture format.
Auto When your set receives the wide screen signal, it will change automatically the picture
format that has been sent.
16:9 You can enjoy the cinema or general TV program through the 16:9 mode.
The screen 16:9 is viewed just like that but the screen 4:3 is magnified to the left and
right so that the screen 16:9 is full.
14:9 You can enjoy the picture format of 14:9 or general TV program through the 14:9 mode.
The screen 14:9 is viewed just like that the screen 4:3 is magnified to the upper/lower
and left/right.
4:3 This picture format is 4 to 3 of general TV.
16:9 Zoom Magnifies the size of the picture on screen 16:9.
14:9 Zoom Magnifies the size of the picture on screen 14:9.
4:3 Zoom Magnifies the size of the picture on screen 4:3.
* In Zoom mode, you can adjust the position of the picture with CHxx/CH button.
(It’s possible when the ARC information is displayed on screen.)
* In PC ANALOG, HDMI, COMPONENT1,2 mode, you can select the picture format of
16:9, 14:9, 4:3.
Note
Page 35
34
Other functions
Other functions
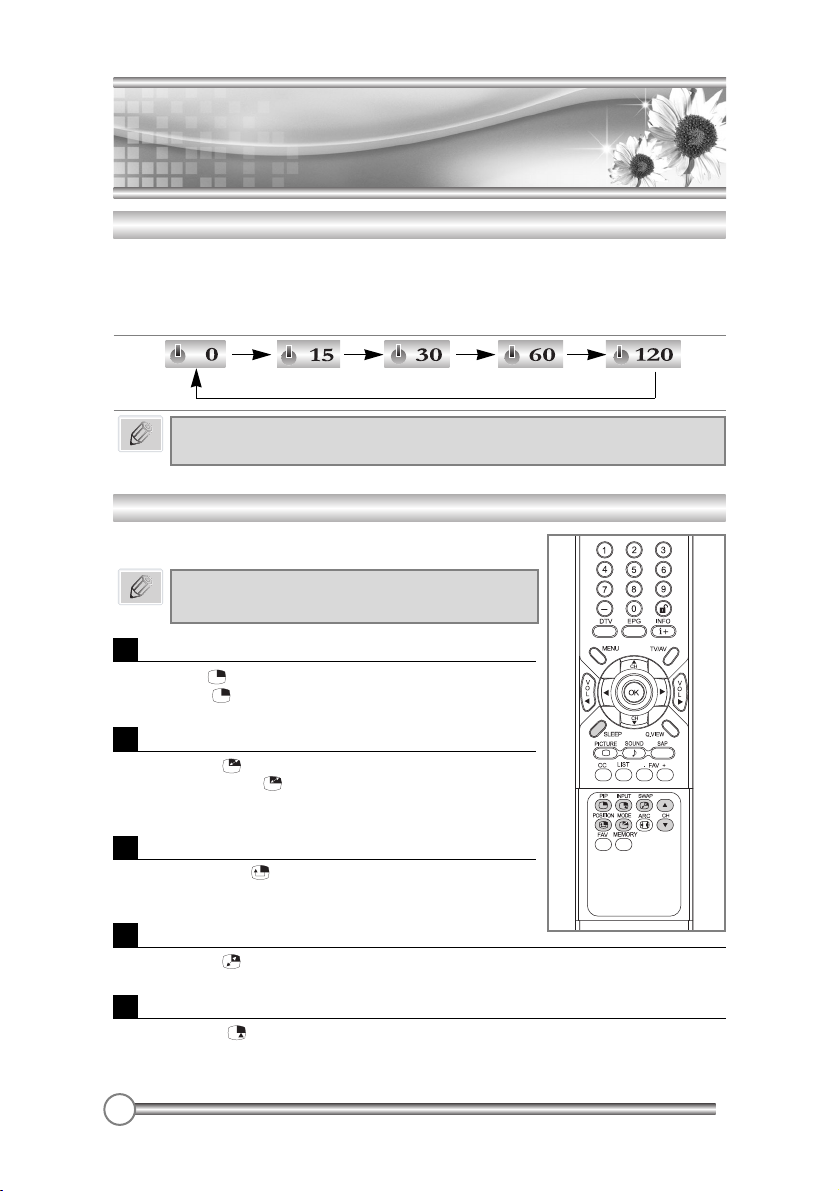
Sleep timer
You don’t have to remember to switch the set off before you go to sleep. The sleep timer
automatically switches the set to standby after the preset time elapses.
Press the SLEEP button to select the number of minutes. The display will appear on the screen,
followed by 0, 15, 30, 60, 120.
The timer begins to count down from the number of minutes selected.
a. To view the remaining sleep time, press the SLEEP button once.
b. To cancel the sleep time, Select 0 with the SLEEP button.
Note
PIP function
PIP will let you view two separate source inputs on your
TV screen at the same time.
Viewing the PIP picture
Press the PIP( ) button.
(Press the PIP( ) button again, to turn PIP off.)
Selecting the PIP picture mode
Press the MODE( ) button to adjust the PIP picture mode.
Each press the MODE( ) button, selects the 16:1, 9:1, Double
Window mode.
Moving the PIP picture
Press the POSITION( ) button to adjust the position of sub
picture in PIP mode.
Switching the main and PIP picture
Press the SWAP( ) button to switch the main and sub picture in PIP Double Window mode only.
Viewing the external source input
Press the INPUT( ) button to select the input source of sub picture in PIP mode.
Press the PIP CHx/PIP CHy button to select the program desired in TV mode of sub picture.
PIP function is available when the main picture is PC
ANALOG, COMPONENT1, COMPONENT2, HDMI mode.
Note
Page 36
35
Other functions
Other functions
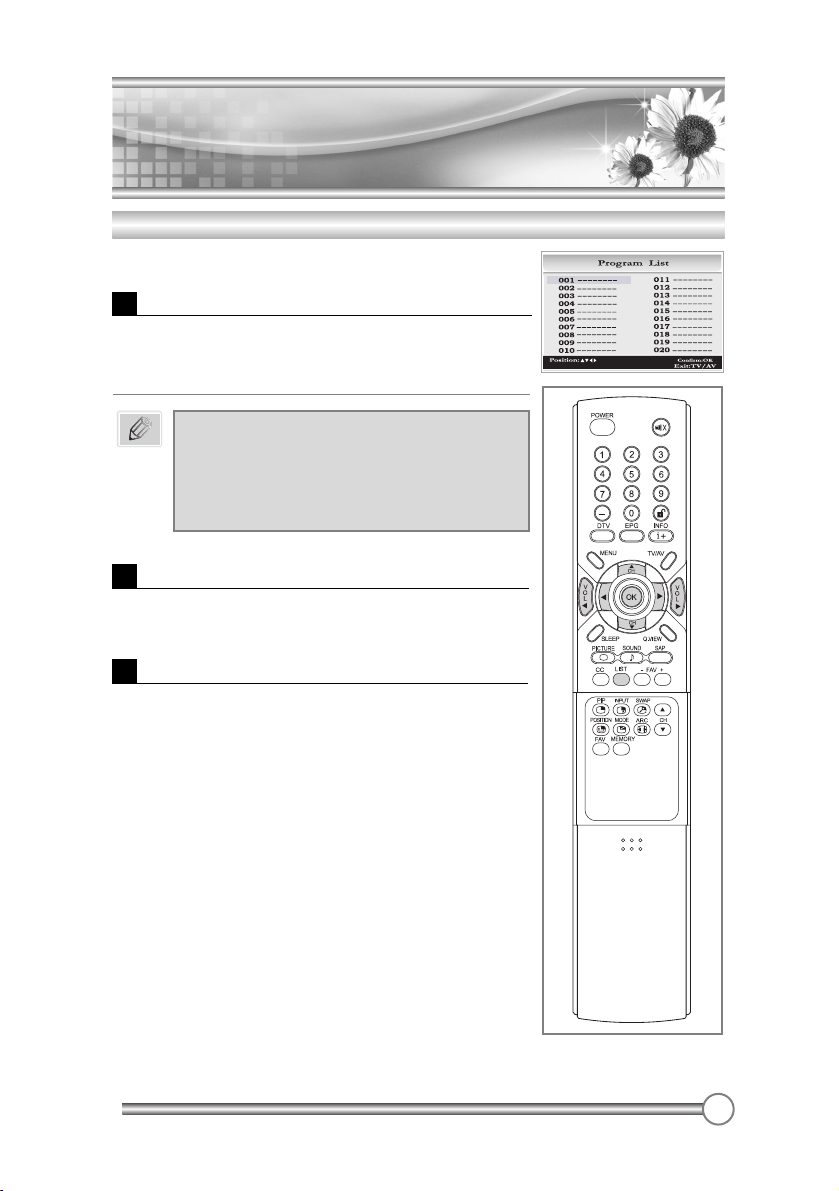
Selecting a program in the program list
Select a program with the CHxx/CHyyor
ÏÏqq
button.
Then press the OK button.
The set switches to the chosen program number.
Paging through a program list
There are 5 program list pages in which contain 100 programs.
Pressing the
CHxx/
CHyyor
ÏÏqq
button repeatedly turns the
pages.
Calling the program list
You can check the programs stored in the memory
by displaying the program list.
Displaying program list
1 Press the LIST button to display the Program list menu.
The program list appears on the screen.
One program list page contains twenty programs as right
picture.
Note
a. You may find some blue programs.
They have been set up to be skipped by auto
programming or in the program edit mode.
b. Some programs with the channel number shown in
the program list indicate there is no station name
assigned.
Page 37
External
Equipment Connection
External
Equipment Connection
You can connect additional equipment, such as VCRs, camcorders etc. to your set.
Examples are shown below.
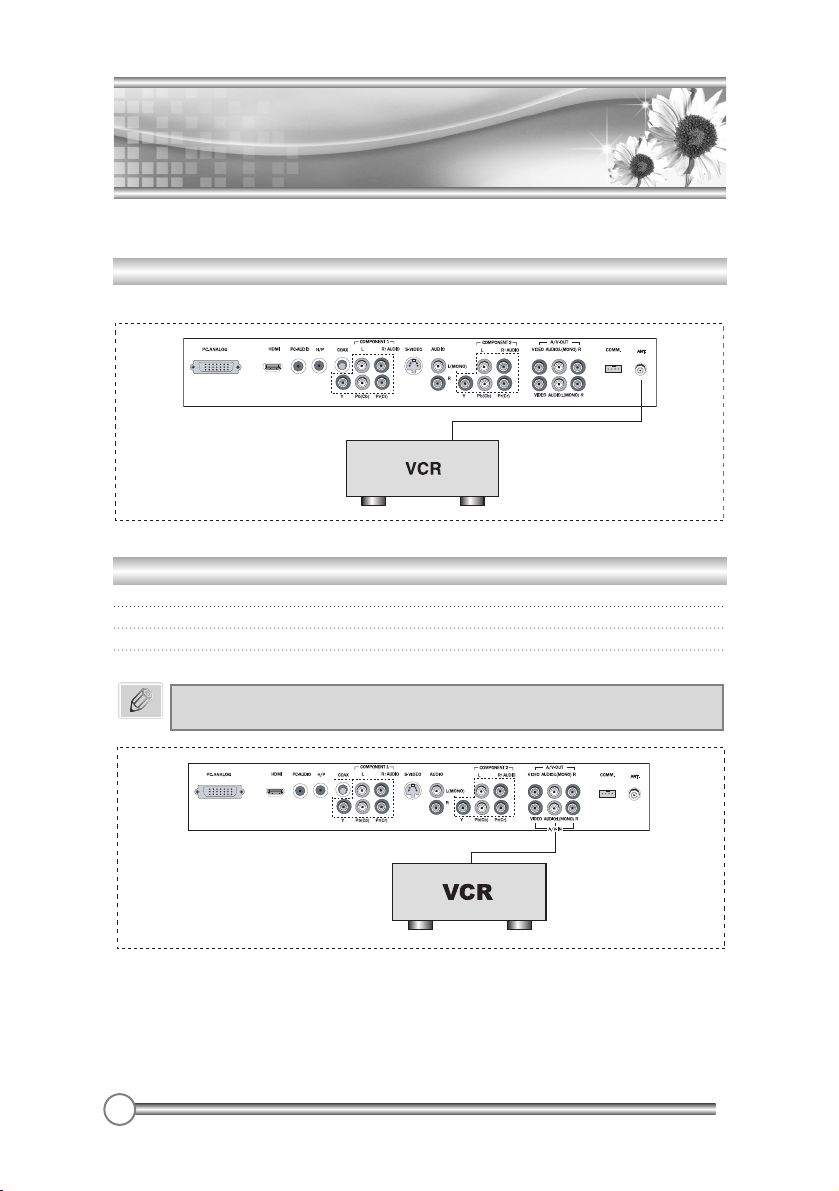
A/V IN
1
Connect the A/V out jacks on a VCR to A/V-IN jacks on the TV.
2 Press the TV/AV button to select VIDEO mode.
3 Press the PLAY button on the VCR.
The VCR playback picture appears on the TV screen.
Antenna connection
Connect RF out on the VCR to the Antenna input on the rear of the TV.
If you have a mono VCR, connect the audio cable from the VCR to the A/V-IN socket
of the set.
Note
36
Page 38
37
External
Equipment Connection
External
Equipment Connection
You can connect additional equipment, such as VCRs, camcorders etc. to your set.
Examples are shown below.
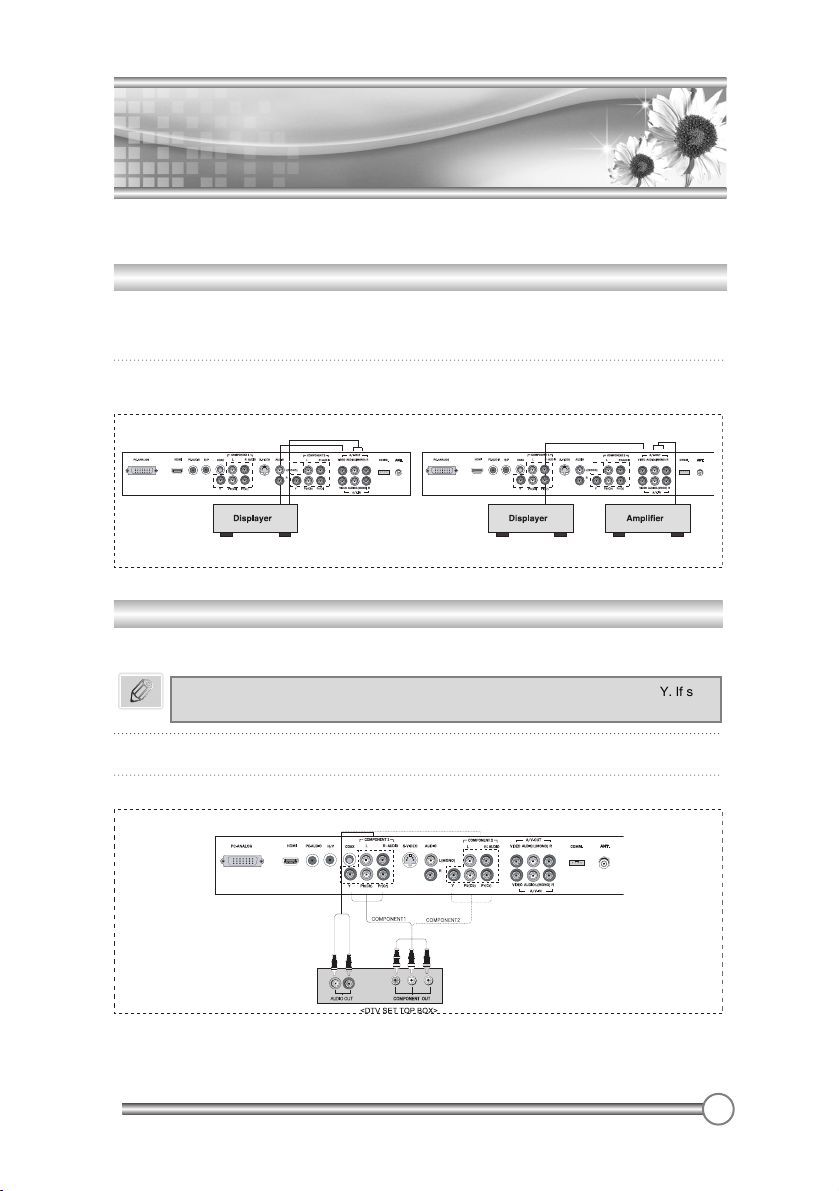
COMPONENT 1 IN / COMPONENT 2 IN
1 Use a component video cable to connect the DVD player’s Y/Pb/Pr jacks to the TV’s,
Y/Pb(Cb)/Pr(Cr) jacks.
2 Use an audio cable to connect the DVD player’s Audio OUT jacks to the TV’s Audio IN
jacks. Be sure to use the upper side of inputs that you used for the video connection.
3 Use the TV/AV button to select COMPONENT1 (or COMPONENT 2) mode.
A/V OUT
1
Connect the Audio outputs(L, R) of the TV to Audio-IN(L, R) of
another displayer or the amplifier system.
- If you connect the amplifier system, you can also play the TV
sound through the stereo amplifier system.
2 Connect the Video output of the TV to Video IN of another
displayer.
The Y/Pb/Pr jacks on your DVD player are sometimes labeled Y/Cb/Cr or Y/B-Y/R-Y. If so,
connect the cables to like colors.
Note
Page 39
38
External
Equipment Connection
External
Equipment Connection
Headphone jack
Insert the headphone plug to the headphone jack on the TV.
You can listen to the sound through the headphone; no sound from the speaker on the TV.
To adjust the headphone volume, use the Headphone menu in the Sound menu.
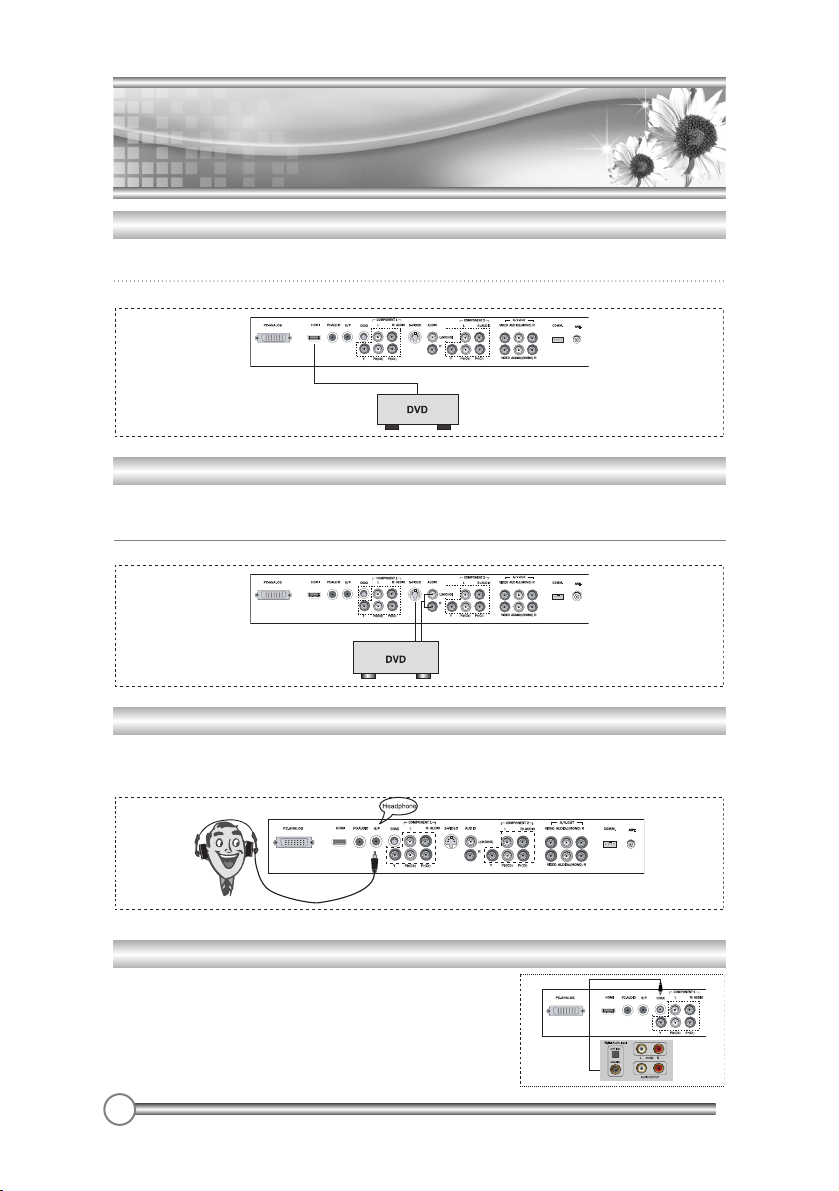
S-VIDEO IN
If the optional equipment you are connecting has an S-VIDEO jack, you can use an S-VIDEO
cable for improved picture quality(compared to an A/V cable). Because S-VIDEO carries only the
video signal, you also need to connect COMPONENT Audio cable for sound.
The VCR playback picture appears on the screen.
Connecting to HDMI (High Definition Multimedia Interface)
1 Connect an HDMI cable between the “HDMI IN” jack on the TV and the HDMI OUT jack on
the set-top box. Please check that the HDMI source is powered on.
2 Press the TV/AV button to select HDMI mode.
Coaxial OUT
You can use the TV’s DIGITAL AUDIO (Coaxial) OUT jack to
connect a digital audio device.
Use an coaxial audio cable to connect the device’s COAXIAL IN
jack to the TV’s DIGITAL AUDIO(COAXIAL) OUT jack.
Page 40
39
Connecting
the PC as a monitor
Connecting
the PC as a monitor
This function is possible only when the set is in PC mode.
Use the TV/AV or TV/PC button on remote controller.
Picture adjustment
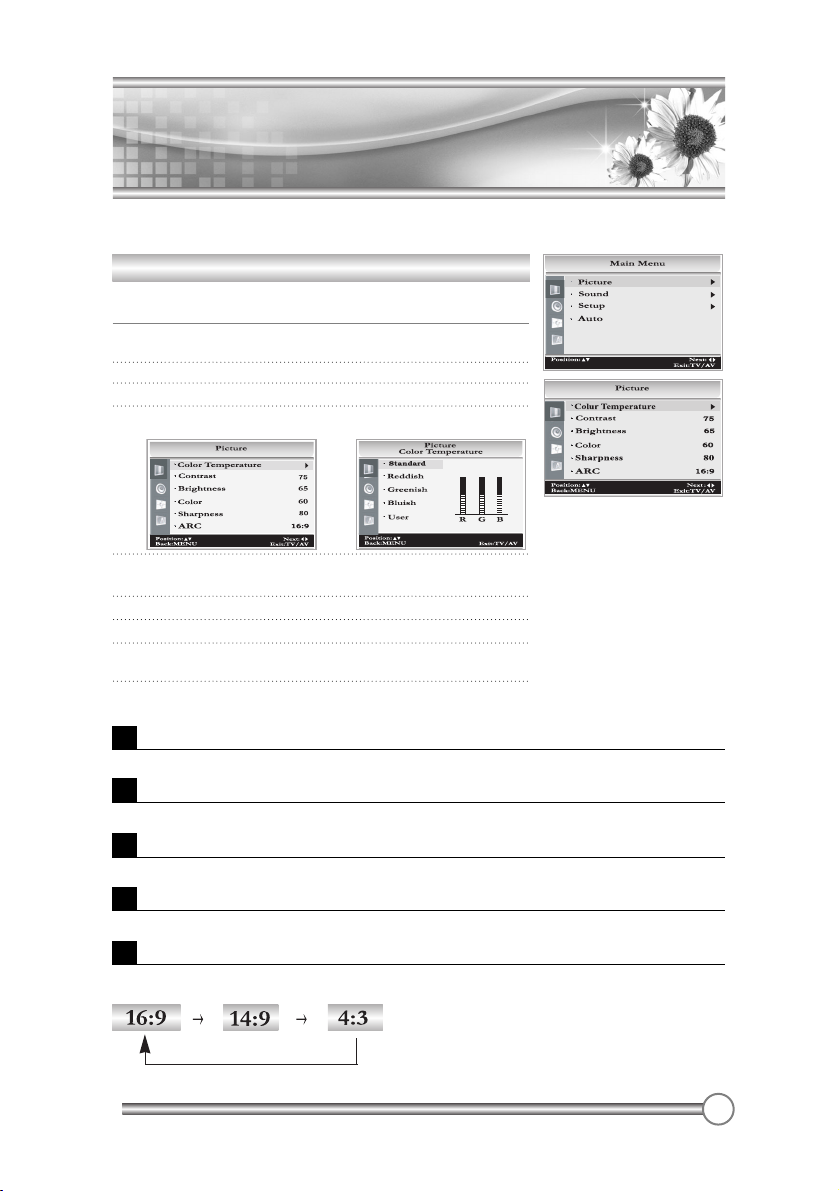
You can adjust picture Color Temperature, Contrast, Brightness,
Color, Sharpness and ARC as you prefer.
1 Press the TV/AV button to select the COMPONENT 1,
COMPONENT 2, PC- ANALOG or HDMI mode.
2 Press the MENU button.
3 Select the Picture.
4
Select Color Temperature using the
ÏÏqq
button.
5
Press the
CHxx/
CHyybutton to select a particular color tone.
If you select User, you can control the value manually.
6 Press the MENU button to return to the prior menu.
7
Press the
CHxx/
CH
yy
button to select a picture item.
8 Press the
ÏÏqq
button to adjust the picture condition as
you want.
9 Press the TV/AV button to store it.
Contrast
This function is to adjust picture to light/dark.
Brightness
This function is to adjust brightness of picture.
Color
This function is to adjust intensity of the color.
Sharpness
Adjust to sharpen or soften the picture.
ARC (Aspect Ratio Control)
Selects a screen mode.
Page 41
40
Connecting
the PC as a monitor
Connecting
the PC as a monitor
Sound adjustment
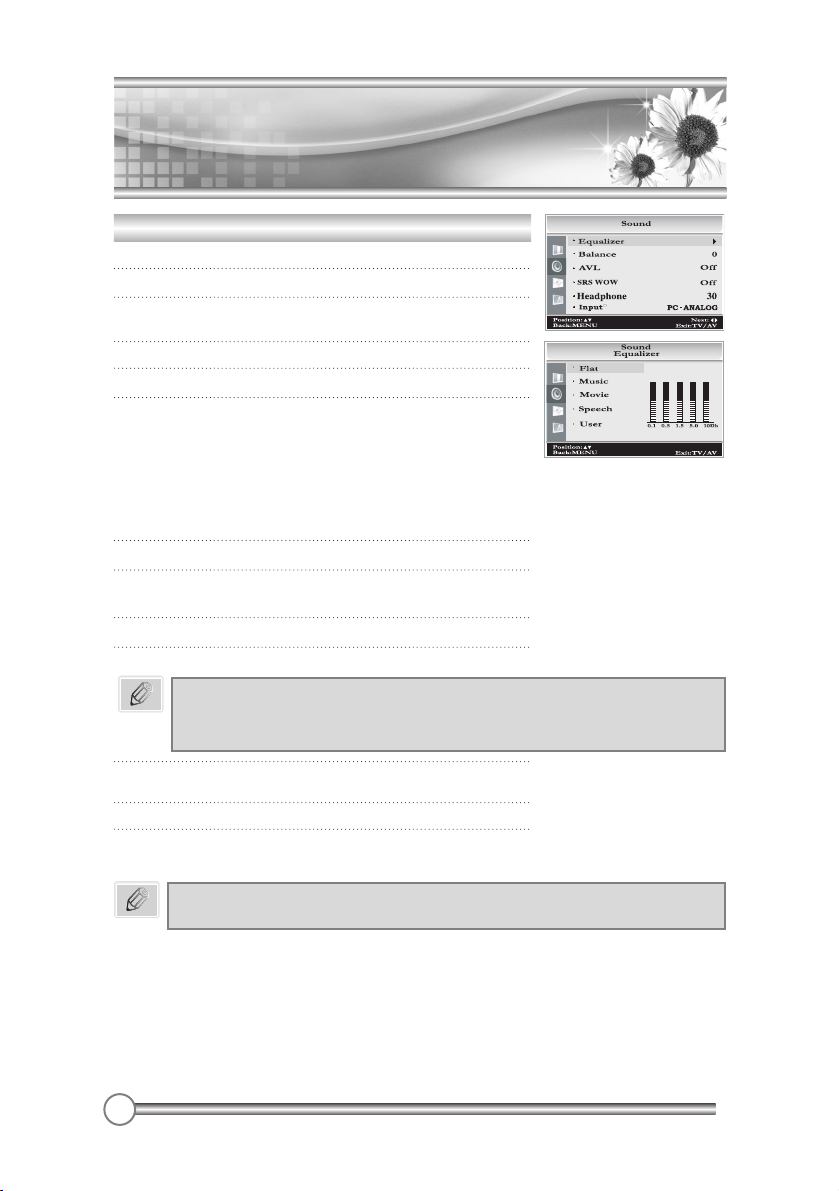
1 Press the MENU button.
2 Select the Sound menu.
3
Press the
CHxx/
CHyybutton to select the desired sound item;
Equalizer, Balance, AVL, SRS WOW, Headphone or Input.
4 Press the
ÏÏqq
button to make desired adjustment.
5 Press the
ÏÏqq
button in Equalizer to set the Equalizer.
6 Press the CH
xx
/
CHyybutton to select your
preferred setting ; Flat, Music, Movie, Speech or User.
To set the Equalizer User.
a. Select User by pressing the CH
xx
/
CHyybutton.
b. Select a sound band by pressing the
ÏÏqq
button.
c. Make appropriate sound level with the CH
xx
/
CHyybutton.
d. Press the MENU button to return to preceding menu.
7 Press the CHxx/
CHyybutton to the Balance menu.
8 Select the Balance menu with the
ÏÏqq
button and adjust
the balance of speaker.
9 Select the AVL(Automatic Volume Leveler) menu On or Off.
10 Select the SRS WOW menu On or Off.
11. Select the Headphone menu and adjust the volume from
headphone.
12 Select the Input with CHxx/
CHyybutton.
13 Press the
ÏÏqq
button to select Input.
In PIP mode, you can select PC-ANALOG or PIP Input.
Input* - Only in PIP mode, Input menu is displayed.
Note
1. The benefits of SRS WOW sound are enormous.
You can be completely enveloped in sound.
2. The Equalizer menu is not available when SRS WOW is set to On.
Note
Page 42
41
Connecting
the PC as a monitor
Connecting
the PC as a monitor
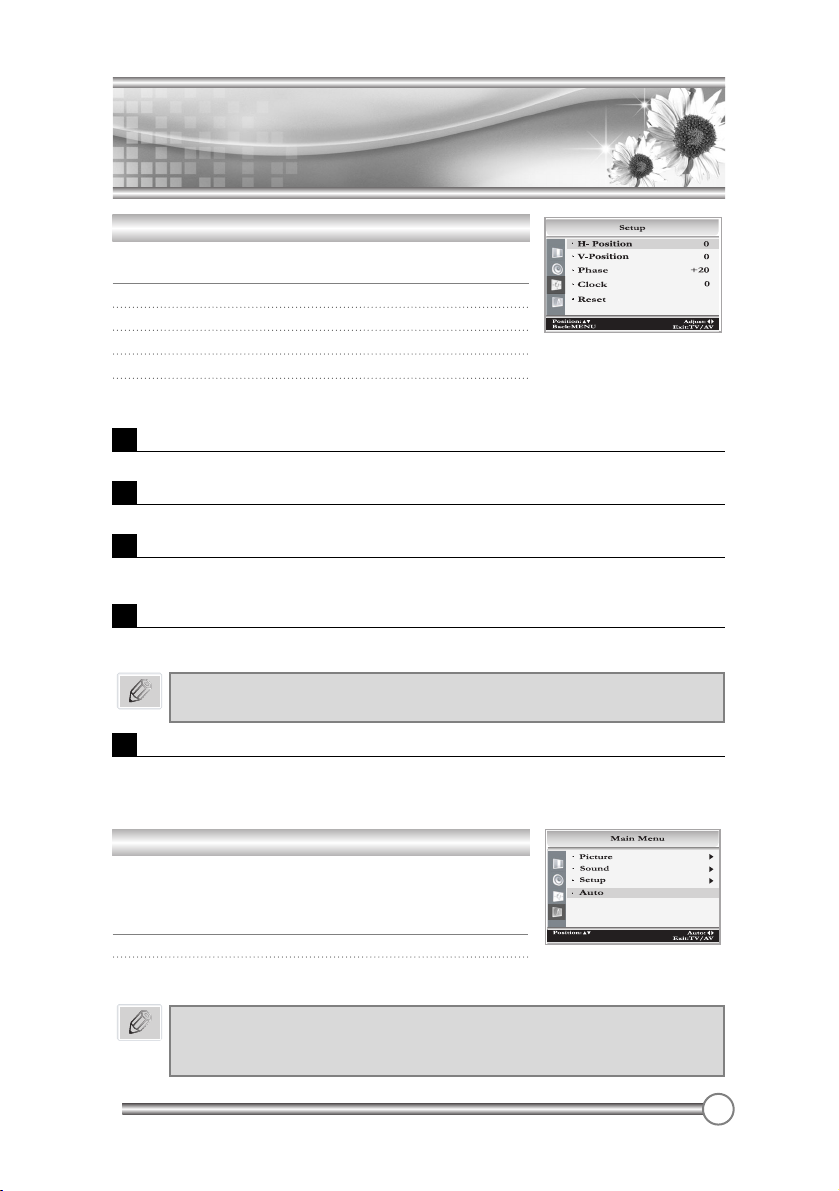
Setup
This function is to adjust picture to left/right and up/down
as you prefer.
1 Press the MENU button.
2 Select the Setup menu.
3 Press the CHxx/
CHyybutton to select the desired item.
4 Press the
ÏÏqq
button to make desired adjustment.
5 Press the TV/AV button to exit menu
Auto
This function is for the automatic adjustment of the screen
position, clock and clock phase. The displayed image will
disappear for a few seconds while the Auto-configuration is in
process.
1 Press the MENU button.
2 Press the CHxx/
CH
yy
button to select the Auto.
Then press the
ÏÏqq
button.
H-Position (Horizontal Position)
This function is to adjust picture to left/right as you prefer.
V-Position(Vertical Position)
This function is to adjust picture to up/down as you prefer.
Phase
This function allows you to remove any horizontal noise and clear or sharpen the image of
characters.
Clock
This function is to minimize any vertical bars or stripes visible on the screen background.
And the horizontal screen size will also change.
Reset
This function allows you to return to the good picture reproduction programed at the factory and
cannot be changed.
This mediation range is different according to the supported resolution.
Note
Some signal from some graphics boards may not function properly.
If the results are unsatisfactory, adjust your monitor’s position, clock and clock
phase manually.
Note
Page 43
42
Connecting
the PC as a monitor
Connecting
the PC as a monitor
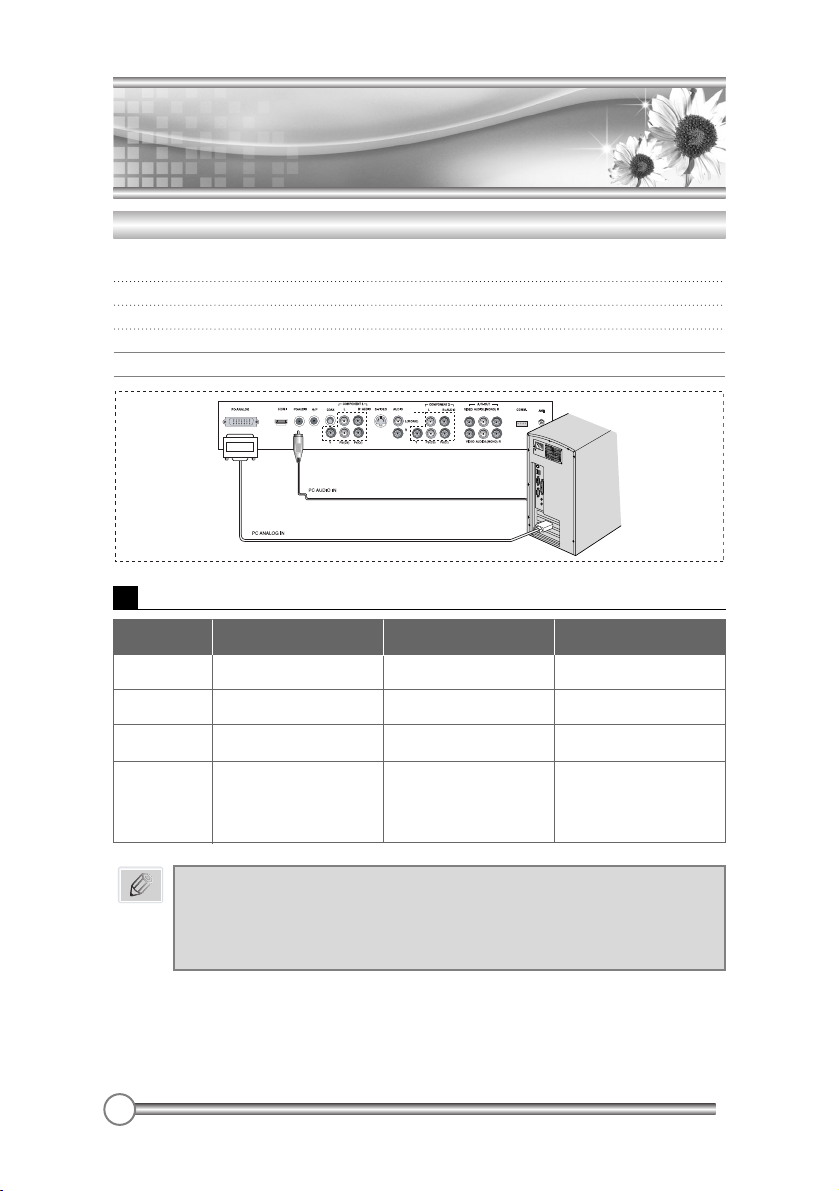
PC INPUT
1 Connect the PC IN cable (D sub cable) from the monitor output socket of the PC to the
PC ANALOG IN socket of the set.
2 Connect the PC AUDIO IN cable from the PC to the PC AUDIO IN of the set.
3 Press the TV/AV or TV/PC button to select PC-ANALOG mode.
4 Switch on the PC, and the PC screen appears on the set.
The set can be operated as the PC monitor.
Resolution
640 x 480
VGA
31.5 KHz
60 Hz
800 x 600
SVGA
37.9 KHz
60 Hz
1024 x 768
XGA
48.4 KHz
60 Hz
1280 x 768
1280 x 768
1360 x 768
WXGA
47.4 KHz
47.8 KHz
47.7 KHz
60 Hz RB
60 Hz
60 Hz
Mode Resolution
Horizontal
frequency (KHz)
Vertical
frequency (Hz)
Note
a. If possible, use the VESA 1024x768@60Hz video mode to obtain the best image
quality for your LCD monitor. If used under the other resolutions, some scaled or
processed pictures may appear on the screen.
b. Some dot defects may appear on the screen, like Red, Green or Blue spots.
However, this will have no impact or effect on the monitor performance.
Page 44
43
Product Specifications
Product Specifications
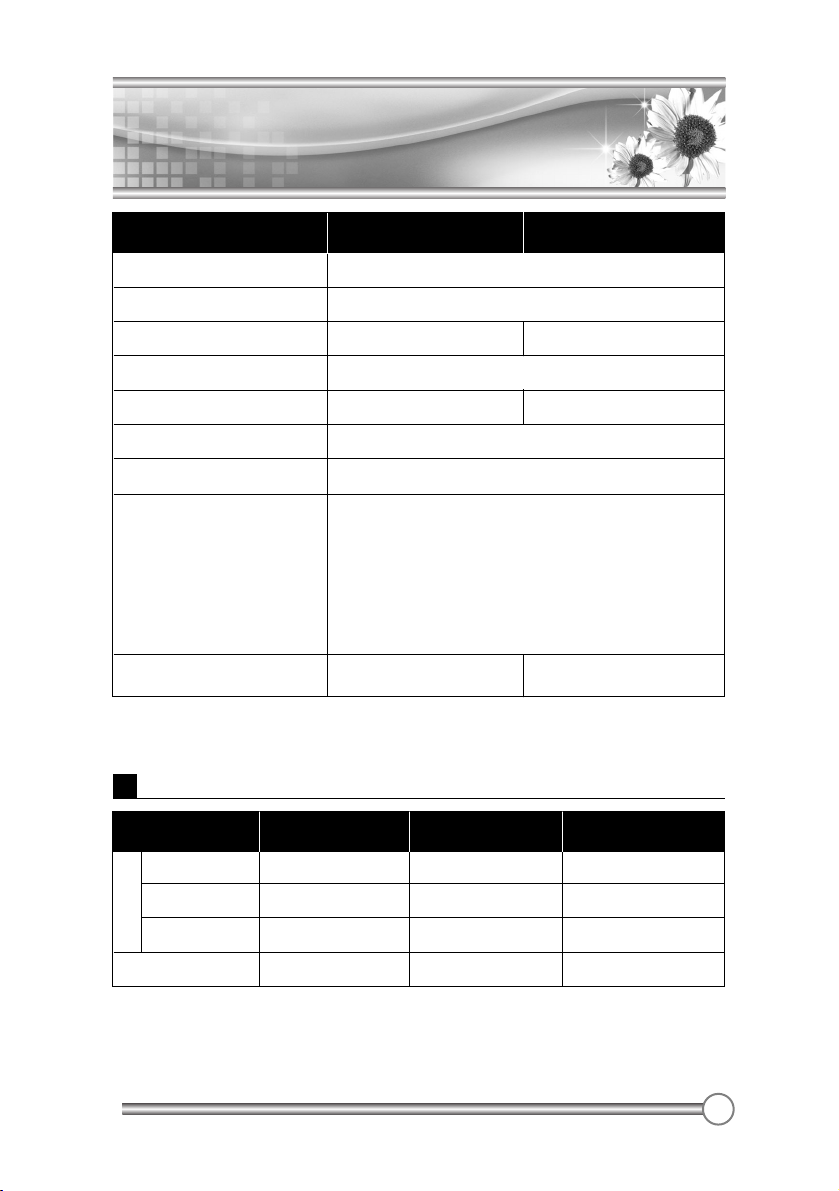
Model
LT-40T6MVH/LT-40H6MVH LT-46T6MVH
Television system
NTSC
Television program VHF: 2~13 UHF :14~69 Cable : 01~125
LCD Panel 40" Wide TFT LCD 46" Wide TFT LCD
Panel Resolution WXGA(1366 x 768)
Power consumption 220W 270W
External antenna impedance 75Ω
Audio output 10W +10W
• HDMI IN • S-VIDEO IN
External IN/OUT ports
• HEADPHONE JACK • PC-ANALOG IN
• PC AUDIO IN • A/V IN IN
• A/V OUT IN
• COAXIAL OUT
• ANTENNA IN • COMPONENT 1 IN
• COMM. PORT • COMPONENT 2 IN
AC Input
100-240V~, 2.5-1.5A, 50/60Hz 100-240V~, 3.0-1.5A, 50/60Hz
Model LT-40H6MVH LT-40T6MVH LT-46T6MVH
Horizontal 1135.2 mm 1265 mm 1395 mm
Height 632.2(704.1) mm 606(663) mm 682(739) mm
Thickness 114.5(280) mm 133(263) mm 143(295) mm
Weight 28.3(32.8) kg 28.6(33.1) kg 38(42) kg
★
All rights reserved for technical modifications.
★
without stand (with stand)
Dimension
SET Dimensions and Weight
Page 45
44
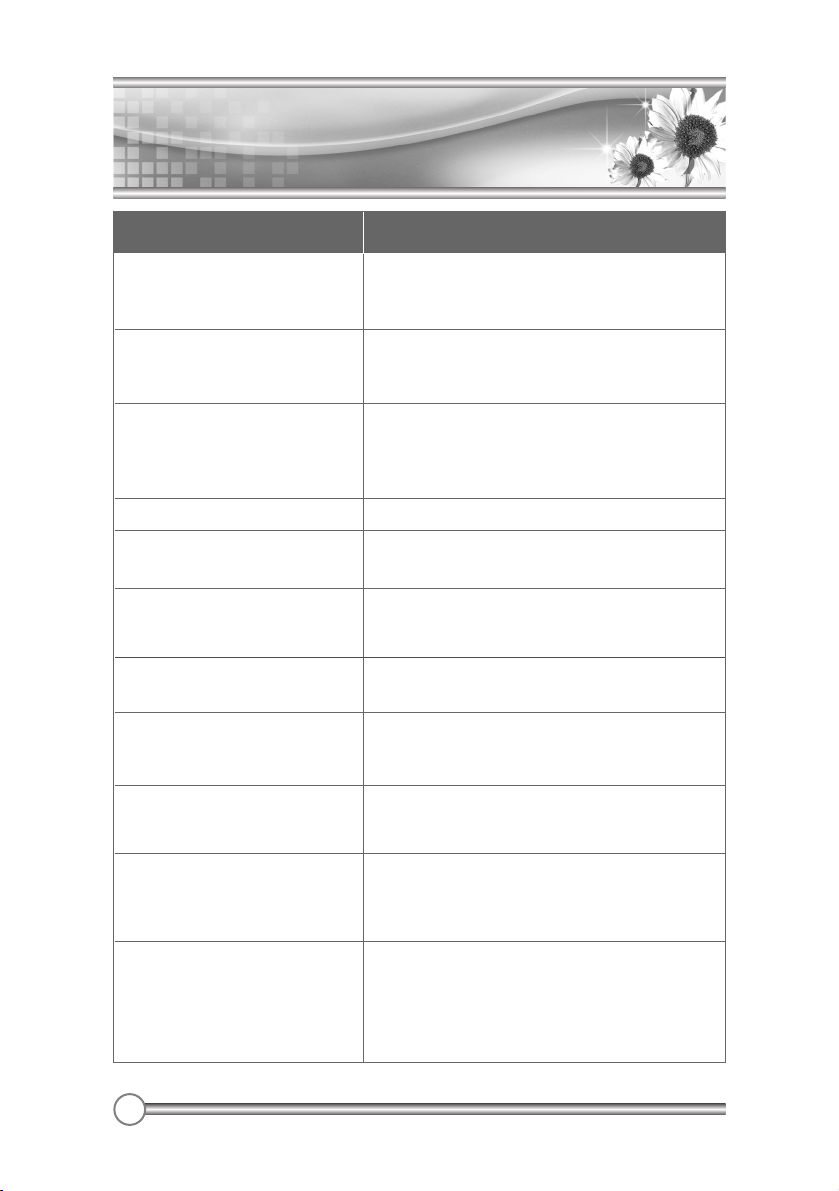
Troubleshooting
Troubleshooting
No picture on screen and no sound
from speakers.
No picture/No picture from AV
terminal.
Picture is displayed, but no sound
from the speakers.
Picture is too light
There are stripes on the screen or
color fade.
Picture is too dark.
Remote control does not work.
No picture from AV OUT terminal.
The picture is not sharp.
The picture moves.
The picture is doubled or tripled.
The picture is spotted.
• Make sure the remote control is not in the standby
mode (The POWER/Standby indicator is red.)
• Turn on the MAIN POWER button on the top of the
display.
• Check the brightness setting of the display.
• Lamp may have malfunction.
• Make sure a cable with no VIDEO input signal is
connected to the S-VIDEO INPUT terminal.
• Check the sound setting.
• Make sure the sound is not muted.
• Make sure the connectors of the optional speaker
system are securely inserted.
• Make sure the setting of AV OUTPUT terminal
• Make sure COLOR and CONTRAST settings.
• Is the unit receiving interference from other devices?
Transmission antennas of radio broadcasting stations
and transmission antennas of amateur radios and
cellular phones may also cause interference.
• Use the unit as far apart as possible from devices
that may cause possible interference.
• Make sure BRIGHTNESS setting is not set too low.
• Check to see if BRIGHTNESS setting
• Lamp may have malfunction.
• Change the batteries.
• Make sure the infrared transmitter window is not
receiving strong light such as light from fluorescent
lamps.
• Make sure AV INPUT is not set.
• Make sure the input source other than AV
• The reception may be weak.
• The state of the broadcast may also be bad.
• Make sure the antenna is facing the right direction.
• Make sure the outside antenna is not disconnected.
• Make sure the antenna is facing the right direction.
• There may be reflected electric waves from
mountains or buildings.
• There may be interference from automobiles, trains,
high voltage lines, neon lights, etc.
• There may be interference between the antenna cable
and power cable. Try positioning them further apart.
Check item
Problem
Page 46

45
Memo
Memo
Page 47
Memo
Memo
Page 48

Memo
Memo
 Loading...