

Page 1
使用说明书
苏州 益节 智能科技有限公司
全国统一客服 热线:400-828-2055
Su Zh ou E JE In te ll ig en t Tec hn olo gy Co. ,L td .
营销总 部:江苏省 苏州市高新 区金河国际 大厦5F
邮政编 码:2150 00
生产基 地:苏州市 吴中区浦庄 工业园区
深圳市 宝安 区马 鞍山 第二 工业园
电 话:051 2-8860 8077
总 机:051 2-8860 8088
传 真:051 2-8860 8099
网 址:www .ejexcq.c om
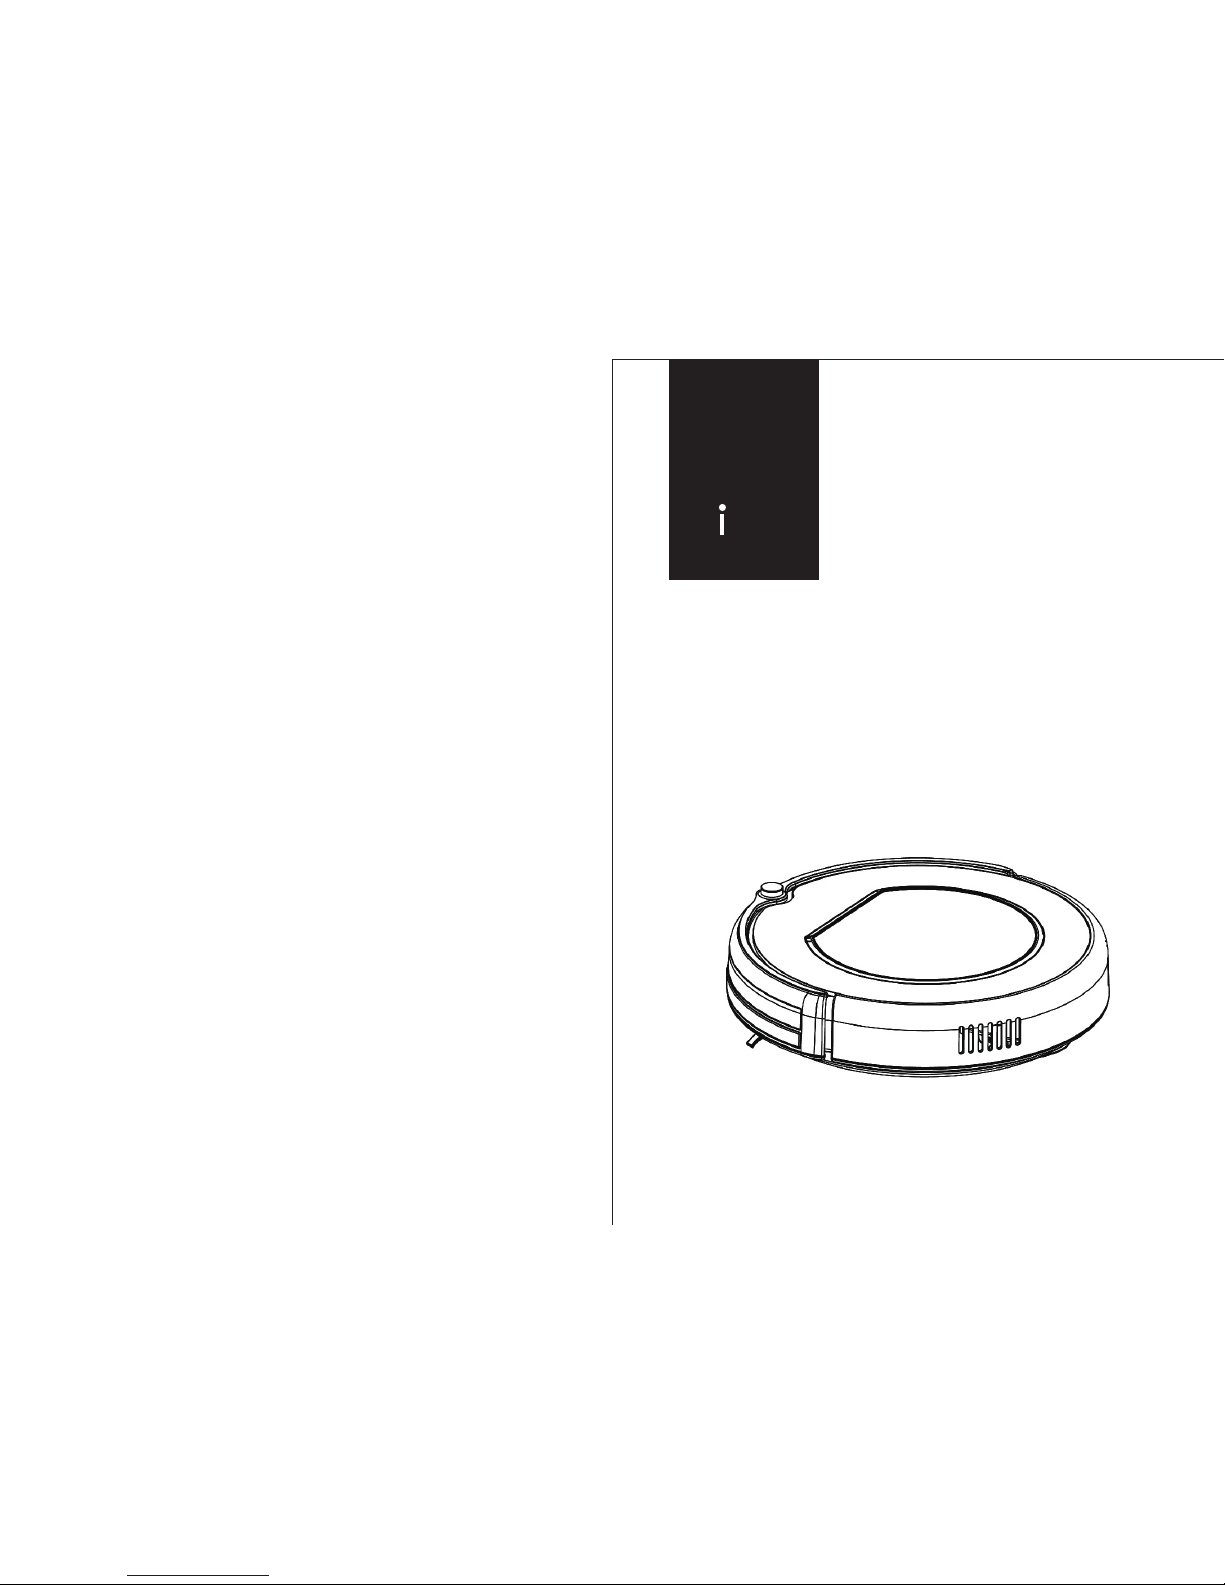
User Manual
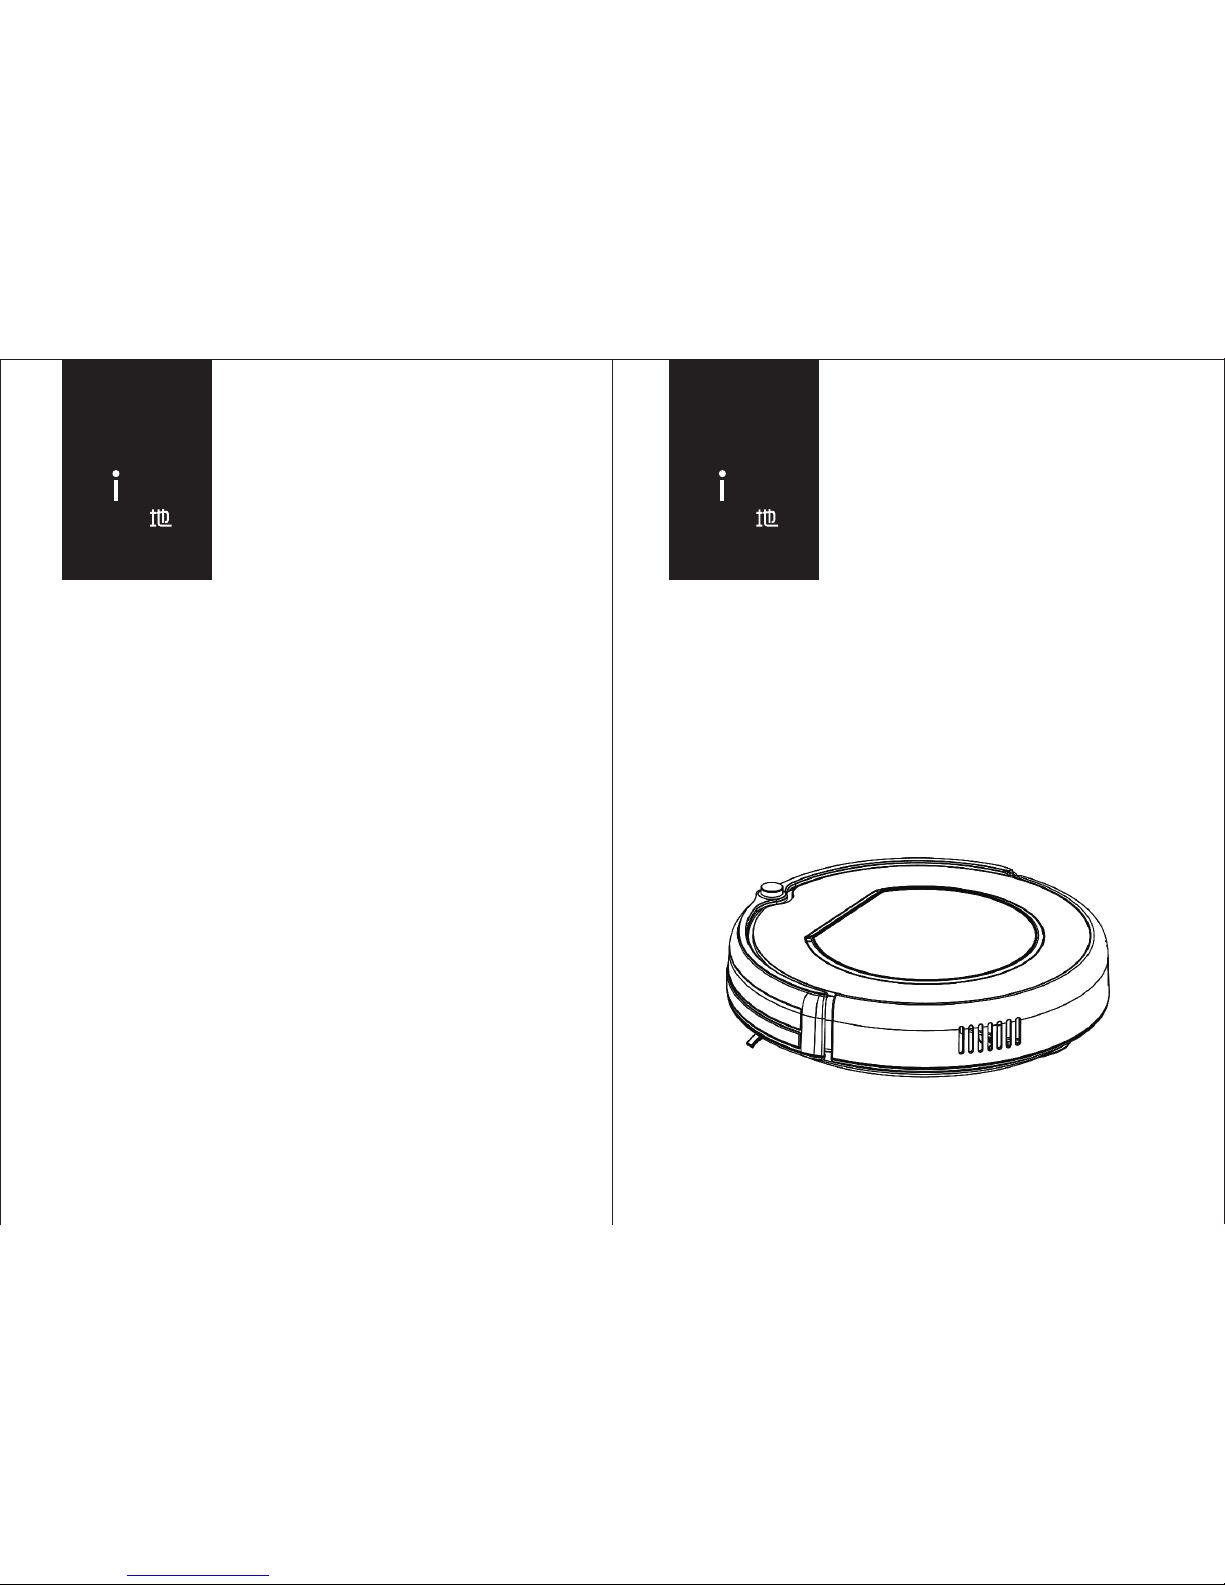
Smart
Vacuum Cleaner
X500
贝
D bea
贝
D bea
Page 2
安全说明
1
2
3
4
5
6
7
8
9
10
11
12
1
使用本产 品前。 请阅读以下 安全说 明并遵 循所有常规 的安全 预防措 施。
请仔细阅读本说明书。
请保留好本说明书。
任何与本说明书不符的操作都有 可能 导致 本产 品损 坏。
注意
只有授权的技术人员方可拆解本 产品 ,不 建议 用户 自行 拆解 本产 品。
本产品只能使用工厂配备的电源 适配 器, 若使 用其 它适 配器 将可 能导 致产 品受 损。
双手潮湿时请勿接触电线、插座 或电 源适 配器 。
请勿使布帘或身体部位卷进产品 驱动 轮。
请勿将本产品靠近烟头、打火机 及其 它明 火。
请在充电结束后对本产品进行清 洁。
请勿过度折弯电线,或将重物及 尖锐 物品 置于 机器 上。
本产品为户内家用产品,请勿在 户外 使用 。
请勿坐在产品上。
请勿在潮湿环境中使用本产品( 如浴 室) 。
使用本产品前,请移除所有易损 物品 (如 玻璃 杯、 灯具 等) 以及 有可 能缠 住边 刷和 吸风 通
道的物品(如线材、纸片、窗帘 )。
请勿将本产品置于易掉落地方( 如桌 椅上 )。
运输过程中或长时间不使用本产 品时 ,请 关掉 机器 底部 的电 源开 关。
使用前请仔细检查电源适配器是 否已 和插 座连 接好 ,否 则可 能导 致电 池受 损。
为预防绊倒,本产品工作时请知 会房 子里 的其 他成 员。
垃圾盒已满时请先清空垃圾盒再 使用 本产 品。
本产品使用的温度为0摄氏度至40摄氏度。
请勿在高温环境下使用本产品。
本产品报废前请将电池从机器上 拆下 。
拆除电池时请确保本产品没有接 通电 源。
请将废弃电池安全回收。
13
14
15
16
17
18
19
20
21
目录
安全说明
产品特性
产品组成
主机及附件
主机图解
充电基座及虚拟墙
遥控器
显示屏
产品操作
电池充电与存储
开机/暂停/睡眠
预约清扫
清扫模式
虚拟墙使用
产品维护
边刷清洁
垃圾盒及滤网清洁
传感器及充电极片清洁
常见故障
出错代码表
可替换模组
电池拆换
产品参数
2
4
3
5
6
7
9
8
1
3- 7
10
8- 11
11
11
12 -1 3
13
12
14 -1 6
12
14
15
16
17
Page 3
产品组成
32
产品特性
超强吸力 及智能 化吸力 调节
超强吸力
本产品的吸力高达25瓦特,即便是 细小 的灰 尘, 也会 被彻 底清 理干 净!
智能化吸 力调节
当探测到不同的地面环境时,本 产品 会依 据不 同地 面状 况, 自行 调节 吸力 功率 的大 小。 这
不仅大大提高了清扫的效率,而 且更 能节 省多 达30 %的电 量!
人性化设 计
多种清扫 模式
操作简单 、易上 手
只需轻轻一按“CLEA N”键 ,便 可操 控机 器! 此外 ,
您的操作将会由提示音再次进行 确认 。按 下“C LE AN” ,
按照提示音操作,让机器开始为 您工 作!
垃圾盒可 用水冲 洗
垃圾盒及初级滤网都可用水直接 进行 冲洗 ,不 需花 费您 过多 的劳 动。
而且,用水冲洗垃圾盒还可避免 灰尘 飞扬 造成 的二 次污 染!
主机及附 件
本产品共有四种清扫模式,满足 您的 不同 需要 。
1. 自动清扫
本产品可自动清扫房间,并根据 不同 环境 自动 采用 不同 的清 扫模 式。
2. 重点清扫
探测到“重灾区”时,本产品会 进入 重点 清扫 模式 。
3. 边缘清扫
探测到墙边时,机器会进入沿墙 走模 式, 开始 边缘 清扫 。
4. 预约清扫
您可以根据需求,预约机器的清 扫时 间。 一旦 被设 定, 机
器会在设定的时间离开充电基座 ,开 始清 扫工 作。
序号
描述
数量
主机
充电基座
遥控器(不含电池)
虚拟墙(不含电池)
电源适配器
清洁工具
使用说明书
1
2
3
4
5
6
7
1
1
1
1
1
1
1
Page 4
产品组成
54
产品组成
主机图解
红外信号接收头
保险杠
面板
中间盖
自动充电极片
左边刷
电池盖
左边轮
电源开关
万向轮
右边刷
吸尘口
右边轮
底壳
中间盖
垃圾盒
电源插口
集尘盒
初级滤网
高效滤网
高效滤网支架
充电基座 及虚拟 墙
红外导引信号发射窗
信号指示灯
顶壳
充电端子
电源插口
红外导引信号发射窗
电源开关
信号指示灯
信号发射窗
上壳
下壳
拔出虚拟墙盖子。
虚拟墙电 池安装
如图所示,
放进2颗R 20或D型电池。
将盖子对准虚拟墙中间凹槽
往下按压盖子,完成安装。
Page 5
3
产品组成
76
产品组成
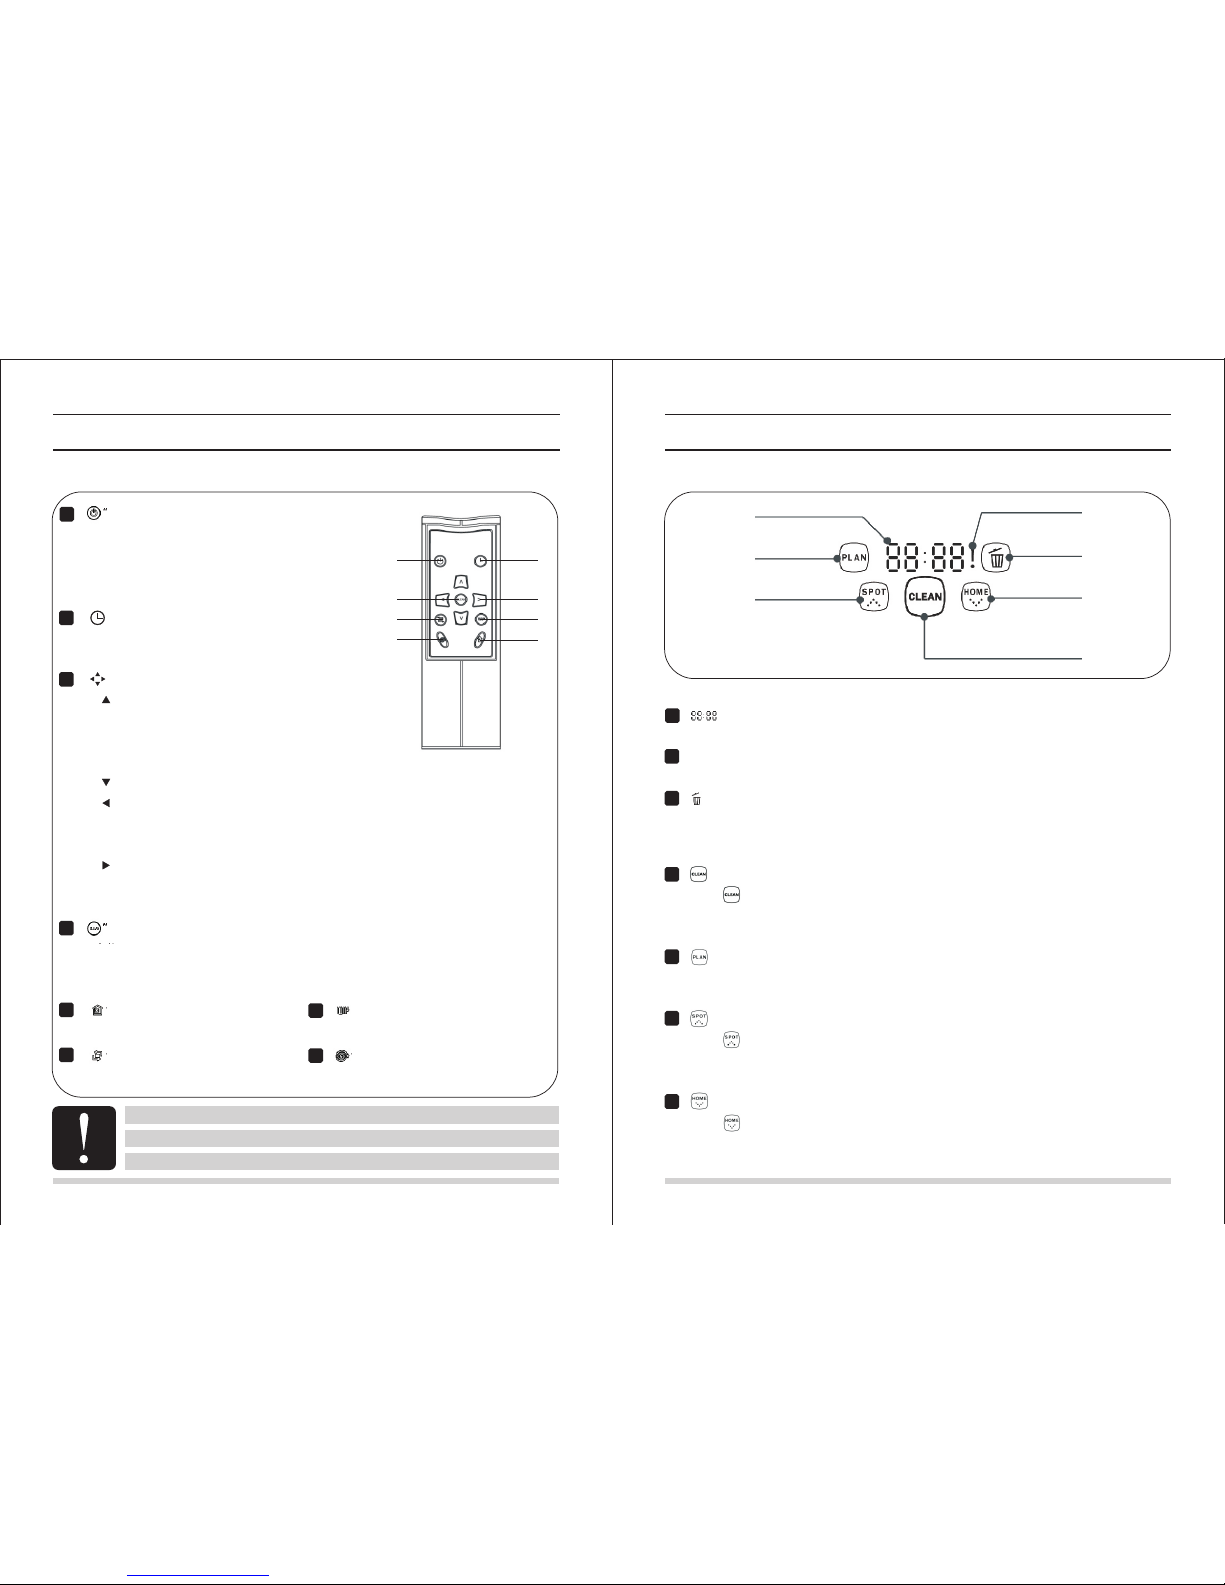
遥控器
1
2
3
4
5
7
6
8
“ ” 电源键
A. 按此 键使机器从睡眠模式切换到选择模式, 或者
从选择模式切换到睡眠模式。
B. 在预 约清扫模式下,按此键取消预约。
C. 机器 工作时,按此键使机器暂停。
“ ” 时钟键
A. 在选 择模式下,按此键使机器进入预约清扫 模式 。
B. 在预 约清扫模式下,按此键使数字在小时和 分钟 内切 换。
“ ” 方向键
A. “ ” 前进 键:
(1) 预约清扫模式下,按此键增加数 字大 小;
(2) 选择模式下,按此键使机器沿直 线向 前行 走;
或者使向前行走中的机器暂停。
B. “ ” 后退 键: 在预 约清扫模式下,按此键减少数字大 小。
C. “ ” 向左 键:
(1) 在预约清扫模式下,按此键使数 字从 分钟 切换 到小 时;
(2) 在选择模式下,按此键使机器向 左转 动。
D. “ ” 向右 键:
(1) 在预约清扫模式下,按此键使数 字从 小时 切换 到分 钟;
(2) 在选择模式下,按此键使机器向 右转 动。
“ ”清扫键
A. 在选 择模式下,按此键使机器开始工作。
B. 在预 约清扫模式下,按此键确定预约。
C. 机器 工作时,按此键使机器暂停。
“ ” 自动回充键
在选择模式下,按此键机器自动 回去 充电 。
“ ” 边缘清扫键
在选择模式下,按此键机器开始 沿边 清扫 。
“ ” 之字清扫键
在选择模式下,按此键机器开始 之字 形清 扫。
“ ” 重点清扫键
在选择模式下,按此键机器螺旋 式重 点清 扫。
1
2
4
5
6
7
8
使用前请安装两颗A AA型的电池;
在充电基座及虚拟墙附近区域, 机器 有可 能无 法接 收到 遥控 器的 信号 ;
若长时间不使用遥控器,请将电 池取 出。
显示屏
1
2
3
4
5
6
7
显示部分
“ ”显示
显示时间设定、进程状况、充电 状态 、出 错代 码等 等。
“ ! ” 显示
错误显示。
“ ” 显示
当垃圾箱装满或吸风通道被堵时 ,会 常亮 显示 。
按键部分
“ ” 清扫键
按压 “ ” 进行以下操作:
A. 从睡 眠模式切换到选择模式;或者长按3秒使机 器从 选择 模式 切换 到睡 眠模 式。
B. 在预 约清扫模式下,按此键完成并确认预约 。C. 在选择 模式 下, 按此 键使 机器 开始 工作 。
“ ” 时钟键
A. 在选 择模式下,按此键进入预约清扫模式。B . 在预约清 扫模 式下 ,按 此键 使数 字在 小时 和
分钟之间切换。C. 在预约清扫模式下,长按此键5秒 取消 预约 。
“ ” 重点清扫键
按压 “ ” 进行以下操作:
A. 在预 约清扫模式下,按此键使数字大小增加 。
B. 在选 择模式下,按此键使机器开始螺旋式重 点清 扫。
“ ” 自动回充键
按压 “ ” 进行以下操作:
A. 在预 约清扫模式下,按此键使数字大小减少 。
B. 在选 择模式下,按此键使机器自动回去找充 电基 座充 电。
3
1
2
4
5
6
7
Page 6
产品操作
98
产品操作
电池充电 及存储
注意:
A. 机 器充 电前 请确保电源开关处于打开状态。
B. 机器充电时,显示屏会显示“1111”, 并且 从右 到左 闪烁 循环 。
C. 首 次充 电请 使机器充满12小时。充电完成时显示屏会 显示 “FU LL”,
如右图所示。
D. 首 次使 用机 器, 请让 机器 把电 量用 完。
E. 电量用完后,请尽快重新对机器进 行充 电。
F. 若长时 间不 使用 机器 ,请 把电 源开 关关 掉。
自动充电
清扫完成或者电量过低时,机器 会自 动开 始寻 找充 电基 座充 电。
注意:请保持充电基座处于 通电 状态 ,否 则, 机器 将无 法找 到基 座进 行充 电。
3
1
2
4
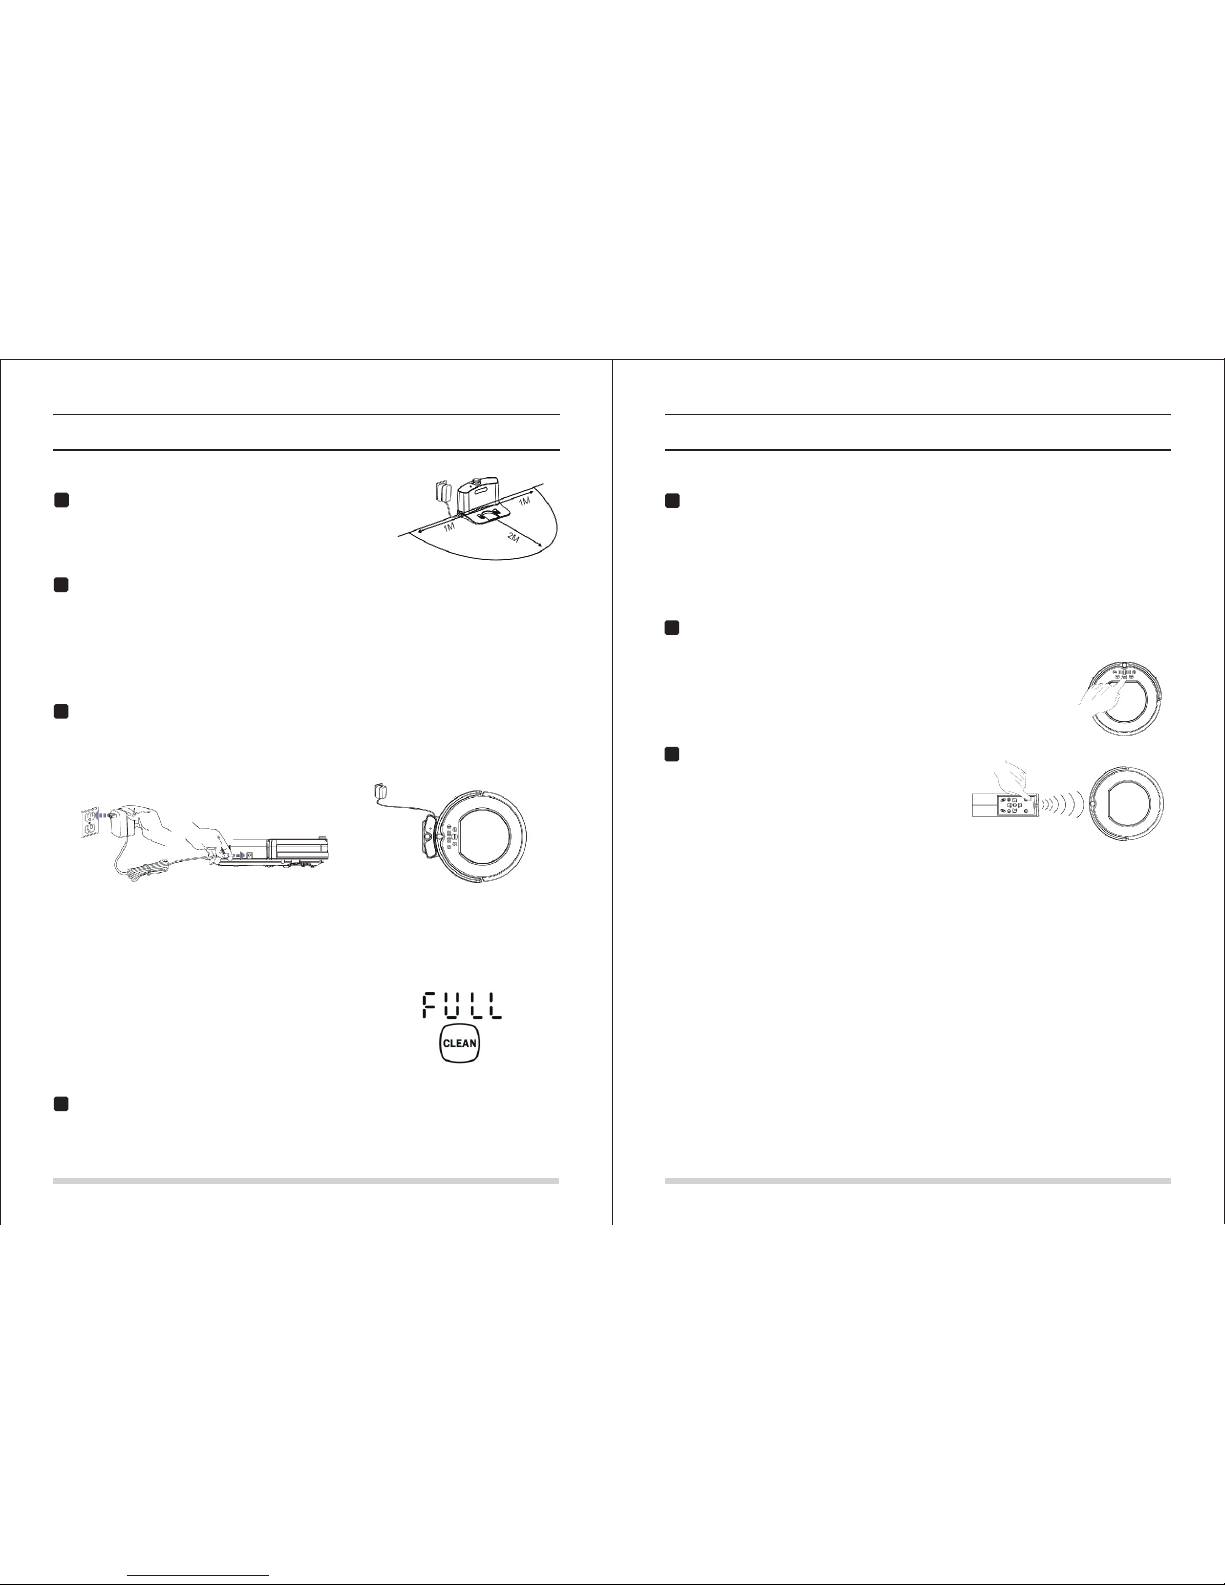
放置好充电基座
把充电基座置于靠墙位置,并移 除充 电基 座左 右各1米 ,前 方2米
的所有障碍物,如右图所示。
打开机器底部的电源开关,显示 屏会 开始 闪动 并进 入选 择模 式。
(如果8秒钟内没有对机器进行操作, 机器 将会 进入 睡眠 模式 。)
注意: A. 请确认电源开关已打开, 否则 ,机 器无 法运 行。
B. 若电源开关被关掉,机器预约将被取消 清零 。
警告:对机器进行充电前,请确 保电 源开 关是 打开 状态 ,否 则, 机器 无法 进行 有效 充电 。
可以用以下两种方式之一对机器 进行 充电 :
A. 直接将电源适配器插孔插到机 器上 ,另 一头 接通 电源 ,如 下面 左图 ;
B. 在选择模式下,按压机器显示 屏上 或者 遥控 器上 的自 动回 充键 ,使 机器 自动 回去 充电 ,
如下面右图所示。
A B
开机 / 暂停 / 睡眠
A. 确保电源开关处于打开状态。
B. 在选择模式下,按压显示屏上 或遥 控器 上的 清扫 键使 机器 开始 工作 。
注意:若机器处于睡眠模式,按 清扫 键使 机器 从睡 眠模 式切 换到 选择 模式 ,然 后再 按一 次清 扫
键,机器将自动开始工作。
暂停
暂停是指使机器从工作状态切换 到选 择模 式, 可由 以下 操作 使机 器暂 停:
A. 按压机器显示屏上的任意按键使机 器暂 停;
B. 按压遥控器上的清扫键或者电源键 使机 器暂 停。
注意:机器暂停后,可重新对机 器进 行操 作。
睡眠
睡眠模式是指机器处于停止状态 ,显 示屏 不亮 。
A. 可按压遥控器上的电源键使机器进 入睡 眠模 式;
B. 长按显示屏上的清扫键3秒使机器进入 睡眠 模式 。
注意:若长时间不使用机器,请 将电 源开 关关 掉。
开机
3
1
2
Page 7
产品操作
1110
产品操作
预约清扫
您可以通过预约使机器从某一特 定时 间开 始工 作。
本机器的预约指延时开始(延时 最长 达23小 时) 。举 例, 现在 为上 午9时, 您通 过预 约在 机器
上设定了6:30,那么机器将在6小时30分钟之后开始 工作 ,即 下午3时3 0分钟 的时 候, 机器 会
开始工作,而且会在每天的下午3时3 0分钟 准时 开始 工作 ,直 至电 源开 关关 掉。
注意: A. 一旦电源开关被关掉,所 有预 约都 会被 取消 清零 。
B. 一旦预约生效,机器会每天准时在预约 好的 时间 开始 工作 。
怎样对机器进 行预 约?
清扫模式
3
1
2
虚拟墙使 用
1
2
注意:在预约清扫模式下,所有 操作 都会 有提 示音 进行 确认 。
1
2
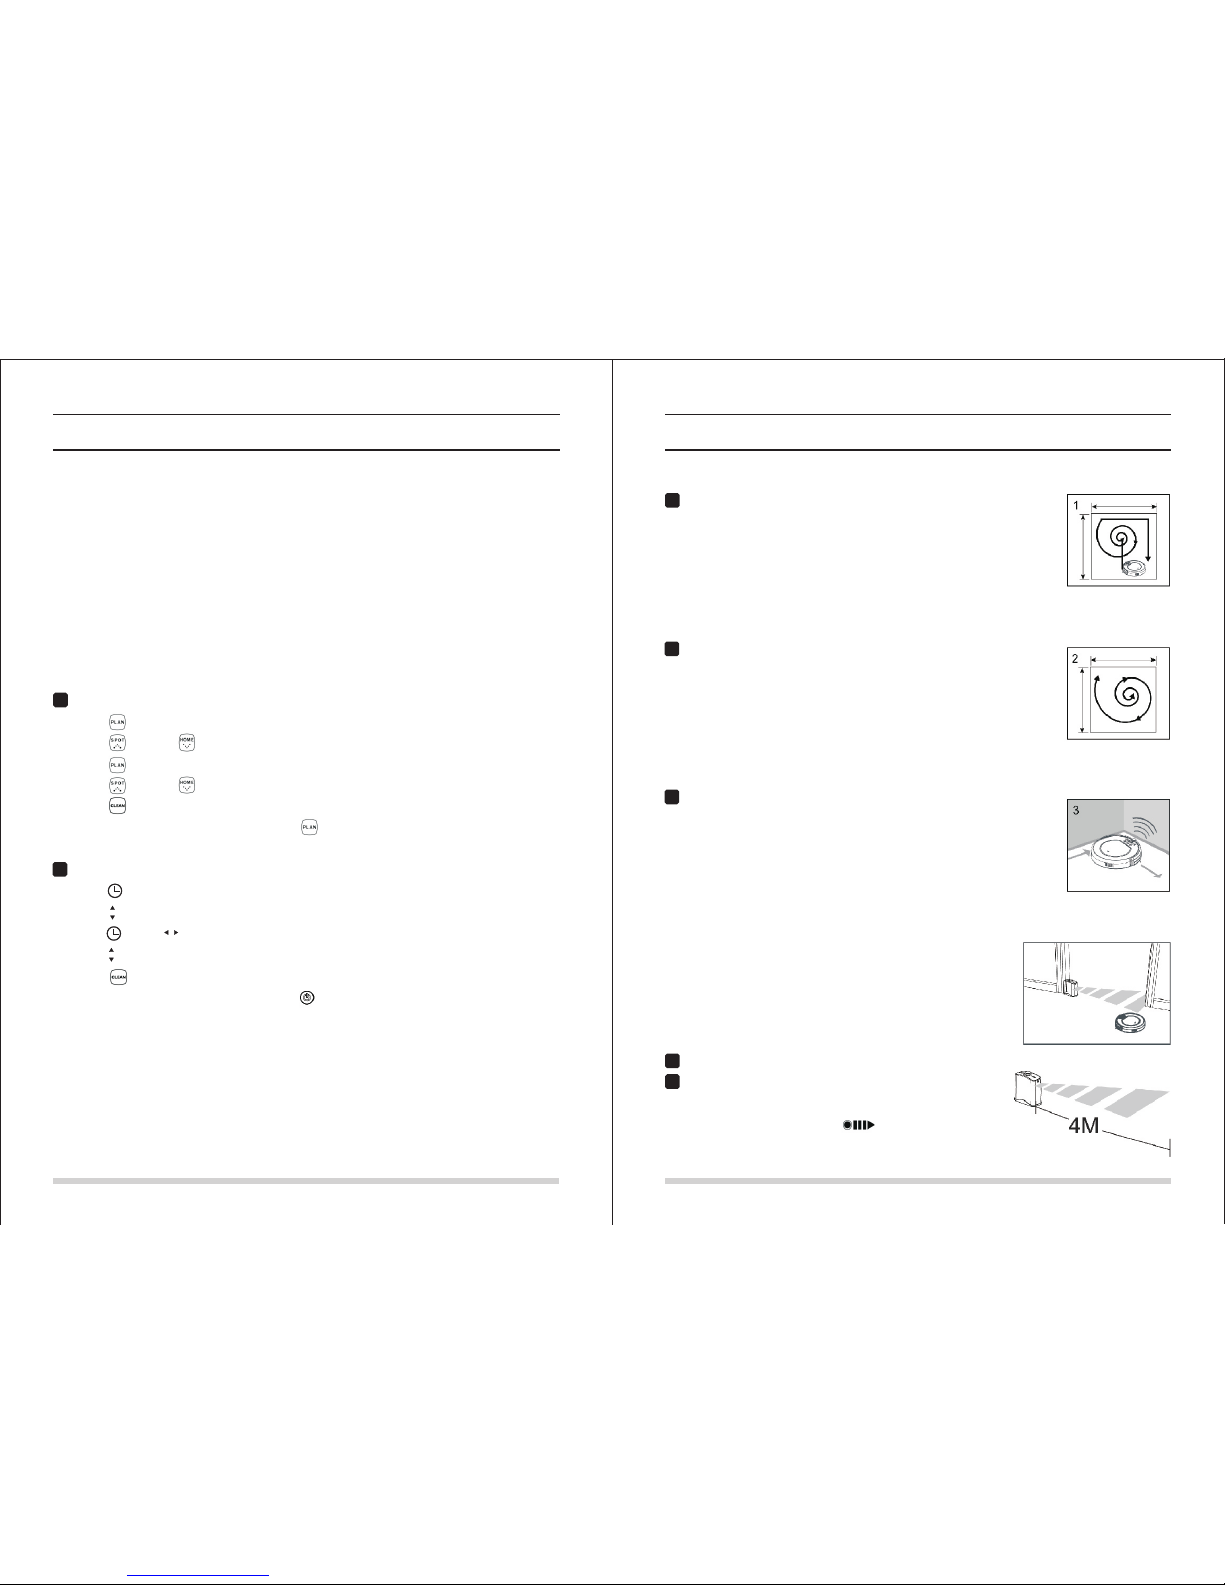
在显示屏上设置
A. 按压 “ ” 进 入预 约清 扫模 式,显示屏上的“88:88”中左边的“88”会开始 闪烁 ;
B. 按压 “ ” 和 “ ” 对 小时 的数 字大 小进 行调整;
C. 按压 “ ” 将 数字 从小 时切 换到分钟;
D. 按压 “ ” 和 “ ” 对分 钟的 数字 大小 进行 调整;
E. 按压 “ ” 完 成预 约。
F. 若需取 消预 约, 请在 预约 清扫 模式 下长 按 “ ” 5秒钟 。
在遥控器上设置
G. 按压 “ ” 进 入预 约清 扫模 式,显示屏上的“88:88”中左边的“88”会 开始 闪烁 ;
H. 按压 “ ” 对 小时 的数 字大 小进行调整;
I. 按压 “ ” 或 “ ” 将 数字 从小 时切 换到分钟;
J. 按压 “ ” 对分钟的数字大小进 行调 整;
K. 按压 “ ” 完 成预 约。
L. 若需 取消 预约 ,请在预约清扫模式下按压 “ ”键。
虚拟墙主要用于阻止机器进入限 制区 域。 它可 以发 出一 条长 达4米
的红外光带,可以用于放在门前 ,走 廊旁 ,或 者电 线及 其他 贵重
物品旁边,防止机器进入。
安装好虚拟墙电池后,打开电源 开关 。
放置虚拟墙的位置。
注意:
使用 虚拟 墙时 ,放置标记有 “ ” 的一端朝向需隔断的区域。
不使 用虚 拟墙 时请把电源开关关掉。
自动清扫
在自动清扫模式下,机器会自动 清扫 房间 ,并 且依 据不 同的 地面 环境 自行
对清扫模式进行调整。
注意:按压显示屏或者遥控器上 的清 扫键 即可 进入 自动 清扫 模式 。在 自动
清扫模式下,通常机器会先沿直 线清 扫, 然后 螺旋 形清 扫。 当探 测到 障碍
物,机器会自行调整清扫模式, 如右 图所 示。
重点清扫
重点清扫模式有两种方式可以触 发: 一是 当机 器探 测到 “重 灾区 ”时 自动
进入;一是按压遥控器或显示屏 上的 重点 清扫 键进 入。
注意:建议在地面上有较多垃圾 时使 用重 点清 扫模 式。 当“ 重灾 区” 清扫
完成时或者机器遇到障碍物时, 本模 式会 自动 终止 。而 一旦 重点 清扫 模式
终止,机器会自动进入选择模式 。
边缘清扫
当探测到障碍物时(如墙角), 机器 有一 定几 率触 发并 进入 边缘 清扫 模式 。
边缘清扫模式下,机器会沿着障 碍物 ,用 其边 刷清 扫障 碍物 边缘 。
注意:可以手动按压遥控器上的 边缘 清扫 键使 机器 进入 边缘 清扫 模式 ;在
边缘清扫模式下,当机器清扫完5米 远的 距离 或者 遇到 障碍 物时 ,边 缘清 扫
模式会终止。
Page 8
产品维护
1312
产品维护
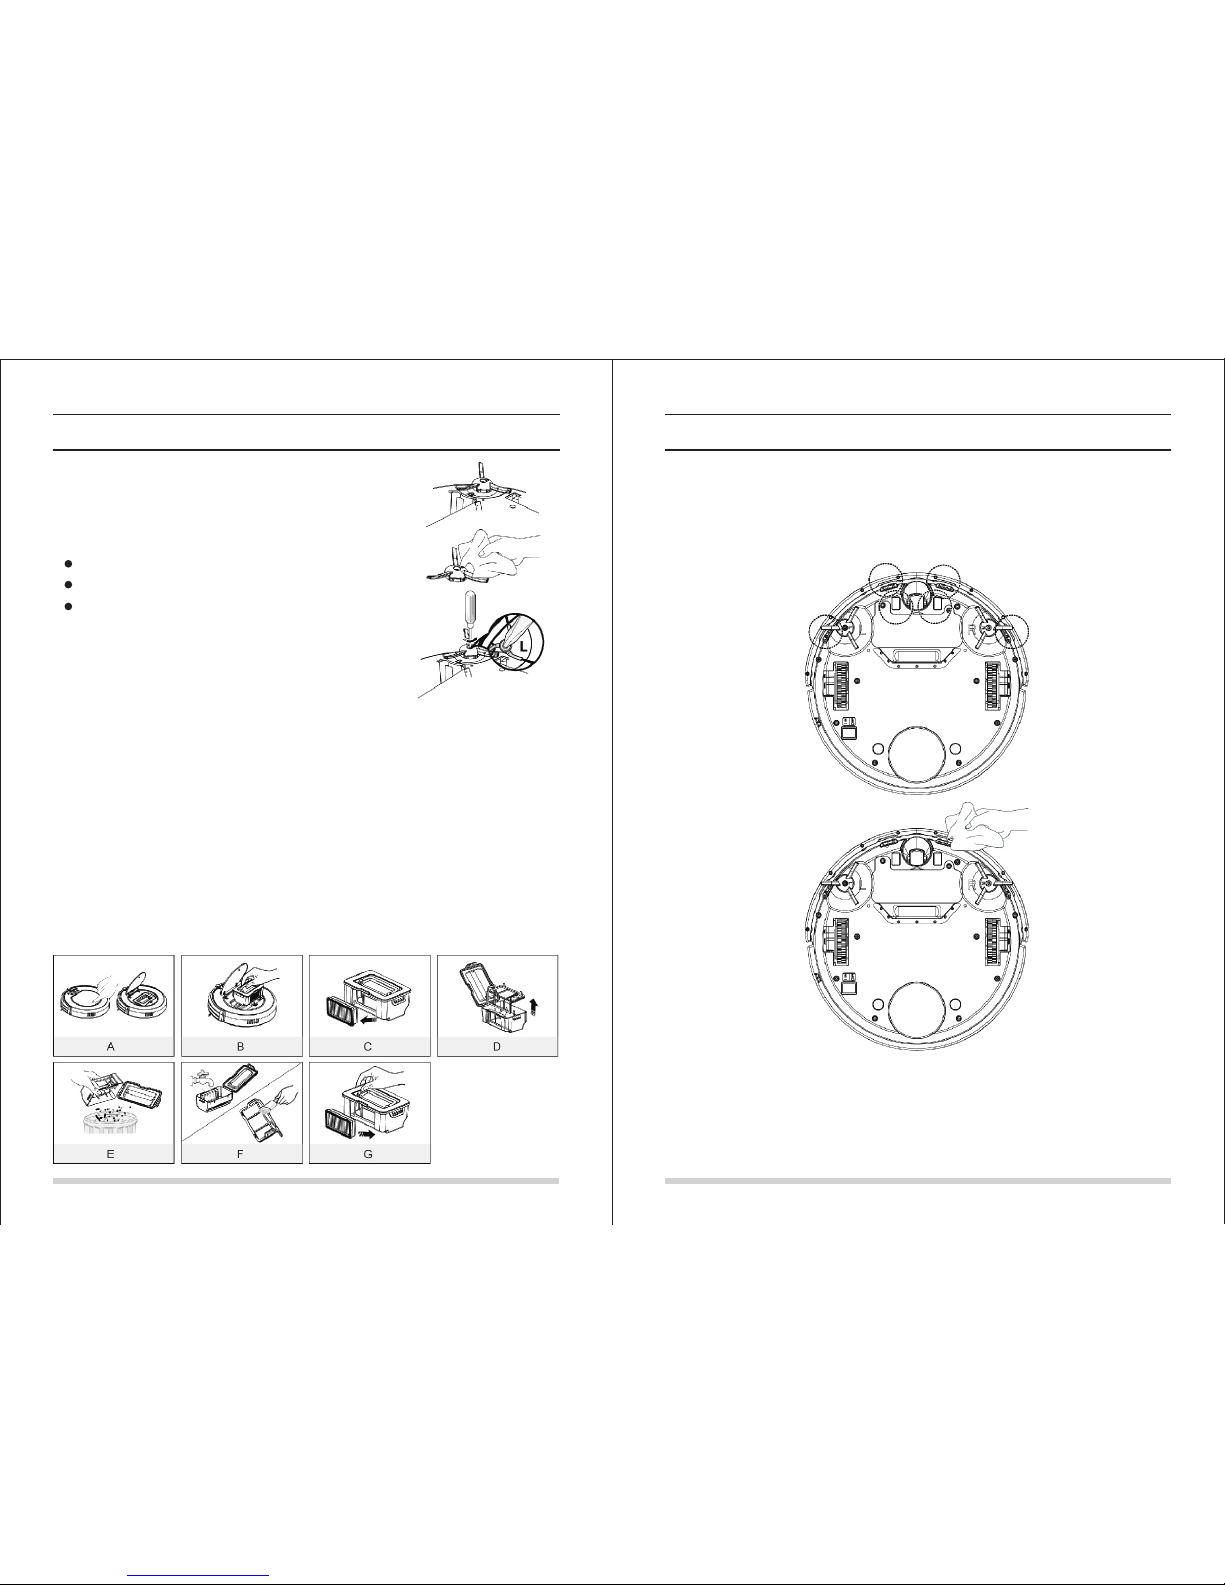
边刷清洁
A. 检查边刷状况:是否边刷已受 损或 者边 刷上 是否 有异 物。
B. 用清洁工具或抹布清洁边刷。
C. 当边刷受损无法使用时,请及 时更 换:
用起子将边刷螺丝拧松取下;
将新的边刷对准螺丝槽放好;
重新锁上螺丝。
垃圾盒及 滤网清 洁
A. 按压中间盖上的“PU SH ”标记来打 开中 间盖 ;
B. 取出垃圾盒;
C. 取下高效滤网;
D. 拉开垃 圾盒 盖子 并取 出初级滤网;
E. 倒掉垃圾盒里的垃圾;
F. 可用水 冲洗 垃圾 盒, 用清 洁工 具清 理滤 网;
注意: 1. 当显示屏上的垃圾盒显示常亮及 “! ”亮 起时 ,请 及时 清理 垃圾 盒和 吸风 通道 ;
2 . 高效 滤网 使用1 5- 30天后,需水洗;高效滤网最大使用寿 命为6个 月。
G. 将初级滤网和高效滤网重新装 回垃 圾盒 里;
注意: 1.安装滤网前,请确保高效及初级 滤网 都处 于干 燥状 态;
2.请勿将高效滤网和初级滤网置于阳光下 曝晒 。
H. 盖上垃圾盒盖子,将垃圾盒安 装到 主机 上。
注意: 高效滤网和初级滤网都是可以更换 的附 件。
A
B
C
传感器及 充电极 片清洁
用清洁工具或软布轻轻拭擦传感 器及 充电 极片 ,如 下图 标记 的位 置。
注意:
充电基座上的充电端子有异物时 也需 及时 清理 干净 。
请勿将水,稀释剂等液体直接接 触传 感器 。
Page 9
常见故障
1514
常见故障
出错代码 表
当机器出现某些常见故障时,会 在显 示屏 上以 代码 显示 ,详 见下 表。
出错代码
故障原因
解决方法
E01
E02
E03
E04
E05
E06
E07
E08
E09
左边轮停止工作
右边轮停止工作
垃圾盒已满或吸风通道被堵
主机被悬空
悬崖传感器错误
保险杠传感器错误
左边刷停止工作
右边刷停止工作
主机被缠住
检查左边轮状况
检查右边轮状况
清理垃圾盒及吸风通道
重新将主机放置回地面上
检查保险杠的灵敏性,是否有异 物
检查左边刷状况
检查右边刷状况
将主机移至另外地方,重新开机
注意:若上述方法无法解决问题 ,请 尝试 以下 动作 :
1. 重新打开主机背面的电源开关 ,重 新启 动机 器;
2. 若重新开机也无法解决问题, 请将 机器 送往 售后 服务 中心 维修 。
首先清洁悬崖传感器,若仍未恢 复
则送往售后服务中心维修
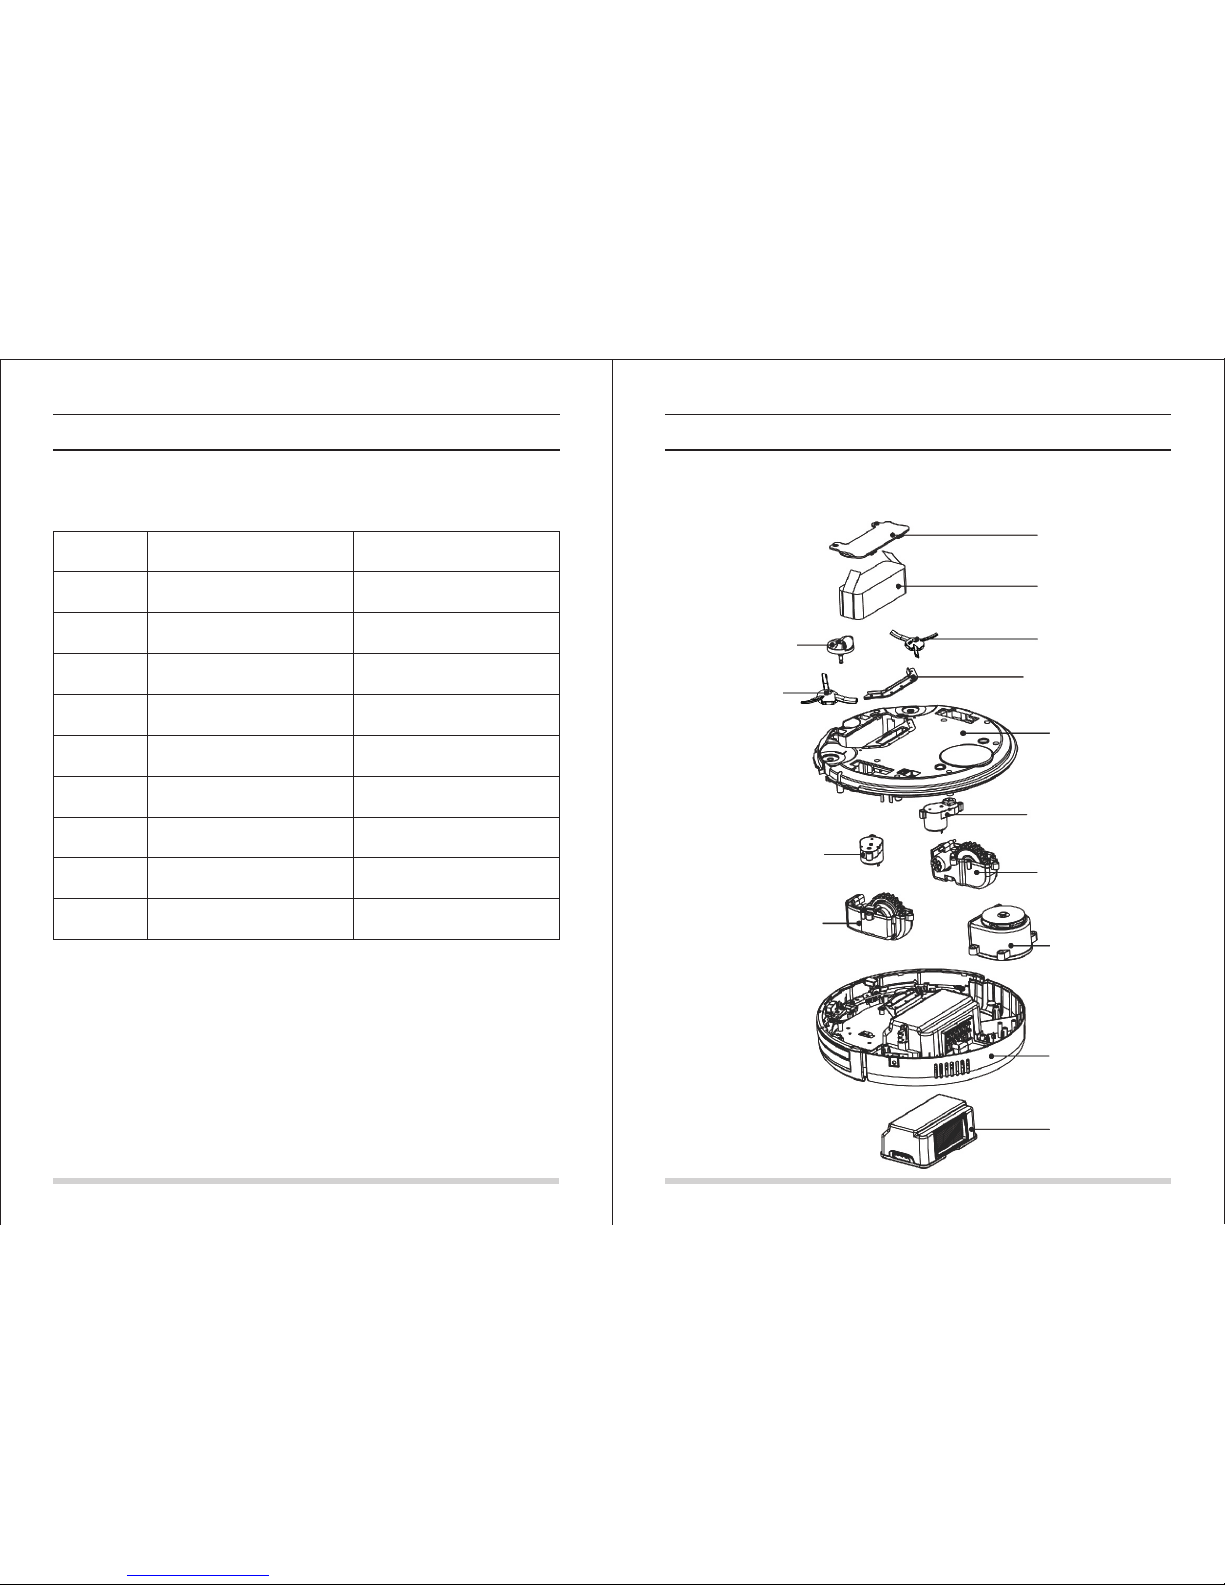
可替换模 组
以下为本机可以替换的模组图。
万向轮组件
电池盖
电池
右边刷
吸风通道挡板组件
底壳
左边刷组件
左边轮组件
风叶组件
面壳
垃圾盒组件
左边刷
右边刷组件
右边轮组件
Page 10
17
16
常见故障
电池拆换
A. 用起子将电池盖上的螺丝拧松 取下 ;
B. 取下电池盖;
C. 双手抓着电池上的绝缘布条, 将电 池拿 起;
D. 拔开连 接电 池和 主机 的电线;
E. 将新电池放进电池槽,电池有 字体 的一 面朝 上;
F. 将电池 和主 机的 电线 连接 好;
G. 将电线和绝缘布条整理好;
H. 将电池盖放回原位;
I. 锁上电池盖。
注意:请勿使 用非 本机 配置 的电 池, 否则 有可 能引 起机 器受 损。
产品参数
分类
项目
参数
直径
高度
净重
电压
电池
垃圾箱容量
充电类型
清扫模式
一次充电时间
一次清扫时间
340 毫米
90 毫米
3.0 千克
14.4 伏
镍氢电池 2000毫安
0.3升
自动充电/手动充电
约200分钟
约90分钟
LE D触摸按键
自动清扫、重点清扫
边缘清扫、之字清扫
结构类
电子类
清扫参数
主机按键类型
Page 11
User Manual
Smart
Vacuum Cleaner
X500
D bea
Page 12
1
2
3
4
5
6
7
8
9
10
11
12
21
Before using this product, please read the following safty instructions
and follow all normal safety precautions.
13
14
15
16
17
18
19
20
21
Table of Contents
Safty Instructions
Product Features
Product Parts
Main body and accessories
Robot anatomy
Name of each part (1)Charging home base & Virtual wa ll
Name of each part (2) Remote control
Name of each part (3) Dis pla y panel
Product Operating
Battery storage and charging
Starting up/Pause/Sleeping
Scheduling
Cleaning mode
Virtual wall use
Product Maintaining
Cleaning side brushes
Cleaning dust bin and filters
Cleaning sensors
Troubleshooting
Error code sheet
Replaceable modules
Battery removal
Product Specifications
22
24
23
25
26
27
29
28
21
23 -2 7
30
28 -3 1
31
31
32 -3 3
33
32
34 -3 6
32
34
35
36
37
Safty Instructions
Read thi s user manual thoro ughly an d carefu lly befo re using th is produ ct.
Save thi s user manual.
Any oper ation s that oppo se to descr iptio ns in this use r manual ma y lead to harm to hum an
or this prod uct.
WARNING
Only the certified technician may disassemble the product. Users are not allowed to disassemble
or repair the product.
Only use the adapter provided by the factory. Using other un-matched adapter may cause
electric shock, fire or product damage.
Do not touch the power cord, plug or adapter when your hands are wet.
Do not make clothes or part of a body drawn into the product’s wheels.
Do not make this product close to cigarette, lighter, match or any flammables.
If the product is needed to clean, clean it after charging is stopped.
Do not over-bend the power cord or pressure the power cord with heavy or sharp objects.
This product is used only indoors, do not use it outdoors.
Do not sit on top of this product or attach an object on the top of it.
Do not use this product in wet or moist environment (any environment with liquid).
Before use, remove all the damageable objects (textile, glass, lighting, etc) and objects that
could get caught in the brushes or suck passage(cords, clothing, papers, drapes, blinds, etc).
Do no place this product where it is easy to drop off (tables, chairs, etc).
Turn off the power switch during transportation or when you don’t need to use this product
for a long time.
Before use, check whether adapter and outlet are properly connected. Or else the battery
may be damaged.
To avoid tripping, inform all the people in the house when this product is working.
Do not use this product when dust bin is full.
Use this product in temperature from 0°to 40°(centigrade degree).
Do not place this product in high-temperature environment.
The battery must be removed from the product before it is scrapped.
The product must be disconnected from the supply mains when removing the battery.
The battery is to be disposed of safty.
NOTE: This product could not be used by children, mentally challenged
people or people lack of related experience and knowledge
(Unless there’s people instruct or supervise them).
Page 13
2322
1
2
3
4
5
6
7
1
1
1
1
1
1
1
Product Features
Powerful Suction & Intelligent Suction Adjustment
Powerful suction
Suction power of this product reaches 25 W, ensuring that even tiny dust on the floor will
be cleaned thoroughly.
Intelligent Suction Adjustment
This product is able to automatically adjust its suction power when meeting different floor
environments. Not only could it make cleaning more efficiently, but also it helps save more
power than 30%!
Considerate Designs
Easy step-by-step operation
By pressing only ONE button, you could easily direct the robot! Besides,
operations you take on the robot will be double confirmed by tone.
Press “CLEAN”, and follow tone demonstration, let your robot start working for you.
Dust bin wash
Dust bin could be washed by water. Simply wash dust bin under water per day
to avoid dust blowing in the air to cause a second polluting!
Various Cleaning Modes
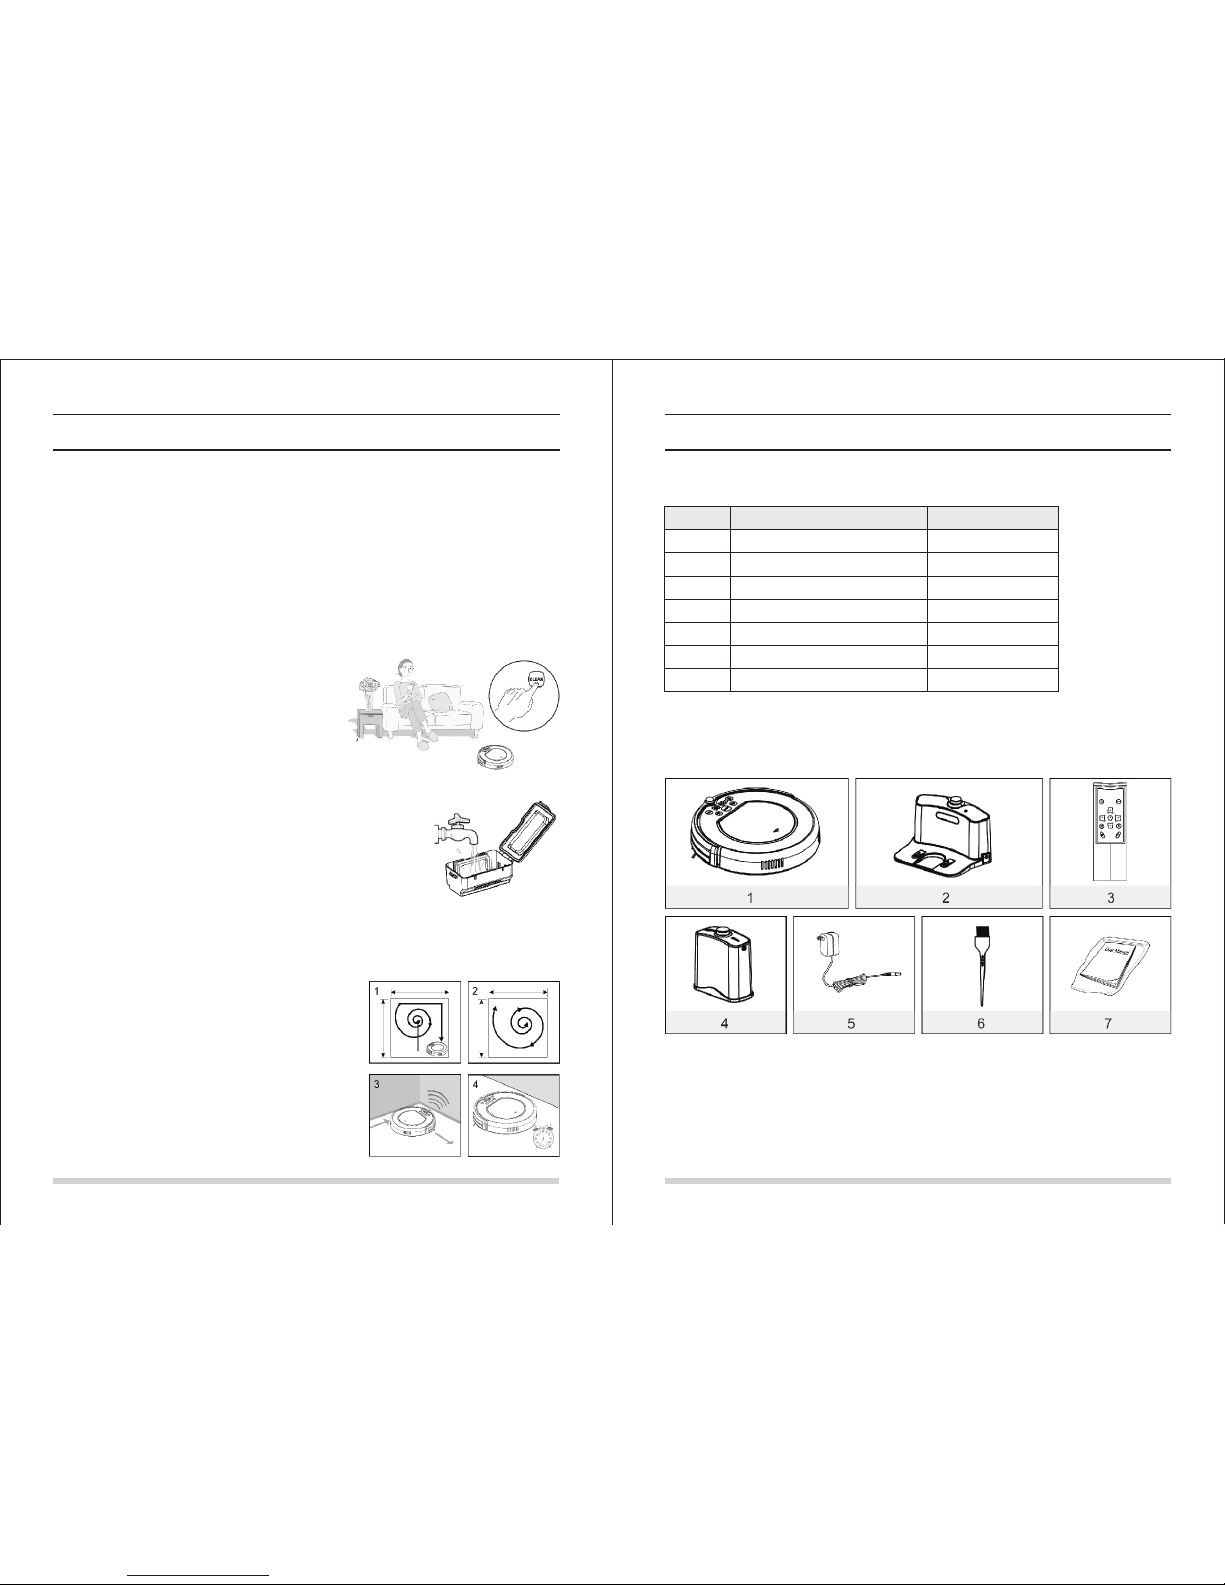
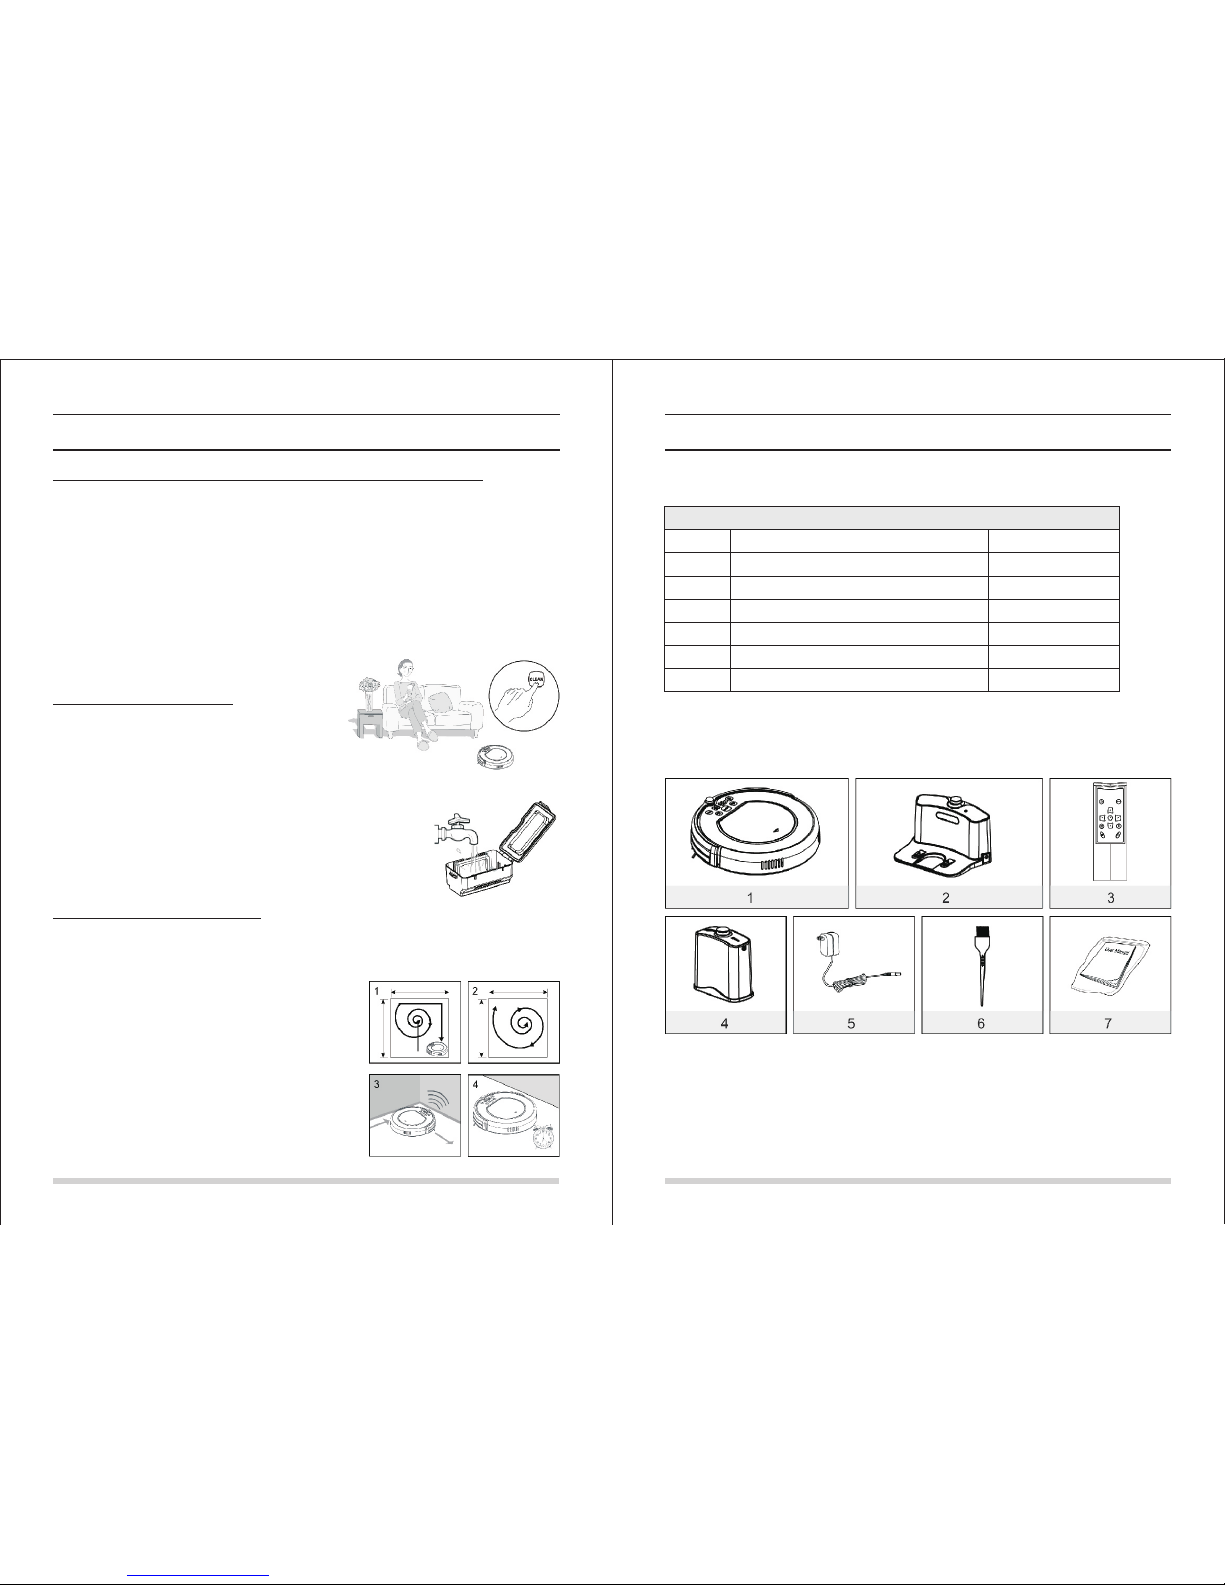
Four cleaning modes are provided to meet your needs.
1. Auto cleaning mode
The robot will clean a room automatically and adjust
its cleaning according to the situation.
2. Spot cleaning mode
The robot will spiral intensely when it detects a dirtier area.
3. Edge cleaning mode
When the robot detects obstacles (wall for example),
it will start cleaning the corner with its two side brushes.
4. Scheduling mode
When certain time is scheduled, the robot will leave the home
base and start working in the scheduled time.
Product Parts
Main body and accessories
No. Descr iption Q'ty
Main Body
Charging Home Base
Remote Control(battery not included)
Virtual Wall(battery not included)
Adapter
Cleaning Tool
User Manual
Page 14
2524
Product Parts
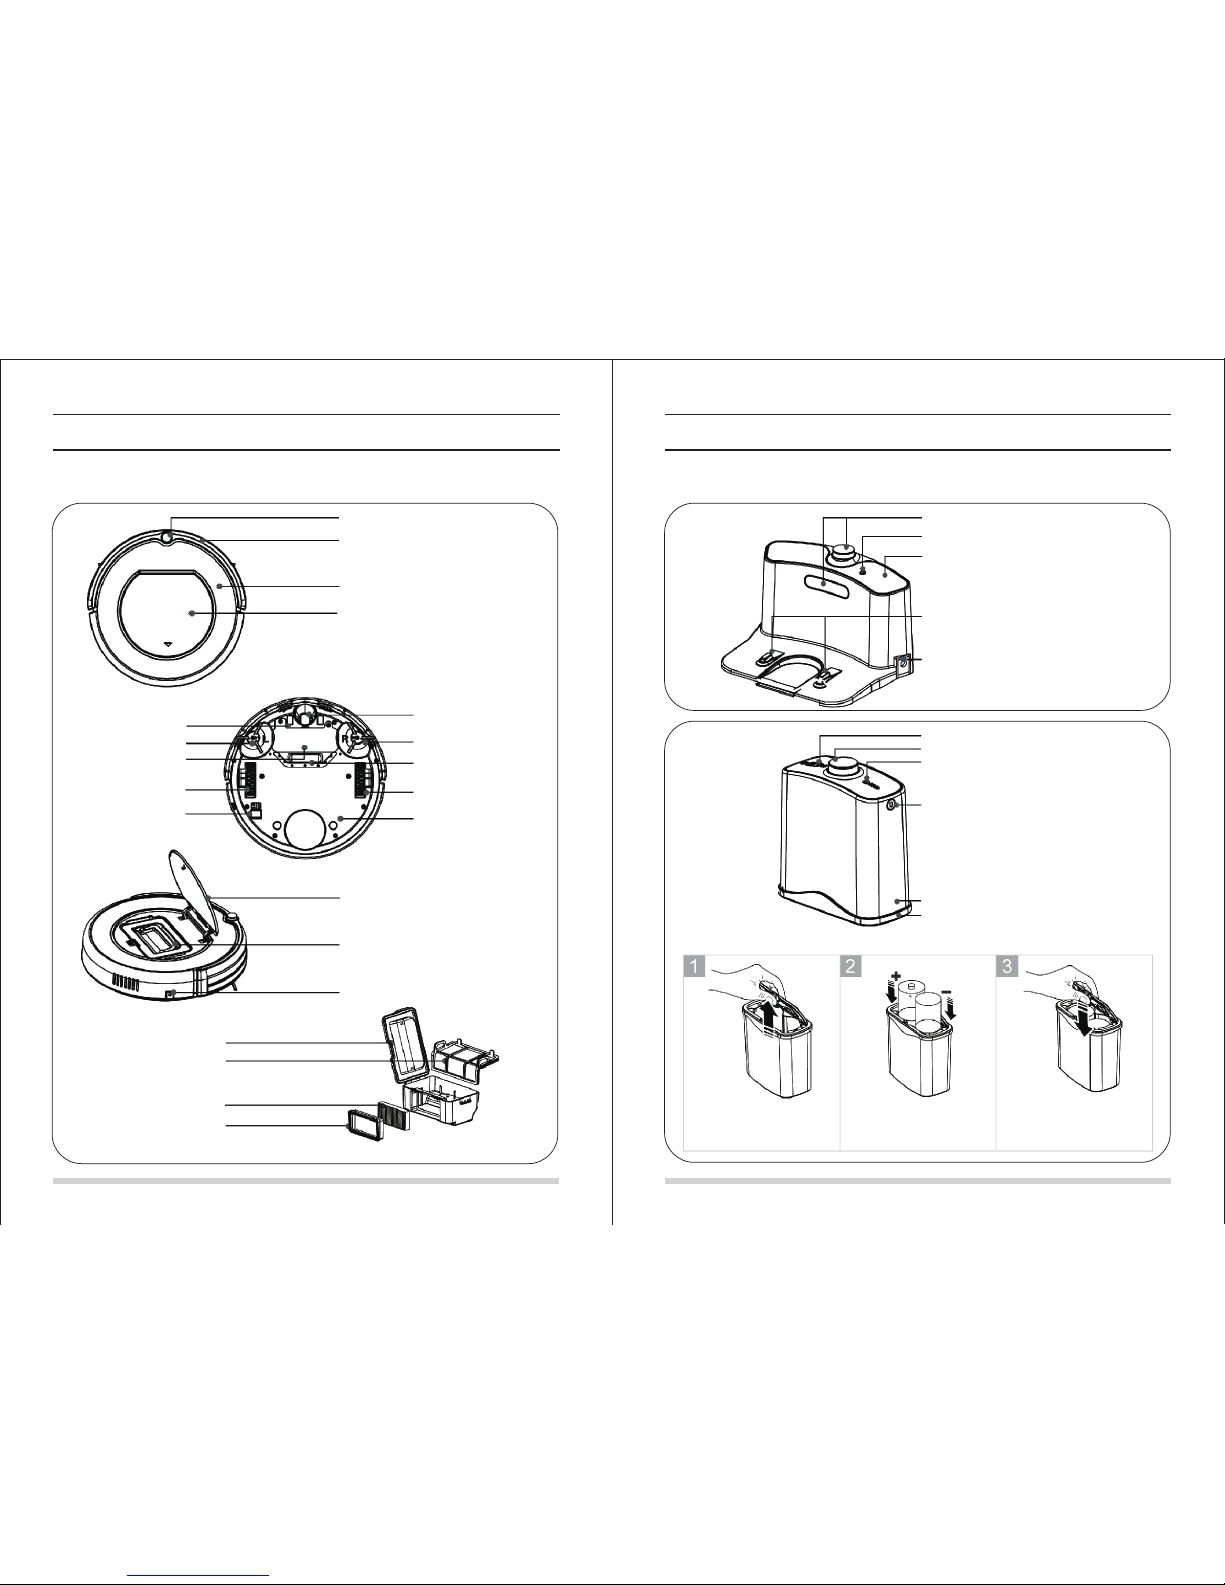
Robot anatomy
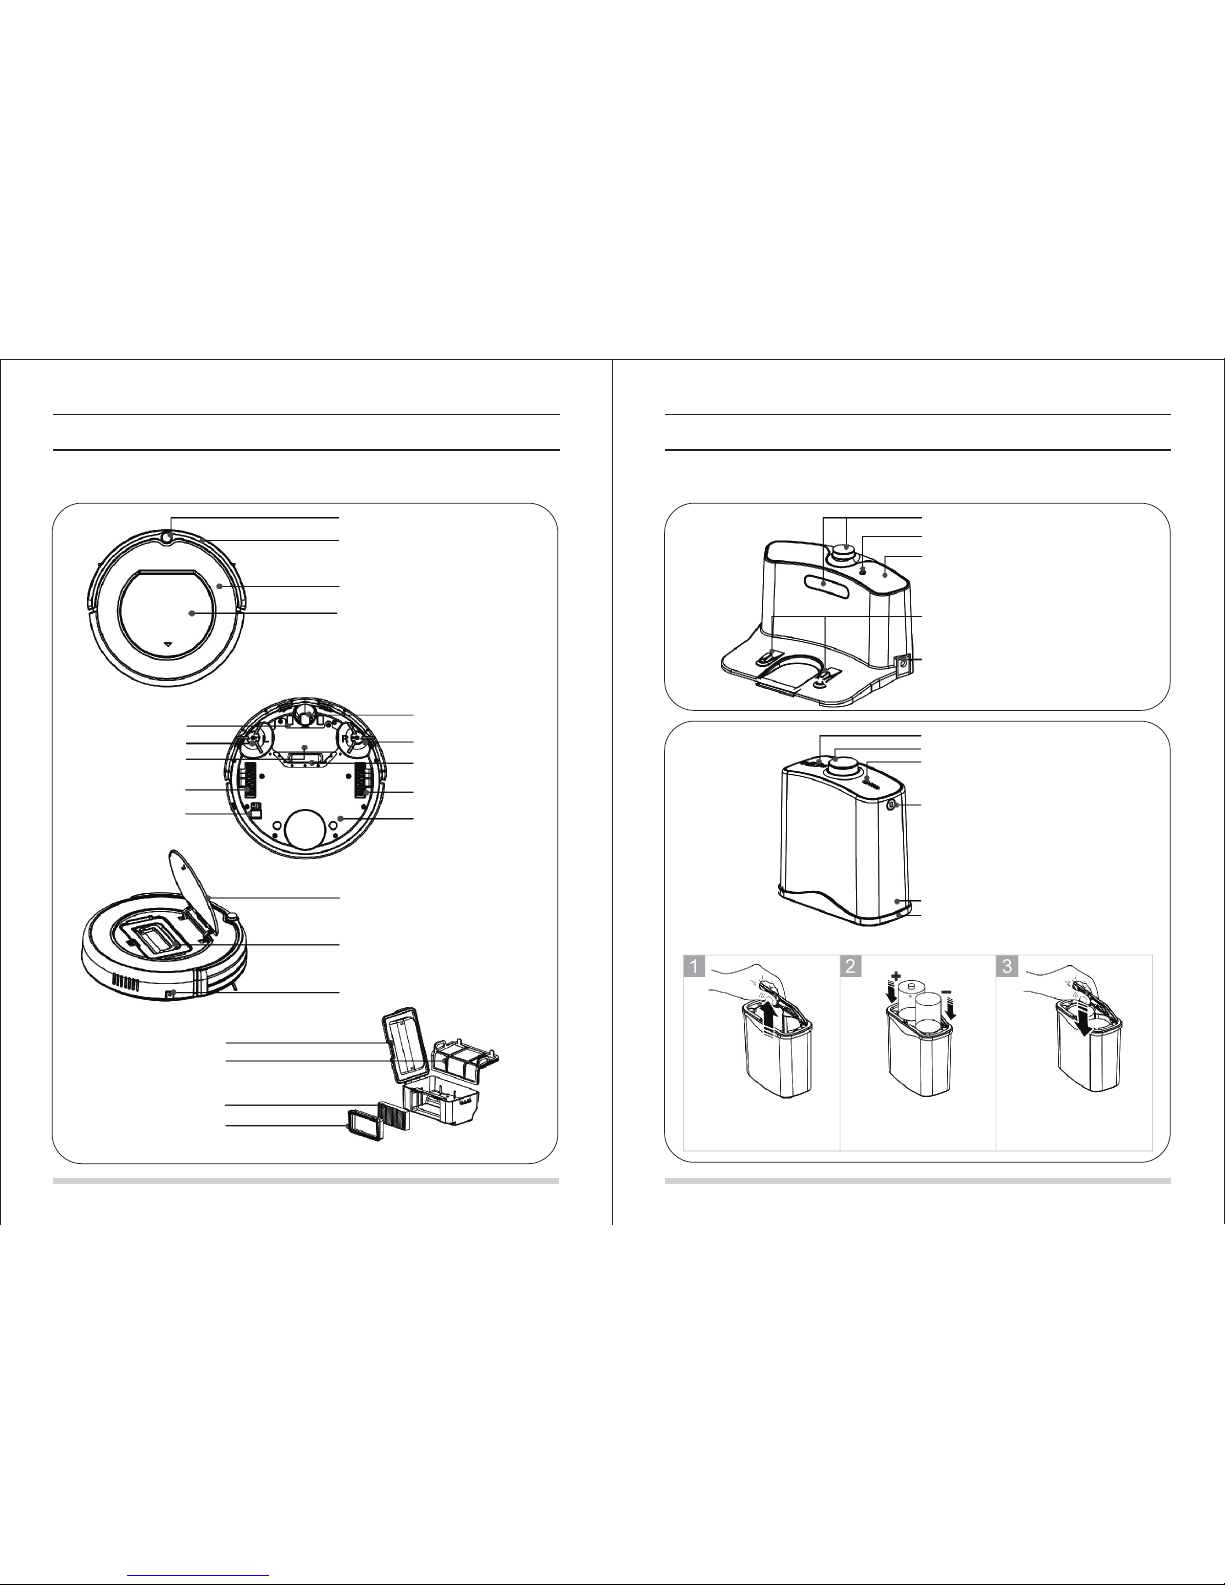
Infrared Signal Receiving Window
Bumper
Main Pad
Cover
Auto Charging Sensor
Left Side Brush
Battery Cover
Left Wheel Module
Power Switch
Nose Wheel
Right Side Brush
Suck Passage
Right Wheel Module
Bottom Cover
Cover
Dust Bin
Power Supply Socket
Dust Bin
Primary Filter
HEPA Filter
HEPA Filter Frame
Product Parts
Name of each part
Infrared Signal Transmitting Window
Signal Light
Top Cover
Charge Connecting Point
Power Supply Socket
Power Switch
Infrared Signal Transmitting Window
Signal Light
Signal Window
Side Cover
Bottom Cover
Installing virtual wall battery
Lift the cover of the virtual wall;
Install two R20/D type batteries
into the virtual wall as shown by
the figure.
After inserting the tip of the cover
Into the slot, push the other end to
close it until it clicks into place.
Note: If not used for long time, please pull the batteries out.
Page 15
2726
1
2
3
4
5
7
6
8
4
5
6
7
8
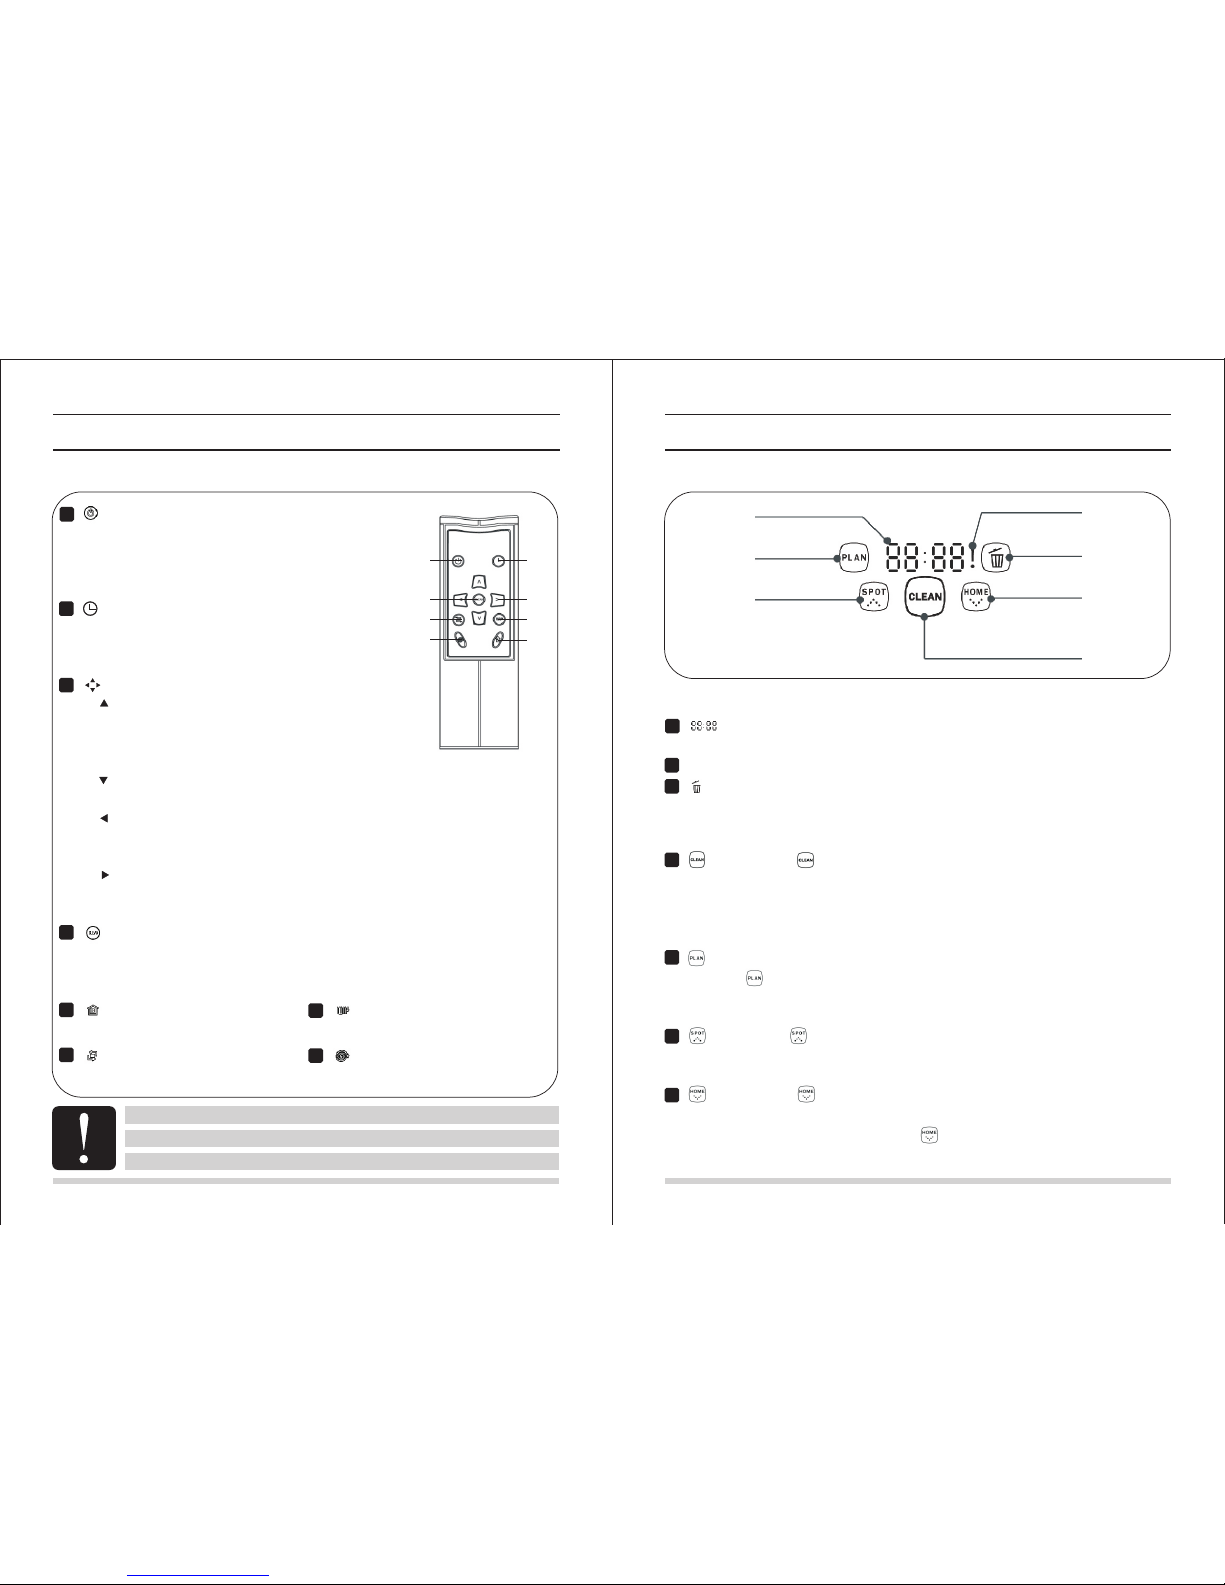
Install two AAA type batteries into remote control.
In areas around charging home base and virtual wall, product may not receive command from remote control.
If not used for long time, please pull the batteries out.
3
1
2
Product Parts
Name of each part
“ ” Power
A. Press this button to exchange from sleeping mode to
selected mode, or from selected mode to sleeping mode.
B. Press this button to cancel scheduling in scheduling mode.
C. Press this button to make the robot pause when it’s cleaning.
Directional Buttons
A. button:
(1)Press this button to increase number in scheduling mode;
(2)Press this button to make robot move forward in selected mode or
make robot stop when robot is moving forward.
B. button:
Press this button to decrease number in scheduling mode.
C. button:
Press this button to exchange from minute to hour in scheduling mode;
Press this button to make robot turn left in selected mode.
D. button:
Press this button to exchange from hour to minute in scheduling mode;
Press this button to make robot turn right in selected mode.
“ ” Scheduling
A. Press this button to enter scheduling mode when in selected mode.
B. Press this button to exchange between hour and minute in
scheduling mode.
“ ”
“ ”
“ ”
“ ”
“ ”
“ ” Clean
A. Press this button to start cleaning in selected mode.
B. Press this button to confirm scheduling in scheduling mode.
C. Press this button to make the robot stop when it’s cleaning.
Product Parts
Name of each part
3
1
2
1
2
3
4
5
6
7
4
5
6
7
Display part
Button part
“ ”
“ ! ” :
“ ” :
Number display: Shows the timer display, progress status, charging status, and error
codes by using numbers, letters and graphies.
display Shows the error that occurs.
display It flashes contantly when dust bin is full or when suck passage is blocked.
“ ” Home: Press this button to return
robot to charging home base in selected mode.
“ ” : Edge Press this button to make
robot clean along wall in selected mode.
“ ” : Zigzag Press this button to make
robot zigzag in selected mode.
“ ” : Spiral Press this button to make
robot start spot cleaning in selected mode.
“ ” Clean: Press “ ” to finish below operations:
A. To change from sleeping mode to selected mode;or keep press this button to change from
selected mode to sleeping mode.
B. To confirm scheduling in scheduling mode.
C. To start cleaning in selected mode.
“ ” Scheduling
A. Press “ ” to enter scheduling mode.
B. Press this button to exchange between hour to minute in scheduling mode.
C. Keep pressing this button for 5 seconds to cancel scheduling in scheduling mode.
“ ” Spot: Press “ ” to finish below operations:
A. Press this button to increase number in scheduling mode.
B. When robot is in selected mode, press this button to make robot start spot cleaning.
“ ” Home: Press “ ” to finish below operations:
A. Press this button to decrease number in scheduling mode.
B. When robot is in selected mode, pressing “ ” to return the robot to charging home base.
Page 16
2928
3
1
2
4
A B
3
1
2
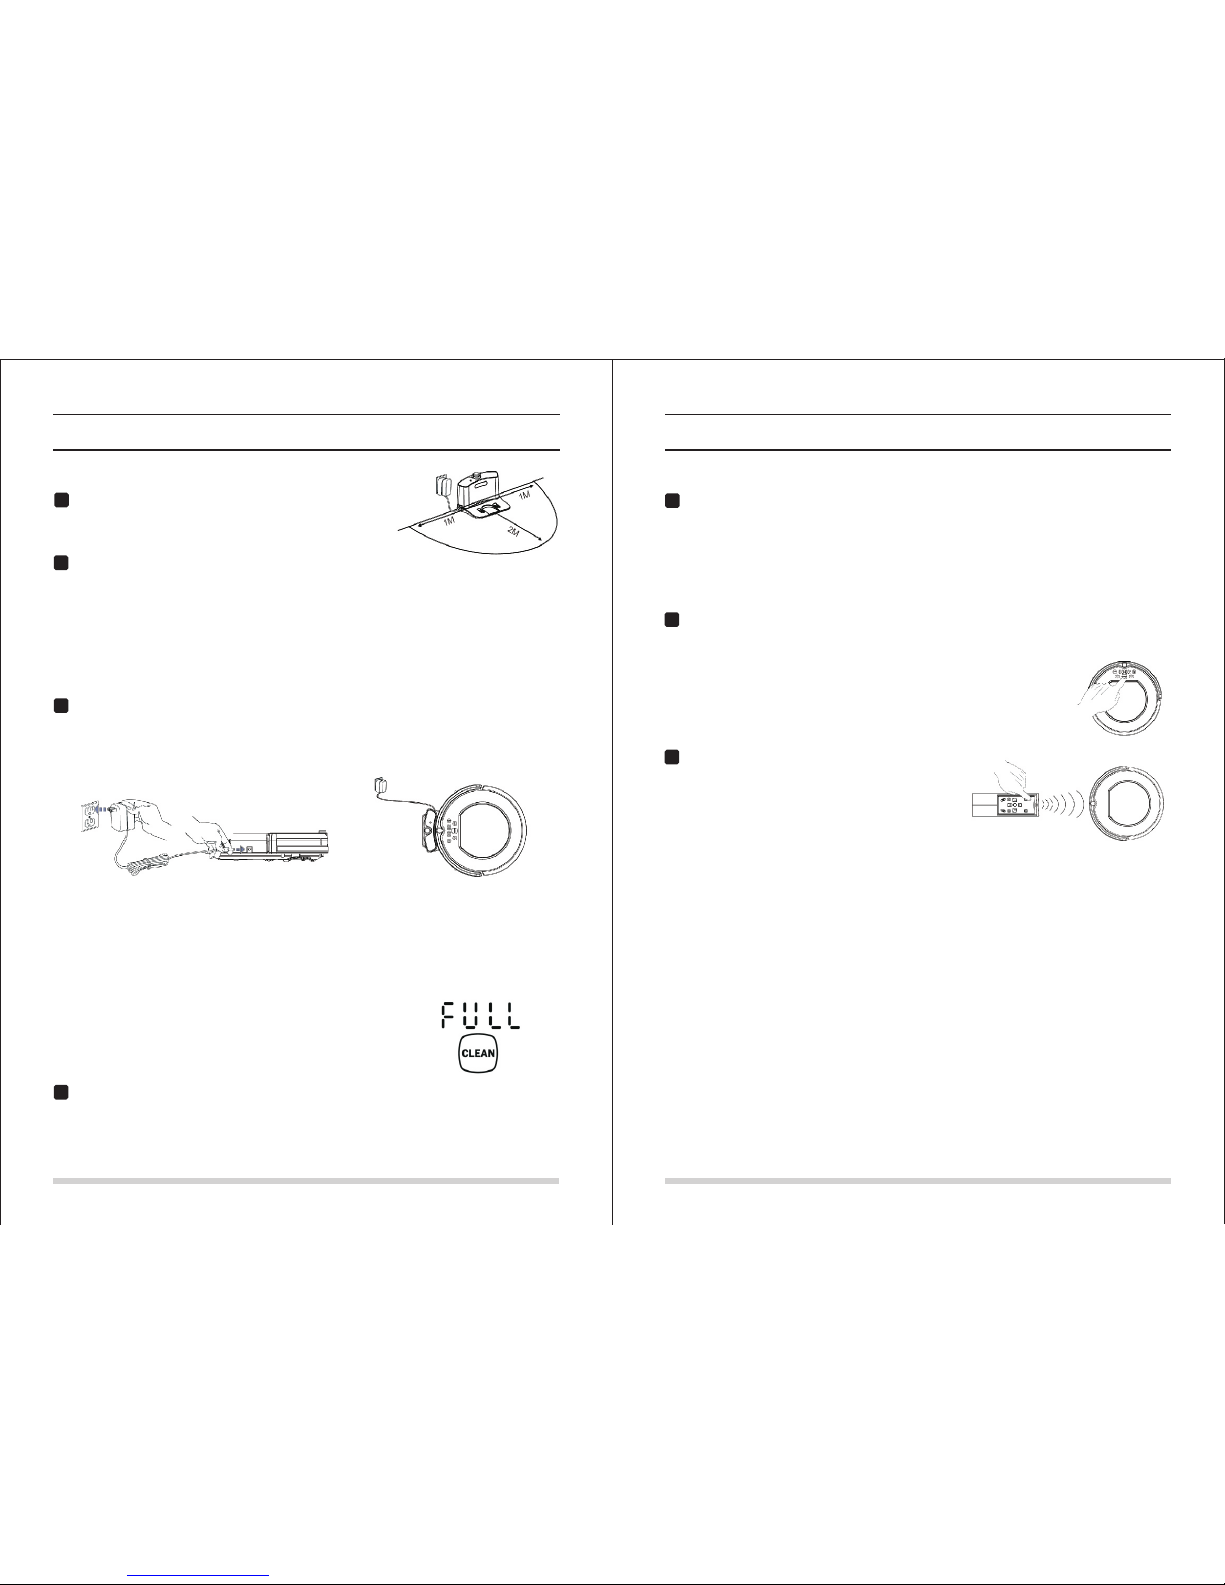
Place charging home base
Note: Put charging home base against the wall and remove
obstacles about 1 meter at two sides and about 2 meters forward.
Turn on the Power Switch at the bottom side of the robot,
then display will flash.
(If no command received, the robot will turn to SLEEPING mode after 8 seconds.)
Note: A. Please always keep the power switch turning on. If not, it is unable to make the robot work.
B. If power switch is turned off, all the scheduling will be cancelled.
Caution: Before charge the robot, please make sure the power switch is turned on, or else
the robot can not be charged.
Charge the robot in either way as shown below:
A. Plug into an outlet;
B. Press HOME on main body or on remote control to make robot return to charging home base
for charging itself.
Product Operating
Battery storage and charging
Note:
A. Turn on the power switch at the bottom side before charge the robot.
B. When robot is charging, display panel will show 1111, and repeat from right to left.
C. Before first use, charge the robot for 12 hours. When charging is
finished, display panel will show FULL.
D. In first use, let the robot clean until battery is used up.
E. After battery uses up, recharge the robot as soon as possible.
F. If the robot is not used for long time, please turn the power switch off.
G. When robot is charging, do not make robot start working.
Auto charging
The robot will automatically return to charging home base when cleaning is done or battery is low.
Note: When battery is low, display panel will show “Lo”.
Please keep charging home base plugged in. If not, robot is unable to auto charge.
Product Operating
Starting up/Pause/Sleeping
Starting up
A. Make sure the power switch is on;
B. Press CLEAN button on main body or on remote control to start cleaning.
Note: If robot is in sleeping mode, press CLEAN button to wake the robot up from sleeping mode.
Then press CLEAN for a second time, the robot starts cleaning automatically.
Pause
To exchange robot from cleaning mode to selected mode:
A. Press either button among PLAN, SPOT, CLEAN and HOME
buttons on main body;
B. Press CLEAN or POWER button on remote control.
Note: When robot is paused, press CLEAN to make robot to re-start cleaning.
Sleeping
To turn robot into sleeping mode from selected mode:
A. Press POWER on remote control;
B. Keep pressing CLEAN on main body for 3 seconds.
Note: If not using the robot for a long time, please turn the power switch off.
Page 17
3130
3
1
2
1
2
1
2
Product Operating Product Operating
You can schedule to let the robot start cleaning from a certain time.
(Time delay up to 24 hours.) For example, it’s 9:00AM now, you set 6:30 on the robot, the robot
will start cleaning after 6 hours and 30 minutes, that is 15:30 PM. So the robot will start cleaning
at 15:30PM everyday untill the power swith is turned off.
Note: A. Once power switch is turned off, all the scheduling will be cancelled.
B. Once certain time is scheduled, the robot will always work according to the setting.
Scheduling
On main body
A. Press “ ” to enter scheduling mode, the left “88” between “88:88” will flash.
B. Press “ ” and “ ” to increase or decrease hour.
C. Press “ ” to exchange from hour to minute.
D. Press “ ” and “ ” to increase or decrease minute.
E. Press “ ” to finish scheduling.
F. To cancel scheduling, keep press “ ” for 5 seconds in scheduling mode.
On remote control
G. Press “ ” to enter scheduling mode, the left “88” between “88:88” on display will flash.
H. Press “ ” button to increase or decrease hour.
I. Press “ ” or “ ” to exchange from hour to minute.
J. Press “ ” button to increase or decrease minute.
K. Press “ ” to finish scheduling.
L. To cancel scheduling, press “ ” in scheduling mode.
Note: In scheduling mode, each operation you take will be double confirmed by tone.
How to schedule the robot?
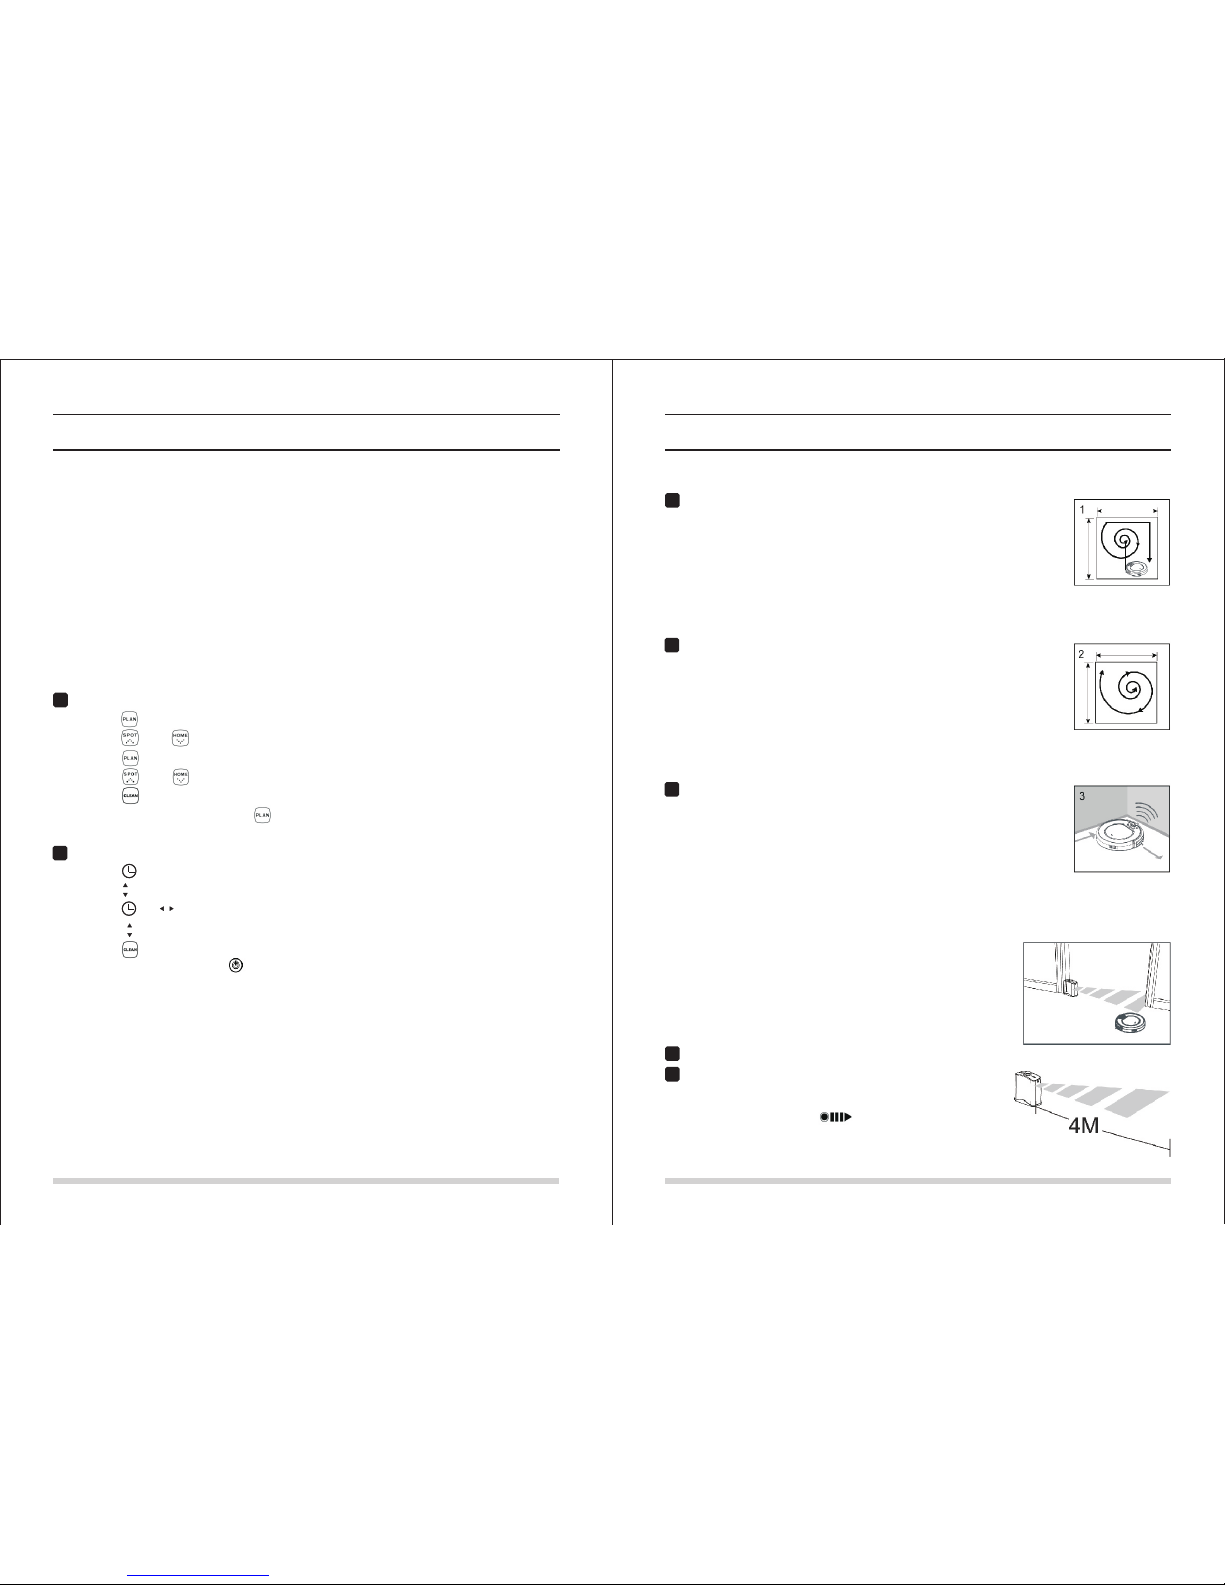
Cleaning mode
Auto cleaning
The robot will clean a room automatically and adjust its cleaning according
to the situation.
Note:
Press CLEAN button on robot or on remote control to start auto cleaning.
Normally, the robot works on a straight line and then change to spiralling.
When it detects obstacles, its cleaning mode will adjust and change automatically.
Spot cleaning
The robot will automatically enter spot cleaning mode when it detects a dirtier
area, or you could press SPOT on robot or remote control to start spot cleaning.
Note:
Spot cleaning is used in certain area where it’s dirtier than other area.
Spot cleaning will stop after the area is cleaned or when it detects obstacle.
And once this mode is stopped, the robot will turn to selected mode.
Edge cleaning
When the robot detects obstacles (wall for example), it may start cleaning the
corner with its two side brushes.
Note:
Press EDGE on remote control to start edge cleaning.
Edge cleaning will stop after the robot cleans along 5m or when it detects obstacle. And once this
mode has stopped, the robot will turn to selected mode.
Virtual wall use (virtual wall is optional
accessory)
Virtual wall is used to prevent robot from entering off-limit area. It could
creat a 4-meter light strip to separate two area, such as in front of doors,
doorways or where there are appliance, cores or other fragile objects.
After batteries installed, turn on the power switch.
Put the virtual wall where you want it to work.
Note:
When using virtual wall, put “ ” side of virtual wall towards
the area you want to set.
Turn the power off when not using virtual wall.
Page 18
3332
A
B
C
Product Maintaining
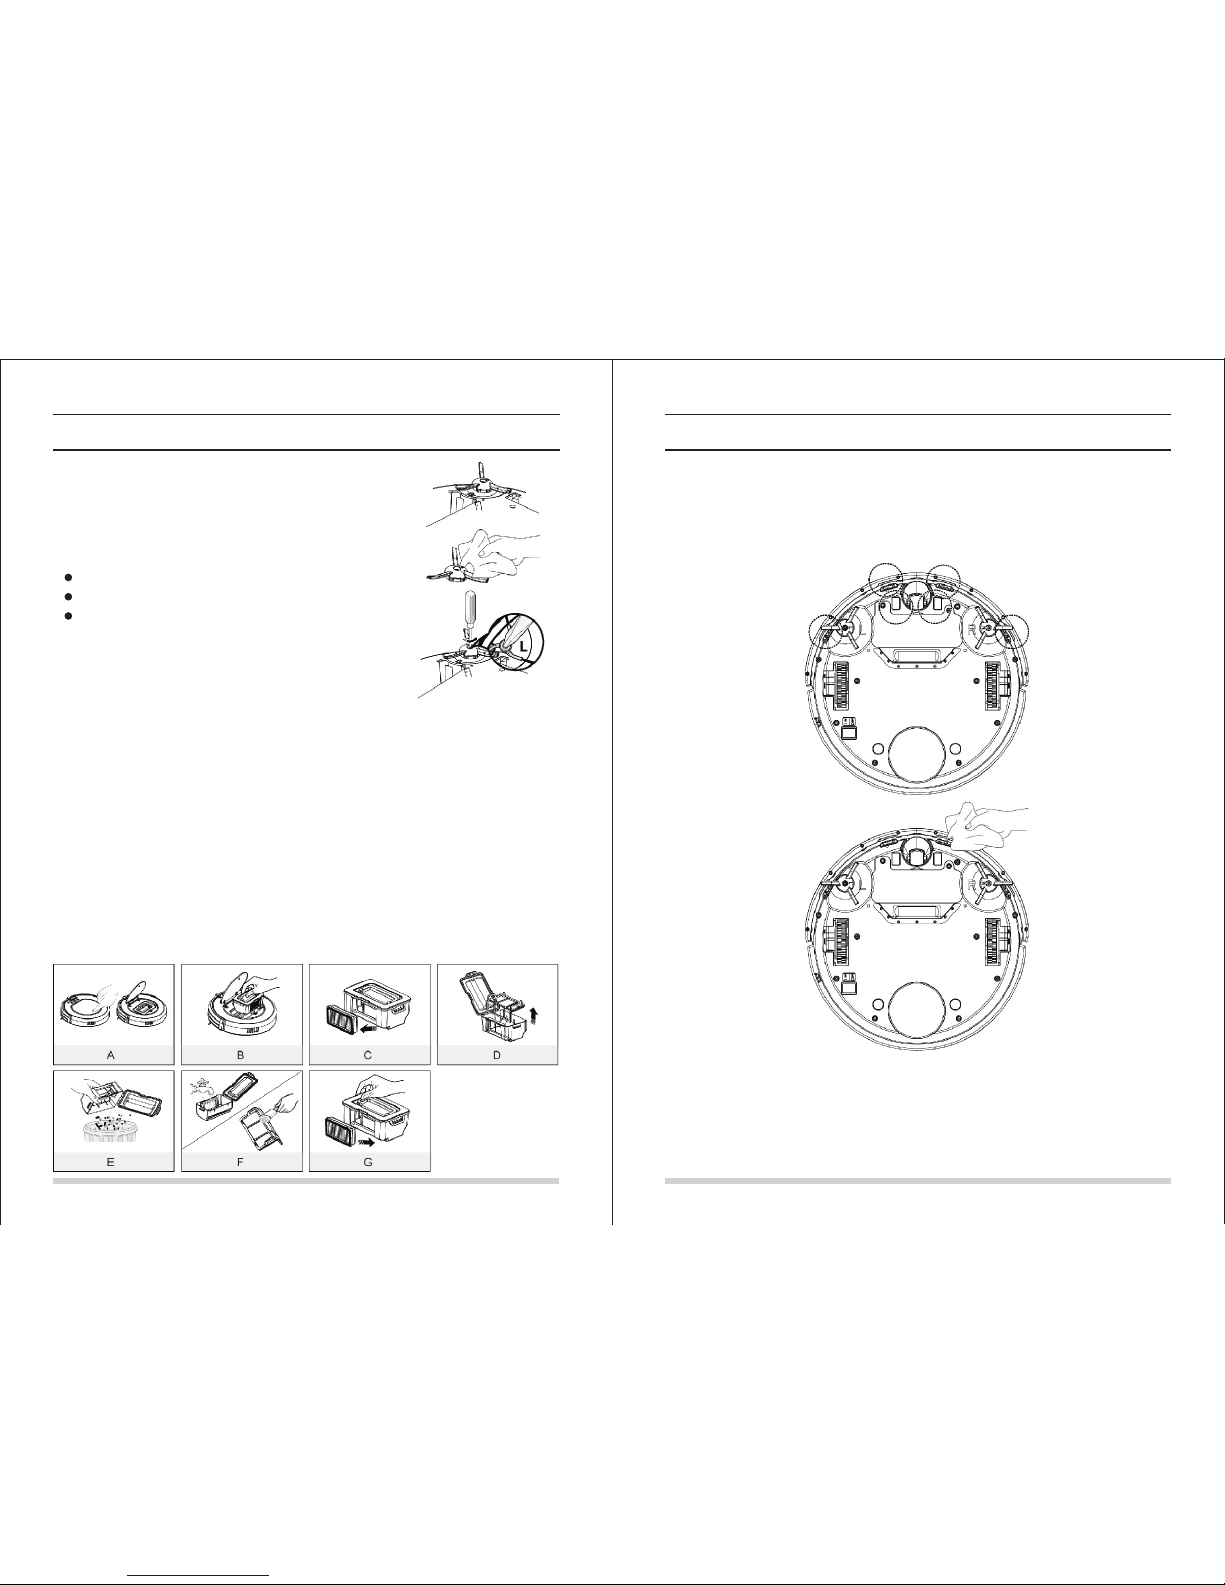
Cleaning side brushes
A. Check side brushes to see whether they’re damaged or whether
there are foreign matter stuck on the brushes.
B. Clean the side brushes.
C. Replace side brushes if it’s damaged:
Remove the screw of side brushes by using a driver.
Press new side brushes to fix the slot.
Screw up to ensure the screw’s locked OK.
Note: Before replace side brushes, check and make “L”, “R” mark match.
Cleaning dust bin and filter
Note: After taking out dust bin, check whether there is foreign matter stuck in suck passage and clean it.
A. Press “PUSH” mark to open the dust bin cover.
B. Take out the dust bin.
C. Separate HEPA filter first from dust bin.
D. Pull out dust bin top cover and take out primary filter.
E. Empty dust bin and wipe the dust.
F. Wash dust bin by water and clean filters with cleaning tool.
Note: 1. Clean dust bin module once dust bin and “!”icon on display panel light constantly.
2. Wash HEPA filter after 15-30 days’ use. And replace it after use for 6 months at maximum.
G. Install primary filter and HEPA filter into dust bin.
Note: 1.Install both HEPA and primary filters when they are dry.
2.Do not place HEPA and primary filters directly in the sun.
H. Close dust bin cover and install it into main body.
Note: Dust bin and filters (including HEPA and primary filter) could be replaced if needed.
Product Maintaining
Cleaning sensors and auto charging sensors.
Slightly wipe the sensor window and auto charging sensors with cleaning tool or a soft dry cloth.
Note:
Charge connecting points on charging home base need to clean if dirty.
Never let water, thinner, etc directly touch the sensor window.
Page 19
3534
E01
E02
E03
E04
E05
E06
E07
E08
E09
Troubleshooting
Error code sheet
When the robot meets with some routine troubles, it will remind you by tone and error code will show on
the display panel.
Error Code Cause Solution
Left wheel no work
Right wheel no work
Dust bin full or suck passage blocked
Main body is picked up
Cliff sensor failure
Bumper sensor failure
Left brush no work
Right brush no work
Main body gets stuck
Check left wheel
Check right wheel
Clean dust bin and suck passage
Re-place the robot on the floor
Clean cliff sensors first, if still no
work, send to seller for repairing
Check bumper’s sensitivity or
whether there’s foreign matter
Check left brush
Check right brush
Move main body and start again
Note: If all above solutions don’t work, please take below actions:
1. Re-set the robot by re-turning on the power switch on the bottom side;
2. If re-set action doesn’t work, please send the robot to seller for repairing.
Troubleshooting
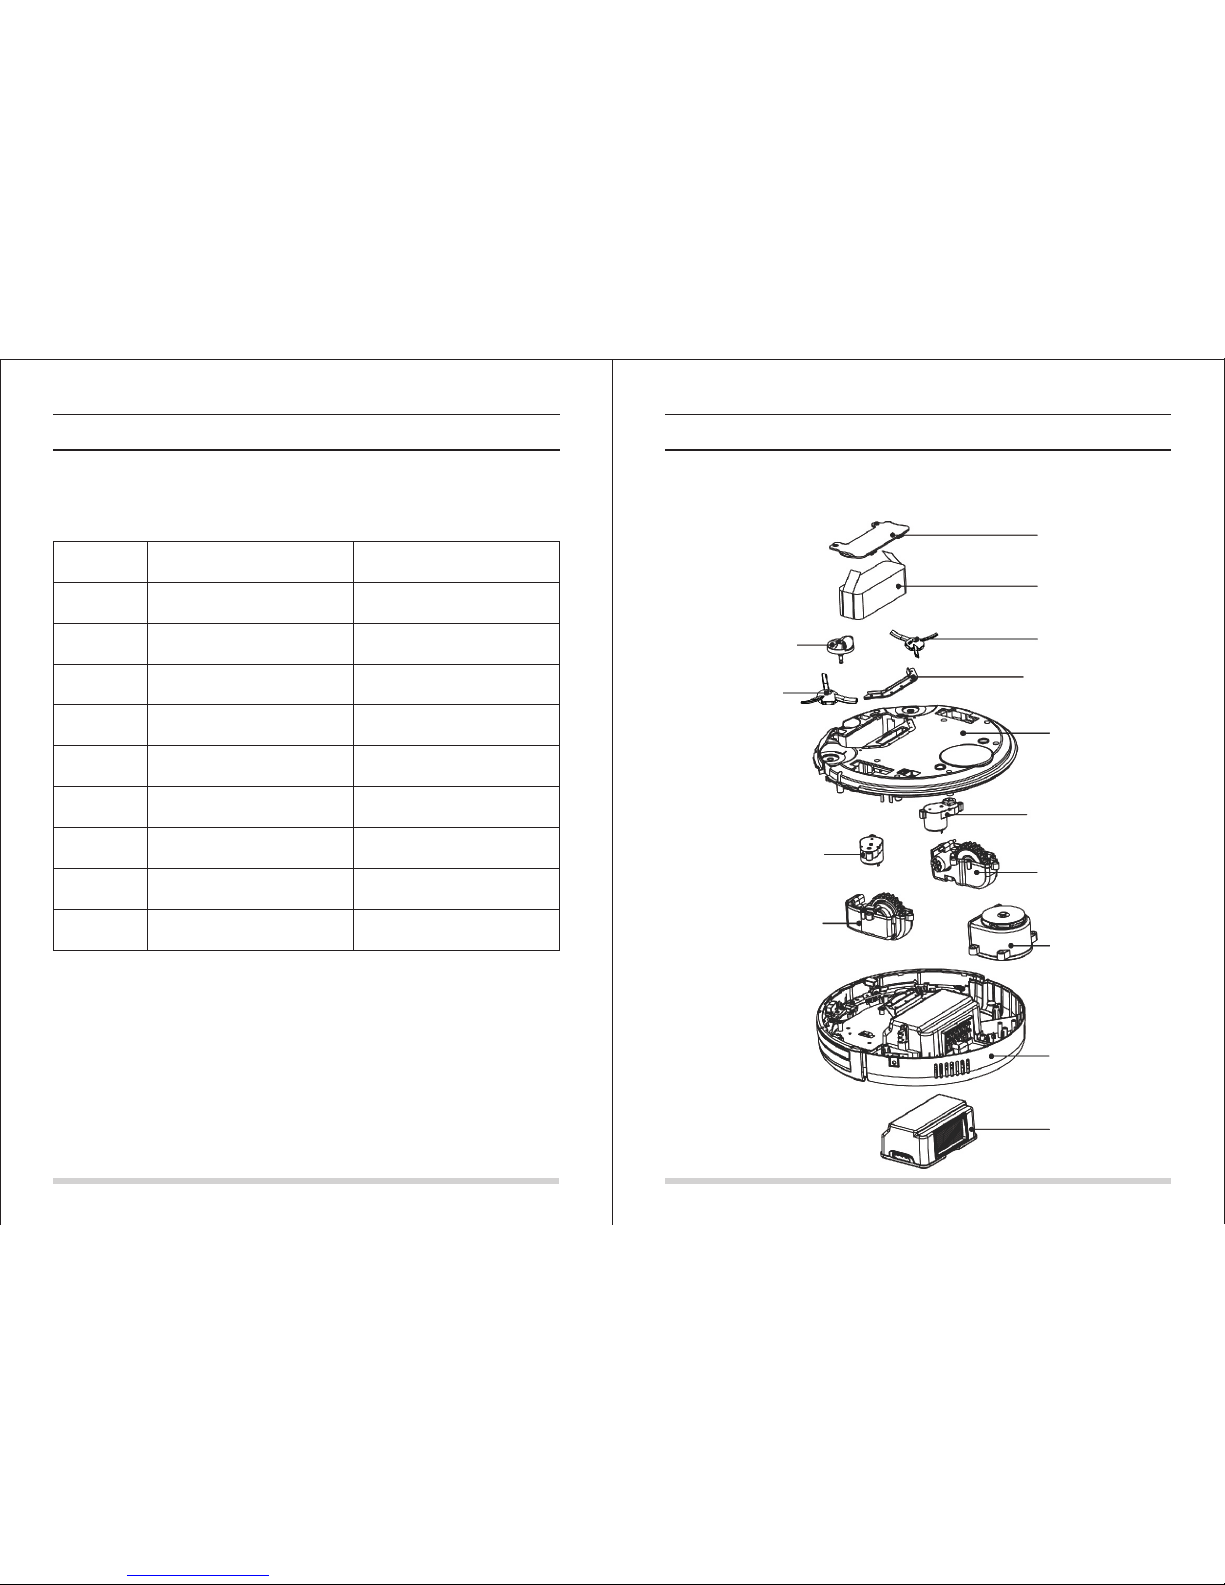
Replaceable modules
There are a number of modules that can be replaced.
Battery Cover
Battery
Right Side Brush
Suck Passage Holder
Bottom body
Left Side Brush Module
Left Wheel Module
Fan Module
Top Body
Dust Bin Module
Nose Wheel Module
Left Side Brush
Right Side Brush Module
Right Wheel Module
Page 20
37
36
Troubleshooting
Battery removal
A. Remove the screws on battery cover with a driver.
B. Pull out the battery cover.
C. Grasp the isolated strips at two sides of the battery and pick the battery up.
D. Separate the wire connector that links battery and robot.
E. Put a new battery into battery slot with the character side facing up.
F. Joint the wire connector between battery and robot.
G. Check whether wire connector and isolated strips have been placed well.
H. Put the battery cover onto battery slot with right direction.
I. Lock the screws on battery cover with a driver.
Note: Use factory-authorized battery only.
Product Specifications
Classification
Item Detail
Mechanical
Specifications
Electrical
Specifications
Cleaning
Specifications
Main Body Button Type
Diameter
Height
Weight
Power voltage
Battery specifications
Dust bin capacity
Charging type
Cleaning mode
Charging time
Cleaning time
340mm
90mm
3.0kg
14.4 V
Ni-MH 2000mA
0.3L
Auto Charging/Manual Charging
Auto, Spot, Edge, Daily Schedule
About 200min
About 90min
Touch(LED display)
Note: Product storage temperature: -20°to 50°(centigrade).
 Loading...