

Page 1
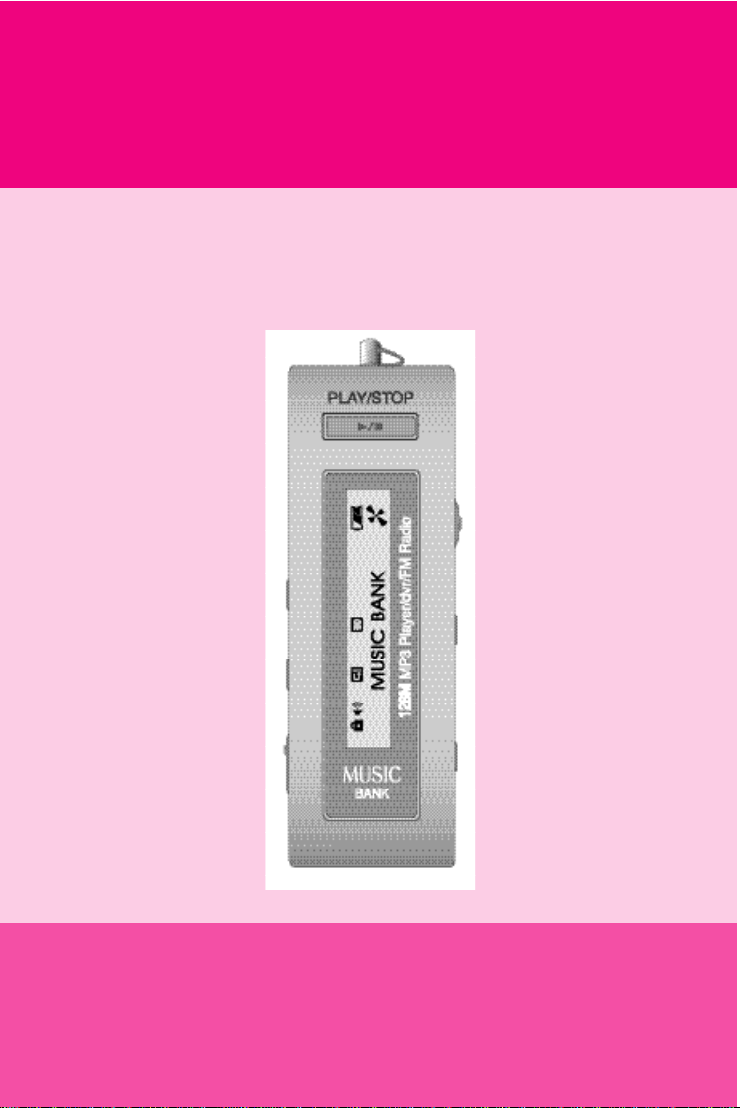
PORTABLE DIGITAL AUDIO PLAYER
MODEL : DMP-105/DMP-115
INSTRUCTION MANUAL
Thank you for purchasing PORTABLE DIGITAL AUDIO
PLAYER from DIASONIC TECHNOLOGY Co. LTD. Please
carefully read the Instruction manual for safe use of the
product. We recommend you to keep this instruction
manual for future reference.
Page 2

INFORMATION TO THE USER
WARNING
Changes or modifications not expressly approved by the
manufacturer could void the user's authority to operate the
equipment.
This device complies with Part 15 of the FCC Rules. Operation is
subject to the following two conditions: (1) this device may not cause
harmful interference, and (2) this device must accept any
interference received, including interference that may cause
undesired operations.
COPYRIGHT
DIASONIC TECHNOLOGY Co. LTD. has all the copyrights for this
instruction manual.
It is against the copyright law to make unauthorized copies, translate
and publish material without prior authorization from DIASONIC
TECHNOLOGY Co. LTD. All the information written in this instruction
manual was produced with our company's careful caution, but they
can be changed without any prior notification. Any differences
between product and manual due to the cause of change the
responsibility will not fall under our company.
Page 3

CONTENTS
1. DMP-105/DMP-115 SERIES
1) Notes for using ······················3
2) About DMP-105/DMP-115 SERIES ············ 4
3) Function and Feature ·················· 5
4) Name of each part and LCD display ············ 6
5) Use of battery and component of package. ········· 7
6) Use of basic functions ·················· 9
7) Folder and File Management Method ···········12
8) Use of buttons ·····················16
9) Operating dial menu ···················18
10) Recording from voice record property ···········21
11) Deleting ························23
12) Connecting to a exterior devices ·············24
13) Receiving FM radio function ···············25
2. DIGITAL AUDIO MANAGER AND MAIL MANAGER
1) USB Driver Installation Method ··············26
2) MANAGING FOLDER ··················28
3) File Download······················30
4) File Deletion ······················31
5) File Format ·······················32
6) What is DIGITAL AUDIO MANAGER? ···········35
7) Mail Manager ······················36
3. Standard Product ····················40
-2-
Page 4

Before use (notes for using)
● Do not drop or give a hard impact. It could cause malfunction.
● Do not use or place it at following places.
- Highly temperate area(above 60℃)
- Under direct light beam or anywhere close to heater
- Car with closed windows. (Especially summer)
- Where lots of moisture exist ex) bathroom.
- Where lots of electricity occurs
● If too much force is pressed on LCD Display window it becomes the
reason of malfunction. And it can cause problem due to LCD
Display windows' specificity.
● If you place any kind of magnetic card; cash card, or commutation
ticket close to a speaker, it will affect magnetic part of cash card,
and commutation tickets and make the card useless.
● Please make sure no dust goes into insertion of this product.
● You should not shake or give impact to the product or remove it
from USB port when it is reading or writing data. At situation like
this, data could be lost or damaged.
● Please understand that our company will not be responsible for any
harm caused by this product or compensation request made by
third party
● Please understand that our company will not be responsible for lose
of memory other than by damage or repair.
● Please do not repair, disassemble, or remodel on users own will.
● Please do not operate where use of electric device is prohibited.
● Please do not operate while driving.
● Please do not overheat the body of the product or the battery, also
do not short the battery.
● Users using assistant equipment please do not use the main
product fasten so closely to assistant equipment's slot.
● There is a chance that stored memories might change, or disappear
due to situation where the customer or the third party misuses the
product or static electricity, and electric shock is given to product or
when repairing the damage or replacing the batteries.
Please record important information on a memo or note.
-3-
Page 5

About DMP-105/DMP-115 SERIES
DMP-105/DMP-115 series are Multi-Function Next-Generation
Portable Digital Audio Player that integrated technology and quality
from DIASONIC TECHNOLOGY Co. LTD. It's a high performance
portable digital audio player which plays digitally compressed audio
file MP3 and WMA file in various ways. It can record high-quality
voice and also has function to record by connecting it to exterior
devices and listening and recording of FM radio broadcast is also
possible.
●Voice and Exterior Device Record
It enables to record voice and record through exterior device; it has
adopted a various voice record function of MP3 player, and it can also
be used as portable data storing device which has portable hard disk
function.
●Listening and Recording of FM Radio
DMP-105/DMP-115 SERIES has function to receive FM Radio
frequency, so you can listen to FM broadcast and at same time you can
record the broadcast that you are listening and re-listen at anytime.
●Graphic LCD Display and Back-Light Function
DMP-105/DMP-115 SERIES uses graphic LCD that supports not
just a Korean, but also English, Chinese, and Japanese, so you can
easily notify the name of the song and playtime, and the back-light
of dark-blue LCD makes it possible for users to configure the menu
at night time.
●Provide DIGITAL AUDIO MANAGER/ Mail Manager
You can freely transmit the data recorded form PC or receive MP3 files
from a PC, and the comfort support of playing and managing stored
data and transmitting record data on e-mail is possible.
-4-
Page 6

Function and Feature
● DMP-105 is MP3 player that stores music file or data only with
connection to the USB port of the computer and can be accessed
relatively rapidly.
● Adopted USB interface for convenient computer storage.
● Plays MP3 file, voice record, receiving and recording of FM radio
broadcast.
● Graphic LCD with back-light (indicates file title, play time, battery
condition, etc)
● Hold function to prevent actions from miss-pressed buttons.
● Repeat play function (normal, 1 track, all, random, section repeat,
album repeat)
● Supports Korean, English, Japanese, Chinese.
● Play/ intro play/stop/ power off/record.
● Next track/ previous track/ Fast forward/ Rewind.
● Volume up/down(digital volume: 30level)
● Storing/Managing Folder function.
● Various equalizer mode (NORMAL, CLASSIC, LIVE, POP, ROCK.
● Adjust back-light time, adjust scroll speed time.
● Delete function (ONE, ALL)
● Display function to change display while MP3 file is being played
(NORMAL, REMAIN, TITLE)
●
Software : DIGITAL AUDIO MANAGER [ File transfer, MP3/WAV/Audio
CD Play,MP3 Encoding (Option) 〕
Mail Manager (DMF play, record, voice mail, voice memo)
-5-
Page 7
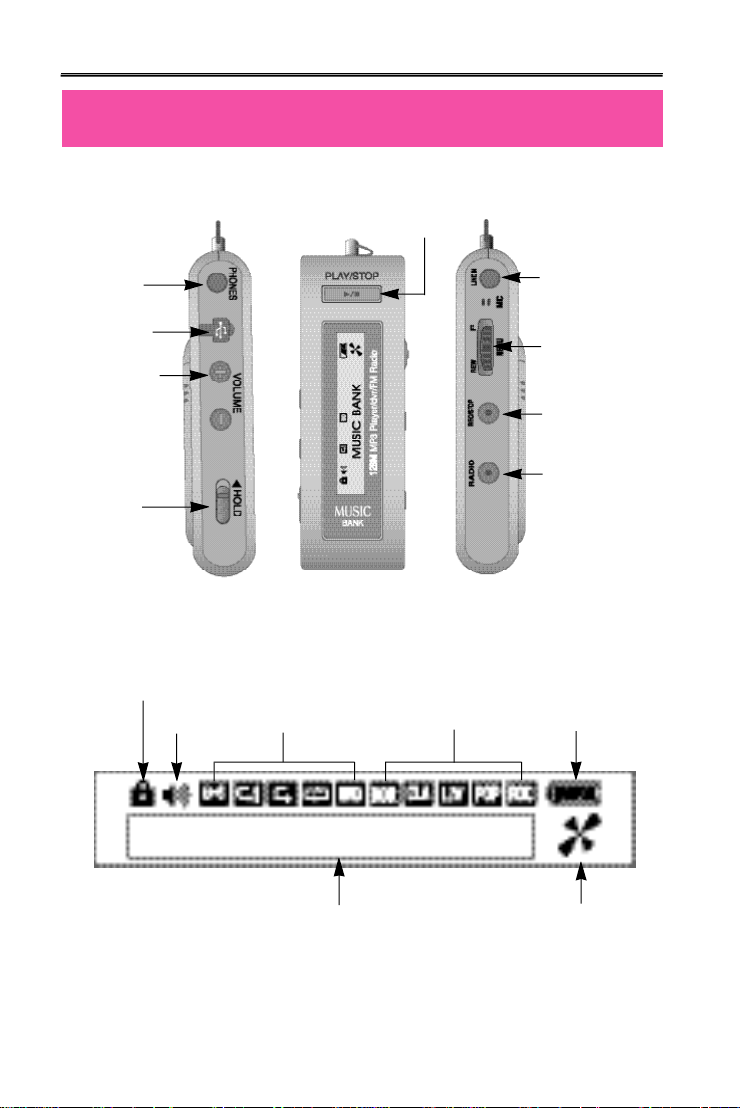
Name of each part and LCD Display
PLAY/STOP
EARPHONE
JACK
USB
JACK
VOL+ / VOL-
HOLD
ON/OFF
HOLD
VOL
REPEAT
EQ
LINE IN
REW/MENU/FF
REC/STOP
RADIO
BATTERY
REC TIME/PLAY TIME/EL/
VOLUME
-6-
REC/PLAY/USB DISK
Page 8
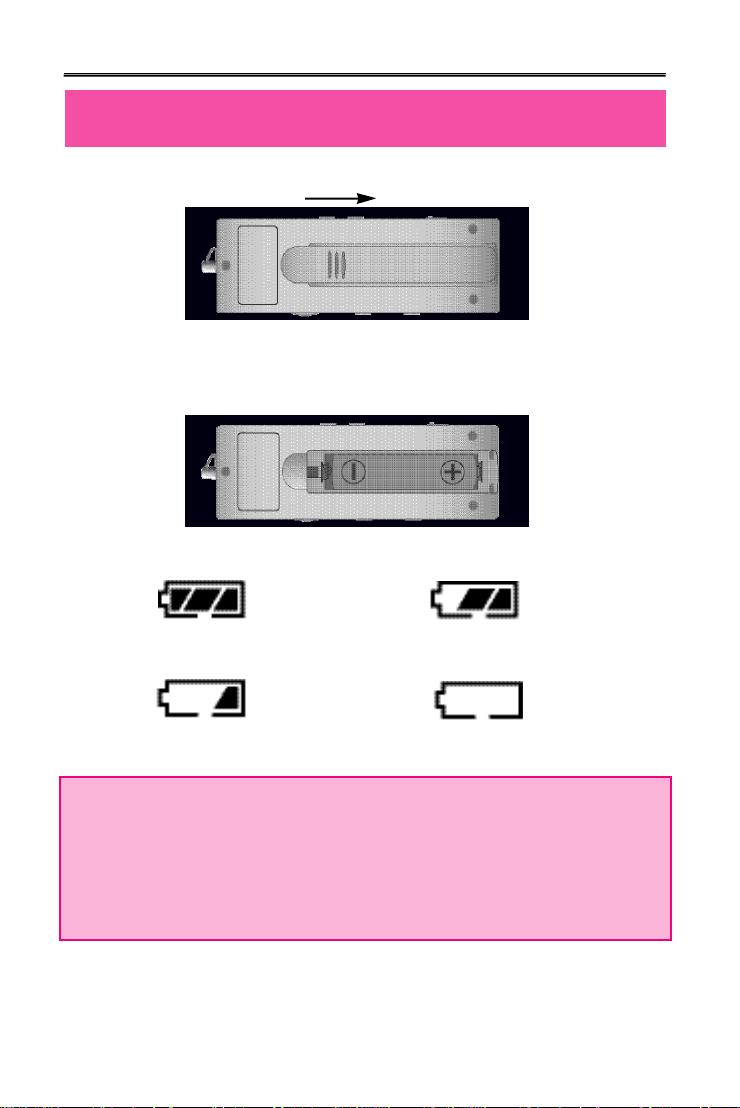
Use of Battery and Component of Package
1. Open the battery cover.
OPEN
2. Insert 1 LR 03 type battery to product matching the (+) (-)polar
signs and close the cover.
[Battery : LR 03 or equal product (SIZE"AAA" or UM-4)
3. Press play/stop button to check the battery.
Battery full Consumed 1/3 of the Battery .
Consumed 2/3 of battery. Battery needs exchange.
※ Notice
If LCD doesn't appear after new battery has been inserted,
immediately check the polar signs of battery. Even after checking the
polar signs of the battery and if LCD still doesn't appear, take the
battery out and request for repair.
-7-
Page 9

4. Use time of battery
When played with
Battery used When recording
Alkaline battery
SIZE"AAA" LR-03
Approx. 7hour Approx. 7hour
earphone
( volume : medium )
5. Attention when using battery
● Take the battery out if it's not going to be used for long period of
time.
● When using rechargeable battery, use it properly after reading the
instruction manual.
6. Package Components
STEREO EARPHONE, USB DRIVER INSTALL CD for WINDOWS 98 SE,
LINE/IN CABLE, USB CABLE(10Cm), INSTRUCTION MANUAL,
BATTERY, NECK STRAP, WIRED CONTROLLER
-8-
Page 10
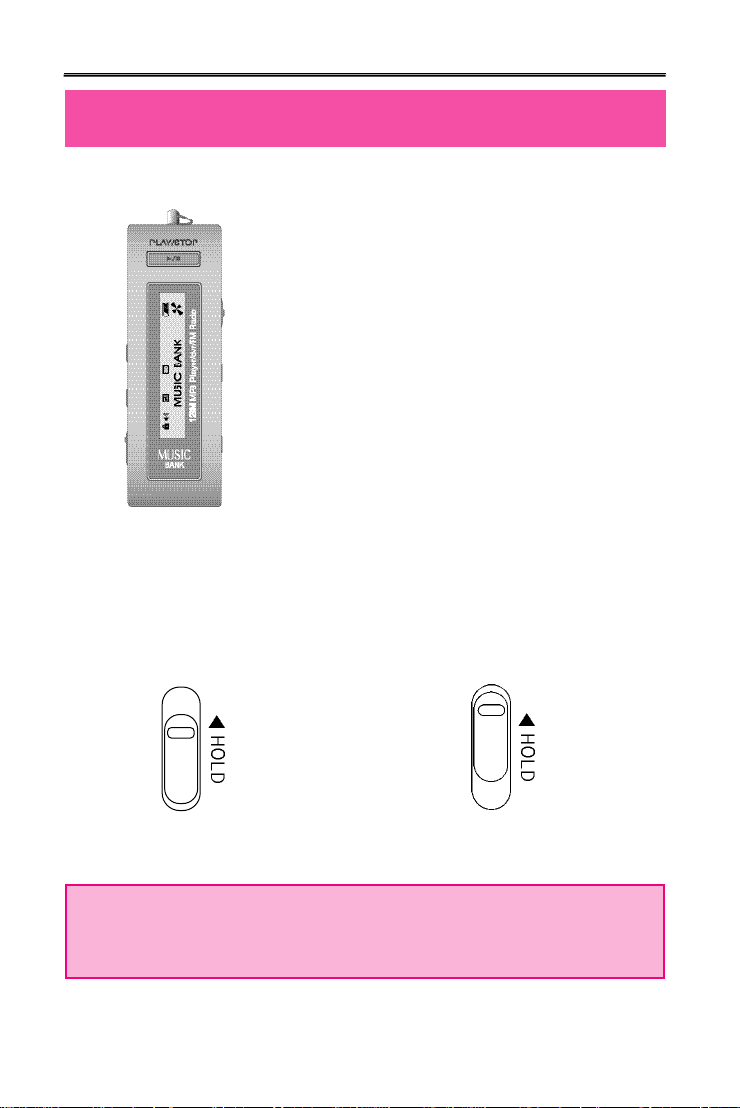
Basic use
● Power ON/OFF
Press play button for over 1seconds to turn the
power on and LCD display screen will appear
like picture on the side. While power is on,
press play button again for over 1second to turn
the power off.
If none of the buttons are pressed over 1minute
power will turn off automatically.
● Using hold switch
If the hold switch is upward switch will not be operated.
Keep the switch upward when it's not being used or if you wish to
maintain the recording condition. Before turning the power on,
make sure hold switch is disabled.
HOLD disabled
Switch will not be enabled.
※ If power is turned on while the hold switch is at ON it will indicate
"HOLD ON", and power will shut off automatically. So, disable
hold and turn the power on.
HOLD
-9-
Page 11

●Conversing Mode
DMP-105/DMP-115 SERIES has MP3 mode, voice record mode, and FM radio
mode. When the player is at stop, press menu button and menu will appear on
LCD screen. Then, use FF or REW button to select between MP3 (audio) and
voice record mode (record). To choose FM radio mode, press radio button when
at stop and it will convert to FM radio mode.
●P L AY, ST O P
After selection of the desired directory using the FF button or the REW button in
the ROOT, push the PLAY button for entry to that directory. For playing, it is all
right to push the PLAY button, and pushing the PLAY button again during playing,
it stops from the played part. At this time, pushing the PLAY button once again, it
plays from the part after the played part. Pushing the REW button, it returns to the
beginning of the played file.
※ If REC button is pressed while file was being played, it will stop and go back to
the beginning of the file.
●Deleting File (ERASE)
To delete current file being displayed on LCD screen press menu button while at
stop then from menu use FF button or REW button to choose ERASE ONE then
select 'yes' from ERASE menu and current file will be deleted.
※ To delete all the files in MP3 mode or Record mode choose ERASE ALL then
select 'yes' from the ERASE menu using FF button or REW button then press
menu button to delete all the files in selected mode.
●Selecting and Moving file
Pushing the FF button or the REW button at the stop state, next directory and
previous directory can be selected. Pushing the PLAY button after selection, it
enters the selected directory, and the desired track can be selected using the FF
button or the REW button. Pushing the FF button during playing, the next track is
played, and pushing it continuously, the present track is played fast. When playing
of one directory is completed, it goes to the next directory immediately. Pushing
the REW button, the present track is played again from the beginning in the event
that the present track has been played over 5 seconds, and the previous track is
played in the event that the present track has been played within 5 seconds.
Continuing to push it, it goes backward to the beginning of the present track fast.
-10-
Page 12

●Adjust Vo l u m e
Press VOLUME + and VOLUME - button to adjust volume. Hold on the button for
continuous adjustment.
※Volume can be adjust from level 0~30
※Volume can only be adjusted with plugged in earphone. When earphone is
unplugged it will auto-detect "earphone unplugged" and automatically adjust
volume to level 20.
●Section Repeat
DMP-105/DMP-115 has a 'selected section-repeated function'. Press and Hold on
REC button while player is playing and it will set the starting point A of the section to
be repeated. Then, repeat section signal (AB) will start flashing on LCD. When
the ending part of the repeat section is playing, press REC button to set the finish
point B, and section-repeat signal will stop flashing with selected section repeating
automatically. Press REC button again to disable section repeat.
●INTRO PLAY
Intro play function plays beginning of 10second on all tracks to check the music and
voice files that are in the memory. While the music is playing, press and hold PLAY
button for over 1second, then "INTRO MODE" will appear on the LCD display. To
listen to current track during intro play, just press PLAY button and disable intro
m o d e .
●Voice Record
After setting it to Record Mode, press REC button to begin recording. To finish
recording press REC button, then it will create DMF file.
When recording at FM Radio Mode, it creates DMF file and saves it on to record
mode. To listen to the file, converse the mode to Record Mode.
☜ The folder of VOICE is created in the ROOT folder on the PC, and the recorded
voice folder is stored.
●Connecting it to PC
When connecting DMP-105/DMP-115 SERIES to PC using USB cable to download
files, LCD display indicated USB CONNECTION and goes in to PC connection mode. If
DMP-105/DMP-115 is connecting to PC it will not play any files. Music file within the SET
can be played only on the PC. So, disconnect the PC connection cable to play files.
When connecting DMP-105/DMP-115 SERIES without battery to PC using USB cable,
DMP-105/DMP-115 SERIES work, When disconnecting, DMP-105/DMP-115 SERIES
power off automatically, Please power on DMP-105/DMP-115 SERIES before using.
-11-
Page 13
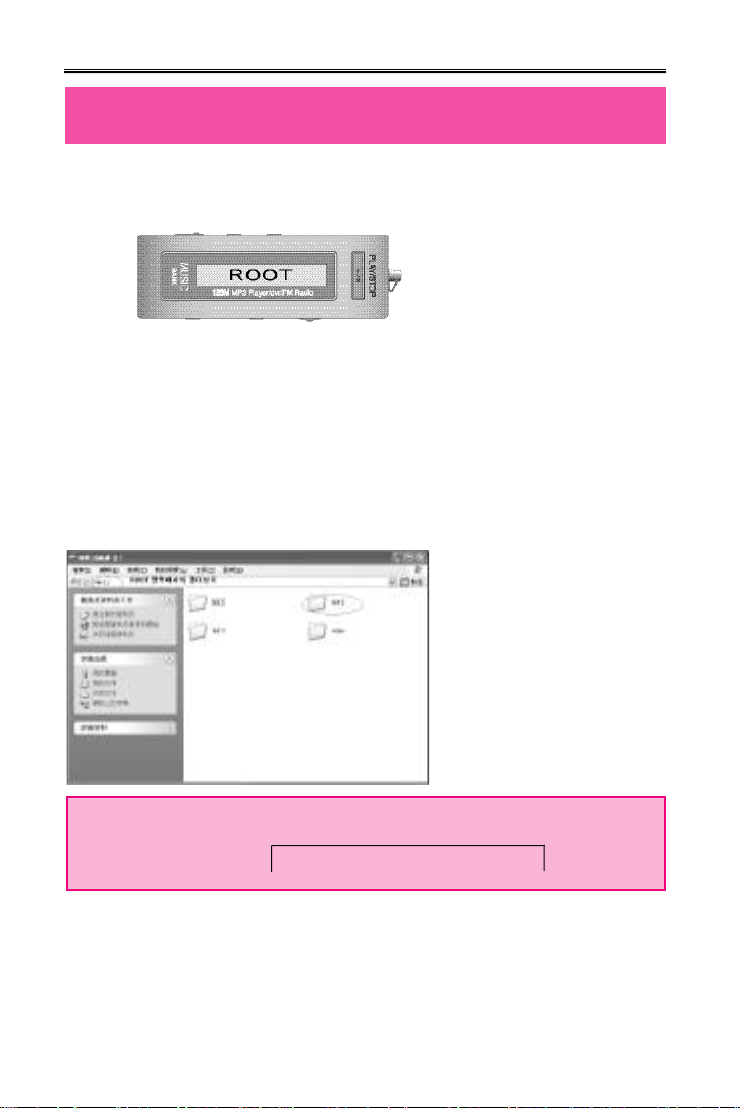
Folder and File Management Method
① Display at the Audio Mode
◆ Upon power on at the initial purchasing state
•ROOT–It means the highest-level folder group of the audio mode at
the device. When there is no folder or file, or upon
formatting, there is no change even though the FF/REW
(search key) is moved.
•F01, F02....–When a folder has been created at the audio mode,
user creates a folder directly at the PC through
connection with the creation USB.
< PC Connection Status>
☜ Search of the setting status by the above-mentioned conditions
(FF/REW) =
ROOTF01F02F03.....
※ F01, F02..... Folder is created sequentially in the order of
folder creation.
※ Within this folder, low-level folder can be created and file can
be put at the PC.
-12-
Page 14
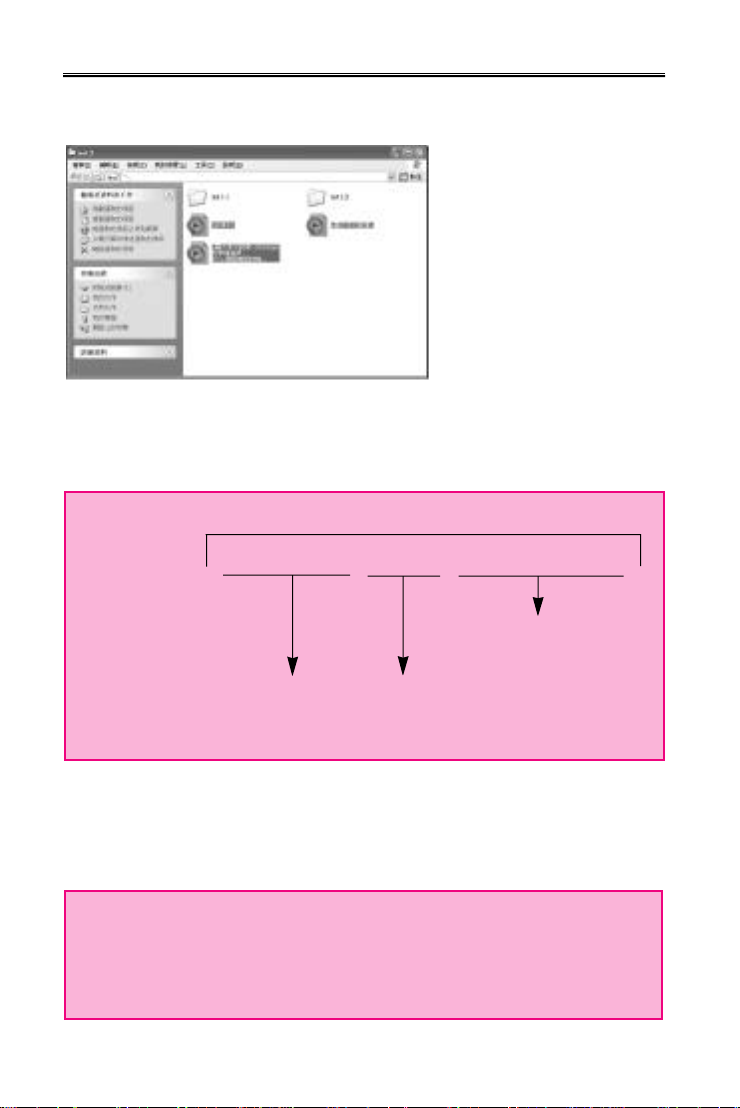
<Exercise 2 Click View of the inside file >
※Low-level folders are formed like F01, F02... in the same as the root folder.
A01, A02....–They are created when the audio files (MP3/WMA) have been
downloaded at the audio mode.
☜Upon search (FF/REW) of the setting status at normal condition
=
UPPER FOLDERF 0 1F 0 2A 0 1A 0 2A 0 3A 0 4
※After selecting each index,
Pushing PLAY KEY (▶/) Music of the corresponding
file is played.
It moves to the upper folder. Folder or file of the selected folder is selected.
※ All movements from the low-level folder except the highest-level root, to the
upper folder can be done at the upper folder.
UPPER FOLDER–It means the search window at the low-level folder except the
root folder at the device.
※It is the state that is movable to the upper folder (to top) upon search of the low-
level folder, and it moves to the upper folder when pushing the PLAY/STOP key.
※
Reference
The root and upper folders are not displayed as separate folder
upon connection with the PC, and they mean the low-level windows
upon the initial and folder search of the active window.
-13-
Page 15
②Movement method
ROOT UPPER FOLDER
F01
F01
F02
F03
※UPPER FOLDER UPPER FOLDER Movement = After selection of the word
'UPPER FOLDER', push the PLAY key.
※After file selection, it plays when pushing the PLAY key.
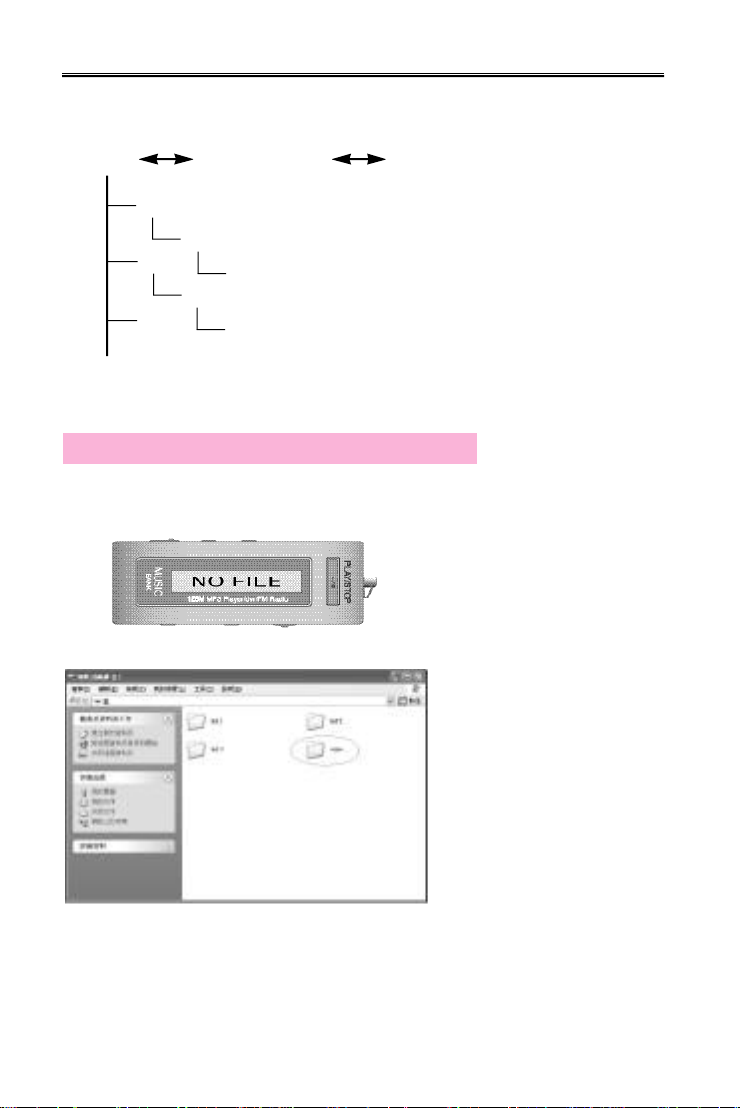
③Display at the record mode
◇Upon power on at the initial purchasing state
<PC Connection Status >
F01
F02
F02
Movement method
※After folder selection (F01, F02...) at the
ROOT, pushing the PLAY key, it enters
the upper folder.
※UPPER FOLDERROOT Movement =
After selection of the word 'UPPER
FOLDER', push the PLAY key.
V01, V02... –In case of the recording at the record mode, files are created
sequentially (DMF).
※Recording files can be created up to maximum 99 files.After 99 files, INDEX
FULL is displayed.
-14-
Page 16
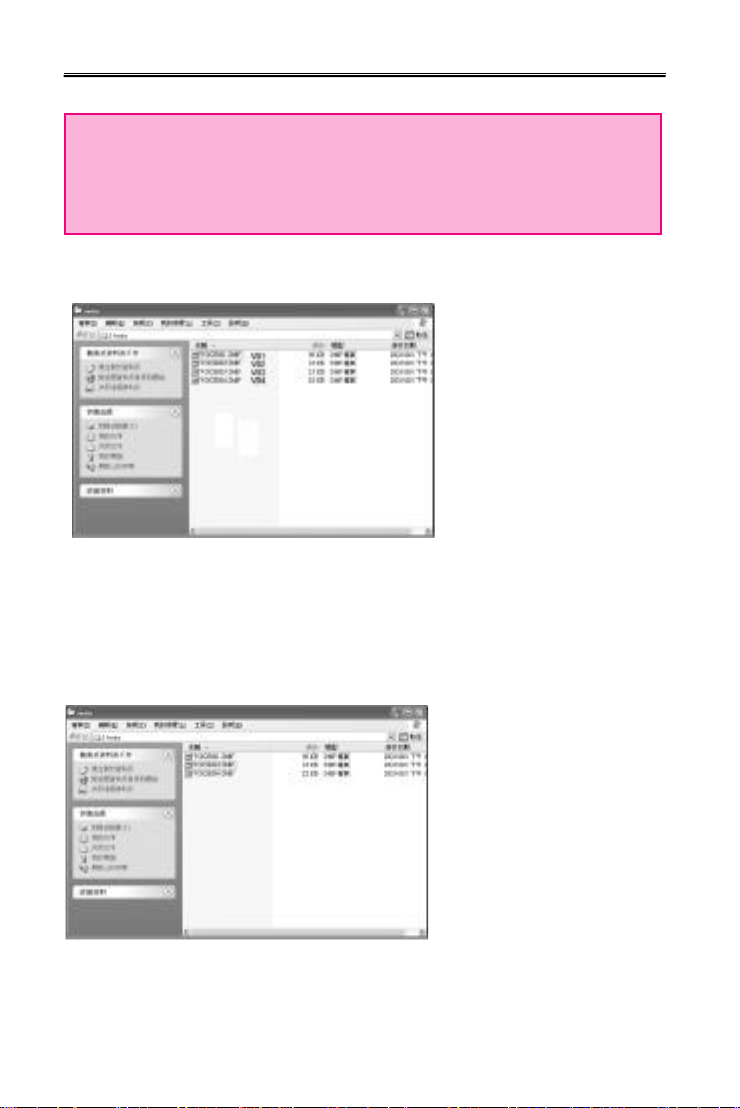
※ Reference
At the record mode, folder cannot be created separately as at the
audio mode, and the recorded files are stored only at the "Voice"
folder.
<VOICE FOLDER ClickView of the inside record file >
※Reference
In case of deleting the voice file - Index number on the set is arrayed sequentially
automatically.
<In case of deleting the above V05 (VOICE005.DMF) >
※While VOICE005.DMF is deleted on the V05 INDEX, it has been changed into
"VOICE 006.DMF".
-15-
Page 17
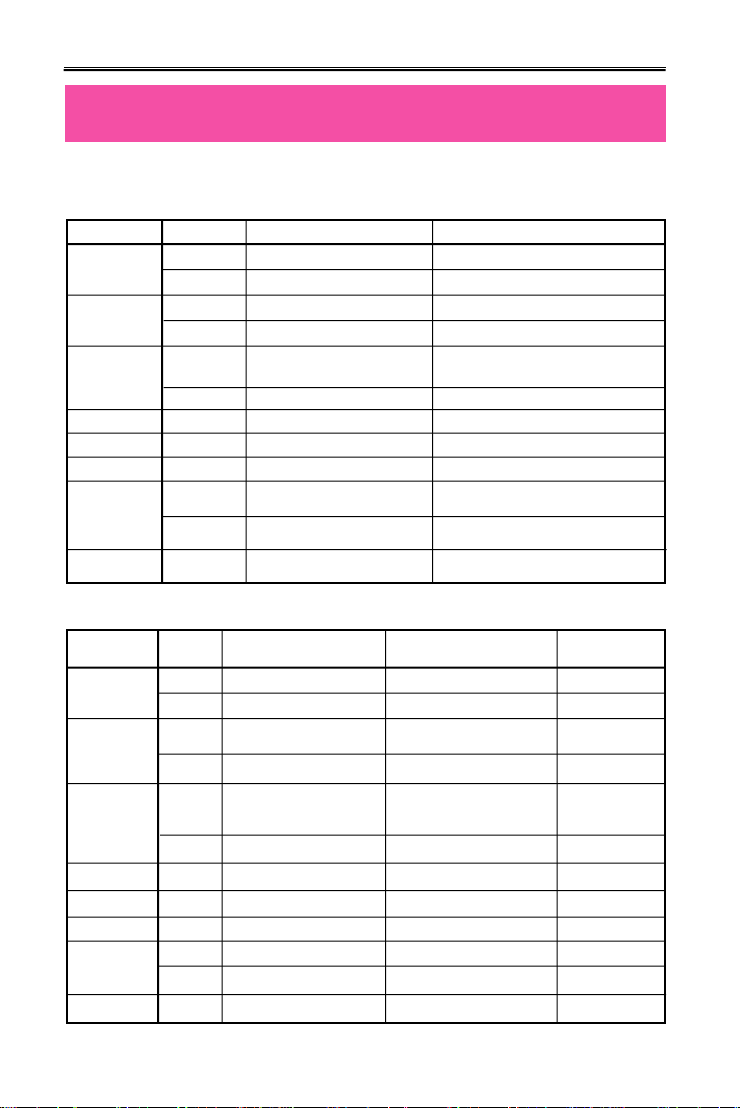
Use of Buttons
● MP3 Mode (SHORT means pressing it for short time and, LONG
means more than 1second)
Button
P L A Y / S T O P
R E W
M E N U
VOLUME +
VOLUME -
REC
R A D I O
F F
Key Movement
S H O R T
L O N G
S H O R T
L O N G
S H O R T
L O N G
S H O R T
L O N G
S H O R T
● Record Mode
When Stopped
Plays Current Track
Power off
Switch to Next
Auto Increase of Next Track
Switch to Previous Track
Auto decrease of previous Track
Volume Up
Volume Down
Switch to FM Radio MODE
Track
Current Track Fast Forward
After 5sec, moves to beginning of the Track
Before 5sec. Plays Previos Track
Current Track Rewind
Menu
Stops Current Track
Configuring and canceling section repeat
While Playing
Stops Current Track
Intro scan
Play the Next Track
Menu
Volume Up
Volume Down
—
Button
P L A Y / S T O P
F F
R E W
M E N U
VOLUME +
VOLUME -
R E C
R A D I O
K e y
M o v e m e n t
S H O R T
L O N G
S H O R T
L O N G
S H O R T
L O N G
S H O R T
L O N G
S H O R T
When Stopped
Plays Current Track
Power off
Switch to Next
Auto Increase of Nent Track
Switch to Previous Track
Auto decrease of previous Track
Volume Up
Volume Down
Starts Recording
Starts Recording
Switch to FM Radio MODE
Track
Menu
-16-
While Playing
Stops Current Track
Intro scan
Play the Next
Current Track Fast Forward
After 5sec, moves to
beginning of the Track
Before 5sec. Plays Previos Track
Current Track Rewind
Volume Up
Volume Down
Stops Current Track
Setting and Erasing Repeat Section
Track
Menu
—
When Recording
—
—
INDEX increase only
after 5seconds.
—
—
—
Change DISPLAY
Volume Up
Volume Down
Stops Recording
Stops Recording
—
Page 18
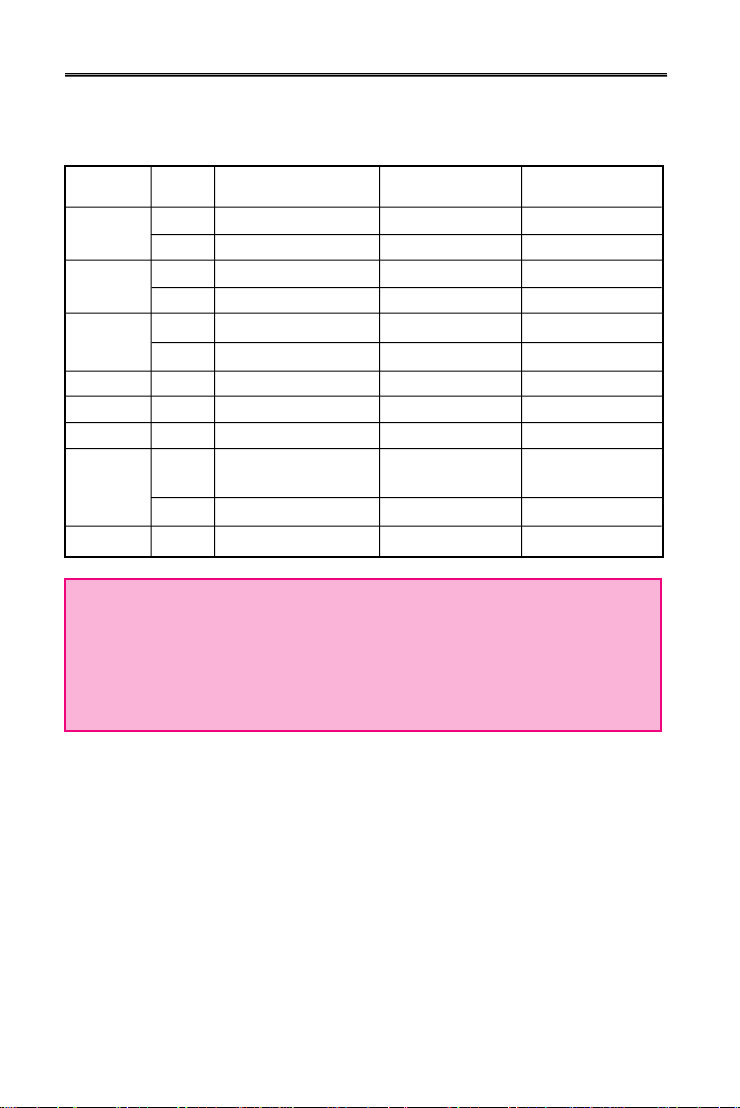
● FM Radio Mode
Button
P L A Y / S T O P
F F
R E W
M E N U
VOLUME +
VOLUME -
R E C
R A D I O
K e y
M o v e m e n t
S H O R T
L O N G
S H O R T
L O N G
S H O R T
L O N G
S H O R T
L O N G
S H O R T
FRQUENCY MODE
Configures STATION
Power Off
Increase FM frequency minutely
FM f r e q u e n c yAUTO SEEK+
Decrease FM frequency minutely
FM f r e q u e n c yAUTO SEEK+
Enable Preset Mode
Volume Up
Volume Down
Starts or stops recording
of Current frequency
-
Disable FM Radio M O D E
PRESET MODE
-
Power Off
Switch to Next Preset
-
Switch to Previous Preset
-
Disable Preset Mode
Volume Up
Volume Down
Starts or stops recording
of Current frequency
-
Disable FM Radio M O D E
CONFIGURE STATION
Configures STATION
Power Off
Switch to Next Preset
-
Switch to Previous Preset
-
Enable Preset Mode
Volume Up
Volume Down
Starts or stops recording
of Current frequency
-
Disable FM Radio M O D E
※ When setting Station, if there is no key movement for 3seconds it
will automatically be terminated.
※ Earphone works as antenna for FM Radio. A better reception will
be received by lengthening the earphone.
※ Volume adjustment is available in plugging with earphone.
-17-
Page 19
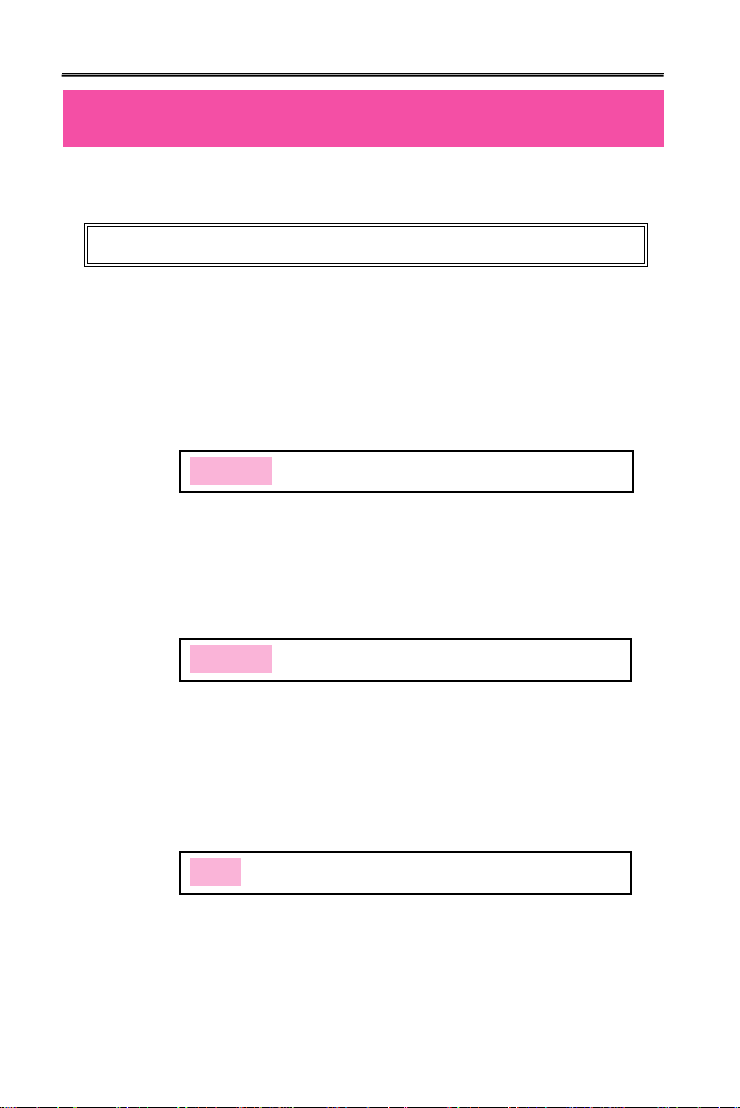
Menu Table
● MP3 Mode
MODE REPEAT EQ SCROLL ERASE DISPLAY BACKLIT
※ Use Menu button to select and configure each menu, and after
moving and selecting upper menu, use FF and REW button to
move through lower Menu.
※ When the desired file is to be entered in the ROOT after power on,
selection and entry can be made using the REW and FF button.
① MODE
AUDIO : Convert to MP3 or WMA FILE playable mode.
RECORD : Convert Line input and voice record mode.
※ Can't configure Menu when the players being played.
② REPEAT
ONE FOLDER : Only the file within the currently set up folder is
ALL FOLDERS : REPEAT is set up against the files within all folders
③ EQ
Choose the equalizer user wants to use (NORMAL, CLASSIC, LIVE,
POP, ROCK)
MODE AUDIO RECORD
REPEAT
repeated.
created in the SET other than the currently set up
folder.
EQ NORMAL CLASSIC LIVE POP ROCK
ONE FOLDER ALL FOLDERS
-18-
Page 20
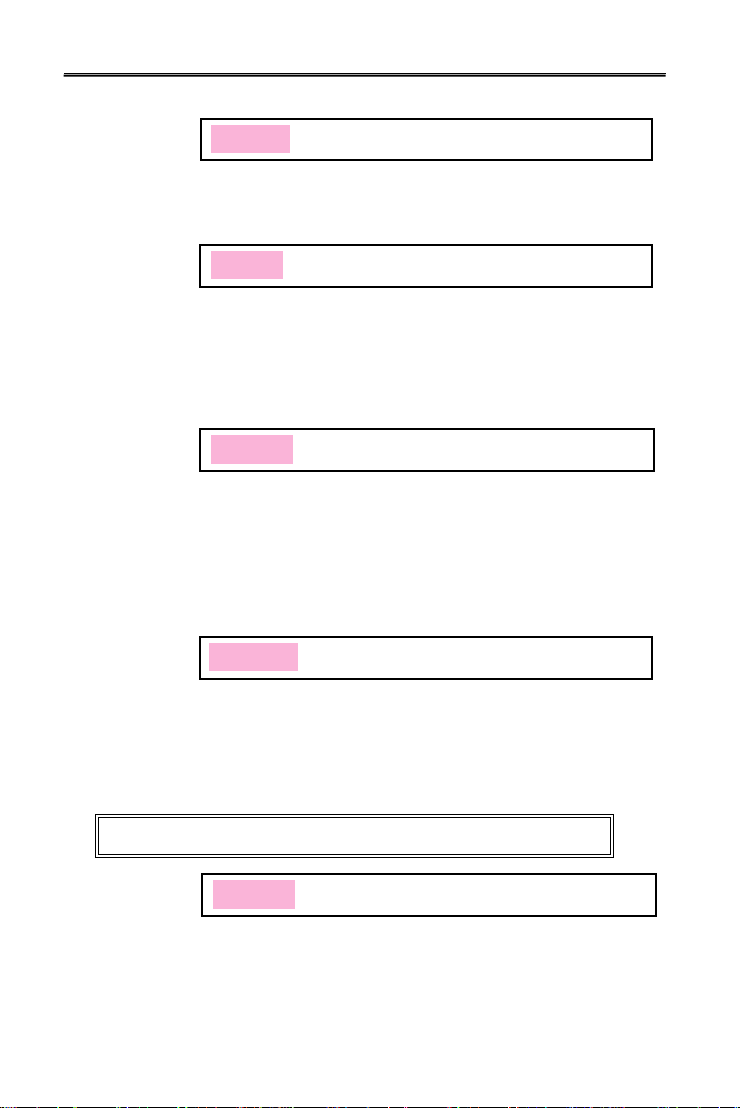
④ SCROLL
Control the speed of music information scrolling on display window
between 0.3second through 1.0second.
SCROLL 0.3SEC 0.5SEC 0.7SEC 0.9SEC 1.0SEC
⑤ ERASE
ONE FILE : Only one tune in the LCD display window is deleted
ONE FOLDER : All files in the selected folder of the MP3 mode are
ALL : All files in MP3 mode are deleted.
⑥ DISPLAY
NORMAL : Allow music information to scroll through LCD display
REMAIN : Allow music information to scroll through LCD display
TITLE : Allow music information to continuously scroll on LCD
⑦ BACKLIT
Turn off or set the time of background light (LCD light) between 0 to
5seconds.
ERASE ONE FILE ONE FOLDER ALL
before entry to the MENU.
deleted.
DISPLAY NORMAL REMAIN TITLE
once and count elapsed time from beginning.
once and count elapsed time backward.
BACKLIT 0SEC 1SEC 2SEC 3SEC 4SEC 5SEC
● VOICE Mode
MODE REPEAT ERASE DISPLAY BACKLIT
① MODE
AUDIO : Convert to MP3 or WMA FILE playable mode.
RECORD : Convert Line input and Record mode.
※ Can't configure Menu when the player is being played.
MODE AUDIO RECORD
-19-
Page 21
② REPEAT
NORMAL: Stop all record files after playing it in order.
ONE: Repeat selected record file continuously.
ALL: Continuously repeats all record files in order.
REPEAT NORMAL ONE ALL
③ ERASE
FILE: Delete record file displayed on LCD window before the erase
menu.
ALL: Delete all record files in voice mode.
※ Can't erase when the music is being played.
④ DISPLAY
NORMAL: Counts elapsed time of record file displayed on LCD.
REMAIN: Reverse counts the elapsed time of record file displayed on
⑤ BACKLIT
Turn off or set the time of background light (LCD light) between 0 to
5seconds.
※ When menu button is pressed display screen displays last
configured menu. At this moment, use FF or REW button to select
the desired menu, then press menu key to configure the details
involved in that menu.
ERASE FILE ALL
DISPLAY NORMAL REMAIN
LCD.
BACKLIT 0SEC 1SEC 2SEC 3SEC 4SEC 5SEC
-20-
Page 22

Recording from Voice Record Property
● Recording
※ Please select RECORD MODE to record on menu mode and can't
record on MP3 mode.
① Face the microphone sound source and press REC/STOP button.
It will start recording with, record number, record time, and progress
displayed on display screen.
② If you wish to stop recording, press the REC/STOP button one more
time.
※ It is impossible to stop recording within 5seconds from start of recording.
Please beware that it won't stop recording even though REC/STOP button
is pressed.
※ Don't need to look for empty space to record like cassette tape because
when REC/STOP button is pressed it will start recording from the final
n u m b e r .
※ When recording for long period of time replace the battery to new one.
※ Please check the battery capacity before start recording.
※ N o t i c e
Perform a test before the actual record to prevent failing.
When battery completely runs out during a record it will show low battery
(LOW POWER) on display and power will shut off automatically.
● Checking leftover record time
You can configure between elapsed time and leftover time from display
configuration at menu.
When files are being played, it's marked with elapsed time or leftover
time of current message and when recording, it's displayed in elapsed
time of current message, or leftover record time of flash memory.
● Record monitoring function
Connect earphones while recording to listen to what is being recorded.
-21-
Page 23

● Separating files while recording
Separating file is possible through need of user while recording.
Use FF KEY to continue recording at next index and it has made it
easy to determine the recorded information.
※ Notice
-. Do not take the battery out while recording. Recorded information
can be erased or it won't function properly. Always take the battery
out from stop position.
-. If memory doesn't have enough space it won't start recording.
"MEMORY FULL" will be indicated when recording time is at full.
Check leftover recording time before recording and erase all
needless files.
-. Recording at MP3 mode property is impossible so when recording
convert to record mode property then start recording.
-. Recording up to 99 messages
-22-
Page 24

Deleting
※ Deleting is possible only from a stop position. (Deleting is same
between MP3 and Voice property)
● Deleting each massage
① Use FF or REW button to select massage to be deleted.
Press menu and use FF or REW button to select ERASE then
choose 'one' After that, select 'yes' then message will be deleted
with 'erasing' displayed on the screen.
※. LCD message number will be pulled forward when messages get
deleted.
※ Notice: Deleted messages can't be recovered.
● Delete all messages
① Use the menu button to select property(MP3 or RECORD) to be
deleted.
② Select the property to delete then press menu and use FF or REW
button to choose ERASE and select 'all'.
After that, select 'yes' and all the messages in selected property will
be deleted with 'Erasing...' displayed on the screen.
Now, LCD will display 'NO FILES'.
- Deleting H/D is possible through USB
- If all the memories from hard-disk function are used up, storing of
recorded or MP3 files are impossible. So, please use it after
arranging the files.
-23-
Page 25
Connecting it to Exterior Device
● Connecting it to Exterior Device
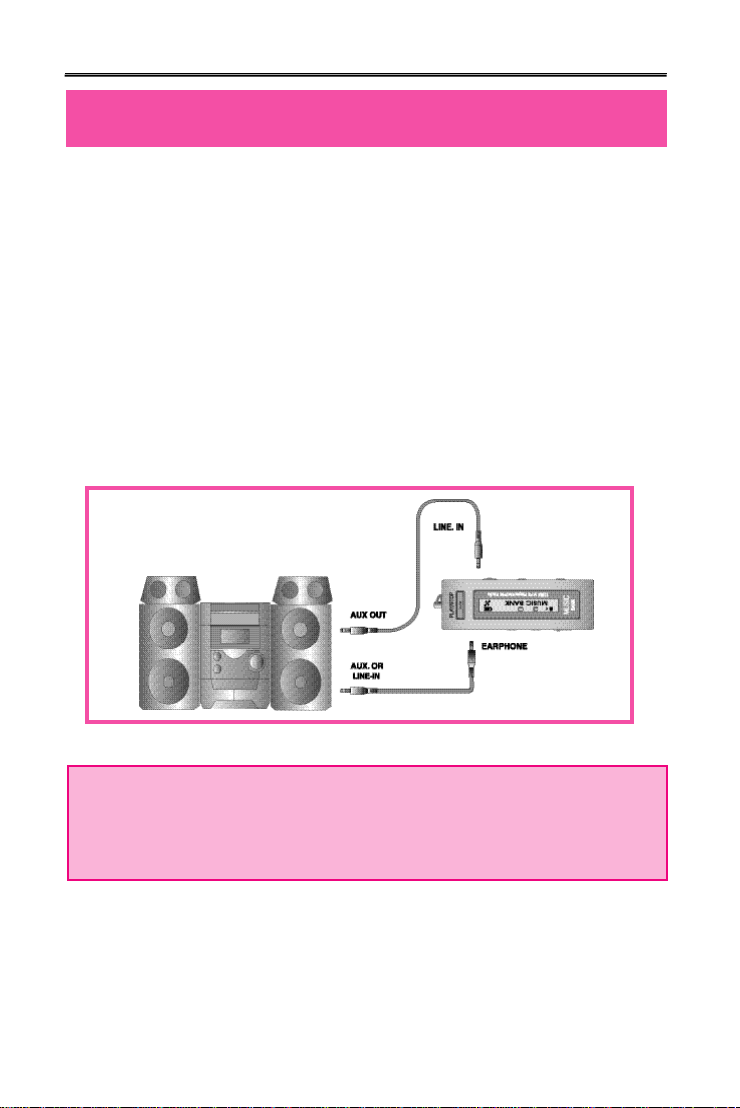
It's possible to record recorded voices from this product to exterior
device, such as cassette or MD using audio cable.
● Connect to Audio
① When recording exterior device to DMP-105/DMP-115 SERIES.
Connect additional audio cables to exterior microphone terminal
and earphone terminal from exterior device or the output terminal of
DMP-105/DMP-115 SERIES.
② When recording DMP-105/DMP-115 SERIES
Connect additional audio cable to earphone terminal and
microphone terminal from exterior device of input of DMP105/DMP-115 SERIES.
Connecting method with an audio
※ Notice
★ When connecting it to exterior device turn the power off.
★ When connecting it to exterior device please carefully read and
understand the manual before the connection.
● Record from Exterior Device
When recording from exterior device lower the volume of the
exterior device and connect audio cable to the product.
Adjust the volume of the product to mid-position and do not change
it during the record procedure.
-24-
Page 26

FM Radio Receiving Function
※ Reference : Works only on FM radio applied model.
※ It's convenient to listen to broadcast with auto seek function.
If FF key or REW key is pressed over 0.5sec after setting to radio,
it stops at a receiving frequency. Auto seek function will not give
you precise broadcast frequency. At this situation, use REW or FF
key for precise control.
● Configuring radio channel
① Select radio mode by pressing radio button.
② Frequency will appear on LCD. Select desired frequency using
FF/REW KEY.
● Storing Channel
Select radio mode by pressing radio button.
① Frequency will appear on LCD. Select desired frequency using
FF/REW KEY.
② When you press PLAY/STOP button 01 will blink where FM is
indicated. Now use FF/REW KEY to select channel (01-10) you
wish to store and press play button again to store it to selected
channel then FM will be indicated again when it get stored. You
can store it up to CH10 using same method.
※ Confirming stored channel
When menu button is pressed 'Preset Mode' will be displayed then
it will show stored channel and frequency.
Now use FF/REW KEY to select stored channel. When menu
button is pressed from channel confirming mode, it will go back to
FM frequency mode with 'Frequency Mode' displayed.
● Recording radio broadcast
① Select desired recording radio channel through same step from
radio channel configuring step1~2.
② Press record button to start recording. Now recorded messages
will be stored in index of voice next to last stored message.
Message can't be increased during recording procedure. So, you
have stop and start recording again.
Checking recording data during record is impossible and it can be
checked from voice property after it's stopped.
-25-
Page 27
USB Driver Installation Method
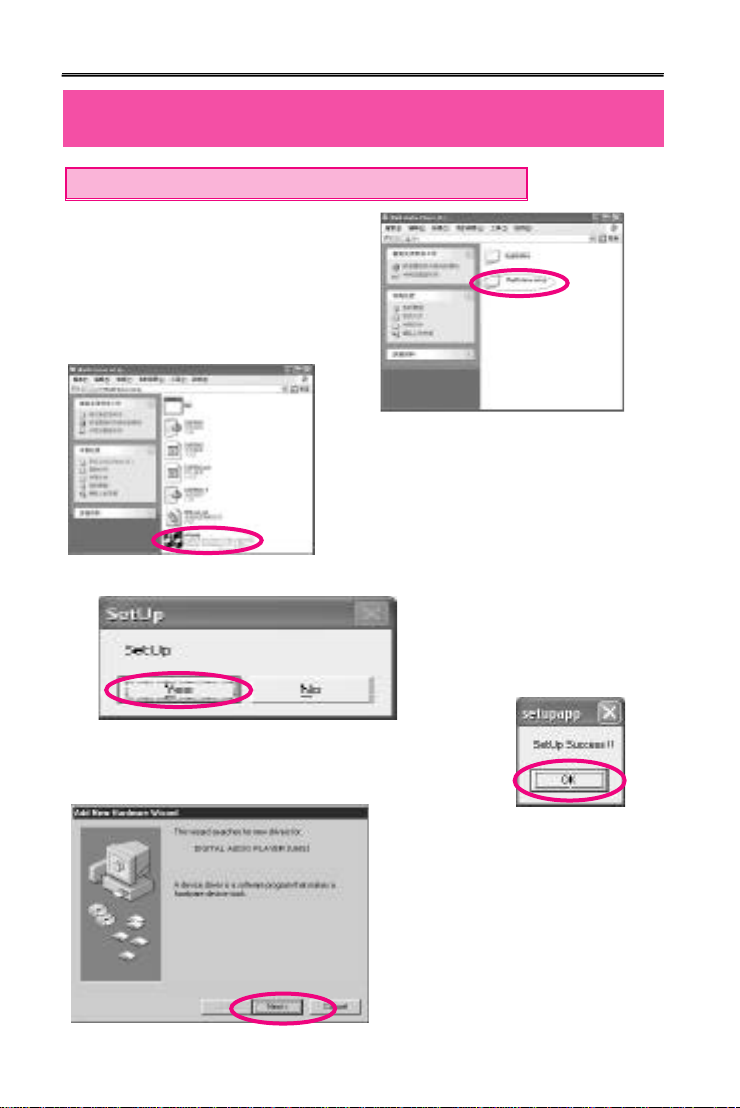
※ Need not install this Driver more than Window ME.
(1) After installation of the provided
program is completed, install the
SETUP file as follows. (✽ Upon
use of the WINDOWS 98)
(2) click “setupapp”.
(3) When the following figure appears, click [Yes].
(4) When the dialogue box to inform that the
SETUP has been made comes out, click [Confirm].
(5) After the SETUP file is installed
and USB is connected, click
[Next] when the following figure
appears.
-26-
Page 28
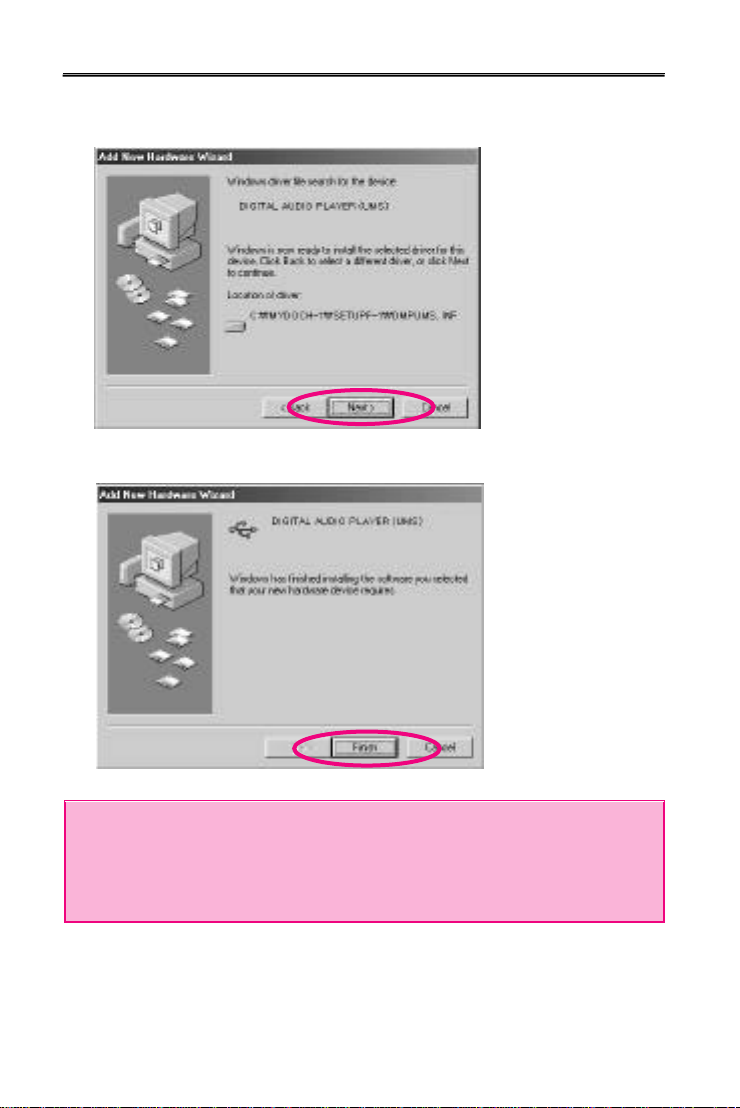
(6) For installation of the driver, click [Next].
(7) When the following figure appears, click [Finish].
※ Reference
For installation of the USB driver, it is installed normally only when
the program has been installed in the PC at first without fail and
then the USB driver is installed.
-27-
Page 29
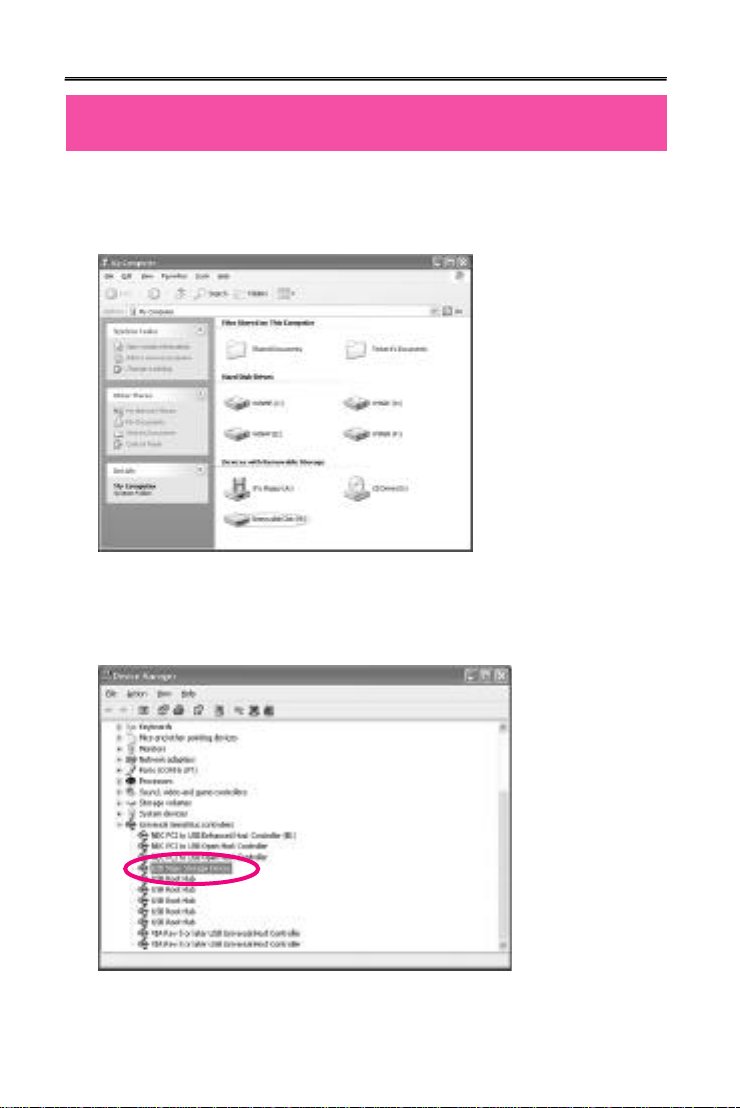
MANAGING FOLDER
(1) Clicking [My Computer] in the computer being used, it is recognized as
portable disk (F:) within [My Computer Screen Window]. (✽ Upon use
of the WINDOWS XP)
(2) After the installation of USB driver by OS has been completed, the
installation status can be confirmed in the Device Manager of My
Computer as follows;
-28-
Page 30
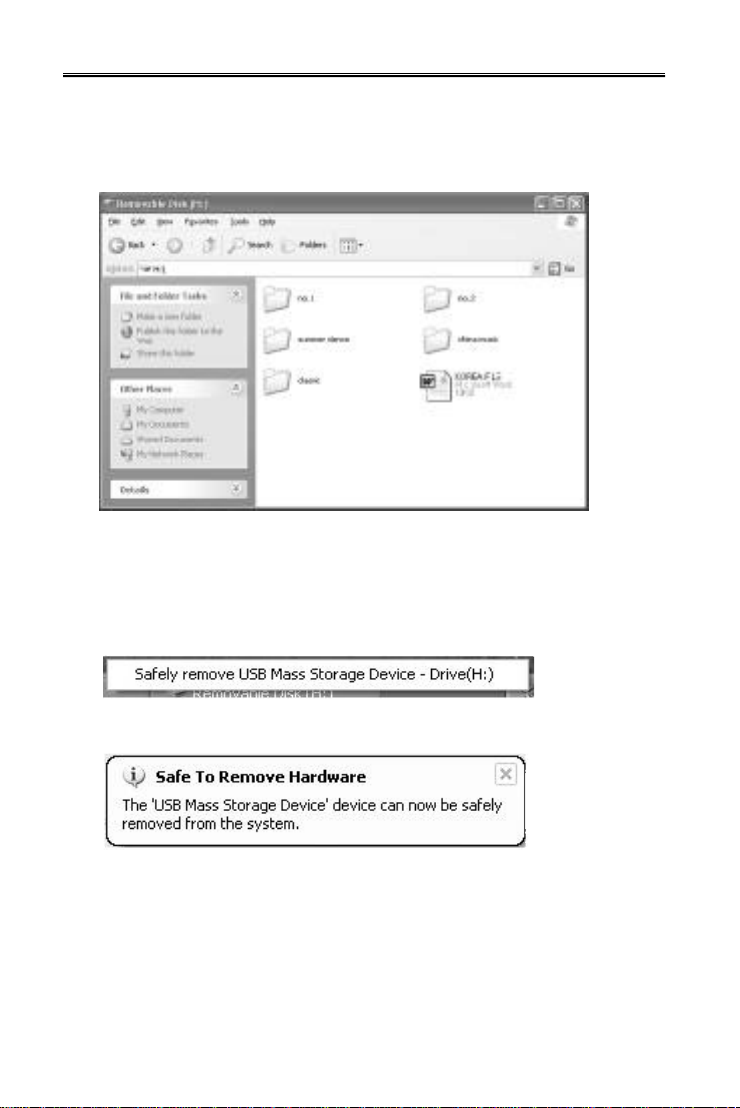
(3) Data as well as MP3 music file are stored as shown in the following
figure, and then it is possible to read, write and delete in the same
method as for the hard disk being equipped in the computer.
(4) DMP-105/115 removal method in the USB port (✽ Upon use of the
WINDOWS XP)
1. Close the File being used.
2. Clicking the icon displayed in the lower end of the right side in the
screen, the following toolbar is created.
3. Clicking the toolbar, DMP-105/115 is removed as follows.
-29-
Page 31
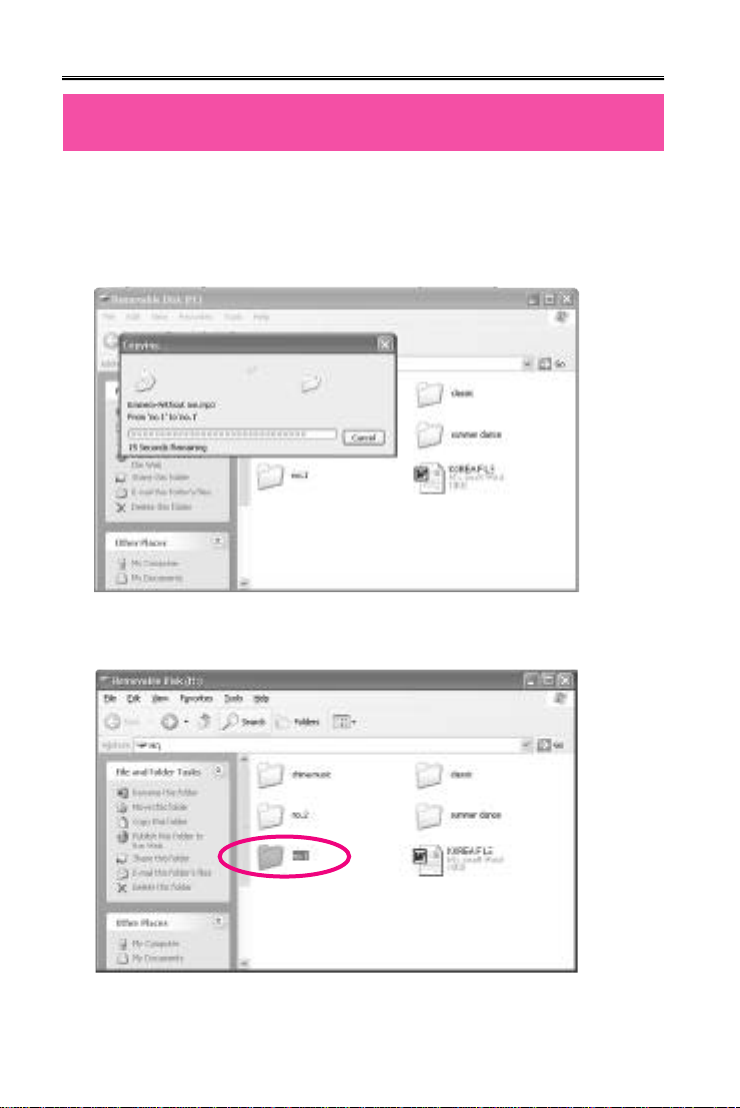
File Download
(1) After the desired music files or data have been copied in the PC, it
is downloaded through copying into the file management window of
DMP-105/115. (At this time, the word of WRITING appears in the
LCD screen.)
(2) Folder is created as follows.
-30-
Page 32
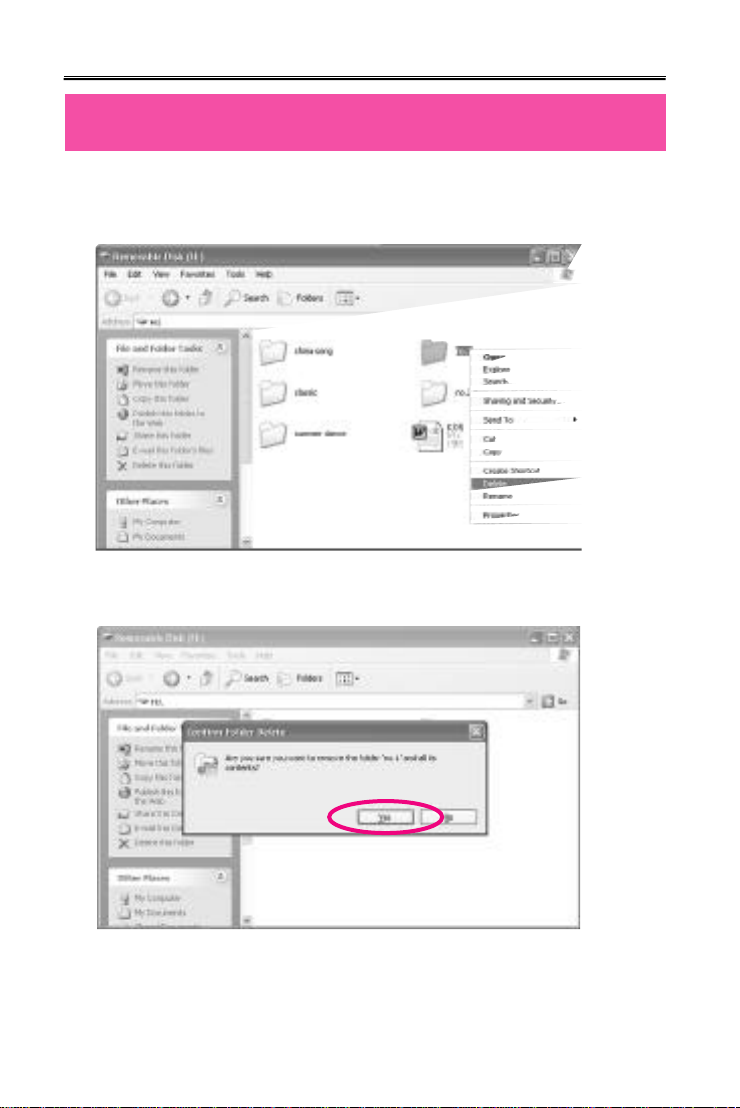
File Deletion
(1) Pushing the right side key of the mouse after selection of file to be
deleted, the following toolbar appears.
(2) Select 'Yes'.
-31-
Page 33
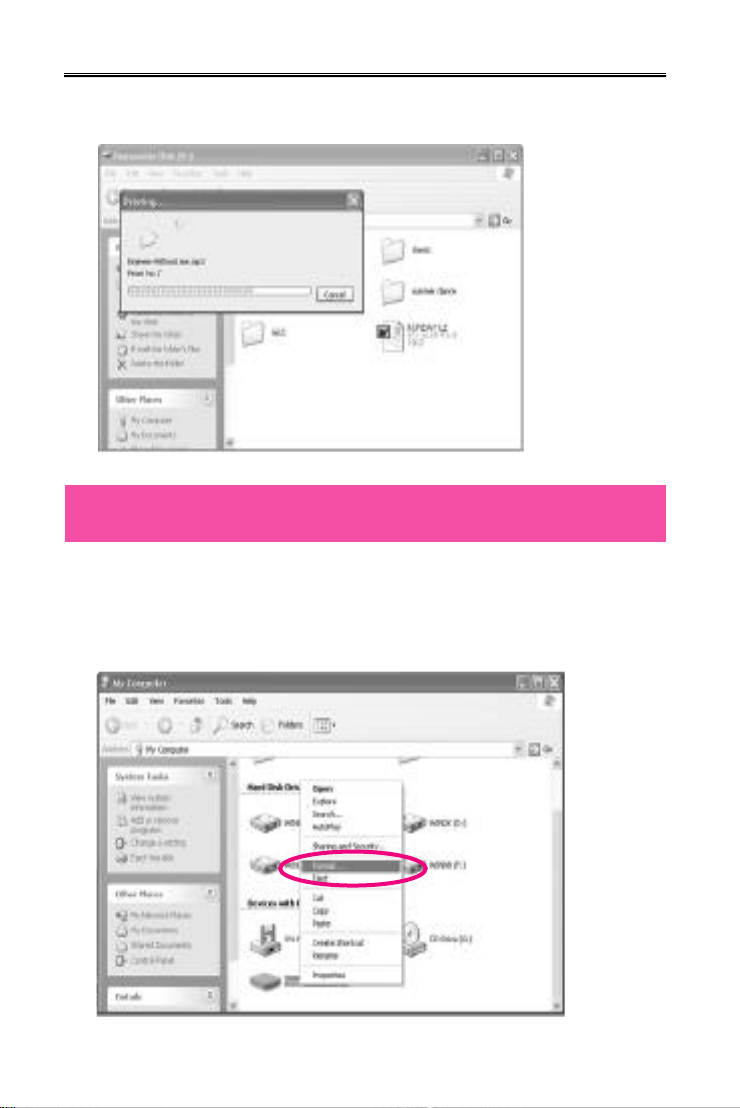
(3) After the following screen appears, it is deleted.
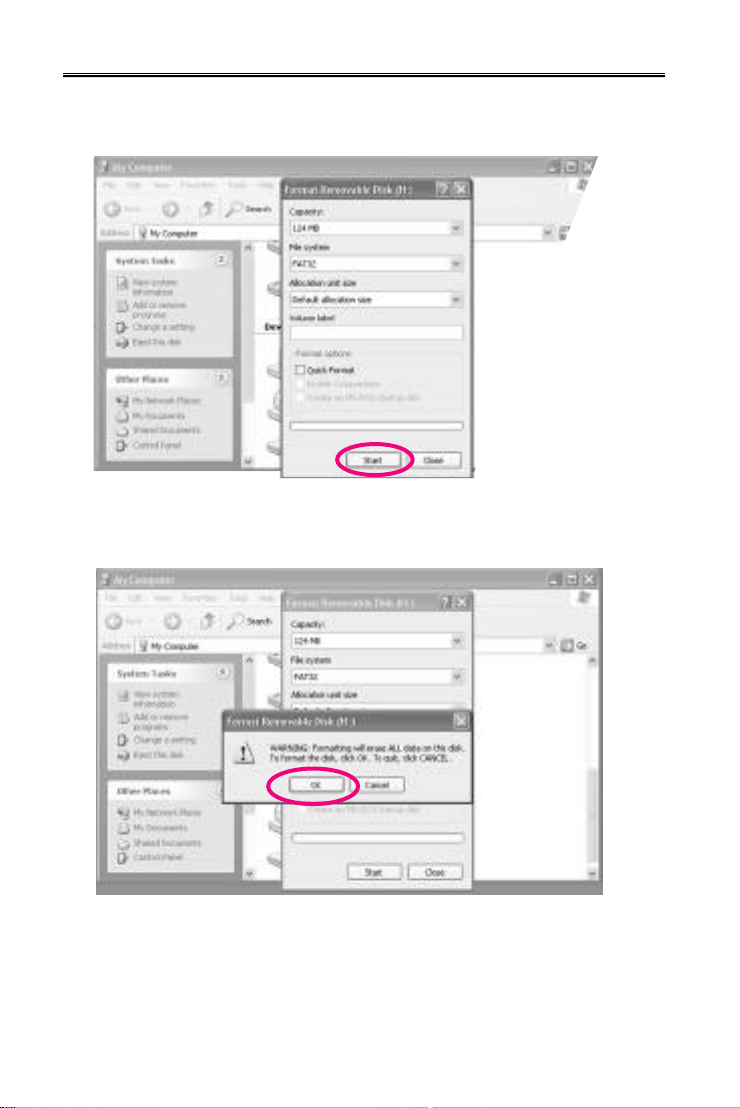
File Format
(1)
Clicking [My Computer] in the computer being used, and then pushing the
right side key of the mouse through selection of the portable disk (F:)
within the [My Computer] screen window, the following screen appears.
At this time, click [FORMAT].
-32-
Page 34
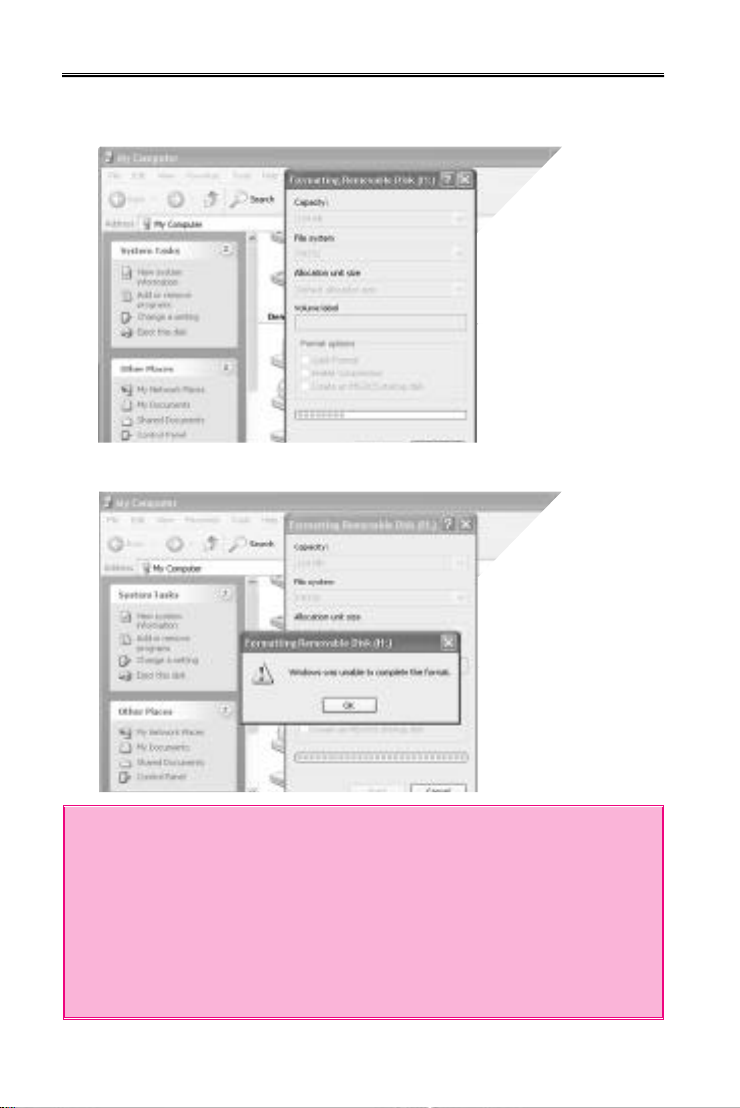
(2) When the following screen appears, click 'Start'.
(3) Click 'Confirm'.
-33-
Page 35
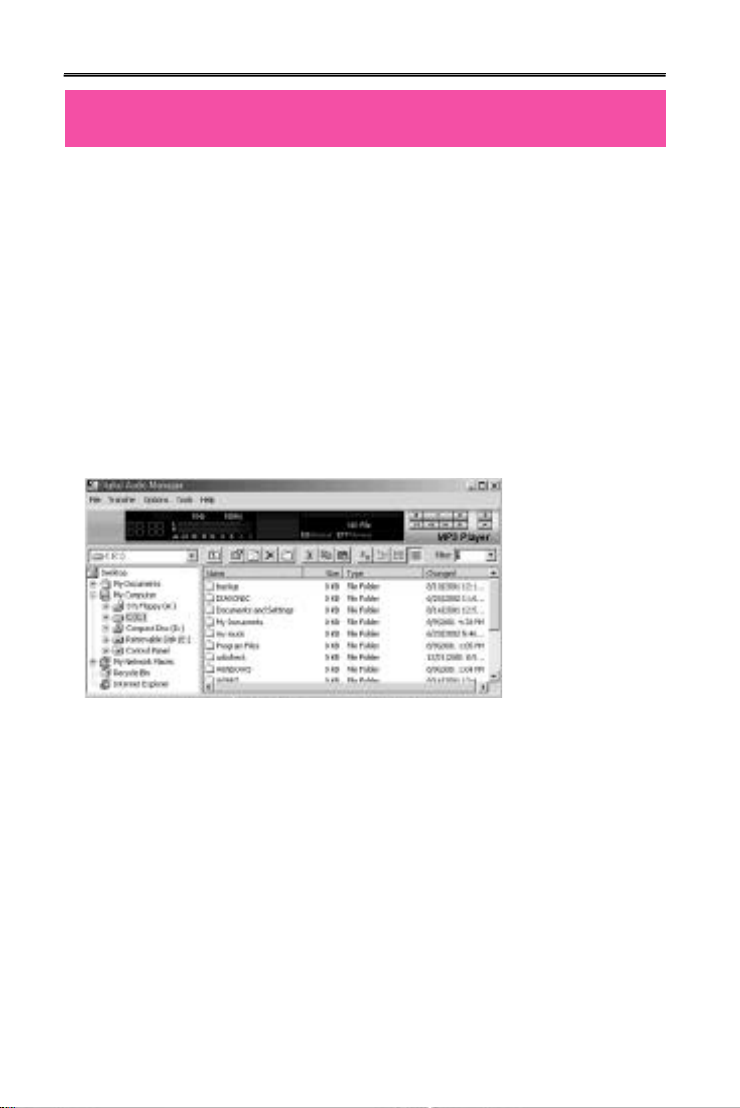
(4) It is being formatted.
(5) Formatting has been completed.
<Reference>
※ After formatting and then execution of disk inspection,
FILE001.CHK file can be created upon confirmation of the
registered information.
※ In case of resetting after connection of the PC with main body,
F01:FOUND.000,BOOTEX.LOG file can be created.
Even though these files are formed, they are not bad files. They
can be used after deletion.
-34-
Page 36
What is DIGITAL AUDIO MANAGER?
DIGITAL AUDIO MANAGER is a program which plays recorded
voice files(DMF), plays MP3 Files and has following features.
● Similar structure to Window Explorer for file managing
● Plays MP3, MP2, WAV, Audio CD, playlist
● DMF/WAV two way convert
● Convenient transfer of files using transfer list
● Various spectrum, equalizer, effect support
● Convenient instruction manual
Appearance of DIGITAL AUDIO MANAGER
Minimum System Requirement for DIGITAL AUDIO MANAGER.
● Pentium 200MHz
● 64MB Memory
● 20MB Empty Hard Disk Space
● 256bit Color
● Window 98/ME/2000/XP(NT Not Supported)
● USB Port
● CD-ROM Drive
● Sound Card, Speaker or Headphone
-35-
Page 37
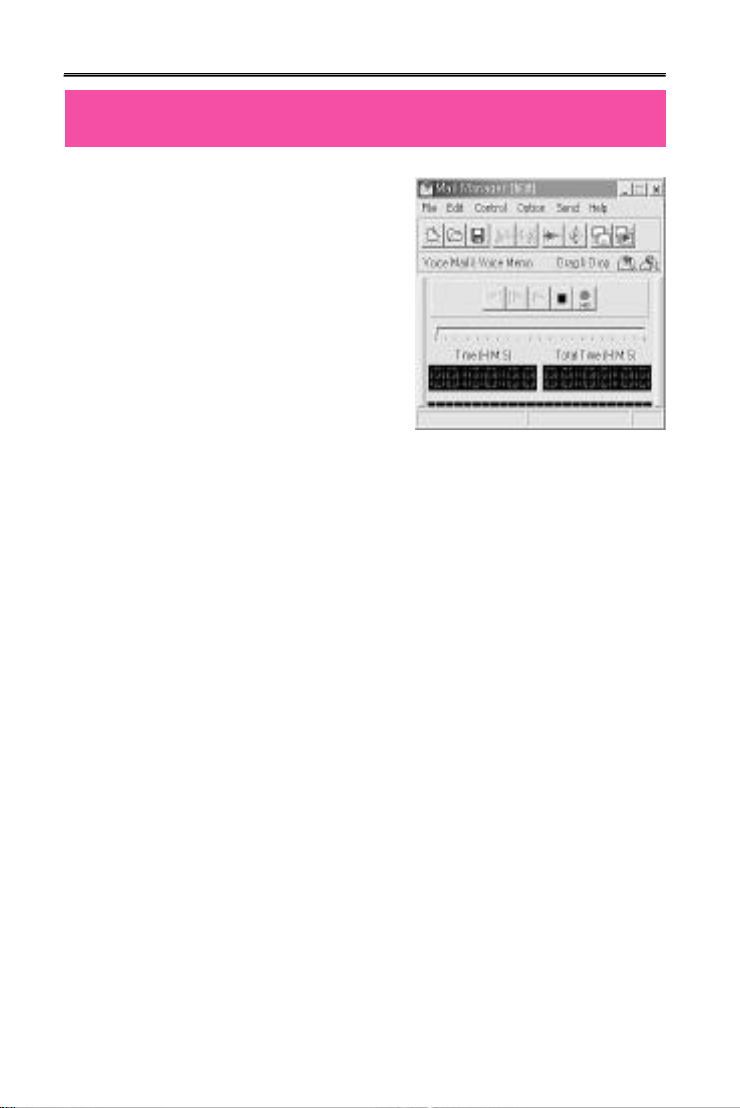
Mail Manager
● Play/Record DMF file
● Voice mail function : auto appending
at mail program
● Creates self play function : voice
file+player
● Edit DMF file : delete front and rear,
middle insert record function
● 16various voice effect
Mail Manager is a program that plays
self created voice file DMF from DMP105/DMP-115 SERIES. It can send voice
mail or record and keep conference meeting and lectures.
Mail Manager send and receive voice mail through e-mail or network
without typing or writing letters. To send voice mail by mail manager
use DMF file recorded from DMP-105/DMP-115 SERIES, or simply
press record and send recorded voice without any difficulties, and If
recorded DMF file from mail manager is sent to DMP-105/DMP-115
SERIES, it can be played through DMP-105/DMP-115 SERIES.
Mail Manager supports mail program like exchange, internet mail,
outlook, outlook express, and Netscape, with use of drag and drop
sending voice mail through other mail program and network program is
possible. One of the special function about mail manager is that it
creates tiny size combined voice data and player in executable file
(.exe), voice mail can be sent even receiver don't have mail manager.
Also, changing original voice through use of various voice effects like
reverb, echo, robot voice, helium voice makes interesting voice mail.
(1) Voice Recorder
Has Voice mail, Voice memo function, and uses high-quality sound
compressed function to make or play recorded DMF files.
● Play
● Pause/Stop
● Record (Half way insertion record possible)
● Move forward
● Move Backward
-36-
Page 38
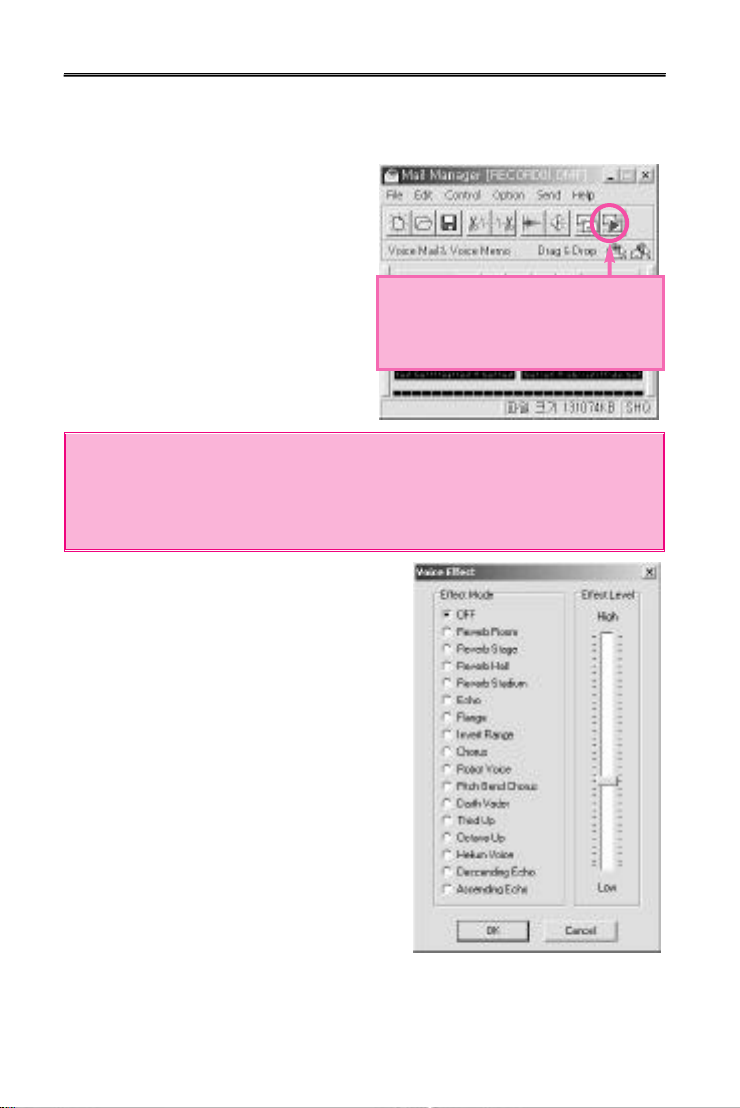
(2) Convenient use method
Auto-append of voice mail to mail program.
● Press ‘record’button
● Say the message
● Press ‘Stop’button
● Finally press ‘send’button and
mail window with voice mail
attached will appear.
To do a proper recording or playing volume must be adjusted at
appropriate level. Adjust [volume control]from window to control wave
volume, and select [recording] at [property] from [option] the select
[microphone] from volume control window to adjust volume at right level.
(3) Production of self play function
● Creates little size of executable file
combined with voice file and player.
● If self player formed mail is sent
receiver can listen to it even without
mail manager.
● From 'save as' save in 'voice
mail+player' from and it will create self
player with executable file(.exe)
(4) 16Digital voice effect
Change recorded voice to various
voices.
Sending Voice mail:Voice file+Player
( .EXE)(In case that the receiver
doesn't have MailManger
-37-
16Digital voice effect
Page 39
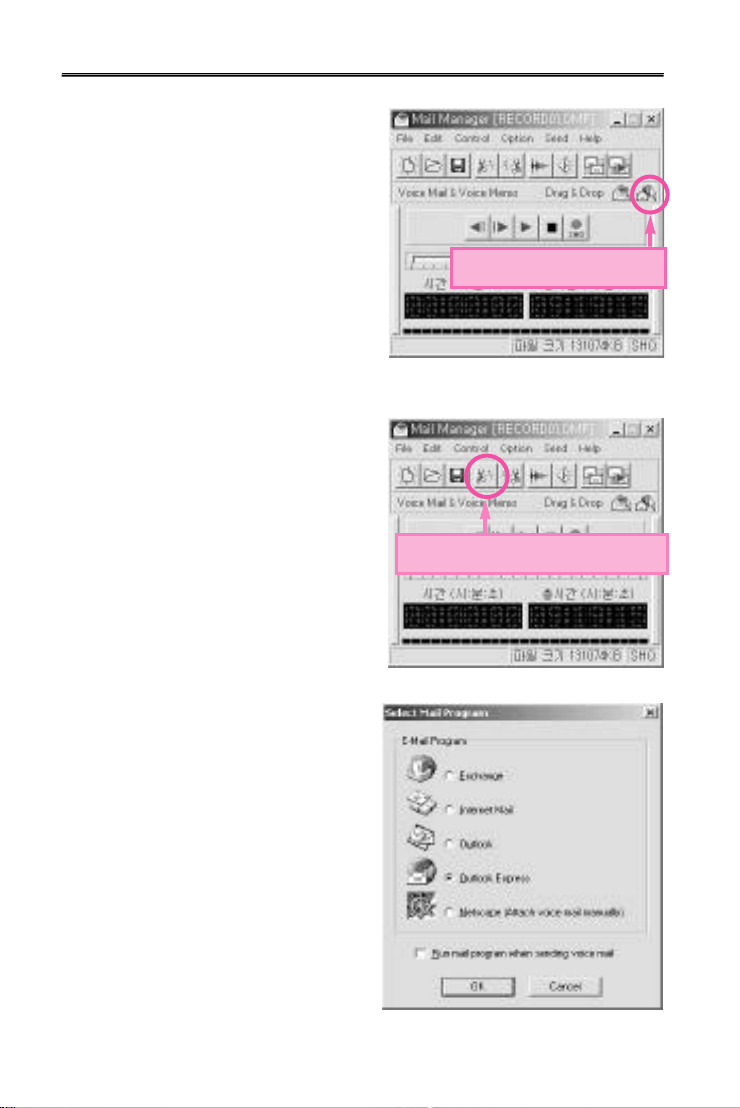
(5) Drag and Drop
If use drag and drop function of mail
manager attaching voice mail to
other mail program or network
emulator not supported by mail
manager will be possible. Press left
button of mouse on drag and drop
to add voice mail to other program.
Now, Use two drags and drop icon,
choose between voice file+player.
(6) Simple edit function
By simple edit function deleting of
front and rear part of recorded
massages are possible, and after
recording if mis-record is found,
delete the mis-part and just record
that part again.
● delete front part of current position
● delete rear part of current position
voice file+player(.EXE).
Delete the front part of current
(7) Supported mail program
● Exchange
● Internet mail
● Outlook
● Outlook express
● Netscape(manual attack of voice
mail)
-38-
Page 40

(8) Shorten Keys
Support of shorten keys, control of mail manager is possible while
using other program.
● F2 : Play
● F3 : Rewind
● F4 : Fast Forward
● F5 : Stop
-39-
Page 41
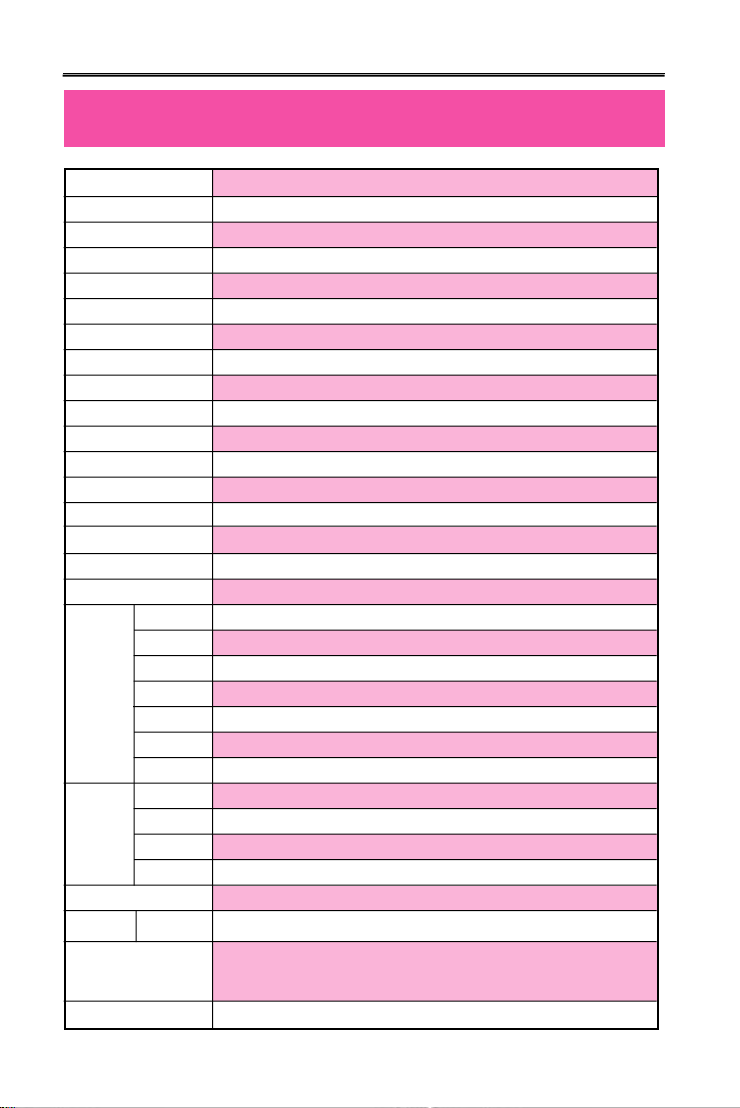
GENERAL SPECIFICATIONS(DMP-105/DMP-115 )
Model
File type
Bitrate
Signal vs noise rate
Distortion
Frequency respond
earphone
Play mode
Search play
Search
Repeat
Download speed
EL/ BACK LIGHT
Memory
AUDIO IN JACK
Key control
Remote control
Network
System
requirement
PC
interface
LCD
128x16DOT
Battery
period
Accessories
OS
Sound card
Display
Earphone
USB
Track
Equalizer
Count
Repeat
Power
Play MP3
Size
DMP-105/DMP-115
MPEG 1/2 LAYER 3, WMA(Over 64kbit)
32Kbps~320Kbps(MPEG 1/2 LAYER 3)
85db (1KHz input 0db at USE LPF 30KHz)
0.3%±0.05 (1KHz input 0db)
20Hz~20Khz
Max. 5mW(16ohm)
EQ : NORMAL, ROCK, POP, CLASSIC, LIVE
Play each track 10 seconds
Easy track search
One song , all song ,section random
Max. 3Mbps(375Kbyte)
Blue
Nand flash memory(128M/256M)
MONO DIRECT RECORD
REC/FF/PLAY/REW/MENU/VOL+, VOL-/HOLD/RADIO
FUNCTION/PLAY/FF/REW/REC
Mass Storage
Pentium 200Mhz, 64mb memory, 20mb hard disk space
windows98 SE, windows2000, windows ME, windows XP
Sound blaster compatible 16
Screen display above 640X480
∮3.5 earphone(mini plug/stereo) IMP less than 16Ω
Mini jack (PC : A TYPE)
01~99(TRACK)
NOR, ROC, POP, CLA, LIV
0h00m00s
A-B REPEAT / ONE REPEAT / NORMAL REPEAT / ALL REPEAT / RANDOM REPEAT
1.5V, LR03, alkaline batteryx1EA(“AAA”size or UM-4)
Approx. 7hours of play time from mid-sound output
Cable to connect to Exterior device (1) / Install CD(1) / neck strap(1) /
Stereo earphone(1) /battery(1) / USB cable(1) / manual(1)
86 x 28 x 16
-40-
 Loading...