

Page 1
1
Thank you for purchasing PORTABLE DIGITAL AUDIO PLAYER from DIASONIC TECHNOLOGY Co.
Please carefully read the Instruction manual for safe use of the product. We recommend that you to
keep this instruction manual for future reference.
User Guide manual
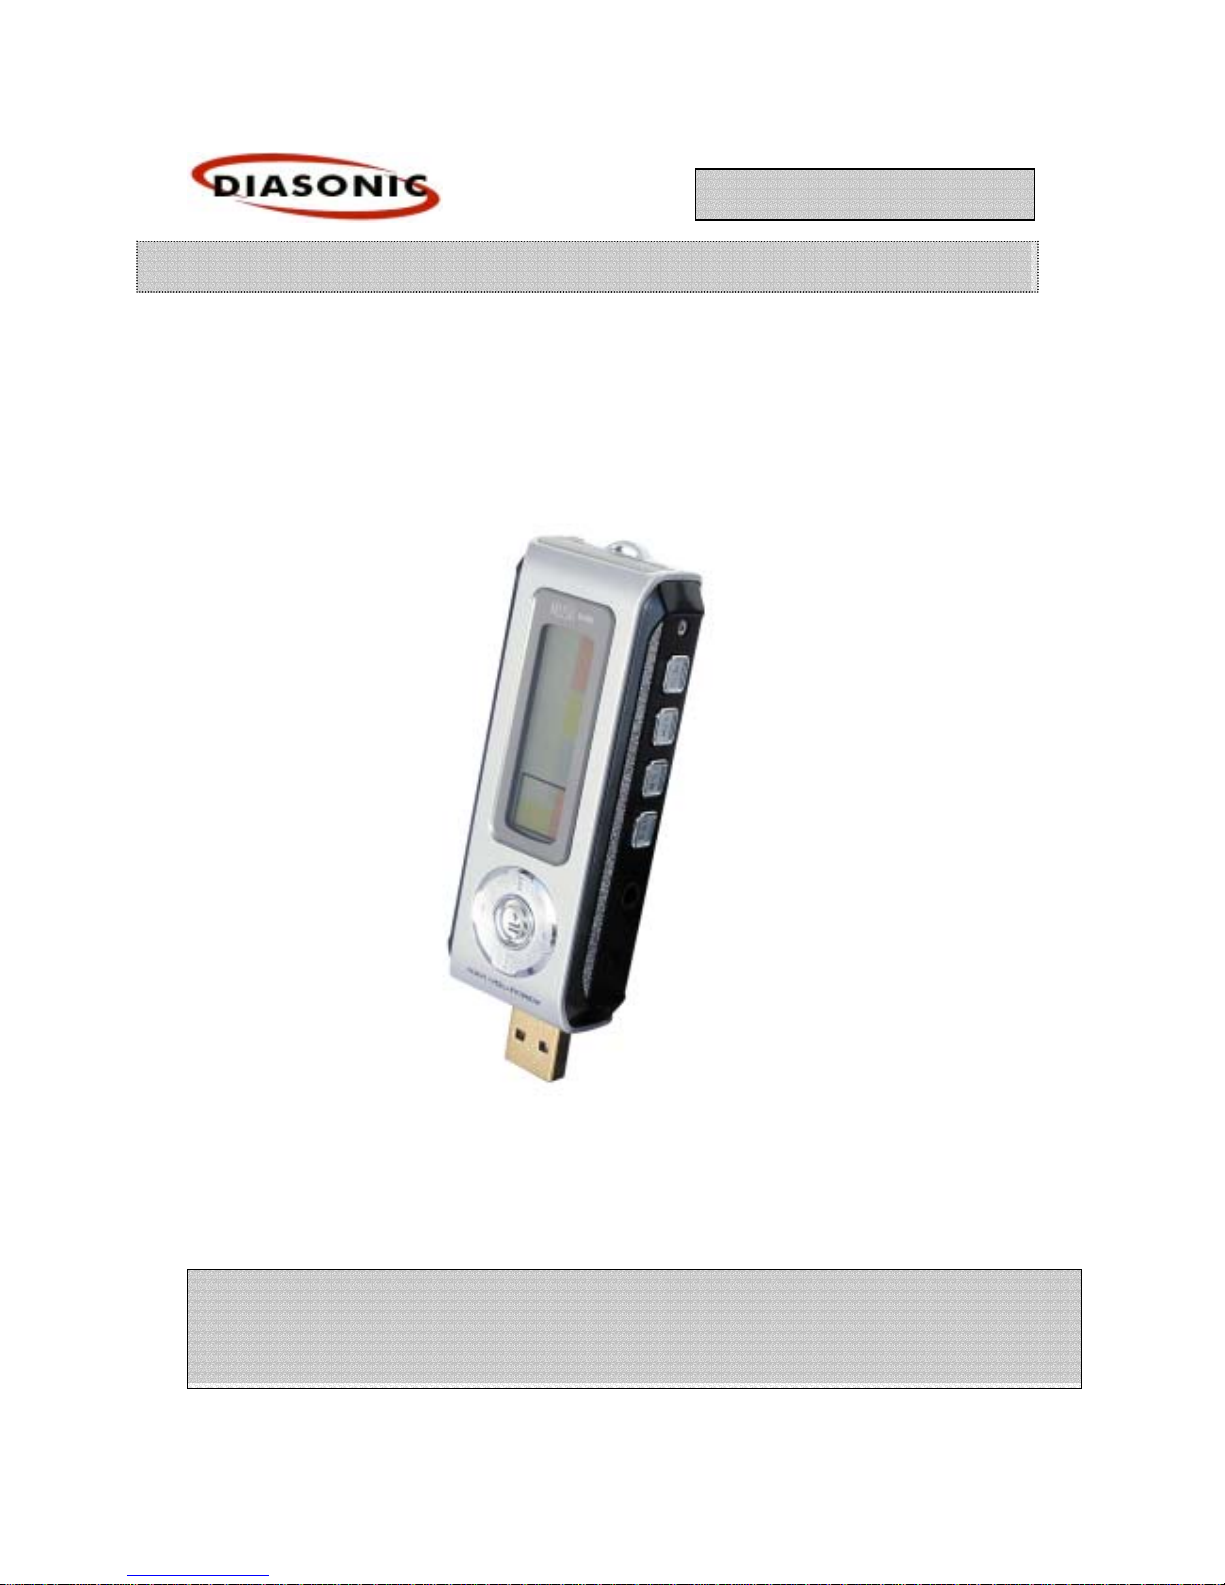
USB Type MP3 PLAYER
MODEL : DMP-310
Page 2
2
Thank you for purchasing Diasonic MP3 Player.
Please read this instruction manual carefully before use.
If you find any defect during the use of this unit, please contact A/S Center [Tel 031-474-0852;
Head Office].
Precautions:
● Do not repair, disassemble or modify the unit at your own discretion.
● The memory content may be changed or lost due to misuse, static electricity or electric shock
during the repair or battery change. Be sure to make a note of important content.
● Diasonic assumes no responsibility for any damage caused by change or loss of memory
content.
● Do not drop the unit in the water or keep it in any damp environment.
● This instruction manual is subject to change without notice for the purpose of product
improvement.
Copyright
● The MP3 files created for MP3 conversion shall not be used for any commercial or public
purposes. Any violation of the prohibition may be a breach of copyright laws.
● Any unauthorized reproduction of recorded files for any other purposes than personal use is
strictly prohibited by the relevant laws and regulations.
Note
This instruction manual is required for the effective use of Diasonic MP3 Player. Pay special
attention not to lose the manual as it is not provided separately from the unit.
Preface
Page 3
3
Warning
● Keep the batteries out of reach of the children. If a child swallowed a battery, please consult a doctor
immediately.
● Do not have the battery shorted, disassembled, heated or put in fire. This may cause leakage, heat,
explosion or fire.
● If the battery leakage gets in your eyes, wash it off with clean water, and seek immediate medical
treatment. If not, you may lose your sight.
● If the LCD is damaged, do not touch the liquid. If the liquid contacts your eyes or skin, wash it off with
clean water, and seek immediate medical treatment.
● If you use the rechargeable batteries, read the user’s manuals for batteries and chargers carefully
before use.
● Read this instruction manual carefully before use.
Using earphones
Road safety
● Do not use earphones while driving, cycling or operating any motorized vehicle. It may cause a traffic
hazard and is illegal in some areas. It can also be dangerous to play your earphones at high volume
while walking, especially at pedestrian crossings.
Preventing hearing damage
● Avoid using earphones at high volume.
Hearing experts advise against continuous, loud and extended play.
● If you experience a ringing in your ears, reduce the volume or discontinue use.
Safety Precautions
Page 4

4
Precautions
1. Functions and Features
2. Parts and Components
3. Quick Operation Guide
4. Recharging Battery
5. Setting PC Environment
6. How to use External Memory
7. FM Radio
8. Recording in RECORD Range
9. Managing Folders and Files
10. Downloading Files
11. Deleting Files
12. Formatting Files
13. Mode Menu & Main Menu
14. Connecting to External Devices
15. Firmware Upgrade
Specifications
Warranty
Contents
Page 5

5
● Diasonic MP3 Player is a high performance portable digital audio player. This multi-functional
next-generation portable digital audio player supports playing of MP3 and WMA (64Kbps or
more) digital compressed music files and recording of music files via external equipment.
● Stylish, luxury and compact design and robust exterior
Stylish and compact design, half-mirror type window and front aluminum case enable a luxurystyle, highly portable and light MP3 player.
● External Expandable Memory Slot with SD/MMC
Up to 512MB can be used for expanding memory with SD/MMC Card.
● Hi-fidelity MP3 Player
Adopting various functions (equalizer / repeat play), the unit gives all the merits of MP3 players.
It also provides rich and sensitive sound quality.
● Direct encoding recording
Adopting voice recorder functions to the MP3 player, the unit supports voice recording and
direct MP3 encoding recording through the external device. The unit can also be used as a
portable data storage or portable hard disk.
● Bit rate variation
You can select various bit rates for voice recording or line-in recording depending on the
circumstances to adjust the recording quality and to use the memory efficiently.
● Speed control
Variable play speed control will facilitate language study.
●
Wide LCD screen supported with 7 colors (Red, Green, Blue, Yellow, Magenta, Cyan and White)
● Multi-language graphic LCD screen and back-light
The graphic LCD supports Korean, English, Chinese, Japanese, European and special characters
to display the names and playtimes of the tracks. The built-in LED back-light enables you to
easily set menus with buttons even at night.
● USB interface facilitates connection to the computer.
● SRS function supports 3D sound.
● BOOK-MARK: You can select tracks you want to play.
● FM BAND: You can hear FM radio anywhere in the world.
● HOLD: You can lock the buttons against any accidental operation.
● Play mode (NORMAL, 1 TRACK, ALL, SHUFFLE)
● Repeat Play (A⇔B): You can select sections to play repeatedly.
● INTRO Play: Playing the first few seconds of each track (5, 10 or 15 seconds).
● Next track / Previous track / Fast forward / Rewind
● Volume control (Digital volume: 30 steps)
Functions and Features
Page 6
6
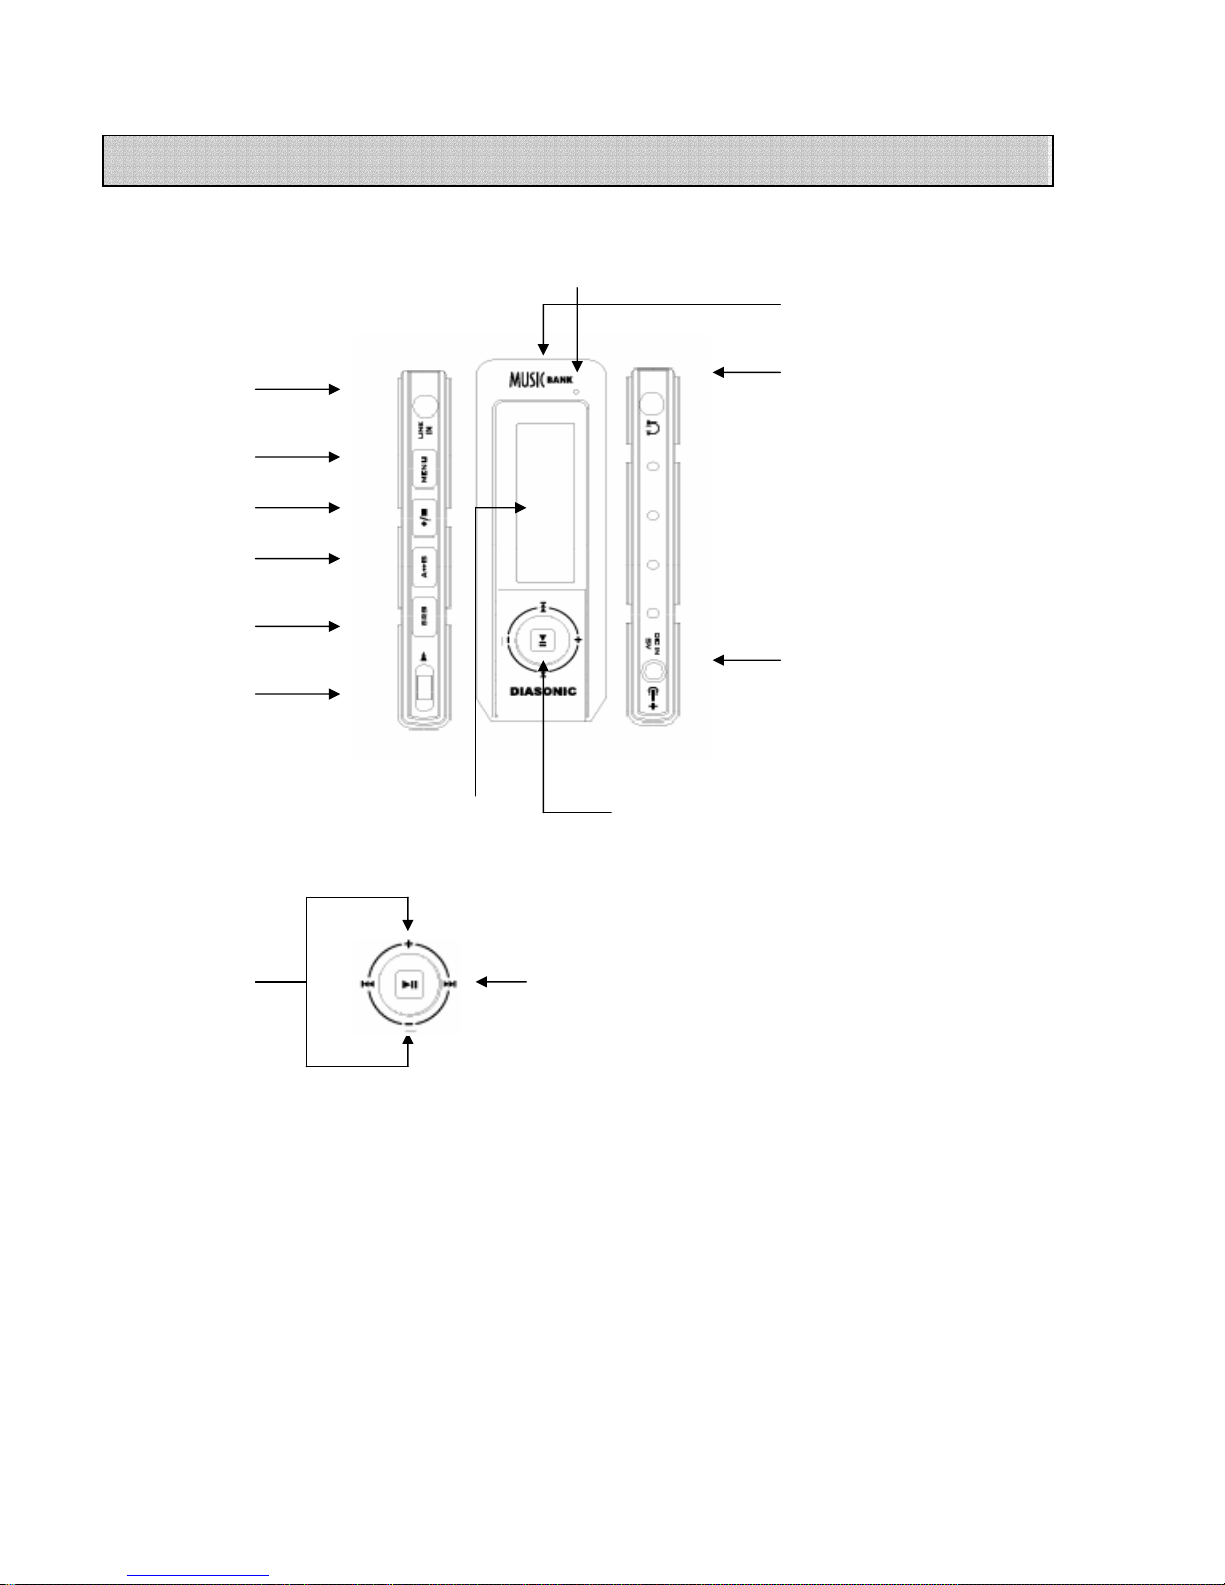
(1) Mainset
LINE IN
MENU
REC/STO
A<->B
(구간반복)
SRS
HOLD
DC JACK
EARPHON
MIC
LCD panel
VOL+/
FF/
REW
Parts and Components
JOG
Expandable Slot
Page 7
7
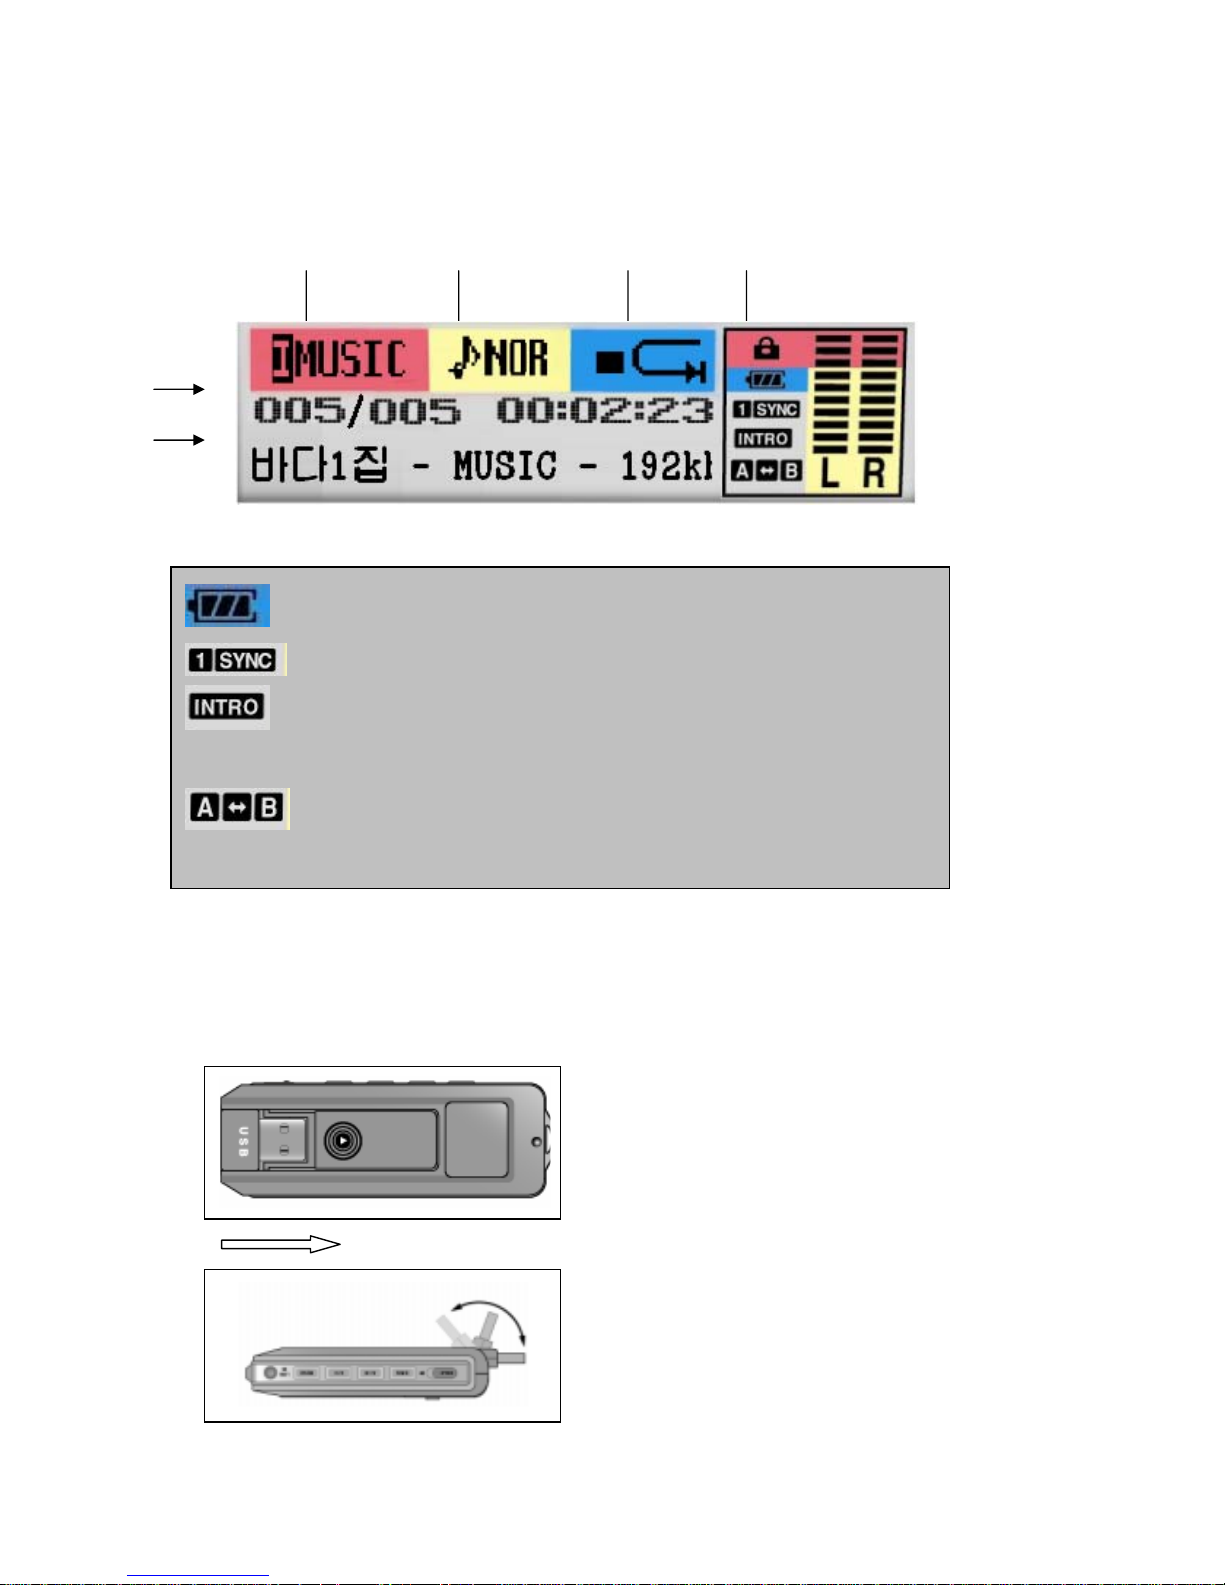
(2) LCD panel
(3) USB CABLE
○
1
Open the case to direction of arrow.
○
2
Indicate the remains of battery.
This icon indicates the function to play first part of
each track.
This icon indicates the function to play designated
section.
MODE EQ
REPEAT
Hold
Track
info
Song info.
enu Controller
Page 8
8
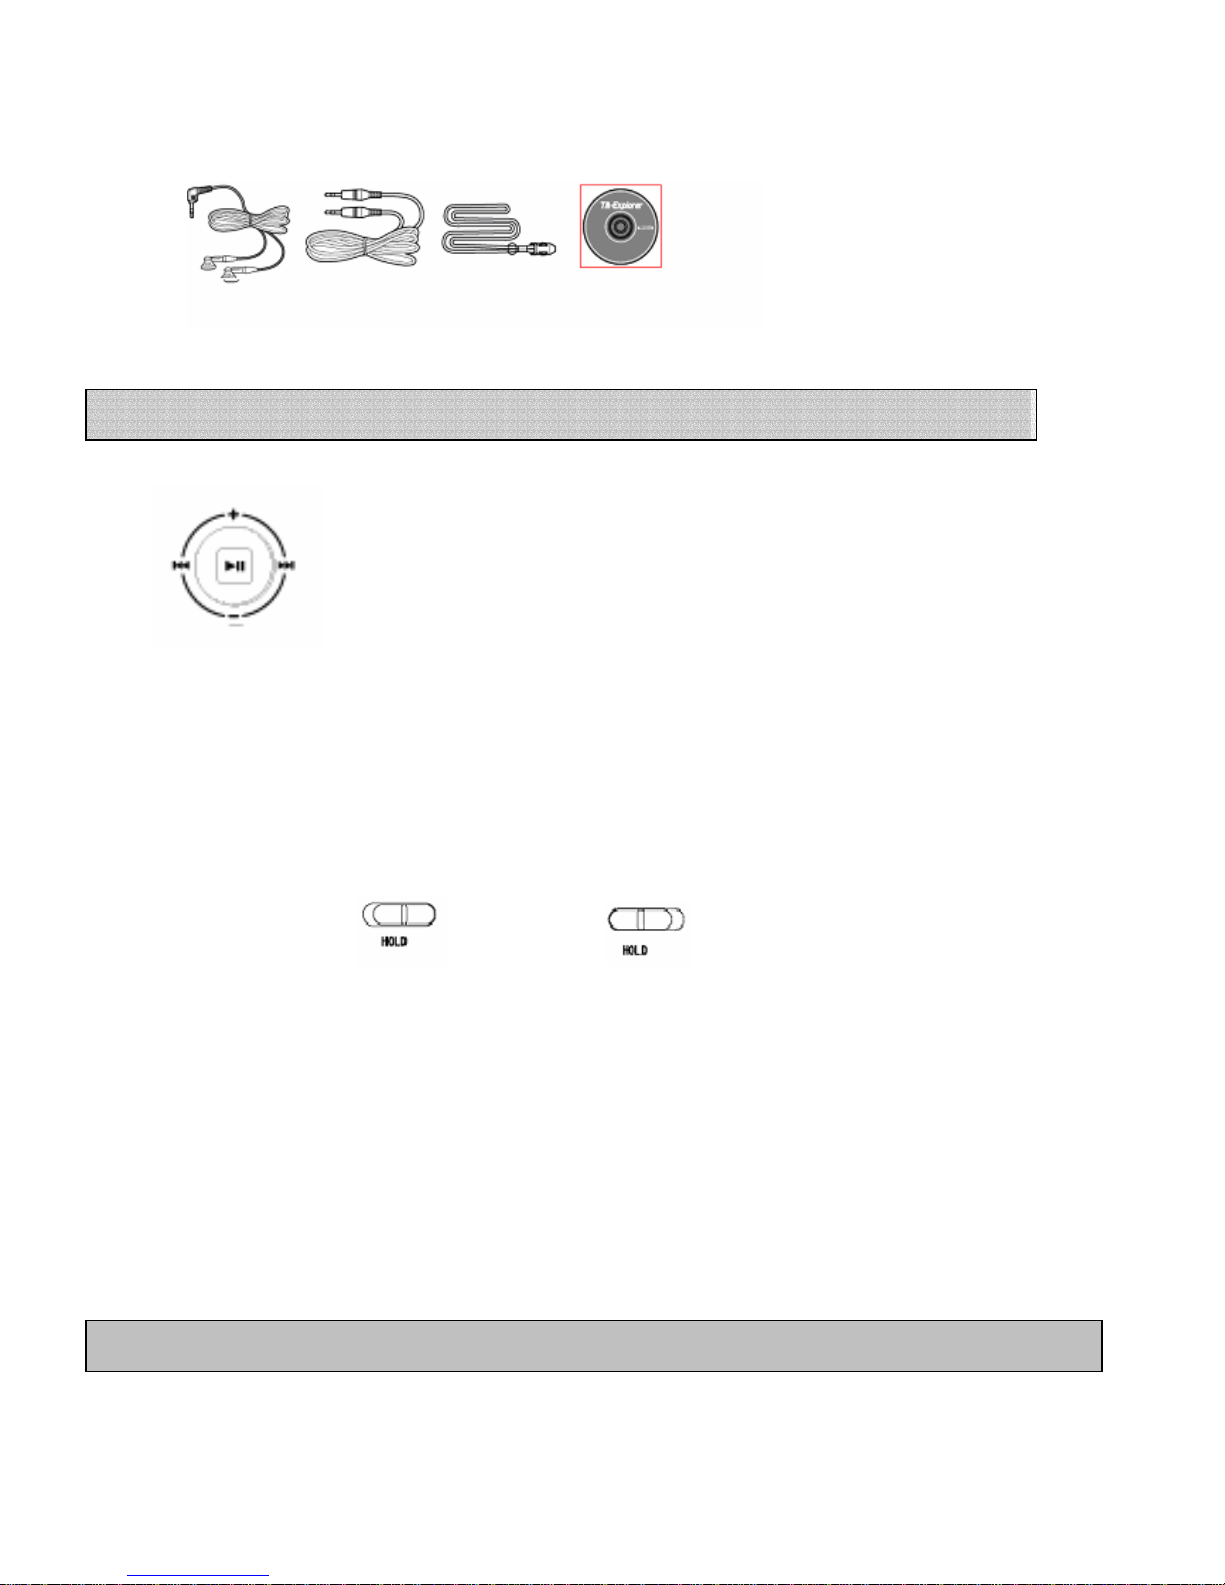
(5) Package ( Accessory )
STREO EARPHONE Line-in Cable Neck Strap CD & Manual
1. Power On/Off
To turn on the power, press and hold the PLAY/PAUSE button for one
second. Press the PLAY/PAUSE button again to turn off the MP3 Player.
2. PLAY, PAUSE and STOP
The MP3 Player starts playing if you press PLAY/PAUSE while the unit is on.
3. HOLD Switch
If the HOLD switch is set to the left (ON), all buttons are locked. Check if the HOLD switch is
released before turning on the power of the MP3 Player.
HOLD Off HOLD On
4. Volume Control
Use VOLUME + or VOLUME – to control volume. Press and hold the key to control volume
continuously. Volume is adjusted by step (Steps 0 ~ 30).
5. Changing Mode
Mode-changing menu is shown while pressing menu button shortly. You can move up to the
mode by using REW/FF button and press play/pause button.
Quick Operation Guide
BOOK-MARK FOLDER PLAY MUSIC PLAY VOICE PLAY LINE IN ENC PLAY RADIO ENC PLAY FM
Page 9

9
6. Listen to Radio
Mode menu appears if pressing menu button shortly. Go to FM MODE and press play/pause
button.
7. Main Menu
Main menu appears when you hold menu button . Choose the menu by tracking REW/Ff
button, press play/pause button.
8. INTRO Play
You can play the first few seconds of each track to check the music files and the voice recording
files. Press play/pause button over 1 second at play status and ‘Intro’ icon is shown on LCD panel.
Device plays first part of all tracks from current track.
MENU button (LONG KEY) -> SYSTEM -> INTRO TIME (5, 10, 15 seconds)
9. Repeat Play
You can select a section you want to play repeatedly. If you press the SPEED/A↔B button during
the play, the starting point (A) for repeated play is selected, and the icon (A↔ B) blinks on the
LCD window. If you press the SPEED/A↔B button again when the end part of the repeated play
is played, the end point (B) for repeated play is selected and the icon (A↔B) blinks. Then the
MP3 Player repeats playing the designated section.
If you want to release Repeat Play, press SPEED/A↔B again.
10. Speed Control
You can select Normal, Fast or Slow play.
If you press and hold the SPEED/A↔B button during the play, the current mode is displayed on
LCD (Normal Spd, Fast Spd, Slow Spd) and the current speed is maintained.
11. How to set BOOK-MARK
When you stop playing music file, you can book-mark this music file by pressing SRS key
shortly. Go to BOOK-MARK MODE and play it.
12. PC Connection
When this device is connected to USB port of PC, this icon appears. While
SYSTEM SOUND DISPLAY SRS DELETE EXIT
Page 10
10
downloading files, this icon
appears. While uploading files, this icon
appears.
<Reference>
When device is connected to PC, you can not play. To play, you should take off device from
PC.
When device is taken off from PC, power is off. Power on device to use it.
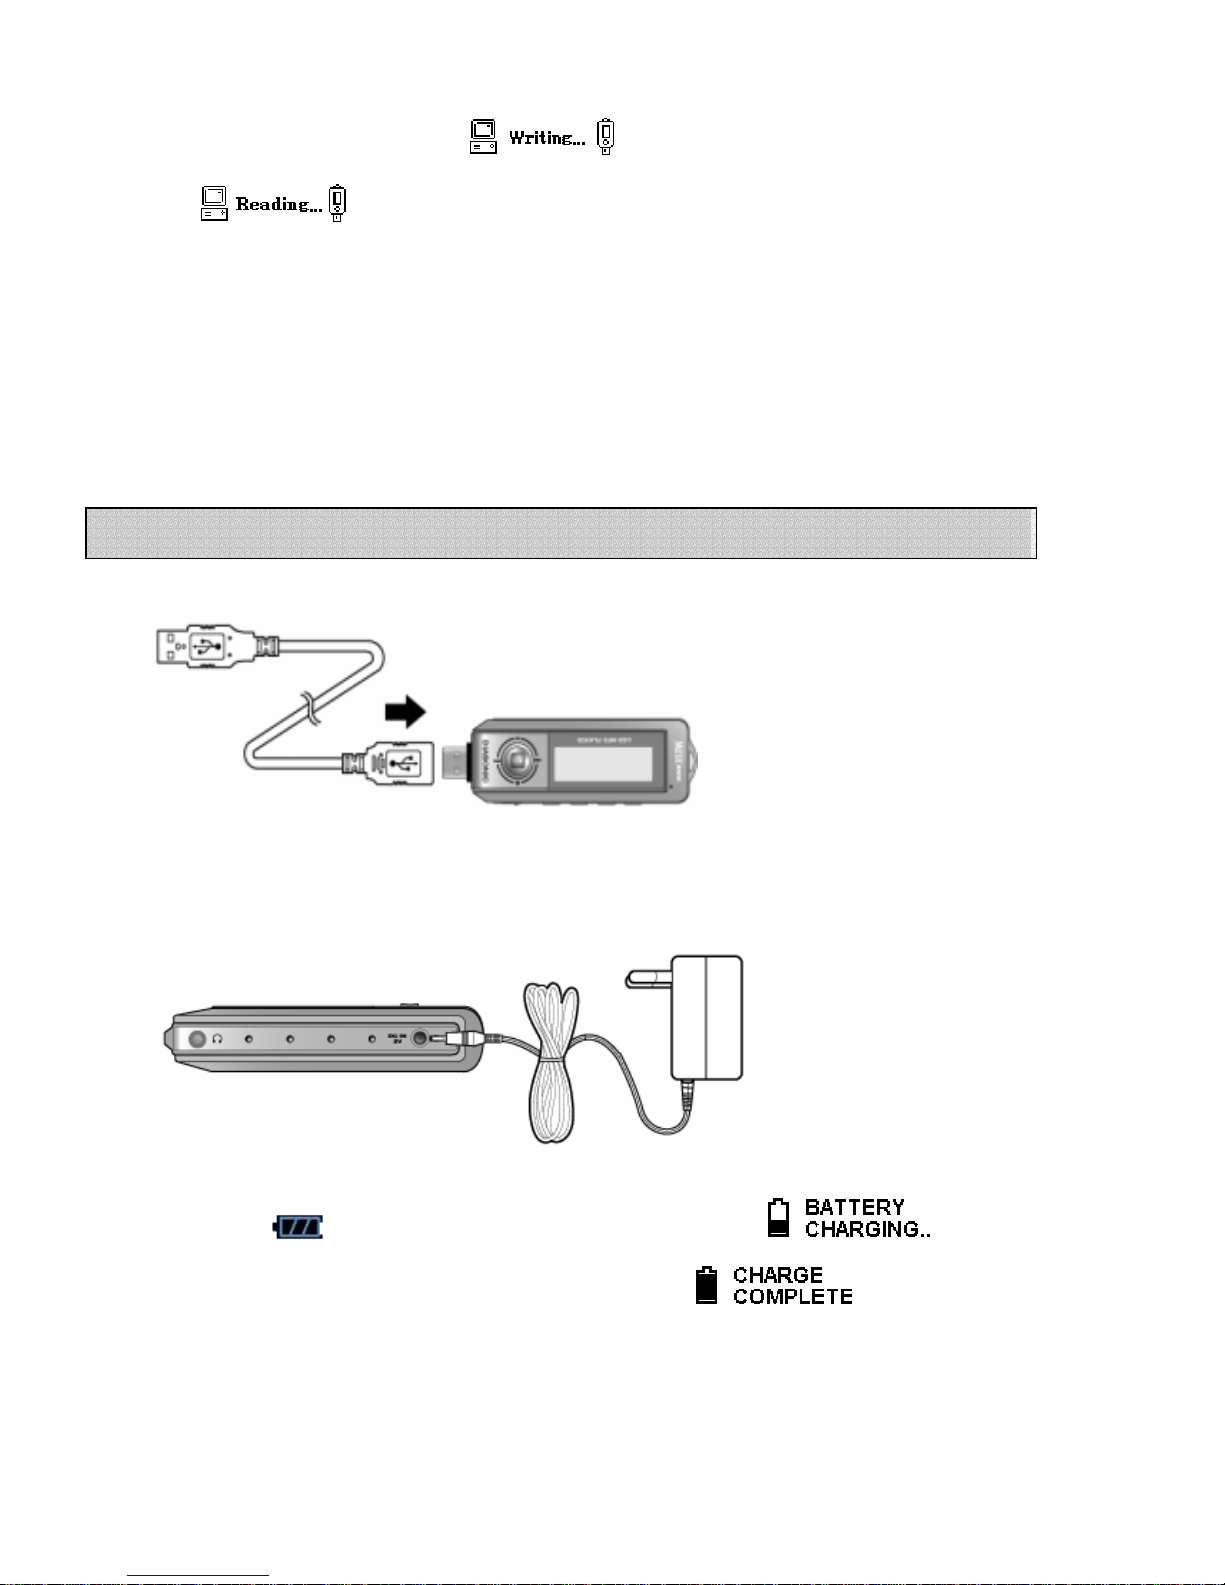
(1) Recharging battery by USB Cable
○1 Connect device to USB cable after PC is power-on.
○2 Recharging begins at same time.
(2) Recharging by ADAPTOR
○1 Connect ADAPTOR to device.
○
2
This icon blinks when you recharge in power on status, appears
when you recharge in power off status. The icon appears when
recharging is completed.
How to Recharge Battery
Page 11

11
○1 Insert an external memory to expanding slot and then press A<->B button in stopping.
INT/CARD will be displayed and it will be separated to an Internal memory & External
Memory section.
○2 After selecting external memory, all functions work as same as internal memory.
○3 External Memory must take out after stopping all operations.
How to use External Memory
<<Caution>>
z Only SD-CARD/MMC-CARD are compatible with DMP-310.
z Do not remove external memory card during recording or playing back to prevent
from malfunction and loosing recording content.
z If the Index and memory full, it won’t work properly.
- If there is no space in memory, “ Memory Full” will appear.
z On recording, recording mode is transferred to VOICE, LINE IN & RADIO by pressing
Page 12
12
It supports USB Mass Storage and it can be used as hard drive.
It can be connected to PC directly without any application by Plug & play method
on Window Me, 2000, XP except for Windows 98SE.
☜ How to install Drive
(1) In case of WIDOWS ME, 2000, XP
When connecting device to PC by USB port, “new hardware detected” is shown and
installation begins automatically.
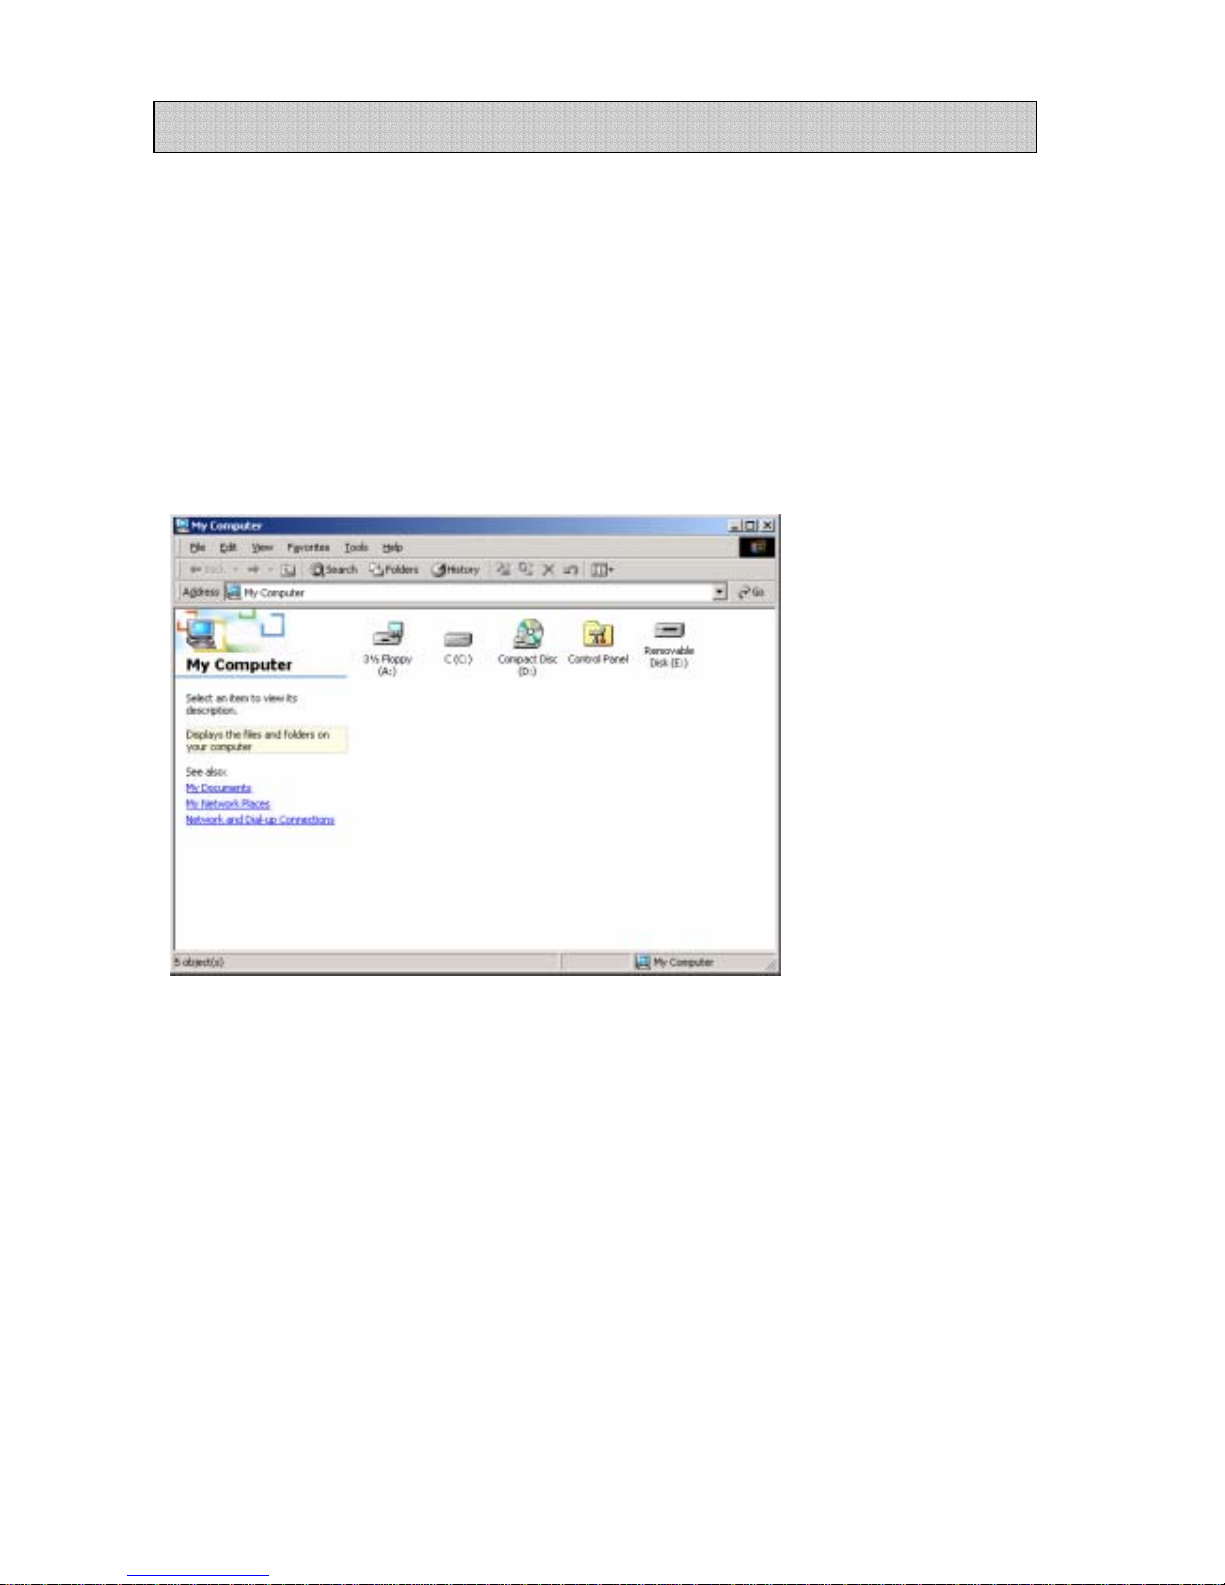
* If you click [My Computer], the MP3 Player is recognized as a portable disk (F:) on [My Computer]
window. (*WINDOWS XP).
(2) In case of WINDOW 98 SE
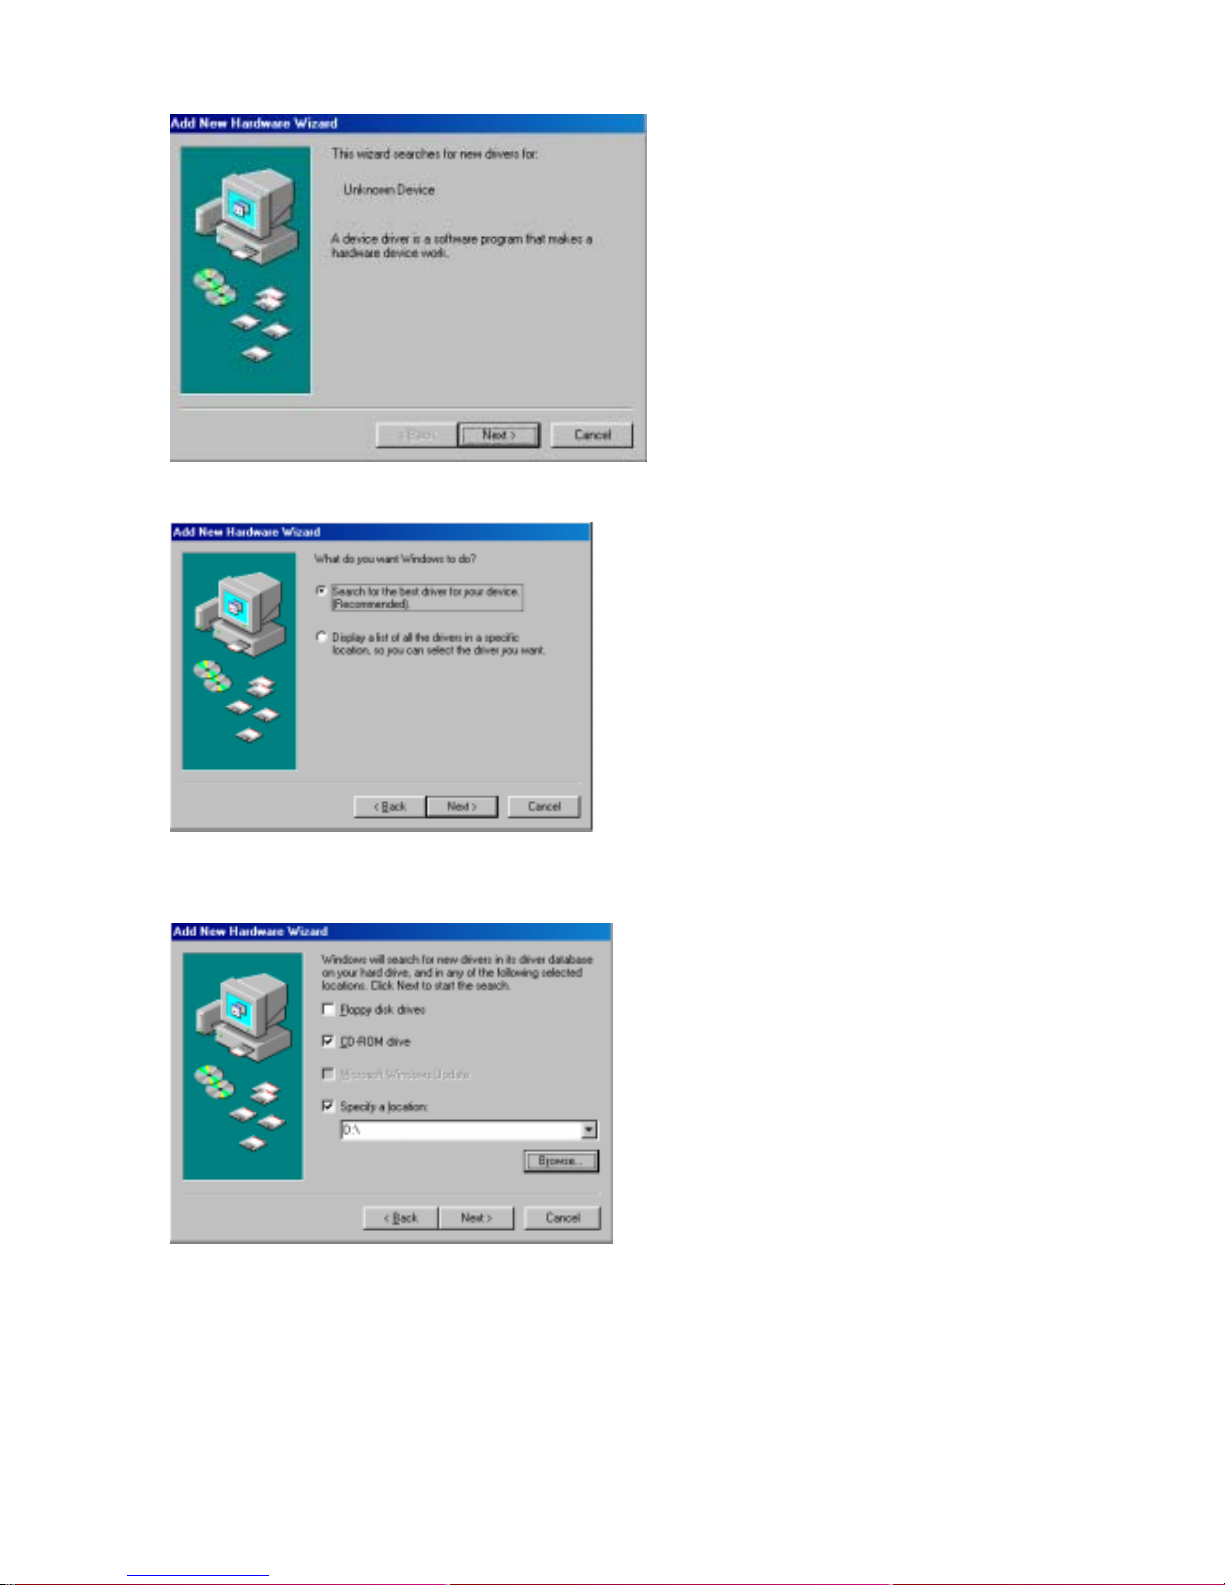
○
1
Connect device to USB port. Click ‘next’.
Setting PC Environment
Page 13
13
○
2
Check ‘Find appropriate driver ’ and click ‘next’.
○3 Check ‘designating location’ and click [Retrieval] button.
○
4
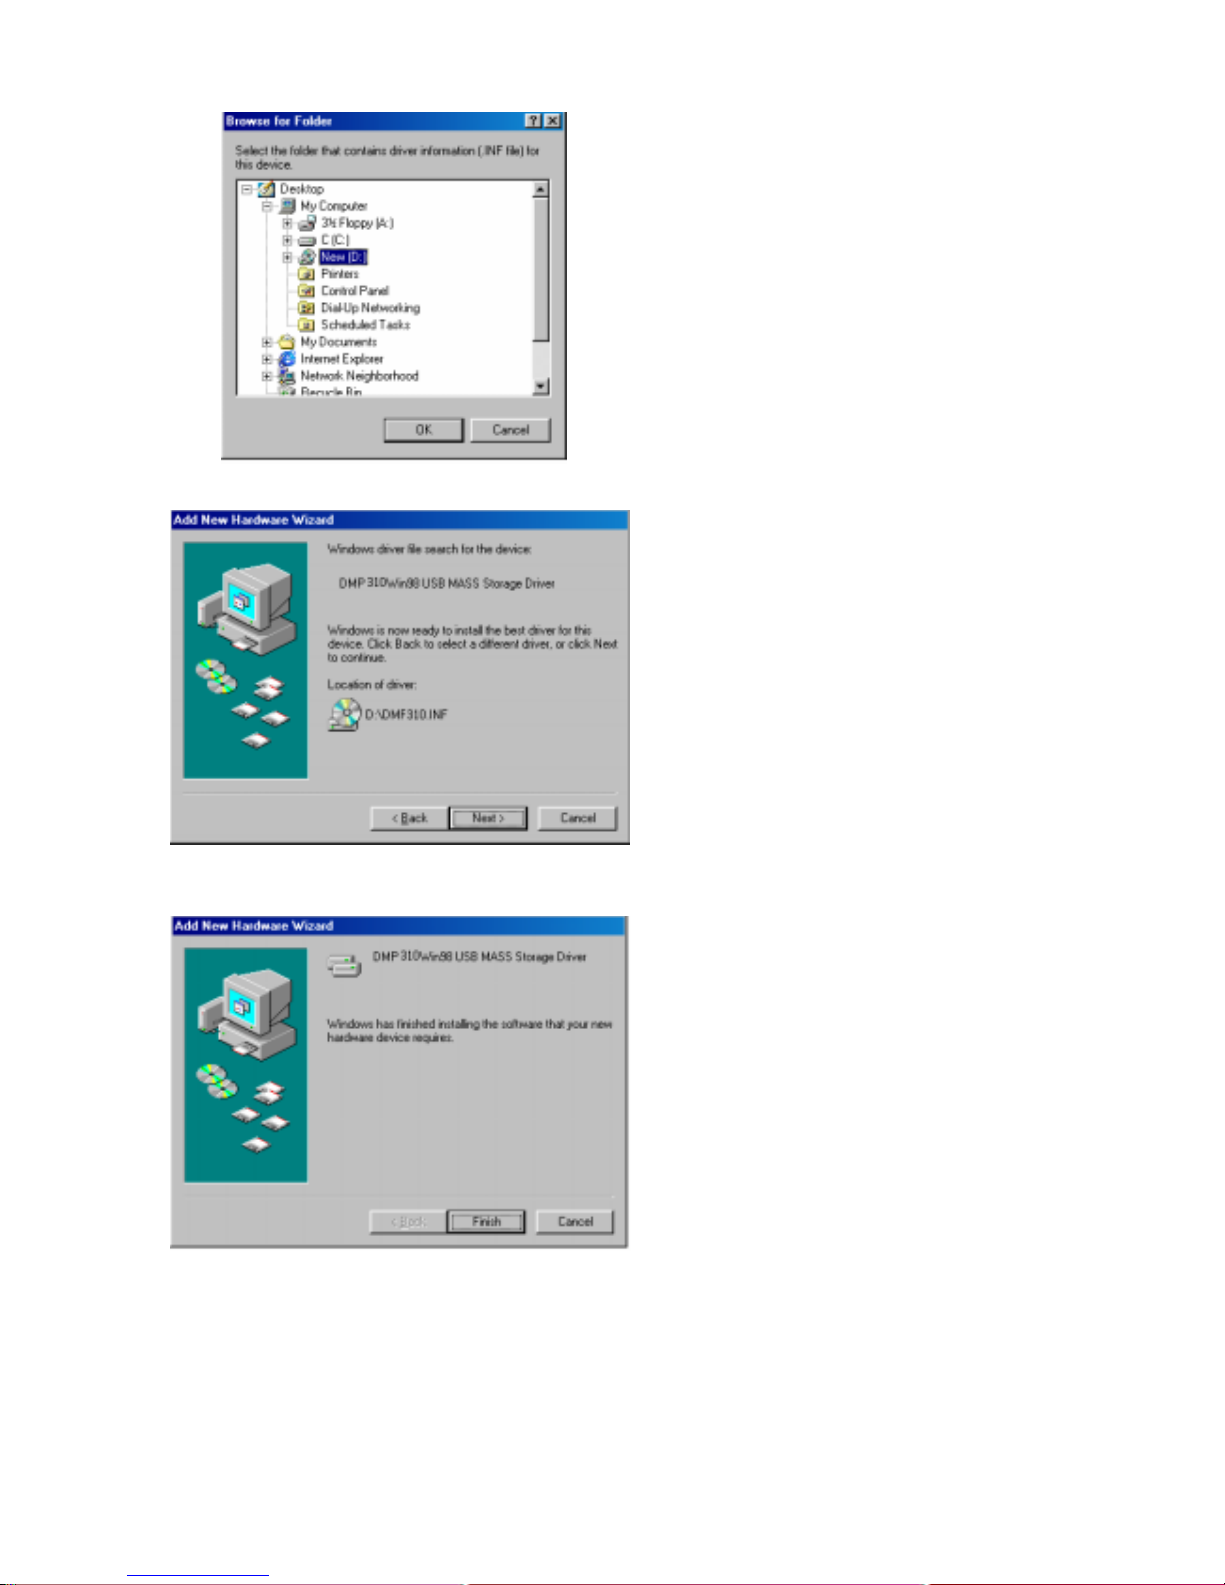
Find installation program on [Folder Retrieval] window.
Page 14
14
○
5
Click ‘next’ on [New hardware wizard] window.
○
6
Below window is shown when installation is completed.
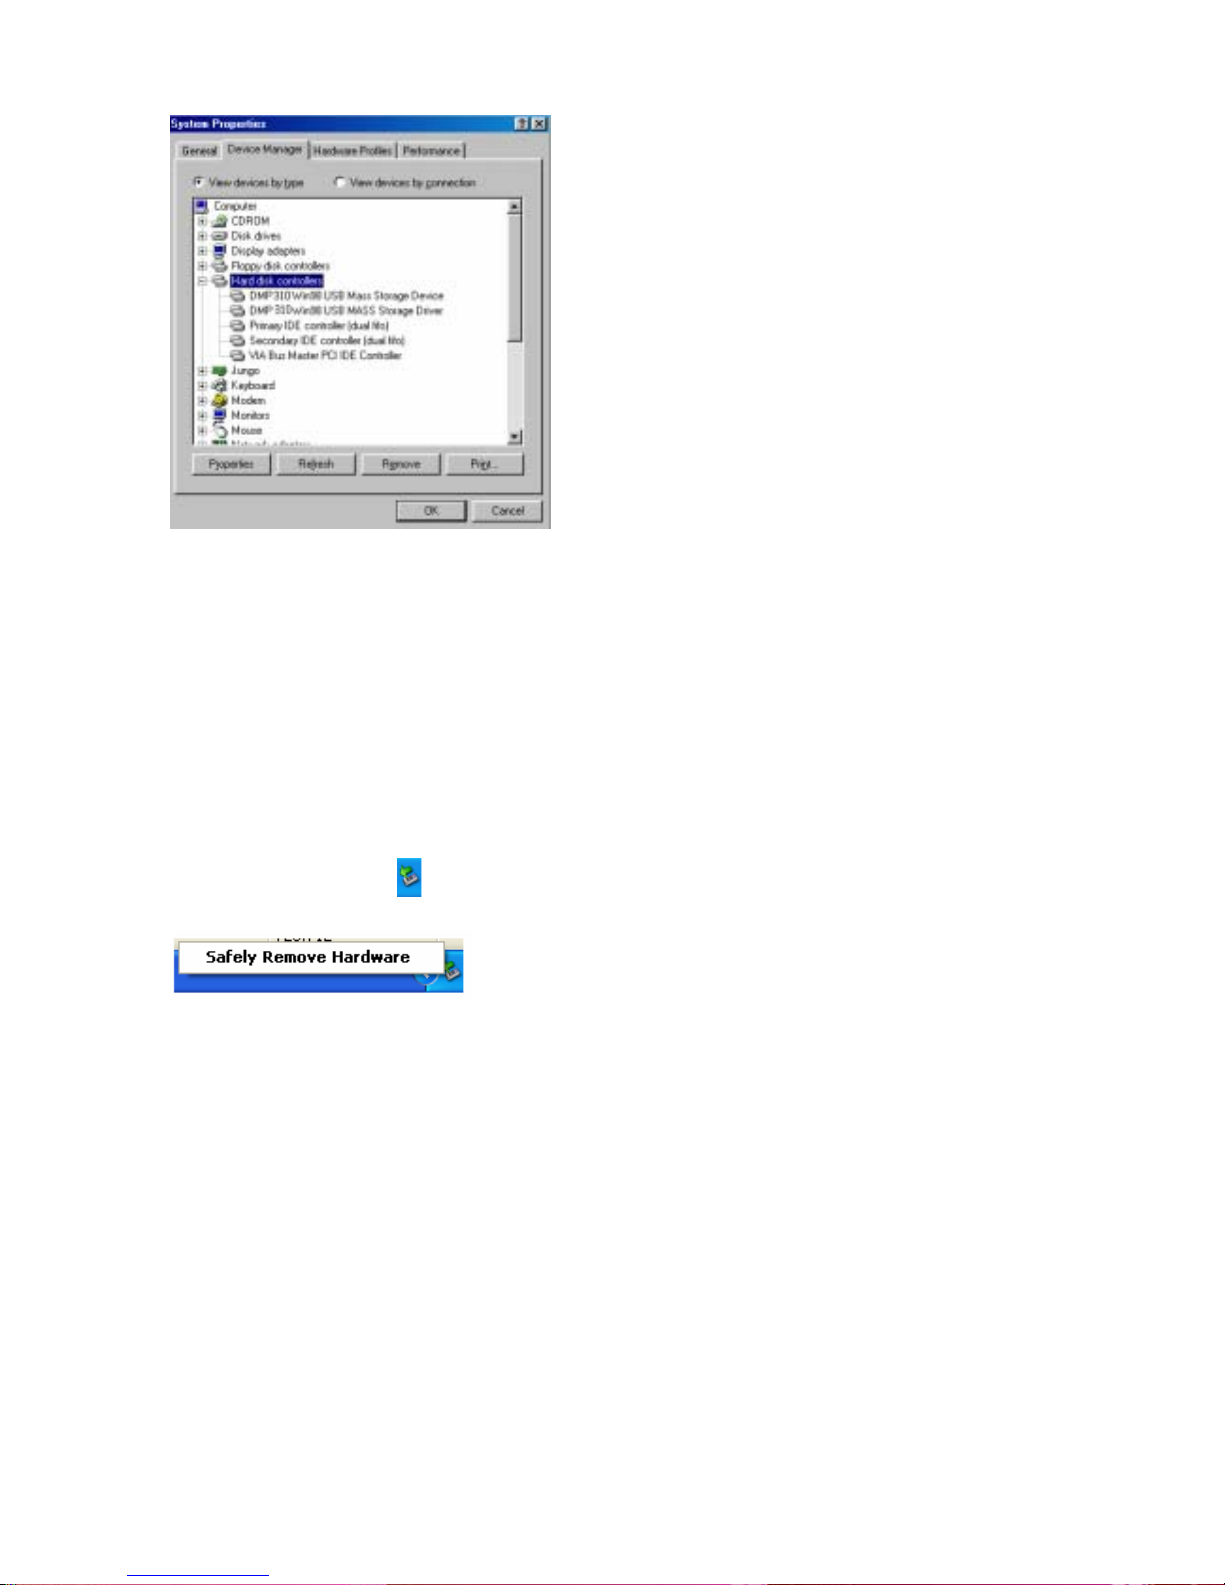
○7 Check finally whether installation has been completed successfully.
[My Computer]-[Control Panel]-[System]-[Device Manager]-[Hard Disk Controller]
Page 15
15
z When installation is completed successfully, it is recognized as USB Mass Storage on
Device Manager of My computer.
( In case of WINDOWS ME, it is normal even though ‘?’ mark is shown.)
(2) How to remove device out of USB port
It is required to remove device before removing device out of PC,
.
○
1
Close existing files.
When there are existing files or folders, there could be some error in removing device.
○2 If you click below icon ( ), following tool bar is created.
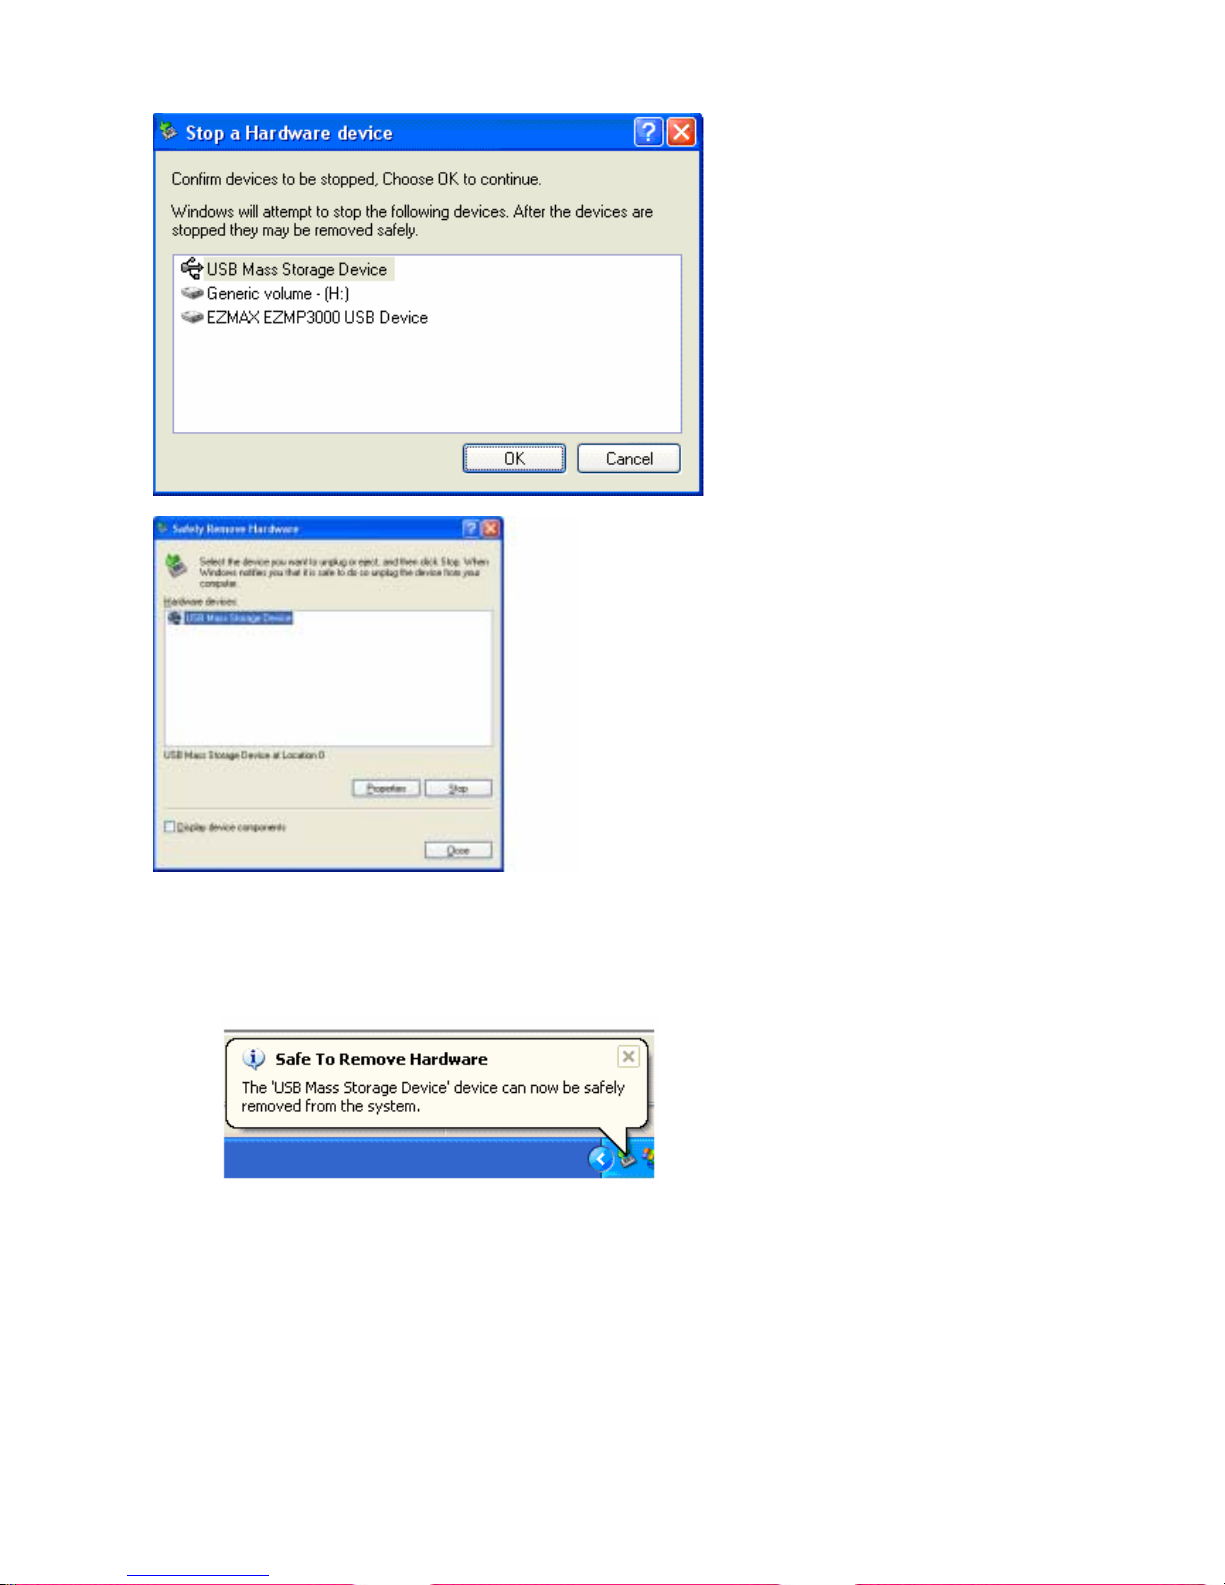
○
3
If you click tool bar, following windows appear. Remove them in series.
Page 16
16
○
4
If below tool bar appears, remove device out of PC.
Page 17

17
* The AUTO SEEK function facilitates tuning in to the radio channel.
Select RADIO, and hold down the FF key or REW key for about one second. The unit stops
seeking channels at the available channel.
The AUTO SEEK function may not be suitable for accurate tuning in the weak coverage area. In
this case, use the REW or FF key for fine tuning.
You can also use the MUTE, MONO or STEREO function for radio listening.
● Setting radio channel
Frequency channels are displayed on the LCD screen. Select the desired frequency with the FF
or REW key.
● Saving channels
① Frequency channels are displayed on the LCD screen. Select the desired frequency with the
FF or REW key.
② While listening to the radio, press the SRS button. The channel you are listening is memorized
in PRESET, and CHANNEL 01 blinks. Select the channel number (01-10) with the FF/REW key,
and press the SRS button. The channel is saved in CHANNEL 01. You can save up to 10
channels (CH1~10).
☞ Checking the saved channels.
In the FREQUENCY mode, hold down the SRS button. The unit enters into the PRESET mode,
and shows the saved channels and frequencies.
You can select a channel with the FF/REW key. If you press the MENU button in the PRESET
mode, you can select the frequency in the FREQUENCY mode.
● Recording radio
① Set the radio channel as explained in ①~② above.
② Press the REC button to record data. The recorded message is saved at the next index to the
last recording file.
You cannot check the recorded data while recording. You can check it in the RECORD range
after stopping recording.
○3 To pause while recording, press the REC button. To resume recording, press the REC button
again.
※ Note
• Noise may occur when recording radio in weak coverage or inside a building. Move to
strong coverage to acquire good sound quality.
• The earphone line works as an antenna. Extend the line to get good coverage.
FM Radio
Page 18

18
(1) LINE IN Recording
When LINE IN CABLE is connected, line in is set automatically in recording. (LINE IN ENC
FILE)
(2) Recording through internal MIC
Unless LINE IN CABL is connected, internal mic is set in recording. (VOICE)
(3) Recording RADIO
While listening to radio, you can record radio by pressing Rec button. (RADIO ENC)
Recording in RECORD Mode
<Reference>
z While recording, you can monitor recording.
z To check the remaining recording time, press the MENU button during the recording.
z You can separate files during the recording 5 seconds later by pressing FF button.
z LEVEL METER does not operate while recording.
<Caution>
* When you input line in cable while recording voice, recording stops and record mode is
converted to line in mode.
* Device can not be transferred to FM mode when line in cable is connected. When line in cable
is taken off, recording stops.
Page 19
19
(1) Default folders
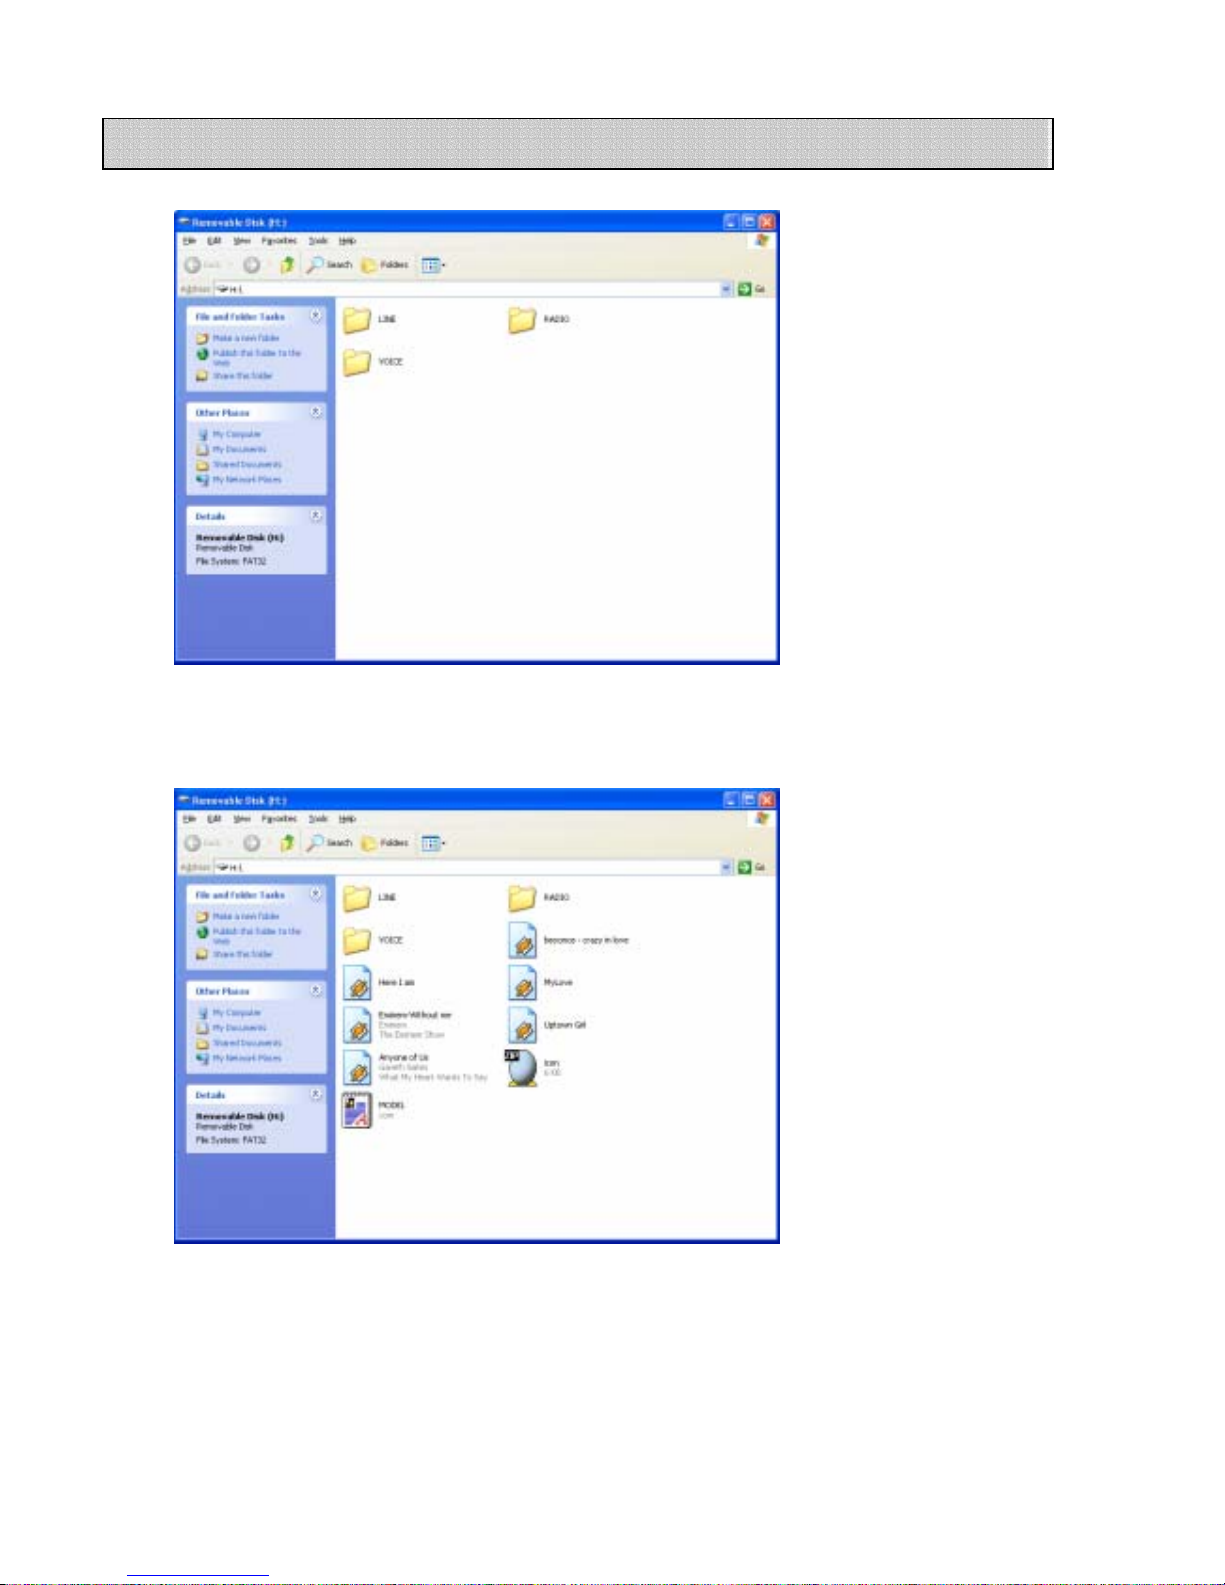
◈ When you connect the
unit to PC, you can find that the LINE, RADIO and VOICE folders are created by default.
(2) AUDIO MODE
◈ No folder is created by default for AUDIO MODE.
You can create the audio folders on the PC, and check the folders with FOLDER PLAY and MUSIC
PLAY on the MP3 Player.
◈ You can create up to 999 music files (MP3 or WMA files) on MUSIC PLAY, and up to 512 folders
on FOLDER PLAY.
Managing Folders and Files
Page 20
20
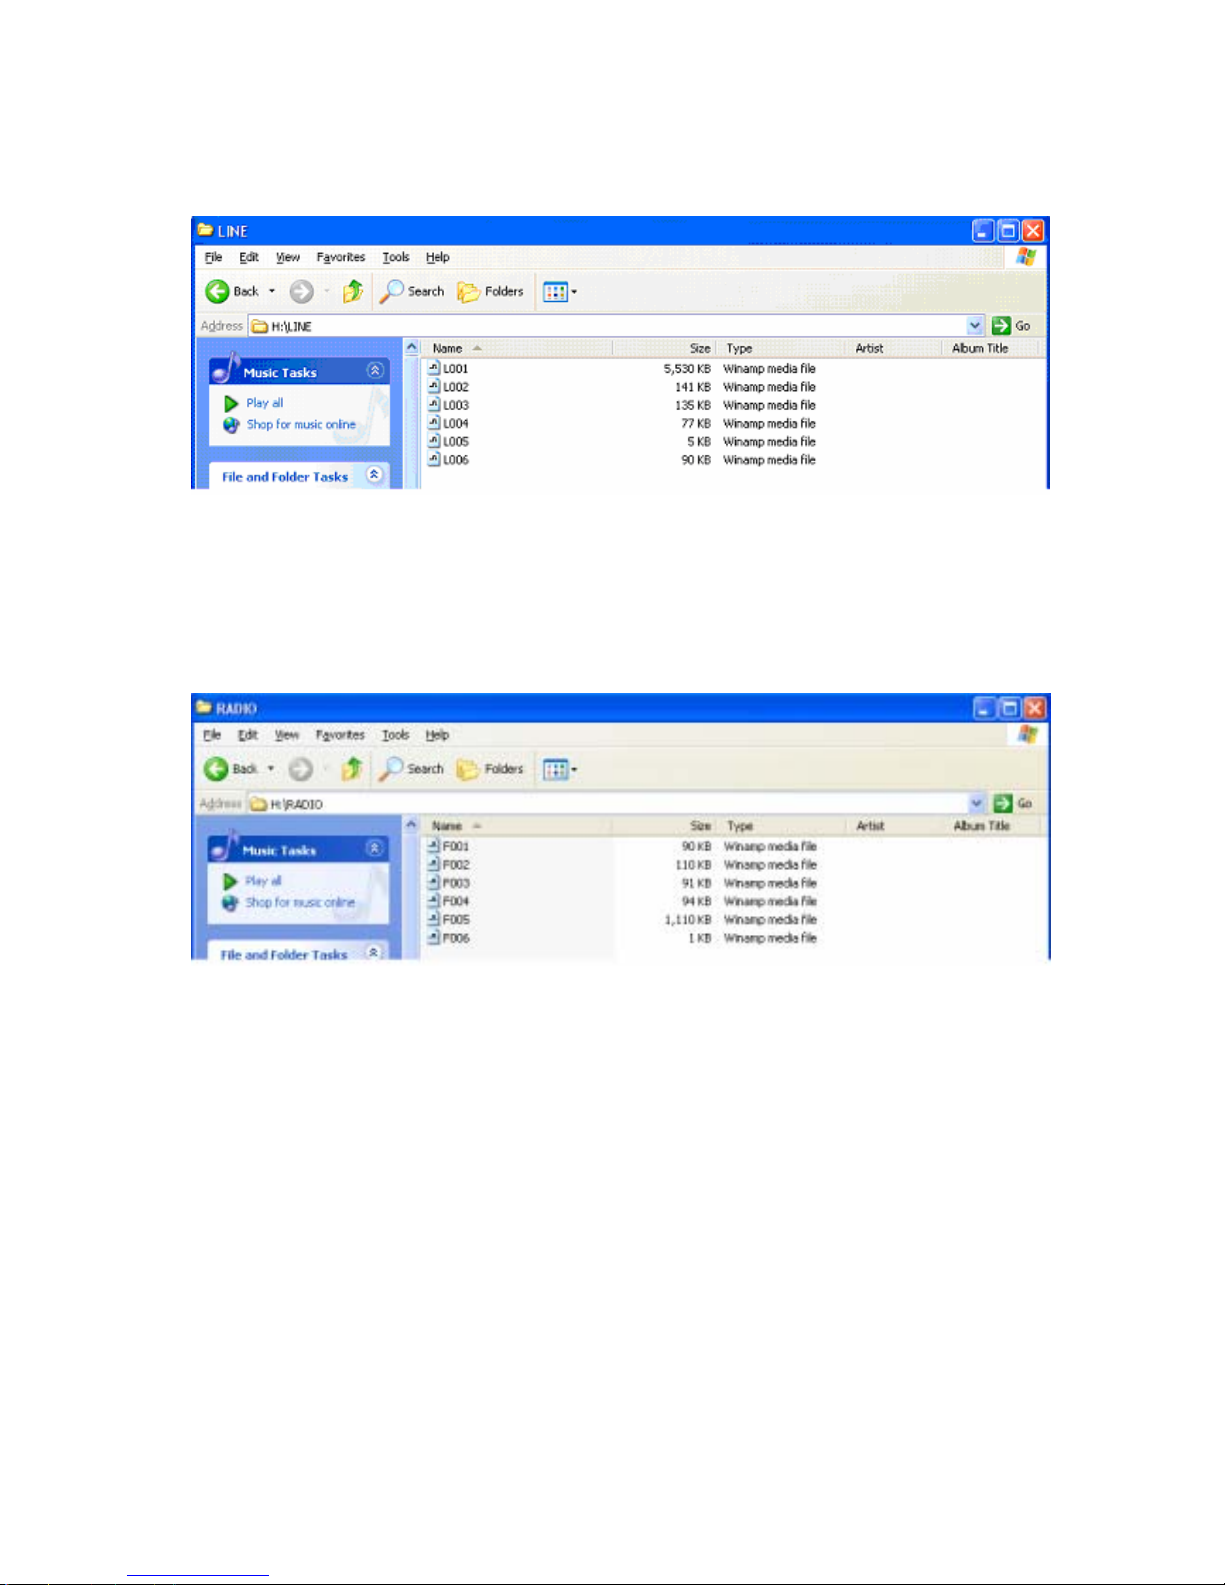
** FOLDER PLAY in the MODE menu shows the folders you created, and MUSIC PLAY shows the
music files within the folder.
(3) LINE IN MODE
◈ LINE IN MODE contains the files recorded from external devices through the line-in cable.
◈ When recording data, up to 256 files can be created in sequence. If the number of files
exceeds 256, the “INDEX FULL” message is displayed.
(4) RADIO MODE
◈ RADIO MODE contains the files recorded from the radio.
◈ When recording data, up to 256 files can be created in sequence. If the number of files
exceeds 256, the “INDEX FULL” message is displayed.
Page 21
21
(5) VOICE MODE
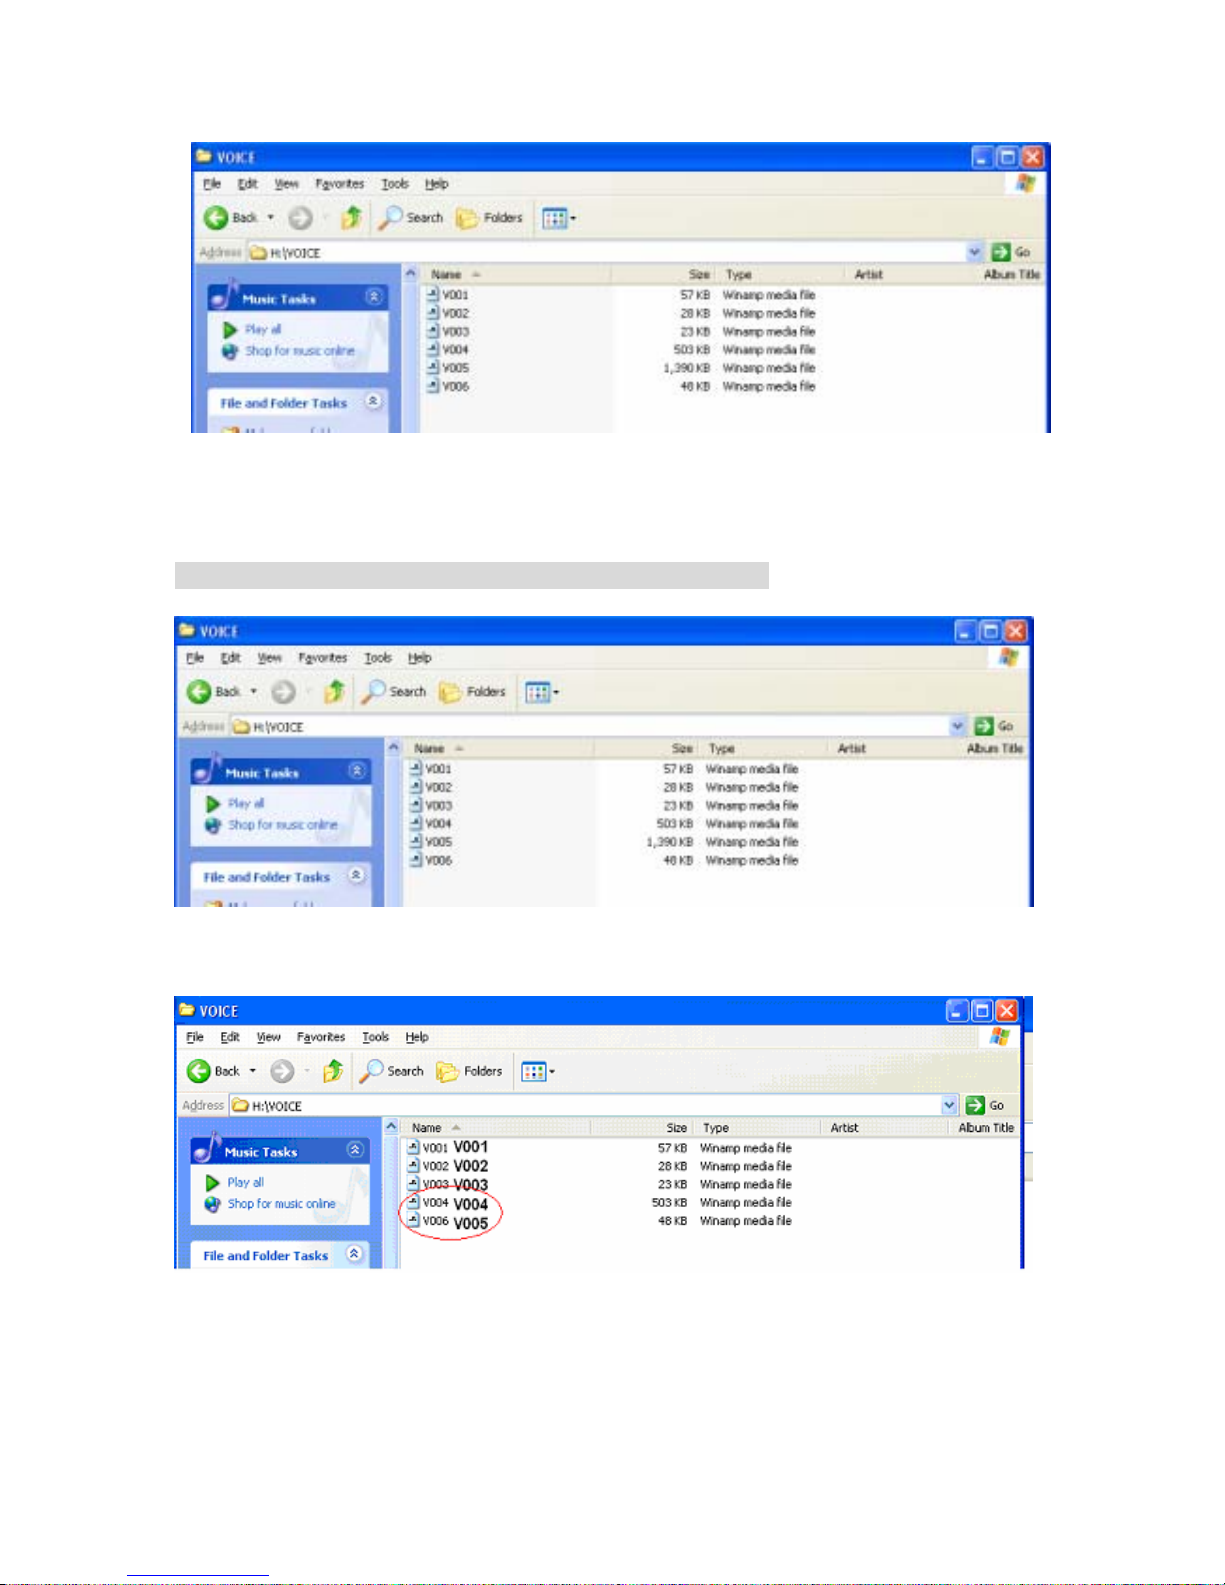
◈ VOICE MODE contains the voice recording files.
◈ When recording data, up to 256 files can be created in sequence. If the number of files
exceeds 256, the “INDEX FULL” message is displayed.
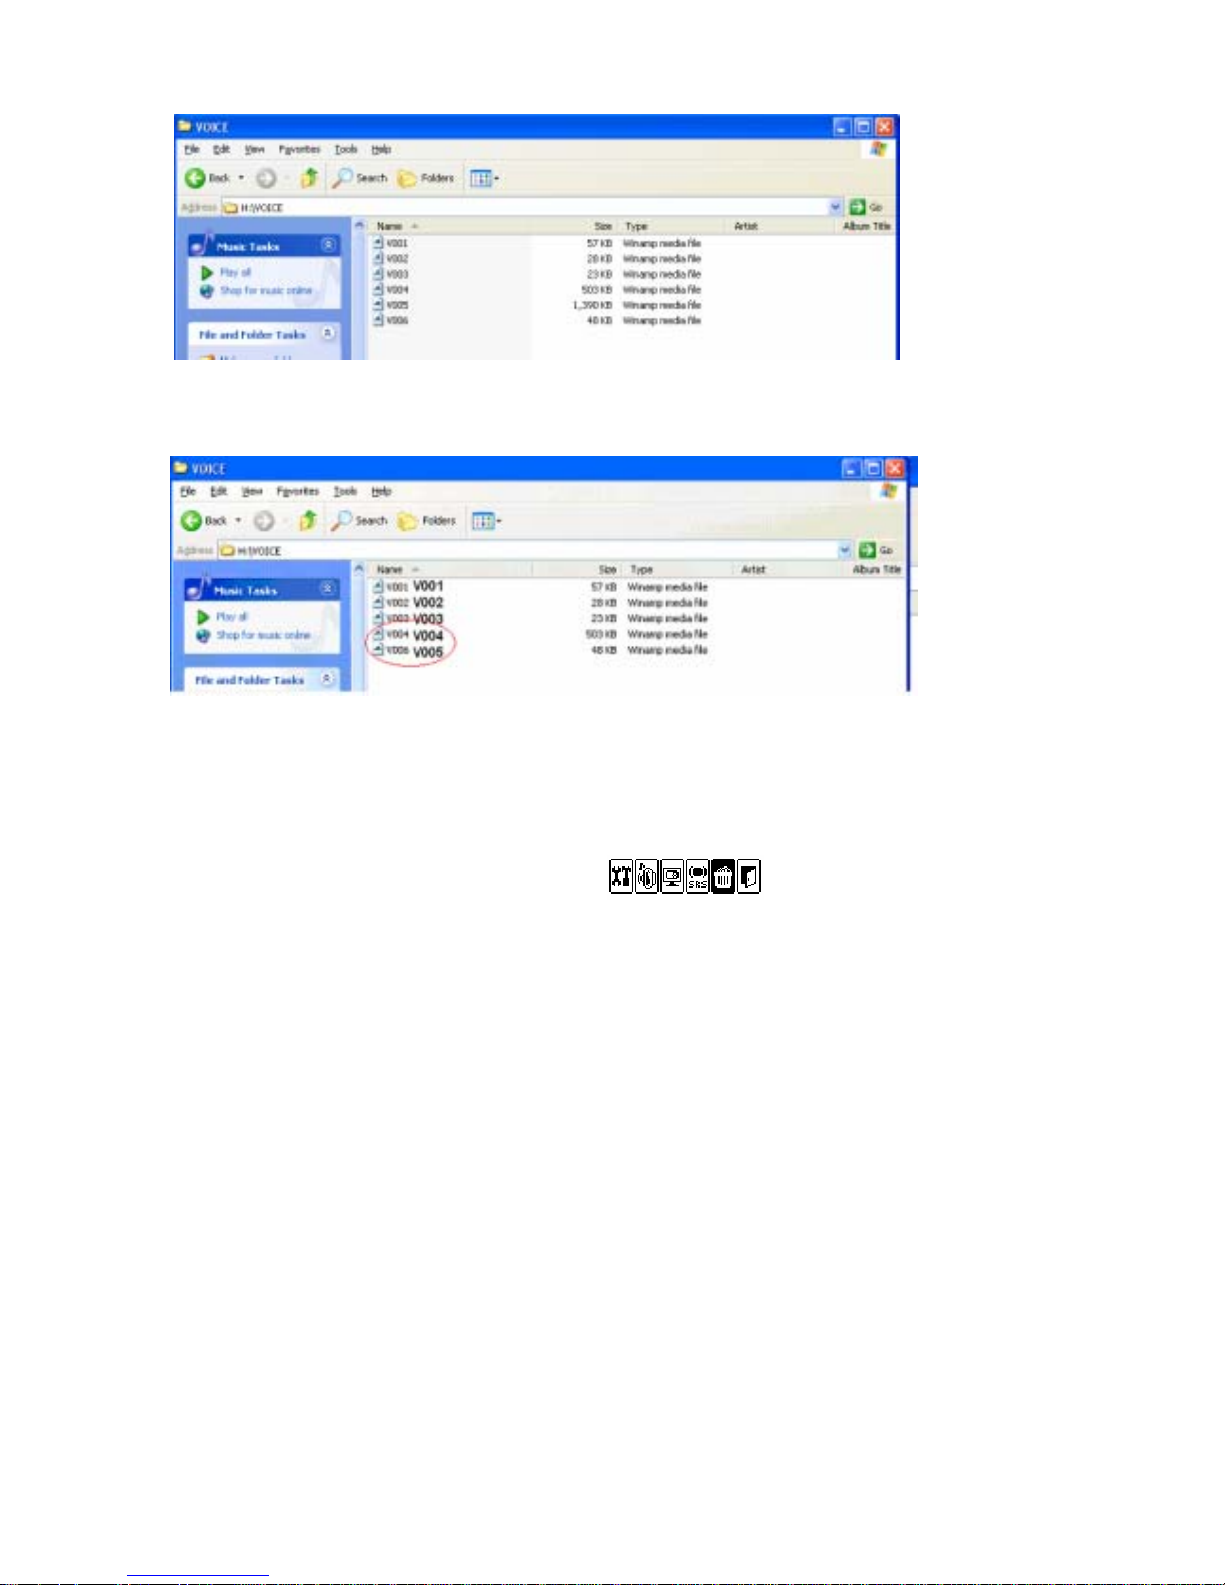
♠ Deleting files in the LINE, RADIO and VOICE MODE ♠
◈ Deleting VOICE005.
As V005 is deleted, V006 is renamed to “V005”.
Page 22
22
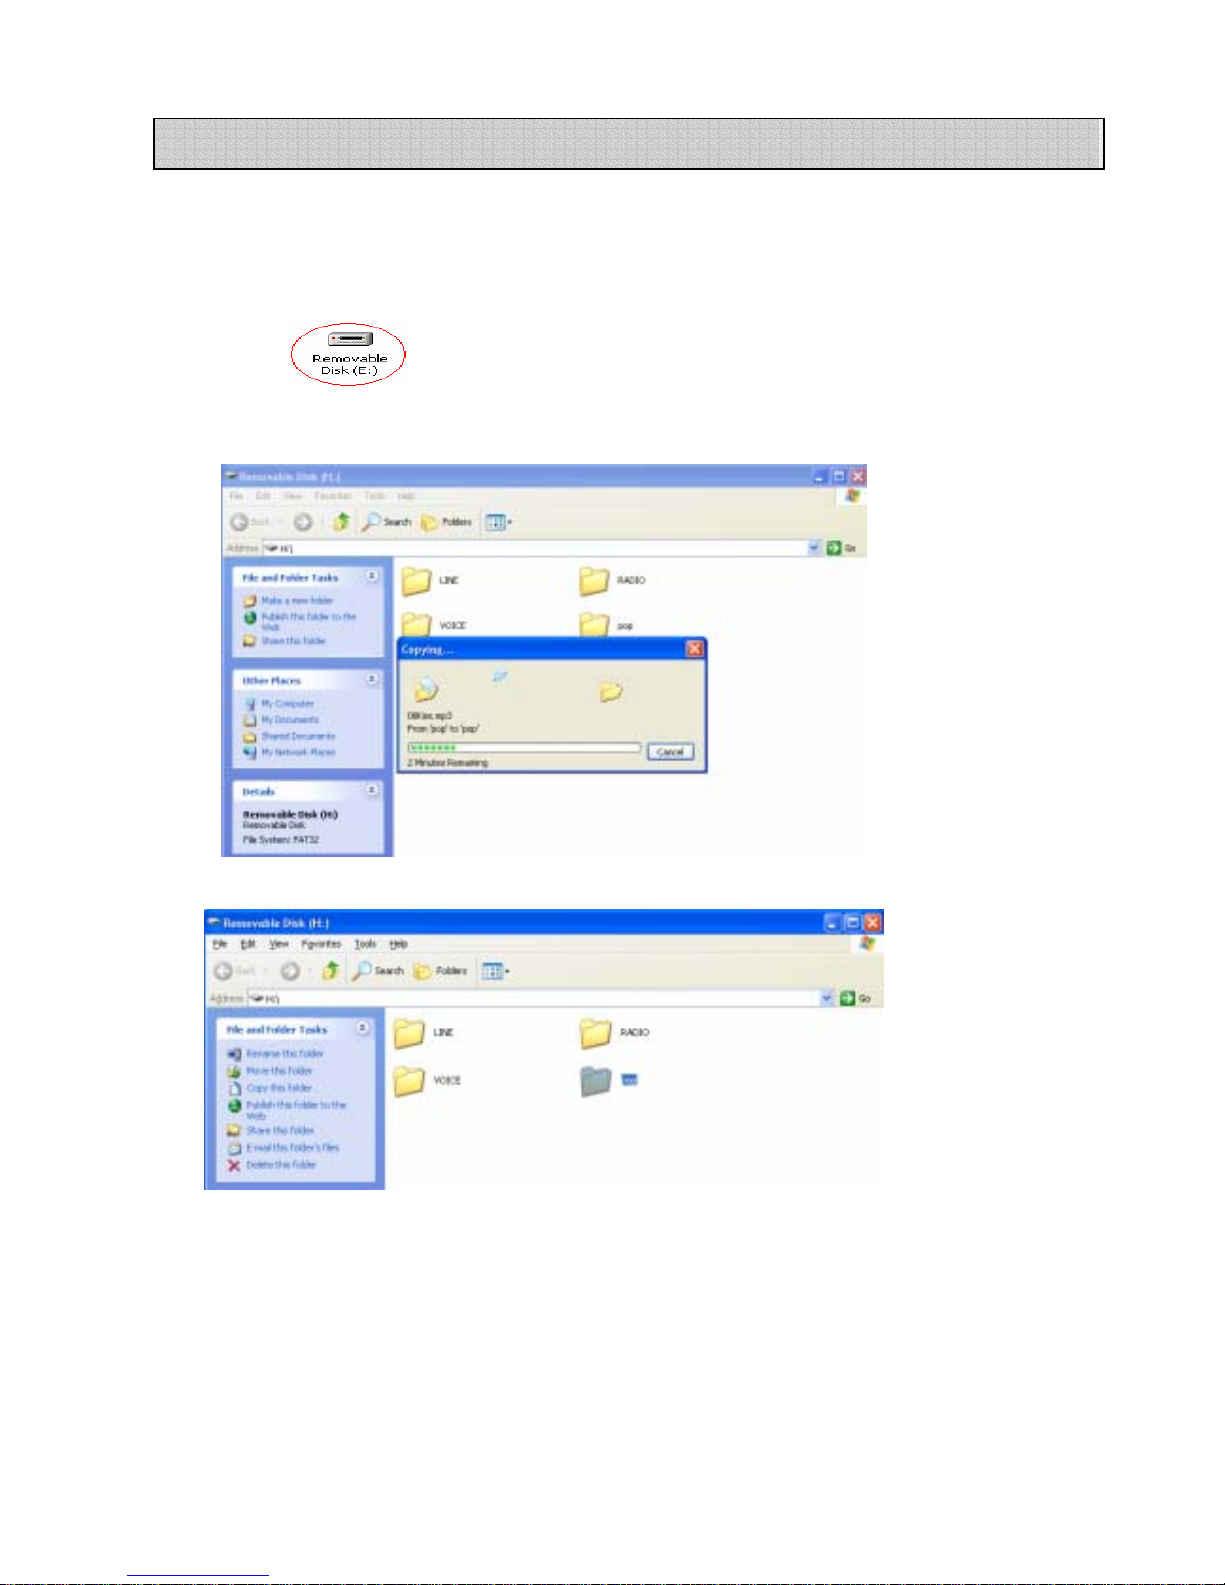
(1) Wait until ‘new hardware detect’ and ‘it is ready to operate’ appears after
connecting device to USB port.
(2) Click
on My Computer.
(3) Copy music files or data from PC folder and download them to device.
(2) Following folder is created.
Downloading Files
Page 23
23
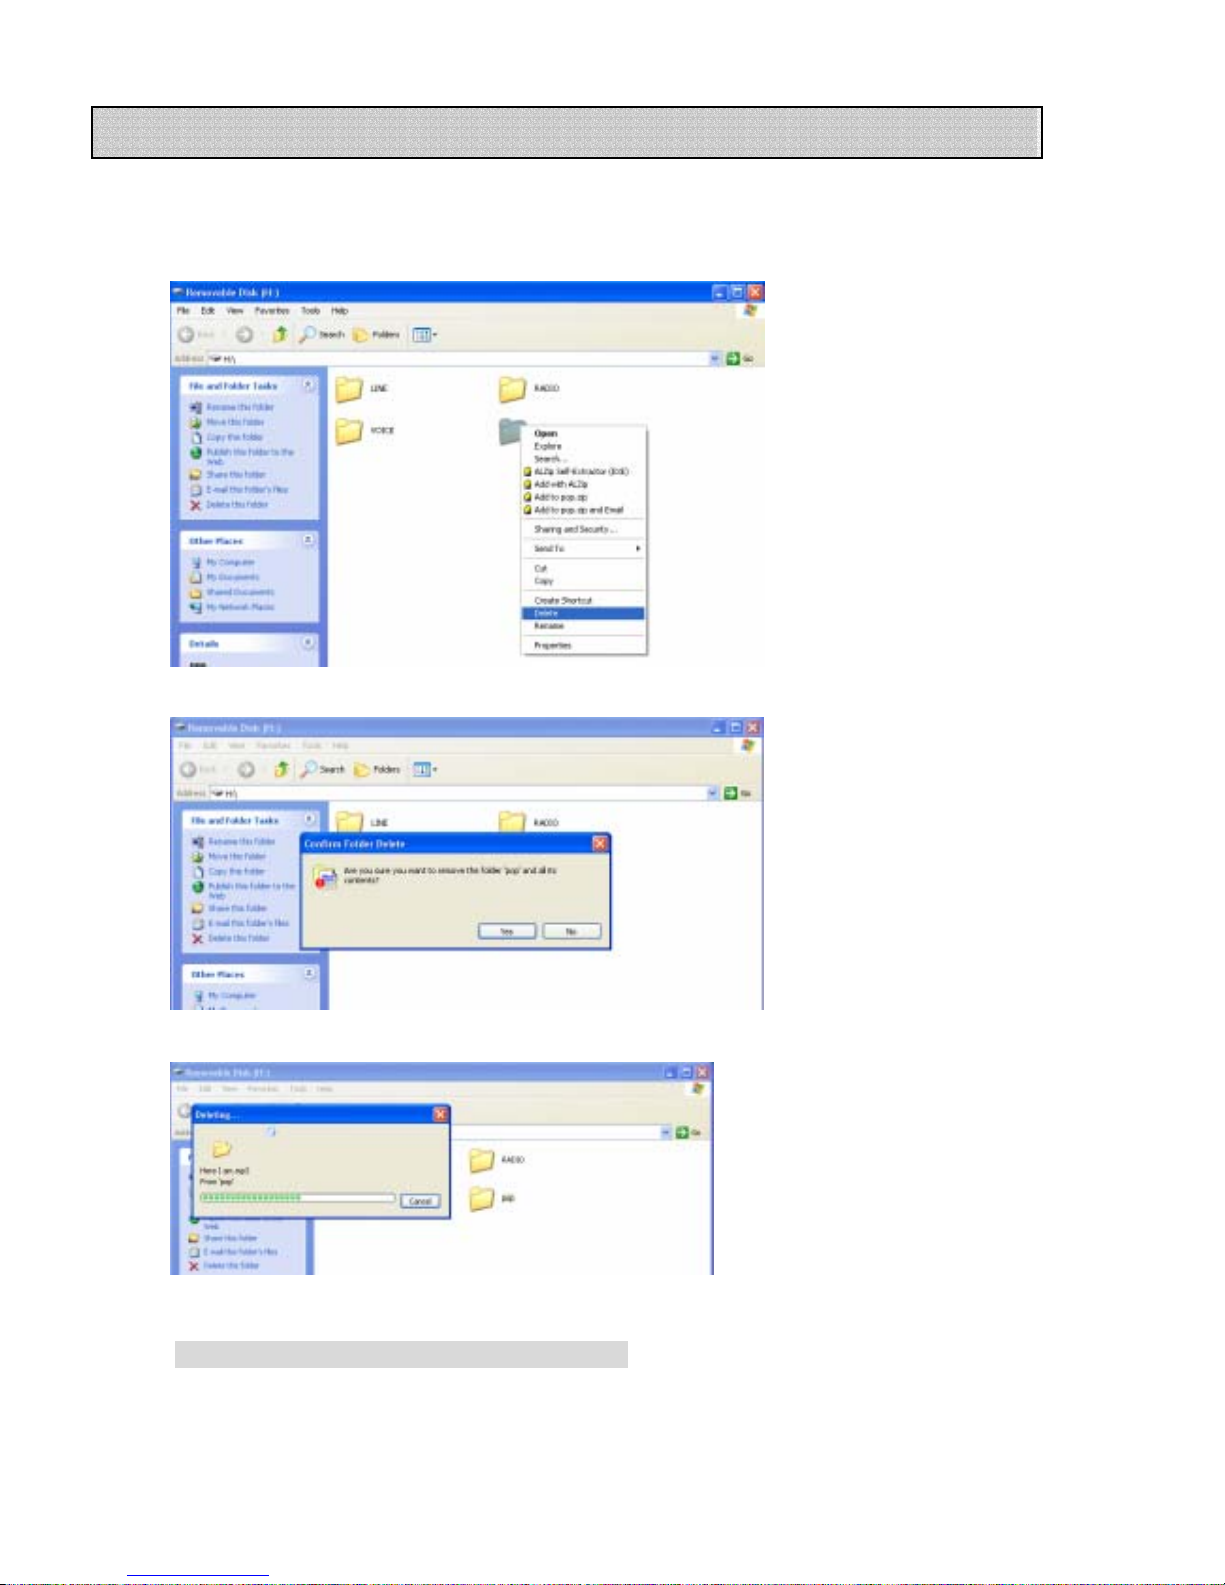
(1) Deleting on PC
○
1
Click file which you try to delete and click right button of mouse. Then following
toolbar appears.
○
2
Click ‘Yes’.
○
3
It indicates the status of deleting.
☞ Deleting on LINE, RADIO, VOICE MODE
Deleting Files
Page 24
24
◈ In case of deleting VOICE005
V005 is deleted, V006 is renamed to “V005”.
(2)Deleting on Device
Press MENU button for a long time and press , choose file or folder and
delete.
Page 25
25
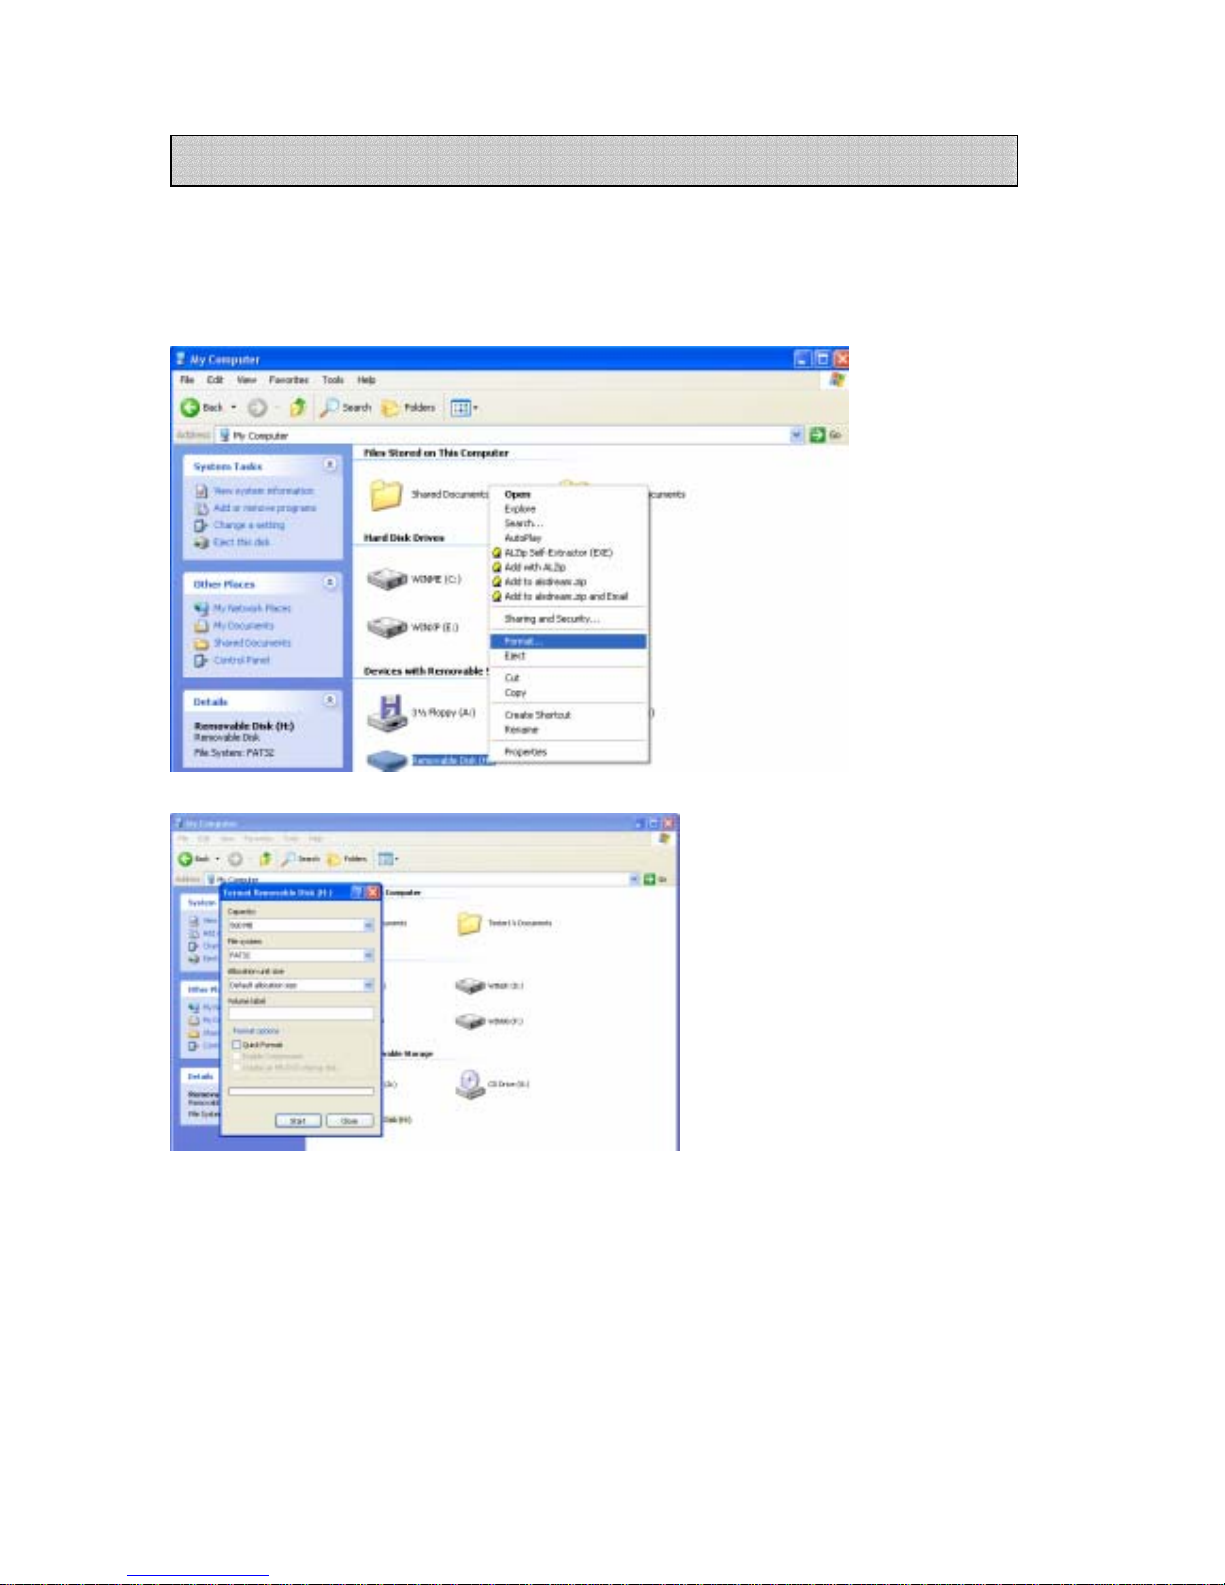
(1) FORMAT on PC
○
1
Go to [ My Computer], choose portable disk(F:) and click right button
of mouse. Following toolbar appears.
At the time, click format.
○
2
Click ‘start’ when following window appears.
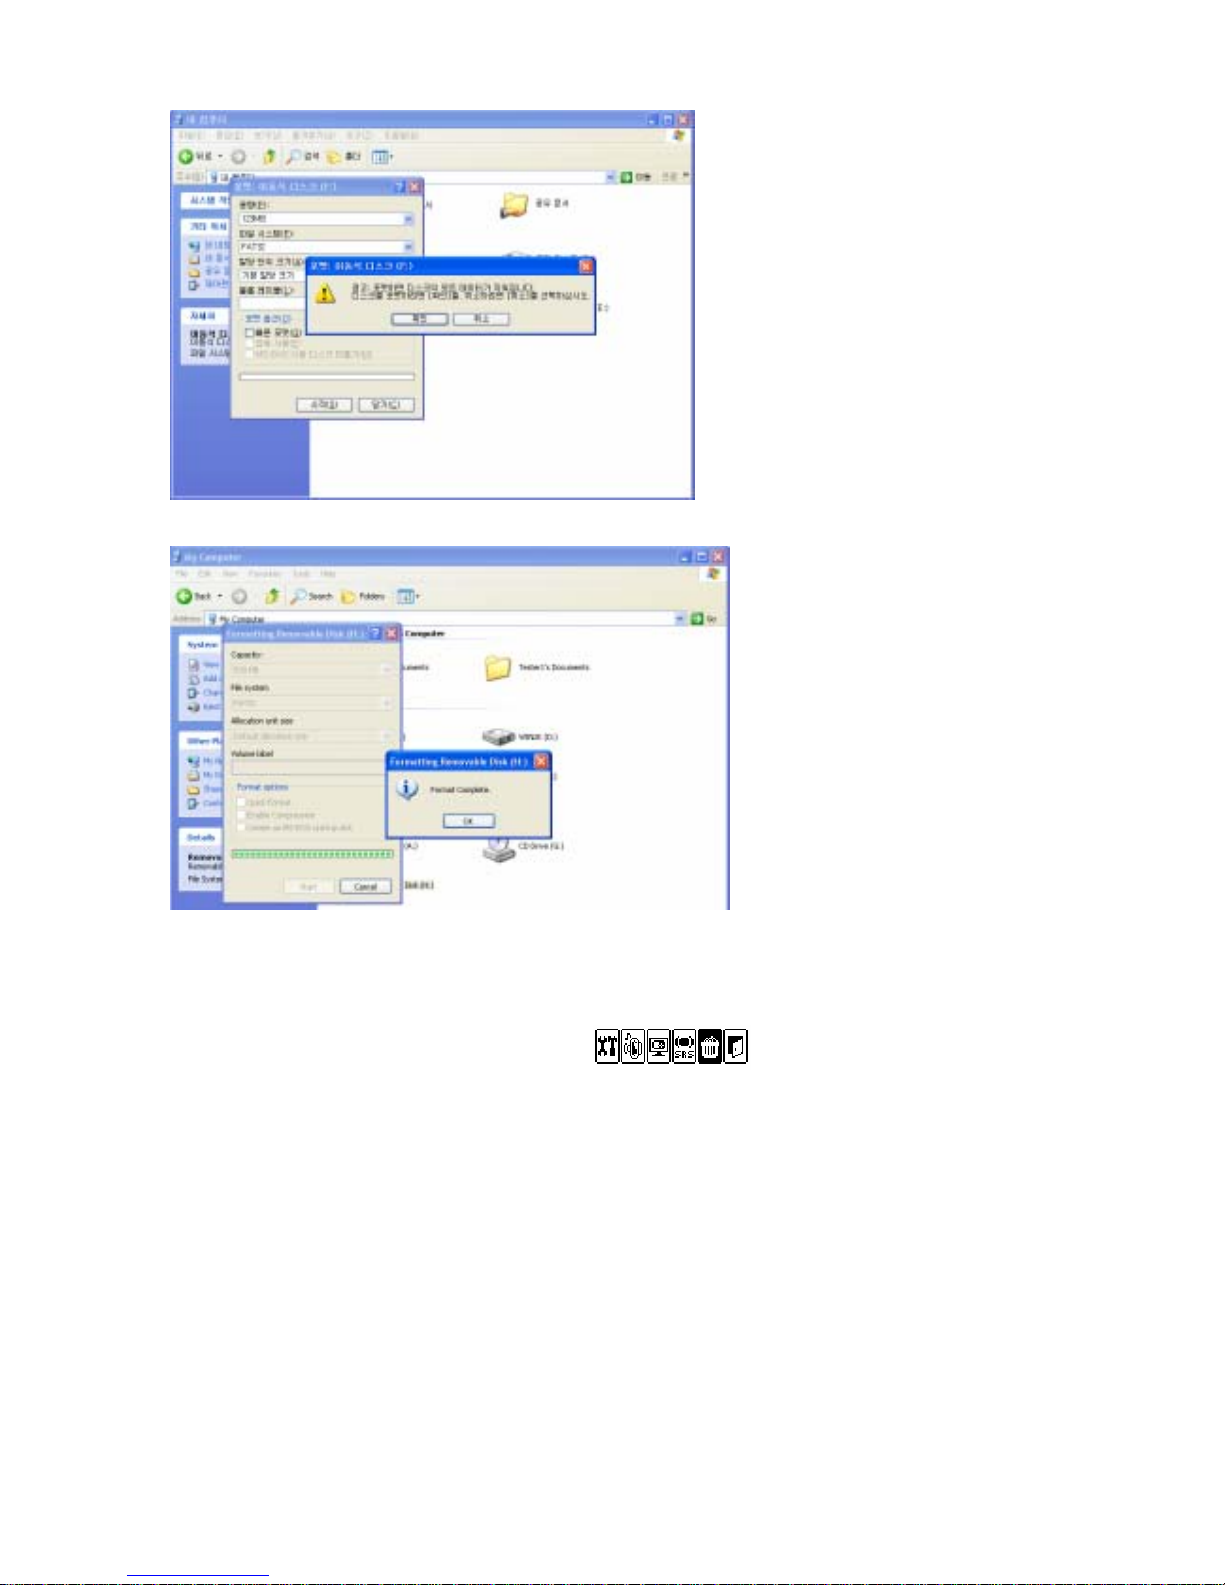
○
3
Click ‘confirm’.
FORMATTING File
Page 26
26
○
4
Format is completed.
(2) FORMAT on device
Press menu button for a long time and press , choose ‘DELETE ALL’ and
format is completed.
Page 27
27
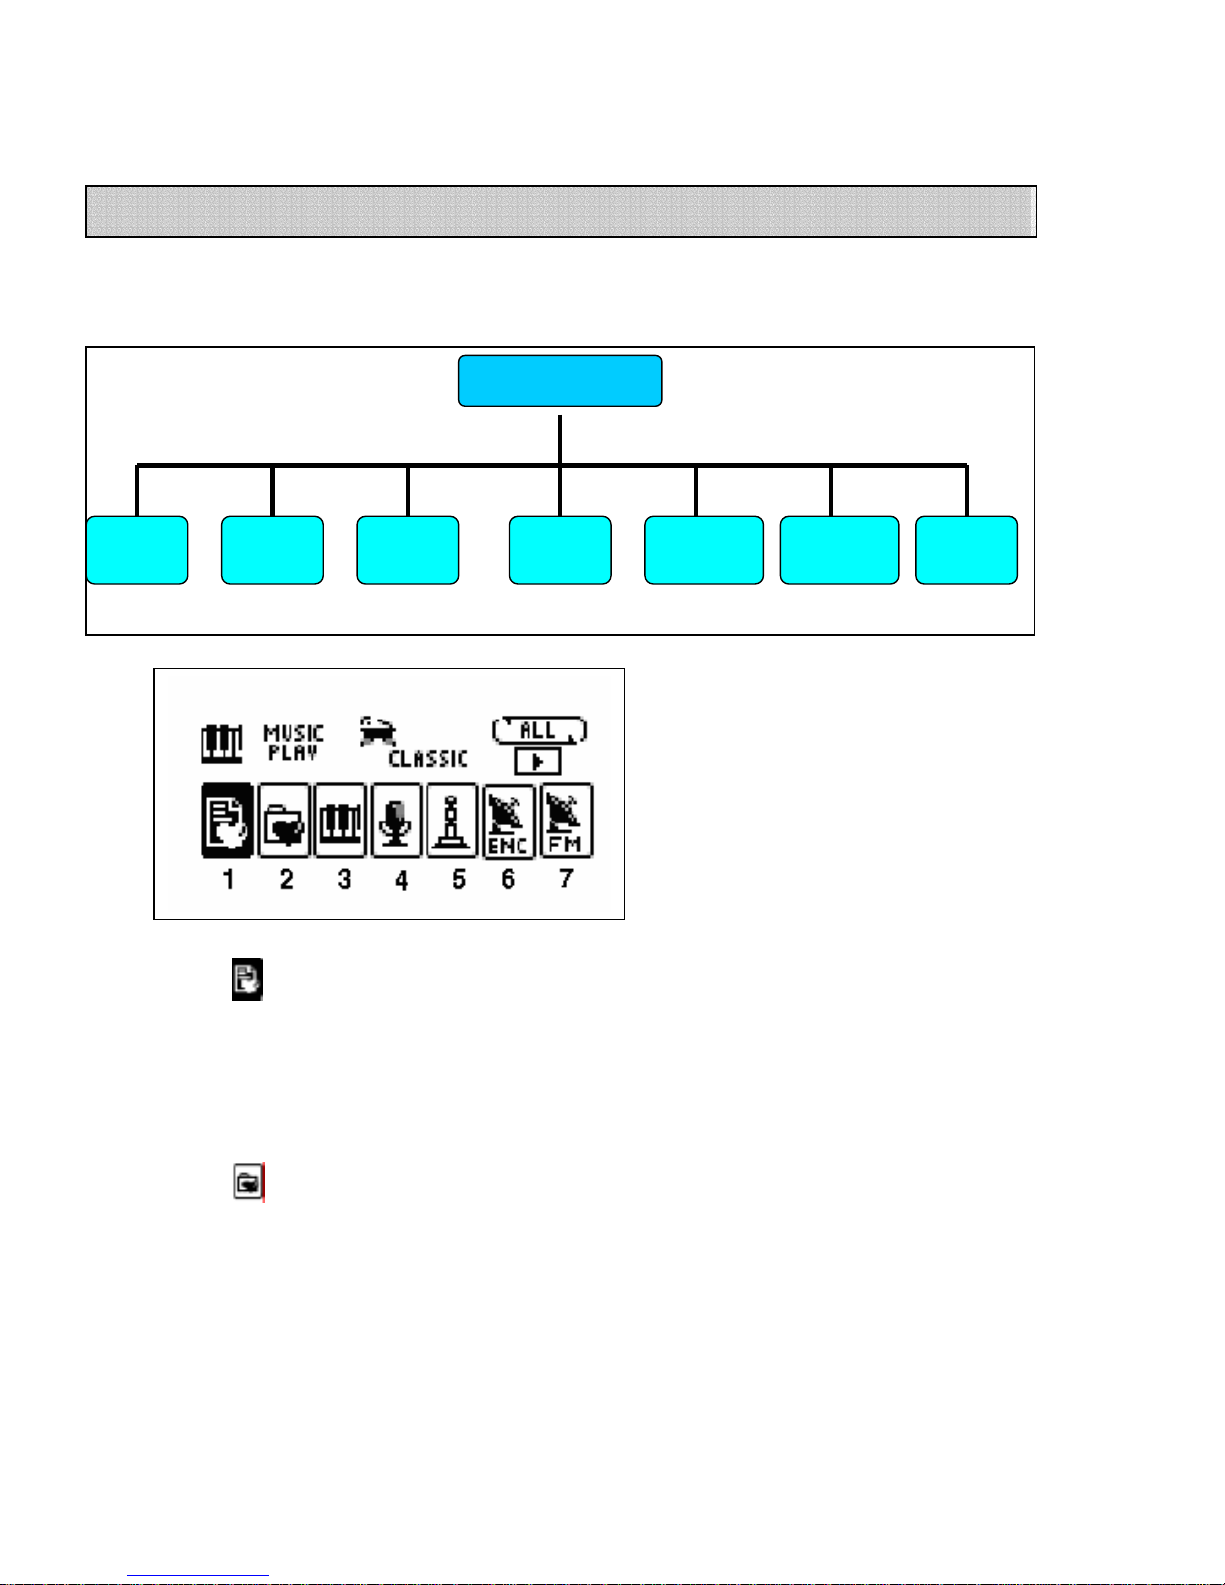
If you press the MENU button, the Mode Menu is displayed. The Mode Menu consists of the following
play related functions.
① BOOK-MARK
z You can play the selected music file.
z Hold down the SRS key to book-mark while playing a music file.
(You cannot create or designate folders.)
② FOLDER PLAY
z The function shows all the folders in the memory.
(The VOICE, RADIO and LINE folders are not displayed.)
z If you select a folder, the files in the folder are displayed, and only the MP3 / WMA files are
played.
(You can create up to 1000 folders.)
MODE MENU
BOOKMARK
FOLDER
PLAY
MUSIC
PLAY
VOICE
PLAY
LINE IN
ENC PLAY
RADIO
ENC PLAY
FM
RADIO
Mode Menu
Page 28
28
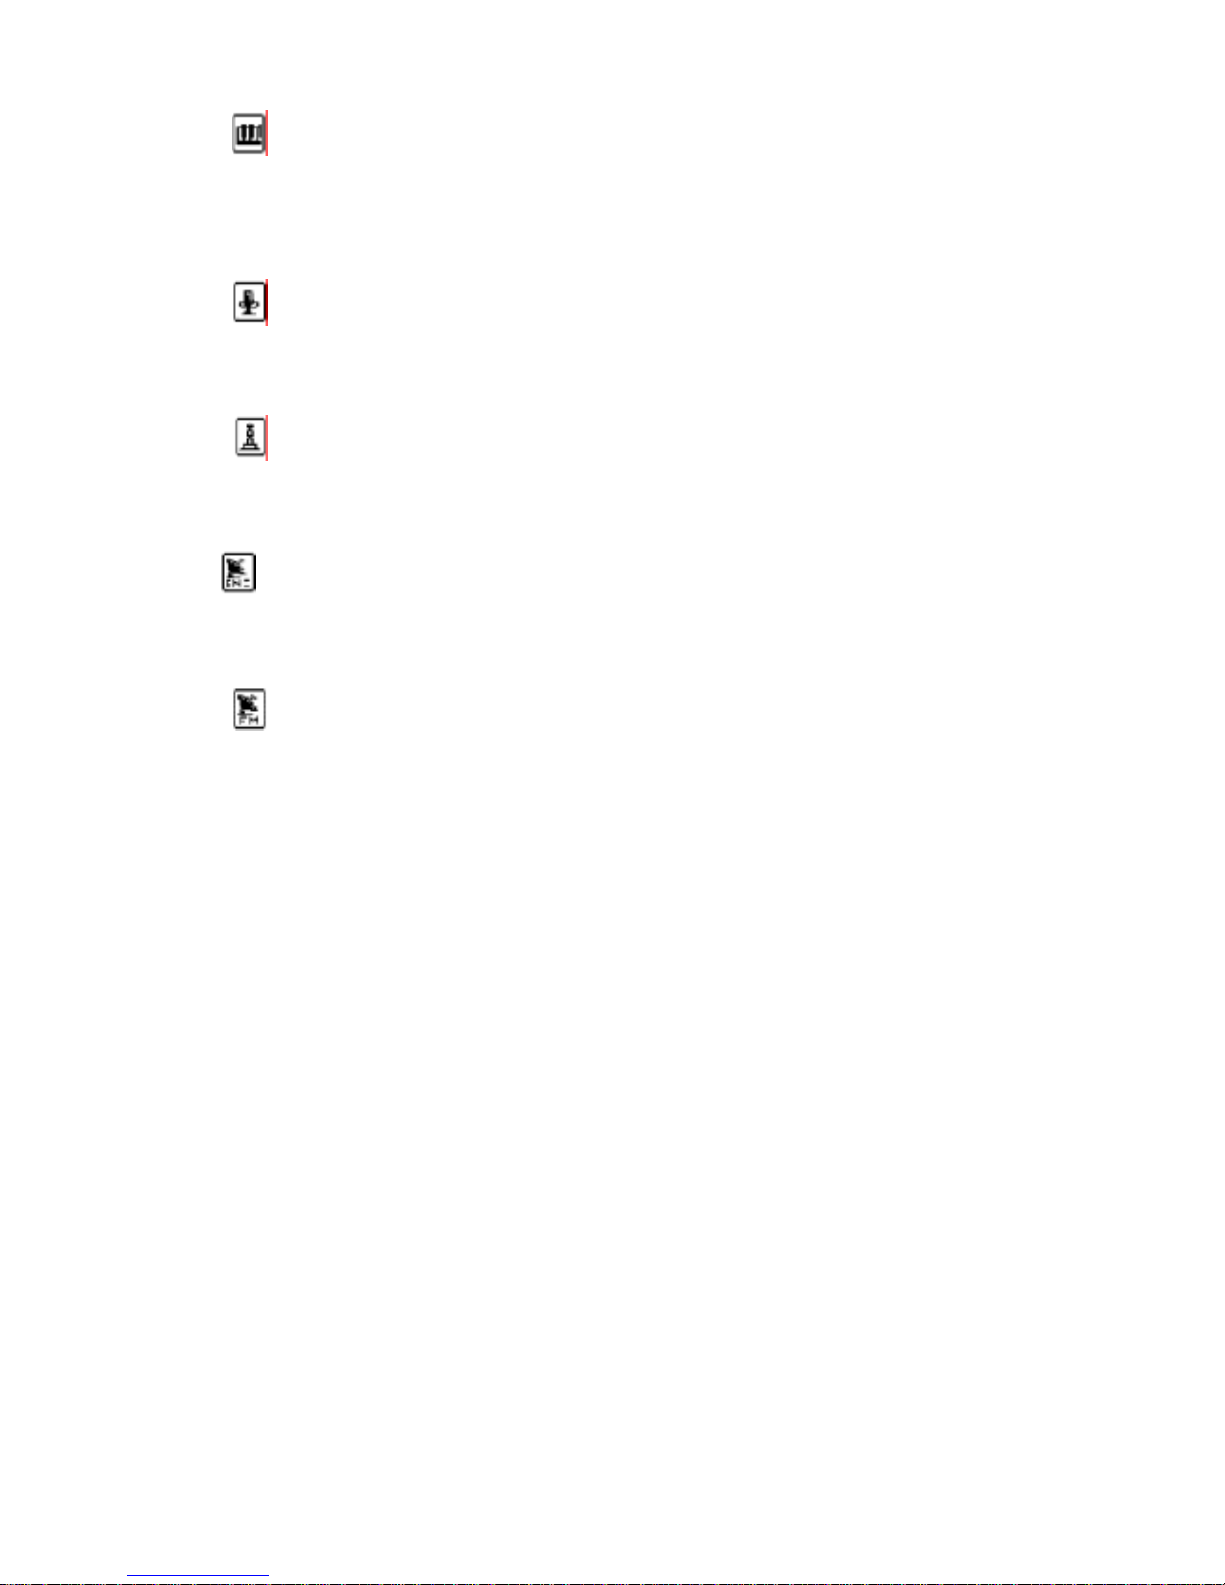
③ MUSIC PLAY
z Plays all the MP3 and WMA files in the memory.
(The files in the VOICE, RADIO and LINE folders are not played.)
z You can use book-mark function while the files are displayed.
④ VOICE PLAY
z Plays the MP3 and WMA files in the VOICE folder.
(Files are played in sequence from V001.mp3 or V001.wma.)
⑤ LINE IN
z Plays the MP3 and WMA files in the LINE folder.
(Files are played in sequence from L001.mp3 or L001.wma.)
⑥ RADIO ENC PLAY
z Plays the MP3 and WMA files in the RADIO folder.
(Files are played in sequence from F001.mp3 or F001.wma.)
⑦ FM RADIO
z You can listen to the radio
Page 29
29
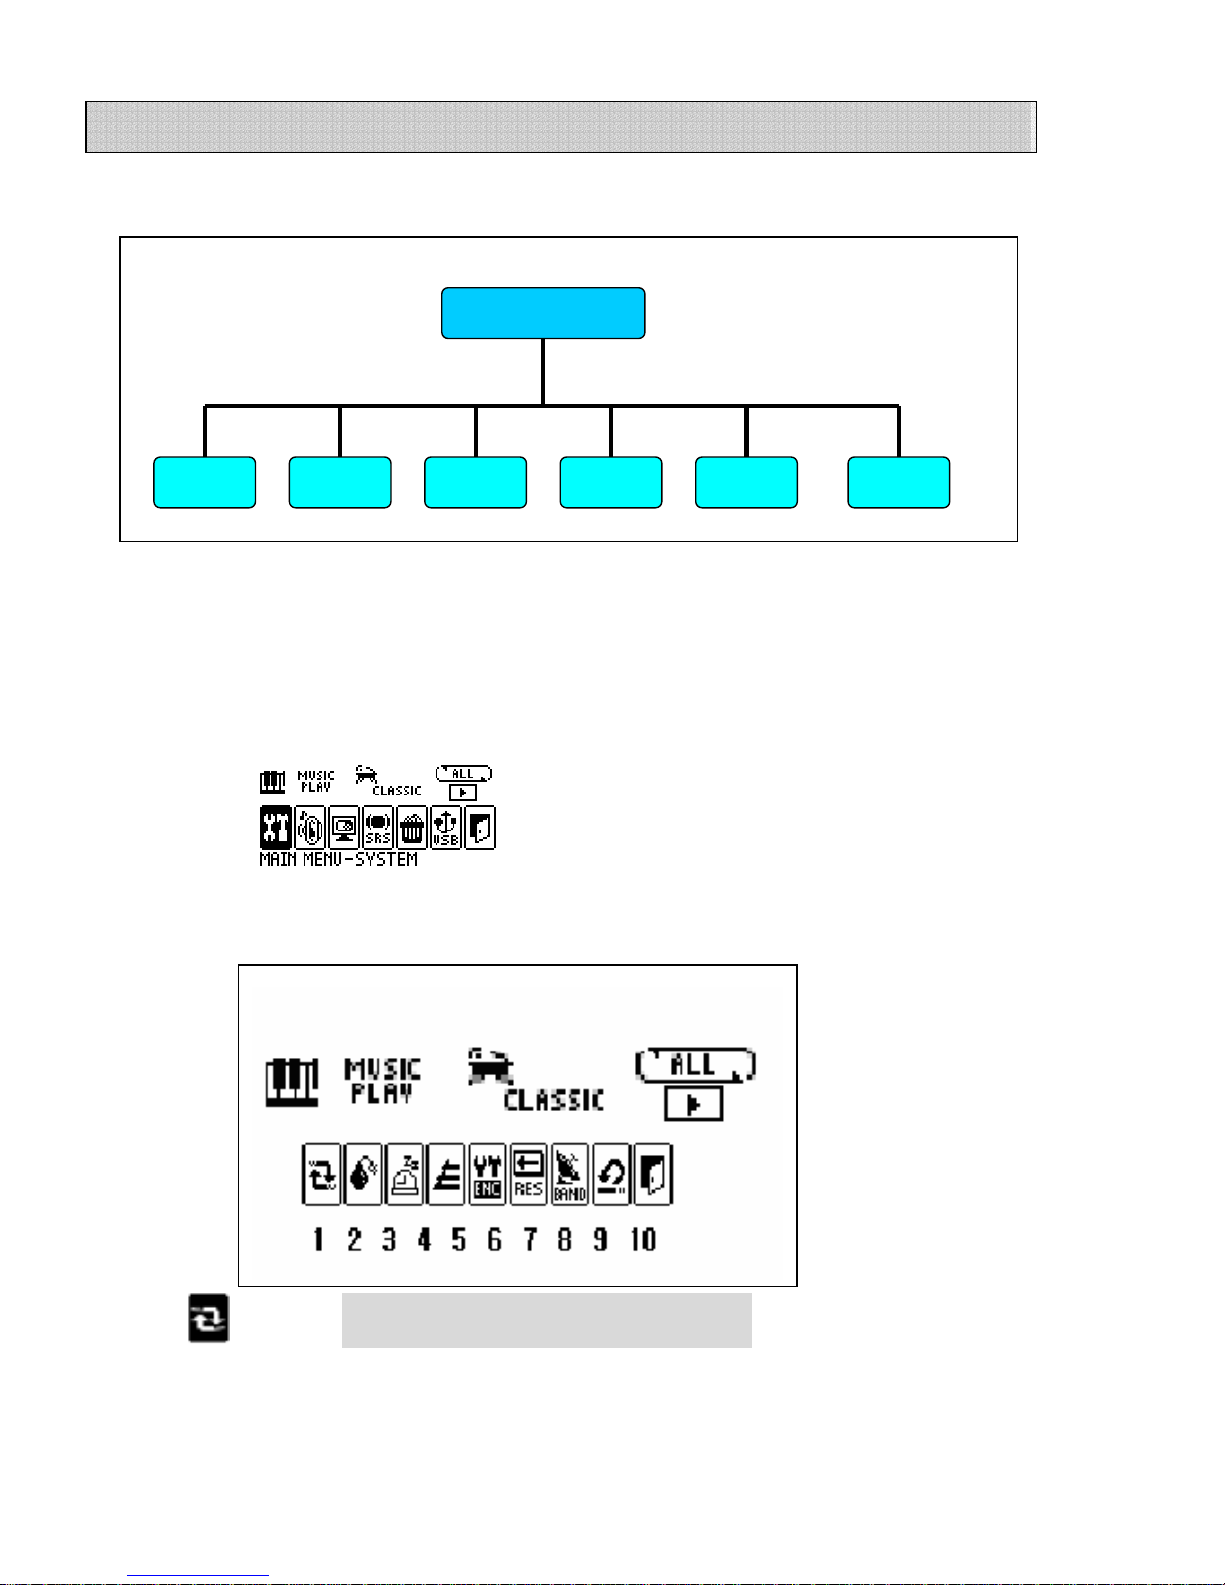
1) Main Menu
If you hold down the ‘MENU’ button, the main menu is displayed. The main menu consists of the
above 6 functions. Select EXIT to exit the main menu.
In the Main Menu, select the desired menu with the FF/REW/V+/V- buttons, and press the ‘MENU’
button.
(1) SYSTEM
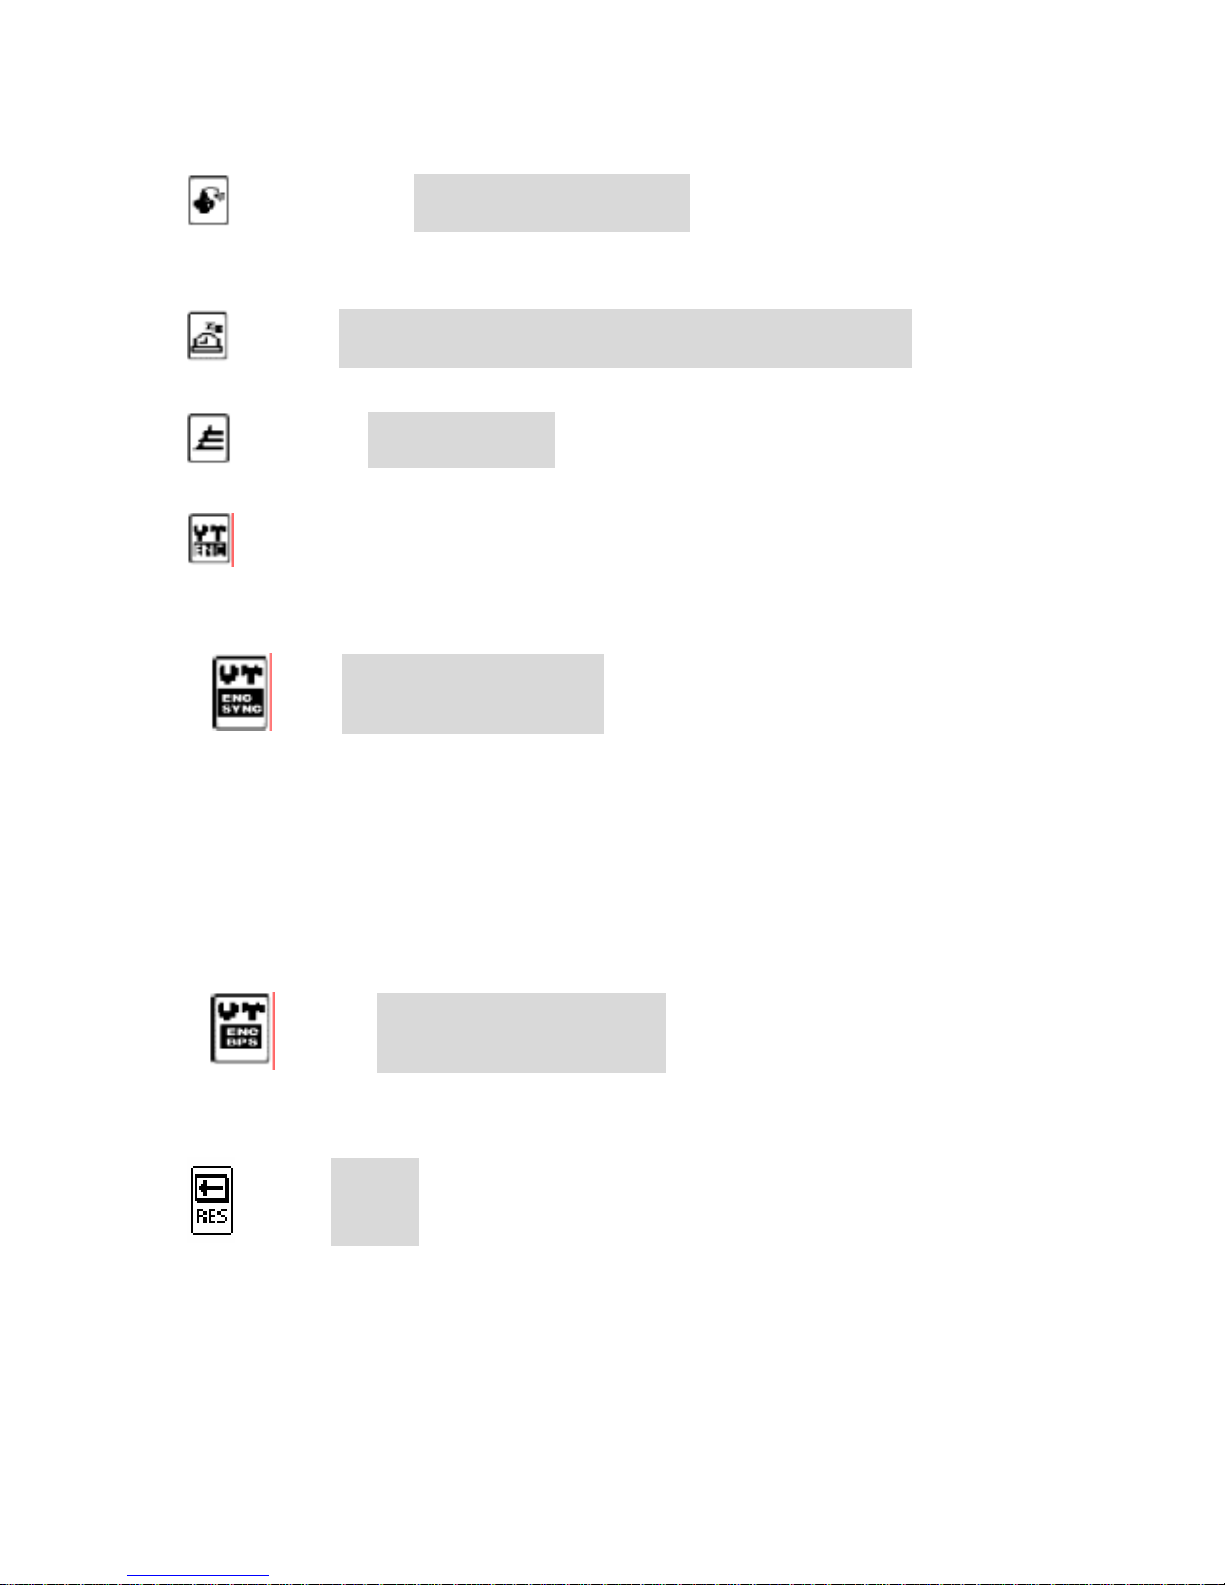
This menu consists of PLAYBACK, POWER OFF TIME, SLEEP TIME, INTRO TIME, ENCODE, DEFAULT
and EXIT.
○1 PLAYBACK NORMAL, REPEAT ONE, REPEAT ALL, SHUFFLE
NORMAL: Plays all files once in sequence.
REPEAT ONE: Repeats the current file.
Main Menu
MAIN MENU
SYSTEM
EXIT
DELETE
SRS
DISPLAY
SOUND
Page 30
30
REPEAT ALL: Repeats all files in sequence.
SHUFFLE: Repeats all files without sequence.
○2 POWER OFF TIME 1Min, 3Min, 5Min, ALWAYS ON
You can select the time period to make the unit power go off automatically if no operation is
made for that time period.
○3 SLEEP TIME OFF, 15Min, 30Min, 45Min, 60Min, 75Min, 90Min, 105Min, 120Min
The unit power is turned off automatically at expiry of the selected time.
○4 INTRO TIME 5S ec, 10Sec, 15Sec
You can select the time period for INTRO Play to play the first few seconds of each track.
○5 ENCODE
You can select whether to use the SYNC function or not for FM RADIO recording or LINE IN
recording, and set the recording bitrate and voice recording bitrate.
A. SYNC AUTO SYNC, ONE SYNC, OFF
AUTO SYNC: The MP3 Player automatically detects start and end of music, and creates a
new file for new music.
ONE SYNC: The unit automatically detects start and end of music, but creates the file only
once.
OFF: The unit does not detect start and end of a music. You can manually adjust start
and end.
B. BIT RATE VOICE BITRATE MP3 BITRATE
VOICE BITRATE: LP, HQ
MP3 BITRATE: 48Kbps, 64Kbps, 96Kbps, 128Kbps, 192Kbps, 256Kbps
○6 RESUME ON, OFF
The MP3 remembers the play data of the current file, and resumes playing the file when you
switch off and on the unit.
ON: The unit resumes the last file from the stopped counter when you switch off and on the unit.
OFF: The unit plays the last file from the index when you switch off and on the unit.
Page 31
31
○
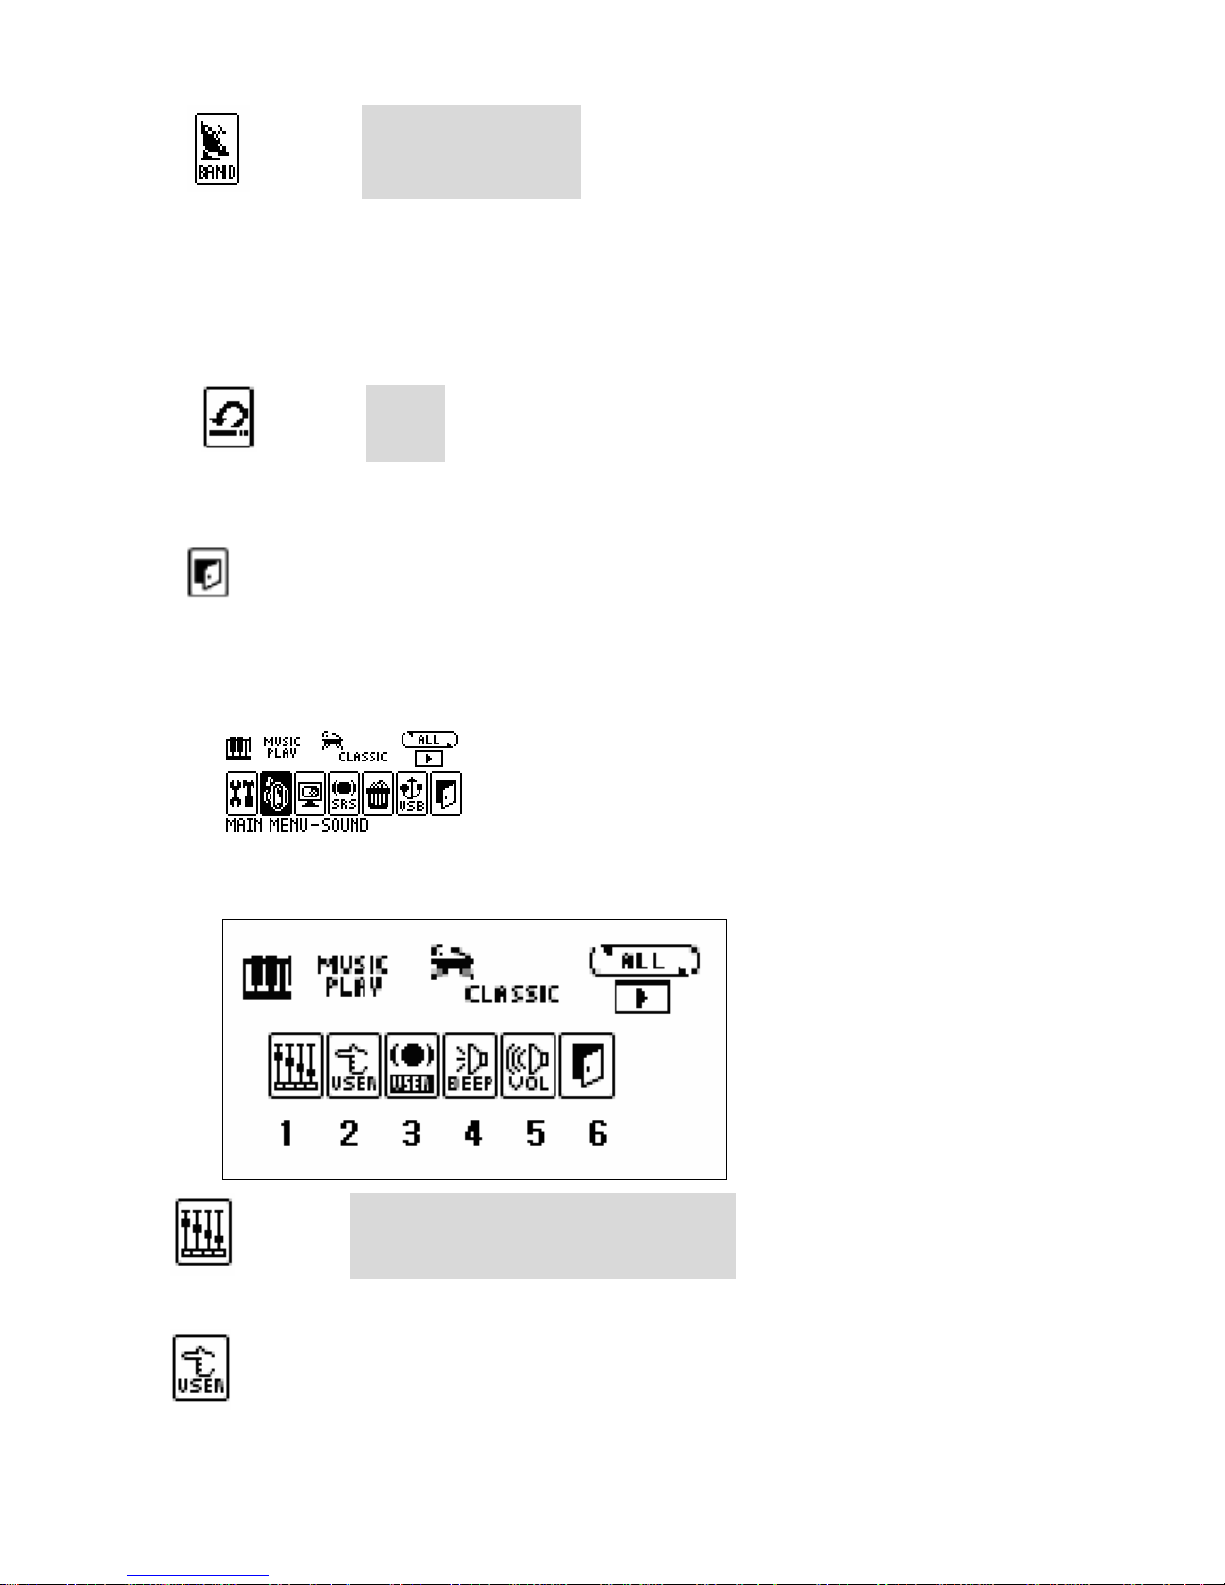
7 FM BAND WORLD, JAPAN, EUROPE
You can select on of the following FM bands.
WORLD: 87.5MHz~108.0MHz (100 KHz STEP)
JAPAN: 76.0MHz~108.0MHz (100 KHz STEP)
EUROPE: 87.50MHz~108.00MHz (50 KHz STEP)
○
8 DEFAULT YES, NO
You can reset the unit to the default status.
○
7
EXIT
You can finish the current menu and move to the upper menu.
(2) SOUND
The SOUND menu consists of EQUALIZER, USER EQ, SRS USER SETTING, BEEP, DEFAULT VOLUME
and EXIT.
○
1
EQUALIZER NORMAL, CLASSIC, POP, ROCK, JAZZ, LIVE
You can select one of the six equalizer modes.
○
2
USER EQ: You can adjust frequency by 3dB from –12dB to +12dB.
Page 32
32
○
3
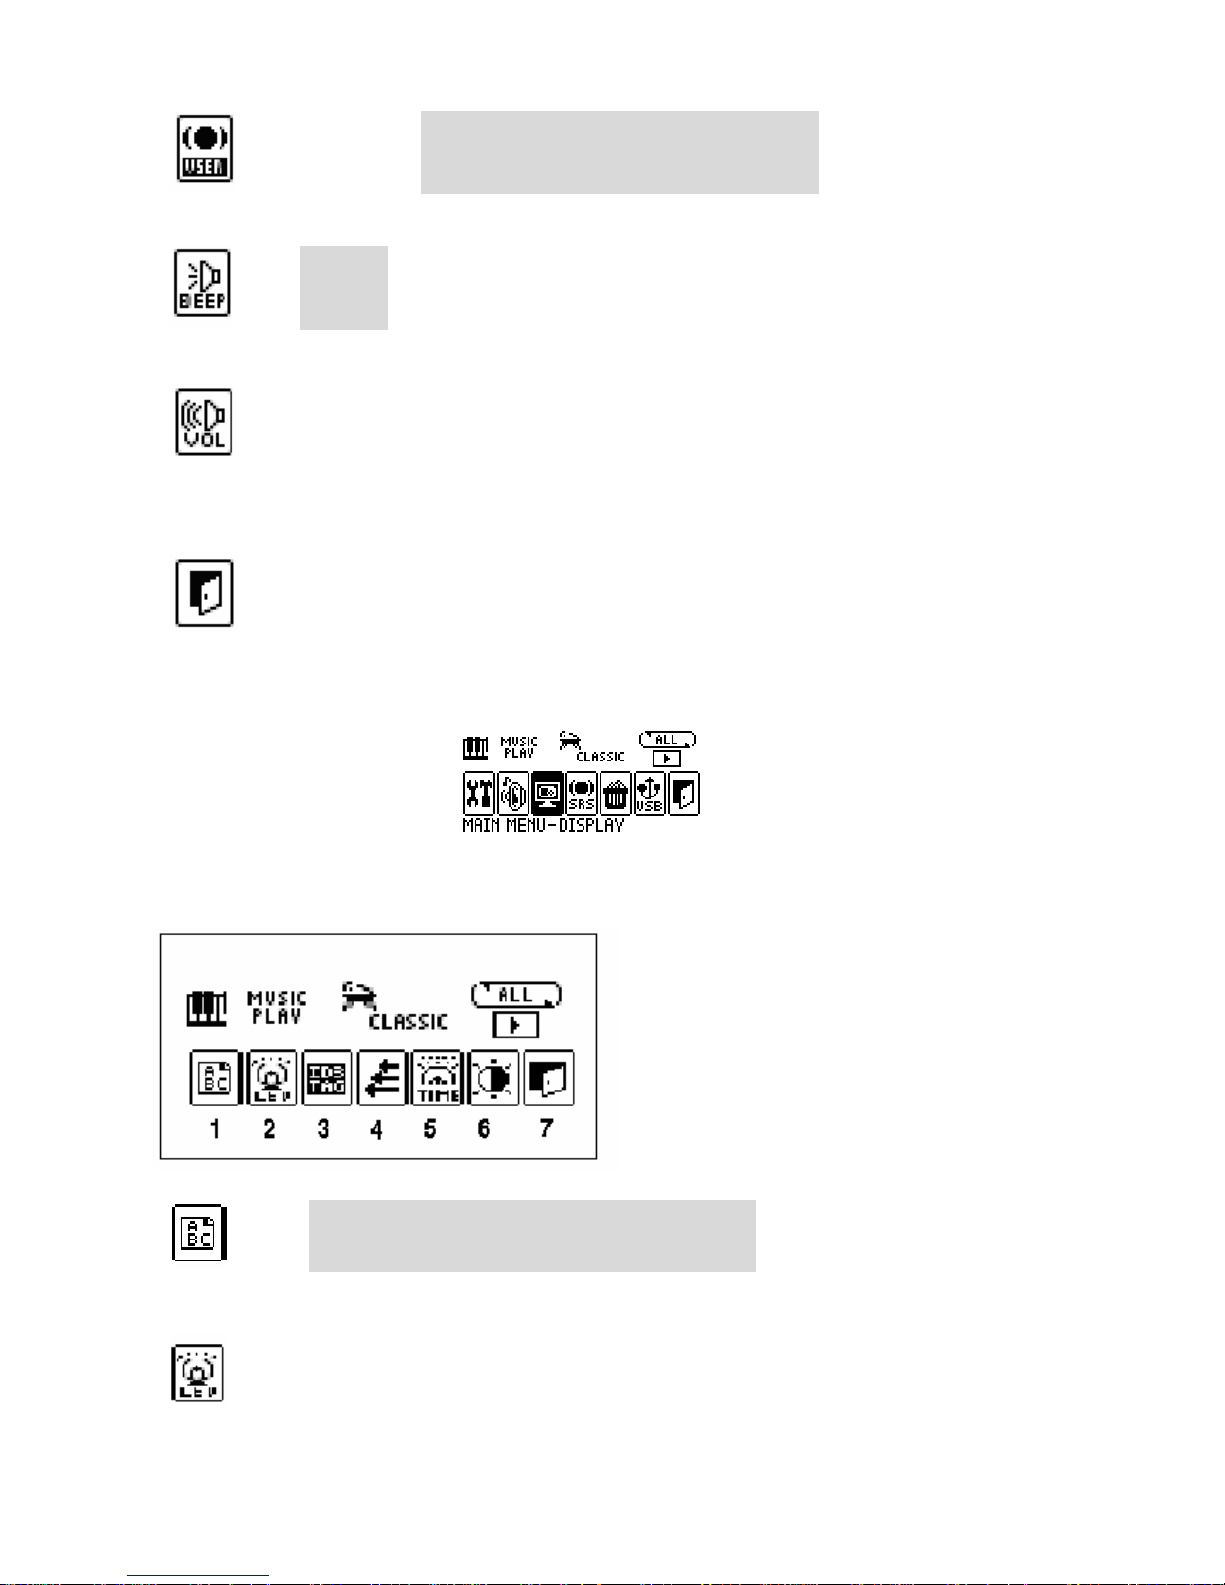
SRS USER SETTING SRS LEVEL, TRUBASS EFFECT, FOCUS LEVEL
You can select the level of SRS effect.
○
4
BEEP ON, OFF
You can adjust the beep sound for key action.
○
5
DEFAULT VOLUME: To prevent bursting of sound when you turn on the power, the unit
adjusts the volume to the previous one if it is lower than the default volume, or to the default
volume if it is higher than the default volume.
○
6
EXIT
You can finish the current menu and move to the upper menu.
(3) DISPLAY
This menu consists of the display related functions (FONT, LOGO, ID3 Tag, SCROLL TIME,
BACKLIGHT TIME, CONTRAST and EXIT).
○
1
FONT KOREAN, ENGLISH, JAPANESE, CHINESE, EUROPE
You can select a language for ID3 TAG information on setting.
○
2
BACKLIGHT COLOR: 9 backlight color options are available.
Page 33
33
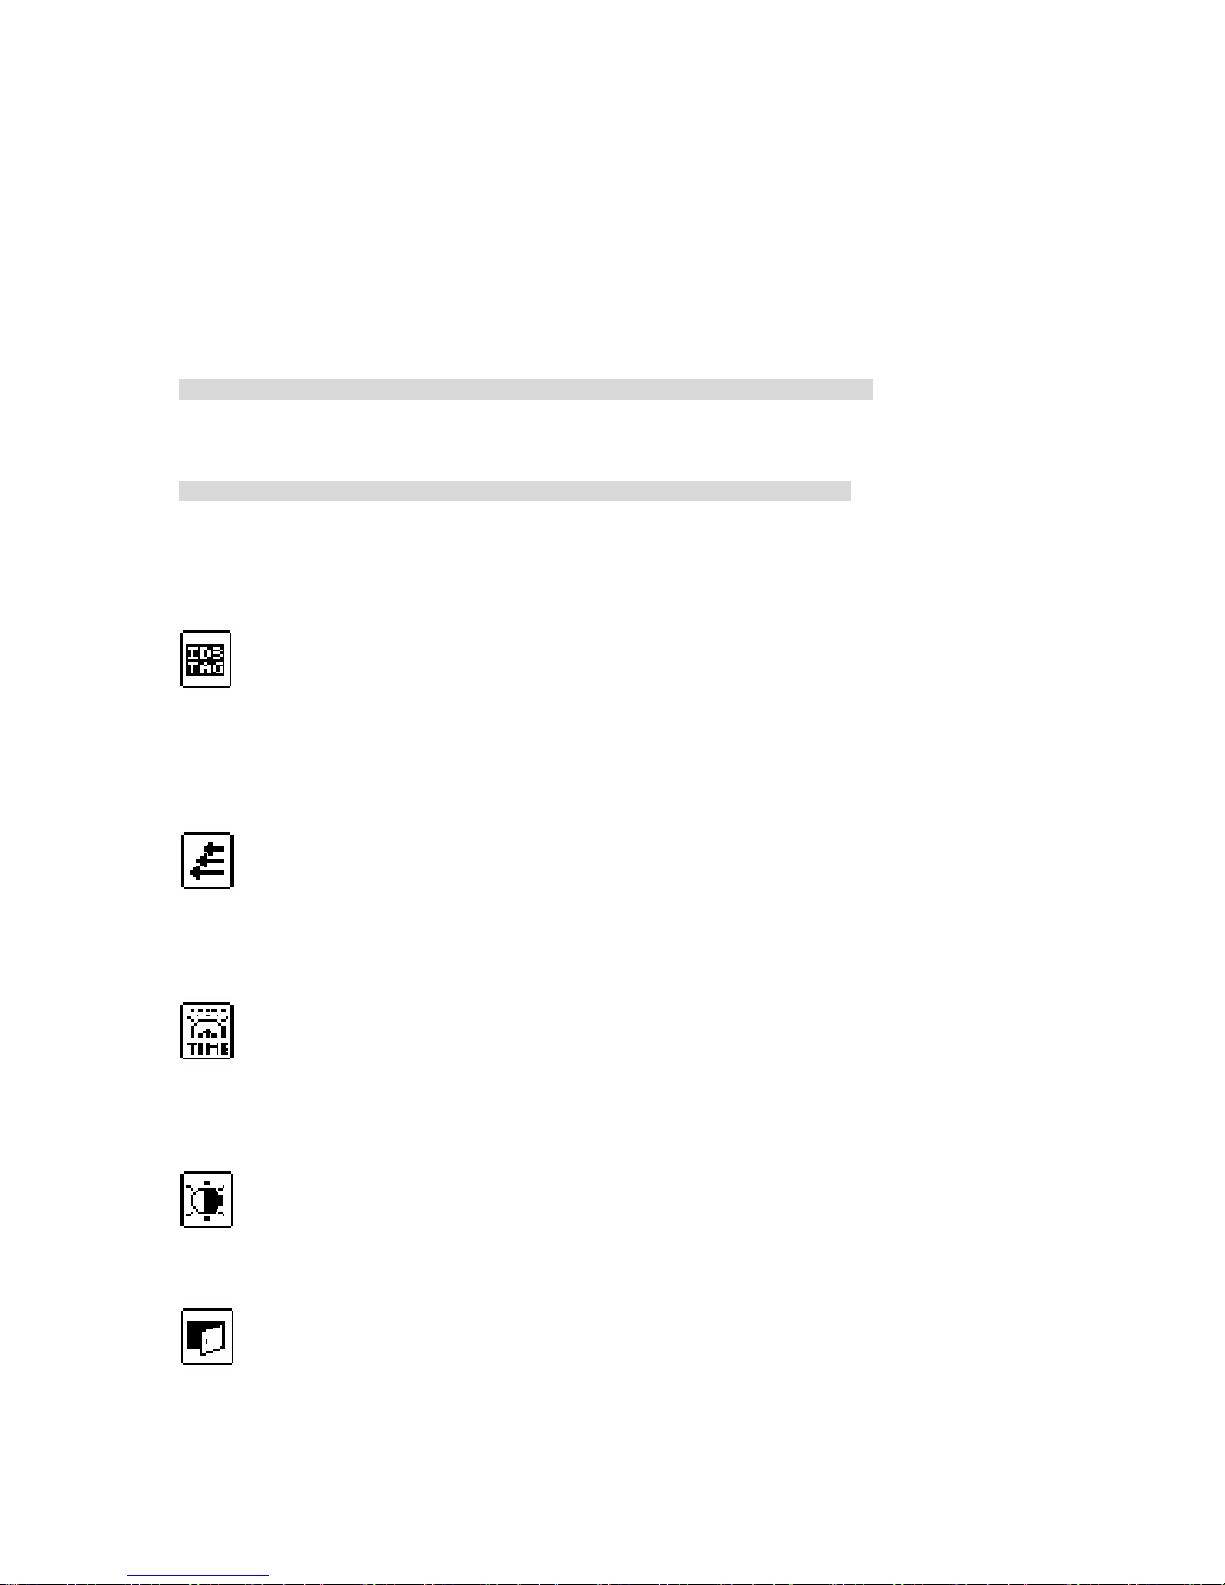
◆ RED
◆ GREEN
◆ BLUE
◆ YELLOW
◆ MEGENTA
◆ CYAN
◆ WHITE
◆ RANDOM – Backlight is changed in random sequence.
RANDOM Sequence: RED->GREEN->BLUE->YELLOW->MAGENTA->CYAN->RED…
◆INTRO – Each backlight color is displayed for one second in the sequence in accordance with
the BACKLIGHT TIME setting.
INTRO Sequence: RED->GREEN->BLUE->YELLOW->MAGENTA->CYAN->RED…
(If you select INTRO after setting the BACKLIGHT TIME to 3 Sec, the backlight is displayed as
RED 1 Sec ON-OFF -> GREEN 1 Sec ON-OFF ->BLUE 1 Sec ON-OFF.
If you change the BACKLIGHT TIME, each color is displayed for one second in INTRO sequence. )
○3 ID3 Tag: The menu is used to display file information.
1. ON: Title, Artist, Bit Rate and Frequency are displayed when the file is played.
2. OFF: Only the file name is displayed.
○4 SCROLL TIME
You can select the file information scrolling speed on LCD from 0 to 10.
(If it is set to 0 Sec, the unit is in the file information stop state.)
○
5
BACKLIGHT TIME
You can select the backlight time from 0 to 10 Sec.
(Backlight is off at 0 Sec.)
○
6
LCD CONTRAST
You can adjust LCD contrast from Step 1 to 10.
○7 EXIT
You can finish the current menu and move to the upper menu.
Page 34
34
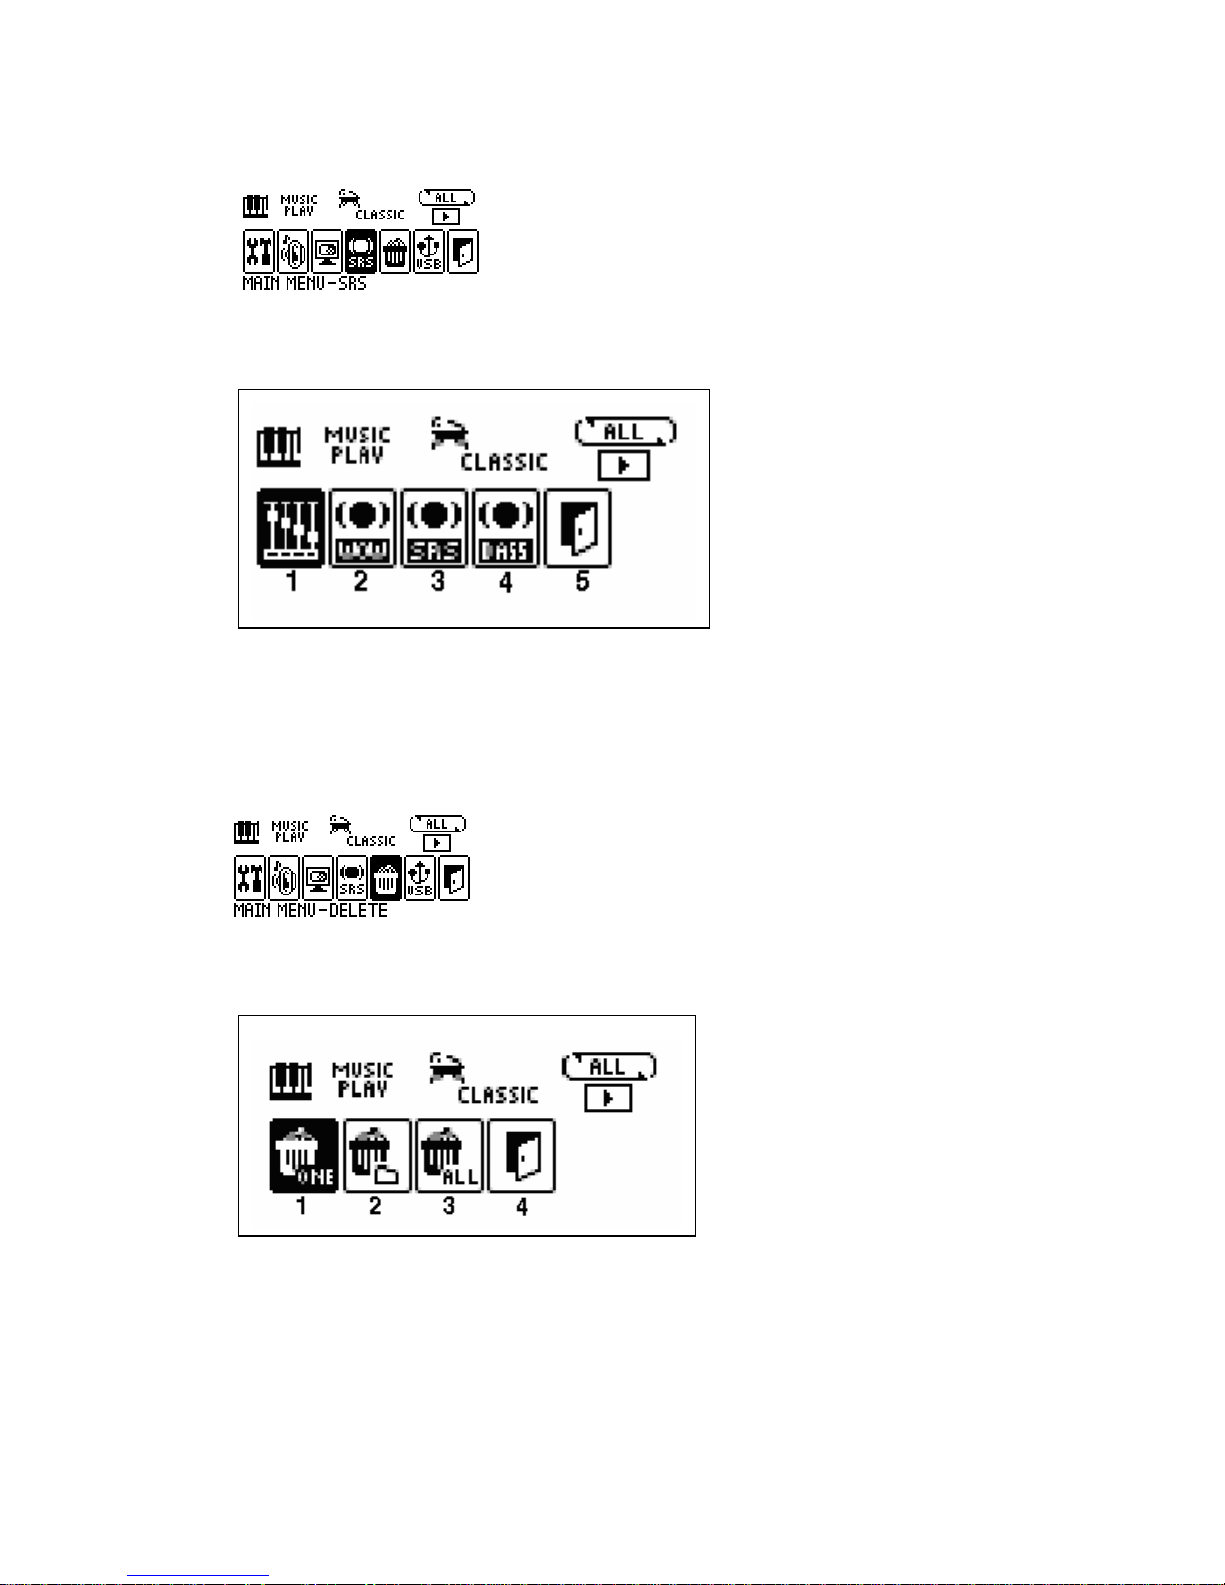
(4) SRS
This menu is used to select the SRS effect. SRS implements the 3D sound.
z ○1NORMAL ○2WOW SELECT ○3SRS SELECT ○4TRUBASS SELECT ○5EXIT
z USER SETTING range consists of WOW VOLUME, TRUBASS and BRIGHTNESS.
(WOW reinforces stereo, and TRUBASS reinforces bass.)
(5) DELETE
You can delete files or folders.
○1 DELETE ONE: You can delete a file.
○2 DELETE FOLDER: All folders in the memory are displayed. If you select a folder, the selected
folder and the files are deleted together. If the folder has sub-folders, the sub-folders and
their files are also deleted.
Page 35
35
○
3
FORMAT: All folders and files in the memory are deleted.
○4 EXIT: You can finish the current menu and move to the upper menu.
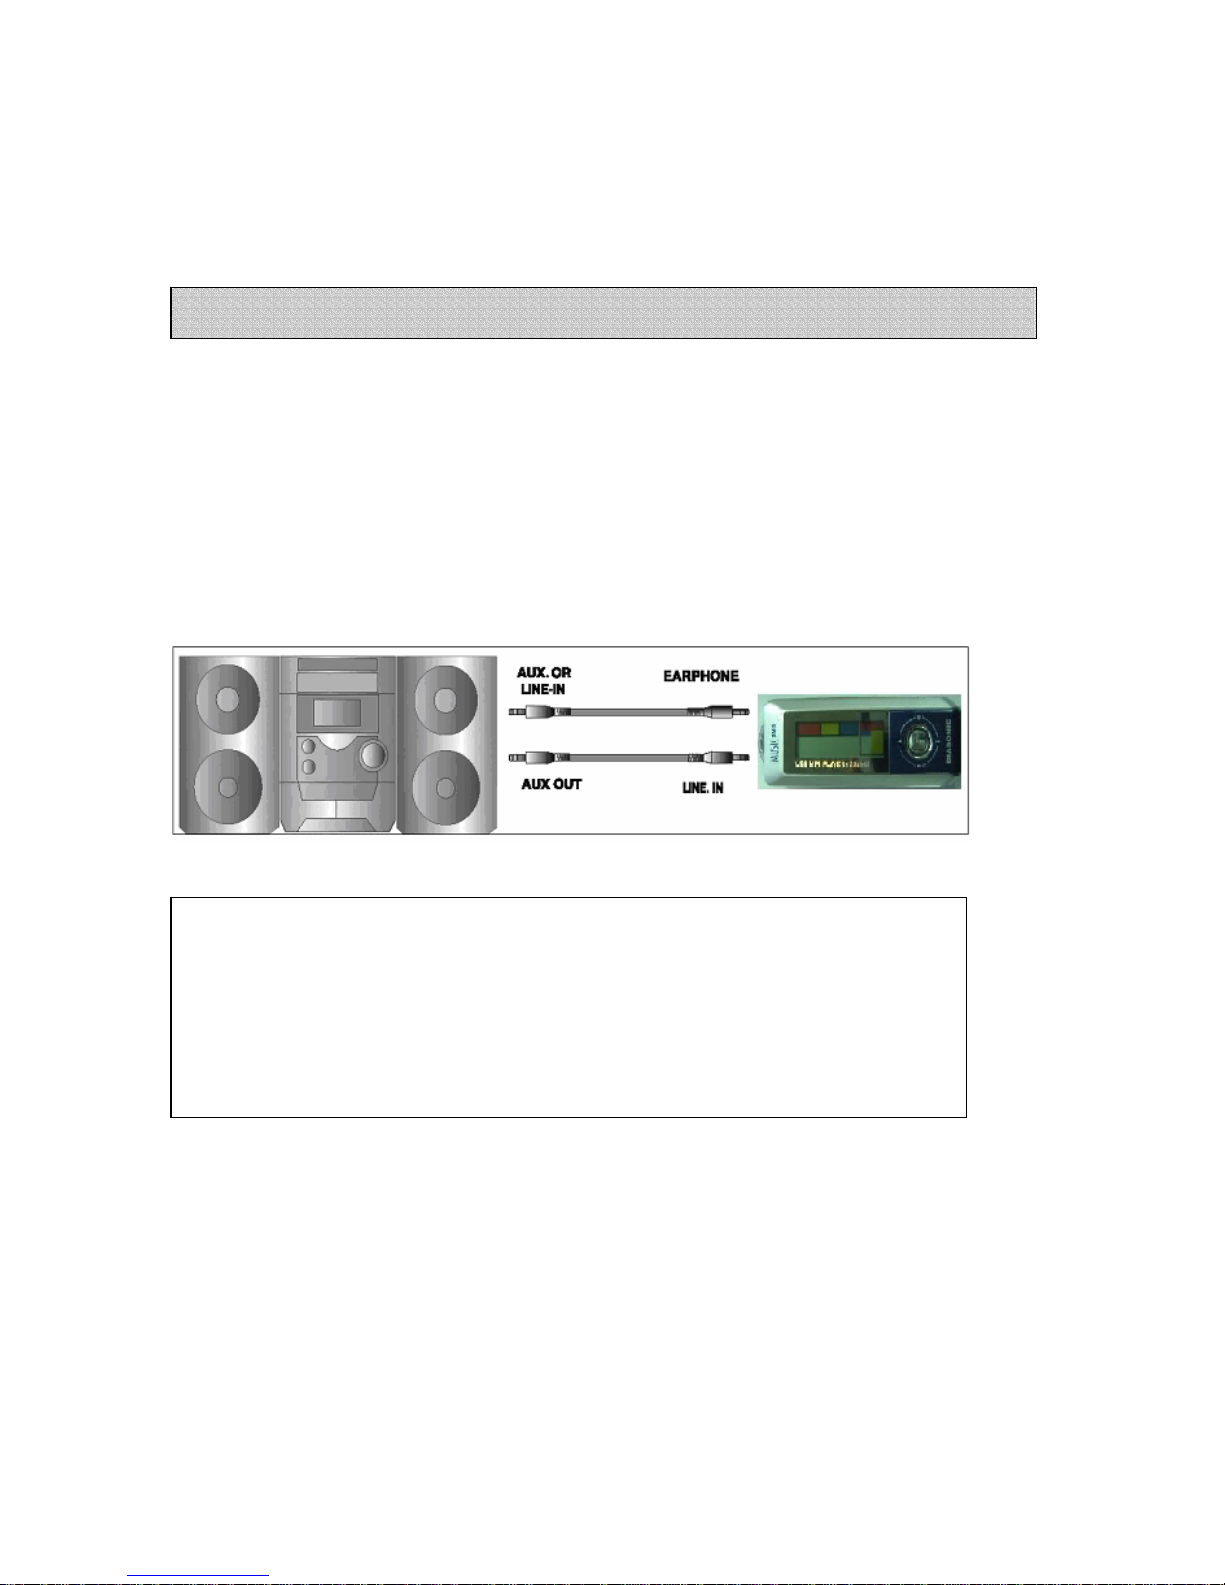
(1) In case of recording from external device to the device.
Plug in the audio cable to line in input terminal of the device.
(2) In case of recording from the device to external device
Plug in the audio cable to line in input terminal of the device and mic or input terminal of
external device.
How to connect with audio.
Connecting to external device
※ Caution
★ In case of connecting to external device, please turn off power before hand.
★ Please read through this manual carefully befo re co nnec tin g to external devic e.
★ This product does not have the installed power that can operate external mic
inside main set.
So, you can not record through external microphone by line-in.
Page 36
36
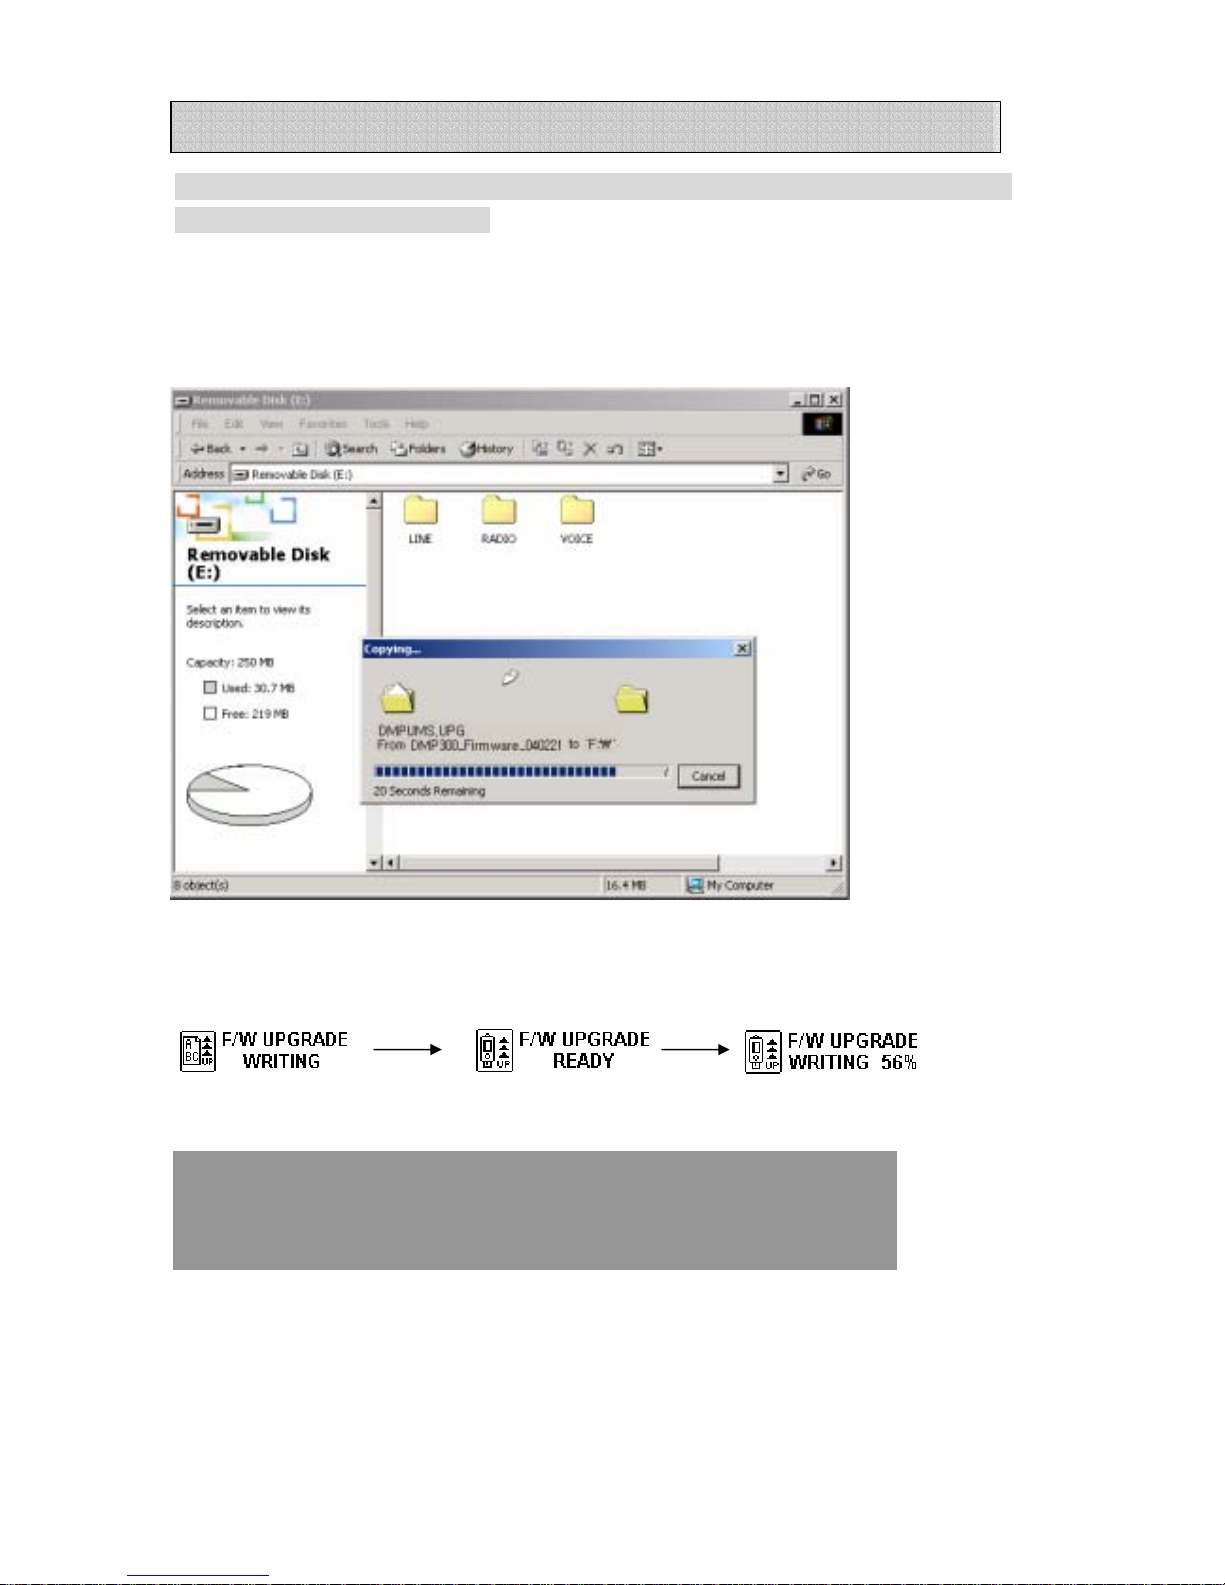
This device has the feature which is to improve function and correct
error by upgrading firmware.
You can download upgrade file by connecting to website.
Firmware upgrade can be operated when you copy firmware file to root of device which is
connected to PC.
After completing this work, take set away from USB connection and turn off for resetting
firmware. Below procedures will display when turn on the set once again.
FIRMWARE UPGRADE
<Caution>
Power of device is off automatically when upgrade is completed.
Do not operate or take off device from PC. It causes defective.
Page 37
37
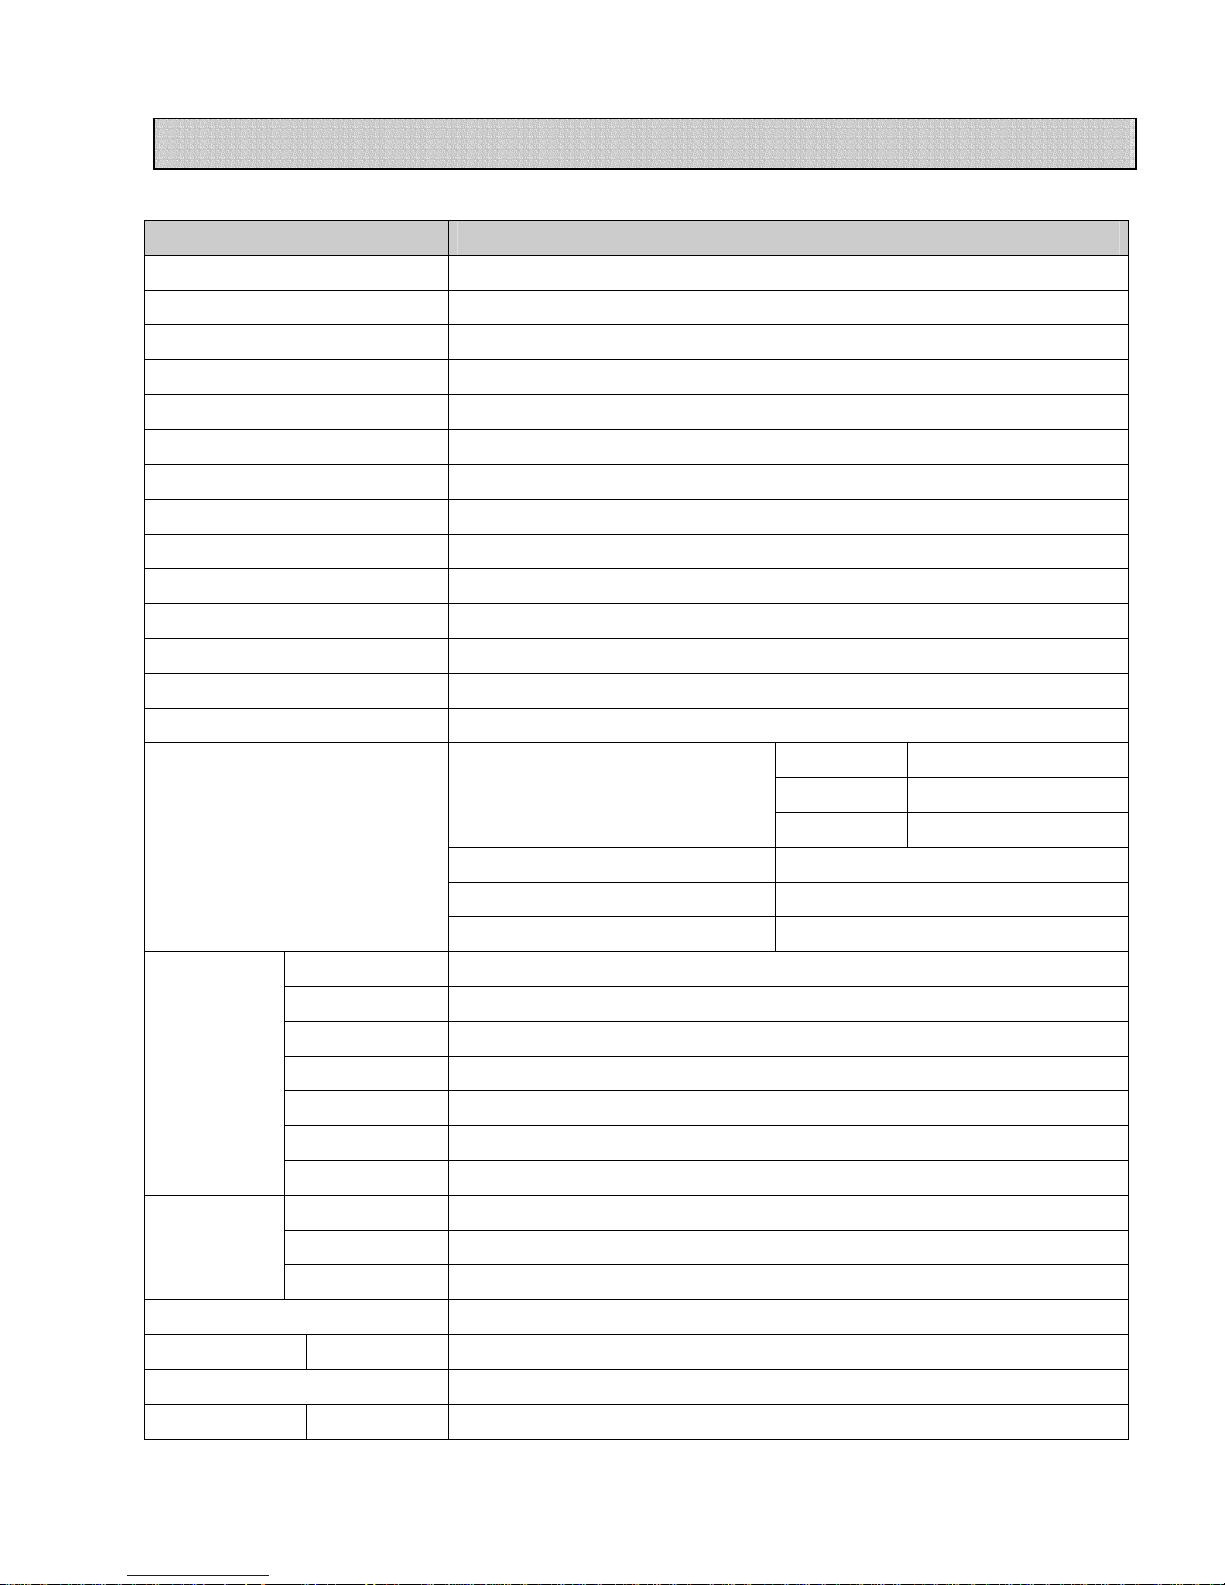
Model DMP-310
File format MPEG 1/2 LAYER 3 , WMA
Bit rate 32Kbps~320Kbps(MPEG 1/2 LAYER 3)
Signal Vs Noise 85db (1KHz input 0db at USE LPF 30KHz)
Distortion
0.3%±0.05 (1KHz input 0db)
Frequency Response 20Hz~20KHz
Earphone Output
MAX. 5mW (16Ω)
Sound Mode EQ : NORMAL, ROCK, POP, CLASSIC, LIVE, JAZZ,SRS
Searching Mode Repeat Each Track 5, 10, 15secs
Searching Easy Track Searching
Repeat Play One, All, A Block & Option Repeat
Download speed Max. 3Mbps(375Kbyte)
BACK LIGHT LED
RED, GREEN, BLUE, YELLOW, MEGENTA,CYAN,WHITE의 7가지 COLO R
Memory ADVANCED NAND FLASH MEMORY(128,256M,512M)
AUDIO IN JACK
∮3.5 STEREO JACK
WORLD 87.5~108.0MHz
JAPAN 76.0~108.0MHz
Frequency Range
EUROPE 87.5~108.0MHz
Earphone Output
5mW(L) + 5mW(R) : 16Ω, Max.
Signal Vs Noise 55dB at 1mV
FM Radio
(Stereo)
Receiving Type Earphone Code Antenna
Interface USB1.1(USB Mass Storage)
System More than CPU 200MHz, RAM 64MB, 20MB
O/S Windows98SE , Windows2000 , Windows ME , Windows XP
Sound Card Sound blaster 16 compatible
Display More than640X480
Earphone
∮3.5 earphone(mini plug/stereo) IMP less than 16Ω
PC
interface
USB JACK USB A TYPE PLUG
Display 132*56DOTS, WITH ICON
BACKLIGHT LED BACK LIGHT
LCD
128x16DOT
Language Korean, Japanese, English, Chinese & other languages
Proper Temperature
5℃~35℃
Battery Life MP3 Play About 13 hrs
Accessory Line-in/out Cable(1) / CD(1) / Neck Strap(1) / Stereo Earphone(1) /Manual(1) /
Recharging Time USB,ADATOR About 210Min.
General Specification
Page 38
 Loading...