

Page 1

STEALTH 3D 2000 Pro On-
Microsoft
line User's Guide
Thank you for purchasing a Diamond Stealth
3D 2000 Pro video board. We know you will
enjoy it. Stealth 3D 2000 Pro provides fast
EDO-DRAM based, 64-bit graphics
technology with realistic 3D and accelerated
video playback. Stealth 3D 2000 Pro cards
are capable of playing full-screen video clips
at rates up to 30 frames-per-second.
How to Read this Manual
About Stealth 3D 2000 Pro
Installing Stealth 3D 2000 Pro
Installing Stealth 3D 2000 Pro Software
Memory Upgrade for Stealth 3D 2000 Pro
Stealth 3D 2000 Pro Technical Data
How to Contact Diamond
Fast Track to Diamond Technical Support
Troubleshooting
3D Dictionary
Trademarks, Copyright and Warranty
FCC Information
Diamond on the Web
Best experienced with
Click here to start.
Page 2

About Stealth 3D 2000 Pro
Hardware
Software
System Requirements
Card Layout
Table of Contents
Hardware
High Performance Graphics Accelerator
S3 ViRGE DX graphics processor with 170 MHz RAMDAC and streams process or for accelerated video playback
2 or 4 MByte fast EDO DRAM
PCI 2.1 Bus
VESA Power Management Support
Optimized 2D Acceleration
BitBlt, Line Draw, Polygon Fill
Optimized 3D Acceleration
Flat and Gouraud Shading
Texture Mapping with perspective Correction, Bi- and Tri-linear Filtering
Mip mapping
Z-Buffering
Video
Scaling of digital Video like VideoCD (MPEG-1) or Video for Windows with X and Y interpolation
Hardware color space conversion
Hardware double buffering
Prepared for Diamond's DVD solutions
TV Output
NTSC / PAL composite and S-Video
Advanced 3-line digital flicker filtering
Automatic detection of TV
PC 97 compliant features
Page 3
Software
BIOS
VESA 2.0 support
DDC2B support
Graphics Driver for
Windows® 95
Windows® 3.1
Windows NT™ 3.51 and NT™ 4.0
Additional Software for Windows® 95
InControl Tools 95
DirectX 3 incl. Direct3D, DirectDraw and DirectVideo support
Software MPEG decoder
Microsoft Internet Explorer
Additional Software for Windows® 3.1x
Software MPEG decoder
Video for Windows DCI support
Microsoft Internet Explorer
Additional Software for Windows NTTM 4.0
DirectDraw
Software MPEG decoder
Multi-monitor support
Microsoft Internet Explorer
Additional Driver for DOS
MS-DOS refresh tool
MS-DOS mode centering tool
System Requirements
IBM 486 or better or other 100% compatibles
4 MB RAM
MS Windows ® 95 or DOS 5.0 or higher or Windows ® 3.1x
PCI 2.1 compliant motherboard and available slot
No other active VGA or SVGA compatible graphics acc elerator in the PC
Page 4
Card Layout
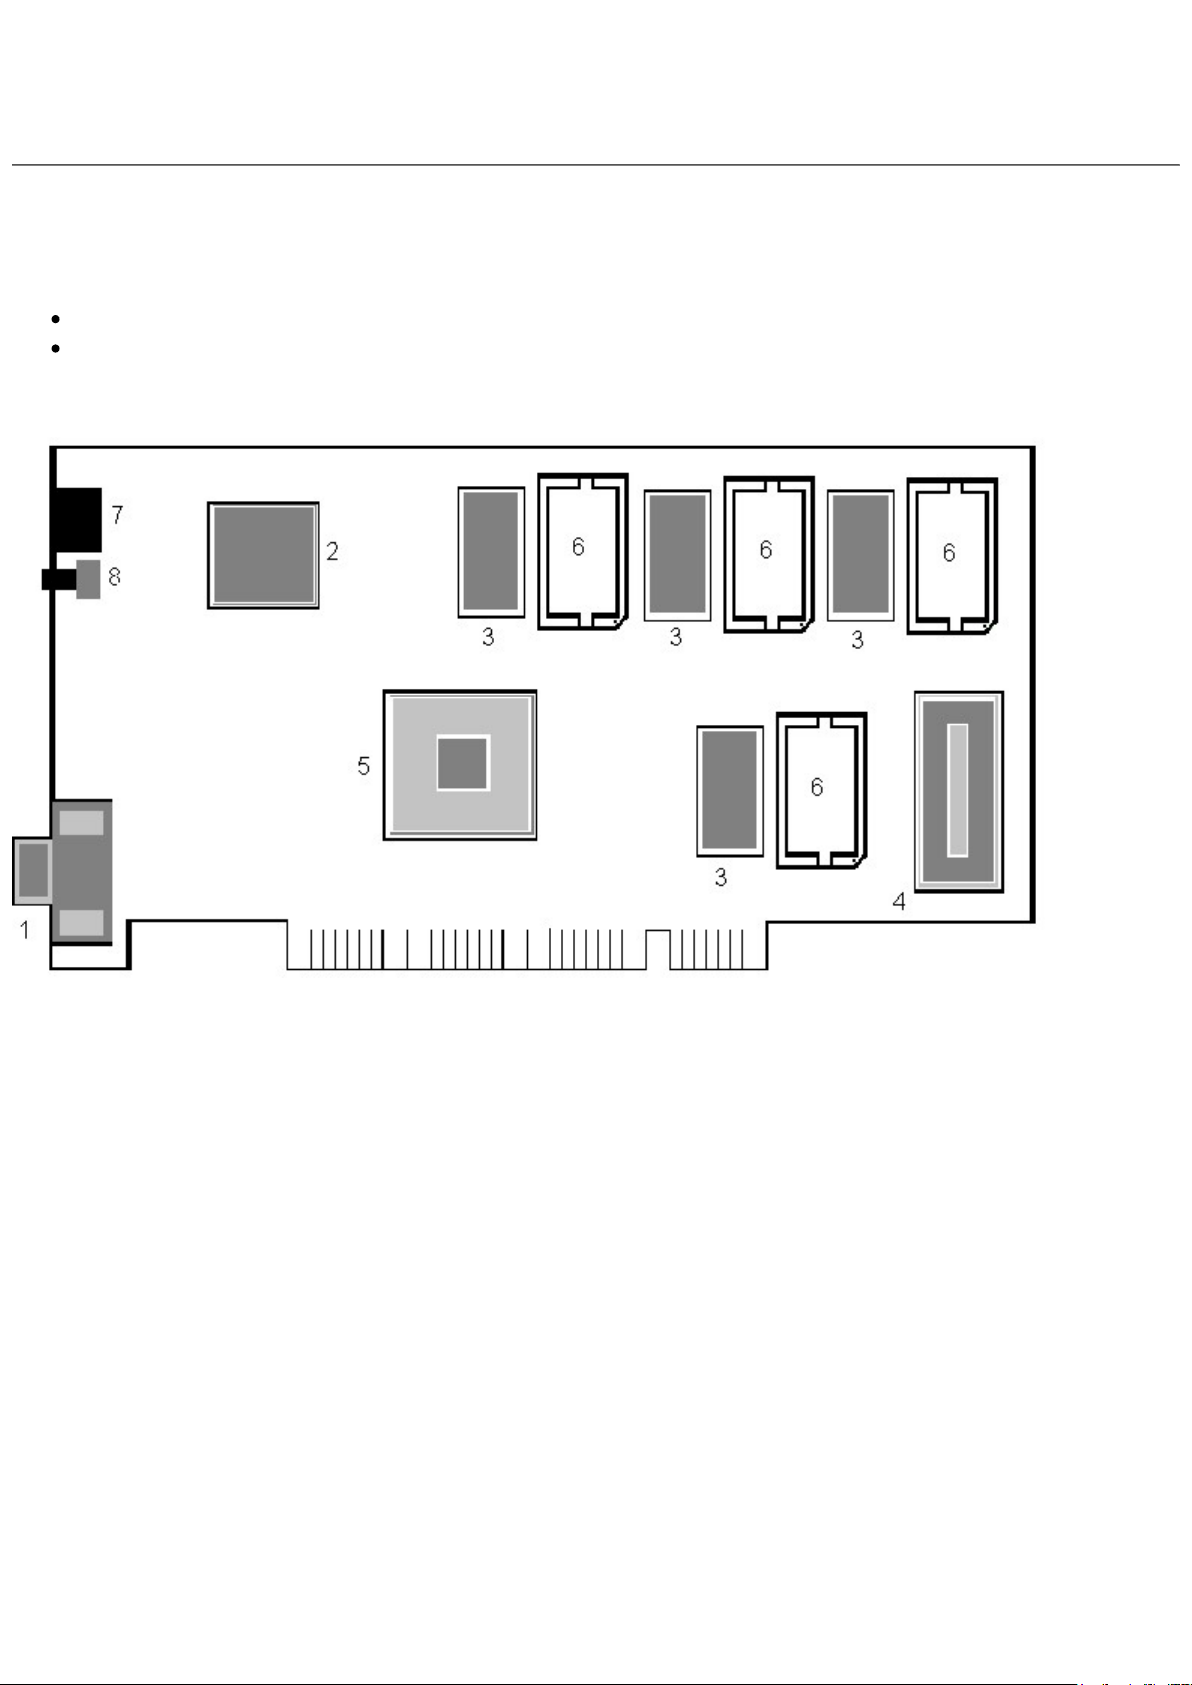
Two versions of the Stealth 3D 2000 Pro are available:
Stealth 3D 2000 Pro with 2 MB EDO-DRAM and sockets for memory upgrade to 4 MB EDO-DRAM with TV Out
Stealth 3D 2000 Pro with 2 MB EDO-DRAM and sockets for memory upgrade to 4 MB EDO-DRAM without TV Out
Stealth 3D 2000 PRO with sockets for memory upgrade and TV out
1 DB-15 Monitor Connector
2 TV Output Controller
3 EDO DRAM Memory Chips
4 BIOS
5 Graphics controller
6 Sockets for DRAM Memory Upgrade
7 S-Video Output (SVHS) (Mini-DIN 4)
8 Composite Video Output (Cinch)
Page 5

Physically Installing
Stealth 3D 2000 Pro
The installation is easy and straightforward. These installation instructions presume that you are familiar with your
computer system. You may need to seek assistance from your dealer or consult your computer operations guide.
Installation procedure
Resolving interrupt conflicts
After installing the board
Fast
Track to
Technical
Support
Table of
Contents
Warning!
Prevent static electric damage. Static charges can cause severe damage to microcircuits, but here are some easy ways to
see that it doesn't happen:
Hold the graphics card by its edges only. Don't touch edge connectors or exposed circuitry.
Leave the card in the anti-static protective bag until ready to install it in your computer.
If possible, ground your body when handling the card. A metal power supply in your computer is generally considered
the best place to ground yourself.
Do not place the graphics card on a metal surface.
Make as few movements as possible to avoid building up static electricity from your clothing, carpets and furniture.
Installation procedure
Step1: With the power off, remove the computer cover, find an available PCI slot and remove the bracket and screw.
This is a good time to check if you have any co-resident graphics adapters built into the motherboard and disable them. If
you do not disable them they will create a memory conflict with your graphic/multimedia card. This is also a good time
to remove any old graphics cards from your computer.
Remember which cables go to which connectors. You may want to label the cables and connectors before
disconnecting them.
Make sure you disable or remove any other video adapters installed in your system that may cause memory
conflicts.
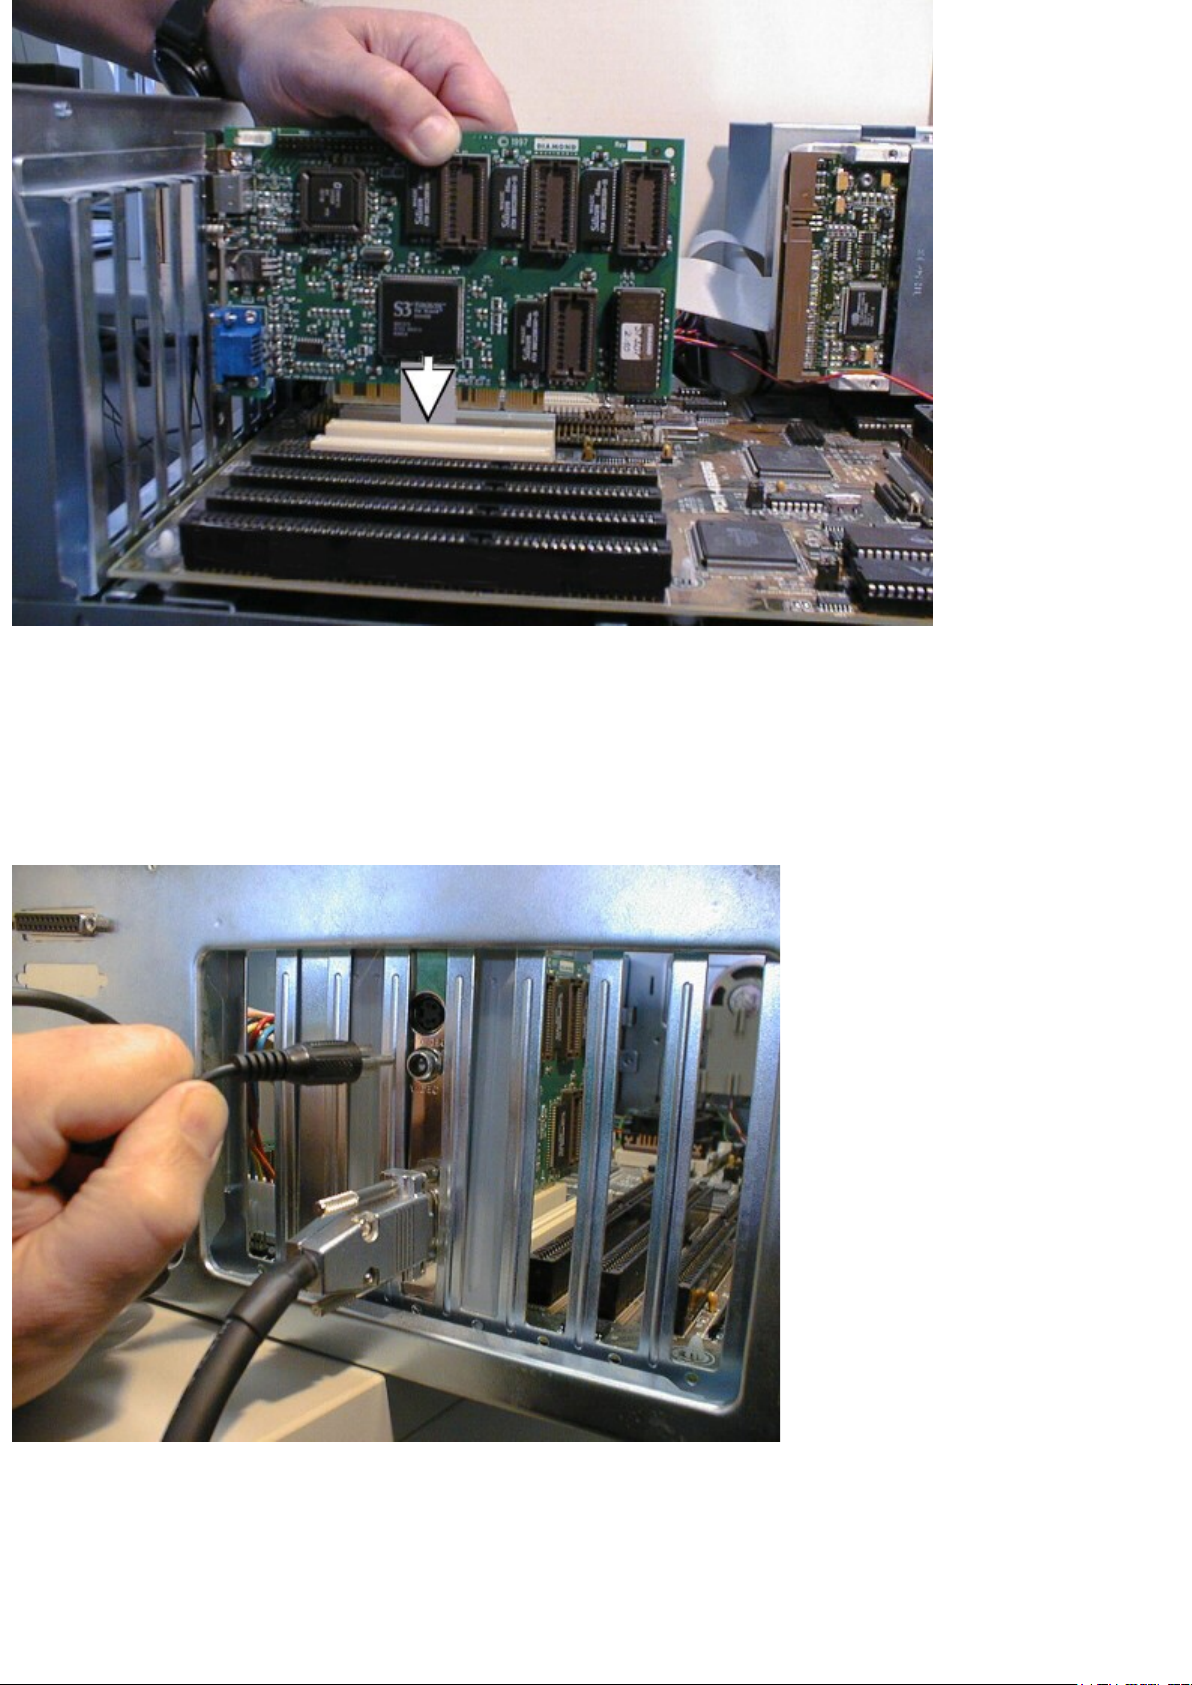
Step 2: Install the card firmly into its designated expansion card slot. Make sure to press it evenly and snugly into the
slot. Once you are certain the card is installed properly in the slot, secure it with the bracket screw.
Page 6
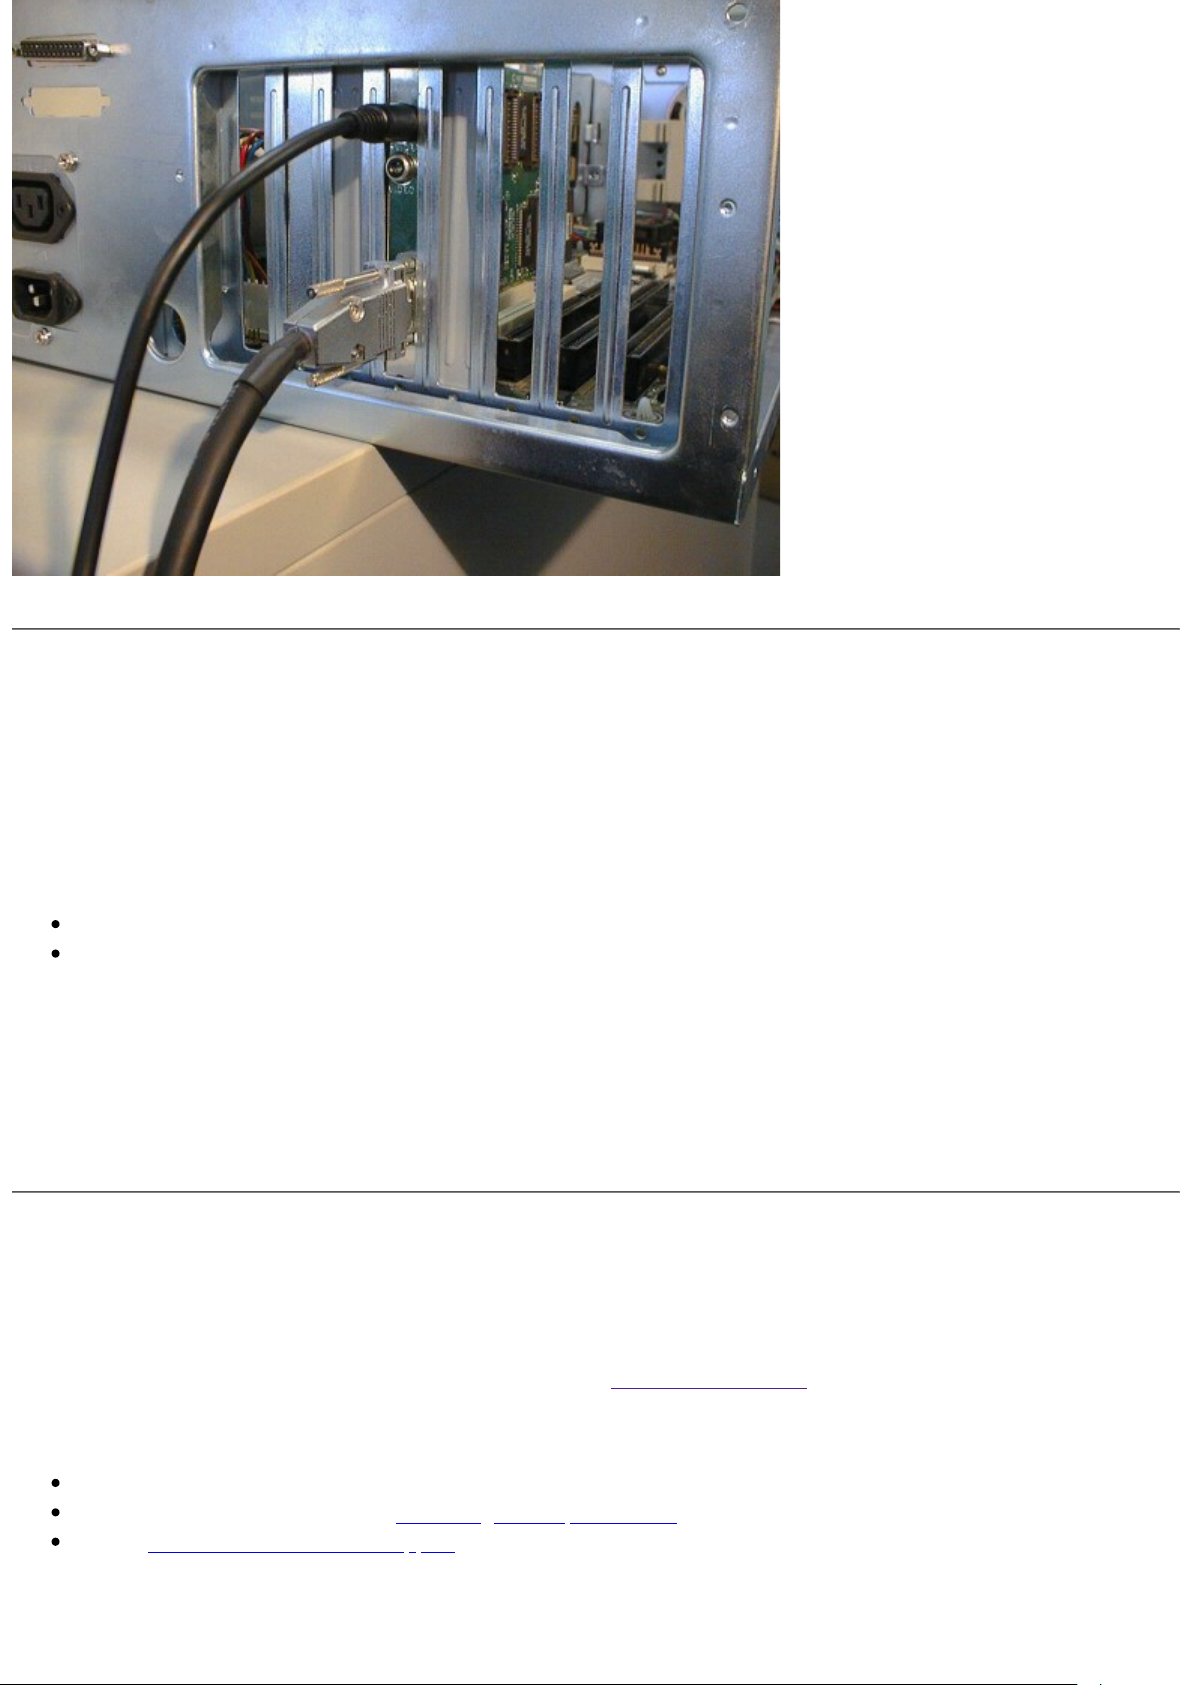
Step 3: Secure the computer cover and attach any previously removed cables. Use a standard IBM VGA DB-15 analog
cable for the new graphic/multimedia card.
Step 4 (only for boards with TV-output): Connect TV with graphics card. To do so you need a cable which fits into the
Composite or S-VHS output of the graphics card on one side and the TV video input connector on the other side. Please
ask your TV dealer for any more specific information about the cable. The board comes without the cable. The system
detects whether a TV is plugged in. The monitor does not necessarily have to be plugged in.
Page 7
Resolving Interrupt Conflicts
To support the special graphics processor on the Stealth 3D 2000 Pro the system BIOS will automatically assign a system
interrupt to the PCI slot where the Stealth 3D 2000 Pro is installed. However, there may be problems if a system interrupt
is used for more than one device. In case of problems:
Check your computer's BIOS SETUP for the interrupt assignments. Refer to your PC manual for information on its BIOS
SETUP and if possible
change the interrupt assignment for the Stealth 3D 2000 Pro, or
change the interrupt assignment for any other device sharing the interrupt with the Stealth 3D 2000 Pro
Try to manually change the interrupt assignment for any other device sharing the interrupt with the Stealth 3D 2000 Pro.
Check the documentation supplied with these devices for information on hardware switches for interrupt setting.
After Installing the Board
If you have correctly installed the board, the DOS messages will then appear on your monitor when the boot procedure is
finished.
After successful installation of the board please continue with software installation.
If your system does NOT boot as it should,
check again to see that the installation instructions were properly followed,
check for interrupt conflicts - see Resolving Interrupt Conflicts, or
refer to Fast Track to Technical Support.
Page 8

Installing
Software
for Stealth 3D
Fast
Track to
Technical
Support
Table of
Contents
2000 Pro
To make installing your video card easier and more intuitive, Diamond has provided an installation utility that will run
automatically when you insert the Diamond SuperCD. From the SuperCD, you can learn more about Diamond and its
products, install software drivers, and read on-line product manuals.
Installing Windows® NT Software
Installing Windows® 95 Software
Installing Windows® 3.1x Software
InControl Tools for Windows® 95 Software
Installing Windows® NT Software
1. Put the SuperCD into your CD drive and start the installation as follows:
2. Windows NT 3.5x: Start the Program Manager, select
the CD.
Windows NT 4.0: Click the START button in the task bar, select the option
the root directory of the CD.
3. Choose
4. Click the
5. If necessary, select the hardware for which you wish to install; this is displayed in the
installation program usually recognizes your hardware automatically.
6. Click the
7. If desired, enter a path to which the software will be installed.
8. Click the button corresponding to the type of installation you want. If you select
components will be displayed. Click the check boxes to specify the components you want to install.
9. A README file will be displayed. Please read this file!
10. After you have read the README, click
11. When prompted to restart your computer, choose
English
Start Installation
Next
as your language for the installation.
button.
button.
.
Next
Yes
.
File
-
, then START.EXE from the root directory of
Run
Run
and then select START.EXE from
Product
Custom
, a list of software
drop-down list. The
Windows NT 3.5x
Select
requirements and the performance of your monitor.
Click OK.
Display
in the
Control Panel
window. Set the resolution, color depth, and refresh rate that best suit your
Page 9

Windows NT 4.0
Start
Click
Windows desktop, select
Settings
-
Control Panel
-
Properties
your requirements and your monitor's performance.
Click OK.
Windows NT 3.5x / Windows NT 4.0
The basic software is now installed. In Windows NT 3.5x you can see the new
Control Panel
window.
and
Display
-
Settings
Settings
-
, or click with the right mouse button on the
. Set the resolution, color depth, and refresh rate that best suit
STEALTH 3D 2000 PRO
icon in the
Installing Windows® 95 Software
The software installation creates the InControl Tools 95 group in the list of programs in the Start group.
When you first install your new Stealth 3D 2000 Pro card in your system and boot Windows 95 for the first time,
Windows 95 will inform you that it has discovered new hardware and will prompt you to install drivers for it.
If you're updating an existing installation or Windows 95's Plug and Play support doesn't request drivers when you start
your system, use the SuperCD's installation program to install drivers and software for your card.
Insert the SuperCD into your CD drive.
When prompted for the location of your driver files, enter X:\DRIVERS, where "X" is the drive letter of your CDROM drive. For example, if your CD-ROM is drive D, you would type D:\DRIVERS.
Click OK, and the driver files will be copied to their destination directories.
Sometimes Windows doesn't find all the files on the first try and prompts again for the path from which to install drivers.
If this happens, use X:\DRIVERS again.
When prompted to restart your computer, click OK. A dialog box will appear, asking if you want to complete the
installation. If you want to install optional Diamond software, click on the INSTALL NOW button.
If Windows 95 does not display a message about new hardware when you start your system, put the SuperCD into your
CD drive and start the installation as follows:
Page 10

If the installation program hasn't already started, click on the START button in the task bar, select the option RUN,
and then select START.EXE from the root directory of the SuperCD.
Choose the language for the software installation.
Click the START INSTALLATION button.
Confirm your hardware if necessary and click Next.
Select either Standard, Custom or Minimal installation and specify a path on your hard disk to which the software
should be installed. For the first installation we recommend the Standard installation, as all necessary programs
will be installed.
Note: Custom installation allows you to choose which software components you want to install. If you decide you don't
want to install a particular component, click on it again to de-select it.
When Windows 95 prompts you to restart the computer, click Yes.
Installing Windows® 3.1x Software
Installing the Basic Software and Utilities
In order to use your board in your PC it is necessary to install a package of basic programs, regardless of the operating
system in use. Please execute the following steps in order to install the basic software.
Put the SuperCD in drive E: and start the installation (from E:) as follows:
1. Start the Program Manager, select
2. Choose
English (E)
as your language for the installation.
'File'-'Run',
3. The main menu is displayed.
4. Click on the
Start Installation
button.
5. Confirm your hardware if necessary.
6. Select one of the displayed installation options, and enter or confirm the path for the software installation.
Depending on your choice, README information or a list of software drivers available for installation, is
displayed.
7. Click the
button and follow the instructions on the screen. The installation program will automatically copy
Next
all the necessary files onto your hard disk.
8. To enable the new driver installation the system restarts.
Note: The monitor configuration set by default is: 640x480 resolution; 60 Hz screen refresh rate.
Set higher screen refresh rates, resolutions, or color depths according to your monitor´s performance, for example, by
using a corresponding tuning program. Refer to the online help for InControl Tools Lite (ICT Lite).
then START.EXE from the CD.
InControl Tool 95 for Windows® 95 Software
InControl Tools 95 provides a set of easy-access display and desktop utilities that help you maintain a picture perfect
environment for work or pleasure.
With InControl Tools 95 you can:
Use a popup menu to instantly switch desktop and viewport resolutions and zoom in and out on your viewport.
Page 11

Center windows and message boxes to the viewport or desktop.
Control other display management features--screen saver, fast scroll, pan lock, even your hot keys and popup
menus--with menu on/off switches.
Adjust colour and brightness of video window
Customize TV output according to your requirements
Adjust your system's audio volume with a handy popup slider bar.
Add or remove items from your left- or right-button popup menus.
The Setup Wizard guides you through the complete InControl Tools customization process. It is run when you
install InControl Tools for the first time, but you can run it again any time by clicking the InControl Tools tray icon
and choosing Setup Wizard.
For a more detailed description of the different InControl features please refer to the online help.
Quick start instructions
When you install InControl Tools 95, a tray icon is added to your Windows95 desktop and several new options are added
to your Display Properties dialog.
Many of the new features available to you are activated immediately after installing InControl Tools and restarting
Windows. You can then modify or toggle any feature on or off, either through the Display Properties dialog or directly
from your enhanced desktop (right button) menu.
To start using InControl Tools immediately after installation and restart:
Click your right mouse button on the Windows desktop. Your enhanced desktop menu appears. Note that this is the
same Windows95 "right-click" menu that normally appears, but with several new items listed above the standard
items. These new items are your InControl Tools enhancements. Check all features and submenus to review the
default settings.
Click your left mouse button on the Windows desktop. Your popup start menu appears. Note that this is the same
menu that appears when you click the Start menu. Now, however, it's also available as a "floating" popup menu.
You're now ready to use or customize all of these new features (such as adding hot key shortcuts).
Page 12

Stealth 3D 2000 Pro
Technical Details
Memory Upgrade
Hardware
Software
System requirements
Compatibility
Service & Support
Video modes
Memory Upgrade
Table of Contents
Hardware
High Performance Graphics Accelerator
S3 ViRGE DX graphics processor with 170 MHz RAMDAC and streams process or for accelerated video playback
2 or 4 MByte fast EDO DRAM
PCI 2.1 Bus
VESA Power Management Support
Optimised 2D Acceleration
BitBlt, Line Draw, Polygon Fill
Optimised 3D Acceleration
Flat and Gouraud Shading
Texture Mapping with perspective Correction, Bi- and Tri-linear Filtering
Mip mapping
Z-Buffering
Video
Scaling of digital Video like VideoCD (MPEG-1) or Video for Windows with X and Y interpolation
Hardware colour space conversion
Hardware double buffering
Prepared for Diamond's DVD solutions
TV output
NTSC / PAL composite and S-Video
Advanced 3-line digital flicker filtering
Auto detection of TV presence
Page 13
PC 97 compliant features
Software
BIOS
VESA 2.0 support
DDC2B support
Graphics Driver for
Windows® 95
Windows® 3.1
Windows NT™ 3.51 and NT™ 4.0
Additional Software for Windows® 95
InControl Tools 95
DirectX 3 incl. Direct3D, DirectDraw and DirectVideo support
Software MPEG decoder
Microsoft Internet Explorer
Additional Software for Windows® 3.1x
Software MPEG decoder
Video for Windows DCI support
Microsoft Internet Explorer
Additional Software for Windows NTTM 4.0
DirectDraw
Software MPEG decoder
Multi monitor support
Microsoft Internet Explorer
Additional Driver for DOS
MS-DOS refresh tool
MS-DOS mode centring tool
System Requirements
IBM 486 or better or other 100% compatibles
4 MB RAM
MS Windows ®95 or DOS 5.0 or higher or Windows ® 3.1x
PCI 2.1 compliant motherboard and available slot
No other active VGA or SVGA compatible graphics acc elerator in the PC
Compatibility
100% compatible with VGA, SVGA and VESA Standard
Service & Support
5 years warranty
Page 14
Free Software updates via BBS, Internet (www.diamondmm.com; www.diamondmm.de), CompuServe (GO SPEA)
Fax-on-Demand Service
Technical support through Hot-line
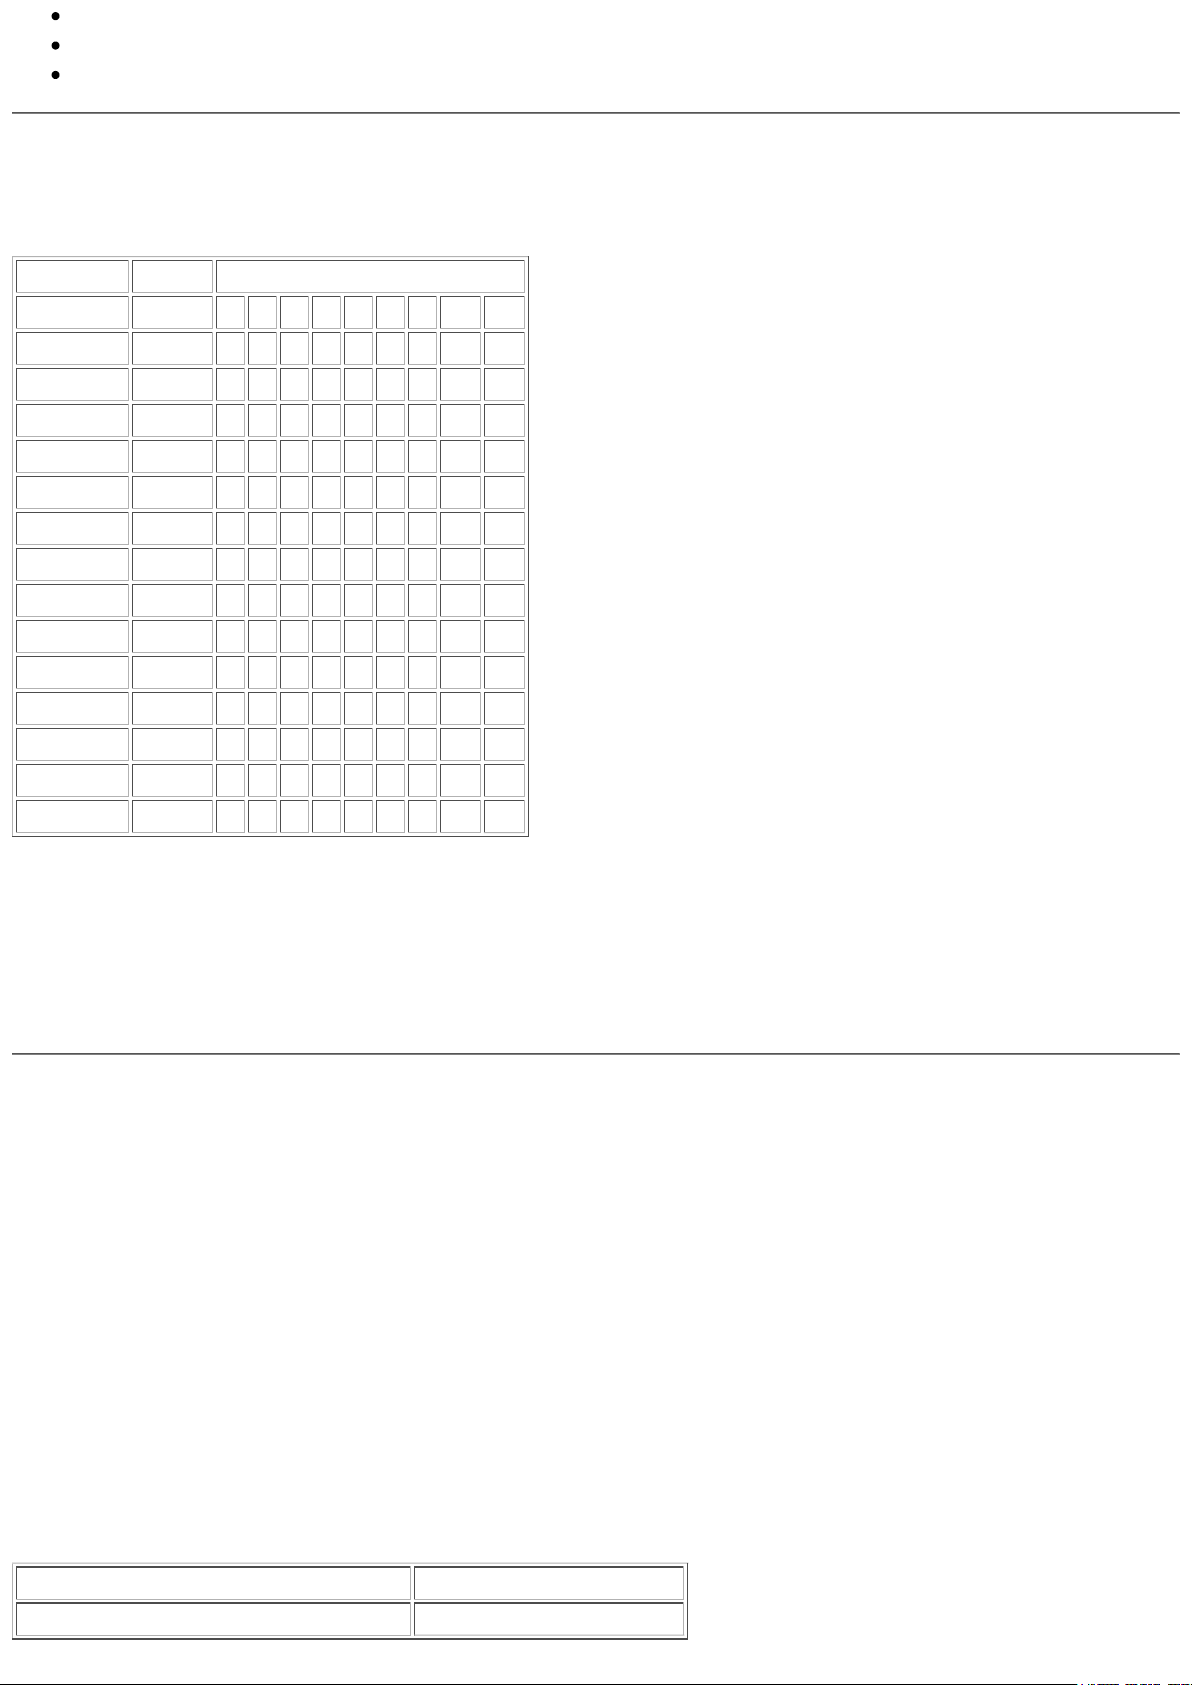
Video Modes
Resolution Colours Vertical refresh rate
- - 56 60 65 70 72 75 85 100 120
640x480 256 - 2 - - 2 2 2 2 2
- 65k - 2 - - 2 2 2 2 2
- 16m - 2 - - 2 2 2 2 2
800x600 256 2 2 - - 2 2 2 2 2
- 65k 2 2 - - 2 2 2 2 2
- 16m 2 2 - - 2 2 2 2 2
1024x768 256 - 2 - 2 2 2 2 2 -
- 65k - 2 - 2 2 2 2 2 -
- 16m - 4 - 4 4 4 4 4 -
1152x864 256 - 2 - 2 - 2 2 - -
- 65k - 2 - 2 - 2 2 - -
1280x1024 256 - 2 - - 2 2 2 - -
- 65k - 4 - 4 4 4 - - -
1600x1200 256 - 2 2 - - - - - -
Note: The chart represents modes supported in Windows® 95. All modes and refresh rates may not be available for other operating systems.
All values listed in the table are MB.
Memory Expansion
Importance of Memory Extension
Your Stealth 3D 2000 PRO is fitted with 2 MB EDO-DRAM or 4 MB EDO-DRAM. This memory size is adequate for many applications on the
market.
4 MB EDO-DRAM is recommended for higher resolutions, faster refresh rates, and/or higher color depths, or, if you want or need z-buffering
(Direct-3D/Games).
Memory Expansion Modules
Optional memory modules (piggyback boards) are available.
For Stealth 3D 2000 PRO with 2 MB EDO-DRAM and upgrade sockets
Upgrade module: 2 MB EDO-DRAM
Maximum video memory: 4 MB EDO-DRAM
Page 15
Adding Memory
Warning!
Prevent static electric damage. Static charges can cause severe damage to microcircuits, but here are some easy ways to see that it
doesn't happen:
Hold the graphics card by its edges only. Don't touch edge connectors or exposed circuitry.
Leave cards in anti-static protective bags until ready to install them in your computer.
If possible, ground your body when handling the cards. A metal power supply in your computer is generally considered the best place
to ground yourself.
Do not place cards on a metal surface.
Make as few movements as possible to avoid building up static electricity from your clothing, carpets and furniture.
Warning!
You must install either none, or all four memory upgrade chips. The board and your system will not function properly
with a partially installed memory upgrade
.
Step 1: Take the graphics card out of your computer, if it is already installed.
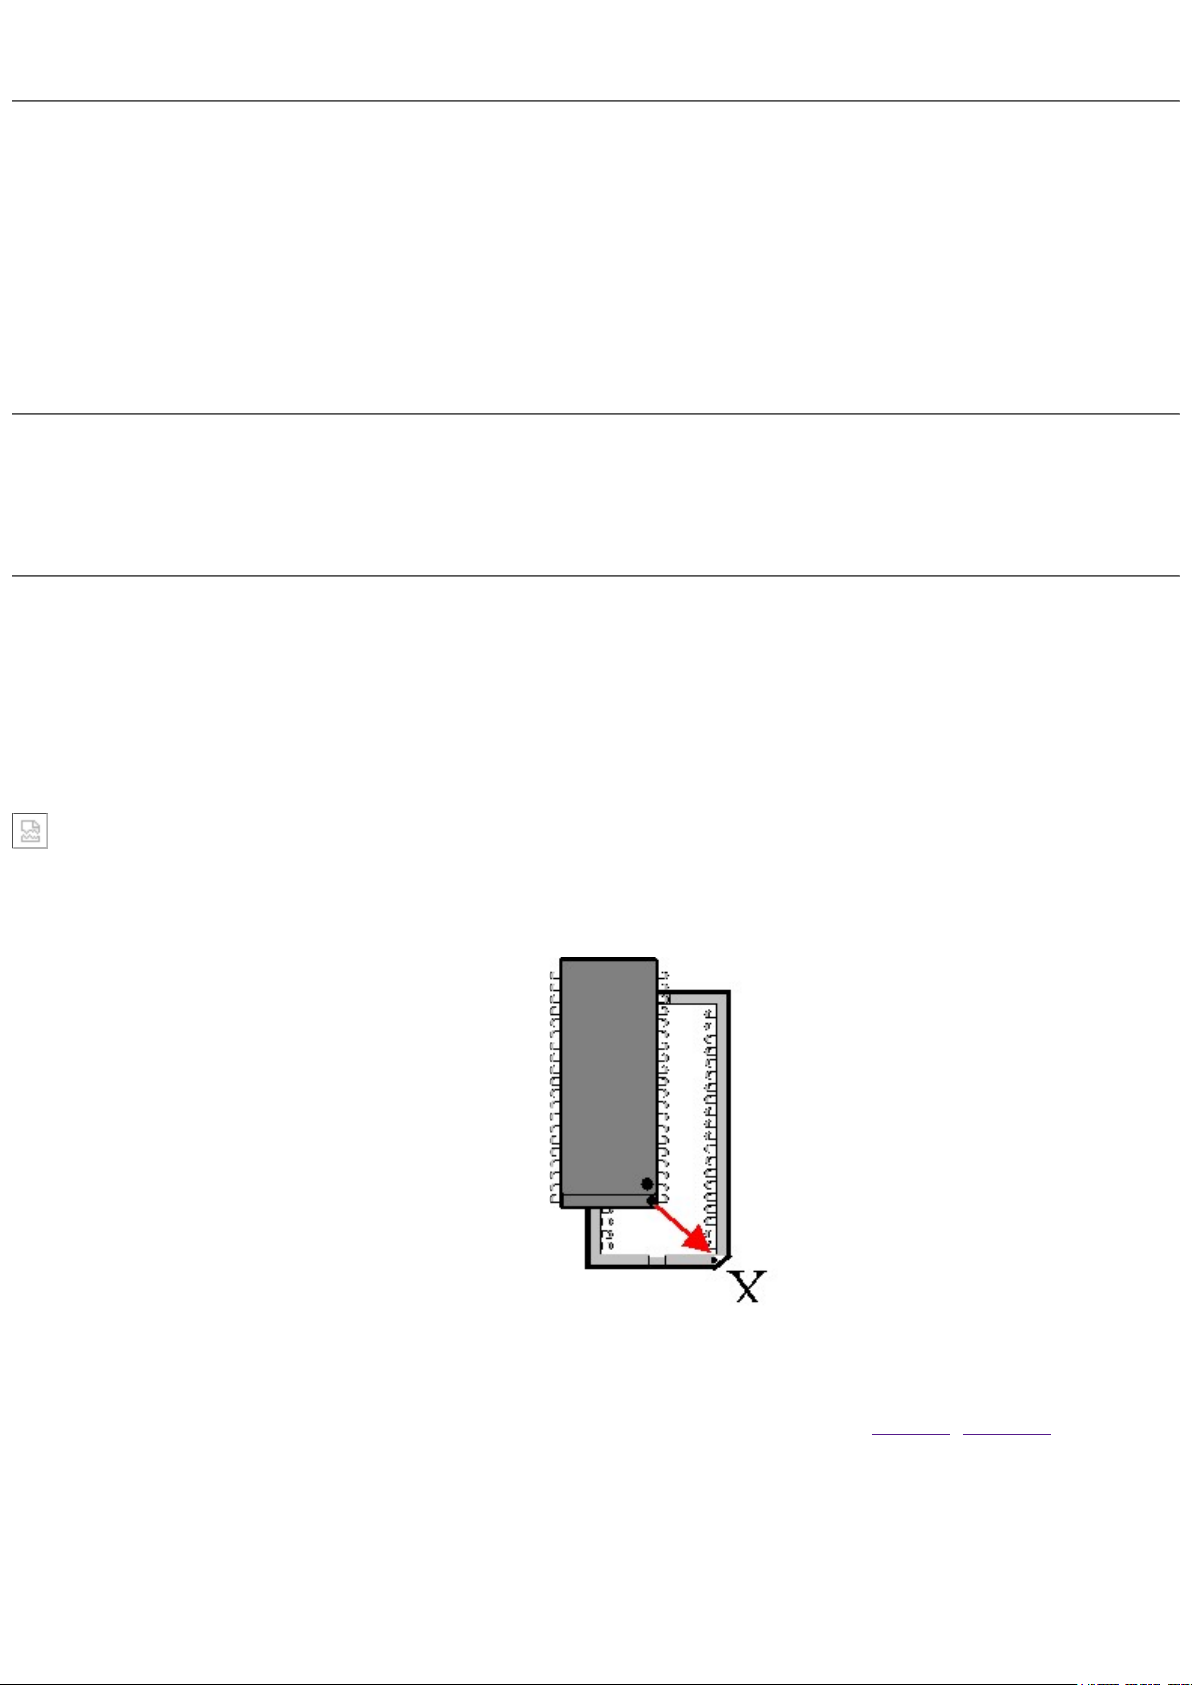
Step 2: Install the four memory upgrade chips to the designated sockets on the graphics card - refer to the illustration.
1. Make sure that pin 1 on the chip, marked with a dot on the beveled edge, connects to pin 1 of the socket, marked
by a beveled corner (X).
2. Press the memory upgrade chips evenly into the sockets until they are fully seated.
1 DB-15 Monitor Connector2 TV Output Controller
3 EDO DRAM Memory Chips
4 BIOS
5 Graphics controller
6 Sockets for DRAM Memory Upgrade (X)
7 S-Video Output (SVHS) (Mini-DIN 4)
8 Composite Video Output (Cinch)
Step 3: Install the graphics card with the memory extension into your computer. Refer to Installing the Card.
Page 16

Stealth 3D 2000 Pro Troubleshooting
Your board is a complex electronic device and can only be repaired by authorized technical personnel with the required
equipment. Do not attempt to change or repair any parts of this product. Doing so will render your warranty invalid.
Contact the DIAMOND ExpertLine for the latest troubleshooting tips.
Stealth 3D 2000 Pro is not properly installed
The Stealth 3D 2000 Pro drivers are not correctly installed
Booting problems
Video problems
Difficulty starting Windows and other applications
General Protection Fault
Stealth 3D 2000 Pro is not properly installed
Check to make sure that Stealth 3D 2000 Pro is properly seated in its PCI slot and that the monitor cable is firmly and
correctly connected to the Stealth 3D 2000 Pro. For more information, please see the Stealth 3D 2000 Pro Installation
Instructions.
Stealth 3D 2000 Pro drivers are not correctly installed
Check to make sure that all software is correctly loaded and that the software configuration settings correspond to your
operating system and applications. For more information, please see Installing Software for Stealth 3D 2000 Pro.
Page 17
Booting problems
No Video
System hangs
System beeps
Solutions
Make sure the card is seated properly in its expansion slot and the monitor cable is securely fastened to the card.
Check to see if your monitor is getting power. You should double check the electrical cable and the power switch.
Make sure your monitor cable has the proper pin-out configuration. It should be able to work with a standard IBM
VGA DB-15 analog graphics adapter.
Check if there is another display adapter in your system, or if your system has built-in video on the motherboard.
You should remove or disable it. Your dealer or system user guide may be able to assist you.
Check other cards in your system that might be using the same addressing space, for example, network or modem
cards.
Disable any VIDEO ROM BIOS shadowing at location C000-C7FF in your PC's CMOS setup. You may find the
option located in the '
Try to install the card to a different PCI slot.
Try the card in another machine. If the card works properly in another computer, there is a conflict between the
system configuration and the card. If you have tried all above suggestions, please contact the Technical Support for
additional help.
Advanced CMOS Setup'
.
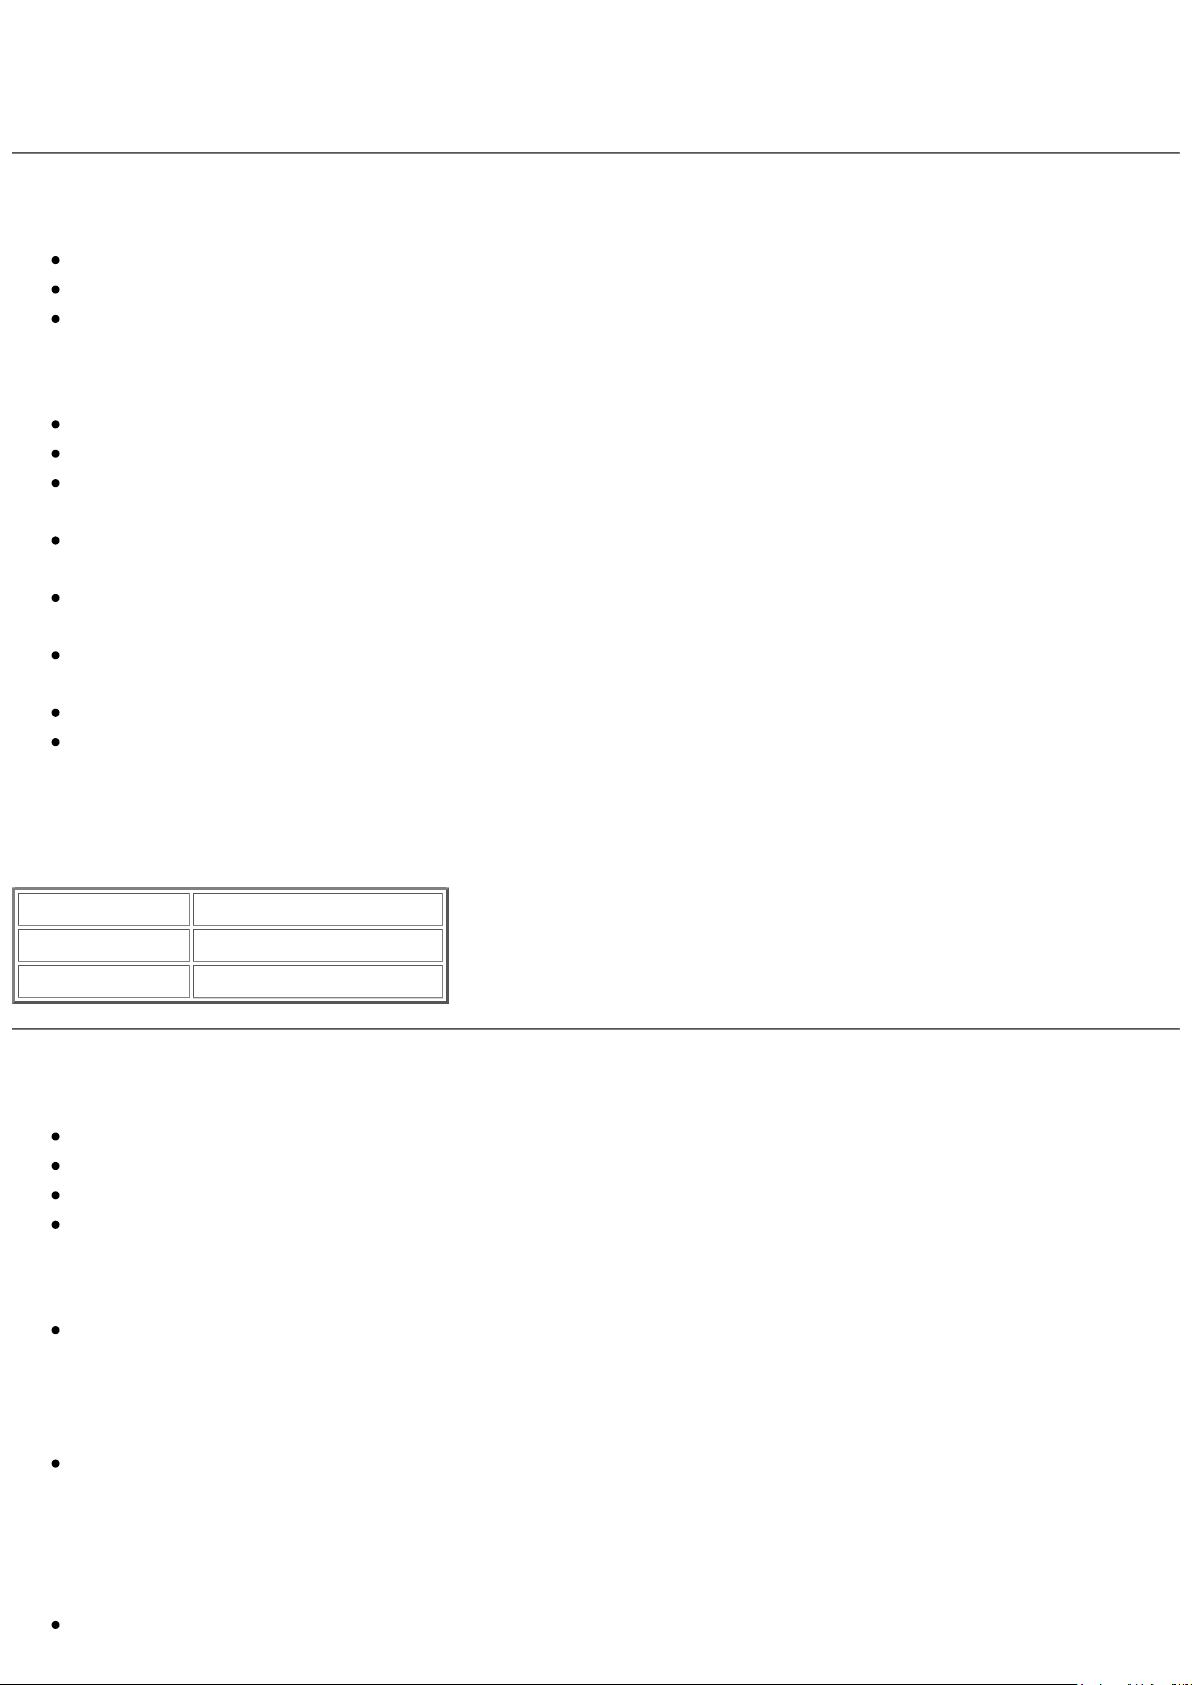
Note: The Stealth 3D 2000 PRO card uses the following address areas.
I/O Address 3B0-3DF
Memory Address A000-AFFF, B800-BFFF
Video BIOS C000-C7FF
Video Problems
Video Flicker
Scrambled Video
Screen Display is Small
Monitor is not Listed
Solutions
Video Flicker
Increase the vertical frequency for the resolution that you are using. Do not specify a frequency that exceeds your
monitor´s frequency range.
Scrambled Video
It is most likely that the selected frequency is not supported by your monitor. Select an alternative frequency that is
supported by your monitor. For information on what resolutions and frequencies your monitor can handle, refer to the
monitor´s user manual or contact your monitor manufacturer.
Screen Display is Small
Page 18

Use a lower vertical refresh rate. The selected vertical refresh rate may be too high for the monitor to support it. A
reduced screen size may be the result
Note: For information on what vertical frequencies your monitor can handle, refer to the monitor´s user manual or
contact your monitor manufacturer.
Monitor is not Listed
To set up the video card for your monitor you will need the vertical and horizontal frequencies along with the polarity
settings for each resolution. Using the InControl Tools mode utility for Windows you can configure your monitor by
selecting the User Defined Monitor option.
Note: For information on what vertical frequencies your monitor can handle, refer to the monitor´s user manual or
contact your monitor manufacturer.
Difficulty Starting Windows and Other Applications
Solutions
Check your CONFIG.SYS file for a memory manager like QEMM386, EMM386, or 386MAX. A memory
manager may be mapping devices in the video area, particularly in the "A000” or "B000” page. All Diamond cards
use the memory area "A000-C7FF” exclusively.
The following examples will help you to reserve the required memory area for your Stealth 3D 2000 PRO card.
Optimize your memory use again after having modified your CONFIG.SYS file.
For using QEMM386 edit the following line in your CONFIG.SYS file DEVICE=C:\QEMM\QEMM386.SYS
add X=A000-C7FF, and for Stealth Option ST:F ST:M also add XST=C000
Example: DEVICE=C:\QEMM\QEMM386.SYS X=A000-C7FF XST=C000
In the SYSTEM.INI file, find the section that starts [386ENH]. Remove the line
DEVICE=MONOUMB2 ("Rem” the line with a semicolon at the beginning).
For using 386MAX edit the following line in your CONFIG.SYS file DEVICE=C:\ 386MAX\386MAX.SYS
add EXCLUDE=A000-C7FF
Example: DEVICE=C:\ 386MAX\386MAX.SYS EXCLUDE=A000-C7FF
In the 386MAX directory edit the file 386MAX.PRO, Place a semicolon (;) in front of the VGASWAP command.
Also check for further commands that may map memory areas conflicting with the video memory area A000-C7FF.
If this does not work, re-install 386MAX and select "NO” for the installation options ROM SEARCH, MDA AREA, and
VGASWAP.
For using EMM386 edit the following line in your CONFIG.SYS file DEVICE=C:\DOS\EMM386.EXE
add X=A000-C7FF
Page 19

You may need to remove HIGHSCAN
Example: DEVICE=C:\DOS\EMM386.EXE X=A000-C7FF
In the SYSTEM.INI file, find the section that starts [386ENH]. Edit the file and add the following statement:
EMMExclude=A000-C7FF
If you have previously used MEMMAKER (DOS 6.x), run MEMMAKER again.
Try to disable the following settings, because of possible conflicts with the driver installation: Wallpaper, 32-bit
disk access, or 32-bit file and access Network drivers Screen Saver.
Disable any programs that are loading automatically when starting Windows, for example, from the STARTUP
group, RUN or LOAD lines from the WIN.INI file. Remove all programs from the STARTUP group and place
semicolons (;) before the 'LOAD' and 'Run' lines in the WIN.INI file.
General Protection Fault (GPF) in Windows
Solutions
Follow the steps below to determine the cause of the problem.
Change your display driver to 'Microsoft Standard VGA' - not 'VGA Version 3.0'
If the problem still exists, an application may have been corrupted or has a conflict with Windows. Re-install the
application and/or contact your application vendor for additional help.
If the problem no longer exists, reset the display to the Stealth driver. Then edit your CONFIG.SYS file and "rem”
all lines except of
DEVICE=C:\DOS\HIGHMEM.SYS
FILES=XX
BUFFERS=XX
for example: rem DEVICE=C:\DOS\ANSI.SYS
Then edit your AUTOEXEC.BAT file and "rem” all lines except of the PATH= statement.
Start your system again.
If the GPF does not show, check your CONFIG.SYS file for a proper memory exclusion. Then add the”rem”-lines
back one at a time to identify the source of the problem.
If the GPF still shows contact the Technical Support for additional help.
Page 20

Trademarks, Copyright and Warranty
Trademarks
IBM PC, OS/2 and OS/2 Warp are registered trademarks of International Business Machines Corporation.
MS-DOS, Windows, Windows NT and Windows ® 95, DirectDraw and Direct3D are either registered trademarks or
trademarks of Microsoft Corporation.
OpenGL is a trademark of Silicon Graphics, Inc.
AutoCAD is a registered trademark of AutoDesk Inc.
Intergraph MicroStation is a registered trademark of INTERGRAPH.
MultiSync is a registered trademark of NEC Corp.
PCI and PCI Local Bus are registered trademarks of the PCI Special Interest Group (SIG).
All other names are tradenames / trademarks or registered trademarks of their respective owners.
Copyright Notice
This manual is copyrighted. All rights reserved. This document may not, in whole or part, be copied, reproduced,
reduced or translated by any means, either mechanical or electronic, without prior consent in writing from Diamond
Multimedia Systems, Incorporated. The information in this manual has been carefully checked and is believed to be
accurate. However, Diamond Multimedia Systems assumes no responsibility for any inaccuracies that may be contained
in this manual. In no event will Diamond Multimedia Systems be liable for direct, indirect, special, incidental, or
consequential damages resulting from any defect or omission in this manual, even if advised of the possibility of such
damages.
In the interest of continued product development, Diamond Multimedia Systems reserves the right to make
improvements in this manual and the products it describes at any time, without notice or obligation.
© Copyright 1995, 1996, 1997
Diamond Multimedia Systems, Incorporated
Diamond Multimedia Systems Service Company Ltd.
Diamond Multimedia Systems Vertriebs GmbH
Page 21

Diamond STEALTH 3D 2000 Pro Warranty
You have a 5-year warranty for your DIAMOND Multimedia graphics card. To ensure your warranty, it is necessary that
you keep the invoice for the graphics card. If your graphics card is damaged, contact your local retailer first.
Your board is a complex electronic device and can only be repaired by authorized technical personnel with the required
equipment. Do not attempt to change or repair any parts of this product. Doing so will render your warranty invalid.
Page 22
CE and FCC Compliance
This device complies with CE Certification pursuant to EN55002 IEC 801-2, 1991. This device also complies with Part
15 of the FCC Rules. These limits are designed to provide reasonable protection against harmful interference in
residential installation. This device generates, uses and can radiate radio frequency energy and, if not installed and used
in accordance with the instructions, may cause harmful interference to radio communications. However, there is no
guarantee that interference will not occur in a particular installation.
FCC Notice
This device complies with Part 15 of the FCC Rules.
Operation is subject to the following two conditions:
(1) this device may not cause harmful interference, and
(2) this device must accept any interference received, including interference
that may cause undesired operation.
DECLARATION OF CONFORMITY
We, the Responsible Party
Diamond Multimedia Systems, Inc.
2880 Junction Avenue
San Jose, CA 95134
declare that the product
Stealth 3D 2000 Pro
Page 23

is in conformity with Part 15 of the FCC Rules. Operation is subject to the following two conditions: (1) this device may
not cause harmful interference, and (2) this device must accept any interference received, including interference that may
cause undesired operation.
___________________________
(Signature)
MATTHEW M. HSU
(Full Name)
DIRECTOR, ENGINEERING SERVICES
(Position)
 Loading...