

Page 1

MONSTER SOUND MX300
USER’S GUIDE
Diamond Multimedia Systems, Inc.
2880 Junction Avenue
San Jose, CA 95134-1922 USA
Page 2

Copyright Notices
Manufactured under license from Dolby Laboratories. "Dolby" and the double-D symbol
are trademarks of Dolby Laboratories. Confidential Unpublished Works. Copyright © 19921998 Dolby Laboratories, Inc. All rights reserved.
This manual is copyrighted. All rights reserved. This
document may not, in whole or part, be copied, reproduced,
reduced, or translated by any means, either mechanical or
electronic, without prior consent in writing from Diamond
Multimedia Systems, Incorporated. The information in this
manual has been carefully checked and is believed to be
accurate. However, Diamond Multimedia Systems assumes
no responsibility for any inaccuracies that may be contained
in this manual. In no event will Diamond Multimedia
Systems be liable for direct, indirect, special, incidental, or
consequential damages resulting from any defect or
omission in this manual, even if advised of the possibility of
such damages.
In the interest of continued product development, Diamond
Multimedia Systems reserves the right to make
improvements in this manual and the products it describes
at any time, without notice or obligation.
Copyright © 1996-1998, Diamond Multimedia Systems, Inc.
2880 Junction Avenue, San Jose, CA 95134
Page 3

Table of Contents
Table of Contents
1 INTRODUCTION......................................................................1
About Monster Sound MX300 ..........................................1
MX300 Features...................................................................2
About Aureal Vortex II.......................................................2
2 INSTALLING MX300..............................................................5
General System Requirements...........................................5
Hardware Installation ..........................................................6
Software Installation ............................................................8
Installing Software Extras....................................................14
3 A3D OVERVIEW AND MX300 SETUP..............................17
About A3D Technology .....................................................17
MX300 Configurations........................................................18
4 ABOUT SOFTDVD
™
AND DOLBY® DIGITAL...................23
What is SoftDVD™? .............................................................23
What is Dolby
®
Digital?.......................................................26
5 TROUBLESHOOTING AND GENERAL Q & A ..................29
A C
ONTACTING DIAMOND ....................................................31
Customer Service ................................................................31
Technical Support................................................................31
B TECHNICAL SPECIFICATIONS ...............................................33
C T
RADEMARK, WARRANTY AND CERTIFICATION
INFORMATION .........................................................................37
Page 4

Page 5

Introduction
1
1
INTRODUCTION
Welcome to the world of Monster Sound MX300! The Monster
Sound MX300 enhances your audio listening experience, taking
you to a whole new level of aural realism. Play the hottest new
3D games, or view the latest DVD titles to hit the market with
sense-shattering sound!
This chapter introduces you to Monster Sound MX300 and its
features.
♦ ♦ ABOUT MONSTER SOUND MX300
♦ ♦ MX300 FEATURES
♦ ♦ ABOUT AUREAL VORTEX II
ABOUT MONSTER SOUND MX300
The MX300 PCI audio card gives you fully immersive 3D
interactive audio. Using Aureal Semiconductor’s A3D 2.0
technology, Monster Sound pinpoints every individual sound in
3D space for incredibly realistic gaming and listening
experiences. Monster Sound MX300 boosts your video
entertainment with cinema-quality DVD, Dolby® Digital sound,
and MP3 tools for fiery digital Internet audio.
MX300 accelerates and enhances applications developed for
Microsoft’s DirectSound standard—so DirectSound,
DirectSound3D, and A3D games will run faster and sound more
realistic.
Page 6

2
MX300 FEATURES
Diamond Multimedia Systems, Inc., has partnered with Aureal
Semiconductor, Inc., to bring the A3D 2.0 positional audio
standard exclusively to your desktop and home entertainment
system.
Powerful features include the following:
♦ A3D 1.0 and 2.0 compliant
♦ Embedded 320-voice DLS compatible wavetable
♦ 96 hardware audio streams
♦ Dolby® Digital support for 2 to 4 speaker output—and up to 6
speakers with future MX-Link daughtercard upgrades
♦ Zoran SoftDVD™ application
♦ MPEG-1 Layer 3 (MP3) audio with bundled MP3 tools
♦ Studio-quality MIDI support for musicians
♦ Real-mode DOS support
♦ 3-year warranty
Monster Sound MX300 includes online Help (msoundii.hlp) to
help you get started with the associatedf software utilities.
Msoundii.hlp also contains a glossary to help you understand
relevant audio terminology.
A
BOUT AUREAL VORTEX II
The Monster Sound MX300 PCI board takes full advantage of
Aureal Semiconductor’s Vortex II chipset. Vortex II uses an
innovative dataflow hardware architecture to provide highly
optimized audio processing capabilities for Monster Sound audio
entertainment. Vortex II, through Aureal’s A3D 2.0 technology,
models human acoustic perception across nearly all audible
spectra—resulting in a truly realistic three-dimensional listening
experience.
Page 7

Introduction
3
Vortex II also furnishes complete hardware emulation of legacy
audio in Windows and DOS—so you can run your favorite, classic
video games.
For more information on A3D, see Chapter 3.
Page 8

4
Page 9

Installing MX300 5
2
INSTALLING MX300
This chapter provides an overview of the MX300 hardware and
instructions on the MX300 hardware and software installation.
♦ ♦ GENERAL SYSTEM REQUIREMENTS
♦ ♦ HARDWARE INSTALLATION
♦ ♦ SOFTWARE INSTALLATION
♦ ♦ INSTALLING SOFTWARE EXTRAS
A
–
Bundled software
C – Installation CD
B
–
MX300 PCI board
GENERAL SYSTEM REQUIREMENTS
The following minimum system is recommended:
♦ Pentium 90MHz or faster (266MHz PII for SoftDVD support)
♦ 16 MB of RAM
♦ Windows 98/95 or NT 4.0
♦ 50 MB free hard disk space
BCA
Page 10

6
Your Monster Sound MX300 kit includes the MX300 card,
installation CD, and additional bundled applications (see kit
photograph).
To make the MX300 installation proceed smoothly, first install
the Monster Sound MX300 hardware, then install the software
drivers from the installation CD disk, and then install the
optional bundled software.
H
ARDWARE INSTALLATION
To install the MX300 card, shut your computer down, and
complete the following steps.
Before you install the Monster Sound MX300 card:
♦ If this is a reinstallation, be sure to completely uninstall all
of Monster Sound software first by using the Monster Sound
uninstall utility. Go to Start > Programs > Monster Sound
II > Uninstall to remove all Monster Sound MX300 software
components.
♦ Review the System Requirements for Monster Sound MX300.
♦ Be sure that Windows 98/95 or Windows NT 4.0 is installed
and functioning properly. Windows NT 4.0 users should be
updated to the most recent Service Pack.
♦ Verify the operating system you have (Windows 95,
Windows 98, or Windows NT 4.0) and what version you are
running.
♦ Ground yourself by touching the power supply case.
♦ Remove any ISA or Sound Blaster compatible sound cards.
Installing the MX300 Card
To install the Monster Sound MX300, complete the following
card installation procedure.
Caution—Static charges can damage electronic components.
Ground yourself by touching the computer's metal case before
Page 11

Installing MX300 7
handling any card. Remove your card from its protective bag.
Handle it by the edges and do not directly touch internal
components or connector contacts.
To install your peripheral card:
1. With the power off,
remove your computer
cover and locate an
available PCI slot.
2. Remove the screw attached
to the bracket cover and
remove the bracket plate.
3. Position the card directly
above the slot.
Note—Cards are designed
to fit one way only. Be
sure your card is properly
aligned.
Page 12
8
4. Insert the card firmly into the PCI slot. Take care to press it
evenly and snugly into its
slot. Do not force.
5. Once you are certain your
card is installed properly in
its slot, secure it to the
computer frame with the
bracket screw you removed
in step 2.
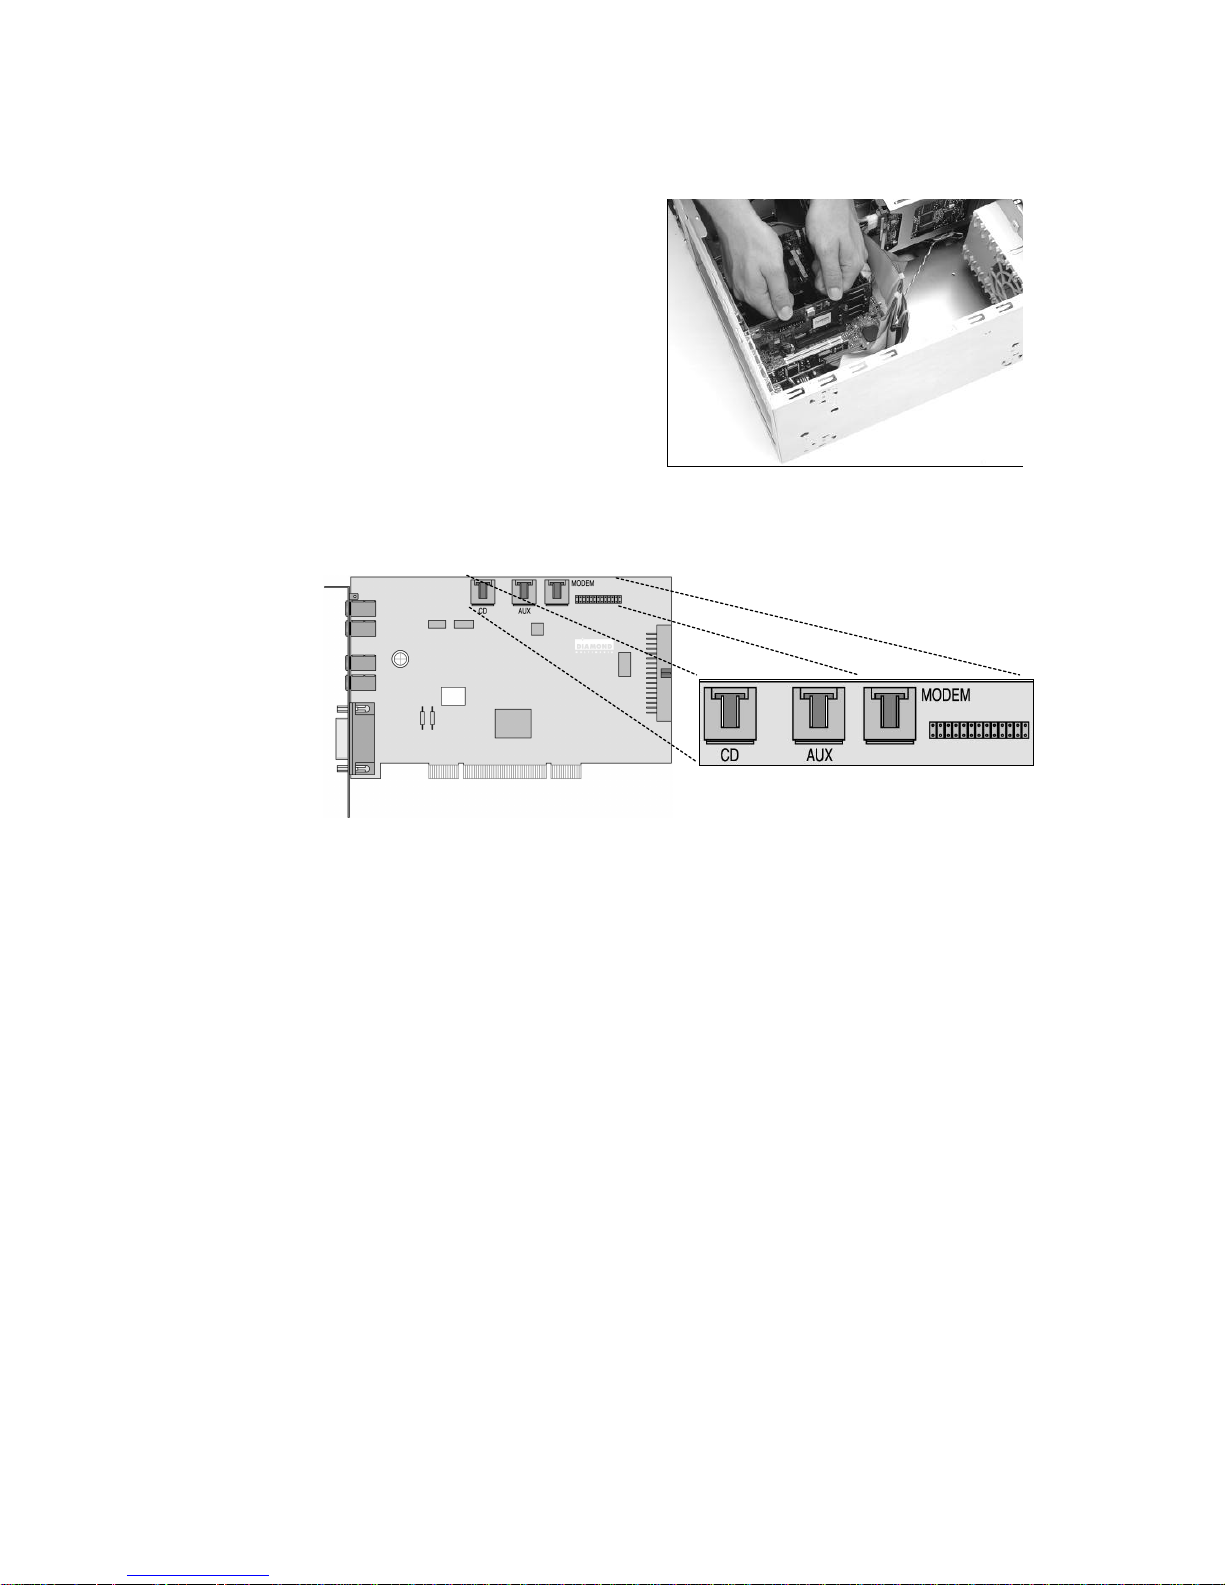
6. If your computer has a CDROM or DVD-ROM drive, connect the CD-ROM audio cable
to the internal connector labeled CD on your MX300 card.
7. Reattach any previously removed cables. Next, attach any
external speaker(s), joystick, and microphone connections to
the Monster Sound MX300 card. See page 18,
MX300
Configurations
, for cable setup and connection information.
8. Secure your computer cover and reboot your computer.
S
OFTWARE INSTALLATION
Follow the instructions for your operating system to complete the
driver installation.
Windows 98
After your system boots, the Add New Hardware Wizard
appears. The Wizard displays the text This wizard searches for
new drivers for: PCI Multimedia Audio Device.
Figure – MX300 card with internal CD, Aux, and Modem connectors
Page 13

Installing MX300 9
1. Click Next.
2. You are prompted with two options for finding the drivers.
Select Search for the best driver for your device. Click
Next.
3. You are offered several search options. Select the Specify a
location check box.
4. Insert the Monster Sound MX300 Installation CD into your
CD-ROM drive and set the path in the install window to
D:\WIN9X (or replace D with the letter that corresponds to
your CD-ROM drive). You can also click Browse and
navigate to your CD-ROM drive.
5. Windows confirms that it has located the drivers for the
Monster Sound II Multifunction Parent. Click Next.
Note—If the drivers could not be located, click Back and
verify that the correct path to the Monster Sound MX300
installation CD has been entered.
6. Windows 98 now copies the Monster Sound MX300 driver
files to your hard drive and informs you when the task is
completed. Click Finish.
Additional drivers will now be installed. Please wait until
Windows 98 finishes loading all drivers—which may take an
extra minute or two.
After all driver files have been installed, the Monster Sound II
Setup screen appears.
To complete the Monster Sound MX300 software installation…
1. Wait until the Welcome screen appears and click Next.
2. Select a Destination Directory and click Next. We
recommend you use the installation default directories.
3. From the available options, select the software you want
installed and click Next.
4. Click Next again to install the selected applications.
5. Click Finish and reboot your computer, if prompted.
Continue with
Installing Software Extras on page 14.
Page 14

10
Windows 95
There are several versions of the Windows 95 operating system.
Verify your version of Windows 95 by clicking Start > Settings
> Control Panel. After the Control Panel directory opens, doubleclick System. The designations 4.00.950 B or 4.00.950 C
indicate you are using one of the OEM Service Releases of
Windows 95. Be sure to follow the instructions below for the
appropriate operating system you are using.
Notes—(1) You may need your original Windows 95 CD to
complete this installation. If you are using one of the OEM
Service Releases, go to the following section, Windows 95
(versions OSR2.X). (2) Windows may request the original
Windows CD to update or install some necessary files. Remove
the Monster Sound MX300 CD and insert the Windows CD into
the CD-ROM drive. Once Windows has installed the necessary
components, the Monster Sound MX300 installation requests the
Monster Sound MX300 installation CD. Remove the Windows CD
and reinsert the Monster Sound MX300 installation CD.
Windows 95 (version 4.00.950)
After your system boots, it will inform you that it has found a
new PCI Multimedia Audio Device and prompts you with
selections:
1. Select the option Driver from disk provided by hardware
manufacturer from the New Hardware Found dialog. Click
OK.
2. Insert the Monster Sound II MX300 Installation CD into your
CD-ROM drive. In the space Copy manufacturers files from,
type D:\WIN9X (or replace D with the letter that corresponds
to your CD-ROM drive). You can also click Browse and
navigate to your CD-ROM.
3. Windows 95 now copies the Monster Sound MX300 driver
files to your hard drive. Click OK.
Page 15

Installing MX300 11
4. You may be requested to reboot your computer. If so, please
restart your computer now—leaving the installation CD in the
CD-ROM drive.
5. Once Windows boots, the Monster Sound II Setup
installation program should automatically start. If not, then
double-click on My Computer and double-click on the
installation CD icon. Select Installation from the available
options.
To complete the Monster Sound II MX300 installation:
1. Wait until the Welcome screen appears and click Next.
2. Select a Destination Directory and click Next. We
recommend you use the installation default directories.
3. From the available options, select the software you want
installed and click Next.
4. Click Next again to install the selected applications.
5. Click Finish and reboot your computer, if prompted.
Note—If the Monster Sound MX300 Utilities fails to start
automatically, browse the Monster Sound MX300 installation CD
and run Setup.exe located in the root directory (usually
D:\Setup.exe)
Continue with
Installing Software Extras on page 14.
Windows 95 (versions OSR2.X)
This section provides driver installation procedures for the OSR2
releases (version 4.00.950 B or 4.00.950 C) of Windows 95.
After your system boots, it will inform you that it has found a
new PCI Multimedia Audio Device and display the Update
Device Driver Wizard.
1. Click Next. Windows now searches for the location of the
driver files. Wait a few moments until you see the Other
Locations button. Click Other Locations.
2. Insert the Monster Sound II MX300 Installation CD into your
CD-ROM drive and set the path in the install window to
D:\WIN9X (or replace D with the letter that corresponds to
Page 16

12
your CD-ROM drive). You can also click Browse and
navigate to your CD-ROM drive.
3. Click OK, then click Finish. The driver files will be copied to
their destination directories. If you are prompted for the
Monster Sound MX300 Installation Disk, Click OK. The
Copying Files… dialog appears.
4. Enter D:\WIN9X (or replace D with the letter that
corresponds to your CD-ROM drive) in the Copy files from
box. You can also click Browse and navigate to your CDROM drive. The Monster Sound II MX300 driver files begin
loading.
5. You may be asked to reboot you computer. If so, please
restart your computer now—leaving the installation CD in the
CD-ROM drive.
6. Once Windows boots, the Monster Sound II Setup
installation program should automatically start. If not, then
double-click on My Computer and double-click on the
installation CD icon. Select Installation from the available
options.
To complete the Monster Sound II MX300 installation:
1. Wait until the Welcome screen appears and click Next.
2. Select a Destination Directory and click Next. We
recommend you use the installation default directories.
3. From the available options, select the software you want
installed and click Next.
4. Click Next again to install the selected applications.
5. Click Finish and reboot your computer, if prompted.
Note—If the Monster Sound MX300 Utilities fails to start
automatically, browse the Monster Sound MX300 installation CD
and run Setup.exe located in the root directory (usually
D:\Setup.exe)
Continue with
Installing Software Extras on page 14.
Page 17

Installing MX300 13
Windows NT 4.0
Software and driver installation for Monster Sound MX300 is a
two-step process under Windows NT 4.0. The following sections
instruct you how to install the MX300 drivers and software.
Notes—(1) Be sure you have already installed the Monster Sound
MX300 hardware. If you have not, complete the hardware
installation instructions that begin on page 6. (2) Because
Windows NT 4.0 does not support Plug-n-Play, the hardware
drivers must be installed manually. Please refer to the following
instructions.
Before Installing the MX300 Drivers…
Insert the Monster Sound installation CD into your CD-ROM
drive. If your system has the CD-ROM set to “auto-play” or “auto
start,” the Monster Sound installation program will begin
automatically. Select Installation from the available options and
the Setup program will begin.
To complete the Monster Sound MX300 software installation…
1. Click Next when you see the installation Welcome screen.
2. Select a Destination Directory and click Next. We
recommend you use the installation default directories.
3. A dialog box appears and prompts you to select which
components you want to install. For Windows NT, Audio
Utilities is the only available option. Click Next.
If you do not want the MX300 Audio Utilities loaded, click
the check box to deselect it, then click Next.
4. Click Next again to install the selected application.
5. The Monster Sound II Setup window notifies you that the
installation is complete. Click Finish.
6. The System Settings Change dialog appears and requests
you to reboot your computer. Click Restart Now.
Page 18

14
MX300 Driver Installation
To install the Monster Sound MX300 Drivers under Windows NT
4.0:
1. From the Windows Taskbar, click Start > Settings > Control
Panel. The Control Panel directory opens.
2. Double-click Multimedia and select the Devices tab.
3. Click Add and select Unlisted or Updated Driver from the
list box. Click OK. The Install Driver dialog appears.
4. Set the path in the Install Driver dialog to D:\WinNT (or
replace D with the letter that corresponds to your CD-ROM
drive). Click OK. The Add Unlisted or Updated Driver dialog
box appears.
5. Select the Monster Sound II driver from the list and click
OK.
6. When the Monster Sound II PCI Audio window appears,
click OK. The MX300 drivers are now loaded into your
system.
Note—The system Restart prompt may appear. Reboot your
system at this time.
I
NSTALLING SOFTWARE EXTRAS
After you have installed the basic Monster Sound MX300
software utilities, you may install additional software tools and
other bundled applications—such as Zoran SoftDVD—included on
the installation CD disk. To view the software Extras your version
of Monster Sound may contain, insert the installation CD. If your
CD-ROM drive is set to “auto-play,” the Monster Sound
installation program automatically starts. Otherwise, you can
double-click the CD-ROM icon from My Computer to start the
Monster Sound installation program.
When the Monster Sound MX300 installation screen appears,
select Extras to view and install any additional software.
Page 19

Installing MX300 15
Additional Software Bundles
Your MX300 kit may contain additional software bundles on
individual CD disks. Choose a CD of interest and install the game
or application.
Page 20

16
Page 21

A3D Overview and MX300 Setup 17
3
A3D OVERVIEW AND
MX300 S
ETUP
Diamond Multimedia Systems has partnered with Aureal
Semiconductor to deliver the latest and most realistic audio
system possible for your PC.
This chapter describes the A3D positional audio technology that
is at the heart of your Monster Sound MX300 card, and includes
some useful audio configurations you can set up with the MX300
card.
♦ ♦ ABOUT A3D TECHNOLOGY
♦ ♦ MX300 CONFIGURATIONS
ABOUT A3D TECHNOLOGY
Aureal’s A3D Interactive is a positional 3D audio technology.
Positional 3D audio—also known as interactive 3D audio—allows
for interactive, on-the-fly positioning of sounds anywhere in the
three-dimensional space surrounding a listener. Support for this
technology has been incorporated into software applications such
as video games to create a natural, immersive, and interactive
audio environment that closely approximates a real-life listening
experience.
Your MX300 audio system aims to digitally reproduce a highly
realistic sound field. To achieve the best possible effect, an A3D
system recreates all of the listening cues to which a human ear
responds: outer ear effects, occlusions, reflections, and so on. A
typical first step to building such a system is to capture the
listening cues by analyzing what happens to a single sound as it
arrives at a listener from different angles (see following
illustration).
Page 22

18
Once captured, the audio cues are synthesized in a computer
simulation for verification.
Aureal Wavetracing (A3D 2.0)
Developed over many years in conjunction with clients such as
NASA, Matsushita, and Disney, Aureal’s Wavetracing technology
parses the geometry description of a 3D space to trace sound
waves in real-time as they are reflected and occluded by passive
acoustic objects in the 3D environment.
What this means to listeners is that they are immersed in a virtual
sound space that “feels” real in almost every detail!
For more information, please open the file msoundii.hlp installed
on your system. Go to Start > Programs > Monster Sound II >
Online Help. When the Topics page opens, double-click the
About A3D Technology topic.
MX300 C
ONFIGURATIONS
The MX300 hardware and software can be configured in a variety
of ways. The following sections outline some basic setups you
can use to get the most from your Monster Sound card.
Sound source
Reflection
Page 23

A3D Overview and MX300 Setup 19
Audio Output: 2 or 4 Speakers
The MX300 card has two separate audio output jacks labeled
Out1 and Out2 respectively on the mounting bracket. (see
following figure)
Note—Powered speakers are required to connect with the audio
outputs.
The MX300 processes A3D and SoftDVD multi-channel sources
and automatically downmixes the signal for 2, or 4-speaker
configurations. You will not lose signal if you have only two
speakers—the MX300 properly manages your output for realistic
sound. Connect your speakers to the MX300 card in the following
manner:
♦ Use Out1 with 2 speakers
♦ Use Out1 and Out2 with 4 speakers
If you using a 4-speaker setup, A3D or SoftDVD signals are
downmixed such that sounds that come from the “front” are
output to Out1; sounds that originate from the “rear” are output
to Out2.
Using Headphones
Attach your headphones to Out2 only.
MIDI Output
The MX300 card can output and accept General MIDI data from
your PC to external MIDI-compatible devices. Use your favorite
music software to control MIDI devices through the MX300 card.
You can also use the powerful, built-in MX300 wavetable to
Figure – Side view of external MX300 I/O connectors
MPU401 MIDI/game
port connector
Page 24

20
produce concert-quality instrumental music directly from music
software. MIDI cables must be purchased separately.
To connect an external MIDI device to MX300:
1. With the computer off, insert a MIDI connector into the
MPU401 MIDI port on the MX300 card. See figure, page 19.
2. Attach the opposite end of the MIDI connector to your MIDIcompatible device or MIDI patch bay.
3. Restart your computer.
MX300 Control Panel
The MX300 control panel is installed when you run the MX300
installation program. Notice the icon at the lower-right side of
the Windows Taskbar—the Diamond Monster Sound musical note.
It appears by default.
To open the Monster Sound MX300 control panel, double-click
the Diamond Monster musical note from the Taskbar. The MX300
control panel is displayed.
Page 25

A3D Overview and MX300 Setup 21
Set your MX300 configurations using the control panel. You may
then select a desired tab to make custom settings, or demo certain
A3D applications.
Click the Help button when inside the MX300 control panel for
more complete MX300 configuration instructions and control
panel information.
Note—Under Windows NT 4.0, the MX300 control panel only
displays the MIDI and Preferences tabs.
Page 26

22
Page 27

About SoftDVD™ and Dolby® Digital 23
4
ABOUT SOFTDVD
™
AND
DOLBY
®
DIGITAL
Your Monster Sound MX300 board supports Zoran SoftDVD and
Dolby Digital audio output. This chapter describes software DVD,
the requirements necessary to run Zoran SoftDVD, and an
overview of Dolby® Digital.
♦ ♦ WHAT IS SOFTDVD?
♦ ♦ WHAT IS DOLBY DIGITAL?
WHAT IS SOFTDVD™?
Software DVD is a software method for decoding DVD signals on
your system. Currently, two kinds of devices read DVD discs: a
DVD player, which connects to your TV and plays DVD movies;
and a DVD drive on your computer, which reads other forms of
DVD content like databases or interactive software.
Zoran SoftDVD™ is a software implementation of DVD that relies
on the powerful Pentium II-class CPUs. SoftDVD enables Pentium
II MMX-equipped PCs to play DVD video content without
dedicated decoding hardware. All video and audio decoding,
navigation, decryption, and 3D audio functions are handled by
software.
In addition to the excellent video quality DVD systems render,
high-quality digital audio is available—if the DVD soundtracks are
encoded with digital audio.
To install SoftDVD, follow the instructions on page 14,
Installing
Software Extras
.
Page 28

24
Refer to page 36 for SoftDVD technical specifications, minimum
system requirements for installation, and the location of the
SoftDVD user’s guide.
Audio Capabilities of SoftDVD
MX300 can output multi-channel audio that is standard with most
DVD movies and titles. There are three modes of audio operation
with SoftDVD:
1. Stereo
2. Surround
3. 3D Sound
Stereo mode is a two-speaker stereo downmix only. There is no
added benefit in using this mode with MX300.
Surround mode uses A3D surround technology to position the 5.1
Dolby Digital audio streams in 3D space through your stereo
speakers. This provides a more realistic surround sound experience.
3D Sound is a four-speaker implementation where all channel
information (5.1 Dolby Digital, for example) is mixed into 4
channels. Use this method for optimum audio performance with
MX300 and a 4 speaker setup.
Page 29

About SoftDVD™ and Dolby® Digital 25
Use the Diamond Monster Sound utility to verify proper speaker
configuration. To verify your speaker configuration, use the
following procedure:
1. From the Windows Taskbar, double-click the Monster Sound
Musical note icon. The Monster Sound properties page
appears.
2. Click Config. On this page, you can verify the audio output
capabilities.
To change the audio mode of SoftDVD:
1. Open the SoftDVD application and click Configure within the
SoftDVD Navigator. The SoftDVD Properties page appears.
Page 30

26
2. Click Audio Settings. Under Audio mode, you can choose
either Stereo, Surround or 3D Sound.
W
HAT IS DOLBY® DIGITAL?
First introduced to moviegoers in 1992 with Batman Returns, and
heard on over 1500 films around the world since then, Dolby
Digital is the latest sound innovation from Dolby Laboratories.
Dolby Digital is commonly referred to as “5.1 surround” due to its
unique configuration.
The consumer equivalent of Dolby Digital film sound forms the
final link from multichannel program producer to home listener.
Like the film format, it provides separate channels for left, right,
and center speakers at the front; two surround speakers at the
sides; and a subwoofer at the listener's option. (see figure)
Page 31

About SoftDVD™ and Dolby® Digital 27
Unlike analog Dolby Surround with its
single band-limited surround channel
(usually played over two speakers),
Dolby Digital 5.1 features two
completely independent surround
channels, each offering the same fullrange fidelity as the three front
channels. As a result, true stereo
surround effects can be achieved for an
expanded sense of depth, localization,
and overall realism.
This section was reprinted with permission of Dolby Laboratories, Inc. For more detailed information on
Dolby audio technologies, visit their web sit at www.dolby.com
Using Dolby Digital with MX300
Your MX300 card can take full advantage of Dolby Digital audio
output on DVD titles. Depending upon your speaker configuration,
the Dolby Digital signal is automatically downmixed to emulate
the 5.1 audio experience for 2 or 4 speakers.
Note—True 5.1 Dolby Digital output is available with the purchase
of Monster MX-Link daughtercard upgrades. Contact Diamond
Customer Service (see page 31) for upgrade information.
Figure – 5.1 speaker configuration
Page 32

28
Page 33

Troubleshooting and General Q & A 29
5
TROUBLESHOOTING
AND
G
ENERAL Q & A
Does the Monster Sound come with a controller for my CD-ROM?
No. There is no CD-ROM ribbon-cable interface on the Monster Sound card.
However, you may be able to use one of the following devices to control your
CD-ROM drive, depending on the type of interface:
♦ The IDE or proprietary interface on your existing legacy sound card.
♦ The IDE interface built into your PC's motherboard.
Are drivers for Windows 3.1 available?
No. Monster Sound only supports the Windows 98/95 or NT 4.0 operating
systems. The DirectSound and DirectSound3D APIs that the Monster Sound was
designed to accelerate are not compatible with Windows 3.1.
What makes A3D positional audio unique?
A3D positional audio does not simply provide an expanded stereo effect as other
technologies have done in the past. A3D provides a truly interactive 3D effect,
where the positioning of sounds along the X,Y and Z axes responds to your input,
allowing you to move and react to sounds in a 3D gaming environment.
Can I use the wavetable daughterboard on my existing sound card to play
MIDI files?
Yes. If you prefer to add an external wavetable—other than the one already
embedded inside the Monster Sound audio chip—there are two options: 1. If you
have retained your legacy sound card, select the Multimedia icon in the Windows
Control Panel. Choose the MIDI tab to select the primary "MIDI output" device,
which will allow you to select the desired wavetable. 2. Alternatively, Monster
Sound has an industry-standard Wave Blaster compatible 26-pin header. If you
have a wavetable that complies to this standard, you may use it with the Monster
Sound MX300 card. The primary MIDI output device should be the Monster
Sound II MPU-401.
Do I need 4 speakers to hear all the sounds ?
Monster Sound provides a 360 degree positional-audio effect with headphones, 2
speakers or 4 speakers.
Page 34

30
Why am I prompted for the Windows 98/95 CD when installing Monster Sound?
The reason Windows 98/95 prompts you for the CD is because it needs one or
more of Windows system components that are not installed on your system.
These are typically audio components that are required when using Monster
Sound. These components include, but are not limited to:
♦ Joystick drivers
♦ Audio Compression modules
♦ Volume Control (Mixer)
♦ Sound Recorder
If Windows prompts you for the Windows 98/95 Installation CD :
1. Remove the Monster Sound CD from the CD-ROM drive.
2. Insert the Window 98/95 CD.
3. After the Windows components are installed, you will be prompted for
the Monster Sound CD.
4. Remove the Windows 98/95 CD from the CD-ROM drive.
5. Insert the Monster Sound CD.
6. The Monster Sound setup program should start automatically. Follow the
on-screen instructions to complete the software installation.
Will the Monster Sound work with my existing ISA sound card (i.e. Sound Blastercompatible)?
Yes, Monster Sound will work with your existing sound card. However, the
Monster Sound MX300 is a comprehensive audio solution. It provides complete
Windows support (98/95/NT) and DOS legacy Sound Blaster emulation. Therefore,
it is recommended that you remove your legacy sound card, or disable your
motherboard’s legacy audio function.
Page 35

Contacting Diamond 31
A
CONTACTING
DIAMOND
CUSTOMER SERVICE
For updates and news on Diamond Multimedia products, please
fill out the product registration card and mail it in. For questions
or information regarding Diamond Multimedia Systems products,
please use any of the following:
U.S. mail:
Diamond Multimedia Systems,
Inc.
7101 Supra Drive SW
Albany OR 97321
Sales Info:
1-800-4-MULTIMEDIA
sales4u@diamondmm.com
Customer Service Phone:
800-468-5846
Customer Service FAX:
408-325-7408
Web Site:
www.diamondmm.com
TECHNICAL SUPPORT
If you need assistance, contact us by phone at 541-967-2450, or
use the following addresses for additional information.
FTP Site:
ftp.diamondmm.com
FAX on-demand:
800-380-0030
World Wide Web:
www.diamondmm.com
Product Support E-
techsupt@diamondmm.com
Developer Relations:
developer@diamondmm.com
Visit the Diamond Multimedia web site for the latest software
updates and technical information.
Page 36

32
Page 37

Trademark, Warranty and Certification Information 33
B
TECHNICAL SPECIFICATIONS
Operating System Support
♦ Windows 98/95, NT 4.0
♦ Real-mode MS-DOS
API Compatibility
♦ DirectSound, DirectSound3D
♦ DirectMusic and DirectShow
♦ A3D, versions 1.0-2.0
Minimum System Requirements
♦ Pentium 90MHz*
♦ 16 MB RAM
♦ 50 MB free hard disk space
♦ one available PCI slot
♦ powered speakers or headphones
*Note—SoftDVD and Dolby Digital support require Pentium II
266MHz or faster. See page 36,
SoftDVD System Requirements
for more information.
Page 38

34
Hardware Specifications
Audio Processing Chipset:
PCI Controller: Aureal Vortex 2
AU8830
Audio Codec:
AC’97 Quad codec
Wavetable:
320-voice DLS wavetable engine
Bus Type:
PCI
Signal-to-Noise-Ratio:
~96dB
Sample Rates:
Up to 48kHz
External Audio Output:
Primary [Out1] and Secondary
[Out2] Buffered Stereo Line Level
Output
External Audio Input:
Mic Input, Stereo Line Input
Internal Audio Input:
CD, Aux, Modem
External Connectors:
MPU401 MIDI/Joystick Game
Port
Internal Connectors:
Wavetable header, MX-Link
(MX-Link daughter cards only)
Performance Specifications
Audio Precision 10/25/98 04:07:05Frequency Response
DAC frequency response.at2
Color Line Style Thick Data Axis
Cyan Solid 1 Anlr.Level A Left
Green Solid 1 Anlr.Level B Right
board: Monster Sound MX300 (23010123-002)
test loop: OOOOXXXXXX
source: Dac 2
destination: Out 2
load: 100K
0 dBr A = 104.0 mVrms
0 dBr B = 100.6 mVrms
-1
+1
-0.8
-0.6
-0.4
-0.2
+0
+0.2
+0.4
+0.6
+0.8
d
B
r
B
-1
+1
-0.8
-0.6
-0.4
-0.2
+0
+0.2
+0.4
+0.6
+0.8
d
B
r
A
20 20k50 100 200 500 1k 2k 5k 10k
Hz
Page 39

Trademark, Warranty and Certification Information 35
Audio Precision 10/24/98 16:39:29THD+N vs FREQUENCY
thd+n vs frequency.at2
Color Line Style Thick Data Axis
Cyan Solid 1 Anlr.THD+N Ratio Left
Cyan Solid 1 Anlr.THD+N Ratio Left
board: Monster Sound MX300 (23010123-002)
test loop: XOOOOOXXXX
input level: 309.7 mVrms
source: Line
destination: Out 1
load: 100K
0.01
0.1
0.02
0.03
0.04
0.05
0.06
0.07
0.08
0.09
%
20 20k50 100 200 500 1k 2k 5k 10k
Hz
Key: THD+N = Total Harmonic
Distortion + noise
Page 40

36
SoftDVD System Requirements
To take full advantage of SoftDVD, the following minimum
system configuration is recommended:
♦ Pentium II 266MHz or faster
♦ Monster Sound MX300 sound card
♦ Windows 98; Windows 95 OSR2 with USB supplement, or
Windows 95 OSR2.1
♦ 32 MB of system memory
♦ DVD-ROM drive
♦ VGA monitor
♦ 15 MB free hard-drive space
♦ TV monitor (optional, depending upon graphics card)
♦ Diamond Viper V550 or Diamond Monster Fusion graphics
card, or other graphics card that is Zoran SoftDVD-compliant
If your system meets these requirements, you can install the
SoftDVD application from the MX300 Installation CD disk.
An online user’s guide for SoftDVD is located inside the MX300
installation CD. Insert the MX300 installation CD, and use
Windows Explorer to open up the root directory (if the
installation program starts, click Quit). Click SoftDVD >
SoftDVDGuide.pdf located in D:\Extras\Manuals (where D is the
letter of your CD-ROM drive). You may have to install the
Adobe® Acrobat® Reader (located in the above directory).
Page 41

Trademark, Warranty and Certification Information 37
C
TRADEMARK, WARRANTY
AND
CERTIFICATION
INFORMATION
Trademarks
All trade names referenced in this manual are the service mark, trademark, or registered
trademarks of their respective manufacturers. Diamond reserves the right to change specifications
without notice.
Diamond Monster Sound MX300 Warranty
Your Monster Sound MX300 kit comes with a three-year hardware warranty. Diamond
Multimedia Systems, Inc., (Diamond) warrants Monster Sound MX300 against defects in material
and workmanship for a period of one year from the date of purchase from Diamond or an
authorized Diamond agent. This warranty applies only to the original purchaser of the Monster
Sound MX300 kit and is not transferable. This warranty does not cover any incompatibilities due to
the user’s computer, hardware, software or any other related system configuration in which
Monster Sound MX300 interfaces. Proof of purchase will be required before any warranty
consideration by Diamond occurs.
This warranty does not cover any damage caused by negligence, non-authorized modifications, or
parts installed without prior written permission from Diamond.
This warranty does not apply if the product has been damaged by accident, abuse, misuse, or
misapplication, nor as a result of service to the product by anyone other than by Diamond.
DIAMOND IS NOT RESPONSIBLE FOR ANY LOST PROFITS, LOST SAVINGS OR
OTHER INCIDENTAL OR CONSEQUENTIAL DAMAGES ARISING OUT OF THE USE
OF, OR INABILITY TO USE, THIS PRODUCT. THIS INCLUDES DAMAGE TO
PROPERTY AND, TO THE EXTENT PERMITTED BY LAW, DAMAGES FOR
PERSONAL INJURY. THIS WARRANTY IS IN LIEU OF ALL OTHER WARRANTIES
INCLUDING IMPLIED WARRANTIES OF MERCHANTABILITY AND FITNESS FOR A
PARTICULAR PURPOSE.
Some states do not allow limitation of implied warranties, or exclusion or limitation of incidental or
consequential damages, so the above limitations may not apply to you. This warranty gives you
specific legal rights. You may have other rights which may vary from state to state.
This warranty applies only to this product, and is governed by the laws of the State of California.
Page 42

38
Certification Information
This equipment has been tested and found to comply with the limits for a Class B digital
device, pursuant to Part 15 of the FCC Rules. These limits are designed to provide
reasonable protection against harmful interference in a residential installation. This
equipment generates, uses and radiates radio frequency energy and, if not installed and
used in accordance with the instructions, may cause harmful interference to radio
communications. However, there is no guarantee that interference will not occur in a
particular installation. If this equipment does cause harmful interference to radio or
television reception, which can be determined by turning the equipment off and on, the
user is encouraged to try to correct the interference by one or more of the following
measures:
1. Reorient or relocate the receiving antenna (television, radio, etc.).
2. Increase the separation between the equipment and receiver.
3. Connect the equipment to an outlet on a circuit different from that to which the
receiver is connected.
4. Consult the dealer or an experienced radio/TV technician for additional help.
Caution: Changes or modifications not expressly approved by the party responsible for
compliance could void the user’s authority to operate the equipment. Contact Diamond
Multimedia Systems, Inc., 7101 Supra Drive SW, Albany OR 97321. Technical Support tel:
541-967-2450. This device complies with Part 15 of the FCC Rules. Operation is subject to
the following two conditions: (1) this device may not cause harmful interference, and (2)
this device must accept any interference received, including interference that may cause
undesired operation. Warning: Using this product in any way other than as described in this
manual or altering the antenna in any way may violate FCC rules. FCC ID JJ4-GP9450-H
(Handset)FCC ID JJ4-GP9450-R (Receiver)
Canadian Radio Interference Regulations
This Class B digital apparatus meets all requirements of the Canadian Interference Causing
Equipment Regulations. Cet appareil numérique de la classe B respecte toutes les exigences
du Règelement sur le matériel brouilleur du Canada.
 Loading...