

Page 1
1
Page 2

2
GC500 Gaming Capture Box Installation Manual
Contents
V1.0
Chapter 1: GC500 Gaming Capture Box Hardware Installation .......................................................................3
1.1 Package Contents ...........................................................................................................................3
1.2 System Requirements.....................................................................................................................3
1.3 Hardware Installation.....................................................................................................................3
Chapter 2: GC500 Gaming Capture Box Quick Installation .............................................................................4
2.1 The Driver Installation of GC500 Gaming Capture Box ...............................................................4
2.2 Diamond Video Capture Application Installation..........................................................................5
Chapter 3 : FAQ .................................................................................................................................................6
3.1 How to check if the driver has been installed successfully or not?................................................6
3.2 How to uninstall device driver?......................................................................................................6
Note: For multi language installation manual, please install Adobe Reader from AutoRun after inserting the
DVD into the DVD-ROM. Click “Browse” and open Installation Manual file where multi- language
installation manuals are in.
Page 3
3
Chapter 1: GC500 Gaming Capture Box Hardware Installation
1.1 Package Contents
Unpack your GC500 Gaming Capture Box package and make sure that all items are intact. The following
items should be included in your package:
GC500 Gaming Capture Box Device
Quick start guide & Installation Manual
DVD-ROM with driver & Diamond Video Capture & CyberLink PowerDirector 8
GC500 BM to AM cable
Component video and Composite Audio Cable
1.2 System Requirements
Pentium-IV 1.6GHz or higher (recommended)
1024 MB RAM of system memory or above (recommended)
One available GC5002.0 port
Graphics Card (Must support DirectX 9.0c)
Sound Card (AC97 compatible sound card)
1GB Free HD Space
DVD-ROM Drive (For software installation)
Microsoft Windows XP / Windows Vista / Windows 7
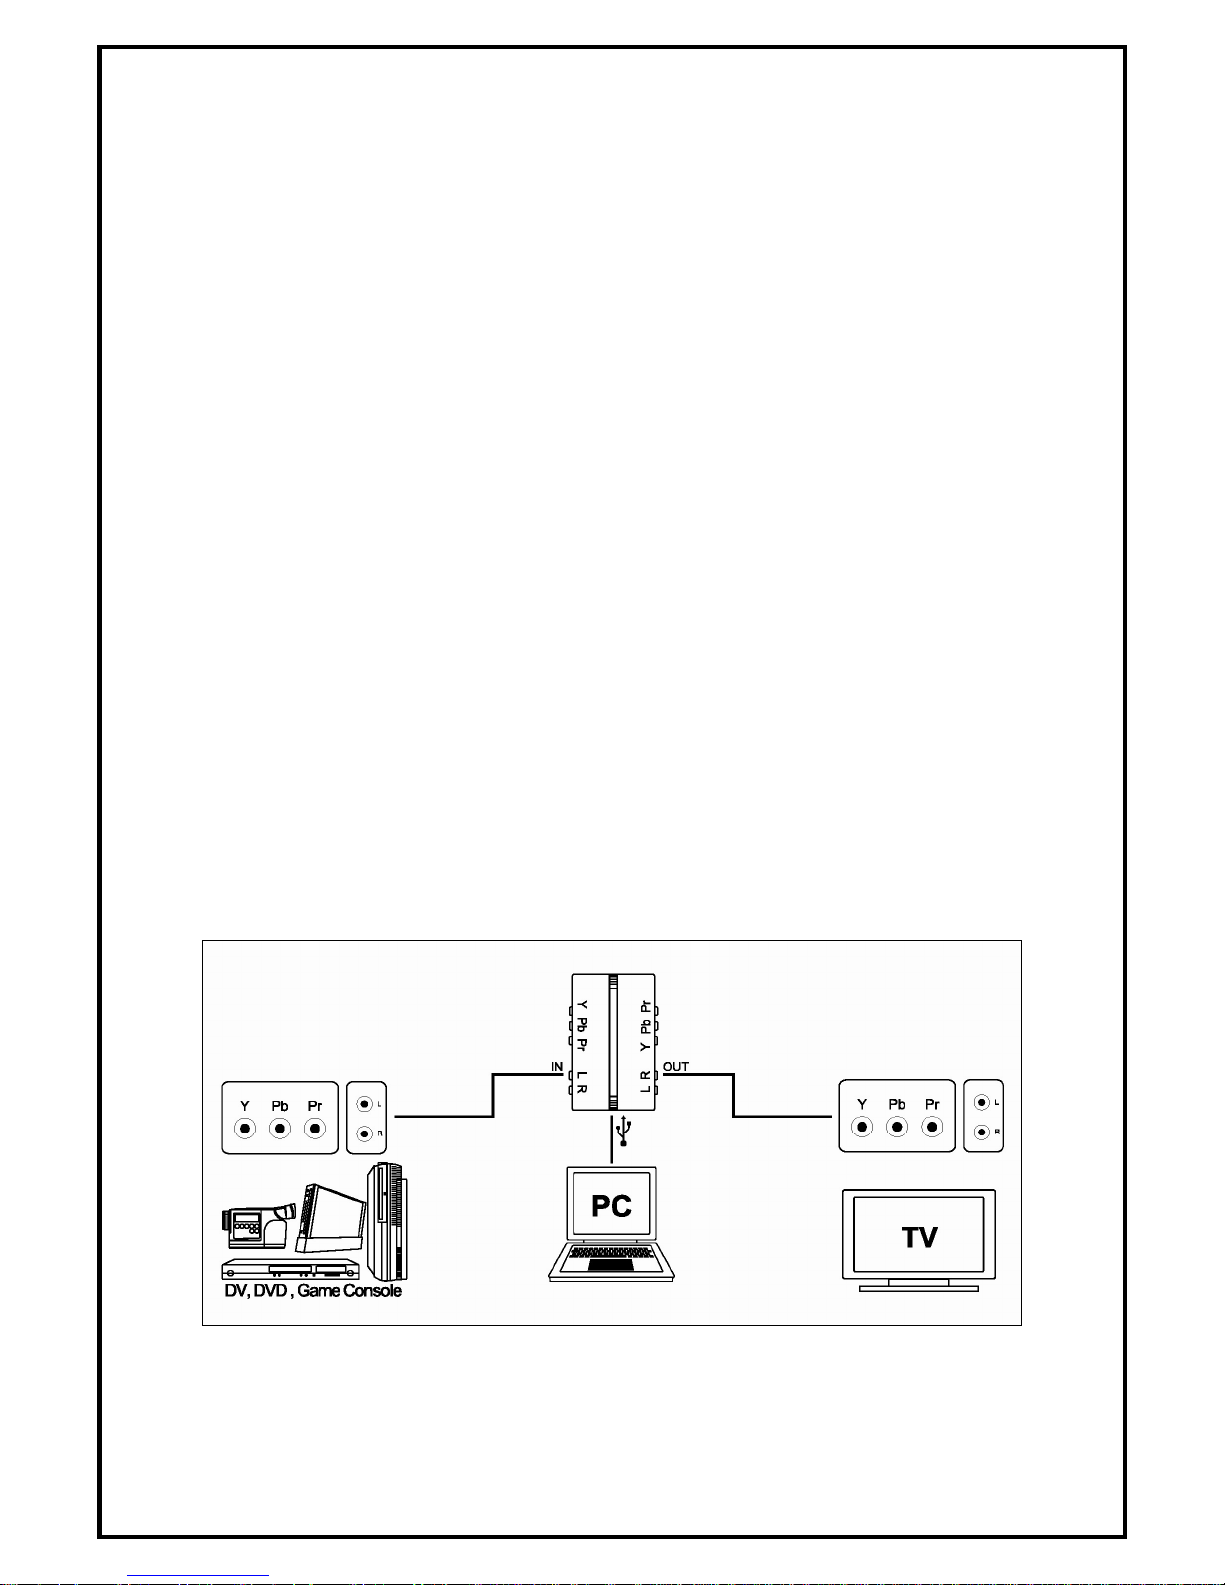
1.3 Hardware Installation
Please follow the steps shown below for installation of your GC500 Gaming Capture Box and follow the
pictorial guide below for peripheral connections.
1. Connect the YPbPr / S-VIDEO input into the GC500 Gaming Capture Box connector.
2. Plug GC500 Gaming Capture Box into the USB 2.0 port of your system.
Page 4
4
Chapter 2: GC500 Gaming Capture Box Quick Installation
The GC500 Gaming Capture Box package comes with complete Windows software utilities. These utilities
can be found on the DVD-ROM in this package. During installation, it is highly recommended to disable any
sub-programs. These include applications such as antivirus software and system monitoring applications.
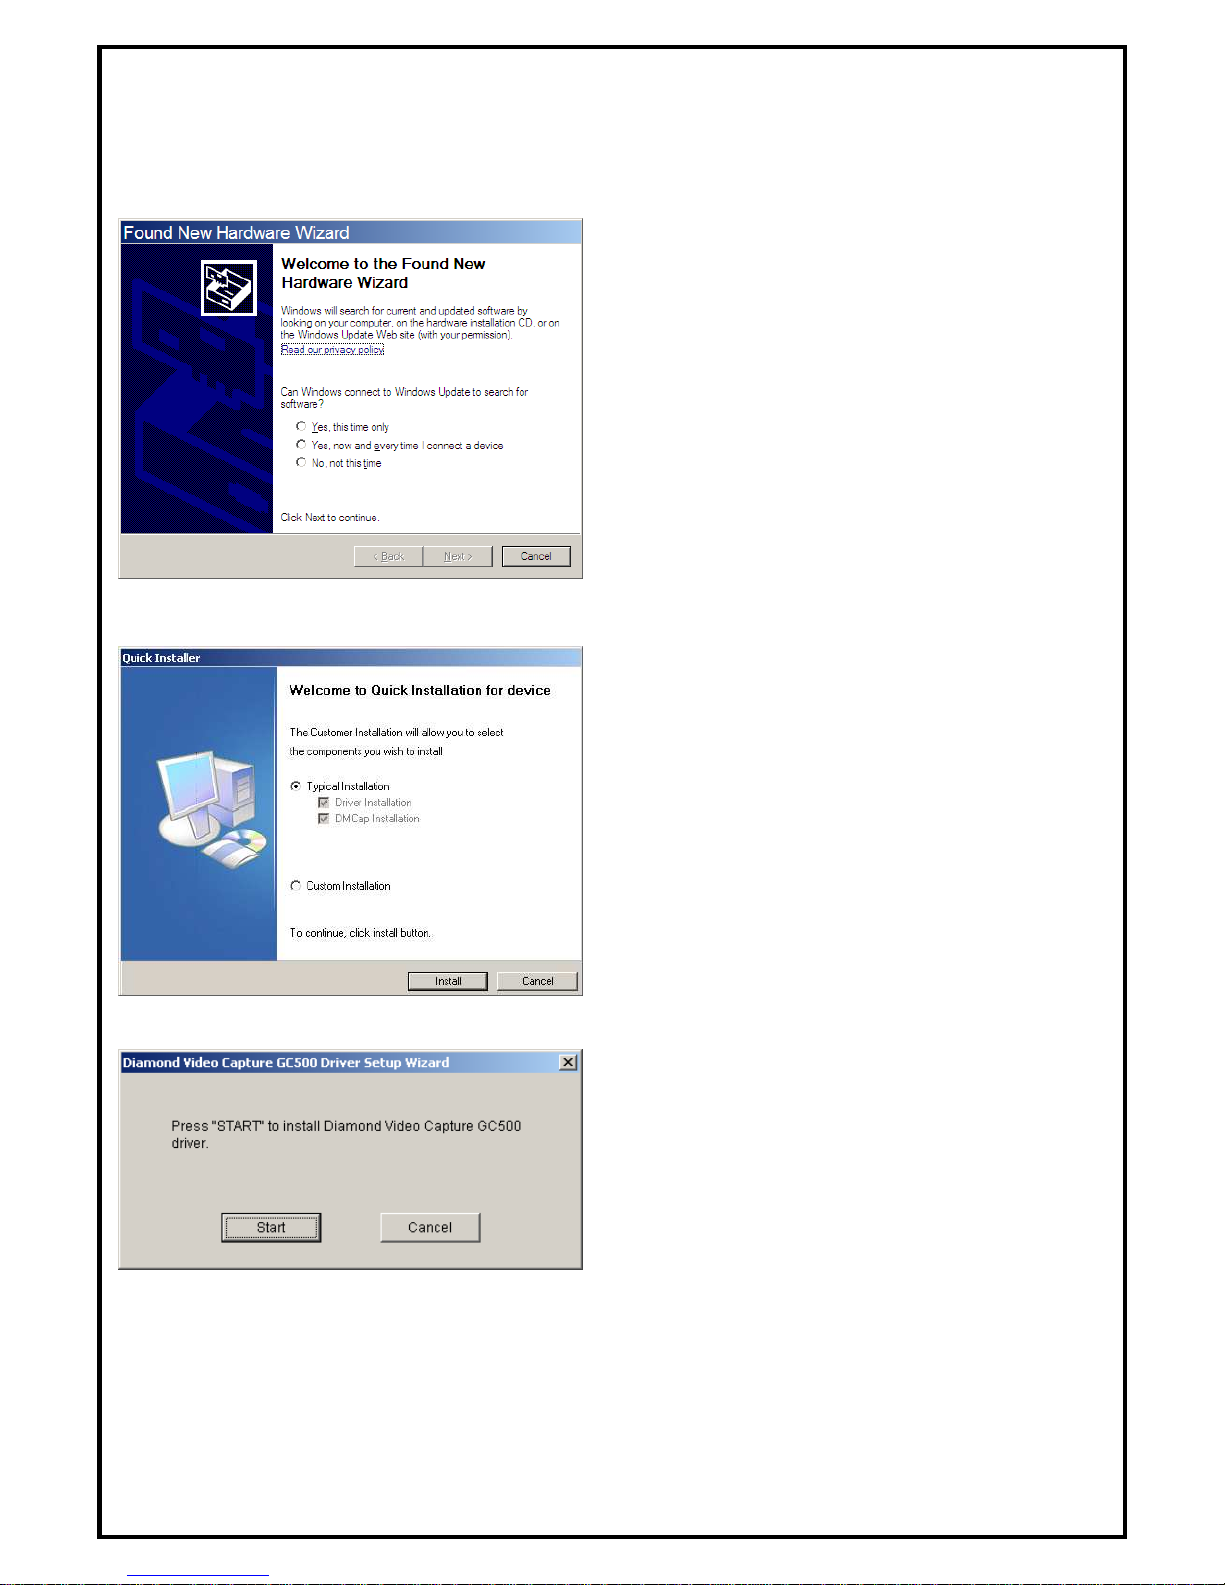
1. When you finish the hardware setup, the “Found
New Hardware Wizard” window will pop up.
Please click “Cancel” and you can make use of
GC500 Gaming Capture Box Quick Installation
for proper installation.
2. The Quick Installation provides you with two
choices to install. Please choose “Typical
Installation” for complete device driver and
software installation, or choose “Custom
Installation” to set up options according to your
personal needs. Click “Install” to continue.
2.1 The Driver Installation of GC500 Gaming Capture Box
3. Click “Start” to install the GC500 Gaming
Capture Box driver. Please wait, while the
installation is in process.
Page 5
5
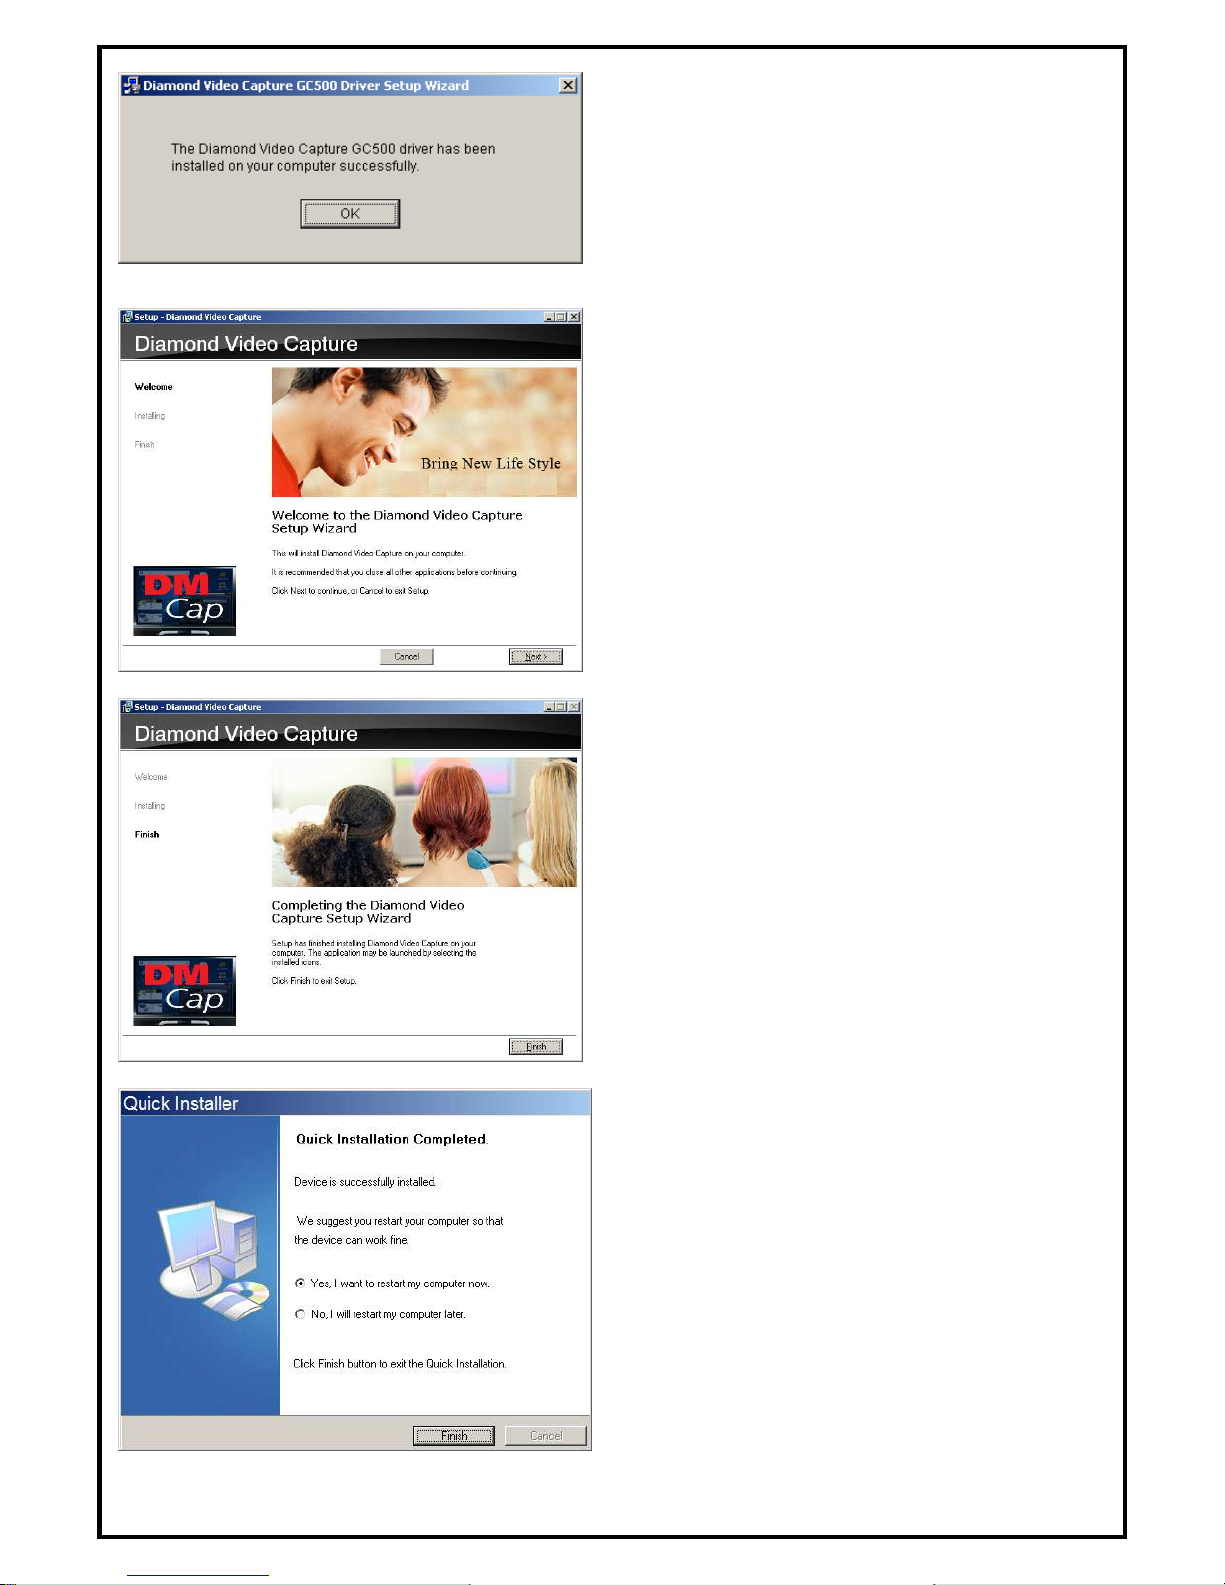
4. Now the driver has been installed successfully on
your computer and click “OK” to finish driver
installation and go to next step.
2.2 Diamond Video Capture Application Installation
5. The InstallShield Wizard will guide you through
installation of Diamond Video Capture
application. Click “Next” to continue.
6. When the message as the one on the left image,
click “Finish” to end the installation.
7. All the drivers and applications have been
installed successfully. Please choose “Yes, I want
to restart my computer now” to restart your
computer (Recommend) and click “Finish” to end
the installation.
Page 6
6
Chapter 3 : FAQ
3.1 How to check if the driver has been installed successfully or not?
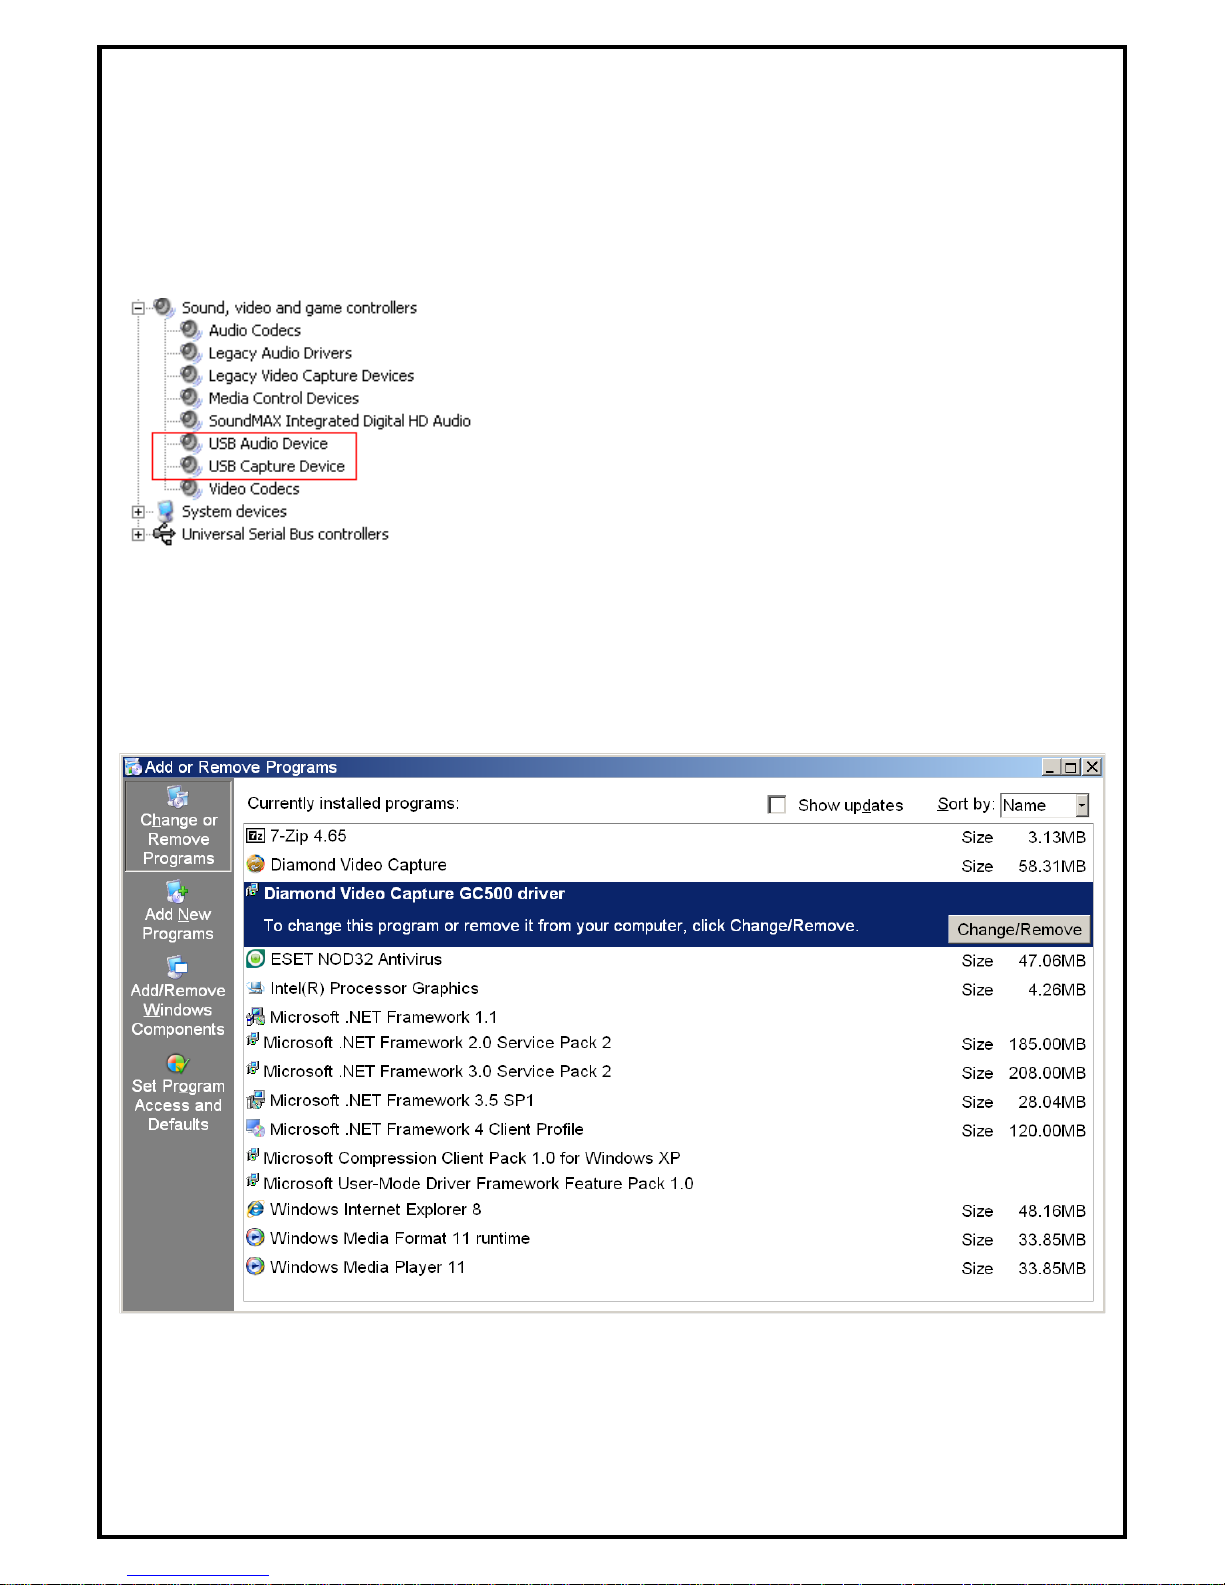
Ans :Right click on “My Computer” on the desktop and choose “Properties”. Once in “Properties”
window, click on “Device Manager” in Hardware panel. Click on the plus icon of “Sound, video and
game controllers” to open the device list. You can find the GC500 Capture Device See Fig.1 below.
Fig.1
3.2 How to uninstall device driver?
Ans::::Click on “Start” on the left-down desktop and choose “Setting”. Once in “Control Panel” window,
click on “Add or Remove Programs”. Click on the plus icon of “Change or Remove Programs” then
choose “Diamond Video Capture GC500 driver” to remove the device
Fig.2
Page 7

7
Technical Support
Diamond Technical Support staff is here to help resolve any issues
that you may be experiencing with the installation of the Diamond
product. Prior to contacting technical support please make sure you
have the following information available.
1. Model #: (Printed on the bar code, located on the box)
2. Installation CD Version: (printed on the CD label)
3. The version of Windows that your system is running.
4. The manufacturer and model # of your computer.
5. CPU type and speed (example: Intel Pentium4 2.4GHZ)
6. A complete description of the problem that you are
experiencing including any steps that you have taken to try
to resolve the issue.
Technical Support Options
Free Telephone Support
818-534-1414
(long distance rates may apply)
Mon - Fri, 8 - 4:30 PST
http://www.diamondmm.com
Page 8

8
One Year Limited Warranty
The warranty described below is extended only to the original buyer and is not transferable.
PLEASE NOTE THAT THE PRODUCT YOU HAVE PURCHASED IS DISTRIBUTED AND WARRANTED BY DIAMOND
MULTIMEDIA ("DIAMOND") AS DESCRIBED BELOW. QUESTIONS REGARDING THIS WARRANTY AND
WARRANTY CLAIMS SHOULD BE MADE TO DIAMOND.
Diamond warrants to the original purchaser of the hardware product, that the product is free from defects in materials or
workmanship under normal use and service for a period of one (1) year from the date of purchase at retail. All cables and
accessories provided with a Diamond product are warranted to be free from defects in materials or workmanship under
normal use and service for a period of for (90) ninety days from date of purchase at retail.
Diamond ’s sole obligation under this warranty shall be, at Diamond ’s option, to: (i) repair the defective product or part;
(ii) deliver to customer an equivalent product or part to replace the defective product. When a product or part is replaced
or exchanged, the item becomes customer’s property and the replaced or exchanged item becomes Diamond ’s property.
When a refund or replacement product is given, the defective product becomes Diamond’s property.
Replacement parts or products may be new or include serviceable used parts with at least the same functional equivalence
to the original product. If, at the time of repair, a product is "out of warranty" or within the last ninety (90) days of the warranty
period, Diamond warrants any repair for ninety (90) days. All software provided is subject to the terms of the associated
software end-user license agreement.
WARRANTY EXCLUSIONS AND LIMITATIONS
THIS WARRANTY IS ONLY APPLICABLE TO PRODUCTS SOLD BY DIAMOND AFTER MAY 1, 2007.
THIS WARRANTY IS ONLY APPLICABLE IF PRODUCT REGISTRATION IS RECEIVED WITHIN 30 DAYS OF THE
DATE THE PRODUCT IS PURCHASED. TO BE ELIGIBLE FOR THIS WARRANTY, YOU MUST REGISTER AT
diamondmm.com. THE ORIGINAL SALES RECEIPT SHOWING THE DATE OF PURCHASE OF THE PRODUCT IS
PROOF OF THE DATE OF PURCHASE. DIAMOND MAY REQUEST THE ORIGINAL SALES RECEIPT OR A COPY AS
PROOF OF DATE OF PURCHASE.
Diamond does not warrant third party products which Diamond distributes "AS IS" unless otherwise specified. Third party
products may be warranted by the third party. Diamond makes no warranty or representation that: (i) the operation of the product will
be uninterrupted or error free; (ii) defects in the product will be corrected; or (iii) that the product will meet Customer’s requirements or
work in combination with any hardware or software provided by third parties.
TO THE FULLEST EXTENT ALLOWED BY LAW, THE WARRANTIES, REMEDIES AND LIMITATIONS CONTAINED
HEREIN ARE EXCLUSIVE AND ARE IN LIEU OF ALL OTHER WARRANTIES, TERMS OR CONDITIONS, EXPRESS OR
IMPLIED, EITHER IN FACT OR BY OPERATION OF LAW, STATUTORY OR OTHERWISE, INCLUDING WITHOUT
LIMITATION, WARRANTIES, TERMS OR CONDITIONS OF MERCHANTABILITY, FITNESS FOR A PARTICULAR
PURPOSE, QUALITY, CORRESPONDENCE WITH DESCRIPTION AND NON-INFRINGEMENT, ALL OF WHICH ARE
EXPRESSLY DISCLAIMED. DIAMOND WILL NOT BE LIABLE UNDER THIS WARRANTY IF ITS TESTING AND EXAMINATION
DISCLOSE THAT THE ALLEGED DEFECT OR MALFUNCTION IN THE PRODUCT OR SOFTWARE DOES NOT EXIST OR WAS
CAUSED BY CUSTOMER’S OR ANY THIRD PARTY’S MISUSE, NEGLECT, IMPROPER INSTALLATION OR TESTING,
UNAUTHORIZED ATTEMPTS TO OPEN, REPAIR OR MODIFY THE PRODUCT OR SOFTWARE, OR ANY OTHER CAUSE
BEYOND THE RANGE OF THE INTENDED USE, OR BY ACCIDENT, FIRE, LIGHTNING, OTHER HAZARDS, OR ACTS OF GOD.
THIS WARRANTY WILL NOT APPLY TO PRODUCTS USED FOR NUCLEAR RELATED, WEAPONS
RELATED, MEDICAL OR LIFE SAVING PURPOSES.
TO THE FULLEST EXTENT ALLOWED BY LAW, DIAMOND ALSO EXCLUDES FOR ITSELF AND ITS SUPPLIERS ANY
Page 9

9
LIABILITY, WHETHER BASED IN CONTRACT OR TORT (INCLUDING NEGLIGENCE), FOR INCIDENTAL,
CONSEQUENTIAL, INDIRECT, SPECIAL OR PUNITIVE DAMAGES OF ANY KIND, OR FOR LOSS OF REVENUE OR
PROFITS, LOSS OF BUSINESS, LOSS OF INFORMATION OR DATA, OR OTHER FINANCIAL LOSS ARISING OUT OF
OR IN CONNECTION WITH THE SALE, INSTALLATION, MAINTENANCE, USE, PERFORMANCE, FAILURE, OR
INTERRUPTION OF ITS PRODUCTS, EVEN IF DIAMOND, ITS SUPPLIERS OR ITS RESELLER HAS BEEN ADVISED
OF THE POSSIBLITY OF SUCH DAMAGES. DIAMOND ’S SOLE LIABILITY WITH RESPECT TO ITS PRODUCT IS
LIMITED TO REPAIR OR REPLACEMENT OF THE PRODUCT, AT DIAMOND ’S OPTION. THIS DISCLAIMER OF
LIABILITY FOR DAMAGES WILL NOT BE AFFECTED IF ANY REMEDY PROVIDED HEREIN SHALL FAIL FOR
ESSENTIAL PURPOSE.
DISCLAIMER: Some jurisdictions may not allow the exclusion or limitation of incidental or consequential damages for
products supplied to consumers, or the limitation of liability for personal injury, so the foregoing limitations and exclusions
may not apply or may be limited in their application to you. When implied warranties are not allowed to be excluded in their
entirety, they will be limited to the duration of the applicable written warranty. This warranty gives you specific legal rights
that may vary depending on the law of the applicable jurisdiction.
OBTAINING WARRANTY SERVICE: Please review the online "help" resources referred to in the accompanying documentation
before seeking warranty service. If the product is still not functioning properly after making use of these resources,
please access the online help website at diamondmm.com for warranty instructions or to obtain warranty services. Some
additional charges may apply for phone support.
Page 10

1
DM Cap User Manual
Contents
V1.0
Chapter 1 Introduction ....................................................................................................... 2
1.1
Software Features .................................................................................................... 2
1.2
Console Setup........................................................................................................... 2
Chapter 2
DM Cap .......................................................................................................... 5
2.1
Main Panel................................................................................................................ 5
2.2
The Tool Menu ....................................................................................................... 11
Chapter 3
Playback....................................................................................................... 15
Chapter 4
Setup............................................................................................................ 16
4.1
General Setting....................................................................................................... 16
Chapter 5
Schedule recording...................................................................................... 22
Page 11
2
Chapter 1 Introduction
Thanks for your purchase. It is highly recommended that you check all the functions that the device supports carefully before using the program. This manual will guide you through the essential information
how to use this application program.
DM Cap is a multi-functional, graphical and easy-to-use application software that offers you the most
comprehensive multimedia entertainment enjoyment. Please notice that the multimedia functions may
vary depending on the product you purchased.
1.1 Software Features
It’s a multi-functional, graphical software application program that consumes less RAM space and
CPU capacity.
Playback recorded videos in PIP mode
Sleep timer ( auto close AP, Auto close PC)
Snapshot format: BMP, JPG, PNG, TIFF
Continuous snapshots counts from 1 to 100
Support multiple H.264 record format
1.2 Console Setup
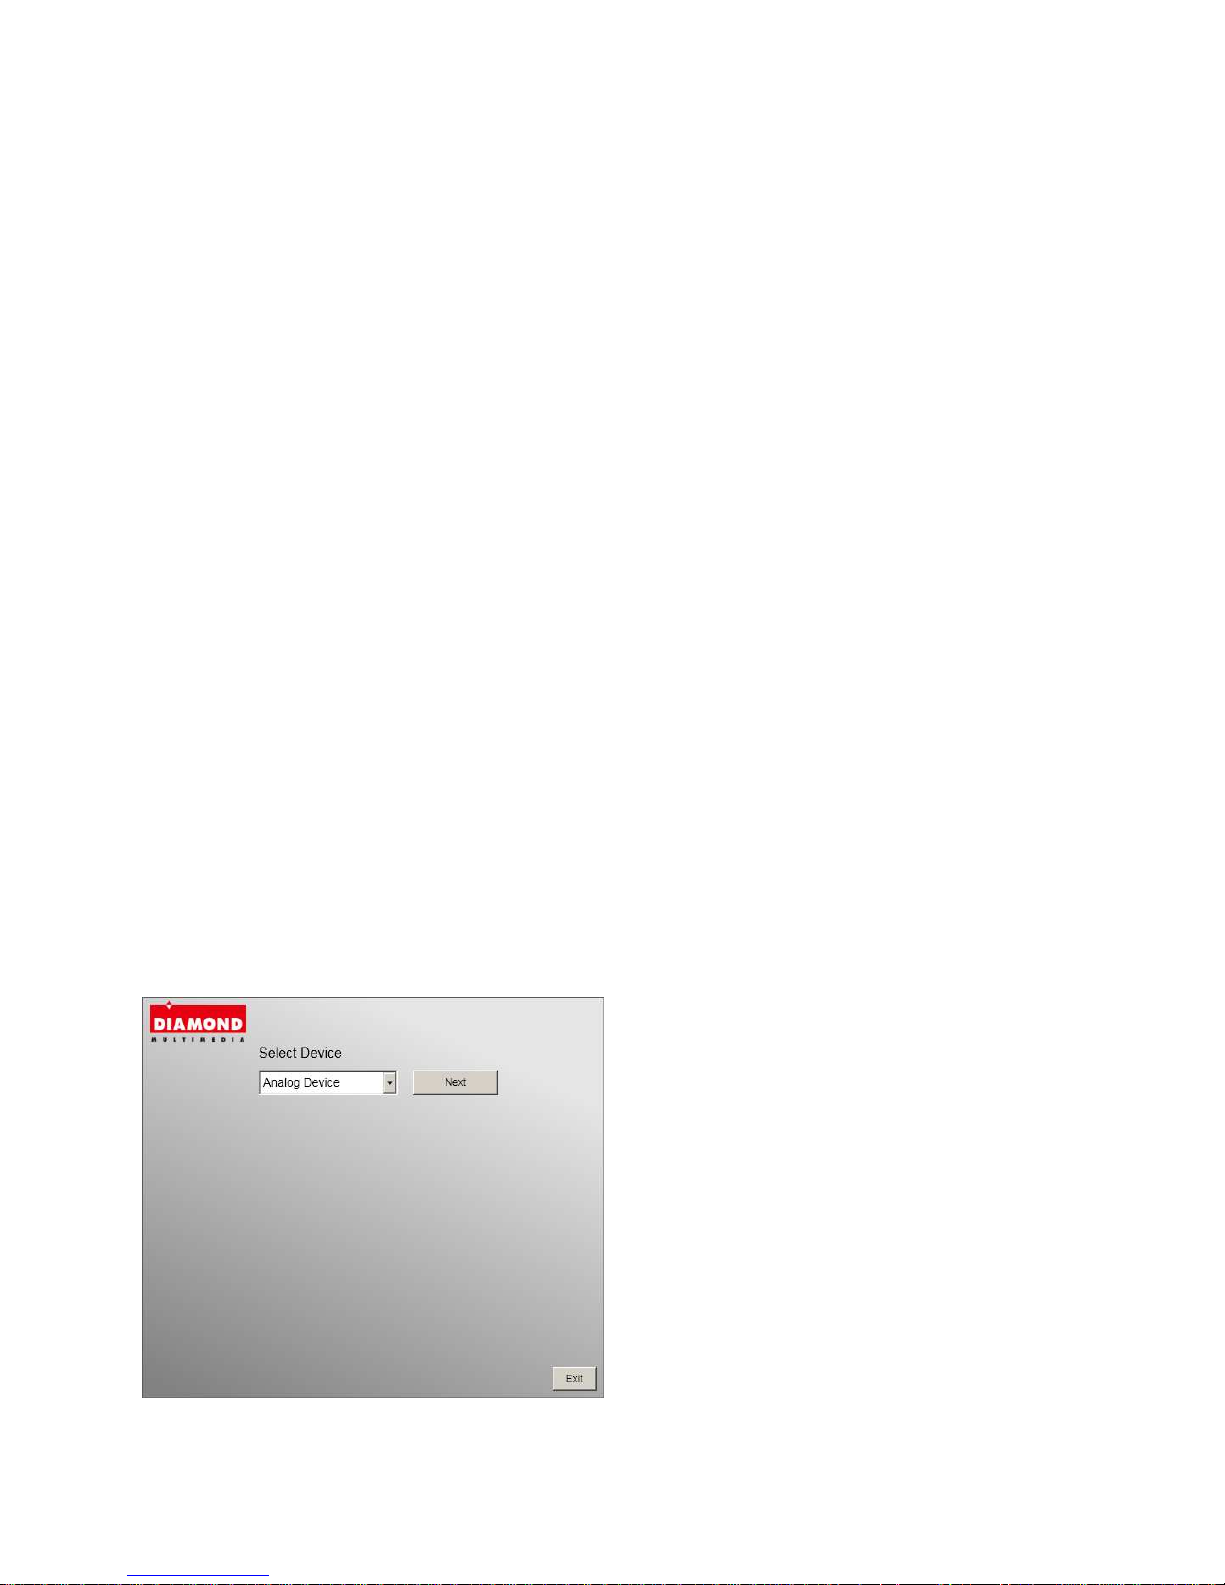
1.2.1 Signal setting
When you run DM Cap for the first time, the system will guide you through the necessary steps of signal
setting.
1. Capture Device belongs to Analog Device.
Please click “Next”.
Page 12

3
2. Here we can see the capture device, Click
“Next”.
3. Please select the video standard for your
input source, and click “Next”.
* U.S. Standard leave Default Settings.
4. Please select capture source and Click
“Exit” to finish the setup.
Page 13

4
1.2.2 Source Inputs
1. Select your device and signal source such as
Analog Device - YPbPr, Analog De-vice –
YPbPr(HD) DM Cap will import the signal
source you select. It depends on the device signal
source and show here.
Analog Device - YPbPr: If you choose Analog
Device - YPbPr , please make sure your game
console display setting is 480i / 576i
Analog Device – YPbPr (HD): If you choose
Analog Device – YPbPr(HD) , please make sure
your game console display setting is 480P /576P /
720p / 1080i.
Notes:YPbPr input for 720p / 1080i only support
60Hz video signal. YPbPr input for 720p with
50Hz and YPbPr input for 1080i with 50Hz are
not supported.
Page 14

5
Chapter 2 DM Cap
You can capture video from game consoles. Once you have done your initial setup (source input), you can
enjoy playback recorded clip video from game consoles.
2.1 Main Panel
Buttons
Capture
Snapshot
Display Ratio
Volume Down
Volume Up
Mute
Playback
Setup
Source Input
Schedule
Record
Capture: Click to capture the scenes you like. Once you capture the scene, it is saved in your Video Path.
If you’d like to stop capture, click caption button again or right click on the screen and then enable “Stop
Capture”.
Page 15

6
Snapshot: You can click the “Snapshot” icon to take snapshots. When the screen shows “Snapshot OK”,
it means the image has been successfully taken into your file folder as picture files.
Page 16

7
Display Ratio: Change ratio base on a routine setting. (Free/4:3/16:9/Base on source)
You can adjust your display ratio when you move your mouse cursor to the arrow at the right of this option. There are Free, 4:3, 16:9. It is the same as you click on the Display Ratio function icon on the interface.
Free: The initial ratio when you start VivaTV and you can adjust it by dragging the edge of the VivaTV
window.
4:3: Its produces a traditional square display
16:9: Its produces a rectangular, wide screen display
Page 17

8
Volume Down: Adjust DM Cap volume to be loud or quiet
Volume UP: Adjust DM Cap volume to be loud or quiet
Page 18

9
Audio Mute Mode: Turn DM Cap volume on or off.
Playback: Playing recorded file from PC.
Page 19

10
Schedule Recording: You can schedule your record process
Source Input: Setting your video source
Page 20

11
Setup: Setting functions
2.2 The Tool Menu
Always On Top:
Apply To All Channels: If you select this option, the adjusted display ratio will be applied to all of your
available channels.
Page 21

12
Display Ratio: You can change your display ratio from free, 4:3, 16:9
Preview Windows: You can setting Full Screen
Source Input: You can choose signal sources
Page 22

13
Capture: You can choose to capture formats.
Snapshot: Activate Snapshot function to take the photo. You can also do the same if you click on the
Snapshot icon on the main control bar.
Mute: you can set the DM Cap no audio output.
Page 23

14
Volume Up: Increase the audio volume.
Volume Down: Decrease the audio volume.
Exit: Close / Exit DM Cap window
Page 24

15
Chapter 3 Playback
When you click on this icon , you can choose a recorded file for playback or a file from folders in
your PC.
Performed the PIP mode when playback recorded file
Page 25

16
Chapter 4 Setup
In DM Cap, you can simply make settings as your favorite in Setup page. Since DM Cap has been
launched, click Setup button to access Setup page.
4.1 General Setting
You can find Sleep Timer, User Interface, Marquee and other options, in Setup page. Those can help
you to improve your power saving, scanning adjustment, colorful UI and language and location.
4.1.1 Sleep Timer
You might watch TV but get sleepy after minutes later or leave your TV for emergency. For any specific
reason, you would like to ask VivaTV to help you on something. There are 5 options, Close Application,
Log off, Hibernate, Shutdown, and Reboot, for setting. Besides, you can move time shuttle left or right to
adjust time period.
Page 26

17
4.1.2 User Interface
4.1.3 Other
4.1.4 Marquee Setting.
Here we can set the properties of the marquee such as moving distance, interval, the content, and so on.
Page 27

18
4.1.5 Video Standard.
Here we can set Video Standard
Page 28

19
4.1.6 Display Ratio.
Here we can set the display ratio: Free, 4:3, 16:9
4.1.7 OSD
Here we can set the OSD color, show or not, and adjust the position, the font color.
Page 29

20
4.1.8 Video Setting.
Here we can adjust the brightness, blue, red, contrast, saturation, the VMR type, and preview windows
size.
4.1.9 Capture
Here we can change video path, capture name setting, capture format, capture bitrate and capture
resolution.
Page 30

21
4.1.10 Snapshot
Here we can set the snapshot file format, where to save the pics, and the how many pics will be saved
when using the snapshot function.
Page 31

22
Chapter 5 Schedule recording
You can click the schedule record on the main floating bar to use the schedule record function.
Capture device:your concorrent using device.
Capture Soruce Type:depends on your signal source.
Capture Format / Capture Size / Audio option / BitRate:choose the proper option to meet your need.
Time Option setting:You can set the Start / End time.
Record Rule:You can choose the record rule such as only once / everyday / every Sunday……
Record in silent mode:silent mode won’t show the video on screen when recording.
In Schedule List Tab. You can see your schedule entry here.
Page 32

23
Add:Add new schedule entry
Edit:Modify the selected schedule entry
Delete:Delete the selected schedule entry
Clear All:Clear All schedule entries
S.R.P.O.:Schedule Record in Power Off mode. When click the S.R.P.O, system will enter hibernate mode
and power off. Because the S.R.P.O need system hibernate function enabled, please be sure the system
supports hibernate function. System BIOS set to S1 is OK.
Page 33

24
In Setting Tab.
Save path:Indicate where to save the recorded file.
File Name:2 options here, use specific name or default name.
System Option:After record is completed, you can choose No Action / Suspend / Shutdown the PC……
Auto-execute at start up:To ensure the schedule record perform correctly, please enable the checkbox.
Page 34

25
In Log tab.
Here will show the log for schedule recording.
 Loading...