

Page 1

DV998FD/FDB
Colour Monitor
19” (48.3 cm) CRT Size
18” (45.7 cm) Viewable Area
User’s Manual
Page 2

Diamond Digital is a registered trademark of Mitsubishi Electric Australia Pty. Ltd.
Microsoft and Windows are registered trademarks of Microsoft Corporation.
Apple and Macintosh are registered trademarks of Apple Computer, Inc.
All other trademarks remain the property of their respective owners.
UG/MON997FD/FDB/01
Page 3

i
Table of Contents
1
1 Important Safety Instructions .......................................... 1
2
2 Features ............................................................................. 2
3
3 Unpacking the Monitor ..................................................... 3
4
4 Installation ......................................................................... 3
Drivers for Windows 95, 98, 2000, XP and Millennium Edition...... 4
5
5 Adjusting the Monitor ....................................................... 5
Selecting Functions and Making Adjustments ............................... 6
Brightness Hotkey........................................................................... 6
Contrast Hotkey .............................................................................. 6
The Main Menu ................................................................................... 7
Making Adjustments........................................................................ 7
Timing and Refresh Rate Setting ................................................... 10
Factory Preset Timings ................................................................... 11
6
6 Troubleshooting.............................................................. 12
7
7 Specifications.................................................................. 14
8
8 Service Contacts ............................................................. 16
Australian Service Contacts ........................................................... 16
Page 4
ii
Copyright Notice
Copyright 2005, Mitsubishi Electric Australia Pty. Ltd. All rights reserved. No
part of this publication may be reproduced, transmitted, transcribed, stored in
a retrieval system or translated into any language or computer language, in
any form or by any means, electronic, mechanical, magnetic, optical,
chemical, manual or otherwise, without the prior written permission.
Disclaimer
Mitsubishi Electric Australia Pty. Ltd. makes no representations or
warranties, either expressed or implied, with respect to the contents hereof
and specifically disclaims any warranties, merchantability or fitness for any
particular purpose. Further, Mitsubishi Electric Australia reserves the right to
revise this publication and to make changes from time to time in the contents
hereof without obligation to notify any person of such revision or changes.
Reference Information
For future reference, write the following information about your monitor in
the space below. The serial number is on the back of the product or on the
bottom of its stand.
Monitor Information
Product Name: DV998FD/FDB
Serial Number:
Date of Purchase:
Dealer Information
Dealer:
Telephone
Number:
Address:
Page 5

1
11
Important Safety
Instructions
Please read the following safety instructions before installing or cleaning your
Diamond Digital monitor:
1. This monitor must be operated from the type of power source indicated
on the rating label. If you are not sure of the type of power available in
your area, consult your dealer or local electricity supply company.
2. This monitor must be operated with a 3 wire electrical cable that has a
plug with a third (grounding) pin. The plug must only be connected to a
grounded power outlet. This is a safety feature. Australian and New
Zealand customers should use the power cable supplied with the
monitor.
3. Make sure that the power outlet that you plug the monitor into is easily
accessible.
4. Unplug the monitor’s power cable from the wall outlet before cleaning.
Do not use liquid or aerosol cleaners. Use a soft cloth to clean the
monitor housing and screen.
5. Slots and openings on the back or top of the cabinet are provided for
ventilation. They must not be blocked or covered. This product should
never be placed near or over a radiator or other heat source, or in a
built-in installation unless proper ventilation is provided.
6. Never push objects of any kind, or spill liquid of any kind into the
monitor.
7. Do not attempt to service the monitor yourself as opening or removing
covers may expose you to dangerous voltages or other risks. Removing
the cover of the monitor may void warranty.
8. If any abnormal operation or an accident (such as dropping the unit)
occurs, disconnect the monitor from the wall power outlet and contact a
Mitsubishi Authorised Service Centre (see chapter 8 for details).
Page 6

2
2
2
Features
Your DV998FD/FDB Monitor has the following features:
♦ Plug and Play Compatibility
With DDC-2B
™
, the DV998FD/FDB is compatible with the Plug and
Play features of Microsoft
®
Windows® 95, 98, 2000, XP and Millennium
Edition.
♦ Compatible with PC, Apple
®
Macintosh® and most other computer
systems.
♦ Flicker-free Image
The monitor supports VESA standard graphics signals with flicker-free
refresh rates at resolutions up to 1920 x 1440 pixels at 60 Hz.
♦ Larger Viewable Size
With its 45.7 cm (18”) diagonal viewable screen size, the
DV998FD/FDB offers a larger viewable screen area than many other
19” CRT monitors.
♦ Easy to Use On Screen Display
The On-Screen Display (OSD) allows you to adjust all settings simply
with on-screen menus.
♦ Low Power Consumption
Maximum power consumption is 83 watts. Most other 19” CRT
monitors use 100 watts or more. The power management complies
with VESA DPMS standard. When the system is idle (off mode), the
monitor automatically cuts its power consumption to less than 2 watts.
♦ On Screen Display
Allows you to adjust all settings simply using on-screen menus.
♦ Green Commitment
No CFCs are used in the manufacturing process of your monitor.
Page 7

3
3
3
4
4
Unpacking the Monitor
Please check that the following items are included with your monitor. If they
are missing or damaged, please contact your place of purchase immediately.
♦ Monitor with attached signal cable
♦ Tilt/swivel base
♦ Power cord
♦ User’s manual
Locate the model name and the serial number label on the back of your
monitor and write the details of the monitor and your place of purchase in the
space on page (ii) of this manual for future reference.
Installation
Your monitor is equipped with an automatic power supply with a voltage
range from 100 to 240 Volts AC at a frequency of 50 to 60 Hz.
To install your DV998FD/FDB monitor:
1. Make sure that the computer system’s power is turned off.
2. Carefully turn the monitor upside down on a soft surface, use the arrow
guides to fit the swivel base on to the bottom of the display.
3. Place the monitor on its base and connect the power cord to the monitor
and attach it to a power socket.
4. Connect the computer end of the D-SUB cable to the 15-pin output
connector on the video board of your computer.
5. Turn the monitor and the computer on.
Page 8

4
If you wish to connect the monitor to an older-type Apple Macintosh
computer, you will need to use a Macintosh cable adaptor (sold separately).
The adaptor connects the video signal cable of your monitor to the video port
of the computer. Your computer dealer should be able to supply you with a
suitable adaptor.
Drivers for Windows 95, 98, 2000, XP and Millennium
Edition
Windows will detect the DV998FD/FDB monitor the first time you turn the
computer on after installing it. The Add New Hardware wizard will prompt for
drivers. Install the standard Windows Plug & Play Monitor driver. This driver
will work correctly and allow you to use the monitor with its optimal
resolutions and refresh rates.
Page 9

5
5
5
Adjusting the Monitor
You can adjust the monitor using its On-Screen Display (OSD) menu system.
There are 6 buttons that control the monitor:
Front Panel Control
●
: Press this knob to switch monitor’s power ON/OFF.
● MENU : Activate OSD menu or confirm adjustment.
: Adjust contrast or other control.
●
/
●
: Adjust brightness or other control. /
● EXIT : Exit a function or close OSD menu.
● Power Indicator :
Green — Power On mode.
Orange — Off mode.
Page 10

6
Selecting Functions and Making Adjustments
Brightness Hotkey
1. Press / to open the brightness adjustment display.
2. Press ◄ or ► to adjust the brightness level.
3. Press the OK button to save your changes.
Contrast Hotkey
4. Press
/ to open the contrast adjustment display.
5. Press ◄ or ► to adjust the contrast level.
1. Press the OK button to save your changes.
Page 11
7
The Main Menu
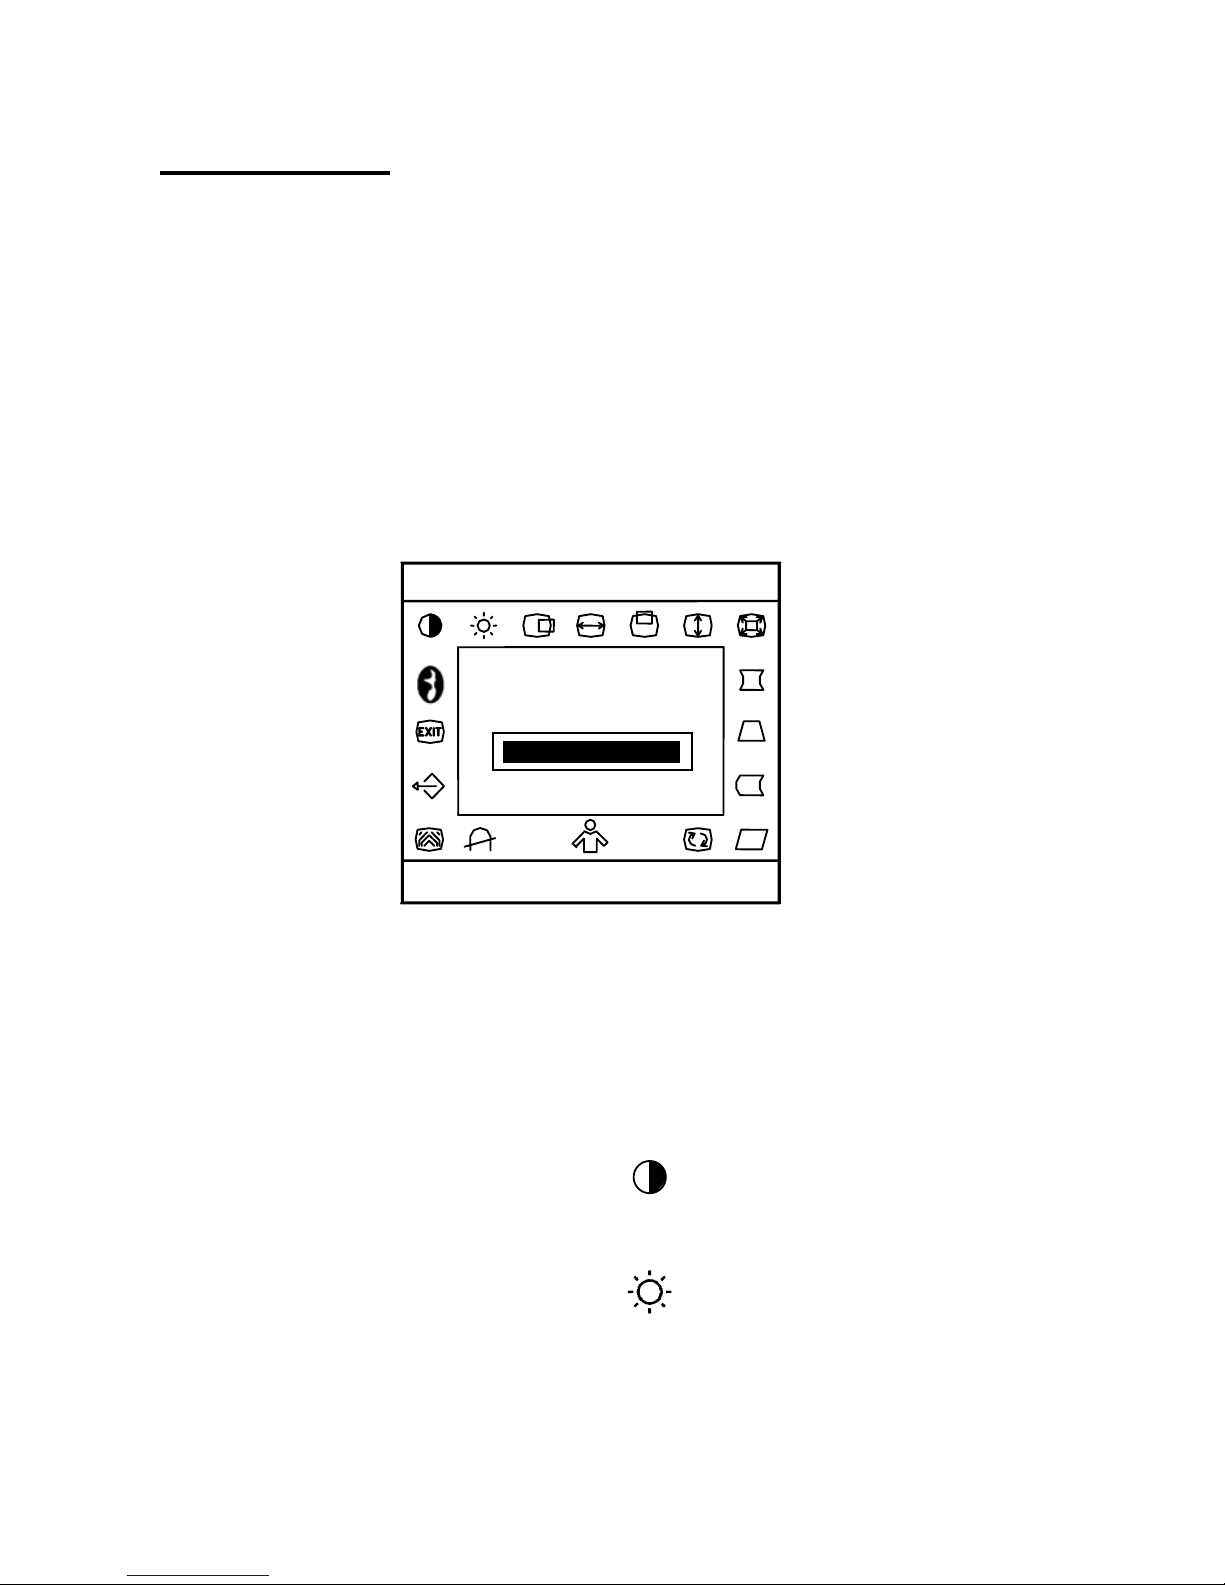
The DV998FD/FDB’s OSD has a Main Menu that is organised into 19
functions: Contrast, Brightness, H-Centre, H-Size, V-Centre, V-Size, Zoom,
Pincushion, Trapezoid, Pin-Balance, Parallelogram, Rotation, Colour
temperature, User Colour, Degauss Moire, Recall, Exit and Language. The
remainder of this chapter describes the use of each function and the way that
you can make adjustments to the image displayed on the monitor’s screen.
Making Adjustments
100
V: 85Hz
9300
6500
H: 68.8KHz
Contrast
1024 × 768
The following is a list of the options available in the OSD. Press MENU to
enter the OSD menu, use ◄ or ► to highlight the option and MENU to
select. Use ◄ or ► to adjust the settings and MENU to save the changes.
To exit the OSD menu press EXIT.
1. CONTRAST
:
Adjust the picture contrast.
:
2. BRIGHTNESS
Adjust the picture brightness.
Page 12
8
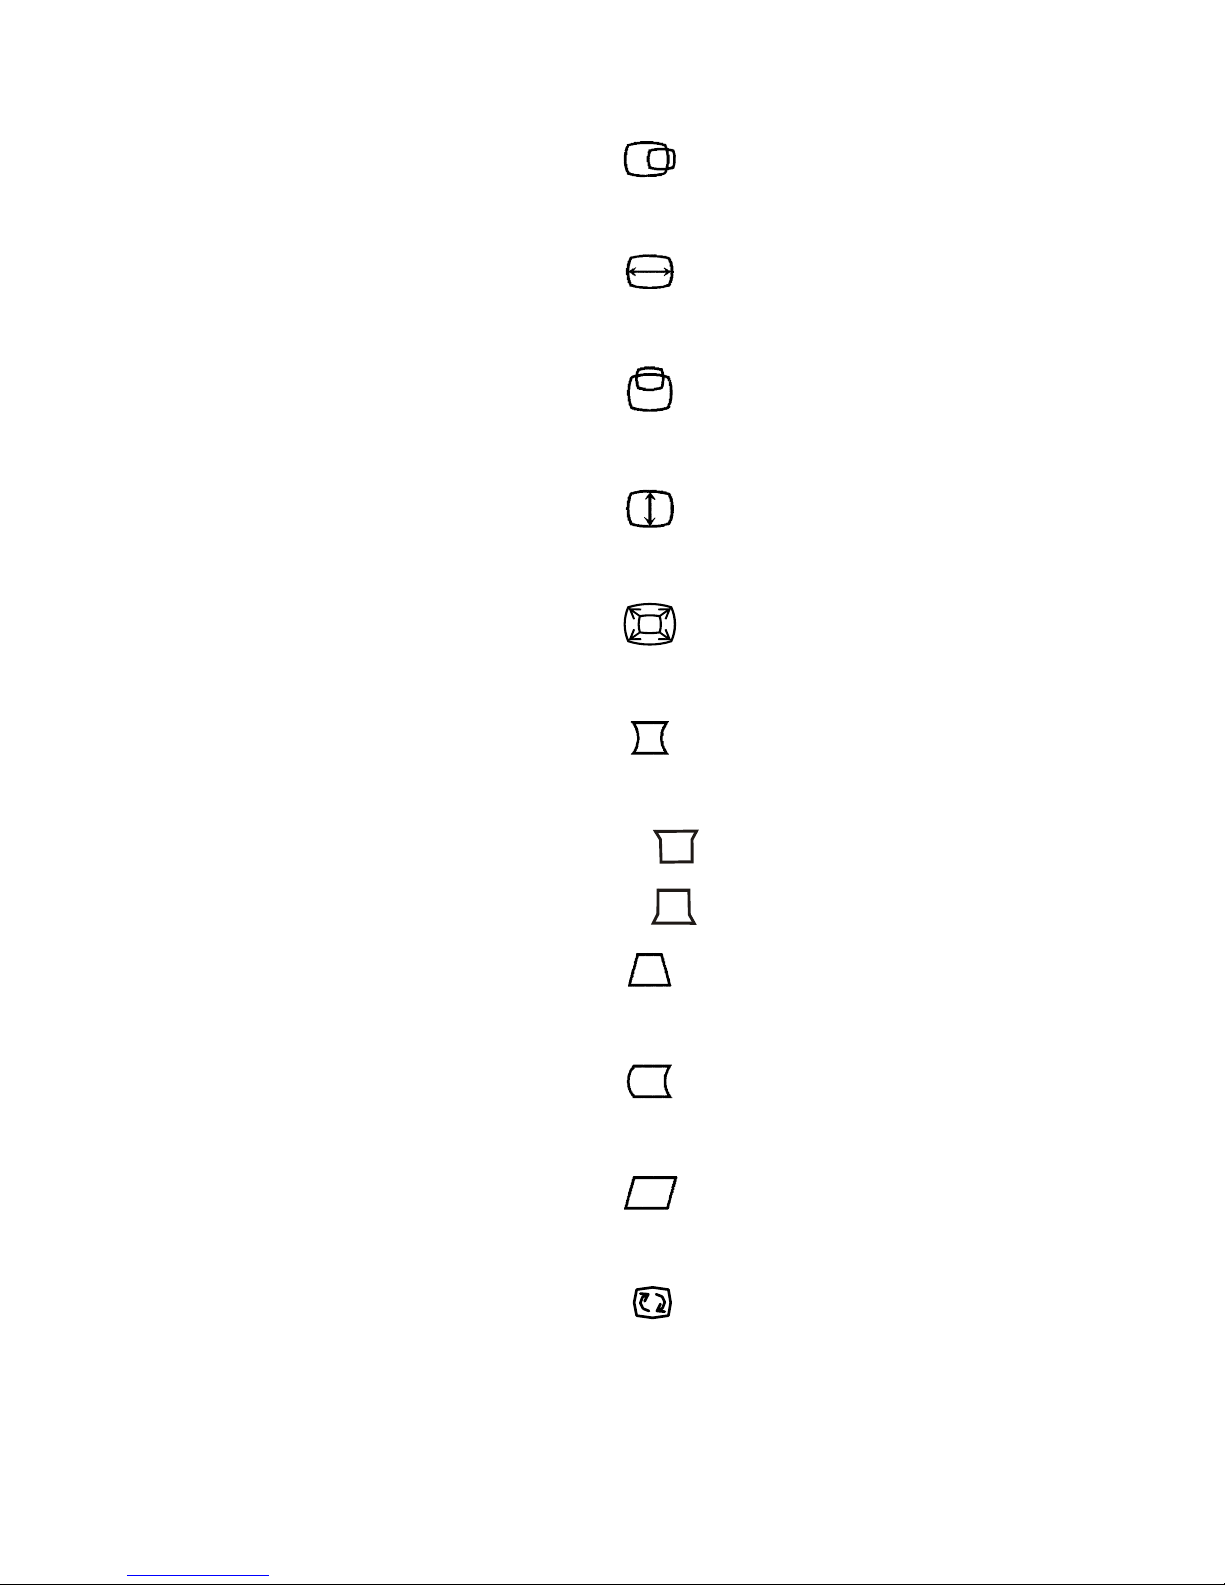
3. H-CENTER
:
Adjust the horizontal position of the picture.
:
4. H-SIZE
Adjust the picture’s horizontal size.
:
5. V-CENTER
Adjust the vertical position of the picture.
:
6. V-SIZE
Adjust the picture’s vertical size.
:
7. ZOOM
Adjust the picture’s horizontal and vertical size simultaneously.
:
8. PINCUSHION
Adjust the pincushion and barrel.
TC: Adjust the Top corner
:
BC: Adjust the Bottom corner :
:
9. TRAPEZOID
Adjust the picture’s trapezoid distortion.
:
10. PIN-BALANCE
Adjust to compensate the pincushion unbalance.
:
11. PARALLELOGRAM
Adjust the picture to be a rectangle.
:
12. ROTATION
Adjust the picture tilt to horizontal position.
Page 13
9
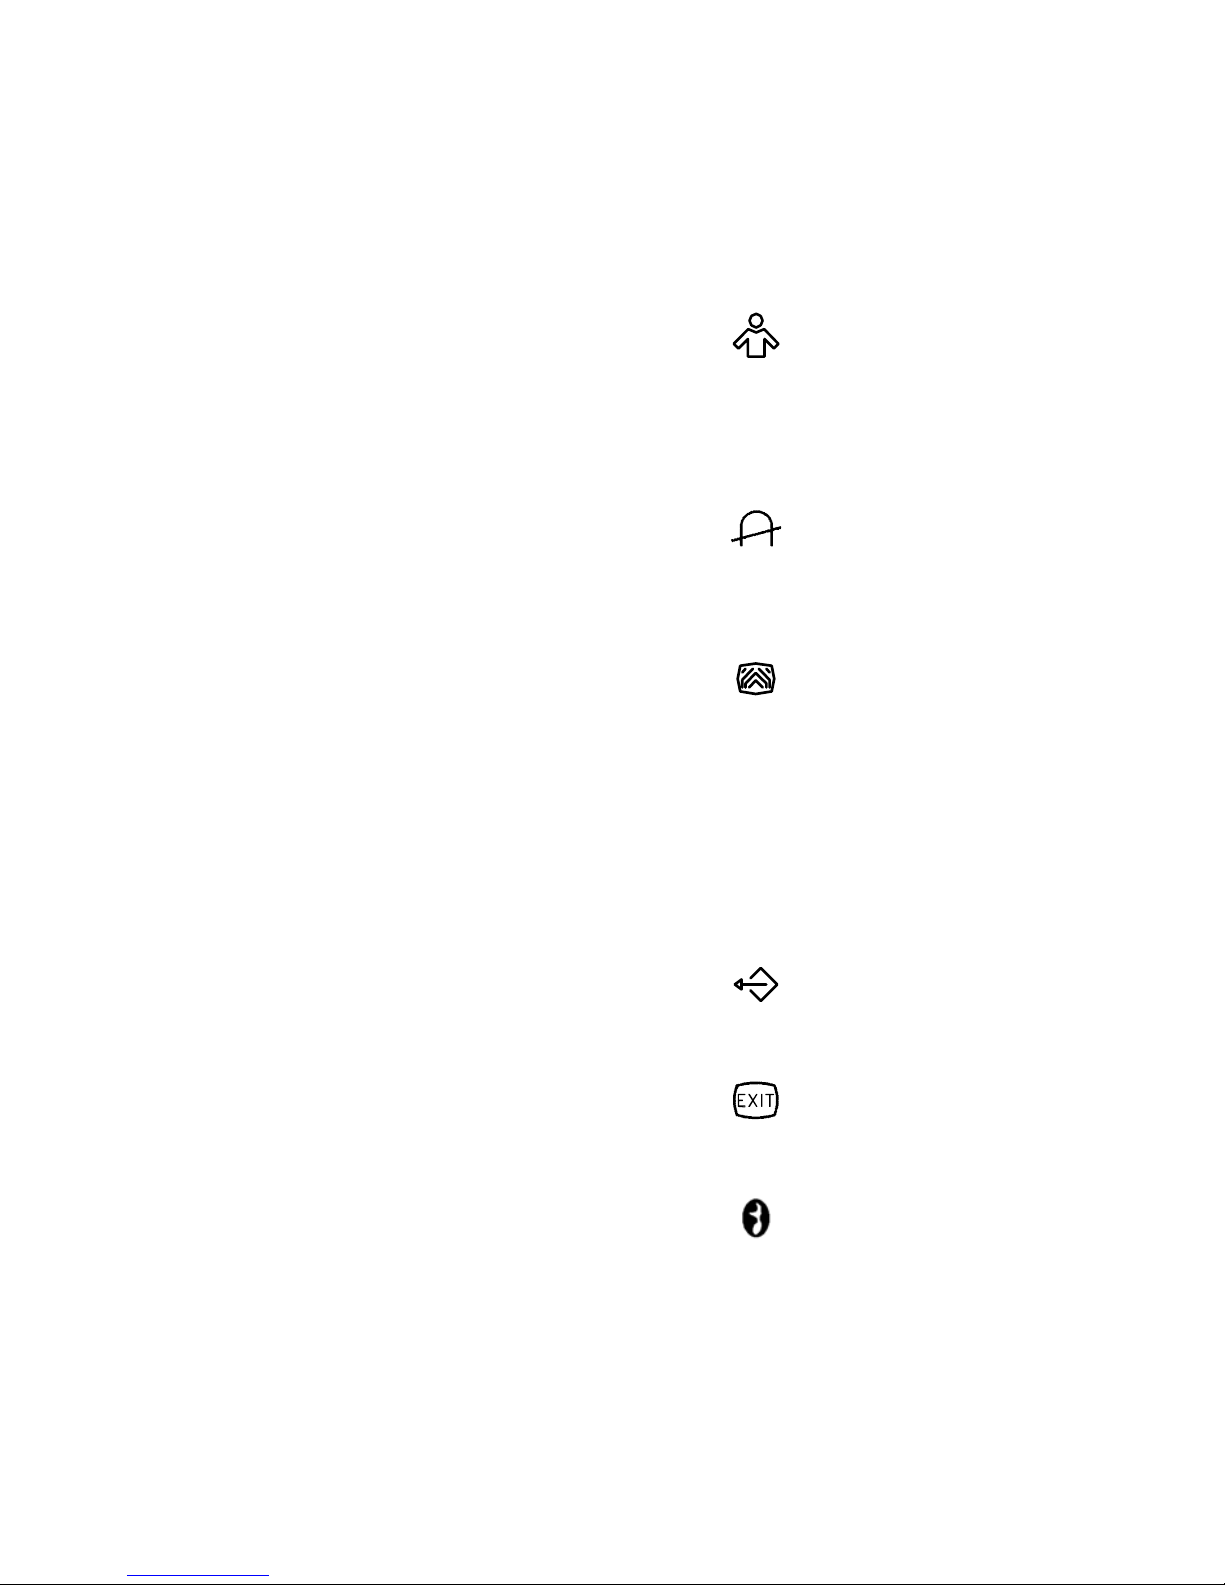
13. 6500°K/9300°K ( COLOUR TEMPERATURE ):
The colour temperature for 6500°K is x=0.313, y=0.329 and 9300°K is
x=0.283, y=0.297. It presents two different colour sets on the screen.
You can select 9300°K or 6500°K by pressing the MENU Key.
14. USER COLOUR ( Red / Blue )
:
If the 9300°K normal white or 6500°K warmer white do not satisfy your
desire, properly adjust R . B GAIN controls to obtain your optimum
whiteness level.
:
15. DEGAUSS
If colour impurity occurs when moving or swiveling the monitor, press
the MENU Key and degauss to fix the picture condition.
:
16. MOIRE REDUCE
Moire is the result of interference between the phosphor layout and the
video signal. In some cases, you may find the moire very noticeable.
Press the MENU Key to enter in the moire reduce setting. Please
adjust the level to the optimum condition. Note: Too high of a setting
will cause the picture to shake.
17. RECALL
:
Press RECALL to restore the monitor to factory settings.
18. EXIT
:
Close OSD window.
:
19. SELECT LANGUAGE
Select the language as you like.
Page 14

10
Timing and Refresh Rate Setting
By making adjustments of your video card settings, you can set the timing
and the refresh rate of the graphics signal to match your requirements.
Please consult your operating system’s and graphics adaptor’s
documentation for details about how this may be done.
The monitor will automatically save the changes that you make and use the
new settings whenever you turn it on. The DV998FD/FDB monitor can
accept horizontal scanning frequencies ranging from 30 kHz to 97 kHz and
vertical frequencies from 50 Hz to 160 Hz. However, due to the
requirements of signals with different resolutions, and to avoid possible
damage to your monitor, do not exceed the following maximum vertical
refresh rates.
Resolution Maximum Vertical
Refresh Rate (Hz)
800 x 600 150
1024 x 768 118
1280 x 1024 88
1600 x 1200 76
Page 15
11
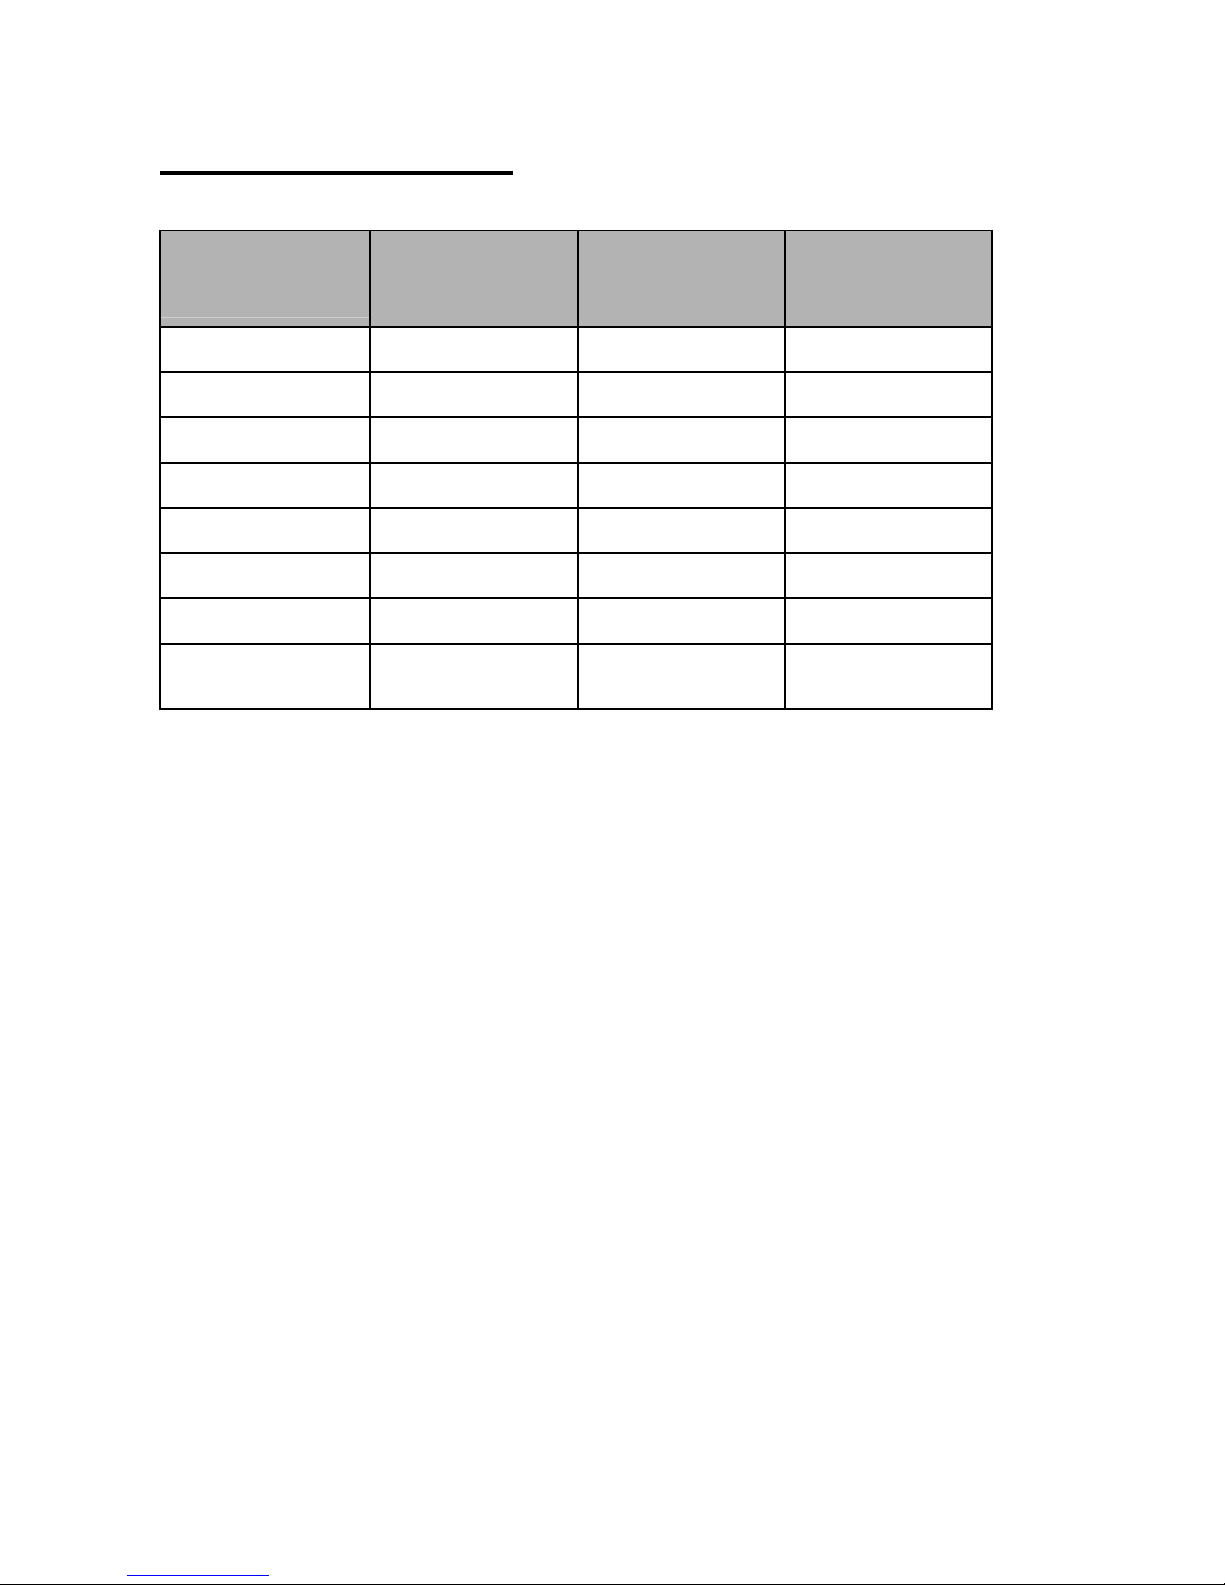
Factory Preset Timings
STANDARD
RESOLUTION
HORIZONTA
L
FREQUENC
Y
VERTICAL
FREQUENCY
IBM 720 × 400 31.5kHz 70Hz
VGA 640 × 480 31.5kHz 60Hz
VESA/85 640 × 480 43.3kHz 85Hz
VESA/85 800 × 600 53.7kHz 85Hz
VESA/85 1024 × 768 68.7kHz 85Hz
VESA/85 1280 × 960 85.9kHz 85Hz
VESA/85 1280 × 1024 91.1kHz 85Hz
VESA/75 1600 × 1200 93.8kHz 75Hz
Page 16

12
6
6
Troubleshooting
If you encounter any trouble using the DV998FD/FDB monitor, make sure
that your monitor is properly installed. (For hardware installation, see
Chapter 4 of this manual.) If the problems persist, please check this chapter
for possible solutions before calling Mitsubishi Electric or one of our
Authorised Service Centres.
No image is displayed
- Check that the light (LED) next to the monitor’s power button is lit and
is green in colour.
- If the LED is flash there is no signal from the computer and the
monitor is in power saving mode. Check that the computer is switched
on. Press a button on the computer keyboard or move the mouse to
wake the computer. If that does not help, check that the VGA cable is
securely plugged into the computer. Also check the pins of the VGA
cable’s connector. If any pins are bent or broken off, then contact your
dealer.
- If the LED is not lit at all, check that the monitor is plugged into the
power socket and that the power switch is turned on at the wall. Check
that the monitor’s power switch is also turned on.
- Video sync signal. The video sync signal from the graphics card must
be as specified for the monitor.
The picture is scrolling or unstable.
- The most common cause of this problem is a loose VGA signal cable
or connector. Check that the cable is securely connected to the
computer.
- Check the VGA signal cable for damage. If any pins are bent or
broken off, contact your dealer or an authorised Mitsubishi Electric
service agent.
- Make sure that the graphics card settings are correct and within the
monitor’s specifications. Change the settings of your graphics card to
values within the monitor’s range.
Page 17

13
- Remove any magnetic objects that are near the monitor. These
include speakers and power supplies (AC adaptors).
Colours are impure.
- Check that the cable is securely connected to the computer.
- Check the VGA signal cable for damage. If any pins are bent or
broken off, contact your dealer or an authorised Mitsubishi Electric
service agent (see Chapter 8 for details).
- Check the monitor’s colour settings. Press the OK button and select
the Colour Settings menu. Select the 9300k menu item to return to the
factory preset colours and press OK.
- Degauss the monitor using the degauss function of the monitor’s On
Screen Display.
- Remove any objects that can create a magnetic field that may be near
the monitor. These include speakers and power supplies (AC
adaptors).
The image is blurred or there is visible ghosting
- Have you used a VGA extension cable? If so, remove the extension
cable and check the displayed image. Is the image quality improved?
Depending on the characteristics and type of the extension cable,
some blurring or distortion may occur due to conduction losses in the
extension cable. You can minimise the distortion by using an
extension cable with lower conduction losses.
- Have you used a VGA splitter or a video amplifier? Depending on the
characteristics and type of the splitter or amplifier some blurring or
distortion may occur due to the limitations of the device’s bandwidth.
Problems caused by a limited bandwidth will increase as the signal’s
resolution and refresh rate increased. If you need to use a splitter or
amplifier with you monitor, make sure that it is a good quality device
that has sufficient bandwidth for the graphics resolution that you need
to use.
Page 18

14
7
7
Specifications
Model DV998FD/FDB
Display Characteristics
Display Type
19” (48.3 cm) pure flat cathode ray
tube
Maximum Viewable Size
18” (45.7 cm)
Dot pitch
0.25 mm
(0.21 mm horizontal dot pitch)
Surface coating
Anti-glare, Anti-Static coating
Graphics Signals
Maximum Resolution
1600 x 1200 pixels (up to 75 Hz)
Recommended Resolution
1280 x 1024 pixels (at 85 Hz)
Horizontal Frequency
30 – 96 kHz
Vertical Frequency
50 – 160 Hz
Video Bandwidth
200 MHz
Microprocessor Controlled
Graphics
8 factory preset timings
21 user modes
Signal Connection
15-pin mini D-sub cable
Video Input
VGA-type (15 pin mini D-sub
connector)
Video Signal
RGB analog (Positive polarity)
0.7 Vpp/75 Ohm
Synchronisation
TTL Level (separate sync.)
Plug & Play
DDC-1/2B
Page 19

15
User Interface
Controls
Power switch, On-Screen Display
with 4 control buttons
On-Screen Display Functions:
Contrast, Brightness, H-Centre, H-Size, V-Centre, V-Size, Zoom,
Pincushion, Trapezoid, Pin-Balance, Parallelogram, Rotation, 6500°K,
9300°K, User Colour, Degauss, Moire Reduce, Exit, Language.
Physical Characteristics
Power Management
VESA DPMS, Energy Star
Maximum Power Consumption
130 Watts
Consumption in Power Saving
Modes
< 3 Watts
Operating Voltage
Automatic switched mode power
supply, 100 - 240 V, 50 - 60 Hz
Dimensions (W x H x D)
446 x 436 x 445 mm (including
base)
Weight
20 kg
Temperature (Operating/Storage)
0 °C ~ 40 °C / -25 °C ~ 65 °C
Air Humidity (Operating/Storage)
10% ~ 85% / 5% ~ 95%
Regulatory Certification
Safety
AS/NZS 60950:2000
EMI/EMC
AS/NZS CISPR 22:2002 (C-Tick)
Page 20

16
8
8
Service Contacts
If problems remain after checking this manual, please contact your place of
purchase or contact
Australian Service Contacts
Visit the Mitsubishi Electric Australia web site at
www.MitsubishiElectric.com.au
For details of your nearest Mitsubishi Electric Authorised Service Centre or
contact the Service Department for your state:
New South Wales and Australian Capital Territory
348 Victoria Road
Rydalmere, NSW, 2116
Telephone: (02) 9684-7669
Fax: (02) 9684-7684
Queensland
12 / 469 Nudgee Road
Hendra, Qld, 4011
Telephone: (07) 3623-2000
Fax: (07) 3630-1888
South Australia and Northern Territory
77 Port Road
Hindmarsh, SA, 5007
Telephone: (08) 8340-0444
Fax: (08) 8340-0555
Page 21

17
Victoria and Tasmania
4 / 303 Burwood Hwy
East Burwood, Vic, 3151
Telephone: (03) 9262-9899
Fax: (03) 9262-9850
Western Australia
5 / 329 Collier Road
Bassendean, WA, 6054
Telephone: (08) 9377-3411
Fax: (08) 9377-3499
 Loading...