

Page 1

950 Ef Owner’s Manual
Page 2
Purchaser’s Reference Information
IT IS IMPERATIVE THAT YOU FILL IN THE FOLLOWING INFORMATION AND
REFER TO IT SHOULD THE NEED FOR SERVICE ARISE.
Product Name: Diamondback 950Ef Elliptical
Serial Number: T _ _ _ _ _ _ _ _ _ _
To Activate Warranty:
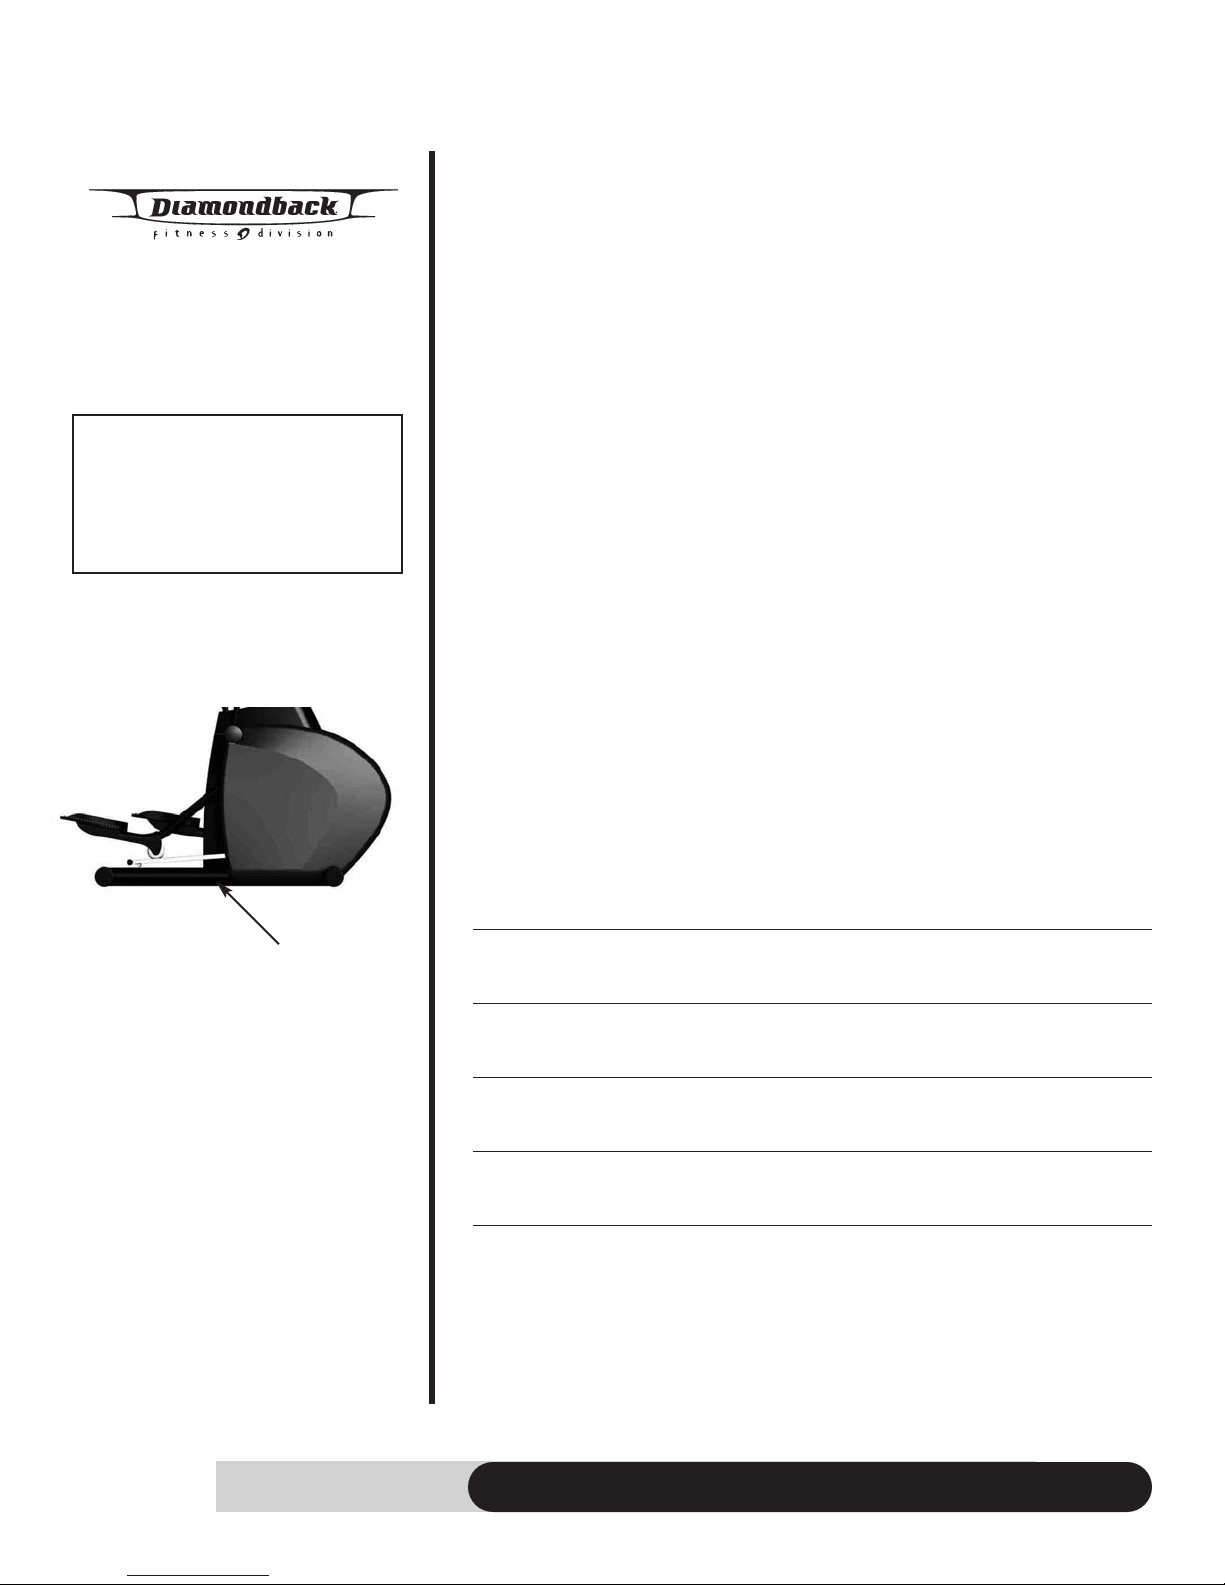
SERIAL NUMBER
T0409370001
IIII III IIIII IIIIII
ARNING REMOVING OR ALTERATION
W
THIS LABEL
OF
VOIDS WARRANTY
Serial No. Sticker
REGISTER YOUR WARRANTY AT
www.diamondbackfitness.com
OR COMPLETELY FILL OUT THE ATTACHED WARRANTY CARD (SEE
BACK COVER) AND RETURN TO DIAMONDACK WITHIN 15 DAYS
OF THE DATE OF PURCHASE. FAILURE TO COMPLY WITH THE WARRANTY ACTIVATION PROCEDURE MAY VOID THE MANFACTURER’S
WARRANTY.
Dealer Name:
Dealer Address:
Dealer Telephone Number: ( )
Dealer Contact Name:
Date Purchased:
Shipping Materials:
Diamondback recommends that you retain the original packing materials
(box and packing items) for future shipping needs.
950 Ef Owner’s Manual
Page 3
Table of Contents
Purchaser’s reference information Inside Front Cover
Introduction 2
Safety Instructions and Warnings 3
Assembly Drawing
Assembly Instructions 5
Workout Guidelines 6
Maximum Heart Rate & Training Zone 7
Quantity & Quality 7
Heart Rate Monitoring Devices 8
Pulse hand grips 8
Chest strap 8
Console 9
Glossary of Terms 9
Default Values 9
Operating Tips 9
Console Layout 11
Displays 12
Function Keys 13
Workout Programs 14
Warm Up 14
Cool Down 14
Workout Summary 15
Quick Start15
Classic programs 16
4
Manual 16
Random
Interval 19
Hill 20
ength 21
Str
HR Interactive Programs 22
Target HR 22
HR Interval 23
Maintenance 26
ranty Information 27
Domestic W
ranty Car
ar
W
ar
d
Inside Back Cover
18
950 Ef Owner’s Manual
1
Page 4
Introduction
Congratulations on the purchase of your new 950Ef elliptical trainer. You are
about to experience one of the most effective and technically advanced methods of low-impact, car
tical trainer was created by Diamondback Fitness, the innovative value leaders
in fitness and bicycle equipment for nearly three decades.
Your power-packed 950Ef has feature after feature to make your workout
extremely efficient and comfortable. Your console offers 5 display windows
with easy to select programming buttons, plus a Polar®Compatible Heart Rate
Receiver and Hand Held Pulse Sensors. You can choose from 16 levels of
intensity including classic Quick Start options and Heart Rate interactive programs. This is a serious piece of equipment that will take on your most extreme
challenges with ease.
You can count on your Diamondback Elliptical trainers to provide years of
pleasure and fitness. The solid steel frame, quality construction and technosavvy electronics are guaranteed to provide you with the ultimate workout
experience. Congratulations on choosing an elliptical from America’s premier
name in light institutional and home exercising equipment.
diovascular exercise available today. Your 950Ef ellip-
For more information or questions regarding your 950Ef, please go to our website at www
Diamondback Fitness
300 Camarillo Ranch Road,
Camarillo, CA 93012
Ph. 1.800.776.7642
Fax: 1.805.388.5890
.diamondbackfitness.com
. Or please contact us:
2
950 Ef Owner’s Manual
Page 5
Safety Instructions and Warnings
The 950Ef is built for optimum safety and is designed to meet or exceed all domestic and international standards. However, certain precautions need to be followed
when operating any exercise equipment. BE SURE TO READ THE ENTIRE
OWNER’S MANUAL BEFORE OPERATING YOUR 950Ef UNIT.
CAUTION – FOR SAFE OPERATION
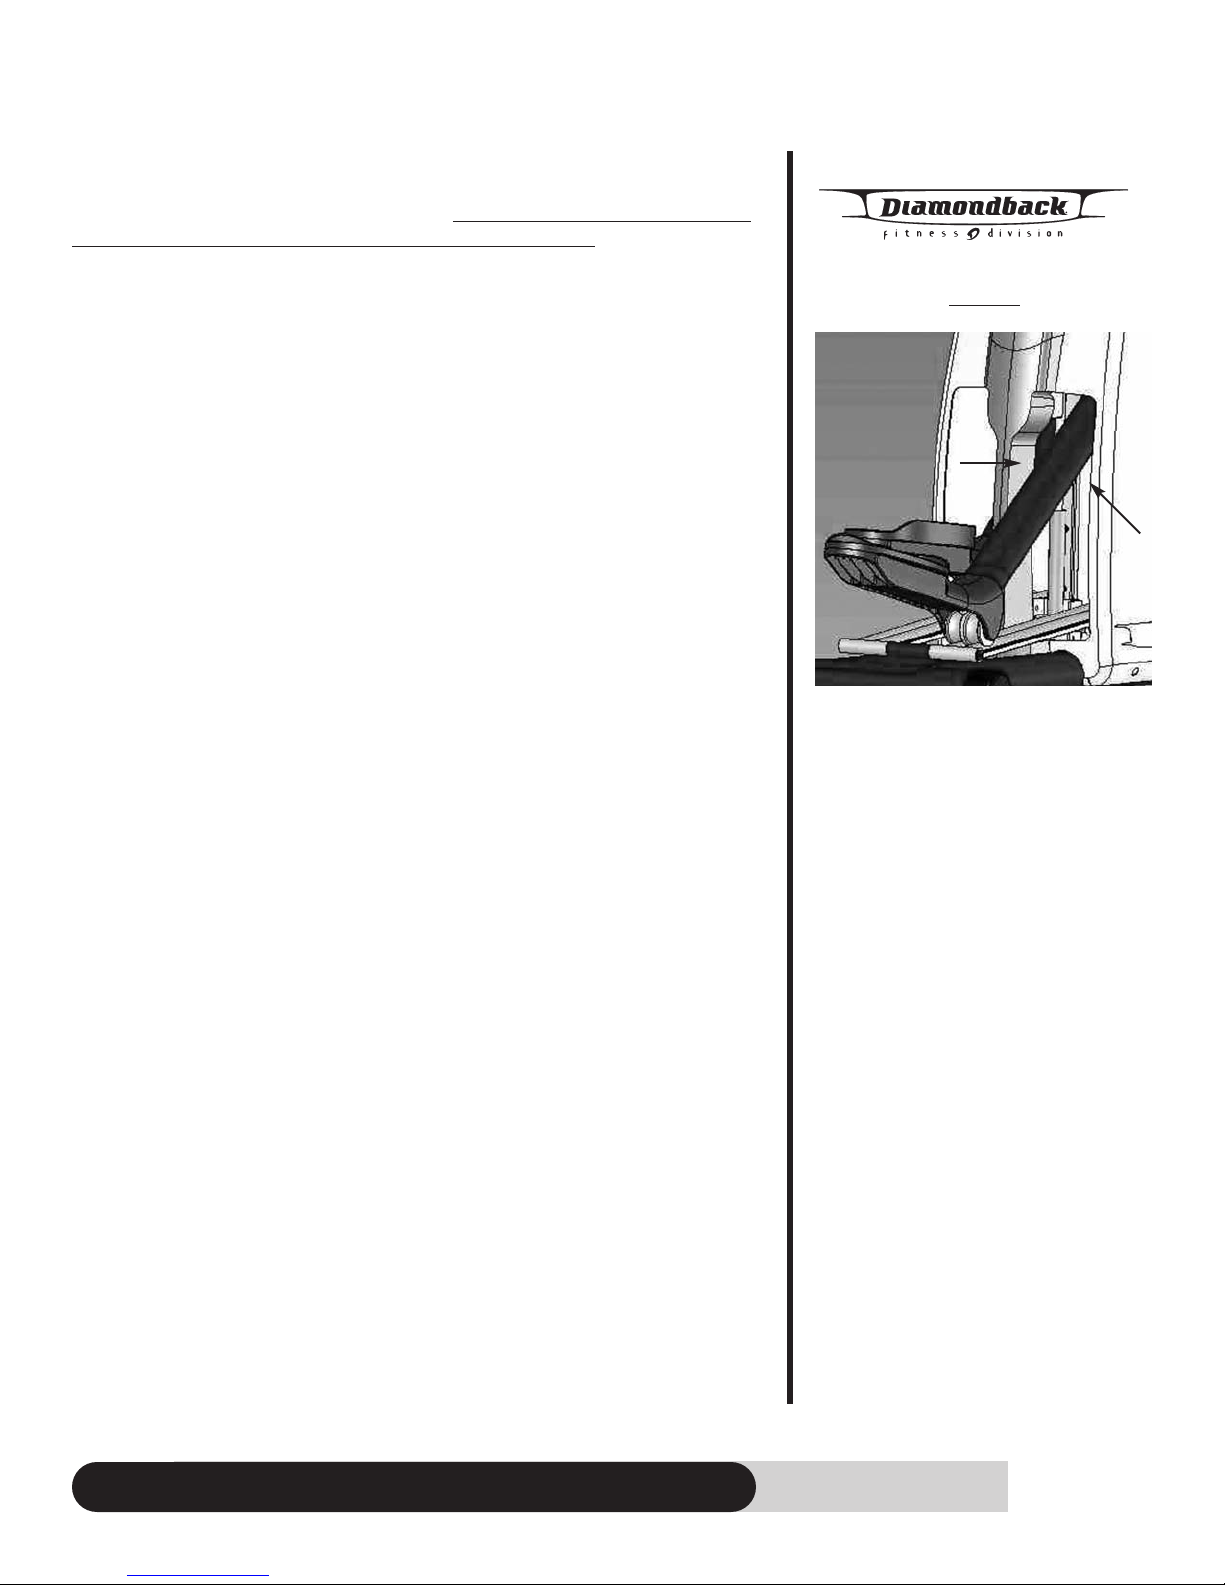
1. Keep your hands and feet away from all moving parts and pinch points. See
figure A for possible pinch points.
2. Before beginning any exercise program on the 950Ef equipment, it is
important to consult with your physician if you have any of the following:
History of heart disease, high blood pressure, diabetes, chronic respiratory
diseases, elevated cholesterol, or if you smoke cigarettes or experience any
other chronic diseases or physical complaints.
3. If over the age of 35 or overweight, consult with your physician before
beginning any exercise program.
4. Pregnant women should consult with their physician before beginning an
exercise program.
5. If you experience dizziness, nausea, chest pains or other abnormal
symptoms during exercise, stop the exercise session immediately. Consult
your physician before continue your exercise.
6. Always drink fluids if you exercise for twenty or more minutes on any 950Ef unit.
WARNING – TO REDUCE RISK OF INJURY TO YOURSELF OR OTHERS
1. To ensure proper functioning of your 950Ef equipment, do not install
attachments or accessories not provided or recommended by Diamondback.
2. Do not use this equipment if it is not working properly or if it has been
damaged/broken. Contact your local authorized Diamondback fitness dealer
for service.
3. Always wear proper clothing and shoes when exercising on your 950Ef unit.
4. User weight is not to exceed 300lbs / 135kgs for 950Ef.
5. Keep children and pets away from 950Ef equipment. Hands and feet may get
caught in the pedals or other moving parts, which could result in serious injury.
Place the 950Ef unit in an area that will meet minimum clearance requirements:
6.
Front & Sides: 2 feet / 60cm, Back: 3feet/90cm.
7. Place Keep 950Ef equipment away from walls to allow proper ventilation. Air
should be able to circulate freely around the units. Keep all air openings free
of dirt and dust. Never insert anything into openings.
8.
The 950Ef is intended for indoor use in the home environment. It is not
intended for outdoor use.
9. Place your 950Ef unit on a solid, level surface when in use.
10.Use the handlebar when getting on and off your 950Ef unit.
11.Make sure all components are fastened securely (i.e. handlebars, handrails,
steparms, footpads) at all times.
Unplug the 950Ef fr
12.
Do not r
13.
Diamondback fitness dealer should perform the service.
14.SAVE THIS OPERA
emove the covers or other components. Only an authorized
om the outlet befor
TING INSTRUCTIONS MANUAL FOR YOUR REFERNCE.
e moving it or ser
vicing it.
Figure A
• The areas around the steparms and
side case openings.
• The area below the incline ramp
structures.
950 Ef Owner’s Manual
3
Page 6
int
er
v
al
man
ua
tar
get
HR
HR
int
erv
al
ran
do
hil
l
str
ength
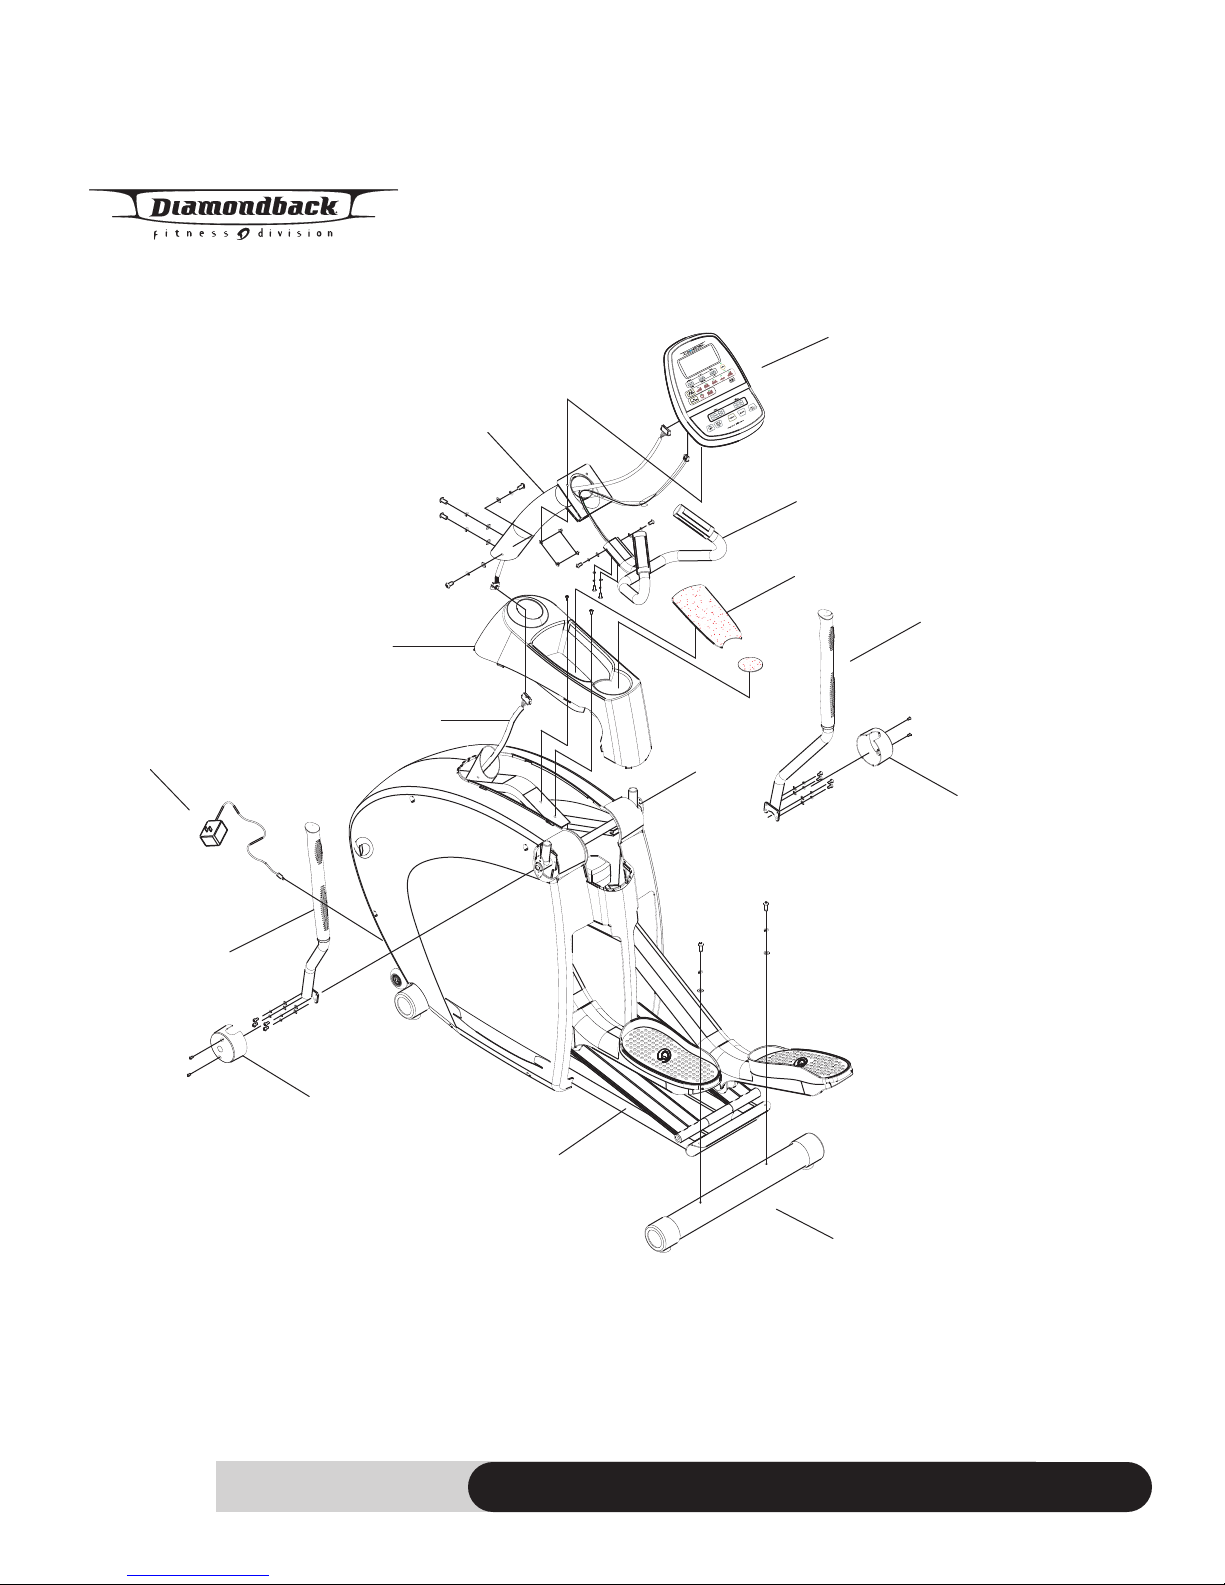
Con
sole
Console Mast
Handle Bar
Handrail, Right
Handrail Cover
Rear Stabilizer Bar
Handrail, Left
Handrail Cover
Console Mast Cover
Transformer
Rubber mat
Main Wire Harness
Main Frame
Assembly Drawing
4
950 Ef Owner’s Manual
Page 7
Assembly Instructions
Step 1: Rear Stabilizer Bar
1. Place rear stabilizer bar under rear mainframe and align the screw holes.
2.
Insert and tighten these two (M8 x 16mm) screws, split lock washer and flat
washers using 6mm Allen wrench.
Step 2: Console Mast Assembly
1. Slide console mast cover onto console mast, making sure it is facing the right
direction.
2. Connect the plug to the plug receptor of the main wire harness inside the
console mast, taking care to install correctly. (See plug alignment marks)
3. Install the console mast by carefully sliding it onto the console mast receptor
while pulling the wire harness. This will keep the slack out of harness so
that the wires will not pinched and short out.
HINT: Pay attention on the wire harness while sliding the console mast and
do not pinch the wire harness. Fail to do so will result a void warranty.
4. Insert the four screws (M8 x 16mm), spring washer and washers into console
mast and hand tighten them. Note: do not tighten them until you have all 4
sets of screws, split lock washers and flat washers inserted. Finally, tighten all
of them with attached 6mm Allen wrench.
5. Place console mast cover in place and align it with snap holes. Snap the con
sole mast cover into main side cases, making sure all snaps are in place.
6. Insert and tighten console mast cover with two screws (M5 x 12mm) using a
Phillips screwdriver.
7. Peel the rubber mats and place them on the accessory trays.
Step 3: Handlebar Assembly
1. Insert the hand pulse harness through the opening of the console mast and
out the top of the console mounting plate.
2. Assemble the handlebar onto the mount and insert and tighten four screws
(M6 x 12mm), split lock washers and flat washers using 4mm Allen wrench.
Be sure not to pinch the hand pulse wire harness during this procedure, as
this will damage the electronic console.
Step 4: Console Assembly
1. Un-tighten the main wire harness on the console mast. Connect both plugs to
the plug receptors on the backside of the console, taking care to install
correctly (see plug alignment marks).
WIRING HARNESS INSTALLATION HINT: Any excess wiring must be carefully
inserted (stored) back into console mast before installing the console onto the
console mounting plate.
2. Fasten the console to the console mounting plate with four (M5 x 12mm)
screws using a Phillips screwdriver.
Step 5: Handrail Assembly
1. Insert Right handrail (See “R” mark on the mounting plate) into handrail
receptor and align the screw holes of two mounting plates.
2. Insert and tighten four (M6 x 12mm) screws, split lock washers and flat
washers with attached 4mm Allen wrench.
3. Install the handrail cover by tighten two (M5 x 8mm) screws using a Phillips
screwdriver. Make sure the oblong opening is facing up and on the handrail
side.
4. Repeat this assembling process for the Left handrail and its cover.
Step 6: Transformer Assembly
1. Place the elliptical equipment on a solid, leveled floor.
2. Plug the transformer into plug receptor located on the front/bottom side of
the main frame.
3. Plug the transformer into power outlet.
NOTE: Be sure to use right transformer for your power outlet; 110V or 220V.
950 Ef Owner’s Manual
5
Page 8
Workout guidelines
Good health is an exercise in common sense.
The Surgeon General released a new study in 2001, The Surgeon General’s Call To
Action To Prevent and Decrease Overweight and Obesity. It indicates that 61% of
American adults ar
increases the risk of health problems, such as heart disease, certain types of cancer,
type 2 diabetes, etc. It further points out that overweight needs to be regarded primarily as a Health rather than as an Appearance issue.
The Surgeon General’s Healthy weight advice for consumers is:
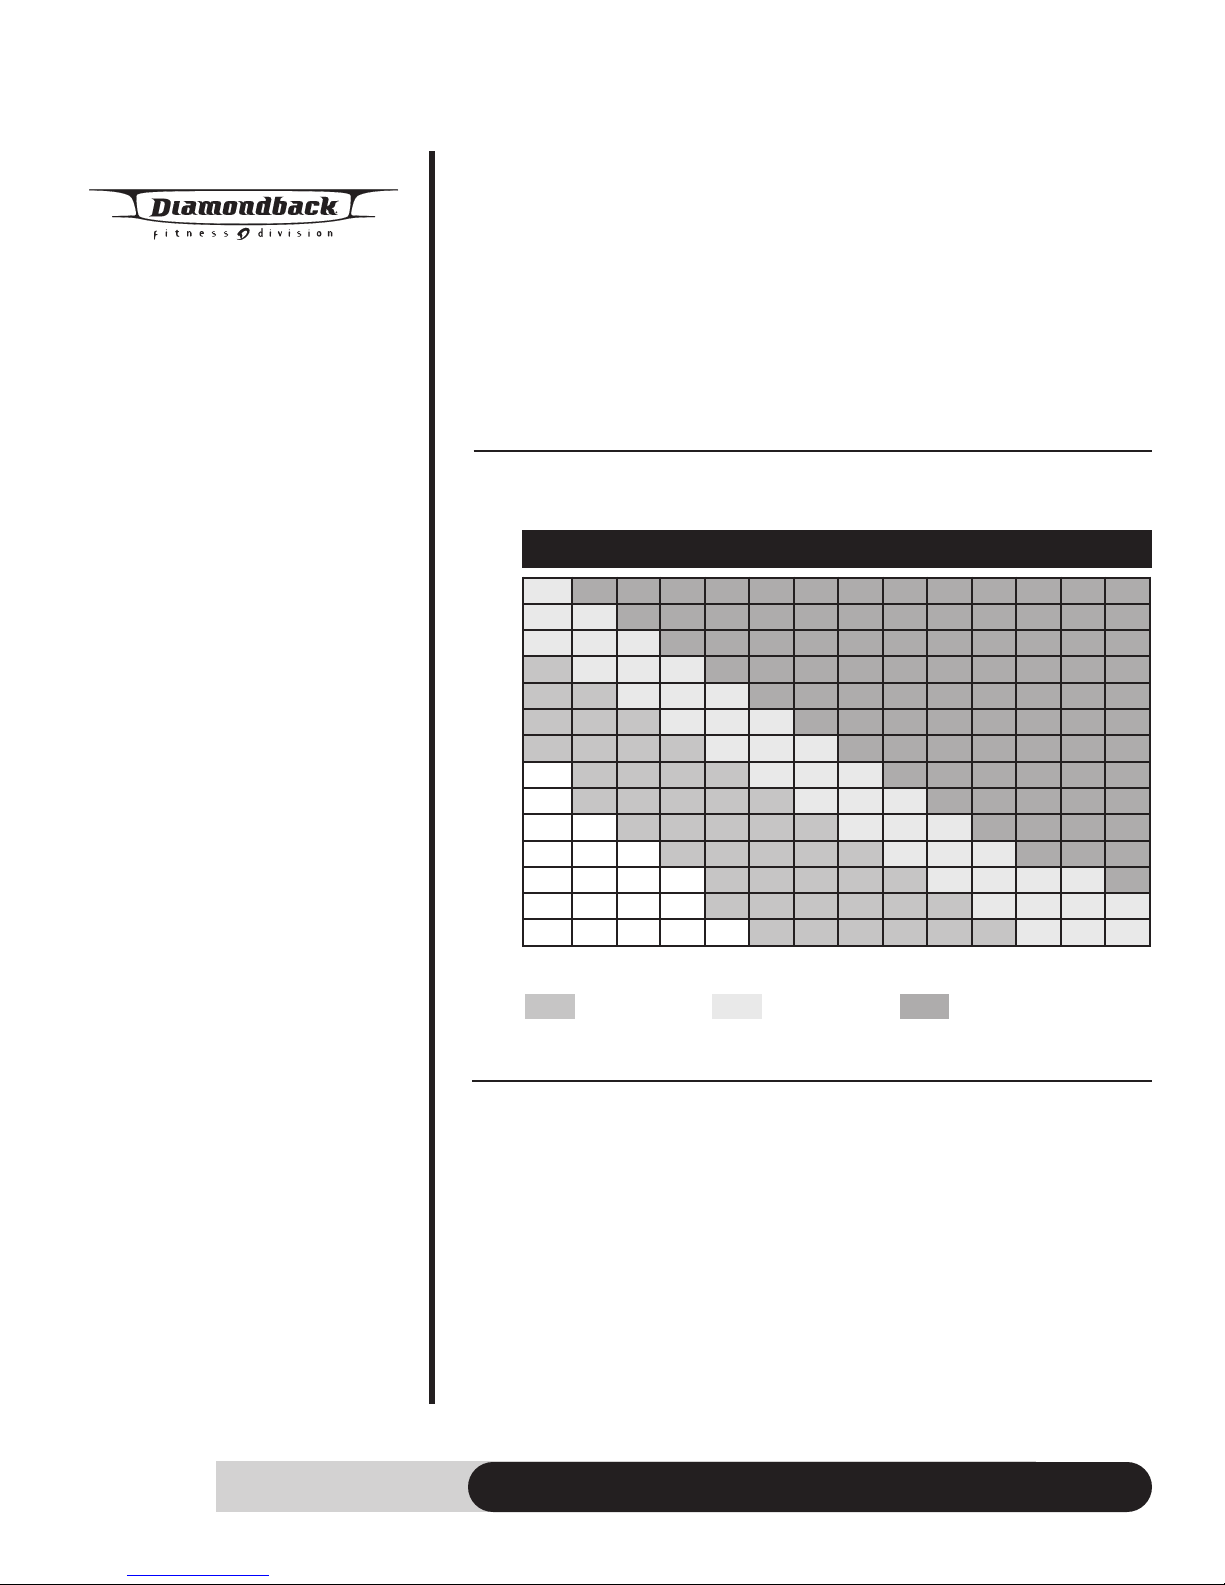
1. Aim for a healthy weight: Find your Body Mass Index (BMI) on the chart below.
2. Be active: Keep physically active to balance the calories you consume.
3. Eat well: Select sensible portion sizes.
120 130 140 150 160 170 180 190 200 210 220 230 240 250
29 31 34 36 39 41 43 46 48 51 53 56 58 60
4’6
27 29 31 34 36 38 40 43 45 47 49 52 54 56
4’8
4’10
Height in Feet and Inches
5’10
25 27 29 31 34 36 38 40 42 44 46 48 50 52
5’0
23 25 27 29 31 33 35 37 39 41 43 45 47 49
5’2
22 24 26 27 29 31 33 35 37 38 40 42 44 46
5’4
21 22 24 26 28 29 31 33 34 36 38 40 41 43
5’6
19 21 23 24 26 27 29 31 32 34 36 37 39 40
5’8
18 20 21 23 24 26 27 29 30 32 34 35 37 38
17 19 20 22 23 24 26 27 29 30 32 33 35 36
6’0
16 18 19 20 22 23 24 26 27 28 30 31 33 34
6’2
15 17 18 19 21 22 23 24 26 27 28 30 31 32
6’4
15 16 17 18 20 21 22 23 24 26 27 28 29 30
6’6
14 15 16 17 19 20 21 22 23 24 25 27 28 29
6’8
13 14 15 17 18 19 20 21 22 23 24 25 26 28
e either overweight or obese. The story states that overweight
BMI = (weight (lb) ÷ height2(in)) x 703
Weight in Pounds
6
Healthy Weight Overweight Obese
Note: This chart is for adults (aged 20 years and older).
Heart rate is an important key to your exercise.
The Surgeon General also released a report on physical activity and health. This report
definitively stated that exercise and fitness are beneficial for a person’s health and redefined that exercise is a key component of disease prevention and healthier living.
Medical research has shown us that there is an amount of exercise, which is enough to
condition the cardio respiratory system and the muscles of the body. This amount of
exercise is between 60% and 85% of your maximum heart rate measured during a
training session. This range allows enough exercise to achieve fitness, but not an excessive amount to cause injury. Your heart rate is an excellent indicator of the amount of
stress placed on the cardiovascular system. Taking full advantage of this information,
the 950Ef is designed to include heart rate monitoring features.
950 Ef Owner’s Manual
Page 9
Workout guidelines (continued)
185
bpm
157
bpm
111
bpm
60% of
MAX.
Maximum Attainable Heart Rate
85% of Maximum
Resting Warm-up
5 Minutes
20-30 Minutes
of Exercise
Cool-down
5 Minutes
Resting
If exercise intensity is too low or too high, no gains will be made in fitness. If the intensity is too low, the stress levels are ineffective. If the intensity is too high, injury or
fatigue may set your exercise program back as you try to recover.
The best way to monitor exercise intensity is to accurately count your pulse during exercise. Your heart rate can easily be determined by counting your pulse at the chest, wrist
or at the carotid artery on your neck. It is difficult to count your own pulse during exercise, mainly because you cannot count fast enough to get an accurate number. The
950Ef is equipped with a wireless telemetry receiving system. What it does is automatically count your heart rate while you are wearing a heart rate chest belt during your
exercising period. Heart rate is monitored and electronically displayed as a digital readout. Your target heart rate, the intensity needed to improve cardiovascular fitness,
depends primarily on your age and not your state of fitness. It is calculated as a percentage of your maximum heart rate, estimated as 220 minus your age. It is most effective
to train at your target heart rate between 60% and 85% of your maximum heart rate.
Maximum Heart Rate & Training Zone
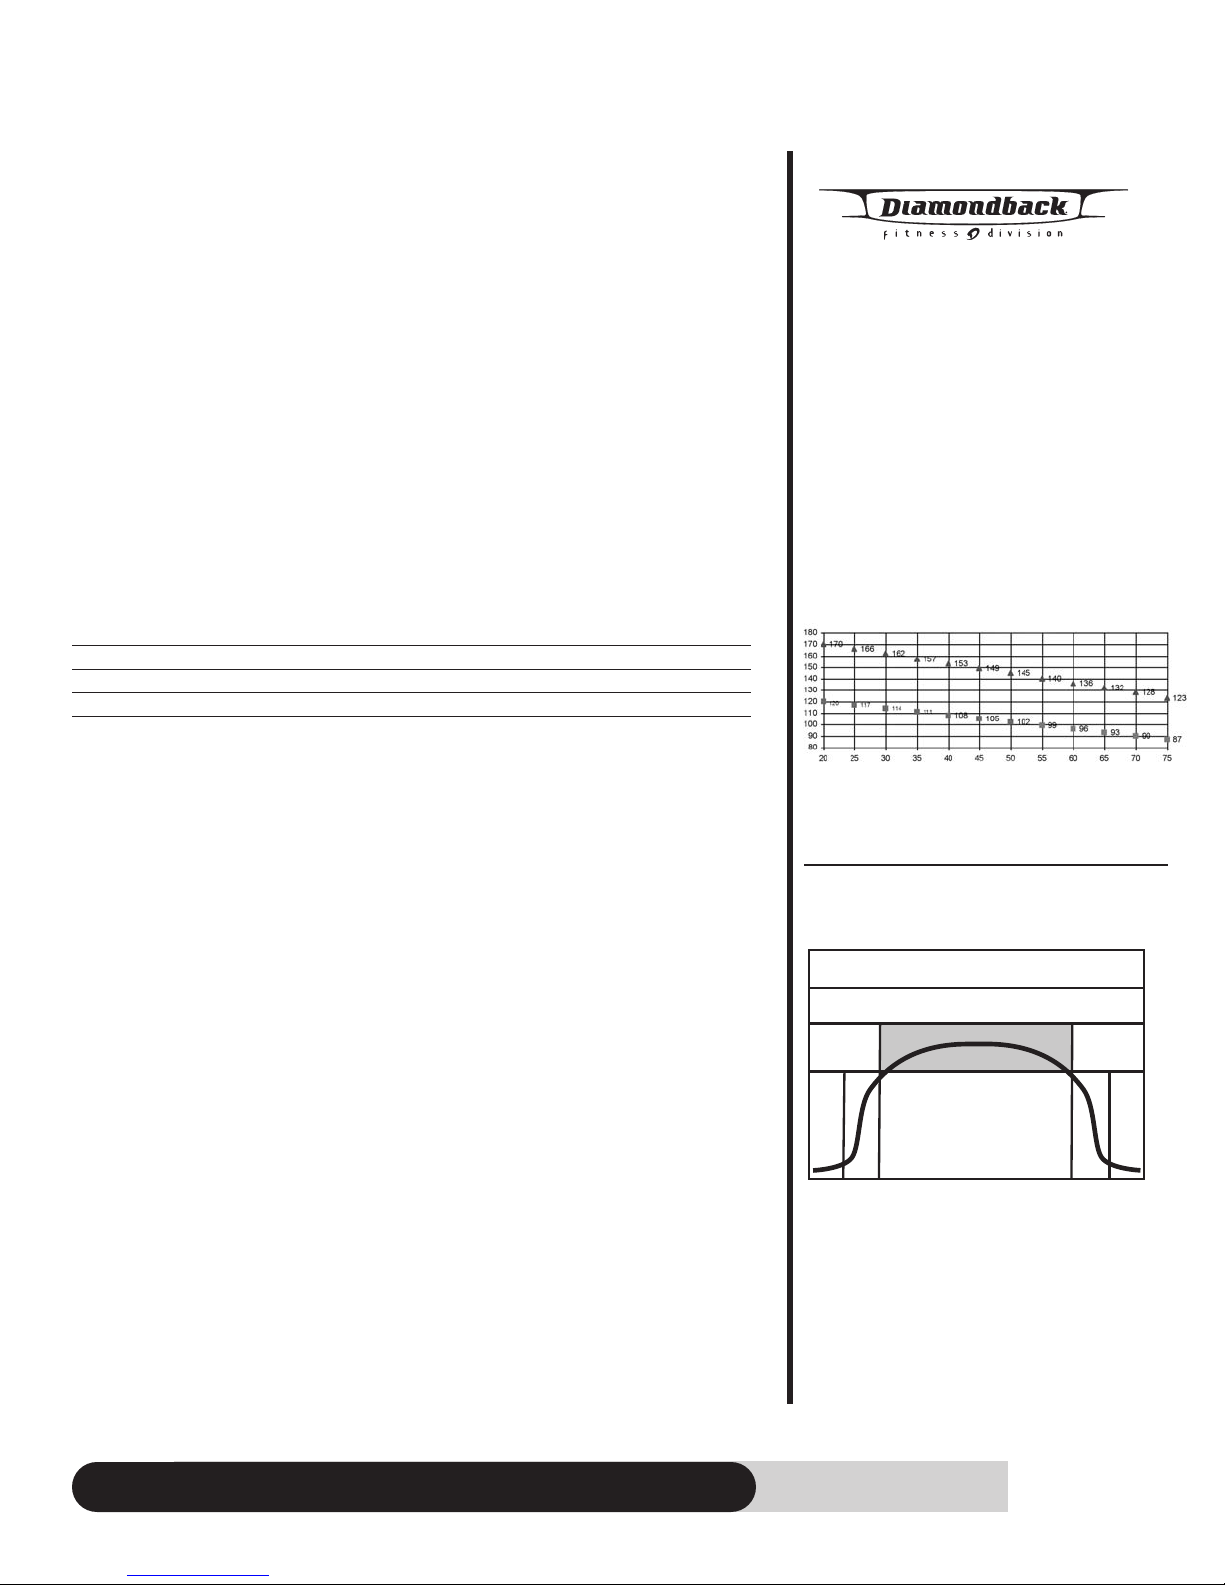
To calculate your maximum heart rate and find your training zone, use the following formula. An example has been provided below based for a 35-year –old person:
220 – Age = Maximum Heart Rate (220 – 35 = 185)
60% of Maximum Heart Rate (60% x 185 = 111bpm)
85% of Maximum Heart Rate (85% x 185 = 157bpm)
Training Zone: 111bpm – 157bpm
Heart Rate Guidelines
60% - 85% Maximum Target
Quantity & Quality
It is recommended that you accumulate at least 30 minutes of physical activity most days
of the week. Physical activity should be initiated slowly and the intensity should be
increased gradually. You should select activities that you enjoy and can fit into your
daily life. Having Diamondback equipment at home certainly gives you the comfortable
and convenient workout you want.
The American College of Sports Medicine makes the following recommendations for the
quantity and quality of training for developing and maintaining cardio respiratory fitness in healthy adults:
• An activity that uses large muscle groups, maintained continuously, and is
rhythmical and aerobic in nature.
• Duration: 20 to 60 minutes of continuous aerobic activity, including a warm-up
and cool-down period for each exercise session.
• Frequency: 3 to 5 times per week.
• Intensity: 60% to 85% of maximum heart rate.
• In addition to aerobic exercise, it is recommended that you add strength training
of moderate intensity twice per week to your program.
Get a smart start on exercising.
Anyone over the age of 35, as well as younger persons whom are overweight, should
check with his/her physician befor
who have diabetes or high blood pr
cholesterol or have lead a sedentar
ical check-up and a stress test, preferably administered during exercise by a healthcare professional.
e beginning any type of exer
e, a family history of heart disease, high
essur
cise program. People
y lifestyle should protect themselves with a med-
Ages in years
▲ = 85% ■ = 60%
Typical Target Zone Exercise
Patterns for 35 year-old
950 Ef Owner’s Manual
7
Page 10
Workout guidelines (continued)
1. Always stretch before your workout to loosen muscles, and afterwards to cool down.
2. The first few minutes of your workout should be devoted to warming up muscles
e a vigorous workout, and building your heart rate slowly.
befor
After your aerobic workout of about 24-32 minutes, spend 10 minutes gradually
3.
educing your heart rate with a lower resistance level.
r
Remember, to start slow, with intensity low, until you build endurance and strength.
And always consult your physician before beginning any exercise program.
HEART RATE MONITORING DEVICES
Pulse Hand Grips (Standard
The 950Ef unit is heart rate controlled and comes standard with stainless steel pulse
handgrips. To activate, gently grasp both handgrips to obtain a heart rate reading.
(Note: It is recommended to wear a chest strap for Heart Rate control program, as it
is more accurate. If you wear a chest strap and use hand grips at the same time for
heart rate monitoring purpose, please note the console will take the measurement of
the chest strap.)
Operating Tips:
If you are not getting a consistent reading while using the hand pulse option, we recommend the following suggestions:
• Make sure that the palms of the hands are touching the contact area of each hand
pulse grip.
• Maintain an even pressure on the grips.
• Do not hold the hand pulse grips too tightly.
Chest Strap (Standard)
The 950Ef is equipped with a built-in receiver and a chest strap for your heart rate monitoring. To get an accurate reading using these devices, you will need to be within three
feet of the console, and a minimum of four feet from others using a heart rate monitoring device.
(Note: The transmitter may fluctuate erratically if you are too close to other heart rate
monitoring equipment or if there are other electronics near by, such as TV, Radio...)
The receiver of the wireless ECG system is built into the console unit of the Diamondback
950Ef equipment. While using heart rate control modes, the computer monitors the
exact measurement of and control over the activity of the heart. Heart rate frequency is
displayed while the computer continually compares heart rate to the preprogrammed
personal data. The computer adjusts the wattage to maintain heart rate at the preprogrammed level.
)
8
our Sensor/ Transmitter
How to W
1.
2.
3. Buckle the other end of the chest strap onto the transmitter.
4. Center the transmitter on your chest below the pectoral muscle (breasts).
5. Stretch the transmitter away from your chest and moisten the conductive electrode
(Note: The transmitter is on automatically when being worn. It is off when it is not connected to your body. However, as moisture may activate the transmitter, thoroughly dry
the transmitter to prolong battery life.)
ear Y
Buckle one end of the chest strap onto the transmitter
Adjust the band length so that the fit is snug, but not too tight.
strips located next to the buckles with water.
.
950 Ef Owner’s Manual
Page 11
Console
Glossary of Terms
Idle mode = Console is reset and waiting for an entry. The dot matrix display
•
window will flash “DB”. If no rpm for 5 minutes, the console will enter power save
mode and the display will be shut of
• LED = The lights on the face of the console.
• Watts = The rate of energy currently being expended.
• Work = The amount of energy expended during exercise.
• Level = The resistance provided by this elliptical. The resistance gradually
increases as the level goes up.
• Difficulty level = In the preset programs, the intensity of the program is designed into
an intensity hill profile with default difficulty level 1. You may select a different
difficulty level to increase or decrease the hill profile.
Default values
• Age = 35 years
• Weight = 155 lb or 70kg for Metric system
• Time = 30 minutes; Segment time = 30/16 minutes.
• Intensity level: Level 1.
• Difficulty level for intensity: Level 1
(Note: Every time age or weight is changed, the default value setting will be updated
to the last modification).
f.
Operating Tips
• Power On: In the power save mode, press any key or start pedaling to wake up
the console and start operation.
Reset: To reset a program during its operation, press and hold the “Stop/Reset”
•
key for 2 seconds. When the program resets, the console returns to idle mode.
•
Pause and Resume: Y
during a workout before the console resets. To pause a program, simply stop
pedaling. T
“Start” or simply start pedaling.
•
Switching a pr
another program during its execution by pressing a new program key and then
Enter key to accept the new program. Calories and distance will continue
accumulating from previous program.
o resume the program back to the point of where you left off, either press
ogram:
– If “Classic Program” or “HR Interactive” program key is pressed during a
pr
ogram-executing mode, it will enter program-switching mode:
•If Enter key is pressed, it will enter this program setup mode. Age
and weight default will be the last update and time will be the
emaining time of
r
•If Star
mode will be skipped.
ou may inter
The user may switch fr
t key is pr
essed, the new program will begin, but Warm Up
rupt or pause a program for up to 5 minutes
ent operating pr
r
om cur
the pervious program.
ogram to
950 Ef Owner’s Manual
9
Page 12
Console (continued)
• If 10 seconds passes and no other key is pressed, the program will
resume back to previous activities.
Re-start a program: The user may re-start a program after the program ends.
•
Simply
program will be started right immediately without Warm up. The program default
will r
accumulating.
Level adjustment: During Quick Start, Manual & Interval program, the user may
•
press Level Up/Down key to adjust the resistance level. (Note: Resistance
adjustments are not allowed in any Heart rate interactive program).
Difficulty level adjustment: During Random, Hill & Strength profile program,
•
the user may press Level Up/Down key to adjust the difficulty level.
press “Start” key during Cool Down or Workout Summary mode. The
emain the same as previous program; the calories and distance will continue
– If Level Up/Down key is pressed, the level data display will show the
current resistance level and adjust it accordingly. The Dot matrix display will
update the profile as well.
– If Level Up/Down key is pressed, the level data display will show the
current resistance level and adjust it accordingly. The Dot matrix display will
update the profile as well.
% MAX HR: Age / (220 minus age).
•
It is recommended to control your % Max heart rate within 60% – 85% for the most
effective workout. It is also unsafe to exceed 90% and above. This elliptical is
equipped with a safety shut off function.
– First, there is a warning for exceeding 90%, the Pulse data display will
blink.
– Second, if the heart rate continues going up and reaches 95% for 5
seconds, the console will reset.
English/Metric setting: The default Units is English system. To enter the system-
•
switching mode, press “ Start” & “Stop” keys at the same time for 2 seconds during
idle mode. The Dot Matrix display will blink “EN” for English units or “ME” for
Metric units. To change it, press “Level Up/Down” key to switch the current Units.
After the setup is completed, pr
return to the idle mode.
ess “Stop” key for 2 seconds to r
eset the console and
10
950 Ef Owner’s Manual
Page 13
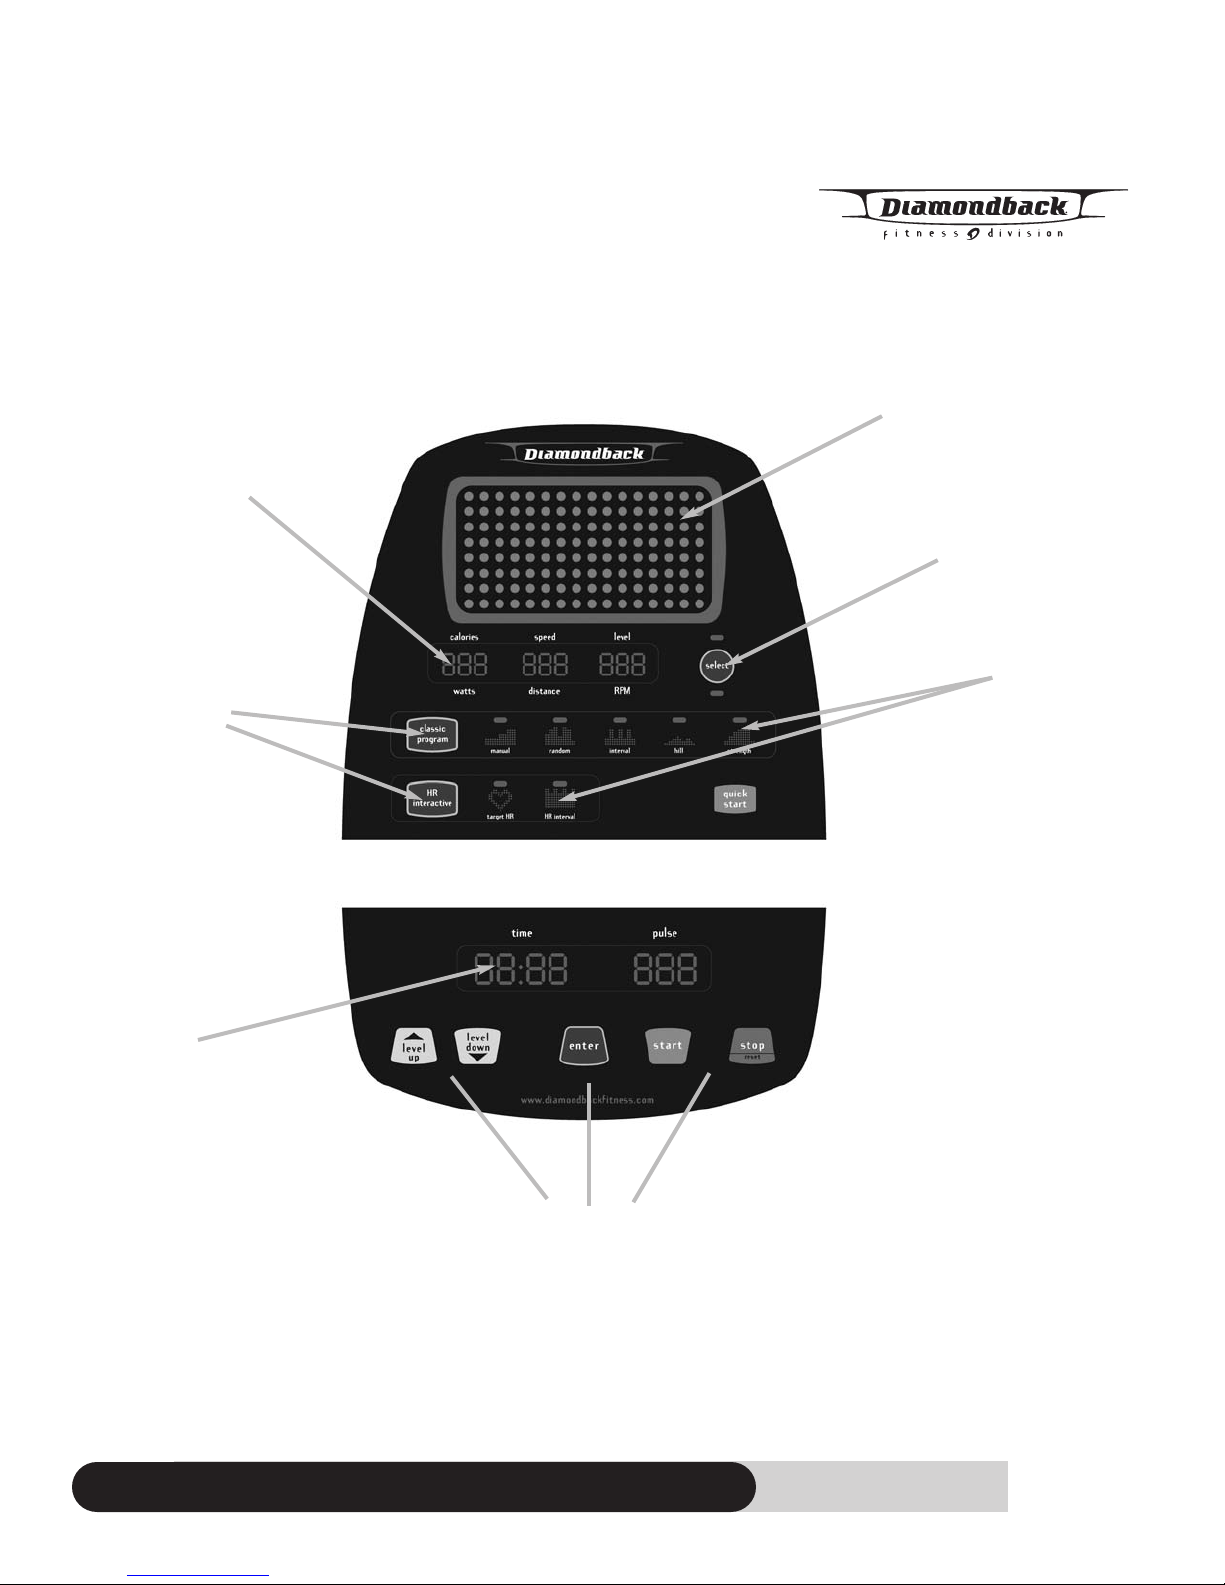
Data display window
Workout
program
selecting
keys
Console (continued)
CONSOLE LAYOUT
Dot matrix window
Data display
select key
Workout
programs
Time & Pulse
displays
950 Ef Owner’s Manual
Function keys
11
Page 14
Console (continued)
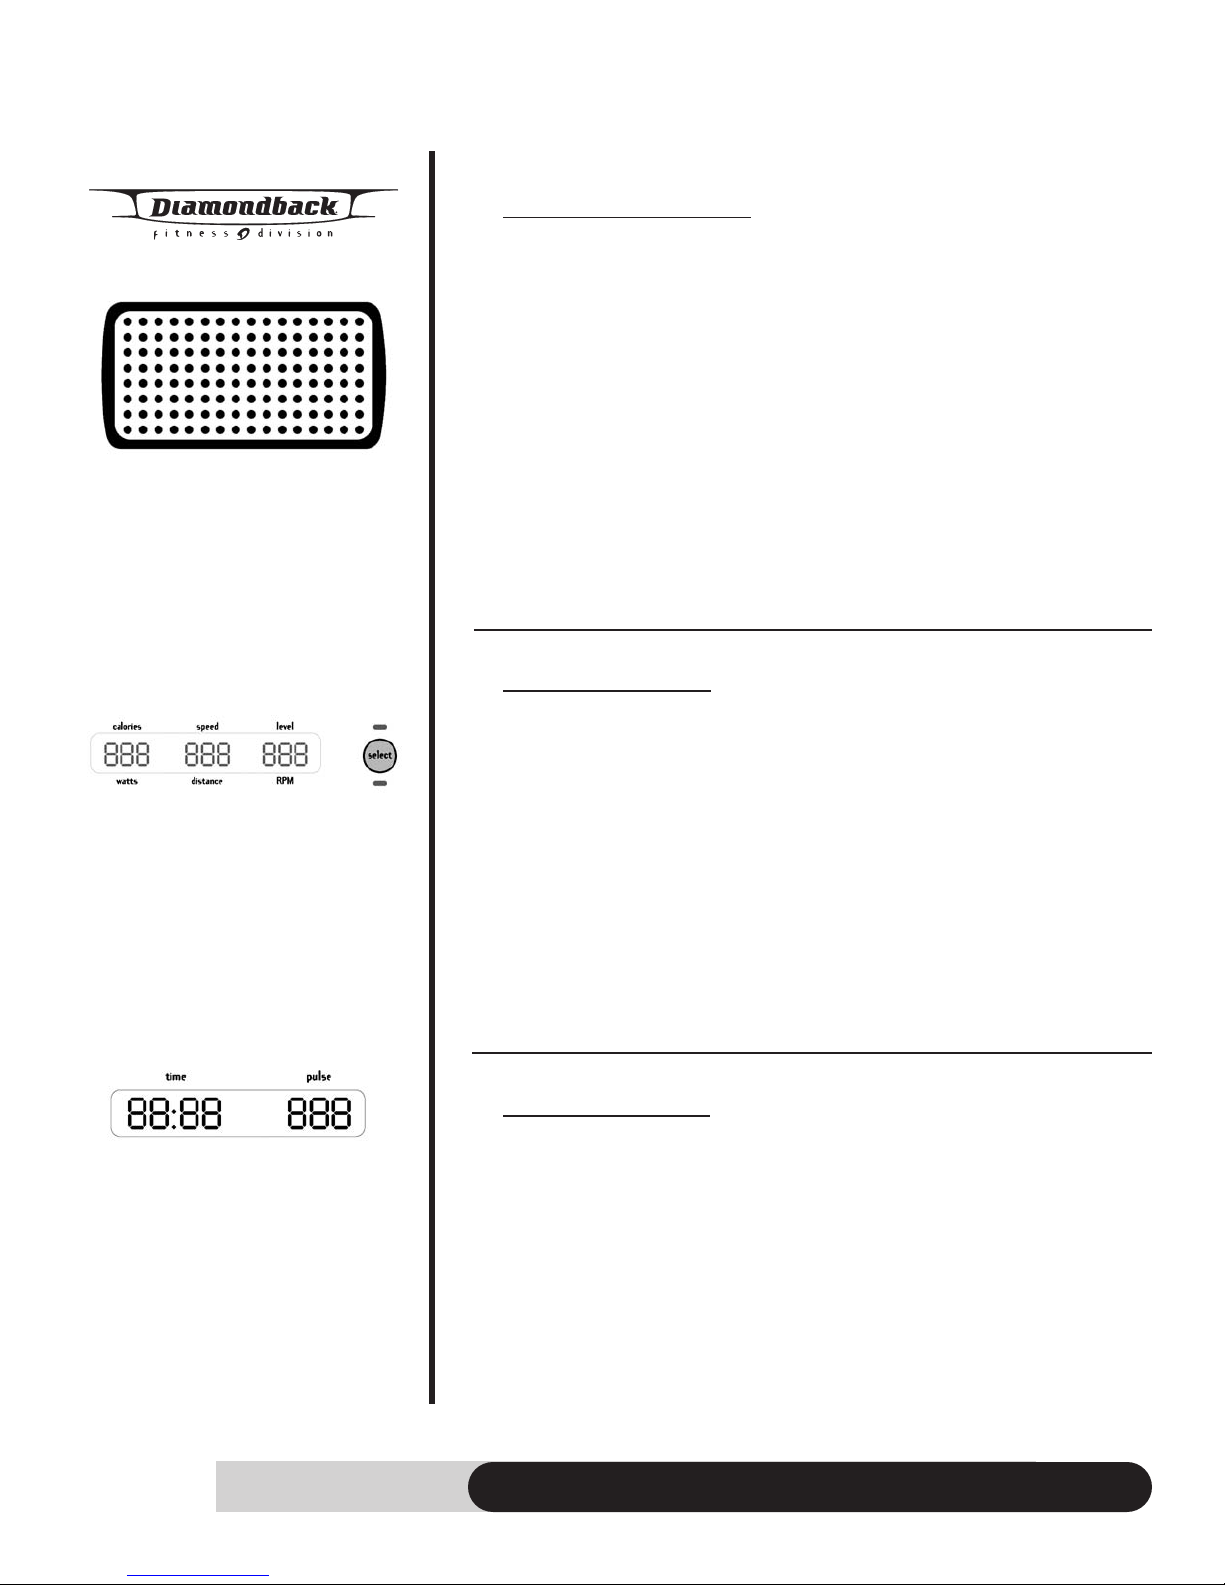
DISPLAYS
Dot Matrix/Profile
display
Workout data
display
a. Dot matrix/pr
1. It displays letters for instruction during setup:
• Display “AGE” during age setup; “WT” for weight setup; “TM” for time setup
& “HR” for HR setup.
• Display “EN” or “ME” for English or Metric units switch.
Scroll “WARM UP” or “COOL DOWN” to indicate entering these modes.
•
It displays the program profile during the program execution.
2.
• Display the level profile during the Classic programs.
• Display the % Max HR profile during the HR interactive programs.
ofile definitions:
3. Pr
Level profile – The LED represents the resistance level, L1- L16; the higher LED
•
lights up, the higher r
rent workout segment.
cur
• % Max HR profile – The LED represents the % Max HR: 0-100%
b. Workout data display
As soon as a program is executed, it will start displaying the default 3 workout data:
calories, speed & level. You may select your favorite data displays by pressing the
“SELECT” button on the right hand side, the LED indicator will light up to show which
row of data is displaying.
• Calories (kcal): Total workout calories.
• Watts (watt): Current workout wattage.
• Speed (mile/hr or km/hr): Current workout speed. It simulates a
• Distance (mile or km): Total workout distance. It simulates a jogging
• Intensity (level 1-16): Current workout level.
• RPM: Revolutions per minute.
ofile display
esistance it is on. The LED will blink to indicate the
jogging exercise.
exercise.
Time & Pulse
displays
12
c. Time & Pulse displays
1. In the program setup, Pulse window will light up and display the default Age,
Weight & HR for adjustment. Time display will light up and display the default
Time for adjustment.
2. As soon as the program is executed, it will start displaying Time and Pulse.
• Time (hr: min or min: sec): The remaining of current program time.
• Pulse (bpm): Your current heart rate. If there is no pulse detected, it will
display “ - - - “ instead.
950 Ef Owner’s Manual
Page 15
Console (continued)
FUNCTION KEYS
a. Level Up/Down keys:
• During program setup, press “Level Up/Down key” to adjust the
following – age, weight, time & HR setting.
• After program started, press “Level Up/Down key” to adjust the level,
difficulty level or HR setting during exercising.
b.
Enter key:
• After program selecting, press “Enter” to accept the program and enter its
setup mode.
• After age, weight, level….. adjustment, press “Enter” key to accept your
entry.
Start key:
c.
• Press “Start” to start a program during program setup.
• Press “Start” key to skip Warm up and enter program executing.
• Press “Start” to re-start a program during Cool Down.
Stop/Reset key:
d.
• Press and hold “Stop” button to reset the console.
• Press “Stop” to end program executing and enter Cool Down.
• Press “Stop” to enter workout summary during Cool Down
Function keys
950 Ef Owner’s Manual
13
Page 16
Workout Programs
WARM UP
Getting Started
The 950Ef automatically initiates a 3-minute Warm Up at the beginning of each program. It is designed to prepare your body for an intensive workout and to reduce the
possibility of injury during workout.
Note: Warm Up is skipped for the Quick Start or Manual programs.
Beginning the Program
Warm Up is active as soon as the “Start” key is pressed and a program is executed.
The Dot matrix window will scroll “WARM UP” and then display program profile. This
sequence will repeat until Warm up is finished.
During the Program
Data Display
• Once it is started, the data display window will display the default workout
data of “calories, speed & level”. Press “Select” button to switch the data
displays to “watts, distance & RPM”.
• The time will display count down from 3:00.
• The pulse display will display the heart rate if there is valid pulse detected.
Adjustment
• Level = L1. Press “Level Up/Down” key to adjust the level from L1- L5 only.
• “Start” key can be pressed to skip the warm up and start the program
immediately.
Ending the Program
• When 3-minute duration is up or Start key is pressed, Warm Up will end and
the program will execute.
• There will be a beep sound to indicate the Warm up is over and the selected
program begins.
Pause, Reset, Re-star
See Console Operating Tips section for details, pages: 9 & 10.
t or Switch a pr
ogram
COOL DOWN
Getting Started
950Ef is equipped with a 3-minute Cool Down at the end of each program. It
appears as soon as a program ends. Cool Down is designed to reduce muscle stiffness and allow your heart rate to recover.
Beginning the Program
Cool Down is active as soon as a program ends. The dot matrix window will scroll
“COOL DOWN” and then display program profile. This sequence will repeat until
Cool Down is finished.
14
950 Ef Owner’s Manual
Page 17
Workout Programs (continued)
During the Program
Data Display
Once it is started, the data display window will display the default workout
•
data of “calories, speed & level”. Pr
plays to “watts, distance & RPM”.
The time will display “3:00” and continuing down.
•
• The pulse display will display the heart rate if there is valid pulse detected.
Adjustment
• Level = L1. Press “Level Up/Down” key to adjust the level from L1- L5 only.
• “Start” key could be pressed to re-start the previous program again.
• “Stop” key could be pressed to skip the cool down mode and active the
Workout Summary immediately.
Ending the Program
When 3-minute duration is up or Stop key is pressed, Cool Down will end and enter
Workout Summary. See Workout summary for details.
Pause, Reset, Re-start or Switch a program
See Console Operating Tips section for details, pages: 9 & 10.
ess “Select” button to switch the data dis
WORKOUT SUMMARY
Getting Started
For your convenience, the 950Ef incorporates a Workout Summary right after the completion of the Cool Down. It will display the total workout data for 30 seconds before
the Console resets.
Beginning the Program
Workout Summary appears as soon as the Cool Down mode ends or a “Stop” key is
pressed during Cool Down mode. The data display will stop counting and show the
final data.
During the Pr
Data Display
• Once this summary is started, the data window will display:
–
–
–
Adjustment
• Intensity and Incline cannot be adjusted during this time.
ogram
Calories: total calories.
Distance: total distance.
ime: total program time
T
Ending the Program
When 30-second duration is up, Workout Summary will end and console will reset.
950 Ef Owner’s Manual
15
Page 18
Quick Start
key
Workout Programs (continued)
Pause, Reset, Re-start or Switch a program
See Console Operating Tips section for details, pages: 9 & 10.
QUICK START
Getting Started
A Quick Star
their workouts right away
default values for calculations. Be sur
out since the Warm Up mode is skipped in the Quick Start program.
Beginning the Program
During idle mode, the dot matrix window displays ”DB”. To begin this program, press
“Quick Start” key once or continue to pedal and press no key for 30 seconds.
Program Default Values
• Time = 30 minutes
• Level = L1.
During the Program
t program is for someone who wants to bypass the setup mode and start
. By picking Quick Start program, you are accepting the
e to include a Warm Up period during your work-
Data Display
• As soon as the “Quick Start” button is pressed, this program will begin; the
data display window will display the default workout data of “calories, speed
& level”. Press “Select” button to switch the data displays to “watts, distance
& RPM”.
• Time display will show 30:00 and count down.
• Pulse display will start displaying if there is a valid pulse.
Adjustment
• Press “Level Up/Down” key to adjust the level from L1 to L16. The level data
display will update the level and the dot matrix window will update the profile
accordingly.
Ending the Program
• When 30-minute duration is up or Stop key is pressed, this program will end
and Cool down will be active. See Cool down section for details.
• There will be a beep sound to indicate the program ends.
Pause, Reset, Re-start or Switch a program
See Console Operating Tips section for details, pages: 9 & 10.
CLASSIC PROGRAMS
16
MANUAL
Getting Started
You could build your own profile with Manual program. Be sure to include a Warm
950 Ef Owner’s Manual
Page 19
Workout Programs (continued)
Up period during your workout since the Warm Up mode is skipped in the Manual
program.
Beginning the Program
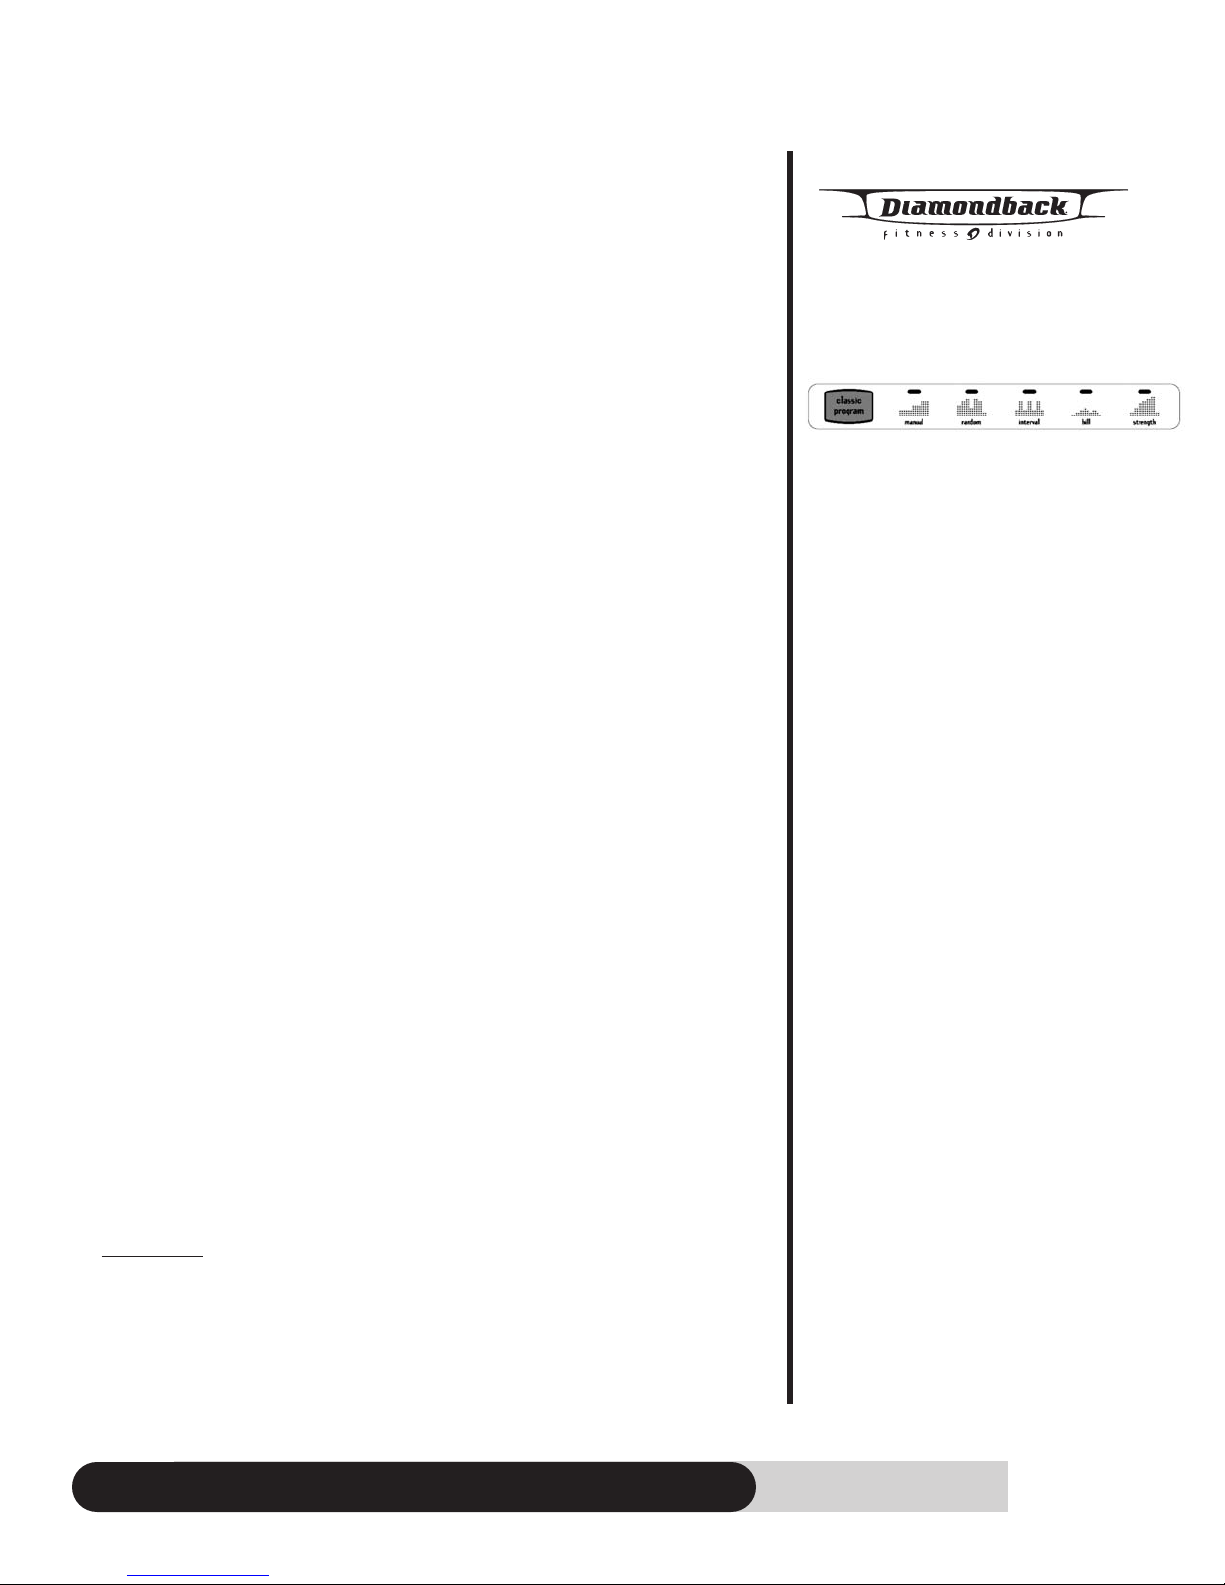
During idle mode, the dot matrix window displays ”DB”. To begin this program, press
“Classic Program” key until “Manual” program LED indicator lights up.
Accepting default values or Entering the program setup mode
When the dot matrix display shows Manual program profile, it indicates you are about
to select the Manual program:
• Press “Start” key to accept current default values and begin Manual program
workout.
– Default Time = 30 minutes
– Default Level = L1.
• Or press “Enter” to enter program setup mode. The dot matrix & data dis
plays will take you through the program setup mode step by step as below:
Entering Age
1. If Enter key is pressed, the dot matrix window will flash “AGE”.
2. The pulse display will display & blink the default age.
3. You may press “Level Up/Down” key to adjust the age.
4. After age adjustment, press “Enter” to accept and enter Weight adjustment.
Classic Programs
Entering Weight
1. If Enter key is pressed after age adjustment, the dot matrix window will flash
“WT”.
2. The pulse display will display & blink the default weight.
3. You may press “Level Up/Down” key to adjust the weight.
4. After weight adjustment, press “Enter” to accept and enter Time adjustment.
Entering Time
1. If Enter key is pressed after weight adjustment, the dot matrix window will
flash “TM”.
2. The time display will display & blink the default time = 30:00.
3. You may press “Level Up/Down” key to adjust the time up to 99:00.
4.
After time adjustment, pr
(Note: you may press Start key anytime to skip the setup and begin the workout
immediately.)
During the Pr
As soon as the “Enter” or “Star
Data Display
Once the pr
•
window will display the default workout data of “calories, speed & level”.
Pr
• Time display will show the selected pr
• Pulse display will star
ogram
ogram is star
ess “Select” button to switch the data displays to “watts, distance & RPM”.
ess “Enter” or “Start” to accept and begin this program.
t” key is pr
ted, this pr
t displaying if there is a valid pulse.
essed, the Manual pr
ogram will begin; the data display
ogram time and count down.
ogram will star
t.
950 Ef Owner’s Manual
17
Page 20
Workout Programs (continued)
Adjustment
Press “Level Up/Down” key to adjust the level from L1 to L16. The level data
•
display will update the level and the dot matrix window will update the pr
dingly.
accor
Ending the Program
When selected program time is up or Stop key is pressed, this program will
•
end and Cool down will be active. See Cool down section for details.
• There will be a beep sound to indicate the program ends.
Pause, Reset, Re-start or Switch a program
See Console Operating Tips section for details, pages: 9 & 10.
RANDOM
Getting Started
The Random program is designed to allow the user to choose from an unlimited number of computer generated profiles.
Beginning the Program
During idle mode, the dot matrix window displays ”DB”. To begin this program, press
“Classic Program” key until “Random” program LED indicator lights up.
ofile
Accepting default values or Entering the program setup mode
• When the dot matrix display shows Random program profile, it indicates you
are about to select the Random program:
– Press “Start” key to accept current default values and begin Random
program workout.
– Default Time = 30 minutes
– Default Level = a computer generated level profile with default difficulty
level = L1.
• Or press “Enter” to enter program setup mode The dot matrix & data displays
will take you through the program setup mode step by step as below: (same
as Manual program setup)
– Entering Age
– Entering Weight
–
Entering T
During the Pr
As soon as the “Enter” or “Star
m Up mode section for details.
ar
W
Data Display
When W
•
default workout data of “calories, speed & level”. Pr
switch the data displays to “watts, distance & RPM”.
ime display will show the selected pr
T
•
Pulse display will star
•
ime
ogram
m Up will be active. See
t” key is pr
m Up mode is completed, the data display window will display the
ar
t displaying if ther
essed, the W
ogram time and count down.
e is a valid pulse.
ar
ess “Select” button to
18
950 Ef Owner’s Manual
Page 21
Workout Programs (continued)
Adjustment
• Press “Level Up/Down” key to adjust the difficulty level. The level data display
will update the level and the dot matrix window will update the profile
accordingly.
Ending the Program
• When selected program time is up or Stop key is pressed, this program will
end and Cool down will be active. See Cool down section for details.
• There will be a beep sound to indicate the program ends.
Pause, Reset, Re-start or Switch a program
See Console Operating Tips section for details, pages: 9 & 10.
INTERV AL
Getting Started
The Interval program helps to build the strength of your cardiovascular system. By alternating the workload from high to low, your heart gets an effective workout.
Beginning the Program
During idle mode, the dot matrix window displays ”DB”. To begin this program, press
“Classic Programs” key until “Interval” program LED indicator lights up.
Accepting default values or Entering the program setup mode
When the dot matrix display shows Interval program profile, it indicates you are
about to select the Interval program:
• Press “Start” key to accept current default values and begin Interval program
workout.
– Default Time = 30 minutes
– Default Level = a default level profile alternates Rest: L2 and Work level:
L10.
• Or press “Enter” to enter program setup mode The dot matrix & data displays
will take you through the program setup mode step by step as below: (same
as Manual program setup)
– Entering Age
– Entering Weight
– Entering Time
During the Program
As soon as the “Enter” or “Start” key is pressed, the Warm Up will be active. See Warm
Up mode section for details.
Data Display
• When Warm Up mode is completed, the data display window will display the
default workout data of “calories, speed & level”. Press “Select” button to
switch the data displays to “watts, distance & RPM”.
• Time display will show the selected program time and count down.
• Pulse display will start displaying if there is a valid pulse.
Adjustment
• Press “Level Up/Down” key during Rest segment to adjust the level from L2.
950 Ef Owner’s Manual
19
Page 22
Workout Programs (continued)
The level of the remaining Rest segments will be updated to the new setting
and the dot matrix window will update the intensity profile accordingly as
well.
Press “Level Up/Down” key during Work segment to adjust the level from L10.
•
The level of the r
and the dot matrix window will update the intensity profile accordingly as
well.
Ending the Program
When selected program time is up or Stop key is pressed, this program will
•
end and Cool down will be active. See Cool down section for details.
• There will be a beep sound to indicate the program ends.
emaining Work segments will be updated to the new setting
Pause, Reset, Re-star
See Console Operating Tips section for details, pages: 9 & 10.
t or Switch a program
HILL
Getting Started
The Hill program simulates a hill climb exercise with a preset hill profile. The exercise
profile will guide you through the up hill climb or down hill glide.
Beginning the Program
During idle mode, the dot matrix window displays ”DB”. To begin this program, press
“Classic Programs” key until “Hill” program LED indicator lights up.
Accepting default values or Entering the program setup mode
When the dot matrix display shows Hill program profile, it indicates you are about to
select the Hill program:
• Press “Start” key to accept current default values and begin Hill program
workout.
– Default Time = 30 minutes
– Default Level = a preset level profile with default difficulty level = L1.
• Or press “Enter” to enter program setup mode The dot matrix & data displays
will take you through the program setup mode step by step as below: (same
as Manual program setup)
– Entering Age
– Entering Weight
– Entering Time
20
During the Program
As soon as the “Enter” or “Start” key is pressed, the Warm Up will be active. See Warm
Up mode section for details.
Data Display
When W
•
default workout data of “calories, speed & level”. Pr
switch the data displays to “watts, distance & RPM”.
Time display will show the selected program time and count down.
•
• Pulse display will start displaying if there is a valid pulse.
arm Up mode is completed, the data display window will display the
ess “Select” button to
950 Ef Owner’s Manual
Page 23
Workout Programs (continued)
Adjustment
• Press “Level Up/Down” key to adjust the difficulty level. The level data display
will update the level and the dot matrix window will update the profile
accordingly.
Ending the Program
When selected program time is up or Stop key is pressed, this program will
•
end and Cool down will be active. See Cool down section for details.
• There will be a beep sound to indicate the program ends.
Pause, Reset, Re-start or Switch a program
See Console Operating Tips section for details, pages: 9 & 10.
STRENGTH
Getting Started
The Strength program gradually increases the workload over time. This program focuses on strengthening both your heart and your major muscle groups.
Beginning the Program
During idle mode, the dot matrix window displays ”DB”. To begin this program, press
“Classic Programs” key until “Strength” program LED indicator lights up.
Accepting default values or Entering the program setup mode
When the dot matrix display shows Strength program profile, it indicates you are about
to select the Strength program:
• Press “Start” key to accept current default values and begin Strength program
workout.
– Default Time = 30 minutes
– Default Level = a preset level profile with default difficulty level = L1.
• Or press “Enter” to enter program setup mode The dot matrix & data displays
will take you through the program setup mode step by step as below: (same
as Manual program setup)
– Entering Age
– Entering Weight
– Entering Time
During the Program
m Up will be active. See
As soon as the “Enter” or “Star
m Up mode section for details.
ar
W
Data Display
m Up mode is completed, the data display window will display the
When W
•
default workout data of “calories, speed & level”. Pr
switch the data displays to “watts, distance & RPM”.
ime display will show the selected program time and count down.
T
•
Pulse display will star
•
ar
t” key is pr
t displaying if there is a valid pulse.
essed, the W
ar
ess “Select” button to
Adjustment
• Press “Level Up/Down” key to adjust the difficulty level. The level data display
950 Ef Owner’s Manual
21
Page 24
Workout Programs (continued)
Tar get % Max HR
81 - 90%
21 - 30%
1 - 20%
Blinking - Actual Heart Rate
will update the level and the dot matrix window will update the profile
accordingly.
HR Interactive
programs
Ending the Pr
When selected program time is up or Stop key is pressed, this program will
•
ogram
end and Cool down will be active. See Cool down section for details.
• There will be a beep sound to indicate the program ends.
Pause, Reset, Re-start or Switch a program
See Console Operating Tips section for details, pages: 9 & 10.
HR INTERACTIVE PROGRAMS
T
ARGET HR
Getting Started
The Target Heart Rate program is designed to keep you training at your chosen heart
rate level. Computer will adjust the intensity level automatically to ensure the target heart
rate is achieved and maintained during the entire program.
A HEART RATE MONITORING DEVICE MUST BE USED FOR THIS PROGRAM. FOR
BETTER RESULTS, A CHEST STRAP IS RECOMMENDED FOR THIS OPERATION.
IMPORTANT: It is unsafe to exceed 95% of your maximum heart rate while
exercising. Please consult your physician before performing any Heart Rate based
training program.
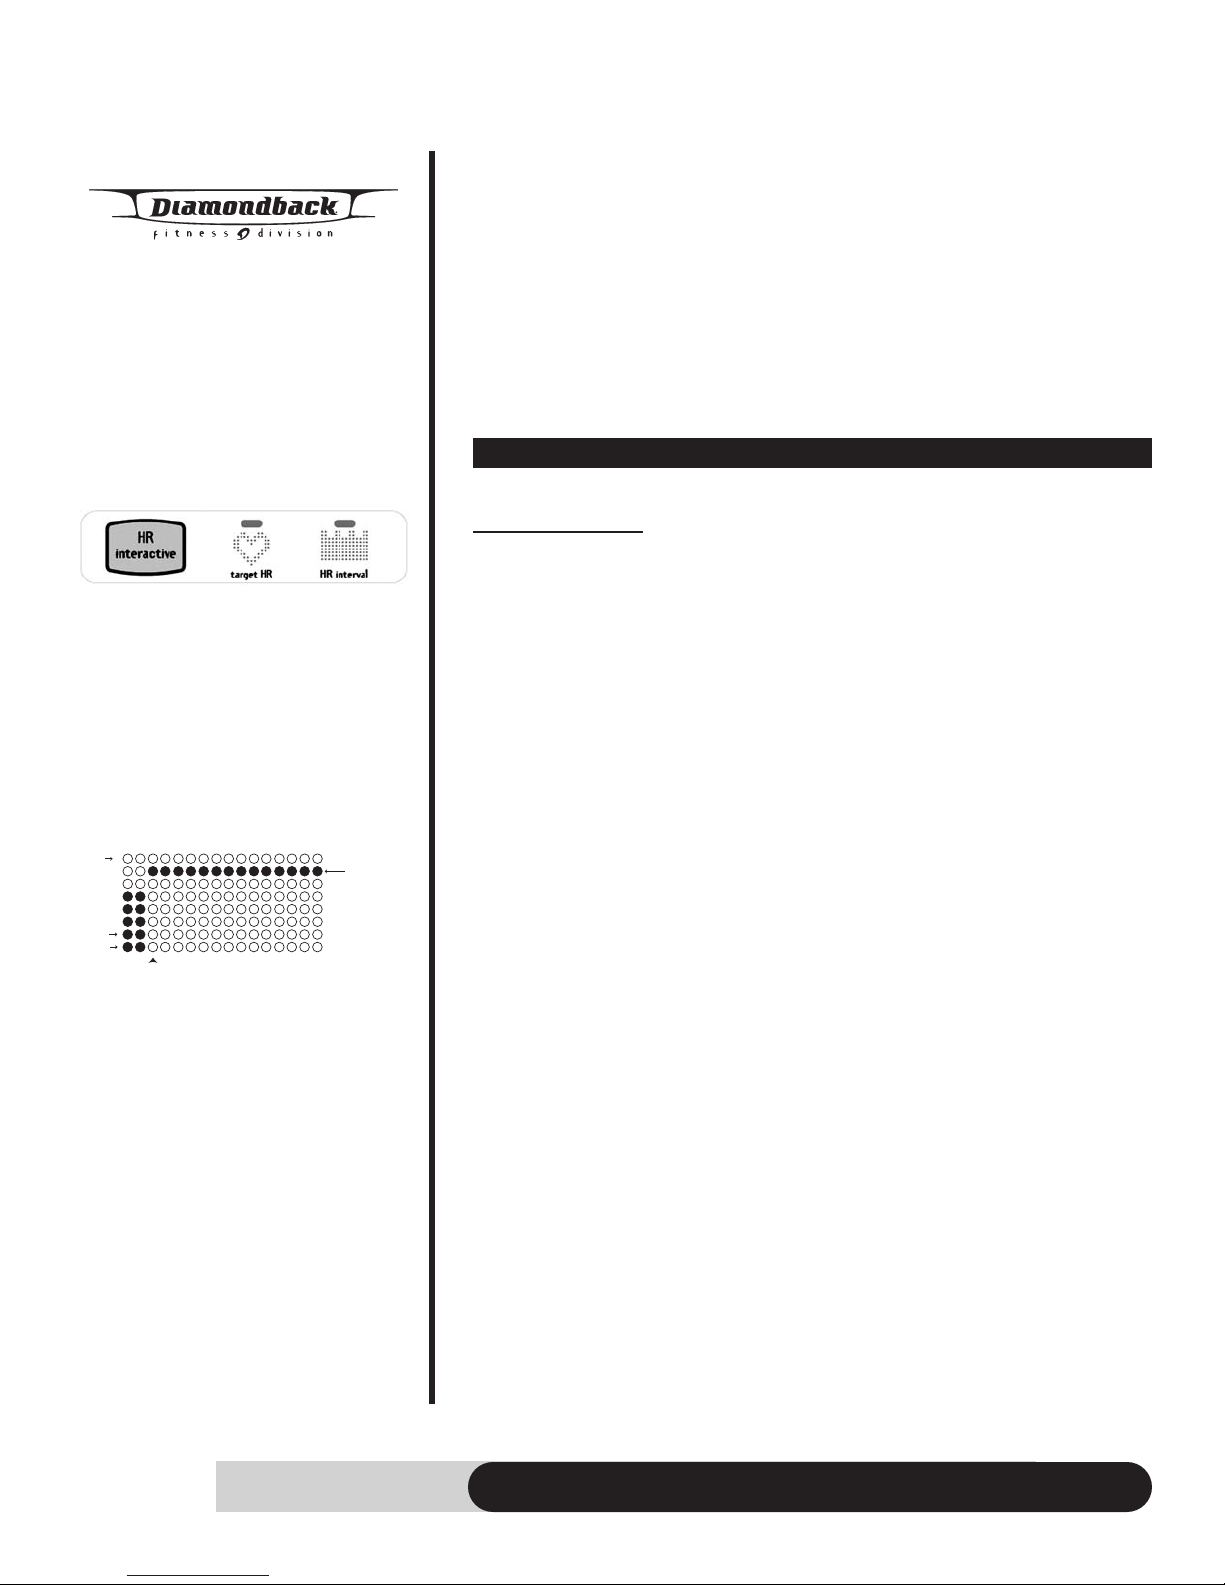
Dot matrix display during HR Interactive
programs – The dot matrix display will display program % Max HR profile, not level
profile. The row of target % Max HR LEDs
will light up to indicate your goal; then the
current segment LEDs will light up and
blink to show your actual heart rate. You
could compare your actual heart rate
against your goal while exercising.
Beginning the Program
During idle mode, the dot matrix window displays ”DB”. To begin this program, press
“HR Interactive” key until “Target HR” program LED indicator lights up.
Accepting default values or Entering the program setup mode
When the dot matrix display shows T
about to select the T
ess “Start” key to accept current default values and begin Target HR
Pr
•
ogram workout.
pr
Default T
–
Default Target HR = 120bpm.
–
arget HR program:
ime = 30 minutes
arget HR program profile, it indicates you are
• Or press “Enter” to enter program setup mode. The message display will take
you through the program setup mode step by step as below:
– Entering Age
– Entering Weight
– Entering Time
– Entering Target HR
1. If Enter key is pressed after time adjustment, the dot matrix window
will flash “HR”.
2. The pulse display will display & blink the default target HR = 120.
3. You may press “Level Up/Down” key to adjust the target HR up to
85% of Max HR.
22
950 Ef Owner’s Manual
Page 25
Workout Programs (continued)
4. After HR adjustment, press “Enter” or “Start” to accept and begin
this program.
(Note: you may press Start key anytime to skip the setup and begin
the workout immediately.)
During the Program
As soon as the “Enter” or “Start” key is pressed, the Warm Up will be active. See
Warm Up mode section for details.
Data Display
• When Warm Up mode is completed, the data display window will display the
default workout data of “calories, speed & level”. Press “Select” button to
switch the data displays to “watts, distance & RPM”.
• Time display will show the selected program time and count down.
• Pulse display:
– If there is no pulse input, the Pulse data display will show “ - - -“ and
blink. If there continues to be no pulse input, this console will maintain its
current resistance setting and not changing until the program ends or is
changed.
– If there is a valid pulse, the Pulse display will show the actual pulse
reading.
Adjustment
• Press “Level Up/Down” key to adjust the target HR setting. The Pulse window
will blink the target HR setting and adjust. Until the adjustment is done, it then
will resume to display actual HR. Dot matrix window will update the % Max
HR profile accordingly.
Ending the Program
• When selected program time is up or Stop key is pressed, this program will
end and Cool down will be active. See Cool down section for details.
• There will be a beep sound to indicate the program ends.
Pause, Reset, Re-start or Switch a program
See Console Operating T
ips section for details, pages: 9 & 10.
HR INTERV AL
Getting Started
The Heart Rate Interval program is designed to alternate periods of hard work (Work
phase) with periods of easy work (Rest phase). The console will adjust the resistance
level up to meet your Work heart rate goal and adjust it down to recover. This phase
changes every 2 segments to best condition your cardiovascular system.
A HEART RATE MONITORING DEVICE MUST BE USED FOR THIS PROGRAM.
FOR BETTER RESULTS, A CHEST STRAP IS RECOMMENDED FOR THIS
OPERATION.
IMPORTANT: It is unsafe to exceed 95% of your maximum heart rate while
exercising. Please consult your physician before performing any Heart Rate based
training program.
950 Ef Owner’s Manual
23
Page 26
Workout Programs (continued)
Beginning the Program
During idle mode, the dot matrix window displays ”DB”. To begin this program, press
“HR Interactive” key until “HR Interval” program LED indicator lights up.
Accepting default values or Entering the program setup mode
When the dot matrix display shows HR Inter
about to select the HR Inter
Press “Start” key to accept current default values and begin HR Interval
•
program workout.
– Default Time = 30 minutes
– Default Work HR = 150bpm, Rest HR = 120bpm
• Or press “Enter” to enter program setup mode. The message display will take
you through the program setup mode step by step as below:
– Entering Age
– Entering Weight
– Entering Time
– Entering Rest HR
1. If Enter key is pressed after time adjustment, the Rest HR setting
columns of dot matrix window will blink.
2. The pulse display will display & blink the default Rest HR = 120.
3. You may press “Level Up/Down” key to adjust the Rest HR up to 80%
of Max HR.
4. After Rest HR adjustment, press “Enter” to accept and begin this
program.
– Entering Work HR
1. If Enter key is pressed after Rest HR adjustment, the Work HR setting
columns of dot matrix window will blink.
2. The pulse display will display & blink the default Work HR = 150.
3. You may press “Level Up/Down” key to adjust the Work HR from “Rest
HR setting” to “85% of Max HR”.
4. After Work HR adjustment, press “Enter” or “Start” to accept and
begin this program.
(Note: you may press Star
the workout immediately.)
val program:
val program profile, it indicates you are
t key anytime to skip the setup and begin
24
During the Program
As soon as the “Enter” or “Start” key is pressed, the Warm Up will be active. See
Warm Up mode section for details.
Data Display
• When Warm Up mode is completed, the data display window will display the
default workout data of “calories, speed & level”. Press “Select” button to
switch the data displays to “watts, distance & RPM”.
• Time display will show the selected program time and count down.
• Pulse display:
– If there is no pulse input, the Pulse data display will show “ - - -“ and
blink. If there continues to be no pulse input, this console will maintain its
current resistance setting and not changing until the program ends or is
changed.
– If there is a valid pulse, the Pulse display will show the actual pulse
reading.
950 Ef Owner’s Manual
Page 27
Workout Programs (continued)
Adjustment
• Press “Level Up/Down” key during Rest HR segment to adjust the Rest HR
setting of the remaining program. The Pulse window will blink the Rest HR
setting and adjust. Until the adjustment is done, it then will resume to display
actual HR. Dot matrix window will update the Rest %Max HR profile
accordingly.
• Press “Level Up/Down” key during Work HR segment to adjust the Work HR
setting of the remaining program. The Pulse window will blink the Work HR
setting and adjust. Until the adjustment is done, it then will resume to display
actual HR. Dot matrix window will update the Work %Max HR profile
accordingly.
Ending the Program
• When selected program time is up or Stop key is pressed, this program will
end and Cool down will be active. See Cool down section for details.
• There will be a beep sound to indicate the program ends.
Pause, Reset, Re-start or Switch a program
See Console Operating Tips section for details, pages: 9 & 10.
950 Ef Owner’s Manual
25
Page 28
Maintenance
CAUTION – FOR SAFE OPERATION
Always inspect hardware prior to any exercise session. Look for loose hardware, loose
pedals, loose handrails, loose cranks and frayed wires. Repair or replace any damaged or worn parts, tighten all loose hardware.
After workout, always wipe down your 950Ef unit. Perspiration that continuously settles on frame, pads or casing may eventually cause rust or damage to the unit. Damage
resulting from lack of proper maintenance will not be covered under warranty. To clean
pads, use a mild soap and warm water. Dry with a clean towel.
If noises develop or malfunctions occur, contact your authorized Diamondback fitness
dealer.
26
950 Ef Owner’s Manual
Page 29
Domestic warranty Information
(Applies to all product sold and placed within the continental US,
Alaska, Hawaii, and Puerto Rico only)
Effective: August 2003
Diamondback warrants its 950Ef to be free from defects in material and workmanship
under normal use in the home and light instructional environments. Diamondback’s obligation under this Warranty is limited to repair or replacement of any defective part without charge through an authorized service agent to the original purchaser with the following parameters:
Who is cover
The Warranty is extended to the individual or legal entity whose name appears on the
Warranty registration card filed with Diamondback and may not be transferred to any
other individual or legal entity.
To obtain service:
To obtain service you must contact your authorized Diamondback Fitness dealer. Your
dealer is also your authorized service agent. An authorized service agent must diagnose your unit in order to determine Warranty claims/issues.
Sales where the unit is delivered unassembled (in a carton) to the end user (e.g. mail
order or Internet sales) without a service contract purchased through the dealer voids
the Warranty.
Warranty Registration:
Warranty commitments are valid only with a completed Warranty card that is returned
within 15 days
Registration is available at www
Proof of purchase from Diamondback’s authorized dealer will be required if the
Warranty card is not registered prior to any consideration of Warranty claim.
WHAT IS COVERED
Home
Maximum Usage: 14 Hours per week
ed:
from the date of purchase and includes the product serial number.
.diamondbackfitness.com.
Frame: Lifetime limited Warranty, covers defects in welds,
materials, and workmanship.
Parts & Electronics: 2 years for parts; 4 years for Brake
Normal Wear Items: 90-day limited on foam grips, pedals, etc.
Labor: 1 Year
Light Institutional
Maximum Usage: 21 Hours per week
Frame: Lifetime limited Warranty, covers defects in welds,
materials, and workmanship.
Parts & Electronics: 1 year
ear Items 90-day limited on foam grips, pedals, etc.
mal W
Nor
ear
Labor:
1 Y
950 Ef Owner’s Manual
27
Page 30
Domestic warranty Information (continued)
Warranty voided if:
The Warranty does not apply to any failure of the product, or any parts of the product,
due to: assembly errors, alterations, modifications, misuse, abuse, accident, improper
maintenance, or if the serial number on the product has been removed, altered or
defaced. Assembly errors include but are not limited to:
Damaged wir
Stripped crank ar
Bolts used in the wr
Parts & Service:
Contact the authorized Diamondback dealer where unit as originally purchased. If you
have moved, or that retailer is unavailable, use our dealer locator at
www
.diamondbackfitness.com to help find another authorized dealer.
Diamondback is not responsible for arranging Warranty service and/or honoring
extended warranties provided by dealers.
Exclusions:
Warranty is void if the 950Ef unit is placed in a commercial or light commercial environment, such as health club, school, or correctional facility.
Additional Rights:
This Warranty is expressly in lieu of all other warranties, and any implied warranties of
merchantability or fitness for a particular purpose created hereby, are limited to the
same duration as the express Warranty herein. Raleigh America, Inc. shall not be liable
for any incidental or consequential damages. Some states do not allow the exclusion or
limitations of implied warranties, incidental or consequential, so the above limitations
and exclusions may not apply to you.
e harness.
ms and/or pedals.
ong location.
Retailers and wholesale outlets for Raleigh America, Inc. products are not authorized to
modify this Warranty in any way.
This War
vary from state to state.
Raleigh America Inc.
6004 S. 190thSt., Suite 101
Kent, WA 98032
Phone no. 253-395-1100
ranty gives the original owner specific legal rights. Other additional rights may
28
950 Ef Owner’s Manual
Page 31
Warranty card
Important! • Important! • Important! • Important! • Important! • Important!
Warranty card must be completed and returned to Diamondback within 15 days of purchase. Failure to
comply may void manufacturer’s Warranty. Or, you may register your product at
www.diamondbackfitness.com.
our Name:
Y
Address:
City: State: Zip:
Daytime phone No.: Evening phone No.:
Dealer Store Name: Address:
City: State: Zip:
Model: Serial No.:
Purchase Date:
Environment Unit Placed:
❏ Home ❏ Light Institutional, i.e. Hotel, Business Center…
Mail completed form to:
Diamondback Fitness - W
300 Camarillo Ranch Road
Camarillo, CA 93012
ranty Car
ar
d
950 Ef Owner’s Manual
Page 32
Diamondback Fitness
300 Camarillo Ranch Road
Camarillo, CA 93012
T 800-776-7642
F 805-388-5890
Diamondback Fitness is a division of Raleigh America, Inc.
Part no. 22-90-900
 Loading...