

Page 1
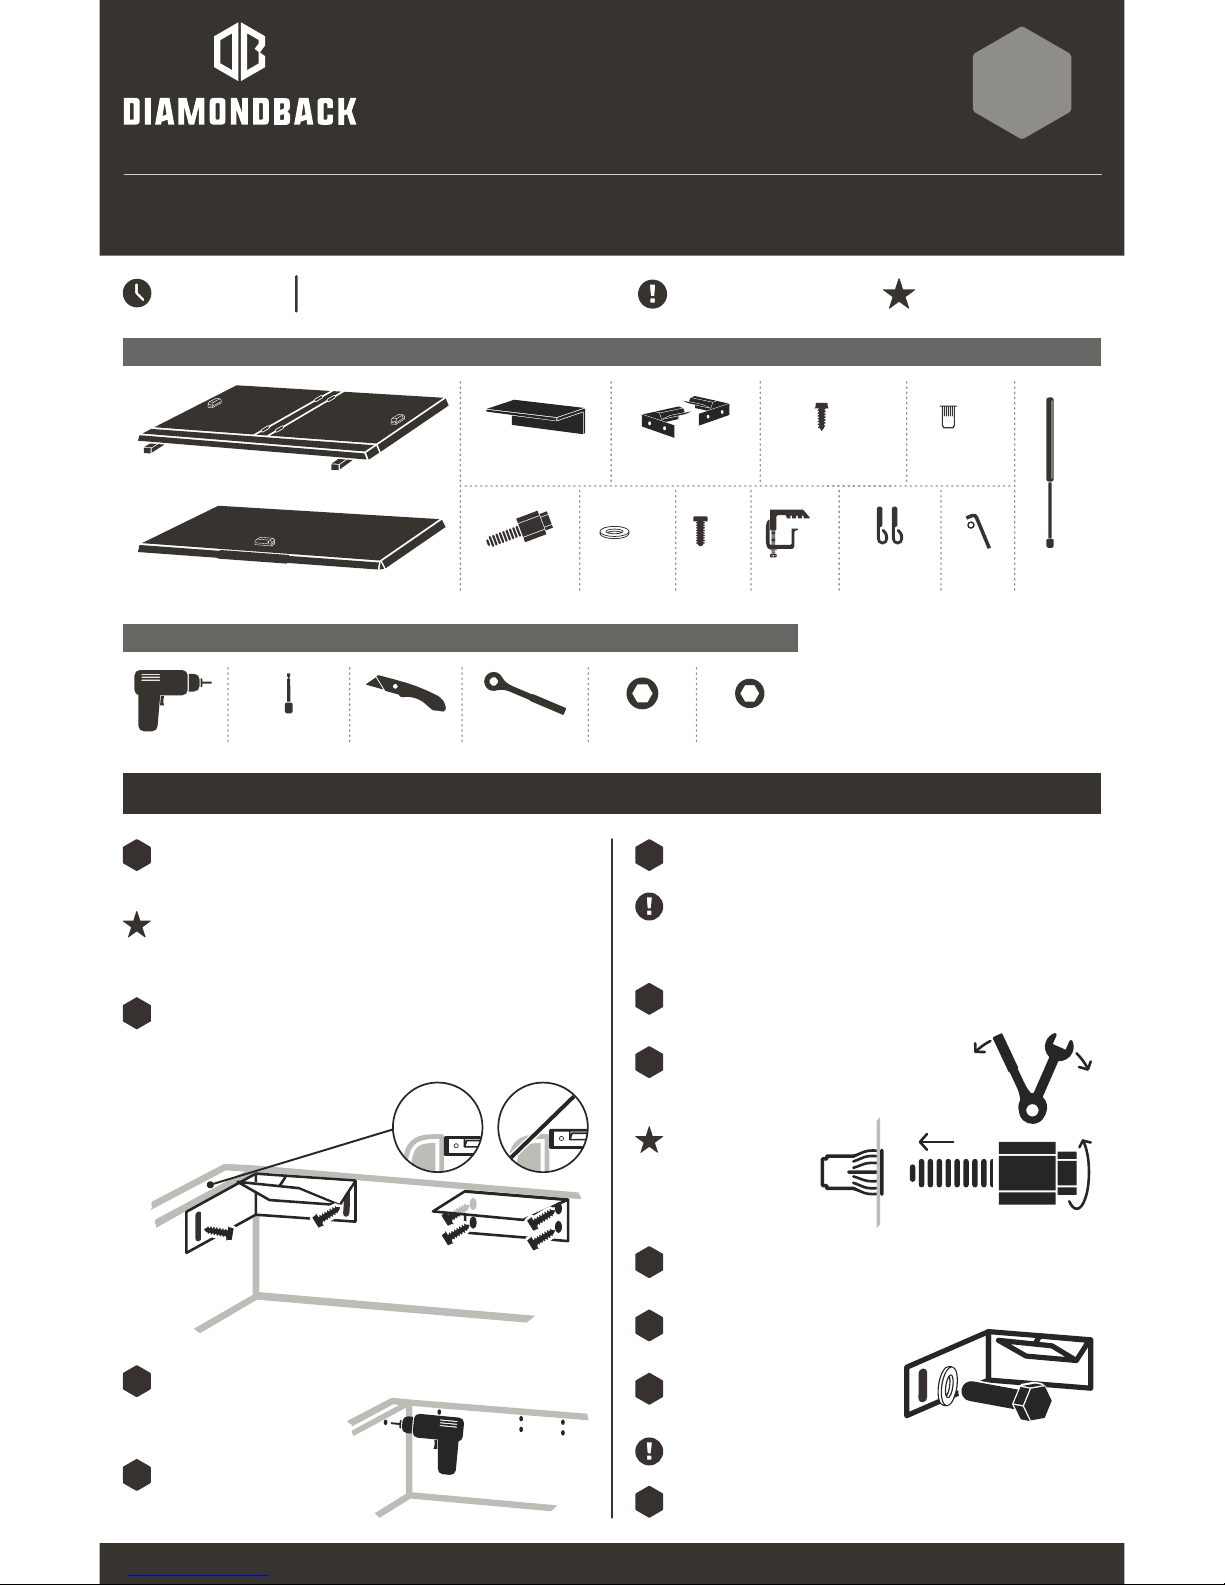
PREPARE THE CARGO BED
If your truck has bed rail caps, you should
affix the included bulkhead prep kit prior to
installing the cover. Refer to the Bulkhead
Prep Kit Installation Guide for details.
Drill 3/8" Nut Dri ver
Utility Knif e
9/16" Socke t 7/16" Socket
Ratchet Wrench
Bed-Rail
Edge Trim (2)
Tail Panel
Cab & T Panels A ssembly
Clamp Bracket
Lock-Rod Striker
Brackets (2)
1/8" Hex
Key
Threaded Insert
Installation Tool
Cap
Clamps (6)
× 6
Gas
Springs (6)
× 6
1/4" Riv et
Nut s (8)
× 8
1/4" Self-Drilling
Scr ews (8)
× 8
1/4" Hex
Bol ts (8)
× 8
1/4" Plain
Washers (8)
× 8
INSTALLATION GUIDE
CVR-270.1
DiamondBackCovers.com / 800 935 4002
Important installation informa tion
IMPORTANT!
Keep an eye out for these icons:
Normal install time
90 minutes
Tips to as sist installat ion
Helpful Hints
270
CONTIN UED ON REVERS E >
PARTS INCLUDED:
TOOLS REQUIRED: PRE-INSTALL ATION NOTE :
1
Attach the clamp bracket to the bulkhead, centered side to side,
flush with the top rail, and longer leg down using a drill, 3/8" nut driver
bit, and four self-drilling screws.
Installing the clamp bracket is easiest if you pre-drill it using
the screws.
Detach all three brackets by removing the self-drilling screws.
3
Use the holes in the truck body
left by the self-drilling screws
as pilot holes to drill larger,
3/8" holes.
4
Attach a lock-rod striker bracket to each front corner of the cargo
bed, the bracke t’s V bend pointing rearwar d and the side flange
located as high as possible without it breaking the plane of the top
of the bed rail, using a drill, 3/8" nut driver bit, two self-drilling
screws, and the two slots nearest the ends of the bracket.
2
Insert the installation-tool mandrel into a rivet nut. Hand-tighten
it until its hexagonal sleeve is tight to the face of the rivet nut.
6
Remove the installation tool by unscrewing the mandrel.
8
You’ll know the rivet
nut is fully compressed when you
feel the mandrel
become very difficult
to turn.
Use a 9/16" wrench to hold the installation-tool
sleeve as you tighten the mandrel with a 7/16"
socket until the rivet nut deforms and locks
against the interior of the bed wall.
7
Hammer a rivet nut into each hole.
5
Do not install rivet nuts through plastic bed rail caps or plastic
bedliners. (Spray-on bedliners are fine.) Use a utility knife to
trim the plastic so that the rivet nuts’ outer flange can sit
tightly against the body of the truck itself.
Do not over tighten the bolts or you might strip the rivet nuts.
Reinstall all three brackets using
the hex bolts, plain washers, and a
7/16" socket.
10
If you are also inst alling a Cross Bin, do so now. Refer to page 2 of
the Cross Bin Installation Guide for details.
11
Repeat steps 6-8 for each rivet nut.
9
Page 2
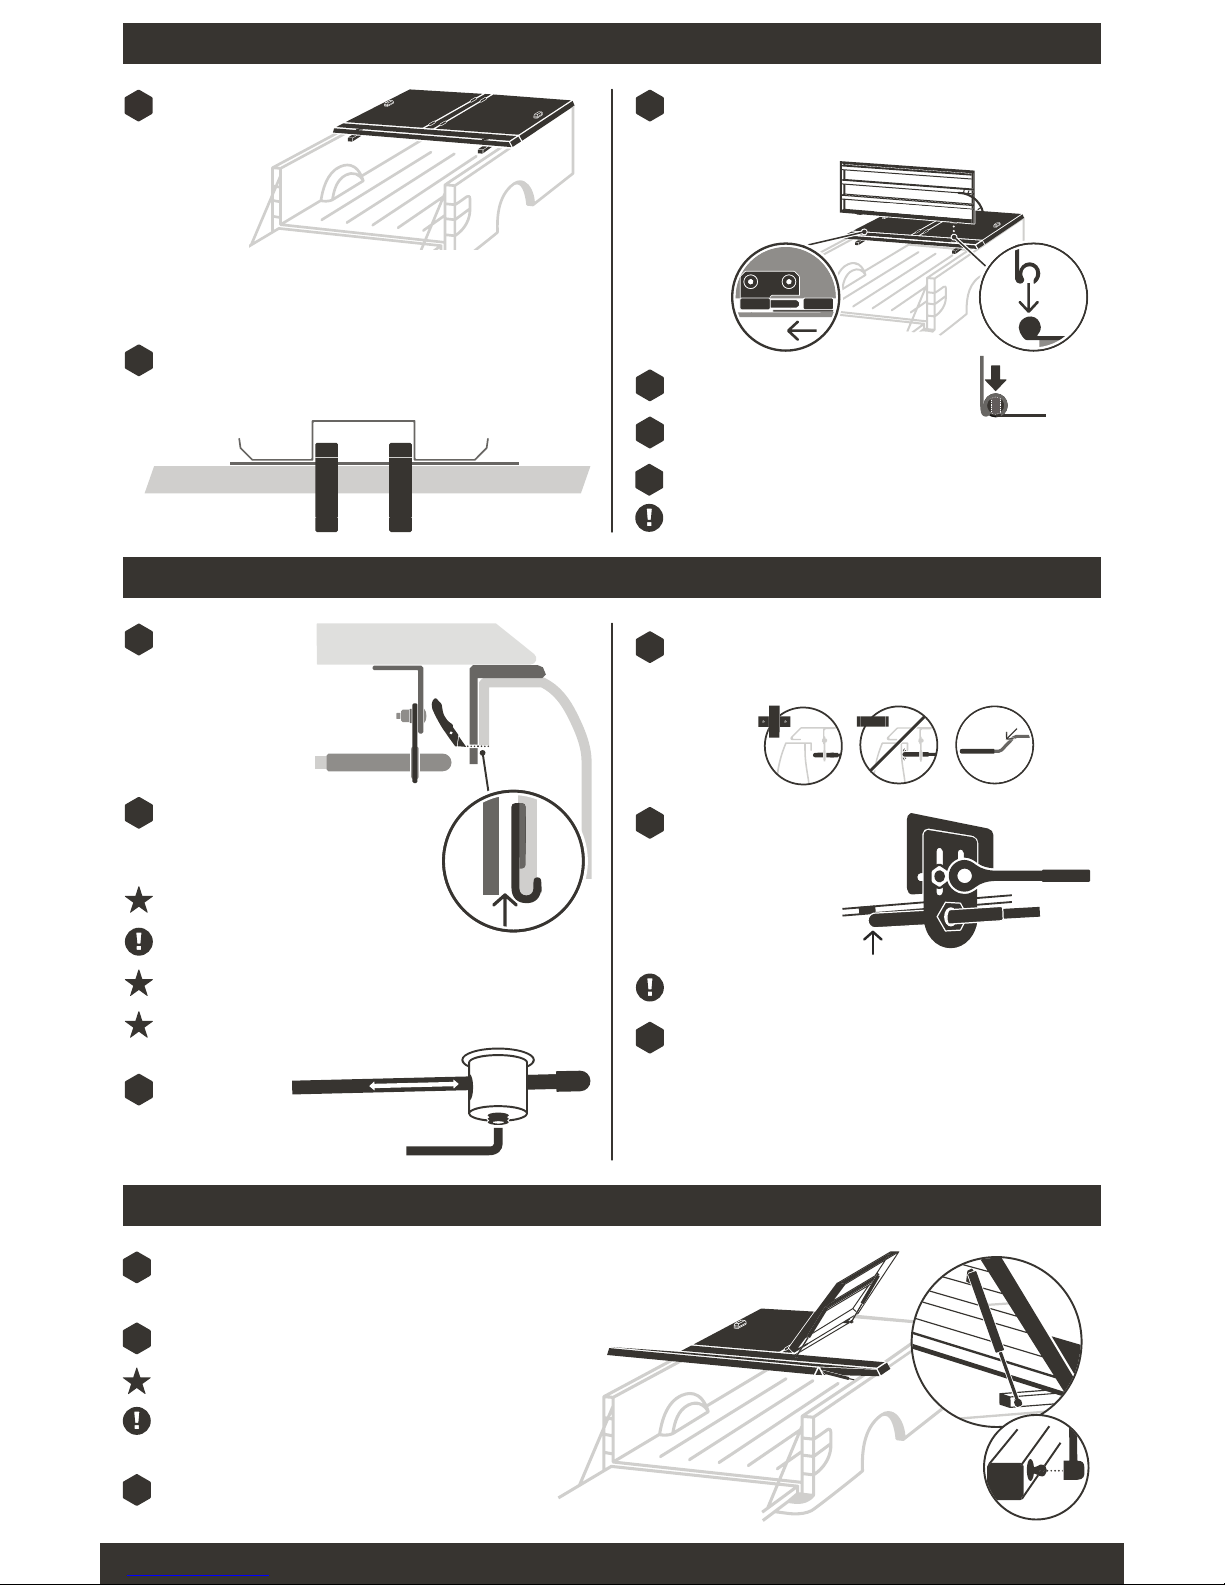
ATTACH THE GAS SPRINGS
24
If you are also inst alling a Side Bin, do so now. Refer to the Side Bin
Installation Guide for details.
Attach the 60-lb. gas springs to the cab-panel ball studs and the
two stronger gas springs to the tailgate-panel ball studs.
25
You’ll find the strength of the gas springs printed on the sides of
the barrels.
To avoid premature failure of your gas springs, at tach
them barrel up, shaft down.
Leave the cover closed and locked for 24 hours
to allow the weatherstrip adhesive, which is
pressure-sensitive, to fully cure.
26
Affix the edge trim to the painted metal only,
behind the plastic bed liner or bed rail cap, if present.
MAY 20 17
DiamondBackCovers.com
NOVEMBER 2018
MOUNT THE COVER
SET THE LOCK RODS
Repeat steps 20–22 for the for ward cab-panel lock rods so that:
A. with the lock handles in the open position, the rod tips
clear the striker brackets,
B. with the handles in the closed position, the forward rod
tips do not strike the bulkhead, and
C. in the closed position, they’re tight against the underside
of the striker brackets, drawing the panels down & compressing the weatherstrip.
23
With the lock handle in the
closed position, position the
lock rods tight against the
underside of the bed rail lips
so that closing them
draws the panels down
& compresses the
weathers trip. Tighten
the rod guide brackets
with a 7/16" socket.
22
For best weather protection, have a second person press down
on the cover while you adjust the lock rods.
7/16" socket
18
If plastic ex tends
beyond the bot tom of
the vertical face of
the metal bed r ails,
trim a two-inch length of it, flush
with the bed rail’s bottom edge,
at both points under the tail
panel where a lock rod
will pass under the rails.
plastic
metal
Loosen the set
screws on the
tailgate-panel
lock-rod linkages.
20
1/8" hex key
Peel the red adhesive backing fr om the edge
trim pieces. Affix them to the met al bed rail at
both points where a rod will pass underneath,
the bottom curl of their j’s touching the
bottom edge of the rail.
19
Using a tool to widen the curl of the ‘j’ can
make this step easier.
Step 19 is unnecessary on ’07–13
Silverados and Sierras.
You may need to pull the plastic bed rail cap away from the metal
bed rail to provide enough clearance to get the edge trim on.
Adjust the lock rods & retighten the set screws so that (1) with lock
handle in the open position, the rod tips clear the bed rails, (2) with
handle in the closed position, the rod tips do not strike the bed
walls, and (3) the first bend in the rods points downward.
21
Place the cab & T panels
assembly on the front
half of the bed so
its leading edge
lines up with
the outside
edge of the
bulkhead.
12
Center the cover side to side.
16
Lower the tail panel into the closed position.
15
17
Tighten the cap clamps with a 9/16" socket.
Road vibration can loosen your clamps. Retighten them after
100 miles. Check them every time you haul on top.
14
Attach the tail panel by angling it 90° from the bed rails, sliding its
driver-side, loop-shaped hinge knuckle fully onto the corresponding center-panel hinge pin, then dropping its passenger-side,
C-shaped hinge knuckle fully onto its corresponding pin.
FIRST
SECOND
90°
13
Loosely affix the T panel to the truck by finger-tightening two
cap clamps under each of the three ends of the T panel, the
clamps’ bot tom jaws under the bed rails at the t wo side ends
and under clamp bracket at the nose.
FU LLY M ATED
 Loading...