

Page 1
DIAMOND
PRODUCTS
WIRE SAW
OPERATION AND
SAFETY MANUAL
MODEL
WS-25
(SEPTEMBER 2006)
Page 1
Page 2

Table of Contents
Overview ..........................................................................................................3
Safety ...............................................................................................................3
Equipment........................................................................................................4
Diamond wire.............................................................................................................. 4
Crimping the wire.......................................................................................................5
Idler pulleys ................................................................................................................ 5
Hydraulic Power Supply and Controller........................................................6
Connecting the hoses (FIG. 8)....................................................................................6
Cutting with Wire.............................................................................................7
Securing the machine.................................................................................................. 7
Introducing water for cooling ..................................................................................... 7
Starting the wire.......................................................................................................... 7
Starting the machine ................................................................................................... 8
Ending the cut.............................................................................................................9
Troubleshooting..............................................................................................9
Page 2
Page 3
Overview
Wire sawing can be a very efficient method of removing large pieces of concrete.
As with any type of construction task, attention must be paid to proper setup and
safety. This manual will outline some of the critical aspects or wire saw safety
and operation. Local ordinances and safety regulations should always be strictly
adhered to.
Safety
As with many construction and destruction operations, safe working practices
must always be adhered to.
As with any concrete sawing operation, care must be taken to ensure that there
is no danger within the concrete to be cut. It is important to ensure that there are
no gas lines, electric lines or water lines within the concrete. It is important to
know of any other foreign objects in the concrete including rebar. Consideration
needs to given to the piece to be removed and how it will be supported such that
it can be safely cut and removed.
The equipment must be in good operating condition. The wire saw must be
inspected to ensure that it is operating properly. Carefully inspect all pulleys and
rubber lining. The wire must be inspected for any abnormal wear, or frayed wire.
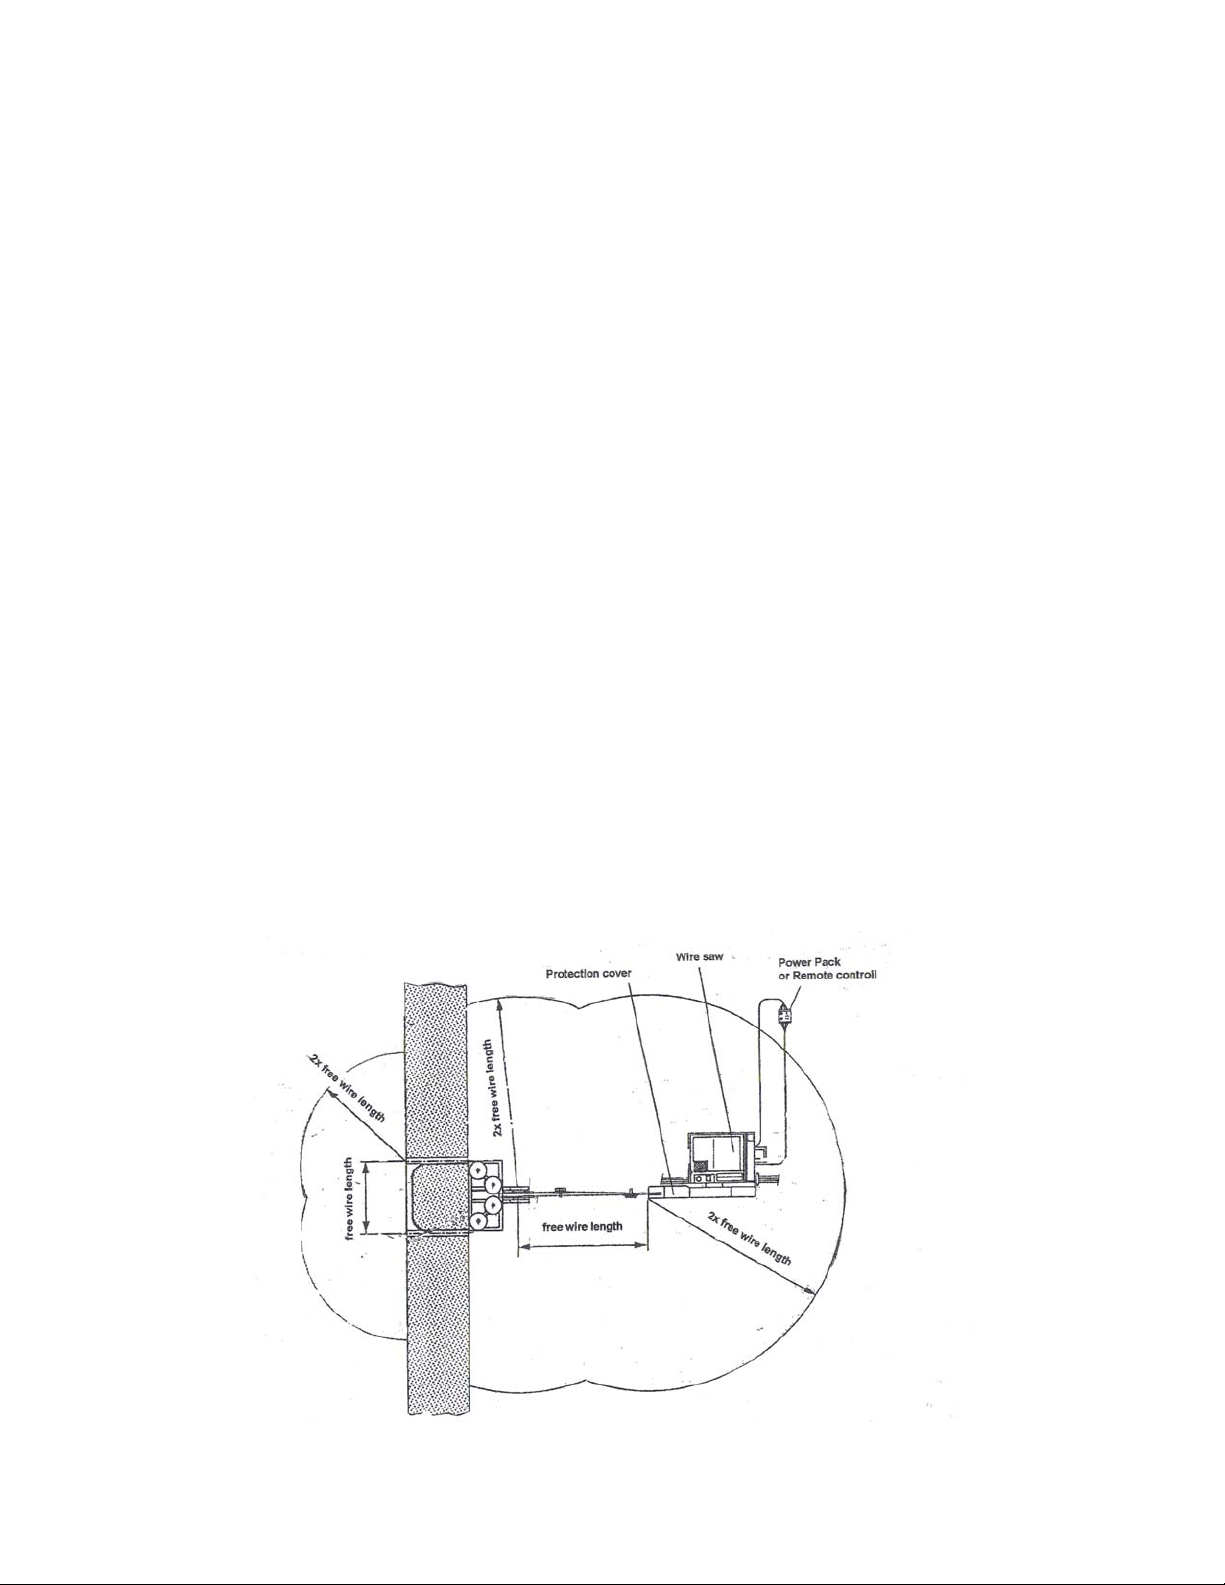
The area must then be prepared. Rope off the area in front of, behind and on the
sides of the site to a distance of at least two times the free wire length (see fig.1).
Page 3
Page 4
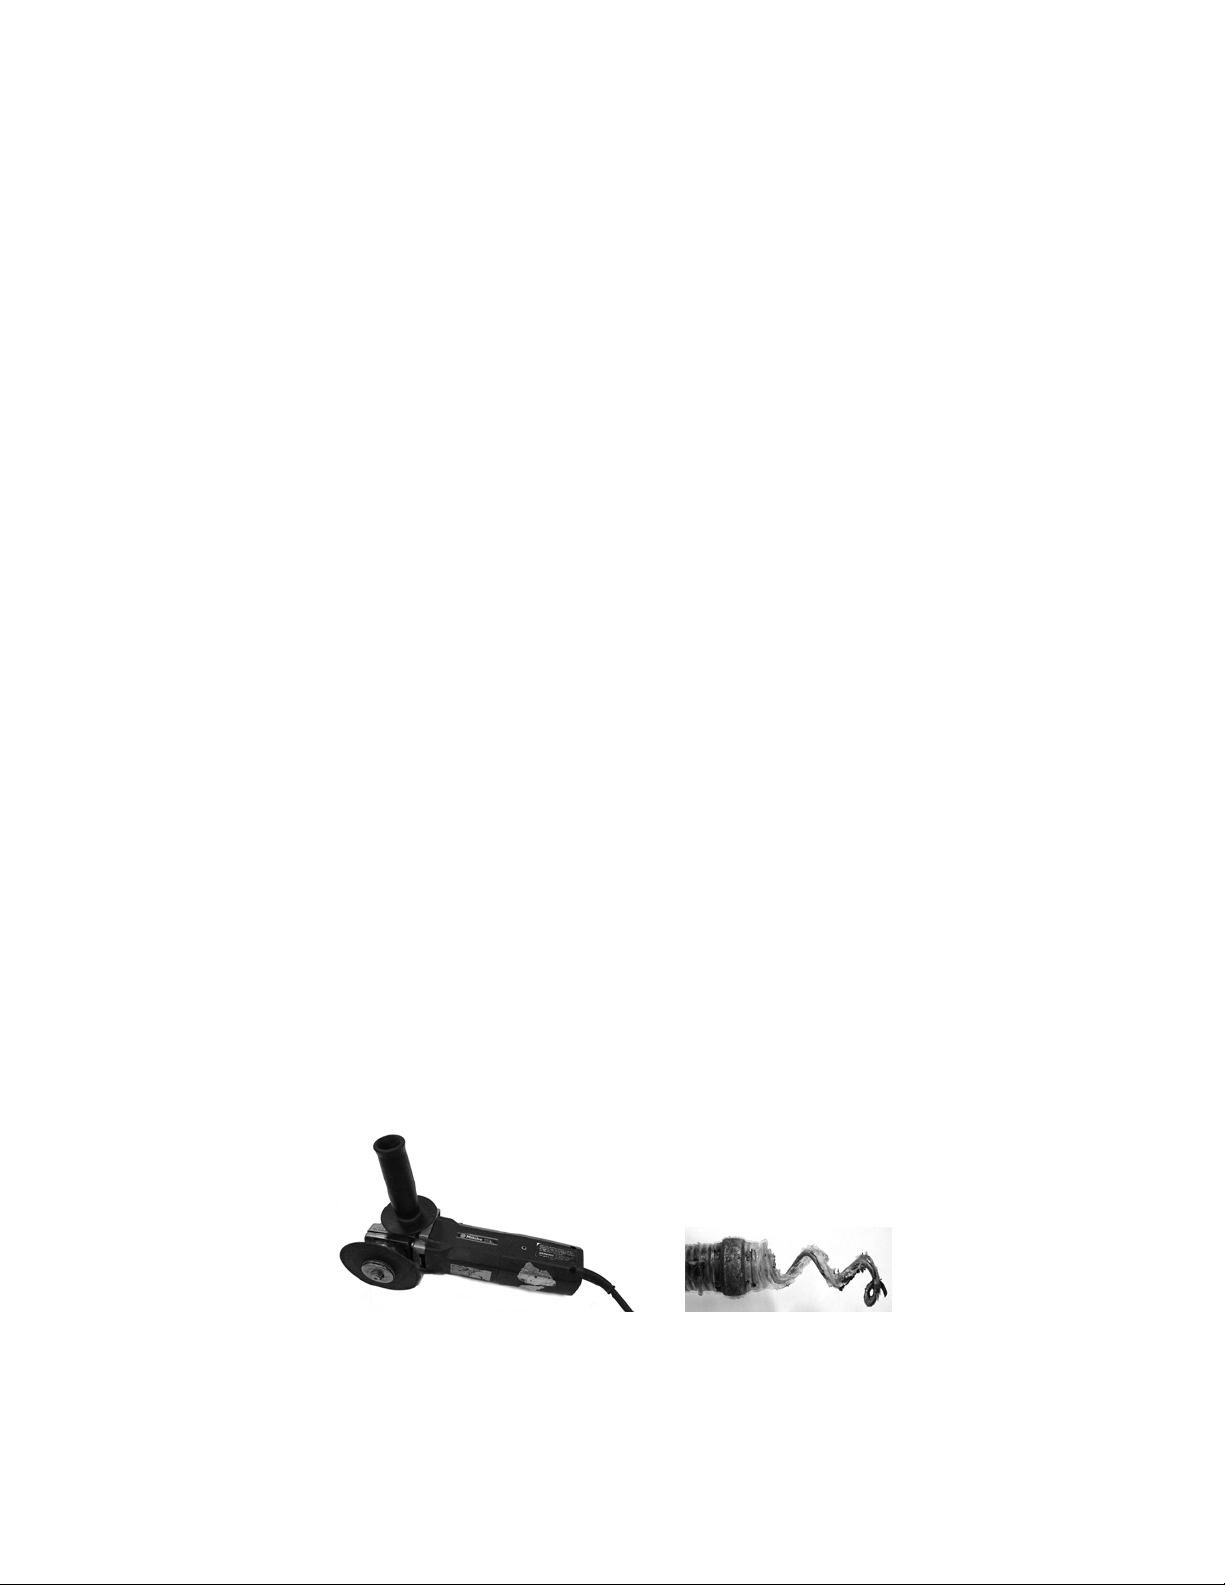
FIG. 1
! Ensure that the wire saw itself and all pulleys are anchored and secured.
! Ensure that all guards are in place. Never saw without all guards
installed.
! Ensure that all unauthorized and unnecessary people are out of the
sawing area. Never enter the danger zone during sawing, even for a short
time.
! Proper personal safety equipment should always be worn. This
equipment includes a hard hat, safety glasses and safety shoes. Be sure
to be familiar with local regulations and standards dealing with required
safety equipment.
Equipment
Diamond wire
Diamond Products wire is available in diameters of 10 mm and 11mm. Measure
your wire to make sure all segments of the wire are the same diameter.
Diamond cutting wire is designed to operate in one direction only. There is an
arrow molded into the wire segments that specifies the direction that the wire is
to be used.
When cutting wire to length, use a right angle grinder (FIG. 2) and a 4” abrasive
cut off wheel. This will ensure a clean cut without fraying (FIG. 5). Do not use
cable cutters as frayed wire may result in a poor joint. (FIG 4.). The proper
crimping tool and crimp connectors must be used.
FIG. 2 FIG. 3
Page 4
Page 5

Crimping the wire
To crimp the wire you must first have a clean surface to crimp. The spring must
be removed by pulling it off with pliers (FIG. 3). Remove the remainder of the
rubber. Slide the crimp on, ensuring that all strands of the wire are in the crimp.
Use the proper crimping tool to crimp wire and crimp (FIG. 6) together. Feed the
wire through the material to be cut. Make sure you check the wire direction to
ensure that it will be cutting in the proper direction. Before connecting the two
ends of the wire it is important to put a twist in the wire. Putting a twist in the wire
ensures that the wire wears more evenly. Generally one twist is recommended
for every 3 feet of wire length.
FIG. 4 FIG. 5 FIG. 6
Always twist wire counter clockwise (FIG. 7), change the amount of twist you put
in wire after each cut. Add a twist or subtract but never less than 1 for every 3
foot make sure the other end of wire does not untwist. Take the second end and
crimp it the same as before.
FIG. 7
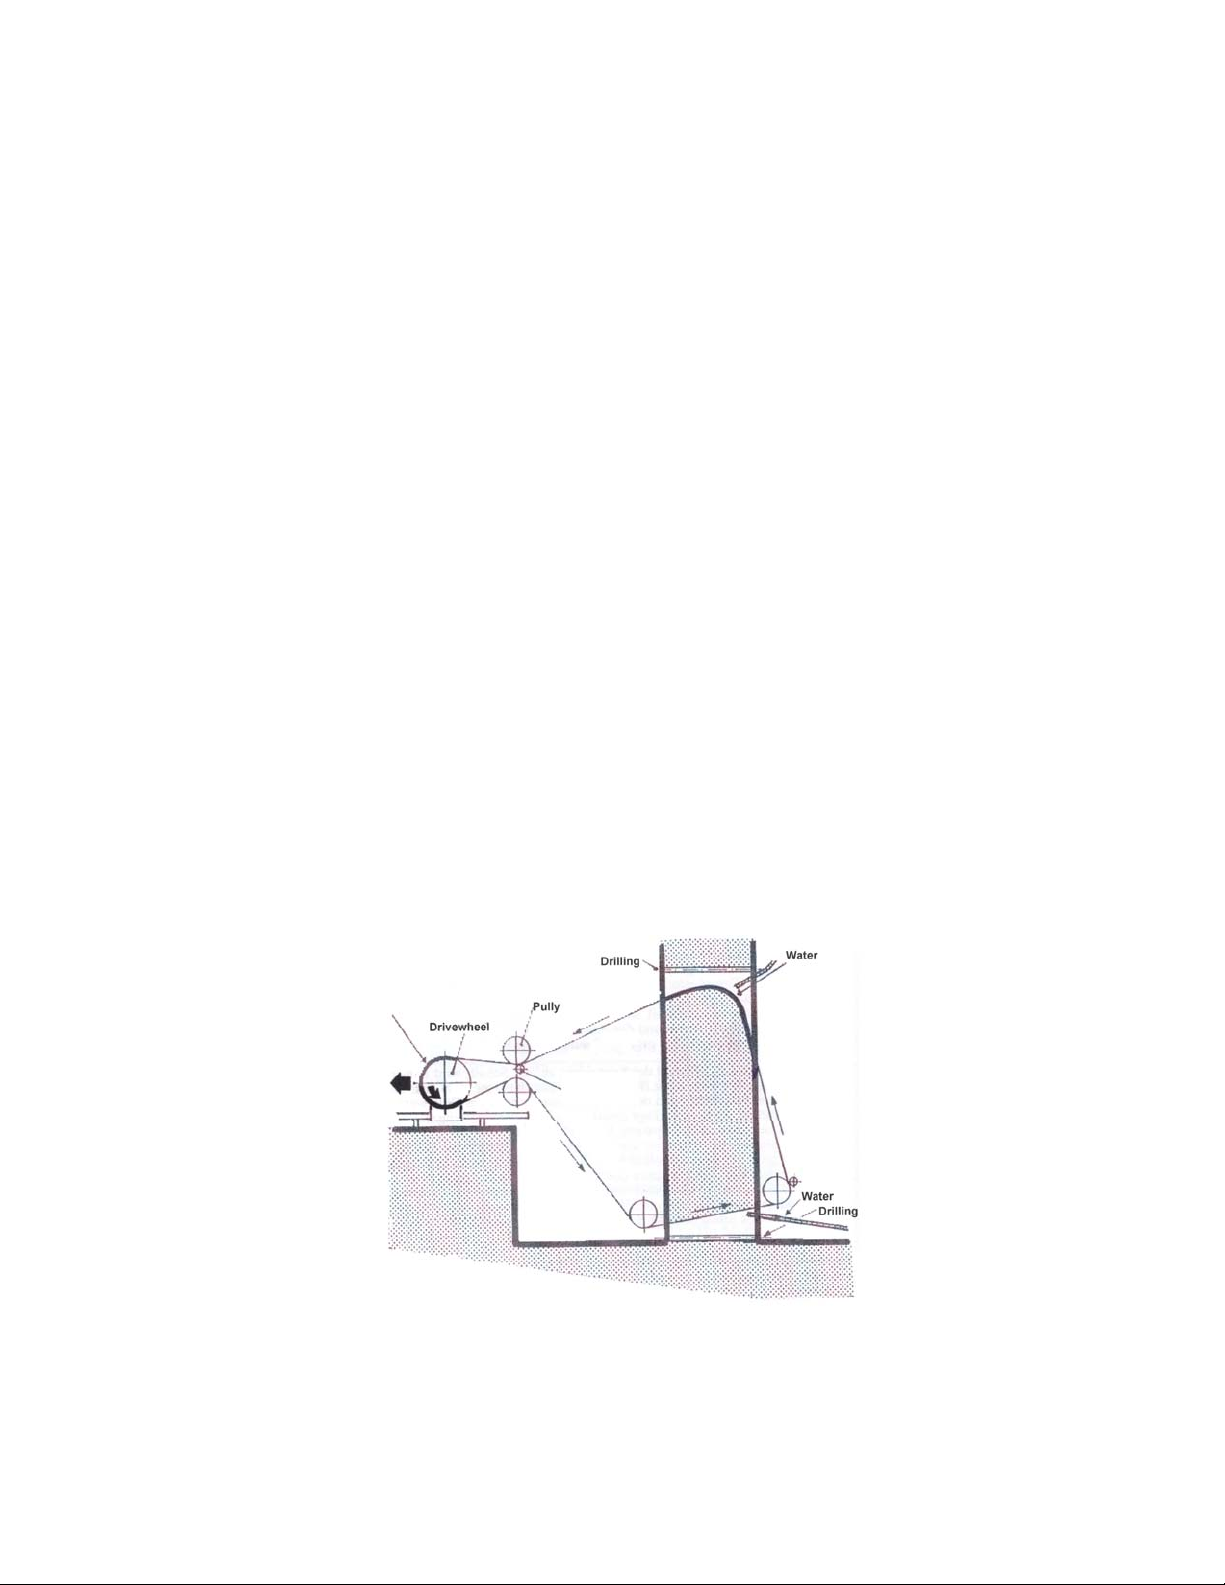
Idler pulleys
It is important to ensure that pulleys are properly aligned. A straighter cut will
minimize wear to the wire and require less power. The correct amount of pulleys
is important. Use the correct amount of pulleys to achieve the desired cut,
remembering that extra pulleys rob the operation of available power.
Page 5
Page 6

Hydraulic Power Supply and Controller
Connecting the hoses (FIG. 8)
Connect the supply hoses form the power pack to the P port and return hoses to
the R1 port of the BS-2. Take the hoses that are supplied with the BS-2 and
connect them as follows:
Take one set of the ¼” hoses with the straight ends. Connect the male
coupling to the V1 port on the BS-2 then connect the female coupling to
the V2 port directly across from it.
The other set of 1/4 lines are not used.
Take the 3/4 lines connect the male nipple to the R1port on BS-2 and
female coupling on hoses to the B port on BS-2
Connect large coupling to the proper fittings on the wire saw motor.
FIG. 8
Page 6
Page 7
Cutting with Wire
Securing the machine
The machine must be secured so it does not move when cutting. This is
generally done with drop-in anchors through frame.
Introducing water for cooling
Water must be introduced at the beginning of the cut line and also at the exit of
cut line. The water at the entry of the cut will get pull trough the cut by wire. The
water at exit of the cut will help clean and cool the wire before reentering the
machine. Additional sources of water may be used at intermediate points to help
with cutting. Note that the location of the water sources may need to be adjusted
as the cut progresses.
Starting the wire
Before starting the machine for the initial cut, check for the correct wire tension.
It should be possible to freely move wire by hand. Power to the machine should
be off during this procedure. Check the corners of the piece to be cut and round
off any sharp corners with a hammer. If the machine has difficulty starting start,
extra pulleys can be set up to move the wire away from corners.
FIG. 9
Note: Before starting the machine make sure you have correct flow for the
motor you have. Maximum recommended flow is 30 GPM.
Page 7
Page 8

Starting the machine
To start cutting perform the following steps:
Make sure there is sufficient tension is on wire.
Screw out the travel pressure control knob (FIG. 10) of the BS-2/ BS
control. The travel pressure valve is used to increase and decrease wire
tension.
Engage Direction Lever A (FIG. 10) so tension is set.
Turn on the main hydraulic flow slowly (Saw Motor Control – see FIG. 8).
The wire should start to move.
Slowly turn in the Main Pressure Valve (increase pressure) ensuring that
the pressure does not exceed 1,800psi while the wire is spinning.
Adjust the travel pressure valve as needed to keep the wire running at the
proper tension.
FIG. 10
Page 8
Page 9

Proper tension is important. This can be visually verified; you should see a slight
wave in the slack side of the wire during cutting (FIG. 11).
FIG. 11
Ending the cut
As you start to get close to the end of the cut, shim the cut with steel shims to
avoid pinching the wire during the cutting operation and when the cut is
complete. Ensure that pulleys are set up so they can catch the wire when it exits
the cut.
Troubleshooting
Problem Possible Cause Solution
Cable will not start Too much cable tension Reduce feed force
Cable thickness variation Check cable for uniform diameter
New cable in a narrow cut Open cut to clear wire
Hanging up on corner Round off edges
Cable locks up in cut Cable overloaded Reduce feed force
Hanging up on corner Round off edges
Cut not straight Not enough diverter pulleys Add more pulleys and check alignment
Cable too slack Increase feed force
Pulley misaligned or loose Check pulley alignment
Uneven wear Not enough pre-twist in wire Ensure that there is at least 1 twist for
every 3 feet.
Cable over tensioned Reduce feed force
Drive wheel and cable too close Increase spacing between saw and
pulley.
Misaligned pulley Align pulleys
Page 9
Page 10

Notes
____________________________________
____________________________________
____________________________________
____________________________________
____________________________________
____________________________________
____________________________________
____________________________________
____________________________________
____________________________________
____________________________________
____________________________________
____________________________________
____________________________________
____________________________________
____________________________________
____________________________________
____________________________________
____________________________________
____________________________________
____________________________________
____________________________________
____________________________________
____________________________________
Page 11

Notes
____________________________________
____________________________________
____________________________________
____________________________________
____________________________________
____________________________________
____________________________________
____________________________________
____________________________________
____________________________________
____________________________________
____________________________________
____________________________________
____________________________________
____________________________________
____________________________________
____________________________________
____________________________________
____________________________________
____________________________________
____________________________________
____________________________________
____________________________________
____________________________________
 Loading...