

Page 1
DIAMOND
VIDEO CARD MANUAL -
MANUEL D’UTILISATION DE CARTE GRAPHIQUE -
Version PCIE
PCIE Version
Quick Start Guide
Guide de démarrage rapide
©20 0 Diamond Multimedia. All rights reserved. p/n: 0 -Bil version . 0
1 16 118 10 1
Page 2

Table of Contents
Safety Notices Page 1
Package Contents Page 1
Before You Begin Page 1
Hardware Pre-Installation Page 2
Hardware Installation Page 2
Monitor Connections Page 3
Television Set Connection Page 4
Driver Installation Page 5
Additional Software Page 7
Troubleshooting Page 8
Technical Support Page 9
* Accessories and Adapters for this product can be
purchased online at www.diamondmm.com.
Page 3
Safety Notices
Please make sure to read all the instructions thoroughly
before attempting the installation of this product.
• Do not attempt to install this product during an
electrical storm.
• Make sure your computer system is connected to a
properly grounded power outlet.
• Touching the exposed metal part of your computer
case (on the rear side) will discharge static electricity
from your body. We recommend you perform this
step before touching this product or any part inside
your computer and periodically while working inside
your PC.
• Internal Boards may contain “Lead” which may
cause birth defects and other reproductive harm.
Please wash your hands thoroughly after handling
these products.
This notice is required under California ” proposition 65 “ and
Health & Safety code.
Package Contents
Please verify your package contains the following items.
1. Diamond Video Card
2. Quick Start Guide
3. Warranty Card
4. Installation CD
Before You Begin
Please have the following items available prior to the installation
1. System / Motherboard manual (or working knowledge)
2. A philips head screwdriver
3. Can of compressed air (optional, recommended for upgraders)
4. Please check the outside of the package to verify that your
system meets the minimum system requirements.
PAGE 1
Page 4
Hardware Pre-Installation
1. If you have on-board video, please follow the instructions
on page 8.
2. Install the most recent drivers for your motherboard.
3. Shutdown the computer.
4. Open the case to your computer.
5. Touch a metal part of the computer case to discharge static.
6. Remove the existing video card from its slot. (If applicable).
Hardware Installation
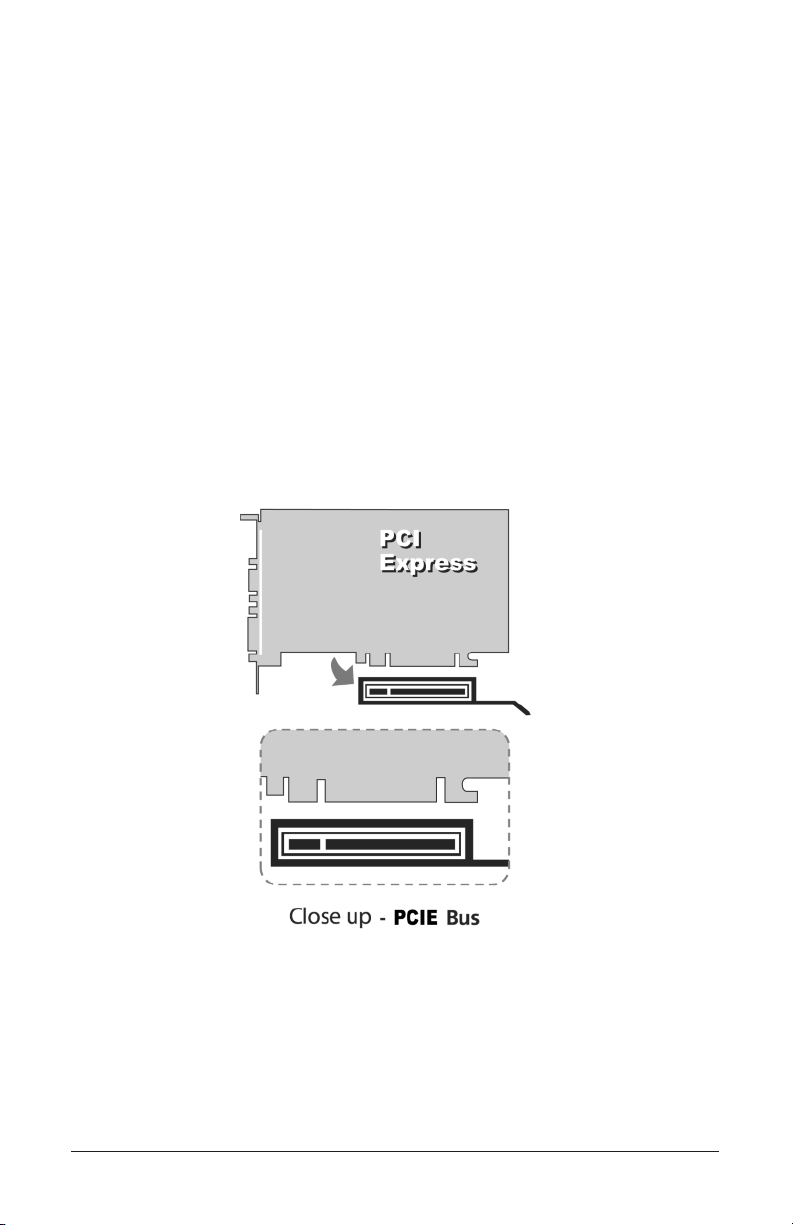
1. Locate the PCI Express slot on the motherboard.
2. Move any cables that may be blocking the slot.
3. Install the Diamond video card into the slot.
* Pictures are for reference only and may differ from the product
purchased
4. Screw the metal bracket into place.
5. Close the computer case.
6. Reconnect any loose cables (mouse, keyboard, etc.).
7. Close the computer case.
PAGE 2
Page 5
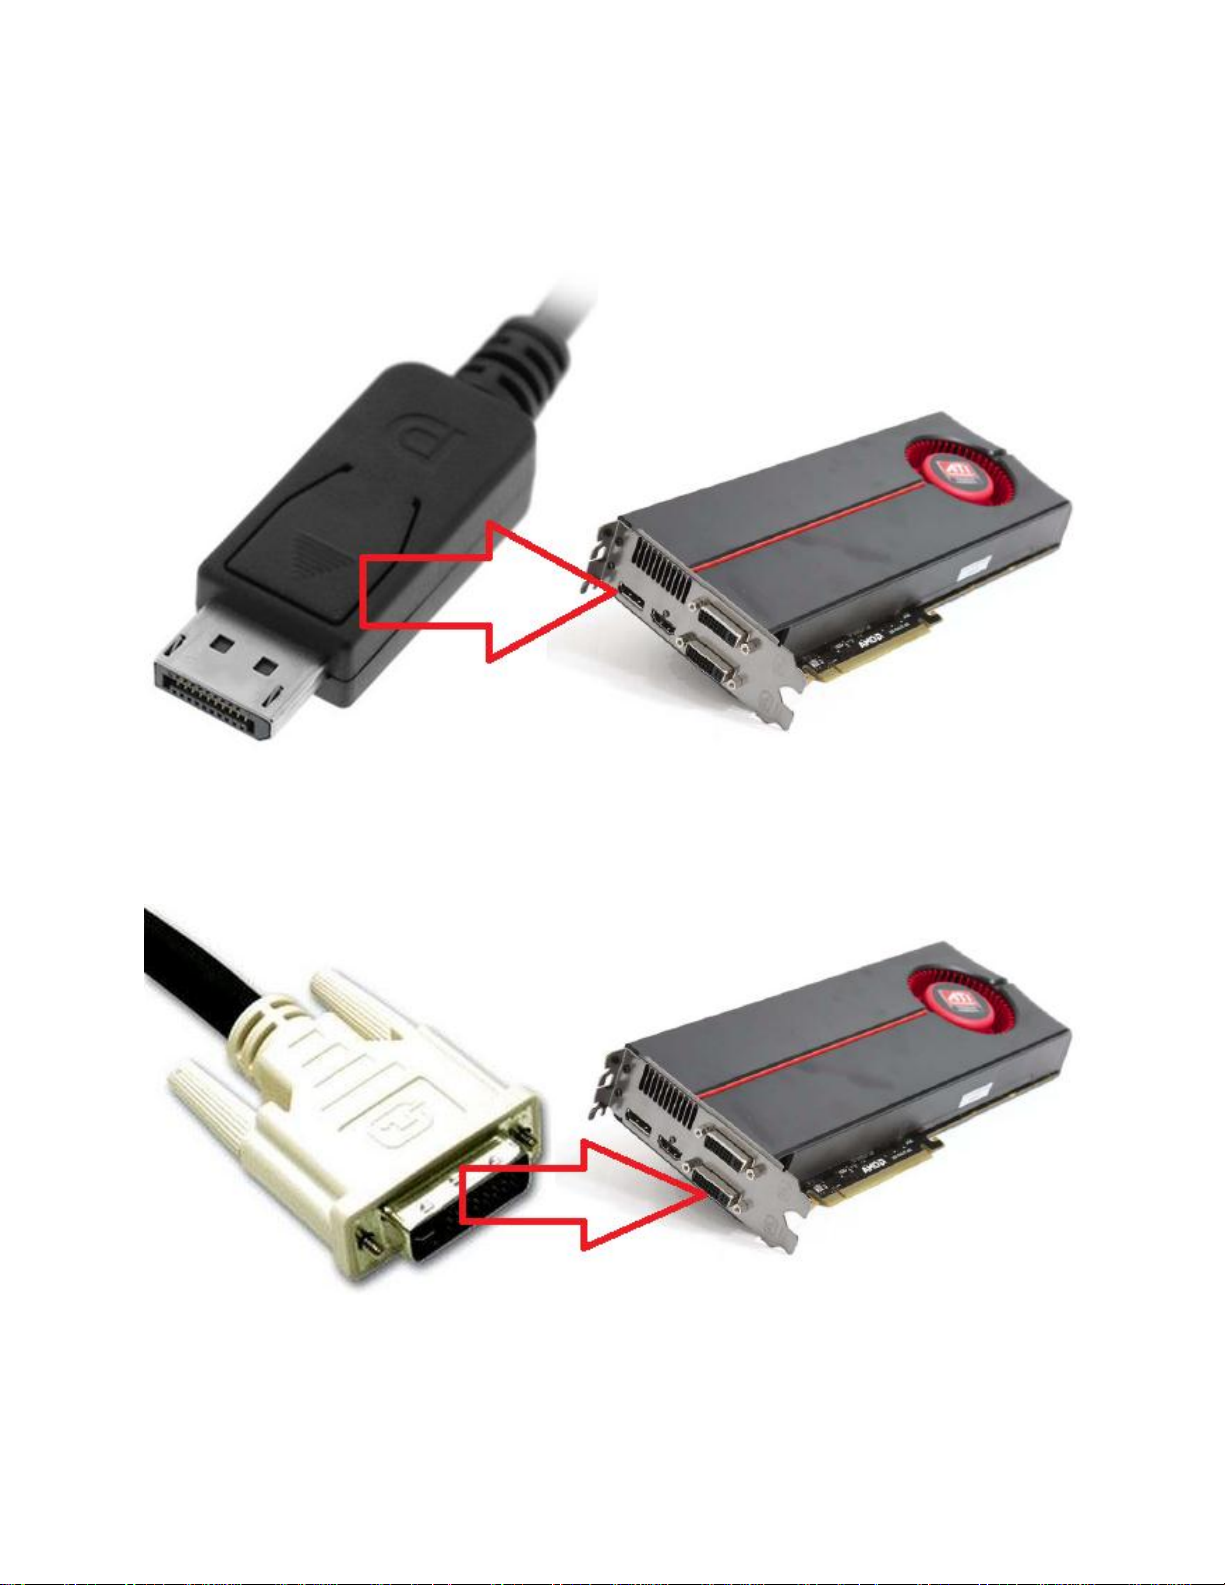
Connecting a Displayport Digital Monitor
Connect a displayport digital monitor by following the step below.
1. Connect the DP cable from your monitor to the DP connector on the back of the video card.
Connecting a DVI-I Compatible Monitor
Connect a DVI-I compatible monitor by following the step below.
1. Connect the DVI-I cable from your monitor to the DVI-I connector on the back of the video card.
Page 6
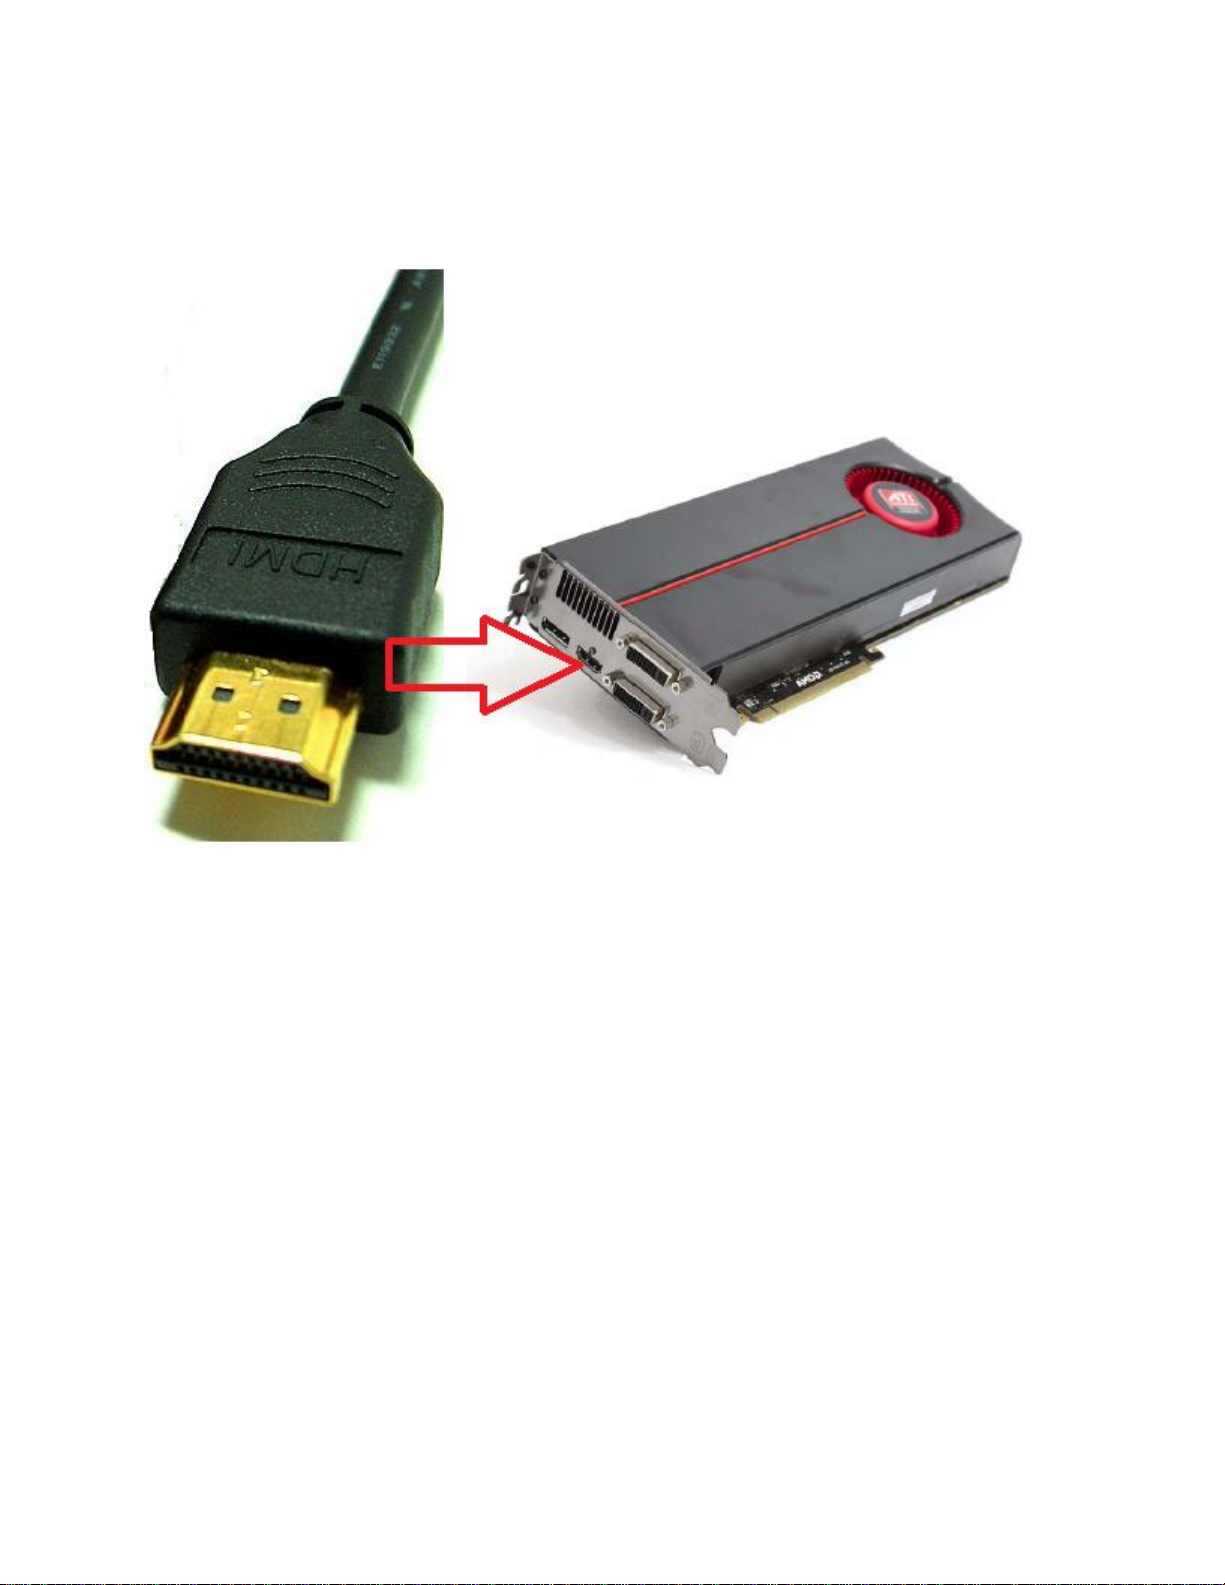
Connecting a High Definition Television Set or Digital LCD with HDMI input
Connect a HDMI compatible HDTV PLASMA/LCD/LED by following the step below.
1. Connect the HDMI cable from your Monitor/HDTV to the HDMI connector on the back of the video
card.
Page 7
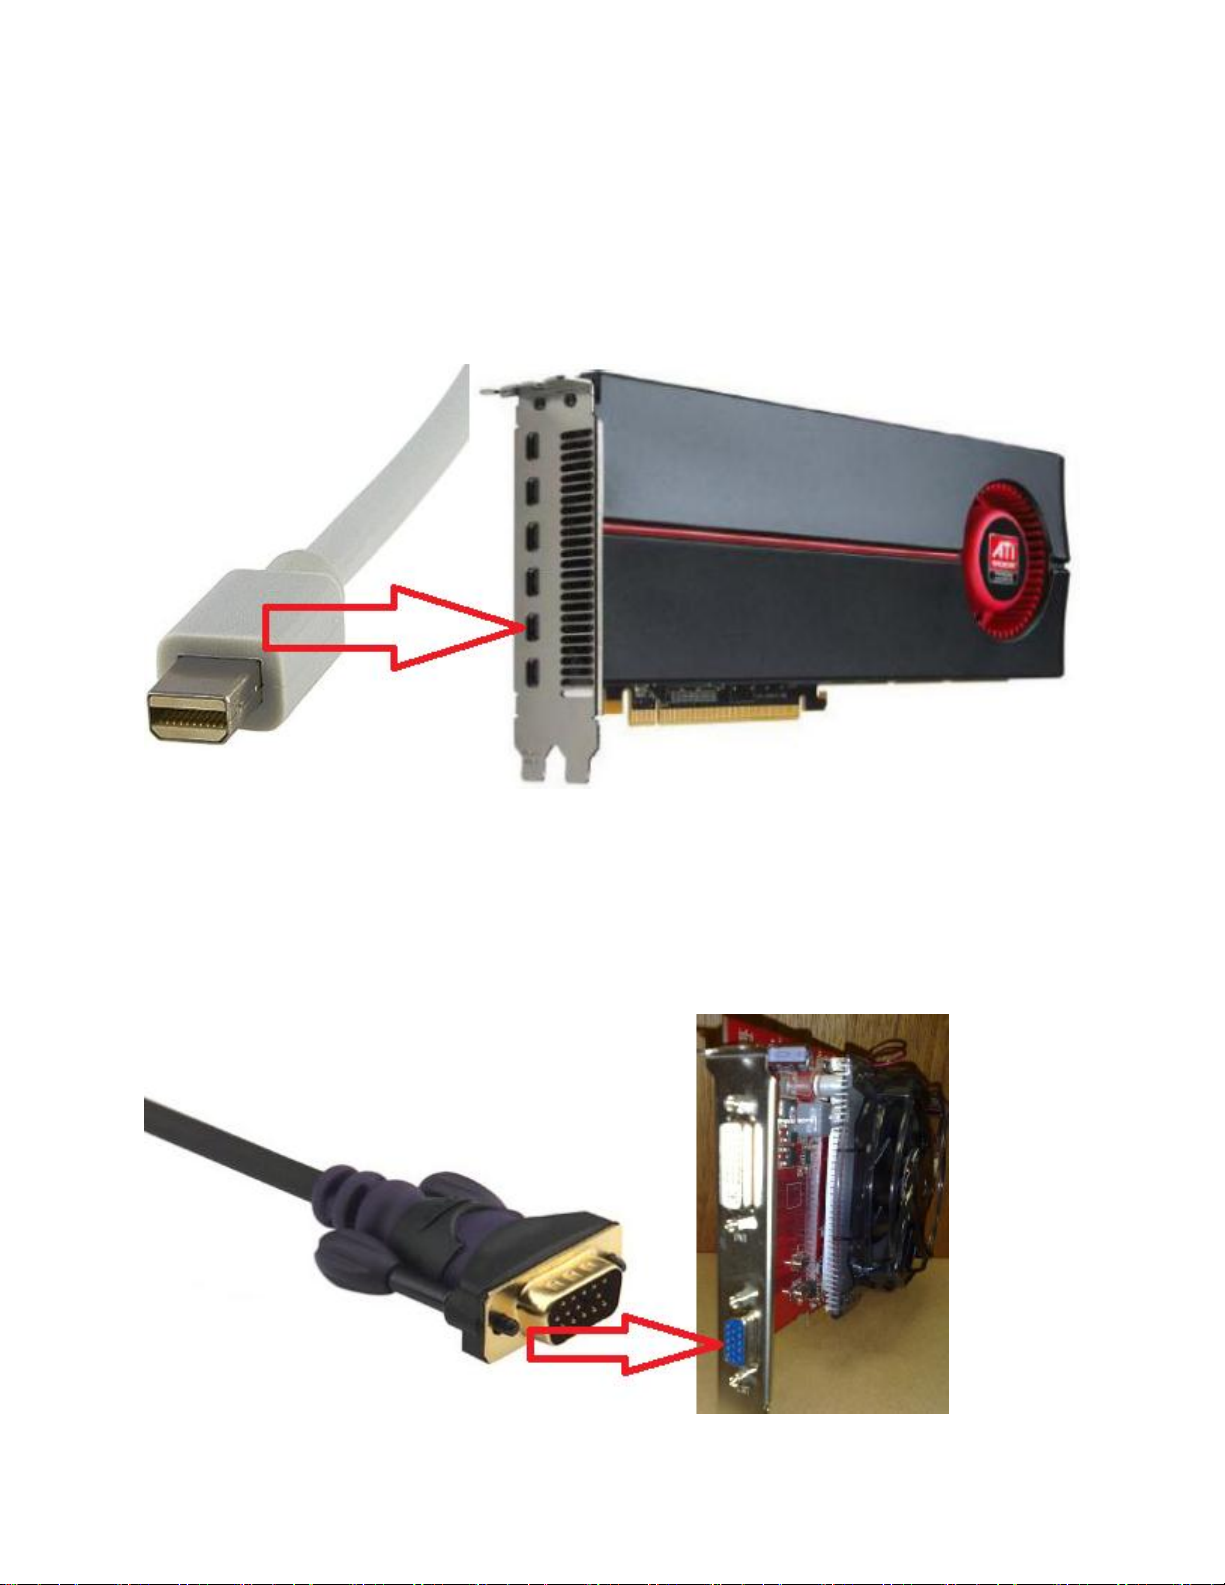
Connecting a Digital LCD with mini DP input
Connect a mini DP compatible Digital Monitor by following the step below.
1. Connect the mini DP Cable/Adapter from your Digital Monitor to the mini DP connector on the
back of the video card.
Connecting a VGA compatible Analog Monitor
Connect a VGA compatible Analog Monitor by following the step below.
1. Connect the VGA from your Analog Monitor to the VGA connector on the back of the video card.
Page 8

Diamond Driver Installation for Windows®XP/MCE/Vista/
Win 7
Please start your computer and do NOT insert the installation CD
until you are prompted to do so.
1. The Found New Hardware Wizard may appear upon Windows
startup. Click the CANCEL button.
NOTICE: Users with cards which support multiple monitors will
need to perform step 1 twice.
2. Insert the Diamond Installation disc into your CD drive and wait
for the menu to appear.
NOTICE 1: If the CD does not start automatically you can double click the My Computer icon on the desktop, double click
your CD drive icon (Diamond) and double click the DIAMOND
(or possibly DIAMOND.EXE) icon.
3. Select the Install Video Driver button on the main menu and
an installation wizard will appear.
4. Click the NEXT button to start the wizard.
5. Click YES to the license agreement.
6. Click the EXPRESS button.
7. You may receive the following notices:
NOTICE 2: Windows XP/MCE/Vista/Win 7 Users - Driver has
not passed Windows logo testing. You must
Anyway to install the driver.
NOTICE 3: If you have receive either of the above posted
notices, please do not be concerned with the actual text of the
message. The message only implies that Microsoft has not
personally tested the drivers. Diamond has thoroughly tested
the drivers prior to the release of the product.
PAGE 5
click Continue
(Continued on next page)
Page 9

8. If prompted, select the option to restart the computer.
9. Click the Finish button.
For advanced setting instructions, please refer to the documentation on the installation CD.
PAGE 6
Page 10

Additional Software
Diamond has additional software on our web site at:
http://dmmdownload.com/hotlinks.php.
These software packages are optional to install.
Adobe Acrobat Reader Installation
This program is required to view the electronic user manual included
on the installation CD.
Acrobat Reader can be downloaded from our web site at:
http://dmmdownload.com/hotlinks.php
PAGE 7
Page 11

Troubleshooting
Disable On-board Video
If your system has built in video support (known as on board video)
you will need to first have the on board video disabled in Windows
before installing the drivers for the Diamond video card..
1. Make sure your monitor is still connected to your on board
video connector.
2. Turn on the power to your computer and wait for the desktop
to appear.
3. Windows XP/MCE/Vista/Win 7 Users
Click Start, Run and type: DEVMGMT.MSC and click OK.
4. Left click the plus symbol [+] next to Display Adapters
5. Double click the onboard display adapter. (Usually this will
show up something like Intel, SIS, VIA, etc.)
Windows XP/MCE/Vista/Win 7 Users
There is a section at the bottom which reads Device
Usage. Click the down arrow and select Do not use this
device (Disable) and click OK.
6. Click Start, Turn Off Computer, and click Turn Off.
7. Disconnect the monitor cable from the onboard video card
and connect it to the newly installed Diamond video card.
PAGE 8
Page 12

Technical Support
Diamond Technical Support staff is here to help resolve any issues
that you may be experiencing with the installation of the Diamond
video card. Prior to contacting technical support please make sure
you have the following information available.
1. Model #: (Printed on the bar code, located on the box)
2. Installation CD Version: (printed on the CD label)
3. The version of Windows that your system is running.
4. The manufacturer and model # of your computer.
5. CPU type and speed (example: Intel Pentium4 2.4GHZ)
6. A complete description of the problem that you are
experiencing including any steps that you have taken to try
to resolve the issue.
Technical Support Options
Free Telephone Support
818-357-5165
(long distance rates may apply)
Mon - Fri, 8 - 4:30 PST
http://www.diamondmm.com
PAGE 9
Page 13

Table des Matières
Notice de Sécurité Page 1
Contenu de la boîte Page 1
Avant de Commencer Page 1
Préparation matérielle avant installation Page 2
Installation du Matériel Page 2
Branchement Moniteurs Page 3
Branchement Télévision Page 4
Installation du Pilote Page 5
Logiciels Additionnels Page 7
Dépannage Page 8
Support Technique Page 9
Page 14
Notice de Sécurité
Veuillez lire attentivement les conseils de sécurité suivants pour
garantir une installation sure et efficace de ce produit.
• N’essayer pas d’installer ce produit lors d’un orage
électrique.
• Assurez-vous que votre système informatique soit
correctement branché à une prise de courant
électrique avec terre.
• En touchant la partie métallique visible de votre
boîtier d’ordinateur (au dos) votre corps se
déchargera de l’électricité statique. Nous vous
recommandons de procéder à cette étape avant de
toucher ce produit ou toute autre partie interne de
votre ordinateur et de le refaire ponctuellement
pendant que vous travailler à l'intérieur de votre PC.
Contenu de la boîte
Veuillez vérifier que votre boîte contienne les éléments suivants :
1. Carte Graphique Diamond
2. Guide de Démarrage Rapide
3. Carte de Garantie
4. CD d’Installation
Avant de Commencer
Assurez-vous d’avoir les éléments suivants disponibles avant de
commencer l’installation:
1. Manuel d’utilisation du Système / de la Carte Mère
(ou d’en connaître le fonctionnement)
2. Un tournevis cruciforme
3. Bombe à air comprimée (optionnelle, recommandée pour les
mises à jour)
4. Vérifiez sur l’extérieur de la boîte que votre système
correspond aux recommandations système minimum.
PAGE 1
Page 15
Préparation matérielle avant installation
1. Si vous possédez une carte graphique intégrée, veuillez suivre
les instructions de la page 8.
2. Installez les pilotes les plus récents pour votre carte mère.
3. Eteignez votre ordinateur.
4. Ouvrez le boîtier de votre ordinateur.
5. Touchez une partie métallique de votre ordinateur pour enlever
l’électricité statique.
6. Enlevez la carte graphique existante de son emplacement.
(Si nécessaire).
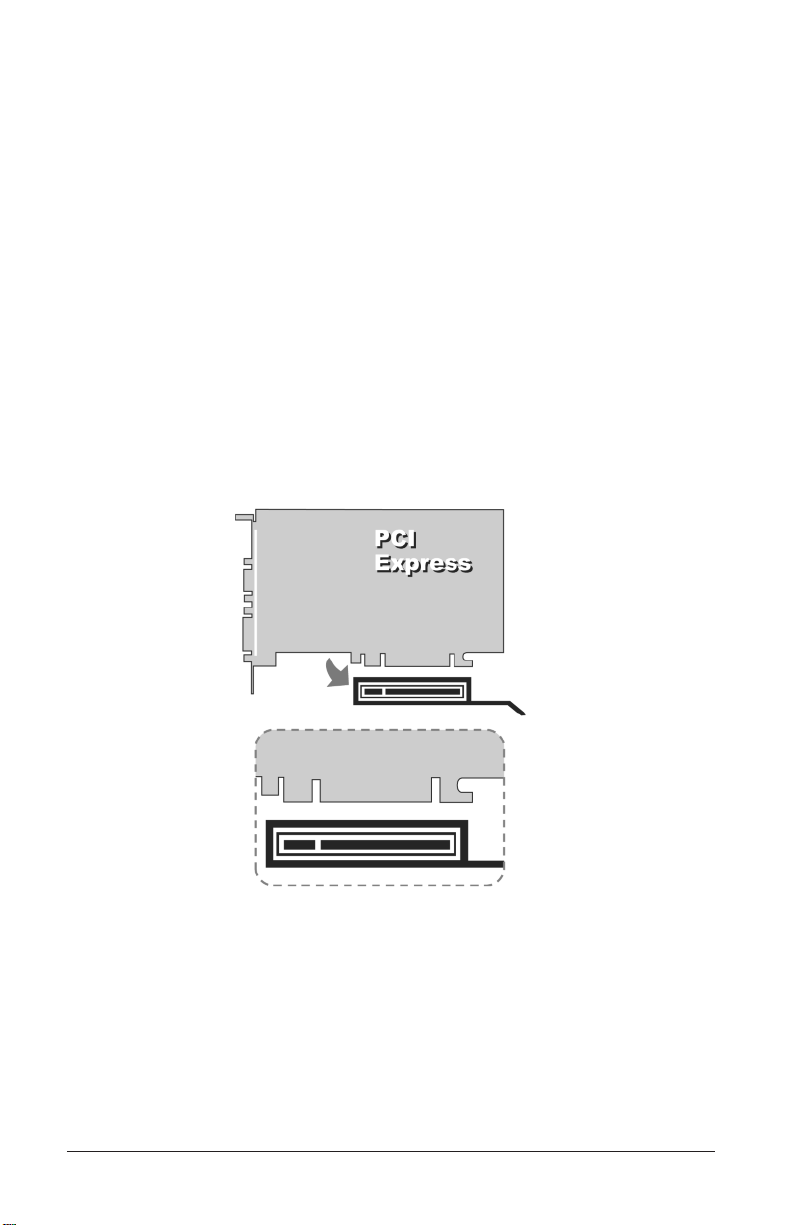
Installation du Matériel
1. Trouvez l’emplacement du connecteur PCIE sur la carte mère.
2. Déplacez tout câble qui pourrait bloquer l’emplacement.
3. Installez la carte graphique Diamond dans l’emplacement.
*Les photos ne sont qu’une simple référence et peuvent être différentes du
produit acheté.
4. Vissez le support métallique de la carte à sa place.
5. Fermez le boîtier de votre ordinateur.
6. Vérifiez les câbles (souris, clavier, etc.) et redémarrez.
PAGE 2
Page 16
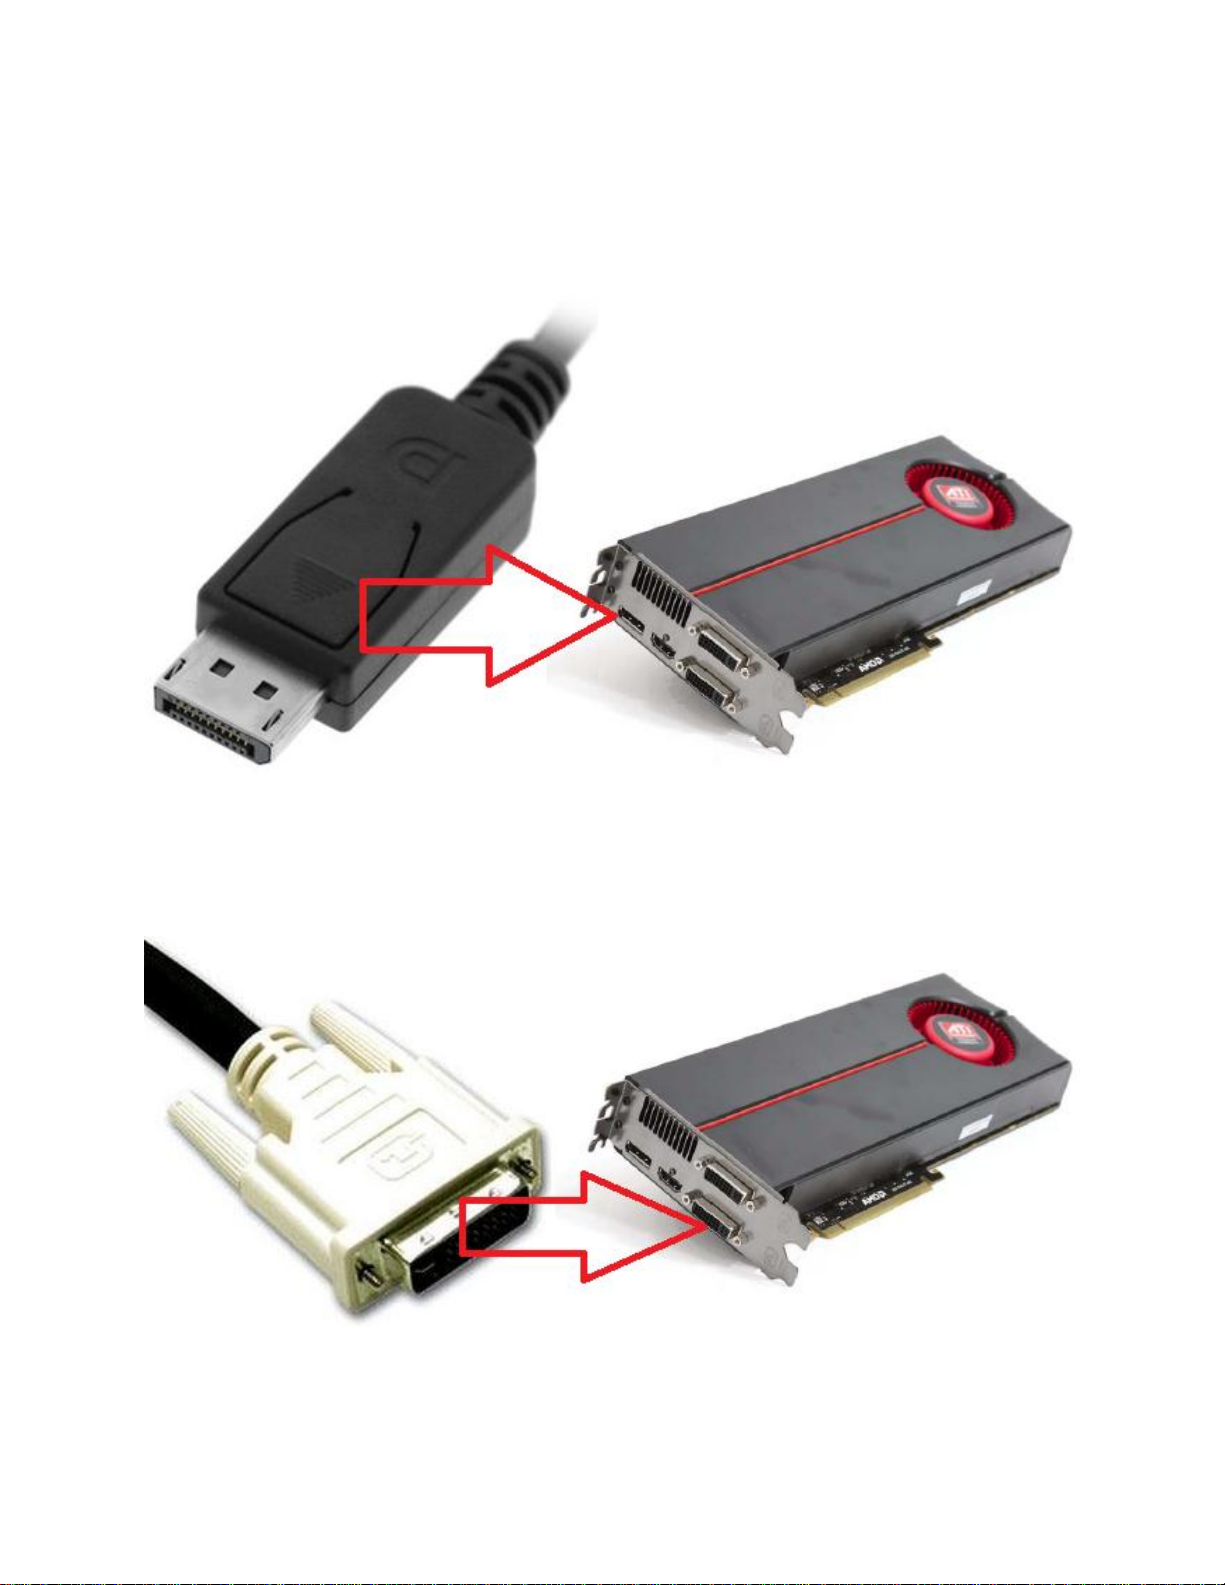
Connexion à un moniteur DisplayPort numérique
Se connecter un écran numérique displayport en suivant les étapes ci-dessous.
1. Connectez le câble de DP de votre moniteur au connecteur DP sur le dos de la carte
vidéo.
Reliant un DVI-je moniteur compatible
Se connecter un DVI-je moniteur compatible en suivant les étapes ci-dessous.
1. Connectez le DVI-je le câble de votre moniteur à la DVI-je connecteur sur le dos de la carte
vidéo.
Page 17
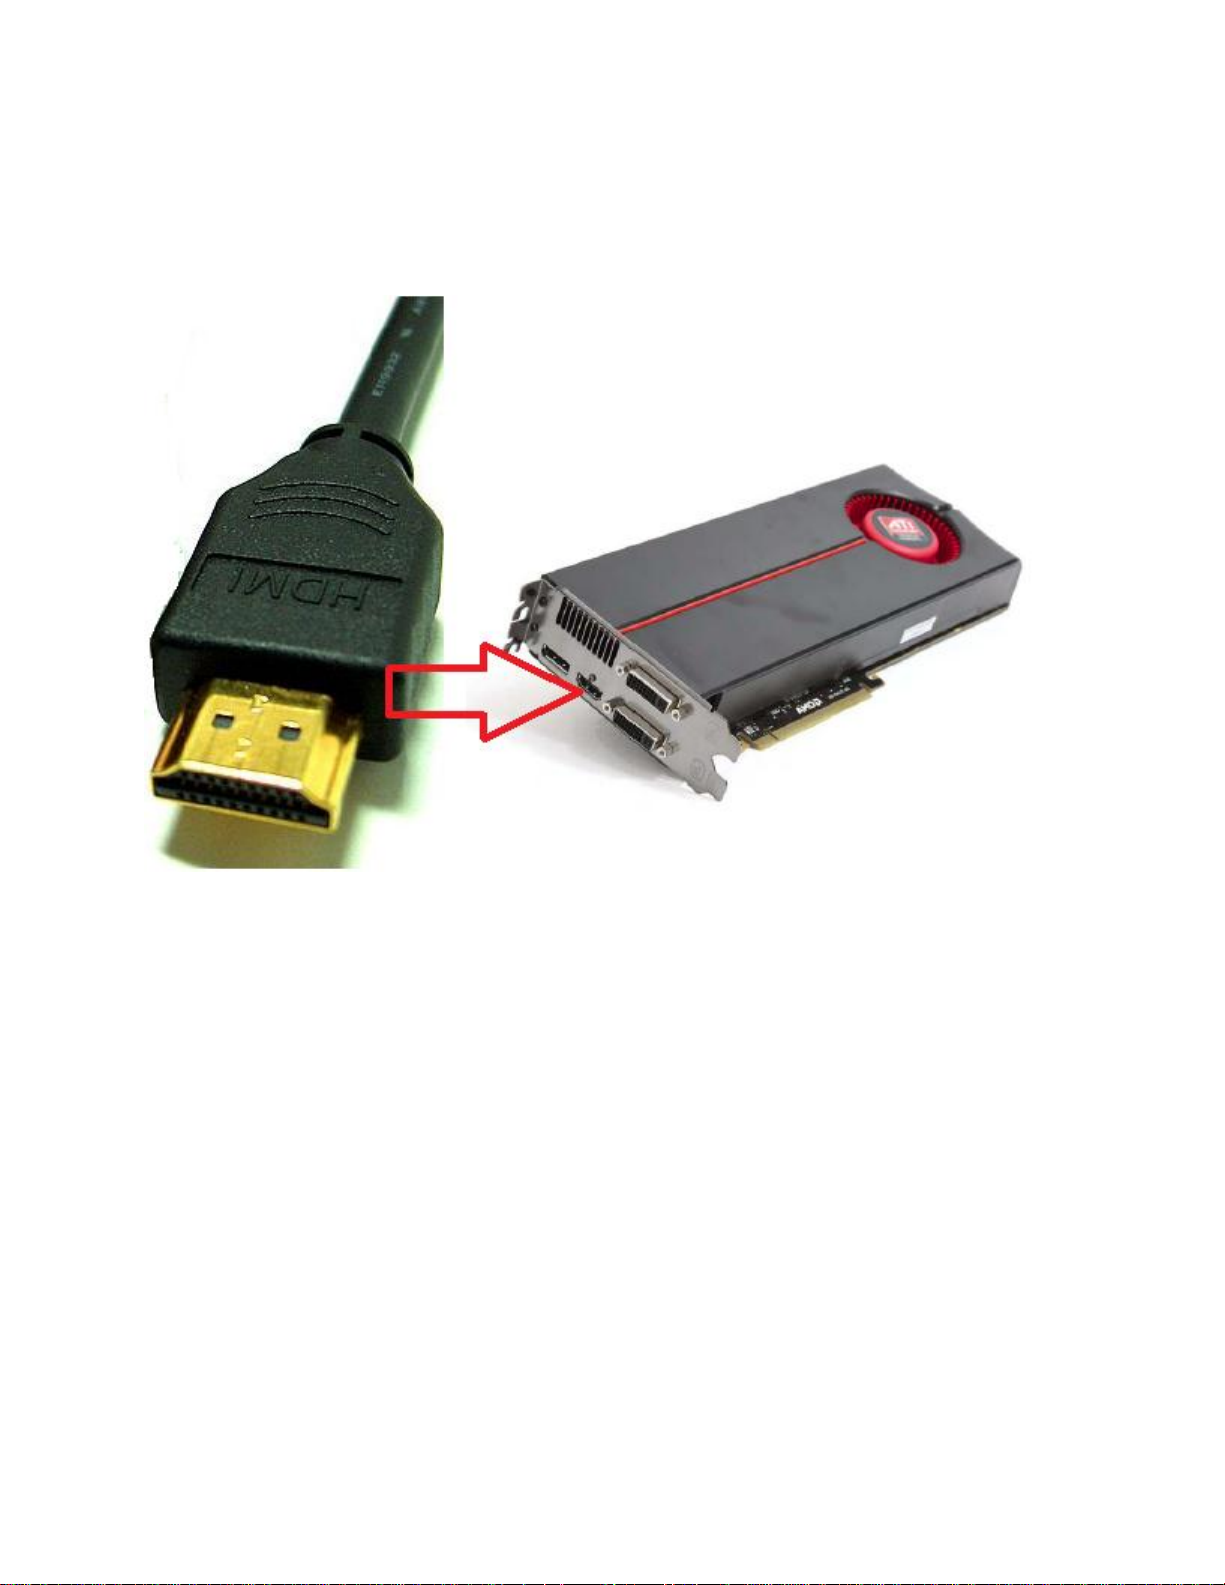
Reliant un High Definition Television Set ou le Digital LCD avec entrée HDMI
Connectez un HDMI compatible TVHD PLASMA/LCD/LED en suivant les étapes ci-dessous.
1. Connectez le câble HDMI de votre moniteur/HDTV le connecteur HDMI sur le dos de la carte
vidéo.
Page 18
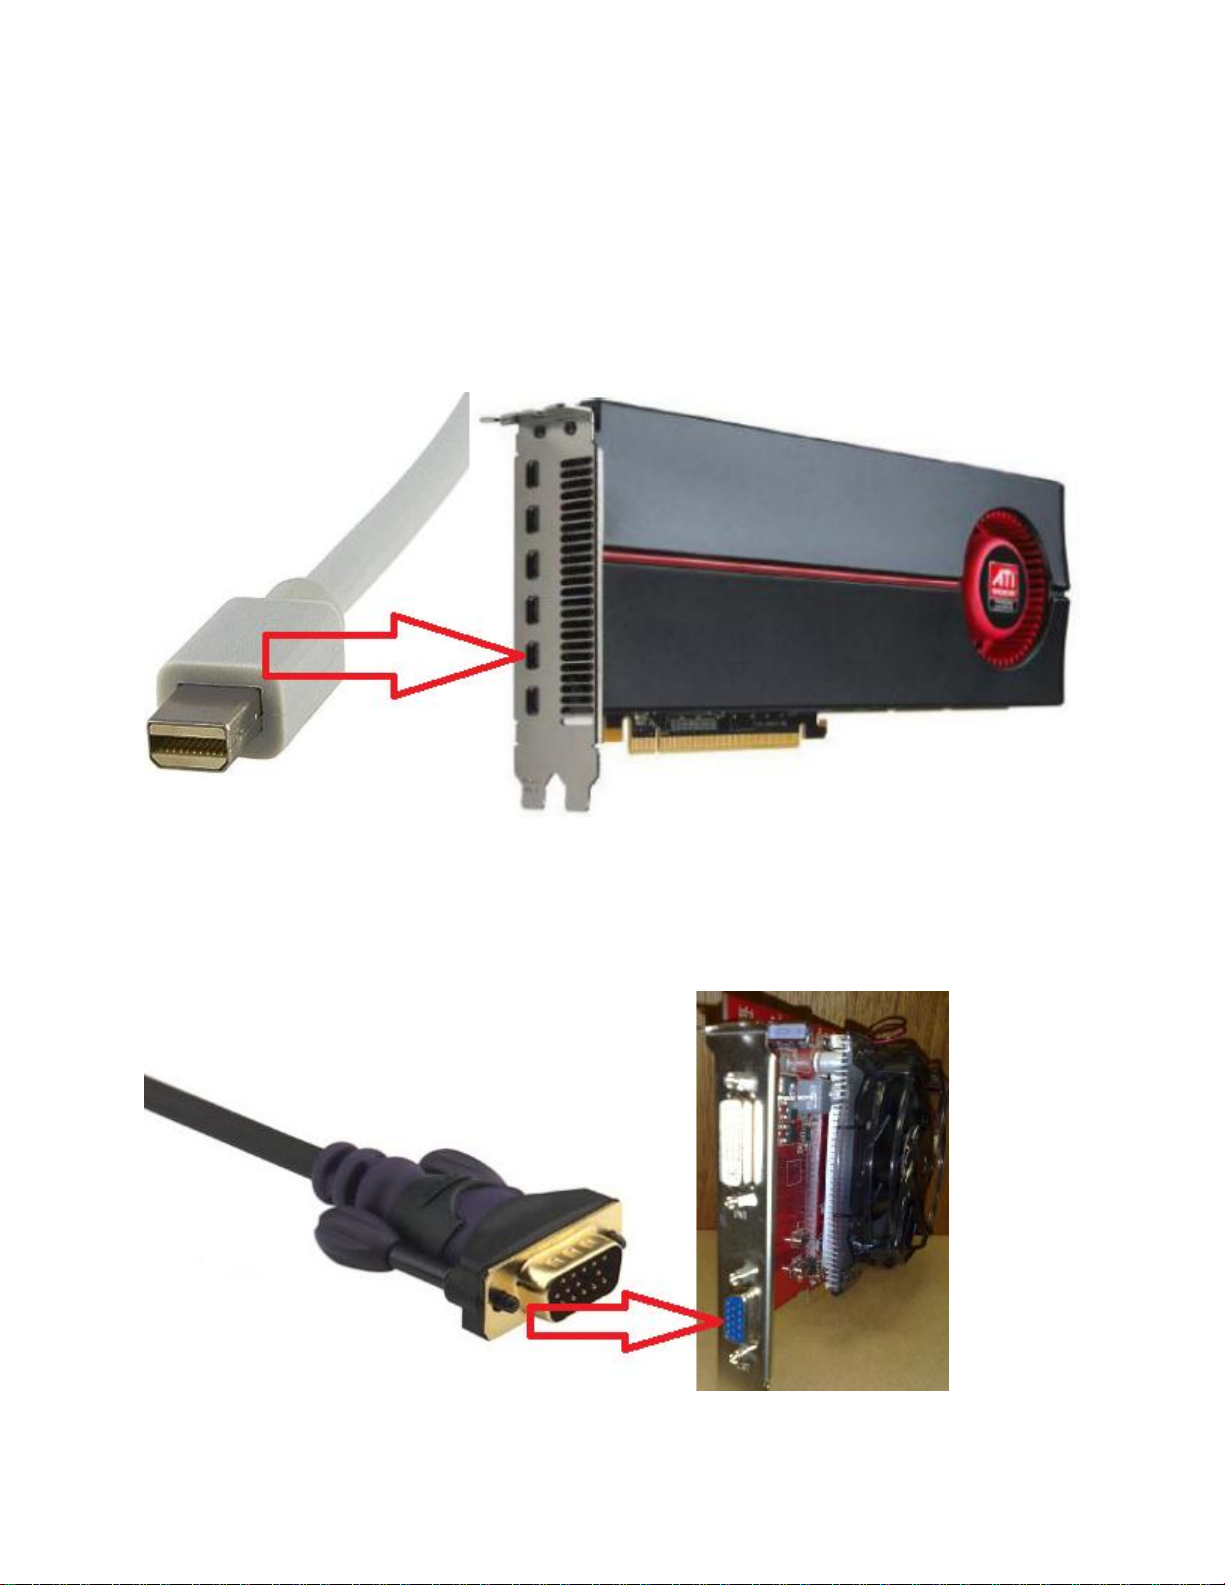
Se connecter un écran LCD numérique avec l'apport de mini DP
Connectez un mini Monitor numérique compatible de DP en suivant les étapes ci-dessous.
1. Connectez le mini DP Cable/carte de votre moniteur numérique au connecteur mini DP sur le dos
de la carte vidéo.
Connexion à un moniteur VGA d'analogique compatible
Connectez un moniteur VGA d'analogique compatible en suivant les étapes ci-dessous.
1. Connectez le VGA de votre moniteur analogique au connecteur VGA à l'arrière de la carte vidéo.
Page 19

Installation du pilote Diamond pour Windows
®
XP/MCE/Vista/Win 7
Veuillez démarrer votre ordinateur et NE PAS insérer le CD d’installation avant d’y être invité.
1. L’Assistant Ajout de Nouveau Matériel peut apparaître au
démarrage de Windows. Cliquez sur le bouton Annuler.
INFORMATION : Les utilisateurs munis de cartes qui
acceptent plusieurs moniteurs devront faire l’étape 1 deux fois.
2. Insérez le CD d’Installation Diamond dans votre lecteur CD et
attendez que le menu apparaisse.
INFORMATION 1: Si le CD ne démarre pas automatiquement
vous pouvez double cliquez sur Poste de travail, double
cliquez l’icône de votre CD (Diamond) et double cliquez l'icône
DIAMOND (ou peut-être DIAMOND.EXE)
3. Sélectionnez le bouton d’Installation du Pilote Vidéo dans le
menu principal un assistante d‘installation apparaîtra.
4. Cliquez sur le bouton suivant pour commencer l’installation.
5. Cliquez sur OUI pour accepter la licence.
6. Cliquez sur le bouton EXPRESS.
7. Vous aurez peut-être les messages suivants:
INFORMATION 2: Utilisateurs Windows XP/MCE/Vista/Win 7
– Le pilote n’est pas certifié Windows XP.
Vous devez de toute façon cliquer sur Continuer pour installer le pilote.
INFORMATION 3:Si vous avez reçu une des deux messages
précédents, n’en tenez pas compte. Ceux-ci disent que
Microsoft n'a pas personnellement testé les pilotes. Diamond
par contre les a testés avant de mettre ce produit à disposition.
PAGE 5
(Suite sur la page suivante)
Page 20

8. Si proposé, sélectionnez l’option de redémarrage de votre
ordinateur.
9. Cliquer sur le bouton fin.
Pour des instructions d’installation plus détaillées, veuillez vous
référer à la documentation sur le CD d’installation.
Logiciels additionnels
Diamond propose des logiciels additionnels sur son site Internet :
http://dmmdownload.com/hotlinks.php.
Ces logiciels sont optionnels pour le fonctionnement de la carte
graphique.
Installation d’Adobe Acrobat Reader
Ce programme est nécessaire pour voir le manuel d’utilisateur
électronique
inclus sur le CD d’installation.
Acrobat Reader peut être téléchargé de notre site Internet:
http://dmmdownload.com/hotlinks.php
Page 21

Dépannage
Désactivez la carte graphique intégrée.
Si votre système a une carte graphique intégrée vous devrez d'abord
désactiver cette carte graphique intégrée dans Windows avant d’installer les pilotes de la carte graphique Diamond.
1. Assurez-vous que votre moniteur soit toujours branché à votre
connecteur de carte graphique intégrée.
2. Allumer votre ordinateur et attendez que votre bureau apparaisse.
3. Utilisateurs de Windows XP/MCE/Vista/Win 7
Cliquez sur Démarrer, Exécuter et écrivez : DEVMGMT.MSC et
cliquez sur OK.
4. Cliquez sur le symbole plus [+] à gauche de Cartes graphiques
5. Double cliquez sur la carte graphique intégrée.
(Normalementcela doit faire apparaître quelque chose comme Intel, SIS, VIA, etc.)
Utilisateurs de Windows XP/MCE/Vista/Win 7
Il y a une zone en bas où l’on peut lire utilisation du périphérique.
Cliquez sur la flèche descendante et sélectionnez Ne pas utiliser
ce périphérique (désactivé) et cliquez sur OK.
6. Cliquez sur Démarrer, Arrêter, et cliquez sur arrêter l'ordinateur.
7. Débrancher le câble de l’écran de la carte graphique intégrée
et branchez-le sur la carte graphique Diamond fraîchement
installée.
PAGE 8
Page 22

Support technique
L’équipe du support technique Diamond est là pour résoudre tous
problèmes que vous pourriez rencontrer lors de l’installation de la
carte graphique Diamond. Avant toute demande auprès du support
technique veuillez vous assurer que vous avez à disposition les
informations suivantes.
1. Numéro du modèle : (imprimé près du code barre, situé sur la
boîte)
2. Version du CD d’installation : (imprimé sur l’étiquette du CD)
3. La version de Windows de votre système.
4. Le fabriquant et le numéro. du modèle de votre ordinateur.
5. Modèle de processeur et vitesse (exemple : Intel Pentium 4
2.4GHz)
6. Une description détaillée du problème que vous avez rencontré
ainsi que toute étape que vous avez faite pour tenter de résoudre
le problème.
Options du service technique
Service téléphonique gratuit
818-357-5165
(Tarif longue distance peut-être appliqué)
Lundi-Vendredi, 8:00-16 :30 PST
http://www.diamondmm.com
PAGE 9
Page 23

Diamond Multimedia Product Warranty
Diamond Multimedia Warranty
All Diamond Multimedia products are guaranteed to come with a standard one year limited
warranty. The warranty is extended only to the original buyer and is not transferable. Some
Diamond Multimedia products have an optional extended limited warranty with registration. It is
recommended that you keep your receipt so Diamond Multimedia can verify the purchase date of
the product and confirm your warranty.
Warranty Length
All Diamond Multimedia Products come with a standard one year limited warranty.
All Diamond Multimedia Graphics Cards purchased ON or AFTER May 1st, 2011 and registered
within 30 days from the original date of purchase will have a FIVE (5) YEAR Limited Warranty.
ALL Diamond MULTIMEDIA GRAPHICS CARDS NOT REGISTERERED WITHIN 30
DAYS FROM THE ORIGINAL DATE OF PURCHASE WILL ONLY QUALIFY FOR THE
ORIGINAL ONE YEAR WARRANTY. Previous Diamond Multimedia Graphics Cards
purchased AFTER June 1st, 2009 and BEFORE May 1st, 2011 and registered within the first 30
days of purchase will still have a TWO (2) YEAR LIMITED WARRANTY.
PRODUCT REGISTRATION
Conditions for the limited five (5) year warranty and limited two (2) year warranty are the same
as the one year standard limited warranty.
Warranty Terms
Product Condition:
• Removal and or Defacing of Serial/Part number sticker(s) on ANY Diamond Multimedia
products WILL void ALL warranties.
• All products must be returned in the originally sold condition. Products received by
Diamond Multimedia for replacement that include 3rd-party attachments will be returned
to the address on the package.
• All products must return in their original packaging with all original components.
• There must be no physical damage to any component including damage that is caused by:
o inadequate or improper repairs carried out by any person or entity which is not
authorized by the manufacturer to perform warranty services on its behalf;
negligence, accidents, modifications, defective installation or misuse and use of
inappropriate spare parts;
o fire, immersion in liquid, lightning, earthquake, inadequate ventilation, Acts of
God, incorrect application of main voltage howsoever arising, or any other cause
beyond the control of Diamond Multimedia;
 Loading...