

Page 1

Page 2
FEATURES
SPECIAL THANKS
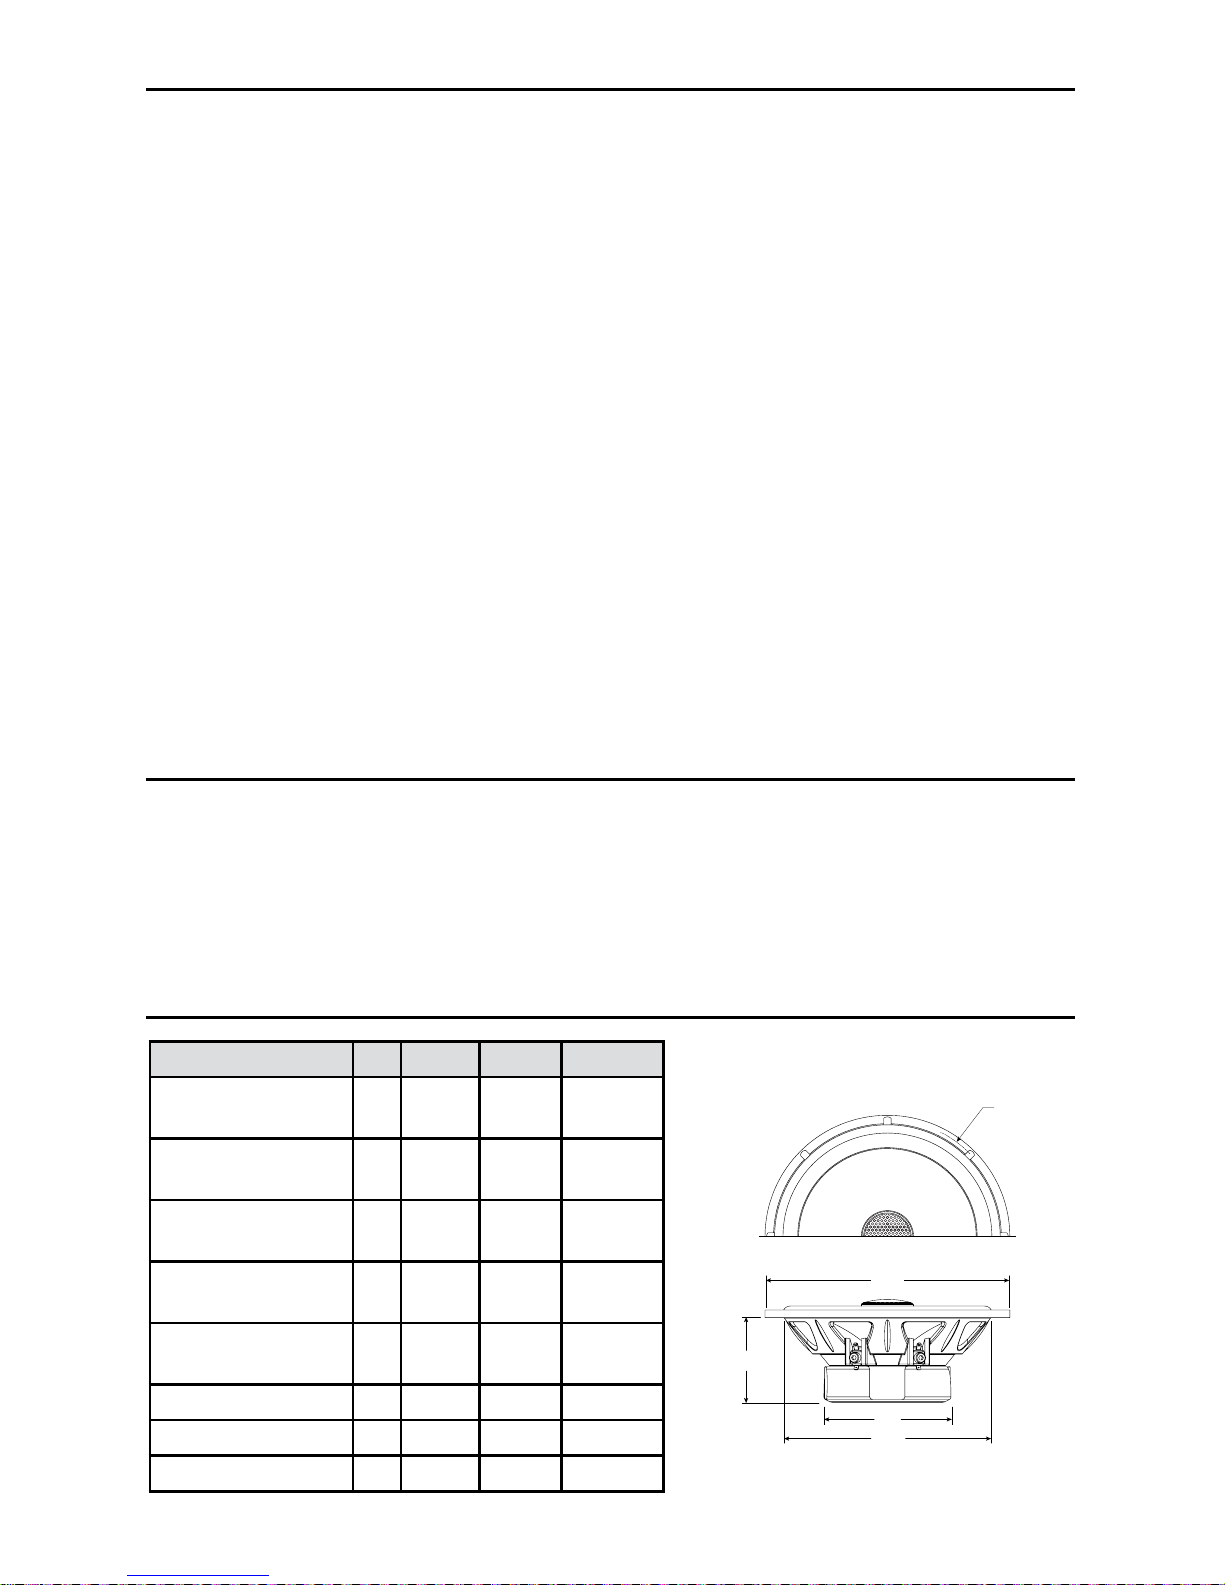
Dimension Unit
TX52v TX65v TX69v
Total Diameter
(A)
in. mm5.57
142.0
6.51
165.5
9.21 x 6.40
234 x 162
Mounting Diameter
(B)
in. mm4.62
117.3
5.53
140.6
8.46 x 5.79
215 x 147
Screw Hole Dia.
(C)
in. mm5.23
133.0
6.14
156.0
6.58 x 4.71
167 x 119
Mounting Depth
(D)
in. mm2.32
59.0
2.32
59.0
2.82
71.8
Magnet Diameter
(E)
in. mm3.07
78.0
3.40
86.4
4.18
106.4
Max Power Watt
100 100 150
Sensitivity dB
86 86 83
Freq. Response Hz
65-20k 55-20k 50-20k
• Tru-mount convertible composite ABS frame design
• High performance graphite injected molded copolymer cone
• 19mm aluminum dome tweeter with Ferro uid cooling
• Optimized on-board crossover
SPECIFICATIONS
A
D
B
E
C
©2012 Diamond Audio Technologies. All rights reserved.
About the Diamond Audio Experience.
Congratulations, you have purchased the nest audio product on the market. At Diamond Audio,
our mobile audio products represent the latest advances in acoustic technology. Diamond Audio
products are designed and engineered using innovative components and materials resulting in
exceptional sound reproduction. Installed properly, Diamond Audio products will provide many
years of the ultimate listening experience.
Please note that prolonged exposure to sound pressure levels in excess of 100dB can cause
permanent hearing loss. Using Diamond Audio products can exceed that level so please exercise
restraint in its operation in order to preserve your ability to enjoy its high delity in the future.
Diamond Audio recommends our products be professionally installed by an authorized Diamond
Audio dealer to achieve the best listening possibilities. This will ensure a proper installation and
extend your one year warranty to two years.
Go ahead, Hear The Music.
Page 3
©2012 Diamond Audio Technologies. All rights reserved.
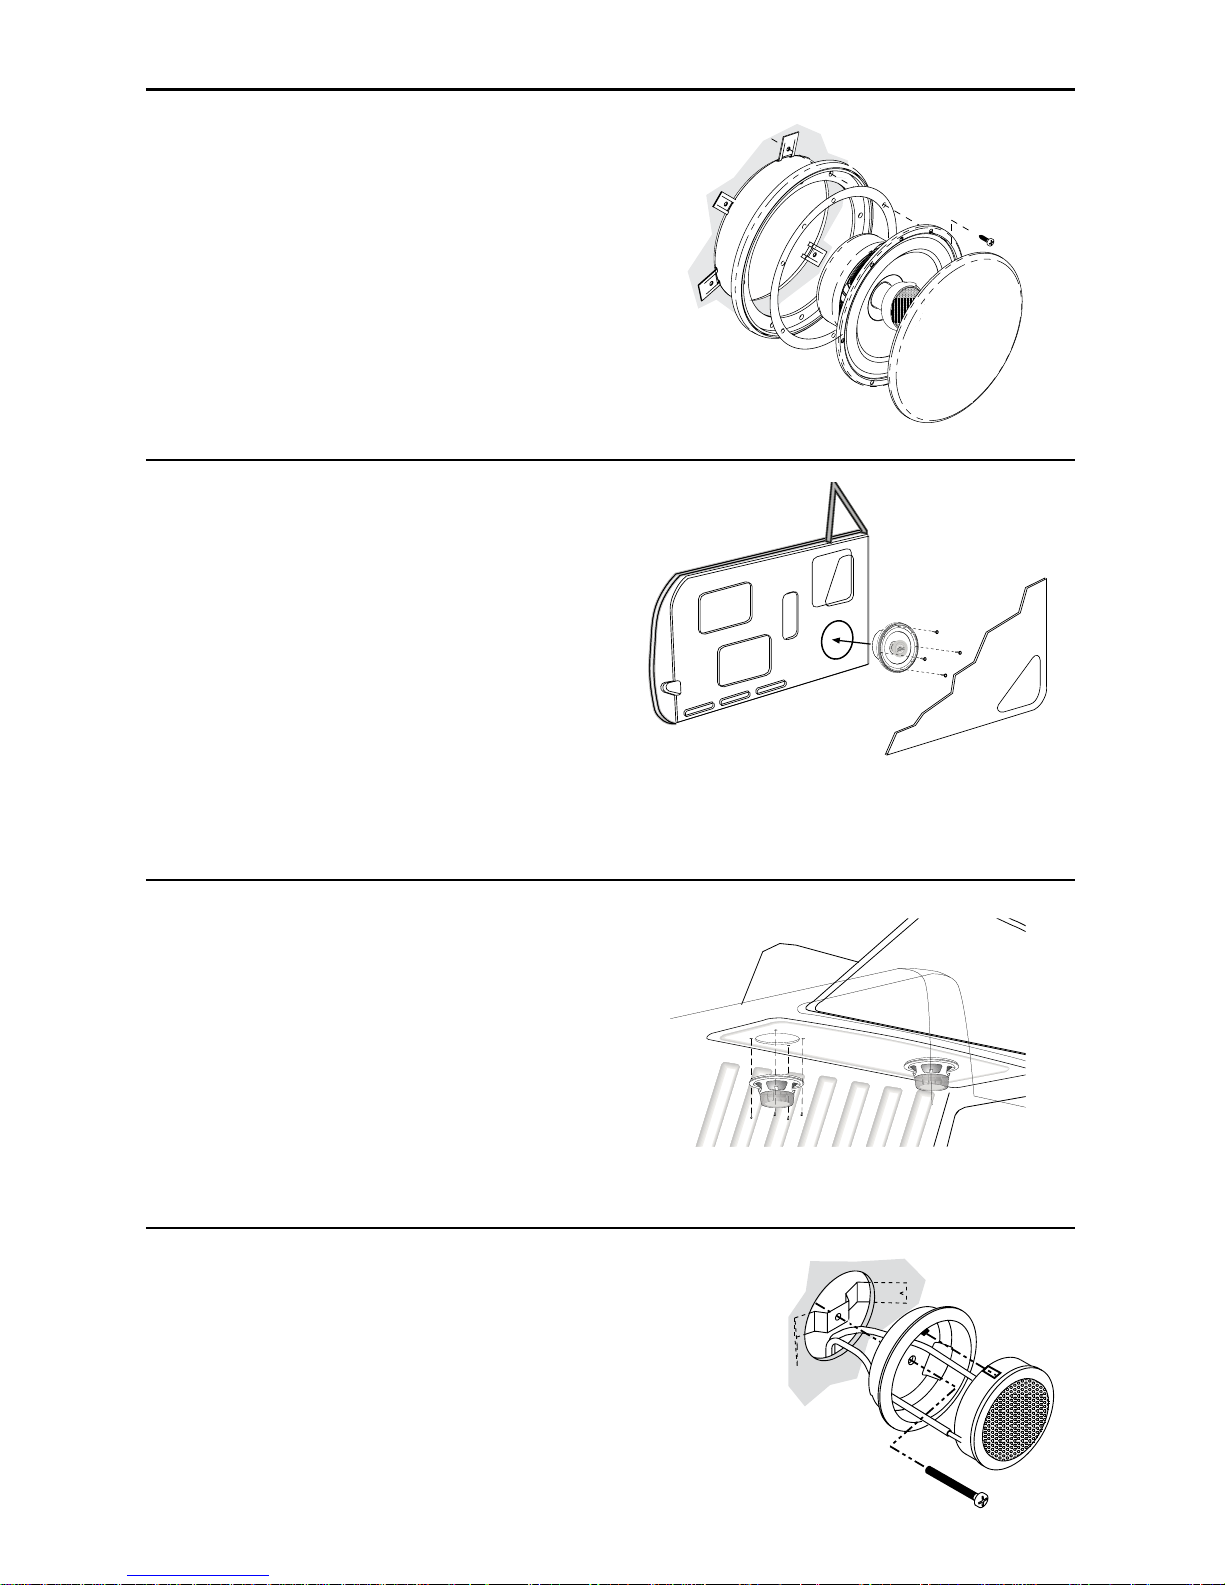
If you are mounting the speakers in the rear of the
vehicle, there are often two options for achieving
a good mount. Some speakers mount from the top
side (from the interior) while other applications have
the speakers mounted from the bottom side (from
the trunk). In either case, a at mounting surface and
a good seal are still extremely important.
Rear Deck Mounting
Determine a location in the door that will accept
the size of your new speaker. Remove the door
panel from the door and check for clearance in
the intended speaker location while operating
window all the way up and down. Avoid cutting
any structural metal to mount the speakers or
to accommodate additional depth. If depth or a
at surface mount are an issue, please seek the
skills of a professional installation technician.
Door Mounting
Diamond Audio speakers are specically designed
for mounting in an innite bafe application. For
optimum performance it is important to isolate
the sound waves emanating from the front of the
speaker and the sound waves emanating from
the back of the speaker. This is accomplished by
mounting the speaker to a at surface and using of
the mounting hardware provided.
MOUNTING
Tweeter Mounting
When ush mounting tweeters, make sure the desired
location can accommodate the hole size and depth
required. Mount the cup using provided hardware.
Mount surface cup at desired angle with provided
screws in tweeter mounting kit. Route speaker wires
through tweeter cup, connect tweeter to wires, and
snap tweeter into cup by aligning the notches.
Mounting hole size:
1.33”
Page 4
LIMITED SPEAKER WARRANTY STATEMENT
Diamond Audio Technologies
6915 West Frye Road
Chandler, AZ 85226 USA
Tel: 480.820.2075
Fax: 480.813.6210
Web: diamondaudio.com
Service/Tech Support:
480.820.2075
Tech Support Email
®
060611
©2012 Diamond Audio Technologies. All rights reserved.
AMPLIFIER
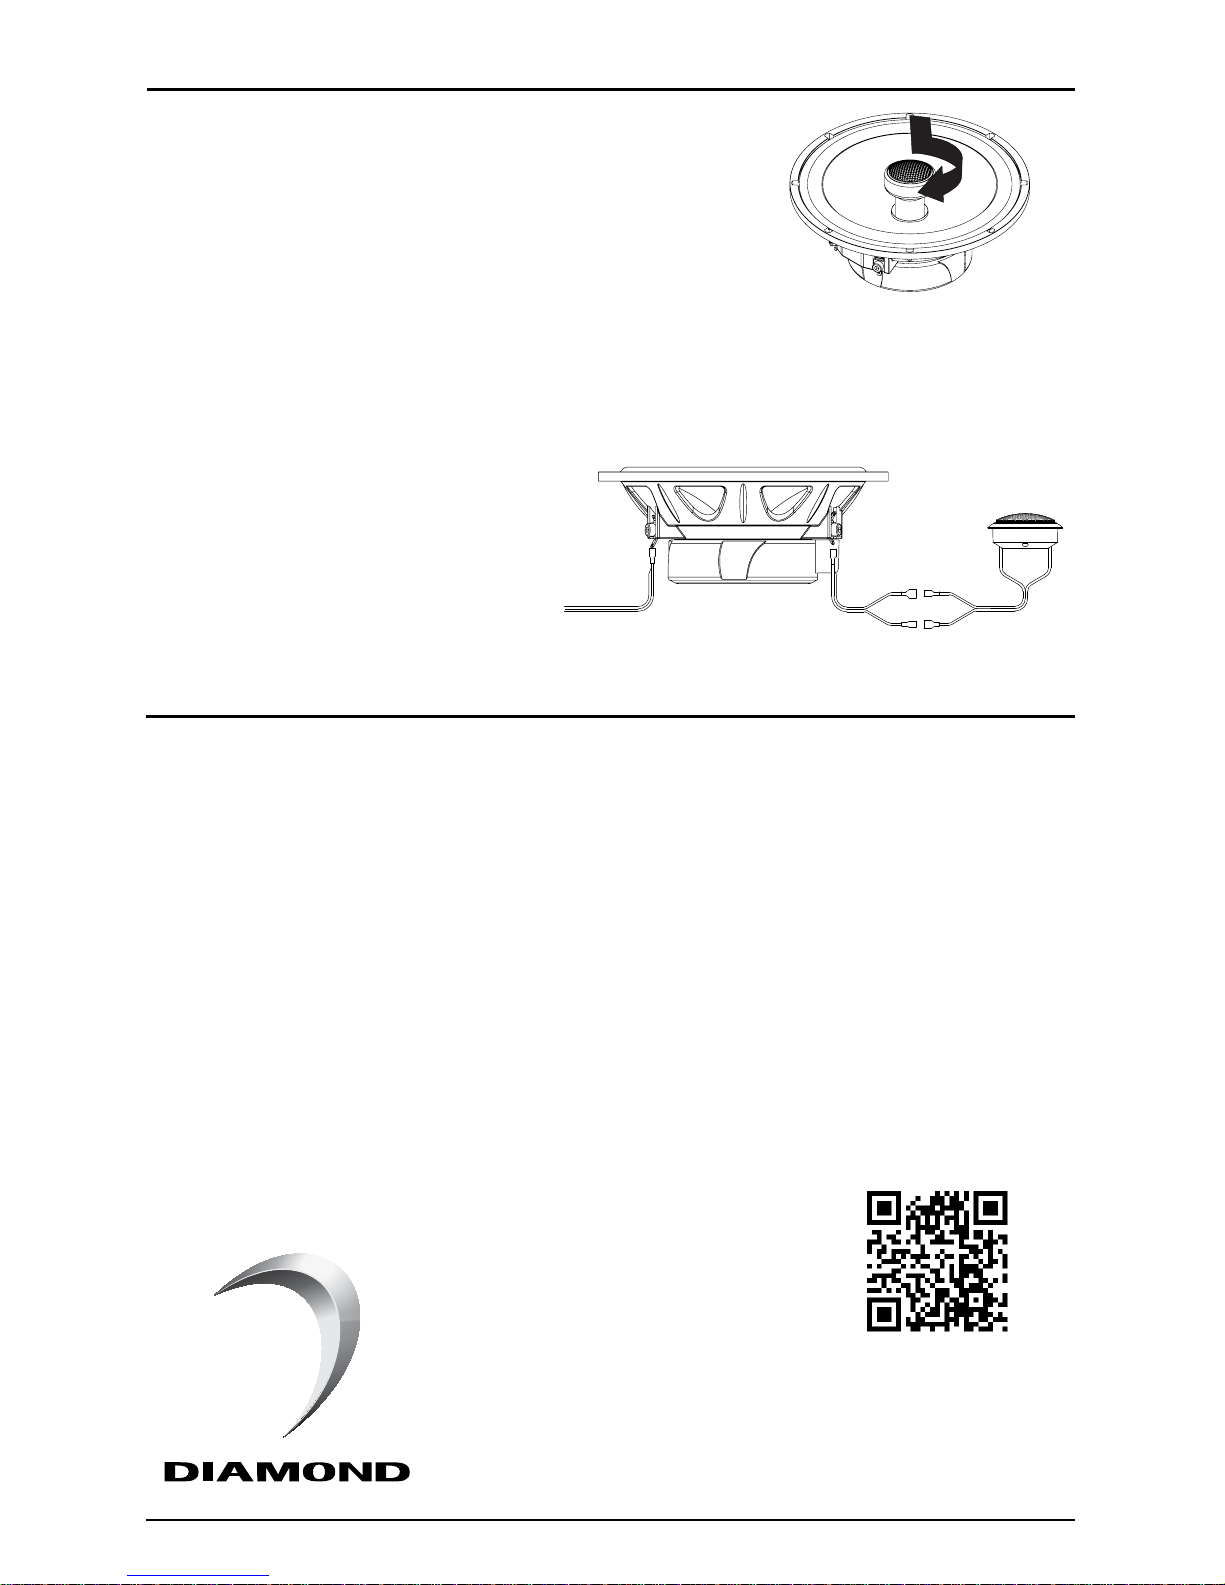
TWEETER CONFIGURATION
You have the option of conguring your speakers as a
coaxial (tweeter attached) or a component (tweeter separate)
system. If your choice is to use as a coax then you will need
to attached the tweeter to the midrange. Locate the supplied
tweeter post support and attach the tweeter to it. Then
remove the rubber boot from the midrange, guide the tweeter
wires down through the middle of the midrange. Guide the
tweeter wires so that they lay in the groove of the inside of the
rubber boot as it replaced.
To use as a component system, attach
tweeter to the terminals as shown using
the extension wire if necessary.
Diamond Audio Technologies, LLC (DAT) warrants this product to be free from defects in material and
workmanship for a period of one (1) year from the original date of purchase provided it was purchased from an
authorized DAT retailer within the United States. However, if this product was installed by the authorized DAT
retailer, the warranty period will be extended to two (2) years.
THIS WARRANTY IS NOT TRANSFERABLE AND APPLIES ONLY TO THE ORIGINAL PURCHASER OF
THIS PRODUCT IN ITS ORIGINAL INSTALLATION. Original purchaser must reside in the United States and
be able to provide proof of purchase and installation with the sales receipt from the authorized DAT retailer
that sold and installed the product.
Should a manufacturing defect occur during above said warranty period, DAT will replace or repair the
defective product with a product of the same or equivalent value and performance.
Damage or failure caused by any of the following is not covered under this warranty policy: negligence,
improper use, abuse, product modication, unauthorized repair attempts, accident, acts of God,
misrepresentations by DAT retailers, and improper/inadequate packaging during return shipping.
 Loading...