

Mod: SR3/DZ
Production code: PT930
09/2010
UK
Important safety instructions
1. To obtain full use of the cabinet, we recommend reading this instruction manual.
2. It is the user’s responsibility to operate the appliance in accordance with the instructions
given.
3. Contact your dealer immediately in case of any malfunctions.
4. Place the cabinet in a dry and ventilated place.
5. Keep the cabinet away from strongly heat-emitting sources and do not expose it to direct
sunlight.
6. Always keep in mind that all electrical devices are sources of potential danger.
7. Do not store inflammable material such as thinner, gasoline etc. in the cabinet.
8. We declare that no asbestos nor any CFC are used in the construction.
9. The oil in the compressor does not contain PCB.
Unpacking and installation
Remove the wooden pallet and the packing. External surfaces are supplied with a protection foil,
which must be removed before installation
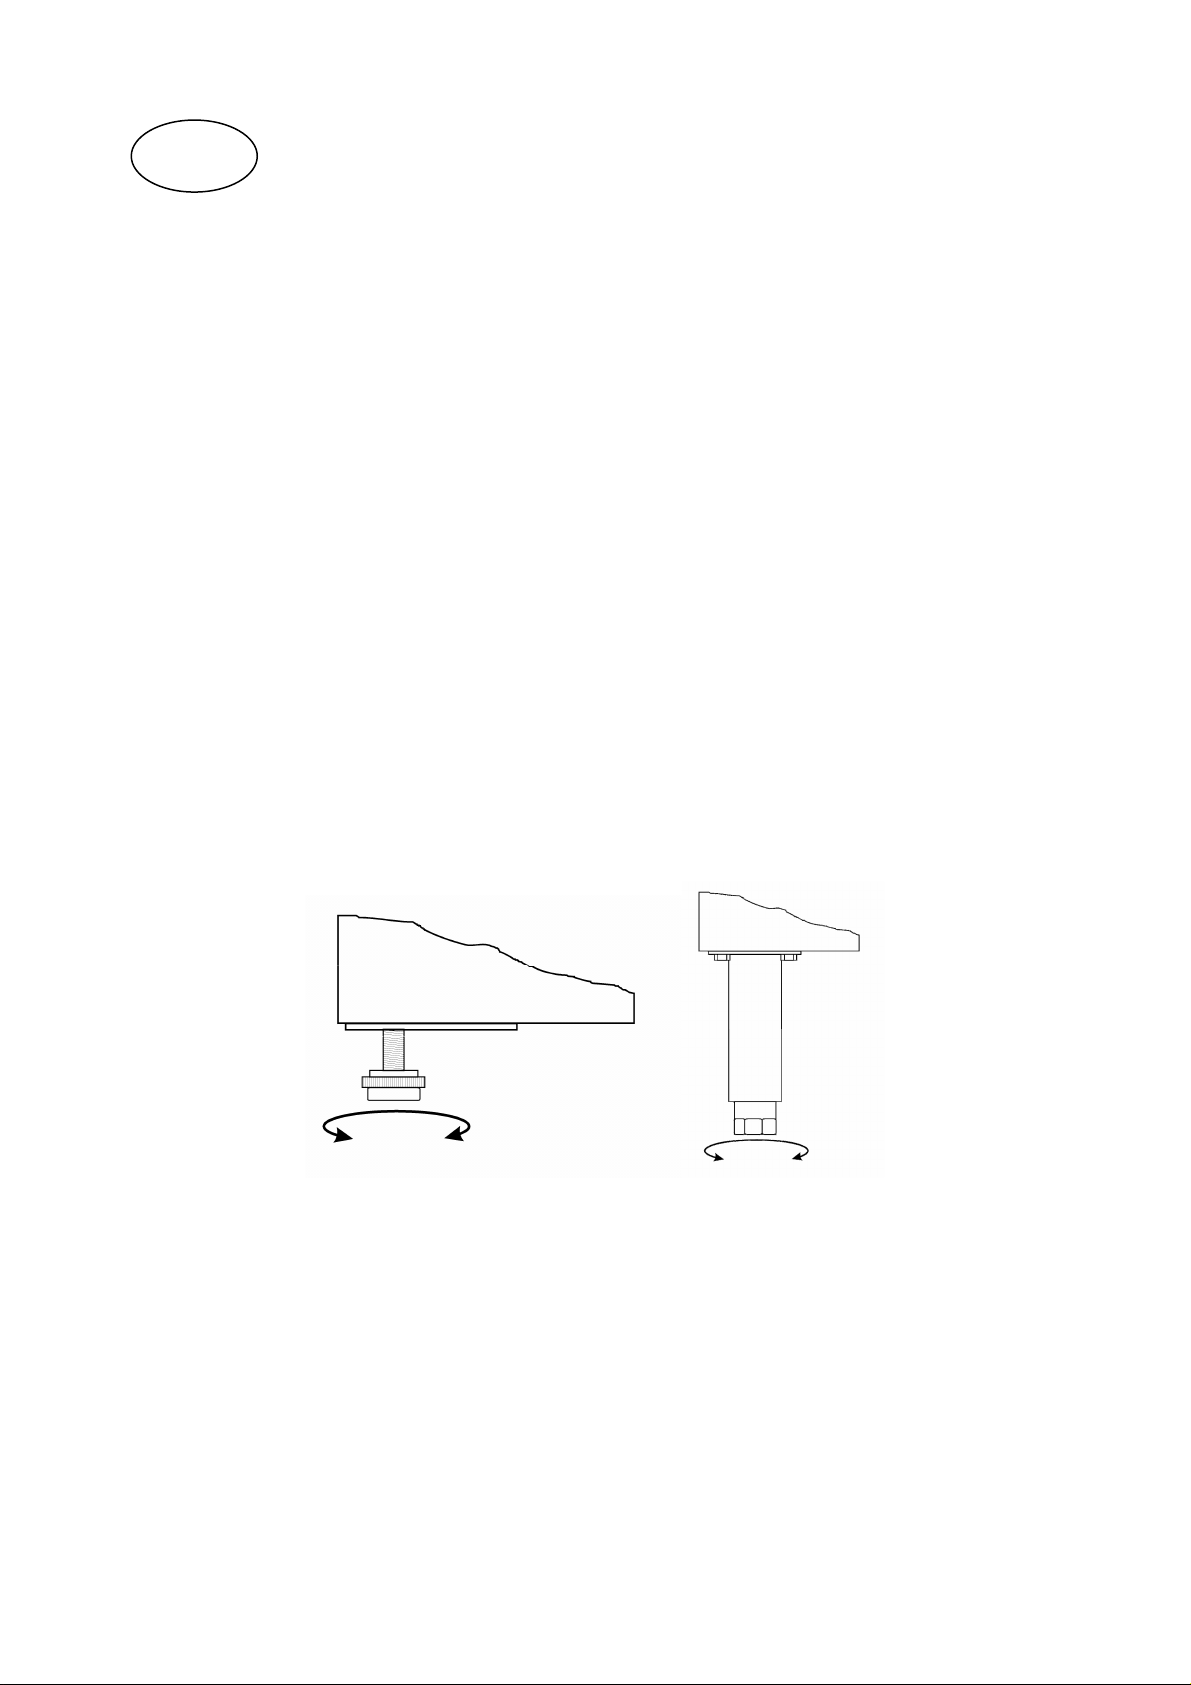
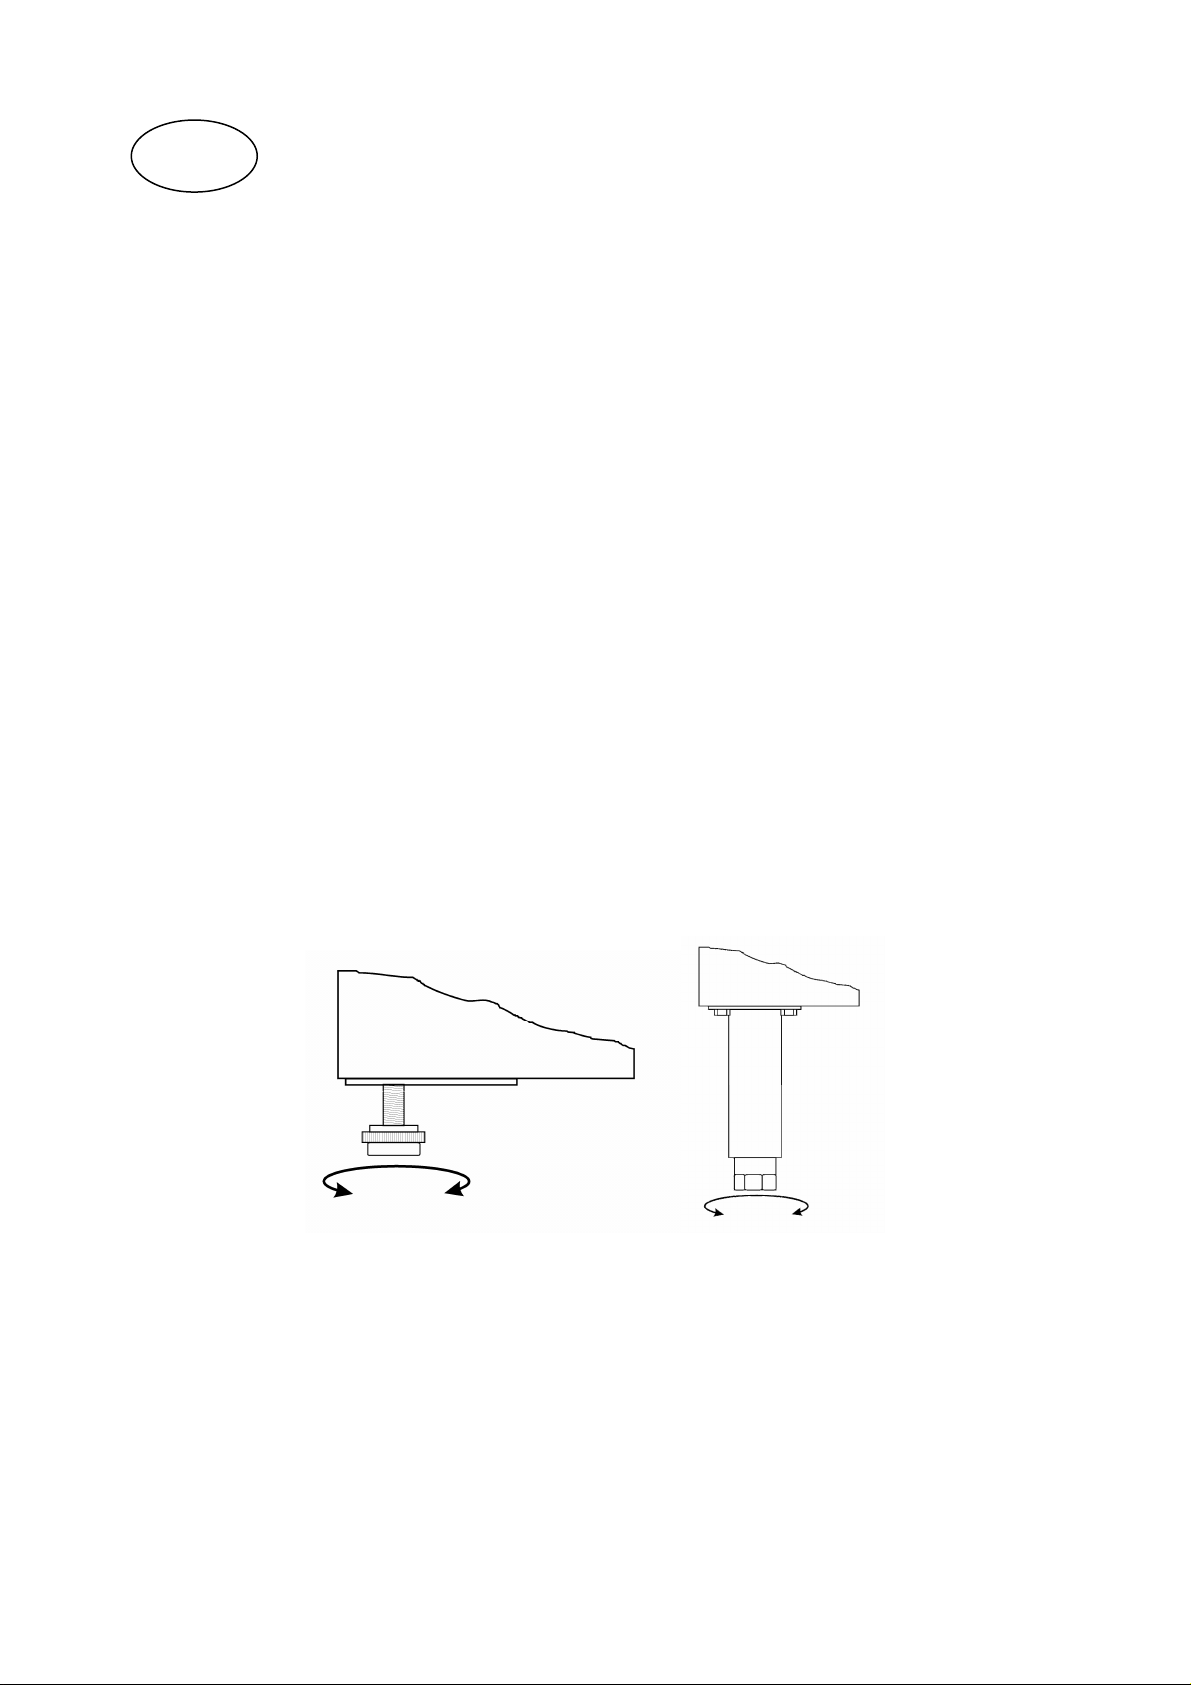
To ensure correct function it is important that the cabinet is level. The cabinet is supplied with legs,
these can be adjusted. See fig. 1.1.
Fig. 1.1
12
Electrical connecting
The cabinet operates on 230 V/50 Hz.
The wall socket should be easily accessible.
All earthing requirements stipulated by the local electricity authorities must be observed. The
cabinet plug and wall socket should then give correct earthing. If in doubt, contact your local
supplier or authorized electrician.
The flexible cord fitted to this appliance has three cores for use with a 3-pin 13-Amp or 3-pin 15Amp plug. If a B.S. 1363 (13-Amp) fused plug is used, it should be fitted with a 13-Amp fuse.
The wires in this mains lead are coloured in accordance with the following code:
Green/Yellow: Earth, Blue: Neutral, Brown: Live.
The main electrical connections must be done by skilled electricians.
Start-up of the cabinet
Before use, we recommend that the cabinet is cleaned, see the section on maintenance and cleaning.
Important !
If the cabinet has been vertically placed during transport, please wait 2 hours before starting up the
cabinet.
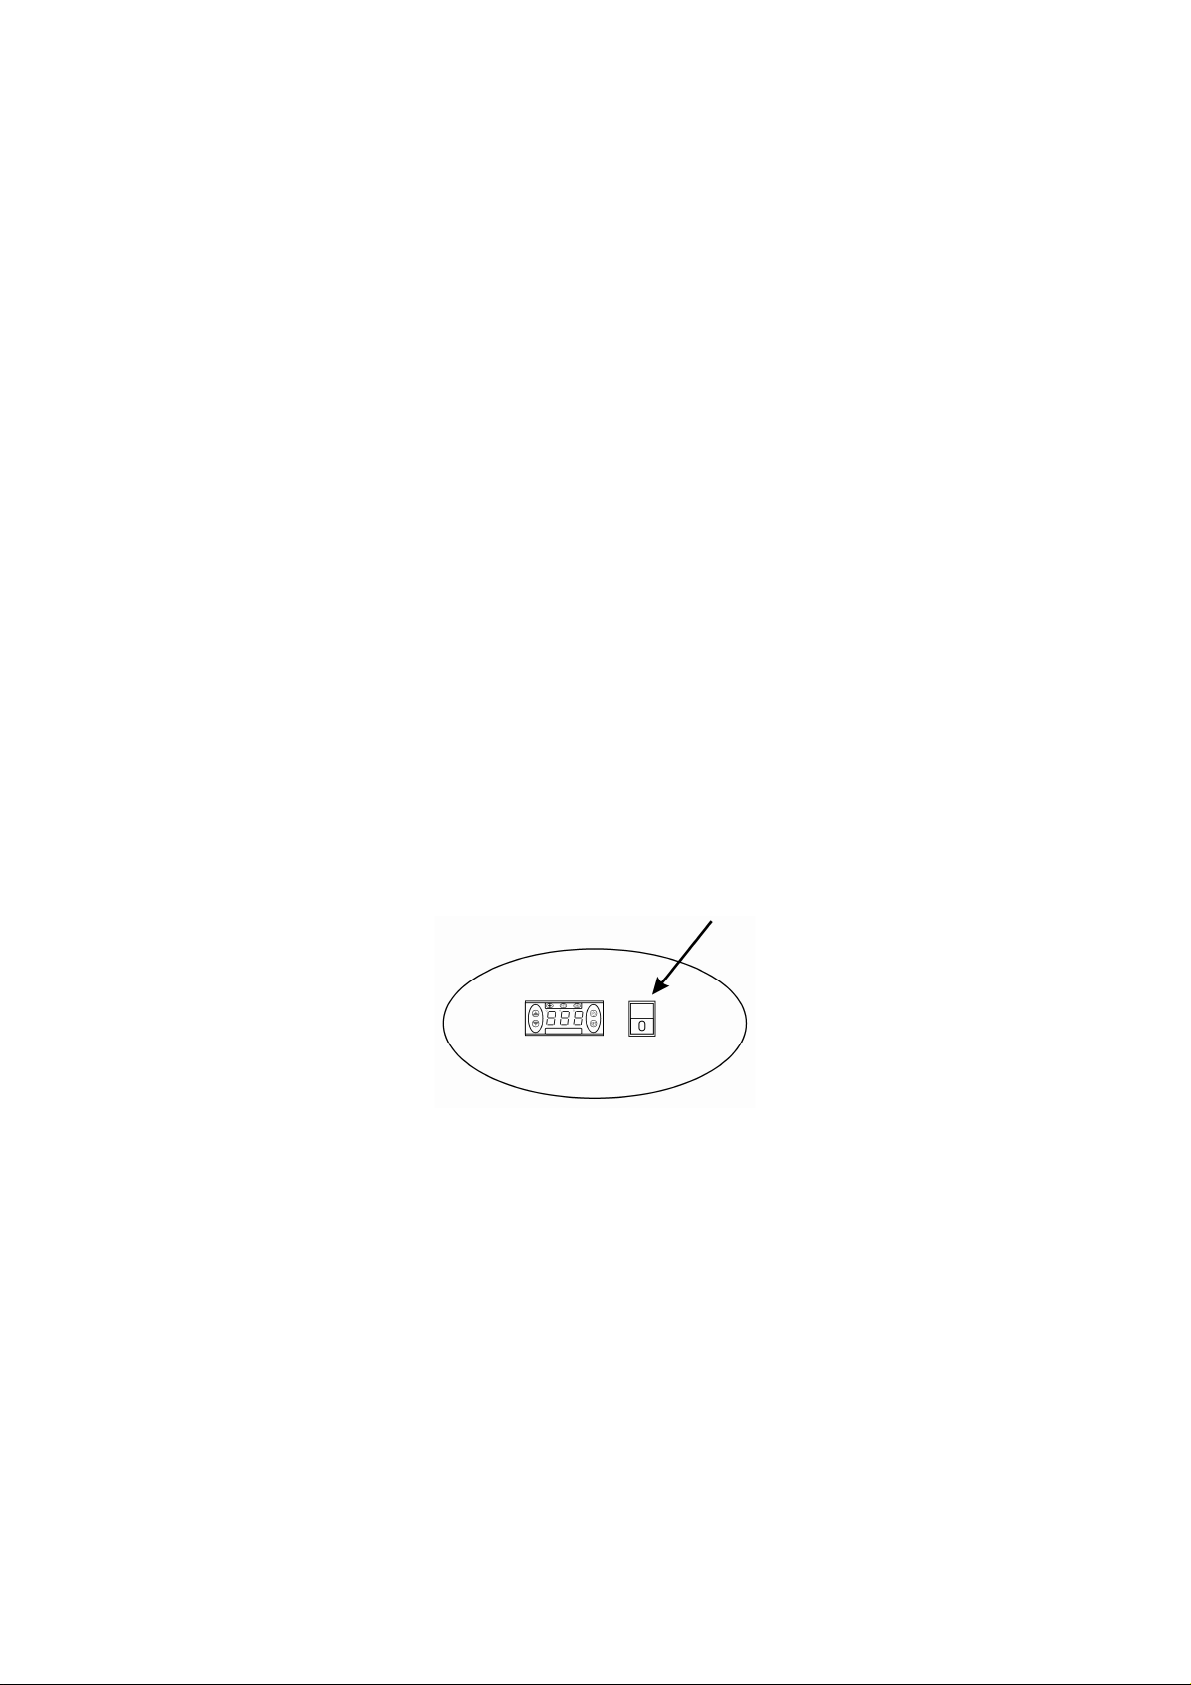
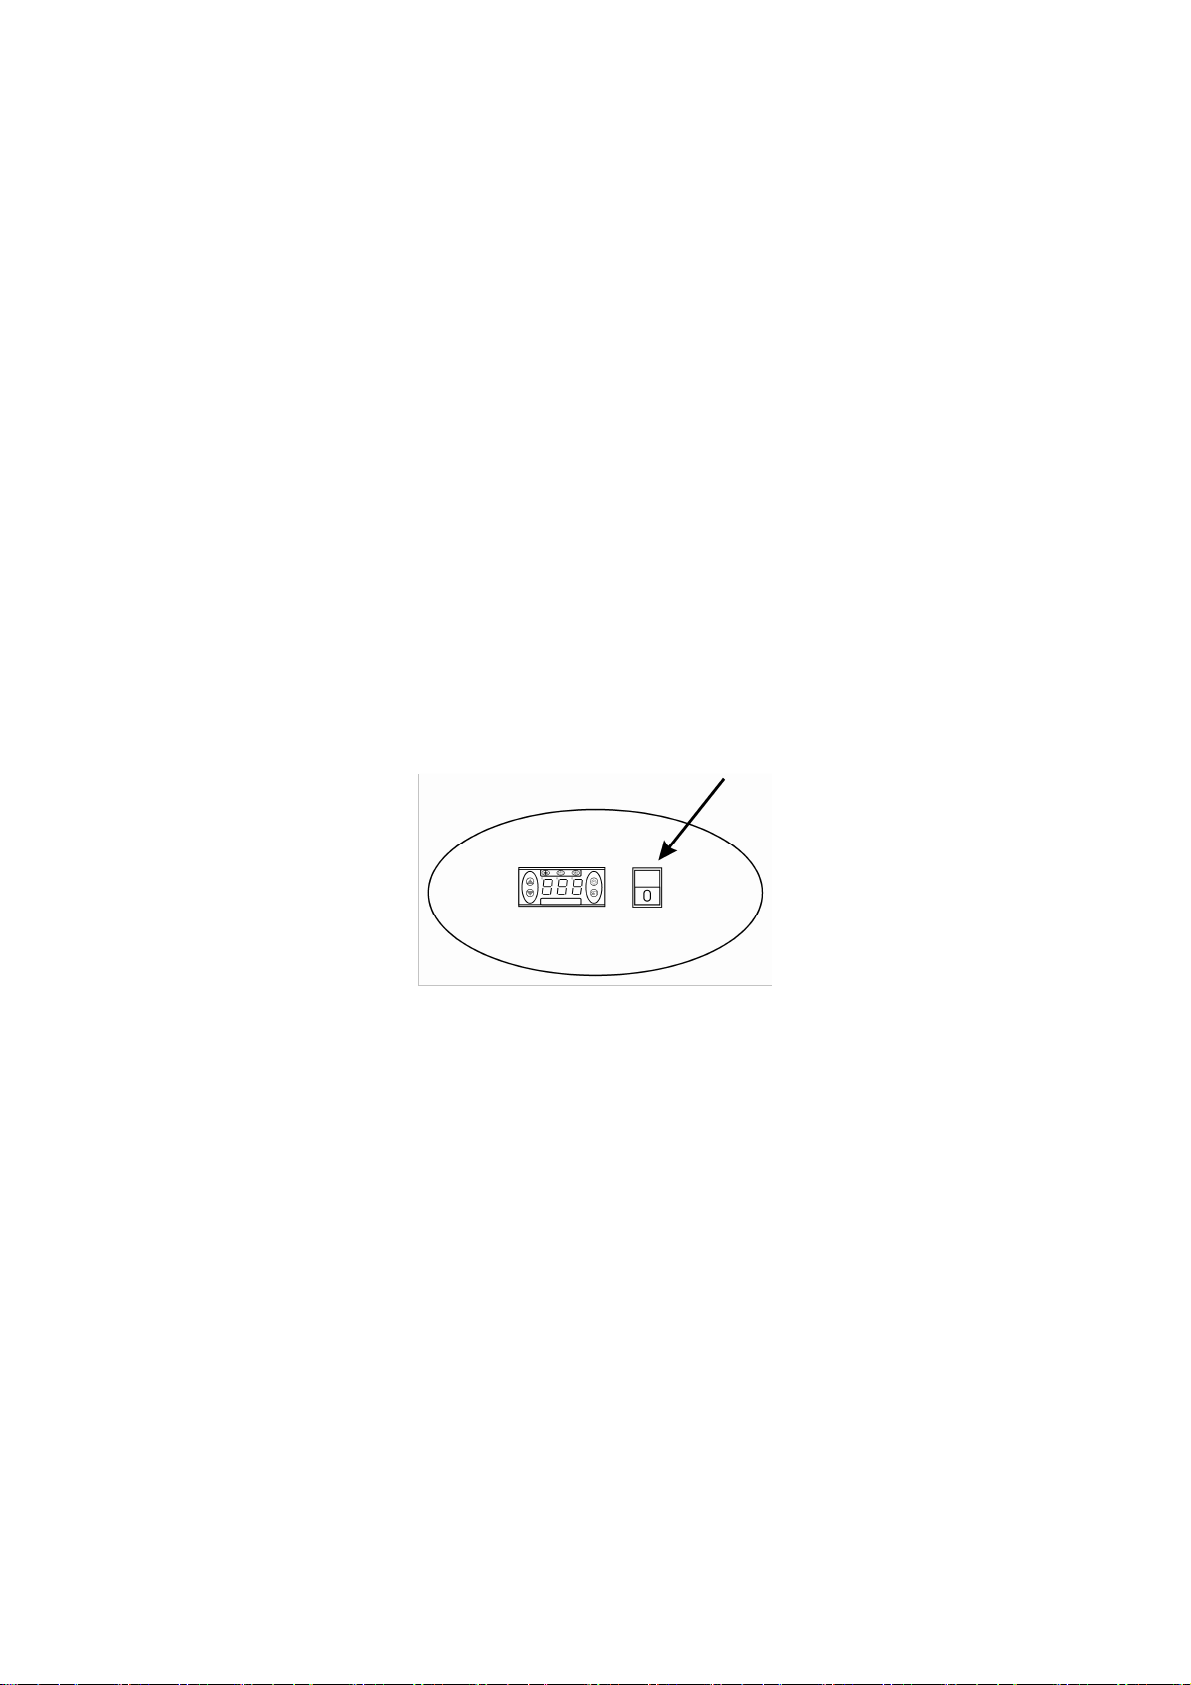
Connect the cabinet to a socket and turn on the switch on the control panel, see fig. 1.9.
Fig. 1.9
13
Thermostat
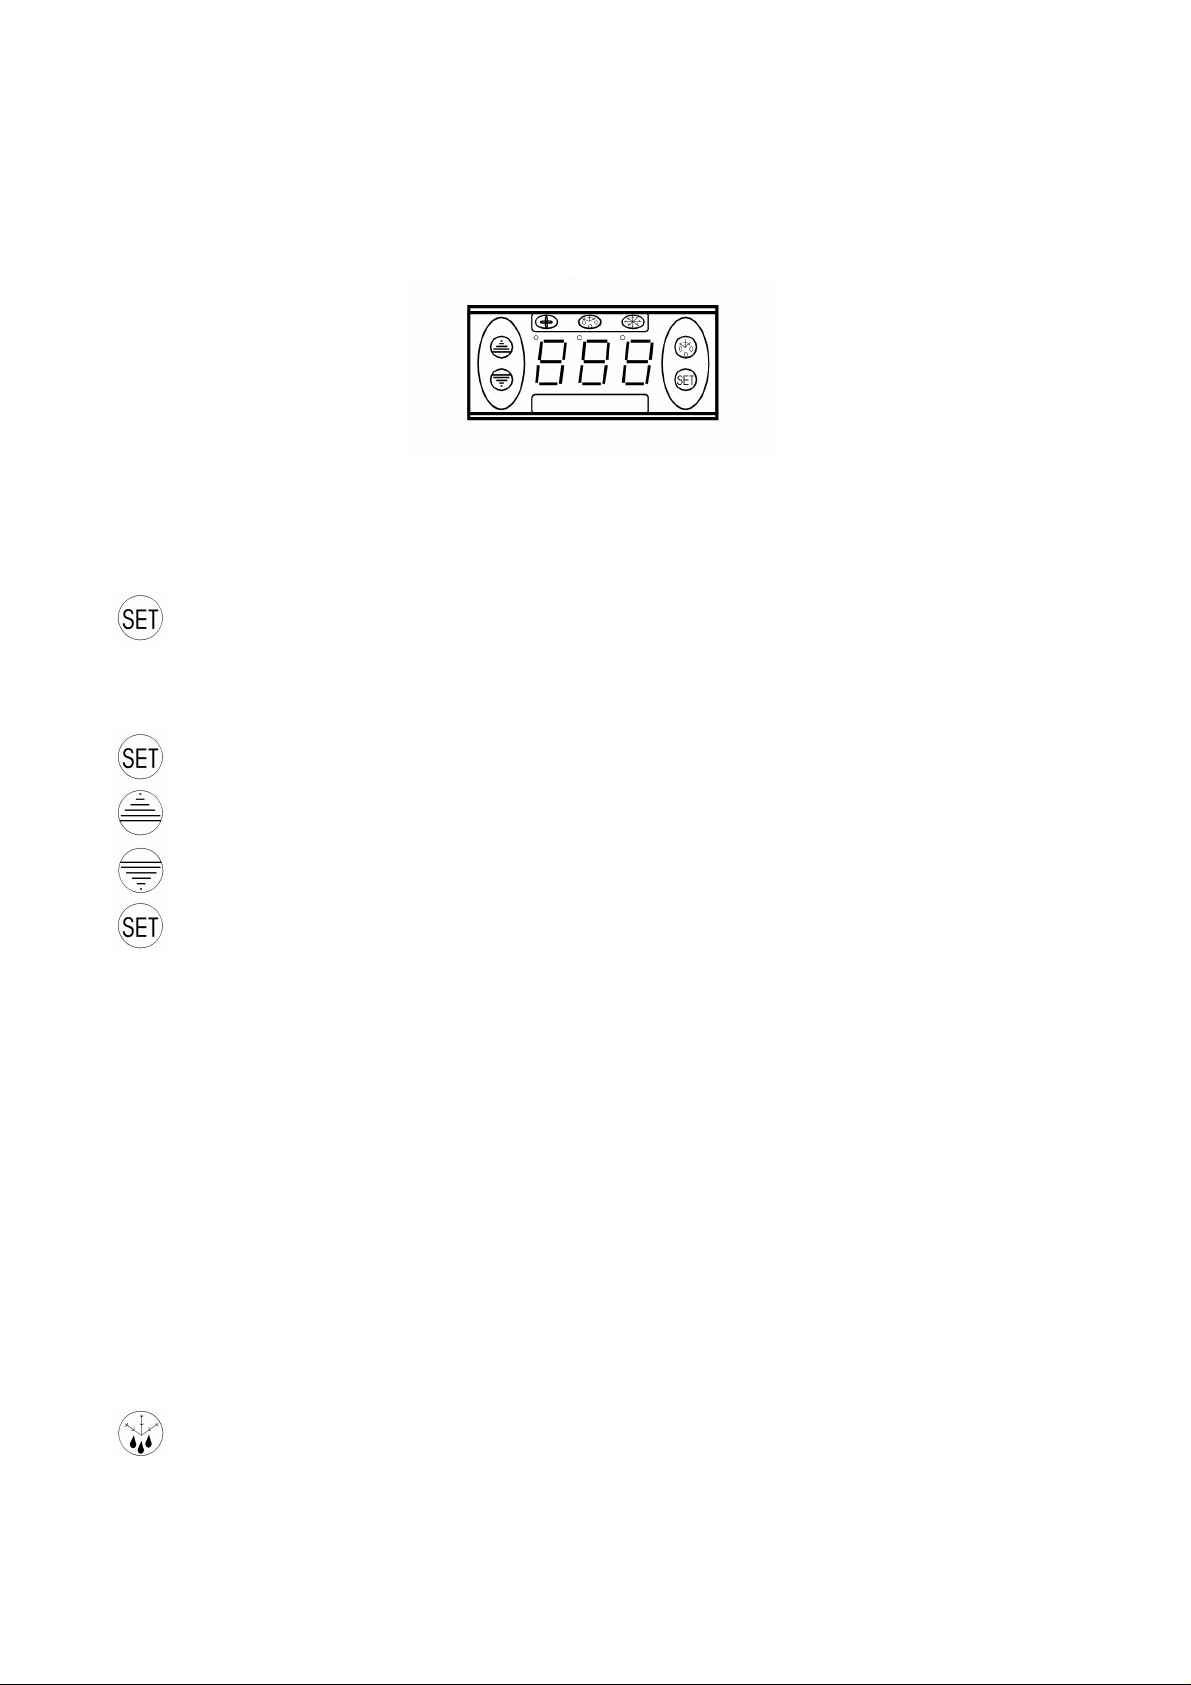
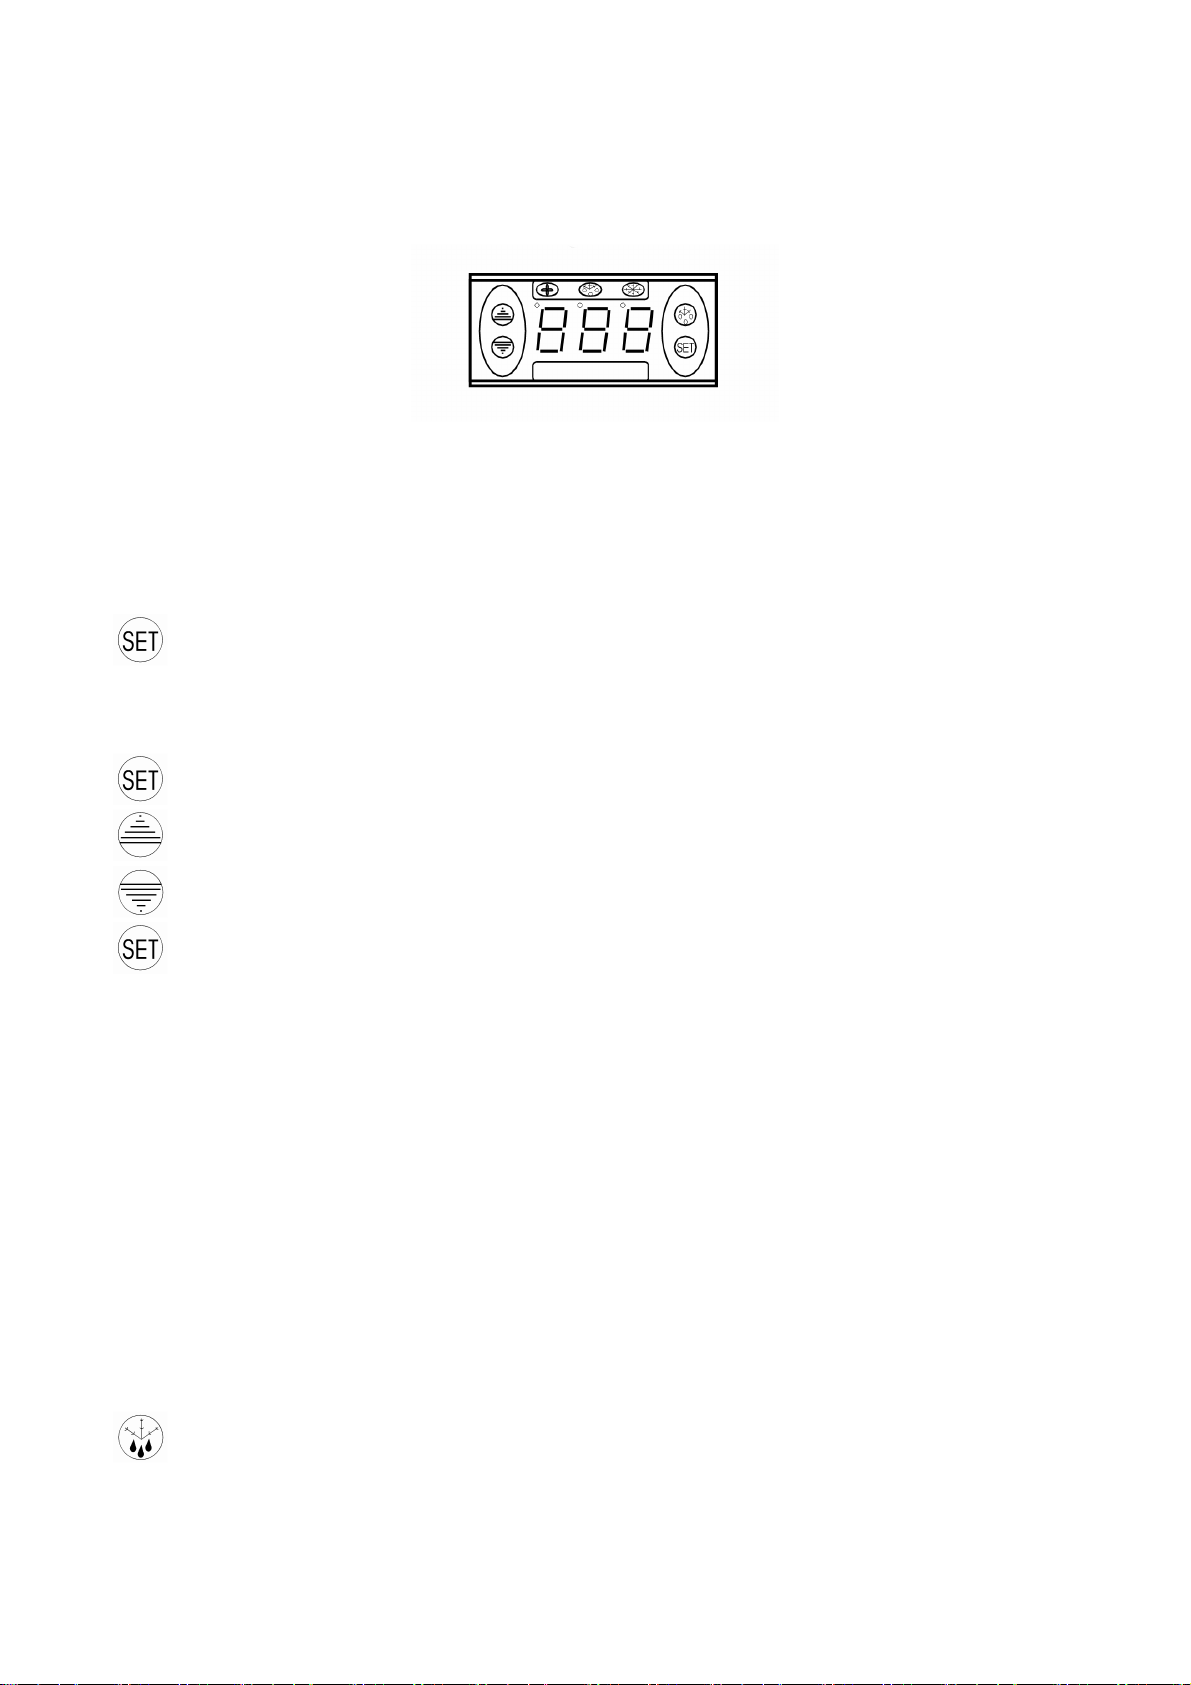
The thermostat is placed in the control panel, see fig. 2.0.
Fig. 2.0
The thermostat has been pre-set and in most cases it is not necessary to adjust the settings.
When turning on the cabinet the display will show the current temperature in the cabinet.
Display set temperature:
Press this key and the display will show the set temperature. Press the key again to return to
normal reading
Set new temperature:
Press this key and the display shows the set temperature.
Press this key to increase the set temperature.
Press this key to lower the set temperature.
Press this key to save the new settings. The display will flash with the new value and will
then return to normal reading.
Alarm codes:
PF1 Flashing in the display: indicates that the cabinet sensor is defective.
The cabinet will strive to keep the set temperature until it has been repaired.
PF2 Flashing in the display: indicates that the evaporator sensor is defective.
This does not influence the operation of the cabinet, but should be repaired as soon as
possible.
Defrosting
The cabinet defrosts automatically with pre-set intervals. If the door to the cabinet is opened or the
contents of the cabinet is changed frequently it may become necessary to defrost the cabinet
manually.
Pressing this key continuously for more than 3 seconds will start a manual defrosting and
then return to normal operation.
Defrosted water runs to a container placed in the compressor compartment and evaporates.
14
Maintenance and cleaning
Switch the cooler off at the socket.
The cabinet must be periodically cleaned. Clean the external and internal surfaces of the cabinet
with a light soap solution and subsequently wipe dry. External surfaces can be maintained using
steel oil.
Do NOT use cleansers containing chlorine or other harsh cleansers, as these can damage the
stainless steel surfaces and the internal cooling system.
Clean the condenser and the compressor compartment using a vacuum cleaner and a stiff brush.
Do NOT hose the compressor compartment with water as this can cause short circuits and damage
on the electrical parts.
Service
The cooling system is a hermetically sealed system and does not require supervision, only cleaning.
If the cabinet fails to cool, check if the reason is a power cut.
If you cannot locate the reason to the failure of the cabinet, please contact your supplier. Please
inform model and serial number of the cabinet. You can find this information on the rating label
which is placed inside the cabinet in the top right hand side.
Disposal
Disposal of the cabinet must take place in an environmentally correct way. Please note existing
regulation on disposal. There may be special requirements and conditions which must be observed.
15
D
Wichtige Sicherheitsvorschriften
1. Vor Inbetriebnahme des Gerätes machen Sie sich bitte mit der Gebrauchanweisung
insbesondere der Sicherheitsvorschriften vertraut.
2. Bei Zuwiderhandlung gegen diese oder fahrlässigem Gebrauch übernimmt der Anwender
des Produktes die Haftung für eventuell dadurch entstehende Sach- sowie Personschäden.
3. Im Falle einer Störung kontaktieren Sie bitte daher umgehend Ihren Fachhändler.
4. Platzieren Sie den Schrank an einem trockenen Standort.
5. Der Schrank darf nicht in der Nähe von Hitzeabstrahlenden Geräten platziert werden.
Vermeiden Sie Standorte mit direktem Sonnenlicht.
6. Bitte denken Sie daran, dass alle elektrischen Geräte gefährlich sein können.
7. Bewahren Sie keine explosiven Stoffe wie z.B. chemische Verdünnungsmittel und Benzin in
diesem Gerät auf.
8. Wir erklären, dass kein Asbest noch CFC im Aufbau verwendet worden ist.
9. Das Öl im Kompressor enthält nicht PWB.
Aufstellung
Der Schrank wird auf einer Holzpalette für sicheren Transport geliefert. Entfernen Sie diese und
stellen Sie den Schrank in einer geraden/waagrechten Position auf.
Schränke mit Beinen werden mit Hilfe der einstellbaren Beine waagerecht aufgestellt, siehe Fig.
1.1.
Fig. 1.1
16
Anschlieβen
Das Gerät hat eine Spannung von 230 V/50 Hz.
Der Stecker muss geerdet sein (Schuko).
Sollten Sie das Kabel ersetzen müssen, benutzen Sie unbedingt ein entsprechendes geerdetes Kabel.
Bitte beachten Sie, dass der Anschluss lediglich durch einen erfahrenen Elektriker erfolgen darf.
Wenn der Kabel beschädigt ist sollte es bei entweder der Hersteller oder ein Service Vertreter
ersetzt werden um Gefahr zu vermeiden.
Einschalten
Es empfiehlt sich das Gerät vor Inbetriebnahme zu reinigen (Näheres unter „Reinigen“).
Wichtig!
Wenn der Schrank stehend geliefert ist, nehmen Sie 2 Stunden vor Einschalten.
Mit dem Anschließen ist das Gerät betriebsbereit, d.h. Netzstecker in Steckdose und der Schalter
am Panel einschalten, sehe Fig. 1.9.
Fig. 1.9
17
Temperaturregelung
Der Regler ist im Kontrollpaneel plaziert, siehe Fig. 2.0.
Fig. 2.0
Der Regler ist voreingestellt für den Schrank und normalerweise es ist nicht notwendig die
Einstellung zu regulieren.
Bei Anschließen zeigt das Display die aktuelle Temperatur im Schrank.
Eingestellt Temperatur gezeigt
Drücken Sie auf diesen Taster und Display zeigt die eingestellte Temperatur. Nochmal
drücken um normale Temperatur zu zeigen
Neue Temperatur einstellen:
Drücken Sie auf diesen Taster und Display zeigt die eingestellt Temperatur.
Drücken Sie auf diesen Taster um die eingestellte Temperatur zu erhöhen.
Drücken Sie auf diesen Taster um die eingestellte Temperatur zu senken.
Drücken Sie auf diesen Taster um die neue Einstellung zu lagern. Display blinkt mit den
neuen Wert und geht zurück zu der normalen Funktion.
Störungsanzeigen:
PF1 Erscheint in Display, bedeutet das der Raum-Sensor defekt ist. Kundendienst heranziehen.
Der Schrank versuch die eingestellte Temperatur zu halten bis Reparatur.
PF2 Erscheint in Display, bedeutet das der Verdampfer-Sensor defekt ist. Kundendienst
heranziehen. Es hat kein Einfluss auf den Betrieb des Schrankes, es ist doch notwendig
schnellstens zu beseitigen.
Abtauen
Der Schrank wird in vorprogrammierten Intervallen automatisch abgetaut. Falls der Schrank mit
häufigen Öffnungen von Tür order häufige Auswechseln von Gefriergut äußerst belastet wird es ist
vielleicht notwendig der Schrank manuell abzutauen..
Drücken Sie auf diesen Taster mehr als 3 Sekunden fängt die manuellen Abtauung statt, und
dann zu normalen Betrieb zurückkehren.
Tauwasser zur Verdampfung wird in einen Behälter im Kompressorraum abgelassen.
18

Reinigung und Pflege Ihres Gerätes
Der Schrank auf Steckdose ausschalten.
In regelmäßigen Zwischenräumen den Schrank reinigen mit mildem Geschirrspülmittel innen und
außen. Alles mit einem Tuch gut trocken. Oberflächen außen mit Stahlöl erhalten.
Verwenden Sie keine säurehaltige Putz- und chemische Lösungsmittel, diese möchten Rostfraß auf
die Edelstahlflächen und Innenkühlsystem verursachen.
Kondensator und das übrige Kompressorraum mit Staubsauger reinigen und eine steife Bürste.
Achten Sie darauf, dass kein Wasser im Kompressorraum und in de elektrischen Teile kommt, das
Kurzschluss verursachen kann
Wartung und Kundendienst
Das Kühlsystem ist ein hermetisches geschlossenes System und fordert kein Besichtigung nur
Reinigung.
Bei Ausfall der Kühlung prüfen Sie ob der Netzstecker richtig in der Stockdose ist und die
Sicherung der Stockdose in Ordnung ist.
Wenn keine Ursachen vorliegen und Sie die Störung nicht selbst beseitigen konnten, wenden Sie
sich bitte an die Kundendienststelle. Teilen Sie die Typenbezeichnung und Seriennummer mit.
Diese Informationen finden Sie auf den Typenschild in Schrank an der rechten Seite oben.
Entsorgung
Wenn der Schrank ausgedient hat, muss die Entsorgung durch eine anständig umweltmäßige Wiese
vorgenommen werden. Beachten Sie die Vorschriften für Entsorgung. Es gibt z.B.
Spezialforderungen und Bedingungen zu beachten.
19

F
Instructions importantes
1. Avant d’utiliser votre armoire, nous vous recommandons de lire ce mode d’emploi dans son
entier.
2. C’est la responsabilité de l’utilisateur de manier l’appareil selon les instructions données.
3. Contacter votre revendeur immédiatement en cas de défauts de fonctionnement de l’armoire.
4. L’armoire doit être placée dans un endroit sec et ventilé.
5. L’armoire ne doit pas être exposée aux rayons du soleil ou à tout autre source de chaleur.
6. N’oublier pas que tous les appareils électriques sont des sources de danger potentiel.
7. Ne conserver pas et n’utilisez pas des produits qui pourraient provoquer des explosions ou
qui sont inflammables, tels que gaz, briquets, essence, éther etc. dans l’armoire.
8. Aucune asbeste ou CFC est utilisée dans la construction de l’armoire.
9. L’huile dans le compresseur ne contient pas de PCB.
Désassemblage et mise en place
L’armoire est livrée avec une palette en bois afin de l’assurer pendant le transport. Enlever la palette
et placer l’armoire d’une position verticale. Les surfaces extérieures sont équippées d’un film
pelable, qu’il faut enlever avant la mise en place.
Lors de la mise en place, l’armoire doit être de niveau, ce qui s’obtient aisément grâce aux pieds
réglables, voir figure 1.1. (Quelques armoires sont livrées avec roulettes au lieu de pieds réglables).
Figure 1.1
20

Branchement électrique
L’armoire doit être branchée par une prise d’un accès facile avec la tension de 220-240V/ 50Hz.
Les installations électriques doivent être effectués par un électricien spécialisé.
Démarrage
Avant d’utiliser votre armoire, nous vous recommandons de la nettoyer, voir la section
« entretien ».
Important !
Si l’armoire a été transportée aux horizontal, il faut attendre 2 heures après l’installation pour
démarrer l’appareil.
Brancher l’armoire par la prise et allumer le panneau de contrôle en appuyant sur l’interrupteur
(figure 1.9).
Figure 1.9
21

Thermostat
Le thermostat est placé dans le panneau de contrôle (figure 2.0).
Figure 2.0
Il est préprogrammé pour l’armoire ; dans la plupart des cas il est donc inutile de le régler.
Quand l’armoire est allumée, l’afficheur va montrer la température actuelle à l’intérieur de
l’armoire.
Montrer la température réglée :
Presser ce bouton et l’afficheur montre la température réglée, presser encore une fois
pour retourner à l’indication normale.
Régler la nouvelle température :
Presser ce bouton et l’afficheur montre la température réglée.
Presser ce bouton pour augmenter la température réglée.
Presser ce bouton pour baisser la température réglée.
Presser ce bouton pour garder le nouveau réglage, l’afficheur clignote avec la nouvelle
température, puis il retourne à l’indication normale.
Codes d’érreurs :
PF1 Clignotant dans l’afficheur signifie que la sonde du thermostat est défectueuse.
L’armoire va tendre à maintenir la température réglée jusqu’à réparation.
PF2 Clignotant dans l’afficheur signifie que la sonde de l’évaporateur est défectueuse. Cela
n’influence pas le fonctionnement de l’armoire, mais l’erreur doit être réparé dès que
possible.
Dégivrage:
L’armoire se dégivre automatiquement avec des intervalles programmés. Si l’armoire est exposée
aux ouvertures de la porte ou remplacements des marchandises très fréquents, un dégivrage manuel
peut être nécessaire.
Presser ce bouton pendant plus de 3 secondes ; cela va lancer un dégivrage manuel et après
retourner au fonctionnement normal.
L’eau de dégivrage est évacuée et s’évapore dans un récipient placé dans le compartiment
compresseur.
22

Entretien :
Débrancher l’armoire pendant le nettoyage.
Le nettoyage de l’intérieur et l’extérieur de l’armoire doit être effectué par intervalles convenables à
l’aide d’un produit à vaisselle non parfumé. L’armoire doit être essuyée minutieusement après le
nettoyage. L’extérieur peut être maintenu avec un produit (creme, huile) pour l’inox.
N’utiliser pas des produits à vaisselle chlorés ou d’autres produits aggrésifs, parce qu’ils pourraient
causer la corrosion de l’acier inox et du système frigorifique interne.
Le condensateur et le compartiment compresseur doivent être nettoyés par l’aide d’un aspirateur et
d’une brosse raide.
Ne laver jamais le compartiment compresseur à grande eau ; on risque les courts-circuits et les
dégâts sur les éléments électriques de l’armoire.
Service
:
Le système frigorifique est étanche à l’air ; il n’est donc pas nécesssaire de le surveiller, il suffit de
le nettoyer.
Si l’armoire ne rafraîchit pas, vérifier que la fiche est bien enfoncée, que la fusible est intact et qu’il
n’y a pas de coupure de courant.
Si vous ne pouvez pas trouver la cause du défaut, contacter votre revendeur. Informer la référence et
le numéro de série de l’armoire, ce que vous pouvez trouver à l’intérieur de l’armoire sur l’étiquette
placée en haut à droite.
Élimination:
Quand l’armoire usée doit être éliminée, il doit se passer d’une manière qui ne compromet pas
l’environnement. Veuillez prendre note des règles d’élimination et examiner s’il existe des
demandes et conditions spécifiques qu’il faut respecter.
23

I
Importanti nozioni di sicurezza
1. Per utilizzare correttamente l’apparecchio, consigliamo una lettura approfondita del presente
libretto di istruzioni
2. Sarà responsabilità dell’utente finale fare in modo che l’apparecchio venga utilizzato in
maniera propria.
3. In caso di qualsiasi malfunzionamento, l’utente è pregato contattare senza esitazioni il
fornitore.
4. Installare l’apparecchio in un luogo asciutto e ventilato.
5. Mantenere il frigorifero al riparo da fonti di calore e non sottoporre l’oggetto alla luce del
sole.
6. Sempre tenere in considerazione che tutti I dispositivi elettronici sono potenzialmente
pericolose.
7. Non avvicinare o inserire materiale infiammabile (diluente, benzina,ecc.) al frigorifero.
8. Il fornitore dichiara che per l’oggetto non contiene sostanze inquinanti quali CFC e amianto.
9. L’olio del compressore non contiene PCB.
Rimozione dell’imballaggio e installazione.
Rimuovere il pallet di legno e l’imballo. Le superfici esterne sono ricoperte da una pellicola
protettiva che deve essere rimosse prima dell’installazione.
Per assicurare un corretto funzionamento è necessario che l’apparecchio sia a livello. Nel caso il
frigorifero sia dotato di piedini , questi possono essere regolati per ottenere un perfetto
posizionamento.
Fig. 1.1
24

Inizializzazione dell’armadio
Prima dell’utilizzo, assicurarsi che l’armadio venga pulito, vedere paragrafo “manutenzione e
pulizia”
Importante!
Se l’armadio è stato mantenuto in posizione orizzontale durante il trasporto, si prega di aspettare
almeno 3 ore prima di procedure all’accensione dell’apparecchio.
Connettere la presa dell’apparecchio ad una presa di corrente e premere l’interruttore posizionato
sul pannello frontale, come nella fig.1.9.
Fig. 1.9
25

Termostato
Il termostato è posizionato sul pannello frontale, vedi fig 2.0.
Fig. 2.0
Il termostato è già stato configurato per un corretto funzionamento e nella maggioranza dei casi non
sarà necessario modificare I parametric impostati.
Appena l’apparecchio viene acceso, si potrà leggere sul display la temperatura dell’armadio.
Visione della temperatura del vano interno:
Premere questo tasto per visualizzare sul display la temperature impostata. Nuovamente
premuto, il display tornerà a visualizzare la temperatura corrente dell’apparecchio.
Impostare una nuova temperature:
Premere questo tasto per visionare la temperature impostata.
Premere il tasto “freccia in alto” per aumentare la temperature.
Premere il tasto “freccia in giù” per abbassare la temperature.
Premere il tasto “SET” per memorizzare I nuovi parametric. Il display lampeggerà mostrando
il nuovo valore impostato per tornare, subito dopo, a visualizzare il corrente valore di
temperatura.
Codici di allarme:
PF1 Lampeggiante sul display: indica che la sonda nel frigorifero è difettosa.
L’apparecchio terrà la temperatura impostata fino alla riparazione.
PF2 Lampeggiante sul display: indica che la sonda dell’evaporatore è difettosa.
Ciò non influenza l’operatività dell’apparecchio, ma deve essere riparata nel più breve tempo
possibile.
Sbrinamento
L’apparecchio è impostato per effettuare lo sbrinamento ad intervalli regolari. Se la porta rimane
aperta o il contenuto viene cambiato di frequente, può essere necessario impostare manualmente lo
sbrinamento.
Tenendo premuto il tasto per un tempo superiore a 3 secondi, lo sbrinamento manuale avrà
inizio per tornare successivamente ad un funzionamento standard.
L’acqua di sbrinamento convoglia ad un contenitore posto nell’unità motore per poi evaporare
automaticamente.
26

Manutenzione e pulizia.
Scollegare la presa di corrente.
L’apparecchio deve essere periodicamente pulito. Pulire le superfici interne ed esterne utilizzando
detergenti non aggressivi, asciugare successivamente. Le superfici esterne possono essere pulite non
aggressivi
Non utilizzare detergenti a base di cloro o altri componenti dannosi; essi potrebbero danneggiare la
superficie dell’acciaio inossidabile e il sistema di raffreddamento interno.
Pulire il condensatore e l’unità motore utilizzando un aspirapolvere.
NON lavare l’unità motore con acqua in quanto altamente rischioso per le parti elettriche e potrebbe
recare danni seri all’operatore. Irreparabili corto circuiti possono manomettere il corretto
funzionamento dell’apparecchio.
Assistenza
Il sistema refrigerante è sigillato ermeticamente e non richiede manutenzione,ma solo una periodica
pulizia.
Se l’apparecchio non raffedda, assicurarsi di non aver problemi con la rete elettrica.
Se l’eventuale danno non è localizzabile, non esitate a contattare il fornitore. Per assicurarsi una
corretta assistenza, fornire il modello ed il numero seriale dell’apparecchio riportati sull’etichetta
posta sul lato destro del vano interno e sul retro dell’apparecchio.
Smaltimento
Lo smaltimento dell’apparecchio deve essere effettuato in accordo con le norme di prevenzione
dell’ambiente. Vi sono specifici procedimenti che devono essere seguiti in accordo con le normative
nazionali vigenti.
27

E
Importantes instrucciones de seguridad
1. Para obtener el uso completo y adecuado del aparato, recomendamos leer este manual de
instrucciones.
2. Es responsabilidad del usuario el manejo adecuado del aparato, de acuerdo con las
instrucciones dadas.
3. Contacte a su comerciante inmediatamente en caso de cualquier funcionamiento defectuoso.
4. Coloque el aparato en un lugar seco y ventilado.
5. Mantenga el aparato totalmente alejado de cualquier fuente de calor y no lo exponga a la luz
directa del sol.
6. Tenga siempre presente que todo dispositivo eléctrico es una fuente potencial de peligro.
7. No almacene material inflammable tal como gas, gasolina, éter ó similares en el aparato.
8. No ha sido utilizado ningún asbesto ni CFC en la construcción.
9. El aceite en el compresor no contiene TCI.
Desembalaje e instalación
El aparato se entrega embalado y en un palet, desembálelo. Las superficies exteriores están forradas
con un plástico protector, quítelo antes de hacer la instalación.
Para asegurar el funcionamiento correcto, es importante que el aparato esté plano y horizontal
después de la instalación. Si el aparato ha sido suministrado con patas, estas pueden ser ajustadas,
ver fig. 1.1.
Fig. 1.1
28

Conexión eléctrica
El aparato está hecho para una conexión de 230-240 V/50 Hz.
Las conexiones eléctricas principales deben ser hechas por electricistas autorizados.
Puesta en marcha del aparato
Antes de su uso, recomendamos que el aparato se limpie, vea la sección de mantenimiento y
limpieza.
Importante !
Si el aparato ha sido colocado horizontalmente durante su transporte, espere, por favor, 2 horas
antes de la puesta en marcha del aparato.
Conecte el aparato a un enchufe, y encienda el interruptor en el tablero de control, ver Fig. 1.9.
Fig. 1.9
29

Termostato
El termostato está colocado en el tablero de control, ver fig. 2.0.
Fig. 2.0
El termostato ya está programado para este aparato. En la mayoria de los casos, no es necesario
ajustar las posiciones.
Al encender el aparato, el display/pantalla mostrará la temperatura actual en el aparato.
Para indicar temperatura:
Apriete esta tecla y la pantalla mostrará la temperatura fija. Apriete la tecla otra vez para
normalizar la lectura.
Cambio a nueva temperatura:
Apriete esta tecla, la pantalla mostrará la temperatura fija.
Apriete esta tecla para aumentar la temperatura fija.
Apriete esta tecla para bajar la temperatura fija.
Apriete esta tecla para guardar la nueva posición. La pantalla destellará con el nuevo
valor, y después volverá a la lectura normal.
Codigos de alarma:
PF1 Destellando en la pantalla, indica que el sensor del aparato está defectuoso.
El aparato se esforzará por mantener la temperatura fija hasta que haya sido reparado.
PF2 Destellando en la pantalla, indica que el sensor de evaporación está defectuoso.
Esto no influye en el funcionamiento del aparato, pero debe ser reparado, tan pronto como
sea possible.
Descongelación
El aparato descongela automáticamente con intervalos fijos programados. Si la puerta del aparato
está abierta o el contenido del aparato se cambia con frecuencia, puede llegar a ser necesario
descongelar el aparato manualmente.
Apriete esta tecla continuamente, más de 3 segundos, esto activará una descongelación
manual, y después volverá a operar normalmente.
El agua de la descongelación circula para su evaporación a un contenedor, que está situado en el
compartimento del compresor.
30

Mantenimiento y limpieza
Apague el aparato desde el enchufe.
El aparato debe ser limpiado periódicamente. Limpie las superficies externas e internas del aparato
con una solución ligera de jabón, y seque bien. Las superficies externas pueden mantenerse limpias
con un aceite especial para acero.
No utilice limpiadores que contienen cloro u otros productos agresivos, pues pueden dañar las
superficies inoxidables del acero y el sistema interior de refrigeración.
Limpie el condensador y el compartimento del compresor con la ayuda de un aspirador y un cepillo
duro.
No riegue con una manguera el compartimento del compresor, ya que el agua puede causar
cortocircuitos y daño en las partes eléctricas.
Servicio técnico
El sistema de refrigeración es un sistema herméticamente sellado, y no requiere supervisión, sólo
limpieza.
Si el aparato falla en la refrigeración, verifique que la razón no sea un apagón, bien desde el enchufe
o de los plomos.
Si no puede localizar la razón del fallo del aparato, contacte, por favor, a su suministrador.
Informe, por favor, del modelo y el número de serie del aparato.Usted puede encontrar esta
información en la etiqueta que está colocada dentro del aparato arriba, a mano derecha.
Como deshacerse del aparato
Cuando se tenga que deshacer del aparato, deberá hacerlo teniendo en cuenta las normas al
respecto. Puede que haya unas exigencias y condiciones que se deban cumplir.
31

PT
Instruções importantes de segurança
1. Para se obter uma utilização plena desta arca vertical, recomendamos-lhe que leia este
manual de instruções.
2. A utilização do aparelho de acordo com as instruções fornecidas é da inteira
responsabilidade do utilizador.
3. Contacte imediatamente o distribuidor em caso de avarias.
4. Coloque a máquina num local seco e ventilado.
5. Mantenha o aparelho afastado de fontes de calor intenso e não o exponha a luz solar directa.
6. Tenha sempre presente que qualquer dispositivo eléctrico é uma fonte de perigo potencial.
7. Não armazene na arca quaisquer materiais inflamáveis, como diluente, gasolina, etc.
8. Declara-se que não foi usado amianto ou CFC na construção deste aparelho.
9. O óleo no compressor não contém PCB.
Desembalagem e instalação
Retire a palete de madeira e a embalagem. As superfícies externas encontram-se revestidas com
uma película de protecção que deverá ser removida antes da instalação.
Para garantir o correcto funcionamento da arca, é importante que esta esteja nivelada. Se a arca tiver
pés, estes podem ser ajustados. Veja a fig. 1.1.
Fig. 1.1
32

Ligações Eléctricas
A arca funciona a 230 V/50 Hz.
A tomada de parede deverá estar facilmente acessível.
Todas as ligações à terra estipuladas pelas autoridades eléctricas locais deverão ser observadas. A
ficha da arca e a tomada de parede deverão fornecer a ligação à terra adequada. Se houver qualquer
dúvida, contacte o distribuidor local ou um electricista qualificado.
As principais ligações eléctricas deverão ser executadas por electricistas credenciados.
Arranque da arca
Antes de utilizá-la, recomendamos que a arca seja limpa; consulte a secção sobre manutenção e
limpeza.
Ligue a arca a uma tomada de parede e ligue o interruptor no painel de controlo; veja fig. 1.9.
Fig. 1.9
33

Termostato
O termóstato encontra-se no painel de controlo, como se mostra na fig. 2.0.
Fig. 2.0
O termóstato foi pré-regulado e, na maioria dos casos, não é necessário qualquer ajuste.
Quando a arca é ligada, o visor irá exibir a temperatura actual na câmara.
Exibir a temperatura definida:
Pressione este botão e o visor vermelho irá exibir, piscando, a temperatura definida. Prima a
tecla novamente para regressar à leitura normal.
Definir uma nova temperatura:
Pressione este botão e o visor vermelho irá exibir a temperatura definida.
Pressione este botão para aumentar a temperatura definida.
Pressione este botão para diminuir a temperatura definida.
Pressione este botão para guardar o novo parâmetro. O visor irá exibir o novo valor a piscar e
regressará à leitura normal.
Códigos de Alarme:
PF1 A piscar no visor: indica que o sensor da arca tem uma anomalia.
A arca irá tentar manter a temperatura até que o sensor seja reparado.
PF2 A piscar no visor: indica que o evaporador da arca tem uma anomalia.
Isso não influencia o funcionamento da arca mas deverá ser reparado o mais rapidamente
possível.
Descongelamento
A arca descongela automaticamente em intervalos pré-definidos. Se houver frequentes aberturas da
porta da arca ou mudanças do conteúdo, poderá ser necessário descongelar a arca manualmente.
Se este botão for premido continuamente durante mais de 3 segundos, dá-se início à
descongelação manual e depois regressará ao funcionamento normal.
A água daí resultante é recolhida num receptáculo colocado no compartimento do compressor e
depois evapora.
34

Manutenção e Limpeza
Desligue a arca da tomada de parede.
A arca deve ser limpa periodicamente. Limpe as superfícies interna e externa da arca com uma
solução ligeiramente ensaboada e seque de seguida. As superfícies externas poderão ser
conservadas com um óleo de máquina.
NÃO utilize produtos de limpeza que contenham cloro ou produtos abrasivos pois poderão danificar
as superfícies de aço inoxidável e o sistema de arrefecimento interno.
Limpe o condensador e o compartimento do compressor utilizando um aspirador e uma escova de
cerdas duras.
NÃO lave à mangueira o compartimento do compressor pois poderá provocar curto-circuitos e
danos às partes eléctricas.
Assistência Técnica
O sistema de arrefecimento é hermeticamente selado e não requer supervisão; apenas limpeza.
Se a arca não arrefecer, verifique se isso se deve a uma falta de electricidade.
Se não conseguir diagnosticar a causa da falha da arca, contacte o distribuidor. Informe o modelo e
o número de série da arca. Poderá encontrar esta informação na etiqueta de características
localizada na parte de dentro da arca, do lado superior direito.
Eliminação
A eliminação da arca deverá efectuar-se de modo ambientalmente correcto. Aquando da eliminação,
tenha em consideração a legislação existente. Poderá haver requisitos e condições especiais a serem
observados.
35

RUS
Внимание
1. Перед использованием изделия, прочитайте инструкцию.
2. Пользователь несёт ответственность за использование стола в соотвествии с
инструкциями.
3. В случае неполадков свяжитесь с дистрибьютором.
4. Стол должен быть расположен в сухом и хорошо проветриваемом помещении.
5. Не допускается установка изделия вблизи источников теплового излучения, т.е.плит,
батарей отопления и т.п., а также в местах действия прямых солнечных лучей.
6. Обратите внимание на то, что любой електрический аппарат может быть опасным.
7. Нельзя использовать для хранения взрывоопасных веществ, таких как например газ.
бензин и т.п.
8. В конструкции изделия не использованы асбест или CFC.
9. Компрессорное масло не содержит PCB
Распаковка и установка
Стол поставляется в упаковке и на деревянных паллетах. Стол надо распаковать и снять с
паллет, необходимо также снять предохраняющую полиэтиленовую пленку.
Для правильной работы стола, место установки должно быть ровным, прочным и жёстким.
Если прилагаются ножки, то вмонтируйте их, см. фигуру 1.1.
Pис.1.1
36

Подключение к электросети
Стол должен быть подключён к питающей электрической сети 220-240 V/50Hz.
Розетка должна находится в легко доступном месте. Подключение к электросети допускается
только через стационарную розетку или удлинитель с заземляющим проводом.
Запуск
Перед использованием стол необходимо почистить, см. раздел «Обслуживание».
Внимание!
Если стол при перевозке находился в лежачем состоянии, подождите 2 часа до того как
влючать его в электросеть.
Включите к электросети и нажмите на кнопку-включатель на контрольной панели Рис.1.9.
Рис. 1.9
37

Термостат
Термостат находится на контрольной панели, рис.2.0.
Pис. 2.0
Термостат запрограммирован, поэтому нет необходимости в его настройке.
При включении стола, на экране дисплея появится актуальная внутренняя температура стола.
Показ внутренней температуры:
Нажмите на данную кнопку и на экране дисплея покажется настроенная температура.
Чтобы вернуться в исходное положение надо ещё раз нажать на кнопку.
Настройка температуры:
При нажатии на эту кнопку,на экране появится актуальная температура.
При нажатии на данную кнопку, температура возрастает.
При нажатии на данную кнопку, температура снижается.
Нажмите на эту кнопку, чтобы запомнить/зарегистрировать новые данные.
Аварийная сигнализация
PF1 – Мигающая лампа указывает на повреждение датчика.
Температура стола будет неизменяемой пока стол не отремонтируется.
PF2 - Мигающая лампа указывает что повреждён датчик испарителя.
Это не влияет на работу стола, но следует починить как можно скорей.
Размораживание стола
Стол размораживается автоматически с запрограммированными интервалами.
В случае частого открывания дверцы стола может возникнуть необходимость ручного
размораживания.
Механическое размораживание запускается при помощи нажатия на данную кнопку
более 3 секунд, после чего изделие запускается как обычно.
Оттаявщая вода стекается в ванночку расположенную в компрессорном отделе.
38

Техобслуживание
Отключите стол от сети.
Стол необходимо регулярно чистить. Мойка изделия производится теплой водой с
небольшим количеством мыльного средства. После чего стол промыть чистой водой и
просушить.
ЗАПРЕЩАЕТСЯ использовать хлоросодержащие моющие средства или другие едкие
средства, которые могут повредить работе стола.
Чистка конденсатора производится при помощи пылесоса и жесткой щетки.
Избегайте попадания воды в компресорный отдел, т.к. это может привести к замыканию и
повреждению электрических деталей стола.
Устранение неполадок
При неполадках в холодильной системе проверьте вставлена ли вилка в розетку и
подключена ли розетка, а также если нет неполадков в сети.
Если причину неисправности не возможно выяснить, обратитесь к дилеру. Обращаясть к
дилеру, назовите модель холодильника, серийный номер и номер изделия. Эти данные
указаны на заводской табличке с правой стороны на внутренней панеле или на внешней
панеле задней части стола.
Утилизация
Если срок эксплуатации изделия подошёл к концу, его следует утилизировать без нанесения
вреда окружающей среде. Следует принимать во внимание существующие правила
утилизации. Помимо этого могут существовать определённые законодательные требования
по утилизации, которым тоже необходимо следовать.
39
 Loading...