

Page 1
02/2016
Mod: STAR-HD/R
Production code: CS 3 E
Page 2
INSTRUCTIONS FOR USE AND
INSTALLATION HOT DOG MACHINES
CS0 E / CS2 E / CS3 E / CS4 E / HD 4
Made in France
Mai 2015
Page 3

HOT DOG MACHINES
CS0 E / CS2 E / CS3 E / CS4 E / HD 4
Congratulations for the acquisition of this upmarket appliance made in France. You
chose an appliance which alloys the best technical qualities with a big userfriendliness. We wish you the biggest contentment
1. SECURITY INSTRUCTIONS
Please respect these instructions scrupulously to avoid any
risk of fire, electric shock, scald or other wounds and damage. During the use of this appliance, fundamental circumspection of security must always be noticed, such as:
- Take into account the instructions to be systematically kept with the appliance.
- Install the appliance always in instructions respect. A
10 cm distance minimum with the partition or the wall
is necessary.
- Protect the appliance from direct light of the sun,
frost and humidity.
- Never leave the appliance within the reach of children or disabled persons without surveillance.
- Ensure that only trained personnel operate the appli-
ance.
- Never move the appliance when it is working.
- Check that the appliance is definitely off before con-
necting it up or disconnecting it.
- Do not touch the hot surfaces of the appliance. The
temperature of the hot surfaces can be very important
when the appliance is working. Always use handles
and control knobs.
10
Page 4

- Do not use the appliance for other functions than
determined use.
- Do not leave the cord of electrical feeding in the
contact of hot surfaces.
- The appliance should not be used close to combustible materials.
- During use, look after not to obstruct hearings of
aeration of the appliance.
- To avoid any electric shock, never plunge the appliance, the cord or plug in water or quite other liquid.
- If the cord is harmed, it must be replaced by the
producer, his after sale service or persons of similar
skills to avoid any risk.
- Entrust compensations only to a skilled person.
- Use only spare parts of origin.
- At the end of cooking, before cleaning the appli-
ance, do not forget to disconnect it.
2. CONTENTS OF CARDBOARD PACKAGING
Device: A hot dog machine
Accessories:- A stainless steel lid (except HD 4)
- A stainless steel 2-section basket (except HD 4)
- A Pyrex glass packaged in a box (except HD 4)
- A water container (except HD 4)
- The present note
See exploded views for each hot dog machines at the end of the document
3. CONFORMITY OF USE
Use the device only to steam sausages (except HD 4) and to toast the bread inside
thanks to heating pins (except CS 0 E)
11
Page 5

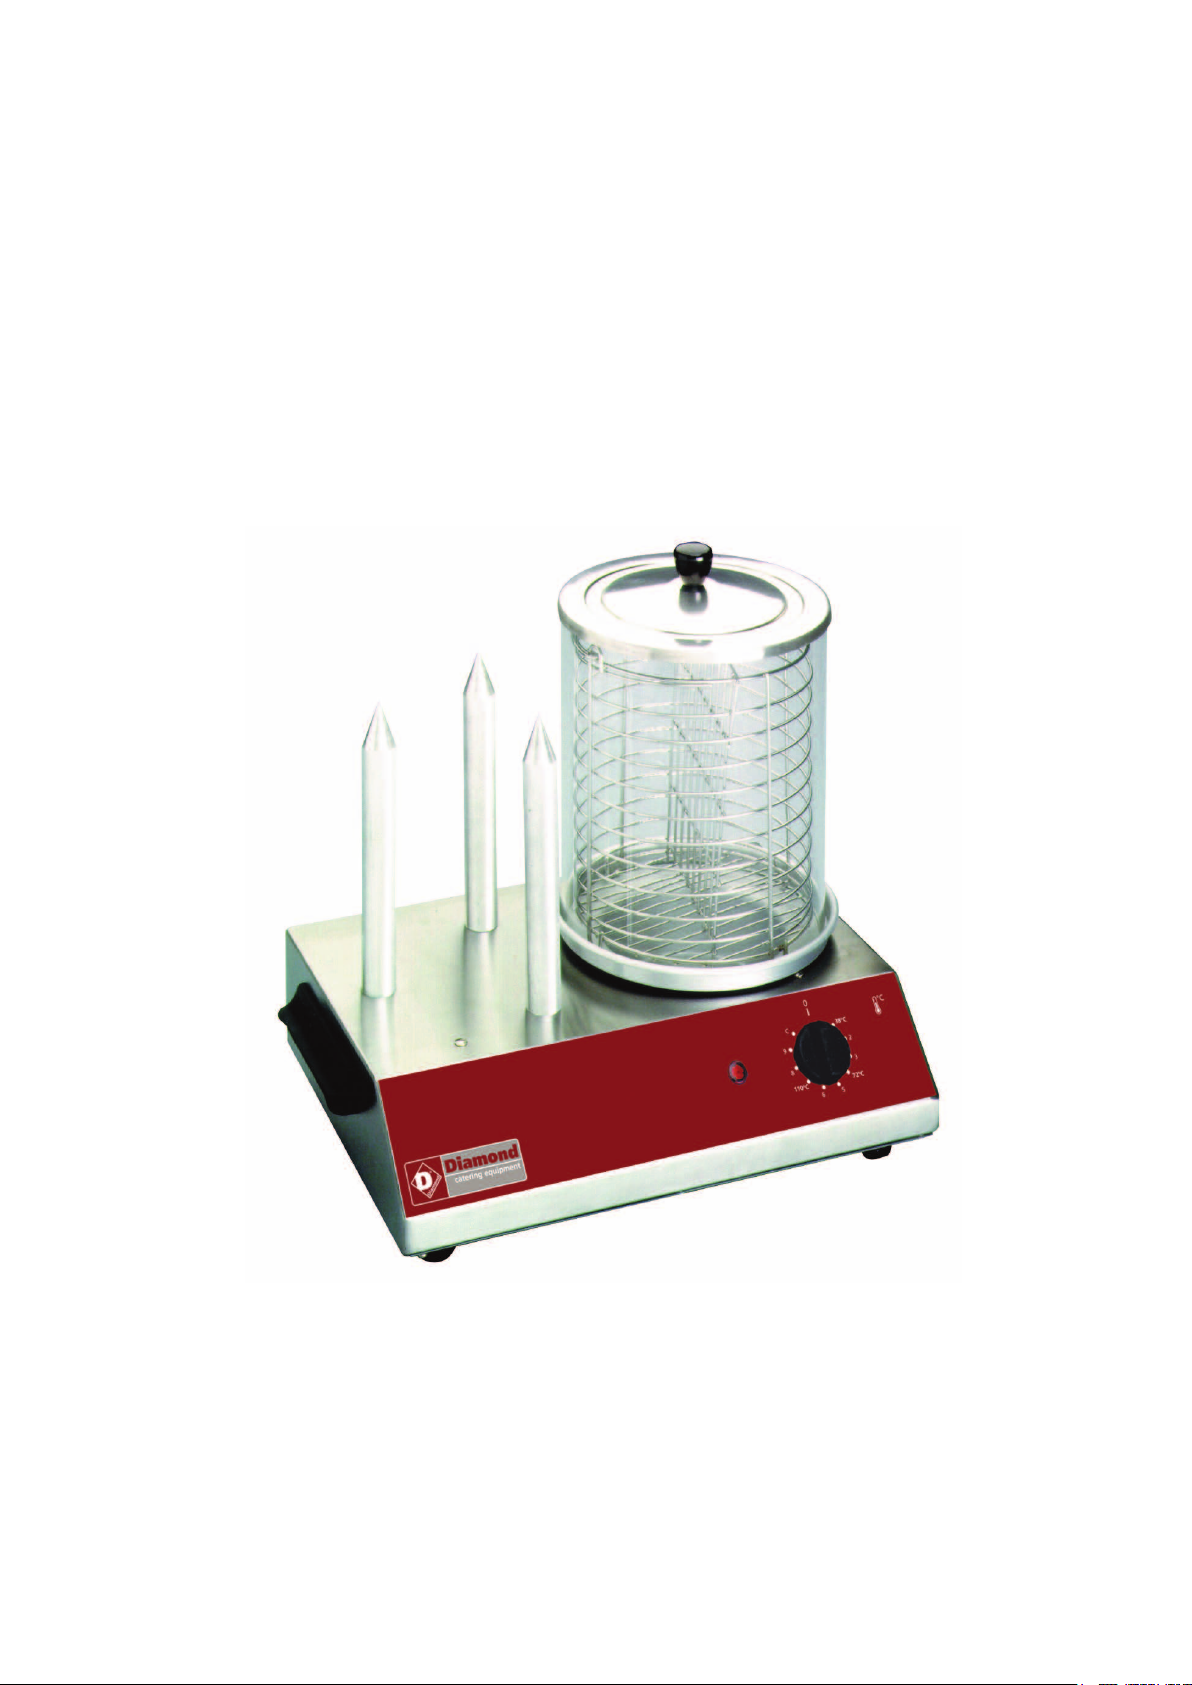
4. WAY OF FUNCTIONING
The hot dog machine HD 4 is available with only 4 heating pins.
The model CS 0 E is available without any heating pins but with a water container.
The others models are fitted with a heated container for cooking and keeping hot
dogs in a damp atmosphere created by means of the water poured in the water tank.
The container is composed of a Pyrex glass casing placed over the tank. This glass
casing holds a 2-section basket : one for the hot dogs being cooked, the other for the
cooked hot dogs.
The hot dogs never come into contact with the water, they are just gently cooked.
The heating pins enable toasting the bread inside into which you will slide the hot
dog.
An energy regulator enables to modulate the temperature of the element and water
container.
To turn on the device, just turn on the power control knob (n°2 on picture) on the
wished position. If you want a quick preheating, set it on maximum position.
The orange pilot light ignites (n°1 on picture) during heating. When orange pilot light
switches off, the device is ready for cooking.
2
1
1
On/off pilot light Power control
2
12
Page 6

5. FUNCTIONING / MANIPULATION
a) Installation / assembly:
- Unpack carefully the device of its packaging.
- Place the hot dog machine on a plane and heatproof surface.
- Never place the device near a wall or near a partition makes of combustible
materials even if it is very well isolated.
- A distance of minimum 10 cm with the partition or the wall is necessary.
- Unpack carefully the accessories, wash them and install them.
b) First starting:
Fill in the water tank till maximum level (about 5cm of water) before connecting the
appliance.
Always operate your appliance with water in the tank.
First cleaning
Clean the device before the first use. (See 6 Cleaning)
Connection of the device
- Check that the tension and the frequency of the electricity network suit to the
values indicated on the descriptive plate.
- Make sure that every control knob is positioned on 0.
- Check that neither the cord nor the plug are damaged
- Unwind completely the electric power cable and connect it in a plug connected
with the earth.
- The device is connected.
NB: in case of connection of the device in a plug without earth protection or directly
on the electricity network, confide its connection to a qualified person .
c)) Use device :
Elements of command and display
Command/Display Function
on Power control knob (n°2
picture)
Orange pilot light
(n°1 on picture)
Temperature setting
Machine is heating (pilot light on)
Temperature reached (pilot light off)
13
Page 7

Putting on
Turn on the power control knob (n°2 on picture) on the wished position: the orange pilot light (n°1 on picture) ignites.
For a quick preheating, set the power control knob on maximum position.
Once orange pilot light (n°1 on picture) is off, the machine reached the wished
temperature.
For a continuous heating, select position C on power control knob.
Temperature setting
Set the temperature by positioning the power control knob (n°2 on picture) to the
desired temperature. The orange pilot light (n°1 on picture) switches on if a higher level of temperature is required and switches off when the same is reached.
Stopping the appliance
Set power control knob (n°2 on picture) on 0: the orange pilot light (n°1 on pic-
ture) switches off and the appliance is no longer functioning.
Let the device cool.
Disconnect the power cable.
Clean the appliance. (See 6. Cleaning)
d) Breakdown / repair:
In case of breakdown or of damaged part, please call your after-sales service and
confide any technical operation to qualified person.
When you contact the after-sales service of your distributor or your store, give him
the complete reference of your device (commercial name, type and serial number).
This information appears on the visible descriptive plate behind the device.
6. CLEANING AND MAINTENANCE
Disconnect the device.
- Let cool completely the device before any technical intervention or cleaning.
- Only use non-abrasive products, clean regularly the external walls of your device
with warm water and wash liquid: avoid the abrasive towelling. Rinse your device
with a wet sponge.
- Never clean the device under a water jet, the infiltrations would risk to damage it in
a irreparable way.
- Never immerse the device, the cord or the plug in the water or quite other liquid to
avoid any electric shock.
- During a prolonged non-use, we recommend you strongly to keep the device
shielded from the humidity.
14
Page 8
7. TECHNICAL SPECIFICATIONS
Models
Outside dimensions mm
Weight
Power
Nb elements
Nb of heating
elements (bread)
Current
Voltage
CS0 E CS3 E CS4 E HD 4 CS 2 E
260x380x400 440x300x400 440x300x400 260x380x300 260x380x400
7 kg 10 kg 10 Kg 6 Kg 8 kg
500 W 650 W 650 W 500 W 500 W
1 1 1 1 1
0 3 4 4 2
2.2 A 3 A 3 A 2.2 A 2.2 A
220-240 V ~ 220-240 V ~ 220-240 V ~ 220-240 V ~ 220-240 V ~
Wires colours correspondence Phase
Neutral
Earth
Brown / Black / Grey
Blue
Yellow-Green
8. NORMS AND LEGALS DISPOSALS
The device is conform to :
IEC/EN 60335-1
IEC/EN 60335-2-38
EN 55014-1 + 55014-2
EN 61000-3-3 + 61000-3-3
9. ELIMINATION OF THE ELECTRIC AND ELECTRONIC WASTE
The device respects the directives:
N°34270064800021 2002 / 96 / CE ( DEEE)
2002 / 95 / CE ( ROHS)
2066/95 CE
2004/108 CE
Reach rule
Never put the device among household waste.
The device must be put down in a centre of recycling for the electric equipments.
The materials of the device are indeed reusable. By eliminating correctly the electric
and electronic wastes, the recycling and quite other shape of re-use of worn equipments, you participate in a significant way in the environmental protection.
15
Page 9

For any information about the collection of electric and electronic waste, please contact your distributor.
10. GUARANTEE
Conditions of guarantee
The guarantee applicable to any device is the commercial guarantee of the distributor or the retailer. Please contact the store where you bought your device to know the
precise conditions.
The guarantee grants no right for damages.
The dispositions which follow are not exclusive of the profit of the legal guarantee
planned by articles 1641 and following ones of the Civil code relative to the defects
and the latent defects.
Exclusion clauses of the guarantee
Bad installation and bad maintenance, in particular if they do not respect current regulations or instructions appearing in this user guide.
Cannot benefit from the guarantee the repairs required as a result of false operations, of inappropriate use, of carelessness or of excess loads of the device, as well
as those resulting from variations of the power supply, over tension or from defective
installations.
The damage due to shocks, bad weather is not flatware by the guarantee. The material travels at the risks of the user; in case of delivery by carrier, the consignee has to
have reservations towards the carrier before any delivery of the device.
The guarantee comes to an end in case of intervention, of repair, of modification by
no qualified persons, or of use in inappropriate purposes.
16
Page 10

PHASE
P1
2
NEUTRE / NEUTRAL
TERRE / EARTH
P2
INFINITE / ENERGY-REGULATOR
RESISTANCE /
HEATING ELEMENT
4
ORANGE
DT42
Date :
26/11/2014
CS 0 E
Dessiné par :
C.Gu
Câblage : C02216
Schéma électrique
Approuvé par :
S.Grenon
Date :
26/11/2014
Indice
A
17
Page 11

SCHEMA
PHASE
NEUTRE / NEUTRAL
TERRE / EARTH
P1
P2
INFINITE / ENERGY-REGULATOR
RESISTANCE /
HEATING ELEMENT
2
4
ORANGE
DT43
Date :
27/11/2014
CS 2 E
Dessiné par :
C.Gu
Câblage : C02216
Schéma électrique
Approuvé par :
S.Grenon
Date :
27/11/2014
Indice
A
18
Page 12

PHASE
P1
2
NEUTRE / NEUTRAL
TERRE / EARTH
P2
INFINITE / ENERGY-REGULATOR
RESISTANCE /
HEATING ELEMENT
4
ORANGE
DT41
Date :
25/11/2014
CS 3 E
Dessiné par :
C.Gu
Câblage : C02015
Schéma électrique
Approuvé par :
S.Grenon
Date :
25/11/2014
Indice
A
19
Page 13

PHASE
P1
2
NEUTRE / NEUTRAL
TERRE / EARTH
P2
INFINITE / ENERGY-REGULATOR
RESISTANCE /
HEATING ELEMENT
4
ORANGE
DT45
Date :
03/12/2014
CS 4 E
Dessiné par :
C.Gu
Câblage : C02015
Schéma électrique
Approuvé par :
S.Grenon
Date :
03/12/2014
Indice
A
20
Page 14

PHASE
P1
2
NEUTRE / NEUTRAL
TERRE / EARTH
P2
INFINITE / ENERGY-REGULATOR
RESISTANCE /
HEATING ELEMENT
4
ORANGE
DT46
Date :
03/12/2014
HD 4
Dessiné par :
C.Gu
Câblage : C02216
Schéma électrique
Approuvé par :
S.Grenon
Date :
03/12/2014
Indice
A
21
Page 15

CODE QTE PIECE SPARE PART
39001 2 SUPPORT PLAQUE ALU C H AU FFE SAUC ISSES ALUMINIUM PLATE HOLDER CS
46073 2 PROTECTION IN T HD 2B/HD 4N/H D 6 INSIDE PROTECTION H D 2B/HD 4N/H D 6
46074 1 SERRE RESISTANC E HD 2B/H D 4N/HD 6 ELEMENT HOLDER H D 2B/H D 4N/HD 6
46075 1 FON D SOCLE HD 2B/H D 4N/HD6 BOTTOM CASING HD 2B/H D 4N/HD6
46076 1 C AISSON HD CASING H D
A04006 1 REGU LATEUR GG, KG, CS, RST REGU LATOR GG, KG, CS, RST
A08003 1 VOYAN T ORANGE DIAM 12 ORAN GE PILOT LIGHT DIAM 12
A10001 1 SERRE CABLE PA 107 CORD CLOSER PA 107
A13003 4 PIED CAOU TCHOU C PZ, CV, MR26 RUBBER FOOT PZ, CV, M R26
A14111 1 BOUTON ELEC T Diam 40 PLAT 6 H ELECTRIC KN OB Diam 40 6 H
A15016 2 POIGN EE C EINTURE FRITEUSE FRYER SIDE HANDLE
C03P04022 1 CORDON CORD
C04007_95 1 SILIGAINE 15 C2 8 mm CON TACT GRILL SHEATH CONTACT GRILL
C04007_115 1 SILIGAIN E 15 C2 8 mm CONTACT GRILL SHEATH CON TACT GRILL
D02029 1 RESISTANC E BLINDEE 500W 220V BM/HD2 ARMOURED H EATING ELEMENT 500W 220V BM/HD2
F04012 1 PAN IER CS BASKET CS
F05009 1 MAN C HON PYREX C S PYREX CYLINDER CS
F05022 1 BAC ALU C S TEFLON TEFLON C ON TAIN ER CS
F05026 1 PLAQU E ALUMIN IUM CHAUFFE SAU CISSES ALUM IN IU M PLATE CS
F05051 1 COUVERC LE C H AU FFE SAUC ISSES H OT DOG M AC H IN ES LID
G06P04022 1 CADRAN FRONT PANEL
DT42
Date :
26/11/2014
CS 0 E
Dessiné par :
C.Gu
Approuvé par :
J.Godéré
Nomenclature
Date :
26/11/2014
Indice
A
22
Page 16

A15016
A08003
A14111
G06P04022
46076
A04006
39001
F05026
F05051
F04012
F05009
F05022
A15016
A10001
C03P04022
D02029
C04007_115
C04007_95
46074
46073
46075
A13003
CS 0 E
Vue éclatée
DT42
Date :
26/11/2014
Dessiné par :
C.Gu
Approuvé par :
S.Grenon
Date :
26/11/2014
Indice
A
23
Page 17

CODE QTE PIECE SPARE PART
39001 2 SUPPORT PLAQUE ALU C H AU FFE SAU CISSES ALUM IN IU M PLATE H OLDER CS
46070 1 CAISSON H D 2B CASIN G HD 2B
46073 2 PROTECTION IN T HD 2B/HD 4N/H D 6 INSIDE PROTECTION H D 2B/H D 4N/HD 6
46074 1 SERRE RESISTANC E HD 2B/HD 4N/H D 6 ELEMENT HOLDER H D 2B/HD 4N/H D 6
46075 1 FON D SOCLE HD 2B/H D 4N/HD6 BOTTOM CASING HD 2B/H D 4N/HD6
A04006 1 REGULATEUR GG, KG, C S, RST REGU LATOR GG, KG, CS, RST
A08003 1 VOYAN T ORANGE DIAM 12 ORAN GE PILOT LIGHT DIAM 12
A10001 1 SERRE C ABLE PA 107 CORD CLOSER PA 107
A13003 4 PIED CAOU TCHOU C PZ, C V, MR26 RUBBER FOOT PZ, CV, M R26
A14111 1 BOUTON ELECT Diam 40 PLAT 6 H ELECTRIC KN OB Diam 40 6 H
A15016 2 POIGN EE C EINTURE FRITEUSE FRYER SIDE HANDLE
C03P04023 1 CORDON CORD
C04007_95 1 SILIGAINE 15 C2 8 mm CON TACT GRILL SH EATH C ON TACT GRILL
C04007_115 1 SILIGAINE 15 C2 8 mm CON TACT GRILL SH EATH CONTACT GRILL
D02029 1 RESISTANC E BLINDEE 500W 220V BM/HD2 ARMOURED HEATING ELEMENT 500W 220V BM/HD2
F04012 1 PAN IER CS BASKET CS
F05009 1 MANCH ON PYREX C S PYREX C YLIN DER C S
F05010 2 PLOT CH AUFFAN T CS LONG 240 MM HEATING ELEM EN T CS
F05022 1 BAC ALU CS TEFLON TEFLON C ON TAIN ER CS
F05026 1 PLAQU E ALUMINIUM C HAUFFE SAU C ISSES ALUMINIUM PLATE CS
F05051 1 COU VERCLE CHAUFFE SAUCISSES H OT DOG MACHINES LID
G06P04023 1 C ADRAN FRONT PANEL
DT43
Date :
27/11/2014
CS 2 E
Dessiné par :
C.Gu
Approuvé par :
J.Godéré
Nomenclature
Date :
27/11/2014
Indice
A
24
Page 18

F05010
A15016
A08003
A14111
G06P04023
46070
A04006
39001
F05026
F05051
F04012
F05009
F05022
A15016
A10001
C03P04023
DT43
D02029
C04007_115
C04007_95
46074
46073
46075
A13003
Date :
27/11/2014
CS 2 E
Dessiné par :
C.Gu
Approuvé par :
S.Grenon
Vue éclatée
Date :
27/11/2014
Indice
A
25
Page 19

CODE QTE PIECE SPARE PART
46001 1 C AISSON CS 3 PLOTS C ASING CS 3
46002 1 FOND DE SOCLE CS 2/3/4/0 PLOTS BOTTOM CASING CS 2/3/4/0 PLOTS
46003 1 BOITE RESISTANCE C S 2/3/4/0 PLOTS HEATING ELEMEN T BOX CS 2/3/4/O
A04006 1 REGULATEUR REGU LATOR
A08003 1 VOYANT ORANGE DIAM 12 ORANGE PILOT LIGH T DIAM 12
A10001 1 SERRE CABLE PA 107 CORD C LOSER PA 107
A13003 4 PIED CAOU TCHOUC RUBBER FOOT
A14111 1 BOUTON ELECT Diam 40 PLAT 6 H ELEC TRIC KNOB Diam 40 6 H
A15016 2 POIGN EE HANDLE
C03P04020 1 CORDON CORD
D02001 1 RESISTANCE C S 650 W HEATING ELEMEN T CS 650 W
F04012 1 PAN IER CS BASKET CS
F05009 1 MAN CHON PYREX CS PYREX CYLINDER C S
F05010 3 PLOT CHAU FFAN T CS Lg 240 mm HEATING ELEM EN T CS Lg 240 mm
F05022 1 BAC ALU CS TEFLON TEFLON CONTAIN ER C S
F05024 1 PLAQU E ALU CS ALU PLATE CS
F05051 1 COU VERCLE LID
G06P04020 1 CADRAN FRONT PAN EL
H02026 2 ISOLANT FOUR INSULATION OVEN
DT41
Date :
25/11/2014
CS 3 E
Dessiné par :
C.Gu
Approuvé par :
J.Godéré
Nomenclature
Date :
25/11/2014
Indice
A
26
Page 20

F05051
F04012
F05010
A15016
A08003
A14111
G06P04020
46001
F05024
D02001
46003
F05009
F05022
A04006
A10001
A15016
C03P04020
DT41
H02026
46002
A13003
Date :
25/11/2014
CS 3 E
Dessiné par :
C.Gu
Approuvé par :
S.Grenon
Vue éclatée
Date :
25/11/2014
Indice
A
27
Page 21

CODE QTE PIECE SPARE PART
46002 1 FON D DE SOC LE CS 2/3/4/0 PLOTS BOTTOM C ASIN G CS 2/3/4/0 PLOTS
46003 1 BOITE RESISTANCE C S 2/3/4/0 PLOTS HEATING ELEM EN T BOX CS 2/3/4/O
46020 1 CAISSON C S 4 PLOTS C ASING C S 4
A04006 1 REGULATEUR REGU LATOR
A08003 1 VOYAN T ORANGE DIAM 12 ORAN GE PILOT LIGHT DIAM 12
A10001 1 SERRE C ABLE PA 107 C ORD C LOSER PA 107
A13003 4 PIED CAOU TCHOU C RUBBER FOOT
A14111 1 BOUTON ELECT Diam 40 PLAT 6 H ELEC TRIC KNOB Diam 40 6 H
A15016 2 POIGN EE HANDLE
C03P04021 1 CORDON CORD
D02001 1 RESISTANC E CS 650 W HEATING ELEMENT CS 650 W
F04012 1 PAN IER CS BASKET CS
F05009 1 MAN C HON PYREX C S PYREX CYLINDER CS
F05010 4 PLOT CHAU FFAN T C S Lg 240 mm HEATING ELEM ENT CS Lg 240 mm
F05022 1 BAC ALU CS TEFLON TEFLON CONTAINER CS
F05024 1 PLAQUE ALU C S ALU PLATE CS
F05051 1 COU VERCLE LID
G06P04021 1 C ADRAN FRONT PAN EL
H02026 2 ISOLANT FOUR INSULATION OVEN
DT45
Date :
03/12/2014
CS 4 E
Dessiné par :
C.Gu
Approuvé par :
J.Godéré
Nomenclature
Date :
03/12/2014
Indice
A
28
Page 22

F05051
F04012
F05010
A15016
A08003
A14111
G06P04021
46020
F05024
D02001
46003
F05009
F05022
A04006
A10001
A15016
C03P04021
DT45
H02026
46002
A13003
Date :
03/12/2014
CS 4 E
Dessiné par :
C.Gu
Approuvé par :
S.Grenon
Vue éclatée
Date :
03/12/2014
Indice
A
29
Page 23

CODE QTE PIECE SPARE PART
39001 2 SUPPORT PLAQUE ALU C H AU FFE SAU CISSES ALUM IN IU M PLATE H OLDER C S
46071 1 CAISSON HD 4N CASIN G HD 4N
46073 2 PROTECTION INT HD 2B/HD 4N/H D 6 INSIDE PROTECTION H D 2B/H D 4N/HD 6
46074 1 SERRE RESISTANCE HD 2B/H D 4N/HD 6 ELEMEN T HOLDER H D 2B/H D 4N/HD 6
46075 1 FON D SOCLE H D 2B/H D 4N/HD6 BOTTOM CASING H D 2B/HD 4N/H D6
A04006 1 REGULATEUR REGULATOR
A08003 1 VOYANT ORANGE DIAM 12 ORAN GE PILOT LIGHT DIAM 12
A10001 1 SERRE CABLE PA 107 CORD CLOSER PA 107
A13003 4 PIED CAOU TCH OU C RU BBER FOOT
A14111 1 BOU TON ELECT Diam 40 PLAT 6 H ELECTRIC KN OB Diam 40 6 H
A15016 2 POIGNEE HAN DLE
C03P04024 1 C ORDON CORD
C04007_95 1 SILIGAIN E DIAM 8 mm SHEATH DIM 8 mm
C04007_115 1 SILIGAINE DIAM 8 mm SH EATH DIM 8 mm
D02029 1 RESISTANC E BLINDEE 500 W ARM OU RED H EA TING ELEMEN T 500 W
F05010 4 PLOT CH AUFFANT C S Lg 240 mm HEATING ELEMENT CS Lg 240 mm
F05026 1 PLAQU E ALUMINIUM CH AUFFE SAUCISSES ALUM IN IU M PLATE C S
G06102 1 CADRAN H D 4 CONTROL PAN EL HD 4
DT46
Date :
03/12/2014
HD 4
Dessiné par :
C.Gu
Approuvé par :
J.Godéré
Nomenclature
Date :
03/12/2014
Indice
A
30
Page 24

F05010
A15016
A08003
A14111
G06102
46071
A04006
39001
F05026
D02029
C04007_115
C04007_95
46074
A15016
A10001
C03P04024
DT46
46073
46075
A13003
Date :
03/12/2014
HD 4
Dessiné par :
C.Gu
Approuvé par :
S.Grenon
Vue éclatée
Date :
03/12/2014
Indice
A
31
 Loading...