

Page 1

CONVERTIBLE SPEAKER
INSTALLATION MANUAL
D652
D662
|
Page 2

SPECIAL THANKS
Dear Valued Customer,
Thank you for choosing Diamond Audio D6 speakers. These speakers represent the latest advances in
acoustic technology, and like all Diamond Audio products, are hand built and tested using the highest
grade components and state of the art techniques. When installed properly, they will provide many
years of accurate sound reproduction.
Please keep in mind that prolonged exposure to sound pressure levels in excess of 100 dB can cause
permanent hearing loss. This high performance speaker system can exceed that level, so please
exercise restraint in its operation in order to preserve your ability to enjoy its delity in the future.
Because of their exible installation possibilities, please consider having your new speakers
professionally installed by an authorized Diamond Audio dealer. This will assure a clean and efcient
installation, and extend your one year warranty to three years.
At Diamond Audio, we strive to bring honest value and excellent quality to all of the products we
build. By your purchase of this product, you have joined the growing family of discerning listeners who
demand only the best. Welcome!
2
©2008 Diamond Audio Technologies. All rights reserved.
Page 3
D6 CONVERTIBLE SPEAKER SYSTEMS
FEATURES
• Hard Annodized Aluminum Cone
• Rubber Surround
• High Density Proprietary Composite Frame
• Flat Progressive Spider
• Inductively Controlled Motor Design
• Rubber Boot Magnet Protector
• Model Specic Crossovers
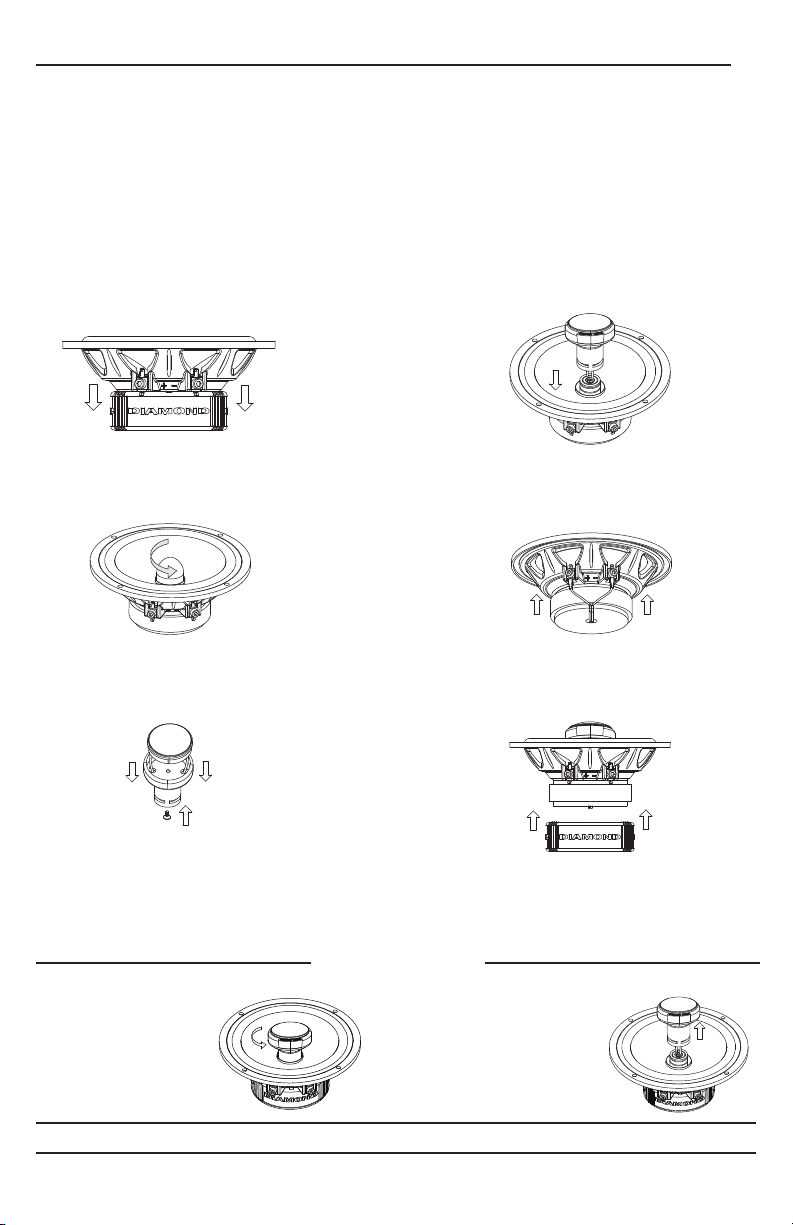
Step 1 - Remove Boot
Carefully remove the rubber
boot from the magnet.
Step 2 - Unscrew Phase Plug
Twist phase plug in a counter-
clockwise direction.
CONVERTIBILITY
Your new D6 speaker system has the unique ability to
be used as either a component or a coaxial speaker.
Depending on your installation requirements, the tweeter
can be installed separately or mounted directly to the
midbass/midrange unit with the supplied kit. This
provides for the most installation exibility possible.
See the drawing below for more details.
Step 4 - Attach Tweeter
Carefully feed the tweeter wires through
the post and through the magnet.
Step 5 - Attach Tweeter Wires
Attach the tweeter wires to their
proper terminals.
Step 3 - Assemble Tweeter Post
Carefully feed the tweeter wires through
the holes and snap tweeter into place on
top of the post .Secure with screw.
Firmly grasp the
tweeter post and turn
to unlock until you
feel a “click”.
©2008 Diamond Audio Technologies. All rights reserved.
Step 6 - Carefully Replace Boot
Carefully replace the motor boot to
cover and protect the tweeter wires.
Removing the Tweeter
After you feel the “click” of
the tweeter post unlocking,
carefully pull the post straight
up from the cone.
3
Page 4

MIDBASS SPEAKER MOUNTING
The following illustrations show the parts included and correct mounting assembly of the D6 midbass
speaker and tweeter. The grill on the midbass is optional.
Parts List
(2) D6 Component Midbass/Midrange Speakers
(2) D6 Component Tweeters
(2) D6 Grills w/ Mounting Ring
(2) Mounting Gaskets
(1) Mounting Hardware Kit
Screw Clips
Gasket
Mid-bass Driver
Grill
4
©2008 Diamond Audio Technologies. All rights reserved.
Mounting Screws
Page 5

Mounting Cup
– IN + – WFR + – TWT + – RAF +
Spring Clip
Tweeter
Tweeter Mounting
When ush or surface mounting tweeters, make sure the desired location can accommodate the
hole size and depth required. Mount the cup using provided hardware (ush mount illustration shown
on right.) Mount surface cup at desired angle with provided screws in tweeter mounting kit. Snake
speaker wires through tweeter cup, connect tweeter to wires, and snap tweeter into cup by aligning
the notches. Be careful not to push on the center of the tweeter grill.
Crossover Programming
Each D6 component set comes with a pair of model specic programmable crossovers. Under the
cover there is a jumper marked “TWEETER” “REFERENCE” or “- 2dB” (See
below). Tweeter
attenuation can be achieved by removing the crossover cover and moving the jumper to the appropriate
position. The REFERENCE position has no attenuation effect on the tweeter.
Tweeter Phase
When using as a component set with the tweeter
mounted in a separate location, perfromance
may be improved by switching the phase of the
tweeter. This can be easily achieved by removing
the crossover cover and moving the jumper inside
the crossover marked “TWEETER PHASE” (See
).
RAF Outputs
Each D6 component crossover has a third set of
outputs marked “RAF”(See
). This stands for Rear Acoustic Fill. This output can be used to power
an additional speaker off the same channel without affecting the impedance load on the source unit.
This output provides 15-20% of the total power to the extra speaker and is unltered or full range.
5
©2008 Diamond Audio Technologies. All rights reserved.
Page 6

COMPONENT SYSTEM CONNECTION
The illustration below shows how to connect one channel of the D6 component system.
Mid-bass Driver
Crossover
Tweeter
Optional RAF
Amplifier
THIELE/SMALL PARAMETERS
Parameter (unit) D652 D662 S.0ta S.0ts
Sensitivity 87.4 87.2 92 91
Qts 0.5 0.82 0.54 0.65
Fs (Hz) 57.8 60.0 1650 1520
Vas (L) 11.0 15.6 n/a n/a
Re (ohm) 3.6 3.62 5.6 5.6
Xmax (mm) 3.6 4.8 n/a n/a
Impedance (ohm) 4 4 8 8
Power (Watts) Nom/Max 60/120 75/150 50/100 50/100
6
©2008 Diamond Audio Technologies. All rights reserved.
Page 7

PHYSICAL DIMENSIONS
Dimension D652 D662 S.0ta/s
Total Diameter (A) 5.57” (141.6mm) 6.50” (165.4mm) 1.9 (48.26mm)
Mounting Diameter (B) 4.60” (117.3mm) 5.50” (140.6mm) 1.64 (41.65mm)
Screw Hole Diameter (C) 5.23” (133mm) 6.14” (156mm) N/A
Mounting Depth (D) 2.16” (55mm) 2.32” (59mm) 0.5 (12.7mm)
Magnet Diameter (E) 3.07” (78mm) 3.40” (86.4mm) N/A
7
©2008 Diamond Audio Technologies. All rights reserved.
Page 8

LIMITED SPEAKER WARRANTY STATEMENT
Diamond Audio Technologies, LLC (DAT) warrants this product to be free from defects in material and workmanship for a
period of one (1) year from the original date of purchase provided it was purchased from an authorized DAT retailer within the
United States. However, if this product was installed by the authorized DAT retailer, the warranty period will be extended to
three (3) years.
THIS WARRANTY IS NOT TRANSFERABLE AND APPLIES ONLY TO THE ORIGINAL PURCHASER OF THIS PRODUCT IN ITS ORIGINAL
INSTALLATION. Original purchaser must reside in the United States and be able to provide proof of purchase and installation
with the sales receipt from the authorized DAT retailer that sold and installed the product.
Should a manufacturing defect occur during above said warranty period, DAT will replace or repair the defective product with
a product of the same or equivalent value and performance.
Damage or failure caused by any of the following is not covered under this warranty policy: negligence, improper use, abuse,
product modication, unauthorized repair attempts, accident, acts of God, misrepresentations by DAT retailers, and improper/
inadequate packaging during return shipping.
Warranty is void if serial numbers have been removed, altered or defaced.
HOW TO OBTAIN WARRANTY SERVICE
In the event a DAT product should require service, you should visit the authorized DAT retailer you purchased the product from
and they can expedite your claim. All claims must fall into the guidelines listed above and be accompanied by a copy of the
original sales and installation receipt from that authorized DAT retailer.
Product returned for warranty service must be freight-prepaid, properly packaged and clearly marked with the Return
Authorization (RA) number issued by DAT. Any product returned to DAT that is improperly packaged, does not have a RA
number clearly marked on the package, or never received a RA number may be refused upon delivery. DAT does not assume
responsibility for lost or misdirected product.
Repair or replacement under this warranty is the exclusive remedy of the consumer. DAT shall not be liable for any incidental
or consequential damages for breach of any expressed or implied warranty on this product. Some states do not allow the
exclusion or limitation of incidental or consequential damages, or allow limitations on how long an implied warranty lasts, so
the above limitations or exclusions may not apply to you. This warranty gives you specic legal rights and you may also have
other rights that may vary from state to state.
Customers outside the United States should contact their local sales ofce to obtain information on pricing, exchange unit
availability, instructions, service and warranty/non-warranty replacement or repair.
Diamond Audio Technologies
6915 West Frye Road
Chandler, AZ 85226 USA
Tel: 480.820.2075
Fax: 480.813.6210
Web: diamondaudio.com
©2008 Diamond Audio Technologies. All rights reserved.
Service/Tech Support:
480.820.2075
Tech Support Email
techsupport@diamondaudio.com
123107
 Loading...